introduction - fantasy flight games · j.r.r. tolkien’s epic novel the lord of the rings. the...
TRANSCRIPT
2
“The Dark Tower had been rebuilt, it was said. From there the power was spreading far and wide, and away east and south there were wars and growing fear.
– From the chapter “The Shadow of the Past” The Lord of The Rings, The Fellowship of the Ring
Middle-earth. It is near the end of the Third Age.
It is a time of growing darkness and despair. In the ashen land of Mordor, the Dark Lord Sauron has become mighty indeed. His power grows daily, a rising shadow that soon threatens to overwhelm all. There is little to stand against him. The fleeting glory and strength that sprang from the Last Alliance of Elves and Men have now withered into a distant past.
Save for a few remaining holdfasts, the Elves have all but abandoned Middle-earth. A cunning observer with keen eyes and nimble feet may still see Elven households traveling under starlight towards the Grey Havens. They’re leaving. Traveling towards the great sea and the Undying Lands that lie beyond.
The kingdoms of Men have grown weak and disparate. Those of the South and the East have already knelt to Mordor. Alas, in the West, once a beacon of strength, the blood of Númenor has run thin. What remains of its vigor now dwells in Minas Tirith, and with the few northern rangers that haunt the ruins and wild country of Arnor. It is rumored that even the noble horse lords of Rohan, once fiercely independent, now pay a tithe of horses to Mordor, in payment for an uneasy peace.
Yet, there is still hope.
The power of the three Elven-rings, and that of their bearers, stand now as a bulwark against Sauron’s will. Bearing Nenya, the Elven Queen Galadriel remains in Lothlórien with the last of the Galadhrim. With Vilya, Elrond Halfelven and his household still dwell in the bastion of healing and knowledge that is Rivendell. And with Narya on his hand, the wizard Gandalf the Grey tirelessly continues his quest to unite the peoples of the West, and to foil Sauron’s plots wherever they may be found.
Except perhaps for his friend Aragorn, who suspects it, only Gandalf knows of that which may be the greatest hope, and greatest danger, of all.
Gandalf believes he may have found the One Ring: the master ring which Sauron forged in the fires of Mount Doom. The ring that, if reclaimed by the Dark Lord, would dominate the three rings that have so-far escaped his reach. By acquiring the One Ring, he would regain his former strength. Yet, despite ever-seeking it, ever-hunting for news of the ring, his ring, its whereabouts have eluded Sauron for almost an age.
That ring, that smallest of things which the Dark Lord of Mordor desires above all, has come into the possession of a small creature. A hobbit. One by the name of Frodo Baggins, to whom it was given by his uncle Bilbo. Gandalf, a dear friend of both hobbits, has over the years come to suspect that Bilbo’s trinket may be more than what it seems. That it may be a relic of significance. Of the utmost significance. In his heart of hearts, Gandalf has come to the dreadful understanding that the One Ring now dwells with the hobbits in their remote and peaceful Shire. It is a knowledge and a responsibility that lies heavily on his heart.
Although he is almost certain as to the true nature of Frodo’s ring, Gandalf has so far hesitated to bring the matter before the White Council. He seeks proof and understanding before he is willing to make so momentous a claim. To this end, he now hunts for the pitiful Gollum, the decrepit creature that possessed the ring before Bilbo. And Gandalf seeks knowledge of the last days of Isildur, of the slain king whom history tells was the last person to have worn the One Ring.
And there is another hope. That in the days ahead, heroes will arise. Heroes, who at Gandalf’s request will guard the Shire from evil and inquiring eyes. Heroes, who will brave the dangers of the Misty Mountains to search for news of Balin and his dwarven colonists. Heroes, who will fight alongside the men of Gondor against the incursions from Mordor. Perhaps even heroes daring enough to venture into the forests of Ithilien, or even into the Land of Shadow itself, to there disrupt Sauron’s plans.
Middle-earth now needs these heroes to help it stand against Sauron until the Final Days arrive. To hold the shadow at bay, until the time when a fellowship of men, elves, dwarves, and hobbits shall set into motion the events leading to the War of the Ring and end of the Third Age.
The events of Middle-earth Quest are set in the lands described in J.R.R. Tolkien’s epic novel The Lord of the Rings. The game takes place during a time-span of 17 years. The years from when Bilbo celebrates his 111th birthday (and Frodo’s 33rd) to days just prior to Frodo’s leaving the Shire. These are years of high adventure and mounting darkness.
Will you take the mantle of a hero, helping Gandalf and the White Council in their struggle against the shadow? Will you help set the stage for the days that follow, as described in The Lord of the Rings? Or, will you take the role of Sauron himself, seeking the domination, corruption, and enslavement of all that is free and kind? Will you, as the Dark Lord of Mordor, succeed in finding that for which you hunger most – the location and return of the One Ring – before Gandalf’s plan can mature?
Whatever the choice, the fate of Middle-earth is in your hands.
Introduction
3
Game Overview“Orcs were multiplying again in the mountains. Trolls were abroad. No longer dull-witted, but cunning and armed with dreadful weapons.”
– From the chapter “The Shadow of the Past” The Lord of the Rings, The Fellowship of the Ring
In Middle-earth Quest, one player takes the role of Sauron, while the remaining players take the roles of brave heroes of the West.
Sauron must use malevolent plots, his ever-growing influence, and the manipulation of evil creatures to achieve his goals. If he succeeds, he will find the One Ring, and a second darkness will embrace the West.
The heroes must help Gandalf discover the truth about the One Ring. To do this, they must seek favor and knowledge from famous characters across Middle-earth. They must embark on perilous quests to foil the Dark Lord’s schemes and those of his minions. If the heroes succeed, then Gandalf will learn the information he needs. With this knowledge, Gandalf will – just in time – get Frodo and the One Ring out of the Shire and onto the epic journey that will lead to the ring’s destruction.
Component ListThis Rulebook•
1 Game Board (in two parts)•
220 Large Cards, including:•
42 Event Cards -
26 Shadow Cards -
10 Starting Quest Cards -
5 Advanced Quest Cards -
3 Starting Plot Cards -
15 Advanced Plot Cards -
75 Region Encounter Cards -
15 Haven Encounter Cards -
15 Peril Cards -
14 Monster Reference Cards -
255 Small Cards, including:•
75 Monster Combat Cards -
125 Hero Cards -
20 Skill Cards -
10 Mission Cards -
9 Item Cards -
16 Corruption Cards -
5 Hero Sheets •
235 Tokens, including:•
50 Monster Tokens -
80 Influence Tokens -
30 Favor Tokens -
1 Current Player Token -
24 Level Tokens -
30 Damage Tokens (20 “1’s” and 10 “3’s”) -
4 Sauron Action Tokens -
8 Character Tokens -
4 Story Markers -
3 Plot Markers -
1 Event Marker -
8 Plastic Character Stands•
5 Plastic Hero Figures•
5 Plastic Minion Figures•
4
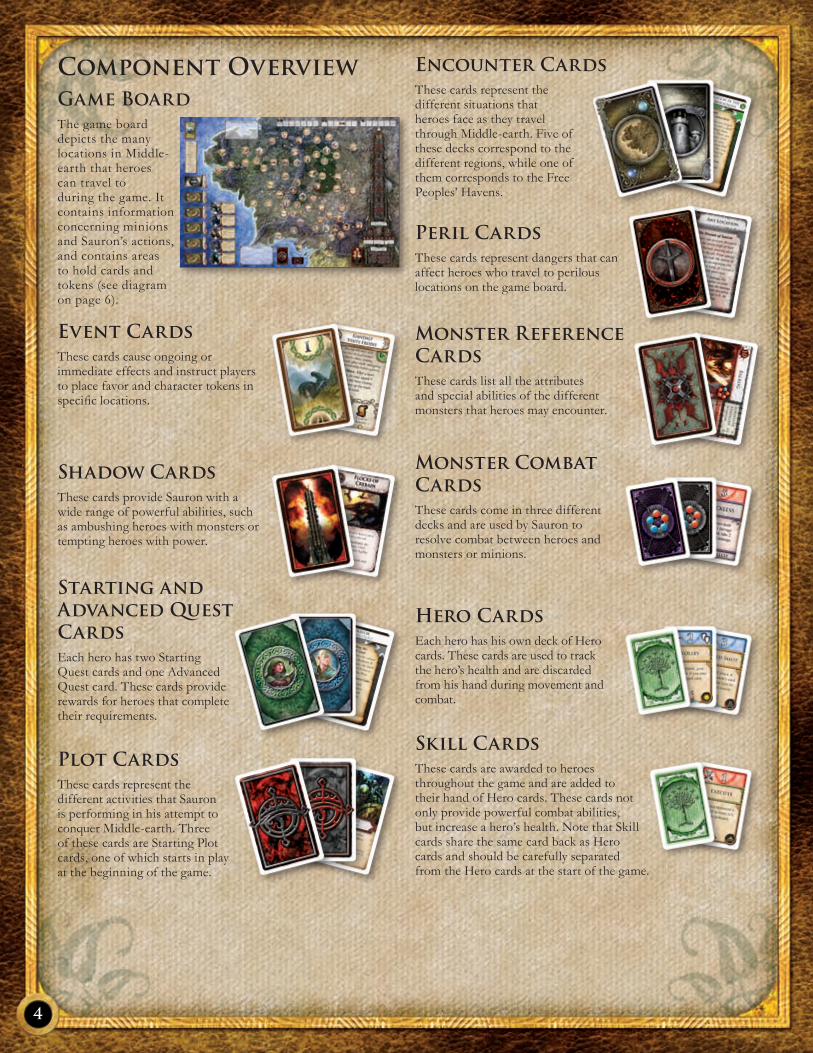
Component OverviewGame BoardThe game board depicts the many locations in Middle-earth that heroes can travel to during the game. It contains information concerning minions and Sauron’s actions, and contains areas to hold cards and tokens (see diagram on page 6).
Event CardsThese cards cause ongoing or immediate effects and instruct players to place favor and character tokens in specific locations.
Shadow CardsThese cards provide Sauron with a wide range of powerful abilities, such as ambushing heroes with monsters or tempting heroes with power.
Starting and Advanced Quest Cards Each hero has two Starting Quest cards and one Advanced Quest card. These cards provide rewards for heroes that complete their requirements.
Plot Cards These cards represent the different activities that Sauron is performing in his attempt to conquer Middle-earth. Three of these cards are Starting Plot cards, one of which starts in play at the beginning of the game.
Encounter Cards These cards represent the different situations that heroes face as they travel through Middle-earth. Five of these decks correspond to the different regions, while one of them corresponds to the Free Peoples’ Havens.
Peril Cards These cards represent dangers that can affect heroes who travel to perilous locations on the game board.
Monster Reference Cards These cards list all the attributes and special abilities of the different monsters that heroes may encounter.
Monster Combat CardsThese cards come in three different decks and are used by Sauron to resolve combat between heroes and monsters or minions.
Hero CardsEach hero has his own deck of Hero cards. These cards are used to track the hero’s health and are discarded from his hand during movement and combat.
Skill CardsThese cards are awarded to heroes throughout the game and are added to their hand of Hero cards. These cards not only provide powerful combat abilities, but increase a hero’s health. Note that Skill cards share the same card back as Hero cards and should be carefully separated from the Hero cards at the start of the game.
5
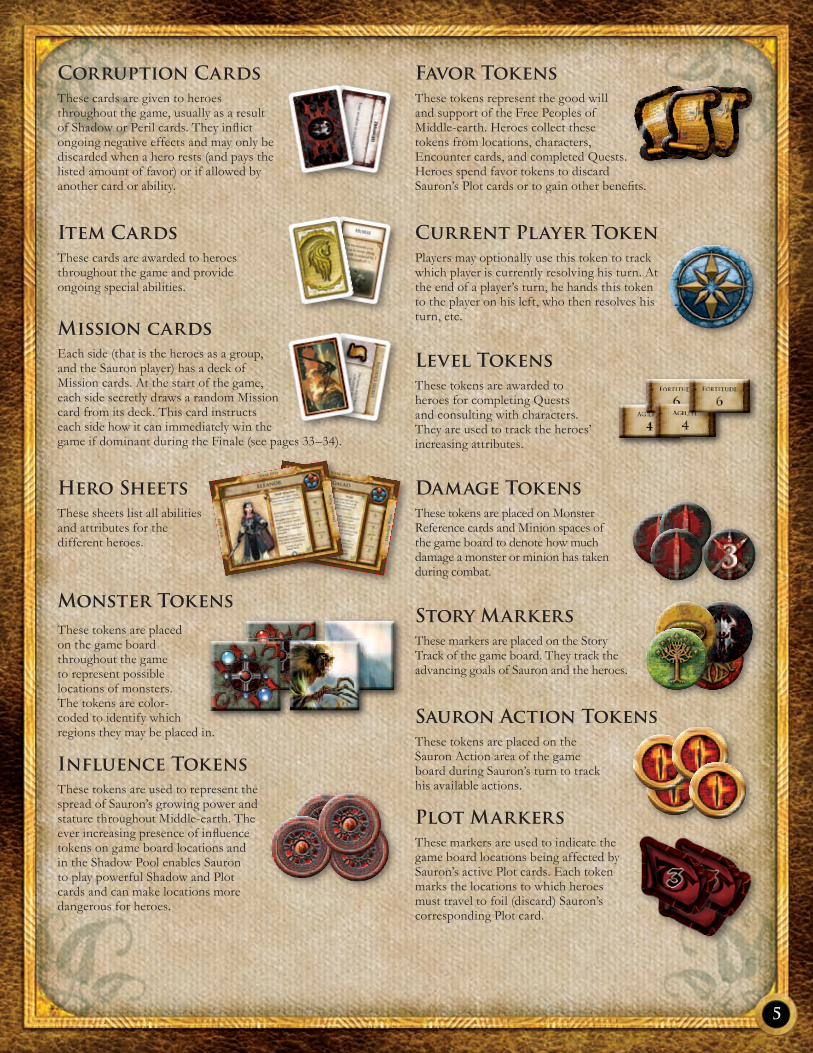
Favor TokensThese tokens represent the good will and support of the Free Peoples of Middle-earth. Heroes collect these tokens from locations, characters, Encounter cards, and completed Quests. Heroes spend favor tokens to discard Sauron’s Plot cards or to gain other benefits.
Current Player TokenPlayers may optionally use this token to track which player is currently resolving his turn. At the end of a player’s turn, he hands this token to the player on his left, who then resolves his turn, etc.
Level TokensThese tokens are awarded to heroes for completing Quests and consulting with characters. They are used to track the heroes’ increasing attributes.
Damage Tokens These tokens are placed on Monster Reference cards and Minion spaces of the game board to denote how much damage a monster or minion has taken during combat.
Story MarkersThese markers are placed on the Story Track of the game board. They track the advancing goals of Sauron and the heroes.
Sauron Action TokensThese tokens are placed on the Sauron Action area of the game board during Sauron’s turn to track his available actions.
Plot MarkersThese markers are used to indicate the game board locations being affected by Sauron’s active Plot cards. Each token marks the locations to which heroes must travel to foil (discard) Sauron’s corresponding Plot card.
Corruption Cards These cards are given to heroes throughout the game, usually as a result of Shadow or Peril cards. They inflict ongoing negative effects and may only be discarded when a hero rests (and pays the listed amount of favor) or if allowed by another card or ability.
Item CardsThese cards are awarded to heroes throughout the game and provide ongoing special abilities.
Mission cardsEach side (that is the heroes as a group, and the Sauron player) has a deck of Mission cards. At the start of the game, each side secretly draws a random Mission card from its deck. This card instructs each side how it can immediately win the game if dominant during the Finale (see pages 33–34).
Hero Sheets These sheets list all abilities and attributes for the different heroes.
Monster Tokens These tokens are placed on the game board throughout the game to represent possible locations of monsters. The tokens are color-coded to identify which regions they may be placed in.
Influence TokensThese tokens are used to represent the spread of Sauron’s growing power and stature throughout Middle-earth. The ever increasing presence of influence tokens on game board locations and in the Shadow Pool enables Sauron to play powerful Shadow and Plot cards and can make locations more dangerous for heroes.
6
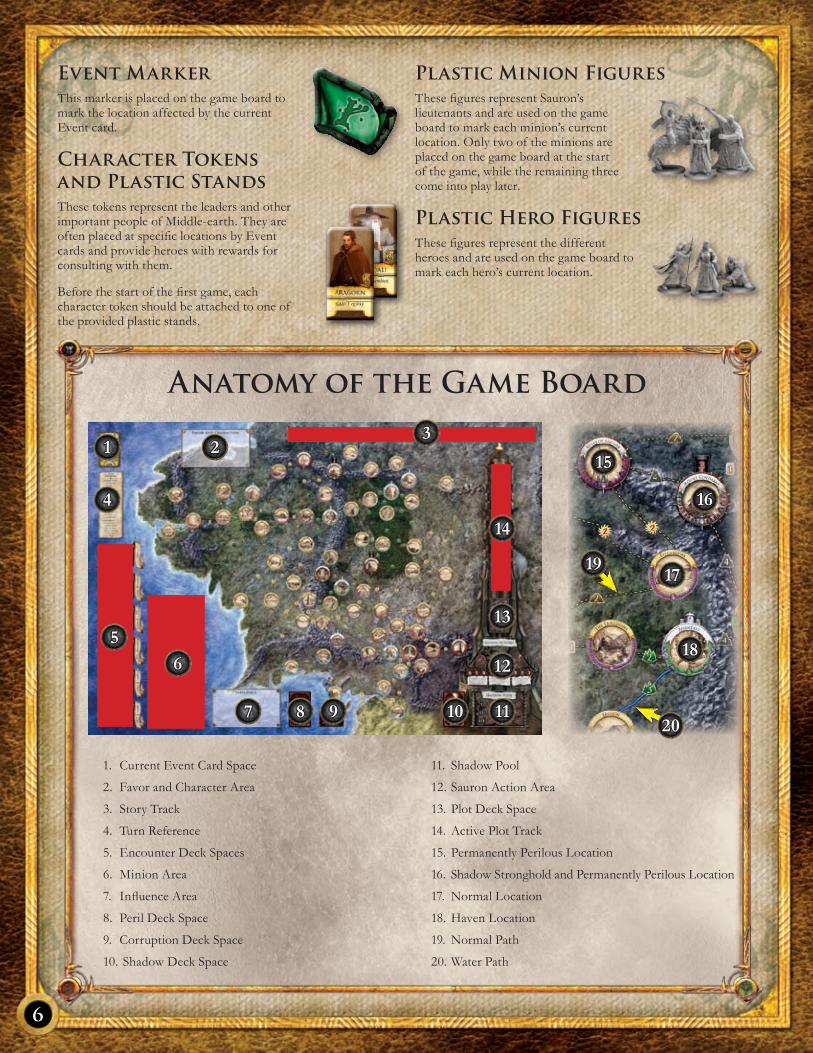
Event MarkerThis marker is placed on the game board to mark the location affected by the current Event card.
Character Tokens and Plastic Stands These tokens represent the leaders and other important people of Middle-earth. They are often placed at specific locations by Event cards and provide heroes with rewards for consulting with them.
Before the start of the first game, each character token should be attached to one of the provided plastic stands.
Plastic Minion FiguresThese figures represent Sauron’s lieutenants and are used on the game board to mark each minion’s current location. Only two of the minions are placed on the game board at the start of the game, while the remaining three come into play later.
Plastic Hero FiguresThese figures represent the different heroes and are used on the game board to mark each hero’s current location.
Anatomy of the Game Board
Current Event Card Space1.
Favor and Character Area2.
Story Track3.
Turn Reference4.
Encounter Deck Spaces5.
Minion Area6.
Influence Area7.
Peril Deck Space8.
Corruption Deck Space9.
Shadow Deck Space10.
Shadow Pool11.
Sauron Action Area 12.
Plot Deck Space13.
Active Plot Track14.
Permanently Perilous Location15.
Shadow Stronghold and Permanently Perilous Location16.
Normal Location17.
Haven Location18.
Normal Path19.
Water Path20.
17
18
15
16
19
2010 11
12
13
14
31 2
4
6
7 8 9
5
“Keep to the green grass. Don’t you go a-meddling with old stone or cold wights or prying in their houses, unless you be strong folk with hearts that never falter.”
– Tom Bombadil speaking to Frodo and his hobbit companions The Lord of the Rings, The Fellowship of the Ring
Object of the GameThe object of the game is for Sauron or the hero players to advance their story marker to the Finale space of the Story Track and complete the requirements on their Mission card. Story markers are advanced through different means depending on which side they belong to.
Sauron’s three story markers advance based upon the Plot cards he has in play. His objective is to advance one of his story markers to the Finale space, or all three of his markers to The Shadow Falls space (see pages 33–34).
The hero players win (or lose) as a team. Their story marker moves automatically every Sauron turn, but can move slower or faster based upon certain Event and Shadow cards.
If a side triggers the Finale, but fails to complete its Mission, then the winner of the game is determined by a final fight between a hero and the Ringwraiths.
Number of PlayersMiddle-earth Quest supports up to four players, with one player taking the role of Sauron and the rest taking the roles of heroes. These rules are written with the assumption that players are playing either a three or four player game. If playing a two player game, players should first read the entire rules and then follow the specific instructions for two player games on page 35.
Getting started
7
Middle-earth Quest is a unique game in that the gameplay of the Sauron player versus that of the hero players is dramatically different. Therefore, we have split all the rules for the two sides into the following distinct sections: the “Sauron Game Rules” and the “Hero Game Rules.” It is important that players read both of these sections, as general game information is found in both. Following the “Sauron Game Rules” and the “Hero Game Rules,” additional rules such as combat and the game Finale can
be found.
Reading these rules
8
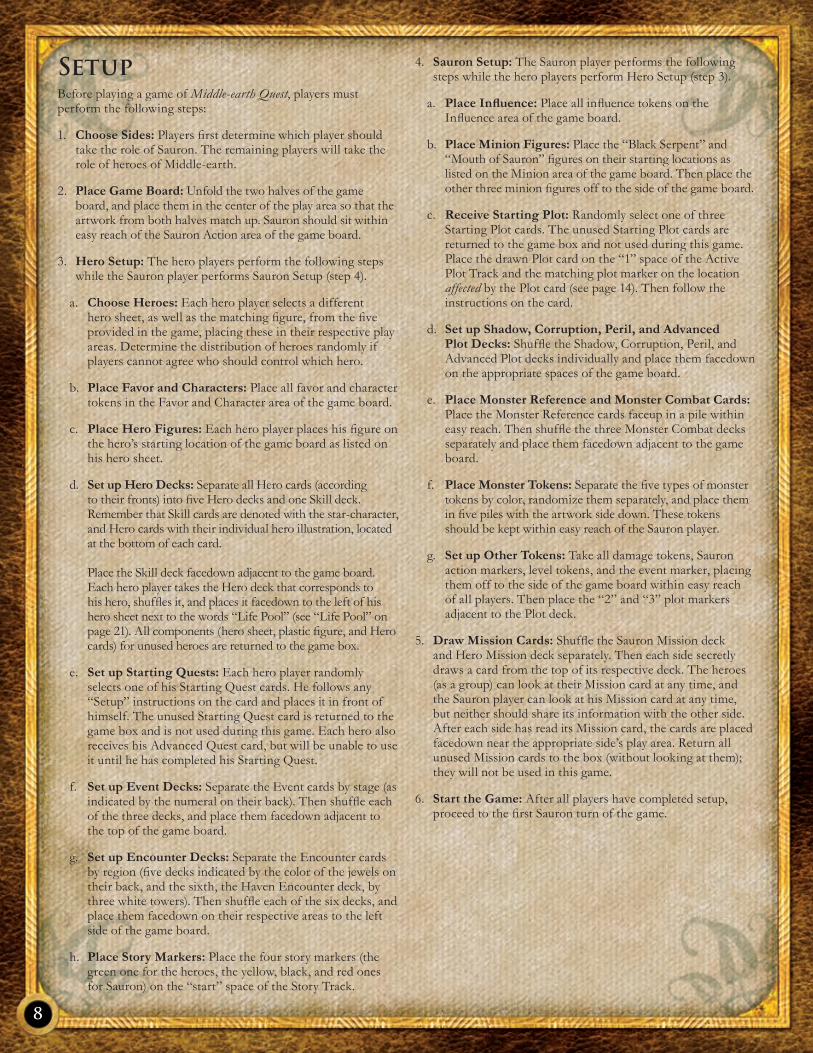
SetupBefore playing a game of Middle-earth Quest, players must perform the following steps:
Choose Sides:1. Players first determine which player should take the role of Sauron. The remaining players will take the role of heroes of Middle-earth.
Place Game Board:2. Unfold the two halves of the game board, and place them in the center of the play area so that the artwork from both halves match up. Sauron should sit within easy reach of the Sauron Action area of the game board.
Hero Setup:3. The hero players perform the following steps while the Sauron player performs Sauron Setup (step 4).
Choose Heroes:a. Each hero player selects a different hero sheet, as well as the matching figure, from the five provided in the game, placing these in their respective play areas. Determine the distribution of heroes randomly if players cannot agree who should control which hero.
Place Favor and Characters: b. Place all favor and character tokens in the Favor and Character area of the game board.
Place Hero Figures:c. Each hero player places his figure on the hero’s starting location of the game board as listed on his hero sheet.
Set up Hero Decks:d. Separate all Hero cards (according to their fronts) into five Hero decks and one Skill deck. Remember that Skill cards are denoted with the star-character, and Hero cards with their individual hero illustration, located at the bottom of each card. Place the Skill deck facedown adjacent to the game board. Each hero player takes the Hero deck that corresponds to his hero, shuffles it, and places it facedown to the left of his hero sheet next to the words “Life Pool” (see “Life Pool” on page 21). All components (hero sheet, plastic figure, and Hero cards) for unused heroes are returned to the game box.
Set up Starting Quests:e. Each hero player randomly selects one of his Starting Quest cards. He follows any “Setup” instructions on the card and places it in front of himself. The unused Starting Quest card is returned to the game box and is not used during this game. Each hero also receives his Advanced Quest card, but will be unable to use it until he has completed his Starting Quest.
Set up Event Decks:f. Separate the Event cards by stage (as indicated by the numeral on their back). Then shuffle each of the three decks, and place them facedown adjacent to the top of the game board.
Set up Encounter Decks: g. Separate the Encounter cards by region (five decks indicated by the color of the jewels on their back, and the sixth, the Haven Encounter deck, by three white towers). Then shuffle each of the six decks, and place them facedown on their respective areas to the left side of the game board.
Place Story Markers:h. Place the four story markers (the green one for the heroes, the yellow, black, and red ones for Sauron) on the “start” space of the Story Track.
Sauron Setup: 4. The Sauron player performs the following steps while the hero players perform Hero Setup (step 3).
Place Influence: a. Place all influence tokens on the Influence area of the game board.
Place Minion Figures: b. Place the “Black Serpent” and “Mouth of Sauron” figures on their starting locations as listed on the Minion area of the game board. Then place the other three minion figures off to the side of the game board.
Receive Starting Plot: c. Randomly select one of three Starting Plot cards. The unused Starting Plot cards are returned to the game box and not used during this game. Place the drawn Plot card on the “1” space of the Active Plot Track and the matching plot marker on the location affected by the Plot card (see page 14). Then follow the instructions on the card.
Set up Shadow, Corruption, Peril, and Advanced d. Plot Decks: Shuffle the Shadow, Corruption, Peril, and Advanced Plot decks individually and place them facedown on the appropriate spaces of the game board.
Place Monster Reference and Monster Combat Cards: e. Place the Monster Reference cards faceup in a pile within easy reach. Then shuffle the three Monster Combat decks separately and place them facedown adjacent to the game board.
Place Monster Tokens: f. Separate the five types of monster tokens by color, randomize them separately, and place them in five piles with the artwork side down. These tokens should be kept within easy reach of the Sauron player.
Set up Other Tokens:g. Take all damage tokens, Sauron action markers, level tokens, and the event marker, placing them off to the side of the game board within easy reach of all players. Then place the “2” and “3” plot markers adjacent to the Plot deck.
Draw Mission Cards: 5. Shuffle the Sauron Mission deck and Hero Mission deck separately. Then each side secretly draws a card from the top of its respective deck. The heroes (as a group) can look at their Mission card at any time, and the Sauron player can look at his Mission card at any time, but neither should share its information with the other side. After each side has read its Mission card, the cards are placed facedown near the appropriate side’s play area. Return all unused Mission cards to the box (without looking at them); they will not be used in this game.
Start the Game:6. After all players have completed setup, proceed to the first Sauron turn of the game.
9
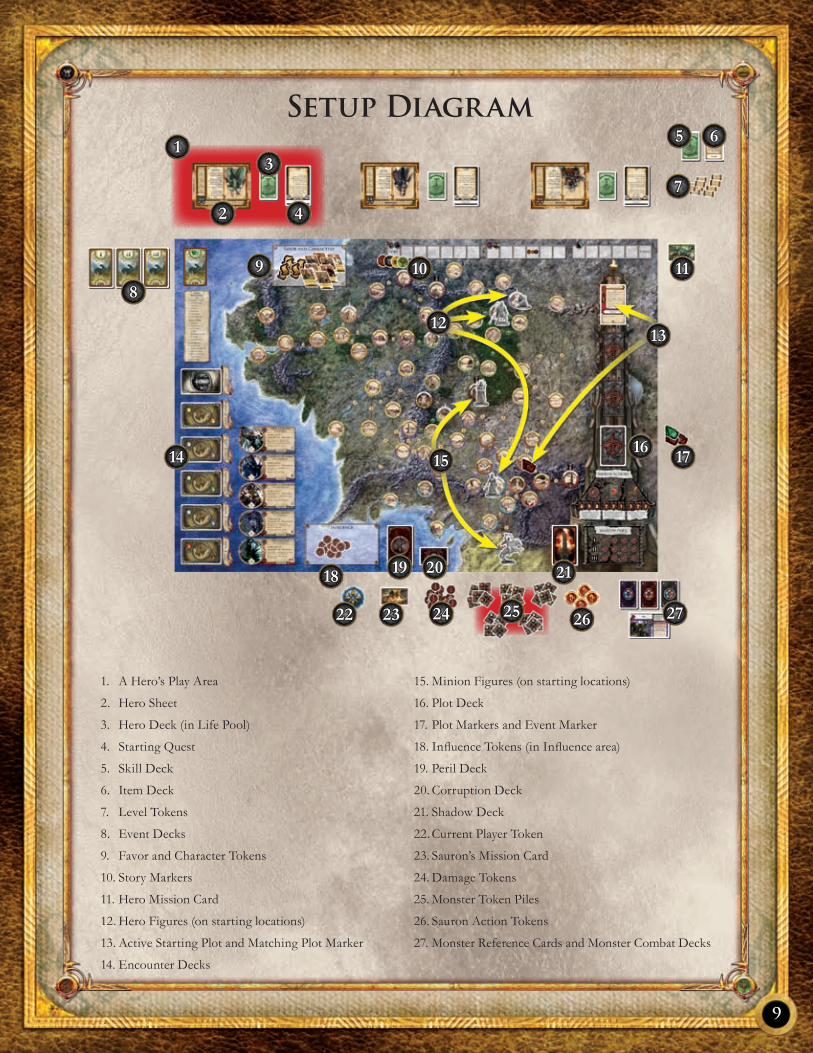
Setup Diagram
A Hero’s Play Area1.
Hero Sheet2.
Hero Deck (in Life Pool)3.
Starting Quest4.
Skill Deck5.
Item Deck6.
Level Tokens7.
Event Decks 8.
Favor and Character Tokens9.
Story Markers10.
Hero Mission Card11.
Hero Figures (on starting locations)12.
Active Starting Plot and Matching Plot Marker13.
Encounter Decks14.
Minion Figures (on starting locations)15.
Plot Deck16.
Plot Markers and Event Marker17.
Influence Tokens (in Influence area)18.
Peril Deck19.
Corruption Deck20.
Shadow Deck21.
Current Player Token22.
Sauron’s Mission Card23.
Damage Tokens24.
Monster Token Piles25.
Sauron Action Tokens26.
Monster Reference Cards and Monster Combat Decks27.
1
1
2
3
4
24
7
5 6
1110
12
15
13
17
2322
16
21
2725
2019
26
8
9
18
14
10
“Soon I became aware that spies of many sorts, even beasts and birds, were gathered around the Shire, and my fear grew. I called for the help of the Dúnedain, and their watch was doubled…”
– Gandalf, at the Council of Elrond The Lord of the Rings, The Fellowship of the Ring
Game TurnsMiddle-earth Quest is played over a number of game turns until the Finale is triggered (usually by a story marker reaching the end of the track – see pages 33–34).
Starting with the Sauron player and proceeding clockwise, each player takes his turn. Each turn is either a Sauron turn in which the Sauron player acts or a hero turn in which one hero player acts. In this way, in a four player game, the turn order would be:
(1) Sauron Turn; (2) Hero 1 Turn; (3) Hero 2 Turn; (4) Hero 3 Turn
After the last hero has completed his turn, Sauron begins his next turn. This continues until the Finale begins (see pages 33–34).
Sauron TurnDuring each Sauron turn, story markers may advance (even the hero’s story marker), Sauron is able to play a single Plot card, and Sauron takes actions to advance and defend his plots. The steps of each Sauron turn are described below, summarized on the game board, and detailed on pages 11–19.
Hero Rally Step:1. Discard all influence tokens from each hero’s location. Example: In her previous hero turn, Beravor ended her turn on the Moria location, which contained two influence tokens. During Sauron’s following Hero Rally step, the two influence tokens are removed. Sauron takes the tokens off Moria and returns them to the Influence area on the game board.
Story Step:2. Advance the hero story marker two spaces up the Story Track. Sauron’s story markers are advanced according to his active Plot cards (see page 13). Skip this step on the first turn of the game. Note: If this is the first time that a story marker has advanced into either stage II or III of the Story Track, then Sauron may place new minions in play (see page 12).
Plot Step: 3. Sauron may play a single Plot card from his hand or discard an active Plot card (see page 13). Skip this step on the first turn of the game.
Event Step:4. Sauron draws three cards from the top of the current stage’s Event deck. He then resolves one of them (per the rules found on page 14). EXCEPTION: If neither team is dominant, Sauron instead draws one card and resolves it. This will always be the case during the first Sauron turn of the game.
Action Step:5. Sauron may take two actions (or three actions if playing a four player game). See “Action Step” on pages 15–19.
Hero Draw Step:6. Each hero may draw cards from his life pool equal to his fortitude (see page 19).
Hero TurnDuring each hero turn, the active hero moves, fights, explores, and resolves an Encounter card in his final location. The steps of each hero turn are described below, summarized on the game board, and detailed on pages 20–25.
Rest Step: 1. If there are no monster tokens or minions in the hero’s location and he is not in a Shadow Stronghold, he may rest (see page 20). Note that if a hero is in a Haven, he may heal (see page 20).
Ambush Step: 2. Sauron must choose and attack with one monster or minion in the hero’s location. In this case, a combat starts (see pages 27–32).
Travel Step:3. During this step, the hero is able to travel to a connected location on the game board, fight enemies, resolve perilous locations, and explore as follows: Note that a hero may perform this step (repeating the sequence below) as many times as his hand of Hero cards allows.
Move: a. The hero may move to an adjacent location by discarding the required Hero card(s) from his hand (see pages 22–23).
Combat or Peril: b. Sauron chooses whether the hero will fight a monster/minion in his location (in any) or resolve a Peril card (if he is in a perilous location – see pages 22–23).
Explore:c. The hero may explore his current location. This includes retrieving favor, consulting with characters, completing quests, and more (see page 24). If a hero wishes to explore in the location that he started his turn in, he may skip the “Move” and “Combat or Peril” parts of his first Travel step and simply explore his current location.
Encounter Step:4. After he has finished moving, if the hero is not in a perilous location, he draws three cards from his location’s Encounter deck and resolves the lowest numbered card that matches his location or region (if any) (see pages 24–25).
Gameplay Overview
11
“The Lord Sauron the Great, so he said, wished for our friendship. Rings he would give for it, such as he gave of old.”
– Glóin, at the Council of Elrond The Lord of the Rings, Fellowship of the Ring
This section defines the core concepts and rules for the Sauron player, focusing on the steps of his turn.
Sauron Turn in DetailThis section provides a detailed description of Sauron’s turn, which is composed of the following steps: the Hero Rally step, Story step, Plot step, Event step, Action step, and Hero Draw step. Note that some of the steps in Sauron’s turn actually benefit the heroes and not Sauron (for example, the Hero Draw step).
The Hero Rally StepIn this step, each hero discards all influence tokens from his current location (as long as he is not in a Shadow Stronghold). Whenever influence is discarded from a location, it is returned to the Influence area of the game board.
Discarding influence during the Hero Rally step serves many purposes, including disrupting influence extensions from Shadow Strongholds (see pages 16–17) and preventing Sauron from placing monster tokens in that location.
Sauron Game Rules
Important TermsBelow are common terms frequently used in this rulebook and on cards.
Dominant: Many cards and rules depend upon which side is dominant. A side is dominant if it has a story marker closer to the Finale space than its opponent (see page 14).
Character: These tokens represent influential people of Middle-earth and can provide heroes with favor or other special benefits.
Current Stage: The rightmost stage of the Story Track containing at least one story marker.
Enemy: A component or player not belonging to the same side as another particular component or player. For example, the heroes are the enemies of Sauron.
Exhausted: An exhausted combatant may not play additional Combat cards for the remainder of a combat (see page 32).
Extension: A string of adjacent locations all containing influence tokens and connected to at least one Shadow Stronghold (see pages 16–17 for more details).
Friendly: A component or player belonging to the same side as another particular component or player.
Hero: This term is used to represent both the hero figure (and his components) as well as the player controlling that hero.
Influence Strength: The number of influence tokens on a Shadow Stronghold.
Location: These circular spaces comprise the main component of the game board. Each location has a colored frame which designates the region to which the location belongs. Locations also have names, which are referred to by other components.
Path: These dotted lines (or solid blue lines) connect all adjacent locations.
Shadow Stronghold: Any location with the Shadow Stronghold icon (a black tower). Sauron is often able to place influence tokens in extension of Shadow Strongholds (see page 16 for more details).
Region: There are ten regions of the game board, differentiated by color, each containing a number of locations. The name of each region can be found to the right of the corresponding Encounter deck space on the game board (which are also identified by color). A region map can be found on page 36 of these rules.
Sauron: This term is short for “the Sauron player.”
Side: Middle-earth Quest is essentially played with two teams, with one team consisting of the hero players and the other team consisting of the Sauron player. These teams are described herein as “sides.”
Haven: Any location on the game board with the Haven icon (three white towers). When a hero rests in a Haven, he may also heal (see page 20 for more details).
Within [X] Spaces: Many cards refer to locations that are within a number of spaces. Adjacent locations are considered one space away. For example, “within 1 space of a hero” includes the hero’s current location and each adjacent location.

12
The Story StepOn every Sauron turn, excluding the first, the hero story marker advances two spaces up the Story Track. Then each of Sauron’s three story markers are advanced individually, as indicated by Sauron’s active Plot cards (see the “Advancing Story Markers” diagram).
If any story marker reaches the Finale space of the Story Track or if all three of Sauron’s markers reach (or pass) The Shadow Falls space, the game Finale begins (see “Winning the Game” on pages 33–34).
Understanding the Story Track
The Story Track runs along the top edge of the game board. This track holds the four story markers, which indicate how close Sauron and the heroes are to fulfilling their objectives.
Thematically, the heroes’ story marker represents how successful the Free Peoples are in holding Sauron’s forces at bay and enabling the heroic deeds described in The Lord of the Rings. If this marker reaches the end of the track, then the game Finale begins (see pages 33–34).
Thematically, the Sauron story markers represent how close Sauron is to gaining the power and knowledge necessary to claim final dominance of the West. The “ring” story marker (yellow) indicates how close Sauron is to unraveling Gandalf’s plans and finding the One Ring, the “conquest” story marker (red) indicates how close Sauron is to mustering his military forces to sufficient strength, and the “corruption” story marker (black) indicates Sauron’s success in corrupting the leaders of the Free Peoples.
Understanding the Game StagesThe game is divided into three stages. These stages represent the advancing years in Middle-earth, with thematic events happening at appropriate times. The Story Track is broken up into three sections to represent these three stages, starting with stage I and ending with stage III.
The term “current stage” is defined as the rightmost stage of the track containing at least one story marker.
Whenever a card or ability refers to the current stage, the players simply check the Story Track stage of the story marker closest to the Finale space.
The stage of the game also determines which Event deck Sauron draws from during the Event step (page 14) and how much influence may be in the Shadow Pool (page 16).
Placing MinionsAfter advancing the markers, if this is the first time that a story marker has entered stage II or stage III of the Story Track, Sauron places the appropriate minion figures (as indicated on the Story Track) on the game board.
At the beginning of the game, Sauron receives the “Mouth of Sauron” and the “Black Serpent” minions (as marked on Stage I of the Story Track). When the game enters stage II, Sauron receives the “Ringwraiths” and “Gothmog of Gorgoroth” minions, and finally, as the game enters stage III, he receives the “Witch-king” minion.
When receiving a minion, Sauron places its plastic figure on the starting location indicated on that minion’s space of the game board.
During the Story step, the hero story marker 1. advances two spaces.
Sauron only has two active Plot cards. Each card 2. allows him to advance his “corruption” story marker one space up the Story Track. If Sauron had additional active Plot cards, he would have been able to move additional markers (as directed by the cards).
Since this is the first time a story marker has entered 3. stage III of the track, the current stage is now stage III and Sauron immediately places the “Witch-king” minion on one of its starting locations.
Advancing Story Markers
1
2
23
13
The Plot StepDuring this step, Sauron may perform one of the following activities. This step is skipped on the first turn of the game.
Play a Plot Card:• Sauron may choose a single Plot card from his hand to play. To play the card, Sauron must fulfill the requirements on the card and place it on an empty space of the Active Plot Track. He then places the corresponding plot marker in the location affected by the card. If there are no empty spaces on the Active Plot Track, Sauron may not play a Plot card.
Discard an Active Plot Card: • Sauron may discard one of his Plot cards from the Active Plot Track. He typically may want to do this if the Active Plot Track is full and he wishes to play a different Plot card on a future turn.
Do Nothing:• If Sauron has no Plot cards that he wishes to play and does not want to discard an Active Plot card, he may choose to do nothing during this step.
Plot Cards Plot cards represent Sauron’s plans and machinations to corrupt and dominate Middle-earth. During each Story step, Sauron’s story markers advance a number of spaces equal to the designated number on each of his Active Plot cards.
Playing Plot Cards
In order to play a Plot card, Sauron must be able to fulfill all requirements on the Plot card. Most requirements are listed as italic text at the top of the text box (for example, “Requires a monster token or minion adjacent to the Woodland Realm”).
Once a Plot card is in play, all requirements on the Plot card are ignored. This means that the card will remain in play even if its requirements are no longer met (such as the Shadow Pool no longer containing the required influence).
Each Plot card lists a number of influence in the upper left corner. This number represents the minimum amount of influence that must be in the Shadow Pool at the time the card is played.
Affected Locations on Plot Cards
All Plot cards affect specific locations. When a plot card is played on the active Plot Track, the corresponding plot marker is immediately placed in the affected location. This marker is a visual reminder to the heroes of where this plot is vulnerable.
Discarding Active Plot Cards
In order for a hero to discard an active Plot card, he must explore a Plot card’s affected location (as identified by the plot marker) during his hero turn and spend the amount of favor indicated on the Plot card (see “Anatomy of a Plot Card” below).
Discarded Plot cards are removed from the Active Plot Track and placed faceup in a discard pile adjacent to the Plot deck. The corresponding plot marker is then removed from the game board.
Remember that Sauron may voluntarily discard an active Plot card during his The Plot step instead of playing a Plot card.
Multiple Active Plot Cards
It is important to note that if Sauron has multiple active Plot cards, it is possible that two (or even all three) of his story markers will advance on the Story Track during the Story step.
If multiple active Plot cards advance the same plot marker along the Story Track, simply resolve the active Plot cards one-at-a-time – advancing the indicated plot marker two (or even three) times as directed.
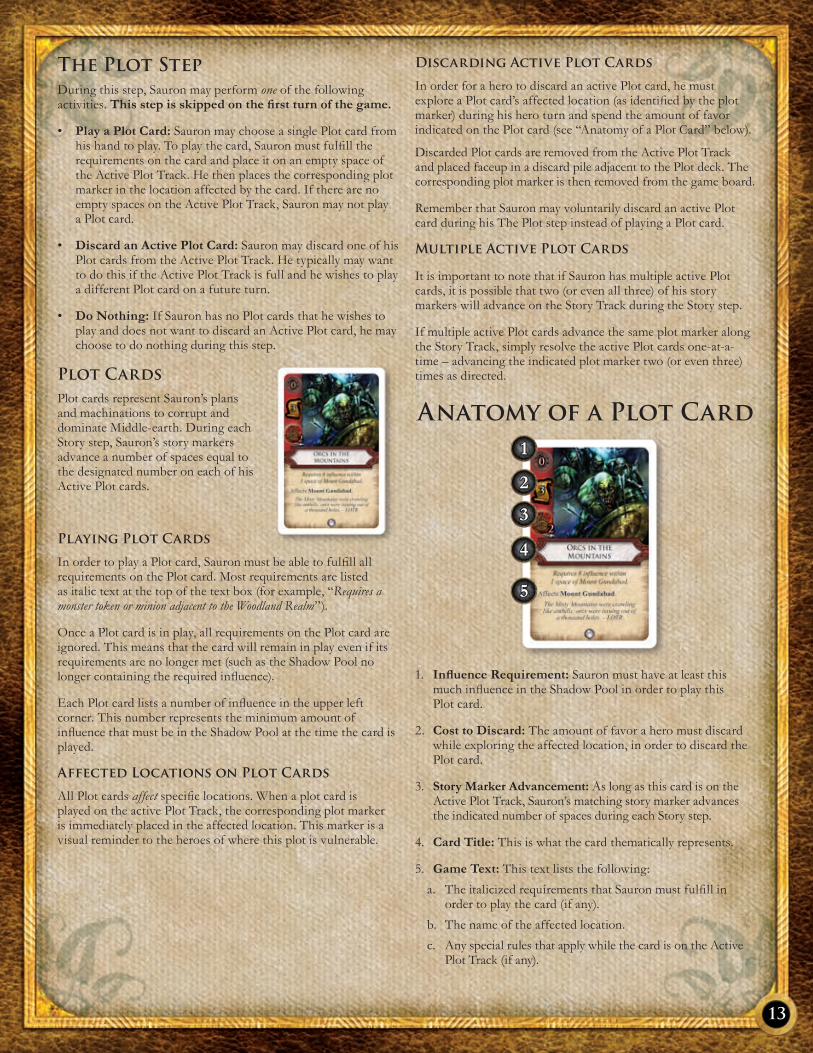
Anatomy of a Plot Card1
2
3
4
5
Influence Requirement:1. Sauron must have at least this much influence in the Shadow Pool in order to play this Plot card.
Cost to Discard: 2. The amount of favor a hero must discard while exploring the affected location, in order to discard the Plot card.
Story Marker Advancement: 3. As long as this card is on the Active Plot Track, Sauron’s matching story marker advances the indicated number of spaces during each Story step.
Card Title:4. This is what the card thematically represents.
Game Text:5. This text lists the following:
The italicized requirements that Sauron must fulfill in a. order to play the card (if any).
The name of the affected location.b.
Any special rules that apply while the card is on the Active c. Plot Track (if any).
14
The Event Step During the Event step, Sauron draws Event cards (resolving one) from the current stage’s Event deck. To do so, Sauron performs the following sequence:
Draw and Resolve Event: 1. Sauron resolves this step as follows:
If the heroes are dominant, Sauron draws three Event a. cards from the current stage’s Event deck and resolves the card with the lowest priority number.
If Sauron is dominant, he draws three Event cards from b. the current stage’s Event deck and resolves the card with the highest priority number.
If neither team is dominant, Sauron simply draws the top c. card of the current stage’s Event deck and resolves it.
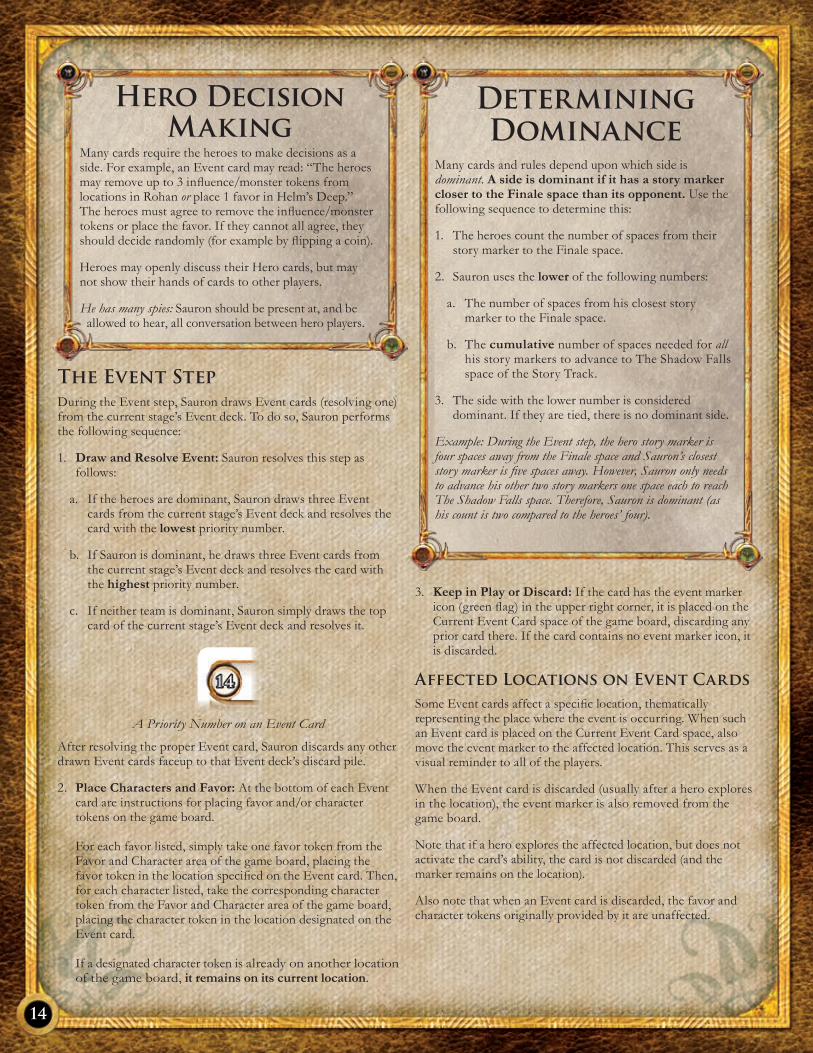
A Priority Number on an Event Card
After resolving the proper Event card, Sauron discards any other drawn Event cards faceup to that Event deck’s discard pile.
Place Characters and Favor:2. At the bottom of each Event card are instructions for placing favor and/or character tokens on the game board. For each favor listed, simply take one favor token from the Favor and Character area of the game board, placing the favor token in the location specified on the Event card. Then, for each character listed, take the corresponding character token from the Favor and Character area of the game board, placing the character token in the location designated on the Event card. If a designated character token is already on another location of the game board, it remains on its current location.
Keep in Play or Discard: 3. If the card has the event marker icon (green flag) in the upper right corner, it is placed on the Current Event Card space of the game board, discarding any prior card there. If the card contains no event marker icon, it is discarded.
Affected Locations on Event CardsSome Event cards affect a specific location, thematically representing the place where the event is occurring. When such an Event card is placed on the Current Event Card space, also move the event marker to the affected location. This serves as a visual reminder to all of the players.
When the Event card is discarded (usually after a hero explores in the location), the event marker is also removed from the game board.
Note that if a hero explores the affected location, but does not activate the card’s ability, the card is not discarded (and the marker remains on the location).
Also note that when an Event card is discarded, the favor and character tokens originally provided by it are unaffected.
Many cards and rules depend upon which side is dominant. A side is dominant if it has a story marker closer to the Finale space than its opponent. Use the following sequence to determine this:
The heroes count the number of spaces from their 1. story marker to the Finale space.
Sauron uses the 2. lower of the following numbers:
The number of spaces from his closest story a. marker to the Finale space.
The b. cumulative number of spaces needed for all his story markers to advance to The Shadow Falls space of the Story Track.
The side with the lower number is considered 3. dominant. If they are tied, there is no dominant side.
Example: During the Event step, the hero story marker is four spaces away from the Finale space and Sauron’s closest story marker is five spaces away. However, Sauron only needs to advance his other two story markers one space each to reach The Shadow Falls space. Therefore, Sauron is dominant (as his count is two compared to the heroes’ four).
Determining Dominance
Hero Decision Making
Many cards require the heroes to make decisions as a side. For example, an Event card may read: “The heroes may remove up to 3 influence/monster tokens from locations in Rohan or place 1 favor in Helm’s Deep.” The heroes must agree to remove the influence/monster tokens or place the favor. If they cannot all agree, they should decide randomly (for example by flipping a coin).
Heroes may openly discuss their Hero cards, but may not show their hands of cards to other players.
He has many spies: Sauron should be present at, and be allowed to hear, all conversation between hero players.
15
Anatomy of an Event Card
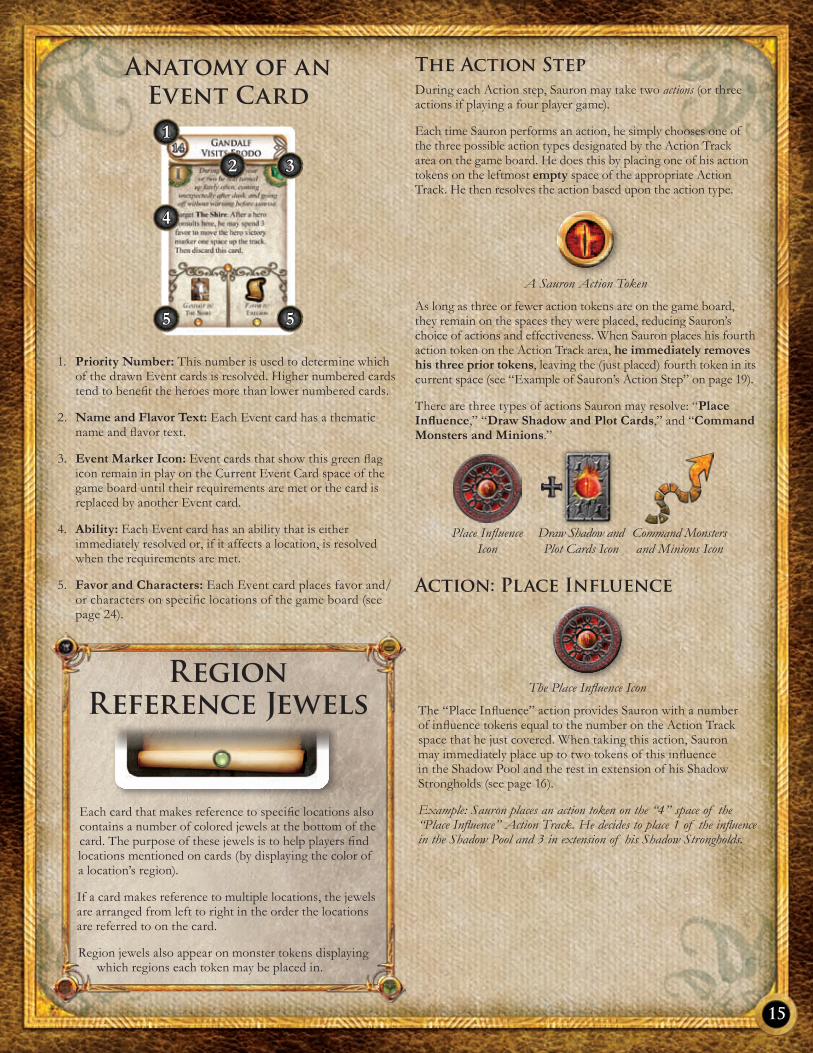
1
4
5
3
5
2
Priority Number:1. This number is used to determine which of the drawn Event cards is resolved. Higher numbered cards tend to benefit the heroes more than lower numbered cards.
Name and Flavor Text:2. Each Event card has a thematic name and flavor text.
Event Marker Icon:3. Event cards that show this green flag icon remain in play on the Current Event Card space of the game board until their requirements are met or the card is replaced by another Event card.
Ability:4. Each Event card has an ability that is either immediately resolved or, if it affects a location, is resolved when the requirements are met.
Favor and Characters:5. Each Event card places favor and/or characters on specific locations of the game board (see page 24).
The Action StepDuring each Action step, Sauron may take two actions (or three actions if playing a four player game).
Each time Sauron performs an action, he simply chooses one of the three possible action types designated by the Action Track area on the game board. He does this by placing one of his action tokens on the leftmost empty space of the appropriate Action Track. He then resolves the action based upon the action type.
A Sauron Action Token
As long as three or fewer action tokens are on the game board, they remain on the spaces they were placed, reducing Sauron’s choice of actions and effectiveness. When Sauron places his fourth action token on the Action Track area, he immediately removes his three prior tokens, leaving the (just placed) fourth token in its current space (see “Example of Sauron’s Action Step” on page 19).
There are three types of actions Sauron may resolve: “Place Influence,” “Draw Shadow and Plot Cards,” and “Command Monsters and Minions.”
Place Influence Icon
Draw Shadow and Plot Cards Icon
Command Monsters and Minions Icon
Action: Place Influence
The Place Influence Icon
The “Place Influence” action provides Sauron with a number of influence tokens equal to the number on the Action Track space that he just covered. When taking this action, Sauron may immediately place up to two tokens of this influence in the Shadow Pool and the rest in extension of his Shadow Strongholds (see page 16).
Example: Sauron places an action token on the “4” space of the “Place Influence” Action Track. He decides to place 1 of the influence in the Shadow Pool and 3 in extension of his Shadow Strongholds.
Each card that makes reference to specific locations also contains a number of colored jewels at the bottom of the card. The purpose of these jewels is to help players find locations mentioned on cards (by displaying the color of a location’s region).
If a card makes reference to multiple locations, the jewels are arranged from left to right in the order the locations are referred to on the card.
Region jewels also appear on monster tokens displaying which regions each token may be placed in.
Region Reference Jewels
16
Influence Tokens Sauron can gain influence through the “Place Influence” action as well as a number of Event, Shadow, and Encounter cards. Influence serves two functions, depending on whether it is in the Shadow Pool or on a location.
Influence in the Shadow Pool
Each time Sauron uses a “Place Influence” action, he receives a number of influence tokens from the Influence area of the game board. He may place up to two of these in the Shadow Pool and the rest in extension of Shadow Stronghold locations on the game board.
Influence tokens that are in the Shadow Pool enable Sauron to play more powerful Shadow and Plot cards. Printed in the upper lefthand corner of each Plot and Shadow card is the amount of influence that Sauron must have in the Shadow Pool for that card to be played.
Note that this number is simply the amount of influence required to play the card, and playing the card does not cause Sauron to discard any influence from the Shadow Pool.
The amount of influence that Sauron may have in the Shadow Pool is equal to four times the current game stage (see “Understanding the Game Stages” on page 12). For example, he may have a maximum of four influence in the Shadow Pool during stage I, eight in stage II, and up to twelve during stage III.
Influence on Locations
Throughout the game, Sauron has many opportunities to place influence on locations of the game board. Influence allows Sauron to place and move monster tokens (see page 18), makes locations perilous for heroes (see page 22–23), and may help fulfill the requirements of his Plot cards (see page 13).
Placing Influence on LocationsWhen Sauron places influence on a location with a “Place Influence” action, he must place it in extension of his Shadow Strongholds.
“Extension of a Shadow Stronghold” means that Sauron must be able to trace a contiguous path through locations, all containing influence, back to a Shadow Stronghold. Such influence may be placed on the Shadow Stronghold itself, on a location that is already part of the extension, or on a location that is adjacent to a location that is already part of the extension (see “Example of Placing Influence” on page 17).
Influence tokens may never be placed in Haven locations.
Maximum Influence The influence strength of a Shadow Stronghold is equal to the number of influence tokens located on it. The red number on the Shadow Stronghold icon represents the maximum number of influence tokens that may be placed there.
Each individual location in extension of the Shadow Stronghold cannot contain more influence than the influence strength of the connected Shadow Stronghold. If a location is in extension of multiple Shadow Strongholds, the highest influence strength value is used.
If a location containing influence is, at any time, in violation of this rule, excess influence immediately must be removed (to a minimum of one influence).
Note that it is possible for heroes to disconnect a contiguous chain of influence tokens. In this case remove all but one influence token from locations no longer in extension (connected to) a Shadow Stronghold.
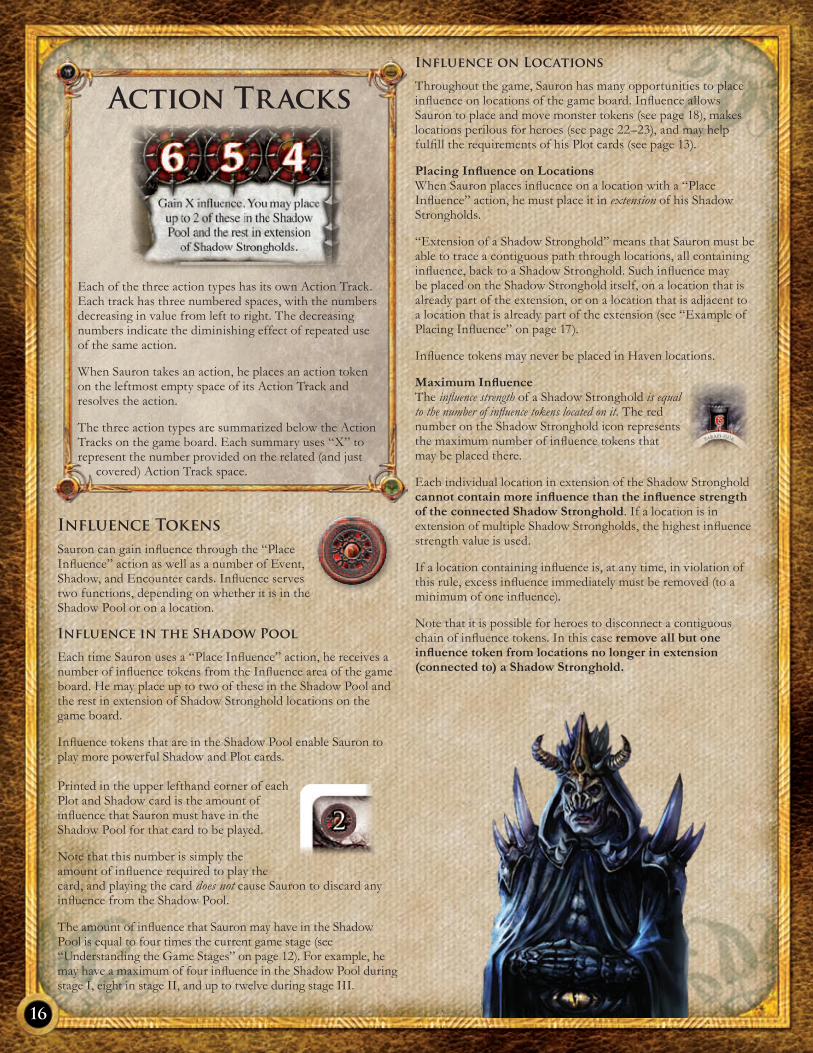
Action Tracks
Each of the three action types has its own Action Track. Each track has three numbered spaces, with the numbers decreasing in value from left to right. The decreasing numbers indicate the diminishing effect of repeated use of the same action.
When Sauron takes an action, he places an action token on the leftmost empty space of its Action Track and resolves the action.
The three action types are summarized below the Action Tracks on the game board. Each summary uses “X” to represent the number provided on the related (and just
covered) Action Track space.

17
Action: Draw Shadow and Plot Cards
The Draw Shadow and Plot Cards Icon
The “Draw Shadow and Plot Cards” action allows Sauron to draw a number of Shadow and Plot cards each equal to the number on the Action Track space that he just covered.
To clarify, this action allows Sauron to draw the indicated number of Shadow cards from the Shadow deck and the same number of Plot cards from the Plot deck.
Sauron places the Shadow cards into his hand, but may only keep one of the drawn Plot cards. He selects one Plot card to add to his hand, placing the remaining drawn Plot cards facedown at the bottom of the Plot deck (in the order of his choice).
Example: Sauron places his action token on the “2” space of the “Draw Shadow and Plot Cards” Action Track. He draws two Shadow cards and two Plot cards. He takes the Shadow cards into his hand and selects one Plot card to keep, placing the other Plot card at the bottom of the Plot deck.
Shadow Cards Shadow cards are usually drawn by Sauron using the “Draw Shadow and Plot Cards” action. These cards provide a wide range of powerful abilities to the Sauron player.
Playing Shadow CardsWhenever Sauron wishes to play a Shadow card, he must have a number of Shadow influence in the Shadow Pool equal to or greater than the amount required by the card (found in the upper left corner).
He must also follow the timing instructions on the card. For example, a Shadow card reading “Play at the start of combat” may only be played at the start of a combat, before any steps of combat are performed.
Only one Shadow card may be played per player’s turn. In other words, in a four player game, Sauron may play up to four Shadow cards per round (that being one during his turn, and one during each of the three hero turns).
Example of Placing Influence
Taking a “Place Influence” action, Sauron places an 1. action token on the “6” space of that Action Track. He takes six influence tokens from the Influence area.
He decides to place one influence in the Shadow Pool.2.
He then places 1 influence on the Sea of Ud3. ûn. He may do this since he can trace a path of locations with influence back to a Shadow Stronghold (Barad-dûr).
He places 2 influence on Barad-dûr, increasing its total to 4. 3 tokens. This means that each location in its extension may contain up to 3 influence.
He places his last 2 influence in the Dead Marshes. He 5. may do this since he can now trace a path of influence locations back to a Shadow Stronghold (Barad-dûr) and as Barad-dûr’s influence strength is at least two.
1
2
53
4
18
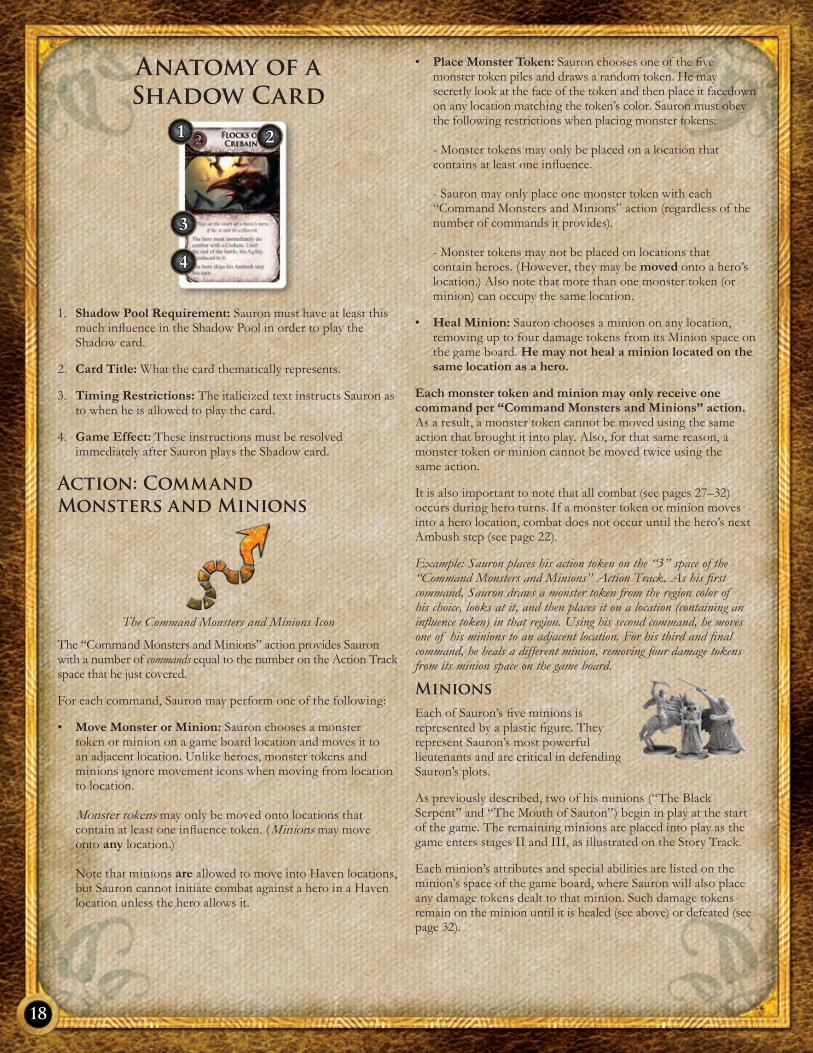
Anatomy of a Shadow Card
1 2
3
4
Shadow Pool Requirement:1. Sauron must have at least this much influence in the Shadow Pool in order to play the Shadow card.
Card Title:2. What the card thematically represents.
Timing Restrictions:3. The italicized text instructs Sauron as to when he is allowed to play the card.
Game Effect:4. These instructions must be resolved immediately after Sauron plays the Shadow card.
Action: Command Monsters and Minions
The Command Monsters and Minions Icon
The “Command Monsters and Minions” action provides Sauron with a number of commands equal to the number on the Action Track space that he just covered.
For each command, Sauron may perform one of the following:
Move Monster or Minion:• Sauron chooses a monster token or minion on a game board location and moves it to an adjacent location. Unlike heroes, monster tokens and minions ignore movement icons when moving from location to location. Monster tokens may only be moved onto locations that contain at least one influence token. (Minions may move onto any location.) Note that minions are allowed to move into Haven locations, but Sauron cannot initiate combat against a hero in a Haven location unless the hero allows it.
Place Monster Token:• Sauron chooses one of the five monster token piles and draws a random token. He may secretly look at the face of the token and then place it facedown on any location matching the token’s color. Sauron must obey the following restrictions when placing monster tokens: - Monster tokens may only be placed on a location that contains at least one influence. - Sauron may only place one monster token with each “Command Monsters and Minions” action (regardless of the number of commands it provides). - Monster tokens may not be placed on locations that contain heroes. (However, they may be moved onto a hero’s location.) Also note that more than one monster token (or minion) can occupy the same location.
Heal Minion:• Sauron chooses a minion on any location, removing up to four damage tokens from its Minion space on the game board. He may not heal a minion located on the same location as a hero.
Each monster token and minion may only receive one command per “Command Monsters and Minions” action. As a result, a monster token cannot be moved using the same action that brought it into play. Also, for that same reason, a monster token or minion cannot be moved twice using the same action.
It is also important to note that all combat (see pages 27–32) occurs during hero turns. If a monster token or minion moves into a hero location, combat does not occur until the hero’s next Ambush step (see page 22).
Example: Sauron places his action token on the “3” space of the “Command Monsters and Minions” Action Track. As his first command, Sauron draws a monster token from the region color of his choice, looks at it, and then places it on a location (containing an influence token) in that region. Using his second command, he moves one of his minions to an adjacent location. For his third and final command, he heals a different minion, removing four damage tokens from its minion space on the game board.
Minions Each of Sauron’s five minions is represented by a plastic figure. They represent Sauron’s most powerful lieutenants and are critical in defending Sauron’s plots.
As previously described, two of his minions (“The Black Serpent” and “The Mouth of Sauron”) begin in play at the start of the game. The remaining minions are placed into play as the game enters stages II and III, as illustrated on the Story Track.
Each minion’s attributes and special abilities are listed on the minion’s space of the game board, where Sauron will also place any damage tokens dealt to that minion. Such damage tokens remain on the minion until it is healed (see above) or defeated (see page 32).
19
Monster Tokens Sauron can place monster tokens in any location containing influence by using the “Command Monsters and Minions” action. Sixty percent of the monster tokens represent actual monsters, while the remaining forty percent are blank and represent false rumors of monsters.
Once a monster token has been placed on the board, Sauron may look at its face at any time.
Although monsters are weaker than minions, they can still deal damage to heroes and are useful in hindering hero movement. There is no limit to the number of monster tokens (or minions) that may be in a single location.
The Hero Draw StepDuring this step, each hero player draws cards from his life pool equal to his hero’s fortitude.
There is no limit to the number of cards that a hero may have in his hand, although hero players should be aware that some Shadow cards force all heroes to discard down to five cards.
Heroes are not required to draw all of the cards allowed by their fortitude, although they will usually want to draw all of them.
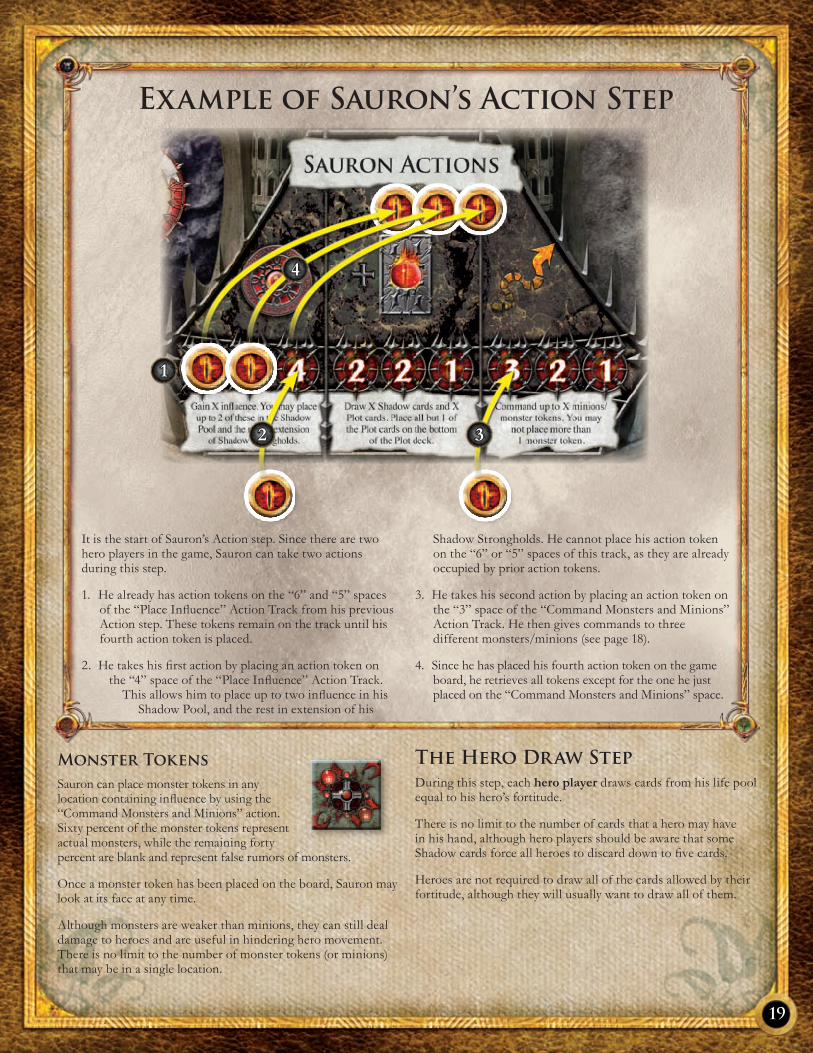
It is the start of Sauron’s Action step. Since there are two hero players in the game, Sauron can take two actions during this step.
He already has action tokens on the “6” and “5” spaces 1. of the “Place Influence” Action Track from his previous Action step. These tokens remain on the track until his fourth action token is placed.
He takes his first action by placing an action token on 2. the “4” space of the “Place Influence” Action Track.
This allows him to place up to two influence in his Shadow Pool, and the rest in extension of his
Shadow Strongholds. He cannot place his action token on the “6” or “5” spaces of this track, as they are already occupied by prior action tokens.
He takes his second action by placing an action token on 3. the “3” space of the “Command Monsters and Minions” Action Track. He then gives commands to three different monsters/minions (see page 18).
Since he has placed his fourth action token on the game 4. board, he retrieves all tokens except for the one he just placed on the “Command Monsters and Minions” space.
1
2
4
3
Example of Sauron’s Action Step
20
“Faithless is he that says farewell when the road darkens,” said Gimli.
“Maybe,” said Elrond, “but let him not vow to walk in the dark, who has not yet seen the nightfall.”
– Exchange between Gimli and Elrond, from the chapter “The Ring Goes South”
The Lord of the Rings, The Fellowship of the Ring
This section defines the core concepts and rules for the hero players, focusing on the steps of the hero players’ turns.
Hero Turn in DetailDuring each hero player’s turn, he performs the following steps in order.
The Rest StepDuring this step, the current hero may rest (or in some cases, heal ).
Throughout the game, as a hero travels throughout Middle-earth and faces Sauron’s creatures in combat, he will be forced to place Hero cards into his rest and damage pools (as separated by the sides of his hero sheet).
Should a hero run out of cards in his hand and in his life pool, he is defeated (see page 32). Managing the Hero cards is therefore an important element of the hero gameplay.
To rest, the hero simply shuffles all cards from his rest pool into his life pool. He must then advance the leftmost Sauron story marker one space on the Story Track (if there is a tie, he may choose which of the tied Sauron story markers to advance).
If there is a monster or minion on the hero’s location, or if he is on a Shadow Stronghold location, he may not rest (and this step is skipped).
Discarding Corruption Cards
Whenever a hero rests, he may also discard one of his Corruption cards by discarding the required number of favor tokens listed in the lower right corner of the Corruption card.
Healing
When a hero rests in a Haven location, he may also heal.
When healing, a player shuffles all cards from his damage pool into his life pool. (In other words, when a player rests on a Haven location, he shuffles all cards from both his rest pool and damage pool into his life pool.)
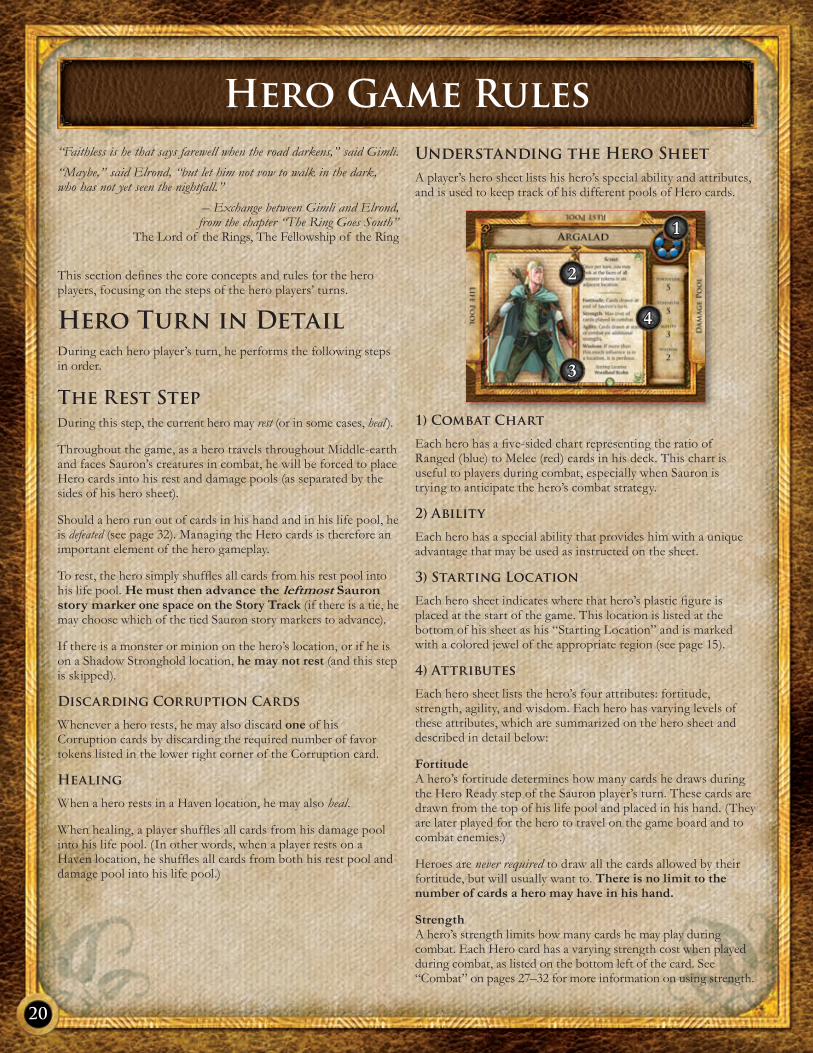
Understanding the Hero SheetA player’s hero sheet lists his hero’s special ability and attributes, and is used to keep track of his different pools of Hero cards.
2
3
4
1
1) Combat Chart
Each hero has a five-sided chart representing the ratio of Ranged (blue) to Melee (red) cards in his deck. This chart is useful to players during combat, especially when Sauron is trying to anticipate the hero’s combat strategy.
2) Ability
Each hero has a special ability that provides him with a unique advantage that may be used as instructed on the sheet.
3) Starting Location
Each hero sheet indicates where that hero’s plastic figure is placed at the start of the game. This location is listed at the bottom of his sheet as his “Starting Location” and is marked with a colored jewel of the appropriate region (see page 15).
4) Attributes
Each hero sheet lists the hero’s four attributes: fortitude, strength, agility, and wisdom. Each hero has varying levels of these attributes, which are summarized on the hero sheet and described in detail below:
FortitudeA hero’s fortitude determines how many cards he draws during the Hero Ready step of the Sauron player’s turn. These cards are drawn from the top of his life pool and placed in his hand. (They are later played for the hero to travel on the game board and to combat enemies.)
Heroes are never required to draw all the cards allowed by their fortitude, but will usually want to. There is no limit to the number of cards a hero may have in his hand.
StrengthA hero’s strength limits how many cards he may play during combat. Each Hero card has a varying strength cost when played during combat, as listed on the bottom left of the card. See “Combat” on pages 27–32 for more information on using strength.
Hero Game Rules

21
AgilityA hero’s agility determines how many cards he may draw at the start of combat or how much of a strength bonus he receives.
During the Preparation step of combat, the hero player must decide how much of his agility he will use to draw Hero cards and how much of his agility he will add to his strength (see “Preparation” on page 28).
Wisdom A hero’s wisdom determines the hero’s ability to avoid perilous locations (and also affects the outcome of many Encounter cards).
During a hero’s Travel step, if the amount of influence on a location exceeds the hero’s wisdom, that location is considered perilous for that hero, and Sauron may draw three cards from the Peril deck and choose one for the hero to resolve (see pages 22–23).
The Hero Card Pools
Three edges of each hero sheet are labeled with the words “Life Pool,” “Rest Pool,” and “Damage Pool,” respectively. At the start of the game, each hero shuffles his Hero deck and places it facedown adjacent to the “Life Pool” edge of his hero sheet. Throughout the game, two additional card pools are created on the “Rest Pool” and “Damage Pool” sides of the hero sheet (these are effectively discard piles from the main Hero deck located in the life pool).
These three pools are used to track the health of the hero (the life pool), how tired he is from exerting himself (the rest pool), and how wounded he is (the damage pool).
1) The Life PoolThe cards of the “Life Pool” are always kept in a facedown deck. This is the only pool that a hero can normally draw cards from. If this pool of cards runs out and the hero has no cards left in his hand, he is immediately defeated (see page 32).
The number of cards in each hero’s life pool is open information and may be counted by any player at any time (although the card faces remain secret).
2) The Rest PoolThe cards of the “Rest Pool” are always kept faceup. Whenever a hero is required to discard Hero cards (for example when traveling on the game board), they are placed faceup on top of this pool. When a hero rests, he takes all cards in his rest pool and shuffles them (facedown) into his life pool.
Players are allowed to examine the cards in a hero’s rest pool at any time, although they are not allowed to rearrange the order of the cards.
3) The Damage PoolThe cards of the “Damage Pool” are always kept facedown. Whenever a hero is dealt damage, he must discard an equal number of cards from either his hand or from his life pool (in any combination) facedown to his damage pool. When a player heals, he shuffles all cards from his damage pool into his life pool (see page 20).
The number of cards in each hero’s damage pool is open information and may be counted by any player at any time (although the card faces remain secret).
1
2
3
22
The Ambush StepIf the current hero is on a location containing one or more monster tokens (and/or minions), Sauron must choose one of those monster tokens (or minions) that the hero must engage in combat. Note, if the hero is defeated in this combat, his turn immediately ends (see page 32).
If the current hero is in a Haven location, combat only takes place if the hero allows it.
The Travel StepDuring the Travel step, the current hero can move and explore adjacent locations.
This step is unique in that it may be performed as many times as the hero wishes, or is able (usually only limited by the amount of Hero cards in the current hero’s hand, or if the hero is defeated in combat during this step).
Each time a hero performs this step, he enacts all parts of the sequence below:
a) MoveThe hero may move to an adjacent location by discarding the required Hero card(s) from his hand.
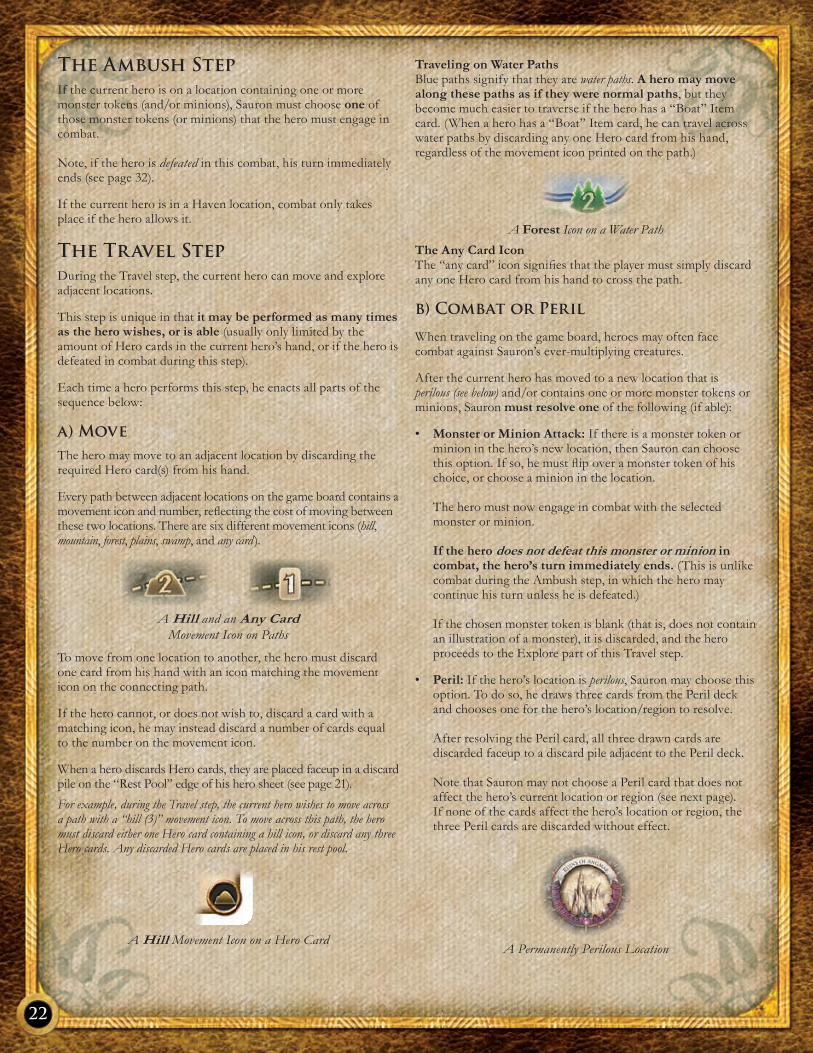
Every path between adjacent locations on the game board contains a movement icon and number, reflecting the cost of moving between these two locations. There are six different movement icons (hill, mountain, forest, plains, swamp, and any card).
A Hill and an Any Card Movement Icon on Paths
To move from one location to another, the hero must discard one card from his hand with an icon matching the movement icon on the connecting path.
If the hero cannot, or does not wish to, discard a card with a matching icon, he may instead discard a number of cards equal to the number on the movement icon.
When a hero discards Hero cards, they are placed faceup in a discard pile on the “Rest Pool” edge of his hero sheet (see page 21).
For example, during the Travel step, the current hero wishes to move across a path with a “hill (3)” movement icon. To move across this path, the hero must discard either one Hero card containing a hill icon, or discard any three Hero cards. Any discarded Hero cards are placed in his rest pool.
A Hill Movement Icon on a Hero Card
Traveling on Water Paths Blue paths signify that they are water paths. A hero may move along these paths as if they were normal paths, but they become much easier to traverse if the hero has a “Boat” Item card. (When a hero has a “Boat” Item card, he can travel across water paths by discarding any one Hero card from his hand, regardless of the movement icon printed on the path.)
A Forest Icon on a Water Path
The Any Card Icon The “any card” icon signifies that the player must simply discard any one Hero card from his hand to cross the path.
b) Combat or Peril
When traveling on the game board, heroes may often face combat against Sauron’s ever-multiplying creatures.
After the current hero has moved to a new location that is perilous (see below) and/or contains one or more monster tokens or minions, Sauron must resolve one of the following (if able):
Monster or Minion Attack:• If there is a monster token or minion in the hero’s new location, then Sauron can choose this option. If so, he must flip over a monster token of his choice, or choose a minion in the location. The hero must now engage in combat with the selected monster or minion. If the hero does not defeat this monster or minion in combat, the hero’s turn immediately ends. (This is unlike combat during the Ambush step, in which the hero may continue his turn unless he is defeated.) If the chosen monster token is blank (that is, does not contain an illustration of a monster), it is discarded, and the hero proceeds to the Explore part of this Travel step.
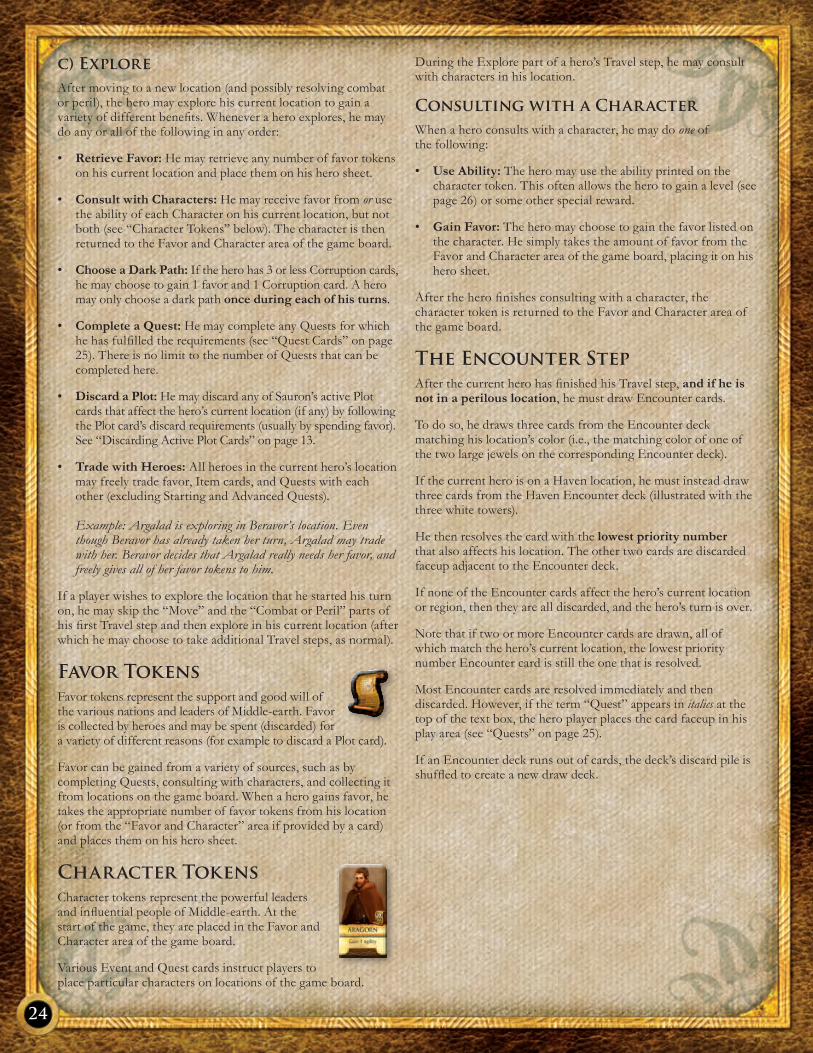
Peril:• If the hero’s location is perilous, Sauron may choose this option. To do so, he draws three cards from the Peril deck and chooses one for the hero’s location/region to resolve. After resolving the Peril card, all three drawn cards are discarded faceup to a discard pile adjacent to the Peril deck. Note that Sauron may not choose a Peril card that does not affect the hero’s current location or region (see next page). If none of the cards affect the hero’s location or region, the three Peril cards are discarded without effect.
A Permanently Perilous Location

23
Peril Cards 1
2
3
Peril cards portray corrupt and evil events that can afflict heroes as they travel through the lands of Middle-earth infested by the shadow (represented by Sauron’s influence tokens or by permanently perilous locations).
A perilous location is defined as any permanently perilous location (illustrated with the peril frame), or a hero’s current location containing more influence tokens than the hero’s wisdom.
Affected Location:1. This text indicates which specific locations that this card affects. If the current hero’s location does not match the name printed here, Sauron may not choose this card for the hero to resolve. Some peril cards affect “Any Location” and may always be chosen by Sauron regardless of the hero’s current location.
Title and Flavor Text:2. Each Peril card has a title and flavor text explaining what the card thematically represents.
Card Effect:3. Below the flavor text are the instructions that the hero must follow when resolving the Peril card.
Travel Step Example
It is Argalad’s Travel step. He discards a Hero card with 1. a forest icon to move from the Woodland Realm to The Forest Trail. Since there are no monster tokens or minions on The Forest Trail, and it is not perilous, he skips the “Combat or Peril” part of this Travel step.
During Argalad’s Explore part of this Travel step, he 2. consults with Gandalf, where he chooses to receive two favor tokens. He then moves Gandalf to the Favor and Character area of the game board.
Next, he chooses to take another Travel step. He 3. discards one Hero card with a mountain icon to move from The Forest Trail to The High Pass.
Since The High Pass contains more influence than 4. Argalad’s wisdom, the location is perilous for him. After the hero enters the location, Sauron draws three Peril
cards and chooses one for Argalad to resolve.
Argalad does not explore The High Pass and decides 5. to take another Travel step. As he does not have any additional Hero cards with a mountain icon, he discards three Hero cards from his hand to move from The High Pass to the Gladden Fields.
Since there is a monster token on the Gladden Fields 6. location, Aragalad must face “Combat or Peril.” Sauron flips the monster token over and reveals an Orc monster. Argalad must now combat the Orc. If he fails to defeat the Orc, Argalad’s turn will immediately end. Otherwise, he may continue his Travel step (starting with exploring the Gladden Fields).
1 3
5
1
3
4
6
5
2
c) ExploreAfter moving to a new location (and possibly resolving combat or peril), the hero may explore his current location to gain a variety of different benefits. Whenever a hero explores, he may do any or all of the following in any order:
Retrieve Favor:• He may retrieve any number of favor tokens on his current location and place them on his hero sheet.
Consult with Characters:• He may receive favor from or use the ability of each Character on his current location, but not both (see “Character Tokens” below). The character is then returned to the Favor and Character area of the game board.
Choose a Dark Path:• If the hero has 3 or less Corruption cards, he may choose to gain 1 favor and 1 Corruption card. A hero may only choose a dark path once during each of his turns.
Complete a Quest:• He may complete any Quests for which he has fulfilled the requirements (see “Quest Cards” on page 25). There is no limit to the number of Quests that can be completed here.
Discard a Plot:• He may discard any of Sauron’s active Plot cards that affect the hero’s current location (if any) by following the Plot card’s discard requirements (usually by spending favor). See “Discarding Active Plot Cards” on page 13.
Trade with Heroes:• All heroes in the current hero’s location may freely trade favor, Item cards, and Quests with each other (excluding Starting and Advanced Quests). Example: Argalad is exploring in Beravor’s location. Even though Beravor has already taken her turn, Argalad may trade with her. Beravor decides that Argalad really needs her favor, and freely gives all of her favor tokens to him.
If a player wishes to explore the location that he started his turn on, he may skip the “Move” and the “Combat or Peril” parts of his first Travel step and then explore in his current location (after which he may choose to take additional Travel steps, as normal).
Favor Tokens Favor tokens represent the support and good will of the various nations and leaders of Middle-earth. Favor is collected by heroes and may be spent (discarded) for a variety of different reasons (for example to discard a Plot card).
Favor can be gained from a variety of sources, such as by completing Quests, consulting with characters, and collecting it from locations on the game board. When a hero gains favor, he takes the appropriate number of favor tokens from his location (or from the “Favor and Character” area if provided by a card) and places them on his hero sheet.
Character Tokens Character tokens represent the powerful leaders and influential people of Middle-earth. At the start of the game, they are placed in the Favor and Character area of the game board.
Various Event and Quest cards instruct players to place particular characters on locations of the game board.
During the Explore part of a hero’s Travel step, he may consult with characters in his location.
Consulting with a CharacterWhen a hero consults with a character, he may do one of the following:
Use Ability:• The hero may use the ability printed on the character token. This often allows the hero to gain a level (see page 26) or some other special reward.
Gain Favor:• The hero may choose to gain the favor listed on the character. He simply takes the amount of favor from the Favor and Character area of the game board, placing it on his hero sheet.
After the hero finishes consulting with a character, the character token is returned to the Favor and Character area of the game board.
The Encounter StepAfter the current hero has finished his Travel step, and if he is not in a perilous location, he must draw Encounter cards.
To do so, he draws three cards from the Encounter deck matching his location’s color (i.e., the matching color of one of the two large jewels on the corresponding Encounter deck).
If the current hero is on a Haven location, he must instead draw three cards from the Haven Encounter deck (illustrated with the three white towers).
He then resolves the card with the lowest priority number that also affects his location. The other two cards are discarded faceup adjacent to the Encounter deck.
If none of the Encounter cards affect the hero’s current location or region, then they are all discarded, and the hero’s turn is over.
Note that if two or more Encounter cards are drawn, all of which match the hero’s current location, the lowest priority number Encounter card is still the one that is resolved.
Most Encounter cards are resolved immediately and then discarded. However, if the term “Quest” appears in italics at the top of the text box, the hero player places the card faceup in his play area (see “Quests” on page 25).
If an Encounter deck runs out of cards, the deck’s discard pile is shuffled to create a new draw deck.
24
25
Anatomy of an Encounter Card
1 2 3
5
4
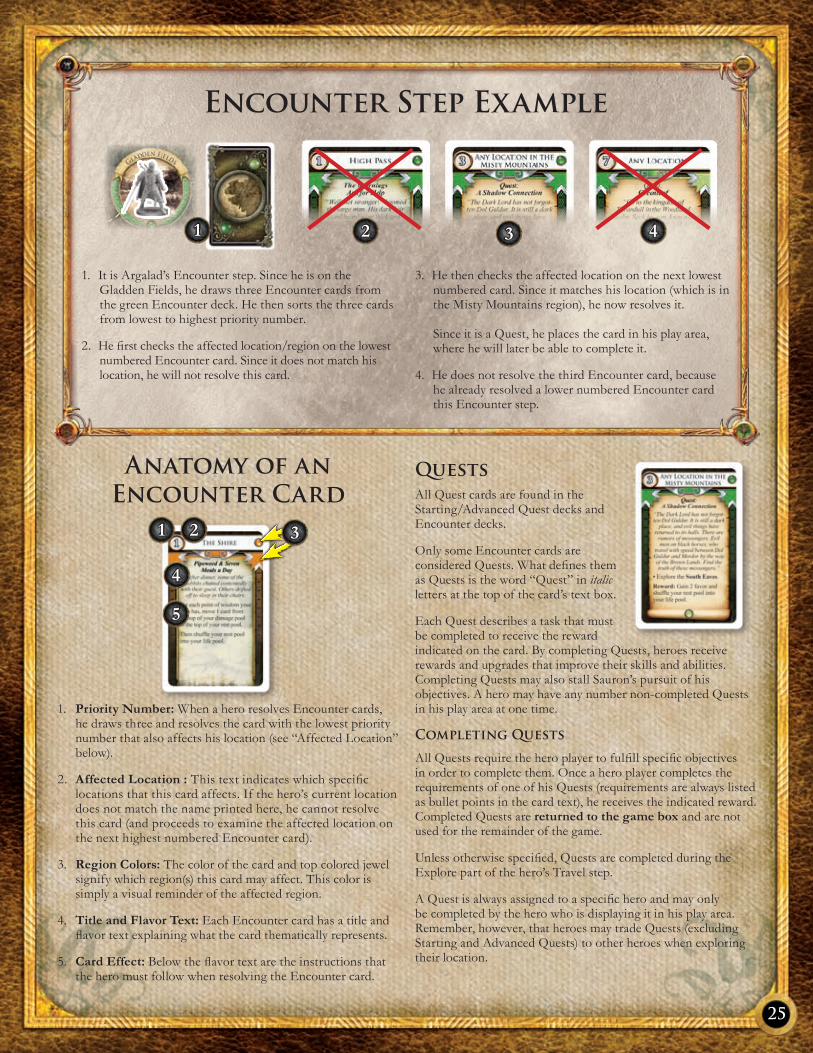
Priority Number: 1. When a hero resolves Encounter cards, he draws three and resolves the card with the lowest priority number that also affects his location (see “Affected Location” below).
Affected Location :2. This text indicates which specific locations that this card affects. If the hero’s current location does not match the name printed here, he cannot resolve this card (and proceeds to examine the affected location on the next highest numbered Encounter card).
Region Colors:3. The color of the card and top colored jewel signify which region(s) this card may affect. This color is simply a visual reminder of the affected region.
Title and Flavor Text: 4. Each Encounter card has a title and flavor text explaining what the card thematically represents.
Card Effect:5. Below the flavor text are the instructions that the hero must follow when resolving the Encounter card.
Quests All Quest cards are found in the Starting/Advanced Quest decks and Encounter decks.
Only some Encounter cards are considered Quests. What defines them as Quests is the word “Quest” in italic letters at the top of the card’s text box.
Each Quest describes a task that must be completed to receive the reward indicated on the card. By completing Quests, heroes receive rewards and upgrades that improve their skills and abilities. Completing Quests may also stall Sauron’s pursuit of his objectives. A hero may have any number non-completed Quests in his play area at one time.
Completing Quests
All Quests require the hero player to fulfill specific objectives in order to complete them. Once a hero player completes the requirements of one of his Quests (requirements are always listed as bullet points in the card text), he receives the indicated reward. Completed Quests are returned to the game box and are not used for the remainder of the game.
Unless otherwise specified, Quests are completed during the Explore part of the hero’s Travel step.
A Quest is always assigned to a specific hero and may only be completed by the hero who is displaying it in his play area. Remember, however, that heroes may trade Quests (excluding Starting and Advanced Quests) to other heroes when exploring their location.
Encounter Step Example
It is Argalad’s Encounter step. Since he is on the 1. Gladden Fields, he draws three Encounter cards from the green Encounter deck. He then sorts the three cards from lowest to highest priority number.
He first checks the affected location/region on the lowest 2. numbered Encounter card. Since it does not match his location, he will not resolve this card.
He then checks the affected location on the next lowest 3. numbered card. Since it matches his location (which is in the Misty Mountains region), he now resolves it. Since it is a Quest, he places the card in his play area, where he will later be able to complete it.
He does not resolve the third Encounter card, because 4. he already resolved a lower numbered Encounter card this Encounter step.
1 2 3 4
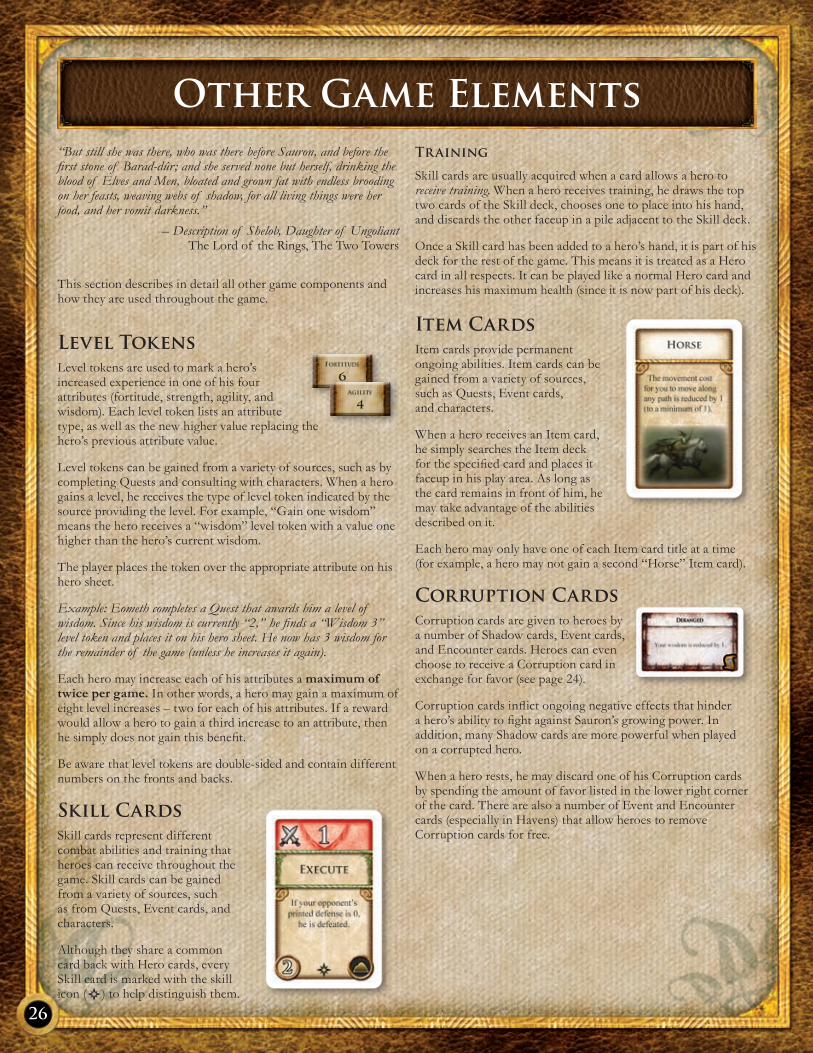
26
“But still she was there, who was there before Sauron, and before the first stone of Barad-dûr; and she served none but herself, drinking the blood of Elves and Men, bloated and grown fat with endless brooding on her feasts, weaving webs of shadow, for all living things were her food, and her vomit darkness.”
– Description of Shelob, Daughter of Ungoliant The Lord of the Rings, The Two Towers
This section describes in detail all other game components and how they are used throughout the game.
Level Tokens Level tokens are used to mark a hero’s increased experience in one of his four attributes (fortitude, strength, agility, and wisdom). Each level token lists an attribute type, as well as the new higher value replacing the hero’s previous attribute value.
Level tokens can be gained from a variety of sources, such as by completing Quests and consulting with characters. When a hero gains a level, he receives the type of level token indicated by the source providing the level. For example, “Gain one wisdom” means the hero receives a “wisdom” level token with a value one higher than the hero’s current wisdom.
The player places the token over the appropriate attribute on his hero sheet.
Example: Eometh completes a Quest that awards him a level of wisdom. Since his wisdom is currently “2,” he finds a “Wisdom 3” level token and places it on his hero sheet. He now has 3 wisdom for the remainder of the game (unless he increases it again).
Each hero may increase each of his attributes a maximum of twice per game. In other words, a hero may gain a maximum of eight level increases – two for each of his attributes. If a reward would allow a hero to gain a third increase to an attribute, then he simply does not gain this benefit.
Be aware that level tokens are double-sided and contain different numbers on the fronts and backs.
Skill Cards Skill cards represent different combat abilities and training that heroes can receive throughout the game. Skill cards can be gained from a variety of sources, such as from Quests, Event cards, and characters.
Although they share a common card back with Hero cards, every Skill card is marked with the skill icon ( ) to help distinguish them.
Training
Skill cards are usually acquired when a card allows a hero to receive training. When a hero receives training, he draws the top two cards of the Skill deck, chooses one to place into his hand, and discards the other faceup in a pile adjacent to the Skill deck.
Once a Skill card has been added to a hero’s hand, it is part of his deck for the rest of the game. This means it is treated as a Hero card in all respects. It can be played like a normal Hero card and increases his maximum health (since it is now part of his deck).
Item Cards Item cards provide permanent ongoing abilities. Item cards can be gained from a variety of sources, such as Quests, Event cards, and characters.
When a hero receives an Item card, he simply searches the Item deck for the specified card and places it faceup in his play area. As long as the card remains in front of him, he may take advantage of the abilities described on it.
Each hero may only have one of each Item card title at a time (for example, a hero may not gain a second “Horse” Item card).
Corruption Cards
Corruption cards are given to heroes by a number of Shadow cards, Event cards, and Encounter cards. Heroes can even choose to receive a Corruption card in exchange for favor (see page 24).
Corruption cards inflict ongoing negative effects that hinder a hero’s ability to fight against Sauron’s growing power. In addition, many Shadow cards are more powerful when played on a corrupted hero.
When a hero rests, he may discard one of his Corruption cards by spending the amount of favor listed in the lower right corner of the card. There are also a number of Event and Encounter cards (especially in Havens) that allow heroes to remove Corruption cards for free.
Other Game Elements
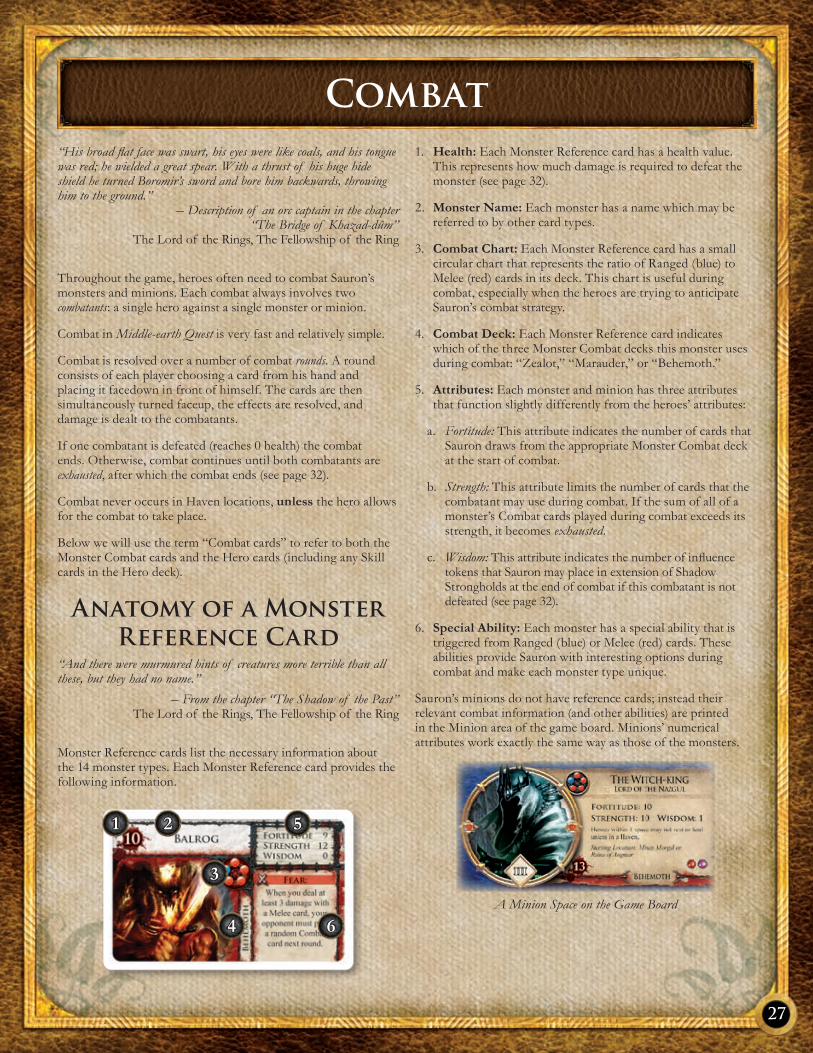
27
“His broad flat face was swart, his eyes were like coals, and his tongue was red; he wielded a great spear. With a thrust of his huge hide shield he turned Boromir’s sword and bore him backwards, throwing him to the ground.”
– Description of an orc captain in the chapter “The Bridge of Khazad-dûm”
The Lord of the Rings, The Fellowship of the Ring
Throughout the game, heroes often need to combat Sauron’s monsters and minions. Each combat always involves two combatants: a single hero against a single monster or minion.
Combat in Middle-earth Quest is very fast and relatively simple.
Combat is resolved over a number of combat rounds. A round consists of each player choosing a card from his hand and placing it facedown in front of himself. The cards are then simultaneously turned faceup, the effects are resolved, and damage is dealt to the combatants.
If one combatant is defeated (reaches 0 health) the combat ends. Otherwise, combat continues until both combatants are exhausted, after which the combat ends (see page 32).
Combat never occurs in Haven locations, unless the hero allows for the combat to take place.
Below we will use the term “Combat cards” to refer to both the Monster Combat cards and the Hero cards (including any Skill cards in the Hero deck).
Anatomy of a Monster Reference Card
“And there were murmured hints of creatures more terrible than all these, but they had no name.”
– From the chapter “The Shadow of the Past” The Lord of the Rings, The Fellowship of the Ring
Monster Reference cards list the necessary information about the 14 monster types. Each Monster Reference card provides the following information.
1 2 5
4 6
3
Health:1. Each Monster Reference card has a health value. This represents how much damage is required to defeat the monster (see page 32).
Monster Name:2. Each monster has a name which may be referred to by other card types.
Combat Chart:3. Each Monster Reference card has a small circular chart that represents the ratio of Ranged (blue) to Melee (red) cards in its deck. This chart is useful during combat, especially when the heroes are trying to anticipate Sauron’s combat strategy.
Combat Deck: 4. Each Monster Reference card indicates which of the three Monster Combat decks this monster uses during combat: “Zealot,” “Marauder,” or “Behemoth.”
Attributes:5. Each monster and minion has three attributes that function slightly differently from the heroes’ attributes:
Fortitude:a. This attribute indicates the number of cards that Sauron draws from the appropriate Monster Combat deck at the start of combat.
Strength:b. This attribute limits the number of cards that the combatant may use during combat. If the sum of all of a monster’s Combat cards played during combat exceeds its strength, it becomes exhausted.
Wisdom:c. This attribute indicates the number of influence tokens that Sauron may place in extension of Shadow Strongholds at the end of combat if this combatant is not defeated (see page 32).
Special Ability:6. Each monster has a special ability that is triggered from Ranged (blue) or Melee (red) cards. These abilities provide Sauron with interesting options during combat and make each monster type unique.
Sauron’s minions do not have reference cards; instead their relevant combat information (and other abilities) are printed in the Minion area of the game board. Minions’ numerical attributes work exactly the same way as those of the monsters.
A Minion Space on the Game Board
Combat
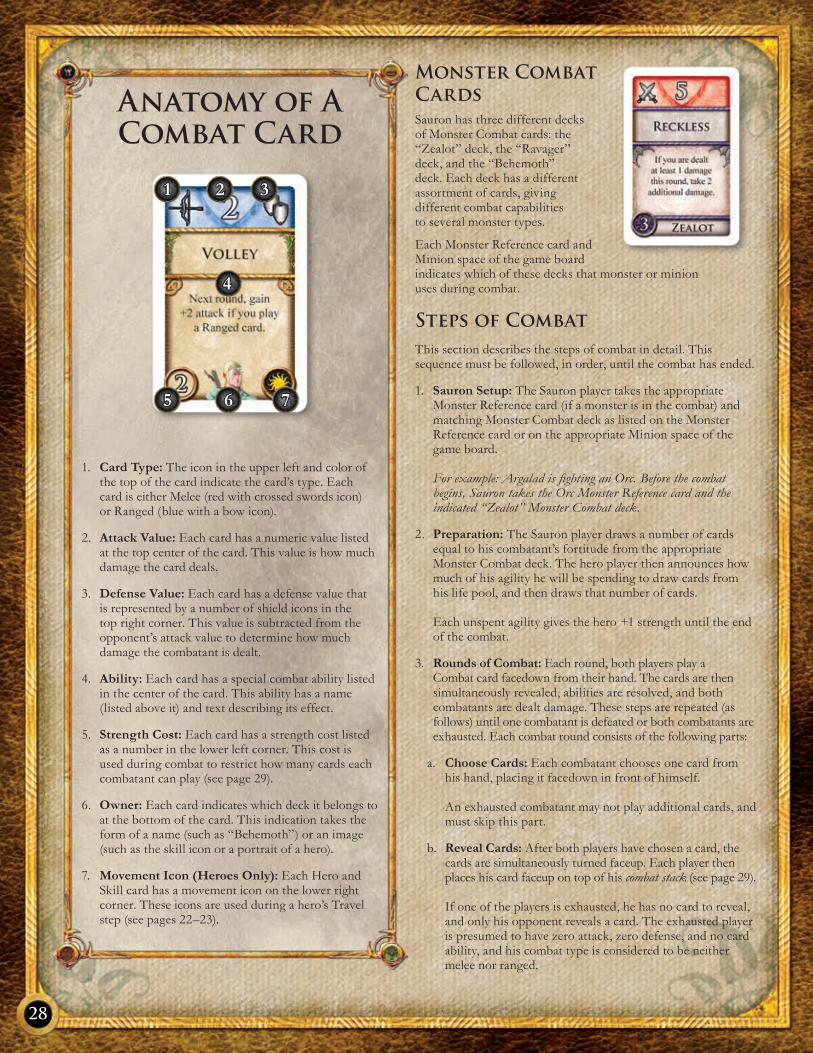
28
Monster Combat CardsSauron has three different decks of Monster Combat cards: the “Zealot” deck, the “Ravager” deck, and the “Behemoth” deck. Each deck has a different assortment of cards, giving different combat capabilities to several monster types.
Each Monster Reference card and Minion space of the game board indicates which of these decks that monster or minion uses during combat.
Steps of CombatThis section describes the steps of combat in detail. This sequence must be followed, in order, until the combat has ended.
Sauron Setup: 1. The Sauron player takes the appropriate Monster Reference card (if a monster is in the combat) and matching Monster Combat deck as listed on the Monster Reference card or on the appropriate Minion space of the game board. For example: Argalad is fighting an Orc. Before the combat begins, Sauron takes the Orc Monster Reference card and the indicated “Zealot” Monster Combat deck.
Preparation:2. The Sauron player draws a number of cards equal to his combatant’s fortitude from the appropriate Monster Combat deck. The hero player then announces how much of his agility he will be spending to draw cards from his life pool, and then draws that number of cards. Each unspent agility gives the hero +1 strength until the end of the combat.
Rounds of Combat: 3. Each round, both players play a Combat card facedown from their hand. The cards are then simultaneously revealed, abilities are resolved, and both combatants are dealt damage. These steps are repeated (as follows) until one combatant is defeated or both combatants are exhausted. Each combat round consists of the following parts:
Choose Cards:a. Each combatant chooses one card from his hand, placing it facedown in front of himself. An exhausted combatant may not play additional cards, and must skip this part.
Reveal Cards:b. After both players have chosen a card, the cards are simultaneously turned faceup. Each player then places his card faceup on top of his combat stack (see page 29). If one of the players is exhausted, he has no card to reveal, and only his opponent reveals a card. The exhausted player is presumed to have zero attack, zero defense, and no card ability, and his combat type is considered to be neither melee nor ranged.
Card Type:1. The icon in the upper left and color of the top of the card indicate the card’s type. Each card is either Melee (red with crossed swords icon) or Ranged (blue with a bow icon).
Attack Value:2. Each card has a numeric value listed at the top center of the card. This value is how much damage the card deals.
Defense Value:3. Each card has a defense value that is represented by a number of shield icons in the top right corner. This value is subtracted from the opponent’s attack value to determine how much damage the combatant is dealt.
Ability:4. Each card has a special combat ability listed in the center of the card. This ability has a name (listed above it) and text describing its effect.
Strength Cost:5. Each card has a strength cost listed as a number in the lower left corner. This cost is used during combat to restrict how many cards each combatant can play (see page 29).
Owner:6. Each card indicates which deck it belongs to at the bottom of the card. This indication takes the form of a name (such as “Behemoth”) or an image (such as the skill icon or a portrait of a hero).
Movement Icon (Heroes Only):7. Each Hero and Skill card has a movement icon on the lower right corner. These icons are used during a hero’s Travel step (see pages 22–23).
Anatomy of A Combat Card
1
5 6 7
4
2 3

Calculate Strength: c. Both players now add up the cumulative strength cost of all cards in their combat stack. If this total exceeds the combatant’s strength, that combatant immediately becomes exhausted and his card is canceled. If both combatants become exhausted during this step, neither combatant is defeated and play proceeds to step 4.
Previous Round Abilities:d. If the card text of any card played in the previous combat denotes “Next Round,” then those abilities are resolved at this time (unless otherwise specified), first by the hero and then by Sauron. Note that if one of the combatants became exhausted this round, his previous round ability is canceled.
Current Round Abilities:e. All abilities from cards that were played during this round are now resolved, first by the hero and then by Sauron.
Deal Damage:f. Each combatant is simultaneously dealt damage equal to his opponent’s total attack value minus his own defense value. (For example, if the monster’s attack value is 5 and the hero’s defense value is 3, the hero is dealt 2 damage.) If, after this part of the sequence, a combatant is defeated (see page 32), play proceeds to step 4. Otherwise, another combat round begins starting with “a. Choose Cards.”
Resolution:4. After all rounds of combat have been resolved, players perform the following steps:
Discard Cards:a. The hero places his combat stack (keeping the cards in order) faceup on top of his rest pool. Sauron takes his combat stack and shuffles it back into the appropriate Monster Combat deck.
Discard Monster Token:b. If a monster token was involved in the combat, the token is now discarded faceup adjacent to the pile of unused tokens. This step is performed regardless of whether the monster was defeated or not. Note that undefeated minions are not removed, and remain on their current location after combat.
Undefeated Monster or Minion: c. If the monster or minion was not defeated, then Sauron may immediately place an amount of influence equal to his combatant’s wisdom in extension of Shadow Strongholds. If this happens during a hero’s Travel step, then the hero’s turn immediately ends.
Combat KeywordsThis section describes some of the words and phrases that often appear in combat abilities.
Cancel:• Cancel abilities are extremely powerful. Whenever a card is canceled, all text on the card is ignored, and the owner’s final attack and defense value are considered zero. Note that the numbers may not be modified above zero and that a canceled card’s strength cost is not reduced (in other words, the canceled card must still be paid for in strength by its combatant). If two cards cancel each other, then they are both blank with zero attack and defense. If a card is canceled that has a “next round” ability, then the ability may not be used on the following round (since text on the card is ignored).
Deal [X] Damage:• Some cards directly deal damage regardless of the opponent’s defense value. Such damage is dealt when the ability is resolved, although combatants cannot be defeated until the Deal Damage part of the round.
Modifying Attack or Defense:• Many Combat cards increase a card’s attack or defense values (such as “+1 attack”). These cards simply modify the card’s final attack or defense values for the “Deal Damage” step of a combat round.
If Opponent’s Printed (Attack or Defense) Is [X]: • Some cards are dependent upon the attack or defense values of the opponent’s cards. This number is always derived from the other card’s printed value (and not from the card’s modified value, if any). Example: The hero player reveals a card with the following text: “Gain +5 attack if your opponent’s printed defense is 0.” The opposing monster reveals a card with zero defense that has the text: “Gain +2 defense.” In this case, the hero’s card does gain +5 attack and the monster gains +2 defense. The hero card effect is applied because its ability is triggered off the printed value of the monster’s card, not the modified one.
Reduce to 0:• If a combatant’s attack or defense is reduced to zero, then this value cannot be increased above zero (any modifiers are ignored).
Combat Stack:• All cards that each combatant plays during combat must remain in front of him in a pile known as his “combat stack.” The purpose of each combatant’s stack is to keep track of how much strength he has spent, as well as which cards he played during the previous combat rounds. Certain cards manipulate the combat stack by adding or subtracting cards from it (thus costing the player more or less strength).
Types:• Many Combat cards refer to a Combat card’s type. Each card is either Ranged (blue) or Melee (red).
Ranged Combat Card Icon
Melee Combat Card Icon
29
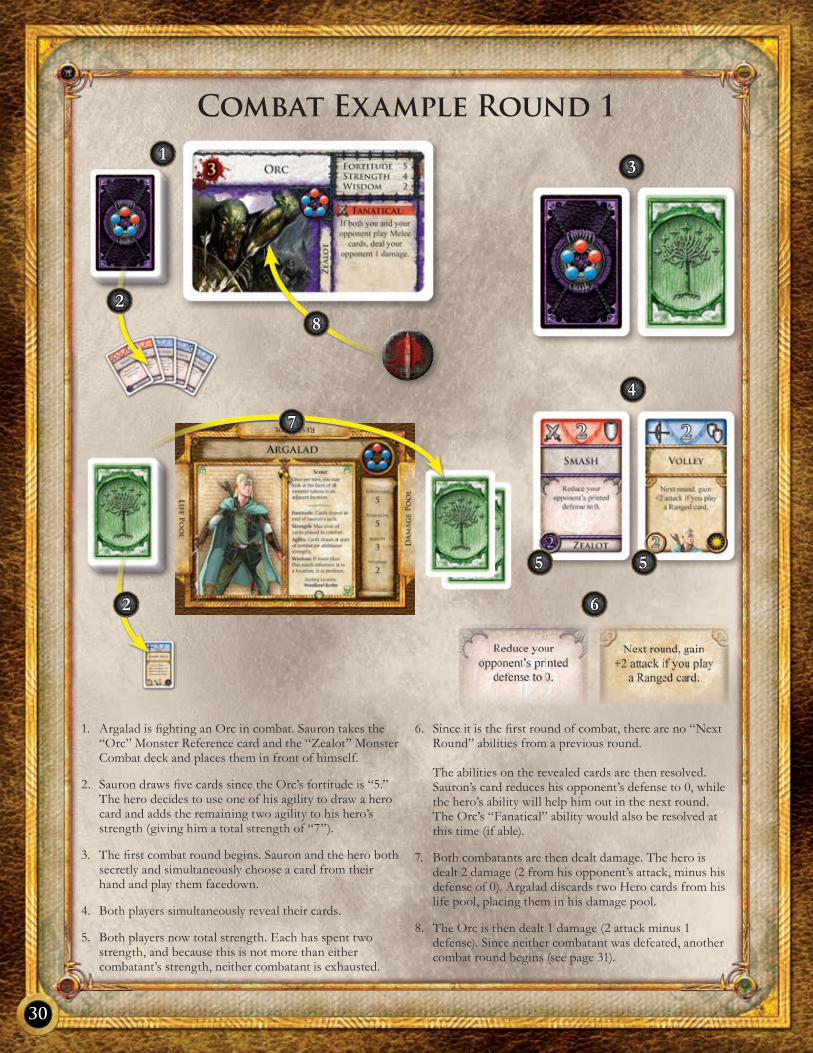
30
Combat Example Round 1
Argalad is fighting an Orc in combat. Sauron takes the 1. “Orc” Monster Reference card and the “Zealot” Monster Combat deck and places them in front of himself.
Sauron draws five cards since the Orc’s fortitude is “5.” 2. The hero decides to use one of his agility to draw a hero card and adds the remaining two agility to his hero’s strength (giving him a total strength of “7”).
The first combat round begins. Sauron and the hero both 3. secretly and simultaneously choose a card from their hand and play them facedown.
Both players simultaneously reveal their cards. 4.
Both players now total strength. Each has spent two 5. strength, and because this is not more than either combatant’s strength, neither combatant is exhausted.
Since it is the first round of combat, there are no “Next 6. Round” abilities from a previous round. The abilities on the revealed cards are then resolved. Sauron’s card reduces his opponent’s defense to 0, while the hero’s ability will help him out in the next round. The Orc’s “Fanatical” ability would also be resolved at this time (if able).
Both combatants are then dealt damage. The hero is 7. dealt 2 damage (2 from his opponent’s attack, minus his defense of 0). Argalad discards two Hero cards from his life pool, placing them in his damage pool.
The Orc is then dealt 1 damage (2 attack minus 1 8. defense). Since neither combatant was defeated, another combat round begins (see page 31).
13
4
55
6
28
7
2
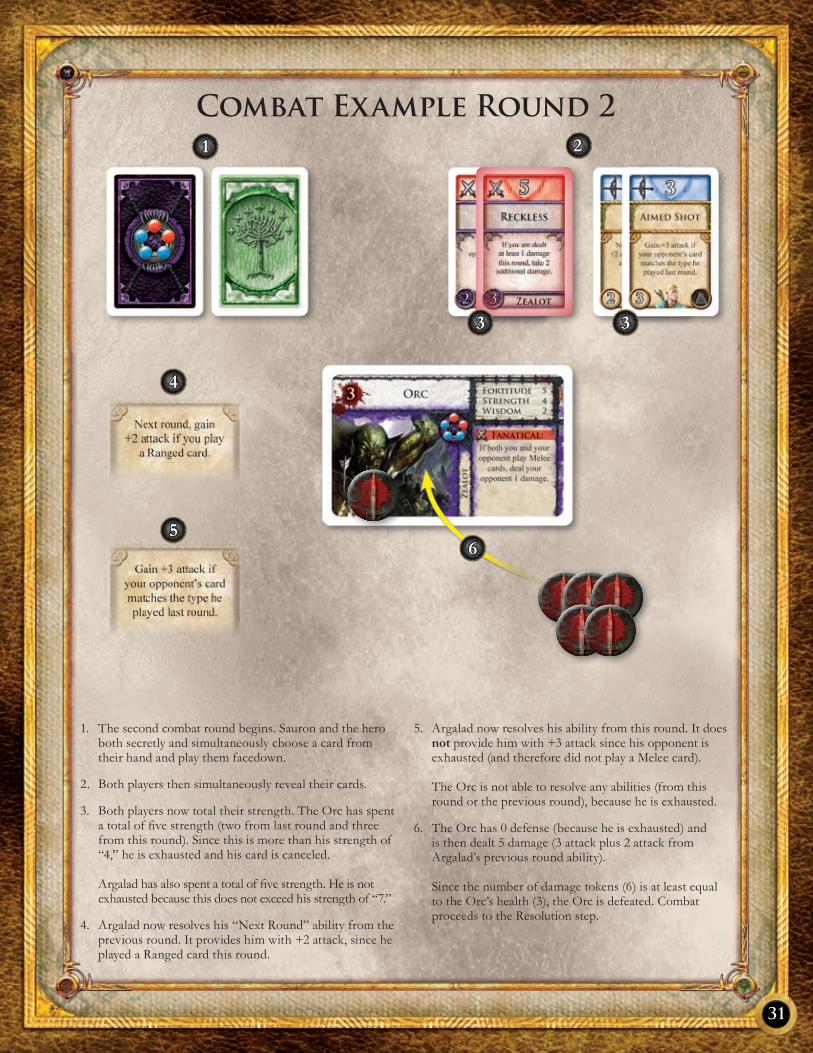
31
Combat Example Round 2
The second combat round begins. Sauron and the hero 1. both secretly and simultaneously choose a card from their hand and play them facedown.
Both players then simultaneously reveal their cards. 2.
Both players now total their strength. The Orc has spent 3. a total of five strength (two from last round and three from this round). Since this is more than his strength of “4,” he is exhausted and his card is canceled. Argalad has also spent a total of five strength. He is not exhausted because this does not exceed his strength of “7.”
Argalad now resolves his “Next Round” ability from the 4. previous round. It provides him with +2 attack, since he played a Ranged card this round.
Argalad now resolves his ability from this round. It does 5. not provide him with +3 attack since his opponent is exhausted (and therefore did not play a Melee card). The Orc is not able to resolve any abilities (from this round or the previous round), because he is exhausted.
The Orc has 0 defense (because he is exhausted) and 6. is then dealt 5 damage (3 attack plus 2 attack from Argalad’s previous round ability). Since the number of damage tokens (6) is at least equal to the Orc’s health (3), the Orc is defeated. Combat proceeds to the Resolution step.
1 2
4
56
33
32
Combat TimingMost combat cards have clear instructions about when their text is resolved. If multiple cards are resolved at the same time, the hero player’s combat card is always resolved first.
Exhausted CombatantsIf a combatant plays a Combat card that causes the cumulative strength of the cards in his combat stack to exceed his strength attribute, he becomes exhausted.
When a player becomes exhausted during Calculate Strength (part c), the Combat card he just played is canceled (meaning that the attack and defense is reduced to zero and any ability on the card is ignored).
When one combatant is exhausted, his opponent continues to resolve combat rounds until either a) a combatant is defeated, or b) both combatants have become exhausted. At which point, Combat proceeds to Resolution (step 4).
Important: Before the start of any combat round, if a combatant does not have any combat cards in his hand (or does not wish to play cards), he declares himself exhausted. In the rare circumstance where both combatants wish to declare themselves exhausted in the same round, the hero player must always do so first (after which Sauron may choose whether he still wishes to do so).
An exhausted combatant will remain exhausted for the duration of the combat.
Dealing Damage and Being Defeated
MonstersFor each damage a monster is dealt during combat, one damage token is placed on its Monster Reference card. If the number of damage tokens on a Monster Reference card equals or exceeds the monster’s health during Deal Damage (part f ) of the combat round, the monster is defeated.
When a monster is defeated, its monster token is removed from the game board and placed faceup adjacent to the piles of unused monster tokens.
MinionsFor each damage that a minion is dealt, one damage token is placed on its corresponding Minion space on the game board. Damage tokens are not removed from a minion at the end of combat and remain until the minion is healed or defeated.
If the number of damage tokens on a minion equals or exceeds its health, it is defeated. When a minion is defeated, all damage tokens are removed from its Minion space and its figure is removed from the game board.
Defeated minions do not return to the game, except for the “Ringwraiths” who return to Minas Morgul at the start of Sauron’s next Action step.
Dealing Damage to Heroes
For each damage a hero is dealt, the hero must discard one card from the top of his life pool (without looking at it) or discard one card of his choice from his hand. All cards that are discarded for damage are placed (one at a time) facedown into the hero’s damage pool.
If a hero has zero cards in his life pool and zero cards in his hand, he is immediately defeated.
Defeated Heroes
When a hero is defeated, he succumbs to his injuries and awakens in the nearest Haven (his broken body was found and transported back to the Haven by a loyal friend). A defeated hero must perform the following steps:
Advance Sauron’s Story:1. The leftmost Sauron story marker is advanced one space up the Story Track. If multiple tokens are tied for this position, the hero may decide which tied token to move.
Lose Favor or Item card:2. The hero must choose whether to discard one favor token from his hero sheet or one of his Item cards. If a hero has neither, this step is skipped.
Move to Haven:3. The hero figure is moved to the closest Haven (closest by number of locations away). If multiple Havens are equally close, then Sauron decides which of the tied Havens the hero is moved to.
Recover: 4. The hero shuffles all cards from his rest pool and damage pool into his life pool.
End Turn:5. The hero’s turn immediately ends and play proceeds to the next player.
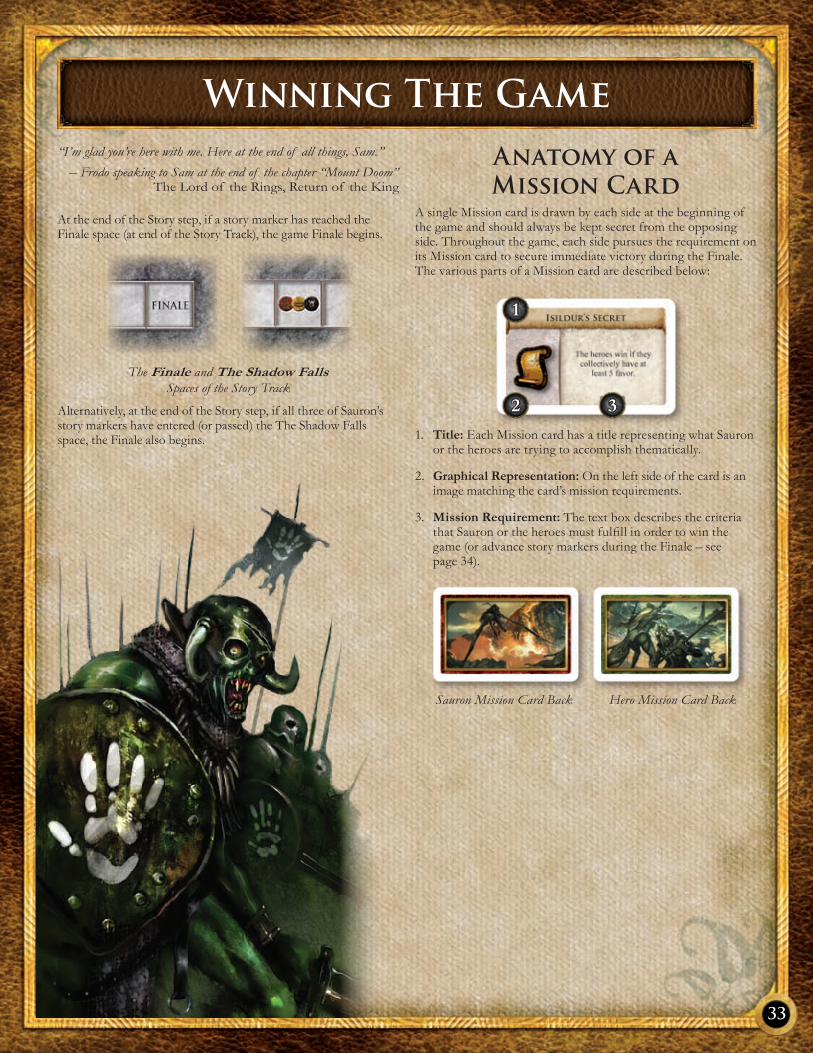
33
“I’m glad you’re here with me. Here at the end of all things, Sam.”
– Frodo speaking to Sam at the end of the chapter “Mount Doom” The Lord of the Rings, Return of the King
At the end of the Story step, if a story marker has reached the Finale space (at end of the Story Track), the game Finale begins.
The Finale and The Shadow Falls Spaces of the Story Track
Alternatively, at the end of the Story step, if all three of Sauron’s story markers have entered (or passed) the The Shadow Falls space, the Finale also begins.
Anatomy of a Mission Card
A single Mission card is drawn by each side at the beginning of the game and should always be kept secret from the opposing side. Throughout the game, each side pursues the requirement on its Mission card to secure immediate victory during the Finale. The various parts of a Mission card are described below:
1
2 3
Title:1. Each Mission card has a title representing what Sauron or the heroes are trying to accomplish thematically.
Graphical Representation: 2. On the left side of the card is an image matching the card’s mission requirements.
Mission Requirement:3. The text box describes the criteria that Sauron or the heroes must fulfill in order to win the game (or advance story markers during the Finale – see page 34).
Sauron Mission Card Back Hero Mission Card Back
Winning The Game

34
FinaleOnce the Finale begins, players no longer take normal turns; instead the following steps are followed:
Check for Immediate Victory:1. The dominant side reveals its Mission card. If it is fulfilling the criteria on its Mission card, the dominant side immediately wins the game. Otherwise, players proceed to step 2. If neither side is dominant, both sides reveal their Mission cards. If only one of the sides is able to fulfill the criteria on its Mission card, then that side immediately wins the game. If neither side has won the game, then players proceed to the next step.
Advance Story Markers:2. If Sauron fulfills his Mission card requirement, he advances each of his story markers one space on the Story Track. Also, if the heroes fulfill their Mission card, they advance their story marker one space on the Story Track. If a story marker is located on the Finale space of the Story Track, it does not advance.
Prepare:3. Sauron now removes all prior damage from the Ringwraiths’ Minion space on the game board. Each hero then shuffles all cards from his hand, rest pool, and damage pool into his life pool. Each hero then draws a number of cards from the top of his life pool equal to his fortitude.
Adjust Difficulty:4. If one team is dominant, the Ringwraiths’ attributes are modified as follows:
Sauron Dominant: - The Ringwraiths gain a number of both health and fortitude equal to the number of spaces that the hero story marker is away from the Finale space on the Story Track.
Heroes Dominant: - The Ringwraiths’ health and fortitude is reduced by the lower of the following two numbers:
The number of spaces that the closest Sauron story a. marker is away from the Finale space on the Story Track.
The cumulative number of spaces needed for Sauron’s b. remaining story marker(s) to advance into The Shadow Falls space on the Story Track (see “Finale Example”).
Choose Champion:5. The heroes choose one hero player. This player will fight the Ringwraiths in step 6. Remember that heroes have already drawn cards based upon their fortitude and may wish to choose their champion based upon which hero thinks he has the strongest hand of cards.
Combat:6. The chosen hero fights the Ringwraiths following all standard rules for combat.
Determine Winner: 7. If the Ringwraiths were defeated during step 6, the heroes immediately win the game. If the Ringwraiths were not defeated, Sauron wins the game.
Finale Example
During the Story step, the hero story marker has reached 1. the Finale space of the Story Track, triggering the start of the Finale. The heroes are dominant, but are unable to fulfill their Mission card’s requirements, and therefore cannot claim immediate victory.
Sauron’s markers advance 1 space since he 2. is fulfilling the requirements of his Mission card.
Since the heroes are dominant, Sauron counts the number 3. of spaces his story markers are from the Finale space and The Shadow Falls space. His closest story marker is 3 spaces away from the Finale space of the Story Track.
Sauron’s other story markers are a total of 5 spaces 4. away from The Shadow Falls space of the Story Track (2 spaces for the yellow story marker plus 3 spaces for the red story marker).
Sauron uses the lower of these numbers (3) to give the 5. the Ringwraiths –3 health and –3 fortitude during the upcoming battle against a hero.
1222
34
4
35
“Then at last his gaze was held: wall upon wall, battlement upon battlement, black, immeasurably strong, mountain of iron, gate of steel, tower of adamant, he saw it: Barad-dûr, Fortress of Sauron. All hope left him.”
– Frodo seeing Barad-dûr from the Seat of Seeing atop Amon Hen The Lord of the Rings, The Fellowship of the Ring
Two Player GameWhen playing Middle-earth Quest with two players, the following rules changes should be followed.
The hero player receives two turns for every Sauron turn as follows:
After the hero finishes his first Encounter step, resolve a • special Hero Rally step and a Hero Draw step.
The hero then receives a second turn starting with his • Rest step.
At the end of his second Encounter step, Sauron begins his • turn as normal (starting with the Hero Rally step).
Sauron may play one Shadow card during each of the hero’s • two turns.
ReshufflingWhen any card deck or the monster token pile is depleted, simply reshuffle the discarded cards (or tokens) into a new deck/pile.
Component LimitationsIf players run out of favor, influence, or damage tokens, add suitable replacements to the game (such as coins, beads, etc.).
All other components are strictly limited to the ones provided.
Optional RulesThis section contains optional rules for players who prefer particular play styles. Each of these rules may only be used if all players agree to it before starting the game.
Advanced DominanceThis optional rule is intended for players who prefer a more precise (and more complicated) calculation for which side is dominant.
A side is considered to be dominant if, given the game’s current state, it would require fewer Story steps for the side to reach the Finale than its opponent. This is calculated by simulating a number of Story steps until a side has reached the Finale with Sauron’s active Plot cards remaining in play.
Other RulesExample: The hero story marker is five spaces away from the Finale space. Since the hero story marker moves two spaces per Story step, it would require three Story steps for this token to reach the Finale space.
Sauron’s active Plot cards advance his black and red story markers 2 spaces apiece each Story step. It will require four Story steps for one of his markers to reach the Finale space, or all of his markers to reach The Shadow Falls space. Therefore, the heroes are dominant (since they will reach the Finale in 3 turns versus 4 turns for Sauron).
High Stakes Stage IIIThis optional rule is intended for players who desire more opportunities for a losing side to catch up during stage III. Simply make the following rules changes:
If the Heroes are dominant during stage III, Sauron may • decide which of his three markers is advanced each time he defeats a hero (instead of advancing his lowest marker).
If Sauron is dominant during stage III, the heroes advance • their story marker one space on the Story Track each time they defeat a minion.
Strategy TipsThis section is to help new players understand what to focus on during their first few turns of the game. Players are not required to follow these tips, although they should prove helpful.
Hero StrategiesThe darkness rising in the east seems nigh unstoppable. Yet, there is still strength in the hearts of men, in the wisdom of the elves, in the steel of the dwarves, and in the will of all living things to be free under the sun. Holding Sauron at bay will require daring, courage, wisdom, and the help of friends and allies. All is not yet lost, so read carefully:
Favor is a hero’s most precious commodity. When given a • choice of receiving favor or another benefit, the hero should usually choose to receive favor. Heroes should not forget the “Choose a Dark Path” exploring option. This option can be extremely helpful, but should be used cautiously.
The heroes should not let Sauron keep Plot cards in play, even • if the heroes seem to be winning. It is much easier for Sauron to play Plot cards later in the game, so the heroes should prepare for this by making sure Sauron is weakened as much as possible from the start.
Do not fear defeat! Sometimes it is necessary to walk into • situations that could lead to a hero being defeated. The heroes should not be afraid to take a necessary risk if it could lead to stopping Sauron’s Plots. Of course, heroes should not rest or be defeated too often, as this would lead to Sauron winning the game quickly.
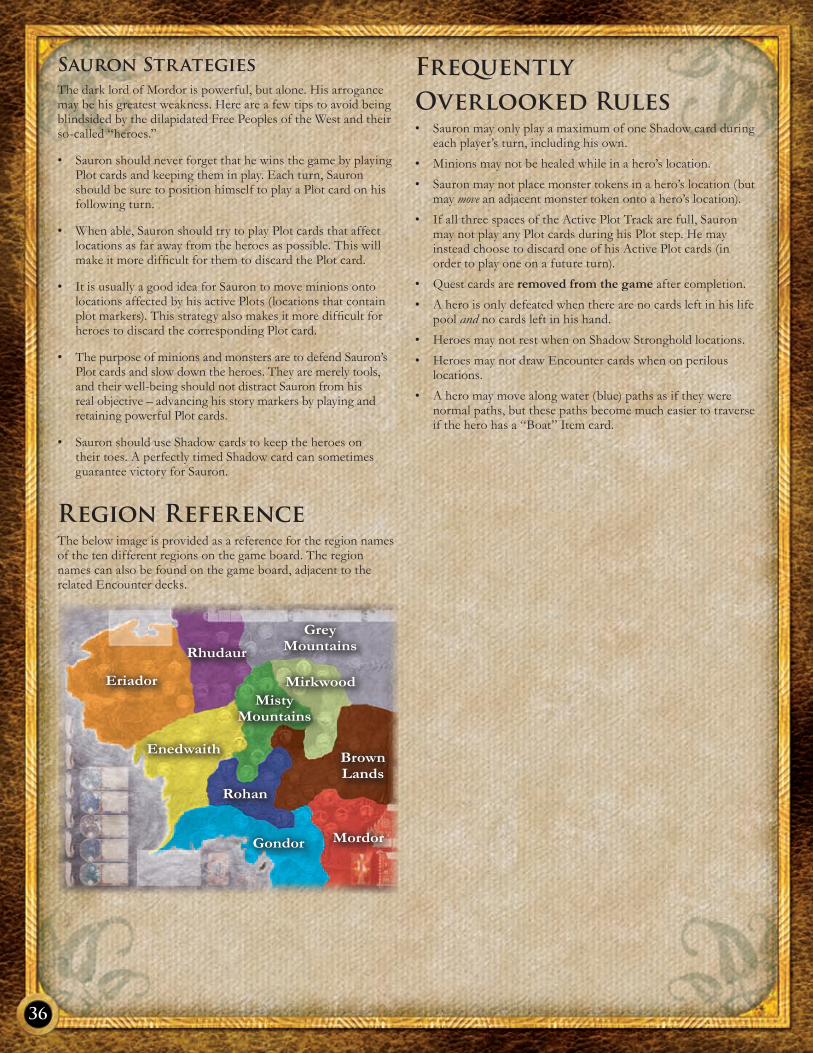
36
Frequently Overlooked Rules
Sauron may only play a maximum of one Shadow card during • each player’s turn, including his own.
Minions may not be healed while in a hero’s location.•
Sauron may not place monster tokens in a hero’s location (but • may move an adjacent monster token onto a hero’s location).
If all three spaces of the Active Plot Track are full, Sauron • may not play any Plot cards during his Plot step. He may instead choose to discard one of his Active Plot cards (in order to play one on a future turn).
Quest cards are • removed from the game after completion.
A hero is only defeated when there are no cards left in his life • pool and no cards left in his hand.
Heroes may not rest when on Shadow Stronghold locations.•
Heroes may not draw Encounter cards when on perilous • locations.
A hero may move along water (blue) paths as if they were • normal paths, but these paths become much easier to traverse if the hero has a “Boat” Item card.
Sauron StrategiesThe dark lord of Mordor is powerful, but alone. His arrogance may be his greatest weakness. Here are a few tips to avoid being blindsided by the dilapidated Free Peoples of the West and their so-called “heroes.”
Sauron should never forget that he wins the game by playing • Plot cards and keeping them in play. Each turn, Sauron should be sure to position himself to play a Plot card on his following turn.
When able, Sauron should try to play Plot cards that affect • locations as far away from the heroes as possible. This will make it more difficult for them to discard the Plot card.
It is usually a good idea for Sauron to move minions onto • locations affected by his active Plots (locations that contain plot markers). This strategy also makes it more difficult for heroes to discard the corresponding Plot card.
The purpose of minions and monsters are to defend Sauron’s • Plot cards and slow down the heroes. They are merely tools, and their well-being should not distract Sauron from his real objective – advancing his story markers by playing and retaining powerful Plot cards.
Sauron should use Shadow cards to keep the heroes on • their toes. A perfectly timed Shadow card can sometimes guarantee victory for Sauron.
Region ReferenceThe below image is provided as a reference for the region names of the ten different regions on the game board. The region names can also be found on the game board, adjacent to the related Encounter decks.
Mordor
Brown Lands
Gondor
Rohan
MirkwoodMisty
Mountains
Grey MountainsRhudaur
Enedwaith
Eriador
CreditsGame Design and Development: Corey Konieczka and Christian T. Petersen
Additional Development: Tim Uren
Editing and Proofreading: Mark O’Connor
Graphic Design: Kevin Childress, Andrew Navaro, Brian Schomburg, and WiL Springer
Art Direction: Zoë Robinson
Cover Art: Tomasz Jedruszek
Map Art and Character Design: Tim Arney-O’Neil
Map Location Art: Trevor Cook
Interior Art: Ryan Barger, Anna Christenson, Daarken, John Gravato, John Howe, and Sedone Thonvilay
Production Manager: Gabe Laulunen
Publisher: Christian T. Petersen
License Manager (Sophisticated Games): Robert Hyde
Playtest Coordinators: Robert A. Kouba and Mike Zebrowski
Playtesters: William Baldwin, Jaffer Batica, Kevin Beckey, Bob Bednar, Carolina Blanken, Pieter Blanken, Bryan Bornmueller, Kevin Childress, Kåre W. Christensen, Flannery Clark, Emile de Maat, Jean9 Duncan, Darci Fosnaugh, Rob Fosnaugh, J.R. Godwin, John Goodenough, Eric Hanson, Peter Hawthorne, Stephen Horvath, Tara King, Thomas Laursen, Erik Lind, Jay Little, Richard Nauertz, Andrew Navaro, Jacob Overbo, Gilbert D. Ponsness, Mike Ring, Paul Schulzetenberg, Arjan Snippe, Erik Snippe, Jeremy Stomberg, Seth Sweep, Jeff Tidball, Steen Moldrup Thomsen, Trent Urness, James Vaelker, Wilco van de Camp, Jason Walden, Matthew Xavier, Tom Zebro, and Jamie Zephyr
Blind Playtesters: “The Lurkers in the Valley”– Ed Browne, Meric England, Loren Overby, Jeffrey Poff, Lisa Poff, Vern Wester.
Christian would like to thank Professor Tolkien for boundless inspiration, Robert Hyde for his amazing patience with him and the marathon MEQ project both, and Corey K. for carrying this game to an epic conclusion, and making this game so much better than what he could have accomplished alone.
Corey would also like to specially thank all of our playtesters, particularly all outside groups who spent countless hours cutting and pasting, and Eric Hanson and Jean9 Duncan who donated many late nights to help iron out the bugs.
© 2009 Fantasy Flight Publishing, Inc., all rights reserved. No part of this product may be reproduced without specific permission. Middle-
earth Quest, Middle-earth, The Watcher logo, The Lord of the Rings, and characters, events, items, and places therein are registered trademarks of the Saul Zaentz Company d/b/a Tolkien Enterprises,
and are used under license by Sophisticated Games Ltd and their licensees. Fantasy Flight Games is located at 1975 West County Road B2, Suite 1, Roseville, Minnesota, 55113, USA, and can be reached
by telephone at 651-639-1905. Retain this information for your records. Not suitable for children under 36 months due to small parts.
Actual components may vary from those shown. Made in China.
Visit Us on the Web at
www.FantasyFlightgames.com
37
38
IndexAction Step: pages 15–19Action Token: page 15Action Track Anatomy: page 16Affected Locations on Event Cards: page 13Affected Locations on Plot Cards: page 14Agility: page 21Ambush Step: page 22Attributes of Heroes: pages 20–21Attributes of Monsters: page 27Cancel: page 29Card Pools: page 21Character Tokens: page 24Component List: page 3Combat: pages 27–32Combat, Steps of: pages 28–29Combat Example: pages 30–31Combat Keywords: page 29Commanding Monsters and Minions: pages 18–19Component Overview: pages 4–6Consulting Characters: page 24Corruption Cards: pages 20, 26 Current Stage: pages 11–12Damage, Dealing: page 32Damage Pool: page 21Defeated Heroes, Monsters, and Minions: page 32Dominance, Determining: page 14Drawing Shadow Cards and Plot Cards: pages 17–18Encounter Card Anatomy: page 25Encounter Step: pages 24–25Event Card Anatomy: page 15Event Step: page 14Exhausted Combatants: page 32Exploring: page 24Extension, Influence in: pages 16–17 Favor Tokens: page 24Finale: pages 33–34Fortitude, Heroes: page 20Fortitude, Monster: page 27Game Board Anatomy: page 6Game Turns: page 10 Havens: page 11Healing Heroes: page 20Healing Minions: page 18Hero and Skill Cards Anatomy: page 28Hero Draw Step: page 19Hero Sheets, Breakdown: pages 20–21Hero Turn in Detail: pages 20–25Hero Turn Overview: page 10Important Terms: page 11Influence, Placing: pages 16–17Influence Strength: page 16Item Cards: page 26Level Tokens: page 26Life Pool: page 21Minions: pages 12, 18Mission Card Anatomy: page 33Monster Combat Cards: page 28Monster Reference Cards: page 27Monster Tokens: page 19Moving, Heroes: pages 22–23Moving Monsters and Minions: page 18Movement Icons: page 22
Paths, Movement: pages 6, 22Peril Cards: page 23Perilous Locations: pages 22–23Character Tokens: page 24Place Influence Action: pages 15–17Placing Monster Tokens: page 18Plot Cards: page 13Plot Step: page 13Quests Cards: page 25Rally Step: page 11Region: page 11Rest Pool: page 21Rest Step: page 20Sauron Turn Overview: page 10Sauron Turn Details: pages 11–19Setup: page 8Shadow Cards Anatomy: page 18Shadow Pool: page 16Shadow Strongholds: page 11Skill Cards: page 26Stages of the Game: page 12Story Step: page 12Story Track: page 12Strength, Heroes: page 20Strength, Monsters: page 27Two Player Game: page 35Travel Step: pages 22–23Training: page 26Winning the Game: pages 33–34Wisdom, Heroes: page 21Wisdom, Monsters and Minions: page 27Within X Spaces: page 11
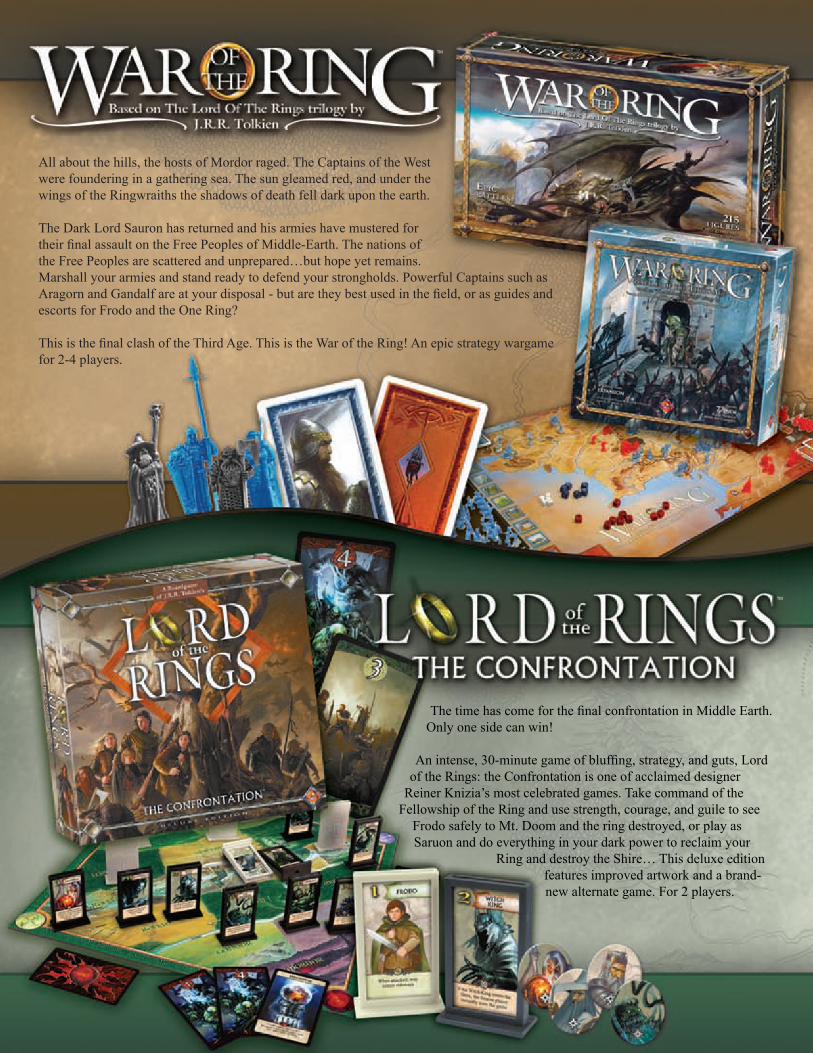
All about the hills, the hosts of Mordor raged. The Captains of the West were foundering in a gathering sea. The sun gleamed red, and under the wings of the Ringwraiths the shadows of death fell dark upon the earth.
The Dark Lord Sauron has returned and his armies have mustered for their final assault on the Free Peoples of Middle-Earth. The nations of the Free Peoples are scattered and unprepared…but hope yet remains. Marshall your armies and stand ready to defend your strongholds. Powerful Captains such as Aragorn and Gandalf are at your disposal - but are they best used in the field, or as guides and escorts for Frodo and the One Ring?
This is the final clash of the Third Age. This is the War of the Ring! An epic strategy wargame for 2-4 players.
The time has come for the final confrontation in Middle Earth. Only one side can win!
An intense, 30-minute game of bluffing, strategy, and guts, Lord of the Rings: the Confrontation is one of acclaimed designer
Reiner Knizia’s most celebrated games. Take command of the Fellowship of the Ring and use strength, courage, and guile to see
Frodo safely to Mt. Doom and the ring destroyed, or play as Saruon and do everything in your dark power to reclaim your
Ring and destroy the Shire… This deluxe edition features improved artwork and a brand-new alternate game. For 2 players.
TM
TM

40
Quick ReferenceMission Card ReferenceThis section lists all of the Mission cards and can be used to help players prepare for the Finale.
Sauron Mission CardsHis Dark Throne: • Sauron wins if there are 3 active Plot cards in play.
In Darkness Bind Them: • Sauron wins if his yellow story marker has advanced to stage III of the Story Track.
To Rule Them All: • Sauron wins if his red story marker has advanced to stage III of the Story Track.
Where the Shadows Lie: • Sauron wins if his black story marker has advanced to stage III of the Story Track.
To Find Them All: • Sauron wins if he has either the Ringwraiths or 6 influence on the Shire.
Hero Mission CardsNoble Blood: • The heroes win if they collectively have 1 or less Corruption cards.
Against The Shadow:• The heroes win if there are no more than 2 monster tokens in play.
Isildur’s Secret:• The heroes win if they collectively have at least 5 favor.
Minas Morgul Kept at Bay:• The heroes win if there are 2 or less minions in play.
The Spear of the West:• The heroes win if each hero has completed both his Starting and Advanced quest.
Combat StepsSauron Setup1.
Preparation (draw Combat cards)2.
Rounds of Combat3.
Choose Cardsa.
Reveal Cardsb.
Calculate Strength c.
Previous Round Abilitiesd.
Current Round Abilities e.
Deal Damagef.
Resolution4.
Discard Cards a.
Discard Monster Tokenb.
Undefeated Monster or Minionc.
sauron turnHero Rally Step:1. Discard all influence tokens from each hero’s location.
Story Step:2. Advance the hero story marker two spaces up the Story Track and Sauron’s story markers according to his active Plot cards. Skip this step on the first turn of the game.
Plot Step: 3. Sauron may play a single Plot card from his hand or discard an active Plot card. Skip this step on the first turn of the game.
Event Step:4. Sauron draws three cards from the top of the current stage’s Event deck. He then resolves one of them (per the rules found on page 14). If neither team is dominant, Sauron instead draws one card and resolves it.
Action Step:5. Sauron may take two actions (or three actions if playing a four player game).
Hero Draw Step:6. Each hero may draw cards from his life pool equal to his fortitude.
Hero turnRest Step: 1. If there are no monster tokens or minions in the hero’s location, and he is not in a Shadow Stronghold, he may rest. If the hero is in a Haven, he may heal.
Ambush Step: 2. Sauron may choose and attack with one monster or minion in the hero’s location.
Travel Step:3. During this step, the hero is able to travel to an adjacent location on the game board, fight enemies, resolve perilous locations, and explore as follows: A hero may perform this step as many times as his hand of Hero cards allows.
Move: a. The hero may move to an adjacent location by discarding the required Hero card(s) from his hand.
Combat or Peril: b. Sauron chooses whether the hero will fight a monster/minion in his location or resolve a Peril card (if he is in a perilous location.
Explore:c. The hero may explore in his current location. This includes retrieving favor, consulting with characters, completing quests, and more.
Encounter Step:4. After he has finished moving, if the hero is not in a perilous location, he draws three cards from his location’s Encounter deck and resolves the lowest numbered card that matches his location.
Quick IndexCombat, Steps of: pages 28–29 • Finale: pages 33–34• Full Index: page 38 • Frequently Overlooked Rules: page 36• Important Terms: page 11• Region Reference: page 36• Setup: page 8• Two Player Game: page 35•