intesio-aquacell · page 7 overview of aquacell® systems acceptance – british board of...
TRANSCRIPT

CI/SfB (52.5) (90.51)
May 2009/rev February 2010 WM424
Uniclass EPIC JR12/JS10 L731/L71121/L2123 J3413 X721
Intelligent stormwater solutions by Wavin
For residential, commercial, industrial and infrastructure applications
Infiltration and Attenuation Systems
Product and Installation Guide


www.intesio.co.ukPage 3
Contents
Wavin operates a programme of continual product development, and therefore reserves the right to modify or amend the specifi cation of their products without notice. All information in this publication is given in good faith, and believed to be correct at the time of going to press. However, no responsibility can be accepted for any errors, omissions or incorrect assumptions. Users should satisfy themselves that products are suitable for the purpose and application intended.
Infiltration and Attenuation
Introduction 4-5
Intesio - For Optimum Stormwater Management 4
AquaCell Systems 4
Garastor System 5
Overview 6-7
Overview of AquaCell Systems 6-7
Applications 8-11
AquaCell Plus for Deeper installations 8-9
AquaCell Core for Trafficked installations 10
AquaCell Lite for Landscaped and Non-Trafficked Sites 11
AquaCell Systems 12-13
Principal Components 12
Ancillary Components 12
System Selector 13
Design and Installation 14-18
Design and Installation Guidance 14-15
Typical Soakaway Installation Method 16
Typical Storage Tank Installation Method 17
Silt Trap 18
Air Vent Design 18
Typical Connections 19-21
Typical Connections to AquaCell Units 19
Typical Air Vent Connections 20
Typical Connection Configurations 21
Typical Details 22-31 Soakaway - Non-Traffic Loading 22
Soakaway - Highway 23
On-Line Storage - Box Feed 24
On-Line Storage - Manifold Feed 25
On-Line Storage - Central Pipe Feed 26
On-Line Storage - Manifold Feed with Bypass 27
Off-Line Storage - Box Feed 28
Off-Line Storage - Manifold Feed 29
Off-Line Storage - Central Pipe Feed 30
Soakaway or Storage Tank - With Silt Trap 31
Garastor System 32-35
Introduction 32
Overview 33
Principal Components 34
Typical Installation Methods 35

Customer Services Technical Enquiries Technical Fax Email01249 766611 01249 766655 01249 766653 [email protected] 4
Infi ltration & Attenuation Systems – Introduction
Intesio – for optimum stormwater management
Continuing urban development, a changing climate and the
consequences of intensifi ed rainfall: all are increasingly prominent
issues on the political and environmental agenda. In combination,
they represent a complex need for the most intelligent, effective
solution.
Intesio is Wavin’s specialist approach to responsible management
of stormwater, including its effi cient capture, transportation,
cleansing, infi ltration, attenuation and re-use. We’re ready to
contribute at any stage in a project, with one central goal: to help
achieve the optimum project outcome. Our in-depth expertise,
design insight and proven system technology is applied wherever
required to ensure each installed scheme achieves maximum
effi ciency of cost and integrated function, and full compliance with
the latest regulatory criteria.
Intesio AquaCell® systems:
The AquaCell systems are a fully tried and tested modular
technique for managing excessive rainfall by creating an
underground structure as either a temporary storage tank or a
soakaway:
• AquaCell Plus (light blue unit) inspectable, for use in deep
traffi cked locations.
• AquaCell Core (blue unit) for traffi cked locations.
• AquaCell Lite (green unit) for landscaped and non-traffi cked
sites.
Box systems – select with care
Rising rainfall levels, and increased focus on SUDS compliance,
have led to a sharp increase in the use of modular box systems to
create underground structures for infi ltration or temporary storage
of stormwater.
However, not all currently available systems have the proven
performance characteristics necessary for the wide range of
complex underground geocellular applications (see pages 8, 9, 10
& 11).
With Intesio AquaCell systems, however, the required strength and
hydraulic capabilities have been verifi ed by independent testing.
AquaCell Plus
AquaCell Core
AquaCell Lite

www.intesio.co.ukPage 5
Infi ltration & Attenuation Systems – Introduction
AquaCell Lite soakaway
Garastor® System*
A polypropylene fl ow control chamber connected to a water
storage reservoir EITHER made up of AquaCell units or located in
a void beneath the garage of individual houses.
* Depending on the application either AquaCell Core or AquaCell
Lite may be used in conjunction with Garastor. For further details
contact Wavin Technical Design.
Note: Garastor can be used as a fl ow control device for any
AquaCell storage system, no greater than one unit deep with a
discharge of up to 1.4 l/s via the 30mm release fl ow orifi ce.
* Garastor is manufactured under licence (Patent Number
GB2357093).
Garastor System
Garastor domestic storage using AquaCell Core tank
Garastor domestic storage using garage void
Large scale AquaCell Core storage tank
Domestic AquaCell Core soakaway
The AquaCell Stormwater Management System
Comprises individual infi ltration modules assembled together
to form underground structures which can either be used for
stormwater storage or as an alternative to domestic soakaways.
Heavy storms and major cloudbursts are becoming more frequent,
resulting in ever increasing volumes of stormwater fl owing into
conventional drainage systems and water courses. When the
capacities of these systems are exceeded the consequences can
be dramatic and damaging.
Stormwater must be controlled; either by limiting the outfl ow
and providing temporary storage or where the ground conditions
are suitable, providing soakaways for the stormwater to infi ltrate
back into the surrounding ground. This has the added benefi t of
recharging the local groundwater.
Both options can be achieved using either the AquaCell Plus,
Core or Lite systems depending on the application.

Customer Services Technical Enquiries Technical Fax Email01249 766611 01249 766655 01249 766653 [email protected] 6
Overview of AquaCell® Systems
AquaCell systems are a fully tried and tested modular technique
for managing excessive rainfall. Units are assembled to create
an underground structure as either temporary storage tank or
soakaway.
There are 3 types of unit:
AquaCell Plus
for extra deep installations and/or inspectability (pages 8-9)
AquaCell Core
for traffi cked locations (page 10), and
AquaCell Lite
for landscaped and non-traffi cked locations (page 11)
For quick, versatile assembly
The lightweight polypropylene, high void units are securely linked
together using special clips and shear connectors.
They can be assembled quickly on site into whatever
confi guration suits each specifi c location.
AquaCell Core and Lite geocellular systems also allow ‘brick-
bonding’, which can give extra stability, without the need for
additional connector pieces.
Wrapped for infi ltration or storage
The complete assembly is wrapped in either geotextile sheet or a
geomembrane:
For pervious soils, the geotextile option allows infi ltration of
stormwater into the surrounding ground.
For impervious ground (e.g. clay) or where infi ltration is not
desirable, the geomembrane holds stormwater in temporary
storage until local drainage fl ows can accept it for normal
disposal.
Benefi ting community and environment
AquaCell systems contribute the following benefi ts:
Signifi cantly reduced fl ooding risk•
Controlled, reduced-volume release of stormwater into existing •
sewer systems or watercourses
Recharging of local groundwater (if infi ltration/soakaway •
application)
Aerobic purifi cation to improve water run-off quality•
Sustainable, cost effective management of the water •
environment
Helping SUDS and planning approval
The proven qualities and performance of AquaCell systems
not only support the achievement of SUDS, they can also
help reinforce and enhance planning applications, and enable
development to proceed.
Types of Connections
There are a number of ways to provide a controlled feed into the
AquaCell units to suit the required fl ow capacity.
These being:
Manifold Confi guration – this confi guration utilizes standard 1.
pipe and fi ttings (see page 21)
Box Confi guration – this confi guration utilizes the AquaCell Core 2.
units (see page 21)
Central Pipe Confi guration – this confi guration utilizes standard 3.
perferated TwinWall pipe and fi ttings (see page 21)

www.intesio.co.ukPage 7
Overview of AquaCell® Systems
Acceptance – British Board of Agrément
The Intesio Infi ltration and Attenuation systems, AquaCell Plus,
Core and Lite have been awarded British Board of Agrément
approval under BBA Agrément Certifi cate No.03/4018.
The certifi cate covers the design data, technical specifi cation,
installation and maintenance aspects for each unit as follows:
AquaCell Core
– approved under BBA Agrément
Certifi cate No.03/4018, Detail Sheet 1
AquaCell Lite
– approved under BBA Agrément
Certifi cate No.03/4018, Detail Sheet 2
AquaCell Plus
– approved under BBA Agrément
Certifi cate No.03/4018, Detail Sheet 3
Construction Industry Research and Information
Association (CIRIA)
CIRIA publishes structural design information for modular geocellular drainage tanks
CIRIA has produced Guidance Document C680 “Structural design
of modular geocellular drainage tanks”...
This document has been produced to ensure that engineers
have the required information to establish that a proposed
underground structure is capable of remaining structurally sound
and operational in traffi cked situations over the lifetime of the
construction.
C680 asserts that engineers should satisfy themselves of
the suitability of the proposed construction, and not rely on
manufacturer’s recommendations. Intesio AquaCell has been fully
tested in accordance with the requirements of C680 and we can, if
required, provide structural calculations for our system within our
designs from an independent consultant.

Customer Services Technical Enquiries Technical Fax Email01249 766611 01249 766655 01249 766653 [email protected] 8
AquaCell Plus for Deeper Installations and/or for Inspectability
For any installation where extra depth and/or inspectability is required.
AquaCell Plus has been developed and engineered to add extra
design scope for AquaCell installations. The units can be used in
combination with AquaCell Core (and with Lite if there is at least
one layer of AquaCell Core in between the Plus and Lite Layer).
Extra lateral loading capacity allows installation at greater depths.
Integral inspection channels in each unit can combine to create
viewing channels for the full length of the installed structure.
PROVEN LOADING CAPACITY
Vertical: 65 tonnes/m2•
Lateral: 8.55 tonnes/m2•
INSTALLATION DEPTH
Maximum to base of units*:•
5.08 metres
*in best soil conditions
OTHER FEATURES
Specifi c to AquaCell Plus:
Distinctive LIGHT BLUE colour – for ease of inspectability•
Integral inspection tunnel•
Approvals: BBA No.03/4018 Detail Sheet 3•
AquaCell Plus: solus – or in combination
AquaCell Plus may be used on its own – or in combination with
AquaCell Lite* and/or AquaCell Core.
*AquaCell Lite can only be used in conjunction with AquaCell Plus,
if there is at least one layer of AquaCell Core inbetween the Plus
and Lite layer.
Extra deep installations
Non-trafficked areas
Trafficked areas
End cap for when an inspection channel is not required
AquaCell Plus6LB200

www.intesio.co.ukPage 9
AquaCell Plus for Deeper Installations and/or for Inspectability
AquaCell Plus: for extra depth and/or inspectability.
The extra lateral loading capacity of AquaCell Plus means it can
be used at a greater depth (maximum 5.08m). This may be on
its own – or in combination with AquaCell Core, which has a
maximum permitted depth of 4.25m (4.1m if traffi cked).
AquaCell Plus: for inspectability
By aligning AquaCell Plus units end-toend, full length viewing
channels can be created – allowing for CCTV inspection if
required. These are created in the bottom layer of an AquaCell
tank installation.
AquaCell Plus units may be installed alongside other AquaCell
units, as in the examples shown.
Wavin recommends that a minimum of three inspection tunnels
are created – at the inlet point (at or near the tank centre line) and
at the two outer edges of the structure. An inspection chamber
should be installed for each tunnel.
NOTE: For any AquaCell Plus units on the perimeter of a structure
that are NOT required for inspection access, the open ends of
the integral inspection tunnels should be fi tted with the end caps
provided.
Inspection chambers
An inspection chamber should precede the inlet pipework for the
AquaCell structure:
For on-line installations:
– (down to 3m) Intesio Non-Entry Inspection Chamber [NIC] or
– (down to 5m) Intesio Tegra 600 Inspection Chamber or
– Traditional manhole*
*where inlet pipework is replaced by AquaCell units acting as fl ow
conduit).
A silt trap prior to the inspection chamber is also recommended.
For off-line installations:
– Traditional manhole with in-built fl ow control
For non-inlet inspection points, use Intesio Non-Entry Inspection
Chamber [NIC] or Intesio Tegra 600 Inspection Chamber only.
RECOMMENDATION: If installing Intesio Non-Entry Inspection
Chamber [NIC] or Intesio Tegra 600 Inspection Chamber,
regardless of depth, ensure the cover and frame includes a
350mm restrictor to prevent man entry.
Inspection and maintenance
CCTV inspection at every inspection point is recommended:
– after every major storm
– at regular intervals according to the specifi c maintenance plan
for the site
Silt traps prior to inlet pipework should be routinely inspected and
cleaned out to minimise debris reaching the tank. It is important to
prevent construction silt from entering the AquaCell structure.
Inspectability scenarios
AquaCell Core and AquaCell Plus
Trafficked tank installation with inspection channels

Customer Services Technical Enquiries Technical Fax Email01249 766611 01249 766655 01249 766653 [email protected] 10
AquaCell Core is ideal for areas subject to regular and heavy traffi c loading, and particularly for larger projects.
Specifi ers, developers and contractors can now choose the right
product to suit each situation. The original AquaCell Core (blue
unit) has already proved its versatility and functional performance
advantages in large projects designed to satisfy demanding
criteria for sustainable drainage. Examples of projects utilising
AquaCell include:
Large scale 7,000 unit soakaway under airport car park•
2,000 unit storage tank in contaminated land, a former power •
station site
1,400 unit storage tank to store run-off from expanding retail •
park
In locations where traffi c loading is NOT anticipated, AquaCell Lite
(green unit) should be selected (see page 11).
In addition to features and benefi ts applicable to BOTH systems
those specifi cally applicable to traffi ckable AquaCell Core (blue
unit) include:
BBA approved and can meet technical requirements of NHBC•
Proven vertical loading capacity: 56 tonnes/m2•
Proven lateral loading capacity: 7.75 tonnes/m2•
For installations both up to and exceeding 1.5 metres deep•
Distinctive BLUE colour – easy to identify•
Designed for all confi gurations and applications, including both •
shallow and deeper installations – Ideal for all sizes of project
including major attenuation schemes
AquaCell Core for Traffi cked Sites
AquaCell Core 6LB100
Typical applications
Industrial/commercial areas
Residential developments
Roads
Car parks

www.intesio.co.ukPage 11
AquaCell Lite for Landscaped and Non-traffi cked Sites
Typical applications
Domestic gardens
Grassed and leisure areas
Roundabouts
Domestic back gardens
AquaCell Lite has been designed and developed for landscaped and other traffi c-free areas where heavy loading capability is not required.
This now enables specifi ers, developers and contractors to
choose the right product to suit each situation.
AquaCell Lite (green unit) offers all the proven installation
versatility and functional performance advantages of AquaCell
Core (see page 10), but has been specifi cally engineered to
provide a cost-effective option for low-loaded locations.
In addition to features and benefi ts applicable to BOTH systems
those specifi cally applicable to AquaCell Lite (green unit) include:
Proven vertical loading capacity: 17.5 tonnes/m2•
Proven lateral loading capacity: 4.0 tonnes/m2•
For installation depth (to base of units) of up to 1.5 metres •
maximum
Built-in ‘hand holes’ for easy carrying/handling•
Distinctive GREEN colour – easy to identify•
Specifi cally designed for restricted depth, low-loaded, •
landscaped sites:
– Ideal for smaller projects
Note: NOT suitable for locations subject to high watertable.
AquaCell Lite 6LB050

Customer Services Technical Enquiries Technical Fax Email01249 766611 01249 766655 01249 766653 [email protected] 12
AquaCell Systems – Principal Components
* 6LB104 – Can only be used when constructing an air vent, on the top
surface of the unit, when installed with AquaCell Lite (6LB050)
** 6LB106 – Not suitable for use with AquaCell Lite (6LB050)
6LB600 Silt Trap
(Use Extension Kit if required)
6D129OsmaDrain S/S Adaptor –
Thinwall Clay Spigot
(For use with 6D916 when
connecting to a BS EN 295
Thinwall Clay Spigot)
6LB106**225mm Flange Adaptor
(To connect to 225mm UltraRib)
6LB104*150mm Flange Adaptor
(Adaptor to be used at points
other than pre-formed socket
to connect to 150mm UltraRib)
4D916160mm OsmaDrain
P/E Adaptor
(Fits into pre-formed socket
as an extension connection
piece)
6LB105Clip
(Used to hold
units together
horizontally)6LB102
Shear Connector
(Used to hold units
together vertically)
6D099OsmaDrain S/S Reducer
160mm x 110mm (fits into
pre-formed socket to connect
to 110mm OsmaDrain)
6TW141TwinWall S/S Adaptor
(Fits into pre-formed socket to
connect to 150mm TwinWall)
6UR141UltraRib S/S Adaptor
(Fits into pre-formed socket
to connect to 150mm
UltraRib)
AquaCell Plus Unit 6LB200
AquaCell Lite Unit 6LB050
AquaCell Core Unit 6LB100
Note : All components on this page are not shown to scale
6SC205Extension Kit
Note: All AquaCell units (Lite, Core and Plus) have identical dimensions: 1m (L) x 0.4m (H) x 0.5m (W)
Principal Components
Ancillary Components
All ancillary components can be used with either the AquaCell
Lite, Core or Plus units, except the 225mm Flange Adaptor
(6LB106) which must only be used with AquaCell Plus or Core.
The 150mm Flange Adaptor (6LB104) should only be
used when constructing an air vent on the top surface of
an AquaCell Lite unit. The adaptor should not be used to
connect inlet pipes to the side of the AquaCell Lite unit.

www.intesio.co.ukPage 13
AquaCell Systems – System Selector
The following selector will help you to determine which AquaCell system, or combination of systems,
is the correct choice for a particular project.
NO YES NO YES
Will the tank be more than 4.25m deep?
Will the tank need to be installedextra deep (ie deeper than 4.1m
in ideal soil conditions)?
NO YES
Will the tank be more than 1.5m deep?
NO YES
Will both tank length and width bemore than 12m?
NO YES
Does the site have a high water table?
NO YES
Will the site be subject to traffic loading?
Use:
Lite up to 1.5m
Use:
Core up to 4.1m
Use combination of:
Core up to 4.25m
Lite up to 1.5m Lite up to 1.5m
Use combination of:
Core
Plus up to 5.08m
up to 4.25m
Use combination of:
Plus up to 4.78m
Core up to 4.1m
Lite AquaCell Lite (6LB050)
Core AquaCell Core (6LB100) See pages 8 and 9
See pages 6 and 7
See pages 10 and 11Plus AquaCell Plus (6LB200)
AquaCell Lite and AquaCell Plus cannot be used directly together.
If the tanks need to be inspectable contactWavin Technical Design on 01249 766655.
Notes:

Customer Services Technical Enquiries Technical Fax Email01249 766611 01249 766655 01249 766653 [email protected] 14
Hydraulic and Structural Design
All AquaCell system units have
identical dimensions: 1m x
0.4m x 0.5m, with a nominal
void ratio of 95%. Hydraulic
calculations are accordingly
the same for AquaCell Core, Lite
and Plus.
Structural design, however,
requires careful consideration
of loading factors specific to
each location.
Minimum cover depth
AquaCell AquaCell AquaCell Location type Lite Core Plus
Landscaped/non-trafficked areas 0.3mb 0.5m 0.5m
Car parks, vehicle up to 2500 kga
gross mass , with AquaCell system
– up to 3 AquaCell units wide in trench n/a 0.6m 0.6m
– more than 3 AquaCell units wide n/a 0.75m 0.75m
Maximum depth to base of unit 1.5m 4.25mc 5.08m
Installation and Cover Depths
After deciding which AquaCell
system is correct for the project
location (using the Product
Selector on page 13), see
Table for the recommended
maximum installation depths
and minimum cover depths.
The Mixing the units together
diagram also shows the depth
parameters for each system,
and so gives guidance on
combining two or more of the
AquaCell systems.
AquaCell Systems: Installation Depths
Each AquaCell system has
been designed to have specific
loading capacities (see pages
8, 9, 10 & 11) that define the
depth parameters for which
they are suitable.
Minimum depth of cover varies
according to whether or not the
installation will be subject to
trafficking by motor vehicles/
HGVs. In each case, the cover
depths shown in the diagram
include both absolute minimum
and recommended minimum
cover depths.
In some situations, installations
have to be located at much
deeper levels with significantly
greater cover depths. Reasons
may include:
Landscaped installation Trafficked installation
0.3-0.5mminimum
cover depth
0.6-0.75mminimumcover depth
4.1m
4.78m
1.5m
4.25m
5.08m
a For specific advice on cover depths for heavier loadings/HGV applications, contact Wavin
Technical Design on 01249 766655.
b 0.3 is minimum depth for AquaCell Lite, although 0.5m cover is recommended to prevent accidental damage.
If construction plant is to be used on site, extra protection may be needed.
c Allowable maximum depth to base of bottom layer of units is dependent on soil type, angle of shearing resistance,
loadings, and groundwater level. In poor ground conditions a shallower depth may apply.
• Deep-running drainage
network
• Other buried services running
above tank location
• Installation into banked/
sloping ground
• Upper layer of clay
preventing infiltration
Lite Core Plus
Mixing the units together
Design and Installation Guidance

www.intesio.co.ukPage 15
Design and Installation Guidance
Geocellular Structures
Important design considerations
To guarantee the structural integrity of an engineered drainage
system, any underground structure must be strong enough
to support the loads to which it will be subjected without any
unacceptable deflection.
The correct choice of geocellular box must have appropriate
proven top (vertical) and side (lateral) load bearing capacity and
deflection characteristics to suit site conditions.
The five key site considerations to be noted when designing a
geocellular box system are:
Depth of cover (See page 14)
Soil type
Surface finishing
Presence of groundwater
Type of traffic/loading
AquaCell Lite: Additional Installation Guidance
Because of the special physical properties of AquaCell Lite,
certain precautions are recommended on site to prevent damage
to the units through excess loading.
Manual assembly
Whilst assembling the tank, it may be necessary to walk on top of
previously laid AquaCell units. Therefore care should be taken not
to damage the edges of the units.
Construction traffic on site
If construction plant (e.g. excavators or loaders) are likely to run
over the installation:
• MINIMUM protective cover should be 500mm well-compacted
granular material
• Excavators MUST NOT weigh more than 14 tonnes, and
compaction plant must not exceed 2300 kg per metre width
• HGVs MUST NOT run over installed AquaCell Lite units
Backfilling
When backfilling AquaCell Lite installations:
• Machines placing the material must be located OFF the units
• Only light compaction should be applied to the material
If Type 1 sub-base (or similar) material over AquaCell Lite units
requires compaction:
• First layer should be 300mm thick before any compaction
• NO vibratory mechanism should be used for compacting this
first layer
• MAXIMUM roller size: 2300 kg per metre width
Ancillaries and Adaptors
All ancillaries and adaptors (see page 12) can be used with either
the AquaCell Plus, Core or Lite units, except the 225mm Flange
Adaptor (6LB106) which must only be used with AquaCell Plus/
Core.
The 150mm Flange Adaptor (6LB104) should only be used when
constructing an air vent on the top surface of an AquaCell Lite
unit. The adaptor should not be used to connect inlet pipes to the
side of the AquaCell Lite unit.
The combination of these 5 factors effectively means that the
required characteristics of a geocellular system to be installed
under a trafficked location (for example) will be very different
from that under a landscaped/low-loaded location. Two typical
examples are given below.
1
2
3
4
5
1
5
2
3
4
EXAMPLE A:
Car park with occasional
lorry traffic and 0.6m cover
depth. Typically requires
minimum vertical strength
of 40 tonnes/m2
EXAMPLE B: Landscaped/
non-trafficked location
and 0.3m cover depth.
Typically requires minimum
vertical strength of 17.5
tonnes/m2
These factors have already been taken into consideration within
the product selector on page 14 for the 3 AquaCell systems.

Customer Services Technical Enquiries Technical Fax Email01249 766611 01249 766655 01249 766653 [email protected] 16
Typical Soakaway Installation Method
Permeable geotextile*
Pre-formed socket
AquaCell Plus/AquaCell Core/AquaCell Lite Units
100mm
100mm
100mmCoarse sand or non angular granular material base and surround
Typical Installation Procdedure
1. Excavate the trench to the required depth ensuring that the plan area is slightly greater than
that of the AquaCell units.
2. Lay 100mm bed of coarse sand or non angular granular material, level and compact.
3. Lay the geotextile* over the base and up the sides of the trench.
4. Lay the AquaCell units parallel with each other. In multiple layer applications, wherever
possible, continuous vertical joints should be avoided. AquaCell units can be laid in
a ‘brick bonded’ formation (i.e. to overlap the joints below). For single layer applications use
the AquaCell Clips and for multi layers use the AquaCell Clips and the AquaCell Shear
Connectors.
5. Fix the Adaptors to the AquaCell units as required and connect pipework.
6. In order to prevent silt from entering the tank, clogging inlet pipework and reducing storage
capacity, it is recommended that the Silt Trap (6LB600) is installed prior to the inlet
pipework - see page 18 for installation guidelines.
7. Wrap and overlap the geotextile covering the entire AquaCell structure.
8. Lay 100mm of coarse sand or non angular granular material between the trench walls and
the AquaCell structure and compact.
9. Lay 100mm of coarse sand or non angular granular material over the geotextile and
compact. Backfill with stone free as-dug material.
10. Rainwater from roof areas may discharge directly into the soakaway but rainwater from
carparks must discharge through a catchpit manhole or a petrol interceptor.
Example shows the use
of AquaCell Lite. However a
soakaway can also be installed
as shown using AquaCell Plus
or Core as appropriate.
* The geotextile should be selected
according to specific site conditions.
Typically, however, a 300g material
will be suitable. Specialist advice
should be sought if surrounding soil
characteristics exhibit a high degree
of fines/low infiltration capacity and/
or there is a high risk of damage
from ground contaminants.

www.intesio.co.ukPage 17
Typical Storage Tank Installation Method
Suitable impermeable geomembrane
Suitable protective geotextile layer
Pre-formed socket
AquaCell Core/AquaCell Lite/AquaCell Plus Units
100mm
100mm
100mmCoarse sand or non angular granular material base and surround
Example shows the use of
AquaCell Core, however a
storage tank can also be
installed as shown using
AquaCell Plus or Lite as
appropiate.
* For large scale, deep installations
a 1mm thick geomembrane is
recommended and joints should be
sealed using proprietary welding
techniques. However, for shallow,
domestic installations it may be
suitable to use a geomembrane
with taped joints. For further details
contact Wavin Technical Design.
Typical Installation Procedure
1. Excavate the trench to the required depth ensuring that the plan area is slightly greater
than that of the AquaCell units. 2. Lay 100mm bed of coarse sand, level and compact.
3. Lay the geotextile over the base and up the sides of the trench.
4. Lay the geomembrane on top of the geotextile over the base and up the sides of the
trench.
5. Lay the AquaCell units parallel with each other. In multiple layer applications, wherever
possible, continuous vertical joints should be avoided. AquaCell units can be laid in a
‘brick bonded’ formation (i.e. to overlap the joints below). For single layer applications
use the AquaCell Clips and for multi layers use the AquaCell Clips and the AquaCell Shear
Connectors (vertical rods).
6. Wrap the geomembrane around the AquaCell structure and seal to manufacturers
recommendations.*
7. If side connections into the AquaCell units is required, (other than the preformed socket),
use the appropiate Flange Adaptor (6LB104 or 6LB105). Fix the flange adaptor to the unit
using self-tapping screws. Drill a hole through the Flange Adaptor and connect the
pipework.
8. In order to prevent silt from entering the tank, clogging inlet pipework and reducing storage
capacity, it is recommended that the Silt Trap (6LB600) is installed prior to the inlet
pipework – see page 18 for installation guidelines.
9. Wrap and overlap the geotextile covering the entire AquaCell structure, to protect the
geomembrane.
10. Lay 100mm of coarse sand between the trench walls and the AquaCell units and compact.
11. Lay 100mm bed of coarse sand over the geotextile and compact. Backfill with stone free
as-dug material.
NB: A storage tank must be vented, and it is recommended that one vent pipe, 110mm in
diameter is provided per 7,500 square metres of impermeable catchment area on a site,
see page 18 for design.

Customer Services Technical Enquiries Technical Fax Email01249 766611 01249 766655 01249 766653 [email protected] 18
Typical Installation: Silt Trap and Air Vent Termination
COVER & FRAME
150mm side fill as dug material with no particle sizes larger than 40mm
100mm bed as per pipe bedding specification
160mm OsmaDrain Inlet/Outlets or use the appropriate adaptor
450mm
1250mm
SHAFT 500mm
Typical Air Vent Design
Silt Trap
Balloon Grafting
Flange Connector (6LB104)
Ventilation Box
110mm OsmaDrain Pipe150mm x 110mm Reducer (6UR099)
Aquacell Plus/Core/Lite Units
Geomembrane sealed to Flange
Typical installation procedure
1. Place the Silt Trap (6LB600) on a
minimum of 100mm bed as per pipe
bedding specification. Ensure that the unit is
as close to the AquaCell system as possible
and in a suitable position to allow pipework
connection.
2. Connect the relevant pipework in
accordance with standard pipe installation
guidelines.
3. Surround the sides of the Silt Trap with
150mm of ‘as dug’ material, with no particle
sizes larger than 40mm.
4. Fit relevant cover and frame.
Notes: When surrounded by a concrete plinth (150mm x 150mm) the cover can be used in situations with a loading of up to 30kN (3 tonnes) i.e domestic driveways.
The silt trap can be extended (if required) using the 500mm Extension Kit (see details on page 34) in conjunction with a 500mm shaft of TwinWall cut to suit.
Note: It is recommended that one vent pipe, 110mm in diameter, is provided per 7,500 square meters of impermeable catchment area on a site. Please contact Wavin Technical Design for further details.

www.intesio.co.ukPage 19
Typical Connections to AquaCell Units
*Note: For pipework other than 160mm
OsmaDrain, these adaptors can be used to
connect to the following:
• 6TW141: TwinWall S/S Adaptor connects
to 150mm TwinWall
• 6D099: OsmaDrain Adaptor connects
to 110mm OsmaDrain
• 4D916: OsmaDrain PE Adaptor connects
to 160mm OsmaDrain
• 6UR141: UltraRib S/S Adaptor connects
to 150mm UltraRib
• 6D128: OsmaDrain S/S Adaptor
connects to 150mm thinwall clay. (needs
to be used in association with 4D916
Adaptor)
AquaCell Plus
AquaCell Core
AquaCell Lite
Jubilee clipPermeable
Geotextile Wrap
150mm pipework to suit
Coarse Sand or Non-Angular Granular Material Base and Surround
Note: It is recommended that all connections and airvent installations in storage applications (usinggeomembrane) are made using a Flange Adaptor.Adhesive or double sided tape should be usedbetween the geomembrane and the fl ange plate toensure a watertight seal.
Note: AquaCell Lite is not suitable for side connectionusing a Flange Adaptor.
Connection for soakaway application using either the pre-formed
socket (as shown below) or standard adaptors into pre-formed socket*
Connection for storage application using Flange Adaptor at points
other than pre-formed socket, (for AquaCell Plus/Core only).
150mm pipework to suit
Coarse Sand or Non-Angular Granular Material Base and Surround
AquaCell Plus/Core Only
Geomembrane Wrap
Flange Adaptor (6LB104/6LB16)
Installation Procedure:
1. Fix Flange Adaptor to the AquaCell unit
with self tapping screws.
2. Drill or cut through the geomembrane
and AquaCell unit using either a
Crown Drill Bit Cutter or similar.
3. Insert pipework into Flange Adaptor.

Customer Services Technical Enquiries Technical Fax Email01249 766611 01249 766655 01249 766653 [email protected] 20
Typical Air Vent Connections
Typical installation procedure:
1. Fix Flange Adaptor to the AquaCell tank
with self-tapping screws.
2. Drill through geomembrane and AquaCell
unit with a long 150mm Crown Drill Bit
Cutter.
3. Insert pipework into Flange Adaptor to
form air vent.
Top Connection for Air Vent
Connect into the top of the AquaCell unit, using Flange Adaptor.
Geomembrane wrap
Connect suitable pipework to form air vent
Flange Adaptor (6LB104)
Coarse sand or non angular granular material base and surround
AquaCell Plus
AquaCell Core
AquaCell Lite
Geomembrane wrap
Jubilee clip
Coarse sand or non angular granular material base and surround
OsmaDrain S/S reducer (6D099)
Suitable bend and pipework to form air vent
Side Connection for Air Vent
Connect into the side of the AquaCell tank unit using standard OsmaDrain
Reducer (6D099).
AquaCell Plus
AquaCell Core
AquaCell Lite
Typical installation procedure:
1. Fix OsmaDrain Reducer to the AquaCell
tank with self-tapping screws.
2. Drill through geomembrane and AquaCell
unit with a long 150mm Crown Drill Bit
Cutter.
3. Insert pipework into OsmaDrain Reducer
to form air vent.

www.intesio.co.ukPage 21
Typical Connection Configurations
Introduction
The connections shown here in schematic form, are the 3 options used to connect
AquaCell box unit assemblies to control chambers. They provide a controlled feed
into and out of the AquaCell box unit assemblies, and are used for either infiltration or
attenuation schemes.
Manifold Connection(Using standard pipes and fittings)
Box Connection(Using AquaCell Core units for fast
water transfer)
Central Pipe Connection(Using standard perforated TwinWall
pipe and fittings)
150mm/225mm UltraRib
Pipe
Cover and frame
Precast concrete chamber sections and cover slab
150mm concrete surround
PipeSump
Cover and frame
Precast concrete chamber sections and cover slab
150mm concrete surround Perforated TwinWall pipe
PipeSump
14mm - 20mm single size granular bedding /backfill material
Precast concrete chamber sections and cover slab
150mm concrete surround
AquaCell box unit assembly
AquaCell box unit assembly
AquaCell box unit assembly
AquaCell box unit assembly
Note: The configuration of pipes in a manifold arrangement will vary to suit site conditions and aniticip[ated stormwater intensity.
See pages 25, 27 and 29 for this option in context.
Note: See pages 24 and 28 for this option in context.
Note: See pages 26 and 30 for this option in context.
Sump
Cover and frame

Customer Services Technical Enquiries Technical Fax Email01249 766611 01249 766655 01249 766653 [email protected] 22
Typical Details: Soakaway - Non-Traffic Loading
Notes
1. Soakaways should
be sited at least 5m
away from the building
(Ref BS EN 752-4)
2. The exact size
and shape of the
soakaways are to
be determined once
all the necessary
calculations have
been produced.
* For information
regarding cover depths
and installation depths,
see page 14.
S
Key
= AquaCell units soakaway
(See note 2)
S
S
Deep Soakaway
Non-traffic load areaMin depth*
Installationdepth*
AquaCell Plus
AquaCell Core
AquaCell Lite
Ground level
Trench Soakaway
Non-traffic load area
AquaCell Plus
AquaCell Core
AquaCell Lite
Min depth*
Installationdepth*
Ground level

www.intesio.co.ukPage 23
Typical Details: Soakaway - Highway
For minimum depth of cover contact Wavin
AquaCell Plus and AquaCell Core only
225mm UltraRib
150mm UltraRib
To road gully
Footpath Finished road level
150mm Concrete surround
Silt trap

Customer Services Technical Enquiries Technical Fax Email01249 766611 01249 766655 01249 766653 [email protected] 24
Typical Details: On-Line Storage - Box Feed
Cover and frameCover and frame
150mm concrete surround
Water flow
Water flow
150mm concrete surroundPrecast concrete chamber sections and cover slab
Precast concrete chamber sections and cover slab
Flow control
Typical vent detail
Open grating
Ventilation box
A
ASump Sump
AquaCell unit assembly Coarse sand or non angular granular material base and surroundLong Section
What Happens to the Water?
1. The water level in the upstream control chamber rises.
2. Then, during a storm event, the AquaCell box unit
storage assembly quickly fills with water via the box feed
connection.
3. After storm event, water flows back out of the AquaCell
box unit storage assembly, finding its own level, and into
the downstream control chamber.
4. The water then flows through the vortex flow control valve.
Cross Section A-A AquaCell Plus units used as the lower layer
Geomembrane wrap with outer protective geotextile wrap AquaCell Core units
Downstream control chamberUpstream control chamber
Plan
AquaCell unit assembly
Water flow
Water flow
Sump
Cover and frame Flow control

www.intesio.co.ukPage 25
Typical Details: On-Line Storage - Manifold Feed
Water flow
Water flow
Cover and frameCover and frame
150mm concrete surround
150mm concrete surroundPrecast concrete chamber sections and cover slab
Precast concrete chamber sections and cover slab
Flow control
Typical vent detail
Open grating
Ventilation box
A
ASump Sump
AquaCell unit assembly Coarse sand or non angular granular material base and surroundLong Section
What Happens to the Water?
1. The water level in the upstream control chamber rises.
2. During a storm event, the AquaCell box unit storage
assembly fills with water via the manifold feed connection.
3. After storm event, water flows back out of the AquaCell
box unit storage assembly, finding its own level, and into
the downstream control chamber.
4. The water then flows through the vortex flow control valve.
Cross Section A-A
Geomembrane wrap with outer protective geotextile wrap AquaCell Core units
AquaCell Plus units used as inspection access
Downstream control chamberUpstream control chamber
Plan
Water flow
Water flow
AquaCell unit assembly
Sump
3-pipe manifoldCover and frame Flow control

Customer Services Technical Enquiries Technical Fax Email01249 766611 01249 766655 01249 766653 [email protected] 26
Typical Details: On-Line Storage - Central Pipe Feed
Wrap the entire AquaCell unit assemblieswith a geotextile wrapping as appropriate
Geomembrane to perimeter of constructonCross Section A-A
Coarse sand or non angular granular material base and surround
14mm - 20mm single size granular bedding/backfill material
What Happens to the Water?
1. The water level in the upstream control chamber rises.
2. AquaCell box unit storage assemblies fill with water via the central pipe connection and
percolation through the granular bedding material.
3. After storm event, water flows back out of the AquaCell box unit storage assemblies, finding
its own level, and into the downstream control chamber.
4. The water then flows through the vortex flow control valve.
Water flow
Water flow
Cover and frameCover and frame
150mm concrete surround
Wavin TwinWall half-perforated pipe
150mm concrete surroundPrecast concrete chamber sections and cover slab
Precast concrete chamber sections and cover slab
Flow control
Typical vent detail
Open grating
Ventilation box
A
ASump Sump
AquaCell unit assembly
Long Section
Upstream control chamber Downstream control chamber
Plan
AquaCell unit assembly
Flow control
Water flow during storm event Water flow after storm event
Water flow
Water flow
Sump
Cover and frame

www.intesio.co.ukPage 27
Typical Details: On-Line Storage - Manifold Feed with Bypass
What Happens to the Water?
1. When storm conditions are high, the water level in the
upstream control chamber rises.
2. The AquaCell tank unit assembly also fills with water to its
designated capacity.
3. The excess water is taken up by the bypass pipe and
guided to the downstream control chamber, to prevent
overloading of the AquaCell tank unit aasembly.
4. As the storm event subsides, the water in the AquaCell tank
unit assembly flows back out, finding its own level, and also
discharges into the downstream control chamber.
5.The water then flows through the vortex flow control valve.
Water flow
Water flow
Cover and frameCover and frame
150mm concrete surround
150mm concrete surround
Precast concrete chamber sections and cover slab
Precast concrete chamber sections and cover slab
Flow control
Typical vent detail
Open grating
Ventilation box
Sump Sump
Bypass pipe
AquaCell unit assembly
Geomembrane wrap with outer protective geotextile wrap
Coarse sand or non angular granular material base and surround
Manifold pipe arrangementLong Section
A
A
Cross Section A-A
Geomembrane wrap with outer protective geotextile wrap Bypass pipe
Water flow
Water flow
Bypass pipe
Upstream control chamber
Downstream control chamber
Geomembrane wrap with outer protective geotextile wrap
Plan
AquaCell unit assembly
Flow control Cover and frame
Sump

Customer Services Technical Enquiries Technical Fax Email01249 766611 01249 766655 01249 766653 [email protected] 28
Typical Details: Off-Line Storage - Box Feed
What Happens to the Water?
1. Control chamber fills with water, up to the top of the
weir wall.
2. The water overflows the weir wall and enters the AquaCell
box unit storage assembly via the box connection.
3. AquaCell box unit storage assembly fills with water.
4. After storm event, water flows back out of the AquaCell
box unit storage assembly, finding its own level, and
through the non-return flap valve at the bottom of the
weir wall.
5. The water then flows through the vortex flow control valve.
Water flow
Cover and frame
150mm concrete surroundPrecast concrete chamber sections and cover slab
Flow control
Weirwall
Typical vent detail
Open grating
Ventilation box
Sump
Non-return flap valve
Coarse sand or non angular granular material base and surround
Geomembrane wrap with outer protective geotextile wrap
AquaCell unit assembly
Long Section
A
A
Cross Section A-A
Geomembrane wrap with outer protective geotextile wrap
Cover and frame
150mm concrete surround
Precast concrete chamber sections
Flow control
Weirwall
Plan
AquaCell unit assembly
Water flow
Water flow

www.intesio.co.ukPage 29
Typical Details: Off-Line Storage - Manifold Feed
What Happens to the Water?
1. Control chamber fills with water, up to the top of the
weir wall.
2. The water overflows the weir wall and enters the AquaCell
box unit storage assembly via the manifold connection.
3. AquaCell box unit storage assembly fills with water.
4. After storm event, water flows back out of the AquaCell
box unit storage assembly, finding its own level, and
through the non-return flap valve at the bottom of the
weir wall.
5. The water then flows through the vortex flow control valve.
Non-return flap valve
Water flow
Cover and frame
150mm concrete surround
Precast concrete chamber sections and cover slab
Flow control
Weirwall
Typical vent detail
Open grating
Ventilation box
Sump
Coarse sand or non angular granular material base and surround
Geomembrane wrap with outer protective geotextile wrap
AquaCell unit assembly
Long Section
A
A
Cross Section A-A
Geomembrane wrap with outer protective geotextile wrap
Cover and frame
150mm concrete surround
Precast concrete chamber sections
Flow control
Weirwall
Plan
AquaCell unit assembly
Water flow
Water flow

Customer Services Technical Enquiries Technical Fax Email01249 766611 01249 766655 01249 766653 [email protected] 30
Typical Details: Off-Line Storage - Central Pipe Feed
Water flow
Cover and frame
150mm concrete surround
Precast concrete chamber sections and cover slab
Flow control
Weirwall
Typical vent detail
Open grating
Ventilation box
SumpWavin TwinWall half-perforated pipe
A
A
Non-return flap valve
Coarse sand or non angular granular material base and surround
AquaCell unit assembly
Long Section
What Happens to the Water?
1. Control chamber fills with water, up to the top of the weir wall.
2. The water overflows the weir wall and enters the AquaCell box unit storage assemblies via the
central pipe connection and percolation through the granular bedding material.
3. AquaCell box unit storage assembly fills with water.
4. After storm event, water flows back out of the AquaCell box unit storage assemblies, finding
its own level, and through the non-return flap valve at the bottom of the weir wall.
5. The water then flows through the vortex flow control valve
Cross Section A-A
Wrap the entire AquaCell unit assemblieswith a geotextile wrapping as appropriate
14mm - 20mm single size granular bedding/backfill material
Geomembrane to perimeter of constructon
Plan
Flow control
Water flow
Water flow
Wavin TwinWall half-perforated pipe 14mm - 20mm single size granular bedding/backfill material
Water flow during storm event Water flow after storm event

www.intesio.co.ukPage 31
Typical Details: Soakaway or Storage Tank - With Silt Trap
Notes
For bedding specification information refer to page 16-17.
The silt trap can be used in conjunction with a soakaway (as
shown) or a storage tank.
For minimum depth of cover contact Wavin
AquaCell Plus
AquaCell Core
AquaCell Lite
Ground level
160mm OsmaDrain
160mm OsmaDrain
160mm OsmaDrain
Silt trap
(Choice depends on application and site conditions)

Customer Services Technical Enquiries Technical Fax Email01249 766611 01249 766655 01249 766653 [email protected] 32
Introduction to Garastor*
The development of sites results in a large proportion of area
being covered by impermeable surfaces such as roofs, car parks
and roads. Surface water run-off therefore increases up to 80%.
Building Regulations and guidance now requires a sustainable
approach to development, which minimises the effects of run-off
to that of a greenfi eld site (20%).
Developed in collaboration with Bryant Homes, Garastor
(polypropylene control chamber) represents a house by house,
rather than a development wide approach, to stormwater
management. Garastor controls the fl ow of water at source by
temporarily storing water under a soft landscaped area using the
AquaCell system or in the void space under the fl oor slab of a
residential garage. It eliminates the need for costly, spacehungry,
on-site communal water-storage structures or ponds which
enables better use of developable land.
During high intensity rainfall, water from the roof or hardstanding
areas is diverted via the Garastor control unit into the storage
void. As the storm subsides the rainwater can be slowly released
back into the main drainage system.
Note: Garastor can be used as a fl ow control device for any
AquaCell storage system, no greater than one unit deep with a
discharge of up to 1.4 l/s via the 30mm release fl ow orifi ce.
*Garastor is manufactured under licence (Patent Number
GB2357093).
Garastor® System – Introduction
Internal view of Garastor
Garastor – polypropylene control chamber

www.intesio.co.ukPage 33
Garastor System
The Garastor unit is a polypropylene chamber that connects to
a water storage reservoir. There are two versions of the Garastor
available both of which are 500mm in diameter, the 6SC500
version is 1m deep for garage installations (with a 300mm storage
depth capacity) and the 6SC501 is 1.25m deep for use with
AquaCell* (with a 400mm storage depth capacity). When Garastor
is used in conjunction with an AquaCell tank the confi guration of
units must be no deeper than 1 AquaCell unit.
If site conditions are such that a deeper Garastor unit is required
then the 500mm Extension Kit (6SC205 – consisting of a coupler
and two ring seals) can be used in conjunction with a shaft of
500mm Twinwall cut to suit, to extend the Garastor unit.
*Depending on the application either AquaCell Plus/Core or Lite
may be used in conjunction with Garastor. For further details
contact Wavin Technical Design.
HOW IT WORKS
Storm or surface water fl ows through two 110mm diameter
incoming pipes. If the fl ow is light to moderate, the water is simply
stored in the chamber before being slowly released through a
30mm orifi ce. However, if the infl ow is heavy, excess water in
the chamber discharges through a 150mm diameter pipe into
the water storage area (either the undercroft of a garage or an
AquaCell tank). The water is temporarily stored until the water
level inside the chamber has dropped suffi ciently, and the water
can fl ow out to the drainage system via the 110mm outfl ow pipe.
Inside the Garastor chamber there are specially designed weir
walls that ensure that the hydraulics of the unit work to the
optimum levels.
Garastor® System – Overview
KEY BENEFITS
No use of valuable, developable land•
Safer than open/above ground storage structures•
Caters for 1 in 150 year storm•
Spreads cost of water storage over the development period•
Maintenance free, with no moving parts or fi lters•
Run-off reverts to that of a greenfi eld site•
AquaCell Plus, Core or Lite units

Customer Services Technical Enquiries Technical Fax Email01249 766611 01249 766655 01249 766653 [email protected] 34
Garastor® System – Principal Components
Note : All components on this page are not shown to scale
4D920 Cover and Frame
S/S TwinWall Adaptor(150mm TwinWall socket x 160mm BSEN 1401 spigot for connection of
150mm TwinWall pipe directly into the AquaCell pre-formed socket)
500mm diameter
1m (6SC500)
1.25m (6SC501)
150mm TwinWall Socket
(for connection to other pipe materials, a small
section of 150mm TwinWall is required, alternatively use the
150mm Garastor Connection Kit (6SC200 – consisting of a short
section of 150mm TwinWall pipe and two
ring seals)
D/S TwinWall Adaptor(150mm TwinWall socket x 160mm
BSEN 1401 socket for connection of 150mm TwinWall pipe to 160mm BSEN
1401 pipe)
S/S TwinWall Adaptor(150mm TwinWall socket x 150mm
UltraRib spigot for connection of 150mm TwinWall pipe directly to 150mm
UltraRib socket)
D/S TwinWall Adaptor(150mm TwinWall socket x 150mm UltraRib socket for connection of 150mm TwinWall pipe to 150mm
UltraRib pipe)
6SC205Extension Kit
Coupler and sealing rings to joint a shaft of 500mm
TwinWall pipe
+
Garastor6SC500 (for use with garage undercroft)
6SC501 (for use with AquaCell Core/AquaCell Lite)
www.intesio.co.ukPage 35
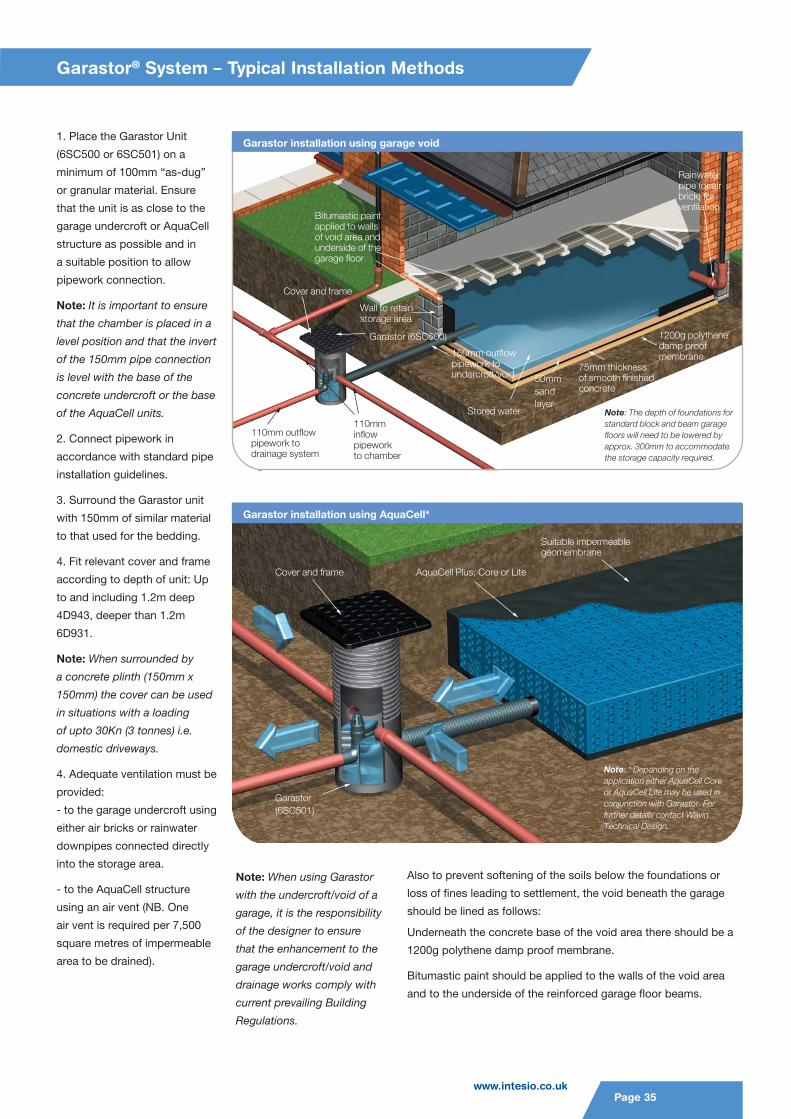
1. Place the Garastor Unit
(6SC500 or 6SC501) on a
minimum of 100mm “as-dug”
or granular material. Ensure
that the unit is as close to the
garage undercroft or AquaCell
structure as possible and in
a suitable position to allow
pipework connection.
Note: It is important to ensure
that the chamber is placed in a
level position and that the invert
of the 150mm pipe connection
is level with the base of the
concrete undercroft or the base
of the AquaCell units.
2. Connect pipework in
accordance with standard pipe
installation guidelines.
3. Surround the Garastor unit
with 150mm of similar material
to that used for the bedding.
4. Fit relevant cover and frame
according to depth of unit: Up
to and including 1.2m deep
4D943, deeper than 1.2m
6D931.
Note: When surrounded by
a concrete plinth (150mm x
150mm) the cover can be used
in situations with a loading
of upto 30Kn (3 tonnes) i.e.
domestic driveways.
4. Adequate ventilation must be
provided:
- to the garage undercroft using
either air bricks or rainwater
downpipes connected directly
into the storage area.
- to the AquaCell structure
using an air vent (NB. One
air vent is required per 7,500
square metres of impermeable
area to be drained).
Garastor® System – Typical Installation Methods
Garastor installation using garage void
Bitumastic paint applied to walls of void area and underside of the garage floor
Cover and frame
Wall to retain storage area
Stored water
75mm thickness of smooth finished concrete
1200g polythene damp proof membrane
50mm sandlayer
Rainwater pipe (or air brick) for ventilation
Note: The depth of foundations for standard block and beam garage floors will need to be lowered by approx. 300mm to accommodate the storage capacity required.
150mm outflow pipework to undercroft/void
110mm inflow pipework to chamber
110mm outflow pipework to drainage system
Garastor (6SC500)
Garastor installation using AquaCell*
Cover and frame AquaCell Plus, Core or Lite
Suitable impermeable geomembrane
Garastor(6SC501)
Note: * Depending on the application either AquaCell Core or AquaCell Lite may be used in conjunction with Garastor. For further details contact Wavin Technical Design.
Note: When using Garastor
with the undercroft/void of a
garage, it is the responsibility
of the designer to ensure
that the enhancement to the
garage undercroft/void and
drainage works comply with
current prevailing Building
Regulations.
Also to prevent softening of the soils below the foundations or
loss of fines leading to settlement, the void beneath the garage
should be lined as follows:
Underneath the concrete base of the void area there should be a
1200g polythene damp proof membrane.
Bitumastic paint should be applied to the walls of the void area
and to the underside of the reinforced garage floor beams.

Intelligent stormwater solutions by Wavin
Wavin LimitedParsonage WayChippenhamWiltshire SN15 5PNTel: 01249 766600
Intesio – working to ensure
optimum stormwater management
Wavin operates a programme of continuous product development, and therefore reserves the right to modify oramend the specification of their products without notice. All information in this publication is given in good faith, andbelieved to be correct at the time of going to press. However, no responsibility can be accepted for any errors,omissions or incorrect assumptions. Users should satisfy themselves that products are suitable for the purpose andapplication intended.
www.intesio.co.uk
The combination of urban development and intensified rainfall from climate
change can create serious problems. Stormwater situations are challenges
that may be unavoidable, but they can be very effectively overcome
when the right expertise is applied.
Intesio is Wavin’s specialist focus for the most efficient capture,
transportation, cleansing, infiltration, attenuation and re-use of stormwater
at source.
The Intesio Team has the essential experience and design insight
to help engineer the best possible solution, in its widest sense,
every time.
Our well-proven system technology is intelligently applied to
the individual needs of each location and situation. We make
thorough checks to ensure efficient performance and full
adherence to the latest statutory regulations.
By making Intesio part of your project approach, the
outcome is assured: the optimum balance of cost,
function and compliance.
WM424 – May 2009/rev February 2010
CWD 3000