international institute of tropical agriculture …oracle.iita.org/mis_info/manuals/ar user...
TRANSCRIPT
ORACLE AR USER MANUAL
- 1 -
ORACLE FINANCIALS USER GUIDE International Institute of Tropical Agriculture
Accounts Receivable Author: Oracle Implementation Team Creation Date: October 27, 2001 Last Updated: October 27, 2001 Control Number: IITA_AR_UG Version: 1

ORACLE AR USER MANUAL
- 2 -
OUTLINE CONTENTS
PAGE
Α RULES A. Rules for the Accounts Receivable Module 3
1. CUSTOMER MANAGEMENT
1.1. Logging into AR 3 1.2. Choosing and Switching to Different Responsibility 3 1.3. Defining Customer - Donor 3 1.4. Defining Customer - Other 5 1.5. Defining Customer – FA Sales 5 1.6. Updating Customer Information 6
2. CUSTOMER INVOICE MANAGEMENT
2.1. Manual Creation of Invoices in the Transaction Window 7 2.2. Creating Quick Invoices 8 2.3. Creating Recurring Invoices (Copy Transactions) 9 2.4. Creating Debit Invoices 9 2.5. Validation for Completing an Invoice 10 2.6. Completing Transactions 11 2.7. Crediting Transactions (Credit Memo) 11 2.8. Applying Credit Memos to Transactions 13 2.9. Unapplying Cash When Crediting a Transaction 13 2.10. Updating Credit Memos 13 2.11. Reviewing Accounting Information 13 2.12. Viewing Accounting Lines 14 2.13. Voiding Invoices 14
3. RECEIPT MANAGEMENT
3.1. Entering Cash and Bank Receipts 15 3.2. Entering Miscellaneous Receipts 16 3.3. Applying On-Account Credits to Receipts 16 3.4. Automatically Applying Receipts 17 3.5. Manually Applying Receipts 18 3.6. Reversing Receipts 18 3.7. Reapplying Receipts 18 3.8. Reviewing Receipts and Applications 20
4. GENERAL TRANSACTIONS
4.1. Printing Dunning Letter 21 4.2. Posting Journals to GL 21 4.3. Opening and Closing Periods in AR 21 4.4. Submitting a Request 21 4.5. Submitting Standard Reports 23 4.6. Canceling Requests 23

ORACLE AR USER MANUAL
- 3 -
CONTENTS
PAGE
5. PERIOD END CLOSING PROCESS
5.1. Posting to GL 25 5.2. Posting Execution Report 25 5.3. Opening and Closing Accounting Periods 25 5.4. Reconciling Outstanding Customer Balances 25 5.5. Reconciling Transactions 26 5.6. Reconciling Receipts 26 5.7. Reconciling Account Balances 27 5.8. Reconciling AR and GL Balances 27
ORACLE FINANCIALS KEYBOARD HOT KEYS 29

ORACLE AR USER MANUAL
- 4 -
A.A.A.A. RULES FOR THE ACCOUNTS RECEIVABLE MODULERULES FOR THE ACCOUNTS RECEIVABLE MODULERULES FOR THE ACCOUNTS RECEIVABLE MODULERULES FOR THE ACCOUNTS RECEIVABLE MODULE
Accounts Receivable Module is the first data entry point for donor invoices and related on account receipts.
General Rules 1. Errors, which are made in the accounts Receivable Module, will not be
corrected in General Ledger. However, the users will be warned by the person responsible for posting in GL and the correct transaction will be posted to GL again. Both the wrong and the correct entries will be posted in GL.
2. The Automatic Revenue Recognition will be carried out as an additional program designed and generated by MIS. On how to use that program, please refer to the The Automatic Revenue Recognition User Manual, which is going to be released in 2002.
3. Cash receipts from Micros will be directly integrated to GL module and entered as a journal, without generating any invoices in AR. However, this integration will be done in 2002.
4. One time customers will not be defined in AR module, unless they are not operating on cash basis but not on payment terms. Related entries will be direct journals in GL Module.
AR01 CUSTOMER MANAGEMENT
TRANSACTION NATURE
NAVIGATION TASKS
1.1. Logging into the System
Click on shortcut icon in your desktop
1. Enter your User ID. 2. Enter your Password 3. Click on Connect Tab
1.2. Choosing and switching on different responsibility
After logging in - go to FILE - switch
responsibility
1 Choose the AR Responsibility name from the list of responsibilities that are assigned to you.
2 Click OK.
1.3. Defining Customer - Donor
Customers> Standard
1. Navigate to the Find/Enter Customers window 2. Select the type of search you want to perform by choosing
the Basic, Advanced, or Text tab. 3. Enter information about a new customer and click on Find.
If the search does not produce a match, you will be prompted to proceed with entering new information. Choose the New button
Note: When you choose the New button, another search is performed. This search attempts to match the customer search criteria you entered with information from an existing organisation or person, so that you can avoid entering a duplicate organisation or person. If the search produces a match, a list is displayed in the Customer Selection window

ORACLE AR USER MANUAL
- 5 -
TRANSACTION NATURE
NAVIGATION TASKS
that shows the existing organisations or persons that match the search criteria. If you select one of these existing organizations or persons, then the customer that you are entering will belong to the organization or person that you select. When the Find/Enter Customers window is displayed, choose New. 4. The Customers - Standard window is displayed. If the new
customer is part of an existing organization or person, information about the organization or person will be displayed
5. Chose “Customer Type” and enter a unique customer name.
NOTE: For Donor Type customer definition, the header level will include the Donor Name in a coded structure, while at customer site level will be the individual Cost Centres and Donor addresses. For example, to define USAID in the system, at the header level, the customer name will be USAID. While at the site level: Site 1: 4065 – USAID Lagos
4066 – USAID Kenya 4067 – USAID London
NOTE: The “Sales Journal Report” can be run to see the outstanding balances of the donors by project 6. If the new customer you are entering is a person rather than
an organization, you can enter information in these additional fields: Prefix, First Name, Middle Name, Last Name, Suffix
7. Enter an alternate name for this customer (optional). 8. Indicate the status of the customer by checking or
unchecking the Active box. 9. Go to the arrow box at the end of the tabs, press it and
select the Profile-Transaction tab to assign a profile class to this customer (Donor CR, Donor CU, or Donor NCP) in the Profile Class field.(every other thing here is default)
10. Go back to the Classification Tab and enter the Customer Type and Class (this is default).
11. Chose the Telephone Tab (optional) and enter the telephone numbers of the customer
12. Chose the Contacts: Telephone tab to enter the Contact Names and Telephone Numbers.
13. Enter the Payment Method(s) for the customer and the effective dates under the Payment Methods tab.
14. Specify the default Currency for the customer under the Profile : Amount tab(if currency is different from USD).
15. Go back to the Address Tab and choose New to enter the customer addresses, which will serve as customer billing sites.
16. On the Customer Addresses window, in the header information level, enter the Country and Address of the customer where bills will be sent. Do not forget to fill in the Postal Code and City fields. Also do not check more than one address as Identifying address of the customer. Under the Business Purpose tab, choose the address Usage (from the list of values for the usage field) and for the Location, use the Project Code as the location for the address.

ORACLE AR USER MANUAL
- 6 -
TRANSACTION NATURE
NAVIGATION TASKS
17. Save your work and close the window. 18. Go back to Customer Standard window and click on open
again, if you want to enter another customer site address. Repeat step 15 through 18. And then repeat steps 12 through 15. Save your work.
1.4. Defining Customer -Other
Customers> Standard
1. Navigate to the Find/Enter Customers window 2. Select the type of search you want to perform by choosing
the Basic, Advanced, or Text tab. 3. Enter information about a new customer and click on Find.
If the search does not produce a match, you will be prompted to proceed with entering new information. Choose the New button
Note: When you choose the New button, another search is performed. This search attempts to match the customer search criteria you entered with information from an existing organisation or person, so that you can avoid entering a duplicate organisation or person. If the search produces a match, a list is displayed in the Customer Selection window that shows the existing organisations or persons that match the search criteria. If you select one of these existing organizations or persons, then the customer that you are entering will belong to the organization or person that you select. When the Find/Enter Customers window is displayed, choose New. 4. The Customers - Standard window is displayed. If the new
customer is part of an existing organization or person, information about the organization or person will be displayed
5. Chose “Customer Type” and enter a unique customer name.
NOTE: For Donor Type customer definition, the header level will include the Donor Name in a coded structure, while at customer site level will be the individual Cost Centres and Donor addresses. For example, to define USAID in the system, at the header level, the customer name will be USAID. While at the site level: Site 1: 4065 – USAID Lagos
4066 – USAID Kenya 4067 – USAID London
NOTE: The “Sales Journal Report” can be run to see the outstanding balances of the donors by project 6. If the new customer you are entering is a person rather than
an organization, you can enter information in these additional fields: Prefix, First Name, Middle Name, Last Name, Suffix
7. Enter an alternate name for this customer (optional). 8. Indicate the status of the customer by checking or
unchecking the Active box. 9. Go to the arrow box at the end of the tabs, press it and
select the Profile-Transaction tab to assign a profile class to this customer (Other IITA customer) in the Profile Class field. Every other thing here is default.
10. Go back to the Classification Tab and enter the Customer

ORACLE AR USER MANUAL
- 7 -
TRANSACTION NATURE
NAVIGATION TASKS
Type and Class (this is default). 11. Chose the Telephone Tab (optional) and enter the
telephone numbers of the customer 12. Chose the Contacts: Telephone tab to enter the Contact
Names and Telephone Numbers. 13. Enter the Payment Method(s) for the customer and the
effective dates under the Payment Methods tab. 14. Specify the default Currency for the customer under the
Profile : Amount tab(if currency is different from USD). 15. Go back to the Address Tab and choose New to enter the
customer addresses, which will serve as customer billing sites.
16. On the Customer Addresses window, in the header information level, enter the Country and Address of the customer where bills will be sent. Do not forget to fill in the Postal Code and City fields. Also do not check more than one address as Identifying address of the customer. Under the Business Purpose tab, choose the address Usage (from the list of values for the usage field) and for the Location, use the Project Code as the location for the address.
17. Save your work and close the window. 18. Go back to Customer Standard window and click on open
again, if you want to enter another customer site address. Repeat step 15 through 18. And then repeat steps 12 through 15. Save your work.
1.5. Defining Customer - FA Sales
Customers> Standard
1. See Defining Customer -Other
1.6. Updating customer information
Customers> Standard
1. Navigate to the customer window and go to the query window through “View�Find”
2. Enter Customer’s Name and click find 3. The customer information will be displayed on the
customer window 4. Update as required 5. Save your work.

ORACLE AR USER MANUAL
- 8 -
AR02 CUSTOMER INVOICE MANAGEMENT
TRANSACTION NATURE
NAVIGATION TASKS
2.1. Manual Creation of Invoices in the Transactions Window
Transactions> Transactions
1. Navigate to the Transactions window. 2. In the Number field, do not enter a transaction number.
Receivables assigns a transaction number when you save the transaction. If you are adding transactions to a batch, the transaction number must be unique within this batch.
Attention: Once you save a transaction, you cannot update the transaction number. 3. Enter the Date and Currency of this transaction. The default
currency is the functional currency; USD, but you can change it to any currency defined in the system if you are defining a transaction in another currency. The default date is either the batch date or, if there is no batch information, the current date.
4. Choose the Transaction Source from the list of value in the Source field for the transaction you are entering.
5. Choose the Transaction Class you want to create, and from the list of values in the Types field, select the Transaction Type to go with the transaction class selected.
6. Enter a GL Date, the default GL Date is the current date. However, if the current date is not in an open period, the default is the last date of the most recent open period. The GL Date you enter must be in an Open or Future period.
7. Enter the customer Bill-To Name and type in the Location for this transaction.
8. Enter the Payment Terms for this transaction. Receivables calculates the Due Date based on the payment terms and date of this transaction. If you enter a split payment term, the due date is the date that the first payment is due.(use IMMEDIATE for IITA).
9. Open the Remit To tabbed region, then enter the Remit To Address for this transaction. The default is the remit-to address assigned to the country, state, and postal code combination for IITA.
10. To enter the goods or services to bill to this customer, choose Line Items, then enter the Item, Quantity, and Unit Price for each item. Receivables automatically calculates the total Amount for each line. If the invoice is for a service sale, then leave the Item field and click on the Description field and choose the particular service type.
Attention: AutoAccounting depends on Standard Lines and if you change the Item field, Receivables displays a pop-up window asking if you want to rerun AutoAccounting for this invoice line. If you choose Yes, Receivables reruns AutoAccounting, changes your revenue account, and changes tax rate information (if your tax information changed). If you choose No, Receivables neither reruns AutoAccounting nor changes tax rate information if your tax information changed 10. To review or update tax information for this line, choose

ORACLE AR USER MANUAL
- 9 -
TRANSACTION NATURE
NAVIGATION TASKS
Tax and to review the GL Accounts for Receivables and Revenue, chose the Distribution tab to enter the line items
11. Save your work. If you are ready to complete this transaction, See: Completing Transactions 2.6 page 9
2.2. Creating
Quick Invoices
Transactions> Transactions
1. Navigate to the Transaction or the Transactions Summary window.
2. Enter a Transaction Source. 3. Enter the Customer Name or Number. 4. Enter the Bill To Name and Location. 5. If you are in the Transactions Summary window, choose
Open. 6. Receivables assigns a document number when you save. 7. To enter invoice lines, choose Line Items, then enter the
Item, description, quantity, and unit price for item (optional). 8. Save your work. If you are ready to complete this
transaction, see: Completing Transactions: 2.6 page 10

ORACLE AR USER MANUAL
- 10 -
TRANSACTION NATURE
NAVIGATION TASKS
2.3. Creating Recurring Invoices (Copy Transactions)
Transactions 1. Navigate to the Transactions Summary or the Copy Transactions window.
2. Query the invoice to use as a model for your copied invoices.
3. If you are in the Transactions Summary window, select the invoice, then choose Copy.
4. It opens the Copy Transactions window, which you can also get to through “Transactions� Copy Transactions”
5. Choose a Copy Rule in the Schedule section of the window. 6. Enter the number of copies to create in the Number of
Times field. 7. If your copy rule is Monthly, enter the Number of Times
between your copied invoice dates. 8. If the Post to GL flag of the model invoice's transaction type
is Yes, enter the First GL Date for the copied invoice. This date must be in an open, future, or never opened period.
Note: If you choose a date in a never opened period, Receivables will create these invoices as incomplete. To complete these invoices, open the period and query the invoice in the Transactions Summary window, then choose the Complete button. However, if you are using the Bill in Arrears invoicing rule, the invoice will be created as complete even if its GL date is in a never opened period. 9. Enter the First Transaction Date to create the copied
invoice. The default is the invoice date of the first copied invoice (determined by the copy rule you entered), but you can change it.
10. Receivables assigns document numbers when you save. 11. Save your work. Receivables submits a concurrent process
to create your copied invoices and generates a unique Request ID number. You can use this number to review the status of your request in the Concurrent Requests Summary window.
12. Receivables also creates the Recurring Invoice Program report when you save. Use this report to review all revenue distributions created for the specified period for invoices that use invoice and accounting rules.
2.4. Creating Debit Invoices
Transactions> Transactions
1. Navigate to the Transactions window. 2. In the Number field, do not enter a transaction number.
Receivables assigns a transaction number when you save the transaction. If you are adding transactions to a batch, the transaction number must be unique within this batch.
Attention: Once you save a transaction, you cannot update the transaction number. 3. Enter the Date and Currency of this transaction. The default
currency is the functional currency; USD, but you can change it to any currency defined in the system if you are entering a transaction in another currency. The default date is either the batch date or, if there is no batch information, the current date.
ORACLE AR USER MANUAL
- 11 -
TRANSACTION NATURE
NAVIGATION TASKS
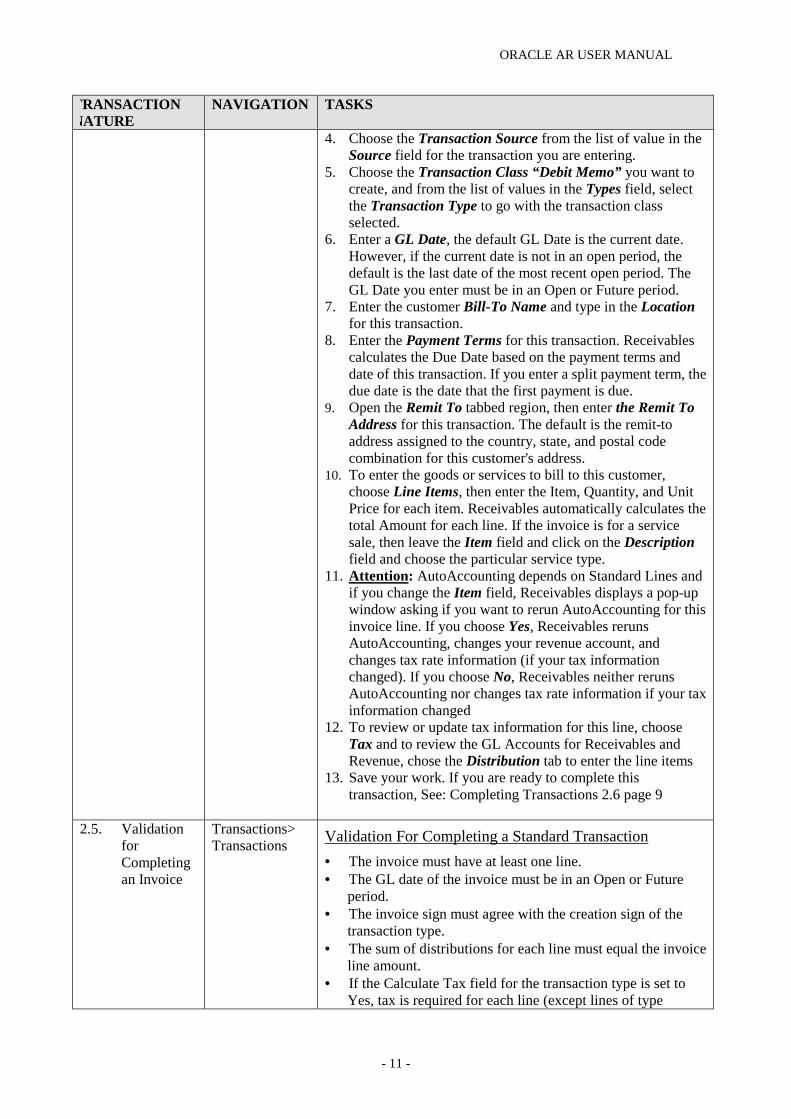
4. Choose the Transaction Source from the list of value in the Source field for the transaction you are entering.
5. Choose the Transaction Class “Debit Memo” you want to create, and from the list of values in the Types field, select the Transaction Type to go with the transaction class selected.
6. Enter a GL Date, the default GL Date is the current date. However, if the current date is not in an open period, the default is the last date of the most recent open period. The GL Date you enter must be in an Open or Future period.
7. Enter the customer Bill-To Name and type in the Location for this transaction.
8. Enter the Payment Terms for this transaction. Receivables calculates the Due Date based on the payment terms and date of this transaction. If you enter a split payment term, the due date is the date that the first payment is due.
9. Open the Remit To tabbed region, then enter the Remit To Address for this transaction. The default is the remit-to address assigned to the country, state, and postal code combination for this customer's address.
10. To enter the goods or services to bill to this customer, choose Line Items, then enter the Item, Quantity, and Unit Price for each item. Receivables automatically calculates the total Amount for each line. If the invoice is for a service sale, then leave the Item field and click on the Description field and choose the particular service type.
11. Attention: AutoAccounting depends on Standard Lines and if you change the Item field, Receivables displays a pop-up window asking if you want to rerun AutoAccounting for this invoice line. If you choose Yes, Receivables reruns AutoAccounting, changes your revenue account, and changes tax rate information (if your tax information changed). If you choose No, Receivables neither reruns AutoAccounting nor changes tax rate information if your tax information changed
12. To review or update tax information for this line, choose Tax and to review the GL Accounts for Receivables and Revenue, chose the Distribution tab to enter the line items
13. Save your work. If you are ready to complete this transaction, See: Completing Transactions 2.6 page 9
2.5. Validation
for Completing an Invoice
Transactions> Transactions Validation For Completing a Standard Transaction
• The invoice must have at least one line. • The GL date of the invoice must be in an Open or Future
period. • The invoice sign must agree with the creation sign of the
transaction type. • The sum of distributions for each line must equal the invoice
line amount. • If the Calculate Tax field for the transaction type is set to
Yes, tax is required for each line (except lines of type

ORACLE AR USER MANUAL
- 12 -
TRANSACTION NATURE
NAVIGATION TASKS
Charges). • If freight was entered for this transaction, you must specify a
freight account. • All the activity date ranges for the setup values (for
example, payment terms) must be valid for the invoice date. • If this transaction uses an automatic payment method, you
must enter Customer bank, branch, and account information.
Validation For Completing an Invoice With Rules • Each line must have an accounting rule and a rule start date. • Valid account sets must exist for each invoice line. • Valid account sets must exist for tax that is calculated or
entered. • Validation for completing a standard credit memo • You must enter at least one credit memo line and specify
revenue account assignments for each memo line. • You must specify a valid receivable account. • If your credit memo is crediting tax, you must specify valid
tax accounts. • If your credit memo is crediting freight, you must specify
valid freight accounts. NOTE: You cannot change the status of a credit memo that you entered against an invoice, debit memo, or commitment from Complete to Incomplete if you entered another credit memo against this item after the initial memo
2.6. Completing Transactions
Transactions> Transactions
1. Navigate to the Transaction or the Transactions Summary window.
2. Query the transaction to complete. 3. Verify that all requirements for completing this type of
transaction are met (see above). 4. If you are in the Transactions Summary window, select the
transaction, then choose the Complete button. 5. If you are in the Transactions window, choose the Complete
button. Note: When you complete a transaction, the button name changes from Complete to Incomplete. If you click on the button again, Receivables changes the transaction status back to Incomplete (unless the transaction was posted to GL or now has activity, such as a receipt application, against it; in this case, you cannot change the status). 6. Save your work.
2.7. Crediting Transactions (Credit Memo)
Transactions> Transactions
1. Navigate to the Transactions window. 2. In the Number field, do not enter a transaction number.
Receivables assigns a transaction number when you save the transaction. If you are adding transactions to a batch, the transaction number must be unique within this batch.
Attention: Once you save a transaction, you cannot update the transaction number. 3. Enter the Date and Currency of this transaction. The default
currency is the functional currency; USD, but you can
ORACLE AR USER MANUAL
- 13 -
TRANSACTION NATURE
NAVIGATION TASKS
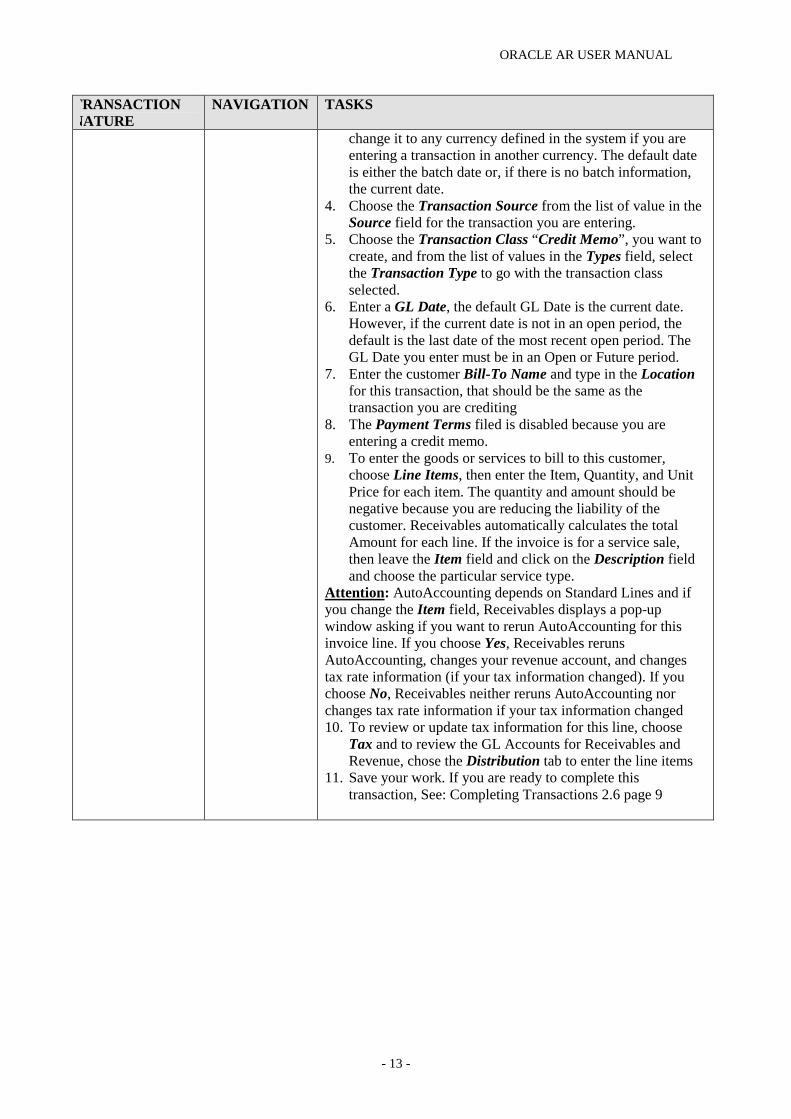
change it to any currency defined in the system if you are entering a transaction in another currency. The default date is either the batch date or, if there is no batch information, the current date.
4. Choose the Transaction Source from the list of value in the Source field for the transaction you are entering.
5. Choose the Transaction Class “Credit Memo”, you want to create, and from the list of values in the Types field, select the Transaction Type to go with the transaction class selected.
6. Enter a GL Date, the default GL Date is the current date. However, if the current date is not in an open period, the default is the last date of the most recent open period. The GL Date you enter must be in an Open or Future period.
7. Enter the customer Bill-To Name and type in the Location for this transaction, that should be the same as the transaction you are crediting
8. The Payment Terms filed is disabled because you are entering a credit memo.
9. To enter the goods or services to bill to this customer, choose Line Items, then enter the Item, Quantity, and Unit Price for each item. The quantity and amount should be negative because you are reducing the liability of the customer. Receivables automatically calculates the total Amount for each line. If the invoice is for a service sale, then leave the Item field and click on the Description field and choose the particular service type.
Attention: AutoAccounting depends on Standard Lines and if you change the Item field, Receivables displays a pop-up window asking if you want to rerun AutoAccounting for this invoice line. If you choose Yes, Receivables reruns AutoAccounting, changes your revenue account, and changes tax rate information (if your tax information changed). If you choose No, Receivables neither reruns AutoAccounting nor changes tax rate information if your tax information changed 10. To review or update tax information for this line, choose
Tax and to review the GL Accounts for Receivables and Revenue, chose the Distribution tab to enter the line items
11. Save your work. If you are ready to complete this transaction, See: Completing Transactions 2.6 page 9
ORACLE AR USER MANUAL
- 14 -
TRANSACTION NATURE
NAVIGATION TASKS
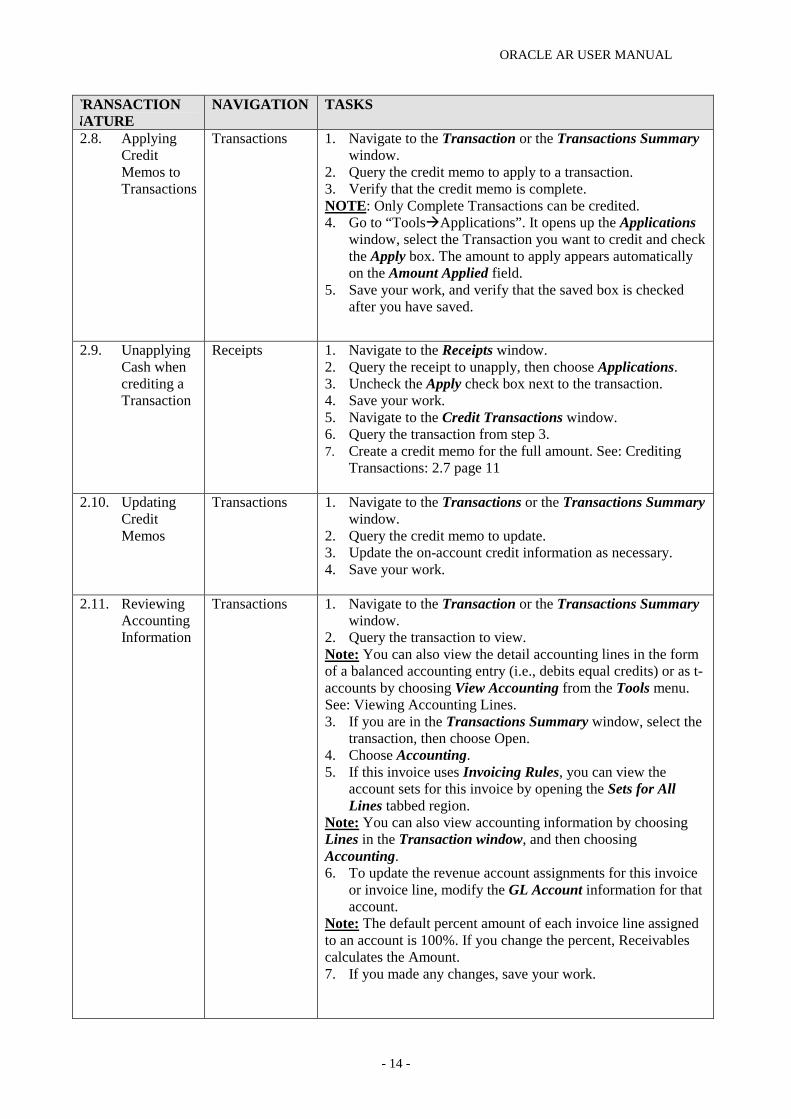
2.8. Applying Credit Memos to Transactions
Transactions 1. Navigate to the Transaction or the Transactions Summary window.
2. Query the credit memo to apply to a transaction. 3. Verify that the credit memo is complete. NOTE: Only Complete Transactions can be credited. 4. Go to “Tools�Applications”. It opens up the Applications
window, select the Transaction you want to credit and check the Apply box. The amount to apply appears automatically on the Amount Applied field.
5. Save your work, and verify that the saved box is checked after you have saved.
2.9. Unapplying Cash when crediting a Transaction
Receipts 1. Navigate to the Receipts window. 2. Query the receipt to unapply, then choose Applications. 3. Uncheck the Apply check box next to the transaction. 4. Save your work. 5. Navigate to the Credit Transactions window. 6. Query the transaction from step 3. 7. Create a credit memo for the full amount. See: Crediting
Transactions: 2.7 page 11
2.10. Updating Credit Memos
Transactions 1. Navigate to the Transactions or the Transactions Summary window.
2. Query the credit memo to update. 3. Update the on-account credit information as necessary. 4. Save your work.
2.11. Reviewing Accounting Information
Transactions 1. Navigate to the Transaction or the Transactions Summary window.
2. Query the transaction to view. Note: You can also view the detail accounting lines in the form of a balanced accounting entry (i.e., debits equal credits) or as t-accounts by choosing View Accounting from the Tools menu. See: Viewing Accounting Lines. 3. If you are in the Transactions Summary window, select the
transaction, then choose Open. 4. Choose Accounting. 5. If this invoice uses Invoicing Rules, you can view the
account sets for this invoice by opening the Sets for All Lines tabbed region.
Note: You can also view accounting information by choosing Lines in the Transaction window, and then choosing Accounting. 6. To update the revenue account assignments for this invoice
or invoice line, modify the GL Account information for that account.
Note: The default percent amount of each invoice line assigned to an account is 100%. If you change the percent, Receivables calculates the Amount. 7. If you made any changes, save your work.
ORACLE AR USER MANUAL
- 15 -
TRANSACTION NATURE
NAVIGATION TASKS
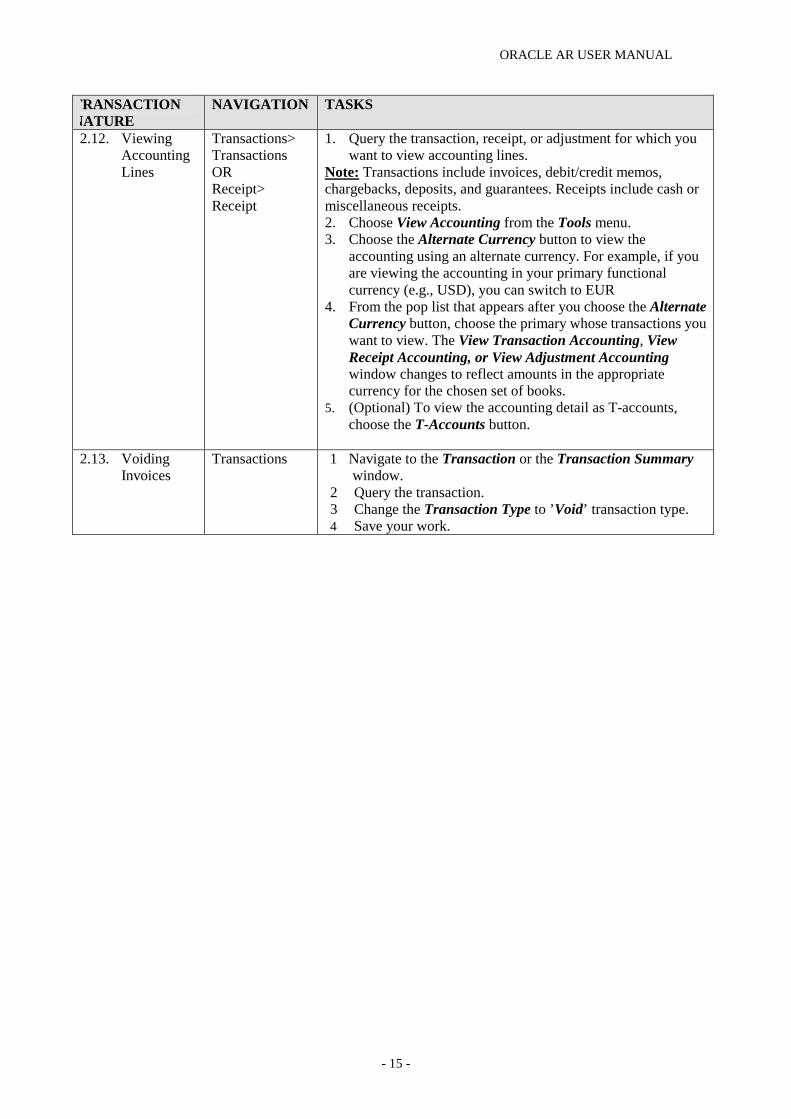
2.12. Viewing Accounting Lines
Transactions> Transactions OR Receipt> Receipt
1. Query the transaction, receipt, or adjustment for which you want to view accounting lines.
Note: Transactions include invoices, debit/credit memos, chargebacks, deposits, and guarantees. Receipts include cash or miscellaneous receipts. 2. Choose View Accounting from the Tools menu. 3. Choose the Alternate Currency button to view the
accounting using an alternate currency. For example, if you are viewing the accounting in your primary functional currency (e.g., USD), you can switch to EUR
4. From the pop list that appears after you choose the Alternate Currency button, choose the primary whose transactions you want to view. The View Transaction Accounting, View Receipt Accounting, or View Adjustment Accounting window changes to reflect amounts in the appropriate currency for the chosen set of books.
5. (Optional) To view the accounting detail as T-accounts, choose the T-Accounts button.
2.13. Voiding
Invoices Transactions 1 Navigate to the Transaction or the Transaction Summary
window. 2 Query the transaction. 3 Change the Transaction Type to ’Void’ transaction type. 4 Save your work.

ORACLE AR USER MANUAL
- 16 -
AR03 - RECEIPT MANAGEMENT
TRANSACTION NATURE
NAVIGATION TASKS
3.1. Entering Cash and Bank Receipts
Receipts 1. Navigate to the Receipts or Receipts Summary window 2. If you are in the Receipt Summary window, enter the
Receipt number, Receipt Type of “Cash or Wire”, Receipt Date, GL Date, Receipt Currency and Amount, with the Payment Method and Remittance Bank Account
3. Chose the Open button to open the Receipt window with the information you just entered in the Receipt Summary window
4. If you are in the Receipt window, enter the Receipt information, including Receipt Number, Currency, Receipt Amount, GL Date, and Receipt Date.
NOTE: You can enter transactions in any currency defined in the system if you have at least one remittance bank account with a Receipts Multi-Currency flag set to Yes. If no such bank account exists, you are limited to entering only those currencies in which bank accounts exist. (The currency of a multiple currency bank account must be the same as your functional currency.) 5. Enter a Payment Method. Receivable uses the payment
method to determine the accounting and remittance bank accounts for this receipt. You can only select payment methods that have remittance bank accounts that are in the same currency as the receipt.
6. Transaction number will default as Document Number. 7. To help identify the customer for this receipt, enter a
Transaction number, that is the invoice number (optional). Receivable displays the customer associated with this transaction. If multiple customers have transactions with the number you entered, Receivable displays a window from which you can select a customer. If you enter a number here,
8. If you did not enter a Transaction number and the receipt is not unidentified, enter customer information for this receipt, including Customer Name or Number and Bill– To Location. When you enter the customer, Receivable enters this customer’s primary Bill– To Location, if one exists (you can change this value
9. Open the Remittance tabbed region, then enter the receipt Deposit Date (optional).
10. Receivable derives the default remittance bank account from the payment method you entered.
11. To prevent the receipt Remittance bank from being automatically overridden during the remittance process, choose Don’t Allow in the Override Bank Account field (optional).
12. If bank charges apply, open the Application Summary tabbed region, then enter an amount for Bank Charges.
13. Save your work. If you entered a customer, the receipt amount appears in the Unapplied field in the Application

ORACLE AR USER MANUAL
- 17 -
TRANSACTION NATURE
NAVIGATION TASKS
Summary tabbed region. Otherwise, the entire receipt amount appears in the Unidentified field.
3.2. Entering Miscellaneous Receipts
Receipts 1. Navigate to the Receipts window. 2. Choose a Receipt Type of 'Misc.' 3. Enter transaction information, including Receipt Number,
Currency, Receipt Amount, GL Date, and Payment Method. If the receipt currency is not the functional currency, change the default functional currency USD, to the receipt currency you are entering. The batch GL Date provides the default GL Date. If there is no batch information, the default is the current date. However, if the current date is not in an open period, the default is the last date of the most recent open period
4. Enter a unique Document Number. Otherwise, Receivables assigns a unique number when you save
5. Select the Miscellaneous Tab, which is enabled when Receipt Type “Misc.” is selected, enter an Activity, or choose one from the list of values. You can enter any Receivables Activity with a type of “IITA Miscellaneous Cash” The Receivables Activity determines the default distribution set and accounting for this transaction.
6. To review or update the distribution set and general ledger account information for this transaction, choose Distributions which is also enabled when the receipt type “Misc.’ is selected
Note: If your tax method is VAT and you calculate tax on miscellaneous transactions, the Distributions window displays the tax code and tax amount for this transaction. 7. Specify from where this payment originated in the Paid
From field (optional). This field is for informational purposes only.
8. If you want to change the tax code for this transaction, enter a Tax Code (optional).
9. Modify the remittance Bank Account (optional). The payment method provides the default bank account, but you can change it. You can enter any bank account assigned to the payment method if the bank account is in the same currency as that of the receipt or the Multi-Currency flag for the remittance bank is set to Yes.
10. Adjust the Deposit Date on the right side of the Miscellaneous Tab(optional). The default date is the deposit date entered at the batch level or, if there is no batch information, the transaction date.
11. Enter a Reference Type for this transaction (optional). 12. If you entered a Reference Type, enter the corresponding
Reference Number, or choose from the list of values. 13. Save your work
3.3. Applying On-Account Credits to Receipts
Receipts 1. Navigate to the Receipts or Receipts Summary window. 2. Query or enter the receipt to apply. See: Entering Receipts. 3. Choose Applications. 4. Select the on-account credit and the open transaction(s) from

ORACLE AR USER MANUAL
- 18 -
TRANSACTION NATURE
NAVIGATION TASKS
the list of values. 5. Apply the receipt to the on-account credit and the open debit
item(s). See: Manually Applying Receipts. 6. Save your work.
3.4. Automatically Applying Receipts
Receipts 1. Navigate to the Receipts window. 2. Query or enter the receipt to apply. See: Entering Receipts. 3. If the receipt is unidentified, enter the name or number of the
customer who remitted this receipt. 4. Choose Mass Apply. 5. Specify the transactions to which you want to apply this
receipt by entering Transaction selection criteria. For example, enter a range of transaction Types, transaction Numbers, Due Dates, or Balances. Leave a field blank if you do not want to limit the search to transactions matching that criteria.
6. Specify how to order selected transactions by entering Sort Criteria (optional). You can mark transactions by Balance Due, Due Date, Invoice Date, or Invoice Number and in Ascending or Descending order. For example, to order items with the largest balances first, choose Balance Due, Descending.
Suggestion: Use sort criteria to ensure that the transactions you want to pay first are listed first in the Applications window. 7. Specify which types of transactions to include in your query
by checking or unchecking the appropriate check boxes in Include section. You can choose Invoices, Credit and Debit Memos, Deposits, Chargebacks, and Disputed Transactions.
8. Enter an Apply Date (optional). If the receipt date is later than the current date, the default is the receipt date; otherwise the default is the current date. Receivables uses this date as the application date for all transactions included in this application.
9. To view the transactions matching your selection criteria without marking them for application, choose Preview. This lets you choose to which transactions you want to apply this receipt (see step 11).
10. To automatically mark the transactions matching your selection criteria for application, choose Apply. Receivables selects each transaction for application in the order queried until the full amount of the receipt is applied. Marked transactions will be paid in full with any discounts automatically taken.
11. If you chose Preview, select transactions for application by checking the Apply check box. Receivables enters the Amount Applied and updates the Unapplied Amount of the receipt and the Balance Due for each transaction. The default Amount Applied is either the open amount of the transaction or the unapplied amount of the receipt, but you can change it (for example, if you want to apply this receipt

ORACLE AR USER MANUAL
- 19 -
TRANSACTION NATURE
NAVIGATION TASKS
to more than one transaction). NOTE: If you chose Apply, you can either accept how Receivables has marked each transaction for application, or modify this information. Unchecking the Apply check box resets the balance due for that transaction and increases the unapplied amount of the receipt. You can update the Amount Applied, select a different transaction, or leave the receipt partially unapplied. 12. To place any remaining amount on account, use the down
arrow to insert a new record, then enter 'On Account' in the Transaction Number field. The default amount is the unapplied amount of the receipt, but you can change it.
12. When you are satisfied with this receipt application, save your work. Receivables updates your customer’s account balances.
3.5. Manually
Applying Receipts
Receipts 1. Navigate to the Receipts window. 2. Enter or query the receipt to apply. See Entering Receipts. 3. If the receipt is unidentified, enter the name or number of the
customer who remitted this receipt. 4. Choose Applications. 5. Select the transaction to which you want to apply this receipt
from the list of values. Receivables enters the amount applied for this receipt and updates the Unapplied Amount of the receipt and the Balance Due for this transaction.
6. To apply this receipt to another transaction, repeat step 5. 7. To place an amount on account, enter 'On Account' in the
Transaction Number field. The default amount is the unapplied amount of the receipt, but you can change it.
8. Receivables marks any portion of this receipt that you do not apply or place on-account as 'Unapplied'.
9. When you are satisfied with this receipt application, save your work. Receivables updates your customer's account balances.
3.6. Reversing
Receipts Receipts 1. Navigate to the Receipts window and query the receipt to
reverse. Note: You can view the detail accounting lines for a receipt in the form of a balanced accounting entry (i.e., debits equal credits) by choosing View Accounting from the Tools menu. You can also choose to view the detail accounting as T-accounts. See: Viewing Accounting Lines. 2. To review the applications for this receipt, choose
Applications and to review the distributions for a miscellaneous transaction, choose Distributions.
3. Choose Reverse…1. 4. Enter the Date of this receipt reversal and the date to post
this reversal to your general ledger. The GL date must be in an open or future period.
5. You can change the reversal and GL Dates, but the reversal date must be on or after the deposit date of the original receipt, and the reversal GL Date cannot be before the
ORACLE AR USER MANUAL
- 20 -
TRANSACTION NATURE
NAVIGATION TASKS
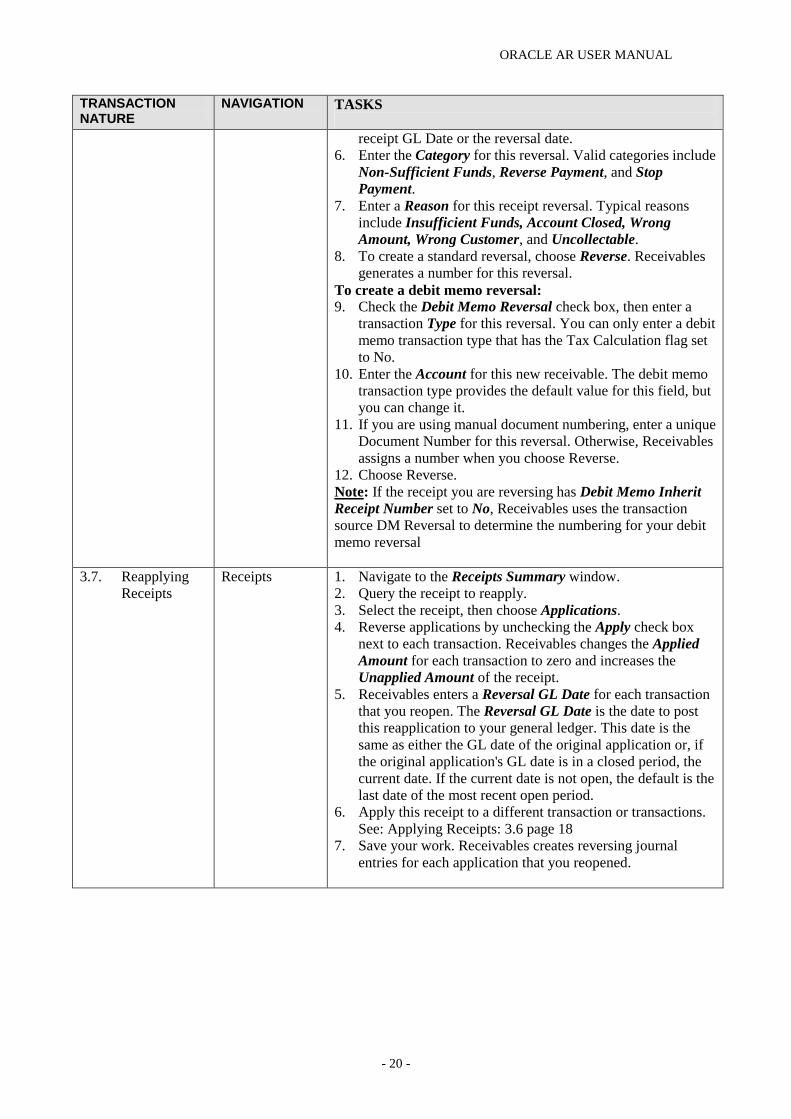
receipt GL Date or the reversal date. 6. Enter the Category for this reversal. Valid categories include
Non-Sufficient Funds, Reverse Payment, and Stop Payment.
7. Enter a Reason for this receipt reversal. Typical reasons include Insufficient Funds, Account Closed, Wrong Amount, Wrong Customer, and Uncollectable.
8. To create a standard reversal, choose Reverse. Receivables generates a number for this reversal.
To create a debit memo reversal: 9. Check the Debit Memo Reversal check box, then enter a
transaction Type for this reversal. You can only enter a debit memo transaction type that has the Tax Calculation flag set to No.
10. Enter the Account for this new receivable. The debit memo transaction type provides the default value for this field, but you can change it.
11. If you are using manual document numbering, enter a unique Document Number for this reversal. Otherwise, Receivables assigns a number when you choose Reverse.
12. Choose Reverse. Note: If the receipt you are reversing has Debit Memo Inherit Receipt Number set to No, Receivables uses the transaction source DM Reversal to determine the numbering for your debit memo reversal
3.7. Reapplying Receipts
Receipts 1. Navigate to the Receipts Summary window. 2. Query the receipt to reapply. 3. Select the receipt, then choose Applications. 4. Reverse applications by unchecking the Apply check box
next to each transaction. Receivables changes the Applied Amount for each transaction to zero and increases the Unapplied Amount of the receipt.
5. Receivables enters a Reversal GL Date for each transaction that you reopen. The Reversal GL Date is the date to post this reapplication to your general ledger. This date is the same as either the GL date of the original application or, if the original application's GL date is in a closed period, the current date. If the current date is not open, the default is the last date of the most recent open period.
6. Apply this receipt to a different transaction or transactions. See: Applying Receipts: 3.6 page 18
7. Save your work. Receivables creates reversing journal entries for each application that you reopened.

ORACLE AR USER MANUAL
- 21 -
TRANSACTION NATURE
NAVIGATION TASKS
3.8. Reviewing Receipts and Applications
Receipts 1. Navigate to the Receipts or Receipts Summary window. 2. Query the receipt to view. Note: You can view the detail accounting lines for a receipt in the form of a balanced accounting entry (i.e., debits equal credits) by choosing View Accounting from the Tools menu. You can also choose to view the detail accounting as t-accounts. See: Viewing accounting Lines. 3. If you are in the Receipts window, open the Application
Summary tabbed region. 4. If you are in the Receipts Summary window, choose Open,
then open the Application Summary tabbed region 5. To review the specific applications for a cash receipt, choose
Applications. To review the distributions for a miscellaneous receipt, choose Distributions.
Suggestion: To view only specific transactions in the Applications window, select Enter from the Query menu, enter the Customer Number, Transaction Number, or Amount Applied, then choose Run from the Query menu.

ORACLE AR USER MANUAL
- 22 -
AR04 GENERAL TRANSACTIONS
TRANSACTION NATURE
NAVIGATION TASKS
4.1. Printing Dunning Letter
Print Documents> Dunning Letters
1 Navigate to the Print Dunning Letters window. 2 Choose “Dunning Letter Generate” from the list of values 3 Fill in the required values in the parameters window for the
dunning letter you want to send 4 Click OK 5 Chose Options tab to open the Options window. Select the printer
to use and specify the number of copies to print. 6 Choose “Submit” to submit the request and note the Request ID
to monitor the request status in the request window See “Submitting a Request”: 4.4 page 21
4.2. Posting Journals to GL
Interfaces> General ledger
1. Navigate to the Run General Ledger Interface window. 2. Choose the Posting Detail or Summary. Chose Detail in the
Posting Detail field. If you transfer transactions in detail, the General Ledger Journal Import Program creates at least one journal entry for each transaction in your posting submission. (If you transfer in summary, it creates one journal entry for each general ledger account)
3. Enter the GL Posted Date for this submission. The default is the current date, but you can change it. Receivables updates all of the posted transactions that you transfer to the general ledger interface area with the GL posted date you enter.
4. Enter the range of GL Dates for your submission. The dates must be within both an open receivables period and an open or future General Ledger period. When you enter a start date, the default GL end date is the last day of the period that you entered for the GL start date.
5. Save your work. Receivables displays the Request ID number for your concurrent process. Use this number to view the status of your request in the Requests window.
6. Receivables also creates the Posting Execution Report. Use this report to see a summary of transactions that are imported into the GL_INTERFACE table. Transactions that failed validation appear in the Unposted Items Report
4.3. Opening
and Closing Periods in AR
Accounting >Receivable Periods
1 Navigate to the Open/Close Accounting Periods window. 2 To update the status of an accounting period, place the cursor in
the Status field next to that period, then enter a new status. 3 To open the next accounting period after the Latest Open Period,
choose Open Next Period. Receivable changes the status of the next period to ’Open.’
4 To close the preceding accounting period before the Latest Open Period, choose Close Period. Receivable changes the status of the next period to ’Close.’
5 Save your work. NOTE: You need to close the accounting periods in the following order:
• Payables • Purchasing

ORACLE AR USER MANUAL
- 23 -
TRANSACTION NATURE
NAVIGATION TASKS
• Inventory NOTE: In the next period, open the periods in the following sequence
• Inventory • Purchasing • Payables
4.4. Submitting
a Request Reports> Accounting
1. To submit a request, navigate to the Submit a New Request window (Other -> Requests -> Run).
2. Check the Request option to submit single requests, or choose to submit a predefined group of requests by checking Request Set.
3. Choose OK. Submitting requests 4. Use the Copy... button to take advantage of previously entered
request submissions. 5. Select the Name of the request (report or program) you want to run
from the list of available requests. Note: Your responsibility's request group determines which requests appear in the list. Defining Parameters 6. A Parameters window automatically appears if you select a
request that requires parameter values. The prompts in the Parameters window are specific to the request you select.
Note: Default values may be predefined for one or more of the parameters associated with your request. The default values are automatically applied to these parameters when the parameters window is opened. However; if you do not open the parameters window, default values are only applied to required parameters. 7. Once you enter the values in the required parameter fields (which
are yellow) and choose OK, the Parameters window closes, and your parameter values are concatenated and displayed in the Parameters field
8. In the Upon Completion... region, use the Save all Output Files to write your request output to a file. If you wish to view your output online, you must use this check box.
9. Choose “Options” to specify additional people to notify, or replace your name if you do not want to be notified.
10. Select a language for each person notified. 11. Select a print style from the pop list. 12. Use the LOV to select the printers you want used to produce a hard
copy of your report. Each printer will produce at least one copy of the report. If you need more than one copy for a particular printer, use the Copies field to enter the number of copies you want printed.
Note: Some requests may have a required Style or Printer that you cannot change. 13. Choose OK. 14. When you are done specifying scheduling and completion options,
choose Submit. 15. Once you submit your request, the Requests window opens and
provides you with the current status of your request and the request ID number.
16. Oracle Applications assigns a request ID to each request

ORACLE AR USER MANUAL
- 24 -
TRANSACTION NATURE
NAVIGATION TASKS
submission so that you can identify the results of the request when it is complete. You can use the request ID to query for your request output in the Requests window. Oracle Applications also assigns a new request ID number to each resubmission of a request and displays the request ID in the log file of the previous request.
17. If you wish to submit another request, simply repeat Steps 1 through 21. All the requests that you submit for the current session appear in the Requests window.
4.5. Submitting Standard Reports
Other> Requests>Run
1. Navigate to the Submit a New Request window. 2. Choose whether to submit a Single Request or a Request Set, then
choose OK. 3. Enter the Request/Report Name (e.g. report or listing) or the
Request Set to run. 4. Enter parameters for running this request or request set. 5. To save the output of this request to a file, check the Save Output
check box. 6. Specify a Schedule and your Completion Options for this request. 7. Choose Submit Request. 8. To review the status of your request, navigate to the Requests
window, and query the report or listing.
4.6. Canceling Requests
Other> Requests>Run
1. Navigate to the Find Requests window. 2. Check My Requests in Progress. 3. Choose Find. 4. With your cursor on the request you wish to cancel, choose Cancel
Request to terminate the request. You can only cancel a request if it is in the Running, Pending, or Inactive phase. You can put your request on hold by choosing Hold Request if the request is Pending or Inactive.
Attention: If you cancel a request set, Oracle Applications automatically cancels all requests in the set. Attention: If you terminate a request while it is in the Running phase, the current run stops, but the resubmission does not. While the resubmitted request is in the Pending phase, you can go to the Resubmission tabbed region of the Requests window and change the Interval for the request to 0 or change the End Date to a date that has passed to cancel the resubmission. 5. Select Save from the File menu.

ORACLE AR USER MANUAL
- 25 -
AR05 PERIOD END PROCESS
TRANSACTION NATURE
NAVIGATION TASKS
5.1. Posting to GL Run the General Ledger Interface program to transfer Receivables Transaction Accounting Distributions to the GL Interface table (GL_INTERFACE) and create either Detailed Journal batches. Receivables lets you create Unposted Journal Entries in GL when you run General Ledger Interface. 1. Navigate to the Run General Ledger Interface window. 2. Choose a Posting Detail of Detail. If you transfer transactions
in detail, the General Ledger Journal Import Program creates at least one journal entry for each transaction in your posting submission.
3. Enter the GL Posted Date for this submission. The default is the current date, but you can change it. Receivables updates all of the Posted Transactions that you transfer to your general ledger or the General Ledger Interface area with the GL Posted Date you enter.
4. Enter the Range of GL Dates for your submission. The dates must be within both an open receivables period and an open or future General Ledger period. When you enter a start date, the default GL End Date is the last day of the period that you entered for the GL Start Date.
5. Set to Run Journal Import to NO 6. Save your work
5.2. Posting Execution Report
Use this report to view a Summary of all Transactions by category and currency that make up your Entries to GL. Receivables automatically generates this report when you run General Ledger Interface. The sum of the entries in the General Ledger Journal Report is equal to the sum of all of the categories of transactions that the Posting Execution Report includes for the same period. The report tells you if posting discovered Errors in your Journals or in your Journal lines. You must Fix All Errors in your Journal Batches before Resubmitting them for Posting. (Contact the GL Super User for guidance). See: Journal Reports in the General Ledger User Guide.
5.3. Opening and Closing Accounting Periods
See Opening and Closing Accounting Periods; 4.3 page 21 NOTE: You need to close the accounting periods in the following order:
• Payables • Purchasing • Inventory
NOTE: In the next period, open the periods in the following sequence
• Inventory • Purchasing • Payables
ORACLE AR USER MANUAL
- 26 -
TRANSACTION NATURE
NAVIGATION TASKS
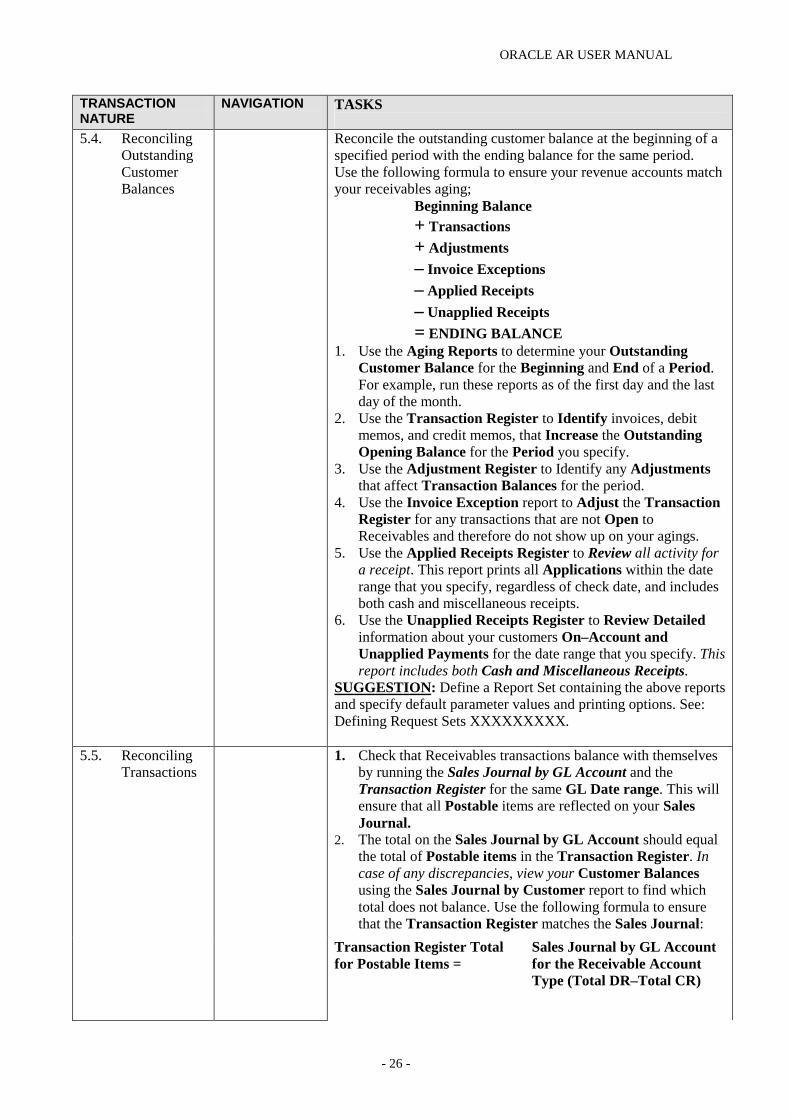
5.4. Reconciling Outstanding Customer Balances
Reconcile the outstanding customer balance at the beginning of a specified period with the ending balance for the same period. Use the following formula to ensure your revenue accounts match your receivables aging;
Beginning Balance + Transactions + Adjustments – Invoice Exceptions – Applied Receipts – Unapplied Receipts = ENDING BALANCE
1. Use the Aging Reports to determine your Outstanding Customer Balance for the Beginning and End of a Period. For example, run these reports as of the first day and the last day of the month.
2. Use the Transaction Register to Identify invoices, debit memos, and credit memos, that Increase the Outstanding Opening Balance for the Period you specify.
3. Use the Adjustment Register to Identify any Adjustments that affect Transaction Balances for the period.
4. Use the Invoice Exception report to Adjust the Transaction Register for any transactions that are not Open to Receivables and therefore do not show up on your agings.
5. Use the Applied Receipts Register to Review all activity for a receipt. This report prints all Applications within the date range that you specify, regardless of check date, and includes both cash and miscellaneous receipts.
6. Use the Unapplied Receipts Register to Review Detailed information about your customers On–Account and Unapplied Payments for the date range that you specify. This report includes both Cash and Miscellaneous Receipts.
SUGGESTION: Define a Report Set containing the above reports and specify default parameter values and printing options. See: Defining Request Sets XXXXXXXXX. 1. Check that Receivables transactions balance with themselves
by running the Sales Journal by GL Account and the Transaction Register for the same GL Date range. This will ensure that all Postable items are reflected on your Sales Journal.
2. The total on the Sales Journal by GL Account should equal the total of Postable items in the Transaction Register. In case of any discrepancies, view your Customer Balances using the Sales Journal by Customer report to find which total does not balance. Use the following formula to ensure that the Transaction Register matches the Sales Journal:
5.5. Reconciling Transactions
Transaction Register Total for Postable Items =
Sales Journal by GL Account for the Receivable Account Type (Total DR–Total CR)

ORACLE AR USER MANUAL
- 27 -
TRANSACTION NATURE
NAVIGATION TASKS
You must Adjust the Transaction Register Total for any Credits because they are Negative on the Transaction Register and Positive on the Sales Journal.
5.6. Reconcile Receipts
1. Check that Receivables Receipts Balance by running the Receipt Journal report and the Receipt Register for the same GL Date range.
2. Use the Receipt Journal to View information about Receipts that appear in your Journal Entries report. Use the Receipt Register to Review a list of receipts for the date range that you specify. The total of the Receipt Journal should equal the total of all receipts in the Receipt Register. These reports display information about both Invoice–Related and Miscellaneous Receipts.
NOTE: You can also use Oracle Cash Management to reconcile your deposits with a bank statement. See: Reconciling Bank Receipts Using Oracle Cash Management in Cash Management User Guide
5.7. Reconcile Account Balances
Run the Sales Journal and Receipt Journal for the same General Ledger date range to see what will post to your General Ledger. Once you internally reconcile your transactions and receipts with your Sales and Receipt Journals, you can perform external reconciliation during and after the posting process. Reconcile the General Ledger Transfer Process 1. General Ledger Interface produces an Execution report that
shows you the total Debits and Credits transferred from Receivables to the General Ledger Interface table.
2. Compare this report to your Sales and Receipt Journal Totals and Verify that they match. Be sure to use the same General Ledger Date ranges for the two journals and your GL transfer.
3. Receivables also produces the Unposted Items Report if there are any items that cannot be transferred to the General Ledger Interface table. You must take into account the total Untransferred Items when Reconciling your Sales and Receipt Journals with the GL Interface Execution report.
4. Once Transactions and Receipts have been transferred to the General Ledger Interface table, they are considered ’Posted’ within the Receivables Sub–Ledger. Account Balances for Transactions and Receipts can be reconciled by Generating the Sales Journal by GL Account, the Receipt Journal (in ’Transaction’ mode), and the Journal Entries report for Posted Items. The account totals in the Sales and Receipt Journals should match the corresponding account balances in the Journal Entries report.
5. The Journal Entries report shows the Transaction and Receipt Numbers that contribute to a Particular GL Account.
6. Run this report using the Summary by Account parameter to Review the Details that make up your general ledger journal entries. This report selects all Transactions that will be Posted to the General Ledger (i.e. associated transaction
ORACLE AR USER MANUAL
- 28 -
TRANSACTION NATURE
NAVIGATION TASKS
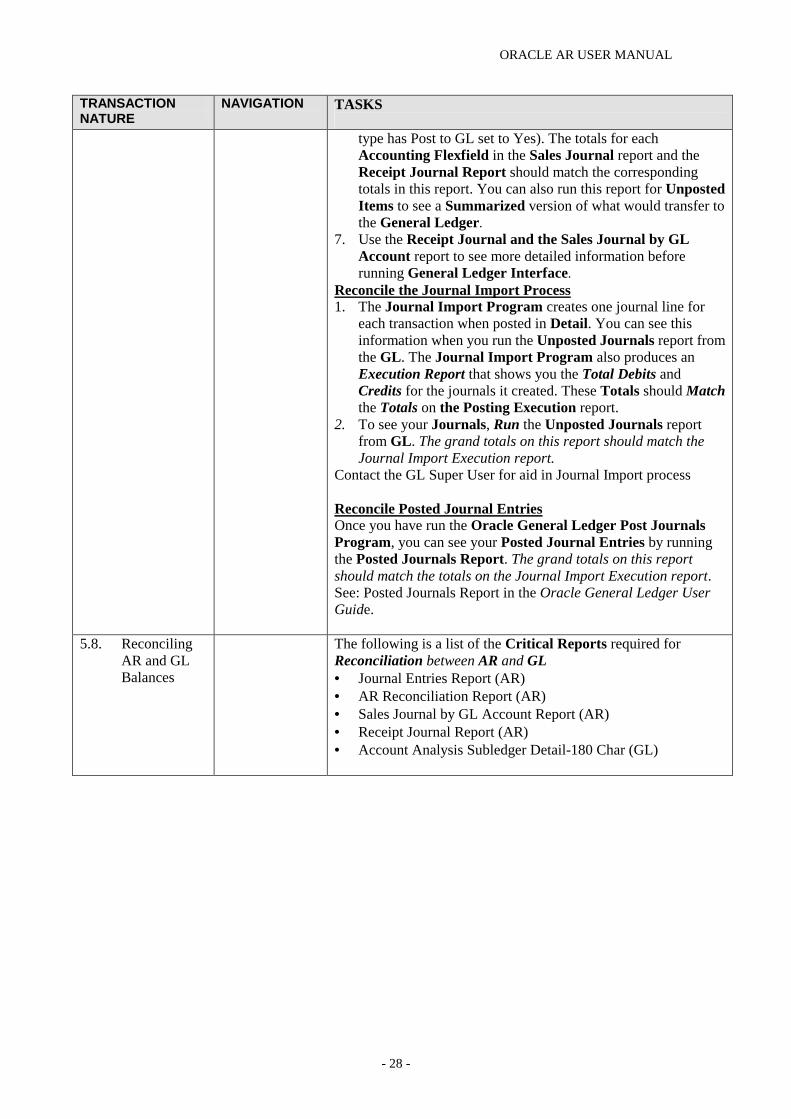
type has Post to GL set to Yes). The totals for each Accounting Flexfield in the Sales Journal report and the Receipt Journal Report should match the corresponding totals in this report. You can also run this report for Unposted Items to see a Summarized version of what would transfer to the General Ledger.
7. Use the Receipt Journal and the Sales Journal by GL Account report to see more detailed information before running General Ledger Interface.
Reconcile the Journal Import Process 1. The Journal Import Program creates one journal line for
each transaction when posted in Detail. You can see this information when you run the Unposted Journals report from the GL. The Journal Import Program also produces an Execution Report that shows you the Total Debits and Credits for the journals it created. These Totals should Match the Totals on the Posting Execution report.
2. To see your Journals, Run the Unposted Journals report from GL. The grand totals on this report should match the Journal Import Execution report.
Contact the GL Super User for aid in Journal Import process Reconcile Posted Journal Entries Once you have run the Oracle General Ledger Post Journals Program, you can see your Posted Journal Entries by running the Posted Journals Report. The grand totals on this report should match the totals on the Journal Import Execution report. See: Posted Journals Report in the Oracle General Ledger User Guide.
5.8. Reconciling AR and GL Balances
The following is a list of the Critical Reports required for Reconciliation between AR and GL • Journal Entries Report (AR) • AR Reconciliation Report (AR) • Sales Journal by GL Account Report (AR) • Receipt Journal Report (AR) • Account Analysis Subledger Detail-180 Char (GL)

ORACLE AR USER MANUAL
- 29 -
ORACLE FINANCIALS HOT KEYS