internal view - kodakapril 30, 2007 1-1 1 setting up the printer package contents the kodak 605...
TRANSCRIPT
Front
Back
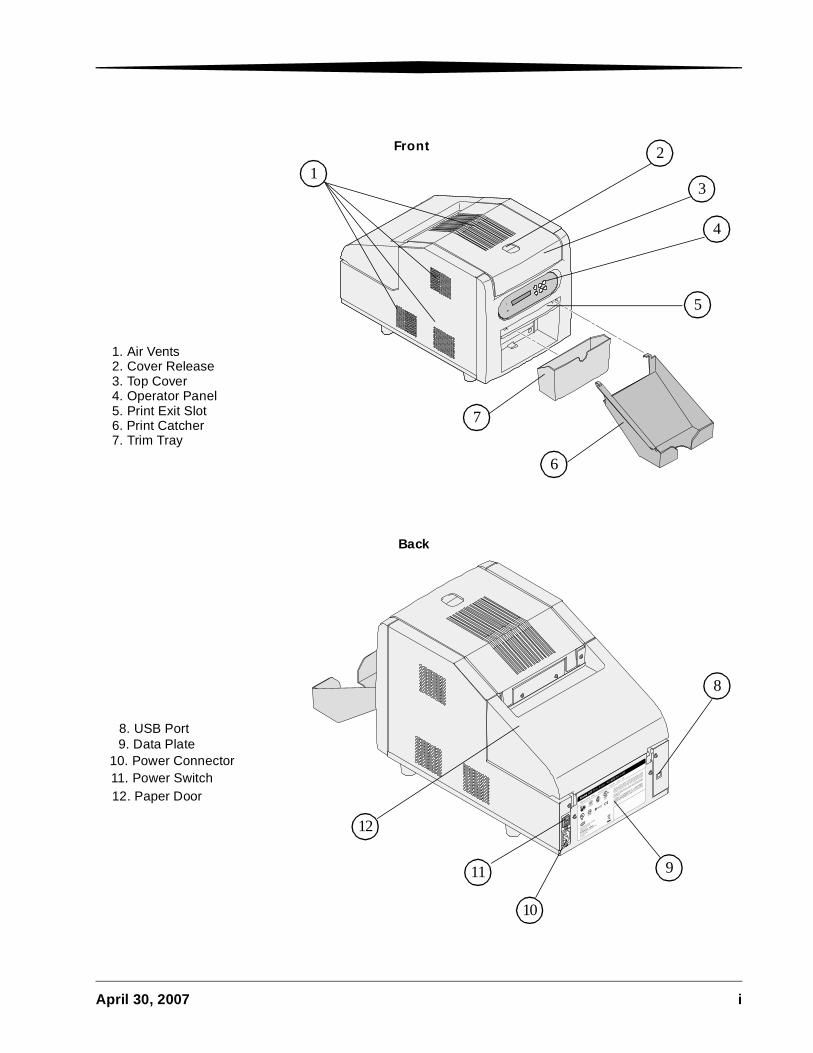
1. Air Vents2. Cover Release3. Top Cover4. Operator Panel5. Print Exit Slot6. Print Catcher
12
3
4
5
6
8. USB Port
10. Power Connector11. Power Switch
9. Data Plate
12. Paper Door
8
9
10
11
12
7. Trim Tray
7
April 30, 2007 i

Internal View
1. Thermal Print Head
1
2. Peel Plate
4. Platen Roller3. Cleaning Roller
2
3
4
Operator Panel
ii April 30, 2007
Table of Contents
1 Setting Up the Printer
Package Contents .............................................................................................................................................1-1Before You Begin .............................................................................................................................................1-2
Recommended Air Flow Clearances ...........................................................................................................1-2Removing the Packing Material ........................................................................................................................1-3Installing the Trim Tray ....................................................................................................................................1-4Installing the Print Catcher...............................................................................................................................1-4Connecting the Cables ......................................................................................................................................1-5
Connecting the Power Cable .......................................................................................................................1-5Connecting the USB Cable ..........................................................................................................................1-5
Loading the Ribbon..........................................................................................................................................1-6Turning On the Printer .....................................................................................................................................1-7Loading the Paper ............................................................................................................................................1-8Making a Test Print ........................................................................................................................................1-10Online User Guide..........................................................................................................................................1-10
2 Operating the Printer
Making Prints...................................................................................................................................................2-1Handling and Storing Prints .............................................................................................................................2-1Understanding the Operator Panel Lights .........................................................................................................2-2Using Setup Mode to Review Printer Settings ....................................................................................................2-2
Accessing the Printer Settings .....................................................................................................................2-3
3 Maintaining the Printer
Cleaning the Printer .........................................................................................................................................3-1Performing Routine Maintenance.....................................................................................................................3-1
Cleaning the Thermal Print Head and the Peel Plate Edge...........................................................................3-2Cleaning the Platen Roller ..........................................................................................................................3-3Cleaning the Cleaning Roller ......................................................................................................................3-3
4 Troubleshooting
Resolving Potential Problems ...........................................................................................................................4-1Resolving Operator Panel Error Messages........................................................................................................4-2Clearing a Paper Jam........................................................................................................................................4-3Recovering from a Power Interruption.............................................................................................................4-4
iv

Table of Contents
Appendix A: Important Printer Information
System Requirements .......................................................................................................................................A-1Printer Specifications .......................................................................................................................................A-1Printer Supplies ...............................................................................................................................................A-2
Paper and Ribbon ......................................................................................................................................A-2Handling and Storing the Paper and Ribbon.........................................................................................A-2
Thermal Printer Cleaning Kit ......................................................................................................................A-3Packing and Transporting the Printer...............................................................................................................A-3Getting Help .....................................................................................................................................................A-3
Appendix B: Safety and Regulatory Information
Important Safety Information ...........................................................................................................................B-1Safety Labels.....................................................................................................................................................B-2Regulatory and Safety Compliance ....................................................................................................................B-3
Safety .........................................................................................................................................................B-3Electromagnetic Compatibility (EMC) ........................................................................................................B-3Noise Emission...........................................................................................................................................B-5Disposal .....................................................................................................................................................B-5
Index
China RoHS................................................................................................................................................B-6
v

1 Setting Up the Printer
Package ContentsThe KODAK 605 Photo Printer is packaged with the following items:
1. Printer
2. KODAK Thermal Printer Cleaning Kit
3. Trim Tray (not installed)
4. Print Catcher (not installed)
5. Power Cable
6. USB Cable
7. Paper Flange with gear (Green)
8. Paper Flange with out gear (Black)
9. User Guide and software CD, not pictured (The User Guide is provided on the CD, and not in printed form.)
1
7
4
5
2
6
3
8
April 30, 2007 1-1

Setting Up the Printer
Before You BeginIMPORTANT: The printer is shipped with several power cables. Be sure to
use the correct power cable for your country.
Have the following items available before you begin your printer setup:
• KODAK Photo Print Kit 6800/4R or KODAK Photo Print Kit 6800/6R which contains the correct paper and ribbon for the best print quality and print life from your printer. See Appendix A for details on the Photo Print Kit (sold separately).
• USB cable (included).
IMPORTANT: The printer weighs 40 lb (18 kg) and is heavier at the front than at the back. Use caution when lifting or moving the printer.
Recommended Air Flow Clearances
If you plan to install the printer in a restricted space such as in a cabinet, refer to the following illustration for the recommended air flow clearances.
1.97 in.(50 mm)
1.97 in.(50 mm)
1.97 in.(50 mm)
1.97 in.(50 mm)
1-2 April 30, 2007
Setting Up the Printer
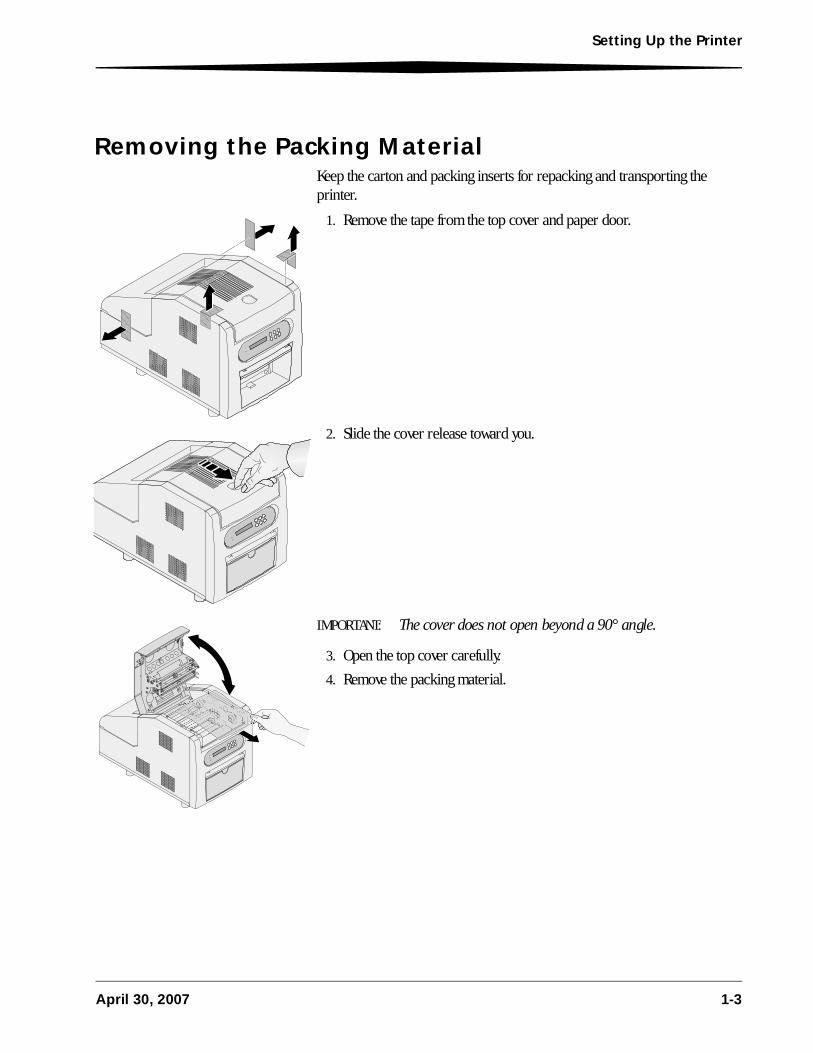
Removing the Packing MaterialKeep the carton and packing inserts for repacking and transporting the printer.
1. Remove the tape from the top cover and paper door.
2. Slide the cover release toward you.
IMPORTANT: The cover does not open beyond a 90° angle.
3. Open the top cover carefully.
4. Remove the packing material.
April 30, 2007 1-3

Setting Up the Printer
Installing the Trim TrayCAUTION:There are sharp cutter blades inside the printer. Do not insert hands or objects.
The trim tray collects paper trimmings that are generated when the printer cuts the prints.
1. Insert the trim tray into the printer as shown.
2. To keep your prints dust-free and to prevent paper jams, empty the trim tray each time you change the paper.
Installing the Print CatcherThe print catcher collects the finished prints as they exit the printer.
• Attach the print catcher to the print exit slot as shown.
Trim Tray
Print Catcher
Print Exit Slot
1-4 April 30, 2007

Setting Up the Printer
Connecting the Cables
Connecting the Power Cable
If you received more than one power cable with your printer, make sure to use the correct power cable for your country.
1. Check that the power switch is turned off ( ).
CAUTION:The power outlet must be grounded. An ungrounded outlet can cause fire, electric shock, or harmful interference to nearby electrical devices.
2. Connect the power cable to the power connector on the back of the printer and to a grounded power outlet.
Connecting the USB Cable
1. Check that the power switch is turned off ( ).
2. Connect the USB cable that was included with the printer to the USB connector on the back of the printer and to the USB connector on the computer.
April 30, 2007 1-5

Setting Up the Printer
Loading the RibbonMake sure that you have a KODAK Photo Print Kit 6800/4R or KODAK Photo Print Kit 6800/6R available. These kits contain the correct size ribbon for your printer. See Appendix A for details on the Photo Print Kits (sold separately).
NOTE: Images remain on the ribbon after printing. If you need to maintain confidentiality, dispose of the used ribbon appropriately.
1. If you are replacing a ribbon, remove the used ribbon.
2. Insert your fingers into the holes in the plastic wrapper on the end of the ribbon. Remove the plastic wrapper from the ribbon.
IMPORTANT: Do not remove the label from the ribbon at this time.
3. Insert the bar code end of the supply spool into the spool holder on the right.
4. Insert the left side of the supply spool into the spool holder on the left.
5. Adjust the supply spool until the spool locks into the spool holder.
Plastic Wrapper
Label
1-6 April 30, 2007
Setting Up the Printer
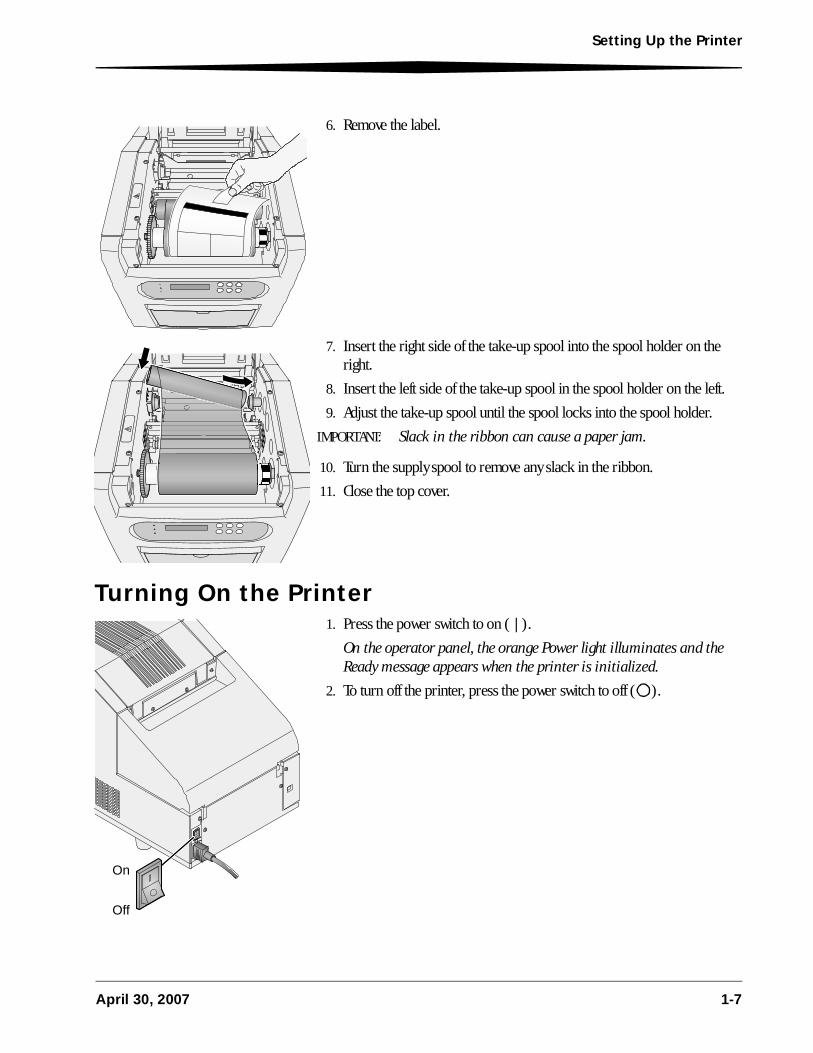
6. Remove the label.
7. Insert the right side of the take-up spool into the spool holder on the right.
8. Insert the left side of the take-up spool in the spool holder on the left.
9. Adjust the take-up spool until the spool locks into the spool holder.
IMPORTANT: Slack in the ribbon can cause a paper jam.
10. Turn the supply spool to remove any slack in the ribbon.
11. Close the top cover.
Turning On the Printer1. Press the power switch to on ( | ).
On the operator panel, the orange Power light illuminates and the Ready message appears when the printer is initialized.
2. To turn off the printer, press the power switch to off ( ).
Take-up spool
On
Off
April 30, 2007 1-7

Setting Up the Printer
Loading the PaperMake sure that you have a KODAK Photo Print Kit 6800/4R or KODAK Photo Print Kit 6800/6R available. These kits contain the correct size paper for your printer. See Appendix A for details on the photo print kits (sold separately).
1. Make sure that the printer power is on ( | ).
2. Remove the plastic from the new paper roll.
IMPORTANT: Do not remove the label from the paper roll until you have successfully loaded the paper in the printer.
3. Attach the paper flanges to each end of the paper roll.
a. Align the lugs on the green paper flange with the notches on the paper roll.
b. Insert green paper flange into the notched end of the paper roll.
c. Insert the black paper flange on the paper roll.
NOTE: Be sure to match the lugs on the green paper flange with the notches on the left side of the paper roll. If you do not attach the paper flange correctly, the paper roll will not fit into the printer.
4. Open the paper door.
Notches
Paper Flange
Paper Flange Lugs
Paper Door
1-8 April 30, 2007

Setting Up the Printer
5. Carefully lower the paper roll into the slots. Match the geared flange (green) with the geared slot (green) on the printer.
6. Remove the label from the paper roll.
NOTE: Verify that the paper unrolls from the top of the roll.
7. Feed the paper into the rear printer slot until the red LED light turns off and the green LED light turns on.
8. Close the paper door.
NOTE: Ribbon must be loaded in the printer before the paper automatically advances.
The printer advances the paper, then cuts and discharges 6 blank test prints—about 24 in. (61 cm). This reduces the possibility of fingerprints or other damage to the prints. It does not decrease the 750 4 x 6 in. (10 x 15 cm) print capacity of the paper roll.
The operator panel displays the Ready message.
IMPORTANT: You must empty the trim tray each time you change the paper to keep your prints dust-free and to prevent paper jams.
9. Empty and replace the trim tray.
Slot
Label
April 30, 2007 1-9
Setting Up the Printer
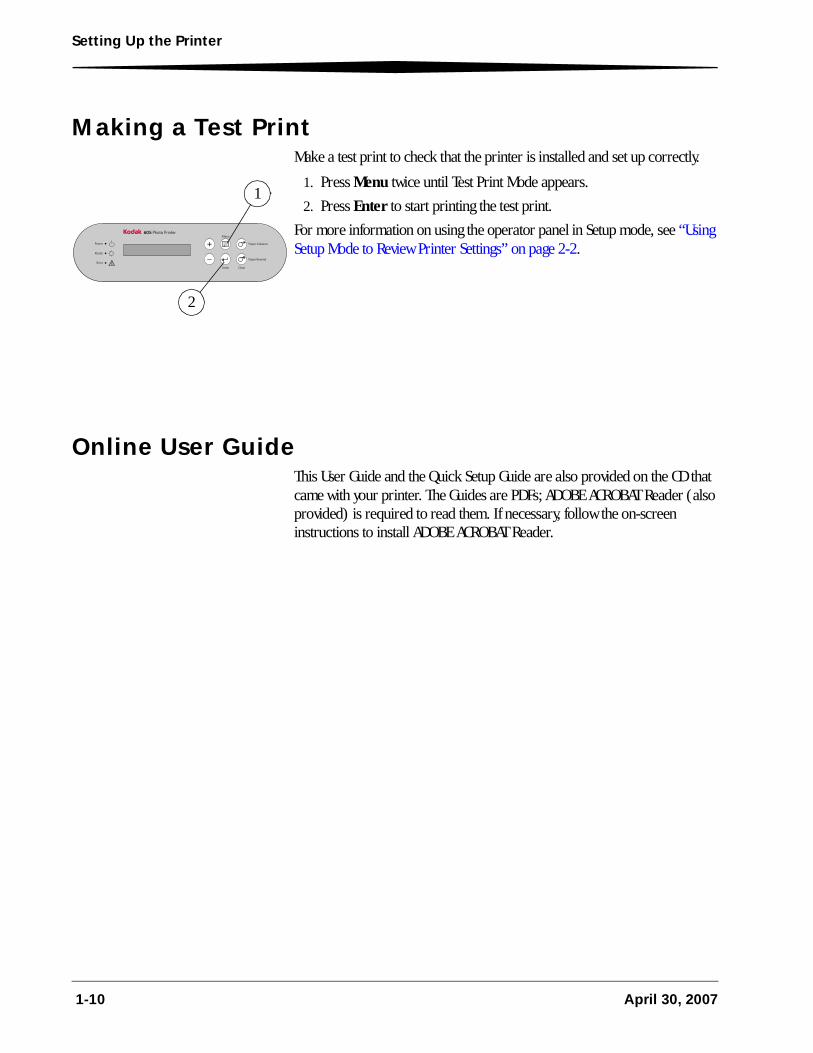
Making a Test PrintMake a test print to check that the printer is installed and set up correctly.
1. Press Menu twice until Test Print Mode appears.
2. Press Enter to start printing the test print.
For more information on using the operator panel in Setup mode, see “Using Setup Mode to Review Printer Settings” on page 2-2.
Online User GuideThis User Guide and the Quick Setup Guide are also provided on the CD that came with your printer. The Guides are PDFs; ADOBE ACROBAT Reader (also provided) is required to read them. If necessary, follow the on-screen instructions to install ADOBE ACROBAT Reader.
1
2
1-10 April 30, 2007

2 Operating the Printer
Making PrintsYou make prints using photo printing software applications. For application-specific printing information, see the user’s guide or online Help for the software application.
Handling and Storing PrintsFor best results:
• Make sure hands are clean and free of food, oil, and grease.
• Store prints in a cool, dry environment free of chemical contamination.
• Store prints at temperatures below 72° F (25° C) for extended periods.
• Store prints at a relative humidity between 30% and 50%.
• Avoid exposure to high-intensity light sources, particularly fluorescent light and sunlight, which are rich in ultraviolet radiation.
• Avoid exposure to vinyl items (those made of polyvinyl chloride, PVC) and any plastic that contains plasticizer. If you use transparent sleeves, make sure that they are not PVC-based.
April 30, 2007 2-1

Operating the Printer
Understanding the Operator Panel Lights
Using Setup Mode to Review Printer SettingsUse the operator panel to review printer settings in Setup mode.
1. Press Menu to enter Setup Mode.
2. Press Menu repeatedly to scroll through the printer settings.
3. Press +/- to scroll through selections.
4. Press Enter to initiate an action or accept a change.
5. Press Clear to exit Setup Mode.
Light Color Printer Status
Power Orange The printer power is on.
Ready Green The printer is ready to make prints.
Error Red An error has occurred. See the message on the operator panel, then see “Resolving Operator Panel Error Messages” on page 4-2.
Printer settingsare displayed here
3
1,2
4 5
2-2 April 30, 2007

Operating the Printer
Accessing the Printer Settings
Press Menu repeatedly to scroll through the printer settings in the following order.
Printer Setting Operator Panel Display
Action Required
Printer ready Ready None. The printer is on and ready to make prints.
Changing energy save mode
Energy Save Mode Press Enter to turn Energy Save Mode on or off. The default is off. When turned on, the printer goes into a standby mode after 30 minutes, using less power. When the printer goes into standby, the time for the first print is increased. Press:
• Energy Save Mode
• Enter
• “+” or “-” to turn on or off
• Enter
• Clear
Making a test print Test Print Mode Press Enter to make a test print. See “Making a Test Print” on page 1-10.
Check remaining media
Remain = XXX/YYY None. XXX represents how many remaining prints you can make with the current paper roll. YYY represents the total number of prints on a paper roll. The counter is reset each time you press Paper Rewind.
Checking the printer total print count
Printed = XXXXXX None. XXXXXX represents the total number of prints made since the printer was manufactured. This counter cannot be reset.
Checking the ribbon status
Donor = XXX[%] None. XXX[%] represents the percentage of the installed ribbon that is available for making prints.
Checking the printer firmware version
Main Firm = XX . YY None. XX . YY represents the printer control firmware version number.
Checking the image processing firmware version
DSP Firm = XX . YY None. XX . YY represents the image processing firmware version number.
Checking the USB firmware version
USB Firm = XX . YY None. XX . YY represents the USB firmware version number.
Checking the print parameter table version
TABLE Firm = XX . YY None. XX . YY represents the print parameter table version number.
April 30, 2007 2-3

Operating the Printer
Changing the wait time
Wait Time Press Enter to change wait time from 0 to 100 seconds. The default is 1 second. This only applies when printing 4R prints using 6R ribbon. The wait time is the length of time that the printer waits before it starts printing after receiving a 4R print. This allows the printer to receive a second 4R print that will print at the same time as the first 4R print. This decreases the print time when printing multiple 4R prints using 6R ribbon. Press:
• Wait Time
• Enter
• “+” or “-” to change the number
• Enter
• Clear
Printer Setting Operator Panel Display
Action Required
2-4 April 30, 2007

3 Maintaining the Printer
To ensure good printer performance and high-quality prints, make sure that the KODAK 605 Photo Printer and its environment are clean and dust free.
Cleaning the PrinterClean the exterior of the printer and the filter openings regularly to eliminate dust buildup and prevent dirt from entering the printer.
CAUTION:Never use abrasives or harsh chemicals to clean any part of the printer. Do not allow any foreign objects or liquids to fall or spill inside the printer. Fire or electric shock could result. If any foreign object enters the printer, turn off the printer power immediately, remove the power cord, and contact your Kodak service representative.
1. Wipe the exterior of the printer, print catcher, and trim tray with a damp, lint-free cloth.
2. Vacuum the filter openings to remove dust.
Performing Routine MaintenanceTo maintain good print quality:
1. Clean the platen roller monthly using the alcohol pads included in the KODAK Thermal Printer Cleaning Kit.
2. Only clean the thermal print head if directed to do so by a Kodak service representative. Do not include the thermal print head in your monthly cleaning process.
NOTE: If paper or ribbon is loaded in the printer, remove it before performing maintenance procedures.
April 30, 2007 3-1

Maintaining the Printer
CAUTION:Alcohol is a flammable liquid. It can cause eye irritation and dry skin. Prolonged or repeated skin contact may cause drying, cracking or irritation. Wash your hands with soap and water following any maintenance procedures where you use alcohol pads. For additional information, see the Material Safety Data Sheet (MSDS).
In the United States for information on health related issues, call 585-722-5151. Customers outside the U.S. can contact their local Kodak service representative. For environmental issues related to Kodak products, contact Kodak at 1-800-242-2424.
Cleaning the Thermal Print Head and the Peel Plate Edge
IMPORTANT: Only do this procedure if directed to do so by a Kodak service representative.
1. Make sure the power switch is turned off ( ).
2. Open the top cover.
CAUTION:The thermal print head becomes extremely hot during normal operation. Wait approximately five minutes to begin cleaning the head after you open the top cover. Fingerprints can damage the thermal head, which looks like a glass bar. Never touch it with your bare hands or fingers.
3. Remove a new alcohol pad from its packaging. Move the pad along the entire length of the thermal print head, in one direction only. When you clean the thermal head:
– Apply firm, even pressure.
– Make three passes along the thermal print head.
– Use a clean part of the pad for each pass.
– Use another clean alcohol pad to wipe the edge of the peel edge.Thermal Print Head
3-2 April 30, 2007

Maintaining the Printer
Cleaning the Platen Roller
1. Remove an alcohol pad from its packaging. Wipe the rubber section of the platen roller with the pad.
2. Rotate the roller to clean the entire surface.
3. Allow the alcohol to dry completely (about five minutes) before you resume printing.
4. Close the top cover.
Cleaning the Cleaning Roller
It is essential to keep the cleaning roller clean to prevent dirt from transferring back onto the prints and to keep the printer operating correctly.
1. Remove an alcohol pad from its packaging. Wipe the rubber section of the roller with the pad.
2. Allow the alcohol to dry completely (about five minutes) before you resume printing.
3. Close the top cover.
Platen Roller
Cleaning Roller
April 30, 2007 3-3


4 Troubleshooting
Resolving Potential ProblemsProblem Description or Cause Possible Solution
Paper jam; error light is on, printer does not operate
Paper is jammed in the printer Clear the paper jam. See “Clearing a Paper Jam” on page 4-3.
Prints have vertical streaks Thermal print head is dirty. If directed by your Kodak service representative, clean the thermal print head. See “Cleaning the Thermal Print Head and the Peel Plate Edge” on page 3-2.
Prints have streaks made up of small dots
The platen roller is dirty. Clean the cleaning rollers. See “Cleaning the Platen Roller” on page 3-3.
Print size or aspect ratio is not what you expected
The image file or printing options need to be adjusted in your photo printing software program.
In your photo printing software program:
• Use Fit to Page or Clip options if available.
• Adjust the image size to match the paper size.
• Make sure that the Portrait/Landscape setting matches the orientation of the image.
• For more information, see the help for your photo printing software program.
NOTE: It is not necessary to adjust the image resolution (dpi) to match the printer resolution. The printer drive automatically scales your image to match the printer resolution.
Insufficient memory errors occur on your computer after making a substantial number of prints
Your computer is low on RAM and/or disk caching memory. This occurs when you rotate, scale, or retouch high resolution images (>72 dpi).
• Minimize the number of images open at the same time.
• Delete the contents of the clipboard frequently.
• Close all programs except the photo printing software program.
• See the help for your photo printing software program for tips on memory optimization.
• See page A1 for system requirements.
April 30, 2007 4-1
Troubleshooting
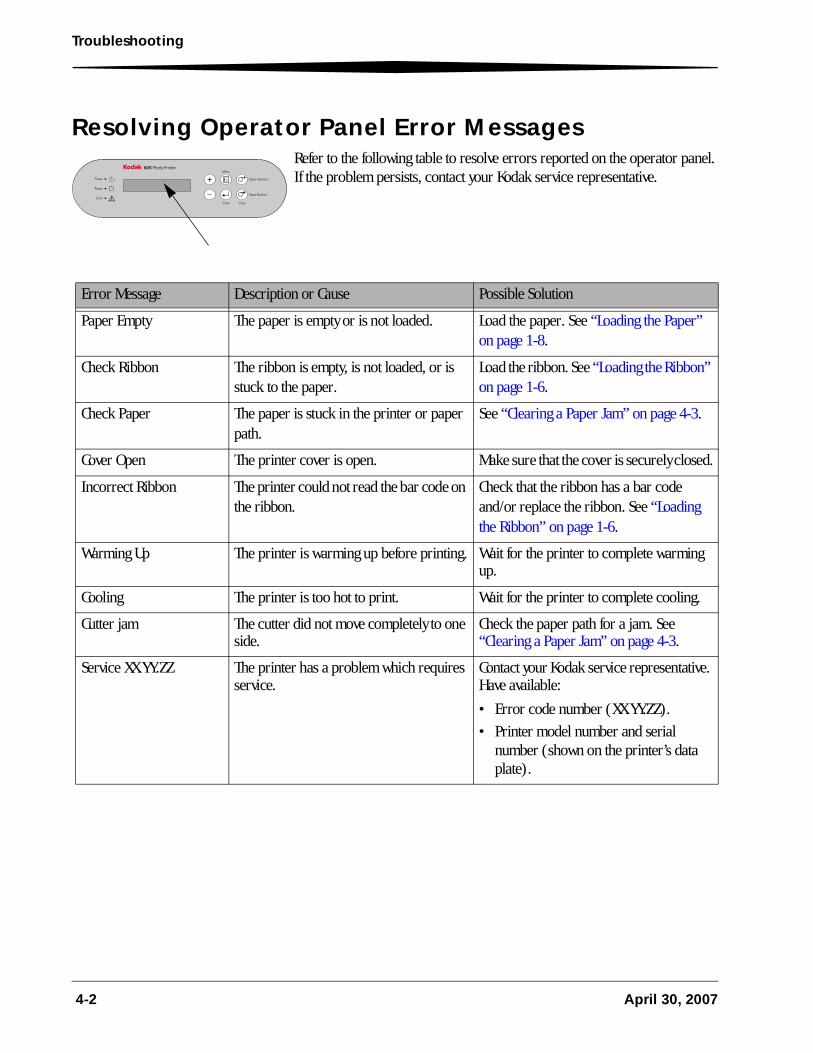
Resolving Operator Panel Error Messages Refer to the following table to resolve errors reported on the operator panel. If the problem persists, contact your Kodak service representative.
Error Message Description or Cause Possible Solution
Paper Empty The paper is empty or is not loaded. Load the paper. See “Loading the Paper” on page 1-8.
Check Ribbon The ribbon is empty, is not loaded, or is stuck to the paper.
Load the ribbon. See “Loading the Ribbon” on page 1-6.
Check Paper The paper is stuck in the printer or paper path.
See “Clearing a Paper Jam” on page 4-3.
Cover Open The printer cover is open. Make sure that the cover is securely closed.
Incorrect Ribbon The printer could not read the bar code on the ribbon.
Check that the ribbon has a bar code and/or replace the ribbon. See “Loading the Ribbon” on page 1-6.
Warming Up The printer is warming up before printing. Wait for the printer to complete warming up.
Cooling The printer is too hot to print. Wait for the printer to complete cooling.
Cutter jam The cutter did not move completely to one side.
Check the paper path for a jam. See “Clearing a Paper Jam” on page 4-3.
Service XX.YY.ZZ The printer has a problem which requires service.
Contact your Kodak service representative. Have available:
• Error code number (XX.YY.ZZ).
• Printer model number and serial number (shown on the printer’s data plate).
4-2 April 30, 2007

Troubleshooting
Clearing a Paper Jam1. Press and hold Paper Rewind until the Paper Empty message appears.
2. Once the Paper Empty message appears:
– Open the paper door.
– Cut off any damaged or printed areas of the paper.
– Load the paper. See “Loading the Paper” on page 1-8.
– If the operator panel displays the Ready message, the jam is cleared.
3. If the Paper Jam message is still displayed on the operator panel:
– Turn off the printer.
– Open the paper door.
– Open the top cover.
– Remove the ribbon from the printer.
4. Manually rewind paper onto the roll.
CAUTION:Prevent damage to the printer. Do not pull abruptly on the paper.
Off
April 30, 2007 4-3

Troubleshooting
5. Cut off any damaged or printed areas of the paper.
NOTE: Do not damage or mark any of the rollers.
6. Look inside the printer and carefully remove any pieces of paper.
7. Turn on the printer.
8. Load the ribbon. See “Loading the Ribbon” on page 1-6.
9. Close the top cover.
10. Load the paper. See “Loading the Paper” on page 1-8.
NOTE: If the Paper Jam message is still displayed on the operator panel, and you are at the end of a paper roll, it is possible that a segment of paper is too short to automatically exit the printer. Contact KODAK Service and Support.
Recovering from a Power InterruptionCAUTION:If the printer loses power while printing, the printer stops with the thermal print head positioned against the platen roller. The platen roller could be deformed and damaged if the thermal print head is left in this position.
If a power outage occurs:
1. Open the cover immediately to release the pressure on the platen roller. Leave the cover open until power is restored.
2. When power is restored, restart the printer by following the procedure for “Clearing a Paper Jam” on page 4-3.
3. Send your print job again.
4-4 April 30, 2007

Appendix A: Important Printer Information
System Requirements • Computer with MICROSOFT WINDOWS XP, WINDOWS 2003 Server,
WINDOWS VISTA Operating System
• Minimum 1.0 GHz Celeron Microprocessor
• Minimum memory requirement is determined by your operating system
• Minimum 2 GB of available hard disk space
• USB High Speed (2.0) compliant host device
Printer Specifications Dimensions Width
DepthHeight
17.4 in. (44.1 cm) 25.2 in. (64.1 cm) 19 in. (48.3 cm)
Weight (without ribbon and paper)
40 lbs (18 kg)
Operating environment
Temperature
Relative Humidity
59 to 95° F (+15 to +35° C)
20 to 80%
Power Voltage/Frequency (auto detection in the prescribed range)
100 V to 240 V / 48 Hz to 62 Hz
Power consumption 5.0 Amps at 100 V AC or 2.5 Amps @ 240 V AC maximum
Print size • 4 x 6 in. (10.16 x 15.24 cm) borderless
• 5 x 7 in. (12.7 x 17.78 cm) with border
• 6 x 8 in. (15.24 x 20.32 cm) borderless
April 30, 2007 A-1

Important Printer Information
Printer Supplies
Paper and Ribbon Each Photo Print Kit contains the correct media set (roll-feed paper and ribbon) for your printer model. Photo Print Kits are sold separately.
IMPORTANT: For best results, replace both the paper and ribbon at the same time. Used ribbon is safe for land-fill disposal. Do not recycle used ribbon.
* Paper and ribbon rolls contain material to make the stated print quantity. Printing of mixed 4 x 6 in. and 6 x 8 in. sizes may yield fewer prints per roll.
** The paper roll contains a small amount of additional paper for lead edge and trailing edge waste.
Handling and Storing the Paper and Ribbon
For the best quality prints, carefully handle and store your paper and ribbon:
• To avoid fingerprints, handle the ribbon by the spool ends; do not touch the ribbon material. Do not touch the glossy side of the paper.
• Store the paper and ribbon away from direct sunlight.
KODAK Photo Print Kit 6800 / 4R
Catalog Number 182-0547
Storage specifications 86° F (30° C) or lower
60% relative humidity or lower
Capacity 750 prints, paper and ribbon*
Paper and ribbon width 6 in. (15 cm)
Ribbon patch length 4 in. (10 cm)
KODAK Photo Print Kit 6800 / 6R
Catalog Number 169-6418
Storage specifications 86° F (30° C) or lower
60% relative humidity or lower
Capacity* 750 - 4 x 6 in. prints, paper, and ribbon** or
375 - 6 x 8 in. prints, paper, and ribbon**
Paper and ribbon width 6 in. (152 mm)
Ribbon patch length 8 in. (203 mm)
A-2 April 30, 2007

Important Printer Information
Thermal Printer Cleaning Kit
Use the KODAK Thermal Printer Cleaning Kit when performing routine maintenance on the printer (see page 3-1). One Thermal Printer Cleaning Kit is included with your printer.
CAUTION:Alcohol is a flammable liquid. It can cause eye irritation and dry skin. Wash your hands with soap and water following any maintenance procedures where you use alcohol pads.
Packing and Transporting the PrinterWARNING:Shipping the printer with paper and ribbon installed can cause damage to the printer.
1. Remove the paper and ribbon from the printer.
2. Reinstall the packing materials (see page 1-3).
3. Repack the printer in the original packing box. See the packing/unpacking instructions included with the box.
Getting HelpHelp with your printer is available from the following sources:
• Troubleshooting section in this user guide, Chapter 6.
• Your Kodak service representative.
KODAK Thermal Printer Cleaning Kit
Catalog number 172-1117
Contents Individually packaged alcohol pads (10)
April 30, 2007 A-3


Appendix B: Safety and Regulatory Information
Important Safety InformationCAUTION:Use of controls or adjustments or performance of procedures other than those specified in this manual may result in injury and/or damage to the printer.
• The power outlet should be easily accessible and installed near the printer.
• Position the power cable so that it cannot be pulled on or tripped over.
• Never allow the power cable to contact hot surfaces.
• The power outlet must be grounded. An ungrounded outlet can cause fire, electric shock, or harmful interference to nearby electrical devices.
• Use only the power cable provided with the printer.
• Do not operate the printer with a damaged power cable.
• Always unplug the power cable from the printer before cleaning or when the printer is not in use.
• If the printer has been dropped or damaged, be sure a qualified service person examines the printer before you use it.
• Do not block the filter openings on the printer cabinet.
• Do not expose the printer to moisture or water.
• Do not allow any foreign objects or liquids to fall or spill inside the printer. Fire or electric shock could result.
• The thermal print head becomes extremely hot during normal operation. Do not touch it.
• Alcohol pads are used to clean the thermal print head and other internal printer components. In the United States for health, safety, and environment information, call 585-722-5151. Customers outside the U.S. can contact their local Kodak service representative.
April 30, 2007 B-1

Safety and Regulatory Information
Safety LabelsPlease observe the important safety warnings that are posted on the printer.
This label is posted behind the trim tray.
CAUTION HOT SURFACETo avoid burns, use caution when closing the cover.
CAUTION SHARP OBJECTSThe metal edges of the printer may be sharp.
CAUTION SHARP CUTTER BLADEThere are sharp cutter blades inside the printer. Do not insert hands or objects.
P/N 2J54391641132233
P/N 2J54521641132183
P/N 2J54511641132182
B-2 April 30, 2007

Safety and Regulatory Information
Regulatory and Safety Compliance
Safety Complies with UL 60950-1:2003
CAN/CSA C22.2 No. 60950-1-03
EN 60950-1:2001
IEC 60950-1:2001
Tested for Norwegian IT Power systems 240V phase to phase
Electromagnetic Compatibility (EMC)
NOTE: This equipment has been tested and found to comply with the limits for a Class A digital device, pursuant to part 15 of the FCC rules. These limits are designed to provide reasonable protection against interference when the equipment is operated in a commercial environment. This equipment generates, uses, and can radiate radio frequency energy and, if not installed and used in accordance with the instruction manual, may cause interference to radio communications. Operation of this equipment in a residential area is likely to cause interference in which case the user will be required to correct the interference at his or her own expense.
This class A digital apparatus complies with Canadian ICES-003.
Cet appareil numérique de la classe A est conforme à la norme NMB-003 du Canada.
Requirements of the EMC directive 89/336/EEC were met through compliance with the following:
• EN 55022: 1998+A1: 2000+A2: 2003 Class A
• EN 61000-3-2: 2000+A2: 2005 Class A
• EN 61000-3-3: 1995+A1: 2001+A2: 2005
• EN 55024: 1998+A1: 2001+A2: 2003
– EN 61000-4-2 ESD
– EN 61000-4-3 Radiated RF Immunity
– EN 61000-4-4 EFT
– EN 61000-4-5 Surge
– EN 61000-4-6 Conducted RF Immunity
– EN 61000-4-8
– EN 61000-4-11 Voltage Dips and Interruptions
April 30, 2007 B-3

Safety and Regulatory Information
CAUTION:This is a class A product. In a domestic environment this product may cause radio interference in which case the user may be required to take adequate measures.
“Changes or modifications not expressly approved by the party responsible for compliance could void the user’s authority to operate the equipment.”
Install and use the equipment according to the instruction manual.
B-4 April 30, 2007

Safety and Regulatory Information
Noise Emission The operator-position noise emission value is less than 70 dB(A).*
* Average value specified in accordance to JIS Z8731
Disposal This product contains a small amount of lead in the solder on the circuit boards. Disposal of this material may be regulated due to environmental considerations. For disposal or recycling information, please contact your local authorities. In the USA, contact the Electronics Industry Alliance at www.eiae.org.
In the European Union, this symbol indicates that when the last user wishes to discard this product, it must be sent to appropriate facilities for recovery and recycling. Contact your local KODAK Representative or refer to www.kodak.com/go/recycle for additional information on the collection and recovery programs available for this product.
April 30, 2007 B-5

Safety and Regulatory Information
China RoHS Environmental Protection Use Period (EPUP)
In China, this number indicates the time period (in years) within which any hazardous substances present in the product are not expected to be released such that there is risk to human health, property, or the environment. This value is assigned based on normal use of the product as described in the operating instructions.
Table of hazardous substance's name and concentration
Model Name: KODAK 605 Photo Printer
B-6 April 30, 2007

Index
Aair flow clearances, 1-2
Bbar code, ribbon, 1-6
Ccable
connecting, 1-5power, 1-1—1-2, 1-5
position of, B-1USB, 1-1
checkingpaper status, 2-3ribbon status, 2-3
cleaningcleaning rollers, 3-3
cleaning rollers, cleaning, 3-3clearances for air flow, 1-2clearing paper jam, 4-3connecting cables, 1-5contents, package, 1-1
Ddisposal, printer, B-5
EElectronics Industry Alliance, B-5EMC directive, compliance with, B-3error messages
operator panel, 4-2
Ffilter openings
blocking, B-1cleaning, 3-1
flanges, paper, 1-1, 1-8
Hhandling
paper, A-2prints, 2-1ribbon, A-2
help with your printersupport, A-3
humiditypaper and ribbon specifications, A-2printer specifications, A-1
Iinstalling
paper, 1-8—1-9ribbon, 1-6—1-7
Jjam, paper
clearing, 4-2
KKODAK Photo Print Kit, 1-6, 1-8, A-2
capacity of, A-2catalog number for, A-2contents of, A-2
KODAK Servicecontacting, 3-1—3-2, B-1
KODAK Thermal Printer Cleaning Kit, 1-1, A-3catalog number for, A-3contents, A-3
KODAK Thermal Printer Service Kit, 3-1
Llabel
paperremoving, 1-9
paper roll, 1-8ribbon, 1-7
labels, safety, B-2Loading, 1-8
I-1

Index
loadingpaper, 1-8—1-9ribbon, 1-6—1-7
Mmaintaining the printer, 3-1maintenance
cleaning rollers, 3-3KODAK Thermal Printer Cleaning Kit, A-3performing routine, 3-1
Material Safety Data Sheet, 3-1
Nnoise emission spec, B-5
Oonline user guide, 1-1, 1-10operator panel
error messages, 4-2lights, 2-2making a test print, 2-3printer settings, 2-3Ready message, 2-3, 2-4setup mode, 2-3
ordering supplies, A-2
Ppackage contents, 1-1packing material, removing, 1-3packing the printer, A-3paper
handling and storing, A-2loading, 1-8—1-9reordering, A-2specifications, A-2
paper flanges, 1-1, 1-8paper jam, clearing, 4-3paper status, checking, 2-3peel plate edge, cleaning, 3-2platen roller
cleaning, 3-1power
cable, 1-1—1-2, 1-5position of, B-1
interruption, recovering, 4-4requirements, A-1turning on, 1-7
power outlet for the printer, B-1print catcher, 1-1
cleaning, 3-1installing, 1-4
print sizes, A-1printer
cleaning, 3-1operating, 2-1packing instructions for, A-3regulatory information, B-1repacking, A-3setting up, 1-1—1-10settings, 2-2specifications, A-1transporting, A-3
printer, dimensions for, A-1printer, environmental requirements for, A-1printer, power consumption of, A-1printer, weight of, A-1printing
making prints, 2-1test print, 2-3
printshandling and storing, 2-1making, 2-1
Rradio frequency compliance, B-3Ready message, operator panel, 2-3, 2-4recycling, printer, B-5reordering supplies, A-2ribbon
bar code, 1-6handling and storing, A-2loading, 1-6—1-7, 4-2reordering, A-2replacing, 1-6specifications, A-2
ribbon status, checking, 2-3
Ssafety
compliance, B-3warning labels, B-2
location of, B-2setting up the printer, 1-1—1-10setup mode, 2-2specifications
paper and ribbon, A-2printer, A-1
storing
I-2

Index
prints, 2-1ribbon, A-2
supplies, printer, A-2supply spool, 1-6switch, power, 1-7system requirements, A-1
Ttakeup spool, 1-7temperature
paper and ribbon specifications, A-2printer specifications, A-1
test print, making, 1-10thermal print head
cleaning, 3-1, 3-2, 4-1transporting the printer, A-3trim tray, 1-1
cleaning, 3-1installing, 1-4
troubleshootingclearing paper jam, 4-3error messages, operator panel, 4-2power interruption, 4-4
Uunpacking, 1-3USB cable, 1-1
connecting, 1-5USB connector, 1-5
WWINDOWS XP, A-1
I-3
