interface - realtyserver systems inc
TRANSCRIPT

1950 Mayfair Gardens. Victoria, BC, V8P 5T41-866-216-2008 | Fax (250) 472-7298© 2008 RealtyServer Systems. All rights reserved.
INTERFACE™
User Manual

Table of Contents Opening INTERFACE™ and Logging In _______________________________________________ 3
Logging in ................................................................................................................. 3
Agent ID and Password .............................................................................................. 3
Remember my ID and Password .................................................................................. 3
Updating INTERFACE™ ............................................................................................... 4
About Firewalls .......................................................................................................... 6
INTERFACE™ Overview ___________________________________________________________ 7
INTERFACE™ Desktop ................................................................................................ 8
Searching ______________________________________________________________________ 9
Search Dialogs ........................................................................................................... 9
Count on the Fly ........................................................................................................ 10
Listing Status ............................................................................................................. 11
Minimum Match & Maximum Near Matches ................................................................... 12
The “Quick Search” Box .............................................................................................. 16
Accessing Last Search Done ........................................................................................ 18
Multiple MLS® Number Search ..................................................................................... 19
Address Search .......................................................................................................... 20
Columns _______________________________________________________________________ 21
Sorting Data by Columns ............................................................................................. 21
Arranging Column Headings ........................................................................................ 21
Adding Column(s) of Data ........................................................................................... 22
Deleting a Column(s) .................................................................................................. 23
Saving Column Arrangements ...................................................................................... 23
Saving Column Arrangements - Custom Layout ............................................................. 24
Saving Column Arrangements - Accessing Custom Layout .............................................. 24
Tagging _______________________________________________________________________ 25
Saving/Retrieving Search Results ................................................................................. 27
Save a List (Table View) ............................................................................................. 27
Open a Saved List ...................................................................................................... 27
Edit Search Content ______________________________________________________________ 28
Deleting listings from a search ..................................................................................... 28
Page 1

2 | P a g e
Combining Searches ______________________________________________________________ 29
Adding listings to a search .......................................................................................... 29
Adding Listings to a Search - Detaching List .................................................................. 29
Printing _______________________________________________________________________ 30
Tagging Specific Listings For Printing ........................................................................... 30
Printing – Print View ................................................................................................... 30
Printing from .............................................................................................................. 30
Detached Window ...................................................................................................... 30
Working with Table View __________________________________________________________ 31
Sorting Listings by Column Headings ............................................................................ 31
Switching Column Formats .......................................................................................... 31
Views ........................................................................................................................ 32
Thumbnail View ......................................................................................................... 33
Running a Hotsheet .................................................................................................... 35
Printing a Hotsheet ..................................................................................................... 35
Client or Full Detail ..................................................................................................... 36
User Information ........................................................................................................ 36
Template Tab ............................................................................................................ 36
Email _______________________________________________________________________ 37
Emailing Using Outlook or Outlook Express ................................................................... 37
Using Other Email Applications .................................................................................... 38
Layout and Statistics _____________________________________________________________ 39
Inserting an Average .................................................................................................. 39
Inserting a Median ..................................................................................................... 39
Inserting Blank Lines .................................................................................................. 39
Inserting a Heading .................................................................................................... 39
Inserting Percent Difference ........................................................................................ 39
Backing up Your Saved Items ______________________________________________________ 40
Property Type Definitions __________________________________________________________ 40
Dates and Status Definitions _______________________________________________________ 41

OPENING INTERFACE™ AND LOGGING IN
The goal of this material is to give users the fundamental knowledge required to manage day-to-day sales activities and MLS® listings. By the end of this workbook, you will understand how to search listings in a variety of ways, organize search results and deliver these results to your clients. The information contained in this document is also found in the online INTERFACE™ Tutorials.
To access the Tutorials:
1. Open INTERFACE™ 2. Click on Help > Tutorials 3. Select your topic.
Logging in
Agent ID and Password
• For REALTORS®:
To run INTERFACE™, you must log in. Your ID (also known as your “logon credentials”) is available from your Board/Association if you are unsure of it. Requiring a user ID and password identifies you to the system and allows your profile to store your preferences and access your own listings.
• For non- REALTORS®:
Non- REALTORS® code (assistants, administrators) enter Board code, a forward slash and your ID (e.g. VIREB/ATKIBI). Your password remains the same.
*NOTE: The realtor information that appears on printouts and emails comes from the membership database, matching the logon credentials used.
Remember my ID and Password When you log on, check the box beside "Remember Password" on the logon window. The next time you open Interface, you will not have to enter your credentials to identify yourself.
The User ID and Password cannot be saved on any PC that is used by more than one person.
Page 3

• Be sure to close INTERFACE™ when you are done if sharing a computer (e.g. at the office). This
will ensure that the next individual logs in with their own credentials and the correct name will appear.
• If you are working for a REALTOR®you must login with their credentials in order to have their name/contact information appear on printouts and emails.
Updating INTERFACE™
Every time INTERFACE™ starts, it automatically updates by checking the files on your computer against files on the server. Any newer or modified files will be downloaded to your computer. An Internet connection is required for the update. Note: INTERFACE™ is only updated on startup – it is not updated continuously. It is possible to run an update when you choose, by selecting File -> Update Data, or by closing and re-starting the application.
Most features work while it is updating, but MLS® data will not be up to date until the process is complete. Some features, such as the CMA, require that INTERFACE™ is up to date before they are available. If a feature is not available, a message will appear when it is launched. The Update Progress window has two tabs of information - the Update Meter and the Communication Log. If you remain on the Update Meter tab, after a few seconds the "No. of Items Remaining" will be filled in and the Update Progress will begin.
4 | P a g e

Check the box at the bottom to show this window every time INTERFACE™ starts. If you leave the box unchecked, it can be restored from the File menu.
• To restore the Update Progress window - click on File Show Update Progress.
Page 5

6 | P a g e
Note: All features are available after the MLS® Listings countdown is complete – you do not have to wait for the photos to update.
o Click the Hide button to continue working.
o Closing this window by clicking the red “X” will not stop the updating process. If you close the Update Progress window, the next download will resume where it stopped.
About Firewalls
Firewalls sometime prevent communications with the server. If your number counts do not appear after a couple of minutes, a FIREWALL may be preventing INTERFACE™ from connecting to the Internet. If the message "No socket connection" appears in the Communications Log, the firewall has prevented a connection or the service is (occasionally) unavailable. Establish a connection and/or configure your firewall to UNBLOCK/PERMIT INTERFACE™ to connect.

INTERFACE™ OVERVIEW
INTERFACE™ uses a Windows Explorer-style view, so it is comfortable and familiar, even to new users. Any action can be run from the menu bar along the top; resting the cursor on any of the selections in the menu bar will open the drop down menus with secondary choices.
Some selections on the secondary menu display a black triangle to the right, indicating a third or further selection is possible.
Page 7

INTERFACE™ Desktop
The INTERFACE™ Desktop is the primary view of the system. INTERFACE™ uses standard Windows functionality with menu bars, shortcut buttons, icons and mouse commands (click, double-click, right-click, tree, etc.).
Menu Bar Quick Search Shortcut Bar
Search Results Window
Tabs
Explorer Window
The Explorer window contains four tabs:
• Data: The data tab displays the searchable types of databases down the left hand side of the desktop; the “Quick Search” box contains an icon showing the current database being searched – in this example, the MLS® database. Click the + sign (or double-click on the database name) to expand/contract the alphabetical list (the ‘tree’).
Opening the MLS® Listings tree will expand all MLS® listings by street name; ICI Listings will expand out ICI listings by street name; BC Assessment expands assessment data by street name. The icon in the “Quick Search” field changes to reflect the database selected in the “Explorer Window”.
• Layout: The layout tab contains settings and options to control the page layout for printed
documents. Any changes to the layout can be saved as the default view by clicking the checkbox.
Click ‘Restore Default Layout’ if changes made do not produced the desired result.
• Forms: The forms library used by your Board for listing and sales transactions; appropriate
forms are stored here for printing out and completion. If forms for routine business transactions are missing or new ones are introduced, contact your Board/Association to request that they be added to the library.
8 | P a g e

• Templates: clicking on a template name will automatically merge it with the data from the listings being searched, displayed and selected on the “Data” tab. All search results will be displayed in the template selected.
SEARCHING
Searching can be done several ways and by numerous classifications; search for Single Family (Detached) properties or a combination of property types such as Townhouse, Apartment Unit and Mobile Home; or search for bare land for recreational purposes. The search created will depend on the intended purpose for the resulting listings. Searches can be saved and reused repeatedly, or given names of intended clients as required – there is no limitation on the number of searches you can save.
Search Dialogs
Search dialogs facilitate retrieval of appropriate listings, by entering as much information as necessary to obtain listing data.
• Click File > New > Search > Residential.
Or • Click Search > MLS® Listings
Page 9

The Search dialog opens, with a “count” of exact matches in the title bar (top left) – this is the “count on the fly” feature that instantly tells you how many listings match the criteria entered so far. In this example, the only criteria are “Residential” and “Active”. Notice the default “Listing Status”.
Count on the Fly
When searching, the "result" changes as you select different search criteria – watch it change as you change criteria, to ensure you are getting the number of listings and that you don't end up with no listings, by entering criteria that eliminates all results.
• Click in the Current Price Minimum field. • Enter 275 and press Tab. The 3 zeros for thousands will automatically be added. • Enter 275 in the Current Price Maximum field. • The count-on-the-fly changes to show the number of listings available in that price range. • Click the “Search” button to execute the search for “Active” listings prices at $275,000; the
results will display on the desktop in Table View.
Count on the fly
10 | P a g e

Listing Status
• Click in the “Listing Status” field – the “Select Listing Status” window appears with the “Active” status selected.
• Click on “Conditional” to add it to the list of search criteria. • Click OK.
• Click in the “Property Type” field. • Select “Single Family”. • Click OK.
Page 11

Note the change in the number of exact matches on the title bar.
Minimum Match & Maximum Near Matches
INTERFACE™ can produce exact matches and find "Near Matches" - properties that don't fit exactly, but are close to it (you determine the percent match). You can also determine the maximum number of near matches you want.
• Change the Minimum Match to 90%; note any additional results.
• Change to 70% and compare results.
12 | P a g e

• Reset the Minimum Near Matches to 100%. • Click File > Save As. The “Save This Search As” dialog opens. • Name the Search “SFD 275K”. • Click Save.
• The Search is saved and the Search dialog is displayed. • Click Close. • Click “Saved Searches” in the Explorer window; any saved searches (including “SFD 275K”) are
displayed on the main desktop. • Double-click on the just-saved search (“SFD 275K”). The Search dialog is displayed. • Click Search.
Search Results: Table View
Page 13

The Search dialog is minimized in the lower left corner and the Search Results (15 listings) are displayed in Table View on the main desktop.
• Click the “Detach List” button to separate the search results window from the desktop into a “Floating Window”. A new search can be started, without deleting or losing the results from the initial search.
14 | P a g e

• Click “Attach List” to restore the search results to the main desktop.
The floating window can now be minimized or closed without affecting the results being displayed on the main desktop.
• Click File > Close Floating Windows. The desktop returns to its original state.
Page 15

• Click the “New” button in the top left corner to clear the screen and launch a new search.
The “Quick Search” Box
The Quick Search box searches by MLS® number or by Street Name – enter the criteria and press enter to get the listing (in the case of the MLS® number) or a list of streets (in the case of the Street Name). Clear any previous search results by clicking the “New” button to the left of the Quick Search box.
Type the Street Name “Abbey” in the Quick Search box. Notice that the Explorer Window expands the MLS® alphabetical list to the “AB” section, and the match is highlighted.
16 | P a g e

Press the “Enter” key; the search results display in the window on the right of the desktop. Notice that the number of results matching your search is displayed at the top of the window.
• Click the “New” button to clear the screen.
Or
• Click “Detach List” to make this list independent of the INTERFACE™ desktop. Once a list is “detached”, it can be minimized, restored, closed, or re-ordered without affecting the desktop. Multiple windows can be detached and minimized, so a new search or task can be started on the main desktop, without repeating previous work.
Page 17

Accessing Last Search Done
To open a saved search, click File > Open. Navigate to the Saved Searches folder and click Open. Your saved searches will be listed by name. Select the desired search and click Open.
18 | P a g e

Multiple MLS® Number Search
To search for multiple MLS® numbers within a range:
• Click Find By Find MLS® Listings By ML Number and type the first MLS® number in the minimum field.
• Press TAB then type in the next MLS® number (do NOT click on OK). Once all desired MLS® numbers are entered, then click OK.
• If only one MLS® listing number is known or desired, use the Quick Search box.
Page 19

Address Search
To search by address search:
• Click Find by Find MLS® Listings By Address. Note that only civic addresses can be used in this search (they must be numeric - LT 1 will not work).
• Enter the civic address; click on the Street Name button.
The “Select the Street” window opens. Start typing the street name (ie. Mam) – the search for matching names begins as you type. Select the correct FULL street name (including type) and click on OK.
The street name is entered in the “Find By” window. Click OK to run the search. The resulting listings are displayed by address, with a count of the results in the box above the “List Price” column header.
Column Headings >>>>>
20 | P a g e

COLUMNS
One of the most versatile features is the ability to "assemble" the listing data by various methods while working in Table View. In columns, you can sort by any column, rearrange, add or remove columns from the display and save the changed column arrangement for future use. The sort order of the listings in the Table View is the order they will be in when they are printed or emailed. Note: Rows can also be ordered by dragging and dropping into the desired order. This is a great feature when you want to precisely set the order of the listings, (e.g. to print a “Tour Sheet” to give to your buyer). The order of the listings on the printed page might be the desired or appropriate order to view the properties, given distances and directions between them.
Sorting Data by Columns
Ascending Sort: Click once on the column heading button. By default, columns are sorted by MLS® number; to sort by Price, click on the column heading for List Price and the listings will sort in price ascending order (lowest to highest). Descending Sort: To reverse, right click on the column heading and then click on Reverse Sort.
• Open the saved search “SFD 275K” from the previous exercise. • Note the “Count on the Fly” number of exact matches and near matches. The objective is to
demonstrate list management; if necessary reduce your price range to display no more than 24 listings.
Multi-Column Sort: To sort by two columns (i.e. you want the listings sorted by Price, and each Map Area to be sorted by List Price) click on the first column - Price and then on the second column heading – Map Area.
Arranging Column Headings
Rearrange the column headings to display the information across the screen/printout as you want. Drag and drop the column heading at the desired position. 1. Click on the column heading you want to move.
2. Drag it between the two columns where you want to place it (an inverted white triangle appears to
indicate where it will land).
3. Release the mouse button and the column will drop into place.
Page 21

Adding Column(s) of Data
By default, INTERFACE™ shows the standard "Listing" column arrangement. It is possible to add other columns of data to the table.
1. Click on the Insert Column icon (inverted white triangle)
2. A floating window will open, listing all available data columns that can be inserted.
3. Scroll through the list until you find what you want.
4. Click on the column heading you want to insert and drag it to the desired position.
5. When the white inverted triangle appears, release the mouse button.
6. The column of information will now be added.
22 | P a g e

Deleting a Column(s)
Deleting a column of information is only temporary; the next time you reset the page, do a new search, or close and open INTERFACE™, it will revert to the default (Listings) column arrangement.
1. Click on the column heading and drag the column out of the headings.
2. Release the mouse button.
3. You will be asked to confirm the deletion.
4. Click on Yes. OR
1. Right click the column heading.
2. Select Delete column.
3. Click Yes to remove the column heading.
Saving Column Arrangements
Different column arrangements may be useful for different types of searches, i.e. one for active searches, one for sold, etc. Save column arrangements as a custom layout that can be accessed when needed, or to overwrite the existing defaults. The default column layouts are those listed in the "Select Columns" drop down box. For example, "Listings" is used automatically any time a listing search is done, "Hot Sheet" is used whenever a Hot Sheet search is done.
Page 23

24 | P a g e
Saving Column Arrangements - Custom Layout
Arrange your columns as desired.
1. Click on File Save Column Arrangement. By default they will be saved in the Saved Columns Folder.
2. Give the arrangement an appropriate file name.
3. Click Save.
Saving Column Arrangements - Accessing Custom Layout
You can save column arrangements that have columns added, removed, rearranged or any combination of the three.

TAGGING
When working with a large selection of search results, select a smaller group to be managed, printed, viewed, etc. From the “Table View”, double-click on the first record of interest to open the detailed view window. In the lower left hand corner, there is a set of controls like those on a DVD or CD player, which do the corresponding actions (from left to right, First, Previous, Next, Last).
• Check the box to the right of the controls to “tag” the record – this marks it for managing in a subset with any other “tagged” records.
• Click the forward control to advance through the record, tagging a few properties as you advance.
• Click “Close” to return to “Table View”. • Note the grey background on the “tagged” records.
Page 25

These multiple selections can now be printed as a group; click the “Layout” tab in the Explorer window and select the radio button “Print Tagged Items Only”. The default view is “List Format” and all other formats are greyed out at this point.
• Click the “Print View” for a preview of the layout you have selected.
• The additional layout selections are now enabled. Click through the selections to preview the printing
results for each of the layout options. • Once you have identified your preference (if any) check the box at the bottom – Set as default layout
for this view. • If you make other changes to the view and want to quickly return to your default layout, click the
“Restore” button at the bottom of the tab.
26 | P a g e

Saving/Retrieving Search Results You can save an assembled list for future reference or modification. For example, you might want to keep a list of all the properties you have shown or plan to show a client. It is recommended to save to the default location in order to expedite opening these files later.
Save a List (Table View)
i) If you are not in Table View, Select Table View.
ii) Click on the Save button or File Save.
iii) Type in a suitable name for the list; click Save.
Open a Saved List
i) Click File Open.
ii) Double-click on Saved Lists.
iii) Double-Click on the List you want to open.
Page 27

EDIT SEARCH CONTENT EDIT SEARCH CONTENT
Listings can be removed from and added to a search. You can also combine searches using the detach window function. Listings can be removed from and added to a search. You can also combine searches using the detach window function.
Deleting listings from a search
If there is a listing (or listings) you want to remove from the search, it is easy to do. When listings are deleted, they are not deleted from the listings database, just from the on-screen display of results. Listings can be deleted one at a time or by selecting a number of listings (rows) at once. To delete selected listings:
1. Click with the right mouse button on the listing.
2. Select Delete.
3. Click Yes to confirm the deletion of tagged items.
OR
1. Click on the listing.
2. Press the Delete key on the keyboard.
3. Click Yes to confirm the deletion of tagged items.
To delete all listings EXCEPT those selected:
1. Click with the left mouse button on the listing.
2. Press the ESC key.
3. Click on Yes to confirm the deletion of all Untagged items.
4. Adding Listings to a Search - by MLS® Number or Address
28 | P a g e
Page 29
COMBINING SEARCHES
Adding listings to a search
If there is a listing (or listings) you want to add to the search: 1. Do the primary search.
2. If you have the MLS® number of the listing you want to add, type it in the Quick Search box and press enter. The listing will be added.
3. If you have the address of the listing you want to add click on Find By Find MLS® Listings by Address. Do the address search and the listing will be added.
Adding Listings to a Search - Detaching List
There may be times when two completely different searches need to be combined. 1. Input and complete the first search.
2. Click the Detach List icon.
3. The search window will detach and become a floating window.
4. Move (drag) this window out of the way or minimize it; don't close the window.
5. Click the main desktop in the background.
6. Run another search.
7. When you call up the search you will be asked if you want to clear the existing search and start a new one; click Yes.
8. Once the 2nd search is completed, click on the Attach List button in the floating window.
9. All listings in the floating window will be added to the main table view.
10. Close the floating window by clicking on the red X.
PRINTING
Tagging Specific Listings For Printing
There are several ways to "tag" listings for printing (or emailing); two of them are described below. Please note that two methods cannot be used together, the "tagging" must be done by one method or the other. Run a typical search. METHOD ONE:
1. In Table View, click on the first listing you want, holding down the CTRL key, click individually
on each listing you want to "tag" for printing. 2. Switch to Print View.
3. Select the print format you want.
4. Select Print Tagged Items Only.
5. Print - and only those tagged items will print.
METHOD TWO:
1. In Table View, double click on the first listing you want to print.
Printing – Print View
There are several options available for printing regardless of the kind of data. Normally, you’ll do your printing in Print View, because the Layouts and Templates are optimized for printing. When printing, you have a choice between Layouts and Templates to set the formatting. Layouts: are typically used for printouts involving multiple listings. Templates: some additional templates designed for a special purpose (e.g. Tour Sheets,
Appointment Lists, Feature Sheets).
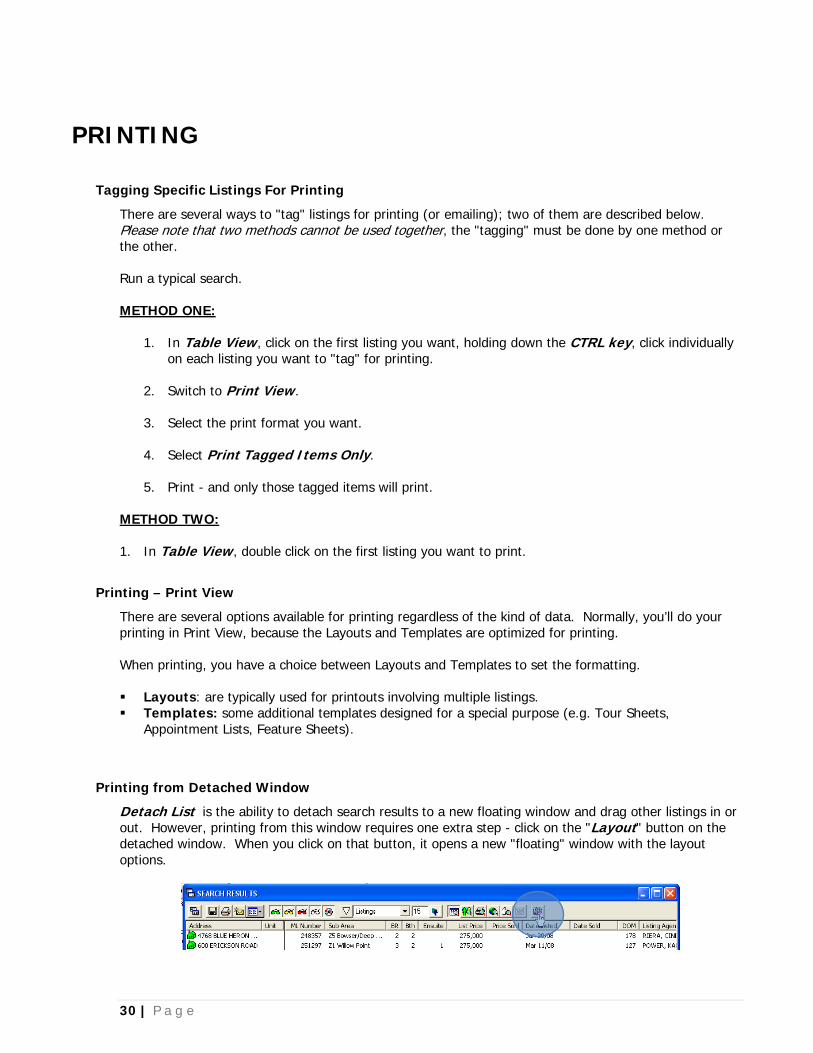
Printing from Detached Window
Detach List is the ability to detach search results to a new floating window and drag other listings in or out. However, printing from this window requires one extra step - click on the "Layout" button on the detached window. When you click on that button, it opens a new "floating" window with the layout options.
30 | P a g e
Page 31
WORKING WITH TABLE VIEW
INTERFACE™ has the ability to manipulate and sort the data in a variety of ways. Table View is the most versatile view, allowing you to sort, add headings and calculations, select specific fields (columns), and more. Therefore, being comfortable with Table View will give you the most benefit from INTERFACE™.
TIP: The order in which you sort the listings in Table View is the order in which they will print or
email. Before you go to print or email, be sure to use Table View to organize the list the way you want it to appear.
Sorting Listings by Column Headings
To sort in ascending order (A to Z or 1 to 99), click on any of the column headings, and the information will be sorted in ascending order of the information in that column.
To sort in reverse order (descending order, Z to A or 99 to 1), right-click on the column heading and select Reverse Sort.
Apply a secondary sort by clicking on a second column heading button – perhaps first by address then by price, or first by agent then by address.
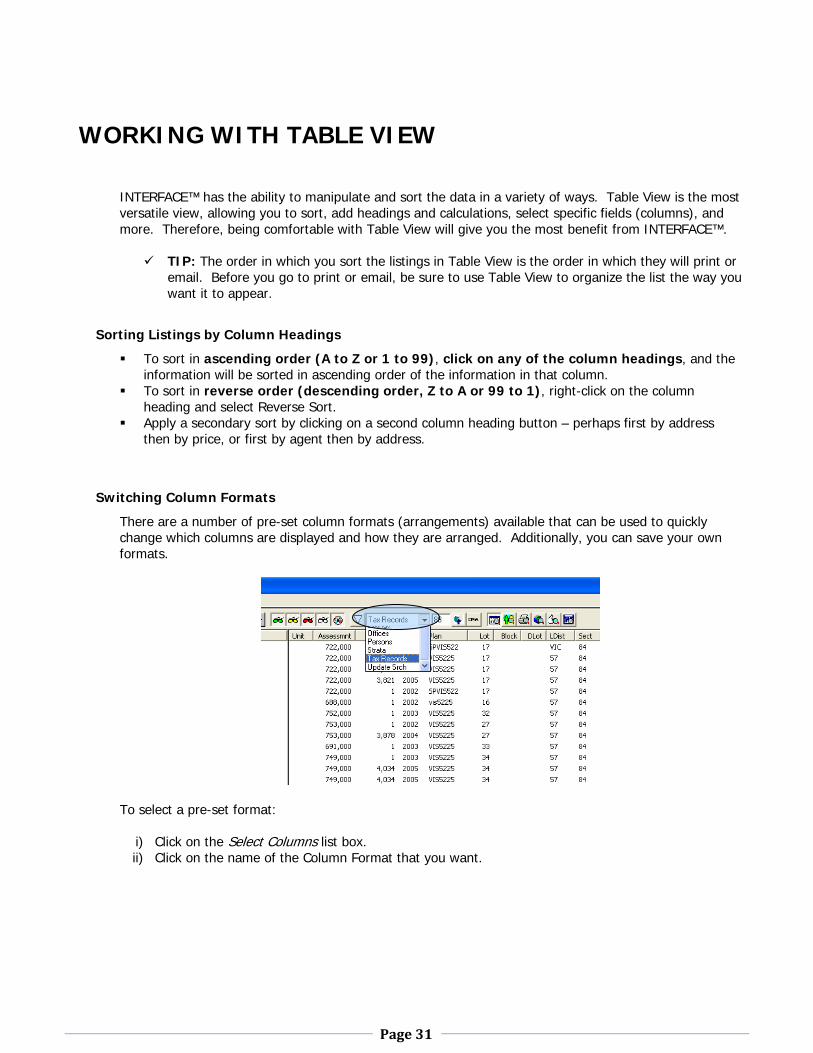
Switching Column Formats
There are a number of pre-set column formats (arrangements) available that can be used to quickly change which columns are displayed and how they are arranged. Additionally, you can save your own formats.
To select a pre-set format:
i) Click on the Select Columns list box. ii) Click on the name of the Column Format that you want.

Views
The main views are Table View, Print View and View as Web Page. The default view upon opening is
“Table View”. Other views can be selected from the drop down menu on the menu bar or the drop down box at the top of the folder list. Note that each view has a corresponding icon on the shortcut bar; selecting a different view will “press” the appropriate icon.
Table View: manage, sort and control your data - it is your "data assembly" area.
Print View: preview - there are print formats available on the Layout tab and on the Templates tab.
View as Web Page: format your information for emailing (or uploading to a web page) - there are
web formats available on the Layout tab and on the Templates tab.
Bottom Preview: view the items in a list without opening. To change to preview mode, click the button in the right main window.
Or, select the Bottom Preview mode from the drop down menu directly below the Quick
Search box.
When the preview button is selected, the preview mode is on. This will display fewer items in the list; however, it will slow the system down, so it is not recommended for constant use.
When the preview mode is on, each item is previewed by moving through the list using the up and down arrow keys. Click in the right window pane to focus before using the arrow keys.
Items in the results list can be tagged and/or selected. “Tagged” means marked as one of a group for further activity; “selected” means currently activated by clicking.
32 | P a g e

Page 33
The previewed item will have a dark background. Items that are both tagged and selected have a black background. Items that are selected but not tagged have a blue background (or your default system color if you have changed your Windows settings from blue).
Items that are tagged but not selected have a tan color (or your default system color if you have changed your Windows settings) background. Items that are not tagged or selected have a white background (or your default system color if you have changed your Windows settings from white).
tagged selected
not tagged selected
tagged not selected
not tagged not selected
Thumbnail View
Thumbnail View is useful to display just the photos and addresses for a list of properties. Pictures can be rearranged by dragging and dropping, or highlighted and deleted, like a Table View list.

HOTSHEETS It is recommended to let INTERFACE™ complete its update before pulling the Hotsheet for the day (or at the least first two lines of updating - MLS® and ICI listings). The Hotsheet dropdown menu allows you to select any date for the past 10 days; clicking on the date pops up the “Hot Sheet Configuration” box. Make the selections for the types of listings you monitor (Residential or ICI), the status changes, districts and date ranges. Entering a number in the “Days” field will change the date range automatically, counting backwards from today.
Checkthe box beside “Always Show this Configuration Box” if you wish to modify the hotsheet details each time you run it. The Hotsheet shows the following:
• New listings entered that day. • Price Changes done that day. • Solds done that day. • Listings off Market (those that are cancelled/withdrawn/expired). • Listing Back on Market (collapsed sales, listings that have been expired and then re-opened). • Districts don't include Islands
34 | P a g e

Page 35
Running a Hotsheet
i) Select Hotsheet Menu. ii) Enter the date you want the hotsheet for. (Remember that hotsheets on weekends would only
show listings that have expired). iii) Unless you have cleared the checkbox, the configuration box will come up and you can select the
information you want to include on the Hotsheet. If you have turned it off and you want to turn it back on, click on Hotsheets Always Show Configuration Box).
iv) To select additional district(s), click in the box under “District” and the list will come up. Remember that the highlighted districts are the ones selected (click to select/deselect or click on the Select All or Clear All buttons).
v) When you've selected what you want, click on OK. vi) Click on the Open Hot Sheet button.
Printing a Hotsheet
The most concise print format is the List layout, and is probably the one you want (although you can use any layout).
i) Run the Hotsheet. ii) Switch to Print View. iii) Select the Layout tab. iv) Click on List format. v) Make sure you have Print All Items selected. vi) Choose Landscape (if it is not the default). vii) Click the Print icon on the toolbar.
TIP: if you find the print size too small, review the data included in the printout and remove any
unneeded columns. Once you have it set the way you want, save the column arrangement. Overwrite the current Hotsheet format and it will become the default Hotsheet format, or give it a distinctive name to expedite identification in the future.
TIP: You can print your hotsheet using any of the available printing formats.

Client or Full Detail Client or Full Detail
This is a very important selection as it will determine some of the data that will show or not show on a printout. These items include such things as the Days on Market, Listing Salesperson, List Date, Seller Name and more. Full detail is meant for REALTORS® and Client Detail is meant for sending to clients.
This is a very important selection as it will determine some of the data that will show or not show on a printout. These items include such things as the Days on Market, Listing Salesperson, List Date, Seller Name and more. Full detail is meant for REALTORS® and Client Detail is meant for sending to clients.
User Information User Information
In INTERFACE™ you can “override” the "User Information” displayed on printouts and emails. You can, for example, add your e-mail address and webpage address by going to File Maintenance User Information. From this User Information window you can also add a second salesperson and display him/her on the printouts with the logged on user accordingly.
In INTERFACE™ you can “override” the "User Information” displayed on printouts and emails. You can, for example, add your e-mail address and webpage address by going to File Maintenance User Information. From this User Information window you can also add a second salesperson and display him/her on the printouts with the logged on user accordingly.
Template Tab Template Tab
Custom printouts can be found under the “Templates” tab (Tour Sheets, Book View, etc). The contents of the “Template” tab are controlled by the View, selected from the drop down at the top of the Explorer Window or the icons on the shortcut bar at the top right. Selecting Table View will return you to the “Data Tab”.
Custom printouts can be found under the “Templates” tab (Tour Sheets, Book View, etc). The contents of the “Template” tab are controlled by the View, selected from the drop down at the top of the Explorer Window or the icons on the shortcut bar at the top right. Selecting Table View will return you to the “Data Tab”.
To print only "tagged" listings, you must select this option from the Layout tab. Some custom templates may be stored in sub-folders.
i) Click on the Templates tab. ii) Choose the template sub-folder from the dropdown – Feature Sheets, Repeating Templates (for
printing multiple properties) or Single Templates. The contents of each folder will change accordingly.
iii) Select the desired template. The main window will display your selection. This is your Print Preview.
iv) Click the Print icon on the toolbar. The standard Windows Print Dialogue box will open up. v) Change your printer options (if desired). vi) Click OK to print.
*NOTE: If you want to print only “tagged” listings, select this on “Layout” tab, then go to “Templates” to apply your template.
36 | P a g e

EMAIL Listings can be emailed directly from search results. The properties displayed in Table View will be the contents embedded in the message. If the number of listings becomes too large to manage effectively, “tag” the desired listings (double-click to open the detail view, check the “tag” box in the lower left corner; OR from table view, hold the CTRL key and click on the desired properties).
INTERFACE™ embeds HTML code into an email – which means there are no attachments to remember (this is important, because more and more places are stripping attachments from emails) and eliminates the need to anticipate or find out what format is acceptable to the recipient and produce it accordingly.
Emailing Using Outlook or Outlook Express
i) In Table View, assemble your listings appropriately (sorting, columns).
• If you only want to email tagged items, tag them now. • Switch to View as Web Page.
ii) Select the format you want: • Go to Layout tab and select your desired layout options;
OR • Click on Template tab, choose the preferred template for this message.
*NOTE: Most of the View as Web Page Templates are designed for ONLY 1 LISTING. If there are multiple properties in your list, the template will not work or will take a long time for format the message. A warning will appear in this case, allowing you to cancel if necessary.
iii) Launch a new email (click the Email icon on the toolbar OR select File Send Email from the menu
bar). • A message window opens with listings embedded in the email, and a horizontal line is inserted
at the top to separate your personal message or introduction from the listings. • Complete your email and send your message as usual.
Page 37

38 | P a g e
One significant difference between these two email programs is that Outlook Express will not automatically insert a preset signature, nor allow the insertion of a signature from a file. Contact information must be added manually on a per-message basis (i.e. typed in each time). Or, create a signature file, save in Word or other word processing software, then copy and paste into the email when required.
Using Other Email Applications
In email software other than Outlook, you may have to use the Copy & Paste method:
i) In Table View, assemble your listings appropriately (sorting, columns). • If you only want to email tagged items, tag them now.
i) Switch to View as Web Page. ii) Select the format you want:
• Either click on Layout tab, and select your desired layout options; OR
• Click on Template tab, and click on the template you want to use.
*NOTE: Most of the View as Web Page Templates are designed for ONLY 1 LISTING. If this is the case, and there is more than one listing in your list, the template will not work.
iii) Right-click on the right hand side of the desktop displaying the listing(s) and choose Select All. iv) Right-click and select Copy. v) Start a new message. vi) In the new message body, right-click and choose Paste. vii) Finish your email and send your message as usual.

Page 39
LAYOUT AND STATISTICS
Change how the list format will look by inserting blank lines or by adding a heading line. Any numerical column can be averaged or have a median added.
Inserting an Average
1. Conduct a typical search.
2. Display the results in “Table View”.
3. From the menu bar, click on Insert Average. Any column containing numerical data (such as price, bedrooms, bathrooms, square footage) etc., will have an average added at the bottom.
Inserting a Median
1. Conduct a typical search.
2. From the menu bar, click Insert Median. Any column containing numerical data (such as price, bedrooms, bathrooms, square footage) etc., will have a median added at the bottom.
Inserting Blank Lines
1. To insert a blank line, click the listing you want the heading to be inserted above.
2. From the menu bar, select Insert Line Space.
Inserting a Heading
1. To insert a heading line, click on the listing you want the heading to be inserted above.
2. From the menu bar, select Insert Heading.
3. Type in the heading name.
Inserting Percent Difference
This function compares the two closest columns to the left. To use it, this column must be inserted after two columns that contain related numerical information, such as list price and sold price. The order of the two comparison columns makes a difference in the percent difference.
1. Click on the Insert Column icon.
2. Find the column heading for Percent.
3. Drag into position after the 2nd column that contains numerical data (in the example the Price Sold column).
4. The percent difference will show. In this example, the Percent column displays the value of the List Price over the Price Sold.
BACKING UP YOUR SAVED ITEMS
Anything you customize should be backed up; in the event of a power failure, hard drive failure, computer virus etc. this will help you to easily restore your system and get you working again quickly, instead of having to rebuild searches and templates, for example. Customized column arrangements will be replaced by the original default arrangements upon reinstallation of INTERFACE™. Backup the C:\Interface Saved Items folder and all its subfolders to ensure you have a copy of all your custom CMA templates, custom column arrangements, saved searches, etc.
PROPERTY TYPE DEFINITIONS
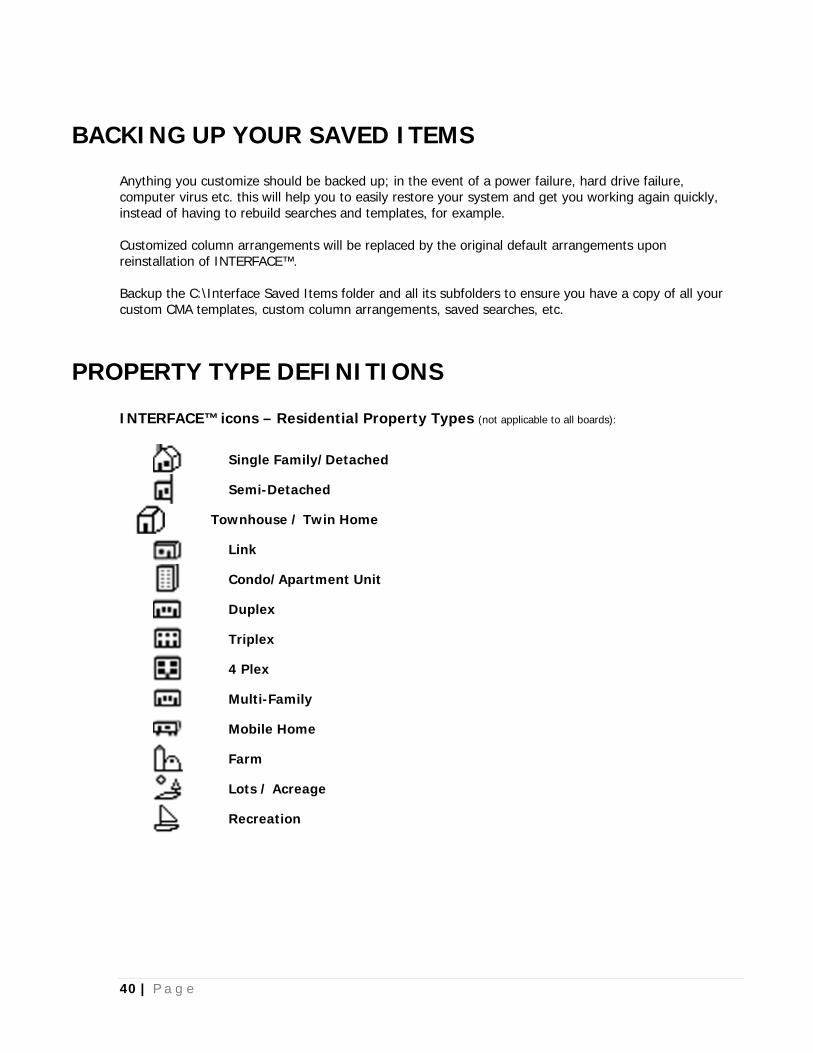
INTERFACE™ icons – Residential Property Types (not applicable to all boards):
Single Family/Detached
Semi-Detached
Townhouse / Twin Home
Link
Condo/Apartment Unit
Duplex
Triplex
4 Plex
Multi-Family
Mobile Home
Farm
Lots / Acreage
Recreation
40 | P a g e

DATES AND STATUS DEFINITIONS
Date Field Definition
The following date fields are automatically assigned by the system
Date Entered The date when the listing was put into the computer
Date Status Changed The date when the status of the listing last changed in the computer
Price Change Dates (last 2) This field applies only to price changes that occur after the cut over from your legacy system
The following date fields are entered by the end-users
Date Listed The date when the listing contact became effective
Date Expired The date when the listing is to expire (or did expire)
Sale Condition Removal Date The date when the condition on the sale of another property is to be removed
Final Condition Removal Date The date when all conditions are to be removed
Date Unconditional / Date Sale Firm
The date when the conditions were actually removed – in the case of an unconditional offer and acceptance, the Date Unconditional will be the acceptance date of the contract.
Date Sold The expected closing date or the date the sale actually closed
Status Definition
Active (green) Currently for sale - under listing contract
Conditional (olive) Has an accepted offer with conditions (e.g. Financing, Building Inspection)
Unconditional / Firm (yellow) Has an accepted offer with all conditions removed
Sold (red) Closed
Expired (white) Past the expiry date of the listing contract without an accepted offer
Cancelled (gray) Cancelled during the term of the listing contract
Inactive (light blue) Suspended from active status - remains under listing contract
Purged (red Ø) Has been marked for deletion but not yet removed from the database
Page 41