interesting articles on windows 10
DESCRIPTION
Various articles on the new windows system.TRANSCRIPT

How to Rename Your Windows 10 Computer
There are several reasons why you would want to rename your Windows 10 computer. If you
upgraded to Windows 10 from Windows 7 or upgraded from 8.1 to Win 10, the name you had will not
change and come along during the update.
Or, if you purchase a new Windows 10 PC, the manufacturer will already have the PC named, and
you might want to name it to something more personal or something that allows you to better manage
your systems.
Whatever the reason you want to rename your computer, there is a new way to do it viaWindows 10
Settings, and the old way to do it still exists, too. Here’s a look at both ways to rename your Windows
10 computer.
Rename Windows 10 PC
Go to Settings > System > About and select the Rename PC button in the right column under PC.
Then type in the name you want to change the computer to.

Keep in mind you can’t have spaces and certain other characters, and if you try to use them, you’ll
get the error message shown below.
A restart is required to complete the naming process. After that’s done, you’ll see the name of your
PC has been changed.

Rename PC the Old Way
While Microsoft wants the new Settings menus to take over Control Panel, you can still use the old
way that you would rename it in XP, Vista, Windows 7, and Windows 8.1.
To do it, right click the Start button to bring up the hidden quick access menu and select Control
Panel.

Then find and select System. Then from the shot shown below, select Change settings under the
Computer name, domain, and workgroup section.

You can also get to this screen by right-clicking This PC and selecting Properties from the Context menu.
The System Properties screen will open with the Computer name tab already selected – click
Change.

Now type in the new name you want in the Computer name box and click OK.

A restart will be required to complete the name change, and after that, you’re all set!

Speaking of reasons to rename your computer, if you have multiple PCs and devices, you can
manage them on your Windows account page. Changing the names, and deleting old devices allows
you to keep things in order.

How to Recover Data from a Hard Drive that Won’t Boot
Andre Da Costa | September 10, 2015 in How-To
At some point or another, technology can and will fail us. For this we should regularly implement
backup strategies to protect our data. We store a lot of important information on our computers and
devices; documents, photos and videos; so losing them can be a terrible regret. Thankfully, Windows
includes a host of solutions that makes backing up your information simple. Whether it’s Backup and
Restore, System Imaging, File History, orOneDrive. In this article, we discuss a situation that can be a
tough one to overcome, what happens if your computer is not booting?
Recover Data Non-booting Hard Drive
For me, this was a reality I recently experienced. I had already backed up recently, but I had also
created new content which I didn’t want to loose either. After exhausting a number of repair options, I
could not get Windows to boot successfully. I even attempted the Refresh options. Of course, I could
try doing a custom install and salvage my data from Windows.old. Unfortunately, I was in a bind, no
working optical drive or a USB stick I could use. So I thought of the next option; putting the hard disk
in an external hard disk enclosure, connect it to a working computer and copy over my data and so
this is what I ended up doing.
Obtain an External Hard Disk Enclosure
This is the first thing you will need to have. They are quite cheap and you can use it also with an
existing hard disk as an external storage device. An enclosure is basically a housing that protects the
drive and allows you to connect it to a USB, FireWire, or eSATA port. You can pick up an enclosure
for between $20 to $50 on Amazon. They are available in 3.5-inch (standard desktop) or 2.5-inch
(notebook) sizes. Make sure you pick the proper internal interface—IDE/ATA or SATA, based on the
type of drive you are using.

Uninstall Non-booting Hard Drive
You will need to remove the hard disk from the system unit in order to install it in the external
enclosure. The process will vary depending on the build, model and form factor. Consult the
manufacturers documentation that came with your computer or check the manufacturers website.
Some are easy and simply require pressing a latch mechanism to release the hard disk from its drive
bay.
Other configurations might require removing a mounting mechanism especially if it is a 2.5 inch drive.
Be prepared to have essential tools such as a Torx 5 point screw driver and or flat head screw driver.
If you plan on building your own computers or doing these type of repairs often…get yourself a
decent set of tools in a computer repair kit.
This particular configuration uses a 2.5 inch drive on a 3.5 inch mount. You will also notice the green
latch mechanism for releasing the drive from its basy.

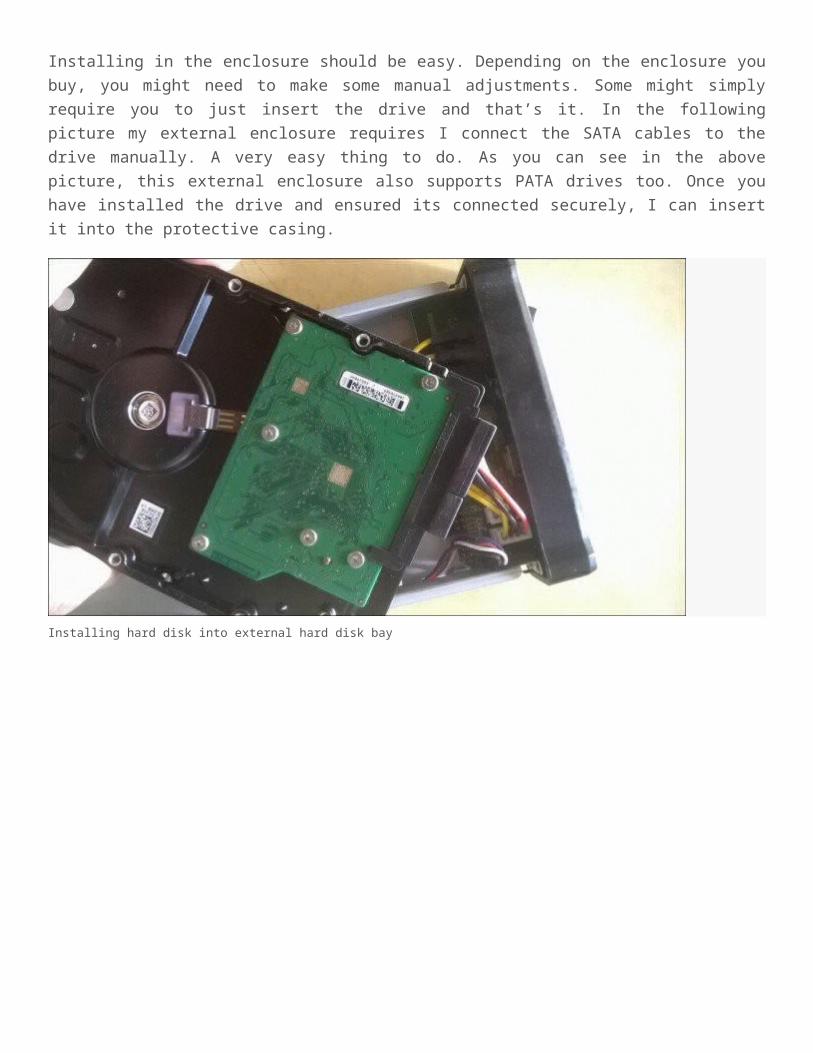
Install Hard Drive in External Enclosure
Installing in the enclosure should be easy. Depending on the enclosure you buy, you might need to
make some manual adjustments. Some might simply require you to just insert the drive and that’s it.
In the following picture my external enclosure requires I connect the SATA cables to the drive
manually. A very easy thing to do. As you can see in the above picture, this external enclosure also
supports PATA drives too. Once you have installed the drive and ensured its connected securely, I
can insert it into the protective casing.
Installing hard disk into external hard disk bay
Installing drive into protective enclosure
Connect USB and Power Cables
The next step is to connect the drive to your computer. There is nothing to it, since this experience
will be just like connecting a regular external hard drive. Once the drive is turned on, Windows will
automatically detect the drive and install it. You’ll either be prompted to browse for it, or you
can access it from File Explorer.

Recovering the Data
Now we would expect to just browse the hard drive and copy over our data. Because the installation
that exists on the drive is still protecting the folders with your data, you’ll get an error message if you
try open and browse the folder. If you are unable to open this folder after clicking Continue, review
our article for instructions about taking ownership of a folder.
Now you can browse the User folder and proceed to copy over your data. Here I am Preparing to
copy over data from the external hard drive to my local hard drive.
When you are sure you have recovered your data from the hard drive, you can format and repartition
the drive if you wish. Remember to browse the common locations where data is stored such as your

User folder C:\Users and C:\Users\Public. Also, if you have unstructured information such as Sticky
Notes, you can find those in:C:\Users\YourAccountName\AppData\Roaming\Microsoft\Sticky Notes,
copy the file StickyNotes.snt into its respective directory. This drive in particular had experienced one
too many power outages resulting in corrupt installation of Windows.
How to Upgrade Windows 10 Using the Easy Upgrade Feature
Andre Da Costa | September 8, 2015 in How-To
Windows 10 is available in a variety of editions that target different markets and user
needs. The three most popular editions are Windows 10 Home, Pro, and Enterprise. Most people
who purchase a new PC will often get Windows 10 Home preinstalled on it. But if you’re a business or
power user and need the unique capabilities of the Pro edition such as Remote Desktop, business
networking, Group Policy, and more. Here’s a look at using the Easy Upgrade feature which lets you
upgrade to a higher edition of Windows 10.
With the launch of Windows 10, Microsoft has made it known Windows 10 will be free to every PC or
device running a genuine version of Windows 7 or Windows 8.1. Your system will be upgraded to the
logical edition. For example, Windows 7 Home Basic or Premium will be upgraded to Windows 10
Home. But you might want or need some of the richer capabilities available in the Pro version. For
this, you will need to purchase the Windows 10 Pro Pack which will include a product key so you can
unlock the Pro edition.
There’s also good news for users who have Home Use rights through an employer’s volume license
program. Volume license is a convenient way for large businesses to purchase Windows licenses in
bulk and deploy it to many computers an organization. Volume license also includes flexible options
that allows an organization’s employees to upgrade their personal devices to the organization’s
licensed edition of Windows.
So for example, if your company is running Windows 10 Enterprise edition and you are running
Windows 10 Home on your personal laptop, you can easily upgrade. This is important for ease of
use, management and support rights that guarantees all systems are standardized and are protected
using the benefits that are available with that particular edition.
For the purposes of this article, I will be upgrading Windows 10 Pro to Windows 10 Enterprise. Of
course, the same procedures apply if you want to upgrade Windows 10 Home to Windows 10 Pro
using either a retail Windows 10 Pro license or Pro Pack key.
Purchase Windows 10 Pro Pack upgrade from within Windows 10 Home
Go to Settings > Update & Security > Activation > Store $99.00 USD.

Please note, Easy Upgrade will preserve your personal files, applications and settings, it simply
unlocks the edition, the process is quite similar to the Windows Anytime Upgrade in Windows 7.
Once you have your Windows 10 key ready select System.
Select About then Change product key or upgrade your edition of Windows.

Click Yes if User Account Control comes up.

Enter your product key for the edition you are upgrading to, whether it is Pro or Enterprise and wait
while the product key verified.

Click all open applications are closed and your work is saved and start the upgrade. Wait while the
upgrade process kicks off, and computer will be restarted several times throughout this process.

The amount of time the upgrade takes will vary between systems. But in my experience, it only took 5
to 10 minutes.

That’s it! Close out of the upgrade complete verification screen and start using your new edition of
Windows.

Windows 10 Tip: Manage Files and Folders with File Explorer
Andre Da Costa | September 9, 2015 in How-To
When using your Windows 10 system to create information. Over time, we accumulate a lot of files
that are stored on our hard disk. A critical part of how Windows 10 (and Windows in general) does
this is by using a File System that manages how files are stored and accessed on your computer. The
part you and I see, when we interact with the files we create on our computers, such as documents,
audio files, pictures, and videos is the File Manager. In the case of Windows it’s File Explorer. Over
the years, this essential part of the Windows experience has evolved from its roots as File Manager in
early releases, then Windows Explorer, and now called File Explorer which was first introduced in
Windows 8.
Since a lot of you are coming from Windows 7 and skipped Windows 8.x completely, we thought
you’d like to take a look at using File Explorer in Windows 10.
Using File Explorer in Windows 10
To see whats stored on your computer click the File Explorer icon located on your Taskbar or
click Start > File Explorer.

When you launch File Explorer in Windows 10, you are presented within the Quick accesswindow.
Formally called Favorites in previous versions of Windows; here you will see your most frequently
accessed folders and files you created.

File Explorer is used for a variety of tasks, in addition to management and organization of files and
folders, it’s also used to view and manage the resources of your computer such as internal, attached
storage, and optical drives.
Quick Access Toolbar
Here you can pin your most frequently accessed commands. Quick Access also automatically pins your most frequently accessed folders.
Ribbon Toolbar
If you are familiar with Microsoft Office or apps such as Paint and WordPad, the Ribbon toolbar command is used to manage your files and reveals often hidden commands quickly. When you select a file or folder, this will display a contextual tab with additional options. You can copy, move, delete, rename and host of other task using the Ribbon.
Navigation and Address Bar
You can use these to easily navigate through a folder hirarchy or back and forward between folders. The Address bar also has a bread crumb menu that makes it easy to navigate to different folder path.
Quick Access Here you can find your most frequently accessed folders and you the ones you pin which is a new feature in Windows 10.
OneDrive synced folders
If you have a Microsoft Account setup with your Windows 10 PC, you can have your files stored in the online storage service and have them synced to

your computer.
This PC In previous versions of Windows, this was called Computer Explorer. Here you can view and manage your internal storage and attached storage devices including optical media.
Search Use the search command to find files stored with the current folder.
Status bar Displays information about the contents stored in the window, such the amount of files, size, file selection and quick access to folder layout.
If you would rather see your computer environment now called This PC, click it in the left pane, or you
can change it to the default from the Folder Options dialogue. To do so, click the View tab on the
Ribbon and click Options under Show/Hide group.

Click in the Open File Explorer to: list box and select This PC then click Apply and OK.
If you don’t like to see your most frequently access folders and recently access files, you can adjust
those settings from the same dialog. Under Privacy, uncheck the following:
Show recently used files in Quick access. Show frequently used folders folders in Quick access
Or you can choose to clear all traces by clicking the Clear button.

User Folder
In Windows 7 and earlier versions, you had a User folder directory which was used to store and
organize your files in folders by content, such as Documents, Audio files, Pictures, Videos and other
types of data. Some of these folders can still be accessed from This PC. Other folders that might be
part of your User Folder created by third-party applications can be accessed from within your user
directory from the Bread Crumb menu.
To do that, click the arrow within the address bar (see above) and click you user folder represented
by your account name. Or, press Windows key + R, then type: %userprofile% and hit Enter.

Change how Files are Displayed in Windows 10 File Explorer
You can change how your files look by using the View tab. When you activate this tab, you will see
various groups for changing the layout of the window, files, current view or hide certain things you see
on screen. Within the Layout group, click one of the available options to change how your files are
displayed on screen. You can also preview the layout before confirming by hovering one of the
available options.

File Explorer provides different ways to view your files
Go Back to a Previous Folder
If you would like to navigate to a previous folder, you can do this a couple ways efficiently using either
Recent Locations button or the Bread Crumb menu.
When you click the Recent Locations menu, you can go back to a previously working directory quickly
without going through multiple directories along the way.
The Bread Crumb menu introduced in Windows Vista provides similar capabilities, for instance, you
can easily navigate to a folder with a folder path. So, if there are sub folders within a folder, you can
quickly jump to any folder within that path.
Tip: You can also use the Backspace key to also go back one step too.
Organizing Files and Folders
If you have a lot of files on your Windows 10 system computer, you’ll want to organize them. So if you
need to see recent files created or older files or you need to archive certain files elsewhere, you can

easily do so. The View tab provides options for sorting how files are displayed. Here, I have chosen to
sort my files by type. When I select this view, I can see all my Microsoft Word documents and Excel
workbooks.
Copy, Pasting a File or Folder
One of the most common operations for users is copying which creates a replica of an original file. To
copy a file, select the file you want to copy and click Copy under the Home tab.
You can just as easily copy or move a file without leaving your current location. Under the Home tab
within the Organize group, click Copy to or Move to button and choose the location if its listed or click
the Choose Location button and select the location.

Customizing Windows 10 File Explorer
If there are folders you commonly access, you can have them pinned to the Quick Access pane.
Right-click the folder you want pinned and select Pin to Quick Access or select the folder and and
then Pin to Quick access under the Home tab.
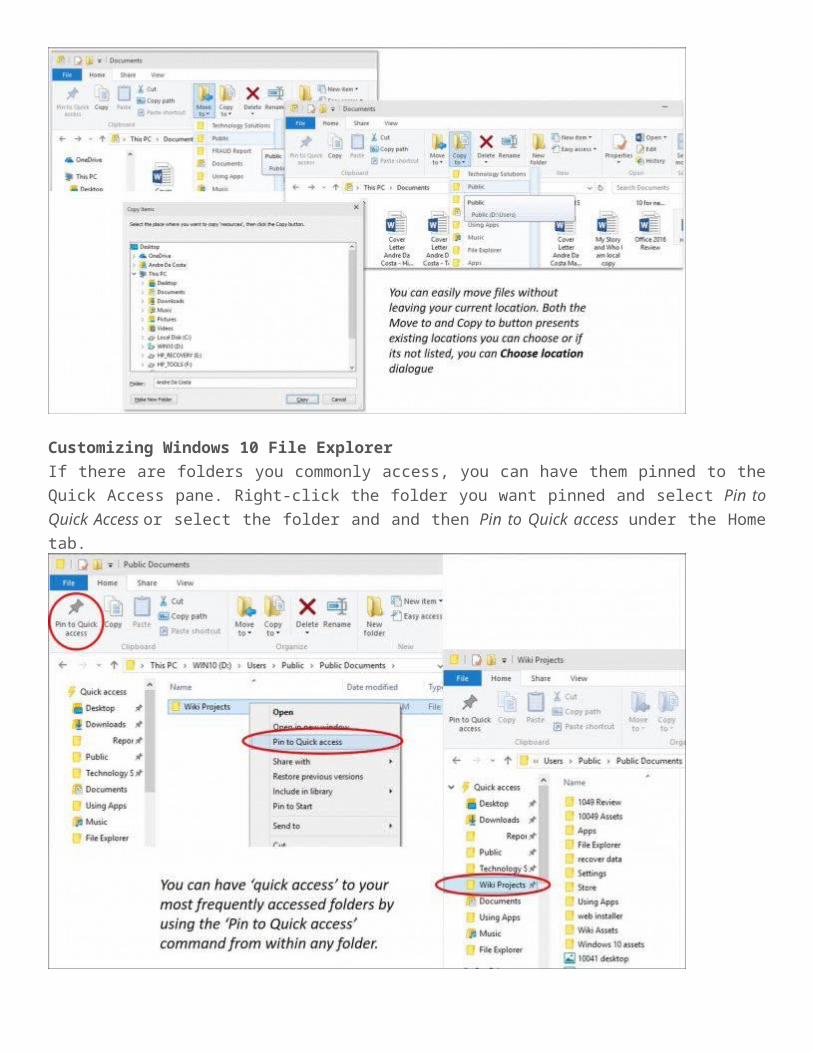
If you don’t want to always see the Ribbon in Windows 10, you can minimize it by clicking the
Minimize button or press Control + F1 on your keyboard.
As you can see, File Explorer in Windows 10 contains a wealth of tools you can use to manage your
files. The ribbon which will be new to many offers many organization tools that quickly accessible and
makes it easier to discover and find your information.
How to Add a New Adult User Account to Windows 10
Brian Burgess | September 8, 2015 in How-To
If you have a PC that other members of your household use, you’ll want to create separate user
accounts. By having separate user accounts, each user has their own files, browser favorites,
desktop, apps, and more that they can call their own.
We already showed you about adding local users in our updated article: How to Create a Local
Account in Windows 10. And here we’ll take a look at adding a new user with their Microsoft
account and using the new cloud based Family Settings feature.
Add an Adult to Windows 10 PC
To start head to Settings > Accounts > Your Account > Family & other users. Under the Other users
section, select Add someone else to this PC.

On the following screen select Add an Adult, type in their Microsoft account email (@outlook, @live,
@hotmail, @msn) and click Next.
Of course, if the person doesn’t have a Microsoft account email yet, you’ll need to create one.

Verify you want to add the user, and a confirmation email will be sent to the person you’re adding.
Here’s a look at the email the new user will receive, they just need to accept it. Then after that they
will need to sign in with their Microsoft account.

By default, they will be added as a Standard user, but you can change it to Administrator — handy if
you’re creating an account for your significant other and managing a family.
Adding a Child as a User in Windows 10
If you add a child as a user, you’ll have the option to monitor the following activities:
Recent activity allows you to turn on activity reporting for your child so that you can see what they’ve been searching for online. Once you’ve turned it on, you can see what websites they’ve been visiting, what apps and games they’ve been downloading and playing, and how much time they’ve been spending on their devices right from the Recent activity page. You can also get activity reports emailed to adults in the family weekly.

Websites is where you can turn on website restrictions for your child. You can choose to block or allow specific sites and to restrict websites rated beyond a certain age. If you have very young children, you can also choose to only allow them to visit websites you’ve decided are safe.
Apps & games is where you can turn on restrictions for apps and games. You can choose to only allow you child to download games below a certain age rating and you can see the apps and games that you’ve blocked or allowed.
Screen time allows you to set limits as to when during the day your child can be on their Windows devices and the maximum amount of time they can spend on each device per day.
For more on managing your child’s PC activities via family settings , read our article: How to Setup
and Use Family Safety in Windows 10.
Windows 10 Tip: Understanding Universal Apps and Menus
Andre Da Costa | September 7, 2015 in How-To
Windows 10 includes a plethora of applications to get you up and running immediately. Windows 10
includes two types of applications — Windows apps and Windows Universal apps. A Windows app is
your standard Windows application normally desktop oriented in design, like Notepad and Microsoft
Paint. If you’ve been using Windows for many years, these are some of the common applications you
interact with when using a Windows based PC normally with a keyboard and mouse. The Universal
apps, (called Metro or Modern apps in Windows 8.x), are new and provide a lot of benefits.
Universal Windows 10 Apps and Menus
Universal Windows Apps (UWAs) present some differences from your standard Windows
applications. These new conventions are critical to getting the most out of using these new kind of
applications. Windows 10 in particular includes critical interface elements to make navigating and
managing these applications on screen easy on the desktop with floating windows, and also easy to
use on touchscreen devices.

Split View with the Hamburger Menu
If you have been using a smartphone or tablet on a modern mobile OS, you should already be
familiar with the so-called hamburger menu (three horizontal lines) in many popular apps such as
Facebook. This menu provides more settings, and is generally replacing the ellipsis menu (…) — the
three dots.
The Split View menu provides quick access to popular app functions without cluttering the interface.
They are what you would describe as the new drop down menu. So, if you are looking for a function,
this is the first place you should look. The shot below is an example of the new Calculator UWA that
uses Split View. In addition to replacing the older standard Calculator Windows App, the new
Calculator is optimized for touch just as well as it works with keyboard and mouse. Unlike the old
calculator, you can resize it on-the-fly, too.

Split View is a function commonly associated with mobile apps that have made the jump to the desktop
Not all Universal apps feature the Split View menu. Microsoft Edge, the next generation web browser
included with Windows 10 you will not find a split view menu, neither will you find it in modern
versions of Microsoft Office for Windows 10. The Split View is really intended to provide access to
functionality only when needed, while keeping it out of your way when not needed. So if there is an
UWA you are using that doesn’t have it, don’t be surprised. Some UWAs will have a menu that looks
like Split View, but its not, this is called the App Command menu. This menu provides quick access to
functions such as Search, Sharing, and Settings.

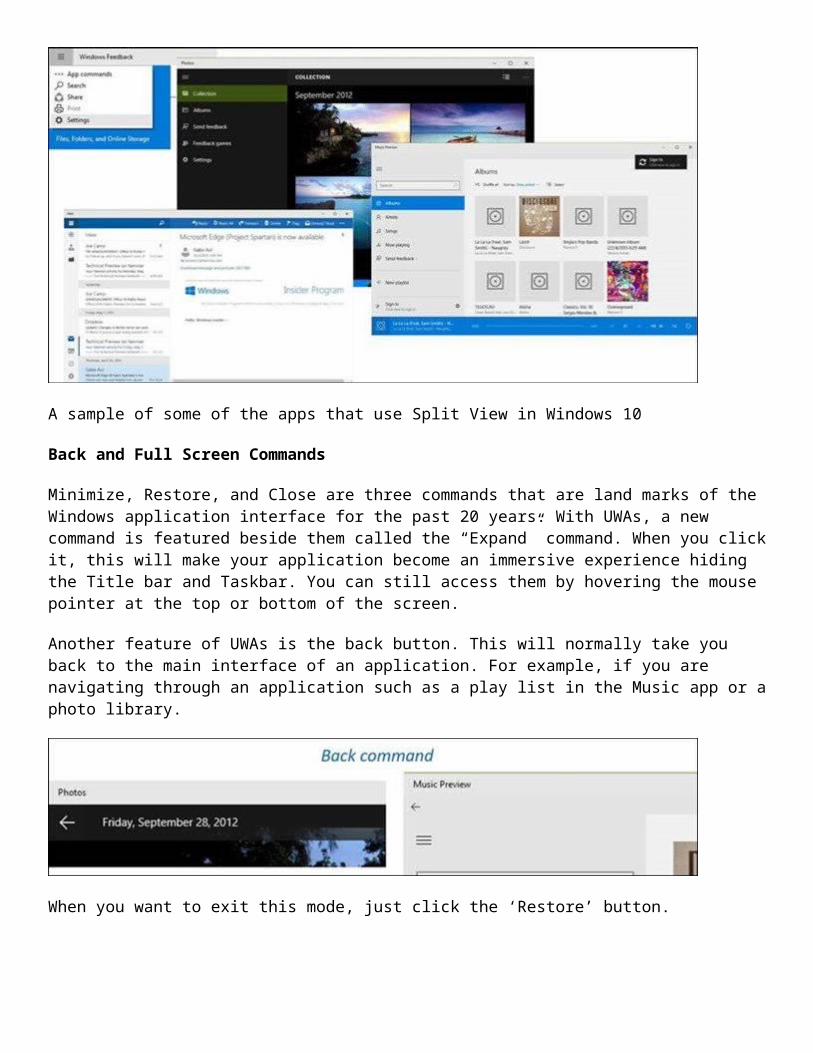
A sample of some of the apps that use Split View in Windows 10
Back and Full Screen Commands
Minimize, Restore, and Close are three commands that are land marks of the Windows application
interface for the past 20 years. With UWAs, a new command is featured beside them called the
“Expand” command. When you click it, this will make your application become an immersive
experience hiding the Title bar and Taskbar. You can still access them by hovering the mouse pointer
at the top or bottom of the screen.
Another feature of UWAs is the back button. This will normally take you back to the main interface of
an application. For example, if you are navigating through an application such as a play list in the
Music app or a photo library.
When you want to exit this mode, just click the ‘Restore’ button.

Windows 8 users who love the immersive experience of apps, can still enable full screen apps in Windows 10
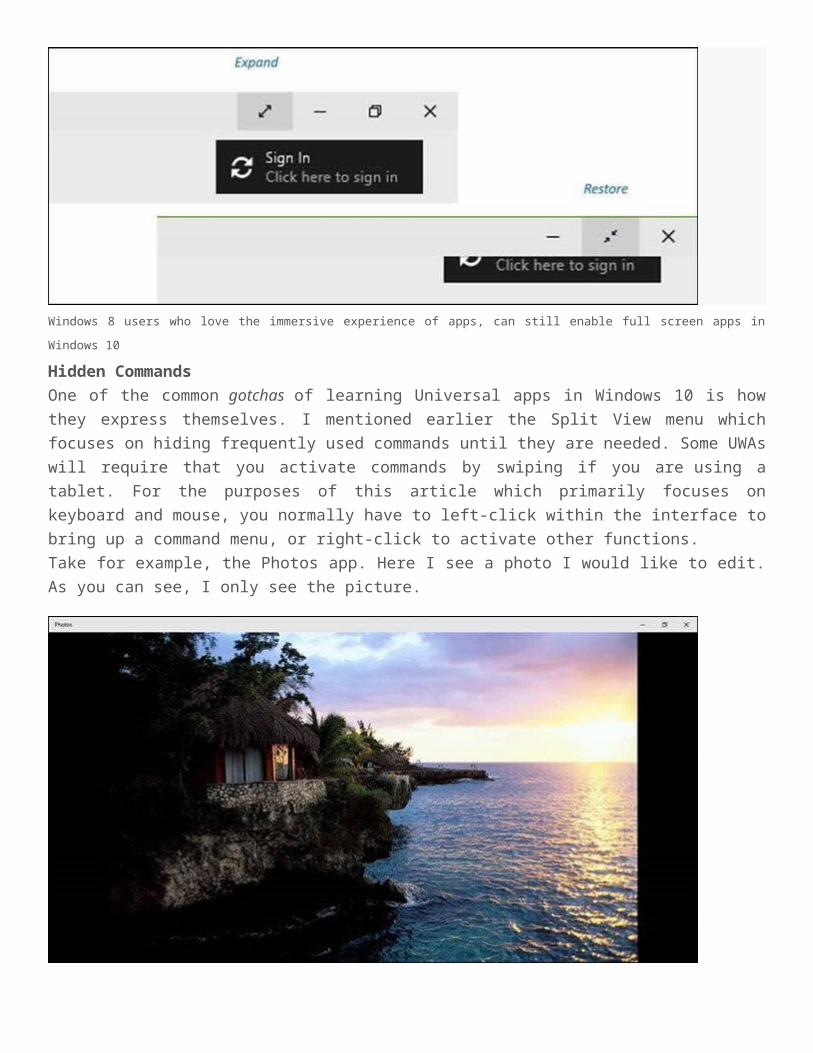
Hidden Commands
One of the common gotchas of learning Universal apps in Windows 10 is how they express
themselves. I mentioned earlier the Split View menu which focuses on hiding frequently used
commands until they are needed. Some UWAs will require that you activate commands by swiping if
you are using a tablet. For the purposes of this article which primarily focuses on keyboard and
mouse, you normally have to left-click within the interface to bring up a command menu, or right-click
to activate other functions.
Take for example, the Photos app. Here I see a photo I would like to edit. As you can see, I only see
the picture.
If I want to access tools within the app, I simply left-click and I will see a command bar appear. If I
need additional functionality, I can right-click to bring up a menu with additional functions.
Share Contract
Apps are socially designed, a lot of computing task involves sharing information these days, whether
it is a picture with friends on a social network such as Facebook or Twitter or a news article with a
colleague at work. In Universal apps, you will find the Share Contract for accomplishing such tasks.
Lets Share a Photo for example:
Click the Share symbol, and you’ll get a list of apps you can use to share. If you don’t see the Share
symbol, look for the word Share. For example, in Microsoft Edge, I can find the Share Contract under
the More Actions menu.

Universal apps do not feature the full power of desktops and probably never will. This is really the
beginning, but we are seeing progress since the days of Windows 8.x which featured a drastic
departure from the days of floating apps to now a cohesive experience. Another thing worth noting
about the UWAs is that many of them have lives tiles that you can access from the Start menu.
Universal apps have matured significantly in the past three years to the point a modern and classic
desktop app can work together in harmony while achieving productivity and delighting users. Has
your universal app usage increased since upgrading to Windows 10? If so, tell us about your
experience in the comments.
Windows 10 Tip: Manage AutoPlay Actions for External Devices
Brian Burgess | September 2, 2015 in How-To
Windows 10 makes it easy to set AutoPlay actions for external devices that you connect to your PC.
And while previous versions of Windows only allowed limited choices, Windows 10 gives you multiple
options that you can change at any time.
Control AutoPlay Options in Windows 10
Like previous versions of Windows, when you plug in a device, i.e. SD card, phone, tablet, an
AutoPlay menu appears and asks how you want Windows to handle the device. If you don’t like this
popping up all the time, you can either disable it, or set each device to do what you want every time
it’s connected.

To get to the AutoPlay options, go to Settings > Devices > AutoPlay. Or if you have “Hey Cortana”
enabled just say: “Hey Cortana. Launch AutoPlay” and it will open up.

Here you have several that let you choose what happens when you plug in your devices. But first, if
you want to just turn AutoPlay off, just flip the switch at the top to Off.
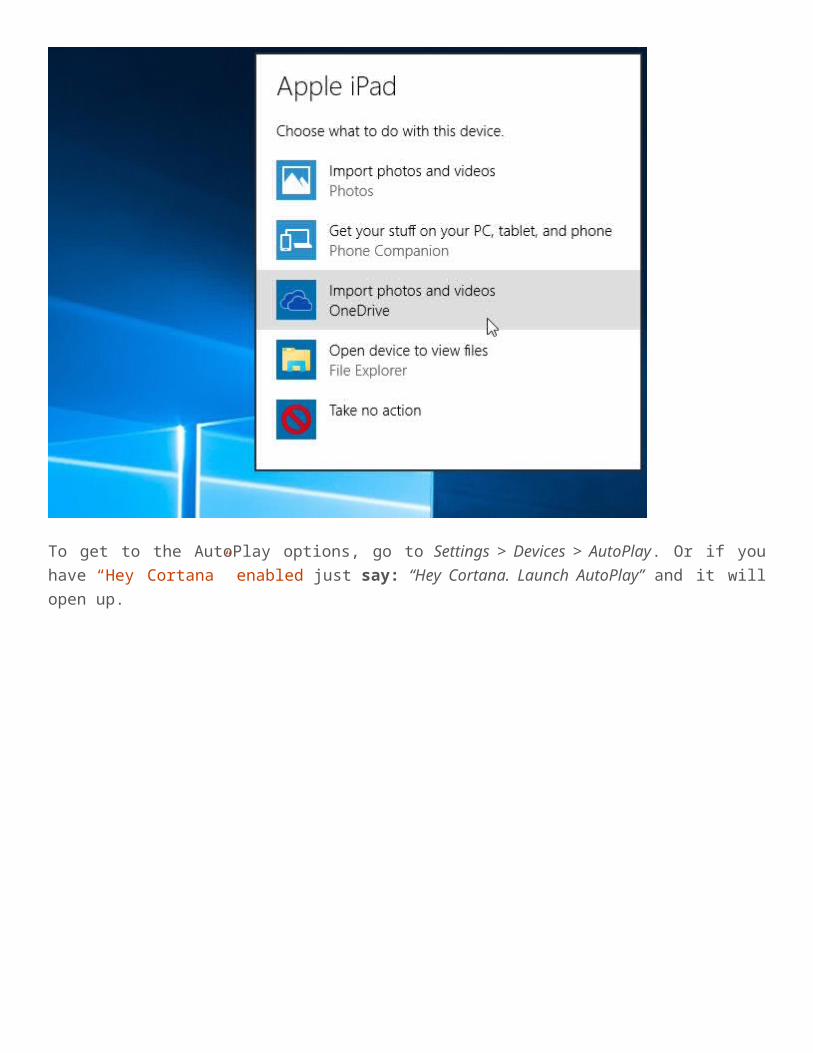
To manage what Windows 10 does with each device when you plug it in, simply select what you want
it to do with each of your listed devices. As you can see in the example below, when I select my
Windows Phone, there are several different actions to choose from. I can import photos and videos
from the phone to my local drive or OneDrive, take no action, open the content to see in File
Explorer…etc. Choose the option that works out best for you.

It’s also worth noting that you can still get to the traditional Control Panel version. That will allow you
to set what happens for media types as well as devices. It, of course, also lets you turn off AutoPlay
completely.
To launch it, just type: autoplay into the search box and hit Enter.
There you have the Control Panel version, with options that might be more familiar if you’re just
getting started with Windows 10, after upgrading from Windows 7.

If you’re not running Windows 10 yet, you can turn off AutoPlay in Windows 8, too.
Waiting to Upgrade to Windows 10? Try Microsoft’s Interactive Demo Site
Brian Burgess | August 10, 2015 in News
Microsoft launched its new OS last month, and we’ve provided you with a lot of coverage of Windows
10. But if you’re still on the fence about whether you’re going to upgrade or not, Microsoft has a cool
interactive site you need to check out.

Microsoft’s Windows 10 Demo
On the Windows 10 demo site, you can get an idea of how all of its new features work. It features
video walkthroughs, Q&As, and device specific demo’s. It allows you to get an idea of what you can
expect from Windows 10 on different devices.
Want to compare how Cortana or Microsoft Edge works on the desktop, tablet, or Windows Phone? It
just takes a couple of clicks. Select what you want to learn about from the menu on the right, and a
video will play showing you how it’s done.

Demonstration of using the Windows Store on Windows 10 for Phone
The site doesn’t provide any voice over tutorials, and doesn’t go into any deep explanations of
features, but it does allow you to get a look and feel for Windows 10 across devices.
To get a feel for what you can expect from the new OS, head to Microsoft’s Windows 10 demo site.
How to Create a Windows 10 System Image Backup
Brian Burgess | August 11, 2015 in How-To
Windows 10 offers several ways to back up and recover your data. One toolset that you might be
used to from Windows 7 is the ability to create a full system image backup. A system image can be
used to recovery files or restore your entire PC if you’re unable to boot into Windows.
It can also be used to access files in backups you might have made in Windows 7 or Windows 8.1.
Create System Image in Windows 10
To get started, right-click the Start button to bring up the hidden Quick Access menu and select
Control Panel.

Or you can have Cortana open it. Say: “Hey Cortana, open control panel.”
Once you have Control Panel open, click Backup and Restore (Windows 7).

Then click Create a system image on the left side of the menu.
Windows will scan your computer for backup devices, and you have a few different ways to create
your system image. You can use an extra internal or external drive, a network location, and you can
still go “old school” and use DVDs.

Note: Backing up to a network location like a NAS or Windows Home Server is for experienced users
and takes a bit of work. Make sure that Windows is set to discover network locations, browse to the
network share, and the first time you’ll need to enter your admin credentials. Unless you have a
network share set up, you don’t need to worry about this option.

For this example I am going to use what most people would — an external drive plugged into my PC.
After selecting your drive and everything looks right, select Start Backup and wait while the image is
created.

You’ll get a progress screen while the backup is being saved. The amount of time it takes will vary
depending on the amount of data you have as well as your hardware.

When it completes, you will get the option to create a USB recovery drive. If you haven’t created one
yet, definitely do it now so you’re prepared to recovery your computer if needed.
If you’re wondering where the image is at, go into the drive or network location your used, and look
for the folder called WindowsImageBackup.

More on Windows 10 Backup and Recovery Tools
Windows 10 has several new backup and recovery features that can come in quite handy if
something goes awry.
There’s a PC Reset feature that allows you to restore Windows 10 while keeping your files, or
even downgrade to your previous version of Windows (within the first 30 days of upgrading).
And the Advanced Recovery environment which provides tools like System Restore, System Image
Recovery, Startup Repair, Selective Startup, and a command prompt for advanced troubleshooting.
You can access Advanced Options by holding down the Shift Key and clicking Restart.
In fact we showed you that trick when we covered how to start Windows 10 in Safe Mode. You can
also access the Advanced Options environment by creating a Windows 10 USB Recovery Drive.

When it comes to file recovery and backup, In addition to making a System Image, there is File
History that can be configured to automatically back up your most important files to a separate drive
or network location. It’s much like Time Machine in Apple’s OS X, but for Windows.
Even with all of these options to backup and recovery your data or PC, there might come a time when
things are so bad (deeply embedded malware for example), or you just want a fresh start…and that’s
where grabbing the Windows 10 ISO and doing a clean install comes into play.
If you haven’t upgraded your Windows PC to Windows 10 yet, make sure you back up your data first,
and with that, you might want to create a system image. Check out the link that pertains to your
system below for a step-by-step guide:
Create a Windows 7 System Image Backup Create a Windows 8.1 System Image Backup
Windows 10: Find Apps by First Letter from Start Menu
Brian Burgess | June 25, 2015 in How-To
Windows Phone has a handy feature that lets you can search through your apps easily by selecting
the first letter of what you’re looking for. This saves you from wasting time scrolling through a long list
of apps – especially if you’re using the phone with one hand.
This feature has been brought to the Start menu in Windows 10 for PCs, too. Here’s a look at how it
works.

Search apps by first name in Windows Phone
Windows 10 Start Menu
Open the Start menu and tap or click All Apps.
That brings up the long list of apps installed on your system. To narrow down what you’re looking for,
click or tap any letter from the list.

That brings up a full menu of all the letters in the alphabet and includes symbols and numbers for the
oddball app names like 7zip. Select the letter or number of the app you’re looking for, in this case I
am using the letter M.
The result is you’re brought directly to the list of apps that start with the letter you selected.

It’s also worth noting that this type of feature is available in Windows 8.1 with the Start screen in a
different interface as you can see in the shot below, but the results are similar. It also provides a “no-
frills” view of just your desktop programs alphabetical order.
For more on that, read our article on how to find apps by first name in Windows 8.1.
The interface for the feature in Windows 8.1 is much different

One of the most anticipated features returning to Windows 10 is the Start menu. While it’s not exactly
like the Windows 7 Start menu, it’s easy to get acclimated to and it has a lot of useful features.
Check out a couple of other neat features available in the Windows 10 Start menu by clicking one of
the articles below.
Make the Windows 10 Start menu Space Efficient Remove Items from the Windows 10 Start Menu’s Most Used List
Print Only Selected Text from a Webpage in WindowsBrian Burgess | January 30, 2012 in tips
When you need to print info from a webpage, it’s annoying getting a bunch of ads and content you don’t need. If you don’t want to waste your ink and paper printing an entire page – just print what you select.
Highlight the text and / or images you want to print. Now in your browser go to File >> Print or simply use the [Ctrl][P] keyboard combination.

The Print screen comes up. Select the Printer you want to use. Then under Print Rage check Selection and click OK.
This quick tip will save you a lot of paper, time and ink when you only want to print out part of a webpage.
How to Print from Photos and Other Windows 10 AppsBrian Burgess | September 15, 2015 in How-To
A lot of computer users (and IT support) despise dealing with printers, and hope to see a completely paperless home and office one day. But until that magical day arrives, the fact remains, there are times when we still need to do it.
If you’re a new Windows 10 user and want to print from one of the new built-in Universal apps, you might not be sure what to do. Here’s a look at how to print from apps like Photos and Microsoft Edge, and a workaround to print a story from the News app.
Print from Windows 10 Photos App
When you have a photo open, select the photo you want to print, and then select the More actions (…) at the upper-right corner and select Print from the dropdown menu. Or, simply hit Ctrl+P on your keyboard.

Then you can select the printer you want to use. And, just like normally printing in Windows, you can choose other options like saving it as a PDF or send to OneNote. You’ll also have options for how you want to manage the quality of the printout.

Printing from Other Windows 10 Universal Apps
Printing from other Windows 10 Universal apps is a completely different story right now. In fact, in several of the built-in apps, the option is simply not available.
But, you can print from Microsoft Edge, either hit Ctrl+P keyboard shortcut, or select the More actions button and then Print.

But unfortunately, you cannot just print what you highlight in an article, which is a great way to save ink and paper when printing from other modern browsers. For more on that, check out our article on how to print only selected text from web pages in Windows.
If you do just want to print what you’ve highlighted from a web page, you can open the page in IE. For more on that, read our article on how to find and use Internet Explorer from Edge in Windows 10. Of course, the other option is to change your default browser. To do that, check out our guide: How to Change the Default Web Browser in Windows 10.

Work-around to Print from News app
If you don’t see any print options in other build-in Universal apps like News, you’ll need to use some type of work-around. In the News app if you find an article that you want to print out, select the Open in Browser icon at the top of the app. Then you can print from Microsoft Edge, or whatever you set your default browser to.
Say what you will about Windows 8.1 and the Charms bar, but it allows you to print from more apps than you can in Windows 10 (right now anyway).
But remember, Microsoft is treating Windows 10 as a service, and more functionality will be added on a regular basis via updates. So as the OS matures, hopefully we’ll see improvements to printing in Universal apps.
Windows 10 Tip: Understanding Universal Apps and MenusAndre Da Costa | September 7, 2015 in How-To
Windows 10 includes a plethora of applications to get you up and running immediately. Windows 10 includes two types of applications — Windows apps and Windows Universal apps. A Windows app is your standard Windows application normally desktop oriented in design, like Notepad and Microsoft Paint. If you’ve been using Windows for many years, these are some of the common applications you interact with when using a Windows based PC normally with a keyboard and mouse. The Universal apps, (called Metro or Modern apps in Windows 8.x), are new and provide a lot of benefits.
Universal Windows 10 Apps and Menus

Universal Windows Apps (UWAs) present some differences from your standard Windows applications. These new conventions are critical to getting the most out of using these new kind of applications. Windows 10 in particular includes critical interface elements to make navigating and managing these applications on screen easy on the desktop with floating windows, and also easy to use on touchscreen devices.
Split View with the Hamburger MenuIf you have been using a smartphone or tablet on a modern mobile OS, you should already be familiar with the so-called hamburger menu (three horizontal lines) in many popular apps such as Facebook. This menu provides more settings, and is generally replacing the ellipsis menu (…) — the three dots.

The Split View menu provides quick access to popular app functions without cluttering the interface. They are what you would describe as the new drop down menu. So, if you are looking for a function, this is the first place you should look. The shot below is an example of the new Calculator UWA that uses Split View. In addition to replacing the older standard Calculator Windows App, the new Calculator is optimized for touch just as well as it works with keyboard and mouse. Unlike the old calculator, you can resize it on-the-fly, too.

Split View is a function commonly associated with mobile apps that have made the jump to the desktop
Not all Universal apps feature the Split View menu. Microsoft Edge, the next generation web browser included with Windows 10 you will not find a split view menu, neither will you find it in modern versions of Microsoft Office for Windows 10. The Split View is really intended to provide access to functionality only when needed, while keeping it out of your way when not needed. So if there is an UWA you are using that doesn’t have it, don’t be surprised. Some UWAs will have a menu that looks like Split View, but its not, this is called the App Command menu. This menu provides quick access to functions such as Search, Sharing, and Settings.

A sample of some of the apps that use Split View in Windows 10
Back and Full Screen Commands
Minimize, Restore, and Close are three commands that are land marks of the Windows application interface for the past 20 years. With UWAs, a new command is featured beside them called the “Expand” command. When you click it, this will make your application become an immersive experience hiding the Title bar and Taskbar. You can still access them by hovering the mouse pointer at the top or bottom of the screen.
Another feature of UWAs is the back button. This will normally take you back to the main interface of an application. For example, if you are navigating through an application such as a play list in the Music app or a photo library.
When you want to exit this mode, just click the ‘Restore’ button.
Windows 8 users who love the immersive experience of apps, can still enable full screen apps in Windows 10
Hidden Commands
One of the common gotchas of learning Universal apps in Windows 10 is how they express themselves. I mentioned earlier the Split View menu which focuses on hiding frequently used commands until they are needed. Some UWAs will require that you activate commands by swiping if you are using a tablet. For the purposes of this article which primarily focuses on keyboard and mouse, you normally have to left-click within the interface to bring up a command menu, or right-click to activate other functions.
Take for example, the Photos app. Here I see a photo I would like to edit. As you can see, I only see the picture.

If I want to access tools within the app, I simply left-click and I will see a command bar appear. If I need additional functionality, I can right-click to bring up a menu with additional functions.
Share Contract
Apps are socially designed, a lot of computing task involves sharing information these days, whether it is a picture with friends on a social network such as Facebook or Twitter or a news article with a colleague at work. In Universal apps, you will find the Share Contract for accomplishing such tasks. Lets Share a Photo for example:

Click the Share symbol, and you’ll get a list of apps you can use to share. If you don’t see the Share symbol, look for the word Share. For example, in Microsoft Edge, I can find the Share Contract under the More Actions menu.
Universal apps do not feature the full power of desktops and probably never will. This is really the beginning, but we are seeing progress since the days of Windows 8.x which featured a drastic departure from the days of floating apps to now a cohesive experience. Another thing worth noting about the UWAs is that many of them have lives tiles that you can access from the Start menu.
Universal apps have matured significantly in the past three years to the point a modern and classic desktop app can work together in harmony while achieving productivity and delighting users. Has your universal app usage increased since upgrading to Windows 10? If so, tell us about your experience in the comments.
Windows 10 Tip: Find and Use Internet Explorer When NeededBrian Burgess | August 10, 2015 in How-To
Microsoft introduced a cleaner and faster browser in Windows 10. The new browser called Microsoft Edge is much faster and more intuitive than any previous version of Internet Explorer.
Microsoft is obviously distancing itself from Internet Explorer in Windows 10. It’s not out in plain view for easy access anymore. By default there is no IE icon on the taskbar or desktop, no live tile in the Start menu, and it’s not even listed under “All Apps” in the Start menu.
There may be times when a page doesn’t load correctly, and you have to open it in Internet Explorer, or perhaps you have proprietary software that requires it to run.
If you really need it, here’s hot to find it and Microsoft Edge has an easy way to open a web page that requires IE.
Find and Use Internet Explorer in Windows 10
To find it, just type: internet explorer in the Cortana search box and hit Enter or select it from the results at the top.
If you find you’ll be needing IE more often than on special occasions, right-click on it and select Pin to Start or Pin to Taskbar for easier access.

You can also find it under the Most used section of the Start menu and pin it from there.

Using IE from Microsoft Edge
If you’re using Microsoft Edge, you might come across a site that isn’t rendering correctly, or needs IE to work properly. Getting it to open from Edge is simple.
While on the page that’s not working correctly, click the More Actions icon in the upper right corner. Then from the list select Open with Internet Explorer.

While Microsoft Edge has some interesting features that make it unique, one glaring omissions is support for addons or extensions. Microsoft says support for extensions is coming in future updates though.
In a recent interview with The Verge, Microsoft Edge program manager Drew DeBruyne said: “We’re doing a lot of work to essentially support the same APIs that Chrome does.” And he also noted that the extensions will be available in the Windows Store.
Everyone loves their favorite extensions for their web browser of choice, and until they are supported in Edge, you might want to change your default browser.
How to Change the Default Web Browser in Windows 10Brian Burgess | August 4, 2015 in unplugged

Microsoft Edge is the default web browser in Windows 10 when you upgrade, even if you had it set to Chrome or Firefox. While the Edge browser is much faster and intuitive than Internet Explorer, there are features that are missing. Namely the ability to use popular addons or extensions that are available in other browsers like Chrome or Firefox.
So you might want to make your default browser something else until we get those abilities in Edge in future updates. It’s actually a lot easier than Mozilla’s CEO Chris Beard wants users to think in his recent open letter to Microsoft CEO Satya Nadella.
In regard to changing your browser back to Firefox, Beard writes:
It now takes more than twice the number of mouse clicks, scrolling through content and some technical sophistication for people to reassert the choices they had previously made in earlier versions of Windows. It’s confusing, hard to navigate and easy to get lost.
That’s a pretty strong statement, and insults the intelligence of Windows users. In fact, you could say he’s insulting his own customers who want to use Firefox in Windows 10.
So, without further ado, here’s a look at changing your default browser after an upgrade to Windows 10.
Change Windows 10 Default Web Browser
In the search field type: default browser and hit Enter. Or just click Choose a default browser from the top of the search results.

That brings you directly to Settings > System > Default apps and the Web browser option is already highlighted. As you can see, Edge is currently set as the default.

To change it click on Microsoft Edge and a menu of different browsers you have installed on your PC pops up. Choose the one you want, close out of the screen, and you’re done!

Moving forward, any time you click any links in your email or other apps, your browser of choice opens up — not Edge.
I hope you didn’t get lost or confused by that.

A Few More Thoughts
The steps outlined above are mainly aimed at those of you who upgraded Windows 7 to Windows 10 or those who upgraded Windows 8.1 to 10. If you do a clean install of Windows 10, you’ll need to download your browser(s) of choice again. And, the first time you run Firefox, it asks if you want to make your default – just like it has always done.

And interestingly enough, the first time I launched Google Chrome, it displays a video that shows you exactly how to make it your default browser (again, same steps as above). If you’re curious, you can see the full video here.

It should be no surprise that Microsoft is going to change your default web browser to its own during the upgrade process. Microsoft wants to show you what it has to offer, and it wants you to use it. But changing it back to whatever you prefer is a simple affair.
Instead of going off on a rant about it being a step backwards and insulting users, Mozilla’s CEO should do something similar to what Google does, or have a landing page with the instructions I outlined above.
Windows 10 Tip: Pin Websites from Edge Browser to Start MenuBrian Burgess | July 22, 2015 in How-To
Microsoft is bringing a new web browser called Edge in with Windows 10. It’s lighter, clean, and much faster than Internet Explorer. And one of the cool things you can do is pin your favorite sites to the Start menu.
This feature was also available in Windows 8.1 using the modern version of Internet Explorer. But now the modern vs desktop IE debacle is gone, and the entire process is simplified with only one browser.

Pin Favorites from Edge to Start Menu in Windows 10
Launch the new Edge browser and navigate to the website you want to pin to the Start Menu (this only works with Microsoft’s Edge browser). Then select the more options button and select Pin to Start from the menu.
When you open the Start menu, you’ll need to scroll to the bottom of your live tiles to find the site. It will appear with the website’s logo and you can drag and drop them to move them in a group, and can resize them with a right-click and selecting the size.

Depending on the site, the size and actions of the live tile will vary. It depends on how the site’s administrator has things set up. For example, when I pin CNN and ESPN to the Start menu, the tiles are live and rotate with different headlines and they work like a web app.
Another thing you’ll notice is the size you want to make the tile varies too. In the example below I have ESPN and CNET set to large, and CNN set to wide. Generic tiles can only be small or medium.

If you want to turn the live tile effect off, just right-click on it and select Turn live tile off and it will just display the site logo.
As website administrators get used to Microsoft Edge over the proceeding months, we should start to see more consistency and live tiles among more sites.

Connect Windows 10 to Wired, Wireless and P2P NetworksAndre Da Costa | September 17, 2015 in How-To
One of the many activities we use computers for is accessing and consuming information. Whether that is on the Internet or local networks such as an Intranet. In this article we take a look at the many options for connecting to Networks, whether it is a peer to peer network, a wireless network or a business network.
Connecting to Networks in Windows 10
Connecting to the Internet: Wireless & Ethernet
There are many ways to connect to the Internet. Using a wireless network is one of the common ways. And most Wi-Fi networks are secured, meaning, you need to have a password in order to join. While some might be open (Are much less secure) and allow anyone to connect to them (like at a Coffee Shop). For secured networks you’ll need to contact the Network Admin, or at a coffee shop or hotel, the person at the desk will give you a password.
A secure network can be easily identified by a shield emblem on the wireless signal which is also used to indicate its strength. The stronger the signal identified by brighter radio wave bars, the better, less bars mean a

weaker signal. Once you identify a network you can connect to, just select Connect, and enter a password if needed.
Note: Before connecting, make sure your wireless adapter is turned on. This is normally represented by a radio icon. Some computers will require a keyboard command normally the function key and an embedded key to enable it, or a simple dedicated wireless button.

Windows 10 networking status icons, and what they mean
Manage Networks
Depending on the type of network you are connecting to, you might want to manage it. For instance, if you are connecting to mobile broadband, such as a cellular connection shared as a Wi-Fi, you might want to set it as Metered. Setting as Metered will ensure that an allotted data plan is not used up immediately. For instance, some network carriers will allot a certain amount of data per month, 2, 3 or 5 GBs. If you are not careful you can use it up in no time. Setting it as Metered will let Windows 10 disable downloading Windows Updates or app updates which can be quite large. To do that, click Start > Settings > Network & Internet > Wi-Fi > Advanced Options > enable the Set as Metered connection on/off switch.

You should also control which background apps have access to data, this I discovered can also considerably use up your data. Windows 10 by default runs a lot of apps in the background that sip data, especially notifications used by Action Center. Click Start > Settings > Privacy > Background Apps. Turn off any app you don’t want running in the background. This will reduce data usage considerably. For more about that, make sure to read our article: How to Limit Windows 10 Data Over a Metered Connection.
Peer to Peer (P2P) Networks
If you want to setup a P2P network between two or more machines, Windows 10 makes it easy. Setting up a P2P network makes it possible to share data with other PCs, or even a printer via the Internet. In this case, I am using a CAT5 (Ethernet) connection between two computers. To ensure both machines can see each other, all you need to do is ensure both machines are in the same Workgroup. To do that:
Press Windows key+X to bring up the hidden quick access menu, and select System then the Change button. Enter your workgroup name. Repeat the same step on all the computers you intend to network together. Restart when prompted. Make sure both machines are connected.

Launch File Explorer on the Taskbar and click Network. You should see the other computer(s) appear in Network Explorer. If not, you’ll be prompted to Turn on network discovery and file sharing. Depending on the type of network you are connected to, click the appropriate option. Press F5 on your keyboard or the refresh button in the Address bar for the window to populate with available computers and resources.

To access resources on another computer, simply double-click it. You might be prompted to enter credentials to access the resources of that computer.
Once you have authenticated, you should see all the resources available on that computer. In this case, I have a shared folder called Documents available which I can browse.

Connecting to a Business Network: Domains
A Domain based network provides centralized administration of an entire network from a single computer called a server. Domains provide single user log on from any networked computer within the network perimeter. Users are able to access resources for which they have appropriate permission. For more, read our article: How to Join a Windows 10 PC to a Domain.
Check out the next page for Troubleshooting Windows 10 Networking Issues
Windows 10 Tip: Use Cortana with Microsoft EdgeBrian Burgess | September 17, 2015 in How-To

Windows 10 includes its new Cortana digital assistant on the PC as well as phone. In fact, Cortana originally launched with Windows Phone and migrated to the PC OS. And the Microsoft Edge browser, while still a work in progress, is gaining new features on a regular basis. Here we’ll look at a couple that have recently been added.
But Microsoft is bringing a big update, code named: Threshold 2 to the Windows 10. Previously it was slated for an October release, but lately it’s looking more and more like it will happen in November.
Windows Insiders are slowly getting updated preview builds of Threshold 2. For example, in August Microsoft rolled out Preview Build 10532 which is the latest build at the time of this writing.
But I digress, here’s a look at some cool things you can do with Cortana and the Microsoft Edge browser now.
Windows 10: Ask Cortana in Microsoft Edge
One of the cool features is the ability to look up items in web pages – all without leaving the page. For example, if you find a word or phrase you’d like to know more about, simply highlight it, and select Ask Cortana.
That brings up a pane on the right that will the results (powered by Bing) of what you’re looking for. Like in this example where it pulled up details from Wikipedia.

Here’s another example of using Ask Cortana to find more information about the US Geological Survey.

It handles things like definitions, places, celebs and other famous people fairly well. It doesn’t just display results from Wikipedia or give you word definitions either. It’s like doing a full Bing search and it gives you photos, maps, and more. If you’re looking for something more in-depth, you still get results, but need to go to that page to find out more. I would like to see the results stay in the right-pane…future update maybe?
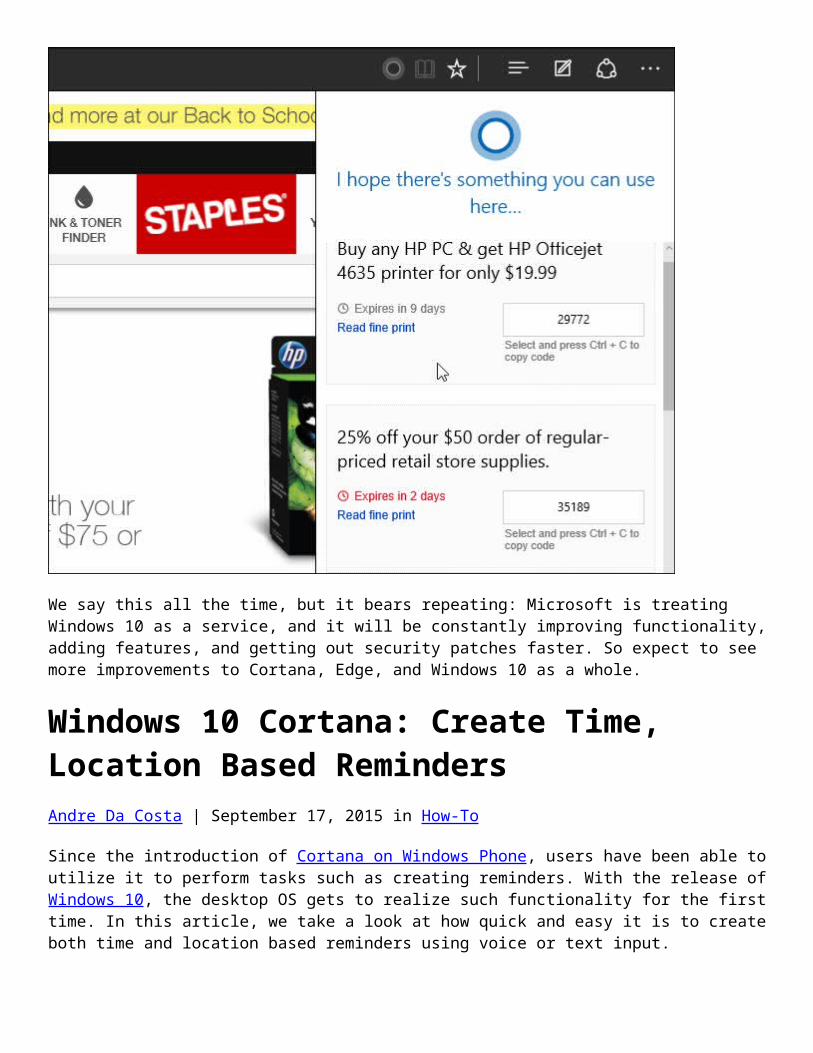
Find Coupons While Shopping & Restaurant Info
A couple of other features Microsoft has added to the Bing and Edge browser partnership was announced on the Blogging Windows site.
It can give you directions to a restaurant, hours it’s open, the menu, reviews from Yelp, and even instant access to reservations. In the example below, if the site supports it, you will see the Cortana icon in the address bar.

Select that and you will get the side-pane with directions, reviews, hours…etc.

Microsoft also announced a new feature that allows you to find coupons while you’re shopping online.According to Microsoft, this particular feature is a pilot feature, and is available in the US only, and this initial release includes coupons for retailers like Staples, Macy’s and Best Buy.
Just go to one of those sites, and you’ll see the Cortana icon, select it, and then you’ll get a list of coupons for the site. Some of the coupons require a code that you can copy, and other you just need to click on to get the deal.

We say this all the time, but it bears repeating: Microsoft is treating Windows 10 as a service, and it will be constantly improving functionality, adding features, and getting out security patches faster. So expect to see more improvements to Cortana, Edge, and Windows 10 as a whole.
Windows 10 Cortana: Create Time, Location Based RemindersAndre Da Costa | September 17, 2015 in How-To
Since the introduction of Cortana on Windows Phone, users have been able to utilize it to perform tasks such as creating reminders. With the release of Windows 10, the desktop OS gets to realize such functionality for the first time. In this article, we take a look at how quick and easy it is to create both time and location based reminders using voice or text input.
Another great thing, when you create reminders on your PC, as long as you are signed into your Microsoft Account on your Windows Phone, you can also have them triggered there, too. Cortana is able to do this by collecting information like your location, history, contacts, voice input, Bing queries, calendar data, communication history from messages, apps, and other information on your computer.
Create Time or Location Reminders in Cortana

Things you should know and do before creating the reminder:
Make sure you have access to the Internet, Cortana does not work without it (if you didn’t know by now).
Location services needs to be turned on (Settings > Privacy > Location). Ensure Notifications are turned on for reminders too. You can use either voice or keyboard input to create your reminders.
To start, make sure you have the Hey Cortana feature enabled. Then say the reminder you need, for example say: Hey Cortana I need garden tools tomorrow.
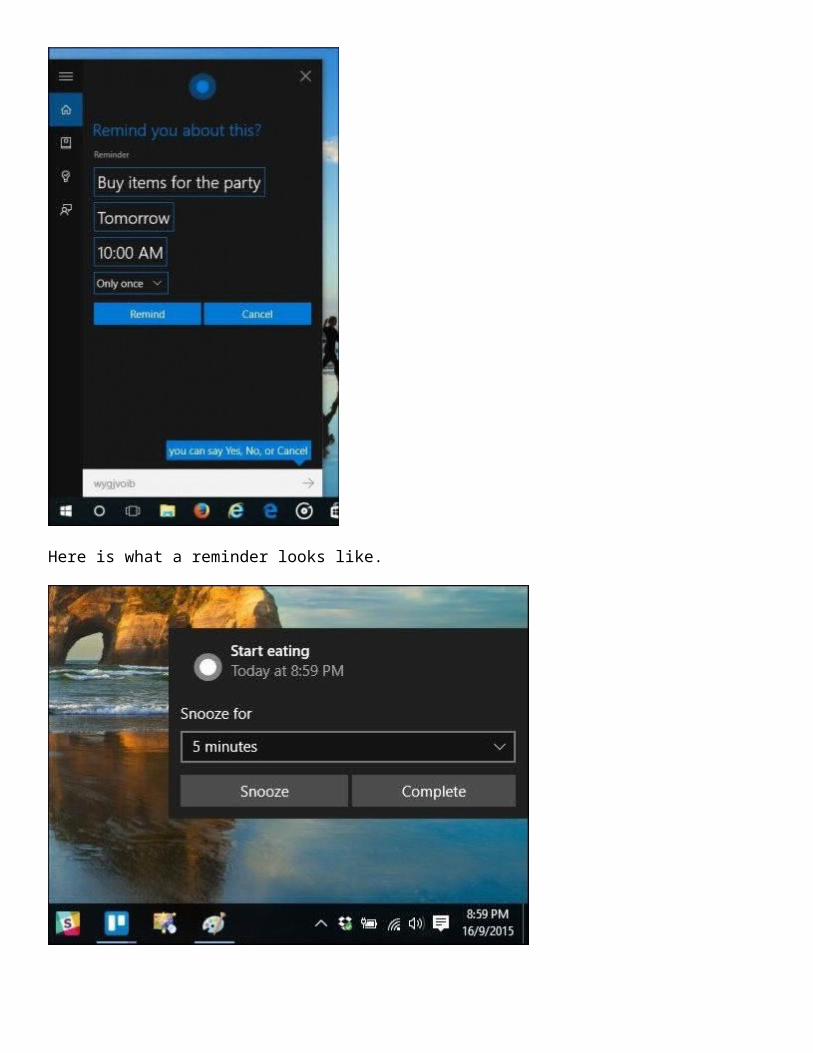
When you’re done, Cortana will begin the process of quickly transcribing your request into human readable information. Cortana will then let you review your reminder. Cortana is intelligent enough to also ask you at what time you would like to be reminded if you didn’t provide it. When you’re satisfied, Cortana will ask if its right, simply say ‘Yes’, Cortana will make a promise to remind you.

Here is what a reminder looks like.
Creating a text based entry is just as easy, just type it into Cortana and select Set reminder.

Reviewing your Reminders
You can manage your reminders from within Cortana’s reminder tab (light bulb icon). Here you will see all reminders which you can sort by Time, Place, and People. Completed reminders are represented by a tick beside its icon. You can also delete completed reminders yourself.

Here’s an example of a location based reminder.
I was pleasantly surprised by how quick and easy it is to use Cortana to perform such simple tasks. Cortana is definitely one of Windows 10’s best features worth checking out.
Outlook Mail and Calendar App on Windows 10 Mobile Gains Dark ThemeBrian Burgess | September 17, 2015 in News
Windows Insiders who are testing the latest version of Windows 10 Mobile also get new additions to apps first. One of which was released today for the Outlook Mail and Calendar apps.
Now through the Personalization Settings, you can enable a new dark theme and it looks pretty cool.

Enable Dark Theme Outlook Mail & Calendar Apps
To get the update, you will need to be a Windows Insider testing Windows 10 Mobile. If you don’t see the update yet, just go in and check the Store for updates.
Then open the Mail or Calendar app and go to Settings > Personalization and select Dark theme. Notice that the Settings are no longer in the hamburger menu like previous versions. Now you get there by tapping the ellipsis icon in the lower right of the screen.
Here you can also customize the look by matching the accent color to your system.
While several of us Windows Phone enthusiasts have been a bit disappointed about Microsoft is taking so long to get this platform done, once in a while we do get a cool new thing. While this is minor, at least it’s something.
Also, don’t forget that Microsoft is holding its big device event on October 6th where we should see new devices including two new flagship phones, a new Surface Pro, and more.
The event starts at 10 am EDT and you can watch it online or your Xbox One or 360 for a better view on the big screen — if you have the day off anyway.
What do you think about the new dark theme options? Leave a comment below and tell us your thoughts.
View & Delete Microsoft Edge Browsing History in Windows 10Brian Burgess | September 22, 2015 in How-To

Windows 10 includes Microsoft’s new web browser called Microsoft Edge. For those of you who have updated your PC to Windows 10 and are new to the OS, here’s a quick tip on how to view and delete your browsing history.
View and Delete Microsoft Edge Browsing History
Launch Microsoft Edge and click the Hub button in the upper-right corner. Then select the History icon (the one that looks like a clock). That will give you a list of your history which is organized by the last hour, by day, and by week.
This organized list of history makes it easier to find something. You know, when you have those “OK, now where was that article I was reading at?” moments.
If you want to get rid of the history, you can do it selectively by clicking the “X” button next to each item.

Or, you can wipe it all out by clicking Clear all history. Selecting that will give you more options for what you want to delete — in addition to just the sites you visited. For example, you can delete passwords, cookies, downloads and more. Just select what you want to get rid of, and click the Clear button.

If you don’t want to view your browsing history, and just want to delete it and other items like cookies, passwords, and more then you can try this.
Select More actions (…) ellipsis icon in the upper-right corner and select Settings.

Then scroll down a bit and select Choose what to clear under the Clear browsing data header. Then you’ll be able to go through and select the items you want to get rid of.

That’s all there is to it. Microsoft Edge is still a work in progress, and we expect to see the addition of extension support in the upcoming update this fall — Threshold 2 which is currently available for testing to Windows Insiders.
Top Things to Configure After Upgrading to Windows 10Andre Da Costa | September 22, 2015 in How-To
So you got Windows 10 up and running successfully on your computer. Whether you upgraded or did a custom install you need to know what your next steps are and ensure you have a system that is configured the way you like and prepped for your everyday needs. There are a few important things you need to do after you have setup Windows 10 and this article will show you what to do.
Add Another Account and Create a System Restore Point
Creating a backup account is important as this can be used to troubleshoot and diagnose issues with the operating system but also applications and drivers. Consider this to be your system administration account. Only use it when you need to do troubleshooting.
You can learn more in our article: How to Create a Local Account in Windows 10
You reached the desktop, Windows 10 is functioning just fine; but before you move on to another activity such as installing drivers or applications, you should create a System Restore point to avoid losing all that time

invested upgrading to Windows 10. System Restore points save you the trouble of having to start over if something were to go awry.
For more on creating one read our article: How to Enable and Create a Windows 10 System Restore Point.
Install the Latest Windows 10 Updates and Check Device Manager
Between RTM and general availability, there might be improvements released that will make your computer perform better. Windows Update will also provide security and driver updates.

Whether you did an in-place upgrade or clean install, check the Device Manager to see if a component was not installed or not working.
To do that, hit Windows key+X and select Device Manager. If there is an exclamation, right-click the device and then Update.

If Windows doesn’t find any available updates, go to the PC manufacturer’s website and look for the driver.
Most manufacturer sites make it easy to get the right drivers, then again, some don’t. If that’s the case, here’s a cool tip. Right-click the device and then select Properties.
Under the Details tab, Click in the Property list box and select Hardware Ids from the dropdown menu. Then copy the entry in the value box and use your default browser to search for a suitable driver and install it.

The most common drivers Windows will need after a clean install are:
Chipset driver (if you built your computer, you should have a motherboard disc that came with it). Video/Display Adapter Wired/Wireless LAN Adapter
Tips: If you’re reading this article before upgrading to Windows 10, it’s recommended you download and store your hardware drivers in advance.
Also, now would be a good time to create another system restore point!
Install and Update Desktop and Store Applications
Windows 10 comes with a lot of built-in apps, but I am sure you have some favorites you would like to install. A great place to install your essential free desktop programs from is Ninite. You just check the ones you want, download an installer file, and it will install everything without any toolbars or extra crapware that you don’t want.

Developers will provide updates and enhancements to their apps from time to time. While Universal apps are set to update in the background by default, after installing Windows, you should get ahead of the game.
To check for updates to your apps, launch the Store and click the Updates menu which will indicate how many updates are available. The store indicates I have 26 app updates available.
You will see a list of updates that are available. If you are on a slow connection, you can click Pause all and select just the apps you want to update by pressing the Play button or remove it from the queue if you don’t want it all.

Adjust Screen Resolution
Some people like things bigger or smaller on their screen. To customize your display, go to Settings > System > Display. Then under Change the size of text, apps, and other items.
Move the slider to what works best for you, then make sure to click the Apply button at the bottom of the screen. If you want to change how much space you have on screen, select the Advanced display settings link at the bottom.

Click in the Resolution list box and change it to what works best for you. Typically the best setting is the maximum resolution of your monitor(s).
If your screen resolution does not have the option to be adjusted, you likely need to update your display driver.
Import Chrome, IE or Firefox Bookmarks into Microsoft EdgeBrian Burgess | September 23, 2015 in How-To
The new Microsoft Edge browser in Windows 10 is still a work in progress, but it’s blazing fast compared to IE and other browsers and it has some interesting features. If you recently upgraded to Windows 10, you’re going to want to at least test it out, even if you changed the default browser.
So, if you’re new to Microsoft Edge, you’ll want to bring some of your favorites and bookmarks with over, too. Here’s a look at how to do exactly that.
Import Bookmarks Into Microsoft Edge
Launch Microsoft Edge and select the More actions button in the upper-right corner and then choose Settings.

Then select the Import favorites from another browser link.

Currently, the only two browsers that are included for an easy import are Chrome and Internet Explorer. Check one or both and then Import.
It should just take a couple seconds, and then you’ll find the bookmarks appear under the Favorites section.

If you have your bookmarks in folders like you can see I do in the image above, just open them up to access the saved web pages.

Also, if you want to see your Favorites bar, go to Settings and then flip the Show favorites bar switch on.
What About the Firefox Bookmarks?

At the time of this writing, Microsoft Edge doesn’t have the ability to import bookmarks via an HTML file. So what you’ll need to do is export your Firefox bookmarks as an HTML file, then import them into a browser that supports the feature — like Chrome or IE.
Then launch Edge and import the new imported Firefox bookmarks from that browser.
How to Fix Windows 10 Product Key Activation Not WorkingAndre Da Costa | September 24, 2015 in How-To
Product Activation was first introduced into the Windows family with the release of Windows XP in 2001. Activation pairs your product key with your computer. It is also used as a mechanism for copy protection in addition to defining support rights depending on the product channel from which the software was acquired: Retail, OEM, Volume License, Trial. With Windows 10, Microsoft has made huge announcements regarding product distribution. The most notable being that Windows 10 is free for existing Windows 7, 8/8.1 users for the first year. Regardless of this, product activation remains a part of Windows 10. In this article, we take a look at product activation and troubleshooting steps.
Understand and Fix Windows 10 Product Key Activation
Things you should know:
A Windows 7 or Windows 8/8.1 product key cannot activate Windows 10. Windows 10 uses its own unique product key.
By default, Windows 10 builds are pre-keyed, meaning, you do not have to enter a product key and should not be prompted to enter one as long as you upgraded from an activated Windows 7 or Windows 8 or Windows 8.1 license or Windows 10 Preview build.
If you perform a clean install on first attempt, you will have to start over from an activated Windows 7 or Windows 8.x installation.

If you are prompted to enter a product key, click Do this later and give it a few days, Windows 10 will activate automatically.
Activation servers might be overwhelmed at the times because of the volume of upgrades, so give it some time if you get an error message such as (0XC004E003, ,0x8007000D, 0x8007232b or 0x8007007B) Windows 10 will eventually activate as long as you upgrade using the appropriate method.
There is no need to know your Windows 10 product key see ‘Understanding Product Activation in Windows 10:
Product Activation in Windows 10
In previous Windows releases, when you installed an upgrade version of Windows, if you wanted to reinstall the upgrade version, you had to first reinstall the qualifying version from which you upgraded, reactivate it, then upgrade again and reactivate again.
With Windows 10, this is no longer the case. Once you have upgraded to Windows 10 and activate, you can simply create a bootable copy on DVD or USB and reinstall just Windows 10 without the need to reinstall the qualifying version and it will reactivate automatically. Windows 10 registers the device with the Product Activation Center and keeps a copy of your devices activation in a Cloud Store. When you perform reinstall or clean install the installation checks with Activation Server, detects the unique installation ID and produces the validation for your device.
When Installing Windows 10 Build 10240
In order to activate Windows 10 build 10240 (RTM), you must upgrade from a previous qualifying operating system that is genuine and activated: this includes Windows 7, Windows 8/8.1 and Windows 10 Insider Previews.
If you are running the Windows 10 Enterprise Preview, you either need to stay in the Windows 10 Insider Preview Program or activate using a product key from the Volume License Service Center (VLSC). If you are not eligible to be running Windows 10 Enterprise, I suggest you make preparations to roll back to the original version of Windows your system was licensed for and make a reservation to upgrade to Windows 10.
Can I Perform a Clean Install Using the Free Upgrade?
No, it will require that you are running a previous qualifying version and start the upgrade from within the qualifying version. You can initiate a clean install after completing the Upgrade.
Please be aware that you cannot use the free upgrade offer to perform a clean install on the first attempt. You must first upgrade from the qualifying version of Windows 7 or Windows 8/8.1 (whether you do it through Windows Update or using the ISO file). Ensure the upgrade is completed successfully and then ensure that it is activated. You can then proceed to do a clean install by using recovery media or using the Reset function in Start > Settings > Update & Security > Recovery > Reset this PC (Get Started).
What if Windows Doesn’t Activate?
If Windows 10 does not activate even after detecting an active Internet Connection, restart and try again. Or wait a few days and Windows 10 should automatically activate itself.
I downloaded the ISO file but Windows 10 setup is prompting me for a product key or indicates the product key does not work with this edition.

Please note: The copy of Windows 10 you download must correspond with the edition of Windows you are upgrading from.
Windows 7 Starter, Home Basic, Home Premium, Windows 8.0 Core, Windows 8.1 Core must use a Windows 10 Home ISO.
Windows 7 Professional, Windows 7 Ultimate, Windows 8.0 Pro, Windows 8.1 Pro must use a Windows 10 Pro ISO.
Your currently installed copy of Windows must be activated. If it is not, you will be prompted to enter a product key.
If you are using Windows 7 Enterprise, Windows 8.0 Enterprise, Windows 8.1 Enterprise editions you won’t be able to use the free upgrade offer.
The Get Windows 10 App Indicates My License is not Activated:
Again, you must ensure you are running a genuine activated copy of Windows 7 or Windows 8/8.1.

Click Start, right-click Computer (Windows 8 or later – press Windows key + X > click System) then click Properties.
Check to make sure Windows is activated.
I upgraded from an activated copy of Windows 7 or Windows 8/8.1 then I decided to reinstall using either the ISO file, Reset this PC, or Recovery drive, but I am prompted to enter a product key:
Select Do this later. Windows 10 will automatically re-activate within a few days.

I just installed or reinstalled a preview build of Windows 10 and I want to upgrade to the final release, but it will not activate.
Microsoft has suspended Preview Builds and also deactivated their product keys at this time. This means you won’t be able to download, install or activate older builds such as 10162 and 10166 or earlier builds in order to qualify for the final release.
Your best option is to reinstall a valid license you have for either Windows 7, Windows 8.0 or Windows 8.1, make sure it is activated, then upgrade from that to Windows 10 on July 29th or later. If you maintained your current activated Windows 10 Preview, you should be able to upgrade from it to the final release.
How do I check my activation status after upgrading?
Go to Settings (press Windows key + I) > Update & security > Activation.

For more on fixing Windows 10 activation errors head to page 2
How to Rename a Windows 10 Local User AccountBrian Burgess | September 25, 2015 in How-To
There might come a time when you want to rename a user with a local account on your shared Windows 10 PC. We recently showed you how to create a local user account in Windows 10, and here’s a look at how you can rename it.
Note that you will need to have an administrator account on the PC.
Change Windows 10 User Account Name
In the search box type: user accounts and hit Enter or select the User Accounts option from the results at the tops of the list.
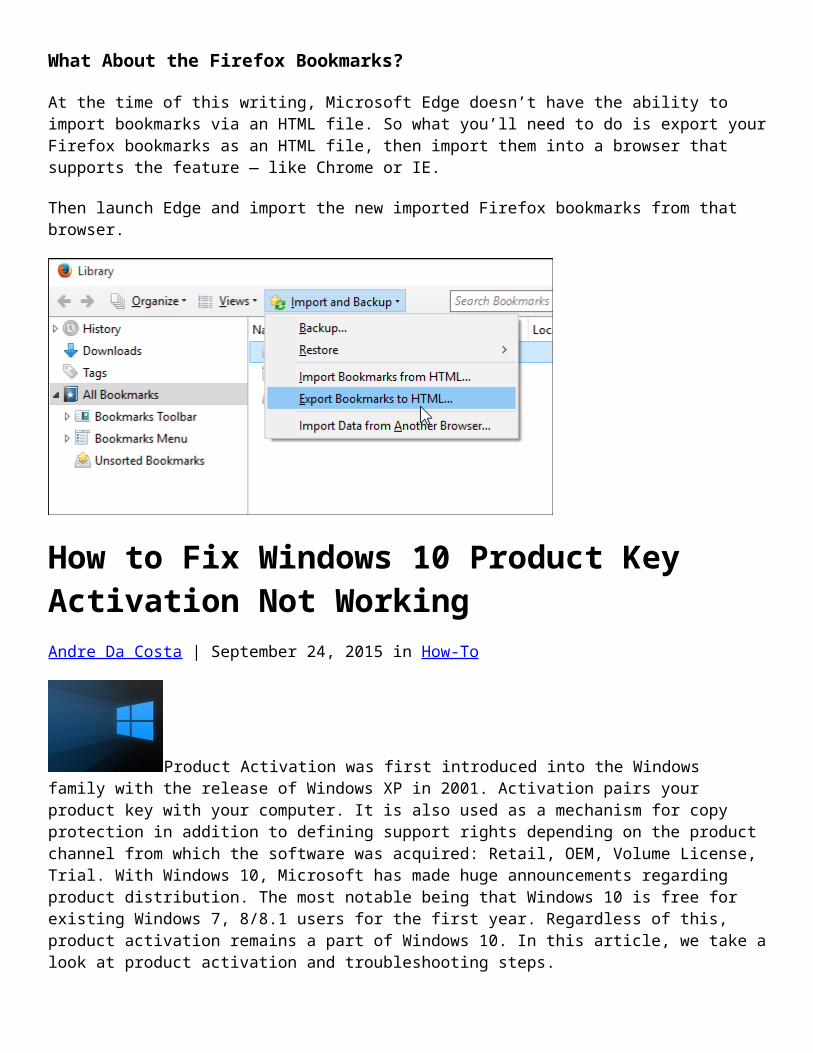
That opens up the User Accounts section in the classic Control Panel and from there select Manage another account.

Next select the user account you want to rename.
In the next section, you have various options you can use to manage the account. In this case you want to select the first option — Change the account name.

Now put in the new name you want to give the account and then click the Change Name button.
That’s all there is to it! The account has been renamed and you’ll see that reflected in the Manage other accounts section as well as the login screen.
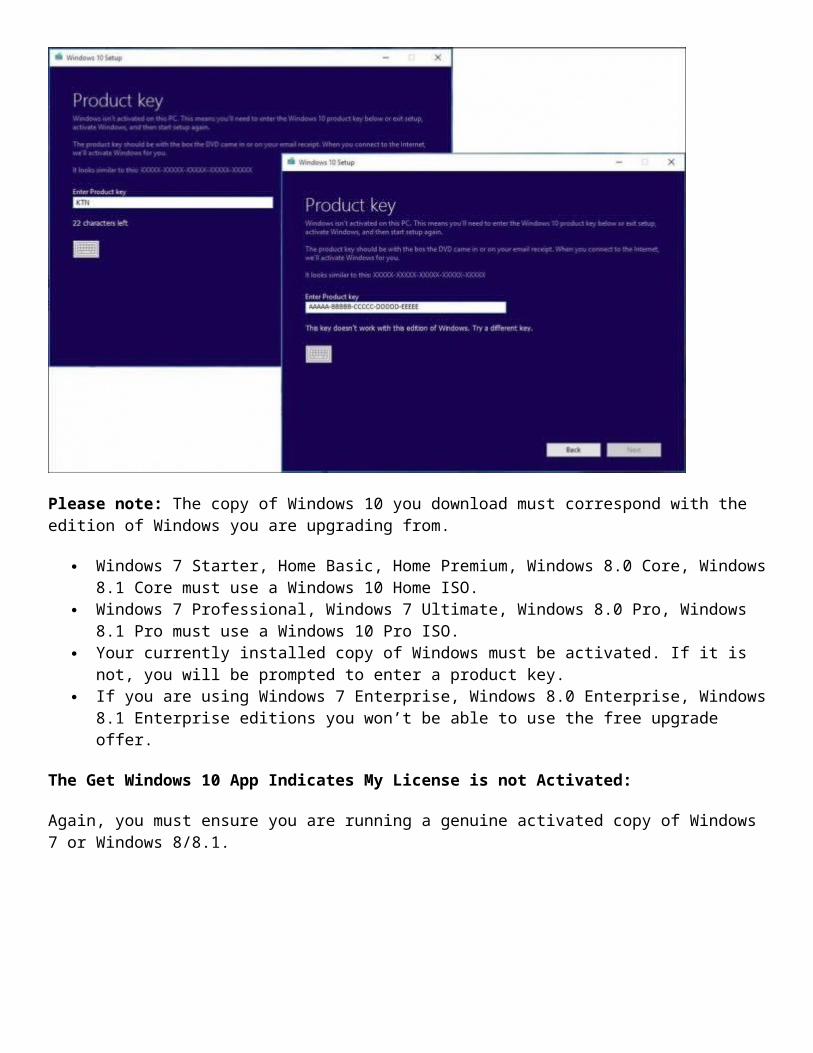
While Microsoft is starting to get away from Control panel and move a lot of the PC configuration to the new Settings app. Control Panel is still there for now. That might change over time as Windows 10 matures. If that happens, we’ll definitely update this process.
If you recently upgraded Windows 7 to Windows 10 and are new to the OS and want to learn more about using it, make sure to check out our complete archive of Windows 10 articles.
How to Customize the Microsoft Edge New Tab PageBrian Burgess | September 25, 2015 in How-To
Windows 10 has a new default browser called Microsoft Edge, as we’ve said in the past, it’s still a work in progress. Currently, it uses a speed dial feature like you see in Opera and other browsers.
It shows top and frequently visited sites, the ability to get top site apps which will open the Store, suggested news content, widgets for weather and sporting events. But if you’re not happy with the default selections Microsoft has included, there is some customization you can do, including having it open to a blank page.

Customize Microsoft Edge New Tab Page
Launch Microsoft Edge and select the More actions icon (…) in the upper-right corner and then Settings.

Next scroll down to Open new tabs with and from the dropdown menu you can have it display top sites and suggested content, top sites only, or just a blank page.
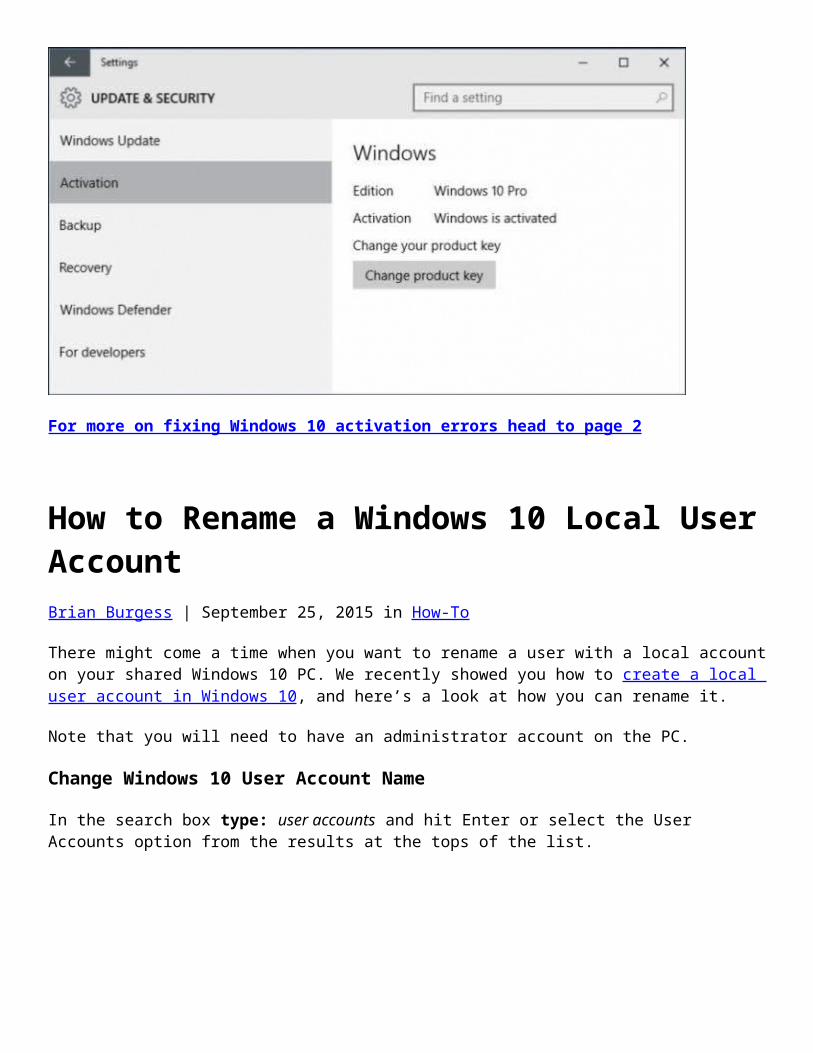
While sometimes I like to see the suggested content, it does seem to slow the browser down a bit…takes a bit of time for the content to load. If you’re looking to increase performance and have no desire to see the extra stuff…just open to a blank page. It’s not a blank page like you’d expect in other browsers like IE or Firefox, but it’s cleaner.

If you are a fan of the suggested content, you can customize it to fit your interests better. Open a new tab and select Customize.

On the next page, you can also select from the customization displayed above and your favorite topics at the bottom.

There is a big update, codenamed Threshold 2, coming to Windows 10 later this fall. In fact, for those of us in the Windows Insider program, we’re already starting to get new builds — he last one was build 10547.
We expect to see support for extensions in Microsoft Edge, and hopefully even more options for customizing the new tab page, too.
How to Customize the Microsoft Edge New Tab PageBrian Burgess | September 25, 2015 in How-To
Windows 10 has a new default browser called Microsoft Edge, as we’ve said in the past, it’s still a work in progress. Currently, it uses a speed dial feature like you see in Opera and other browsers.
It shows top and frequently visited sites, the ability to get top site apps which will open the Store, suggested news content, widgets for weather and sporting events. But if you’re not happy with the default selections Microsoft has included, there is some customization you can do, including having it open to a blank page.
Customize Microsoft Edge New Tab Page
Launch Microsoft Edge and select the More actions icon (…) in the upper-right corner and then Settings.

Next scroll down to Open new tabs with and from the dropdown menu you can have it display top sites and suggested content, top sites only, or just a blank page.

While sometimes I like to see the suggested content, it does seem to slow the browser down a bit…takes a bit of time for the content to load. If you’re looking to increase performance and have no desire to see the extra stuff…just open to a blank page. It’s not a blank page like you’d expect in other browsers like IE or Firefox, but it’s cleaner.

If you are a fan of the suggested content, you can customize it to fit your interests better. Open a new tab and select Customize.

On the next page, you can also select from the customization displayed above and your favorite topics at the bottom.

There is a big update, codenamed Threshold 2, coming to Windows 10 later this fall. In fact, for those of us in the Windows Insider program, we’re already starting to get new builds — he last one was build 10547.
We expect to see support for extensions in Microsoft Edge, and hopefully even more options for customizing the new tab page, too.