interactive suite software guide - luidia · text box enhancements ... spotlight lets you bring...
TRANSCRIPT
Welcome & Introduction Welcome to eBeam Interactive Suite 3.
Overview eBeam Interactive Suite 3 allows you to create lessons with provided resources and enhances curriculum delivery with dynamic annotation tools. The software also lets you record and distribute content.
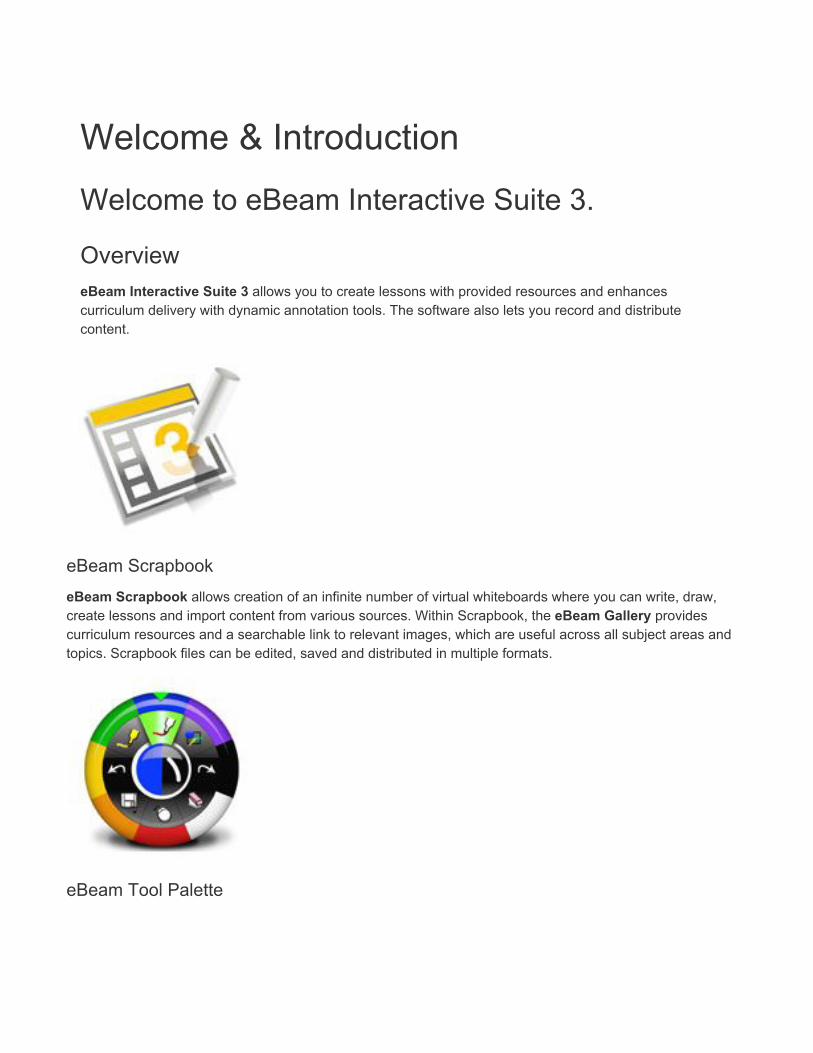
eBeam Scrapbook eBeam Scrapbook allows creation of an infinite number of virtual whiteboards where you can write, draw, create lessons and import content from various sources. Within Scrapbook, the eBeam Gallery provides curriculum resources and a searchable link to relevant images, which are useful across all subject areas and topics. Scrapbook files can be edited, saved and distributed in multiple formats.
eBeam Tool Palette
The eBeam Tool Palette works with any file or application and allows for annotation, screen recording and general navigation.
Flash Installation
Help for installing the proper Flash files for multimedia use in Scrapbook.
What’s New in eBeam Interactive Suite 3 All Platforms
● New Gallery design ● Drag and drop backgrounds ● Additional Resources in Gallery ● Text Box enhancements ● Master Pages ● Attention Mode ● Individual Assignment
Mac ● Spotlight
● Coversheet ● Fully Integrated Gallery ● Hyperlinking
eBeam Interactive Suite Menu
Overview The eBeam Interactive Suite menu is located in different places, according to your computer’s operating system:
Windows In the Windows Taskbar on the lower right side
Mac In the Mac Tool Bar in the upper right

Linux In the Linux System menu in the upper right
Connect & Calibrate
Overview The eBeam Interactive Suite can be used while your computer is connected to an eBeam Sensor or when it isn’t. When connected to an eBeam Sensor, the eBeam Interactive Stylus controls many of the software features. The calibration feature in the software allows you to define your interactive area based on the size and type of display surface you use.

Connect The software detects when an eBeam Sensor has been connected and launches and activates the software. When an eBeam Sensor is disconnected the software displays an alert.
To manually configure the eBeam Sensor connection settings (including Bluetooth), select System Preferences from the eBeam Interactive Suite menu-bar menu.

Calibrate Before using the eBeam software with an eBeam Sensor, you need to define the dimensions of your interactive work area by carefully and precisely going to the center of each target and releasing the stylus from the display area. Note: some users find it easier to place the tip of the stylus outside the target and drag to the center and release. Proper calibration ensures that the Interactive Stylus will function with accuracy on your displayed image. We recommend calibrating your display surface at the beginning of each interactive session.

Push the large center button on the front of the sensor in order to manually launch the calibration process.
eBeam Interactive Stylus Think of the eBeam Interactive Stylus as your wireless mouse. The tip of the stylus works just like a standard mouse and allows you to (01) click and drag. The larger button provides (02) right-click mouse actions. The small round button allows you to (03) hide and show the eBeam Tool Palette.

eBeam Tool Palette
Overview The eBeam Tool Palette floats over the top of open applications and is used to navigate and annotate. The Tool Palette lets you draw and erase, create shapes, highlight, enter text and take snapshots.
Behavior The eBeam Tool Palette appears automatically when you open eBeam Scrapbook or when an eBeam Sensor is connected to your computer.
To show or hide the eBeam Tool Palette:
● Press the Tool Palette (round) button on the eBeam Interactive Stylus, or ● Select Tool Palette from the eBeam Interactive Suite menu.

Annotation Features in Scrapbook
Annotation Tools
Pen Tool lets you select color and line-thickness, and annotate with virtual ink. Double-click any color on the Tool Palette to select a custom color.

Shapes Tool allows you to draw rectangles, circles, lines and arrows on a Scrapbook page or over the top of any open application. You can change the color and line thickness to suit your needs.
Slide Forward lets you to move to the next page in a Scrapbook file.

Eraser Tool allows you to erase any annotations, shapes, or images you input using the Tool Palette.
Cursor Tool lets you select single or multiple elements within the Scrapbook page to move, rotate, resize, group or copy.

Undo Tool allows you to undo the most recent action.
Slide Back lets you move to the previous page in a Scrapbook file.

Highlighter Tool allows you to select a color and line thickness, and highlight with a translucent color. Double-click any color on the Tool Palette to select a custom color.
Tool Color Selection To change the color of your pen, highlighter or shapes tool, go to the outer circle of the Tool Palette and click to choose the color you want.
Line Thickness Selection

To choose your desired line thickness, select the line-thickness button at the center of the Tool Palette. Make your section from the options that display.
eBeam Scrapbook
Overview eBeam Scrapbook allows you to brainstorm, take notes, diagram concepts and collaborate. You can import files into Scrapbook—including images, Flash media, PDFs and PowerPoint presentations—and you can use Scrapbook as a virtual whiteboard and create content using provided resources.
Scrapbook data can be edited, saved and distributed in a variety of formats including: .bmp, .iwb, .jpg, .pdf and .png.

Navigation and the Thumbnail Pane The thumbnail panel displays all pages—in order—in your Scrapbook file. Choose a thumbnail from the list to view that page in normal size in the main window. Reorder pages by dragging a page to a new location in the Thumbnail Pane.

Managing Pages
Add a page to your Scrapbook file.

Duplicate a page.
Delete a page.
Scrapbook Toolbar
Overview The Scrapbook Toolbar provides quick access to many of the software features that make presentations engaging, such as the eBeam Gallery, dynamic text input and editing, Zoom, Spotlight, Coversheet and the Camera Viewer.
Toolbar Features Moves the Toolbar to the bottom of your Scrapbook window.

Moves the Toolbar back to the top of your Scrapbook window.
Text lets you add a text box to the active Scrapbook page.
Flash allows you to import Flash files and Flash movies. (To do this, you need to have the Adobe Flash Player browser plugin installed. Click here for more information.)
Image lets you add your own photos and images to the active Scrapbook page. Supported file formats include .bmp, .jpg and .png.

Snapshot enables you to capture a screenshot on the fly. You can capture the entire screen or click and drag an area to capture a selection of the screen.
Camera Viewer accesses any built-in or connected webcam and allows you to take a snapshot and add it to Scrapbook as a screen object or as a background.
● From the Camera Viewer Toolbar, Add Object To Scrapbook: After clicking Camera Viewer, you can add this snapshot to a Scrapbook page, and edit or modify it.
● From the Camera Viewer Toolbar, Add Image As Background: After clicking Camera Viewer, you can use the snapshot as a background (it will fill the entire page).
Spotlight lets you bring focus to a particular region of your display area.
● From the Spotlight Options: Use the menu button to move and customize the Spotlight. You can modify the opacity, along with the shape and size of the Spotlight.

Cover Sheet lets you hide and reveal content. After you click the Cover Sheet button, the current Scrapbook page is fully hidden (thumbnails are not affected). You can uncover more of the page by dragging the covered area from the top, bottom, left and right.
● Cover Sheet Options: Use the menu button to modify the cover sheet’s opacity.
eBeam Gallery
Overview The eBeam Scrapbook Gallery provides a collection of curriculum resources that you can add to your pages as Scrapbook Elements or as Scrapbook Page Backgrounds. It is comprised of content-specific sub-folders, and includes both images and Flash files. When you have selected an item you want to use, simply drag and drop the file to your Scrapbook page. If you drag a file to the corner of a page, it can be added as a background.
eBeam Gallery also includes My Gallery, which lets you add links to any folders on your computer that contain images.
In addition, you’ll find Internet image search capability through Flickr and video search through YouTube. You can simply drag and drop images and videos directly to your Scrapbook Pages.
Categories At A Glance Backgrounds & Templates

Classroom Tools
Dynamic Content

Geography
Graphic Design & Art

Health
History & Social Studies

Literature & Language Arts
Mathematics
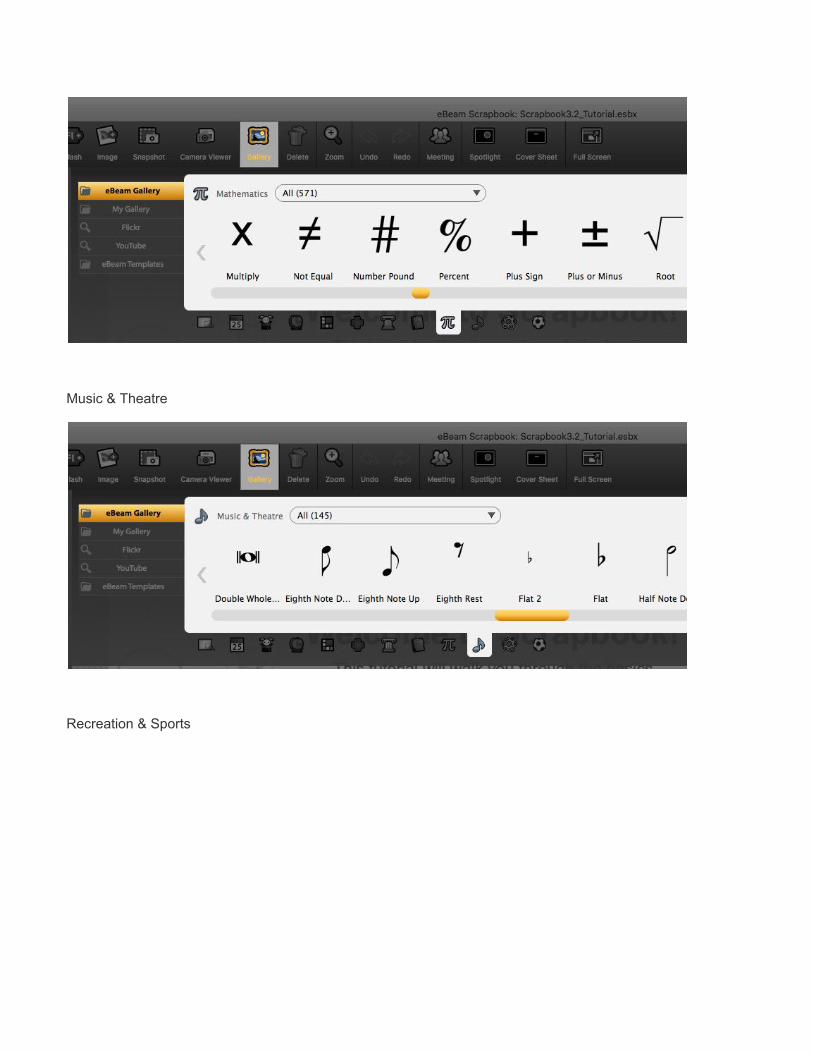
Music & Theatre
Recreation & Sports

Science
My Gallery My Gallery lets you create custom links to folders on your hard drive that contain images. These shortcuts are a convenient and fast way to access images you want to use in Scrapbook.
● From the Scrapbook Toolbar, select Gallery, then My Gallery, and click the “+” sign. Click Browse to navigate to the desired image folder and click OK.

If the folder you select contains multiple levels or tiers of sub-folders, note that My Gallery will display images from the top-level folder and the second-level folder. All images contained in third-level and lower-level folders (if any) will be combined and displayed alongside the second-level folder images. You can also add another link to point to a fourth- or fifth-level folder, for instance.
● Use the arrow drop-down menu and click All to view the entire collection of images from the top-level folder and any sub-folders.
● Right-click any folder link to edit, refresh (when you have added new images to this folder on your hard drive), or remove. You can also right-click to add a new folder link.

Note: If any of your folders contain a large number of images—exceeding a thousand (or more), for example—you may have to wait while Scrapbook indexes your files. Do not attempt to link your entire hard drive.
Flickr To access Flicker Image Search, click Gallery and then the Flickr button. After you agree to the terms of use, enter a keyword. To filter your search for tagged images only, use the arrow drop-down menu to choose your preference. Note: All images available through the eBeam Flickr search include Creative Commons licensing.
YouTube
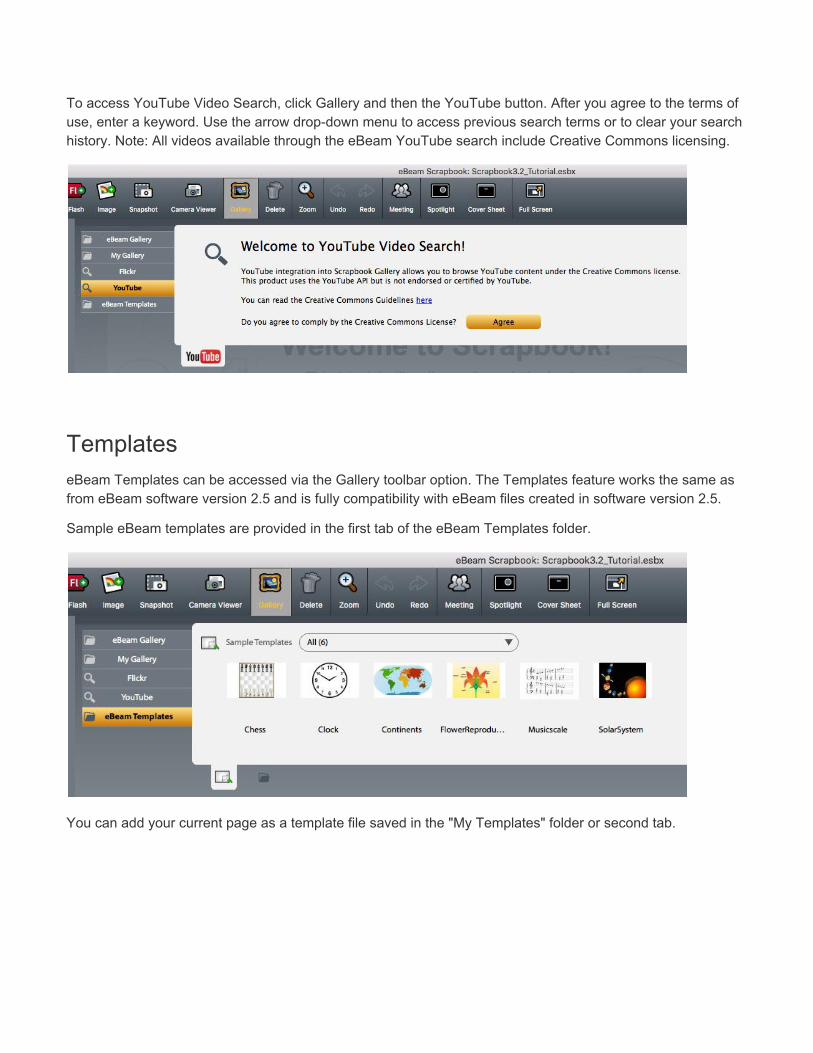
To access YouTube Video Search, click Gallery and then the YouTube button. After you agree to the terms of use, enter a keyword. Use the arrow drop-down menu to access previous search terms or to clear your search history. Note: All videos available through the eBeam YouTube search include Creative Commons licensing.
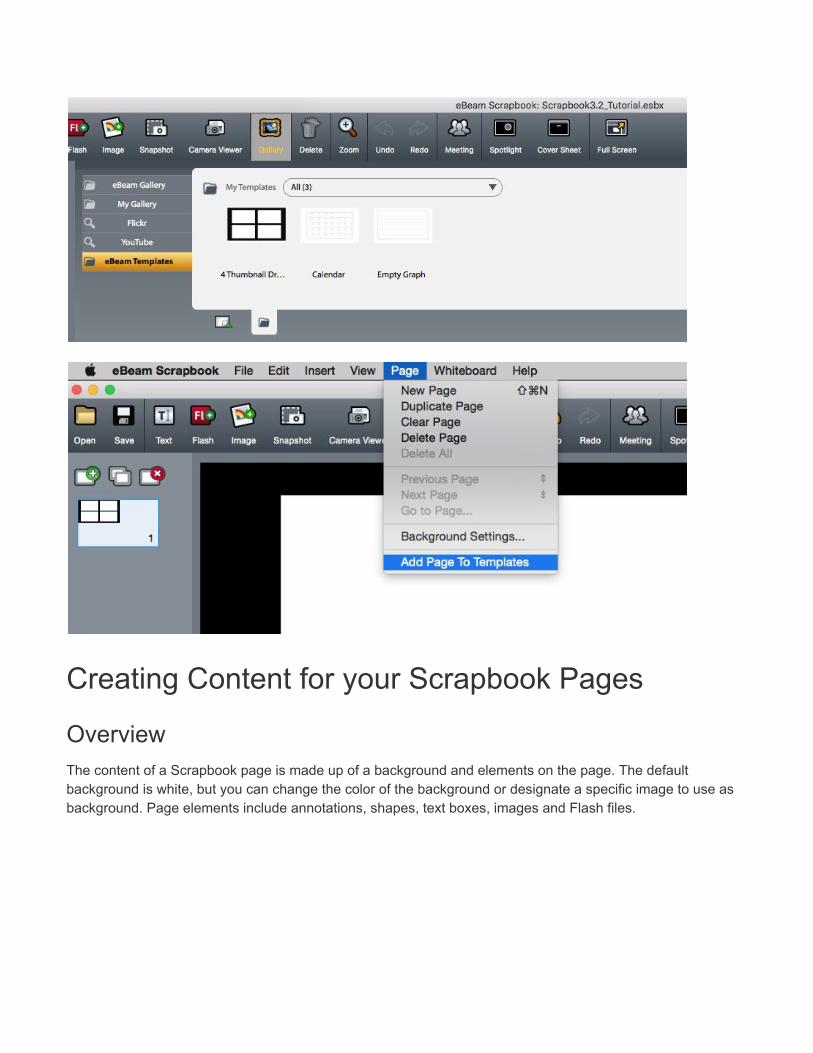
Templates eBeam Templates can be accessed via the Gallery toolbar option. The Templates feature works the same as from eBeam software version 2.5 and is fully compatibility with eBeam files created in software version 2.5.
Sample eBeam templates are provided in the first tab of the eBeam Templates folder.
You can add your current page as a template file saved in the "My Templates" folder or second tab.
Creating Content for your Scrapbook Pages
Overview The content of a Scrapbook page is made up of a background and elements on the page. The default background is white, but you can change the color of the background or designate a specific image to use as background. Page elements include annotations, shapes, text boxes, images and Flash files.

Note: To use Flash media in Scrapbook files on Windows machines, you need to have Adobe Flash Player installed. Click here for more information and a link to the download page.
Additionally, to import Microsoft Word and Excel files or to view metafile objects in Scrapbook files, you need to have Java Runtime Environment installed. Note that importing PowerPoint files only requires you to have PowerPoint installed. Click here for more information and a link to the download page.
Manipulating Objects On A Page Using the eBeam Tool Palette’s Select Tool, each element or object can be selected and moved, rotated, resized and grouped. You can also change the position of objects—moving them to the front or back—flip them vertically or horizontally, rearrange the order, duplicate and delete.
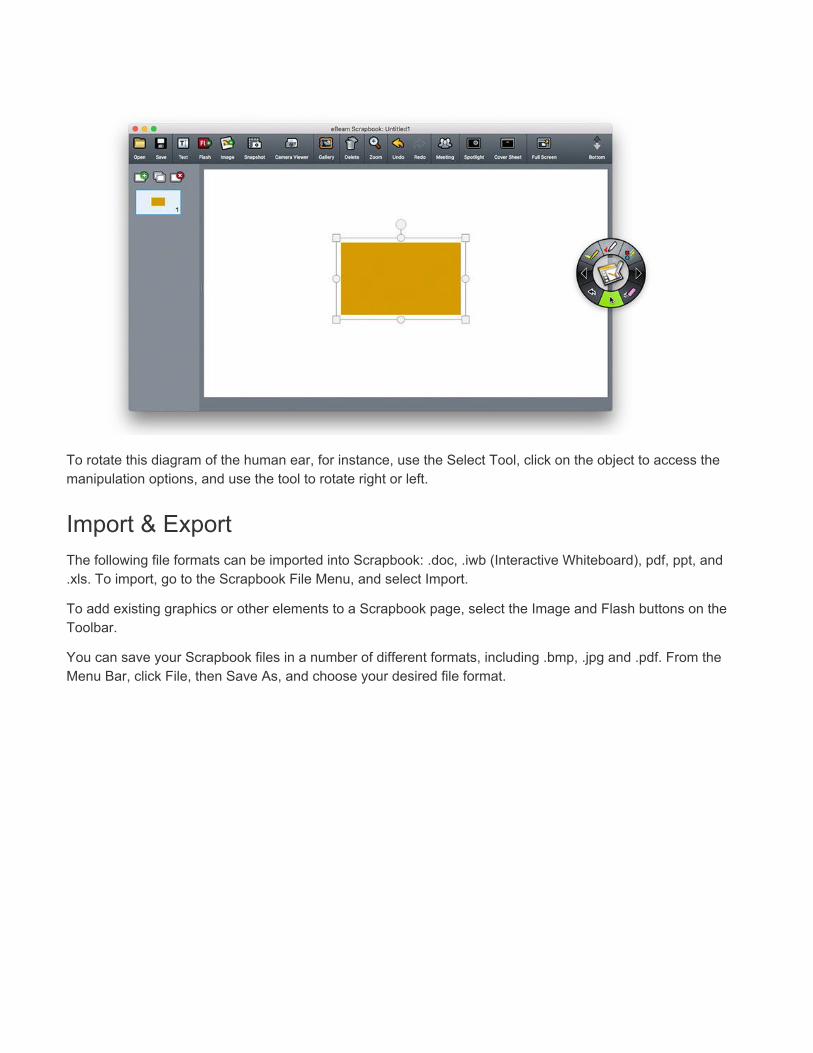
To rotate this diagram of the human ear, for instance, use the Select Tool, click on the object to access the manipulation options, and use the tool to rotate right or left.
Import & Export The following file formats can be imported into Scrapbook: .doc, .iwb (Interactive Whiteboard), pdf, ppt, and .xls. To import, go to the Scrapbook File Menu, and select Import.
To add existing graphics or other elements to a Scrapbook page, select the Image and Flash buttons on the Toolbar.
You can save your Scrapbook files in a number of different formats, including .bmp, .jpg and .pdf. From the Menu Bar, click File, then Save As, and choose your desired file format.

Background Settings Choose Your Background Type Scrapbook gives you two ways to set a page’s background.
● From the Scrapbook Menu Bar, click Page, then Background Settings, and use the available options to customize the background the way you’d like.
● From the Scrapbook Toolbar, select Gallery and choose an image from the collection. Then drag and
hold the image on the Scrapbook page until you see a visual of the page corner folded back in the

lower right and upper right. Drop the image over the top of one of the folded back areas.
Background Settings for Multiple Pages For every Scrapbook file you open, you can choose a background for a single Page, apply new background settings to all of your Pages, and create default settings for all new Pages.
In the "Apply to" setting, select Current Page if you only want your background to apply to the Page you’re working on. Or choose All Pages if you want this background to appear on every Page in your Scrapbook file so far.
Note: This setting will replace backgrounds on all pages and can’t be undone.
Check New Pages to also set this background for every new Page you add to this Scrapbook file. You can always change the setting for New Pages on the fly. As you insert new pages, Scrapbook will default to the last New Pages setting you selected.
Note: To return to blank page backgrounds for new Pages, you must set a new background as white, and then check "New Pages."
Master Pages You can see the Master Page by navigating to the main menu->View->Master Page. The Master Page works the same as eBeam software version 2.5 and is fully compatible with eBeam files created in software version 2.5.

You can edit your own master page using any image from the gallery or uploaded image.
The master page is applied to all new pages as the background.
*Note: If you manually set another background on a page, the master page will then be replaced with the new background.
eBeam Tool Palette in Other Applications

Overview From any application outside eBeam Scrapbook, the eBeam Navigation Tool Palette allows you to easily interact with your computer files and applications, using the Interactive Stylus as a wireless mouse.
This mouse function remains active until you select a tool from the Navigation Tool Palette.
Features Screen Annotation Tool lets you annotate with virtual ink and save those annotations into Scrapbook. Note: While in Screen Annotation mode, navigation is disabled.
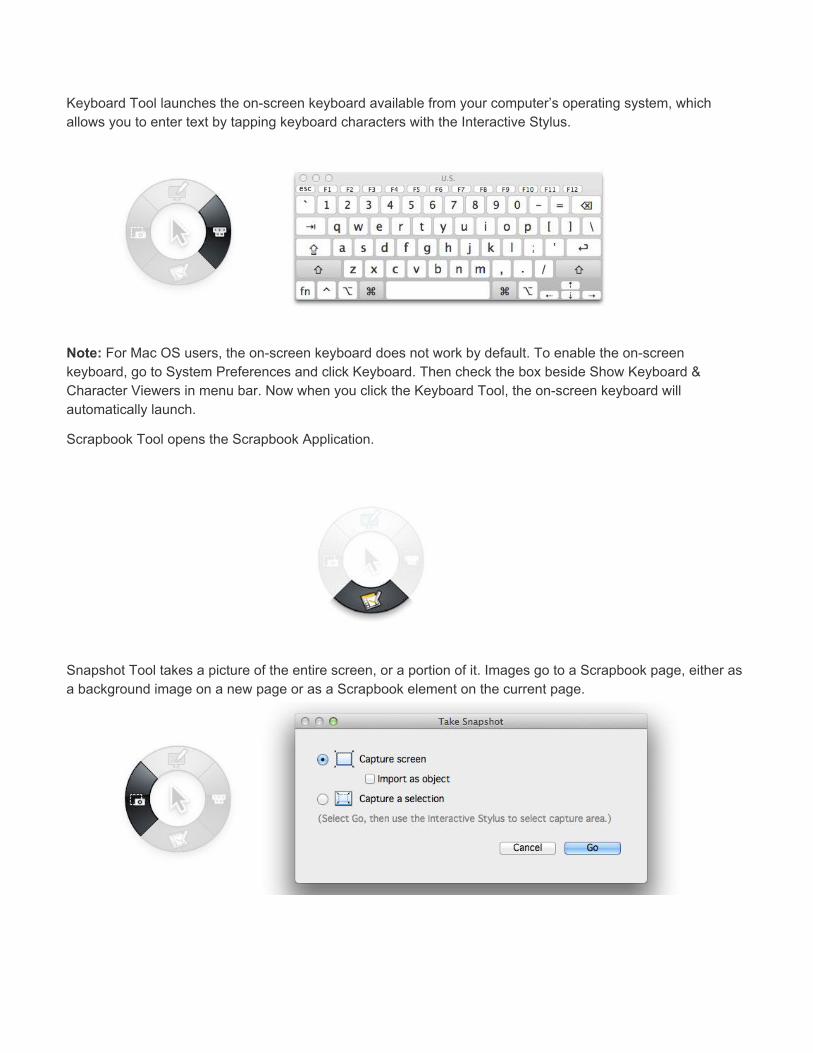
Keyboard Tool launches the on-screen keyboard available from your computer’s operating system, which allows you to enter text by tapping keyboard characters with the Interactive Stylus.
Note: For Mac OS users, the on-screen keyboard does not work by default. To enable the on-screen keyboard, go to System Preferences and click Keyboard. Then check the box beside Show Keyboard & Character Viewers in menu bar. Now when you click the Keyboard Tool, the on-screen keyboard will automatically launch.
Scrapbook Tool opens the Scrapbook Application.
Snapshot Tool takes a picture of the entire screen, or a portion of it. Images go to a Scrapbook page, either as a background image on a new page or as a Scrapbook element on the current page.

eBeam Annotation Tool Palette
Overview The eBeam Annotation Tool Palette lets you write, draw, add shapes and erase over the top of any application or file on your computer. While in this mode, navigation is disabled, and it is as though a transparent glass layer is covering your display area. If you wish to save your annotations, select the Cursor Tool from the Tool Palette and by default, your annotations will saved into Scrapbook. If you to change the default option to discard annotation, choose this option in the Tool Palette Preferences.
Features
Pen Tool lets you annotate over the top of any active file or application. When the Pen Tool is in use, the button stays highlighted, and the center of the Annotation Tool Palette displays the current color and line width settings.

Shapes Tool enables you to draw shapes on your active file. From the Annotation Tool Palette, you can select type of shape, color and line thickness.
Redo Tool lets you redo the last undone action performed by the Undo Tool.

Eraser Tool erases any annotations you made using the Pen, Highlighter, Shape Tool, or Image you made using the Tool Palette.
Cursor Tool switches you from annotating to navigating.

Save Tool saves a snapshot of the file with annotations and shapes into Scrapbook as a new page. As the new page is being saved, a Save icon appears on your desktop. You must save the Scrapbook file if you want to keep the annotations associated with your document permanently.
Undo Tool erases the annotation made by the Pen, Highlighter or Shapes Tools.

Highlighter Tool lets you highlight over the top of any active file or application. When the Highlighter Tool is in use, the button stays highlighted and the center of the Annotation Tool Palette displays the current color and line width settings.
Going from Annotation Tool Palette back to Navigation Tool Palette.
Overview

To return to the Navigation Tool Palette, select the arrow at the bottom of the Annotation Tool Palette. By default, all screen annotations will be saved to Scrapbook. If you wish to change this setting, go to eBeam Scrapbook Menu, select Preferences and un-check Always save screen annotations to Scrapbook.
Scrapbook Meeting
Overview Meetings let people view and participate in your session remotely anywhere there is an internet connection. The host can make their session secure with an optional password and if the device is used within a closed system, there are advanced options to create internal sessions.
Start a meeting
Press the Meeting button in the toolbar to open the Meeting Panel on the right side of the Scrapbook window.

To start a meeting, press the Start Meeting button in the Meeting Panel.
The Display name and Title are automatically populated, but you can also customize them to represent yourself and the meeting appropriately. Add a profile picture that will be your visual representation in the participant list. Press the Start Meeting button to start your session.

Click the lock icon to add ro remove a password to your session.
Starting a Local Meeting Server By default, eBeam uses the eBeam Global Server. Users can also create a Local Meeting Server within their own computer and host a meeting.
Installing the Local Meeting Server on your computer
● Download the Install file and guide from www.luidia.com/app ● Follow the procedures in the guide to install the Local Meeting Server
Refer to the minimum specifications listed in the guide to ensure the Local Meeting Server runs properly.
Setting up a Meeting Server in Scrapbook The Meeting Server can be changed in the Scrapbook Network Options. By default the Meeting Server option is set to eBeam Global Server.
If users want to connect using an invitation message, you should not set up a Local Meeting Server.
● Navigate to [Setting]-[Options]-[Network]-[Meeting Server]-[Add]. User will be able to add new server

● Adding Meeting Server ● Server Name: [any name user selects] ● IP Address/port: [input server information] ● * Inquire to your IT administrator for server information ● Press [OK] to create a new server
Meeting Invites Once a meeting has begun, you can invite other participants via email by clicking on the mail icon in the meeting panel or by sharing the meeting ID#.
The participant list sill show you who is currently connected. The host is able to allow or disallow interaction capabilities for each individual participant by clicking on the pencil icon next to their name. When the pencil icon is gray, they participant can only view the session. When the pencil is white, the user can fully interact with the meeting board.

Use the Group Chat at the bottom of the meeting panel to chat with the connected users.
Join a meeting
To join a meeting that has been started, press the Join Session button in the Meeting Panel.

● Participants can also optionally customize their dispayed name and profile image as well. ● Input the 9 digit numerical Meeting ID provided by the meeting host. ● If the host set a password for the session, input it in the password field. ● Press the Join Session button to join the meeting session.
Individual Assignment With Individual Assignment, clients can write on their screen individually without needing specific authorization. Plus, the host can view all of the clients' screens on their display. The host can also choose to zoom in on one and share it with the rest of the clients.

● Attention Mode
Attention Mode turns all of the clients’ screens off. The clients will not be able to write on the screen even if they have the writing authorization.

● Saving Meeting Notes
When you leave the meeting room, you can either choose to save the meeting notes on the server or discard them. If you save them, people can access and download the notes after the host ends the meeting. If the host chooses to discard the meeting notes, they will not be uploaded to the server or accessible to anyone other than the host.

Whiteboard Capture
Overview The Scrapbook capture functionality and features are included in the latest version of the software. The capture software works with both the Capture Pack and eBeam’s latest Marker Pack accessories.
Calibration for Marker Pack and Capture Pack
In order to calibrate the software, make sure your hardware is set up properly and is recognized by the software. If your whiteboard has not been calibrated before, a calibration window will automatically open. To calibrate, tap the Marker Pens on the board as directed by the software. To manually start the calibration:
● Select Yes when prompted, or ● Select Calibrate Capture Area from the Capture Tools Menu.
You should always perform the calibration setup unless you are certain the Sensor hasn’t been moved since the last use.
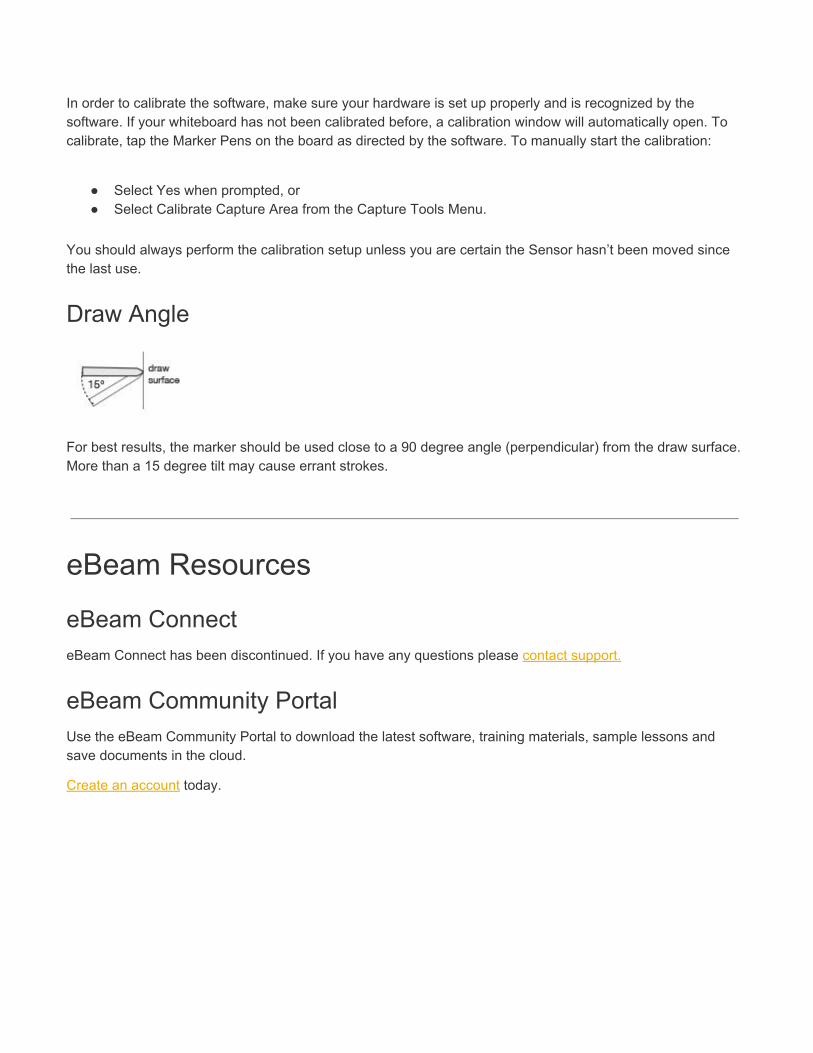
Draw Angle
For best results, the marker should be used close to a 90 degree angle (perpendicular) from the draw surface. More than a 15 degree tilt may cause errant strokes.
eBeam Resources
eBeam Connect eBeam Connect has been discontinued. If you have any questions please contact support.
eBeam Community Portal Use the eBeam Community Portal to download the latest software, training materials, sample lessons and save documents in the cloud.
Create an account today.
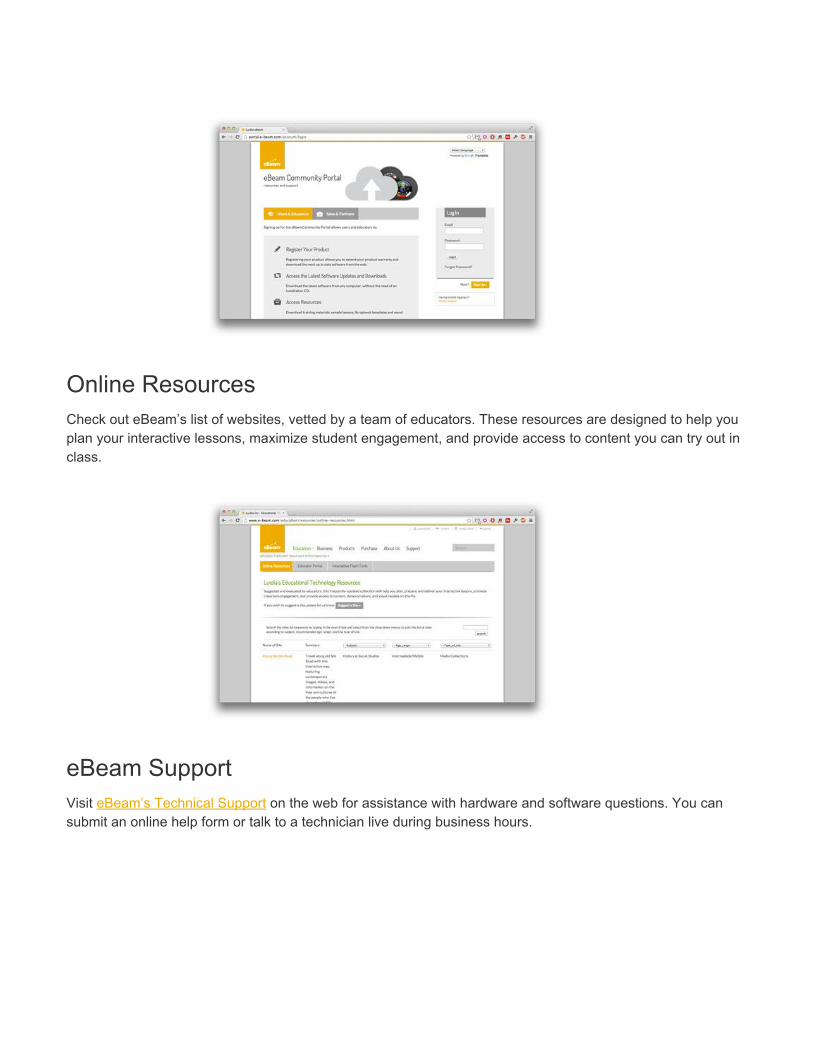
Online Resources Check out eBeam’s list of websites, vetted by a team of educators. These resources are designed to help you plan your interactive lessons, maximize student engagement, and provide access to content you can try out in class.
eBeam Support Visit eBeam’s Technical Support on the web for assistance with hardware and software questions. You can submit an online help form or talk to a technician live during business hours.
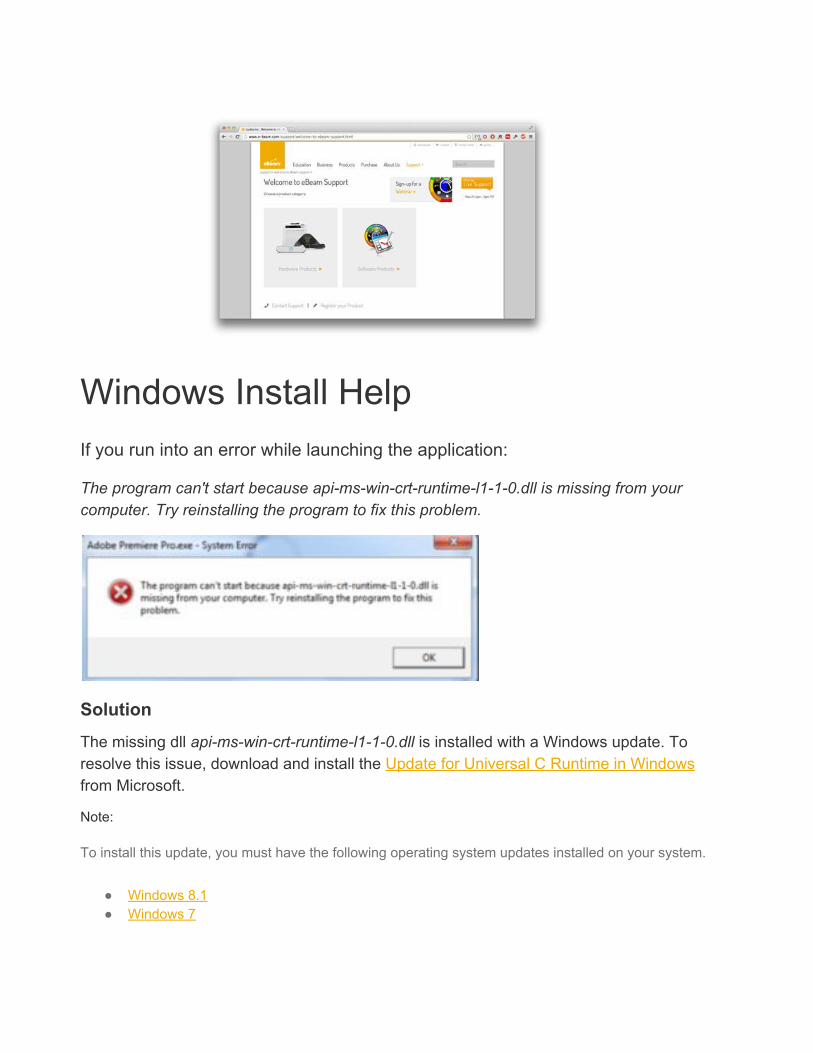
Windows Install Help If you run into an error while launching the application:
The program can't start because api-ms-win-crt-runtime-l1-1-0.dll is missing from your computer. Try reinstalling the program to fix this problem.
Solution The missing dll api-ms-win-crt-runtime-l1-1-0.dll is installed with a Windows update. To resolve this issue, download and install the Update for Universal C Runtime in Windows from Microsoft.
Note:
To install this update, you must have the following operating system updates installed on your system.
● Windows 8.1 ● Windows 7