intelligent nimh/nicd/li-ion charger - rechargeable · pdf filetenergy 4-bay nimh/nicd/li-ion...
TRANSCRIPT

Intelligent NiMH/NiCd/Li-ion Charger TN456
USER’S MANUAL
www.Tenergy.com

CONTENTS 1. Intended Use .........................................................................................3
2. Package Contents ..................................................................................4
3. Safety Instructions .................................................................................4
3.1 Product Safety .................................................................................4
3.2 Battery safety...................................................................................4
4. Operating Elements ...............................................................................5
5. Power Supply ........................................................................................5
6. Operation...............................................................................................5
6.1 Mode Selection ................................................................................6
6.2 Current selection..............................................................................6
7. Operation Modes and Display................................................................6
7.1 Operation Mode ...............................................................................6
7.2 Display .............................................................................................8
8. Maintenance. .........................................................................................9
9. Disposal.................................................................................................9

Tenergy 4-Bay NiMH/NiCd/Li-ion Intelligent Charger with Backlit LCD, TN456
Tenergy's TN456 is an intelligent charger designed for 1.2V NiMH / NiCd (A, AA, AAA, SC, C) and 3.7V Li-ion (26650, 22650, 26500, 18650, 17670, 18490, 17500, 17335, 16340(123A), 14500, 10440) rechargeable batteries. TN455 can be used to charge your batteries, as well as to test their capacities. Its backlit LCD allows you to see the charging status in real time, including the charging current, battery voltage, accumulated capacity, internal resistance, and elapsed time.
Parameter
Value
Input Voltage DC 12V /3.0A Power Consumption 18W-max Supported Battery Types NiMH, NiCd, Li-ion Supported Battery Sizes A, AA,AAA, SC, C, 26650, 22650, 26500,
18650, 17670, 18490, 17500, 17335, 16340 (123A), 14500, 10440
Number of Charging Slots 4 (independently controlled channels) Charge current 300mA, 500mA, 700mA, 1000mA
Discharge current 250 mA, 500mA
Charging Method -dV (NiMH / NiCd), CC/CV (Li-ion) Safety Protection Over-charging, overheating, short-circuit Device operation modes Charge, Test
Backlit LCD Yes USB output Yes
Please carefully read the following instructions before use. OPERATING INSTRUCTIONS
1. Intended Use The product is designed for use with NiMH, NiCd or Li-ion rechargeable batteries. It provides four independent charging slots compatible with these battery sizes: A, AA, AAA, A, SC, C, 26650, 22650, 26500, 18650, 17670, 18490, 17500, 17335, 16340 (123A), 14500, and 10440. Each charging slot can be independently controlled, and has its own display to show various information, such as charging current, battery voltage, charged capacity, internal resistance, and elapsed time. The charging current can be selected from 300 mA, 500 mA, 700 mA and 1000 mA. Batteries of different types (NiMH/NiCd/Li-ion) and sizes with different capacities can be charged at the same time. This charger uses the minus delta voltage (-ΔV) function to determine the charging status for NiMH/NiCd batteries, and the CC-CV(Constant Current-Constant Voltage) function to control the charging of Li-ion batteries. The charger also has
3

built-in overheat detection to protect rechargeable batteries and charger itself from getting too hot during use. The charger can only be used with the original power supply included with this charger.
The charger can only be powered by the included power supply. Operate and store it in dry indoor environment only. This product fulfills European and national requirements related to electromagnetic compatibility (EMC). CE conformity has been verified and the relevant statements are available upon request. Unauthorized conversion and/or modification of device are inadmissible because of safety and approval reasons (CE). Any usage other than described above is not permitted and can damage the product and lead to associated risks such as short-circuit, fire, electric shock, etc. Please read the operating instructions thoroughly and keep them for future reference.
2 Package Contents
Tenergy TN456 Charger x 1
Power Adapter x 1
User Manual x 1
3. Safety Instructions
We do not assume liability for resulting damages to property or personal injury if the product has been abused in any way or damaged by improper use or failure to observe these operating instructions. The warranty will then expire!
3.1 Product Safety
This product must not be exposed to substantial mechanical strain or strong vibrations. This product must be protected against electromagnetic files, static electrical fields, extreme temperatures, direct sunlight and moisture. The manufacturer’s instructions for the batteries must be observed, before they are used with this charger. This product should not be connected immediately after it has been brought from an area of cold temperature to an area of warm temperature, as condensed water may damage the product. Wait until the product adapts to the new ambient temperature before use. Sufficient ventilation is essential when operating the charger. Never cover the charger during use. 3.2 Battery safety
Correct polarity must be observed while inserting the batteries.
Non-rechargeable batteries, rechargeable alkaline batteries (RAM), lead acid batteries and lithium batteries must not be charged with this product. Batteries should be removed from the device if it is not used for a long period of time to prevent damage through battery leaking. Leaking or damaged batteries might cause acid burns when they come contact with the skin, therefore please use suitable protective gloves to handle damaged batteries.
4

Batteries must not be dismantled, short-circuited or thrown into fire. Never recharge non-rechargeable batteries as it may lead to explosion. If you have any queries about the device that are not answered user manual, please check with the distributor or manufacturer for further help.
4. Operating Elements
CHANNEL buttons (1, 2, 3, 4): Select a battery compartment to customize the operation mode or current setting.
MODE button: Lets you choose the operation mode (Charge, Test). The button should be held down for more than one second to activate mode change. To change operation mode for just one channel, press the corresponding CHANNEL button first.
DISPLAY button: Lets you toggle between different displayed info: current, voltage, capacity, internal resistance, and elapsed time.
CURRENT button: Lets you select the desired charge / discharge current setting. You can do so within eight seconds after inserting batteries, or after activation of mode selection.
5. Power Supply
Only the power adapter included with the charger is allowed to be used. When the charger is powered up, all LCD segments
will light up momentarily. The “null” icon will be shown in the LCD display for each slot, until a battery has been detected. When the charger is powered up, its USB output can be used to charge your portable devices regardless whether there are batteries in the charger. 6. Operation
Once a rechargeable battery is inserted, its present voltage (for example,”3.7V”) will be displayed for 4 seconds, then “300mA Charge” will be shown on display for another 4 seconds as the default setting. If the MODE or CURRENT button is not pressed during these 8 seconds, the charging process will start.
After that, you can either change the charging current and/or operation mode for all 4 channels by pressing MODE and holding it for 1 second, or you can specify which channel to modify by pressing the corresponding CHANNEL button (1-4) first, then use MODE / CURRENT to change the settings. For fully discharged batteries, using a slow charging current will be more effective. If completely empty or defective batteries are inserted into the charger, the “null” icon will be shown on the display, and the charger will refuse to charge them.
5

tage 2 Charge over
6.1 Mode Selection
Press and hold the MODE for 1 second to change the operating mode for all charging slots.
Press MODE button again to toggle between the Charge and Test modes.
After selecting the mode you can change the charging/discharging current pressing CURRENT.
Mode selection can be activated for specific channel only by pressing the 1,2,3,4
channel buttons first, before following the instructions above. separately for specific battery compartment.
6.2 Current selection
Within the first 8 seconds after inserting the batteries, press CURRENT to select desired charge current of 300, 500, 700 or 1000m. To change the charging current and / or operation mode again, press and hold MODE for 1 second, or press channel button 1-4 first and then press MODE to change the settings.
At any time during charger's opation, press DISPLAY to toggle between different display options: voltage, current, capacity, inner resistance and elapsed time.
7. Operation Modes and Display
7.1 Operation Mode
Charge Mode: The rechargeable battery is charged up to its maximum capacity.
Stage1 Charge.
S
6

Test mode: Checks the present capacity of a rechargeable battery. The maximum
capacity is determined by discharging the rechargeable battery after it was fully charged. If the maximum capacity is much lower than the rated capacity then it may reach the end of its lifetime.
Stage 1 Charge.
Stage 2 Discharge.
Stage 3 Discharge over, the second charge current selected.
Stage 4 The testing process is over.
7
7.2 Display
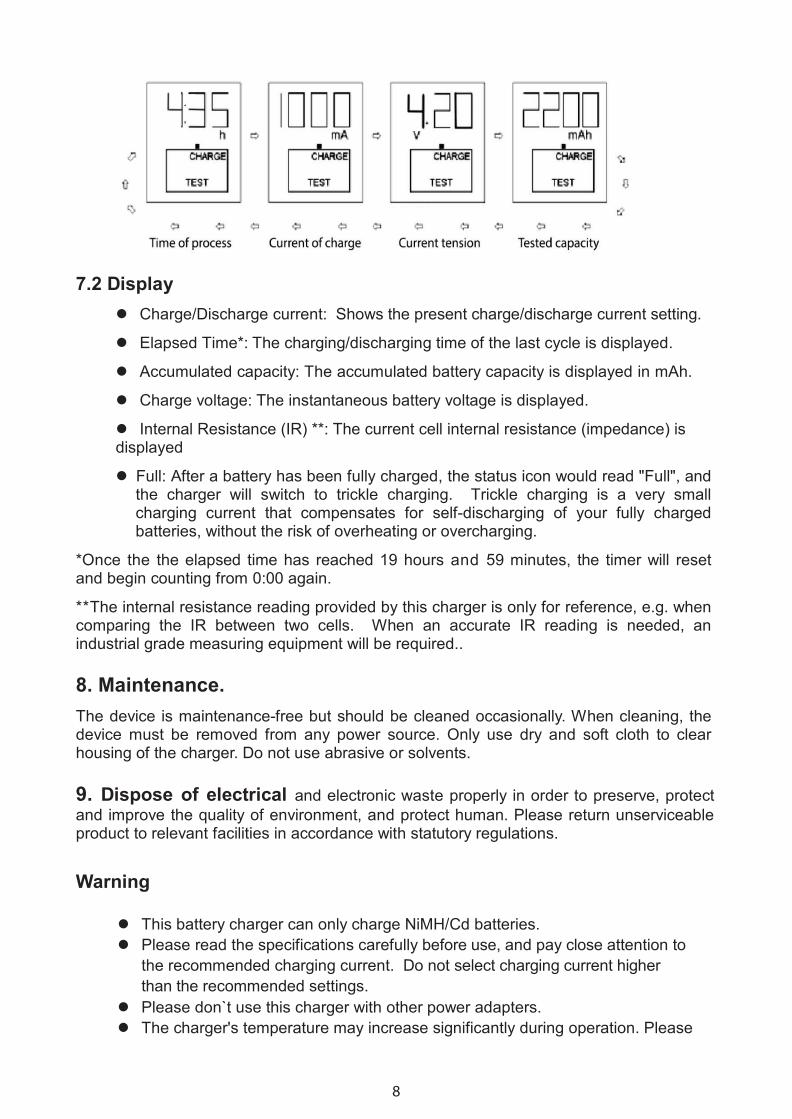
Charge/Discharge current: Shows the present charge/discharge current setting.
Elapsed Time*: The charging/discharging time of the last cycle is displayed.
Accumulated capacity: The accumulated battery capacity is displayed in mAh.
Charge voltage: The instantaneous battery voltage is displayed.
Internal Resistance (IR) **: The current cell internal resistance (impedance) is displayed
Full: After a battery has been fully charged, the status icon would read "Full", and the charger will switch to trickle charging. Trickle charging is a very small charging current that compensates for self-discharging of your fully charged batteries, without the risk of overheating or overcharging.
*Once the the elapsed time has reached 19 hours and 59 minutes, the timer will reset and begin counting from 0:00 again.
**The internal resistance reading provided by this charger is only for reference, e.g. when comparing the IR between two cells. When an accurate IR reading is needed, an industrial grade measuring equipment will be required.. 8. Maintenance.
The device is maintenance-free but should be cleaned occasionally. When cleaning, the device must be removed from any power source. Only use dry and soft cloth to clear housing of the charger. Do not use abrasive or solvents.
9. Dispose of electrical and electronic waste properly in order to preserve, protect and improve the quality of environment, and protect human. Please return unserviceable product to relevant facilities in accordance with statutory regulations.
Warning This battery charger can only charge NiMH/Cd batteries. Please read the specifications carefully before use, and pay close attention to
the recommended charging current. Do not select charging current higher than the recommended settings.
Please don`t use this charger with other power adapters. The charger's temperature may increase significantly during operation. Please
8

use it in a well-ventilated area. Please unplug the power supply and remove your batteries from the charger's
charging slots when the charger is not in use. The battery data displayed by this product is just for your reference only, and
may differ from those measured with a professional equipment.
9