intel audience impression metrics suite · pdf fileyou shall indemnify and hold intel and its...
TRANSCRIPT
Document Number: 328606-002
Intel® Audience Impression Metrics Suite User Guide April 2013

Intel® Audience Impression Metrics Suite User Guide April 2013 2 Document Number: 328606-002
INFORMATION IN THIS DOCUMENT IS PROVIDED IN CONNECTION WITH INTEL PRODUCTS. NO LICENSE, EXPRESS OR IMPLIED, BY ESTOPPEL OR OTHERWISE, TO ANY INTELLECTUAL PROPERTY RIGHTS IS GRANTED BY THIS DOCUMENT. EXCEPT AS PROVIDED IN INTEL'S TERMS AND CONDITIONS OF SALE FOR SUCH PRODUCTS, INTEL ASSUMES NO LIABILITY WHATSOEVER AND INTEL DISCLAIMS ANY EXPRESS OR IMPLIED WARRANTY, RELATING TO SALE AND/OR USE OF INTEL PRODUCTS INCLUDING LIABILITY OR WARRANTIES RELATING TO FITNESS FOR A PARTICULAR PURPOSE, MERCHANTABILITY, OR INFRINGEMENT OF ANY PATENT, COPYRIGHT OR OTHER INTELLECTUAL PROPERTY RIGHT.
A "Mission Critical Application" is any application in which failure of the Intel Product could result, directly or indirectly, in personal injury or death. SHOULD YOU PURCHASE OR USE INTEL'S PRODUCTS FOR ANY SUCH MISSION CRITICAL APPLICATION, YOU SHALL INDEMNIFY AND HOLD INTEL AND ITS SUBSIDIARIES, SUBCONTRACTORS AND AFFILIATES, AND THE DIRECTORS, OFFICERS, AND EMPLOYEES OF EACH, HARMLESS AGAINST ALL CLAIMS COSTS, DAMAGES, AND EXPENSES AND REASONABLE ATTORNEYS' FEES ARISING OUT OF, DIRECTLY OR INDIRECTLY, ANY CLAIM OF PRODUCT LIABILITY, PERSONAL INJURY, OR DEATH ARISING IN ANY WAY OUT OF SUCH MISSION CRITICAL APPLICATION, WHETHER OR NOT INTEL OR ITS SUBCONTRACTOR WAS NEGLIGENT IN THE DESIGN, MANUFACTURE, OR WARNING OF THE INTEL PRODUCT OR ANY OF ITS PARTS.
Intel may make changes to specifications and product descriptions at any time, without notice.
Designers must not rely on the absence or characteristics of any features or instructions marked "reserved" or "undefined." Intel reserves these for future definition and shall have no responsibility whatsoever for conflicts or incompatibilities arising from future changes to them.
The products described in this document may contain design defects or errors known as errata which may cause the product to deviate from published specifications. Current characterized errata are available on request.
Any software source code reprinted in this document is furnished under a software license and may only be used or copied in accordance with the terms of that license.
Contact your local Intel sales office or your distributor to obtain the latest specifications and before placing your product order.
BlueMoon, BunnyPeople, Celeron, Celeron Inside, Centrino, Centrino Inside, Cilk, Core Inside, E-GOLD, Flexpipe, i960, Intel, the Intel logo, Intel AppUp, Intel Atom, Intel Atom Inside, Intel CoFluent, Intel Core, Intel Inside, Intel Insider, the Intel Inside logo, Intel NetBurst, Intel NetMerge, Intel NetStructure, Intel SingleDriver, Intel SpeedStep, Intel Sponsors of Tomorrow., the Intel Sponsors of Tomorrow. logo, Intel StrataFlash, Intel vPro, Intel Xeon Phi, Intel XScale, InTru, the InTru logo, the InTru Inside logo, InTru soundmark, Itanium, Itanium Inside, MCS, MMX, Pentium, Pentium Inside, Puma, skoool, the skoool logo, SMARTi, Sound Mark, Stay With It, The Creators Project, The Journey Inside, Thunderbolt, Ultrabook, vPro Inside, VTune, Xeon, Xeon Inside, X-GOLD, XMM, X-PMU and XPOSYS are trademarks of Intel Corporation in the U.S. and/or other countries.
*Other names and brands may be claimed as the property of others.
Copyright © 2013, Intel Corporation. All rights reserved.

Intel® Audience Impression Metrics Suite April 2013 User Guide Document Number: 328606-002 3
Contents 1 Introduction ................................................................................................................ 8
1.1 Overview ............................................................................................................. 8 1.2 Scope ................................................................................................................. 9 1.3 Privacy Recommendations ..................................................................................... 9 1.4 Reference Documents .......................................................................................... 10 1.5 Terminology ....................................................................................................... 10 1.6 Hardware Requirements ....................................................................................... 11
2 Software Quick Setup ................................................................................................ 14 2.1 Software Download .............................................................................................. 14 2.2 Microsoft Windows Setup ...................................................................................... 15 2.3 Linux* Setup ...................................................................................................... 16
2.3.1 Intel® AIM Suite Package Verification Setup ................................................. 16 2.3.2 Intel® AIM Suite Software Installation ......................................................... 18
2.4 Common Setup ................................................................................................... 19
3 Hardware Selection ................................................................................................... 23 3.1 Camera Selection ................................................................................................ 23
3.1.1 Lighting................................................................................................... 23 3.1.2 Detection Distance ................................................................................... 23 3.1.3 Hardware Placement ................................................................................. 24 3.1.4 Camera Image Quality .............................................................................. 24
3.2 System Selection ................................................................................................. 25 3.2.1 Camera Requirements............................................................................... 25 3.2.2 Multiple Instances .................................................................................... 25 3.2.3 Third-Party Components ............................................................................ 25
4 Camera Setup ............................................................................................................ 27 4.1.1 Camera Positioning ................................................................................... 27 4.1.2 Camera Drivers ........................................................................................ 29 4.1.3 Camera Connections ................................................................................. 29 4.1.4 General Camera Configuration ................................................................... 29 4.1.5 Camera Exposure Settings ......................................................................... 29 4.1.6 Camera Gain and White-Balancing .............................................................. 30 4.1.7 Camera Pan/Tilt/Zoom Settings.................................................................. 30 4.1.8 Logitech USB Webcam Settings (Windows Only) ........................................... 30 4.1.9 IP Camera Settings ................................................................................... 31
4.2 Software Configuration ......................................................................................... 31 4.3 System Configuration ........................................................................................... 31
4.3.1 BIOS and Hardware Configuration .............................................................. 32 4.3.2 Operating System Configuration ................................................................. 32
4.4 Setup Verification ................................................................................................ 33
5 Software Features ..................................................................................................... 35 5.1 Intel® AIM Suite Audience Counter Instances .......................................................... 35
5.1.1 Managing Instances .................................................................................. 35

Intel® Audience Impression Metrics Suite User Guide April 2013 4 Document Number: 328606-002
5.1.2 Licensing ................................................................................................. 36 5.1.3 Camera Setup .......................................................................................... 38 5.1.4 Remote Activation .................................................................................... 42 5.1.1 Activation Utility ....................................................................................... 43
5.2 Intel® AIM Suite Audience Counter Settings ............................................................ 45 5.2.1 Active Zone ............................................................................................. 45 5.2.2 Face Mask ............................................................................................... 45 5.2.3 Distances ................................................................................................ 45 5.2.4 Intel® AIM Suite Opportunity To See Counter ............................................... 46 5.2.5 Parallel Processing .................................................................................... 47
5.3 Global Settings .................................................................................................... 48 5.3.1 Configure Intel® AIM Suite ........................................................................ 48
5.4 Intel® AIM Suite Audience Counter Instance Display ................................................ 53 5.4.1 Sizable Graphical User Interface Window ..................................................... 54 5.4.2 Intel® AIM Suite Audience Counter Instance Selection .................................. 54 5.4.3 Status Pane ............................................................................................. 55 5.4.4 Video Stream ........................................................................................... 55 5.4.5 Scalable Video Aspect Ratio ....................................................................... 55
5.5 Third-Party Integration ......................................................................................... 55 5.5.1 Intel® AIM Suite Socket API ....................................................................... 56 5.5.2 Campaign Analytics .................................................................................. 56
5.6 Intel® AIM Suite Watcher ..................................................................................... 56 5.6.1 Windows Specifics .................................................................................... 56 5.6.2 Linux Specifics ......................................................................................... 57
6 Intel® AIM Manage .................................................................................................... 60 6.1 Overview ............................................................................................................ 60 6.2 Sensor and License Management ........................................................................... 60
6.2.1 Sensor Management ................................................................................. 60 6.2.2 Remote Management ................................................................................ 61 6.2.3 License Ownership .................................................................................... 64
6.3 User Management ............................................................................................... 64 6.4 Status Reports .................................................................................................... 65 6.5 Software Downloads ............................................................................................ 65
7 Intel® AIM Analytics .................................................................................................. 66 7.1 Viewing Reports .................................................................................................. 66 7.2 Report Date and Time Range ................................................................................ 66 7.3 Report Granularity ............................................................................................... 67 7.4 Report Types ...................................................................................................... 68 7.5 Data Extraction ................................................................................................... 69
7.5.1 Export to CSV .......................................................................................... 69 7.5.2 Intel® AIM Suite Web API .......................................................................... 69
Appendix A – Intel® AIM Suite Installation Checklist ......................................................... 70
Figures
Figure 1. Intel® AIM Suite Deployment Configuration ............................................. 9 Figure 2. Intel® AIM Suite Download Web Site ...................................................... 14 Figure 3. Installation Type ................................................................................. 16 Figure 4. Manage Instances Dialog ...................................................................... 20
Intel® Audience Impression Metrics Suite April 2013 User Guide Document Number: 328606-002 5
Figure 5. Sensor Configuration Dialog – General Settings....................................... 21 Figure 6. Sensor Configuration Dialog - Advanced Settings .................................... 22 Figure 7. Camera Positioning Example ................................................................. 28 Figure 8. Manage Instances Dialog ...................................................................... 36 Figure 9. Configure License Dialog ...................................................................... 37 Figure 10. Sensor Configuration Dialog – General Settings ..................................... 39 Figure 11. Sensor Configuration Dialog – Advanced Settings .................................. 41 Figure 12. Sensor Configuration Dialog – Remote Activation .................................. 43 Figure 13. Configure Audience Counter Dialog ...................................................... 46 Figure 14. Intel® AIM Suite OTS Counter Traffic Flows ........................................... 47 Figure 15. Configure Intel® AIM Suite Dialog – General Settings ............................. 49 Figure 16. Allow Content Triggering for Child and Teen .......................................... 50 Figure 17. Configure Intel® AIM Suite Dialog – Proxy Settings ................................ 51 Figure 18. Configure Intel® AIM Suite Dialog – Advanced Settings .......................... 52 Figure 19. Intel® AIM Suite Graphical User Interface ............................................. 54 Figure 20. Intel® AIM Suite Audience Counter Instance Dropdown .......................... 55 Figure 21. Intel® AIM Suite Watcher GUI ............................................................. 57 Figure 22. Intel® AIM Suite Watcher Log GUI ....................................................... 59 Figure 23. Sensor Table Row .............................................................................. 61 Figure 24. Date Range Selection Tool .................................................................. 67 Figure 25. Report Granularity Tabs ..................................................................... 67 Figure 26. Report Types Tree ............................................................................. 69
Tables
Table 1. Terminology ........................................................................................ 10 Table 2. System Requirements ........................................................................... 12 Table 3. Recommended Camera ......................................................................... 13 Table 4. Alternative Camera ............................................................................... 13 Table 5. Detection Distance for Various System Configurations ............................... 24 Table 6. Configuration Settings ........................................................................... 32 Table 7. General Settings .................................................................................. 39 Table 8. Advanced Settings ................................................................................ 41 Table 9. Activation Utility Options ....................................................................... 44 Table 10. General Settings ................................................................................. 49 Table 11. Proxy Settings .................................................................................... 51 Table 12. Advanced Settings .............................................................................. 53 Table 13. Sensor Status Values .......................................................................... 61 Table 14. Remote Management Commands .......................................................... 62 Table 15. Remote Configuration Commands ......................................................... 63
Intel® Audience Impression Metrics Suite User Guide April 2013 6 Document Number: 328606-002
Revision History
Document Number
Revision Number Description Revision Date
328606
002
Added Automatic USB Camera Assignment. Updated document names and numbers in Reference Documents. Added Remote Configuration. Updated recommended camera list and added other USB cameras that are supported.
April 2013
001
Updated to add Scalable Video Aspect Ratio, Activation Utility, clarification for standalone application and operating system service installation types, and use of trademarks and names. Renamed document title to Intel® Audience Impression Metrics Suite User Guide, and changed the document’s number (was 465720).
February 2013
465720
1.5 Minor update. Added Panasonic* camera support information. October 2012
1.4 Updated software sections for Ubuntu and Red Hat details. September 2012
1.3
Updated the Intel® AIM Manage and Intel® AIM Suite Analytics URLs. Updated required USB camera specifications to include latest USB cameras.
August 2012
1.2
Added Section 5.2.5 for enabling the parallel processing feature in Intel® AIM Suite Audience Counter. Updated Figure 13 to include the parallel processing checkbox. Added Section 1.3 regarding privacy recommendations regarding the video stream. Updated Section 5.5.1 to briefly describe some security implications when enabling the Socket API.
December 2011
1.1
Added Figure 1 to better illustrate the deployment configuration. Clarified environmental requirements in Table 3, Table 4, and Section 3.1.1. Clarified camera placement requirements in Section 4.1.1. Updated Section 5.2.4 with additional details on Intel® AIM Suite Opportunity To See Counter.
July 2011
1.0 Initial release. December 2010

Intel® Audience Impression Metrics Suite April 2013 User Guide Document Number: 328606-002 7

Introduction
Intel® Audience Impression Metrics Suite User Guide April 2013 8 Document Number: 328606-002
1 Introduction
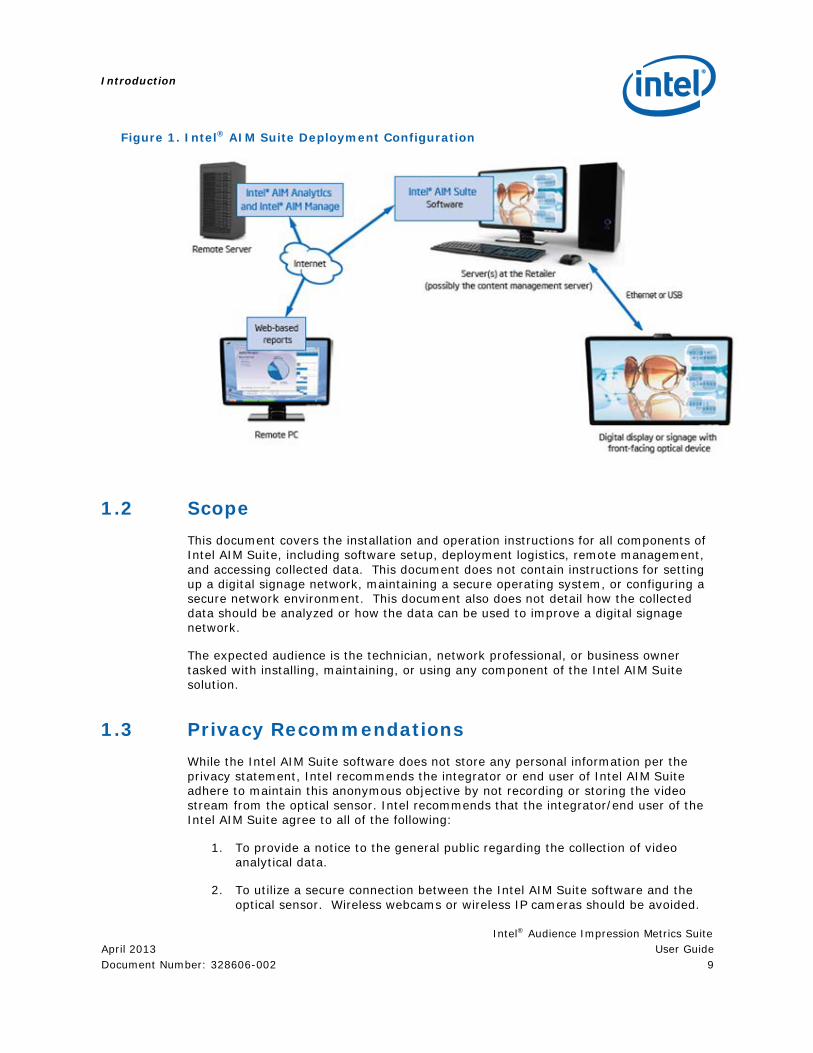
1.1 Overview Intel® Audience Impression Metrics Suite (Intel® AIM Suite) is a fully automated audience measurement system that uses Anonymous Viewer Analytics (AVA) technologies and has been optimized for use in digital signage networks. Intel AIM Suite is powered by proprietary face detection technology called Intel® AIM Suite Audience Counter. Intel AIM Suite Audience Counter is a software-based technology that uses a camera to gather viewership metrics for signage. Recorded metrics include total viewer counts, viewing times, and demographic information such as gender and age. For privacy purposes, all collected data is anonymous and none of this data can be associated with a specific individual. These metrics can be used to measure the return-on-investment (ROI) for in-store marketing, to gauge the effectiveness of advertising campaigns, to tailor screen content based on audience characteristics, and to determine the best locations for signage.
The major components of an Intel AIM Suite deployment are shown below in Figure 1. The Intel AIM Suite Audience Counter technology is configured and controlled by software called Intel AIM Suite. Intel AIM Suite is run on a computer system that is located in the same physical location as the signage that is being measured. The system running Intel AIM Suite has a physical connection to all cameras used for measurement. Intel AIM Suite will store all collected data locally on the system and then periodically upload the data over the Internet to the Intel® Audience Impression Metrics Analytics (Intel® AIM Analytics) server. End users can use the Intel AIM Analytics Web site to view predefined reports of the collected data. End users can also manage licenses and remotely manage their deployments using the Intel® Audience Impression Metrics Manage (Intel® AIM Manage) Web site.
Introduction
Intel® Audience Impression Metrics Suite April 2013 User Guide Document Number: 328606-002 9
Figure 1. Intel® AIM Suite Deployment Configuration
1.2 Scope This document covers the installation and operation instructions for all components of Intel AIM Suite, including software setup, deployment logistics, remote management, and accessing collected data. This document does not contain instructions for setting up a digital signage network, maintaining a secure operating system, or configuring a secure network environment. This document also does not detail how the collected data should be analyzed or how the data can be used to improve a digital signage network.
The expected audience is the technician, network professional, or business owner tasked with installing, maintaining, or using any component of the Intel AIM Suite solution.
1.3 Privacy Recommendations While the Intel AIM Suite software does not store any personal information per the privacy statement, Intel recommends the integrator or end user of Intel AIM Suite adhere to maintain this anonymous objective by not recording or storing the video stream from the optical sensor. Intel recommends that the integrator/end user of the Intel AIM Suite agree to all of the following:
1. To provide a notice to the general public regarding the collection of video analytical data.
2. To utilize a secure connection between the Intel AIM Suite software and the optical sensor. Wireless webcams or wireless IP cameras should be avoided.
Introduction
Intel® Audience Impression Metrics Suite User Guide April 2013 10 Document Number: 328606-002
3. To secure (via either a software or hardware firewall) the network connection on the media player on which the Intel AIM Suite software is installed.
4. To apply the latest security updates and patches for the operating system on the media player which has Intel AIM Suite installed.
1.4 Reference Documents
Document Document No.
Intel® Audience Impression Metrics Suite Socket API Reference Manual 328766
Intel® Audience Impression Metrics Suite HTTP API Reference Manual 328767
1.5 Terminology Table 1. Terminology
Term Description
Activation Code An alphanumeric string generated by Intel® AIM Suite that uniquely identifies an Intel® AIM Suite Audience Counter instance.
AIM Audience Impression Metrics – data that contains anonymous viewer information.
AVA Anonymous Viewer Analytics – a technology that analyzes video to gather anonymous metrics.
CSV Comma Separated Value – a file format where values are separated by commas and new lines.
Digital Signage An electronic display that shows dynamically changing messages and advertisements.
FPS Frames-Per-Second – the number of camera frames processed or produced in one second.
Instance A component enabled by the Intel® AIM Suite Audience Counter technology for every camera feed that is to be measured.
Intel® AIM Suite Software that is used to configure and perform audience measurement.
Intel® AIM Suite Audience Counter
Proprietary face detection technology used for audience measurement.
Intel® AIM Suite Opportunity To See Counter
A technology that acts as an add-on component for the Intel® AIM Suite Audience Counter face detection technology to estimate how many people had the opportunity to look at the screen being measured.

Introduction
Intel® Audience Impression Metrics Suite April 2013 User Guide Document Number: 328606-002 11
Term Description
Intel® AMT Intel® Active Management Technology – a technology that enables powerful remote management capabilities when used with remote management software.
License The usage permissions for an Intel® AIM Suite Audience Counter instance.
License Code A code associated with a license that is generated by the Intel® AIM Manage Web site and copied into Intel® AIM Suite to enable functionality for an Intel® AIM Suite Audience Counter instance.
Location The physical location where a group of sensors are located.
PoE Power over Ethernet – a technology that allows components to be powered through CAT5e or CAT6 cabling.
PSE Power Sourcing Equipment – hardware that acts as the power source for PoE devices.
ROI Return On Investment – a measurement of the efficiency of an investment.
Sensor An individual camera or Intel® AIM Suite Audience Counter instance that is used for face detection.
Static Signage A sign that always displays the same message or advertisement, such as a poster or a cardboard display.
System The computer system used to run Intel® AIM Suite and perform audience measurement.
Venue A term used on the Intel® AIM Analytics Web site and has the same meaning as location.
Watcher A software application that supports Intel® AIM Suite and is run on the same computer system.
1.6 Hardware Requirements There are two main pieces of hardware that must be acquired in order to deploy the Intel AIM Suite solution: a computer system and a camera. The system requirements listed below in Table 2 should be applicable to the majority of deployments. The recommended camera to be used for deployments— the Logitech HD Webcam C910*, Logitech HD Webcam C920* or the Logitech Quickcam Pro 9000*—is described below in Table 3. An alternative camera—the Axis M1054*—is described below in Table 4. These cameras are both compatible with the recommended system when used at a camera resolution of 640x480 or 800x500 respectively. The properties of both cameras should be evaluated to determine the most appropriate camera for the deployment.

Introduction
Intel® Audience Impression Metrics Suite User Guide April 2013 12 Document Number: 328606-002
Additional details regarding system requirements and cameras can be found in the Hardware Selection section. It is recommended to review this entire section for all deployments, particularly under the following circumstances.
• The same system will be used to power face detection for multiple cameras.
• The system will be used to run CPU intensive software in addition to Intel AIM Suite, such as a digital signage player.
• Neither of the cameras listed meet the requirements of the deployment.
• The required face detection distance is less than 10 feet or greater than 25 feet.
• Signage larger than 50 inches or smaller than 20 inches (diagonally) is being measured.
Table 2. System Requirements
CPU
Not integrated with a Content Management System (CMS): Intel® Core™ i3 processor, 2.4 GHz or faster (3.2 GHz is preferred) Integrated with a Content Management System (CMS): Intel® Core™ i5 or Core™ i7, 2.4 GHz or faster (3.2 GHz is preferred)
Operating System Windows XP*, Windows Vista*, or Windows 7* Ubuntu* 12.04.2 32-bit Red Hat Enterprise Linux* 6.2 32-bit
RAM 2 GB
Available Hard Drive Space 40 GB
Other
Windows Only: To use the Intel® AIM Suite software with Windows Vista or Windows 7, User Account Control (UAC) must be disabled on the system and the software must be installed and run with an Administrator account. Linux Only: To use the Intel® AIM Suite software with Ubuntu or Red Hat, the software must be installed by someone with sudo privileges.
The system must have an active Internet connection for deployments.
Note: Recommendations listed in this table may not be appropriate for all CMS applications. Performance testing should be completed per the Third-Party Components section in this document.
Introduction
Intel® Audience Impression Metrics Suite April 2013 User Guide Document Number: 328606-002 13
Table 3. Recommended Camera
Model Logitech HD Webcam C910*, or Logitech HD Webcam C920*
Connection Type USB
Maximum Distance Placed From System
Approximately 5 meters. USB extenders can be purchased to increase this distance.
Lighting Requirements
A brightly lit, evenly illuminated, indoor environment is required, such as a supermarket.
Face Detection Distance Up to 25 feet at a camera resolution of 640x480
Table 4. Alternative Camera
Model Axis M1054*, Axis Q1602*, or Axis Q1604*
Connection Type IP Ethernet
Maximum Distance Placed From System Approximately 100 meters
Lighting Requirements
A brightly lit, evenly illuminated, indoor environment (such as a supermarket) is preferred. An environment with a medium level of brightness is also acceptable, such as a restaurant in the afternoon.
Face Detection Distance Up to 25 feet at a camera resolution of 800x500
Other Supports Power over Ethernet (PoE) Class 2. Note that Power Sourcing Equipment (PSE), such as a PoE switch, will be required to use the PoE features of the camera.
Note: Other supported USB cameras include the following:
• Microsoft LifeCam Cinema* • Microsoft LifeCam HD-3000* • Creative Live! Cam Optia AF* • HP WebCam HD-3110* • Logitech Quickcam Pro 9000* (Logitech 2.51 driver required)
§

Software Quick Setup
Intel® Audience Impression Metrics Suite User Guide April 2013 14 Document Number: 328606-002
2 Software Quick Setup This section describes a set of tasks that need to be completed in order to install the Intel AIM Suite solution for use with a single camera. It may be helpful to refer to the checklist in Appendix A – Intel® AIM Suite Installation Checklist when installing the Intel AIM Suite solution.
This section only covers basic setup requirements and is intended to be used when setting up Intel AIM Suite for demonstration or testing purposes. For full deployments of the Intel AIM Suite solution it is recommended to also refer to the other sections of this document. Additionally, it is highly recommended that all task guidelines be followed, as not doing so could result in data loss, invalid data, and increased maintenance costs.
Note: Intel AIM Suite can be installed as a Microsoft Windows* operating system service or a standalone application. Throughout most of this document both installation types are referred to generically as “Intel AIM Suite”. However, when discussing operational differences, the installation type will be specified.
2.1 Software Download Intel AIM Suite must be installed on all computer systems that will be connected to cameras and used to collect viewership metrics. Intel AIM Suite can be installed by following the steps listed below.
1. Log in to the Intel® AIM Manage Web site https://aimsuite.intel.com/manage using the computer system that Intel AIM Suite will be installed on.
2. Navigate to the “Files” section of the Web site.
3. Click on the download link under the “Intel AIM Suite Installer” section, which is shown below in Figure 2.
4. Run the installer on the system after the download has completed.
5. Follow all onscreen instructions displayed by the installer.
Figure 2. Intel® AIM Suite Download Web Site

Software Quick Setup
Intel® Audience Impression Metrics Suite April 2013 User Guide Document Number: 328606-002 15
2.2 Microsoft Windows Setup This section describes the steps required to install Intel AIM Suite software on Microsoft Windows operating systems.
1. Install the Intel AIM Suite software onto the system using the Intel AIM Suite installation application.
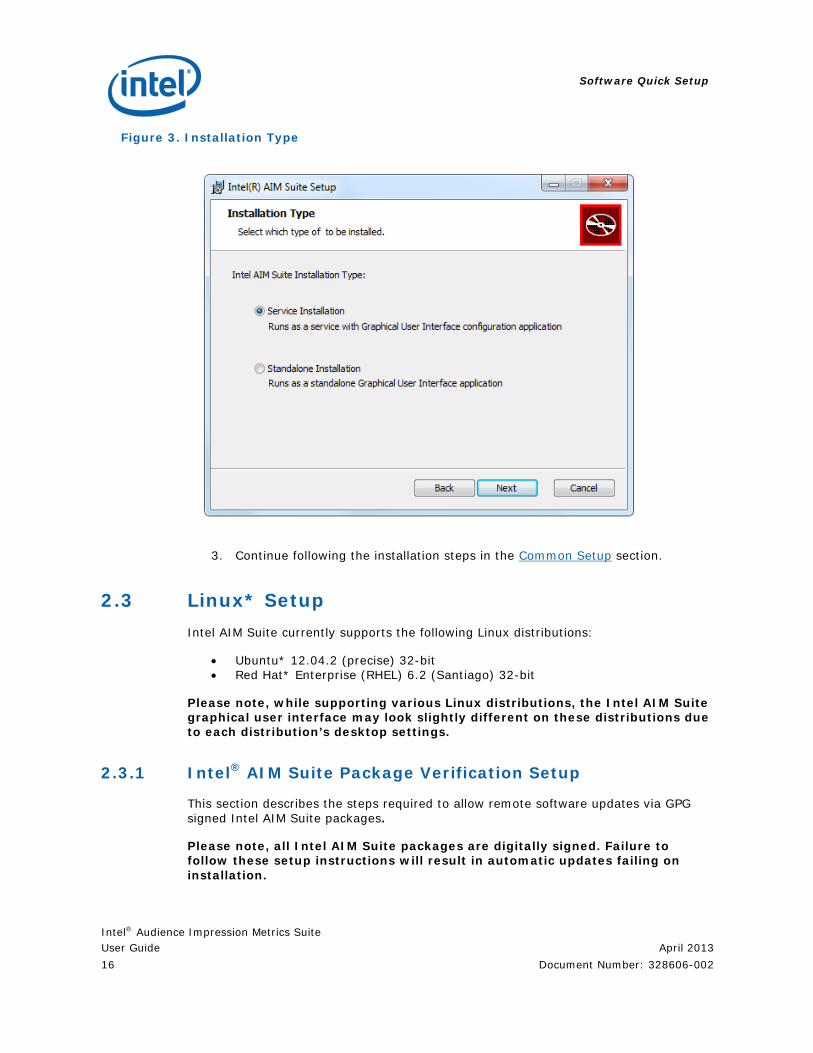
2. The installation application will prompt you to select the Intel AIM Suite Installation Type, as shown below in Figure 3.
a. Choose “Service Installation” to run Intel AIM Suite as a Microsoft Windows operating system service with a Graphical User Interface configuration application. When this option is selected:
i. The service will start immediately when installation is finished and then automatically every time the operating system is initialized.
ii. To launch the Intel AIM Suite Graphical User Interface configuration application, run: <install directory>\AIMSuite.exe, or from the Start menu, run: Intel AIM Suite Configuration.
Note: When the Intel AIM Suite graphical user interface configuration application is run, it will stop the Intel AIM Suite service while the configuration application is active and restart the service after the configuration application is exited or after 15 minutes time has elapsed without configuration activity, whichever comes first.
b. Choose “Standalone Installation” to run Intel AIM Suite as a standalone Graphical User Interface application. When this option is selected:
i. The Intel AIM Suite graphical user interface application should start automatically when the installation is finished. If it does not start within 30 seconds, double-click the “AIM Watcher” icon on the desktop.
Software Quick Setup
Intel® Audience Impression Metrics Suite User Guide April 2013 16 Document Number: 328606-002
Figure 3. Installation Type
3. Continue following the installation steps in the Common Setup section.
2.3 Linux* Setup Intel AIM Suite currently supports the following Linux distributions:
• Ubuntu* 12.04.2 (precise) 32-bit • Red Hat* Enterprise (RHEL) 6.2 (Santiago) 32-bit
Please note, while supporting various Linux distributions, the Intel AIM Suite graphical user interface may look slightly different on these distributions due to each distribution’s desktop settings.
2.3.1 Intel® AIM Suite Package Verification Setup
This section describes the steps required to allow remote software updates via GPG signed Intel AIM Suite packages.
Please note, all Intel AIM Suite packages are digitally signed. Failure to follow these setup instructions will result in automatic updates failing on installation.

Software Quick Setup
Intel® Audience Impression Metrics Suite April 2013 User Guide Document Number: 328606-002 17
Ubuntu
1. Install debsig-verify. a. sudo apt-get install debsig-verify
2. Import the Intel AIM Suite key.
a. gpg --import AIMSuite_key.asc The AIMSuite_key.asc file can be obtained at the same location where the Intel AIM Suite package was downloaded.
3. The next step is to import the key into the debsig keyring. To do this: a. sudo mkdir /usr/share/debsig/keyrings/3C99CC06F4905412 b. sudo gpg --no-default-keyring --keyring
/usr/share/debsig/keyrings/3C99CC06F4905412/debsig.gpg --import AIMSuite_key.asc
4. Now we need to create the debsig-verify policy a. sudo mkdir /etc/debsig/policies/3C99CC06F4905412 b. sudo vi /etc/debsig/policies/3C99CC06F4905412/aimsuite.pol c. Copy/paste the policy text below into the aimsuite.pol file.
<?xml version="1.0"?> <!DOCTYPE Policy SYSTEM "http://www.debian.org/debsig/1.0/policy.dtd"> <Policy xmlns="http://www.debian.org/debsig/1.0/"> <Origin Name="Intel AIMSuite" id="3C99CC06F4905412" Description="AIMSuite Package"/> <Selection> <Required Type="origin" File="debsig.gpg" id="3C99CC06F4905412"/> </Selection> <Verification MinOptional="0"> <Required Type="origin" File="debsig.gpg" id="3C99CC06F4905412"/> </Verification> </Policy>
5. Verify the package.
a. sudo debsig-verify <aimsuite-packagename> The output of this command should look similar to this: debsig: Verified package from `package from AIMSuite' (Intel AIMSuite)
Red Hat Enterprise Linux
1. Import the Intel AIM Suite key. a. gpg --import --trusted-key 3C99CC06F4905412 AIMSuite_key.asc
The AIMSuite_key.asc file can be obtained at the same location where the AIM Suite package was downloaded.
2. Verify the package. a. gpg <aimsuite-packagename>.gpg

Software Quick Setup
Intel® Audience Impression Metrics Suite User Guide April 2013 18 Document Number: 328606-002
The output of this command should look similar to this:
gpg: Signature made Thu 31 May 2012 08:26:33 AM MST using RSA key ID F4905412
gpg: Good signature from "AIM Suite Support (AIM Suite Linux Signing Key) <[email protected]>"
b. The above command should produce a file with the name of <aimsuite-packagename> under current directory, but without the “.gpg” extension.
2.3.2 Intel® AIM Suite Software Installation
1. Install the Intel AIM Suite software onto the system using the Intel AIM Suite installation package.
a. Installation steps of Intel AIM Suite software
Ubuntu
i. To install on Ubuntu, use “sudo dpkg –i <aimsuite-packagename>”, where <aimsuite-packagename> will be the name of the installation package with a “.bin” extension.
Please note, to uninstall, use “sudo dpkg –r aimsuite”.
Red Hat Enterprise Linux
i. To install on RHEL, please ensure the installing user has sudo right. This can be done by adding a line “<user> ALL=(ALL) ALL” to “/etc/sudoers”, where <user> is the name of current installing user. Please note that you must have super-user right to make this change.
1. Execute “chmod +x <aimsuite-packagename>”, where <aimsuite-packagename> will be the name of the installation package with a “.bin” extension.
2. Execute “sudo ./<aimsuite-packagename>” and follow the on-screen instructions to install the software.
3. Please note, to uninstall, use “sudo rpm –e aimsuite”.
b. After the installation is complete, one or more users will need to be added to the “aimgroup” so that they can run the AIMSuite and AIMWatcher applications. This step of adding the current user is done automatically by the AIMSuite Installer.
To manage the group manually or add/remove users, please use the “System → Administration → Users and Groups” in Ubuntu Classic or Red Hat to “Manage Groups” for the “aimgroup”.

Software Quick Setup
Intel® Audience Impression Metrics Suite April 2013 User Guide Document Number: 328606-002 19
i. Please note, you must log out and log back in for the user and group modifications to take effect.
ii. If you are using the Ubuntu Unity interface, please use the search facility to find the “Users and Groups” application.
2. To start the software, click on the “AIM Watcher” icon located in Applications → Other → AIM Watcher. This will launch AIM Watcher, which will launch the Intel AIM Suite application.
a. If using the Ubuntu Unity interface, please use the Search facility to find and launch AIM Watcher.
3. Continue following the installation steps in the Common Setup section.
2.4 Common Setup Once the operating system specific installation steps are complete and Intel AIM Suite is launched, follow the following steps to configure Intel AIM Suite.
If configuring a USB camera, ensure that the camera has a wired connection to the system. If configuring an Internet Protocol (IP) camera, ensure that the camera is attached to the network.
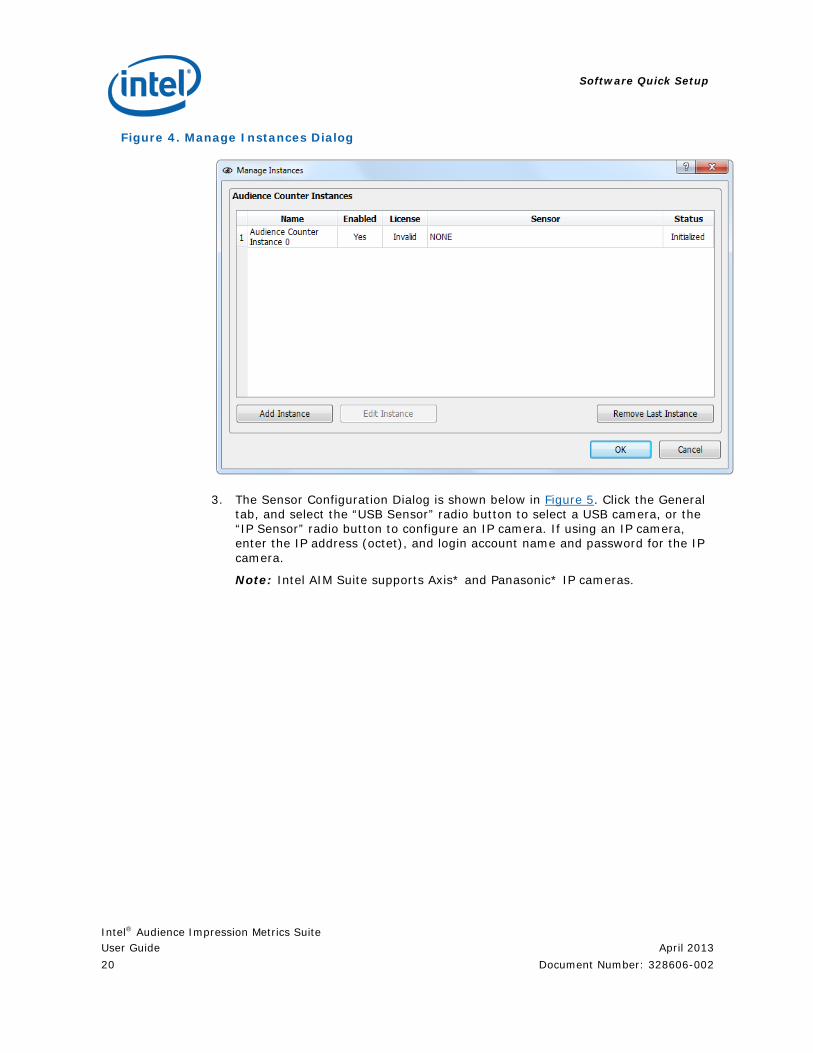
1. Select “AIM → Manage Instances” from the menu.
Note: A default Intel AIM Suite Audience Counter Instance is created automatically the first time Intel AIM Suite is configured, as shown below in Figure 4.
2. Click on the default Intel AIM Suite Audience Counter Instance to configure a device for the instance.
Software Quick Setup
Intel® Audience Impression Metrics Suite User Guide April 2013 20 Document Number: 328606-002
Figure 4. Manage Instances Dialog
3. The Sensor Configuration Dialog is shown below in Figure 5. Click the General tab, and select the “USB Sensor” radio button to select a USB camera, or the “IP Sensor” radio button to configure an IP camera. If using an IP camera, enter the IP address (octet), and login account name and password for the IP camera.
Note: Intel AIM Suite supports Axis* and Panasonic* IP cameras.

Software Quick Setup
Intel® Audience Impression Metrics Suite April 2013 User Guide Document Number: 328606-002 21
Figure 5. Sensor Configuration Dialog – General Settings
4. Alternatively, check the box “Enable automatic USB camera assignment” if you would like Intel AIM Suite to automatically assign an available USB camera to the instance during runtime. Refer to the Sensor Configuration Dialog General Settings Table 7, for a detailed description of this option.
Note: "Enable automatic USB camera assignment" is enabled by default for the Intel Audience Counter instance.
5. Click the Advanced tab in the Sensor Configuration Dialog, which is shown below in Figure 6 to configure the camera specific information. Select a resolution of 640x480 if configuring the Logitech HD Webcam C910*, Logitech HD Webcam C920*, or Logitech Quickcam Pro 9000*. The recommended resolution for the Axis M1054* IP camera is 800x500.

Software Quick Setup
Intel® Audience Impression Metrics Suite User Guide April 2013 22 Document Number: 328606-002
Figure 6. Sensor Configuration Dialog - Advanced Settings
6. Click “OK” and wait for the camera to initialize.
7. Click “OK” on the Manage Instances dialog.
8. Select “View → Show Video Stream” from the menu.
9. Position a face in front of the camera and ensure that a green circle is drawn around the face within Intel AIM Suite.
§
Hardware Selection
Intel® Audience Impression Metrics Suite April 2013 User Guide Document Number: 328606-002 23
3 Hardware Selection
3.1 Camera Selection Selecting an appropriate camera to use with the Intel AIM Suite solution is very critical as an incorrect camera could result in invalid data, unfulfilled deployment requirements, and increased maintenance costs. The correct camera for a deployment depends on a variety of factors including the environment, distance requirements, and hardware constraints.
The Intel AIM Suite software can use a DirectShow* compatible camera (USB or FireWire*) on Windows* systems, Video 4 Linux* compatible cameras (USB UVC devices) on Linux systems, an Axis IP camera that uses the VAPIX protocol or IP cameras that use the Panasonic protocol. However, not all cameras that can be selected for use with Intel AIM Suite will give optimal results with the Intel AIM Suite Audience Counter technology. It is highly recommended to use one of the cameras listed in the Hardware Requirements section if possible. Otherwise, the guidelines in this section must be followed when selecting an alternative camera.
3.1.1 Lighting
The Intel AIM Suite Audience Counter technology is designed for optimal use in a brightly lit, evenly illuminated, indoor environment, such as a supermarket. It is preferable that the lighting is not influenced by sunlight. Additionally, the camera should not be pointed directly at a light source, such as a ceiling light or the Sun. In some circumstances, the Intel AIM Suite Audience Counter technology can be used in environments that are not brightly lit (such as a restaurant in the evening) or in environments that are affected by sunlight. For such circumstances, the selected camera should have a low Lux rating and may also benefit from wide-dynamic-range capabilities. It is recommended to speak directly with a support representative before using the Intel AIM Suite Audience Counter technology in a non-optimal environment.
3.1.2 Detection Distance
It is important to consider the detection distance requirements of the deployment as the chosen camera resolution affects how far away viewers can be detected. At the recommended camera resolution of 640x480, faces can be detected up to 25 feet away from the camera under ideal conditions. This distance requirement is recommended for screens of size 20 inches to 50 inches (as measured diagonally). A higher resolution is required to detect faces farther away, and a lower resolution can be selected for lower distance requirements.

Hardware Selection
Intel® Audience Impression Metrics Suite User Guide April 2013 24 Document Number: 328606-002
The selected camera must support a resolution that is compatible with the distance requirements of the deployment. A consequence of using a higher resolution is that a more powerful system will be required. Conversely, using a lower resolution will require a less powerful system. Intel AIM Suite does not impose a maximum resolution limitation and can be used with any resolution as long as the system is powerful enough. The estimated detection performance for various system configurations is listed below in Table 5.
Table 5. Detection Distance for Various System Configurations
Resolution Maximum Distance1,2 Minimum CPU Recommended for:
320x240 10 feet Intel® Core™ 2 Duo 1.8 GHz
Small-size displays such as kiosks (less than 20 inches diagonal)
640x480 25 feet Intel Core 2 Duo 2.0 GHz Medium-sized displays (20 to 50 inches diagonal)
1280x960 50 feet Intel Core 2 Quad 2.6 GHz Large-sized displays (50 inches or larger diagonal)
Notes: 1. Under optimal lighting conditions (bright, evenly distributed illumination).
3.1.3 Hardware Placement
The camera choice can be influenced by how close the camera can be placed to the system. If the camera can be placed within 5 meters of the system then a USB camera or an IP camera can be used. If this distance is greater than 5 meters (but less than 100 meters) an IP camera can still be used, but a USB camera could only be used in conjunction with USB extenders.
When using an IP camera, access to power for the camera must be considered. If power is unavailable where the camera will be mounted, an IP camera that supports Power-over-Ethernet (PoE) is a good option. PoE support allows an IP camera to be powered directly through CAT5e or CAT6 cabling. To use PoE, the camera must be connected to Power-Sourcing-Equipment (PSE), such as a PoE switch.
3.1.4 Camera Image Quality
The image quality of the camera can greatly affect the performance of the Intel AIM Suite Audience Counter technology. In general, the image from the camera should be clear and crisp. Camera images that are fuzzy or blurry should be avoided. Camera images that are spotty or pixilated should also be avoided. The camera should be able to output frames of this quality at a rate of at least 12 frames-per-second (FPS), although 15 FPS is preferred. It is recommended that a customer consult a support representative before using a camera that has not been explicitly recommended for use with the Intel AIM Suite solution.

Hardware Selection
Intel® Audience Impression Metrics Suite April 2013 User Guide Document Number: 328606-002 25
3.2 System Selection When selecting a system to run the Intel AIM Suite software, the CPU is the most important component to consider. The Intel AIM Suite Audience Counter technology used by Intel AIM Suite is very CPU-intensive. Intel AIM Suite does not require a lot of RAM or hard drive space. There are minimal graphics requirements, and any integrated graphics should be sufficient. The system should have a motherboard with on-board Ethernet or a network card so that the system can be connected to the Internet. Intel AIM Suite can be run without an Internet connection for demonstration purposes, but an Internet connection is required for deployments. The hardware requirements (except the CPU requirements) listed above in Table 2 should be applicable to most deployments.
3.2.1 Camera Requirements
The greatest impact the camera has on system selection is based on the resolution that the camera will operate at. Higher camera resolutions require a faster CPU in order to process the additional data in the video stream. The effect of camera resolution on CPU choice is described in more detail above in the Detection Distance subsection.
3.2.2 Multiple Instances
As described below in the Intel® AIM Suite Audience Counter Instances subsection, a single system can be used to process multiple camera feeds. Running multiple instances requires a combination of improved support for multi-threaded applications, and faster CPU processing power. The preferred CPU for running multiple instances will have a higher number of CPU cores or CPU threads.
3.2.3 Third-Party Components
The performance requirements of all other software required to run on the system must be taken into consideration when selecting a system. Because Intel AIM Suite is a software solution, it is often possible to run the Intel AIM Suite on the same system as a digital signage player. It is important to verify that the CPU is powerful enough to run both the digital signage player and Intel AIM Suite. Digital signage players that make use of a graphics card can be beneficial in this scenario as they will place a lower load on the CPU. The below steps are a guideline for determining if the system is powerful enough to run Intel AIM Suite and the digital signage player. These steps assume that the system is already powerful enough to run only Intel AIM Suite.
1. Ensure that Intel AIM Suite is installed on the system and has been configured to use one camera.
2. Ensure that the digital signage player has been installed on the system.
3. Launch the Intel AIM Suite software and ensure that the Intel AIM Suite window has been minimized.
4. Launch the digital signage player and ensure that it is operating in a state that represents its maximum CPU requirement.

Hardware Selection
Intel® Audience Impression Metrics Suite User Guide April 2013 26 Document Number: 328606-002
5. Use a CPU monitoring tool – such as the Windows Task Manager* on Windows systems or System Monitor* on Linux systems – to track the total CPU usage of the system.
6. Place four faces in front the camera and have the faces move around slightly for a period of ten seconds. If the total CPU usage of the system remains below 80% then the system should be powerful enough.

Camera Setup
Intel® Audience Impression Metrics Suite April 2013 User Guide Document Number: 328606-002 27
4 Camera Setup A camera in an incorrect position or with an incorrect configuration can prevent the Intel AIM Suite Audience Counter technology from properly detecting viewers; therefore, it is critical to properly position the camera and configure its settings. Following the guidelines in this section will help to ensure optimal performance of the Intel AIM Suite solution.
4.1.1 Camera Positioning
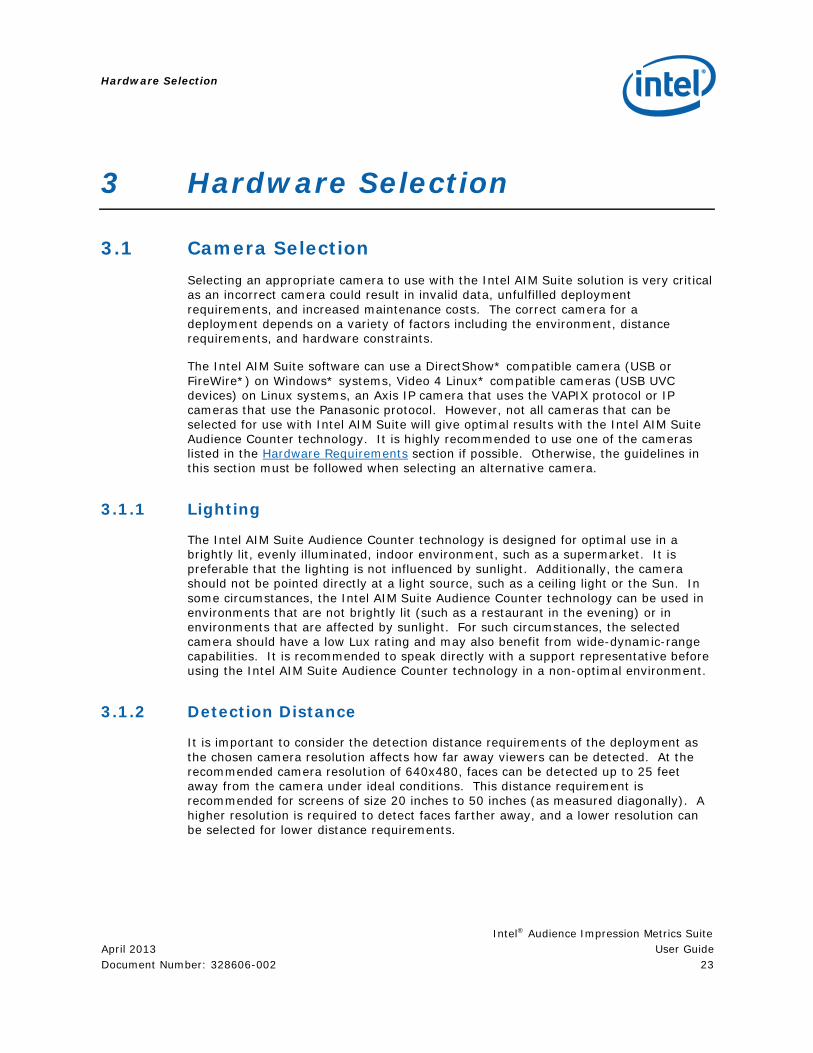
The camera should always be positioned as close as possible to the screen that is being measured and must be pointed towards the audience of the screen. A typical example of how the camera is positioned is shown below in Figure 7. The following rules describe how the camera should be positioned relative to the screen being measured, the audience, and the environment.
1. The camera must be positioned so that the faces of viewers will be oriented vertically.
2. The camera must be placed as close as possible to the screen being measured, and ideally in line with the horizontal center of the screen.
3. The camera can be placed within five to seven feet above the ground, and ideally will be placed as close as possible to five and a half feet above the ground.
4. The camera should not be pointed directly at a bright light source such as a ceiling light, the Sun, or an area with strong backlighting.
5. The camera should be angled so that the faces of viewers will be positioned near the vertical center of the video feed.
6. If the camera must be placed behind a pane of glass – such as when measuring signage that is located within a glass display case – then it should be positioned as close as possible to the pane of glass and should be angled to look directly through the glass.
Camera Setup
Intel® Audience Impression Metrics Suite User Guide April 2013 28 Document Number: 328606-002
Figure 7. Camera Positioning Example
When monitoring digital signage, the camera will typically be placed on top of the screen. However, if the screen is high above the ground it would be best to place the camera on the bottom of the screen so that it is closer to face-height. In such scenarios it might be easier to install the camera upside-down. This is perfectly acceptable as long as the faces of viewers are oriented vertically, as Intel AIM Suite can be configured to flip an upside-down video feed.
Lastly, the position of the camera relative to the system must also be considered. USB cameras must be placed within 5 meters of the system to function correctly.

Camera Setup
Intel® Audience Impression Metrics Suite April 2013 User Guide Document Number: 328606-002 29
However, USB extenders can be used to place a USB camera farther than 5 meters away from the system. IP cameras must be placed within 100 meters of the system to function correctly.
4.1.2 Camera Drivers
Before connecting the camera to the system, all drivers for the camera must already be installed. Drivers must be installed for certain USB cameras, but no drivers need to be installed when using IP cameras. Alternatively, some USB cameras (such as the Logitech HD Webcam C910, the Logitech HD Webcam C920 or the Logitech Quickcam Pro 9000) can be used in USB Video Class (UVC) mode. For Windows, no drivers need to be installed when using a camera in UVC mode, as the Windows UVC driver will automatically be selected for use after the camera is connected to the system.
4.1.3 Camera Connections
It is required that all cameras have a wired connection to the system that runs Intel® AIM Suite. If using an IP camera, it is acceptable to have other network devices (such as a router or switch) between the system and the camera as long as only wired connections are used. Some IP cameras can be accessed using a wireless network connection; however, accessing the camera over a wireless connection is strongly discouraged. Sending a video feed over a wireless connection can increase the chance of a dropped frame rate, which can adversely affect data collection. Sending a video feed over a wireless network could also raise privacy concerns, particularly if the wireless network was unsecured.
It is important to ensure that each camera is powered correctly and is properly connected to the system. USB cameras are powered through their direct connection to the system, unless USB extenders are used. IP cameras must be powered by a direct connection to a power outlet, or by using PoE if supported by the camera. To power a camera using PoE, the camera must be directly connected to a PSE (such as a PoE switch) using CAT5e or CAT6 cabling.
4.1.4 General Camera Configuration
The camera settings must be configured after the camera has been connected to the system and all required drivers have been installed on the system. There are general configuration requirements that are applicable to most cameras: exposure settings, gain and white-balancing settings, and pan/tilt/zoom settings. Additionally, there are specific configuration requirements for each of the cameras recommended for use with Intel AIM Suite; see supported cameras are detailed in Hardware Requirements. The configuration settings for most cameras can be accessed by selecting “AIMSensor→ Sensor Properties” from the Intel AIM Suite menu.
4.1.5 Camera Exposure Settings
Many cameras allow the exposure of the camera to be set manually or to automatically be adjusted by the camera. In brightly lit, evenly illuminated, indoor environments it is recommended to allow the exposure to be automatically adjusted by the camera. If a minimum exposure time can be selected, then a time no shorter

Camera Setup
Intel® Audience Impression Metrics Suite User Guide April 2013 30 Document Number: 328606-002
than 1/15 seconds should be selected. Exposure times less than 1/15 seconds can adversely affect the performance of the Intel AIM Suite Audience Counter technology, which needs to operate close to 15 FPS. In environments that are not brightly-lit, the exposure time should be manually set to 1/15 seconds if no minimum exposure time can be selected. In darker environments, automatically selected exposure times are more likely to drop below 1/15 seconds.
4.1.6 Camera Gain and White-Balancing
Many cameras also allow the gain and white-balancing of the camera to be set manually or to be automatically be adjusted by the camera. In most environments, the camera should be allowed to automatically select these values. In darker environments, if after setting the exposure time to 1/15 seconds the image is not bright enough, then the gain and white-balancing should manually be adjusted to optimal values for the environment. This can also be necessary in environments where there is strong backlighting. When manually setting the gain and white-balancing it is preferred that the lighting in the environment remains fairly static during the portion of the day when data must be collected.
4.1.7 Camera Pan/Tilt/Zoom Settings
It is critical to disable any camera settings that cause the video feed to automatically zoom, pan, or tilt. Some cameras offer the ability to perform face-tracking, and it is critical to disable such options as well. Also, if the camera has any manual zoom settings, in most cases the camera should be zoomed out as much as possible.
4.1.8 Logitech USB Webcam Settings (Windows Only)
The Logitech* webcam is recommended to be used in UVC mode when the camera is used in a brightly-lit environment. However, if the drivers for this camera must be installed then the Logitech Webcam Software should also be installed on the system. In this case the steps below must be followed to properly configure the Logitech camera. In all scenarios, the general configuration instructions described in the General Camera Configuration section must also be followed.
1. Open the Logitech Webcam Software.
2. Ensure that the “Keep webcam software on top of other windows” is unchecked.
3. Open the Logitech Webcam Controller application.
4. Select the “Advanced Settings” option.
5. Select the “Webcam Control” tab.
6. Click on the “Restore to default” button.
7. Ensure “Follow my face” is unchecked and “Auto-Focus” is checked.
8. Select the “Advanced Settings” tab.

Camera Setup
Intel® Audience Impression Metrics Suite April 2013 User Guide Document Number: 328606-002 31
9. Click on the “Restore to default” button.
10. Ensure that “RightLight” is checked.
11. Save the settings.
4.1.9 IP Camera Settings
The first step to configure an IP camera is to assign an IP address to the camera. Refer to the camera’s manual for instructions on how to do this. Next, it is highly recommended to reset the camera to its factory default settings, even if it is a newly purchased camera. The instructions below describe how to do this for many cameras. Lastly, all general configuration instructions described on page 29 must be followed.
1. Navigate to the IP address of the camera using a web browser on the system. Enter the username and password for the camera if prompted.
2. Select the “Setup” link.
3. Select the “System Options” link in the menu.
4. Select the “Maintenance” link in the menu underneath “System Options”.
5. Under the “Maintain Server” section click on the “Restore” button.
6. Click “OK” on the dialog that appears.
4.2 Software Configuration The Intel AIM Suite software needs to be configured for each camera that will be used. It is not necessary that the cameras have been mounted in their final locations when configuring Intel AIM Suite, but all required cameras should be connected to the system. It is important to note that Intel AIM Suite can only be fully verified after all cameras have been mounted and after the system has been connected to the Internet. Detailed instructions on configuring the Intel AIM Suite software can be found in the Software Quick Setup and the Software Features section of this user guide.
4.3 System Configuration The system must be properly configured to ensure system stability, to create an optimal run-time environment for Intel AIM Suite, and to maximize the remote management capabilities. It is highly recommended to perform the configurations below for deployments. However, many of these configurations are not required if only testing or demonstrating the Intel AIM Suite software. System configuration must occur before installation verification, but otherwise can be performed at any time during the installation of the Intel AIM Suite solution.

Camera Setup
Intel® Audience Impression Metrics Suite User Guide April 2013 32 Document Number: 328606-002
4.3.1 BIOS and Hardware Configuration
The BIOS and hardware options below should be configured for all deployments. However, some of the options may not be available for all systems.
1. Ensure that all hardware and cabling required to provide Internet to the system is connected and configured.
2. Within the BIOS, disable halting on errors during system startup. This prevents a problem where the system may not boot if a mouse or keyboard is not attached.
3. In the BIOS, enable auto-power-on. This allows the machine to automatically reboot after a power failure.
4. Enable Intel® Active Management Technology (Intel® AMT) if it is present on the system. Intel AMT enables powerful remote management capabilities when using appropriate remote management software, including allowing the machine to be remotely powered on. Detailed information about Intel AMT can be found on the below Web site.
http://www.intel.com/p/en_US/support/highlights/sftwr-prod/vpro
4.3.2 Operating System Configuration
A number of Windows and Linux configuration settings need to be applied and are described below in Table 6. Not all the settings below are applicable to all Windows or Linux desktop environments. This section does not provide specific instructions for modifying the settings. However, most of the settings can be modified using dialogs in the Windows Control Panel (Windows) or the System → Preferences and System → Administration menu options (Linux) to adjust power options, display setting and system security. For specific instructions on how to configure the items below, it is recommended to refer to the Microsoft Windows help Web site (http://windows.microsoft.com/en-us/windows/help), Ubuntu help Web site (http://help.ubuntu.com), Red Hat Enterprise Linux Web site (http://www.redhat.com/support/) or to use a search engine.
Table 6. Configuration Settings
Power Options
Configuration Item Notes
Disable System Sleep and Standby
This functionality could stop Intel® AIM Suite from running.
Disable Hibernation This functionality could stop Intel® AIM Suite from running.
Disable Hard-Drive Auto-Off
This functionality could stop Intel® AIM Suite from running.
Disable Display Auto-Off
This functionality would interfere with a live demonstration of Intel® AIM Suite. This functionality might also disable the operation of remote management software.

Camera Setup
Intel® Audience Impression Metrics Suite April 2013 User Guide Document Number: 328606-002 33
Disable Screen Saver This functionality would interfere with a live demonstration of Intel® AIM Suite. This functionality might also disable the operation of remote management software.
Set Minimum Processor State to 100%
A minimum processor state of less than 100% could degrade the performance of Intel® AIM Suite.
Security Options
Configuration Item Notes
Auto-Login The system must be configured to automatically login to the operating system (Windows* or Linux*) upon rebooting, which is required to run the Intel® AIM Suite software.
Disable UAC Windows Only
UAC can interfere with the operation of Intel® AIM Suite. In addition to disabling UAC, Intel® AIM Suite must be installed and run with an Administrator account. UAC is only available on Windows Vista and Windows 7.
Configure Anti-Virus Windows Only
All anti-virus software – including Windows Defender* – must be configured to exclude scanning of the below directories. • On Windows XP
C:\Documents and Settings\All Users\Application Data\Intel • On Windows Vista and Windows 7
C:\ProgramData\Intel\ • On Windows 64-bit operating systems
C:\Program Files(x86)\Intel\AIMSuite • On Windows 32-bit operating systems
C:\Program Files\Intel\AIMSuite
Enable Firewall If the Intel® AIM Suite API Server will be enabled then all software firewalls – including Windows Firewall* – must be configured to allow Intel® AIM Suite to communicate through the firewall.
System Options
Configuration Item Notes
Configure System Date and Time
The system date and time must be set to the local date and time of where the system will be installed. Automatic adjustment for Daylight Savings Time should be enabled.
Disable Automatic Windows Updates Windows Only
Windows updates can cause the system to reboot automatically, which could stop Intel® AIM Suite from running. All Windows updates must be installed manually during an appropriate time of day to minimize data loss.
Disable Notifications This functionality would interfere with a live demonstration of Intel® AIM Suite.
4.4 Setup Verification The system configuration of the Intel AIM Suite solution should be verified after Intel AIM Suite software has been installed and configured, after the system BIOS, hardware, and operating system have been configured, and after the cameras have
Camera Setup
Intel® Audience Impression Metrics Suite User Guide April 2013 34 Document Number: 328606-002
been configured and mounted in their final locations. The verification below should be performed for all cameras and systems that have been deployed. The primary goal of verification is to ensure that data is being collected properly and that the components of the Intel AIM Suite solution are stable. Any problems found during verification must be corrected.
1. Ensure that Intel AIM Suite AIM Watcher and Intel AIM Suite are running.
2. Reboot the system.
3. Ensure that the system restarts, login automatically occurs, and that Intel AIM Suite Watcher and Intel AIM Suite start automatically.
4. Ensure that there is a valid Internet connection by opening a web browser and navigating to any webpage.
5. When Intel AIM Suite is installed as a Standalone Installation, open the Intel AIM Suite application user interface by double-clicking on the Intel AIM Suite tray icon (an eyeball). When Intel AIM Suite is installed as a Service Installation, launch the Intel AIM Suite Configuration application from the Start programs menu.
6. Select “View → Show Video Stream” from the menu and ensure that the video feed is displayed within Intel AIM Suite.
7. Place a face in front of the camera and ensure that a green circle is drawn around the face within Intel AIM Suite.
8. Evaluate the “FPS” item in the status text and ensure that its value does not drop below 12.
9. Remove the face in front of the camera. Note that steps 7 through 9 should be performed for all enabled Intel AIM Suite Audience Counter instances.
10. Select “AIM → Force Analytics Upload” from the menu while paying attention to the “Uploader Status” in the status text. Ensure that the status changes to “Uploading” and then returns to “Idle”.
Note: This operation is not available through the Intel AIM Suite Configuration application, which is used to configure Intel AIM Suite when Intel AIM Suite is installed as a service. Refer to the Intel AIM Suite Installation Guide for more information about installing Intel AIM Suite as a service.
11. Login to the Intel AIM Manage Web site, navigate to the Sensor Management page, and verify that the sensor status lights are green for all Intel AIM Suite Audience Counter instances enabled on the system.
12. From another computer system, connect to the system running Intel AIM Suite using remote desktop management software.
§

Software Features
Intel® Audience Impression Metrics Suite April 2013 User Guide Document Number: 328606-002 35
5 Software Features
5.1 Intel® AIM Suite Audience Counter Instances Intel AIM Suite has the ability to simultaneously perform audience measurement for multiple camera feeds on a single computer system. An Intel AIM Suite Audience Counter instance is enabled within Intel AIM Suite for every camera feed that is to be processed. Each instance is associated with a software license, configuration settings for one camera, and advanced configuration settings. Enabling multiple instances will require a more powerful system. For more information on system requirements, refer to the System Selection subsection.
5.1.1 Managing Instances
The Manage Instances dialog is used to manage all Intel AIM Suite Audience Counter instances, and is shown below in Figure 8. The Manage Instances dialog can be accessed by selecting “AIM → Manage Instances” from the menu.
Note: A default Intel AIM Suite Audience Counter instance is created automatically the first time Intel AIM Suite is configured. Click on the default instance to assign a device and license to the instance.
An example of an Intel AIM Suite Audience Counter instance assigned to a USB camera device and validated license is depicted in Figure 8.

Software Features
Intel® Audience Impression Metrics Suite User Guide April 2013 36 Document Number: 328606-002
Figure 8. Manage Instances Dialog
The “Add Instance” button on the dialog can be used to add a new instance. The “Remove Instance” button can be used to remove the selected instance.
The “Audience Counter Instances” table lists all Intel AIM Suite Audience Counter instances that have been activated within Intel AIM Suite. Each row in the table displays information and provides access to configuration options for an individual instance. The “Enabled” column allows an instance to temporarily be disabled by un-checking the corresponding checkbox. Using this checkbox to disable an instance is often preferred over removing an instance because disabling preserves all configuration settings. The “License” column displays the current status of the license and provides access to the license configuration. The “Sensor” column displays the current status of the camera and provides access to the camera configuration. Lastly, the “Status” column displays whether or not an instance has been initialized.
5.1.2 Licensing
A license must be associated with each Intel AIM Suite Audience Counter instance that is enabled within Intel AIM Suite. Licenses must first be purchased through an authorized distributor of Intel AIM Suite. A purchased license then must be activated and assigned to an individual AIM instance by using the Intel® Audience Impression Metrics Manage [Intel AIM Manage] Web site http://aimsuite.intel.com. After a license has been assigned to an instance, a license code can be copied from the Intel AIM Manage Web site and entered into the Intel AIM Suite software.
License settings within Intel AIM Suite can be modified by using the license configuration dialog, which is shown below in Figure 9. To access the dialog open the Manage Instances dialog by selecting “AIM → Manage Instances” from the menu. Then, in the table, select the instance to edit and choose Edit Instance.

Software Features
Intel® Audience Impression Metrics Suite April 2013 User Guide Document Number: 328606-002 37
Figure 9. Configure License Dialog
Select the License tab. The dialog will display an activation code and the current license code. If an instance has not previously been licensed then the license code field will be blank. The activation code is used to uniquely identify an individual instance. The process for obtaining a license code is as follows:
1. Ensure that the required license has been purchased.
2. Log into the Intel AIM Manage Web site https://aimsuite.intel.com/manage.
3. Click on “Sensor Management”

Software Features
Intel® Audience Impression Metrics Suite User Guide April 2013 38 Document Number: 328606-002
4. If an appropriate location has not already been added into the system, then click on “Add New Location”. Note that a location represents a geographical location where the screen being measured resides, such as a retail outlet. On the next page enter details for the location and then click “Add New Location”.
5. Click on “Add New Sensor”. Note that a sensor is used to identify an individual instance. When running queries on the Intel AIM Analytics Web site, all the data collected by an instance will be labeled with its associated sensor’s name.
6. Enter a descriptive name into the “Sensor Name” field for the new sensor.
7. Use the “Location” dropdown to select the location where the sensor will reside.
8. Return to the Intel AIM Suite window and open the license dialog for the instance that is being licensed. Copy the displayed activation code into the “Activation Code” field on the Intel AIM Manage Web site.
9. On the Web site, select the appropriate purchased license from the “Use Available License” dropdown.
10. Click on “Add New Sensor”
11. Copy the license code that is displayed on the webpage into the licensing dialog within Intel AIM Suite.
It is important to note that a license can only be used on a single computer system and cannot be transferred to another computer system. If a system that has already been assigned a license needs to be replaced, then a support representative must be contacted. Similarly, a support representative must be contacted if the network card or motherboard of the system is being replaced, as such hardware changes can invalidate licenses on that system.
Licenses that are nearing their expiry date will automatically be renewed if the system has an Internet connection and the appropriate license renewals have been purchased. If the expiry date for a license is reached, then the associated instance will stop collecting data. Thus, it is very important to periodically monitor the state of all licenses, to ensure that data collection is not interrupted.
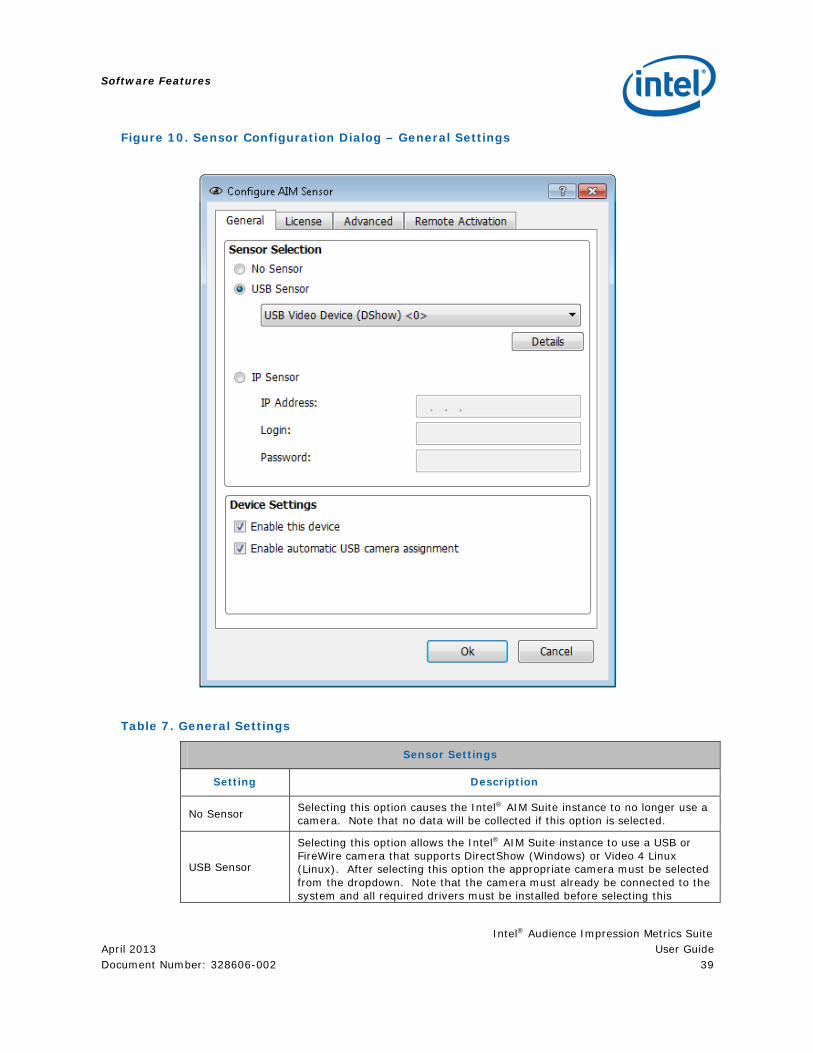
5.1.3 Camera Setup
The Sensor Configuration dialog, shown below in Figure 10, is used to configure the camera settings for an Intel AIM Suite Audience Counter instance. To access the dialog first open the Manage Instances dialog by selecting “AIM → Manage Instances” from the menu. In the instances table, select an Audience Counter Instance and choose Edit Instance. The options on the Sensor Configuration dialog are described below in Table 7.
Software Features
Intel® Audience Impression Metrics Suite April 2013 User Guide Document Number: 328606-002 39
Figure 10. Sensor Configuration Dialog – General Settings
Table 7. General Settings
Sensor Settings
Setting Description
No Sensor Selecting this option causes the Intel® AIM Suite instance to no longer use a camera. Note that no data will be collected if this option is selected.
USB Sensor
Selecting this option allows the Intel® AIM Suite instance to use a USB or FireWire camera that supports DirectShow (Windows) or Video 4 Linux (Linux). After selecting this option the appropriate camera must be selected from the dropdown. Note that the camera must already be connected to the system and all required drivers must be installed before selecting this

Software Features
Intel® Audience Impression Metrics Suite User Guide April 2013 40 Document Number: 328606-002
Sensor Settings
Setting Description
option. The Details button can be used to display the full camera name.
Enable automatic USB camera assignment
Enabling this option will cause Intel® AIM Suite to automatically assign an available USB camera to the instance. The automatic USB camera assignment will occur immediately when Intel AIM Suite is started or during runtime after the camera heart beat times out, and under the following conditions:
• When no camera is assigned to the instance. • When the camera originally assigned to the instance (default
camera) is no longer detected on the system, The default camera will automatically be restored to its respective Audience Counter Instance when the camera is detected again and operating correctly.
Note: Automatic camera assignments that occur during the camera heartbeat are dependent on the heartbeat rhythm. Therefore, it could take a few moments before the Intel® AIM Suite Audience Counter instance starts receiving the video image from the camera.
IP Sensor Selecting this option allows the Intel® AIM Suite instance to use an IP camera.
IP Address The IP address of the camera must be entered into this field when using an IP camera.
Login The camera login must be entered into this field when using an IP camera.
Password The camera password must be entered into this field when using an IP camera.
Software Features
Intel® Audience Impression Metrics Suite April 2013 User Guide Document Number: 328606-002 41
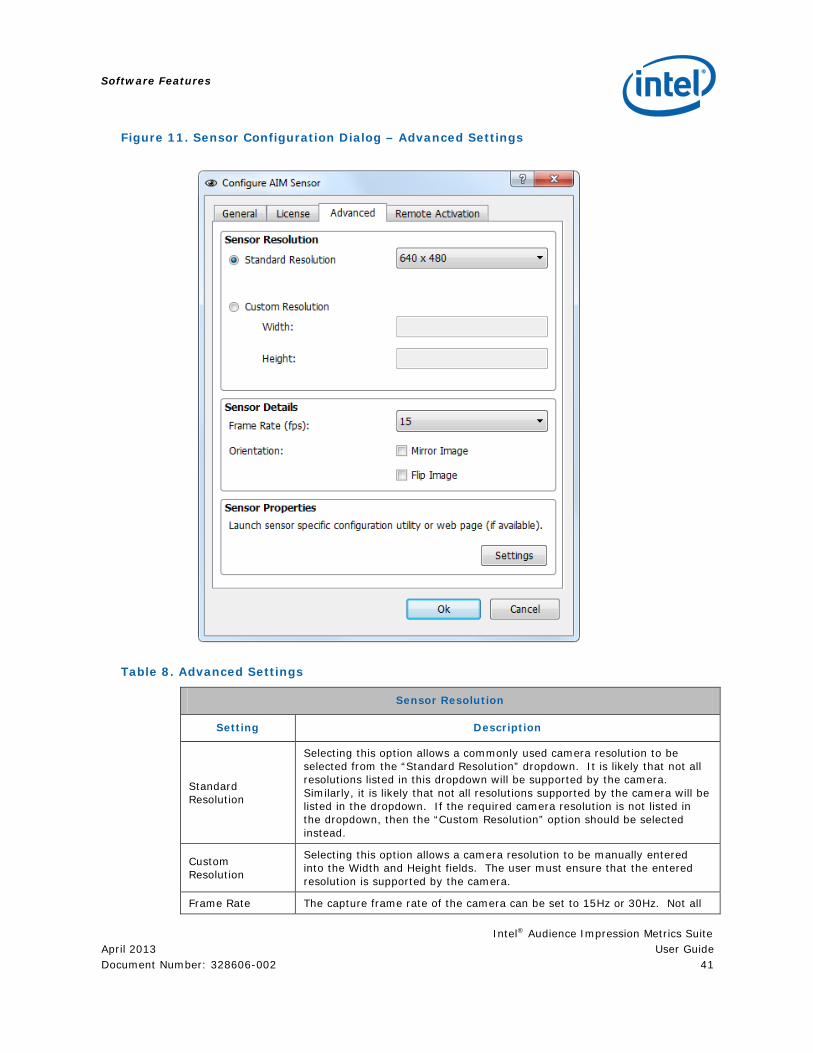
Figure 11. Sensor Configuration Dialog – Advanced Settings
Table 8. Advanced Settings
Sensor Resolution
Setting Description
Standard Resolution
Selecting this option allows a commonly used camera resolution to be selected from the “Standard Resolution” dropdown. It is likely that not all resolutions listed in this dropdown will be supported by the camera. Similarly, it is likely that not all resolutions supported by the camera will be listed in the dropdown. If the required camera resolution is not listed in the dropdown, then the “Custom Resolution” option should be selected instead.
Custom Resolution
Selecting this option allows a camera resolution to be manually entered into the Width and Height fields. The user must ensure that the entered resolution is supported by the camera.
Frame Rate The capture frame rate of the camera can be set to 15Hz or 30Hz. Not all

Software Features
Intel® Audience Impression Metrics Suite User Guide April 2013 42 Document Number: 328606-002
Sensor Resolution
Setting Description
cameras will support both frame rates, and the user must ensure that the selected frame rate is supported by the camera.
Mirror Image This causes each frame of the video feed to be mirrored across a vertical axis before being processed by the Intel® AIM Suite Audience Counter instance.
Flip Image
This causes each frame of the video feed to be flipped across a horizontal axis before being processed by the Intel® AIM Suite Audience Counter instance. This can be useful if the camera was mounted upside-down with respect to the area being measured.
Enable this device
This specifies whether or not the Intel® AIM Suite Audience Counter instance will process the video feed. For deployments, this setting must be enabled. It might be useful to temporarily disable this setting for testing or demonstration purposes.
5.1.4 Remote Activation
The remote activation feature simplifies the process of activating sensors, by allowing a sensor to be activated entirely through Intel AIM Suite without requiring the user to access Intel AIM Manage. This feature is currently not enabled by default, but can be enabled for a customer account by contacting a support representative.
If remote activation has been enabled, the steps below can be followed to activate a sensor. Note that an Internet connection is required to perform remote activation.
1. Open the Sensor Configuration dialog by selecting “AIMSensor Configure AIM Sensor” from the menu.
2. Click on the Remote Activation tab to access the interface shown in Figure 12. 3. Enter an Intel AIM Manage username and password. 4. Enter a descriptive name for the sensor and the name of the location where
the sensor is being deployed. 5. Press the “Activate” button. 6. Within a few seconds, the activation status area at the bottom of the dialog
should display the result of the activate operation.

Software Features
Intel® Audience Impression Metrics Suite April 2013 User Guide Document Number: 328606-002 43
Figure 12. Sensor Configuration Dialog – Remote Activation
5.1.1 Activation Utility
The Activation Utility is a software application which can be used in conjunction with the Remote Activation feature. The Activation Utility allows activation of an AIM Suite sensor using 1) a volume license key or 2) a volume license key and sensor metadata.
The Activation Utility, “activateAIMSensor”, is located in the same location as the AIM Suite executable and can be executed from a command shell. The usage is listed below:
Usage: activateAIMSensor -sensorIndex <SensorIndex> [-vlk <VLK>] [-sensorName <Sensor_Name> -locationName <Location_Name>]

Software Features
Intel® Audience Impression Metrics Suite User Guide April 2013 44 Document Number: 328606-002
[-sensorFile <File_Name>]
Note: Either the volume license key or sensor name/location (or both) must be provided.
Table 9. Activation Utility Options
Activation Utility Options
Setting Description
-sensorIndex <Sensor_Index>
Use this option to provide the sensor index. This is the index number of the particular sensor to activate (e.g., 0, 1, 2...). This field is required.
-vlk <VLK> Use this option to specify the volume license key.
-sensorName <Sensor_Name> Use this option to set a descriptive name for the sensor (e.g., "My sign in the soup aisle").
-sensorLocation <Location_Name> Use this option to set the name of the deployment location (e.g., "Supermarket XYZ").
-sensorFile <FileName>
Use this option to set the sensor name and deployment location via file; both items must be specified. Example File (mySensorInfo.txt: ASCII or UTF8): Line 1 - My Sign Line 2 - Supermarket XYZ Please note “Line X - ” should not be contained in the sensor metadata file. Sensor name should be first on its own line followed by sensor location also on its own line.
-help, -? Help text.
For example, to activate sensor #2 with a volume license key, the following command would be used: > activateAIMSensor -sensorIndex 2 -vlk ABCDEFGHIJKLMNOPQRSTUVWXY Another example to add the sensor name and location to an already activated sensor would be: > activateAIMSensor -sensorIndex 0 -sensorName "My Sign" -sensorLocation "Supermarket XYZ"
More examples can be seen in the Activation Utility’s help text.
After the Activation Utility is executed, volume license key and sensor metadata files with the information specified are saved. The actual activation occurs via Intel AIM Suite. Please note, the Activation Utility can be used either before Intel AIM Suite is running or while Intel AIM Suite is running. In the former case, activation will not occur until Intel AIM Suite is started.

Software Features
Intel® Audience Impression Metrics Suite April 2013 User Guide Document Number: 328606-002 45
5.2 Intel® AIM Suite Audience Counter Settings There are a number of settings that are specific to the Intel AIM Suite Audience Counter face detection technology. These settings are associated with an individual Intel AIM Suite Audience Counter instance. To modify any of the Intel AIM Suite Audience Counter settings, the associated Audience Counter instance must currently be selected in the Intel AIM Suite Audience Counter instance. Note that there should be no need to modify these settings for most deployments.
5.2.1 Active Zone
The active zone specifies the rectangular region of the video frame that will be analyzed by the Intel AIM Suite Audience Counter technology. The active zone can be modified by selecting “Audience Counter → Edit Active Zone” from the menu, and then following all onscreen instructions.
Typically, the active zone will should include the entire video frame. However, it might be beneficial to shrink the active zone in cases where the entire video frame does not need to be measured. A potential advantage of shrinking the active zone is that the CPU usage of Intel AIM Suite will be reduced.
5.2.2 Face Mask
The face mask specifies particular portions of the video frame that will not be analyzed by the Intel AIM Suite Audience Counter technology. The face mask can be modified by selecting “Audience Counter → Edit Face Mask” from the menu, and then following all onscreen instructions.
Typically, the face mask is used to prevent false positives in Intel AIM Suite Audience Counter. An example of a false positive is if the camera was pointed at a static sign that had a picture of a face, and the software was detecting the face to be a viewer. Note that for deployments, it is not necessary to create a face mask to handle such scenarios. The Intel AIM Analytics server is able to detect the occurrence of such false positives and remove them from the data. Thus, a face mask is usually only necessary if false positives are present during a live demonstration of Intel AIM Suite.
To prevent a face from being detected, it is only necessary to mask out the top-left corner of the face. This mask should be approximately one quarter the size of the face, should be vertically centered at the top of the head, and should be horizontally centered at the left side of the face.
5.2.3 Distances
The Configure Audience Counter dialog can be used to configure the minimum and maximum distances from the camera within which Intel AIM Suite Audience Counter will search for faces. The dialog is shown below in Figure 13 and can be accessed by selecting “Audience Counter → Configure Audience Counter” from the menu.

Software Features
Intel® Audience Impression Metrics Suite User Guide April 2013 46 Document Number: 328606-002
Figure 13. Configure Audience Counter Dialog
The minimum distance is usually left at its default of 2 feet. The maximum distance is sometimes increased beyond its default of 25 feet when using a higher camera resolution (greater than 640x480). Higher camera resolutions allow faces to be detected farther away from the camera, but can only be processed by a more powerful system. The maximum distance can also be decreased when using lower camera resolutions (less than 640x480), in order to slightly reduce the CPU usage of Intel AIM Suite. It is important to note that the minimum and maximum distances are not exact and that actual detection distances can vary slightly depending on lighting conditions, and the properties of the camera (lens quality, sensor quality, and capture resolution).
5.2.4 Intel® AIM Suite Opportunity To See Counter
Intel® AIM Suite Opportunity To See Counter (Intel® AIM Suite OTS Counter) is a technology that acts as an add-on component for the Intel AIM Suite Audience Counter face detection technology. OTS will use the same camera feed as Intel AIM Suite Audience Counter to estimate how many people had the opportunity to look at the screen being measured. This metric can be used to determine a conversion ratio of how many people had the opportunity to look at the screen versus how many people actually looked at the screen.
OTS will perform best in environments where potential viewers walk in a common direction, as shown in the top-half of Figure 14. The OTS results will be poor if viewers walk in a variety of directions, as shown in the bottom-half of Figure 14. It is recommended to contact a support representative before enabling OTS. They will help determine if the deployment environment is suitable for the Intel AIM Suite OTS Counter technology and will provide configuration assistance.
In order to enable OTS, the “Enable OTS” checkbox on the Configure Audience Counter dialog must be checked. After checking this box and pressing the “OK” button on the dialog, OTS will enter a calibration state. It can take up to 24 hours for OTS to finish calibrating, at which point OTS data will automatically start being collected.
Intel AIM Suite OTS Counter must be re-calibrated if the camera is ever repositioned, or if there are changes in the environment that will significantly

Software Features
Intel® Audience Impression Metrics Suite April 2013 User Guide Document Number: 328606-002 47
affect the traffic flow of potential viewers. OTS can be re-calibrated by selecting “Audience Counter → Reset OTS Calibration” from the menu.
Figure 14. Intel® AIM Suite OTS Counter Traffic Flows
5.2.5 Parallel Processing
Parallel processing is a technique that can accelerate certain operations on multi-core processors. Intel AIM Suite Audience Counter supports parallel processing in order to improve the rate at which faces are detected, which is particularly beneficial when Intel AIM Suite Audience Counter is operating on high resolution video streams. In order to enable parallel processing, the “Enable Parallel (TBB)” checkbox on the Configure Audience Counter dialog must be checked (see Figure 13). After checking this box and pressing the “OK” button on the dialog, the software will begin to make

Software Features
Intel® Audience Impression Metrics Suite User Guide April 2013 48 Document Number: 328606-002
use of any additional processor cores that have been detected on the system to speed up the face-detection process. It should be noted that enabling this option may increase the overall CPU utilization by Intel AIM Suite, which is an important consideration if other applications such as a media player will be running concurrently.
5.3 Global Settings There are a number of configuration settings that are shared by all Intel AIM Suite Audience Counter instances. Some of these settings are managed using the Intel AIM Suite software, and some are managed by other applications.
5.3.1 Configure Intel® AIM Suite
The Configure dialog, shown below in Figure 15, is used to manage common Intel AIM Suite settings that are shared between all Intel AIM Suite Audience Counter instances. The dialog can be accessed by selecting “AIM → Configure AIM” from the menu. The options on the configuration dialog General Settings tab are described below in Table 10.
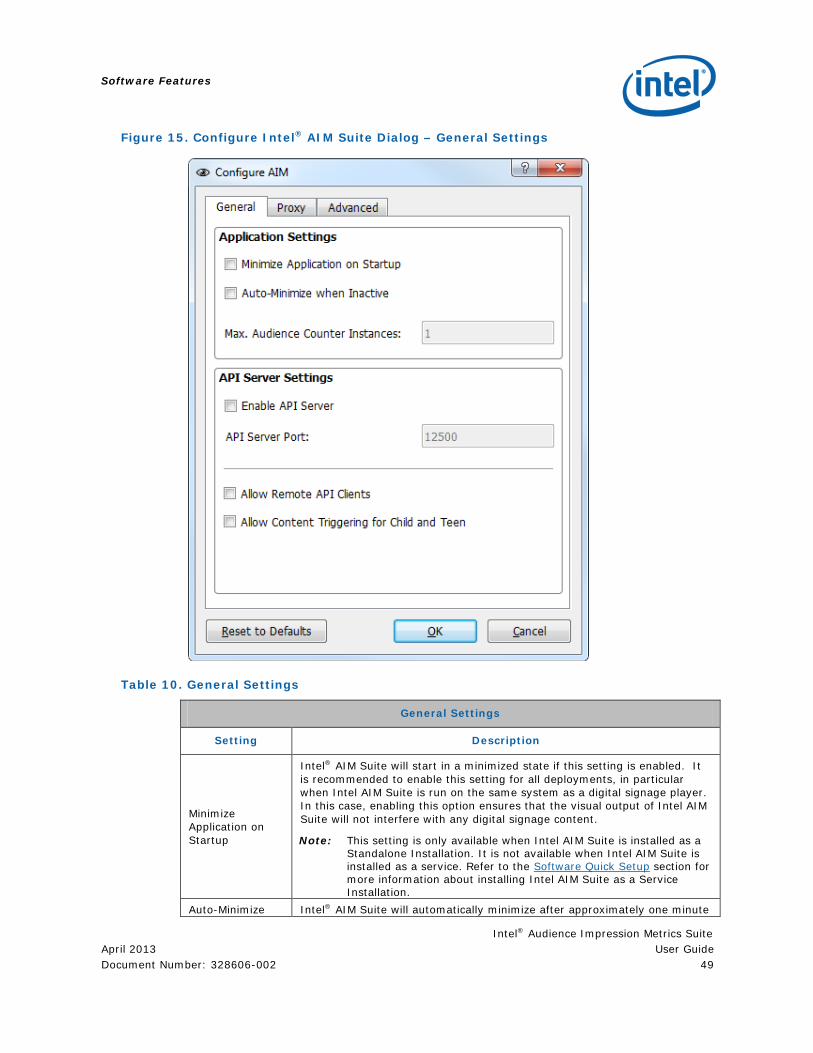
Software Features
Intel® Audience Impression Metrics Suite April 2013 User Guide Document Number: 328606-002 49
Figure 15. Configure Intel® AIM Suite Dialog – General Settings
Table 10. General Settings
General Settings
Setting Description
Minimize Application on Startup
Intel® AIM Suite will start in a minimized state if this setting is enabled. It is recommended to enable this setting for all deployments, in particular when Intel AIM Suite is run on the same system as a digital signage player. In this case, enabling this option ensures that the visual output of Intel AIM Suite will not interfere with any digital signage content.
Note: This setting is only available when Intel AIM Suite is installed as a Standalone Installation. It is not available when Intel AIM Suite is installed as a service. Refer to the Software Quick Setup section for more information about installing Intel AIM Suite as a Service Installation.
Auto-Minimize Intel® AIM Suite will automatically minimize after approximately one minute
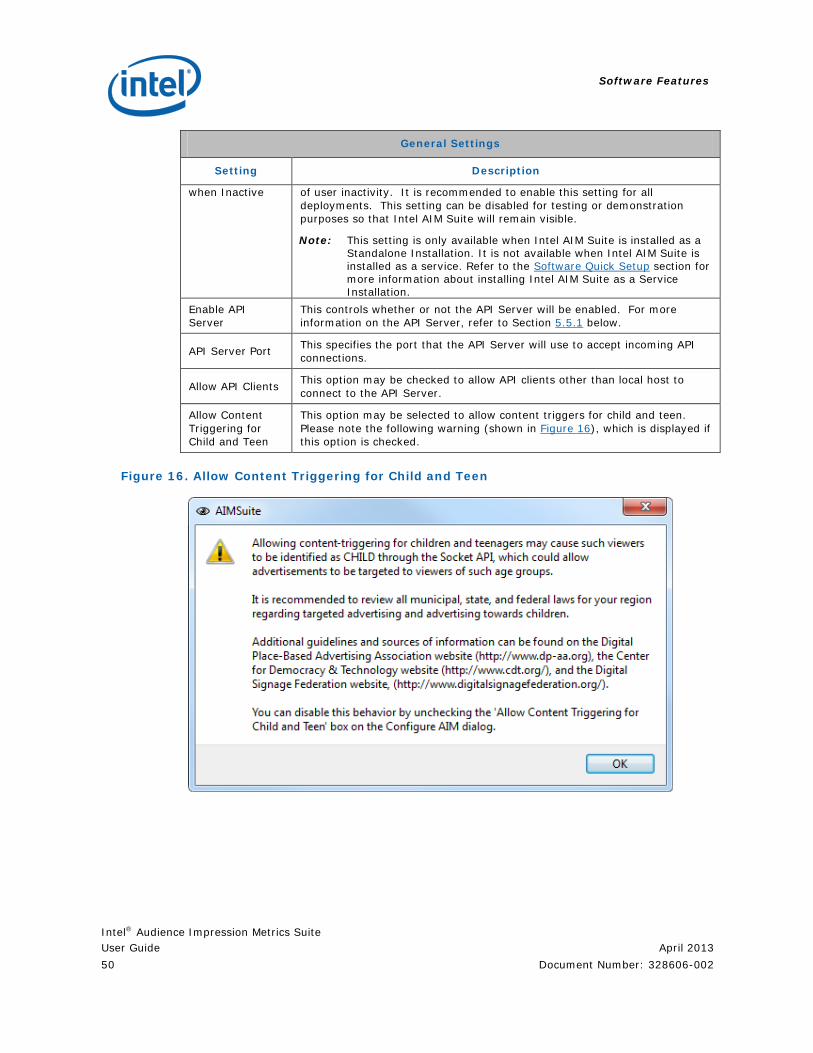
Software Features
Intel® Audience Impression Metrics Suite User Guide April 2013 50 Document Number: 328606-002
General Settings
Setting Description
when Inactive of user inactivity. It is recommended to enable this setting for all deployments. This setting can be disabled for testing or demonstration purposes so that Intel AIM Suite will remain visible.
Note: This setting is only available when Intel AIM Suite is installed as a Standalone Installation. It is not available when Intel AIM Suite is installed as a service. Refer to the Software Quick Setup section for more information about installing Intel AIM Suite as a Service Installation.
Enable API Server
This controls whether or not the API Server will be enabled. For more information on the API Server, refer to Section 5.5.1 below.
API Server Port This specifies the port that the API Server will use to accept incoming API connections.
Allow API Clients This option may be checked to allow API clients other than local host to connect to the API Server.
Allow Content Triggering for Child and Teen
This option may be selected to allow content triggers for child and teen. Please note the following warning (shown in Figure 16), which is displayed if this option is checked.
Figure 16. Allow Content Triggering for Child and Teen

Software Features
Intel® Audience Impression Metrics Suite April 2013 User Guide Document Number: 328606-002 51
Figure 17. Configure Intel® AIM Suite Dialog – Proxy Settings
Table 11. Proxy Settings
Proxy Settings
Setting Description
No Proxy Select this option if Intel® AIM Suite does not need to connect through a proxy to access the Internet.
HTTP Proxy Select this option to cause Intel® AIM Suite to connect through an HTTP proxy when making an outgoing connection over the Internet.
SOCKS4 Proxy Select this option to cause Intel® AIM Suite to connect through a SOCKS4 proxy when making an outgoing connection over the Internet.
SOCKS5 Proxy Select this option to cause Intel® AIM Suite to connect through a SOCKS5 proxy when making an outgoing connection over the Internet.

Software Features
Intel® Audience Impression Metrics Suite User Guide April 2013 52 Document Number: 328606-002
Proxy Settings
Setting Description
Auto Proxy URL
Select this option if your proxy settings are determined by using a Proxy Auto-Configuration (PAC) script. The URL for the script must be entered into the textbox beside this option. For a script located on the local machine, you would enter something similar to the following line: file://c:/temp/script.pac
Proxy Server This specifies the server name or the IP address of the proxy server.
Proxy Port This specifies the port of the proxy server.
Proxy Login This specifies the login name for the proxy server. This should be left blank if no login name is required.
Proxy Password This specifies the password for the proxy server. This should be left blank if there is no password
Figure 18. Configure Intel® AIM Suite Dialog – Advanced Settings
Software Features
Intel® Audience Impression Metrics Suite April 2013 User Guide Document Number: 328606-002 53
Table 12. Advanced Settings
Analytics Settings
Setting Description
Enable Analytics Uploader
This controls whether or not data is uploaded to the Intel® AIM Analytics server. This setting must be enabled for all deployments.
Upload Start Hour
This specifies the first hour in the day (on a 24-hour clock) that data can be uploaded to the Intel® AIM Analytics server, using the local system clock. Typically the upload start hour will be 0 and the upload end hour will be 24 so that data can be uploaded at any time during the day. It is possible to restrict the data upload window, which might be useful when trying to preserve bandwidth during certain hours of the day. For example, to ensure that data is only uploaded between 2AM and 6AM, the upload start hour would be set to 2 and the upload end hour would be set to 6. Do note that uploading of analytics data typically takes very little bandwidth (often less than one megabyte per day).
Upload End Hour Data will no longer be uploaded to the Intel® AIM Analytics Server once this hour in the day (on a 24 hour clock) is reached on the local system clock. Refer to the Upload Start Hour description for more details.
Upload Period This specifies the number of hours Intel® AIM Suite will wait after analytics data successfully uploads before attempting to upload new analytics data.
Upload Retry This specifies the interval that Intel® AIM Suite will wait after analytics data fails to upload before retrying to upload the data.
Server Host This specifies the server that Intel® AIM Suite will communicate with for data uploading and remote management. This field should be left at its default value.
Server Port This specifies the port that Intel® AIM Suite will use when communicating with the Server Host. This field should be left at its default value.
5.4 Intel® AIM Suite Audience Counter Instance Display The Intel AIM Suite Audience Counter instance display composes the entire internal region of the main Intel AIM Suite Graphical User Interface (GUI) window, and is shown below in Figure 19. The AIM instance display will show the camera feed and status information for a single AIM instance. It is also used to configure certain Intel AIM Suite Audience Counter options such as the active zone and the face mask.
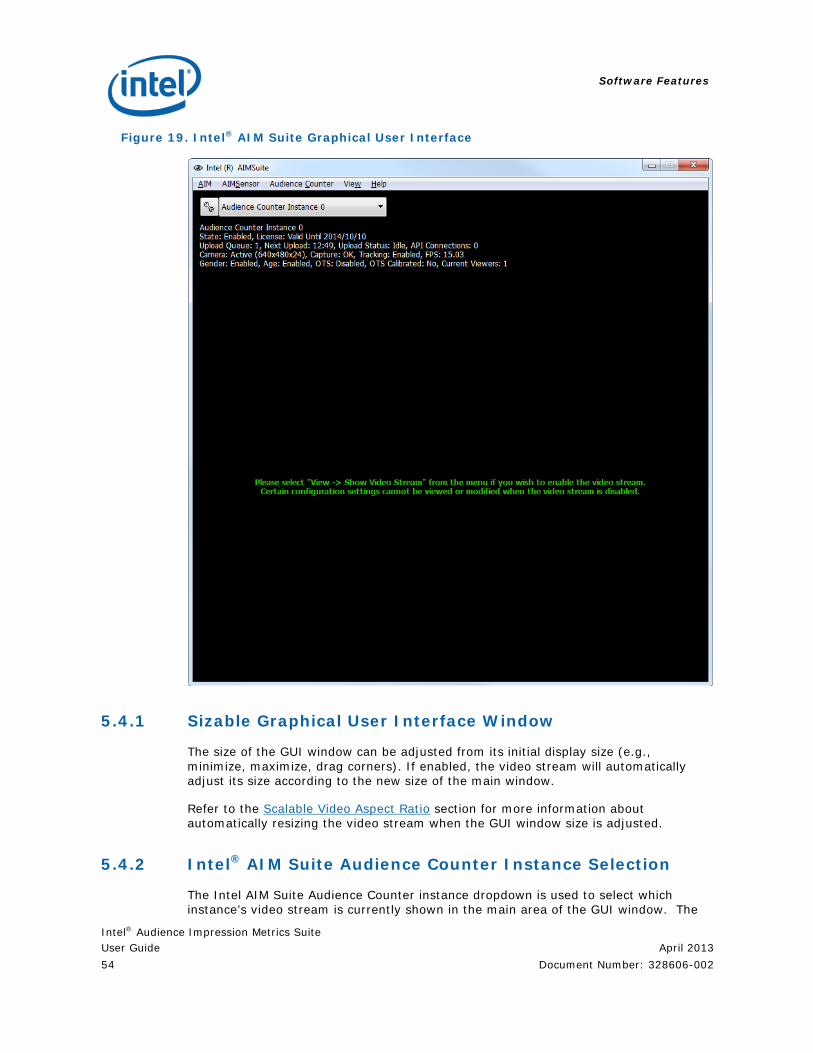
Software Features
Intel® Audience Impression Metrics Suite User Guide April 2013 54 Document Number: 328606-002
Figure 19. Intel® AIM Suite Graphical User Interface
5.4.1 Sizable Graphical User Interface Window
The size of the GUI window can be adjusted from its initial display size (e.g., minimize, maximize, drag corners). If enabled, the video stream will automatically adjust its size according to the new size of the main window.
Refer to the Scalable Video Aspect Ratio section for more information about automatically resizing the video stream when the GUI window size is adjusted.
5.4.2 Intel® AIM Suite Audience Counter Instance Selection
The Intel AIM Suite Audience Counter instance dropdown is used to select which instance’s video stream is currently shown in the main area of the GUI window. The

Software Features
Intel® Audience Impression Metrics Suite April 2013 User Guide Document Number: 328606-002 55
instance dropdown is located at the top of the main Intel AIM Suite window and is shown below in Figure 20. The visibility of the Intel AIM Suite Audience Counter instance dropdown can be toggled by selecting “View → Instance Toolbar” from the menu.
Figure 20. Intel® AIM Suite Audience Counter Instance Dropdown
5.4.3 Status Pane
The status pane is located at the top of the Intel AIM Suite Audience Counter instance display and shows status information about the currently selected instance. The information on the status pane is intended to be used for advanced configuration purposes. The status text is color-coded and any red, orange, or yellow text indicates a warning or error condition. Such warnings or errors should always be investigated. Some problems will be obvious, such as red license expiry text indicating an expired license. A support representative should be contacted if the user is unable to resolve any issue identified on the status pane. The visibility of the status pane can be toggled by selecting “View → Status Pane” from the menu.
5.4.4 Video Stream
The video stream composes the largest portion of the GUI window for the Intel AIM Suite Audience Counter instance. The visibility of the video stream can be toggled by selecting “View → Show Video Stream” from the menu. The video stream is disabled by default when Intel AIM Suite is launched or after the Intel AIM Suite window has been minimized.
5.4.5 Scalable Video Aspect Ratio
The video stream can be scaled to maintain its aspect ratio or stretch to fit the AIM instance display as the main Intel® AIM Suite window is resized. This can be toggled by selecting "View -> Keep Aspect Ratio" from the menu. The video stream must be enabled and displaying in order for toggling the aspect ratio to function.
5.5 Third-Party Integration There are numerous ways in which third-party applications can integrate with the Intel AIM Suite solution. Third-party applications can communicate with Intel AIM Suite using the Intel AIM Suite Socket API to gather real-time information about the current audience. Digital signage networks that collect proof-of-play information can enable Campaign Analytics to gather viewership metrics for individual pieces of content.

Software Features
Intel® Audience Impression Metrics Suite User Guide April 2013 56 Document Number: 328606-002
Prospective integrators must ask their sales representative to speak directly with an Intel representative in order to obtain the documentation required to perform integration.
5.5.1 Intel® AIM Suite Socket API
The Intel AIM Suite Socket API allows third-party applications to access information about the current audience in real-time. For digital signage, this enables the ability to perform real-time content triggering, which allows content to dynamically be chosen based on the current audience. This is accomplished by opening a TCP/IP socket on the specified “API Server Port” whenever the “Enable API Server” option is enabled and allowing incoming connections from client applications that wish to retrieve audience information. Detailed information on the Socket API can be found in the AIM Socket API Reference Manual. For security reasons, the Socket API option should only be enabled by an end user if the Intel AIM Suite platform has been secured with a software or hardware firewall that prevents incoming connections from outside of the local area network (LAN).
It is important to note that the Socket API should not be used for data collection. Refer to the Intel® AIM Suite Web API subsection for information on a more suitable alternative for extracting data to a third-party system.
5.5.2 Campaign Analytics
Campaign Analytics allows viewership metrics to be determined for individual pieces of content across an entire digital signage network, in addition to gathering viewership metrics for individual screens. For integration to be possible, the digital signage network must record time-stamped proof-of-play information for pieces of content, including when the content was played and on what screen.
5.6 Intel® AIM Suite Watcher Intel AIM Suite Watcher (included as part of the Intel AIM Suite installation package for Windows and Linux) works with Intel AIM Suite to provide improved functionality and reliability. Intel AIM Suite should never directly start Intel AIM Suite. Instead, they should launch Watcher, which is responsible for starting Intel AIM Suite.
5.6.1 Windows Specifics When Intel AIM Suite is installed as a Standalone installation, Watcher can be configured to start automatically when the computer system boots.
This functionality is enabled by default, and is required for all deployments.
This option can be toggled by right-clicking on the Intel AIM Suite Watcher system tray icon and then selecting the “Start on System Boot” option.

Software Features
Intel® Audience Impression Metrics Suite April 2013 User Guide Document Number: 328606-002 57
5.6.2 Linux Specifics
When Intel AIM Suite is installed, Watcher can be configured to start automatically when the computer system boots. This functionality is enabled by default, and is required for all deployments.
Watcher monitors and ensures that the Intel AIM Suite is kept up-and-running at all times; it is the recommended way to launch Intel AIM Suite. Watcher will continuously check to make sure Intel AIM Suite is running. If it is not, for any reason, it will re-launch Intel AIM Suite.
Under Ubuntu Classic or RHEL, please select “Applications → Other → AIMWatcher” to launch Watcher. Upon execution, the following dialog will be displayed.
Intel AIM Suite Watcher will check whether another instance of Intel AIM Suite Watcher is already running. If so, the program will exit immediately. Note that no notification is given so as to not conflict with any full-screen applications running at the time.
The Watcher main window, shown in Figure 21 below, has a colored icon that indicates the status of Intel AIM Suite:
• Green - Intel AIM Suite is running.
• Yellow - Starting Intel AIM Suite or performing software update.
• Red - Cannot start Intel AIM Suite or an error occurred.
Figure 21. Intel® AIM Suite Watcher GUI
Auto-minimize behavior: When Intel AIM Suite Watcher is in 'Green' mode (Intel AIM Suite is running) for more than 60 seconds, the Watcher main window will automatically minimize.
Configurable items: Watcher has three configurable items as follows. User must click ‘Save’ button for the configurable item to take effect.
• Restart inactive Intel AIM Suite seconds - This configurable item defines the time (in seconds) that elapses after Watcher receives the last heartbeat message from Intel AIM Suite. When the elapsed time passes this threshold,

Software Features
Intel® Audience Impression Metrics Suite User Guide April 2013 58 Document Number: 328606-002
Intel AIM Suite will be deemed as inactive, and Watcher will restart Intel AIM Suite. Please note the default value is 945 seconds and the minimum value is 135 seconds for a single instance configuration. User should add 120 seconds for each additional active instance.
• Output Intel AIM Suite status seconds - This configurable item defines the time (in seconds) when Intel AIM Suite Watcher outputs a message about the status of Intel AIM Suite to ‘/var/log/syslog’.
• Start Intel AIM Suite Watcher on system boot - When checked, Watcher will be automatically started when the user logs into the system.
Note: Intel AIM Suite Watcher logs its own messages in syslog. User may review the Intel AIM Suite Watcher logging messages in ‘/var/log/syslog’.
Viewing the Watcher log with the GUI: User may expand the down arrow button to view the log file, as shown in Figure 22 below. To clear the log, user may click the ‘Clear log’ button and user may also hide the log information section by clicking the up arrow button.

Software Features
Intel® Audience Impression Metrics Suite April 2013 User Guide Document Number: 328606-002 59
Figure 22. Intel® AIM Suite Watcher Log GUI
§

Intel® AIM Manage
Intel® Audience Impression Metrics Suite User Guide April 2013 60 Document Number: 328606-002
6 Intel® AIM Manage
6.1 Overview Many features of the Intel AIM Suite solution can be managed remotely using the Intel AIM Manage Web site. This Web site allows a user to manage licenses, remotely monitor deployments, download software, manage user accounts, and set up automated reports. Using this Web site to remotely manage deployments is much more scalable than having to directly access each machine that runs Intel AIM Suite.
To access the Intel AIM Manage Web site each user must navigate to https://aimsuite.intel.com/manage and login with a valid username and password. An Intel AIM Manage account will be provided to new users of the Intel AIM Suite solution after a license has been purchased. Existing users with the required permission level will be able to create additional accounts for other members of their organization.
6.2 Sensor and License Management The primary purpose of the Intel AIM Manage site is to manage sensors and licenses. A sensor is used to identify and label an individual Intel AIM Suite Audience Counter instance. When running queries on the Intel AIM Analytics Web site, all data collected by an instance will be labeled with its associated sensor’s name. Additionally, remote management features for an instance will be accessible under its associated sensor. For data collection to occur, a sensor and its associated instance must be assigned a valid license. A license can only be assigned to one sensor and can only be transferred to another sensor after it has been assigned by an appropriate support representative.
6.2.1 Sensor Management
Sensors can be managed by selecting the “Sensor Management” link on the main page after logging in. The Sensor Management page displays all locations, sensors, and available licenses that belong to a particular customer. Locations are used to organize groups of sensors. Typically, a location will represent a geographical location where a screen being measured resides, such as a retail outlet. Each location can have many sensors assigned to it, but each sensor can only be assigned to a single location.
Locations can be added, modified, and deleted. The “Edit” link beside each location in the locations table can be selected to modify a particular location. Similarly, the “Delete” link beside each location in the locations table can be selected to delete a particular location. Note that a location can only be deleted if no sensors are currently assigned to it. Instructions for adding a new location are listed below.
1. Click on the “Add New Location” link on the Sensor Management page.
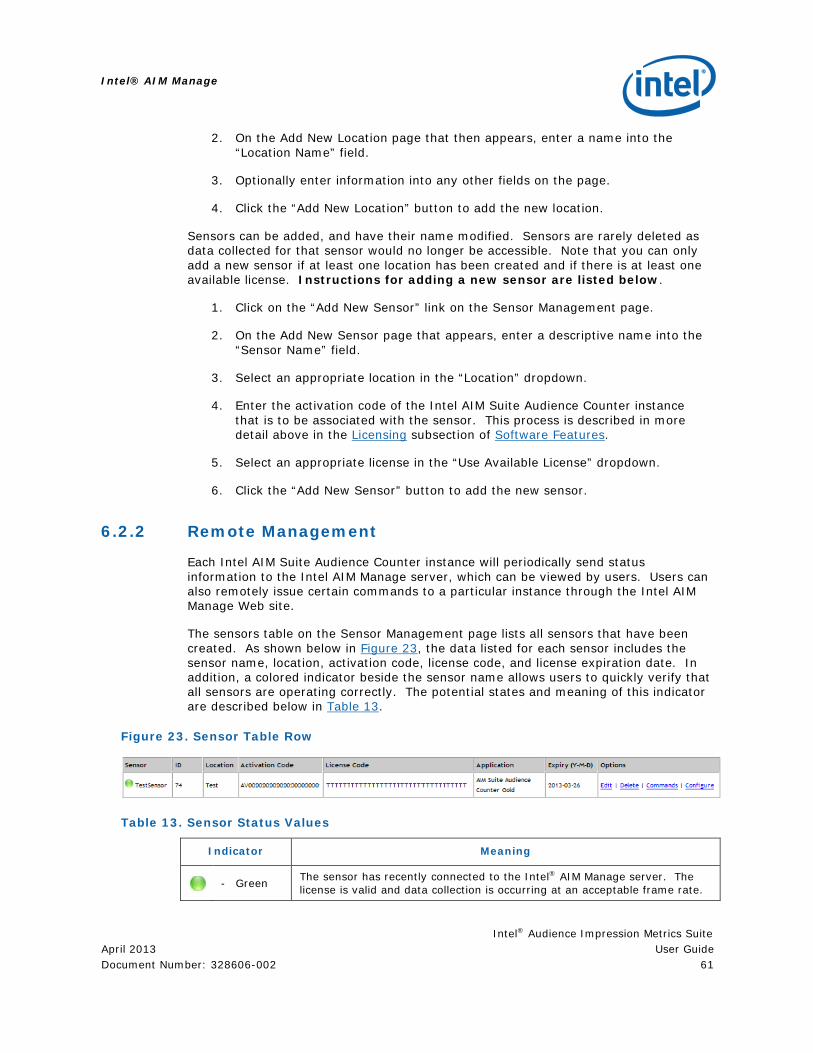
Intel® AIM Manage
Intel® Audience Impression Metrics Suite April 2013 User Guide Document Number: 328606-002 61
2. On the Add New Location page that then appears, enter a name into the “Location Name” field.
3. Optionally enter information into any other fields on the page.
4. Click the “Add New Location” button to add the new location.
Sensors can be added, and have their name modified. Sensors are rarely deleted as data collected for that sensor would no longer be accessible. Note that you can only add a new sensor if at least one location has been created and if there is at least one available license. Instructions for adding a new sensor are listed below.
1. Click on the “Add New Sensor” link on the Sensor Management page.
2. On the Add New Sensor page that appears, enter a descriptive name into the “Sensor Name” field.
3. Select an appropriate location in the “Location” dropdown.
4. Enter the activation code of the Intel AIM Suite Audience Counter instance that is to be associated with the sensor. This process is described in more detail above in the Licensing subsection of Software Features.
5. Select an appropriate license in the “Use Available License” dropdown.
6. Click the “Add New Sensor” button to add the new sensor.
6.2.2 Remote Management
Each Intel AIM Suite Audience Counter instance will periodically send status information to the Intel AIM Manage server, which can be viewed by users. Users can also remotely issue certain commands to a particular instance through the Intel AIM Manage Web site.
The sensors table on the Sensor Management page lists all sensors that have been created. As shown below in Figure 23, the data listed for each sensor includes the sensor name, location, activation code, license code, and license expiration date. In addition, a colored indicator beside the sensor name allows users to quickly verify that all sensors are operating correctly. The potential states and meaning of this indicator are described below in Table 13.
Figure 23. Sensor Table Row
Table 13. Sensor Status Values
Indicator Meaning
- Green The sensor has recently connected to the Intel® AIM Manage server. The license is valid and data collection is occurring at an acceptable frame rate.

Intel® AIM Manage
Intel® Audience Impression Metrics Suite User Guide April 2013 62 Document Number: 328606-002
Indicator Meaning
- Yellow The sensor has not recently connected to the Intel® AIM Manage server, or data collection is occurring below an acceptable frame rate, or data collection is disabled.
- Red The license has expired.
- Grey The sensor has never made a connection to the Intel® AIM Manage server.
The “Commands” link beside a sensor can be selected for access to advanced remote management functionality. The Remote Management page displays additional details about the sensor such as the last time it connected to the server, the last time data was uploaded, and the most recent frame rate of the camera. Remote commands can also be issued by selecting the required remote command checkboxes and then pressing the “Send Commands” button. These commands are described below in Table 14. Note that it can take a few minutes for these command to be processed and that the status of any issued commands can be viewed by pressing the “Refresh” button.
Table 14. Remote Management Commands
Remote Command Description
Force Software Restart This causes the Intel® AIM Suite software to restart.
Note: This operation is not available through the Intel AIM Suite Configuration application, which is used to configure Intel AIM Suite when Intel AIM Suite is installed as a service. Refer to the Software Quick Setup section for more information about installing Intel AIM Suite as a service.
Force System Reboot This causes the system running Intel® AIM Suite to reboot.
Note: This operation is not available through the Intel AIM Suite Configuration application, which is used to configure Intel AIM Suite when Intel AIM Suite is installed as a service. Refer to the Software Quick Setup section for more information about installing Intel AIM Suite as a service.
Force Analytics Upload
This causes Intel® AIM Suite to upload analytics data that has not yet been uploaded to the Intel® AIM Analytics server. Note that it can take up to 24 hours for data to be viewable through the Intel® AIM Analytics server.
Note: This operation is not available through the Intel AIM Suite Configuration application, which is used to configure Intel AIM Suite when Intel AIM Suite is installed as a service. Refer to the Software Quick Setup section for more information about installing Intel AIM Suite as a service.
Force License Validation This causes Intel® AIM Suite to download and validate its latest license code.
Force Camera Reset This causes Intel® AIM Suite to reset its connection to the camera.

Intel® AIM Manage
Intel® Audience Impression Metrics Suite April 2013 User Guide Document Number: 328606-002 63
The “Configure” link beside a sensor can be selected for access to advanced remote configuration functionality. Remote Configuration settings can be changed by entering new settings into the fields then pressing the “Configure” button. The settings that can be configured are described below in Table 15. Note that it can take a few minutes for these configurations to be processed and that the status of any issued configurations can be viewed by pressing the “Refresh” button. If a dialog is open on Intel AIM Suite or Intel AIM Suite Configuration application and a remote configuration has been issued the remote configuration will fail with Failure status shown on all remote configuration settings.
Note: If AIM Suite is currently being used to configure any of the properties listed in Table 15, Remote Configuration commands will fail, and yield to the local configuration changes.
Table 15. Remote Configuration Commands
Remote Configuration Description
Upload Start Hour
This specifies the first hour in the day (on a 24-hour clock) that data can be uploaded to the Intel® AIM Analytics server, using the local system clock. Typically the upload start hour will be 0 and the upload end hour will be 24 so that data can be uploaded at any time during the day. It is possible to restrict the data upload window, which might be useful when trying to preserve bandwidth during certain hours of the day. For example, to ensure that data is only uploaded between 2AM and 6AM, the upload start hour would be set to 2 and the upload end hour would be set to 6. Do note that uploading of analytics data typically takes very little bandwidth (often less than one megabyte per day).
Upload End Hour
Data will no longer be uploaded to the Intel® AIM Analytics Server once this hour in the day (on a 24 hour clock) is reached on the local system clock. Refer to the Upload Start Hour description for more details.
Upload Period This specifies the number of hours Intel® AIM Suite will wait after analytics data successfully uploads before attempting to upload new analytics data.
Upload Retry This specifies the interval that Intel® AIM Suite will wait after analytics data fails to upload before retrying to upload the data.
Heartbeat Period This specifies the interval that Intel® AIM Suite will communicate with Intel® AIM Manage server.
Set Frame Rate
The capture frame rate of the camera can be set to 15Hz, 20Hz, 25 Hz or 30Hz. Not all cameras will support the four frame rates, and the user must ensure that the selected frame rate is supported by the camera.
Set Resolution Width This specifies the camera resolution width that Intel® AIM Suite will use for the sensor. The user must ensure that the entered resolution is supported by the camera.
Set Resolution Height This specifies the camera resolution height that Intel® AIM Suite will use for the sensor. The user must ensure that the entered resolution is supported by the camera.
Enable OTS Enable or disable the Intel® AIM Suite OTS Counter. After
Intel® AIM Manage
Intel® Audience Impression Metrics Suite User Guide April 2013 64 Document Number: 328606-002
enabling, OTS will enter a calibration state. It can take up to 24 hours for OTS to finish calibrating, at which point OTS data will automatically start being collected.
6.2.3 License Ownership
Each license assigned to a customer will be owned by a single user from the customer’s organization. Only the owner of a license can view and activate the license. After activating a license by creating a new sensor, all users for the associated customer will be able to view the sensor and its license code. One exception is that a Customer Power Administrator—as described below in the User Management section—can view and activate all licenses assigned to the customer’s account. It is recommended to make use of license ownership when different users from the same company are each dealing with different deployments.
The “License Ownership” link on the main page can be selected to navigate to the Transfer License Ownership page. The steps to transfer license ownership are described below.
1. Select a user to transfer licenses to in the “Users” dropdown.
2. Select either “Activated Licenses” or “Not Activated Licenses” as the “Sensor Type”, depending on what type of licenses you want to transfer.
3. Select “Audience Counter” in the “License Type” dropdown.
4. Check the items in the “My Sensors” tree that are to be transferred.
5. Click the “Assign” button.
6.3 User Management Each customer will be assigned one user account that is given Customer Power Administrator permission levels. A Customer Power Administrator has elevated privileges and can perform many tasks that other users cannot. In particular, a Customer Power Administrator will be able to create new use accounts for other people in their organization.
User accounts can be added through the Manage User Accounts page, which can be accessed by selecting the “User Management” link on the main page. The steps to add a new user are described below.
1. Click the “Add New User” link.
2. Enter a valid email address for the user into the “Username” field.
3. Enter a password into the “Password” field.
4. Enter the same password into the “Re-enter Password” field.
5. Select the required permission level in the “Account Groups” field. The “Customer Administrator” account group should be selected for users that will need to add new sensors and remotely manage sensors. The “Customer User”

Intel® AIM Manage
Intel® Audience Impression Metrics Suite April 2013 User Guide Document Number: 328606-002 65
account group should be selected for users that only need to view information, such as analytics data or status reports.
6. Click the “Add New User button”.
A Customer Power Administrator can also assign this permission level to another user. Note that there can only be one Customer Power Administrator per customer. The below steps describe how to assign a new Customer Power Administrator.
1. Click the “Power Admin Assign” link on the Manage User Accounts page.
2. Select the new Customer Power Administrator in the “Users” dropdown.
3. Click the “Assign” button.
6.4 Status Reports Status reports can be automatically sent to an email address at regular intervals. Status reports can only be configured by the Customer Power Administrator. These reports will indicate if a sensor has not recently uploaded analytics data. Typically, these reports are configured to be sent on a daily basis, in the morning. Steps to enable a status report are listed below.
1. Click the “Email Reports Configuration” link on the main page.
2. Click the “Add New Report” link on the Manage Email Report Configuration page.
3. Enter a descriptive name for the report into the “Report Name” field.
4. Select a time to send the report each day in the “Report Start Time” dropdown.
5. Select how frequently to send the report in the “Repeat Frequency” dropdown.
6. Select the appropriate customer in the “Customers” dropdown.
7. Highlight the sensors that should be included in the report in the “Sensors” list. To enable reporting for all sensors, select the “Select All” item in the list.
8. Enter the email address that the report should be sent to into the “Email Address” field.
6.5 Software Downloads All software required for the Intel AIM Suite solution can be downloaded through the Intel AIM Manage Web site. The “File Downloads” link on the main page can be selected to access the File Downloads page. Each item on the File Downloads page has a corresponding link that can be selected to download the file. In particular, Intel AIM Suite can be downloaded from the File Downloads page.
§

Intel® AIM Analytics
Intel® Audience Impression Metrics Suite User Guide April 2013 66 Document Number: 328606-002
7 Intel® AIM Analytics
7.1 Viewing Reports Reports on all collected data can be viewed using the Intel AIM Analytics Web site. Data can be viewed through the Intel AIM Analytics Web site within 24 hours after it has been uploaded from the system. To view reports a user must login to http://analytics.cognovision.com/ with a valid username and password. A large variety of report queries can then be performed for all sensors belonging to the user’s organization. Report results are displayed graphically using charts and can also be extracted in raw formats.
7.2 Report Date and Time Range Common to all reports is the ability to select a date range for the report. The date range for a report can be changed by following the steps below, and referring to Figure 24.
1. Click on the date and time box.
2. Click on the “Start Date” value in the dropdown that appears.
3. Select the required month and year in the dropdowns on the calendar that appears.
4. Click on the required date in the calendar.
5. Repeat steps 2-4 for the “End Date”.
6. Click the “Update Graph” button.

Intel® AIM Analytics
Intel® Audience Impression Metrics Suite April 2013 User Guide Document Number: 328606-002 67
Figure 24. Date Range Selection Tool
For time-of-day reports, a time range can also be selected. The time range can be selected on the same dropdown that is used to select a date range.
7.3 Report Granularity Reports of various levels of granularity can be generated: sensor reports, venue reports, and customer reports. Note that the term “venue” has the same meaning on the Intel AIM Analytics Web site as the term “location” on the Intel AIM Manage Web site. The granularity level of the reports can be changed by selecting the appropriate tab at the top of the webpage, which is shown below in Figure 25.
Figure 25. Report Granularity Tabs
Most sensor reports will include information about each requested sensor; however, there are some aggregated sensor reports that merge data for all requested sensors. Each sensor report allows any subset of individual sensors to be included in the report. A list of all available sensors is located at the bottom of the webpage. The checkbox beside each sensor that is to be included in the report must be checked; however, if no boxes are checked then all sensors will be included in the report. The “Update Graph” link must be selected after modifying the list of sensors.
Each venue in a venue report will contain aggregated data for all sensors that belong to that venue. Similarly, each customer in a customer report will contain aggregated

Intel® AIM Analytics
Intel® Audience Impression Metrics Suite User Guide April 2013 68 Document Number: 328606-002
data for all venues belonging to that customer. Most venue or customer reports will include information about each requested venue or customer respectively; however, there are some aggregated reports that merge data for all requested venues or customers. Similar to sensor reports, individual venues and customers can be selected for venue and customer reports.
7.4 Report Types There are a large number of predefined reports that are available for use. Most reports can be identified by one or more of the following classifications:
• Totals reports contain aggregated information over a specified timeframe.
• Comparison reports show comparisons between groups of sensors, venues, or customers.
• Time-of-day reports show data on an hourly basis.
• Day-of-week reports show data from each day of the week.
The available reports are listed in the tree at the left side of the webpage, which is shown below in Figure 26. The required report must be clicked on in the tree in order to view the results. The main categories for the reports are described below. These categories are not mutually exclusive, and certain reports will apply to multiple categories.
• Audience reports include total viewer counts.
• Exposure reports include how long viewers looked for.
• Gender reports include data for male and female viewers.
• Age reports include data for child, young adult, adult, and senior viewers.

Intel® AIM Analytics
Intel® Audience Impression Metrics Suite April 2013 User Guide Document Number: 328606-002 69
Figure 26. Report Types Tree
7.5 Data Extraction In addition to viewing a large variety of reports, the Intel AIM Analytics Web site also allows data to be extracted in a raw format. There are currently two methods to extract raw data from the Intel AIM Analytics Web site: exporting the results of queries to a Comma Separated Value (CSV) file, and exporting data using the Intel AIM Suite Web API.
7.5.1 Export to CSV
After the results for a report query have been displayed, the results of the query can be extracted in a raw data format. The “Export to CSV” link to the right of the report can be selected to download a CSV file that contains the report results. The CSV file will contain the report parameters in addition to the results.
7.5.2 Intel® AIM Suite Web API
Another method of extracting data from the Intel AIM Analytics server is to use the Intel AIM Suite Web API. Using this interface allows data to be extracted by calling a PHP script over HTTP. This interface is applicable to situations where data extraction needs to be automated. Detailed information can be found in the AIM HTTP Web API Reference Manual.

Appendix A – Intel® AIM Suite Installation Checklist
Intel® Audience Impression Metrics Suite User Guide April 2013 70 Document Number: 328606-002
Appendix A – Intel® AIM Suite Installation Checklist
Note that not all equipment in this list is likely to be required for the installation. Refer to the Software Quick Setup section for detailed information regarding the checklist items.
Installation Equipment PC AC power adapter for PC Power bar Camera Ethernet cables USB extenders
Configuration Equipment Monitor AC extension cord for monitor Monitor RGB/DVI/HDMI extension cord DVI or HDMI adapter Keyboard and mouse USB extension for keyboard and mouse
Camera Setup Install camera drivers if required Position the camera above the screen and in-line with the horizontal center of
the screen (in most cases) Ensure that the camera is upright so faces will be oriented vertically Angle the camera so viewers will appear as close as possible to the center of
the video feed Ensure that the camera is powered and has a wired connection to the system Reset the camera settings to factory defaults Disable camera face-tracking and zoom settings. Configure the exposure, gain, and white-balance.
Intel® AIM Suite Setup Initialize an AIM Instance for every camera Activate a license and select a camera, for every AIM Instance. Ensure that Intel® AIM Suite is set to minimize on startup Ensure that AIM Watcher is set to start on system boot Configure the proxy server if required.
System BIOS and Hardware Setup Internet connection hardware and cables Disable halting on startup errors Enable auto-power-on Enable Intel® AMT

Appendix A – Intel® AIM Suite Installation Checklist
Intel® Audience Impression Metrics Suite April 2013 User Guide Document Number: 328606-002 71
Operating System Setup Disable system sleep/standby Disable hibernation Disable hard drive auto-off Disable monitor auto-off Disable screen saver Set minimum processor state to 100% Enable automatic login to the operating system’s desktop Disable automatic software updates (Windows) Configure Windows Defender or antivirus software (Windows) Configure Firewall to allow Intel® AIM Suite Configure system date and time
Remote Management Install remote desktop software
Installation Validation Verify that AIM Watcher and Intel® AIM Suite startup after the system is
rebooted Ensure that viewers can be detected for all cameras Ensure the processing FPS is greater than 12 for all cameras Verify that there is an Internet connection Verify that analytics data can be uploaded Test remote management tools including Intel® AIM Manage
§