instrumental analysis - fac.ksu.edu.sa · instrumental analysis chem340 ... trace analysis - it...
TRANSCRIPT

Introduction
-1-
Instrumental Analysis CHEM340
hope that you will enjoy this practical course because you will see each experiment as a challenge to you to obtain results which are in accord with the theory and because you will experience and overcome the problems of doing accurate analysis first-hand. We
have tried to make the experiments as relevant and interesting as possible yet still teach you something about the technique. It is hoped that in this set of practicals that you will learn something about the practical skills of doing an analytical exercise. You will soon see that theory and the practical skills go hand in hand. We hope you are able to see that the practicals are an integral part of the learning process and that both the theory and the practical components support one another. Since the practicals are run on a round robin basis, you may not have covered the theory in lectures. This is not a problem as you will have been given notes, we have also written the manual such that the relevant information is present and with a little prior research you will be able to carry out the experiment and then hopefully understand the lecture material better. This manual contains the information you need to carry out the experiments successfully; it is hoped that the background information is both helpful and interesting. You are also expected to read a good textbook on analytical chemistry in conjunction with each experiment. You must know which experiments you are doing on each particular day. You will get much more out of the session, if you read the manual before you come. If you do not understand something then ask at the beginning. If at any point you do not understand, stop and think, and then if you are still having problems ask. If you still do not understand ask again! You are also expected to keep a correct and legible record of what you do in the laboratory in a duplicate copy book. The carbon copy to be handed in at the end of the class. The full report to be handed in the following week. Success in analytical chemistry depends on care and attention to detail in everything you do in the laboratory. I give here some guidance on these matters, but you should realise that most of these points are only common sense and should be obvious. GLP Good Laboratory Practice - is now a widely recognised term, covering standards of working practice which are required by law in many laboratories and demanded by clients in many others. QA Quality Assurance - is a system of recording past history, sources and quality of all materials, and calibration and performance of apparatus/equipment used for a process or business, aimed at ensuring a consistently high quality of finished article. In our case we aim to ensure the high quality of analytical results. Good documentation of methods and standards is the key to good Quality Assurance. QC Quality Control - is a system of controlling the quality of finished articles. In our case the quality (accuracy) of analytical results can be controlled by regularly analysing check control samples of known composition, and of course by regularly calibrating all apparatus used in the analysis. General aspects which should be considered in a GLP programme are:
Introduction
-2-
1. Safety and cleanliness in the laboratory 2. Keeping full and accurate records of work done 3. Routine checking of performance of methods and equipment (normally done for you at
undergraduate level) 4. Good housekeeping 5. Cost and efficiency Safety and Cleanliness • If the laboratory and the apparatus in it are clean - and this is absolutely essential for
trace analysis - it will also be a safe laboratory, and accidents will be rare. • Labelling of all containers is a MUST. Clean the outside of the bottles as well as the
inside, and have only ONE label! Either use a glass marking felt tip pen or a sticky label.
• The method of cleaning will depend on what was in the article before, and what the article is made of. If it is only dilute inorganic reagents then a simple rinse with dilute nitric acid followed by several rinses with water and finally one rinse with deionised water will suffice. For organic or concentrated reagents detergents are usually good enough; especially when helped by brushing. All apparatus must then be rinsed very thoroughly. It is not always necessary to dry apparatus but when it is, glassware may be dried in the oven. Rinsing with solvents may leave residues and costs moneys and there is a disposal problem.
Records • A laboratory notebook must be used at all times. No scribbling pads or loose pieces of
papers with instrument readings or weighing! Record all relevant data. Use a duplicate book. Hand in the copy at the end of the practical.
• Record the date and the experiment name on each page. Use the notebook also for rough calculations, for example, at working out how much of chemical is needed for preparing a solution. Should you have problems afterwards, such "thinking details" can help indicate where you have gone wrong.
• It is expected that you will discuss the measurements and the results with other students in the group - indeed, often you will have to pool your results for a fuller picture, however, the report must be your own work.
Good Housekeeping • You will be working in a busy laboratory shared with many other people, and often you
will be using shared equipment. Co-operation is the only solution. Think about the consequences for other people when you do something for yourself.
• Wash up regularly and tidy away clean apparatus. Clean the bench and the shelves where you work.
• Put waste chemicals and solvents in clearly marked Waste bottles for safe disposal. Label all bottles correctly and clearly.
• Keep instruction books beside instruments.
Cost and efficiency

Introduction
-3-
Chemicals cost money - look at the price of a bottle of solvent or acid. Scaling down will save on cost and also on the disposal problem when you have finished. Consider the grade of the chemical. Laboratory reagent grades are adequate for many purposes, other times the higher purity of analytical grade reagents will be called for. Read the label! The other aspect of efficiency concerns planning. Before you start, sketch out a plan of action for the session, with a note of what should be achieved. It is a good idea to have tables already drawn up so all you have to do in the laboratory is fill them in. Your working time in the laboratory would be charged to a client at ~ R200 per hour. Would you be prepared to pay that rate for what you have achieved?
Laboratory Reports
-4-
Writing laboratory reports The laboratory Notebook The laboratory notebook is intended to be the complete data storage base for all the work done in the laboratory. You must note everything in your laboratory notebook. This will include measurement values, with sufficient notes to make clear what they are, notes on planning the experiments and how to make the solutions, how to deal with the sample, notes on information from the literature etc. It should be laid out in the following manner.
The Laboratory report During this module you will perform several laboratory experiments and tutorials that should be presented in lab reports. The following paragraphs describe general outlines for how such a report may be written. Do not forget that you are writing an accurate account of what happened for anyone who wishes to read your report, not just the person who will mark it. You should be able to give your report to a friend who has never seen the practical manual and he or she should be able to follow what you did and what your results were, assuming they have some basic knowledge in the subject. The report should contain your results, how you achieved them, and an evaluation of the results. You should demonstrate that you have understood the experiment as well as how to document and present it. Try to keep the text as short as possible without leaving out important information or using a poor language. This is a difficult task but practice makes perfect. The layout is important for a good final result, hence the report should be computer written with a word processing program. A recommended font is e.g. Times New Roman. Figures should be constructed with the aid of a computer program or scanned. The report is much easier to read if you don't have to flip back and forth between the main text and an appendix. Remember that figures must be numbered, have a legend and be referred to in the text. Generally, lab reports should include the following sections, as in the usual outline of a scientific paper. Front page The front page contains title of the laboratory experiment, your name, group, samples analysed, date you made the experiment as well as the date you hand in the report. Name: A. N. Other Group: B Title: Spectrophotometery; Nitrate analysis Unknown Sample Number: # (if you have one or type of sample analysed) Date of Practical: 09 July 2003 Hand in Date: 16 July 2003

Laboratory Reports
-5-
Abstract The abstract should give a brief (5-10 lines) summary of the entire report i.e. the purpose of the experiment, the methods you used, and the results you have achieved. This is the section in a scientific article where you are supposed to get the reader interested in the subject.
Common errors: The abstract is sometimes completely left out. Results and conclusions are missing from the abstract Introduction In the introduction you supply the reader with some basic background which is important to allow the work to be placed into perspective. You may use a textbook, the laboratory manual and lectures as references. The references are included in a reference list at the end of the report. Decide what the main purpose of the lab is. Does it introduce a new instrumental method or does it demonstrate a new method of standardisation? Pictures may be included, e.g. a drawing of some equipment, an overview of the chemical reactions etc. Mathematical and chemical formula should also be added to this section. Do not forget figure legends and numbering as well as references if you take pictures from the literature including the internet.
Common errors Some parts are left out. Numbering of figures and/or figure legends are missing. Methods (Procedure) In this section you describe equipment, chemicals and how you did the experiment. Most people add too much, all you need are the main points. It is a good way for me to see that you understand the key steps in the procedure. There is a complete list in the manual it is senseless to just copy it down. There may be differences between what is written down and what is given verbally i.e. slight difference in instructions, note these.
Common errors: Wrong tense, the methods section should be written in the past tense. Text is copied directly from the manual.
Results This is the most important part of the report where you should present the results you obtained as clearly and concisely as possible, e.g. absorbance measurements and observations. This is the place where you can show one sample calculation and then results go in table. The table should contain a heading, it should contain run number, mean and standard deviation. If any runs left out, then these should be indicated. It is best that separate tables are used for each unknown or are clearly separated from other data. Make it as easy as possible for the reader to see the results Extensive presentations of raw data like long lists of absorbance measurements, chromatograms and calculations should be included in an appendix. References to figures

Laboratory Reports
-6-
and tables must be added both when they are present directly in the text as well in appendices.

Laboratory Reports
-7-
Common errors: Raw data sometimes missing and only the summary of the data presented. Results not described in the text, i.e. there is a table of results but no text refers to it. Legends, headings and references left out. Calculated values contain too many decimals, e.g. the beer contained 5.457895% v/v ethanol. Samples not identified but simply presented as "sample 1, sample 2. You need to specify what the sample or series is. Labels missing from plots. Discussion State again what the goal of the lab was. Discuss how these goals were accomplished and how your results compare to previous knowledge. Did you expect these results? Why? It is not correct to simply state that a result is "wrong" or "right". Instead you should make an effort to try to explain why you got a particular value or result. Equipment that was used may be commented, maybe it is possible to develop or improve the method. Discuss possible errors. Are your results unambiguous or would it be possible to suggest additional experiments to exclude uncertainties?
Some of the experiments include questions and discussion points. These are meant to point out things you should think about. Use them as support for your reports, in particular in the results and discussion sections. Do not simply answer them one by one.
Common errors: You write e.g. "The experiment went very well and we got the results we had expected" i.e. the results are not compared to other facts. You make no attempt to evaluate your results. The last two sections of the lab report may alternatively be combined into one section titled Results and discussion. The general outline should still follow the above mentioned recommendations. References Here you list the references you have given in your text. Each reference should list the author(s), year, title and page of the reference. You may either number the references as they follow in the text (1), (2) etc. Alternatively you indicate the name of the first author and publication year in the text e.g. (Smith et al., 1998). In the latter case the references are listed alphabetically. Internet sources can be difficult to reference, a typical example could be as follows: Steffen Thomas, Spectroscopic Tools, University of Potsdam, updated 30/8/2002, <http://www.chem.uni-potsdam.de/tools/>.
An excellent reference on how to reference material can be found on the internet. A guide to referencing, USQ University Library, updated 15 February 2005, http://www.usq.edu.au/library/infoabout/ref_guides/harvardonline.htm
Common errors: You forget to reference sources taken from the internet.

Laboratory Reports
-8-
Appendix The appendix may contain documentation that is too extensive to be inserted inside the report, e.g. raw data, spectra, chromatograms and larger tables. Appendices should be numbered and referred to in the text.
Common errors: No numbering or reference inside the report. Tables and figures In manuscripts for submission to scientific journals, each table and figure is on a separate page at the end of the manuscript. In this type of lab report it is better to include them at appropriate places. Tables are numbered separately, Table 1, Table 2, etc. Each table should have a short descriptive title placed above as a header. It should include necessary details to distinguish from other tables. In general you should be able to understand the table without having to refer to the text. Each column/row should have a descriptor and a UNIT (when applicable), comments can be added as footnotes below the table. Figures include drawings, diagrams, plots, chromatograms etc. They are also numbered, Fig. 1, Fig. 2, etc. The title is usually put below the figure in what is called the "Figure legend" which may also include a short description of what it is supposed to illustrate. Common errors: No numbering or reference inside the report. UNITS and VALUES Whenever you write a value you MUST also provide the unit. Otherwise the value is completely meaningless. A good idea is to include the units in the calculations, thus you will be able to make sure that your method of calculation is correct and yields the correct units. Check also that you have the right order of magnitude. For values it is important to estimate how many valid digits to provide. The precision of a resulting value can never be higher than the least precise of the input values. More difficult is to estimate the precision of the experimental methods. Until you have statistical data (e.g. standard deviation), don't use more than 2-3 valid digits in lab reports. Common errors: No units or incorrect units Incorrect number of significant figures
Marking Everything will be taken into account, from results down to presentation. Work out your results in the laboratory. If you find out, once you have left the laboratory that a mistake has been made then it is too late. You will be heavily penalised for this type of mistake. If a calibration or some other set of measurements has not worked out, then make up the solutions and repeat the measurements. You must set yourself a reasonable standard and try to maintain it. Bad results are useless and will be marked as such. Most of the marks will go on the results and your treatment of the data. You have been taught some statistical methods, use them.

Laboratory Reports
-9-
Attendance If you cannot attend the practical you must still hand in a practical write up. You must obtain the relevant data, from the lecturer in charge that will allow you to write the practical. It must be accompanied with the reason for not attending, e.g. medical certificate.
Marking Scheme The mark for each practical will be out of 20. Although the different practicals have different slants on them and marks will be distributed differently the following marking scheme should give you a good idea how you are performing. 20-18 Student displays outstanding critical, analytical, reasoning and practical abilities.
Very good accuracy in the analysis of unknowns. 17-15 A thorough understanding of the material with minimal errors. Good accuracy in
the analysis of unknowns 14-12 A reasonable level of competence. Reasonable accuracy in the analysis of
unknowns. 11-9 Poor understanding, poor laboratory work, lack of clarity in expression but basic
information correctly provided. Reasonable accuracy in the analysis of unknowns. 8-5 Major errors in interpretation and understanding, confused presentation, flawed or
missing data. Accuracy of analysis very poor. <5 Very serious problems, you are in danger of losing your DP.
The total mark for the practicals will be given as a percentage which will count 20% towards your final module mark.
The final module mark will be based on the following:
Tests 10%
Practical reports 20%
Exam 70%

Units in Analytical Chemistry
-10-
Units in analytical chemistry You should be familiar with Molarity as the standard concentration unit for solutions in chemistry. Sometimes Normality is used, it is especially convenient for calculations that involve complex stoichiometry. Some other important ways of expressing concentrations are described here: %w/w = percent weight for weight This is often called "weight percent" (more correctly "mass percent") and is useful for all solids. Thus we may say that a brass sample has 61% w/w copper which implies that in 100 g of brass there is 61 g of copper.
% v/v = percent volume in volume Often called "volume percent", this is useful for liquids and for gases. Thus 55% v/v methanol - water would be prepared by taking 55 mL of methanol and making to 100 mL with water. Because there are volume changes when two liquids mix, we cannot assume that the volume of water added will be 45 mL.
% w/v = percent weight in volume The term used for preparing solutions of a solid in a liquid, so that 20% w/v sodium chloride will contain 20 g of the solid dissolved in water and made to 100 mL with water. For dilute solutions, % w/w and % w/v are nearly the same since the density of water is close to 1 g/mL.
ppm = parts per million This is the number of parts of the trace constituent in one million parts of the sample. Thus 1 ppm for solids or for solutions when ρ≠1 is 1μg/g or 1 mg/kg or for solutions where ρ=1 is 1 μg/mL or 1 mg/L and for gases 1 mL/m3. The term ppm is most often applied to dilute solutions. Since sample volumes are usually small and concentrations of the analyte in solutions is small, the unit μg/mL is usually the preferred "synonym" for ppm.
ppb = parts per billion The American billion 109 is firmly established. This is used for very low concentrations in ultra-high purity materials, e.g. μg/kg, μg/L or ng/mL. This is an extremely small number, if you colour a 1 mm2 box on a standard piece of graph paper, you would need 20000 sheets of graph paper ( ∼2 m high stack of paper) in order to represent 1 ppb.

Analytical Glassware
-11-
UUssiinngg GGllaasssswwaarree Think about what you are trying to do. Think about the degree of precision that is needed in a measurement. A little bit of thinking will save you time!
The correct way to fill and
dispense liquids from a pipette How to use a rubber
pipette filler How to attach the bulb filler
to a pipette
The correct way to use a burette
What method of measuring should you use?
Method Typical volumes
Accuracy
Pasteur pipette 1-5 mL low
beaker / flask 25-5000 mL very low
Measuring cylinder 5-2000 mL medium
Volumetric flask 5-2000 mL high
Burette 1-100 mL high
Glass pipette 1-100 mL high
Weighing - very high
evacuate bulb
fill pipette
empty pipette
To drain the pipette properly, you must let it drain until almost empty and then let the tip touch the vessel surface and count to 10.

The Analytical Balance
-12-
The Analytical Balance Until the relatively recent introduction of electronic instruments, it was very obvious that analytical balances were delicate instruments, and users therefore seemed prepared to treat them with respect. However, although modern electronic balances are very much easier and quicker to use, they will not give correct readings unless they too are treated with the same sort of care. Most of the necessary precautions are the same as those we had to observe with mechanical balances. Thus, a balance must be placed away from windows, to protect it from sunlight and draughts, and it should be kept away from air ducts or fans, and from lights. The room temperature should be kept as constant as possible, and so should the humidity. The weighing table should not transmit vibrations, should have no deflection when it is worked on, be made of antimagnetic materials, and be protected against static charges. Balances must be calibrated regularly, at the location where they are used, against a standard mass. We have attempted to meet these conditions as well as we can. The other points to note are under your control: • Check that the balance is level, and adjust if necessary. • Press the bar to switch on and zero the balance. • Before opening the weighing chamber, check to make sure that the display is indicating
exactly zero. • Touch the container as little as possible, to avoid transfer of heat and humidity. • Open the weighing chamber only long enough to put the vessel on the pan. As far as
possible, keep your hands out of the chamber. • Place the vessel in the middle of the pan. • Take the reading as soon as the display stabilises, then remove the vessel. • Keep the weighing chamber and pan clean. Only use clean containers for weighing. • Do not use any plastic containers for weighing, because they are very susceptible to
developing a static charge, which could cause wrong weights to be obtained. Glass vessels may cause problems too if the humidity is low.
• Objects should only be weighed when they are at the same temperature as the air in the balance room. Allow warm objects to cool, and cold objects to warm up before weighing.
• Chemicals should NEVER be weighed directly on the pan, but should always be placed in a vessel, preferably a weighing bottle.
• "Weighing by difference" should be the normal practice. That is, place the chemical in the weighing bottle, put the bottle on the balance and record the weight. Tip a suitable quantity into the destination container OUTSIDE the balance case, then reweigh the bottle.
[It is normal practice to use the rough balance on the laboratory side-benches to get approximately the correct amount of chemical into the bottle at the start.]
NEVER attempt to add a chemical to a vessel inside the weighing chamber.

Atomic Weights
-13-
Atomic Weights Name Symbol At. wt. Actinium* 227Ac 227.03 Aluminium Al 26.982 Americium* 241Am 241.06 Antimony Sb 121.76(3) g Argon Ar 39.948 g r Arsenic As 74.922 Astatine* 210At 209.99 Barium Ba 137.33 Berkelium* 249Bk 249.08 Beryllium Be 9.0122 Bismuth Bi 208.98 Boron B 10.811(5) g m r Bromine Br 79.904 Cadmium Cd 112.41 Caesium Cs 132.91 Calcium Ca 40.078(4) g Californium* 252Cf 252.08 Carbon C 12.011 g r Cerium Ce 140.12 g Chlorine Cl 35.453 m Chromium Cr 51.996 Cobalt Co 58.933 Copper Cu 63.546(3) Curium* 244Cm 244.06 Dysprosium Dy 162.50(3) g Einsteinium* 252Es 252.08 Erbium Er 167.26(3) g Europium Eu 151.96 g Fermium* 257Fm 257.10 Fluorine F 18.998 Francium* 223Fr 223.02 Gadolinium Gd 157.25(3) g Gallium Ga 69.723 Germanium Ge 72.61(2) Gold Au 196.97 Hafnium Hf 178.49(2) Helium He 4.0026 Holmium Ho 164.93 Hydrogen H 1.0079 g m Indium In 114.82 Indium In 192.22(3) Iodine I 126.90 Iron Fe 55.847(3) Krypton Kr 83.80 g m Lanthanum La 138.91 Lawrencium* 262Lr 262.11 Lead Pb 207.2 g r Lithium Li 6.941(2) g m r Lutetium Lu 174.97 g Magnesium Mg 24.305 Manganese Mn 54.938 Mendelevium* 258Md 258.10
Name Symbol At. wt. Mercury Hg 200.59(2) Molybdenum Mo 95.94 g Neodymium Nd 144.24(3) g Neon Ne 20.180 m Neptunium* 237Np 237.05 Nickel Ni 58.693 Niobium Nb 92.906 Nitrogen N 14.007 Nobelium* 259No 259.10 Osmium Os 190.23(3) g Oxygen O 15.999 Palladium Pd 106.42 Phosphorus P 30.974 Platinum Pt 195.08(3) Plutonium* 239Pu 239.05 Polonium* 210Po 209.98 Potassium K 39.098 g Praseodymium Pr 140.91 Promethium 147Pm 146.92 Protactinium Pa 231.04 Radium* 226Ra 226.03 Radon* 222Ra 222.02 Rhenium Re 186.21 Rhodium Rh 102.91 Rubidium Rb 85.468 Ruthenium Ru 101.07(2) g Samarium Sm 150.36(3) g Scandium Sc 44.956 Selenium Se 78.96(3) Silicon Si 28.086 Silver Ag 107.87 Sodium Na 22.990 Strontium Sr 87.62 g r Sulfur S 32.066(6) g r Tantalum Ta 180.95 Technetium* 99Tc 98.906 Tellurium Te 127.60 g Terbium Tb 158.93 Thallium Tl 204.38 Thorium Th 232.04 g Thulium Tm 168.93 Tin Sn 118.71 Titanium Ti 47.88(3) Tungsten W 183.84 Uranium U 238.03 g m Vanadium V 50.942 Xenon Xe 131.29(2) g m Ytterbium Yb 173.04(3) g Yttrium Y 88.906 Zinc Zn 65.39(2) Zirconium Zr 91.224(2) g
1991 Table of standard atomic weights abridged to five significant figures. Scaled to the relative atomic mass 12C = 12.0
r – the accuracy is less than to five significant figures because of normal variability of isotopic compositions g – the tabulated values do not apply to some unusual geological occurrences, or the isotopic composition is
sometimes artificially altered m – The modified abundances of commercial samples may not be disclosed * – elements with no stable isotope. Source: Chemistry International, 1993, 15(4), 128

Safety
-14-
Safety in the Laboratory These are to augment the instructions from the beginning of the manual, they also contain new information so please read and make sure you understand. If you do not comply with any of the rules you will be warned and if you persist you will be asked to leave the laboratory and you will be given 0 for the practical. If you are a persistent offender you may lose your DP. Safety Precautions • Your eyes are extremely sensitive; you must wear goggles or spectacles all the time you
are in the laboratory. Even if you are performing some safe operation, someone else might do something that could affect you. Sunglasses are not acceptable. Report any accident at once to the demonstrator.
• Splashes of chemical in the eye should be dealt with immediately by flushing with large quantities of gently running water from a tap or an eyebath for at least 10 minutes.
• Before you use any chemical, make sure that the name on the bottle is exactly the same as that specified in the instructions: if in doubt, consult a demonstrator.
• Do not heat flammable substances in an open container near a flame.
• Many substances have unpleasant effects on the skin, so you should avoid touching (and tasting) them. If you spill any chemicals onto yourself, or the bench or floor, add water immediately, since dilution is normally the most effective way of treating spillages. If you get any chemical in your mouth, rinse well with water immediately, then report to a demonstrator.
• Acids and alkalis, particularly if concentrated, should always be treated with the greatest respect. Always add acid to water, never water to concentrated acid. Always wash any spills off the skin immediately, remove contaminated clothing if necessary, and report to a demonstrator as soon as possible.
• Experimental instructions must always be followed carefully. It is especially important to use a fume cupboard when this is specified, and also to ensure that the fume cupboard is turned on and is operating.
• Pipettes should be cleaned thoroughly. You should use pipette filler.
• Wear a laboratory coat at all times in the laboratory, but take it off when you leave.
• All bottles must be labelled with name, date and what it is. Unlabelled containers found in the laboratory will be emptied out.
• Take time to learn and remember where the following safety equipment are located:- eye-wash bottles, fire blankets/extinguishers, safety drench showers fire exits and safety data sheets.
• Always report any incident to the lecturer in charge.

Potentiometric Analysis
-15-
Experiments
Fundamentals of Spectrophotometry Absorption of light Many early scientists studied the passage of light through transparent media such as coloured glasses or solutions. Bouguer (1729) discovered that if one piece of glass could halve the intensity of a light beam passing through it, two pieces reduced the intensity not to zero, but to a quarter of the original value. Lambert stated this mathematically:
"If a beam of intensity Io passes through a glass plate and is reduced in intensity to Io/k, then passage through n plates will result in an intensity transmitted of:
It = Io/kn "
Much later, Beer (1852) showed that this applied to coloured solutions, and that if the concentration were halved, then doubling the path length would compensate for the change in the light intensity. That is,
It = Io/klC
where C is the concentration and l is the path length. By taking logarithms, we get to the usual form of the Beer-Lambert law, and define Absorbance as
A = logIo/It = εlc
in which ε is the molar absorptivity of the molecule or ion at the particular wavelength specified. Errors in spectrophotometry:
Instrumental stray light at high absorbance readings lamp instability at low absorbance readings wavelength setting error
Chemical formation of an unwanted complex dissociation of a desired complex
Operational dirty cells path-length errors reflectivity differences suspended solids air bubbles solvent droplets
Most students tend to assume at first that any instrument will give correct results, particularly if it looks shiny and new. However, this is never a safe assumption; it is always necessary to check an instrument to make sure that it is performing correctly.

Potentiometric Analysis
-16-
Spectrophotometry
Spectrophotometry: method of standard additions
Manganese in Steel Manganese is one of the most common "alloying" elements added to iron to make steel. It helps to increase the strength, ductility and toughness of the metal. Without the addition of manganese the steel becomes difficult to hot-roll or forge. It is added in relatively small quantities, normally less than 1% by mass. Small variations in the manganese content of steel can have important consequences for the physical properties. Therefore, it is important to be able to accurately determine the manganese content of a steel. Analysis of manganese in steel or other metal alloys is routinely carried out in foundries. In modern plants automated instrumental analysis is used. In older plants, or in other places where it is not a routine analysis a spectrophotometric method would generally be employed. In this practical session you will dissolve the sample and convert the manganese to a 'coloured' strongly absorbing form and analyse a steel sample using a spectrophotometer. The species which we will measure spectrophotometrically is the intensely coloured permanganate ion. The Mn(II) ion is easily oxidised to the permanganate ion by potassium periodate. The periodate ion can oxidise other alloying elements which absorb light at the same wavelength as the permanganate ion. To get around this problem the method of standard additions is used. This is an important concept and you should understand why it is commonly used. In the Fundamentals of Analytical Chemistry, the authors treat the results/data in a mathematical form. If you want to do this feel free, however, an easier way is to plot a graph of absorbance versus 'concentration'. The negative of the x-axis intercept gives you the concentration of the analyte in the diluted sample. Stainless steels can not be used for this practical since the nitric acid will not dissolve the steel sample. Nitric acid is an oxidising acid which will help build up the protective Cr2O3 layer which makes stainless steel inert.
Reagents 1000 ppm Manganese solution toxic Nitric acid, 4 M corrosive Ammonium persulphate ((NH4)2S2O8) toxic, strong oxidising agent Sodium bisulphite (NaHSO3) toxic production of SO2 with acid, asthmatics beware Phosphoric acid, 85% corrosive Potassium periodate (KIO4) toxic, strong oxidising agent
1 E X P E R I M E N T
Potentiometric Analysis
-17-
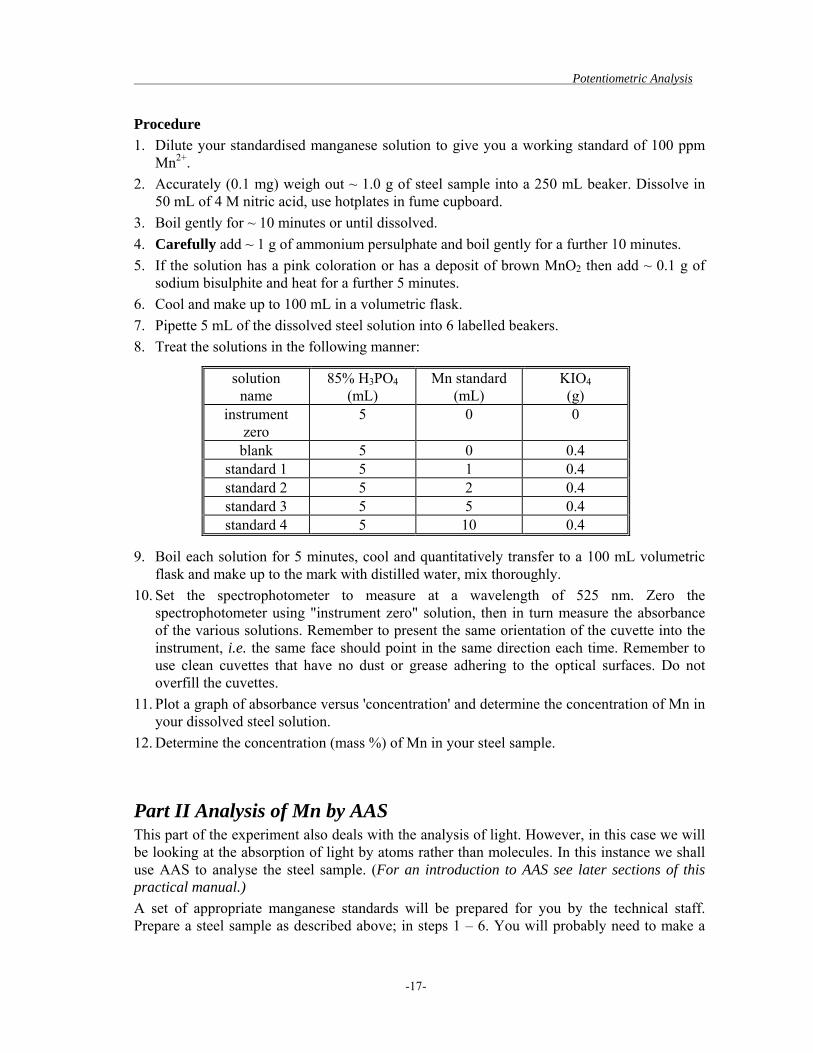
Procedure 1. Dilute your standardised manganese solution to give you a working standard of 100 ppm
Mn2+. 2. Accurately (0.1 mg) weigh out ~ 1.0 g of steel sample into a 250 mL beaker. Dissolve in
50 mL of 4 M nitric acid, use hotplates in fume cupboard. 3. Boil gently for ~ 10 minutes or until dissolved. 4. Carefully add ~ 1 g of ammonium persulphate and boil gently for a further 10 minutes. 5. If the solution has a pink coloration or has a deposit of brown MnO2 then add ~ 0.1 g of
sodium bisulphite and heat for a further 5 minutes. 6. Cool and make up to 100 mL in a volumetric flask. 7. Pipette 5 mL of the dissolved steel solution into 6 labelled beakers. 8. Treat the solutions in the following manner:
solution name
85% H3PO4 (mL)
Mn standard (mL)
KIO4 (g)
instrument zero
5 0 0
blank 5 0 0.4 standard 1 5 1 0.4 standard 2 5 2 0.4 standard 3 5 5 0.4 standard 4 5 10 0.4
9. Boil each solution for 5 minutes, cool and quantitatively transfer to a 100 mL volumetric flask and make up to the mark with distilled water, mix thoroughly.
10. Set the spectrophotometer to measure at a wavelength of 525 nm. Zero the spectrophotometer using "instrument zero" solution, then in turn measure the absorbance of the various solutions. Remember to present the same orientation of the cuvette into the instrument, i.e. the same face should point in the same direction each time. Remember to use clean cuvettes that have no dust or grease adhering to the optical surfaces. Do not overfill the cuvettes.
11. Plot a graph of absorbance versus 'concentration' and determine the concentration of Mn in your dissolved steel solution.
12. Determine the concentration (mass %) of Mn in your steel sample.
Part II Analysis of Mn by AAS This part of the experiment also deals with the analysis of light. However, in this case we will be looking at the absorption of light by atoms rather than molecules. In this instance we shall use AAS to analyse the steel sample. (For an introduction to AAS see later sections of this practical manual.) A set of appropriate manganese standards will be prepared for you by the technical staff. Prepare a steel sample as described above; in steps 1 – 6. You will probably need to make a

Potentiometric Analysis
-18-
dilution of the sample. The idea of this experiment is to help you compare and contrast different instrumental methods of analysing the same sample.
Questions 1. Why do we need to use the method of standard additions in the spectrophotometric
analysis? 2. Why does the calibration graph need to be linear? 3. If pure manganese had been used to prepare the 1000 ppm standard Mn solution, how
much would be needed to prepare 250 mL of this solution. 4. Why is important that the solution is not turbid? 5. Why is potassium periodate added? 6. Compare and contrast your results from the different techniques. Which method do you
prefer?

Spectrophotometry
-19-
Spectrophotometry
Spectrophotometric analysis of a mixture Caffeine and benzoic acid in a soft drink Adapted from V.L. McDevitt, et al., J. Chem. Ed. 1998, 75, 625
In this experiment, we use ultraviolet absorbance to measure two major species in soft drinks. Caffeine is added as a stimulant and sodium benzoate is a preservative. Benzoic acid was the first chemical preservative allowed in foods by the USA Food & Drug Administration (FDA) and it is widely used in acidic foods (pH 2.5 - 4). In South Africa, soft drinks are permitted to contain a maximum of 400 mg/L benzoic acid.1 It is normally added as the salt, sodium benzoate, as is this is approximately 200 times more soluble in water. (At pH 2.5, what will be the predominant form, benzoic acid or benzoate?) Although benzoic acid is a man-made food additive, benzoic acid can occur naturally in several fruits e.g. Scandinavian cloudberry, which has several times the FDA legal limit!
N
N N
NCH3
CH3
H3C
O
O
CO2H
Caffeine Benzoic acid (pKa = 4.20) 182.2 g/mol 122.1 g/mol In this analysis we shall limit ourselves to non-diet soft drinks because the sugar substitute, aspartame, found in diet drinks, also absorbs ultraviolet radiation that slightly interferes in the analysis. We also avoid darkly coloured drinks because the colorants also absorb in the region of interest. In this experiment we shall analyse Mountain Dew. There will be some UV absorbance from colorants in these drinks and this will give rise to a small systematic error.
0
0.2
0.4
0.6
0.8
1
1.2
1.4
1.6
1.8
200 220 240 260 280 300
λ (nm)
Abs
orba
nce
10ppm benzoic acid
12ppm caffeine
UV absorption of benzoic acid and caffeine in 0.01 M HCl
___________________________________________________________________________ 1 R.965/1977, http://www.doh.gov.za/docs/regulations/1977/reg0965.pdf accessed 22/01/2004
2 E X P E R I M E N T

Spectrophotometry
-20-
Beer’s law also applies to a medium containing more than one kind of absorbing substance. Provided there is no interaction among the various species, the total absorbance for a multicomponent system is given by:
Atotal = A1 + A2 + .….. + An (Equation 1)
Atotal = ε1bc1 + ε 2bc2 + .….. + ε nbcn
where the subscripts refer to absorbing components 1, 2, …n.
The above equation indicates that the total absorbance of a solution at a given wavelength is equal to the sum of the absorbances of the individual components present. This relationship makes possible the quantitative determination of the individual constituents of a mixture, even if their spectra overlap. If enough spectrometric information is available, all of the components of mixtures can be quantified without separation. For a two-component mixture (compound X and Y) with overlapping absorbances, one could solve for the concentration of each species, [X] and [Y], by measuring the absorbances at two different wavelengthts, λ' and λ". The problem is mathematically equivalent to having two simultaneous equations with two unknowns.
A1= ε x,1bcx + ε Y,1bcY (total absorbance at λ') (Equation 2)
A2= ε x,2bcx + ε Y,2bcY (total absorbance at λ") (Equation 3)
The four molar absorptivities, ε x,1 , ε y,1 , ε x,2 , ε y,2 , can be evaluated from individual standard solutions of X and Y, or better, from the slopes of their Beer’s law plots. The problem becomes simpler when one of the compounds has no interference with the other compound. If there is substantial interference then you must solve the simultaneous equations.
Using UV spectroscopy, you will determine the concentrations of caffeine and sodium benzoate (determined as benzoic acid), in the soft drink Mountain Dew. The UV spectra of caffeine and benzoic acid overlap at certain wavelengths, thus you will need to measure the absorbance of the unknown mixtures using two different wavelengths, and apply equations 2 and 3 to evaluate the concentrations of caffeine and benzoic acid.
See Fundamentals of Analytical Chemistry, D.A. Skoog, D.M. West and F.J. Holler for help in carrying out the calculations. The experiment could be shortened by recording just one spectrum of caffeine (20 mg/L) and one of benzoic acid (10 mg/L) and assuming that Beer’s law is obeyed. However, we shall construct a calibration graph and carry out a full analysis.
Reagents Stock solutions: benzoic acid 100 mg /L
caffeine 200 mg /L 0.10 M HCl

Spectrophotometry
-21-
Procedure 1. Calibration standards: Prepare a set of benzoic acid solutions containing 2, 4, 6, 8, and
10 mg/L in 0.010 M HCl. In a similar manner, prepare caffeine standards containing 4, 8, 12, 16, and 20 mg/L in 0.010 M HCl.
2. Soft drink: Warm ~ 20 mL of soft drink in a beaker on a hot plate to expel CO2 and filter the warm liquid through filter paper to remove any particles. After cooling to room temperature, pipette 2.00 mL into a 50-mL volumetric flask. Add 10.0 mL of 0.10 M HCl and dilute to the mark.
3. Verifying Beer’s law: Record the ultraviolet spectrum of each of the 10 standards with water in the reference cuvette. Note the wavelength of peak absorbance for benzoic acid (λ′) and the wavelength for the peak absorbance of caffeine (λ′′). Measure the absorbance of each standard at both wavelengths. Prepare a calibration graph of absorbance versus concentration for each compound at each of the two wavelengths. Each graph should go through 0. The slope of the graph is the absorptivity at that wavelength.
4. Unknowns: Measure the ultraviolet absorption spectrum of the diluted sample of the soft drink. With the absorbance at the wavelengths λ′ and λ′′ determine the concentrations of benzoic acid and caffeine in the original soft drink.
5. You will need to take a stiffy disc to laboratory so that you can copy the data from the spectrometers in the form of a .csv file. This can then be converted using Microsoft Excel into a UV spectrum.

Flame Spectroscopy
-22-
Flame Spectroscopy Flame photometry is a type of flame spectroscopy and is more properly called atomic emission spectroscopy. The atoms of a number of elements can be excited in a hot flame to give emission spectra, at a given temperature the emission intensity correlates to the concentration of the element. In 1860 Bunsen and Kirchhoff discovered Cs using the flame developed by Bunsen and measuring the atomic spectra of the unknown element. Flame photometry as a quantitative method dates back to about 1930. For many metals this emission occurs in the visible region of the electromagnetic spectrum. (This is the basis of the flame test in inorganic qualitative analysis). Usually the spectrum consists of lines, so that with a good monochromator the method can be highly specific for each element. However a good monochromator costs money and in many cases a simple optical filter can be used for several elements. These elements are the group one elements, the 'alkalis'. They have emission lines which tend to be lower in energy (longer wavelength) and therefore with a relatively cool flame and optical filters, a simple cheap instrument can be used for these elements.
The lowest energy ground-state transition (2eV) is from 3S to 3P, giving rise to orange light at 589nm. The next transition is more energetic (3.7eV) 3S to 4P, giving UV light at 330nm. Less likely as the energy required is higher, and anyway not visible. The final step (5.12eV) leads to ionisation, this is not desirable. Temperature is the controlling factor.
Figure 1. Energy levels for a sodium atom The sample is introduced to the flame as a fine spray of a dilute solution. The fine droplets are produced in a pneumatic nebuliser. Much of the solution is wasted, because only the finest droplets are carried into the flame. The waste solution is drained via a drain tube. The drain trap on the tube must be full before the flame is lit, to prevent flash back (explosion), and to prevent the fuel-oxidant mixture escaping into the laboratory. Many atoms are not excited to give emission in the flames normally used, but may instead absorb light at their own characteristic wavelengths- this is known as atomic absorption. An atomic line source must be used, usually a hollow-cathode lamp with the cathode fabricated from the element to be determined Figure 2. Hollow-cathode lamp The Beer Lambert law holds, so it is convenient to have the logarithmic conversion to absorbance done electronically in the instrument. For greater sensitivity the flame is narrow
3S
3P
4P 4D
5.12eV
589nm
330nm 819nm
ionisation
Quartz window
Hollow cathode(made of analyte)
Anode
Glassshield
Ne or Arat 1.5 torr

Flame Spectroscopy
-23-
and long, rather than round as for flame emission. Figure 3 shows the basic units for a flame photometer and atomic absorption spectrometer.
Figure 3. Flame photometer (top) and atomic absorption spectrometer (bottom)
Figure 4. The main processes occurring in flame spectroscopy. The purpose of the flame is to produce free atoms. Sample, as a solution, (usually aqueous) is aspirated into the flame as an aerosol. In the flame a number of processes takes place.
Evaporation of the droplet ↓
Melting of the solid salt ↓
Vaporisation of the molten salt -as molecules- *
-Excitation- -Band spectra-
-Emission- ↓
Dissociation of molecules into atoms
-Excitation- -Line spectra-
-Absorption or Emission- ↓
Ionisation†
† not good for atomic spectroscopy
Monochromatoror Filter
Detector Amplifier
Meter
Hollow cathodelamp
Lens
Monochromatorsample Spray Chamber
Recorder
PMT
Excited state vapour
* * * hν hνhν
Vaporisation
Desolvation
Processed spray
Spray
Sample
Solution transport
+eMolecular Atomic Ionised vapour vapour vapour
Equilibrium of vapourised species
nebulisation
Aerosol transport

Flame Spectroscopy
-24-
Types of flames used As can be seen from above, flame temperature is very important. The main gases used are propane and acetylene and the oxidants are air or nitrous oxide, although other gases may be used. Other methods can be used to excite atoms; electrothermal atomisation or in a plasma. Inductively Coupled Plasmas (ICP) are in common use today.
Flame /oxidant Temperature °C C2H2 / air 2450
C2H2 / N2O 3200 C3H8 / air 1750 Ar plasma ~7000
Figure 5. The periodic table divided into groups of elements and the appropriate flame conditions for their analysis.
Li Be B
Ca Mg Al Si
K Ca Sc Ti V Cr Mn Fe Co Ni Cu Zn Ga Ge As Se
Rb Sr Y Zr Nb Mo Ru Rh Pd Ag Cd In Sn Sb Te
Cs Ba La Hf Ta W Re Os Ir Pt Au Hg Tl Pb Bi H2/air is not common and hydride generation is a better alternative. As + NaBH4 → AsH3 (g) Hydride generation can also be used for other hydride forming elements e.g. Ge, Sn, Pb, Sb Hg is best done by cold vapour AAS, Hg salt + Sn2+ in N2 → Hg (g) (detection limit low ng/L)
Sources of Error in Flame spectroscopy The errors given here are for all branches of flame spectroscopy, which ones are relevant to flame emission and which to atomic absorption?
Flame emission: The background spectrum from excited radicals in the flame produced during the combustion process, is very dependent on the flame conditions, especially the fuel-to-oxidant mix, and hence temperature. Flame emission can be checked by running a blank solution and preferably also by recording its emission spectrum.
Ionisation: If there is sufficient energy in the flame to dissociate molecules to give atoms, there may well also be sufficient energy to ionise some atoms, resulting in a decrease in the atom population in the flame and hence the analytical signal. The effect can be minimised by adding a large excess of another element which ionises more easily. Thus 2500 ppm of potassium should be added to the solution when calcium is being analysed by C2H2/N2O flame.
Acetylene/Nitrous OxideAcetylene/Air
Propane/Air
H2/Air

Flame Spectroscopy
-25-
Chemical effects: Many species can exist as molecular species, particularly oxides, even at high temperatures; Al, Ba, Ca, Mo Si, etc. Hotter flames assist dissociation of the stable molecules, so the nitrous oxide-acetylene flame is preferred for these elements. Alternatively, or additionally, using a reducing flame, i.e. a fuel-rich flame will assist the reduction of the metal oxide. Therefore for each element the flame must be optimised.
Other anions can cause problems, e.g. phosphate and sulphate, again by forming stable compounds in the flame. One method that can be used to overcome this is by the addition of a releasing agent. A releasing agent is one that forms a stronger association with the interfering ion than the analyte. Lanthanum is a good releasing agent in the analysis of Ca when phosphate or sulphate is present.
Self-absorption: The phenomenon of atomic absorption is also encountered in flame emission work, when analyte atoms in the cooler outer regions of the flame absorb light emitted by the hotter atoms in the centre of the flame. Sodium exhibits this effect clearly, you will see this in the flame photometry exercise.
Spectral interferences: When the spectral lines of two elements are very close, each will interfere in the determination of the other. In flame emission this is additive but in atomic absorption the additional lines (of the analyte element or of another element in the case of a multi-element lamp) may not be absorbed by the analyte atoms and therefore give rise to serious curvature of the calibration. This can be easily observed with iron, part of the spectrum is shown in Fig 6. Working with a narrower bandwith (i.e. monochromator slit width) does help.
Figure 6. Part of the emission spectrum from an iron hollow-cathode lamp.
The weak emission at 248.4nm is from an excited-state transition and is therefore not absorbed by ground state Fe atoms in the flame. Calibrations based on the 248.3nm line therefore exhibit curvature when the bandwidth of the spectrometer is wide enough to transmit both lines.
Solution properties: Any technique which involves aerosol production is prone to errors arising from the physical/chemical nature of the solution being measured. A viscous solution uptake is slower than a non-viscous solution. Droplet size is important, small droplets evaporate quicker than large droplets therefore atomisation efficiency is effected. Uptake rate is also affected by the presence of surfactants.
It is clear that for flame spectroscopy (as for many types of analysis) the standards and the samples should be carefully matched in terms of solution properties; matrix matching.
248.3 nm
247.3 nmnon absorbedline: 248.4 nm
IronHollow Cathode LampEmission
Flame Spectroscopy
-26-
Flame Spectroscopy Experiments
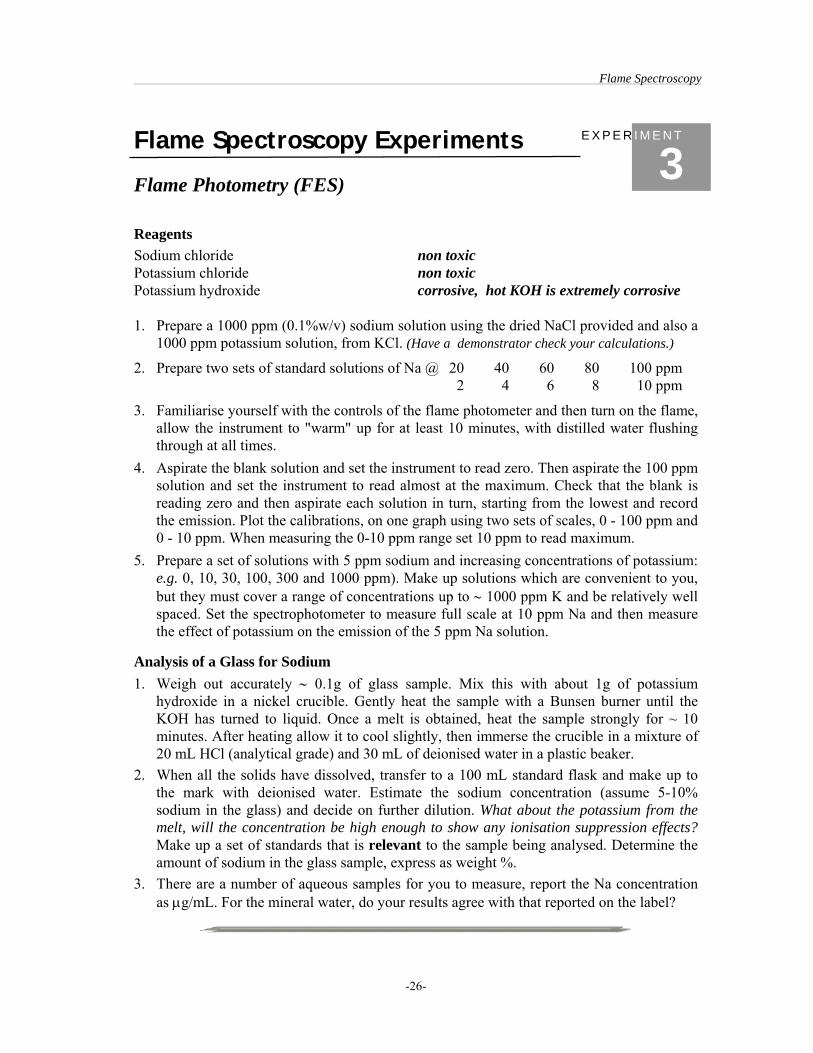
Flame Photometry (FES) Reagents Sodium chloride non toxic Potassium chloride non toxic Potassium hydroxide corrosive, hot KOH is extremely corrosive 1. Prepare a 1000 ppm (0.1%w/v) sodium solution using the dried NaCl provided and also a
1000 ppm potassium solution, from KCl. (Have a demonstrator check your calculations.)
2. Prepare two sets of standard solutions of Na @ 20 40 60 80 100 ppm 02 04 06 08 010 ppm
3. Familiarise yourself with the controls of the flame photometer and then turn on the flame, allow the instrument to "warm" up for at least 10 minutes, with distilled water flushing through at all times.
4. Aspirate the blank solution and set the instrument to read zero. Then aspirate the 100 ppm solution and set the instrument to read almost at the maximum. Check that the blank is reading zero and then aspirate each solution in turn, starting from the lowest and record the emission. Plot the calibrations, on one graph using two sets of scales, 0 - 100 ppm and 0 - 10 ppm. When measuring the 0-10 ppm range set 10 ppm to read maximum.
5. Prepare a set of solutions with 5 ppm sodium and increasing concentrations of potassium: e.g. 0, 10, 30, 100, 300 and 1000 ppm). Make up solutions which are convenient to you, but they must cover a range of concentrations up to ∼ 1000 ppm K and be relatively well spaced. Set the spectrophotometer to measure full scale at 10 ppm Na and then measure the effect of potassium on the emission of the 5 ppm Na solution.
Analysis of a Glass for Sodium 1. Weigh out accurately ∼ 0.1g of glass sample. Mix this with about 1g of potassium
hydroxide in a nickel crucible. Gently heat the sample with a Bunsen burner until the KOH has turned to liquid. Once a melt is obtained, heat the sample strongly for ~ 10 minutes. After heating allow it to cool slightly, then immerse the crucible in a mixture of 20 mL HCl (analytical grade) and 30 mL of deionised water in a plastic beaker.
2. When all the solids have dissolved, transfer to a 100 mL standard flask and make up to the mark with deionised water. Estimate the sodium concentration (assume 5-10% sodium in the glass) and decide on further dilution. What about the potassium from the melt, will the concentration be high enough to show any ionisation suppression effects? Make up a set of standards that is relevant to the sample being analysed. Determine the amount of sodium in the glass sample, express as weight %.
3. There are a number of aqueous samples for you to measure, report the Na concentration as μg/mL. For the mineral water, do your results agree with that reported on the label?
3 E X P E R I M E N T

Flame Spectroscopy
-27-
Flame Spectroscopy Experiments
Inductively Coupled Plasma- Atomic Emission Spectroscopy (ICP-AES))
This technique is finding widespread use in industry, commercial models first became available in 1970. It has some important advantages when compared to Atomic Absorption Spectrophotomtery. These are: no need for hollow-cathode lamps; sequential or simultaneous multi-element capability; much larger calibration ranges; less "flame" interferences. This makes this practical a little bit difficult as there are very few parameters which you can change that will effect the operation and conditions of analysis. So in this practical you will learn about sample and standard preparation as well as data manipulation. You will also get to see the ICP in operation. You will analyse a coffee bean sample and determine the concentration of some of the following elements: phosphorus, calcium, magnesium, iron, manganese, copper, iron and molybdenum. You will also see that although the analysis time is very quick, standard and sample preparation are time consuming. A fact that is usually overlooked when using instrumental techniques, is that no matter how good your instrument is, it is only as good as the quality of the solutions you prepare.
Figure 7. shows a typical design of an ICP torch, they are usually constructed from quartz glass. In the ICP-AES system it is mounted vertically whereas in ICP-MS it is mounted horizontally. The inductively coupled plasma is an electrodeless discharge in a gas at atmospheric pressure, maintained by energy coupled to it from a radio frequency generator. This is done by a suitable coupling coil, which functions as the primary of a radio frequency transformer, the secondary of which is created by the discharge itself. Argon is the gas which is normally used and the frequency used is usually between 27-41 MHz giving a total power output of 1-2 kW.
4 E X P E R I M E N T
Flame Spectroscopy
-28-
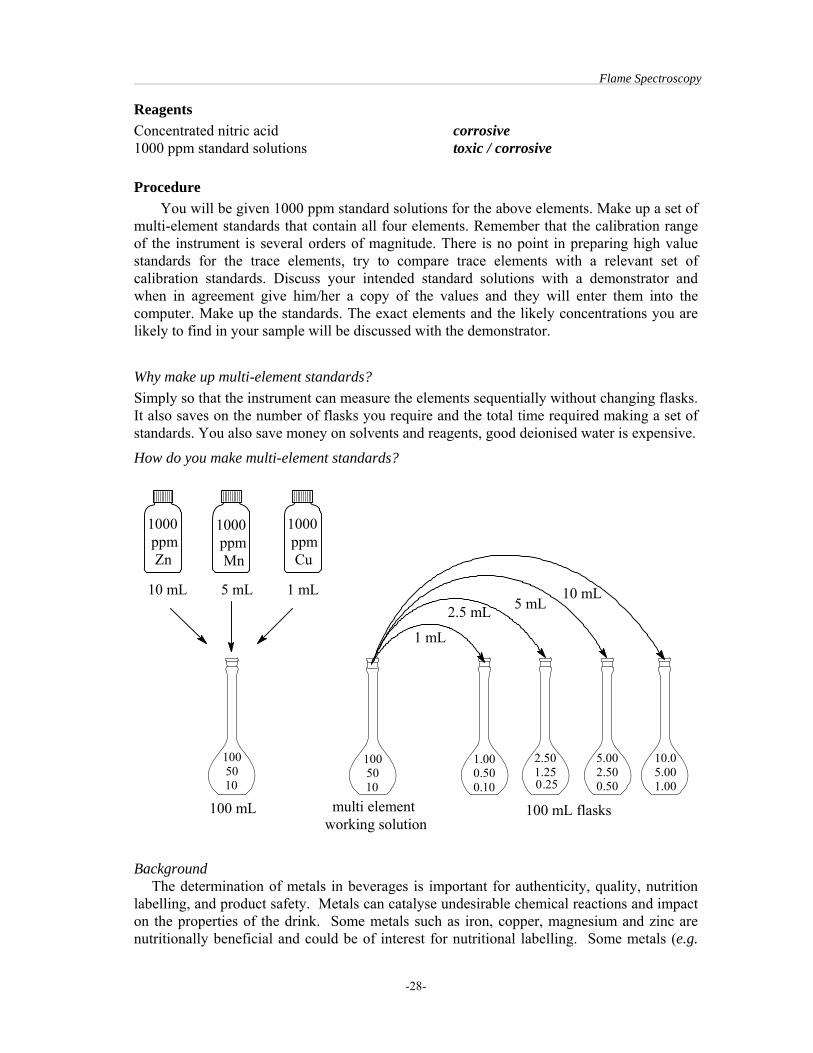
Reagents Concentrated nitric acid corrosive 1000 ppm standard solutions toxic / corrosive Procedure You will be given 1000 ppm standard solutions for the above elements. Make up a set of multi-element standards that contain all four elements. Remember that the calibration range of the instrument is several orders of magnitude. There is no point in preparing high value standards for the trace elements, try to compare trace elements with a relevant set of calibration standards. Discuss your intended standard solutions with a demonstrator and when in agreement give him/her a copy of the values and they will enter them into the computer. Make up the standards. The exact elements and the likely concentrations you are likely to find in your sample will be discussed with the demonstrator.
Why make up multi-element standards? Simply so that the instrument can measure the elements sequentially without changing flasks. It also saves on the number of flasks you require and the total time required making a set of standards. You also save money on solvents and reagents, good deionised water is expensive.
How do you make multi-element standards?
10 mL 5 mL 1 mL
100 50 10
100 mL
100 50 1
100 50 10
multi element working solution
1 mL
10 mL5 mL2.5 mL
1.00 0.50 0.10
10.0 5.00 1.00
5.00 2.50 0.50
2.50 1.25 0.25
100 mL flasks
1000 ppm Zn
1000 ppm Cu
1000 ppm Mn
Background The determination of metals in beverages is important for authenticity, quality, nutrition labelling, and product safety. Metals can catalyse undesirable chemical reactions and impact on the properties of the drink. Some metals such as iron, copper, magnesium and zinc are nutritionally beneficial and could be of interest for nutritional labelling. Some metals (e.g.

Flame Spectroscopy
-29-
lead) are toxic at high levels and monitoring their presence directly impacts the safety of the drink. These heavy metals often get into the food via contamination resulting from poor agricultural practices and the soil or migration from packaging materials during storage. Trace elements can also be useful for determining the country of origin of a product. A plant’s tissues will have a trace element fingerprint that mimics that of the soil in which it was grown. This makes trace elements especially useful to detect incidences of substitution of one product with another. For instance few people could detect (by tasting) whether the coffee in their cup was actually grown in the Blue Mountains of Jamaica or not (assuming the roast was the same). Coffee beans grown in particular regions are more highly regarded and command higher prices. Adulteration through substitution of a product is possible for these commodities. US regulations require that the country of origin be listed on label of a product if it was not produced in the USA. Trace element profiles can help establish that product are correctly labelled. Sample Preparation: Before you prepare your standards you should prepare your sample. This will be done using the microwave digestion apparatus. Microwave digestion offers many improvements over traditional wet and dry ashing. The important attributes of microwave digestion systems (using sealed bombs) are: • Fast decomposition times, may be a short as 10 minutes but typically 25 minutes,
compare this with several hours in an open vessel. • With closed vessels, the loss of volatile components is low. • Contamination tends to be lower, nothing can get in (as well as out). • Since typical conditions for a digestion would be 200°C & 75 bar, decomposition is more
complete, ∴ higher precision with replicate analysis, i.e. reproducibility. The microwave oven system is not the only expensive part of the instrument, the bombs, vessel holders and rotors are also expensive. All bombs are made out of Teflon (or similar inert high temperature polymer e.g. PFA) or, as in our case, quartz. Weigh out accurately ~ 0.3 g of coffee or tea and place it in the quartz digestion bomb, add to the bomb, 5 mL of concentrated, analytical grade, nitric acid. The demonstrator will seal the vessels and start the digestion process. Whilst the samples are digesting you should be preparing the standards. You will be advised as to which elements you will analyse. After approximately a ½ hour the sample digestion will be complete. The demonstrator will remove and vent the bombs. You will transfer the digest to 50 mL volumetric flasks and dilute to the mark. The demonstrator will show you the ICP-AES and will run the samples with you. Once the run is finished, calculate the concentrations of the various elements.
6 place rotor arm for Anton Paar microwave

Flame Spectroscopy
-30-
Report: • Calculate the concentration of the elements (express your results in μg/g or mg/g) in the
samples, remember the statistics. • Are the coffee (or tea) samples significantly different in terms of the elemental
composition? • Sometimes it is not possible to prepare multi-element standards, why not? • Draw the main components of the ICP-AES and describe briefly the function of each
part. • The Perkin Elmer 5000 ICP-OES is described as dual view, what does this mean and
what are the advantages of this type of system.

Flame Spectroscopy
-31-
Flame Spectroscopy Experiments
Atomic Absorption Spectrometry (AAS)
You will be given sets of prepared solutions and as a group you will carry out sets of experiments designed to show you the operation and problems associated with AAS. After carrying out the communal experiments you will then carry out an individual experiment. You should decide which one is to be done before you carry out the communal experiments as in most cases the sample preparation involves heating the sample in acid for ½ - ¾ of an hour. It is hoped that you will find these individual experiments interesting as well as teach you something about sample preparation, preparing solutions and reporting the results. Read the complete list to get an idea of the types of analysis that can be done.
CCOOMMMMUUNNAALL EEXXPPEERRIIMMEENNTTSS Reagents 1000 ppm standard solutions toxic / corrosive Concentrated hydrochloric acid corrosive Concentrated nitric acid corrosive Trichloroacetic acid toxic / corrosive Hydrogen peroxide 200 vol. strong oxidising agent
BBAARRIIUUMM BBYY AAEESS In this experiment we shall see the effect of ionisation and the use of an ionisation suppresser (sometimes called a buffer). You will also be using the nitrous oxide acetylene flame. Depending on the availability of a lamp you will either use AAS or AES.
Procedure 1. Select the relevant conditions on the instrument depending on whether you are using
AAS or AES. 2. Using the Ba standards provided 0, 5.0, 10.0, 15.0, 20.0 and 25.0 ppm all of which also
contain 2500 ppm K+, obtain a calibration graph. 3. Now aspirate the 10.0 ppm Ba solutions which contain varying amounts of K+. 0, 10, 100,
500, 1000, 2500 and 5000 ppm K+. 4. Discuss the results (a graph may help).
Questions: Describe how would you go about making 1000 mg/L calcium and magnesium standard
solutions? What effects can be achieved by varying the acetylene flow Why is a nitrous oxide flame needed for the analysis of barium?
5 E X P E R I M E N T

Flame Spectroscopy
-32-
IINNDDIIVVIIDDUUAALL EEXXPPEERRIIMMEENNTTSS Atomic absorption spectroscopy provides one of the most useful and convenient means for the determination of metallic elements in solution from a wide variety of samples. The sample must be solubilised in aqueous or other solvents in order that it can be aspirated into the flame of the atomic absorption spectrophotometer. Zinc in grass You will be given 2 samples of grass; one from an area around a galvanised fence and one from a "clean" area. Take 1 g of dried grass and add it to a 100.0 mL beaker. To this add 5 mL of concentrated nitric acid and cover with a watch glass. Place on the hotplate and allow to digest. After half an hour very carefully (vigorous reaction) add ∼1 mL of hydrogen peroxide solution. Boil to remove excess H2O2. Cool the solution and filter, wash with several 10 mL portions of deionised water. Collect the filtrate and transfer to a 100 mL volumetric flask. Remember to wash the flask into the sample. Prepare a set of Zn standards 0 - 1.0 ppm in 1% nitric acid. Measure the Zn content of the grass and express as μg/g. Are the two samples significantly different?
Zinc in toothpaste Zinc is added to some toothpastes as a bactericide to try and reduce the amount of bacteria in your mouth. These bacteria can form plaque or produce acids which cause dental decay. Only one toothpaste manufacturer has the patent to do this. From the two samples you have, can you tell which one it is? Procedure Take one gram of the two toothpaste samples and place it in beakers, add approximately 50 mL water and 5 mL concentrated nitric acid. Using a mechanical stirrer, stir for approximately 10 minutes or until completely dissolved. Transfer to a 100 mL volumetric flask and make up to the mark. Allow the contents to settle. It may be necessary to centrifuge the samples. Measure the Zn content in the samples by comparing the absorbance to a calibration graph for 0 - 1.0 ppm Zn. The Zn is added as the citrate salt, express the Zn content as % w/w zinc citrate.
Zinc in Lichen Lichens are two organisms; a green plant and a fungus which live together and function as one organism (mutualism). They do not have roots therefore most of their nutrients are obtained from the air. This means that they can be used to monitor air pollution. You will have two samples one from Kloof gorge and one from a fence post on Francois Rd. Procedure Take 0.5 g of lichen and dissolve in nitric acid. Use the same procedure as outlined in Zinc in grass. Measure the Zn content of the lichen and express as μg/g. Are the two samples significantly different?
Lead in Edinburgh Crystal

Flame Spectroscopy
-33-
Edinburgh crystal is famous throughout the world. However, in recent times the glass is not often made in Edinburgh but more commonly in Eastern Europe. It is called "Edinburgh crystal" as the original design is from Edinburgh and indeed most of the engraving is still done there. The lead is added as a modifier and makes the glass heavier and more translucent than normal glass. Procedure Silicates are very difficult to destroy and hydrofluoric acid is commonly used. This is an extremely dangerous chemical and can not be used for teaching purposes. Instead you will use an alkali fusion to "open" up the silicate structure. Weigh out 0.1g of powdered glass and transfer it to a nickel crucible. Mix this with about 1.5 g of potassium hydroxide in a nickel crucible. Gently heat the sample with a Bunsen burner until the KOH has turned to liquid. Once a melt is obtained, heat the sample strongly for ~ 10 minutes. After heating allow it to cool a little, then immerse the crucible in a mixture of 20 mL nitric acid (Analytical grade) and 30 mL of deionised water in a plastic beaker. CARE hot KOH is extremely corrosive. Once dissolved make up to 100.0 mL. Prepare a set of lead standards containing 0, 5.0, 10.0, 15.0 and 20.0 ppm Pb. All the standard solutions should contain 1% nitric acid. Construct a calibration graph and measure the Pb content of the glass, % m/m Pb.
Lead in Lichen Refer to section Zinc in Lichen. Lead is a common contaminant in cities and is usually derived from lead added to petrol as tetraethyl lead as an antiknock agent. Lead is available in two forms from petrol as the unburnt tetraethyl lead which is volatile and as inorganic lead after the petrol has been burnt. Lichens will pick up both types of lead pollution. You will have two samples one from Kloof gorge and one from alongside a busy road. Procedure Use the same procedure as described in Zinc in Lichen but dilute to 50.0 mL instead of 100.0 mL. Also use the following set of standards: 0, 2.5, 5.0, 7.5 and 10.0 ppm Pb, all containing 1% nitric acid. Determine the Pb content as μg/g, do the results make sense?
Lead in Soil As discussed above lead is a common contaminant in cities. You will look at the lead content from two different sites; one from alongside the busy M27 and one from my garden. The lead you will be measuring is the inorganic lead. Procedure Use the procedure as described in Zinc in grass, except make up to 50.0 mL. However, use one gram of dried soil. Discuss the results and express the lead concentration as μg/g. NB this method of sample preparation will not dissolve the silicate matter.
Multivitamin/Mineral Tablets Multivitamin tablets are now commonly used by people to make up for the highly refined foods which may be deficient in vitamins and minerals.. The best tablets contain the mineral in an available form. This usually means they are present as an organometalic complex. You will have to determine one of the following elements: Cu, Zn, Mn or Fe. The ranges for standard solutions can be found in standard reference books. Instrument manufactures usually supply analytical methods books with the instrument. The most sensitive lines for the above elements are Cu 0 - 5 ppm, Zn 0 - 1 ppm, Fe 0 - 10 ppm Mn 0

Flame Spectroscopy
-34-
- 5 ppm. If you use different lines, then different detection limits and linear calibration ranges will be obtained. Procedure Put the tablet in a 250-mL beaker, add 7 mL of concentrated hydrochloric acid (measuring cylinder), and heat gently on a tripod stand with a Bunsen burner in your small fume cupboard to dissolve as completely as possible, it should become quite black and charred. Add 50 mL of water, then filter (No. 40 paper) into a 100 mL standard flask. Wash the residue on the paper with about 25 mL of water, then dilute to volume. Express the results as mg per tablet. In most countries content must be with in 7.5% (± 7.5%). Do your results agree with those stated on the label?
Copper in Whisky Whisky is a famous export from Scotland but it is also made in Ireland where it has a different spelling , Whiskey. (The effects are the same) Whisky is produced from barley that is allowed to sprout for several days so that maltose can form in the shoots. It is then dried over an open flame (this is what gives it the smoky flavour) Traditionally peat is used for the fire. The dried barley is mashed mixed with water and allowed to ferment. The fermented mash is then distilled in a copper still, it may be distilled more than once. During the distillation procedure copper is dissolved and gets carried across to the final product. You have to determine the copper content of the whisky. Procedure Make up a set of standard copper solutions, 0, 1.0 2.0, 3.0 ,4.0 and 5.0 ppm Cu. The solutions must be made in 40% (v/v) ethanol. Use 50 mL volumetric flasks. Report the Cu content for the different types of whisky. Express the copper content as μg/mL. Why are the standards prepared in 40% ethanol?
Copper in black Tea Dry Ashing of Black Tea leaves: Ash 5 g of the tea leaves at 500-550°C for 1 hour. After cooling, moisten the ash with 10 mL of 8M nitric acid and evaporate on a steam bath to near dryness. Then carefully and quantitatively transfer the moist render to a 50 mL volumetric flask and dilute to the mark with distilled water. Filter ready for analysis by AAS. By dilution (with distilled water) of the 100 ppm solution supplied, prepare the following standards 0, 0.5, 1, 2, 3, and 4 ppm Cu solutions.
Calcium / Magnesium / Zinc in Milk The above elements are important minerals for a healthy body. Calcium is important for good bone formation, magnesium is important for proper functioning of muscle, nerves and the brain. Zinc has several functions, it is important for the proper functioning of cells and in healing. Anorexia nervosa has been linked to Zn deficiency. It is concentrated in several parts of the body with parts of the eye containing large amounts Zn. Zinc is also important for the proper functioning of sperm and semen has quite high levels of Zn. Oysters contain high levels of Zn and this is possibly why they are seen as an aphrodisiac. Recent studies have shown that Zn-deficiency is a major problem is some areas, e.g. in India 40% of children are Zn deficient. The problem with milk and other body fluids is that proteins can cause problems with the analysis. You can ash the sample (dry or wet) to destroy them or you can use trichloroacetic acid (TCA)to denature the proteins. Procedure

Flame Spectroscopy
-35-
Take and aliquot of 5 mL of milk and low fat milk. Transfer to a 100 mL volumetric flask and add 50 mL of a 24% (w/v) TCA solution. Dilute to volume with deionised water. Shake the samples at five minute intervals for 30 minutes. For Zn analysis no further dilution is necessary. For Ca and Mg analysis transfer a 5 mL aliquot to a 50 mL flask and add La solution so that the final La concentration is 5000 ppm La. Prepare a set of standards 0 - 10 ppm for Ca and 0 - 1 for Mg, these should also contain 1.2% TCA and 5000 ppm La. Determine the Mg or Ca content of the milk samples. Discuss the results. The average daily requirement for Mg is 300 mg, how much milk is required to achieve this?

Potentiometric Analysis
-36-
Potentiometric Titration
Determination of chloride in various samples
In potentiometric methods, we measure the potential of an electrochemical cell to find the concentration of an analyte. The concentration is related to the potential via the Nernst equation.
+
−=nan M
o 1lnF
RTEE
where E = measured potential E° = standard electrode potential R = molar gas constant: 8.314 J mol-1 K-1 T = temperature in Kelvin F = Faraday constant 96485 Coulombs mol-1 ln = natural logarithm a = activity of analyte Mn+ n = number of electrons involved in the redox reaction
If the concentration of the analyte is low, which is normal for potentiometric titrations, then the activity ≈ concentration. The most common form of the Nernst equation is as follows
]M[
1log0.0592EE 10o
+−= nn
@ 25°C
Two basic types of electrodes are commonly used in potentiometric methods: the metallic indicator electrode and the membrane electrode. These groups can be further subdivided into different categories.
Potentiometric electrodes
metallic indicator
electrode membrane electrode
First order
Second order
Inert electrode
glass membrane
liquid membrane
solid state membrane
In this practical we shall be using a metallic indicator electrode to determine the chloride content of a tomato sauce. It is possible to use a number of different electrodes for this type of analysis, e.g. second order electrode or a membrane electrode which is specific to chloride
6 E X P E R I M E N T

Potentiometric Analysis
-37-
ions. Electrodes which are highly selective to a specific ion are known as ion-selective electrodes (ISE). These types of electrodes are generally quite expensive (~ 6000 Rand for a chloride ISE) and are only used when no simpler electrode system exists. In this case we will make use of a much cheaper and simpler electrode system: a silver electrode as the indicator/sensing electrode which will "sense" the silver concentration in solution and a platinum wire as the reference. How does this actually function? We are determining the chloride concentration of a sample by sensing the silver ion content.
]Ag[
1log 0592.0EE 10o
+−= or Aglog 0592.0EE 10
o ++=
We also know that silver ions react with chloride to form a sparingly soluble salt
AgCl(s) Ag+(aq) + -Cl (aq) Ksp = 1.82 × 10⁻¹⁰ @ 25°C
[Ag+] = ]Cl[ −
spK
By subsituting this into the Nernst equation we have the following relationship:
][Cllog 0.0592-log 0592.0EE -10sp10
o K+=
Hence a silver wire can be used to determine the chloride ion concentration. As we add silver ions to the solution containing chloride ions, a precipitate will form immediately and effectively remove all the silver from solution. At equivalence point the silver will no longer be removed and there will be a rapid increase in concentration of silver ions. There are a two ways to carry out potentiometric measurements: direct measurement where the electrode is calibrated using solutions of known concentration and the potential of an unknown solution is measured and the concentration determined from the calibration graph. This is effectively what you are doing when you measure the pH of a solution using a pH meter. The alternative is titration where you measure the electrode response as a factor of reagent added. The endpoint is determined from the change in slope of the graph of potential versus volume.
As with all instrumental methods of analysis there are a number of problems which affect potentiometric analysis. You should acquaint yourself with the most common sources of errors.
We will carry out three separate experiments which are designed to demonstrate typical applications of a potentiometric titration. Reagents • Silver nitrate solution 0.1000 M (toxic) • A solution containing NaCl and NaI (~0.02 M halide) • A chloride salt of a Group I element (toxic) • 4 M nitric acid (corrosive) • Sodium nitrate (toxic) • Tomato sauce (disgusting)

Potentiometric Analysis
-38-
PROCEDURE The apparatus will be set up for you and you will be instructed on how to use it. Please listen carefully. Although the apparatus will look home made and you will wonder if it will work, if you follow the instructions given, you will get good results without much difficulty. The main points to be aware of are:
The tip of the burette must be immersed in the solution. The pipette tip is acting as a salt bridge therefore to have electrical connection the tip must be in the solution.
The plastic pipette tip (containing the platinum electrode) which is attached to the bottom of the burette must be completely full of silver nitrate solution.
The stirrer should only be turning slowly, stirring fast will result in errors. Do a rough determination using large volume (e.g. 0.5 mL) additions to find out
approximately where the end points are. Then carry out a precise titration, adding the silver nitrate in 0.2 mL increments at first and then in 0.1 mL aliquots or less around the end point.
Ag electrode
Pt electrodesealed into tip of burette
tip must be immersed in solution
Part 1 In this experiment you will determine the concentration of chloride and iodide in a given solution. How many endpoints will you observe? 1. Pipette 50 mL of the unknown solution into a 100 mL beaker. 2. Add approximately 10 mL of distilled water 3. Add 3 drops of 4 M HNO3 and ~1.0 g NaNO3. 4. Stir the solution until the salt has dissolved. 5. Reduce the speed of the stirrer until it is gently mixing the solution. 6. Place the burette tip in the solution and place the silver electrode in the solution. 7. Select the DC volts option on the multimeter and record the potential in mV. 8. Titrate the solution, it will be easier if you record and plot the potential as you go. One
person can do the titration whilst the other can record the data.
Potentiometric Analysis
-39-
9. Plot two graphs on the same piece of graph paper: E versus volume of Ag+ added and ΔE/ΔVol versus volume of Ag+ added. (When plotting the volume for ΔE/ΔVol versus volume , use the average of the two volumes used to calculate ΔVol.)
10. Determine the concentration of iodide and chloride in solution.
Part 2 In this experiment you will be given a chloride salt of a group I cation. Using a potentiometric titration you will determine the chloride content and hence determine the cation present. 1. Weigh by difference one gram of your unknown salt to ± 0.1 mg. 2. Accurately transfer this to a 250.0 mL volumetric flask and make to volume using
distilled water. 3. Transfer 10.00 mL of this solution to a 100 mL beaker. 4. Add approximately 50 mL of distilled water 5. Add 3 drops of 4 M HNO3 and ~1.0 g NaNO3. 6. Stir the solution until the salt has dissolved. 7. Reduce the speed of the stirrer until it is gently mixing the solution. 8. Place the burette tip in the solution and place the silver electrode in the solution. 9. Select the DC volts option on the multimeter and record the potential in mV. 10. Titrate the solution, it will be easier if you record and plot the potential as you go. One
person can do the titration whilst the other can record the data. 11. Plot two graphs on the same piece of graph paper: E versus volume of Ag+ added and
ΔE/ΔVol versus volume of Ag+ added. 12. Identify the salt you have.
Part 3 Aim: To determine the concentration of chloride in a sample of tomato sauce.
1. Weigh ~ 2 g (weigh to ± 1 mg) of tomato sauce directly into a 100 mL plastic beaker. (Normally you weigh by difference but tomato sauce is difficult to do by this method)
2. Add approximately 50 mL of distilled water 3. Add 3 drops of 4 M HNO3 and ~1.0 g NaNO3. 4. Stir the solution until the salt has dissolved and the tomato sauce is well dispersed. 5. Reduce the speed of the stirrer until it is gently mixing the solution. 6. Place the burette tip in the solution and place the silver electrode in the solution. 7. Select the DC volts option on the multimeter and record the potential in mV. 8. Titrate the solution, it will be easier if you record and plot the potential as you go. One
person can do the titration whilst the other can record the data. 9. Plot two graphs on the same piece of graph paper: E versus volume of Ag+ added and
ΔE/ΔVol. versus volume of Ag+ added.

Potentiometric Analysis
-40-
10. Determine the chloride content of the tomato sauce, express your results as % Cl (m/m) and % NaCl (m/m).
11. Could have you used Fajan's titration for this analysis?
When filling your 10 mL burette, do this carefully and place the burette at an angle, DO NOT allow the solution to bubble down, you will find it virtually impossible to get rid of the bubbles. For your final report which you hand in use a spreadsheet package e.g. Excel™ to calculate ΔE/ΔVol. etc. as well as for plotting your graphs.

Potentiometric Analysis
-41-
Ion Selective Electrode (ISE)
Determination of fluoride in dental products
You will already have used an ion selective electrode and be familiar with its operation; the glass combination pH electrode which is sensitive to H+. If you have forgotten how this works consult your Intermediate Instrumental Analysis notes or any standard Chemistry text book. Most ion selective electrodes fall into one of the following classes: 1. Glass membranes for H+ and certain monovalent cations. 2. Solid-state electrodes based on inorganic salt crystals or pressed pellets. 3. Liquid membrane Ion-exchange electrodes using a hydrophobic polymer membrane
saturated with a hydrophobic liquid ion-exchanger. In today's experiment we will be using a solid-state fluoride electrode. The solid state electrode ion-selective electrode based on an inorganic salt is shown in Figure 1.
The fluoride electrode uses a crystal of LaF3 doped with Eu2+. Doping means that a small amount of Eu2+ is added in place of La3+. The filling solution contains 0.1 M NaF and 0.1 M NaCl. Fluorine ions are selectively adsorbed on the surface of the crystal. Unlike H+ in the glass pH electrode, F- actually migrates through the LaF3 crystal. This is because the crystal is doped with EuF2, anion vacancies are created within the crystal. An adjacent fluoride ion can jump into the vacancy, thus leaving a new vacancy behind. In this manner F- diffuses from one side of the crystal to the other thereby establishing the potential difference across the crystal required to make the electrode function. The fluoride electrode gives nearly a Nernstian response over a concentration range from about 10-6 M to 1 M. The electrode is more responsive to F- than to other ions by a factor greater than 1000. The only interfering species is OH-, for which the selectivity coefficient is κF-,OH- = 0.1. This ratio is the value which represents the maximum ratio (OH/F) for no interference. At low pH, F- is converted to HF (pKa = 3.17), to which the electrode is insensitive.
Fig. 1. Solid state F- electrode
In analytical chemistry, concentrations rather than activities are generally desired. Because ion-selective electrodes respond to activity, the standard solutions and samples must be matched in terms of activity coefficient of the analyte ion. This requires that the ionic strength of these solutions be essentially equal. In this practical a Total Ionic Strength Adjustment Buffer (TISAB) will be used to adjust the ionic strength and the pH. The pH of
LaF3 crystal
Filling solution
Ag/AgCl electrode
To potentiometer
7 E X P E R I M E N T

Potentiometric Analysis
-42-
the buffer is 5, at this pH the predominant fluorine species is F-. This buffer also contains cyclohexylaminedinitrileotetraacetic acid which forms stable chelates with Fe(III) and Al(III).
In this practical we will be measuring the fluoride content of a mouthwash, toothpaste, mineral water and drinking water. Fluoride is added as it helps prevent destruction of the enamel (hydroxyapatite) i.e. tooth decay.
( ) ( )Ca PO OH + H 10Ca + 6HPO + H O10 4 6 2+ 2+
42-
2→ The acid, formed by bacteria by the metabolism of sugars, removes the calcium and phosphate ions and is called demineralisation. This can be slowed down by converting the hydroxyapatite to the less soluble fluorapatite.
( ) ( ) ( )Ca PO OH + 2F Ca PO F + 2OH10 4 6 2-
10 4 6 2-→
The most common compound which is added to toothpaste and drinking water is NaF, but in the past Sn(II)F2 was common in toothpaste. Fluoride belongs to a group of chemicals which are beneficial at trace levels but at higher levels they are toxic. 100 mg of NaF per Kg of body mass will be fatal and even at low levels (5 ppm) there is concern that damage is being done to various organs in the body, notably the heart. Therefore, it is vitally important to have a method for fluoride determination that is sensitive and reliable.
Preparation of Solutions: 1. Total Ionic Strength Adjustment Buffer Corrosive/toxic This solution is marketed
commercially under the trade name TISAB.™ Sufficient buffer for 15-20 determinations can be prepared by stirring 4 g of cyclohexylaminedinitrileotetraacetic acid, 57 mL of glacial acetic acid, 58 g of NaCl and 500 mL of distilled water in a 1 L beaker. Cool the contents and then carefully add 6M NaOH until a pH of 5 to 5.5 is reached. Dilute to 1 L and store in a plastic bottle.
2. Standard fluoride solution, 1000 ppm Using the dry NaF (110°C for 2 hrs ) prepare 1 L of a 1000 ppm F solution. Transfer it to a plastic bottle. Caution NaF is toxic.
Procedure: 1. Transfer two 25 mL aliquots of tap-water to 50 mL volumetric flasks, and dilute to the
mark with TISAB solution. Do the same for the bottled mineral water. 2. Take duplicates samples of mouthwash (5mL) and mix well with 30 mL of deionised
water. Add 50 mL TISAB and then make up to 100 mL with deionised water. 3. Prepare a 50 ppm F solution by diluting the 1000 ppm standard. Transfer aliquots of this
50 ppm solution so that the following standards are prepared 0, 0.1, 0.5, 1.0, 2.5, 5.0 and 10.0 ppm F-. These should be prepared in 100 mL volumetric flasks and should contain 50 mL of the TISAB solution.
4. After thorough rinsing and drying with a paper tissue, immerse the electrodes in the blank stir for about 3 minutes and record the potential. Repeat with all the standards starting from the lowest.
5. Plot the measured potential against the log of the concentration of the standards. Determine the concentration in ppm of F- in the drinking water and in the mouthwash. Also express the concentration of NaF in the mouthwash as mg NaF / mL .

Potentiometric Analysis
-43-
6. Disperse ~0.5 g of toothpaste in 50 mL of TISAB stir until dissolved. Carry this out in duplicate. Once the entire sample is dispersed, transfer to a 100 mL volumetric flask and dilute to volume with deionised water. Determine the fluoride content. Express the concentration as mg/g NaF.
Questions: Why is the calibration plotted in log concentration? TISAB complexes with Fe(III) and Al(III), why is this important? Comment on your results and the technique in general?

Gas Chromatography
-44-
Gas Chromatography: In common with all other chromatographic techniques, gas chromatography depends on the differential migration of the components of a mixture caused by the partitioning to different extents, of the components between two phases; one moving (here, a gas) and one stationary (here, a liquid). In this case the technique is more properly known as gas liquid chromatography (GLC) The liquid is held as a thin coating on the surface of an absorbent solid called the support, (as illustrated in Fig. 1), together constituting the packing which is filled into a long piece of tubing called the column.
Fig. 1 Diagram of a packed column for GLC
In a mixture of components with similar polarities but differing volatility, the more volatile ones will spend more time in the mobile (gas) phase (called the carrier) and will therefore move faster than the less volatile ones and elute before them, resulting in a separation in time of the components of the mixture (Fig. 2).
Fig. 2 Gas chromatogram of a petrol on a Carbowax packed column Other factors can be involved in GC separations. Whatever the nature of this retention, be it by partitioning (solubility), chemical bonding, polarity or molecular filtration, the column will hold back some components longer than others. Thus, the component compounds move down the column at a rate determined by many factors, but mainly by their "strength" of retention. Here, this refers to both their degree of solubility in the liquid stationary phase and also to their volatility. Bearing in mind that different compounds will have different solubility in the liquid phase and different volatilities, they will progress down the column at varying rates and consequently, assuming the column is long enough, the solute components of a mixture will emerge separately at the outlet of the column. In other words, all components pass through the column at different speeds and emerge in the inverse order of their retention by column materials.
N2
8
6
4
2 0
min
paraffins benzene
toluene
m, p-xylenes ethylbenzene
o-xylene
methyl ethylbenzene mesitylene (1,3,5-trimethylbenzene)
1,2,4-trimethylbenzene

Gas Chromatography
-45-
Apparatus for gas chromatography The apparatus consists of a controlled pressure carrier gas supply, a temperature-controlled (and programmable) oven to house the column, an injection port for getting the sample on to the column and a detector to produce a signal proportional to the quantity of each sample component injected. These are shown schematically in Fig 3. The oven is fan-assisted to ensure a very even temperature, and has a low thermal mass to enable it to be heated or cooled rapidly. Very good temperature control is essential if retention times are to be reproducible.
Fig 3 Diagram of a gas chromatograph The injection port has to meet several design criteria: 1. It must volatilise the sample, say 5μL, in not more than one second. 2. It must introduce the sample as a sharply focused plug of vapour onto the column. 3. It must not be so hot as to cause thermal degradation of the sample.
These criteria become more critical when capillary columns are being used. The injection port will, if possible, be heated to above the boiling point of the least volatile of the sample components. Capillary columns can be easily overloaded, only a proportion of the sample is injected onto the column, this is known as the split ratio. A split ratio of 1:50 means that only 2% of the sample is injected.
Recorder
Column
OvenCarrier gas
Sample Syringe
Injection port Detector
Air
+ 200 V
Carrier gas from column
Heater
Temp
Sensor
Hydrogen
Flame
Cathode electrodeTo
Amplifier
insulatingring
Cooling fins
septum
Glassliner
HeaterBlock
Carrier gasOven
Heater
Thermocouple
Nut
Fig. 4 Flame ionisation detector Fig 5 Packed column injector

Gas Chromatography
-46-
The detector is located immediately at the exit of the gas chromatography column and its object is to detect efficiently, accurately and with the best sensitivity possible the emergence of a compound from the column. There are a considerable number of detection systems. The flame ionisation detector (FID) performs very well in meeting several criteria: 1. It has a very wide linear working range. 2. It responds to a very wide range of organic compounds (but with a useful low sensitivity
to CS2 which can therefore be used as a solvent, and no response to CO2 or CO). 3. It has good sensitivity, giving signals from as little as 10 ng of most organic compounds.
The disadvantage of the FID is that it requires supplies of hydrogen and clean air for the flame, in addition to the supply of carrier gas. These supplies must be controlled, as response does vary with hydrogen flow rate. Hydrogen is chosen because this low temperature air diffusion flame fragments organic molecules into ions, which can be detected by measuring the electrical conductivity of the flame, also because the air-hydrogen flame itself does not have any ions (as it burns with a free-radical reaction).
Chromatographic peaks The initial sharp plug of vapour injected onto the column emerges to give a somewhat broadened signal over a period of time which, when plotted on a chart recorder (or integrator) is termed a peak. The retention time tR is characteristic of the compound eluting, for a given length of column, type of packing, carrier flow rate and oven temperature while the peak width at the base, tW is a measure of the broadening and hence of the efficiency of the column. The efficiency is measured in terms of theoretical plates (derived from considering the chromatographic peak as a Gaussian statistical distribution), so that the number of plate, or effective separation stages, is given by
n tt
= 162
2R
W
The van Deemter equation indicates how the Height Equivalent to a Theoretical Plate, HETP, which is the length of the column in mm divided by n, can be related to the carrier flow rate, v, and other parameters describing the column and its packing;
HETP + + C= •A Bν
ν
Qualitative analysis by gas chromatography depends on matching retention times of unknown and "guessed" compounds. In this experiment you will "identify" certain aromatic hydrocarbons in petrol on the basis of their retention times. Confident identification is, however, only possible when the chromatograph is coupled to a spectroscopic technique, as in GC-MS or GC-FTIR. Quantitative analysis by gas chromatography depends on measurement of the peak - either its height or its area. At low concentrations, measurement of peak height (using a chart recorder) is very effective, with a wide linear range. At high concentrations, where the column may be overloaded, peak area must be measured using a computing integrator. In one of these experiments you will test the wide range linearity of the FID for aromatic hydrocarbons. Two methods of quantitation can be used, normal standards (with or without the use of an internal standard) and by calculating response factors.

Gas Chromatography
-47-
Gas Chromatography
Determination of Ethanol in Beer Use of Internal Standard
AIM In this practical you will investigate the use of an internal standard as an aid to analysis. Internal standards are commonly used when small differences in the performance of an instrument can cause relatively high errors. It is also useful when dealing with samples that have a troublesome matrix. In the case of GC, the sample introduction can be a significant source of error.
INTRODUCTION The determination of ethanol in dilute aqueous solutions is very important. Various colorimetric methods are available but gas chromatography is widely used. The flame ionisation detector is insensitive to water and is therefore convenient, when determining low concentrations of organic material in water. Gas chromatography is routinely used by the breweries as an online quality control check of their products. If they want to determine some of the more volatile components that can give different beers their characteristic flavour, they use a technique known as headspace analysis. In this method, a sample of beer is sealed in a vial and the air space above the beer is allowed to become saturated with the volatile (aroma) components of the beer. A sample of the gas above the liquid phase is removed via a septum and injected into a gas chromatograph. This allows one to detect the compounds responsible for the smell and taste of the beer.
METHOD
Apparatus: Buck Scientific 910 Gas chromatograph Column: OV17 Phenyl methyl siloxane (50% phenyl)
Instrument Conditions Carrier Gas : Nitrogen at 10 mL/min Temperature : 80°C Hydrogen Flow Rate : 25 mL/min Air Flow Rate : 250 mL/min
Standard Solutions : n-Propanol Stock Solution: (harmful) Using a top-loading balance weigh 2.50 g of n-propanol into a 1 litre volumetric flask.
Dilute to volume with distilled water. Ethanol Stock Solution: As above weigh 1.000 g of ethanol into 1 litre volumetric flasks. Dilute with distilled
water up to the mark.
8 E X P E R I M E N T

Gas Chromatography
-48-
Procedure : 1. Pipette 10.00 mL of the standard n-propanol solution into each of four 100 mL
volumetric flasks labelled A to D. 2. To the above flasks add the following amounts of ethanol standard.
Flask A B C D Final conc. 50 ppm 100 ppm 200 ppm 400 ppm
n-propanol std 10 mL 10 mL 10 mL 10 mL ethanol std 5 mL 10 mL 20 mL 40 mL
3. Inject a 5 μL portion of standard in flask A onto the column. When the recorder pen reaches the baseline inject a second 5 μL portion of A. Repeat using B, C and D solutions. (Each standard must be done in triplicate).
4. Determine the area of each peak on the chromatograms. Plot the standard curve of concentration versus ratio of peak area.
Analysis of Sample: 1. Dilute 50.00 mL of sample to 1 litre with distilled water to form a stock solution. (Would
it be easier to weigh the sample? Would it make any difference to the results if you weighed the sample?
2. Pipette 10.00 mL of this stock solution and 10.00 mL of the n-propanol standard into a 100 mL volumetric flask. Dilute to volume with distilled water. Inject 5 μL of this solution onto the column. Repeat the injection when the recorder pen has returned to the baseline. Make a total of five measurements. Determine the peak area ethanol/peak area of n-propanol for each chromatogram. Determine the weight % ethanol. Give an average weight % ethanol in the sample the standard deviation and the relative standard deviation.
3. Comment on your results. Is the method of using an internal standard better? (Look at the statistics)
4. The value you determined will be different to that displayed on the cans/bottle. This is because the values given by the manufacturers is in vol/vol%. Recalculate the concentration of ethanol in the beer in terms of vol/vol %.

HPLC
-49-
Alpha plot
0
0.5
1
0 1 2 3 4 5 6 7 8 9
pH
α
High Performance Liquid Chromatography
Analysis of fruit acids in fruit juices by HPLC AIM To quantify the fruit acids of various fruit juices and learn some of the fundamentals of HPLC analyses. You will also try and determine which fruit juice has been added to the expensive fruit juices. INTRODUCTION Fruits can naturally contain a number of different fruit acids. These compounds are responsible for the tart flavour of fruits and in particular the sourness of unripe fruits. If you have ever eaten a sour worm, then you have eaten malic acid. As you can see from the structure, this is a chiral molecule. In nature the L-form is biologically active and therefore the predominant form. However, when prepared in the laboratory, the D-form is synthesised. It is possible to determine whether the molecule is the D or L form, typically this is one using spectrophotometry. (Although it is possible to determine the D or L stereoisomers present using HPLC; special columns are required and are beyond the scope of this practical.) This means that you can tell whether your fruit juices have been adulterated with synthetic malic acid. In this practical you will determine the different fruit acids present in fruit juices using reverse phase HPLC. Once you have recorded the retention times for the various fruit acids you will determine the type of fruit acids present in different pure fruit juices. You will then determine what fruit juices have been used to adulterate some expensive fruit juices such as cranberry juice. You will use the photodiode array detector (PDA) in this analysis so you will be able to record the UV spectrum of each compound as it elutes. This will help you identify the various compounds present. One important aspect of this analysis is the form of the acid, it should be in the form of an undissociated molecule rather than the ionised form. If the acids are in the ionised form they will interact poorly with the column material and no separation of the compounds will be achieved. Therefore, the mobile phase used is an aqueous phosphate buffer at around pH 2.5. Ideally it should be lower than pH 2 but unfortunately the C18 stationary phase will hydrolyse and the C18 will free itself from the packing substrate and be lost. It is important
9 E X P E R I M E N T
Malic acid

HPLC
-50-
to ensure that the phosphate buffer is thoroughly washed out from the column. If the buffer is left in the column it is possible for crystals to form and these can damage the pistons of the pump. You should also determine the molar absorptivity of the different acids given to you. You will need to decide how you are going to do this. Although this is a relatively simple practical to carry out, most of the work will be done in the writing of the report. Some aspects you need to cover are: • Why was the fruit juices centrifuged and filtered through a 0.45 μm filter? • Why are there two peaks in the chromatogram for malic acid? • Why is there such a difference in peak area for malic acid and fumaric acid? • Which fruit acids are associated with which type of fruits? • Which fruit juices have been adulterated and with what type of fruit juice? There are not many instructions in this practical, this is because the lecturer in-charge will explain in more detail the instrument and work through the practical with you. The main idea is that you ask questions about the instrument and try and make sense of the results.
Some common acids found in plants
Malic acid Tartaric acid
134.09 g/mol 150.09 g/mol
Citric acid Fumaric acid
192.12 g/mol 116.07 g/mol

HPLC
-51-
High Performance Liquid Chromatography
Quantification of Caffeine in Various Drinks by HPLC AIM To quantify the caffeine content of cola soft drinks using an internal standard and investigate the use of solid phase extraction for sample clean-up. INTRODUCTION The amount of caffeine in soft drinks such as Coke and Pepsi or in beverages such as coffee or tea can be determined by HPLC using an internal standard under isocratic conditions. The Internal Standard method is used when the injection procedure may not be precise, the chromatographic conditions are unstable, or if there has been any sample preparation. Theophylline is used here as an internal standard as the structure and chemical properties of theophylline compare favourably with caffeine. Another common internal standard for this analysis is 8-chlorotheophylline, it is slightly more water-soluble than theophylline.
N
N N
NCH3
CH3
H3CO
O
N
N N
NH
CH3
H3CO
O
Caffeine Theophylline METHOD Solutions to be analysed. The standard solutions will be prepared for you. You will prepare the samples. The samples should be made up in deionised water. Normally, you would prepare the samples in a solution the same composition as the mobile phase.
Solution 1: Caffeine 10 ppm Solution 2: Caffeine 10 ppm and theophylline 10 ppm Solution 3: Caffeine 10 ppm and theophylline 10 ppm extracted. Solution 4: Coke with 10 ppm theophylline added; extracted and filtered. Solution 5: TAB with 10 ppm theophylline added extracted and filtered. Solution 6: Pepsi with 10 ppm theophylline added extracted and filtered.
In some cases the samples may be other types of drinks such as Red Bull or Tea or coffee.
10 E X P E R I M E N T

HPLC
-52-
All samples and standards should be filtered to at least 0.45 μm, this is most conveniently done using membrane syringe filters. All the cola samples should be degassed prior to the addition of the theophylline, this will be done for you. You will carry out the extractions. Measurements of samples and standards Detector: UV 275 nm Mobile phase: Methanol/water (35:65) Column: C18 Flow Rate: 1 mL/min Injection Volume: 250 μL (actually 10 μL loop is used and only 10 μL goes onto the column) Solution 1: Caffeine (10 ppm) filtered. This solution is used to determine the retention time for caffeine and thus to distinguish caffeine from theophylline. It must be filtered through a 0.45 μm filter prior to injection. Solution 2: Caffeine (10 ppm) and theophylline (10 ppm) filtered. This solution is used to develop the appropriate chromatographic conditions for analysis and to calibrate the analysis by calculation of the relative response factors for the analyte and internal standard. It must be filtered through a 0.45 μm filter prior to injection. Calculate the relative response of caffeine to theophylline from the peak areas. Be sure you have correctly identified which peak is due to caffeine Internal Standard Calibration Calculation Calculate the relative response factor (RRF) for caffeine.
standard Int. conc. Analyte of areapeak standard Int. of areapeak Analyte conc RFF
××
=
Clean-up of Standard Solution by solid phase extraction (SPE) Solution 3: Caffeine (10 ppm) and theophylline (10 ppm) extracted and filtered. Step 1: Condition the solid phase extraction column (C18) with 5 mL of methanol
followed by 5 mL of deionised water. (Conditioning) Step 2: Inject three (3) mL of the calibration solution (solution 2) through the column and
discard the eluent. The caffeine and theophylline will remain on the column. (Loading)
Step 3: Flush the solid phase column with 5 mL of deionised water. (Washing or clean-up) Step 4: A 0.45 μm filter is then attached to the bottom of the C18 extraction cartridge and
the caffeine/theophylline is extracted from the column into a sample tube by injecting three (3) mL of HPLC grade methanol into the extraction cartridge.
This solution can then be dried and reconstituted, but here it will be analysed directly. (Eluting)
Step 4: The C18 extraction cartridge will be reused. Clean the cartridge by flushing with methanol (3 × 5 mL) followed by water (2 × 5 mL).

HPLC
-53-
Analysis of the Standard Solution Inject 250 μL of the solution of caffeine and theophylline after extraction and filtration (solution 3) and note the areas. The areas before extraction were determined previously. Determine the % recovery for the clean-up step for both caffeine and theophylline using the following formula:
100 extraction before areapeak
extractionafter areapeak Recovery % ×=
Are the % recoveries different? If so, comment on the use of the internal standard method. Sample clean-up by solid phase extraction The samples (solutions 4, 5 and 6) are prepared as described in solid phase extraction clean-up procedure described above. Use degassed soft drinks diluted 1 in 10 to prepare the starting solutions (10 mL with 10 ppm added theophylline) for these extractions. Be sure to clean the cartridge as described above between each soft drink sample. Sample analysis Inject in turn 250 μL of the solutions of each soft drink Calculate the concentration of caffeine in the samples using the RRF calculated previously.
standardinternal areaPeak standard] [Internal RRF caffeine areaPeak [caffeine] ××
=
Use the following format for recording your results and calculations in the practical record book. Caffeine in Coke: Conc. Internal Standard (theophylline) = 10 ppm Peak Area Internal Standard = Peak Area caffeine = RRF (caffeine) = [caffeine] in solution = show calculation [caffeine] in sample = (μg/mL) (NB dilution factor!) DISCUSSION Compare the caffeine levels between the soft drinks and with that reported in the literature. Discuss the use of internal standard. Discuss the use of SPE. Discuss the chromatograms of the sample solutions.

Analysis of Xylene
-54-
Combined Techniques FTIR & GC
Analysis of Xylene Infrared spectrophotometry was traditionally thought to be only a qualitative tool. The spectra are traditionally displayed as %-T and not absorbance and the ability to manipulate data was poor. With dispersive instruments, scanning an IR spectrum could be quite a lengthy process if it were to be done at high resolution. This meant that samples could heat up in the beam and this affects ε in Beer's law A = εbc. FT-IR helps to reduce many of the above problems in the following ways: • Good signal to noise ratio, because of high energy throughput (no slit) and "scanning" is
very quick therefore several scans can be collected in a short time. S:N = √ No. of scans. • All frequencies and intensities are measured simultaneously over the entire frequency
range, therefore no instrumental drift and is quick. • All information is digitised therefore easier manipulation of data.
Jean Fourier (1768-1830) developed the mathematical operation called Fourier transformation, which allows one to describe complex wave motions in terms of simple sine and cosine functions. A.A. Michelson (1852-1931) first described a device for modulating infrared radiation in 1891. This device is known as a Michelson interferometer and was at the heart of early commercial FT-IR. The design has now changed in some spectrometers, but the principles are essentially the same. Given that the two essential parts to FT-IR spectrometer were developed before the beginning of this century, why was it not until the 1970's that commercial spectrometers became available?
Cells for Infrared Spectroscopy Several types of cells can be used for IR analysis and they can be made from several materials depending on the sample and the information required. Typical materials are NaCl and KBr. Since these materials are hygroscopic care must be taken to keep them dry, including sweat from hands. The main methods used are: 1. grinding a small amount of solid sample with KBr and pressing this under vacuum to
form a window (disc). 2. mixing the solid with nujol (paraffin oil) and making a paste and pressing this between
two discs to form a sandwich. 3. thin film method, either viscous liquid sample is placed between two discs or a solid is
dissolved and cast onto surface (thin film) of disc and solvent evaporated 4. liquid cell, sample is placed between two windows and a spacer is used to make a cell,
typical path lengths of cells are 0.05 - 0.1mm. (see Fig. 1) 5. gas cell, samples which are in the gas phase must use cells with longer pathlengths,
typical path lengths are 10cm however 20m can be used for trace analysis. Cell bodies are constructed from either glass, stainless steel or brass with KBr etc. windows
11 E X P E R I M E N T

Analysis of Xylene
-55-
AIM The aim of this practical is to introduce you to IR spectroscopy and sample preparation. IR spectroscopy is widely used as qualitative method but in this practical we will also introduce the concept of it as a quantitative method of analysis. You will also compare your results with those obtained from capillary column gas chromatography. Look at other experiments on chromatography for the background on chromatography. You must experience both FTIR and GC, you will be marked on the comparison.
INTRODUCTION Commercial xylene (toxic) usually consists of three isomers and depending on the grade, other trace impurities. The three isomers are o-xylene, m-xylene and p-xylene.
CH3
CH3
CH3
CH3
CH3CH3
o-xylene m-xylene p-xylene b.p. 144.4 °C b.p. 139.1 °C b.p. 138.4 °C
Initially you will run "qualitative" IR scans of the isomers of xylene then of the "crude" xylene and identify the main compounds present. You will then make up a set of standard solutions and determine the concentration of each isomer in the "crude" xylene.
PROCEDURE 1. Familiarise yourself with operation of the instrument, ask the demonstrator if you are
unsure of the operation of the instruments. 2. Place a drop of the compound to be studied on a KBr disc/window. Using a tissue, remove
most of the sample so that only a thin smear is left behind. Record the spectra of the individual compounds against a background scan of a clean KBr disc.
3. Plot the spectra and identify the various isomers in the "crude" xylene. Are there any peaks unaccounted for? If so can you identify them? Identify peaks in the spectra of the individual xylene which are unique to that compound and could be used for quantitative measurements. Consult with the demonstrator before moving on with the next part
4. A set standard mixtures in 50 mL volumetric flasks as follows:
Component std #1 std #2 std #3 sample o-xylene 1.0 mL 2.5 mL 5.0 mL - m-xylene 2.5 mL 5.0 mL 1.0 mL - p-xylene 5.0 mL 1.0 mL 2.5 mL -
crude xylene - - - 8.5 mL Make up to 50 mL with cyclohexane

Analysis of Xylene
-56-
5. Measure the spectrum of the standards and samples this time using the liquid cell. The cell you have been given has a path length of 0.025 mm and also has NaCl windows. Using the peaks identified construct a calibration graph of peak area versus concentration and calculate the concentrations of the three isomers in the commercial xylene. If the points do not form a straight line repeat the preparation and measurement of one of the standards.
Questions • Should the spectrum be converted into % transmittance or absorbance? • How do you cope with baselines which are not level? • When measuring the peaks should area or peak height be used? • Does the calibration graphs obey Beer's law? • Comment on the technique. Comment on the standards used and the calibration graph.
Details of cell materials
Crystal Transmission range cm-1
Solubility g/L water
NaCl 40,000-625 357
KBr 40,000-385 538
CaF2 50,000-1,110 1.51x10⁻²
BaF2 50,000-770 1.7
AgBr 20,000-285 insoluble
Other points which are important when deciding which cell material to use are: • mechanical and thermal properties • Ease of polishing • Refractive index Figure 1 Demountable liquid cell
Figure 2 Correct way to fill a cell Figure 3 Cleaning a <0.075 mm sealed cell
Gasket WindowSpacerWindowSpacer
Back plate
Front Plate

Analysis of Xylene
-57-
GGaass CChhrroommaattooggrraapphhyy
AIM The aim of this part of the experiment is to give you further exposure to GC and to give you something to compare your FTIR results with. Analysis of xylene isomers by GC is relatively difficult as there is very little difference in the boiling points of the meta and para isomers, also there is very little difference in the polarity of the isomers. You will also analyse your standards and samples using GC, the demonstrator will show you how to carry out the analysis. You will use the same standards that were given to you for FTIR analysis. Inject 1 μL of sample. You should be able to work out which peak is which on the chromatogram. If not, you will have to inject aliquots of the various isomers individually. Please take note of the type of column, detector and the operating conditions of the GC. Calculate the composition of the different isomers, using a normal standard curve as well as by using response factors. In your write up please compare your results from both methods. In particular discuss the information obtained from the two different techniques. Also discuss how you would improve the GC analysis.

Drug Analysis
-58-
Combined Techniques UV, FTIR & HPLC
Forensic Analysis of Drugs One sector of industry that heavily uses instrumental methods of analysis for qualitative and quantitative analysis is the pharmaceutical industry. Forensic science also makes use of various methods of instrumental analysis, this may be for criminal investigation. In many cases this can be a highly complex analysis of metabolites of drugs (banned substances in sportsmen), this can involve a number of separations and "clean up" stages. Chromatography is widely used for analysis of metabolites with GC-MS proving be one of the most successful methods. HPLC is widely used in the identification of drugs before entering the body, however, it can also be used in the analyses of metabolites. In this set of experiments we are going to look at a number of methods of analysis. Identification of the chemical components of a “white powder” or a “white tablet” is a common problem in forensic science. It may be necessary to identify material in a drug of abuse, or to identify tablets that have been used in an accidental or deliberate overdose. In general we will use simplified methods of analysis. The analysis of tablets and capsules can be quite difficult as medicines are normally mixed with a number of other ingredients to make a tablet. In most instances the active drug must be separated from the rest of the material (non active ingredients) which makes up the drug. We shall look at four drugs that are commonly encountered. Aspirin (CAS number 50-78-2)
A derivative of salicylic acid that is a mild, non-narcotic analgesic useful in the relief of headache and muscle and joint aches. Aspirin is also effective in reducing fever, inflammation, and swelling and thus has been used for treatment of rheumatoid arthritis, rheumatic fever, and mild infection. In these instances, aspirin generally acts on the symptoms of disease and does not modify or shorten the duration of a
disease. It can also be utilised as an anticoagulant in the treatment of such conditions as unstable angina or following a minor stroke or heart attack because of its ability to inhibit the production of blood platelet aggregates. Acetaminophen (CAS number 103-90-2)
Acetaminophen is probably better known as paracetamol or panado. It is a commonly used drug which is an alternative to aspirin for relief of mild pain, such as tension headache and pain in joints and muscles, or to reduce fever. Acetaminophen relieves pain by raising
the body's pain threshold, and it reduces fever by its action on the temperature-regulating centre of the brain, though the drug's particular modes of action remain unclear. Acetaminophen is much less likely to cause gastrointestinal side effects than aspirin, but overdoses of it can cause fatal liver damage. Unlike aspirin, acetaminophen has no anti-inflammatory effect.
COOH
O C CH3
O
12 E X P E R I M E N T
OHCH3 CN
O
H

Drug Analysis
-59-
Ibuprofen (CAS number 15687-27-1) This is a nonsteroidal anti-inflammatory drug that is often used to treat dysmenorrhea and the symptoms of rheumatoid arthritis. Like aspirin, ibuprofen is effective against minor pain, fever, and tissue-swelling and works by inhibiting prostaglandin synthesis. (Prostaglandins are diverse and potent body chemicals that, among other effects, aid blood clotting and work to sensitise nerve endings.) Ibuprofen may irritate the gastrointestinal tract, and other ill effects may result if the drug is combined with certain other
drugs. Allergy to aspirin may indicate a similar reaction to ibuprofen. The drug is not recommended for use by children under age 12, and, like aspirin and acetaminophen, it should not be used during pregnancy except under medical supervision.
Caffeine (CAS number 58-08-2) A well-known nitrogenous organic compound of the alkaloid group, substances that have marked physiological effects. Caffeine occurs in tea, coffee, cacao and a number of other sources. Caffeine is generally less soluble in organic solvents than in hot water. It is odourless but has a bitter taste. Caffeine is present in ground coffee in amounts ranging between 0.75 and 1.5 percent by weight. The average cup of coffee (not Ricoffy) therefore contains about 100 mg of caffeine. The caffeine
content of tea varies greatly depending on the strength of the tea, but it averages about 40 mg. There are also about 40 mg of caffeine in a normal can of cola. Caffeine has a stimulating effect on the central nervous system, heart, blood vessels, and kidneys. It is often used in a number of medicines, especially those that have a sedative effect, not for any therapeutic effect but as a stimulant; "it gives you wings" so you feel better without actually being better.
EXPERIMENTS Remember that the materials you are analysing are drugs and are therefore potentially dangerous. You must inform the lecturer in charge if you have any sensitivity or reactions to any of the four drugs listed above. You will split into subgroups for these experiments and carry out each of the experiments in turn. In many cases you will be shown how to do the analysis. This manual contains only the brief outline of the procedure. You will need to discuss the actual procedure and experimental conditions with your demonstrator. There will be three methods of analysis that you will carry out: • FTIR analysis of drugs; separation of drugs and identification of drugs by FTIR • UV absorption as a quantitative analysis of drugs. • HPLC analysis; qualitative and quantitative analysis of a proprietary drug. Here we will
use the diode array detector for the analyses. FFTTIIRR aannaallyyssiiss
COOHCH
CH3
CH2
HC
CH3
CH3
N
N N
NCH3
CH3
H3C
O
O

Drug Analysis
-60-
There are a number of ways to do this analysis, it could be done in solution, however, this makes the spectrum more complicated for identification purposes (also you will gain experience of liquid cells in another 3IA2 practical). In this instance you will analyse the powder. The first procedure you must carry out is to separate the active drug from the rest of the tablet. You will then disperse the drug in KBr, which does not absorb infrared radiation in the region you are studying, press the drug/KBr into a pellet and record the IR spectrum. You will then identify the active ingredient in the medicine. 1. If the drug is in tablet form you must crush this in a mortar and pestle. 2. Dissolve the active ingredient in diethyl ether, ~ 20 mL. You will need to stir for ~ 5
minutes. 3. Filter the solution through a filter paper. 4. Remove the solvent using a steam bath. 5. Prepare a KBr disc; you will require ~2 mg of sample and 200 mg of KBr. You will be
shown how to do this. 6. Record the IR spectrum. 7. Interpret the spectrum and identify the active ingredient in the medication.
(Useful websites for IR spectra http://www.sigmaaldrich.com, http://www.acros.be/, http://webbook.nist.gov/chemistry/)
QQuuaalliittaattiivvee aannaallyyssiiss bbyy UUVV ssppeeccttrroopphhoottoommeettrryy.. This is a very basic experiment to get you used to measuring UV spectra. It will also allow you to see how useful UV can be for drug analysis. Sets of solutions will be prepared for you. You will be shown how to record a UV spectrum. Record the spectra and save the data as a data file and use Microsoft Excel to generate spectra. (Bring along a stiffy disc to save your spectra.) Briefly discuss the spectra. How will this analysis help with the HPLC analysis of drugs? Does it make sense to use a fixed wavelength for HPLC? HHPPLLCC aannaallyyssiiss It is quite common to use HPLC to ascertain the active ingredient or check the purity of a drug. In this case you will analyse a medicine so that you can determine the active ingredient(s) in the medicine. The basic steps for the analysis by HPLC are: 1. Grind drug. 2. Dissolve in suitable solvent, ~10 mg/100 mL. A typical mixture for this type of analysis
45:55 H2O:CH3OH with 1 drop of glacial acetic acid per 100 mL of solvent. 3. Filter through a Whatman N° 1 filter paper and then filter an aliquot through a 0.45 μm
membrane filter and retain the solution. 4. Whilst the sample is dissolving, you can determine the retention time of the drugs
describe above. You will be provided with standard solutions and shown how to use the HPLC instrument.

Drug Analysis
-61-
5. Once you have determined the retention times of the standards you will identify the active ingredients in the drug sample you have been given. Does the use of a diode array detector help in the analysis? The exact method and conditions will be given to you at the time of the practical. Be sure to record these.
This instrument is equipped with an autosampler, the technician will have prepared a set of samples and you will use this calibration to quantify the drugs present in your sample.
You will not gain in-depth knowledge of the techniques during this practical, the intention is to show you a family of techniques and their application. You will get more instrumental experience in the other experiments. In part it is also to get you to think about the order in which you should do different experiments and the relationship between the different types of information.

Table of Contents
TTAABBLLEE OOFF CCOONNTTEENNTTSS Page No. Experiment
Health & Safety Introduction 1 Working practices 1 Writing laboratory reports 4 Units in Analytical Chemistry 9 Analytical glassware 10 The Analytical balance 11 Atomic Weights 12 Safety in the laboratory 13 Fundamentals of spectrophotometry 14 1. Spectrophotometry: method of standard additions 15 2. Spectrophotometric analysis of a mixture 18
Flame Spectroscopy 21 3. Flame Photometry (FES) 26 4. Inductively Coupled Plasma- Atomic Emission Spectroscopy 26 5. Atomic Absorption Spectrometry (AAS) 31 Barium AES 30 Zinc in grass 31 Zinc in toothpaste 31 Zinc in Lichen 31 Lead in Edinburgh crystal 32 Lead in Lichen 32 Lead in soil 32 Multivitamin tablets 32 Copper in Whisky 33 Copper in Tea 33 Calcium/Magnesium/Zinc in milk 33 Potentiometric Analysis 6. Potentiometric Titration using metallic electrode 35 7. Potentiometric Determination Using Ion Selective Electrode 40 Gas Chromatography 43 8. Quantitative Analysis using the Method of Internal Standards Ethanol in Beer 46 High Performance Liquid Chromatography 9. Analysis of fruit acids 48 10. Quantification of Caffeine in beverages 50 Combined Techniques FTIR & GC Analysis of Xylene Isomers 53 Forensic Analysis of Drugs 57