instructor infant cpr manual - lifesafe services · cpr skills check-off sheet. 5. ......
TRANSCRIPT

Instructor
Manual
PROGRAM OUTLINE VIDEO SEGMENTS
1. Teaching Principles and Requirements.
2. Course Roster.
3. Course Evaluation.
4. CPR Training Adult and Pediatric. CPR Guideline Cover. CPR Course Outline. CPR skills check-off sheet.
5. CPR Challenge. CPR Challenge Guideline Cover. CPR Challenge Course Outline. CPR Challenge skills check-off
sheet. 6. AED Training.
AED Guideline Cover. AED Course Outline. AED Scenarios.
7. Essential First Aid. EFA Guideline Cover. EFA Course Outline. EFA skills check-off sheet.
8. Standard First Aid. SFA Guideline Cover. SFA Course Outline. SFA skills check-off sheet.
9. Bloodborne & Airborne Pathogens. ABP & BBP Guideline Cover. ABP & BBP Course Outline.
10. Emergency Oxygen Administration.
11. Healthcare Provider CPR.
Movie Clips
Monty Python and the Holy Grail Ace Ventura Caddy Shack Jaws The Producers Wizard of Oz Talladega Nights Seinfeld Horrible Bosses Three Amigos
CPR
Assessment of the Scene 4:10 Heart Education 3:20 Adult CPR 5:20 Adult Choking Procedure 1:40
ADULT CPR TEST
AED Training 8:00 AED TEST
Child CPR 3:15 Infant CPR 3:30 Infant Choking Procedure 2:40
PEDIATRIC CPR TEST
ESSENTIAL FIRST AID Assessment of Victim 3:30
Wounds 8:00 Artery ~ Punctures Amputations ~ Internal Eye Injuries ~ Abrasions.
Shock 2:00
BASIC FIRST AID Include EFA and the following: Burns 9:30 Thermal
Electrical Chemical
Musculoskeletal 4:30 Stroke 3:00 Seizures 2:30 Diabetic Emergencies 2:30 Asthma 3:00 Anaphylactic Shock 4:00
Heat Emergencies 5:00

A Good Instructor is Prompt, Enthusiastic, Speaks Clearly, Avoids
going off-topic, involves the students, and has empathy.
Teaching Principles and Requirements:
Arrive a minimum of 30 minutes prior to class.
Follow the course outlines for each program.
Assure Audio/Video set up.
Prepare manikins: 1-1 manikin ratio is required.
Prepare course materials. Cards, Evaluations and Rosters.
Set out class roster and have students print legibly.
Prepare gloves and first aid supplies if needed. It is recommended that there be no more than ten students per instructor. If the course has more than ten participants, another instructor will be
utilized. The 1 to 10 instructor ratio must be maintained, if the number of students exceeds 30, an additional 15 minutes needs to be added for logistics. It is not recommended to exceed 40 people per class.
The classroom must be suitable for discussion, viewing video segments, practicing skills, and completing the skills session. The classroom should be conveniently located and equipped with the materials, equipment, and supplies needed for First Aid/CPR/AED/ BBP/ Emergency Oxygen program courses and modules as needed.
Attain and utilize, during the class, the company’s AED and emergency oxygen unit.
Note location of the company’s emergency equipment and let the students know where they are located in the building.
Determine if the company’s phone requires a prefix number when calling 9-1-1.
Determine if the organization has an emergency response team that needs to be notified of an emergency.
A multi-media presentation is to be used followed by hands on practice after each segment.
The outline has minimum hands on practice time of 35%, or 45-minute minimum of class time.
Adhere to the class time frames (see below).
A score of 80% is required, remediation and retesting is allowed. Upon successful completion the appropriate certification card can be issued.
At the end of class distribute the appropriate certification card (s) and evaluation forms to each employee.
When the class is over give the class coordinator: o A copy of the training roster. o Copy of the evaluation forms.
Class Supplies Needed.
Class Roster.
1 – 1 Manikin Ratio.
Guidebook for each student.
Bandaging supplies and gloves.
DVD player
Monitor or TV
1-10 Instruction ratio
Skills Sheet
Test Answers
Evaluation Forms
Certification Cards
Emergency Oxygen Unit
AED Unit
The book is available on-line for review at ATEM.US.
The book can be downloaded into their smart phone. Directions are on the website ATEM
The test is available on-line to review their skills at ATEM.US.

GO GREEN
Recycle any student manuals into another class if the student does not want their manual.
Adult CPR 2.5 CPR & Choking for ages 8 and older 2 yrs
Pediatric CPR 2 CPR & Choking for ages 8 and under 2 yrs
Adult / Pediatric CPR 3 CPR and Choking for all age groups 2 yrs
CPR for the Professional Rescuer 4 CPR for the Healthcare Provider 2 yrs
SFA (Standard First Aid) 2 First Aid for Injuries and Illnesses 2 yrs
EFA (Essential First Aid) 1 First Aid for immediately life threatening situations 2 yrs
AED (Automated External Defibrillator) 1 AED training for adult and pediatric victims 2 yrs
BBP and Airborne Pathogens 1 Bloodborne Principles, Practices and Requirements 1 yr
Emergency Oxygen Administration 1 Oxygen Administration for the lay rescuer 2 yrs

Class Registration form
Date of Course. / / 20____ # of students Lead instructor
Organization Sponsor. Co-instructor
City / State / Zip code. Co-instructor
This roster is Page 1 of __________. I verify that the information on this page is accurate and true. Circle one: ACPR PCPR AED BBP EFA SFA Eo2 HCP Lead instructor signature:
Legibly - Please Print Your Name as it Should Appear on the Course Card
Name (first / last ) City / State Signature Pass / Fail
1.
2.
3.
4.
5.
6.
7.
8.
9.
10.
11.
12.
13.
Instructors: Remember to copy class roster.

CLASS EVALUATION FORM
Lead Instructor: Course Date
Circle Training Class(es) taken: ACPR PCPR AED BBP EFA SFA E02
1. The class length was appropriate. Yes No N/A
2. The instructor was:
Knowledgeable Yes No N/A
Well organized Yes No N/A
Kept participants involved Yes No N/A
Noted student's skill errors and corrected Yes No N/A
Provided good demonstrations. Yes No N/A
Held my attention. Yes No N/A
3. A one to one manikin ratio was utilized. Yes No N/A
4. The video was informative. Yes No N/A 5. An oxygen unit was demonstrated during the class. Yes No N/A
6. An AED was used during AED training. Yes No N/A
7. Universal Precaution practice was implemented. Yes No N/A
8 Bandaging techniques were taught for FA Yes No N/A
9. Splinting Techniques were practiced in SFA Yes No N/A
10. The class met my expectations. Yes No N/A
Additional Comments:

CPR TRAINING
Adult CPR: 2 hours
Adult / Pediatric: 3 hours If on-line test completed, reduce class time by 15 minutes.
1 -1 manikin ratio required.
BY THE END OF THE CLASS YOUR STUDENTS SHOULD HAVE A THOROUGH UNDERSTANDING OF
THE FOLLOWING TOPICS:
Outline: Adult & Pediatric CPR
Assessing the Scene. o Video. o Discussion.
Heart Education. o Video. o Discussion. o Stroke
Adult CPR. o Discussion. o Demonstration. o Students Hands on practice.
Adult Choking. o Discussion. o Demonstration. o Students Hands on practice.
Quiz 80% correct.
Child CPR. o Discussion. o Demonstration. o Students Hands on practice.
Infant CPR. o Discussion. o Demonstration. o Students Hands on practice.
Infant Choking. o Discussion. o Demonstration. o Students Hands on practice.
Quiz 80% correct.

CPR Media
Course Topic
Lecture / Emphasize Topics on the Video that are
worth repeating.
Video Time / Page No.
Demo /
Practice
Lecture /Emphasize Topics not on video that
are worth discussion.
Lecture Introduction and explanation of class procedures.
Introduce yourself and your background.
Ascertain if any students have limitations that wound limit them from manikin practice.
5 mins.
Some students may have taken the quiz online. If that is the case collect quiz results at this time.
Video Introduction 2 mins
Lecture Breakdown class Reiterate that most workplace incidents are minor. This adult CPR class will cover life-threatening situations.
Describe a brief outline of the class.
Assessing the scene. Assessing the victim. Heart Education. Adult CPR. Adult choking. Group quiz.
Describe how the class will be broken into segments. About 5 mins. of video, followed by a quick lecture, Q&A’s and then practice sessions. Let them know this will happen for all 5 segments.
Video Assessing the Scene
Contacting 911
Legal Concerns
Universal Precautions
5 mins.
Page 2
CPR
Media
Course Topic
Lecture / Emphasize Topics on the Video that are
worth repeating.
Video Time / Page No.
Demo /
Practice
Lecture /Emphasize Topics not on video that
are worth discussion.
Lecture Assessing the Scene
Contacting 911
Legal Concerns
Universal Precautions
Reiterate calling 911 and the difference between cardiac arrest due to heart issues, and cardiac arrest due to asphyxia.
10 mins.
Demo safe removal of contaminated gloves.
Discuss the emotional, mental and physical impact to the rescuer and witnesses in an

Reaffirm that the Good Samaritan laws vary by jurisdiction.
Assume everyone has a contagious disease and use universal precautions.
emergency. It is normal to have post-traumatic stress.
You must not abandon a victim once you have initiated care.
Discuss the risks of BBP with CPR.
Demo & Practice
3 mins. Demo safe removal of contaminated gloves.
Have students practice glove removal.
Video
Chain of Survival
Heart Attack Signs and Symptoms
Heart Attack Risks
Heart Attack Treatment
3:30
mins. Page 7
Lecture Chain of Survival
Heart Attack Signs and Symptoms
Heart Attack Risks
Heart Attack Treatment
Review the importance of early activation of 911.
Remind students that people often deny they are having a heart attack.
Reiterate the administration of aspirin if there are no contra-indications.
10 mins.
Stroke signs, symptoms and treatment Page 45.
Review the Cincinnati Stroke scale.
Lecture Stroke
Option:
2 min video in the FA segment.
Lecture using page 45.
Role Play the Cincinnati Hospital guide.
5 mins Page 50
Patients with acute stroke are at risk for respiratory compromise
from aspiration, upper airway obstruction, hypoventilation, and (rarely) neurogenic pulmonary edema. The combination of poor perfusion and hypoxemia will exacerbate and extend ischemic
brain injury and has been associated with worse outcome from
stroke. Both out-of-hospital and in-hospital medical personnel
should administer supplemental oxygen to hypoxemic (ie, oxygen
saturation <94%) stroke patients (Class I, LOE C) or those with unknown oxygen saturation.
Video
Adult CPR 6 mins. Page 9
Lecture Adult CPR FROM THE ECC http://circ.ahajournals.org/cgi/content/full/
122/18_suppl_3/S685
Review that adult CPR starts at the onset of puberty. If we cannot determine the age, use your best estimate.
7 mins.
Have students lean their head forward and swallow. (It will be easy) not have
http://circ.ahajournals.org/cgi/content/full/1
22/18_suppl_3/S685
The American Heart Association states the following need for

The American Heart Association requests that this document be cited as follows: Berg RA, Hemphill R, Abella BS, Aufderheide TP, Cave DM, Hazinski MF, Lerner EB, Rea TD, Sayre MR, Swor RA. Part 5: Adult basic life support: 2010 American Heart Association Guidelines for Cardiopulmonary Resuscitation and Emergency Cardiovascular Care. Circulation. 2010;122.
How can bystander CPR be effective without rescue breathing? Initially during SCA with VF, rescue breaths are not as important as chest compressions because the oxygen level in the blood remains adequate for the first several minutes after cardiac arrest … However, at some time during prolonged CPR, supplementary oxygen with assisted ventilation is necessary. The precise interval for which the performance of Hands-Only CPR is acceptable is not known at this time.
Discuss agonal breaths, these commonly occur at the beginning of cardiac arrest. It is confusing for rescuers that are not familiar with them. By checking for no breathing or no normal breathing, the rescuer should begin chest compressions earlier.
Review C-A-B.
Discuss the new hand position – middle of the breastbone in the middle of the chest. No more xiphoid.
Reiterate o Push hard. o Push fast. o Push at the rate of at
least 100 compressions per minute.
o Allow full recoil of chest.
o Minimize interruptions to chest compressions.
o Only attempt two rescue breaths.
Discuss the option for chest compression only.
Review the CPR algorithm PAGE 11.
them lean their heads back and swallow. This will be difficult because the lounge is lifted off the back of the throat, which is why we do head /tilt chin/lift.
Reiterate that the guidelines state to only attempt ventilation twice, even if they’re unsuccessful
There are several reasons why the Pulse check was removed from layperson CPR. The main reason is as follows:
“At least 35 percent of trained and untrained rescuers are wrong about whether or not
a victim has a pulse. Pulse
check is not effective. Even health care workers have difficulties. And when bystanders look for a pulse, it's even less effective. Almost 99 percent of them can't do it in the first 10-15
seconds.”
supplemental oxygen for extended CPR. “… How- ever, at some time during prolonged CPR; supplementary oxygen with assisted ventilation is necessary.”
Remind students that people who need CPR are dead. There is almost nothing you can do to harm a person in cardiac arrest except delay the response time.
CPR is tiring.
Fatigue makes CPR less effective. If a second rescuer is there switch about every 2 minutes.
If you come across
CPR in progress, let the rescuer know you are trained and can help.
Discuss:
Different acceptable hand positions.
Possibility of broken ribs.
Discuss gastric inflammation from rescue breaths.
What to do if a victim vomits.
Jaw thrust maneuver.
Drowning and hypothermia may allow more time to start CPR. Do not assume it is too late to start CPR.

Demo & Practice
Adult CPR
20
mins. Page 9
Demo Adult CPR.
Using the 1-1 manikin ratio and coach the students through the CPR cycle.
Allow students to practice in groups of 2. One will perform CPR, while the other uses the CPR algorithm on page 11 to guide them.
Provide informal evaluation and prompt feedback on skills.
Demo the use of a pocket mask. Explain the options to avoid direct mouth-to-mouth contact, including CPR as compression only.
While demoing the mask, show the jaw thrust maneuver and discuss.
Demo different hand positions for people with arthritis or other hand issues.
Look for common mistakes:
Not tapping and shouting.
Not compressing hard enough.
Not allowing the chest to recoil.
Not compressing fast enough.
Removing their hands during compressions.
Not pinching the nose closed.
Not tilting the head back.
Not looking for the chest to rise and fall.
Video
Adult choking procedures. 3 mins. Page 16
Lecture Adult Choking. The most common food item that causes choking is meat.
If the victim becomes unconscious start CPR. When it is time to perform rescue breaths, look in the mouth, if
7 mins
Prevention of choking:
Chew thoroughly.
Cut food in small pieces.
Don’t talk or laugh with food in your

you see an item remove it. If you are not doing rescue breaths, stop after 30 compressions and look in the mouth, if you see an item remove it.
mouth.
Abdominal thrusts could cause damage to the internal organs, or the choking object may have damaged the throat. A doctor should evaluate the victim after the incident.
Demo and practice
Adult choking procedures.
15 mins.
Demo how to perform the Heimlich maneuver on yourself if you are alone.
Use a volunteer to demo adult choking. Have students practice with each other.
How to perform the Heimlich maneuver on yourself.
Quiz Review quiz. Quiz questions 1 – 15 10 mins. Some clients may have taken the quiz online to reduce class time. If they have turned in the quiz skip this step.
Video Child CPR 4 mins.
Page 12
Lecture Child CPR
Review: Child CPR starts at the age of one to the onset of puberty. If you cannot determine the age use your best estimate.
Discuss that children and infants usually go into cardiac arrest due to respiratory arrest.
Review the CPR algorithm PAGE 10
5 mins.
Many students are used to checking breaths and then checking the pulse before starting CPR. Remind them there is no pulse check!
Demo & Practice
15 mins.
Demo Child CPR.
Coach the students through the CPR cycle.
Look for common mistakes:
Not tapping and shouting.

Allow students to practice in groups of 2. One will perform CPR, while the other uses the CPR algorithm on page 13.
Allow students to practice. Provide informal evaluation and prompt feedback on skills.
Not compressing hard enough.
Not allow the chest to recoil.
Not compressing fast enough.
Removing their hands during compressions.
Not pinching the nose closed.
Not tilting the head back.
Not looking for the chest to rise and fall.
Video Infant CPR 4 mins. Page 14
Lecture Infant CPR Discuss the neutral position.
Discuss covering the mouth and nose for rescue breaths.
Highlight that the rescue breaths are just puffs of air.
5 mins
Demo and Practice
Infant CPR 20 mins Demo Infant CPR.
Coach the students through the CPR cycle.
Allow students to practice in groups of 2. One will perform CPR, while the other uses the CPR algorithm on page 13.
Allow students to practice. Provide informal evaluation and prompt feedback on skills.
Video Infant choking. 2 mins. Page 18
Lecture Infant choking. How to recognize an infant 5 mins

who is choking.
Supporting the baby’s weight while managing infant choking.
Demo and Practice
Infant choking. 15 mins. Demo infant choking.
Coach students through an infant choking scenario.
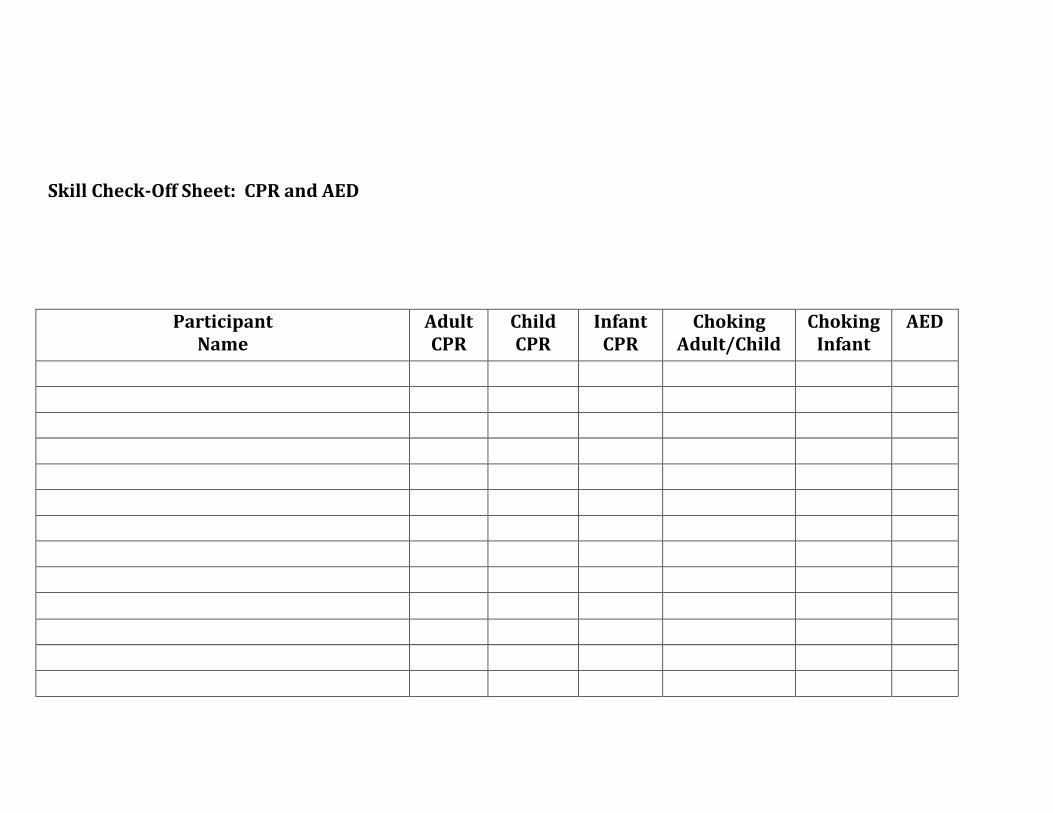
Skill Check-Off Sheet: CPR and AED
Participant Name
Adult CPR
Child CPR
Infant CPR
Choking Adult/Child
Choking Infant
AED

CPR CHALLENGE TRAINING
Adult CPR: 45 – 60 minutes.
Adult / Pediatric: 80 – 90 minutes.
1 -1 manikin ratio required.
Completion by each student of on-line test.
Minimum standard sore of 80%. Students must show proof of completing the cognitive portion on-line. Use the CPR guidelines for details of CPR.
Adult Challenge CPR Pediatric Challenge CPR
Review questions for: o Assessing the Scene. o Assessing the Victim. o Heart Education.
Adult CPR. o Demo. o Hands on practice. o Provide feedback as needed.
Adult Choking. o Demo. o Hands on practice.
Child CPR. o Demo. o Hands on practice. o Provide feedback as needed.
Infant CPR. o Demo. o Hands on practice. o Provide feedback as needed.
Infant Choking. o Demo. o Hands on practice. o Provide Feedback as needed.
o Provide feedback as needed.

AED TRAINING
AED training: 1 hour (CPR training certification is a requirement for participation) AED with Adult CPR: 3 hours.
An AED trainer is required. If a company has an AED, it needs to be brought to class.
BY THE END OF THE CLASS YOUR STUDENTS SHOULD HAVE A THOROUGH UNDERSTANDING OF
THE FOLLOWING TOPICS:
Outline: AED CPR
AED Training. o Video
3rd link in the Chain of Survival. How to Use. Troubleshooting. Maintenance.
AED Demonstration utilizing the different scenarios.
Group Practice.
Quiz – minimum grade 80%. If taken online the student must provide their pass/fail report as confirmation of passing.
AED Media
Course Topic
Lecture / Emphasize Topics on the Video that are
worth repeating.
Video Time / Page No.
Demo /
Practice
Lecture /Emphasize Topics not on video that
are worth discussion.
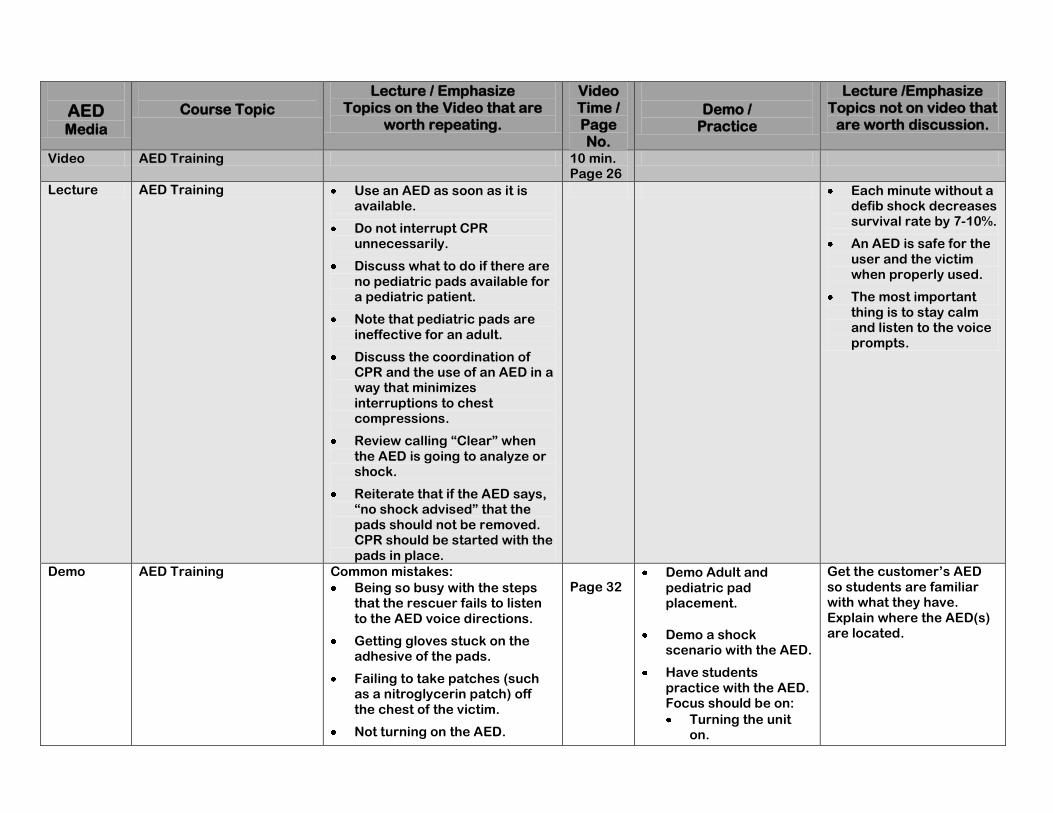
Video AED Training 10 min. Page 26
Lecture AED Training Use an AED as soon as it is available.
Do not interrupt CPR unnecessarily.
Discuss what to do if there are no pediatric pads available for a pediatric patient.
Note that pediatric pads are ineffective for an adult.
Discuss the coordination of CPR and the use of an AED in a way that minimizes interruptions to chest compressions.
Review calling “Clear” when the AED is going to analyze or shock.
Reiterate that if the AED says, “no shock advised” that the pads should not be removed. CPR should be started with the pads in place.
Each minute without a defib shock decreases survival rate by 7-10%.
An AED is safe for the user and the victim when properly used.
The most important thing is to stay calm and listen to the voice prompts.
Demo AED Training Common mistakes:
Being so busy with the steps that the rescuer fails to listen to the AED voice directions.
Getting gloves stuck on the adhesive of the pads.
Failing to take patches (such as a nitroglycerin patch) off the chest of the victim.
Not turning on the AED.
Page 32
Demo Adult and pediatric pad placement.
Demo a shock scenario with the AED.
Have students practice with the AED. Focus should be on:
Turning the unit on.
Get the customer’s AED so students are familiar with what they have. Explain where the AED(s) are located.

Incorrect placement of pads
The pads touching each other on a child.
Not calling clear.
Pushing shock button before the AED instructs you too.
Attaching the pads.
Calling “Clear” for the machine to analyze.
Calling “Clear” if shock is indicated.
Delivering a shock if indicated.
Immediately starting CPR with the pads in place.
Following the voice prompts.
Practice AED scenarios Utilize the AED scenarios on the next page.
Read a scenario to the students. Coach them through the appropriate responses. Have students reverse the role and run through a second scenario.
Video
Q and A and Exam Show the questions on the screen.
Discuss as a group the possible answers. Explain the correct answer and why it is the correct answer (see test sheet for AED for details in the appendix).

AED SCENERIOS
Scenario 1
Setup: As part of the ERT (emergency response team) you respond to a call in the warehouse that a co-worker has collapsed at his workstation. You grab your response kit w/ AED and proceed to the location. When you arrive, you find that someone has begun CPR and EMS has been activated.
The person performing CPR continues with the CPR cycle until the AED is ready for use.
Attach the AED pads, (if the chest has not been bared, remove all clothing and jewelry on the chest). Turn on the AED as soon as possible and
minimize any interruptions to CPR in progress.
Stop CPR and call “Clear” for the AED to analyze the victim.
The AED prompts the rescuer to press the shock button.
The rescuer calls “Clear” and does a visual inspection to ensure no one is touching the victim.
Shock is delivered.
The AED prompts that no shock is advised.
CPR sequence is initiated, leaving the pads in place.
EMS arrives and takes over.
Scenario 2
Setup: You are leaving work, on the way out you see a co-worker who appears to be unconscious. You are the first one to the scene and no one else is in the immediate vicinity.
Assess the area for safety.
Call out for help - someone does respond to the call for help.
Initiate 9-1-1 and activate the AED.
Assess the victim - after tapping and shouting it is determined the victim is unconscious and is not breathing normally.
CPR sequence is initiated.
AED arrives:
o Attach pads to victim’s bare chest.
o Turn on the power.
o Rescuer calls “clear” for the AED to analyze.
o Rescuer calls “clear” for the shock to be delivered.
After one shock the AED states to continue CPR. Rescuer resumes CPR. EMS arrives.

Scenario 3
Setup: You are leaving work, on the way out you see a co-worker who appears to be unconscious. You are the first one to the scene, and no one else is in the immediate vicinity.
Assess the area for safety.
Call out for help - Someone does respond to the call for help.
Initiate 9-1-1 and activate the AED.
Assess the victim - After tapping and shouting it is determined the victim is unconscious and is not breathing normally.
CPR sequence is initiated.
AED arrives:
o Attach pads to victim’s bare chest.
o Turn on the power.
o The AED prompts the responder to check the pads. Responder checks the pads for proper placement, connection and adhesion to victim’s
chest, then calls “Clear”. AED reanalyzes; Responder gives 2 shocks. AED advises not to shock. Responder resumes CPR. EMS arrives.
Scenario 4
Setup: You are at the YMCA and hear a commotion, you go to investigate the noise and see a child collapsed by the pool. Everyone is just standing around confused.
Assess the area for safety - The child is in a puddle of water. Quickly move the victim to a dry area.
Point to someone and have them call 9-1-1.
Point to someone and have them get an AED.
Assess the victim - After tapping and shouting it is determined the victim is unconscious and is not breathing normally.
Initiate the CPR sequence – As this is mostly likely caused by asphyxia, complete 5 cycles of CPR before attaching the AED.
AED arrives – after 5 cycles of CPR:
o Attach pads to victim’s bare chest.
The child is so small the pads are touching each other. It is necessary to then place the pads in the same position as they would be
placed for an infant.
o Turn on the power.
Rescuer calls “Clear” for the AED to analyze.
o Rescuer calls “Clear” for the shock to be delivered.
After one shock from the AED the child starts to cough. Continue to monitor the patient until EMS arrives.

ESSENTIAL FIRST AID
Only taught in conjunction with CPR.
Approx. 1 hour in length.
Bandaging techniques required.
Glove practice was completed in the CPR portion, so is now not necessary.
Primary and Secondary survey were already completed in the CPR portion.
This class deals with immediate life-threatening situations. Class is not appropriate for rural areas where the arrival of EMS may be prolonged.
BY THE END OF THE CLASS YOUR STUDENTS SHOULD HAVE A THOROUGH UNDERSTANDING OF
THE FOLLOWING TOPICS.
OUTLINE Accessing the Victim
Artery Wounds Shock
Since this class discusses artery wounds, we will also cover all types of wounds including:
Head Injuries
Eye Injuries
Amputations
Impaled Objects
Falls from heights
Abrasions
Dental Injuries
In the First Aid guidelines below, the far right column lists all of the ECC 2010 references for first aid. Circulation. 2010;122:S934-S946
doi: 10.1161/CIRCULATIONAHA.110.971150 The American Heart Association and the American Red Cross request that this document be cited as follows: Markenson D, Ferguson JD, Chameides L, Cassan P, Chung K-L,
Epstein J, Gonzales L, Herrington RA, Pellegrino JL, Ratcliff N, Singer A. Part 17: first aid: 2010 American Heart Association and American Red Cross Guidelines for First Aid. Circulation. 2010;122(suppl 3):S934–S946
These pose an immediate risk to the patient and need to be treated prior to EMS arrival.

EFA Media
Segment Topic
Lecture / Emphasis Of Key Points.
Video Length / Page #
2010 ECC CIRRICULUM GUIDELINES
Video Assessing the Victim
Head to Toe Exam
Recovery Position
4 mins. Page 4 Page 5 Page 6
Lecture Assessing the Victim
Head to Toe Exam
Recovery Position
Reiterate: Unless the scene is un-safe,
do not move the victim. 15 mins.
Demo & Practice
Scenario quiz: You hear a loud noise behind you. When you turn around you see a coworker on the floor, not moving and not responding to your voice. What should you do first? Then what?
10 min
Use a volunteer to demonstrate the modified Haines position.
Optional Student practice:
Recovery position.
Head to Toe
Interviewing the victim.
Lecture Class outline.
Usually EMS will arrive within 5-10 minutes. Not many injuries are life threatening in that time frame. However, there are two topics that must be covered.
1. Artery Wounds can be fatal. Exsanguination is the term for bleeding to death. If the bleeding is from an arterial source, death may only take 20 seconds to a couple of minutes.
2. Shock in and of itself is life threatening, and also causes illnesses & injuries to be more serious.
5 mins.
Circulation. 2010;122:S934-S946 doi: 10.1161/CIRCULATIONAHA.110.971150
The American Heart Association and the American Red Cross request that this document be cited as follows: Markenson D, Ferguson JD, Chameides L, Cassan P, Chung K-L, Epstein J,
Gonzales L, Herrington RA, Pellegrino JL, Ratcliff N, Singer A. Part 17: first aid: 2010 American Heart Association and
American Red Cross Guidelines for First Aid. Circulation. 2010;122(suppl 3):S934–S946
Video Wounds The video will demonstrate how to treat artery wounds and amputations.
6 Mins. Page 51
Lecture Artery Wounds Amputations Impaled Objects Eviscerations Eye Injuries Dental Injuries Minor Abrasions
Discuss how external bleeding may be present itself in one of these three ways:
o Arterial – bright red blood spurts with each heartbeat.
o Venous – darker red blood, which may pool.
o Capillary – oozes out.
Apply direct pressure.
If bandage soaks through apply
5 mins.
Direct PressureBleeding is best controlled by applying pressure until bleeding stops or EMS rescuers arrive (Class I, LOE A). The amount of pressure applied and the time the pressure is held are the most important factors affecting successful control of bleeding. The pressure must be firm, and it must be maintained for a long time. Methods of applying pressure include: Manual pressure on gauze or other cloth placed over the bleeding source. If bleeding continues, do not remove the gauze; add more gauze on top and apply more pressure. If it is not possible to provide continuous manual pressure, wrap an elastic bandage firmly over gauze to hold it in place with pressure.

another on top so as not to ruin the clotting process.
Elevating the legs has been eliminated because the benefit has not been proven.
Pressure points are no longer recommended.
Tourniquets may be used by those properly trained.
Discuss how to check the fingernail bed to make sure the bandage is not too tight.
Amputations:
To preserve the amputated body part:
Wrap the body part in a clean sterile dressing.
Seal it inside a plastic bag.
Place the plastic bag on ice.
Keep it cool – but do not let it freeze.
Eviscerations: Cover the wound. Keep the dressings moist. Eye Injury Key Points: If there is a protruding object, remember to cover both eyes as the eyes move in unison. When Rinsing the eye, make sure you are rinsing downward, away from the uninjured eye.
TourniquetsAlthough tourniquets have been shown to control bleeding effectively on the battlefield and during surgery and have been used by paramedics in a civilian setting without complications, there are no studies on controlling bleeding with first aid provider use of a tourniquet. Potential dangers of prolonged tourniquet application include temporary or permanent injury to the underlying nerves and muscles ,and systemic complications resulting from limb ischemia ,including acidemia, hyperkalemia, arrhythmias, shock, and death. Complications are related to tourniquet pressure and duration of occlusion ,but there is insufficient evidence to determine a minimal critical time beyond which irreversible complications may occur. Because of the potential adverse effects of tourniquets and difficulty in their proper application, use of a tourniquet to control bleeding of the extremities is indicated only if direct pressure is not effective or possible (Class IIb, LOE B). Specifically designed tourniquets appear to be better than ones that are improvised, but tourniquets should only be used
with proper training (Class IIa, LOE B). If a tourniquet is used, make sure that you note the time it was applied and communicate that time to EMS personnel. Pressure Points and ElevationElevation and use of pressure points are not recommended to control bleeding (Class III, LOE C). This new recommendation is made because there is evidence that other ways of controlling bleeding are more effective. The hemostatic effect of elevation has not been studied. No effect on distal pulses was found in volunteers when pressure points were used. Most important, these unproven procedures may compromise the proven intervention of direct pressure, so they could be harmful. Hemostatic AgentsAmong the large number of commercially available hemostatic agents, some have been shown to be effective. However, their routine use in first aid cannot be recommended at this time because of significant variation in effectiveness by different agents and their potential for adverse effects, including tissue destruction with induction of a proembolic state and potential thermal injury (Class IIb, LOE B).
EFA Media
Segment Topic
Lecture / Emphasis Of Key Points.
Video Length / Page #
2010 ECC CIRRICULUM GUIDELINES
Lecture Eye Injuries Because the eyes are so sensitive, all injuries to them should be treated as serious. Eye Injury Key Points: If there is a protruding object, remember to cover both eyes as the eyes move in unison. The blindness
3 mins.
Page 40
Rinse eyes exposed to toxic substances immediately with a copious amount of water (Class I, LOE C), unless a specific
antidote is available.

may cause the victim to panic – stay with the victim. When Rinsing the eye, make sure the rinsing occurs downward, away from the uninjured eye.
Lecture Dental Injuries Page 40
Dental InjuriesTraumatic dental injuries are common. The first aid for an avulsed tooth is as follows: Clean bleeding wound(s) with saline solution or tap water. Stop bleeding by applying pressure with gauze or cotton. Handle the tooth by the crown, not the root (ie, do not handle the part that was beneath the gum). Place the tooth in milk, or clean water if milk is not available. Contact the patient's dentist or take the tooth and victim to an emergency care center as quickly as possible (Class IIa, LOE C).
Demo & Practice
Wounds Use a volunteer to Demo the Bandaging techniques.
Break students into groups of 2 and have them practice the procedure on each other.
Walk around and provide feedback as needed.
o Assure the knot is on top of the wound.
o Make sure it’s not too tight by checking the fingernail bed.
15
mins.
Small Wounds and Abrasions All wounds, no matter how small, need to be protected against infection. Always wash the wound, apply antibiotic ointment & cover. Signs of infection include:
Increasing pain, tenderness or swelling.
Redness spreading from around the edges of the wound.
Warmth.
Pus coming from the wound.
Advanced infection will include chills, fever & swollen glands.
Page 53
Wounds and AbrasionsSuperficial wounds and abrasions should be thoroughly irrigated with a large volume of warm or room temperature potable water with or without soap until there is no foreign matter in the wound (Class I, LOE A). Cold water appears to be as effective as warm water, but it is not as comfortable. If running water is unavailable, use any source of clean water. Wounds heal better with less infection if they are covered with an antibiotic ointment or cream and a clean occlusive dressing (Class IIa, LOE A). Apply antibiotic ointment or cream only if the wound is an abrasion or a superficial injury and only if the victim has no known allergies to the antibiotic.
Video Shock 2 mins.
Lecture Shock “EVERY VICTIM” of a major illness or injury can go into shock, therefore, after treating the major illness or injury, TREAT FOR SHOCK.
If a victim shows evidence of shock, have the victim lie supine. If there is no evidence of trauma or injury, raise the feet about 6 to 12 inches (about 30° to 45°) (Class IIb, LOE C). Do not raise the feet if the movement or the position

Circulatory shock, more commonly known simply as “shock,” is a dangerous and highly threatening condition that can lead to death unless treatment is provided quickly. Shock is caused by a lack of sufficient blood flow to carry essential oxygen and nutrients to your body. The actions you take might save their life.
Cover the victim with something to keep them warm.
Elevate the legs if it causes no pain to the victim.
Administer emergency oxygen.
Do not leave the victim unattended.
Page 49 causes the victim any pain.
Demo and Practice
Shock Display a shock blanket and discuss how it might be used. Also, remember that the ground may be cold so a blanket can be used to place under the victim.

Skill Check-Off Sheet: Essential First Aid
Participant
Name Bleeding Control Shock Bandaging
Technique Universal
Precautions

STANDARD FIRST AID
2 Hours.
Bandaging techniques required.
The ECC 2010 guidelines for first aid are listed in the last column.
BY THE END OF THE CLASS YOUR STUDENTS SHOULD HAVE A THOROUGH UNDERSTANDING OF
THE FOLLOWING TOPICS:
COMPLETE THE ESSENTIAL FIRST AID SEGMENT, FOLLOWED THEN BY: Burns – Thermal, Chemical and Electrical Musculoskeletal Stroke Anaphylactic Shock Seizures Diabetes Asthma Heat Stroke Cold – Frostbite. Bites – Human, animal and insects.
SFA MEDIA
Segment Topic
Lecture / Emphasis of Key Points.
Video Length / Page #
2010 ECC CIRRICULUM GUIDELINES
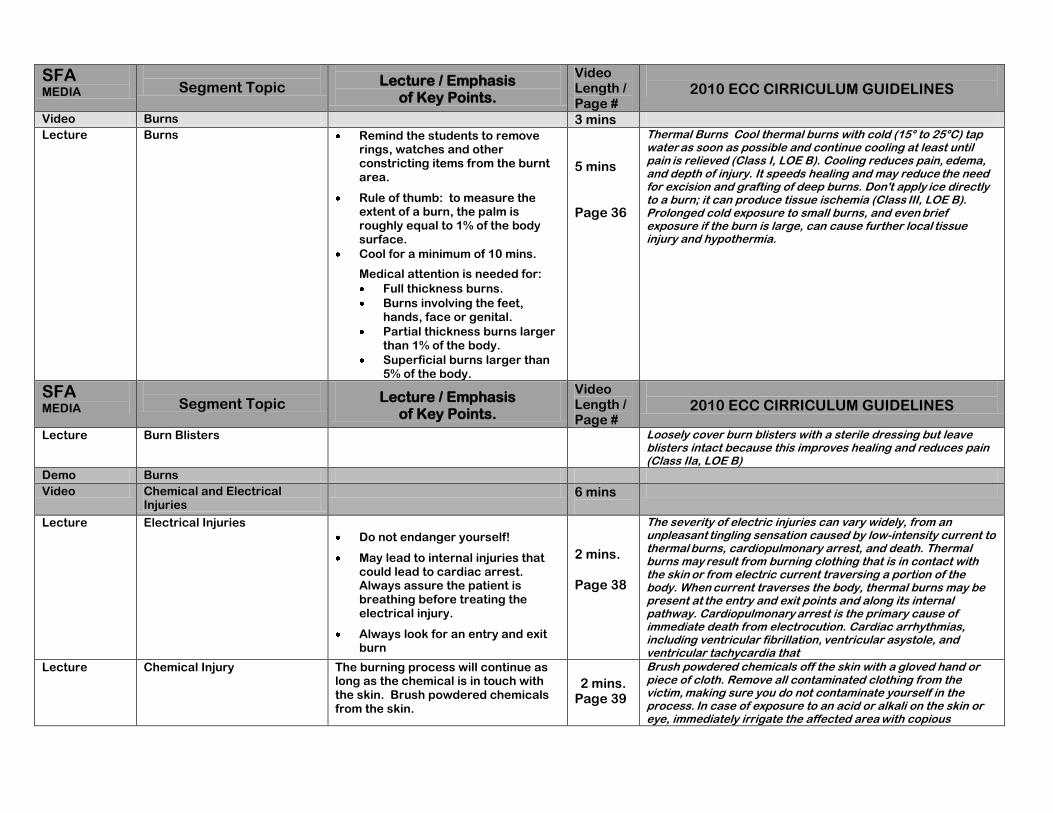
Video Burns 3 mins
Lecture Burns Remind the students to remove rings, watches and other constricting items from the burnt area.
Rule of thumb: to measure the extent of a burn, the palm is roughly equal to 1% of the body surface.
Cool for a minimum of 10 mins.
Medical attention is needed for:
Full thickness burns.
Burns involving the feet, hands, face or genital.
Partial thickness burns larger than 1% of the body.
Superficial burns larger than 5% of the body.
5 mins Page 36
Thermal BurnsCool thermal burns with cold (15° to 25°C) tap water as soon as possible and continue cooling at least until pain is relieved (Class I, LOE B). Cooling reduces pain, edema, and depth of injury. It speeds healing and may reduce the need for excision and grafting of deep burns. Don't apply ice directly to a burn; it can produce tissue ischemia (Class III, LOE B). Prolonged cold exposure to small burns, and even brief exposure if the burn is large, can cause further local tissue injury and hypothermia.
SFA MEDIA
Segment Topic
Lecture / Emphasis of Key Points.
Video Length / Page #
2010 ECC CIRRICULUM GUIDELINES
Lecture Burn Blisters Loosely cover burn blisters with a sterile dressing but leave
blisters intact because this improves healing and reduces pain
(Class IIa, LOE B)
Demo Burns
Video Chemical and Electrical Injuries
6 mins
Lecture Electrical Injuries
Do not endanger yourself!
May lead to internal injuries that could lead to cardiac arrest. Always assure the patient is breathing before treating the electrical injury.
Always look for an entry and exit burn
2 mins. Page 38
The severity of electric injuries can vary widely, from an unpleasant tingling sensation caused by low-intensity current to thermal burns, cardiopulmonary arrest, and death. Thermal burns may result from burning clothing that is in contact with the skin or from electric current traversing a portion of the body. When current traverses the body, thermal burns may be present at the entry and exit points and along its internal pathway. Cardiopulmonary arrest is the primary cause of immediate death from electrocution. Cardiac arrhythmias, including ventricular fibrillation, ventricular asystole, and ventricular tachycardia that
Lecture Chemical Injury The burning process will continue as long as the chemical is in touch with the skin. Brush powdered chemicals from the skin.
2 mins.
Page 39
Brush powdered chemicals off the skin with a gloved hand or
piece of cloth. Remove all contaminated clothing from the victim, making sure you do not contaminate yourself in the process. In case of exposure to an acid or alkali on the skin or eye, immediately irrigate the affected area with copious

amounts of water (Class I, LOE B).
Video
Musculoskeletal
4 mins.
Lecture Fracture
Splint a person only if they need to be moved.
Do not splint an injury if it causes the victim more harm.
Splint an injury in the position found.
5 mins. Page 46
FracturesAssume that any injury to an extremity includes a bone fracture. Cover open wounds with a dressing. Do not move or try to straighten an injured extremity (Class III, LOE C). There is no evidence that straightening an angulated suspected long bone fracture shortens healing time or reduces pain prior to permanent fixation. Expert opinion suggests that splinting may reduce pain and prevent further injury. So, if you are far from definitive health care, stabilize the extremity with a splint in the position found (Class IIa, LOE C). If a splint is used, it should be
padded to cushion the injury. If an injured extremity is blue or extremely pale, activate EMS immediately because this could be a medical emergency. A victim with an injured lower extremity
should not bear weight until advised to do so by a medical professional.
Lecture Sprains and Muscle Contusions.
Page 46
Soft-tissue injuries include joint sprains and muscle contusions.
Cold application decreases hemorrhage, edema, pain, and disability, and it is reasonable to apply cold to a soft-tissue
injury. Cooling is best accomplished with a plastic bag or damp
cloth filled with a mixture of ice and water; the mixture is better than ice alone. Re-freezable gel packs do not cool as effectively as an ice-water mixture. To prevent cold injury, limit each
application of cold to periods 20 minutes. If that length of time is uncomfortable, limit application to 10 minutes. Place a barrier, such as a thin towel, between the cold container and the skin (Class IIb, LOE C.) It is not clear whether a compression bandage is helpful for a joint injury. Heat application to a contusion or injured joint is not as good a first aid measure as cold application.
Demo and Practice
Fractures Dislocations
Use a volunteer to demonstrate splints and slings.
Have students splint and sling each other.
Provide feedback as needed.
10 mins
Video Stroke 2 mins
Lecture Stroke
Review the First 3 letters of the word stroke.
STR Smile ~ Talk ~ Raise Arms Review Warning Signs
5 mins Page 50
Patients with acute stroke are at risk for respiratory compromise from aspiration, upper airway obstruction, hypoventilation, and (rarely) neurogenic pulmonary edema. The combination of poor perfusion and hypoxemia will exacerbate and extend ischemic brain injury and has been associated with worse outcome from stroke. Both out-of-hospital and in-hospital medical personnel should administer supplemental oxygen to hypoxemic (ie, oxygen saturation <94%) stroke patients (Class I, LOE C) or those with unknown oxygen saturation.
Video Anaphylactic Shock and

Seizures 3 mins Lecture Anaphylactic Shock If after administering a prescribed
epinephrine (Epi) auto-injector the victim’s symptoms continue, a second dose of a prescribed Epi auto-injector should be given if EMS is delayed.
5 mins Page 33
First aid providers should be familiar with the epinephrine auto-injector so that they can help a victim with an anaphylactic
reaction to self-administer it. First aid providers should also
know how to administer the auto-injector if the victim is unable
to do so, provided that the medication has been prescribed by a physician and state law permits it (Class IIb, LOE B). In retrospective studies 18% to 35% of patients having signs of anaphylaxis required a second dose of epinephrine if symptoms persisted or progressed after the first dose. Because of the difficulty in making a diagnosis of anaphylaxis and the potential harm from epinephrine if the diagnosis is incorrect, first aid providers are advised to seek medical assistance if symptoms persist, rather than routinely administering a second dose of epinephrine. In unusual circumstances, when advanced medical assistance is not available, a second dose of epinephrine may be given if symptoms of anaphylaxis persist (Class IIb, LOE C).
Lecture Seizures Key Points:
Do not place anything in the victim’s mouth.
Do not try to restrain the victim.
Move dangerous objects away from the victim while they are having a seizure.
5 mins Page 49
The general principles of first aid management of seizures are
to: • Ensure an open airway. • Prevent injury.
“Do not restrain the victim during a seizure. Do not try to open
the victim's mouth or try to place any object between the victim's teeth or in the mouth. Restraining the victim may cause musculoskeletal or soft-tissue injury. Placing an object in the victim's mouth may cause dental damage or aspiration (Class IIa, LOE C). It is not unusual for the victim to be unresponsive or confused for a short time after a seizure.”
Demo and Practice
In Anaphylactic Shock and Seizures
Demo the use of the EPI Pen. 5 mins.
Video Diabetes and Asthma 5 Mins.
Lecture
Diabetes If you do not know whether the person has too much blood sugar or not enough always give sugar.
Hypoglycemia symptoms.
Can come on very quickly.
Strange behavior- mimics intoxication.
Sweating – cold, clammy skin. Hyperglycemia symptoms:
May take hours or days to build up.
Dry skin.
Acid smelling breath.
Rapid pulse.
2 mins Page 40

SFA MEDIA
Segment Topic
Lecture / Emphasis of Key Points.
Video Length / Page #
2010 ECC CIRRICULUM GUIDELINES
Lecture Asthma
Rescuer may assist the victim in using the prescribed inhaler.
Oxygen should be provided to all patients with severe asthma.
2 mins. Page 34
First aid providers are not expected to make a diagnosis of asthma, but they may assist the victim in using the victim's prescribed bronchodilator medication (Class IIa, LOE B) under the following conditions: The victim states that he or she is having an asthma attack
or symptoms associated with a previously diagnosed breathing disorder, and the victim has the prescribed medications or inhaler in his or her possession. The victim identifies the medication and is unable to administer it without assistance. First aid providers should become familiar with inhalers so
that they can assist a victim with an acute asthma attack in
using the inhaler. Patients with severe life-threatening asthma require urgent
and aggressive treatment with simultaneous administration of oxygen, bronchodilators, and steroids.
Demo Diabetes and Asthma
Demo the use of an inhaler. 5 mins
Video Heat Emergencies 5 Mins.
Lecture Heat Emergencies If you suspect heatstroke:
Call 911 or emergency medical help. Intravenous fluids are needed.
Cool the person by immersing them up to the chin in cold water.
If immersion is not possible, cool the patient by available means: covering them with damp cold sheets or spraying with cool water.
Do not try to force the victim to drink fluids, but the victim may drink if they are able to and have the desire.
Page 43
Heat-induced symptoms, often precipitated by vigorous exercise, may include heat cramps, heat exhaustion, and heat stroke. Heat cramps are painful involuntary muscle spasms that most
often affect the calves, arms, abdominal muscles, and back.
First aid includes rest, cooling off, and drinking an electrolyte-carbohydrate mixture, such as juice, milk, or a commercial electrolyte-carbohydrate drink. Stretching, icing, and massaging the painful muscles may be helpful. Exercise should not be resumed until all symptoms have resolved. Heat exhaustion is caused by a combination of exercise-induced heat and fluid and electrolyte loss as sweat. Signs and symptoms may start suddenly and include: nausea, dizziness, muscle cramps, feeling faint, headache, fatigue, and heavy sweating. Heat exhaustion is a serious condition because it can rapidly advance to the next stage, heat stroke, which can be fatal. Heat exhaustion must be vigorously treated by having the victim lie down in a cool place, taking off as many clothes as possible, cooling the victim with a cool water spray, and encouraging the victim to drink cool fluids, preferably containing carbohydrates and electrolytes. Heat stroke includes all the symptoms of heat exhaustion plus
signs of central nervous system involvement, including dizziness, syncope, confusion, or seizures. The most important action by a first aid provider for a victim of heat stroke is to begin immediate cooling, preferably by immersing the victim up

to the chin in cold water. It is also important to activate the EMS system. Heat stroke requires emergency treatment with intravenous fluids. Do not try to force the victim to drink liquids.
Lecture Hypothermia Treatment for hypothermia:
Seek emergency medical assistance. While waiting for
help to arrive, monitor the person's breathing. If breathing stops or seems dangerously slow or shallow, begin cardiopulmonary resuscitation (CPR) immediately.
Move the person out of the cold. If going indoors isn't
possible, protect the person from the wind. Cover his or her head and insulate his or her body from the cold
ground. Remove wet clothing. Replace
wet items with warm, dry ones.
Wrap all exposed body
surfaces with anything at hand, such as blankets, clothing, and newspapers.
If EMS help is delayed start
active rewarming, such as placing the victim near a heat source and placing containers of warm, but not hot, water in
contact with the skin. Don't give the person alcohol.
Offer warm nonalcoholic drinks, unless the person is vomiting.
Don't massage or rub the person. Handle people with
hypothermia gently; their skin may be frostbitten, and rubbing frostbitten tissue can cause severe damage.
Page 44
Hypothermia is caused by exposure to cold. The urgency of treatment depends on the length of exposure and the victim's body temperature. Begin rewarming a victim of hypothermia immediately by moving the victim to a warm environment, removing wet clothing, and wrapping all exposed body surfaces with anything at hand, such as blankets, clothing, and newspapers. If the hypothermia victim is far from definitive health care, begin active rewarming (Class IIa, LOE B) although the effectiveness of active rewarming has not been evaluated. Active rewarming should not delay definitive care. Potential methods of active rewarming include placing the victim near a heat source and placing containers of warm, but not hot, water in contact with the skin.
Lecture Frostbite Slowly rewarm the body part.
Do not rewarm the body part if the potential for further frostbite still exists.
Page 45
Frostbite usually affects an exposed part of the body such as
the extremities and nose. In case of frostbite, remove wet clothing and dry and cover the victim to prevent hypothermia. Transport the victim to an advanced medical facility as rapidly

as possible. Do not try to rewarm the frostbite if there is any chance that it might refreeze or if you are close to a medical facility (Class III, LOE C). Minor or superficial frostbite (frostnip) can be treated with simple, rapid rewarming using skin-to-skin contact such as a warm hand. Severe or deep frostbite should be rewarmed within 24 hours of injury and this is best accomplished by immersing the frostbitten part in warm (37° to 40°C or approximately body temperature) water for 20 to 30 minutes (Class IIb, LOE C).
Chemical warmers should not be placed directly on frostbitten
tissue because they can reach temperatures that can cause burns (Class III, LOE C). Following rewarming, efforts should be
made to protect frostbitten parts from refreezing and to quickly
evacuate the patient for further care. The effectiveness of
ibuprofen or other nonsteroidal anti-inflammatory drugs (NSAIDs) in frostbite has not been well established in human studies
Lecture Human and Animal Bites Page 34
Irrigate human and animal bites with copious amounts of water
(Class I, LOE B). This irrigation has been shown to prevent
rabies from animal bites and bacterial infection.
Lecture Snake Bites Use a pressure immobilization bandage to any snakebite.
Page 35
Do not apply suction as first aid for snakebites (Class III, LOE C). Suction does remove some venom, but the amount is very
small. Suction has no clinical benefit and it may aggravate the injury. Applying a pressure immobilization bandage with a pressure between 40 and 70 mm Hg in the upper extremity and between 55 and 70 mm Hg in the lower extremity around the entire length of the bitten extremity is an effective and safe way to slow the dissemination of venom by slowing lymph flow (Class IIa, LOE C). For practical purposes pressure is sufficient if the bandage is comfortably tight and snug but allows a finger to be slipped
under it. Initially it was theorized that slowing lymphatic flow by external pressure would only benefit victims bitten by snakes producing neurotoxic venom, but the effectiveness of pressure immobilization has also been demonstrated for bites by non-neurotoxic American snakes. The challenge is to find a way to teach the application of the correct snugness of the bandage because inadequate pressure is ineffective and too much pressure may cause local tissue damage. It has also been demonstrated that, once learned, retention of the skill of proper pressure and immobilization application is poor.
Lecture Jellyfish Bite Liberally wash stings with vinegar.
If vinegar is not available use a baking soda slurry.
Victim should immerse the effected body part in hot water or take a hot shower.
Page 36
This section is new to the First Aid Guidelines. First aid for
jellyfish stings consists of two important actions: preventing
further nematocyst discharge and pain relief. To inactivate
venom load and prevent further envenomation, jellyfish stings
should be liberally washed with vinegar (4% to 6% acetic acid
solution) as soon as possible for at least 30 seconds (Class IIa, LOE B). The inactivation of venom has been demonstrated for Olindias sambaquiensis and for Physalia physalis (Portuguese
man-of-war). If vinegar is not available, a baking soda slurry

may be used instead. For the treatment of pain, after the nematocysts are removed or deactivated, jellyfish stings should be treated with hot-water
immersion when possible (Class IIa, LOE B). The victim should
be instructed to take a hot shower or immerse the affected part
in hot water (temperature as hot as tolerated, or 45°C if there is the capability to regulate temperature), as soon as possible, for at least 20 minutes or for as long as pain persists. If hot water is not available, dry hot packs or, as a second choice, dry cold packs may be helpful in decreasing pain but these are not as effective as hot water (Class IIb, LOE B). Topical application of aluminum sulfate or meat tenderizer, commercially available aerosol products, fresh water wash, and papain, an enzyme derived from papaya used as a local medicine, are even less effective in relieving pain (Class IIb, LOE B). Pressure immobilization bandages are not recommended for the treatment of jellyfish stings because animal studies show that pressure with an immobilization bandage causes further
release of venom.

SFA MEDIA
Segment Topic
Lecture / Emphasis of Key Points.
Video Length / Page #
2010 ECC CIRRICULUM GUIDELINES
Lecture Drowning
Drowning is a major cause of unintentional death. Methods of
preventing drowning include isolation fencing around swimming
pools (gates should be self-closing and self-latching), wearing
personal flotation devices (life jackets) while in, around, or on water, never swimming alone, and avoiding swimming or
operating motorized watercraft while intoxicated. Outcome following drowning depends on the duration of the submersion, the water temperature, and how promptly CPR is started. Occasional case reports have documented intact neurological survival in children following prolonged submersion in icy waters. Remove the victim rapidly and safely from the water, but do not place yourself in danger. If you have special training, you can start rescue breathing while the victim is still in the water providing that it does not delay removing the victim from the water. There is no evidence that water acts as an obstructive
foreign body, so do not waste time trying to remove it with
abdominal or chest thrusts. Start CPR and, if you are alone,
continue with about 5 cycles (about 2 minutes) of chest compressions and ventilations before activating EMS. If 2 rescuers are present, send 1 rescuer to activate EMS immediately.
Lecture Poisonings For a Poison Emergency Call 800-222-1222
Page 48
Do not administer anything by mouth for any poison ingestion
unless advised to do so by a poison control center or emergency medical personnel because it may be harmful (Class III, LOE C). There is insufficient evidence that dilution of the ingested poison with water or milk is of any benefit as a first aid measure. Animal studies have shown that dilution or neutralization of a caustic agent with water or milk reduces tissue injury, but no human studies have shown a clinical benefit. Possible adverse effects of water or milk administration include emesis and aspiration. Do not administer activated charcoal to a victim who has ingested a poisonous substance unless you are advised to do so by poison control center or emergency medical personnel (Class IIb, LOE C). There is no evidence that activated charcoal is effective as a component of first aid. It may be safe to administer, but it has not been shown to be beneficial, and there are reports of it causing harm. In addition the majority of children will not take the recommended dose Do not administer syrup of ipecac for ingestions of toxins (Class III, LOE B). Several studies found that there is no clinically relevant advantage to administering syrup of ipecac;
its administration is not

Skill Check-Off Sheet: Standard First Aid
Participant Name
Bleeding Control
Shock Splints and Slings
Bandaging Technique
Inhaler &
EPI Pen
Universal Precautions

BLOODBORNE & AIRBORNE PATHOGENS
1 hour. BBP kit. PPE kit.
BY THE END OF THE CLASS YOUR STUDENTS SHOULD HAVE A THOROUGH UNDERSTANDING OF
THE FOLLOWING TOPICS:
Outline. Define ABP and BBP. Explain transmission routes. Detail HBC, HCV, HIV and TB. PPE Engineering controls. Work practice controls Administration controls Sharps containers Laundering Clean-up Reporting.

Media
Course Topic
Lecture / Emphasize Topics on the Video that are
worth repeating.
Video Time / Page No.
Demo /
Practice
Lecture /Emphasize Topics not on video
that are worth discussion.
Video Bloodborne and Airborne Pathogens.
4 mins.
Page 55
Lecture Define BBP and ABP and why OSHA has established guidelines for the work place.
Explain OPIM.
Means and transmission.
Conditions that must exist for transmission.
Discuss the 3 main BBP. HIV, HBV and HCV. Cover the following for each:
o Incubation. o Symptoms. o Treatments. o Vaccines
Other Potentially Infectious Materials (OPIM) means (1) The following human body fluids: semen, vaginal secretions, cerebrospinal fluid, synovial fluid, pleural fluid, pericardial fluid, peritoneal fluid, amniotic fluid, saliva in dental procedures, any body fluid that is visibly contaminated with blood, and all body fluids in situations where it is difficult or impossible to differentiate between body fluids; (2) Any unfixed tissue or organ (other than intact skin) from a human (living or dead); and (3) HIV-containing cell or tissue cultures, organ cultures, and HIV- or HBV-containing culture medium or other solutions; and blood, organs, or other tissues from experimental animals infected with HIV or HBV.
5 mins.
The center for disease control has more information on BBP’s. Refer your students to their website. http://www.cdc.gov/niosh/topics/bbp/genres.html
Required to take BBP course every year.
Video Universal Precautions & Personal protection Eq.
2 mins.
Page 60
Lecture Review tools for effective precautions.
2 mins. Using a BBP kit. Demo the contents.
Demo & Practice
Proper glove removal. 3 mins
Have students practice proper glove removal.
Video Controls for a safe environment.
1 min.
Page 63
Lecture Define and give examples of work practice controls and engineering controls.
Demo & Practice
Sneezing etiquette. Blood soaked shirt removal.
2 mins
Have students practice proper glove removal.
Video Controls for a safe environment.
1 min.

Page 66
Lecture Define and give examples of work practice controls and engineering controls.
Review the guidelines for regulated waste. Show different Haz/Mat labels.
2 mins. Be sure to cover all points of the regulated waste. Reference the OSHA website.
Video Needles and sharps.
1 min.
Page 66
Demo & Practice
Disposal and recapping. Hand washing.
Reiterate the importance of hand washing for 2 minutes.
2 mins
Have students practice recapping needle technique.
Video Exposure control plan and reporting.
2 min.
Page 68
Lecture Reporting and post exposure follow up. Legal rights. Laundry engineering controls.
What must be on the report? Victim’s legal rights. Confidentiality of Medical information.
2 mins. Employer must follow all of the CDC’s guidelines for BBP exposure.
Video Airborne Pathogens
2 min.
Page 70
Lecture Highlight: Transmission Protection Vaccines Treatment Caring for the ill
Discuss the importance of vaccines, hand washing and sneeze etiquette. Have an interactive discussion on caring for the ill.
2 mins. Discuss what treatments work and which do not.
Lecture Specific illnesses. Review, in detail, tuberculosis and other illnesses.
2 mins. Use the illness chart in the back of the book to reference illnesses that most concern the participants.

EMERGENCY OXYGEN ADMINISTRATION
45 mins.
Site’s Emergency Oxygen Unit required. Hands on practice with Emergency Oxygen strongly encouraged. Course Outline: Video: 15 mins.
Body’s need for oxygen.
Using oxygen on conscious victim.
Using oxygen on unconscious victim.
Maintenance for Emergency Oxygen
Legal requirements for Emergency Oxygen.
Demonstration. Hands on Practice.

EO2 MEDIA
Segment Topic
Medical Organizations Oxygen Studies.
Video Length Page #
2010 ECC CIRRICULUM GUIDELINES Regarding Emergency Oxygen
Lecture Discuss the need for Emergency Oxygen and why all injuries and illness can lead to shock.
Circulation. 2010;122:S934-S946 doi: 10.1161/CIRCULATIONAHA.110.971150
The American Heart Association and the American Red Cross request that this document be cited as follows: Markenson D, Ferguson JD, Chameides L, Cassan P, Chung K-L, Epstein J,
Gonzales L, Herrington RA, Pellegrino JL, Ratcliff N, Singer A. Part 17: first aid: 2010 American Heart Association and
American Red Cross Guidelines for First Aid. Circulation. 2010;122(suppl 3):S934–S946
Video Emergency Oxygen
The video will demonstrate how to use, care for, label and maintain your emergency oxygen unit.
15 Mins. Page
54
Lecture Oxygen is essential to life, and supplemental oxygen is the most frequently used drug in the treatment of acutely ill and injured patients. An understanding of oxygen, its side effects, systems of delivery and reasons for precise dosage is essential in the management of very ill patients.. This article reviews the physiology of oxygen, systems of delivery and the rationale for their use.
Emergency Medicine, 1992;4(3):163–178
Passive ventilation offers an alternate method of oxygen delivery for out-of-hospital cardiac arrest patients. We compared the survival of out-of-hospital cardiac arrest patients receiving initial passive ventilation (oxygen flowing into a mask placed over the patient’s nose and mouth) with survival based on receiving initial bag-valve-mask ventilation. Among the 1,019 adult out-of-hospital cardiac arrest patients in the analysis, 459 received passive ventilation and 560 received bag-valve-mask ventilation. Conclusion: Among adult, witnessed, ventricular fibrillation/ventricular tachycardia, out-of-hospital cardiac arrest resuscitated with minimally interrupted cardiac resuscitation, survival to hospital discharge was higher for individuals receiving initial passive oxygen administration.
Annals of Emergency Medicine, 2009;54:656-662
We evaluated the efficacy of three methods by which rescuers can breathe supplemental oxygen to increase their delivered oxygen concentration during single rescuer, bystander-
CPR AND OXYGEN http://circ.ahajournals.org/cgi/content/full/122/18_suppl_3/S685
How can bystander CPR be effective without rescue breathing? Initially during SCA with VF, rescue breaths are not as important as chest compressions because the oxygen level in the blood remains adequate for the first several minutes after cardiac arrest… However, at some time during prolonged CPR, supplementary oxygen with assisted ventilation is necessary. The precise interval for which the performance of Hands-Only CPR is acceptable is not known at this time. or victims of prolonged cardiac arrest both ventilations and compressions are important because over time oxygen in the blood is consumed and oxygen in the lungs is depleted (although the precise time course is unknown). Ventilations and compressions are also important for victims of asphyxia arrest, such as children and drowning victims, because they are hypoxemic at the time of cardiac arrest.30,109
STROKE AND EMERGENCY OXYGEN http://circ.ahajournals.org/cgi/content/full/122/18_suppl_3/S818
Patients with acute stroke are at risk for respiratory compromise from aspiration, upper airway obstruction, hypoventilation, and (rarely) neurogenic pulmonary edema. The combination of poor perfusion and hypoxemia will exacerbate and extend ischemic brain injury and has been associated with worse outcome from stroke.45 Both

initiated CPR. Volunteers trained only in basic life support performed ventilation only and full CPR on a CPR manikin using room air and each of three supplemental oxygen delivery methods: nasal cannula, oxygen supply tube/mask, and demand valve. The volunteers received minimal instruction on how to use the supplemental oxygen delivery methods. Conclusion: The use of supplemental oxygen increases the rescuer's FDO2 during ventilation-only and full CPR without interfering with CPR performance.
Annals of Emergency Medicine, 1994;23(5):1027-1031
For critically ill patients, high concentration oxygen should be administered immediately and this should be recorded afterwards in the patient’s health record. All critically ill patients should be assessed and monitored using a recognized physiological track and trigger system. Staff that is trained in oxygen administration should administer oxygen. Oxygen saturation and delivery system should be recorded on the patient’s monitoring chart
Thorax 2008;63:vi1-vi68
We tested the hypothesis that the supplemental administration of oxygen decreases the incidence of wound infection. We randomly assigned 500 patients to receive 30 percent or 80 percent inspired oxygen during an operation and for two hours afterward. Anesthetic treatment was standardized, and all patients received antibiotic therapy. Among the 250 patients who received 80 percent oxygen, 13 had surgical-wound infections, as compared with 28 of the 250 patients given 30 percent oxygen (P=0.01). Conclusion: The administration of supplemental oxygen is a practical method of reducing the incidence of surgical-wound infections.
New England Journal of Medicine, 2000;342(3):161-167.
The primary goal of oxygen therapy is to correct alveolar and/or tissue hypoxia. Therefore, any disorder causing hypoxia is a potential indication for oxygen administration. But the tissue oxygen delivery depends upon an adequate function of cardiovascular and the respiratory systems. Therefore, tissue hypoxia is not relieved by oxygen therapy alone – functioning of all the systems also needs to be improved. Conclusion: Oxygen therapy should be administered according to guidelines. Proper monitoring of oxygen therapy is recommended to ensure adequate oxygenation and to save precious oxygen
out-of-hospital and in-hospital medical personnel should administer supplemental oxygen to hypoxemic (ie, oxygen saturation <94%) stroke patients (Class I, LOE C) or those with unknown oxygen saturation.
Acute Coronary Syndrome. http://circ.ahajournals.org/cgi/content/full/122/18_suppl_3/S787
Oxygen should be administered to patients with breathlessness, signs of heart failure, shock, or an arterial oxyhemoglobinsaturation <94% (Class I, LOE C). Noninvasive monitoring of blood oxygen saturation can be useful .
EMERGENCY OXYGEN AND ASTHMA
http://circ.ahajournals.org/cgi/content/full/122/18_suppl_3/S829 .Initial Stabilization
Patients with severe life-threatening asthma require urgent and aggressive treatment with simultaneous administration of oxygen, bronchodilators, and steroids. Healthcare providers must monitor these patients closely for deterioration. Although the pathophysiology of life-threatening asthma consists of bronchoconstriction, inflammation, and mucous plugging, only bronchoconstriction and inflammation are amenable to drug treatment. Primary Therapy Oxygen Oxygen should be provided to all patients with severe asthma, even those with normal oxygenation. As noted above, successful treatment with β2-agonists may cause
an initial decrease in oxygen saturation because the resultant bronchodilator can initially increase the ventilation-perfusion mismatch.
CARDIAC ARREST AND PREGNET.
Scope of the ProblemThe Confidential Enquiries into Maternal and Child Health (CEMACH) data set constitutes the largest population-based data set
Key Interventions to Prevent ArrestThe following
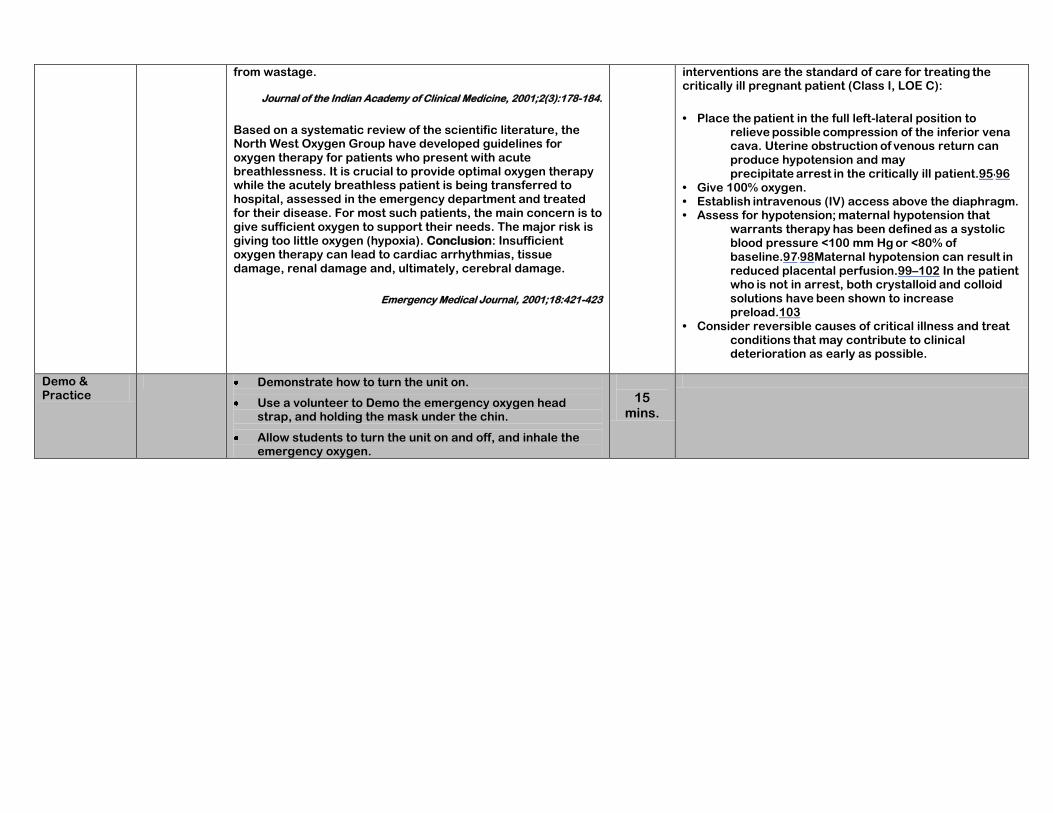
from wastage.
Journal of the Indian Academy of Clinical Medicine, 2001;2(3):178-184.
Based on a systematic review of the scientific literature, the North West Oxygen Group have developed guidelines for oxygen therapy for patients who present with acute breathlessness. It is crucial to provide optimal oxygen therapy while the acutely breathless patient is being transferred to hospital, assessed in the emergency department and treated for their disease. For most such patients, the main concern is to give sufficient oxygen to support their needs. The major risk is giving too little oxygen (hypoxia). Conclusion: Insufficient oxygen therapy can lead to cardiac arrhythmias, tissue damage, renal damage and, ultimately, cerebral damage.
Emergency Medical Journal, 2001;18:421-423
interventions are the standard of care for treating the critically ill pregnant patient (Class I, LOE C):
• Place the patient in the full left-lateral position to relieve possible compression of the inferior vena cava. Uterine obstruction of venous return can produce hypotension and may precipitate arrest in the critically ill patient.95,96
• Give 100% oxygen. • Establish intravenous (IV) access above the diaphragm. • Assess for hypotension; maternal hypotension that
warrants therapy has been defined as a systolic blood pressure <100 mm Hg or <80% of baseline.97,98Maternal hypotension can result in reduced placental perfusion.99–102 In the patient who is not in arrest, both crystalloid and colloid solutions have been shown to increase preload.103
• Consider reversible causes of critical illness and treat conditions that may contribute to clinical deterioration as early as possible.
Demo & Practice
Demonstrate how to turn the unit on.
Use a volunteer to Demo the emergency oxygen head strap, and holding the mask under the chin.
Allow students to turn the unit on and off, and inhale the emergency oxygen.
15
mins.

HEALTHCARE PROVIDER CPR TRAINING
4 hours, 5 hours if client does no have a current AED card.
If on-line test completed, reduce class time by 15 minutes.
1 - 1 manikin ratio required.
Airway Adjuncts Required.
AED if they don’t have a current AED card.
Outline:
Assessing the Scene. o Video. o Discussion.
Heart Education. o Video. o Discussion. o STROKE discussion option.
Adult CPR. o Discussion. o Demonstration. o Students Hands on practice.
Child CPR. o Discussion. o Demonstration. o Students Hands on practice.
Infant CPR. o Discussion. o Demonstration. o Students Hands on practice
2-Rescuer CPR o Discussion. o Demonstration. o Students Hands on practice.
Infant Choking. o Discussion. o Demonstration. o Students Hands on practice.
AED Training see page 18.
HCP CPR and AED Quiz see page 55.

HCP CPR
Media
Course Topic Lecture / Emphasize
Topics on the Video that are worth repeating.
Video Time / Page No.
Demo /
Practice
Lecture /Emphasize Topics not on video that
are worth discussion.
Lecture Introduction and explanation of class procedures.
Introduce yourself and your background. Explain class procedures and expectations.
Ascertain if any students have limitations that would limit them from manikin practice.
5 mins.
Some clients may have taken the quiz online. If that is the case collect quiz results at this time.
Video HCP’s working in teams.
Activating the Emergency Response system
Legal Concerns
Universal Precautions
Explain the importance of working in teams.
Utilizing effective communication.
Explain that the class will teach both lone rescuer CPR as well as two or more rescuer CPR.
5 mins.
Page 19
Healthcare providers are encouraged to practice a simulated and a choreographed approach to CPR.
Lecture
Activating the Emergency Response system.
Legal Concerns
Universal Precautions
Reiterate calling 911 and the difference between cardiac arrest due to heart issues, and cardiac arrest due to asphyxia.
Reaffirm that the Good Samaritan laws vary by jurisdiction.
Assume everyone has a contagious disease and use universal precautions.
10 mins.
Demo safe removal of contaminated gloves.
Discuss the emotional, mental and physical impact to the rescuer and witnesses in an emergency. It is normal to have post-traumatic stress.
You must not abandon a victim once you have initiated care.
Discuss the risks of BBP with CPR.
Demo & Practice
3 mins. Demo safe removal of contaminated gloves.
Have students practice glove removal.
HCP CPR
Media
Course Topic
Lecture / Emphasize Topics on the Video that are
worth repeating.
Video Time / Page No.
Demo /
Practice
Lecture / Emphasize Topics not on video that
are worth discussion.
Chain of Survival

Video
Heart Attack Signs and Symptoms
Heart Attack Risks
Heart Attack Treatment
3:30 mins Page 42
Lecture Chain of Survival
Heart Attack Signs and Symptoms
Heart Attack Risks
Heart Attack Treatment
Review the importance of early activation of 911.
Remind students that people often deny they are having a heart attack.
Reiterate the administration of aspirin if there are no contra-indications.
10 mins.
Stroke signs, symptoms and treatment Page 45.
Review the Cincinnati Stroke scale.
Lecture Stroke
Option:
2 min video in the FA segment
Lecture using page 45
Role Play the Cincinnati Hospital Guide
5 mins Page 50
Patients with acute stroke are at risk for respiratory compromise
from aspiration, upper airway obstruction, hypoventilation, and (rarely) neurogenic pulmonary edema. The combination of poor perfusion and hypoxemia will exacerbate and extend ischemic
brain injury and has been associated with worse outcome from
stroke. Both out-of-hospital and in-hospital medical personnel
should administer supplemental oxygen to hypoxemic (ie, oxygen
saturation <94%) stroke patients (Class I, LOE C) or those with unknown oxygen saturation.
Video
Adult CPR 6 mins. Page 11
Lecture Adult CPR FROM THE ECC http://circ.ahajournals.org/cgi/content/full/
122/18_suppl_3/S685 The American Heart Association requests that this document be cited as follows: Berg RA, Hemphill R, Abella BS, Aufderheide TP, Cave DM, Hazinski MF, Lerner EB, Rea TD, Sayre MR, Swor RA. Part 5: Adult basic life support: 2010 American Heart Association Guidelines for Cardiopulmonary Resuscitation and Emergency Cardiovascular Care. Circulation. 2010;122.
The healthcare provider
Review that adult CPR starts at the onset of puberty. If the age can not be determined, use your best estimate.
Discuss agonal breaths, these commonly occur at the beginning of cardiac arrest. It is confusing for rescuers that are not familiar with them. By checking for no breathing or no normal breathing, the rescuer should begin chest
7 mins.
Have students lean their head forward and swallow (it will be easy). Now have them lean their head back and swallow. This will be difficult because the tongue is lifted off the back of the throat, which is why we do head /tilt chin/lift.
Reiterate that the
http://circ.ahajournals.org/cgi/content/full/1
22/18_suppl_3/S685
The American Heart Association states the following need for supplemental oxygen for extended CPR. “… How- ever, at some time during prolonged CPR; supplementary oxygen with assisted ventilation is necessary.”
Remind students that people who need CPR

should take no more than 10 seconds to check for a pulse and, if the rescuer does not definitely feel a pulse within that time period, the rescuer should start chest compressions (Class IIa, LOE C).45,46
Healthcare providers should interrupt chest compressions as infrequently as possible and try to limit interruptions to no longer than 10 seconds, except for specific interventions such as insertion of an advanced airway or use of a defibrillator (Class IIa, LOE C).
Because of the difficulty in providing effective chest compressions while moving the patient during CPR, the resuscitation should generally be conducted where the patient is found (Class IIa, LOE C).
compressions earlier.
Review C-A-B.
Discuss the new hand position – middle of the breastbone in the middle of the chest. No more xiphoid.
Reiterate o Push hard. o Push fast. o Push at the rate of at
least 100 compressions per minute.
o Allow full recoil of chest.
o Minimize interruptions to chest compressions.
o Only attempt two rescue breaths.
Discuss the option for chest compression only.
Emphasize that the pulse check should be for no more than 10 seconds.
Reiterate that the routine use of the carotid maneuver is no longer recommended.
Review the CPR algorithm PAGE 10.
guidelines state to only attempt ventilation twice, even if they’re unsuccessful.
Demo how to choose a properly fitting mask.
are dead. There is almost nothing you can do to harm a person in cardiac arrest except delay the response time. CPR is tiring.
Fatigue makes CPR less effective. If a second rescuer is there switch about every 2 minutes.
If you come across CPR in progress, let the rescuer know you are trained and can help.
Discuss
Different acceptable hand positions.
Possibility of broken ribs.
Discuss gastric inflammation from rescue breaths.
What to do if a victim vomits.
Jaw thrust maneuver.
Drowning and hypothermia may allow more time to start CPR. Do not assume it is too late to start CPR.
Demo & Practice
Adult CPR
20
mins. Page 9
Demo Adult CPR.
Using the 1-1 manikin ratio, coach the students through the CPR cycle.
Allow students to practice in groups of
Look for common mistakes:
Not tapping and shouting.
Not compressing hard enough.
Not allowing the chest

2. One will perform CPR, while the other uses the CPR algorithm on page 13 to guide them.
Provide informal evaluation and prompt feedback on skills.
Demo the use of a pocket mask, face shield and bag-mask ventilation.
Demo the jaw thrust maneuver and discuss.
Demo and have students practice rescue breathing.
to recoil.
Not compressing fast enough.
Removing their hands during compressions.
Not pinching the nose closed.
Not tilting the head back.
Not looking for the chest to rise and fall.
Media
Course Topic
Lecture / Emphasize Topics on the Video that are
worth repeating.
Video Time / Page No.
Demo /
Practice
Lecture / Emphasize Topics not on video that
are worth discussion.
Video Child CPR 4 mins. Page 12
Lecture Child CPR
Review: Child CPR starts at the
age of one to the onset of puberty. If you can’t determine the age use your best estimate.
Discuss that children and infants usually go into cardiac arrest due to respiratory arrest.
Note that femoral artery can also be checked.
5 mins.
Many students are use to checking breaths and then checking the pulse before starting CPR. Remind them there is no pulse check!

Reiterate that one or two hands may be used on an infant.
Review the CPR algorithm PAGE 10
Demo & Practice
15 mins.
Demo Child CPR.
Coach the students through the CPR cycle.
Allow students to practice in groups of 2. One will perform CPR, while the other uses the CPR algorithm on page 13.
Demo rescue breathing.
Allow students to practice. Provide informal evaluation and prompt feedback on skills.
Look for common mistakes:
Not tapping and shouting.
Not compressing hard enough.
Not allowing the chest to recoil.
Not compressing fast enough.
Removing their hands during compressions.
Not pinching the nose closed.
Not tilting the head back.
Not looking for the chest to rise and fall.
Video Infant CPR 4 mins. Page 14
Lecture Infant CPR Discuss the neutral position.
Discuss covering the mouth and nose for rescue breaths.
Highlight that the rescue breaths are just puffs of air.
Note that when two or more rescuers are working on an infant, the 2 thumb encircling
5 mins

hand position is recommended and will be covered under 2-rescuer CPR.
Demo and Practice
Infant CPR 20 mins Demo Infant CPR.
Coach the students through the CPR cycle.
Coach students through rescue breathing at a rate of one breath every 3-5 seconds.
Students should practice finding the brachial artery.
Allow students to practice in groups of two. One will perform CPR, while the other uses the CPR algorithm on page 15.
Allow students to practice. Provide informal evaluation and prompt feedback on skills.
Video 2 Rescuer CPR 6 mins. Page 25
Lecture 2 Rescuer CPR Reiterate practicing in teams.
Discuss how CPR is fatiguing and how and when to switch positions.
Highlight what to do when more rescuers arrive.
Discuss the consequences of
5 mins

breaths that are given too quickly and too forcefully.
Note that the chest compressions are continuous when an advanced airway is in place.
Stress that when 2 rescuers are working on a pediatric patient the ratio changes from 30 compressions and 2 breaths to 15 compressions and 2 breaths.
Note that when two or more rescuers are working on an infant, the 2 thumb encircling hand position is recommend and will be covered under 2-rescuer CPR.
Demo and Practice
2 rescuer CPR 20 mins
Working in groups of two, have students practice both roles in 2-rescuer CPR.
Assure students are communicating effectively by counting out loud the compressions, calling for the switch and encouraging the performance of each other.
Have students practice the 2 thumb encircling hand position that is recommended.

In groups of 2, have students practice bag-mask ventilations.
Students should practice finding the carotid, brachial and femoral artery.
Allow students to practice. Provide informal evaluation and prompt feedback on skills.
Video
Adult choking procedures. 3 mins. Page 16
Lecture Adult Choking. The most common food item that causes choking is meat.
If the victim becomes unconscious start CPR. When it is time to perform rescue breaths, look in the mouth, if you see an item remove it. If you are not doing rescue breaths, stop after 30 compressions and look in the mouth, if you see an item remove it.
7 mins
Prevention of choking:
Chew thoroughly.
Cut food in small pieces.
Don’t talk or laugh with food in your mouth.
Abdominal thrusts could cause damage to the internal organs, or the choking object may have damaged the throat. A doctor should evaluate the victim after the incident.
Demo and practice
Adult choking procedures.
15 mins.
Demo how to do the Heimlich maneuver on yourself if you are alone.
Use a volunteer to demo adult choking. Have students practice with each other.
How to do the Heimlich maneuver on yourself.
Video Infant choking. 2 mins. Page 18

Lecture Infant choking. How to recognize an infant who is choking.
Supporting the baby’s weight while managing infant choking.
5 mins
Demo and Practice
Infant choking. 15 mins. Demo infant choking.
Coach students through an infant choking scenario.

Healthcare Provider Test
1. Should a person suspected of having a heart attack take two baby aspirin or one adult aspirin?
a. Yes
b. No
2. What is not a valid reason to stop CPR? a. You are presented with a DNR. b. Advanced life support team takes over. c. The victim becomes responsive.
d. None of the above.
3. How far down should the sternum be depressed on an adult?
a. ½ to 1 inch. b. 1 to 1 ½ inches. c. 1 ½ to 2 inches.
d. At least 2 inches.
4. What is the best hand placement for the adult if the heel of one hand is on the center (middle) of the victim’s chest, which is the lower half of the sternum,
and the other hand:
a. on top of the first.
b. to the right of the first. c. to the left of the first. d. where ever it is most comfortable.
5. What is the rate of chest compressions for an adult? a. At least 40 compressions per minute. b. At least 60 compressions per minute. c. At least 80 compressions per minute.
d. At least 100 compressions per minute.

6. When checking the pulse the HCP should take no more than: a. 5 seconds.
b. 10 seconds.
c. 15 seconds. d. 20 seconds.
7. What is the most common cardiac rhythm that an adult is most likely to experience during cardiac arrest? a. Ventricular Fibrillation b. Asystole. c. Pulseless Electrical Activity.
d. Ventricular Tachycardia.
8. The CPR sequence is: a. A – B – C b. B – A – C c. B – C – A
d. C – A – B
9. What is the ratio of compressions to ventilations when performing one-rescuer CPR on a child or infant? a. 5 compressions to 1 breath. b. 5 compressions to 2 breaths. c. 15 compressions to 2 breaths.
d. 30 compressions to 2 breaths.
10. What is the ratio of compressions to ventilations when performing two-rescuer CPR on an Adult? a. 5 compressions to 1 breath. b. 5 compressions to 2 breaths. c. 15 compressions to 2 breaths.
d. 30 compressions to 2 breaths.
11. What is the ratio of compressions to ventilations when performing two-rescuer CPR on a child or infant? a. 5 compressions to 1 breath. b. 5 compressions to 2 breaths.
c. 15 compressions to 2 breaths.
d. 30 compressions to 2 breaths.
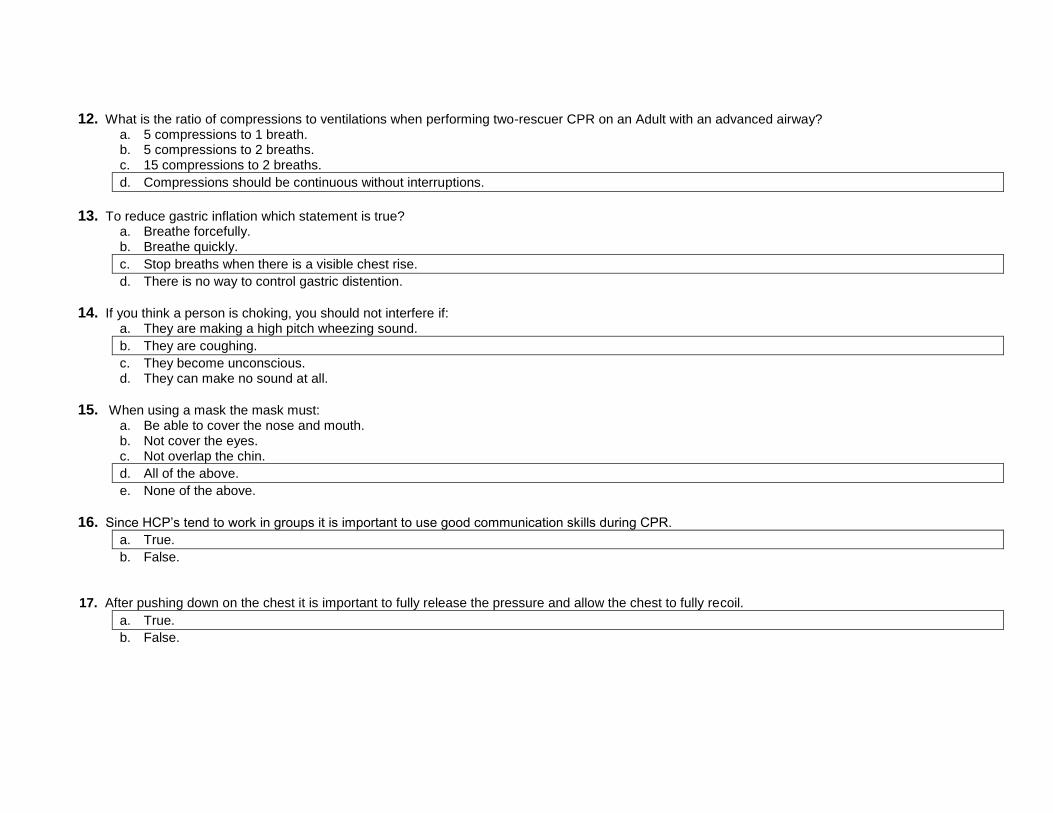
12. What is the ratio of compressions to ventilations when performing two-rescuer CPR on an Adult with an advanced airway? a. 5 compressions to 1 breath. b. 5 compressions to 2 breaths. c. 15 compressions to 2 breaths.
d. Compressions should be continuous without interruptions.
13. To reduce gastric inflation which statement is true? a. Breathe forcefully. b. Breathe quickly.
c. Stop breaths when there is a visible chest rise.
d. There is no way to control gastric distention.
14. If you think a person is choking, you should not interfere if: a. They are making a high pitch wheezing sound.
b. They are coughing.
c. They become unconscious. d. They can make no sound at all.
15. When using a mask the mask must: a. Be able to cover the nose and mouth. b. Not cover the eyes. c. Not overlap the chin.
d. All of the above.
e. None of the above.
16. Since HCP’s tend to work in groups it is important to use good communication skills during CPR.
a. True.
b. False.
17. After pushing down on the chest it is important to fully release the pressure and allow the chest to fully recoil.
a. True.
b. False.
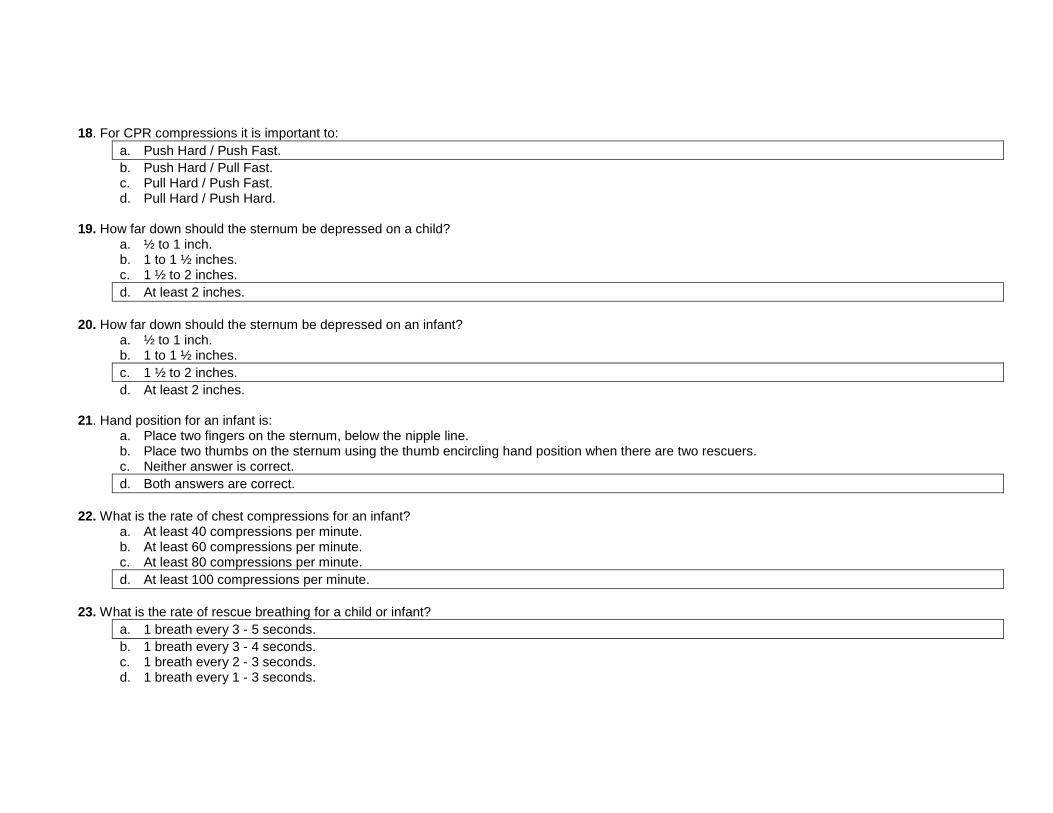
18. For CPR compressions it is important to:
a. Push Hard / Push Fast.
b. Push Hard / Pull Fast. c. Pull Hard / Push Fast. d. Pull Hard / Push Hard.
19. How far down should the sternum be depressed on a child?
a. ½ to 1 inch. b. 1 to 1 ½ inches. c. 1 ½ to 2 inches.
d. At least 2 inches.
20. How far down should the sternum be depressed on an infant?
a. ½ to 1 inch. b. 1 to 1 ½ inches.
c. 1 ½ to 2 inches.
d. At least 2 inches.
21. Hand position for an infant is: a. Place two fingers on the sternum, below the nipple line. b. Place two thumbs on the sternum using the thumb encircling hand position when there are two rescuers. c. Neither answer is correct.
d. Both answers are correct.
22. What is the rate of chest compressions for an infant?
a. At least 40 compressions per minute. b. At least 60 compressions per minute. c. At least 80 compressions per minute.
d. At least 100 compressions per minute.
23. What is the rate of rescue breathing for a child or infant?
a. 1 breath every 3 - 5 seconds.
b. 1 breath every 3 - 4 seconds. c. 1 breath every 2 - 3 seconds. d. 1 breath every 1 - 3 seconds.

24. For a conscious choking infant perform:
a. 5 back blows and then 5 chest thrust.
b. 5 chest thrusts and then 5 back blows. c. Continual chest thrusts until the object is relieved. d. Continual back blows until the object is relieved.
25. The best way to position an infant for CPR is to:
a. Hold the infant in your arms.
b. Place the infant on a firm surface such as the floor or a table.
c. Not move the infant, if found in a crib, perform chest compressions on the mattress. d. None of the above.
26. When giving rescue breaths to an infant:
a. Cover the victim’s mouth and nose with your mouth.
b. Breathe as hard as you can into their mouth. c. Give 5 rescue breaths before returning to chest compressions. d. Pinch the victim’s nose with your fingers, and cover the victim’s mouth with your mouth.
27. AED pads should not be removed unless:
a. The victim shows signs of responsiveness. b. You are too exhausted to continue CPR.
c. There is a poor pad connection due to excessive hair on the chest.
d. EMS arrives.
28. If you get a message “poor pad connection” you should: a. Make sure the cable is plugged in firmly. b. Press the pads firmly against the chest. c. Apply a new set of pads if the prompt continues.
d. All of the above.
29. If the AED indicates “motion detected” you should:
a. Jiggle the pad cables.
b. Make sure CPR has been stopped.
c. Restart the AED. d. None of the above.
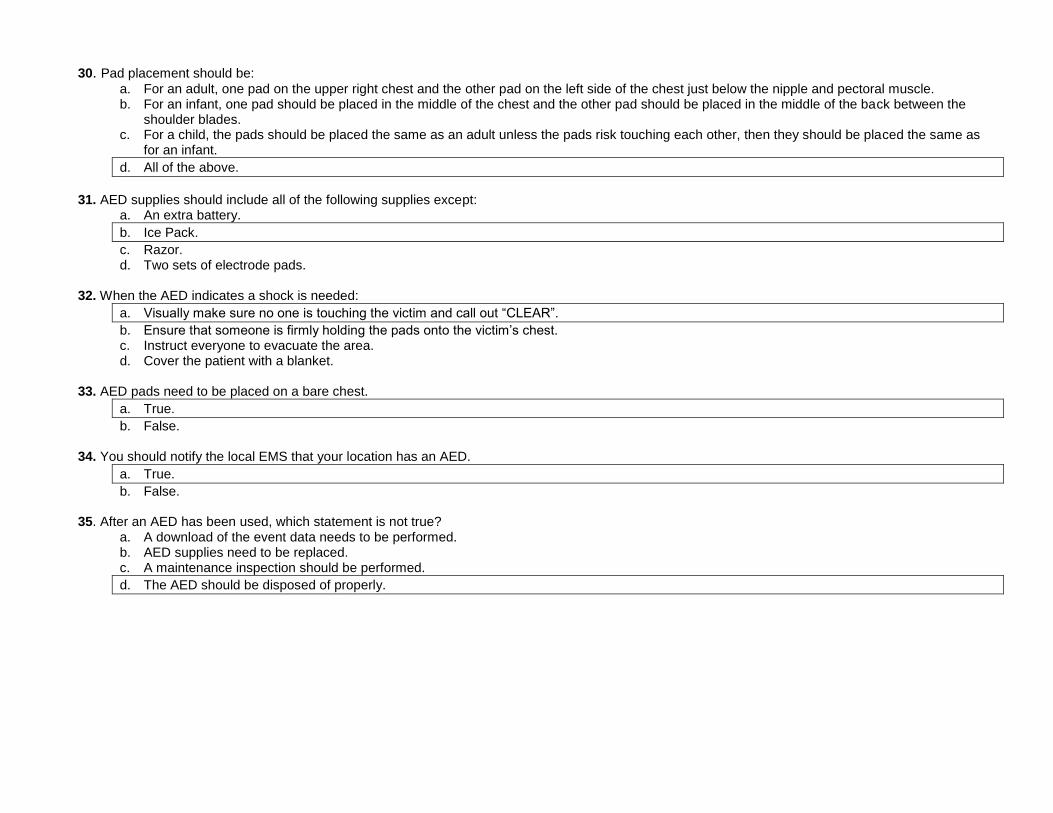
30. Pad placement should be:
a. For an adult, one pad on the upper right chest and the other pad on the left side of the chest just below the nipple and pectoral muscle. b. For an infant, one pad should be placed in the middle of the chest and the other pad should be placed in the middle of the back between the
shoulder blades. c. For a child, the pads should be placed the same as an adult unless the pads risk touching each other, then they should be placed the same as
for an infant.
d. All of the above.
31. AED supplies should include all of the following supplies except:
a. An extra battery.
b. Ice Pack.
c. Razor. d. Two sets of electrode pads.
32. When the AED indicates a shock is needed:
a. Visually make sure no one is touching the victim and call out “CLEAR”.
b. Ensure that someone is firmly holding the pads onto the victim’s chest. c. Instruct everyone to evacuate the area. d. Cover the patient with a blanket.
33. AED pads need to be placed on a bare chest.
a. True.
b. False.
34. You should notify the local EMS that your location has an AED.
a. True.
b. False.
35. After an AED has been used, which statement is not true? a. A download of the event data needs to be performed. b. AED supplies need to be replaced. c. A maintenance inspection should be performed.
d. The AED should be disposed of properly.

Adult CPR Test
1. Should a person suspected of a heart attack take two baby aspirin or one adult aspirin?
a. Yes
b. No
2. What is not a valid reason to stop CPR? a. You are too exhausted to continue. b. Professional rescuers take over. c. The victim becomes responsive.
d. You don’t think the chest compressions are working.
3. How far down should the sternum be depressed on an adult?
a. ½ to 1 inch. b. 1 to 1 ½ inches. c. 1 ½ to 2 inches.
d. At least 2 inches.
4. What best hand placement for the adult is the heel of one hand on the center (middle) of the victim’s chest, which is the lower half of the sternum, and
the other hand:
a. on top of the first.
b. to the right of the first. c. to the left of the first. d. where ever it is most comfortable.
5. What is the rate of chest compressions for an adult?
a. At least 40 compressions per minute. b. At least 60 compressions per minute. c. At least 80 compressions per minute.
d. At least 100 compressions per minute.

6. For an adult victim who is not breathing, after calling out for help and getting no response you should: a. Perform one minute of CPR and then call 911. b. Perform 5 cycles of CPR (about 2 mins) and then call 911. c. Scream a little louder to get more attention.
d. Call 911 yourself and then start CPR.
7. Which of the following are not changeable risk factors for heart attack?
a. Cholesterol, weight and age. b. Gender, age, smoking.
c. Heredity, gender and diabetes.
d. Smoking, age and weight. e. Smoking, cholesterol and diabetes.
8. What is the most common cardiac rhythm that an adult is most likely to experience during cardiac arrest?
a. Ventricular Fibrillation
b. Asystole. c. Pulseless electrical activity. d. Ventricular Tachycardia.
9. The CPR sequence is:
a. A – B – C b. B – A – C c. B – C – A
d. C – A – B
10. What is the ratio of compressions to ventilations when performing one rescuer CPR on an Adult?
a. 5 compressions to 1 breath. b. 5 compressions to 2 breaths. c. 15 compressions to 2 breaths.
d. 30 compressions to 2 breaths.
11. If you think a person is choking, you should not interfere if:
a. They are making a high pitch wheezing sound.
b. They are coughing.
c. They become unconscious. d. They can make no sound at all.
12. CPR should be started if:
a. The patient is not breathing. b. The patient is not breathing normally. c. The patient has agonal breathing.
d. All of the above.

13. The best way to position yourself for adult CPR is:
a. Straddle the victim’s thighs. b. Position yourself at the victim’s head. c. Kneel as far away from the victim as possible.
d. Kneel as close as comfortable to the victim’s side.
14. After pushing down on the chest it is important to fully release the pressure and allow the chest to fully recoil.
a. True.
b. False.
15. For CPR compressions it is important to:
a. Push Hard / Push Fast.
b. Push Hard / Pull Fast. c. Pull Hard / Push Fast. d. Pull Hard / Push Hard.

AED Test
1. AED pads should not be removed unless:
a. The victim shows signs of responsiveness. b. You are too exhausted to continue CPR.
c. There is a poor pad connection due to excessive hair on the chest.
d. EMS arrives.
2. If you get a message “poor pad connection” you should: a. Make sure the cable is plugged in firmly. b. Press the pads firmly against the chest. c. Apply a new set of pads if the prompt continues.
d. All of the above.
3. If the AED indicates “motion detected” you should:
a. Jiggle the pad cables.
b. Make sure CPR has been stopped.
c. Restart the AED. d. None of the above.
4. Pad placement should be:
a. For an adult one pad on the upper right chest and the other pad on the left side of the chest just below the nipple and pectoral muscle. b. For an infant one pad should be placed in the middle of the chest and the other pad should be placed in the middle of the back between the
shoulder blades. c. For a child the pads should be placed the same as an adult unless the pads risk touching each other, then they should be placed the same as for
an infant.
d. All of the above.
5. AED supplies should include all of the following supplies except:
a. An extra battery.
b. Ice Pack
c. Razor. d. Two sets of electrode pads.

6. When the AED indicates a shock is needed:
a. Visual make sure no one is touching the victim and call out “CLEAR”.
b. Ensure that someone is firmly holding the pads onto the victim’s chest. c. Instruct everyone to evacuate the area. d. Cover the patient with a blanket.
7. AED pads need to be placed on a bare chest:
a. True.
b. False.
8. You should notify the local EMS that your location has an AED:
a. True.
b. False.
9. AED pads should be placed over nitroglycerin patches: a. True.
b. False.
10. After an AED has been used, which statement is not true:
a. A download of the event data needs to be performed. b. AED supplies need to be replaced. c. A maintenance inspection should be performed.
d. The AED should be disposed of properly.

First Aid Test
1. Do not move a person with a suspected neck injury unless:
a) There is a fire close by. b) They need CPR. c) They are not breathing. d) There are poisonous gaseous vapors present.
e) All of the above.
2. When someone is bleeding the clotting process can be assisted by?
a. Applying direct pressure to the wound.
b. Removing a bandage if it has soaked trough. c. Applying a splint. d. None of the above.
3. How often should you replace a bandage that has soaked through?
a. As often as you need. b. When the dressing is soaked through. c. Every 2 minutes.
d. Rather than replace it, add more dressing on top of the existing bandage.
e. Every minute.
4. Treatment for a shock victim includes: a. Assisting them to walk around. b. Start CPR. c. Give them something to eat.
d. Regulate the body temperature.
5. Most major illnesses or injuries can lead to shock:
a. True
b. False

6. If a known epileptic is experiencing a seizure, you should: a. Restrain them so they can’t harm themselves. b. Place a spoon in their mouth so they don’t bite their tongue. c. Place a pillow or blanket under their feet.
d. Move furniture or other objects to create a safe environment.
e. None of the above.
7. Under certain circumstances you can help an asthma victim administer their prescribed inhaler:
a. True
b. False.
8. To immobilize a broken limb use: a. A rolled blanket. b. One or more splints. c. Magazine. d. An adjacent body part.
e. All of the above.
9. Heat stroke, a life-threatening situation, is characterized by:
a. Excessive sweating
b. Skin hot and dry.
c. Frequent urination. d. Frothing at the mouth.
10. Which word is not related to the acronym RICE?
a. Rest. b. Immobilize. c. Cold application.
d. Elongate the bone.
11. What are some common burn complications?
a. Infection. b. Dehydration. c. Hypothermia.
d. All of the above.
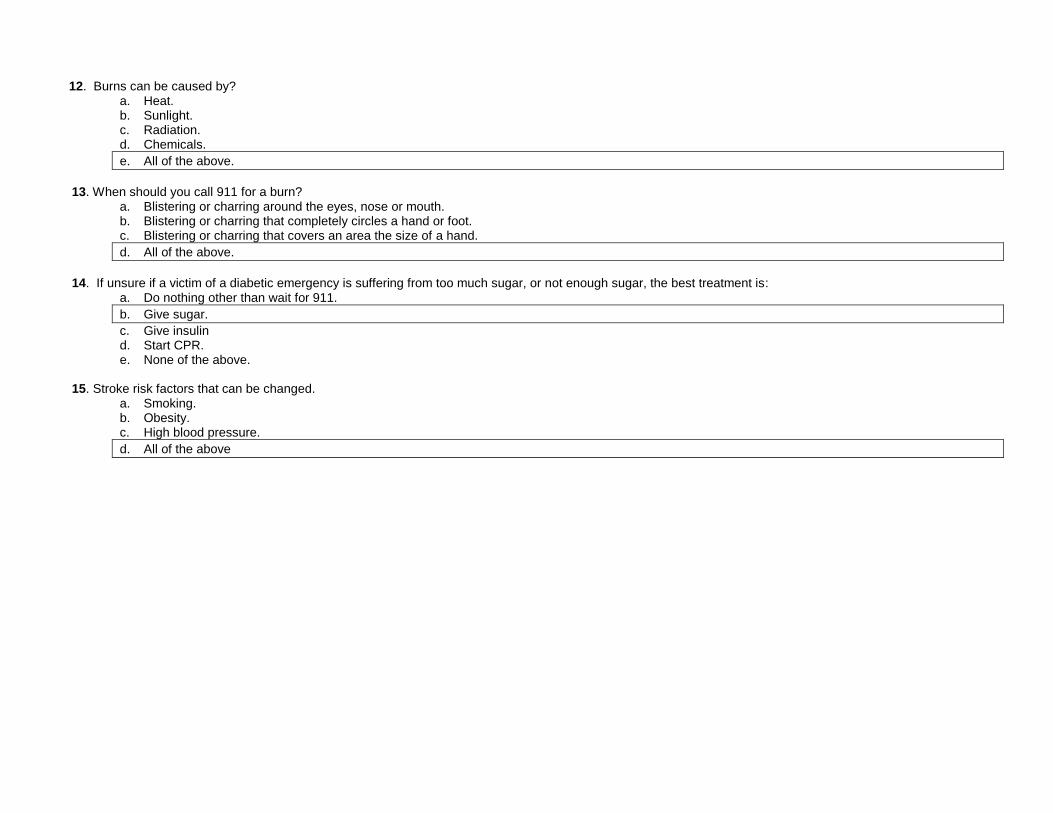
12. Burns can be caused by?
a. Heat. b. Sunlight. c. Radiation. d. Chemicals.
e. All of the above.
13. When should you call 911 for a burn?
a. Blistering or charring around the eyes, nose or mouth. b. Blistering or charring that completely circles a hand or foot. c. Blistering or charring that covers an area the size of a hand.
d. All of the above.
14. If unsure if a victim of a diabetic emergency is suffering from too much sugar, or not enough sugar, the best treatment is:
a. Do nothing other than wait for 911.
b. Give sugar.
c. Give insulin d. Start CPR. e. None of the above.
15. Stroke risk factors that can be changed.
a. Smoking. b. Obesity. c. High blood pressure.
d. All of the above

Pediatric CPR Test
1. How far down should the sternum be depressed on a child?
a. ½ to 1 inch. b. 1 to 1 ½ inches. c. 1 ½ to 2 inches.
d. At least 2 inches.
2. How far down should the sternum be depressed on an infant?
a. ½ to 1 inch. b. 1 to 1 ½ inches.
c. 1 ½ to 2 inches.
d. At least 2 inches.
3. Hand position for an infant is: a. The heel of the palm on the breastbone in the center of the infant’s chest. b. The heel of the palm on the left nipple of the infant.
c. Place two fingers on the sternum, below the nipple line.
d. Two fingers on the left nipple of the infant.
4. What is the rate of chest compressions for an infant? a. At least 40 compressions per minute. b. At least 60 compressions per minute. c. At least 80 compressions per minute.
d. At least 100 compressions per minute.
5. For a pediatric victim who is not breathing, after calling out for help and getting no response you should:
a. Perform one minute of CPR and then call 911.
b. Perform 5 cycles of CPR (about 2 mins) and then call 911.
c. Scream a little louder to get more attention. d. Call 911 yourself and then start CPR.

6. What is the ratio of compressions to ventilations when performing one rescuer CPR on an Adult, Child, or Infant? a. 5 Compressions to 1 breath. b. 5 compressions to 2 breaths. c. 15 compressions to 2 breaths.
d. 30 compressions to 2 breaths.
7. For a conscious choking infant perform:
a. 5 back blows and then 5 chest thrust.
b. 5 chest thrusts and then 5 back blows. c. Continual chest thrusts until the object is relieved. d. Continual back blows until the object is relieved.
8. The best way to position yourself for adult or child CPR is:
a. Straddle the victim’s thighs. b. Position yourself at the victim’s head. c. Kneel as far away from the victim as possible.
d. Kneel as close as is comfortable to the victim.
9. The best way to position an infant for CPR is to:
a. Hold the infant in your arms.
b. Place the infant on a firm surface such as the floor or a table.
c. Not move the infant, if found in a crib, perform chest compressions on the mattress. d. None of the above.
10. When giving rescue breaths to an infant:
a. Cover the victim’s mouth and nose with your mouth.
b. Breathe as hard as you can into their mouth. c. Give 5 rescue breaths before returning to chest compressions. d. Pinch the victim’s nose with your fingers, and cover the victim’s mouth with your mouth.

Emergency Oxygen Test
1. Signs and symptoms of hypoxia and shock include: a. Increased breathing and heart rate. b. Changes in level of consciousness. c. Chest Pain. d. Abnormal skin tone.
e. All of the above.
2. If the conscious victim does not like the oxygen mask on their face the rescuer should?
a. Place the oxygen mask under their chin.
b. Don’t turn the oxygen unit on. c. Put the mask over their face even if they don’t like the mask because it is important. d. None of the above.
3. If the rescuer is not sure whether or not to give oxygen they should?
a. Never give oxygen unless they are absolutely sure it is needed. b. Only give oxygen if authorized by a doctor. c. Ask the victim if they ever had oxygen before.
d. If in doubt give oxygen.
4. Emergency oxygen requires a prescription.
a. True
b. False
5. You can use emergency oxygen without training. a. True
b. False

6. When cleaning the oxygen cylinder you should remove all labels. a. True
b. False
7. When should emergency oxygen be administered to the patient?
a. When the EMS personnel arrive. b. Only if the patient is unconscious. c. Only if the patient is not breathing.
d. As soon as possible.
8. The legal requirements for oxygen include:
a. Proper labeling on all oxygen tanks. b. Must be medical grade oxygen. c. Requires routine testing.
d. All the above.
9. Which of the following precautions should be used with oxygen?
a. Do not stand oxygen cylinders upright unless they are well secured. b. Do not drag or roll cylinders, or carry a cylinder by the valve or regulator. c. Do not hold onto the protective valve, caps, or guards when moving or lifting the cylinders.
d. All the above.

BBP / ABP Test
1. Which of the following is not a bloodborne pathogen?
a. HIV b. Hepatitis A c. Hepatitis B d. Hepatitis C
e. Tuberculosis
2. Bloodborne pathogens are found in all the following except
a. Blood b. Synovial Fluid c. Peritoneal Fluid
d. Perspiration
e. cerebrospinal Fluid 3. Which of the following is considered Personal Protective Equipment?
a. Eye protection. b. Latex-free gloves c. CPR masks with a one-way valve.
d. All of the above.
4. In addition to the blood, blood borne pathogens may also be transmitted through the mucous membranes of the eyes, nose, and mouth.
a. True
b. False
5. What is the most accurate description of "Engineering Controls"? a. Policies developed to reduce the risk of BBP exposure b. Governmental regulations to assure workplace safety
d. Physical or mechanical systems used to eliminate hazards at the source and prevent staff exposures.
e. Rules and regulations related to cleaning work areas.

6. What is the correct order of steps to follow in the event you are exposed to a bloodborne pathogen?
a. Clean the exposure site, notify your supervisor. b. Clean the area, go home and shower.
c. Notify your supervisor.
d. Take aspirin. 7. Which of the following are work practice controls that reduce risk of employee exposure to blood or OPIM?
a. Placing sharps in sharps containers immediately after use b. Not bending or recapping needle c. Not cleaning infected broken glass with your hands.
e. All of the above are work practice controls
8. Which BLOODBORNE pathogen has an effective vaccine?
a. Hepatitis C c. HIV
d. Hepatitis B
e. Tuberculosis 9. The standard recommendation for proper decontamination is:
a. Ivory soap. b. Alcohol c. One cup baking soda per one gallon of water
d. A quarter cup of household bleach per one gallon of water.
10. Never break or shear needles:
a. True
b. False 11. The best protection against exposure is to wash your hands with an abrasive soap.
a. True
b. False
12. Human Immunodeficiency Virus (HIV):
a. Attacks the central nervous system. b. Attacks the cardiovascular system.
c. Attacks the body’s immune system.