instructions . siting your trampoline your trampoline works best and is safest if it is dead...
TRANSCRIPT

Kangaroo/Super Kangaroo Performance Trampoline
Instructions
www.supertramp.co.uk

SITING YOUR TRAMPOLINE Your trampoline works best and is safest if it is dead level. If your trampoline is
fitted with a safety enclosure then potential hazards within 2 metres of the trampoline like paving stones, fences, pools, tree trunks and buildings will not be critical. Without a safety enclosure it is vital to keep clear 2 metres of lawn space all round the trampoline.
Always ensure that the area above the trampoline is clear of overhead cable and branches. Even if the cables and branches are way up high, birds will roost on them and use your trampoline for target practice.
Garden trampolines are designed to stand on a lawn. If they are on concrete or gravel the underside of the leg bases will wear away quite quickly. If you are planning to site your Trampoline on concrete or on a patio you should fix floor guards to your Trampoline legs.
If you need to level your trampoline try and raise one side by the same distance that you sink the other. That way you still have sufficient clearance beneath the trampoline to prevent larger and more energetic bouncers bottoming out and hitting the ground. Unless the slope is very slight just blocking up the lower legs will not work well as the trampoline will tend to move down the slope and fall off the blocks. It is better to create a groove for the uphill legs to rest in or alternatively ground anchor them so they cannot creep down hill. A quick and simple way to check that your trampoline is level is to take off a spring and see if it will roll downhill on the trampoline bed.
Before you start

Building the Trampoline Parts list Your Super Tramp Kangaroo will arrive in a total of SEVEN packages: 2 x side rail
2 x end rail
2 x leg base

2 x triangular shrink-wrapped packs of frame parts
4 x triangular leg section
1 x carton containing springs (100), spring anchor straps (100), black trampoline bed (polypropylene for kangaroo/2-string for super kangaroo), elasticated toggle loops (24) and fitting instructions for coverall frame pads.
1 x carton containing coverall frame pads

Step 1
Lay all frame parts out on the ground as illustrated so that they are to hand for assembly

Insert leg section into one end of the leg base and repeat with other end of same leg base. Insert the other two leg sections into the remaining leg base
Let each leg assembly sit on the ground with as shown in photo below

3. Insert one side rail onto spigot ‘B’>>>
Insert one side rail onto spigot ‘B’
Now pull the side rail downwards until horizontal and insert spigot ‘B’ of the other leg assembly into the other end of the side rail
Step 2a

At this point it is important to ensure that the trampoline frame is square. To do this, fit one end of an end rail to the end of one of the triangular leg sections and ensure that it lines up with the spigot on the opposite triangle leg section. DO NOT ATTEMPT TO PUT THE END RAIL INTO PLACE YET as it will not reach across the full width of the trampoline at this stage because the frame is not yet under tension
CORRECT: INCORRECT:
- Then unfold the trampoline bed on the ground within the trampoline frame so that each end lies across each leg base. Ensure ‘cross’ is uppermost.
Step 2b
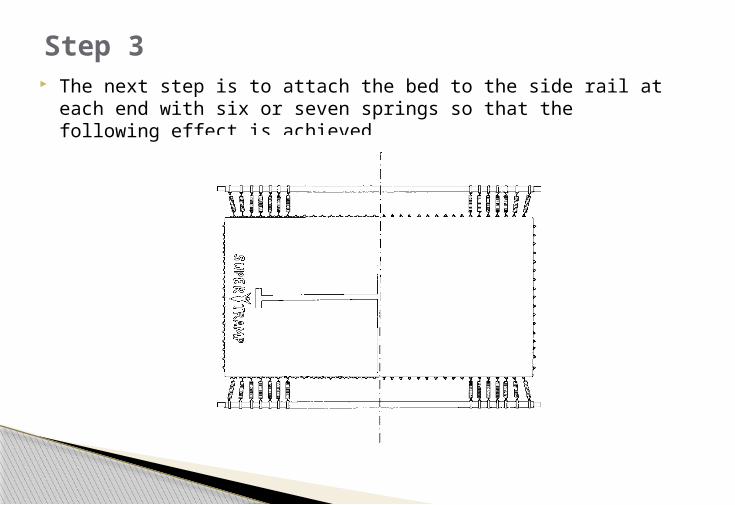
Step 3 The next step is to attach the bed to the side rail at each end
with six or seven springs so that the following effect is achieved

Attachment of springs: The springs are attached to the frame using the black nylon spring anchor straps. Each strap is placed round the frame so that the eyes at each end meet on the inside of the frame. The spring hook is then hooked through the two eyelets as illustrated:
Springs
IMPORTANT: Ensure that the spring anchor straps on each side are placed round the top tube of the leg section as shown:

When fitting the springs: First attach the spring to the triangular ring on the bed with hook pointing downwardsAttach one end of spring anchor strap to spring hookWith your right hand, pull back spring to touch frame. Hold other end of spring anchor strap in left hand, pass under frame and position eyelet onto the spring hook. Once 8 is completed, the side rails should be pulled inwards sufficiently to allow the end rails to slide onto spigot ‘C’ in each leg section. You may need to tap these with a wooden block due to the tension in the trampoline. Please do not hit the frame with a steel or metal hammer as this could cause damage to the frame.
Now attach springs to each end of the trampoline bed at the corners and using the spring anchor straps attach springs to the frame, ensuring they are the same distance in from each corner.

PLEASE NOTE:
The spring anchor straps will not slide sideways easily once under tension. It is therefore important at this stage to ensure that the bed is properly centred in the frame before attaching the rest of the springs.

Fit springs and spring anchor straps to each end of the trampoline. Ideally work opposite your assistant. If you have no assistant put three or four springs on one end and then spring up the other end with a similar number of springs and continue to work from end to end.
Fit the remainder of the springs and anchor straps along one side of the trampoline. Ensure that all springs are evenly spaced and at 90 degrees right angle to the edge of the bed and that spring tensions are the same at each end and on each side. Check that the trampoline is level. To do this, take off a spring. If the spring rolls in any direction on the bed, then the trampoline is not sufficiently level for safe operation and should be blocked up and/or dug in slightly until level. See separate instructions for fitting of the coverall frame pads. Please read the instructions for use of the trampoline CAREFULLY before bouncing.
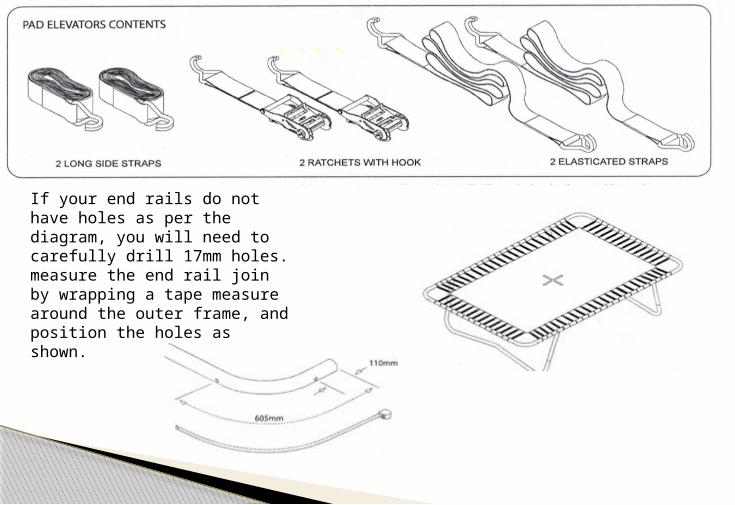
If your end rails do not have holes as per the diagram, you will need to carefully drill 17mm holes. measure the end rail join by wrapping a tape measure around the outer frame, and position the holes as shown.

Thread the plain end of the long strap through the ratchet spindle as shown below. Make sure both hooks point upwards.
Lay the straps along either side of the trampoline and fit the hooks into the holes on the end rails as shown. The straps will be at full tension once the pads are attached.
Fit the elasticated end straps across the frame, ensuring they lie over the top of the side straps and fit the hooks into the holes

Lay the frame pads upside down with the eyelets uppermost.
Pass the flexible end of a toggle loop through the eyelets as shown on the right. Use a tool such as a screwdriver to carefully pull the toggle loop out the second eyelet. Repeat for all the pads.
Turn over the frame pads and lay them evenly around the edge of the trampoline so that the frame and springs are covered. Slide the corner pocket of each side of each side pocket onto the rounded end of each end pad.

Attach pads around frame by holding elastic loop, and stretching the plastic toggle around the frame and inserted back through the loop. As shown. Fit the frame pads, using the supplied toggle
loops, Working from underneath the trampoline. Use the leaver on the ratchets to tension the straps. Once this is done pull the skirt of the pads over the frame.

18
Here is what you should have…

Your Guarantee
IMPORTANT Please keep your proof of purchase it will be needed to make a claim
10 Years
* Please note we recommend that all 2 string beds to be refurbished ever 2-5 years. All enquires please call +44 (0)3302 232948.

Twitter : Feel free to tweet us a picture of your trampoline @supertrampuk
@JetSportsLtd
Facebook: https://www.facebook.com/supertrampltd
Pinterest: http://www.pinterest.com/jetsportsltd/pins/
Social Media

Enjoy
For more information on trampolines check out Get Britain Bouncing and for spare parts visit our website
www.supertramp.co.uk www.getbritainbouncing.org.uk