instructions pertaining to a risk of fire, … · any thanks for adding the vox pathfinder 15/ ......
TRANSCRIPT

INSTRUCTIONSPERTAINING TO A RISK OFFIRE, ELECTRIC SHOCK,OR INJURY TO PERSONS
IMPORTANT SAFETYINSTRUCTIONSWARNING—When using electric products, basicprecautions should always be followed, including the following:
1) Read all the instructions before using the product.2) Do not use this product near water-for example, near a
bathtub, washbowl, kitchen sink, in a wet basement, or near aswimming pool, or the like.
3) This product should be used only with a cart or stand that isrecommended by the manufacturer.
4) This product, either alone or in combination with an amplifierand headphones or speakers, may be capable of producingsound levels that could cause permanent hearing loss. Do notoperate for a long period of time at a high volume level or at alevel that is uncomfortable. If you experience any hearing lossor ringing in the ears, you should consult an audiologist.
5) The product should be located so that its location or positiondoes not interfere with its proper ventilation.
6) The product should be located away from heat sources suchas radiators, heat registers, or other products that produceheat.
7) The product should be connected to a power supply only of thetype described in the operating instructions or as marked onthe product.
8) The power-supply cord of the product should be unpluggedfrom the outlet when left unused for a long period of time.
9) Care should be taken so that objects do not fall and liquids arenot spilled into the enclosure through openings.
10) The product should be serviced by qualified service personnelwhen:a) The power-supply cord or the plug has been damaged; orb) Objects have fallen, or liquid has been spilled onto the
product; orc) The product has been exposed to rain; ord) The product does not appear to operate normally or
exhibits a marked change in performance; ore) The product has been dropped, or the enclosure damaged.
11) Do not attempt to service the product beyond that described inthe user-maintenance instructions. All other servicing shouldbe referred to qualified service personnel.
SAVE THESE INSTRUCTIONS
The lightning flash with arrowhead symbolwithin an equilateral triangle, is intended toalert the user to the presence of uninsulated"dangerous voltage" within the product'senclosure that may be of sufficient magnitudeto constitute a risk of electric shock to persons.
The exclamation point within an equilateraltriangle is intended to alert the user to thepresence of important operating andmaintenance (servicing) instructions in theliterature accompanying the product.
GROUNDING INSTRUCTIONSThis product must be grounded. If it should malfunction orbreakdown, grounding provides a path of least resistance forelectric current to reduce the risk of electric shock. This product isequipped with a cord having an equipment-grounding conductorand a grounding plug. The plug must be plugged into anappropriate outlet that is properly installed and grounded inaccordance with all local codes and ordinances.DANGER—Improper connection of the equipment-groundingconductor can result in a risk of electric shock. Check with aqualified electrician or serviceman if you are in doubt as to whetherthe product is properly grounded. Do not modify the plug providedwith the product—if it will not fit the outlet, have a proper outletinstalled by a qualified electrician.
CE mark for European Harmonized StandardsCE mark which is attached to our company's products of AC mainsoperated apparatus until December 31, 1996 means it conforms toEMC Directive (89/336/EEC) and CE mark Directive (93/68/EEC).And, CE mark which is attached after January 1, 1997 means itconforms to EMC Directive (89/336/EEC), CE mark Directive (93/68/EEC) and Low Voltage Directive (73/23/EEC).Also, CE mark which is attached to our company's products ofBattery operated apparatus means it conforms to EMC Directive(89/336/EEC) and CE mark Directive (93/68/EEC).
IMPORTANT NOTICE FOR THE UNITED KINGDOMWARNING—THIS APPARATUS MUST BE EARTHEDAs the colours of the wires in the mains lead of this apparatus maynot correspond with the coloured markings identifying the terminalsin your plug,proceed as follows:• the wire which is coloured green and yellow must be connected
to the terminal in the plug which is marked with the letter E or bythe earth symbol , or coloured green or green and yellow.
• the wire which is coloured blue must be connected to theterminal which is marked with the letter N or coloured black.
• the wire which is coloured brown must be connected to theterminal which is marked with the letter L or coloured red.

WELCOME ABOARD!
1. Input SectionThis, believe it or not, is where you plug your guitar intothe amp! Make sure you use a good quality guitar cableto do this.
2. GainThis adjusts the overall preamp gain of the amplifier.Turning this control up (clockwise) will produce crunchy,distorted tones that range from mild to mayhemic! On theother hand, turning the Gain down (counter clockwise)will clean up your sound nicely. The possibilities areendless I tell ya!
3. Boost On/Off SwitchWant more Gain? If your answer is “yes” simply press thisbutton in for an instant boost! Even cooler is this - youcan turn this function on and off with the optional VFS-2Dual Footswitch. Go out and buy a VFS-2 rightaway…you know you want one!
4. Master Volume.Amazingly enough, this one determines the overallvolume of the amplifier – hence its name! Setting thiscontrol high while keeping the Gain low works well forclean sounds, while setting the Master Volume lower andturning up the Gain will give you a fat, distorted sound ata lower, “bedroom friendly” volume.
5. Treble ControlThis adjusts the treble frequencies in your tone. It cantake your sound from soft and round, to bright andcutting, and any point in-between.
6. Bass ControlThis adjusts the bass frequencies in your tone. It can takeyour sound from warm and light, to dark and heavy andany point in-between.
7. Tremolo SpeedThis control enables you to control the speed of the built-in Tremolo effect. To add to the flexibility of this wonderful,vintage-flavoured effect, it is footswitchable via theoptional VOX VFS-2 footswitch – now you have to getone, right?
IMPORTANT NOTE: What is Tremolo? A commonmisconception in the six-string world is that “Tremolo”is an effect that alters the pitch of the note(s) beingplayed – this is NOT true! What Tremolo actually doesis vary the volume of the note(s) being played,resulting in a cool, pulsating sound.
8. Tremolo DepthThis control enables you to vary the depth (intensity) ofthe built-in Tremolo effect.
9. Reverb Control (Only on Pathfinder 15R)This control enables you to vary the level of the built-inspring Reverb – from subtle to surf!
10. Power SwitchUmm…this is how you turn on power to the amplifier.Assuming it’s plugged in to a working outlet, of course!! Itis plugged into a working outlet right? Good…
THE TOP PANEL
truly versatile guitar amp that is ideal for practicing,jamming with your friends or, if you’re that way inclined,just annoying your neighbours! Let’s take a quick tour ofthe features ‘n’ controls that make your new Pathfinder15/15R as flexible as it is toneful…
Many thanks for adding the VOX Pathfinder 15/15R amp to your sonic arsenal. We’re sure it’llprovide you with a plethora of great guitar tones
that feel as good as they sound! With the addition ofmodern features like Boost, Line out, Headphone jack,Tremolo (and Reverb on 15R), the Pathfinder 15/15R is a
Only on Pathfinder 15R
1 2 3 4 5 6 7 8 9 10

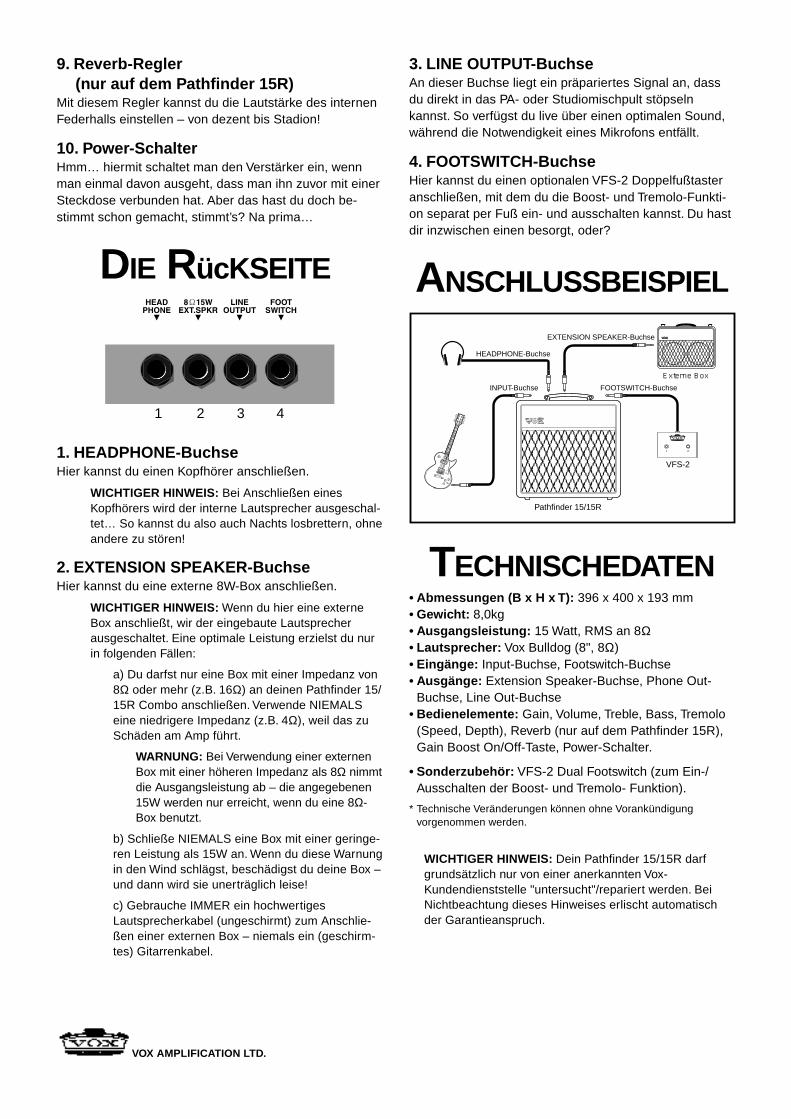
THE REAR PANEL
1 2 3 4
1. HEADPHONE JackConnect your headphones here.
IMPORTANT NOTE: Connecting the headphoneshere mutes the internal speaker…making this facilityperfect for late-night, “silent” practice!
2. EXTENSION SPEAKER JackThis is where you can connect an 8W extension speakercabinet.
IMPORTANT NOTE: Connecting an extensionspeaker here mutes the internal speaker. For optimumperformance we strongly recommend the following:
a) Only use extension cabinets with an imped-ance of 8 Ohms or more (e.g. 16 Ohms) with yourPathfinder 15/15R combo. NEVER use a lowerimpedance (e.g. 4 Ohms) or damage could result.
WARNING: If you use an extension cabinetwith an impedance of more than 8 Ohms yourPathfinder 15/15R’s output power will bereduced – it only produces its full output of 15Watts when presented with an 8 Ohm speakerload.
b) DO NOT use a speaker cabinet with a Wattagerating that is less than 15 Watts. If you ignore thiswarning, you could end up blowing a speaker –and that’s not recommended!
c) ALWAYS use a good quality speaker cable(unshielded) to connect an external cabinet –NEVER use a guitar (shielded) cable
3. LINE OUTPUT JackThis output carries a specially filtered signal for directconnection to a soundboard or recording console. Thisgives you a good sounding signal for recording or livework without having to mic up the amp.
4. FOOTSWITCH JackFor connecting the optional VFS-2 Dual Footswitch withwhich you can switch both the Boost and Tremolo func-tions on and off independently with a mere tap of yourfoot. You’ve already bought one…right?
SETTINGS DIAGRAMS
Pathfinder 15/15R
INPUT Jack
HEADPHONE Jack
CABNET
EXTENSION SPEAKER Jack
FOOTSWITCH Jack
VFS-2
SPECIFICATIONS• Dimensions (W x H x D): 396 x 400 x 193 mm
(15-1/2 x 15-3/4 x 7-5/8 inches)• Weight: 8.0 kg (17.7 pounds)• Output Power : 15 Watts RMS into 8 Ohms• Speaker: Vox Bulldog (8”, 8 Ohm)• Inputs: Input jack, Footswitch jack• Outputs: Extension Speaker jack, Headphone jack,
Line Out jack• Controls: Gain, Master Volume, Treble, Bass, Tremolo
(Speed, Depth), Reverb (Only on Pathfinder 15R), GainBoost on/off switch, Power on/off switch
• Options: VFS-2 Dual Footswitch (for switching Boost &Tremolo functions on/off)
*Specifications are subject to change without notice.
IMPORTANT REMINDER: Your Pathfinder 15/15Rshould only be “examined”/repaired by an AuthorizedVox Service Centre. Failure to do so will void yourwarranty.
VOX AMPLIFICATION LTD. 9 Newmarket Court, Kingston, Milton Keynes, MK10 OAU, UK
NOTICE: VOX products are manufactured under strict specifications and voltages as required by each country. These products are warranted by the VOXdistributor in the country where they are purchased. Any VOX product not sold with a warranty card or carrying a serial number disqualifies that product soldfrom the manufacture’s / distributor’s warranty and liability. This requirement is for your own protection and safety.
©2001 VOX AMPLIFICATION LTD. Printed in Korea

CONSIGNES DE SECURITEIMPORTANTESAVERTISSEMENT—Lors de l'utilisation d'appareilsélectriques, veillez a respecter les précautions élémentairessuivantes:
1. Lisez toutes les instructions avant d'utiliser l'appareil.2. N'utilisez pas cet appareil a proximité d'eau — par exemple,
près d'une baignoire, d'un évier, d'un lavabo, dans une cavehumide ou pres d'une piscine.
3. Cet appareil ne peut être utilise qu'avec le supportrecommande par son fabricant.
4. Cet appareil, que ce soit seul ou avec un ampli et casque ouhaut-parleurs, peut produire des niveaux sonores qui peuventinfliger des dommages irréversibles a l'ouïe. N'utilisez jamaislongtemps un volume trop élevé. Si vous avez l'impression quevotre ouie est moins bonne ou que vos oreilles tintent, voyezun spécialiste.
5. L'appareil doit étre place de sorte a ce que ses sortiesd'aération soient bien dégagées.
6. L'appareil ne peut se trouver pres de sources de chaleur tellesque radiateurs, convecteurs ou autres appareils producteursde chaleur.
7. L'appareil doit etre branche a une source de courant du typedécrit dans les instructions ou indique sur l'appareil.
8. Le cordon d'alimentation de l'appareil doit etre débranché de laprise secteur lorsqu'il n'est pas utilise pendant une périodeprolongée.
9. Veillez a ce qu'aucun objet ou liquide ne pénètre par lesorifices a l'intérieur du boitier.
10. L'appareil doit etre réparé par du personnel qualifié lorsque:a. Le cordon d'alimentation ou la prise a été endommagé(e).b. Des objets ou du liquide a pénètre dans le boitier.c. L'appareil a été expose a de la pluie.d. L'appareil ne semble pas fonctionner normalement ou n'est
pas aussi performant.e. L'appareil est tombe ou le boitier est endommage.
11. N'essayez pas de résoudre un problème autre que ceuxdécrits dans la section Dépannage, réservée a l'utilisateur. Lesproblèmes plus sérieux nécessitent l'intervention d'un servicetechnique qualifie.
CONSERVEZ CES INSTRUCTIONS
Le symbole de l'éclair dans un triangle attirel'attention de l'utilisateur sur la présenced'une tension "dangereuse" non isolée dansle boitier de l'appareil qui risque deprovoquer une électrocution.
Le point d'exclamation dans un triangle attirel'attention de l'utilisateur sur la présented'une importante littérature concernant lefonctionnement et l'entretien (lesréparations) de l'appareil dans les manuelsfournis.
INSTRUCTIONS DE MISE A LA MASSECet appareil doit etre mis a la masse (terre). En cas de mauvaisfonctionnement ou de panne, cette mise a la masse offre une voiede moindre résistance pour le courant électrique et réduit ainsi lerisque d'electrocution. Cet appareil est dote d'un cordoncomportant un fil et une broche de terre. La broche doit etrebranchée a une prise adéquate, reliée a la terre selon lesprescriptions et normes locales.DANGER — Une mise a la terre inadéquate voire inexistanterisque de provoquer une electrocution. Renseignez-vous auprèsd'un électricien ou d'un technicien si vous avez le moindre doute ace sujet. Ne modifiez pas la fiche fournie avec l'appareil. Si ellen'entre pas dans la prise secteur, faites changer la prise par unelectricien qualifie.
Marque CE pour les normes européennes harmoniséesLa marque CE qui se trouve sur nos appareils faisant appel a desprises secteur jusqu'au 31 décembre 1996 signifie que cesappareils répondent a la directive EMC (89/336/EEC) et a ladirective CE (93/68/EEC).La marque CE apposée après le 1 janvier 1997 signifie que cesappareils répandent a la directive EMC (89/336/EEC), a la directiveCE (93/68/EEC) et a la directive sur les basses tensions (73/23/EEC).La marque CE qui se trouve sur nos appareils faisant appel a despiles signifie que ces appareils répondent a la directive EMC (89/336/EEC) et a la directive CE (93/68/EEC).

BIENVENUE à BORD!
uniquement sur le Pathfinder 15R
1 2 3 4 5 6 7 8 9 10
1. Section d’entréeA peine croyable: Cette prise sert à brancher ta guitare àl’ampli! On te conseille d’utiliser uniquement un câblepour guitare de bonne qualité.
2. GainCette commande règle le niveau du préamplificateur. En"ouvrant" cette commande (en la tournant à fond àdroite), tu produis un son saturé, que tu peux soit con-server dans les limites de la décence, soit plonger dansla démence! Par contre, quand tu règles la commandeGain sur une valeur inférieure (en la tournant à gauche),tu épures le son. Les possibilités sont tout bonnementinfinies!
3. Bouton Boost On/OffTu souhaites un niveau encore plus élevé? Si jamais taréponse à cela est "Oui!", il te suffit d’appuyer sur cebouton pour casser la baraque! Ce qui est encore pluscool, c’est que tu peux aussi activer/couper cette fonctionavec un double commutateur au pied VFS-2 en option.Nous te conseillons donc de courir chez ton revendeurpour t’en procurer un. C’est un must…
4. VolumeIncroyable mais vrai: cette commande sert à régler levolume général de l’ampli – d’où son nom! Si tu choisisici une valeur élevée mais que tu spécifies une petitevaleur de Gain, tu obtiens un magnifique son Clean. Parcontre, si tu règles la commande Gain à fond et que turéduis le niveau avec la commande Volume, tu obtiens unson saturé bien épais, dont le niveau permet toutefois de
préserver la paix dans ton voisinage.
5. Commande TrebleCette commande te permet de régler le niveau des aiguset de produire un son rond et chaleureux ou au contraireun son bien tranchant – mais aussi naturellement tousles sons intermédiaires.
6. Commande BassCette commande te permet de régler le niveau desgraves de ton son. Selon ce que tu as en tête, tu peuxrendre le son chaleureux et léger ou sombre et lourd –plus tous les intermédiaires.
7. Tremolo SpeedCette commande spécifie la vitesse de l’effet Tremolointerne. Pour garantir une flexibilité encore plus grandede cet effet au parfum "Vintage", tu peux l’activer et lecouper au pied – et cela avec un commutateur au piedVOX VFS-2 en option. Alors, il serait peut-être temps quetu files chez ton revendeur, tu ne penses pas?
REMARQUE IMPORTANTE: Qu’est-ce que ceTremolo? Dans le monde à six cordes, il y a encorepas mal de gens qui pensent que le "Tremolo" est uneffet qui modifie la hauteur des notes jouées. C’estFAUX! Le Tremolo influence le volume des notesjouées, produisant un son cool et animé de pulsa-tions.
8. Intensité du TremoloCette commande permet de régler l’intensité (alias la"profondeur") de l’effet Tremolo.
LA FACE AVANT
Tremolo (ainsi qu’une Reverb sur le 15R), font du 15/15Run ampli de guitare ultra- polyvalent, un outil génial pourt’exercer, jammer et – si c’est ton truc – vraiment fâcherles voisins! Voyons rapidement les fonctions et comman-des qui rendent ton nouveau Pathfinder 15/15R si flexi-ble. Ce qui vaut aussi pour le son, cela va de soi…
Merci beaucoup d’avoir choisi l’amplificateur VOXPathfinder 15/15R pour compléter ton arsenal sonore.Nous sommes sûrs qu’armé de cet ampli, tu vas pouvoirte concocter toute une palette de sons qui non seulementsonnent d’enfer, mais produisent en outre le feelingparfait! L’ajout de nouvelles fonctions, telles que Boost,une prise Line Out, une prise pour casque et un effet

9. Commande Reverb(uniquement sur le Pathfinder 15R)
Cette commande permet de régler le volume de l’effet deréverbération à ressorts de l’ampli – d’une réverb. subtileau son de stade!
10. Interrupteur PowerHmm… C’est ce qui sert à mettre l’amplificateur soustension, à condition de l’avoir branché au préalable à uneprise de courant, naturellement. Mais ça, c’est sansdoute déjà fait, pas vrai? Bien…
LA FACE ARRIERE
1 2 3 4
1. Prise HEADPHONETu peux brancher un casque à cette prise.
REMARQUE IMPORTANTE: Quand tu branches uncasque, le son du haut-parleur interne est coupé… Tupeux donc t’entraîner la nuit sans déranger personne!
2. Prise EXTENSION SPEAKERCette prise te permet de brancher une enceinte externede 8W.
REMARQUE IMPORTANTE: Quand tu branches uneenceinte externe à cette prise, le haut- parleur interneest coupé. Pour obtenir des résultats optimum,respecte les consignes suivantes:
a) Branche uniquement une enceinte d’uneimpédance de 8Ω ou plus (16Ω par ex.) à toncombo Pathfinder 15/15R. N’utilise JAMAISd’impédance inférieure (4Ω par ex.) car celaendommagerait l’ampli.
AVERTISSEMENT: Si tu utilises une enceinteexterne d’une impédance supérieure à 8Ω, lapuissance de sortie diminuera – pour obtenirla puissance maximum de 15W, tu doisimpérativement utiliser une enceinte de 8Ω.
b) Ne branche JAMAIS d’enceinte dont la puis-sance est inférieure à 15W. Si tu ignores cetteconsigne, tu endommageras ton enceinte – et làelle deviendra vraiment muette!
c) Utilise TOUJOURS un câble pour haut-parleurde haute qualité (non blindé) pour brancher uneenceinte externe – ne te sers jamais d’un câblede guitare (blindé).
3. Prise LINE OUTPUTCette prise offre un signal tout prêt que tu peux directe-ment transmettre à la console de la sono ou du studio. Tubénéficies donc d’un son optimal sur scène sans devoirt’encombrer d’un microphone.
4. Prise FOOTSWITCHCette prise sert à brancher un double commutateur aupied VFS-2, qui permet d’activer et de couper séparé-ment les fonctions Boost et Tremolo au pied. Alors ça yest, tu t’en es enfin procuré un?
EXEMPLE DE BRANCHEMENT
Pathfinder 15/15R
Prise INPUT
Prise HEADPHONE
Enceinte externe
Prise EXTENSION SPEAKER
Prise FOOTSWITCH
VFS-2
FICHE TECHNIQUE• Dimensions (L x H x P): 396 x 400 x 193 mm• Poids: 8,0kg• Puissance de sortie: 15W, RMS sous 8Ω• Haut-parleur: Vox Bulldog (8", 8Ω)• Entrées: prise Input, prise Footswitch• Sorties: prise Extension Speaker, prise Phone Out,
prise Line Out• Commandes: Gain, Volume, Treble, Bass, Tremolo
(Speed, Depth), Reverb (uniquement sur le Pathfinder15R), bouton Gain Boost On/Off, interrupteur Power.
• Accessoires: VFS-2 Dual Footswitch (pour activer/couper les fonctions Boost et Tremolo).
* Les spécifications sont sujets à modifications sans avispréalable.
REMARQUE IMPORTANTE: Tu dois confier tout"examen"/réparation de ton Pathfinder 15/15R unique-ment à un centre de S.A.V. agréé de Vox. Le non-respect de cette consigne entraîne l’annulationautomatique de la garantie.
VOX AMPLIFICATION LTD.
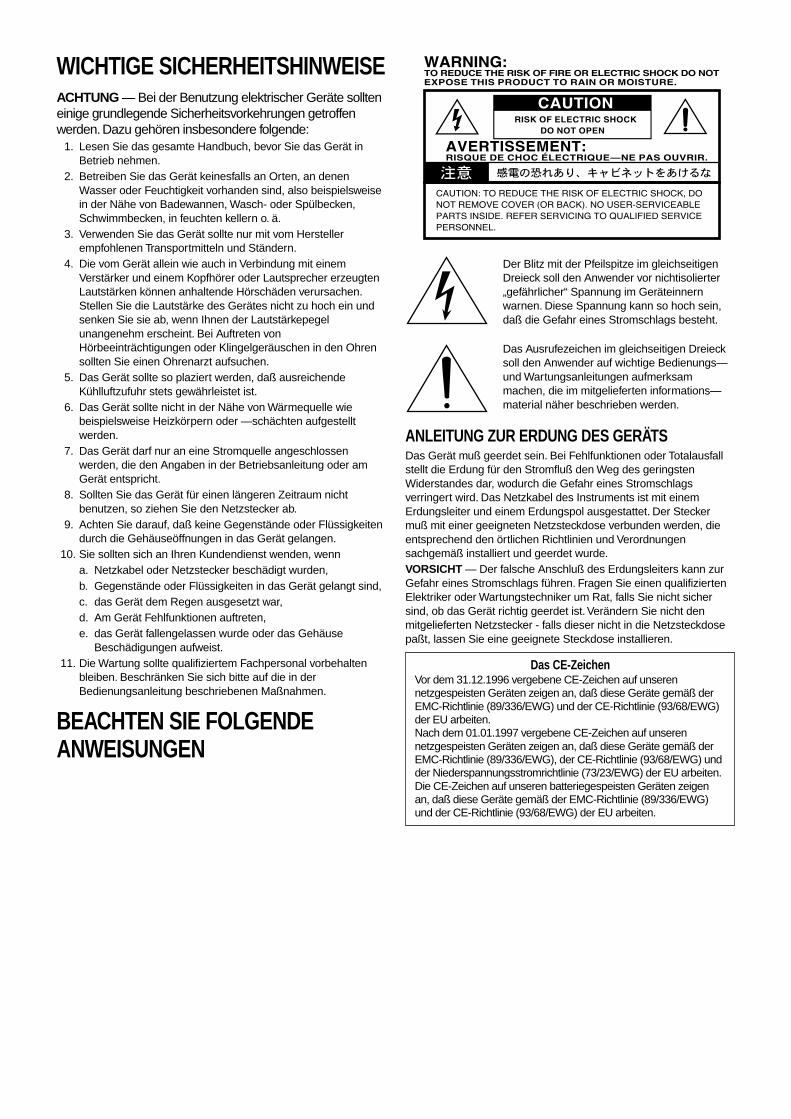
WICHTIGE SICHERHEITSHINWEISEACHTUNG — Bei der Benutzung elektrischer Geräte sollteneinige grundlegende Sicherheitsvorkehrungen getroffenwerden. Dazu gehören insbesondere folgende:
1. Lesen Sie das gesamte Handbuch, bevor Sie das Gerät inBetrieb nehmen.
2. Betreiben Sie das Gerät keinesfalls an Orten, an denenWasser oder Feuchtigkeit vorhanden sind, also beispielsweisein der Nähe von Badewannen, Wasch- oder Spülbecken,Schwimmbecken, in feuchten kellern o. ä.
3. Verwenden Sie das Gerät sollte nur mit vom Herstellerempfohlenen Transportmitteln und Ständern.
4. Die vom Gerät allein wie auch in Verbindung mit einemVerstärker und einem Kopfhörer oder Lautsprecher erzeugtenLautstärken können anhaltende Hörschäden verursachen.Stellen Sie die Lautstärke des Gerätes nicht zu hoch ein undsenken Sie sie ab, wenn Ihnen der Lautstärkepegelunangenehm erscheint. Bei Auftreten vonHörbeeinträchtigungen oder Klingelgeräuschen in den Ohrensollten Sie einen Ohrenarzt aufsuchen.
5. Das Gerät sollte so plaziert werden, daß ausreichendeKühlluftzufuhr stets gewährleistet ist.
6. Das Gerät sollte nicht in der Nähe von Wärmequelle wiebeispielsweise Heizkörpern oder —schächten aufgestelltwerden.
7. Das Gerät darf nur an eine Stromquelle angeschlossenwerden, die den Angaben in der Betriebsanleitung oder amGerät entspricht.
8. Sollten Sie das Gerät für einen längeren Zeitraum nichtbenutzen, so ziehen Sie den Netzstecker ab.
9. Achten Sie darauf, daß keine Gegenstände oder Flüssigkeitendurch die Gehäuseöffnungen in das Gerät gelangen.
10. Sie sollten sich an Ihren Kundendienst wenden, wenna. Netzkabel oder Netzstecker beschädigt wurden,b. Gegenstände oder Flüssigkeiten in das Gerät gelangt sind,c. das Gerät dem Regen ausgesetzt war,d. Am Gerät Fehlfunktionen auftreten,e. das Gerät fallengelassen wurde oder das Gehäuse
Beschädigungen aufweist.11. Die Wartung sollte qualifiziertem Fachpersonal vorbehalten
bleiben. Beschränken Sie sich bitte auf die in derBedienungsanleitung beschriebenen Maßnahmen.
BEACHTEN SIE FOLGENDEANWEISUNGEN
Der Blitz mit der Pfeilspitze im gleichseitigenDreieck soll den Anwender vor nichtisolierter„gefährlicher“ Spannung im Geräteinnernwarnen. Diese Spannung kann so hoch sein,daß die Gefahr eines Stromschlags besteht.
Das Ausrufezeichen im gleichseitigen Dreiecksoll den Anwender auf wichtige Bedienungs—und Wartungsanleitungen aufmerksammachen, die im mitgelieferten informations—material näher beschrieben werden.
ANLEITUNG ZUR ERDUNG DES GERÄTSDas Gerät muß geerdet sein. Bei Fehlfunktionen oder Totalausfallstellt die Erdung für den Stromfluß den Weg des geringstenWiderstandes dar, wodurch die Gefahr eines Stromschlagsverringert wird. Das Netzkabel des Instruments ist mit einemErdungsleiter und einem Erdungspol ausgestattet. Der Steckermuß mit einer geeigneten Netzsteckdose verbunden werden, dieentsprechend den örtlichen Richtlinien und Verordnungensachgemäß installiert und geerdet wurde.VORSICHT — Der falsche Anschluß des Erdungsleiters kann zurGefahr eines Stromschlags führen. Fragen Sie einen qualifiziertenElektriker oder Wartungstechniker um Rat, falls Sie nicht sichersind, ob das Gerät richtig geerdet ist. Verändern Sie nicht denmitgelieferten Netzstecker - falls dieser nicht in die Netzsteckdosepaßt, lassen Sie eine geeignete Steckdose installieren.
Das CE-ZeichenVor dem 31.12.1996 vergebene CE-Zeichen auf unserennetzgespeisten Geräten zeigen an, daß diese Geräte gemäß derEMC-Richtlinie (89/336/EWG) und der CE-Richtlinie (93/68/EWG)der EU arbeiten.Nach dem 01.01.1997 vergebene CE-Zeichen auf unserennetzgespeisten Geräten zeigen an, daß diese Geräte gemäß derEMC-Richtlinie (89/336/EWG), der CE-Richtlinie (93/68/EWG) undder Niederspannungsstromrichtlinie (73/23/EWG) der EU arbeiten.Die CE-Zeichen auf unseren batteriegespeisten Geräten zeigenan, daß diese Geräte gemäß der EMC-Richtlinie (89/336/EWG)und der CE-Richtlinie (93/68/EWG) der EU arbeiten.

WILLKOMMEN AN BORD!
nur auf dem Pathfinder 15R
1 2 3 4 5 6 7 8 9 10
1. Input-SektionMan glaubt es kaum: Über diese Buchse kannst du deineGitarre an den Amp anschließen! Am besten verwendestdu hierfür ein hochwertiges Gitarrenkabel.
2. GainHiermit stellt du den Vorverstärkerpegel ein. Wenn dudiesen Regler völlig auf (ganz nach rechts) drehst,erzielst du einen herrlich verzerrten Brat-Sound, derentweder dezent oder richtig böse sein kann! Stellst duden Gain-Regler hingegen auf einen kleineren Wert(weiter nach links), wird der Sound (stuben)rein. DieMöglichkeiten sind schier grenzenlos!
3. Boost On/Off-SchalterBrauchst du einen noch höheren Pegel? Wenn deineAntwort hierauf "Ja" lautet, musst du diese Taste drücken,um mal richtig durchzustarten! Noch cooler ist aber:diese Funktion kann man auch mit einem optionalenVFS-2 Doppelfußtaster ein-/ausschalten. Am bestenrennst du gleich zu deinem Händler, um dir einen zubesorgen. Du brauchst das Teil…
4. VolumeEs kommt noch besser: Mit diesem Regler kannst du dieallgemeine Lautstärke deines Amps einstellen – "Volume"bedeutet nämlich "Lautstärke"! Wenn du hier einen hohenWert, für Gain aber einen kleinen Wert wählst, bekommstdu einen lauten Clean-Sound. Wenn du hingegen Gainvoll auf drehst und mit Volume etwas weniger Gas gibst,erzielst du einen fetten, verzerrten Sound, während derPegel trotzdem noch nachbarschaftlich vertretbar ist.
5. Treble-ReglerHiermit kannst du den Pegel der Höhen in deinem Soundeinstellen und wahlweise einen runden, warmen odereinen beißenden Klang erzielen – und natürlich alles,was dazwischen liegt.
6. Bass-ReglerHiermit kannst du den Bassanteil deines Sounds einstel-len. Damit machst du den Sound entweder warm undleicht oder dunkel und schwer – mit allem, was dazwi-schen liegt.
7. Tremolo SpeedMit diesem Regler bestimmst du die Geschwindigkeit desinternen Tremolo-Effekts. Um diesen herrlichen "Vintage"-Effekt noch flexibler zu gestalten, kannst du ihn per Fuß –nämlich mit einem optionalen VOX VFS-2 Fußtaster ein-und ausschalten. Jetzt wird es aber Zeit, dass du zudeinem Händler rennst, glaubst du nicht?
WICHTIGER HINWEIS: Was ist überhaupt Tremolo?In der Zunft der Sechssaiter gibt es immer noch viele,die glauben, dass "Tremolo" ein Effekt ist, mit demman die Tonhöhe der gespielten Noten ändert. StimmtNICHT! Tremolo beeinflusst die Lautstärke dergespielten Noten, was für einen coolen, pulsierendenSound sorgt.
8. Tremolo-IntensitätMit diesem Regler kannst du die Intensität (alias die"Tiefe") des Tremolos einstellen.
DIE OBERSEITE
kann man den 15/15R getrost einen vielseitigen Gitarren-Amp nennen, mit dem du optimal üben, jammen und –falls dir danach ist– mal richtig die Nachbarn ärgernkannst! Sehen wir uns kurz die Funktionen und Regleran, die deinen neuen Pathfinder 15/15R so flexibelmachen. Dass das auch für den Sound gilt, versteht sichwohl von selbst…
Vielen Dank, dass du dich für einen VOX Pathfinder15/15R Verstärker entschieden hast, um deinKlangarsenal aufzuwerten. Wir sind sicher, dass
du damit eine ganze Reihe an Sounds einstellen kannst,die nicht nur edel klingen, sondern auch den richtigenDruck erzeugen! Dank Hinzufügung neuer Funktionen,wie Boost, eines Line Out-Anschlusses, einer Kopfhörer-buchse und Tremolo (wie auch Reverb auf dem 15R)
9. Reverb-Regler(nur auf dem Pathfinder 15R)
Mit diesem Regler kannst du die Lautstärke des internenFederhalls einstellen – von dezent bis Stadion!
10. Power-SchalterHmm… hiermit schaltet man den Verstärker ein, wennman einmal davon ausgeht, dass man ihn zuvor mit einerSteckdose verbunden hat. Aber das hast du doch be-stimmt schon gemacht, stimmt’s? Na prima…
DIE RücKSEITE
1 2 3 4
1. HEADPHONE-BuchseHier kannst du einen Kopfhörer anschließen.
WICHTIGER HINWEIS: Bei Anschließen einesKopfhörers wird der interne Lautsprecher ausgeschal-tet… So kannst du also auch Nachts losbrettern, ohneandere zu stören!
2. EXTENSION SPEAKER-BuchseHier kannst du eine externe 8W-Box anschließen.
WICHTIGER HINWEIS: Wenn du hier eine externeBox anschließt, wir der eingebaute Lautsprecherausgeschaltet. Eine optimale Leistung erzielst du nurin folgenden Fällen:
a) Du darfst nur eine Box mit einer Impedanz von8Ω oder mehr (z.B. 16Ω) an deinen Pathfinder 15/15R Combo anschließen. Verwende NIEMALSeine niedrigere Impedanz (z.B. 4Ω), weil das zuSchäden am Amp führt.
WARNUNG: Bei Verwendung einer externenBox mit einer höheren Impedanz als 8Ω nimmtdie Ausgangsleistung ab – die angegebenen15W werden nur erreicht, wenn du eine 8Ω-Box benutzt.
b) Schließe NIEMALS eine Box mit einer geringe-ren Leistung als 15W an. Wenn du diese Warnungin den Wind schlägst, beschädigst du deine Box –und dann wird sie unerträglich leise!
c) Gebrauche IMMER ein hochwertigesLautsprecherkabel (ungeschirmt) zum Anschlie-ßen einer externen Box – niemals ein (geschirm-tes) Gitarrenkabel.
3. LINE OUTPUT-BuchseAn dieser Buchse liegt ein präpariertes Signal an, dassdu direkt in das PA- oder Studiomischpult stöpselnkannst. So verfügst du live über einen optimalen Sound,während die Notwendigkeit eines Mikrofons entfällt.
4. FOOTSWITCH-BuchseHier kannst du einen optionalen VFS-2 Doppelfußtasteranschließen, mit dem du die Boost- und Tremolo-Funkti-on separat per Fuß ein- und ausschalten kannst. Du hastdir inzwischen einen besorgt, oder?
ANSCHLUSSBEISPIEL
Pathfinder 15/15R
INPUT-Buchse
HEADPHONE-Buchse
Externe Box
EXTENSION SPEAKER-Buchse
FOOTSWITCH-Buchse
VFS-2
TECHNISCHEDATEN• Abmessungen (B x H x T): 396 x 400 x 193 mm• Gewicht: 8,0kg• Ausgangsleistung: 15 Watt, RMS an 8Ω• Lautsprecher: Vox Bulldog (8", 8Ω)• Eingänge: Input-Buchse, Footswitch-Buchse• Ausgänge: Extension Speaker-Buchse, Phone Out-
Buchse, Line Out-Buchse• Bedienelemente: Gain, Volume, Treble, Bass, Tremolo
(Speed, Depth), Reverb (nur auf dem Pathfinder 15R),Gain Boost On/Off-Taste, Power-Schalter.
• Sonderzubehör: VFS-2 Dual Footswitch (zum Ein-/Ausschalten der Boost- und Tremolo- Funktion).
* Technische Veränderungen können ohne Vorankündigungvorgenommen werden.
WICHTIGER HINWEIS: Dein Pathfinder 15/15R darfgrundsätzlich nur von einer anerkannten Vox-Kundendienststelle "untersucht"/repariert werden. BeiNichtbeachtung dieses Hinweises erlischt automatischder Garantieanspruch.
VOX AMPLIFICATION LTD.
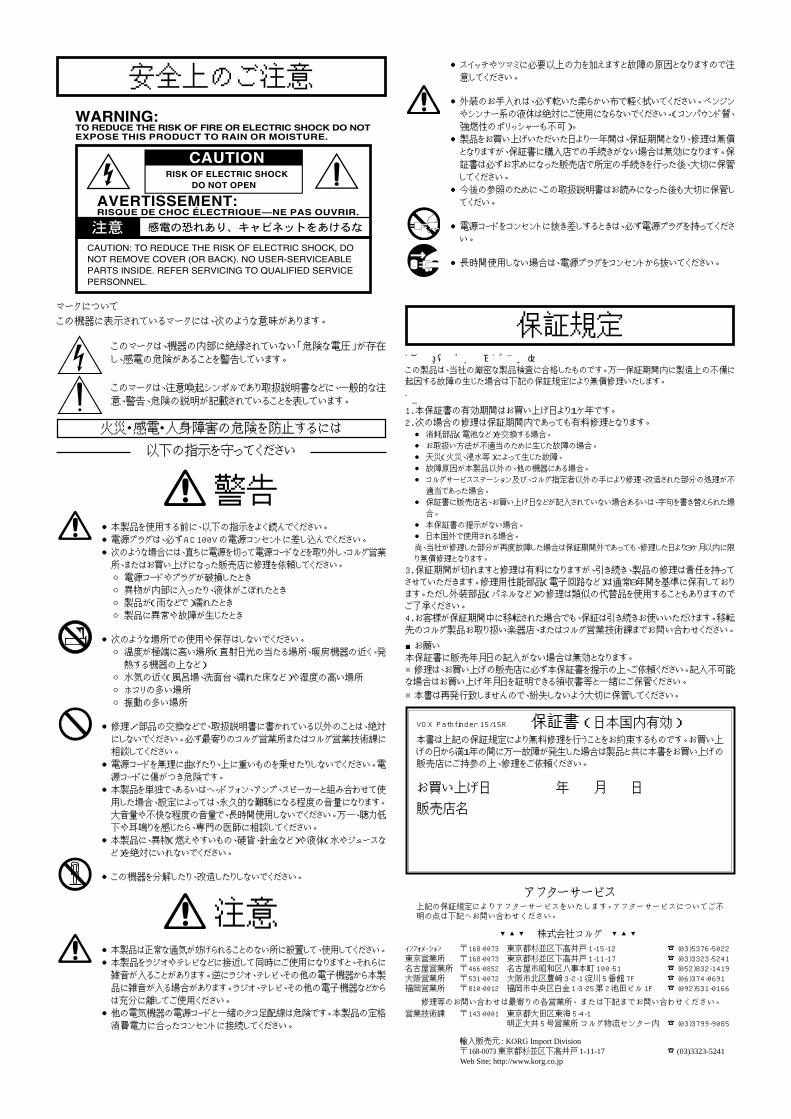
安全上のご注意
マークについてこの機器に表示されているマークには、次のような意味があります。
このマークは、機器の内部に絶縁されていない「危険な電圧」が存在し、感電の危険があることを警告しています。
このマークは、注意喚起シンボルであり取扱説明書などに、一般的な注意、警告、危険の説明が記載されていることを表しています。
火災・感電・人身障害の危険を防止するには
以下の指示を守ってください
警告本製品を使用する前に、以下の指示をよく読んでください。電源プラグは、必ずAC100Vの電源コンセントに差し込んでください。次のような場合には、直ちに電源を切って電源コードなどを取り外し、コルグ営業所、またはお買い上げになった販売店に修理を依頼してください。電源コードやプラグが破損したとき異物が内部に入ったり、液体がこぼれたとき製品が(雨などで)濡れたとき製品に異常や故障が生じたとき
次のような場所での使用や保存はしないでください。温度が極端に高い場所(直射日光の当たる場所、暖房機器の近く、発熱する機器の上など)
水気の近く(風呂場、洗面台、濡れた床など)や湿度の高い場所ホコリの多い場所振動の多い場所
修理/部品の交換などで、取扱説明書に書かれている以外のことは、絶対にしないでください。必ず最寄りのコルグ営業所またはコルグ営業技術課に相談してください。
電源コードを無理に曲げたり、上に重いものを乗せたりしないでください。電源コードに傷がつき危険です。
本製品を単独で、あるいはヘッドフォン、アンプ、スピーカーと組み合わせて使用した場合、設定によっては、永久的な難聴になる程度の音量になります。大音量や不快な程度の音量で、長時間使用しないでください。万一、聴力低下や耳鳴りを感じたら、専門の医師に相談してください。
本製品に、異物(燃えやすいもの、硬貨、針金など)や液体(水やジュースなど)を絶対にいれないでください。
この機器を分解したり、改造したりしないでください。
注意本製品は正常な通気が妨げられることのない所に設置して、使用してください。本製品をラジオやテレビなどに接近して同時にご使用になりますと、それらに雑音が入ることがあります。逆にラジオ、テレビ、その他の電子機器から本製品に雑音が入る場合があります。ラジオ、テレビ、その他の電子機器などからは充分に離してご使用ください。他の電気機器の電源コードと一緒のタコ足配線は危険です。本製品の定格消費電力に合ったコンセントに接続してください。
スイッチやツマミに必要以上の力を加えますと故障の原因となりますので注意してください。
外装のお手入れは、必ず乾いた柔らかい布で軽く拭いてください。ベンジンやシンナー系の液体は絶対にご使用にならないでください。(コンパウンド質、強燃性のポリッシャーも不可)。
製品をお買い上げいただいた日より一年間は、保証期間となり、修理は無償となりますが、保証書に購入店での手続きがない場合は無効になります。保証書は必ずお求めになった販売店で所定の手続きを行った後、大切に保管してください。今後の参照のために、この取扱説明書はお読みになった後も大切に保管してくだい。
電源コードをコンセントに抜き差しするときは、必ず電源プラグを持ってください。
長時間使用しない場合は、電源プラグをコンセントから抜いてください。
保証規定ご注意(必ずお読みください)この製品は、当社の厳密な製品検査に合格したものです。万一保証期間内に製造上の不備に起因する故障の生じた場合は下記の保証規定により無償修理いたします。
保証条件1. 本保証書の有効期間はお買い上げ日より1ケ年です。2. 次の場合の修理は保証期間内であっても有料修理となります。 消耗部品(電池など)を交換する場合。 お取扱い方法が不適当のために生じた故障の場合。 天災(火災、浸水等)によって生じた故障。 故障原因が本製品以外の、他の機器にある場合。コルグサービスステーション及び、コルグ指定者以外の手により修理、改造された部分の処理が不適当であった場合。
保証書に販売店名、お買い上げ日などが記入されていない場合あるいは、字句を書き替えられた場合。
本保証書の提示がない場合。 日本国外で使用される場合。尚、当社が修理した部分が再度故障した場合は保証期間外であっても、修理した日より3ケ月以内に限り無償修理となります。3. 保証期間が切れますと修理は有料になりますが、引き続き、製品の修理は責任を持ってさせていただきます。修理用性能部品(電子回路など)は通常8年間を基準に保有しております。ただし外装部品(パネルなど)の修理は類似の代替品を使用することもありますのでご了承ください。4. お客様が保証期間中に移転された場合でも、保証は引き続きお使いいただけます。移転先のコルグ製品お取り扱い楽器店、またはコルグ営業技術課までお問い合わせください。
お願い本保証書に販売年月日の記入がない場合は無効となります。※修理は、お買い上げの販売店に必ず本保証書を提示の上、ご依頼ください。記入不可能な場合はお買い上げ年月日を証明できる領収書等と一緒にご保管ください。※本書は再発行致しませんので、紛失しないよう大切に保管してください。
VOX Pathfinder 15/15R 保証書(日本国内有効)本書は上記の保証規定により無料修理を行うことをお約束するものです。お買い上げの日から満1年の間に万一故障が発生した場合は製品と共に本書をお買い上げの販売店にご持参の上、修理をご依頼ください。
お買い上げ日 年 月 日
販売店名
アフターサービス上記の保証規定によりアフターサービスをいたします。アフターサービスについてご不明の点は下記へお問い合わせください。
株式会社コルグ
インフォメーション 168-0073 東京都杉並区下高井戸1-15-12 (03)5376-5022東京営業所 168-0073 東京都杉並区下高井戸1-11-17 (03)3323-5241名古屋営業所 466-0852 名古屋市昭和区八事本町100-51 (052)832-1419大阪営業所 531-0072 大阪市北区豊崎3-2-1淀川5番館7F (06)374-0691福岡営業所 810-0012 福岡市中央区白金1-3-25第 2池田ビル1F (092)531-0166
修理等のお問い合わせは最寄りの各営業所、または下記までお問い合わせください。営業技術課 143-0001 東京都大田区東海5-4-1
明正大井5号営業所 コルグ物流センター内 (03)3799-9085
輸入販売元 : KORG Import Division 168-0073 東京都杉並区下高井戸 1-11-17 (03)3323-5241Web Site; http://www.korg.co.jp

トップ・パネルの特徴
はじめに
1. インプット・ジャックギターを接続します。質の良いギター(シールド)・ケーブルを使用することをおすすめします。
2. ゲインプリアンプ・ゲインを調節します。ゲインを上げると(時計回りに回す)、マイルドなひずみから、強烈なひずみまで、幅広いディストーション・サウンドが出せます。ゲインを下げると(反時計回りに回す)、クリーンな気持ちよいサウンドが出ます。可能性は無限です!
3. ブーストオン/オフ・スイッチさらにゲインを上げたいときは、このボタンを押します。即座にブーストできます!この機能のオン/オフ操作は、オプション(別売)のVFS-2デュアル・フットスイッチでも操作できます。即座のコントロールもこれで万全です。今すぐ、近くの楽器店にVFS-2を買いに行きましょう!
4. マスター・ボリューム全体的な音量を調節します。ゲインを下げてマスター・ボリュームを上げると、美しいクリーン・サウンドが出ます。また、ゲインを上げてマスター・ボリュームを下げると、小音量でありながらも、太く歪んだサウンドが出せます。
5.トレブル・コントロール高域の音質を調節します。ソフトで優しいサウンドから、ブライトでエッジのしっかりとしたサウンドまで、自在に調節できます。
6. ベース・コントロール低域の音質を調節します。ウォームでライトなサウンドから、ダークでヘビーなサウンドまで、自在に調節できます。
7.トレモロ・スピード内蔵トレモロ・エフェクトのスピードを調節します。このすばらしいビンテージ・テイストのエフェクトのオン/オフを切り替えるには、オプション(別売)のVFS-2デュアル・フットスイッチを使って操作可能です。やっぱりあなたにも一つ必要ですよね?
トレモロとは?: ギターのトレモロ・ユニットでの奏法のように、“トレモロ”の効果を周期的にピッチを変えるものだと思っている人もいるかもしれませんが、これは正しくありません(この効果はビブラートです)。実際には、トレモロは周期的に音量を変える効果で、その結果クールで振動するようなサウンドが得られるのです。
8.トレモロ・デプス内蔵トレモロ・エフェクトのかかる深さを調節します。
9. リバーブ・コントロール (Pathfinder 15Rのみ)内蔵スプリング・リバーブのかかる深さを調節します。
10. パワー・スイッチアンプの電源スイッチです。アンプの電源ケーブルがコンセントに差し込まれているかを確かめてください。電源をオンにしているときは、赤いランプが点灯しています。
Pathfinder 15Rのみ
1 2 3 4 5 6 7 8 9 10
しませんが、もしあなたにそうしたい気持ちがあるのならば、ご近所をイラつかせるのに真に理想的なギター・アンプにもなるのです?!(音楽を楽しむときは、周囲への音の配慮が必要です。演奏する時間によって、音量調節したり、ヘッドホンを使用してください。)
さあ、Pathfinder 15/15Rの豊富なサウンドを引き出すために、機能と操作について簡単に説明しましょう。
なお、本製品を末永くお使いいただくためにも、この取扱説明書をよくお読みになって正しい方法でご使用ください。また取扱説明書は、お読みになった後も大切に保管してください。
このたびは、VOX Pathfinder 15/15Rをお買い上げいただき、まことにありがとうございます。
あなたのアンプ・コレクションに新たに加わったこのVOX Path-finder 15/15Rは、あなたの感性を最大限に生かす豊富なギター・サウンドを提供してくれるでしょう!
ブースト、ラインアウト、ヘッドホン・ジャックやトレモロ、リバーブ(リバーブはPathfinder 15Rのみ)といったギタリストに欠かせない機能を装備したこのPathfinder 15/15Rは、練習や友達とのセッションなど、さまざまな用途でご使用いただけます! 決しておすすめ
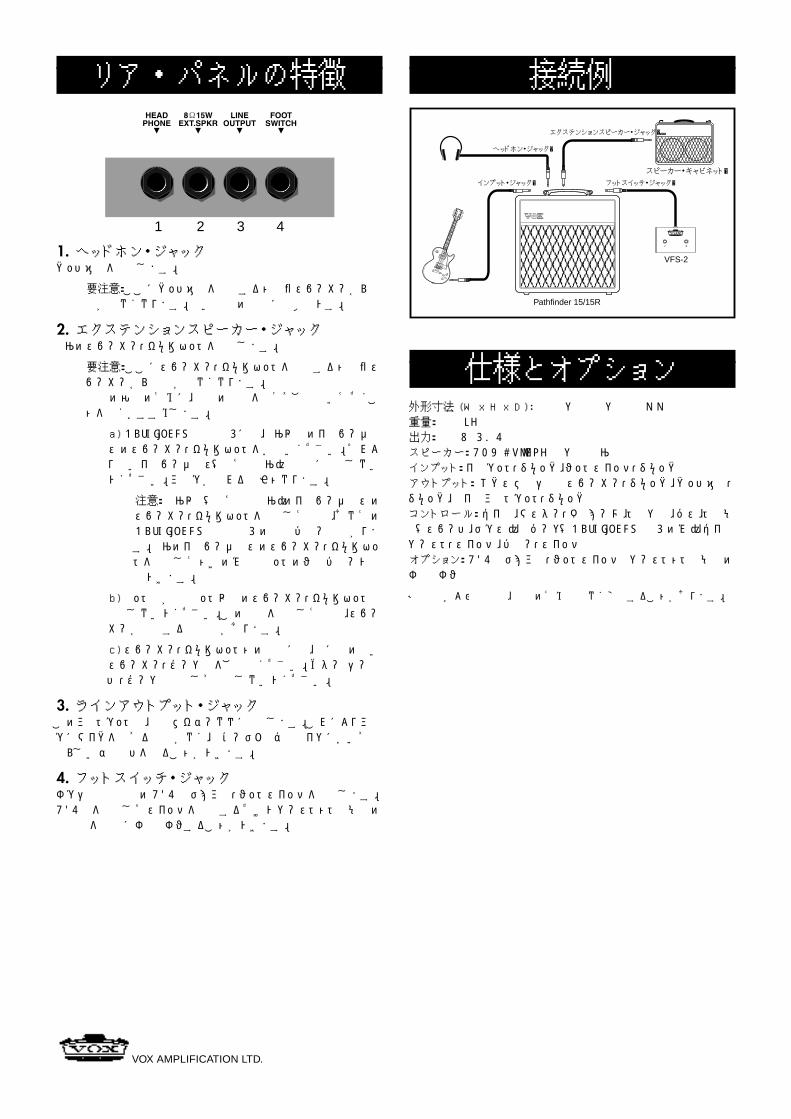
リア・パネルの特徴
1 2 3 4
1. ヘッドホン・ジャックヘッドホンを接続します。
要注意: ここにヘッドホンを接続すると内蔵スピーカーからは音が出なくなります。遅い時間の練習にも便利です。
2. エクステンションスピーカー・ジャック8Ωのスピーカー・キャビネットを接続します。
要注意: ここにスピーカー・キャビネットを接続すると内蔵スピーカーからは音が出なくなります。最高の演奏のために、下記の事項を守ってご使用いただくことを強くおすすめします。
a) Pathfinder 15/15Rには、8Ω以上のインピーダンスのスピーカー・キャビネットをお使いください。それより低いインピーダンス(例えば4Ω)は絶対に使用しないでください。アンプが壊れる原因となります。
注意: 8Ω以上(例えば16Ω)のインピーダンスのスピーカー・キャビネットを使用した場合、あなたのPathfinder 15/15Rの出力パワーは下がります。8Ωのインピーダンスのスピーカー・キャビネットを使用したときのみ15ワットのフルパワーで出力できます。
b) ワット数が15ワット以下のスピーカー・キャビネットは使用しないでください。この警告を無視した場合、スピーカーが破損する可能性があります。
c) スピーカー・キャビネットとの接続には、常に質の良いスピーカー・ケーブルをご使用ください。ギター(シールド)・ケーブルは決して使用しないでください。
3. ラインアウトプット・ジャックこのアウトプットは、直接ミキサーなどに接続します。これによりアンプにマイクを立てる必要がなく、レコーディングやライブにおいて素晴らしいサウンドを得ることができます。
4. フットスイッチ・ジャックオプション(別売)のVFS-2デュアル・フットスイッチを接続します。VFS-2を接続してスイッチを操作するだけでブーストとトレモロの両機能を自在にオン/オフすることができます。
接続例
Pathfinder 15/15R
インプット・ジャック
ヘッドホン・ジャック
スピーカー・キャビネット
エクステンションスピーカー・ジャック
フットスイッチ・ジャック
VFS-2
仕様とオプション外形寸法 (W x H x D): 396 x 400 x 193 mm重量: 8.0 kg出力: 15 W(RMS)スピーカー: VOX Bulldog 8 x 1 (8Ω)インプット: インプット・ジャック、フットスイッチ・ジャックアウトプット: エクステンションスピーカー・ジャック、ヘッドホン・ジャック、ラインアウトプット・ジャックコントロール: ゲイン、マスター・ボリューム、トレブル、バス、トレモロ(スピード、デプス)、リバーブ(Pathfinder 15Rのみ)、ゲインブースト・スイッチ、パワー・スイッチオプション: VFS-2デュアル・フットスイッチ (ブーストとトレモロのオン/オフ用)
※ 仕様および外観は、改良のため予告なく変更することがあります。
VOX AMPLIFICATION LTD.