instructions for using the multimedia equipmentinstructions for using the multimedia equipment you...
TRANSCRIPT

INSTRUCTIONS FOR USING THE MULTIMEDIA EQUIPMENT
You can use your personal laptop (with audio)*, playback from a DVD, from a VCR**, or from a personal portable digital device, such as a smartphone or iPad***.
The document camera is controlled by software on the PC, and DVD playback is also controlled/initiated from the computer and its software (Windows Media Player).
The Sympodium is a tablet style screen with a touch-sensitive stylus that displays the Windows 7 operating system. There is also a standard keyboard and wired mouse.
---------------------------------------------------------------------------------------------------------------------------------------------------------------------------------------------------- * Use of a laptop disables the ability to project the room PC and document camera, as well as functionality of the Sympodium and SmartBoard (if room is equipped).
** To use a VCR you will need to place an order in advance with Instructional Technology Services. There is an online ordering system at: http://instructech.usi.edu/equipmentorders.asp
*** Use of a personal digital device may require a proprietary connection cable that is not generally available in the classroom.
EQUIPMENT OVERVIEW
The multimedia equipment in this room is maintained by the department of Instructional Technology Services. The technical support number for ITS is: 464-1838on the web at: http://instructech.usi.eduemail to: [email protected]
The PC in this room is maintained by the USI Computer Center and their support number is 465-1080
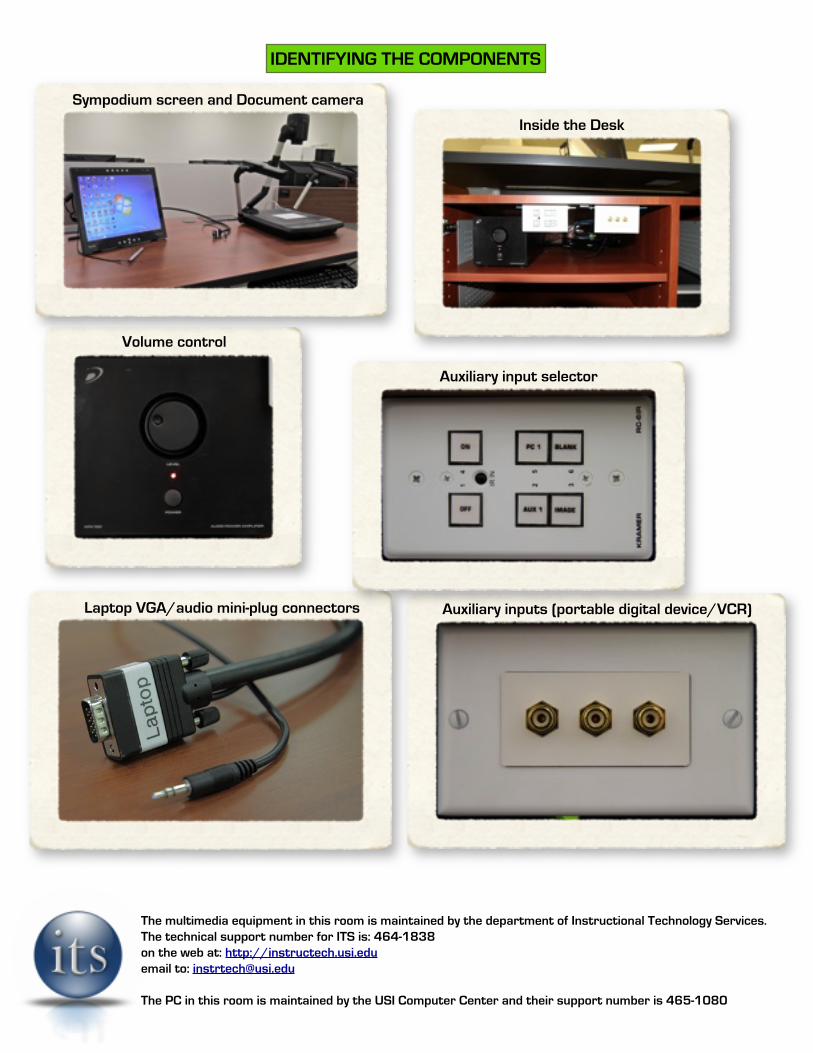
IDENTIFYING THE COMPONENTS
Sympodium screen and Document camera
Auxiliary inputs (portable digital device/VCR)
Auxiliary input selector
Laptop VGA/audio mini-plug connectors
Volume control
Inside the Desk
The multimedia equipment in this room is maintained by the department of Instructional Technology Services. The technical support number for ITS is: 464-1838on the web at: http://instructech.usi.eduemail to: [email protected]
The PC in this room is maintained by the USI Computer Center and their support number is 465-1080
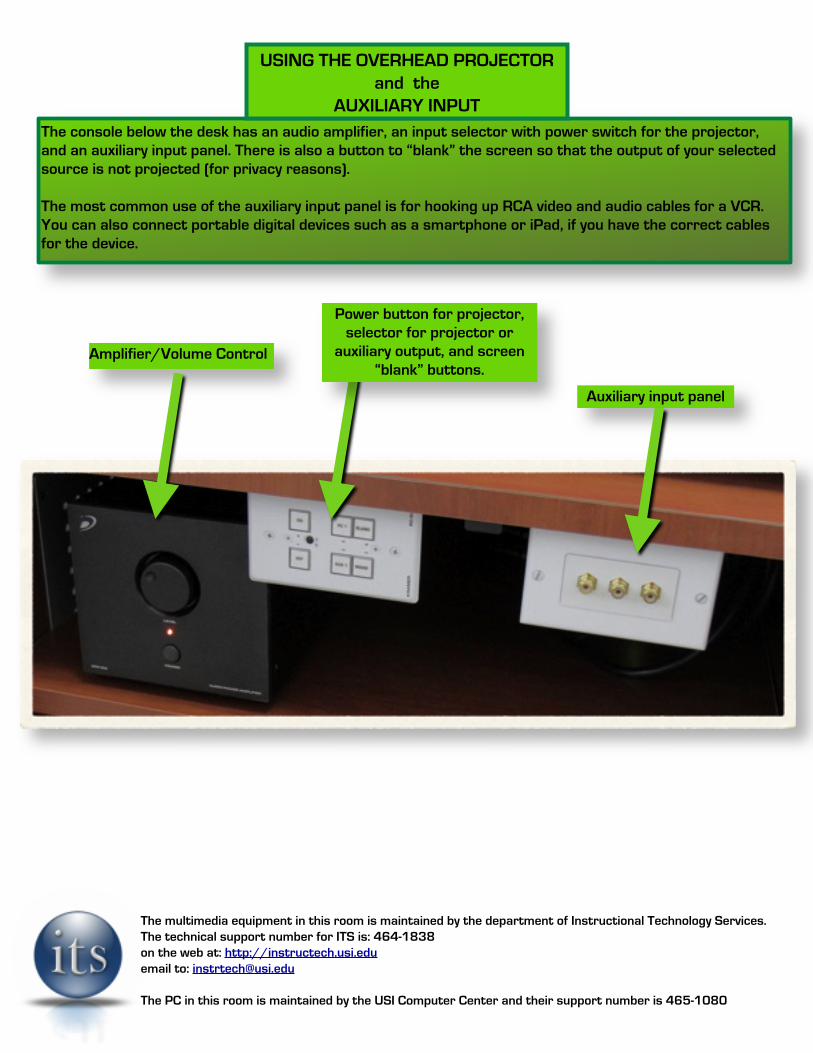
The console below the desk has an audio amplifier, an input selector with power switch for the projector, and an auxiliary input panel. There is also a button to “blank” the screen so that the output of your selected source is not projected (for privacy reasons).
The most common use of the auxiliary input panel is for hooking up RCA video and audio cables for a VCR. You can also connect portable digital devices such as a smartphone or iPad, if you have the correct cables for the device.
USING THE OVERHEAD PROJECTOR and the
AUXILIARY INPUT
Amplifier/Volume Control
Power button for projector, selector for projector or
auxiliary output, and screen “blank” buttons.
Auxiliary input panel

The multimedia equipment in this room is maintained by the department of Instructional Technology Services. The technical support number for ITS is: 464-1838on the web at: http://instructech.usi.eduemail to: [email protected]
The PC in this room is maintained by the USI Computer Center and their support number is 465-1080
The console below the desk has an audio amplifier, an input selector with power switch for the projector, and an auxiliary input panel. There is also a button to “blank” the screen so that the output of your selected source is not projected (for privacy reasons).
The most common use of the auxiliary input panel is for hooking up RCA video and audio cables for a VCR. You can also connect portable digital devices such as a smartphone or iPad, if you have the correct cables for the device.
USING THE POWER, INPUT SELECTOR
andSCREEN “BLANK” BUTTON
To turn the projector on, press the “ON” button.
ALWAYS turn the projector off when you are
finished by pressing the “OFF” button.
The multimedia equipment in this room is maintained by the department of Instructional Technology Services. The technical support number for ITS is: 464-1838on the web at: http://instructech.usi.eduemail to: [email protected]
The PC in this room is maintained by the USI Computer Center and their support number is 465-1080
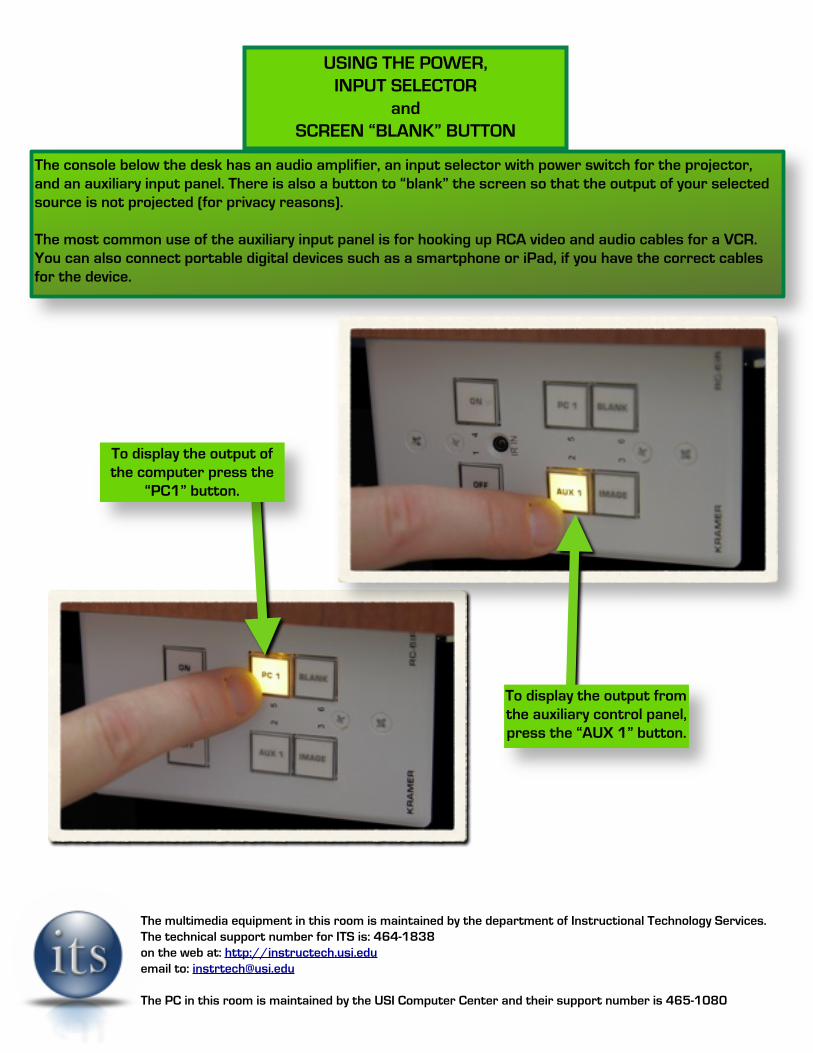
The console below the desk has an audio amplifier, an input selector with power switch for the projector, and an auxiliary input panel. There is also a button to “blank” the screen so that the output of your selected source is not projected (for privacy reasons).
The most common use of the auxiliary input panel is for hooking up RCA video and audio cables for a VCR. You can also connect portable digital devices such as a smartphone or iPad, if you have the correct cables for the device.
USING THE POWER, INPUT SELECTOR
andSCREEN “BLANK” BUTTON
To display the output of the computer press the
“PC1” button.
To display the output from the auxiliary control panel, press the “AUX 1” button.

The multimedia equipment in this room is maintained by the department of Instructional Technology Services. The technical support number for ITS is: 464-1838on the web at: http://instructech.usi.eduemail to: [email protected]
The PC in this room is maintained by the USI Computer Center and their support number is 465-1080
The console below the desk has an audio amplifier, an input selector with power switch for the projector, and an auxiliary input panel. There is also a button to “blank” the screen so that the output of your selected source is not projected (for privacy reasons).
The most common use of the auxiliary input panel is for hooking up RCA video and audio cables for a VCR. You can also connect portable digital devices such as a smartphone or iPad, if you have the correct cables for the device.
USING THE POWER, INPUT SELECTOR
andSCREEN “BLANK” BUTTON
To return the image to the screen, press the “IMAGE”
button.
To send a “BLANK” image to the screen, press the
“BLANK” button

The multimedia equipment in this room is maintained by the department of Instructional Technology Services. The technical support number for ITS is: 464-1838on the web at: http://instructech.usi.eduemail to: [email protected]
The PC in this room is maintained by the USI Computer Center and their support number is 465-1080
The console below the desk has an audio amplifier, an input selector with power switch for the projector, and an auxiliary input panel. There is also a button to “blank” the screen so that the output of your selected source is not projected (for privacy reasons).
The most common use of the auxiliary input panel is for hooking up RCA video and audio cables for a VCR. You can also connect portable digital devices such as a smartphone or iPad, if you have the correct cables for the device.
USING THE POWER, INPUT SELECTOR
andSCREEN “BLANK” BUTTON
RCA inputs panel
RCA right channel (red) cable input
RCA left channel (white) cable input
RCA VIDEO cable(yellow)

The multimedia equipment in this room is maintained by the department of Instructional Technology Services. The technical support number for ITS is: 464-1838on the web at: http://instructech.usi.eduemail to: [email protected]
The PC in this room is maintained by the USI Computer Center and their support number is 465-1080
Anytime a laptop is connected to the supplied VGA cable, all functionality of the Sympodium and SmartBoard is lost. The audio output of the laptop will still be
amplified if it is connected to the supplied audio mini-connector.
CONNECTING A LAPTOP
VGA (laptop) and mini-audio connectors
The multimedia equipment in this room is maintained by the department of Instructional Technology Services. The technical support number for ITS is: 464-1838on the web at: http://instructech.usi.eduemail to: [email protected]
The PC in this room is maintained by the USI Computer Center and their support number is 465-1080
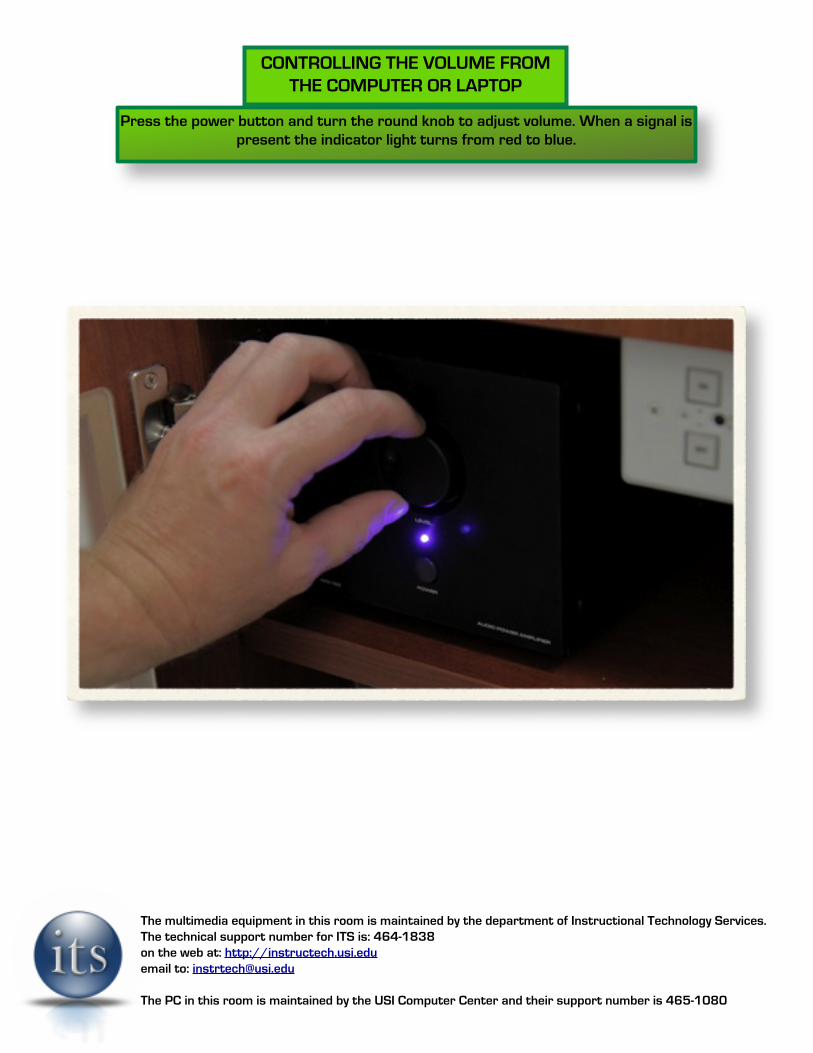
Press the power button and turn the round knob to adjust volume. When a signal is present the indicator light turns from red to blue.
CONTROLLING THE VOLUME FROM THE COMPUTER OR LAPTOP

The multimedia equipment in this room is maintained by the department of Instructional Technology Services. The technical support number for ITS is: 464-1838on the web at: http://instructech.usi.eduemail to: [email protected]
The PC in this room is maintained by the USI Computer Center and their support number is 465-1080
USING THE SYMPODIUM
THERE IS NO PROVISION FOR ALLOWING THE SYMPODIUM TO INTERFACE WITH LAPTOP CONNECTIONS.
Tethered to the Sympodium screen is a stylus pen. Holding the stylus like a pen, bring it to light contact with the surface of the Sympodium monitor.
The mouse cursor will follow the stylus around the screen. Tap the pen on the screen to activate features of the computer operating system or other programs.
Double tapping the stylus has the same effect as a mouse double-click.
The multimedia equipment in this room is maintained by the department of Instructional Technology Services. The technical support number for ITS is: 464-1838on the web at: http://instructech.usi.eduemail to: [email protected]
The PC in this room is maintained by the USI Computer Center and their support number is 465-1080
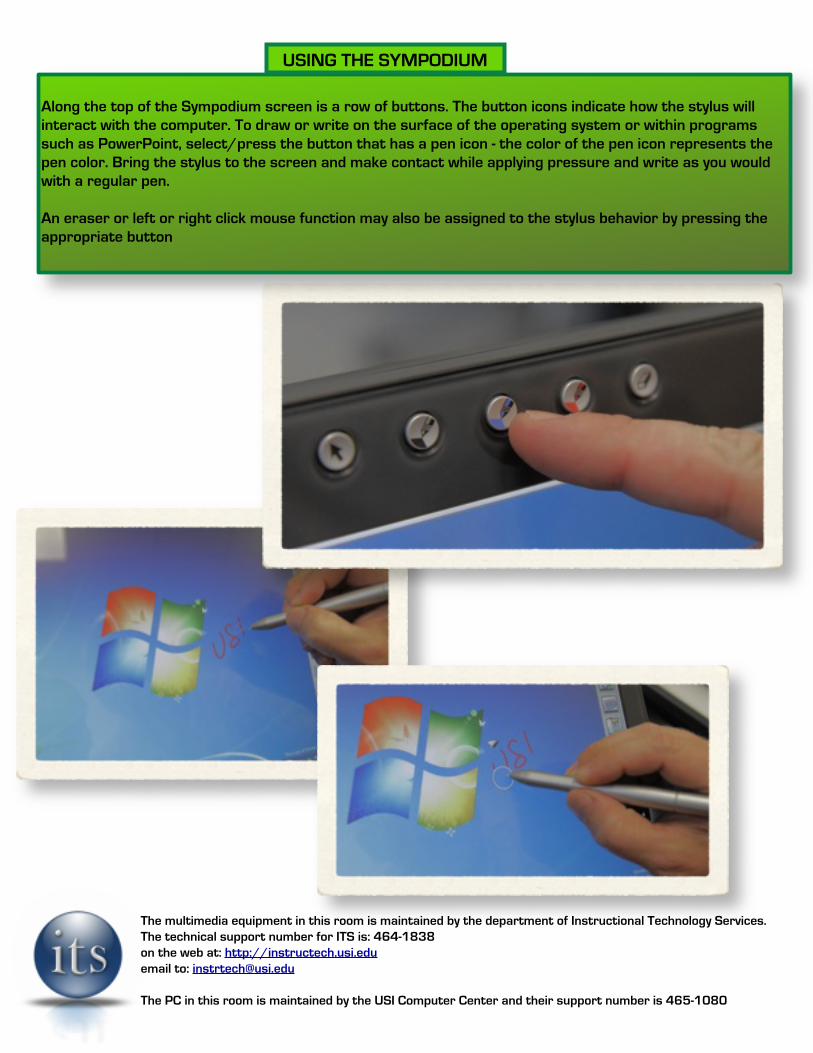
Along the top of the Sympodium screen is a row of buttons. The button icons indicate how the stylus will interact with the computer. To draw or write on the surface of the operating system or within programs such as PowerPoint, select/press the button that has a pen icon - the color of the pen icon represents the pen color. Bring the stylus to the screen and make contact while applying pressure and write as you would with a regular pen.
An eraser or left or right click mouse function may also be assigned to the stylus behavior by pressing the appropriate button
USING THE SYMPODIUM

The multimedia equipment in this room is maintained by the department of Instructional Technology Services. The technical support number for ITS is: 464-1838on the web at: http://instructech.usi.eduemail to: [email protected]
The PC in this room is maintained by the USI Computer Center and their support number is 465-1080
There are also 6 function buttons along the bottom of the Sympodium screen. Each button has its own function. For example, the button with a keyboard icon will display an onscreen virtual keyboard when pressed. Short sections of text can then be tapped out using the stylus by touching the appropriate letters.
For more information about the classroom Sympodium, view or download the document from the url listed below:
http://instructech.usi.edu/sympodium.pdf
USING THE SYMPODIUM

The multimedia equipment in this room is maintained by the department of Instructional Technology Services. The technical support number for ITS is: 464-1838on the web at: http://instructech.usi.eduemail to: [email protected]
The PC in this room is maintained by the USI Computer Center and their support number is 465-1080
DO NOT USE ANY DRY ERASE MARKERS ON SMARTBOARDS. USE ONLY THE SMARTBOARD PENS PROVIDED ON THE TRAY.
If this room is equipped with a SmartBoard you can control the computer using your fingers or write on the surface using one of four physical “pens” or erase with a virtual eraser. These 5 objects are found in the tray below the SmartBoard. When finished using a pen or eraser, immediately return it to its placeholder in the
tray, or the SmartBoard will think you are still using it, and will not release it and give you access to the cursor until you do so.
To control the computer cursor within applications or the operating system, apply pressure to the board with your finger and drag across the surface of the SmartBoard. To select an icon on the desktop, lightly touch or tap it on the surface, to perform a double-click, double-tap the icon, much like a double-click on a
mouse
For more information about the classroom SmartBoard, view or download the document from the url listed below:
USING THE SMARTBOARD

The multimedia equipment in this room is maintained by the department of Instructional Technology Services. The technical support number for ITS is: 464-1838on the web at: http://instructech.usi.eduemail to: [email protected]
The PC in this room is maintained by the USI Computer Center and their support number is 465-1080
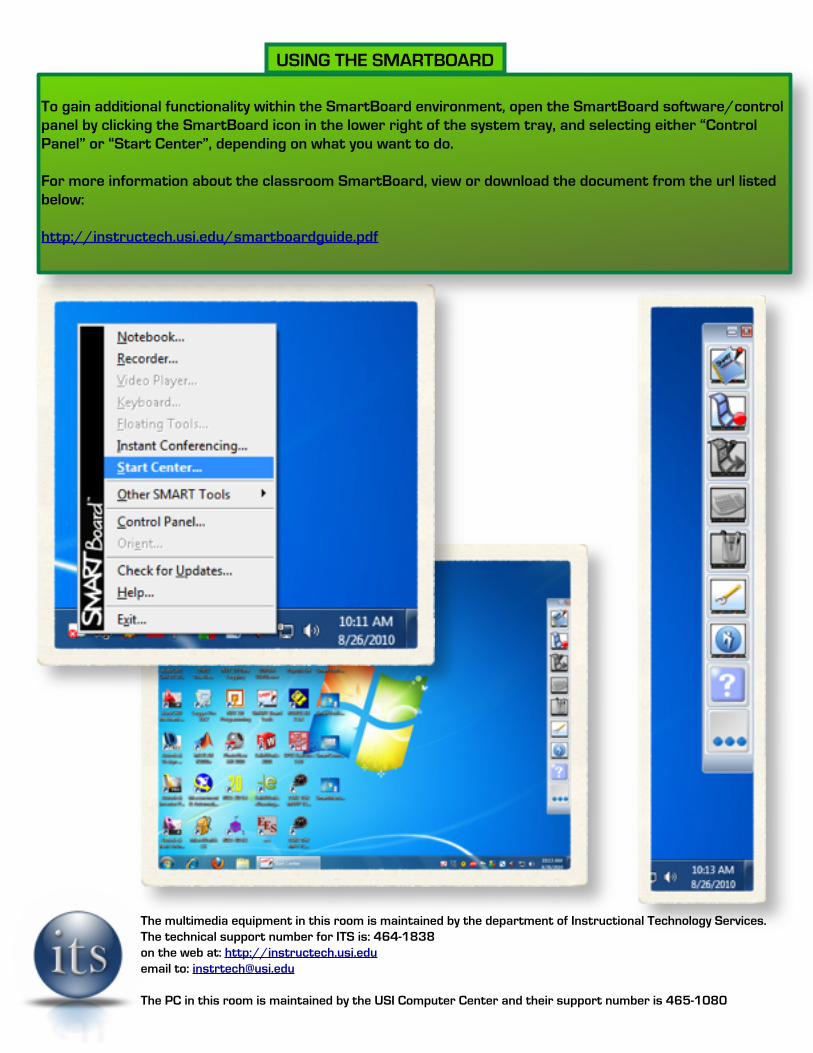
To gain additional functionality within the SmartBoard environment, open the SmartBoard software/control panel by clicking the SmartBoard icon in the lower right of the system tray, and selecting either “Control Panel” or “Start Center”, depending on what you want to do.
For more information about the classroom SmartBoard, view or download the document from the url listed below:
http://instructech.usi.edu/smartboardguide.pdf
USING THE SMARTBOARD
SmartBoard system tray app launcher

The multimedia equipment in this room is maintained by the department of Instructional Technology Services. The technical support number for ITS is: 464-1838on the web at: http://instructech.usi.eduemail to: [email protected]
The PC in this room is maintained by the USI Computer Center and their support number is 465-1080
To gain additional functionality within the SmartBoard environment, open the SmartBoard software/control panel by clicking the SmartBoard icon in the lower right of the system tray, and selecting either “Control Panel” or “Start Center”, depending on what you want to do.
For more information about the classroom SmartBoard, view or download the document from the url listed below:
http://instructech.usi.edu/smartboardguide.pdf
USING THE SMARTBOARD

The multimedia equipment in this room is maintained by the department of Instructional Technology Services. The technical support number for ITS is: 464-1838on the web at: http://instructech.usi.eduemail to: [email protected]
The PC in this room is maintained by the USI Computer Center and their support number is 465-1080
All functions of the document camera are controlled by software on the computer. To open the software, click the round Windows icon in the lower left of the system tray, and click “Applications”, and then scroll to and select SDP9xA USBViewer to launch the document camera software. Alternatively, you can look for a desktop shortcut icon for the SDP9xA USBViewer and double-click it to launch the software
USING THE DOCUMENT CAMERA
Windows 7 “Start Menu” icon
SDPxA USBViewer desktop shortcut

The multimedia equipment in this room is maintained by the department of Instructional Technology Services. The technical support number for ITS is: 464-1838on the web at: http://instructech.usi.eduemail to: [email protected]
The PC in this room is maintained by the USI Computer Center and their support number is 465-1080
After you launch the SDP9xA USB Viewer a control panel will appear on screen, allowing you access to all of the document camera’s functions.
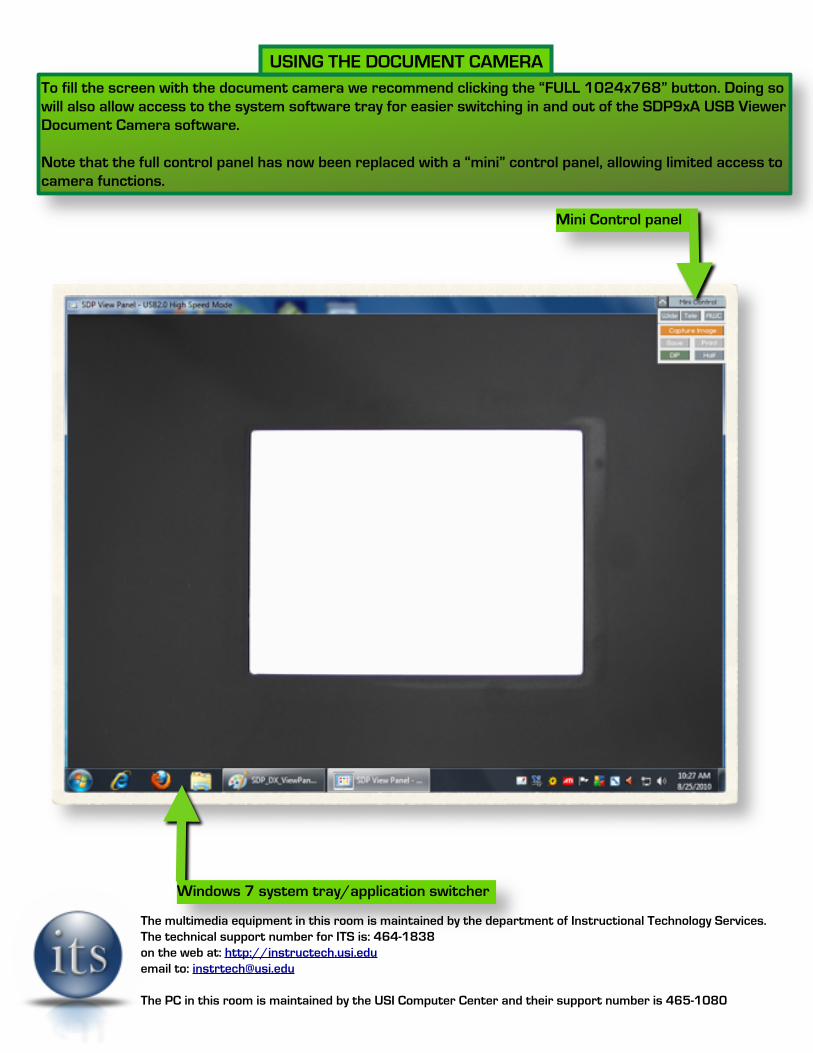
To fill the screen with the document camera we recommend clicking the “FULL 1024x768” button. Doing so will also allow access to the system software tray for easier switching in and out of the SDP9xA USB Viewer Document Camera software.
USING THE DOCUMENT CAMERA
“FULL 1024x768” button
The multimedia equipment in this room is maintained by the department of Instructional Technology Services. The technical support number for ITS is: 464-1838on the web at: http://instructech.usi.eduemail to: [email protected]
The PC in this room is maintained by the USI Computer Center and their support number is 465-1080
To fill the screen with the document camera we recommend clicking the “FULL 1024x768” button. Doing so will also allow access to the system software tray for easier switching in and out of the SDP9xA USB Viewer Document Camera software.
Note that the full control panel has now been replaced with a “mini” control panel, allowing limited access to camera functions.
USING THE DOCUMENT CAMERA
Windows 7 system tray/application switcher
Mini Control panel

The multimedia equipment in this room is maintained by the department of Instructional Technology Services. The technical support number for ITS is: 464-1838on the web at: http://instructech.usi.eduemail to: [email protected]
The PC in this room is maintained by the USI Computer Center and their support number is 465-1080
To access the full range of document camera functions, such as zoom, iris, lamp, image capture, etc., you’ll want to switch back and forth from the “mini control panel” shown below, to the full control panel. This is accomplished by clicking the small up arrow in the upper right of the software.
USING THE DOCUMENT CAMERA
Mini Control panel
Small up arrow switches to full control panel allowing access to all camera functions.

The multimedia equipment in this room is maintained by the department of Instructional Technology Services. The technical support number for ITS is: 464-1838on the web at: http://instructech.usi.eduemail to: [email protected]
The PC in this room is maintained by the USI Computer Center and their support number is 465-1080
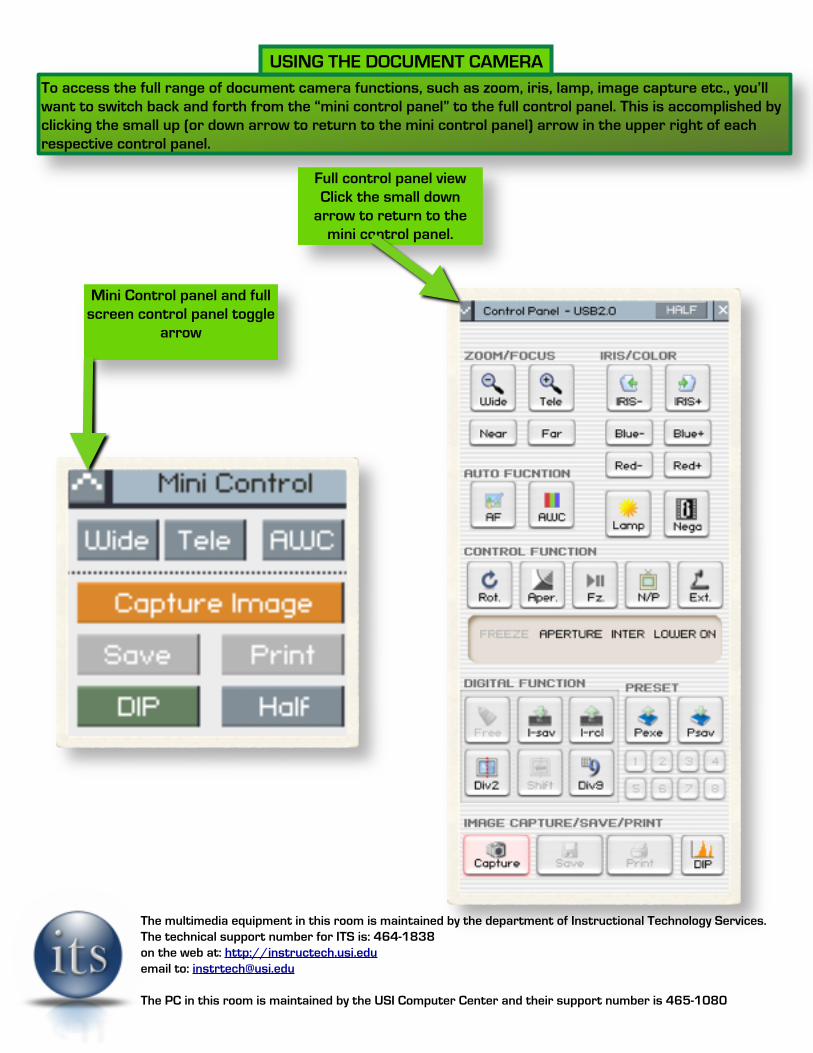
To access the full range of document camera functions, such as zoom, iris, lamp, image capture etc., you’ll want to switch back and forth from the “mini control panel” to the full control panel. This is accomplished by clicking the small up (or down arrow to return to the mini control panel) arrow in the upper right of each respective control panel.
USING THE DOCUMENT CAMERA
Full control panel view Click the small down
arrow to return to the mini control panel.
The multimedia equipment in this room is maintained by the department of Instructional Technology Services. The technical support number for ITS is: 464-1838on the web at: http://instructech.usi.eduemail to: [email protected]
The PC in this room is maintained by the USI Computer Center and their support number is 465-1080
To access the full range of document camera functions, such as zoom, iris, lamp, image capture etc., you’ll want to switch back and forth from the “mini control panel” to the full control panel. This is accomplished by clicking the small up (or down arrow to return to the mini control panel) arrow in the upper right of each respective control panel.
USING THE DOCUMENT CAMERA
Mini Control panel and full screen control panel toggle
arrow
Full control panel view Click the small down
arrow to return to the mini control panel.
The multimedia equipment in this room is maintained by the department of Instructional Technology Services. The technical support number for ITS is: 464-1838on the web at: http://instructech.usi.eduemail to: [email protected]
The PC in this room is maintained by the USI Computer Center and their support number is 465-1080
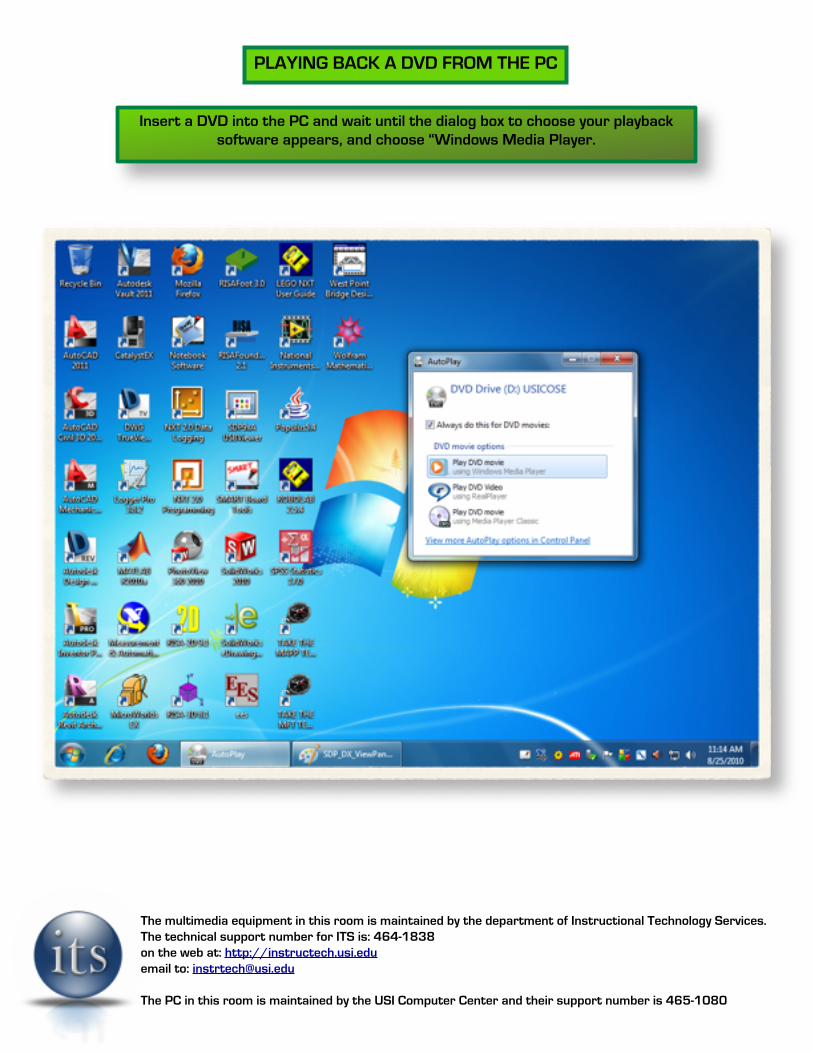
Insert a DVD into the PC and wait until the dialog box to choose your playback software appears, and choose “Windows Media Player.
PLAYING BACK A DVD FROM THE PC
The multimedia equipment in this room is maintained by the department of Instructional Technology Services. The technical support number for ITS is: 464-1838on the web at: http://instructech.usi.eduemail to: [email protected]
The PC in this room is maintained by the USI Computer Center and their support number is 465-1080
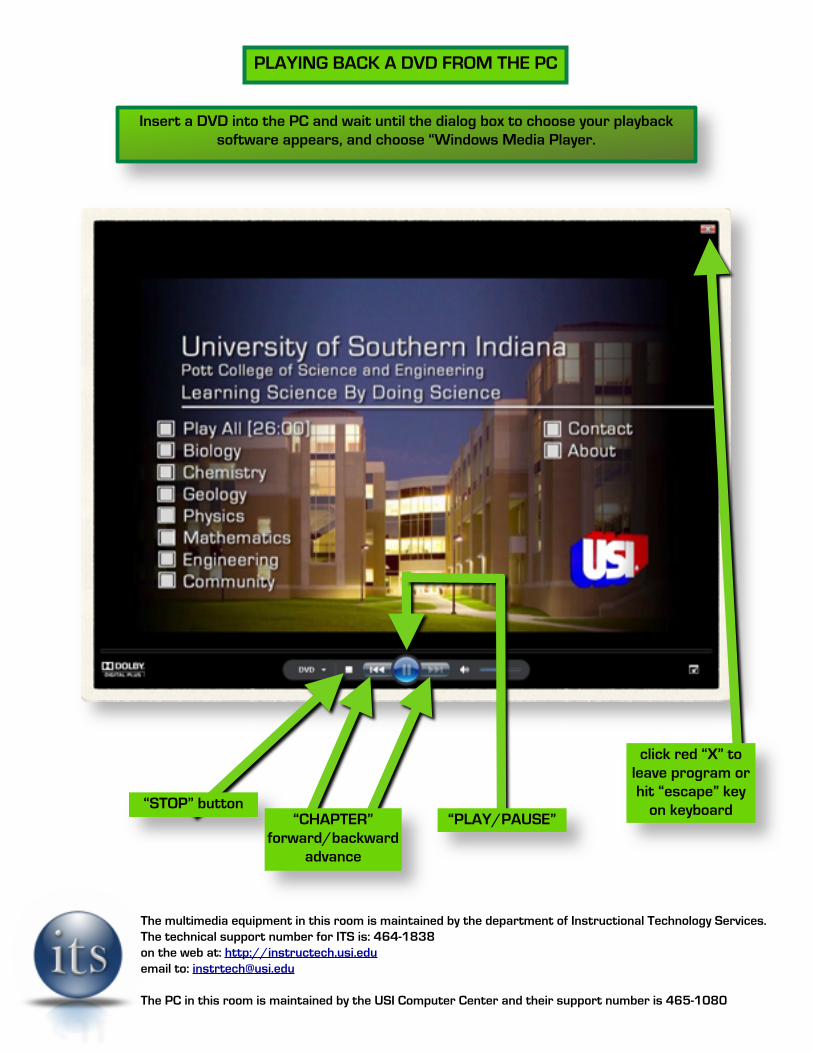
Insert a DVD into the PC and wait until the dialog box to choose your playback software appears, and choose “Windows Media Player.
PLAYING BACK A DVD FROM THE PC
“STOP” button“CHAPTER”
forward/backward advance
“PLAY/PAUSE”
click red “X” to leave program or hit “escape” key
on keyboard