instruction manual specifications ozito.com… · instruction manual specifications voltage:...
TRANSCRIPT

1
SPRAYGUN400WINSTRUCTION MANUALSPECIFICATIONSVoltage: 230-240V ~ 50HzPower: 400WMax. Flow Rate: 450ml/minViscosity: 20 - 80 secsonds Less than 30 DIN-SPot Capacity: 800mlNozzle: ø2.5mmWeight (tool only): 1.5kg
WHAT’S IN THE BOX
Spray Gun
Cleaning Needle
Viscosity Cup
ozito.com.au
SGP-300

1ONLINE MANUALScan this QR Code with your mobile device to take you to the online manual.
1 Air Cap
2 Nozzle
3 On/Off Trigger
4 Paint Pot
5 Spray Regulator Dial
6 Soft Grip Handle
7 Quick Release Dial
8 Airfilter
SPRAY GUN
KNOW YOUR PRODUCT
1 2 3 4 5 6 7
9
8
10
1. ASSEMBLY
9 Viscosity Cup
10 Cleaning Needle
ACCESSORIES
SETUP & PREPARATION
1 Turn the quick release knobs on both sides of the body to the unlock position.
Note: Ensure the paint head and spray gun body are aligned correctlyforproperfitting
1 When spraying horizontal or low objects turn the suction tube to the front.
3 Turn the quick release knobs on both sides to the lock position to secure paint head
2 Insert the paint head fully into the gun body.
2 When spraying overhead objects turn the suction tube to the back.
Inserting the Paint Head
Aligning the Suction Tube
WARNING! ENSURE THE TOOL IS DISCONNECTED FROM THE POWER SUPPLY BEFORE PERFORMING ANY OF THE FOLLOWING OPERATIONS.

1
3. CONTROLS
OPERATION
2. PREPARATION
1 Before pouring any paint or thinners work out how much of each substance is needed.
1 Submerge the viscosity cupintothematerialtofill.
3 Time how long it takes to empty the cup. This is referred to as DIN seconds.
Thinning is particularly important when spraying. Most paints are supplied ready for brush application and need to be diluted sufficientlyforsprayingpurposes. Follow the manufacturers guide for thinning ratios which should be labelled on the paint container.
It is vital to determine the viscosity of the coating material to see if it is suitable to be used in the spray gun.
2 Pour the required paint andthinnersusingafilterinto a mixing cup and mix thoroughly.
2 Raise the cup out of the material and start timing.
4 If the material is above 30 DIN-S the material will need to be thinned more and retested.
Thinning
Determining Viscosity
NOTE: FOR BEST RESULTS, SURFACE PREPARATION AND PAINT THINNING ARE THE TWO MOST IMPORTANT AREAS. ENSURE ALL SURFACES ARE FREE OF DUST, DIRT AND GREASE.
IMPORTANT! THE SPRAY GUN CANNOT BE USED WITH MATERIALS CONTAINING ABRASIVE SUBSTANCES, GLAZES, DISPERSION PAINTS, CAUSTIC AND ALKALINE SUBSTANCES OR TEXTURED COATINGS.
1 Squeeze the on/off trigger to start spraying.
1 Squeeze the trigger while aiming at a piece of cardboard or scrap.
1 Removethefiltercoverwithaflatscrewdriver.
3 Cliptheinnercoverandfiltercoverbackontothespraygun.
The regulator dial is a stop that limits the distance the trigger can be pressed. This results in less material being sprayed.
Filters can be purchased in packs of 2 (p/n: SPSPG300-03) and are available from the Special Orders Desk at any Bunnings Warehouse.
2 Release the on/off trigger to stop spraying.
2 Rotate the regulator dial to the required position for optimal results.
2 Wash or replace the dirty filterandplaceinsidetheinner cover.
On/Off Trigger
Spray Regulator Dial
Replacing Air Filter
CAUTION: TO REDUCE THE RISK OF ELECTRICAL SHOCK, A RESIDUAL CURRENT DEVICE (RATED 30MA OR LESS) MUST BE USED.
PAINT
THINNERS
PAINT
THINNERS
WARNING! NEVER OPERATE THE SPRAY GUN WITHOUT A FILTER. DIRT COULD BE SUCKED IN AND DAMAGE THE OPERATION OF THE UNIT.

1
4. ADJUSTING THE SPRAY GUN 5. HOW TO SPRAY
SGP-300
1 Start off your workpiece and spray in a smooth speed maintaining a distance of roughly 20cm from the workpiece. Be sure to keep the spray gun at a perpendicular angle.
1 For vertical surfaces use a horizontal fan. This is done by rotating the air cap into the position shown to the right.
2 For horizontal surfaces use a vertical fan. This is done by rotating the air cap into the position shown to the right.
3 For corners, edges and other hard to access places use a round fan. This is done by rotating the air cap into the position shown to the right.
To change spray patterns simply loosen the air cap and rotate to the desired position. Ensure that the air cap is tightened again to secure in place.
Spraying Technique
Choosing Spray Patterns1 Work out how much of
each substance is needed.
1 Adjust the suction tube and air cap into the desired position for the job.
1 Evenly control the speed of movement along the workpiece while maintaining distance and angle to the piece.
3 Check the viscosity is less than 30 DIN-S to suit the spray gun.
2 Filter and mix the material using the manufactures guide
2 Spray onto scrap material to check that the spray pattern is correct.
2 Overlap each stroke by 2cm to achieve an even coat.
4 Pour the material into the paint cup.
Preparation
Adjustments
Spraying Technique
PAINT
THINNERS
PAINT
THINNERS

• Keep the vents of the spray gun clean at all times. If possible, prevent foreign matter from entering the vents.
• If the body of the spray gun requires cleaning, do not use solvents but a moist soft cloth only. Never let any liquid get inside the gun body; never immerse any part of the spray gun into a liquid.
Note: Ozito Industries will not be responsible for any damage or injuries caused by the repair of the sander by an unauthorised person or by mishandling of the spray gun.
MAINTENANCE
DESCRIPTION OF SYMBOLS
CARING FOR THE ENVIRONMENT
TROUBLE SHOOTING
Power tools that are no longer usable should not be disposed of with household waste but in an environmentally friendly way. Please recycle where facilities exist. Check with your local council authority for recycling advice.
Recyclingpackagingreducestheneedforlandfillandrawmaterials.Reuse of recycled material decreases pollution in the environment. Please recycle packaging where facilities exist. Check with your local council authority for recycling advice.
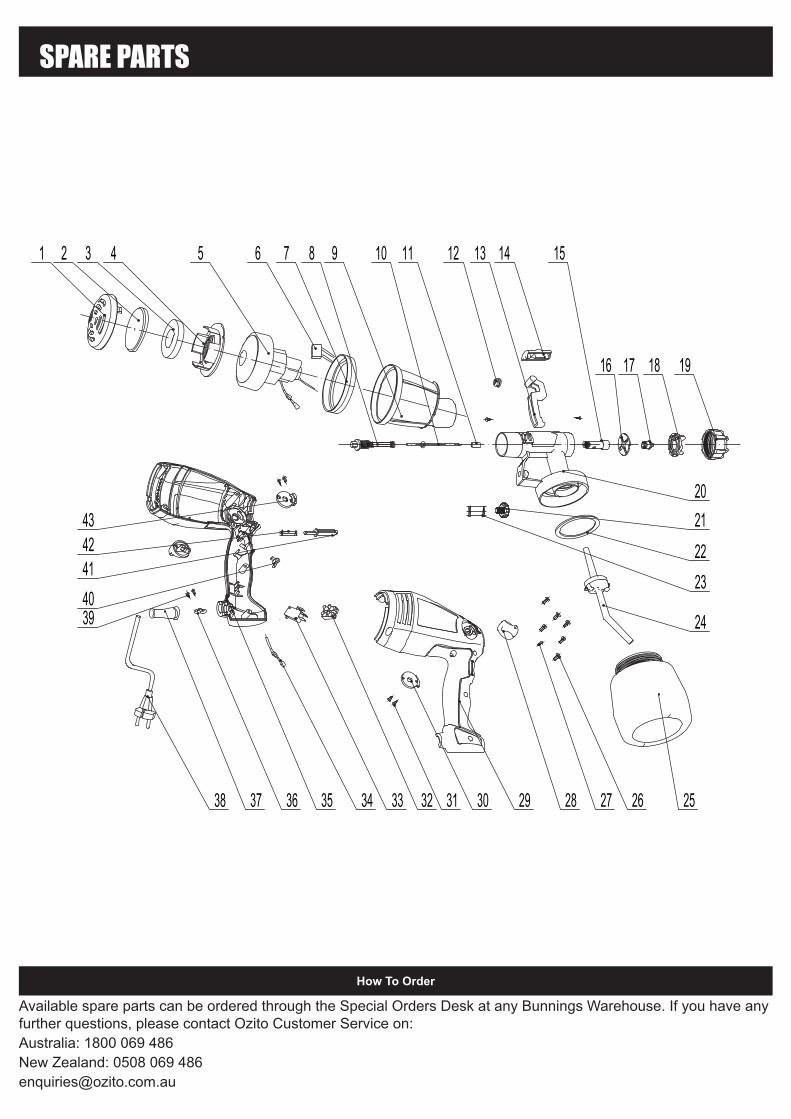
Filter (pack 2) SPSPG300-03Valve Spring Assy. SPSPG300-08Nozzle Kit SPSPG300-17KSuction Tube Assy. SPSPG300-24Pot SPSPG300-25
Spare parts can be ordered from the Special Orders Desk at your local Bunnings Warehouse. For further information, or any parts not listed here, visit www.ozito.com.au or contact Ozito Customer Service: Australia 1800 069 486 New Zealand 0508 069 486 E-mail: [email protected]
SPARE PARTS
Problem Cause Remedy
Little or no material flow
Nozzle / Suction tube cloggedSpray regulator dial to lowSuction tube looseNo pressure build up in paint potAirfilterclogged
CleanIncrease regulator dialInsertTighten paint potClean or replace
Material leaking Nozzle looseNozzle wornMaterial build up on air cap and nozzle
TightenReplaceClean
Atomization is too coarse
Viscosity of material too highMaterial volume too largeNozzle cloggedAirfiltercloggedToo little pressure build up in container
Thin materialDecrease spray regulator dialCleanClean or replaceTighten paint pot
Spray jet pulsates Material in paint pot running outAirfilterclogged
RefillClean or replace
Pattern runs or sags Applying to much material Decrease spray regulator dial or increase movement speed
Too much overspray Gun too far from spray objectToo much material applied
Reduce distanceDecrease spray regulator dial
Pattern is very light and splotchy
Moving the spray gun to fast Decrease spray regulator dial or decrease movement speed
V Volts Hz Hertz
~ Alternating current W Watts
BAR Pressure rating
Read Instruction manual Warning
Double insulated
Wear eye, breathing, ear protection
Do not use in raining
/min Revolutions or r
Regulatory ComplianceMark (RCM)
eciprocation per minute
ºC Degrees Celsius
WARNING! ENSURE THE TOOL IS DISCONNECTED FROM THE POWER SUPPLY BEFORE PERFORMING ANY OF THE FOLLOWING OPERATIONS.
1 Unscrew the paint pot and return remaining material into a container.
1 Unscrew the air cap nut to remove the air cap.
3 Remove and dismantle the suction tube by turning clockwise.
5 Take note of the 3 holes on the suction tube, if blocked clean using the provided cleaning needle.
3 Clean the paint pot and suction tube with a brush and then screw the pot back into the gun.
5 Remove the paint pot and empty any remaining solvent.
After each use it is essential that the spray gun is cleaned thoroughly. This will prevent any blockages occurring and provide reliable performance when you next come to use it.
2 Fill the paint pot with solvent or water. Note: Only use solvents with a flash point over 21°C
2 Turn both quick release knobs to remove the paint head.
4 Dip a cloth in solvent or water and clean the air cap, nozzle, gun housing, rear of the paint head and suction tube.
6 Prior to storing the spray gun, ensure it is completely dry.
4 Plug the gun back in and spray the solvent into a container. Repeat until clear solvent comes out.
Cleaning
Cleaning Parts
SPARE PARTS
How To Order
Available spare parts can be ordered through the Special Orders Desk at any Bunnings Warehouse. If you have any further questions, please contact Ozito Customer Service on:Australia: 1800 069 486New Zealand: 0508 069 [email protected]
37
8 107 9 11 13 1412 15
16 17 18 19
2021
2322
24
25262728293031323334353638
1 2 3 4 5 6
40414243
39
Tool: Spray G
un Paint 300W
Model N
o. SG
P-300

SPRAY GUN SAFETY WARNINGS
WARNING! When using mains-powered tools, basic safety precautions, including the following, should always be followed to reduce risk of fire, electric shock, personal injury and material damage.
Read the whole manual carefully and make sure you know how to switch the tool off in an emergency, before operating the tool. Save these instructions and other documents supplied with this tool for future reference.The electric motor has been designed for 230V and 240V only. Always check that the power supply corresponds to the voltage on the rating plate.Note: The supply of 230V and 240V on Ozito tools are interchangeable for Australia and New Zealand.
This tool is double insulated in accordance with AS/NZS 60745-1; therefore no earth wire is required.
If the supply cord of this power tool is damaged, it must be replaced by a specially prepared cord available through the service organization.Note: Double insulation does not take the place of normal safety precautions when operating this tool. The insulation system is for added protection against injury resulting from a possible electrical insulation failure within the tool.Using an Extension LeadAlways use an approved extension lead suitable for the power input of this tool. Before use, inspect the extension lead for signs of damage, wear and ageing. Replace the extension lead if damaged or defective.When using an extension lead on a reel, always unwind the lead completely. Use of an extension lead not suitableforthepowerinputofthetoolorwhichisdamagedordefectivemayresultinariskoffireandelectricshock.To reduce the risk of electrical shock, a residual current device (rated 30mA or less) must be used.
WARNING! Read all safety warnings and all instructions. Failure to follow the warnings and instructionsmayresultinelectricshock,fireand/orseriousinjury. Save all warnings and instructions for future reference. The term “power tool” in the
warnings refers to your mains-operated (corded) power tool or battery-operated (cordless) power tool.1. Work area safety a. Keep work area clean and well lit. Cluttered or dark areas invite accidents. b. Do not operate power tools in explosive atmospheres, such as in the presence of flammable
liquids, gases or dust. Power tools create sparks which may ignite the dust or fumes. c. Keep children and bystanders away while operating a power tool. Distractions can cause you to
lose control.2. Electrical safety a. Power tool plugs must match the outlet. Never modify the plug in any way. Do not use any
adapter plugs with earthed (grounded) power tools.Unmodifiedplugsandmatchingoutletswillreduce risk of electric shock.
b. Avoid body contact with earthed or grounded surfaces, such as pipes, radiators, ranges and refrigerators. There is an increased risk of electric shock if your body is earthed or grounded.
c. Do not expose power tools to rain or wet conditions. Water entering a power tool will increase the risk of electric shock.
d. Do not abuse the cord. Never use the cord for carrying, pulling or unplugging the power tool. Keep cord away from heat, oil, sharp edges or moving parts. Damaged or entangled cords increase the risk of electric shock.
e. When operating a power tool outdoors, use an extension cord suitable for outdoor use. Use of a cord suitable for outdoor use reduces the risk of electric shock.
f. If operating a power tool in a damp location is unavoidable, use a residual current device (RCD) protected supply. Use of an RCD reduces the risk of electric shock.
3. Personal safety a. Stay alert, watch what you are doing and use common sense when operating a power tool. Do
not use a power tool while you are tired or under the influence of drugs, alcohol or medication. A moment of inattention while operating power tools may result in serious personal injury.
b. Use personal protective equipment. Always wear eye protection. Protective equipment such as dust mask, non-skid safety shoes, hard hat, or hearing protection used for appropriate conditions will reduce personal injuries.
c. Prevent unintentional starting. Ensure the switch is in the off-position before connecting to power source and/or battery pack, picking up or carrying the tool. Carrying power tools with your fingerontheswitchorenergisingpowertoolsthathavetheswitchoninvitesaccidents.
d. Remove any adjusting key or wrench before turning the power tool on. A wrench or a key left attached to a rotating part of the power tool may result in personal injury.
e. Do not overreach. Keep proper footing and balance at all times. This enables better control of the power tool in unexpected situations.
f. Dress properly. Do not wear loose clothing or jewellery. Keep your hair, clothing and gloves away from moving parts. Loose clothes, jewellery or long hair can be caught in moving parts.
g. If devices are provided for the connection of dust extraction and collection facilities, ensure these are connected and properly used. Use of dust collection can reduce dust-related hazards.
4. Power tool use and care a. Do not force the power tool. Use the correct power tool for your application. The correct power tool
will do the job better and safer at the rate for which it was designed. b. Do not use the power tool if the switch does not turn it on and off. Any power tool that cannot be
controlled with the switch is dangerous and must be repaired. c. Disconnect the plug from the power source and/or the battery pack from the power tool before
making any adjustments, changing accessories, or storing power tools. Such preventive safety measures reduce the risk of starting the power tool accidentally.
d. Store idle power tools out of the reach of children and do not allow persons unfamiliar with the power tool or these instructions to operate the power tool. Power tools are dangerous in the hands of untrained users.
e. Maintain power tools. Check for misalignment or binding of moving parts, breakage of parts and any other condition that may affect the power tool’s operation. If damaged, have the power tool repaired before use. Many accidents are caused by poorly maintained power tools.
f. Keep cutting tools sharp and clean. Properly maintained cutting tools with sharp cutting edges are less likely to bind and are easier to control.
g. Use the power tool, accessories and tool bits etc. in accordance with these instructions, taking into account the working conditions and the work to be performed. Use of the power tool for operations different from those intended could result in a hazardous situation.
5. Service a. Have your power tool serviced by a qualified repair person using only identical replacement
parts. This will ensure that the safety of the power tool is maintained.
GENERAL POWER TOOL SAFETY WARNINGS
ELECTRICAL SAFETY
WARNING!Hold power tool by insulated gripping surfaces, when performing an operation where the cutting accessory may contact hidden wiring or its own cord. Cutting accessory contacting a “live” wire may make exposed metal parts of the power tool “live“ and could give the operator an electric shock.This appliance is not intended for use by persons (including children) with reduced physical, sensory or mental capabilities, or lack of experience and knowledge, unless they have been given supervision or instruction concerning use of the appliance by a person responsible for their safety.Using an Extension LeadAlways use an approved extension lead suitable for the power input of this tool. Before use, inspect the extension lead for signs of damage, wear and ageing. Replace the extension lead if damaged or defective.When using an extension lead on a reel, always unwind the lead completely. Use of an extension lead not suitable for the power input of the tool or which is damaged or defectivemayresultinariskoffireandelectricshock.It is recommended that the extension lead is a maximum of 25m in length. Do Not use multiple extension leads.NEVER under any circumstances aim the nozzle at another person or animal.• In the event of an injury occurring, seek medical advice immediately.•Thespraygunmustnotbeusedforsprayingflammablepaintsandsolventswithaflashpointoflessthan21ºC.
• Always ensure there is adequate ventilation when spraying.• The use of ear protection is recommended.• Eye protection is recommended to keep hazardous vapours and liquids out of eyes.• Always wear a face mask when spraying.• Always read the paint manufacturers thinning instructions before using.• Always keep the spray basket nozzle in place during use. Never allow the spray to come in direct contact with the skin.
DANGER! Never immerse the spray gun in liquid. This could lead to electric shock, personal injury and material damage.
•Thespraygunmustnotbecleanedbyusingflammableliquidswithaflashpointoflessthan21ºC.NEVER spray near a naked flame, including an appliance pilot light.NEVER smoke whilst spraying.NEVER allow children to operate or play with the spray gun.• Before cleaning, always disconnect the appliance from the mains supply.•Alwaysdisconnectfrommainssupplywhenrefillingthepaintpot.• After every use ensure you clean your spray gun thoroughly.NEVER use the spray gun outside when it is raining.

IN ORDER TO MAKE A CLAIM UNDER THIS WARRANTY YOU MUST RETURN THE PRODUCT TO YOUR NEAREST BUNNINGS WAREHOUSE WITH YOUR BUNNINGS REGISTER RECEIPT. PRIOR TO RETURNING YOUR PRODUCT FOR WARRANTY PLEASE TELEPHONE OUR CUSTOMER SERVICE HELPLINE:
Australia 1800 069 486New Zealand 0508 069 486
WARRANTY
TO ENSURE A SPEEDY RESPONSE PLEASE HAVE THE MODEL NUMBER AND DATE OF PURCHASE AVAILABLE. A CUSTOMER SERVICE REPRESENTATIVE WILL TAKE YOUR CALL AND ANSWER ANY QUESTIONS YOU MAY HAVE RELATING TO THE WARRANTY POLICY OR PROCEDURE.
OZITO Australia/New Zealand (Head Office) 1-23 Letcon Drive, Bangholme, Victoria, Australia 3175.
The benefits provided under this warranty are in addition to other rights and remedies which are available to you at law.
Our goods come with guarantees that cannot be excluded at law. You are entitled to a replacement or refund for a major failure and for compensation for any other reasonably foreseeable loss or damage. You are also entitled to have the goods repaired or replaced if the goods fail to be of acceptable quality and the failure does not amount to a major failure.
Generally you will be responsible for all costs associated with a claim under this warranty, however, where you have suffered any additional direct loss as a result of a defective product you may be able to claim such expenses by contacting our customer service helpline above.
0915
1 YEAR REPLACEMENT WARRANTYYour product is guaranteed for a period of 12 months from the original date of purchase and is intended for DIY (Do It Yourself) use only. If a product is defective it will be replaced in accordance with the terms of this warranty. Warranty excludes consumable parts, for example: viscosity cup, cleaning needle, nozzle, filter, paint pot.
WARNINGThe following actions will result in the warranty being void.• If the tool has been operated on a supply voltage other than
that specified on the tool.• If the tool shows signs of damage or defects caused by or
resulting from abuse, accidents or alterations.• Failure to perform maintenance as set out within the
instruction manual.• If the tool is disassembled or tampered with in any way.
• Professional, industrial or high frequency use.