instruction manual bedienungsanleitung manuel d ... · instruction manual bedienungsanleitung...
TRANSCRIPT

Instruction ManualBedienungsanleitung
Manuel d’utilisationManuale di istruzioni
Manual de instrucciones
7s7
SD Logo is a trademark of SD-3C, LLC

2 SPEKTRUM DX7s • RADIO INSTRUCTION MANUAL
EN
WARNING: Read the ENTIRE instruction manual to become familiar with the features of the product before operating. Failure to operate the product correctly can result in damage to the product, personal property and cause serious injury.
This is a sophisticated hobby product. It must be operated with caution and common sense and requires some basic mechanical ability. Failure to operate this Product in a safe and responsible manner could result in injury or damage to the product or other property. This product is not intended for use by children without direct adult supervision. Do not attempt disassembly, use with incompatible components or augment product in any way without the approval of Horizon Hobby, Inc. This manual contains instruc-tions for safety, operation and maintenance. It is essential to read and follow all the instructions and warnings in the manual, prior to assembly, setup or use, in order to operate correctly and avoid damage or serious injury.
The following terms are used throughout the product literature to indicate various levels of potential harm when operating this product:
NOTICE: Procedures, which if not properly followed, create a possibility of physical property damage AND little or no possibility of injury.
CAUTION: Procedures, which if not properly followed, create the probability of physical property damage AND a possibility of serious injury.
WARNING: Procedures, which if not properly followed, create the probability of property damage, collateral damage and serious injury OR create a high probability of superficial injury.
NOTICE
All instructions, warranties and other collateral documents are subject to change at the sole discretion of Horizon Hobby, Inc. For up-to-date product literature, visit horizonhobby.com and click on the support tab for this product.
Meaning of Special Language
WARNING AGAINST COUNTERFEIT PRODUCTS Thank you for purchasing a genuine Spektrum product. Always purchase from a Horizon Hobby, Inc. authorized dealer to ensure authentic high-quality Spektrum product. Horizon Hobby, Inc. disclaims all support and warranty with regards, but not limited to, compatibility and performance of counterfeit products or products claiming compatibility with DSM or Spektrum.
WARRANTY REGISTRATIONVisit www.spektrumrc.com/registration today to register your product.
GENERAL NOTES • Models are hazardous when operated and maintained
incorrectly. • Always install and operate a radio control system correctly. • Always pilot a model so the model is kept under control in
all conditions. • Please seek help from an experienced pilot or your local
hobby store. • Contact local or regional modeling organizations for
guidance and instructions about flying in your area. • When working with a model, always power on the
transmitter first and power off the transmitter last. • After a model is bound to a transmitter and the model is set
up in the transmitter, always bind the model to the transmitter again to establish failsafe settings.
PILOT SAFETY• Always make sure batteries are fully charged before flying. • Time flights so you can fly safely within the time allotted by
your battery.• Do a range check of the transmitter and the model before
flying the model. • Make sure control surfaces correctly respond to transmitter
controls before flying. • Do NOT fly a model near spectators, parking areas or any
other area that could result in injury to people or damage to property.
• Do NOT fly during adverse weather conditions. Poor visibility can cause pilot disorientation and loss of control of a model. Wind, moisture and ice can cause loss of control and dam-age to a model.
• Do NOT point transmitter antenna directly at a model. The signal coming from the tip of the antenna is weak by comparison to the signal coming from other parts of the antenna.
• When a flying model does not respond correctly to controls, land the model and correct the cause of the problem.

3SPEKTRUM DX7s • RADIO INSTRUCTION MANUAL
EN
TABLE OF CONTENTSQuick Start Guide .........................................................4Charging Your Transmitter .............................................5Transmitter Batteries ....................................................5Transmitter Functions ...................................................6Binding........................................................................7Using the transmitter ....................................................8
Antenna ...................................................................8Main Screen ............................................................8
Navigation ...................................................................9System Settings ...........................................................9
User Name...............................................................9Contrast ..................................................................9Mode.......................................................................9Selecting a Region (EU Version) ...............................10Selecting a Language .............................................10
Acro and Heli setup ....................................................10System Setup ............................................................11
Model Select ..........................................................11Model Type ............................................................11Model Name ..........................................................11Switch Select .........................................................11Model Reset...........................................................11Model Copy ...........................................................12Warnings ...............................................................12Telemetry...............................................................12Frame Rate ............................................................13
Acro ..........................................................................13Wing Type ..............................................................13Differential .............................................................14Flap System ...........................................................14
Heli ...........................................................................14Swash Type ...........................................................14Throttle, Pitch and Tail Curves .................................15Gyro ......................................................................15Governor................................................................16
Flight Mode............................................................16Swashplate ............................................................16
Function List ..............................................................17Servo Setup ..........................................................17D/R & Exponential ..................................................17Throttle Cut ............................................................17Range Test .............................................................18Timer ....................................................................19Monitor ..................................................................19Trainer ...................................................................19
Failsafes ....................................................................20SmartSafe Failsafe .................................................20Hold Last Command ...............................................20Preset Failsafe .......................................................20
Receiver and servo information ...................................21Receiver Installation ...............................................21Servo Installation ....................................................21Servo Precautions ..................................................21Power System Requirements ..................................21Recommended Power System Guidelines ................21
Appendix ...................................................................22Mode Conversion ...................................................22Installing Optional LiPo Battery Pack ........................23Servo Control .........................................................24
Troubleshooting Guide ................................................27Parts list ....................................................................27AMA National Model Aircraft Safety Code ....................28FCC Information .........................................................29FAA Information .........................................................29Warranty and Service Contact Information ...................31Parts Contact Information ...........................................31Compliance Information for the European Union ...........31Acro Model setup .....................................................134Heli model setup ......................................................135
BOX CONTENTS• 2000mAh Ni-MH Transmitter Pack (Installed in transmitter)• 128MB SD Card• 12V DC Power Supply (with 4 Clips)• SPMAR8000 8-Channel Receiver
(Not included with Transmitter only versions)
• SPM6803 Male/Female Bind plug• Manual (User/Inst./Quick Start Guide)• Hex Wrench• DX7s Neck Strap• DX7s Decal Sheet
This manual covers the versatile Spektrum DX7s 7-channel computerized transmitter. Please visit www.spektrumrc.com for current information and firmware updates for DX7s programming. This transmitter’s field-proven features are ready to be applied to your model’s setup, control and tuning.

4 SPEKTRUM DX7s • RADIO INSTRUCTION MANUAL
EN
1. Install Main ReceiverCover the main receiver in protective foam and attach the receiver in your gas or glow aircraft using rubber bands or hook and loop straps. In electric airplanes or helicopters, use double-sided foam tape to attach the main receiver to the model.
2. Install Remote ReceiverInstall the remote receiver in the model using double-sided tape. Make sure the remote receiver antennas are more than 2 inches from the main receiver antennas. Always install remote antennas perpendicular to the main receiver’s antennas. Connect the main and remote receivers using the included 6-inch remote receiver lead.
3. Connect Servos to the Main Receiver
4. Install the Telemetry ModuleInstall the telemetry module in the aircraft using double-sided tape. Connect the telemetry module to the receiver’s Data Port. Receiver voltage and Flight Log data displays on your telemetry screen. If you want an external voltage (main flight pack voltage) to show on the telemetry screen, connect the voltage telemetry sensor in the telemetry module. Connect voltage telemetry wires to the input lead on the aircraft’s ESC using solder, with the polarity red=positive and black=negative.
5. Charging Radio BatteriesFirst, connect the included power supply to the charging port on the side of the transmitter and place the transmitter on a non-flammable surface. Second, connect the AC adapter to a power outlet using the appropriate outlet clip. Charge the included NiMH battery for 10-12 hours.
CAUTION: Do not overcharge batteries. Charging times greater than 12 hours may damage the battery and transmitter.
6. Bind the Receiver and Telemetry Module A. Insert the bind plug in the receiver’s BIND/DATA port. In
systems using a separate battery pack and 3-wire switch, insert the bind plug to the charge jack.
B. Power on the receiver. The LEDs on the receivers will flash. C. Move transmitter sticks and switches to the desired failsafe
positions (low throttle and neutral control positions). D. Push in the Trainer/Bind button on the transmitter while pow-
ering on the transmitter. Once the transmitter has entered bind mode you can release the Bind button.
E. The LED on the receiver will show solid amber and the system will connect after several seconds.
F. Remove the bind plug. Typical Electric - Receiver uses the ESC for power. Typical Glow/Gas - Uses receiver battery pack and 3-wire switch.
7. Charge and Test Receiver BatteriesLoss of power to the receiver and servos is the leading cause of failure. When using a receiver battery pack, make sure the pack is properly charged and check the voltage under a 1A or 2A load. Do not fly if the voltage is below 4.8V for a 4-cell pack while loaded. If the voltage falls below the receiver’s operating thresh-old (3.5 volts) at any time, an interruption in the link may occur.
8. Programming the TransmitterPower on the transmitter, then power on the receiver. Make sure the model responds to the transmitter controls as desired. Use Servo Setup in the transmitter to reverse channels or adjust travel as needed. Program other functions as needed to safely control your model. Refer to additional sections of the manual for more information about programming your transmitter.
9. Re-Bind the SystemOnce the transmitter is programmed for your model, re-bind the system to set the failsafe position. If your model uses retracts, re-bind the system with retracts in the down position. If the sig-nal is lost, the throttle servo will go to the preset position chosen during binding (normally low-throttle).
10. Range CheckA. With the system powered and the model restrained from
flyaway, stand 30 paces (approximately 90 feet/30 meters) away from the model.
B. Face the model and hold the transmitter in your normal flying position. Go to the transmitter’s Range Test screen and press the Trainer button on the top of the transmitter. This causes reduced power output from the transmitter.
C. Operate transmitter controls to make sure you have total control of the model while holding down the trainer button.
D. If control issues exist, refer to the Troubleshooting Guide. If you continue to experience control issues, contact the appropriate Horizon Hobby Product Support office or go to horizonhobby.com to find a local Spektrum distributor in your country of service.
QUICK START GUIDE

5SPEKTRUM DX7s • RADIO INSTRUCTION MANUAL
EN
TRANSMITTER BATTERIES
• Read all safety precautions and literature prior to use of this product• Never allow minors to charge battery packs• Never drop charger or batteries• Never attempt to charge damaged batteries• Never attempt to charge a battery pack containing different types
of batteries• Never charge a battery if the cable has been pinched or shorted• Never allow batteries or battery packs to come into contact with
moisture at any time• Never charge batteries in extremely hot or cold places (recom-
mended between 50–80 degrees F or 10–27 degrees C) or place in direct sunlight
• Always disconnect the battery after charging, and let the charger cool between charges
• Always inspect a new battery before charging• Always terminate all processes and contact Horizon Hobby if the
product malfunctions• Always keep batteries and charger away from any material that
could be affected by heat (such as ceramic and tile), as they can get hot
• Always end the charging process if the charger or battery be-comes hot to the touch or starts to change form (swell) during the charge process
Battery and Charging Precautions and WarningsFailure to exercise caution while using this product and comply with the following warnings could result in product malfunction, electrical issues, excessive heat, FIRE, and ultimately injury and property damage.
Charging Your TransmitterThe DX7s includes a rechargeable NiMH battery pack. The DX7s has a built-in multi-chemistry charger designed to charge 4-cell NiMH and 2-cell LiPo batteries at a charge rate of 200mAh. The charge port on the right side of the transmitter is not polarity-dependent.
CAUTION: Never connect a peak detection charger or fast charger to your DX7s. These devices can damage the internal charge circuit. Use only the included 12V DC source.Charge in a safe place NOT affected by the usual heat that comes from a charger and batteries during charging.
1. Power off your transmitter. 2. Connect the power supply’s connector to the transmitter’s
charge port. 3. Connect the included 12-volt power supply to a power outlet
using the appropriate outlet clip. 4. The blue LED on the front of the transmitter will illuminate
during charging.5. The blue LED will remain lit when charging the included
NiMH battery. When charging the optional LiPo battery the blue LED will go off when charging is complete.
6. Disconnect the transmitter from the power supply when charging is complete.
7. Disconnect the power supply from a power outlet when the power supply is not in use.
For first use, charge the included NiMH battery pack for 10 to 12 hours until fully charged. Use the included 12V power supply.If you purchase the optional LiPo battery pack (SPMB4000LPTX), the initial charge can take up to 30 hours.
CAUTION: Never leave a charging battery unattended.
Battery AlarmThe System Settings Screen allows you to change the battery type and low alarm settings.• Always set the Battery Type to correspond with the chem-
istry of battery that is installed to enable the correct low voltage limit. When using a LiPo battery, you must connect the battery to the transmitter and then change the battery type in the programming. See Appendix for LiPo battery pack installation.
• An alarm will sound when the battery reaches the low volt-age limit (4.3V for NiMH, 6.4V for LiPo).CAUTION: Never change the low voltage limit for LiPo
batteries from 6.4V. Doing so could over-discharge the battery and damage both battery and transmitter.
6 SPEKTRUM DX7s • RADIO INSTRUCTION MANUAL
EN
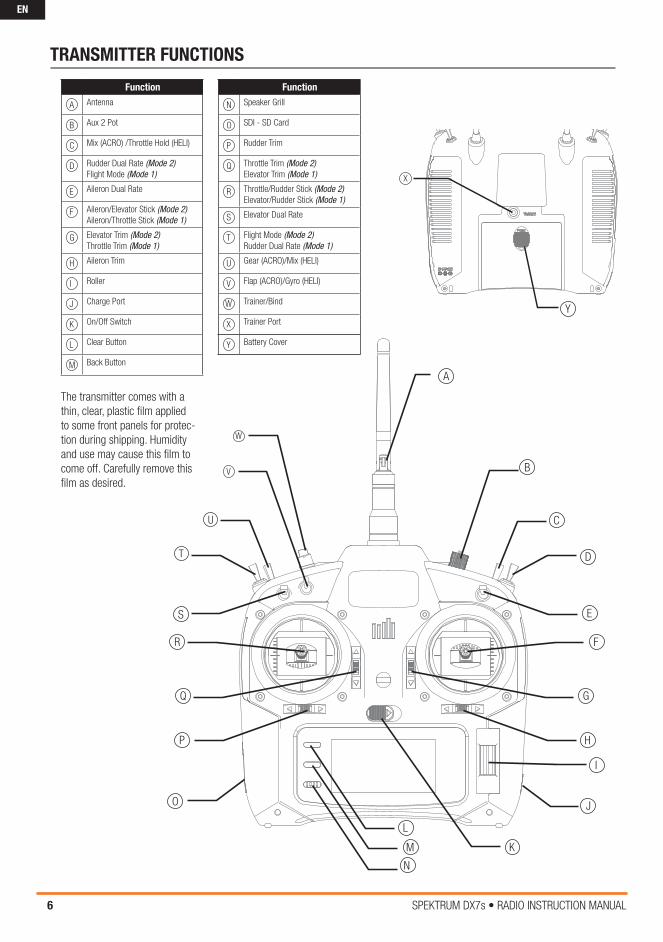
Function
A Antenna
B Aux 2 Pot
C Mix (ACRO) /Throttle Hold (HELI)
D Rudder Dual Rate (Mode 2)Flight Mode (Mode 1)
E Aileron Dual Rate
F Aileron/Elevator Stick (Mode 2)Aileron/Throttle Stick (Mode 1)
G Elevator Trim (Mode 2)Throttle Trim (Mode 1)
H Aileron Trim
I Roller
J Charge Port
K On/Off Switch
L Clear Button
M Back Button
Function
N Speaker Grill
O SDI - SD Card
P Rudder Trim
Q Throttle Trim (Mode 2)Elevator Trim (Mode 1)
R Throttle/Rudder Stick (Mode 2)Elevator/Rudder Stick (Mode 1)
S Elevator Dual Rate
T Flight Mode (Mode 2)Rudder Dual Rate (Mode 1)
U Gear (ACRO)/Mix (HELI)
V Flap (ACRO)/Gyro (HELI)
W Trainer/Bind
X Trainer Port
Y Battery Cover
The transmitter comes with a thin, clear, plastic film applied to some front panels for protec-tion during shipping. Humidity and use may cause this film to come off. Carefully remove this film as desired.
TRANSMITTER FUNCTIONS
Y
R
S
Q
P
O
M
N
L
K
J
I
H
G
F
E
D
C
B
A
U
T
V
W
X

7SPEKTRUM DX7s • RADIO INSTRUCTION MANUAL
EN
BINDINGYou must bind the receiver to the transmitter before it will operate. Binding teaches the receiver the specific code of the transmitter. Once bound, the receiver only connects to the transmitter when the previously bound model memory is selected. You will need to rebind the receiver after the model is set in the transmitter to fully program the model’s failsafe positions. If another model memory is selected, the receiver will not connect. This feature is called ModelMatch™ and prevents flying a model using the wrong model memory.
2. 3.
2. 3.
4.
6. 7.
HOLD BUTTON WHILE POWERING ON
Mode 2 Shown
1.
1.
4.
HOLD BUTTON WHILE POWERING ON
Mode 2 Shown
5.
5. 6.
Binding Using the Receiver and Receiver Battery
Binding Using the Receiver and ESC
2. 3.
2. 3.
4.
6. 7.
HOLD BUTTON WHILE POWERING ON
Mode 2 Shown
1.
1.
4.
HOLD BUTTON WHILE POWERING ON
Mode 2 Shown
5.
5. 6.
1. Lower throttle to the lowest position and make sure the transmitter is powered off.
2. Insert bind plug into the BIND/DATA port.3. Insert receiver battery into ANY open port. The receiver’s LED
will flash when the receiver is ready to bind.4. While pressing the Trainer/Bind button, power on the
transmitter.
5. Release the Trainer/Bind button after the receiver has stopped flashing rapidly, once the receiver’s LED stays illuminated; this indicates the receiver is bound to the trans-mitter. The screen also provides binding information.
6. Remove the bind plug from the receiver.
1. Lower throttle to the lowest position and make sure the transmitter is powered off.
2. Insert bind plug into the BIND/DATA port.3. Insert ESC plug into the THRO port.4. Connect battery to ESC and turn on ESC switch, if available.
The receiver’s LED will rapidly flash when the receiver is ready to bind.
5. While pressing the Trainer/Bind button, power on the trans-mitter.
6. Release the Trainer/Bind button after the receiver has stopped flashing rapidly, once the receiver’s LED stays illuminated; this indicates the receiver is bound to the transmitter. The screen also provides binding information.
7. Remove the bind plug from the receiver.

8 SPEKTRUM DX7s • RADIO INSTRUCTION MANUAL
EN
E
GI
K
Main Screen
USING THE TRANSMITTERAntennaThe transmitter antenna bends and turns at the hinge (A) and only bends and turns to the front of the transmitter. The antenna cannot point to the back of the transmitter. Turn the antenna tip to point away from the model and ground. Signals transmit strongest from the antenna shaft, not the tip.
WARNING: Do not pick up the transmitter by the antenna. Do not alter or put weight on the antenna. Damage to antenna parts can decrease transmitter signal strength, which can result in loss of model control, injury or property damage.
NOTICE: While DSMX allows you to use more than 40 transmit-ters simultaneously, when using DSM2 receivers, DSMX receiv-ers in DSM2 mode or transmitters in DSM2 mode, do not use more than 40 transmitters simultaneously.
A
SD CardUse an SD Card and the Transfer SD Card screen in the System Setup list to to do the following:• Import (copy) models from another DX7s transmitter• Export (transfer) models to another DX7s transmitter• Update AirWare™ software in the transmitter• Share model files among DX7s transmitters.
Put an SD card in the SD card slot on the left side of the transmit-ter with the card’s label facing forward.
Function
A Transmitter Battery Charge Level
B Model Memory
C Model Name
D Model Type
EElevator Trim (Mode 2)Throttle Trim (Mode 1)
F Aileron Trim
GDigital Battery Voltage (an alarm sounds and the screen flashes when battery charge gets down to 4.3V when using an NiMH battery or 6.4V for a LiPo battery.)
H Rudder Trim
I Timer
JThrottle Trim (Mode 2)Elevator Trim (Mode 1)
J
IH
GF
E
DCBA

9SPEKTRUM DX7s • RADIO INSTRUCTION MANUAL
EN
SYSTEM SETTINGSUse the System Setting screen to establish the overall transmitter setting that will apply to ALL model memories. These settings include: User Name, Contrast, Mode, Region and Language. If you select Mode One, then Mode One will be selected for all 20 model memories. Even when models are imported from an SD card, the system settings in the transmitter will remain.
Controls for Navigation• Use the roller, Back and Clear buttons near the LCD screen
for DX7s programming. • Turn or press the roller to move through, select or change
screen content. • Use the Back button to go to the previous screen (for
example, to go from the Mixing Screen to the Function List). • Use the Clear button to change a selected value on a screen
to its default setting (Some values do not have a default set-ting. For example, there is no default alarm type in the Timer Screen).
• While the transmitter is powered on, go to the Model Select screen by pressing the Clear and Back buttons at the same time. This is Direct Model Access, and will let you go to the Model Select Screen without powering off and on.
• Press and hold the roller while powering on the transmitter to show the System Setup list. This list is usually used when setting up a model and is not often used at the flying field.
No radio transmission occurs when a System Setup screen is displayed, preventing accidental damage to link-ages and servos during changes to programming.
• Powering on the transmitter without touching any controls will show the Main Screen and the active model memory. Press the roller while on the Main Screen to show the Func-tion List.
NAVIGATION
TurnPress Press
Enter, Choose or Exit
Move between options or change value in an option
Hold for 3 seconds and release to move to the Main Screen
Turn HoldPress
Accessing System SettingsThe Model Select function is used to change to a different modelmemory, typically when switching from the current model. You can store up to 20 models in the DX7s model memory. Access the model select function through the System Setup mode or through Direct Model Access (pressing the Clear and Back buttons at the same time). Direct Model Access allows you to access the model select function at any time the main screen or a telemetry screen is displayed.
ContrastIn the Systems Settings screen rotate the roller to highlight User Contrast then press.
Rotate the roller to adjust the contrast (from 1 to 20) noting it on screen. Press to accept.
User NameUser Name allows the identification of the owner to be pro-grammed into the transmitter. The user name appears during the startup process at the lower left corner of the startup screen.
To Program a User NameIn the Systems Settings screen rotate the roller to highlight User Name then press. Highlight the desired character position then press the roller to access that position. Rotate the roller to change to the desired character. Press to accept.
Repeat the process until the name is complete. Note that the User Name displays on the lower left of the startup screen.
ModeSee Appendix for Mode Conversion.

10 SPEKTRUM DX7s • RADIO INSTRUCTION MANUAL
EN
ACRO AND HELI SETUPFunction List and System Setup list content is dependent on the Model Type (ACRO or HELI) selected for your active model memory.
ACRO
System SetupModel SelectModel Type Model NameWing Type (can enable other programming options)Switch SelectModel Reset
Model CopyWarningsTelemetry (requires telemetry module and sensors)Frame RateTrainerSystem SettingsTransfer SD Card
HELI
System SetupModel SelectModel TypeModel NameSwash Type (enable other programming options)Switch SelectF-Mode Setup
Model ResetModel CopyWarningsTelemetry (requires telemetry module and sensors)Frame Rate TrainerSystem SettingsTransfer SD Card
Function ListServo SetupD/R & ExpoThrottle CutThrottle CurvePitch CurveSwashplate (made available by Swash Type)
Gyro (requires Gyro channel)Governor (requires Governor channel)Tail Curve (used for non-tail lock gyros)MixingRange TestTimerMonitor
Function ListServo SetupD/R & ExpoDifferential (requires dual ailerons, elevons or flaperons on sepa-rate channels)Throttle Cut
Flap System (requires flap channel or channels)MixingRange TestTimerMonitor
Selecting a Region (EU Version)In the Systems Settings screen rotate the roller to highlight Region then press the roller to select the Region function. Note that two regions are available for EU radios only. EU328 (compli-ant for European countries) and FR328 compliant for France. US radios are fixed to US-247 USA compliant.Rotate the roller to select the desired Region based on where the radio will be used. With Region selected, press the roller to accept that region.
Selecting a LanguageIn the Systems Settings screen rotate the roller to highlight Language then press the roller to select the Language function. Note that five Languages are available, English, German, Spanish, French, and Italian.
Rotate the roller to select the desired Language. When the desired Language is selected, press the roller to accept that Language.

11SPEKTRUM DX7s • RADIO INSTRUCTION MANUAL
EN
Model SelectThe Model Select function is used to change to a different modelmemory, typically when switching from the current model. You can store up to 20 models in the DX7s model memory. Access the model select function through the System Setup mode or through Direct Model Access (pressing the Clear and Back buttons at the same time). Direct Model Access allows you to access the model select function at any time the main screen or a telemetry screen is displayed.
SYSTEM SETUP
Model TypeModel Type programs the selected model memory to function in Helicopter (HELI) or Airplane (ACRO) programming. Always choose model type before doing any other programming for a model. Each model memory can be either HELI or ACRO. When you change model types (Heli to Acro or Acro to Heli) all current programming in the selected model memory will reset to the factory default settings. All previous settings will be lost.
Model NameNaming a model is normally done during initial setup. Name a model memory in the Model Name Screen using up to 10 characters (a mix of upper and lower case letters, numbers and symbols) to identify a model. Assign a name that helps you quickly identify and select a model memory. You can modify or change names at any time without affecting other programming.
Switch SelectThe Switch Select function assigns or inhibits switches or the knob to functions or channels. Functions which you can assign to switches vary between HELI and ACRO types.
Model ResetModel Reset is typically used to clear the programming for a model you will no longer be flying. Model Reset resets the selected model’s programming to fac-tory default. No other model memories are affected. When a model’s memory is reset, all programming for that model is permanently deleted and cannot be recovered.

12 SPEKTRUM DX7s • RADIO INSTRUCTION MANUAL
EN
WarningsThe Warnings function programs an alarm to sound or a vibration to be made if specific switches or stick positions are in an unsafe position when the transmitter is powered on. When such an unsafe condition exists, an alarm sounds, the screen displays a warning and transmission will not occur until the stick or switch is moved back to a safe position.You can program additional warnings to alert yourself of unsafe conditions during operation (for example component overheating or low battery power).
In helicopter model type, default warnings include Throttle, Stunt and Hold. In airplane model type, default warnings include Throttle Low, Flaps and Gear.
Model CopyThe Model Copy Screen supports copying the active model’s programming to one of the other 19 model memories. Common uses of this Model Copy function include:• Organize model memories by category, type, etc. You will
need to re-bind after moving models among the 20 memo-ries.
• Experiment with model programming while keeping a safety copy.
• Use Model Copy to try two setups for one model, but remem-ber to re-bind the receiver each time you change between model memories.
• Copy an existing model’s programming to a memory for a similar model. Some pilots simplify programming this way. For example, a JR® Vibe™ 50 helicopter with 120CCPM mixing, gyro and governor programming is a good program-ming start for another nitro-powered 120CCPM mixing
helicopter. Also, an Extra 300 with dual aileron and elevator servos programmed for dual flap and dual elevator mixing is a good programming start for another aerobatic airplane with the same control system.
• Copying to a model memory overwrites and deletes existing programming in that memory. Refer to Transfer SD Card for saving model memories on an SD card.
TelemetryThe DX7s is ready to operate with telemetry modules. Please scroll through available options on the Telemetry Screen for ideas about what sensor types you would like to purchase.Refer to www.spektrumrc.com for more information about new telemetry modules and DX7s firmware updates to support telemetry options. Telemetry input to the transmitter requires correct installation and binding of telemetry modules. Telemetry data is only avail-able on screen when using a receiver with a telemetry module.
Bind the Telemetry Module and Receiver1. Connect the data port on the telemetry module to the data
port on the receiver using the data lead. 2. Press and hold the bind button on the side of the telemetry
module. 3. While holding the bind button on the telemetry module,
power on the receiver. The main receiver, attached remote receiver and the telemetry module LEDs will blink, indicating the system is in bind mode.
4. Put throttle and switches in the desired failsafe positions (normally low throttle and neutral sticks) and put the trans-mitter into bind mode.
5. The transmitter’s main screen will show the receiver type. After several seconds, the system connects and the trans-mitter will show the Main Screen.
6. Go to the Telemetry Screen and make sure flight log data and receiver voltage shows.

13SPEKTRUM DX7s • RADIO INSTRUCTION MANUAL
EN
Frame RateThe Frame rate function supports 22ms and 11ms. Default is 22ms. Change to 11ms when a 11ms Frame rate receiver is used with compatible servos. The 11ms fast frame rate is not compatible with some types of analog servos, so the 22ms rate may be required.
Wing TypeUse the Wing Type Screen to select wing and tail types to match your airplane model. Diagrams show the servo setups with the named types. Available wing and tail types are shown in the screenshot illustrations below.
Select wing and tail types before doing other programming such as Servo Setup (Travel, Sub-Trim and Reverse), D/R and Expo, Flap System, Differential or Mixing. V-Tail and Elevon Wing selections may require attention to Servo Setup Reverse to make model respond correctly to controls. See Appendix for more recommendations.
ACRO
NOTICE: Refer to your airplane manual for recommended control throws.
CAUTION: Always do a Control Test of your model with the transmitter after programming to make sure your model responds as desired.

14 SPEKTRUM DX7s • RADIO INSTRUCTION MANUAL
EN
Flap SystemThe DX7s flap system supports programming Norm (normal), Mid (middle—only available when using the three-position Flap Switch) and Land (landing) flap and elevator positions. Use of flaps can enable takeoff and landing in shorter distances. Assign a switch to enable a specific flap setting during flight. Change Speed value to slow flap travel for a scale effect on your model. Unless flaps are enabled in the Wing Type Screen, the flap system is inhibited (INH). See Wing Type Screen for available flap setup choices.
Swash TypeUse the Swash Type Screen to select from swashplate types to match your helicopter model. Available swash types are shown in screenshot illustrations below.
Select swashplate type before doing any other programming such as Servo Setup (Travel, Sub-Trim and Reverse).
HELI
NOTICE: Refer to your helicopter, gyro and governor manuals for programming recommendations.
CAUTION: Always do a Control Test of your model with the transmitter after programming changes to make sure your model responds as desired.
DifferentialThe Differential function decreases the amount an aileron moves down without affecting the amount the other aileron moves up. This can decrease adverse yaw (right or left movement of the aircraft nose) tendencies during roll maneuvers. Positive (+) and negative (-) differential is available; however, normally more up (+) aileron travel is required than down (-). Assign a switch to enable differential values during flight or select “On” so that differential is always enabled.
Differential programming is only available if wing control surfaces (aileron, flaperon or elevon) are connected to separate servos on separate channels. See the Wing Type Screen to see available wing setup choices.

15SPEKTRUM DX7s • RADIO INSTRUCTION MANUAL
EN
Throttle, Pitch and Tail CurvesThe Throttle, Pitch and Tail Curve Screens support changing the relationship between control stick positions (five positions, from 0 to 100%, in 25% increments) and channel output. Curve programming can change channel response from a linear rate for small adjustment of response among flight modes. These functions support adjustment of response during flight modes of N (normal, or 0 on an assigned switch (see Switch Select)), 1 (Stunt 1, or 1 on an assigned switch (see Switch Select)) and H (Hold on the assigned Throttle Hold switch (see Flight Mode)). These flight modes are shown as the boxes marked N, 1 and H on the Curve screens.The screens display a 5-point graph on the left to show the result of the values chosen on the right. Moving the throttle stick moves a vertical line across the curve graphic. Make Expo ACT (active) to smooth the sharp-angled shape into a curve across the five stick position values.
Throttle CurveThis function supports adjustment of throttle response in three flight modes. When properly adjusted, the main rotor head speed or rpm (revolutions per minute) should remain consistent in all maneuvers and throttle stick positions. A constant main rotor head speed and proper idle speeds improve the operation of other systems. Throttle curves vary among powerplants, so adjust values in test flights to get a consistent main rotor head speed in all flight modes.
Pitch CurveThis function supports adjustment of collective pitch (up and down movement of the swashplate, using available swashplate servos) in three flight modes.
Tail Curve This function mixes tail rotor input with the throttle/collective function to counter torque from the main rotor blades when using a non-heading hold (tail lock) gyro or when using rate mode on a gyro.
GyroThe Gyro function supports setting gain for gyros that operate on transmitter programming or with flight modes. Assign the receiver channel connected to the gyro, then assign the switch for gyro options. You can also assign values to available switch positions (from one to three rates are available, depending on the switch assigned). Make sure the gyro operates correctly and compensates in the correct direction.

16 SPEKTRUM DX7s • RADIO INSTRUCTION MANUAL
EN
GovernorThe Governor Screen supports adjustment of the engine revolutions per minute (rpm) when using a Governor or throttle limiter. Program governor values assigned to the flight mode switch or another switch as desired. RPM values can be adjusted in 0.5% increments. Make sure the governor and receiver are connected. Assign a switch to governor control, select the channel connected to the governor, then assign values to available switch positions. The governor and the gyro must use two different channels. If the gyro function uses a channel, it will not appear in the governor list.
Values displayed on the screen are the corrected governor values. 0% represents 1.500ms (or power off) with most governors.
Flight ModeThe Flight Mode (F-Mode) Screen assigns switches for Flight Mode and Hold. The Flight Mode default switch assignment is Flight Mode–Flight Mode switch and Hold–Inhibited. Assign Flight Mode and Hold to available switches as desired.
SwashplateThe Swashplate Screen supports adjustment of the amount and direction of swashplate travel of the aileron, elevator and/or pitch functions. Options vary with the Swash Type selected for a model (see Swash Type). A value change on the Swashplate Screen causes change to the overall travel of a function and not to overall travel of only 1 servo or channel. For example, increasing pitch values increase travel of all servos controlling pitch. Swashplate values will vary among models.You can use positive or negative Swashplate values as needed for correct direction response of the helicopter.1. Before making swashplate value adjustments in this screen,
make sure the servos move in response to controls in the desired direction by “Reversing” in Servo Setup so that:A. The aileron stick input tilts the swashplate to the right
and left.B. The elevator stick input tilts the swashplate forward and
back.C. The pitch/throttle stick input moves the whole
swashplate up and down.
2. Adjust each swashplate value (positive or negative) for cor-rect overall swashplate travel.
3. Always enable Expo when using a standard rotating-arm servo.
NOTICE: This Expo application delivers linear movement of the swashplate from a standard rotary servo. When Expo is inhibited, the standard servo’s arm moves on a curved path, with decreased swashplate movement at the extremes of the servo arm’s travel. Do not enable Expo when using a linear servo.

17SPEKTRUM DX7s • RADIO INSTRUCTION MANUAL
EN
FUNCTION LISTServo Setup Servo Setup supports travel adjustment, Sub Trim, and servo reversing. Servo Setup screens feature a servo monitor that shows a visual reference for adjustments.Travel adjust sets the overall travel or endpoints of the servo. You can use Travel adjust to:• prevent overthrowing a control surface or blocked movement• increase or decrease overall control surface throw• change flight performance of the model
Sub-Trim adjusts the center point for a servo’s travel CAUTION: Use only small sub-trim values so a servo’s
maximum travel (in either direction) is NOT overdriven.
Servo Reversing is used to reverse the direction of a servo if a control moves in the incorrect direction. When reversing the Throttle channel, after pressing reverse, a screen will show
stating “Confirm Throttle Reverse. Are you sure? NO or YES” To confirm, highlight YES and press the roller. A message appears, reminding you to re-bind the system and set a new failsafe. If you do not wish to reverse the throttle, highlight NO and press the roller to prevent the throttle from reversing.
CAUTION: Always test the model after making adjustments to make sure the model responds to controls as desired. Rebind the transmitter to the model and set the failsafe after setting the Servo Setup.
D/R & ExponentialDual Rates and exponentials are available on the aileron, eleva-tor and rudder channels. This adjusts control rates for servos. Adjust the throws (Dual Rate) and center sensitivity (Expo) of the control’s range independently. Designate a switch for moving between control rates for a servo channel. Move the designated switch to change the position (0 or 1) for Dual Rate and Expo values.
CAUTION: Always test the model after making adjustments to make sure the model responds to controls as desired. Dual Rate affects the overall travel of a channel affecting control response sensitivity equally throughout the range of that chan-nel. Decreasing the dual rate decreases the maximum control rate as well as overall sensitivity.
Exponential affects control response sensitivity around center but has no affect on overall travel. Positive and negative exponential values are available. We recommend a positive expo value as it decreases control sensitivity around the center and does not affect maximum travel. Negative exponential values increase sensitivity around neutral and are seldom used.
Throttle CutThe Throttle Cut function is for powering down an engine or mo-tor using a designated switch. Throttle Cut has higher authority than any other flight mode.When the switch is activated, the throttle channel is driven to its programmed value (normally off). Test the Throttle Cut function by activating the programmed switch. This effectively stops the engine or motor. Release the throttle cut switch and normal throttle operation resumes. The value of 0% is low throttle with mid trim. You may use negative values. Make sure the throttle goes to the desired position as shown in the servo monitor on the left side of the screen.
CAUTION: Always test the model after making adjustments to make sure the model responds to controls as desired.

18 SPEKTRUM DX7s • RADIO INSTRUCTION MANUAL
EN
MixingMixing allows control input for a channel to affect more than one channel at a time. Mixing functions support: • Mixing a channel to another channel. • Mixing a channel to itself. • Designating offset or where zero movement is for the sec-
ondary channel. • Linking primary to secondary trim. • Assigning a mix to a switch position.
These mixes are available for each model memory: six program-mable mixes, Cyclic to Throttle (HELI) or Elevator to Flap (ACRO) and Aileron to Rudder (ACRO).
Select a channel for master and slave. Inputs for the mas-ter channel control both the master and slave channels. For example ELE > FLP makes elevator the master channel and flap the slave channel.
Not all programmable mixes have Offset. Change offset value to change the effective center position of the slave channel in one direction (negative in one direction and positive in the other direction).
Set Trim to Act to make primary channel trim adjustment change the secondary channel trim.
A channel monitor on the left side of the screen shows how channels respond to input. An assigned switch must be in an activating position for a mix to show on the monitor.
You can activate ACRO mixes by an assigned switch. HELI mixes are active in one or more assigned flight modes: N (normal), 1 (Stunt 1), H (Hold) and M (Mix). See Flight Mode and Switch Select for assignment of flight modes to switches and switch positions.
CAUTION: Always do a Control Test of your model after changing mixes.
Range TestAlways do a radio system range test before each flying session, especially when flying a new model. All Spektrum aircraft transmitters incorporate a range testing system which, when activated, decreases output power for a range test.1. With the system powered on and the model restrained, stand
30 paces (approximately 90 feet/28 meters) from the model.2. Face the model with the transmitter in your normal flying
position and put the transmitter into range test mode.3. Operate the controls while holding the trainer/bind button.
You should keep full control of the model at 30 paces (90 feet/28 meters).
4. If the model does not respond correctly to controls, make sure receiver antennas, receiver, servos and power supply are operating correctly.
5. Release the trainer/bind button to return transmitter output to full power.
6. Doing a range test while using a telemetry module will display the flight log data on the transmitter screen.
Advanced Range TestingFor models containing large amounts of conductive material, use a Flight Log for an advanced range test. The advanced range test confirms that the receivers are operat-ing correctly in their installed positions. The Flight Log shows RF performance of each receiver. Two people are required for doing the advanced range testing.
1. Connect a Flight Log (SPM9540) to the main receiver’s data port and power on the system (transmitter and receiver).
2. Press the button on the Flight Log until the F- frame losses are displayed.
3. Stand 30 paces (approximately 90 feet/28 meters) away from the model, then face the model with the transmitter in your normal flying position.
4. Put your transmitter into range test mode and decrease the transmitter’s power output.
5. Operate the transmitter controls while holding the trainer switch. You should have full control of the model at 30 paces (90 feet/28 meters) from the model.
6. Have a helper move the model (nose up, nose down, nose toward the transmitter, nose away from the transmitter—similar to how the model will fly) while using the flight log to see the effect of aircraft’s orientation on frame losses.
7. Do this range test for one minute, using the timer on the transmitter. A successful advanced range test shows:
H- 0 holds; F- less than 10 frame losses;A, B, R, L- Frame losses will typically be less than 100.
Compare relative frame losses. If a receiver has significantly higher frame loss values (two to three times more), do the test again. If the results are the same, move the receivers in the model until results improve.

19SPEKTRUM DX7s • RADIO INSTRUCTION MANUAL
EN
TimerThe DX7s Timer function allows you to program a countdown timer or stop watch (count up timer) to display on the mainscreen. An alarm sounds when the programmed time is reached. You can program the timer to start using the trainer switch or automatically when throttle is raised above a programmed position. An internal timer that shows run time for a specific model displays on the Main Screen.
MonitorThe Monitor screen displays the servo positions for each chan-nel graphically and numerically. This is useful to verify program-ming functions, trim settings, mix directions, etc. The numeric value is directly relative to the travel adjust and mix values (e.g., 100% travel adjust equals 100% value in the Monitor).
TrainerThe DX7s features a programmable trainer function with threetrainer modes. The transmitter assigns the trainer function tothe trainer button. The function activates when you press the trainer switch and select one of the three trainer modes. The three trainer Modes include:
InhibitIn Inhibit, the slave transmitter must have the same program-ming as the master (e.g., servo reversing, travel adjust, sub-trim, trims).
ProgrammableWith Programmable, you can program the transmitter to transfer any or all channels when you activate the trainer switch. This is ideal for beginners so the student learns control of individual channels (aileron only for example) while the trainer maintains control of all other channels.
The slave transmitter should be set to factory default settings with Pilot Link Slave trainer type selected if available.
Pilot Link MasterWhen Pilot Link Master is selected, the slave transmitter has control of the stick function only (aileron, elevator, rudder and throttle) while the master maintains control of all other chan-nels and functions (including D/R and switch positions). This is ideal for complex models as the master maintains control of all secondary functions and controls all other channels.
SlaveUse Slave mode when flying with the DX7s as a slave when the master radio has activated its Pilot Link. In this case, there is no need to match programming between the slave and master transmitter.
DX7s Trainer Operation• Bind the transmitter to the model• Connect the controlling trainer cord (SMP6805) to the back
of the master transmitter.• Make sure the slave transmitter batteries are charged.• Make sure the slave transmitter is powered off; the slave
transmitter receives power when you connect the trainer cord.
• Connect the trainer cord to the slave transmitter.• The slave transmitter screen will show information but will
not send a signal to the model.• Release the button on the master transmitter for the master
transmitter to regain control of the model.

20 SPEKTRUM DX7s • RADIO INSTRUCTION MANUAL
EN
FAILSAFES
When you bind your transmitter, you are programming the receiver with failsafe defaults. If connection is lost between the transmitter and receiver, the receiver immediately operates in those preprogrammed default positions. Those positions are failsafes. The AR8000 has three failsafes: SmartSafe Failsafe, Hold Last Command Failsafe, and Preset Failsafe.
SmartSafe FailsafeSmartSafe is a safety feature on the throttle channel only that offers the following benefits:• Prevents electric motors from operating when the receiver
only is turned on (no signal present).• Prevents the speed controller from arming until the throttle is
moved to low throttle position after connection is made.• Shuts off electric motor and reduces gas/glow engines to idle
if signal is lost.• If throttle is at any position other than low, the ESC won’t arm• If connection is lost in flight, SmartSafe sets the throttle to
the position it was in during the binding process.
How To ProgramSmartSafe is automatically set when the receiver is bound.NOTICE: You must put the throttle stick in the low position to store low throttle during binding.
To TestConfirm the failsafe setting is correct by turning off the transmit-ter. The throttle should go to the preset low throttle position.
CAUTION: Make sure the aircraft is restrained on the ground. If failsafe is not set, your aircraft might advance to mid or full throttle.
Hold Last CommandIf you lose connection, all channels except for throttle channel hold last given command and the aircraft continues on its path. So, if you were turning when connection was lost, your aircraft would continue turning.
How To Program1. Leave the bind plug in the bind port through the entire
binding process. 2. Remove bind plug only after receiver connects to transmitter.
To TestConfirm the failsafe settings are correct by turning off the transmitter. All channels except for the throttle should hold the last command.
CAUTION: Make sure the aircraft is restrained on the ground. If failsafe is not set, your aircraft might advance to mid or full throttle.
Preset FailsafeIf the signal is lost, all channels are driven to their failsafe position set during binding.Preset Failsafe is ideal for sailplanes, as spoliers can be deployed during loss of signal, preventing a flyaway.
How To Program1. Insert the bind plug and power on the receiver.2. When the receiver LEDs blink indicating bind mode, remove
bind plug before binding the transmitter to the receiver.3. LED lights will continue to blink.4. Move transmitter’s control sticks and switches to the desired
Preset Failsafe positions then turn it on in bind mode.5. The system should connect in less than 15 seconds.
NOTICE: Failsafe features vary according to receiver, so if us-ing a receiver other than the AR8000, consult your receiver’s instructions for the failsafes that apply.Before flight, ALWAYS confirm your binding is good and failsafe is set. To do this, make sure the system is connected, turn your transmitter off. Confirm that low-throttle is active.
CAUTION: Make sure the aircraft is restrained on theground. If failsafe is not set, your aircraft might advance to midor full throttle.

21SPEKTRUM DX7s • RADIO INSTRUCTION MANUAL
EN
RECEIVER AND SERVO INFORMATIONReceiver InstallationWhere supplied with the transmitter, install the primary receiver in your model. Put the primary receiver in protective foam and install the receiver in the model using rubber bands or hook-and-loop straps. Use thick double-sided foam tape to install the primary receiver in electric airplanes or helicopters.
Install the remote receiver apart from the primary receiver to improve RF path diversity (a receiver’s ability to detect a signal in all conditions). Each receiver needs a different RF environment, especially in aircraft containing conductive materials (such as large gas engines, carbon fiber, pipes, etc.) that block a radio signal.
Install the remote receiver in the model using servo tape. Keep primary and remote receiver antennas at least 2 inches (51mm) apart. Install the receivers so the antenna wires are perpendicu-lar to each other.
In airplanes, install the main receiver in the servo tray in the center of the fuselage. Install the remote receiver in the servo tray by the side of the fuselage or in the turtle deck (space behind the canopy and in front of the vertical stabilizer).
In helicopters, install receivers in the radio tray, where there is usually sufficient room for receiver separation. Where there is not sufficient room, install a receiver on an external receiver mount made of clear plastic.NOTICE: The DSMX DX7s is compatible with all current Spe-ktrum DSM2 and DSMX aircraft receivers, but NOT compatible with the original DSM AR6000 receiver.
CAUTION: When using the DSMX DX7s with parkflyer receivers (the AR6100, AR6110, and AR6115), it’s imperative that these receivers only be flown in parkflyer-type aircraft (small electric airplanes or mini and micro helicopters). Flying receivers designed for park flyers in larger aircraft could cause loss of connection.
Servo InstallationDo not over-tighten mounting screws. See model instructions for installing servo(s) in your model.
Servo PrecautionsDo NOT lubricate servo gears or motors.Do NOT overload retract servos during retracted or extended conditions. Always make sure servo arms and linkages can move freely over the whole path of their intended travel. A blocked servo linkage or servo arm can cause a servo to draw too much current so a battery charge is quickly drained. Always correct control surface vibration, such as “buzz” or “flut-ter.” Vibration can destroy feedback potentiometers in servos. Always install servos using rubber grommets and brass eyelets. Do NOT over-tighten servo mounting screws. Doing so inhibits the screws from dampening vibration. Always make sure a servo arm is fully attached to the servo. Use only supplied servo arm screws. Use of other sizes of screws or screws from other manufacturers can result in damage to the servo.Always remove and discard “yellowed” or otherwise discolored
servo arms. Discoloration shows material may be brittle and can break at any time, possibly causing an aircraft crash.Always make sure model screws and linkages are tight. Vibra-tion loosens screws and linkages so that damage can result.
Power System RequirementsSet up and operate a model so power to the receiver is NEVER interrupted while flying. This is especially critical on giant-scale models that use several high-torque or high-current servos. Power systems unable to provide minimum receiver voltage in flight are the number-one cause of in-flight failures. Some components that cause a receiver to have too little power supply include:
• Receiver battery (number of cells, capacity, cell type, state of charge)
• Switch harness• Battery leads• Regulator (where used), • Power bus (where used)
A Spektrum receiver’s minimum operational voltage is 3.5 volts. This battery charge capacity compensates for discharge during flight or for flight loads larger than ground test loads.
CAUTION: We recommend that you DO NOT fly a model with battery charges at less than 5.3-volts.
Recommended Power System Guidelines1. When setting up large or complex aircraft with multiple high-
torque servos, use a current and voltmeter (HAN172). Plug the voltmeter in an open channel port in the receiver, and with the system on, load the control surfaces on your aircraft by applying pressure with your hand. Monitor the current as you load control surfaces. The voltage should remain above 4.8 volts even when all servos are heavily loaded.
2. With the current meter inline with the receiver battery lead, load control surfaces while monitoring the current. The maximum continuous recommended current for a single heavy-duty servo/battery lead is 3 amps. Short-duration cur-rent spikes of up to 5 amps are acceptable. If your system draws more than these currents, you need to use multiple packs of the same capacity with multiple switches and multiple leads plugged into the receiver.
3. If using a regulator, perform tests for a 5-minute period. A regulator may provide adequate short-term power, but this tests its ability to maintain voltage at significant power levels over time.
4. For really large aircraft or complex models, multiple battery packs with multiple switch harnesses are necessary. No matter what power systems you choose, always carry out test #1. Make sure the receiver is constantly provided with 4.8 volts or more under all conditions.CAUTION: When charging any brand of NiMH battery pack,
make sure the battery is fully charged. Due to the nature of peak charges and variations in charging rates, heat development, and cell types–the capacity reading of a battery charged on a fast peak charger may only reach 80% of its nominal value. Use a charger that displays total charge capacity. Note the number of mAh put into a discharged pack to verify the charge is at full capacity.

22 SPEKTRUM DX7s • RADIO INSTRUCTION MANUAL
EN
Adjust Stick Tension • Adjust stick tension using the screws on the stick gimbals
through holes in the back of the transmitter.• Move the grips on the back of the transmitter case to see
holes marked with an M (for Mode), a vertical arrow and a horizontal arrow.
• Turn the screws in these holes a small amount using a small Phillips screwdriver to adjust tension on the vertical and horizontal gimbals.
When changing modes that require the throttle and elevator to be moved from one side to the other (for example, when chang-ing from Mode 1 to 2), hold a stick fully up or fully down while tightening or loosening the centering screw. Holding the stick decreases the load on the mechanism, making screw adjust-ment easier.
NOTICE: Always do a test of stick tension while turning these screws to ensure stick tension is not too loose or too tight. Tightening a screw too much can damage a spring. Loosening a screw too much can let a spring fall off and cause short- circuit in the transmitter.
CAUTION: Always power off the transmitter, disconnect and remove the battery before opening the transmitter case. Not doing so could result in property damage or injury.
APPENDIXMode ConversionYou can change Modes in your DX7s transmitter among Modes 1, 2, 3 and 4. Make mode changes in the transmitter using the System Settings Screen. Exit the System Settings Screen to save the new Mode number. Power off the transmitter and disconnect the battery.
Adjust Friction Straps• Remove rubber plugs from the back of the transmitter to
adjust friction straps on vertical gimbals. • Use a small Phillips screwdriver to tighten or loosen the
screw for either the ratchet or smooth friction strap. • Always install the plugs after adjusting the friction straps.
Move Throttle Stops Between Gimbals Move the throttle stops or wedges between the left and right control sticks when changing between Modes 1 and 2 or between Modes 3 and 4. These wedges limit the range of the throttle for improved throttle feel. 1. Place the front of the transmitter face down on a foam pad
using care to not push hard on the transmitter which could damage the gimbals or switches.
2. Carefully pull back the rear grips so two screws show. 3. Remove these Phillips screws and four others from the back
of the transmitter.
CAUTION: Make sure no wiring is damaged when opening the transmitter or moving parts in the transmitter.
4. Remove the side rubber panel from the right side of the back of the case (looking from the back of the case).
5. Carefully open the right side of the case and put the back of the case down to the left of the front of the case.

23SPEKTRUM DX7s • RADIO INSTRUCTION MANUAL
EN
6. Remove four screws from two boards near the top of the front of the case. These screws are different sizes for electri-cal safety purposes; you must return them to the same places you remove them from.
7. Carefully move the boards a small amount to get to the screws holding the gimbal cages on the gimbals.
8. Remove eight screws and two gimbal cages from the gim-bals. Make sure no wire connectors are disconnected when moving the gimbal cages.
9. Move the gimbals a small amount to remove a screw and wedge from the top and bottom of the throttle gimbal.
10. Install the wedges on the other gimbal using two screws.
11. Install the cages on the gimbals using the eight screws. 12. Install the boards using the four screws. 13. Carefully close the case, making sure no wiring is pinched
or damaged. 14. Install the six screws and replace the grips on the back and
sides of the transmitter. 15. Guide pins on the grips into transmitter holes so the grips
fit correctly. 16. Power on the transmitter. When a calibration screen shows,
move the control sticks to extremes and to centers as directed to correctly calibrate controls.
Installing Optional LiPo Battery Pack1. Remove battery cover from the back of the transmitter.2. Remove the battery pack and disconnect the battery from
the transmitter power port.3. Remove the U shaped foam and flat foam from the battery
compartment.4. Install the L shaped foam included in the package.5. Connect the battery pack to the transmitter power port.6. Install the optional LiPo battery pack into the transmitter.7. Install the battery cover.
NOTICE: When installing a LiPo battery pack, always set the bat-tery chemistry to LiPo in the Systems Setting screen to correctly set the low voltage alarm.

24 SPEKTRUM DX7s • RADIO INSTRUCTION MANUAL
EN
Recommended Servo Connections
V-Tail Type Connection
Dual Aileron Wing Type Connection
Elevon Wing Type Connection
Recommended Servo Connections
Dual Aileron Wing Type Connection
V-Tail Type Connection
Elevon Wing Type Connection
A
DC
DC
F
F
E
E
B
A B
V-Tail Type Connection
Dual Aileron Wing Type Connection
Elevon Wing Type Connection
Recommended Servo Connections
Dual Aileron Wing Type Connection
V-Tail Type Connection
Elevon Wing Type Connection
A
DC
DC
F
F
E
E
B
A B
A AUX1 servo port (left aileron)B AILE servo port (right aileron)
C ELEV servo port (left V-tail)D RUDD servo port (right V-tail)
E AILE servo port (left aileron)F ELEV servo port (right aileron)
Servo ControlFor a delta wing or elevon wing setting, check the control throw directions. Begin by checking the aileron direction. With right aileron stick movement, the right elevon should move up and the left elevon should move down. If the right elevon moves in the incorrect direction, reverse the channel in the transmitter that the right elevon is plugged into. If the left elevon moves in the incorrect direction, reverse that channel in the transmitter. Once both elevons move in the correct direction with aileron stick movement, check the elevator direction. With up elevator, both elevons should go up and vice versa. If the elevator direction is incorrect, switch the servo channels in the receiver.
The possible servo reversing options for a delta wing model are below:
Aileron Elevator
Normal Reverse
Normal Normal
Reverse Reverse
Reverse Normal

25SPEKTRUM DX7s • RADIO INSTRUCTION MANUAL
EN
TROUBLESHOOTING GUIDEProblem Possible Cause Solution
The system will not connect
Transmitter and receiver are too near each other Move transmitter 8 to 12 feet (2.4 to 3.6m) from receiver
Throttle channel is reversed Move away from large metal objects (vehicles, etc.)
Selected model is not bound in transmitterMake sure correct model is selected and that transmitter is bound to the model
Transmitter accidentally put in bind mode so receiver is no longer bound
Rebind transmitter and receiver
The receiver goes into failsafe mode a short distance away from the transmitter
Check the receiver antenna to be sure it is not cut or damaged
Replace or contact Horizon Product Support
Main and remote receivers too near each otherInstall main and remote receivers at least 2 inches (51mm) apart and perpendicular to each other
Receiver quits responding during operation
Low battery voltage Completely recharge flight battery
Loose or damaged wires or connectors between battery and receiver
Do a check of the wires and connection between battery and receiver. Repair or replace wires and/or connectors
Receiver loses its bind
Transmitter stand or tray could be pressing the bind button
If stand is pressing bind button, remove from stand and rebind
Bind button pressed before transmitter powered on Rebind by performing binding instructions
Receiver slowly blinking at landing
Loss of power to the receiver during flight Check battery voltage
System powered on and connected then receiver pow-ered off without powering off transmitter
Power off transmitter when receiver is powered off
Receiver taking longer than usual to link with transmitter
Transmitter and receiver are operating on DSM2 DSM2 receivers can take longer to link with transmitter
PARTS LIST
Number Description
SPMA9568 Battery Door, DX7s Painted
SPMB2000NMTX 2000mAh 4.8V TX Pack: DX8, DX7s
SPM6831 Replacement Antenna: DX8, DX7s
SPM9551 International 12V Transmitter AC Adapter
SPM6701 Spektrum Deluxe Transmitter Case, Aircraft
SPM6702 Spektrum Transmitter Case Foam
SPM6706 Spektrum Deluxe Double Transmitter Case, Aircraft
Number Description
SPM6707 Spektrum Double Transmitter Case Foam, Aircraft
SPM6708 Spektrum Single Stand Up Transmitter Case
SPM6709 Spektrum Single Stand Up Transmitter Case Foam
SPM6803 Male/Female Universal Bind Plug
SPM9540 Spektrum Flight Log
HAN172 Digital Servo and Receiver Current Meter: Hangar 9
SPM6805 Trainer Cord

26 SPEKTRUM DX7s • RADIO INSTRUCTION MANUAL
EN
AMA NATIONAL MODEL AIRCRAFT SAFETY CODEEffective January 1, 2011
A. GENERAL: A model aircraft is a non-human-carrying aircraft capable of sustained flight in the atmosphere. It may not exceed limitations of this code and is intended exclusively for sport, recreation and/or competition. All model flights must be conducted in accordance with this safety code and any additional rules specific to the flying site.
1. Model aircraft will not be flown:(a) In a careless or reckless manner.(b) At a location where model aircraft activities are prohibited.
2. Model aircraft pilots will:(a) Yield the right of way to all man carrying aircraft.(b) See and avoid all aircraft and a spotter must be used
when appropriate. (AMA Document #540-D-See and Avoid Guidance.)
(c) Not fly higher than approximately 400 feet above ground level within three (3) miles of an airport, without notifying the airport operator.
(d) Not interfere with operations and traffic patterns at any airport, heliport or seaplane base except where there is a mixed use agreement.
(e) Not exceed a takeoff weight, including fuel, of 55 pounds unless in compliance with the AMA Large Model Aircraft program. (AMA Document 520-A)
(f) Ensure the aircraft is identified with the name and address or AMA number of the owner on the inside or affixed to the outside of the model aircraft. (This does not apply to model aircraft flown indoors).
(g) Not operate aircraft with metal-blade propellers or with gaseous boosts except for helicopters operated under the provisions of AMA Document #555.
(h) Not operate model aircraft while under the influence of alcohol or while using any drug which could adversely affect the pilot’s ability to safely control the model.
(i) Not operate model aircraft carrying pyrotechnic devices which explode or burn, or any device which propels a pro-jectile or drops any object that creates a hazard to persons or property.
Exceptions:• Free Flight fuses or devices that burn producing
smoke and are securely attached to the model aircraft during flight.
• Rocket motors (using solid propellant) up to a G-series size may be used provided they remain attached to the model during flight. Model rockets may be flown in accordance with the National Model Rocketry Safety Code but may not be launched from model aircraft.
• Officially designated AMA Air Show Teams (AST) are authorized to use devices and practices as defined within the Team AMA Program Document (AMA Document #718).
(j) Not operate a turbine-powered aircraft, unless in compliance with the AMA turbine regulations. (AMA Document #510-A).
3. Model aircraft will not be flown in AMA sanctioned events, air shows or model demonstrations unless:
(a) The aircraft, control system and pilot skills have successfully demonstrated all maneuvers intended or anticipated prior to the specific event.
(b) An inexperienced pilot is assisted by an experienced pilot.4. When and where required by rule, helmets must be properly worn
and fastened. They must be OSHA, DOT, ANSI, SNELL or NOCSAE approved or comply with comparable standards.
B. RADIO CONTROL (RC)1. All pilots shall avoid flying directly over unprotected people, vessels,
vehicles or structures and shall avoid endangerment of life and property of others.
2. A successful radio equipment ground-range check in accordance with manufacturer’s recommendations will be completed before the first flight of a new or repaired model aircraft.
3. At all flying sites a safety line(s) must be established in front of which all flying takes place (AMA Document #706-Recommended Field Layout):
(a) Only personnel associated with flying the model aircraft are allowed at or in front of the safety line.
(b) At air shows or demonstrations, a straight safety line must be established.
(c) An area away from the safety line must be maintained for spectators.
(d) Intentional flying behind the safety line is prohibited.4. RC model aircraft must use the radio-control frequencies currently
allowed by the Federal Communications Commission (FCC). Only individuals properly licensed by the FCC are authorized to operate equipment on Amateur Band frequencies.
5. RC model aircraft will not operate within three (3) miles of any pre-existing flying site without a frequency-management agreement (AMA Documents #922-Testing for RF Interference; #923- Fre-quency Management Agreement)
6. With the exception of events flown under official AMA Competition Regulations, excluding takeoff and landing, no powered model may be flown outdoors closer than 25 feet to any individual, except for the pilot and the pilot’s helper(s) located at the flight line.
7. Under no circumstances may a pilot or other person touch a model aircraft in flight while it is still under power, except to divert it from striking an individual. This does not apply to model aircraft flown indoors.
8. RC night flying requires a lighting system providing the pilot with a clear view of the model’s attitude and orientation at all times.
9. The pilot of a RC model aircraft shall:(a) Maintain control during the entire flight, maintaining visual
contact without enhancement other than by corrective lenses prescribed for the pilot.
(b) Fly using the assistance of a camera or First-Person View (FPV) only in accordance with the procedures outlined in AMA Document #550.
Please see your local or regional modeling association’s guidelines for proper, safe operation of your model aircraft.

27SPEKTRUM DX7s • RADIO INSTRUCTION MANUAL
EN
This device complies with part 15 of the FCC rules. Operation is subject to the following two conditions: (1) This device may not cause harmful interference, and (2) this device must accept any interference received, including interference that may cause undesired operation.
CAUTION: Changes or modifications not expressly approved by the party responsible for compliance could void the user’s authority to operate the equipment.This product contains a radio transmitter with wireless technol-ogy which has been tested and found to be compliant with the applicable regulations governing a radio transmitter in the 2.400GHz to 2.4835GHz frequency range.
Antenna Separation DistanceWhen operating your Spektrum transmitter, please be sure to maintain a separation distance of at least 5 cm between your body (excluding fingers, hands, wrists, ankles and feet) and the antenna to meet RF exposure safety requirements as determined by FCC regulations.The illustrations below show the approximate 5 cm RF exposure area and typical hand placement when operating your Spektrum transmitter.
FCC INFORMATION
FAA INFORMATIONPurposeThis advisory outlines safety standards for operations of model aircraft. We encourage voluntary compliance with these standards.
BackgroundAttention has been drawn to the increase in model aircraft op-eration. There is a need for added caution when operating free flight and radio controlled craft in order to avoid creating a noise nuisance or a potential hazard to full-scale aircraft and persons and/or property on the surface.
Operating StandardsModelers generally are concerned with safety and exercise good judgment when flying model aircraft. However, in the interest of safer skies, we encourage operators of radio controlled and free flight models to comply with the following standards:a. Exercise vigilance in locating full-scale aircraft (get help if
possible) so as not to create a collision hazard.b. Select an operating site at sufficient distance from
populated areas so you do not create a noise problem or a potential hazard.
c. Do not fly higher than 400 feet above the surface.d. Always operate more than three miles from the boundary
of an airport unless you are given permission to be closer by the appropriate air traffic control facility in the case of an airport for which a control zone has been designated or by the airport manager in the case of other airports.
e. Do not hesitate to ask for assistance in complying with these guidelines at the airport traffic control tower or air route traffic control center nearest the site of your proposed operation.
Information Provided ByDirector, Air Traffic Service Federal Aviation Administration, Washington, D.C.

28 SPEKTRUM DX7s • RADIO INSTRUCTION MANUAL
EN
ONE YEAR LIMITED WARRANTYWhat this Warranty CoversExclusive Warranty- Horizon Hobby, Inc., (Horizon) warranties that the Products purchased (the “Product”) will be free from defects in materials and workmanship for a period of 1 year from the date of purchase by the Purchaser.
What is Not CoveredThis warranty is not transferable and does not cover (i) cosmetic damage, (ii) damage due to acts of God, accident, misuse, abuse, negligence, commercial use, or due to improper use, installation, operation or maintenance, (iii) modification of or to any part of the Product, (iv) attempted service by anyone other than a Horizon Hobby authorized service center, or (v) Products not purchased from an authorized Horizon dealer.
OTHER THAN THE EXPRESS WARRANTY ABOVE, HORIZON MAKES NO OTHER WARRANTY OR REPRESENTATION, AND HEREBY DISCLAIMS ANY AND ALL IMPLIED WARRANTIES, INCLUDING, WITHOUT LIMITATION, THE IMPLIED WARRANTIES OF NON-INFRINGEMENT, MERCHANTABILITY AND FITNESS FOR A PARTICULAR PURPOSE. THE PURCHASER ACKNOWLEDGES THAT THEY ALONE HAVE DETERMINED THAT THE PRODUCT WILL SUITABLY MEET THE REQUIREMENTS OF THE PURCHASER’S INTENDED USE.
Purchaser’s RemedyHorizon’s sole obligation and purchaser’s sole and exclusive remedy shall be that Horizon will, at its option, either (i) service, or (ii) replace, any Product determined by Horizon to be defective. Horizon reserves the right to inspect any and all Product(s) involved in a warranty claim. Service or replacement decisions are at the sole discretion of Horizon. Proof of purchase is required for all warranty claims. SERVICE OR REPLACEMENT AS PROVIDED UNDER THIS WARRANTY IS THE PURCHASER’S SOLE AND EXCLUSIVE REMEDY.
Limitation of LiabilityHORIZON SHALL NOT BE LIABLE FOR SPECIAL, INDIRECT, INCIDENTAL OR CONSEQUENTIAL DAMAGES, LOSS OF PROFITS OR PRODUCTION OR COMMERCIAL LOSS IN ANY WAY, REGARDLESS OF WHETHER SUCH CLAIM IS BASED IN CONTRACT, WARRANTY, TORT, NEGLIGENCE, STRICT LIABILITY OR ANY OTHER THEORY OF LIABILITY, EVEN IF HORIZON HAS BEEN ADVISED OF THE POSSIBILITY OF SUCH DAMAGES. Further, in no event shall the liability of Horizon exceed the individual price of the Product on which liability is asserted. As Horizon has no control over use, setup, final assembly, modification or misuse, no liability shall be assumed nor accepted for any resulting damage or injury. By the act of use, setup or assembly, the user accepts all resulting liability. If you as the purchaser or user are not prepared to accept the liability associated with the use of the Product, purchaser is advised to return the Product immediately in new and unused condition to the place of purchase.
LawThese terms are governed by Illinois law (without regard to conflict of law principals). This warranty gives you specific legal rights, and you may also have other rights which vary from state to state. Horizon reserves the right to change or modify this warranty at any time without notice.
WARRANTY SERVICES Questions, Assistance, and Services Your local hobby store and/or place of purchase cannot provide warranty support or service. Once assembly, setup or use of the Product has been started, you must contact your local distributor or Horizon directly. This will enable Horizon to better answer your questions and service you in the event that you may need any assistance. For questions or assistance, please direct your email to [email protected], or call 877.504.0233 toll free to speak to a Product Support representative. You may also find information on our website at www.horizonhobby.com.
Inspection or ServicesIf this Product needs to be inspected or serviced, please use the Horizon Online Service Request submission process found on our website or call Horizon to obtain a Return Merchandise Authorization (RMA) number. Pack the Product securely using a shipping carton. Please note that original boxes may be included, but are not designed to withstand the rigors of shipping without additional protection. Ship via a carrier that provides tracking and insurance for lost or damaged parcels, as Horizon is not responsible for merchandise until it arrives and is accepted at our facility. An Online Service Request is available at http://www.horizonhobby.com under the Support tab. If you do not have internet access, please contact Horizon Product Support to obtain a RMA number along with instructions for submitting your product for service. When calling Horizon, you will be asked to provide your complete name, street address, email address and phone number where you can be reached during business hours. When sending product into Horizon, please include your RMA number, a list of the included items, and a brief summary of the problem. A copy of your original sales receipt must be included for warranty consideration. Be sure your name, address, and RMA number are clearly written on the outside of the shipping carton. Notice: Do not ship LiPo batteries to Horizon. If you have any issue with a LiPo battery, please contact the appropriate Horizon Product Support office.Warranty Requirements For Warranty consideration, you must include your original sales receipt verifying the proof-of-purchase date. Provided warranty conditions have been met, your Product will be serviced or replaced free of charge. Service or replacement decisions are at the sole discretion of Horizon. Non-Warranty Service Should your service not be covered by warranty service will be completed and payment will be required without notification or estimate of the expense unless the expense exceeds 50% of the retail purchase cost. By submitting the item for service you are agreeing to payment of the service without notification. Service estimates are available upon request. You must include this request with your item submitted for service. Non-warranty service estimates will be billed a minimum of ½ hour of labor. In addition you will be billed for return freight. Horizon accepts money orders and cashiers checks, as well as Visa, MasterCard, American Express, and Discover cards. By submitting any item to Horizon for service, you are agreeing to Horizon’s Terms and Conditions found on our website http://www.horizonhobby.com/Service/Request/.

29SPEKTRUM DX7s • RADIO INSTRUCTION MANUAL
EN
WARRANTY AND SERVICE CONTACT INFORMATION
COMPLIANCE INFORMATION FOR THE EUROPEAN UNION
Declaration of Conformity(in accordance with ISO/IEC 17050-1)No. HH20110602
Product(s): SPM DX7s Channel Transmitter Telemetry System Item Number(s): SPM7800Equipment class: 2The object of declaration described above is in conformity with the requirements of the specifications listed below, following the provi-sions of the European R&TTE directive 1999/5/EC, EMC Directive 2004/108/EC and LVD Directive 2006/95/EC:
EN 300-328 V1.7.1:2006 EN 301 489-1 V1.7.1: 2006EN 301 489-17 V1.3.2: 2008 EN55022: 2006 +A1:2007EN55024:1998+A1:2001+A2:2003EN61000-3-2:2006+A1:2009+A2:2009 EN61000-3-3:2008 EN 60950-1:2006+A1:2010
Signed for and on behalf of: Horizon Hobby, Inc.Champaign, IL USAJune 2, 2011
Instructions for disposal of WEEE by users in the European Union
This product must not be disposed of with other waste. Instead, it is the user’s respon-sibility to dispose of their waste equipment by handing it over to a designated collections point for the recycling of waste electrical and electronic equipment. The separate collec-
tion and recycling of your waste equipment at the time of disposal will help to conserve natural resources and ensure that it is recycled in a manner that protects human health and the environment. For more information about where you can drop off your waste equipment for recycling, please contact your local city office, your household waste disposal service or where you purchased the product.
Steven A. Hall Vice President
International Operations and Risk Management Horizon Hobby, Inc.
Country of Purchase Horizon Hobby Address Phone Number/Email Address
United States of America
Horizon Service Center(Electronics and engines)
4105 Fieldstone RdChampaign, Illinois, 61822 USA
877-504-0233Online Repair Request:visit www.horizonhobby.com/repairs
Horizon Product Support (All other products)
4105 Fieldstone RdChampaign, Illinois, 61822 USA
United Kingdom Horizon Hobby Limited
Units 1-4 Ployters RdStaple TyeHarlow, EssexCM18 7NS, United Kingdom
+44 (0) 1279 641 [email protected]
Germany Horizon Technischer Service Hamburger Str. 1025335 Elmshorn, Germany
+49 4121 46199 [email protected]
France Horizon Hobby SAS14 Rue Gustave EiffelZone d’Activité du Réveil Matin91230 Montgeron
+33 (0) 1 60 47 44 [email protected]
Country of Purchase Horizon Hobby Address Phone Number/Email Address
United States Sales 4105 Fieldstone RdChampaign, Illinois, 61822 USA
United Kingdom Horizon Hobby Limited
Units 1-4 Ployters RdStaple TyeHarlow, EssexCM18 7NS, United Kingdom
+44 (0) 1279 641 [email protected]
Germany Horizon Hobby GmbH Hamburger Str. 1025335 Elmshorn, Germany
+49 4121 46199 [email protected]
France Horizon Hobby SAS14 Rue Gustave EiffelZone d’Activité du Réveil Matin91230 Montgeron
+33 (0) 1 60 47 44 [email protected]
PARTS CONTACT INFORMATION
AT BG CZ CY DE
DK ES FI FR GR
HU IE IT LT LU
LV MT NL PL PT
RO SE SI SK UK

134 SPEKTRUM DX7s
DUAL RATE•
EXPO
SWITCH POSITION AILE ELEV RUDD
0D/R % % %
EXP % % %
1D/R % % %
EXP % % %
THRO AILE ELEV RUDD GEAR FLAP AUX2SERVO REVERSE N R N R N R N R N R N R N R
SUB-TRIM
TRAVEL ADJH % L % U % L % + % U % U %
L % R % D % R % - % D % D %
ELEV - FLAP MIX
UP %
DOWN %
ELEV - RUDDMIX
RATE %
SW
ACRO MODEL SETUP
Model Number:Model Name:
WING TYPE NORMAL DUAL AIL FLAPERON 1 AIL 1 FLAP 1 AIL 2 FLAPS 2 AIL 1 FLAP 2 AIL 2 FLAPS ELEVON
TAIL TYPE NORMAL V-TAIL DUAL ELEV DUAL RUDD DUAL RUD/ELEV 2 AIL 1 FLAP
THROTTLE CUT
INH - SWITCH:
POS: %
DIFFERENTIALINH - SWITCH:
POS 0: %
POS 1: %
CHANNEL MIXING
CHANNEL ACTIVATION RATE 1 RATE 2 SW POS TRIMMIX ELE - FLP ACT INH % %
MIX AIL - RUD ACT INH % %
MIX 1 - ACT INH % %
MIX 2 - ACT INH % %
MIX 3 - ACT INH % %
MIX 4 - ACT INH % %
MIX 5 - ACT INH % %
MIX 6 - ACT INH % %
DUAL RATE•
EXPO
SWITCH POSITION AILE ELEV RUDD
0D/R % % %
EXP % % %
1D/R % % %
EXP % % %
SWITCH
FLAP SYSTEM
FLAP RATE FLAP RATE SWITCH F. MODE SPEED
0: % 0: % NORM
1: % 1: % MID
2: % 2: % LAND
SWITCH SELECT
TRAINER FLAP F. MODE MIX GEAR KNOB

135SPEKTRUM DX7s
Model Number:Model Name:
THROTTLECURVE
POS L POS 2 POS 3 POS 4 POS HNORMAL
STUNT
HOLD
PITCHCURVE
POS L POS 2 POS 3 POS 4 POS HNORMAL
STUNT
HOLD
SWASH TYPE NORMAL 90° CCPM 120° CCPM 180° CCPM
THROTTLE HOLD
POSONOFF
SWITCH SELECT
D/R
GEAR
FL-M
SWASH MIX
AILE ELEV PITC % % %
REV R • N REV R • N REV R • N
CHANNEL MIXING
CHANNEL ACTIVATION RATE 1 RATE 2 SW POS TRIMCYCLIC AIL - THROTTLE ACT INH % %
CYCLIC ELE - THROTTLE ACT INH % %
CYCLIC AIL - THROTTLE ACT INH % %
MIX 1 - ACT INH % %
MIX 2 - ACT INH % %
MIX 3 - ACT INH % %
MIX 4 - ACT INH % %
MIX 5 - ACT INH % %
MIX 6 - ACT INH % %
DUAL RATE•
EXPO
SWITCH POSITION AILE ELEV RUDD
0D/R % % %
EXP % % %
1D/R % % %
EXP % % %
HELI MODEL SETUP
THRO AILE ELEV RUDD GEAR FLAP AUX2SERVO REVERSE N R N R N R N R N R N R N R
SUB-TRIM
TRAVEL ADJH % L % U % L % + % U % U %
L % R % D % R % - % D % D %
SWASH TYPE
1 SERVO NORMAL
2 SERVOS 180°
3 SERVOS 90°
3 SERVOS 120°
3 SERVOS 135°
3 SERVOS 140°

© 2011 Horizon Hobby, Inc.
The Spektrum trademark is used with permission of Bachmann Industries, Inc. All other marks and logos are trademarks or registered trademarks of Horizon Hobby, Inc.
US 7,391,320. Other patents pending.
www.spektrum-rc.com
Created 5/11 16798 SPM7800