instruction and maintenance manual - manuals.ggp …manuals.ggp-group.com/8215-3206-01_gb.pdf · i...
TRANSCRIPT

ATTENZIONE: prima di utilizzare la macchina, leggere attentamente il presente libretto WARNING: read thoroughly the instruction booklet before using this machine.
ATTENTION: lire attentivement le manuel avant d'utiliser cette machine.ACHTUNG: vor Inbetriebnahme des Geräts die Gebrauchsanleitung aufmerksam lesen.CUIDADO: antes de utilizar esta máquina, lea atentaemente el manual de instrucciones.
LET OP: lees voordat u dit machine in gebruik gaat nemen eerst de gebruiksaanwijzingen.ATENÇÃO: antes de utilizar esta máquina, leia com atenção o manual de instruções.
¶ƒ√™√Ã∏: ¶ÚÈÓ ¯ÚËÛÈÌÔÔÈ‹ÛÂÙ ÙÔ ·Ï˘ÛÔÚ›ÔÓÔ, ‰È·‚¿ÛÙ ÚÔÛÂÎÙÈο ÙȘ Ô‰ËÁ›Â˜ ·ÛÊ·Ï›·˜.
Per la vostra sicurezza!For your safety!
Pour votre sécurité!Für ihre Sicherheit!
Para su seguridad!Voor uw veiligheid!Para a sua segurança!°È· ÙËÓ ·ÛÊ¿ÏÂÈ¿ Û·˜!
MotosegaI
Chain-sawGBTronçonneuseFMotorsägeD
MotosierraE
KettingzaagNLMotosserraP
∞Ï˘ÛÔÚ›ÔÓÔ GR
INSTRUCTION AND MAINTENANCE MANUAL

2
Attenzione!Warning!Avis!Achtung!
Aviso!Let op!Atençao¶ÚÔÛÔ¯‹!
• Prima di usare questa macchina leggere illibretto istruzioni, per essere al correntedelle norme di sicurezza
• Read operator’s instruction book beforeoperating this machine
• Lire le manuel avant d’utilizer cette machine
• Betriebsanleitung vor der Inbetriebnahmelesen
• Ante de utilisar esta maquina, Ieer elmanual de instrucciones
• Lees veer het gebruik de gebruiksaanwij-zing aandachtig door overtuig uzelf dat ude inhoud begrijpt
• Antes de usar esta máquina, ler comatenção este manual de instruções.
• ¶ÚÈÓ ¯ÚËÛÈÌÔÔÈ‹ÛÂÙ ÙÔ Ì˯¿ÓËÌ·,‰È·‚¿ÛÙ ÚÔÛÂÎÙÈο ÙȘ Ô‰ËÁ›Â˜¯Ú‹Û˘.
≥ 85 dB (A)Attenzione!Il vostro apparato uditivo è in pericolo didanno irreversibile.Usando in modo continuativo la macchina,siete esposti ad un livello di rumore pari osuperiore agli 85 dB (A). Si raccomandapertanto l’uso di appositi tappi per gli orec-chi o di cuffie. Si consiglia inoltre l’uso dicasco, occhiali o visiera.
Warning!Wear head, eye and ear protection.
Avis!Vetir casque, visiere et protège-oreilles
Achtung!Immer Helm, Schutzbrille und Gehorschutztragen
Aviso!Levar casco, gatas y auriculares de protec-clon.
Let op!Draag tijdens gebruik beschermmiddelenvoor; ogen, oren en hoofd.
Atenção!Usar sempre capacete, óculos de seguran-ça e protecções de ouvido.
¶ÚÔÛÔ¯‹!ÃÚËÛÈÌÔÔÈ‹ÛÙ ÎÚ¿ÓÔ˜, ÚÔÛٷ٢ÙÈοÁ˘·ÏÈ¿ Î·È Î·Ï‡ÌÌ·Ù· ÁÈ· ÙËÓ ·ÎÔ‹

3
SimboliSymbolsSymbolesSymbole
SímbolosSymbolenSimbolos™‡Ì‚ÔÏÔ
– Attenzione / Pericolo.– Danger / Warning.– Danger / Avis.– Achtung / Gefahr.
– Peligro / Aviso.– Gevaar / Let op.– Atenção/Perigo– ¶ÚÔÛÔ¯‹/ΛӉ˘ÓÔ˜
– Leggere il manuale di istruzionid’uso.
– Read owner’s manual.– Lire le manuel de l’utilisateur.– Bedienungsanleitung lesen.
– Leer el manual del operano.– Lees de gebruiksaanwijzing.– Ler o manual de instruções de uso– ¢È·‚¿ÛÙ ÙȘ Ô‰ËÁ›Â˜ ¯Ú‹Û˘
– Usare cuffie di protezione per l’udito.– Wear hearing protection.– Porter de protection pour l’ouïe.– Gehorschutz und Schutzbrille tra-
gen.
– Utilizar protección para los oidos.– Gebruik gehcorbeschermers.– Usar protector de ruídos– ÃÚËÛÈÌÔÔÈ‹ÛÙ ÚÔÛٷ٢ÙÈο
ηχÌÌ·Ù· ÁÈ· ÙËÓ ·ÎÔ‹
– Pericolo! Attenzione ai rimbalzi!– Danger! Beware of kickback!– Danger! Attention aux rebonds!– Gefahr! Auf Ruckschlag achtenl– Peligro! Hay que prevenlrse contra
el retrocesso!– Gevaar! Let op terugslag!– Perigo! Atenção ao recuo!– ∫›Ó‰˘ÓÔ˜! ¶ÚÔÛÔ¯‹ ÛÙËÓ ÂÎÙ›Ó·ÍË!
– Non tagliare di punta.– Avoid bar nose contact.– Ne pas couper avec la pointe du
guide.– Nicht mit der Schwertspitze sagen.
– Evitare! contacto del saliente de labarra.
– De zaagbladtop niet gebrulken.– Não cortar com a ponta da guia– ªËÓ Îfi‚ÂÙ Ì ÙËÓ ·È¯Ì‹
– Non usare mai con una sola mano.– Do not use one-handed.– Ne pas utiliser avec seulement une
main.– Kein einhandiger Betrieb.– No utilizar con solamente un mano.
– Kettingzaag niet met ken handgebruiken.
– Nunca usar com uma mão só– ªË ¯ÚËÛÈÌÔÔț٠ÔÙ¤ ÙÔ
·Ï˘ÛÔÚ›ÔÓÔ Ì ¤Ó· ¯¤ÚÈ
– Impugnare la elettrosega conentrambe le mani.
– Hold saw with both hands.– Tenir la scie avec les dèux mains.– Sage mit beiden Handen fuhren.– Aguantar la sierra con ambas manos.
– Zaag met beide handen gebruiken.– Segurar a motosserra com as duas
mãos– ∫ڷٿ٠ÙÔ ·Ï˘ÛÔÚ›ÔÓÔ Ì ٷ ‰‡Ô
¯¤ÚÈ·
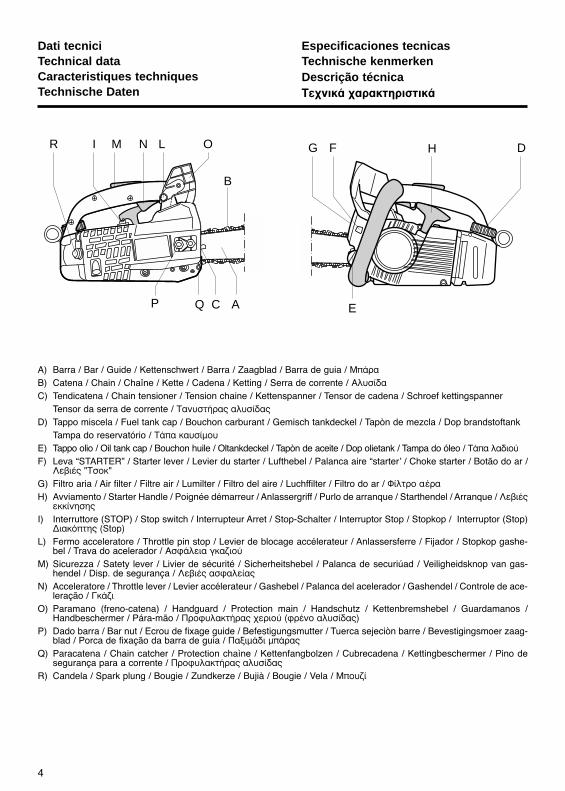
Dati tecniciTechnical dataCaracteristiques techniquesTechnische Daten
Especificaciones tecnicasTechnische kenmerkenDescrição técnica∆¯ÓÈο ¯·Ú·ÎÙËÚÈÛÙÈο
B
C A
M OIR
P
N L
Q
A) Barra / Bar / Guide / Kettenschwert / Barra / Zaagblad / Barra de guia / ª¿Ú·
B) Catena / Chain / Chaîne / Kette / Cadena / Ketting / Serra de corrente / ∞Ï˘Û›‰·
C) Tendicatena / Chain tensioner / Tension chaine / Kettenspanner / Tensor de cadena / Schroef kettingspannerTensor da serra de corrente / ∆·Ó˘ÛÙ‹Ú·˜ ·Ï˘Û›‰·˜
D) Tappo miscela / Fuel tank cap / Bouchon carburant / Gemisch tankdeckel / Tapòn de mezcla / Dop brandstoftankTampa do reservatório / ∆¿· η˘Û›ÌÔ˘
E) Tappo olio / Oil tank cap / Bouchon huile / Oltankdeckel / Tapòn de aceite / Dop olietank / Tampa do óleo / ∆¿· Ï·‰ÈÔ‡
F) Leva “STARTER” / Starter lever / Levier du starter / Lufthebel / Palanca aire “starter’ / Choke starter / Botão do ar /§Â‚Ȥ˜ "∆ÛÔÎ"
G) Filtro aria / Air filter / Filtre air / Lumilter / Filtro del aire / Luchffilter / Filtro do ar / º›ÏÙÚÔ ·¤Ú·
H) Avviamento / Starter Handle / Poignée démarreur / Anlassergriff / Purlo de arranque / Starthendel / Arranque / §Â‚Ȥ˜ÂÎΛÓËÛ˘
I) Interruttore (STOP) / Stop switch / Interrupteur Arret / Stop-Schalter / Interruptor Stop / Stopkop / Interruptor (Stop)¢È·ÎfiÙ˘ (Stop)
L) Fermo acceleratore / Throttle pin stop / Levier de blocage accélerateur / Anlassersferre / Fijador / Stopkop gashe-bel / Trava do acelerador / ∞ÛÊ¿ÏÂÈ· Áη˙ÈÔ‡
M) Sicurezza / Satety lever / Livier de sécurité / Sicherheitshebel / Palanca de securiúad / Veiligheidsknop van gas-hendel / Disp. de segurança / §Â‚Ȥ˜ ·ÛÊ·Ï›·˜
N) Acceleratore / Throttle lever / Levier accélerateur / Gashebel / Palanca del acelerador / Gashendel / Controle de ace-leração / °Î¿˙È
O) Paramano (freno-catena) / Handguard / Protection main / Handschutz / Kettenbremshebel / Guardamanos /Handbeschermer / Pára-mão / ¶ÚÔÊ˘Ï·ÎÙ‹Ú·˜ ¯ÂÚÈÔ‡ (ÊÚ¤ÓÔ ·Ï˘Û›‰·˜)
P) Dado barra / Bar nut / Ecrou de fixage guide / Befestigungsmutter / Tuerca sejeciòn barre / Bevestigingsmoer zaag-blad / Porca de fixação da barra de guia / ¶·ÍÈÌ¿‰È Ì¿Ú·˜
Q) Paracatena / Chain catcher / Protection chaìne / Kettenfangbolzen / Cubrecadena / Kettingbeschermer / Pino desegurança para a corrente / ¶ÚÔÊ˘Ï·ÎÙ‹Ú·˜ ·Ï˘Û›‰·˜
R) Candela / Spark plung / Bougie / Zundkerze / Bujià / Bougie / Vela / ªÔ˘˙›
4
E
H DFG

5
fig. 7
fig. 1
fig. 3
fig. 5
fig. 8
fig. 2
fig. 4
fig. 6
B
13
A
C
2˚
1˚P Q
3˚ F

6
fig. 15
fig. 9
fig. 11
fig. 13
fig. 16
fig. 10
fig. 12
fig. 14
MAX 0,5 mm.
35¡
H
M
B
A
T
L
H

WARNING!Please read these safety rules carefully before using the chain saw and foilow the instructions: to pre-vent accidents and ensure personal safety.
Instructions for use
1. Children and boys must not use chain saws, excluding youths over 16 under an expert adult’s supervisionfor training purposes.
2. Use the bar cover when moving the chain saw away from the work site.3. During transport, turn the motor off or pull the brake to prevent undesired starting of the chain.4. Hold the chain saw firmly or place it in a stable position before starting; bar and chain must be free.5. When using the chain saw, hold it firmly with both hands.6. It is advisable to provide a support for the chain saw when cutting branches. Do not cut using the bar point
and beware of branches under tension.7. Avoid breathing chain saw exhaust substances when handling it, especially indoors, so work in well ven-
tilated rooms.8. Turn off the chain saw if not temporarily used to prevent injuries.9. Turn off the engine to check the chain under tension, to pertorm chain adjustment, replacement or clean-
ing10. Use a timber dog if necessary.11. Ensure chain saw’s safety conditions, especially bar and chain, before use.12. The machine must not work in an expiosive environment.
Proper use of the chain saw
13. Wear suitable clothes which do not hinder movement14. Turn off the chain saw before adding fuel. Do not smoke while refuelling and keep at a safe distance from
naked flames15. Find a stable position before beginning work.16. Keep people away from the chain saw when using it.17. Check the following conditions before beginning work:
a) there should be no people in the felling area:b) the only people should be those performing felling operations;c) the working area should be free from obstacles.
18. Make a wedge-shaped cut before felling the tree, then the felling cut leaving a hinge for the falling direc-tion.
19. Beware of any falling branches after felling operations.20. Beware of wood splinters when cutting chopped wood21. When working on slopes, the saw operator must stand beside or above the wood to cut, i.e. felled trees.22. Do not use steel riving knives
Instructions for the use of personal equipment
23. Use specific protections during operations involving head, hands, feet, eyes and ears.24. We recommend the use of a helmet with a visor during felling, branch cutting and chopping operations.25. Wear gloves with an external protection when using the chain saw26. Use ear protections to prevent hearing injuries.27. Wear safety boots when using the chain saw.28. We recommend the use of anticut pants and jackets to protect legs and arms.
12
GB
SAFETY RULES

BAR - CHAIN ASSEMBLY
– Unfasten the nuts and remove the clutch hou-sing (Fig. 1).
Use protective gloves for the chainsawassembly operations listed below.
– Insert the bar (A) into the stud bolts and push ittowards the pinion (Fig. 2).
– Insert the chain into the pinion (clutch chamber)(Fig. 3) with the teeth pointing forward (towardsthe tip of the bar). Fit the transmission links intothe pinion teeth.
– Make the chain fit perfectly against the bar (Fig.4).
If necessary, force the tip with a screwdriver.Ensure that the chain-tensioning pin (B) fits cor-rectly into the hole on the bar.
– Put the clutch housing back into place and tigh-ten the nuts. Then, insert a screwdriver in thechain-tensioning screw and tighten the chainuntil it fits correctly (Fig. 5).
– Lift the chain and bar, and tighten the nuts withthe spanner provided (Fig. 6).
NOTE - If the chain-tensioning pin is not fittedinto the hole on the bar, it may cause irrepara-ble damage when the two clutch-housing nutsare tightened.
– Lift the chain with your fingers to ensure that thedriving links do not come off completely fromtheir groove. When the chain tension is correct,the chain should slide smoothly when pulled withthe hands.
– The chain will stretch after a few minutes ofwork. Adjust the chain tension again by faste-ning the nuts as described above.
– Always wear gloves while you carry out theseoperations.
REFUELLING
– Use premium grade fuel without impurities.
– USE ONLY A FUEL MIXTURE CONTAINING 2TOIL (TWO-STROKE).
– We recommend the use of our special Prof. 2TOil, which is designed especially for two- strokeengines (2% oil).
RUNNING-IN
– We recommend the use of a fuel mixture with6% oil for the first 4 - 5 hours of work with thechainsaw.
Alternatively, use special Prof. 2T Oil (4% oil).
IMPORTANT: Do not take the engine to peakrpm while it is being run-in.
STANDARD OPERATION
– Petrol - oil ratio 4% (25:1).
When original Prof. 2T Oil is used, the ratio is2,5% (40:1).
REFUELLING– Shake the fuel can well before refuelling the tank
of the chainsaw so that the oil and petrol aremixed. Remove the fuel tank cap and pour thetwo-stroke into the tank through a funnel, thenreplace the cap.
– Chain lubrication oil. Remove the oil tank capand fill with lubricant oil using a funnel, thenreplace the cap.
– When lubricating the chains, use oil with a SAE30 - 40 viscosity.
– Do not use old or recycled oil. Do not use oilcontaining impurities.
GENERAL INSTRUCTIONS FOR THEUSE OF UNLEADED PETROL
As this petrol has a special chemical composition,follow these instructions in order to prevent dama-ging the engine and invalidating the guarantee:1) Only use high-performance oils, in doses of 4%,
that are purpose-designed for two-stroke engi-nes. If ready-made fuel mixtures are purchasedfrom a distributor, the oil percentage has to be6%.
2) Shake the fuel mixture can well before refuellingthe chainsaw.
3) Ensure that carburation is rich, but never exceedthe max. idle rpm (see instruction manual).Unleaded fuel mixtures should never be kept formore than 5 - 6 days, since harmful reactionsare produced after such a period, and the petroland oil are irreversibly separated.
STARTING
– Ensure that the STOP switch is not on and thechain brake is not engaged.
– Switch on the accelerator lock by pushing thesafety lever (P) with your palm and operating theaccelerator lever (Q) (Fig. 7).
– Pull the choke lever (F) into the “CHOKE” posi-tion (Fig. 8). Stand the machine on the ground,hold the front grip (M) with your left hand, holdthe starter knob (H) with your right hand, andpull firmly several times until the engine beginsto fire (Fig. 9).
– Put the choke lever back in the “RUNNING”
13
GB

position.
– Pull the starter knob again until the enginestarts.
– The chain will turn once the engine starts.
– Press and release the accelerator lever (Q) toset the engine at idling speed.
CARBURATION
– Carburation is carried out by the manufacturer atsea level. It may therefore be necessary to makeadjustments, especially if the chainsaw is usedat altitude. In this case, proceed as follows.
– Carburation should always be carried out whenthe bar and chain are mounted and well lubrica-ted.
a) PRE-SETTING THE SCREW (L) THAT REGU-LATES IDLING SPEED (Fig. 10).
– With the engine off, tighten the screw comple-tely without forcing it, then loosen it by appro-ximately 1 turn.
b) PRE-SETTING THE SCREW (H) THAT REGU-LATES PEAK SPEED (fig 10).
– With the engine off, tighten the screw com-pletely without forcing it, then loosen it byapproximately 1 turn.
c) DEFINITIVE SETTING OF IDLING SPEED.
– With the engine running, tighten the idle jetscrew slowly until the engine revs increase;when they start to decrease, stop and loosenthe screw by approximately a 1/4 turn.
d) SETTING THE CARBURETTOR SHUTTERSCREW (T) (Fig. 10).
– Tighten the screw (clockwise) until the chainstarts moving, then loosen it slowly until thechain stops.
N.B. Setting must be carried out with the engi-ne on, but without accelerating.
e) DEFINITIVE SETTING OF PEAK RPM
– When the engine is on, accelerate to peakrpm. Then tighten the peak jet screw slowlyuntil the engine stops producing the typicalnoise of a four-stroke engine. However, it isadvisable to use an electronic engine speedindicator and to regulate the speed accordingto the “rpm data chart”.
– For correct carburation, follow the indicationsgiven in the “rpm data chart”.
– Proceed with carburation when:
a) The bar and chain are mounted, and thechain is correctly adjusted.
b) The air filter is clean and correctly moun-ted.
c) The engine has already been running forsome minutes.
– Carburation is regular when:
a) The revs increase promptly when accele-rated and, at peak speed, the engine pro-duces the typical noise of a four-strokeengine.
b) At idling speed, the chain does not turnand the engine runs in all positions.
CHART INDICATING R.P.M. AND RELEVANTCARBURATOR SETTING SCREWS.
N° SCREW N° RPM N° SCREW N° RPM N° SCREWTURNS AT ENGINE TURNS AT ENGINE TURNS OFMIN. AT MIN. MAX. AT MAX. FUEL(L) (rpm min) (H) (rpm min) (T)1 TURN 1 TURN 1 TURN
Unscrewing 2.700-3.000 Unscrewing 10.800-11.300 Tighteningfrom fully from fully from momentTightened Tightened in which fuel
lever istouched
CHAIN SHARPENINGAND MAINTENANCE
The chain requires sharpening when the chainsawdoes not cut well; always avoid working with achain that does not cut. To sharpen the chain, pro-ceed as follows:– Extend the chain.
– Fix the bar in a vice so that the chain can slidefreely (Fig. 11).
– Fix the file in a file holder and place it on thetooth at 35º (see notch on the file holder) (Fig.11).
– File only with a forward movement until all thewear on the tooth has been eliminated.
– Count the file movements made on the first toothand use the same amount on all the others, bothon the right and the left.
– After some sharpening, the delimiting device willexceed the template; file the part that sticks outwith a flat file. Round off the depth-delimitingdevice (Fig. 11).
– The chain must be replaced when the toothheight is less than 5 mm or if there is too muchplay on the rivets.
14
GB

– “Deep” filing should be performed with an elec-tric file. Therefore, we recommend you contact aservice centre for this operation.
– Ensure that the chain slides smoothly over thebar when pulled with the hands. (Periodicallysharpen the chain and check the chain tension).
– Bars with sprockets need frequent greasing,which can be performed as follows:
a) Fill the special syringe provided with greasefor bearings.
b) At least each time the saw is used, applygrease through the hole provided near the tipof the bar until the grease penetrates at thetip.
N.B. No syringe is provided when the bar does nothave a “greasing hole”.
WARNING!To prevent the bar races deteriorating rapidly, it isessential to start and finish cutting in a straight lineas the bar will be irreparably damaged if force isexerted on the chainsaw at an oblique angle.
MAINTENANCE
– The air filter gets clogged with sawdust whenoperating, so it requires frequent cleaning with abrush and petrol. Do not damage the filteringmesh. A clogged filter alters carburation andengine performance (Fig. 12).
– Turn the bar periodically to use both sides sothat it wears evenly.
– It is essential to keep the suction grille on thestarter unit and the cylinder fins free from saw-dust deposits. Clean them whenever there isany sign of sawdust accumulating and alwaysafter long periods of use. The accumulation ofsawdust in these points decreases the engine’scooling capacity and overheats it, damagingboth the engine and other important accessories(starter coil, oil pump, etc.).
– Clean the oil-suction filter every 20 hours of nor-mal working conditions and every 10 hours ofdifficult conditions (e.g. in dusty environments).Clean the filter by removing it from the hole ofthe oil cap, but do not disconnect it from theinternal coupling. Clean it with a brush andpetrol. Put the filter back into the tank in its ori-ginal position.
– Clean the guide and oil holes periodically usingthe template scraper (Fig. 13).
– Deburr the race sides periodically with a flat file.Time may cause the burrs to fall off and damagethe bar.
– The races need to be evened with a flat file ifone is higher than the other, and then smoothedwith a file and fine sand paper. If the races areconsiderably worn, check that the height isalways greater than the chain transmission linksso that the latter do not touch the bottom.Replace the bar if this should occur.
– With use, the pinion is marked by the chaintransmission links. This means that the perime-ter (chord) of the chain resting on the pinion isdifferent from the initial theoretical perimeter.Ensure that wear does not exceed 0.5 mm(depth), otherwise the pinion must be replaced(Fig. 14).
ROUTINE MAINTENANCE
STARTER UNIT– Periodically ensure that the starter cord is in per-
fect condition; replace when it starts to fray.
CHAIN BRAKE– Check the efficiency of the brake frequently and
inspect belt thickness at points subject to majorfriction; replace when thickness becomes lessthan half of the initial thickness.
CHAIN LOCK– Check the condition of the chain lock periodi-
cally. Replace it if damaged.
SPARK PLUG– Check the condition of the spark plug periodi-
cally. Remove any deposits from the electrodesand set them 0.5 mm apart. Replace the sparkplug when the electrodes are worn.
SCREW TIGHTENING– Periodically test that all the screws and nuts are
secure. Never operate the saw if any of the partsare loose, and tighten them immediately if theyare.
SPECIAL MAINTENANCE
– Contact an authorised service centre for anyoperations that are not part of the routine main-tenance schedule.
– Have your chainsaw inspected frequently byyour mechanic.
– Use original spare parts only.
– Use appropriate oil to lubricate the chain and thebar (SAE 30 – 40 viscosity).
– Prepare the fuel mixture only with special high-
15
GB

16
performance two-stroke engine oil and petrolcontaining no impurities.
STORAGE
– Clean the air filter with a brush and petrol, drywell and re-install.
– Clean the whole unit with a brush and petrol, dryand grease with a cloth impregnated with oil.
– Dispose of the oil and the fuel mixture in accor-dance with the laws in force.
– Put the chainsaw back into its original packagingand store in a dry place. Avoid particularly dryand hot boiler rooms and damp places (Fig. 15).
CUTTING TECHNIQUES
CROSSCUTTING– Drive the felling dog into the bark in point (A).
– Lever on (A) and pull upwards with your righthand so that the chain goes into the wood.
– Pivot on (B) and repeat the operation until the
trunk has been cut completely (Fig. 16).
– To prevent recoil, do not touch protruding bran-ches with the tip of the bar.
– When cutting, always use the central part of thebar. Never use the tip.
BRANCH CUTTING– Stand behind the branches to be cut. Begin from
the base and proceed towards the tip.
– Cut from high to low.
GB

47
Garanzia
1) OggettoLa garanzia viene assunta solo per difetti di fabbrica-zione o per vizi dei materiali, tali da impedire l’uso nor-male della macchina, rispetto a quanto enunciato nellascheda tecnica e nel manuale d’uso allegato.
2) DurataLa garanzia è valida per 12 mesi dal momento dell’ac-quisto. La data dell’acquisto è comprovata dalla fattu-ra o dallo scontrino fiscale, che devono essere con-servati e presentati all’atto della riparazione.
3) LimitiLa garanzia si limita alla sostituzione delle parti difet-tose ed alla relativa mano d’opera necessaria per ren-dere funzionante la macchina. Le eventuali spese ditrasporto sono escluse.
4) EsclusioniL’obbligo alla garanzia decade qualora non siano staterispettate le prescrizioni d’uso e manutenzione delmanuale allegato alla macchina, qualora sia stato fattoun uso improprio, qualora siano stati montati ricambinon originali o qualora la macchina sia stata mano-messa da riparatori non abilitati da noi.
5) DoveIl centro di assistenza abilitato localmente alla ripara-zione in garanzia, viene indicato dal rivenditore pressocui l’avete acquistata. Richiedetelo!
IWarranty
1) ObjectThe warranty covers exclusively manufacturing andmaterial faults, which don’t allowed a normal use of themachine, as stated in the technical table and in theinstruction manual enclosed.
2) ValidityThe warranty lasts 12 months from the moment of pur-chase. The purchasing date is prooved by the invoiceand the fiscal note, which have to be kept and showedat the time of repairing.
3) LimitsThe warranty covers only the substitution of the faul-ting parts and the relevant necessary hand-labour tomake the machine working. Incidental for transport arenot eclosed.
4) ExclusionsWarranty expires when tho using and upkeeping pre-scriptions, which are enclosed to the machine, havenot been respected, when an imprompter use hasbeen made, when not original spare parts have beenused or when not qualified repairers have tamperedwith the machine.
5) WhereThe qualified local After-Sale-Service, for the raparingunder warranty, is indicated by the retailer, by whomyou have purchased the machine. Ask for it!
Garantie
1) ObjetNous assumons la garantie seulement pour lesdéfauts de fabrication ou pour les vices sur les matiè-res premières qui rendraient nos appareils et machi-nes impropres à l’usage normal, selon les instructionsdans nos fiches techniques instructions d’emploi.
2) DuréeLa garantie est valable pour 12 mois à partir de la dated’achat, avec comme preuve, la date sur la facture oureçu fiscal qui doivent être tenus et présentés à lareparation.
3) LimitesLa garantie est limitée au replacement des piècesdéfectueses et aux frais de main d’hoeuvre nécessai-res pour réparer la machine. Le transport du matérielou des pièces reste à la charge de l’utilisateur.
4) ExclusionsNous sommes en droit de refuser l’exécution de notreobbligation de garantie, lorsque nos prescriptions d’u-sage et d’entretien n’ont pas été respectées, lorsquel’utilisateur a employé le materiel à des fins autres quecelles destinées au matériel, lorsque des piéces d’ori-gine autres que celles de notre marque ont été mon-tées sur nos matériels, lorsque des réparateurs nonagrées par notre société ont pratiqué des interven-tions sur les matériels garantis.
5) Ou trouver votre centre service après-venteToute intervention sous garantie doit être effectuée parun centre autorisé à effectuer les réparations, indiquépar le revendeur où vous avez acheté la machine.N’hésitez pas à demander ses coordonnés!
Garantie
1) GegenstandDie Garantie erstreckt sich ausschließlich aut Materialoder Fabrikationsfehler. Wenn die beiliegendenBetriebs-Vorschriften nicht eingehalten werden entfalltder Anspruch.
2) GültigkeitDie Dauer der Garantie beträg 12 Monate. Für einenGarantieantrag muss sich der Kunde mit derRechnung oder Lieferschein uber das Einkaulsdatumausweisen können.
3) BedingungenDie Garantie gewährt nur den Ersatz der schadhaftenTeile und dessen Arbeitsaufwand. Transport-Kostensowie weiters Spesen sind ausgeschlossen.
4) AusschlussDie Garantie-Verpflichtung entfällt, wenn dieGebrauchs- und Wartungsvorschriften nicht befolgtwerden die Maschine abgeändert oder für ungeeigne-ten Gebrauch verwendet wird. Auch Maschinenbruchund übermäßiger Verschleiss sind von Garantie-Leistungen ausgenommen.
5) KundendienstFür Auskunft und Beratung wenden Sie sich ambesten an Ihre Verkautsstelle. Die vom Hersteller aner-kannten Vertragshändler werden Inhen auch eineneinwandfreien Ersatzteildienst garantieren.
GB
F D

Cod
. 99
61911
Tip
ogra
fiaA
sola
na /
Aso
lo (
TV
)
Garantia
1) ObjetoSe reconoce como garantia solamente los defectos defabricación o vicios del material que impidan el normaluso de la máquina, según se detalla en la ficha tecni-ca y en el manual de uso adjunto.
2) DuracionLa garantia es válida durante 12 meses a partir delmomento de la compra. La fecha de compra se com-probará por el ticket o factura, la cual deberá ser con-servada y presentada en el momento de la reparación.
3) LimiteLa garantia se limita a la sustitución de la piezasdefectuosas y a la mano de obra necesaria para quela máquina funcione correctamente. Los eventualesgastos de transporte quedan excluidos.
4) ExclusionesLa garantia desaparacerá cuando las prescrlpclonesde uso y manutenclon del manual adjunto a la maqui-na no han sido respetadas: cuando el uso efectuadosea impropio de la máquina, cuando le hayan sidomontados recambios no onginales y siempre que lamáquina haya sido manipulada por reparadores noautorizados por nosotros
5) Donde se atender la garantiaEl distribuidor que le ha suministrado la máquina leindicará el Servicio Tecnico Autorizado más próximodónde le atenderán la reparacion en garantia.
Garantie
1) MachineU heeft garantie op fabrieks en materiaalfouten mitsde machine wordt gebruikt zoals beschreven in degebruikshandleiding.
2) TermijnDe garantie termijn bednsagt 12 maanden vanaf deaankoopdatum eindgebruiker. Bewaar daarom altijd draankoopfactuur.
3) VoorwardeDe garantie dekt zowel onderdelen als arbeidsloonechter niet de transportkosten.
4) UltzonderingDe garantie vervalt indien niet originele delen zijngebruikt of als er door een niet erkende dealer aan isgewerkt.
5) WaarLaat uw machine in de garantietermijn repareren bij dedealer waar u de machine heeft aangeschatt. Vraagvan de reparatie een garantienota.
Garantia
1) ObjectoA garantia cobre somente os defeitos de fabrico oudefeitos de materiais, que impeçam o uso normal damáquina, conforme ilustrado na ficha técnica e nomanual de uso anexado.
2) ValidadeA garantia é válida por 12 meses a contar do momen-to da compra. A data de compra é comprovada pelafactura ou pelo recibo fiscal, que devem ser conserva-dos e apresentados no momento da reparação.
3) LimitesA garantia limita-se à substituição das peças defeituo-sas e respectiva mão-de-obra necessária para reparara máquina. As eventuais despesas de transporte nãosão incluídas.
4) ExclusõesTemos o direito de invalidar a garantia se não foremrespeitadas as prescrições de uso e manutenção domanual anexado à máquina, se tiver sido utilizada deforma imprópria, se tiverem sido montadas peças nãooriginais ou se a máquina foi modificada por repara-ções não habilitadas pelo fabricante.
5) Centro de AssistênciaCentro de Assistência habilitado na zona para a repa-ração em garantia deve ser solicitado ao revendedordo qual adquiriu a máquina.
∂ÁÁ‡ËÛË
1) £¤Ì·∏ ÂÁÁ‡ËÛË ÈÛ¯‡ÂÈ ÌfiÓÔ ÁÈ· ÂÏ·ÙÙÒÌ·Ù· ηٷÛ΢‹˜ ‹·ÛÙÔ¯›Â˜ ÙˆÓ ˘ÏÈÎÒÓ, Ô˘ ÂÌÔ‰›˙Ô˘Ó ÙË ÛˆÛÙ‹ ¯Ú‹ÛËÙÔ˘ Ì˯·Ó‹Ì·ÙÔ˜, fiˆ˜ ÂÚÈÁÚ¿ÊÂÙ·È ÛÙËÓ Ù¯ÓÈ΋ηÚ٤Ϸ Î·È ÛÙÔ Û¯ÂÙÈÎfi ÂÁ¯ÂÈÚ›‰ÈÔ ¯Ú‹Û˘.
2) ¢È¿ÚÎÂÈ·∏ ÂÁÁ‡ËÛË ÈÛ¯‡ÂÈ ÁÈ· 12 Ì‹Ó˜ ·fi ÙËÓ ËÌÂÚÔÌËÓ›··ÁÔÚ¿˜. ∏ ËÌÂÚÔÌËÓ›· ·ÁÔÚ¿˜ ·Ô‰ÂÈÎÓ‡ÂÙ·È ·fi ÙÔÙÈÌÔÏfiÁÈÔ ‹ ·fi ÓfiÌÈÌË ·fi‰ÂÈÍË, Ô˘ Ú¤ÂÈ Ó·Ê˘Ï¿ÛÛÔÓÙ·È Î·È Ó· ÂȉÂÈÎÓ‡ÔÓÙ·È ÚÔ Ù˘ ÂÈÛ΢‹˜.
3) ¶ÂÚÈÔÚÈÛÌÔ›∏ ÂÁÁ‡ËÛË ÂÚÈÔÚ›˙ÂÙ·È ÛÙËÓ ·ÓÙÈηٿÛÙ·ÛË ÙˆÓÂÏ·Ùو̷ÙÈÎÒÓ ÂÍ·ÚÙËÌ¿ÙˆÓ Î·È ÛÙȘ ·Ó·Áη›Â˜ÂÚÁ·Û›Â˜ ÁÈ· ÙËÓ ·ÔηٿÛÙ·ÛË Ù˘ ÏÂÈÙÔ˘ÚÁ›·˜ ÙÔ˘Ì˯·Ó‹Ì·ÙÔ˜. ∂Ӊ¯fiÌÂÓ· ¤ÍÔ‰· ÌÂÙ·ÊÔÚ¿˜ ‰ÂÓηχÙÔÓÙ·È.
4) ∂Í·ÈÚ¤ÛÂȘ∏ ˘Ô¯Ú¤ˆÛË ÂÁÁ‡ËÛ˘ ÂΛÙÂÈ Â¿Ó ‰ÂÓ ÙËÚËıÔ‡Ó ÔÈÔ‰ËÁ›Â˜ ¯Ú‹Û˘ Î·È Û˘ÓÙ‹ÚËÛ˘ ÙÔ˘ ÂÁ¯ÂÈÚȉ›Ô˘ ÙÔ˘Ì˯·Ó‹Ì·ÙÔ˜, Û ÂÚ›ÙˆÛË ·Î·Ù¿ÏÏËÏ˘ ̄ Ú‹Û˘, ¿ӯÚËÛÈÌÔÔÈËıÔ‡Ó ÌË ÁÓ‹ÛÈ· ·ÓÙ·ÏÏ·ÎÙÈο ‹ ÛÂÂÚ›ÙˆÛË ÂÈÛ΢‹˜ ÙÔ˘ Ì˯·Ó‹Ì·ÙÔ˜ ·fi ÌËÂÍÔ˘ÛÈÔ‰ÔÙË̤ÓÔ˘˜ Ù¯ÓÈÎÔ‡˜.
5) ¶Ô‡∆Ô ÙÔÈÎfi ÂÍÔ˘ÛÈÔ‰ÔÙË̤ÓÔ ™¤Ú‚Ș ÁÈ· ÙȘ ÂÈÛ΢¤˜˘fi ÂÁÁ‡ËÛË, ˘Ô‰ÂÈÎÓ‡ÂÙ·È ·fi ÙÔ Î·Ù¿ÛÙËÌ·ÒÏËÛ˘. ∑ËÙ‹ÛÙ ÙÔ!
E NL
P GR