installing nagios core 4.1.1 with nrpe 2 - juri calleri · installing nagios 4 with nrpe 2.16rc2...
TRANSCRIPT

P a g e | 1
Juri Calleri | www.juricalleri.net | last update: 20/12/2016
Installing Nagios 4 with nrpe 2.16RC2 plus samples
Installing Nagios Core 4.1.1 with NRPE 2.16RC2
Purpose
This document contains the information and steps to proceed to install and configure the Nagios
monitoring system on Ubuntu Server 14.04 using the Nrpe 2.16RC2 and an example of check_by_ssh
command.
The commands used below will of course work with any recent release of Nagios Core 4.x.
Nrpe 2.16RC2 is still not at its last (or defined stable) version but I tested it and didn’t have particular
issue. This plugin is a great improvement since it holds an increase of security thanks to the use of
server-client certificate and an improvement of the encryption system.
A few examples (samples) are inside the document for an easy view on the configuration file.
About the document
The original link of this file is Here
About the author
I am reachable a few click away from Here
Like?
If you like this document and if it was useful to you, please consider a Donation
Questions?
I’ll try my best to reply as soon as possible! Here

P a g e | 2
Juri Calleri | www.juricalleri.net | last update: 20/12/2016
Installing Nagios 4 with nrpe 2.16RC2 plus samples
In details, these are the main points of the document:
1. Prepare Ubuntu Machine
2. Install Nagios
3. Install Plugin
4. Install Nrpe 2.16rc2
5. Secure Nrpe
6. Protect Apache with ssl
7. Configure Nagios
8. Configure hosts
9. Install plugins and nrpe on client
10. Create Nagios certificates
11. Add pnp4nagios graph
90. SAMPLES
91. SAMPLES with graphs
97. Other plugins
98. Using check_by_ssh
99. Useful Commands
1. Prepare Ubuntu Server v. 14.04.3
1. Run:
apt-get update && apt-get upgrade -y
2. Set up static IP:
File: # vi /etc/network/interfaces
# The primary network interface
auto eth0
iface eth0 inet static
address 192.168.0.X
netmask 255.255.255.0
network 192.168.0.0
broadcast 192.168.0.255
gateway 192.168.0.X
dns-nameservers 192.168.0.X
3. Restart single eth card (# ifdown eth0 – # ifup eth0) or Reboot.
4. Install openssh server:
apt-get install openssh-server -y
5. Edit sshd_conf to disable rootLogin:
File: # vi /etc/ssh/sshd_conf

P a g e | 3
Juri Calleri | www.juricalleri.net | last update: 20/12/2016
Installing Nagios 4 with nrpe 2.16RC2 plus samples
PermitRootLogin no
6. Restart the ssh service or reboot.
2. Install Nagios core
1. Install Lamp stack and secure mysql_installation.
2. Create User and group for nagios:
useradd userNagios
groupadd groupNagios
usermod -a -G groupNagios userNagios
passwd userNagios
userNagios or groupNagios must be a very, very hard name and out of a dictionary attack. Let’s
say that „2rV$%&c0C4_3cß2Dv“ might be a nice one.
3. Install Build dependencies - re-update package list:
apt-get update
4. Install required packages:
apt-get install build-essential libgd2-xpm-dev openssl libssl-
dev xinetd apache2-utils unzip -y
5. Change directory to /home/$USER/downloads and enter:
curl -L -O
https://assets.nagios.com/downloads/nagioscore/releases/nagios-
4.1.1.tar.gz
tar xvf nagios-*.tar.gz
cd nagios-*
. /configure --with-nagios-user=userNagios --with-nagios-
group=groupNagios --with-command-group=groupNagios
6. If you must send mails, install both postfix and mailutils (sudo apt-get install postfix && apt-get
install mailutils). Add:
--with-mail=/usr/sbin/sendmail
at the end of the previous code.
N.B. While I set up the mails I found out I was able to send them using the command “mail –s”
but I was not able to send them from Nagios. There was a problem with the configuration file. I
edit then “command.cfg” changing /bin/mail -s to mail -s and Nagios started sending the mails.
7. Compile Nagios:
make all
make install

P a g e | 4
Juri Calleri | www.juricalleri.net | last update: 20/12/2016
Installing Nagios 4 with nrpe 2.16RC2 plus samples
make install-init
-- You can stop here if you are upgrading Nagios version --
make install-commandmode
make install-config
/usr/bin/install -c -m 644 sample-config/httpd.conf
/etc/apache2/sites-available/nagios.conf
7. To issue external command to Nagios, add web server user to nagios group:
usermod -G groupNagios www-data
3. Install Nagios plugin
1. Change directory to /home/$USER/downloads and enter:
curl -L -O http://nagios-plugins.org/download/nagios-plugins-
2.1.1.tar.gz
tar xvf nagios-plugins-*.tar.gz
cd nagios-plugins-*
./configure --with-nagios-user=userNagios --with-nagios-
group=groupNagios --with-openssl
make
make install
4. Install NRPE
1. Change directory to /home/$USER/downloads and enter:
Update: The version used below is not the latest anymore, it was removed from the repository as
well. I believe that the following code would work with the latest version of the plugin, the NRPE
3.0.1 RC1 but I haven’t tested yet.
curl -L -O
https://github.com/NagiosEnterprises/nrpe/archive/nrpe-2-16-
RC2.zip
unzip nrpe-*.zip -d nrpe
cd nrpe/nrpe*
chmod +x configure
./configure --with-nrpe-user=userNagios --with-nrpe-
group=groupNagios --with-nagios-user=userNagios --with-nagios-
group=groupNagios --with-ssl=/usr/bin/openssl --with-ssl-
lib=/usr/lib/x86_64-linux-gnu
make all

P a g e | 5
Juri Calleri | www.juricalleri.net | last update: 20/12/2016
Installing Nagios 4 with nrpe 2.16RC2 plus samples
make install
make install-xinetd
make install-daemon-config
2. Only the xinetd that run on the client must be edited to allow the Nagios server to connect:
File: # vi /etc/xinetd.d/nrpe
only_from = IP_OF_SERVER
3. Restart service:
service xinetd restart
5. Secure Nrpe
1. Read "Create Nagios certificates" at #10 section.
2. Set the server's ssl directory and all directories under it to 777, and change all files to 666 if errors
like these appear:
"Status Information: Error: could not use certificate file
'/usr/local/nagios/etc/ssl/client_certs/nag_serv.pem'."
"CHECK_NRPE: Error - Could not complete SSL handshake with 192.168.10.219: 1"
6. Protect Apache with SSL
1. Enable auth digest (optional):
a2enmod auth_digest
htdigest -c /usr/local/nagios/etc/.digest_pw "Nagios Access"
nagiosadmin
2. Add auth. File (done in sample)
File: # vi /etc/apache2/sites-available/nagios.conf
add auth file (done in sample)
3. Use apache2 ssl
a2enmod ssl
4. Add certificates to conf.
File: # vi /etc/apache2/sites-available/default-ssl.conf
SSLCertificateFile /etc/ssl/server.crt
SSLCertificateKeyFile /etc/ssl/private/server.key

P a g e | 6
Juri Calleri | www.juricalleri.net | last update: 20/12/2016
Installing Nagios 4 with nrpe 2.16RC2 plus samples
5. Creating the cert:
The certificate will last 10 years.
openssl genrsa -des3 -out server.3des-key 1024
openssl rsa -in server.3des-key -out server.key
openssl req -new -key server.key -x509 -out server.crt -days
3650
chmod 600 server.key
rm server.3des-key
mv server.crt /etc/ssl/
mv server.key /etc/ssl/private/
6. Add 'SSLRequireSSL' directive to both the 'sbin' and 'share' directories
File: # vi /etc/apache2/sites-available/nagios.conf
(done in sample)
7. Apply SSL
a2ensite default-ssl.conf
service apache2 restart
8. Enable:
a2enmod rewrite
a2enmod cgi
9. Create symbolic link:
ln -s /etc/apache2/sites-available/nagios.conf
/etc/apache2/sites-enabled/
10. Restart services:
service nagios start
service apache2 restart
11. Enable Nagios to start on boot:
ln -s /etc/init.d/nagios /etc/rcS.d/S99nagios
12. Accessing the Nagios Web Interface:
https://nagios_server/nagios and enter user: nagiosadmin paswd: XXXX
7. Configure Nagios
1. Add cfg folders to Nagios configuration:

P a g e | 7
Juri Calleri | www.juricalleri.net | last update: 20/12/2016
Installing Nagios 4 with nrpe 2.16RC2 plus samples
File: # vi /usr/local/nagios/etc/nagios.cfg
#cfg_dir=/usr/local/nagios/etc/servers to delete the sharp sign '#'
Add any other cfg file in the appropriate section( hostconf.cfg; nrpecommands.cfg and so on )
2. Create this folder:
mkdir /usr/local/nagios/etc/servers
3. Configure Nagios contacts:
File: # vi /usr/local/nagios/etc/objects/contacts.cfg
email nagios@localhost ; <<***** CHANGE THIS TO YOUR EMAIL ADDRESS ******
4. Configure check_nrpe command:
File: # vi /usr/local/nagios/etc/objects/nrpecommands.cfg
define command{
command_name check_nrpe
command_line $USER1$/check_nrpe -H $HOSTADDRESS$ -c $ARG1$
}
define command{
command_name check_nrpe_cert
command_line $USER1$/check_nrpe -H $HOSTADDRESS$ -C
/usr/local/nagios/etc/ssl/client_certs/nag_serv.pem -K
/usr/local/nagios/etc/ssl/client_certs/nag_serv.key -A
/usr/local/nagios/etc/ssl/ca/ca_cert.pem -c $ARG1$ -t 15
}
8. Configure Hosts
1. Check "Samples" section.
9. Install plugins and nrpe on client
1. Follow step #1, "Prepare Machine"
2. Create User and group for nagios:
useradd userNagios
groupadd groupNagios
usermod -a -G groupNagios userNagios
passwd userNagios

P a g e | 8
Juri Calleri | www.juricalleri.net | last update: 20/12/2016
Installing Nagios 4 with nrpe 2.16RC2 plus samples
3. Re-update and install build dependencies
apt-get update
apt-get install build-essential openssl libssl-dev xinetd unzip
libsys-statistics-linux-perl -y
libsys-statistics-linux-perl is used by check_linux_stats.pl plugin, found on Nagios plugins hub. This
plugin is good for checks on cpu, memory, disk and so on. I’m using this plugin in the “Sample”
section, if you like I’d suggest you to download from Nagios Exchange and “chmod +x” to make it
executable when copied to /usr/local/nagios/libexec.
*At the time I’m writing, if you want to use this plugin you need to correct a bug by yourself. It
affects the string the client sends to the server about the CPU status.
Correct it like this:
File: # vi +62 /usr/local/nagios/libexec/check_linux_stats.pl
replace
if ($o_context){
with
elsif ($o_context){
**But, if you plan to use graphs to graph the CPU, I’d not suggest the CPU part of this script since
you may want to see the load on the CPU and not the Idle percentage.
check_cpu.py under this point of view is better and comes with a template for pnp4nagios too!
Just remember to rename the php with the command you send to the client, our case is
“check_nrpe_cert_check_cpu.php”.
Yes this document will cover this part too, chapter 11 section 6.
4. Follow steps: 3, 4 and apply client cert from part 5
5. Check "Samples" (90) section on how to edit nrpe.cfg
10. Create Nagios Certificates
Certificate Generation Example
Il will create certificates that lasts 10 years.
1. Set up the directories
mkdir -p -m 750 /usr/local/nagios/etc/ssl
chown root.groupNagios /usr/local/nagios/etc/ssl
cd /usr/local/nagios/etc/ssl
mkdir -m 750 ca
chown root.root ca
mkdir -m 750 server_certs
P a g e | 9
Juri Calleri | www.juricalleri.net | last update: 20/12/2016
Installing Nagios 4 with nrpe 2.16RC2 plus samples
chown root.groupNagios server_certs
mkdir -m 750 client_certs
chown root.groupNagios client_certs
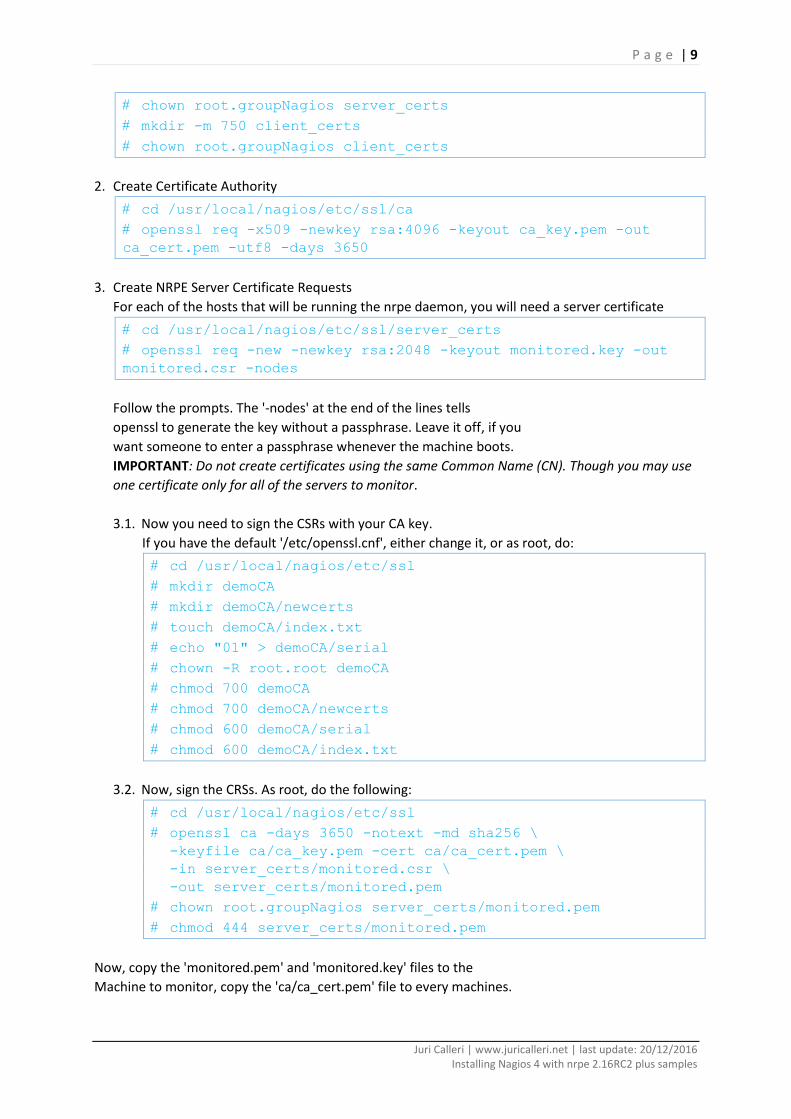
2. Create Certificate Authority
cd /usr/local/nagios/etc/ssl/ca
openssl req -x509 -newkey rsa:4096 -keyout ca_key.pem -out
ca_cert.pem -utf8 -days 3650
3. Create NRPE Server Certificate Requests
For each of the hosts that will be running the nrpe daemon, you will need a server certificate
cd /usr/local/nagios/etc/ssl/server_certs
openssl req -new -newkey rsa:2048 -keyout monitored.key -out
monitored.csr -nodes
Follow the prompts. The '-nodes' at the end of the lines tells
openssl to generate the key without a passphrase. Leave it off, if you
want someone to enter a passphrase whenever the machine boots.
IMPORTANT: Do not create certificates using the same Common Name (CN). Though you may use
one certificate only for all of the servers to monitor.
3.1. Now you need to sign the CSRs with your CA key.
If you have the default '/etc/openssl.cnf', either change it, or as root, do:
cd /usr/local/nagios/etc/ssl
mkdir demoCA
mkdir demoCA/newcerts
touch demoCA/index.txt
echo "01" > demoCA/serial
chown -R root.root demoCA
chmod 700 demoCA
chmod 700 demoCA/newcerts
chmod 600 demoCA/serial
chmod 600 demoCA/index.txt
3.2. Now, sign the CRSs. As root, do the following:
cd /usr/local/nagios/etc/ssl
openssl ca -days 3650 -notext -md sha256 \
-keyfile ca/ca_key.pem -cert ca/ca_cert.pem \
-in server_certs/monitored.csr \
-out server_certs/monitored.pem
chown root.groupNagios server_certs/monitored.pem
chmod 444 server_certs/monitored.pem
Now, copy the 'monitored.pem' and 'monitored.key' files to the
Machine to monitor, copy the 'ca/ca_cert.pem' file to every machines.

P a g e | 10
Juri Calleri | www.juricalleri.net | last update: 20/12/2016
Installing Nagios 4 with nrpe 2.16RC2 plus samples
4. Create NRPE Client Certificate Requests
Now you need to do the same thing for the machine that will be running the check_nrpe program.
DO NOT confuse Client-Server, everytime a connection is established between 2 “servers”, the
MONITORED machine is the server and the SERVER machine is the client. ALWAYS.
cd /usr/local/nagios/etc/ssl/client_certs
openssl req -new -newkey rsa:2048 -keyout nag_serv.key -out
nag_serv.csr -nodes
cd /usr/local/nagios/etc/ssl
openssl ca -extensions usr_cert -days 3650 -notext -md sha256 \
-keyfile ca/ca_key.pem -cert ca/ca_cert.pem \
-in client_certs/nag_serv.csr \
-out client_certs/nag_serv.pem
chown root.groupNagios client_certs/nag_serv.pem
chmod 440 client_certs/nag_serv.pem
Now, copy the 'nag_serv.pem', 'nag_serv.key' and 'ca/ca_cert.pem'
files to the nag_serv machine, if you did the above on a different
computer.
Put the location of each computers' three files in the 'nrpe.cfg'
file or in the check_nrpe command line. You should now have
encryption and, if desired, key validation.
11. Pnp4nagios graph
1. Change directory to /home/$USER/downloads and enter:
apt-get install rrdtool librrds-perl
curl -L -O http://docs.pnp4nagios.org/_media/dwnld/pnp4nagios-
head.tar.gz
tar -xvzf pnp4nagios*
cd pnp4nagios
./configure --with-nagios-user=userNagios --with-nagios-
group=groupNagios --with-httpd-conf=/etc/apache2/sites-
available
Follow the prompts. This is the output:
*** Configuration summary for pnp4nagios-0.6.2 23-12-2009 ***
General Options:
------------------------- -------------------
Nagios user/group: userNagios groupNagios

P a g e | 11
Juri Calleri | www.juricalleri.net | last update: 20/12/2016
Installing Nagios 4 with nrpe 2.16RC2 plus samples
Install directory: /usr/local/pnp4nagios
HTML Dir: /usr/local/pnp4nagios/share
Config Dir: /usr/local/pnp4nagios/etc
Location of rrdtool binary: /usr/bin/rrdtool Version 1.2.12
RRDs Perl Modules: FOUND (Version 1.2012)
RRD Files stored in: /usr/local/pnp4nagios/var/perfdata
process_perfdata.pl Logfile: /usr/local/pnp4nagios/var/perfdata.log
Perfdata files (NPCD) stored in: /usr/local/pnp4nagios/var/spool
Web Interface Options: ------------------------- -------------------
HTML URL: http://localhost/pnp4nagios/
Apache Config File: /etc/apache2/sites-available/pnp4nagios.conf
Review the options above for accuracy. If they look okay,
type 'make all' to compile.
Be sure it uses the same user and group defined for Nagios and that the apache config is the right
one for your system, on Ubuntu 14.04 this is correct.
2. Compiling the program
Make all
Make install
Make install-webconf
Make install-config
Make install-init
Or, all of these commands reassumed in:
Make fullinstall
3. If you changed the nagiosadmin webuser authentication to use the „digest“, do:
File: # vi /etc/apache2/sites-available/pnp4nagios.conf
AuthName "Nagios Access"
AuthType Digest
AuthUserFile /usr/local/nagios/etc/.digest_pw
Replace it in the appropriate section.
4. Configuration
The Synchronous mode will not work, I’m focusing then to use the Bulk mode but there are other
configurations available, check them here: Quick-start
4.1. Enable process_performance_data and add new directives
File: # vi /usr/local/nagios/etc/nagios.cfg
Find
process_performance_data=0
And change it to
process_performance_data=1

P a g e | 12
Juri Calleri | www.juricalleri.net | last update: 20/12/2016
Installing Nagios 4 with nrpe 2.16RC2 plus samples
[… add the below code at the end of the file, or wherever you want …]
#
# service performance data
#
service_perfdata_file=/usr/local/pnp4nagios/var/service-perfdata
service_perfdata_file_template=DATATYPE::SERVICEPERFDATA\tTIMET::$TIMET$\tHOSTNA
ME::$HOSTNAME$\tSERVICEDESC::$SERVICEDESC$\tSERVICEPERFDATA::$SERVICEPERFDAT
A$\tSERVICECHECKCOMMAND::$SERVICECHECKCOMMAND$\tHOSTSTATE::$HOSTSTATE$\t
HOSTSTATETYPE::$HOSTSTATETYPE$\tSERVICESTATE::$SERVICESTATE$\tSERVICESTATETYP
E::$SERVICESTATETYPE$
service_perfdata_file_mode=a
service_perfdata_file_processing_interval=15
service_perfdata_file_processing_command=process-service-perfdata-file
#
# host performance data starting with Nagios 3.0
#
host_perfdata_file=/usr/local/pnp4nagios/var/host-perfdata
host_perfdata_file_template=DATATYPE::HOSTPERFDATA\tTIMET::$TIMET$\tHOSTNAME::
$HOSTNAME$\tHOSTPERFDATA::$HOSTPERFDATA$\tHOSTCHECKCOMMAND::$HOSTCHEC
KCOMMAND$\tHOSTSTATE::$HOSTSTATE$\tHOSTSTATETYPE::$HOSTSTATETYPE$
host_perfdata_file_mode=a
host_perfdata_file_processing_interval=15
host_perfdata_file_processing_command=process-host-perfdata-file
4.2. Add commands for graphs
File: # vi /usr/local/nagios/etc/objects/commands.cfg
define command{
command_name process-service-perfdata-file
command_line /usr/local/pnp4nagios/libexec/process_perfdata.pl --
bulk=/usr/local/pnp4nagios/var/service-perfdata
}
define command{
command_name process-host-perfdata-file
command_line /usr/local/pnp4nagios/libexec/process_perfdata.pl --
bulk=/usr/local/pnp4nagios/var/host-perfdata
}
4.3. Checking the configuration
If all tests have passed *successfully* the file pnp4nagios/share/install.php can be deleted
or renamed to install.php.ignore
If you receive the message “PHP magic_quotes_gpc is deprecated” then please locate your
php.ini and set the value to Off.
5. Definition for hosts and services with web popups
File: # vi /usr/local/nagios/etc/objects/hostconf.cfg

P a g e | 13
Juri Calleri | www.juricalleri.net | last update: 20/12/2016
Installing Nagios 4 with nrpe 2.16RC2 plus samples
Add:
define host {
name host-pnp
action_url /pnp4nagios/index.php/graph?host=$HOSTNAME$&srv=_HOST_' class='tips'
rel='/pnp4nagios/index.php/popup?host=$HOSTNAME$&srv=_HOST_
register 0
}
File: # vi /usr/local/nagios/etc/objects/services.cfg
Add:
define service {
name srv-pnp
action_url /pnp4nagios/index.php/graph?host=$HOSTNAME$&srv=$SERVICEDESC$'
class='tips' rel='/pnp4nagios/index.php/popup?host=$HOSTNAME$&srv=$SERVICEDESC$
register 0
}
6. Pnp4nagios must understand what is the command used for the checks.
File: # vi /usr/local/pnp4nagios/etc/check_command/check_nrpe_cert.cfg
#
# Adapt the Template if check_command should not be the PNP Template
#
# Command: check_nrpe_cert!check_mem
# ________0__________| |
# ________1_________________|
#
# User ARG1
CUSTOM_TEMPLATE = 0,1
7. Pnp4nagios uses templates to show graphs based on the command executed.
Using the nrpe, the command that the server will send to the client will always be
check_nrpe_cert_check_mem for example.
In the pnp4nagios/share/templates folder then, we need to create a php file called
check_nrpe_cert_check_mem.php and this template will match this command. The more
commands you want to show as a graph, the more templates with the command’s name you
need to create.
„One does not simply creates templates, but when he wants to use it, he will search pnp4nagios
templates on Google“
The pnp4nagios/share/templates.special folder instead will contain the templates used to show
the graph of the same service on several different servers.
This is an example:

P a g e | 14
Juri Calleri | www.juricalleri.net | last update: 20/12/2016
Installing Nagios 4 with nrpe 2.16RC2 plus samples
<?php
$this->MACRO['TITLE'] = "Ping";
$this->MACRO['COMMENT'] = "For All Servers";
$services = $this->tplGetServices("","PING");
# The Datasource Name for Graph 0
$ds_name[0] = "Ping";
$opt[0] = "--title \"Ping\"";
$def[0] = "";
# Iterate through the list of hosts
$i=0;
foreach($services as $key=>$val){
if($i == 1) {$i = 2;}
$data = $this->tplGetData($val['host'],$val['service']);
#throw new Kohana_exception(print_r($a,TRUE));
$hostname = rrd::cut($data['MACRO']['HOSTNAME']);
$def[0] .= rrd::def("var$key" , $data['DS'][0]['RRDFILE'], $data['DS'][0]['DS'] );
$def[0] .= rrd::line1("var$key", rrd::color($i), $hostname);
$def[0] .= rrd::gprint("var$key", array("MAX", "AVERAGE"));
$i++;
}
?>
The name of the service, you can change this to match your service name.
This is where you’d want to write the name of the host, use "" for all the hosts.
Like the service name, but this is the one configured in Nagios. Be careful, if what you write here
does not match any service, it will simply not work.
This is something I had to do. In order to assign a different colour to all the hosts, I had to replace
the $key with a different variable, like $i. This, because the $key will at one point set itself as „1“
and that is the color of the Yellow. The yellow is hard to see on a white background, to avoid this
I wrote that code, in case $i = 1 -> $i = 2.
You do not need to rename this template like the command name, ping-all.php is fine.
Additionally, you may want to open the graphs on the main window of Nagios.
File: # vi +325 /usr/local/nagios/etc/cgi.cfg
and replace
action_url_target=_blank
with
action_url_target=main
8. Jump to section „91. SAMPLES with graphs“ to see how to edit the current samples.
90. ## Samples ##

P a g e | 15
Juri Calleri | www.juricalleri.net | last update: 20/12/2016
Installing Nagios 4 with nrpe 2.16RC2 plus samples
1. Nrpe.cfg (Nagios server)
log_facility=daemon
pid_file=/var/run/nrpe.pid
dont_blame_nrpe=0
allow_bash_command_substitution=0
debug=0
command_timeout=60
connection_timeout=300
ssl_version=TLSv1.2+
ssl_use_adh=1
ssl_cipher_list=ALL:!MD5:@STRENGTH
ssl_client_certs=2
ssl_logging=0xff
2. Nrpe.cfg (Any monitored machine). I’m using external plugins.
log_facility=daemon
pid_file=/var/run/nrpe.pid
dont_blame_nrpe=0
allow_bash_command_substitution=0
debug=0
command_timeout=60
connection_timeout=300
ssl_version=TLSv1.2+
ssl_use_adh=1
ssl_cipher_list=ALL:!MD5:@STRENGTH
ssl_cacert_file=/usr/local/nagios/etc/ssl/ca_cert.pem
ssl_cert_file=/usr/local/nagios/etc/ssl/db_server.pem
ssl_privatekey_file=/usr/local/nagios/etc/ssl/db_server.key
ssl_client_certs=2
ssl_logging=0xff
command[check_mem]=/usr/local/nagios/libexec/check_linux_stats.pl -M -w 100,25 -c 100,50
command[check_log_fail2ban]=/usr/local/nagios/libexec/check_log3.pl -l /var/log/fail2ban.log -
p 'Ban' -w 1 -c 5
“fail2ban”, this tool is wonderful when you need to check who wants to log in to your server and
ban those who keeps trying bruteforcing user or password. The ban lasts a few minutes but it can
be changed and will send you a mail (if configured) to tell you the last banned IP and service it
tried to access (I set it up for ssh).
But, we do not want that fail2ban sends the mails, rather, I want that Nagios do it.
You will find in my samples the configuration of the service and host to allow fail2ban to check
the auth.log log file every few minutes and, if something is found, fail2ban will ban the ip while
Nagios will send me an email.
I think that this is a smart system.
3. hostconf.cfg (Nagios server)

P a g e | 16
Juri Calleri | www.juricalleri.net | last update: 20/12/2016
Installing Nagios 4 with nrpe 2.16RC2 plus samples
#########################
#
# HOST GROUP DEFINITION
#
#########################
define hostgroup{
hostgroup_name Test Hostgroup
alias Test Servers
}
define hostgroup{
hostgroup_name Prod Hostgroup
alias Prod Servers
}
define hostgroup{
hostgroup_name Nagios Hostgroup
alias Nagios Server
}
###################
#
# HOST DEFINITION
#
###################
define host{
name linux-host
notifications_enabled 1
event_handler_enabled 1
flap_detection_enabled 1
process_perf_data 1
retain_status_information 1
retain_nonstatus_information 1
notification_period 24x7
check_period 24x7
retry_interval 1
max_check_attempts 10
check_command check-host-alive
contact_groups avengers
register 0
}
define host{
name nagios-server
use linux-host
hostgroups Nagios Hostgroup

P a g e | 17
Juri Calleri | www.juricalleri.net | last update: 20/12/2016
Installing Nagios 4 with nrpe 2.16RC2 plus samples
check_interval 5
notification_interval 120
notification_options d,u,r
register 0
}
define host{
name linux-test
use linux-host
hostgroups Test Hostgroup
check_interval 2
notification_period workhours
notification_interval 30
notification_options d,u,r
register 0
}
define host{
name linux-prod
use linux-host
hostgroups Prod Hostgroup
check_interval 5
notification_interval 120
notification_options d,u,r
register 0
}
4. nrpecommands.cfg
#####################
#
# NRPE ONLY
#
#####################
define command{
command_name check_nrpe
command_line $USER1$/check_nrpe -H $HOSTADDRESS$ -c $ARG1$
}
define command{
command_name check_nrpe_cert
command_line $USER1$/check_nrpe -H $HOSTADDRESS$ -C
/usr/local/nagios/etc/ssl/client_certs/nag_serv.pem -K
/usr/local/nagios/etc/ssl/client_certs/nag_serv.key -A /usr/local/nagios/etc/ssl/ca/ca_cert.pem
-c $ARG1$ -t 15
}

P a g e | 18
Juri Calleri | www.juricalleri.net | last update: 20/12/2016
Installing Nagios 4 with nrpe 2.16RC2 plus samples
5. services.cfg
#######################
#
# SERVICES DEFINITION
#
#######################
define service{
name generic-service
active_checks_enabled 1
passive_checks_enabled 0
parallelize_check 1
obsess_over_service 0
check_freshness 0
notifications_enabled 1
event_handler_enabled 1
flap_detection_enabled 1
process_perf_data 0
retain_status_information 1
retain_nonstatus_information 1
is_volatile 0
check_period 24x7
max_check_attempts 3
check_interval 5
retry_interval 2
contact_groups avengers
notification_options w,u,c,r
notification_interval 60
notification_period 24x7
register 0
}
define service{
name fail2banlog-service
use generic-service
flap_detection_enabled 0
retain_status_information 0
retain_nonstatus_information 0
is_volatile 1
max_check_attempts 1
check_interval 4
retry_interval 2
notification_interval 0
register 0
}
define service{
name local-service

P a g e | 19
Juri Calleri | www.juricalleri.net | last update: 20/12/2016
Installing Nagios 4 with nrpe 2.16RC2 plus samples
use generic-service
max_check_attempts 4
check_interval 4
retry_interval 1
register 0
}
6. ubuntu-test3.cfg (Nagios server - inside /usr/local/nagios/etc/servers/ directory). I show how to
define the services using both the certificates and not. I’d suggest to only choose one of them,
“check_nrpe_cert” for example.
#############
#
# HOST
#
#############
define host{
use linux-test
host_name ubuntu-test3
alias Ubuntu test 3
address 192.168.10.219
}
#############
#
# SERVICES
#
#############
## nrpe without certificates ##
define service{
use generic-service
host_name ubuntu-test3
service_description Check memory
check_command check_nrpe!check_mem
}
## nrpe with certificates (use this one in your configuration) ##
define service{
use generic-service
host_name ubuntu-test3
service_description Check memory with certs
check_command check_nrpe_cert!check_mem
}
define service{
use fail2banlog-service
host_name ubuntu-test3

P a g e | 20
Juri Calleri | www.juricalleri.net | last update: 20/12/2016
Installing Nagios 4 with nrpe 2.16RC2 plus samples
service_description Fail2ban
check_command check_nrpe_cert!check_log_fail2ban
}
7. contacts.cfg
#######################
#
# CONTACTS DEFINITION
#
#######################
define contact{
name generic-contact
service_notification_period 24x7
host_notification_period 24x7
service_notification_options w,u,c,r,f,s
host_notification_options d,u,r,f,s
service_notification_commands notify-service-by-email
host_notification_commands notify-host-by-email
register 0
}
############
#
# CONTACTS
#
############
define contact{
contact_name Tony
use generic-contact
alias Ironman
email [email protected]
}
define contact{
contact_name Captain
use generic-contact
alias Captain America
email [email protected]
}
##################
#
# CONTACT GROUPS
#
##################

P a g e | 21
Juri Calleri | www.juricalleri.net | last update: 20/12/2016
Installing Nagios 4 with nrpe 2.16RC2 plus samples
define contactgroup{
contactgroup_name avengers
alias Nagios Administrators
members Tony, Captain
}
8. Final configuration for apache2 with digest authentication and ssl certificate.
# SAMPLE CONFIG SNIPPETS FOR APACHE WEB SERVER
#
# This file contains examples of entries that need
# to be incorporated into your Apache web server
# configuration file. Customize the paths, etc. as
# needed to fit your system.
ScriptAlias /nagios/cgi-bin "/usr/local/nagios/sbin"
<Directory "/usr/local/nagios/sbin">
SSLRequireSSL
Options ExecCGI
AllowOverride None
<IfVersion >= 2.3>
<RequireAll>
Require all granted
# Require host 127.0.0.1
AuthName "Nagios Access"
AuthType Digest
AuthUserFile /usr/local/nagios/etc/.digest_pw
Require valid-user
</RequireAll>
</IfVersion>
<IfVersion < 2.3>
Order allow,deny
Allow from all
# Order deny,allow
# Deny from all
# Allow from 127.0.0.1
AuthName "Nagios Access"
AuthType Digest
AuthUserFile /usr/local/nagios/etc/.digest_pw
Require valid-user
</IfVersion>
</Directory>
Alias /nagios "/usr/local/nagios/share"
<Directory "/usr/local/nagios/share">
SSLRequireSSL
Options None
AllowOverride None
<IfVersion >= 2.3>

P a g e | 22
Juri Calleri | www.juricalleri.net | last update: 20/12/2016
Installing Nagios 4 with nrpe 2.16RC2 plus samples
<RequireAll>
Require all granted
# Require host 127.0.0.1
AuthName "Nagios Access"
AuthType Digest
AuthUserFile /usr/local/nagios/etc/.digest_pw
Require valid-user
</RequireAll>
</IfVersion>
<IfVersion < 2.3>
Order allow,deny
Allow from all
# Order deny,allow
# Deny from all
# Allow from 127.0.0.1
AuthName "Nagios Access"
AuthType Digest
AuthUserFile /usr/local/nagios/etc/.digest_pw
Require valid-user
</IfVersion>
</Directory>
You may want to restrict the access here to your lan only or single IP. Just uncomment the Allow
from and add the network or single host you want.
UPDATE: Remember to open it on the firewall, the best is to open it to your office IP only, just to
mitigate a little potential attacks. This does not prevent though that you webserver Is protected,
which anyway setting up a protected apache server is out of this guide.
91. Samples with Graphs
1. Services.cfg
#######################
#
# SERVICES DEFINITION
#
#######################
define service{
name generic-service
active_checks_enabled 1
passive_checks_enabled 0
parallelize_check 1
obsess_over_service 0
check_freshness 0
notifications_enabled 1
event_handler_enabled 1

P a g e | 23
Juri Calleri | www.juricalleri.net | last update: 20/12/2016
Installing Nagios 4 with nrpe 2.16RC2 plus samples
flap_detection_enabled 1
process_perf_data 0
retain_status_information 1
retain_nonstatus_information 1
is_volatile 0
check_period 24x7
max_check_attempts 3
check_interval 5
retry_interval 2
contact_groups avengers
notification_options w,u,c,r
notification_interval 60
notification_period 24x7
register 0
}
define service{
name service-with-graph
use generic-service,srv-pnp
process_perf_data 1
register 0
}
define service{
name fail2banlog-service
use generic-service
flap_detection_enabled 0
retain_status_information 0
retain_nonstatus_information 0
is_volatile 1
max_check_attempts 1
check_interval 4
retry_interval 2
notification_interval 0
register 0
}
define service{
name local-service
use generic-service
max_check_attempts 4
check_interval 4
retry_interval 1
register 0
}
define service{
name local-service-with-graph

P a g e | 24
Juri Calleri | www.juricalleri.net | last update: 20/12/2016
Installing Nagios 4 with nrpe 2.16RC2 plus samples
use generic-service,srv-pnp
process_perf_data 1
max_check_attempts 4
check_interval 4
retry_interval 1
register 0
}
define service{
name srv-pnp
action_url /pnp4nagios/index.php/graph?host=$HOSTNAME$&srv=$SERVICEDESC$'
class='tips' rel='/pnp4nagios/index.php/popup?host=$HOSTNAME$&srv=$SERVICEDESC$
register 0
}
2. hostconf.cfg
#########################
#
# HOST GROUP DEFINITION
#
#########################
define hostgroup{
hostgroup_name Test Hostgroup
alias Test Servers
}
define hostgroup{
hostgroup_name Prod Hostgroup
alias Prod Servers
}
define hostgroup{
hostgroup_name Nagios Hostgroup
alias Nagios Server
}
###################
#
# HOST DEFINITION
#
###################
define host{
name host-pnp
action_url /pnp4nagios/index.php/graph?host=$HOSTNAME$&srv=_HOST_' class='tips'
rel='/pnp4nagios/index.php/popup?host=$HOSTNAME$&srv=_HOST_

P a g e | 25
Juri Calleri | www.juricalleri.net | last update: 20/12/2016
Installing Nagios 4 with nrpe 2.16RC2 plus samples
register 0
}
define host{
name linux-host
notifications_enabled 1
event_handler_enabled 1
flap_detection_enabled 1
process_perf_data 1
retain_status_information 1
retain_nonstatus_information 1
notification_period 24x7
check_period 24x7
retry_interval 1
max_check_attempts 10
check_command check-host-alive
contact_groups avengers
register 0
}
define host{
name nagios-server
use linux-host,host-pnp
hostgroups Nagios Hostgroup
check_interval 5
notification_interval 120
notification_options d,u,r
register 0
}
define host{
name linux-test
use linux-host,host-pnp
hostgroups Test Hostgroup
check_interval 2
notification_period workhours
notification_interval 30
notification_options d,u,r
register 0
}
define host{
name linux-prod
use linux-host,host-pnp
hostgroups Prod Hostgroup
check_interval 5
notification_interval 120
notification_options d,u,r

P a g e | 26
Juri Calleri | www.juricalleri.net | last update: 20/12/2016
Installing Nagios 4 with nrpe 2.16RC2 plus samples
register 0
}
3. Ubuntu-test3.cfg
#############
#
# HOST
#
#############
define host{
use linux-test
host_name ubuntu-test3
alias Ubuntu test3
address 192.168.10.219
}
#################
#
# SERVICES
#
#################
define service{
use service-with-graph
host_name ubuntu-test3
service_description PING
check_command check_nrpe_cert!check_host_alive
}
define service{
use fail2banlog-service
host_name ubuntu-test3
service_description Fail2ban
check_command check_nrpe_cert!check_log_fail2ban
}
97. Other Plugins
You may want to check not only the system specs but maybe like me you need something specific for
your system.
1. Fail2ban, I wrote earlier about this tool and a good plugin that can be used to check the log
files is check_log3.pl

P a g e | 27
Juri Calleri | www.juricalleri.net | last update: 20/12/2016
Installing Nagios 4 with nrpe 2.16RC2 plus samples
2. You may want to check the services too, probably your database is down and you don’t
know. I found check_service.sh and the author was very nice to me to talk about his plugin.
He also explained me how to edit it to add the Postgre database service check. Unfortunately
this plugin does not have the performance data but it was easy to add this feature too.
The modified code is at the end of this chapter.
3. Check_linux_stats.pl, I really like this plugin because I can check everything I need using this
one only. Still, I had to use another plugin for the CPU because check_linux_stats.pl will
report the Idle percentage and not the used percentage. I am not a programmer, maybe it is
possible to change it but I found the next plugin better for the CPU.
*If you want to use the CPU report of this plugin remember to fix the bug explained in
chapter 9 section 3.
4. Check_cpu.py, nice! It does a good job and comes with a pnp4nagios template, I like it!
File: $ more /usr/local/Nagios/libexec/check_service.sh
echo "$STATUS_MSG |offline=0"
echo "$STATUS_MSG |online=1"
Nagios recognizes as performance data everything that is after the “|” in a output script, in this
case if the status is critical (service not available) perfdata is 0, if available is 1.
The graph will have only 0/1 values.
Skipping to where the modification applies.
[…]
case $STATUS_MSG in
*stop*)
echo "$STATUS_MSG |offline=0"
exit $CRITICAL
;;
*STOPPED*)
echo "$STATUS_MSG |offline=0"
exit $CRITICAL
;;
*not*running*)
echo "$STATUS_MSG |offline=0"
exit $CRITICAL
;;
*running*)
echo "$STATUS_MSG |online=1"
exit $OK
;;
*RUNNING*)
echo "$STATUS_MSG |online=1"
exit $OK
;;
*SUCCESS*)
echo "$STATUS_MSG |online=1"
exit $OK

P a g e | 28
Juri Calleri | www.juricalleri.net | last update: 20/12/2016
Installing Nagios 4 with nrpe 2.16RC2 plus samples
;;
*[eE]rr*)
echo "Error in command: $STATUS_MSG |offline=0"
exit $CRITICAL
;;
*[eE]nable*)
echo "$STATUS_MSG |online=1"
exit $OK
;;
*[dD]isable*)
echo "$STATUS_MSG |offline=0"
exit $CRITICAL
;;
*[cC]annot*)
echo "$STATUS_MSG |offline=0"
exit $CRITICAL
;;
*inactive*)
echo "$STATUS_MSG |offline=0"
exit $CRITICAL
;;
*dead*)
echo "$STATUS_MSG |offline=0"
exit $CRITICAL
;;
*[aA]ctive*)
echo "$STATUS_MSG |online=1"
exit $OK
;;
*[oO]nline*)
echo "$STATUS_MSG |online=1"
exit $OK
;;
*[dD]own*)
echo "$STATUS_MSG |offline=0"
exit $CRITICAL
;;
#This is for postgre DB
*Subsystem*not*on*file)
echo "$STATUS_MSG |offline=0"
exit $CRITICAL
;;
[1-9][1-9]*)
echo "$SERVICE running: $STATUS_MSG |online=1"
exit $OK
;;
"")
echo "$SERVICE is not running: no output from service command |offline=0"

P a g e | 29
Juri Calleri | www.juricalleri.net | last update: 20/12/2016
Installing Nagios 4 with nrpe 2.16RC2 plus samples
exit $CRITICAL
;;
*)
echo "Unknown status: $STATUS_MSG"
echo "Is there a typo in the command or service configuration?: $STATUS_MSG |offline=0"
exit $UNKNOWN
;;
esac
98. Configure SSH shared key authentication
This is an alternate method to check the clients through ssh. Useful when the only way to access to
the monitored server is by ssh only. The host configuration and commands are not inserted here.
1. On the Nagios server
# su - nagiosUser
$ ssh-keygen -t rsa
Hit SEND until done to accept default settings, when asked for password keep pressing SEND.
2. Should appear something like:
ssh-keygen -t rsa
Generating public/private rsa key pair.
Enter file in which to save the key (/home/demo/.ssh/id_rsa):
Enter passphrase (empty for no passphrase):
Enter same passphrase again:
Your identification has been saved in /home/demo/.ssh/id_rsa.
Your public key has been saved in /home/demo/.ssh/id_rsa.pub.
The key fingerprint is:
4a:dd:0a:c6:35:4e:3f:ed:27:38:8c:74:44:4d:93:67 demo@a
The key's randomart image is: +--[ RSA 2048]----+
| .oo. |
| . o.E |
| + . o |
| . = = . |
| = S = . |
| o + = + |
| . o + o . |
| . o |
| |
+-----------------+
3. IMPORTANT!
Now a nagios user for the remote server must be created along nagios-plugins installed.

P a g e | 30
Juri Calleri | www.juricalleri.net | last update: 20/12/2016
Installing Nagios 4 with nrpe 2.16RC2 plus samples
4. The commands below will copy the created keys inside a file called authorized_keys, in the
remote server.
$ ssh-copy-id [email protected]
OR
$ cat ~/.ssh/id_rsa.pub | ssh [email protected] "mkdir -p ~/.ssh && cat >> ~/.ssh/authorized_keys"
Type yes when prompted and eventually the user's password too.
99. Useful commands
1. Check Validity script:
/usr/local/nagios/bin/nagios -v
/usr/local/nagios/etc/nagios.cfg
2. Start Nagios Service:
/usr/local/nagios/bin/nagios -d
/usr/local/nagios/etc/nagios.cfg
Or:
service nagios start
3. Reload:
/etc/rc.d/init.d/nagios reload
Or:
service Nagios reload
4. Stop:
/etc/rc.d/init.d/nagios stop
Or:
service nagios stop
5. Restart Xinetd (Probably you never need to run this command):
service xinetd restart

P a g e | 31
Juri Calleri | www.juricalleri.net | last update: 20/12/2016
Installing Nagios 4 with nrpe 2.16RC2 plus samples
A Big Thanks to
Website
support.nagios.com
(for the great help by its members)
digitalocean.com
(for the Nagios installation quick-start tutorial)
Users
Box293
hsmith
jfrickson
(for the great work on nrpe 2.16rc2 and certificates guide)
rkennedy
Myself
(I worked almost 4 months straight on this project)