installation walk-through macros - unc abruce/fall14/360/ · example 3: macros macros are used to...
TRANSCRIPT
WebIOPi
InstallationWalk-through
Macros

Installation
● Install WebIOPi on your Raspberry Pi– Download the tar archive file:
wget www.cs.unca.edu/~bruce/Fall14/WebIOPi-0.7.0.tar.gz
– Uncompress:
tar xvfz WebIOPi-0.7.0.tar.gz
– Change directory to new WebIO folder:
cd WebIOPi-0.7.0
– Run setup shell script:
sudo ./setup.sh
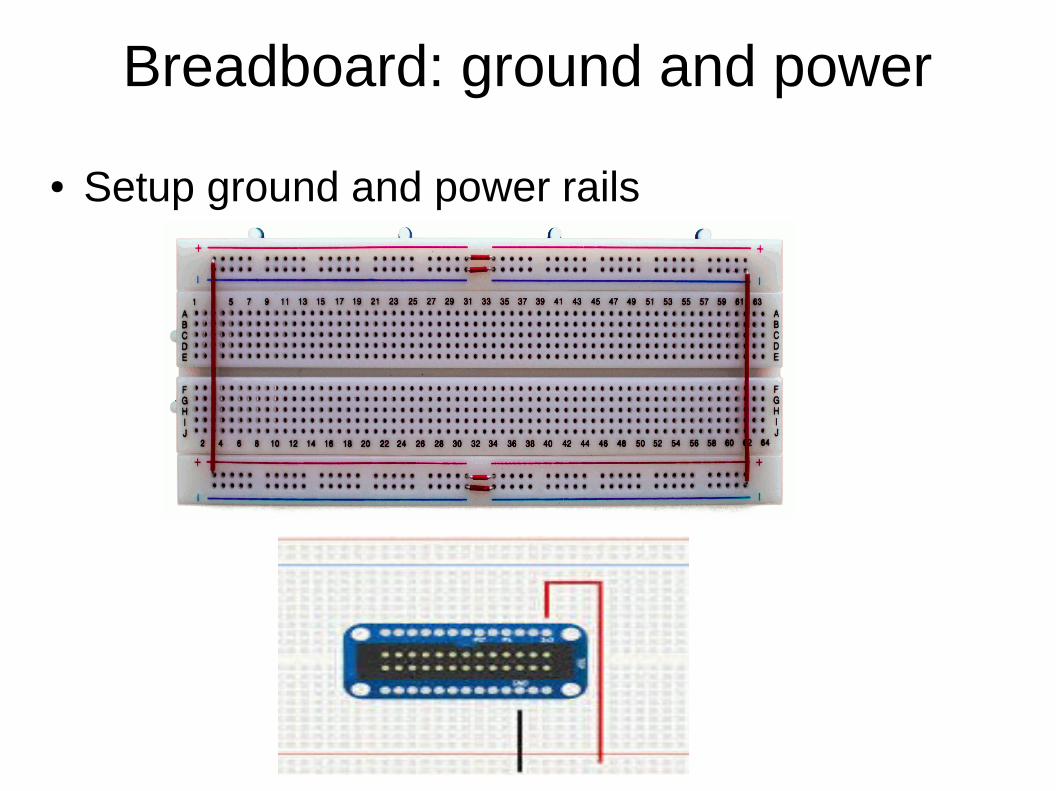
Breadboard: ground and power
● Setup ground and power rails

Breadboard: Add components
WebIOPi
● Try it: – On the Pi, start the web server:
sudo service webiopi start
– On the Pi, open the WebIOPi default page in Midori:
use the URL: localhost:8000
– Open the WebIOPi default page in Chrome on your PC:● On your Pi, use the ifconfig command to determine your pi's IP
– For example, it might be: 192.168.0.146● On you PC, open Chrome and open the URL: IP:8000
– For example the URL might be: 192.168.0.146:8000

What's happening
● All of the source code is installed on your Pi in the WebIOPi-0.7.0 directory but it's easier to view on the Source tab of the WebIOPi site
● WebIOPi is REST API containing many things: a HTTP server (written in python), a library of javascript library, python library...
● The default WebIOPi display is created using:– the index.html file in the htdocs directory
– The GPIO configuration as defined by the files in the python directory
● Both the GPIO configuration and the browser display can be customized
A tour of WebIOPi: Example 1
● Start with the example scripts installed in your WebIOPi folder– Change directory to WebIOIPi-0.7.0/examples/scripts/simple
– Notice the file index.html
● Edit the WebIOPi config file to reference this html files:
– sudo gedit (or nano) /etc/webiopi/config– In the [HTTP] section, change doc-root to be:
doc-root=/home/pi/WebIOPi-0.7.0/examples/scripts/simple● Stop the server:
sudo service webiopi stop● Restart the server:
sudo service webiopi start● Look at the default URL in the brower and open the index.html
file to understand what's happening
Recap on building a custom HTML file
● Include the webiopi.js javascript library ● Include in-line javascript code that begins with an
anonymous Javascript function passed to the WebIOPi JS library function webiopi().ready()
● The $(“id”) returns the DOM object of the element with that id
● Create buttons using webiopi().createGPIOButton()● Append buttons to html elements using the jQuery method
append()● Include webiopi().refreshGPIO(true) to update the display● WebIOPi has predefined CSS ids and classes

Example 2● Let's look at the blink example script in your WebIOPi folder
– Change directory to WebIOIPi-0.7.0/examples/scripts/blink
– Notice the script.py file but no index.html
● Edit the WebIOPi config file to reference this script file and remove the reference to the previous custom index.html file:
– sudo gedit (or nano) /etc/webiopi/config– In the [HTTP] section, comment out the doc-root assignment:
#doc-root=/home/pi/WebIOPi-0.7.0/examples/scripts/simple– In the [SCRIPTS] section, change myscript to be:
myscript=/home/pi/WebIOPi-0.7.0/examples/scripts/blink/script.py● Stop the server:
sudo service webiopi stop● Restart the server:
sudo service webiopi start● Look at the default URL in the brower and open the index.html file to
understand what's happening

Recap on make custom python scripts
● import webiopi ● define GPIO = webiopi.GPIO● Interface with server via setup(), loop() and destory()
functions– setup() is run once on first load
– loop() is run repeatedly
– destroy() is run before server shutdown
● Can define other functions to be called within the three above

Example 3: Macros● Macros are used to define custom functionality in the WebIOPi API
– They are functions written in python that can be referenced in the html document running in a browser---exchange information between server and browser
● Edit /etc/webiopi/config file to load the contents of the tutorials/2.macros directory
– In the [HTTP] section, make the doc-root assignment:
doc-root=/home/pi/WebIOPi-0.7.0/tutorials/2.macros– In the [SCRIPTS] section, change myscript to be:
myscript=/home/pi/WebIOPi-0.7.0/tutorials/2.macros/script.p● Stop the server:
sudo service webiopi stop● Restart the server:
sudo service webiopi start● Look at the default URL in the brower and open the index.html file to
understand what's happening

Example 4, more macros
● Edit /etc/webiopi/config file to load the contents of the examples/scripts/macros directory
– In the [HTTP] section, make the doc-root assignment:
doc-root=/home/pi/WebIOPi-0.7.0/examples/scripts/macros– In the [SCRIPTS] section, change myscript to be:
myscript=/home/pi/WebIOPi-0.7.0/examples/scripts/macros/script.p
● Stop the server:
sudo service webiopi stop● Restart the server:
sudo webiopi -d -c /etc/webiopi/config● Look at the screen output

Recap on Macros
● Used to exchange information between server and browser
● The WebIOPi JS library function webiopi().callMacro() is useful for calling macros that return values – The return values become the input to the referenced callback
function
● Functions assigned to variables are useful for referencing callback functions
● Macros that return values are not useful unless used in conjunction with a callback function
Resources
● WebIOPi main page● WebIOPi source code● WebIOPi forum● jQuery API