installation / service instructions -series - escea · installation / service instructions ... c11...
TRANSCRIPT

Installation / Service Instructions
For the latest documentation, visit www.escea.com
AF / FS-Series
630343_5
Gas Fireplace
Important:The appliance shall be installed in accordance with;• This installation instruction booklet• Local gas fitting regulations• Municipal building codes• Electrical wiring regulations• Any other relevant statutory regulations.• AS/NZS 5601:2013 Gas InstallationsNOTE: NOT INTENDED FOR FIREPLACE INSERT
WARNING:This appliance must be installed by a qualified person.
Do not modify this appliance.
This appliance is not intended for use by young children or infirm persons unless they have been adequately supervised by a responsible person to ensure that they can use the appli-ance safely.
Young children should be supervised to ensure that they do not play with the appliance.
Failure to follow these instructions could cause a malfunction of the heater, which could result in death, serious bodily injury, and/or property damage. Failure to follow these instructions may also void your fire insurance and/or warranty.
Who can install this product:Installation must be carried out by a registered installer who, on completion of the installation, must issue a:AUS: Certificate of Compliance NZ: Certificates that comply with the latest legislationin accordance with national and/or local codes. If these are not issued then the Escea warranty may be void.
Warranty Repair and Annual Servicing:Warranty repair work must be carried out by a recognised gas fire technician. It is recom-mended that recognised Escea Gas Fire Technicians are also used to carry out annual servicing requirements (particularly during the warranty period). For contact details of recognised Escea Gas Fire Technicians in your area, please contact the retailer from whom the appliance was purchased.
The heater must be installed according to these instructions and in compliance with all relevant building, gas fitting, electrical and other statutory regulations (eg. AS/NZS 5601). Any shortcomings in the appliance and flue installation will be the responsibility of the installer, and Escea will not be accountable for any such failings or their consequences.
Manufactured by: Escea Ltd, PO Box 5277 Dunedin NZ, Ph: +64 3 478 8220For contact details of your local escea distributor or dealer please visit:
www.escea.com [email protected]

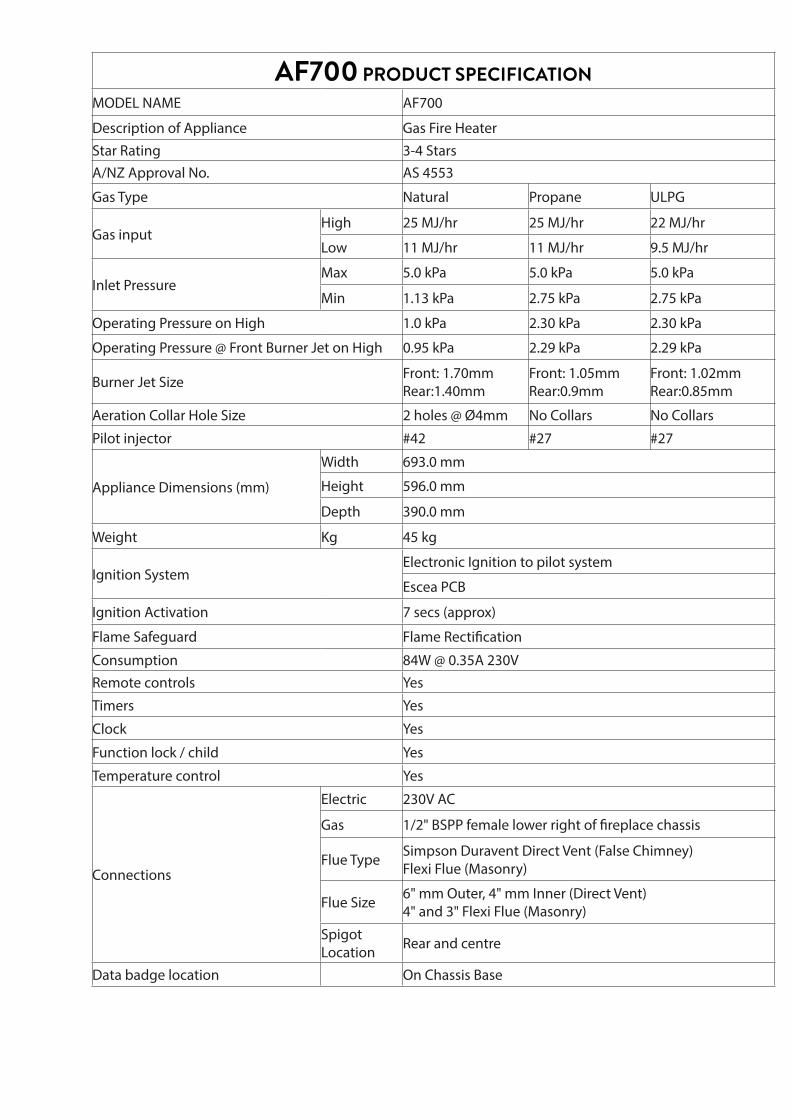
AF700 PRODUCT SPECIFICATION
MODEL NAME AF700
Description of Appliance Gas Fire HeaterStar Rating 3-4 StarsA/NZ Approval No. AS 4553
Gas Type Natural Propane ULPG
Gas inputHigh 25 MJ/hr 25 MJ/hr 22 MJ/hr
Low 11 MJ/hr 11 MJ/hr 9.5 MJ/hr
Inlet PressureMax 5.0 kPa 5.0 kPa 5.0 kPa
Min 1.13 kPa 2.75 kPa 2.75 kPa
Operating Pressure on High 1.0 kPa 2.30 kPa 2.30 kPa
Operating Pressure @ Front Burner Jet on High 0.95 kPa 2.29 kPa 2.29 kPa
Burner Jet Size Front: 1.70mm Rear:1.40mm
Front: 1.05mmRear:0.9mm
Front: 1.02mmRear:0.85mm
Aeration Collar Hole Size 2 holes @ Ø4mm No Collars No Collars
Pilot injector #42 #27 #27
Appliance Dimensions (mm)
Width 693.0 mm
Height 596.0 mm
Depth 390.0 mm
Weight Kg 45 kg
Ignition SystemElectronic Ignition to pilot system
Escea PCB
Ignition Activation 7 secs (approx)
Flame Safeguard Flame Rectification
Consumption 84W @ 0.35A 230VRemote controls Yes
Timers Yes
Clock Yes
Function lock / child Yes
Temperature control Yes
Connections
Electric 230V AC
Gas 1/2" BSPP female lower right of fireplace chassis
Flue Type Simpson Duravent Direct Vent (False Chimney)Flexi Flue (Masonry)
Flue Size 6" mm Outer, 4" mm Inner (Direct Vent)4" and 3" Flexi Flue (Masonry)
Spigot Location Rear and centre
Data badge location On Chassis Base

AF960 PRODUCT SPECIFICATION
MODEL NAME AF960
Description of Appliance Gas Fire Heater
Star Rating 3.5-3.75 StarsA/NZ Approval No. AS 4553
Gas Type Natural Propane ULPG
Gas inputHigh 31 MJ/hr 31 MJ/hr 28 MJ/hr
Low 15 MJ/hr 14 MJ/hr 12 MJ/hr
Inlet PressureMax 5.0 kPa 5.0 kPa 5.0 kPa
Min 1.13 kPa 2.75 kPa 2.75 kPa
Operating Pressure on High 1.0 kPa 2.30 kPa 2.30 kPa
Operating Pressure @ Front Burner Jet on High 0.94 kPa 2.20 kPa 2.20kPa
Burner Jet Size Front: 1.90mm Rear: 1.70mm
Front: 1.20mmRear: 1.05mm
Front: 1.10mmRear: 1.02mm
Aeration Collar Hole Size for Logs & Flakes 2 holes @ Ø6mm No Collars No Collars
Aeration Collar Hole Size for Coals 1 hole @ Ø3.5mm 2 holes @ Ø7mm 2 holes @ Ø10mm
Pilot injector #42 #27 #27
Appliance Dimensions (mm)
Width 943.0 mm
Height 596.0 mm
Depth 402.0 mm
Weight Kg 70 kg
Ignition SystemElectronic Ignition to pilot system
Escea PCB
Ignition Activation 7 secs (approx)
Flame Safeguard Flame Rectification
Consumption 84W @ 0.35A 230VRemote controls Yes
Timers Yes
Clock Yes
Function lock / child Yes
Temperature control Yes
Connections
Electric 230V AC
Gas 1/2" BSPP female lower right of fireplace chassis
Flue Type Simpson Duravent Direct Vent (False Chimney)Flexi Flue (Masonry)
Flue Size 6" mm Outer, 4" mm Inner (Direct Vent)4" and 3" Flexi Flue (Masonry)
Spigot Location Rear and centre
Data badge location On Chassis Base
A Installation Process and Product Description 8A1 Product Description 8A2 Recommended Installation Process 8A3 Product Dimensions 9
B Creating the Cavity 10B1 Cavity Shape 10B2 Floor Clearances 11B3 Flexi Flue & Converter Box Clearances 11B4 Corner Installations 12B5 Hearth 12B6 Cavity Base 12B7 Wall Linings 12B8 Mantle Clearance 13B9 Television Clearances 13B10 Distance from Fireplace base to Fascia base 13
C Installing the flue 14C1 Flue Restrictor Adjustment 14C2 Installing False Cavity Flueing 14C3 Supporting the Direct Vent Flue System 16C4 Sealing ‘Through Roof’ and ‘Through Wall’ Penetrations 16C5 Twist Locking Procedure 17C6 Installing the Converter Box 17C7 AF700 Vertically Terminating Flue Restriction Diagram 20C8 AF700 Horizontally Terminating and Vertically Terminating with a Horizontal Offset Flue Restriction Diagram 21C9 AF960 ONLY Vertically Terminating Flue Restriction Diagram 22C10 AF960 ONLY Horizontally Terminating and Vertically Terminating with a Horizontal Offset Flue Restriction Diagram 23C11 Hybrid (Masonry to Combustible) Horizontally terminating and vertically terminating with a horizontal offset diagram 24C12 Horizontal Brick Exit Flue Diagram (Masonry Only) 25C13 Flue Terminal Clearances 26C14 Connecting the Flexi Flue to the Masonry Terminal Kit 29C15 Setting up the Flue Spigot Plate 30
D Installing the Electricity and Gas to the Appliance 31D1 Power Supply 31D2 Removing the Glass 31D3 Removing the Burners 32D4 Gas Pipe Sizing 33D5 Gas Pipe Position 33
E Installing the Appliance 34E1 Installation 34E2 Connecting the Flue 34E3 Removing the Burner Tray 35

E4 Fixing the Appliance to the Base 36E5 Network Cable 36E6 Connecting the Gas Pipe to the Regulator 37E7 Gas Isolating Valve 37E8 Pressure Test Point 37E9 Checking the Operating Pressure 38E10 Converting the Appliance Gas Type 39E11 Flame Picture 40E12 Coal Fuelbed Installation 40E13 Log Fuelbed Installation 40E14 Installing the Glass 41E15 Home Automation Setup 41E16 Home Automation Operation 42
F Fitting the Fascia and Finishing Installation 43F1 Fitting the Fascia 43F2 Locating Wall Mount Cradle for Remote 43F3 Operating the Appliance for the First Time 44F4 Normal Operating Sounds and Smells 45F5 Cleaning the glass 45
G Freestanding Unit (FS730) Installation 46G1 Product Dimensions 46G2 Hearth and Clearances 46G3 Locating the FS730 46G4 Gas Pipe Routing Information 47G5 Flue Installation 48 G6 Inroom Horizontal Flue Kit 49G7 AF700 Fireplace Installation into FS730 Freestanding Unit 49
H Installation Checklist 50
S Service Manual 51S1 Error Codes 51S2 Serial Number 52S3 Checking Operating Pressure 52S4 Cleaning the Fascia 53S5 Cleaning the Log Set and Glass 53S6 Removing or Cleaning Fan 53S7 Removing the Electronic Tray 54S8 Replacing the Thermal Cut Out 55S9 Replacing a Remote 56S10 Annual service procedure 57S11 Wiring Diagram 58

BA
CD
EF
GSERVICE
8
A Product Description and Installation Process
A1 Product descriptionThe Escea AF-Series gas fire is a room sealed gas appliance designed to be built into a masonry cavity or a false chimney cavity. The AF-Series fireplace is provided with standoff rails installed to the outside of the chassis to attain a zero clearance rating. The appliances is flued using co-linear flexible aluminium flue for masonry installations and 4” x 6” co-axial direct vent steel flue for false chimney installations. The user will control their fire with the Radio Frequency (RF) remote that will normally be located in it’s wall mount cradle. In addition to the RF remote the appliance has a single auxiliary On/Off button on the unit. When not in operation it is in a standby mode unless it is physically isolated from the mains supply.
A2 Recommended Install ProcessThe following diagram illustrates the steps required to install your gas fire.The sequence in which you choose to do these tasks will vary depending on your individual scenario. Please read these instructions fully before proceeding with the installation.
Masonry Installation
Modifying the cavity to suit
Install electrical / gas connections and flue
system
Install appliance and finish cavity
Finish installation, fit fascia and test
appliance
Section B Section C, D Section E Section F
False Cavity Installation
Create The Framed-Cavity
Install electrical / gas connections and flue
system
Install appliance and finish cavity
Finish installation, fit fascia, test appli-
ance and clad the cavity
Section B Section C, D Section E Section F

BA
CD
EF
GSE
RVIC
E
9
A3 Product DimensionsNote: All outside dimensions taken from the appliance are with the standoffs attached
*Slim Fascia Dimensions.
A
E*
D*
C
B
A B C D* E*
AF700 693mm 387mm 596mm 711mm 593mm
AF960 943mm 402mm 596mm 961mm 593mm
END OF SECTION ABy the end of this section, you should have: � A framed false cavity
OR � A masonry cavity sized to suit the appliance

BA
CD
EF
GSERVICE
10
B Creating the Cavity
B1 Cavity Shape The standoff rails installed on the outside must only be removed when being installed into a masonry cavity.
Note: a top is not required when creating the cavity
Height Width Depth
AF700 False Cavity installation (top stand-offs must be adjusted to the upright position)
600mm 695mm 390mm + minimum 65mm flue clearances
Masonry install with standoff rails & top standoffs removed.
590mm** 685mm 385mm
AF960 False Cavity installation (top stand-offs must be adjusted to the upright position)
600mm 945mm 405mm + minimum65mm flue clearances
Masonry install with standoff rails & top standoffs removed.
590mm** 935mm 400mm
Note: If cavity dimensions significantly exceed those specified, a register plate is available for purchase through your local escea retailer (New Zealand Only).**Note: This dimension makes an allowance for the 30mm spacer for floor mounted intallations (see next page).False Cavity Installation RequirementsFor floor mounted installations, allow for fascia clearance (see B10)
D
H
W
BA
CD
EF
GSE
RVIC
E
11
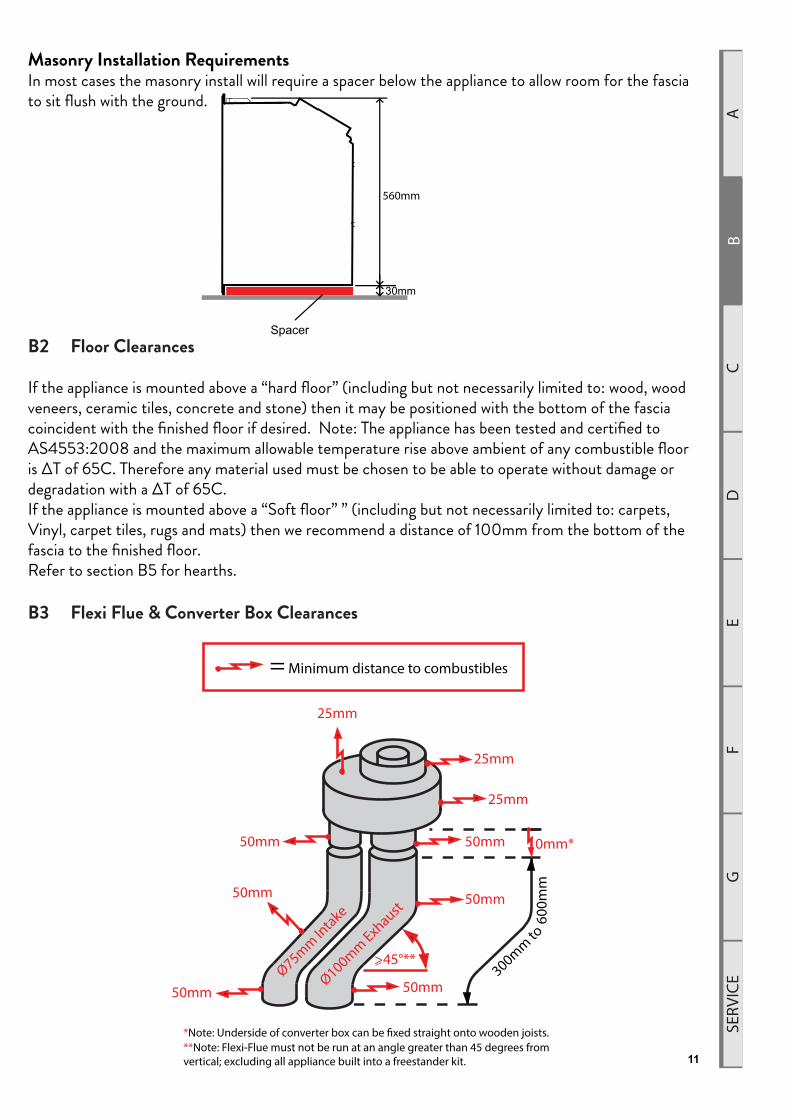
Masonry Installation RequirementsIn most cases the masonry install will require a spacer below the appliance to allow room for the fascia to sit flush with the ground.
B2 Floor Clearances
If the appliance is mounted above a “hard floor” (including but not necessarily limited to: wood, wood veneers, ceramic tiles, concrete and stone) then it may be positioned with the bottom of the fascia coincident with the finished floor if desired. Note: The appliance has been tested and certified to AS4553:2008 and the maximum allowable temperature rise above ambient of any combustible floor is ΔT of 65C. Therefore any material used must be chosen to be able to operate without damage or degradation with a ΔT of 65C.If the appliance is mounted above a “Soft floor” ” (including but not necessarily limited to: carpets, Vinyl, carpet tiles, rugs and mats) then we recommend a distance of 100mm from the bottom of the fascia to the finished floor.Refer to section B5 for hearths.
B3 Flexi Flue & Converter Box Clearances
560mm
25mm
= Minimum distance to combustibles
50mm 50mm 0mm*
*Note: Underside of converter box can be fixed straight onto wooden joists.**Note: Flexi-Flue must not be run at an angle greater than 45 degrees from vertical; excluding all appliance built into a freestander kit.
50mm
50mm
>45°**
50mm
Ø75mm Intake
Ø100mm Exhaust
50mm
25mm
25mm
600
mm
300mm to

BA
CD
EF
GSERVICE
12
B4 Corner InstallationsIf a cavity is to be created in a corner, the following drawing gives the minimum sized interior wall dimensions.
A B C
AF700 775mm 695mm 420mm
AF960 915mm 945mm 435mm
B5 HearthA Hearth is not required, however it may be used for decorative purposes or for protection of soft/sen-sitive flooring as stated in section B2 to allow a smaller floor clearance. The hearth should not obscure the front face of the fire, must protrude at least 200mm from the face of the fireplace and be at least the width of the appliance.
B6 Cavity BaseThis appliance MUST be fully supported on its base. The base must extend over the entire area of the underside of the appliance. The base must also be levelled to prevent vibration from possible fan imbalance. M5 Standoffs (circled in the diagram below) may be used to screw in any feet with an M5 thread to level the rear of the fireplace inside the cavity. The base of the cavity must be strong enough to support 80kgs.
B7 Wall LiningsNOTE: for false cavity installations, DO NOT line the wall before the fireplace has been fitted into the cavity; the top standoffs are required to be upright for this installation type. The AF-Series fireplace is zero clearance rated with the standoff rails installed on the ouside of the chassis. The standoff rails may only be removed when installing the fire into a masonry cavity.The side-front flanges of the appliance must be on top of the finished wall surface in order for the fascia to mount properly. Take into account any plaster board, tiles or any other finishing surface that may be intended for the finished wall surface. The wall board that lines the outside of this opening can be normal dry wall (plaster board) and does not need to be non-combustible.If for some reason the cavity dimensions exceed those specified in section B1 a register plate is avail-able (New Zealand Only) for purchase through your local escea distributor.Note: The temperature of the wall lining directly above the heater does get warm and hence may discolour paint finishes that are susceptible to temperature damage or distort vinyl wall coverings. For durability of finishes and surfaces you should contact the relevant manufacturer for their specification.
Top View of Chassis Base

BA
CD
EF
GSE
RVIC
E
13
B8 Mantle ClearancePlease refer to the diagram below. Mantles or protruding ledges mounted above the heater that are made from combustible materials, must not extend outside of the dimensions shown below.
B9 Television ClearancesThe following are the recommended minimum clearances for the location of any electrical equipment (such as Plasma TV, LCD TV or home theatre) above an Escea AF-Series gas fire. Use either a shelf or mantle below your TV screen or alternatively you can construct a recess to mount your TV screen into.
Note: The above television clearance recommenda-tions are to be treated as a suggestion of a suitable installation only. It is the responsibility of the end user to check the installation instructions of their electrical appliances to ensure that the location in relation to the gas fire is suitable. Escea in no way guarantees or takes responsibility that the above in-stallation suggestion will be suitable for all electrical or home entertainment appliances.
B10 Distance from Fireplace base to Fascia baseThe following side-on view shows the measurement from the base of the fireplace to the base of the fascia:

BA
CD
EF
GSERVICE
14
C Installing The Flue
C1 Flue Restrictor AdjustmentThe flue restrictors are adjusted by removing the firebox baffle inside the firebox by removing a screw in the centre rear of the baffle; once removed the baffle can be lifted up then out. The restrictors are a simple sheetmetal part with a finger fold, allowing the installer to bend the flue restrictor open or closed (flat) with his/her hands or pliers. The flue diagrams in section C7, C8, C9 & C10 refer to different restrictor setups for different flue configurations. Use the following index for creating the correct restriction:
C2 Installing False Cavity Flueing (if installing appliance into masonry, skip to C7)Ensure all rigid flue components are Simpson Duravent Direct Vent Pro 4” x 6,” no other fluetypes may be used.Use the diagrams in sections C7, C8, C9 & C10 to check if your proposed flue system isacceptable. Section C11 will also need to be used to determine whether the flue terminallocation meets the requirements of AS/NZS 5601. Then use the table following section C11 to work out the quantities of the flue components that are required.
5
6
AF960 Restrictor SetupAF700 Restrictor Setup
N/A
N/A

BA
CD
EF
GSE
RVIC
E
15
Rigid flue system rules for installation:• The appliance comes with 300mm of flexi flue (compressed) and a converter box to convert the
appliance to rigid flueing.• Any offsets in your flue configuration should be 45° where possible.• If your flue configuration has a horizontal run, there must be a minimum 1° inclination (20mm
vertical rise per 1m horizontal run) leading upwards towards the termination.• Do not install the flue with horizontal sections sloping down towards the termination. This could
cause the fire to operate incorrectly and possibly create an unsafe condition.• This flue system cannot be cut to length. Correct lengths must be selected for each installation.
For a full list of available flue lengths, contact your Escea retailer.• The listed length of the flue pipe is not the installed length. 1 ½” (38mm) needs to be subtracted
for each join to determine the installed length of each piece of flue pipe. E.g. 48” length has installed length of 45”.• All vertical measurements should be measured from the top surface of the fireplace casing itself
(not the fascia).• When using 90° elbows in the installation, use the diagram below to help calculate installations
horizontal and vertical distances. 1½” (38mm) will still need to be subtracted from each join.• When using horizontal flue runs, vertical measurements should be measured to the centre line of
the horizontal flue pipes (as shown in diagram below).
• If using a 45° offset in your installation, consult the chart below to select the required flue length to give the desired offset. 1½” (38mm) will still need to be subtracted from each of the 45° bends to allow for the joins.

BA
CD
EF
GSERVICE
16
• Adjustable lengths are available depending on stock levels. Contact escea for more information.The flue must maintain the following clearances to combustible materials; 25mm from all sides and bottom of the flue, and 50mm from the top of the flue:
C3 Supporting the Direct Vent flue systemWall straps are required to fix the Direct Vent flue system in place for each installation. This will ensure that no undue strain is placed on flue components once installed.
For a flue offset or horizontal run, it is recommended that wall straps be used to secure the flue system with a spacing of 900mm between straps. Plumbers strapping / tape can be used to connect the wall straps to the building structure where there are large distances between the support point and the anchor point.
For vertical flue runs it is recommended that wall straps be used to anchor the flue system with a spacing of 1200mm between straps.
C4 Sealing ‘Through Roof’ and ‘Through Wall’ PenetrationsFor ‘through roof’ penetrations, use a Deck-tite flashing or equivalent to create a weather-tight seal between the flue and the roof cladding.
For ‘through wall’ penetrations, this will require the use of a Wall Thimble. The Wall Thimble will ensure you have suitable clearance from combustibles as well as sealing the penetration. The section of the wall thimble installed on the external surface of the wall should be sealed to the wall using a high tem-perature sealant such as a High Temperature RTV Silicone or equivalent. Additional sealant is required to seal the Terminal Cap to the external wall. A bead should be run along the edge of the Terminal that will be in contact with the wall once installed.

BA
CD
EF
GSE
RVIC
E
17
C5 Twist locking procedure Before connecting flue components, to ensure an airtight seal run a single 7-8mm bead of High Tem-perature RTV Silicone or equivalent, on the ‘male’ end of the flue as shown in the diagram below.
The four indentations located on the female end of the flue are designed to slide straight onto the male ends of the adjacent flue length, by orienting the four flue indentations so they match and slide into the four entry slots on the male ends.
Push the pipe sections completely together, then twist-lock one section clockwise approximately one-quarter turn, until the two sections are fully locked.
Wipe off any excess sealant from the exterior of the flue joint.
C6 Installing Converter BoxThe AF-Series fireplace only comes with a spigot plate suited for flexi flue, because of this, a converter box is required to convert a 300mm, 4” and 3” flexi flue length to Simpsons Duravent 4” x 6” direct vent flueing.The converter box must be appropriately secured and should not take the weight of the duravent rigid flue; rigid flueing should be secured by wall straps as stated in section C3.NOTE: The joists used to support the converter box from below MUST still maintain clearances from the flexi pipes.
Combustible clearances for the converter box are as shown in a diagram in section B3

BA
CD
EF
GSERVICE
18
Locate the 30cms long piece of fibreglass tape in the accessory pack provided with the AF-Series fire.Remove the tape backing and adhere it to the Exhaust spigot of the Co-axial transition box spigot approximately 10mm off the face of the planer surface of the transition box.
Locate the 100mm exhaust flexi flue. Stretch the flexi flue to the desired length ensuring that the end part that fits onto the exhaust spigot is completely extended (stretched).Locate the exhaust flue onto the exhaust spigot over the fibreglass tape.
Locate 1 X 100mm diameter stainless steel band clamp provided with the flexi flue kit.Mark, centre punch and drill 3 x 4.0mm diameter holes approximately equally spaced around the diameter of the band clamp.

BA
CD
EF
GSE
RVIC
E
19
Place the band clamp over the exhaust flexi flue. Position the band so that it aligns with the fibreglass tape underneath (approximately 15mm off the planar surface of the transition box). Tighten the band clamp.
ONLY TIGHTEN ENOUGH TO JUST HOLD AND PREVENT THE FLEXI FLUE FROM COM-ING OFF THE SPIGOT IF PULLED ON. OVER TIGHTENING THE CLAMP WILL CRUSH & DAMAGE THE FLEXI FLUE.
Pilot drill 3 X 3.00 diameter holes through the previously drilled holes in the band clamp and into and through both the flexi flue and the exhaust spigot.Screw a stainless steel self-tapping screw (provided with the fibre glass tape) into each of the 3 holes.
Ensure that the joint is sound and secure.The steel ‘flashing plate’ provided with the 46DVA-CT collinear kit may be used (if desired) to force distances to combustible materials and provide a platform to screw onto appropriately placed wooden joists (supports).
The joint on the 75mm intake spigot is achieved in the same manner however the fibreglass tape is not required to be fitted to the intake spigot.

BA
CD
EF
GSERVICE
20
C7 AF700 ONLY Vertically Terminating Flue Restriction Diagram
^AF700 ONLY^Hybrid flueing: any length of flexi Flue or rigid Duravent may be used as long as the total length of vertical flueing does not exceed 12m. The flexi flue must be used within masonry and convert to rigid duravent immediately after exiting masonry.
NOTE: If your flue configuration falls on or near a restriction zone boundary line in diagrams located in section C7, C8, C9 or C10 it may require the restriction setup from either side of the boundary line to achieve the correct flame aesthetic (refer to E11 for flame aesthetic), this may vary from installation to installation.

BA
CD
EF
GSE
RVIC
E
21
C8 AF700 ONLY Horizontally Terminating and Vertically Terminating with a Horizontal Offset Flue Restriction Diagram
^AF700 ONLY^NOTE: If your flue configuration falls on or near a restriction zone boundary line in diagrams located in section C7, C8, C9 or C10 it may require the restriction setup from either side of the boundary line to achieve the correct flame aesthetic (refer to E11 for flame aesthetic), this may vary from installation to installati

BA
CD
EF
GSERVICE
22
C9 AF960 ONLY Vertically Terminating Flue Restriction Diagram
^AF960 ONLY^Hybrid flueing: any length of flexi Flue or rigid Duravent may be used as long as the total length of vertical flueing does not exceed 12m. The flexi flue must be used within masonry and convert to rigid duravent immediately after exiting masonry.
NOTE: If your flue configuration falls on or near a restriction zone boundary line in diagrams located in section C7, C8, C9 or C10 it may require the restriction setup from either side of the boundary line to achieve the correct flame aesthetic (refer to E11 for flame aesthetic), this may vary from installation to installation.
BA
CD
EF
GSE
RVIC
E
23
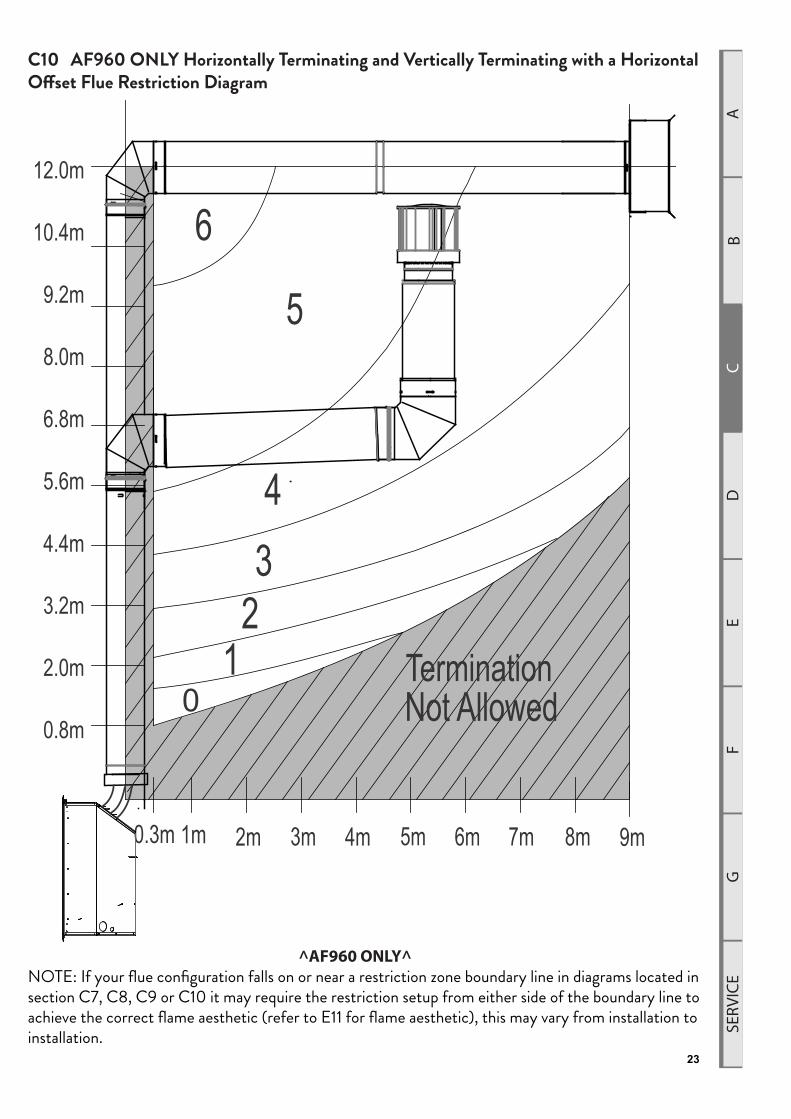
C10 AF960 ONLY Horizontally Terminating and Vertically Terminating with a Horizontal Offset Flue Restriction Diagram
^AF960 ONLY^NOTE: If your flue configuration falls on or near a restriction zone boundary line in diagrams located in section C7, C8, C9 or C10 it may require the restriction setup from either side of the boundary line to achieve the correct flame aesthetic (refer to E11 for flame aesthetic), this may vary from installation to installation.

BA
CD
EF
GSERVICE
24
C11 Hybrid (Masonry to Combustible) Horizontally terminating and vertically terminating with a horizontal offset Diagram
The above diagram is only for visual reference. Depending on which fire you are installing refer to either C8 or C10 for restriction settings.The flexi flue must be used within masonry and convert to rigid duravent immediately after exiting masonry.

BA
CD
EF
GSE
RVIC
E
25
C12 Horizontal Brick Exit Flue Diagram (Masonry only)
Must conform to the correct flue diagram (C8 - AF700, C10 - AF960). Ensure that the restrictors are set correctly.

BA
CD
EF
GSERVICE
26
C13 Flue Terminal Clearances
Vertical Termination ClearancesThis diagram applies to all vertical flue type installations on this appliance
500mm minimumto nearest surface

BA
CD
EF
GSE
RVIC
E
27
Horizontal Termination ClearancesThis diagram applies to all horizontal flue type installations on this appliance.

BA
CD
EF
GSERVICE
28
Ref. ItemMinimum Clearances
(mm)
Natural draught
Fan assisted
a Below eaves, balconies and other projections:
Gas appliances up to 50 MJ/h input 300 200
Gas appliances over 50 MJ/h input 500 300
b From the ground, above a balcony or other surface (see note 6) 300 300
c From a return wall or external corner (see note 6) 500 300
d From a gas meter (M) (see 2.5.4.9 for vent terminal location ofRegulator) 1000 1000
e From an electricity meter or fuse box (P) 500 500
f From a drain pipe or soil pipe 150 75
g Horizontally from any building structure (see note 6) or obstructionFacing a terminal 500 500
h From any other flue terminal, cowl, or combustion air intake
(see note 6) 500 300
j Horizontally from an openable window, door, non-mechanical air
Inlet, or any other opening into a building with the exception of
Sub-floor ventilation:
Gas appliances up to 150 MJ/h input 500 300
Gas appliances over 150 MJ/h input up to 200 MJ/h input 1500 300
Gas appliances over 200 MJ/h input 1500 500
All fan-assisted flue gas appliances, in the direction of discharge 1500
k From a mechanical air inlet, including a spa blower 1500 1000
n Vertically below an openable window, non-mechanical air inlet, or
Any other opening into a building with the exception of sub-floor
Ventilation:
Space heaters up to 50 MJ/h input 150 150
Other gas appliances up to 50 MJ/h input 500 500
Gas appliances over 50 MJ/h input and up to 150 MJ/h input 1000 1000
Gas appliances over 150 MJ/h input 1500 1500
NOTE-(1) All distances are measured to the nearest part of the flue terminal(2) Prohibited area below electricity meter or fuse box extends to ground level(3) See 2.6.13.3 for restrictions on a flue terminal under a covered area(4) See appendix G LPG Cylinder Locations, figure G2 and figure G3, for clearances re-quired from a flue terminal to an LPG cylinder. A flue terminal is considered to be a source of ignition.(5) For gas appliances not addressed above, the design shall be certified by a suitably quali-fied engineer.(6) Some gas appliances may be suitable for closer installation; refer to the manufacturer’s instructions.

BA
CD
EF
GSE
RVIC
E
29
C14 Connecting the Flexi flue to the Masonry Terminal Kit (46DVA-CL34)NOTE: The chimney kit 46DVA-CL34 must only be installed into a non-combustible masonry or concrete chimney.
Locate the 100mm (4”) exhaust flexi flue. Stretch the flexi flue to the desired length ensuring that the end part that fits onto the exhaust spigot is completely extended (stretched).
Locate the 100mm (4”) exhaust flue onto the exhaust spigot.
Locate 1 X 100mm diameter stainless steel band clamp provided with the 46DVA-CL34 flexi flue kit. Mark, centre punch and drill 3 x 4.0mm diameter holes approximately equally spaced around the diameter of the band clamp. Place the band clamp over the exhaust flexi flue and tighten.
ONLY TIGHTEN ENOUGH TO JUST HOLD AND PREVENT THE FLEXI FLUE FROM COMING OFF THE SPIGOT IF PULLED ON. OVER TIGHTENING THE CLAMP WILL CRUSH & DAMAGE THE FLEXI FLUE.
Screw a self-tapping screw (provided with the 46DVA-CL34 flexi flue kit into each of the 3 holes through the band clamp and into and through both the flexi flue and exhaust spigot.
Ensure that the joint is sound and secure.The joint on the 75mm intake spigot is achieved in the same manner.

BA
CD
EF
GSERVICE
30
C15 Setting up the Flue Spigot PlateConnect the flexi flue to the spigot plate while the cavity is still empty using the hose clamps provided.
END OF SECTION CBy the end of this section, you should have: � For a false cavity installation: a self supporting converter box with a 3” and 4” 300mm length of flexi flue attached to the flue spigot plate dangling flush with the top of the cavity opening. � For a masonry installation: A length of flexi flue attached to the flue spigot plate dangling flush with the top of the cavity opening. � A weather-tight Flue Terminal with clearance as specified by AS/NZ5601
� Reasonable access to the outside face for maintenance purposes

BA
CD
EF
GSE
RVIC
E
31
D Installing the Electricity and Gas to the Appliance
In order to install gas to the fireplace, check the operating pressure or install the network cable, the glass and burner tray needs to be removed.
D1 Power SupplyWhilst the cavity is being created consideration should be given to appropriate location of a standard 3 pin, EARTHED 230/240V power outlet. This must be within 1.0m of the rear bottom right hand corner of the appliance.
IMPORTANT: Locating the power outlet within the cavity makes the installation very neat but the provision MUST be made to be able to switch the power supply off and on (electrical isolation switch) and MUST be accessible after the heater has been installed. This is normally done by means of a separate switch which must be located adjacent to the appliance as per AS/NZS 5601.1.2010. This will allow service technicians to isolate the power supply before performing service work on the appliance.
This appliance must not be located directly below a socket outlet.
This appliance will draw a maximum of 2 Amps from a 230/240V supply.
An electrical wiring diagram is located underneath the electronic tray, and also in the rear of this manual (Service section).
D2 Removing the GlassThe AF-Series fireplace has two layers of glass; the inner glass seals the firebox and is called the prima-ry glass, the outer glass is called the secondary glass.
Secondary Glass1. Turn the upper glass brackets towards the centre of the fire to release the glass.2. Pull the top of the glass toward you slightly, lift the glass out of the bottom glass retainer and care-fully set glass aside.
1 2

BA
CD
EF
GSERVICE
32
Primary Glass 3. Remove both machine screws holding in the top bracket and slide forward. Note: some fireplaces may have an aluminium extrusion instead which is not fixed with screws, that needs to be lifted up to remove. 4. Remove the two screws in each of the two side brackets. 5. Pull the top of the glass toward you slightly, lift the glass out of the bottom glass retainer and carefully set glass aside.
D3 Removing the BurnersRemove the 2 screws in the rear corners of the infill assembly and the 2 screws either side of the pilot guard (shown in diagram below). Lift the infill assembly up and out of the firebox and place carefully aside.
Remove the 2 machine screws at the lefthand end of each burner. The burner can now be carefully moved left to detach the burner tube from the burner jets and lifted out of the firebox.
3
4 5

BA
CD
EF
GSE
RVIC
E
33
D4 Gas Pipe SizingGas pipe should be sized as per the requirements of AS/NZS 5601. The pipe sizing must be sufficient to deliver the following volume of gas to the heater with all other gas appliances in the home running at the same time:
AF700 Gas Consumption = 25MJ/hr
AF960 Gas Consumption = 31MJ/hr
D5 Gas Pipe PositionThe AF-Series fireplace gas pipe entry point is located in the lower right corner; a sheet of silicone is used as a grommet (circled below).
Get the gas pipe lined up with the silicone grommet so that when the chassis is pushed into the cavity in section E the fire will look like the diagram shown below.
Fireplace
Cavity
Regulator
Gas supply pipe
Siliconegrommet
BA
CD
EF
GSERVICE
34
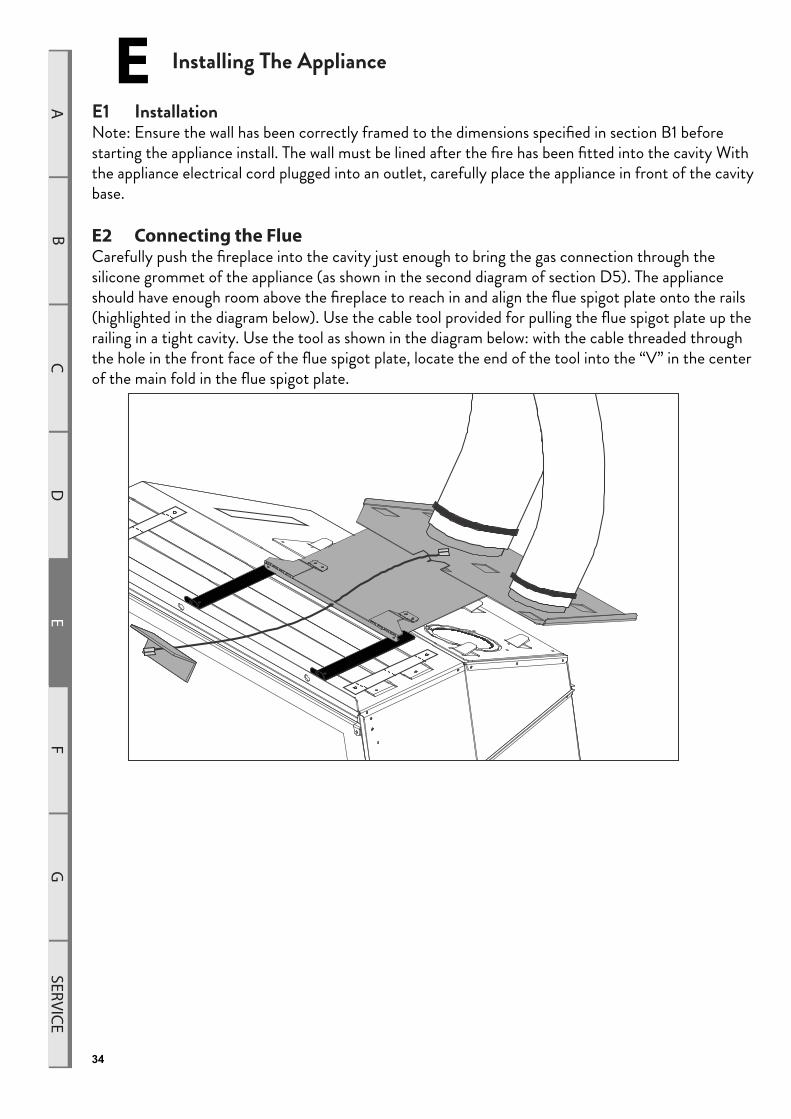
E Installing The Appliance
E1 InstallationNote: Ensure the wall has been correctly framed to the dimensions specified in section B1 before starting the appliance install. The wall must be lined after the fire has been fitted into the cavity With the appliance electrical cord plugged into an outlet, carefully place the appliance in front of the cavity base.
E2 Connecting the FlueCarefully push the fireplace into the cavity just enough to bring the gas connection through the silicone grommet of the appliance (as shown in the second diagram of section D5). The appliance should have enough room above the fireplace to reach in and align the flue spigot plate onto the rails (highlighted in the diagram below). Use the cable tool provided for pulling the flue spigot plate up the railing in a tight cavity. Use the tool as shown in the diagram below: with the cable threaded through the hole in the front face of the flue spigot plate, locate the end of the tool into the “V” in the center of the main fold in the flue spigot plate.

BA
CD
EF
GSE
RVIC
E
35
Make sure that all six of the fold up tabs (shaded in the diagram below) used for locating the flue spigot plate onto the chassis are poking through the flue spigot plate.
Insert the 2 long self tapping screws into the location shown in the diagram above to secure the flue spigot plate to the chassis.
E3 Removing the Burner TrayRemove the screws circled in the diagram below.
The lefthand side of the burner tray can now be carefully tilted and lifted out of the firebox slightly to detach the 2 ignition leads, 6-way teddington valve connector and the earth lead.
BA
CD
EF
GSERVICE
36
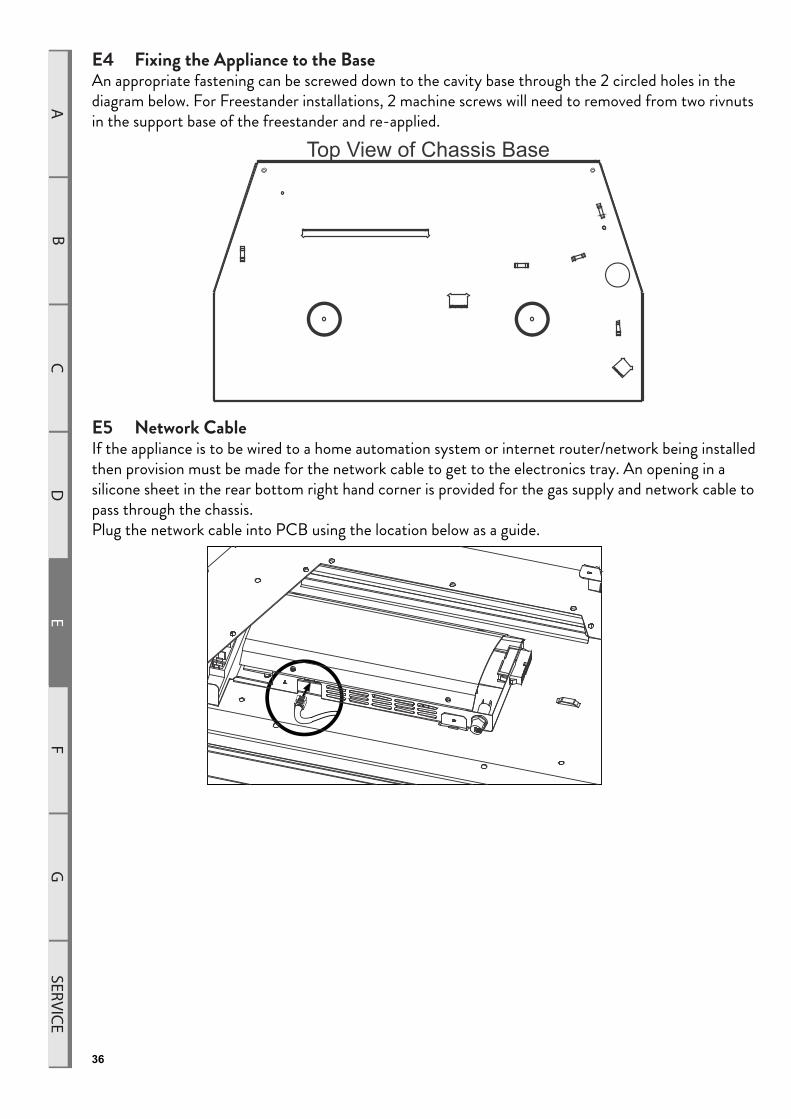
E4 Fixing the Appliance to the BaseAn appropriate fastening can be screwed down to the cavity base through the 2 circled holes in the diagram below. For Freestander installations, 2 machine screws will need to removed from two rivnuts in the support base of the freestander and re-applied.
E5 Network CableIf the appliance is to be wired to a home automation system or internet router/network being installed then provision must be made for the network cable to get to the electronics tray. An opening in a silicone sheet in the rear bottom right hand corner is provided for the gas supply and network cable to pass through the chassis. Plug the network cable into PCB using the location below as a guide.
Top View of Chassis Base
BA
CD
EF
GSE
RVIC
E
37
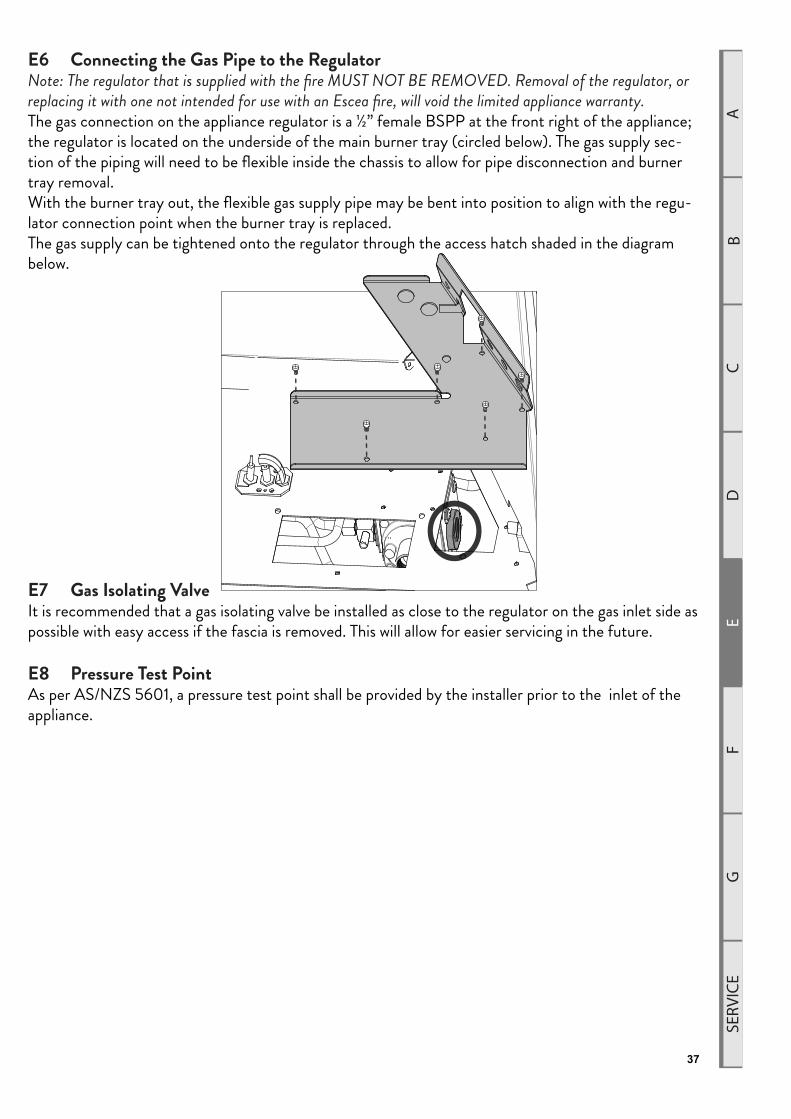
E6 Connecting the Gas Pipe to the RegulatorNote: The regulator that is supplied with the fire MUST NOT BE REMOVED. Removal of the regulator, or replacing it with one not intended for use with an Escea fire, will void the limited appliance warranty.The gas connection on the appliance regulator is a ½” female BSPP at the front right of the appliance; the regulator is located on the underside of the main burner tray (circled below). The gas supply sec-tion of the piping will need to be flexible inside the chassis to allow for pipe disconnection and burner tray removal. With the burner tray out, the flexible gas supply pipe may be bent into position to align with the regu-lator connection point when the burner tray is replaced.The gas supply can be tightened onto the regulator through the access hatch shaded in the diagram below.
E7 Gas Isolating ValveIt is recommended that a gas isolating valve be installed as close to the regulator on the gas inlet side as possible with easy access if the fascia is removed. This will allow for easier servicing in the future.
E8 Pressure Test PointAs per AS/NZS 5601, a pressure test point shall be provided by the installer prior to the inlet of the appliance.

BA
CD
EF
GSERVICE
38
E9 Checking the Operating PressureWARNING: The regulator that is supplied with the fire MUST NOT BE REMOVED. Removal of the regulator, or replacing it with one not intended for use with an Escea fire, will void the limited appliance warranty.
� Check the inlet pressure to the appliance. Attach manometer tube to the first test point upstream of the appliance (typically at the gas utility meter or auto change device for a propane bottle station)
� Run the heater on full (both burners running) and measure inlet pressure with all the other gas appliances in the building running. If pressure does not fall within the maximum or minimum pressures listed on the specification sheet at the start of this manual then reassess installation pipe size or upstream regulator settings.
� Loosen the operating pressure test point screw. Connect the manometer tube and mea sure the operating pressure with the fireplace running on full (both burners running) and with all the other gas appliances in the building running. The manometer tube can be applied to the test point by removing the access hatch and feeding the tube through the front (as shown in the diagram below).
� Adjust the operating pressure by feeding a screw driver through the front face of the fireplace and turning the regulator adjustment screw.
� Tighten the operating test point screw and leak test both test points using a soapy water solution.
� Replace the test point hatch
Operating Pressure Test Point
Regulator Adjustment screw

BA
CD
EF
GSE
RVIC
E
39
E10 Converting the Appliance Gas TypeThis appliance has been factory set to operate on Natural Gas only. To convert the appliance to oper-ate on propane or ULPG, proceed as follows:
AF700 ONLY
Jets Front Burner Rear Burner Aeration Collar (2x) Pilot Jet
NG Ø 1.70 mm Ø 1.40 mm 2 holes @ Ø 4mm #42
Propane Ø 1.05 mm Ø 0.90 mm None #27
ULPG Ø 1.02 mm Ø 0.85 mm None #27
AF960 ONLY
Logs & Flakes
Jets Front Burner Rear Burner Aeration Collar (2x) Pilot Jet
NG Ø 1.90 mm Ø 1.70 mm 2 holes @ Ø 6mm #42
Propane Ø 1.20 mm Ø 1.05 mm None #27
ULPG Ø 1.10 mm Ø 1.02 mm None #27
Coals
Jets Front Burner Rear Burner Aeration Collar (2x) Pilot Jet
NG Ø 1.90 mm Ø 1.70 mm 1 hole @ Ø 3.5mm #42
Propane Ø 1.20 mm Ø 1.05 mm 2 holes @ Ø 7mm #27
ULPG Ø 1.10 mm Ø 1.02 mm 2 holes @ Ø 10mm #27
� Remove the front and rear burner jet and replace with the correct jet as stated in the above table. � Remove the 4 screws securing the pilot assembly to the burner tray.
� Carefully lift the pilot assembly away from the burner tray to access and unscrew the pilot pipe nut. Slowly pull the pipe, nut and olive away from the pilot assembly to let the pilot jet down. Remove the existing pilot jet and replace with the jet supplied in the conversion kit. Tip: removing the test point hatch and guiding the pilot pipe up from below can make this process easier. � Remove the left access hatch (shaded in the second diagram of section E9). Remove the regulator screw cap and screw out the nylon adjuster screw to remove the existing spring. � Replace the current spring with the purple spring supplied in the conversion kit and refit the nylon adjuster screw. � Refit the access hatch using one screw to hold it in place. � Replace (or remove) the aeration collars using the table above. � Refit the burners. � Operate the fire with the glass off and adjust the operating pressure to 2.3kPa for Propane / ULPG by turning the nylon adjustor screw whilst the appliance is running on maximum. � Turn the fire off and remove the burners and access hatch again to replace the metal regulator cap � Adhere the Conversion label over the top of the Natural Gas data label on the appliance data plate. � Refit the access panel (all screws), burners, infill and fuel bed. � Adhere the ‘Propane’ or ‘ULPG’ label over the top of the existing Natural Gas label on the side of the appliance (if accessible).
BA
CD
EF
GSERVICE
40
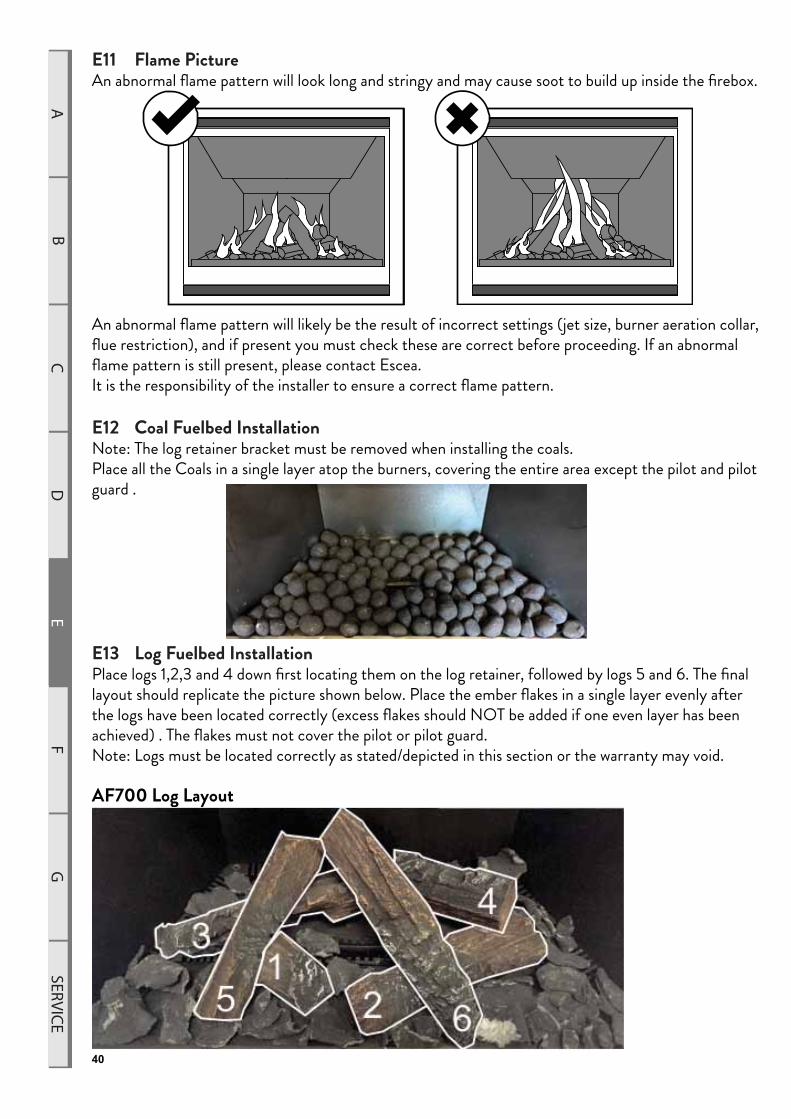
E11 Flame PictureAn abnormal flame pattern will look long and stringy and may cause soot to build up inside the firebox.
An abnormal flame pattern will likely be the result of incorrect settings (jet size, burner aeration collar, flue restriction), and if present you must check these are correct before proceeding. If an abnormal flame pattern is still present, please contact Escea.It is the responsibility of the installer to ensure a correct flame pattern.
E12 Coal Fuelbed InstallationNote: The log retainer bracket must be removed when installing the coals.Place all the Coals in a single layer atop the burners, covering the entire area except the pilot and pilot guard .
E13 Log Fuelbed InstallationPlace logs 1,2,3 and 4 down first locating them on the log retainer, followed by logs 5 and 6. The final layout should replicate the picture shown below. Place the ember flakes in a single layer evenly after the logs have been located correctly (excess flakes should NOT be added if one even layer has been achieved) . The flakes must not cover the pilot or pilot guard.Note: Logs must be located correctly as stated/depicted in this section or the warranty may void.
AF700 Log Layout

BA
CD
EF
GSE
RVIC
E
41
AF960 Log Layout
Use the index below as a guide for selecting the correct logs:
E14 Installing the GlassRefer to section D2 and reverse the steps.
E15 Home automation SetupThe AF-Series fireplace has a simple interface for connection to a home automation system. Simply put this allows the fireplace to be woken up and started and then shut down. The “Close to wake” con-nection shown is essentially taking one of the 3.3 volt DC pins on the fireplace micro controller and pulling it down to ground. In order to isolate the fireplace from the automaton system a relay needs to be used as shown. This allows you to use any nominal voltage to drive the relay while keeping the fireplaces 3.3V supply isolated.

BA
CD
EF
GSERVICE
42
Note: you will need to match the relay coil voltage with the volt-age from your automaton system. The Home Automation connection can be found to the right of the electronics tray (for access instructions see section E3). The socket is shown to the right and can be identified by green wires.
E16 Home Automation Operation
Relay closedThe fireplace will start in a medium setting until it receives a signal from the remote control unit (up to 3 minutes). Once the remote has communicated with the fireplace it will turn on and begin operating the fireplace thermostatically. The remote will use whatever temperature the user has previously set and cannot be altered by the home automation system. The fireplace will continue to operate while the relay is closed.Note: If the fireplace cannot communicate with the remote controller within 10 minutes of the relay contact closure then the fireplace will shut down and return to standby. The remote controller is required to be operating within range of the fireplace for its safe operation.
Relay openIf the fireplace was operating with a closed relay then upon opening the relay contacts the fireplace will shut down and return the remote controller to its standby mode when it next updates (up to 3 min-utes). While the relay is open the fireplace will be in standby mode and available for manual operation by the user.
μTerminal block
Connectoron fireplaceFireplace
Connector and terminalblock supplied by Escea
+3.3VDCFrom Automation system
Required relay
END OF SECTION EBy the end of this section, you should have:
� The appliance installed in the cavity
� The flue correctly secured to the rear of the appliance
� The appliance fixed to the cavity base
� The appliance plugged into a mains electricity supply
� The selected fuel bed installed and glass in place
� The appliance gas supply attached and pressure tested with all other gas appliances running
� Checked that the appliance ignites reliably and safely at least three times

BA
CD
EF
GSE
RVIC
E
43
F Fitting the Fascia and Finishing Installation
F1 Fitting the FasciaSlide the top of the fascia (the side with two prongs facing away from the front face) into the fascia rails attached to the chassis in the two top corners. Push the bottom fascia lip above the chassis base. The fascia should now be flush with the wall.
F2 Locating Wall Mount Cradle for RemoteThe appliance’s remote contains the thermostat that will sense the room temperature and communi-cate this back to the heater via radio frequency.A wall mount cradle has been provided for the remote and where possible the control should be housed in this cradle.
The location of this cradle should be decided by taking into account the following factors;
Simple, convenient access for the userAway from air flow and drafts through the roomThe parts of the room that people are likely to spend timeAway from direct sun lightA suitable distance away from the heater.Ideally 1.2m to 1.5m from the floor
The radio frequency signal will go through some walls but for best results Escea suggest that the cradle position is between 1 and 5 metres away from the heater. Please ensure that cradle is screwed firmly onto the wall using the screws provided.

BA
CD
EF
GSERVICE
44
F3 Operating the Appliance for the First TimeRemove the battery cover on the rear of the remote. Insert the new “AA” size batteries, paying atten-tion to the polarity.You should now see on the display of the remote the time showing “0:00”.
To turn the fire on, press the “POWER” button once, and within a few seconds the appliance will begin its startup sequence.NOTE: once the rear burner has lit there will be a fixed 3 minute warmup cycle before the front burner will light.
When the appliance has lit, set the room temperature by pressing the ‘plus’ or ‘minus’ button re-peatedly until the display is showing the desired temperature. The remote will then revert back to the ‘current’ room temperature 30 seconds after making the change.
Run the appliance on full for an hour with the windows and doors open in the dwelling. This will ensure any running-in smells have the chance to dissipate.
The appliance is turned off by pressing the “POWER” button once more. The remote will display the time only.
Run the appliance again and check the operation of the thermostat by increasing and reducing the set temperature. Check the Flame Effect function and the Fan Boost functions work correctly.
For further operation instructions please refer to the User Guide.

BA
CD
EF
GSE
RVIC
E
45
F4 Normal Operating Sounds and SmellsNote: Each time the fire is lit from cold the glass may fog up with condensation. This is normal and the condensation will disappear within a few minutes once the glass heats up.
SoundsIt is possible that you will hear some sounds from your gas appliance. This is perfectly normal due to the fact that there are various types of materials used within your appliance. Listed below are some examples (These are all normal operating sounds and should not be considered as defects in your appliance):
• Fan: Escea gas appliances use electric fans to push heated air further into the room. It is not un-usual for the fan to make a “whirring” sound when ON. This sound will increase or decrease in volume depending on the speed setting of your fan.
• Gas Control Valve: As the gas control valves turn ON and OFF, a dull clicking sound may be audible, this is the normal operation of a valve. When the fire is switched off after being run for a while, there may be popping and fluttering noises as the residual gas in the burners burns away. These are normal and should be no cause for concern.
• Unit Body/Firebox: Different types and thicknesses of steel will expand and contract at different rates resulting in some “cracking” and “ticking” sounds being heard throughout the heating and cool down processes.
Smells:The first few times the unit is operated, the unit may release an odour and the flames will appear orange caused by the curing of the paint, the burning off of the starch in the gas logs and the oils in the metal. This is a temporary curing process which will disappear with use.
F5 Cleaning the glassA deposit on the inside of the inner glass, caused by the starch in the logs, may appear as a build up after several uses. If this film is not removed, it will bake on and may become difficult to remove. When the inner and outer glass is cold, remove both and clean the inside of the inner glass with a non-abra-sive cleaner.DO NOT ATTEMPT TO CLEAN THE GLASS WHILE IT IS HOT. NEVER OPERATE THE UNIT WITH THE GLASS REMOVED.
END OF SECTION FBy the end of this section, you should have:
� A correctly fitted fascia
� The remote control mounted on its cradle on a wall
� Operated the fire and verified that it lights reliably and safely
� Run the appliance on full for an hour with the doors & windows open
� Checked the operation of the thermostat, Flame Effect & Fan Boost functions
BA
CD
EF
GSERVICE
46
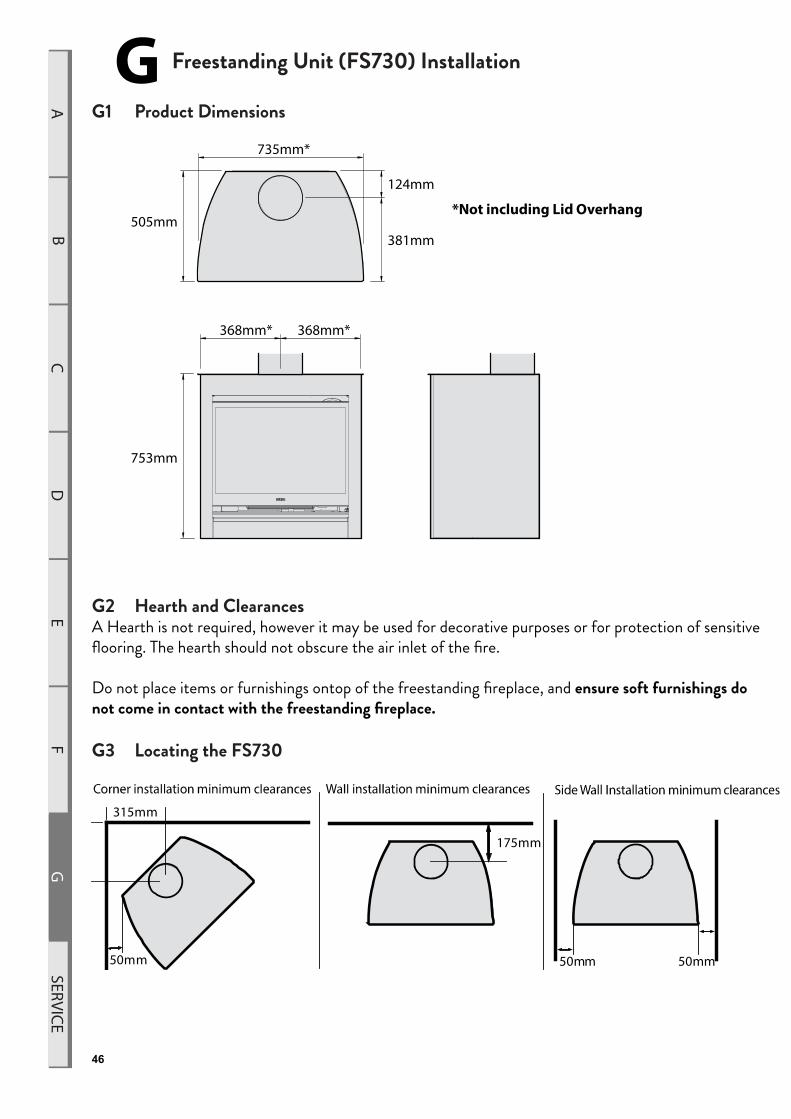
G Freestanding Unit (FS730) Installation
G1 Product Dimensions
G2 Hearth and ClearancesA Hearth is not required, however it may be used for decorative purposes or for protection of sensitive flooring. The hearth should not obscure the air inlet of the fire. Do not place items or furnishings ontop of the freestanding fireplace, and ensure soft furnishings do not come in contact with the freestanding fireplace.
G3 Locating the FS730
505mm
735mm*
381mm
124mm
753mm
368mm* 368mm*
*Not including Lid Overhang
175mm
315mm
50mm 50mm 50mm

BA
CD
EF
GSE
RVIC
E
47
G4 Gas pipe Routing Information

BA
CD
EF
GSERVICE
48
G5 Flue InstallationThe freestanding unit and flue system should be installed prior to the AF-Series fireplace being installed (for horizontal termination for FS730: see next page, section G6).
����Place the freestanding unit in the correct location, complying with the clearances specified in the previous section.
����Remove 2 screws on each side of the fas-cia just below the top panel and pull towards you to remove the fascia.
��� Fix the FS730 unit to the floor using the four securing holes in each corner of the unit.
��� Refer to Section B3 for flexi flue and converter box clearances. ����Refer to section C of this installation manual for minimum and maximum flue lengths, restrictor settings for your installa-tion, and all other flue information.
����Run the black Ø230mm flue liner lengths from the top of the freestanding unit until it penetrates the Ø265mm ceiling hole.
����Use the supplied Ceiling plate for tidying the internal termination point of the Ø230mm flue liner.
����Run the 2x flexible flues down through the Ø230mm flue liner and attach it to the Flue Spigot Plate as per section C of this manual
����Open the flue liner rodent guard and close around the flexi flue. Rivet, screw or cable tie the open end to prevent it from opening. Bend the two perpendicular tabs down and screw into the flue liner using a short self tapping screw. Note: Take care when installing the rodent guard to not cause damage to the flexi flue.
����Install flue termination as per section C of this manual
Note: Ensure a power supply is within 1m of the rear of the appliance.
Ceiling Ring
230mmFlue liner
2x Flexibleflue inner
Coaxial to Colinearconversion box
Duravent 4x6”Rigid Direct-ventflue
Rigid flue
Flexible flue clampedto Flue Spigot Plate
AF700Fireplace
FS730 FreestandingUnit
Flue LinerRodent Guard
Ø265 mmCeiling hole

BA
CD
EF
GSE
RVIC
E
49
G6 Inroom Horizontal Flue KitFor horizontal termination the following are dimensions for installing the Inroom Horizontal flue kit. (minimum clearances in section G3 do not apply when using this kit)Note: Instructions for installation are provided with the kit
G7 AF700 Fireplace installation into FS730 Freestanding UnitOnce the freestanding unit is in place, and the flue system installed, the AF700 fireplace installation can commence. Note: for the Apartment Flue Kit, see the instructions provided with the kit.
����Place the freestanding unit in the correct location, complying with the clearances specified in the previous section.
����Remove 2 screws on each side of the fascia just below the top panel and pull towards you to remove the fascia. ����Refer to section C of this installation manual for minimum and maximum flue lengths, restrictor settings for your installation, and all other flue information.
����Prepare the flue for fire installation, by sliding the flexible flues down the liner and attaching to the flue spigot plate as per the end of section C
����Take the plastic grommet in the back panel out. Push the power cable through the hole in the rear, then push the grommet over the power cable and fix the grommet back to the back panel.
����Install the AF700 fireplace into the freestanding unit while sliding on the flue spigot plate as per section E.
����Run gas piping to the front right of the fireplace as shown, where you will find a hole positioned so the gas pipe can run directly to the regulator and be connect-ed as per section E.
BA
CD
EF
GSERVICE
50
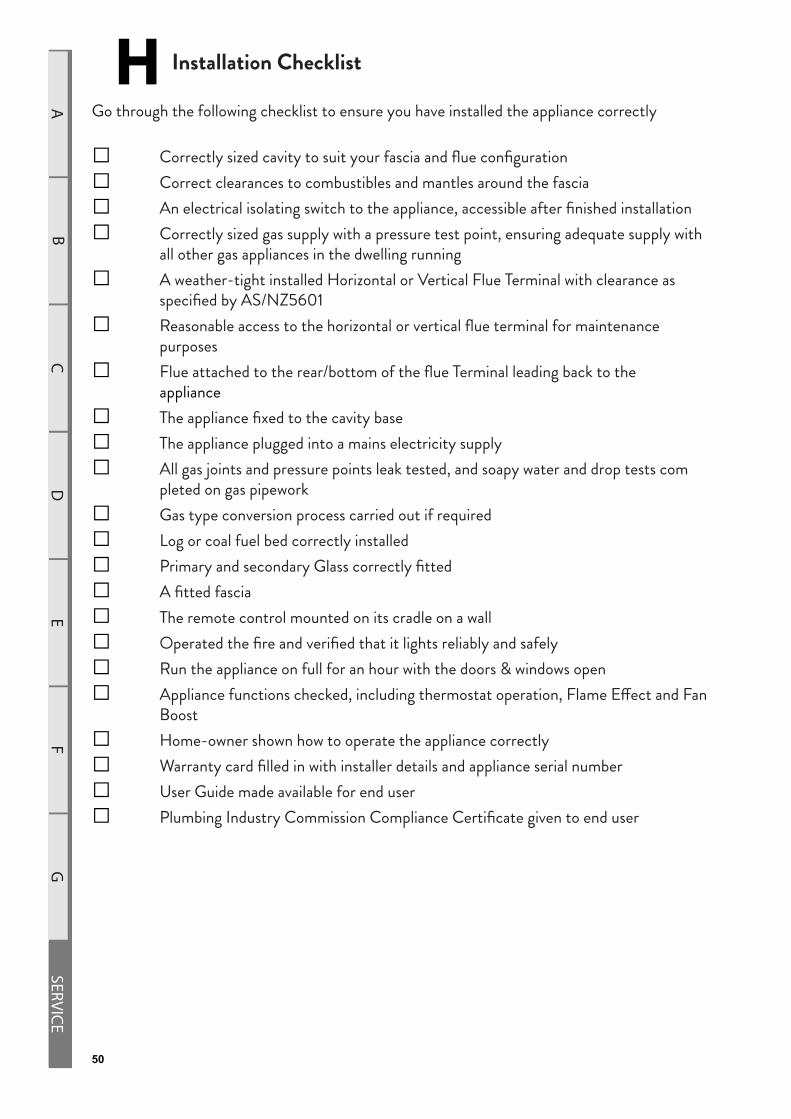
H Installation Checklist
Go through the following checklist to ensure you have installed the appliance correctly
� Correctly sized cavity to suit your fascia and flue configuration
� Correct clearances to combustibles and mantles around the fascia
� An electrical isolating switch to the appliance, accessible after finished installation
� Correctly sized gas supply with a pressure test point, ensuring adequate supply with all other gas appliances in the dwelling running
� A weather-tight installed Horizontal or Vertical Flue Terminal with clearance as specified by AS/NZ5601
� Reasonable access to the horizontal or vertical flue terminal for maintenance purposes
� Flue attached to the rear/bottom of the flue Terminal leading back to the appliance
� The appliance fixed to the cavity base
� The appliance plugged into a mains electricity supply
� All gas joints and pressure points leak tested, and soapy water and drop tests com pleted on gas pipework
� Gas type conversion process carried out if required
� Log or coal fuel bed correctly installed
� Primary and secondary Glass correctly fitted
� A fitted fascia
� The remote control mounted on its cradle on a wall
� Operated the fire and verified that it lights reliably and safely
� Run the appliance on full for an hour with the doors & windows open
� Appliance functions checked, including thermostat operation, Flame Effect and Fan Boost
� Home-owner shown how to operate the appliance correctly
� Warranty card filled in with installer details and appliance serial number
� User Guide made available for end user
� Plumbing Industry Commission Compliance Certificate given to end user
BA
CD
EF
GSE
RVIC
E
51
S Service Manual
IMPORTANT:
• This appliance must be serviced every 12 months.• Any service operation should be carried out only by a suitably qualified and
trained person.• Gas and electricity supply MUST be isolated before any service operation is
carried out on this appliance.• This manual should be left with the appliance.• DO NOT MODIFY THIS APPLIANCE.
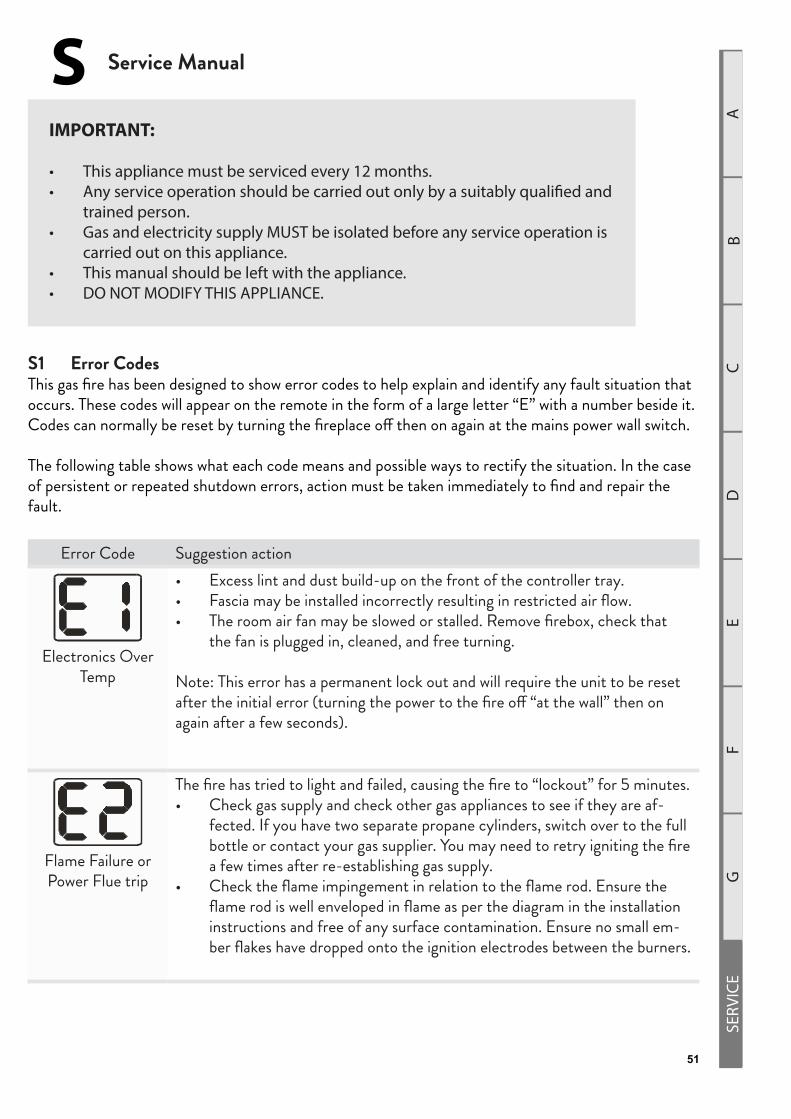
S1 Error CodesThis gas fire has been designed to show error codes to help explain and identify any fault situation that occurs. These codes will appear on the remote in the form of a large letter “E” with a number beside it. Codes can normally be reset by turning the fireplace off then on again at the mains power wall switch.
The following table shows what each code means and possible ways to rectify the situation. In the case of persistent or repeated shutdown errors, action must be taken immediately to find and repair the fault.
Error Code Suggestion action
Electronics Over Temp
• Excess lint and dust build-up on the front of the controller tray.• Fascia may be installed incorrectly resulting in restricted air flow.• The room air fan may be slowed or stalled. Remove firebox, check that
the fan is plugged in, cleaned, and free turning.
Note: This error has a permanent lock out and will require the unit to be reset after the initial error (turning the power to the fire off “at the wall” then on again after a few seconds).
Flame Failure or Power Flue trip
The fire has tried to light and failed, causing the fire to “lockout” for 5 minutes.• Check gas supply and check other gas appliances to see if they are af-
fected. If you have two separate propane cylinders, switch over to the full bottle or contact your gas supplier. You may need to retry igniting the fire a few times after re-establishing gas supply.
• Check the flame impingement in relation to the flame rod. Ensure the flame rod is well enveloped in flame as per the diagram in the installation instructions and free of any surface contamination. Ensure no small em-ber flakes have dropped onto the ignition electrodes between the burners.

BA
CD
EF
GSERVICE
52
Appliance Over Temperature Sensor Trip
The bimetallic snap disk mounted on the back chassis panel has tripped. The possible causes for this could include:• Fascia may be installed incorrectly resulting in restricted air flow.• The room air fan may be slowed or stalled. Remove firebox, check that
the fan is plugged in, cleaned, and free turning.• The gas regulator being set too high resulting in excess heat build-up.• The inlet flue not being connected and the appliance drawing warm air
from the cavity. Check flues are securely connected at both ends.
Valve Solenoid Check Failure
The valve solenoids have failed the pre-ignition test. This is to detect a faulty valve solenoid. However, it is possible a wire has dislodged. • Check that the connections to each solenoid are secure and in place. It
may be that the connections on the ends of the wires need to be tight-ened a little (e.g. with a pair of pliers) to ensure a robust connection to the valve terminal.
• Disconnect and reconnect the firebox connectors ensuring they are firmly pushed into place.
• It could also be that one of the solenoids on the valve inside the fire has failed. If this is the case the valve will need to be replaced.
Internal Remote Error
Internal remote error:• Press the on/off button on the remote to clear the error.
S2 Serial NumberThe serial number for the fire can be found in two places. The first is in the battery compartment of the remote under the batteries. The second is on the data sticker on the chassis under the firebox on the left hand side.
S3 Checking Operating PressureSee section E9 of this manual.

BA
CD
EF
GSE
RVIC
E
53
S4 Cleaning the FasciaNEVER RUB THE FASCIA. The outside of the fascia’s must only be cleaned with a clean damp cloth, dry off after cleaning. The high temp silver powder coating that is used on Escea fascia parts contains certain amounts of aluminium that when rubbed too hard will oxidise leaving a black smudge that cannot be removed. For stainless steel fascias: we recommend the use of Steel Kleen brand Ezi Wipes. Always clean when cold.
S5 Cleaning the Log Set and GlassThis is a service procedure that will need to be carried out whenever soot builds up on logs and/or inside of glass. If soot build up becomes excessive or regular then one of the following actions may be required:
• Check gas pressure; operating gas pressure may be too high.• Reposition log set so that each log is sitting correctly in the log retainer bracket.• Clear any blockage from primary air port of burner.• Check flue tube is not damaged or disconnected.
For diagrams and further info on removing your fascia, reverse the steps found in section F.
• Refer to section D2 for instructions on removing the glass.• Clean the inside and outside of both pieces of glass with normal glass cleaning products.
Use a CLEAN DRY cloth only. Stubborn marks may be cleaned with a ceramic glass cleaner.
• Replace in opposite order and test run heater.
S6 Removing or Cleaning FanAs part of regular service procedure, it is recommended that the fan is removed for cleaning. Dust will build up on the fan rotor and in the cavity where the fan is located. This can be removed by the service person using a hearth brush and a vacuum cleaner.ISOLATE THE POWER AND GAS SUPPLY TO THE FIRE BEFORE COMMENCING THIS PROCEEDURE.
Remove the electronic tray located on the base of the chassis (instructions provided in the next sec-tion ) before attempting to remove the room air fan. Disconnect the 3-way fan connector and remove the two screws circled in the diagram below (the AF960 requires the LH access hatch to be removed in order to get to the LH screw) . The room air fan can now be pull towards you and removed through the burner tray hole.
AF700 Fan Screw Locations

BA
CD
EF
GSERVICE
54
AF960 Fan Screw Locations
S7 Removing Electronic TrayISOLATE THE POWER TO THE FIRE BEFORE THIS PROCEDURE.All of the electronic components of the heater have been located on a removable tray. Remove the 18-way connector from the end of the tray, the network cable, if installed (both locations circled in diagram below) and the transformer connector located in the rear LH corner of the electronics tray.Remove one self tapping screw in the front face of the electronics tray. The tray can now be slid towards the RH side then lifted of the burner tray hole in the firebox.

BA
CD
EF
GSE
RVIC
E
55
S8 Replacing the Thermal Cut Out Once the firebox base, electronic tray, and fan have been removed (As per previous sections), the Thermal Cut Out can be removed and replaced if required.
Disconnect the electrical plug con-necting the TCO bracket (shown right) to the fireplace wiring harness.
Using an 8mm spanner, remove the nut located on the base of the TCO bracket shown to the right and pull the bracket off the bolt.
The Bracket should now be free to move, rotate it as it drops downwards so that you can remove it through the opening in the firebox base as shown.

BA
CD
EF
GSERVICE
56
S9 Replacing a RemoteIf the remote becomes lost or damaged, a new one can be ordered from any Escea retail agent. When you have the new remote, the following procedure needs to be followed to “teach” the remote to only communicate with that fire.
1. Ensure the fire and remote are set to “Off” (only the time is displayed on the remote).
2. While the remote is in its “OFF” mode with only the time showing on the display, press the MINUS, PLUS and FAN BOOST buttons simultaneously (as shown right) until the characters “03” light up on the display. Release the buttons and the remote will count down and display “GO”. The screen will then display all characters and should be reading 00. This will put the remote into test mode. Note: if the digits start counting then the remote is already paired.
3. Press and hold the – (minus) button until the two large temperature digits reading 00 start to flash slowly. Release the – (minus) button. The remote control is now ready to be addressed to the fire.
4. Press and hold the black auxiliary on/off button (found on the front face of the fireplace, circled below) for a minimum of ten seconds, or until the two large temperature digits start counting upwards from 00 to 99 repeatedly on the remote control.
Note: Pressing the black auxiliary button on/off button will start the fire. Once the remote control is counting the fire can be turned off by pressing the black auxiliary button again.
5. Press the large power button in the middle of the remote control to exit the test mode and return to normal operation. The remote should only be displaying the time. Check the fire will start using the remote control by pressing the large power button. Turn it off again using the remote control.
6. The fire is now re-addressed to the remote control.
BA
CD
EF
GSE
RVIC
E
57
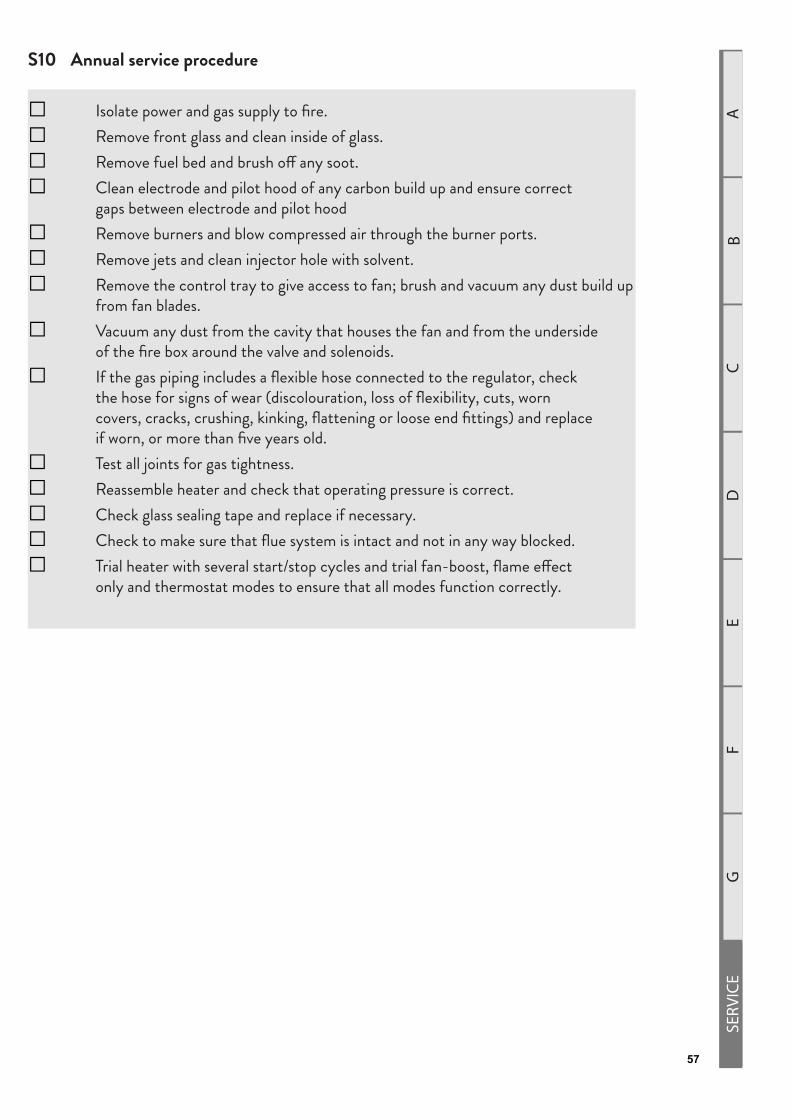
S10 Annual service procedure
� Isolate power and gas supply to fire.
� Remove front glass and clean inside of glass.
� Remove fuel bed and brush off any soot.
� Clean electrode and pilot hood of any carbon build up and ensure correct gaps between electrode and pilot hood
� Remove burners and blow compressed air through the burner ports.
� Remove jets and clean injector hole with solvent.
� Remove the control tray to give access to fan; brush and vacuum any dust build up from fan blades.
� Vacuum any dust from the cavity that houses the fan and from the underside of the fire box around the valve and solenoids.
� If the gas piping includes a flexible hose connected to the regulator, check the hose for signs of wear (discolouration, loss of flexibility, cuts, worn covers, cracks, crushing, kinking, flattening or loose end fittings) and replace if worn, or more than five years old.
� Test all joints for gas tightness.
� Reassemble heater and check that operating pressure is correct.
� Check glass sealing tape and replace if necessary.
� Check to make sure that flue system is intact and not in any way blocked.
� Trial heater with several start/stop cycles and trial fan-boost, flame effect only and thermostat modes to ensure that all modes function correctly.

BA
CD
EF
GSERVICE
58
S11 Wiring Diagram