installation operation manual - century … · equipment or restricting water flow on water cooled...
TRANSCRIPT

INSTALLATION OPERATIONMANUAL
Table of ContentsReceiving and Inspection ...................................................1Equipment Rigging .............................................................1Equipment Mounting...........................................................1 Compressor Mounting .............................................1, 4 Unit Clearance Drawings ..........................................2-3Equipment Piping ...............................................................4Equipment Wiring ...............................................................4System Evacuation .............................................................4System Charging .............................................................4-5Start-Up High Pressure Control .................................................5 Low Pressure Control ..................................................5 Temperature Control ....................................................5 Freeze Protection Control ............................................5 Thermostatic Expansion Valve .................................5-6 Hot Gas Bypass ...........................................................6Shut Down ..........................................................................6System Restart After Shut Down ........................................6Warranty ..........................................................................7-8Oil Control System..............................................................9Head Pressure Control .....................................................10Air Cooled Condensing Units - Low Ambient Operation Fan Cycle .................................................................. 11 Fan Cycle with Positive Start ..................................... 11 Compressor Compartments ...................................... 11 Pressure Switch Settings ...........................................12 A20 Flood Control ......................................................12 B20 Flood Control ......................................................12Refrigerant Piping .............................................................13Hot Gas Bypass Control ...................................................13Effects of Unbalanced Voltage .........................................14Trouble Shooting Chart ...............................................15-16Installation, Operation, and Maintenance forUnit Coolers Series “A,” “BOC,” “BALV,” & “PFE ............................17 Series “FH” ................................................................17 Series “FV” ................................................................17Sequence of Operation Defrost Cycle (Electric Defrost Models) .....................18 Coil Recooling Cycle (Electric Defrost Models) .........18 Fan Delay Control ......................................................18Maintenance Condensing Units and Evaporators ...........................19 Maintenance Schedule ..............................................20Appendix A - Temperature Pressure Chart ..................21-23Appendix B - Approved Oil Types ................................24-25Appendix C - Electronic Expansion Valves ..................26-29Appendix D - Superheat Controller..............................30-33Appendix E - Kelvin Controller.....................................34-37Appendix F - Maintenance Chart .................................38-40
1
INSTALLATION, OPERATION & MAINTENANCE INSTRUCTIONSCENTURY REFRIGERATION AIR COOLED CONDENSERS,
CONDENSING UNITS & PACKAGED CHILLERSI. RECEIVING AND INSPECTION
A. Immediately upon receiving shipment, equipment should be inspected for evidence of any damage received in transit. (Suggestion: photograph unit for documentation.) If shipping damage has occurred, a claim should be made with the transportation company, and the local Century Refrigeration representative should be advised of the nature of the damage.
B. Equipment should be inspected for compliance with original order acknowledgment (equipment model numbers, voltages, etc.)
C. System should be checked for positive pressure.
II. RIGGING A. Equipment is equipped with lifting eyes or sling
points. These should be used to prevent structural damage.
B. Equipment should be lifted in a near level condition to prevent undue stress on structural members.
III. MOUNTINGA. Equipment should be mounted on a smooth, hard,
level surface.B. Mounting surface should be rigid, and provision
should be made to prevent noise transmission (structural) to surrounding areas.
C. Air cooled equipment should not be installed under low structural overhangs which can cause condenser air recirculation or restriction.
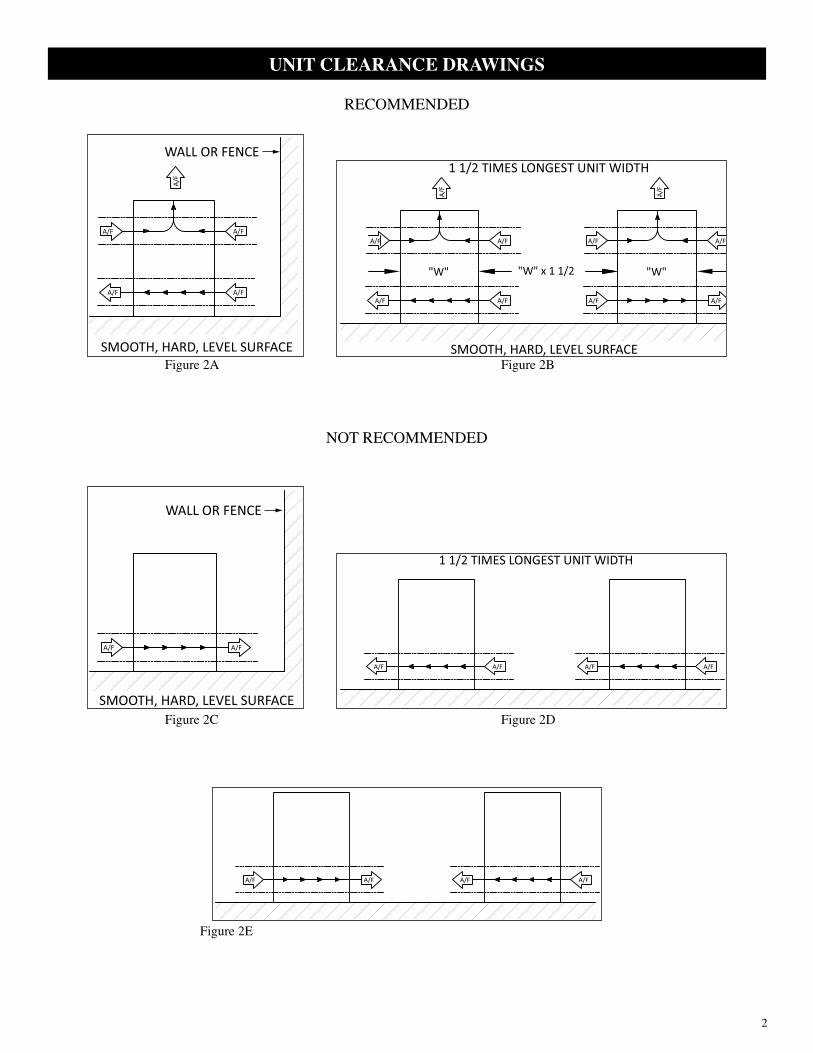
D. Adequate area (approx. 1 unit width) must be provided around equipment for unrestricted air flow and service. Two units side by side should have a minimum of 1 1/2 unit width between them. See Figures 2A through 2E and Figures 3A through 3D.
E. Care should be taken to prevent air from other sources from entering condenser if this air is at an elevated temperature.
F. Indoor design equipment must be installed in a protected enclosure.
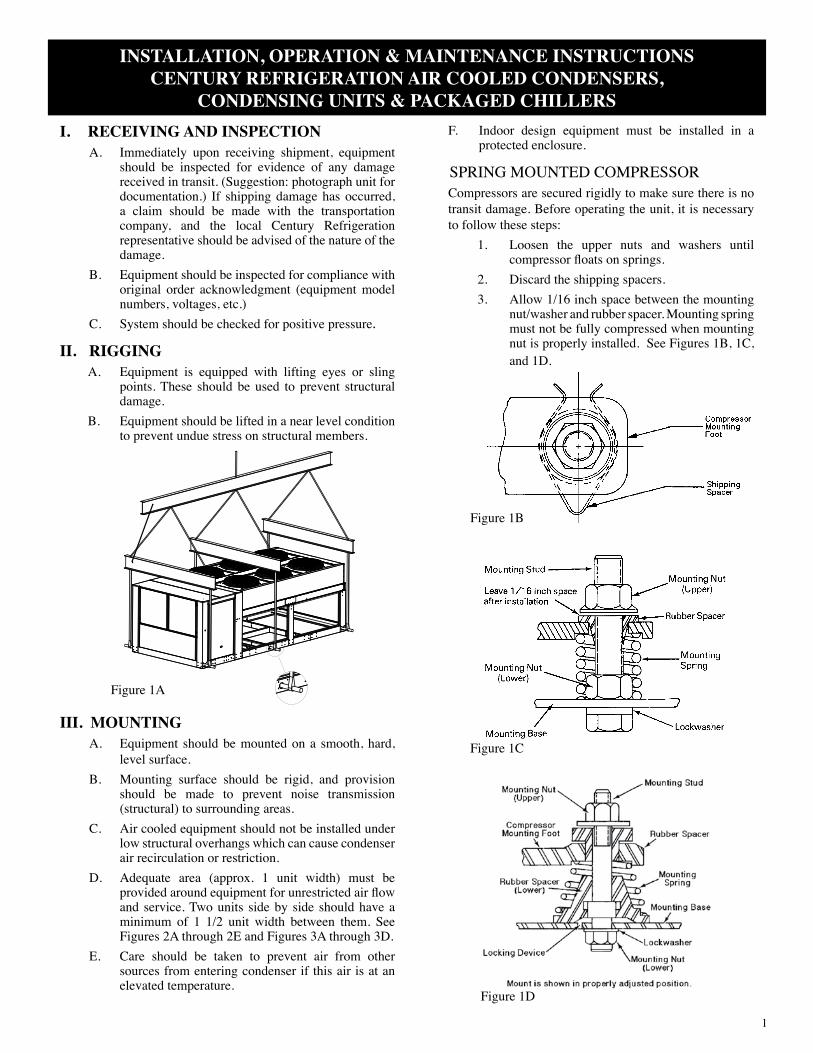
SPRING MOUNTED COMPRESSORCompressors are secured rigidly to make sure there is no transit damage. Before operating the unit, it is necessary to follow these steps:
1. Loosen the upper nuts and washers until compressor floats on springs.
2. Discard the shipping spacers.3. Allow 1/16 inch space between the mounting
nut/washer and rubber spacer. Mounting spring must not be fully compressed when mounting nut is properly installed. See Figures 1B, 1C, and 1D.
Figure 1B
Figure 1C
Figure 1D
Figure 1A
2
A/F
A/FA/F
A/FA/F
WALL OR FENCE
SMOOTH, HARD, LEVEL SURFACE
RECOMMENDED
A/F
A/FA/F
A/FA/F
SMOOTH, HARD, LEVEL SURFACE
A/F
A/FA/F
A/F A/F
"W" "W""W" x 1 1/2
1 1/2 TIMES LONGEST UNIT WIDTH
NOT RECOMMENDED
A/F A/F
SMOOTH, HARD, LEVEL SURFACE
WALL OR FENCE
A/FA/F A/FA/F
1 1/2 TIMES LONGEST UNIT WIDTH
A/F A/F A/FA/F
Figure 2A Figure 2B
Figure 2C Figure 2D
Figure 2E
UNIT CLEARANCE DRAWINGS

3
UNIT COOLER CLEARANCE DRAWINGS
A/F
A/F
A/F
A/F
H H
H
H = Total height ofevaporator coil surface.
PLAN VIEW
PLAN VIEW
H HH
H
3' minimum for heater removal
ONE EVAPORATOR
TWO EVAPORATORS
H = Total height ofevaporator coil surface.
A/F
A/F
A/F
A/F
1 1/2H 1 1/2H
1 1/2H
H = Total height ofevaporator coil surface.
PLAN VIEW
PLAN VIEW
1 1/2H 1 1/2H3H
1 1 /2H
3' minimum for heater removal
TWO EVAPORATORS
H = Total height ofevaporator coil surface.
ONE EVAPORATOR
A & BOC SERIES RECOMMENDED
FH SERIES RECOMMENDED
Figure 3A
Figure 3B
Figure 3C
Figure 3D
4
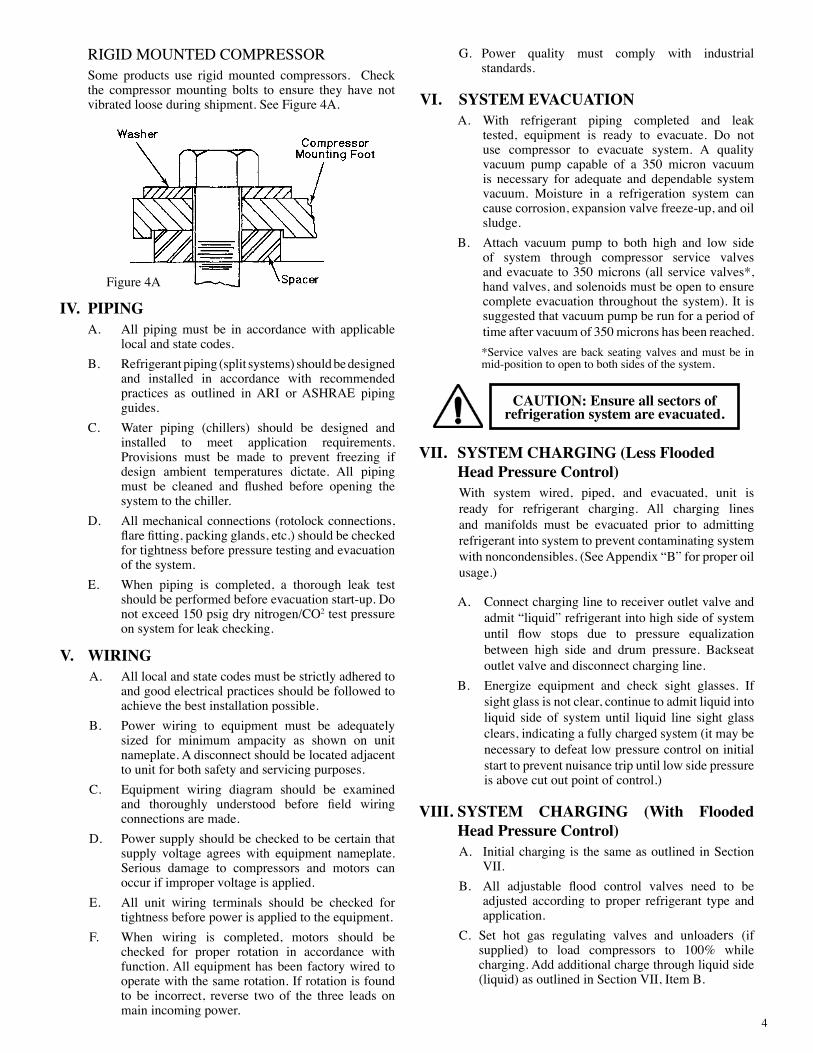
RIGID MOUNTED COMPRESSORSome products use rigid mounted compressors. Check the compressor mounting bolts to ensure they have not vibrated loose during shipment. See Figure 4A.
IV. PIPINGA. All piping must be in accordance with applicable
local and state codes.B. Refrigerant piping (split systems) should be designed
and installed in accordance with recommended practices as outlined in ARI or ASHRAE piping guides.
C. Water piping (chillers) should be designed and installed to meet application requirements. Provisions must be made to prevent freezing if design ambient temperatures dictate. All piping must be cleaned and flushed before opening the system to the chiller.
D. All mechanical connections (rotolock connections, flare fitting, packing glands, etc.) should be checked for tightness before pressure testing and evacuation of the system.
E. When piping is completed, a thorough leak test should be performed before evacuation start-up. Do not exceed 150 psig dry nitrogen/CO2 test pressure on system for leak checking.
V. WIRINGA. All local and state codes must be strictly adhered to
and good electrical practices should be followed to achieve the best installation possible.
B. Power wiring to equipment must be adequately sized for minimum ampacity as shown on unit nameplate. A disconnect should be located adjacent to unit for both safety and servicing purposes.
C. Equipment wiring diagram should be examined and thoroughly understood before field wiring connections are made.
D. Power supply should be checked to be certain that supply voltage agrees with equipment nameplate. Serious damage to compressors and motors can occur if improper voltage is applied.
E. All unit wiring terminals should be checked for tightness before power is applied to the equipment.
F. When wiring is completed, motors should be checked for proper rotation in accordance with function. All equipment has been factory wired to operate with the same rotation. If rotation is found to be incorrect, reverse two of the three leads on main incoming power.
G. Power quality must comply with industrial standards.
VI. SYSTEM EVACUATIONA. With refrigerant piping completed and leak
tested, equipment is ready to evacuate. Do not use compressor to evacuate system. A quality vacuum pump capable of a 350 micron vacuum is necessary for adequate and dependable system vacuum. Moisture in a refrigeration system can cause corrosion, expansion valve freeze-up, and oil sludge.
B. Attach vacuum pump to both high and low side of system through compressor service valves and evacuate to 350 microns (all service valves*, hand valves, and solenoids must be open to ensure complete evacuation throughout the system). It is suggested that vacuum pump be run for a period of time after vacuum of 350 microns has been reached. *Service valves are back seating valves and must be in mid-position to open to both sides of the system.
VII. SYSTEM CHARGING (Less Flooded Head Pressure Control)With system wired, piped, and evacuated, unit is ready for refrigerant charging. All charging lines and manifolds must be evacuated prior to admitting refrigerant into system to prevent contaminating system with noncondensibles. (See Appendix “B” for proper oil usage.)
A. Connect charging line to receiver outlet valve and admit “liquid” refrigerant into high side of system until flow stops due to pressure equalization between high side and drum pressure. Backseat outlet valve and disconnect charging line.
B. Energize equipment and check sight glasses. If sight glass is not clear, continue to admit liquid into liquid side of system until liquid line sight glass clears, indicating a fully charged system (it may be necessary to defeat low pressure control on initial start to prevent nuisance trip until low side pressure is above cut out point of control.)
VIII. SYSTEM CHARGING (With Flooded Head Pressure Control)A. Initial charging is the same as outlined in Section
VII.B. All adjustable flood control valves need to be
adjusted according to proper refrigerant type and application.
C. Set hot gas regulating valves and unloaders (if supplied) to load compressors to 100% while charging. Add additional charge through liquid side (liquid) as outlined in Section VII, Item B.
Figure 4A
CAUTION: Ensure all sectors of refrigeration system are evacuated.

5
IX. START-UP This is a continuation of “system charging” and must be performed before equipment can be left operating and unattended. This will involve the checking and adjusting of all safety and operating controls (pressure and temperature controls need to be adjusted according to proper refrigerant type and application, and it is desirable to confirm that settings are correct and controls function properly.) Do not attempt to function safety controls without some means of stopping compressor in event of extreme high or low pressure conditions that could damage the equipment. If controls fail to function at set points, determine cause and correct.
A. HIGH PRESSURE CONTROL – Connect a gauge to the compressor discharge service valve. Stop condenser air flow by stopping fans on air cooled equipment or restricting water flow on water cooled equipment. Control should open immediately when discharge pressure reaches control set point.
B. LOW PRESSURE (PUMP-DOWN) CONTROL – Connect a gauge to the compressor suction service valve. Throttle receiver outlet valve to lower suction pressure at compressor. Compressor should pump-down and be de-energized when suction pressure reaches “cut-out” setting of control. Open receiver outlet valve and observe rise in pressure at compressor suction connection. Compressor should be energized when pressure reaches “cut-in” setting of control.
C. Approved Oil Types (see Appendix “B”)D. TEMPERATURE CONTROL (Water Chillers) –
This control is the main unit operating thermostat. As standard, the control cycles both the compressor and the unloader(s) in response to return fluid temperature. The sensing bulb is located in a well on the return fluid nozzle. This control has been factory set to maintain desired leaving fluid temperature. The temperature control can be field adjusted. To calculate the proper set point, add the specified leaving fluid temperature and the design temperature difference of return to supply (TD.) Temperature control adjustment should be made as follows:
EXAMPLE FOR REFERENCE ONLY (This is for 100% H2O fluid application):
Design conditions: 10°F TD, 55°F entering (return) fluid, 45°F leaving (supply) fluid and 5 psi fluid side pressure drop at rated flow.1. Check proper flow through cooler. Pressure
gauges at the entering and leaving nozzles should be used. Adjust flow by balancing valves or throttling valves on discharge side of the cooler to corresponding pressure drop.
2. The system fluid temperature should be at 60°F or above to simulate a pull down for proper start-up and check out.
3. Adjust temperature control dial to 55°F. This will produce 45°F leaving fluid temperature at designed flow rate.
4. Observe the pressures as the return fluid temperature continues to fall and the compressor(s) and/or unloader(s) are staged by the temperature control. The suction temperature at the compressor should not fall below approximately 32°F during all stages of compressor(s) operation. The compressor(s) will eventually be staged off by the temperature control. When this occurs, the return fluid temperature must rise to the “cut-in” set point of the temperature control (the dial setting) before the compressor(s) is staged on again.
E. FREEZE PROTECTION CONTROL (Water Chillers) - Control is a pressure sensing, manual reset safety control. It responds to suction pressure and prevents circuit operation should suction pressure fall below control set point for a period in excess of 120 seconds. For straight water systems, the control is factory set at 32°F. The fixed time delay (120 seconds) allows circuit to stabilize on start-up and normal pump-down operation. For systems other than straight water systems, refer to electrical diagram for freeze control settings.
F. THERMOSTATIC EXPANSION VALVE – Adjust superheat setting to job requirements. To determine superheat correctly:1. Measure the temperature of the suction line at
the point the bulb is clamped.2. Obtain the suction pressure that exists in the
suction line at the bulb location by either of the following methods:a. If the valve is externally equalized, a
gauge in the external equalizer line will indicate the desired pressure directly and accurately, OR,
b. Read the gauge pressure at the suction valve of the compressor. To the pressure, add the estimated pressure drop through the suction line between bulb location and compressor suction valve.
WARNING: Jumpering any safety control other than for tesing purposes is dangerous to personnel and equipment,
and nullifies equipment warranty.
CAUTION: Energize crankcase heaters and allow a minimum of 24 hours
operation before a compressor start.
WARNING: Stop operation if “cut-out” exceeds set point.
WARNING: Always consult equipment submittals for the proper design conditions before adjusting the
temperature control.
6
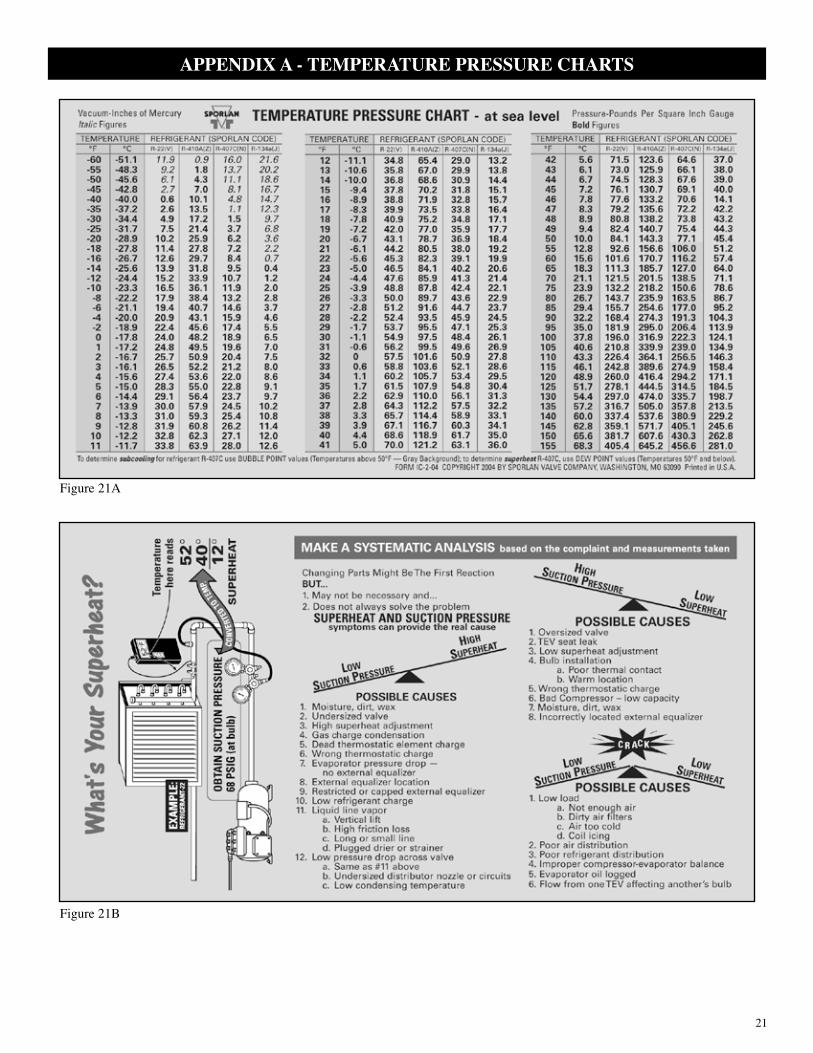
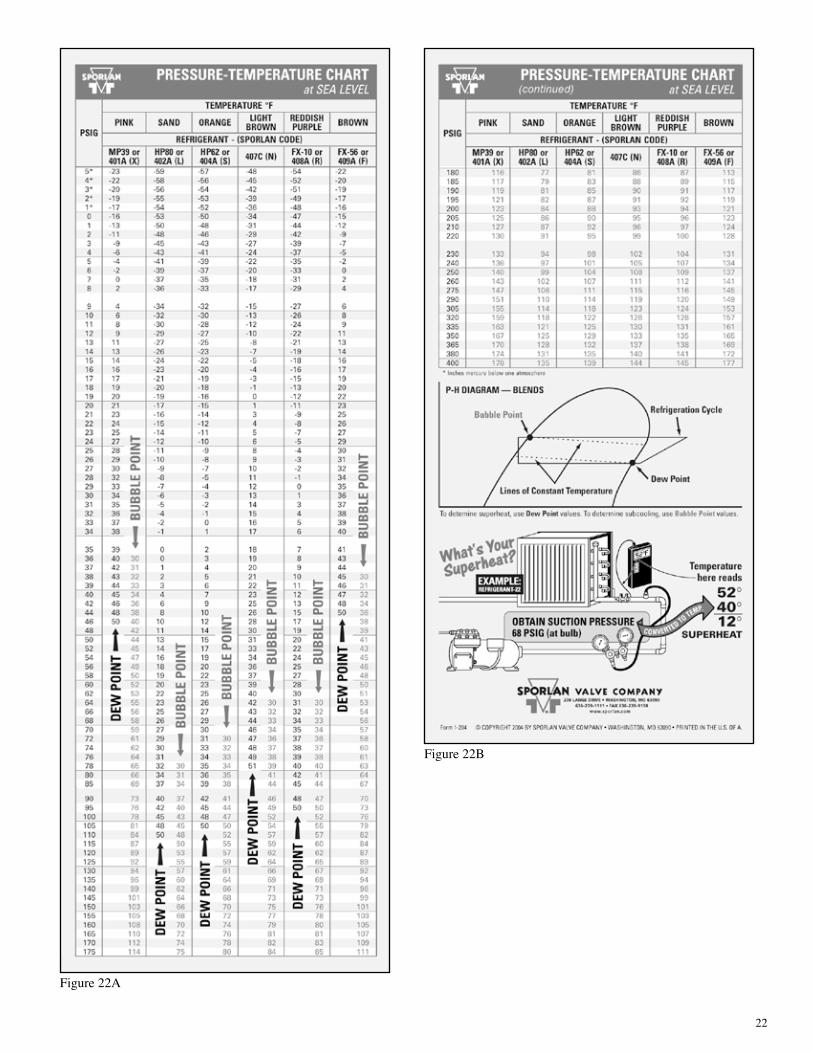
The sum of the gauge reading and the estimated pressure drop will equal the approximate suction line pressure at the bulb.3. Convert the pressure obtained in 2a or 2b to
saturated evaporator temperature by using a temperature-pressure chart (see Appendix “A.”)
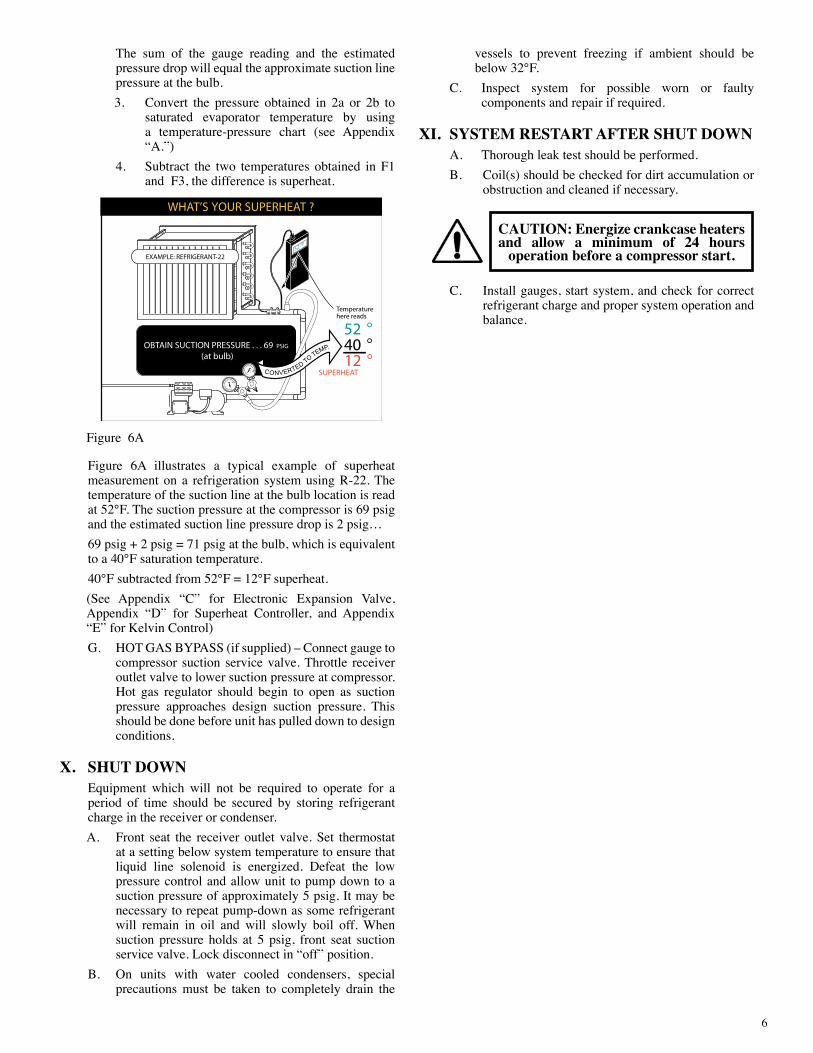
4. Subtract the two temperatures obtained in F1 and F3, the difference is superheat.
Figure 6A
Figure 6A illustrates a typical example of superheat measurement on a refrigeration system using R-22. The temperature of the suction line at the bulb location is read at 52°F. The suction pressure at the compressor is 69 psig and the estimated suction line pressure drop is 2 psig…69 psig + 2 psig = 71 psig at the bulb, which is equivalent to a 40°F saturation temperature. 40°F subtracted from 52°F = 12°F superheat. (See Appendix “C” for Electronic Expansion Valve, Appendix “D” for Superheat Controller, and Appendix “E” for Kelvin Control)G. HOT GAS BYPASS (if supplied) – Connect gauge to
compressor suction service valve. Throttle receiver outlet valve to lower suction pressure at compressor. Hot gas regulator should begin to open as suction pressure approaches design suction pressure. This should be done before unit has pulled down to design conditions.
X. SHUT DOWN Equipment which will not be required to operate for a period of time should be secured by storing refrigerant charge in the receiver or condenser.A. Front seat the receiver outlet valve. Set thermostat
at a setting below system temperature to ensure that liquid line solenoid is energized. Defeat the low pressure control and allow unit to pump down to a suction pressure of approximately 5 psig. It may be necessary to repeat pump-down as some refrigerant will remain in oil and will slowly boil off. When suction pressure holds at 5 psig, front seat suction service valve. Lock disconnect in “off” position.
B. On units with water cooled condensers, special precautions must be taken to completely drain the
vessels to prevent freezing if ambient should be below 32°F.
C. Inspect system for possible worn or faulty components and repair if required.
XI. SYSTEM RESTART AFTER SHUT DOWNA. Thorough leak test should be performed.B. Coil(s) should be checked for dirt accumulation or
obstruction and cleaned if necessary.
C. Install gauges, start system, and check for correct refrigerant charge and proper system operation and balance.
52°F
CONVERTED TO TEMP.OBTAIN SUCTION PRESSURE . . . 69 PSIG
(at bulb)
52 °40 °12 °
SUPERHEAT
Temperaturehere reads
EXAMPLE: REFRIGERANT-22
WHAT’S YOUR SUPERHEAT ?
CAUTION: Energize crankcase heaters and allow a minimum of 24 hours
operation before a compressor start.

7
RAE CORPORATION EXPRESS LIMITED ANDEXTENDED EXPRESS LIMITED WARRANTY
The Express Limited Warranty and Extended Express Limited Warranty are only available to customers if the Start-Up Warranty Checklist and Warranty Registration Card is completed and returned to RAE Corp. service department. The Start-Up Warranty Checklist must be; (1) completed at the time of start-up, (2) dated and signed by the technician, and (3) forwarded with the warranty registration card to the RAE Corp service department for warranty validation within 10 days after start-up. The Start-Up Warranty Checklist and Warranty registration Card are included with each product sold.
I. EXPRESS LIMITED WARRANTYSubject to the terms, limitations, and disclaimer provisions set forth herein, RAE Corp. warrants to the original Purchaser that products manufactured by RAE Corp. shall be free from defects in material and workmanship under normal use and service. This warranty as to material and workmanship shall extend for a period of (1) year from original date of installation, (18) months from the date of shipment from RAE Corp. plant, whichever occurs first.
This warranty is issued only to the original Purchaser, is not transferable, applies only to a unit installed within the United States of America, its territories or possessions and Canada and is in lieu of all other warranties expressed or implied. RAE Corp. neither assumes, nor authorizes any other person to issue or assume for RAE Corp., any obligations or liabilities not herein stated.
It is agreed that in the event of breach of any of the express warranties described herein, the liability of RAE Corp. shall be limited to RAE Corp. repairing or replacing the non-conforming goods. RAE Corp. will repair or replace, free of cost to Purchase-User, F.O.B. RAE Corp. factory, any part or parts that in RAE Corp.’s judgment is defective. Upon RAE Corp. authorization, the said part or parts should be returned to RAE Corp., transportation prepaid by purchaser, for inspection and judgment. RAE Corp. assumes no responsibility for the expense of labor or materials necessary to remove a defective part or install repaired or new parts.
The Express Limited Warranty is subject to the terms and conditions described herein.
II. EXTENDED EXPRESS LIMITED WARRANTYA four-year Extended Express Limited Warranty (“Extended Warranty”) may be purchased at the time of purchase. The warranty runs until an additional 4 years after expiration of the Express Limited Warranty. The Extended Warranty must be purchased prior to the start-up date. RAE Corp., at its sole discretion, may authorize the purchase of an extended warranty after the unit is initially started, based on approval of the provided start-up documentation. The Extended Warranty is limited to the original purchaser and may not be transferred to subsequent purchasers.
The Extended Warranty is subject to the terms and conditions described herein
III. GENERAL DISCLAIMERS AND LIMITATIONS ON WARRANTYRAE CORP. DISCLAIMS, AND MAKES NO WARRANTY OF MERCHANTABILITY AND NO WARRANTY OF FITNESS FOR ANY PARTICULAR PURPOSE, NOR DOES IT MAKE ANY WARRANTY, EXPRESS OR IMPLIED, OF ANY NATURE WHATSOEVER WITH RESPECT TO PRODUCTS SOLD BY RAE CORP. OR THE USE THEREOF EXCEPT AS IS SPECIFICALLY SET FORTH ON THE FACE HEREOF. THIS WARRANTY, WHICH IS GIVEN EXPRESSLY AND IN LIEU OF ALL OTHER WARRANTIES, EXPRESS OR IMPLIED CONSTITUTES THE ONLY WARRANTY MADE BY THE SELLER.
RAE CORP. SHALL IN NO EVENT BE LIABLE FOR DIRECT, INDIRECT, SPECIAL, INCIDENTAL, CONSEQUENTIAL OR PENAL DAMAGES. RAE CORP. MAKES NO WARRANTY OF ANY KIND, EITHER EXPRESS OR IMPLIED, TO ‘CONSUMERS’ AS THAT TERM IS DEFINED IN SEC. 101 OF PUBLIC LAW 93-637, THE MAGNUSON-MOSS WARRANTY-FEDERAL TRADE COMMISSION IMPROVEMENT ACT.
RAE CORP. SHALL NOT BE LIABLE FOR ANY DAMAGE OR DELAYS OCCURRING IN TRANSIT, FOR ANY DEFAULT OR DELAYS IN PERFORMANCE CAUSED BY ANY CONTINGENCY BEYOND ITS CONTROL INCLUDING WAR, GOVERNMENT RESTRICTIONS OR RESTRAINTS, STRIKES, SHORT OR REDUCED SUPPLY OF RAW MATERIALS, FIRE, FLOOD OR OTHER ACTS OF GOD, NOR FOR DAMAGE OR LOSS OF ANY PRODUCTS, REFRIGERANT, PROPERTY, LOSS OF INCOME OR PROFIT DUE TO MALFUNCTIONING OF SAID UNIT.
ANY AND ALL CONTROVERSIES, ISSUES, CLAIMS OR DISPUTES RELATING TO THIS PURCHASE AND SALE TRANSACTION, INCLUDING BUT NOT LIMITED TO, ANY CONTROVERSIES, ISSUES, CLAIMS AND DISPUTES CONCERNING THE INTERPRETATION OR ENFORCEMENT OF ANY WARRANTY (OR ANY LIMITATION OR OTHER ASPECT THEREOF), SHALL BE GOVERNED BY OKLAHOMA LAW.
IV. SPECIFIC LIMITATIONS TO WARRANTYPARTS ONLY -This warranty is limited to repair or replacement of defective parts only and does not include labor. RAE Corp., at its sole discretion, may preauthorize the inclusion of labor expense. No claim for labor charges will be allowed without a written preauthorization from RAE Corp.’s service department. Prior written approval from RAE Corp. is required, in the event RAE Corp has authorized the customer to purchase replacement parts for any warranted parts; and, such replacement parts must be
8
obtained directly from a manufacturer’s representative or RAE Corp. Claims for replacement parts obtained locally will be disallowed unless accompanied by a RAE Corp. purchase order for such replacement parts.
Orders for warranty replacement parts will be shipped ground transportation prepaid using the most appropriate transportation method. Any premium transportation service will be at the cost of the requestor.
EXPORT EQUIPMENT - Equipment exported outside the United States will be covered under the same parts only warranty as non exported equipment; provided that, all warranty transactions must take place within the territorial United States. Parts covered under warranty must be paid for in advance of any parts shipment. The customer will be reimbursed upon return of the warranty part and after the part has been inspected and determined defective. All exporting paperwork and shipping costs, including crating, will be the responsibility of the party ordering the part.
INITIAL INSPECTION - RAE Corp. will not be responsible for shipping damage, or for parts lost in transit, or for any claims of concealed damage. It is the responsibility of the receiving party to thoroughly inspect the equipment upon delivery for damage, refrigerant leaks or dry nitrogen pressure loss in transit, and to verify that any loose parts have been included in the shipment. The bill of lading will indicate if parts are shipped loose in the unit. If shipping damage has occurred, or loose parts are missing, the receiving party must resolve the issue through the claim process with the company responsible for transporting the equipment..
REFRIGERANT - Refrigerant is excluded from the warranty. RAE Corp., at its sole discretion, may preauthorize the inclusion of refrigerant. No payment will be made for any leak that occurs at a threaded, mechanical joint (defined as flare joints, pipe thread joints or rotolock joints). It is the responsibility of the Contractor to check these joints upon arrival of the equipment or prior to charging the system. Any claim for refrigerant reimbursement must be pre-authorized by RAE Corp’s service department and a purchase order issued. Any claims received without a RAE Corp. purchase order will be disallowed. Should an obligation be approved by RAE Corp., RAE Corp. specifically reserves the right to provide the refrigerant, or replace the refrigerant in a like quantity to the user.
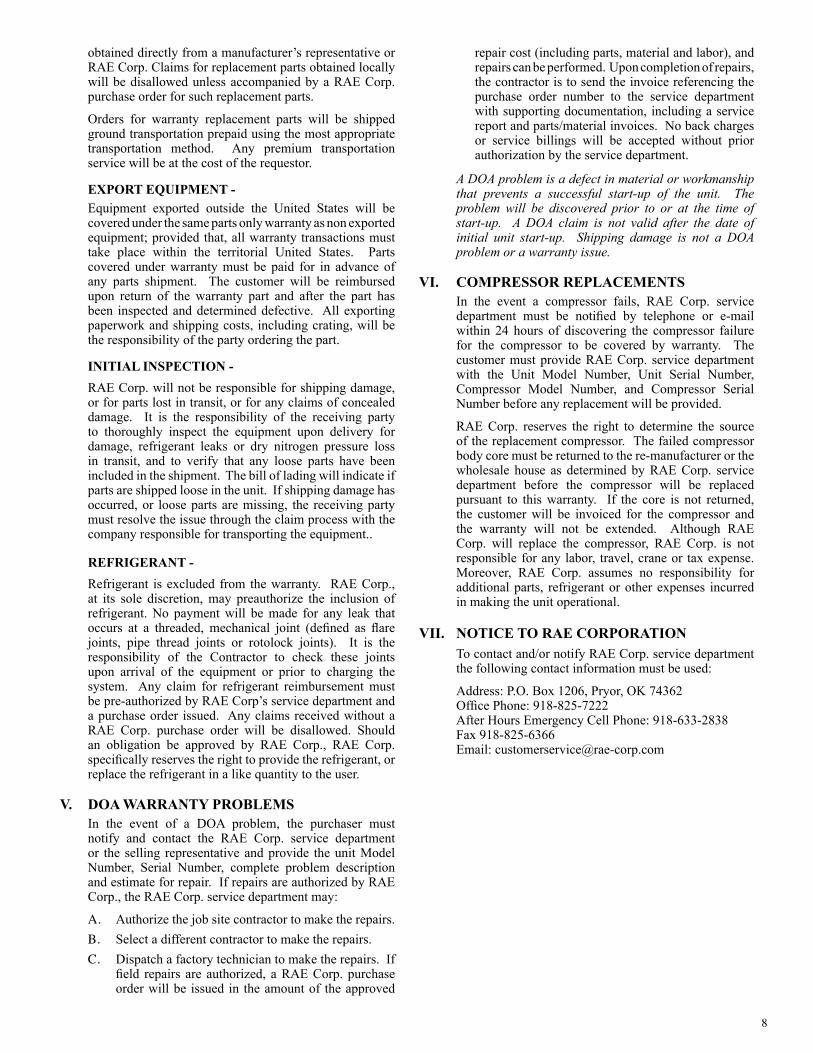
V. DOA WARRANTY PROBLEMS In the event of a DOA problem, the purchaser must notify and contact the RAE Corp. service department or the selling representative and provide the unit Model Number, Serial Number, complete problem description and estimate for repair. If repairs are authorized by RAE Corp., the RAE Corp. service department may:
A. Authorize the job site contractor to make the repairs.B. Select a different contractor to make the repairs.C. Dispatch a factory technician to make the repairs. If
field repairs are authorized, a RAE Corp. purchase order will be issued in the amount of the approved
repair cost (including parts, material and labor), and repairs can be performed. Upon completion of repairs, the contractor is to send the invoice referencing the purchase order number to the service department with supporting documentation, including a service report and parts/material invoices. No back charges or service billings will be accepted without prior authorization by the service department.
A DOA problem is a defect in material or workmanship that prevents a successful start-up of the unit. The problem will be discovered prior to or at the time of start-up. A DOA claim is not valid after the date of initial unit start-up. Shipping damage is not a DOA problem or a warranty issue.
VI. COMPRESSOR REPLACEMENTSIn the event a compressor fails, RAE Corp. service department must be notified by telephone or e-mail within 24 hours of discovering the compressor failure for the compressor to be covered by warranty. The customer must provide RAE Corp. service department with the Unit Model Number, Unit Serial Number, Compressor Model Number, and Compressor Serial Number before any replacement will be provided.
RAE Corp. reserves the right to determine the source of the replacement compressor. The failed compressor body core must be returned to the re-manufacturer or the wholesale house as determined by RAE Corp. service department before the compressor will be replaced pursuant to this warranty. If the core is not returned, the customer will be invoiced for the compressor and the warranty will not be extended. Although RAE Corp. will replace the compressor, RAE Corp. is not responsible for any labor, travel, crane or tax expense. Moreover, RAE Corp. assumes no responsibility for additional parts, refrigerant or other expenses incurred in making the unit operational.
VII. NOTICE TO RAE CORPORATIONTo contact and/or notify RAE Corp. service department the following contact information must be used:
Address: P.O. Box 1206, Pryor, OK 74362Office Phone: 918-825-7222After Hours Emergency Cell Phone: 918-633-2838Fax 918-825-6366Email: [email protected]

9
The Parallel Series condensing units and chillers are designed having multiple compressors on a common circuit. When using this method, it is necessary that oil equalization between each compressor be maintained to prevent loss of oil from either compressor.
The method of crankcase equalization used by Century Refrigeration consists of an oil separator mounted in the common discharge line, an oil reservoir, and an oil regulating valve mounted on each compressor crankcase. In addition, a check valve having a 20 pound differential is installed in the vent line from the reservoir to the suction line.
With any or all compressors running, the oil separator will collect the oil leaving the compressor(s) and return this oil to the reservoir. The reservoir will be at a pressure approximately 20 pounds above the compressor crankcase pressure. Oil from the reservoir is piped to the oil regulators which are mounted on the compressor crankcase. As crankcase oil level drops, the regulator will admit oil to the crankcase to maintain a proper operating level.
HOW IT WORKSA reserve of oil is necessary for the operation of the OIL CONTROL SYSTEM. The OIL RESERVOIR is the holding vessel for this stand-by oil. It has two sight glass ports on the shell to observe the oil level inside the vessel. Oil is fed into the OIL RESERVOIR by the OIL SEPARATOR.
High pressure from the high side returns with the oil from the OIL SEPARATOR to the RESERVOIR. In a period of time, enough pressure could build up to adversely affect the float and needle assembly in the OIL LEVEL REGULATOR. For protection, a vent line is installed from the top of the OIL RESERVOIR (a fitting is provided) back to the low pressure suction line. This line permits the pressure in the OIL RESERVOIR to be approximately the same as the pressure in the suction line and the crankcases of the compressors. Oil in the OIL RESERVOIR feeds down through 3/8 inch and 1/4 inch OD tubing and keeps the OIL LEVEL REGULATORS supplied with oil.
A REGULATING VALVE is mounted on the suction line vent connection on top of the OIL RESERVOIR and will maintain 20 pounds pressure differential over the crankcase. This positive pressure will keep the oil line to the OIL LEVEL REGULATORS filled and ready.
The valve on the top of the OIL RESERVOIR automatically receives oil from the OIL SEPARATOR (open position). To add oil to the OIL RESERVOIR, manually close the valve and fill the OIL RESERVOIR through the 1/4 inch flare connection on the side of the valve. Open valve after filling.
The valve on the bottom of the OIL RESERVOIR is the distribution valve to the OIL LEVEL REGULATORS (open position.) To remove oil from the OIL RESERVOIR, close the valve and use the 1/4 inch flare connection on the side of the valve to drain the oil out. Open valve after draining.
VALVECHECK
HV
HV
SUCTIONHV
SUCTIONHV
OIL SOL.
STRAINEROIL
RESERVOIROIL
DISCHARGEHV
COMPRESSOR
OIL VALVE
DISCHARGE
OIL REG.
HV
COMPRESSOR VALVECHECK
SEP.OIL
VIBRATIONABSORBERMUFFLER
VALVECHECKVIBRATION
ABSORBERMUFFLER
CHECKVALVE
VIBRATIONABSORBER
VIBRATIONABSORBER
Figure 9A
OIL CONTROL SYSTEM - PARALLEL SERIES UNITS

10
NEW SYSTEM START-UP
It is commonly accepted that in a new refrigeration system, some oil will be absorbed by the refrigerant as the system becomes balanced out. After two hours of operation, the OIL RESERVOIR, if necessary, should again be filled to the upper sight glass. After two days, by which time the entire refrigeration system should be balanced out, check oil again. Then the OIL RESERVOIR must be observed on each service call. No oil should be added again until the oil level falls below the lower sight glass port.
EXISTING SYSTEM START-UP When installing this OIL CONTROL SYSTEM on a parallel system that has been in operation for some time the amount of oil should be added cautiously. With the efficiency of the new OIL SEPARATOR, the oil return could likely be sufficient to fill the OIL RESERVOIR. Fill the OIL RESERVOIR to the lower sight glass port only. Observe for one day. After the second day, if the oil level has not risen to the upper sight glass, add oil. If the oil level has risen above the upper sight glass port, remove the excess oil from the OIL RESERVOIR.
NOTE: On system start-up of a new parallel system, oil should be added to the OIL RESERVOIR to the upper sight glass portion,
NOT ABOVE IT
NOTE: Only approved oil types and viscosities should be added to a system. See Appendix “B.”
Condenser From MainCondenser Pump
Direct Acting WaterRegulating Valve
PRV
ServiceValve
Condenser Main CondenserWater SupplyFrom Pump
3-Way WaterRegulating Valve
PRV
ServiceValve
Bypass BalancingValves or Cocks
Figure 10A
Figure 10B
Since air-cooled systems are normally subjected to varying load requirements, and fluctuating ambient temperatures, it is difficult to design units to operate satisfactorily and with optimum efficiencies without some means of control of discharge pressures
In order to achieve proper system operation, it is necessary that adequate discharge pressures be maintained to ensure that the expansion valve will feed correctly to prevent low suction conditions. The expansion valve is sized to meet capacity requirements at a pressure differential between discharge pressure and design suction pressure. If discharge pressure is allowed to drop below a point which will not maintain this design differential, the suction will also drop due to “starving” of the evaporator. When this happens, nuisance tripping of low
pressure control, or low evaporator temperature will occur.
Normal system design will allow satisfactory operation with discharge pressure down to approximately 95°F. On air cooled equipment, a number of methods can be used to maintain this minimum discharge pressure. The most common (and suitable for applications where ambient temperatures are not extreme) is fan cycling. When closer control or extreme ambient differentials are encountered, condenser flooding and fan cycling are preferred methods.
On water cooled equipment, discharge pressures are much easier to control, and the most common would be by the use of condenser water regulating valves directly sensing discharge pressure. (See Piping Illustration, Figures 10A and 10B.).
HEAD PRESSURE CONTROL

11
Refrigeration systems utilizing air cooled condensing units operating at ambient temperatures below design will require some means to stabilize high side pressure. In order to maintain sufficient high side pressure, the condenser capacity must be reduced in response to decreasing high side pressure. This may be accomplished by either reducing the air flow across the condenser, or reducing effective condenser surface by “flooding” the condenser with liquid refrigerant. Century Refrigeration offers both means of control, factory installed and preset.
FAN CYCLE Controls head pressure by cycling condenser fan(s) in response to a decrease in high side pressure. This system is normally satisfactory during mild conditions. Each step of control is accomplished by a pilot duty pressure control(s), fused fan motor contactor(s), completely installed, wired, and factory calibrated. See Figure 11A for typical fan cycle wiring.
FAN CYCLE WITH POSITIVE STARTIncludes, in addition to fan cycling controls, a “positive start” control circuit to ensure that the compressor will start at low ambient. All Century Refrigeration condensing units operate on a pumpdown cycle. During low ambient, sufficient low side pressure may not develop to start the compressor upon a call for cooling. The “positive start” time relay momentarily bypasses the low pressure operating control to ensure compressor operation for 90 seconds. At the end of this timed period, the system pressure will be up to normal operating levels. The timer contacts open returning compressor control to the low pressure operating control. See Figures 11B and 11C for typical wiring of the positive start circuit.
FUSE
L1
L2
L3
T1
T2
T3
#
FAN MOTOR
HP____RLA___
CONTACTOR C7A
12.3
CONDENSER FAN A
CONDENSER FAN B
L1
L2
L3
T1
T2
T3
#
FAN MOTORCONTACTOR C8B
1HP____RLA___2.3
C7
C8
1-1FCS
( )8
( )7A
Figure 11A
LO-XXX
XXXX
SEC.TD- 21
90
R22-1
22R
TD-21, XX
R22, XX
POS. START TIMER
POS. START RELAY
TD-21
# LLS- 1
(115V)
LO-XXX
XXXX
R21-1
# LLS- 1
(230V)
R20-1
SEC.TD- 20
9020R
21R
Res.R20, XX
R21, XX
POS TIMER RELAY
POS RELAY
XXX
Figure 11B
Figure 11C
COMPRESSOR COMPARTMENTS
Figure 11D
AIR COOLED CONDENSING UNITS - LOW AMBIENT OPERATION

12
In Out In Out In Out In OutManual 400 Manual 280 Manual 400 Manual 585
50/20 20/0 40 20 50 20 70 40
Step 1 220 200 140 120 270 200* 340 320Step 2 230 210 170 140 280 210* 360 340Step 3 240 230 160 140 290 220* 380 360Step 4 250 240 170 150 300 230* 400 380Step 1 220 200 140 120 270 200* 340 320Step 2 230 210 150 130 280 210* 360 340Step 3 250 230 170 150 290 220* 400 360Step 1 220 200 140 120 270 200* 360 320Step 2 250 230 170 120 290 220* 400 360
Fan Cycle Step 1 250 200 170 120 270 200* 400 320
250 200 170 120 270 200 400 320
Manual 54 Manual 26 Manual 70 (407c=48) Manual 97
R-410a*
High Pressure
Freeze Control
CONROL R-22, 407C R134a* R-404a, 507
Low Pressure (High/Low Temp.)
Fan Cycle (4 Steps)
Fan Cycle (3 Steps)
Fan Cycle (2 Steps)
Penn Adjustable Fan Cycle
PRESSURE SWITCH SETTINGS
* Use adjustable switches
1. Set for job site requirements per shop wiring diagram. All low pressure controls may require further adjustments per equip-ment specifications.
2. Water and evaporative-cooled high pressure switch R-22, R407c -315 psig.
3. Load limit pressure switch R-22 makes at 380psig/opens at 350psig.
4. Freeze controls to be adjusted per conditions below freezing.5. Un-loaders to be adjusted per the application requirements.6. High pressure cut-out setting shall not be set above 90% of
the pressure relief valve setting.
NOTE:
A20 FLOOD CONTROLUtilizes a valve(s) mounted, piped, and adjusted to regulate condensing pressure by flooding the condenser with liquid refrigerant. This option does require additional refrigerant in the system. As shown in Figure 12A, during the normal cycle the valve will prevent flow from the discharge line into the receiver and allow free flow of liquid from the condenser. As the receiver pressure drops, the valve will modulate allowing discharge gas to enter the receiver and restrict liquid flow from the condenser. The valve continues to modulate in this manner, maintaining a constant receiver pressure.
B20 FLOOD CONTROLIncludes, in addition to flooding valve(s), a “positive start” control circuit to insure that the compressor will start at low ambient. All standard Century Refrigeration condensing units operate on a pumpdown cycle. During low ambient, sufficient low side pressure may not develop to start the compressor upon a call for cooling. The “positive start” time relay momentarily bypasses the low pressure operating control to ensure compressor operation for 90 seconds. At the end of this timed period, the system will be up to normal operating levels. The timer contacts open returning compressor control to the low pressure operating control. See Figures 11B and 11C for typical wiring.
RECEIVER
VALVESCH.
BV BVPRV
HOT GAS DISCHARGE LINE FROM COMPRESSOR
SUBCOOLERCOIL
SUBCOOLERCOIL
AIR COOLEDCONDENSER
PRESSURECONTROL
HEAD
Figure 12A
Applicable to: TSI, CRI, RSI
13
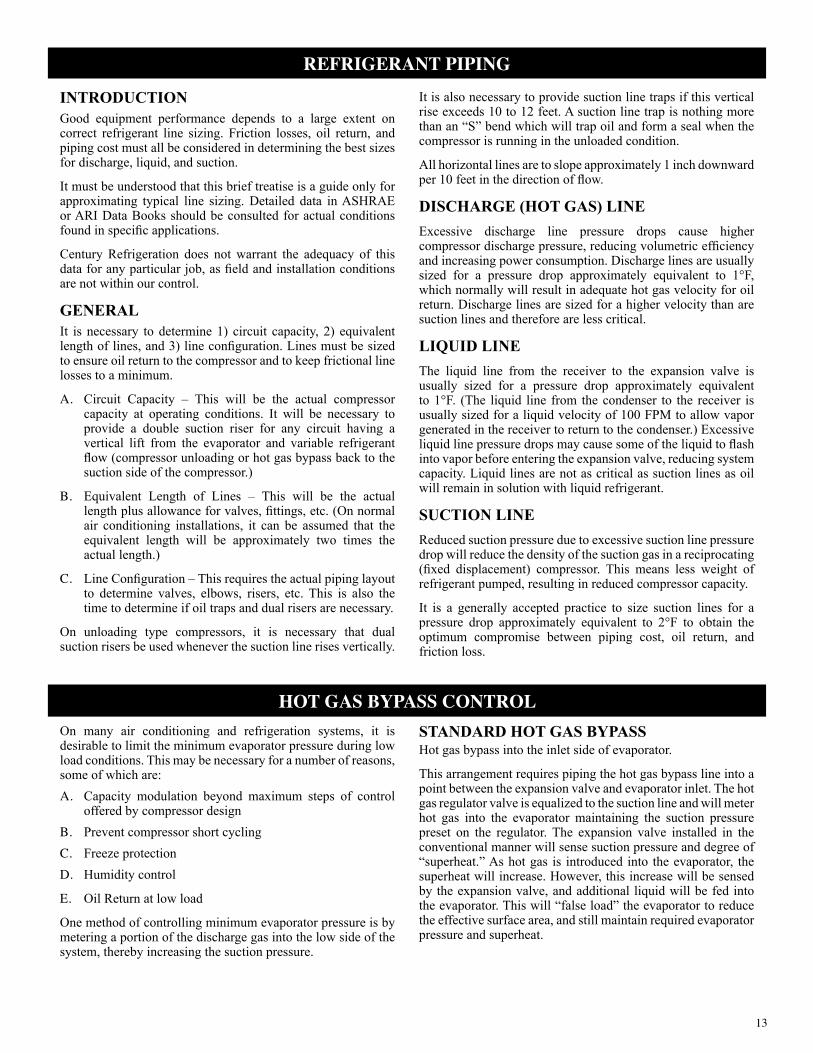
INTRODUCTIONGood equipment performance depends to a large extent on correct refrigerant line sizing. Friction losses, oil return, and piping cost must all be considered in determining the best sizes for discharge, liquid, and suction.
It must be understood that this brief treatise is a guide only for approximating typical line sizing. Detailed data in ASHRAE or ARI Data Books should be consulted for actual conditions found in specific applications.
Century Refrigeration does not warrant the adequacy of this data for any particular job, as field and installation conditions are not within our control.
GENERALIt is necessary to determine 1) circuit capacity, 2) equivalent length of lines, and 3) line configuration. Lines must be sized to ensure oil return to the compressor and to keep frictional line losses to a minimum.
A. Circuit Capacity – This will be the actual compressor capacity at operating conditions. It will be necessary to provide a double suction riser for any circuit having a vertical lift from the evaporator and variable refrigerant flow (compressor unloading or hot gas bypass back to the suction side of the compressor.)
B. Equivalent Length of Lines – This will be the actual length plus allowance for valves, fittings, etc. (On normal air conditioning installations, it can be assumed that the equivalent length will be approximately two times the actual length.)
C. Line Configuration – This requires the actual piping layout to determine valves, elbows, risers, etc. This is also the time to determine if oil traps and dual risers are necessary.
On unloading type compressors, it is necessary that dual suction risers be used whenever the suction line rises vertically.
It is also necessary to provide suction line traps if this vertical rise exceeds 10 to 12 feet. A suction line trap is nothing more than an “S” bend which will trap oil and form a seal when the compressor is running in the unloaded condition.
All horizontal lines are to slope approximately 1 inch downward per 10 feet in the direction of flow.
DISCHARGE (HOT GAS) LINEExcessive discharge line pressure drops cause higher compressor discharge pressure, reducing volumetric efficiency and increasing power consumption. Discharge lines are usually sized for a pressure drop approximately equivalent to 1°F, which normally will result in adequate hot gas velocity for oil return. Discharge lines are sized for a higher velocity than are suction lines and therefore are less critical.
LIQUID LINEThe liquid line from the receiver to the expansion valve is usually sized for a pressure drop approximately equivalent to 1°F. (The liquid line from the condenser to the receiver is usually sized for a liquid velocity of 100 FPM to allow vapor generated in the receiver to return to the condenser.) Excessive liquid line pressure drops may cause some of the liquid to flash into vapor before entering the expansion valve, reducing system capacity. Liquid lines are not as critical as suction lines as oil will remain in solution with liquid refrigerant.
SUCTION LINEReduced suction pressure due to excessive suction line pressure drop will reduce the density of the suction gas in a reciprocating (fixed displacement) compressor. This means less weight of refrigerant pumped, resulting in reduced compressor capacity.
It is a generally accepted practice to size suction lines for a pressure drop approximately equivalent to 2°F to obtain the optimum compromise between piping cost, oil return, and friction loss.
On many air conditioning and refrigeration systems, it is desirable to limit the minimum evaporator pressure during low load conditions. This may be necessary for a number of reasons, some of which are:A. Capacity modulation beyond maximum steps of control
offered by compressor designB. Prevent compressor short cyclingC. Freeze protectionD. Humidity control
E. Oil Return at low load
One method of controlling minimum evaporator pressure is by metering a portion of the discharge gas into the low side of the system, thereby increasing the suction pressure.
STANDARD HOT GAS BYPASSHot gas bypass into the inlet side of evaporator.
This arrangement requires piping the hot gas bypass line into a point between the expansion valve and evaporator inlet. The hot gas regulator valve is equalized to the suction line and will meter hot gas into the evaporator maintaining the suction pressure preset on the regulator. The expansion valve installed in the conventional manner will sense suction pressure and degree of “superheat.” As hot gas is introduced into the evaporator, the superheat will increase. However, this increase will be sensed by the expansion valve, and additional liquid will be fed into the evaporator. This will “false load” the evaporator to reduce the effective surface area, and still maintain required evaporator pressure and superheat.
HOT GAS BYPASS CONTROL
REFRIGERANT PIPING

14
Alternating current polyphase motors will operate successfully under running conditions at rated load when the voltage unbalance at the motor terminals does not exceed 1 percent. Performance will not necessarily be the same as when the motor is operating with an unbalanced voltage at the motor terminals.
A relatively small unbalance in voltage will cause a considerable increase in temperature rise. In the phase with the highest current, the percentage increase in temperature rise will be approximately two times the square of the percentage voltage unbalance. The increase in losses, and consequently, the increase in average heating of the whole winding will be slightly lower than the winding with the highest current.
If nuisance trip outs or repeated trip outs of a motor are experienced and diagnosis of the motor shows no faults, phase unbalance is a likely cause.
To illustrate the severity of this condition, an approximate 3.5 percent voltage unbalance will cause an approximate 25 percent increase in temperature rise.
The percent of voltage unbalance is equal to 100 times the maximum voltage deviation from the average voltage divided by the average voltage.
EXAMPLE:220 Volt Circuit
Phase 1,2 = 217V 2,3 = 221V 3,1 = 228V
NOTE: WE RECOMMEND A SETTING OF NO MORE THAN 3% UNBALANCE
COMPRESSOR
HVDISCHARGE
SIGHTGLASS
SIGHTGLASS LIQUID DRIER
(REPLACEABLE CORE
MUFFLER
SUCTION FILTER(REPLACEABLE CORE)
VIBRATIONABSORBER
VIBRATIONABSORBER
RECEIVER
PRVBV BV
REGULATORHOT GAS
HOT GASSOLENOID
HOT GAS
HOT GAS
BV
SUCTIONACCUMULATOR
LIQUID LINESOLENOID
LIQUID
SUCTION
TXV
INLET
OUTLET
EVAPORATOR
3228-222 = 6V
100 x 6
= 222V217 + 221 + 228
222 = 2.7% Voltage Unbalance
PercentVoltage
Unbalanced
PercentCurrent
Rise
PercentTemperature
Rise3.5 29.4 25.03.0 25.2 18.02.5 21.0 12.52.0 16.75 8.01.5 12.5 4.51.0 8.0 2.00.5 3.8 0.50 0 0
Hot Gas Bypass Control, Figure 14A
EFFECTS OF UNBALANCED VOLTAGE ON MOTOR PERFORMANCE

15
TROUBLE SHOOTING CHARTPROBLEM POSSIBLE CAUSES POSSIBLE CORRECTIVE STEPS
Compressor will not run a. Main switch openb. Fuse blownc. Thermal overloads tripped or fuses
blownd. Defective contactor or coile. System shut downf. No cooling requiredg. Liquid line solenoid will not openh. Motor electric troublei. Loose wiring
a. Close switchb. Check electrical circuits and motor winding
for shorts or grounds; investigate for possible over-loading; replace fuse or reset breakers after fault is corrected
c. Overloads are auto reset; check unit closely when unit comes back on line
d. Repair or replace contactor or coile. Determine type and cause of shutdown and
correct it before resetting safety switchf. None. Wait until unit calls for coolingg. Repair or replace coilh. Check motor for opens, short circuit or burnouti. Check all wire junctions, tighten all terminal
screws
Compressor noisy or vibrating a. Flooding of refrigerant into crankcaseb. Improper piping support on discharge
or liquid linec. Worn compressor
a. Check setting of expansion valveb. Relocate, add, or remove hangersc. Replace compressor
High discharge pressure a. Condenser water insufficient or temperature too high
b. Fouled condenser tubes (water-cooled condenser); clogged spray nozzles (evaporative condenser); dirty tube and fin surface (air cooled condenser)
c. Non-condensibles in systemd. System overcharged with refrigerante. Discharge shut off valve partially
closedf. Condenser undersizedg. High ambient conditions
a. Readjust water regulating valve; investigate ways to increase water supply
b. Cleanc. Purge the non-condensiblesd. Remove excess refrigerante. Open valvef. Check condenser rating tables against the
operationg. Check condenser rating tables against the
operation
Low discharge pressure a. Faulty condenser temperature regulation
b. Suction shut off valve partially closedc. Insufficient refrigerant in systemd. Low suction pressuree. Compressor operating unloadedf. Condenser too largeg. Low ambient conditions
a. Check condenser control operationb. Open valvec. Check for leaks; repair and add charged. See corrective steps for “low suction pressure”
sectione. See corrective steps for “compressor will not
load or unload” sectionf. Check condenser rating tables against the
operationg. Check condenser rating tables against the
operation
High suction pressure a. Excessive loadb. Expansion valve overfeedingc. Compressor unloaders open
a. Reduce load or add additional equipmentb. Check remote bulb; regulate superheatc. See corrective steps for “compressor will not
load or unload” section
Low suction pressure a. Lack of refrigerantb. Evaporator dirtyc. Clogged liquid line filter drierd. Clogged suction line or compressor
suction gas strainers e. Expansion valve malfunctioningf. Condensing temperature too lowg. Compressor will not unloadh. Insufficient water flow
a. Check for leaks; repair and add chargeb. Clean chemicallyc. Replace cartridge(s)d. Clean strainerse. Check and reset for proper superheat; replace
if necessaryf. Check means for regulating condensing
temperatureg. See corrective steps for “compressor will not
load or unload” sectionh. Adjust GPM

16
TROUBLE SHOOTING CHARTPROBLEM POSSIBLE CAUSES POSSIBLE CORRECTIVE STEPS
Compressor will not load or unload
a. Defective capacity controlb. Unloader mechanism defectivec. Faulty thermostat stage or broken
capillary tubed. Stages not set for application
a. Replace capacity controlb. Replace unloader mechanismc. Replace thermostat stage or capillary tubed. Reset thermostat setting to fit application
Compressor loading/unloading intervals too short
a. Erratic water thermostatb. Insufficient water flow
a. Replace water thermostatb. Adjust GPM
Little or no oil pressure a. Clogged suction oil strainerb. Excessive liquid in crankcasec. Oil pressure gauge defectived. Low oil pressure safety switch
defectivee. Worn out pumpf. Oil pump reversing gear stuck in
wrong positiong. Worn bearingsh. Low oil leveli. Loose fitting on oil linesj. Pump housing gasket leaksk. Flooding of refrigerant into crankcase
a. Clean suction oil strainerb. Check crankcase heater; reset expansion valve
for higher superheat; check liquid line solenoid valve operation
c. Repair or replace; keep valve closed except when taking reading
d. Replace safety switche. Replace pumpf. Reverse direction of compressor rotationg. Replace compressorh. Add oili. Check and tighten systemj. Replace gasketk. Adjust thermal expansion valve
Compressor loses oil a. Lack of refrigerantb. Velocity in risers too lowc. Oil trapped in lined. Excessive compression ring blow by
a. Check for leaks and repair; add refrigerantb. Check riser sizesc. Check pitch of lines and refrigerant velocitiesd. Replace compressor
Motor overload relays or circuit breakers open
a. Low voltage during high load conditions
b. Defective or grounded wiring in motor or power circuits
c. Loose power wiringd. High condensing temperaturee. Power line fault causing unbalanced
voltagef. High ambient temperature around the
overload relayg. Failure of second starter to pull in on
part winding start system
a. Check supply voltage for excessive line dropb. Replace compressor motorc. Check all connections and tightend. See corrective steps for “high discharge
pressure” sectione. Check supply voltage; notify power company;
do not start until fault is correctedf. Provide ventilation to reduce heatg. Repair or replace starter or time delay
mechanism
Compressor thermal protector switch open
a. Operating beyond design conditionsb. Discharge valve partially shutc. Blown valve plate gasket
a. Add facilities so that conditions are within allowable limits
b. Open valvec. Replace gasket
Freeze protection opens a. Thermostat set too low b. Low water flowc. Low suction pressure
a. Reset to 40°F or aboveb. Adjust GPMc. See “low suction pressure” section

17
INSTALLATION, OPERATION & MAINTENANCE FOR UNIT COOLERS
SERIES “A,” “BOC,” “BALV,” & “PFE”
MOUNTINGThe “A,” “BOC,” “BALV,” & “PFE” Series are shipped in the upright position. Check equipment for shipping damage. If shipping damage has occurred, a claim should be made with the transportation company. The local Century representative should be advised of the nature of the damage.
Remove top and sides of crate. Leave unit on skid in shipping position to do necessary electrical work and assemble expansion valve to coil. The shipping skid may be used to support unit while installing.
The Series A, BOC, BALV & PFE evaporators are designed to be mounted directly to ceiling or suspended by rods. The top of the evaporator must be closed and sealed to the ceiling or suspended to provide sufficient clearance so it is readily accessible for cleaning. Do not mount unit with less than 30 inches between coil face and wall. Ample space should be allowed at each end to adjust expansion valve or service electrical controls if required. Fan side of unit must be kept clear for proper air distribution. After unit is securely fastened in position, shipping legs may be removed from Series A units.
PIPINGAll “A,” “BOC,” “BALV,” “PFE,” “FH,” & “FV” Series evaporators are designed for use with remote condensing units. All connecting piping must be installed by qualified personnel in accordance with applicable local and national codes. All piping, traps, risers and line sizes should be in accordance with good piping practices for proper operation.
The drain line piping located inside the refrigerated space should be kept as short as possible and pitched a minimum of 1/2 inch per foot. If room is held below freezing, drain line must be wrapped with heat tape and insulated. Do not overlap heat tape unless otherwise instructed by manufacturer. Do not trap drains immediately after exit from low temperature area.
WIRINGThe nameplate on the unit is marked with the current characteristics to be used for wiring the unit. If control circuit voltage is different from nameplate voltage, a separate decal is located by the electrical box marked “Control Circuit Voltage.” All internal wiring is completed at the factory. A wiring diagram is furnished with each unit showing field connections and internal wiring. Access to internal connections may be made by removing end panel opposite expansion valve end of unit. All power must be turned off before removing any access panels. All wiring should be done in strict accordance with local and national electrical codes.
NOTE: Unit must be mounted level for proper condensate draining.
WARNING: The unit cabinet must be grounded.
MOUNTINGThe “FH” Series evaporators are shipped in the inverted position. Check equipment for shipping damage. If shipping damage has occurred, a claim should be made with the transportation company. The local Century representative should be advised of the nature of the damage.
Remove top and sides of crate or box. Leave unit on skid in shipping position to do necessary electrical work and assemble expansion valve to coil. Turn unit to mounting position and remove skid. Take necessary precautions not to damage the drain pan.
The “FH” Series evaporator is designed to be mounted directly to ceiling or suspended by rods. The top of the evaporator must be closed and sealed to the ceiling or suspended to provide sufficient clearance so it is readily accessible for cleaning. Do not mount unit with less than 15 inches between coil face and wall. Ample space should be allowed at each end to adjust expansion valve or service electrical controls if required. Fan side of unit must be kept clear for proper air distribution.
MOUNTINGThe “FV” Series evaporators are shipped in the inverted position. Check equipment for shipping damage. If shipping damage has occurred, a claim should be made with the transportation company. The local Century representative should be advised of the nature of the damage.
Remove top and sides of crate. Leave unit on shipping skid to do necessary electrical work and assemble expansion valve to coil. Remove bolts from skid, turn unit to mounting position and place back on skid, taking necessary precautions not to damage unit.
The “FV” Series evaporator is designed to be mounted directly to the ceiling or suspended from rods. The top of the evaporator must be closed and sealed to the ceiling or suspended to provide sufficient clearance so it is readily accessible for cleaning. Unit is pitched with the hangers for proper condensate drainage; therefore, unit must be mounted level with the top of the hangers. Unit is a blow-through type with air entering at the bottom and discharging out both sides. Ample space at each end to adjust expansion valve or service electrical controls is required. For proper air distribution, both sides and bottom of unit must be kept clear.
SERIES “FH”
NOTE: Unit must be mounted level for proper condensate draining.
SERIES “FV”

18
SEQUENCE OF OPERATIONNORMAL REFRIGERATION CYCLE:
1. Power is supplied to unit terminals designated on wiring diagram.
2. The defrost heaters are off (electric defrost units.)3. Compressor operates in accordance with the demands
of the refrigeration system temperature.4. The unit cooler fan(s) operates continually.
DEFROST CYCLE (ELECTRIC DEFROST MODELS)
1. Defrosting of the evaporator is started automatically by the timer at predetermined times. Typical settings of the timer would be four defrost periods per 24 hours.
2. Timer breaks circuit to evaporator fan motors and compressor, thereby shutting them off. At the same time, current is supplied to the heater circuit.
3. The properly positioned heaters warm up the evaporator coil above 32°F causing the frost to melt.
4. Frost on the evaporator is melted and defrost water drips into the heated drain pan and flows down the drain.
5. When the frost is melted, the evaporator coil continues to warm up to ensure a frost free coil.
COIL RECOOLING CYCLE (ELECTRIC DEFROST MODELS)
1. When the coil warms up to approximately 55°F the defrost termination thermostat closes. This allows current to flow to the solenoid in the timer, which is then energized and trips the timer switch back to the normal refrigeration cycle. The fan delay portion of this thermostat is now open.
2. The compressor starts its normal refrigeration cycle.3. The evaporator fan motor(s) remains off because fan
delay thermostat is open. This will prevent warm air and moisture from being blown into the refrigerated space.
4. When evaporator coil temperature reaches approximately +30°F, the fan delay thermostat closes; this allows current to flow to the fan motor(s) and the unit returns to its normal refrigeration cycle.
FAN DELAY CONTROL (STANDARD ON “FH” & “FV” SERIES UNITS)This control is a single pole, double throw switch. The red lead wire is the common wire. The black wire is wired in series with the fan motors. The brown wire is wired in series with the defrost termination solenoid in the timer. The brown and red contacts are closed when the temperature is above 55°F while the black and red contacts are open. The black and red contacts are closed below 30°F and the brown and red contacts are open.When the refrigeration system is first started up, the room ambient and the coil temperature are normally above 55°F,
the fan delay thermostat is open, and the fan remains off. The fan motors will come on when the temperature is pulled below 30°F. The number of times the fan will cycle is dependent on the initial ambient temperature, size of cabinet, and the refrigeration equipment. This type of fan delay control cannot be adjusted.
FAN DELAY CONTROL – PENN TYPE A19ZBC (STANDARD ON “A” & “BOC” SERIES UNITS, OPTIONAL ON “FH” & “FV” SERIES UNITS)This control is a single pole, double throw switch (refer to the sequence of operation.) This control has an adjustable defrost period. It is obtained by turning the black knob clockwise to increase the temperature setting required to terminate defrost. The defrost duration increases only as long as necessary to remove frost and ice from the refrigeration unit cooler coil.
SETTING DEFROST TERMINATION AND FAN DELAY
A. With a normal frost accumulation on the coil:1. Turn the knob clockwise to the end of the
calibrated dial.
2. Move the fan-start differential adjustment pin.3. Trip the timer to defrost cycle.
4. Observe when the coil has completely defrosted and the condensate has completely drained. Then turn the knob counterclockwise until the refrigeration cycle resumes (the fans will remain idle with fan delay hookup.) This is the final setting of the indicator knob.
B. Fan start differential adjustment pin on thermostat:1. For fan delay adjustment, observe when the coil
begins to frost.2. Holding the indicator knob firmly in place, move
the differential adjustment pin clockwise until the fan motors start. This is the final setting of the differential adjustment pin.
FANSTART
ENDDEFROST
DEFROST TERMINATIONAND FAN DELAY
DOES NOT CONTROLBOX TEMPERTURE
Figure 18A

19
MAINTENANCEFAN MOTORSThe fan motors are lifetime lubricated for trouble-free operation. If fan motors should require servicing, the fan guard must be removed. If a motor does not operate or it cycles on thermal overload, the problem could be that the coil is blocked with ice.
DEFROST HEATERS (ELECTRIC DEFROST MODELS)Heaters are maintenance free. If evaporator fails to defrost properly, check for defective heater. Series “A” & “BOC” defrost heaters can be replaced by removing side panel for access. Series “FH” & “FV” defrost heaters can be replaced by removing the drain pan for access.
MAINTENANCE ENTIRE UNITIt is recommended that the unit be inspected occasionally for dirt accumulation on coil inlet. Grease and soil should be removed from the fan and guard.
MAINTENANCE (CONDENSING UNITS AND EVAPORATORS)Under normal usage and conditions, it is recommended that the following list of preventive maintenance steps should be examined quarterly:
1. Inspect electrical wiring, components, and connections. Verify that all connections are tight and complete as required.
2. Water Treatment (Water Chillers and Water Cooled Units) – The water should be tested by a local testing agency and their recommendations adhered to.
3. Check contactors and relays for proper operation; replace if points are worn.
4. Check fan motors; tighten motor mount bolts/nuts and fan set screws.
5. Visually inspect the equipment for oil stains (leaks) on interconnecting piping, solder joints, condenser and evaporator coil finned area.
6. Check and tighten all flare connections.7. Check hand valve packing for leaks and tighten if
needed.8. Check condenser coil surface and clean if needed.9. Visually check liquid line sight glass for flash gas.
Glass must be clear with no bubbles. If glass is not clear, check system for leaks.
10. Check the liquid line sight glass moisture indicator and replace the liquid line drier if there is any indication of moisture.
11. Compressor Oil Level – The compressor oil level should be checked periodically. If oil is needed, allow equipment to pump down to approximately 5 psig crankcase pressure. Place disconnect in “off” position and close suction and discharge service valves. Add clean, dry oil then open discharge and suction service valves. Restart compressor and check oil level after two hours of operation. (Loss of oil would suggest that a leak may be in system. Carefully inspect entire system for evidence of oil and repair as necessary.)
12. Check for unusual noise and look for compressor pulsation or line vibration.
13. Check all safety and operating controls for proper settings and operation. Settings are listed on wiring diagram.
14. Check evaporator coil surface and clean if needed.15. Check that all defrost controls and defrost heaters are
functioning properly; check amperage.16. Clean the drain pan with warm soapy water or mild
acid and check for proper drainage.17. Check drain line heater (if equipped) for proper
operation. The heater power should be on continuously. The drain line should be insulated to prevent heat loss.
18. Check the evaporator for proper defrosting. The frost amount and pattern can vary greatly depending on the temperature of the room, the type of product being stored, how often new product is brought in, and the percentage of time the door to the room is open. It may be necessary to periodically change the number of defrost cycles or adjust the duration of defrost and fan delay.
19. Check the refrigeration cycle; take suction, discharge, and new oil pressure readings.
20. Check pressure drop across filters and driers (replace as required).
21. Verify that superheat conforms to specifications.
In addition to quarterly maintenance checks the following should be examined annually:
1. Take an oil sample and check for high concentrations of acid or moisture. Change oil and driers, if test results are not normal. A test kit may be purchased at most wholesalers.
2. Take amperage readings on compressors, motors, and defrost circuits. Amperage is listed on the wiring diagram.
20
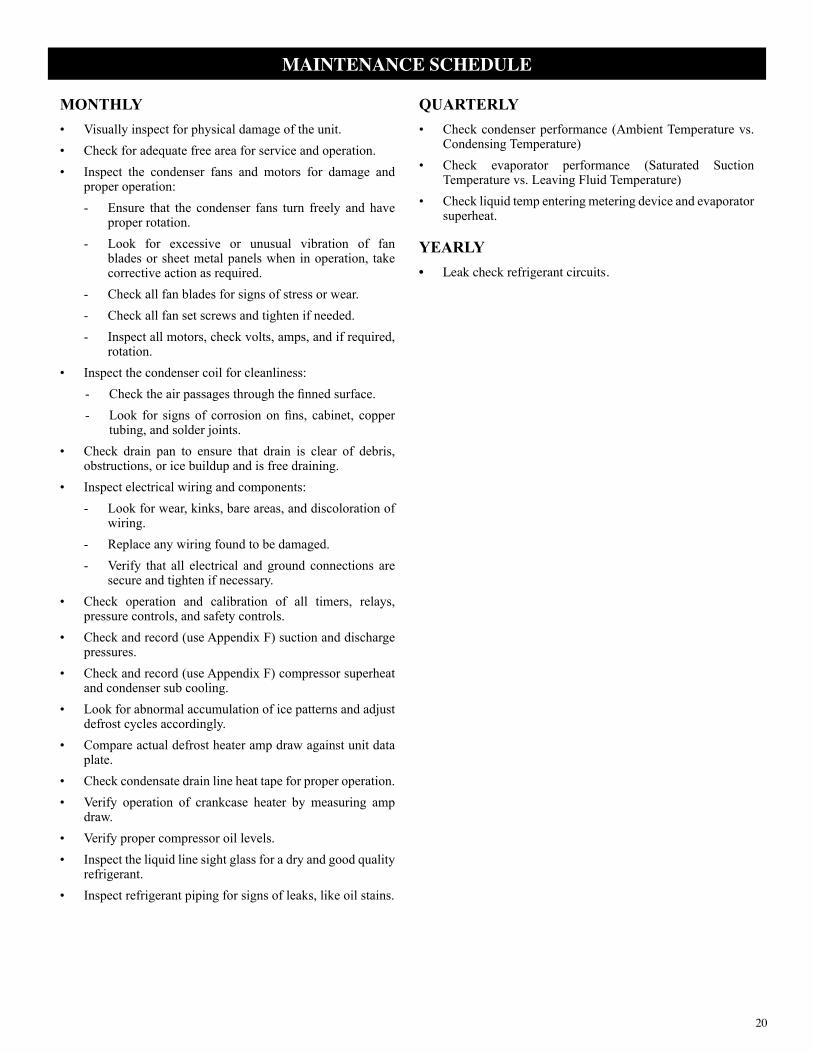
MAINTENANCE SCHEDULE
MONTHLY• Visually inspect for physical damage of the unit.• Check for adequate free area for service and operation.• Inspect the condenser fans and motors for damage and
proper operation: - Ensure that the condenser fans turn freely and have
proper rotation. - Look for excessive or unusual vibration of fan
blades or sheet metal panels when in operation, take corrective action as required.
- Check all fan blades for signs of stress or wear. - Check all fan set screws and tighten if needed. - Inspect all motors, check volts, amps, and if required,
rotation.• Inspect the condenser coil for cleanliness:
- Check the air passages through the finned surface. - Look for signs of corrosion on fins, cabinet, copper
tubing, and solder joints.• Check drain pan to ensure that drain is clear of debris,
obstructions, or ice buildup and is free draining. • Inspect electrical wiring and components:
- Look for wear, kinks, bare areas, and discoloration of wiring.
- Replace any wiring found to be damaged. - Verify that all electrical and ground connections are
secure and tighten if necessary. • Check operation and calibration of all timers, relays,
pressure controls, and safety controls.• Check and record (use Appendix F) suction and discharge
pressures.• Check and record (use Appendix F) compressor superheat
and condenser sub cooling.• Look for abnormal accumulation of ice patterns and adjust
defrost cycles accordingly.• Compare actual defrost heater amp draw against unit data
plate.• Check condensate drain line heat tape for proper operation.• Verify operation of crankcase heater by measuring amp
draw.• Verify proper compressor oil levels.• Inspect the liquid line sight glass for a dry and good quality
refrigerant.• Inspect refrigerant piping for signs of leaks, like oil stains.
QUARTERLY• Check condenser performance (Ambient Temperature vs.
Condensing Temperature)• Check evaporator performance (Saturated Suction
Temperature vs. Leaving Fluid Temperature)• Check liquid temp entering metering device and evaporator
superheat.
YEARLY• Leak check refrigerant circuits.
21
APPENDIX A - TEMPERATURE PRESSURE CHARTS
Figure 21A
Figure 21B
22
Figure 22A
Figure 22B

23
Figure 23A
Figure 23B

24
APPENDIX B - APPROVED OIL TYPES
BITZER RECIPROCATINGModel Compressor Type Refrigerant Temperature Oil Type
2C
Semi-hermetic
R134a/R407c/R404a/R507a
L BSE32
4C (L) BSE554B R22 (R12/R502) All B5.26B R124a All S688C R410a All BSE55
2x.2
Open Semi-hermetic
R134a/R407c/R404a/R507a
L BSE32
4x.2 (L) BSE556x.2 R22 (R12/R502) All B5.2
x=T, N, P, H, G, F NH3 (R717) All Clavus G68S4
2 StageR404a/R507a L BSE32
S6 R22L B5.2
I to VII Open Slow Speed
R22
R134a/R407c/R404a/R507a
All BSE32
(L) BSE55
Bitzer Oils Lubricant Type 5 Gallon 1 Gallon 1 QuartB5.2 AB & MIN 793-3150-34 793-1150-24 793-1150-04
BSE32 POE 793-1031-34 793-1031-04BSE55 POE 793-1068-34 793-1068-04
Clavus G68 MIN 915119-01S68 AB 793-3300-34 793-3300-24
Temperature RangesH te > 30°FM te > 20°FL te < 20°F
(L) te < 20°F
Bitzer Oil Alternative Oil Manufacturer
B5.2
Zerice S46 Exxon MobilZerice S68 Exxon MobilZerol 150 Petrosynthese
Clavus SD2212 ShellReniso SP46 FuchsReniso SP32 Fuchs
BSE32
Clavus R32 ShellRL32H UniquemaSEZ32 Fuchs
Castrol Icematic SW32 Deutsche BPEAL Arctic 22 CC Exxon Mobil
EAL Arctic 32 Exxon MobilSolest 31-HE CPI
BSE55
Solest 68 CPISE55 Fuchs
Castrol Icematic SW68 Deutsche BPRL68S Uniquema
Clavus R68 ShellEAL Arctic Exxon Mobil
S68 Alkyl 300 BVA
BITZER OIL PART NUMBERS (1 gallon = 3.78 liters)
te = saturated suction temperature

25
ZP & ZB KCPtRefrigerants Similar To
Application Lubricant ChoicesComments
Retrofit New Preferred Alt #1 Alt #2Ozone
Dep
leting CFC R‐12 L, M MIN AB & MIN
Phased out in 1996
CFC R‐502 L, M MIN AB & MIN POE‐32Phased out in
1996
HCFC R‐22 L, M, H MIN AB & MIN POE‐32No new
equipment 2010
Interims
HCFC R401a R‐12 M, H AB & MIN POE 32 & MIN POE‐32Service only Suva MP39
HCFC R401b R‐12 L, M AB & MIN POE 32 & MIN POE‐32Service only Suva MP66
HCFC R402a R‐502 L, M AB & MIN POE 32 & MIN POE‐32Service only Suva HP80
HCFC R402b R‐502 L, M AB & MIN POE 32 & MIN POE‐32Service only Suva HP81
HCFC R408a R‐502 L, M AB & MIN POE 32 & MIN POE‐32Service only
FX10
HCFC R409a R‐12 L, M AB & MIN POE 32 & MIN POE‐32Service only
FX56
ting
Non
‐Ozone
Dep
le
HFC R134a R‐12 M, H M, H POE‐32
HFC R404a R‐502 L, M L, M POE‐32Suva HP62, Forane FX70
HFC R507 R‐502 L, M L, M POE‐32 Genetron AZ50
HFC R407a R‐22 L, M L, M POE‐32
HFC R407c R‐22 L, M, H L, M, H POE‐32Suva 9000/ KLEA
66
HFC R410a M, H POE‐32ZP & ZB KCP
Copeland Scroll models only
HFC R422a/d R‐22 L, M MIN POE‐32 ABDiscus
supermarket racks only
HFC R438a R‐22 L, M MIN POE‐32 AB
Discus supermarket racks only;
ISCEON MO99
R704 Helium Cryogenic PAGZC Copeland Scroll models
only
R744 CO2 Sub‐critical POE**ZO Copeland Scroll models
only
REFRIGERANTS/LUBRICANTS APPROVED FOR USE IN COPELAND COMPRESSORS
LEGEND: MIN* -AB -POE 32 -POE** -PAG -POE-32 & MIN -AB & MIN -(L) -L -M -H -
Mineral Oil, *Mineral oils are interchangeable for “top off” purposesAlkyl Benzene OilPolyolester OilContact Application Engineer for oil detailsPolyalkylene Glycol OilMinimum 50% POEMinimum 50% Alkyl BenzeneFreezer applicationsLow temperature applicationMedium temperature applicationHigh temperature application
26
OPERATION
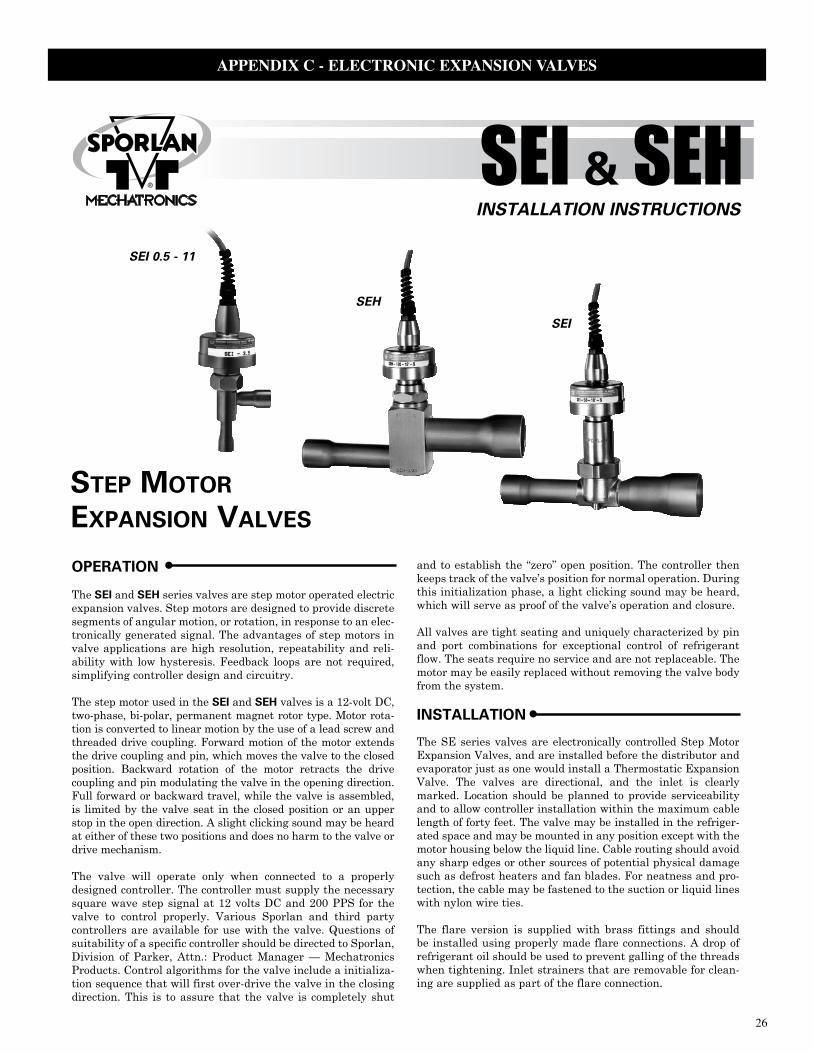
The SEI and SEH series valves are step motor operated electric expansion valves. Step motors are designed to provide discrete segments of angular motion, or rotation, in response to an elec-tronically generated signal. The advantages of step motors in valve applications are high resolution, repeatability and reli-ability with low hysteresis. Feedback loops are not required, simplifying controller design and circuitry.
The step motor used in the SEI and SEH valves is a 12-volt DC, two-phase, bi-polar, permanent magnet rotor type. Motor rota-tion is converted to linear motion by the use of a lead screw and threaded drive coupling. Forward motion of the motor extends the drive coupling and pin, which moves the valve to the closed position. Backward rotation of the motor retracts the drive coupling and pin modulating the valve in the opening direction. Full forward or backward travel, while the valve is assembled, is limited by the valve seat in the closed position or an upper stop in the open direction. A slight clicking sound may be heard at either of these two positions and does no harm to the valve or drive mechanism.
The valve will operate only when connected to a properly designed controller. The controller must supply the necessary square wave step signal at 12 volts DC and 200 PPS for the valve to control properly. Various Sporlan and third party controllers are available for use with the valve. Questions of suitability of a specific controller should be directed to Sporlan, Division of Parker, Attn.: Product Manager — Mechatronics Products. Control algorithms for the valve include a initializa-tion sequence that will first over-drive the valve in the closing direction. This is to assure that the valve is completely shut
and to establish the “zero” open position. The controller then keeps track of the valve’s position for normal operation. During this initialization phase, a light clicking sound may be heard, which will serve as proof of the valve’s operation and closure.
All valves are tight seating and uniquely characterized by pin and port combinations for exceptional control of refrigerant flow. The seats require no service and are not replaceable. The motor may be easily replaced without removing the valve body from the system.
INSTALLATION
The SE series valves are electronically controlled Step Motor Expansion Valves, and are installed before the distributor and evaporator just as one would install a Thermostatic Expansion Valve. The valves are directional, and the inlet is clearly marked. Location should be planned to provide serviceability and to allow controller installation within the maximum cable length of forty feet. The valve may be installed in the refriger-ated space and may be mounted in any position except with the motor housing below the liquid line. Cable routing should avoid any sharp edges or other sources of potential physical damage such as defrost heaters and fan blades. For neatness and pro-tection, the cable may be fastened to the suction or liquid lines with nylon wire ties.
The flare version is supplied with brass fittings and should be installed using properly made flare connections. A drop of refrigerant oil should be used to prevent galling of the threads when tightening. Inlet strainers that are removable for clean-ing are supplied as part of the flare connection.
SEI & SEHINSTALLATION INSTRUCTIONS
Step Motor expanSion ValVeS
SEI 0.5 - 11
SEH
SEI
APPENDIX C - ELECTRONIC EXPANSION VALVES
27
Page 2
The sweat version has copper connections and any solder or brazing alloy may be used to install the valve. There is no need to disassemble the valve for installation, however, the torch flame should be directed away from the motor housing and cable. Care must be taken to assure that the cable is not dam-aged either directly from the flame, or indirectly from contact with hot piping. The valve is shipped in the open position to prevent heat being conducted into the motor, but it is strongly suggested that the valve body be wrapped with a wet cloth dur-ing the soldering operation. Inlet strainers are supplied option-ally with ODF style valves, and if used, should be oriented in the proper direction as shown on the strainer package. The valve should be completely installed and reassembled before connecting to the controller and applying power. The wiring is color-coded and the controller manufacturer should be con-sulted for the proper attachment to the controller.
FIELD SERVICING INSTRUCTIONS SEI & SEH Only
The following steps are necessary for the proper disassem-bly, inspection, cleaning and reassembly of all valves except SER 1.5, 6, 11 and 20 (whether in or out of the refrigerant piping).
1. Before disassembling the valve, be sure the refrigerant pressure in the system has been reduced to a safe level (0 psig).
2. Disconnect the line voltage to the valve controller.
3. Refer to the exploded view of the SEI/SEH for the remaining instructions. Using the appropriate wrenches or a vice to properly support the valve body, remove the motor assem-bly from the valve body by loosening the lock nut. To pre-vent permanent damage to the motor, DO NOT attempt to disassemble the motor housing.
CAUTION: Regardless of whether the valve is in the sys-tem or in a vise, care must be taken to prevent distorting the valve parts when tightening.
4. The motor assembly may be removed for inspection and cleaning.
5. If the motor fails to operate properly, check the resistance of each motor phase. Resistance between the black and white leads or between the red and green leads should be as shown in Table 1. Differences of more than 10% between phases indicate a defective motor. Resistance between black and red, or any lead and housing should be infinite, any resistance reading will indicate a shorted winding and the motor will need to be replaced.
6. If you have access to a SMA test instrument, operation of the valve may be proven. Connect the motor leads to the proper color-coded connector on the SMA. Set the rate to 200 PPS and toggle in the “OPEN” direction. The white driver/piston should retract into the driver guide/adaptor. After approxi-mately 30 seconds, the driver should be fully retracted and a light clicking or “ratcheting” sound may be heard, this is normal to the valves and proves operation of the motor. If
the SMA is toggled in the “CLOSE” position, after approxi-mately 30 seconds the white polyester driver/piston should disengage the lead screw, and can be removed. Inspect the driver/piston for damage. To replace the driver, toggle the SMA to the “OPEN” position and carefully engage the driver to the lead screw.
CAUTION: Whenever the motor is powered while not in place on the valve, the driver must be fully retracted into the guide before the valve is reassembled. Failure to do this will permanently damage the valve.
7. If the motor responds to step 6 above, the valve body itself should be checked for obstruction. Check for contaminants in the port or strainer, if used.
8. If the valve body and strainer are clear and the motor oper-ates as in step 6 above, the valve is considered operational and the problem lies in the controller or power supply. The manufacturer of these components should be contacted for further assistance.
MOTOR ADAPTOR ASSEMBLY REPLACEMENT SER-30, -50 & SEH Only
If the motor is found to be defective in the above, the entire motor assembly must be replaced.
1. Remove all power from the valve and controller.
2. Cut the existing valve cable at a convenient point at the dri-est or most protected location.
3. Splice the new cable to the old cable using the waterproof butt splices. COLOR CODING ON THE INDIVIDUAL WIRES MUST BE MATCHED; FAILURE TO DO SO WILL RENDER THE VALVE INOPERATIVE AND MAY DAMAGE EITHER THE VALVE OR CONTROLLER.
4. Waterproof the splice with shrink tube or electrical tape suitable for use in cold and damp environments. Care should be taken to prevent the splice from lying in the case pan or other wet location.
VALVE REPLACEMENT
The entire valve may be replaced if desired. The old valve may be unbrazed or cut out of the piping. If cut out, use a tubing or pipe cutter and not a saw. When installing the new valve any convenient brazing alloy and method may be used. The valve need not be disassembled, but the body and motor assembly should be wrapped with a wet cloth to prevent damage.
Extra care should be taken to prevent damage to the motor cable, either directly from the torch, or indirectly from contact with a hot surface.
Waterproof butt splices are not supplied with complete valves but must be used to prevent corrosion on the motor leads.
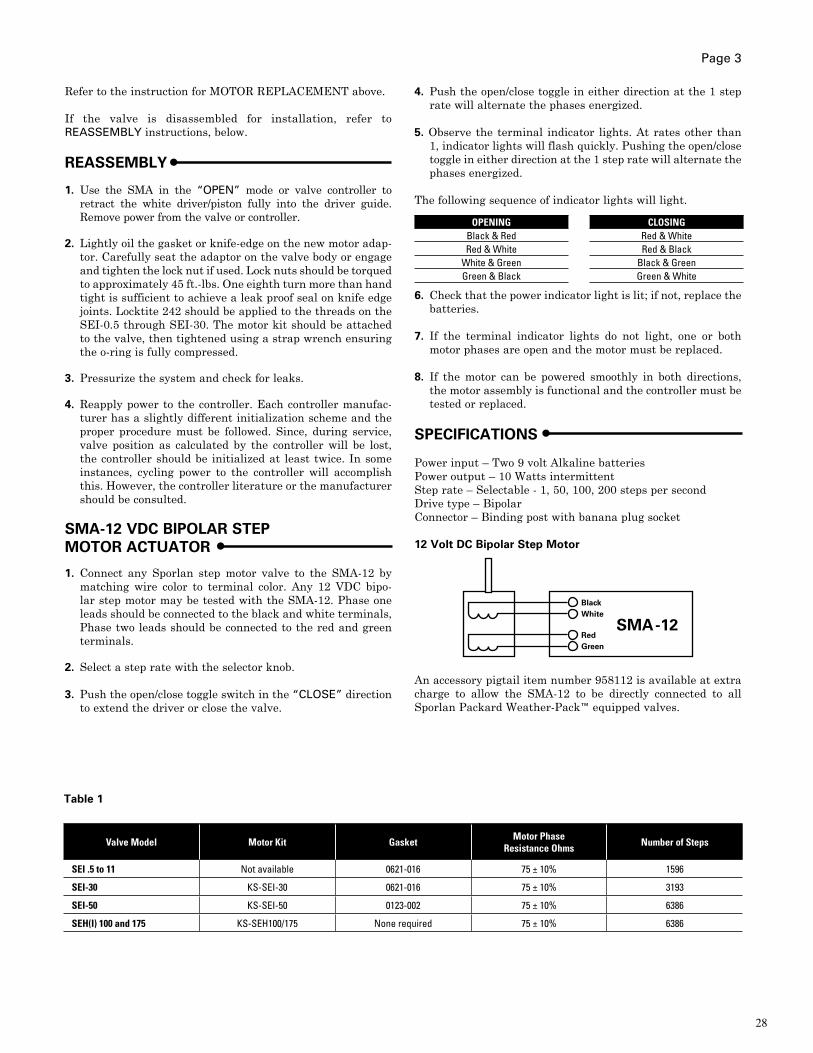
28
Page 3
Refer to the instruction for MOTOR REPLACEMENT above.
If the valve is disassembled for installation, refer to REASSEMBLY instructions, below.
REASSEMBLY
1. Use the SMA in the “OPEN” mode or valve controller to retract the white driver/piston fully into the driver guide. Remove power from the valve or controller.
2. Lightly oil the gasket or knife-edge on the new motor adap-tor. Carefully seat the adaptor on the valve body or engage and tighten the lock nut if used. Lock nuts should be torqued to approximately 45 ft.-lbs. One eighth turn more than hand tight is sufficient to achieve a leak proof seal on knife edge joints. Locktite 242 should be applied to the threads on the SEI-0.5 through SEI-30. The motor kit should be attached to the valve, then tightened using a strap wrench ensuring the o-ring is fully compressed.
3. Pressurize the system and check for leaks.
4. Reapply power to the controller. Each controller manufac-turer has a slightly different initialization scheme and the proper procedure must be followed. Since, during service, valve position as calculated by the controller will be lost, the controller should be initialized at least twice. In some instances, cycling power to the controller will accomplish this. However, the controller literature or the manufacturer should be consulted.
SMA-12 VDC BIPOLAR STEP MOTOR ACTUATOR
1. Connect any Sporlan step motor valve to the SMA-12 by matching wire color to terminal color. Any 12 VDC bipo-lar step motor may be tested with the SMA-12. Phase one leads should be connected to the black and white terminals, Phase two leads should be connected to the red and green terminals.
2. Select a step rate with the selector knob.
3. Push the open/close toggle switch in the “CLOSE” direction to extend the driver or close the valve.
4. Push the open/close toggle in either direction at the 1 step rate will alternate the phases energized.
5. Observe the terminal indicator lights. At rates other than 1, indicator lights will flash quickly. Pushing the open/close toggle in either direction at the 1 step rate will alternate the phases energized.
The following sequence of indicator lights will light.
6. Check that the power indicator light is lit; if not, replace the batteries.
7. If the terminal indicator lights do not light, one or both motor phases are open and the motor must be replaced.
8. If the motor can be powered smoothly in both directions, the motor assembly is functional and the controller must be tested or replaced.
SPECIFICATIONS
Power input – Two 9 volt Alkaline batteriesPower output – 10 Watts intermittentStep rate – Selectable - 1, 50, 100, 200 steps per secondDrive type – BipolarConnector – Binding post with banana plug socket
12 Volt DC Bipolar Step Motor
An accessory pigtail item number 958112 is available at extra charge to allow the SMA-12 to be directly connected to all Sporlan Packard Weather-Pack™ equipped valves.
BlackWhite
RedGreen
SMA -12
Valve Model Motor Kit Gasket Motor Phase Resistance Ohms Number of Steps
SEI .5 to 11 Not available 0621-016 75 ± 10% 1596
SEI-30 KS-SEI-30 0621-016 75 ± 10% 3193
SEI-50 KS-SEI-50 0123-002 75 ± 10% 6386
SEH(I) 100 and 175 KS-SEH100/175 None required 75 ± 10% 6386
OPENING CLOSINGBlack & Red Red & WhiteRed & White Red & Black
White & Green Black & GreenGreen & Black Green & White
Table 1
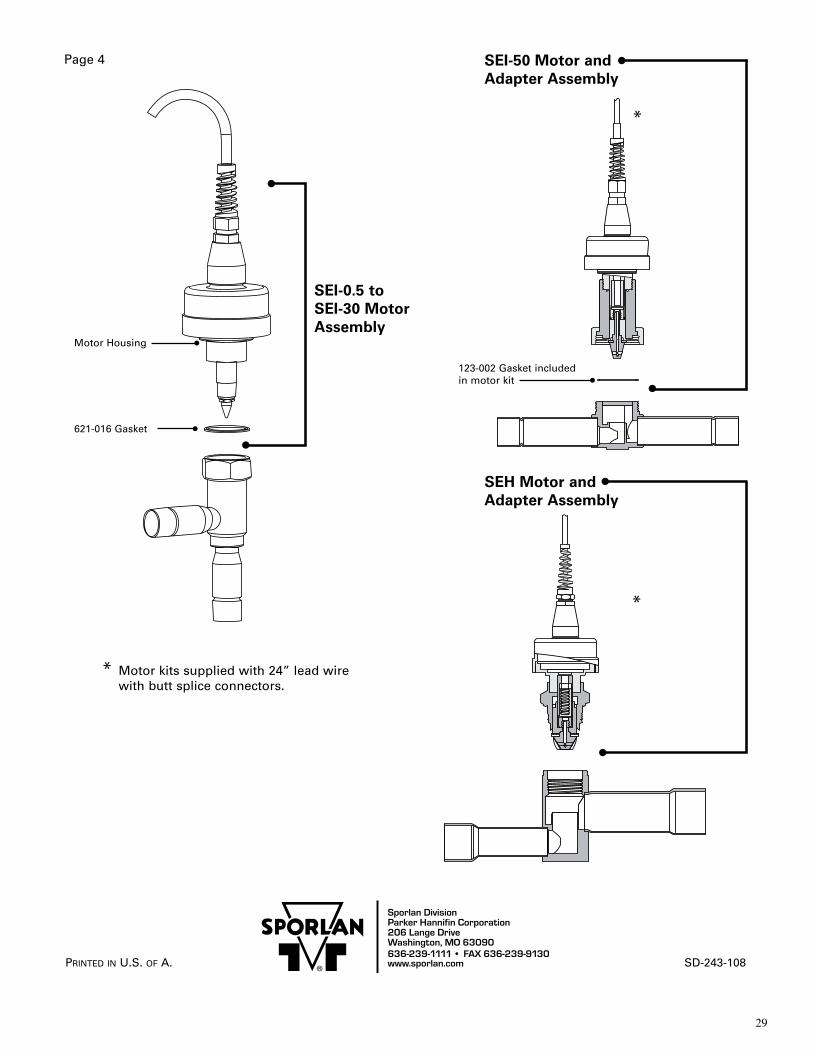
29
Page 4
Printed in U.S. of A. Sd-243-108
SEI-50 Motor and Adapter Assembly
SEI-0.5 to SEI-30 Motor Assembly
SEH Motor and Adapter Assembly
* Motor kits supplied with 24” lead wire with butt splice connectors.
123-002 Gasket included in motor kit
Motor Housing
621-016 Gasket
*
*

30
The Superheat Controller will control one Sporlan Electric ExpansionValve by means of pressure-temperature control. Pressure-temperaturesuperheat control for one of four common refrigerants may be selected.Controllers can be ordered configured for R-22, R-134a, R-404A, R-407Cand R-507. The refrigerant type can be changed in the field by use of theoptional "Panel Display". Onboard readouts show actual superheat, super-heat set point, and valve position. Two push buttons are provided on theboard, to change the superheat set point, as well as open, close, or positionthe valve. Proportional and Integral set points are also included to changeresponsiveness of the valve.
As illustrated in Figure 1, the controller is provided with hardware andinput/output connections for a number of user specified purposes. Seebelow:
• One valve control• One pressure input (transducer supplied by Sporlan)• One digital input (from external switches or relays)• Two temperature inputs (Sporlan supplied surface or air sensors)• Optional battery backup for onboard time clock and fail-safe
valve closure• Two digit LED readout• One green LED indicator• One red LED indicator• Two push buttons for set point, alarm cancellation, etc.• RS 485 port• Panel Display jack
Please note that although RS485 port appears on the Superheat Board,standard software does not support communication. Custom (propri-etary) software must be written for anything other than superheat con-trol. Please contact Sporlan for more information.
INSTALLATION
When handling the boards, electrostatic protection procedures should befollowed. The installer should be grounded through a ground strap. Ifground straps or other ESD protection is not available, ONLY handle theboard by its edges or by the battery holders. DO NOT TOUCH ANYCOMPONENTS ON THE BOARD EXCEPT THE BATTERY HOLDERAND RELAYS.
1. The board should be mounted in a dry, protected environment using thepredrilled mounting holes in each corner. Make sure none of the printedcircuit paths or components are touching the metal panel or anythingconductive. See Figure 3.
2. Connections are to be made to terminal block shown.3. Controllers are configured for pressure temperature superheat control.4. Connect temperature sensor to TS2. The sensor is not polarized. For
suction lines 7/8” or less, the sensor should be mounted to the coppersuction line after the evaporator, using the furnished clamps. For largerlines or steel piping, a well sensor (P/N 952795), available from Sporlan,should be installed.
5. The pressure transducer should be mounted on the top of the suction linenear the temperature sensor location. Transducer connections to theboard are as follows:• The power wire is red and is connected to the 1+ terminal.• The signal wire is green and is connected to the 1S terminal.• The ground wire is black and is connected the 1- terminal.
6. The valve leads are connected to the terminals labeled Valve 1.• The black lead is connected to terminal labeled B of Valve 1.• The white lead is connected to terminal labeled W of Valve 1.• The green lead is connected to terminal labeled G of Valve 1.• The red lead is connected to terminal labeled R of Valve 1.
7. DI1 is a digital input used as a pumpdown terminal. A short or closedcontact from an external relay will close the valve for pumpdown. Whenthe relay opens or the short is removed, the valve will return to normaloperation.
8. Power is connected to the terminal marked 24VAC. Power require-ments are 24 volts AC at 40 VA. For protection from electrical tran-sients, connect one MOV varistor between one leg of the input voltageof the 24 VAC transformer and earth ground. Connect a second MOVvaristor between the other leg of the input voltage of the 24 VAC trans-former to earth ground. Two MOV varistors are included with the con-troller.
NOTE: Sensor and valve wires may be extended for remote applications.Waterproof butt connectors should be used, and the cable should be atleast 16 gauge. Care must be taken to ensure a good splice and that theindividual wires are correctly identified. For remote installation where thesensors are located more than 25 ft. from the controller, contact Sporlanfor guidance.
OPERATION1. When first powered up the numeric display will show actual super
heat.2. The small Green LED will be lit.
One Digital Input
One 5 ampere240 VACNC/NO relay
Holders forOptional FailSafe Batteries
One Pressure Input
One Valve Input
Two TemperatureInputs
Green Status LED
RedStatusLED
PanelDisplayJack
24 Volt AC50/60 Hz.40 VA Input
Figure 1
SUPERHEAT CONTROLLERInstallation and Servicing Instructions
Two Set PointPushbuttons
Two Digit Display
SD-257March 2005
APPENDIX D - SUPERHEAT CONTROLLER

31
3. PB2 will toggle the readings as follows and the small Green LED will be steady or flash:• Actual Superheat, LED constant.• Valve percentage open, LED slow flash.
4. To change superheat set point:• Make sure the display shows the superheat.• Press and hold PB1 and PB2 for 8 seconds, LED will flash rapidly.• Use PB1 to increment set point.• Use PB2 to decrement set point.• Press and hold PB1 and PB2 simultaneously for 5 seconds to lock in set
point and return to actual superheat.5. To manually change valve position:
• Scroll to valve position reading with PB2.• Press and hold PB1 and PB2 simultaneously for 8 seconds, Green
LED will flash rapidly.• Increment "valve open" percentage by pressing PB1 for 1 second.• Decrement "valve open" percentage by pressing PB2 for 1 second.
Valve will maintain manual open position for 1 hour or until PB1 and PB2 are pressed simultaneously and held for 5 seconds.
REMOTE PANEL DISPLAYA remote panel display is available that will allow access to all the parame-ters of the controller. The Remote Panel Display can be used as a set pointtool in production, a diagnostic tool in the field or as a permanent readoutdevice for the controller. A five-foot cable is included.
Plug the remote display into the telephone jack (J9) on the controller. The fol-lowing is a list of readings available:
SUPH Superheat read by controller for AC circuit 1POSN Number of steps valve is open (0-6386) for AC circuit 1PRES Pressure read by the transducer (0-153 psi gauge) for AC cir-
cuit 1TEMP Temperature read by the temperature sensor (-50 to 103°F) for
AC circuit 1TSAT Saturated temperature for AC circuit 1ACON, PMDN
ACON when in normal operation,PMDN when in pumpdown
R22, 134A, 407C, 404A, 507R22 for refrigerant R-22, 134A for refrigerant R-134a, 407C forrefrigerant R-407C, and 404A for refrigerant R-404A and R507for refrigerant R-507. Note: not all controllers have both R-507 and R-407C.
LRGE, SMAL, MEDMLRGE if the EEV used is an SEI-50 or larger. SMAL if the EEV used is smaller than an SEI-25 and all SER. MEDM if the EEV used is a SEI-25.
SHSP Superheat set point (0 to 16°F). Default is 10°F.MOPD Maximum operating suction pressure set point (0 to 153 PSI).
Default is 153 PSI.CTSP Cut out suction pressure set point (0 to 153 PSI)CALP Calibrate pressure transducer for AC circuit 1CALT Calibrate temperature sensor for AC circuit 1PROP Proportional gain set point. Number of steps per degree that super-
heat is above or below the superheat set point (5 to 255 steps perdegree). Default is 45 for LRGE setting, 22 for MEDM setting, and11 for SMAL setting.
INTG Integral set point. Number of seconds the controller waits to updatethe reference valve position. (1 to 120 seconds). Default is 10 sec-onds.
DLCN Time to open and keep valve open ‘DLST’ steps when the pump-down signal is removed (0 to 120 seconds). Default is 0.
DLST Number of steps to open valve when the pumpdown signal isremoved (0 to 6386). Default is 0.
CONTROLLER MENUSENTER Will toggle display between one of the displays described above
and the numeric value read for that particular display.UP Will scroll through the menu from SHSP to POSN, etc.DOWN Will scroll through the menu the opposite way.
POSN MODEPress and hold the UP button and ENTER button simultaneously for 5 sec-onds to put the controller in manual valve position. The number of steps openwill be displayed and the 1000’s digit will blink.
Pressing the UP button will open the valve 1000 steps.Pressing the DOWN button will close the valve 1000 steps.Pressing the ENTER button will change the flashing digit from 1000’s digitto the 100’s digit.
Pressing the UP button will open the valve 100 steps.Pressing the DOWN button will close the valve 100 steps.Pressing the ENTER button will change the flashing digit from 100’s digit tothe 10’s digit.
Pressing the UP button will open the valve 10 steps.Pressing the DOWN button will close the valve 10 steps.Pressing the ENTER button will change the flashing digit from 10’s digit tothe 1’s digit.
Pressing the UP button will open the valve 1 step.Pressing the DOWN button will close the valve 1 step.Pressing the ENTER button will change the flashing digit from 1’s digit tothe 1000’s digit.
Press and hold the UP button and ENTER button simultaneously for 5 seconds toput the controller in normal control. The digits will stop blinking.
SHSP MODEPress and hold the UP button and ENTER button simultaneously for 5 sec-onds to enable the superheat set point to be changed. The set point is dis-played and the 100’s digit will blink.
Pressing the UP button will increase the set point by 100 degrees. Pressingthe DOWN button will decrease the set point by 100 degrees. Pressing theENTER button will change the flashing digit from 100’s digit to the 10’sdigit.
Pressing the UP button will increase the set point by 10 degrees.Pressing the DOWN button will decrease the set point by 10 degrees.Pressing the ENTER button will change the flashing digit from 10’s digit tothe 1’s digit.
Pressing the UP button will increase the set point by 1 degree.Pressing the DOWN button will decrease the set point by 1 degree.Pressing the ENTER button will change the flashing digit from 1’s digit tothe 100’s digit.
Page 2 / SD-257
Figure 2

32
SD-257/ Page 3
Press and hold the UP button and ENTER button simultaneously for 5 sec-onds to save the set point. The digits will stop blinking.
MOPD MODEPress and hold the UP button and ENTER button simultaneously for 5 sec-onds to enable the Maximum Operating suction Pressure set point to bechanged. The set point is displayed and the 100’s digit will blink.
Pressing the UP button will increase the set point by 100 PSI.Pressing the DOWN button will decrease the set point by 100 PSI.Pressing the ENTER button will change the flashing digit from 100’s digit tothe 10’s digit.
Pressing the UP button will increase the set point by 10 PSI.Pressing the DOWN button will decrease the set point by 10 PSI.Pressing the ENTER button will change the flashing digit from 10’s digit tothe 1’s digit.
Pressing the UP button will increase the set point by 1 PSI.Pressing the DOWN button will decrease the set point by 1 PSI.Pressing the ENTER button will change the flashing digit from 1’s digit tothe 100’s digit.
Press and hold the UP button and ENTER button simultaneously for 5 sec-onds to save the set point. The digits will stop blinking.
CTSP MODEPress and hold the UP button and ENTER button simultaneously for 5 sec-onds to enable the cut out suction pressure set point to be changed. The setpoint is displayed and the 100’s digit will blink.
Pressing the UP button will increase the set point by 100 PSI.Pressing the DOWN button will decrease the set point by 100 PSI.Pressing the ENTER button will change the flashing digit from 100’s digit tothe 10’s digit.
Pressing the UP button will increase the set point by 10 PSI.Pressing the DOWN button will decrease the set point by 10 PSI.Pressing the ENTER button will change the flashing digit from 10’s digit tothe 1’s digit.
Pressing the UP button will increase the set point by 1 PSI.Pressing the DOWN button will decrease the set point by 1 PSI.Pressing the ENTER button will change the flashing digit from 1’s digit tothe 100’s digit.
Press and hold the UP button and ENTER button simultaneously for 5 sec-onds to save the set point. The digits will stop blinking.
NOTE: CTSP set point is used to help stop nuisance, low suction pressure tripsof the compressor. If the suction pressure goes below CTSP, and the superheatis above the superheat set point, the valve will keep opening until the suctionpressure is above CTSP or the superheat is below its set point. The controllerwill start controlling superheat from this new valve position. If the superheat isbelow its set point and the suction pressure is below this set point, the controllerwill change CTSP to 12 PSI below current suction pressure. If power is lost,the original saved set point is used again.
When in CALP or CALT, the numeric display shows the PSI or degrees tobe either added or subtracted from that particular sensor, depending if thereading is negative or positive. Press and hold the UP button and ENTERbutton for 5 seconds to enable the sensor to be calibrated.
The CAL number is displayed and the 10’s digit will blink.Pressing the UP button will increase the CAL number by 10 PSI or degrees.Pressing the DOWN button will decrease the CAL number by 10 PSI ordegrees.
Pressing the ENTER button will change the flashing digit from 10’s digit to the1’s digit.
Pressing the UP button will increase the CAL number by 1 PSI or degree.Pressing the DOWN button will decrease the CAL number by 1 PSI ordegree.Pressing the ENTER button will change the flashing digit from 1’s digit to the0.1’s digit.
Pressing the UP button will increase the CAL number by 0.2 PSI or degree.Pressing the DOWN button will decrease the CAL number by 0.2 PSI ordegree.Pressing the ENTER button will change the flashing digit from 0.1’s digit tothe 10’s digit.
Press and hold the UP button and ENTER button simultaneously for 5 sec-onds to save the CAL number. The digits will stop blinking.
PROP MODEPress and hold the UP button and ENTER button simultaneously for 5 sec-onds to enable the proportional gain set point to be changed. The set point isdisplayed and the 100’s digit will blink.
Pressing the UP button will increase the set point by 100 steps per degree.Pressing the DOWN button will decrease the set point by 100 steps per degree.Pressing the ENTER button will change the flashing digit from 100’s digit tothe 10’s digit.
Pressing the UP button will increase the set point by 10 steps per degree.Pressing the DOWN button will decrease the set point by 10 steps perdegree.Pressing the ENTER button will change the flashing digit from 10’s digit tothe 1’s digit.
Pressing the UP button will increase the set point by 1 step per degree.Pressing the DOWN button will decrease the set point by 1 step per degree.Pressing the ENTER button will change the flashing digit from 1’s digit to the100’s digit.
Press and hold the UP button and ENTER button simultaneously for 5 sec-onds to save the set point. The digits will stop blinking.
INTG MODEPress and hold the UP button and ENTER button simultaneously for 5 sec-onds to enable the integral set point to be changed. The set point is displayedand the 100’s digit will blink.
Pressing the UP button will increase the set point by 100 seconds. Pressing the DOWN button will decrease the set point by 100 seconds. Pressing the ENTER button will change the flashing digit from 100’s digit tothe 10’s digit.
Pressing the UP button will increase the set point by 10 seconds. Pressing the DOWN button will decrease the set point by 10 seconds.Pressing the ENTER button will change the flashing digit from 10’s digit tothe 1’s digit.
Pressing the UP button will increase the set point by 1 second.Pressing the DOWN button will decrease the set point by 1 second.Pressing the ENTER button will change the flashing digit from 1’s digit tothe 100’s digit.
Press and hold the UP button and ENTER button simultaneously for 5 sec-onds to save the set point. The digits will stop blinking.
CHANGING REFRIGERANTSPress and hold the UP button and ENTER button simultaneously for 5 sec-onds to enable the controller to change to another type of refrigerant. All 4digits will start to blink.
Pressing the UP button or the DOWN button will change the display to otherrefrigerants.

33
SD-257-305
When the display shows the desired refrigerant, press and hold the UP buttonand ENTER button simultaneously for 5 seconds. The controller will save anduse the selected refrigerant’s table for saturated temperature. The digits willstop blinking.
CHANGING VALVE TYPES – LRGE, SMAL, or MEDMPress and hold the UP button and ENTER button simultaneously for 5 sec-onds to enable the controller to change to the other type of valves. All 4 dig-its will start to blink.
Pressing either the UP button or the DOWN button will change the displaybetween the different valve types. Press and hold the UP button and ENTERbutton together for 5 seconds to save the selection. The digits will stop blink-ing.
Pressing the UP button and the DOWN button simultaneously will togglethe display between AC circuit 1 and AC circuit 2.
DLCN MODEPress and hold th UP button and ENTER button simultaneously for 5 secondsto enable the DLCN set point to be changed. The set point is displayed and the100’s digit will blink.
Pressing the UP button will increase the set point by 100 seconds. Pressingthe DOWN button will decrease the set point by 100 seconds. Pressing theENTER button will change the flashing digit from 100’s digit to the 10’sdigit.
Pressing the UP button will increase the set point by 10 seconds. Pressing the DOWN button will decrease the set point by 10 seconds. Pressingthe ENTER button will change the flashing digit from 10’s digit to the 1’s digit.
Pressing the UP button will increase the set point by 1 second. Pressing the DOWN button will decrease the set point by 1 second. Pressingthe ENTER button will change the flashing digit from 1’s digit to the 100’sdigit.
Press and hold UP button and ENTER button simultaneously for 5 seconds tosave the set point. The digits will stop blinking.
DLST MODEPress and hold UP button and ENTER button simultaneously for 5 secondsto enable this set point to be changed. The number of steps to open will bedisplayed and the 1000’s digit will blink.
Pressing the UP button will increase the set point by 1000 steps. Pressing theDOWN button will decrease the set point by 1000 steps. Pressing theENTER button will change the flashing digit from 1000’s digit to the 100’sdigit.
Pressing the UP button will increase the set point by 100 steps. Pressing the DOWN button will decrease the set point by 100 steps. Pressingthe ENTER button will change the flashing digit from 100’s digit to the 10’sdigit.
Pressing the UP button will increase the set point by 10 steps. Pressing the DOWN button will decrease the set point by 10 steps. Pressingthe ENTER button will change the flashing digit from 10’s digit to the 1’sdigit.
Pressing the UP button will increase the set point by 1 step. Pressing the DOWN button will decrease the set point by 1 step. Pressing theENTER button will change the flashing digit from 1’s digit to the 1000’sdigit.
Press and hold UP button and ENTER button simultaneously for 5 secondsto save the set point. The digits will stop blinking.
Page 4 / SD-257
Evaporator
DI11- = Black
1S = Green1+ = RedR = Red
G = GreenW = WhiteB = Black
TS2 - Temp. Sensor 2TS1 - Temp. Sensor 1
PB1 PB2
8.8.
TemperatureSensor
SEI/SEH
TS2
TS1
BW
GR
1+ 1
S1-
DI1
24 VAC
24 VAC40 VA
Transformer
PumpdownRelay
(optional)
PressureTransducer
Valve 2 connections on left block when used
SUPERHEAT CONTROLLER WIRING SCHEMATIC
© 2005 Parker Hannifin Corporation
Figure 32.5”
1.98”1.37”
8.25”
5.0”
.25” typical.25”

34
SD-324/112009
DescriptionThe Kelvin II is a standalone superheat controller. The Kelvin II may be connected with a MODBUS master or a Network Master to give remote access to pressure and temperature readings in addition to viewing and editing the controller’s setpoints. The user can also take advantage of the easy to use local display or a Remote Display to accomplish the same tasks.1. Kelvin II ConfigurationSpecificationsn Input Voltage: 24 VAC (± 10%), 40 VA minimum to board
with external transformern Operating ambient temperature: -40°F to 120°Fn LED: One Power LEDn Communications: 1 RS485 Port, 1 USB port (Not operational)n 4 Digit 7 segment displayn Inputs: – Optical Encoder (Knob) – One Pressure Input – Three Temperature inputsn Valve Control of all Sporlan Electric Expansion Valves
“EEV”n 3 amp Solid State Relay for Liquid Line Solenoid Kelvin II
w/o Local Displayn 1 amp Solid State Relay for Liquid Line Solenoid Kelvin II
w/Local Display
2. Kelvin II ConnectionsThe Kelvin II has screw terminals on the each side of the controller. The controller should be wired as follows and as shown in Figure 1.
Item Wire (line) Kelvin II connect point
Power 24VAC 124 VAC 2
Valve
SEI, SER, SEH ESX —N/C Gray 4Black Orange 5White Yellow 6Green Red 7Red Black 8
RS-485Ground 13A+ 14B- 15
Liquid Line SolenoidLine 19Load 20
Auxiliary Temperature Sensor(Displayed menu item: S-3) T3
2728
Room Temperature Sensor(Displayed menu item: CtP) T2
2930
Coil Out Temperature Sensor(Display option: tout) T1
3132
Pressure Transducer(Displayed menu item: SucP)
Sense (WHITE) 33Ground (GREEN) 34+5 VDC (BLACK) 35
3. Kelvin II Display Upon the first power-up from Sporlan, the Kelvin II will en-ter the setup menu. This menu allows the user to set some critical setpoint values, seen in Table 1, before the controller will operate. These critical values can be set via the local or remote displays, MODBUS, or Network Master. (Note: Only the Valve Type and Refrigerant have to be set via MODBUS or Network Master for the controller to operate) Once these values are entered the Kelvin II will then begin its control. If the setup menu is displayed on the local or remote displays
1 24 VAC
18
17
16
15
14
13
12
11
10
9
8
7
6
5
4
3
2
19
36
35
34
33
32
31
30
29
28
27
26
25
24
23
22
21
20 24 VAC
N/C
N/C
N/C
N/C
N/C
Ground
RS-485 A+
RS-485 B-
N/C
N/C
N/C
Load
Line
N/C
N/C
N/C
N/C
N/C
N/C
T3-
T3+
T2-
T2+
T1-
T1+
PWR
Room
ToutRS485
Valve
LL Sol
N/C
Pressure
AuxSER, SEI, SEH ESX
Red Black
Green Red
White Yellow
Black Orange
N/C Gray
Black
Green
White
+5VDC
Ground
Sense
Figure 1
Sporlan Kelvin II Refrigeration Controller User’s Manual®
APPENDIX E - KELVIN CONTROL

35
Page 2
and the user sets these values via MODBUS then the Kelvin II will automatically leave the setup menu.
Table 1 Setup MenuDisplayed Menu Item Description Selections
StEP Valve Type 1596, 3192, 2500, 6384, 400
rEFr Refrigerantr22, 134A, 402A, 404A, 407A, 407C, 410A, 417A, r507, 422d, r744, 245F
PtYP Pressure Sensor Type gAUg, AbSL
un_T Temperature Units FAHR, CELS
un_P Pressure Units PSI, BAR
After setup, the Kelvin II defaults to showing the Superheat value. The user can then turn the knob to view the other pro-cess values of their system. The screen will alternate between the process values identity and value alternating every 3 sec-onds. For ease of use, the value that is displayed for a process value may come in the form of text to eliminate the need of ‘looking up the meaning’. The menu text and meanings for process values are described in Table 2.
The user may also view/edit the setpoints by pressing the knob and holding it down for 5 seconds. The user is then prompted for a password to verify his credentials. The knob should be rotated up to ‘111’ for the password. If the password is cor-rect the user may change the setpoints to the value he desires in order to obtain optimum system performance. The menu text and meanings for setpoint values are described in Table 3. Setpoints are saved to the controller when the user leaves the Setpoint menu by pressing the knob when “ESC” is shown. The setpoint menu has a timeout of 60 seconds for inactiv-ity. When this timeout is reached the controller goes back to showing the process values and does not save any setpoints that might have been changed. If the user is in the Manual Valve Position setpoint then this timeout length is 60 minutes. As long as the controller does not time out the 60 minutes, Setpoints are saved to the controller when the user leaves the Setpoint menu by pressing the knob when “ESC” is shown.
All process values and setpoints are accessible1 through the local and remote displays.
Table 2 Process Value MenusDisplayed Menu Item Description RangeSuPH Superheat 0 to 165°F, 0 to 91.6°CSucP Suction Pressure4 0 to 150 PSI, 0 to 10.34 Bar tSAt Saturation Temperature -60 to 150°F, -51.1 to 65.6°Ctout Suction Temperature -60 to 150°F, -51.1 to 65.6°CCtP System Temperature -60 to 150°F, -51.1 to 65.6°CPoSn Valve Position 0 to 100% OpenS-3 Auxiliary Temperature2 -60 to 150°F, -51.1 to 65.6°CrELA Solenoid Status dEng, Eng
StAt System Cycle Status Current cycle and manual valve position state
ALS Alarm Status3 noAL or all active alarms
Table 3 Setpoint MenuDisplayed
Menu Item
Description Range Default Setting
UserSetpoints
ESC Escape and save settings — —
SHSP Superheat Setpoint 0 to 45°F, 0 to 25°C 8
rEFr Refrigerant
r22, 134A, 402A, 404A, 407A, 407C, 410A, 417A, r507, 422d, r744, 245F
404A
d_On Delay On 0 to 60 seconds 0dOFF Delay Off 0 to 60 seconds 0
d_St Delay Percent Open of Valve 0 to 100 percent 0
CtSP Cut-out Suction Pressure
0 to 1504 PSI, 0 to 10.34 Bar 0
H_oP Maximum Operating Pressure
0 to 1504 PSI, 0 to 10.34 Bar 150
C_in Cut-in Temperature -60 to 125°F, -51.1 to 51.6°C -59
Cout Cut-out Temperature -60 to 124°F, -51.1 to 51.1°C -60
HiCP Max Valve Capacity 20 to 100% 100SUPS Supermarket Setting OFF, ON OFF
-P- Proportional Coefficient 0 to 100 40
-I- Integral Coefficient 0 to 100 25
-d- Derivative Coefficient 0 to 100 5
StEP Valve Type 1596, 3192, 2500, 6384, 400 1596
SPoS Manual Valve Position 0 to 100% Open Present
Position
nEtNetwork Type (MODBUS or Network Master)
nbUS (MODBUS) or ProP (Network Master)
nbUS
Addr MODBUS/Network Master Address 1 to 255 1
un_P Pressure Units PSI, BAR PSIun_T Temperature Units FAHR, CELS FAHR
PtYP Pressure Sensor Type AbSL, gAUg gAUg
CaLP Pressure Sensor calibration value
-5 to 5 PSI, -0.34 to 0.34 Bar 0
CLt1 Tout calibration value
-5 to 5°F, -2.7 to 2.7°C 0
CLt2 Ctp calibration value -5 to 5°F, -2.7 to 2.7°C 0
CLt3 S-3 calibration value -5 to 5°F, -2.7 to 2.7°C 0
CAdr Controller Display Address 0 to 99
0 or 1 for local display
4. Kelvin II MODBUSThe Kelvin II can communicate with a MODBUS master. The Kelvin II will transfer process values and setpoints via MODBUS.
1 Setpoints can only be viewed and edited when the proper password is entered.2 The Auxiliary Temperature sensor input has a special Pumpdown feature. If a “short” or switch closure is placed across these terminals, the valve will
shut for pumpdown. The full details of this feature are described in Section 5.3 The Alarm Status process value is described in Section 6.4 The maximum value varies based on which refrigerant is selected. (R-410A is 300 PSI, R-744 is 500 PSI and all others are 150 PSI).

36
Page 3
The Kelvin II only supports the RTU transmission mode. The serial settings are as follows:n 9600 baud n 8 data bitsn 1 stop bitn Even parity
The Kelvin II supports the ‘Read Input Registers’, ‘Read Holding Register’, ‘Write Single Register’, ‘Read Multiple Coils’ and ‘Write Single Coil’ function codes. Any other re-quest will result in an exception response. The Kelvin II will allow a full and partial block read of the Input and Holding registers and Coils.
4.1. ScalingIn order to preserve precision, scaling was implemented when using Bar or Celsius for units. PSI and Fahrenheit units are both in whole numbers and have no scaling. The tables of the MODBUS memory map below reflect this implementation.
The Celsius values that are transferred via MODBUS are 10X. For example, if Celsius is chosen for the temperature units then 45°C is transferred for the Superheat. The actual Super-heat is 4.5°C. If the user desired to change a setpoint they should keep this in mind when they enter a value.
The Bar values that are transferred via MODBUS are 100X. For example, if Bar is chosen for the pressure units then 1034 Bar is transferred for the Maximum Operating Pressure. The actual Maximum Operating Pressure is 10.34 Bar. If the user desired to change a setpoint they should keep this in mind when they enter a value.
4.2. MODBUS Memory MapTable 4 Memory Map
MODBUS Function
Code
Mapped Data Data Map Range
Read Coils (0x01)
Manual Valve
Control
Bit 0 = Manual Valve Enabled Flag Bit 1 = Manual Valve Duration Enabled Flag
0 = Disabled, 1 = Enabled.
Read Holding Register
(0x03)Setpoints
0. Superheat Setpoint
0 to 45°F, 0 to 250°C (0.0 to 25.0°C)
1. Refrigerant Type
0 = r22 1 = 134A 2 = 402A 3 = 404A 4 = 407A 5 = 407C6 = 410A 7 = 417A 8 = 422A 9 = 422d 10 = r507 11 = r744 12= 245F
2. Delay On Relay 0 to 60 seconds3. Delay Off Relay 0 to 60 seconds4. Delay Steps 0 to 100 % Open5. Cut-out Suction Pressure
0 to 1505 PSI, 0 to 1034 Bar (0 to 10.34 Bar)
MODBUS Function
Code
Mapped Data Data Map Range
Read Holding Register
(0x03)Setpoints
6. Max Operation Pressure
0 to 150 6 PSI, 0 to 1034 Bar (0 to 10.34 Bar)
7. Temperature Cut-in
-60 to 125°F, -511 to 516 °C(-51.1 to 51.6 °C)
8. Temperature Cut-out
-60 to 124°F, -511 to 511 °C(-51.1 to 51.1 °C)
9. Valve Maximum 20 to 100 %10. Supermarket Mode 0 = OFF 1 = ON
11. P 0 to 10012. I 0 to 10013. D 0 to 100
14. Valve Type0 = 1596 1 = 31922 = 2500 3 = 63844 = 400
15. Manual Valve Position 0 to 100 % Open
16. Network Type 0 = MODBUS 1 = Network Master
17. Unit Address 1 to 25518. Pressure Units 0 = PSI, 1 = BAR19. Temperature Units 0 = FAHR, 1 = CELS
20. Pressure Sensor Type 0 = GauG, 1 = ABSL
21. Pressure Calibration Offset
-5 to 5°F, -34 to 34 Bar (-0.34 to 0.34 Bar)
22. Suction Temperature Calibration Offset
-5 to 5°F, -27 to 27°C (-2.7 to 2.7°C)
23. Room Temperature Calibration Offset
-5 to 5°F, -27 to 27°C (-2.7 to 2.7°C)
24. Auxiliary Temperature Calibration Offset
-5 to 5°F, -27 to 27°C (-2.7 to 2.7°C)
Read Input Registers
(0x04)
Process Variables
0. Superheat 0 to 165°F, 0 to 916°C (0 to 91.6°C)
1. Suction Pressure6
0 to 150 PSI, 0 to 1034 Bar (0 to 10.34 Bar)
2. Saturation Temperature
-60 to 150°F, -511 to 656°C(-51.1 to 65.6°C)
3. Suction Temperature
-60 to 125°F, -511 to 656°C (-51.1 to 65.6°C)
4. Room Temperature
-60 to 125°F, -511 to 656°C (-51.1 to 65.6°C)
5. Valve Capacity 0.0 to 100.0% Open (0.0 to 100.0)
6. Auxiliary Temperature
-60 to 125°F, -511 to 656°C (-51.1 to 65.6°C)
7. Relay Status 0 = Deenergized, 1 = Energized
5 The maximum value varies based on which refrigerant is selected. (410A is 300 PSI, r744 is 500 PSI and all others are 150 PSI).6 The maximum value varies based on which refrigerant is selected. (410A is 300 PSI, r744 is 500 PSI and all others are 150 PSI).

37
Page 4
MODBUS Function
Code
Mapped Data Data Map Range
Read Input Registers
(0x04)
Process Variables
8. Alarm Status
If Bit set then alarm is active: Bit 0 = Suction Transducer Failure Bit 1 = Tout Sensor Failure Bit 2 = High Superheat Bit 3 = Low Superheat
9. System Cycle Status
If Bit set then mode is active: Bit 1 = Setup Mode Bit 2 = Off Cycle Bit 3 = Cooling Cycle Bit 4 = Pump-down Cycle Bit 5 = Manual Valve Override Mode
Write Single Coil (0x05)
Manual Valve Control
Bit 0 = Manual Valve Enabled Flag
0 = Disabled, 1 = Enabled. The Manual Valve duration Bit is read-only.
Write Single Register (0x06)
Setpoints Same as above.
The max number of registers written at a time is 1. The limits can be seen above in the ‘Read Holding Register’ definition.
5. Kelvin II Features5.1. Pumpdown FeatureThe Kelvin II will initiate a pumpdown when Auxiliary Tem-perature sensor terminals are shorted. If desired, this temper-ature connection could be set up as a dry contact. When a pumpdown is desired the contact should be closed. The pump-down will be ended when the short is removed provided that there are no sensor alarms.
5.2. Manual Valve Position FeatureThe Kelvin II has the ability to manually control the valve. To enable this manual control via the local or remote displays simply open the setpoint menu and edit the ‘SPoS’ setpoint. When the value is displayed for this setpoint the user is manu-ally controlling the valve. The valve position can be changed by rotating the knob clockwise or counterclockwise. There is an inactivity timer of 60 minutes while in manual control. The timer is reset each time the user moves the valve. The manual control of the valve is ended when the user presses the knob to go back to displaying ‘SPoS’ or a timeout has been reached.
6. Kelvin II AlarmsThe Kelvin II has 4 alarms. The following table lists the possible alarms and the text that is seen on the controller. The controller’s alarm status can be viewed via MODBUS, Network Master, and local and remote displays.
Table 5 AlarmsAlarm Text MeaningNoAL No Alarms activePSAL Pressure Sensor alarmTSAL Tout Sensor alarm
Alarm Text MeaningHSAL High Superheat alarmLSAL Low Superheat alarm
Normally, on the process value screens, the process value text alternates with its value. When an alarm is activated the alarm status “-AL-“screen is added to the rotation to make the user aware that an alarm has been activated. The Alarm Status menu display item ALS, will show the active alarms shown in Table 5.
7. Kelvin II Display NetworkingThe Kelvin II displays can be set up to access other Kelvin II controllers on the network. The controller’s current ‘CAdr’ value can be determined by pressing down the button on the display while viewing a process value. To enable the display network the ‘CAdr’ setting MUST be set to a unique nonzero value with the RJ-45 connector on the side of the controller DISCONNECTED.After ‘CAdr’ has been set, an ‘End’ screen is added just be-fore the ‘SuPH’ process value. Pressing the button on the display while viewing the ‘End’ screen brings up a menu al-lowing the selection of other Kelvin II controllers connected to the display network. Turning the knob allows the selec-tion of other Kelvin II controllers based on their appropriate ‘CAdr’ address. The local controller is listed as ‘LocL’ by a local display. Note: the remote display always includes the ‘End’ screen since it must be able to view any controller on the display network.
8. Kelvin II Factory ResetA factory reset can be performed by holding the button down on the local or remote displays for 5 seconds when power is first applied. If using a local display the display will show ‘FrSt’ while the factory reset is being performed and then automatically connect to the local controller.If using a remote display the display will show ‘FrSt’ and switch to a menu that allows the selection of the controller to reset. To perform a factory reset, select the controller with the appropriate ‘CAdr’ value. The display should show ‘----‘ while the reset is being performed. When finished perform-ing factory resets turn the knob counterclockwise until ‘ESC’ is shown on the display. Pressing the button while ‘ESC’ is shown on the display exits the factory reset menu and should automatically connect to a controller on the display network.Table 6 Replacement PartsPart Number Description952560 Kelvin II without display952561 Kelvin II with local display952562 Kelvin II Remote panel display952662 Temperature Sensor Assembly952795 Well Sensor Kit953091 Pressure Transducer 150 psig with cable952995 Pressure Transducer 150 psia with cable
952740 Pressure Transducer 300 psig with cable for R-410A applications only
952504 Pressure Transducer 500 psig with cable for R-477 applications only
112009 / SD-324Sporlan Division, Parker Hannifin Corporation • 206 Lange Drive • Washington, MO 63090 USA

38
DATE COMPRESSOR SUPERHEAT
DISCHARGE SUCTION EVAP SUPERHEAT NOTES
TEMP PRESSURE TEMP PRESSURE
APPENDIX F - MAINTENANCE CHART

39
DATE COMPRESSOR SUPERHEAT
DISCHARGE SUCTION EVAP SUPERHEAT NOTES
TEMP PRESSURE TEMP PRESSURE
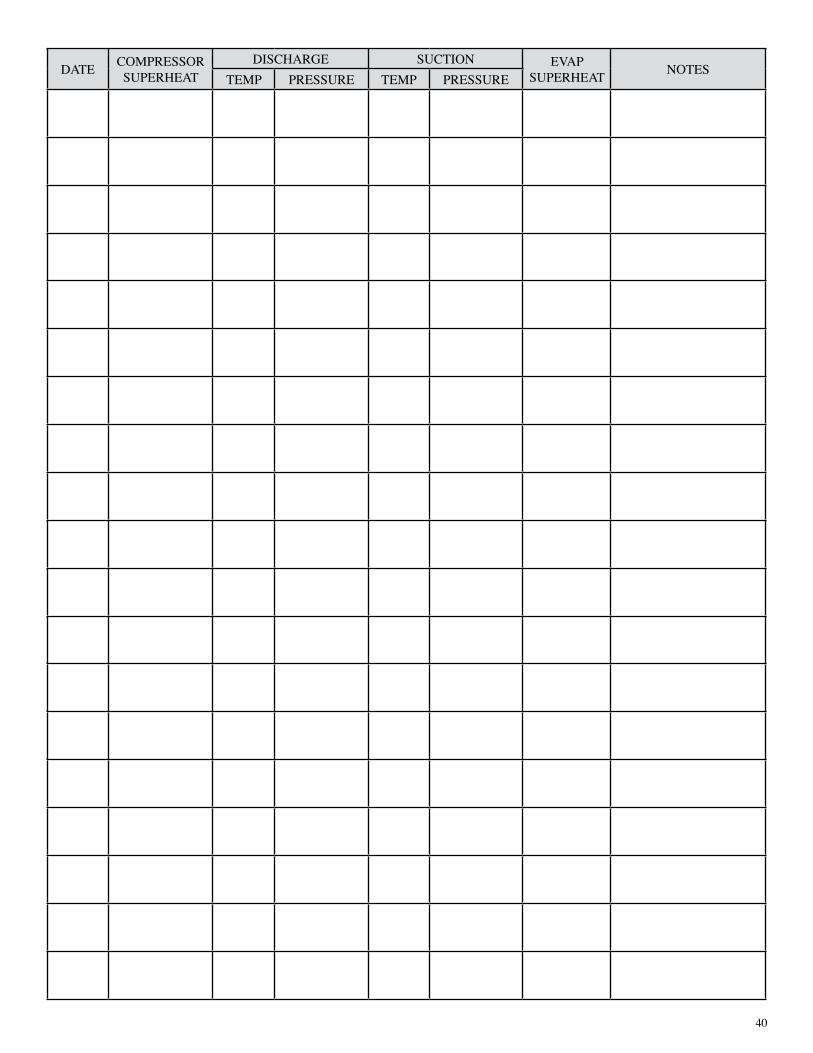
40
DATE COMPRESSOR SUPERHEAT
DISCHARGE SUCTION EVAP SUPERHEAT NOTES
TEMP PRESSURE TEMP PRESSURE

P.O. Box 1206 - Pryor, OK 74362 - (918) 825-7222 - Fax (800) 264-5329
www.century-refrigeration.com
We reserve the right to change or revise specifications and product design in connection with any feature of
our products. Such changes do not entitle the buyer to corresponding changes, improvements, additions or
replacement for equipment previously sold or shipped.
ALL CENTURY REFRIGERATION EQUIPMENT MUST BE STARTED AND SERVICED BY QUALIFIED
REFRIGERATION SERVICE PERSONNEL.
Bulletin #C-IOM-0911P/N QE0016A