installation / operation / maintenance model · pdf filethe cia-vai model 100-01 hytrol valve...
TRANSCRIPT

Description
The CIa-VaI Model 100-01 Hytrol Valve is a main valve for CIa-VaIAutomatic Control Valves. It is a hydraulically operated, diaphragm-actu-ated, globe or angle pattern valve.
This valve consists of three major components; body, diaphragm assem-bly, and cover. The diaphragm assembly is the only moving part. Thediaphragm assembly uses a diaphragm of nylon fabric bonded with syn-thetic rubber. A synthetic rubber disc, contained on three and one halfsides by a disc retainer and disc guide, forms a seal with the valve seatwhen pressure is applied above the diaphragm. The diaphragm assem-bly forms a sealed chamber in the upper portion of the valve, separatingoperating pressure from line pressure.
Installation
1. Before valve is installed, pipe lines should be flushed of all chips,scale and foreign matter.2. It is recommended that either gate or block valves be installed onboth ends of the 100-01 Hytrol Valve to facilitate isoIating the valve forpreventive maintenance and repairs.3. Place the valve in the line with flow through the valve in the direc-tion indicated on the inlet nameplate. (See “Flow Direction” Section)Note: Valve can be installed in the vertical or horizontal position.
4. Allow sufficient room around valve to make adjustments and for dis-assembly.5. CIa-VaI 100-01 Hytrol Valves operate with maximum efficiency whenmounted in horizontal piping with the cover UP, however, other posi-tions are acceptable. Due to size and weight of the cover and internalcomponents of 8 inch and larger valves, installation with the cover UPis advisable. This makes internal parts readily accessible for periodicinspection.
6. Caution must be taken in the installation of this valve toinsure that galvanic and/or electrolytic action does not takeplace. The proper use of dielectric fittings and gaskets arerequired in all systems using dissimilar metals.7. If a pilot control system is installed on the 100-01 HytrolValve, use care to prevent damage. If it is necessary toremove fittings or components, be sure they are kept cleanand replaced exactly as they were.8. After the valve is installed and the system is first pressur-ized, vent air from the cover chamber and pilot system tub-ing by loosening fittings at all high points.
Tight Closing Operation
When pressure from the valve inlet (oran equivalent independent operatingpressure) is applied to the diaphragmchamber the valve closes drip-tight.
Full Open Operation
When pressure in diaphragm chamberis relieved to a zone of lower pressure(usually atmosphere) the line pressure(5 psi Min.) at the valve inlet opens thevalve.
Modulating Action
Valve modulates when diaphragm pres-sure is held at an intermediate pointbetween inlet and discharge pressure.With the use of a Cla-Val. "modulatingcontrol," which reacts to line pressurechanges, the pressure above thediaphragm is varied, allowing the valveto throttle and compensate for thechange.
Principles of Operation
Three Way Pilot Control
Three Way Pilot Control
Restriction
Modulating
Control
100-01Hytrol Valve
MODEL
INSTALLATION / OPERATION / MAINTENANCE
2
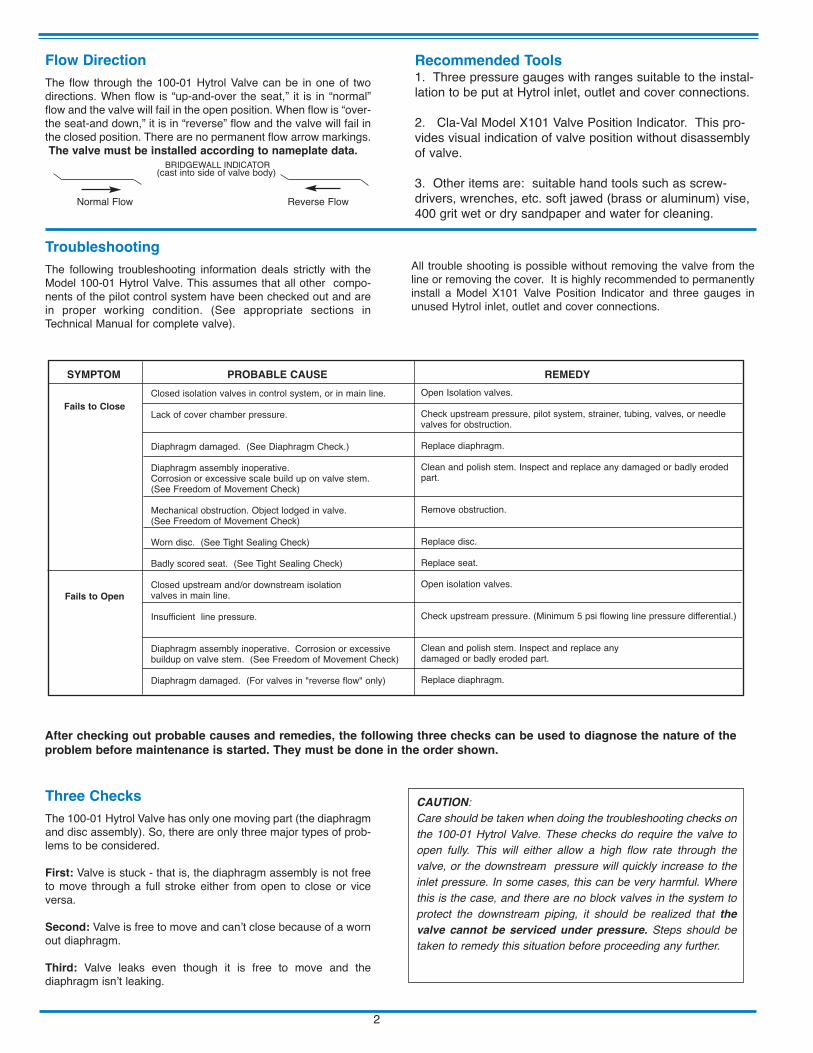
Flow Direction
The flow through the 100-01 Hytrol Valve can be in one of twodirections. When flow is “up-and-over the seat,” it is in “normal”flow and the valve will fail in the open position. When flow is “over-the seat-and down,” it is in “reverse” flow and the valve will fail inthe closed position. There are no permanent flow arrow markings.The valve must be installed according to nameplate data.
BRIDGEWALL INDlCATOR
Normal Flow Reverse Flow
Troubleshooting
The following troubleshooting information deals strictly with theModel 100-01 Hytrol Valve. This assumes that all other compo-nents of the pilot control system have been checked out and arein proper working condition. (See appropriate sections inTechnical Manual for complete valve).
Three Checks
The 100-01 Hytrol Valve has only one moving part (the diaphragmand disc assembly). So, there are only three major types of prob-lems to be considered.
First: Valve is stuck - that is, the diaphragm assembly is not freeto move through a full stroke either from open to close or viceversa.
Second: Valve is free to move and can’t close because of a wornout diaphragm.
Third: Valve leaks even though it is free to move and thediaphragm isn’t leaking.
Closed isolation valves in control system, or in main line.
Lack of cover chamber pressure.
Diaphragm damaged. (See Diaphragm Check.)
Diaphragm assembly inoperative.Corrosion or excessive scale build up on valve stem.(See Freedom of Movement Check)
Mechanical obstruction. Object lodged in valve.(See Freedom of Movement Check)
Worn disc. (See Tight Sealing Check)
Badly scored seat. (See Tight Sealing Check)
Closed upstream and/or downstream isolation valves in main line.
Insufficient line pressure.
Diaphragm assembly inoperative. Corrosion or excessivebuildup on valve stem. (See Freedom of Movement Check)
Diaphragm damaged. (For valves in "reverse flow" only)
After checking out probable causes and remedies, the following three checks can be used to diagnose the nature of the
problem before maintenance is started. They must be done in the order shown.
Open Isolation valves.
Check upstream pressure, pilot system, strainer, tubing, valves, or needlevalves for obstruction.
Replace diaphragm.
Clean and polish stem. Inspect and replace any damaged or badly erodedpart.
Remove obstruction.
Replace disc.
Replace seat.
Open isolation valves.
Check upstream pressure. (Minimum 5 psi flowing line pressure differential.)
Clean and polish stem. Inspect and replace anydamaged or badly eroded part.
Replace diaphragm.
Fails to Close
Fails to Open
CAUTION: Care should be taken when doing the troubleshooting checks onthe 100-01 Hytrol Valve. These checks do require the valve toopen fully. This will either allow a high flow rate through thevalve, or the downstream pressure will quickly increase to theinlet pressure. In some cases, this can be very harmful. Wherethis is the case, and there are no block valves in the system toprotect the downstream piping, it should be realized that thevalve cannot be serviced under pressure. Steps should betaken to remedy this situation before proceeding any further.
(cast into side of valve body)
SYMPTOM PROBABLE CAUSE REMEDY
Recommended Tools1. Three pressure gauges with ranges suitable to the instal-lation to be put at Hytrol inlet, outlet and cover connections.
2. Cla-Val Model X101 Valve Position Indicator. This pro-vides visual indication of valve position without disassemblyof valve.
3. Other items are: suitable hand tools such as screw-drivers, wrenches, etc. soft jawed (brass or aluminum) vise,400 grit wet or dry sandpaper and water for cleaning.
All trouble shooting is possible without removing the valve from theline or removing the cover. It is highly recommended to permanentlyinstall a Model X101 Valve Position Indicator and three gauges inunused Hytrol inlet, outlet and cover connections.

Diaphragm Check (#1 )
1. Shut off pressure to the Hytrol Valve by slowly closing upstreamand downstream isolation valves. SEE CAUTION.2. Disconnect or close all pilot control lines to the valve cover andleave only one fitting in highest point of cover open to atmosphere.3.With the cover vented to atmosphere, slowly open upstreamisolation valve to allow some pressure into the Hytrol Valve body.Observe the open cover tapping for signs of continuous flow. It isnot necessary to fully open isolating valve. Volume in cover cham-ber capacity chart will be displaced as valve moves to open posi-tion. Allow sufficient time for diaphragm assembly to shift posi-tions. If there is no continuous flow, you can be quite certain thediaphragm is sound and the diaphragm assembly is tight. If thefluid appears to flow continuously this is a good reason to believethe diaphragm is either damaged or it is loose on the stem. Ineither case, this is sufficient cause to remove the valve cover andinvestigate the leakage. (See “Maintenance” Section for procedure.)
Freedom of Movement Check (#2)
4. Determining the Hytrol Valve’s freedom of movement can bedone by one of two methods.5. For most valves it can be done after completing DiaphragmCheck (Steps 1, 2, and 3). SEE CAUTION. At the end of step 3the valve should be fully open.6. If the valve has a Cla-Val X101 Position Indicator, observe theindicator to see that the valve opens wide. Mark the point of max-imum opening.7. Re-connect enough of the control system to permit the appli-cation of inlet pressure to the cover. Open pilot system cock sopressure flows from the inlet into the cover.8. While pressure is building up in the cover, the valve shouldclose smoothly. There is a hesitation in every Hytrol Valve closure,which can be mistaken for a mechanical bind. The stem willappear to stop moving very briefly before going to the closed posi-tion. This slight pause is caused by the diaphragm flexing at aparticular point in the valve’s travel and is not caused by amechanical bind.9. When closed, a mark should be made on the X101 Valve posi-tion indicator corresponding to the “closed” position. The distancebetween the two marks should be approximately the stem travelshown in chart.
10. If the stroke is different than that shown in stem travel chartthis is a good reason to believe something is mechanically restrict-ing the stroke of the valve at one end of its travel. If the flow doesnot stop through the valve when in the indicated “closed” position,the obstruction probably is between the disc and the seat. If theflow does stop, then the obstruction is more likely in the cover. Ineither case, the cover must be removed, and the obstruction locat-ed and removed. The stem should also be checked for scale build-up. (See “Maintenance, section for procedure.)11. For valves 6” and smaller, the Hytrol Valve’s freedom of move-ment check can also be done after all pressure is removed fromthe valve. SEE CAUTION. After closing inlet and outlet isolationvalves and bleeding pressure from the valve, check that the coverchamber and the body are temporarily vented to atmosphere.Insert fabricated tool into threaded hole in top of valve stem, andlift the diaphragm assembly manually. Note any roughness. Thediaphragm assembly should move smoothly throughout entirevalve stroke. The tool is fabricated from rod that is threaded onone end to fit valve stem and has a “T” bar handle of some kindon the other end for easy gripping. (See chart in Step 4 of“Disassembly” Section.)12. Place marks on this diaphragm assembly lifting tool when thevalve is closed and when manually positioned open. The distancebetween the two marks should be approximately the stem travelshown in stem travel chart. If the stroke is different than thatshown, there is a good reason to believe something is mechani-cally restricting the stroke of the valve. The cover must beremoved, and the obstruction located and removed. The stemshould also be checked for scale build-up. (See “Maintenance”Section for procedure.)
Tight Sealing Check (#3)
13. Test for seat leakage after completing checks #1 & #2 (Steps1 to 12). SEE CAUTION. Close the isolation valve downstream ofthe Hytrol Valve. Apply inlet pressure to the cover of the valve, waituntil it closes. Install a pressure gauge between the two closedvalves using one of the two ports in the outlet side of the Hytrol.Watch the pressure gauge. If the pressure begins to climb, theneither the downstream isolation valve is permitting pressure tocreep back, or the Hytrol is allowing pressure to go through it.Usually the pressure at the Hytrol inlet will be higher than on theisolation valve discharge, so if the pressure goes up to the inletpressure, you can be sure the Hytrol is leaking. Install anothergauge downstream of isolating valve. If the pressure between thevalves only goes up to the pressure on the isolation valvedischarge, the Hytrol Valve is holding tight, and it was just the iso-lation valve leaking.
STEM TRAVEL(Fully Open to Fully Closed)
Valve Size (inches) Travel (inches)Inches MM Inches MM
1 1/4 32 0.4 101 1/2 40 0.4 102 50 0.6 152 1/2 65 0.7 183 80 0.8 204 100 1.1 286 150 1.7 438 200 2.3 5810 250 2.8 7112 300 3.4 8614 350 4.0 10016 400 4.5 11420 500 5.6 14324 600 6.7 16530 800 7.5 19036 900 8.5 216
COVER CHAMBER CAPACITY(Liquid Volume displaced when valve opens)
Valve size (inches) DisplacementGallons Liters
1 1/4 .020 .071 1/2 .020 .072 .032 .122 1/2 .043 .163 .080 .304 .169 .646 .531 2.08 1.26 4.810 2.51 9.512 4.00 15.114 6.50 24.616 9.57 36.220 12.00 45.424 29.00 109.830 42.00 197.036 90.00 340.0
3

Maintenance
Preventative Maintenance
The Cla-Val Co. Model 100-01 Hytrol Valve requires no lubrication orpacking and a minimum of maintenance. However, a periodic inspec-tion schedule should be established to determine how the operatingconditions of the system are affecting the valve. The effect of theseactions must be determined by inspection.
Disassembly
Inspection or maintenance can be accomplished without removingthe valve from the line. Repair kits with new diaphragm and disc arerecommended to be on hand before work begins.WARNING: Maintenance personnel can be injured and equipmentdamaged if disassembly is attempted with pressure in the valve. SEE
CAUTION.
1. Close upstream and downstream isolation valves and independ-
ent operating pressure when used to shut off all pressure to thevalve.
2. Loosen tube fittings in the pilot system to remove pressure fromvalve body and cover chamber. After pressure has been releasedfrom the valve, use care to remove the controls and tubing. Note andsketch position of tubing and controls for re-assembly. The schemat-ic in front of the Technical Manual can be used as a guide whenreassembling pilot system.
3. Remove cover nuts and remove cover. If the valve has been inservice for any length of time, chances are the cover will have to beloosened by driving upward along the edge of the cover with a dull
cold chisel.
On 6” and smaller valves block and tackle or a power hoist can beused to lift valve cover by inserting proper size eye bolt in place ofthe center cover plug. on 8” and larger valves there are 4 holes (5/8”— 11 size) where jacking screws and/or eye bolts may be insertedfor lifting purposes. Pull cover straight up to keep from damagingthe integral seat bearing and stem.
4. Remove the diaphragm and disc assembly from the valve body.With smaller valves this can be accomplished by hand by pulling
straight up on the stem so as not to damage the seat bearing.
On large valves, an eye bolt of proper size can be installed in thestem and the diaphragm assembly can be then lifted with a block andtackle or power hoist. Take care not to damage the stem or bearings.The valve won't work if these are damaged.
5. The next item to remove is the stem nut. Examine the stemthreads above the nut for signs of mineral deposits or corrosion.If the threads are not clean, use a wire brush to remove as muchof the residue as possible. Attach a good fitting wrench to the nutand give it a sharp “rap” rather than a steady pull. Usuallyseveral blows are sufficient to loosen the nut for further removal.On the smaller valves, the entire diaphragm assembly can be heldby the stem in a vise equipped with soft brass jaws beforeremoving the stem nut.
The use of a pipe wrench or a vise without soft brass jaws scarsthe fine finish on the stem. No amount of careful dressing canrestore the stem to its original condition. Damage to the finish ofthe stem can cause the stem to bind in the bearings and the valvewill not open or close.
6. After the stem nut has been removed, the diaphragm assemblybreaks down into its component parts. Removal of the disc fromthe disc retainer can be a problem if the valve has been in serv-ice for a long time. Using two screwdrivers inserted along the out-side edge of the disc usually will accomplish its removal. Careshould be taken to preserve the spacer washers in water, partic-ularly if no new ones are available for re-assembly.
7. The only part left in the valve body is the seat which ordinarilydoes not require removal. Careful cleaning and polishing of insideand outside surfaces with 400 wet/dry sandpaper will usuallyrestore the seat’s sharp edge. If, however, it is badly worn andreplacement is necessary, it can be easily removed.
Seats in valve sizes 1 1/4” through 6” are threaded into the valvebody. They can be removed with accessory X109 Seat RemovingTool available from the factory. On 8” and larger valves, the seatis held in place by flat head machine screws. Use a tight-fitting,long shank screwdriver to prevent damage to seat screws. If uponremoval of the screws the seat cannot be lifted out, it will be nec-essary to use a piece of angle or channel iron with a hole drilledin the center. Place it across the body so a long stud can be insert-ed through the center hole in the seat and the hole in the angleiron. By tightening the nut a uniform upward force is exerted onthe seat for removal.
NOTE: Do not lift up on the end of the angle iron as this may forcethe integral bearing out of alignment, causing the stem to bind.
VALVE STEM THREAD SIZEValve Size Thread Size (UNF Internal)
1 1/4"—2 1/2" 10—323"—4" 1/4—286"—14" 3/8—24
16" 1/2—2020 3/4-1624" 3/4-1630” 3/4-1636” 3/4-16
COVER CENTER PLUG SIZEValve Size Thread Size (NPT)
1 1/4"—1 1/2" 1/4"2"—3" 1/2"4"—6" 3/4"8"—10" 1"
12" 1 1/4"14" 1 1/2"16" 2"
20” & 24" 2"30” & 36” 2”
NUTANGLE OR CHANNEL IRON
LONG STUD OR BOLT
NUT OR BOLT HEAD
DO NOTLIFT
VALVE SEAT
VALVE BODY
4

Lime Deposits
One of the easiest ways to remove lime deposits from the valvestem or other metal parts is to dip them in a 5-percent muriaticacid solution just long enough for the deposit to dissolve. Thiswill remove most of the common types of deposits. CAUTlON:
USE EXTREME CARE WHEN HANDLING ACID. Rinse parts inwater before handling. If the deposit is not removed by acid, thena fine grit (400) wet or dry sandpaper can be used with water.
Reassembly
1. Reassembly is the reverse of the disassembly procedure. If anew disc has been installed, it may require a different number ofspacer washers to obtain the right amount of “grip” on the disc.When the diaphragm assembly has been tightened to a pointwhere the diaphragm cannot be twisted, the disc should be com-pressed very slightly by the disc guide. Excessive compressionshould be avoided. Use just enough spacer washers to hold thedisc firmly without noticeable compression.
2. MAKE SURE THE STEM NUT IS VERY TIGHT. Attach a goodfitting wrench to the nut and give it a sharp “rap” rather than asteady pull. Usually several blows are sufficient to tighten thestem nut for final tightening. Failure to do so could allow thediaphragm to pull loose and tear when subjected to pressure.
Test Procedure After Valve Assembly
There are a few simple tests which can be made in the field tomake sure the Hytrol Valve has been assembled properly. Dothese before installing pilot system and returning valve toservice. These are similar to the three troubleshooting tests.
1. Check the diaphragm assembly for freedom of movementafter all pressure is removed from the valve. SEE CAUTlON.
Insert fabricated tool into threaded hole in top of valve stem, andlift the diaphragm assembly manually. Note any roughness,sticking or grabbing. The diaphragm assembly should movesmoothly throughout entire valve stroke. The tool is fabricatedfrom rod that is threaded on one end to fit valve stem (See chartin Step 4 of “Disassembly” section.) and has a “T” Bar handle ofsome kind on the other end for easy gripping.
Place marks on this diaphragm assembly lifting tool when thevalve is closed and when manually positioned open. The dis-tance between the two marks should be approximately the stemtravel shown in stem travel chart. (See “Freedom of MovementCheck” section.) If the stroke is different than that shown, thereis a good reason to believe something is mechanically restrictingthe stroke of the valve. The cover must be removed, the obstruc-tion located and removed. (See “Maintenance” Section forprocedure.)
Inspection of Parts
After the valve has been disassembled, each part should beexamined carefully for signs of wear, corrosion, or any otherabnormal condition. Usually, it is a good idea to replace the rub-ber parts (diaphragm and disc) unless they are free of signs ofwear. These are available in a repair kit. Any other parts whichappear doubtful should be replaced. WHEN ORDERlNGPARTS, BE SURE TO GIVE COMPLETE NAMEPLATE DATA,ITEM NUMBER AND DESCRlPTlON.
NOTE: If a new disc isn’t available, the existing disc can beturned over, exposing the unused surface for contact with theseat. The disc should be replaced as soon as practical.
3. Carefully install the diaphragm assembly by lowering the stemthrough the seat bearing. Take care not to damage the stem orbearing. Line up the diaphragm holes with the stud or bolt holeson the body. on larger valves with studs, it may be necessary tohold the diaphragm assembly up part way while putting thediaphragm over the studs.
4. Put spring in place and replace cover. Make sure diaphragmis Iying smooth under the cover.
5. Tighten cover nuts firmly using a cross-over pattern until allnuts are tight.
6. Test Hytrol Valve before re-installing pilot valve system.
Due to the weight of the diaphragm assembly this procedure isnot possible on valves 8” and larger. on these valves, the samedetermination can be made by carefully introducing a lowpressure-less than five psi) into the valve body with the covervented. SEE CAUTION. Looking in cover center hole see thediaphragm assembly lift easily without hesitation, and thensettle back easily when the pressure is removed.
2. To check the valve for drip-tight closure, a line should beconnected from the inlet to the cover, and pressure applied at theinlet of the valve. If properly assembled, the valve should holdtight with as low as ten PSI at the inlet. See “Tight SealingCheck” section.)
3. With the line connected from the inlet to the cover, apply fullworking pressure to the inlet. Check all around the cover for anyleaks. Re-tighten cover nuts if necessary to stop leaks past thediaphragm.
4. Remove pressure, then re-install the pilot system and tubingexactly as it was prior to removal. Bleed air from all high
points.
5. Follow steps under “Start-Up and Adjustment” Section inTechnical Manual for returning complete valve back to service.
5

1
58
10
14 16
617
79
OUTLETINLET
GLOBE PATTERN
9
2627
12
1514
16
INLET
OUTLET
ANGLE PATTERN
22
23
13
12
14
10 11 15
23
TOP VIEW
8" - 24" SEAT DETAIL1 1/4" - 6" SEAT DETAIL 16" COVER DETAIL
4
242
25
13
31
28
30
295
14
3
Item Description1. Pipe Plug2. Drive Screws (for nameplate)3. Hex Nut (8” and larger)4. Stud (8” and larger)5. Cover Bearing6. Cover7. Stem Nut8. Diaphragm Washer9. Diaphragm
10. Spacer Washers11. Disc Guide12. Disc Retainer13. Disc
14. Stem15. Seat16. Body17. Spring22. Flat Head Screws (8” and larger)23. Seat O-Ring24. Hex head Bolt (1 1/4” thru 4”)25. Nameplate26. Upper Spring Washer (Epoxy coated valves only)27. Lower Spring Washer (Epoxy coated valves only)28. Cover Bearing Housing (16” only)29. Cover O-Ring (16’” only)30. Hex Bolt (16” only)31. Pipe Cap (16” only)
PARTS LIST
6

100-
01Hy
trol V
alve
Ser
vice
Dat
a M
ODE
L
INST
ALL
ATIO
N /
OPE
RAT
ION
/ M
AIN
TEN
AN
CE
Des
crip
tion
100-
01 H
ytro
l Val
veTh
e C
Ia-V
aI M
odel
100
-01
Hyt
rol
Valv
e is
a m
ain
valv
e fo
rC
Ia-V
aI A
utom
atic
Con
trol V
alve
s. It
is a
hyd
raul
ical
ly o
pera
ted,
diap
hrag
m-a
ctua
ted,
glo
be o
r ang
le p
atte
rn v
alve
.
This
val
ve c
onsi
sts
of th
ree
maj
or c
ompo
nent
s; b
ody,
diap
hrag
mas
sem
bly,
and
cove
r. Th
e di
aphr
agm
ass
embl
y is
the
onl
ym
ovin
g pa
rt. T
he d
iaph
ragm
ass
embl
y us
es a
dia
phra
gm o
f nyl
onfa
bric
bon
ded
with
syn
thet
ic r
ubbe
r. A
synt
hetic
rub
ber
disc
,co
ntai
ned
on th
ree
and
one
half
side
s by
a d
isc
reta
iner
and
dis
cgu
ide,
form
s a
seal
with
the
valv
e se
at w
hen
pres
sure
is a
pplie
dab
ove
the
diap
hrag
m. T
he d
iaph
ragm
ass
embl
y fo
rms
a se
aled
cham
ber
in th
e up
per
porti
on o
f the
val
ve, s
epar
atin
g op
erat
ing
pres
sure
from
line
pre
ssur
e.
Des
crip
tion
100-
20 6
00 S
erie
s H
ytro
l Val
veTh
e C
Ia-V
aI M
odel
100
-20
Hyt
rol V
alve
(600
Ser
ies
mai
n va
lve)
have
onl
y on
e pa
rt -th
e bo
dy- t
hat i
s di
ffere
nt fr
om s
tand
ard
100
Serie
s C
la-V
al m
ain
valv
e pa
rts.
The
rem
aini
ng p
arts
of t
he 6
00se
ries
mai
n va
lve
are
stan
dard
Cla
-Val
mai
n va
lve
parts
. Al
l ser
v-ic
e an
d m
aint
enan
ce i
nfor
mat
ion
for
the
stan
dard
100
Ser
ies
mai
n va
lves
als
o ap
ply
to th
e 60
0 se
ries
mai
n va
lves
.
The
mos
t im
porta
nt th
ing
to re
mem
ber w
hen
orde
ring
mai
nva
lve
repa
ir ki
ts a
nd re
plac
emen
t par
ts, e
xcep
t for
the
body
, all
othe
r par
ts a
re g
oing
to b
e fo
r a s
mal
ler s
ize
mai
n va
lve.
Cla
-Va
l ide
ntifi
es m
ain
valv
e pa
rts w
ith th
e fla
nge
size
of t
he s
tan-
dard
100
Ser
ies
mai
n va
lve.
Ref
er to
the
"Mai
n Va
lve
Size
s”ch
art b
elow
.
HYT
RO
L Se
rvic
e D
ata
HYT
RO
L SI
ZESt
emTr
avel
Cov
er C
apac
ityD
ispl
acem
ent
Valv
e St
emTh
read
UN
F-In
tern
al
Cov
erC
ente
rPl
ugN
PT
Cov
er N
ut o
r Bol
tC
over
Lifti
ngH
oles
UN
C
Cov
er P
lug
Cov
er T
orqu
eSt
em N
ut**
Stem
Nut
Tor
que
(ft. L
bs.)
100-
0110
0-20
Thre
ad(B
olt)
Sock
etQ
tyTh
read
Sock
etft.
Lbs
.in
. Lbs
.Th
read
Sock
et(L
ong)
inch
esm
min
ches
mm
inch
esm
mG
allo
nsLi
ters
Lube
dD
RY1"
250.
38
1/4"
1/4"
- 20
(B)
7/16
"8
448
3/8"
- 24
46
1 1/
4"32
0.4
100.
020
0.07
10 -
321/
4"5/
16" -
18
(B)
1/2"
88
967/
16" -
206
101
1/2"
400.
410
0.02
00.
0710
- 32
1/4"
5/16
" - 1
8 (B
)1/
2"8
896
7/16
" -20
610
2"50
0.6
150.
032
0.12
10 -
321/
2"3/
8" -
16 (B
)9/
16"
83/
8"7/
16"
121/
2" -
203/
4"10
152
1/2"
650.
718
0.04
30.
1610
- 32
1/2"
7/16
" - 1
4 (B
)5/
8"8
1/2"
9/16
"20
5/8"
- 18
15/1
6"21
303"
804"
100
0.8
200.
080
0.30
1/4
- 28
1/2"
1/2"
- 13
(B)
3/4"
81/
2"9/
16"
305/
8" -
1815
/16"
2130
4"10
06"
150
1.1
230.
169
0.64
1/4
- 28
3/4"
3/4"
- 10
(B)
1 1/
8"8
3/4"
5/8"
110
3/4"
- 16
1 1/
16"
4060
6"15
08"
200
1.7
430.
531
2.00
3/8
- 24
3/4"
3/4"
- 10
(B)
1 1/
8"12
3/4"
5/8"
110
7/8"
- 14
1 5/
16"
8512
58"
200
10"
250
2.3
581.
264.
803/
8 - 2
41"
3/4"
- 10
1 1/
4"16
5/8"
- 11
1"13
/16"
110
1 1/
8" -1
21
13/1
6"12
518
510
"25
012
"30
02.
871
2.51
9.50
3/8
- 24
1"7/
8" -
91
7/16
"20
3/4"
- 10
1"13
/16"
160
1 1/
2" -1
21
7/8"
252
375
12"
300
16"
400
3.4
864.
015
.10
3/8
- 24
1 1/
4"1
1/8"
- 7
1 13
/16"
203/
4" -
101"
13/1
6"39
01
1/2"
-12
2 1/
2"27
040
014
"35
03.
999
6.5
24.6
03/
8 - 2
41
1/2"
1 1/
4" -
72"
201"
- 8
1"13
/16"
545
1 1/
2" -1
22
1/2"
280
420
16"
400
20",
24"
600
4.5
114
9.6
36.2
01/
2 - 2
02"
1 1/
4" -
72"
201"
- 8
1"13
/16"
545
2" -
163"
500
750
20"
500
5.63
143
1245
.40
3/4
- 16
1 1/
2"1
3/8"
- 6
2 1/
8"24
1" -
81"
13/1
6"67
02
1/4"
- 16
3 1/
2"93
0N
/R24
"60
030
"80
06.
7516
529
.010
8.80
3/4
- 16*
3/4"
1 1/
2" -
122
3/8"
241
1/8"
- 71"
13/1
6"80
03"
- 12
Spec
ial
1350
N/R
* Ada
pter
p/n
2594
101E
insi
de 1
/4" -
28"
Gra
de 5
Bol
ts"H
eavy
" Gra
de N
uts
Tigh
ten
cove
r nut
s in
a "s
tar"
cros
s-ov
er p
atte
rn
** M
ust U
se O
NLY
Cla
-Val
Sup
plie
d pa
r t

CLA-VAL
C
opyr
ight C
la-Va
l 201
4 P
rinte
d in
USA
Spe
cifica
tions
subje
ct to
chan
ge w
ithou
t not
ice.
P.
O. B
ox 1
325 • N
ewpo
rt Be
ach,
CA
9265
9-03
25 •
Pho
ne: 9
49-7
22-4
800 • F
ax: 9
49-5
48-5
441 • E
: clav
al@cla
-val.
com
• W
ebsit
e cla
-val.
com
©
COVE
R PI
PE P
LUG
COVE
R BE
ARIN
G SP
RING
STEM
NUT
DIAP
HRAG
M W
ASHE
R
DISC
RET
AINE
R
BODY
*SPA
CER
WAS
HERS
DISC
GUI
DE
SEAT
PIPE
PLU
G
STEM
SEAT
O-R
ING
STUD
8"
and
Lar
ger
*DIA
PHRA
GM
*DIS
C
*Rep
air P
arts
Seat
Scr
ew
8" a
nd L
arge
r
(Glob
e or
Ang
le)
PIPE
PLU
G
HEX
NU
T 8"
and
Lar
ger
Cove
r Bol
t 6"
and
Sm
aller
K
O DI
SC G
UIDE
KO
SE
AT
KO A
nti-C
avita
tion
T
rim O
ptio
n
N-1
00-0
1 (R
-08/
2014
)
BOLT
/NU
T TO
RQ
UIN
G P
RO
CED
UR
ES O
N V
ALVE
CO
VER
S
4BO
LTS
6BO
LTS
8BO
LTS
12BO
LTS
16BO
LTS
20BO
LTS
4
3 2
1
65
4
3 2
1
8
7
6
5
4
3
2
1
0
9
8
7
6
5
4
3
2
112
1110
9
8
76
5
4
3
2
116
1514
13
12
11
10
9
8
7
6
5 4
3
2
120
1918
17
16
15
14
1312
11
Follo
w th
is p
roce
dure
whe
n re
asse
mbl
ing
MAI
N V
alve
:
1. T
ight
ens
bolts
/nut
s in
a “S
tar”
or “C
ross
-Ove
r” pa
ttern
follo
win
g th
e nu
mbe
rs s
how
n ab
ove
to in
sure
that
cov
er s
eats
eve
nly
on th
e di
aphr
agm
mat
eria
l and
bod
y.
2. T
orqu
e th
e bo
lt/nu
ts in
thre
e st
ages
with
a "S
tar"
or "C
ross
-Ove
r" pa
ttern
for e
ach
stag
e:
A. T
o ap
prox
imat
ely
10%
of f
inal
torq
ue.
B. T
o ap
prox
imat
ely
75%
of f
inal
torq
ue.
C. T
o fin
al re
quire
d to
rque
.
3. V
alve
s th
at a
re to
be
test
ed to
375
PSI
or h
ighe
r sho
uld
be re
torq
ued
afte
r 24
hour
s.
100-
01 H
ytro
l Mai
n Va
lve
Asse
mbl
y