installation manual - bluestar
TRANSCRIPT

1
INSTALLATION MANUAL
Salamander Broiler
PRZSAL

2
BlueStar® Salamander Broiler
MODELS PRZSAL
THIS APPLIANCE WAS DESIGNED FOR EASE OF INSTALLATION AND OPERATION. HOWEVER, WE RECOMMEND THAT YOU READ ALL SECTIONS OF THIS MANUAL BEFORE YOU BEGIN INSTALLATION. INSTALLATION MUST BE PERFORMED BY AN APPROVED GAS INSTALLER OR GAS SERVICE TECHNICIAN OR THE WARRANTY IS VOID. IN THE COMMONWEALTH OF MASSACHUSETTS A LICENSED PLUMBER OR GAS FITTER CAPABLE OF REVIEWING AND PERFORMING THE MANUFACTURER’S INSTALLATION CHECKLIST SHOULD INSTALL THIS APPLIANCE. THE INSTALLATION CHECKLIST IS INCLUDED AT THE REAR OF THIS BOOKLET.
DO NOT REMOVE PERMANENTLY AFFIXED LABELS, WARNINGS OR DATA PLATES FROM YOUR APPLIANCE. THIS MAY VOID THE MANUFACTURER’S WARRANTY AND/OR HINDER EFFECTIVE SERVICING AND MAINTENANCE.
THESE INSTRUCTIONS ARE TO REMAIN WITH THE APPLIANCE AND THE CONSUMER IS TO RETAIN THEM FOR
FUTURE REFERENCE.
WARNING: If the information in this manual is not followed exactly, a
fire or explosion may result causing property damage, personal injury
or death.
- Do not store or use gasoline or other flammable vapors and
liquids in the vicinity of this or any other appliance.
- WHAT TO DO IF YOU SMELL GAS
• Do not try to light any appliance
• Do not touch or activate any electrical switch
• Do not use any phone in your building
• Immediately call your gas supplier from a neighbor’s phone.
Follow the gas supplier’s instructions.
• If you cannot reach your gas supplier, call the fire department
- Installation and service must be performed by a qualified
installer, service agency or the gas supplier.
NOTE: WARRANTY SERVICE MUST BE PERFORMED BY AN AUTHORIZED SERVICE AGENT. YOU MAY
REQUEST WARRANTY SERVICE BY CALLING 800-449-8691. YOU MAY ALSO REQUEST SERVICE VIA THE
INTERNET BY SUBMITTING THE SERVICE REQUEST FORM AT WWW.BLUESTARCOOKING.COM
In the Commonwealth of Massachusetts, gas connections must be performed by a licensed plumber or
licensed gas fitter.
Proposition 65 Warning
WARNING: THIS PRODUCT CAN EXPOSE YOU TO CHEMICALS INCLUDING CARBON MONOXIDE WHICH IS KNOWN TO THE STATE OF CALIFRONIA TO CAUSE BIRTH DEFECTS OR OTHER REPRODUCTIVE HARM. FOR MORE INFORMATION GO TO WWW.P65Warnings.ca.gov
© Copyright 2019 Prizer –Painter Stove Works, Inc. All specifications are subject to change without prior notification

Installation and Operation Instructions for
BlueStar® Infrared Salamander Broiler
THIS APPLIANCE MUST BE MOUNTED UNDER AN APPROVED VENTILATION HOOD.
CONTACT A LICENSED GAS CONTRACTOR IN ACCORDANCE WITH THE LOCAL CODES (OR
IN THE ABSENCE OF LOCAL CODES, WITH THE NATIONAL FUEL GAS CODE, ANSI
Z223.1/NFPA 54) FOR INSTALLATION.
This appliance is not intended to be installed underneath a cabinet.
This appliance must be electrically grounded in accordance with the local codes or, in the absence of local
codes, with the National Electrical Code, ANSI/NFPA 70.
The appliance and its individual shutoff valve must be disconnected from the gas supply piping system
during any pressure testing of that system at test pressures in excess of ½ psi (3.5 kPa).
The appliance must be isolated from the gas supply piping system by closing its individual manual shutoff
valve during any pressure testing of the gas supply piping system at test pressures equal to or less than ½
psi (3.5 kPa).
The appliance must not be used for space heating purposes.
The cooking area or the exterior top areas are not for storage purposes.
The appliance must be disconnected from the electrical supply before servicing.
The appliance comes set for the type of gas as specified on the rating plate and tag on the unit. If a
different gas type of gas is required, please contact your local authorized gas technician.
Leak testing of the appliance shall be conducted according to the manufacturer’s instructions.
WARNING: ELECTRICAL GROUNDING INSTRUCTIONS
This appliance is equipped with a three-prong grounding plug for your protection against shock hazard
and should be plugged directly into a properly grounded receptacle. Do not cut or remove the grounding
prong from this plug.
All specifications are subject to change without prior notification

Table of Contents
Table of Contents 1
General Information 2
Specifications 3
Dimensions and Models 4, 5, 6 & 7
Installation 8, 9 & 10
Ventilation and Air Supply 11
Operation 12 & 13
Wiring Diagram 14
Cooking Guide 15
Maintenance 16
Performance Checklist
Warranty & Service Information
All specifications are subject to change without prior notification
All specifications are subject to change without prior notification
General Information
The BlueStar® Infrared Salamander Broiler is designed to be a high speed cooking appliance. It is ideal for
preparing a variety of meats, fish, melted chees dishes, casseroles, au gratin dishes, souffle’s, French onion soup
and other ethnic foods.
Infrared Broiler Performance and Construction
Two hi/low gas valves provide individual control of the (2) atmospheric-type 10,500 BTU gas infrared burners
for the salamander. The “LO” position is adjustable for most field gas pressure situations. The high-efficiency,
infrared burners provide fast pre-heat and uniform production. Unique atmospheric burner design eliminates the
need for fans or filters to assist in the operation of the appliance. Heat is directed downward to the large heavy
duty broiling rack. The rack is easily removed from the spring balanced lower rack assembly. The inner rack
assembly rolls out for ease of loading and unloading. Rack assembly raises and lowers with positive locking in
four positions. A full-width grease deflector attached to the underside of the rack assembly channels hot
drippings to a large capacity drain pan even when the rack assembly is rolled out (Drain pan must always be
attached during use). The rack assembly and drain pan are easily removed for cleaning. When mounted the
infrared broiler is supported by heavy-formed stainless steel brackets. The broiler construction consists of an all
stainless steel interior and exterior, which provides unmatched quality and durability for many, many years.

All specifications are subject to change without prior notification
Salamander Specifications:
Width: 25”
Depth: 19 ½”
Height: 16 ½”
Gas Specifications:
All Models (2) Burners at 10,500 BTU/HR each. Total 21,000 BTU/HR
Natural Gas: @ 5” Water Column Orifice Size: 54
Propane Gas: @ 10” Water Column Orifice Size: 64
Minimum Clearances for PRZSAL24: Sides Rear Top
Combustible construction 6” 6” N/A
Non-combustible construction 0” 0” N/A
All other models do not require any clearances for combustible or non-combustible construction.
The Top Clearance is noted as N/A as all models are intended for installation underneath a suitable ventilation
hood only.
Model Number and Description:
PRZ24SAL 24” Counter top Salamander with legs
PRZSAL24WM Salamander with 24” wall mount system
PRZSAL36WM Salamander with 36” wall mount system
PRZSAL48WM Salamander with 48” wall mount system
PRZSAL60WM Salamander with 60” wall mount system
BG3617 Salamander 36” wide by 17” integrated backguard
BG4817 Salamander 48” wide by 17” integrated backguard
BG6017 Salamander 60” wide by 17” integrated backguard
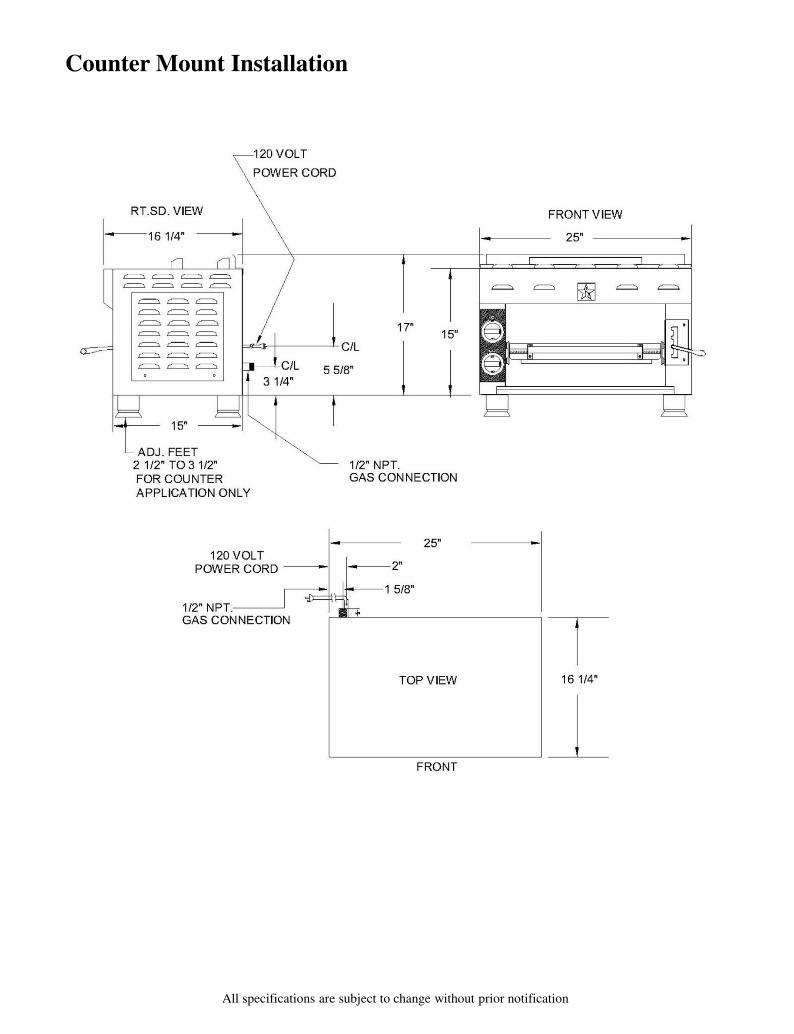
Counter Mount Installation
All specifications are subject to change without prior notification

Counter Mount Installation
All specifications are subject to change without prior notification

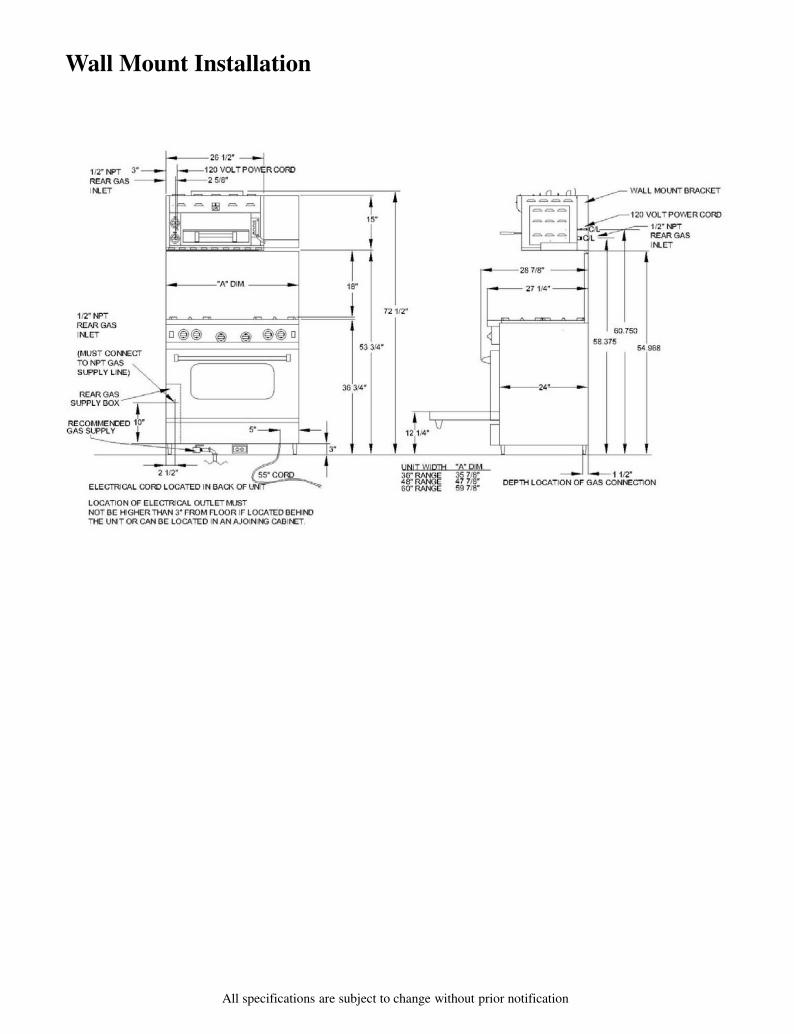
Wall Mount Installation
All specifications are subject to change without prior notification
Wall Mount Installation
All specifications are subject to change without prior notification
All specifications are subject to change without prior notification
Installation
The importance of the proper installation of the Gas Cooking Equipment cannot be over stressed. Proper
performance of the equipment is dependent, in great part, on the compliance of the installation with the
manufacturer’s specifications. Installation must conform to local codes or, in the absence of local codes, with the
National Fuel Code. ANSI Z223.1 National Gas Installation Code, CAN/CGA-B149.1, or the Propane
Installation Code, CAN/CGA-B149.2, as applicable
Before assembly and connection, check gas supply.
A. The type of gas for which the unit is equipped is stamped on the data plate located behind the right access
panel of the unit. Connect a unit stamped “NAT” only to natural gas supply: connect those stamped “LP”
only to the propane gas supply.
B. If it is a new installation, have gas authorities check meter size and piping to assure that the unit is supplied
with sufficient amount of gas pressure required to operate the unit.
C. If it is additional equipment or replacement have a qualified gas technician check the gas pressure to make
certain that existing gas facilities (meter, piping, etc) will deliver the BTU’s of gas required at the unit with
no more than ½” water column pressure drop. When checking pressure be certain that other equipment on
the same gas line is on and at full rate. A pressure regulator is supplied with the unit pre-set at the factory for
the type of gas that was specified. The pressure regulator is located behind the left access panel of the unit.
D. The appliance and its individual shut off valve (supplied by others) must be disconnected from the gas supply
piping system during any pressure testing of the system at pressures in excess of ½” psi (3.45 kPa).
E. Gas supply connection is made in back lower left hand corner of the unit. A readily accessible approved type
gas hand valve (supplied by others) should be installed on each supply line. TEST FOR LEAKS – DO
NOT USE AN OPEN FLAME.
NOTE: THE PRESSURE REGULATOR IS LOCATED INSIDE THE UNIT. TO GAIN ACCESS TO
IT, REMOVE THE LEFT SIDE ACCESS PANEL OF THE UNIT.
Make certain that the new piping, joints and connections have been made in a clean manner and have been
purged, so that the piping chips, compound, etc. will not clog the valves and/or controls. Use pipe joint sealant
that is resistant to liquefied petroleum gas.
WARNING: CHECK GAS CONNECTIONS FOR LEAKS. USE A SOAP SOLUTION OR SIMILAR
MEANS. DO NOT USE AN OPEN FLAME.

Installation: Wall Mounted Salamander and Shelf Assembly for
36”, 48” and 60” Wide Units
1. Each gas appliance shall be located with respect to building construction and other equipment so as to permit
access to the appliance. Such access and clearance is necessary for service and cleaning.
2. A weld wall mount Salamander and shelf assembly, which includes two (2) hi-hat supports, one (1) lower
support angle, one (1) upper support angle, one (1) rear shelf panel, one (1) shelf and one (1) Salamander
bottom panel. Also hardware required for attachment of components.
3. Review pages 4 & 5 as a reference for mounting the wall mount kit. Drilled holes are required in both the
upper and lower left to right supports. (Added by others), before any mounting can take place.
NOTE: Installer is responsible for mounting hardware as well as insuring that the wall mount assembly
once positioned in place can support a minimum of 200lbs.
4. After the wall mount unit has been installed, remove the second screw back from the front top piece (1) from
the left side (1) from the right side. Slide the Salamander in between the flanges of the wall mount assembly.
By keeping the front flush with the wall mount brackets, the bottom mounting holes should line up. With the
(4) 1/3 – 20 x 1” bolts supplied from the factory, secure the Salamander to the bottom flanges of the wall
mount assembly.
5. Attach the upper shelf angle to the top rear support with (2) sheet metal screws provided. Attach the lower
shelf angle to the bottom rear support with (2) sheet metal screws .
6. Next position and attach the shelf back panel to the (2) angles added in step 6.
7. Attach the shelf with (3) 10-24 machine screws provided. Make adjustments as necessary.
8. Attach the bottom panel and use the (4) plug buttons to seal the ½” holes.
9. Replace the screws removed in step 5. Assembly is complete.
All specifications are subject to change without prior notification

All specifications are subject to change without prior notification
Installation: Salamander Mount without Shelf
1. Each gas appliance shall be located with respect to building construction and other equipment so as to permit
access to the appliance. Such access and clearance is necessary for service and cleaning.
2. A weld wall mount Salamander and shelf assembly, which includes two (2) hi-hat supports and a left and
right wall mount bracket.
3. One bottom panel, (4) sheet metal screws and (4) plug buttons.
4. Holes required for mounting and hardware for mounting not provided and required by others.
5. Once the wall mount bracket assembly is in place it is required to support a minimum of 200 lbs.
6. Before sliding the Salamander in place remove the second screw back from the front top piece from both the
left and right side of the Salamander. Connect the gas supply and check for gas leaks. DO NOT USE AN
OPEN FLAME.
7. Plug in electrical cord.
8. Slide Salamander to the rear of the assembly until the front of the unit is flush with the wall mount brackets.
Re-install the (2) screws removed from step 7.
9. With the (4) ¼ - 20 bolts provided, secure the Salamander to the bottom flanges of the left and right wall
mount brackets.
10. Secure the bottom panel with (4) sheet metal screws provided and plug the ½ diameter holes with the (4)
plug buttons. Assembly is complete.
WARNING: NEVER USE THIS APPLIANCE AS A SPACE HEATER TO HEAT OR
WARM THE ROOM. DOING SO MAY RESULT IN CARBON MONOXIDE
POISONING AND OVERHEATING OF THE OVEN.

Ventilation and Air Supply
• ALL VENTILATION HOODS MUST COMPLY WITH THE U.L. STANDARD – U.L. 507 HOOD
SPECIFICATIONS
NOTE: ALL SALAMANDER BROILERS MUST BE MOUNTED UNDER AN APPROVED
VENTILATION HOOD
Adequate ventilation is very important for proper operation. The ideal method of ventilation for a Salamander
Broiler is the use of a properly designed canopy hood which should extend three inches (3”) beyond all sides of
the appliance and six feet (6’) six inches (6”) from the floor. All gas burners need sufficient air to operate and
large objects should not be placed in front of or on top of the broiler, which would obstruct the airflow through
the front of the broiler.
All specifications are subject to change without prior notification
FOR YOUR SAFETY NEVER PLACE ANY TYPE OF OBJECT ON TOP OF THE
SALAMANDER BROILER AS THE TOP OF THE BROILER CAN CAUSE SEVERE
BURNS OR FIRE AND OBSTRUCT VENTILATION.

Operation
Main Burner Operation:
1. Push and turn the lower valve dial to the left so that the HIGH position on the dial is at 12 o’clock.
Immediately you will hear the spark igniter snapping and the top front burner will ignite.
NOTE: Until the burner has adequate amount of gas it will not igniter
2. Repeat the procedure for the upper valve dial, which will ignite the top rear burner.
3. When ignition has been accomplished a blue flame will be visible across the entire face of the infrared
burner. After approximately 2 ½ to 3 minutes the entire burner surface will glow a bright orange red color.
Burn Off Period:
Many parts used in the manufacturing of this appliance have a thin protective coating of oil. This oil should be
burned off before the equipment is used for food preparation. The same goes for the infrared burners. Until the
binders etc are burned off, the burner will emit a strong odor. Make sure your range hood is one in the HIGH
position during this burn off period.
To Conserve Energy:
Do not waste energy by leaving the controls in the HIGH temperature settings during idle periods. We
recommend you turn the appliance off. Very seldom will you use the low setting on the burner dial. When this
setting is used, the burner will not burn the bright red orange color, but blue flames will travel across the entire
face of the burner.
Shut Down Instructions:
Turn the main burner valves to the OFF position. If the unit is to be shut down for an extended period of time,
close the manual inline service valve to the off position. NOTE: The inline service valve is not factory supplied.
All specifications are subject to change without prior notification
FOR YOUR SAFETY NEVER PLACE ANY TYPE OF OBJECT ON TOP OF THE
SALAMANDER BROILER AS THE TOP OF THE BROILER CAN CAUSE SEVERE
BURNS OR FIRE AND OBSTRUCT VENTILATION.

Operation
Main Burner Adjustments:
All Salamanders are provided with a fixed burner orifice to provide 10,500 BTU/HR per burner at the “MAX”
setting for Natural gas supplied at 5.0” water column pressure and 10,500 BTU/HR per burner at the “MAX”
setting on Propane gas supplied at 10.0” water column pressure.
The “Low” setting is adjustable and should be set as follows:
1. Set the burner valve knob to the low setting and remove the burner knob.
2. Insert a thin bladed screwdriver into the valve stem to engage the slot inside the stem.
3. Holding the valve stem, turn the setscrew clockwise to decrease the rate and counter clockwise to increase
rate.
4. Proper adjustment is attained at a point where the burner flame travels back and forth across the face of the
ceramics. If set too low a constant spark will continuous. If this occurs increase the low setting.
This adjustment has been factory pre-set, however, with changing pressures this adjustment may need to be re-
done after installation.
NOTE: THIS IS NOT CONSIDERED A MANUFACTURING DEFECT AND IS NOT WARRANTABLE.
All specifications are subject to change without prior notification
WARNING: NEVER COVER ANY SLOTS, HOLES OR PASSAGES IN THE OVEN
BOTTOM OR COVER AN ENTIRE RACK WITH MATERIALS SUCH AS ALUMINUM
FOIL. DOING SO BLOCKS AIRFLOW THROUGH THE OVEN AND MAY CAUSE
CARBON MONOXIDE POISONING. ALUMINUM FOIL LININGS MAY ALSO TRAP
HEAT CAUSING A FIRE HAZARD.

All specifications are subject to change without prior notification
Salamander Wiring Diagram

All specifications are subject to change without prior notification
Cooking Guide
ITEM BURNER
SETTING
RACK
POSITION
EST. COOK TIME
Strip Steak (1 ¼” thick) High 3 4 min per side for medium
T-Bone Steak (1” thick) High 3 4 min per side for medium
Sausage (Pre-cooked) High 2 7 min turning
Hamburger High 2 3 min per side for medium
Chicken Pieces (Full rack) High 1 or 2 35 min turning
Hot Dogs High 1 3 min turning
French Onion Soup (Large) High 1 7 min
Garlic Bread High 1 1 min
NOTE: Cook times will vary due to the items thickness and item preference. Rack positions as
tested are (1) being the lowest to (4) being the highest. The #4 position was used to finish off
some of the steak items tested. Again this will vary due to preference.

All specifications are subject to change without prior notification
Maintenance
• A program of proper cleaning techniques will aid in continued trouble free operation of this or any
quality equipment.
Daily:
The Grid Rack should be wiped daily while still warm, using a heavy cloth or other grease absorbing material to
remove grease and burnt food before they burn into the grid. Remove burnt materials, such as carbonized grease
or food, with a stiff wire brush. Do not use any type of steel wool. Small particles may be left on the grid
surface and get into the food products. Grid Rack should be washed thoroughly using a wire brush and a hot,
mild detergent or soap solution. Rinse with clear, warm water.
Exterior and Interior Cleaning:
1. Wipe exposed, clean-able surfaces when cool with a mild detergent and hot water. Stubborn spots may be
removed with a lightweight non-metallic scouring pad. Dry thoroughly with a clean cloth.
2. Stainless steel should be cleaned using a mild detergent, a soft cloth and hot water. If it is necessary to use a
non-metallic scouring pad, always rub in the direction of the grain in the metal to prevent scratching. Use
water based stainless steel cleaner if you want a high shine.
3. To remove the inner rack assembly, place lift handle in the lowest position, pull the rack out as far as it will
go. Remove the rack, and then remove the drip chute and set aside. Push the rack assembly back into the
unit as far as it will go. Position the lift handle into the #2 position. Carefully push down on the rack handle,
which should allow the rear rollers to lift up and out of the roller guides. Now roll the rack assembly forward
till you can grab it with both hands to remove it completely. Once you clean the rack assembly and are ready
to re-install repeat the steps in reverse order.
IMPORTANT: THESE INSTRUCTIONS ARE TO REMAIN WITH THE APPLIANCE AND THE
CONSUMER IS TO RETAIN THEM FOR FUTURE REFERENCE.

3
PERFORMANCE CHECKLIST
This checklist has been developed to assure proper installation of your appliance. To validate your warranty you must mail or submit online this form within 90 days of installation and a copy of your receipt to: Warranty Department, Prizer-Painter Stove Works Inc., 318 June Avenue Blandon, PA 19510 or www.bluestarcooking.com/support/product-registration/. Customer Information (Please Print) Product Information (Please Print) Name: ________________________________________ Model No: ________________________________ Address: ______________________________________ Serial No: _________________________________ City: _________________________________________ Purchase Date: _____________________________ State, Zip Code: ________________________________ Installation Date: ___________________________ E-mail: _______________________________________ Installer’s Name: ___________________________ Telephone: ____________________________________ Company: _________________________________ Dealer: _______________________________________ Telephone: ________________________________
CHECK ALL THAT APPLY
Appearance and Aesthetics Electrical Connection Exterior Correct voltage Top section Grounded outlet Oven interior Polarized outlet No GFCI Installation Gas Connection Proximity to cabinets Verify fuel—_____Nat _____LP Level Gas shut-off present and accessible Backguard in place Supply line properly sized Read User Manual Supply pressure checked Review safety instructions Operating pressure checked All connections checked for leaks Ignition Flame Adjustment Air/Gas Mixture Valve Operation Oven Burner Oven Burner Oven Burner Oven Burner Infrared Broiler Infrared Broiler Infrared Broiler Infrared Broiler Controls Oven Door Knobs Alignment Thermostats Door seal Convection oven fan & switch Hinges Oven light switch
For further information about this warranty,
contact Prizer-Painter Customer Service at 1-800-449-8691
LIMITED WARRANTY BlueStar
® Cooking Appliances, BlueStar
® Ventilation Hoods, Prizer Hoods
® Ventilation Hoods and
Abbaka Ventilation hoods and remote blowers
Before using your Product, please read this Limited Warranty and Arbitration Clause carefully to understand your rights. This Warranty is provided to you by Prizer-Painter Stove Works, Inc. (“Prizer-Painter”), which warrants the parts of your BlueStar® cooking appliance, BlueStar® ventilation hood, Prizer Hoods® ventilation hood, or Abbaka ventilation hood or remote blower (“Product”), as described below. This Warranty covers the owner of the residence in which the Product is installed, and his or her spouse (“Owner” or “You”). Products Covered This Warranty applies only to BlueStar® cooking appliances, BlueStar® ventilation hoods, Prizer Hoods®
ventilation hoods and Abbaka ventilation hoods and remote blowers purchased in the continental U.S. and Canada on or after April 1, 2019. This Warranty applies only to Product sold by a BlueStar® authorized dealer or Prizer-Painter directly for use in residential properties only. Products must be installed by a qualified, licensed installer. Any service call deemed to be the result of improper installation shall be the responsibility of the owner. This Warranty is also void if the original factory installed serial number is altered or removed from the Product. Products Not Covered This Warranty does not apply to Products installed or used in any commercial or other non-residential property such as, but not limited to, day care facilities, hotels, motels, firehouses and nursing homes. This Warranty does not cover Products installed outside the U.S. or Canada. This Warranty does not apply to gas type conversions on cooking appliances not completed by a certified gas technician, licensed plumber or certified BlueStar®
servicers. Full Two-Year Warranty Product Registration is not required to obtain Warranty Coverage but is highly recommended for optimal servicing and affects the length and certain remedies available under the warranty. If the Product is properly registered within 90 days of Installation Date: For two (2) years from the date that the Product is originally installed, this Warranty covers all parts and labor to repair or replace, at our discretion, any functional component of the Product, that is defective in materials or workmanship. Replacement service will only be provided if and when attempts to repair the Product have been exhausted. Such repair or replacement service must be performed by a factory authorized service agent located within 100 miles roundtrip from the location of the Product. Service will be provided during normal business hours. The Owner will be responsible for any and all costs associated with additional mileage, non-standard service or overtime, and special equipment required to remove the Product so that service may be performed. Prizer-Painter reserves the right to deny warranty coverage for excessive installation delays. For products not properly registered: For one (1) year from the date that the Product is originally installed, this Warranty covers all parts and labor to repair or replace, at our discretion, any functional component of the Product, that is defective in materials or workmanship. Replacement service will only be provided if and when attempts to repair the Product have been exhausted. Such repair or replacement service must be performed by a

For further information about this warranty,
contact Prizer-Painter Customer Service at 1-800-449-8691
factory authorized service agent located within 100 miles roundtrip from the location of the Product. Service will be provided during normal business hours. The Owner will be responsible for any and all costs associated with additional mileage, non-standard service or overtime, and special equipment required to remove the Product so that service may be performed. Prizer-Painter reserves the right to deny warranty coverage for excessive installation delays.
Limited Cosmetic Component Warranty: This Warranty covers the repair or replacement of all cosmetic component flaws for thirty (30) calendar days from the date of delivery of the Product to the owner’s home from a BlueStar® authorized dealer. Cosmetic components include top grates, ring grates, plate rail, kick panel, body sides, glass, control panel, door panel, back guards, oven seals), front sides of hoods, and hoods strapping. Cosmetic components flaws include visible chips, scratches, dents, provided, however, that cosmetic flaws caused by freight damage are excluded. Limited Warranty on Floor Models Not Used For Demonstration: Floor Models are covered by a one (1) year limited functional parts and related services warranty, with proof of date of installation. There is no cosmetic warranty of any kind for floor models. Limited Warranty on Floor Models Used For Demonstration: Floor Models used for demonstration are covered by a ninety (90) day limited parts warranty only, with proof of date of installation. There is no service or cosmetic warranty of any kind for floor models. Limited Warranty on Product Refurbished Refurbished Products are covered by a six (6) months limited functional parts and labor warranty, with proof of installation, as well as an additional six (6) months limited parts warranty. There is no cosmetic warranty of any kind on Refurbished Product. Registration Registration is strongly recommended. While not necessary to effectuate warranty coverage, it is the best way for Prizer-Painter to communicate with you about important events and also provides additional warranty coverage. TO REGISTER, please fill out the “Performance Checklist and Warranty Form” located online at www.bluestarcooking.com/support/product-registration. Or mail the form located in the back of the Product Use and Care Manual to: Warranty Department, Prizer-Painter Stove Works, 318 June Avenue, Blandon, PA 19510-9566. Obtaining Warranty Service If a Warranty claim is not submitted as required, such claim will be invalid and will not be honored. To obtain Warranty service, where applicable, the Owner must call the Service Center (toll free: 1-800-449-8691) or fill out the online form at www.bluestarcooking.com/service to report a warranty claim, and may be required to, at the time, provide (1) the model number of the Product, (2) the serial number of the Product, (3) proof of delivery, (4) a signed installation receipt, (5) a description of the claimed defect, and (6) proof of purchase of the Product, including the original retail receipt or invoice to establish the Warranty Period. Prizer-Painter must be given an opportunity to inspect any Product subject to a warranty claim. All warranty related service repairs must be performed by a factory authorized service agent. This Limited Warranty gives you specific legal rights, and you may also have other rights that may vary from state to state or province to province. Out of Warranty Product

For further information about this warranty,
contact Prizer-Painter Customer Service at 1-800-449-8691
Prizer-Painter is under no obligation, at law otherwise, to provide you with any concessions, including repairs, pro-rates or Product replacement, once this warranty has expired. What Is Not Covered This Warranty does not cover, and specifically excludes:
Damages caused by shipping.
Damage or repairs to the porcelain igniters, calibrations and normal adjustments after installation and setup, including burner adjustments.
Normal wear and tear, care, and maintenance of the Product as described in the installation and operating manual, such as cleaning of parts, discoloration of the griddle, rust, gasket materials, ceramic materials, and fuses.
Damage or repairs caused by alterations or modifications, abuse, excessive force, misuse, neglect, or improper installation, instruction, handling, operation, maintenance or storage.
Accidental or intentional damage.
Damage or repairs caused by unauthorized or improper service or repairs.
Damages or repairs as a result of natural disasters, fires, floods, earthquakes, winds, lightning, corrosive atmosphere, loss of electrical power to the Product for any reason, or other conditions beyond Prizer-Painter’s control.
Damage or repairs caused by alteration for outdoor use.
Damage or repairs caused by the use of harsh chemicals or cleaning products improperly applied.
Discolorations to backguards from use of griddle or burners.
The replacement of a part or Product under this Warranty does not extend the Warranty period.
If the Product is removed from the property where it was originally installed .
Slight color variations may be noticed because of differences in painted parts, kitchen lighting, product placement, and other factors; this warranty does not apply to color variations.
Service calls to educate the customer on proper use and care of the product.
Failure of the product when used for commercial, business, rental or any application other than for residential consumer use.
Liability or responsibility for damage to surrounding property including cabinetry, floors, ceilings and other structures or objects around the Product.
Consequential or incidental damage, including but not limited to food or medicine loss, time away from work or restaurant meals.
This warranty is in lieu of all other express warranties. No employee or representative of Prizer-Painter is authorized to make any modification, extension or addition to this Limited Warranty. ALL IMPLIED WARRANTIES, INCLUDING BUT NOT LIMITED TO WARRANTIES OF
MERCHANTABILITY AND FITNESS FOR PARTICULAR PURPOSE ARE LIMITED TO THE
DURATION OF THIS WARRANTY. Some states and provinces do not allow limitations on implied warranties, so the above limitation may not apply to you.
THE OWNER AND PRIZER-PAINTER AGREE THAT THE REMEDIES SET OUT HEREIN ARE
THE OWNER’S EXCLUSIVE REMEDIES FOR BREACH OF ALL WARRANTIES, EXPRESS OR IMPLIED.
WHETHER ANY CLAIM IS BASED ON NEGLIGENCE OR OTHER TORT, BREACH OF
WARRANTY OR BREACH OF CONTRACT, OR ANY THEORY, PRIZER-PAINTER SHALL IN NO
EVENT BE LIABLE FOR INCIDENTAL, CONSEQUENTIAL OR SPECIAL DAMAGES,

For further information about this warranty,
contact Prizer-Painter Customer Service at 1-800-449-8691
INCLUDING BUT NOT LIMITED TO DAMAGES FOR EXPENSES, SUCH AS, EXTRA UTILITY
EXPENSES, SHIPPING COSTS RELATED TO REPAIR OR REPLACEMENT OF ANY PRODUCT
OR DAMAGES TO PROPERTY, RESULTING FROM BREACH OF THIS WARRANTY OR ANY
IMPLIED WARRANTY. Some states and provinces do not allow the exclusion or limitation of incidental or consequential damages, so these provisions may not apply to you. Where Can Any Legal Remedies Be Pursued Please see the Arbitration Clause and Related Provisions, which affect your legal rights. Read this Arbitration Clause and its related provisions carefully. The Arbitration Clause is also available on Prizer-Painter’s website.

For further information about this warranty,
contact Prizer-Painter Customer Service at [1-800-449-8691]
ARBITRATION CLAUSE BlueStar® Cooking Appliances, BlueStar® Ventilation Hoods, Prizer Hoods® Ventilation Hoods and
Abbaka Ventilation Hoods and remote blowers
ARBITRATION CLAUSE. IMPORTANT. PLEASE REVIEW THIS ARBITRATION CLAUSE. IT
AFFECTS YOUR LEGAL RIGHTS. YOU SHOULD ALSO CONSIDER CONSULTING WITH
OTHERS ABOUT ARBITRATION BECAUSE THE INFORMATION PROVIDED IS NOT
INTENDED TO CONTAIN A COMPLETE EXPLANATION OF THE CONSEQUENCES OF
ARBITRATION.
1. Parties: This arbitration clause affects your rights against Prizer-Painter Stove Works, Inc. and any of its affiliates or employees or agents, successors, or assigns, all of whom together are referred to as “we” or “us” for ease of reference. 2. ARBITRATION REQUIREMENT: EXCEPT AS STATED BELOW, ANY DISPUTE
BETWEEN YOU AND ANY OF US SHALL BE DECIDED BY NEUTRAL, BINDING ARBITRATION
RATHER THAN IN COURT OR BY JURY TRIAL. “Dispute” will be given the broadest possible meaning allowable by law. It includes any dispute, claim, or controversy arising from or relating to your purchase of a Prizer-Painter Product, any warranty upon the unit, or the unit’s condition. The arbitrator(s) shall have the exclusive power and jurisdiction to make all procedural and substantive decisions concerning the Dispute including the power to determine the question of arbitrability including the scope or applicability of this Arbitration Clause. The arbitration requirement applies to all claims including those arising out of contract and tort, pursuant to statute, or otherwise. 3. CLASS-ARBITRATION WAIVER: ARBITRATION IS HANDLED ON AN INDIVIDUAL
BASIS. IF A DISPUTE IS ARBITRATED, YOU AND WE EXPRESSLY WAIVE ANY RIGHT TO
PARTICIPATE AS A CLASS REPRESENTATIVE OR CLASS MEMBER ON ANY CLASS CLAIM
YOU MAY HAVE AGAINST US, AND US AGAINST US, OR AS A PRIVATE ATTORNEY GENERAL
OR IN ANY OTHER REPRESENTATIVE CAPACITY. YOU AND WE ALSO WAIVE ANY RIGHT
TO CLASS ARBITRATION OR ANY CONSOLIDATION OF INDIVIDUAL ARBITRATIONS. 4. Discovery and Other Rights: Discovery and rights to appeal in arbitration are generally more limited than in a lawsuit. This applies to both you and us. Other rights that you or we would have in court may not be available in arbitration. Please read this Arbitration Clause and consult the rules of the arbitration organizations listed below for more information. 5. SMALL CLAIMS COURT OPTION: YOU MAY CHOOSE TO LITIGATE ANY DISPUTE
BETWEEN YOU AND ANY OF US IN SMALL CLAIMS COURT, RATHER THAN IN ARBITRATION,
IF THE DISPUTE MEETS ALL REQUIREMENTS TO BE HEARD IN SMALL CLAIMS COURT.
6. OPTING OUT OF THIS ARBITRATION CLAUSE: YOU MAY OPT OUT OF THIS
ARBITRATION CLAUSE WITHIN 60 DAYS OF WHEN WARRANTY COVERAGE BEGINS, IF YOU
INFORM PRIZER-PAINTER IN WRITING, VIA REGISTERED MAIL (SENT TO PRIZER-PAINTER
CONSUMER AFFAIRS , Prizer-Painter Stoveworks, 318 June Avenue Blandon, PA 19510-9566. THAT YOU
ARE OPTING OUT. Please also provide your name, address, product model and serial number and proof of purchase. There is no other procedure to opt out. Opting out of this Arbitration Clause will not affect your other rights under this warranty. 7. Governing Law: The procedures and effect of the arbitration clause will be governed by the Federal

For further information about this warranty,
contact Prizer-Painter Customer Service at [1-800-449-8691]
Arbitration Act (9 U.S.C. § 1 et seq.) rather than by state law concerning arbitration. The law governing your substantive warranty rights and other claims will be the law of the state in which you purchased your Prizer-Painter Product. Any court having jurisdiction may enter judgment on the arbitration award. 8. Rules of the Arbitration: If the amount in controversy is less than $50,000, the arbitration will be decided by a single arbitrator to be appointed according to the rules of the arbitration association that is chosen. If the amount in controversy is greater than or equal to $50,000, the arbitration will be decided by a panel of three arbitrators. The arbitrator(s) will be chosen pursuant to the rules of the administering arbitration organization. You may choose either of the following arbitration organizations, and its applicable rules: the American Arbitration Association, 1633 Broadway, 10th Floor, New York, NY 10019 (www.adr.org), JAMS, 1920 Main Street, Ste. 300, Irvine, CA 92614 (www.jamsadr.com), or any other organization that you may choose subject to our approval. These organizations’ rules can be obtained by contacting the organization or visiting its website. If the chosen arbitration organization’s rules conflict with this Arbitration Clause, the provisions of this Arbitration Clause control. The award of the arbitrator(s) shall be final and binding on all parties. 9. Location of the Arbitration Hearing: Unless applicable law provides otherwise, the arbitration hearing will be conducted in the federal judicial district in which you reside. 10. Costs of the Arbitration: Each party is responsible for its own attorney, expert and other fees, unless awarded by the arbitrator(s) under applicable law. Prizer-Painter will pay your share of the fees charged by the arbitration organization and arbitrator(s) beyond the first $200. Where permissible by law, you may be required to reimburse Prizer-Painter for the fees of the arbitration organization and arbitrator(s) in whole or in part by decision of the arbitrator(s) at the discretion of the arbitrator(s). 11. Survival and Enforceability of this Arbitration Clause: This Arbitration Clause shall survive the expiration or termination, or any transfer, of the warranty on your unit. If any part of this Arbitration Clause, except waivers of class-action rights, is found to be unenforceable for any reason, the remainder shall remain enforceable. If, in a case in which class-action allegations have been, a waiver of class-action rights is found to be unenforceable with respect to all or some parts of a dispute, the remainder of this Arbitration Clause shall be unenforceable as those parts. Instead, those parts will be severed and proceed in court, with the remaining parts proceeding in arbitration. 12. Confidentiality. The arbitrator(s), Prizer-Painter and Owner will maintain confidentiality of the proceedings including but not limited to all information gathered, prepared and presented for purposes of the arbitration relate to the Dispute. 13. Informal Process to Resolve Disputes. Our goal is to resolve claims fairly and quickly. For any Dispute that You have against Prizer-Painter, you agree to first contact Prizer-Painter and attempt to resolve the claim informally by sending written notice of your claim by email to [email protected]. The notice must include (a) your name, address, email address and mobile telephone number; (b) describe the nature and basis of the Dispute; and (c) set forth the specific relief being sought. If You and Prizer-Painter cannot reach an agreement within thirty (30) days after such notice is received, then either party may submit this Dispute to binding arbitration as set forth above or where applicable to small claims court.