installation instructions safety symbols - lesman · safety symbols product terminology flow body -...
TRANSCRIPT

Flow Control Components - SMARTLINK® METER 10 - 30.9 - 21E - i - 7/08
Installation instructions
Safety symbols
Product terminology
Flow body - The flanged assembly with integrated flow conditioning screens. All air meters have flow bodies with removable conditioning screens.
Flow sensor - The housed, electronic sensor probe assembly that is inserted into the Flow Body
"Normal" conditions - Temperature and pressure reference conditions for flows displayed in "Normal" volumetric and "Normal" velocity flow rate units. For this product, "Normal" Conditions = 32° F and 14.696 psia per ISO 10780. (This definition varies widely based on industry, manufacturer, and geographic location.)
"Standard" conditions - Temperature and pressure reference conditions for flows displayed in "Standard" volumetric, "Standard" velocity, and all mass flow rate units. For this product, "Standard" Conditions = 60 °F and 14.73 psia per ANSI/API MPMS, 14.3.1. (This definition varies widely based on industry, manufacturer, and geographic location.)
"Standard" density - The density of the calibration reference gas at "Standard" conditions. This value is used for calculation in all displayed mass flow rate units (LB/H, LB/M, LB/S, KG/H, KG/M, and KG/S).
Velocity profile - The variation of fluid velocity over a cross-section area of pipe. SMARTLINK® METER is a point velocity sensing device. The flow conditioning screens in the flow body (along with proper field installation) ensure that a turbulent flow is developed and the velocity profile across the pipe is reasonably "flat", creating a good average velocity at the point of sensing.
Thermal profile - The variation of fluid temperature over a cross-section area of pipe. The flow conditioning screens in the flow body minimize thermal profiles by creating a turbulent flow and a good average temperature.
Abbreviations
Fcal: Product label field indicating the "flow calibration" range
Gcal: Product label field indicating the "gas calibration" type
LCD: Liquid Crystal Display
Ref: Product label field indicating flow sensor assembly "reference" serial number
Caution, risk of danger (ISO 7000 - 0434)
Hot Surface (IEC 60417 - 5041)
Protective Earth (IEC 60417-5019)
!
w w w . m a x o n c o r p . c o mcombustion systems for industry
Maxon reserves the right to alter specifications and data without prior notice. © 2008 Copyright Maxon Corporation. All rights reserved.

10 - 30.9 - 22E - i - 7/08 Flow Control Components - SMARTLINK® METER
General safety considerations
Storage, handling and product verification
Store flow meter shipment in a safe, dry, indoor location until ready for installation. Handle flow meter assembly with care during transport, unpacking, and lifting. After removal from shipment packaging, verify there is no physical damage to the flow sensor or flow body assemblies. A brass plug fitting (for capping the flow body after sensor removal) and a protective plastic cap (for the sensor probe when removed from the flow body) are provided along with a product instruction manual. On the flow sensor assembly and flow body product labels, locate the two fields, "Gcal" and "Fcal" that indicate the two important meter calibration parameters: fluid (or gas) type and the maximum flow range, respectively. Verify the process gas (or fluid) and flow range indicated on both labels are the same. (This ensures the flow sensor assembly is inserted in the proper flow body.) In addition, verify the fluid (or gas) of the intended installation matches the gas indicated on both labels.
Mechanical installation
Piping
To minimize measurement error due to velocity profile disturbances (see Product terminology on page 10-30.9-21), the piping requirements provided in the following drawings should be followed. Additional up and downstream lengths (beyond the minimum required lengths) are recommended. Failure to provide adequate up and downstream straight runs will result in a repeatable measurement but with a reduction in accuracy that cannot be quantified.
Gas meter installations should include an upstream drip leg, Y-strainer (with 100 mesh stainless steel screen), and a high-turndown regulator (such as a Sensus 243-RPC, 441-57S with “V-wing” option). The Y-strainer prevents debris from clogging the regulator as well as the meter’s flow conditioning screens and moisture reaching the sensor element. Proper sizing of the regulator, using upstream/downstream pressures and min/max flow requirements, is essential for preventing low flow regulator “chatter” which affects meter performance. Follow all regulator installation requirements for location of the downstream sensing line.
Air meter installations with a process or combustion fan should include an inlet filter to minimize the collection of debris on the removable flow conditioning screens. If air flow control is performed using a valve, a surge-less fan should be specified to ensure flow pulsations do not affect meter performance.
If a large temperature difference (i.e. 50° F or greater) exists between the fluid and the ambient conditions surrounding the pipe, a thermal gradient (see Product terminology on page 10-30.9-21) will develop across the diameter of the flow body causing a measurement error. Although the conditioning screens in the flow body minimize the thermal gradient, insulation with an R-factor greater than 12 (or 2 in fiberglass or thicker) should be installed around the flow body and 3 or more upstream pipe diameters.
SMARTLINK® METER is designed and manufactured in accordance with ANSI/ISA 61010-1, Safety Requirements for Electrical Equipment for Measurement, Control, and Laboratory Use (12 July 2004). To ensure hazard-free operation after shipment, all instructions contained in this documenta-tion must be thoroughly read and followed. Proper and safe operation of the mass flow meter requires installation, commissioning, and maintenance by qualified personnel and operation within the design limits provided by the technical specifications. The meter is intended for mass flow mea-surement of only the process fluid type specified on the product label. The flow sensor assembly is not intended to be used as an "insertion" type meter because calibration is dependent on the velocity profile established by the conditioning screens in the flow body. IMPROPER INSTALLATION OR USE OF THIS PRODUCT COULD RESULT IN BODILY INJURY, DEATH, OR DAMAGE TO OTHER EQUIPMENT.
!
w w w . m a x o n c o r p . c o mcombustion systems for industry
Maxon reserves the right to alter specifications and data without prior notice. © 2008 Copyright Maxon Corporation. All rights reserved.

Flow Control Components - SMARTLINK® METER 10 - 30.9 - 23E - i - 7/08
1) Flow direction
2) For any type of downstream control valve, a minimum undisturbed straight length of 3xØ or 12 inches, whichever is greater.
Before a control valve
1) Flow direction
2) 5xØ
3) For any type of downstream control valve, a minimum undisturbed straight length of 3xØ or 12 inches, whichever is greater.
4) Recommended 1/4” NPT fitting by others to detect screen blockage by differen-tial pressure measurement in air applications only
5) Flow condition screens
6) 1xØ
Combustion blower outlet with control valve
1) Flow direction
2) 5xØ
3) Recommended 1/4” NPT fitting by others to detect screen blockage with differ-ential pressure measure-ment in air applications only
4) Flow condition screens
5) For any type of downstream control valve, a minimum undisturbed straight length of 3xØ or 12 inches, whichever is greater.
After a control valve (Only recommended for air meter installations that require valve installation close to fan outlet to prevent surging/pulsations)
1
2
Ø
5
4
2
1
3 6
Ø
4
1
3
Ø
Ø52
w w w . m a x o n c o r p . c o mcombustion systems for industry
Maxon reserves the right to alter specifications and data without prior notice. © 2008 Copyright Maxon Corporation. All rights reserved.

10 - 30.9 - 24E - i - 7/08 Flow Control Components - SMARTLINK® METER
1) Flow direction
2) 3xØ (or 12 inches, whichever is greater)
3) For all downstream configu-rations (except with a control valve), a minimum undis-turbed straight length of 2xØ or 6 inches, whichever is greater.
One 90° elbow
1) Flow direction
2) 3xØ (or 12 inches, whichever is greater)
3) For all downstream configu-rations (except with a control valve), a minimum undis-turbed straight length of 2xØ or 6 inches, whichever is greater.
Two 90° elbows (one plane)
3
1
Ø
2
3
1
Ø
2
w w w . m a x o n c o r p . c o mcombustion systems for industry
Maxon reserves the right to alter specifications and data without prior notice. © 2008 Copyright Maxon Corporation. All rights reserved.

Flow Control Components - SMARTLINK® METER 10 - 30.9 - 25E - i - 7/08
1) Flow direction
2) 5xØ or 12 inches, whichever is greater
3) For all downstream configu-rations (except with a control valve), a minimum undis-turbed straight length of 2xØ or 6 inches, whichever is greater.
Two 90° elbow (two planes)
1) Flow direction
2) 3xØ (or 12 inches, whichever is greater)
3) For all downstream configu-rations (except with a control valve), a minimum undis-turbed straight length of 2xØ or 6 inches, whichever is greater
Reduction
1) Flow direction
2) 5xØ or 12 inches, whichever is greater
3) For all downstream configu-rations (except with a control valve), a minimum undis-turbed straight length of 2xØ or 6 inches, whichever is greater
Expansion
3 2
Ø
1
3 2
Ø 1
3 2
Ø 1
w w w . m a x o n c o r p . c o mcombustion systems for industry
Maxon reserves the right to alter specifications and data without prior notice. © 2008 Copyright Maxon Corporation. All rights reserved.
10 - 30.9 - 26E - i - 7/08 Flow Control Components - SMARTLINK® METER
Flow body and LCD orientation
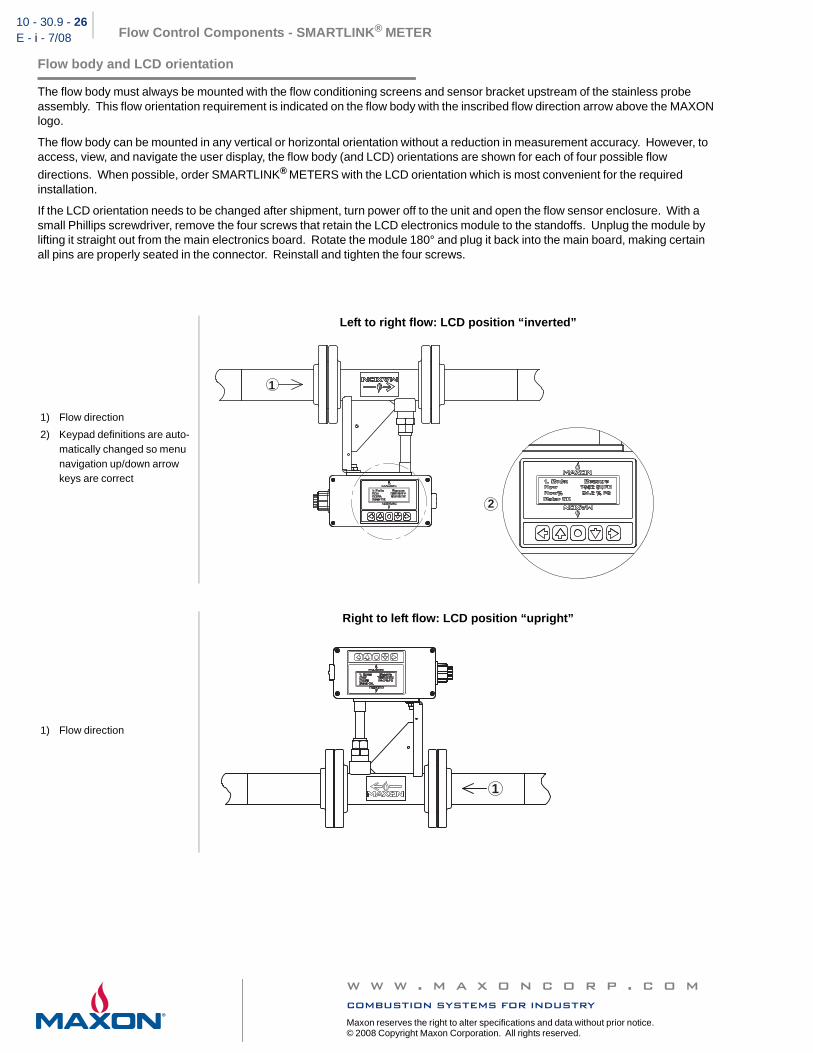
The flow body must always be mounted with the flow conditioning screens and sensor bracket upstream of the stainless probe assembly. This flow orientation requirement is indicated on the flow body with the inscribed flow direction arrow above the MAXON logo.
The flow body can be mounted in any vertical or horizontal orientation without a reduction in measurement accuracy. However, to access, view, and navigate the user display, the flow body (and LCD) orientations are shown for each of four possible flow
directions. When possible, order SMARTLINK® METERS with the LCD orientation which is most convenient for the required installation.
If the LCD orientation needs to be changed after shipment, turn power off to the unit and open the flow sensor enclosure. With a small Phillips screwdriver, remove the four screws that retain the LCD electronics module to the standoffs. Unplug the module by lifting it straight out from the main electronics board. Rotate the module 180° and plug it back into the main board, making certain all pins are properly seated in the connector. Reinstall and tighten the four screws.
1) Flow direction
2) Keypad definitions are auto-matically changed so menu navigation up/down arrow keys are correct
Left to right flow: LCD position “inverted”
1) Flow direction
Right to left flow: LCD position “upright”
1
2
1
w w w . m a x o n c o r p . c o mcombustion systems for industry
Maxon reserves the right to alter specifications and data without prior notice. © 2008 Copyright Maxon Corporation. All rights reserved.
Flow Control Components - SMARTLINK® METER 10 - 30.9 - 27E - i - 7/08
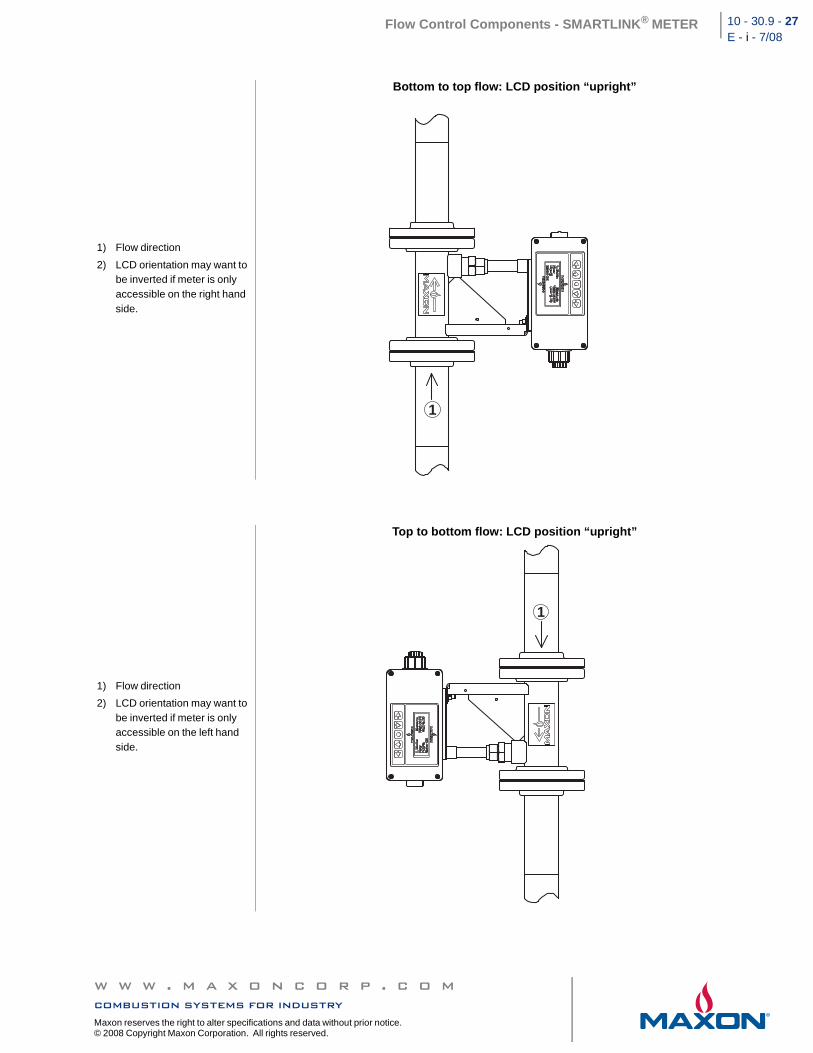
1) Flow direction
2) LCD orientation may want to be inverted if meter is only accessible on the right hand side.
Bottom to top flow: LCD position “upright”
1) Flow direction
2) LCD orientation may want to be inverted if meter is only accessible on the left hand side.
Top to bottom flow: LCD position “upright”
1
1
w w w . m a x o n c o r p . c o mcombustion systems for industry
Maxon reserves the right to alter specifications and data without prior notice. © 2008 Copyright Maxon Corporation. All rights reserved.

10 - 30.9 - 28E - i - 7/08 Flow Control Components - SMARTLINK® METER
Air flow body assembly and screen position
A SMARTLINK® METER for air flow measurement includes a flow body with two removable flow conditioning screens. The inlet screen and gaskets are shipped as loose items and require installation as shown in the exploded view below. The conditioning screens are keyed with an alignment pin and can be installed in one of four different 90° positions (L = left, R = right, T = top, or B = bottom) depending on flow body access needs. Install the inlet screen with the same orientation (i.e. handle position) as the downstream screen, making sure the alignment pin is securely seated in the slot of the adjacent flow body flange.
1) Gasket
2) Flow body
3) Gasket
4) Downstream screen
5) Gasket
6) Flow body extension
7) Gasket
8) Inlet screen
9) Gasket
Exploded view of air flow body
T = Top
R = Right
B = Bottom
L = Left
Screen position options
1
2
3
6
7
8
9
45
"L" "R"
"T"
"B"
w w w . m a x o n c o r p . c o mcombustion systems for industry
Maxon reserves the right to alter specifications and data without prior notice. © 2008 Copyright Maxon Corporation. All rights reserved.

Flow Control Components - SMARTLINK® METER 10 - 30.9 - 29E - i - 7/08
Flow sensor insertion
As shown in the following figures, flow sensor assembly removal (and insertion) clearances are required.
Air flow sensor assembly and screen removal
1) 2X removable screen
2) To remove sensor
3) 2X special flange mates with ANSI 125-150# bolt pattern
4) To remove screen
Dimensions in inches unless stated otherwiseModel Size A B C D E F G H
0800 SLM 8” 2.0 3.2 3/4 NPT 12.9 23.4 22.5° 10 22.5 1200 SLM 12” 2.0 3.2 3/4 NPT 12.9 25 15° 13 31.1 1600 SLM 16” 2.0 3.2 3/4 NPT 14.4 27.1 11.2° 15.3 37.7
2000 SLM 20” 2.0 3.2 3/4 NPT 16.4 29.1 9° 17.2 44 2400 SLM 24” 2.0 3.2 3/4 NPT 18.4 31.1 9° 19.5 50.3 2800 SLM 28” 2.0 3.2 3/4 NPT 20.4 33.1 7.5° 21.8 56.7
A
B C
D
E 2
1
3
F
G
H4
w w w . m a x o n c o r p . c o mcombustion systems for industry
Maxon reserves the right to alter specifications and data without prior notice. © 2008 Copyright Maxon Corporation. All rights reserved.

10 - 30.9 - 30E - i - 7/08 Flow Control Components - SMARTLINK® METER
If the flow sensor assembly is provided separately or removed during flow body installation, the following procedure should be followed when re-inserting the sensor into the flow body:
1. Verify the compression brass nut, large, and small ferrule are positioned on the probe assembly in the correct order as shown in the following figure. Remove the 3/8”-24 hex nut and flat washer from the threaded stud. (If installed, remove the compression plug fitting from the flow body and the plastic protective cap from the sensor probe.)
2. Verify the threaded stud engages the hole in the flow body mounting bracket and that the bottom of the bar with the threaded stud is seated flush with the top of the bracket.
3. Verify the tank fitting ferrules are properly seated, thread the tank fitting nut onto the body and hand tighten. Tighten the fitting nut with a 1-1/8" wrench by turning the nut 2 turns. Bolt the threaded stud in place using a 3/8”-24 hex jam nut and flat washer. Using a 9/16” wrench, torque to 10-12 ft-lb.
Gas flow sensor assembly removal
1) To remove sensor
2) 2X 150# RF ANSI flange
Dimensions in inches unless stated otherwise
Model Size A B C D E F0200 SLM 2” 2.0 3.2 3/4 NPT 8.9 16.2 45°0300 SLM 3” 2.0 3.2 3/4 NPT 8.9 16.8 45°
0400 SLM 4” 2.0 3.2 3/4 NPT 8.9 17.3 22.5°0600 SLM 6” 2.0 3.2 3/4 NPT 9.8 18.4 22.5°
A
B
D
F 2
E
C
1
w w w . m a x o n c o r p . c o mcombustion systems for industry
Maxon reserves the right to alter specifications and data without prior notice. © 2008 Copyright Maxon Corporation. All rights reserved.

Flow Control Components - SMARTLINK® METER 10 - 30.9 - 31E - i - 7/08
Pipe purging and leak testing
Prior to installation of a gas or air flow body, the upstream piping should be purged to clear out any dust, debris, oil or other foreign material that would collect on the flow conditioning screens or probe assembly and cause measurement error. Assemble the flow body to the mating flanges, gaskets, and hardware in compliance with all local and national piping codes. Leak test all flanges and fittings in the flow stream with a soapy liquid after pressurizing the piping.
Flow sensor conduit connection and enclosure
To maintain the water-tight environmental rating of the enclosure (IP66 / NEMA 4X) after termination of all electrical connections, close the flow sensor assembly enclosure lid, tighten the four screws, and properly seal the flow meter conduit hub to a flexible or rigid conduit.
Electrical installation
Electrical safety
1) Sensor assembly
2) Brass hex nut
3) Brass ferrule (small)
4) Brass ferrule (large)
5) Brass tank fitting
6) 3/8” stud
7) 3/8” flat washer
8) 3/8” hex nut
9) Gas or air flow body
10) Detail
Flow sensor assembly insertion hardware
SMARTLINK® METER is designed and manufactured in accordance with ANSI/ISA 61010-1, Safety Requirements for Electrical Equipment for Measurement, Control and Laboratory Use (12 July 2004). To ensure a hazard-free installation, all flow meter wiring and protective earth grounding shall be done in accordance with national and local electrical codes. In addition, the insulation for all meter wiring must have minimum voltage and temperature ratings of 300 VAC and 158°F, respectively. All electrical installation work must be performed with the power off.
1
2
3
4
5
6
7
8
10
9A
A
w w w . m a x o n c o r p . c o mcombustion systems for industry
Maxon reserves the right to alter specifications and data without prior notice. © 2008 Copyright Maxon Corporation. All rights reserved.

10 - 30.9 - 32E - i - 7/08 Flow Control Components - SMARTLINK® METER
Wiring terminals and requirements
To access the field wiring compartment for power and low-voltage meter connections, unscrew the 4 screws on the meter enclosure and open the hinged door. Pass all customer-supplied wires into the enclosure through the 3/4” conduit hub.
The two diagrams below (for the AC and DC model) indicate each wiring terminal and the following reference table identifies each terminal’s signal type, function, and wiring requirement. Many applications will not require connections to all low voltage terminals.
AC model wiring terminals DC model wiring terminals
1
GNDGND
(ON CONDUIT HUB
)(ON C
ONDUIT HUB)
L1L1 L2L2 DADA DBDB SHLDSHLD
(NOT USED)(NOT USED)POWERPOWERINPUTINPUT
(J12)(J12)PEPE
SMARTLINK SMARTLINK METERMETER
2
3
4
5
6
9
ACAC
4-20mA ANALOG4-20mA ANALOGINPUT A (AI-A)INPUT A (AI-A)
4-20mA ANALOG4-20mA ANALOGOUTPUT B (AO-B)OUTPUT B (AO-B)
4-20mA ANALOG4-20mA ANALOGOUTPUT A (AO-A)OUTPUT A (AO-A)
(-)(-)
8(+)(+)
7(-)(-)
1010(+)(+)
1111(-)(-)
1212(+)(+)
RELAY RETURNRELAY RETURN
RELAY DRIVE OUTPUT ARELAY DRIVE OUTPUT A
RELAY INPUT ARELAY INPUT A
RELAY INPUT BRELAY INPUT B
RELAY DRIVE OUTPUT BRELAY DRIVE OUTPUT B
RELAY DRIVE OUTPUT CRELAY DRIVE OUTPUT C
R
PROTECTIVE EARTH
PROTECTIVE EARTH
1
GNDGND
CONNEC
TION NOTCONNEC
TION NOT
- + DADA DBDB SHLDSHLD
(NOT USED)(NOT USED)POWERPOWERINPUTINPUT
(J12)(J12)PEPE
SMARTLINK SMARTLINK METERMETER
2
3
4
5
6
9
24VDC24VDC
4-20mA ANALOG4-20mA ANALOGINPUT A (AI-A)INPUT A (AI-A)
4-20mA ANALOG4-20mA ANALOGOUTPUT B (AO-B)OUTPUT B (AO-B)
4-20mA ANALOG4-20mA ANALOGOUTPUT A (AO-A)OUTPUT A (AO-A)
(-)(-)
8(+)(+)
7(-)(-)
1010(+)(+)
1111(-)(-)
1212(+)(+)
RELAY RETURNRELAY RETURN
RELAY DRIVE OUTPUT ARELAY DRIVE OUTPUT A
RELAY INPUT ARELAY INPUT A
RELAY INPUT BRELAY INPUT B
RELAY DRIVE OUTPUT BRELAY DRIVE OUTPUT B
RELAY DRIVE OUTPUT CRELAY DRIVE OUTPUT C
R
PROTECTIVE EARTH
PROTECTIVE EARTH
REQUIRED FOR DC M
ODELREQUIRED FOR DC
MODEL
w w w . m a x o n c o r p . c o mcombustion systems for industry
Maxon reserves the right to alter specifications and data without prior notice. © 2008 Copyright Maxon Corporation. All rights reserved.

Flow Control Components - SMARTLINK® METER 10 - 30.9 - 33E - i - 7/08
Wiring requirement summary
Terminal reference(Signal name)
Termination connector, signal type, function, electrical/wiring requirementsNote 1: Minimum wire rating of 300 VAC and 158°F Note 2: Wire size 16-22 AWGNote 3: No length restrictions (other than voltage drop considerations)
Power / Ground Terminals(AC model only)
2-position power connector (labeled “L1 L2”)
L1 (AC mains - hot)L2 (AC mains - neutral)
AC mains power input- Connect terminals to AC mains source- No product configuration required for 115 or 230 VAC operation115-230 VAC (50/60 Hz); 0.04 - 0.02 ampsNote 1, 2, 3
PE (protective earth) Protective earth ground- Connect external earth ground to meter conduit hub screw terminal lugNote 1, 2
Power Terminals(DC model only)
2-position power connector (labeled “+ -”)
+ (+24VDC)- (-24VDC)
DC power input - Connect terminals to external 24VDC power supply, ±5% regulation24VDC, 0.2 amps (max)Note 1, 2, 3
Low Voltage Terminals 12-position input/output (I/O) connector
#1 (relay return) Input/output relay returnCommon (return) for low voltage terminals #2 through #6- Connect to external 24VDC common used with output and input relays30VDC (max), 340mA (max with all I/O energized)Note 1, 2, 3
#2 (relay drive output A\)#3 (relay drive output B\)#4 (relay drive output C\)
Solid-state digital outputs; open collector type; terminal #1 is common (return)
#2 (RO-A): NO Meter/Flow Test Active (ON state)#3 (RO-B): NO Meter Alarm (ON state)#4 (RO-C): NO Limit Condition (ON state)
- Fail-safe output design: With the output terminal connected to the minus (-) terminal of a DC relay coil, a meter alarm, limit or flow test active condition is indicated when the open collector relay driver output is in the OFF state, resulting in 24 VDC measured from the output terminal to Relay Return. An open collector relay driver output ON state will result in 0.3 VDC mea-sured from the output terminal to Relay Return.- Connect to external electro-mechanical (or solid-state) relays with transient suppression and a coil rating of 24VDC @ 100 mA max, ORConnect to a PLC or DCS, 24VDC current sourcing input - Terminal #1 must also be connected to (-) or Common of external 24VDC supply used to energize relay coil (or to source the current for the PLC/DCS input)- Reference operating instructions for configuration of Terminal #4 output function
30 VDC max @ 100 mA (max)Note 1, 2, 3
#5 (relay input A)#6 (relay input B)
Solid-state digital inputs; optically isolated type; terminal #1 is common (return)
#5: (RI-A) Activate Meter/Flow Test (Momentary ON, 1 second minimum)#6: (RI-B) Future Use
- Connect to the switched side of an electro-mechanical relay contact with ONLY DC voltage, OR Connect to PLC/DCS, 24VDC digital current sourcing output - Terminal #1 must also be connected to (-) or Common of external 24VDC supply used to energize one side of relay contact or PLC/DCS input
Minimum ON state requirement: 5VDC @ 2mA Maximum terminal ratings: 30VDC @ 20mA max Note 1, 2, 3
w w w . m a x o n c o r p . c o mcombustion systems for industry
Maxon reserves the right to alter specifications and data without prior notice. © 2008 Copyright Maxon Corporation. All rights reserved.
10 - 30.9 - 34E - i - 7/08 Flow Control Components - SMARTLINK® METER
Wiring requirement summary (continued)
Terminal reference(Signal name)
Termination connector, signal type, function, electrical/wiring requirementsNote 1: Minimum wire rating of 300 VAC and 158°F Note 2: Wire size 16-22 AWGNote 3: No length restrictions (other than voltage drop considerations)
Low Voltage Terminals 12-position input/output (I/O) connector
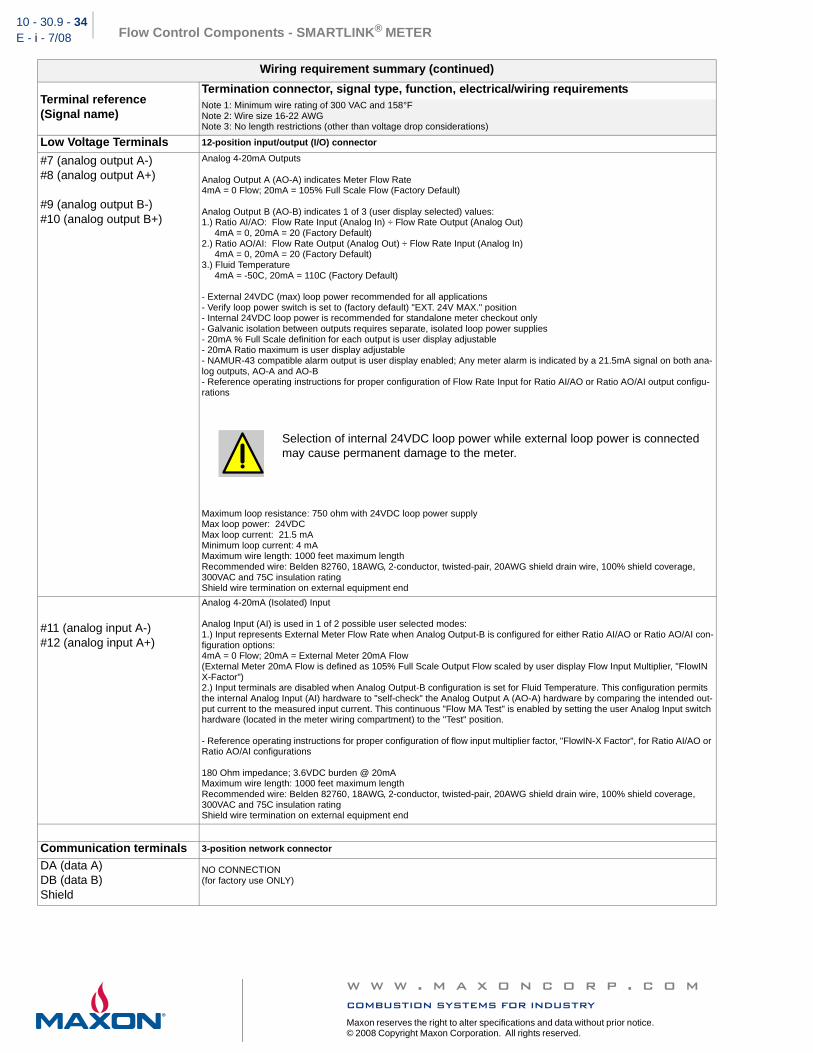
#7 (analog output A-)#8 (analog output A+)
#9 (analog output B-)#10 (analog output B+)
Analog 4-20mA Outputs
Analog Output A (AO-A) indicates Meter Flow Rate4mA = 0 Flow; 20mA = 105% Full Scale Flow (Factory Default)
Analog Output B (AO-B) indicates 1 of 3 (user display selected) values:1.) Ratio AI/AO: Flow Rate Input (Analog In) ÷ Flow Rate Output (Analog Out) 4mA = 0, 20mA = 20 (Factory Default)2.) Ratio AO/AI: Flow Rate Output (Analog Out) ÷ Flow Rate Input (Analog In) 4mA = 0, 20mA = 20 (Factory Default)3.) Fluid Temperature 4mA = -50C, 20mA = 110C (Factory Default)
- External 24VDC (max) loop power recommended for all applications- Verify loop power switch is set to (factory default) "EXT. 24V MAX." position - Internal 24VDC loop power is recommended for standalone meter checkout only- Galvanic isolation between outputs requires separate, isolated loop power supplies - 20mA % Full Scale definition for each output is user display adjustable- 20mA Ratio maximum is user display adjustable- NAMUR-43 compatible alarm output is user display enabled; Any meter alarm is indicated by a 21.5mA signal on both ana-log outputs, AO-A and AO-B - Reference operating instructions for proper configuration of Flow Rate Input for Ratio AI/AO or Ratio AO/AI output configu-rations
Maximum loop resistance: 750 ohm with 24VDC loop power supplyMax loop power: 24VDCMax loop current: 21.5 mAMinimum loop current: 4 mA Maximum wire length: 1000 feet maximum lengthRecommended wire: Belden 82760, 18AWG, 2-conductor, twisted-pair, 20AWG shield drain wire, 100% shield coverage, 300VAC and 75C insulation ratingShield wire termination on external equipment end
#11 (analog input A-)#12 (analog input A+)
Analog 4-20mA (Isolated) Input
Analog Input (AI) is used in 1 of 2 possible user selected modes:1.) Input represents External Meter Flow Rate when Analog Output-B is configured for either Ratio AI/AO or Ratio AO/AI con-figuration options:4mA = 0 Flow; 20mA = External Meter 20mA Flow (External Meter 20mA Flow is defined as 105% Full Scale Output Flow scaled by user display Flow Input Multiplier, "FlowIN X-Factor")2.) Input terminals are disabled when Analog Output-B configuration is set for Fluid Temperature. This configuration permits the internal Analog Input (AI) hardware to "self-check" the Analog Output A (AO-A) hardware by comparing the intended out-put current to the measured input current. This continuous "Flow MA Test" is enabled by setting the user Analog Input switch hardware (located in the meter wiring compartment) to the "Test" position.
- Reference operating instructions for proper configuration of flow input multiplier factor, "FlowIN-X Factor", for Ratio AI/AO or Ratio AO/AI configurations
180 Ohm impedance; 3.6VDC burden @ 20mAMaximum wire length: 1000 feet maximum lengthRecommended wire: Belden 82760, 18AWG, 2-conductor, twisted-pair, 20AWG shield drain wire, 100% shield coverage, 300VAC and 75C insulation ratingShield wire termination on external equipment end
Communication terminals 3-position network connector
DA (data A)DB (data B)Shield
NO CONNECTION(for factory use ONLY)
Selection of internal 24VDC loop power while external loop power is connected may cause permanent damage to the meter.
w w w . m a x o n c o r p . c o mcombustion systems for industry
Maxon reserves the right to alter specifications and data without prior notice. © 2008 Copyright Maxon Corporation. All rights reserved.

Flow Control Components - SMARTLINK® METER 10 - 30.9 - 35E - i - 7/08
Input power and grounding
SMARTLINK® METER can be ordered for operation with either 24VDC input power or for connection to a mains supply, 115-230VAC, 50/60Hz. The product label on the flow sensor enclosure indicates if the meter was manufactured with the AC or DC power input option. The two-position power input connector on the main electronics board is also labeled to indicate the power input option.
For the AC model, connect two wires from the mains supply to the power connector, labeled "L1 L2". The wires connected to the meter L1 and L2 terminals should correspond to the same connections of the AC source. Product configuration is NOT required to select between 115VAC and 230VAC operation. Connect an earth ground wire to the conduit hub terminal that is labeled with the protective earth symbol. Provide a switch and non-time delay (North America), quick-acting, high breaking capacity, type F (Europe), ½ amp, 250 V fuse, or circuit breaker as part of the installation. The switch or circuit break shall be located in close proximity of the meter, be in easy reach of the operator, and shall be marked as the disconnecting device for the meter.
For the 24VDC model, connect two wires from a 24VDC supply (with ±5% voltage regulation) to the power connector, labeled "+24V -". The polarity of each wire from the DC power source must match the meter's connection polarity. No protective earth ground wire is required for the DC model. Verify the supply has the capacity required to power the connected meter(s) and the associated interface relays, output current loops, and all other externally connected equipment.
Low voltage wiring
The field wiring label shown below is adhered to the enclosure lid as an aid for termination of all meter low-voltage circuits. This label, along with the following installation checklist, should be used to ensure correct termination of the low-voltage signals required by the application.
4-20ma
4-20ma
4-20ma
KK
K
24VDC
24VDC
24VDC
LOOP POWER
AI-A TEST
ANALOG INPUT
FLOW
12
711
13
54
21
08
96
INT.24V
EXT.24VMAX
MIN. WIRETEMP. RATING:70C/158F
w w w . m a x o n c o r p . c o mcombustion systems for industry
Maxon reserves the right to alter specifications and data without prior notice. © 2008 Copyright Maxon Corporation. All rights reserved.

10 - 30.9 - 36E - i - 7/08 Flow Control Components - SMARTLINK® METER
Loop power selectionA loop power selection switch is provided in the field wiring compartment below the power input connector. (The loop power selection switch and its factory default position is represented in the lower left corner of the field wiring label.) For all field applications, it is recommended that external, 24VDC (max) loop power is provided for the two 4-20mA output circuits. Therefore, the loop power switch should remain in the (factory default) "EXT. 24V MAX." position. If both analog outputs are used and galvanic isolation is required between each 4-20mA output, a separate, isolated loop power source should be provided for each current loop.
Output current loop wiringVerify correct polarity connections to external loop power and current loop measurement equipment. Although a number of possible wiring configurations exist, the convention indicated on the field wiring label is recommended:
- Connect the positive (+) terminal of the external 4-20mA measurement device to the positive (+) meter output terminal (#8 or #10).
- Connect the positive (+) terminal of the external 24VDC supply to the negative (-) meter output terminal (#7 or #9).
- Connect the negative (-) terminal of the loop supply to the negative (-) or common terminal of the external 4-20mA measurement device.
A PLC/DCS, multi-channel analog input card may include separate connections for internal or external loop power and this would eliminate the need for any external series connection of the loop supply as described above.
Relay (drive) output wiring
Each solid-state, open collector, relay drive output (meter terminals #2, #3, and #4) should be connected to a 24VDC relay coil with transient suppression and a maximum ON current of 100mA. It is also possible to connect these outputs directly to a PLC/DCS, 24VDC sourcing input channel. Relay Return, Terminal #1, must be connected to the common or negative (-) of the external 24VDC supply used to energize the relay coil or used to source the current for the PLC/DCS input.
Relay input wiringConnect Terminal #5 to the switched side of an electromechanical relay contact with DC voltage ONLY, when closed. Direct connection to a PLC/DCS, 24VDC digital current sourcing output channel is also acceptable. Relay Return, Terminal #1, must be connected to the common or negative (-) of the 24VDC supply that is “switched” in by the relay contact or the PLC/DCS output module. If a relay output and input are required by the application, the same DC supply must be used due to the meter’s single Relay R return terminal for both functions.
Input current loop wiring
If "standalone" ratio monitoring is required by the application without a PLC or DCS, an external flow meter will require connection to the input current loop for “local” meter measurement of the second flow. The current source shown on the field wiring label can be replaced by the 2nd meter's externally powered, 4-20 mA flow output current loop with connection to Analog Input A (- / +), Terminals #11 and #12. (The following section provides a more detailed electrical drawing of this ratio monitoring application and the associated current loop connections required.)
Selection of internal 24VDC loop power while external loop power is connected may cause permanent meter damage. Internal 24VDC loop power is recommended for standalone meter checkout ONLY. The switch position for internal loop power is indicated as "INT. 24V".
Maintain the integrity of the MAXON enclosure by using NEMA 4X or IP66 rated dust- and water-tight electrical connectors. Use cable-sealing grips and strain-relief loops for any cord or cable. Use internal sealing materials on all conduit connections. Moisture can have a harmful effect on device internals if permitted to enter through wiring connectors. Ensure that the device connection is not at a low point of the conduit to avoid condensation run-off into the housing; install a drip loop if necessary. Make sure that the access cover plate is in place and securely fastened. All cover screws should be tightened using an alternate cross-corner tightening pattern. Cover screws should be checked periodically to ensure adequate sealing protection.
w w w . m a x o n c o r p . c o mcombustion systems for industry
Maxon reserves the right to alter specifications and data without prior notice. © 2008 Copyright Maxon Corporation. All rights reserved.

Flow Control Components - SMARTLINK® METER 10 - 30.9 - 37E - i - 7/08
Typical electrical installations
The following two schematics represent "typical" electrical installations of SMARTLINK® METER.
The first electrical drawing consists of a single, 24VDC natural gas meter interfaced to alarm relays, a meter test switch, and a remote panel display.
The second drawing includes two 24VDC powered, SMARTLINK® METERS used to monitor the air/fuel ratio of a combustion system. The 4-20mA flow output from the air meter is connected to the gas meter's 4-20mA input for measurement of an external flow. The gas meter is configured to output a 4-20mA ratio and to de-energize a relay if the ratio exceeds a user-selected window limit condition. A momentary switched 24VDC is connected to each meter's input that activates an "on-line" flow/meter self test. The flow and ratio output current loops, output relay coils, and both (air and gas) meters are powered using the same 24VDC power supply.
w w w . m a x o n c o r p . c o mcombustion systems for industry
Maxon reserves the right to alter specifications and data without prior notice. © 2008 Copyright Maxon Corporation. All rights reserved.

10 - 30.9 - 38E - i - 7/08 Flow Control Components - SMARTLINK® METER
SMARTLINK® METER (24VDC) - Typical electrical installation
w w w . m a x o n c o r p . c o mcombustion systems for industry
Maxon reserves the right to alter specifications and data without prior notice. © 2008 Copyright Maxon Corporation. All rights reserved.

Flow Control Components - SMARTLINK® METER 10 - 30.9 - 39E - i - 7/08
SMARTLINK® METER (24VDC, ratio monitor) - Typical electrical installation
w w w . m a x o n c o r p . c o mcombustion systems for industry
Maxon reserves the right to alter specifications and data without prior notice. © 2008 Copyright Maxon Corporation. All rights reserved.

10 - 30.9 - 40E - i - 7/08 Flow Control Components - SMARTLINK® METER
Commissioning instructions
After completing the mechanical and electrical installation of the flow meter, the following commissioning checklist procedure should be performed.
Check the product ratings for gas type, flow range, power input, and maximum pressure on the meter label match the applica-tion for which it is being installed.
Check the flow body size for a correct match with the installed flow sensor by comparing the flow range on the sensor label to the flow range on the body label. Confirm the intended direction of flow through the meter matches the direction indicated by the arrow inscribed above the MAXON logo on the flow body.Verify the proper upstream and downstream piping requirements are provided. For air meter installations, confirm proper position of the air flow body extension with respect to the direction of flow and the 2 removable screens have been installed in the same orientation. Check that all flow meter related mechanical and electrical installation work meets applicable code and safety requirements.
Check for Loop Power selector switch placement in the rightmost "EXT. 24V MAX." factory default position. (The switch is located on the left side of the field wiring compartment below the power connector.)
Check for display illumination, a '0' flow reading, and a "Meter OK" message (on Menu #1) after turning power on and waiting for a 30-second start-up period to complete.
Consult the instructions on meter operation to determine if the factory configuration requires adjustment for the installed appli-cation (i.e. 4-20mA output configuration, flow filtering, etc.). If the meter's "built-in" ratio monitoring or limit output functions are used by the application, meter configuration via the user display MUST be performed by the commissioning engineer for proper operation.Verify proper function of all wired inputs and outputs (after meter configuration is completed) by using the 4-20mA output and input status menu screens. With all external process control disabled or in a manual mode, zero and span all external equip-ment inputs connected to the meter's 4-20mA outputs using the Test Output ON/OFF commands.
Check for a reasonable and stable flow output on Menu #1 with no meter alarms after a steady process flow is enabled. If avail-able, use other process measurements (such as burner differential pressure) to validate the flow reading as described in the maintenance section. Confirm proper meter operation by executing the flow/meter test command. Refer to the operation instructions on use of the flow/meter test command.Check for secure installation of the enclosure lid and that passcode protection of the meter configuration has been enabled if required for the application.
w w w . m a x o n c o r p . c o mcombustion systems for industry
Maxon reserves the right to alter specifications and data without prior notice. © 2008 Copyright Maxon Corporation. All rights reserved.

Flow Control Components - SMARTLINK® METER 10 - 30.9 - 41E - i - 7/08
Operating instructions
General
This section describes the basic operation of the meter and how to use the display for:
Viewing meter status and manufacturing/calibration information, Executing meter test and configuration commands, and Configuring the meter for specific functions such as limit and ratio outputs, signal filtering, and selection of displayed measure-ment units.
Meter 100% full-scale flow output
Discussions in the following material related to the meter’s 4-20mA flow output and its configuration refer to % Full Scale (FS).
Modes of operation
The meter has four distinct modes of operation:
Startup mode is entered after the meter is powered ON. During this period, the electronics are initialized and power is applied to the RTD probe assembly. This mode is displayed as "Startup" on Menu #1 and is active for about 10 seconds after power is applied.
Measurement mode is entered after startup initialization is complete. In the first ½ minute of this mode (and during the 10-second startup period), the flow output may be non-zero while the RTD assembly stabilizes in temperature. This mode is displayed as "Measure" on Menu #1 and is active if the meter is powered ON and no Input/Output or Flow Test command is being executed. Measurement mode is automatically re-entered after a Flow Meter Test cycle is completed or when any Input/Output Test command is turned OFF.
Flow meter test mode is user-initiated by a user command or when a digital input is turned ON. This mode is displayed as "Flo-Test" on Menu #1 and provides a complete "self-check" of the meter electronics and RTD sensor assembly. Reference the section on User Commands for more detailed information.
Input/output test mode is user-initiated by display commands for checkout of the electrical connections, I/O hardware, and external equipment after meter installation. This mode is displayed as "I/O Test" on Menu #1. Reference the section on User Commands for more detailed information.
The following meter 100% Full Scale definition applies to all MAXON SMARTLINK® METERS:
Meter 100% Full Scale Flow = Calibrated Max Flow Rate (on sensor label) + 5%
The 5% "buffer" permits most closed-loop control applications to properly operate at the maximum calibrated flow rate printed on the label that is used for product selection. All meters are shipped with the 20mA Flow Output set to represent 100% Full Scale. Although the 4-20mA flow output can be "scaled" to represent lower 20mA flow rates, the 100% Full Scale flow rate of the meter cannot be exceeded or changed and the maximum application measurement flow must be less than (or equal to) the calibrated maximum flow rate on the product label.
w w w . m a x o n c o r p . c o mcombustion systems for industry
Maxon reserves the right to alter specifications and data without prior notice. © 2008 Copyright Maxon Corporation. All rights reserved.

10 - 30.9 - 42E - i - 7/08 Flow Control Components - SMARTLINK® METER
Display Overview
Menu Navigation
User display menus are all numbered and divided into three categories: Meter Status (1.-1.12), User Commands (2.-2.6), and User Configuration (3.-3.16). Refer to the table below for a summary of the user display functions within each of the categories.
User display menu summary
Meter status User commands User configuration1. Mode: Measure 2. Totalizer Reset 3. Flow Units1.1 Flow Totalizer 2.1 Meter/Flow Test 3.1 Temp Units
1.2 Meter Status 2.2 Output ON Test 3.2 Output-B Setup1.3 Ratio Status 2.3 Output OFF Test 3.3 FlowIN X-Factor1.4 Output A: Flow 2.4 Setup Reset 3.4 20mA Ratio AO-B
1.5 Output B: Ratio 2.5 Reset Event Log 3.5 AC Filter1.6 Input A: Flow 2.6 All Tests OFF 3.6 21.5mA Alarm1.7 Relay Outputs 3.7 Flow Filter
1.8 Event Log 3.8 Flow Bias1.9 Passcode Entry 3.9 Flow Cutoff1.10 Unit Mfg Data A 3.10 LO Limit A-Flow
1.11 Unit Mfg Data B 3.11 HI Limit A-Flow1.12 Calibration 3.12 LO Limit B
3.13 HI Limit B
3.14 20mA Flow3.15 20mA OutB3.16 Passcode
w w w . m a x o n c o r p . c o mcombustion systems for industry
Maxon reserves the right to alter specifications and data without prior notice. © 2008 Copyright Maxon Corporation. All rights reserved.

Flow Control Components - SMARTLINK® METER 10 - 30.9 - 43E - i - 7/08
The meter keypad is shown in the two figures below. The LCD can be installed in two positions and the arrow keys will automatically change functions. (Refer to the mechanical installation section on LCD orientation for instructions on how to change the LCD orientation.)
The four arrow keys: LEFT, UP, RIGHT, and DOWN are used to select the desired menu display as follows:
1. The RIGHT arrow key is used to select the first display in the "next" menu column (or category). If Menu #1.4, Output A: Flow is displayed and the RIGHT arrow key is pressed, Menu #2.Totalizer Reset is displayed. When any Menu #3.x item is selected and the RIGHT arrow key is pressed, the display will "wrap" to Menu #1. Mode.
2. The LEFT arrow key is used to select the first display in the "previous" menu column (or category). If Menu #2.1 Meter/Flow Test is displayed and the LEFT arrow key is pressed, Menu #1. Mode is displayed. When any Menu #1.x item is selected and the LEFT arrow key is pressed, the display will "wrap" to Menu #3. Flow Units.
3. The UP arrow key is used to move "up" the menu column to a lower item number. When the first item in a column is selected and the UP arrow is pressed, the display will "wrap" to the last item in the column.
4. The DOWN arrow key is used to move "down" the menu column to a higher item number. When the last item in a column is selected and the DOWN arrow is pressed, the display will "wrap" to the first item in the column.
5. Pressing the LEFT and RIGHT arrow keys simultaneously forces the first item in the column to be displayed. If both keys are held down longer, Menu #1 is selected and the LCD is electronically re-initialized.
Executing commands
All user commands (Menu #2.-2.6) are executed by pressing the ENTER key. Command execution is only permitted if the meter is "unlocked", i.e. not passcode protected.
Left Arrow
Up Arrow
Down Arrow
Right Arrow
Left ArrowUp Arrow
Down Arrow
Right Arrow
Enter
Enter
Keypad functions with LCD “upright” Keypad functions with LCD “inverted”
w w w . m a x o n c o r p . c o mcombustion systems for industry
Maxon reserves the right to alter specifications and data without prior notice. © 2008 Copyright Maxon Corporation. All rights reserved.

10 - 30.9 - 44E - i - 7/08 Flow Control Components - SMARTLINK® METER
Changing/entering data
Changing/entering numeric data is required to modify specific meter configuration parameters (Menu #3.3, #3.4, and #3.8-3.16) or for meter passcode entry (Menu #1.9). All five keys: (LEFT), (UP), (RIGHT), (DOWN), and (ENTER) are used in the following procedure:
1. Press ENTER to begin the change procedure. The first digit that can be changed is indicated by a flashing cursor.
2. The UP and DOWN arrow keys are used to select a digit (0-9), a decimal (for non-integer values), - minus sign (for negative values), and a blank character to delete digits in all but the first position.
3. Use the RIGHT and LEFT arrow keys to select the digit to be changed or entered.
4. Press ENTER to save the modified data.
5. If NO data change is desired after beginning to edit, press the LEFT arrow key until the cursor stops blinking and the previous screen is displayed.
6. Changing user configuration data is only permitted if the meter is "unlocked", i.e. not passcode protected.
Changing selections
Changing a selection is required to modify specific meter configuration parameters (Menu #3.1, #3.2, #3.5-3.7). The four keys: LEFT, UP, DOWN, and ENTER are used in the following selection change procedure:
1. Press ENTER and the cursor will flash indicating that a change can be made.
2. The UP and DOWN arrow keys are used to make a selection from a list of options.
3. Press ENTER to save the modified selection.
4. If NO selection change is desired after beginning to scroll the list of options, press the LEFT arrow key until the cursor stops blinking and the previous screen is displayed.
5. Changing user configuration data is only permitted if the meter is "unlocked", i.e. not passcode protected.
Meter configuration
All meters are shipped with the following configuration:
Flow rate displayed in scfh
Temperatures displayed in °FAnalog Output-A (Flow) 20mA = meter 100% FS (i.e. calibration flow max + 5%)4-20mA Output-B (Ratio, AI/AO) enabled; NOT configured for external flow input
60Hz data acquisition rejection filtering21.5mA current loop alarm function disabledNo filtering of flow output signal (i.e. fastest response)
No flow output biasAll limit output functions disabledPasscode protection disabled
Refer to the sections below for guidance on specific configuration functions.
w w w . m a x o n c o r p . c o mcombustion systems for industry
Maxon reserves the right to alter specifications and data without prior notice. © 2008 Copyright Maxon Corporation. All rights reserved.

Flow Control Components - SMARTLINK® METER 10 - 30.9 - 45E - i - 7/08
Flow measurement and total units
The meter's mass flow rate out, 4-20mA input/output definitions, and calibration range, are displayed in one of the following "Standard" or "Normal" units as selected by the Menu #3 Flow Units configuration setting. For each flow rate unit, the flow total is
displayed in the corresponding volumetric units. (Note the reference conditions and densities below for all SMARTLINK® METER flow rate units. These definitions vary widely across industries, manufacturers, and geographic regions.)
Summary of display, flow, and totalizer units
Flow display units Flow unit description Totalizer display units
SCFH Standard cubic feet per hour scf
SCFM Standard cubic feet per minute scf
SFPM Standard feet per minute scf
SFPS Standard feet per second scf
LB/H Pounds per hour lbs
LB/M Pounds per minute lbs
LB/S Pounds per second lbs
NM3H Normal cubic meters per hour nm3
NM3M Normal cubic meters per minute nm3
NMPM Normal meters per minute nm3
NMPS Normal meters per second nm3
NLPH Normal liters per hour nl
NLPM Normal liters per minute nl
KG/H Kilograms per hour kg
KG/M Kilograms per minute kg
KG/S Kilograms per second kg
SMPM Standard meters per minute sm3
Reference conditions
Temperature and pressure conditions for flows displayed in "Standard" volumetric, "Standard" veloc-ity, and all mass flow rate units: 60°F and 14.73 psia per ANSI/API MPMS, 14.3.1
Temperature and pressure conditions for flows displayed in "Normal" volumetric and "Normal" velocity flow units: 32°F and 14.696 psia
Reference densities Air models: 0.076 lbs/ft3Natural gas models: 0.042 lbs/ft3
w w w . m a x o n c o r p . c o mcombustion systems for industry
Maxon reserves the right to alter specifications and data without prior notice. © 2008 Copyright Maxon Corporation. All rights reserved.

10 - 30.9 - 46E - i - 7/08 Flow Control Components - SMARTLINK® METER
20mA flow output scaling
Analog Output-A (AO-A) is a 4-20mA current loop that is configured at the factory to output 4mA at 0 flow and 20mA at the meter's
100% Full Scale (FS) flow rate. As defined for all SMARTLINK® METERS:
100% Meter Full Scale (FS) Flow = Calibrated Max Flow Rate (on sensor label) + 5%
The meter full scale flow rate can be calculated as shown above or can be found as the "MAX" value on Menu #1.12 Calibration.
As an example, a SMARTLINK® METER for natural gas, Model 0200 SLM, has a maximum calibrated operating flow rate of 8000 scfh and a maximum 100% meter full scale range of 8400 scfh , 5% higher than the calibrated operating range. As shipped, this unit would have a 20mA output that will represent 8400 scfh.
The 4 and 20 mA flow definitions as well as the actual mA output current can be displayed on Menu #1.4 Output A- Flow. Using either of the following formulas with consistent units, verify the flow rate on Menu #1 corresponds to the current output level displayed on Menu #1.4 and the calculated or displayed flow in any external equipment interfaced to the output:
Flow Rate Output (mA) = 4mA + 16mA x
Or
Flow Rate = x 20mA flow rate
A scaling parameter is provided to set the 20mA output at any specific value less than the 100% Full Scale flow rate. The parameter, "20MA Flow" can be changed on Menu #3.14 as a percent of the meter's full scale flow rate using the following formula:
Required 20mA Flow (%FS) Configuration Parameter = 100% x
Modifying the 20mA meter output definition is not typically required but is provided as a convenience for setting a "custom" full scale range on remote monitoring or display equipment. The 4mA definition of zero flow cannot be modified.
Flow mA test
A continuous check on the flow output (AO-A) can be performed if ratio monitoring (i.e. Analog Input-A) is NOT required by the application. To enable this "Flow MA Test", Analog Output-B must be setup for Fluid Temperature (Menu #3.2) and the "AI-A" switch, located in the wiring compartment, must be set to the "TEST" position. This configuration permits the internal Analog Input (AI) hardware to monitor the Analog Output A (AO-A) hardware by comparing the intended output current to the measured input current. If the flow output hardware fails or the loop circuit is open, the meter alarm is activated (output terminal #3). This function is intended to protect against single-point failures in the flow output hardware when air or fuel measurements are used for safety-critical combustion control applications.
Ratio monitor
To configure SMARTLINK® METER as a "standalone" ratio monitor for combustion applications, the following procedure must be performed:
1. An external, second meter’s 4-20mA flow output must be connected to the primary meter's 4-20mA input (analog input-A, terminal #11 and #12). Configure the flow measurement units of the second meter to be the same as the primary meter (configured for ratio monitoring). DO NOT select any velocity flow rate units for ratio monitoring. On the external meter, verify the 21.5mA alarm function is disabled on Menu #3.6 and record the 20mA flow output definition on Menu #1.4 in the selected flow units.
2. On the primary meter, Analog Output-B (AO-B) must be configured for ratio output using Menu #3.2. The parameter, "Output-B Setup", must be set to either "AI / AO" or "AO / AI". The two configuration options are defined as follows:
a. "AI/AO"=
Flow rate20mA flow rate------------------------------------------
(mA flow rate out - 4mA)16 mA
---------------------------------------------------------------------
Required 20mA flow rate100% meter full scale flow--------------------------------------------------------------------------
Flow rate of Analog Input-A (ext. 2nd meter)Flow rate of Analog Output-A
--------------------------------------------------------------------------------------------------------------------
w w w . m a x o n c o r p . c o mcombustion systems for industry
Maxon reserves the right to alter specifications and data without prior notice. © 2008 Copyright Maxon Corporation. All rights reserved.

Flow Control Components - SMARTLINK® METER 10 - 30.9 - 47E - i - 7/08
This (AI/AO) is the factory default configuration and is used for an external air meter to calculate air/fuel ratio; for combustion systems, this is the process variable of interest.
b. "AO/AI" =
This configuration is used for an external gas meter to calculate air/fuel ratio.
3. For the primary meter to calculate ratio, the 4-20mA input current (AI-A) representing the flow of the 2nd, external meter, must be properly configured. The configuration parameter, "FlowIN-X Factor" must be setup as follows:
"FlowIN-X Factor" =
The meter 100% full scale flow rate is displayed as the "MAX" value on Menu #1.12 Calibration. Refer to the previous section for a complete discussion on full scale meter flow rate. The external meter's 20mA Flow Rate definition was recorded in Step #1, above. Calculate the parameter, "FlowIN-X Factor", using the equation above and enter this value in Menu #3.3.
4. Verify the 20mA input flow rate (on Menu #1.6) now matches the 20mA output flow rate (on Menu #1.4 of the 2nd, external meter). If the two flow rates are not the same, repeat Step #3.
5. If the application ratio exceeds 20:1, change the configuration parameter, "20MA Ratio AO-B" on Menu #3.5 to a value equal to or greater than the largest ratio required for monitoring. Verify the configuration parameter, "20MA OutB" is set to 100% FS and the desired ratio output at 20mA is displayed on Menu #1.5.
6. With both meters operational and reading a non-zero flow rate, verify the external meter flow rate matches the input flow rate on the primary meter.
7. Using either of the following formulas below, verify the ratio on Menu #1.3, Ratio Status, corresponds to the current output displayed on Menu #1.5, Output-B: Ratio and the calculated/displayed ratio in any external equipment interfaced to Analog Output-B:
Ratio Output (mA) = 4mA + 16mA x
Or
Ratio = x 20mA ratio
8. If any changes are made to the external meter's 20mA output definition, repeat Step #3, 4, 6, and 7.
Although not required, the following additional configuration and output options should be considered for all safety-critical air/fuel ratio monitoring and control applications. (Refer to the respective operating instruction section for each topic below):
Configuration of the meter limit output function: An acceptable air/fuel ratio operating "window" can be created through setup of the HI / LO Limit (Output) B parameters in Menu #3.10 and #3.11. Passcode protection of meter configuration: Selection of a meter passcode (other than 0) on Menu #3.16 will eliminate tamper-ing by "locking" all meter configuration parameters and test functions. Passcode protection is strongly recommended for all closed-loop air/fuel ratio control applications. Meter alarm outputs: Terminal #3 (from both the primary and external meter) can be monitored by external PLC/DCS equip-ment or connected to relays and lamp indicators to ensure that invalid ratio measurements are not used if a meter failure occurs.
Redundant ratio outputs: The second meter can also be setup for ratio monitoring so that redundant ratio outputs can be moni-tored by external PLC/DCS or equipment or remote displays to ensure that invalid ratio measurements are not used if a meter failure occurs. Flow measurement filtering: For applications in which the air and fuel flow rates change substantially (i.e. fast firing rate modu-lation), the flow rate outputs from each meter may need to be additionally filtered by selecting the 2 or 4 second value on Menu #3.7. The filtering should be set the same for both meters and all control loops that utilize the flow and ratio outputs will need to accommodate these slower sensor response times.
Flow rate of Analog Output-AFlow rate of Analog Input-A (ext. 2nd meter)--------------------------------------------------------------------------------------------------------------------
Meter 100% full scale flow rateExternal meter 20mA flow rate--------------------------------------------------------------------------------------
Ratio20mA ratio-------------------------------
(mA ratio output - 4mA)16 mA
-------------------------------------------------------------------
w w w . m a x o n c o r p . c o mcombustion systems for industry
Maxon reserves the right to alter specifications and data without prior notice. © 2008 Copyright Maxon Corporation. All rights reserved.

10 - 30.9 - 48E - i - 7/08 Flow Control Components - SMARTLINK® METER
Temperature output
If ratio monitoring is NOT required by the application, SMARTLINK® METER can be configured to monitor and output fluid temperature using the following procedure:
1. Change the parameter, "Output-B Setup", to "Fluid Temp" on Menu #3.2. This configures Analog Output-B (AO-B) for fluid temperature.
2. With the meter operational and reading a non-zero flow, verify the mA output current and the 4 and 20 mA fluid temperature definitions on Menu #1.5. Menu #1.5 will be titled, "Output B-Temp" when the meter is configured for fluid temperature output.
3. Using either of the following formulas with consistent units, verify the fluid temperature (on Menu #1.2 Meter Status) corresponds to the current output level displayed on Menu #1.5 and the calculated or displayed temperature in the external equipment interfaced to the output:
Temperature Output (mA) = 4ma + 16mA x
Or
Temperature (°C or °F) = 4mA Temp + [20mA Temp - 4mA Temp] x
A scaling parameter is provided to set the 20mA temperature output at any specific value less than the 100% full scale temperature of 230°F. The parameter, "20mA OutB" can be changed on Menu #3.15 using either of the following formulas:
Required 20mA OutB (%FS) = 100% x
Or
Required 20mA OutB (%FS) = 100% x
Modifying the 20mA meter output definition is not typically required but is provided as a convenience for setting a "custom" full scale range on remote monitoring or display equipment. The 4mA temperature definition is always set to -58°F and cannot be modified.
Limit output
SMARTLINK® METER includes a fail-safe limit output that can be used to notify plant personnel or external PLC/DCS monitoring equipment of high and low levels of flow and ratio (or fluid temperature).
To enable a High and/or Low Flow Limit condition, the following configuration parameters need to be set using the following formulas:
HI Limit A-Flow %FS (Menu #3.11) =
LO Limit A-Flow %FS (Menu #3.10) =
(Fluid temp - 4mA temp)(20mA temp - 4mA temp)----------------------------------------------------------------------
(mA temp output - 4mA)16 mA
--------------------------------------------------------------------
[Required 20mA °F temp - (-58°F)]288°F
-----------------------------------------------------------------------------------------------
[Required 20mA °C temp - (-50°C)]160°C
-------------------------------------------------------------------------------------------------
100% x required HI threshold flow rate100% meter full scale flow rate
-------------------------------------------------------------------------------------------------------------
100% x required LO threshold flow rate100% meter full scale flow rate
---------------------------------------------------------------------------------------------------------------
w w w . m a x o n c o r p . c o mcombustion systems for industry
Maxon reserves the right to alter specifications and data without prior notice. © 2008 Copyright Maxon Corporation. All rights reserved.

Flow Control Components - SMARTLINK® METER 10 - 30.9 - 49E - i - 7/08
For an example, a SMARTLINK® METER for natural gas, Model 0200 SLM, has a 100% meter full scale range of 8400 scfh . If a limit output is required by the application to "trip" at 7000 scfh or higher, then the HI Limit A-Flow %FS is calculated as follows: 83.3% = 100% x 7000 scfh ÷ 8400 scfh . The limit output is fail-safe and therefore is normally turned ON when the condition does NOT exist. A HI Limit Flow condition will also be indicated on the user display when the measured flow rate is equal to or greater than 7000 scfh . To avoid chattering limit relays, a fixed hysteresis of 2% FS is applied to all limits. Therefore, the HI Flow Limit condition will remain active until the flow rate drops below 81.3% or 6832 scfh . Both High and Low Flow Limits can be enabled at the same time.
When Analog Output-B is setup for ratio, High and/or Low Ratio Limit configuration parameters can be set with the following formulas:
HI Limit B %FS (Menu #3.13) = 100% x
LO Limit B %FS (Menu #3.12) = 100% x
When Analog Output-B is setup for fluid temperature, High and/or Low Temperature Limit configuration parameters can be set with the following formulas:
HI Limit B %FS (Menu #3.13) = 100% x
Or
100% x
LO Limit B %FS (Menu #3.12) = 100% x
Or
100% x
HI Limit, LO Limit, or both conditions (for Flow on Analog Output-A and Ratio or Fluid Temperature on Analog Output-B) can be enabled at the same time although only one hardware limit output is provided. Scaling of the 20mA Flow, Ratio, or Fluid Temperature outputs DO NOT affect the limit thresholds. All meters are shipped with limit functions disabled.
Note that a -1.00 %FS disables the LO Limit functions and 110 %FS disables the HI Limit functions. Although designed as a fail-safe signal, the limit output, is NOT intended to replace combustion permissive functions such as high and low gas pressure switches.
Required HI threshold ratio20mA ratio AO-B (Menu #3.4)----------------------------------------------------------------------------------
Required LO threshold ratio20mA ratio AO-B (Menu #3.4)----------------------------------------------------------------------------------
(Required HI threshold fluid temp - 58°F)288°F
-------------------------------------------------------------------------------------------------------------------
(Required HI threshold fluid temp - 50°C)160°C
-------------------------------------------------------------------------------------------------------------------
(Required LO threshold fluid temp - 58°F)288°F
---------------------------------------------------------------------------------------------------------------------
(Required LO threshold fluid temp - 50°C)160°C
----------------------------------------------------------------------------------------------------------------------
w w w . m a x o n c o r p . c o mcombustion systems for industry
Maxon reserves the right to alter specifications and data without prior notice. © 2008 Copyright Maxon Corporation. All rights reserved.
10 - 30.9 - 50E - i - 7/08 Flow Control Components - SMARTLINK® METER
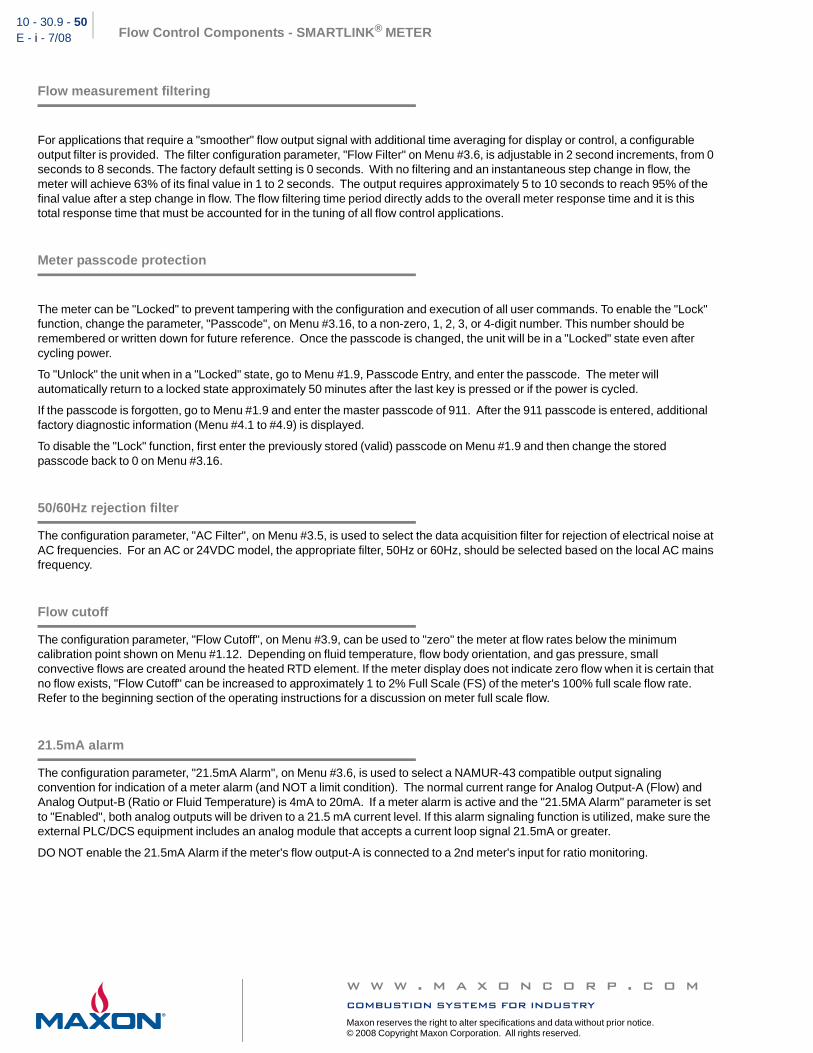
Flow measurement filtering
For applications that require a "smoother" flow output signal with additional time averaging for display or control, a configurable output filter is provided. The filter configuration parameter, "Flow Filter" on Menu #3.6, is adjustable in 2 second increments, from 0 seconds to 8 seconds. The factory default setting is 0 seconds. With no filtering and an instantaneous step change in flow, the meter will achieve 63% of its final value in 1 to 2 seconds. The output requires approximately 5 to 10 seconds to reach 95% of the final value after a step change in flow. The flow filtering time period directly adds to the overall meter response time and it is this total response time that must be accounted for in the tuning of all flow control applications.
Meter passcode protection
The meter can be "Locked" to prevent tampering with the configuration and execution of all user commands. To enable the "Lock" function, change the parameter, "Passcode", on Menu #3.16, to a non-zero, 1, 2, 3, or 4-digit number. This number should be remembered or written down for future reference. Once the passcode is changed, the unit will be in a "Locked" state even after cycling power.
To "Unlock" the unit when in a "Locked" state, go to Menu #1.9, Passcode Entry, and enter the passcode. The meter will automatically return to a locked state approximately 50 minutes after the last key is pressed or if the power is cycled.
If the passcode is forgotten, go to Menu #1.9 and enter the master passcode of 911. After the 911 passcode is entered, additional factory diagnostic information (Menu #4.1 to #4.9) is displayed.
To disable the "Lock" function, first enter the previously stored (valid) passcode on Menu #1.9 and then change the stored passcode back to 0 on Menu #3.16.
50/60Hz rejection filter
The configuration parameter, "AC Filter", on Menu #3.5, is used to select the data acquisition filter for rejection of electrical noise at AC frequencies. For an AC or 24VDC model, the appropriate filter, 50Hz or 60Hz, should be selected based on the local AC mains frequency.
Flow cutoff
The configuration parameter, "Flow Cutoff", on Menu #3.9, can be used to "zero" the meter at flow rates below the minimum calibration point shown on Menu #1.12. Depending on fluid temperature, flow body orientation, and gas pressure, small convective flows are created around the heated RTD element. If the meter display does not indicate zero flow when it is certain that no flow exists, "Flow Cutoff" can be increased to approximately 1 to 2% Full Scale (FS) of the meter's 100% full scale flow rate. Refer to the beginning section of the operating instructions for a discussion on meter full scale flow.
21.5mA alarm
The configuration parameter, "21.5mA Alarm", on Menu #3.6, is used to select a NAMUR-43 compatible output signaling convention for indication of a meter alarm (and NOT a limit condition). The normal current range for Analog Output-A (Flow) and Analog Output-B (Ratio or Fluid Temperature) is 4mA to 20mA. If a meter alarm is active and the "21.5MA Alarm" parameter is set to "Enabled", both analog outputs will be driven to a 21.5 mA current level. If this alarm signaling function is utilized, make sure the external PLC/DCS equipment includes an analog module that accepts a current loop signal 21.5mA or greater.
DO NOT enable the 21.5mA Alarm if the meter's flow output-A is connected to a 2nd meter's input for ratio monitoring.
w w w . m a x o n c o r p . c o mcombustion systems for industry
Maxon reserves the right to alter specifications and data without prior notice. © 2008 Copyright Maxon Corporation. All rights reserved.

Flow Control Components - SMARTLINK® METER 10 - 30.9 - 51E - i - 7/08
Flow bias
SMARTLINK® METER is intended to measure flow accurately after proper field installation. The configuration parameter, "Flow Bias", on Menu #3.8, can be used to scale the flow output for the following reasons:
1. The flow units used by the customer are referenced to different standard conditions or a different reference density if mass rate units are selected. (Reference Appendix B for conversion factors needed to display flow rates with alternative reference conditions.)
2. The flow output wants to be "matched" to a secondary measurement that is used for periodic meter field validation.
The flow bias is applied directly to the actual meter flow output as a scale factor or multiplier term. It will scale all flows displayed by the same amount, including the 4 and 20mA flow output definitions, with the exception of the "MAX" calibrated flow on Menu #1.12. All HI and LO Limit conditions are NOT affected because thresholds are set in % Full Scale.
If a more accurate secondary flow measurement is available (such as positive displacement or Coriolis flow instrument), the flow bias can also be used to minimize field measurement errors that are typically less than 2% of reading and include the following:
Velocity profile disturbances due to upstream piping configurationVarying gas "constituents" (i.e. chemical mixture)Fluid pressure
Humidity (in air)Thermal gradients due to large body/fluid temperature differences
Temperature measurement units
The configuration parameter, "Temp Units", on Menu #3.1, is used to select displayed temperature units of °F or °C.
Wiring compartment configuration switches
Two switches in the field wiring compartment are provided for the following configuration settings:
1. Loop Power: "EXT. 24V MAX." should always be the selected position for field installations. "INT. 24V" is used only for standalone meter 4-20mA output testing. (Refer to the electrical connections section for more details on external loop power.)
2. Analog Input: The "AI-A" (or Analog Input A) position should be selected if Analog Output-B is configured for ratio monitoring. The "AI-A" configuration permits the measurement of a 2nd, external flow (needed for a ratio calculation) on Analog Input-A. The "Test" position enables the continuous Flow MA Test on the flow output hardware and associated loop circuit. (Refer to the section of the operating instructions on the 4-20mA Flow Output for more detailed information on the Flow mA Test.)
Wiring compartment configuration switches
w w w . m a x o n c o r p . c o mcombustion systems for industry
Maxon reserves the right to alter specifications and data without prior notice. © 2008 Copyright Maxon Corporation. All rights reserved.

10 - 30.9 - 52E - i - 7/08 Flow Control Components - SMARTLINK® METER
Meter configuration menu summary
The following table summarizes all configuration parameter screens and their associated factory default, options or typical range.
Configuration menu summary
Configuration menus Parameter (default), options or typical range
3. Flow UnitsTo Change Item: Press [ENTER]SCFH
(SCFH), SCFM, SFPM, SFPS, LB/H, LB/S, NM3H, NM3M, NMPM, NMPS, NLPH, NLPM, KG/H, KG/M, KG/S, SMPM, SMPS
3.1 Temp UnitsTo Change Item: Press [ENTER]°F
(°F), °C
3.2 Output-B SetupTo Change Item: Press [ENTER]Ratio AI/AO
(AI / AO), AO / AI, Fluid Temp
3.3 FlowIN X-FactorTo Change Item: Press [ENTER]1.000
(1.000), Gas with Ext. Air: ~10.00 to 25.00; Air with Ext. Gas: ~0.040 to 0.1000
3.4 20MA Ratio AO-BTo Change Item: Press [ENTER]20.0
(20.0), 2.0 to 100
3.5 AC FilterTo Change Item: Press [ENTER]60Hz
(60Hz), 50Hz
3.6 21.5MA AlarmTo Change Item: Press [ENTER]Disabled
(Disabled), Enabled
3.7 Flow FilterTo Change Item: Press [ENTER]0 SECS
(0 SECS), 2 SECS, 4 SECS, 6 SECS, 8 SECS
3.8 Flow BiasTo Change Item: Press [ENTER]1.00
(1.00), 0.95 to 1.05, if required
3.9 Flow CutoffTo Change Item: Press [ENTER]0.5 %FS
(0.5 %FS), 0.5 to 2.0%
3.10 LO Limit A-FlowTo Change Item: Press [ENTER]-1.00 %FS
(-1.00 %FS, LO Flow Limit Disabled), To Enable LO Flow Limit, x ≥ 0.0 %FS
3.11 HI Limit A-FlowTo Change Item: Press [ENTER]110 %FS
(110 %FS, HI Flow Limit Disabled), To Enable HI Flow Limit, x ≤ 100.00 %FS
3.12 LO Limit BTo Change Item: Press [ENTER]-1.00 %FS
(-1.00 %FS, LO Limit B Disabled), To Enable LO Limit B, x ≥ 0.0 %FS
3.13 HI Limit BTo Change Item: Press [ENTER]110 %FS
(110 %FS, HI Limit B Disabled), To Enable HI Limit B, x ≤ 100.00 %FS
3.14 20 MA FlowTo Change Item: Press [ENTER]100 %FS
(100 %FS), 10 - 99 %FS, if required
3.15 20 MA OutBTo Change Item: Press [ENTER]100 %FS
(100 %FS), 10 - 99 %FS, if required
3.16 PasscodeTo Change Item: Press [ENTER]0
(0), Any 1, 2, 3, or 4-digit positive number
w w w . m a x o n c o r p . c o mcombustion systems for industry
Maxon reserves the right to alter specifications and data without prior notice. © 2008 Copyright Maxon Corporation. All rights reserved.

Flow Control Components - SMARTLINK® METER 10 - 30.9 - 53E - i - 7/08
Meter status
Meter status is viewable on the user display and includes mode of operation, flow rate, totalized flow and time, fluid type, ratio or fluid temperature, housing temperature, output current levels, 4mA/20mA output definitions, relay output states, passcode entry, alarm/limit status and event log, and manufacturing/calibration data.
All meter status information is displayed on Menu #1. through #1.12 as summarized in the table below.
Summary of meter status menus
1. Mode: MeasureFlow 7534 SCFHFlow% 89.7 %FSMeter OK
1.4 Output A: FlowAO-A 18.4 MA 4mA= 0.00 SCFH20mA= 8400 SCFH
1.8 Event LogChange Item: ENTERALARM:Meter Flo-TestEvent Total: 0
1.1 Flow Totalizer Fluid Natural GasTotal 0 SCFTime 59.571 HRS
1.5 Output B: RatioAO-B 14.8 MA 4mA= 0.00 20mA= 20.0
1.9 Passcode EntryUser Setup:UNLOCKEDPress [ENTER]0
1.2 Meter StatusFluid 76.3°FHousing 82.3°FMeter OK
1.6 Input A: FlowAI-A 15.1 MA 4mA= 0.00 SCFH 20mA= 147000 SCFH
1.10 Unit Mfg Data A SMARTLINK MeterMaxon CorporationSMN10SSAIU-CSSA-101
1.3 Ratio StatusFlow 7534 SCFHAI-A 102062 SCFHRatio 13.5
1.7 Relay OutputsA: No Flow Test 1B: No Alarms 1C: No Limits 1
1.11 Unit Mfg Data B S/N-Main: 0604-068S/N-Probe: 0612-052S/W Version: 1.01 1.12 Calibration:Min 420 SCFHMax 8400 SCFHDate 02/15/06
Note 1: Display indicates ratio function is disabled when AO-B is setup for "Fluid Temp" Note 2: Display indicates fluid temperature when AO-B is setup for "Fluid Temp"
w w w . m a x o n c o r p . c o mcombustion systems for industry
Maxon reserves the right to alter specifications and data without prior notice. © 2008 Copyright Maxon Corporation. All rights reserved.
10 - 30.9 - 54E - i - 7/08 Flow Control Components - SMARTLINK® METER
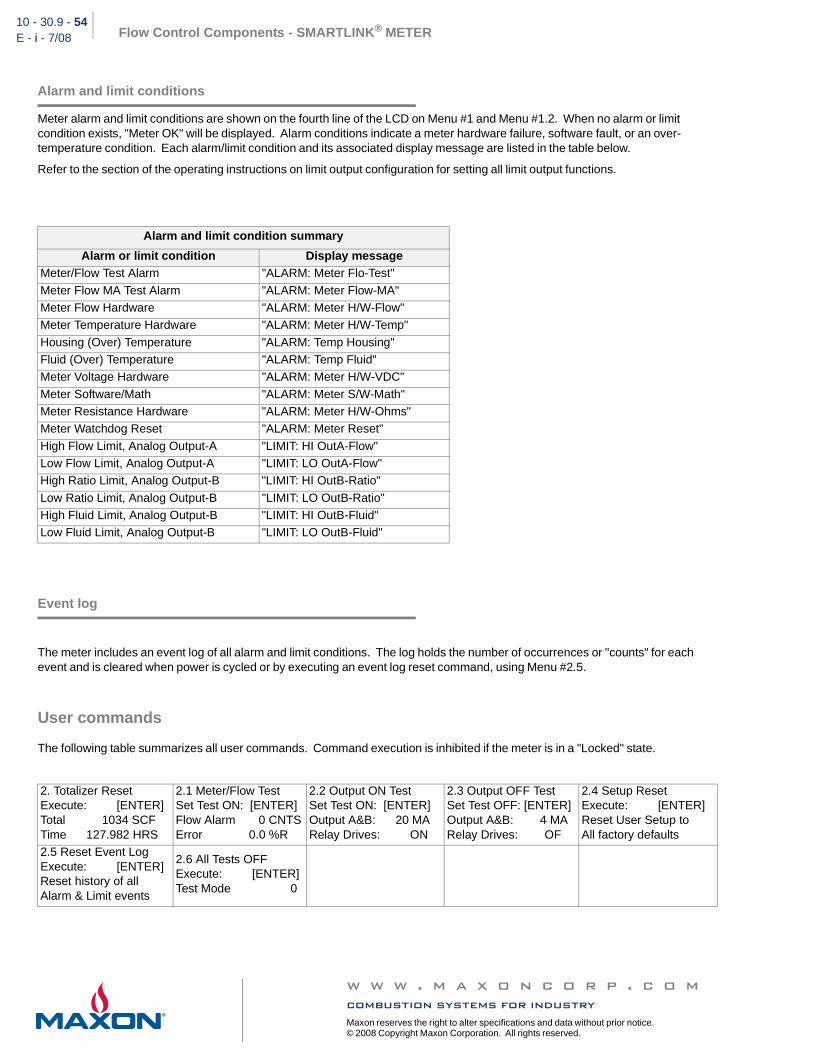
Alarm and limit conditions
Meter alarm and limit conditions are shown on the fourth line of the LCD on Menu #1 and Menu #1.2. When no alarm or limit condition exists, "Meter OK" will be displayed. Alarm conditions indicate a meter hardware failure, software fault, or an over-temperature condition. Each alarm/limit condition and its associated display message are listed in the table below.
Refer to the section of the operating instructions on limit output configuration for setting all limit output functions.
Event log
The meter includes an event log of all alarm and limit conditions. The log holds the number of occurrences or "counts" for each event and is cleared when power is cycled or by executing an event log reset command, using Menu #2.5.
User commands
The following table summarizes all user commands. Command execution is inhibited if the meter is in a "Locked" state.
Alarm and limit condition summary
Alarm or limit condition Display messageMeter/Flow Test Alarm "ALARM: Meter Flo-Test"
Meter Flow MA Test Alarm "ALARM: Meter Flow-MA"Meter Flow Hardware "ALARM: Meter H/W-Flow"Meter Temperature Hardware "ALARM: Meter H/W-Temp"
Housing (Over) Temperature "ALARM: Temp Housing"Fluid (Over) Temperature "ALARM: Temp Fluid"Meter Voltage Hardware "ALARM: Meter H/W-VDC"
Meter Software/Math "ALARM: Meter S/W-Math"Meter Resistance Hardware "ALARM: Meter H/W-Ohms"Meter Watchdog Reset "ALARM: Meter Reset"
High Flow Limit, Analog Output-A "LIMIT: HI OutA-Flow"Low Flow Limit, Analog Output-A "LIMIT: LO OutA-Flow"High Ratio Limit, Analog Output-B "LIMIT: HI OutB-Ratio"
Low Ratio Limit, Analog Output-B "LIMIT: LO OutB-Ratio"High Fluid Limit, Analog Output-B "LIMIT: HI OutB-Fluid"Low Fluid Limit, Analog Output-B "LIMIT: LO OutB-Fluid"
2. Totalizer ResetExecute: [ENTER]Total 1034 SCF Time 127.982 HRS
2.1 Meter/Flow TestSet Test ON: [ENTER]Flow Alarm 0 CNTSError 0.0 %R
2.2 Output ON TestSet Test ON: [ENTER]Output A&B: 20 MARelay Drives: ON
2.3 Output OFF TestSet Test OFF: [ENTER]Output A&B: 4 MARelay Drives: OF
2.4 Setup ResetExecute: [ENTER]Reset User Setup toAll factory defaults
2.5 Reset Event LogExecute: [ENTER]Reset history of allAlarm & Limit events
2.6 All Tests OFFExecute: [ENTER]Test Mode 0
w w w . m a x o n c o r p . c o mcombustion systems for industry
Maxon reserves the right to alter specifications and data without prior notice. © 2008 Copyright Maxon Corporation. All rights reserved.

Flow Control Components - SMARTLINK® METER 10 - 30.9 - 55E - i - 7/08
Meter/flow test
The Meter/Flow Test command can be initiated by the user display (on Menu #2.1) or a hardware input momentary ON pulse (i.e. 1 second, minimum ON duration). The test is a complete "self-check" of the meter electronics and RTD probe assembly and can be performed while the unit is measuring flow. The meter operating mode displayed during the test is shown as "Flo-Test" on Menu #1 and is active for 40 seconds to 2.5 minutes. During this mode, flow measurement and the 4-20mA output remain active, however, the fluid temperature is assumed to be the same value throughout the test. Because the ambient temperature sensing RTD is used as a velocity sensing RTD, the test should be performed only when the gas temperature and flow rate is steady and greater than 20% of full scale. In addition, all control loops that utilize the flow output should be disabled during the test. After the test completes, the meter will remain in the "Flo-Test" operating mode until the fluid temperature RTD has stabilized which can take up to approximately 2 minutes depending on flow rate. While observing the display after command execution, a test failure is indicated by a "Flow Alarm" count of 1 or more. If the test fails or the error percentage is greater than 2% just before being reset to 0%, refer to the maintenance instructions below on how to properly clean the RTD elements and when to send the flow sensor back for re-calibration. The Flow Alarm count can be reset using the "Reset Event Log" command on Menu #2.5.
Input/output tests
Two input/output test commands are provided on the user display for checkout of the electrical connections, I/O hardware, and external equipment after meter installation. These commands should only be executed when the outputs are not being used for monitoring and control purposes since normal operating output states are overridden. The "Output ON Test", on Menu #2.2, turns on all relay drive outputs and sets both 4-20mA signals to 20mA. Conversely, the "Output OFF Test", on Menu #2.3, turns off all relay drive outputs and sets both 4-20mA signals to 4mA. Each command can be "toggled" off as prompted on the display. In addition, the command, "All Tests OFF", on Menu #2.6, will turn either input/output command off as well as the meter/flow test.
w w w . m a x o n c o r p . c o mcombustion systems for industry
Maxon reserves the right to alter specifications and data without prior notice. © 2008 Copyright Maxon Corporation. All rights reserved.

10 - 30.9 - 56E - i - 7/08 Flow Control Components - SMARTLINK® METER
Maintenance
Because SMARTLINK® METER has no moving parts and includes advanced diagnostics, periodic/preventative maintenance activities are limited to the following:
Sensor probe and conditioning screen inspection
When a meter is first installed, the two RTD elements of the sensor probe and the flow conditioning screens should be inspected for dirt build-up in the first several months of operation and a cleaning schedule established as required. For gas meters, pressure taps can be installed up and downstream of the flow body to assist in determining flow conditioning screen blockage. For air meters, one pressure tap is provided downstream of the second flow conditioning screen. An additional pressure tap should be installed upstream of the flow body extension as shown in the section on piping requirements. If taps are installed, a differential pressure measurement can be made at 50% full scale flow or higher to determine if screens are significantly blocked. For properly installed natural gas piping and combustion air applications with appropriate inlet filtering, a typical inspection/cleaning period is every 6 to 12 months.
The inspection of the flow conditioning screens on gas meters will require removal of the body from the line. The flow conditioning screens for air meters are removable. For screen removal, provide temporary support for the air flow body. Loosen and remove the flange bolts on half of the flow body surrounding the handle. Use 3 to 5 jack bolts to spread the flanges. Remove the screens by grasping and pulling the handle outward from the body. Clean and replace each screen, making certain the alignment pin fits in the adjacent flange. Replace and tighten all flange bolts.
To inspect the flow sensor probe, turn power off to the device, depressurize and/or purge the pipe of any hydrocarbon gas. Remove the 3/8" jam nut on the threaded stud of the flow body mast, and unloosen the brass compression nut fitting. Remove the flow meter from the flow body. Inspect the two RTD elements sheathed in stainless steel. If coated with any foreign material or film, carefully clean both RTD "stings" with water or alcohol (ethanol) and a soft brush until they appear clean again. Reinstall the flow sensor per the installation instructions on flow sensor insertion.
Alarm/event log monitoring and meter/flow test execution
The following flow sensor maintenance procedures must be performed before each scheduled probe and flow conditioning screen inspection:
SMARTLINK® METER includes "built-in" diagnostics for detection of meter hardware failures, software faults, and over-temperature conditions. An event log can be displayed with the total number of alarm occurrences or "events." While measuring flow and before powering down the meter for probe inspection, view Menu #1 for any existing alarm conditions and check the event log on Menu #1.8 for alarm conditions that may have occurred since the last meter power-up. If the meter is remotely mounted (and not easily accessible) or is periodically powered down (clearing the event log), wire the alarm relay drive output to an external relay and lamp to indicate when an alarm condition is active and continuously monitor the alarm output with a PLC/DCS system.
After checking for meter alarms, execute the Meter/Flow Test command on Menu #2.1 which performs a complete "self-check" of the meter electronics and RTD probe assembly while the unit is measuring flow. (Refer to the operating instructions on User Commands for more detailed information on use of the Meter/Flow Test.)
If the Meter/Flow Test fails or other alarm conditions exist (or were recorded in the event log), take the corrective action recommended in the troubleshooting section below.
Before removing a flow sensor, flow body, or flow conditioning screen, make sure there is no pressure in the line and power is turned off to the meter. For combustible gases, be sure the line is completely purged before removing the probe.
w w w . m a x o n c o r p . c o mcombustion systems for industry
Maxon reserves the right to alter specifications and data without prior notice. © 2008 Copyright Maxon Corporation. All rights reserved.

Flow Control Components - SMARTLINK® METER 10 - 30.9 - 57E - i - 7/08
Field validation of meter reading and spare meter comparison
Perform field validation of the flow meter reading after each scheduled probe and flow conditioning screen inspection. For the majority of combustion applications, gas and air flow rates can be approximated by measuring differential pressures across burner orifices. To perform field validation of the meter reading, place the process temperature controller in manual mode and drive the burner to a specific firing rate, 20% to 100% of burner rated capacity. Using the technical product manual of the installed burner, estimate the flow rates using the differential pressure measurements and compare these flows to the meter readings. If the difference between calculated and measured flow rate is greater than ~10% (of reading) or there is a "shift" in the error percentage (from the previous validation) of ~5% or greater, refer to the troubleshooting section for corrective action. If process conditions permit, it is important to perform this field validation process each time at the same flow rate or set of flow rates (if validation of more than one flow rate is desired).
If flow cannot be derived from secondary measurements, perform field validation by meter output comparison with a spare flow sensor. The output of the primary meter should be recorded at a specific set of process conditions (i.e. burner firing rate, control valve position, or variable speed drive frequency, etc.). Power down the primary sensor, remove from the flow body, and replace with the spare flow sensor which must match the primary sensor's calibration range and gas type. Re-establish the same process conditions and compare the spare sensor output to the recorded value. If the comparison error exceeds ±5% of reading, return the primary sensor to MAXON for factory re-calibration.
Factory calibration
For applications which do not use meter flow outputs for closed-loop control, factory re-calibration is not required if the following preventative maintenance activities are performed successfully on the same schedule as probe and flow conditioning screen inspection:
Field validation of meter reading, Alarm and event log monitoring, and
Meter/flow test execution.
For applications which use meter flow outputs for safety-critical closed-loop combustion control, factory re-calibration of the meter is recommended every three years or on a more frequent interval based on plant QA requirements, ISO compliance, or sensor probe erosion (due to fine abrasives, trace amounts of H2S, etc.). Factory re-calibration, however, can be eliminated if the field validation process uses a second, spare flow meter for comparison to the installed meter. (Refer to the field validation process instructions above when using a spare flow meter.) Re-calibration requires only the return of the flow sensor and not the flow body.
w w w . m a x o n c o r p . c o mcombustion systems for industry
Maxon reserves the right to alter specifications and data without prior notice. © 2008 Copyright Maxon Corporation. All rights reserved.

10 - 30.9 - 58E - i - 7/08 Flow Control Components - SMARTLINK® METER
Troubleshooting and corrective action
Contact MAXON sales for return equipment authorization (REA). When a meter is returned to MAXON, place the red plastic protective cap over the end of the probe, package the meter to prevent shipping damage, and indicate on the return authorization what specific alarms/test failures occurred and under what operating conditions.
The following table should be used to identify a possible cause and corrective action.
The SMARTLINK® METER electronics and sensor probe assembly is calibrated as an integrated precision mass flow meter. Interchanging sensor probe or electronics will produce incorrect outputs and negate the factory calibration. Do not remove the electronic boards or probe assembly (other than the LCD module for orientation changes). Board level inspection and replacement is performed only at the factory.
Meter problem Possible causes and corrective actionsOne or more of following alarms:"ALARM: Meter H/W-Flow""ALARM: Meter H/W-Temp""ALARM: Meter H/W-VDC""ALARM: Meter S/W-Math""ALARM: Meter H/W-Ohms""ALARM: Meter Reset"
a.) Permanent electronic hardware/software failure or sensor probe assembly damage.b.) Non-permanent electronic hardware/software fault due to voltage tran-sient.Re-power unit. If alarm events re-occur, record alarms and operating condi-tions, i.e. flow, gas temperature, etc. Return flow sensor to MAXON.
Flow MA (AO-A) test alarm:"ALARM: Meter Flow-MA"
a.) Incorrect 4-20mA wiring or Loop Power switch position: Verify the follow-ing: no open circuit exists in field-wiring, correct voltage and polarity for external loop power, maximum loop resistance of 750 Ohms, and "EXT. 24V MAX" position of Loop Power switch in wiring compartment. b.) Permanent electronic hardware failure: If problem still exists after verifica-tions listed above, remove all field wiring and connect a jumper across AO-A output terminals. Select "INT 24V" for Loop Power switch position. If alarm condition still exists, return flow sensor to MAXON.
Fluid temperature alarm: "ALARM: Temp Fluid"
a.) Fluid temperature is out of permissible operating range: Increase/decrease fluid temperature to be within flow meter specified range.b.) Permanent electronic hardware or temperature RTD wire/probe assembly failure: Indicated by a non-realistic temperature reading; return flow sensor to MAXON.
Housing temperature alarm: "ALARM: Temp Housing"
a.) Housing temperature exceeds electronic temperature operating range: Correct out-of-range ambient temperature condition surrounding flow sensor enclosure.b.) Permanent electronic hardware failure: Indicated by a non-realistic tem-perature; return flow sensor to MAXON.
Meter/Flow Test failure indicated by event counts or alarm display:"ALARM: Meter Flo-Test"
a.) Test performed at zero or low flows: Reset event log and re-start test at flow rates 20% full scale or higher. (Refer to operating instructions for test condition requirements.) If test can only be performed at no or low flows, ini-tiate 2nd or 3rd test immediately after error % is reset to zero and display prompts for setting test "ON". Test should pass on 2nd or 3rd attempt with no or low flow. b.) Foreign material build-up on probe assembly: Inspect and clean probe assembly as described in maintenance instructions. Re-test and verify test passes. c.) Permanent electronic or probe assembly failure: Re-test and verify alarm continues to occur. Return flow sensor to MAXON.
w w w . m a x o n c o r p . c o mcombustion systems for industry
Maxon reserves the right to alter specifications and data without prior notice. © 2008 Copyright Maxon Corporation. All rights reserved.

Flow Control Components - SMARTLINK® METER 10 - 30.9 - 59E - i - 7/08
Meter problem Possible causes and corrective actionsField validation of meter reading fails (high or low) and/or flow reading fluctuates significantly
a.) Flow conditioning screens filled with debris: Clean screens and re-vali-date meter reading.b.) Missing flow conditioning screen: For air meters, verify both removable screens are installed. c.) Flow body extension is not correctly installed: For air meters, verify extension is positioned upstream of spool piece with flow sensor support bracket (mast).d.) Flow body in backwards: Verify flow direction is consistent with direction arrow on flow body.e.) Sensor probe assembly needs cleaning: Clean RTD elements of probe assembly as described in maintenance instructions.f.) Flow disturbance due to insufficient up or downstream straight-run piping: Correct flow body installation as described in piping requirements section. g.) Meter requires calibration or electronics/probe assembly is damaged: First verify that validation failure is not due to causes listed above. Perform Meter/Flow Test and field validation with spare sensor, if available. Return to MAXON if field validation indicates output difference with spare sensor.
Flow reading "spikes" high Condensing moisture on probe: Find and remove moisture source. Add insu-lation around pipe if moisture saturated gas condenses on cool pipe and flow body walls.
Flow reading does notread zero at zero flow
Convective flows around heated RTD element at higher gas pressures: Increase the zero cut-off configuration parameter to 1-2% FS (full scale).
No 4-20 mA signal a.) Incorrect 4-20mA wiring or Loop Power switch position: Verify the follow-ing: no open circuit exists in field-wiring, correct voltage and polarity for external loop power, maximum loop resistance of 750 Ohms, and "EXT. 24V MAX" position of Loop Power switch in wiring compartment. b.) Permanent electronic hardware failure: If problem still exists after verifica-tions listed above, remove all field wiring and connect a jumper across AO-A output terminals. Select "INT 24V" for Loop Power switch position. If alarm condition still exists, return flow sensor to MAXON.
4-20 mA output saturates before reaching full scaleflow, ratio, or fluid temperature
Incorrect configuration setting: Set 20 mA Flow or 20 mA Out-B configuration parameters to 100% FS (full scale).
LCD characters change slowly or characters are unreadable (dark)
LCD viewing temperature range is exceeded: Electronics for flow measure-ment works over -40°F (-40°C) to +158°F (+70°C) but LCD viewing is limited to -4°F (-20°C) to +122°F (+50°C).
Keypad does not work Keypad ribbon connector disconnected from main electronics board: Re-attach ribbon connector to main board.
w w w . m a x o n c o r p . c o mcombustion systems for industry
Maxon reserves the right to alter specifications and data without prior notice. © 2008 Copyright Maxon Corporation. All rights reserved.

10 - 30.9 - 60E - i - 7/08 Flow Control Components - SMARTLINK® METER
Appendix A: Display menu summary
Meter status User commands User configuration1. Mode: MeasureFlow 7534 SCFHFlow% 89.7 %FSMeter OK
2. Totalizer Reset Execute: [ENTER]Total 1034 SCF Time 127.982 HRS
3. Flow UnitsTo Change Item:Press [ENTER]SCFH
1.1 Flow Totalizer Fluid Natural GasTotal 0 SCFTime 59.571 HRS
2.1 Meter/Flow TestSet Test ON: [ENTER]Flow Alarm 0 CNTSError 0.0 %R
3.1 Temp UnitsTo Change Item:Press [ENTER]°F
1.2 Meter StatusFluid 76.3°FHousing 82.3°FMeter OK
2.2 Output ON TestSet Test ON: [ENTER]Output A&B: 20 MARelay Drives: ON
3.2 Output-B SetupTo Change Item:Press [ENTER]Ratio AI/AO
1.3 Ratio Status (Note 1)Flow 7534 SCFHAI-A 102062 SCFHRatio 13.5
2.3 Output OFF TestSet Test OFF: [ENTER]Output A&B: 4 MARelay Drives: OFF
3.3 FlowIN X-FactorTo Change Item:Press [ENTER]1.000
1.4 Output A: FlowAO-A 18.4 MA 4ma= 0.00 SCFH20ma= 8400 SCFH
2.4 Setup ResetExecute: [ENTER]Reset User Setup toAll factory defaults
3.4 20MA Ratio AO-BTo Change Item:Press [ENTER]20.0
1.5 Output B: Ratio (Note 2)AO-B 14.8 MA 4ma= 0.00 20ma= 20.0
2.5 Reset Event LogExecute: [ENTER]Reset history of allAlarm & Limit events
3.5 AC FilterTo Change Item:Press [ENTER]60Hz
1.6 Input A: FlowAI-A 15.1 MA 4ma= 0.00 SCFH 20ma= 147000 SCFH
2.6 All Tests OFFExecute: [ENTER]Test Mode 0
3.6 21.5MA AlarmTo Change Item:Press [ENTER]Disabled
1.7 Relay OutputsA: No Flow Test 1B: No Alarms 1C: No Limits 1
3.7 Flow FilterTo Change Item:Press [ENTER]0 SECS
1.8 Event LogChange Item: [ENTER]ALARM:Meter Flo-TestEvent Total: 0
3.8 Flow BiasTo Change Item:Press [ENTER]1.00
1.9 Passcode EntryUser Setup:UNLOCKEDPress [ENTER]0
3.9 Flow CutoffTo Change Item:Press [ENTER]0.5 %FS
1.10 Unit Mfg Data A SMARTLINK MeterMaxon CorporationSMN10SSAIU-CSSA-101
3.10 LO Limit A-FlowTo Change Item:Press [ENTER]-1.00 %FS
1.11 Unit Mfg Data B S/N-Main: 0604-068S/N-Probe: 0612-052S/W Version: 1.01
3.11 HI Limit A-FlowTo Change Item:Press [ENTER]110 %FS
1.12 Calibration:Min 420 SCFHMax 8400 SCFHDate 02/15/06
3.12 LO Limit BTo Change Item:Press [ENTER]-1.00 %FS
3.13 HI Limit BTo Change Item:Press [ENTER]110 %FS
3.14 20MA FlowTo Change Item:Press [ENTER]100 %FS
3.15 20MA OutBTo Change Item:Press [ENTER]100 %FS
3.16 PasscodeTo Change Item:Press [ENTER]0
Note 1: Display indicates ratio function is disabled when AO-B is setup for "Fluid Temp" Note 2: Display indicates fluid temperature when AO-B is setup for "Fluid Temp"
w w w . m a x o n c o r p . c o mcombustion systems for industry
Maxon reserves the right to alter specifications and data without prior notice. © 2008 Copyright Maxon Corporation. All rights reserved.

Flow Control Components - SMARTLINK® METER 10 - 30.9 - 61E - i - 7/08
Appendix B: Flow rate conversion factors
The following table provides the conversion factor for displaying mass flow rate referenced to several alternative "Standard" or "Normal" conditions. This table was created using the following two general equations:
Q = QS x x
Q = QN x x
Where:
Q = Mass Flow Rate at alternate reference conditions, P and T
QS = Mass Flow Rate referenced to "Standard" conditions, (60°F and 14.73 psia)
QN = Mass Flow Rate referenced to "Normal" conditions, (32°F and 14.696 psia )
PS = "Standard" pressure reference condition of 14.73 psia
TS = "Standard" temperature reference conditions of 519.67 °R (60°F)
PN = "Normal" pressure reference condition of 14.696 psia
TN = "Normal" temperature reference condition of 491.67 °R (32°F)
P = Alternative pressure reference condition in psia
T = Alternative temperature reference condition in ° R, (°Rankin = °F + 459.67)
Conversion factor for flow rate referenced to alternative conditions
Reference temperature
Reference Pressures
From MAXON “Standard conditions” (60°F and 14.73 psia)
From MAXON “Normal conditions” (32°F and 14.696
psia)
°F psia ATM mmHg Bar kPa
0.998 1.057 60 14.696 1.000 760 1.013 101.325
1.000 1.055 60 14.730 1.002 762 1.016 101.5600.996 1.055 59 14.696 1.000 760 1.013 101.3251.017 1.077 70 14.696 1.000 760 1.013 101.325
0.932 1.013 32 14.504 0.987 750 1.000 100.0000.944 1.000 32 14.696 1.000 760 1.013 101.3250.996 1.055 59 14.696 1.000 760 1.013 101.325
1.013 1.073 68 14.696 1.000 760 1.013 101.3251.030 1.092 77 14.696 1.000 760 1.013 101.325
1.017 1.106 77 14.504 0.987 750 1.000 100.0001.000 1.087 68 14.504 0.987 750 1.000 100.000.0983 1.069 59 14.504 0.987 750 1.000 100.000
PS
P-------⎝ ⎠⎛ ⎞ T
TS-------⎝ ⎠⎛ ⎞
PN
P-------⎝ ⎠⎛ ⎞ T
TN-------⎝ ⎠⎛ ⎞
w w w . m a x o n c o r p . c o mcombustion systems for industry
Maxon reserves the right to alter specifications and data without prior notice. © 2008 Copyright Maxon Corporation. All rights reserved.