installation instructions for part 99-7001 · mitsubishi galant 1994-1998 (figure a) (figure b)...
TRANSCRIPT
APPLICATIONS
METRA. The World’s best kits.™ metraonline.com1-800-221-0932 © COPYRIGHT 2004-2014 METRA ELECTRONICS CORPORATION
REV.
8/1
3/20
14
INST
99-7
001
CAUTION: Metra recommends disconnecting the negative battery terminal before beginning any installation. All accessories, switches, and especially air bag indicator lights must be plugged in before reconnecting the battery or cycling the ignition.
NOTE: Refer to the instructions included with the aftermarket radio.
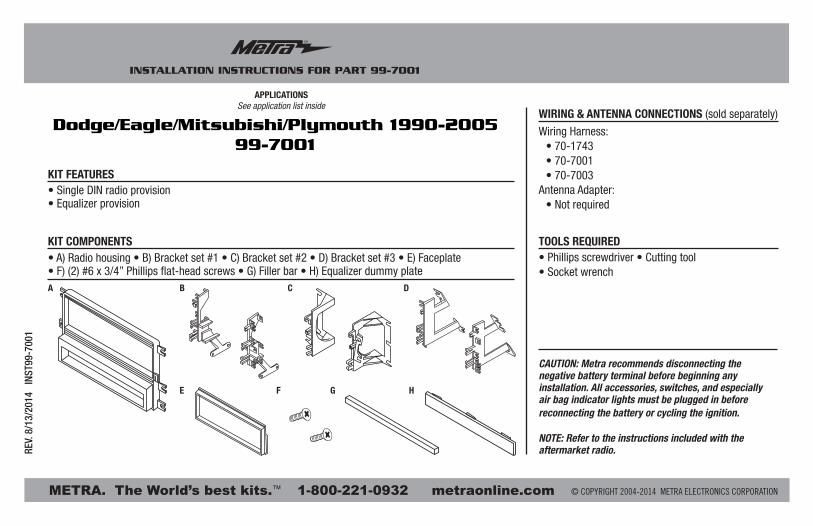
INSTALLATION INSTRUCTIONS FOR PART 99-7001
• Single DIN radio provision• Equalizer provision
• A) Radio housing • B) Bracket set #1 • C) Bracket set #2 • D) Bracket set #3 • E) Faceplate• F) (2) #6 x 3/4” Phillips flat-head screws • G) Filler bar • H) Equalizer dummy plate
KIT FEATURES
KIT COMPONENTS
WIRING & ANTENNA CONNECTIONS (sold separately)
Wiring Harness:• 70-1743• 70-7001• 70-7003
Antenna Adapter:• Not required
• Phillips screwdriver • Cutting tool• Socket wrench
TOOLS REQUIRED
Dodge/Eagle/Mitsubishi/Plymouth 1990-200599-7001
See application list inside
A
E
B DC
F G H

2
Dash Disassembly
– Dodge Colt/Eagle Summit 1993-1995, Mitsubishi Mirage 1993-1996 .................3
– Dodge Stealth 1991-1996, Mitsubishi 3000GT 1991-1998 ..................................4
– Eagle Summit (wagon) 1992-1996, Mitsubishi Expo 1992-1995,
Plymouth Colt Vista 1992-1994 ...........................................................................5
– Eagle Talon/Mitsubishi Eclipse/Plymouth Laser 1990-1994 .................................6
– Eagle Talon 1995-1998, Mitsubishi Eclipse 1995-1999 .......................................7
– Mitsubishi Diamante 1994-1996 .........................................................................8
– Mitsubishi Eclipse 2000-2005 .............................................................................9
– Mitsubishi Galant 1994-1998 ............................................................................10
– Mitsubishi Mirage 1997-2002 ...........................................................................11
– Mitsubishi Montero 1992-1996 .........................................................................12
– Mitsubishi Montero Sport 2000-2004 ...............................................................13
Kit Assembly ................................................................................................. 14-17
– Single DIN radio provision .................................................................................15
– Equalizer provision ............................................................................................15
Table of Contents
99-7001
Applications
DODGE
Colt ...................................... 1993-1995
Stealth ................................. 1991-1996
EAGLE
Summit ................................ 1993-1995
Summit (wagon) .................... 1992-1996
Talon ................................... 1990-1994
Talon ................................... 1995-1998
MITSUBISHI
3000GT ............................... 1991-1998
Diamante ............................. 1994-1996
Eclipse ................................. 1990-1994
Eclipse ................................. 1995-1999
Eclipse ................................. 2000-2005
Expo .................................... 1992-1995
Galant .................................. 1994-1998
MITSUBISHI (continued)
Mirage ................................. 1993-1996
Mirage ................................. 1997-2002
Montero ............................... 1992-1996
Montero Sport ...................... 2000-2004
PLYMOUTH
Colt Vista ............................. 1992-1994
Laser .................................. 1990-1994

3
Dash Disassembly 99-7001
(Figure B)
(Figure A)
1. Remove (2) Phillips screws below the A/C vents. Pry out on the top of the dash trim bezel and remove the bezel. (Figure A)
2. Remove (4) screws securing the factory radio and disconnect the wiring.
3. Cut and remove mounting tabs “A” and “B” on the radio housing.
4. Cut and remove all mounting tabs on bracket set #1 EXCEPT tabs “C”. (Figure B)
Note: Mounting tabs are identified by the letter stamped on backs of each tab.
Dodge Colt/Eagle Summit 1993-1995, Mitsubishi Mirage 1993-1996
Dash trim bezels with a divided radio opening:• If NOT keeping the factory pocket: Cut and remove the upper rib from the radio opening
and snap the filler bar onto the bottom of the radio housing. (Figure C, 1) • If keeping the factory pocket: Cut and remove the upper rib from the radio opening and
the bottom portion of the radio housing. (Figure C, 2)
Dash trim bezels with an undivided radio opening:• If NOT keeping the factory pocket: Cut and remove the lower rib from the radio opening
and the top portion of the radio housing. (Figure C, 3)• If keeping the factory pocket: Cut and remove the lower rib from the radio opening, the
top portion of the radio housing and the bottom portion of the housing. (Figured C, 4)
Continue to kit assembly
(2)
(1)
(4)
(3)
(Figure C)
C
C

4
Dash Disassembly 99-7001
(Figure B)
(Figure A)
1. Using a panel removal tool, pry out on the radio trim bezel and remove. (Figure A)
2. Remove (4) screws securing the factory radio and disconnect the wiring.
3. Cut and remove mounting tabs “A” and “B” on the radio housing.
4. Cut and remove all mounting tabs on bracket set #2 EXCEPT tabs “E”. (Figure B)
Note: Mounting tabs are identified by the letter stamped on backs of each tab.
Dodge Stealth 1991-1996, Mitsubishi 3000GT 1991-1998
Dash trim bezels with a divided radio opening:• If NOT keeping the factory pocket: Cut and remove the upper rib from the radio opening
and snap the filler bar onto the bottom of the radio housing. (Figure C, 1)
• If keeping the factory pocket: Cut and remove the upper rib from the radio opening and the bottom portion of the radio housing. (Figure C, 2)
Dash trim bezels with an undivided radio opening:• Cut and remove the lower rib from the radio opening and the top portion of the radio
housing. (Figure C, 3)
Continue to kit assembly
(1) (2) (3)
(Figure C)
E
E

5
Dash Disassembly 99-7001
(Figure B)
(Figure A)
1. Remove (2) screws from the top edge of the dash trim bezel. Remove the ashtray and (2) screws exposed. Unclip the dash trim bezel and disconnect the cigarette lighter wiring.
2. Remove (4) Phillips screws securing the factory radio and disconnect the wiring.
3. Cut and remove mounting tabs “A” and “B” on the radio housing.
4. Cut and remove all mounting tabs on bracket set #2 EXCEPT tabs “F”.
Note: Mounting tabs are identified by the letter stamped on backs of each tab.
Eagle Summit (wagon) 1992-1996, Mitsubishi Expo 1992-1995,Plymouth Colt Vista 1992-1994
Dash trim bezels with a divided radio opening:• If NOT keeping the factory pocket: Cut and remove the upper rib from the radio opening
and snap the filler bar onto the bottom of the radio housing. (Figure C, 1) • If keeping the factory pocket: Cut and remove the upper rib from the radio opening and
the bottom portion of the radio housing. (Figure C, 2)
Dash trim bezels with an undivided radio opening:• If NOT keeping the factory pocket: Cut and remove the lower rib from the radio opening
and the top portion of the radio housing. (Figure C, 3)• If keeping the factory pocket: Cut and remove the lower rib from the radio opening, the
top portion of the radio housing and the bottom portion of the housing. (Figured C, 4)
Continue to kit assembly
(Figure C)
F
F
(2)
(1)
(4)
(3)

6
Dash Disassembly 99-7001
(Figure B)
(Figure A)
1. Unclip the radio trim bezel (the factory pocket will be attached).
2. Remove (4) screws securing the factory radio and disconnect the wiring.
3. Cut and remove all mounting tabs on the radio housing EXCEPT tabs “B”. (Figure B)
Note: Mounting tabs are identified by the letter stamped on backs of each tab.
Eagle Talon/Mitsubishi Eclipse/Plymouth Laser 1990-1994
Dash trim bezels with a divided radio opening:• If NOT keeping the factory pocket: Cut and remove the upper rib from the radio opening
and snap the filler bar onto the bottom of the radio housing. (Figure C, 1)
• If keeping the factory pocket: Cut and remove the upper rib from the radio opening and the bottom portion of the radio housing. (Figure C, 2)
Dash trim bezels with an undivided radio opening:• Cut and remove the lower rib from the radio opening and the top portion of the radio
housing. (Figure C, 3)
Continue to kit assembly
(Figure C)
(1) (2) (3)
B
B

7
Dash Disassembly 99-7001
(Figure B)
(Figure A)
1. Slide the front seats forward and remove (1) cover cap and (1) Phillips screw from each side of the center console.
2. Unsnap the cupholder/ashtray assembly and remove (2) Phillips screws exposed.
3. Unclip the radio trim bezel and remove (2) Phillips screws exposed. (Figure A)
4. Unscrew the shifter knob. Disconnect the cigarette lighter and light wiring. Lift up on the center console and remove.
5. Remove (4) Phillips screws securing the factory radio and disconnect the wiring.
Eagle Talon 1995-1998, Mitsubishi Eclipse 1995-1999
6. Cut and remove mounting tabs “A” and “B” on the radio housing. Cut and remove the lower rib from the radio opening. (Figure B)
7. Cut and remove all mounting tabs on backet set #2 EXCEPT tabs “G”. (Figure C)
Note: Mounting tabs are identified by the letter stamped on backs of each tab.
8. Once the mounting tabs are removed, cut and remove the SHADED portions of the brackets. (Figure C)
Continue to kit assembly
(Figure C)
Radio trim bezel
Center console
B
B
A
Cut and remove
Keep “G” tabs
Removeshaded portions

8
Dash Disassembly 99-7001
(Figure B)
1. Remove (2) Phillips screws from each side of the gear shifter console.
2. Remove (2) Phillips screws from the top of the console (under the ashtray).
3. Lift the console out and remove (2) Phillips screws exposed at the base of the dash trim bezel. Pull out on the bottom of the dash trim bezel, disconnect the wiring and remove the bezel. (Figure A)
4. Remove (4) screws securing the factory radio and disconnect the wiring.
5. Cut and remove all mounting tabs on the radio housing EXCEPT tabs “A”. Cut and remove the lower rib from the radio opening. (Figure B)
Note: Mounting tabs are identified by the letter stamped on backs of each tab.
Mitsubishi Diamante 1994-1996
6. Cut and remove all mounting tabs on bracket set #1 EXCEPT tabs “A”. (Figure C)
Note: Mounting tabs are identified by the letter stamped on backs of each tab.
7. Once the mounting tabs are removed, cut the SHADED portions from the brackets. (Figure C)
Continue to kit assembly
(Figure C)
(Figure A)
Keep “A” tabs
Cut and remove
Keep “A” tabs
Cut and remove shaded areas

9
Dash Disassembly 99-7001
1. Remove (2) Phillips screws under the climate controls. Unclip the radio/climate control trim bezel and remove the bezel. (Figure A)
2. Remove (4) Phillips screws securing the factory radio and disconnect the wiring.
3. Cut and remove mounting tabs “A” and “B” on the radio housing. (Figure C)
4. Locate mounting tabs “A” on bracket set #3. (Figure B)
Note: Mounting tabs are identified by the letter stamped on backs of each tab.
5. Cut and remove the lower rib from the radio opening and the top portion of the radio housing. (Figure C)
Continue to kit assembly
Mitsubishi Eclipse 2000-2005
(Figure A) (Figure B) (Figure C)
Locate mounting tabs “A”
B
B
A
Cut and remove

10
Dash Disassembly 99-7001
1. Unclip the gear shifter trim panel and remove. Remove (2) Phillips screws exposed at the base of the dash trim bezel. (Figure A)
2. Unclip the dash trim bezel. Remove (4) Phillips screws securing the factory radio and disconnect the wiring.
3. Cut and remove mounting tabs “A” and “B” on the radio housing. (Figure C)
4. Cut and remove all mounting tabs on bracket set #1 EXCEPT tabs “D”. (Figure B)
Note: Mounting tabs are identified by the letter stamped on backs of each tab.
5. Cut and remove the lower rib from the radio opening. (Figure C)
Continue to kit assembly
Mitsubishi Galant 1994-1998
(Figure A) (Figure B) (Figure C)
Keep all “D” tabs
B
B
A
Cut and remove
Keep all “D” tabs

11
Dash Disassembly 99-7001
(Figure B)
(Figure A)
1. Pry out on the top of the dash trim bezel and remove the bezel. (Figure A)
2. Remove (4) screws securing the factory radio and disconnect the wiring.
3. Cut and remove mounting tabs “A” and “B” on the radio housing.
4. Locate mounting tabs “C” on bracket set #1. (Figure B)
Note: Mounting tabs are identified by the letter stamped on backs of each tab.
Mitsubishi Mirage 1997-2002
C
C
Dash trim bezels with a divided radio opening:• If NOT keeping the factory pocket: Cut and remove the upper rib from the radio opening
and snap the filler bar onto the bottom of the radio housing. (Figure C, 1) • If keeping the factory pocket: Cut and remove the upper rib from the radio opening and
the bottom portion of the radio housing. (Figure C, 2)
Dash trim bezels with an undivided radio opening:• If NOT keeping the factory pocket: Cut and remove the lower rib from the radio opening
and the top portion of the radio housing. (Figure C, 3)• If keeping the factory pocket: Cut and remove the lower rib from the radio opening, the
top portion of the radio housing and the bottom portion of the housing. (Figured C, 4)
Continue to kit assembly
(2)
(1)
(4)
(3)
(Figure C)

12
Dash Disassembly 99-7001
(Figure B)
(Figure A)
1. Remove (2) screws above the climate controls. Unclip the bottom of the dash trim bezel and remove the bezel. (Figure A)
2. Remove (4) screws securing the factory radio and disconnect the wiring.
3. Cut and remove mounting tabs “A” and “B” on the radio housing.
4. Cut and remove all mounting tabs on bracket set #1 EXCEPT tabs “B”. (Figure B)
Note: Mounting tabs are identified by the letter stamped on backs of each tab.
Mitsubishi Montero 1992-1996
Dash trim bezels with a divided radio opening:• If NOT keeping the factory pocket: Cut and remove the upper rib from the radio opening
and snap the filler bar onto the bottom of the radio housing. (Figure C, 1) • If keeping the factory pocket: Cut and remove the upper rib from the radio opening and
the bottom portion of the radio housing. (Figure C, 2)
Dash trim bezels with an undivided radio opening:• If NOT keeping the factory pocket: Cut and remove the lower rib from the radio opening
and the top portion of the radio housing. (Figure C, 3)• If keeping the factory pocket: Cut and remove the lower rib from the radio opening, the
top portion of the radio housing and the bottom portion of the housing. (Figured C, 4)
Continue to kit assembly
(2)
(1)
(4)
(3)
(Figure C)
B
B

13
Dash Disassembly 99-7001
1. Unclip the radio/climate control trim bezel and remove the bezel.
2. Remove (4) Phillips screws securing the factory radio and disconnect the wiring.
3. Cut and remove mounting tabs “A” and “B” on the radio housing.
4. Locate mounting tabs “B” on bracket set #3 and cut and remove the mounting legs containing tabs “A” by cutting along scored lines “X”.
Note: Mounting tabs are identified by the letter stamped on backs of each tab.
5. Cut and remove the lower rib from the radio opening and the top portion of the radio housing. (Figure C)
Continue to kit assembly
Mitsubishi Montero Sport 2000-2004
(Figure A) (Figure B) (Figure C)
Cut along the “X” score lines

14
Kit Assembly 99-7001
All Vehicles
If the lower portion of the radio housing has been removed for pocket retention:
• Mount the brackets to the radio housing with (2) clips and (2) #6 x 1/4” Phillips flat-head screws supplied. (Figure A, 1)
If the lower portion of the radio housing has not been removed (excluding Diamante and Galant):
• Mount the brackets to the radio housing with (4) clips and (2) #6 x 1/4” Phillips flat-head screws supplied. (Figure A, 2)
Mitsubishi Diamante:
• Mount the brackets to the radio housing with (2) clips and (2) #6 x 1/4” Phillips flat-head screws supplied. (Figure A, 3)
Mitsubishi Galant:
• Mount the brackets to the radio housing with (4) clips and (2) #6 x 1/4” Phillips screws supplied. Slide the factory cupholder onto the mounted brackets until the locater pins engage and mount with (2) screws previously removed. (Figure A, 4)
Continue onto the next page
(Figure A)
(1)
(2)
(3)
(4)

15
99-7001
Kit Assembly
(Figure A)
(Figure B)
Single DIN radio provision:
• For dash trim bezels with an undivided radio opening: Slide the DIN cage into the radio housing and secure by bending
the metal locking tabs down. Slide the aftermarket radio into the cage until secure. With the side notches down, snap the faceplate onto the front of the housing. (Figure A, 1)
• For dash trim bezels with a divided radio opening: Slide the DIN cage into the radio housing and secure by bending
the metal locking tabs down. Slide the aftermarket radio into the cage until secure. With the side notches up, snap the faceplate onto the front of the housing. (Figure A, 2)
Equalizer provision
• If an equalizer will be included: Slide the aftermarket equalizer into the back of the radio housing.
Using the hardware included with the equalizer, mount the radio to the kit. (Figure B, 1)
• If an equalizer will NOT be included: Snap the equalizer dummy plate onto the radio housing.
(Figure B, 2)
Continue onto the next page
(1) (2)
(1) (2)
Notch down Notch up

16
99-7001
Kit Assembly
Talon 1995-1998, Eclipse 1995-1999, Colt, Summit, Mirage, Stealth, 3000GT, Diamante, Galant, Montero: • No cutting of the dash or dash trim bezel is required.
Continue onto the next page
Talon, Eclipse, Laser 1990-1994: • If keeping the factory pocket is desired, cut and remove the
inside half of each pocket mount located on the back of the dash trim bezel. (Figure C, 1)
Continue onto the next page
Summit (wagon), Expo, Colt Vista:• Cut and remove 1/4” from the top edge of the dash cavity
opening. (Figure C, 2)
• If keeping the factory pocket is desired, cut and remove the pocket mounts located on the back of the dash trim bezel. (Figure C, 3)
Continue onto the next page
(Figure C)
(1)
(3)
(2)
1/4”

17
99-7001
Kit Assembly
• Locate the factory wiring harness in the dash. Metra recommends using the proper mating adapter from Metra or AXXESS.
• Re-connect the negative battery terminal and test the radio for proper operation.
• Reassemble dash in reverse order of disassembly. (Figure D)
(Figure D)
Notes

METRA. The World’s best kits.™ metraonline.com1-800-221-0932 © COPYRIGHT 2004-2014 METRA ELECTRONICS CORPORATION
REV.
8/1
3/20
14
INST
99-7
001
KNOWLEDGE IS POWEREnhance your installation and fabrication skills by enrolling in the most recognized and respected mobile electronics school in our industry.Log onto www.installerinstitute.com or call 800-354-6782 for more information and take steps toward a better tomorrow.
Metra recommends MECP certified technicians
INSTALLATION INSTRUCTIONS FOR PART 99-7001