installation instructions - f2048/01 - l51xxdxxlp and tp
TRANSCRIPT

Installation InstructionsREGISTERED DESIGN • REGISTERED PATENT
Professional Dimmer L51xxDxxLPL51xxDxxTP
Series

© Copyright 2009 by Schneider Electric
All rights reserved. This material is copyright under Australian and international laws. Except as permitted under the relevant law, no part of this work may be reproduced by any process without prior written permission of and acknowledgement to Schneider Electric.
The information in this manual is provided in good faith. Schneider Electric endeavours to ensure the relevance and accuracy of the information, but it assumes no responsibility for any loss incurred as a result of its use. Schneider Electric does not warrant that the information is fit for any particular purpose, nor does it endorse its use in applications that are critical to the health or life of any human being. Schneider Electric reserves the right to update the information at any time without notice.
Clipsal and C-Bus are registered trademarks of Schneider Electric.
Megger is a registered trademark of AVO International (formerly the Biddle Co.), but the term is widely used for all similar tests regardless of manufacturer.
All other trademarks are property of their respective owners.
April 2009

C-Bus Professional Series Dimmer Installation Instructions
3
CONTENTS
1.0 Product Range 5
1.1 Leading Edge Dimmer Units 6
1.2 Trailing Edge Dimmer Units 7
2.0 Description 8
3.0 Important Safety Information 10
4.0 Getting Started 12
4.1 Installation Requirements 12
4.2 What You Need to Install the Unit 12
5.0 Compatible Loads 13
6.0 Installation 14
6.1 Mounting the Dimmer on the Wall 15
6.2 Connecting the Supply and Load Wiring 18
6.3 C-Bus Network Connections 20
6.4 C-Bus Remote ON/OFF and Override (options) 21
7.0 Controls and Indicators 23
7.1 Dimmer Channel Override Switch 23
7.2 Control Panel Switches and Indicators 23
7.3 C-Bus Unit and Status Indicators 24
7.4 Phases Indicators 25
7.5 Channel Toggle and Indicator Buttons 25
7.6 Priority of Control Modes 26
8.0 C-Bus Requirements 27
8.1 Power Requirements 27
8.2 C-Bus Programming 28
8.3 Network Burden 28
8.4 Network Clock 28

C-Bus Professional Series Dimmer Installation Instructions
4
9.0 Replacing a Channel Module 29
9.1 Removing a Channel Module 29
9.2 Installing a Channel Module 30
9.3 Replacing an MCB 30
10.0 Troubleshooting 31
11.0 Definitions and Acronyms 32
12.0 Electrical Specifications 33
13.0 Environmental and Mechanical Specifications 38
13.1 Environmental Specifications (all models) 38
13.2 Leading Edge Mechanical Specifications 39
13.3 Trailing Edge Mechanical Specifications 39
14.0 Standards Complied 40
15.0 Two-Year Warranty 42

C-Bus Professional Series Dimmer Installation Instructions
5
1.0 Product Range
The Professional Series Dimmers are designed for high power leading edge or trailing edge applications. You can specify 3, 6, or 12 dimmer channels that operate at a specified current rating. Optional variants with Residual Current Devices (RCDs/RCCBs) and 3-phase MCBs might be required for some applications. For the latest information, contact your Clipsal representative.
The catalogue number represents the configuration of your dimmer unit. The definitions of the fields in the number are shown below.
L51 12 06 03
D 20 16 10
5 3
L P 12631
3M
L51 12 06 03
D 20 16 10
5 3
T P 631
3M

C-Bus Professional Series Dimmer Installation Instructions
6
1.1 Leading Edge Dimmer Units
Table 1 shows the nominal current per channel and supply phases and maximum load for leading edge models.
Do not exceed the maximum load allowed for the dimmer unit.
Catalogue No. Channels Current per Channel
Supply phases
Maximumunit load
L5112D20LP 12 20A 3ϕ 180A
L5112D16LP 12 16A 3ϕ 180A
L5112D10LP 12 10A 3ϕ 120A
L5112D5LP 12 5A 3ϕ 60A
L5112D3LP 12 3A 1ϕ/2ϕ 36A
L5106D20LP 6 20A 3ϕ 120A
L5106D10LP 6 10A 3ϕ 60A
L5106D5LP 6 5A 1ϕ/3ϕ 30A
L5106D3LP 6 3A 1ϕ 18A
L5103D20LP 3 20A 3ϕ 60A
L5103D10LP 3 10A 1ϕ/3ϕ 30A
L5103D5LP 3 5A 1ϕ 15A
Table 1. C-Bus Professional Leading Edge Dimmers phase and current characteristics

C-Bus Professional Series Dimmer Installation Instructions
7
1.2 Trailing Edge Dimmer Units
Table 2 shows the nominal current per channel and supply phases and maximum load for trailing edge models.
Do not exceed the maximum load allowed for the dimmer unit.
Catalogue No. Channels Current per channel
Supply phases
Maximum unit load
L5112D10TP 12 10A 3ϕ 120A
L5112D5TP 12 5A 3ϕ 60A
L5112D3TP 12 3A 1ϕ/2ϕ 36A
L5106D20TP 6 20A 3ϕ 120A
L5106D16TP 6 16A 3ϕ 120A
L5106D10TP 6 10A 3ϕ 60A
L5106D5TP 6 5A 1ϕ/3ϕ 30A
L5106D3TP 6 3A 1ϕ 18A
L5103D20TP 3 20A 3ϕ 60A
L5103D10TP 3 10A 1ϕ/3ϕ 30A
L5103D5TP 3 5A 1ϕ 15A
Table 2. C-Bus Professional Trailing Edge Dimmers phase and current characteristics

C-Bus Professional Series Dimmer Installation Instructions
8
2.0 Description
The C-Bus Professional Dimmers are high-powered 3-, 6- or 12- channel dimmers designed for commercial applications. Individual channels can have either leading edge or trailing edge phase control. Refer to Table 3.
Channel Module Type Load Current Output Stage Technology
LE (Leading Edge) 3A / 5A Single Triac with Toroidal Choke
LE 10A / 20A Dual SCRs with Toroidal Choke
TE (Trailing Edge) 3A - 20A Dual MOSFETs
Table 3. Characteristics of Professional Dimmer channel modules
The Professional dimmer channels have on-board MCB protection, thermal overload protection, over-current protection, and short circuit protection. They also accommodate the RCD requirements as per AS/NZS3000: 2007.
Figure 1. C-Bus Professional Dimmer (6-channel dimmer shown)

C-Bus Professional Series Dimmer Installation Instructions
9
When customer requirements change, dimmer channel modules can be upgraded in the field. Contact the Clipsal sales organisation for details and product availability.
In the event of an over-temperature condition, for example, one caused by excessive load current being drawn, the dimmer channel reduces the output power as long as the condition exists.
The main isolation switch disconnects all internal circuits from building power. Each dimmer channel has a circuit breaker and a front panel control switch. The channel modules have an override switch for testing the connected lighting load or for isolating the load during testing and commissioning.
The Professional Dimmer is programmed using C-Bus Toolkit software and has ‘learn’ capability. The dimmers have software-enabled C-Bus clocks and burden. In the event that AC power is lost and restored, programmed dimmer channels return to their previously set lighting levels. When connected to building power, the dimmer unit does not sink current from the C-Bus network. At the C-Bus Group Address level, output load power variation follows the input control in a linear fashion.
The soft power on/off feature helps protect lamp filaments. The bottom panel has three RJ45 C-Bus connectors wired in parallel and a 4-pin C-Bus connector wired in parallel with them. A four-pin connector is provided for optional, independent C-Bus remote On/Off operation.
The dimmer incorporates voltage compensation (over a significant part of the dimming range) to minimise load brightness variation if the AC supply voltage drifts. The dimmer also incorporates filtering to reduce load brightness fluctuations typically associated with the presence of AC supply voltage signalling.

C-Bus Professional Series Dimmer Installation Instructions
10
3.0 Important Safety Information
Only qualified personnel may install the C-Bus Professional dimmer. The installation must meet all local safety requirements.
Follow all cautions and safety instructions on the packaging materials and on the unit. Read the following cautions before you install the unit:
Dimmer units weigh from 10kgs to 40kgs. Make certain that the mounting fixtures are secure before attaching the unit, and get assistance from another person when lifting.
Never operate or service the dimmer unit with the front cover panel open. Always secure the panel with the locking screw before applying power. The C-Bus Professional Dimmer is for indoor use only. Never allow liquids to spill or drip on the top of the unit. To prevent electrical shock, do not service the unit if it is wet. Do not stand on a wet surface when servicing the unit.
Hazardous voltage is present at the dimmer channel outputs when building power is connected (this is a characteristic of dimmer products). Turn off the main isolation switch and padlock it before accessing the lighting circuits. The Merlin Gerin padlocking device for the main input isolation switch is catalogue number 26970.
The channel module T-brackets do not use heat sink compound. The T-bracket retainer screw torque specification is 0.7 Nm.
During normal operation, the heat main sink can be hot to the touch.
Do not exceed current ratings per channel or per unit. Refer to Electrical Specifications.

C-Bus Professional Series Dimmer Installation Instructions
11
For protection against fire and equipment damage when upgrading a channel module, you must replace the associated MCB with one of the correct type and current rating. Refer to Module Installation and Replacement. Do not short circuit dimmer channel outputs or connect channel outputs together.
Do not connect more than three MCBs downstream from a single RCD.
Do not block the ventilation holes at the top and bottom of the unit. Do not allow debris or dust to enter the unit.
All connections must be tight to avoid risk of fire or damage to equipment. Connections might loosen during shipment.
Do not Megger test channel modules. Isolate the lighting load using the channel MCB before testing.
Using non C-Bus software might cause erratic equipment behaviour and voids the warranty.

C-Bus Professional Series Dimmer Installation Instructions
12
4.0 Getting Started
4.1 Installation Requirements
• The dimmer unit must be connected to phases equipped with a circuit breaker or fuse that has a short circuit withstand current rating of 6 kA.
• Use of the supplied mounting brackets is mandatory. Refer to Mounting Considerations.
• The dimmer units containing 3A dimmer modules do not have an MCB for each channel. You must install a 4A MCB for each output channel between the terminal block and the load. Refer to Wiring Instructions.
• Airflow around the main heatsink and the ventilation holes must not be restricted. If an enclosure is used, it must provide adequate ventilation.
• Connect only compatible load types to the dimmer.
• Using non C-Bus software voids the warranty.
• Do not short circuit channels or wire the channels in parallel.
• Clipsal recommends the use of external protection against power surges.
4.2 What You Need to Install the Unit
When installing the dimmer unit on the wall, you need the following:
• Mounting bracket template that is shipped with the unit.
• 2 Mounting brackets, shipped with the unit.
• 4 Mounting screws or anchors (not supplied), appropriate for wall material and thickness.
Optional Items that might be helpful:
• Merlin Gerin padlocking device for the main input isolation switch (catalogue number 26970)
• Clipsal 970 Series Surge suppression device
• Clipsal C-Bus Network Analyser tool (5100NA)

C-Bus Professional Series Dimmer Installation Instructions
13
5.0 Compatible Loads
The dimmer channels can supply power to a wide range of load types. Refer to Wiring Instructions for diagrams and best practices. Dimmer channel loading is limited by two factors:
• Never exceed the maximum load on any input phase. Refer to Electrical Specifications.
• Never exceed the rated value of the channel overload MCB.
Incandescent and 240V halogen lamps
The minimum load requirement can be found in Electrical Specifications. When using several channels, distribute the load as evenly as possible among the channels.
Electronic transformer
Be sure to use transformers that are compatible with the dimmer channel module. Check with the manufacturer of the transformer for compatibility information.
Neon lighting with iron core transformers
Clipsal recommends using an appropriately rated circuit breaker between the dimmer unit and each iron-core transformer. The dimmer channel overload MCB might have too high a current rating to protect an individual transformer.
Low voltage lighting with iron core transformers
There are no special wiring considerations.
Note: Only iron core transformers compatible with electronic switches may be used to ensure compliance to IEC 60669-2-1.
Motor speed control
The motor running current total and all other connected lighting loads must not exceed the channel module load rating.

C-Bus Professional Series Dimmer Installation Instructions
14
6.0 Installation
Use these steps to minimise the risk of personal injury or damage to the dimmer unit or lighting fixtures.
1. Check the unit for obvious physical damage before installation.
2. Choose a wall location where the unit will not interfere with normal business operations. Provide for adequate ventilation. See Mounting the Dimmer on the Wall.
3. Use the supplied template. Accurately drill the mounting holes. Install the mounting brackets securely to the wall.
4. Place the dimmer unit on the mounting brackets. Check that the unit is securely fastened to the wall.
5. Measure the hole size needed for cable entry. Drill holes in the cover plates so that there are no gaps larger than 10mm around the cables. There must be no sharp edges around the cable entry holes. Insulated conductors must not rest against bare live parts at a different potential and shall be adequately supported. Then install the cable entry covers.
6. Connect the lighting load wiring, do not exceed maximum rated load current per channel. The dimmer is compatible with copper and aluminium conductors.
7. Connections can loosen during shipping. Make sure that all internal circuit breaker and terminal connections are tight.
8. Route the C-Bus network cables away from mains power conductors to comply with all local wiring regulations.
9. Set the channel override switches ON for testing, and then switch them OFF for normal operation.
10. Double check all wiring connections before applying mains power to the unit.

C-Bus Professional Series Dimmer Installation Instructions
15
6.1 Mounting the Dimmer on the Wall
When mounting the dimmer unit, follow these guidelines:
• You must use the supplied mounting brackets. Use the provided installation template to accurately drill the four required holes.
• The mounting bracket hole size is 10 mm. Use 8mm minimum diameter Dynabolts or similar, depending on the mounting surface. Use suitable washers. Bolts and washers are not provided.
• The mounting substrate must be reinforced to support the weight of the unit, up to 40 kg.
Providing Clearance for the Dimmer
Allow a minimum gap of 100 mm on each side of the dimmer to allow for adequate ventilation and access to wiring and connectors.
When installing the mounting brackets, refer to Figures 2 through 4 and Tables 4 and 5.
Figure 2. Mounting clearance for multiple units

C-Bus Professional Series Dimmer Installation Instructions
16
Figure 3. Side clearance requirements for Professional Dimmers (Refer to Table 2 for exact dimensions)
Dimension Value Dimmer width 455 412 405
A Left side distance from the nearest wall or dimmer to the left-hand hole centres of the mounting brackets
250 207 200
B Distance from the left side of the dimmer to the left-hand hole centres of the mounting brackets
150 107 100
C Distance between mounting bracket hole centres
250 250 250
D Distance from right-hand hole centres of the mounting brackets to the right side of the dimmer
55 55 55
E Right side distance from the right-hand hole centres of the mounting brackets to the wall or the next dimmer
155 155 155
Table 4. Side clearance dimensions for Professional Dimmers

C-Bus Professional Series Dimmer Installation Instructions
17
Figure 4. Vertical clearance requirements for Professional Dimmers Refer to Table 3)
Dimension Value Dimmer height 713 602 451 358 289 AA Distance above from the nearest
solid barrier or dimmer to the hole centres of the top mounting bracket
157 158 165 157 165.5
BB Distance from the top of the dimmer to the hole centres of the top mounting bracket
57 58 65 57 65.5
CC Vertical distance between mounting bracket hole centres
635 510 365 280 202.5
DD Distance from the hole centres of the bottom mounting bracket to the bottom edge of the dimmer
21 32 20 24 20.5
EE Distance below from the hole centres of the bottom mounting bracket to the nearest solid barrier or dimmer
121 132 120 124 120.5
Table 5. Vertical clearance dimensions for Professional Dimmers

C-Bus Professional Series Dimmer Installation Instructions
18
6.2 Connecting the Supply and Load Wiring
Mains input power enters the enclosure and is connected to the main isolation switch terminals. The bus bar distributes power to the channel MCBs. Neutral and earth connections branch out from main terminal blocks. Refer to Figure 5.
When connecting loads, do not connect more than 3 MCBs to a single residual current device. Also, isolate channel outputs from each other. For additional installation requirements, refer to Section 4.
Figure 5. Basic wiring diagram for installation

C-Bus Professional Series Dimmer Installation Instructions
19
Dimmer units containing 3-Amp dimmer modules do not have channel MCBs. These dimmer channels require the installation of a 4A MCB between the terminal block and the load. Refer to Figure 6.
Figure 6. Wiring diagram for units without internal MCBs

C-Bus Professional Series Dimmer Installation Instructions
20
6.3 C-Bus Network Connections
Connection to the C-Bus network is made using the RJ45 sockets or the C-Bus four-pin connector (all wired in parallel). Use Cat.5e Unshielded Twisted Pair (UTP) C-Bus cable, and an appropriately wired RJ45 plug or supplied 4-pin female plug. Pinouts are provided in Figure 7.
Figure 7. C-Bus wiring connections
The Clipsal catalogue number for the C-Bus Cat.5e UTP cable is 5005C305B.

C-Bus Professional Series Dimmer Installation Instructions
21
6.4 C-Bus ON/OFF and Override (options)
C-Bus Remote On/Off connections are optional. If you intend to use this feature, connect the green/green & white and brown/ brown & white pairs across the network during installation. Otherwise, tie back the unused wire pairs.
On the C-Bus network, when one of the remote inputs is enabled (active low referenced to C-Bus negative), all dimmer channels are set to either ON or OFF. In the event that the Remote On and Remote Off functions are activated simultaneously, Remote Off has priority. Refer to Figure 8.
Figure 8. C-Bus Network Remote On/Off wiring diagram
The Remote Override on the dimmer unit is capable of working independently of the C-Bus network. There are several methods of wiring, depending on how the Remote Override is to be used.
Note: The REMOTE ‘C’ terminals are connected together. The extra ‘C’ connection is provided to connect REMOTE ‘C’ to C-Bus ‘–‘.

C-Bus Professional Series Dimmer Installation Instructions
22
Figure 9 shows the wiring of a dimmer unit where the Remote Override circuit is connected to the C-Bus network. In this configuration, the C-Bus network controls the Remote On/Off function of the dimmer unit.
Figure 9. Standard C-Bus connection with Remote Override connected to C-Bus
The Remote Override for the dimmer unit can function inde-pendently of the C-Bus network. Figure 10 shows the wiring for independent unit operation. In this alternate Remote Override mode, the Remote terminals are NOT connected to the C-Bus cable.
Figure 10. Dimmer unit Remote Override independent of the C-Bus network

C-Bus Professional Series Dimmer Installation Instructions
23
7.0 Controls and Indicators
7.1 Dimmer Channel Override Switch
The dimmer channel override switch, shown in Figure 11, allows you to isolate the lighting load for commissioning or testing at full power.
The override switch does not control the emergency lighting terminal output. To isolate the channel load and emergency lighting load use the channel MCB.
I = Dimmer module is in override mode for isolation or testing. O = Dimmer module is set for normal dimming operation.
Figure 11. Dimmer Channel override switch location
7.2 Control Panel Switches and Indicators
The C-Bus indicators, Phases indicators and channel buttons are located on the front panel. The channel buttons provide local on/off switching, mode and fault status. The channel switches have two indicators, source and mode.
Do not rely on the 'Phases' indicators to tell you if power is present inside the dimmer enclosure. Always turn off and lock out power at the source before opening the front panel.

C-Bus Professional Series Dimmer Installation Instructions
24
Figure 12. Professional Dimmer front control panel.
7.3 C-Bus Unit and Status Indicators
The ‘unit’ indicator shows the status of the C-Bus network operation inside the dimmer. The unit indicator modes are shown in Table 6.
Colour Condition Description
Green On Normal operation
Green Flashing Unit is in override mode
Table 6. C-Bus Unit Indicator LED modes
The ‘status’ indicator shows the status of the C-Bus network. If sufficient network voltage and a valid C-Bus clock signal are present, the indicator illuminates (as a continuous green light).
Colour Condition Meaning
Green On The power is on and the network is functional
Green Flashing The network voltage is marginal; above 15 V, but less than 20 V.
Green Off No C-Bus clock is present, mains power is not connected, or network voltage is below 15 V.
Table 7. C-Bus Status Indicator LED modes

C-Bus Professional Series Dimmer Installation Instructions
25
7.4 Phases Indicators
The ‘Phases’ indicators provide a visual check on the presence or absence of input voltage phases inside the dimmer unit. The main input isolations switch must be on for the indicators to work.
Colour Condition Meaning
Orange On Normal operation, phase voltage present
Orange Off Phase not present.
Table 8. Phases indicators
7.5 Channel Toggle and Indicator Buttons
The channel buttons control the local override function. The buttons allow you to toggle each channel on and off. Each button LED illuminates when its respective channel is in the ON state. The local override option can be disabled using the C-Bus Toolkit software.
When disconnected from a C-Bus network, the dimmer can function as a stand-alone unit, provided the channels are programmed, using the C-Bus Toolkit software. Depending on how they are pressed, the buttons perform different functions. The double quick-press and long press operations only apply when the unit/channel is in local override mode.
Operation Function
Quick-press A single quick-press toggles the state of a channel
Double quick-press Two quick-presses in quick succession returns the channel to the C-Bus network level
Long press Pressing any of the buttons for 1 second or more returns all channels to the C-Bus network level
Table 9. Channel toggle button functions

C-Bus Professional Series Dimmer Installation Instructions
26
A mode indicator is located on the right side of each of the channel toggle buttons.
Colour Condition Description
Green On Normal operation, Leading Edge Orange On Normal operation, Trailing Edge
Green Flashing Phase Failure Breaker Trip / Off
Orange Flashing Thermal Overload
Red/Green Red/Orange
Flashing Internal error
Table 10. Channel Mode Indicator LED modes
Note: If an error condition persists, call Technical Support.
7.6 Priority of Control Modes
Because a channel may be controlled by various means, there is a priority of control modes. Table 11 provides the priority information.
Mode Priority Function
Current overload 1 (highest) channel off (MCB trips)
Electronic cutout 2 channels off (MCB on)
Thermal shutdown 3 channel power ramps down
Remote off (option) 3 all channels off
Remote on (option) 4 all channels on
Channel buttons and C-Bus Toolkit software 5 Toggle the channel and
provide programming control
Table 11. Priority of Control Modes

C-Bus Professional Series Dimmer Installation Instructions
27
8.0 C-Bus Requirements
8.1 Power Requirements
C-Bus Professional Series Dimmers sink current from the C-Bus network when mains power is not connected. Dimmer units do not need a mains connection during programming.
Parameter Description
C-Bus supply voltage 20 V to 36 V DC
Maximum units per network 100
Unit input current 0 mA (mains connected) 18 mA (no mains connected)
Unit output current (onto C-Bus)
0 mA
Connection type RJ45 (3 locations) 4-pin female (wired in parallel with RJ45)
Network clock Software selectable Network burden Software selectable (unit address 001
only)
Table 12. C-Bus power, clock and burden requirements
C-Bus Toolkit software provides a summary of a C-Bus network project. This can be helpful in determining the power supply requirements of a particular network.

C-Bus Professional Series Dimmer Installation Instructions
28
8.2 C-Bus Programming
The C-Bus Professional Series Dimmer must be programmed before it will function as part of a C-Bus network. This can be accomplished using Learn Mode. However, using C-Bus Toolkit software provides a greater level of flexibility and customisation. The software can be downloaded from the Clipsal Integrated Systems web site (www.clipsal.com/cis). Further information about programming C-Bus units is provided at this site.
C-Bus Toolkit software helps you to configure all operating parameters, including the setting of control sources and power-up options. Indicators and dimmers function only when mains are connected.
8.3 Network Burden
C-Bus Professional Series Dimmers incorporate a software selectable network burden. The network burden can be enabled from the unit’s ‘Global’ tab in the C-Bus Toolkit software, but only if the C-Bus system clock is enabled, and the Unit Address is set to 001. One network burden is normally required to ensure correct operation of each C-Bus network. The Network window of a C-Bus Toolkit project provides a summary of a C-Bus network according to the units added to the Database. This can be helpful in determining whether or not a burden is required on a particular network.
8.4 Network Clock
C-Bus Professional Series Dimmers incorporate a software selectable C-Bus system clock. The system clock is used to synchronise data communication over a C-Bus network. At least one active C-Bus system clock is required on each C-Bus network for successful communication. No more than three units on a C-Bus network should have their clock enabled, so this option is normally disabled using C-Bus Toolkit software. If a system clock is required, it can be enabled from the unit’s ‘Global’ tab in the C-Bus Toolkit software.

C-Bus Professional Series Dimmer Installation Instructions
29
9.0 Replacing a Channel Module
Only qualified service personnel may replace a channel module.
9.1 Removing a Channel Module
Before starting, make certain that you have a screwdriver and materials to label the module after removing it from the unit.
1. Identify the channel module to be replaced before powering off the unit.
2. Power off the unit and disconnect mains power using the main isolation switch. Do not rely on the ‘Phases’ indicators on the front display panel to tell you if power is present inside the unit.
3. Open the front cover panel and disconnect the earth wire connection from the door to the chassis.
4. Disconnect the power cable from the channel module to be removed. Slide the connector from the terminals. Do not pull on the brown and white wires.
5. Remove the machine screw that fastens the T-bracket to the main heat sink.
6. Pull the channel module out of the card connector. 7. When it is free from the unit, label the module and put it in a
safe place. If you are returning a channel module to Clipsal, label it and pack it properly. Be sure to label the module with the following information:
Dimmer unit catalogue and serial numbers
Channel module location and serial number
Date the part was removed
Reason for removal from the unit.

C-Bus Professional Series Dimmer Installation Instructions
30
9.2 Installing a Channel Module
1. Remove the new channel module from the package. Save the package to return the original part to Clipsal.
2. Examine the module carefully for any damage from shipping.
3. Connect the channel module power cable to the circuit board by sliding the connector onto the terminals. Make certain that the connector is fully seated on the terminals.
4. Slide the channel module into the connector in the unit. Make sure the module is fully seated. Do NOT use heat sink compound.
5. Install the retainer screw to secure the T-bracket to the main heat sink. Tighten the screw to the torque value 0.7 Nm.
6. Check the position of the channel module. Be sure to connect the earth wire and close the front cover before operating the unit.
9.3 Replacing an MCB
When replacing an MCB, do the following:
1. Remove mains power by shutting off the unit at the main isolation switch.
2. Open the front cover. 3. Loosen the 2 screws that hold the MCB on the bus bar and
disconnect the load wiring. 4. Carefully pull the DIN rail retainer clip away from the body of
the MCB with a flat screwdriver blade. 5. Rock the MCB loose from the DIN rail and bus bar. 6. Remove the old part and install a new MCB of the correct
rating. 7. Be sure that the new circuit breaker is properly fastened to
the DIN rail and bus bar. Connect the load wiring. 8. Check that all connections are tight. 9. Attach the cover panel earth wire and close the cover before
powering on the unit.

C-Bus Professional Series Dimmer Installation Instructions
31
10.0 Troubleshooting
At installation, before calling technical support, please check your unit for obvious problems.
• Isolate the problem, as much as possible, to a single circuit or function.
• Disconnect mains power at the panel. Check for loose input or load wiring.
• Recheck all wiring connections. Check for correct wiring of the C-Bus cables and connectors.
• Decode any channel indicator messages. A label with mode and status information is located inside the front cover.
• Make sure that any local or remote overrides are turned off.
• Verify C-Bus operating requirements such as voltage, clock and burden.
• Refer to the Toolkit online HELP for assistance.
• Further debugging of possible network problems can be achieved using the Clipsal C-Bus Network Analyser tool (5100NA).

C-Bus Professional Series Dimmer Installation Instructions
32
11.0 Definitions and Acronyms
C-Bus network
A network that connects C-Bus input, control, and output devices for power distribution and programmable control functions. Each C-Bus device has a unique address on the network. Multiple C-Bus networks can include network bridges and wireless equipment.
MCB
Miniature circuit breaker
Megger® testing
A device momentarily applies a DC voltage (typically 600 to 2500 volts) for several minutes. While the voltage is applied, the device measures the current ‘leaking’ through the insulation and displays the resistance in Megohms.
RCCB
Residual current circuit breaker
RCD
Residual current device
RJ45
A connector type commonly used in network cabling and telephony applications. Typically, four twisted pairs are used.
Toroidal choke
An inductive component constructed around a ring-shaped core.
C-Bus Professional Series Dimmer Installation Instructions
33
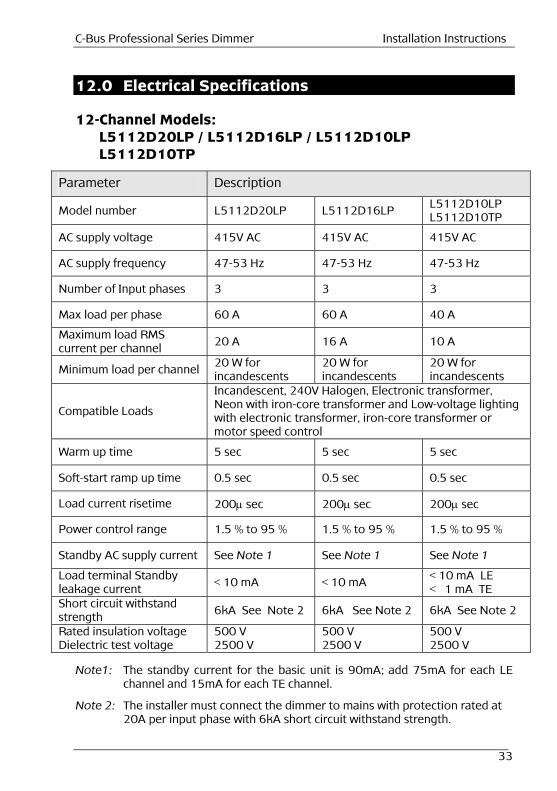
12.0 Electrical Specifications
12-Channel Models: L5112D20LP / L5112D16LP / L5112D10LP L5112D10TP
Parameter Description
Model number L5112D20LP L5112D16LP L5112D10LP L5112D10TP
AC supply voltage 415V AC 415V AC 415V AC
AC supply frequency 47-53 Hz 47-53 Hz 47-53 Hz
Number of Input phases 3 3 3
Max load per phase 60 A 60 A 40 A
Maximum load RMS current per channel
20 A 16 A 10 A
Minimum load per channel20 W for incandescents
20 W for incandescents
20 W for incandescents
Compatible Loads
Incandescent, 240V Halogen, Electronic transformer, Neon with iron-core transformer and Low-voltage lighting with electronic transformer, iron-core transformer or motor speed control
Warm up time 5 sec 5 sec 5 sec
Soft-start ramp up time 0.5 sec 0.5 sec 0.5 sec
Load current risetime 200μ sec 200μ sec 200μ sec
Power control range 1.5 % to 95 % 1.5 % to 95 % 1.5 % to 95 %
Standby AC supply current See Note 1 See Note 1 See Note 1
Load terminal Standby leakage current < 10 mA < 10 mA
< 10 mA LE < 1 mA TE
Short circuit withstand strength 6kA See Note 2 6kA See Note 2 6kA See Note 2
Rated insulation voltage Dielectric test voltage
500 V 2500 V
500 V 2500 V
500 V 2500 V
Note1: The standby current for the basic unit is 90mA; add 75mA for each LE
channel and 15mA for each TE channel.
Note 2: The installer must connect the dimmer to mains with protection rated at 20A per input phase with 6kA short circuit withstand strength.

C-Bus Professional Series Dimmer Installation Instructions
34
12-Channel Models: L5112D5LP / L5112D3LP L5112D5TP / L5112D3TP
Parameter Description
Model number L5112D5LP L5112D5TP
L5112D3LP L5112D3TP
AC supply voltage 415V AC 240V AC
AC supply frequency 47-53 Hz 47-53 Hz
Number of Input phases 3 1 or 2
Warm up time 5 sec 5 sec
Max load per phase 20 A 36 A (1) 18 A (2)
Maximum load RMS current per channel
5 A 3 A
Minimum load per channel 20 W for incandescents
20 W for incandescents
Compatible Loads Incandescent, 240V Halogen, Electronic transformer, Neon with iron-core transformer and Low-voltage lighting with electronic transformer, iron-core transformer or motor speed control
Soft-start ramp up time 0.5 sec 0.5 sec
Load current risetime 200μ sec 200μ sec
Power control range 1.5 % to 95 % 1.5 % to 95 %
Standby AC supply current See Note 1 See Note 1
Load terminal Standby leakage current
< 10 mA LE < 1 mA TE
< 10 mA LE < 1 mA TE
Short circuit withstand strength
6kA See Note 2 See Note 2
Rated insulation voltage Dielectric test voltage
500 V 2500 V
500 V 2500 V
Note 1: The standby current for the basic unit is 90mA; add 75mA for each LE
channel and 15mA for each TE channel.
Note 2: The installer must connect the dimmer to mains with protection rated at 20A per input phase with 6kA short circuit withstand strength.

C-Bus Professional Series Dimmer Installation Instructions
35
6-Channel Models: L5106D20LP / L5106D10LP L5106D20TP / L5106D16TP / L5106D10TP
Parameter Description
Model number L5106D20LP L5106D20TP
L5106D16TP L5106D10LP L5106D10TP
AC supply voltage 415V AC 415V AC 415V AC
AC supply frequency 47-53 Hz 47-53 Hz 47-53 Hz
Number of Input phases 3 3 3
Warm up time 5 sec 5 sec 5 sec
Max load per phase 40 A 40A 20 A
Maximum load RMS current per channel
20 A 16A 10 A
Minimum load per channel 20 W for incandescents
20 W for incandescents
20 W for incandescents
Compatible Loads Incandescent, 240V Halogen, Electronic transformer, Neon with iron-core transformer and Low-voltage lighting with electronic transformer, iron-core transformer or motor speed control
Soft-start ramp up delay 0.5 sec 0.5 sec 0.5 sec
Load current risetime 200μ sec 200μ sec 200μ sec
Power control range 1.5 % to 95 % 1.5 % to 95 % 1.5 % to 95 %
Standby AC supply current See Note1 See Note1 See Note1
Load terminal Standby leakage current
< 10 mA LE < 1 mA TE
< 1 mA < 10 mA LE < 1 mA TE
Short circuit withstand strength
6kA See Note 2 6kA See Note 2 6kA See Note 2
Rated insulation voltage Dielectric test voltage
500 V 2500 V
500 V 2500 V
500 V 2500 V
Note 1: The standby current for the basic unit is 90mA; add 75mA for each LE
channel and 15mA for each TE channel.
Note 2: The installer must connect the dimmer to mains with protection rated at 20A per input phase with 6kA short circuit withstand strength.

C-Bus Professional Series Dimmer Installation Instructions
36
6-Channel Models: L5106D5LP / L5106D3LP L5106D5TP / L5106D3TP
Parameter Description
Model number L5106D5LP L5106D5TP
L5106D3LP L5106D3TP
AC supply voltage 415V AC 240V AC
AC supply frequency 47-53 Hz 47-53 Hz
Number of Input phases 3 1
Warm up time 5 sec 5 sec
Max load per phase 10 A 20 A
Maximum load RMS current per channel
5 A 3 A
Minimum load per channel
20 W for incandescents 20 W for incandescents
Compatible Loads Incandescent, 240V Halogen, Electronic transformer, Neon with iron-core transformer and Low-voltage lighting with electronic transformer, iron-core transformer or motor speed control
Soft-start ramp up time 0.5 sec 0.5 sec
Load current risetime 200μ sec 200μ sec
Power control range 1.5 % to 95 % 1.5 % to 95 %
Standby AC supply current
See Note 1 See Note 1
Load terminal Standby leakage current
< 10 mA LE < 1 mA TE
< 10 mA LE < 1 mA TE
Short circuit withstand strength
6kA See Note 2 See Note 2
Rated insulation voltage Dielectric test voltage
500 V 2500 V
500 V 2500 V
Note 1: The standby current for the basic unit is 90mA; add 75mA for each LE
channel and 15mA for each TE channel.
Note 2: The installer must connect the dimmer to mains with protection rated at 20A with 6kA short circuit withstand strength.

C-Bus Professional Series Dimmer Installation Instructions
37
3-Channel Models: L5103D20LP / L5103D10LP / L5103D5LP L5103D20TP / L5103D10TP / L5103D5TP
Parameter Description
Model number L5103D20LP L5103D20TP
L5103D10LP L5103D10TP
L5103D5LP L5103D5TP
AC supply voltage 415V AC 415V AC 240V AC
AC supply frequency 47-53 Hz 47-53 Hz 47-53 Hz
Number of Input phases 3 3 1
Warm up time 5 sec 5 sec 5 sec
Max load per phase 20 A 10 A 15 A
Maximum load RMS current per channel
20 A 10 A 5 A
Minimum load per channel
20 W for incandescents
20 W for incandescents
20 W for incandescents
Compatible Loads Incandescent, 240V Halogen, Electronic transformer, Neon with iron-core transformer and low-voltage lighting with electronic transformer, iron-core transformer or motor speed control
Soft-start ramp up time 0.5 sec 0.5 sec 0.5 sec
Load current risetime 200μ sec 200μ sec 200μ sec
Power control range 1.5 % to 95 % 1.5 % to 95 % 1.5 % to 95 %
Standby AC supply current
See Note See Note See Note
Load terminal Standby leakage current
< 10 mA LE < 1 mA TE
< 10 mA LE < 1 mA TE
< 10 mA LE < 1 mA TE
Short circuit withstand strength
6kA 6kA 6kA
Rated insulation voltage Dielectric test voltage
500 V 2500 v
500 V 2500 V
500 V 2500 V
Note 1: The standby current for the basic unit is 90mA; add 75mA for each LE
channel and 15mA for each TE channel.
Note 2: The installer must connect the dimmer to mains with protection rated at 20A with 6kA short circuit withstand strength.

C-Bus Professional Series Dimmer Installation Instructions
38
13.0 Environmental and Mechanical Specifications
13.1 Environmental Specifications (all models)
Parameter Description
EMC Environment Environment A Environment 1 (see Note 1)
IP Rating 2XB (see Note 2)
Operating ambient temperature
0—45 degrees C (32—113 degrees F)
Minimum space between units vertical: 100 mm; horizontal: 100 mm
Operating relative humidity 10% to 90%, non-condensing
Mounting mode wall
Mounting bracket hole size 10 mm diameter
Types of electrical connection
(Suitable for copper or aluminium conductors)
FFD; as detailed below:
Fixed supply terminal for 1 x 25mm2 wire per phase
Fixed load terminal for 1 x 6mm2 wire or 2 x 2.5mm2 wires
Disconnectable aux (C-Bus) connectors for 3 x RJ45 2 x 4-pin female
Note 1: Environment A and Environment 1 mainly relate to low-voltage
residential, commercial and light industrial locations and installations. Note 2: To ensure compliance with IP rating 2XB, the installer must be sure that
there is no opening greater than 10mm around either mains or lighting load cables entering the dimmer chassis. Refer to Wiring Instructions.

C-Bus Professional Series Dimmer Installation Instructions
39
13.2 Leading Edge Mechanical Specifications
Model Dimensions in mm (H x W x D)
Weight in Kg
L5112D20LP 713 x 455 x 164 40
L5112D16LP 713 x 455 x 164 40
L5112D10LP 713 x 412 x 164 31
L5112D5LP 713 x 405 x 115 26
L5112D3LP 602 x 405 x 115 23
L5106D20LP 451 x 455 x 164 27
L5106D10LP 451 x 412 x 164 21
L5106D5LP 451 x 405 x 115 18
L5106D3LP 358 x 405 x 115 16
L5103D20LP 289 x 455 x 164 15
L5103D10LP 289 x 412 x 164 12
L5103D5LP 289 x 405 x 115 10
13.3 Trailing Edge Mechanical Specifications
Model Dimensions in mm (H x W x D)
Weight in Kg
L5112D10TP 713 x 455 x 164 25
L5112D5TP 713 x 412 x 164 24
L5112D3TP 713 x 412 x 164 23
L5106D20TP 713 x 455 x 164 18
L5106D16TP 713 x 455 x 164 18
L5106D10TP 451 x 455 x 164 20
L5106D5TP 451 x 412 x 164 18
L5106D3TP 451 x 412 x 164 17
L5103D20TP 451 x 455 x 164 15
L5103D10TP 289 x 455 x 164 10
L5103D5TP 289 x 412 x 164 10

C-Bus Professional Series Dimmer Installation Instructions
40
14.0 Standards Complied
Declarations of Conformity
Australian/New Zealand EMC & Electrical Safety Frameworks and Standards
The C-Bus Professional Series Dimmers comply with the following:
Regulation Standard Title
AS/NZS CISPR 14-1 Electromagnetic compatibility – Requirements for household appliances, electric tools and similar apparatus – Part 1: Emission
EMC
AS/NZS CISPR 15 Limits and methods of measurement of radio disturbance characteristics of electrical lighting and similar equipment
AS/NZS 3439-1 Low-voltage switchgear and control gear assemblies. Part 1: Type-tested and partially type-tested assemblies
Electrical Safety
IEC 60669-2-1 Switches for household and similar fixed electrical installations – Part 2: Particular requirements – section 1: Electronic switches
European Council Directives and Standards
The C-Bus Professional Series Dimmers comply with the following:
Directive Standard Title
EMC Directive 2004/108/EC
EN 60669-2-1 Clause 26.1
Immunity to ESD, RFI, EFT, Surge Voltages, Voltage Dips and Interruptions
EN 60669-2-1 Clause 26.2
RF and Low Frequency Emissions
EN 55014-1 Electromagnetic compatibility – Requirements for household appliances, electric tools and similar apparatus - Emission
EN 55015 Limits and methods of measurement of radio disturbance characteristics of electrical lighting and similar equipment
EN 61000-3-2 * Electromagnetic compatibility (EMC) – Part 3-2: Limits for harmonic current emissions (equipment input current up to and including 16A per phase)

C-Bus Professional Series Dimmer Installation Instructions
41
Directive Standard Title
EMC Directive 2004/108/EC
EN 61000-3-3 * Electromagnetic compatibility (EMC) – Part 3-3: Limits – Limitation of voltage changes, voltage fluctuations and flicker in public low-voltage systems, for equipment with rated current less or equal to 16A per phase and not subject to conditional connection
Low Voltage Directive 2006/95/EC
EN 60439-1 Low-voltage switchgear and control gear assemblies. Part 1: Type-tested and partially type-tested assemblies
EN 60669-2-1 Switches for household and similar fixed electrical installations – Part 2: Particular requirements – section 1: Electronic switches
RoHS Directive 2002/95/EC
Restriction of Hazardous Substances
* Also applies to 20A units.
Additional Standards
The C-Bus Professional Series Dimmers comply with the following:
Regulation Standard Title
IEC 60439-1 Low-voltage switchgear and control gear assemblies. Part 1: Type-tested and partially type-tested assemblies
Electrical Safety
IEC 60669-2-1 Switches for household and similar fixed electrical installations – Part 2: Particular requirements – section 1: Electronic switches

C-Bus Professional Series Dimmer Installation Instructions
42
15.0 Two-Year Warranty
The C-Bus Professional Series Dimmers carry a two-year warranty against manufacturing defects.
Warranty Statement
1) The benefits conferred herein are in addition to, and in no way shall be deemed to derogate; either expressly or by implication, any or all other rights and remedies in respect to this Schneider Electric product, which the consumer has under the Commonwealth Trade Practices Act or any other similar State or Territory Laws.
2) The warrantor is Schneider Electric, with offices worldwide.
3) This Schneider Electric product is guaranteed against faulty workmanship and materials for a period of two (2) years from the date of installation.
4) Schneider Electric reserves the right, at its discretion, to either repair free of parts and labour charges, replace or offer refund in respect to any article found to be faulty due to materials, parts or workmanship.
5) This warranty is expressly subject to the Schneider Electric product being installed, wired, tested, operated and used in accordance with the manufacturer's instructions.
6) All costs of a claim shall be met by Schneider Electric, however should the product that is the subject of the claim be found to be in good working order, all such costs shall be met by the claimant.
7) When making a claim, the consumer shall forward the Schneider Electric product to the nearest Clipsal office with adequate particulars of the defect within 28 days of the fault occurring. The product should be returned securely packed, complete with details of the date and place of purchase, description of load, and circumstances of malfunction.
For all warranty enquiries, contact your local Clipsal sales representative. The address and contact number of your nearest Clipsal Australia office can be found at http://www.clipsal.com/locations or by telephoning Technical Support.

C-Bus Professional Series Dimmer Installation Instructions
43
This page is blank for formatting purposes.

F2048/01 10386241 April 2009
Clipsal Australia Pty Ltd reserves the right to change specifications, modify designs and discontinueitems without incurring obligation and while every effort is made to ensure that the descriptions,specifications and other information in this document are correct, no warranty is given in respectthereof and the company shall not be liable for any error therein.
© Clipsal Australia Pty Ltd. The identified trademarks and copyrights are the property ofSchneider Electric unless otherwise noted.
Product of Clipsal Australia Pty LtdA member of Schneider Electric
Contact us: clipsal.com/feedback
National Customer Care Enquiries:
Tel 1 300 202 525Fax 1 300 202 556
clipsal.com
Technical Support and Troubleshooting
For further assistance in using this product, consult your nearest Clipsal IntegratedSystems (CIS) Sales Representative or Technical Support Officer.
Technical Support Contact Numbers
Australia 1300 722 247 (CIS Technical Support Hotline)
New Zealand 0800 888 219 (CIS Technical Support Hotline)
Northern Asia +852 2484 4157 (Clipsal Hong Kong)
South Africa 011 314 5200 (C-Bus Technical Support)
Southern Asia +603 7665 3555 Ext. 236 or 242 (CIS Malaysia)
United Kingdom 0870 608 8 608 (Schneider Electric Support)
Technical Support Email: [email protected]