installation instructions 4shp16ls series
TRANSCRIPT

506860-03 Issue 1946 Page 1 of 27
Save these instructions for future reference
INSTALLATION INSTRUCTIONS
4SHP16LS SERIESSplit System Heat Pump
*506860-03**506860-03*
Manufactured ByAllied Air Enterprises LLC
A Lennox International, Inc. Company215 Metropolitan Drive
West Columbia, SC 29170
Table of ContentsGeneral ........................................................................1Installation ...................................................................2Refrigerant Piping ........................................................4Electrical Wiring .........................................................12Start-Up .....................................................................14Operation ...................................................................157-Segment Alert and System Status Codes ..............17Maintenance ..............................................................24Homeowner Information ............................................24Wiring Diagrams ........................................................26
General
Read this entire instruction manual, as well as the instructions supplied in separate equipment, before starting the installation. Observe and follow all warnings, cautions, instructional labels, and tags. Failure to comply with these instructions could result in an unsafe condition and/or premature component failure.
These instructions are intended as a general guide only for use by qualified personnel and do not supersede any national or local codes in any way. The installation must comply with all provincial, state, and local codes as well as the National Electrical Code (U.S.) or Canadian Electrical Code (Canada). Compliance should be determined prior to installation.
This manual must be left with the homeowner for future reference.
This is a safety alert symbol and should never be ignored. When you see this symbol on labels or in manuals, be alert to the potential for personal injury or death.
Installation and servicing of air conditioning equipment can be hazardous due to internal refrigerant pressure and live electrical components. Only trained and qualified service personnel should install or service this equipment. Installation and service performed by unqualified persons can result in property damage, personal injury, or death.
WARNING
Sharp metal edges can cause injury. When installing the unit, use care to avoid sharp edges.
WARNING
ELECTRICAL SHOCK HAZARD!Risk of electrical shock. Disconnect all remote power supplies before installing or servicing any portion of the system. Failure to disconnect power supplies can result in property damage, personal injury, or death.
WARNING

506860-03Issue 1946Page 2 of 27
This unit uses R-410A, which is an ozone-friendly HFC refrigerant. The unit must be installed with a matching indoor coil and line set. A filter drier approved for use with R-410A is installed in the unit.
IMPORTANT: This product has been designed and manufactured to meet ENERGY STAR criteria for energy efficiency when matched with appropriate coil components. However, proper refrigerant charge and proper air flow are critical to achieve rated capacity and efficiency. Installation of this product should follow the manufacturer’s refrigerant charging and air flow instructions. Failure to confirm proper charge and airflow may reduce energy efficiency and shorten equipment life.
When servicing or repairing HVAC components, ensure the fasteners are appropriately tightened. Table 1 shows torque values for fasteners.
Table 1. Torque Table
Fastener TorqueStem Caps 8 ft. lbs.
Service Port Caps 8 ft. lbs.
Sheet Metal Screws 16 in. lbs.
#8 Machine Screws 16 in. lbs.
#10 Machine Screws 28 in. lbs.
Compressor Bolts 90 in. lbs.
Inspection of ShipmentUpon receipt of equipment, carefully inspect it for possible shipping damage. If damage is found, it should be noted on the carrier’s freight bill. Take special care to examine the unit inside the carton if the carton is damaged. Any concealed damage discovered should be reported to the last carrier immediately, preferably in writing, and should include a request for inspection by the carrier’s agent.
If any damages are discovered and reported to the carrier DO NOT INSTALL THE UNIT, as claim may be denied.
Check the unit rating plate to confirm specifications are as ordered.
Safety PrecautionsFollow all safety codes. Wear safety glasses and work gloves. Use quenching cloth for brazing operations. Have fire extinguisher available. Read these instructions thoroughly and follow all warning or cautions attached to the unit.1. Always wear proper personal protection equipment.2. Always disconnect electrical power before removing
panel or servicing equipment.3. Keep hands and clothing away from moving parts.4. Handle refrigerant with caution; refer to proper MSDS
from refrigerant supplier.5. Use care when lifting, avoid contact with sharp edges.
Installation
NOTE: In some cases, noise in the living area has been traced to gas pulsations from improper installation of equipment.• Locate unit away from windows, patios, decks, etc.
where unit operation sounds may disturb customer.• Leave some slack between structure and unit to
absorb vibration.• Place a sound-absorbing material, such as Isomode,
under the unit if it will be installed in a location or position that will transmit sound or vibration to the living area or adjacent buildings.
• Install the unit high enough above the ground or roof to allow adequate drainage of defrost water and prevent ice buildup.
• In heavy snow areas, do not locate the unit where drifting snow will occur. The unit base should be elevated above the depth of average snows.NOTE: Elevation of the unit may be accomplished by constructing a frame using suitable materials. If a support frame is constructed, it must not block drain holes in unit base.
• When installed in areas where low ambient temperatures exist, locate unit so winter prevailing winds do not blow directly into outdoor coil.
• Locate unit away from overhanging roof lines which would allow water or ice to drop on, or in front of, coil or into unit.
When outdoor unit is connected to factory-approved indoor unit, outdoor unit contains system refrigerant charge for operation with matching indoor unit when connected by 15 ft. of field-supplied tubing. For proper unit operation, check refrigerant charge using charging information located on control box cover.
Outdoor SectionZoning ordinances may govern the minimum distance the condensing unit can be installed from the property line.
Install on a Solid, Level Mounting PadThe outdoor section is to be installed on a solid foundation. This foundation should extend a minimum of 2” (inches) beyond the sides of the outdoor section. To reduce the possibility of noise transmission, the foundation slab should NOT be in contact with or be an integral part of the building foundation. See Figure 1.
If conditions or local codes require the unit be attached to pad or mounting frame, tie down bolts should be used and secured to unit base pan.

506860-03 Issue 1946 Page 3 of 27
Discharge Air
Mounting Slab
Ground Level
BuildingStructure
Mounting slab must slope slightly away from building, not to exceed 1/4” per foot.
Figure 1. Slab Mounting
Elevate Unit
Accumulation of water and ice in base pan may cause equipment damage.
CAUTION
Elevate unit per local climate and code requirements to provide clearance above estimated snowfall level and ensure adequate drainage of unit. Use snow stand in areas where prolonged freezing temperatures are encountered.
If conditions or local codes require the unit be attached to pad or mounting frame, tie down bolts should be used and fastened through knockouts provided in unit base pan.
Clearance RequirementsWhen installing, allow sufficient space for airflow clearance, wiring, refrigerant piping, and service. For proper airflow, quiet operation and maximum efficiency. Position so water, snow, or ice from roof or eaves cannot fall directly on unit. Refer to Table 2 for installation clearances.
Location Minimum ClearanceService box 30”Top of unit* 48”Between units 24”Against wall 6”* Maximum soffit overhang is 36”.NOTE: At least one side should be unobstructed by a wall or other barrier.
Table 2. Clearances
30” aroundControl
Box
24”
6”*
NOTE: See Table 2 for specific minimum clearance guidelines.
Figure 2.
DO LOCATE THE UNIT:• With proper clearances on sides and top of unit• On a solid, level foundation or pad (unit must be level
to within ± 1/4 in./ft. per compressor manufacturer specifications)
• To minimize refrigerant line lengths
DO NOT LOCATE THE UNIT:• On brick, concrete blocks or unstable surfaces• Near clothes dryer exhaust vents• Near sleeping area or near windows• Under eaves where water, snow or ice can fall directly
on the unit • With clearance less than 2 ft. from a second unit• With clearance less than 4 ft. on top of unit
Operating AmbientThe minimum outdoor operating ambient in cooling mode is 55°F, and the maximum outdoor operating ambient in cooling mode is 125°F. The maximum outdoor operating ambient in heating mode is 66°F.
Rooftop InstallationsInstall unit at a minimum of 6” above surface of the roof to avoid ice buildup around the unit. Locate the unit above a load bearing wall or area of the roof that can adequately support the unit. Consult local codes for rooftop applications.
If unit cannot be mounted away from prevailing winds, a wind barrier should be constructed. Due to variation in installation applications, size and locate barrier according to the best judgment of the installer.

506860-03Issue 1946Page 4 of 27
Refrigerant Piping
• Use only refrigerant grade copper tubes. • Split systems may be installed with up to 50 feet of
line set (no more than 20 feet vertical) without special consideration (see long line set guidelines).
• Ensure that vapor and liquid tube diameters are appropriate to capacity of unit.
• Run refrigerant tubes as directly as possible by avoiding unnecessary turns and bends.
• When passing refrigerant tubes through the wall, seal opening with RTV or other silicon-based caulk.
• Avoid direct tubing contact with water pipes, duct work, floor joists, wall studs, floors, walls, and any structure.
• Do not suspend refrigerant tubing from joists and studs with a rigid wire or strap that comes in direct contact with tubing.
• Ensure that tubing insulation is pliable and completely surrounds vapor tube.
It is important that no tubing be cut or seals broken until you are ready to actually make connections to the evaporator and to the condenser section. DO NOT remove rubber plugs or copper caps from the tube ends until ready to make connections at evaporator and condenser. Under no circumstances leave the lines open to the atmosphere for any period of time, if so unit requires additional evacuation to remove moisture.
Table 3. Refrigerant Line Set Diameters (in.)
Model Liquid Line Suction Line
24 3/8 3/436 3/8 7/848 3/8 7/860 3/8 1-1/8
For installations exceeding 50’, refer to long line set guidelines
Be extra careful with sharp bends. Tubing can “kink” very easily, and if this occurs, the entire tube length will have to be replaced. Extra care at this time will eliminate future service problems.
It is recommended that vertical suction risers not be up-sized. Proper oil return to the compressor should be maintained with suction gas velocity.
Filter DrierThe filter drier is very important for proper system operation and reliability. If the drier is shipped loose, it must be installed by the installer in the field. Unit warranty will be void, if the drier is not installed.
Installation of Line SetsDO NOT fasten liquid or suction lines in direct contact with the floor or ceiling joist. Use an insulated or suspension type of hanger. Keep both lines separate, and always insulate the suction line. Liquid line runs (30 feet or more) in an attic will require insulation. Route refrigeration line sets to minimize length.
DO NOT let refrigerant lines come in direct contact with foundation. When running refrigerant lines through the foundation or wall, openings should allow for a sound and vibration absorbing material to be placed or installed between tubing and foundation. Any gap between foundation or wall and refrigerant lines should be filled with a vibration damping material.
If ANY refrigerant tubing is required to be buried by state or local codes, provide a 6 inch vertical rise at service valve.
CAUTION
506860-03 Issue 1946 Page 5 of 27
Flushing Line SetsIf the unit will be installed in an existing system that uses an indoor unit or line sets charged with R-22 refrigerant, installer must perform the following flushing procedure.
NOTE: Existing system components (including line set and indoor coil) must be an AHRI match with the unit in order to fulfill unit warranty requirements.
Refrigerant must be reclaimed in accordance with national and local codes.
WARNING
Do NOT attempt to flush and re-use existing line sets or indoor coil when the system contains contaminants (i.e., compressor burn out).
CAUTION
“Clean refrigerant” is any refrigerant in a system that has not had compressor burnout. If the system has experienced burnout, it is recommended that the existing line set and indoor coil be replaced.
NOTE
In lieu of R-410A, an industry-standard flushing agent may also be used.
NOTE
LOW HIGH
EXISTINGINDOOR
UNIT
GAUGEMANIFOLD
CYLINDER CONTAININGCLEAN R-410A TO BEUSED FOR FLUSHING(Positioned to deliver liquidrefrigerant)
LIQUID LINE SERVICEVALVE
INLETDISCHARGE
TANKRETURN
CLOSEDOPENED
RECOVERYCYLINDER
RECOVERY MACHINE
NEWOUTDOOR
UNIT
VAPOR LINESERVICE VALVE
VAPOR
LIQU
ID
1A
B
CD
A Cylinder with clean R-410A (positioned to deliver liquid refrigerant) to the vapor service valve.
B Refrigerant gauge set (low side) to the liquid line valve.
C Refrigerant gauge set center port to inlet on the recovery machine with an empty recovery tank connected to the gauge set.
D Connect recovery tank to recovery machine per machine instructions.
Figure 3.
1. Connect gauges and equipment as shown in Figure 3.2. Set the recovery machine for liquid recovery and start
the recovery machine. Open the gauge set valves to allow the recovery machine to pull a vacuum on the existing system line set and indoor unit coil.
3. Position the cylinder of clean R-410A for delivery of liquid refrigerant and open its valve to allow liquid refrigerant to flow into the system through the vapor line valve. Allow the refrigerant to pass from the cylinder and through the line set and the indoor unit coil before it enters the recovery machine.
4. After all of the liquid refrigerant has been recovered, switch the recovery machine to vapor recovery so that all of the R-410A vapor is recovered. Allow the recovery machine to pull the system down to 0.
5. Close the valve on the inverted R-410A drum and the gauge set valves. Pump the remaining refrigerant out of the recovery machine and turn the machine off.

506860-03Issue 1946Page 6 of 27
Refrigerant Piping - Install Indoor Expansion Valve This outdoor unit is designed for use in systems that include an expansion valve metering device (purchased separately) at the indoor coil. See the Product Specifications for approved expansion valve kit match-ups and application information. The check expansion valve unit can be installed internal or external to the indoor coil. In applications where an uncased coil is being installed in a field-provided plenum, install the check/expansion valve in a manner that will provide access for future field service of the expansion valve. Refer to below illustration for reference during installation of expansion valve unit.
1 - Attach the vapor line sensing bulb in the properorientation as illustrated to the right using the clamp andscrews provided.
NOTE - Though it is preferred to have the sensing bulbinstalled on a horizontal run of the vapor line, installationon a vertical run of piping is acceptable if necessary.NOTE - Confirm proper thermal contact between vaporline and check/expansion bulb before insulating thesensing bulb once installed.
2 - Connect the equalizer line from the check expansionvalve to the equalizer vapor port on the vapor line. Fingertighten the flare nut plus 1/8 turn (7 ft-lbs) as illustratedbelow.
TWO PIECEPATCH PLATE
(UNCASEDCOIL ONLY)
VAPORLINE
LIQUID LINEORIFICE
HOUSINGDISTRIBUTOR
TUBES
LIQUID LINE
MALE EQUALIZER LINEFITTING (SEE
EQUALIZER LINEINSTALLATION FORFURTHER DETAILS)
SENSINGLINE
EQUALIZERLINE
CHECKEXPANSION
VALVE
TEFLON®RING
(Uncased Coil Shown)
Sensing bulb insulation is required ifmounted external to the coil casing. sensingbulb installation for bulb positioning.
STUBEND
TEFLON®RING
LIQUID LINEASSEMBLY WITH
BRASS NUT
DISTRIBUTORASSEMBLY
3 - Install one of the provided Teflon® rings around thestubbed end of the check expansion valve and lightlylubricate the connector threads and expose surface ofthe Teflon® ring with refrigerant oil.
4 - Attach the stubbed end of the check expansion valve tothe liquid line orifice housing. Finger tighten and use anappropriately sized wrench to turn an additional 1/2 turnclockwise as illustrated in the figure above, or tighten to20 ft-lb.
5 - Place the remaining Teflon® washer around the otherend of the check expansion valve. Lightly lubricateconnector threads and expose surface of the Teflon®
ring with refrigerant oil. 6 - Attach the liquid line assembly to the check expansion
valve. Finger tighten and use an appropriately sizedwrench to turn an additional 1/2 turn clockwise asillustrated in the figure above or tighten to 20 ft-lb.
ON 7/8” AND LARGER LINES,MOUNT SENSING BULB ATEITHER THE 4 OR 8 O'CLOCKPOSITION.
12
ON LINES SMALLER THAN7/8”, MOUNT SENSINGBULB AT EITHER THE 3 OR9 O'CLOCK POSITION.
12
BULB
VAPOR LINE
VAPOR LINE
NOTE - NEVER MOUNT THE SENSING BULB ONBOTTOM OF LINE.
BULB
BULBBULB
VAPOR LINE
FLARE NUT
COPPER FLARESEAL BONNET
MALE BRASS EQUALIZERLINE FITTING
FLARE SEAL CAP
OR
1234
567891011 12
1/2 Turn
SENSING BULB INSTALLATION
EQUALIZER LINE INSTALLATION
1234
567891011 12
1/8 Turn
1 - Remove and discard either the flare seal cap or flare nutwith copper flare seal bonnet from the equalizer line porton the vapor line as illustrated in the figure below.
2 - Remove the field-provided
sembly.
INDOOR EXPANSION VALVE INSTALLATION

506860-03 Issue 1946 Page 7 of 27
ATTACH THE MANIFOLD GAUGE SET FOR BRAZING LIQUID AND VAPOR LINE SERVICE VALVES
OUTDOORUNIT
LIQUID LINE
VAPOR LINE
LIQUID LINE SERVICEVALVE
VAPOR LINESERVICE
VALVE
ATTACHGAUGES
INDOOR
UNIT
VAPOR SERVICE PORT MUST BE OPEN TO ALLOW EXIT POINT FOR NITROGEN
A - Connect gauge set low pressure side toliquid line service valve (service port).
B - Connect gauge set center port to bottle ofnitrogen with regulator.
C - Remove core from valve in vapor lineservice port to allow nitrogen to escape.
NITROGEN
HIGHLOW USE REGULATOR TO FLOWNITROGEN AT 1 TO 2 PSIG.
B
A
C
WHEN BRAZING LINE SET TOSERVICE VALVES, POINT FLAME
AWAY FROM SERVICE VALVE.
Flow regulated nitrogen (at 1 to 2 psig) through the low-side refrigeration gauge set into the liquid line service port valve, and out of thevapor line service port valve.
CUT AND DEBUR CAP AND CORE REMOVALCut ends of the refrigerant lines square (free from nicks or dents)and debur the ends. The pipe must remain round. Do not crimp endof the line.
Remove service cap and core fromboth the vapor and liquid line serviceports.
1 2
LIQUID LINE SERVICEVALVE
SERVICEPORTCORE
SERVICE PORTCAP
SERVICEPORTCORE
SERVICEPORT CAP
CUT AND DEBUR
LINE SET SIZE MATCHESSERVICE VALVE CONNECTION
DO NOT CRIMP SERVICE VALVECONNECTOR WHEN PIPE IS
SMALLER THAN CONNECTION
3
VAPOR LINE SERVICEVALVE
COPPER TUBESTUB
REFRIGERANT LINE
REDUCER
SERVICE VALVECONNECTION
LINE SET SIZE IS SMALLERTHAN CONNECTION
Refrigerant Piping - Brazing Procedures
Before brazing, ensure the system is fully recovered of all refrigerant. Application of a brazing torch to a pressurized system may result in ignition of the refrigerant and oil mixture. Check the high and low pressures before applying heat.
WARNING
Brazing alloys and flux contain materials which are hazardous to your health.Avoid breathing vapors or fumes from brazing operations. Perform operations only in well-ventilated areas.Wear gloves and protective goggles or face shield to protect against burns.Wash hands with soap and water after handling brazing alloys and flux.
WARNINGUse a manifold gauge set designed for use on R-410A refrigerant systems.
NOTE

506860-03Issue 1946Page 8 of 27
WHEN BRAZING LINE SET TOSERVICE VALVES, POINT FLAME
AWAY FROM SERVICE VALVE.
LIQUID LINE SERVICE VALVE
LIQUID LINE
BRAZE LINE SETWrap both service valves with water-saturated cloths as illustrated here and as mentioned in step 4, before brazing to line set.Cloths must remain water-saturated throughout the brazing and cool-down process.
WATER-SATURATEDCLOTH
IMPORTANT — Allow braze joint to cool. Applyadditional water-saturated cloths to help cool brazedjoint. Do not remove water-saturated cloths untilpiping has cooled. Temperatures above 250ºF willdamage valve seals.
6
VAPOR LINE
WATER-SATURATEDCLOTH
VAPOR LINE SERVICE VALVE
After all connections have been brazed, disconnect manifold gauge set from service ports. Apply additional water-saturated cloths to bothservices valves to cool piping. Once piping is cool, remove all water-saturated cloths.
WHEN BRAZING LINE SET TOSERVICE VALVES, POINT FLAME
AWAY FROM SERVICE VALVE.
PREPARATION FOR NEXT STEP7
WRAP SERVICE VALVESTo help protect service valve seals during brazing, wrap water-saturated cloths around service valve bodies and copper tube stubs. Useadditional water-saturated cloths underneath the valve body to protect the base paint.
4FLOW NITROGENFlow regulated nitrogen (at 1 to 2 psig) through the refrigeration gauge set into the valve stem port connection on the liquid service valve andout of the vapor valve stem port. See steps 3A, 3B and 3C on manifold gauge set connections.5
WARNING
FIRE, PERSONAL INJURY, OR PROPERTY DAMAGEmay result if you do not wrap a water-saturated cloth aroundboth liquid and suction line service valve bodies and coppertube stub while brazing the line set! The braze, whencomplete, must be quenched with water to absorb anyresidual heat.
Do not open service valves until refrigerant lines andindoor coil have been leak-tested and evacuated. Referto Leak Test and Evacuation section of this manual.
WARNINGWhile protecting the service valve seals with water-saturated cloths, ensure that water does NOT enter the system.

506860-03 Issue 1946 Page 9 of 27
TO VAPORSERVICE VALVE
HFC-410A
MANIFOLD GAUGE SET
OUTDOOR UNIT
HIGHLOW
1
2
AB
NITROGEN
NOTE - Positioncanister to deliverliquid refrigerant.
A - With both manifold valves closed, connect the cylinder of HFC-410A refrigerant to the center port of themanifold gauge set. Open the valve on the HFC-410A cylinder (vapor only).
B - Open the high pressure side of the manifold to allow HFC-410A into the line set and indoor unit. Weigh ina trace amount of HFC-410A. [A trace amount is a maximum of two ounces (57 g) refrigerant or threepounds (31 kPa) pressure.] Close the valve on the HFC-410A cylinder and the valve on the highpressure side of the manifold gauge set. Disconnect the HFC-410A cylinder.
C - Connect a cylinder of nitrogen with a pressure regulating valve to the center port of the manifold gaugeset.
D - Adjust nitrogen pressure to 150 psig (1034 kPa). Open the valve on the high side of the manifold gauge setin order to pressurize the line set and the indoor unit.
E - After a few minutes, open one of the service valve ports and verify that the refrigerant added to thesystem earlier is measurable with a leak detector.
F -
After the line set has been connected to the indoor and outdoor units, check the line set connections andindoor unit for leaks. Use the following procedure to test for leaks:
A - Connect the high pressure hose of an HFC-410A manifold gauge set to the vapor valve service port.NOTE - Normally, the high pressure hose is connected to the liquid line port. However, connecting itto the vapor port better protects the manifold gauge set from high pressure damage.
B - With both manifold valves closed, connect the cylinder of HFC-410A refrigerant to the center port ofthe manifold gauge set.
CONNECT GAUGE SET
TEST FOR LEAKS
NOTE - Later in the procedure, the HFC-410A container will be replaced by the nitrogen container.
After leak testing, disconnect gauges from service ports. NOTE - Service valve cores remain removed for the following evacuation procedure.
LEAK TEST
Leak Test and Evacuation
506860-03Issue 1946Page 10 of 27
A - Open both manifold valves and start the vacuum pump.B -
NOTE - During the early stages of evacuation, it is desirable to close the manifold gauge valve at least once. A rapid rise in pressureindicates a relatively large leak. If this occurs, repeat the leak testing procedure.
NOTE - The term absolute pressure means the total actual pressure above absolute zero within a given volume or system. Absolutepressure in a vacuum is equal to atmospheric pressure minus vacuum pressure.
C - When the absolute pressure reaches 23,000 microns (29.01 inches ofmercury), perform the following:Close manifold gauge valves.Close valve on vacuum pump.Turn off vacuum pump.Disconnect manifold gauge center port hose from vacuum pump.Attach manifold center port hose to a nitrogen cylinder with pressureregulator set to 150 psig (1034 kPa) and purge the hose.Open manifold gauge valves to break the vacuum in the line set and indoorunit.Close manifold gauge valves.
D - Shut off the nitrogen cylinder and remove the manifold gauge hose from the cylinder. Open the manifold gauge valves to release thenitrogen from the line set and indoor unit.
E - Reconnect the manifold gauge to the vacuum pump, turn the pump on, and continue to evacuate the line set and indoor unit until theabsolute pressure does not rise above 500 microns (29.9 inches of mercury) within a 20-minute period after shutting off the vacuum pumpand closing the manifold gauge valves.
F - When the absolute pressure requirement above has been met, disconnect the manifold hose from the vacuum pump and connect it to acylinder of HFC-410A positioned to deliver liquid refrigerant. Open the manifold gauge valve 1 to 2 psig in order to release the vacuum in theline set and indoor unit.
G - Perform the following:Close manifold gauge valves.Shut off HFC-410A cylinder.Reinstall service valve cores by removing manifold hose from service valve. Quickly install cores with coretool while maintaining a positive system pressure.Replace stem caps and finger tighten them, then tighten an additional one-sixth (1/6) of a turn as illustrated.
OUTDOORUNIT
TO VAPORSERVICE VALVE
TO LIQUID LINESERVICE VALVE
MICRONGAUGE
VACUUM PUMP
1/4 SAE TEE WITH SWIVELCOUPLER
500
MANIFOLDGAUGE SET
HFC-410A
RECOMMENDMINIMUM 3/8” HOSE
A - Connect low side of manifold gauge set with1/4 SAE in-line tee to vapor line service valve
B - Connect high side of manifold gauge set toliquid line service valve
C - Connect available micron gauge connectoron the 1/4 SAE in-line tee.
D - Connect the vacuum pump (with vacuumgauge) to the center port of the manifoldgauge set. The center port line will be usedlater for both the HFC-410A and nitrogencontainers.
HIGHLOW
123
4567
8910
11 12
1/6 TURN
NITROGEN
3CONNECT GAUGE SET
A
B
C
D
4 EVACUATE THE SYSTEM
NOTE - Remove cores from service valves (if not already done).
Possible equipment damage.Avoid deep vacuum operation. Do not usecompressors to evacuate a system.Extremely low vacuum can cause internalarcing and compressor failure. Damagecaused by deep vacuum operation willvoid warranty.
WARNING !
EVACUATION
H - Open suction service valve first before liquid valve to release the unit charge into the system. Replace valvecaps and tighten (8 ft. lb.). Caps are the primary seal.
Evacuate the line set and indoor unit until a slight vacuum is indicated on the micron gauge (approximately 23,000 microns or 29.01 inches of mercury).
NOTE - Position canister to deliver liquid refrigerant.

506860-03 Issue 1946 Page 11 of 27
Liquid and Suction Line Service ValvesThe liquid line and suction line service valves (see Figure 4) and service ports are used for leak testing, evacuation, charging, and checking charge.
Each valve is equipped with a service port which has a factory-installed Schrader valve. A service port cap protects the Schrader valve from contamination and serves as the primary leak seal.
To Access the Schrader Port:1. Remove the service port cap with an adjustable
wrench.2. Connect gauge to the service port.3. When testing is completed, replace service port cap.
Tighten finger tight, then an additional 1/6 turn.
To Open Liquid or Suction Line Service Valve:1. Remove stem cap with an adjustable wrench.2. Use service wrench with a hex-head extension to back
the stem out counterclockwise as far as it will go. Use a 3/16” hex head extension for liquid line service valves and a 5/16” extension for suction line service valves.
3. Replace the stem cap. Tighten finger tight, then tighten an additional 1/6 turn.
To Close Liquid or Suction Line Service Valve:1. Remove the stem cap with an adjustable wrench.2. Use a service wrench with a hex-head extension to
turn the stem clockwise to seat the valve. Tighten firmly.
3. Replace the stem cap. Tighten finger tight, then tighten an additional 1/6 turn.
Suction Line (Ball Type) Service ValveSuction line (ball type) service valves function the same way as the other valves; the difference is in the construction (see Figure 5).
The ball valve is equipped with a service port with a factory-installed Schrader valve. A service port cap protects the Schrader valve from contamination and serves as the primary seal.
Figure 4.
Figure 5.
506860-03Issue 1946Page 12 of 27
Electrical Wiring
All field wiring must be done in accordance with the National Electrical Code (NEC) recommendations, Canadian Electrical Code (CEC) and CSA Standards, or local codes, where applicable.
Electrical Shock Hazard! Turn OFF electric power before connecting unit, performing any maintenance or removing panels or doors. More than one disconnect may be required to turn off all power.FAILURE TO DO SO COULD RESULT IN BODILY INJURY OR DEATH.
WARNING
Unit must be grounded in accordance with national and local codes. Failure to ground unit properly can result in personal injury or death.
WARNING
Line voltage is present at all components when unit is not in operation on units with single pole contactors. Disconnect all remote electric power supplies before opening access panel. Unit may have multiple power supplies. Failure to disconnect all power supplies could result in personal injury or death.
WARNING
Refer to the furnace or blower coil Installation Instructions for additional wiring application diagrams and refer to unit rating plate for minimum circuit ampacity and maximum overcurrent protection size.1. Install line voltage power supply to unit from a properly
sized disconnect switch. Any excess high voltage field wiring should be trimmed or secured away from the low voltage field wiring.
2. Ground unit at unit disconnect switch or to an earth ground. To facilitate conduit, a hole is in the bottom of the control box. Connect conduit to the control box using a proper conduit fitting. Units are approved for use only with copper conductors. 24V Class II circuit connections are made in the low voltage junction box. A complete unit wiring diagram is located inside the unit control box cover.
3. Install room thermostat according to thermostat installation instruction and on an inside wall that is not subject to drafts, direct sunshine, or other heat sources.
4. Install low voltage wiring from outdoor to indoor unit and from thermostat to indoor unit (see Figure 6).
5. Do not bundle any excess 24V control wire inside control box. Run control wire through installed wire tie and tighten wire tie to provide low voltage strain relief and to maintain separation of field-installed low and high voltage circuits.
1 Refer to thermostat installation instructions
2 If applicable
3 Refer to indoor unit installation instructions
4 “L” is used for any accessories (e.g. diagnostic / warning / alarm), used to activate thermostat warning light
W / W1 / W2 / W3 are auxiliary heat (supplemental to heat pump).“E” is emergency heat (disables heat pump).
NOTES:
W3
W2
RR R
CC C
W1W/W1 W1
Auxiliary Heat(Heat Pump)
GG Indoor Blower Only
O OHeat Pump
Y2 Y2
Thermostat Indoor Unit Outdoor Unit
E
L L
B
Y1 Compressor / 1st Stage Y1
4
1
2
31 2
31 2
1
1
Not Used
L
Auxiliary Heat(Heat Pump)
Compressor / 2nd Stage
Figure 6. Thermostat Designations - Non-Communicating
506860-03 Issue 1946 Page 13 of 27
Figure 7.
Indoor ControlOutdoor Unit
Connect single wire to terminal C
NOTE: On communicating systems, extra wires must terminate on the indoor “C” Comfort SyncTM terminal strip (RSBus). Use an additional wire to connect all unused wires to “C” terminal on the indoor control ONLY.
Comfort SyncTM
Thermostat
Connect single wire to terminal C
All unused wires
All unused wires
Comfort SyncTM Thermostat with Comfort SyncTM-enabled Furnace / Air Handler and Non-Communicating Heat Pump
Comfort SyncTM Thermostat with Comfort SyncTM-enabled Furnace / Air Handler and Comfort SyncTM-enabled Heat Pump
COMFORT SYNCTM-ENABLED FURNACE
OR AIR HANDLER
RSBus
RSBus
OPTIONALDISCHARGEAIR SENSOR
COMFORT SYNCTM
THERMOSTAT
COMFORT SYNCTM-ENABLED HEAT PUMP
RSBus
OPTIONALOUTDOOR
AIR SENSOR
OPTIONALDISCHARGEAIR SENSOR
COMFORT SYNCTM-ENABLED FURNACE
OR AIR HANDLER
COMFORT SYNCTM
THERMOSTAT
NON-COMMUNICATINGHEAT PUMP
1 OR 2 STAGE
NOTES:Maximum total length of all connections on the RSBus is limited to 1500 ft. Wire gauge of RSBus wire is 18.Cut Y1-Y2 on-board link for 2-stage outdoor unitsCut R-O on-board link for outdoor heat pump units
Field Wiring and Routing - Communicating ControlsMaximum length of wiring (18 gauge) for all connections on the RSBus is 1500 feet (457 meters). Wires should be color coded, with a temperature rating of 95ºF (35ºC) minimum, and solid core (Class II Rated Wiring). All low voltage wiring must be connected through the low voltage grommet in the control box.

506860-03Issue 1946Page 14 of 27
Start-Up
If unit is equipped with a crankcase heater, it should be energized 24 hours before unit start-up to prevent compressor damage as a result of slugging.
CAUTION
1. Rotate fan to check for frozen bearings or binding.2. Inspect all factory and field-installed wiring for loose
connections.3. After evacuation is complete, open liquid line and
suction line service valves to release refrigerant charge (contained in outdoor unit) into system.
4. Replace the stem caps and secure finger tight, then tighten an additional 1/6 of a turn.
5. Check voltage supply at the disconnect switch. The voltage must be within the range listed on the unit nameplate. If not, do not start equipment until the power company has been consulted and the voltage condition corrected.
6. Set thermostat for cooling demand, turn on power to indoor blower, and close the outdoor unit disconnect switch to start the unit.
7. Recheck unit voltage with unit running. Power must be within range shown on unit nameplate.
Refrigerant Charging
Excessive amounts of liquid refrigerant entering the suction line can damage the compressor. When adding refrigerant, precautions must be taken to control the flow of liquid into the system. This can be done by using a liquid vaporizing adapter or manual control using a sight glass as indicator.
CAUTION
Units are factory charged with the amount of R-410A refrigerant indicated on the unit rating plate. This charge is based on a matching indoor coil and outdoor coil with 15’ line set. For varying lengths of line set, refer to Table 4 for refrigerant charge adjustment. A blank space is provided on the unit rating plate to list the actual field charge.
Table 4. Refrigerant Charge Adjustment
Liquid Line Set Diameter Oz. Per 5 ft. adjust from 15 ft. line set*
3/8 in. 3 oz. per 5 ft. or 0.6 oz. per 1 ft.
* If line length is greater than 15 ft., add this amount. If line length is less than 15 ft., remove this amount.
Mineral oils are not compatible with R-410A. If oil must be added, it must be a polyolester oil.
IMPORTANT
NOTE: Both airflow and refrigerant charge must be monitored for proper system set-up. It may be necessary to alternately check and adjust the airflow and the refrigerant charge.
If the system is void of refrigerant, or if the outdoor ambient temperature is cool, use the weigh-in method to charge the unit. Do this after any leaks have been repaired.1. Recover the refrigerant from the unit.2. Conduct a leak check, then evacuate as previously
outlined.3. Weigh in the charge according to the total amount
shown on the unit nameplate.
If weighing facilities are not available or if unit is being charged during warm weather, use one of the following procedures.• For systems using a TXV on the indoor evaporator
and outdoor temperature above 60°F – charge in cooling mode using the subcooling method and table provided on the unit access panel.
• For systems below 60°F – charge in heating mode using the subcooling method and table provided on the unit access panel. Attach low pressure gauge hose to auxiliary service port to access suction side in heating mode.NOTE: All unit table values are based on 70 to 80°F indoor return air temperature for cooling mode, and 65°F to 75°F return air temperature for heat mode.

506860-03 Issue 1946 Page 15 of 27
Operation
The outdoor unit and the indoor blower cycle on demand from the room thermostat. When the thermostat blower switch is moved to the ON position, the indoor blower operates continuously.
Filter DrierThe unit is equipped with a large capacity bi-flow filter that keeps the system clean and dry. If replacement is necessary, replace with one of similar design and capacity. The replacement filter drier must be suitable for use with R-410A refrigerant.
Crankcase HeaterIf unit is equipped with a crankcase heater, it should be energized 24 hours before unit start-up to prevent compressor damage as a result of slugging.
Emergency Heat Function (Room Thermostat)An emergency heat function is designed into some room thermostats. This feature is applicable when isolation of outdoor unit is required or when auxiliary electric heat is stage by outdoor thermostats. When the room thermostat is placed in the emergency heat position, the outdoor unit control circuit is isolated from power and the field-supplied relays bypass the outdoor thermostats. An amber indicating light simultaneously comes on to remind the homeowner that the unit is operating in the emergency heat mode.
Emergency heat is usually used during an outdoor shutdown, but it should also be used following a power outage if power has been off for over an hour and the outdoor temperature is below 50°F. System should be left in the emergency heat mode at least 6 hours to allow the crankcase heater sufficient time to prevent compressor slugging.
Pressure Switch CircuitThe control board includes two pressure switch circuits. A high pressure switch is connected to the board’s HI-PS terminals (see Figure 8). The low pressure, or loss-of-charge pressure, switch is connected to the LO-PS terminals.
During a single demand cycle, the control board will lock out the unit after the fifth time that the circuit is interrupted by a pressure switch wired to the control board. In addition, the diagnostic LEDs will indicate a locked-out pressure switch after the fifth occurrence of an open pressure switch.
The unit will remain locked out until power to the board is interrupted, then re-established, or until the error is cleaned.
NOTE: The control board ignores input from the low pressure switch terminals as follows:• During the TEST mode• During the defrost cycle• During the 90 seconds start-up period• For the first 90 seconds each time the reversing valve
switches heat/cool modes
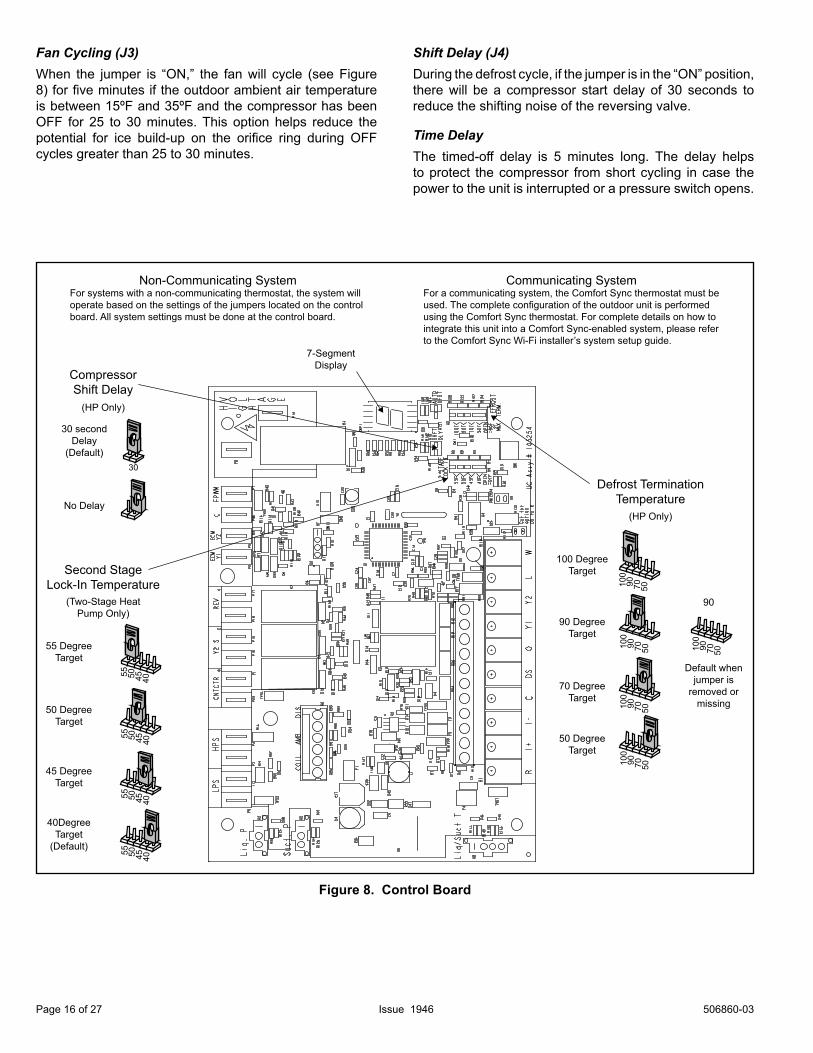
Heat Pump Control-Defrost OperationThe defrost termination pins must be set on the heat pump control prior to starting the system to ensure proper defrost operation.
The heat pump control measures differential temperatures to detect when the system is performing poorly because of frost buildup on the outdoor coil. The heat pump control self-calibrates when the defrost system starts and after each system defrost cycle. The heat pump control monitors ambient temperature, outdoor coil temperature, and total run time to determine when a defrost cycle is required. The coil temperature sensor is designed with a spring clip to allow mounting to the outside coil tubing. The location of the coil sensor is important for proper defrost operation.
NOTE: The heat pump control accurately measures the performance of the system as frost accumulates on the outdoor coil. This typically will translate into longer running time between defrost cycles as more frost accumulates on the outdoor coil before the heat pump control initiates defrost cycles.
Defrost Operating ModesThe heat pump control operational modes are:
• Defrost calibration and operation• Defrost test
Defrost Termination Temperature (J1)The heat pump control can be set to terminate the defrost cycle at 50, 70, 90, or 100°F (10, 21, 32 and 38°C) (see Figure 8). The termination jumper is factory set at 50°F (10°C). If the termination jumper is not installed, the default termination temperature is 90°F (32°C).
NOTE: Colder climates may require a higher defrost termination temperature setting to maintain a clear coil.
Second Stage Lock-In (J2)For second-stage heat pumps, if the outdoor ambient temperature is below the selected compressor lock-in temperature, the second-stage compressor solenoid will be energized even without a Y2 thermostat input. If the jumper is not connected to one of the temperature selection pins (40, 45, 50, 55°F) (see Figure 8), the second-stage lock-in feature will not be activated. Factory default is 40ºF.
506860-03Issue 1946Page 16 of 27
Fan Cycling (J3)When the jumper is “ON,” the fan will cycle (see Figure 8) for five minutes if the outdoor ambient air temperature is between 15ºF and 35ºF and the compressor has been OFF for 25 to 30 minutes. This option helps reduce the potential for ice build-up on the orifice ring during OFF cycles greater than 25 to 30 minutes.
Shift Delay (J4)During the defrost cycle, if the jumper is in the “ON” position, there will be a compressor start delay of 30 seconds to reduce the shifting noise of the reversing valve.
Time DelayThe timed-off delay is 5 minutes long. The delay helps to protect the compressor from short cycling in case the power to the unit is interrupted or a pressure switch opens.
Figure 8. Control Board
Communicating SystemFor a communicating system, the Comfort Sync thermostat must be used. The complete configuration of the outdoor unit is performed using the Comfort Sync thermostat. For complete details on how to integrate this unit into a Comfort Sync-enabled system, please refer to the Comfort Sync Wi-Fi installer’s system setup guide.
Non-Communicating SystemFor systems with a non-communicating thermostat, the system will operate based on the settings of the jumpers located on the control board. All system settings must be done at the control board.
(HP Only)
CompressorShift Delay
30
30 secondDelay
(Default)
No Delay
(Two-Stage Heat Pump Only)
Second Stage Lock-In Temperature
55 50 45 40
55 50 45 40
55 50 45 40
55 50 45 40
50 DegreeTarget
55 DegreeTarget
45 DegreeTarget
40DegreeTarget
(Default)
Defrost Termination Temperature
(HP Only)
100
90 70 50
100
90 70 50
100
90 70 50
100
90 70 50 100
90 70 50
50 DegreeTarget
70 DegreeTarget
90 DegreeTarget
100 DegreeTarget
90
Default when jumper is
removed or missing
7-SegmentDisplay
506860-03 Issue 1946 Page 17 of 27
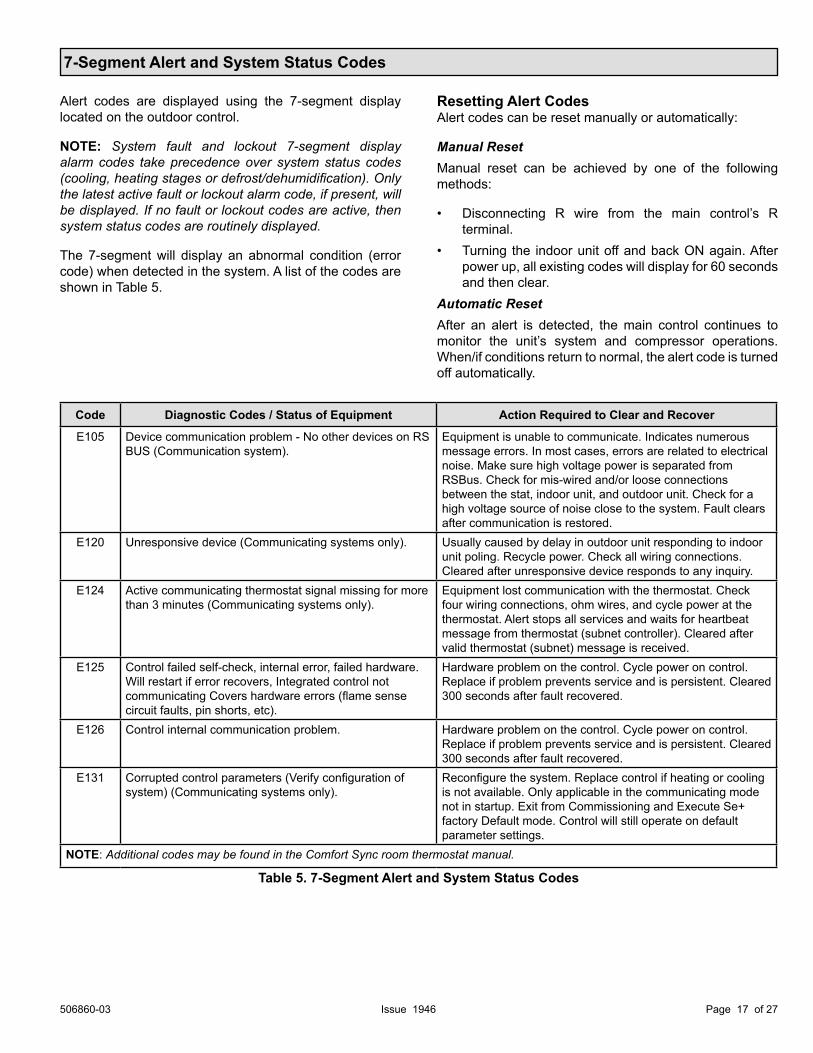
Code Diagnostic Codes / Status of Equipment Action Required to Clear and Recover
E105 Device communication problem - No other devices on RS BUS (Communication system).
Equipment is unable to communicate. Indicates numerous message errors. In most cases, errors are related to electrical noise. Make sure high voltage power is separated from RSBus. Check for mis-wired and/or loose connections between the stat, indoor unit, and outdoor unit. Check for a high voltage source of noise close to the system. Fault clears after communication is restored.
E120 Unresponsive device (Communicating systems only). Usually caused by delay in outdoor unit responding to indoor unit poling. Recycle power. Check all wiring connections. Cleared after unresponsive device responds to any inquiry.
E124 Active communicating thermostat signal missing for more than 3 minutes (Communicating systems only).
Equipment lost communication with the thermostat. Check four wiring connections, ohm wires, and cycle power at the thermostat. Alert stops all services and waits for heartbeat message from thermostat (subnet controller). Cleared after valid thermostat (subnet) message is received.
E125 Control failed self-check, internal error, failed hardware. Will restart if error recovers, Integrated control not communicating Covers hardware errors (flame sense circuit faults, pin shorts, etc).
Hardware problem on the control. Cycle power on control. Replace if problem prevents service and is persistent. Cleared 300 seconds after fault recovered.
E126 Control internal communication problem. Hardware problem on the control. Cycle power on control. Replace if problem prevents service and is persistent. Cleared 300 seconds after fault recovered.
E131 Corrupted control parameters (Verify configuration of system) (Communicating systems only).
Reconfigure the system. Replace control if heating or cooling is not available. Only applicable in the communicating mode not in startup. Exit from Commissioning and Execute Se+ factory Default mode. Control will still operate on default parameter settings.
NOTE: Additional codes may be found in the Comfort Sync room thermostat manual.
Table 5. 7-Segment Alert and System Status Codes
7-Segment Alert and System Status Codes
Alert codes are displayed using the 7-segment display located on the outdoor control.
NOTE: System fault and lockout 7-segment display alarm codes take precedence over system status codes (cooling, heating stages or defrost/dehumidification). Only the latest active fault or lockout alarm code, if present, will be displayed. If no fault or lockout codes are active, then system status codes are routinely displayed.
The 7-segment will display an abnormal condition (error code) when detected in the system. A list of the codes are shown in Table 5.
Resetting Alert CodesAlert codes can be reset manually or automatically:
Manual ResetManual reset can be achieved by one of the following methods:
• Disconnecting R wire from the main control’s R terminal.
• Turning the indoor unit off and back ON again. After power up, all existing codes will display for 60 seconds and then clear.
Automatic ResetAfter an alert is detected, the main control continues to monitor the unit’s system and compressor operations. When/if conditions return to normal, the alert code is turned off automatically.

506860-03Issue 1946Page 18 of 27
Code Diagnostic Codes / Status of Equipment Action Required to Clear and Recover
E180 Outdoor air temperature sensor failure. Only shown if shorted or out of range (Communicating systems only)
Compare outdoor sensor resistance to temperature resistance charts in unit installation instructions. Replace sensor pack if necessary. At beginning of (any) configuration, furnace or air handler control will sense outdoor air and discharge air temperature sensor(s) If detected (reading in range), appropriate feature will be set as installed and that could be seen in 'About ' screen. In normal operation after control recognizes sensors, alarm will be sent if valid temperature reading is lost. To get rid of setting and alarm, redo configuration and make sure that temperature sensor is marked as not installed in indoor Unit ‘About’ screen. When indoor unit control is replaced thermostat will ‘tell’ new control if temperature sensor is in system or not. Clears 30 seconds after fault recovered.
E409 LSOM - Compressor low voltage. Secondary voltages below 18VAC. After 10 minutes, operation is discontinued. Clears the code after voltage is higher than 20VAC for 2 seconds or after power reset.
E410 The outdoor unit pressure is below the required limit. Unit pressure is below the lower limit. The system is shut down. The low pressure switch for R-410A will open at 40 PSIG and close at 90 PSIG. Confirm that the system is properly charged with refrigerant. Check TXV, indoor unit blower motor, dirty filters or clogged refrigerant filter. Confirm that the evaporator coil is clean. The alarm clears after the pressure switch closes or after a power rest.
E411 The low pressure switch has opened 5 times during one cooling cycle. As a result, the system will shut down.
Open low pressure switch error count reached 5 strikes. The low pressure switch for R-410A will open at 40 PSIG and close at 90 PSIG. Confirm that the system is properly charged with refrigerant. Check TXV, indoor unit blower motor, dirty filters or clogged refrigerant filter. Confirm that the evaporator coil is clean. The alarm clears after a power rest.
E412 The outdoor unit pressure is above the required limit. The system will shut down.
Unit pressure is above the upper limit. System is shut down. The high pressure switch for R-410A will open at 590 PSIG and close at 418 PSIG. Confirm that the system is properly charged with refrigerant. Check condenser fan motor, TXV, indoor unit blower motor, stuck reversing valve or clogged refrigerant filter. Confirm that the outdoor unit is clean. The alarm clears after 4 consecutive normal compressor run cycles, the pressure switch closes or a power reset.
E413 The high pressure switch has opened 5 times during one cooling cycle. As a result, the Comfort Sync thermostat will shut down.
Open high pressure switch error count reached 5 strikes. System is shut down. The high pressure switch for R-410A will open at 590 PSIG and close at 418 PSIG. Confirm that the system is properly charged with refrigerant. Check condenser fan motor, TXV, indoor unit blower motor, stuck reversing valve or clogged refrigerant filter. Confirm that the outdoor unit is clean. The alarm clears after a power reset.
E414 The discharge line temperature is higher than the recommended upper limit of 279°F.
Discharge line temperature is > 279°F. Confirm that the system is properly charged with refrigerant. Check system operating pressures and compare to unit charging charts in installation manual. Confirm that the outdoor unit is clean. The alarm clears after the discharge temperature is < 225°F.
E415 The discharge line temperature has been consistently higher than the recommended upper limit of 279°F.
Discharge line high temperature error count reached 5 strikes. Confirm that the system is properly charged with refrigerant. Check system operating pressures and compare to unit charging charts in installation manual. Confirm that the outdoor unit is clean. The alarm clears after the discharge temperature is < 225°F. The alarm clears after a power reset.
NOTE: Additional codes may be found in the Comfort Sync room thermostat manual.
Table 5. 7-Segment Alert and System Status Codes
506860-03 Issue 1946 Page 19 of 27
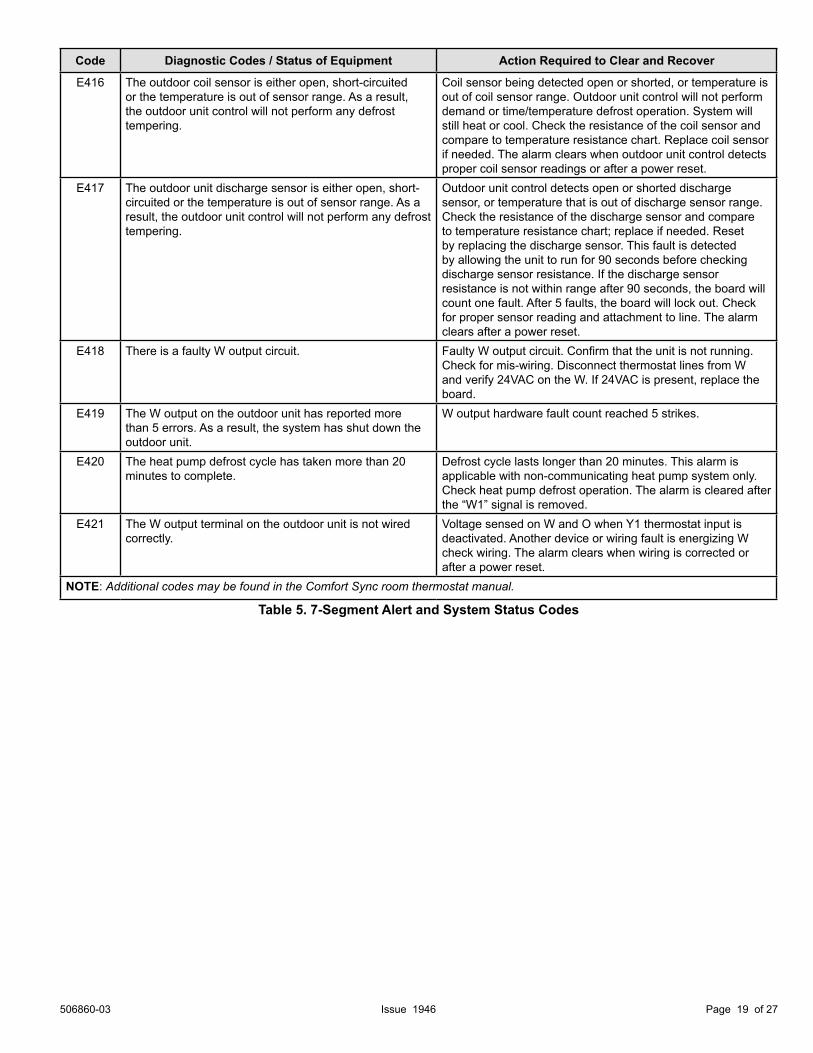
Code Diagnostic Codes / Status of Equipment Action Required to Clear and Recover
E416 The outdoor coil sensor is either open, short-circuited or the temperature is out of sensor range. As a result, the outdoor unit control will not perform any defrost tempering.
Coil sensor being detected open or shorted, or temperature is out of coil sensor range. Outdoor unit control will not perform demand or time/temperature defrost operation. System will still heat or cool. Check the resistance of the coil sensor and compare to temperature resistance chart. Replace coil sensor if needed. The alarm clears when outdoor unit control detects proper coil sensor readings or after a power reset.
E417 The outdoor unit discharge sensor is either open, short-circuited or the temperature is out of sensor range. As a result, the outdoor unit control will not perform any defrost tempering.
Outdoor unit control detects open or shorted discharge sensor, or temperature that is out of discharge sensor range. Check the resistance of the discharge sensor and compare to temperature resistance chart; replace if needed. Reset by replacing the discharge sensor. This fault is detected by allowing the unit to run for 90 seconds before checking discharge sensor resistance. If the discharge sensor resistance is not within range after 90 seconds, the board will count one fault. After 5 faults, the board will lock out. Check for proper sensor reading and attachment to line. The alarm clears after a power reset.
E418 There is a faulty W output circuit. Faulty W output circuit. Confirm that the unit is not running. Check for mis-wiring. Disconnect thermostat lines from W and verify 24VAC on the W. If 24VAC is present, replace the board.
E419 The W output on the outdoor unit has reported more than 5 errors. As a result, the system has shut down the outdoor unit.
W output hardware fault count reached 5 strikes.
E420 The heat pump defrost cycle has taken more than 20 minutes to complete.
Defrost cycle lasts longer than 20 minutes. This alarm is applicable with non-communicating heat pump system only. Check heat pump defrost operation. The alarm is cleared after the “W1” signal is removed.
E421 The W output terminal on the outdoor unit is not wired correctly.
Voltage sensed on W and O when Y1 thermostat input is deactivated. Another device or wiring fault is energizing W check wiring. The alarm clears when wiring is corrected or after a power reset.
NOTE: Additional codes may be found in the Comfort Sync room thermostat manual.
Table 5. 7-Segment Alert and System Status Codes

506860-03Issue 1946Page 20 of 27
Mode Description Example of Display
Power Up / Reset
Unit type and number of stages is displayed. Verify configuration with information published on the unit nameplate. If the information is incorrect, refer to flow chart “Manual Configuration of Unit Type” to reconfigure control.
1 Stage AC: 1AC2 Stage AC: 2AC1 Stage AC: 1HP1 Stage AC: 2HP
Power-Up 7-Segment Display String
2 H P_________
_________
Unit Type / Stages No Capacity No Fan Profile
Power Up / Reset following display of self-discovered configuration
Unit nominal capacity is displayed. If not programmed, then three horizontal lines and the decimal point are displayed for 2 seconds.
Power up nominal capacity display of an 4SHP - LS136
Power-Up 7-Segment Display String
2 H P 3 6_________
Unit Type / Stages Capacity No Fan Profile
Power Up / Reset following display of nominal capacity
Fan Profile code (a single- or two-digit number).
Displays the number of the selected fan profile.
Power-Up 7-Segment Display String
2 H P 3 6 3
Unit Type / Stages Capacity Fan Profile
Idle Mode Decimal point blinks at 1 Hz Idle Mode: Decimal point blinks at 1 Hz (0.5 second on, 0.5 second off). Display OFF.
Soft Disabled Top and bottom horizontal line and decimal point blink at 1 Hz.
Soft Disabled: Top and bottom horizontal line and decimal point blink at 1 Hz (0.5 second on, 0.5 second off). NOTE: Control should be replaced.
O.E.M. Test Mode All segments flashing at 2 Hz (unless error is detected). NOTE: Control should be replaced.
Anti-Short Cycle Delay
Middle line shall blink at 1 Hz for 2 seconds, followed by a two-second display of the rounded up number of minutes left in the timer (two minutes, one second shall be displayed as “3”). The Anti-Short Cycle Delay time remaining is displayed when the delay is active.
Cooling Stage Shows what stage of heat pump is currently operating.
Following string is repeated if two-stage cooling is active with outdoor fan speed set at 700 RPM. NOTE: A - If available, displays outdoor ambient temperature.
C2 pause F700 pause
Heat Pump Stage Shows what stage of heat pump is currently operating.
Following string is repeated if first-stage cooling is active with outdoor fan speed set at 600 RPM. NOTE: A - If available, displays outdoor ambient temperature.
H1 pause F600 pause
*Information will be displayed, but does not apply to this unit.
Table 6. Outdoor Control 7-Segment Unit Status Displays

506860-03 Issue 1946 Page 21 of 27
Defrost Mode Shown only while in an active defrost.Following string is repeated if defrost is active while unit was in first-stage heat pump heating mode:
dF pause H1 pause
Dehumidification Mode
Shows that the unit is providing dehumidification instead of straight cooling.
Following string is repeated if dehumidification is active with outdoor fan speed set at 225 RPM:
d pause f225 pause
Diagnostic Recall Shows the last 10 stored diagnostic error codes.
If first error is E250, second E231:E pause 250 pause E pause 231Next codes (up to 10) are shown using same method.
If there are no error codes stored: E pause 000
Fault Memory Clear
After the fault memory is cleared, the following string is displayed with 0.5 seconds character on/off time:
0000 pause
Active error in outdoor control idle mode
Shows all active error(s) codes.Following string is repeated if Error E125 and E201 are present:
E125 pause E201
Active error in run mode
Shows current status and all active error(s) codes.
Following string is repeated if Error E311 is present while blower speed at 700 RPM:
F700 pause E311
Outdoor Ambient Temperature (OAT)
Any time OAT is sensed in operating range, value is displayed if unit is in diagnostic and non-diagnostic modes.
Following string is repeated if second stage cooling is active with outdoor fan speed set at 650 RPM and OAT is 104°F:
C2 pause F650 pause A104 pause
Outdoor Coil Temperature (OCT)
Any time OCT is sensed in operating range, value is displayed if unit is in diagnostic mode.
Following string is repeated if 2nd stage heat is active with outdoor fan speed set at 550 RPM and OCT is 25°F:
H2 pause F550 pause c25 pause
Discharge Line Temperature (DIS)
Any time DIS is sensed in operating range, value is displayed if unit is in diagnostic mode.
Following string is repeated if 2nd stage cooling is active with outdoor fan speed set at 650 RPM and DIS is 185°F
C2 pause F650 pause d185 pause
*Information will be displayed, but does not apply to this unit.
Table 6. Outdoor Control 7-Segment Unit Status Displays
Table 7. Error Recall Menu Options
Error Code Recall Mode(NOTE: control must be in Idle mode)
Solid ETo enter error code recall mode, push and hold button until solid E appears, then release button. Control will display up to 10 error codes stored in memory. If E000 is displayed, there are no stored error codes.
Solid______
To exit error code recall mode, push and hold button until three solid horizontal bars appear, then release button. NOTE: Error codes are not cleared.
Solid c To clear error codes stored in memory, continue to hold push button while the 3 horizontal bars are displayed. Release push button when solid c is displayed.
Blinking c Hold push button for three seconds to confirm command to delete codes. Error codes are cleared.NOTE: Once the error history is deleted, it cannot be recovered. After the history is deleted, the unit will reset itself.* Information will be displayed, but does not apply to this product.

506860-03Issue 1946Page 22 of 27
Display Display and action (normal operation) Display and action (configuration and test mode)
Power-UpDisplay string displays > number of unit stages > pause > AC or HP unit > pause > unit capacity in BTUs > pause > RPM setting of outdoor fan. If 3 horizontal bars are displayed during any sequence of this string, it indicates that the specific parameter is not configured.
- Idle mode - decimal blinks at 1 Hz > 0.5 second ON, 0.5 second OFF
AA in the display string represents the ambient temperature in °F at the outdoor sensor on the outdoor unit.
Enter A test mode: Display will string active error code(s) E, ambient A, coil c and discharge d temperature in °F at outdoor unit.
c Enter A test mode: Display will string active error codes (E), ambient (A), coil (c), and discharge (d) temperature in °F at outdoor unit.
d
d - dehumidification mode string > d > pause > F (Outdoor fan) RPM > pause > A (ambient temp displayed) > pause > repeat mode. IMPORTANT: On 2-stage unit, R to DS link must be cut and correct RPM outdoor fan profile selected for outdoor fan to operate at lower RPM speed when EDA is active.
Enter d test mode: Forced defrost. (System must be configured as HP. Unit must be running in heating mode). Test defrost will terminate when coil terminate temperature is reached (or 10 seconds, whichever is longer) or 14 minutes if coil temperature remains below terminate temperature or by pushing button down for less than 2 seconds. Enter A test mode: Display will string active error codes E, ambient A, coil c and discharge d temperature in °F at outdoor unit.
dF dF displays when system is in defrost mode - unit must be running in heating mode, outdoor ambient must be below 65°F and outdoor coil temperature must be below defrost termination temperature.
F*
F in the display string indicates RPM setting output on terminals PWM and com (used with EBM motors). RPM displayed does not apply to motor connected on ECM Y1 and ECM Y2.
Enter F test mode: Control outputs DC Voltage onto PWM and com terminals. Outdoor fan will cycle ON for 10 minutes at 490 RPM. To exit test - Push and hold button until three horizontal bars display. Release button, outdoor fan will cycle OFF. (Test DOES NOT output DC voltage to ECM Y1 and ECM Y2 terminals)
H1 Heat stage 1 string display > pause > F outdoor fan RPM displayed > pause > A (ambient temperature displayed > pause > repeat mode.
H2 Heat stage 2 string display > pause > F outdoor fan RPM displayed > pause > A (ambient temperature displayed > pause > repeat mode.
C1 Cool stage 1 string display > pause > F outdoor fan RPM displayed > pause > A (ambient temperature displayed > pause > repeat mode.
C2 Cool stage 2 string display > pause > F outdoor fan RPM displayed > pause > A (ambient temperature displayed > pause > repeat mode.
* Information will be displayed, but does not apply to this product.
Table 8. Field Test and Program Menu Options

506860-03 Issue 1946 Page 23 of 27
Configuring Unit Capacity(NOTE: Control must be in Idle mode)
Solid PCRelease push button - Allows user to select Unit Capacity. IMPORTANT: Field replacement control may need to be manually configured to validate outdoor unit capacity. Refer to unit nameplate model number for capacity in 1,000 of BTUs. (18, 24, 30, 36, 42, 48, 60)
Blinking PC
Push and hold button - Control will display unit capacity number for 3 seconds. When the correct unit capacity number is displayed, release button. Selected code will flash for a 10-second period. During that period, hold push button for 3 seconds to store code. Once code is stored, control will automatically exit Field Test Mode. If 10-second period expires or push button is held less than 3 seconds, control will automatically exit Field Test Mode and go into Idle Mode without storing unit capacity number. If this happens, configuring procedure must be repeated.
Table 9. Configuring Unit Capacity
Display Code Procedure
Solid Pt
Release push button - Allows user to select type and number of stages on outdoor unit. IMPORTANT: Field replacement control may need to be manually configured to validate outdoor unit fan RPM setting is right for unit capacity. See RPM table on unit wiring diagram for proper RPM settings. Type and number of stages: 1AC, 2AC, 1HP, 2HP - AC - air conditioning and HP - Heat Pump.
Blinking Pt
Push and hold button - Control will display type and number of stages for 3 seconds. When the correct type and number of stages is displayed, release button. Selected code will flash for a 10-second period. During that period, hold push button for 3 seconds to store code. Once code is stored, control will automatically exit Field Test Mode. If 10-second period expires or push button is held for less than 3 seconds, control will automatically exit Field Test Mode and go into Idle Mode without storing type and number of stages. If this happens, configuring procedure must be repeated.
Table 10. Configuring Type and Number of Stages

506860-03Issue 1946Page 24 of 27
Maintenance
Regular Maintenance RequirementsYour system should be regularly inspected by a qualified service technician. These regular visits may include (among other things) checks for:• Motor operation• Ductwork air leaks• Coil & drain pan cleanliness (indoor & outdoor)• Electrical component operation & wiring check• Proper refrigerant level & refrigerant leaks• Proper airflow• Drainage of condensate• Air filter(s) performance• Blower wheel alignment, balance & cleaning• Primary & secondary drain line cleanliness• Proper defrost operation (heat pumps)
Air FilterInspect air filters at least monthly and replace or clean as required. Disposable filters should be replaced. Washable filters may be cleaned by soaking in mild detergent and rinsing with cold water. Allow filter to dry before reinstalling. Replace filters with the arrows pointing in the direction of airflow. Dirty filters are the most common cause of poor heating / cooling performance and compressor failures.
Indoor CoilIf the system has been operated with a clean filter in place, it should require minimal cleaning. If cleaning is needed, call your dealer for service.
Condensate DrainDuring cooling season check at least monthly for free flow of drainage and clean if necessary.
Condenser CoilsGrass cuttings, leaves, dirt, dust, lint from clothes dryers, and foliage from trees can be drawn into coils by movement of the air. Clogged condenser coils will lower the efficiency of your unit and could cause damage to the condenser. Periodically, debris should be brushed from the condenser coils. Use a soft bristle brush with light pressure only. DO NOT damage or bend condenser coil fins. Damaged or bent fins may affect unit operation.
SHARP OBJECT HAZARD!Condenser coils have sharp edges. Wear adequate body protection on body extremities (e.g. gloves).FAILURE TO FOLLOW THIS WARNING COULD RESULT IN BODILY INJURY.
WARNING
Painted SurfacesFor maximum protection of the unit’s finish, a good grade of automobile wax should be applied every year. In geographical areas where water has a high concentration of minerals (calcium, iron, sulfur, etc.), it is recommended that lawn sprinklers not be allowed to spray the unit. In such applications, the sprinklers should be directed away from the unit. Failure to follow this precaution may result in premature deterioration of the unit finish and metal components.In sea coast areas, special maintenance is required due to the corrosive atmosphere provided by the high salt concentration in ocean mists and the air. Periodic washing of all exposed surfaces and coil will add additional life to your unit. Please consult your installing dealer for proper procedures in your geographic area.
Homeowner Information
ELECTRICAL SHOCK HAZARD!Turn OFF electric power to unit before performing any maintenance or removing panels or doors.FAILURE TO DO SO COULD RESULT IN BODILY INJURY OR DEATH.
WARNINGHeat Pump OperationYour new heat pump has several characteristics that you should be aware of:• Heat pumps satisfy heating demand by delivering large
amounts of warm air into the living space. This is quite different from gas-or oil-fired furnaces or an electric furnace which deliver lower volumes of considerably hotter air to heat the space.
• Do not be alarmed if you notice frost on the outdoor coil in the winter months. Frost develops on the outdoor coil during the heating cycle when temperatures are below 45°F. An electronic control activates a defrost cycle lasting 5 to 15 minutes at preset intervals to clear the outdoor coil of the frost.
506860-03 Issue 1946 Page 25 of 27
Indicating LightMost heat pump thermostats have an amber light which indicates when the heat pump is operating in the emergency heat mode.
Temperature IndicatorThe temperature indicator displays the actual room temperature.
Programmable ThermostatsYour system may be controlled by a programmable thermostat. These thermostats provide the added feature of programmable time-of-day set points for both heating and cooling. Refer to the user’s information manual provided with your particular thermostat for operation details.
Important System Information• Your system should never be operated without a clean
air filter properly installed.• Return air and supply air registers should be free from
restrictions or obstructions to allow full flow of air.
IF YOUR SYSTEM DOES NOT WORK, BEFORE REQUESTING A SERVICE CALL:1. Ensure thermostat is set below (cooling) or above
(heating) room temperature and that the system lever is in the “COOL”, “HEAT” or “AUTO” position.
2. Inspect your return air filter: If it is dirty, your heat pump may not function properly.
3. Check indoor and outdoor disconnect switches. Confirm circuit breakers are ON or that fuses have not blown. Reset breakers/replace fuses as necessary.
4. Inspect the outdoor unit for clogged condenser coils, (grass cuttings, leaves, dirt, dust or lint). Ensure that branches, twigs or other debris are not obstructing the condenser fan.
IF YOUR SYSTEM STILL DOES NOT OPERATE, CONTACT YOUR SERVICING DEALER.
Be sure to describe the problem, and have the model and serial numbers of the equipment available.If warranty replacement parts are required, the warranty must be processed through a qualified distribution location.
• During the defrost cycle, you may notice steam rising from the outdoor unit. This is a normal occurrence. The thermostat may engage auxiliary heat during the defrost cycle to satisfy a heating demand; however, the unit will run to normal operation at the conclusion of the defrost cycle.
In case of extended power outage...If the outdoor temperature is below 50°F and power to your outdoor unit has been interrupted for one hour or longer, observe the following when restoring power to your heat pump system.• Set the room thermostat selector to the “Emergency
Heat” setting to obtain temporary heat for a minimum of 6 hours. This will allow system refrigerant pressures and temperatures enough time to return to a stabilized condition.
• In Emergency Heat mode, all heating demand is satisfied by auxiliary heat; heat pump operation is locked out. After a 6 hour “warm-up” period, the thermostat can then be switched to the “Heat” setting and normal heat pump operation may resume.
Thermostat OperationThe wall-mounted thermostat controls your heat pump. The thermostat is available in various configurations from different manufacturers. The information below is typical for most thermostats. Ask your dealer for specific information regarding the model of thermostat installed.
Fan SwitchIn AUTO or INT (intermittent) mode, the blower operates only when the thermostat calls for heating or cooling. This mode is generally preferred when humidity control is a priority.
The ON or CONT mode provides continuous indoor blower operation, regardless of whether the compressor or auxiliary heat are operating. This mode is required when constant air circulation or filtering is desired.
On models without a fan selection switch, the fan will cycle with the outdoor unit.
System SwitchSet the system switch for heating, cooling or auto operation. The auto mode allows the heat pump to automatically switch from heating mode to cooling mode to maintain predetermined comfort settings. Many heat pump thermostats are also equipped with an emergency heat mode which locks out heat pump operation and provides temporary heat supplied by the auxiliary heat.

506860-03Issue 1946Page 26 of 27
4SHP16LS124-, -36, -48
Wiring Diagrams

506860-03 Issue 1946 Page 27 of 27
4SH
P16L
S160