installation guide adaptive server enterprise...
TRANSCRIPT
Installation Guide
Adaptive Server® Enterprise15.7
Sun Solaris
DOCUMENT ID: DC35889-01-1570-02LAST REVISED: June 2012Copyright © 2012 by Sybase, Inc. All rights reserved.This publication pertains to Sybase software and to any subsequent release until otherwise indicated in new editions ortechnical notes. Information in this document is subject to change without notice. The software described herein is furnishedunder a license agreement, and it may be used or copied only in accordance with the terms of that agreement.Upgrades are provided only at regularly scheduled software release dates. No part of this publication may be reproduced,transmitted, or translated in any form or by any means, electronic, mechanical, manual, optical, or otherwise, without the priorwritten permission of Sybase, Inc.Sybase trademarks can be viewed at the Sybase trademarks page at http://www.sybase.com/detail?id=1011207. Sybase andthe marks listed are trademarks of Sybase, Inc. ® indicates registration in the United States of America.SAP and other SAP products and services mentioned herein as well as their respective logos are trademarks or registeredtrademarks of SAP AG in Germany and in several other countries all over the world.Java and all Java-based marks are trademarks or registered trademarks of Oracle and/or its affiliates in the U.S. and othercountries.Unicode and the Unicode Logo are registered trademarks of Unicode, Inc.IBM and Tivoli are registered trademarks of International Business Machines Corporation in the United States, othercountries, or both.All other company and product names mentioned may be trademarks of the respective companies with which they areassociated.Use, duplication, or disclosure by the government is subject to the restrictions set forth in subparagraph (c)(1)(ii) of DFARS52.227-7013 for the DOD and as set forth in FAR 52.227-19(a)-(d) for civilian agencies.Sybase, Inc., One Sybase Drive, Dublin, CA 94568.
Contents
Adaptive Server Enterprise Overview ..................................1Edition Overview .............................................................1
Determining the Current Edition ............................2Available Options for Adaptive Server ............................2Server Component Descriptions and Directory Layout
....................................................................................3Tools for Managing Adaptive Server Enterprise .............5PC-Client Product Descriptions and Directory Layout
....................................................................................5Separately Installable PC-Client Products .............7
Planning an Adaptive Server Installation ............................9Determine Whether to Install or Upgrade Adaptive
Server .........................................................................9Obtaining a License ........................................................9
SySAM License Server ........................................11IPv6 Configuration ...............................................12SySAM Licensing Checkout .................................12
System Requirements .........................................................13Memory Requirements .................................................14
Preparing to Install Adaptive Server ..................................15Adjusting the Operating System Shared Memory
Parameters ...............................................................16Managing Java in the Database During Installations
and Upgrades ...........................................................18Adaptive Server Installation ...............................................19
Installing Adaptive Server in GUI Mode ........................19Minimally Configuring Adaptive Server in GUI Mode ....21Creating a Response File for Unattended Adaptive
Server Installations ...................................................25Installing Adaptive Server from the Command Line .....25
Installation Guide iii
Installing Adaptive Server in Unattended, Silent Mode..................................................................................26
Installer Changes from Adaptive Server 12.5.4 toAdaptive Server 15.7 ................................................26
Installation of Version 15.7 Over an Existing 15.xAdaptive Server ...............................................................29
Determining the Adaptive Server Version .....................29Backing Up Adaptive Server .........................................29Installing Adaptive Server Using Binary Overlay ..........30
Postinstallation Tasks .........................................................31Verifying that Servers are Running ...............................31Verifying Your Connection to the Servers .....................31PC-Client Installation ....................................................32
System Requirements for Clients ........................33Installing the Client ..............................................33Getting Started After Installing .............................35Uninstalling PC-Client ..........................................37
Setting the System Administrator Password .................37Installing Sample Databases ........................................38
Default Devices for Sample Databases ...............38Running the Database Scripts .............................39Installing the interpubs Database ........................39Installing the jpubs Database ...............................40Maintaining Sample Databases ...........................41
Adaptive Server Upgrades ..................................................43Upgrade Considerations for Component Integration
Services ....................................................................43Preparing to Upgrade ...................................................44Performing Preupgrade Tasks ......................................44
System Table and Stored Procedure ChangesDuring Upgrade ...............................................47
Reserved Words ..................................................47Preparing the Database and Devices ..................48The sybprocsdev device ......................................50
Upgrade to Adaptive Server 15.7 .................................53
Contents
iv Adaptive Server Enterprise

Upgrading Interactively Using sqlupgrade ...........53Upgrading Noninteractively Using
sqlupgraderes .................................................55Manually Upgrading to Adaptive Server .............. 56
Postupgrade Tasks ....................................................... 56Running the instmsgs.ebf Script .........................57Restoring Functionality in Adaptive Server After
Upgrading ........................................................57Reenabling Auditing .............................................58Reenabling Replication Server After the
Dataserver Upgrade ........................................59Migrating from 32-Bit to 64-Bit Versions on Different
Computers ................................................................61Migrating Data Using a Dump and Load Method
.........................................................................61Using bcp to Migrate Data ...................................62Migrating Data by Replacing the Binary .............. 62
Adaptive Server Components and Related Products ......65Upgrading Job Scheduler .............................................65
Upgrading Job Scheduler Templates ...................66Upgrading Java in the Database ...................................69
Enabling Java in the Database in a HighAvailability System ...........................................69
Upgrading Backup Server .............................................70Upgrading Databases Using Dump and Load ..............70How Compiled Objects are Handled When Upgrading
Adaptive Server ........................................................71Finding Compiled Object Errors Before
Production .......................................................72Adaptive Server Downgrades .............................................75
Preparing to Downgrade Adaptive Server .................... 75Downgrading from Adaptive Server 15.7 ......................76Additional Considerations for New Features Used .......78Restoring Original Messages After a Downgrade .........79Downgrading Job Scheduler .........................................79
Contents
Installation Guide v
Downgrading an Adaptive Server that UsesEncryption ................................................................ 80
Downgrade Considerations for Adaptive Server withReplicated Databases ..............................................81
Post-Downgrade Tasks for Adaptive Server .................81Uninstalling Adaptive Server ..............................................83
Removing an Existing Adaptive Server ........................83Troubleshoot SySAM ...........................................................85
Troubleshooting SySAM ...............................................86If the Installation Program Cannot Find a Suitable
License .....................................................................89If Adaptive Server Cannot Check Out a License and
Starts Using a License Under a Grace Period .........90E-Mail Notifications .......................................................91Before You Contact Sybase Technical Support ............91
Troubleshoot the Server ......................................................93Error Logs for Installation Utilities .................................94Error Logs for Sybase Servers .....................................94Troubleshooting Common Installation Problems ...........95
Stopping Adaptive Server After a Failure .............97Recovering from a Failed Installation ...................97
If Adaptive Server Fails the Preupgrade Eligibility Test..................................................................................97
When an Upgrade Fails ................................................98If You Can Identify the Cause of the Upgrade
Failure ..............................................................98Restoring Databases After a Failed Upgrade ......98Recovering from a Failed Upgrade ......................98If You Cannot Identify the Cause of an Upgrade
Failure ............................................................100Obtaining Help and Additional Information ....................101
Technical Support .......................................................101Downloading Sybase EBFs and Maintenance Reports
................................................................................101Sybase Product and Component Certifications ..........102
Contents
vi Adaptive Server Enterprise
Creating a MySybase Profile ......................................102Accessibility Features .................................................102
Index ................................................................................105
Contents
Installation Guide vii

Contents
viii Adaptive Server Enterprise

Adaptive Server Enterprise Overview
Adaptive Server® Enterprise is based on a client/server model, communicating with its clientsover the network via the Tabular Data Stream™ (TDS) protocol. Each client process mayexecute on one machine and communicate with a database server on the same or a differentmachine.
Adaptive Server runs as an application on top of an operating system. The hardware that theoperating system runs on is completely transparent to Adaptive Server, which sees only theoperating system's user interfaces. To enhance performance on multiprocessor systems,configure multiple processes (engines).
Adaptive Server is divided into a DBMS component and a kernel component. The kernelcomponent uses the operating system services for process creation and manipulation, deviceand file processing, and interprocess communication. The DBMS component manages SQLstatement processing, accesses data in a database, and manages different types of serverresources.
Edition OverviewSybase® offers various editions of Adaptive Server® Enterprise.
• Enterprise Edition – has no limit on scalability and can run all available options that can bepurchased separately.
• Small Business Edition – has limited scalability, and runs a limited set of options that arepurchased separately.
• Developer Edition – has limited scalability and includes many of the options that areincluded in the Enterprise Edition.
See the Sybase Software Asset Management Users Guide for information about unlockingeditions and optional features.
There is a change to the license quantity used by per-CPU and per-chip license types. AdaptiveServer version 15.7 and later checks out the same number of licenses as the number of cores onthe machine (or chips, depending on the license type) regardless of any configuration settings.This correction from earlier versions of the server, in which if Adaptive Server was licensedper CPU or CPU chip, the requested license quantity was reduced if the max online enginesconfiguration parameter was set to fewer than the number of CPUs on the machine.
The Adaptive Server installer automatically installs the SySAM License Server if you choosethe full installation option or enter a served license when it prompts you for the SySAM licensekey. You can also choose to install the license server using the installer's custom installationoption. See the Sybase Software Asset Management Users Guide to generate licenses.
Adaptive Server Enterprise Overview
Installation Guide 1
Determining the Current EditionIf you already use Adaptive Server, find out what edition you are running with thesp_lmconfig system procedure.
Enter:sp_lmconfig 'edition'
Adaptive Server returns a value of EE, SE, or DE based on the edition that is currently running.See the Reference Manual for more information about the sp_lmconfig command.
Available Options for Adaptive ServerSybase offers various optional features for Adaptive Server, such as data compression,partitions, and encrypted columns.
• Data compression – Enables compression for regular and large object data, which usesless storage space for the same amount of data, reduces cache memory consumption, andimproves performance due to lower I/O demands.
• Security and directory services – Provides lightweight directory services and network-based authentication and encryption using SSL and Kerberos.
• Partitions – Enables semantic partitioning for table row data.• Encrypted columns – Increases security parameters and allows for addition of datatypes.• Tivoli Storage Manager – Enables the database to back up and restore operations to IBM
Tivoli Storage Manager.• In-memory database – Provides zero-disk-footprint in-memory database support that is
fully integrated with Adaptive Server for high-performance transactional applications.Provides performance enhancements to disk-resident databases with relaxed durabilityproperties.
Adaptive Server editions and optional features are unlocked by SySAM licenses. See theSybase Software Asset Management Users Guide.
Adaptive Server Enterprise Overview
2 Adaptive Server Enterprise
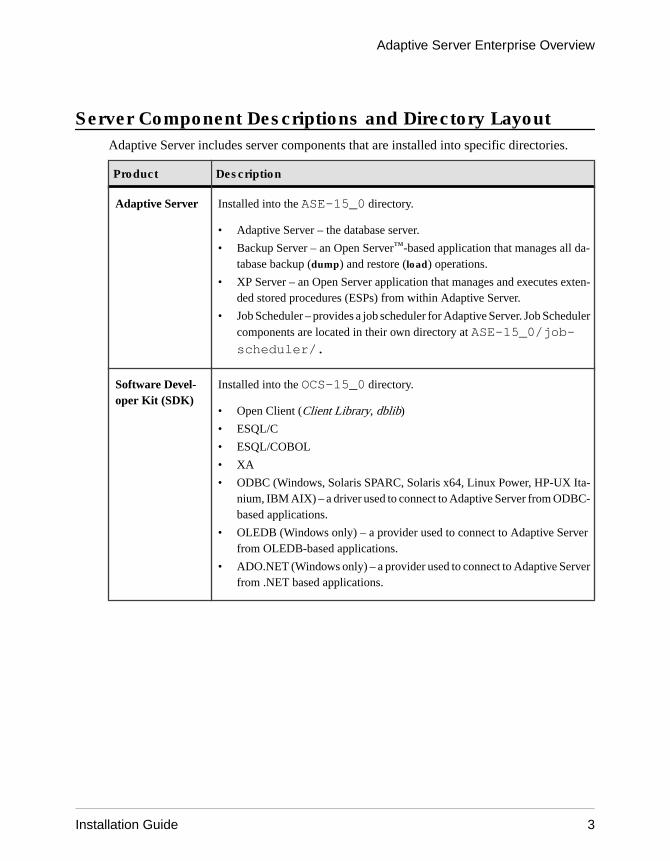
Server Component Descriptions and Directory LayoutAdaptive Server includes server components that are installed into specific directories.
Product Description
Adaptive Server Installed into the ASE-15_0 directory.
• Adaptive Server – the database server.
• Backup Server – an Open Server™-based application that manages all da-tabase backup (dump) and restore (load) operations.
• XP Server – an Open Server application that manages and executes exten-ded stored procedures (ESPs) from within Adaptive Server.
• Job Scheduler – provides a job scheduler for Adaptive Server. Job Schedulercomponents are located in their own directory at ASE-15_0/job-scheduler/.
Software Devel-oper Kit (SDK)
Installed into the OCS-15_0 directory.
• Open Client (Client Library, dblib)
• ESQL/C
• ESQL/COBOL
• XA
• ODBC (Windows, Solaris SPARC, Solaris x64, Linux Power, HP-UX Ita-nium, IBM AIX) – a driver used to connect to Adaptive Server from ODBC-based applications.
• OLEDB (Windows only) – a provider used to connect to Adaptive Serverfrom OLEDB-based applications.
• ADO.NET (Windows only) – a provider used to connect to Adaptive Serverfrom .NET based applications.
Adaptive Server Enterprise Overview
Installation Guide 3
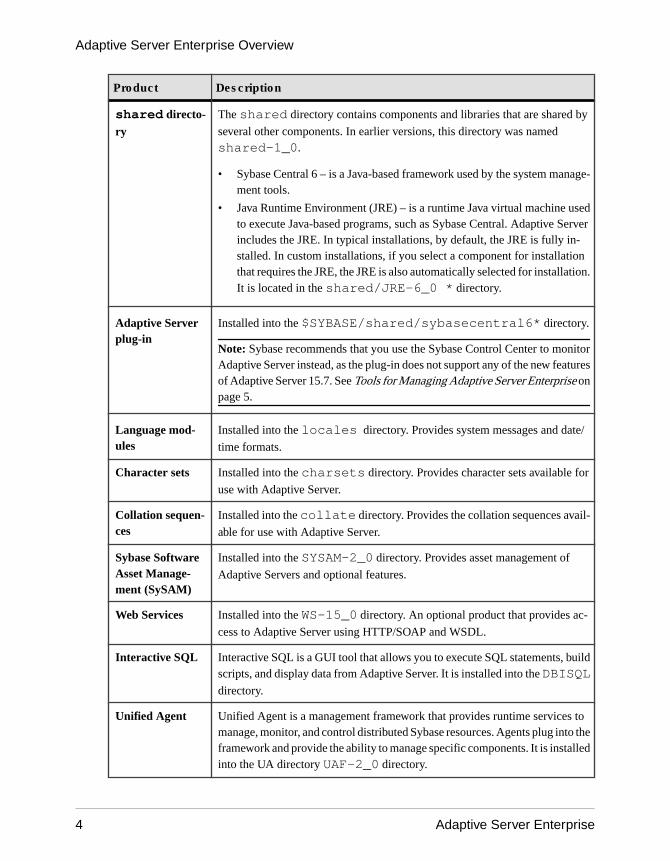
Product Description
shared directo-
ry
The shared directory contains components and libraries that are shared by
several other components. In earlier versions, this directory was namedshared-1_0.
• Sybase Central 6 – is a Java-based framework used by the system manage-ment tools.
• Java Runtime Environment (JRE) – is a runtime Java virtual machine usedto execute Java-based programs, such as Sybase Central. Adaptive Serverincludes the JRE. In typical installations, by default, the JRE is fully in-stalled. In custom installations, if you select a component for installationthat requires the JRE, the JRE is also automatically selected for installation.It is located in the shared/JRE-6_0 * directory.
Adaptive Serverplug-in
Installed into the $SYBASE/shared/sybasecentral6* directory.
Note: Sybase recommends that you use the Sybase Control Center to monitorAdaptive Server instead, as the plug-in does not support any of the new featuresof Adaptive Server 15.7. See Tools for Managing Adaptive Server Enterprise onpage 5.
Language mod-ules
Installed into the locales directory. Provides system messages and date/
time formats.
Character sets Installed into the charsets directory. Provides character sets available for
use with Adaptive Server.
Collation sequen-ces
Installed into the collate directory. Provides the collation sequences avail-
able for use with Adaptive Server.
Sybase SoftwareAsset Manage-ment (SySAM)
Installed into the SYSAM-2_0 directory. Provides asset management of
Adaptive Servers and optional features.
Web Services Installed into the WS-15_0 directory. An optional product that provides ac-
cess to Adaptive Server using HTTP/SOAP and WSDL.
Interactive SQL Interactive SQL is a GUI tool that allows you to execute SQL statements, buildscripts, and display data from Adaptive Server. It is installed into the DBISQLdirectory.
Unified Agent Unified Agent is a management framework that provides runtime services tomanage, monitor, and control distributed Sybase resources. Agents plug into theframework and provide the ability to manage specific components. It is installedinto the UA directory UAF-2_0 directory.
Adaptive Server Enterprise Overview
4 Adaptive Server Enterprise

Product Description
jutils-3_0utilities
A collection of Adaptive Server utility programs including ribo, a tool to traceTDS traffic between client program and Adaptive Server.
jConnect™ forJDBC™
Installed into the jConnect-7_0 directory. Provides a Java Database Con-
nectivity (JDBC) driver for Adaptive Server.
Note: Sybase strongly recommends you install the ECDA DirectConnect option orMainframeConnect™ DirectConnect™ for z/OS, including DirectConnect Manager, into itsown directory.
Tools for Managing Adaptive Server EnterpriseSybase Control Center is a server application that uses a Web browser-based client to deliveran integrated solution for monitoring and managing Sybase products.
Sybase Control Center provides a single, comprehensive, Web-administration console forreal-time performance, status, and availability monitoring of large-scale Sybase enterpriseservers. Sybase Control Center combines a modular architecture, a rich client administrativeconsole, agents, common services, and tools for managing and controlling Sybase products. Itincludes historical monitoring, threshold-based alerts and notifications, alert-based scriptexecution, and intelligent tools for identifying performance and usage trends.
Although the Adaptive Server 15.7 installation includes the Adaptive Server plug-in forSybase Central (which contains software for managing Sybase servers and its associatedservers), Sybase recommends that you use the Sybase Control Center to monitor AdaptiveServer, as the plug-in does not support any of the new features of Adaptive Server 15.7.
PC-Client Product Descriptions and Directory LayoutAn Adaptive Server installation includes additional products that are installed into specificdirectories.
Product Description
Software Devel-oper Kit (SDK)
Installed into the OCS-15_0 directory:
• Open Client™ (Client Library, dblib)
• ESQL/C
• ESQL/COBOL
• XA
• Adaptive Server Enterprise extension module for Python
Adaptive Server Enterprise Overview
Installation Guide 5
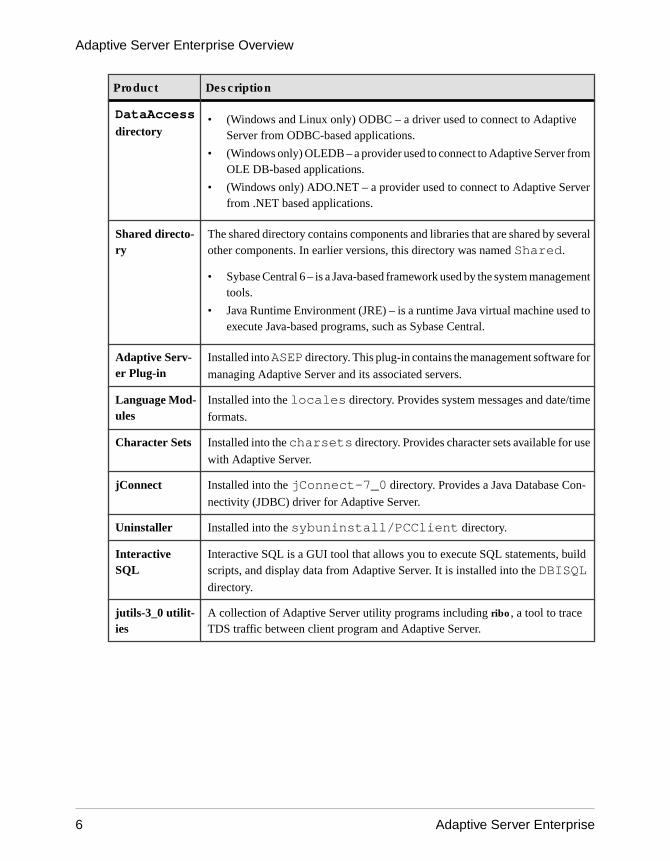
Product Description
DataAccessdirectory
• (Windows and Linux only) ODBC – a driver used to connect to AdaptiveServer from ODBC-based applications.
• (Windows only) OLEDB – a provider used to connect to Adaptive Server fromOLE DB-based applications.
• (Windows only) ADO.NET – a provider used to connect to Adaptive Serverfrom .NET based applications.
Shared directo-ry
The shared directory contains components and libraries that are shared by severalother components. In earlier versions, this directory was named Shared.
• Sybase Central 6 – is a Java-based framework used by the system managementtools.
• Java Runtime Environment (JRE) – is a runtime Java virtual machine used toexecute Java-based programs, such as Sybase Central.
Adaptive Serv-er Plug-in
Installed into ASEP directory. This plug-in contains the management software for
managing Adaptive Server and its associated servers.
Language Mod-ules
Installed into the locales directory. Provides system messages and date/time
formats.
Character Sets Installed into the charsets directory. Provides character sets available for use
with Adaptive Server.
jConnect Installed into the jConnect-7_0 directory. Provides a Java Database Con-
nectivity (JDBC) driver for Adaptive Server.
Uninstaller Installed into the sybuninstall/PCClient directory.
InteractiveSQL
Interactive SQL is a GUI tool that allows you to execute SQL statements, buildscripts, and display data from Adaptive Server. It is installed into the DBISQLdirectory.
jutils-3_0 utilit-ies
A collection of Adaptive Server utility programs including ribo, a tool to traceTDS traffic between client program and Adaptive Server.
Adaptive Server Enterprise Overview
6 Adaptive Server Enterprise
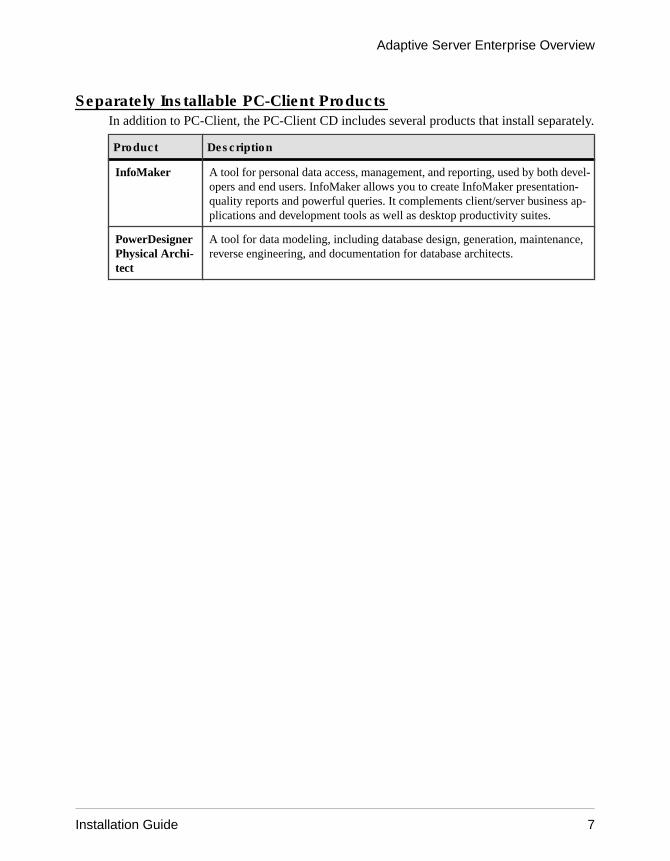
Separately Installable PC-Client ProductsIn addition to PC-Client, the PC-Client CD includes several products that install separately.
Product Description
InfoMaker A tool for personal data access, management, and reporting, used by both devel-opers and end users. InfoMaker allows you to create InfoMaker presentation-quality reports and powerful queries. It complements client/server business ap-plications and development tools as well as desktop productivity suites.
PowerDesignerPhysical Archi-tect
A tool for data modeling, including database design, generation, maintenance,reverse engineering, and documentation for database architects.
Adaptive Server Enterprise Overview
Installation Guide 7
Adaptive Server Enterprise Overview
8 Adaptive Server Enterprise
Planning an Adaptive Server Installation
Understand the basics of an Adaptive Server installation.
1. Read the release bulletins for the most current information on the Sybase products you areinstalling, including the "Special Installation Instructions" sections.
2. Review hardware and system requirements to ensure that your system meets the version-level, RAM, and network protocol requirements for your platform.
3. Read Determine Whether to Install or Upgrade Adaptive Server on page 9 to confirmwhat type of installation to run.
Determine Whether to Install or Upgrade Adaptive ServerIdentify whether to install or upgrade Adaptive Server.
The instructions in this guide differ depending on whether you are installing or upgradingAdaptive Server. Identify that which best fits your scenario:
• No Adaptive Server installed – if you never had Adaptive Server on your machine, performall of the prerequisite tasks then see the installation instructions.
• Adaptive Server currently installed, running a version earlier than 15.x – is a major—orfull—upgrade.
• Adaptive Server currently installed, running version 15.x or later – is a minor upgrade thatis performed automatically through a binary overlay, with no manual steps involved.
Obtaining a LicenseBefore installing your product, choose a SySAM license model, determine the license serverinformation, and obtain license files.
When you purchase SySAM 2–enabled Sybase products, you must generate, download, anddeploy SySAM product licenses.
• If you purchased your product from Sybase or an authorized Sybase reseller, go to thesecure Sybase Product Download Center (SPDC) at https://sybase.subscribenet.com andlog in to generate license keys. The license generation process may vary slightly,depending on whether you ordered directly from Sybase or from a Sybase reseller
• If you ordered your product under an SAP® contract and were directed to download fromSAP Service Marketplace (SMP), you can use SMP at http://service.sap.com/licensekeysto generate license keys for Sybase products that use SySAM 2-based licenses.
Planning an Adaptive Server Installation
Installation Guide 9
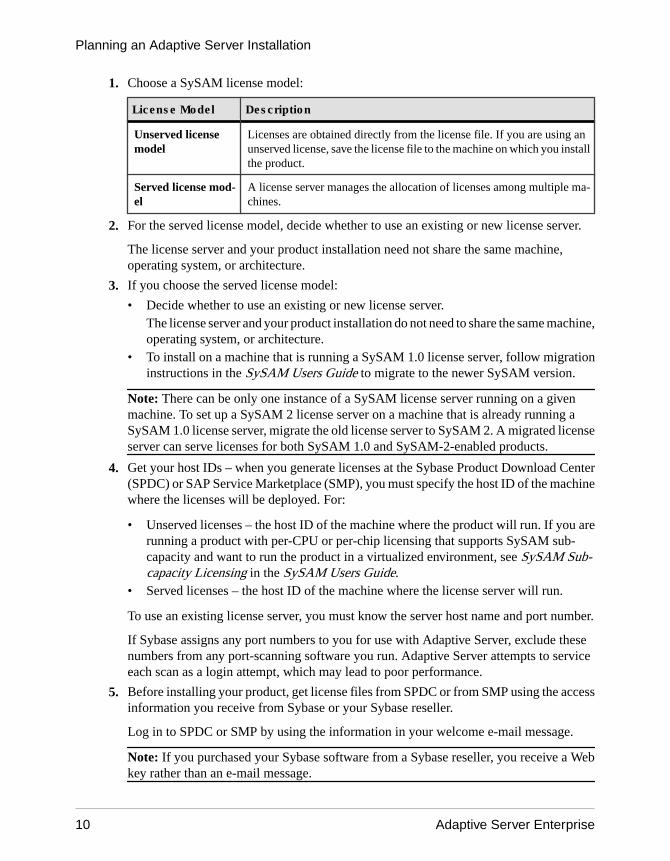
1. Choose a SySAM license model:
License Model Description
Unserved licensemodel
Licenses are obtained directly from the license file. If you are using anunserved license, save the license file to the machine on which you installthe product.
Served license mod-el
A license server manages the allocation of licenses among multiple ma-chines.
2. For the served license model, decide whether to use an existing or new license server.
The license server and your product installation need not share the same machine,operating system, or architecture.
3. If you choose the served license model:
• Decide whether to use an existing or new license server.The license server and your product installation do not need to share the same machine,operating system, or architecture.
• To install on a machine that is running a SySAM 1.0 license server, follow migrationinstructions in the SySAM Users Guide to migrate to the newer SySAM version.
Note: There can be only one instance of a SySAM license server running on a givenmachine. To set up a SySAM 2 license server on a machine that is already running aSySAM 1.0 license server, migrate the old license server to SySAM 2. A migrated licenseserver can serve licenses for both SySAM 1.0 and SySAM-2-enabled products.
4. Get your host IDs – when you generate licenses at the Sybase Product Download Center(SPDC) or SAP Service Marketplace (SMP), you must specify the host ID of the machinewhere the licenses will be deployed. For:
• Unserved licenses – the host ID of the machine where the product will run. If you arerunning a product with per-CPU or per-chip licensing that supports SySAM sub-capacity and want to run the product in a virtualized environment, see SySAM Sub-capacity Licensing in the SySAM Users Guide.
• Served licenses – the host ID of the machine where the license server will run.
To use an existing license server, you must know the server host name and port number.
If Sybase assigns any port numbers to you for use with Adaptive Server, exclude thesenumbers from any port-scanning software you run. Adaptive Server attempts to serviceeach scan as a login attempt, which may lead to poor performance.
5. Before installing your product, get license files from SPDC or from SMP using the accessinformation you receive from Sybase or your Sybase reseller.
Log in to SPDC or SMP by using the information in your welcome e-mail message.
Note: If you purchased your Sybase software from a Sybase reseller, you receive a Webkey rather than an e-mail message.
Planning an Adaptive Server Installation
10 Adaptive Server Enterprise
If you plan to use sub-capacity licensing, see the SySAM Users Guide for information onhow to configure using the sysamcap utility.
SySAM License ServerMake sure that you have installed the required SySAM license server version. ReplicationServer 15.5 and later include FLEXnet Publisher license server manager, which is platform-specific.
• License server versionYou must install the SySAM license server version 2.1 or later. To determine the currentlicense server version, use the sysam version command.
Note: License server version 2.0 and earlier do not include this command.
The SySAM license server installer is available in your ASE_installer_image/sysam_setup directory. You can also download the latest license server from theSySAM License Server and Utilities Install Web site at http://www.sybase.com/sysam/server.
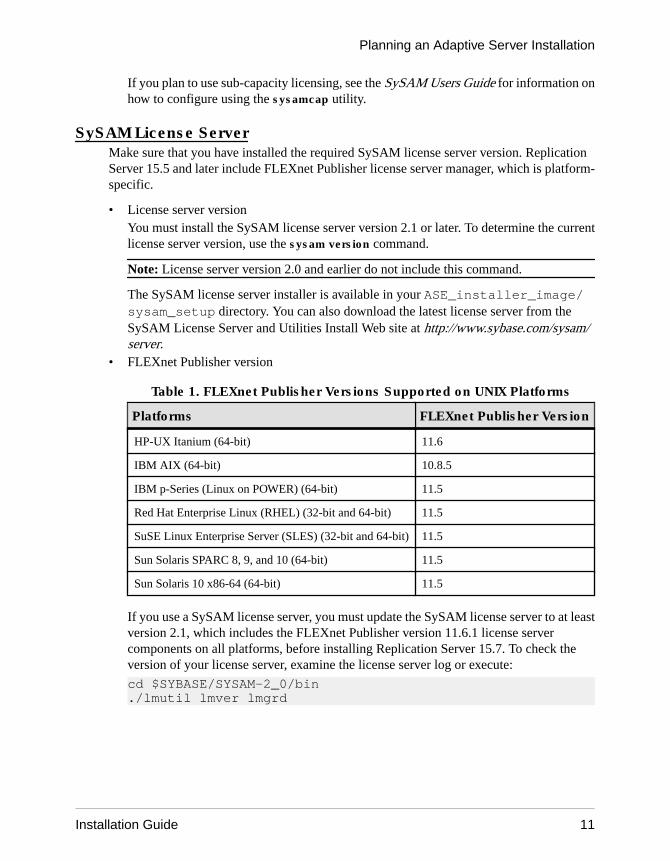
• FLEXnet Publisher version
Table 1. FLEXnet Publisher Versions Supported on UNIX Platforms
Platforms FLEXnet Publisher Version
HP-UX Itanium (64-bit) 11.6
IBM AIX (64-bit) 10.8.5
IBM p-Series (Linux on POWER) (64-bit) 11.5
Red Hat Enterprise Linux (RHEL) (32-bit and 64-bit) 11.5
SuSE Linux Enterprise Server (SLES) (32-bit and 64-bit) 11.5
Sun Solaris SPARC 8, 9, and 10 (64-bit) 11.5
Sun Solaris 10 x86-64 (64-bit) 11.5
If you use a SySAM license server, you must update the SySAM license server to at leastversion 2.1, which includes the FLEXnet Publisher version 11.6.1 license servercomponents on all platforms, before installing Replication Server 15.7. To check theversion of your license server, examine the license server log or execute:
cd $SYBASE/SYSAM-2_0/bin ./lmutil lmver lmgrd
Planning an Adaptive Server Installation
Installation Guide 11
IPv6 ConfigurationUse the sysam configure command to choose the version of the license server based on yourenvironment.
Adaptive Server includes IPv4 and IPv6 versions of the SySAM license server software. Bydefault, the installer configures SySAM for IPv4 support.
The IPv4 version of the license server cannot be used properly if you have enabled IPv6 on thelicense server host. If this is the case, you can:
• Disable IPv6 TCP/IP protocol on the license server host.• Use another Windows host that does not have IPv6 enabled.• Use a UNIX host for the license server. You can use the IPv4 version of the license even if
both IPv4 and IPv6 are enabled on UNIX.
If you are using the IPv6 version of the license server on a Windows host, you can access thislicense server only through the IPv6 protocol. Any host with an IPv4 only network stackcannot obtain licenses from this IPv6 license server. To resolve this issue:
• Use a UNIX host for the license server. License servers on UNIX can serve licenses to bothIPv4 and IPv6 client hosts.
• Use two separate Windows machines. Set up two license servers on two different hosts inthe network; one to serve the IPv4 network and the other one to serve the IPv6 network.
You can use the SySAM script to configure the appropriate version of the license server:
sysam configure [IPv6|IPv4]
For example, to configure use of the IPv4/IPv6 dual stack binaries, use:
sysam configure IPv6
SySAM Licensing CheckoutIf Adaptive Server was licensed using a per-processor license type in versions earlier than15.7, the license quantity was determined at start-up.
Adaptive Server periodically checks the number of processors it can use and attempts to checkout additional licenses for any increase. Replication Server shuts down after a 30-day graceperiod expires if additional licenses are not made available within this period.
See the SySAM Users Guide.
Planning an Adaptive Server Installation
12 Adaptive Server Enterprise
System Requirements
Before installing Adaptive Server, ensure that your system is updated with the latest patchesand system requirements. Do not use a patch that is earlier than the version suggested for youroperating system. Use the patch recommended by the operating system vendor, even if itsupersedes the patch listed.
To list all currently installed patches and display the operating system version level, enter:showrev -p
Sun Solaris Requirements
Note: Solaris 10 is required to use the Java in the database feature.
All Solaris systems support the TCP protocol. Platform system requirements are:
• Sun4u Architecture – Solaris 10• AMD Architecture – Solaris 10
Solaris 64-bit platform system requirements are:
• Processor – 64-bit• Minimum RAM for Adaptive Server – 106MB• Default user stack size – 94KB• Memory per user connection – Approximately 245KB
Sun Solaris AMD platform system requirements are:
• Processor – 64-bit• Minimum RAM for Adaptive Server – 106MB• Default user stack size – 98KB• Memory per user connection – Approximately 247KB
Note: Adaptive Server supports the 128-bit Zettabyte File System (ZFS) on Solaris 10. Toguarantee data integrity, set DSYNC or Direct IO on. You can turn DSYNC or Direct IO offonly for temporary databases that do not require recovery.
Sun system patch requirements:
• For Solaris 10 SPARC• 120753-05• 120048-03• 144190-03
• For Solaris 10 on AMD• 120754-05
System Requirements
Installation Guide 13
• 120049-03• 144191-02
Solaris disc space requirements:
• Typical installation• 64-bit: 985MB• AMD: 890MB
• Default databases created during installation – 306MB• Total
• 64-bit: 1141MB• AMD: 1046MB
Ensure that you have the required operating system patches for the Java Runtime Environment(JRE) version 6.
Information about the required operating system patches is available from the Sun Web siteabout Java.
Memory RequirementsEach operating system has a default maximum shared-memory segment. Make sure youroperating system is configured to allow the allocation of a shared-memory segment at least aslarge as the maximum memory value.
The amount of memory Adaptive Server can use is:
• On Sun Solaris 10 (SPARC) – 16 EB• On Sun Solaris 10 on AMD (x86) – chip-dependent
System Requirements
14 Adaptive Server Enterprise
Preparing to Install Adaptive Server
Prepare your system before starting the installation.
1. For Sun Solaris SPARC 64-bit, before the installation, set the file descriptors limit to aspecific value. After the installation is complete, you can set the file descriptors tounlimited.
2. Ensure that the account used to start the server has read and write permissions over thedirectory in which you are installing the server. You may need to create nonadministrativelogins to install the server into personal directories.
3. Review the SySAM licensing procedures and plan your server configuration using theconfiguration guide for your platform.
4. Create a Sybase account with administrative privileges for consistency and security. Thisuser account could be "sybase" or any other username. Use this account to perform allinstallation and device-creation tasks.
This user must have permission privileges from the top (or root) of the disk partition oroperating system directory down to the specific physical device or operating system file.Maintain consistent ownership and privileges for all files and directories. A single user—the Sybase system administrator with read, write, and execute permissions—shouldperform all installation, upgrade, and setup tasks.
If you are installing Adaptive Server on more than one computer, create the "sybase" useraccount on each machine.
5. Log in to the machine as the Sybase user.
Maintain consistent ownership and privileges for all files and directories. A single user—the Sybase system administrator with read, write, and execute permissions—shouldperform all installation, upgrade, and setup tasks.
6. If you have enabled the Java in the database feature, create the sybpcidb database anddisable the feature during the installation. See Managing Java in the Database DuringInstallations and Upgrades on page 18.
7. Decide where to install Adaptive Server:• Make sure there is sufficient disk space and temporary directory space available.• Ensure that there are no spaces in the path name of the directory.
8. Decide whether you want licensing events to trigger e-mail alerts, and the severity of theevents that generate e-mail messages.If you choose to have e-mail notifications for license events, know your:• SMTP server host name• Port number for an SMTP server
Note: If Sybase assigns any port numbers to you for use with Adaptive Server, makesure to exclude these numbers from any port-scanning software you run. Adaptive
Preparing to Install Adaptive Server
Installation Guide 15
Server attempts to service each scan as a login attempt, which could lead to poorperformance.
• E-mail return address• Recipients of the notifications• Severity level of an event that triggers mail. Your choices are:
• None• Informational• Warning• Error
9. Verify that your network software is configured.
Sybase software uses network software even if Adaptive Server and Sybase clientapplications are installed on a machine that is not connected to a network.
If you are having connection problems, or to verify your network configuration, ping thehost.
10. Adjust the shared memory for your operating system.
Adjusting the Operating System Shared MemoryParameters
Adjust shared memory segments if Adaptive Server cannot obtain large memory as a singlesegment or if Backup Server stripes fail due to insufficient segments.
Depending on the number and types of devices used for backup (dump) and recovery (load),you may need to adjust the shared memory segment parameter in the operating systemconfiguration file to accommodate concurrent Backup Server processes. There are six defaultshared memory segments available for process attachments.
If any reconfiguration through sp_configure requires additional memory, Adaptive Serverallocates shared memory segments after start-up. To account for these additional segments,allocate the maximum memory available to Adaptive Server by using the allocate max sharedmemory configuration parameter. See the System Administration Guide.
1. Adjust the operating system shared memory parameter.
Solaris 10 has shifted to a new method of controlling system resources. For this reasonshminfo_shmmax is technically obsolete. If you still have an entry for it in /etc/system it will work. However, the new method requires an additional entry to the file /etc/project. For example:
project-sybase:200:For use by Sybase:sybase:sybase:project.max-shm-memory=\(privileged,17179869184,deny)
The new parameter is project.max-shm-memory=(privileged,17179869184,deny) —replaces the old parameter shminfo-shmmax. “Privilege” is a threshold value on a
Preparing to Install Adaptive Server
16 Adaptive Server Enterprise
resource control that constitutes a point at which local actions are triggered or globalactions such as logging into a machine can occur.
Privilege levels:• Basic – can be modified by the owner of the calling process.• Privilege – can be modified by privileged callers.• System – is fixed for the duration of the operating system instance.
In specifying the threshold value of “privilege”, you can use the abbreviation “priv” Forexample:project.max-shm-memory=(priv, 17179869184,deny)
• "17179869184" – is the threshold value (16GB) on the resource control.• deny – denies attempts to use more than 16GB.
The default value for project.max-shm-memory is 25% of the physical memory on thesystem. The maximum value is UINT64_MAX, which works out to18446744073709551615 bytes, so is limited only by the size of the physical memory.
To set the project.max-shm-memory while the system is running use the prctl command.The rctladm command sets the configuration permanently.
2. If the installer cannot update for Solaris 10 patch ID 120012-14, edit your /etc/user_attr file with:
sybase::::type=normal;project=project-sybase--------------------
To confirm that the update to this patch, use either of these commands:# projects -d sybaseproject-sybase
# id -p sybaseuid=204409(sybase) gid=1(other) projid=200(project-sybase)
This update allows changes to shared-memory parameters within Solaris 10.
3. Adjust shared memory segments.
Depending on the number and types of devices used for backup (dump) and recovery(load), you may need to adjust the shared memory segment parameter in the operatingsystem configuration file to accommodate concurrent Backup Server processes. Thedefault number of shared memory segments available for process attachments is 6.
Adaptive Server may allocate shared memory segments after start-up if anyreconfiguration through sp_configure requires additional memory. You may need toaccount for these additional segments. Allocate the maximum memory available toAdaptive Server, by using the allocate max shared memory configuration parameter. Seethe System Administration Guide for more information.
To adjust shared memory segments of the operating system, add the following line to theconfiguration file where x is the number of shared memory segments./etc/system:
Preparing to Install Adaptive Server
Installation Guide 17
set shmsys:shminfo_shmseg=x
Managing Java in the Database During Installations andUpgrades
If you have enabled the Java in the database feature, create the sybpcidb database beforeinstalling or upgrading to Adaptive Server version 15.7.
If you plan to use sqlupgrade utility to upgrade from a pre-15.0.x Adaptive Server, do notdisable the Java in the database feature. The sqlupgrade utility automatically disables, thenre-enables, the feature.
1. Create the sybpcidb database. The sybpcidb database stores configurationinformation for the pluggable component interface (PCI) and all pluggable componentadapter (PCA) components. This database is used by the installpcidb script. Forexample:1> disk init2> name = "sybpcidb_dev",3> physname = "${SYBASE}/data/sybpcidb_dev.dat",4> size = '24MB'5> go1> create database sybpcidb on sybpcidb_dev = 242> go
The device and database sizes depend on the Adaptive Server page size:• 2K page size – 24MB• 4K page size – 48MB• 8K page size – 96MB• 16K page size – 192MB
2. Disable the Java in the database feature:1> sp_configure 'enable java', 02> go
Note: If you are upgrading from a pre 15.0.x server, do not disable Java in the databasefeature. sqlupgrade automatically disables this feature before an upgrade and re-enablesthe feature after an upgrade.
3. Reenable the feature after you have successfully installed or upgraded to Adaptive Server15.7:1> sp_configure 'enable java', 12> go
Preparing to Install Adaptive Server
18 Adaptive Server Enterprise
Adaptive Server Installation
Install Adaptive Server.
The installer creates the target directory (if it does not yet exist) and installs the selectedcomponents into that directory.
Note: Adaptive Server Enterprise 15.7 includes new major versions of Adaptive Server andmany of the supporting components. Installing Adaptive Server version 15.7 into the samedirectory with existing products should not impact the existing products. However, installingother products on top of Adaptive Server version 15.7 may result in one or more products notworking correctly.
Sybase strongly recommends that you install Adaptive Server version 15.7 into its owndirectory if possible. If you must install other products into the same directory, installAdaptive Server version 15.7 last.
At the end of the installation, you can verify the product installation. You may need to performadditional configuration procedures before using some products.
Installing Adaptive Server in GUI ModeUse GUI mode to install Adaptive Server and related products for use.
PrerequisitesShut down all programs before running the installer.
Task
1. Insert the Adaptive Server installation media in the appropriate drive, or download andextract the Adaptive Server installation image from the Sybase Product Download Center(SPDC) or the SAP Service Marketplace (SMP).
2. Mount the disk:mount -v "cdrfs" -r <device> /cdrom
3. Launch the installer:
/cdrom/setup.bin
4. Select the language.
5. On the Welcome screen, click Next.
6. Accept the default directory or enter a new path, then click Next.
Adaptive Server Installation
Installation Guide 19
If you see a Choose Update Installation pane, this means you have an earlier version ofthe server, and you need to perform an upgrade rather than a new installation. See AdaptiveServer Upgrades on page 43.
7. Choose the type of installation to be performed.
• Typical• Full• Custom – if you choose this, you see the Products and Features Selection window.
Select the products to install. The installer installs unselected items if your selectionsare dependent on them.
8. Select the software license type for the Adaptive Server suite:
• Install licensed copy of Adaptive Server Suite• Install Free Developer Edition of Adaptive Server Suite• Evaluate Adaptive Server Suite which is valid for 30 days from the installation
date
9. Choose the most appropriate region, read the license terms, then click I agree. ClickNext.
10. (Licensed copy of Adaptive Server Suite only) Specify the license type:
• Enter a license file. If it is a served license key, you are prompted to set up the licenseserver.
• Use an existing license server• Proceed without specifying license information for the duration of 30 days from the
installation date.
11. (Licensed copy of Adaptive Server Suite only) Specify product edition:
• Enterprise Edition• Small Business Edition• Developer Edition• Unknown – select this if you are unsure about the license type.
Note: Choosing Unknown prevents you from being able to select Optimize AdaptiveServer, later in the installation process.
Depending on the edition, you can also select the license type under which the product islicensed.
12. (Licensed copy of Adaptive Server Suite only) To configure your server to send e-mailnotifications about license management events that require attention, provide:
• SMTP server host name• SMTP server port number• E-mail return address• Recipient e-mail addresses
Adaptive Server Installation
20 Adaptive Server Enterprise
• Message severity that triggers e-mail messages
In the summary window, click Next.
13. Verify the installation type and that you have enough disk space for the installation. ClickNext.The installation status window displays the result of the installation process.
Minimally Configuring Adaptive Server in GUI ModeUse GUI mode to minimally configure Adaptive Server and related products for use.
1. If you installed the Adaptive Server plug-in, select enable or disable to remember theAdaptive Server password, then click Next.
2. Depending on the products you have installed, you may be prompted to configure newservers. Select the servers you want to configure. Unselect any items you do not want toconfigure now:
• Configure a new Adaptive Server• Configure a new Backup Server – see the System Administration Guide.• Configure a new XP Server – see the Transact-SQL® Users Guide.• Configure Job Scheduler – see the Job Scheduler Users Guide.• Enable Self Management• Configure Web Services – see Web Services Users Guide.• Configure an Unified Agent – see Unified Agent and Agent Management Console.
Click Next.
3. Enter your custom Adaptive Server configuration information:• Adaptive Server name• Port number• Error log – name and location of the error log file.• Application type:
• (Default) MIXED – both OLTP and DSS.• OLTP – online transaction Processing generally consists of smaller, less complex
transactions.• DSS – decision-support systems generally have less update activity with large
complex queries.• Page size:
• 2KB• (Default) 4KB• 8KB• 16KB
Note: The default page size selection changed to 4KB in Adaptive Server version 15.5.The default in earlier versions was 2KB. If you plan to load database dumps from an
Adaptive Server Installation
Installation Guide 21
Adaptive Server with a page size that is not 4KB, enter the page size to match thedatabase dump.
• Language• Character set• Sort order• Optimize Adaptive Server configuration – if you select this option, you must also
provide this information:• Available physical memory for Adaptive Server – the value is 80 percent of sum of
combined physical memory and OS shared memory.• Available CPU for Adaptive Server – the value is 80 percent of the physical CPU,
with a minimum of 1.
Note: If the value specified is larger than the available resource for allocation to theserver, the optimize configuration may fail, causing the server to not start.
• Create sample databases – create or install sample databases. Make sure you calculatethe additional space for your master device.
After customizing your Adaptive Server configuration, click Next to record the inputfields.
4. You see the second custom configuration window.
• Master device – name of master device and the path where it should be located.• Master device size – the default options are:
• 2KB page size – 30MB• 4KB page size – 60MB• 8KB page size – 120MB• 16KB page size – 240MB
• Master database size – the default options are:• 2KB page size – 13MB• 4KB page size – 26MB• 8KB page size – 52MB• 16KB page size – 104MB
• System procedure device path• System procedure device and database size – the default is 172MB.• System device path• System device size – the default options are:
• 2KB page size server – 3MB• 4KB page size server – 6MB• 8KB page size server – 12MB• 16KB page size server – 24MB
• System database size – the default options are:• 2KB page size server – 3MB
Adaptive Server Installation
22 Adaptive Server Enterprise
• 4KB page size server – 6MB• 8KB page size server – 12MB• 16KB page size server – 24MB
• Temporary database device• Temporary database device size:
• 2KB page size server – 100MB• 4KB page size server – 100MB• 8KB page size server – 100MB• 16KB page size server – 100MB
• Temporary database size:• 2KB page size server – 100MB• 4KB page size server – 100MB• 8KB page size server – 100MB• 16KB page size server – 100MB
• Enable PCI in Adaptive Server – if you select this option, provide this additionalinformation:• PCI device• PCI device size• PCI database size – PCI device and PCI database size are the same:
• 2KB page size server – 24MB• 4KB page size server – 48MB• 8KB page size server – 96MB• 16KB page size server – 192MB
After customizing your Adaptive Server configuration, click Next to record the inputfields.
5. Enter the Backup Server information:
• Backup Server name• Port number• Error log
Click Next.
6. Enter the XP Server configuration information:
• Port number• Error log
Click Next.
7. Enter Job Scheduler information:
• Job Scheduler• Agent name• Port number
Adaptive Server Installation
Installation Guide 23
• Management device• Management device size – the default is 75MB• Management database size – the default is 75MB
Click Next.
8. Custom-configure self management:
• Self management user name• Self management password
Note: If you choose the default user name "sa," you cannot enter the password. The "sa"default password is null.
9. Custom-configure Web Service:
• Producer HTTP Port Number• Producer HTTPS Port Number• Producer Host Name• Certificate Password• Confirm Certificate Password• Keystore Password• Confirm Keystore Password• Producer Log File• Consumer Port Number• Consumer Log File
10. Choose a Self-Discovery Service Adapter to configure:
• UDP Adapter• JINI Adapter – if you select this, enter:
• JINI host name• JINI port number• JINI heart beat period
11. Security Login Modules – choose the security login modules for the Unified Agent, thenclick Enable:
• Simple Login Module – a dialog asks you to change the user name and password• Adaptive Server Login Module• Unix Proxy Login Module
12. Verify that the values that appear in the Configure New Servers Summary window arecorrect, then click Next. You see the Configure Server Progress window
You may see the restart window, which reminds you to either log out or restart yourmachine to complete the installation process.
13. In the Installation Complete window, click Done.
Adaptive Server Installation
24 Adaptive Server Enterprise
Adaptive Server and related products have been successfully installed, and minimallyconfigured for use. See Installing Sample Databases on page 38, to begin experimentingwith your servers, or see the System Administration Guide for more advanced topics.
If you encounter any errors, see the Troubleshooting Guide.
Creating a Response File for Unattended Adaptive ServerInstallations
By saving installation configuration information into a response file during the initial GUIinstallation, you can perform subsequent installations of Adaptive Server using a silent—or"unattended"—method.
Note: Adaptive Server version 15.7 uses a rearchitected installation program that isincompatible with response files generated for versions 15.0.3 and earlier. Do not use responsefiles from these earlier versions; create a new one from a 15.7 installation instead.
To create a response file when installing in GUI or console mode, specify the -r command lineargument. The -r argument records your responses to the installation wizard prompts andcreates a response file when the InstallAnywhere wizard exits. The response file is a text filethat you can edit to change any responses prior to using it in any subsequent installations. Asample response file exists at installer image/sample_response.txt.
Create a response file during GUI installation by specifying the -r command-line argument,and, optionally, specifying the name of your response file:
setup.bin -r response_file_nameWhere:
• -r – specifies the command line argument• (Optional) response_file_name – is the absolute path of the file into the installation
information is stored, such as /tmp/responsefile.txt.
Note: The directory path you specify must already exist.
Installing Adaptive Server from the Command LineChoose command line installation if you are developing custom installation scripts, or youprefer a nonwindowing interface.
1. At the command line, enter:setup.bin -i console
The installation program starts.
2. If the installation program launches automatically, select Cancel to stop the GUIinstallation, then launch the setup program from a terminal or console.
Adaptive Server Installation
Installation Guide 25
The flow of the installation is identical to a regular GUI installation, except that the displayis written to a terminal window and responses are entered using the keyboard.
Installing Adaptive Server in Unattended, Silent ModeIf you have more than one installation of Adaptive Server to perform, you can, after runningthe installer in GUI mode and recording the responses into a response file, edit the file tocustomize the responses. You can then use that response file to answer the installer when yourun the installer in silent mode.
PrerequisitesUse setup.bin -r responseFileName to generate a installation response file duringa console or GUI installation.
TaskRun the following, where responseFileName is the absolute path of the file name containingthe installation options you chose:setup.bin –f responseFileName -i silent-DAGREE_TO_SYBASE_LICENSE=true -DRUN_SILENT=true
Note: You must agree to the Sybase License Agreement when installing in silent mode. Youcan either:• Include the option -DAGREE_TO_SYBASE_LICENSE=true in the command line
argument.• Edit the response file to include the property AGREE_TO_SYBASE_LICENSE=true.
Except for the absence of the GUI screens, all actions of InstallAnywhere are the same, and theresult of an installation in silent mode is exactly the same as one done in GUI mode with thesame responses.
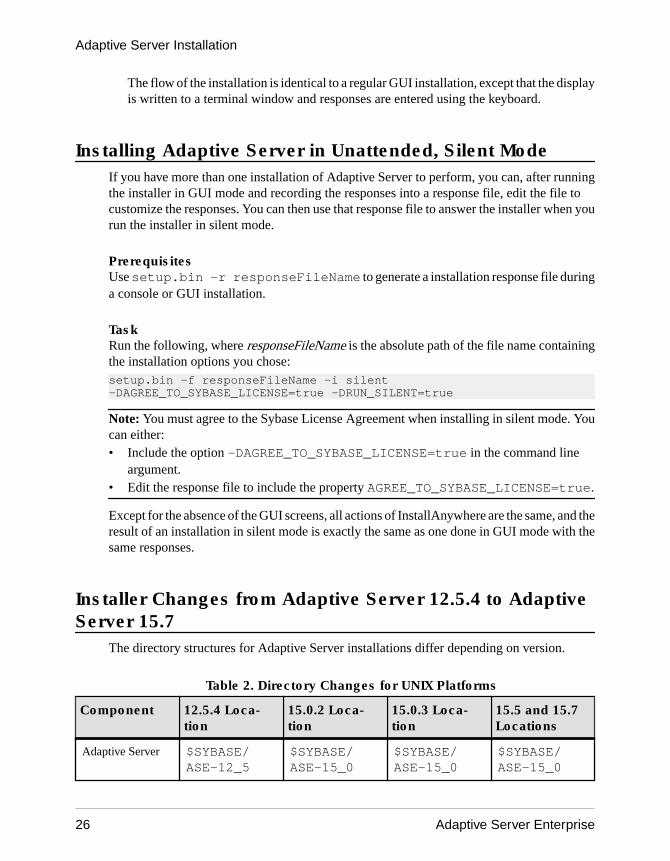
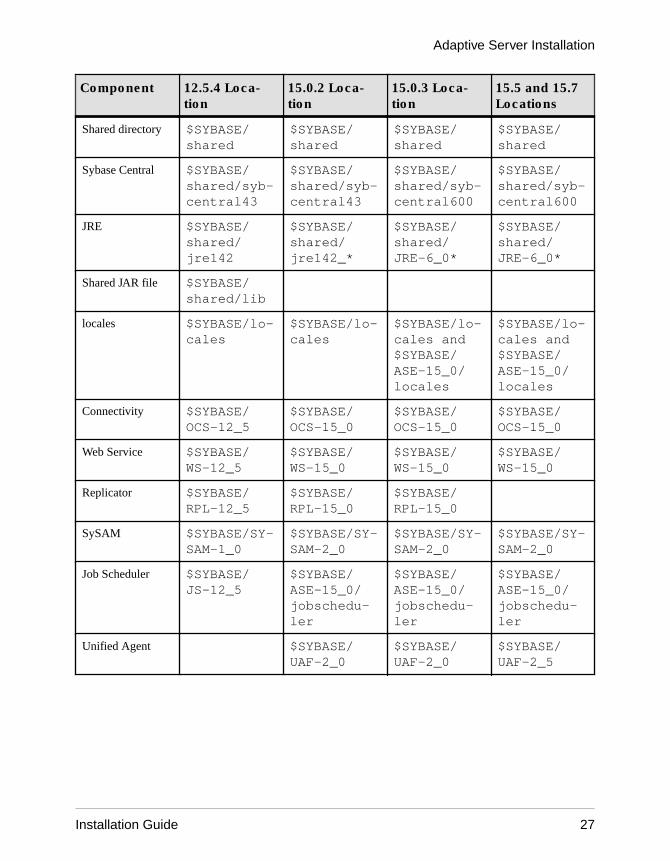
Installer Changes from Adaptive Server 12.5.4 to AdaptiveServer 15.7
The directory structures for Adaptive Server installations differ depending on version.
Table 2. Directory Changes for UNIX Platforms
Component 12.5.4 Loca-tion
15.0.2 Loca-tion
15.0.3 Loca-tion
15.5 and 15.7Locations
Adaptive Server $SYBASE/ASE-12_5
$SYBASE/ASE-15_0
$SYBASE/ASE-15_0
$SYBASE/ASE-15_0
Adaptive Server Installation
26 Adaptive Server Enterprise
Component 12.5.4 Loca-tion
15.0.2 Loca-tion
15.0.3 Loca-tion
15.5 and 15.7Locations
Shared directory $SYBASE/shared
$SYBASE/shared
$SYBASE/shared
$SYBASE/shared
Sybase Central $SYBASE/shared/syb-central43
$SYBASE/shared/syb-central43
$SYBASE/shared/syb-central600
$SYBASE/shared/syb-central600
JRE $SYBASE/shared/jre142
$SYBASE/shared/jre142_*
$SYBASE/shared/JRE-6_0*
$SYBASE/shared/JRE-6_0*
Shared JAR file $SYBASE/shared/lib
locales $SYBASE/lo-cales
$SYBASE/lo-cales
$SYBASE/lo-cales and$SYBASE/ASE-15_0/locales
$SYBASE/lo-cales and$SYBASE/ASE-15_0/locales
Connectivity $SYBASE/OCS-12_5
$SYBASE/OCS-15_0
$SYBASE/OCS-15_0
$SYBASE/OCS-15_0
Web Service $SYBASE/WS-12_5
$SYBASE/WS-15_0
$SYBASE/WS-15_0
$SYBASE/WS-15_0
Replicator $SYBASE/RPL-12_5
$SYBASE/RPL-15_0
$SYBASE/RPL-15_0
SySAM $SYBASE/SY-SAM-1_0
$SYBASE/SY-SAM-2_0
$SYBASE/SY-SAM-2_0
$SYBASE/SY-SAM-2_0
Job Scheduler $SYBASE/JS-12_5
$SYBASE/ASE-15_0/jobschedu-ler
$SYBASE/ASE-15_0/jobschedu-ler
$SYBASE/ASE-15_0/jobschedu-ler
Unified Agent $SYBASE/UAF-2_0
$SYBASE/UAF-2_0
$SYBASE/UAF-2_5
Adaptive Server Installation
Installation Guide 27

Adaptive Server Installation
28 Adaptive Server Enterprise
Installation of Version 15.7 Over an Existing15.x Adaptive Server
Use a binary overlay to install Adaptive Server 15.7 over an existing version 15.x.
If you have enabled the Java in the database feature, create the sybpcidb database anddisable the feature during the installation. See Managing Java in the Database DuringInstallations and Upgrades on page 18.
Determining the Adaptive Server VersionVerify that your current version of Adaptive Server is not earlier than 15.x before using thebinary overlay.
If your server is at a 15.x version level, you can begin installing Adaptive Server 15.7.
1. Verify that your version of Adaptive Server you have is version 15.x:
• If your server is running:1> select @@version2> go
• If your server is not running: $SYBASE/$SYBASE_ASE/bin/dataserver -v
2. Source environment variables before executing dataserver -v.
If the result shows that the Adaptive Server is lower than version 15.x, you cannot use thebinary overlay, but use an upgrade method instead. See Adaptive Server Upgrades on page43.
Backing Up Adaptive ServerInstalling Adaptive Server version 15.7 overwrites the current Adaptive Server software.Before installing, verify that your databases are error free, and back up the Sybase directory.
1. To ensure that your database is error free, run dbcc checkdb, dbcc checkcatalog and dbcccheckstorage before loading any new Adaptive Server binaries, including the masterdatabase. If the dbcc commands reveal problems, check the Error Messages andTroubleshooting Guide for actions necessary to fix the problem. If the error is not listed inthe manual, call Sybase Technical Support.
Installation of Version 15.7 Over an Existing 15.x Adaptive Server
Installation Guide 29
2. After you have verified that your database is error free, back up your $SYBASE directoryin case you need to roll back to the original version of the software.
3. Adaptive Server provides the uninstmsgs.ebf script for backing up sysmessagesbefore upgrading to 15.5. Use it to back up sysmessages before runninginstmsgs.ebf.
Installing Adaptive Server Using Binary OverlayUse InstallShield to install Adaptive Server version 15.7 on top of an Adaptive Server that isno earlier than version 15.x.
1. From your SYBASE directory, shut down the servers that are using the binaries,
2. Use InstallShield to load the new software from the CD or DVD.
Navigate to the CD or DVD drive and enter ./setup.bin.
3. Install Adaptive Server 15.7 into the existing $SYBASE installation path.
Note: Once files are loaded into your $SYBASE directory, select not to configure the newserver, and click Continue to finish the installation.
4. Restart Adaptive Server:$SYBASE/$SYBASE_ASE/install/startserver [-f RUN_server_name file]
5. Run select @@version. The server should now be at version 15.7.
6. In Adaptive Server version 15.7, several changes have been made to the system storedprocedures and many new error messages have been added. After performing a binaryoverlay, you must perform the postinstallation tasks before running installmaster orinstmsgs.ebf.
Installation of Version 15.7 Over an Existing 15.x Adaptive Server
30 Adaptive Server Enterprise
Postinstallation Tasks
After you install the server, set it up.
The Adaptive Server installation includes directories containing sample client libraryapplications. These sample programs are included for training purposes only and are notintended to be installed in a production environment.
If you are setting up a production environment, remove these directories:
• $SYBASE/OCS-15_0/sample
• $SYBASE/DataAccess/ODBC/samples
• $SYBASE/jConnect-7_0/sample2
• $SYBASE/jConnect-7_0/classes/sample2
• $SYBASE/ASE-15_0/sample
• $SYBASE/WS-15_0/samples
Verifying that Servers are RunningVerify the servers are running.
PrerequisitesBefore starting the server, make sure you have stopped, then started the services related to theserver.
TaskIf you have already started the server, do not run the command a second time. Running it morethan once can cause problems.
Verifying Your Connection to the ServersVerify your connection to the servers.
Use isql to perform a quick test:
• At the command prompt, enter the following, where server_name is the Adaptive Servername:isql -Usa -P<password or leave it blank> -Sserver_name
Warning! The first time you log in to Adaptive Server, there is a default "sa" user namewith all of the privileges but no password. After logging in for the first time, Sybasestrongly advises you to change the system administrator’s password.
Postinstallation Tasks
Installation Guide 31

You see the isql prompt if the login is successful.• At the isql prompt, enter:
1> select @@version2> go
The output should show Adaptive Server at version 15.7.If you encounter errors, see the Troubleshooting Guide.
PC-Client InstallationThe PC-Client installer contains client applications and utilities you can use to access theAdaptive Server to execute queries or manage the server. It also contains the Sybase OpenClient/ Open Server™ Software Developers Kit, which you can use to develop applicationsthat access the server, and ODBC, OLE DB, and ADO.NET clients.
Client applications, such as Sybase Central and Open Client, access Adaptive Server.
The Sybase PC-Client CD includes the Software Developer’s Kit (SDK) for Windowsplatforms, consisting of:
• Embedded SQL™
• Embedded SQL™/C (ESQL/C)• Embedded SQL/Cobol (ESQL/Cobol)
• XA-Library™ – XA Interface Library for ASE Distributed Transaction Manager• Adaptive Server Enteprise extension module for Python• Additional connectivity language modules• Open Client™ (CT-Library, DB-Library™)• Microsoft Cluster Server Resource Type for ASE• Interactive SQL• Sybase Central™
• ASE ADO.NET Data Provider• ASE OLE DB Provider by Sybase• ASE ODBC Driver by Sybase• ASE plug-in• QPTune• jConnect™ 7.0 for JDBC• SySAM License Utilities• DBISQL• SDC Administration Utility
Postinstallation Tasks
32 Adaptive Server Enterprise
System Requirements for ClientsCheck the system requirements for the machine on which you plan to install the PC-Client.
Type Requirement
Product PC-Client
Hardware P4 1.0GHz
Operating system Windows Server 2008 R2, Windows Vista, Windows 7, Windows XP
Suggested minimum RAM 512MB
Note: If you are using ODBC, OLE DB, or ADO.NET drivers, make sure that Microsoft .NETFramework 2.0 Service Pack 1 is installed on your Windows machine. To confirm that it isinstalled, select Control Panel > Add or Remove Programs and verify that .NETFramework appears in the list of currently installed programs.
Installing the ClientThe PC-Client CD contains several components that are each packaged with their owninstaller. When you insert the PC-Client CD, a menu program launches automatically. Themenu program presents the list of components that can be installed from the CD and allowsyou to install them one at a time. Before installing any products, review the readme.txtfile, which contains a brief description of each of the products, lists dependencies, andcontains any last-minute instructions or changes.
The PC-Client CD contains 32-bit and 64-bit SDK. It installs 32-bit SDK on 32-bit OS; and64-bit SDK on 64-bit OS.
1. Verify that your computer has sufficient disk space for each product.
2. If you are unloading components, log in using an account with administrator privileges.
3. Close any open applications or utilities to free memory and system resources.
4. Go to Start > Run to start the installation program, and enter the following, where X is thedirectory into which you have copied the PC-Client installation files:X:\autorun.exe
5. Select Client Components 15.7. You see the Welcome window.
6. Select a country, agree to the licensing terms.
7. Enter the directory path. If you specify a destination that contains an earlier version of theserver, you see Choose Update Installation, and you can select the features to update.
8. Only if you are installing a new server, choose the type of installation:
Typical Install Installs the default components that most users need.
Postinstallation Tasks
Installation Guide 33
Full Install Installs every component on the CD.
Custom Install Allows you to select the components to install. Certain componentsare automatically installed if they are required to run other selectedcomponents. If you select Custom Install, specify the components toinstall.
9. The Summary window displays every component to be installed by the installer, therequired disk space, and the available disk space.
10. If the target directory does not have enough free space, the available space appears in red.Click Previous to return to the previous window and change your selections, or Cancel toquit the installer.
Creating a Response File for Unattended Adaptive Server InstallationsBy saving installation configuration information into a response file during the initial GUIinstallation, you can perform subsequent installations of Adaptive Server using a silent—or"unattended"—method.
Note: Adaptive Server version 15.7 uses a rearchitected installation program that isincompatible with response files generated for versions 15.0.3 and earlier. Do not use responsefiles from these earlier versions; create a new one from a 15.7 installation instead.
To create a response file when installing in GUI or console mode, specify the -r command lineargument. The -r argument records your responses to the installation wizard prompts andcreates a response file when the InstallAnywhere wizard exits. The response file is a text filethat you can edit to change any responses prior to using it in any subsequent installations. Asample response file exists at installer image/sample_response.txt.
Create a response file during GUI installation by specifying the -r command-line argument,and, optionally, specifying the name of your response file:
setup.bin -r response_file_nameWhere:
• -r – specifies the command line argument• (Optional) response_file_name – is the absolute path of the file into the installation
information is stored, such as /tmp/responsefile.txt.
Note: The directory path you specify must already exist.
Installing the Client in Unattended, Silent ModeAfter running the installer in GUI mode and recording the responses into a response file, editthe file to customize the responses.To install in unattended, silent mode, run:setupConsole.exe –f responseFileName -i silent-DAGREE_TO_SYBASE_LICENSE=true
where responseFileName is the absolute path of the file name containing the installationoptions you chose.
Postinstallation Tasks
34 Adaptive Server Enterprise
Agree to the Sybase License Agreement when installing in silent mode by either:• Including this text in the command-line argument: -
DAGREE_TO_SYBASE_LICENSE=true, or
• Editing the response file to include the propertyAGREE_TO_SYBASE_LICENSE=true
The only difference when you install the client in silent mode is the absence of the GUIscreens. All actions and responses are the same as using InstallAnywhere.
Warning! Sybase recommends that you use the setupConsole.exe executable, whichruns in the foreground when you are running a silent installation. The normal setup.exeexecutable runs in the background, giving you the impression that the installation hasterminated, and results in additional installation attempts using the silent installation. Multipleinstallations at the same time may corrupt the Windows Registry and lead to a failure to restartthe operating system.
Getting Started After InstallingAfter installing Adaptive Server, Sybase Central, and the Java Runtime Environment, test theinstallation and network connections. Adaptive Server communicates with other AdaptiveServers, Open Server applications (such as Backup Server), and client software on yournetwork. Clients can talk to one or more servers, and servers can communicate with otherservers by remote procedure calls.
For Sybase products to interact with one another, each product must know where the othersreside on the network. Sybase stores this information in the interfaces file on Windows orin a Lightweight Directory Access Protocol (LDAP) server.
1. Select Start > Programs > Sybase > Sybase Central 6.0.0.
2. Select Tools > Connect from the Sybase Central menu bar to activate an Adaptive Serverlogin window.
3. Log in using the default user ID, "sa," without a password. If you have changed thepassword, use the new password.
4. Select the Adaptive Server to which you want to connect.
5. To disconnect from a server, select Tools > Disconnect , or right-click the connected servericon and select Disconnect.
6. Exit Sybase Central.
Configuring libtcl.cfg for LDAPUse the libtcl.cfg file to specify an LDAP server name, port number, DIT base, username, and password to connect to an LDAP server.
When an LDAP server is specified in the libtcl.cfg file, the server information isaccessible only from the LDAP server. Adaptive Server ignores the interfaces file. OpenClient and Open Server applications that use the -i option at start-up override the
Postinstallation Tasks
Installation Guide 35
libtcl.cfg file and use the interfaces file. See the Adaptive Server configurationguide for your platform for more information.
1. Configure the libtcl.cfg file to use directory services—use any standard ASCII texteditor to:
• Remove the semicolon (;) comment markers from the beginning of the LDAP URLlines in the libtcl.cfg file under the [DIRECTORY] entry.
• Add the LDAP URL under the [DIRECTORY] entry. See the Configuration Guide forsupported LDAP URL values.
In its simplest form on 32-bit LDAP drivers, the libtcl.cfg file is in this format:
[DIRECTORY]ldap=libsybdldap.dll
Warning! Ensure that the LDAP URL is on a single line.
ldap=libsybdldap.dllldap://host:port/ditbase??scope??bindname=username?password
For example (entry shown on multiple lines only for readability):[DIRECTORY] ldap=libsybdldap.dllldap://huey:11389/dc=sybase,dc=com??one??bindname=cn=Manager,dc=sybase,dc=com?secret
Note: On Windows x64, the .dll file is called libsybdldap64.dll.
2. Verify that the appropriate environment variable points to the required third-partylibraries. The Netscape LDAP SDK libraries are in %SYBASE%\%SYBASE_OCS%\dll.
The Windows PATH environment variable must include this directory.
Adding a Server to the Directory ServiceUse the dsedit directory service editor utility to add a server to the directory service.
1. From Windows, select Start > Programs > Sybase > Connectivity > Open ClientDirectory Service Editor.
2. Select LDAP from the list of servers, and click OK.
3. Click Add New Server Entry.
4. Enter:
• Server name – this is required.• (Optional) Security mechanism – there is a list of security mechanism OIDs in
%SYBASE%\ini\objectid.dat.
5. Click Add New Network Transport:
Postinstallation Tasks
36 Adaptive Server Enterprise
1. Select the transport type2. Enter the host name3. Enter the port number
6. Click OK twice to exit the dsedit utility.
Uninstalling PC-ClientChoose one of two methods to remove PC-Client from a Windows machine.
Actions performed by the installer are removed during an uninstallation process. Files, orregistry entries created after installation are not removed and must be manually removed whenthe installation process has finished.To uninstall PC-Client from a Windows machine:
• Run:%SYBASE%\sybuninstall\PCClient\uninstall.exe
• Use Control Panel > Add or Remove Programs.
Setting the System Administrator PasswordA user account called "sa" is created for the Sybase system administrator when you install theSybase software. A user logged in as "sa" can use any database on Adaptive Server, includingmaster, with full privileges.
Immediately after a new installation, there is no password on the "sa" account. The initialdefault value for the password is NULL. In a production environment, the Sybase systemadministrator should always use a non-default password. The Sybase system administratorshould log in to Adaptive Server as "sa" and set a password:The Sybase system administrator should log in to Adaptive Server as "sa" and set a password:$SYBASE/$SYBASE_OCS/bin/isql -Usa -P -Sserver_name1> sp_password null, new_password2> go
where:• null – is the default password.• new_password – is the password that you are assigning to the "sa" account.
For the greatest security, Sybase recommends that you create a password of at least sixcharacters, with a combination of letters and numbers.
Postinstallation Tasks
Installation Guide 37
Installing Sample DatabasesThe sample databases contain fictitious information and are intended to help you learn how touse Adaptive Server.
Note: The sample databases are intended for training purposes only. Do not install them in anAdaptive Server production environment.
• installpubs2 – installs the pubs2 sample database. This database contains data thatrepresents a publishing operation. Use this database to test your server connections and tolearn Transact-SQL. Most of the examples in the Adaptive Server documentation querythe pubs2 database.
• installpubs3 – installs the pubs3 sample database. This updated version of pubs2uses referential integrity. In addition, its tables are slightly different than the tables used inpubs2. Where noted, the Adaptive Server documentation uses the pubs3 database in itsexamples.
• installpix2 – installs the image data that is used with the pubs2 database.
Note: The master device size should be at least 30MB to install the full pubs2 database,including the image data.
Run the installpix2 script after you run installpubs2.
Default Devices for Sample DatabasesThe Adaptive Server installation includes scripts for installing the us_english sampledatabase, foreign language sample databases, and the image data associated with the USEnglish pubs2 sample database.
These scripts are located in $SYBASE/SYBASE_ASE/scripts.
If you have not used sp_diskdefault to change the status of the master device or to specifyanother default device, the scripts install the sample databases on the master device. Sybaserecommends you do not use this configuration because it uses valuable space that is best usedfor system tables. Each sample database requires 3MB on a 2K server, and multiples of 3MBon a 4K, 6K, 8K, and 16K server on your database device.
Use a text editor to edit the script, if necessary, to specify a default device other than themaster device, or use sp_diskdefault. See sp_diskdefault in Reference Manual:Procedures.
Postinstallation Tasks
38 Adaptive Server Enterprise
Running the Database ScriptsLearn how to run the database scripts.
Note: The image data requires 10MB—there are six pictures, two each in the PICT, TIFF,and Sun raster file formats. Run installpix2 script only to use or test the image datatype.Sybase does not supply any tools for displaying image data. You must use appropriatewindow graphics tools to display the images after you have extracted them from the database.
For more information about running these scripts, see the Configuration Guide.
1. Start Adaptive Server.
2. Make a copy of the original installpubs2 and installpubs3 scripts. Be sure youcan access the copies, in case you have problems with the edited scripts.
3. Use a text editor to edit the script, if necessary, to specify a default device other than themaster device, or use sp_diskdefault.
4. Go to the Adaptive Server scripts directory, at $SYBASE/$SYBASE_ASE/scripts,to run the scripts.
5. Use isql to log in to Adaptive Server and run the script:isql -Usa -P*****-Sserver_name -iscript_name
where:• server_name – represents the destination server for the database.• script_name – is the full path to and file name of the script to run.
For example, to install pubs2 on a server named VIOLIN, enter:
isql -Usa -P***** -SVIOLIN -i $SYBASE/$SYBASE_ASE/scripts/installpubs2
6. Install the image data associated with pubs2:
isql -Usa -Ppassword -Sservername -i$SYBASE/$SYBASE_ASE/scripts/installpix2
The pubs3 database does not use image data.
Installing the interpubs Databaseinterpubs is similar to the pubs2 database, and contains French and German data.
PrerequisitesMake a copy of the original installintpubs script. Be sure you can access this copy, incase you experience problems with the edited script.
Task
The interpubs database contains 8-bit characters and is available for use at AdaptiveServer installations using the ISO 8859-1 (iso_1), ISO 8859-15 (iso_15), Roman 8, or
Postinstallation Tasks
Installation Guide 39
Roman9 (for HP-UX) character set. To display the French and German data correctly, youmust set up your terminal to display 8-bit characters.
1. Be sure iso_1, iso_15, Roman8, Roman 9, or UTF-8 is installed as the default character setor as an additional character set.
2. Determine the type (raw partition, logical volume, operating system file, and so on) andlocation of the device where you will be storing the interpubs database. You will needto provide this information later.
3. Use a text editor to edit the script, if necessary, specify a default device other than themaster device, or use sp_diskdefault.
4. Execute the script, using the -J flag to ensure that the database is installed with the correctcharacter set:isql -Usa -Ppassword -Sservername -Jiso_1 \ -i $SYBASE/$SYBASE_ASE/scripts/iso_1/installintpubs
Installing the jpubs DatabaseLearn how to install the jpubs database.
Note: If you installed the Japanese Language Module with your server, the scripts file containsthe installjpubs script for installing the jpubs database. jpubs is a database similar topubs2 that contains Japanese data. installjpubs uses the EUC-JIS (eucjis), UTF-8(utf8), or the Shift-JIS (sjis) character sets.
1. Set your terminal to display 8-bit characters.
2. Verify that either the EUC-JIS, Shift-JIS, or the UTF-8 character set is installed as theAdaptive Server default character set or as an additional character set.
3. Determine the type (raw partition, logical volume, operating system file, and so on) andlocation of the device where you will be storing the jpubs database. You will need toprovide this information later.
4. Make a copy of the original installjpubs script. Be sure that you can access this copy,in case you experience problems with the edited script.
5. Use a text editor to edit the script, if necessary, to specify a default device other than themaster device, or use sp_diskdefault.
6. Execute the installjpubs script, using the -J flag to ensure that the database isinstalled with the correct character set:isql -Usa -Ppassword -Sservername -Jeucjis \ -i $SYBASE/$SYBASE_ASE/scripts/eucjis/installjpubs
isql -Usa -Ppassword -Sservername -Jeucjis \ -i %SYBASE%\%SYBASE_ASE%\scripts\eucjis\installjpubs
or:isql -Usa -Ppassword -Sservername -Jsjis \ -i $SYBASE/$SYBASE_ASE/scripts/sjis/installjpubs
Postinstallation Tasks
40 Adaptive Server Enterprise
isql -Usa -Ppassword -Sservername -Jsjis \ -i %SYBASE%\%SYBASE_ASE%\scripts\sjis\installjpubs
For more information on the -J option in isql, see the Utility Guide.
Maintaining Sample DatabasesThe sample databases contain a guest user option that allows authorized users to access thedatabase. Guest users have a wide range of privileges, including permissions to select, insert,update, and delete user tables.
The sample databases contain a guest user option that allows authorized users to access thedatabase. Guest users have a wide range of privileges, including permissions to select, insert,update, and delete user tables. Sybase recommends that you remove the "guest" user optionfrom user databases in production systems. For more information about the guest user and alist of guest permissions, see the System Administration Guide.
1. If possible, and if space allows, give each new user a clean copy of the sample databases sothat each user is not confused by other users’ changes.
2. If space is a problem, instruct users to issue the begin transaction command beforeupdating a sample database.
3. After users have finished updating one of the sample databases, instruct them to issue therollback transaction command to undo the changes.
Postinstallation Tasks
Installation Guide 41

Postinstallation Tasks
42 Adaptive Server Enterprise
Adaptive Server Upgrades
You can upgrade to Adaptive Server 15.7 from Adaptive Server versions 15.0 through 15.0.3,with the exception of versions 15.0.1 and 15.0.3 of the Cluster Edition.
You can upgrade to this version of Adaptive Server from:
• Adaptive Server 15.0 through 15.0.3 (but not the 15.0.1 or 15.0.3 of the Cluster Edition) –to install version 15.7 on top of an earlier 15.x version, see Installing Adaptive ServerUsing Binary Overlay on page 30.
• Adaptive Server 12.5.x – to upgrade from Adaptive Server 12.5.4 or earlier, execute theupgrade sequence from the same node on which the database resides.
You can upgrade from a 32-bit version to a 64-bit version, but you can neither upgrade normove from a 64-bit to a 32-bit:
You cannot upgrade to this version of Adaptive Server from:
• Adaptive Server version 12.5.3a• Adaptive Server version 12.0.x or earlier – Sybase recommends that you first upgrade to
version 12.5.4 before upgrading to version 15.7
If your server has replicated databases, consult the Replication Server Configuration Guidebefore starting the preupgrade tasks.
Only upgrades to and from the same page size are supported. Use sybmigrate to re-create theschema and load data from one page size to another. See the Utility Guide for informationabout sybmigrate.
Adaptive Server version 15.7 includes both new and changed system catalogs that may affectyour existing applications. See the Adaptive Server Enterprise New Feature Guide for acomplete list.
Sybase recommends that you do not use the new features offered in Adaptive Server version15.7 until you are committed to staying with 15.7.
Upgrade Considerations for Component IntegrationServices
If you have both a local and a remote server running on an Adaptive Server version 15.x andare upgrading both of them to version 15.7, upgrade the local server first. If you only plan toupgrade one server but not the other, upgrade the local server.
Sybase does not certify that Component Integration Services running on earlier versions ofAdaptive Server can connect to later versions. You may encounter errors if an earlier version
Adaptive Server Upgrades
Installation Guide 43
of Adaptive Server maps a proxy table to a later version and the remote table uses functionalitynot available in the earlier version.
Sybase certifies that each version of Adaptive Server connects to earlier releases throughComponent Integration Services. Component Integration Services is tested and certified toconnect to earlier versions of Adaptive Server.
Preparing to UpgradeBefore you upgrade, run the preupgrade utility. You must have system administratorprivileges to perform an upgrade.
If your server is at a 15.x level, do not use the sqlupgrade or sqlupgraderes upgrade utilities.
Each new server version contains features that introduce parameters, commands, reservedwords, and so on. preupgrade prepares the old server for upgrade by making sure all necessarydirectories and settings are correct for the upgrade. When running preupgrade, manually stopand start the server. You need not start the server before running the sqlupgrade upgradeutility; the utility starts the server when needed.
• If you are upgrading from:
• Version 12.5.3 with cache bindings on sybsystemdb – drop the cache bindings forsybsystemdb that are bound to a user-defined cache before you run preupgrade.
• Earlier than version 15.x but later than 12.5.3 – from the Adaptive Server 15.7installation directory, perform the preupgrade checks on the old server using thepreupgrade utility, located at $SYBASE/ASE-15_0/upgrade.
• Manually drop objects before you execute procedures for the first time. The first time yourun the server after an upgrade, the server internally rebuilds procedures from the text insyscomments. The procedure may not execute properly if it contains code that drops,then re-creates, an existing object.
Performing Preupgrade TasksTo ensure a successful upgrade, review and perform the preupgrade tasks as necessary.Depending on the old server configuration, you may not need to perform all preupgrade tasks.
PrerequisitesIf you are upgrading Adaptive Server:
• You need the master and system procedures files to upgrade the server. By default, themaster (master.dat) and system procedures device (sybsytemprocs.dat) filesare installed in the $SYBASE/data directory.
Adaptive Server Upgrades
44 Adaptive Server Enterprise
• The previously installed version of the server must be running. If you are upgradingBackup Server, Historical Server, or XP Server, those servers must not be running.
Task
1. Shut down earlier versions of Adaptive Server.
2. Install Adaptive Server 15.7 into a separate directory than the earlier version installed onyour system.
3. Check system and upgrade requirements.
4. Ensure that the directory to which your TEMP environment variable points exists. Theinstallation program uses this directory to write files temporarily during the installation,which it locates through the TEMP environment variable.
5. Verify the name and location of the runserver file, as well as that you renamed it toRUN_servername, where servername is the name of the old server, as it appears in theinterfaces file.
The default RUN_servername file for a server SYBASE is called RUN_SYBASE. If theRUN_servername file for your current server is named differently, use the actual nameof your server during the upgrade process.
6. Verify that the text of all stored procedures you upgrade is available in syscomments byeither:
• Reinstalling the procedures with text, or,• Removing and reinstalling the procedures after the upgrade.
This step can allow you to inspect the stored procedures for any hidden or unwanted text.
7. Set the 'allow password downgrade' password policy option to 1 to ensure that passwordsare encrypted with both the old and new algorithms, in case you need to downgrade to anearlier version of Adaptive Server.
8. Make sure reserved words use quoted identifiers.
9. Verify that users are logged off.
10. Use dbcc to check for database integrity.
11. Back up databases.
12. Dump the transaction log.
13. Verify that master is the default database for the "sa" user.
14. Prepare the database and devices for upgrade using the preupgrade utility:
a) Create a sybsystemdb database if it does not already exist.
b) Disable auditing by running sp_configure 'auditing', 0
c) Disable Job Scheduler.
Adaptive Server Upgrades
Installation Guide 45
d) Obtain the current audit settings for the pre-15.7 Adaptive Server usingsp_displayaudit; you use this saved information to re-enable auditing after youcomplete the installation. See Reenabling Auditing on page 58.
e) Disable disk mirroring.f) Verify that your SYBASE environment variable points to the location of the new server
software files you just installed.
Set the OLDSYBASE, OLDSYBASE_ASE, and OLDSYBASE_OCS environmentvariables to the location of the server you are upgrading, to avoid having to type thispath when you run sqlupgrade.
Fix any problems that preupgrade utility reports.
You can safely ignore any warnings Adaptive Server issues about configurationparameters not being set to the default, as these are only for your information.
15. Ensure that the procedure cache size is at least 150 percent of the default procedure cachesize, or between 53,248 and 2,147,483,647 2K pages.
16. Copy these files from earlier versions of the server to their corresponding Adaptive Server15.x installation locations:
• $SYBASE/interfaces
• $SYBASE/$SYBASE_ASE/servername.cfg – where servername is yourserver name.
• $SYBASE/$SYBASE_OCS/config/libtcl.cfg
• $SYBASE/SYSAM-2_0/licenses/license.lic
17. If you have enabled the Java in the database feature, create the sybpcidb database anddisable the feature during the installation.
18. Set the environment variables by sourcing the SYBASE.[csh, sh, env] file.
Warning! Do not run the environment variable script more than once.
19. Set the OLDSYBASE_ASE variable to the SYBASE_ASE appropriate to your olderserver. If you are upgrading from 12.5 for example, it should be ASE-12_5.
If upgrading from Adaptive Server 12.5:setenv OLDSYBASE <old_$SYBASE_directory>setenv OLDSYBASE_ASE ASE-12_5
This is required if you are using the sqlupgraderes utility to perform your upgrade.
Sybase recommends you also set the OLDSYBASE, and OLDSYBASE_OCSenvironment variables to point to the old installation of Adaptive Server, so the upgradeutility automatically populates input fields with the correct information as you upgrade.
Adaptive Server Upgrades
46 Adaptive Server Enterprise
System Table and Stored Procedure Changes During UpgradeDrop and re-create syscomments to include the new and changed tables.
If you deleted text from the syscomments system table, drop and then re-create the storedprocedures to again add the text. Sybase recommends that you use the sp_hidetext storedprocedure to hide text, rather than deleting text.
If you modified any system stored procedures without altering their names, back them upbefore you upgrade Adaptive Server. The upgrade process overwrites these modifiedprocedures with default versions.
Reserved WordsReserved words are pieces of SQL syntax that have special meaning when used as part of acommand.
Transact-SQL does not allow words that are part of command syntax to be used as identifiers,unless they are enclosed in quotation marks. If you are upgrading Adaptive Server, you seeerrors when you run queries, stored procedures, or applications that use these identifiers inyour user databases that match new reserved words.
Note: Before performing your upgrade, use sp_renamedb to change the name of any userdatabase that is a reserved word.
If you change an object name, change applications and stored procedures that refer to thatobject. Conflicts between object names do not prevent the upgrade process from completing.However, applications that refer to conflicting object names may not work after the upgrade.Rename all objects that use reserved words.
As part of the preupgrade process, you can have sqlupgrade, sqlupgraderes, or preupgradeperform a reserved-word check for you. See the Reference Manual for a complete list ofreserved words.
Running a Reserved Word CheckRun the reserved word check on the old Adaptive Server.
Even if you plan to use sqlupgraderes to upgrade Adaptive Server noninteractively, you canstill first run the interactive sqlupgrade utility to perform reserved word checks and otherpotential upgrade eligibility problems, and then continue with the upgrade if no problems arefound.
Both sqlupgrade and sqlupgraderes automatically install new reserved words and thesp_checkreswords system procedure, which detects and displays identifiers in your existingdatabases that conflict with reserved words in the new database. You can usesp_checkreswords at any time while preforming preupgrade tasks.
Adaptive Server Upgrades
Installation Guide 47

Note: Do not use an older version of sp_checkreswords to check for reserved words, as itdoes not contain the most current list of reserved words.
1. Checking for reserved words generates a list of identifiers that conflict with reservedwords, and the owners of those identifiers, in the file $SYBASE/$SYBASE_ASE/init/logs/sqlupgradeMMDD.nnn. Review this file to determine which identifiersto change.
2. The Server Config utility installs sp_checkreswords and checks the reserved wordsduring the upgrade. Server Config does not display the names or locations of identifiersthat conflict with reserved words; only the number of conflicts.
Addressing Reserved Words ConflictsChange any database names that are reserved words.
1. Use sp_dboption to set the database to single-user mode, and then run sp_renamedb,specifying the new name.
2. If other identifiers are reserved words, you can use:
• sp_rename to change the name of the object, before or after the upgrade.• Quoted identifiers.• Brackets around the identifier. For example:
create table [table] ( [int] int, [another int] int )
3. Run sp_checkreswords in master and in each user database to display the names andlocations of conflicting identifiers.
See Reference Manual: Procedures for information about sp_dboption, sp_rename, andsp_checkreswords.
Quoted IdentifiersTo avoid reserved word conflicts, all users on the server must invoke the quoted_identifieroption in all stored procedures and queries that include the reserved words.
To invoke the quoted_identifier option of the set command in procedures and queries thatinclude the reserved words, enclose the reserved words which are identifiers in doublequotation marks. The set quoted_identifier option tells Adaptive Server to treat any characterstring enclosed in double quotation marks as an identifier.
Preparing the Database and DevicesBefore starting the upgrade process, confirm that you have enough space for the upgrade tosucceed.
1. Double the size of the largest catalog that you are going to upgrade, then addapproximately 10 percent to calculate the free space required for the upgrade to succeed.For example, if you have a large number of stored procedures or compiled object in anydatabase, the syscomments and sysprocedures system tables require additional space.
Adaptive Server Upgrades
48 Adaptive Server Enterprise
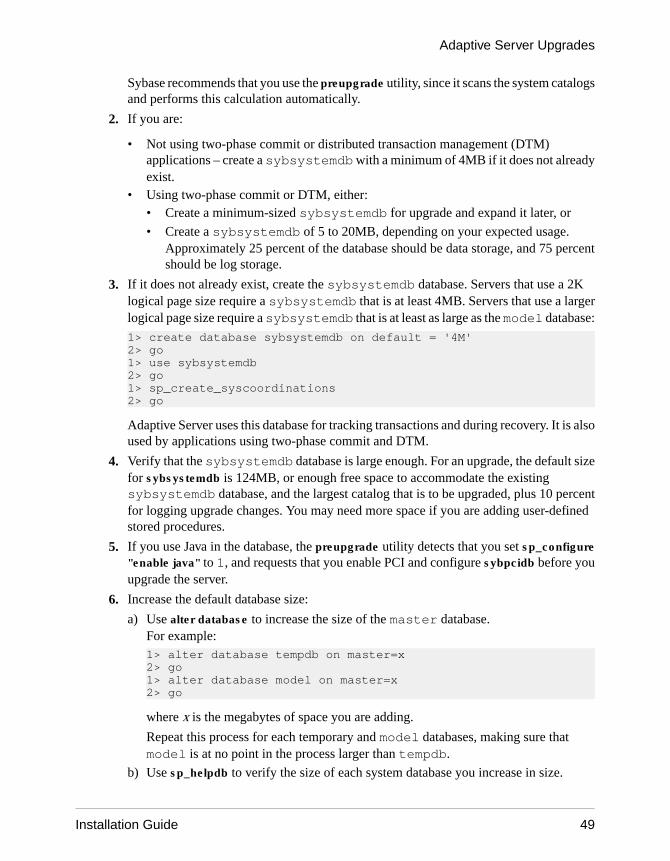
Sybase recommends that you use the preupgrade utility, since it scans the system catalogsand performs this calculation automatically.
2. If you are:
• Not using two-phase commit or distributed transaction management (DTM)applications – create a sybsystemdb with a minimum of 4MB if it does not alreadyexist.
• Using two-phase commit or DTM, either:• Create a minimum-sized sybsystemdb for upgrade and expand it later, or
• Create a sybsystemdb of 5 to 20MB, depending on your expected usage.Approximately 25 percent of the database should be data storage, and 75 percentshould be log storage.
3. If it does not already exist, create the sybsystemdb database. Servers that use a 2Klogical page size require a sybsystemdb that is at least 4MB. Servers that use a largerlogical page size require a sybsystemdb that is at least as large as the model database:
1> create database sybsystemdb on default = '4M'2> go1> use sybsystemdb2> go1> sp_create_syscoordinations2> go
Adaptive Server uses this database for tracking transactions and during recovery. It is alsoused by applications using two-phase commit and DTM.
4. Verify that the sybsystemdb database is large enough. For an upgrade, the default sizefor sybsystemdb is 124MB, or enough free space to accommodate the existingsybsystemdb database, and the largest catalog that is to be upgraded, plus 10 percentfor logging upgrade changes. You may need more space if you are adding user-definedstored procedures.
5. If you use Java in the database, the preupgrade utility detects that you set sp_configure"enable java" to 1, and requests that you enable PCI and configure sybpcidb before youupgrade the server.
6. Increase the default database size:
a) Use alter database to increase the size of the master database.For example:1> alter database tempdb on master=x2> go1> alter database model on master=x2> go
where x is the megabytes of space you are adding.
Repeat this process for each temporary and model databases, making sure thatmodel is at no point in the process larger than tempdb.
b) Use sp_helpdb to verify the size of each system database you increase in size.
Adaptive Server Upgrades
Installation Guide 49
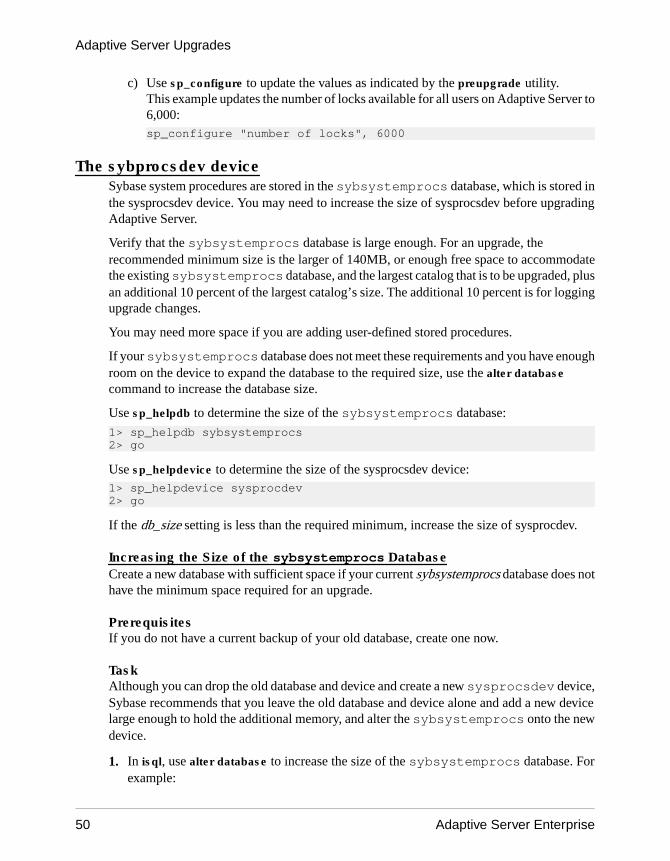
c) Use sp_configure to update the values as indicated by the preupgrade utility.This example updates the number of locks available for all users on Adaptive Server to6,000:sp_configure "number of locks", 6000
The sybprocsdev deviceSybase system procedures are stored in the sybsystemprocs database, which is stored inthe sysprocsdev device. You may need to increase the size of sysprocsdev before upgradingAdaptive Server.
Verify that the sybsystemprocs database is large enough. For an upgrade, therecommended minimum size is the larger of 140MB, or enough free space to accommodatethe existing sybsystemprocs database, and the largest catalog that is to be upgraded, plusan additional 10 percent of the largest catalog’s size. The additional 10 percent is for loggingupgrade changes.
You may need more space if you are adding user-defined stored procedures.
If your sybsystemprocs database does not meet these requirements and you have enoughroom on the device to expand the database to the required size, use the alter databasecommand to increase the database size.
Use sp_helpdb to determine the size of the sybsystemprocs database:
1> sp_helpdb sybsystemprocs2> go
Use sp_helpdevice to determine the size of the sysprocsdev device:1> sp_helpdevice sysprocdev2> go
If the db_size setting is less than the required minimum, increase the size of sysprocdev.
Increasing the Size of the sybsystemprocs DatabaseCreate a new database with sufficient space if your current sybsystemprocs database does nothave the minimum space required for an upgrade.
PrerequisitesIf you do not have a current backup of your old database, create one now.
TaskAlthough you can drop the old database and device and create a new sysprocsdev device,Sybase recommends that you leave the old database and device alone and add a new devicelarge enough to hold the additional memory, and alter the sybsystemprocs onto the newdevice.
1. In isql, use alter database to increase the size of the sybsystemprocs database. Forexample:
Adaptive Server Upgrades
50 Adaptive Server Enterprise

1> use master2> go1> alter database sybsystemprocs on sysprocsdev=402> go
In this example, "sysprocsdev" is the logical name of the existing system proceduresdevice, and 40 is the number of megabytes of space to add. If the system procedures deviceis too small, you may receive a message similar to the following when you try to increasethe size of the sybsystemprocs database:
Could not find enough space on disks to extenddatabase sybsystemprocs
If there is space available on another device, expand sybsystemprocs to a seconddevice, or initialize another device that is large enough.
2. Verify that Adaptive Server has allocated more space to sybsystemprocs:
1> sp_helpdb sybsystemprocs2> go
When the database is large enough to accommodate the inceased size of sybsystemprocs,continue with the other preupgrade tasks.
Increasing Device and Database Capacity for System ProceduresIf you cannot fit the enlarged sybsystemprocs database on the system procedures device,increase the size of the device and create a new database.
This procedure involves dropping the database. For more information on drop database, seethe Reference Manual.
Warning! This procedure removes all stored procedures you have created at your site. Beforeyou begin, save your local stored procedures using the defncopy utility. See the UtilityGuide.
1. Determine which device(s) you must remove:select d.name, d.phyname from sysdevices d, sysusages u where u.vstart between d.low and d.high and u.dbid = db_id("sybsystemprocs") and d.status & 2 = 2 and not exists (select vstart from sysusages u2 where u2.dbid != u.dbid and u2.vstart between d.low and d.high)
where:• d.name – is the list of devices to remove from sysdevices.
• d.phyname – is the list of files to remove from your computer.
The not exists clause in this query excludes devices that are used by sybsystemprocsand other databases.
Adaptive Server Upgrades
Installation Guide 51
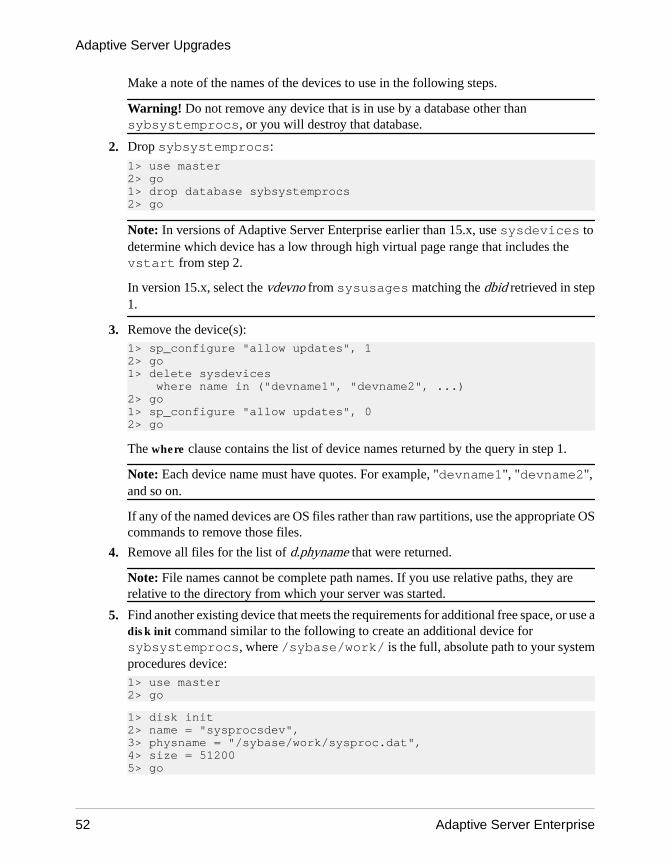
Make a note of the names of the devices to use in the following steps.
Warning! Do not remove any device that is in use by a database other thansybsystemprocs, or you will destroy that database.
2. Drop sybsystemprocs:
1> use master2> go1> drop database sybsystemprocs2> go
Note: In versions of Adaptive Server Enterprise earlier than 15.x, use sysdevices todetermine which device has a low through high virtual page range that includes thevstart from step 2.
In version 15.x, select the vdevno from sysusages matching the dbid retrieved in step1.
3. Remove the device(s):1> sp_configure "allow updates", 12> go1> delete sysdevices where name in ("devname1", "devname2", ...)2> go1> sp_configure "allow updates", 02> go
The where clause contains the list of device names returned by the query in step 1.
Note: Each device name must have quotes. For example, "devname1", "devname2",and so on.
If any of the named devices are OS files rather than raw partitions, use the appropriate OScommands to remove those files.
4. Remove all files for the list of d.phyname that were returned.
Note: File names cannot be complete path names. If you use relative paths, they arerelative to the directory from which your server was started.
5. Find another existing device that meets the requirements for additional free space, or use adisk init command similar to the following to create an additional device forsybsystemprocs, where /sybase/work/ is the full, absolute path to your systemprocedures device:1> use master2> go
1> disk init2> name = "sysprocsdev",3> physname = "/sybase/work/sysproc.dat",4> size = 512005> go
Adaptive Server Upgrades
52 Adaptive Server Enterprise
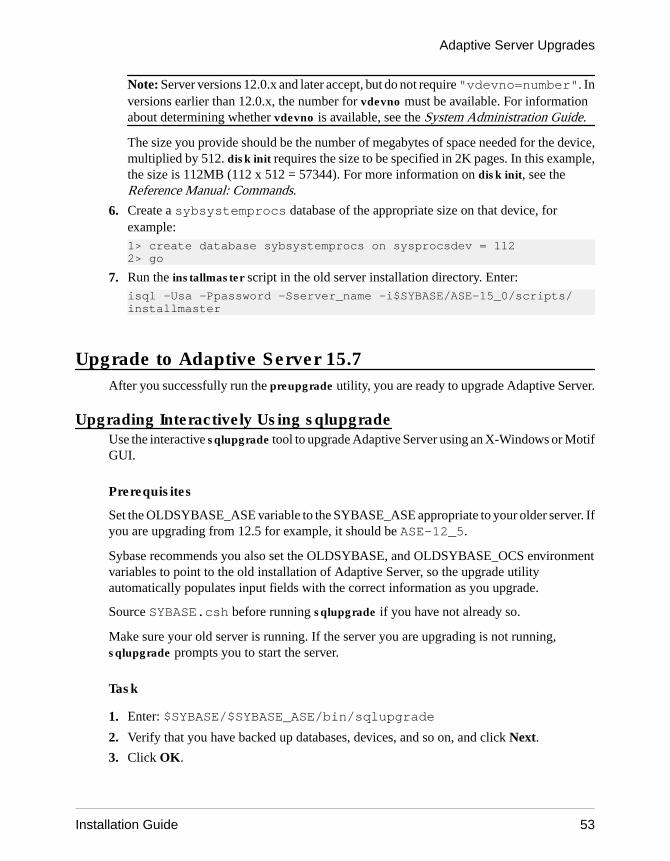
Note: Server versions 12.0.x and later accept, but do not require "vdevno=number". Inversions earlier than 12.0.x, the number for vdevno must be available. For informationabout determining whether vdevno is available, see the System Administration Guide.
The size you provide should be the number of megabytes of space needed for the device,multiplied by 512. disk init requires the size to be specified in 2K pages. In this example,the size is 112MB (112 x 512 = 57344). For more information on disk init, see theReference Manual: Commands.
6. Create a sybsystemprocs database of the appropriate size on that device, forexample:1> create database sybsystemprocs on sysprocsdev = 1122> go
7. Run the installmaster script in the old server installation directory. Enter:isql -Usa -Ppassword -Sserver_name -i$SYBASE/ASE-15_0/scripts/installmaster
Upgrade to Adaptive Server 15.7After you successfully run the preupgrade utility, you are ready to upgrade Adaptive Server.
Upgrading Interactively Using sqlupgradeUse the interactive sqlupgrade tool to upgrade Adaptive Server using an X-Windows or MotifGUI.
Prerequisites
Set the OLDSYBASE_ASE variable to the SYBASE_ASE appropriate to your older server. Ifyou are upgrading from 12.5 for example, it should be ASE-12_5.
Sybase recommends you also set the OLDSYBASE, and OLDSYBASE_OCS environmentvariables to point to the old installation of Adaptive Server, so the upgrade utilityautomatically populates input fields with the correct information as you upgrade.
Source SYBASE.csh before running sqlupgrade if you have not already so.
Make sure your old server is running. If the server you are upgrading is not running,sqlupgrade prompts you to start the server.
Task
1. Enter: $SYBASE/$SYBASE_ASE/bin/sqlupgrade
2. Verify that you have backed up databases, devices, and so on, and click Next.
3. Click OK.
Adaptive Server Upgrades
Installation Guide 53
4. Enter the name of the old Sybase directory and the old Adaptive Server directory, thenclick OK.
5. From the list of server names, select the server you want to upgrade, and click OK.
6. Enter the password for the system administrator (SA) login, then click OK.
7. Specify an upgrade option, then click OK. sqlupgrade then performs the upgradeeligibility test to verify that your current server meets the requirements for upgrading to thenew version.
If your current server fails the upgrade eligibility test, fix the problem based on theinformation from the results of the test.
8. Click OK to upgrade your server.
You see the Status Output window, which shows the completion status and informationalmessages about the upgrade process.
Warning! Do not interrupt the upgrade, connect to Adaptive Server, or run any storedprocedures while the upgrade is in progress.
You can also check the progress of the upgrade by viewing the sqlupgrade log in$SYBASE/$SYBASE_ASE/init/logs/sqlupgradeMMDD.NNN, where:
• MM – is the month.• DD – is the date.• NNN – is a three-digit number identifying the srvbuild server upgrade session.
After all pre-upgrade checks are successful, sqlupgrade shuts the old server down, thenstarts the new Adaptive Server dataserver binary on the old master device.
When the upgrade succeeds, you can:
• Click OK to specify another server to upgrade, or• Exit sqlupgrade, and go to Post-upgrade tasks on page 56.
The upgrade process:
• Creates the RUN_servername file, which contains the information required to restartthe server
• Runs the installmasterscript to create system procedures
To verify that the upgrade was successful, log in to the server and run:
• select @@version – Adaptive Server should return 15.7.
• sp_configure "upgrade version" – Adaptive Server should return 15000.
Adaptive Server Upgrades
54 Adaptive Server Enterprise
Upgrading Noninteractively Using sqlupgraderesYou can upgrade Adaptive Server without the graphical user interface (GUI), in noninteractivemode by using values from a resource file that defines the attributes for the server to beupgraded.
1. Edit the sample resource file included in your Adaptive Server distribution in $SYBASE/$SYBASE_ASE/init/sample_resource_files. Use a text editor to edit theresource file as described in Alternative Installation Methods.
2. Run the sqlupgraderes utility. This utility creates a new file containing the values youspecified for the upgrade session, and writes it to the sqlupgradeMMDD.NNN-server_name.rs file in $SYBASE/$SYBASE_ASE/init/logs/.
where:• server_name – is the server you are upgrading.• MM – is the month.• DD – is the date.• NNN – is a three-digit number identifying the srvbuild session.
If the resource file you are modifying was created by sqlupgrade, the prefix of the attributename may vary. sqlupgraderes ignores this prefix when processing the resource file.
Attribute Default Value [other options]
sybinit.release_directory $SYBASE [path = _name_of_old_release]
sybinit.product sqlsrv
sqlsrv.server_name server_name
sqlsrv.new_config No
sqlsrv.sa_login current_login
sqlsrv.sa_password current_password
sqlsrv.do_upgrade Yes
sqlsrv.do_reserved_word_check Yes
All attributes are required, and all values are case-sensitive.
3. To execute sqlupgraderes, enter the following at the UNIX prompt, where resource_filespecifies the resource file containing the attributes that describe the server to upgrade:$SYBASE/$SYBASE_ASE/bin/sqlupgraderes -r resource_file
Adaptive Server Upgrades
Installation Guide 55
Manually Upgrading to Adaptive ServerYou can upgrade manually without using a wizard or utility.
To upgrade Adaptive Server manually, use the upgrade executable located in the $SYBASE/ASE-15_7/upgrade/.
1. Shut down the pre-15.x server.
2. Copy the server entry from the old interfaces file to the new interfaces file.
3. Copy the server_name.cfg file from old directory to the new $SYBASE directory.
4. Start the 15.7 server with the old master device from the old server.
5. Run upgrade. If problems occur, fix them, and re-run the upgrade process.
6. Reinstall the Sybase-supplied stored procedures to prevent any errors caused fromchanges to the system catalogs.
Postupgrade TasksAfter you have upgraded, make sure your new Adaptive Server is up and running.
Note: The upgrade process does not cause any changes in existing statistics, so you need notrun update statistics on any tables after the upgrade. If you are upgrading from AdaptiveServer version 15.x, however, restart the server to make the statistics available.
1. If you upgraded from Adaptive Server version 12.5.2 or earlier, run dbcc checkcatalogwith the fix option to ensure there are no issues with OAM pages:dbcc checkcatalog (database_name, fix)
2. Install new system stored procedures before starting any application activities:isql -Usa -Psa_password -Sserver_name -i$SYBASE/$SYBASE_ASE/scripts/script_name -ooutput_file
The output of the script is saved in output_file. See How Compiled Objects areHandled When Upgrading Adaptive Server on page 71 if you are using dbccupgrade_object to upgrade compiled objects such as check constraints, rules, triggers,and views.
3. Run the scripts for different options or licensed features:
• installcommit – if you use two-phase commit or distributed transactions, re-runinstallcommit to restore:• sp_start_xact
• sp_abort_xact
• sp_remove_xact
• sp_stat_xact
• sp_scan_xact
Adaptive Server Upgrades
56 Adaptive Server Enterprise
• sp_probe_xact
• installsecurity – if you used auditing in your earlier installation.• installhasvss – if you enabled high-availability functionality, and are using this
feature in this installation.• installmsgsvss – if you enabled real-time messaging functionality, and you are using
this feature in this installation.• installpcidb – if you enabled the Java in the database feature in your earlier installation.• installjsdb – if you enabled Job Scheduler in your earlier installation.
4. If you have any system stored procedures that you had saved from before the upgrade(because you had modified them without altering their names), reload them now.
Running the instmsgs.ebf ScriptRun message-related scripts after upgrading from an Adaptive Server version 15.0.x toversion 15.7.
1. If you upgraded from Adaptive Server version 15.0.x, run uninstmsgs.ebf:isql -Usa -Ppassword -w1000 -iuninstmsgs.ebf -orestoremsgs.ebf
This safeguards your modified messages in the master database before you install thedefault version 15.7 messages.
2. Regardless of the Adaptive Server version you upgraded from, run the instmsgs.ebf:isql -Usa -Ppassword -iinstmsgs.ebf
Note: To undo instmsgs.ebf changes, run this script once you have downgraded to theversion from which you upgraded:isql -S -Usa -P restore_msgs.ebf
3. If you use localized files, install any localized language using langinstall, sqlloc, orsyconfig.
If you run instmsgs.ebf after installing the 15.7 localized message, this script may deletesome new messages.
Restoring Functionality in Adaptive Server After UpgradingRestore functionality in the server after an upgrade.
1. If you changed any configuration parameters before upgrading, use sp_configure to setthem back to their earlier values.
2. Use sp_dboption to reset any database options you disabled before upgrading.
3. Before you use the upgraded server, verify that all scripts developed at your site point toAdaptive Server 15.7.
4. Verify procedure cache allocation. The size should be the same as before upgrading, unlessthe original size was smaller than the default value.
Adaptive Server Upgrades
Installation Guide 57
5. Check the procedure cache requirements. Stored procedures, triggers, and other compiledobjects require much more memory to run in Adaptive Server 15.7.
Use sp_configure to increase the procedure cache size during runtime, andsp_configure verify to verify any changes you make to the configuration file withouthaving to restart Adaptive Server:sp_configure "configuration file", 0, "verify", "full_path_to_file"
See Reference Manual: Procedures and the Performance and Tuning Guide for detailsabout sp_configure and sp_sysmon, and the System Administration Guide forinformation on configuring memory.
6. Verify data cache allocation.
The server ensures that all data cache sizes remain the same after upgrading. AdaptiveServer treats this size as an absolute value of 8MB and sets it in the config file. Versionsearlier than 12.5 defined the size as all the memory left after allocating memory for otherconfigurations, procedures, and user-defined named caches.
During the upgrade process, the server ensures that the default data cache size remains thesame. Therefore, during the preupgrade process, the size of the default data cache isobtained and written to the configuration file as an absolute value, not as a default. Thisenables the server to have the same default data cache size as before the upgrade. If this sizeis less than the default size of 8MB, the server allocates a default data cache of 8MB.
7. If you unmirrored devices, remirror them using the disk remirror command.
8. If you used compiled objects, see How Compiled Objects are Handled When UpgradingAdaptive Server on page 71.
9. If you used two-phase commit in the earlier version of Adaptive Server, run the script toinstall the two-phase commit tables:isql -Usa -Psa_password -Sserver_name -i$SYBASE/$SYBASE_ASE/scripts/installcommit
Run this script only if you use two-phase commit.
Reenabling AuditingIf the server you upgraded from was configured for auditing, reenable auditing in the upgradedserver.
1. Enter:
sp_configure 'auditing', 1
2. Reenable auditing for all system stored procedures for which auditing was enabled beforethe upgrade.
a) Use the output of sp_displayaudit recorded during preupgrade to help determine thesystem stored procedures for which auditing was enabled.
Adaptive Server Upgrades
58 Adaptive Server Enterprise
b) Reenter the audit options using sp_audit. For example, if you had enabled storedprocedure auditing for sp_addlogin stored procedure in your server before upgrade,run:sp_audit "exec_procedure", "all", "sp_addlogin", "on"
Updating Threshold Procedures for Audit SegmentsAn update is required for threshold procedures used to archive audit segments.
If your installation used a threshold procedure, similar to this, to archive the sysaudits table:INSERT MyPre15SysAuditHistoryTable SELECT * FROMsysaudits_0n
Where n corresponds to the sysaudits table number 1–8 andMyPre15SysAuditHistoryTable is a table defined prior to Adaptive Server version15.7, then you must alter MyPre15SysAuditHistoryTable to add a nodeid columnusing:alter table MyPre15SysAuditHistoryTable add nodeid tinyint NULL
See the Reference Manual: Tablesfor system tables sysaudits01 throughsysaudits08 for further details about the sysaudits tables.
Reenabling Replication Server After the Dataserver UpgradeIf you disabled replication before the upgrade, you must reenable replication.
1. Remove older formatted log records from your database.
2. Use the dump tran command to dump the database and transaction logs to remove theolder format log records from your database. This prevents Replication Agent™ and otherlog readers from accessing the pre-upgrade portion of the transaction logs.
1> use master2> go1> dump database sales to dumpdev2> go1> dump transaction sales with truncate_only2> go
3. Reenable replication.
Restoring Replication on Replicate DatabasesRestore replication if you have upgraded a destination-only dataserver in a replication system.If the replicate database is also a source for replication, follow the steps in RestoringReplication on Primary Databases.
Perform these steps for each replicate database and Replication Server System Database(RSSD).
1. Start Adaptive Server if it is not already running.
Adaptive Server Upgrades
Installation Guide 59
2. Log in to the Adaptive Server.
3. If you have zeroed out the locator for the database, go to the next step. Otherwise, stopReplication Server, then run:1> use RSSD2> go1> rs_zeroltm dataserver, database2> go
4. Restart the Replication Servers.
5. Resume the DSI connections that were suspended before the upgrade by executing thefollowing Replication Server command for each suspended database:1> resume connection to dataserver.database2> go
The replication system is now ready for Adaptive Server 15.7, and applications can resume.
If you installed any Sybase client products, such as Open Client, use the dsedit utility to edityour interfaces file and to specify the servers to which you want to connect.
For more information about establishing client/server connections, see Installing Sybase PC-Client Products or the Open Client Configuration Guide.
Restoring Replication on Primary DatabasesFollow the steps in this section if you have upgraded a source database, or primary database, ina Replication Server system, or the destination database is also a source for other ReplicationServers.
1. If you have zeroed out the locator for the database, go to the next step. Otherwise, stopReplication Server, then run:
1> use RSSD_name2> go1> rs_zeroltm dataserver, database2> go
2. Log in to each replicated primary, and replicated RSSD and issue:1> use database2> go
1> dbcc settrunc ('ltm', 'valid')2> go
3. Restart the Replication Server.
4. If the database is also used as an RSSD, resume the Replication Server connection to theRSSD by issuing the following command to the Replication Server specifying the samestring that was specified during the 'hibernate_on' command:1> sysadmin hibernate_off, 'Replication Server'2> go
5. Log in to the Replication Server, and resume the Log Transfer connection for eachreplicated primary and each replicated RSSD:
Adaptive Server Upgrades
60 Adaptive Server Enterprise
1> resume log transfer from server.database2> go
If this is a replicated RSSD, you must log in to the replicate Replication Server.
6. If you are using Rep Agent, log in to the Adaptive Server and restart the Rep Agent:1> use database2> go1> sp_start_rep_agent database2> go
7. If you are using the Log Transaction Manager, restart it.
Migrating from 32-Bit to 64-Bit Versions on DifferentComputers
There are three ways to migrate data on different computers.
PrerequisitesTo migrate Adaptive Server from the 32-bit to the 64-bit version, first install and configure the64-bit operating system.
• Use dump and load.• Use the bcp bulk copy utility.• Replace the binary.
Migrating Data Using a Dump and Load MethodMigrate data using a dump and load method to migrate data from a 32-bit to a 64-bit AdaptiveServer version.
1. In the 32-bit Adaptive Server, run dbcc checks (checkdb, checkalloc, checkcatalog andcheckstorage) on all databases in the 32-bit Adaptive Server to ensure they are error-free.
2. Create a 64-bit Adaptive Server in a new directory.
3. Create devices and databases to match those in the 32-bit server. Make sure that thesysusages mapping is correct.
Note: Allow 10 percent additional space for the sybsystemprocs database.
4. Dump the databases from the 32-bit server.
5. Load the databases to the 64-bit server.
6. If you have partitioned tables, update partition statistics.
7. Run dbcc checks on the 64-bit server to ensure they run cleanly.
For information on upgrading compiled objects, see Finding Compiled Object ErrorsBefore Production on page 72.
Adaptive Server Upgrades
Installation Guide 61
Using bcp to Migrate DataIf you use DDL scripts to create devices, databases, tables, rules, stored procedures, triggers,and views, you can use bcp to migrate data from a 32-bit Adaptive Server to a 64-bit AdaptiveServer.
If you do not have DDL scripts, use the ddlgen utility to re-create the schema for the AdaptiveServer you are about to upgrade. See the Utility Guide.
1. In the 32-bit Adaptive Server, run dbcc checks (checkdb, checkalloc, checkcatalog andcheckstorage) on all databases in the 32-bit Adaptive Server to ensure they are error-free.
2. Use bcp to extract all the data from all the tables in the databases.
3. Create a new 64-bit Adaptive Server in a new directory.
4. Create devices, databases, and tables.
5. Use bcp to bulk copy data into tables.
6. Re-create all views, triggers, and stored procedures.
7. Run dbcc checks on the 64-bit server and make sure they run cleanly.
Migrating Data by Replacing the BinaryMigrate data from a 32-bit server to a 64-bit server by replacing the binary.
1. In the 32-bit Adaptive Server, run dbcc checks (checkdb, checkalloc, checkcatalog andcheckstorage) on all databases in the 32-bit Adaptive Server to ensure they are error-free.
2. Copy the files for the 64-bit Adaptive Server into a new directory.
3. Shut down the 32-bit server.
4. Copy the interfaces file and the configuration file from the 32-bit $SYBASEdirectory to the 64-bit $SYBASE directory.
5. Copy the 32-bit $SYBASE/$SYBASE_ASE/install/RUN_server file to theequivalent 64-bit $SYBASE/$SYBASE_ASE/install directory.
6. Edit the RUN_server file to reflect the new location of the interfaces,configuration, and log files.
7. Remove all references to the 32-bit $SYBASE directories from your $PATH definition.
8. Change to the 64-bit $SYBASE directory and source the SYBASE.csh script (C shell).
9. Change to the 64-bit $SYBASE/$SYBASE_ASE/install directory and execute:
startserver -f RUN_server
10. After the 64-bit server starts, run installmaster, installmodel, and instmsgs.ebf.
11. If you used dbccdb for dbcc checkstorage, run installdbccdb. This re-creates tablesin the dbccdb. This may cause you to lose data.
Adaptive Server Upgrades
62 Adaptive Server Enterprise
12. Drop and re-create the compiled objects, such as stored procedures, triggers, views, anddefaults.
13. If you have partitioned tables, update partition statistics.
14. Run dbcc again on all databases to verify that they run cleanly.
Adaptive Server Upgrades
Installation Guide 63

Adaptive Server Upgrades
64 Adaptive Server Enterprise
Adaptive Server Components and RelatedProducts
After you finish upgrading Adaptive Server, upgrade its components and related products.
Refer to Using Sybase Failover in a High Availability System for instructions on how toupgrade an Adaptive Server configured with high availability.
Upgrading Job SchedulerAfter upgrading to a new Adaptive Server, upgrade Job Scheduler.
Note: You must have $SYBASE/$SYBASE_OCS/bin directory in $PATH so the isqlexecutable is accessible. Use isql to perform all the steps in this task.
1. Copy the directory services entry for JSAGENT (or jsagent) from the old server to the newserver.
2. Make sure the new server is running.
3. Stop the Job Scheduler:1> sybmgmtdb..sp_sjobcontrol @name=NULL, @option="stop_js"2> go
4. Ensure that at least 9000 locks are configured. If the number of locks on the server is fewerthan 9000, increase the number of locks:1> sp_configure "number of locks", 90002> go
5. Upgrade the internal Job Scheduler SQL code using:1> use sybmgmtdb2> go1> dbcc upgrade_object2> go
6. Restart Adaptive Server.
7. (Optional) Add more log space. Some 64-bit platforms require additional space for thesybmgmtdb log:
1> use master2> go1> alter database sybmgmtdb LOG on sybmgmtdev=202> go
8. To upgrade sybmgmtdb, run the installjsdb script that is included and save theoutput to a file:isql -Usa -Psa_password -Sservername -n -i$SYBASE/$SYBASE_ASE/scripts/installjsdb-ooutput_file
Adaptive Server Components and Related Products
Installation Guide 65
Note: When upgrading from Adaptive Server version 12.5.x to 15.5 and later, increase thesize of sybmgmtdb from 50MB to 90MB.
9. Enable Job Scheduler to start when Adaptive Server starts:sp_configure "enable job scheduler", 1
10. To start Job Scheduler from isql, enter:sybmgmtdb..sp_sjobcontrol @name=NULL, @option="start_js"go
Upgrading Job Scheduler TemplatesAfter upgrading to the new server, upgrade the templates and jobs created by Job Scheduler
Note: Several changes impact the Job Scheduler templates. These changes make sometemplates incompatible with earlier versions of the server. The current templates are version3.0 in the XML files.
1. Disable Job Scheduler.
2. Update any environment variables, scripts, or applications that refer to the Job Schedulerdirectory path. The Job Scheduler directory has been renamed and moved beneath theASE-15_0 directory. The new location is $SYBASE%\$SYBASE_ASE/jobscheduler .
Directories below jobscheduler remain the same.
3. Copy files from the jobscheduler directory to the new ASE-15_0 directory. If youare installing the new server directories over the old server directories, the installerautomatically moves your files to the new jobscheduler directory.
4. If you modified Sybase-supplied templates, stored procedures, or XML documents, do notoverlay the new templates with your modified versions. If you do, you lose theenhancements provided by the revised templates. Carefully merge your template changesinto the Sybase template files, or better yet, rename your modified templates.
Note: If you modify Sybase-supplied templates, save the changes under new names and innew files.
5. You may need to make minor modifications to jobs you created from 2.0 or earliertemplates. In some templates, parameters changed from varchar(5) to int. Thefollowing table lists the templates that changed in version 2.1 and the changes you mustmake to the SQL code in the jobs created from the templates.
Adaptive Server Components and Related Products
66 Adaptive Server Enterprise
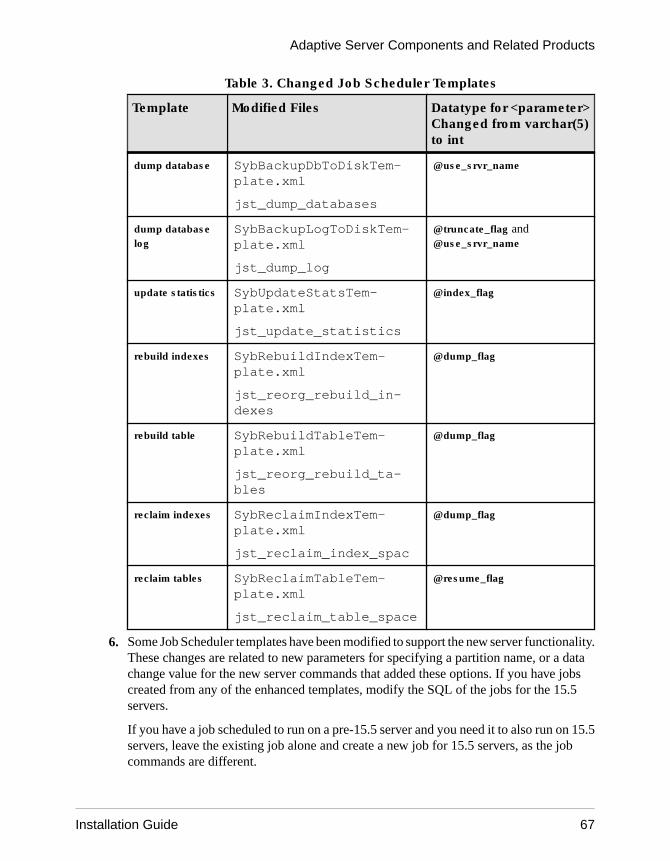
Table 3. Changed Job Scheduler Templates
Template Modified Files Datatype for <parameter>Changed from varchar(5)to int
dump database SybBackupDbToDiskTem-plate.xml
jst_dump_databases
@use_srvr_name
dump databaselog
SybBackupLogToDiskTem-plate.xml
jst_dump_log
@truncate_flag and@use_srvr_name
update statistics SybUpdateStatsTem-plate.xml
jst_update_statistics
@index_flag
rebuild indexes SybRebuildIndexTem-plate.xml
jst_reorg_rebuild_in-dexes
@dump_flag
rebuild table SybRebuildTableTem-plate.xml
jst_reorg_rebuild_ta-bles
@dump_flag
reclaim indexes SybReclaimIndexTem-plate.xml
jst_reclaim_index_spac
@dump_flag
reclaim tables SybReclaimTableTem-plate.xml
jst_reclaim_table_space
@resume_flag
6. Some Job Scheduler templates have been modified to support the new server functionality.These changes are related to new parameters for specifying a partition name, or a datachange value for the new server commands that added these options. If you have jobscreated from any of the enhanced templates, modify the SQL of the jobs for the 15.5servers.
If you have a job scheduled to run on a pre-15.5 server and you need it to also run on 15.5servers, leave the existing job alone and create a new job for 15.5 servers, as the jobcommands are different.
Adaptive Server Components and Related Products
Installation Guide 67
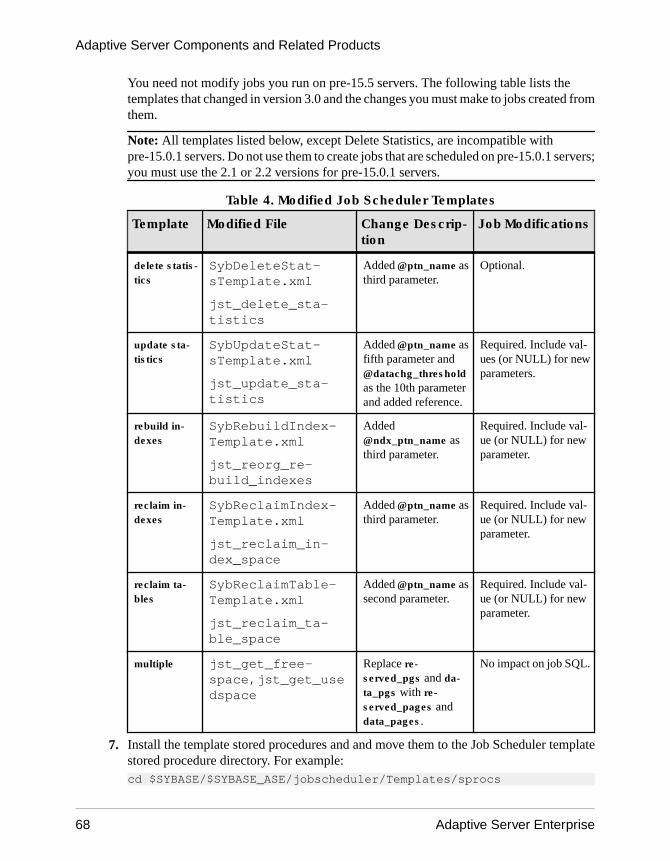
You need not modify jobs you run on pre-15.5 servers. The following table lists thetemplates that changed in version 3.0 and the changes you must make to jobs created fromthem.
Note: All templates listed below, except Delete Statistics, are incompatible withpre-15.0.1 servers. Do not use them to create jobs that are scheduled on pre-15.0.1 servers;you must use the 2.1 or 2.2 versions for pre-15.0.1 servers.
Table 4. Modified Job Scheduler Templates
Template Modified File Change Descrip-tion
Job Modifications
delete statis-tics
SybDeleteStat-sTemplate.xml
jst_delete_sta-tistics
Added @ptn_name asthird parameter.
Optional.
update sta-tistics
SybUpdateStat-sTemplate.xml
jst_update_sta-tistics
Added @ptn_name asfifth parameter and@datachg_thresholdas the 10th parameterand added reference.
Required. Include val-ues (or NULL) for newparameters.
rebuild in-dexes
SybRebuildIndex-Template.xml
jst_reorg_re-build_indexes
Added@ndx_ptn_name asthird parameter.
Required. Include val-ue (or NULL) for newparameter.
reclaim in-dexes
SybReclaimIndex-Template.xml
jst_reclaim_in-dex_space
Added @ptn_name asthird parameter.
Required. Include val-ue (or NULL) for newparameter.
reclaim ta-bles
SybReclaimTable-Template.xml
jst_reclaim_ta-ble_space
Added @ptn_name assecond parameter.
Required. Include val-ue (or NULL) for newparameter.
multiple jst_get_free-space,jst_get_usedspace
Replace re-served_pgs and da-ta_pgs with re-served_pages anddata_pages.
No impact on job SQL.
7. Install the template stored procedures and and move them to the Job Scheduler templatestored procedure directory. For example:cd $SYBASE/$SYBASE_ASE/jobscheduler/Templates/sprocs
Adaptive Server Components and Related Products
68 Adaptive Server Enterprise
a) Run the stored procedure installation script for each server being upgraded:installTemplateProcs <servername> <username> <password>
Note: Upgrade template stored procedures on all Job Scheduler servers and targetservers that are upgraded to Adaptive Server version 15.5. Do not install them onpre-15.5 servers.
8. Install the template XML documents. Move to the JS template XML directory. Forexample:cd $SYBASE/$SYBASE_ASE/jobscheduler/Templates/xml
a) Run the XML installation script on 15.0.1 servers with Job Scheduler installed:installTemplateXml servername machinename serverport username password [language_code]
Use "en" for the language_code or omit the parameter completely, as "en" is the default.
Note: Upgrade template XML on all Job Scheduler servers upgraded to Adaptive Serverversion 15.0.1. Do not install them on pre-15.0.1 servers or servers where Job Scheduler isnot installed.
Upgrading Java in the DatabaseYou must run installpcidb script if the Java in the database functionality is currently enabled.This script creates tables and stored procedures in the sybpcidb database.
1. Using isql, run the installpcidb script that is included with the release. Save theoutput to an operating system file.isql -Usa -P<sa_password> -S<server_name> -i$SYBASE/$SYBASE_ASE/scripts/installpcidb -o<output_file>
2. Enable the Java in the database functionality:1> sp_configure 'enable pci', 12> go1> sp_configure 'enable java', 12> go
You may need to increase 'max memory' to enable these parameters. Restart the server forchanges to take effect. You can configure the maximum size of the PCI Bridge memorypool through the 'pci memory size' configuration parameter. For more information, seeJava in Adaptive Server Enterprise for 15.7.
Enabling Java in the Database in a High Availability SystemYou can use the Java in the database feature on a system that also uses high availability.
Drop high availability companionship before installing the sybpcidb, and re-establishcompanionship afterwards.
Adaptive Server Components and Related Products
Installation Guide 69
Java in the database feature must be either enabled or disabled on both nodes of the highavailability system.
Upgrading Backup ServerYou can upgrade Backup Server after you upgrade Adaptive Server. The procedures forupgrading Backup Server are similar. XP Server does not have a formal upgrade process.
1. If you are upgrading during the initial server installation, select:
• Upgrade Existing Servers from the drop-down menu when the installer promptsBuild
• Upgrade Adaptive Server and Backup Servers.
This launches the sqlupgrade utility. Click OK.
2. If you are upgrading after the initial installation, start the sqlupgrade utility from thecommand line. Enter:$SYBASE/$SYBASE_ASE/bin/sqlupgrade
3. Click OK when you see a warning message.
4. Enter the old Sybase directory and the old Adaptive Server directory.
5. Select the server to upgrade, and click OK.
6. Enter the system administrator password, and click OK.
7. When the upgrade is complete, you see Done in the Status Output window. Click OK.
8. In the sqlupgrade window, either upgrade another server, or click Exit to leave the utility.
Upgrading Databases Using Dump and LoadWhen you upgrade Adaptive Server, you can also upgrade databases and transaction logs fromversions of Adaptive Server as early as 12.5 using the dump and load commands.
Some issues of which you should be aware:
• The upgrade process requires space for copying data and logging changes to the systemtables. If the source database in the dump was full, the upgrade process might fail. You canuse alter database to extend the free space in the event of insufficient-space errors.
• After reloading an older dump, run sp_checkreswords from the new installation on theloaded database to check for reserved words.
Adaptive Server Components and Related Products
70 Adaptive Server Enterprise
How Compiled Objects are Handled When UpgradingAdaptive Server
Adaptive Server upgrades compiled objects based on their source text.
Compiled objects include:
• Check constraints• Defaults• Rules• Stored procedures (including extended stored procedures)• Triggers• Views
The source text for each compiled object is stored in the syscomments table, unless it hasbeen manually deleted. The upgrade process verifies the existence of the source text insyscomments. However, compiled objects are not actually upgraded until they are invoked.
For example, if you have a user-defined stored procedure named list_proc, the presence of itssource text is verified when you upgrade. The first time list_proc is invoked after the upgrade,Adaptive Server detects that the list_proc compiled object has not been upgraded. AdaptiveServer recompiles list_proc, based on the source text in syscomments. The newly compiledobject is then executed.
Upgraded objects retain the same object ID and permissions.
You do not receive any notification if the compiled objects in your database dump are missingsource text. After loading a database dump, run sp_checksource to verify the existence of thesource text for all compiled objects in the database. Then, you can allow the compiled objectsto be upgraded as they are executed, or you can run dbcc upgrade_object to find potentialproblems and upgrade objects manually.
Compiled objects for which the source text was hidden using sp_hidetext are upgraded in thesame manner as objects for which the source text is not hidden.
For information on sp_checksource and sp_hidetext, see Reference Manual: Procedures.
Note: If you are upgrading from a 32-bit to a 64-bit Adaptive Server, the size of each 64-bitcompiled object in the sysprocedures table in each database increases by approximately55 percent when the object is upgraded. The pre-upgrade process calculates the exact size;increase your upgraded database size accordingly.
To ensure that compiled objects have been upgraded successfully before they are invoked,upgrade them manually using the dbcc upgrade_object command.
Adaptive Server Components and Related Products
Installation Guide 71
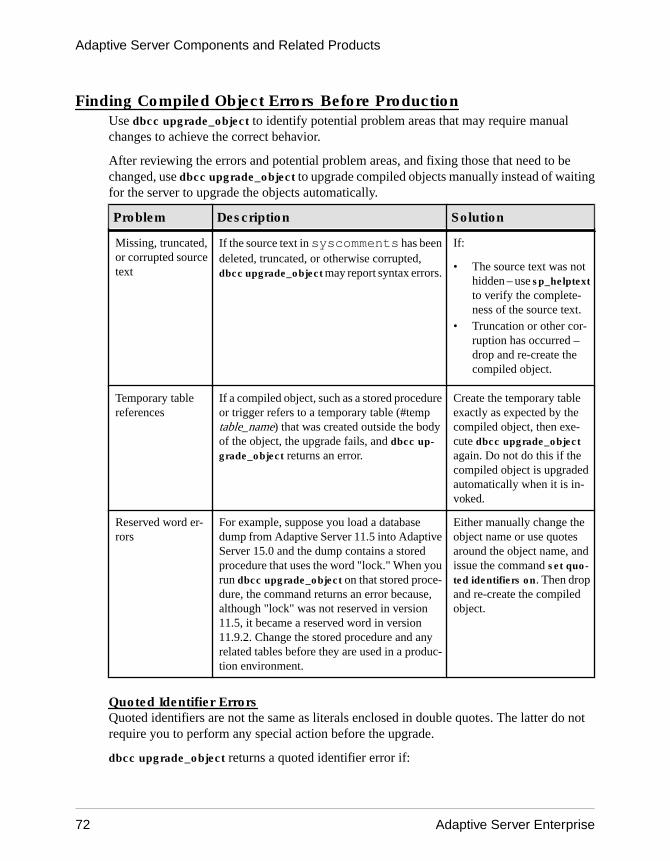
Finding Compiled Object Errors Before ProductionUse dbcc upgrade_object to identify potential problem areas that may require manualchanges to achieve the correct behavior.
After reviewing the errors and potential problem areas, and fixing those that need to bechanged, use dbcc upgrade_object to upgrade compiled objects manually instead of waitingfor the server to upgrade the objects automatically.
Problem Description Solution
Missing, truncated,or corrupted sourcetext
If the source text in syscomments has beendeleted, truncated, or otherwise corrupted,dbcc upgrade_object may report syntax errors.
If:
• The source text was nothidden – use sp_helptextto verify the complete-ness of the source text.
• Truncation or other cor-ruption has occurred –drop and re-create thecompiled object.
Temporary tablereferences
If a compiled object, such as a stored procedureor trigger refers to a temporary table (#temptable_name) that was created outside the bodyof the object, the upgrade fails, and dbcc up-grade_object returns an error.
Create the temporary tableexactly as expected by thecompiled object, then exe-cute dbcc upgrade_objectagain. Do not do this if thecompiled object is upgradedautomatically when it is in-voked.
Reserved word er-rors
For example, suppose you load a databasedump from Adaptive Server 11.5 into AdaptiveServer 15.0 and the dump contains a storedprocedure that uses the word "lock." When yourun dbcc upgrade_object on that stored proce-dure, the command returns an error because,although "lock" was not reserved in version11.5, it became a reserved word in version11.9.2. Change the stored procedure and anyrelated tables before they are used in a produc-tion environment.
Either manually change theobject name or use quotesaround the object name, andissue the command set quo-ted identifiers on. Then dropand re-create the compiledobject.
Quoted Identifier ErrorsQuoted identifiers are not the same as literals enclosed in double quotes. The latter do notrequire you to perform any special action before the upgrade.
dbcc upgrade_object returns a quoted identifier error if:
Adaptive Server Components and Related Products
72 Adaptive Server Enterprise
• The compiled object was created in a pre-11.9.2 version with quoted identifiers active (setquoted identifiers on).
• Quoted identifiers are not active (set quoted identifiers off) in the current session.
For compiled objects created in version 11.9.2 or later, the upgrade process automaticallyactivates or deactivates quoted identifiers as appropriate.
1. Activate quoted identifiers before running dbcc upgrade_object.
When quoted identifiers are active, use single quotes instead of double quotes aroundquoted dbcc upgrade_object keywords.
2. If quoted identifier errors occur, use the set command to activate quoted identifiers, andthen run dbcc upgrade_object to upgrade the object.
Potential Problem Areas With select *The result of a select * clause in a stored procedure, trigger, or view that was created in aversion of Adaptive Server earlier than 11.9.3 may be different from what you expect.
If dbcc upgrade_object finds a select * clause in the outermost query block of a storedprocedure, it returns an error, and does not upgrade the object.
For example, consider these stored procedures:create procedure myproc as select * from employeesgo
create procedure yourproc as if exists (select * from employees) print "Found one!"go
dbcc upgrade_object returns an error on myproc because myproc includes a statement with aselect * clause in the outermost query block. This procedure is not upgraded.
dbcc upgrade_object does not return an error on yourproc because the select * clause occursin a subquery. This procedure is upgraded.
For more information about dbcc upgrade_ojbect, see dbcc in Reference Manual:Commands.
Determining Whether to Change select * in ViewsDetermine whether columns have been added to or deleted from the table since the view wascreated.
Perform these queries when dbcc upgrade_object reports the existence of select * in a view.
1. Compare the output of syscolumns for the original view to the output of the table.
In this example, you have the following statement:create view all_emps as select * from employees
Adaptive Server Components and Related Products
Installation Guide 73
Warning! Do not execute a select * statement from the view. Doing so upgrades the viewand overwrites the information about the original column information in syscolumns.
2. Before upgrading the all_emps view, use these queries to determine the number ofcolumns in the original view and the number of columns in the updated table:select name from syscolumns where id = object_id("all_emps")select name from syscolumns where id = object_id("employees")
3. Compare the output of the two queries by running sp_help on both the view and the tablesthat comprise the view.
This comparison works only for views, not for other compiled objects. To determinewhether select * statements in other compiled objects need to be revised, review the sourcetext of each compiled object.
If the table contains more columns than the view, retain the pre-upgrade results of theselect * statement. Change the select * statement to a select statement with specificcolumn names.
4. If the view was created from multiple tables, check the columns in all tables that comprisethe view and rewrite the select statement if necessary.
Adaptive Server Components and Related Products
74 Adaptive Server Enterprise
Adaptive Server Downgrades
An Adaptive Server that has been upgraded to 15.7 requires specifics tasks before it can bedowngraded, due to the introduction of new features.
Even if you have not used any of the new features in Adaptive Server 15.7, the upgraded serveradds columns to system tables. This means you must use sp_downgrade to perform thedowngrade.
The sp_downgrade procedure requires sybase_ts_ role, and you must have sa_role orsso_role permissions. See sp_downgrade in Reference Manual: Procedures.
There are additional steps to perform if you are using encryption or replicated databases.
Preparing to Downgrade Adaptive ServerPrepare your system before starting the downgrade.
Before you begin downgrading Adaptive Server, perform these steps for the features orconfigurations you enabled in Adaptive Server 15.7.
• If the logical page size for your Adaptive Server is larger than 8192 bytes and you haveconfigured any databases to allow wide data-only-locked rows, turn the option off:sp_configure @dbname, 'allow wide dol rows', false
Before you downgrade Adaptive Server, verify that no wide DOL rows exist in any table inthese databases. Adaptive Server cannot find them, and thus does not warn you about theirexistence. When you then downgrade to a version that is earlier than 15.7, Adaptive Servertreats these as corrupt.
This does not occur if your logical page size is 8192 bytes or smaller.• If you have configured any database to use either row or page compression, turn it off:
alter database @dbname set compression none
• If any database has non-zero, in-row large object (LOB) lengths, set it to zero:alter database @dbname set inrow_lob_length = 0
• If any table is configured to use compression, turn it off:alter table @tablename set compression = nonereorg rebuild @tablename
• If any table uses LOB compression or uses in-row LOBs:
a) Copy the data from that table to a new tableb) Drop the original table
• If any table was altered to include nonmaterialized columns, convert those columns tostandard columns:
Adaptive Server Downgrades
Installation Guide 75
reorg rebuild @tablename
• If there are any holes in the log from previous alter database log off commands, removethe holes by using alter database log on to extend the log.
If you do not perform this before the downgrade, sp_downgrade displays an errormessage similar to:Error: Database 'dbname' contains num hidden pages that have to be filled. Please, use alter database log on command to extend the log num pages.
You can extend the log on whatever device you prefer, as long as you specify the number ofindicated pages as being at least as large as the num value.
Downgrading from Adaptive Server 15.7Use sp_downgrade to downgrade Adaptive Server 15.7 to an earlier version.
Prerequisites
1. Save the current auditing settings for the 15.7 Adaptive Server by saving the output of thesp_displayaudit system procedure in all system and user databases where any auditingoptions have been turned on:1> sp_displayaudit2> go
2. Back up all of your databases and the $SYBASE release area.
Task
Downgrade from Adaptive Server 15.7 to an Adaptive Server 15.0, 15.0.1, 15.0.2, 15.0.3, or15.5. Downgrading to versions of Adaptive Server earlier than 15.0 is not supported.
Downgrade from Adaptive Server Cluster Edition version 15.7 to to Adaptive Server ClusterEdition 15.0.1.5.
1. Start the 15.7 server in single-user mode using dataserver -m to guarantee that no otheruser can access Adaptive Server while you are going through the downgrade steps. See theUtility Guide for more details on starting the server in single-user mode. If you do not dothis, Adaptive Server displays the following when you run sp_downgrade:You cannot run sp_downgrade; server must be in single-user mode.Try restarting the server using the -m option.
2. Make sure Adaptive Server 15.7 is prepared for downgrade by executing this commandfrom the master database:sp_downgrade 'prepare', @toversion='version'
Adaptive Server Downgrades
76 Adaptive Server Enterprise
The format for the value of version does not need periods, so these are all valid:"15.5","155", "15.0", "150", "15.0.1", "1501", "15.0.2", "1502", "15.0.3," "1503". The versionyou enter should be the Adaptive Server version to which you want to downgrade.
Note: If you have used the 15.0.2 features for encrypted columns and you are downgradingto:• Adaptive Server 15.0 or 15.0 ESD #1 – specify the version as "15.0."• Adaptive Server 15.0, 15.0 ESD #2, 15.0.1, or a 15.0.1 ESD – specify the version
parameter as "15.0.1."• Adaptive Server 15.0.2 or a 15.0.2 ESD – specify the version parameter as "15.0.2."
sp_downgrade 'prepare' validates the readiness of Adaptive Server 15.7 for downgrade. Itmay print messages regarding manual changes required before the downgrade can becompleted. Repeat this step, correcting any errors reported, and make sure you understandthe implications of all warnings before proceeding.
3. Execute:
sp_downgrade 'downgrade', @toversion='version', @override=1
Use the same version number as in step 2. Once this command completes successfullythere can be no more activity on the 15.7 server. Run checkpoint and immediately shutdown the 15.7 server.
4. Copy the RUN_SERVER file to the release area for the version you are downgrading to.Modify the file to use the dataserver binary of the version to which you are downgrading,using -e, -c, and -M option point to the old server.
For example, if you are downgrading to 15.0.2, change 15.7-related information to 15.0.2-related information. From the SYBASE directory:
/work_dirs/sybase/ase1502/ASE-15_0/bin/dataserver\ -s old_server_name\ -d downgraded_master_device\ -e old_server_log_file\ -c old_server_config_file\ -M /work_dirs/sybase/ase1502\
5. Restart the old server using the modified RUN_SERVER file. Ensure that the environmentvariable points to the old server release such as $SYBASE, $SYBASE_ASE, or$SYBASE_OCS.
Note: When downgrading to a 15.0 or a 15.0.1 server, you can reset user passwords bysetting sp_passwordpolicy 'allow password downgrade' to 0. User passwords are resetand print on the console. Be sure to save the output of sp_downgrade 'downgrade',<version> into a file, so the passwords are not lost. To regenerate the sa password, restartthe downgraded server with -psa. See sp_passwordpolicy in Reference Manual:Procedures.
6. Run any post-downgrade scripts that may be applicable to your site.
If you have not used any 15.7 functionality, this completes the primary downgrade process.
Adaptive Server Downgrades
Installation Guide 77
Additional Considerations for New Features UsedAdditional downgrade steps may be necessary due to Adaptive Server 15.7 features that arenot available in the Adaptive Server version to which you are downgrading.
In general, no additional steps are required when you are returning to an Adaptive Serverversion in which the feature was already available.
Returning to 15.0.2 ESD #3 is easier than downgrading to other versions, because this versioncan handle a number of error conditions that may arise as a result of downgrading.
If you return to a pre-15.0.2 ESD #3 version of Adaptive Server, no error handling is provided.Using the new features can result in inexplicable behavior, including misleading errormessages and stack traces, unless you are uninstall all usages of the new features reported bysp_downgrade.
Feature Considerations
Wide, varia-ble-length da-ta-only-locked (DOL)rows
You cannot downgrade versions that contain wide, variable-length DOL rows toversions that do not support the feature.
Use the dol_downgrade_check function to determine if a database includes tableswith wide, variable-length DOL rows. See Reference Manual: Basics for informa-tion about dol_downgrade_check.
Note: If you:
1. Disable the allow wide dol rows database option before performing a databaseor transaction log dump
2. Load these database dumps onto an earlier version of Adaptive Server.
Data returned from queries on the wide rows may be incorrect, or queries might failbecause the earlier version of Adaptive Server perceives the data rows as corrupt.
Java in Adap-tive Server
• User classes compiled by a Java version later than 1.2 do not work in pre-15.0.3Adaptive Server versions.
• Earlier versions of Adaptive Server ignore the enable pci parameter; you canremove it.
• sybpcidb is not used by Adaptive Server versions earlier than 15.0.3, and maybe dropped.
sp_addserverwith filter pa-rameter
If you have any entries in sysservers.srvnetname column that are longerthan 32 bytes, delete these entries before downgrading, and add them back afterdowngrading.
Adaptive Server Downgrades
78 Adaptive Server Enterprise

Feature Considerations
Unicode non-characters
If you used sp_configure to enable functionality group or permissive Unicode inAdaptive Server 15.7 and also stored Unicode noncharacters (that is, u+FFFF oru+FFFE) in a database, you may see a conversion error after you downgrade to aversion earlier 15.7 when Adaptive Server retrieves the data and triggers a characterset conversion.
To avoid such errors, search for and remove those characters from the system.
Disabled var-binary trun-cation
If you used sp_configure to turn on the disable varbinary truncation config-uration in Adaptive Server 15.7, the varbinary data stored in the system mayhave trailing zeros. When you downgrade to a version earlier than 15.7, thesetrailing zeros are not removed and become part of the select output. This does notaffect query results involving comparisons.
Sharable in-line default
If you used sp_configure to enable the sharable inline default setting in AdaptiveServer 15.7 and downgrade to a version earlier than 15.7, running the ddlgen utilityto generate data-definition language can cause Adaptive Server to generate extracreate default statements. You can remove such statements before using the outputto create new schema.
Restoring Original Messages After a DowngradeYou can restore the original messages for the earlier version of Adaptive Server after youperform a downgrade.Run this script after downgrading the server:isql -Usa -Psa_password -irestoremsgs.ebf
Downgrading Job SchedulerIf you are downgrading to Adaptive Server versions 15.0 or 15.0.1, run installjsdb script fromthe earlier version.
1. Disable Job Scheduler:1> sp_configure "enable job scheduler", 02> go1> sybmgmtdb..sp_sjobcontrol @name=NULL, @option="stop_js"2> go
2. Follow the downgrade steps for your platform.
3. After downgrading, enter this command from the earlier version of Adaptive Server:isql –Usa –Psa_password –Sservername–i$SYBASE/$SYBASE_ASE/scripts/installjsdb
Adaptive Server Downgrades
Installation Guide 79
Note: The directory with the isql executable ($SYBASE_OCS/bin) must be in yourpath.
4. Enable Job Scheduler:sp_configure "enable job scheduler", 1
5. To start Job Scheduler, either restart the server, or enter:1> use sybmgmtdb2> go1> sp_sjobcontrol @name=NULL, @option="start_js"2> go
Downgrading an Adaptive Server that Uses EncryptionPerform these steps to downgrade an Adaptive Server versions 15.7 and later if you enabled256-bit key encryption keys.
1. Set the downgrade_kek_size configuration option to true. This means you must changethe key encryption key size to 128 bits.
2. Run sp_downgrade to find all column encryption keys (CEKs) and key copies that areprotected by master keys or by dual control.
3. Drop dual control for each CEK:alter encryption key keyname [with passwd password modify encryption with no dual_control
4. Use drop encryption key to drop user and login password-protected key copies.
5. Create a system encryption password for each database that has master keys:sp_encryption system_encr_passwd, <password>
6. Re-encrypt each CEK with the master key:alter encryption key keyname with passwd master key modify encryption with passwd system_encr_passwd
Note: The key owner must perform the re-encryption for each CEK, or else the keyownership changes.
7. Re-encrypt all base keys that are protected by user passwords:alter encryption key keyname with passwd old_password modify encryption with passwd new_passwd
Note: The key owner must perform the re-encryption for each base key, or else the keyownership changes.
Adaptive Server Downgrades
80 Adaptive Server Enterprise

Downgrade Considerations for Adaptive Server withReplicated Databases
Special considerations exist for downgrading Adaptive Server version 15.7 that usesreplicated databases,
If the server you are downgrading from has replicated databases and SQL replication has beenenabled, you must follow different procedures depending upon the version of Adaptive Serveryou are downgrading to.
If your replication system is using RepAgent and you are downgrading to a 15.0.2 ESD #3 orlater, there are no additional steps required. Adaptive Server 15.0.2 ESD #3 can keep the datasynchronized.
If you are not using RepAgent, consult the specific documentation for the product you areusing to replicate data.
If you downgrade to a version earlier than 15.0.2 ESD #3, Sybase recommends that you use thestandard documented procedure to downgrade an Adaptive Server with replicated databases.
The standard procedure to downgrade Adaptive Server with replicated databases consists ofensuring that all replicated data in the primary database transaction log has been successfullytransferred to the standby or replicate database. Once RepAgent is started again after thedowngrade process, you must ensure that it does not read logs written with version 15.7:
1. Suspend transaction processing and replication activities.2. Drain the transaction logs for primary databases.3. Disable the secondary truncation point.
Post-Downgrade Tasks for Adaptive ServerAfter you perform the basic downgrade steps, finish the process by handling residual tasks.
1. Installing system stored procedures of the old version drops auditing information aboutsystem stored procedures. Use the output of sp_displayaudit recorded duringpredowngrade to help determine the system stored procedures for which auditing wasenabled. Reenter the audit options using sp_audit. For example, sp_addlogin was auditedin your server before upgrading, run this command to reenable auditing onsp_addlogin:sp_audit "exec_procedure", "all", "sp_addlogin", "on"
After you run installmaster, installmodel, installcommit,installsecurity, installhasvss, installjsdb, and installmsgsvsson your downgraded server, return system stored procedures to their earlier form. New
Adaptive Server Downgrades
Installation Guide 81

stored procedures introduced in releases subsequent to the downgraded server are notremoved.
Warning! Attempts to execute new stored procedures against an older binary haveunpredictable results.
2. During the upgrade to Adaptive Server 15.7 you should have created arestore_msgs.ebf file. Run this script now to restore your messages back to theversion from which you upgraded:isql -Usa -P <sa_password> -S <server_name> -i <restore_msgs.ebf>
Note: If you upgraded from a 15.0 or 15.0.1 release and are reverting back to the 15.0 or15.0.1 release, then you must only run instmsgs.ebf file from the relevant release.
3. The on-disk structures of stored procedures, triggers, and views may contain statementidentity tokens, datatypes, and object references that are not understood by the earlierAdaptive Server versions. You must drop all compiled objects that use features introducedinto Adaptive Server subsequent to the release to which you are downgrading.
4. If during the upgrade process you ran the update all statistics on syslogins, you mustdelete statistics for syslogins and re-create them.
spt_values are dropped and re-created when you run installmaster from the release areayou downgraded to. Any new types are eliminated from this table.
5. Running installmaster from the release area of the server to which you downgradedremoves configuration parameters that belong to 15.7, by deleting sysconfigures rows forconfiguration parameters that do not exist in syscurconfigs. After runninginstallmaster, the error messages no longer appear when you start the server.
If you start a downgraded server using the 15.7 configuration file, the new options generatean Unknown parameter message. The unknown options are reported the first time yourestart the server. You can ignore these messages; the configuration file is rewrittenwithout the unknown options.
Adaptive Server Downgrades
82 Adaptive Server Enterprise
Uninstalling Adaptive Server
Run the uninstaller to remove Adaptive Server.
Prerequisites
You must shut down all servers before uninstalling Adaptive Server.
Task
Note: The uninstallation process reverses only those actions originally performed by theinstaller, leaving intact any files or registry entries you created after the installation. Youremove these after you complete the uninstallation.
1. Execute the uninstall program:$SYBASE/sybuninstall/ASESuite/uninstall
2. Click Next in the Uninstall Welcome window.
3. Choose one of the following, then click Next:
• Complete Uninstall – uninstalls everything originally installed by the installer.• Uninstall Specific Features – displays a list of features. If any unselected products/
components are dependent on features selected for uninstall, you can still proceed withthe uninstall but dependent features are not uninstalled.
You see a window indicating that the uninstallation process is being performed. There is noprogress bar.
Note: You may need to confirm the deletion of some files that have been modified sinceinstallation.
4. When you see the final window, click Done to exit the uninstallation program.
Removing an Existing Adaptive ServerLearn how to remove an existing Adaptive Server.
1. From $SYBASE, enter:
rm servername.*
2. Change to $SYBASE/$SYBASE_ASE/install and run the following commands:
rm RUN_servername.*rm servername.*
3. Edit $SYBASE/interfaces, to remove all references to the Adaptive Server.
Uninstalling Adaptive Server
Installation Guide 83
4. Remove any operating system files for existing database devices.
Uninstalling Adaptive Server
84 Adaptive Server Enterprise
Troubleshoot SySAM
If SySAM errors are not addressed in a timely fashion, Adaptive Server may cease to function.
There may be more recent information published in the SySAM Asset Management UsersGuide online at the SySAM FAQ. If your Sybase product cannot find a required license, itcontinues to operate in grace mode, if a grace period is available. Determine the license statusof your product using the output from sp_lmconfig command. The Status column showsgraced for any license that is operating within a grace period.
Typically, you have 30 days during which to resolve any SySAM-related issues. When alicense is awarded under grace, the Sybase product error log entry and optional e-mailmessage include the date and time when the grace period expires. In addition, you can executesp_lmconfig to determine the expiration date.
All SySAM-related errors are printed in your Sybase product error log and are prefixed with"kernel SySAM." For example:
<timestamp> kernel SySAM: Failed to obtain 1 license(s)for ASE_CORE feature from license file(s) or server(s).
If e-mail alerts are configured, recipients receive an e-mail whenever a SySAM event occurs.
You can always check the current state of SySAM licenses in your Sybase product using thesp_lmconfig command. The output shows the current SySAM configuration and the status ofeach license.
If you are using a served license model, the license server’s debug log, located in the logdirectory, provides information about any license checkout issues.
The Sybase product log includes information about licenses awarded under grace mode. Ife-mail notifications are set up for a severity of "warning," e-mail messages are sent for thisevent. Warnings in the Adaptive Server error log and e-mail messages are repeated while thelicense is under grace mode.
Troubleshoot SySAM
Installation Guide 85
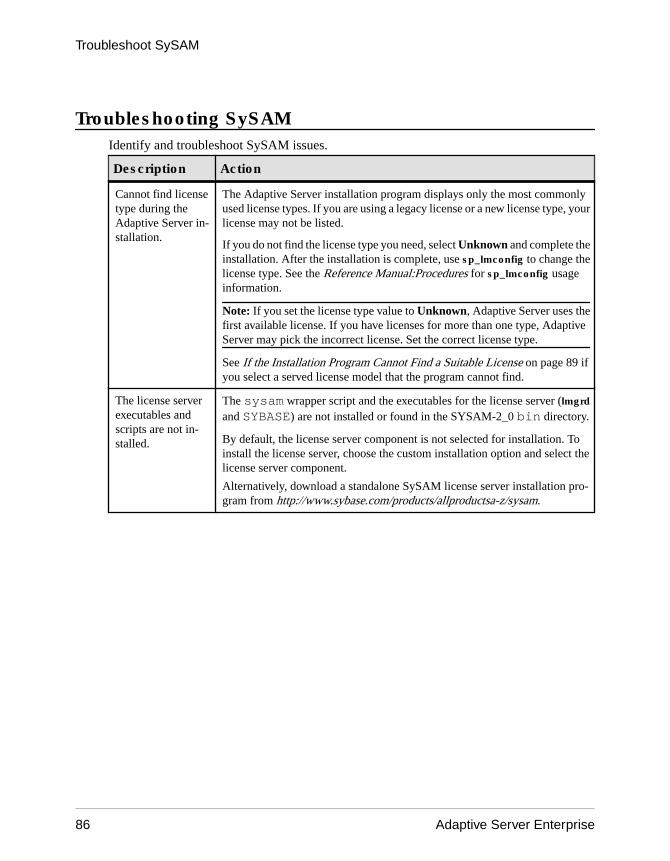
Troubleshooting SySAMIdentify and troubleshoot SySAM issues.
Description Action
Cannot find licensetype during theAdaptive Server in-stallation.
The Adaptive Server installation program displays only the most commonlyused license types. If you are using a legacy license or a new license type, yourlicense may not be listed.
If you do not find the license type you need, select Unknown and complete theinstallation. After the installation is complete, use sp_lmconfig to change thelicense type. See the Reference Manual:Procedures for sp_lmconfig usageinformation.
Note: If you set the license type value to Unknown, Adaptive Server uses thefirst available license. If you have licenses for more than one type, AdaptiveServer may pick the incorrect license. Set the correct license type.
See If the Installation Program Cannot Find a Suitable License on page 89 ifyou select a served license model that the program cannot find.
The license serverexecutables andscripts are not in-stalled.
The sysam wrapper script and the executables for the license server (lmgrd
and SYBASE) are not installed or found in the SYSAM-2_0 bin directory.
By default, the license server component is not selected for installation. Toinstall the license server, choose the custom installation option and select thelicense server component.
Alternatively, download a standalone SySAM license server installation pro-gram from http://www.sybase.com/products/allproductsa-z/sysam.
Troubleshoot SySAM
86 Adaptive Server Enterprise
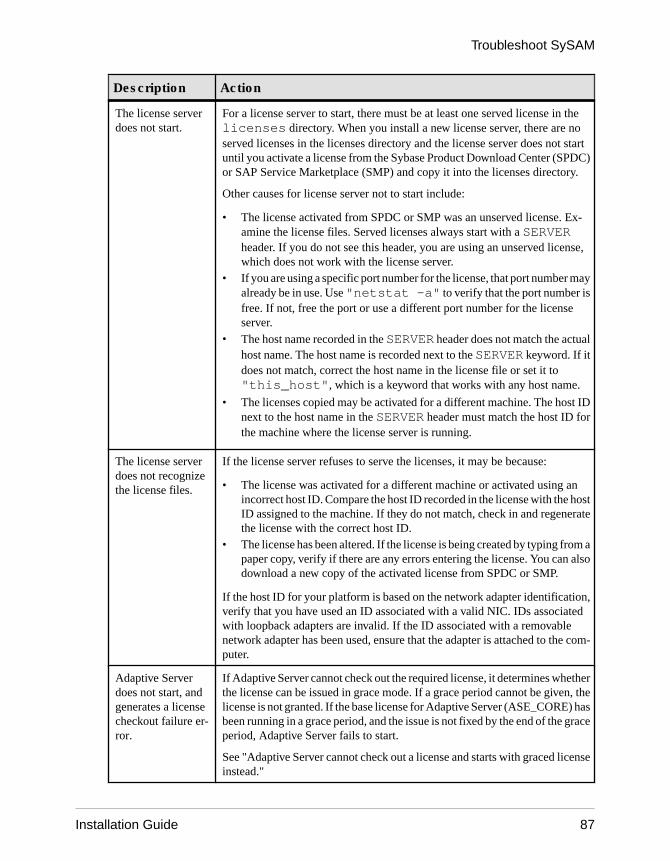
Description Action
The license serverdoes not start.
For a license server to start, there must be at least one served license in thelicenses directory. When you install a new license server, there are noserved licenses in the licenses directory and the license server does not startuntil you activate a license from the Sybase Product Download Center (SPDC)or SAP Service Marketplace (SMP) and copy it into the licenses directory.
Other causes for license server not to start include:
• The license activated from SPDC or SMP was an unserved license. Ex-amine the license files. Served licenses always start with a SERVERheader. If you do not see this header, you are using an unserved license,which does not work with the license server.
• If you are using a specific port number for the license, that port number mayalready be in use. Use "netstat -a" to verify that the port number isfree. If not, free the port or use a different port number for the licenseserver.
• The host name recorded in the SERVER header does not match the actualhost name. The host name is recorded next to the SERVER keyword. If itdoes not match, correct the host name in the license file or set it to"this_host", which is a keyword that works with any host name.
• The licenses copied may be activated for a different machine. The host IDnext to the host name in the SERVER header must match the host ID forthe machine where the license server is running.
The license serverdoes not recognizethe license files.
If the license server refuses to serve the licenses, it may be because:
• The license was activated for a different machine or activated using anincorrect host ID. Compare the host ID recorded in the license with the hostID assigned to the machine. If they do not match, check in and regeneratethe license with the correct host ID.
• The license has been altered. If the license is being created by typing from apaper copy, verify if there are any errors entering the license. You can alsodownload a new copy of the activated license from SPDC or SMP.
If the host ID for your platform is based on the network adapter identification,verify that you have used an ID associated with a valid NIC. IDs associatedwith loopback adapters are invalid. If the ID associated with a removablenetwork adapter has been used, ensure that the adapter is attached to the com-puter.
Adaptive Serverdoes not start, andgenerates a licensecheckout failure er-ror.
If Adaptive Server cannot check out the required license, it determines whetherthe license can be issued in grace mode. If a grace period cannot be given, thelicense is not granted. If the base license for Adaptive Server (ASE_CORE) hasbeen running in a grace period, and the issue is not fixed by the end of the graceperiod, Adaptive Server fails to start.
See "Adaptive Server cannot check out a license and starts with graced licenseinstead."
Troubleshoot SySAM
Installation Guide 87
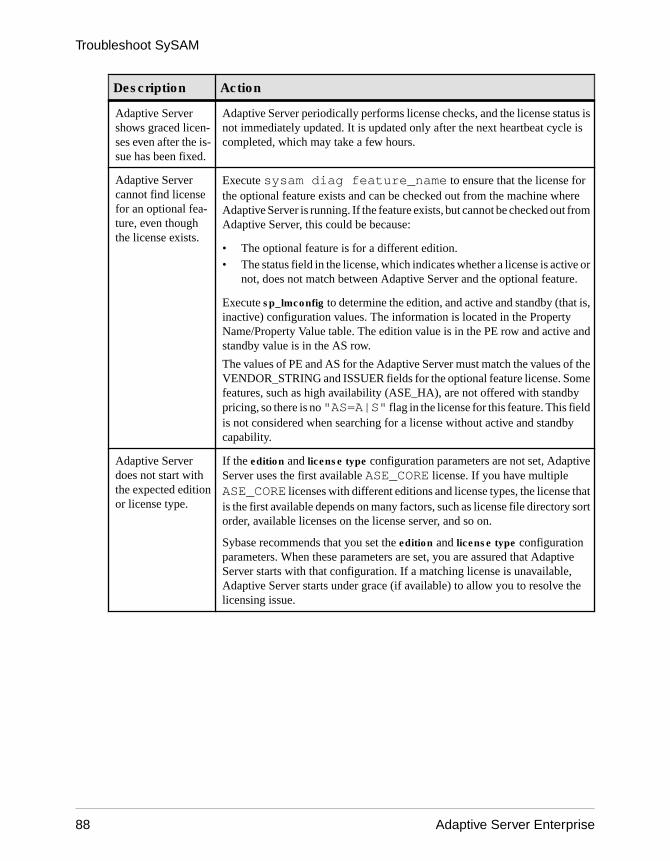
Description Action
Adaptive Servershows graced licen-ses even after the is-sue has been fixed.
Adaptive Server periodically performs license checks, and the license status isnot immediately updated. It is updated only after the next heartbeat cycle iscompleted, which may take a few hours.
Adaptive Servercannot find licensefor an optional fea-ture, even thoughthe license exists.
Execute sysam diag feature_name to ensure that the license forthe optional feature exists and can be checked out from the machine whereAdaptive Server is running. If the feature exists, but cannot be checked out fromAdaptive Server, this could be because:
• The optional feature is for a different edition.• The status field in the license, which indicates whether a license is active or
not, does not match between Adaptive Server and the optional feature.
Execute sp_lmconfig to determine the edition, and active and standby (that is,inactive) configuration values. The information is located in the PropertyName/Property Value table. The edition value is in the PE row and active andstandby value is in the AS row.
The values of PE and AS for the Adaptive Server must match the values of theVENDOR_STRING and ISSUER fields for the optional feature license. Somefeatures, such as high availability (ASE_HA), are not offered with standbypricing, so there is no "AS=A|S" flag in the license for this feature. This fieldis not considered when searching for a license without active and standbycapability.
Adaptive Serverdoes not start withthe expected editionor license type.
If the edition and license type configuration parameters are not set, AdaptiveServer uses the first available ASE_CORE license. If you have multipleASE_CORE licenses with different editions and license types, the license thatis the first available depends on many factors, such as license file directory sortorder, available licenses on the license server, and so on.
Sybase recommends that you set the edition and license type configurationparameters. When these parameters are set, you are assured that AdaptiveServer starts with that configuration. If a matching license is unavailable,Adaptive Server starts under grace (if available) to allow you to resolve thelicensing issue.
Troubleshoot SySAM
88 Adaptive Server Enterprise

Description Action
Adaptive Serverpicks an incorrectlicense.
Adaptive Server looks for licenses in these locations:
• Any saved values in the registry on Windows platforms, orthe .flexlmrc file on UNIX platforms. Use "lmpath -sta-tus" to view the saved values.
• The values set for SYBASE_LICENSE_FILE and LM_LICENSE_FILEenvironment variables.
• All license files (any file with a .lic extension) in the licenses directoryunder the SYSAM-2_0 directory.
All of the above locations are searched in the order specified until a suitablelicense is found. When a directory is specified, license files in that directory areloaded in the directory sort order.
The first license that matches the feature name, version, edition, and licensetype filter is used. This license may not be what you were expecting to use.Adjust the above locations to control this.
If the Installation Program Cannot Find a Suitable LicenseIf you select a served license model, the installer checks for a license with the selected editionand license type. You see a warning message if no suitable license is available.
If you are performing a new Adaptive Server installation or upgrading an existing AdaptiveServer version 12.5.x or earlier, proceed with the installation. Adaptive Server provides a 30-day grace period to resolve licensing issues. Once the installation is complete, debug thelicense checkout failure. See "Adaptive Server cannot check out a license and starts withgraced license instead" in Troubleshooting SySAM on page 86.
If you are upgrading an existing Adaptive Server version 15.0 or later, Adaptive Server maynot start after the upgrade if you do not have a suitable license. Exit the installation programand see if the existing Adaptive Server can check out licenses. If it cannot, troubleshoot thisissue and then proceed with the upgrade.
If the existing Adaptive Server can check out licenses, verify that the license you are usingauthorizes the update you are applying. This can be determined using the date-based versionof your license file and the date this update was released. You must have a license with a date-based version that is later than or equal to the date the update was released. Adaptive Serverprovides a grace period for updating the licenses after support is renewed.
Determine the date-based version of the license from the Version column of the output fromsp_lmconfig, by looking at the license checkout message in the Adaptive Server error log, orby examining the license itself. See Anatomy of a License in the Sybase Software AssetManagement Users Guide.
Troubleshoot SySAM
Installation Guide 89
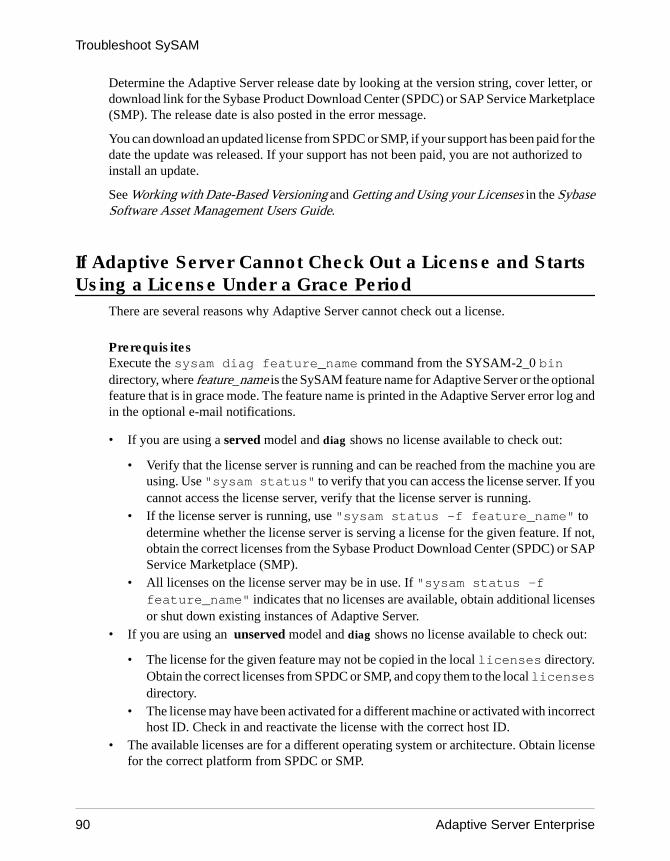
Determine the Adaptive Server release date by looking at the version string, cover letter, ordownload link for the Sybase Product Download Center (SPDC) or SAP Service Marketplace(SMP). The release date is also posted in the error message.
You can download an updated license from SPDC or SMP, if your support has been paid for thedate the update was released. If your support has not been paid, you are not authorized toinstall an update.
See Working with Date-Based Versioning and Getting and Using your Licenses in the SybaseSoftware Asset Management Users Guide.
If Adaptive Server Cannot Check Out a License and StartsUsing a License Under a Grace Period
There are several reasons why Adaptive Server cannot check out a license.
PrerequisitesExecute the sysam diag feature_name command from the SYSAM-2_0 bindirectory, where feature_name is the SySAM feature name for Adaptive Server or the optionalfeature that is in grace mode. The feature name is printed in the Adaptive Server error log andin the optional e-mail notifications.
• If you are using a served model and diag shows no license available to check out:
• Verify that the license server is running and can be reached from the machine you areusing. Use "sysam status" to verify that you can access the license server. If youcannot access the license server, verify that the license server is running.
• If the license server is running, use "sysam status -f feature_name" todetermine whether the license server is serving a license for the given feature. If not,obtain the correct licenses from the Sybase Product Download Center (SPDC) or SAPService Marketplace (SMP).
• All licenses on the license server may be in use. If "sysam status -ffeature_name" indicates that no licenses are available, obtain additional licensesor shut down existing instances of Adaptive Server.
• If you are using an unserved model and diag shows no license available to check out:
• The license for the given feature may not be copied in the local licenses directory.Obtain the correct licenses from SPDC or SMP, and copy them to the local licensesdirectory.
• The license may have been activated for a different machine or activated with incorrecthost ID. Check in and reactivate the license with the correct host ID.
• The available licenses are for a different operating system or architecture. Obtain licensefor the correct platform from SPDC or SMP.
Troubleshoot SySAM
90 Adaptive Server Enterprise
• If you are running in a terminal server environment, you cannot use unserved licenses. Setup served licenses for a terminal server environment.
• The available license may not authorize this version of Adaptive Server. For informationabout date-based versioning, see the SySAM Users Guide.
• If the diag command shows the license for the given feature is available for checkout, thismay be because the product edition or license type does not match the requirement. If theedition and license type configuration parameters are set, Adaptive Server uses only thelicense that matches these settings:
a) Run sp_lmconfig to see the configured values.b) Check the VENDOR_STRING attribute of the licenses to verify that a matching license
exists.
If a matching license does not exist, obtain a suitable license from SPDC or SMP, oradjust the Adaptive Server configuration.
If Adaptive Server cannot start because the grace period expired, examine theservername.properties file located in the ASE-15_0/sysam directoryunder your SYBASE directory for values. These values are stored in two lines that startwith PE= and LT=. These lines are present only if the configuration is set.
E-Mail NotificationsUse sp_lmconfig to configure e-mail notification. To view the current notification status andconfiguration, execute sp_lmconfig without any parameters.
To enable e-mail notifications, set the smtp host, smtp port, email sender, email recipients,and email severity properties.
To change the severity that triggers e-mail notification, set the email severity property to:"ERROR", "WARNING", "INFORMATIONAL", or "NONE".
To change the list of e-mail recipients, set the email recipients property to a comma-separatedlist of e-mail addresses. E-mail addresses can include anything that is capable of receivingSMTP messages.
Before You Contact Sybase Technical SupportGet information about your situation before you call Sybase Technical Support aboutSySAM-related issues.
• The Adaptive Server error log.• $SYBASE/ASE-15_0/install/<servername>.log
• If Adaptive Server does not start, the server’s properties file:• $SYBASE/ASE-15_0/sysam/<servername>.properties
Troubleshoot SySAM
Installation Guide 91

servername must correspond to the name of the Adaptive Server that does not start.• The license files saved in the SYSAM-2_0 licenses directory on the machine running
Adaptive Server.• The value of SYBASE_LICENSE_FILE and LM_LICENSE_FILE environment
variables.• Output from lmutil lmpath -status command. lmutil is located in the bin directory
under the SYSAM-2_0/bin folder.
• If you are using a served license model:• The licenses saved in the $SYBASE/SYSAM-2_0/licenses directory of the
license server.• The license server log file in the $SYBASE/SYSAM-2_0/log directory.
Troubleshoot SySAM
92 Adaptive Server Enterprise
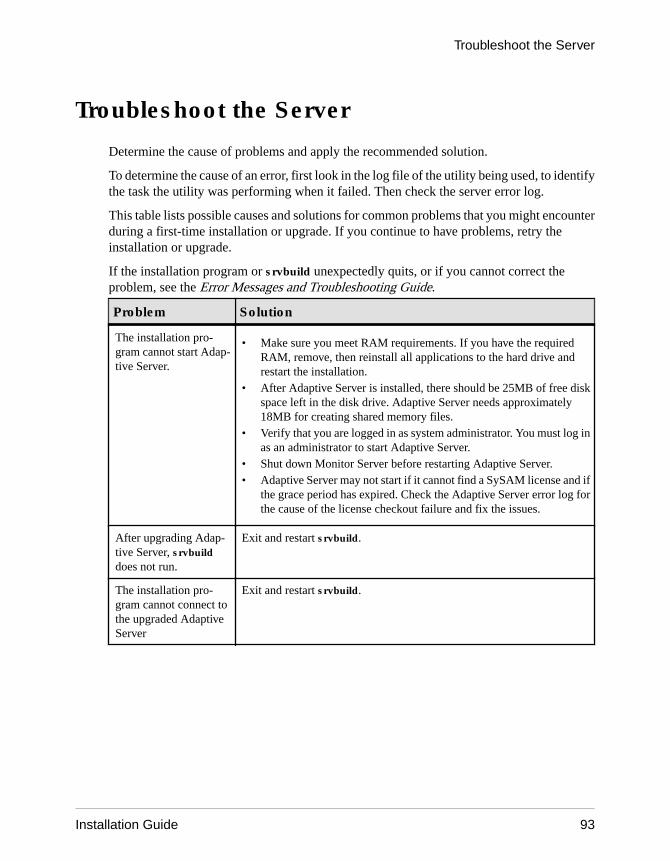
Troubleshoot the Server
Determine the cause of problems and apply the recommended solution.
To determine the cause of an error, first look in the log file of the utility being used, to identifythe task the utility was performing when it failed. Then check the server error log.
This table lists possible causes and solutions for common problems that you might encounterduring a first-time installation or upgrade. If you continue to have problems, retry theinstallation or upgrade.
If the installation program or srvbuild unexpectedly quits, or if you cannot correct theproblem, see the Error Messages and Troubleshooting Guide.
Problem Solution
The installation pro-gram cannot start Adap-tive Server.
• Make sure you meet RAM requirements. If you have the requiredRAM, remove, then reinstall all applications to the hard drive andrestart the installation.
• After Adaptive Server is installed, there should be 25MB of free diskspace left in the disk drive. Adaptive Server needs approximately18MB for creating shared memory files.
• Verify that you are logged in as system administrator. You must log inas an administrator to start Adaptive Server.
• Shut down Monitor Server before restarting Adaptive Server.• Adaptive Server may not start if it cannot find a SySAM license and if
the grace period has expired. Check the Adaptive Server error log forthe cause of the license checkout failure and fix the issues.
After upgrading Adap-tive Server, srvbuilddoes not run.
Exit and restart srvbuild.
The installation pro-gram cannot connect tothe upgraded AdaptiveServer
Exit and restart srvbuild.
Troubleshoot the Server
Installation Guide 93
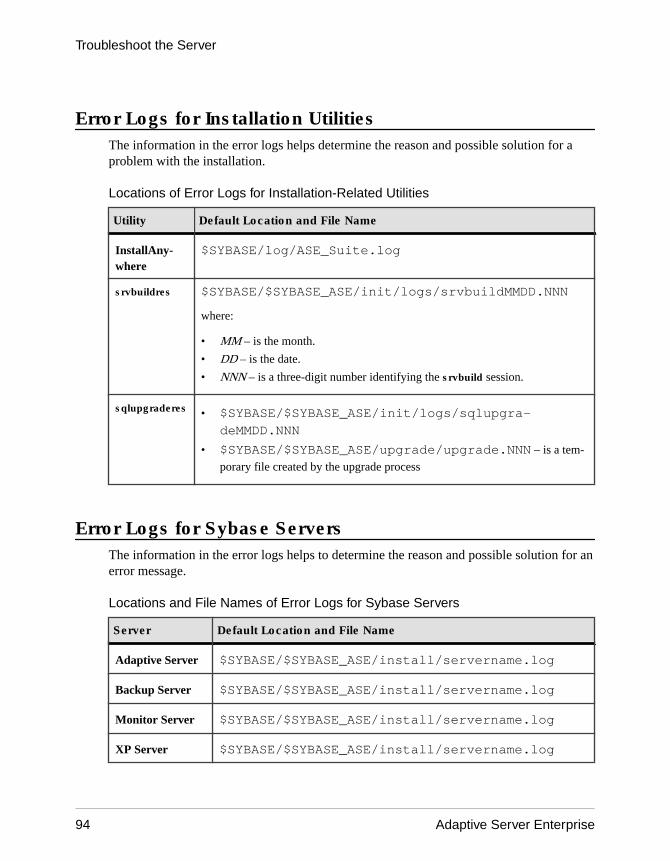
Error Logs for Installation UtilitiesThe information in the error logs helps determine the reason and possible solution for aproblem with the installation.
Locations of Error Logs for Installation-Related Utilities
Utility Default Location and File Name
InstallAny-where
$SYBASE/log/ASE_Suite.log
srvbuildres $SYBASE/$SYBASE_ASE/init/logs/srvbuildMMDD.NNN
where:
• MM – is the month.
• DD – is the date.
• NNN – is a three-digit number identifying the srvbuild session.
sqlupgraderes • $SYBASE/$SYBASE_ASE/init/logs/sqlupgra-deMMDD.NNN
• $SYBASE/$SYBASE_ASE/upgrade/upgrade.NNN – is a tem-
porary file created by the upgrade process
Error Logs for Sybase ServersThe information in the error logs helps to determine the reason and possible solution for anerror message.
Locations and File Names of Error Logs for Sybase Servers
Server Default Location and File Name
Adaptive Server $SYBASE/$SYBASE_ASE/install/servername.log
Backup Server $SYBASE/$SYBASE_ASE/install/servername.log
Monitor Server $SYBASE/$SYBASE_ASE/install/servername.log
XP Server $SYBASE/$SYBASE_ASE/install/servername.log
Troubleshoot the Server
94 Adaptive Server Enterprise
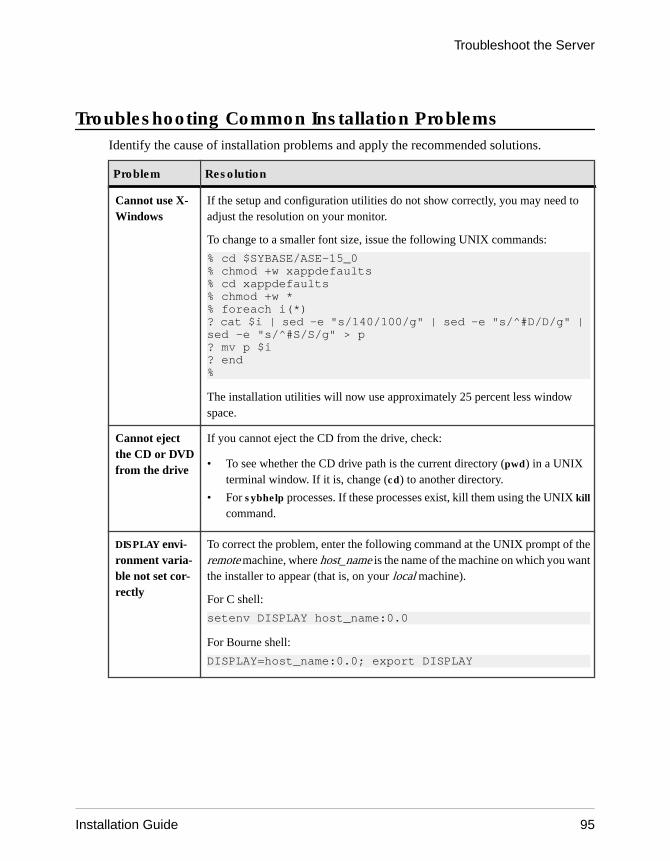
Troubleshooting Common Installation ProblemsIdentify the cause of installation problems and apply the recommended solutions.
Problem Resolution
Cannot use X-Windows
If the setup and configuration utilities do not show correctly, you may need toadjust the resolution on your monitor.
To change to a smaller font size, issue the following UNIX commands:
% cd $SYBASE/ASE-15_0% chmod +w xappdefaults% cd xappdefaults% chmod +w *% foreach i(*) ? cat $i | sed -e "s/140/100/g" | sed -e "s/^#D/D/g" | sed -e "s/^#S/S/g" > p? mv p $i? end%
The installation utilities will now use approximately 25 percent less windowspace.
Cannot ejectthe CD or DVDfrom the drive
If you cannot eject the CD from the drive, check:
• To see whether the CD drive path is the current directory (pwd) in a UNIXterminal window. If it is, change (cd) to another directory.
• For sybhelp processes. If these processes exist, kill them using the UNIX kill
command.
DISPLAY envi-ronment varia-ble not set cor-rectly
To correct the problem, enter the following command at the UNIX prompt of theremote machine, where host_name is the name of the machine on which you wantthe installer to appear (that is, on your local machine).
For C shell:
setenv DISPLAY host_name:0.0
For Bourne shell:
DISPLAY=host_name:0.0; export DISPLAY
Troubleshoot the Server
Installation Guide 95

Problem Resolution
Client not au-thorized to con-nect to server
This error message means the remote machine does not have permission to displaythe user interface on the local machine where you start working:
Xlib: connection to "host_name" refused by serverXlib: Client is not authorized to connect to Serverxhost: unable to open display "host_name"
To correct the problem:
1. Enter the following command at the UNIX prompt of your local machine,where remote_machine is the machine on which you are running the installer:
xhost +remote_machine
2. Restart the installer.
Address al-ready in use
To correct the problem, enter a different port number on the srvbuild window. Thecommand netstat -a produces a list of port numbers in use.
Adaptive Serv-er fails to start
The shared memory of the operating system may not be set high enough. Adjustthe shared memory value. Restart the installation or upgrade process.
The Installerfails to start
If the installer does not start, restart it using the debug mode, set the environmentvariable LAX_DEBUG to true before running the installer.
Cannot startXP Server
You may receive the following message from XP Server when it is invoked byxp_cmdshell or some other extended stored procedure:
Msg 11018, Level 16, State 1:Procedure "xp_cmdshell", Line 2:XP Server must be up for ESP to execute.(return status = -6)
Verify that there is an XP Server entry in the Adaptive Server sysservers table. Ifyou created XP Server in a different srvbuild session than Adaptive Server and youdid not specify a related Adaptive Server, srvbuild cannot update the sysserverstable. Verify that the XP server exists in the interfaces file or LDAP server.
Use sp_addserver to add an entry to the sysservers table.
Troubleshoot-ing ResourceFile Installa-tions
If you encounter problems during the build, configuration, or upgrade processwhile using the srvbuild[res], sqlloc[res], or sqlupgrade[res], it may be that theseutilities did not allow enough time for Adaptive Server to shut down properly. Setthe SYBSHUTWAIT environment variable to force the utilities to wait for Adap-tive Server to shut down. For example, this command forces the utility to wait fortwo minutes to allow Adaptive Server to shut down before proceeding with thenext task:
% setenv SYBSHUTWAIT 120
Troubleshoot the Server
96 Adaptive Server Enterprise
Stopping Adaptive Server After a FailureIf the installation or upgrade session fails after you start Adaptive Server for any reason, usethe shutdown command.
1. Log on as "sa".
2. Shut down Adaptive Server using the shutdown with nowait command. Using the withnowait option stops the Adaptive Server immediately, without waiting for currentlyexecuting SQL statements to finish:1> shutdown with nowait2> go
3. If the installation or upgrade session fails after you start Adaptive Server, try using SybaseCentral to shut down the server. If Sybase Central cannot shut down the server, use theshutdown command.
Recovering from a Failed InstallationIf the installation fails, you see error messages.Review the error messages and your Adaptive Server error log to determine the cause of theinstallation failure.
If the Installation Quits While You Are Configuring Adaptive ServerLearn what to do if the installation suddenly quits.
1. View the contents of the log file generated by Adaptive Server.
2. Take any suggested actions to correct the problem.
3. If the installation fails after the installation program:
• Created any operating system files, such as the master device or system proceduresdevice files – delete those files.
• Starts the Adaptive Server that you are attempting to install – shut down that server.
4. Use Server Config to restart the configuration.
If Adaptive Server Fails the Preupgrade Eligibility TestExamine the log file to determine why Adaptive Server was not eligible for an upgrade.
If Adaptive Server fails the pre-upgrade test, Server Configuration displays:Server SERVER_NAME failed preupgrade eligibility test.See log for more information.
1. From the Upgrade window, select Exit.
2. Examine the log file created in the $SYBASE/$SYBASE_ASE/init/logs directoryto find out why Adaptive Server failed the pre-upgrade eligibility test.
Troubleshoot the Server
Installation Guide 97
After you resolve any problems, shut down Adaptive Server and use sqlupgrade tocomplete the upgrade session.
When an Upgrade FailsIf the upgrade process fails, the installation program displays error messages.
Once you start Adaptive Server on the new version, you cannot start Adaptive Server on theearlier version. Attempts to do so result in having to restore from backups.
If You Can Identify the Cause of the Upgrade FailureIf the error logs or messages clearly indicate the cause of failure, and you do not believe yourdatabases have been damaged, you can attempt to fix the problem and re-run the upgradeimmediately.
1. Exit the sqlupgrade program.
2. Perform the necessary actions to fix the problem.
For example, if the error log indicates that the upgrade failed because your existingdatabases do not contain enough space, use the alter database command to increase theavailable space.
3. If needed, shut down Adaptive Server.
Shutting down the server enables the installation program to start the server and re-run theupgrade session.
4. Start sqlupgrade again.
5. Select Upgrade Adaptive Server, and proceed with the upgrade.
Restoring Databases After a Failed UpgradeYou may need to restore your databases due to a failed upgrade.
• If you think the upgrade failure or its cause may have damaged your databases, restore thedatabases from backups. For information on restoring databases, see the SystemAdministration Guide.
• If you are concerned about the possible corruption of your databases, exit Server Config,but do not attempt to restart the upgrade session until you have restored the databases frombackup. After restoration is complete, retry the upgrade.
Recovering from a Failed UpgradeIssues with upgrades could be due to a failure to upgrade an individual database, or a failure tocomplete configuration changes after all databases have been upgraded.
Use the output from the upgrade utility to correct the problem that caused the failure.
Troubleshoot the Server
98 Adaptive Server Enterprise
• If the upgrade failed because the process ran out of some resource, such as data or logspace, locks, or auxiliary scan descriptors, add space to the database using the alterdatabase command.
You may also correct other resource failures by changing the server’s configuration usingthe sp_configure stored procedure.
• If an upgrade failure leaves a database offline, and the failure can be corrected only bymaking data changes in the database, you can gain access to the failed database by usingisql or a similar program to connect to the affected server as user "sa" and issuing thiscommand:dbcc traceon(990)
Having set this trace flag, user "sa" can now use the offline database and make thenecessary changes to correct the upgrade failure.
Note: This trace flag grants access only to user "sa"; "sa_role" does not work. If you havedisabled the "sa" login, reenable it to get access using this method.
To restart a server that has not successfully upgraded, use:online database failed_db_name
The server restarts that database’s upgrade from the point of failure.• If the failure occurs after all databases have been upgraded, or if a failure somehow causes
the upgrade utility to fail, manually re-run the utility. After you diagnose and correct thefailure, run the upgrade utility:$SYBASE/$SYBASE_ASE/upgrade/upgrade
When restarted in this way, the upgrade process says it is "verifying" the upgrade ratherthan "starting" it, but it makes all the same checks as for the original upgrade.
• To verify that a database has upgraded successfully, check any database’s upgrade statususing the online database command. If any upgrade is required for a database, thiscommand performs it. You may also use a procedure such as this to check all databases at agiven installation:declare @dbname varchar(255) select @dbname = min(name) from master..sysdatabases while @dbname is not null begin online database @dbname select @dbname = min(name) from master..sysdatabases where name > @dbname end
• Reinstall system stored procedures using the scripts from the new version:isql -Usa -Ppassword -i $SYBASE/$SYBASE_ASE/scripts/installmaster
Note: When a server fails during an upgrade process, it attempts to upgrade the databaseswhen it restarts. When the installation is fully recovered, re-run the upgrade utility to
Troubleshoot the Server
Installation Guide 99

ensure that all post-upgrade configuration work is done. Then reinstall the system storedprocedures.
• During the upgrade process, the log may become too full due to recorded catalog changes.If so, log in to the new server using isql, and issue:isql> dump tran dbname with truncate_only
a) If truncate_only indicates that it could not truncate the log, retry the command asno_log instead.
b) If this does not truncate the log successfully, use the alter database command to extendthe database as explained below.
• In some cases, pre-upgrade space estimations are insufficient for the data copy phase ofupgrade. You see a message that there is insufficient space in the system segment for theupgrade. When this happens, the upgrade process stops responding, waiting for space to beprovided. To increase the size of the database, log in to the new server using isql, and usealter database:isql> alter database dbname on device_name = "2m"
alter database allows you to specify the size to alter the database with the unit specifier"m", or "M".
Note: There are certain upgrade failures from which the server cannot recover. Forexample, attempts to upgrade system tables to version 15.x are quite sensitive to failures atcertain points during the required changes. If you encounter such a failure, restore thefailed database from backup. To prevent the upgrade from failing again, correct theproblem that caused the original failure before issuing the online database command forthat database. These catastrophic failures are nearly always caused by running out ofresources, as described above, which then causes a failure to undo the aborted transaction.
If You Cannot Identify the Cause of an Upgrade FailureYour attempts to upgrade may continue to fail.
1. If attempts to upgrade continue to fail, check the error log file to identify where and wherethe upgrade failed.
By default, the log file is located in $SYBASE/$SYBASE_ASE/install/<servername>.log.
2. Contact Sybase Technical Support with the information.
Troubleshoot the Server
100 Adaptive Server Enterprise

Obtaining Help and Additional Information
Use the Sybase Getting Started CD, Product Documentation site, and online help to learnmore about this product release.
• The Getting Started CD (or download) – contains release bulletins and installation guidesin PDF format, and may contain other documents or updated information.
• Product Documentation at http://sybooks.sybase.com/ – is an online version of Sybasedocumentation that you can access using a standard Web browser. You can browsedocuments online, or download them as PDFs. In addition to product documentation, theWeb site also has links to EBFs/Maintenance, Technical Documents, Case Management,Solved Cases, Community Forums/Newsgroups, and other resources.
• Online help in the product, if available.
To read or print PDF documents, you need Adobe Acrobat Reader, which is available as a freedownload from the Adobe Web site.
Note: A more recent release bulletin, with critical product or document information addedafter the product release, may be available from the Product Documentation Web site.
Technical SupportGet support for Sybase products.
If your organization has purchased a support contract for this product, then one or more ofyour colleagues is designated as an authorized support contact. If you have any questions, or ifyou need assistance during the installation process, ask a designated person to contact SybaseTechnical Support or the Sybase subsidiary in your area.
Downloading Sybase EBFs and Maintenance ReportsGet EBFs and maintenance reports from the Sybase Web site or the SAP® ServiceMarketplace (SMP). The location you use depends on how you purchased the product.
• If you purchased the product directly from Sybase or from an authorized Sybasereseller:
a) Point your Web browser to http://www.sybase.com/support.b) Select Support > EBFs/Maintenance.c) If prompted, enter your MySybase user name and password.d) (Optional) Select a filter, a time frame, or both, and click Go.e) Select a product.
Obtaining Help and Additional Information
Installation Guide 101

Padlock icons indicate that you do not have download authorization for certain EBF/Maintenance releases because you are not registered as an authorized support contact.If you have not registered, but have valid information provided by your Sybaserepresentative or through your support contract, click My Account to add the“Technical Support Contact” role to your MySybase profile.
f) Click the Info icon to display the EBF/Maintenance report, or click the productdescription to download the software.
• If you ordered your Sybase product under an SAP contract:
a) Point your browser to http://service.sap.com/swdc.b) Select Search for Software Downloads and enter the name of your product. Click
Search.
Sybase Product and Component CertificationsCertification reports verify Sybase product performance on a particular platform.
To find the latest information about certifications:
• For partner product certifications, go to http://www.sybase.com/detail_list?id=9784• For platform certifications, go to http://certification.sybase.com/ucr/search.do
Creating a MySybase ProfileMySybase is a free service that allows you to create a personalized view of Sybase Web pages.
1. Go to http://www.sybase.com/mysybase.
2. Click Register Now.
Accessibility FeaturesAccessibility ensures access to electronic information for all users, including those withdisabilities.
Documentation for Sybase products is available in an HTML version that is designed foraccessibility.
Vision impaired users can navigate through the online document with an adaptive technologysuch as a screen reader, or view it with a screen enlarger.
Sybase HTML documentation has been tested for compliance with accessibility requirementsof Section 508 of the U.S Rehabilitation Act. Documents that comply with Section 508generally also meet non-U.S. accessibility guidelines, such as the World Wide WebConsortium (W3C) guidelines for Web sites.
Obtaining Help and Additional Information
102 Adaptive Server Enterprise
Note: You may need to configure your accessibility tool for optimal use. Some screen readerspronounce text based on its case; for example, they pronounce ALL UPPERCASE TEXT asinitials, and MixedCase Text as words. You might find it helpful to configure your tool toannounce syntax conventions. Consult the documentation for your tool.
For information about how Sybase supports accessibility, see the Sybase Accessibility site: http://www.sybase.com/products/accessibility. The site includes links to information aboutSection 508 and W3C standards.
You may find additional information about accessibility features in the productdocumentation.
Obtaining Help and Additional Information
Installation Guide 103

Obtaining Help and Additional Information
104 Adaptive Server Enterprise
IndexAAdaptive Server
uninstalling 83Adaptive Server editions 1
determining which edition you have 2Adaptive Server plug-in for Sybase Central 5additional steps for downgrading new features 78adjusting
shared memory parameters in operating system16
applicationschanging after renaming objects 47
BBacking up the server 29basic configuration 21basic downgrade steps using sp_downgrade 76
Ccommands
showserver 31Component Integration Services
upgrading local and remote servers 43configuration after installation
basic settings 21configuration parameters 81conflicting object names 47
Ddatabases
image data for sample 39optional 38
determining the current edition 2determining whether select* should be changed in
views 73determining whether to install or upgrade 9directory changes 26directory locations 5downgrading
Adaptive Server 75, 76handling new features 78
replicated databases, with 81steps to prepare beforehand 75
downgrading Adaptive Serverencrypted columns 80
downgrading back to the original installation afterupgrading 79
downgrading job scheduler 79dsedit utility 59
EEnabling the Java in the database in a high
availability system 69encrypted columns
downgrading Adaptive Server 80error log files
troubleshooting and 97
Ffails preupgrade eligibility 97file descriptors 15finding compiled object errors before production
72
GGUI installation 19
Iidentifiers
conflicting with reserved words 47increasing
device and database capacitysystem procedures 51
installation steps for PC-Client 33installer suddenly quits 97installing
command line 25silent mode 26unattended mode 26
installing Adaptive ServerGUI mode 19
installpix script 39
Index
Installation Guide 105
installpubs2 script 39installpubs3 script 39interfaces file 59
J
Java in the databasepreparing before installing Adaptive Server
18
K
keywords 81reserved by Sybase 53
L
LDAP librariesenvironment variables 35location of 35
license model 9licenses
check number of processors 12licensing software
obtaining 9
M
memory requirements 14minimal configuration
Adaptive Server 21
N
new featuresreverting to earlier version 78
O
objectsconflicting names of 47renaming 47
obtainingSySAM license 9
optional databases 38options for server editions
packages 2overview of the upgrade process 43
P
PC_Clientseparate products 7
PC-Clientdirectory layout 5product description 5system requirements for 33
planning the installation 9post downgrade 81preinstallation tasks 15preupgrade tasls
before upgrade 44
Q
quoted identifier errors 72quoted identifiers 48
R
re-running the upgrade 98recovering from a failed installation 97reenable Replication Server 59removing
existing server 83renaming objects 47replacing the binary 62replicated databases
restoring 60Replication Server 59
draining logs for Adaptive Server 59reserved words 47
conflicts 48resource files 55response file 25, 34restoring from backup 98
S
sample databases 38scripts
installpix 39installpubs2 39installpubs3 39location 38
select* problem areas 73
Index
106 Adaptive Server Enterprise

servercomponent descriptions 3directory layout 3overview 1
shared memory parametersadjusting 16
shared-memory segmentsallocating 14
showserver command 31source environment variables 19sp_checkreswords system procedure 47sqlupgrade utility 53sqlupgraderes utility 55stopping Adaptive Server after a failure 97stopping servers 97stored procedures
changing after renaming objects 47Sybase Central 5Sybase Control Center 5SYBASE directory 19sybsytemprocs database
increasing the size of 50SySAM
configure IPv6 12FLEXnet Publisher 11grace period 85license checkout 12license server version 11obtaining a license 9sub-capacity licensing 11
SySAM license server 11sysmessages 81system administrator password
setting 37system requirements
PC-Client 33Solaris 13
system stored procedures 81system tables 81
changes due to upgrade 47
T
technical supportcalling 91
troubleshootingby using error log files 97
U
uninstallingPC-Client 37registry entries 83server 83the old server 83
unknown cause of failure 98, 100unrecognized tokens or objects 81upgrading
failure 98upgrading compatibility
versions 43upgrading compiled objects
dbcc upgrade_object 71upgrading Job Scheduler templates 66Upgrading using BCP 62utilities
dsedit 59sqlupgrade 53sqlupgraderes 55
V
verifying connection to the server 31
Index
Installation Guide 107

Index
108 Adaptive Server Enterprise