installation guide 10g release 1 (10.1.1) for solaris operating system...
TRANSCRIPT

Oracle® Collaboration SuiteInstallation Guide
10g Release 1 (10.1.1) for Solaris Operating System (SPARC)
B14483-01
July 2005

Oracle Collaboration Suite Installation Guide, 10g Release 1 (10.1.1) for Solaris Operating System (SPARC)
B14483-01
Copyright © 2002, 2005, Oracle. All rights reserved.
Primary Authors: Meeta Gupta, Rashmi Patel
Contributors: Warren Briese, Stephen Mayer, Mohammed Yunus Qureshi, Janaka Ranatunga, Jayashree Natarajan, Chitra Kodali, Richard Hall, Suresh Mathew, Raymond Dutcher, Susan Kornberg, Sudip Roy, Nagarajan Ragunathan, Byung Choung, Rui Konno, Andrew Mitchell, Ellie Stiller, Madhubala Mahabaleshwar, Rima Dave, Priya Badkar, Valerie Moore, Mark Paterson, James Steven, Prakash Jashnani
The Programs (which include both the software and documentation) contain proprietary information; they are provided under a license agreement containing restrictions on use and disclosure and are also protected by copyright, patent, and other intellectual and industrial property laws. Reverse engineering, disassembly, or decompilation of the Programs, except to the extent required to obtain interoperability with other independently created software or as specified by law, is prohibited.
The information contained in this document is subject to change without notice. If you find any problems in the documentation, please report them to us in writing. This document is not warranted to be error-free. Except as may be expressly permitted in your license agreement for these Programs, no part of these Programs may be reproduced or transmitted in any form or by any means, electronic or mechanical, for any purpose.
If the Programs are delivered to the United States Government or anyone licensing or using the Programs on behalf of the United States Government, the following notice is applicable:
U.S. GOVERNMENT RIGHTS Programs, software, databases, and related documentation and technical data delivered to U.S. Government customers are "commercial computer software" or "commercial technical data" pursuant to the applicable Federal Acquisition Regulation and agency-specific supplemental regulations. As such, use, duplication, disclosure, modification, and adaptation of the Programs, including documentation and technical data, shall be subject to the licensing restrictions set forth in the applicable Oracle license agreement, and, to the extent applicable, the additional rights set forth in FAR 52.227-19, Commercial Computer Software--Restricted Rights (June 1987). Oracle Corporation, 500 Oracle Parkway, Redwood City, CA 94065
The Programs are not intended for use in any nuclear, aviation, mass transit, medical, or other inherently dangerous applications. It shall be the licensee's responsibility to take all appropriate fail-safe, backup, redundancy and other measures to ensure the safe use of such applications if the Programs are used for such purposes, and we disclaim liability for any damages caused by such use of the Programs.
Oracle, JD Edwards, PeopleSoft, and Retek are registered trademarks of Oracle Corporation and/or its affiliates. Other names may be trademarks of their respective owners.
The Programs may provide links to Web sites and access to content, products, and services from third parties. Oracle is not responsible for the availability of, or any content provided on, third-party Web sites. You bear all risks associated with the use of such content. If you choose to purchase any products or services from a third party, the relationship is directly between you and the third party. Oracle is not responsible for: (a) the quality of third-party products or services; or (b) fulfilling any of the terms of the agreement with the third party, including delivery of products or services and warranty obligations related to purchased products or services. Oracle is not responsible for any loss or damage of any sort that you may incur from dealing with any third party.

iii
Contents
Preface ............................................................................................................................................................. xxiii
Audience................................................................................................................................................... xxiiiDocumentation Accessibility ................................................................................................................. xxiiiRelated Documents ................................................................................................................................. xxivConventions ............................................................................................................................................. xxiv
1 What You Should Know Before Installation
1.1 Order of Installation ................................................................................................................... 1-21.2 Contents of Oracle Collaboration Suite DVD Pack................................................................ 1-21.3 Compatibility with Earlier Versions ........................................................................................ 1-21.4 Where Do I Install Oracle Collaboration Suite?...................................................................... 1-21.5 Oracle Home Directory .............................................................................................................. 1-31.6 Installing Any Oracle Product for the First Time................................................................... 1-41.7 What Are the Types of Installations Supported by Oracle Collaboration Suite? .............. 1-41.7.1 Basic Installation .................................................................................................................. 1-51.7.2 Advanced Installation ......................................................................................................... 1-71.7.2.1 Oracle Collaboration Suite Infrastructure Installation............................................ 1-81.7.2.2 Oracle Collaboration Suite Applications Installation.............................................. 1-81.7.2.3 Oracle Collaboration Suite Infrastructure and Applications Installation ............ 1-81.8 Installing Support for Additional Languages......................................................................... 1-81.9 Oracle Collaboration Suite Instances and Instance Names .................................................. 1-91.9.1 How Oracle Collaboration Suite Uses Instance Names ................................................. 1-91.10 The ias_admin User and Restrictions on Its Password ...................................................... 1-101.11 Where Does the Installer Write Files?................................................................................... 1-111.12 Why Do I Need to Log In as root at Certain Times During Installation? ........................ 1-111.13 Running root.sh During Installation ..................................................................................... 1-111.14 Connecting to Oracle Internet Directory Through SSL ...................................................... 1-12
2 Preparing to Install Oracle Collaboration Suite
2.1 Hardware Requirements............................................................................................................ 2-12.1.1 Considerations for Real-Time Collaboration................................................................... 2-32.1.2 Tips for Reducing Memory Usage .................................................................................... 2-42.2 Software Requirements .............................................................................................................. 2-42.2.1 Operating System Patches .................................................................................................. 2-42.2.2 Operating System Packages ............................................................................................... 2-6

iv
2.3 Kernel Parameters....................................................................................................................... 2-72.4 Ports ........................................................................................................................................... 2-102.4.1 Checking If a Port Is in Use ............................................................................................. 2-112.4.2 Using Default Port Numbers .......................................................................................... 2-112.4.3 Using Custom Port Numbers (The "Static Ports" File) ................................................ 2-112.4.3.1 Format of the staticports.ini File.............................................................................. 2-112.4.3.2 Error Conditions That Will Cause the Installer to Use Default Ports Instead of
Specified Ports 2-142.4.4 Ports for Oracle HTTP Server and OracleAS Web Cache........................................... 2-152.4.4.1 Examples That Use the staticports.ini File ............................................................. 2-152.4.5 If Port 1521 Is In Use......................................................................................................... 2-162.4.5.1 If Port 1521 Is Being Used by an Existing Oracle Database................................. 2-162.4.5.2 If Port 1521 Is Being Used by Some Other Application ....................................... 2-182.5 Operating System Groups ...................................................................................................... 2-182.5.1 Create a Group for the Inventory Directory ................................................................. 2-192.5.2 Create Groups for Database Administrators ................................................................ 2-202.6 Operating System User ........................................................................................................... 2-202.7 Environment Variables ........................................................................................................... 2-222.7.1 Environment Variable Tips ............................................................................................. 2-222.7.2 ORACLE_HOME and ORACLE_SID............................................................................ 2-222.7.3 PATH, CLASSPATH, and Shared Library Path Environment Variables................. 2-222.7.4 DISPLAY ............................................................................................................................ 2-222.7.5 TNS_ADMIN..................................................................................................................... 2-232.7.6 TMP..................................................................................................................................... 2-232.8 The /etc/hosts File .................................................................................................................. 2-242.8.1 Location of the Default Identity Management Realm................................................. 2-242.8.2 Host Name for Oracle Application Server Single Sign-On ........................................ 2-252.9 Network Topics ........................................................................................................................ 2-252.9.1 Installing Oracle Collaboration Suite on Multihomed Computers ........................... 2-252.9.2 Copying the DVD to a Hard Drive ................................................................................ 2-252.9.3 Installing Oracle Collaboration Suite from a Remote DVD-ROM Drive.................. 2-262.9.4 Installing Oracle Collaboration Suite on Remote Computers.................................... 2-272.9.5 Installing Oracle Collaboration Suite on NFS-Mounted Storage............................... 2-272.9.6 Support for NIS and NIS+ ............................................................................................... 2-282.10 Prerequisite Checks Performed by the Installer .................................................................. 2-28
3 Starting the Oracle Collaboration Suite Installation
3.1 Installing Oracle Collaboration Suite from the DVDs ........................................................... 3-13.1.1 Mounting DVDs for the Solaris Operating Environment (SPARC) ............................. 3-23.1.1.1 Mounting DVDs for the Solaris Operating Environment (SPARC) with Volume
Management Software 3-23.1.1.2 Mounting DVDs for the Solaris Operating Environment (SPARC) Manually.... 3-23.2 Installing Oracle Collaboration Suite from a Hard Drive ..................................................... 3-33.3 Understanding Oracle Universal Installer .............................................................................. 3-33.3.1 oraInventory Directory and Installation Session Log Files ........................................... 3-43.3.2 Additional Component Installations with Oracle Universal Installer......................... 3-43.4 Starting Oracle Universal Installer ........................................................................................... 3-5
v
4 Installing Oracle Collaboration Suite 10g Infrastructure
4.1 Types of Infrastructure Installation.......................................................................................... 4-14.1.1 Why Would I Select Different Types of Installation? ..................................................... 4-24.2 Order of Infrastructure Installation.......................................................................................... 4-24.3 Preparing to Install Oracle Collaboration Suite 10g Infrastructure ..................................... 4-34.3.1 Can I Install Components on Separate Computers?....................................................... 4-44.3.2 Tips for Installing Identity Management Components Separately .............................. 4-64.3.3 Do I Need the Oracle Delegated Administration Services or Oracle Directory
Integration and Provisioning Components? 4-74.3.4 Can I Use an Existing Instance of Oracle Internet Directory?....................................... 4-74.3.5 How Do I Register Oracle Collaboration Suite Database in Oracle Internet Directory
and Randomize the Password 4-84.3.6 Can I Use Multiple Oracle Collaboration Suite Databases? .......................................... 4-94.3.7 What High Availability Options Does Oracle Collaboration Suite Support?.......... 4-104.3.8 What are the Restrictions on the Passwords for the SYS and SYSTEM Users? ....... 4-104.3.9 What Do I Enter in the Specify Namespace in Internet Directory Screen? .............. 4-114.3.10 How Do I Determine Port Numbers Used by Components?..................................... 4-114.4 Understanding Common Installation Screens..................................................................... 4-124.4.1 First Few Screens of the Installation .............................................................................. 4-124.4.2 Screens of Oracle Collaboration Suite Database Installation ..................................... 4-154.4.3 Screens of OracleAS Certificate Authority Installation............................................... 4-184.4.4 Last Few Screens of the Installation ............................................................................... 4-194.5 Installing Oracle Collaboration Suite 10g Infrastructure ................................................... 4-204.5.1 Installing Oracle Collaboration Suite Database and Identity Management Components
in a New Database 4-214.5.2 Installing Only Oracle Collaboration Suite Database in a New Database ............... 4-224.5.3 Installing Oracle Collaboration Suite Database in an Existing Database ................. 4-234.5.4 Installing Identity Management Components Excluding Oracle Internet Directory ........
4-234.5.5 Installing Identity Management Components Including Oracle Internet Directory.........
4-254.5.6 Installing Only Oracle Internet Directory ..................................................................... 4-264.5.7 Installing Oracle Collaboration Suite 10g Infrastructure for an Existing Instance of
Oracle Internet Directory 4-274.5.8 Installing Only Oracle Application Server Certificate Authority and Oracle
Collaboration Suite Database 4-294.5.9 Running the OCSdbSchemaReg Script.......................................................................... 4-304.5.10 Using an Existing Instance of Identity Management from Oracle Application Server.....
4-334.5.11 Using an Existing Instance of OracleAS Portal from Oracle Application Server.... 4-33
5 Installing Oracle Collaboration Suite Database in an Existing Database
5.1 Preparing to Install ..................................................................................................................... 5-15.2 Installing Oracle Collaboration Suite Database in an Existing Database ........................... 5-25.2.1 Applying the 10g Release 1 (10.1.0.4.2) Patchset ............................................................. 5-25.2.1.1 Preinstallation Requirements...................................................................................... 5-25.2.1.2 Preinstallation Tasks .................................................................................................... 5-2

vi
5.2.1.3 Installation Tasks ....................................................................................................... 5-105.2.1.4 Postinstallation Tasks................................................................................................ 5-135.2.2 Installing Oracle Collaboration Suite............................................................................. 5-205.2.2.1 Preinstallation Tasks ................................................................................................. 5-205.2.2.2 Installation Tasks ....................................................................................................... 5-215.3 Split Configuration .................................................................................................................. 5-24
6 Configuring Oracle Internet Directory for Installation Privileges
6.1 Default Users in Oracle Internet Directory ............................................................................. 6-16.2 Groups in Oracle Internet Directory ........................................................................................ 6-26.2.1 Global Groups ...................................................................................................................... 6-26.2.2 Groups for Each Oracle Collaboration Suite 10g Database ........................................... 6-36.2.3 Groups for Each Component ............................................................................................. 6-36.3 Groups Required to Configure or Deinstall Components .................................................... 6-46.4 Groups Required to Install Oracle Collaboration Suite Database ....................................... 6-76.5 Creating Users in Oracle Internet Directory ........................................................................... 6-76.6 Adding Users to Groups in Oracle Internet Directory .......................................................... 6-76.6.1 Using Oracle Directory Manager to Add Users to Groups ........................................... 6-76.6.1.1 Navigating to Global Groups ..................................................................................... 6-86.6.1.2 Navigating to Oracle Collaboration Suite Database Groups ................................. 6-86.6.1.3 Navigating to Component Groups ............................................................................ 6-86.6.2 Using Deployment Delegation Console to Add Users to Groups................................ 6-96.7 Contents of a New Oracle Internet Directory ...................................................................... 6-106.8 User Name and Realm for Logging In to Oracle Internet Directory................................ 6-10
7 Installing Oracle Internet Directory in Replicated Mode
7.1 Oracle Internet Directory Replication Overview ................................................................... 7-17.1.1 Fan-Out Replication (LDAP Replication)......................................................................... 7-27.1.2 Multimaster Replication (Advanced Replication) .......................................................... 7-27.2 Requirements............................................................................................................................... 7-37.2.1 Database Requirements ...................................................................................................... 7-37.2.2 Clock Synchronization ........................................................................................................ 7-47.3 Installation Order........................................................................................................................ 7-47.4 Installing a Master Oracle Internet Directory ......................................................................... 7-47.5 Installing an Oracle Internet Directory Replica...................................................................... 7-57.5.1 Overview of Installing a Replica ....................................................................................... 7-57.5.2 Installing an Oracle Internet Directory Replica with a New Database........................ 7-57.5.3 Installing an Oracle Internet Directory Replica Against an Existing Database.......... 7-77.6 Accessing Oracle Application Server Single Sign-On and Oracle Delegated Administration
Services 7-9
8 Installing Oracle Collaboration Suite 10g Applications
8.1 Oracle Collaboration Suite 10g Applications and Oracle Collaboration Suite 10g Infrastructure 8-1
8.2 Components in Oracle Collaboration Suite Applications..................................................... 8-18.3 Which Components Do I Need? ............................................................................................... 8-2

vii
8.4 Component Dependencies......................................................................................................... 8-28.4.1 Component Dependency on Oracle Mail......................................................................... 8-28.4.2 Component Dependency on an Existing Instance of OracleAS Portal and Oracle
Collaborative Portlets 8-38.5 How Can I Determine the Port Numbers Used by Components?....................................... 8-48.6 Installing Oracle Collaboration Suite Applications Against an Upgraded Oracle Internet
Directory 8-48.7 Configuring Additional Applications-Tier Components After Installation ...................... 8-58.8 Can I Upgrade and Expand Oracle Collaboration Suite 10g Applications at the Same Time?
8-58.9 Can I Use a Specific Oracle Calendar Server Node ID During the Installation? ............... 8-58.9.1 Selecting a Node ID ............................................................................................................. 8-58.9.2 Not Connecting a Node ...................................................................................................... 8-58.10 Installing Oracle Collaboration Suite Applications ............................................................... 8-68.10.1 Preinstallation Tasks ........................................................................................................... 8-68.10.1.1 Sendmail-Related Tasks............................................................................................... 8-68.10.1.2 Oracle Collaboration Suite Search-Related Tasks.................................................... 8-68.10.2 First Few Screens of the Installation ................................................................................. 8-68.10.3 Component Installation Screens ........................................................................................ 8-98.10.4 Last Few Screens of the Installation ............................................................................... 8-11
9 Installing Oracle Collaboration Suite on a Single Computer
9.1 Using Basic Installation for Single-Computer Installation ................................................... 9-19.2 Using Advanced Installation for Single-Computer Installation .......................................... 9-29.2.1 Starting Single-Computer Installation.............................................................................. 9-29.2.2 Performing Single-Computer Installation........................................................................ 9-3
10 Installing Oracle Collaboration Suite in High Availability Environments
10.1 Understanding High Availability Configurations: Overview and Common Requirements .. 10-1
10.1.1 Understanding the Common High Availability Principles........................................ 10-110.1.1.1 Oracle Collaboration Suite Database Tier .............................................................. 10-110.1.1.2 Identity Management Service .................................................................................. 10-210.1.1.3 Oracle Calendar ........................................................................................................ 10-310.1.1.4 Oracle Collaboration Suite Applications Tier ....................................................... 10-310.1.2 Overview of High Availability Configurations ........................................................... 10-310.1.2.1 Single Cluster Architecture ...................................................................................... 10-410.1.2.2 Colocated Identity Management Architecture...................................................... 10-510.1.2.3 Distributed Identity Management Architecture ................................................... 10-710.1.2.4 Summary of Differences ......................................................................................... 10-1010.1.3 Installation Order for High Availability Configurations.......................................... 10-1010.1.4 Requirements for High Availability Configurations................................................. 10-1010.1.4.1 Check Minimum Number of Nodes ..................................................................... 10-1110.1.4.2 Check That Groups Are Defined Identically on All Nodes .............................. 10-1110.1.4.3 Check the Properties of the oracle User ............................................................... 10-1110.1.4.4 Check for Previous Oracle Installations on All Nodes ...................................... 10-1110.2 Preparing to Install Oracle Collaboration Suite in High Availability Environments .. 10-12

viii
10.2.1 Preinstallation Steps ....................................................................................................... 10-1210.2.1.1 Use the Same Path for the Oracle Home Directory (Recommended).............. 10-1210.2.1.2 Synchronize Clocks on All Nodes......................................................................... 10-1310.2.1.3 Configure Virtual Server Names and Ports for the Load Balancer.................. 10-1310.2.1.4 Configure Your LDAP Virtual Server to Direct Requests to Node 1 Initially 10-1310.2.1.5 Set Up Cookie Persistence on the Load Balancer................................................ 10-1310.2.2 About Oracle Internet Directory Passwords............................................................... 10-1410.2.3 About Configuring SSL and Non-SSL Ports for Oracle HTTP Server .................... 10-1410.2.3.1 Case 1: Client and the Load Balancer Use HTTP and the Load Balancer and Oracle
HTTP Server Also Use HTTP for Communication 10-1510.2.3.2 Case 2: Client and the Load Balancer Use HTTPS and the Load Balancer and
Oracle HTTP Server Also Use HTTPS for Communication 10-1510.2.3.3 Case 3: Client and the Load Balancer Use HTTPS and the Load Balancer and
Oracle HTTP Server Use HTTP for Communication 10-1610.3 Installing Oracle Calendar Server in High Availability Environments ......................... 10-1610.3.1 High Availability Configuration for Oracle Calendar .............................................. 10-1710.3.2 Preinstallation Steps for Installing Oracle Calendar in High Availability Environments
10-1710.3.2.1 Check That Clusterware Is Running..................................................................... 10-1710.3.2.2 Map the Virtual Host Name and Virtual IP Address......................................... 10-1710.3.2.3 Set Up a File System That Can Be Mounted from Both Nodes......................... 10-1910.3.2.4 Review Recommendations for Automatic Storage Management (ASM)........ 10-2010.3.3 Installing Oracle Calendar............................................................................................. 10-2010.3.3.1 Installing Oracle Calendar Server in a Cold Failover Cluster Configuration. 10-2210.3.3.2 Performing the Postinstallation Steps .................................................................. 10-2410.3.3.3 Installing Oracle Collaboration Suite Applications............................................ 10-24
11 Installing in High Availability Environments: Single Cluster Architecture
11.1 Summary of Installation Steps ............................................................................................... 11-111.2 Installing Oracle Collaboration Suite Single Cluster Architecture .................................. 11-111.2.1 Installing and Applying Patch to Oracle Cluster Ready Services ............................. 11-211.2.1.1 Installing Oracle Cluster Ready Services ............................................................... 11-211.2.1.2 Applying Oracle Cluster Ready Services 10.1.0.4.2 Patchset .............................. 11-411.2.2 Installing the Oracle Collaboration Suite Database on RAC...................................... 11-411.2.2.1 Prerequisites for Selecting the Types of RAC storage.......................................... 11-511.2.2.2 Review Recommendations for Automatic Storage Management (ASM).......... 11-511.2.2.3 Installation Tasks ....................................................................................................... 11-611.2.2.4 Postinstallation Tasks................................................................................................ 11-711.2.2.4.1 Troubleshooting the Installation Errors .......................................................... 11-711.2.3 Configuring Load Balancers for Identity Management .............................................. 11-711.2.3.1 Prerequisites for Installing Identity Management on High-Availability Nodes.........
11-711.2.3.1.1 Configuring the load balancer.......................................................................... 11-711.2.3.1.2 Synchronize the System Clocks on All Nodes ............................................... 11-811.2.4 Installing Identity Management on High Availability Nodes ................................... 11-911.2.4.1 Installing First Instance of Identity Management................................................. 11-911.2.4.2 Installing Subsequent Instance of Identity Management .................................. 11-1011.2.4.3 Postinstallation Tasks.............................................................................................. 11-13

ix
11.2.4.3.1 Troubleshooting the Installation Errors ........................................................ 11-1311.2.4.3.2 Performing Manual Postinstallation steps ................................................... 11-1311.2.5 Register the Oracle Collaboration Suite Database with Oracle Internet Directory and
Execute Component Database Configuration Assistants 11-1311.2.6 Installing Oracle Calendar Server ................................................................................ 11-1411.2.6.1 Preinstallation Tasks ............................................................................................... 11-1411.2.6.1.1 Check if the clusterware is running............................................................... 11-1411.2.6.1.2 Map the virtual hostname and virtual IP address....................................... 11-1411.2.6.1.3 Set Up a File System That Can Be Mounted from Both Nodes ................. 11-1611.2.6.2 Installation Tasks ..................................................................................................... 11-1711.2.6.3 Postinstallation tasks............................................................................................... 11-1911.2.6.3.1 Troubleshooting the Installation Errors ........................................................ 11-1911.2.6.3.2 Performing Manual Postinstallation Steps ................................................... 11-2011.2.7 Installing the First Instance of Oracle Collaboration Suite Applications (without Oracle
Calendar Server) 11-2011.2.8 Configuring the First Oracle Collaboration Suite Applications Tier with a Load
Balancer 11-2211.2.8.1 Configure the Load Balancer ................................................................................. 11-2211.2.8.2 Configure the Oracle HTTP Server with the Load Balancer ............................. 11-2311.2.8.3 Configure the Parallel Page Engine Loop-Back with the Load Balancer ........ 11-2411.2.8.4 Modify the Portal Dependency Settings (iasconfig.xml) File............................ 11-2511.2.8.5 Register the OracleAS Portal URLs with the Load Balancer............................. 11-2611.2.8.6 Reset the Oracle Enterprise Manager 10g Link ................................................... 11-2611.2.8.7 Configure OracleAS Web Cache with the Load Balancer ................................. 11-2611.2.8.8 Reregister mod_osso ............................................................................................... 11-2711.2.8.9 Verify Connectivity for Invalidation Messages from the Database to OracleAS Web
Cache on ocs_apps1.mycompany.com through the Load Balancer 11-2811.2.8.10 Enable Monitoring of the Frontend Host and Port Settings of the Load Balancer for
OracleAS Portal 11-2811.2.8.11 Configuring Real-Time Collaboration with Load Balancer .............................. 11-2811.2.8.12 Updating Oracle Collaboration Suite Service Registry Entries in Oracle Internet
Directory to Use the Load Balancer 11-2911.2.8.13 Test the Configuration ............................................................................................ 11-3211.2.9 Installing Subsequent Instance of Oracle Collaboration Suite Applications ......... 11-3311.2.9.1 Installation Tasks ..................................................................................................... 11-3311.2.9.2 Postinstallation tasks............................................................................................... 11-3511.2.9.2.1 Troubleshooting the Installation Errors ........................................................ 11-3511.2.9.2.2 Performing Manual Postinstallation Steps ................................................... 11-3611.2.10 Post Installation Steps for Subsequent Instances of Oracle Collaboration Suite
Applications to Work with the Load Balancer 11-3611.2.10.1 Enable Portal ............................................................................................................ 11-3711.2.10.2 Configure the Oracle HTTP Server with the Load Balancer ............................. 11-3811.2.10.3 Configure the Parallel Page Engine Loop-Back with the Load Balancer ........ 11-3911.2.10.4 Modify the Portal Dependency Settings (iasconfig.xml) File............................ 11-3911.2.10.5 Reregister mod_osso ............................................................................................... 11-4011.2.10.6 Configure OracleAS Web Cache Clusters............................................................ 11-4011.2.10.7 Enable Monitoring of the Frontend Host and Port Settings of the Load Balancer for
OracleAS Portal 11-42

x
11.2.10.8 Enable Session Binding on OracleAS Web Cache Clusters ............................... 11-4211.2.10.9 Configure Collaborative Portlets........................................................................... 11-4311.2.10.10 Configure Oracle Collaboration Suite Mobile Collaboration............................ 11-4311.2.10.11 Configure Oracle Discussions................................................................................ 11-4311.2.10.12 Test the Configuration ............................................................................................ 11-44
12 Installing in High Availability Environments: Colocated Identity Management Architecture
12.1 Summary of Installation Steps ............................................................................................... 12-112.2 Installing Oracle Collaboration Suite Colocated Identity Management Architecture... 12-212.2.1 Installing and Applying Patch to Oracle Cluster Ready Services ............................. 12-212.2.1.1 Installing Oracle Cluster Ready Services ............................................................... 12-212.2.1.2 Applying Oracle Cluster Ready Services 10.1.0.4.2 Patchset .............................. 12-412.2.2 Installing the Oracle Collaboration Suite Database on RAC...................................... 12-412.2.2.1 Prerequisites for Selecting the Types of RAC storage.......................................... 12-512.2.2.2 Review Recommendations for Automatic Storage Management (ASM).......... 12-512.2.2.3 Installation Tasks ....................................................................................................... 12-612.2.2.4 Postinstallation Tasks................................................................................................ 12-712.2.2.4.1 Troubleshooting the Installation Errors .......................................................... 12-712.2.3 Configuring Load Balancers for Identity Management .............................................. 12-712.2.3.1 Prerequisites for Installing Identity Management on High-Availability Nodes.........
12-712.2.3.1.1 Configuring the load balancer.......................................................................... 12-712.2.3.1.2 Synchronize the System Clocks on All Nodes ............................................... 12-812.2.4 Installing Identity Management on High Availability Nodes ................................... 12-912.2.4.1 Installing First Instance of Identity Management................................................. 12-912.2.4.2 Installing Subsequent Instance of Identity Management .................................. 12-1012.2.4.3 Postinstallation Tasks.............................................................................................. 12-1312.2.4.3.1 Troubleshooting the Installation Errors ........................................................ 12-1312.2.4.3.2 Performing Manual Postinstallation steps.................................................... 12-1312.2.5 Register the Oracle Collaboration Suite Database with Oracle Internet Directory and
Execute Component Database Configuration Assistants 12-1312.2.6 Installing Oracle Calendar Server ................................................................................ 12-1412.2.6.1 Preinstallation Tasks ............................................................................................... 12-1412.2.6.1.1 Check if the clusterware is running............................................................... 12-1412.2.6.1.2 Map the virtual hostname and virtual IP address....................................... 12-1412.2.6.1.3 Set Up a File System That Can Be Mounted from Both Nodes ................. 12-1612.2.6.2 Installation Tasks ..................................................................................................... 12-1712.2.6.3 Postinstallation tasks............................................................................................... 12-1912.2.6.3.1 Troubleshooting the Installation Errors ........................................................ 12-1912.2.6.3.2 Performing Manual Postinstallation Steps ................................................... 12-2012.2.7 Installing the First Instance of Oracle Collaboration Suite Applications (without Oracle
Calendar Server) 12-2012.2.8 Configuring the First Oracle Collaboration Suite Applications Tier with a Load
Balancer 12-2212.2.8.1 Configure the Load Balancer ................................................................................. 12-2212.2.8.2 Configure the Oracle HTTP Server with the Load Balancer ............................. 12-2312.2.8.3 Configure the Parallel Page Engine Loop-Back with the Load Balancer ........ 12-24

xi
12.2.8.4 Modify the Portal Dependency Settings (iasconfig.xml) File............................ 12-2512.2.8.5 Register the OracleAS Portal URLs with the Load Balancer............................. 12-2612.2.8.6 Reset the Oracle Enterprise Manager 10g Link ................................................... 12-2612.2.8.7 Configure OracleAS Web Cache with the Load Balancer ................................. 12-2612.2.8.8 Reregister mod_osso ............................................................................................... 12-2712.2.8.9 Verify Connectivity for Invalidation Messages from the Database to OracleAS Web
Cache on ocs_apps1.mycompany.com through the Load Balancer 12-2812.2.8.10 Enable Monitoring of the Frontend Host and Port Settings of the Load Balancer for
OracleAS Portal 12-2812.2.8.11 Configuring Oracle Real-Time Collaboration with Load Balancer.................. 12-2812.2.8.12 Updating Oracle Collaboration Suite Service Registry Entries in Oracle Internet
Directory to Use the Load Balancer 12-2912.2.8.13 Test the Configuration ............................................................................................ 12-3212.2.9 Installing Subsequent Instance of Oracle Collaboration Suite Applications ......... 12-3312.2.9.1 Installation Tasks ..................................................................................................... 12-3312.2.9.2 Postinstallation tasks............................................................................................... 12-3512.2.9.2.1 Troubleshooting the Installation Errors ........................................................ 12-3512.2.9.2.2 Performing Manual Postinstallation Steps ................................................... 12-3612.2.10 Post Installation Steps to Redeploy Oracle Collaboration Suite Applications with a
Load Balancer 12-3612.2.10.1 Enable Portal ............................................................................................................ 12-3712.2.10.2 Configure the Oracle HTTP Server with the Load Balancer ............................. 12-3812.2.10.3 Configure the Parallel Page Engine Loop-Back with the Load Balancer ........ 12-3912.2.10.4 Modify the Portal Dependency Settings (iasconfig.xml) File............................ 12-3912.2.10.5 Reregister mod_osso ............................................................................................... 12-4012.2.10.6 Configure OracleAS Web Cache Clusters............................................................ 12-4012.2.10.7 Enable Monitoring of the Frontend Host and Port Settings of the Load Balancer for
OracleAS Portal 12-4212.2.10.8 Enable Session Binding on OracleAS Web Cache Clusters ............................... 12-4212.2.10.9 Configure Collaborative Portlets........................................................................... 12-4312.2.10.10 Configure Oracle Collaboration Suite Mobile Collaboration............................ 12-4312.2.10.11 Configuring Oracle Discussions............................................................................ 12-4312.2.10.12 Test the Configuration ............................................................................................ 12-44
13 Installing in High Availability Environments: Distributed Identity Management Architecture
13.1 Summary of Installation Steps ............................................................................................... 13-113.2 Installing Oracle Collaboration Suite Distributed Identity Management Architecture 13-213.2.1 Installing and Applying Patch to Oracle Cluster Ready Services ............................. 13-213.2.1.1 Installing Oracle Cluster Ready Services ............................................................... 13-213.2.1.2 Applying Oracle Cluster Ready Services 10.1.0.4.2 Patchset .............................. 13-413.2.2 Installing the Oracle Collaboration Suite Database on RAC...................................... 13-413.2.2.1 Prerequisites for Selecting the Types of RAC storage.......................................... 13-513.2.2.2 Review Recommendations for Automatic Storage Management (ASM).......... 13-513.2.2.3 Installation Tasks ....................................................................................................... 13-613.2.2.4 Postinstallation Tasks................................................................................................ 13-713.2.2.4.1 Troubleshooting the Installation Errors .......................................................... 13-7

xii
13.2.3 Configuring Load Balancers for Identity Management .............................................. 13-713.2.3.1 Prerequisites for Installing Identity Management on High-Availability Nodes.........
13-713.2.3.1.1 Configuring the load balancer.......................................................................... 13-713.2.3.1.2 Synchronize the System Clocks on All Nodes ............................................... 13-813.2.4 Installing Identity Management on High Availability Nodes ................................... 13-813.2.4.1 Installing First Instance of Oracle Internet Directory and Directory Integration and
Provisioning 13-913.2.4.2 Installing Second Instance of Oracle Internet Directory and Directory Integration
and Provisioning 13-1013.2.4.3 Postinstallation Tasks.............................................................................................. 13-1213.2.4.3.1 Troubleshooting the Installation Errors ........................................................ 13-1213.2.4.3.2 Performing Manual Postinstallation steps.................................................... 13-1213.2.4.4 Installing First Instance of Delegated Administration Services and OracleAS Single
Sign-On 13-1213.2.4.5 Installing Second Instance of Delegated Administration Services and OracleAS
Single Sign-On 13-1313.2.5 Register the Oracle Collaboration Suite Database with Oracle Internet Directory and
Execute Component Database Configuration Assistants 13-1513.2.6 Installing Oracle Calendar Server ................................................................................ 13-1513.2.6.1 Preinstallation Tasks ............................................................................................... 13-1513.2.6.1.1 Check if the clusterware is running............................................................... 13-1613.2.6.1.2 Map the virtual hostname and virtual IP address....................................... 13-1613.2.6.1.3 Set Up a File System That Can Be Mounted from Both Nodes ................. 13-1813.2.6.2 Installation Tasks ..................................................................................................... 13-1813.2.6.3 Postinstallation tasks............................................................................................... 13-2113.2.6.3.1 Troubleshooting the Installation Errors ........................................................ 13-2113.2.6.3.2 Performing Manual Postinstallation Steps ................................................... 13-2113.2.7 Installing the First Instance of Oracle Collaboration Suite Applications (without Oracle
Calendar Server) 13-2113.2.8 Configuring the First Oracle Collaboration Suite Applications Tier with a Load
Balancer 13-2313.2.8.1 Configure the Load Balancer ................................................................................. 13-2413.2.8.2 Configure the Oracle HTTP Server with the Load Balancer ............................. 13-2513.2.8.3 Configure the Parallel Page Engine Loop-Back with the Load Balancer ........ 13-2513.2.8.4 Modify the Portal Dependency Settings (iasconfig.xml) File............................ 13-2613.2.8.5 Register the OracleAS Portal URLs with the Load Balancer............................. 13-2713.2.8.6 Reset the Oracle Enterprise Manager 10g Link ................................................... 13-2713.2.8.7 Configure OracleAS Web Cache with the Load Balancer ................................. 13-2813.2.8.8 Reregister mod_osso ............................................................................................... 13-2913.2.8.9 Verify Connectivity for Invalidation Messages from the Database to OracleAS Web
Cache on ocs_apps1.mycompany.com through the Load Balancer 13-3013.2.8.10 Enable Monitoring of the Frontend Host and Port Settings of the Load Balancer for
OracleAS Portal 13-3013.2.8.11 Configuring Real-Time Collaboration with Load Balancer .............................. 13-3013.2.8.12 Updating Oracle Collaboration Suite Service Registry Entries in Oracle Internet
Directory to Use the Load Balancer 13-3113.2.8.13 Test the Configuration ............................................................................................ 13-3413.2.9 Installing Subsequent Instance of Oracle Collaboration Suite Applications ......... 13-35
xiii
13.2.9.1 Installation Tasks ..................................................................................................... 13-3513.2.9.2 Postinstallation tasks............................................................................................... 13-3613.2.9.2.1 Troubleshooting the Installation Errors ........................................................ 13-3713.2.9.2.2 Performing Manual Postinstallation Steps ................................................... 13-3713.2.10 Post Installation Steps to Redeploy Oracle Collaboration Suite Applications with a
Load Balancer 13-3813.2.10.1 Enable Portal ............................................................................................................ 13-3913.2.10.2 Configure the Oracle HTTP Server with the Load Balancer ............................. 13-3913.2.10.3 Configure the Parallel Page Engine Loop-Back with the Load Balancer ........ 13-4013.2.10.4 Modify the Portal Dependency Settings (iasconfig.xml) File............................ 13-4113.2.10.5 Reregister mod_osso ............................................................................................... 13-4113.2.10.6 Configure OracleAS Web Cache Clusters............................................................ 13-4213.2.10.7 Enable Monitoring of the Frontend Host and Port Settings of the Load Balancer for
OracleAS Portal 13-4313.2.10.8 Enable Session Binding on OracleAS Web Cache Clusters ............................... 13-4313.2.10.9 Configure Collaborative Portlets........................................................................... 13-4413.2.10.10 Configure Oracle Collaboration Suite Mobile Collaboration............................ 13-4513.2.10.11 Configure Oracle Discussions................................................................................ 13-4513.2.10.12 Test the Configuration ............................................................................................ 13-45
14 Silent and Noninteractive Installation
14.1 Introduction to Noninteractive Installations ....................................................................... 14-114.1.1 Silent Installation .............................................................................................................. 14-114.1.2 Noninteractive Installation.............................................................................................. 14-214.2 Installation Requirements....................................................................................................... 14-214.3 Installing Oracle Application Server Certificate Authority............................................... 14-214.4 Creating Files for Silent and Noninteractive Installation................................................... 14-314.4.1 oraInst.loc File Creation................................................................................................... 14-314.4.2 oratab File Creation .......................................................................................................... 14-314.5 Selecting a Response File ........................................................................................................ 14-314.6 Editing the Response File........................................................................................................ 14-414.7 Creating a Response File Using the Record Mode in the Installer ................................... 14-514.8 Specifying a Response File and Starting the Installation ................................................... 14-514.9 Running the root.sh Script...................................................................................................... 14-614.9.1 root.sh and Silent Installation ......................................................................................... 14-614.9.1.1 Oracle HTTP Server .................................................................................................. 14-614.9.1.2 Using Oracle HTTP Server on a Different Port ..................................................... 14-714.9.2 root.sh and Noninteractive Installation......................................................................... 14-714.10 Error Handling ......................................................................................................................... 14-714.11 Deinstallation............................................................................................................................ 14-814.12 Using Configuration Assistants in Noninteractive Mode.................................................. 14-814.12.1 Response File Error Handling......................................................................................... 14-9
15 Postinstallation Tasks for Oracle Collaboration Suite
15.1 Setting Environment Variables .............................................................................................. 15-115.2 Modifying Password Settings for Oracle Internet Directory............................................. 15-2

xiv
15.3 Enabling SSL............................................................................................................................. 15-315.4 Performing Component-Specific Tasks ................................................................................ 15-415.4.1 Configuring Oracle Mail and TNS Listener.................................................................. 15-415.4.2 Configuring Oracle Collaboration Suite Search ........................................................... 15-4
16 End-User Documentation Portal Installation
16.1 Installing the End-User Documentation Portal ................................................................... 16-116.1.1 Testing PHP ....................................................................................................................... 16-116.1.2 Installing the DOM XML Extension............................................................................... 16-216.2 Deploying the End-User Documentation Portal Package.................................................. 16-316.3 Restricting Access to End-User Documentation Portal Administration Panel............... 16-416.4 Securing End-User Documentation Portal Administration Panel with Apache
Authentication 16-4
A What’s New in the Installation
A.1 No Manual Configuration ........................................................................................................ A-1A.2 Option of Changing Ports During Installation ...................................................................... A-2A.3 Improved Oracle Collaboration Suite Infrastructure and Applications Installation on a
Single Computer A-2A.4 Changes in Oracle Collaboration Suite Database (Previously Known as Information
Storage) A-2A.5 Changes in Applications Tier Installation.............................................................................. A-2A.6 Support for High Availability Configurations ...................................................................... A-3A.7 Support for Secure Installation ................................................................................................ A-3A.8 Enhancements in Configuration Assistants ........................................................................... A-3A.9 More Prerequisite Checks......................................................................................................... A-3A.10 Support for Generating Installation Statistics........................................................................ A-3A.11 Changed Terminology .............................................................................................................. A-4A.12 Oracle Collaboration Suite Database Uses Oracle 10g Database ........................................ A-4A.13 Support for Oracle Internet Directory Replication ............................................................... A-4
B Installation Checklists for Oracle Collaboration Suite
B.1 Oracle Collaboration Suite 10g Infrastructure Installation Checklist................................. B-1B.2 Oracle Collaboration Suite 10g Applications Installation Checklist................................... B-2
C Installing Oracle Calendar Standalone
C.1 System Requirements ................................................................................................................ C-1C.1.1 Common Requirements ..................................................................................................... C-2C.1.2 Oracle Calendar Server Requirements ............................................................................ C-2C.1.3 Oracle Calendar Application System Requirements ..................................................... C-3C.2 Preinstallation............................................................................................................................. C-3C.2.1 Setting Up Your Directory Server .................................................................................... C-4C.2.1.1 Terminology for Directory Servers ........................................................................... C-4C.2.1.2 Setting Up a Sun ONE Directory Server .................................................................. C-5C.2.1.3 Setting Up an OpenLDAP Directory Server............................................................ C-5C.2.1.4 Setting Up a Syntegra Aphelion Directory Server.................................................. C-6

xv
C.2.2 Planning Separate Installations of the Oracle Calendar Application System and the Oracle Calendar Server C-6
C.3 Installation .................................................................................................................................. C-7C.3.1 Installing Oracle Calendar Server and the Oracle Calendar Application System .... C-7C.3.2 Installing Oracle Calendar Server Only .......................................................................... C-9C.3.3 Installing Oracle Calendar Application System Only ................................................... C-9C.3.4 Manually Running the Oracle Calendar Server Configuration Assistant.................. C-9C.3.5 Manually Starting and Stopping the Oracle Calendar Application System ............ C-10C.4 Upgrades ................................................................................................................................... C-11C.5 Postinstallation Configuration ............................................................................................... C-11C.5.1 Configuring the Oracle Calendar Application System and Oracle Calendar
Administrator C-11C.5.2 Configuring the Directory Server................................................................................... C-12C.5.2.1 Configuring a Sun ONE Directory Server ............................................................. C-12C.5.2.2 Configuring an OpenLDAP ..................................................................................... C-12C.5.2.3 Syntegra Aphelion Directory Server....................................................................... C-12C.5.3 Configuring the Oracle Calendar Server....................................................................... C-13C.5.3.1 Starting and Stopping the Oracle Calendar Server .............................................. C-13C.5.3.2 Checking Port Values................................................................................................ C-13C.5.3.3 Opening and Configuring Oracle Calendar Administrator................................ C-13C.5.3.4 Setting Up Resource Approval ................................................................................ C-14C.5.3.5 Working with LD_LIBRARY_PATH ...................................................................... C-15C.5.3.6 Working with Security Mechanisms....................................................................... C-15C.5.4 Checking and Configuring the Oracle Calendar Application System...................... C-15C.5.4.1 Checking the Status of the Oracle Calendar Application System ...................... C-15C.5.4.2 Configuring the Oracle Calendar Application System ........................................ C-15C.5.5 Configuring Oracle Calendar E-mail Delivery............................................................. C-16C.5.6 Configuring Oracle Calendar Web Client with a Traditional Node Network ........ C-16C.6 Oracle Calendar Deinstallation.............................................................................................. C-18C.7 General Issues and Workarounds ......................................................................................... C-18C.7.1 Oracle Calendar Server Issues ........................................................................................ C-18C.7.1.1 Installation .................................................................................................................. C-18C.7.1.2 Reinstallation.............................................................................................................. C-19C.7.1.3 Coexistence and Upgrades....................................................................................... C-19C.7.1.4 Designates................................................................................................................... C-20C.7.1.5 Other Issues ................................................................................................................ C-20C.7.2 Oracle Calendar Application System Issues................................................................. C-21C.7.2.1 Installation-Related Issues........................................................................................ C-21C.7.2.2 Upgrade-Related Issues............................................................................................ C-21
D Installing Oracle Collaboration Suite Clients
D.1 Installing Oracle Calendar Clients .......................................................................................... D-1D.1.1 Installing the Oracle Calendar Desktop Client............................................................... D-1D.1.1.1 Installing the Oracle Calendar Desktop Client for Linux...................................... D-1D.1.1.2 Installing the Oracle Calendar Desktop Client for Macintosh.............................. D-3D.1.1.3 Installing the Oracle Calendar Desktop Client for Solaris .................................... D-3D.1.1.4 Installing the Oracle Calendar Desktop Client for Windows ............................... D-5
xvi
D.1.1.5 Customizing the Oracle Calendar Initialization File.............................................. D-7D.1.2 Installing Oracle Calendar Sync ....................................................................................... D-7D.1.2.1 Installing Oracle Calendar Sync for Palm for Macintosh ...................................... D-7D.1.2.2 Installing Oracle Calendar Sync for Palm for Windows...................................... D-11D.1.2.3 Installing Oracle Calendar Sync for Pocket PC..................................................... D-13D.2 Installing Oracle Connector for Outlook .............................................................................. D-15D.2.1 System Requirements....................................................................................................... D-16D.2.2 Preinstallation Requirements.......................................................................................... D-17D.2.3 Installing Oracle Connector for Outlook on the Desktop........................................... D-17D.2.4 Installing Oracle Connector for Outlook in Interactive Mode ................................... D-18D.2.4.1 Specifying the Installation Language for a First-Time Installation of Oracle
Connector for Outlook D-18D.2.4.2 Upgrading Oracle Connector for Outlook............................................................. D-20D.2.4.3 Modifying, Repairing, or Removing Oracle Connector for Outlook ................. D-20D.2.4.4 Troubleshooting an Oracle Connector for Outlook Installation......................... D-21D.2.5 Installing Oracle Connector for Outlook in Silent Mode ............................................ D-22D.2.5.1 The Initialization File ................................................................................................ D-22D.2.5.2 Configuring the Initialization File........................................................................... D-23D.2.5.3 Upgrading, Maintaining, or Removing Oracle Connector for Outlook in Silent
Mode D-25D.2.6 Installing Oracle Connector for Outlook with Additional Privileges....................... D-25D.2.6.1 Setting the AlwaysInstall Elevated Policy ............................................................. D-26D.2.6.2 Performing an Advertised Installation of Oracle Connector for Outlook ........ D-26D.2.6.3 Deploying the Oracle Connector for Outlook Package Using Group Policy ... D-26D.2.7 Using the Configuration Wizard to Configure Oracle Connector for Outlook....... D-27D.2.7.1 Interactive Profile Creation and Configuration Mode......................................... D-28D.2.7.2 Interactive PRF File Creation Mode........................................................................ D-28D.2.7.3 Silent Profile Creation Mode.................................................................................... D-29D.3 Installing Oracle Real-Time Collaboration Clients ............................................................. D-30D.3.1 System Requirements for Oracle Real-Time Collaboration Clients .......................... D-30D.3.2 Installing the Oracle Web Conferencing Client............................................................ D-31D.3.3 Installing the RTC Messenger Client ............................................................................. D-31
E Using Command-Line Options and Variables
E.1 Running Prerequisite Checks ................................................................................................... E-1E.2 Starting Oracle Universal Installer .......................................................................................... E-1E.3 Specifying Custom Ports........................................................................................................... E-2
F URLs for Components
G Default Port Numbers for Oracle Collaboration Suite Components
G.1 Method of Assigning Default Port Numbers......................................................................... G-1G.2 Default Port Numbers ............................................................................................................... G-1
H Deinstallation and Reinstallation
H.1 The Deconfig Tool...................................................................................................................... H-1

xvii
H.1.1 Parameters ........................................................................................................................... H-2H.1.2 Log Files Generated by the Deconfig Tool...................................................................... H-2H.2 Overview of the Deinstallation Procedure............................................................................ H-2H.3 Deinstalling Applications Tiers ............................................................................................... H-4H.4 Deinstalling Oracle Collaboration Suite Database................................................................ H-5H.5 Deinstalling Oracle Collaboration Suite Infrastructure........................................................ H-6H.5.1 Deinstallation Order........................................................................................................... H-6H.5.2 Deinstallation Steps ............................................................................................................ H-7H.6 Deinstalling a Single-Computer Installation.......................................................................... H-8H.7 Harmless Errors in the Log File ............................................................................................... H-9H.8 Cleaning Up Oracle Collaboration Suite Processes .............................................................. H-9H.9 Reinstallation ............................................................................................................................ H-10
I Troubleshooting
I.1 Verifying Requirements .............................................................................................................. I-1I.1.1 Checking Dependencies....................................................................................................... I-1I.1.2 Reading the Release Notes .................................................................................................. I-1I.2 Troubleshooting User Interface Problems ............................................................................... I-2I.3 Troubleshooting Installation Errors .......................................................................................... I-2I.4 Troubleshooting Configuration Assistants .............................................................................. I-2I.4.1 General Tips........................................................................................................................... I-2I.4.2 Configuration Assistant Result Codes............................................................................... I-3I.4.3 Failure During Component Configuration and Startup ................................................. I-3I.4.4 Irrecoverable Errors.............................................................................................................. I-4I.5 Troubleshooting Administration Errors After Installation.................................................... I-4I.5.1 Failure to Restart Oracle Calendar ..................................................................................... I-4I.6 Troubleshooting Oracle Collaboration Suite Web Client Configuration ............................ I-5I.7 Troubleshooting Oracle Real Application Clusters ................................................................ I-6I.8 Need More Help?......................................................................................................................... I-6
J Sample Load Balancer Configuration For High Availability Installations
Index

xviii

xix
List of Figures
1–1 Configuration with Multiple Applications Tiers and an Infrastructure............................. 1-31–2 Types of Oracle Collaboration Suite Installations.................................................................. 1-52–1 Configuring Both OracleAS Web Cache and Oracle HTTP Server .................................. 2-152–2 Suggested Directory Structure for Copying DVD Content to Hard Disk ....................... 2-264–1 Multiple Instances of Oracle Collaboration Suite Database in Use .................................. 4-104–2 Sequence for the First Few Screens in the Installation ....................................................... 4-157–1 Example of Fan-Out Replication (LDAP Replication)........................................................... 7-27–2 Example of Multimaster Replication (Advanced Replication) ............................................ 7-38–1 Sequence of the Screens During Oracle Collaboration Suite Applications Installation ... 8-710–1 A Typical Single Cluster Architecture Configuration ........................................................ 10-510–2 A Typical Colocated Identity Management Architecture Configuration........................ 10-710–3 A Typical Distributed Identity Management Architecture Configuration ..................... 10-910–4 Oracle Calendar High Availability Configuration............................................................ 10-2116–1 Default PHP Page..................................................................................................................... 16-2

xx
List of Tables
1–1 Directories to Which the Installer Writes Files ................................................................... 1-112–1 Hardware Requirements for Solaris Systems ........................................................................ 2-22–2 Required Patches for Solaris Operating Systems .................................................................. 2-52–3 Kernel Parameters Settings for Solaris Systems .................................................................... 2-72–4 Location of the staticports.ini File on DVD......................................................................... 2-132–5 Scenarios and Outcomes While Installing Infrastructure On a Computer Already Having a
Database 2-172–6 Privileges for the OSDBA and OSOPER Groups ............................................................... 2-202–7 Properties of the Operating System User Who Runs the Installer .................................. 2-202–8 Environment Variables Summary ........................................................................................ 2-222–9 Prerequisite Checks Performed by the Installer ................................................................. 2-284–1 Oracle Collaboration Suite 10g Infrastructure Components ............................................... 4-14–2 Oracle Collaboration Suite 10g Infrastructure Configurations ........................................... 4-54–3 Supported Versions of Oracle Internet Directory ................................................................. 4-84–4 Database Registration Scenarios .............................................................................................. 4-94–5 First Few Screens of the Installation..................................................................................... 4-134–6 Screens of Oracle Collaboration Suite Database Installation............................................ 4-164–7 Screens of OracleAS Certificate Authority Installation ..................................................... 4-194–8 Last Few Screens of the Installation ..................................................................................... 4-204–9 Installation Screens for Collaboration Suite Database and Identity Management
Components in a New Database 4-214–10 Screens for Installing Only Collaboration Suite Database in a New Database.............. 4-224–11 Screens for Installing Identity Management Components Excluding Oracle Internet
Directory 4-244–12 Screens for Installing Identity Management Components Including Oracle Internet
Directory 4-254–13 Screens for Installing Only Oracle Internet Directory ....................................................... 4-274–14 Screens for Installing Oracle Collaboration Suite Infrastructure for an Existing Instance of
Oracle Internet Directory 4-284–15 Screens for Installing Only OracleAS Certificate Authority and Collaboration Suite
Database 4-305–1 Database Configuration Parameters and Their Minimum Values for Installing Oracle
Collaboration Suite in an Existing Database 5-205–2 Screens for Installing Oracle Collaboration Suite in an Existing Database .................... 5-216–1 Global Groups ............................................................................................................................ 6-26–2 Metadata Repository Groups That Are Registered with Oracle Internet Directory ........ 6-36–3 Groups Associated with Each Oracle Collaboration Suite Component ............................ 6-36–4 Oracle Internet Directory Groups Required to Configure Components ........................... 6-47–1 Installing an Oracle Internet Directory Replica with a New Database .............................. 7-67–2 Installing an Oracle Internet Directory Replica Against an Existing Database ................ 7-88–1 Components in Oracle Collaboration Suite Applications.................................................... 8-28–2 First Few Screens of the Installation........................................................................................ 8-88–3 Component Installation Screens ........................................................................................... 8-108–4 Remaining Screens of the Installation.................................................................................. 8-119–1 Screens for Single-Computer installation............................................................................... 9-29–2 Screens for Single-Computer installation............................................................................... 9-310–1 Differences Among the High Availability Configurations............................................. 10-1010–2 Case 1: Screen and Configuration File Values .................................................................. 10-1510–3 Case 2: Screen and Configuration File Values .................................................................. 10-1610–4 Case 3: Screen and Configuration File Values .................................................................. 10-1610–5 Installing Oracle Calendar Server in a Cold Failover Cluster Configuration .............. 10-2211–1 Installing Oracle Cluster Ready Services............................................................................. 11-211–2 Installing Oracle Cluster Ready Services............................................................................. 11-4

xxi
11–3 Installing Oracle Collaboration Suite Database.................................................................. 11-611–4 Installing First Instance of Identity Management .............................................................. 11-911–5 Installing Subsequent instance of Identity Management................................................ 11-1111–6 Installing Oracle Calendar Server in Cold Failover Cluster Configuration ................. 11-1711–7 Installing First Instance of Oracle Collaboration Suite Applications ............................ 11-2011–8 Installing Subsequent Instance of Oracle Collaboration Suite Applications................ 11-3312–1 Installing Oracle Cluster Ready Services............................................................................. 12-212–2 Installing Oracle Cluster Ready Services............................................................................. 12-412–3 Installing Oracle Collaboration Suite Database.................................................................. 12-612–4 Installing First Instance of Identity Management .............................................................. 12-912–5 Installing Subsequent instance of Identity Management................................................ 12-1112–6 Installing Oracle Calendar Server in Cold Failover Cluster Configuration ................. 12-1712–7 Installing First Instance of Oracle Collaboration Suite Applications ............................ 12-2012–8 Installing Subsequent Instance of Oracle Collaboration Suite Applications................ 12-3313–1 Installing Oracle Cluster Ready Services............................................................................. 13-213–2 Installing Oracle Cluster Ready Services............................................................................. 13-413–3 Installing Oracle Collaboration Suite Database.................................................................. 13-613–4 Installing First Instance of Oracle Internet Directory and Directory Integration and
Provisioning 13-913–5 Installing Second Instance of Oracle Internet Directory and Directory Integration and
Provisioning 13-1113–6 Installing First Instance of Delegated Administration Services and OracleAS Single
Sign-On 13-1213–7 Installing Second Instance of Delegated Administration Services and Single Sign-On..........
13-1413–8 Installing Oracle Calendar Server in Cold Failover Cluster Configuration ................. 13-1913–9 Installing First Instance of Oracle Collaboration Suite Applications ............................ 13-2213–10 Installing Subsequent Instance of Oracle Collaboration Suite Applications................ 13-3514–1 oratab and oraInst.loc File Locations ................................................................................... 14-314–2 Response Files ......................................................................................................................... 14-4A–1 Changed Terminology ............................................................................................................. A-4B–1 Oracle Collaboration Suite 10g Infrastructure Installation Information........................... B-1B–2 Oracle Collaboration Suite Applications Installation Information.................................... B-2C–1 Oracle Calendar and Directory Server Concordance .......................................................... C-4D–1 System Requirements for Installing the Oracle Calendar Desktop Client for Linux...... D-2D–2 System Requirements for Installing the Oracle Calendar Desktop Client for Macintosh.......
D-3D–3 System Requirements for Installing the Oracle Calendar Desktop Client for Solaris .... D-4D–4 System Requirements for Installing the Oracle Calendar Desktop Client for Windows D-5D–5 Command-Line Switches for a Silent Installation of the Oracle Calendar Desktop Client
for Windows D-5D–6 Files Extracted While Running cal_win_1011x.exe in Administrative Mode .................. D-7D–7 System Requirements for Installing Oracle Calendar Sync for Palm for Macintosh ...... D-8D–8 System Requirements for Installing Oracle Calendar Sync for Palm for Windows ..... D-11D–9 System Requirements for Installing Oracle Calendar Sync on Pocket PC ..................... D-13D–10 System Requirements for Oracle Connector for Outlook ................................................. D-16D–11 Languages Supported by Oracle Connector for Outlook ................................................. D-19D–12 UI Parameter Values for Configuring Visual Feedback.................................................... D-25D–13 System Requirements for Installing Oracle Real-Time Collaboration Client ................ D-31F–1 URLs for Components.............................................................................................................. F-1G–1 Default Port Numbers and Ranges (Grouped by Component) ......................................... G-1H–1 Items to Deinstall ...................................................................................................................... H-3J–1 Sample Load Balancer Configuration Details for Oracle Collaboration Suite High
Availability Installations J-1

xxii

xxiii
Preface
This manual is your primary source of preinstallation, installation, and postinstallation information for Oracle Collaboration Suite.
This preface contains these topics:
■ Audience
■ Documentation Accessibility
■ Related Documents
■ Conventions
AudienceThis guide is intended for users who are comfortable running some system administration operations, such as creating users and groups, adding users to groups, and installing operating system patches on the computer where Oracle Collaboration Suite will be installed. Users who install Oracle Collaboration Suite need root access to run some scripts.
Documentation AccessibilityOur goal is to make Oracle products, services, and supporting documentation accessible, with good usability, to the disabled community. To that end, our documentation includes features that make information available to users of assistive technology. This documentation is available in HTML format, and contains markup to facilitate access by the disabled community. Accessibility standards will continue to evolve over time, and Oracle is actively engaged with other market-leading technology vendors to address technical obstacles so that our documentation can be accessible to all of our customers. For more information, visit the Oracle Accessibility Program Web site at
http://www.oracle.com/accessibility/
Accessibility of Code Examples in DocumentationScreen readers may not always correctly read the code examples in this document. The conventions for writing code require that closing braces should appear on an otherwise empty line; however, some screen readers may not always read a line of text that consists solely of a bracket or brace.

xxiv
Accessibility of Links to External Web Sites in DocumentationThis documentation may contain links to Web sites of other companies or organizations that Oracle does not own or control. Oracle neither evaluates nor makes any representations regarding the accessibility of these Web sites.
TTY Access to Oracle Support ServicesOracle provides dedicated Text Telephone (TTY) access to Oracle Support Services within the United States of America 24 hours a day, seven days a week. For TTY support, call 800.446.2398.
Related DocumentsFor more information, refer to the following Oracle resources:
■ The Oracle Collaboration Suite 10g Documentation Set, especially
– Oracle Collaboration Suite Deployment Guide
– Oracle Collaboration Suite Concepts Guide
– Oracle Collaboration Suite Administrator's Guide
– Oracle Collaboration Suite Upgrade Guide
– Oracle Collaboration Suite Documentation Roadmap
– Oracle Enterprise Manager Configuration for Oracle Collaboration Suite
– Oracle Calendar Administrator's Guide
■ The Oracle Application Server Documentation Set, especially
– Oracle Application Server High Availability Guide
– Oracle Internet Directory Administrator's Guide
– Oracle HTTP Server Administrator's Guide
– Oracle Application Server Web Cache Administrator's Guide
– Oracle Application Server Metadata Repository Creation Assistant User’s Guide
■ The Oracle Database 10g Documentation Set, especially
– Oracle Database SQL Reference
– Oracle Universal Installer Concepts Guide
ConventionsThe following text conventions are used in this document:
Convention Meaning
boldface Boldface type indicates graphical user interface elements associated with an action, or terms defined in text or the glossary.
italic Italic type indicates book titles, emphasis, or placeholder variables for which you supply particular values.
monospace Monospace type indicates commands within a paragraph, URLs, code in examples, text that appears on the screen, or text that you enter.

What You Should Know Before Installation 1-1
1What You Should Know Before Installation
Oracle Collaboration Suite 10g release (10.1.1.0.2) consists of three conceptual layers or tiers. The first layer is Oracle Collaboration Suite Infrastructure (also known as the Infrastructure tier) that consists of Oracle Collaboration Suite Database (an Oracle 10g Database) and the necessary Oracle Identity Management components. The second layer, Oracle Collaboration Suite Applications (also known as the Applications tier) consists of the applications that are the heart of Oracle Collaboration Suite. These applications include:
■ Oracle Collaboration Suite 10g Calendar
■ Oracle Collaboration Suite 10g Content Services
■ Oracle Collaboration Suite 10g Discussions
■ Oracle Collaboration Suite 10g Mail
■ Oracle Collaboration Suite 10g Mobile Collaboration
■ Oracle Collaboration Suite 10g Real-Time Collaboration
■ Oracle Collaboration Suite 10g Voicemail & Fax
■ Oracle Collaboration Suite 10g Workspaces
■ Oracle Collaboration Suite 10g Search
Oracle Collaboration Suite also consists of a third tier called Client tier that consists of the end-user applications that reside on client devices, such as desktops, laptops, wireless phones, and PDAs.
The aim of this guide is to help you to install Oracle Collaboration Suite. This chapter provides basic information about the installation process.
This chapter contains the following sections:
■ Section 1.1, "Order of Installation"
■ Section 1.2, "Contents of Oracle Collaboration Suite DVD Pack"
■ Section 1.3, "Compatibility with Earlier Versions"
■ Section 1.4, "Where Do I Install Oracle Collaboration Suite?"
■ Section 1.5, "Oracle Home Directory"
■ Section 1.6, "Installing Any Oracle Product for the First Time"
■ Section 1.7, "What Are the Types of Installations Supported by Oracle Collaboration Suite?"
■ Section 1.8, "Installing Support for Additional Languages"

Order of Installation
1-2 Oracle Collaboration Suite Installation Guide
■ Section 1.9, "Oracle Collaboration Suite Instances and Instance Names"
■ Section 1.10, "The ias_admin User and Restrictions on Its Password"
■ Section 1.11, "Where Does the Installer Write Files?"
■ Section 1.12, "Why Do I Need to Log In as root at Certain Times During Installation?"
■ Section 1.13, "Running root.sh During Installation"
■ Section 1.14, "Connecting to Oracle Internet Directory Through SSL"
1.1 Order of InstallationYou must install Oracle Collaboration Suite 10g Infrastructure first. It is a prerequisite for all Oracle Collaboration Suite 10g Applications, such as Oracle Collaboration Suite 10g Content Services, Oracle Collaboration Suite 10g Calendar, and other components. Install Applications after you install Infrastructure.
1.2 Contents of Oracle Collaboration Suite DVD PackOracle Collaboration Suite DVD Pack contains the following disks:
■ Oracle Collaboration Suite (3 DVDs)
■ OracleAS Metadata Repository (2 disks)
■ Oracle Enterprise Manager (1 disk)
■ Documentation (1 disk)
1.3 Compatibility with Earlier VersionsRefer to the Oracle Collaboration Suite Upgrade Guide for information about compatibility with earlier versions.
1.4 Where Do I Install Oracle Collaboration Suite?You can install Oracle Collaboration Suite Infrastructure and components of the Oracle Collaboration Suite Applications on the same computer or on different computers. For optimum performance, it is recommended that you install Infrastructure on one computer and Applications on different computers.
For example, Figure 1–1 shows a topology with four computers. The Applications tier is distributed on different computers. All applications connect to an instance of Infrastructure, which is installed on a separate computer.

Oracle Home Directory
What You Should Know Before Installation 1-3
Figure 1–1 Configuration with Multiple Applications Tiers and an Infrastructure
1.5 Oracle Home DirectoryThe directory in which you install Oracle Collaboration Suite is called the Oracle home. During the installation, you must specify the full path and a name for the Oracle home.
For example, you can install Oracle Collaboration Suite Infrastructure in the directory /home/oracle/OraHome_infra, and you can name it InfraHome.
Oracle Universal Installer does not allow you to install Applications and Infrastructure in the same Oracle home. If you plan to install Applications and Infrastructure on the same computer, then you must install them in different Oracle home directories. Typically, you cannot install Oracle Collaboration Suite in an existing Oracle home.
Refer to Section 2.10 for a list of invalid installation scenarios.
See Also: Oracle Collaboration Suite Deployment Guide
OracleCollaboration
SuiteDatabase
Oracle Calender
Oracle Mail
Oracle Content Services
Computer 1
Computer 2
Computer 3
Oracle Collaboration Suite Infrastructure
OracleAS Single Sign-On
Oracle Internet Directory

Installing Any Oracle Product for the First Time
1-4 Oracle Collaboration Suite Installation Guide
1.6 Installing Any Oracle Product for the First TimeOracle recommends that you create an operating system user to perform all tasks related to installation of Oracle products. This guide refers to this user as the oracle user.
Refer to Section 2.6 for more details about creating an operating system user.
If Oracle Collaboration Suite is the first Oracle product to be installed on a computer, then the installer displays a screen where you specify the location of an inventory directory (the oraInventory directory). This inventory directory is used by the installer to keep track of all Oracle products installed on the computer. The inventory directory is different from the Oracle home for Oracle Collaboration Suite.
Users in the oinstall group install Oracle products. To ensure that other users in the oinstall group have access to the inventory directory, do not use home directory of the oracle user because home directories might not have the proper permissions set up for the oinstall group. Instead, create the inventory directory in the /var/opt/oracle directory. For more information, refer to Section 2.5.1.
If an Oracle product was installed previously on the computer, then the installer uses the existing inventory directory. To ensure that you have write permissions on that directory, run the installer as the same operating system user who installed the existing Oracle product.
1.7 What Are the Types of Installations Supported by Oracle Collaboration Suite?
Oracle Collaboration Suite 10g Release 1 (10.1.1.0.2) supports the following types of installation:
■ Section 1.7.1, "Basic Installation"
■ Section 1.7.2, "Advanced Installation"
Figure 1–2 illustrates the different types of Oracle Collaboration Suite installations.
Notes:
■ Spaces are not allowed in the Oracle home directory path. For example, you cannot install in the following path:
/var/opt/oracle/collab suite/infra10_1_1 path
This is because of the space character in collab suite. The installer does not check for this until several screens after you have entered the path.
■ It is not possible to install Applications in an existing Oracle home, for example, when you are trying to add components to the Applications tier.
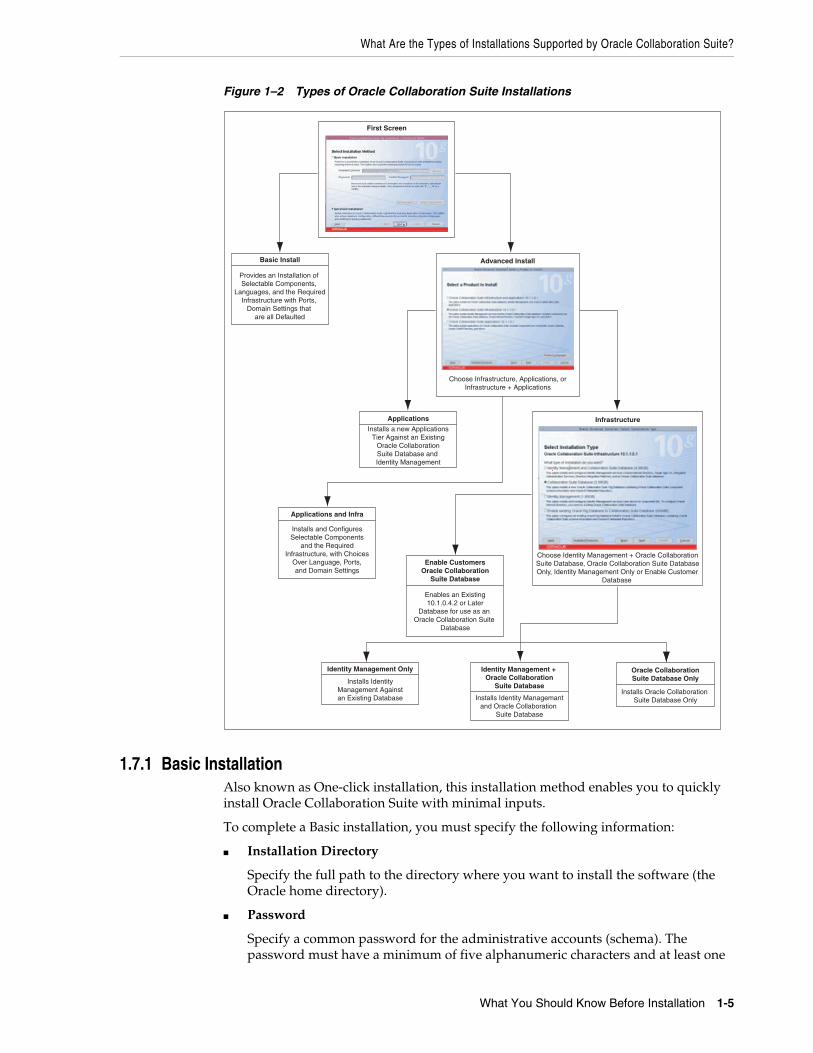
What Are the Types of Installations Supported by Oracle Collaboration Suite?
What You Should Know Before Installation 1-5
Figure 1–2 Types of Oracle Collaboration Suite Installations
1.7.1 Basic InstallationAlso known as One-click installation, this installation method enables you to quickly install Oracle Collaboration Suite with minimal inputs.
To complete a Basic installation, you must specify the following information:
■ Installation Directory
Specify the full path to the directory where you want to install the software (the Oracle home directory).
■ Password
Specify a common password for the administrative accounts (schema). The password must have a minimum of five alphanumeric characters and at least one
Installs a new ApplicationsTier Against an Existing
Oracle CollaborationSuite Database and Identity Management
Applications
Advanced Install
Choose Infrastructure, Applications, orInfrastructure + Applications
Infrastructure
Choose Identity Management + Oracle CollaborationSuite Database, Oracle Collaboration Suite DatabaseOnly, Identity Management Only or Enable Customer
Database
Applications and Infra
Installs and ConfiguresSelectable Components
and the RequiredInfrastructure, with Choices
Over Language, Ports,and Domain Settings
Enable CustomersOracle Collaboration
Suite Database
Enables an Existing10.1.0.4.2 or Later
Database for use as an Oracle Collaboration Suite
Database
Identity Management Only
Installs IdentityManagement Againstan Existing Database
Identity Management + Oracle Collaboration
Suite Database
Installs Identity Managemantand Oracle Collaboration
Suite Database
Oracle CollaborationSuite Database Only
Installs Oracle Collaboration Suite Database Only
Basic Install
Provides an Installation of Selectable Components,
Languages, and the RequiredInfrastructure with Ports,
Domain Settings that are all Defaulted
First Screen

What Are the Types of Installations Supported by Oracle Collaboration Suite?
1-6 Oracle Collaboration Suite Installation Guide
of the characters must be a number. Also, the password can not start with dollar sign ($), underscore (_), number sign (#), or a number.
You must reenter the password that you specified previously to confirm that it is correct.
■ Components that you must select
Click Select Components to display the Select Components to Configure screen.
By Default, All Oracle Collaboration Suite components are selected for configuration during an installation. However, you might have one or more components installed on another Oracle Collaboration Suite Applications tier. Or, you may choose not to use some components at all. Deselect any components that you do not want to configure on this Applications tier.
■ Set Languages
Click Set Languages to display the Language Selection screen.
The default language selected in the Selected Languages list is English. However if the language of the operating system of the computer on which you are installing Oracle Collaboration Suite is not English, then that language will also be automatically added to Selected Languages list. As a result, two languages, English and the locale language of your operating system, will be installed as a part of the basic Oracle Collaboration Suite installation.
If you want to install any other languages, ensure that the required languages are added to the Selected Languages list.
During the Basic installation uses the following defaulted variables and values:
■ Oracle Home name
If there are no Oracle homes already present on the computer where you are installing Oracle Collaboration Suite, then the default value used is OCS_home.
If there is an Oracle home already present on the computer where you are installing Oracle Collaboration Suite, then a new unique value, such as OCS_home1, OCS_home2, ....OCS_homen, which does not exist, is computed.
■ Database SID
If there are no database SIDs already present on the computer where you are installing Oracle Collaboration Suite, then the default value used is ocsdb.
If there is a database SID already present on the computer where you are installing Oracle Collaboration Suite, then a new unique value, such as ocsdb1, ocsdb2, ....ocsdbn, which does not exist, is computed.
■ Configured components
By default, all the components of the Applications tier are selected. However, you can change this by using the Select Components to Configure screen.
Note: For Advanced installation, if there are no database SIDs already present on the computer where you are installing Oracle Collaboration Suite, then the default value used is orcl.
If there is a database SID already present on the computer where you are installing Oracle Collaboration Suite, then a new unique value, such as orcl1, orcl2, ....orcln, which does not exist, is computed.

What Are the Types of Installations Supported by Oracle Collaboration Suite?
What You Should Know Before Installation 1-7
■ Product Languages
By default, the language is set to English and if the locale language of the operating system of the computer on which you are installing Oracle Collaboration Suite is not English, then this locale language is also defaulted.
During the Basic installation uses the following computed variables and values:
■ From location
The "From" location is computed to the install_path/stage/products.xml. The install_path is the directory where runInstaller is located.
■ Mount point
The value of mount point is computed to $ORACLE_BASE/oradata.
For example, if the Oracle home for the Infrastructure installation is /private/ocs/infra , then the mount point location will be computed to /private/ocs/oradata .
■ E-mail domain
The value is computed to the domain name of the computer, such as us.oracle.com. The domain name of the computer is determined and is assigned as the e-mail domain.
If the domain name has the occurrences of "-", then it is automatically changed to "_".
■ Global database name
The value is computed to Database_SID.Email_Domain. For example, ocsdb.us.oracle.com.
If the domain name has the occurrences of "-", then it is automatically changed to "_".
■ Identity Admin context
The value is computed to period-separated values from the e-mail domain. For example, dc=us,dc=oracle,dc=com.
■ Operators group
The value is computed to the first group available to the user.
■ dba group
The value is computed to the same as the operators group.
1.7.2 Advanced InstallationThis installation method enables you to complete any of the following tasks:
■ Perform a custom software installation or choose a different database configuration.
■ Select an installation type.
Note: For Advanced installation, the value is computed to Database_SID.Email_Domain. For example, orcl.us.oracle.com.

Installing Support for Additional Languages
1-8 Oracle Collaboration Suite Installation Guide
■ Install Oracle Collaboration Suite Applications components of your choice.
■ Enables you to install Oracle Collaboration Suite in an existing database.
■ Select different product languages.
■ Specify different passwords for all schemas.
Advanced installation can be of the following types:
■ Section 1.7.2.1, "Oracle Collaboration Suite Infrastructure Installation"
■ Section 1.7.2.2, "Oracle Collaboration Suite Applications Installation"
■ Section 1.7.2.3, "Oracle Collaboration Suite Infrastructure and Applications Installation"
1.7.2.1 Oracle Collaboration Suite Infrastructure InstallationThis Infrastructure installation type offers the following choices for Infrastructure installation:
■ Identity Management-only installation
■ Oracle Collaboration Suite Database-only installation
■ Identity Management and Oracle Collaboration Suite Database installation
■ Enable existing Oracle 10g Database to Oracle Collaboration Suite installation
Refer to Chapter 4 for more information on Oracle Collaboration Suite Infrastructure installation.
1.7.2.2 Oracle Collaboration Suite Applications InstallationThis installation type enables you to install a new Applications tier against an existing Identity Management and Oracle Collaboration Suite Database.
Refer to Chapter 8 for more information on Oracle Collaboration Suite Applications installation.
1.7.2.3 Oracle Collaboration Suite Infrastructure and Applications InstallationThis installation type enables you to install an instance of Oracle Collaboration Suite Infrastructure and Oracle Collaboration Suite Applications on a single computer.
Refer to Chapter 9 for more information on Oracle Collaboration Suite Infrastructure and Oracle Collaboration Suite Applications installation on one computer.
1.8 Installing Support for Additional LanguagesBy default, the installer installs Oracle Collaboration Suite with text in English and in the operating system language. To install support for additional languages, select the required language or languages from the Available Languages list and add them to the Selected Languages list on the Language Selection screen.
Selection of additional languages is also possible when you choose the Basic installation mode. Click Set Languages to display the Language Selection screen. Refer to Section 1.7.1 for detailed information on Basic installation mode.
Note: You cannot install support for additional languages after installation. You must install support for additional languages during the installation.

Oracle Collaboration Suite Instances and Instance Names
What You Should Know Before Installation 1-9
If you run Oracle Collaboration Suite in an environment that uses a language that you did not install, then the user interface may display text in that language or in English. It may also display square boxes, which are caused by missing fonts, instead of text.
1.9 Oracle Collaboration Suite Instances and Instance NamesWhen you install Infrastructure or Applications, an instance of Oracle Collaboration Suite is created. During the installation, the installer prompts you to provide a name for the Oracle Collaboration Suite instance. For example, you can name the instance infrainstance. This name can be different from the Oracle home name. You cannot change the instance name after installation.
Oracle Collaboration Suite appends the host name and domain name to the given instance name to form a complete instance name. For example, if you are installing an instance on a computer named c1, and you name the instance infra1, then the full name of the instance is infra1.c1.mydomain.com, assuming the domain name is mydomain.com.
Valid characters in instance names can only consist of:
■ Alphanumeric characters (A to Z, a to z, 0 to 9)
■ The underscore (_)
■ The dollar sign ($)
There is no restriction for the length of instance names.
1.9.1 How Oracle Collaboration Suite Uses Instance NamesInstance names are important because Oracle Collaboration Suite uses them to uniquely identify instances. So, if you install multiple Oracle Collaboration Suite instances on the same computer (for example, an Infrastructure instance and an Applications instance), you must give them different names.
When you administer Oracle Collaboration Suite using Oracle Enterprise Manager, the instance name appears on the screens. Oracle Enterprise Manager Configuration for Oracle Collaboration Suite is a browser-based administration tool for Oracle Collaboration Suite. You can click the instance name to see details about the instance,
Note: If you want to install Oracle Collaboration Suite in a language other than English, then you must set the NLS_LANG and LANG variables to the appropriate language.
To set the NLS_LANG variable:
■ In Bourne and compatible shells:
NLS_LANG=JAPANESE_JAPAN.JA16EUC; export NLS_LANG
■ In C Shell:
setenv NLS_LANG JAPANESE_JAPAN.JA16EUC
To set the LANG variable:
■ In Bourne and compatible shells:
LANG=ja_JP.EUC; export LANG
■ In C Shell:
setenv LANG ja_JP.EUC

The ias_admin User and Restrictions on Its Password
1-10 Oracle Collaboration Suite Installation Guide
such as the components that are installed in that instance, whether the components are running or stopped, and the log files for the components.
Some dcmctl commands require an instance name as a parameter. dcmctl is a command-line tool for administering Oracle Collaboration Suite instances.
1.10 The ias_admin User and Restrictions on Its PasswordThe installer prompts you to specify the password for the ias_admin user. The ias_admin user is the administrative user for Oracle Collaboration Suite instances. To manage Oracle Collaboration Suite Infrastructure instances using Application Server Control, you log in as ias_admin.
You can install multiple Oracle Collaboration Suite instances on a given computer with a unique name for each instance, but the name of the administrative user is ias_admin for all instances. The password for the ias_admin user can be different for each instance.
The password for the ias_admin user must conform to the password policy of Oracle Internet Directory:
■ If you are using the version of Oracle Internet Directory that is shipped with this release of Oracle Collaboration Suite and you did not change the default password policy, then passwords have the following restrictions:
– The minimum length must be five alphanumeric characters.
– At least one of the characters must be a number.
■ If you are using any other version of Oracle Internet Directory (for example, you are using an existing Oracle Internet Directory), then your Oracle Internet Directory administrator might have defined a different password policy. The password you enter for the ias_admin user must conform to the password policy of the existing Oracle Internet Directory.
■ In addition to the password policy defined in Oracle Internet Directory, the password for the ias_admin user:
– Must be shorter than 30 characters
– Can contain only alphanumeric characters from the Database character set, the underscore (_), the dollar sign ($), and the number sign (#)
– Must begin with an alphabetic character
– Cannot be Oracle reserved words
Oracle Database SQL Reference lists the reserved words. To refer to the guide, visit Oracle Technology Network at
http://www.oracle.com/technology/documentation
Alternatively, avoid using words that sound like they might be reserved words.
See Also: Distributed Configuration Management Administrator’s Guide for more details about dcmctl
Note: To manage the Applications tier instances, you must use Application Server Control for Collaboration Suite.

Running root.sh During Installation
What You Should Know Before Installation 1-11
Remember the password, because you must enter it in the following cases:
■ When you log on to Application Server Control to manage Oracle Collaboration Suite Infrastructure, you log on as the ias_admin user.
■ When you expand the Applications tier by installing more components in Oracle home, you must enter the existing password during the installation.
If you forget the password, you can reset it.
1.11 Where Does the Installer Write Files?The installer writes files to the directories listed in Table 1–1.
1.12 Why Do I Need to Log In as root at Certain Times During Installation?
At least once during installation, the installer prompts you to log in as the root user and run a script. You must be the root user because the script needs to write to files and directories not owned by the oracle user or any other user installing the product.
1.13 Running root.sh During InstallationThe installer prompts you to run the root.sh script in a separate window. This script creates files in the local bin directory, which is /usr/local/bin, by default.
If the script finds files of the same name, it prompts you to overwrite the existing files. You should first back up these files, which you can do from another window, and then overwrite them.
See Also: Oracle Collaboration Suite Administrator's Guide for more details on resetting the ias_admin password
Table 1–1 Directories to Which the Installer Writes Files
Directory Description
Oracle home This directory contains Oracle Collaboration Suite files. You specify this directory during installation.
Inventory When you install the first Oracle product on a computer, you specify this directory. The installer uses this directory to keep track of Oracle products that are installed on the computer. In subsequent installations, the installer uses the same inventory directory.
/var/opt/oracle This directory contains information about locations of Oracle homes on the computer.
If you installed Oracle9iAS Release 2 (9.0.2) on your computer, then this directory also contains files that provide information for Oracle Enterprise Manager.
/tmp The installer writes files needed during installation to a temporary directory. By default, the temporary directory is /tmp. To specify a different directory, set the TMP environment variable.
Refer to Table 2.7.6 for more information about setting a different temporary directory.
Connecting to Oracle Internet Directory Through SSL
1-12 Oracle Collaboration Suite Installation Guide
1.14 Connecting to Oracle Internet Directory Through SSLBy default, SSL is disabled when you install Oracle Collaboration Suite. However, when you install Infrastructure or Applications, you can specify that Applications must connect to Oracle Internet Directory only through Secure Sockets Layer (SSL) connections. On screens where you specify the host name and port for Oracle Internet Directory, you can select the Use Only SSL Connections with This Oracle Internet Directory check box.
See Also: Oracle HTTP Server Administrator's Guide

Preparing to Install Oracle Collaboration Suite 2-1
2Preparing to Install Oracle Collaboration
Suite
Before installing Oracle Collaboration Suite, ensure that your computer meets the requirements described in this chapter.
This chapter contains the following sections:
■ Section 2.1, "Hardware Requirements"
■ Section 2.2, "Software Requirements"
■ Section 2.3, "Kernel Parameters"
■ Section 2.4, "Ports"
■ Section 2.5, "Operating System Groups"
■ Section 2.6, "Operating System User"
■ Section 2.7, "Environment Variables"
■ Section 2.8, "The /etc/hosts File"
■ Section 2.9, "Network Topics"
■ Section 2.10, "Prerequisite Checks Performed by the Installer"
2.1 Hardware RequirementsThis section lists the hardware configurations required to install Oracle Collaboration Suite.
Table 2–1 lists the system requirements for running Oracle Collaboration Suite.
The installer checks these requirements at the start of the installation process and warns you if any of these requirements are not met. Therefore, to save time, you can manually check only the remaining requirements.
You can also run the system checks performed by the installer without doing an installation by running the following command, where the runInstaller executable is on the Oracle Collaboration Suite DVD.
# mount_point/runInstaller -executeSysPrereqs
Note: To view updated certification information refer to the OracleMetaLink site at
http://metalink.oracle.com

Hardware Requirements
2-2 Oracle Collaboration Suite Installation Guide
The results are displayed on the screen as well as written to a log file. For more information about the subset of checks performed, refer to Section 2.10.
Table 2–1 Hardware Requirements for Solaris Systems
Item Minimum RequirementChecked by Installer
Processor type SPARC Processor. The processor must have a v9 architecture. No
Processor Speed 450 MHz or greater recommended. Oracle recommends a multiple CPU computer.
To determine the processor speed, enter the psrinfo command with the -v option:
# /usr/sbin/psrinfo -v
No
Network The computer must be connected to a network. You cannot install Oracle Collaboration Suite on a standalone computer that is not connected to a network.
Installing Oracle Collaboration Suite on standalone computers is supported for Linux and Microsoft Windows.
No
IP The IP address of the computer must be static. Oracle Collaboration Suite does not support systems using Solaris DHCP.
DHCP is supported on Linux and Microsoft Windows.
No
Memory The installer checks the amount of memory on your computer and will not let you proceed if your computer does not meet the following minimum memory requirements:
Oracle Collaboration Suite 10g Infrastructure: 1 gigabyte (GB)
Oracle Collaboration Suite 10g Applications: 1 GB
Oracle Collaboration Suite 10g Database: 1 GB
Note: For Oracle Collaboration Suite Infrastructure and Applications installation on a single computer, 2 GB or more is recommended.
To determine the amount of memory, enter the following command:
# /usr/sbin/prtconf | grep Memory
These values assume you are running only one Oracle Collaboration Suite instance for each computer.
The memory requirements provided for the various installation types represent enough physical memory to install and run Oracle Collaboration Suite. However, for most production sites, you should configure at least 2 GB of physical memory. For sites with substantial traffic, increasing the amount of memory further may improve your performance.
To determine the optimal amount of memory for the installation, you should load test your site. Resource requirements can vary substantially for different applications and different usage patterns. In addition, some operating system utilities for monitoring memory can overstate memory usage (partially because of the representation of shared memory). The preferred method for determining memory requirements is to monitor the improvement in performance resulting from the addition of physical memory in the load test. Refer to your platform vendor documentation for information about how to configure memory and processor resources for testing purposes.
Yes

Hardware Requirements
Preparing to Install Oracle Collaboration Suite 2-3
2.1.1 Considerations for Real-Time CollaborationThe Oracle Real-Time Collaboration components perform load balancing as they handle communications between clients and servers. The Redirector determines which multiplexer or communication manager processes are available as it routes requests from clients. The multiplexer determines which Web Conferencing Server processes are available as it routes communications from and to the Web Conferencing clients.
You may also choose to use a Load Balancer to manage processes handled by your Oracle mid-tier servers. If so, then keep these considerations in mind:
■ All systems behind the load balancer should have intranet-routable IP addresses and must be directly accessible from the Internet at least on the standard HTTP and HTTPS ports (80 and 443).
Disk space The installer may display inaccurate disk space requirement figures. The disk space requirements are:
Oracle Collaboration Suite 10g Infrastructure: 8 GB
Oracle Collaboration Suite 10g Applications: 5 GB
Oracle Collaboration Suite 10g Database: 5.4 GB
To determine the amount of free disk space, use the df command:
# df -k dir
Replace dir with the Oracle home directory or with the parent directory if the Oracle home directory does not exist yet. For example, if you plan to install Oracle Collaboration Suite in /private/oracle/infra, replace dir with /private/oracle or /private/oracle/infra.
No
Space in /tmp directory 250 MB
To determine the amount of free disk space in the /tmp directory, enter the following command:
# df -k /tmp
If the /tmp directory does not have enough free space, you can specify a different directory by setting the TMP environment variable. Refer to Section 2.7.6 for details.
Yes
Swap space 1.5 GB of available swap space
To determine the amount of available swap space, enter the following command:
# /usr/sbin/swap -l
If necessary, refer to your operating system documentation for information about how to configure additional swap space.
Yes
Monitor 256-color display
To determine the display capabilities of the monitor, enter the following command:
# /usr/openwin/bin/xwininfo
Look for the "Depth" line. You need a depth of at least 8 bits for each pixel.
Yes
Table 2–1 (Cont.) Hardware Requirements for Solaris Systems
Item Minimum RequirementChecked by Installer

Software Requirements
2-4 Oracle Collaboration Suite Installation Guide
■ If you use geographic load balancers – that is, load balancers to separate loads between geographic locations – then you must create Oracle Real-Time Collaboration clusters to partition the system based on geographical distribution.
2.1.2 Tips for Reducing Memory UsageTo reduce memory consumption:
■ Configure only the components that you need.
■ After installation, start only the components that you need. Refer to the Oracle Collaboration Suite Administrator's Guide for details.
2.2 Software RequirementsThe installer also checks that your computer contains the required operating system patches. If it determines that some required patches are missing, it displays an error.
In addition to the software requirements for the computer, you must have a compatible browser.
The following browsers are supported:
■ Netscape 7.1, 7.2 and later
■ Mozilla 1.5 and later. You can download Mozilla from
http://www.mozilla.org
Note that Firefox, the standalone Mozilla browser, is not certified at the time of publication.
■ Safari 1.2 on Apple Macintosh computers
2.2.1 Operating System PatchesTable 2–2 lists the Solaris operating system patches that you must install before installing Oracle Collaboration Suite. These are patches that make up the J2SE patch cluster. You can download the patches from
http://sunsolve.sun.com
Refer to the README file included with the patch for instructions on installing it.
Note: Oracle Messenger also uses ports 5222 and 5223 which in some cases must be open to the Internet.
Note: For the most current list of supported operating system-specific software, operating system version, and certified browsers, check OracleMetaLink at
http://metalink.oracle.com

Software Requirements
Preparing to Install Oracle Collaboration Suite 2-5
How to Get a List of Operating System Patches Installed on Your ComputerTo determine which patches are installed on your computer:
1. Enter the showrev command with the -p option. The following command saves the sorted output to a file called patchList.
# showrev -p | sort > patchList
2. Open the file in a text editor, such as vi or emacs, and search for patch numbers.
Note: Although the patches listed in Table 2–2 are current at the time of publication, Sun Microsystems, Inc. often updates the list of required patches for J2SE. Click the "Readme" link on the following URL for the most current list of patches http://sunsolve.sun.com/pub-cgi/show.pl?target=patches/J2SE
Table 2–2 Required Patches for Solaris Operating Systems
Operating System Patches Required
Solaris 8 ■ 108652-82 or later: X11 6.4.1: Xsun patch
■ 108921-21 or later: CDE 1.4: dtwm patch
■ 108940-62 or later: Motif 1.2.7 and 2.1.1: Run-time library patch
■ 108773-18 or later: IIIM and X input and output method patch
■ 111310-01 or later: /usr/lib/libdhcpagent.so.1 patch
■ 109147-28 or later: Linker patch
■ 111308-04 or later: /usr/lib/libmtmalloc.so.1 patch
■ 112438-03 or later: /kernel/drv/random patch
■ 108434-17 or later: 32-Bit shared library patch for C++
■ 108435-17 or later: 64-bit shared library patch for C++
■ 111111-04 or later: /usr/bin/nawk patch
■ 112396-02 or later: /usr/bin/fgrep patch
■ 110386-03 or later: RBAC feature patch
■ 111023-03 or later: /kernel/fs/mntfs and /kernel/fs/sparcv9/mntfs patch
■ 111317-05 or later: /sbin/init and /usr/sbin/init patch
■ 113648-03 or later: /usr/sbin/mount patch
■ 115827-01 or later: /sbin/sulogin and /sbin/netstrategy patch
■ 116602-01 or later: /sbin/uadmin and /sbin/hostconfig patch
■ 108987-13 or later: Patch for patchadd and patchrm
■ 108528-29 or later: Kernel update patch
■ 108989-02 or later: /usr/kernel/sys/acctctl and /usr/kernel/sys/exacctsys patch
■ 108993-36 or later: LDAP2 client, libc, libthread and libnsl libraries patch
■ 109326-14 or later: libresolv.so.2 and in.named patch
■ 110615-11 or later: sendmail patch
Solaris 9 ■ 113096-03 or later: X11 6.6.1: OWconfig patch
■ 112785-35 or later: X11 6.6.1: Xsun patch

Software Requirements
2-6 Oracle Collaboration Suite Installation Guide
How the Installer Checks for Operating System PatchesThe installer searches for the required patch versions on your computer. If it does not find an exact match, it displays a warning message in the shell where you started the installer.
# mount_point/runInstaller...... installer performs prerequisite checks here ......Some optional pre-requisite checks have failed. Continue? (y/n) [n] n
The installer gives you a choice to exit or continue.
Type n to exit the installer if you do not have all the patches. You should download and install the patches.
Type y to continue only if you are sure all the required patches are installed.
2.2.2 Operating System PackagesCheck that your computer contains the following operating system packages. If the packages are not present, the installer cannot continue.
■ SUNWarc
■ SUNWbtool
■ SUNWhea
■ SUNWlibm
■ SUNWlibms
■ SUNWsprot
■ SUNWsprox
■ SUNWtoo
■ SUNWi1of (the character after the "i" is the number 1, not the letter L)
■ SUNWxwfnt
■ SUNWi1cs (the character after the "i" is the number 1, not the letter "ell")
■ SUNWi15cs (the character after the "i" is the number 1, not the letter "ell")
The last two packages (SUNWi1cs and SUNWi15cs) are required for the ISO8859-1 and ISO8859-15 code sets.
To check if an operating system package is installed on your computer, enter the pkginfo command with the name of the package. The syntax for running pkginfo is:
pkginfo package_name1 package_name2 ...
For example, to check if all of the listed packages are installed on your computer, enter the following command:
# pkginfo SUNWarc SUNWbtool SUNWhea SUNWlibm SUNWlibms SUNWsprot SUNWsprox SUNWtoo SUNWi1of SUNWxwfnt SUNWi1cs SUNWi15cs
Note: This package is not required if Operating System version is Solaris 10 (SPARC 64-bit).

Kernel Parameters
Preparing to Install Oracle Collaboration Suite 2-7
If your computer is missing a package, contact your system administrator.
2.3 Kernel ParametersOracle Collaboration Suite installation requires you to configure your system kernel parameters. Compliance with this requirement is especially important for production environments. Review your kernel parameter settings to ensure that they meet Oracle Collaboration Suite requirements.
Table 2–3 shows the kernel parameters and their required minimum settings.
Note:
■ If the current value of any parameter is higher than the value listed in the table, then do not change the value of that parameter.
■ If any kernel parameter values do not meet the requirements, the installer displays an error message. You cannot continue the installation until you update the kernel parameters to the required values.
■ If you update kernel parameter values, you must restart your computer for the new values to take effect.
Table 2–3 Kernel Parameters Settings for Solaris Systems
ParameterLine in /etc/system Showing the Minimum Value Description
msgmax set msgsys:msginfo_msgmax=4096 Defines the maximum message size.
msgmnb set msgsys:msginfo_msgmnb=360000 Defines the maximum number of bytes on the message queue.
msgmni set msgsys:msginfo_msgmni=3774 Defines the number of queue identifiers.
msgtql set msgsys:msginfo_msgtql=2500 Defines the number of message headers.
semaem set semsys:seminfo_semaem=16384 Defines the maximum amount a semaphore value can be changed by a semaphore undo operation.
semmni set semsys:seminfo_semmni=554 Defines the maximum number of semaphore sets in the entire system.
semmnu set semsys:seminfo_semmnu=1042 Defines the number of semaphore undo structures.
semmns set semsys:seminfo_semmns=1024 Defines the maximum semaphores on the system. The 256 is only a minimum value for computers that will be running a single database (the Oracle Collaboration Suite 10g Infrastructure that you are installing).
If you are already running a database on the computer, refer to "Determining the Minimum Value for the semmns Parameter".
semopm set semsys:seminfo_semopm=12 Defines the maximum number of operations for each semopm call.

Kernel Parameters
2-8 Oracle Collaboration Suite Installation Guide
Determining the Minimum Value for the Process Parameter for the Oracle Collaboration Suite DatabaseThe processes parameter for the Oracle Collaboration Suite Database must be the sum of all connections from all components of all Applications tiers, plus any processes used by other applications.
The default value of the processes parameter for the Oracle Collaboration Suite Database is 250. This value for each Applications tier installation is approximately calculated as follows:
■ 38 for Oracle Mail (This includes Oracle Discussions, Oracle Web Access Client, and WebMail.)
■ 37 for Oracle Real-Time Collaboration (This includes Oracle Messenger.)
■ 28 for Oracle Mobile Collaboration
■ 25 for Oracle Content Services
semmsl set semsys:seminfo_semmsl=256 Defines the minimum recommended value for initial installation only.
Note: If you increase the database 'processes' value, you should modify the value of semmsl parameter to match it. You should, then, reboot your system.
semume set semsys:seminfo_semume=42 Defines the maximum number of IPC semaphores that a given process can have undo operations pending on.
semvmx set semsys:seminfo_semvmx=32767 Defines the maximum value of a semaphore.
shmmax set shmsys:shminfo_shmmax=4294967295
Defines the maximum allowable size of one shared memory segment (4 GB = 4294967295).
shmmin set shmsys:shminfo_shmmin=1 Defines the minimum allowable size of a single shared memory segment.
Note: This parameter is not used in Solaris 9.
shmmni set shmsys:shminfo_shmmni=100 Defines the maximum number of shared memory segments in the entire system.
Note: For Applications tier installation, the value of the shmmni parameter must be set to 117 or higher.
shmseg set shmsys:shminfo_shmseg=10 Defines the maximum number of shared memory segments one process can attach.
Note: This parameter is not used in Solaris 9.
Note: For Applications tier installation, the value of the shmseg parameter must be set to 17 or higher.
rlim_fd_max set rlim_fd_max=4117 Defines the hard limit on file descriptors that a single process can have open.
rlim_fd_cur set rlim_fd_cur=1024 Defines the soft limit of open files.
noexec_user_stack
set noexec_user_stack=1 Defines the stack to be marked as nonexecutable. This helps make buffer-overflow attacks more difficult.
Table 2–3 (Cont.) Kernel Parameters Settings for Solaris Systems
ParameterLine in /etc/system Showing the Minimum Value Description

Kernel Parameters
Preparing to Install Oracle Collaboration Suite 2-9
■ 12 for Oracle Workflow
■ 12 for OracleAS Portal
■ 9 for Oracle Application Server Single Sign-On
■ 5 for Oracle Internet Directory
Additionally, a value of approximately 40 is reserved for internal processes, bringing the total to approximately 200. Providing for additional buffer of 50, the default value is calculated to 250.
This number will be smaller if fewer components are configured. However, in a production environment the processes parameter for the Oracle Collaboration Suite Databases must be configured as the sum of the Database connections for each configured component, specific to each deployment.
For example, a deployment may have 3 Applications tiers running SMTP and IMAP. SMTP and IMAP on each Applications tier may be configured by the administrator with 100 database connections each. Therefore, for these processes, the Oracle Mail Database processes parameter must be increased by 2 x 3 x 100 = 600 to ensure that the Database does not run out of processes.
Determining the Minimum Value for the semmns ParameterIf you are installing the Oracle Collaboration Suite Infrastructure on a computer that is not already running an Oracle Database (that is, the Infrastructure will be the only component running on the computer), then set the semmns parameter to a minimum of 256.
If you are installing the Infrastructure on a computer that is already running an Oracle Database, then set the semmns parameter to the sum of the processes initialization parameter for each Oracle Database (including the Infrastructure), then adding the largest value twice, and then adding an additional 10 for each database.
The default value of the processes parameter for the Oracle Collaboration Suite Database is 250.
Example: The computer is already running an Oracle Database, and its processes parameter is set at 250. In this case, you must set the semmns parameter to at least 920, which is explained as follows:
■ Sum of the processes parameter for all Oracle Databases: 250 for the existing Database + 150 for the Infrastructure that you are installing = 400
■ Add the largest one twice: 250 + 250 = 500
■ Add 10 for each Database: 10 + 10 = 20
■ Total: 400 + 500 + 20 = 920
To determine the value of the processes parameter for an Oracle Database, enter the following command in SQL*Plus:
# sqlplus "sys/password as sysdba"SQL> show parameters processes
In the preceding syntax, password specifies the password for the SYS user.
Note: The optimum number of processes and maximum connections per component is a tuning exercise, performed as more information is learned about usage patterns of the system.

Ports
2-10 Oracle Collaboration Suite Installation Guide
To add or update kernel parameter values:1. Become root user on the computer where you must change the values.
2. Make a backup copy of the /etc/system file. For example, the following command makes a backup copy called system.back.
# cp /etc/system /etc/system.back
3. Using a text editor such as vi or emacs, update the values or add new lines in the /etc/system file as necessary. For example, the following lines show sample values for the parameters:
set semsys:seminfo_semmni=300set semsys:seminfo_semmns=800set semsys:seminfo_semmsl=256set shmsys:shminfo_shmmax=4294967295set shmsys:shminfo_shmmin=1set shmsys:shminfo_shmmni=512set shmsys:shminfo_shmseg=150
4. Restart the computer for the new values to take effect.
2.4 PortsComponents of Oracle Collaboration Suite Infrastructure (such as Oracle HTTP Server, OracleAS Web Cache, and Oracle Enterprise Manager) and Oracle Collaboration Suite Applications use ports. You can have the installer assign default port numbers, or use port numbers that you specify, including the port numbers under 1024.
This section contains the following topics:
■ Section 2.4.1, "Checking If a Port Is in Use"
■ Section 2.4.2, "Using Default Port Numbers"
■ Section 2.4.3, "Using Custom Port Numbers (The "Static Ports" File)"
■ Section 2.4.4, "Ports for Oracle HTTP Server and OracleAS Web Cache"
■ Section 2.4.5, "If Port 1521 Is In Use"
Why the Default Port for Oracle HTTP Server Is Port 7777 and Not Port 80By default, the installer configures Oracle HTTP Server to use port 7777, not port 80. Port 7777 is the default port because on UNIX, components that use port numbers lower than 1024 require additional steps to be done as the root user before the components can run. Because the installer does not have root access, it must use a port greater than 1024.
If you want Oracle HTTP Server to use a different port, such as port 80, use the static ports feature, which enables you to specify port numbers for components. Although you can change the port number after installation, it is easier to set the port number during installation.
Note: The comment character for the /etc/system file is the asterisk (*), not the number sign (#).

Ports
Preparing to Install Oracle Collaboration Suite 2-11
2.4.1 Checking If a Port Is in UseTo check if a port is being used, you can enter the netstat command to show the used port as follows:
# netstat -an | grep port_num
In the preceding syntax, port_num refers to the port number you want to check.
2.4.2 Using Default Port NumbersTo use the default port numbers for components such as Oracle HTTP Server, OracleAS Web Cache, and Oracle Enterprise Manager, you do not have to do anything. Refer to Appendix G for a list of default port numbers that the installer will assign to components.
2.4.3 Using Custom Port Numbers (The "Static Ports" File)Instead of using default ports, you can assign custom port numbers for Oracle Collaboration Suite components during the installation. For this, you must create a file containing the component names and port numbers. Section 2.4.3.1 describes the file format. This file is typically called the staticports.ini file, but you can name it anything you want.
To instruct the installer to assign custom port numbers for components, you must specify the path to staticports.ini as a parameter to the runInstaller command as follows:
./runInstaller oracle.ocs.infrastructure:s_staticPorts=path_to_your_ini_file (for installing Oracle Collaboration Suite 10g Infrastructure)
./runInstaller oracle.ocs.midtier:s_staticPorts=path_to_your_ini_file (for installing Oracle Collaboration Suite 10g Applications)
./runInstaller oracle.ocs.onebox:s_staticPorts=path_to_your_ini_file (for installing Oracle Collaboration Suite 10g Applications and Infrastructure)
If you do not specify the full path to the file, the installer cannot find the file. The installer will then assign default ports for all the components, and it will do this without displaying any warning.
2.4.3.1 Format of the staticports.ini FileThe staticports.ini file has the following format. Replace port_num with the port number that you want to use for the component.
# staticports.ini Template File
# This file is a template for specifying port numbers at installation time.# To specify a port number, uncomment the appropriate line (remove #) and
Note: You can also use the /usr/sbin/lsof -i :port_num command for the purpose.
Note: If you specify custom port numbers using the staticports.ini file, then the installer will not show the Ports Configuration Options screen.

Ports
2-12 Oracle Collaboration Suite Installation Guide
# replace "port_num" with the desired port number.# You can then launch Oracle Universal Installer with special options to use this# file.# Please refer to Oracle Collaboration Suite 10.1.1.0.2 Installation Guide for# instructions.
# Ports common to Infrastructure and Applications install
# Oracle HTTP Server port = port_num# Oracle HTTP Server Listen port = port_num# Oracle HTTP Server SSL port = port_num# Oracle HTTP Server Listen (SSL) port = port_num# Oracle HTTP Server Diagnostic port = port_num# ASG port = port_num# Application Server Control port = port_num# Application Server Control RMI port = port_num# Java Object Cache port = port_num# Log Loader port = port_num# DCM Discovery port = port_num# Oracle Notification Server Request port = port_num# Oracle Notification Server Local port = port_num# Oracle Notification Server Remote port = port_num# Oracle Management Agent port = port_num
# Ports specific to Infrastructure install# Oracle Internet Directory port = port_num# Oracle Internet Directory (SSL) port = port_num# Enterprise Manager Console HTTP port = port_num# Enterprise Manager Agent port = port_num
# Ports specific to Applications install# Web Cache HTTP Listen port = port_num# Web Cache HTTP Listen (SSL) port = port_num# Web Cache HTTP Administration port = port_num# Web Cache Invalidation port = port_num# Web Cache Statistics port = port_num# Oracle Net Listener = port_num# Oracle Mail IMAP4 port = port_num# Oracle Mail IMAP4 Secure port = port_num# Oracle Mail POP3 port = port_num# Oracle Mail POP3 Secure port = port_num# Oracle Mail SMTP port = port_num# Oracle Mail NNTP port = port_num# Oracle Mail NNTP Secure port = port_num# Oracle Calendar server = port_num# Oracle Calendar server manager (CSM) = port_num# Wireless PIM Notification Dispatcher = port_num# Wireless PIMAP UDC Dispatcher = port_num# RTC Redirector Server port= port_num# RTC Redirector MX port= port_num# RTC Redirector XMPP port= port_num# RTC Redirector Secure XMPP port= port_num# RTC process monitor port = port_num# RTC messenger director server first port = port_num# RTC messenger director server second port = port_num# RTC messenger multiuser chat port = port_num# RTC messenger connection manager port = port_num# RTC messenger statistics collection port = port_num# RTC messenger server to server connection port = port_num# RTC messenger group service port = port_num

Ports
Preparing to Install Oracle Collaboration Suite 2-13
# RTC messenger voice proxy port = port_num
The easiest way to create the file is to use the staticports.ini file on the DVD as a template:
1. Copy the staticports.ini file from the DVD to your hard disk.
Table 2–4 specifies the location of the staticports.ini file on DVD.
2. Edit the local copy (the file on the hard disk) to include the desired port numbers.
You do not specify port numbers for all components in the staticports.ini file. If a component is not listed in the file, then the installer uses the default port number for that component.
You cannot change the port used by the Infrastructure Database listener (port 1521) during installation, but you can do so after installation.
The following example sets the Application Server Control port and some ports for the Web Cache. For components not specified, the installer will assign the default port numbers.
Application Server Control port = 2000Web Cache Administration port = 2001Web Cache Invalidation port = 2002Web Cache Statistics port = 2003
When installation is complete, you can check the ORACLE_HOME/install/portlist.ini file to refer to the assigned ports.
Note: If you plan to install Oracle Collaboration Suite Infrastructure and Oracle Collaboration Suite Applications on a single computer, then you must use the staticports.ini.onebox template.
Table 2–4 Location of the staticports.ini File on DVD
Media Location of staticports.ini File
DVD-ROM Disk 1: mount_point/response/staticports.ini
Notes on Choosing Port Numbers:
■ Port numbers cannot be greater than 65536.
■ If you use a port number less than 1024 for a component, you must run the component as the root user.
■ If you use a port number less than 1024 for a component, the installer cannot start the component at the end of installation. You may need to configure the component first before you can start it. Refer to the appropriate component documentation for details.
■ If you plan to set port numbers for Oracle HTTP Server and OracleAS Web Cache, be sure you read Section 2.4.4.

Ports
2-14 Oracle Collaboration Suite Installation Guide
The installer verifies that the ports specified in the file are available by checking memory. This means that it can only detect ports that are being used by running processes. It does not look in configuration files to determine which ports an application is using.
If the installer detects that a specified port is not available, it displays an alert. The installer will not assign a port that is not available. To fix this:
1. Edit the staticports.ini file to specify a different port, or shut down the application that is using the port.
2. Click Retry. The installer rereads the staticports.ini file and verifies the entries in the file again.
2.4.3.2 Error Conditions That Will Cause the Installer to Use Default Ports Instead of Specified PortsCheck your staticports.ini file carefully, because a mistake can cause the installer to use default ports without displaying any warning. Here are some things that you should check:
■ If you specify the same port for more than one component, the installer will use the specified port for the first component, but for the other components, it will use the default ports of the components. The installer does not warn you if you have specified the same port for multiple components.
■ If you have syntax errors in the staticports.ini file (for example, if you omitted the = character for a line), the installer ignores the line. For the components specified on such lines, the installer assigns the default ports. The installer does not display a warning for lines with syntax errors.
■ If you misspell a component name, the installer assigns the default port for the component. Names of components in the file are case-sensitive. The installer does not display a warning for lines with unrecognized names.
■ If you specify a nonnumeric value for the port number, the installer ignores the line and assigns the default port number for the component. It does this without displaying any warning.
■ If you misspell the parameter on the command line, the installer does not display a warning. It continues and assigns default ports to all components.
■ If you specify a relative path to the staticports.ini file (for example, ./staticports.ini or just staticports.ini) on the command line, the installer will not find the file. The installer continues without displaying a warning and it will assign default ports to all components. You must specify a full path to the staticports.ini file.
■ If the parameter you specify on the command line does not match the type of installation that you are performing (for example, if you specify the parameter for Applications but you are installing the Infrastructure), the installer does not give a warning. It continues and assigns default ports to all components.
Tip: The staticports.ini file uses the same format as the ORACLE_HOME/install/portlist.ini file, which is created after an Oracle Collaboration Suite installation. If you have installed Oracle Collaboration Suite and you want to use the same port numbers in another installation, you can use the portlist.ini file from the first installation as the staticports.ini file for subsequent installations.

Ports
Preparing to Install Oracle Collaboration Suite 2-15
2.4.4 Ports for Oracle HTTP Server and OracleAS Web CacheBe sure you understand the following when setting ports for these components.
In the httpd.conf file for Oracle HTTP Server, the Port and the Listen directives specify the ports used by OracleAS Web Cache and Oracle HTTP Server, as shown in Figure 2–1.
Figure 2–1 Configuring Both OracleAS Web Cache and Oracle HTTP Server
1. Set the port for OracleAS Web Cache.
OracleAS Web Cache uses the port specified by the Port directive. To set this port, use this line in the staticports.ini file:
Web Cache HTTP Listen port = port_number
To configure the SSL port for OracleAS Web Cache, use the following line:
Web Cache HTTP Listen (SSL) port = port_number
You cannot set the port number using the Oracle HTTP Server port line in this case. If your staticports.ini file contains both Oracle HTTP Server port and Web Cache HTTP Listen port, the Oracle HTTP Server port line is ignored. For example, the Port directive would be set to 7979, if you had the following lines in staticports.ini:
Web Cache HTTP Listen port = 7979Oracle HTTP Server port = 8080
2. Set the port for Oracle HTTP Server.
Oracle HTTP Server uses the port specified by the Listen directive. To set this port, use this line in the staticports.ini file:
Oracle HTTP Server Listen port = port_number
To configure the SSL Listen port, use the following line:
Oracle HTTP Server Listen (SSL) port = port_number
2.4.4.1 Examples That Use the staticports.ini FileThis section describes some common scenarios for using staticports.ini.
■ Configuring Oracle HTTP Server to Use Ports 80 and 443 with OracleAS Web Cache as the Front End
■ Configuring Oracle HTTP Server to Use Ports 80 and 443 without OracleAS Web Cache
OracleAS Web Cache
Oracle HTTP Server
Uses this directivein the httpd.conf file
Line in staticports.ini to setthe value for the directive
Port
Listen
Web Cache HTTP Listen port
Oracle HTTP Server Listen port

Ports
2-16 Oracle Collaboration Suite Installation Guide
Configuring Oracle HTTP Server to Use Ports 80 and 443 with OracleAS Web Cache as the Front EndIn this scenario, create a staticports.ini file that includes the following lines:
Web Cache HTTP Listen port = 80Oracle HTTP Server Listen port = 81Web Cache HTTP Listen (SSL) port = 443Oracle HTTP Server Listen (SSL) port = 444
The ports for Oracle HTTP Server Listen and SSL Listen can be any available port. The example uses ports 81 and 444. These port numbers must not be less than 1024. If you select port numbers less than 1024, you must start Oracle HTTP Server and OracleAS Web Cache as the root user.
Configuring Oracle HTTP Server to Use Ports 80 and 443 without OracleAS Web CacheIn this scenario, create a staticports.ini file that includes the following lines:
Oracle HTTP Server port = 80Oracle HTTP Server Listen port = 80Oracle HTTP Server SSL port = 443Oracle HTTP Server Listen (SSL) port = 443
2.4.5 If Port 1521 Is In UseIf port 1521 on your computer is already in use by an existing application, such as Oracle Database 10g listener or some other application, you might have to take some action before running the installer. Refer to the following sections for details:
■ If Port 1521 Is Being Used by an Existing Oracle Database
■ If Port 1521 Is Being Used by Some Other Application
2.4.5.1 If Port 1521 Is Being Used by an Existing Oracle DatabaseIf you are installing a new database for the Oracle Collaboration Suite Infrastructure on a computer that is already running an Oracle Database, ensure that the listeners for both databases do not conflict.
You might be able to use the same listener for both the existing Oracle Database and the Oracle Collaboration Suite Database. Consider the version of the existing listener
Note: Because you are using port numbers less than 1024, you must configure Oracle HTTP Server and OracleAS Web Cache to run as the root user. You can perform the configuration during installation or after installation.
■ To perform the configuration during installation, you must follow the steps listed in Section 4.4.4 after running root.sh but before clicking OK. You run root.sh near the end of the installation.
■ You can perform the configuration after installation, but the installer will not be able to start the components because they are not yet configured.
For details, refer to the Oracle HTTP Server Administrator's Guide and the Oracle Application Server Web Cache Administrator's Guide.

Ports
Preparing to Install Oracle Collaboration Suite 2-17
as well as the port number. Table 2–5 shows the various scenarios and the respective outcomes.
You can change the Infrastructure listener to use a different port after installation. Refer to the Oracle Collaboration Suite Administrator's Guide for details.
To check the listener version, enter the following command:
# $ORACLE_HOME/bin/lsnrctl VERSION
In this command, ORACLE_HOME is the home directory for your database.
You can also use the same command to check the listener port.
# lsnrctl VERSIONLSNRCTL for Solaris: Version 10.1.0.3.0 - Production on 31-AUG-2004 19:10:54
Copyright (c) 1991, 2004, Oracle Corporation. All rights reserved.
Connecting to (DESCRIPTION=(ADDRESS=(PROTOCOL=TCP)(HOST=test-sun.us.oracle.com)(PORT=1521)))TNSLSNR for Solaris: Version 10.1.0.3.0 - Production TNS for Solaris: Version 10.1.0.3.0 - Production Unix Domain Socket IPC NT Protocol Adaptor for Solaris: Version 10.1.0.3.0 - Production Oracle Bequeath NT Protocol Adapter for Solaris: Version 10.1.0.3.0 - ProductionThe command completed successfully
Scenario 1: Existing Listener Uses Port 1521 and Listener Version Is Earlier Than 10.1.0.2Listeners earlier than version 10.1.0.2 are not compatible with the Infrastructure from this Oracle Collaboration Suite release (10.1.1.0.2). What you can do is to install Infrastructure, which installs a version 10.1.0.3 listener, and use this new listener for both databases.
1. Stop the existing listener before you install Infrastructure.
# $ORACLE_HOME/bin/lsnrctl stop
ORACLE_HOME is the home directory for your existing database.
Table 2–5 Scenarios and Outcomes While Installing Infrastructure On a Computer Already Having a Database
Version of the Existing Listener Existing Listener Uses Port 1521
Existing Listener Uses a Port Other Than 1521
Earlier than 10.1.0.2 You need two listeners: one for the existing Database and one for the Oracle Collaboration Suite Infrastructure.
Refer to "Scenario 1: Existing Listener Uses Port 1521 and Listener Version Is Earlier Than 10.1.0.2" on page 2-17.
You need two listeners: one for the existing Database and one for the Oracle Collaboration Suite Infrastructure.
Refer to "Scenario 3: Existing Listener Uses a Port Other Than 1521" on page 2-18.
10.1.0.2 or later The existing listener supports both the existing Database and the Oracle Collaboration Suite Infrastructure.
Refer to "Scenario 2: Existing Listener Uses Port 1521 and Listener Version Is 10.1.0.2 or Later" on page 2-18.
You need two listeners: one for the existing database and one for the Oracle Collaboration Suite Infrastructure.
Refer to "Scenario 3: Existing Listener Uses a Port Other Than 1521" Part .

Operating System Groups
2-18 Oracle Collaboration Suite Installation Guide
If you do not stop the existing listener, the installation will fail.
2. Install Infrastructure.
3. Update the configuration file of the new listener, as necessary. The name of the listener configuration file is listener.ora, located in the ORACLE_HOME/network/admin directory.
a. Check network address entries in the configuration file of the existing listener.
Does the configuration file contain only the following network addresses?
* TCP Port 1521
* IPC key EXTPROC
If so, you do not have to edit the configuration file of the Infrastructure listener for network addresses.
If the configuration file contains other network addresses, you must add them to the configuration file of the Infrastructure listener.
b. Check SID_DESC entries in the configuration file of the existing listener.
If the configuration file of the existing listener contains SID_DESC entries for the existing database, you must add these entries to the configuration file of the Infrastructure listener.
c. Do not start the existing listener (version earlier than 10.1.0.2). The new listener supports both databases, so you do not must run the existing listener.
Scenario 2: Existing Listener Uses Port 1521 and Listener Version Is 10.1.0.2 or LaterThe existing listener will support both the existing database and the Infrastructure. The installer will perform this configuration automatically. You do not have to do anything.
The existing listener must be stopped during installation.
Scenario 3: Existing Listener Uses a Port Other Than 1521You will end up running two listeners: one for the existing database and one for the Infrastructure, regardless of the version of the existing listener.
The existing listener can be running during installation, because it is not using port 1521.
2.4.5.2 If Port 1521 Is Being Used by Some Other ApplicationIf another application is listening on port 1521, you must reconfigure it to listen on a different port. If that is not possible, shut it down while you install Oracle Collaboration Suite Database. After installation, you can reconfigure Oracle Collaboration Suite Database to use a port other than 1521. Refer to the Oracle Collaboration Suite Administrator's Guide for instructions.
2.5 Operating System GroupsCreate operating system groups in the following situations:
Note: Step c in the preceding section is very important. You only must run one listener (the new listener) to support both databases.

Operating System Groups
Preparing to Install Oracle Collaboration Suite 2-19
■ If you plan to install Oracle Collaboration Suite on a computer that does not have Oracle products, create a group to own the "inventory" directory. Refer to Section 2.5.1.
■ If you plan to install Oracle Collaboration Suite 10g Infrastructure in a new database (that is, one created by the installer), create groups for database administrators. Refer to Section 2.5.2.
To create a local operating system group, use the Solaris Management Console:
1. Set the DISPLAY environment variable to point to the monitor where you want the Solaris Management Console window to appear. Refer to Section 2.7.4 if you need help setting the environment variable.
2. Start the Solaris Management Console.
# /usr/sadm/bin/smc
3. In the left frame, expand This Computer, then expand System Configuration.
4. Click Users. This displays the Log In window.
5. In the Log In window, log in as the root user.
6. In the left frame, expand Users and select Groups.
7. Select Action. Select Add Group.
8. In Group Name, enter the name of the group.
9. (optional) In Group ID Number, enter an ID number for the group.
10. Click OK.
For more information about operating system users and groups, refer to your operating system documentation or contact your system administrator.
2.5.1 Create a Group for the Inventory DirectoryIf you plan to install Oracle Collaboration Suite on a computer that does not have Oracle products already installed, create a group to own the inventory directory. The installer writes its files in the inventory directory to keep track of the Oracle products installed on the computer.
This guide uses the name oinstall for this operating system group.
By having a separate group for the inventory directory, you enable different users to install Oracle products on the computer. Users need write permission for the inventory directory. They can achieve this by belonging to the oinstall group.
For the first-time installation of any Oracle product on a computer, the installer displays a screen where you enter a group name for the inventory directory, and a screen where you enter the location of the inventory directory.
The default name of the inventory directory is oraInventory.
To determine if an inventory directory already exists on the computer, look in the /var/opt/oracle/oraInst.loc file. This file lists the location of the inventory directory and the group who owns it. If the file does not exist, the computer does not have Oracle products installed on it. To ensure that you have write permissions on that director run the installer as the same operating system user who installed the existing Oracle product.

Operating System User
2-20 Oracle Collaboration Suite Installation Guide
2.5.2 Create Groups for Database AdministratorsThis section applies only if you plan to install Oracle Collaboration Suite Infrastructure in a new database created by the installer.
When the database is not mounted and database authentication is unavailable, the database uses operating system groups to determine user privileges. The database recognizes the groups and privileges listed in Table 2–6.
You must create operating system groups for these groups.
If you want an operating system group called dba to have SYSDBA privileges:
1. Create the dba group.
2. Ensure that the user running the installer is a member of the dba group.
If you want a different operating system group to have SYSDBA privileges, or to associate SYSDBA and SYSOPER privileges with different groups, ensure that the user running the installer does not belong to the dba group.
If the user running the installer does not belong to the dba group, the installer displays a screen where you can enter the names of groups to have the database administrator privileges. The screen has two fields: one for the OSDBA group and one for the OSOPER group (refer to Table 2–6). You can enter the same operating system group for both fields.
2.6 Operating System UserCreate an operating system user to install and upgrade Oracle products. This guide refers to this user as the oracle user. The oracle user running the installer must have write permission for these directories:
■ The Oracle home directory, which contains files for the product you are installing
■ The inventory directory, which is used by the installer for all Oracle products
If the computer contains other Oracle products, you might already have a user for this purpose. Look in the /var/opt/oracle/oraInst.loc file. This file lists the location of the inventory directory and the group who owns it. If the file does not exist, the computer does not have Oracle products installed on it.
If you do not already have a user for installing Oracle products, create a user with the properties listed in Table 2–7.
Table 2–6 Privileges for the OSDBA and OSOPER Groups
Group Description
OSDBA This is the database administrator group. Users in this group are granted SYSDBA privileges.
OSOPER Users in this group are granted SYSOPER privileges, which comprise privileges required for basic maintenance. These include database startup and shutdown, and other privileges required for database operation. SYSOPER privileges are a subset of SYSDBA privileges.
Table 2–7 Properties of the Operating System User Who Runs the Installer
Item Description
Login name You can use any name for the user. This guide refers to the user as the oracle user.

Operating System User
Preparing to Install Oracle Collaboration Suite 2-21
To create a local operating system user, use the Solaris Management Console as follows:
1. Set the DISPLAY environment variable to point to the monitor where you want the Solaris Management Console window to appear. Refer to Section 2.7.4 if you need help setting the environment variable.
2. Start the Solaris Management Console.
# /usr/sadm/bin/smc
3. In the left frame, expand This Computer, then expand System Configuration.
4. Click Users. This displays the Log In window.
5. In the Log In window, in the User Name field, enter root. In the Password field, enter the root password.
6. In the left frame, expand Users and select User Accounts.
7. Select Action. Click Add User. Click With Wizard.
8. In the User Name field, enter the name of the user (oracle). The Full Name and Description fields are optional. Click Next.
9. In the User ID Number field, accept the default value. Click Next.
10. Select User Must Use This Password At First Login, and enter a password for the user. Click Next.
11. Select Primary Group for the user. This is the group you created earlier to own the inventory directory. Refer to Section 2.5.1. Click Next.
12. In the Path field, enter a home directory for the user. Click Next.
13. Review the mail server information for the user and click Next.
14. Review the user information and click Finish to create the user.
To check which groups an operating system user belongs to, enter the groups command with the name of the user. For example:
# groups oracle
For more information about operating system users and groups, refer to your operating system documentation or contact your system administrator.
Group identifier The primary group of the oracle user must have write permission for the oraInventory directory. Refer to Section 2.5.1 for more information about this group.
You can use any name for the group. This guide uses the name oinstall.
Home directory The home directory for the oracle user can be consistent with the home directories of other users.
Login shell The default login shell can be the C, Bourne, or Korn shell.
Note: Use the oracle user only for installing and running Oracle products. Do not use root as the oracle user.
Table 2–7 (Cont.) Properties of the Operating System User Who Runs the Installer
Item Description

Environment Variables
2-22 Oracle Collaboration Suite Installation Guide
2.7 Environment VariablesThe operating system user who installs Oracle Collaboration Suite needs to set or unset certain environment variables.
Table 2–8 summarizes whether you set or unset an environment variable.
2.7.1 Environment Variable TipsHere are some tips when working with environment variables:
■ If you set environment variables in the .profile file, they might not be read. To ensure that environment variables are set to the correct values, check their values in the shell where you will be running the installer.
■ To check the value of environment variables, use the env command. This displays all the currently defined environment variables and their values.
# env
■ If you use the su command to switch users (for example, switching from the root user to the oracle user), check the environment variables when you are the new user because the environment variables might not be passed to the new user. This can happen even if you enter su with the - parameter (su - user).
# /* root user */# su - oracle# env
2.7.2 ORACLE_HOME and ORACLE_SIDORACLE_HOME and ORACLE_SID must not be set.
2.7.3 PATH, CLASSPATH, and Shared Library Path Environment VariablesEdit your PATH, CLASSPATH, and shared library path environment variables so that they do not reference any Oracle home directories.
2.7.4 DISPLAYSet the DISPLAY environment variable to point to the X server that will display the installer. The format of the DISPLAY environment variable is:
hostname:display_number.screen_number
Table 2–8 Environment Variables Summary
Environment Variable Set or Unset
ORACLE_HOME and ORACLE_SID
Must not be set.
PATH, CLASSPATH, and Shared Library Path Environment Variables
Must not contain references to directories in any Oracle home directories.
DISPLAY Set it to the monitor where you want the installer window to appear.
TMP Optional. If unset, defaults to /tmp.
TNS_ADMIN Unset.

Environment Variables
Preparing to Install Oracle Collaboration Suite 2-23
Example (C shell):
# setenv DISPLAY test.mydomain.com:0.0
Example (Bourne or Korn shell):
# DISPLAY=test.mydomain.com:0.0; export DISPLAY
You can test the display by running the xclock program:
# /usr/openwin/bin/xclock &
Oracle Collaboration Suite requires a running X server during installation only. The frame buffer X server installed with your operating system requires that you remain logged in and have the frame buffer running during installation. If you do not wish to do this, then you must use a virtual frame buffer, such as X Virtual Frame Buffer (XVFB) or Virtual Network Computing (VNC).
For information about obtaining and installing XVFB or other virtual frame buffer solutions, visit Oracle Technology Network at
http://www.oracle.com/technology/index.html
Search OTN for "frame buffer".
2.7.5 TNS_ADMINThis section describes two requirements:
■ The TNS_ADMIN environment variable must not be set.
■ The /etc and the /var/opt/oracle directories must not contain a tnsnames.ora file.
These requirements are necessary to prevent conflicts between the Net configuration files for different Oracle products.
To set TNS_ADMIN or if you have the tnsnames.ora file in /etc or /var/opt/oracle, perform the following steps before installing Oracle Collaboration Suite.
1. If the tnsnames.ora file is in the /etc or /var/opt/oracle directory, move the file to a different directory or you can rename the file.
2. Make sure the TNS_ADMIN environment variable is not set.
Example (C shell):
# unsetenv TNS_ADMIN
Example (Bourne or Korn shell):
# unset TNS_ADMIN
After installation, you can merge the contents of the newly created tnsnames.ora file with your existing tnsnames.ora file.
2.7.6 TMPThe installer uses a temporary directory for swap space. The installer checks for the TMP environment variable to locate the temporary directory. By default, the installer uses the /tmp directory.

The /etc/hosts File
2-24 Oracle Collaboration Suite Installation Guide
If you want the installer to use a directory other than /tmp, set TMP to the full path of an alternate directory. The directory must meet the requirements listed in Section 2.1.
Example (C shell):
% setenv TMP /tmp2
Example (Bourne or Korn shell):
$ TMP=/tmp2; export TMP
If you do not set this environment variable, and the default directory does not have enough space, then the installer displays an error message that says the environment variable is not set. You can either set the environment variable to point to a different directory or free up enough space in the default directory. In either case, you must restart the installation.
2.8 The /etc/hosts FileThe contents of the /etc/hosts file affect the following:
■ Location of the Default Identity Management Realm
■ Host Name for Oracle Application Server Single Sign-On
The installer provides alternative methods for you to enter the values that you want without editing the hosts file as explained in Section 2.8.1 and Section 2.8.2.
2.8.1 Location of the Default Identity Management RealmThe installer reads the hosts file to construct the location of the default Identity Management realm. It displays this location in the "Specify Namespace in Internet Directory" screen.
The hosts file should use the following format:
ip_address fully_qualified_hostname short_hostname
Example:
123.45.67.89 primaryHost.mydomain.com primaryHost
In the preceding example, the location of the default Identity Management realm would display as "dc=mydomain,dc=com".
If the file uses a different format, the installer displays an incorrect value in the screen. For example, suppose the hosts file contains the following line:
123.45.67.89 primaryHost primaryHost.mydomain.com <--- incorrect format
Then the installer would display "dc=primaryHost,dc=com" as the default Identity Management realm. This is probably not the value that you want for the default Identity Management realm.
Note: If you need the hosts file to use a different format, you can edit the file to use the required format, perform the installation, then revert the file back to its original format after installation.
If you are unable, or unwilling, to edit the hosts file, you can enter the desired value for the default Identity Management realm in the Custom Namespace field on the "Specify Namespace in Internet Directory" screen.

Network Topics
Preparing to Install Oracle Collaboration Suite 2-25
2.8.2 Host Name for Oracle Application Server Single Sign-OnIf you are installing Oracle Application Server Single Sign-On and your hosts file contains only the host name of your computer (without the domain name) then you will only be able to sign on to the OracleAS Single Sign-On server using the host name by itself (without the domain name).
To require a domain name when connecting to the OracleAS Single Sign-On server, you can edit the hosts file to include the domain name. If you do not want to edit the file, you can use the OUI_HOSTNAME command-line parameter to the installer to override the value in hosts. For example:
# mount_point/runInstaller OUI_HOSTNAME=myserver.mydomain.com
2.9 Network TopicsTypically, the computer on which you want to install Oracle Collaboration Suite is connected to the network, has local storage to contain the Oracle Collaboration Suite installation, has a display monitor, and has an appropriate disk drive.
This section describes how to install Oracle Collaboration Suite on computers that do not meet the typical scenario. It covers the following cases:
■ Section 2.9.1, "Installing Oracle Collaboration Suite on Multihomed Computers"
■ Section 2.9.2, "Copying the DVD to a Hard Drive"
■ Section 2.9.3, "Installing Oracle Collaboration Suite from a Remote DVD-ROM Drive"
■ Section 2.9.4, "Installing Oracle Collaboration Suite on Remote Computers"
■ Section 2.9.5, "Installing Oracle Collaboration Suite on NFS-Mounted Storage"
■ Section 2.9.6, "Support for NIS and NIS+"
2.9.1 Installing Oracle Collaboration Suite on Multihomed ComputersIf you are installing Oracle Collaboration Suite on a computer with multiple network cards, then the installer uses the first names in the /etc/nodenames file to determine the host name to use for IP address lookup.
If this is not the name that you want to use, then you can:
■ Start up the installer with the OUI_HOSTNAME parameter, if you do not want to edit the /etc/nodenames file. Specify the host name that you want to use in this parameter. For example:
# mount_point/runInstaller OUI_HOSTNAME=myserver.mydomain.com
2.9.2 Copying the DVD to a Hard DriveInstead of installing from the Oracle Collaboration Suite DVD, you can copy the contents of the DVD to a hard drive and install the product from there. This might be easier if you plan to install many instances of Oracle Collaboration Suite on your network, or if the computers where you want to install Oracle Collaboration Suite do not have DVD-ROM drives.
You can also install Oracle Collaboration Suite from remote DVD-ROM drives. Refer to Section 2.9.3 for more information.

Network Topics
2-26 Oracle Collaboration Suite Installation Guide
Checking the Space RequirementEnsure that the hard drive contains enough space to hold the contents of the Oracle Collaboration Suite DVD.
Copying the Content of DVD-ROMs1. Create a directory structure on your hard drive as shown in Figure 2–2. First create
a parent directory (called OCS_10g_10_1_1 in the figure, but you can name it anything you like), and, under the parent directory, create subdirectories called Disk1, Disk2, and so on. The names of the subdirectories must be DiskN, where N is the disk number.
Figure 2–2 Suggested Directory Structure for Copying DVD Content to Hard Disk
2. Copy the contents of each disk in to the corresponding directory.
# cp -pr /dvd_mount_point/* /path/to/hard/drive/Disk1/# cp -pr /dvd_mount_point/* /path/to/hard/drive/Disk2/... Repeat for each disk
To run the installer from the copied files, invoke the runInstaller executable from the root directory. Run it from the computer that will be running Oracle Collaboration Suite.
# /path/to/hard/drive/runInstaller
2.9.3 Installing Oracle Collaboration Suite from a Remote DVD-ROM DriveIf the computer where you want to install Oracle Collaboration Suite does not have a DVD-ROM drive, then you can perform the installation from a remote drive. Check the following points:
■ You must share the remote DVD-ROM drive through Network File System.
On the remote computer, which has the DVD-ROM drive:
1. Insert the Oracle Collaboration Suite DVD in to the DVD-ROM drive.
2. Share the DVD-ROM drive.
DVD-ROM:
# suPassword: root_password# share -F nfs -o ro /dvdrom
The path /dvdrom specifies the path to the DVD-ROM drive. You can use any path you like.
On the local computer, access the DVD-ROM and run the installer as follows:
# /net/remote_computer_hostname/dvdrom/runInstaller
Oracle_Collaboration_Suite_10g_10_1_1
Disk1 Disk2 Disk3
Contentsof Disk1
Contentsof Disk2
Contentsof Disk3

Network Topics
Preparing to Install Oracle Collaboration Suite 2-27
Replace remote_computer_hostname with the name of the remote computer.
2.9.4 Installing Oracle Collaboration Suite on Remote ComputersYou can run the installer on a remote computer (remote_computer), but display the installer screens on your local computer (local_computer). The installer will install Oracle Collaboration Suite on the remote computer.
1. Allow remote_computer to appear on local_computer. Use the following command on the console of the local computer.
local_computer> xhost +remote_computer
If you do not run xhost, you might get an Xlib error similar to "Failed to connect to server", "Connection refused by server," or "Can’t open display" when starting the installer.
2. On local_computer, perform a remote login (using telnet or rlogin) to remote_computer. Log in as the oracle user, as described in Section 2.6. Ensure that the user has set the environment variables correctly, as described in Section 2.7.
local_computer> rlogin -l oracle remote_computer.mydomain.com
OR
local_computer> telnet remote_computer.mydomain.com
3. Set the DISPLAY environment variable on remote_computer to point to local_computer.
Example (C shell):
remote_computer> setenv DISPLAY local_computer.mydomain.com:0.0
Example (Bourne or Korn shell):
remote_computer> DISPLAY=local_computer.mydomain.com:0.0; export DISPLAY
4. Run the installer. Refer to Section 3.4.
2.9.5 Installing Oracle Collaboration Suite on NFS-Mounted StorageCurrently, Oracle Collaboration Suite is certified to run on the following Network File Storage (NFS)-mounted storage system:
■ Network Appliance filers
The NFS-mounted system should be exported to at least the remote install user and remote root user. You can do this using exportfs command:
# exportfs -i /vol/vol1
To check the latest certification list for any updates, visit the Oracle Technology Network at
Note: You can use a PC X emulator to run the installer if it supports a PseudoColor color model or PseudoColor visual. Set the PC X emulator to use a PseudoColor visual, and then start the installer. Refer to the X emulator documentation for instructions on how to change the color model or visual settings.

Prerequisite Checks Performed by the Installer
2-28 Oracle Collaboration Suite Installation Guide
http://www.oracle.com/technology/index.html
2.9.6 Support for NIS and NIS+You can install and run Oracle Collaboration Suite in Network Information System (NIS) and NIS+ environments.
2.10 Prerequisite Checks Performed by the InstallerTable 2–9 lists the checks performed by the installer.
Table 2–9 Prerequisite Checks Performed by the Installer
Item Description
Operating system version Refer to Section 2.1 for supported versions.
Operating system patches Refer to Section 2.2.1 for a list of required patches.
Operating system packages Refer to Section 2.2 for a list of required packages.
Operating system kernel parameters
Refer to Section 2.3 for a list of required kernel parameters.
Monitor Refer to Section 2.1 for monitor requirements.
Display permission The installer checks that the user has permissions to display on the monitor specified by the DISPLAY environment variable.
Operating system version Refer to Section 2.2 for supported versions.
Operating system patches Refer to Section 2.2.1 for a list of required patches.
Operating system kernel parameters
Refer to Section 2.3 for a list of required kernel parameters.
Memory Refer to Section 2.1 for recommended values.
Swap space Refer to Section 2.1 for recommended values.
TMP space Refer to Section 2.1 for recommended values.
Oracle home directory name
The installer checks that the Oracle home directory name does not contain any spaces.
Path to the Oracle home directory
The installer checks that the path to the Oracle home directory is not longer than 127 characters.
Oracle home directory contents
The installer checks that the Oracle home directory does not contain any files that might interfere with the installation.

Prerequisite Checks Performed by the Installer
Preparing to Install Oracle Collaboration Suite 2-29
Oracle home directory Always install Oracle Collaboration Suite in a new directory, unless you are expanding a Oracle Collaboration Suite 10g Applications. Refer to Section 8.7. Here are some examples of installations that are not allowed:
■ Any type of Oracle Collaboration Suite in to an Oracle Database Release 8.0, 8i, 9.0.1, or 9.2 database Oracle home
■ Any type of Oracle Collaboration Suite in to an Oracle Management Service Oracle home
■ Any type of Oracle Collaboration Suite in to an Oracle HTTP Server standalone Oracle home
■ Any type of Oracle Collaboration Suite in to an OracleAS Web Cache standalone Oracle home
■ Any type of Oracle Collaboration Suite in to an Oracle9i Developer Suite Release 9.0.2 Oracle home
■ Any type of Oracle Collaboration Suite in to an Oracle Application Server Containers for J2EE standalone Oracle home
■ Any type of Oracle Collaboration Suite in to an Oracle9iAS 1.0.2.2 Oracle home
■ Oracle Collaboration Suite Applications tier in to an infrastructure Release 9.0.2 or 10g Release 1 (10.1.1.0.2) Oracle home
■ Oracle Collaboration Suite Applications tier in to an Oracle9iAS Release 9.0.2 or 9.0.3 middle tier Oracle home
■ Oracle Collaboration Suite Infrastructure in to any Oracle9iAS Release 9.0.2 Oracle home
Port 1521 The installer displays a warning if port 1521 is in use by any application, including database listeners of any version. You must stop the application that is using port 1521, then click Retry in the warning dialog.
If a database listener is using port 1521, you might be able to use it for Oracle Collaboration Suite Database. Refer to Section 2.4.5 for details.
If it is another application that is using port 1521, you must stop it or configure it to use a different port. Alternatively, you can change the database listener to use a port other than 1521, but you can do this only after installation. Refer to the Oracle Collaboration Suite Administrator's Guide for details.
Static port conflicts The installer checks the ports listed in the staticports.ini file, if specified. Refer to Section 2.4.
DISPLAY environment variable
The installer checks that the DISPLAY environment variable is set.
TNS_ADMIN environment variable
The TNS_ADMIN environment variable must not be set.
There must not be a tnsnames.ora file in the /etc or /var/opt/oracle directories.
Table 2–9 (Cont.) Prerequisite Checks Performed by the Installer
Item Description

Prerequisite Checks Performed by the Installer
2-30 Oracle Collaboration Suite Installation Guide
Cluster file system The installer checks that you are not installing Oracle Collaboration Suite in a cluster file system (CFS).
Oracle Enterprise Manager directories are writable
The installer runs this check only if you are expanding Oracle Collaboration Suite 10g Applications or if you are reinstalling Oracle Collaboration Suite in the same Oracle home. The installer checks that these directories are writable by the operating system user running the installer:
■ ORACLE_HOME/sysman/emd
■ ORACLE_HOME/sysman/config
■ ORACLE_HOME/sysman/webapps/emd/WEB-INF/config
Oracle Enterprise Manager files exist
The installer runs this check only if you are expanding Oracle Collaboration Suite 10g Applications or if you are reinstalling Oracle Collaboration Suite in the same Oracle home. The installer checks that these files exist:
■ ORACLE_HOME/sysman/config/iasadmin.properties
■ ORACLE_HOME/sysman/webapps/emd/WEB-INF/config/consoleConfig.xml
Table 2–9 (Cont.) Prerequisite Checks Performed by the Installer
Item Description

Starting the Oracle Collaboration Suite Installation 3-1
3Starting the Oracle Collaboration Suite
Installation
This chapter describes how to get started with Oracle Collaboration Suite installations. You must follow the procedures in this chapter to ensure that the installation process is successful.
This chapter contains the following sections:
■ Section 3.1, "Installing Oracle Collaboration Suite from the DVDs"
■ Section 3.2, "Installing Oracle Collaboration Suite from a Hard Drive"
■ Section 3.3, "Understanding Oracle Universal Installer"
■ Section 3.4, "Starting Oracle Universal Installer"
3.1 Installing Oracle Collaboration Suite from the DVDsOracle Collaboration Suite includes DVD-ROMs for installing the following products:
■ Oracle Collaboration Suite
■ Oracle Calendar server Standalone
■ Oracle Voicemail & Fax and Oracle Web Conferencing Conversion Servers for Microsoft Windows
■ Patches (Portal, Oracle Database, and other required patches)
■ Oracle Collaboration Suite clients
■ Oracle Cluster Ready Services 10.1.0.4.2
Oracle Collaboration Suite is also shipped with three CD-ROMs that provide additional support, such as:
■ OracleAS Metadata Repository Creation Assistant
■ OracleAS Metadata Repository Upgrade Assistant and Utilities
■ Documentation
You can either choose to install Oracle Collaboration Suite directly from the DVDs, or copy the DVD content and then install from your system hard drive. You must complete the procedures required for the installation method you choose before starting Oracle Universal Installer.
For operating systems that do not support automatic mounting of DVDs, the DVDs must be mounted manually. You must have root privileges to mount or unmount a DVD. Be sure to unmount a DVD before removing it from the drive.

Installing Oracle Collaboration Suite from the DVDs
3-2 Oracle Collaboration Suite Installation Guide
3.1.1 Mounting DVDs for the Solaris Operating Environment (SPARC)Mount the first DVD to start the installation. Use the following procedures to mount DVDs.
This section contains the following sections:
■ Mounting DVDs for the Solaris Operating Environment (SPARC) with Volume Management Software
■ Mounting DVDs for the Solaris Operating Environment (SPARC) Manually
3.1.1.1 Mounting DVDs for the Solaris Operating Environment (SPARC) with Volume Management SoftwareIf you are using Volume Management software (available by default on Solaris), then the DVD is mounted automatically to the /dvdrom/volume_name directory when inserted in to the DVD-ROM drive. Proceed to Section 3.4 on page 3-5.
To check if you have Volume Management software, use the following command:
$ ps -e | grep vold
If you have Volume Management software, then the output must be similar to the following:
404 ? 16:03 vold
■ If the Volume Management software is running, then the DVD is mounted automatically. Use the following commands to unmount subsequent DVD:
$ cd /$ eject
After entering these commands, proceed to Section 3.4 on page 3-5.
■ If no lines are returned, then Volume Management software is not running, and you must mount the DVD-ROM manually. Proceed to Section 3.1.1.2 on page 3-2.
Perform the following steps to mount subsequent DVDs:
1. Remove the DVD from the DVD-ROM drive by using the following commands:
$ cd /$ eject
2. If required, insert the next DVD in to the DVD-ROM drive and enter the correct mount point.
3.1.1.2 Mounting DVDs for the Solaris Operating Environment (SPARC) ManuallyPerform the following steps to mount the DVD manually:
1. Place the first DVD of the appropriate installation in the DVD-ROM drive.
2. Log in as the root user and, if necessary, create a DVD-ROM mount point directory by using the following commands:
$ su root$ mkdir dvdrom_mount_point_directory
3. Mount the DVD-ROM drive on the mount point directory, and then exit the root account by using the following commands:
# mount options device_name dvdrom_mount_point_directory

Understanding Oracle Universal Installer
Starting the Oracle Collaboration Suite Installation 3-3
# exit
If you are unsure of the correct device_name, then consult your system administrator. Typically, the device_name is /dev/dsk/c0t6d0s0. For example:
$ su root# mkdir /dvdrom# mount -r -F hsfs /dev/dsk/c0t6d0s0 /dvdrom# exit
If you run Oracle Universal Installer while the current working directory is on the DVD-ROM, then follow these steps to mount the next DVD-ROM:
1. Change directories to the root directory of your system and log in as the root user by using the following commands:
$ cd /$ su root
2. Unmount the DVD by using the following command:
# umount dvdrom_mount_point_directory
3. Remove the DVD from the DVD-ROM drive.
4. If required, insert and mount the next DVD in the DVD-ROM drive by using the following command:
# mount options device_name dvdrom_mount_point_directory
3.2 Installing Oracle Collaboration Suite from a Hard DriveYou can avoid the need to mount and unmount DVD-ROMs during installation by copying the contents of each DVD to your system hard drive. You must have a file system that is not in use by other applications and enough disk space available.
1. Copy the content of each DVD to your system hard drive under a directory named Disk1 for the first DVD, and so on (depending upon the number of the DVDs in the sequence of disks that comprises the set).
2. Start Oracle Universal Installer.
3.3 Understanding Oracle Universal InstallerOracle Collaboration Suite uses Oracle Universal Installer to guide you through each step of the installation process. Oracle Universal Installer provides the following features:
■ Describes installation options for Oracle Collaboration Suite
■ Detects preset environment variables and configuration settings
■ Sets environment variables and configuration during installation
■ Deinstalls Oracle Collaboration Suite products
See Also:
■ Section 2.1 for hard disk requirements for your platform
■ Section 3.1 for instructions on mounting and unmounting DVD-ROMs

Understanding Oracle Universal Installer
3-4 Oracle Collaboration Suite Installation Guide
This section describes the following Oracle Universal Installer features:
■ oraInventory Directory and Installation Session Log Files
■ Additional Component Installations with Oracle Universal Installer
3.3.1 oraInventory Directory and Installation Session Log FilesOracle Collaboration Suite creates the oraInventory directory the first time it is run on a computer. The oraInventory directory keeps an inventory of products that Oracle Collaboration Suite installs on your computer, as well as other installation information. If you have previously installed Oracle products, then you might already have an oraInventory directory.
The UNIX group that owns Oracle Collaboration Suite must have permission to write to the oraInventory directory. Attempts to run Oracle Collaboration Suite without this permission fail. For more information, refer to Section 2.5.
The location of oraInventory is defined in a file named oraInst.loc, located in the directory /var/opt/oracle/oraInst.loc on your operating system.
The log file of the most recent installation is as follows:
$ORACLE_BASE/oraInventory/logs/installActionstodays_date_time.log
In this specification, $ORACLE_BASE is the location for your installation files and todays_date_time is the date and time of installation.
Do not delete or manually alter the oraInventory directory or its contents. Doing so can prevent Oracle Universal Installer from locating products that you have installed on your system.
3.3.2 Additional Component Installations with Oracle Universal InstallerIf you plan to install a subsequent Oracle Collaboration Suite or Oracle Collaboration Suite 10g Infrastructure installation on the same host, Oracle recommends the following steps:
1. Review Chapter 2 for preinstallation tasks.
2. Stop the Oracle Enterprise Manager Web site. For more information, refer to the Oracle Collaboration Suite Administrator's Guide.
3. Ensure that all other previously installed Oracle Collaboration Suite instances are running when you begin installation.
4. Specify a different Oracle home than the first Oracle Collaboration Suite installation.
5. Use the same oraInventory directory for subsequent Oracle Collaboration Suite installations.
Note: The make.log file in the ORACLE_HOME/install directory contains a log of every make file action executed during the installation process. The make.log file also records any link errors during installation. Do not delete or alter the make.log file.
See Also: Section 3.3.1, "oraInventory Directory and Installation Session Log Files"

Starting Oracle Universal Installer
Starting the Oracle Collaboration Suite Installation 3-5
3.4 Starting Oracle Universal InstallerTo start Oracle Universal Installer, perform the following steps:
1. If your computer does not mount DVDs automatically, you must set the mount point manually.
2. Log in as the oracle user.
3. Insert the Oracle Collaboration Suite DVD-ROM in to the DVD-ROM drive.
4. Insert the first DVD in to the DVD-ROM drive.
5. Run the Oracle Universal Installer using the command:
# cd# /dvdrom/runInstaller
This starts Oracle Universal Installer, through which you can install Oracle Collaboration Suite.
Notes:
■ Ensure that you are not logged in as the root user when you start Oracle Universal Installer. If you perform the installation with the root user, then only the root user will have permissions to manage Oracle Collaboration Suite.
■ Do not use dvd_mount_point as your working directory when you start Oracle Universal Installer. If you do, then you cannot eject the first DVD during the installation step to insert the second DVD, if required.
■ Oracle recommends using the same operating system user account when installing and configuring additional Oracle Collaboration Suite Applications on the same host.

Starting Oracle Universal Installer
3-6 Oracle Collaboration Suite Installation Guide

Installing Oracle Collaboration Suite 10g Infrastructure 4-1
4Installing Oracle Collaboration Suite 10g
Infrastructure
This chapter contains the following sections:
■ Section 4.1, "Types of Infrastructure Installation"
■ Section 4.2, "Order of Infrastructure Installation"
■ Section 4.3, "Preparing to Install Oracle Collaboration Suite 10g Infrastructure"
■ Section 4.4, "Understanding Common Installation Screens"
■ Section 4.5, "Installing Oracle Collaboration Suite 10g Infrastructure"
4.1 Types of Infrastructure InstallationOracle Collaboration Suite 10g Infrastructure components can be grouped in to Identity Management components and components associated with Oracle Collaboration Suite 10g Database. Table 4–1 describes these components.
Table 4–1 Oracle Collaboration Suite 10g Infrastructure Components
Infrastructure Components Description
Identity Management components These components provide directory, security, and user management functionality. Some of these components, such as OracleAS Single Sign-On, have schemas in Oracle Collaboration Suite Database. The components are:
■ Oracle Internet Directory
■ OracleAS Single Sign-On
■ Oracle Delegated Administration Services
■ Oracle Directory Integration and Provisioning
■ OracleAS Certificate Authority

Order of Infrastructure Installation
4-2 Oracle Collaboration Suite Installation Guide
When you install the Infrastructure, you can install Identity Management components, Oracle Collaboration Suite Database, or both. The following types of installation are available for installing Infrastructure:
■ Identity Management and Oracle Collaboration Suite Database
■ Identity Management
■ Oracle Collaboration Suite Database
■ Enable existing 10g Database to Collaboration Suite Database
In addition to the components listed in Table 4–1, when you install Infrastructure, the following components are also installed:
■ Oracle HTTP Server
■ Oracle Enterprise Manager 10g components
These components are always installed, regardless of the type of installation that you select.
4.1.1 Why Would I Select Different Types of Installation?By separating the Infrastructure in to Identity Management components and Oracle Collaboration Suite Database, the installer enables you to install Infrastructure components on multiple computers. For example, you can install Oracle Collaboration Suite Database on one computer and Identity Management components on another computer. Within the Identity Management option, you can install Identity Management components on multiple computers as well.
The options for selecting different types of installations also enable you to create a new database or use an existing database for Oracle Collaboration Suite Database. If you select the "Oracle Collaboration Suite Database" or the "Identity Management and Oracle Collaboration Suite Database" option, then the installer creates a new database and populates it with schemas of Oracle Collaboration Suite Database. To use an existing database, refer to Chapter 5.
4.2 Order of Infrastructure InstallationIf you plan to install both Identity Management components and Oracle Collaboration Suite Database on the same computer, then select the Identity Management and Oracle Collaboration Suite Database option. The installer installs the components in the correct order.
Oracle Collaboration Suite Database
Oracle Collaboration Suite Database is a collection of schemas used by other components of Oracle Collaboration Suite Infrastructure and Oracle Collaboration Suite Applications. The schemas can be grouped in to the following categories:
■ Product metadata
■ Identity Management metadata
■ Management metadata
■ Oracle Collaboration Suite Applications components
Table 4–1 (Cont.) Oracle Collaboration Suite 10g Infrastructure Components
Infrastructure Components Description

Preparing to Install Oracle Collaboration Suite 10g Infrastructure
Installing Oracle Collaboration Suite 10g Infrastructure 4-3
If you plan to install the Infrastructure components on separate computers, then you must install them in the following order:
1. Install Oracle Collaboration Suite Database.
You can run the installer to create a new database and populate it with the schemas of Oracle Collaboration Suite Database. Alternatively, you can use the Enable existing 10g Database to Collaboration Suite Database option to install Oracle Collaboration Suite Database in an existing database.
2. Install Identity Management components.
The installer prompts you to enter information that is used as connect information for Oracle Collaboration Suite Database. Refer to Section 4.5.5 for more information about this procedure.
The installer registers the Oracle Collaboration Suite Database with the newly created instance of Oracle Internet Directory. Refer to Section 4.3.5 for more information about registration.
If you install only Oracle Collaboration Suite Database during the installation of the Infrastructure, then the installer creates a new database and populates it with schemas of Oracle Collaboration Suite Database. The installer also creates a new instance of Oracle Collaboration Suite that is different from other Oracle Collaboration Suite instances in the following ways:
■ The installer does not prompt you to name this Oracle Collaboration Suite instance.
■ At the end of the installation, Oracle Enterprise Manager 10g Application Server Control is not started, because it is not configured for this instance. You do not need Application Server Control to manage this instance, which consists of only Oracle Collaboration Suite Database.
To manage this instance, you use database management tools.
■ At the end of the installation, Oracle HTTP Server is also not started, because you do not need it to manage this instance.
4.3 Preparing to Install Oracle Collaboration Suite 10g InfrastructureThis section explains the different types of Infrastructure installations and answers some common questions about the installation of the Infrastructure.
This section covers the following sections:
■ Section 4.3.1, "Can I Install Components on Separate Computers?"
Note: You cannot register the Oracle Collaboration Suite Database with Oracle Internet Directory at this point, because you do not have an instance of Oracle Internet Directory yet. The registration is done in the next step.
Note: Installing only Oracle Collaboration Suite Database does not give you an Oracle Collaboration Suite instance.
See Also: Oracle Collaboration Suite Administrator's Guide

Preparing to Install Oracle Collaboration Suite 10g Infrastructure
4-4 Oracle Collaboration Suite Installation Guide
■ Section 4.3.2, "Tips for Installing Identity Management Components Separately"
■ Section 4.3.3, "Do I Need the Oracle Delegated Administration Services or Oracle Directory Integration and Provisioning Components?"
■ Section 4.3.4, "Can I Use an Existing Instance of Oracle Internet Directory?"
■ Section 4.3.5, "How Do I Register Oracle Collaboration Suite Database in Oracle Internet Directory and Randomize the Password"
■ Section 4.3.6, "Can I Use Multiple Oracle Collaboration Suite Databases?"
■ Section 4.3.7, "What High Availability Options Does Oracle Collaboration Suite Support?"
■ Section 4.3.8, "What are the Restrictions on the Passwords for the SYS and SYSTEM Users?"
■ Section 4.3.9, "What Do I Enter in the Specify Namespace in Internet Directory Screen?"
■ Section 4.3.10, "How Do I Determine Port Numbers Used by Components?"
4.3.1 Can I Install Components on Separate Computers?You can install components on separate computers. The distribution of components over multiple computers is especially useful for Infrastructure components. Such a distribution can improve performance, security, scalability, and availability of Infrastructure services.
For example, you can install Oracle Collaboration Suite Database on a single computer. The Infrastructure uses Oracle Collaboration Suite Database to contain the schemas of Oracle Collaboration Suite Database. You can install Identity Management components in the Infrastructure separately, on one or more computers.
Table 4–2 shows some possible Oracle Collaboration Suite 10g Infrastructure configurations.

Preparing to Install Oracle Collaboration Suite 10g Infrastructure
Installing Oracle Collaboration Suite 10g Infrastructure 4-5
Table 4–2 Oracle Collaboration Suite 10g Infrastructure Configurations
Configuration Description / How to Install
In this configuration, the Oracle Collaboration Suite Database and the Identity Management components run from the same Oracle home.
To install this configuration, install the Oracle Collaboration Suite Database and the Identity Management components at the same time. For installation steps, refer to Section 4.5.1.
OracleCollaboration
SuiteDatabase
Identity Management Components

Preparing to Install Oracle Collaboration Suite 10g Infrastructure
4-6 Oracle Collaboration Suite Installation Guide
4.3.2 Tips for Installing Identity Management Components SeparatelyTo install Identity Management components separately, consider the following guidelines when selecting the components that you want to configure on the Select Configuration Options screen:
In this configuration, the Oracle Collaboration Suite Database and the Identity Management components run on separate computers.
To install this configuration:
1. Install the Oracle Collaboration Suite Database first. Refer to Section 4.5.2.
Alternatively, you can install the Oracle Collaboration Suite Database in an existing database. Refer to Chapter 5.
2. Then install the Identity Management components. Refer to Section 4.5.5.
In this configuration, the Oracle Collaboration Suite Database runs on one computer, Oracle Internet Directory runs on a second computer, and the remaining Identity Management components run on a third computer.
To install this configuration:
1. Install the Oracle Collaboration Suite Database first. Refer to Section 4.5.2.
Alternatively, you can install the Oracle Collaboration Suite Database in an existing database. Refer to Chapter 5.
2. Install Oracle Internet Directory. Refer to Section 4.5.6.
3. Install the remaining Identity Management components. Refer to Section 4.5.4.
In this configuration, you want Oracle Application Server Certificate Authority to use its own Oracle Collaboration Suite Database for security reasons. Other Identity Management components use another Oracle Collaboration Suite Database.
To install this configuration:
1. Install Oracle Collaboration Suite Database and Identity Management components, but not Oracle Application Server Certificate Authority.
You can install all these items in the same Oracle home (refer to the first configuration), or you can distribute them. The figure shows a distributed configuration.
2. Install Oracle Application Server Certificate Authority with its own Oracle Collaboration Suite Database. Refer to Section 4.5.7.
See Also: Oracle Collaboration Suite Deployment Guide
Table 4–2 (Cont.) Oracle Collaboration Suite 10g Infrastructure Configurations
Configuration Description / How to Install
OracleCollaboration
SuiteDatabase
Identity Management Components
• Oracle Directory Integration and Provisioning• Oracle Delegated Administration Services• OracleAS Single Sign-On• OracleAS Certificate Authority
OracleCollaboration
SuiteDatabase
Oracle Internet Directory
Identity Management Components
OracleCollaboration
SuiteDatabase
• Oracle Directory Integration and Provisioning• Oracle Delegated Administration Services• OracleAS Single Sign-On• OracleAS Certificate Authority
Oracle Internet Directory
Identity Management Components
OracleCollaboration
SuiteDatabase
OracleAS Certificate Authority

Preparing to Install Oracle Collaboration Suite 10g Infrastructure
Installing Oracle Collaboration Suite 10g Infrastructure 4-7
■ You cannot install and configure more than one instance of OracleAS Certificate Authority for the same Oracle Collaboration Suite Database. You can install and configure more than one instance of OracleAS Single Sign-On, Oracle Delegated Administration Services, and Oracle Directory Integration and Provisioning for the same Oracle Collaboration Suite Database.
■ You must select at least one component for configuration. Otherwise, the installation will not complete successfully.
■ If you configure OracleAS Single Sign-On and Oracle Delegated Administration Services in separate installations for the same instance of Oracle Internet Directory, then ensure that you configure OracleAS Single Sign-On before Oracle Delegated Administration Services installation. This is because Oracle Delegated Administration Services depends on mod_osso, which will not be set up during installation unless the Oracle Internet Directory it points to already has OracleAS Single Sign-On configured.
4.3.3 Do I Need the Oracle Delegated Administration Services or Oracle Directory Integration and Provisioning Components?
These components are required and you must install them before you install Oracle Collaboration Suite Applications. This is because they provide the following services:
■ Oracle Delegated Administration Services provides a browser-based interface to Oracle Internet Directory. You can use this interface to perform tasks such as changing passwords, searching for other users in the directory, and creating groups. If you have the required privileges, then you can also create additional users.
■ Oracle Directory Integration and Provisioning enables you to integrate different applications and third-party LDAP directories with Oracle Internet Directory. You can also use Oracle Directory Integration and Provisioning to synchronize data in all directories and send notifications to applications when data in Oracle Internet Directory changes (for example, when you add users or groups to Oracle Internet Directory).
4.3.4 Can I Use an Existing Instance of Oracle Internet Directory?You can use an existing instance of Oracle Internet Directory instead of having the installer create a new one. You might want to do this if your applications must authenticate users whose information is already stored in the existing instance of Oracle Internet Directory.
See Also: Oracle Internet Directory Administrator's Guide for more details about configuring more than one instance of Oracle Internet Directory for the same Oracle Collaboration Suite Database
Note: You can install Identity Management, Oracle Collaboration Suite Database, and the Applications tier in any order you wish. However, if you install Oracle Collaboration Suite Database before Identity Management, then later you must register the Database with Identity Management.
The recommended order of installation is Identity Management, Oracle Collaboration Suite Database, and then finally the Applications tier.

Preparing to Install Oracle Collaboration Suite 10g Infrastructure
4-8 Oracle Collaboration Suite Installation Guide
Table 4–3 shows the supported versions of Oracle Internet Directory. However, you must upgrade these versions to the Oracle Internet Directory shipped with Oracle Collaboration Suite 10g Release 1 (10.1.1.0.2).
To determine the version of Oracle Internet Directory, ensure that it is up and running. Then enter the following command:
oidldapd -version
The output of the command should be similar to the following:
oidldapd: Release 9.2.0.1.0 - Production on Fri Feb 28 09:26:53 2003(c) Copyright 2001 Oracle Corporation. All rights reserved.
The oidldapd command can be found in the ORACLE_HOME/bin directory, where ORACLE_HOME is the root directory of Oracle Collaboration Suite containing Oracle Internet Directory.
4.3.5 How Do I Register Oracle Collaboration Suite Database in Oracle Internet Directory and Randomize the Password
Oracle Collaboration Suite Database and Oracle Internet Directory work together closely. In most cases, you must ensure that Oracle Collaboration Suite Database is registered with Oracle Internet Directory before you can use it.
Table 4–4 lists the scenarios where the installer automatically registers Oracle Collaboration Suite Database with Oracle Internet Directory, and the scenarios where you decide whether to register it or not.
Note: To use an existing instance of Oracle Internet Directory during the Infrastructure installation, do not select the Oracle Internet Directory option in the Select Configuration Options screen.
You must provide the connect information (host name, port, user name, password) for the existing instance of Oracle Internet Directory.
Table 4–3 Supported Versions of Oracle Internet Directory
Version Notes
9.2.0.x This version of Oracle Internet Directory is shipped with Oracle9i Database Release 2 (9.2).
You must upgrade it to 10g Release 1 (10.1.1.0.2) before you can use it with Oracle Collaboration Suite.
For details on how to upgrade, refer to the Oracle Collaboration Suite Upgrade Guide.
9.0.2 This version of Oracle Internet Directory is shipped with Oracle9i Application Server Release 2 (9.0.2).
You can run this version of Oracle Internet Directory with 10g Release 1 (10.1.1.0.2) components, but you need 9.0.2 metadata repository for the 9.0.2 Oracle Internet Directory.
You can also upgrade Oracle Internet Directory Release 9.0.2 Oracle Internet Directory to 10g Release 1 (10.1.1.0.2).
For details on how to upgrade, refer to the Oracle Collaboration Suite Upgrade Guide.

Preparing to Install Oracle Collaboration Suite 10g Infrastructure
Installing Oracle Collaboration Suite 10g Infrastructure 4-9
4.3.6 Can I Use Multiple Oracle Collaboration Suite Databases?You can install multiple Oracle Collaboration Suite Databases to increase performance. This enables different components in your topology to use different databases.
Figure 4–1 shows a topology that involves two databases. It uses four computers:
Computer 1 runs an instance of Oracle Collaboration Suite Database and Identity Management components. The Identity Management components use this database.
Computer 2 has an instance of Oracle Collaboration Suite Database that is registered with the Oracle Internet Directory running on Computer 1.
Computer 3 has an instance of Oracle Mail. This Applications tier uses the database on Computer 1 for its product metadata because it was registered with that database during installation.
Computer 4 has an instance of Oracle Collaboration Suite 10g Content Services. This Applications tier uses the database on Computer 2 for its product metadata because it was registered with that database during installation.
Table 4–4 Database Registration Scenarios
Scenario Registration Schema Passwords
Install and configure the Oracle Collaboration Suite Database and Oracle Internet Directory in the same installation session.
Automatic Randomized
Install Oracle Collaboration Suite Database for an existing Oracle Internet Directory
Automatic Randomized
Install Oracle Internet Directory for an existing Oracle Collaboration Suite Database
Automatic Randomized (the Oracle Collaboration Suite Database schemas are given new randomized passwords)
Install Oracle Collaboration Suite Database only (without installing Identity Management components) and you choose to register it with Oracle Internet Directory
This scenario applies to installing it in a new database or in an existing database.
Yes Randomized
Install Oracle Collaboration Suite Database only (without installing Identity Management components) and you choose not to register it with Oracle Internet Directory.
This scenario applies to installing it in a new database or in an existing database.
No The schemas are locked, and the passwords are expired.

Preparing to Install Oracle Collaboration Suite 10g Infrastructure
4-10 Oracle Collaboration Suite Installation Guide
Figure 4–1 Multiple Instances of Oracle Collaboration Suite Database in Use
4.3.7 What High Availability Options Does Oracle Collaboration Suite Support?Refer to Chapter 10 for more information on installing Oracle Collaboration Suite in high availability environments.
4.3.8 What are the Restrictions on the Passwords for the SYS and SYSTEM Users?When you install Oracle Collaboration Suite Database in a new database, the installer prompts you to set passwords for the SYS and SYSTEM users. These users are privileged users of the database. These passwords have certain restrictions. These passwords:
Note:
■ If you are installing multiple databases on the same computer, each database must have a unique global database name and system identifier (SID).
■ If you are registering databases with the same Oracle Internet Directory, each database must have a unique global database name and SID. If not, the Oracle Internet Directory Configuration Assistant will fail when you install the second database with the same name.
Note: Hardware clustering is supported for Infrastructure only. It is not supported for Applications.
ProductMetadata
ProductMetadata
Computer 3
OracleMail
Computer 2
OracleCollaboration
SuiteDatabase2
OracleContent Services
Computer 4
Oracle CollaborationSuite Infrastructure
Both databases areregistered in theInternet Directory
OracleCollaboration
SuiteDatabase1
OracleASSingle
Sign-On
OracleInternet
Directory
Computer 1
IdentifyManagement

Preparing to Install Oracle Collaboration Suite 10g Infrastructure
Installing Oracle Collaboration Suite 10g Infrastructure 4-11
■ Must be shorter than 30 characters
■ Can contain only alphanumeric characters from the database character set, the underscore (_), the dollar sign ($), and the number symbol (#)
■ Must begin with an alphabetic character
Passwords cannot begin with a number, the underscore (_), the dollar sign ($), or the number sign (#).
■ Cannot be Oracle reserved words
Oracle Database SQL Reference guide lists the reserved words. To access the guide, visit the Oracle Technology Network at
http://www.oracle.com/technology/documentation
Alternatively, avoid using words that sound like they might be reserved words.
■ Cannot be the default passwords, which are change_on_install and manager
4.3.9 What Do I Enter in the Specify Namespace in Internet Directory Screen?The distinguished name (DN) that you specify in the Specify Namespace in Internet Directory screen will be designated as the namespace in Oracle Internet Directory, where users and groups are administered.
A suggested namespace appears on the screen. The installer determines the suggested namespace from the /etc/hosts file. If it meets your deployment requirements, then select it. If not, enter another DN in the Custom Namespace field.
Refer to Section 2.8.
If you plan to integrate your Identity Management components with a third-party directory, then you should enter the DN of a namespace that matches the DN of the default namespace in the third-party directory.
4.3.10 How Do I Determine Port Numbers Used by Components?During installation, you might need to know the port numbers used by certain Oracle Collaboration Suite components. For example, if you install Infrastructure for an existing instance of Oracle Internet Directory, then the installer prompts for the Oracle Internet Directory host name and port number.
Refer to Appendix G for the list of ports used by Oracle Collaboration Suite components.
Alternatively, you can assign custom port numbers, which are different from the default port numbers. Refer to Section 2.4.3 for more details on how to assign custom port numbers to components.
After installation, you can get a list of port numbers by:
■ Using Oracle Enterprise Manager 10g Application Server Control.
■ Clicking the Ports link on the Oracle Enterprise Manager home page. This takes you to a page that lists all ports in use and the suggested port ranges for different components.
■ Looking in the ORACLE_HOME/install/portlist.ini file. ORACLE_HOME refers to the path to the directory containing the Oracle Collaboration Suite installation.
See Also: Oracle Internet Directory Administrator's Guide
Understanding Common Installation Screens
4-12 Oracle Collaboration Suite Installation Guide
4.4 Understanding Common Installation ScreensThis section describes screens that are common to most installation procedures of the Infrastructure.
This section covers the following sections:
■ Section 4.4.1, "First Few Screens of the Installation"
■ Section 4.4.2, "Screens of Oracle Collaboration Suite Database Installation"
■ Section 4.4.3, "Screens of OracleAS Certificate Authority Installation"
■ Section 4.4.4, "Last Few Screens of the Installation"
4.4.1 First Few Screens of the InstallationThe first few screens of the installer are the same for all installations. All installation procedures in this chapter refer to this section as their starting point.
Table 4–5 describes these screens.
Note: If you change the port number of a component after installation, then the portlist.ini file is not updated because the portlist.ini file is not updated after installation.
Note: Oracle Universal Installer uses the /etc/nodenames file to determine the host name. The host name that you specified in the hosts file may or may not be fully qualified. However, host names that are not fully qualified may not be usable outside the domain.
For example, if the fully-qualified domain name for a server is myserver.acme.uk, and the hosts file only registers the name myserver, then clients in the acme.co.uk domain have no trouble communicating with this host. However connections made by users in the acme.co.de domain may fail.
Also, ensure that the host name that you specify corresponds exactly to the host name you have, whether fully qualified or not.
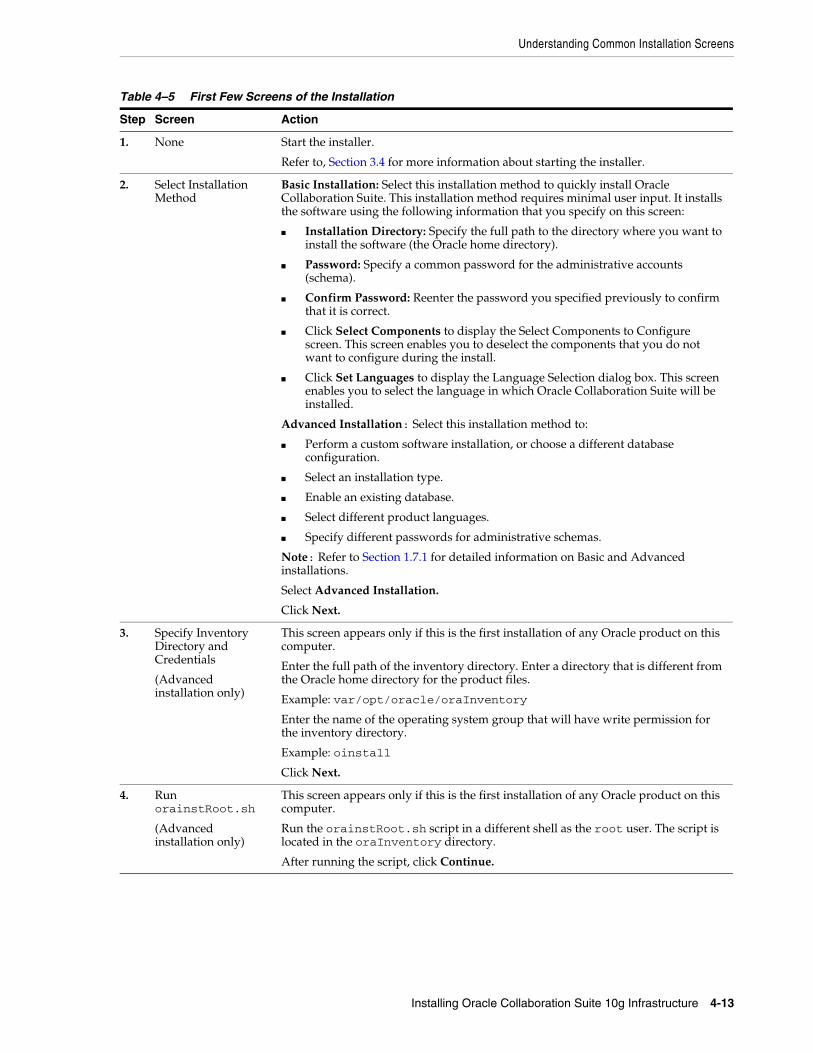
Understanding Common Installation Screens
Installing Oracle Collaboration Suite 10g Infrastructure 4-13
Table 4–5 First Few Screens of the Installation
Step Screen Action
1. None Start the installer.
Refer to, Section 3.4 for more information about starting the installer.
2. Select Installation Method
Basic Installation: Select this installation method to quickly install Oracle Collaboration Suite. This installation method requires minimal user input. It installs the software using the following information that you specify on this screen:
■ Installation Directory: Specify the full path to the directory where you want to install the software (the Oracle home directory).
■ Password: Specify a common password for the administrative accounts (schema).
■ Confirm Password: Reenter the password you specified previously to confirm that it is correct.
■ Click Select Components to display the Select Components to Configure screen. This screen enables you to deselect the components that you do not want to configure during the install.
■ Click Set Languages to display the Language Selection dialog box. This screen enables you to select the language in which Oracle Collaboration Suite will be installed.
Advanced Installation: Select this installation method to:
■ Perform a custom software installation, or choose a different database configuration.
■ Select an installation type.
■ Enable an existing database.
■ Select different product languages.
■ Specify different passwords for administrative schemas.
Note: Refer to Section 1.7.1 for detailed information on Basic and Advanced installations.
Select Advanced Installation.
Click Next.
3. Specify Inventory Directory and Credentials
(Advanced installation only)
This screen appears only if this is the first installation of any Oracle product on this computer.
Enter the full path of the inventory directory. Enter a directory that is different from the Oracle home directory for the product files.
Example: var/opt/oracle/oraInventory
Enter the name of the operating system group that will have write permission for the inventory directory.
Example: oinstall
Click Next.
4. Run orainstRoot.sh
(Advanced installation only)
This screen appears only if this is the first installation of any Oracle product on this computer.
Run the orainstRoot.sh script in a different shell as the root user. The script is located in the oraInventory directory.
After running the script, click Continue.

Understanding Common Installation Screens
4-14 Oracle Collaboration Suite Installation Guide
Figure 4–2 summarizes the screen sequence.
5. Specify File Locations
(Advanced installation only)
Enter the full path of the Source directory in the Path field for Source.
Enter a name to identify the Oracle home in the Name field for Destination. The name cannot contain spaces and has a maximum length of 16 characters.
Example: OH_INFRA_10_1_1
Enter the full path to the destination directory in the Path field for Destination. This is the Oracle home. If the directory does not exist, the installer creates it. To create the directory beforehand, create it as the oracle user.
Do not create the directory as the root user.
Example: /home/oracle/infra_10_1_1
Click Next.
6. Specify Hardware Cluster Installation Mode
(Advanced installation only)
This screen appears only if the computer is part of a hardware cluster.
Select the computers in the hardware cluster where you want to install the Infrastructure. You can select multiple computers, or you can just select the current computer.
Click Next.
7. Select a Product to Install
(Advanced installation only)
Select Oracle Collaboration Suite Infrastructure 10.1.1.0.2.
If you need to install support for additional languages, then click Product Languages.
Refer to Section 1.8 for more information about how to install support for support for additional languages.
Click Next.
8. Select Installation Type
(Advanced installation only)
The options displayed on this screen depend on what you select in the Select Product to Install screen.
The installation types for Infrastructure are:
■ Identity Management and Oracle Collaboration Suite Database
■ Identity Management
■ Oracle Collaboration Suite Database
■ Enable existing Oracle 10g Database to Oracle Collaboration Suite Database
Click Next.
9. Product-Specific Prerequisite Checks
(Advanced installation only)
The installer verifies requirements such as memory, disk space, and operating system version. If any check fails, make the required changes and click Retry. Refer to Chapter 2 for the list of hardware and software requirements.
Click Next.
10. Language Selection
(Advanced installation only)
This screen enables you to select the language in which Oracle Collaboration Suite components will run.
Select the required language or languages from the Available Languages list and add them to the Selected Languages list.
Click Next.
Table 4–5 (Cont.) First Few Screens of the Installation
Step Screen Action

Understanding Common Installation Screens
Installing Oracle Collaboration Suite 10g Infrastructure 4-15
Figure 4–2 Sequence for the First Few Screens in the Installation
4.4.2 Screens of Oracle Collaboration Suite Database InstallationIf you are installing Oracle Collaboration Suite Database in a new database, then the installer displays the screens listed in Table 4–6.
If this is the first Oracle product tobe installed on this computer
If the computer is part of hardware cluster
Oracle Collaboration Suite InfrastructureOracle Collaboration Suite ApplicationsOracle Collaboration Suite Infrastructure and Applications
For Oracle Collaboration Suite Infrastructure:• Identity Management and Oracle Collaboration Suite Database• Oracle Collaboration Suite Database• Identity Management
For Oracle Collaboration Suite Applications(Applications Tier):• Oracle Mail• Oracle Content Services• Oracle Calender server• Oracle Calender application system• Oracle Real-Time Collaboration• Oracle Mobile Collaboration• Oracle Collaboration Suite Search• Oracle Collaborative Portlets• Oracle Discussions• Oracle Workspaces
Preview of Steps
Welcome
Specify File Locations
Select a Product to Install
Select Installation Type
Confirm Pre-InstallationRequirements
Specify Inventory Directory
Unix Group NameUNIX Group Name
Run orainstRoot.sh (locatedin the inventory directory)
Specify Hardware ClusterInstallation Mode

Understanding Common Installation Screens
4-16 Oracle Collaboration Suite Installation Guide
Table 4–6 Screens of Oracle Collaboration Suite Database Installation
Step Screen Action
1. Specify Database Configuration Options
(Advanced installation only)
Global Database Name: Enter a name for the Oracle Collaboration Suite Database. Append a domain name to the database name. This domain name for the global database name can be different from your network domain name.
The domain name portion of the global database name has the following naming restrictions:
■ Can contain only alphanumeric, underscore (_), and number sign (#) characters
■ Must not be longer than 128 characters
The database name portion of the global database name has the following naming restrictions:
■ Must contain alphanumeric characters only
■ Must not be longer than eight characters
■ Must not contain PORT or HOST in uppercase characters
If you want the name to contain "host" or "port", use lowercase characters.
Example: orcl.mydomain.com
Note: Be sure that you do not enter two or more periods together, for example, orcl..mydomain.com. The installer does not check for this, and this will lead to errors later during the installation process.
SID: Enter the system identifier for the Oracle Collaboration Suite Database database. Typically this is the same as the global database name, but without the domain name. The SID must be unique across all databases.
SIDs have the following naming restrictions:
■ Must contain alphanumeric characters only
■ Must not be longer than eight characters
■ Must not contain PORT or HOST in uppercase characters. If you want the name to contain "host" or "port", use lowercase characters.
Example: orcl
Database File Location: Enter the full path to the parent directory for the data files directory. This parent directory must already exist, and you must have write permissions in this directory.
The installer will create a subdirectory in this parent directory, and the subdirectory will have the same name as the SID. The data files will be placed in this subdirectory.
Example: If you enter /u02/oradata, and the SID is orcl, then the data files will be located in /u02/oradata/ORCL.
Click Next.
2. Select Database Management Option
(Advanced installation only)
This screen appears if you selected the option of installing only Oracle Collaboration Suite Database, without Identity Management components. To centrally manage the database, select Use Grid Control for Database Management and enter the name of the Management Service through which you want to centrally manage your database.
To locally manage the database, select Use Database Control for Database Management. To receive alerts, select Enable Email Notifications and enter the SMTP Server name and an e-mail address.

Understanding Common Installation Screens
Installing Oracle Collaboration Suite 10g Infrastructure 4-17
3. Specify Database File Storage Option
(Advanced installation only)
This screen appears if you selected the option of installing only Oracle Collaboration Suite Database, without Identity Management components.
To store the database files on a file system, select File System. For RAC installations, the file system that you choose must be a cluster file system or be on a certified network attached storage (NAS) device.
To store the database files in an automatic storage management (ASM) disk group, select Automatic Storage Management. ASM disk groups are created by specifying one or more disk devices that will be managed by a separate Oracle ASM instance. For RAC installations, the disk devices that you add to the ASM disk group must be shared by all nodes of the cluster.
To store the database files on raw devices (raw partitions or raw volumes), select Raw Devices. To select this option, the required raw devices must already exist. For RAC installations, you must create the raw devices on disk devices that are shared by all nodes of the cluster.
4. Specify Backup and Recovery Options
(Advanced installation only)
This screen appears if you selected the option of installing only Oracle Collaboration Suite Database, without Identity Management components. To manually back up the database, select Do Not Enable Automated Backups.
For automatic backup, select Enable Automated Backup.
5. Specify Database Schema Passwords
(Advanced installation only)
Set passwords for privileged database accounts, which are used for database management and postinstallation tasks. Refer to Section 4.3.8 for rules on setting passwords for these accounts.
Set passwords for privileged Oracle Collaboration Suite Application accounts.
The rules for setting the passwords that apply to the SYS and SYSTEM users also apply to these schemas.
Click Next.
6. Privileged Operating System Groups
(Advanced installation only)
This screen appears if you are running the installer as a user who is not in the OSDBA or the OSOPER operating system group.
Enter a name for the Database Administrator (OSDBA) Group.
Example: dbadmin
Enter a name for the Database Operator (OSOPER) Group.
Example: dbadmin
Click Next.
Note: At the end of this Oracle Collaboration Suite Infrastructure installation, when you click Release Information, then no information might be displayed:
In this case, for more information refer to
http://Infrastructure_host:infra_port_number/relnotes/toc.htm
Table 4–6 (Cont.) Screens of Oracle Collaboration Suite Database Installation
Step Screen Action

Understanding Common Installation Screens
4-18 Oracle Collaboration Suite Installation Guide
4.4.3 Screens of OracleAS Certificate Authority InstallationIf you select OracleAS Certificate Authority in the Select Configuration Options screen when you are installing Infrastructure, then the installer displays the screens listed in Table 4–7.
Note: If you only install an Oracle Collaboration Suite Database and want that this database should show up as OracleAS Metadata Repository during the Applications tier installation, then you must perform the following tasks:
1. Run Metadata Repository Configuration Assistant (MRCA) on the Oracle Collaboration Suite Database home.
Use the OracleAS Metadata Repository Configuration Assistant CD-ROM, which is shipped with the Oracle Collaboration Suite software.
2. Select to register just that Database in the corresponding Oracle Internet Directory.
The preceding steps register the Database information in the Oracle Internet Directory and the Database shows up as a Metadata Repository.
Note: You cannot install more than one OracleAS Certificate Authority for the same Oracle Collaboration Suite Database.
When you are installing only Identity Management components for an existing instance of Oracle Collaboration Suite Database, ensure that the database does not already have an instance of OracleAS Certificate Authority configured for it.
For example, suppose you install Oracle Collaboration Suite Database and Identity Management components including OracleAS Certificate Authority on a computer. If you try to install additional Identity Management components, including OracleAS Certificate Authority on the same or different computer for the same Oracle Collaboration Suite Database, then the installation will fail.

Understanding Common Installation Screens
Installing Oracle Collaboration Suite 10g Infrastructure 4-19
4.4.4 Last Few Screens of the InstallationThe last few screens of the installer are the same for all installations. All installation procedures in this chapter refer to this section as their end point.
Table 4–7 Screens of OracleAS Certificate Authority Installation
Step Screen Action
1. Select Oracle Collaboration Suite Database
(Advanced installation only)
This screen appears only if you are:
■ Configuring OracleAS Certificate Authority
■ Using an existing instance of Oracle Internet Directory
■ Using an existing instance of Oracle Collaboration Suite Database
The Oracle Internet Directory must contain the registration information for the Oracle Collaboration Suite Database that you want to use.
Select the Oracle Collaboration Suite Database that you want OracleAS Certificate Authority to use.
Click Next.
2. Specify OCA Distinguished Name
(Advanced installation only)
OracleAS Certificate Authority uses the DN specified on this screen to populate the Issuer field of certificates that it issues.
Use the Typical DN section if your DN uses only the attributes listed in this section. You do not have to fill in all the attributes specified in this section. Only the o (organization) attribute is required. Note that the ‘ (single quotation mark) character is not a valid character in any of the attributes.
Enter the name that you want on the certificate in the Common Name field. This name must be different from your host name.
Example: John Doe
Enter the name of your division or department in the Organizational Unit field.
Example: Sales
Enter the name of your company or organization in the Organization field.
Example: Oracle
Select country.
If your DN uses attributes not listed in the Typical DN section, then specify your DN in Custom DN section.
Click Next.
3. Select OCA Key Length
(Advanced installation only)
Select the key length used in RSA algorithm to sign all certificates issued by OracleAS Certificate Authority.
It is recommended that you use at least a 2048-bit key length. Longer key lengths provide greater security, but require more time to issue each new certificate.
Click Next.
4. Specify OCA Administrator’s Password
(Advanced installation only)
Enter and confirm the password for the OracleAS Certificate Authority administrator. The first character of the password must not be a number. It must contain at least:
■ Eight characters
■ One alphabetic character
■ One nonalphabetic character
You need this password to manage OracleAS Certificate Authority. OracleAS Certificate Authority Configuration Assistant also uses this password.
You can change the password after installation using the ocactl command. Refer to OracleAS Certificate Authority Online help for details.
Click Next.

Installing Oracle Collaboration Suite 10g Infrastructure
4-20 Oracle Collaboration Suite Installation Guide
Table 4–8 describes these screens.
4.5 Installing Oracle Collaboration Suite 10g InfrastructureThis section explains the different ways of installing the Infrastructure. It describes the different scenarios of the installation process in detail.
This section covers the following topics:
■ Section 4.5.1, "Installing Oracle Collaboration Suite Database and Identity Management Components in a New Database"
■ Section 4.5.2, "Installing Only Oracle Collaboration Suite Database in a New Database"
■ Section 4.5.3, "Installing Oracle Collaboration Suite Database in an Existing Database"
■ Section 4.5.4, "Installing Identity Management Components Excluding Oracle Internet Directory"
■ Section 4.5.5, "Installing Identity Management Components Including Oracle Internet Directory"
■ Section 4.5.6, "Installing Only Oracle Internet Directory"
■ Section 4.5.7, "Installing Oracle Collaboration Suite 10g Infrastructure for an Existing Instance of Oracle Internet Directory"
■ Section 4.5.8, "Installing Only Oracle Application Server Certificate Authority and Oracle Collaboration Suite Database"
■ Section 4.5.9, "Running the OCSdbSchemaReg Script"
■ Section 4.5.10, "Using an Existing Instance of Identity Management from Oracle Application Server"
Table 4–8 Last Few Screens of the Installation
Step Screen Action
1. Summary Verify your selections and click Install.
2. Install Progress This screen shows the progress of the installation.
3. Run root.sh Note: Do not run the root.sh script until this dialog box appears.
1. When you see this dialog box, run the root.sh script in a different shell as the root user. The script is located in the Oracle home directory for this instance.
2. Click OK.
Note: During the root.sh prompt, you might get some warning messages. Ignore the messages and continue with the installation.
4. Configuration Assistants
This screen shows the list of Configuration Assistants that run for the selected components.
5. End of Installation Click Exit to quit the installer.
Note: The information displayed at the end of the installation is also available in the $ORACLE_HOME/install/setupinfo.txt file. This file contains summarized information about Oracle Collaboration Suite and links to the URLs.

Installing Oracle Collaboration Suite 10g Infrastructure
Installing Oracle Collaboration Suite 10g Infrastructure 4-21
■ Section 4.5.11, "Using an Existing Instance of OracleAS Portal from Oracle Application Server"
4.5.1 Installing Oracle Collaboration Suite Database and Identity Management Components in a New Database
As a part of Oracle Collaboration Suite Infrastructure installation, this option enables you to install and configure Identity Management services, such as Oracle Internet Directory, Oracle Application Server Single Sign-On, Oracle Delegated Administration Services, and Oracle Directory Integration and Provisioning, and Oracle Collaboration Suite Database.
Perform the procedure listed in Table 4–9 to install Oracle Collaboration Suite Database and Identity Management components in a new database. This procedure provides a complete Infrastructure in a single Oracle home.
Table 4–9 Installation Screens for Collaboration Suite Database and Identity Management Components in a New Database
Step Screen Action
1. None Start the installer and perform the required actions on the first few screens. Refer to Section 4.4.1 for details.
Note that you must select Identity Management and Collaboration Suite Database in the Select Installation Type screen.
2. Select Configuration Options
(Advanced installation only)
Select Oracle Internet Directory.
Select OracleAS Single Sign-On.
Select Oracle Delegated Administration Services.
Select Oracle Directory Integration and Provisioning.
Select OracleAS Certificate Authority to configure your own certificate authority, which can issue certificates for users and servers.
Do not select High Availability and Replication.
Click Next.
3. Specify Namespace in Internet Directory
(Advanced installation only)
Select the suggested namespace, or enter a custom namespace for the location of the default Identity Management realm.
Ensure that the value shown in Suggested Namespace meets your deployment needs. Refer to Section 4.3.9 for more details.
Click Next.
4. Specify Port Configuration Options
(Advanced installation only)
To use default ports for the components, select Automatic.
If you do not want to use the default ports, then select Manually Specify Ports and select the component for which you want to specify the port.
Refer to Section 2.4.3 for more details about how to manually specify ports.
Click Next.
5. Guest Account Password
(Advanced installation only)
Enter and confirm password for the guest account, orclguest, that is created automatically for Oracle Collaboration Suite components that use the Oracle Internet Directory specified in Step 3.
Click Next.
6. OracleAS Certificate Authority Screens
(Advanced installation only)
If you select OracleAS Certificate Authority in the Select Configuration Options screen, then the installer displays screens where you must enter OracleAS Certificate Authority information. Refer to Section 4.4.3 for more details.

Installing Oracle Collaboration Suite 10g Infrastructure
4-22 Oracle Collaboration Suite Installation Guide
4.5.2 Installing Only Oracle Collaboration Suite Database in a New DatabaseAs a part of Oracle Collaboration Suite Infrastructure installation, this option enables you to install and configure Oracle Collaboration Suite Database on the specified computer.
Perform the procedure listed in Table 4–10 to create a new database and populate it with schemas of Oracle Collaboration Suite Database. This procedure does not install any components of Identity Management.
7. Oracle Database 10g Screens
(Advanced installation only)
Enter information for Oracle Collaboration Suite Database. Refer to Section 4.4.2 for more details.
8. Specify Instance Name and ias_admin Password
(Advanced installation only)
Enter a name for the Infrastructure in the Instance Name field.
Instance names can contain the dollar sign ($) and underscore (_) in addition to any alphanumeric characters. If you have more than one Oracle Collaboration Suite instance on a computer, then the instance names must be unique.
Example: infra_10_1_1
Enter a password for the ias_admin user in the ias_admin Password field. Enter the password again in the Confirm Password field. This password will also be the Oracle Internet Directory administrator password for the Infrastructure. Refer to Section 4.3.8 for restrictions on the password.
Example: welcome99
Click Next.
9. None Refer to Section 4.4.4 to complete the installation of the Infrastructure.
Table 4–10 Screens for Installing Only Collaboration Suite Database in a New Database
Step Screen Action
1. None Start the installer and perform the required actions on the first few screens. Refer to Section 4.4.1 for details.
Note that you must select Collaboration Suite Database on the Select Installation Type screen.
2. Database Creation
(Advanced installation only)
Select Yes.
3. Register Oracle Collaboration Suite Database
(Advanced installation only)
If you already have an instance of Oracle Internet Directory and you know its connect information, then select Yes.
Enter the name of the computer where Oracle Internet Directory is running and the port number. If you do not know the port number, then refer to Section 4.3.10.
If you want Oracle Collaboration Suite components to use SSL to connect to Oracle Internet Directory, then select Use SSL to connect to Oracle Internet Directory. If you do not have an Oracle Internet Directory, or do not know its connect information, then select No.
Click Next.
Table 4–9 (Cont.) Installation Screens for Collaboration Suite Database and Identity Management Components in a New Database
Step Screen Action

Installing Oracle Collaboration Suite 10g Infrastructure
Installing Oracle Collaboration Suite 10g Infrastructure 4-23
4.5.3 Installing Oracle Collaboration Suite Database in an Existing DatabaseAs a part of Oracle Collaboration Suite Infrastructure installation, this option enables you to configure Oracle Collaboration Suite Database in an existing Oracle 10g Database.
Refer to Chapter 5 for more information.
4.5.4 Installing Identity Management Components Excluding Oracle Internet DirectoryYou already might an existing instance of Oracle Internet Directory taht you might want to use instead of having the installer create a new one. You might want to do this if your applications must authenticate users whose information is already stored in the existing instance of Oracle Internet Directory.
Perform the procedure listed in Table 4–11 to install Identity Management components such as OracleAS Single Sign-On, Oracle Delegated Administration Services, and Oracle Directory Integration and Provisioning components for an existing instance of Oracle Internet Directory. Oracle Collaboration Suite Database and Oracle Internet Directory are not installed.
4. Specify Username and Password for Oracle Internet Directory
(Advanced installation only)
This screen appears only if you selected Yes on the previous screen.
Enter the user name for logging in to the Oracle Internet Directory in the Username field.
Enter the password in the Password field.
The Realm field appears only if your Oracle Internet Directory contains multiple realms. Enter the name of the realm for which you want to authenticate the user.
Click Next.
5. Oracle Database 10g screens
(Advanced installation only)
Enter information for Oracle Collaboration Suite Database. Refer to Section 4.4.2 for more details.
6. None Refer to Section 4.4.4 to complete the installation of the Infrastructure.
Note: Oracle Collaboration Suite Database and Oracle Internet Directory must be installed on the computer before this procedure is performed.
Table 4–10 (Cont.) Screens for Installing Only Collaboration Suite Database in a New Database
Step Screen Action

Installing Oracle Collaboration Suite 10g Infrastructure
4-24 Oracle Collaboration Suite Installation Guide
Table 4–11 Screens for Installing Identity Management Components Excluding Oracle Internet Directory
Step Screen Action
1. None Start the installer and perform the required actions on the first few screens. Refer to Section 4.4.1 for details.
Note that you must select Identity Management on the Select Installation Type screen.
2. Select Configuration Options
(Advanced installation only)
Do not select Oracle Internet Directory.
Select OracleAS Single Sign-On.
If you need the services provided by Oracle Delegated Administration Services or Oracle Directory Integration and Provisioning or both, then select the components. Refer to Section 4.3.3 for more details.
To configure your own certificate authority, which can issue certificates for users and servers, select OracleAS Certificate Authority.
Do not select High Availability and Replication.
Click Next.
3. Register with Oracle Internet Directory
(Advanced installation only)
Enter the name of the computer where Oracle Internet Directory is running and the port number. If you do not know the port number, then refer to Section 4.3.10.
If you want Oracle Collaboration Suite components to use SSL to connect to Oracle Internet Directory, then select Use SSL to Connect to Oracle Internet Directory.
Click Next.
4. Specify Oracle Internet Directory Login
(Advanced installation only)
Enter the user name for logging in to the Oracle Internet Directory in the Username field.
Enter the password in the Password field.
The Realm field appears only if your Oracle Internet Directory contains multiple realms. Enter the name of the realm for which you want to authenticate the user.
Click Next.
5. Specify ODS Password
(Advanced installation only)
Enter password for OracleAS Metadata Repository schema.
6. Enter information to configure OracleAS Certificate Authority
(Advanced installation only)
If you select OracleAS Certificate Authority on the Select Configuration Options screen, then the installer displays screens where you must enter OracleAS Certificate Authority information. Refer to Section 4.4.3 for more details.
7. Specify Instance Name and ias_admin Password
(Advanced installation only)
Enter a name for the Infrastructure in the Instance Name field.
Instance names can contain the dollar sign ($) and underscore (_) in addition to any alphanumeric characters. If you have more than one Oracle Collaboration Suite instance on a computer, then the instance names must be unique.
Example: infra_10_1_1
Enter a password for the ias_admin user in the ias_admin Password field. Enter the password again in the Confirm Password field. This password will also be the Oracle Internet Directory administrator password for the Infrastructure. Refer to Section 4.3.8 for restrictions on the password.
Example: welcome99
Click Next.
8. None Refer to Section 4.4.4 to complete the installation of the Infrastructure.
After the installation, you must register the database with Oracle Internet Directory by running OCSdbSchemaReg script. Refer to Section 4.5.9 for more information.

Installing Oracle Collaboration Suite 10g Infrastructure
Installing Oracle Collaboration Suite 10g Infrastructure 4-25
4.5.5 Installing Identity Management Components Including Oracle Internet DirectoryAs a part of Oracle Collaboration Suite Infrastructure installation, this option enables you to install and configure Identity Management services, such as Oracle Internet Directory, Oracle Application Server Single Sign-On, Oracle Delegated Administration Services, and Oracle Directory Integration and Provisioning.
To configure Oracle Internet Directory successfully, you need an existing instance of Oracle Collaboration Suite Database.
Perform the procedure listed in Table 4–12 to install Identity Management components without installing Oracle Collaboration Suite Database.
This procedure is mainly useful to configure Oracle Internet Directory for a remote Oracle Collaboration Suite Database. The Oracle Collaboration Suite Database might be installed in a new database or in an existing database.
Note: Oracle Collaboration Suite Database must be installed on the computer before you can perform this procedure. It must not be registered with any Oracle Internet Directory.
Table 4–12 Screens for Installing Identity Management Components Including Oracle Internet Directory
Step Screen Action
1. None Start the installer and perform the required actions on the first few screens. Refer to Section 4.4.1 for details.
Note that you must select Identity Management on the Select Installation Type screen.
2. Select Configuration Options
(Advanced installation only)
Select Oracle Internet Directory.
Select OracleAS Single Sign-On.
If you need the services provided by Oracle Delegated Administration Services or Oracle Directory Integration and Provisioning or both, then select the components. Refer to Section 4.3.3 for more details.
To configure your own certificate authority, which can issue certificates for users and servers, select OracleAS Certificate Authority.
Do not select High Availability and Replication.
Click Next.
3. Specify Oracle Collaboration Suite Database Location and Login information
(Advanced installation only)
Enter the user name for logging in to the Oracle Collaboration Suite Database, in the Username field. The user must have DBA privileges.
Enter a password for the user in the Password field.
Enter the name of the computer where the database is running, in the Hostname field.
Enter the number of the port on which it is listening in the Hostname field. The host name must be in the following format:
host:port
Enter the service name of the database in the Service Name field. Note that the service name must include the database domain name.
Example: orcl.mydomain.com
Click Next.

Installing Oracle Collaboration Suite 10g Infrastructure
4-26 Oracle Collaboration Suite Installation Guide
4.5.6 Installing Only Oracle Internet DirectoryYou can choose to install and configure only Oracle Internet Directory as a part of Identity Management services.
Perform the procedure listed in Table 4–13 to install Oracle Internet Directory.
4. Enter information to configure OracleAS Certificate Authority
(Advanced installation only)
If you select OracleAS Certificate Authority in the Select Configuration Options screen, then the installer displays screens where you must enter OracleAS Certificate Authority information. Refer to Section 4.4.3 for more details.
5. Specify Instance Name and ias_admin Password
(Advanced installation only)
Enter a name for the Infrastructure in the Instance Name field.
Instance names can contain the dollar sign ($) and underscore (_) in addition to any alphanumeric characters. If you have more than one Oracle Collaboration Suite instance on a computer, then the instance names must be unique.
Example: idmgmt_10_1_1
Enter a password for the ias_admin user in the ias_admin Password field. Enter the password again in the Confirm Password field. This password will also be the Oracle Internet Directory administrator password for the Infrastructure. Refer to Section 4.3.8 for restrictions on the password.
Example: welcome99
Click Next.
6. None Refer to Section 4.4.4 to complete the installation of the Infrastructure.
After the installation, you must register the database with Oracle Internet Directory by running OCSdbSchemaReg script. Refer to Section 4.5.9 for more information.
Note: Oracle Collaboration Suite Database must be installed on the computer before you can perform this procedure
Table 4–12 (Cont.) Screens for Installing Identity Management Components Including Oracle Internet
Step Screen Action

Installing Oracle Collaboration Suite 10g Infrastructure
Installing Oracle Collaboration Suite 10g Infrastructure 4-27
4.5.7 Installing Oracle Collaboration Suite 10g Infrastructure for an Existing Instance of Oracle Internet Directory
If you already have an existing instance of Oracle Internet Directory, then you can install Oracle Collaboration Suite Infrastructure against it.
Perform the procedure listed in Table 4–14 to install Identity Management components (except Oracle Internet Directory) and Oracle Collaboration Suite Database.
Table 4–13 Screens for Installing Only Oracle Internet Directory
Step Screen Action
1. None Start the installer and perform the required actions on the first few screens. Refer to Section 4.4.1 for details.
Note that you must select Identity Management on the Select Installation Type screen.
2. Select Configuration Options
(Advanced installation only)
Select Oracle Internet Directory.
Do not select OracleAS Single Sign-On.
Do not select Oracle Delegated Administration Services.
Do not select Oracle Directory Integration and Provisioning.
Do not select OracleAS Certificate Authority.
Do not select High Availability and Replication.
Click Next.
3. Specify Oracle Collaboration Suite Database Location and Login information
(Advanced installation only)
Enter the user name for logging in to the Oracle Collaboration Suite Database, in the Username field. The user must have DBA privileges.
Enter a password for the user in the Password field.
Enter the name of the computer where the database is running, in the Hostname field.
Enter the number of the port on which it is listening in the Hostname field. The host name must be in the following format:
host:port
Enter the service name of the database in the Service Name field. Note that the service name must include the database domain name.
Example: orcl.mydomain.com
Click Next.
4. Specify Instance Name and ias_admin Password
(Advanced installation only)
Enter a name for the Infrastructure in the Instance Name field.
Instance names can contain the dollar sign ($) and underscore (_) in addition to any alphanumeric characters. If you have more than one Oracle Collaboration Suite instance on a computer, then the instance names must be unique.
Example: infra_10_1_1
Enter a password for the ias_admin user in the ias_admin Password field. Enter the password again in the Confirm Password field. This password will also be the Oracle Internet Directory administrator password for the Infrastructure. Refer to Section 4.3.8 for restrictions on the password.
Example: welcome99
Click Next.
5. None Refer to Section 4.4.4 to complete the installation of the Infrastructure.
Note: Oracle Internet Directory must be installed on the computer before you can perform this procedure.

Installing Oracle Collaboration Suite 10g Infrastructure
4-28 Oracle Collaboration Suite Installation Guide
This procedure is mainly useful when you already have an Oracle Internet Directory and its associated Oracle Collaboration Suite Database, and you want to implement any one of the following scenarios:
■ Install OracleAS Certificate Authority with its own Oracle Collaboration Suite Database
■ Install another Oracle Collaboration Suite Database for Oracle Internet Directory replication
It is unlikely that you would use this procedure to install other Identity Management components (OracleAS Single Sign-On, Oracle Delegated Administration Services, or Oracle Directory Integration and Provisioning), because this procedure installs a new instance of Oracle Collaboration Suite Database.
Table 4–14 Screens for Installing Oracle Collaboration Suite Infrastructure for an Existing Instance of Oracle Internet Directory
Step Screen Action
1. None Start the installer and perform the required actions on the first few screens. Refer to Section 4.4.1 for details.
Note that you must select Identity Management and Collaboration Suite Database on the Select Installation Type screen.
2. Select Configuration Options
(Advanced installation only)
Do not select Oracle Internet Directory because you want to use an existing one.
Do not select OracleAS Single Sign-On.
If you need the services provided by Oracle Delegated Administration Services or Oracle Directory Integration and Provisioning or both, then select the components. Refer to Section 4.3.3 for more details.
To configure your own certificate authority, which can issue certificates for users and servers, select OracleAS Certificate Authority.
Do not select High Availability and Replication.
Click Next.
3. Specify Port Configuration Options
(Advanced installation only)
To use default ports for the components, select Automatic.
If you do not want to use the default ports, then select Manually Specify Ports and select the component for which you want to specify the port.
Refer to Section 2.4.3 for more details about how to manually specify ports.
Click Next.
4. Guest Account Password
(Advanced installation only)
Enter and confirm password for the guest account, orclguest, that is created automatically for Oracle Collaboration Suite components that use the Oracle Internet Directory specified in Step 3.
Click Next.
5. Register with Oracle Internet Directory
(Advanced installation only)
Enter the name of the computer where Oracle Internet Directory is running and the port number. If you do not know the port number, then refer to Section 4.3.10.
If you want Oracle Collaboration Suite components to use only SSL to connect to Oracle Internet Directory, then select Use Only SSL Connections with this Oracle Internet Directory.
Click Next.
6. Specify Username and Password for Oracle Internet Directory
(Advanced installation only)
Enter the user name for logging in to the Oracle Internet Directory in the Username field.
Enter the password in the Password field.
The Realm field appears only if your Oracle Internet Directory contains multiple realms. Enter the name of the realm for which you want to authenticate the user.
Click Next.

Installing Oracle Collaboration Suite 10g Infrastructure
Installing Oracle Collaboration Suite 10g Infrastructure 4-29
4.5.8 Installing Only Oracle Application Server Certificate Authority and Oracle Collaboration Suite Database
You can install only OCA and Oracle Collaboration Suite Database as a part of Oracle Collaboration Suite Infrastructure installation.
Perform the procedure listed in Table 4–15 to install only OracleAS Certificate Authority and Oracle Collaboration Suite Database.
7. Enter information to configure OracleAS Certificate Authority
(Advanced installation only)
If you select OracleAS Certificate Authority in the Select Configuration Options screen, then the installer displays screens where you must enter OracleAS Certificate Authority information. Refer to Section 4.4.3 for more details.
8. Oracle Database 10g screens
(Advanced installation only)
Enter information for Oracle Collaboration Suite Database. Refer to Section 4.4.2 for more details.
9. Specify Instance Name and ias_admin Password
(Advanced installation only)
Enter a name for the Infrastructure in the Instance Name field.
Instance names can contain the dollar sign ($) and underscore (_) in addition to any alphanumeric characters. If you have more than one Oracle Collaboration Suite instance on a computer, then the instance names must be unique.
Example: infra_10_1_1
Enter a password for the ias_admin user in the ias_admin Password field. Enter the password again in the Confirm Password field. This password will also be the Oracle Internet Directory administrator password for the Infrastructure. Refer to Section 4.3.8 for restrictions on the password.
Example: welcome99
Click Next.
10. None Refer to Section 4.4.4 to complete the installation of the Infrastructure.
Note: Oracle Internet Directory must be installed on the computer before you can perform this procedure.
Table 4–14 (Cont.) Screens for Installing Oracle Collaboration Suite Infrastructure for an Existing Instance of Oracle Internet Directory
Step Screen Action

Installing Oracle Collaboration Suite 10g Infrastructure
4-30 Oracle Collaboration Suite Installation Guide
4.5.9 Running the OCSdbSchemaReg ScriptIf you selected Identity Management Components on the Select Installation Type screen for a distributed Infrastructure installation, then after the installation you must run the OCSdbSchemaReg script on the computer that contains the Database instance.
This script registers the Database instance with Identity Management instance and runs the backend Oracle Collaboration Suite Configuration Assistants.
To register the database with Oracle Internet Directory, execute OCSdbSchemaReg.sh as follows:
sh OCSdbSchemaReg.sh compulsory_arguments [optional_parameters]
Table 4–15 Screens for Installing Only OracleAS Certificate Authority and Collaboration Suite Database
Step Screen Action
1. None Start the installer and perform the required actions on the first few screens. Refer to Section 4.4.1 for details.
Note that you must select Identity Management and Collaboration Suite Database on the Select Installation Type screen.
2. Select Configuration Options
(Advanced installation only)
Select Oracle Internet Directory.
Do not select OracleAS Single Sign-On.
Do not select Oracle Delegated Administration Services.
Do not select Oracle Directory Integration and Provisioning.
Select OracleAS Certificate Authority.
Do not select High Availability and Replication.
Click Next.
3. Register with Oracle Internet Directory
(Advanced installation only)
Enter the name of the computer where Oracle Internet Directory is running and the port number. If you do not know the port number, then refer to Section 4.3.10.
If you want Oracle Collaboration Suite components to use SSL to connect to Oracle Internet Directory, then select Use SSL Connections to connect to Oracle Internet Directory.
Click Next.
4. Specify Username and Password for Oracle Internet Directory
(Advanced installation only)
Enter the user name for logging in to the Oracle Internet Directory in the Username field.
Enter the password in the Password field.
The Realm field appears only if your Oracle Internet Directory contains multiple realms. Enter the name of the realm for which you want to authenticate the user.
Click Next.
5. Enter information to configure OracleAS Certificate Authority
(Advanced installation only)
Refer to Section 4.4.3 for more details.
6. Oracle Database 10g Oracle Database 10g screens
(Advanced installation only)
Enter information for Oracle Collaboration Suite Database. Refer to Section 4.4.2 for more details.
7. None Refer to Section 4.4.4 to complete the installation of the Infrastructure.

Installing Oracle Collaboration Suite 10g Infrastructure
Installing Oracle Collaboration Suite 10g Infrastructure 4-31
Refer to the following section for a list of compulsory arguments and optional parameters.
You can find the log file for script output at ORACLE_HOME/install/OCSdbSchemaReg.log.
Compulsory Arguments and Optional Parameters of OCSdbSchemaRegThe compulsory arguments of the OCSdbSchemaReg script are as follows:
■ -h Oracle Internet Directory host
■ -p Oracle Internet Directory non-SSL port
■ -x Oracle Internet Directory SSL port
■ -u Oracle Internet Directory user name
■ -w Oracle Internet Directory user password
■ -g Global database name
■ -s Database SYS password
■ -t Database SYSTEM password
■ -e Oracle Mail schema password
■ -v Oracle Voicemail & Fax schema password
■ -o Oracle Voicemail & Fax ovfMetrics schema password
■ -r Oracle Real-Time Collaboration schema password
■ -c Oracle Calendar Server schema password
■ -i Oracle Content Services schema password
■ -b Oracle Workspaces password
■ -a Oracle Collaboration Suite Web Access system password
■ -k Oracle Collaboration Suite Web Access metrics password
■ -k Oracle Collaboration Suite Database schema password
■ -y Host list
The list must be comma-separated and the entries must be in the form of db_hostname:listener_port.
■ -F Filesystem type
The value of this argument can be fs (directory path to the datafile storage), asm (ASM disk group, such as +DATA), or raw (path to the rawconfig mapping file).
Optional ParametersThe optional arguments of OCSdbSchemaReg are as follows:
■ -l
Note: This password is used for all Oracle Collaboration Suite Database schema passwords. If you set this argument, then arguments, such -e, -r, -c, -v, -i, -b, -a, -k, -o will be ignored, even if they are set.

Installing Oracle Collaboration Suite 10g Infrastructure
4-32 Oracle Collaboration Suite Installation Guide
Pass this parameter if the Oracle Internet Directory port is the SSL port (no argument required). If this switch is not passed, the default is the standard Oracle Internet Directory port that you are using.
■ -z
Pass this parameter if you want to only register the database in to Oracle Internet Directory without running component backend Configuration Assistants.
You can use the following parameter if you want to bypass the command-line arguments and use a parameter file instead:
■ -f ini filename
Pass this parameter to bypass the command-line arguments and use a file that contains values for all compulsory arguments.
Refer to OCSdbSchemaReg.ini.sample located in ORACLE_HOME/install for a sample .ini file.
If you pass -f argument, no other command-line arguments will be processed. You must either enter all compulsory arguments or an -f argument pointing to the .ini file.
Functions of OCSDBSchemaRegThe main functions of the OCSdbSchemaReg script are:
■ Registering database in to Oracle Internet Directory. The script will optionally create the ORACLE_HOME/ldap/admin/ldap.ora file if it does not already exist. The entries in the ldap.ora file, if it exists, must match with the Oracle Internet Directory host that the script is configured against.
■ Running Configuration Assistants for:
– Oracle Real-Time Collaboration
– Oracle Mail
– Oracle Voicemail & Fax
– Oracle Collaboration Suite Search
– Oracle Content Services
– Oracle Collaborative Workspaces
– Oracle Web Access Client
■ Keeping track of the processes that have succeeded. You can rerun the script if any tool fails after fixing the issue. You will only have to run those Configuration Assistants that did not succeed. The file containing these results is located in ORACLE_HOME/install/schemaReg.results
Note: Passwords are in plain text format.
Note:
If the script detects that a database entry already exists in Oracle Internet Directory, it will assume that the database has already been properly registered. Component Configuration Assistants will attempt to use the connect string contained in that registration.

Installing Oracle Collaboration Suite 10g Infrastructure
Installing Oracle Collaboration Suite 10g Infrastructure 4-33
4.5.10 Using an Existing Instance of Identity Management from Oracle Application Server
If you have already installed Oracle Application Server, then you can use the existing instance of Identity Management for Oracle Collaboration Suite. Depending on the version of Identity Management you want to use, follow the steps mentioned in the following sections:
Starting with Identity Management 9.0.2.xIf you are planning to use the following instance of Identity Management 9.0.2.x:
■ Identity Management 9.0.2.0.1
The upgrade will fail during the Applications tier upgrade, if you do not apply the appropriate patch. You must apply Portal Patch 9.0.2.3, which is a mandatory patch.
■ Identity Management 9.0.2.3
If you do not apply any patch, you will be prompted to complete the upgrade of Oracle Collaborative Portlets, as documented in Section 7.8 of the Oracle Collaboration Suite Upgrade Guide.
If you applied Portal patch 9.0.2.6 before upgrade, you do not have to do extra steps as documented in Section 7.8 of the Oracle Collaboration Suite Upgrade Guide.
Starting with Identity Management 9.0.4.0 and LaterTo use an instance of Identity Management 9.0.4.0 and later, you do not need to apply any patch before the upgrade.
Refer to Chapter 4 in Oracle Collaboration Suite Upgrade Guide for details.
4.5.11 Using an Existing Instance of OracleAS Portal from Oracle Application ServerIf you have already installed Oracle Application Server, then it is possible to use the existing instance of OracleAS Portal for Oracle Collaboration Suite.
Depending on the version of OracleAS Portal you want to use, refer to the information in the following sections.
Starting with OracleAS Portal 9.0.2.xYou would not have to do anything if you are starting with OracleAS Portal 9.0.2.x.
Starting with OracleAS Portal 9.0.4.0You would not have to do anything if you are starting with OracleAS Portal 9.0.4.0.
Starting with OracleAS Portal 9.0.4.1If you are starting with OracleAS Portal 9.0.4.1, then you must apply the Portal 9.0.2.6 patchset or the iAS 9.0.4 patch before you start the upgrade.
After you apply the Portal 9.0.2.6 patchset, you must then apply the Portal 3923448 patch.
Note: For all the above cases, you must apply the required Portal 10g patch after the Applications-tier upgrade and before you run OracleAS Metadata Repository Upgrade Assistant, as documented in Section 7.3.1.1 in Oracle Collaboration Suite Upgrade Guide.

Installing Oracle Collaboration Suite 10g Infrastructure
4-34 Oracle Collaboration Suite Installation Guide
Refer to Oracle Collaboration Suite Upgrade Guide for more information. You can also find more information at OracleMetaLink at:
http://metalink.oracle.com

Installing Oracle Collaboration Suite Database in an Existing Database 5-1
5Installing Oracle Collaboration Suite
Database in an Existing Database
You might have an existing Database that you might want to use for storing Oracle Collaboration Suite data. You can use the Enable existing 10g Database to Collaboration Suite Database option during the installation process to do so. This option seeds the Oracle Collaboration Suite schemas in the specified Database and then registers the Database within Oracle Internet Directory so that the applications can be configured against this Database for a subsequent Applications tier installation.
This chapter contains the following sections:
■ Section 5.1, "Preparing to Install"
■ Section 5.2, "Installing Oracle Collaboration Suite Database in an Existing Database"
■ Section 5.3, "Split Configuration"
5.1 Preparing to InstallTo be able to install Oracle Collaboration Suite in an existing Database, you must complete the following requirements:
■ System requirements
Refer to Chapter 2 for detailed information.
■ Oracle Collaboration Suite 10g Infrastructure requirements
You need an operational Oracle Internet Directory to register your Database.
■ Database requirements
You need Oracle Database 10g (10.1.0.4.2) for the Oracle Collaboration Suite installation to be successful. If you have an earlier version of database, for example Oracle Database 10g (10.1.0.2) or Oracle Database 10g (10.1.0.3), then you must apply the Oracle Database 10g Release 1 (10.1.0.4.2) Patchset to this existing Database.
Refer to Section 5.2.1 for detailed information on applying the Patchset.
■ Character set requirements
The Oracle Database 10g (10.1.0.4.2) you select must be configured with the AL32UTF8 character set, which is the supported character set for Oracle Collaboration Suite. However, for upgrade from a previous release the UTF8 character set is also supported, although the AL32UTF8 character set is recommended.

Installing Oracle Collaboration Suite Database in an Existing Database
5-2 Oracle Collaboration Suite Installation Guide
You may either choose another database with a supported character set or migrate the Database character set following the procedures in the Globalization Support Whitepaper available at:
http://www.oracle.com/technology/tech/globalization/pdf/TWP_AppDev_Unicode_10gR2.pdf
5.2 Installing Oracle Collaboration Suite Database in an Existing Database
This section contains the following topics:
■ Section 5.2.1, "Applying the 10g Release 1 (10.1.0.4.2) Patchset"
■ Section 5.2.2, "Installing Oracle Collaboration Suite"
5.2.1 Applying the 10g Release 1 (10.1.0.4.2) PatchsetYou need Oracle Database 10g (10.1.0.4.2) for the Oracle Collaboration Suite installation to be successful. If you have an earlier version of database, for example Oracle Database 10g (10.1.0.2) or Oracle Database 10g (10.1.0.3), then you must apply the Oracle Database 10g Release 1 (10.1.0.4.2) Patchset to this existing Database.
This section contains the following topics:
■ Preinstallation Requirements
■ Preinstallation Tasks
■ Installation Tasks
■ Postinstallation Tasks
5.2.1.1 Preinstallation RequirementsThe following are the system requirements for this patchset:
■ Solaris 8 or Solaris 9
■ Oracle Database 10g (10.1.0.2) or later
5.2.1.2 Preinstallation TasksComplete the following preinstallation tasks before installing the patchset:
■ Review Known Preinstallation Issues
■ Identify the Oracle Database Installation
■ Check Postrelease Updates
■ Extract the Installation Software
■ Set the ORACLE_HOME and ORACLE_SID Environment Variables
■ Shut Down Oracle Databases
■ Stop All Processes
■ Back Up the System
Review Known Preinstallation IssuesReview the information in the following sections. If any of the issues apply to your Oracle installation, then follow the instructions before installing the patchset:
Installing Oracle Collaboration Suite Database in an Existing Database
Installing Oracle Collaboration Suite Database in an Existing Database 5-3
■ Adding a Second Node to An Existing Single-Node Oracle Real Application Clusters Installation
■ Upgrading to or Installing Release Oracle Database 10g Release (10.1.0.4.2) on a Fujitsu PRIMECLUSTER System
■ Upgrading Oracle E-Business Suite Databases
■ Upgrading Installations that use Physical or Logical Standby Databases
■ Rolling Upgrades Using Oracle Data Guard SQL Apply
■ Upgrading Preconfigured Standard Edition Databases
■ Upgrading Oracle Workspace Manager and Oracle Messaging Gateway
■ Upgrading Installations that use Java Virtual Machine or Oracle interMedia
■ Upgrading Oracle Cluster Ready Services
■ Updating UDLM on an Oracle Real Application Clusters Installation Running Sun Cluster 3.0
Adding a Second Node to An Existing Single-Node Oracle Real Application Clusters Installation
If you installed Oracle Real Application Clusters, 10g release 1 (10.1.0.2 or 10.1.0.3) on a single node and created a database during the installation, then the initialization parameter DB_RECOVERY_FILE_DEST might be set incorrectly if you made the following choices:
■ You specified a local directory path for the Oracle home directory
■ You chose the General Purpose, Data Warehousing, or Transaction Processing database configuration option
■ You chose not to enable automated backups
If you made these choices, then the DB_RECOVERY_FILE_DEST parameter incorrectly specifies a directory on the local file system (either $ORACLE_BASE/flash_recovery_area or $ORACLE_HOME/flash_recovery_area, depending on your environment settings). Because this directory is not shared, this setting prevents you from adding another node to your Oracle Real Application Clusters installation.
This issue is tracked with Oracle bug 3480750.
Upgrading to or Installing Release Oracle Database 10g Release (10.1.0.4.2) on a Fujitsu PRIMECLUSTER System
For information on how to upgrade to or install Oracle Database 10g release 1 (10.1.0.4.2) on a Fujitsu PRIMECLUSTER system, refer to the following documents:
■ Document 263719.1 available on the OracleMetaLink Web site:
http://metalink.oracle.com
■ SMAWrac10g.readme.html, available on the Fujitsu Web site:
Note: This problem does not occur if you choose the Custom installation type or choose the Advanced database configuration option during the installation or use the DBCA to create an Oracle Real Application Clusters database after you have installed the software.

Installing Oracle Collaboration Suite Database in an Existing Database
5-4 Oracle Collaboration Suite Installation Guide
http://uc.fujitsu.com/Oracle/downloads/SMAWrac10g.readme.html
Upgrading Oracle E-Business Suite Databases
If you are an Oracle E-Business Suite customer and you want to upgrade your Oracle E-Business Suite release 11i database server to this patchset, then you must check the latest certification status and Interoperability Notes available on the OracleMetaLink Web site:
http://metalink.oracle.com
Upgrading Installations that use Physical or Logical Standby Databases
Before applying this patchset to an Oracle Database 10g release 1 (10.1.0.2 or 10.1.0.3) installation that uses one or more physical or logical standby databases, review the following OracleMetaLink documents:
■ For information about physical standby databases, review document 278641.1.
■ For information about logical standby databases, review document 278643.1.
These documents are available on the OracleMetaLink Web site:
http://metalink.oracle.com
Rolling Upgrades Using Oracle Data Guard SQL Apply
If you use logical standby databases, then you can use Oracle Data Guard SQL Apply to perform rolling upgrades to upgrade Oracle Database 10g release 1 (10.1.0.3) to release 1 (10.1.0.4.2). During a rolling upgrade, you can run different releases of the Oracle software on the primary and logical standby databases while you upgrade them one at a time. If you do this, then you will incur minimal downtime on the primary database. For information and instructions on rolling upgrades with logical standby databases, review document 300479.1, available on the OracleMetaLink Web site:
http://metalink.oracle.com
Upgrading Preconfigured Standard Edition Databases
If you are using an Oracle Database 10g release 1 (10.1.0.2 or 10.1.0.3) preconfigured Standard Edition database, then the database contains the following components that are not supported by the Standard Edition:
■ Oracle Data Mining
■ Oracle OLAP Catalog
■ Oracle OLAP Analytic Workspace
■ Oracle OLAP API
■ Spatial
The catpatch.sql script does not run the patch scripts for these components. It sets the component STATUS to OPTION OFF in the DBA_REGISTRY view. The original versions of the dictionary objects for the components remain in the database but the catpatch.sql script does not apply the patch to them.
Upgrading Oracle Workspace Manager and Oracle Messaging Gateway
Oracle Workspace Manager and Oracle Messaging Gateway are not upgraded by this patchset installation. If the Oracle Database 10g release 1 (10.1.0.2 or 10.1.0.3)

Installing Oracle Collaboration Suite Database in an Existing Database
Installing Oracle Collaboration Suite Database in an Existing Database 5-5
installation includes these components, then upgrade them separately with patches specific to these products.
Upgrading Installations that use Java Virtual Machine or Oracle interMedia
If any of the databases use Java Virtual Machine or Oracle interMedia, then install the Oracle Database 10g Products installation type from the Oracle Database 10g Companion DVD before installing the 10.1.0.4.2 patchset.
For information about installing the Oracle Database 10g Products installation type from the Companion DVD, refer to Oracle Database 10g Installation Guide or Oracle Database 10g Companion CD Installation Guide available at
http://metalink.oracle.com
This installation type includes the Natively Compiled Java Libraries (NCOMP) files to improve Java performance. If you do not install the NCOMP files, then the "ORA-29558:JAccelerator (NCOMP) not installed" error occurs when a database that uses Java VM is upgraded to the patch release.
Upgrading Oracle Cluster Ready Services
The Oracle Cluster Ready Services software (CRS) must be at the same or newer level as the Oracle software in the Oracle Real Application Clusters Oracle home. Therefore, you should always upgrade CRS before you upgrade Oracle Real Application Clusters.
However, before you upgrade CRS to 10.1.0.4.2, you must apply the patch for Oracle bug 3671865 to all the release 10.1.0.2 Oracle Real Application Clusters Oracle home directories that are part of your cluster database environment. This patch is required so that 10.1.0.2 Oracle Real Application Clusters Oracle homes can operate with the upgraded 10.1.0.4.2 CRS software.
You must apply this patch to the Oracle Real Application Clusters Oracle homes even if you later upgrade the Oracle homes to 10.1.0.4.2 after you upgrade CRS.
Updating UDLM on an Oracle Real Application Clusters Installation Running Sun Cluster 3.0
If you are installing this patchset on an Oracle Real Application Clusters installation running Sun Cluster 3.0, then perform the following steps on all nodes of the cluster to install the Oracle UNIX Distributed Lock Manager (UDLM):
1. Shut down all existing clients of UDLM, including all Oracle Real Application Clusters and Oracle Parallel Server instances.
2. Log in as root.
3. Restart the cluster node in noncluster mode as follows, where nodename is the name of the cluster node you are restarting:
# scswitch -S -h nodename
Note: UDLM is also referred to as the Cluster Membership Monitor.
See Also: "Shutting Down and Booting a Cluster" section of the Sun Cluster 3.0 System Administration Guide for information about shutting down and booting a cluster or cluster node in different modes

Installing Oracle Collaboration Suite Database in an Existing Database
5-6 Oracle Collaboration Suite Installation Guide
# shutdown -g 0 -y
The OK prompt appears.
4. At the OK prompt, enter the following command:
boot -x
5. Back up the following files if you want to save them to use later:
/opt/SUNWcluster/lib/udlm_shmem_addr_file.txt/etc/opt/SUNWcluster/conf/udlm.conf
6. Log in as root.
7. If necessary, enter the following command to remove the existing ORCLudlm package:
# pkgrm ORCLudlm
8. Copy the ORCLudlm.tar.Z file in the racpatch directory to a temporary directory
# cp ORCLudlm.tar.Z /tmp
9. Change directory to the /tmp directory.
10. Enter the following commands to unpack the ORCLudlm.tar.Z file:
# uncompress ORCLudlm.tar.Z# tar xvf ORCLudlm.tar
11. Enter the following command to install the ORCLudlm package:
# pkgadd -d . ORCLudlm
12. To start UDLM, restart the cluster node in cluster mode:
# shutdown -g 0 -y -i 6
Identify the Oracle Database Installation This is not a complete software distribution. You must install it in an existing Oracle Database 10g Oracle home. To identify Oracle home directories, view the /var/opt/oracle/oratab file.
If you are installing this patchset on an existing Oracle Real Applications Cluster 10g release 10.1.0.2 or 10.1.0.3 installation, then you must run Oracle Universal Installer from the same node from which the Oracle Database software was installed.
Note: The UDLM configuration file in Sun Cluster 3.0 is /etc/opt/SUNWcluster/conf/udlm.conf. The pkgadd command copies the configuration_file_name.template file to the /etc/opt/SUNWcluster/conf file. This file contains the recommended configuration parameter values. It is also copied to the default configuration file udlm.conf.

Installing Oracle Collaboration Suite Database in an Existing Database
Installing Oracle Collaboration Suite Database in an Existing Database 5-7
Check Postrelease Updates Before installing this patchset in a production environment, review document 263719.1, ALERT: Oracle 10g Release 1 (10.1) Support Status and Alerts, available on the OracleMetaLink Web site:
http://metalink.oracle.com
To locate this document:
1. Log on to OracleMetaLink.
2. Click Advanced at the top of the OracleMetaLink page.
3. Enter 263719.1 in the Document ID field, then click Submit.
This document is created by Oracle Support Services and provides information about the status of issues discovered after this patchset was released. If you are unable to access this site, then contact Oracle Support Services before installing this patchset in a production environment.
Extract the Installation Software To extract the patchset installation software:
1. Extract the appropriate patchset from the Oracle Collaboration Suite Supplemental DVD to a directory that is not the Oracle home directory or under the Oracle home directory.
2. Enter the following command to unzip and extract the installation files:
$ unzip patchset_name.zip
In the preceding command, patchset_name represents the appropriate patchset for your platform.
Set the ORACLE_HOME and ORACLE_SID Environment Variables Enter the following commands to set the ORACLE_HOME and ORACLE_SID environment variables:
■ Bourne, Bash, or Korn shell:
$ ORACLE_HOME=oracle_home$ ORACLE_SID=sid$ export ORACLE_HOME ORACLE_SID
■ C shell:
% setenv ORACLE_HOME oracle_home% setenv ORACLE_SID sid
In these examples, oracle_home is the Oracle home directory where the Oracle Database 10g installation that you want to upgrade is installed, and sid is the SID of the database that you want to upgrade.
Shut Down Oracle Databases Shut down any existing Oracle Database instances with normal or immediate priority. On Oracle Real Application Clusters systems, shut down all instances on each node.
If Automatic Storage Management (ASM) is running, then shut down all databases that use ASM, then shut down the ASM instance on each node of the cluster.

Installing Oracle Collaboration Suite Database in an Existing Database
5-8 Oracle Collaboration Suite Installation Guide
Stop All Processes Stop all listener and other processes running in the Oracle home directory where you want to install the patchset.
■ If you are upgrading a single instance installation, then shut down the following Oracle Database 10g services before installing the patchset:
1. Shut down any processes in the Oracle home that might be accessing a database, for example Oracle Enterprise Manager Database Control or iSQL*Plus.
2. Shut down all database instances.
3. Shut down the ASM instance, if the ASM instance is running in the Oracle home to be patched.
4. Shut down all listeners.
5. Shut down the Oracle Cluster Synchronization Services (CSS) daemon as the root user:
# /etc/init.d/init.cssd stop
■ If you are upgrading a CRS installation, then shut down the following Oracle Database 10g services before installing the patchset:
Note: If you are using CRS, then you must shut down all Oracle Database instances on all cluster nodes before applying the patchset to the CRS installation. All Oracle Database instances are restarted during the CRS patchset installation. After the CRS patchset installation is complete, you must shut down all Oracle Database and ASM instances running in the Oracle Real Application Clusters Oracle home before patching the Oracle Real Application Clusters Oracle home.
Note: If you shut down ASM instances, then you must first shut down all database instances that use ASM, even if these databases run from different Oracle homes.
Note: You must perform these steps in the order listed.
Note: Before you shut down any processes that are monitored by Enterprise Manager Grid Control, set a blackout in Grid Control for the processes that you intend to shut down. This is necessary so that the availability records for these processes indicate that the shutdown was planned downtime rather than an unplanned system outage.
Note: You must perform these steps in the order listed.

Installing Oracle Collaboration Suite Database in an Existing Database
Installing Oracle Collaboration Suite Database in an Existing Database 5-9
1. Shut down any processes in the Oracle home on each node that might be accessing a database, for example Oracle Enterprise Manager Database Control.
2. Shut down all Oracle Real Application Clusters instances on all nodes. To shut down all Oracle Real Application Clusters instances for a database, enter the following command where db_name is the name of the database:
$ oracle_home/bin/srvctl stop database -d db_name
3. Shut down all ASM instances on all nodes. To shut down an ASM instance, enter the following command, where node is the name of the node where the ASM instance is running:
$ oracle_home/bin/srvctl stop asm -n node
4. Stop all node applications on all nodes. To stop node applications running on a node, enter the following command, where node is the name of the node where the applications are running:
$ oracle_home/bin/srvctl stop nodeapps -n node
5. Shut down the CRS process by entering the following command on all nodes as the root user:
# /etc/init.d/init.crs stop
■ If you are upgrading an Oracle Real Application Clusters installation and node applications are running in the Oracle Real Application Clusters Oracle home, then shut down the following Oracle Database 10g services before installing the patchset:
1. Shut down any processes in the Oracle home on each node that might be accessing a database, for example Oracle Enterprise Manager Database Control.
Note: Before you shut down any processes that are monitored by Enterprise Manager Grid Control, set a blackout in Grid Control for the processes that you intend to shut down. This is necessary so that the availability records for these processes indicate that the shutdown was planned downtime rather than an unplanned system outage.
Note: If the CRS installation is not on a shared Oracle home, then you can upgrade the CRS installation one node at a time. To do this, perform the preceding steps only on the first node that you are upgrading, then follow the instructions on the installer screen.
Note: You must perform these steps in the order listed.

Installing Oracle Collaboration Suite Database in an Existing Database
5-10 Oracle Collaboration Suite Installation Guide
2. Shut down all Oracle Real Application Clusters instances on all nodes. To shut down all Oracle Real Application Clusters instances for a database, enter the following command where db_name is the name of the database:
$ oracle_home/bin/srvctl stop database -d db_name
3. Shut down all ASM instances on all nodes. To shut down an ASM instance, enter the following command, where node is the name of the node where the ASM instance is running:
$ oracle_home/bin/srvctl stop asm -n node
4. Stop all node applications on all nodes. To stop node applications running on a node, enter the following command, where node is the name of the node where the applications are running:
$ oracle_home/bin/srvctl stop nodeapps -n node
Back Up the System Oracle recommends that you create a backup of the Oracle Database 10g installation before you install the patchset. After the patchset is installed, there is no way to remove it.
5.2.1.3 Installation TasksYou can install the patchset either interactively or noninteractively. Refer to one of the following sections for information about how to complete the installation:
■ To install the patchset interactively, refer to Installing the Oracle Database 10g Patchset Interactively.
■ To install the patchset noninteractively, refer to Installing the Oracle Database 10g Patchset Noninteractively.
Installing the Oracle Database 10g Patchset Interactively To install the Oracle Database 10g patchset interactively:
1. Log in as the oracle user.
Note: Before you shut down any processes that are monitored by Enterprise Manager Grid Control, set a blackout in Grid Control for the processes that you intend to shut down. This is necessary so that the availability records for these processes indicate that the shutdown was planned downtime rather than an unplanned system outage.
Note: If you attempt to install this patchset in an Oracle home directory that does not contain an Oracle Database 10g release (10.1.0.2 or 10.1.0.3) installation, then Oracle Universal Installer displays a warning dialog with the following error:
There are no patches that need to be applied from the patchset Oracle Database 10g Patchset 2 10.1.0.4.2
The Oracle Universal Installer does not allow the installation to proceed. Click OK, then click Cancel to end the installation.

Installing Oracle Collaboration Suite Database in an Existing Database
Installing Oracle Collaboration Suite Database in an Existing Database 5-11
2. If you are not installing the software on the local system, then enter the following command to direct X applications to display on the local system:
■ Bourne, Bash, or Korn shell:
$ DISPLAY=local_host:0.0 ; export DISPLAY
■ C shell:
% setenv DISPLAY local_host:0.0
In this example, local_host is the host name or IP address of the system that you want to use to display Oracle Universal Installer (your workstation or PC).
3. Enter the following commands to start Oracle Universal Installer, where patchset_directory is the directory where you unzipped the patchset software:
% cd patchset_directory/Disk1% ./runInstaller
4. On the Welcome screen, click Next.
5. On the Specify File Locations screen, click Browse next to the Path field in the Source section.
6. Select the products.xml file from the stage directory where you unpacked the patchset files, then click Next. For example:
directory_path/stage/products.xml
7. In the Name field in the Destination section, select the name of the Oracle home that you want to update from the drop-down list, then click Next.
8. If you are installing the patchset on an Oracle Real Application Clusters cluster, then click Next when the Selected Nodes screen appears.
Note: If you want to install the Oracle9i globalization support locale definition files, then enter the following commands to run Oracle Universal Installer:
% ./runInstaller oracle.rsf.nlsrtl_rsf:b_cr9idata=true

Installing Oracle Collaboration Suite Database in an Existing Database
5-12 Oracle Collaboration Suite Installation Guide
9. On the Summary screen, click Install.
This screen lists all the patches available for installation.
10. When prompted, run the $ORACLE_HOME/root.sh script as the root user. If you are applying the patchset to an Oracle Real Application Clusters installation, then run the root.sh script on each node of the cluster.
11. On the End of Installation screen, click Exit, then click Yes to exit from Oracle Universal Installer.
Installing the Oracle Database 10g Patchset NoninteractivelyTo install the Oracle Database 10g patchset noninteractively
1. Copy the response file template provided in the response directory where you unpacked the patchset archive file.
2. Edit the values for all fields labeled as <Value Required> as described by the comments and examples in the template
Note: The Selected Nodes screen lists the existing Oracle Real Application Clusters 10g release 1 nodes. The first node in the list is the node from where the Oracle Real Application Clusters 10g release 1 software was installed. You must install the patchset software from this node. If this is not the node where you are running Oracle Universal Installer, then exit Oracle Universal Installer and install the patchset software from the first node in the list of nodes.
Alternatively, reset the node order as follows:
1. Exit Oracle Universal Installer.
2. Enter a command similar to the following, where the node that you want to install the patchset from is the first node in the list of nodes:
$ runInstaller -updateNodeList "CLUSTER_NODES=node2, node1,node3" -localORACLE_HOME=oracle_home_path
In this example, the Oracle Real Application Clusters 10g release 1 software was installed from node1, but the patchset will be installed from node2.
3. Start Oracle Universal Installer from the first node in the list.
Note: If you are applying this patchset to a CRS installation:
■ If you shut down all CRS services on all nodes as described in Section 5.2.1.2 before starting the installation, then complete all the steps except the first step in the instructions displayed by the installer screen.
■ If you did not shut down all CRS services on all nodes, then complete all the steps in the instructions displayed by the installer screen.
In either case, you will not be prompted to run the root.sh script.
The CRS installation instructions displayed by the installer screen are also available in the CRS_HOME/install/readme.txt file.

Installing Oracle Collaboration Suite Database in an Existing Database
Installing Oracle Collaboration Suite Database in an Existing Database 5-13
3. To run Oracle Universal Installer, enter a command similar to the following, where response_file is the full path to the response file that you edited:
% ./runInstaller -silent -responseFile response_file
4. After the installation, run the $ORACLE_HOME/root.sh script as the root user. If you are applying the patchset to an Oracle Real Application Clusters installation, then run the root.sh script on each node of the cluster.
5.2.1.4 Postinstallation TasksReview the information in this section before using the upgraded software. This section lists required and optional postinstallation tasks, depending on the installation type and the products that you want to use.
■ Upgrading Release 9.2 and Earlier Databases Directly to Oracle Database 10g Release 1 (10.1.0.4.2)
■ Upgrading an Oracle9i Database to Oracle Database 10g
■ Upgrading a Release 9.2 Database Not Using OLS
■ Required Postinstallation Tasks
■ Running the configPatch.pl Script on an Oracle RAC Cluster
■ Resetting the DBMS_SCHEDULER Time Zone
■ Oracle Enterprise Manager Postinstallation Steps for Database Console
■ Automatically Restarting Oracle Notification Service
Upgrading Release 9.2 and Earlier Databases Directly to Oracle Database 10g Release 1 (10.1.0.4.2) After you have installed the patchset software, use one of the following methods to upgrade Oracle Databases from a previous release, as described in the Oracle Database Upgrade Guide:
Note: If you want to install the Oracle9i globalization support locale definition files, then set the b_cr9idata variable to True in the response file.
For Oracle Real Application Clusters installations, make sure the CLUSTER_NODES variable specifies all the nodes used in the original Oracle Real Application Clusters installation.
Note: If you are applying this patchset to a CRS installation:
■ If you shut down all CRS services on all nodes as described in Section 5.2.1.2 before starting the installation, then complete all the steps except the first step in the CRS_HOME/install/readme.txt file.
■ If you did not shut down all CRS services on all nodes, then complete all the steps in the CRS_HOME/install/readme.txt file.

Installing Oracle Collaboration Suite Database in an Existing Database
5-14 Oracle Collaboration Suite Installation Guide
■ Run the u0902000.sql, u0900010.sql, u0801070.sql, or u0800060.sql upgrade scripts. These scripts are installed in the $ORACLE_HOME/rdbms/admin directory.
■ Use the Database Upgrade Assistant to perform the upgrades. If you are upgrading an Oracle Real Application Clusters database, then the Database Upgrade Assistant might display the following message:
The database databasename does not have the cluster configuration and also not listed in the registry of remote cluster nodes. Do you want the Database Upgrade Assistant to continue upgrading it as non cluster database?
If this message appears, then do one of the following:
– From the database Oracle home, run the srvctl command to add the database configuration information to the Oracle Cluster Register (OCR).
– On all nodes of the cluster, add the following entry to the oratab file:
databasename:oraclehome:N
Upgrading an Oracle9i Database to Oracle Database 10g If you upgrade an Oracle9i database to Oracle Database 10g release 1, then Oracle Flashback features using a timestamp may fail. To work around this problem, enter the following SQL script from the Oracle Database 10g database:
SQL> DELETE FROM smon_scn_time WHERE orig_thread <> 0;SQL> COMMIT;
This issue is tracked with Oracle bug 3994270.
Upgrading a Release 9.2 Database Not Using OLS If you want to upgrade an Oracle9i release 9.2 preconfigured database, and you are not using Oracle Label Security (OLS), then complete the following steps to avoid errors during the upgrade:
1. Use Oracle Universal Installer release 9.2 to install OLS using the Custom installation type.
2. Run the $ORACLE_HOME/rdbms/admin/catnools.sql script with the SYSDBA privilege to remove OLS components from the database.
Required Postinstallation Tasks Review the Check Tablespace Sizes and Set Parameter Values section and complete the steps in the Upgrade the Release 10.1 Database section after you have installed the patchset software.
Check Tablespace Sizes and Set Parameter Values
Review the following sections before upgrading a database.
■ Check SYSTEM Tablespace Size
■ Check XDB Tablespace Size
■ Set the SHARED_POOL_SIZE and JAVA_POOL_SIZE Initialization Parameters
See Also: Oracle Real Application Clusters Administrator's Guide

Installing Oracle Collaboration Suite Database in an Existing Database
Installing Oracle Collaboration Suite Database in an Existing Database 5-15
Check SYSTEM Tablespace Size
If JServer is part of the installation, then ensure that there is at least 10 MB of free space allocated to the SYSTEM tablespace.
Check XDB Tablespace Size
For Oracle Real Application Clusters installations, ensure that there is at least 50 MB of free space allocated to the XDB tablespace.
Set the SHARED_POOL_SIZE and JAVA_POOL_SIZE Initialization Parameters
Set the value of the SHARED_POOL_SIZE and the JAVA_POOL_SIZE initialization parameters, as follows:
1. Start the database:
SQL> STARTUP
2. If necessary, enter the following command to determine whether the system uses an initialization parameter file (initsid.ora) or a server parameter file (spfiledbname.ora):
SQL> SHOW PARAMETER PFILE;
This command displays the name and location of the server parameter file or the initialization parameter file.
3. Determine the current values of these parameters:
SQL> SHOW PARAMETER SHARED_POOL_SIZESQL> SHOW PARAMETER JAVA_POOL_SIZE
4. If the system is using a server parameter file:
a. If necessary, set the value of the SHARED_POOL_SIZE initialization parameter to at least 150 MB:
SQL> ALTER SYSTEM SET SHARED_POOL_SIZE='150M' SCOPE=spfile;
b. If necessary, set the value of the JAVA_POOL_SIZE initialization parameter to at least 150 MB:
SQL> ALTER SYSTEM SET JAVA_POOL_SIZE='150M' SCOPE=spfile;
5. If the system uses an initialization parameter file, then, if necessary, change the values of the SHARED_POOL_SIZE and the JAVA_POOL_SIZE initialization parameters to at least 150 MB in the initialization parameter file (initsid.ora).
6. Ensure that the value of the SGA_TARGET initialization parameter size is greater than the sum of the values of the SHARED_POOL_SIZE and the JAVA_POOL_SIZE initialization parameters.
7. Shut down the database:
SQL> SHUTDOWN
Upgrade the Release 10.1 Database
After you install the patchset, you must perform the following steps on every database associated with the upgraded Oracle home:
Installing Oracle Collaboration Suite Database in an Existing Database
5-16 Oracle Collaboration Suite Installation Guide
1. Log in as the Oracle software owner user.
2. For Oracle Real Application Clusters installations, start node applications on each node of the cluster as follows:
$ srvctl start nodeapps -n nodename
3. If you are using ASM, then start the ASM instance.
4. For single-instance installations, start the listener, as follows:
$ lsnrctl start
5. For single-instance installations, use SQL*Plus to log in to the database as the SYS user with SYSDBA privileges:
$ sqlplus /nologSQL> CONNECT / AS SYSDBA
6. For Oracle Real Application Clusters installations:
a. Start the database, where db_name is the database name and inst_name is the local instance name:
$ srvctl start instance -d db_name -i inst_name
b. Use SQL*Plus to log in to the database as the SYS user with SYSDBA privileges:
$ sqlplus /nologSQL> CONNECT / AS SYSDBA
c. Set the CLUSTER_DATABASE initialization parameter to FALSE:
SQL> ALTER SYSTEM SET CLUSTER_DATABASE=FALSE SCOPE=spfile;
d. Shut down the database:
SQL> SHUTDOWN
7. Enter the following SQL*Plus commands:
SQL> STARTUP UPGRADESQL> SPOOL patch.logSQL> @?/rdbms/admin/catpatch.sqlSQL> SPOOL OFF
8. Review the patch.log file for errors and inspect the list of components that is displayed at the end of catpatch.sql script. This list provides the version and status of each SERVER component in the database.
Note: If you do not run the catpatch.sql script, as described in this section and you start up a database for normal operation, then "ORA-13516: SWRF Operation failed: CATPROC not valid" errors will occur.
Note: If you are using the Oracle OLAP option, then make sure that the listener is running.

Installing Oracle Collaboration Suite Database in an Existing Database
Installing Oracle Collaboration Suite Database in an Existing Database 5-17
9. If necessary, rerun the catpatch.sql script after correcting any problems.
10. Restart the database:
SQL> SHUTDOWNSQL> STARTUP
11. Run the utlrp.sql script to recompile all invalid PL/SQL packages now instead of when the packages are accessed for the first time. This step is optional but recommended.
SQL> @?/rdbms/admin/utlrp.sql
12. If you are using the Oracle Recovery Manager catalog, then enter the following command:
$ rman catalog username/password@aliasRMAN> UPGRADE CATALOG;
13. For Oracle Real Application Clusters installations:
a. Set the CLUSTER_DATABASE initialization parameter to TRUE:
SQL> ALTER SYSTEM SET CLUSTER_DATABASE=TRUE SCOPE=spfile;
b. Restart the database:
SQL> SHUTDOWNSQL> STARTUP
c. Start any services that you want to use:
srvctl start service -d db_name -s service_name
Running the configPatch.pl Script on an Oracle RAC Cluster The configPatch.pl script updates the Oracle Enterprise Manager Database Control files. Although Oracle Universal Installer copies the configPatch.pl script to all the Oracle homes on the cluster, it runs the script only on the node running Oracle Universal Installer.
If you install this patch on an Oracle Real Application Clusters installation that does not use a shared Oracle home directory, then you must manually run the $ORACLE_HOME/sysman/install/configPatch.pl script on each node of the cluster, except on the node from which you ran Oracle Universal Installer.
Note: When the 10.1.0.4.2 patchset is applied to an Oracle Database 10g Standard Edition database, there may be 42 invalid objects after the utlrp.sql script runs. These objects belong to the unsupported components and do not affect the database operation.
Ignore any messages indicating that the database contains invalid recycle bin objects similar to the following:
BIN$4lzljWIt9gfgMFeM2hVSoA==$0
Note: These instructions do not apply to Oracle Real Application Clusters installations where the nodes of the cluster share the same Oracle home.

Installing Oracle Collaboration Suite Database in an Existing Database
5-18 Oracle Collaboration Suite Installation Guide
Resetting the DBMS_SCHEDULER Time Zone If you created a preconfigured database during the Oracle Database 10g release 1 installation, then specify the local time zone, as follows:
1. Start SQL*Plus:
$ sqlplus "/ AS SYSDBA"
2. If necessary, start the database:
SQL> STARTUP
3. Enter the following command:
SQL> SELECT TZNAME FROM V$TIMEZONE_NAMES;
The output from this command lists the different time zone settings for the TZNAME attribute.
4. From the output of the preceding command, identify the time zone for your location.
5. Reset the DEFAULT_TIMEZONE attribute for the scheduler, where timezone is the time zone that you identified in the previous step:
SQL> BEGINDBMS_SCHEDULER.SET_SCHEDULER_ATTRIBUTE('DEFAULT_TIMEZONE','timezone');END ;/
The DEFAULT_TIMEZONE attribute determines the time zone that the maintenance windows use.
This issue is tracked with Oracle bug 3721687.
Oracle Enterprise Manager Postinstallation Steps for Database Console If you upgraded a release 10.1.0.2 or 10.1.0.3 database configured to use Oracle Enterprise Manager Database Console to release 10.1.0.4.2, then you must perform the following steps:
1. Enter the following command:
SQL> SELECT TZNAME FROM V$TIMEZONE_NAMES;
The output from this command lists the different time zone settings for the TZNAME attribute.
2. Set the TZ environment variable to your time zone:
■ Bourne, Bash, or Korn shell:
$ TZ=timezone; export TZ
■ C shell:
% setenv TZ timezone
3. Set the ORACLE_SID environment variable:
Note: On Oracle Real Application Clusters, perform these steps on each node of the cluster.

Installing Oracle Collaboration Suite Database in an Existing Database
Installing Oracle Collaboration Suite Database in an Existing Database 5-19
■ Bourne, Bash, or Korn shell:
$ ORACLE_SID=sid ; export ORACLE_SID
■ C shell:
% setenv ORACLE_SID sid
4. If you tried unsuccessfully to start the Database Console after you upgraded the database, then enter the following command:
$ oracle_home/bin/emctl stop dbconsole
5. Enter the following command:
$ oracle_home/bin/emctl resetTZ agent
This command updates the $ORACLE_HOME/hostname_sid/sysman/config/emd.properties file to match the value of the TZ environment variable. It also returns the command required in step 7.
6. Connect to the database as an Enterprise Manager Repository user (SYSMAN):
$ sqlplus SYSMAN/sysman_password
7. Enter the command displayed in step 5, for example:
SQL> EXEC MGMT_TARGET.SET_AGENT_TZRGN('host_name.domain_name:1830','PST8PDT')SQL> COMMIT
8. Exit SQL*Plus.
SQL> EXIT;
9. Start Oracle Enterprise Manager Database Console:
$ emctl start dbconsole
This issue is tracked with Oracle bug 4132656.
Automatically Restarting Oracle Notification ServiceFor Oracle Database 10g release 1 (10.1.0.2) installations, the Oracle Notification Service (ONS) AUTO_START parameter is set to 0 on each node of the cluster. For this reason, CRS does not automatically start ONS when the node is restarted.
To work around this issue, perform the following steps as the CRS owner for each ONS resource:
1. Change directory to the crs_home/crs/public directory.
2. Use the following command to create a file containing the profile resources:
Note: Alternatively, you can connect as the SYS user with SYSDBA privileges, as follows:
$ sqlplus SYS/sys_password AS SYSDBA
After you connect as the SYS user, alter the session to run as SYSMAN:
SQL> ALTER SESSION SET current_schema = SYSMAN;

Installing Oracle Collaboration Suite Database in an Existing Database
5-20 Oracle Collaboration Suite Installation Guide
$ crs_home/bin/crs_stat -p ora.nodename.ons > ora.nodename.ons.cap
3. Enter the following command to change the AUTO_START parameter value to 1 in the ora.nodename.ons.cap file:
$ crs_home/bin/crs_profile -update ora.nodename.ons -o as=1
4. Enter the following command to update the resource profile:
$ crs_home/bin/crs_register -u ora.nodename.ons
This issue is tracked with Oracle bug 4011834.
5.2.2 Installing Oracle Collaboration SuiteThis section contains the following topics:
■ Preinstallation Tasks
■ Installation Tasks
5.2.2.1 Preinstallation TasksBefore you start to install Oracle Collaboration Suite in an existing Database, ensure that the kernel parameters are set as listed in Table 5–1:
Table 5–1 Database Configuration Parameters and Their Minimum Values for Installing Oracle Collaboration Suite in an Existing Database
Kernel Parameter Minimum Value of the Parameter
pga_aggregate_target 203423744
db_cache_size 150994944
session_max_open_files 50
processes 250
sga_max_size 629145600
aq_tm_processes 1
db_recovery_file_dest_size 2147483648
star_transformation_enabled TRUE
sga_target 629145600
compatible 10.1.0.4.2
shared_pool_size 184549376
sessions 400
job_queue_processes 10
java_pool_size 125829120
dml_locks 200
max_commit_propagation_delay 1
dispatchers (PROTOCOL=TCP) (SERVICE={SID}XDB)
open_cursors 400
db_block_size 8192
remote_login_passwordfile EXCLUSIVE

Installing Oracle Collaboration Suite Database in an Existing Database
Installing Oracle Collaboration Suite Database in an Existing Database 5-21
5.2.2.2 Installation TasksPerform the steps Table 5–2 in to install Oracle Collaboration Suite in an existing Database.
undo_management AUTO
db_file_multiblock_read_count 32
Note: Oracle Universal Installer uses the /etc/nodenames file to determine the host name. The host name that you specified in the hosts file may or may not be fully qualified. However, host names that are not fully qualified may not be usable outside the domain.
For example, if the fully-qualified domain name for a server is myserver.acme.uk, and the hosts file only registers the name myserver, then clients in the acme.co.uk domain have no trouble communicating with this host. However connections made by users in the acme.co.de domain may fail.
Also, ensure that the host name that you specify corresponds exactly to the host name you have, whether fully qualified or not.
Table 5–2 Screens for Installing Oracle Collaboration Suite in an Existing Database
Step Screen Action
1. None Start the installer.
Refer to Section 3.4 for more information about starting the installer.
2. Select Installation Method
Select Advanced Installation.
Note: Refer to Section 1.7.1 for detailed information on Basic and Advanced installations.
Click Next.
3. Specify Inventory Directory and Credentials
(Advanced installation only)
This screen appears only if this is the first installation of any Oracle product on this computer.
Enter the full path of the inventory directory. Enter a directory that is different from the Oracle home directory for the product files.
Example: var/opt/oracle/oraInventory
Enter the name of the operating system group that will have write permission for the inventory directory.
Example: oinstall
Click Next.
4. Run orainstRoot.sh
(Advanced installation only)
This screen appears only if this is the first installation of any Oracle product on this computer.
Run the orainstRoot.sh script in a different shell as the root user. The script is located in the oraInventory directory.
After running the script, click Continue.
Table 5–1 (Cont.) Database Configuration Parameters and Their Minimum Values for Installing Oracle Collaboration Suite in an Existing Database
Kernel Parameter Minimum Value of the Parameter

Installing Oracle Collaboration Suite Database in an Existing Database
5-22 Oracle Collaboration Suite Installation Guide
5. Specify File Locations
(Advanced installation only)
Enter the full path of the Source directory in the Path field for Source.
Enter a name to identify the Oracle home in the Name field for Destination. The name cannot contain spaces and has a maximum length of 16 characters.
Example: OH_INFRA_10_1_1
Enter the full path to the destination directory in the Path field for Destination. This is the Oracle home. If the directory does not exist, the installer creates it. To create the directory beforehand, create it as the oracle user.
Do not create the directory as the root user.
Example: /home/oracle/infra_10_1_1
Click Next.
6. Specify Hardware Cluster Installation Mode
(Advanced installation only)
This screen appears only if the computer is part of a hardware cluster.
Select the computers in the hardware cluster where you want to install the Infrastructure. You can select multiple computers, or you can just select the current computer.
Click Next.
7. Select a Product to Install
(Advanced installation only)
Select Oracle Collaboration Suite Infrastructure 10.1.1.0.2.
Refer to Section 1.8 for more information about how to install support for support for additional languages.
Click Next.
8. Select Installation Type
(Advanced installation only)
The options displayed on this screen depend on what you select in the Select Product to Install screen.
The installation types for Infrastructure are:
■ Identity Management and Oracle Collaboration Suite Database
■ Identity Management
■ Oracle Collaboration Suite Database
■ Enable existing Oracle 10g Database to Oracle Collaboration Suite Database
Select Enable existing Oracle 10g Database to Oracle Collaboration Suite Database and click Next.
9. Product-Specific Prerequisite Checks
(Advanced installation only)
The installer verifies requirements such as memory, disk space, and operating system version. If any check fails, make the required changes and click Retry. Refer to Chapter 2 for the list of hardware and software requirements.
Click Next.
10. Language Selection
(Advanced installation only)
This screen enables you to select the language in which Oracle Collaboration Suite components will run.
Select the required language or languages from the Available Languages list and add them to the Selected Languages list.
Click Next.
11. Specify Oracle Internet Directory
(Advanced installation only)
Host: Enter the name of the computer where Oracle Internet Directory is running.
Port: Enter the port number at which Oracle Internet Directory is listening. If you do not know the port number, refer to Section 8.5.
Use SSL to connect to Oracle Internet Directory: Select this option if you want Oracle Collaboration Suite components to use only SSL to connect to Oracle Internet Directory.
Click Next.
Table 5–2 (Cont.) Screens for Installing Oracle Collaboration Suite in an Existing Database
Step Screen Action
Installing Oracle Collaboration Suite Database in an Existing Database
Installing Oracle Collaboration Suite Database in an Existing Database 5-23
12. Oracle Internet Directory
(Advanced installation only)
Username: Enter the user name to use to log in to Oracle Internet Directory.
Password: Enter the user password.
Click Next.
Note: Use cn=orcladmin as the user name if you are the Oracle Internet Directory Superuser.
13. Specify Database Identification
(Advanced installation only)
Username: Enter a database administrator name to log in to the existing Database against which you want to install Oracle Collaboration Suite.
Password: Enter the password for the database administrator account you specified in the Username field.
Hostname and Port: Enter the host name of the computer where the database that you want to use is installed. Also, specify the port that this database is using, as follows:
hostname:port
Service Name: Enter the service name for the database you want to use.
SID: Enter the system identifier for the existing database that you want to use. Typically this is the same as the global database name, but without the domain name.
Click Next.
14. Specify Database File Storage Option
(Advanced installation only)
Select the storage mechanism that you would like to use for your Database files.
To store the database files on a file system, select File System. For RAC installations, the file system that you choose must be a cluster file system or be on a certified network attached storage (NAS) device.
To store the database files in an automatic storage management (ASM) disk group, select Automatic Storage Management. ASM disk groups are created by specifying one or more disk devices that will be managed by a separate Oracle ASM instance. For RAC installations, the disk devices that you add to the ASM disk group must be shared by all nodes of the cluster.
To store the database files on raw devices (raw partitions or raw volumes), select Raw Devices. To select this option, the required raw devices must already exist. For RAC installations, you must create the raw devices on disk devices that are shared by all nodes of the cluster.
Click Next.
Note: Depending on the option that you select in this screen, the following screen might differ from the one listed in the next step.
15. Specify Database File Location
(Advanced installation only)
Directory for Database Files: Specify the location of the directory where you would like to store the Database files.
Note: For best database performance, it is recommended that you install Database files (data files, control files, and redo logs) and the Database on separate disks.
Click Next.
16. Specify Database Schema Passwords
(Advanced installation only)
Set passwords for privileged database accounts, which are used for database management and postinstallation tasks. Refer to Section 4.3.8 for rules on setting passwords for these accounts.
Set passwords for privileged Oracle Collaboration Suite Application accounts.
The rules for setting the passwords that apply to the SYS and SYSTEM users also apply to these schemas.
Click Next.
17. Summary Verify your selections and click Install.
18. Install Progress This screen displays the progress of the installation.
Table 5–2 (Cont.) Screens for Installing Oracle Collaboration Suite in an Existing Database
Step Screen Action

Split Configuration
5-24 Oracle Collaboration Suite Installation Guide
5.3 Split ConfigurationYou can also enable an existing remote Oracle 10g Database database to Collaboration Suite Database. This is known as split configuration.
For detailed information on split configuration, refer to OracleMetaLink at
http://metalink.oracle.com
19. Run root.sh Note: Do not run the root.sh script until this dialog appears.
1. When you see this dialog, run the root.sh script in a different shell as the root user. The script is located in the Oracle home directory of this instance.
2. Click OK.
20. Configuration Assistants
This screen shows the progress of the configuration assistants. Configuration assistants configure components.
21. End of Installation Click Exit to quit the installer.
Note: At the end of this Oracle Collaboration Suite Infrastructure installation, when you click Release Information, then no information might be displayed:
In this case, for more information refer to
http://Infrastructure_host:infra_port_number/relnotes/toc.htm
Table 5–2 (Cont.) Screens for Installing Oracle Collaboration Suite in an Existing Database
Step Screen Action

Configuring Oracle Internet Directory for Installation Privileges 6-1
6Configuring Oracle Internet Directory for
Installation Privileges
When you install certain Oracle Collaboration Suite 10g Applications or infrastructure components, the installer prompts you for a user name to log in to Oracle Internet Directory. For the installation to end successfully, this user must belong to certain groups in Oracle Internet Directory. The groups that are required for installation depend on the components that you are installing.
The cn=orcladmin user is the superuser, who has rights to perform all operations, including installation. Users need not log in as the superuser to perform installations. To enable other users to perform installations, add users to specific groups.
This chapter contains the following sections:
■ Section 6.1, "Default Users in Oracle Internet Directory"
■ Section 6.2, "Groups in Oracle Internet Directory"
■ Section 6.3, "Groups Required to Configure or Deinstall Components"
■ Section 6.4, "Groups Required to Install Oracle Collaboration Suite Database"
■ Section 6.5, "Creating Users in Oracle Internet Directory"
■ Section 6.6, "Adding Users to Groups in Oracle Internet Directory"
■ Section 6.7, "Contents of a New Oracle Internet Directory"
■ Section 6.8, "User Name and Realm for Logging In to Oracle Internet Directory"
6.1 Default Users in Oracle Internet DirectoryWhen you install Oracle Internet Directory, the following users are automatically created:
■ cn=orcladmin
The cn=orcladmin user is the Oracle Internet Directory superuser. This user has all the privileges to perform all tasks in Oracle Internet Directory. The initial password for the cn=orcladmin user is the same as the password for the ias_admin user for the Oracle Collaboration Suite instance, which you specified during installation.
The cn=orcladmin user is the owner of the objects created during the same installation session. For example, when you install Oracle Internet Directory, Oracle Collaboration Suite 10g Database, and Oracle Delegated Administration Services, the cn=orcladmin user is automatically created and made a member of

Groups in Oracle Internet Directory
6-2 Oracle Collaboration Suite Installation Guide
the Repository Owners group, the DAS Component Owners group, and the IAS Admins group.
■ orcladmin
The DN for the orcladmin user is: cn=orcladmin,cn=users,[default realm DN]. The initial password for the orcladmin user is the same as the password for the ias_admin user for the Oracle Collaboration Suite instance, which you specify during installation.
To manage other Oracle Internet Directory users, you can log in to Oracle Internet Directory as the orcladmin user by using Oracle Delegated Administration Services. You can do this because the orcladmin user is a valid Oracle Application Server Single Sign-On user.
6.2 Groups in Oracle Internet DirectoryGroups in Oracle Internet Directory can be classified in to these categories:
■ Section 6.2.1, "Global Groups"
■ Section 6.2.2, "Groups for Each Oracle Collaboration Suite 10g Database"
■ Section 6.2.3, "Groups for Each Component"
6.2.1 Global GroupsTable 6–1 describes the groups that concern all Oracle Collaboration Suite instances and components registered with Oracle Internet Directory.
Note: You cannot log in to Oracle Internet Directory as the cn=orcladmin user by using Oracle Delegated Administration Services. To log in as the cn=orcladmin user, you must use the Oracle Directory Manager.
Table 6–1 Global Groups
Group Description
IAS Admins
DN: cn=IASAdmins, cn=groups, cn=OracleContext
Members of the IAS Admins group have the privileges required to:
■ Install and register new Oracle Collaboration Suite 10g Database.
However, this group does not have the privileges required to manage existing databases already registered with Oracle Internet Directory.
■ Install OracleAS Portal, Collaborative Portlets, Oracle Collaboration Suite 10g Voicemail & Fax, Oracle Real-Time Collaboration, Oracle Wireless and Voice, and Oracle Search.
Trusted Application Admins
DN: cn=Trusted Application Admins, cn=groups, cn=OracleContext
To install OracleAS Portal, Collaborative Portlets, or Oracle Mail, you must belong to several groups, one of which is the Trusted Application Admins group. Table 6–4 lists the groups required for each component.
User Management Application Admins
DN: cn=IAS and User Mgmt Admins, cn=groups, cn=OracleContext
To install Identity Management, OracleAS Portal, Collaborative Portlets, Oracle Mobile Collaboration, Oracle Content Services, Oracle Calendar, or Oracle Mail, or you must belong to several groups, one of which is User Management Application Admins group. Table 6–4 lists the groups required for each component.

Groups in Oracle Internet Directory
Configuring Oracle Internet Directory for Installation Privileges 6-3
6.2.2 Groups for Each Oracle Collaboration Suite 10g DatabaseEach Oracle Collaboration Suite Database registered with Oracle Internet Directory has its own groups, which are described in Table 6–2. This enables you to assign different owners and users for each repository.
6.2.3 Groups for Each ComponentOracle Collaboration Suite components also have groups in Oracle Internet Directory. Each component has a Component Owners group and an Associated Middle Tiers group. These groups are described in Table 6–3.
Table 6–2 Metadata Repository Groups That Are Registered with Oracle Internet Directory
Group Description
Repository Owners
DN: cn=Repository Owners, orclReferenceName=dbName, cn=IAS Infrastructure Databases, cn=IAS, cn=Products, cn=OracleContext
The user who installs Oracle Collaboration Suite Database becomes a member of this group.
Members of the Repository Owners group have the privileges required to:
■ Add or remove users to or from the group
■ Unregister the repository
■ Add or remove users to or from the Application-Tier Administrators group for this database
■ Add or remove Applications instances to or from the database
The group also has all the privileges of the Application-Tier Administrators group.
Application-Tier Administrators
DN: cn=Repository Mid-tiers, orclReferenceName=dbName, cn=IAS Infrastructure Databases, cn=IAS, cn=Products, cn=OracleContext
Members of the Mid-Tier Administrators group have the privileges required to:
■ Add or remove Applications instances from the Associated Applications Tiers group for this repository
■ Install Applications or configure an Applications component to use a different repository
■ Access metadata for the repository database object
Associated Application Tiers
DN: cn=Associated Mid-tiers, orclReferenceName=dbName, cn=IAS Infrastructure Databases, cn=IAS, cn=Products, cn=OracleContext
Members of this group are Applications instances associated with this database. Instances of Applications are added to this group during installation. You do not need to manually add the instances to this group.
Members of the Associated Middle Tiers group have the privileges required to access metadata for the repository database object and its schemas.
Table 6–3 Groups Associated with Each Oracle Collaboration Suite Component
Group Description
Component Owners Members of the Component Owners group have the privileges required to:
■ Add or remove owners for the component.
■ Unregister the component.
■ Associate additional Applications with the component.
Associated Application Tiers
Members of Associated Middle Tiers group are Oracle Collaboration Suite Applications instances.
Groups Required to Configure or Deinstall Components
6-4 Oracle Collaboration Suite Installation Guide
6.3 Groups Required to Configure or Deinstall ComponentsYou must belong to specific groups to configure or deinstall Oracle Collaboration Suite components. These groups are described in Table 6–4. You become the owner of the components that you install.
Table 6–4 Oracle Internet Directory Groups Required to Configure Components
To Configure This Component User Must Be a Member of All the Listed Groups:
Infrastructure Components
Oracle Collaboration Suite Database To register Oracle Collaboration Suite Database with Oracle Internet Directory, you must log in to Oracle Internet Directory as a user who belongs to the IAS Admins group.
Oracle Internet Directory In OracleAS Cluster (Identity Management) environments, to install subsequent Oracle Internet Directory instances after the first one, you must be the Oracle Internet Directory superuser, cn=orcladmin.
Oracle Delegated Administration Services ■ Trusted Application Admins
■ IAS Admins
■ Application-Tier Admins group for the database used by Oracle Application Server Single Sign-On
If you are not sure about the database that is used by Oracle Application Server Single Sign-On, then refer to "To Determine the Database Used by OracleAS Single Sign-On".
■ Component Owners for the Oracle Delegated Administration Services component
Note: You must be a member of the Component Owners for the Oracle Delegated Administration Services component only if you are installing multiple instances of Oracle Delegated Administration Services. When you are installing the second and subsequent instances, then you only need to belong to the Component Owners group. You do not need to be a member of the group when you install the first Oracle Delegated Administration Services instance.
Refer to Section 6.6.1 for the steps add users to groups.
OracleAS Single Sign-On You must install Oracle Application Server Single Sign-On as the cn=orcladmin user.
Oracle Directory Integration and Provisioning
■ IAS Admins
■ Trusted Application Admins
■ Admin for Oracle Directory Integration and Provisioning, which is identified by cn=dipadmingrp,cn=odi,cn=Oracle Internet Directory
■ Mid-Tier Admins group for the database used by Oracle Application Server Single Sign-On.
If you are not sure about the database that is used by Oracle Application Server Single Sign-On, refer to "To Determine the Database Used by OracleAS Single Sign-On".
Oracle Application Server Certificate Authority, configured against an existing Oracle Collaboration Suite Database
■ Trusted Application Admins
■ IAS Admins
■ Repository Owners group for the existing database
Oracle Application Server Certificate Authority, configured against a new Oracle Collaboration Suite Database
■ Trusted Application Admins
■ IAS Admins

Groups Required to Configure or Deinstall Components
Configuring Oracle Internet Directory for Installation Privileges 6-5
Identity Management Access only ■ IAS Admins
Identity Management Access and OracleAS Cluster (Database-Based or File-Based)
■ IAS Admins
■ Mid-Tier Admins or Repository Owners group for the database
OracleAS Portal ■ Trusted Application Admins
■ IAS and User Management Application Admins
■ IAS Admins
■ Mid-Tier Admins or Repository Owners group for the database
■ Component Owners group for the OracleAS Portal component
Note: Membership of this group is required if you need to install additional OracleAS Portal instances. It does not apply for the first OracleAS Portal installation. For subsequent OracleAS Portal installations, you can perform the installation as the same Oracle Internet Directory user who performed the first installation. To allow a different Oracle Internet Directory user to install OracleAS Portal, then you must add this user to the Component Owners group for the OracleAS Portal application entity.
OracleAS Wireless ■ IAS and User Management Application Admins
■ IAS Admins
■ Mid-Tier Admins or Repository Owners group for the database
■ Component Owners group for the Oracle Collaboration Suite Wireless component
Note: Membership of this group is required if you need to install additional Oracle Collaboration Suite Wireless instances. It does not apply for the first Oracle Collaboration Suite Wireless installation. For subsequent OracleAS Portal installations, you can perform the installation as the same Oracle Internet Directory user who performed the first installation. To allow a different Oracle Internet Directory user to install Oracle Collaboration Suite Wireless, then you must add this user to the Component Owners group for the Wireless application entity.
Application Tier Components
Oracle Calendar Server ■ IAS Admin
■ Trusted Application Admin
■ Oracle Internet Directory Schema Admin
■ Service Registry Admin
Oracle Mail ■ Trusted Application Admins
■ User Management Application Admins
■ Oracle Internet Directory Schema Admin
Oracle Content Services User Management Application Admins
Oracle Real-Time Collaboration IAS Admin
Table 6–4 (Cont.) Oracle Internet Directory Groups Required to Configure Components
To Configure This Component User Must Be a Member of All the Listed Groups:

Groups Required to Configure or Deinstall Components
6-6 Oracle Collaboration Suite Installation Guide
To Determine the Database Used by OracleAS Single Sign-On1. Enter the following command (all on one line):
# $ORACLE_HOME/bin/ldapsearch -h oidhostname -p oidport -D cn=orcladmin -w password -b "orclapplicationcommonname=orasso_ssoserver,cn=sso,cn=products, cn=oraclecontext" -s base "objectclass=*" seealso
The values that you must provide are:
■ oidhostname - name of the computer running Oracle Internet Directory Example: dbmachine.mydomain.com
■ oidport - port number on which Oracle Internet Directory is listening
Example: 389
■ password - password for the cn=orcladmin user
2. If the command in Step 1 does not return the name of the database, then enter the following commands:
a. Enter the following command first to get the orclreplicaid value:
# $ORACLE_HOME/bin/ldapsearch -h oidhostname -p oidport -D cn=orcladmin -w password -b "" -s base "objectclass=*" orclreplicaidThis returns something like:
orclreplicaid=broeser-sun_iocsdb
b. Use the orclreplicaid value obtained by running the preceding command when you run the following command:
# $ORACLE_HOME/bin/ldapsearch -h oidhostname -p oidport -D cn=orcladmin -w password -b "orclreplicaid=value_from_previous_command,cn=replication configuration" -s base "objectclass=*" seealso
This command returns a seealso value in the format: cn=Metadata repository DB Name,cn=oraclecontext.
This returns something like:
orclreplicaid=broeser-sun_ocsdb,cn=replication configurationseealso=cn=OCSDB,cn=OracleContext
Oracle Search IAS Admin
Oracle Voicemail & Fax IAS Admin
Oracle Wireless and Voice ■ IAS Admin
■ User Management Application Admins
Table 6–4 (Cont.) Oracle Internet Directory Groups Required to Configure Components
To Configure This Component User Must Be a Member of All the Listed Groups:

Adding Users to Groups in Oracle Internet Directory
Configuring Oracle Internet Directory for Installation Privileges 6-7
6.4 Groups Required to Install Oracle Collaboration Suite DatabaseTo install additional databases, a user must be a member of the IAS Admins group. After installation, the user then becomes a member of the Repository Owners group for that database.
6.5 Creating Users in Oracle Internet DirectoryYou can create users in Oracle Internet Directory by using Self-Service Console, which is part of Oracle Delegated Administration Services.
6.6 Adding Users to Groups in Oracle Internet DirectoryTo add users to groups in Oracle Internet Directory, you can use one of the following tools:
■ Oracle Directory Manager
This is a Java-based tool for managing Oracle Internet Directory.
■ Oracle Delegated Administration Services
This is a Web-based tool intended to enable end users to perform tasks such as changing their passwords and editing their personal information. If users have the proper privileges, then they can also use this tool to create groups and users.
6.6.1 Using Oracle Directory Manager to Add Users to GroupsWhen you must log in as the cn=orcladmin superuser to add users to groups, you must use Oracle Directory Manager, instead of Oracle Delegated Administration Services.
To add users to groups using Oracle Directory Manager:
1. Use the following commands to start Oracle Directory Manager:
# cd $ORACLE_HOME/bin# ./oidadmin
In the preceding command, ORACLE_HOME refers to the home directory where Oracle Internet Directory is installed.
2. In the Oracle Directory Manager Connect screen, enter the connect information for Oracle Internet Directory:
See Also: Oracle Internet Directory Administrator's Guide for details
Note: You cannot connect to Oracle Internet Directory as the cn=orcladmin superuser using Oracle Delegated Administration Services. To connect to Oracle Internet Directory as the superuser, use Oracle Directory Manager.
Note: You cannot log in to Oracle Internet Directory as the cn=orcladmin superuser by using Oracle Delegated Administration Services. When you log in as the superuser to add users to groups (or to perform other Oracle Internet Directory-related tasks), you must use Oracle Directory Manager.

Adding Users to Groups in Oracle Internet Directory
6-8 Oracle Collaboration Suite Installation Guide
■ Enter cn=orcladmin in the User field.
■ Enter the password for cn=orcladmin in the Password field.
■ Click the icon at the right of the field to enter the name of the computer running Oracle Internet Directory in the Server field.
■ Enter the port number on which Oracle Internet Directory is listening, in the Port field.
■ Click Login.
3. On the left side, navigate to the group to which you want to add users. Select the group on the left side to display its attributes on the right side.
For instructions on navigation to global groups, refer to Section 6.6.1.1.
For instructions on navigation to repository groups, refer to Section 6.6.1.2.
For instructions on navigation to, refer to Section 6.6.1.3.
4. Add the DNs of the users to the uniquemember attribute.
6.6.1.1 Navigating to Global GroupsThe global groups are listed in Table 6–1. The general navigation path is as follows:
1. Click the top-level entry, Oracle Internet Directory Servers, then click the specific Oracle Internet Directory.
2. Click Entry Management and then click cn=OracleContext.
3. Click cn=Groups.
4. Click the group to which you want to add users.
6.6.1.2 Navigating to Oracle Collaboration Suite Database GroupsThe database groups are listed in Table 6–2. The general navigation path is as follows:
1. Click the top-level entry, Oracle Internet Directory Servers, then click the specific Oracle Internet Directory.
2. Click Entry Management and then click cn=OracleContext.
3. Click cn=Products and then click cn=IAS.
4. Click cn=IAS Infrastructure Databases.
5. Click orclReferenceName=dbName, where dbName is the name of the database.
6. Click the group to which you want to add users.
6.6.1.3 Navigating to Component GroupsThe component groups are listed in Table 6–3.
The general navigation path is as follows:
1. Click the top-level entry, Oracle Internet Directory Servers and then click the specific Oracle Internet Directory.
2. Click Entry Management and then click cn=OracleContext.
3. Click cn=Products.
4. Click the particular component, for example, cn=DAS or cn=Apps, to whose groups you want to add users.

Adding Users to Groups in Oracle Internet Directory
Configuring Oracle Internet Directory for Installation Privileges 6-9
5. Click orclApplicationCommonName=appName, where appName is specific to the component and Collaboration Suite instance. If you have installed multiple instances of a component, then multiple instances of this entry appear on the screen.
6. Click the group to which you want to add users.
6.6.2 Using Deployment Delegation Console to Add Users to GroupsUsing the Deployment Delegation Console, which is installed as part of Oracle Delegated Administration Services, you can add users to, or remove users from the following groups:
■ Repository Owners
■ Mid-Tier Administrators
■ Component Owners
To add users to these groups:
1. Ensure that Oracle Delegated Administration Services and Oracle Internet Directory are running.
2. Display the Deployment Delegation Console page.
The URL is:
http://hostname:port/oiddas/ui/oidinstallhome
Here, hostname specifies the name of the computer where you installed Oracle Delegated Administration Services and port specifies the port on which Oracle HTTP Server is listening.
3. Click Login.
4. Enter a user name and password to log in to Oracle Internet Directory, and click Login.
The login user must have sufficient privileges to enable you to add users to the desired group:
5. Perform these steps to add users to the desired group:
Note: You can add users to these groups only if these groups have existing members other than the cn=orcladmin superuser. If the only member of these groups is the superuser, then you must use Oracle Directory Manager to add users to these groups. Refer to Section 6.6.1 for more information.
To Add Users to This Group: Log in as a User Who Belongs to:
Repository Owners The same Repository Owners group
Mid-Tier Administrators The Repository Owners group for the same repository
Component Owners The same Component Owners group

Contents of a New Oracle Internet Directory
6-10 Oracle Collaboration Suite Installation Guide
6.7 Contents of a New Oracle Internet DirectoryWhen you install Oracle Collaboration Suite 10g Infrastructure with Oracle Internet Directory, Oracle Collaboration Suite Database, and Oracle Delegated Administration Services, the Oracle Internet Directory contains the following objects:
■ The Global groups, which are listed in Table 6–1
■ The cn=orcladmin superuser
■ The orcladmin user belonging to the default realm
■ An entry for the instance of Oracle Collaboration Suite Database registered with the Oracle Internet Directory
This database is associated with the groups listed in Table 6–2. The cn=orcladmin superuser is a member of the Repository Owners group.
■ An application entity entry for the Oracle Delegated Administration Services component
This component is associated with the groups listed in Table 6–3. The cn=orcladmin superuser is a member of the Component Owners group.
To enable other users to install additional instances of Oracle Delegated Administration Services, log in as cn=orcladmin in Oracle Directory Manager and add the users to the Component Owners group. Refer to Section 6.6.1.
6.8 User Name and Realm for Logging In to Oracle Internet DirectoryThe installer displays the Specify Login for Oracle Internet Directory screen in each of the following scenarios:
To Add Users to the Repository Owners Group
To Add Users to the Mid-Tier Administrators Group
To Add Users to the Component Owners Group
1. Click the Repository tab.
This displays all the metadata repositories for which you are an owner.
2. Select the database to which you want to add a user, and click Manage Owners.
3. On the page that displays the current owners, click Add.
4. Enter the first few characters of the user name in the Search field, and click Go. If you leave the Search field empty and click Go, then you would get a list of all the users in Oracle Internet Directory.
5. Select the user that you want to add to the Repository Owners group, and click Select.
6. Click Submit on the Manage Repository Owners page.
1. Click the Repository tab.
This displays all the metadata repositories for which you are an owner.
2. Select the database to which you want to add a user, and click Manage Administrators.
3. On the page that displays the current administrators, click Add.
4. Enter the first few characters of the user name in the Search field, and click Go. If you leave the Search field empty and click Go, then you would get a list of all the users in Oracle Internet Directory.
5. Select the user that you want to add to the Mid-Tier Administrators group, and click Select.
6. Click Submit on the Manage Administrators page.
1. Click the Components tab.
This displays all the components for which you are an owner.
2. Select the component to which you want to add a user, and click Manage Owners.
3. On the page that displays the current component owners, click Add.
4. Enter the first few characters of the user name in the Search field, and click Go. If you leave the Search field empty and click Go, then you would get a list of all the users in Oracle Internet Directory.
5. Select the user that you want to add to the Component Owners group, and click Select.
6. Click Submit on the Manage Component Owners page.

User Name and Realm for Logging In to Oracle Internet Directory
Configuring Oracle Internet Directory for Installation Privileges 6-11
■ You are installing Oracle Collaboration Suite 10g Infrastructure and using an existing Oracle Internet Directory.
■ You are installing an Applications tier that requires an Infrastructure.
This screen prompts you to enter the login details and realm required to log in to Oracle Internet Directory.
UsernameEnter either the simple user name or the DN of the user in the Username field.
Example of a simple user name: jdoe
Example of a DN: cn=ocsadmin
The user must belong to specific groups for installing and configuring certain components. Refer to Table 6–4 for details.
To specify the superuser, enter cn=orcladmin instead of orcladmin in the Username field.
RealmThe Realm field appears only if your Oracle Internet Directory contains more than one realm. The user name that you enter is authenticated against the specified realm. If you are not sure about the name of the realm, then contact your Oracle Internet Directory administrator.
Examples of names of realms are:
■ In a hosted deployment, the realm name might be similar to the name of the hosted company: XYZCorp.
■ Within an enterprise, you might have separate realms for internal users and external users. The realm name for the external users could be externalUsers.

User Name and Realm for Logging In to Oracle Internet Directory
6-12 Oracle Collaboration Suite Installation Guide

Installing Oracle Internet Directory in Replicated Mode 7-1
7Installing Oracle Internet Directory in
Replicated Mode
This chapter describes how to install Oracle Internet Directory in replicated mode, that is, how to install Oracle Internet Directory masters and replicas.
This chapter contains the following sections:
■ Section 7.1, "Oracle Internet Directory Replication Overview"
■ Section 7.2, "Requirements"
■ Section 7.3, "Installation Order"
■ Section 7.4, "Installing a Master Oracle Internet Directory"
■ Section 7.5, "Installing an Oracle Internet Directory Replica"
■ Section 7.6, "Accessing Oracle Application Server Single Sign-On and Oracle Delegated Administration Services"
7.1 Oracle Internet Directory Replication OverviewTo run Oracle Internet Directory in a replication environment means that you have more than one Oracle Internet Directory, each with its own Oracle Collaboration Suite 10g Database. The Oracle Internet Directory instances synchronize the data in the metadata repositories so that the data in the repositories are loosely consistent. This means that the data in the repositories are not guaranteed to be synchronized in real time, but the data become identical within an acceptable time interval.
For More InformationThis chapter provides information from an installation point of view. For in-depth information about replication, refer to the following guides:
■ For information about Oracle Internet Directory replication concepts and administration, refer to the Oracle Internet Directory Administrator's Guide.
■ For information about Oracle Internet Directory replication deployment scenarios, refer to the Oracle Identity Management Concepts and Deployment Planning Guide.
Types of ReplicationThere are two types of replication. During installation, you select the type of replication that you want.
■ Section 7.1.1, "Fan-Out Replication (LDAP Replication)"
■ Section 7.1.2, "Multimaster Replication (Advanced Replication)"
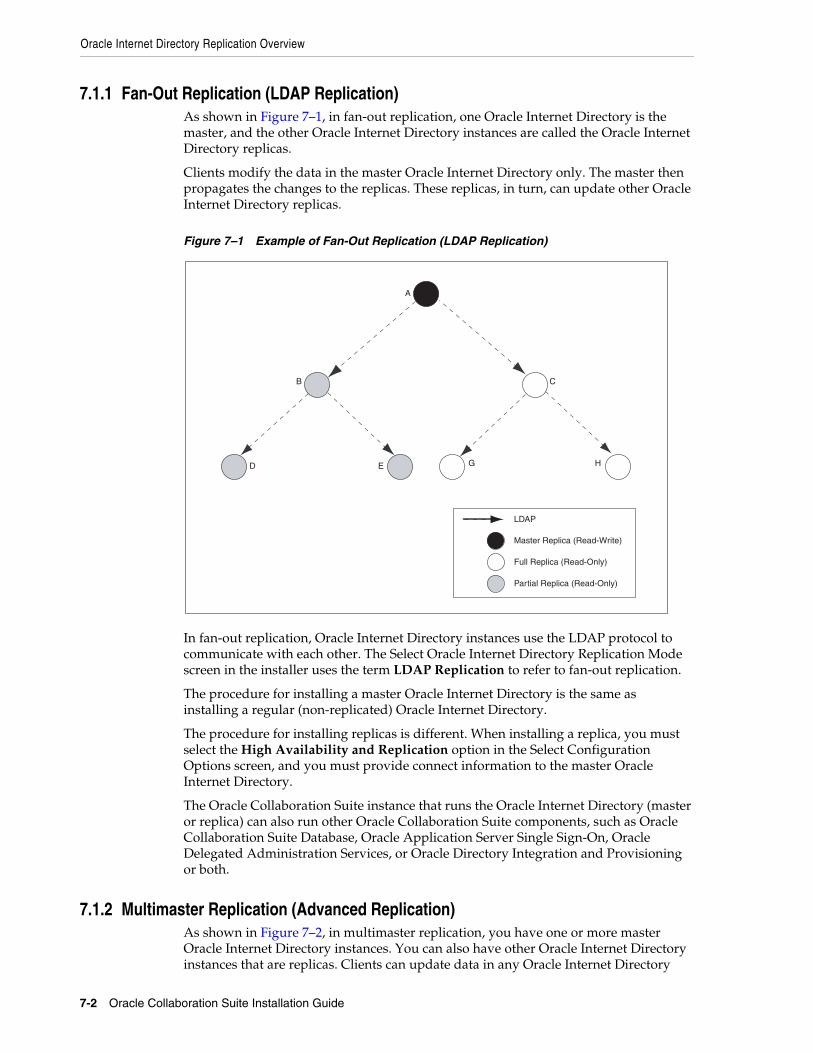
Oracle Internet Directory Replication Overview
7-2 Oracle Collaboration Suite Installation Guide
7.1.1 Fan-Out Replication (LDAP Replication)As shown in Figure 7–1, in fan-out replication, one Oracle Internet Directory is the master, and the other Oracle Internet Directory instances are called the Oracle Internet Directory replicas.
Clients modify the data in the master Oracle Internet Directory only. The master then propagates the changes to the replicas. These replicas, in turn, can update other Oracle Internet Directory replicas.
Figure 7–1 Example of Fan-Out Replication (LDAP Replication)
In fan-out replication, Oracle Internet Directory instances use the LDAP protocol to communicate with each other. The Select Oracle Internet Directory Replication Mode screen in the installer uses the term LDAP Replication to refer to fan-out replication.
The procedure for installing a master Oracle Internet Directory is the same as installing a regular (non-replicated) Oracle Internet Directory.
The procedure for installing replicas is different. When installing a replica, you must select the High Availability and Replication option in the Select Configuration Options screen, and you must provide connect information to the master Oracle Internet Directory.
The Oracle Collaboration Suite instance that runs the Oracle Internet Directory (master or replica) can also run other Oracle Collaboration Suite components, such as Oracle Collaboration Suite Database, Oracle Application Server Single Sign-On, Oracle Delegated Administration Services, or Oracle Directory Integration and Provisioning or both.
7.1.2 Multimaster Replication (Advanced Replication)As shown in Figure 7–2, in multimaster replication, you have one or more master Oracle Internet Directory instances. You can also have other Oracle Internet Directory instances that are replicas. Clients can update data in any Oracle Internet Directory
A
B C
D E G H
LDAP
Master Replica (Read-Write)
Full Replica (Read-Only)
Partial Replica (Read-Only)

Requirements
Installing Oracle Internet Directory in Replicated Mode 7-3
(master or replica). The Oracle Internet Directory instances propagate the changes among themselves.
Figure 7–2 Example of Multimaster Replication (Advanced Replication)
In multimaster replication, Oracle Internet Directory instances use the Oracle Database Advanced Replication protocol to communicate with each other. The Select Oracle Internet Directory Replication Mode screen in the installer uses the term Advanced Replication to refer to multimaster replication.
The procedure for installing a master Oracle Internet Directory is the same as installing a regular (non-replicated) Oracle Internet Directory.
The procedure for installing replicas is different. When installing a replica, you must select the High Availability and Replication option in the Select Configuration Options screen, and you must provide connect information to the master Oracle Internet Directory.
The Oracle Collaboration Suite instance that runs the Oracle Internet Directory (master or replica) can also run other Oracle Collaboration Suite components, such as Oracle Collaboration Suite Database, Oracle Application Server Single Sign-On, Oracle Delegated Administration Services, or Oracle Directory Integration and Provisioning or both.
7.2 RequirementsCheck that you meet the following requirements for installing Oracle Internet Directory in replication mode:
■ Section 7.2.1, "Database Requirements"
■ Section 7.2.2, "Clock Synchronization"
7.2.1 Database RequirementsEach Oracle Internet Directory, whether master or replica, needs its own Oracle Collaboration Suite Database. You can install it with a new Oracle Collaboration Suite Database, or against an existing Oracle Collaboration Suite Database.
If installing against an existing Oracle Collaboration Suite Database, you can create an existing Oracle Collaboration Suite Database in two different ways:
■ You can install it by selecting the Oracle Collaboration Suite Database option in the Select Installation Type screen.
■ You can install the Oracle Collaboration Suite Database in an existing database. Refer to the Oracle Application Server Metadata Repository Creation Assistant User’s
A
CB

Installation Order
7-4 Oracle Collaboration Suite Installation Guide
Guide for details on how to load the Oracle Collaboration Suite Database in an existing database.
If you are installing against an existing Oracle Collaboration Suite Database, the Oracle Collaboration Suite Database must not be already registered with another Oracle Internet Directory. If you specify an instance of Oracle Collaboration Suite Database that is already registered with an Oracle Internet Directory, the installer assumes you are installing a high availability environment, and it does not display the replication options.
7.2.2 Clock SynchronizationCheck that the clocks on the computers running the masters and replicas are within 250 seconds of each other.
7.3 Installation OrderTo install Oracle Internet Directory in replicated mode, you need a master Oracle Internet Directory and one or more Oracle Internet Directory replicas. You install them in the following order:
1. Install the master Oracle Internet Directory.
2. Install the Oracle Internet Directory replicas. The installer will prompt you to enter connect information for the master Oracle Internet Directory.
7.4 Installing a Master Oracle Internet DirectoryThe procedure for installing a master Oracle Internet Directory is the same as installing a regular (non-replicated) Oracle Internet Directory. You can install the master Oracle Internet Directory against an existing database, or you can install it with a new database.
Notes:
■ In the Select Configuration Options screen, you must select Oracle Internet Directory. You can select other components to configure, as desired.
■ Also in the Select Configuration Options screen, you do not need to select High Availability and Replication. Select this option only if you are installing this Oracle Collaboration Suite instance in a high availability configuration.
■ If you select the High Availability and Replication option in Select Configuration Options screen, the installer displays the Select High Availability Option screen. In this, do not select the Replication option, because this option is for installing a replica Oracle Internet Directory, not a master Oracle Internet Directory.
You can use any of the procedures in Chapter 4 to install a master Oracle Internet Directory. Examples:
■ To install a master Oracle Internet Directory with a new database, follow the procedure in Section 4.5.1.
■ To install a master Oracle Internet Directory with an existing database, follow the procedure in Section 4.5.6 or Section 4.5.5.

Installing an Oracle Internet Directory Replica
Installing Oracle Internet Directory in Replicated Mode 7-5
7.5 Installing an Oracle Internet Directory ReplicaYou can install an Oracle Internet Directory replica against an existing database, or you can install it with a new database.
This section contains the following topics:
■ Section 7.5.1, "Overview of Installing a Replica"
■ Section 7.5.2, "Installing an Oracle Internet Directory Replica with a New Database"
■ Section 7.5.3, "Installing an Oracle Internet Directory Replica Against an Existing Database"
7.5.1 Overview of Installing a ReplicaWhen you install an Oracle Internet Directory replica, remember the following:
■ In the Select Configuration Options screen, you must select Oracle Internet Directory and High Availability and Replication.
■ In the Select High Availability Option screen, select Replication.
■ When the installer prompts you to enter connect information for the master Oracle Internet Directory, you must connect as the Oracle Internet Directory superuser (cn=orcladmin). You must know the password for the superuser.
■ The master Oracle Internet Directory must not already contain a registration for a database with the same global database name or SID as the Oracle Collaboration Suite Database to be used for the replica.
■ The Oracle Collaboration Suite Database for the replica cannot already be registered with any Oracle Internet Directory.
7.5.2 Installing an Oracle Internet Directory Replica with a New DatabaseFollow the steps listed in Table 7–1 to install an Oracle Internet Directory replica with a new database.

Installing an Oracle Internet Directory Replica
7-6 Oracle Collaboration Suite Installation Guide
Table 7–1 Installing an Oracle Internet Directory Replica with a New Database
Step Screen Action
1. None Start the installer and complete the first few screens. Refer to Section 4.4.1 for details.
Notes:
■ In the Select a Product to Install screen, select Oracle Collaboration Suite Infrastructure 10.1.1.0.2.
■ In the Select Installation Type screen, select Identity Management and Oracle Collaboration Suite Database.
2. Select Configuration Options
Select Oracle Internet Directory.
Select High Availability and Replication.
The other options on this screen are optional:
Select OracleAS Single Sign-On, Delegated Administration Services, OracleAS Directory Integration and Provisioning or OracleAS Certificate Authority or both if you need these components.
Click Next.
3. Specify Port Configuration Options
To use default ports for the components, select Automatic.
If you do not want to use the default ports, then select Manually Specify Ports and select the component for which you want to specify the port.
Click Next.
4. Select High Availability Option
This screen is required to install a replica. This screen appears only if you selected High Availability and Replication in the Select Configuration Options screen.
Select Replication, and click Next.
5. Select Oracle Internet Directory Replication Mode
Select LDAP Replication if you want fan-out replication.
Select Advanced Replication if you want multimaster replication.
Click Next.
6. Specify Oracle Internet Directory Master Node
Hostname: Enter the name of the computer running the master Oracle Internet Directory.
Port: Enter the port at which the master Oracle Internet Directory is listening.
Do not select Use only SSL connections with this Oracle Internet Directory. If you want Oracle Internet Directory to run in SSL-only mode, you can make this configuration change after installation. Refer to the Oracle Collaboration Suite Administrator's Guide for details.
Click Next.
7. Specify Master Oracle Internet Directory Login
Username: Enter cn=orcladmin because you must connect to the master Oracle Internet Directory as the superuser.
Password: Enter the password for the superuser.
Click Next.
8. Specify Namespace in Internet Directory
Select the suggested namespace, or enter a custom namespace for the location of the default Identity Management realm.
Ensure that the value shown in Suggested Namespace meets your deployment needs. If not, enter the desired value in Custom Namespace.
Click Next.
9. OCA screens If you selected OracleAS Certificate Authority in the Select Configuration Options screen, the installer displays screens for configuring Oracle Application Server Certificate Authority. Refer to Section 4.4.3 for details.

Installing an Oracle Internet Directory Replica
Installing Oracle Internet Directory in Replicated Mode 7-7
7.5.3 Installing an Oracle Internet Directory Replica Against an Existing DatabaseFollow the steps listed in Table 7–2 to install an Oracle Internet Directory replica against an existing database.
10. Specify Database Configuration Options
Global Database Name: Enter a name for Oracle Collaboration Suite Database. Append the domain name of your computer to the database name.
Example: orcl.mydomain.com
Note: Ensure that the master Oracle Internet Directory does not already contain a registration for a database with the same global database name or SID. (The installer checks this for you.)
SID: Enter the system identifier for the Oracle Collaboration Suite Database. Typically this is the same as the global database name, but without the domain name. The SID must be unique across all databases. The SID cannot be longer than eight characters.
Example: orcl
Select Database Character Set: Select the character set to use.
Specify Database File Location: Enter the full path to the parent directory for the data files directory. This parent directory must already exist, and you must have write permissions in this directory.
The installer will create a subdirectory in this parent directory, and the subdirectory will have the same name as the SID. The data files will be placed in this subdirectory.
Click Next.
11. Specify Database Schema Passwords
Set the passwords for these privileged database schemas: SYS, SYSTEM, SYSMAN, and DBSNMP. You can set different passwords for each schema, or you can set the same password for all the schemas.
Click Next.
12. Specify Instance Name and ias_admin Password
Instance Name: Enter a name for this infrastructure instance. Instance names can contain alphanumeric characters and the _ (underscore) character. If you have more than one Oracle Collaboration Suite instance on a computer, the instance names must be unique.
Example: infra_10_1_1
ias_admin Password and Confirm Password: Enter and confirm the password for the ias_admin user. This is the administrative user for this infrastructure instance.
This password will also become the password for the following users:
■ Oracle Internet Directory superuser cn=orcladmin
■ Oracle Internet Directory database user ods
■ The replication DN, which is the identity used by the replication server. The DN is: "cn=replication dn, orclreplicaid=replica_ID, cn=replication configuration", where replica_ID is the replica ID of the Oracle Internet Directory being installed.
Example: welcome99
Click Next.
13. None Finish the installation. Refer to Section 4.4.4 for details.
Table 7–1 (Cont.) Installing an Oracle Internet Directory Replica with a New Database
Step Screen Action

Installing an Oracle Internet Directory Replica
7-8 Oracle Collaboration Suite Installation Guide
Table 7–2 Installing an Oracle Internet Directory Replica Against an Existing Database
Step Screen Action
1. None Start the installer and complete the first few screens. Refer to Section 4.4.1 for details.
Notes:
■ In the Select a Product to Install screen, select Oracle Collaboration Suite Infrastructure 10.1.1.0.2.
■ In the Select Installation Type screen, select Identity Management.
2. Select Configuration Options
Select Oracle Internet Directory.
Select High Availability and Replication.
The other options on this screen are optional:
Select OracleAS Single Sign-On, Delegated Administration Services, OracleAS Directory Integration and Provisioning, or OracleAS Certificate Authority or both, if you need these components.
Click Next.
3. Specify Port Configuration Options
To use default ports for the components, select Automatic.
If you do not want to use the default ports, then select Manually Specify Ports and select the component for which you want to specify the port.
Click Next.
4. Specify Repository Enter information for the Oracle Collaboration Suite Database that you want to use for the replica.
Notes:
■ This Oracle Collaboration Suite Database cannot already be registered with any Oracle Internet Directory.
■ The master Oracle Internet Directory, which you will specify in Step 7, must not already contain a registration for a database with the same global database name or SID as this Oracle Collaboration Suite Database. (The installer does not check this for you.)
Username: Enter the user name to use to log in to the Oracle Collaboration Suite Database. The user must have DBA privileges.
Password: Enter the user password.
Hostname and Port: Enter the name of the computer where the database is running, and the port number at which it is listening. Use the format: host:port.
Service Name: Enter the service name of the database. Note that the service name must include the database domain name.
Example: orcl.mydomain.com
Click Next.
5. Select High Availability Option
This screen is required to install a replica. If you do not see this screen, return to the Select Configuration Options screen and ensure that you selected High Availability and Replication.
Select Replication.
Click Next.
6. Select Oracle Internet Directory Replication Mode
Select LDAP Replication if you want fan-out replication.
Select Advanced Replication if you want multimaster replication.
Click Next.

Accessing Oracle Application Server Single Sign-On and Oracle Delegated Administration Services
Installing Oracle Internet Directory in Replicated Mode 7-9
7.6 Accessing Oracle Application Server Single Sign-On and Oracle Delegated Administration Services
To access Oracle Application Server Single Sign-On or Oracle Delegated Administration Services on the replica node, you must use the password for the orcladmin user on the master Oracle Internet Directory, not the replica Oracle Internet Directory.
Example:
7. Specify Oracle Internet Directory Master Node
Hostname: Enter the name of the computer running the master Oracle Internet Directory.
Port: Enter the port at which the master Oracle Internet Directory is listening.
Do not select Use only SSL connections with this Oracle Internet Directory. If you want Oracle Internet Directory to run in SSL-only mode, you can make this configuration change after installation. Refer to the Oracle Collaboration Suite Administrator's Guide for details.
Click Next.
8. Specify Master Oracle Internet Directory Login
Username: Enter cn=orcladmin because you must connect to the master Oracle Internet Directory as the superuser.
Password: Enter the password for the superuser.
Click Next.
9. Specify Namespace in Internet Directory
Select the suggested namespace, or enter a custom namespace for the location of the default Identity Management realm.
Ensure that the value shown in Suggested Namespace meets your deployment needs. If not, enter the desired value in Custom Namespace.
Click Next.
10. OCA screens If you selected OracleAS Certificate Authority in the Select Configuration Options screen, the installer displays screens for configuring Oracle Application Server Certificate Authority. Refer to Section 4.4.3 for details.
11. Specify OracleAS Instance Name and ias_admin Password
Instance Name: Enter a name for this Infrastructure instance. Instance names can contain alphanumeric characters and the _ (underscore) character. If you have more than one Oracle Collaboration Suite instance on a computer, the instance names must be unique.
Example: idmgmt_10_1_1
ias_admin Password and Confirm Password: Set the password for the ias_admin user. This is the administrative user for the instance.
This password will also become the password for the following users:
■ Oracle Internet Directory superuser cn=orcladmin
■ Oracle Internet Directory database user ods
■ The replication DN, which is the identity used by the replication server. The DN is: "cn=replication dn, orclreplicaid=replica_ID, cn=replication configuration", where replica_ID is the replica ID of the Oracle Internet Directory being installed.
Example: welcome99
Click Next.
12. None Finish the installation. Refer to Section 4.4.4 for details.
Table 7–2 (Cont.) Installing an Oracle Internet Directory Replica Against an Existing Database
Step Screen Action

Accessing Oracle Application Server Single Sign-On and Oracle Delegated Administration Services
7-10 Oracle Collaboration Suite Installation Guide
1. Enter the URL for Oracle Application Server Single Sign-On or Oracle Delegated Administration Services in your browser:
For Oracle Application Server Single Sign-On, the URL is: http://host:port/pls/orasso.
For Oracle Delegated Administration Services, the URL is: http://host:port/oiddas.
host specifies the name of the computer where you installed the Oracle Internet Directory replica.
port specifies the port number on which Oracle HTTP Server is listening.
2. To log in, enter orcladmin as the user name and the password you entered when you installed the master Oracle Internet Directory. If you enter the password for the replica Oracle Internet Directory, the login will not succeed.

Installing Oracle Collaboration Suite 10g Applications 8-1
8Installing Oracle Collaboration Suite 10g
Applications
This chapter contains the following sections:
■ Section 8.1, "Oracle Collaboration Suite 10g Applications and Oracle Collaboration Suite 10g Infrastructure"
■ Section 8.2, "Components in Oracle Collaboration Suite Applications"
■ Section 8.3, "Which Components Do I Need?"
■ Section 8.4, "Component Dependencies"
■ Section 8.5, "How Can I Determine the Port Numbers Used by Components?"
■ Section 8.6, "Installing Oracle Collaboration Suite Applications Against an Upgraded Oracle Internet Directory"
■ Section 8.7, "Configuring Additional Applications-Tier Components After Installation"
■ Section 8.8, "Can I Upgrade and Expand Oracle Collaboration Suite 10g Applications at the Same Time?"
■ Section 8.9, "Can I Use a Specific Oracle Calendar Server Node ID During the Installation?"
■ Section 8.10, "Installing Oracle Collaboration Suite Applications"
8.1 Oracle Collaboration Suite 10g Applications and Oracle Collaboration Suite 10g Infrastructure
Oracle Collaboration Suite 10g Applications, sometimes also known as the Applications tier, requires an Oracle Collaboration Suite 10g Infrastructure instance. This is because Applications components must access their schemas in Oracle Collaboration Suite 10g Database, which is installed as a part of the Infrastructure. In addition, the components of Applications must be authenticated against Oracle Internet Directory and Oracle Application Server Single Sign-On.
8.2 Components in Oracle Collaboration Suite ApplicationsTable 8–1 shows the components that are installed as a part of Oracle Collaboration Suite 10g Applications.

Which Components Do I Need?
8-2 Oracle Collaboration Suite Installation Guide
8.3 Which Components Do I Need?You deploy your applications on Applications instances. If you know what components you will be using, you can choose them during the installation. For example, if you need e-mail, content management, and real-time collaboration functionality, you can choose Oracle Mail, Oracle Content Services, and Oracle Real-Time Collaboration. You can also select Oracle Collaborative Portlets if you must provide an interface to Oracle Collaboration Suite components.
8.4 Component DependenciesThis section contains the following topics:
■ Section 8.4.1, "Component Dependency on Oracle Mail"
■ Section 8.4.2, "Component Dependency on an Existing Instance of OracleAS Portal and Oracle Collaborative Portlets"
8.4.1 Component Dependency on Oracle MailIf you select Oracle Discussions, ensure that you have selected Oracle Mail. This is because Oracle Discussions is dependent on schemas in the Oracle Mail database.
Table 8–1 Components in Oracle Collaboration Suite Applications
Component Description
Oracle Calendar Provides an enterprise-wide scheduling server
Oracle Calendar Web client Provides the client framework for the enterprise-wide scheduling server
Oracle Collaboration Suite Search Provides highly-configurable, all-in-one search solution across Oracle Collaboration Suite Applications.
Oracle Collaboration Suite Web Access Provides a rich Web-based interface to mail and contacts
Oracle Content Services A Content Management application for storing and sharing files
Oracle Discussions Provides the online forums and threaded discussion service
Oracle Mail Provides standards-based e-mail message delivery and retrieval facility
Oracle Mobile Collaboration Provides access to content with mobile devices and voice gateways
Oracle Collaborative Portlets Provides a rich portal interface to all Oracle Collaboration Suite components and services
Oracle Real-Time Collaboration Provides Web conferencing and instant messaging service
Oracle Workspaces Provides framework within which the collaborative efforts can be organized
Note: You can not install Oracle Web Access Client as a standalone product.

Component Dependencies
Installing Oracle Collaboration Suite 10g Applications 8-3
If you select Oracle Discussions without selecting Oracle Mail, a Warning dialog box will be displayed during the installation. You must go back to the Select Components to Configure screen and select Oracle Mail to ensure that the component is installed and configured properly.
If you are installing Oracle Discussions against an existing Infrastructure that already has an Oracle Mail instance configured against it, and you did not select Oracle Mail, then a list of configured Oracle Mail domains will be displayed. Select an appropriate domain and continue with the installation.
Oracle Content Services, Oracle Real-time Collaboration, Oracle Voicemail & Fax, and Oracle Workspaces are not directly dependent on Oracle Mail. However, they use the same SMTP server as Oracle Mail. Therefore, if you select any of these Applications components without selecting Oracle Mail, an additional screen will be displayed during installation. You must specify the SMTP server host and port and continue with the installation.
8.4.2 Component Dependency on an Existing Instance of OracleAS Portal and Oracle Collaborative Portlets
During the installation of an Applications tier, the installer checks the OracleAS Metadata Repository for both OracleAS Portal and Oracle Collaborative Portlets schemas.
If both Oracle Collaborative Portlets and OracleAS Portal were not detected in the OracleAS Metadata Repository, then the Oracle Collaborative Portlets option is displayed in the Select Components to Configure screen, during the installation. Oracle Collaborative Portlets and OracleAS Portal will be detected in the Metadata Repository, only if you have already installed them on a different Applications tier.
If you do not choose to configure Oracle Collaborative Portlets, neither OracleAS Portal nor Oracle Collaborative Portlets will be configured. In Oracle Collaboration Suite installations, you cannot configure OracleAS Portal without Oracle Collaborative Portlets.
If you do choose to configure Oracle Collaborative Portlets:
■ If OracleAS Portal was detected in the OracleAS Metadata Repository then you have the option to create a new OracleAS Portal by overwriting the older instance, or use the existing OracleAS Portal. This could be the case if you previously installed a non-Oracle Collaboration Suite instance of OracleAS Portal.
■ If an OracleAS Portal installation is not detected in the OracleAS Metadata Repository, then the installer will configure both the Oracle Collaborative Portlets and OracleAS Portal on that Applications tier.
If both OracleAS Portal and Oracle Collaborative Portlets are detected in the OracleAS Metadata Repository, then Oracle Collaborative Portlets will not be offered in the Configurable Components panel.

How Can I Determine the Port Numbers Used by Components?
8-4 Oracle Collaboration Suite Installation Guide
8.5 How Can I Determine the Port Numbers Used by Components?During installation, you might need to know port numbers used by certain components. For example, when you install Applications, the installer prompts for the Oracle Internet Directory port.
You can get a list of port numbers in the following ways:
■ Use Oracle Enterprise Manager Application Server Control.
Click the Ports link on the Oracle Enterprise Manager home page. This takes you to a page that lists all ports in use and the suggested port ranges for different components.
■ Look in the ORACLE_HOME/install/portlist.ini file. ORACLE_HOME refers to the directory containing the Oracle Collaboration Suite installation.
Note that if you change the port number of a component after installation, the portlist.ini file is not updated. The portlist.ini file is not updated after installation.
8.6 Installing Oracle Collaboration Suite Applications Against an Upgraded Oracle Internet Directory
If you plan to install Applications against an Oracle Internet Directory that was upgraded from an earlier version, make sure you followed the steps on upgrading Oracle Internet Directory as documented in the Oracle Collaboration Suite Upgrade Guide.
Note: If you choose to host instances of Oracle Collaborative Portlets on different Applications tiers than OracleAS Portal (for example, if OracleAS Portal is configured on appstier1 and Oracle Collaborative Portlets is configured on appstier2), then the images within the Oracle Collaborative Portlets will break.
This is because the images are stored with relative pathnames on the assumption that OracleAS Portal can locate Oracle Collaborative Portlets images on the same machine.
To fix this problem:
■ Edit the ocsprovs.properties file in the Applications tier Oracle home that is hosting the OracleAS Portal instance with broken images:
[ORACLE_HOME]/ocsprovs/classes/oracle/webdb/install/resource/ocsprovs.properties
■ Change each image path to point to the URL of an Applications tier hosting Oracle Collaborative Portlets.
■ Fix the Oracle Collaboration Suite logo from the OracleAS Portal configuration page. In other words, change the relative URL to an absolute URL of the Applications tier hosting Oracle Collaborative Portlets.

Can I Use a Specific Oracle Calendar Server Node ID During the Installation?
Installing Oracle Collaboration Suite 10g Applications 8-5
8.7 Configuring Additional Applications-Tier Components After Installation
After installing Oracle Collaboration Suite Applications, you may decide that you need a component that you did not select during installation. For example, you selected Oracle Mail, Oracle Content Services, and Oracle Calendar and much later you realize that you need Oracle Collaboration Suite Search as well.
The installer installs all the components, irrespective of the components you select. However only those components that you select during installation are configured.
You can use Oracle Collaboration Suite Control to configure any components that were not configured during the installation.
8.8 Can I Upgrade and Expand Oracle Collaboration Suite 10g Applications at the Same Time?
To upgrade Oracle Collaboration Suite 10g Applications and expand it at the same time, you must perform two procedures:
1. Upgrade Oracle Collaboration Suite 10g Applications. This procedure is documented in the Oracle Collaboration Suite Upgrade Guide.
2. Expand Oracle Collaboration Suite 10g Applications. Refer to Section 8.7 for details.
8.9 Can I Use a Specific Oracle Calendar Server Node ID During the Installation?
This section contains the following topics:
■ Selecting a Node ID
■ Not Connecting a Node
8.9.1 Selecting a Node IDDuring the installation of Applications tier, an Oracle Calendar Server node ID is automatically selected for you when the node is configured. However, there may be cases when you might want to use a specific node ID while configuring a new Oracle Calendar Server.
If you want to specify a particular Oracle Calendar Server node number during the configuration, then use the following command to start the installation:
./runInstaller oracle.cal.server:s_nodeID="1234"
8.9.2 Not Connecting a NodeWhile configuring a new Oracle Calendar Server, any slave nodes are automatically connected to its node network. Use the following command to disable this feature:
./runInstaller oracle.cal.server:s_override="-noconnectnodes"
Note: This is recommended only for expert users, who have prior knowledge or have done this earlier.
Installing Oracle Collaboration Suite Applications
8-6 Oracle Collaboration Suite Installation Guide
8.10 Installing Oracle Collaboration Suite ApplicationsThis section describes the screens of the installation process of Oracle Collaboration Suite 10g Applications.
This section covers the following topics:
■ Section 8.10.1, "Preinstallation Tasks"
■ Section 8.10.2, "First Few Screens of the Installation"
■ Section 8.10.3, "Component Installation Screens"
■ Section 8.10.4, "Last Few Screens of the Installation"
8.10.1 Preinstallation TasksYou must perform the preinstallation tasks discussed in the following sections:
■ Sendmail-Related Tasks
■ Oracle Collaboration Suite Search-Related Tasks
8.10.1.1 Sendmail-Related TasksCheck if sendmail is running using the following command:
prompt> ps -elf | grep sendmail
If sendmail is running, shut it down as the root user as follows:
prompt> /etc/init.d/sendmail stop
Disable sendmail as the root user by using the following command:
prompt> chmod -x /etc/init.d/sendmail
8.10.1.2 Oracle Collaboration Suite Search-Related TasksIf you are configuring Oracle Collaboration Suite Search as a part of your Applications tier, then you must provide the same Oracle Internet Directory credentials you provided for installaling Oracle Collaboration Suite Database.
If you do not have the Oracle Internet Directory credentials with which you installed the associated Oracle Collaboration Suite Database, then perform the following steps:
1. Navigate to the Oracle Collaboration Suite Search Store using the oidadmin tool.
The path to Oracle Collaboration Suite Search backend is as follows:
Entry Management, your_realm, cn=Products, cn=Portal, cn=UltraSearch, cn=Database Instances, cn=orclApplicationCommonName=your_Search_Store
2. Add the Oracle Internet Directory user as a unique menber of the cn=Component Owners node for the Oracle Collaboration Suite Search store.
By performing the preceding steps, Then this OID user will be able to see the search store showing up as an available database during Midtier Install.
8.10.2 First Few Screens of the InstallationFigure 8–1 summarizes the screen sequence for installing Oracle Collaboration Suite 10g Applications.

Installing Oracle Collaboration Suite Applications
Installing Oracle Collaboration Suite 10g Applications 8-7
Figure 8–1 Sequence of the Screens During Oracle Collaboration Suite Applications Installation
If this is the first Oracle product tobe installed on this computer
If the computer is part of hardware cluster
Welcome
Specify File Locations
Specify Inventory Directory
Unix Group NameUNIX Group Name
Run orainstRoot.sh (locatedin the inventory directory)
Specify Hardware ClusterInstallation Mode
Select a Product to Install
Product-specific Prerequisite Checks
Select Components toConfigure
Register with OracleInternet Directory
Specify UserName and Password for Oracle Internet Directory
OracleAS Metadata Repository
Select Database for Components
Specify Port ConfigurationOptions
Specify Administrative Password and Instance Name
Was Oracle Calendarserver Selected?
Oracle Calendar server Host Alias
WasOracle Mail Selected?
Specify Oracle Mail DomainInformation
Summary
Y
N
N
Y

Installing Oracle Collaboration Suite Applications
8-8 Oracle Collaboration Suite Installation Guide
Table 8–2 describes the first few screens of the installation.
Note: Oracle Universal Installer uses the /etc/nodenames file to determine the host name. The host name that you specified in the hosts file may or may not be fully qualified. However, host names that are not fully qualified may not be usable outside the domain.
For example, if the fully-qualified domain name for a server is myserver.acme.uk, and the hosts file only registers the name myserver, then clients in the acme.co.uk domain have no trouble communicating with this host. However connections made by users in the acme.co.de domain may fail.
Also, ensure that the host name that you specify corresponds exactly to the host name you have, whether fully qualified or not.
Table 8–2 First Few Screens of the Installation
Step Screen Action
1. None Start the installer. Refer to Section 3.4.
2. Select Installation Method
Select Advanced Installation.
Note: Refer to Section 1.7.1 for detailed information on Basic and Advanced installations.
Click Next.
3. Specify Inventory Directory and Credentials
(Advanced installation only)
This screen appears only if this is the first installation of any Oracle product on this computer.
Enter the full path for the inventory directory: Enter a full path to a directory for the installer files. Enter a directory that is different from the Oracle home directory for the product files.
Example: /private/oracle/oraInventory
Click OK.
4. UNIX Group Name
(Advanced installation only)
This screen appears only if this is the first installation of any Oracle product on this computer.
Enter the name of the operating system group to have write permission for the inventory directory.
Example: dba
Click Next.
5. Run orainstRoot.sh
(Advanced installation only)
This screen appears only if this is the first installation of any Oracle product on this computer.
Run the orainstRoot.sh script in a different shell as the root user. The script is located in the oraInventory directory.
Click Continue.

Installing Oracle Collaboration Suite Applications
Installing Oracle Collaboration Suite 10g Applications 8-9
8.10.3 Component Installation ScreensTable 8–3 describes the component install screens of the installer.
6. Specify File Locations
(Advanced installation only)
Enter the full path of the Source directory in the Path field for Source, if required.
Name: Enter a name to identify this Oracle home. The name cannot contain spaces, and has a maximum length of 16 characters.
Example: OH_apptier_10_1_1
Destination Path: Enter the full path to the destination directory. This is the Oracle home. If the directory does not exist, the installer creates it. To create the directory beforehand, create it as the oracle user. Do not create it as the root user.
Example: /private/oracle/OH_apptier_10_1_1
Click Next.
7. Specify Hardware Cluster Installation Mode
(Advanced installation only)
This screen appears only if the computer is part of a hardware cluster.
When you are installing Applications, select Local Installation because hardware cluster is not supported for Applications.
Click Next.
8. Select a Product to Install
(Advanced installation only)
Select Oracle Collaboration Suite Applications 10.1.1.0.2 to install Applications.
If you need to install additional languages, click Product Languages. Refer to Section 1.8 for details.
Click Next.
9. Product-specific Prerequisite Checks
(Advanced installation only)
The installer verifies requirements such as memory, disk space, and operating system version. If any check fails, make the required changes and click Retry. Refer to Chapter 2 for the list of hardware and software requirements.
Click Next.
Note: If the kernel parameter check fails and you click the Retry button after making the required changes, the installer does not rerun the check. After changing the kernel parameters, select User Verified and proceed. To validate the changes, you may want to restart the installer.
10. Language Selection
(Advanced installation only)
This screen enables you to select the language in which Oracle Collaboration Suite components will run.
Select the required language or languages from the Available Languages list and add them to the Selected Languages list.
Click Next.
See Also: Section 1.7.1 for detailed information on Basic installation
Table 8–2 (Cont.) First Few Screens of the Installation
Step Screen Action

Installing Oracle Collaboration Suite Applications
8-10 Oracle Collaboration Suite Installation Guide
Table 8–3 Component Installation Screens
Step Screen Action
1. Select Components to Configure
(Advanced installation only)
Select the components that you would like to configure during the installation. The selected components will automatically start at the end of the installation.
Note: If you select Oracle Discussions, ensure that you have selected Oracle Mail. This is because Oracle Discussions is dependent on schemas in Oracle Mail database. If you select this component without selecting Oracle Mail, you might get a warning during the installation. You can continue with the installation. However, later, you must install Oracle Mail to ensure that this component functions properly.
Note: You can also configure any component after installation. Refer to Section 8.7.
Click Next.
2. Register with Oracle Internet Directory
(Advanced installation only)
Host: Enter the name of the computer where Oracle Internet Directory is running.
Port: Enter the port number at which Oracle Internet Directory is listening. If you do not know the port number, refer to Section 8.5.
Use SSL to connect to Oracle Internet Directory: Select this option if you want Oracle Collaboration Suite components to use only SSL to connect to Oracle Internet Directory.
Click Next.
3. Specify UserName and Password for Oracle Internet Directory
(Advanced installation only)
Username: Enter the user name to use to log in to Oracle Internet Directory.
Password: Enter the user password.
Click Next.
Note: Use cn=orcladmin as the user name if you are the Oracle Internet Directory Superuser.
4. OracleAS Metadata Repository
(Advanced installation only)
Database Connection String: Select the OracleAS Metadata Repository that you want to use for this Applications tier instance. The installer will register this instance with the selected OracleAS Metadata Repository.
Click Next.
5. Select Database for Components
(Advanced installation only)
This screen shows the database to be used for each of the components that were earlier selected in the "Select Components to Configure" screen.
Click Next.
Note: If multiple instances of Oracle Collaboration Suite Databases are available in Oracle Internet Directory, then you must click on the Database Name column and then select the correct database for each component from the drop-down list. However, when you click Next to go to the next screen, the selection might not be retained. To ensure that the selection is retained, you must click the Database Name column again after selecting the required database for each component.
6. Specify Port Configuration Options
(Advanced installation only)
Select the method in which you want the ports to be configured for Oracle Collaboration Suite.
Click Next.
Note: If you manually configure the ports, then you must specify the port values for each port.

Installing Oracle Collaboration Suite Applications
Installing Oracle Collaboration Suite 10g Applications 8-11
8.10.4 Last Few Screens of the InstallationTable 8–4 describes the remaining screens of the installation.
Note that most installation procedures in this chapter refer to this section as their end point.
7. Specify Administrative Password and Instance Name
(Advanced installation only)
Instance Name: Specify the name of the OracleAS instance for the Oracle Collaboration Suite administrative accounts.
Administrative Password: Specify the initial password for the Oracle Collaboration Suite administrative accounts.
Confirm Password: Confirm the password.
Click Next.
8. Oracle Calendar Server Host Alias
(Advanced installation only)
Host or Alias: Specify either the host address or the alias of the Calendar server instance.
Click Next.
Note: Oracle recommends that you use alias in place of host name if later you want to move the calendar server instance or change the host name. Specify the host name if an alias is not configured.
9. Specify Oracle Mail Domain Information
(Advanced installation only)
Local Domain: Specify the domain of the local network for IMAP/SMTP, or other mail protocols.
Click Next.
Note: If at any time during the installation (before you click the Install button) you need to make changes to the list of applications that you want configured, then you must exit out of the installation and restart it.
Table 8–4 Remaining Screens of the Installation
Step Screen Action
1. Summary Verify your selections and click Install.
2. Install Progress This screen displays the progress of the installation.
3. Run root.sh Note: Do not run the root.sh script until this dialog appears.
1. When you see this dialog, run the root.sh script in a different shell as the root user. The script is located in the Oracle home directory of this instance.
2. Click OK.
4. Configuration Assistants This screen shows the progress of the configuration assistants. Configuration assistants configure components.
5. End of Installation Click Exit to quit the installer.
Note: The information displayed at the end of the installation is also available in the $ORACLE_HOME/install/setupinfo.txt file. This file contains summarized information about Oracle Collaboration Suite and links to the URLs.
Table 8–3 (Cont.) Component Installation Screens
Step Screen Action

Installing Oracle Collaboration Suite Applications
8-12 Oracle Collaboration Suite Installation Guide

Installing Oracle Collaboration Suite on a Single Computer 9-1
9Installing Oracle Collaboration Suite on a
Single Computer
Although Oracle recommends that you install Oracle Collaboration Suite 10g Infrastructure and Oracle Collaboration Suite 10g Applications on different computers for better performance, you can perform a Oracle Collaboration Suite Infrastructure and Applications installation on a single computer also.
You can perform the Oracle Collaboration Suite Infrastructure and Applications installation on a single computer in the following ways:
■ Section 9.1, "Using Basic Installation for Single-Computer Installation"
■ Section 9.2, "Using Advanced Installation for Single-Computer Installation"
9.1 Using Basic Installation for Single-Computer InstallationPerform the steps listed in Table 9–1 to install Oracle Collaboration Suite on one computer using the Basic installation method.
Note: Oracle Universal Installer uses the /etc/nodenames file to determine the host name. The host name that you specified in the hosts file may or may not be fully qualified. However, host names that are not fully qualified may not be usable outside the domain.
For example, if the fully-qualified domain name for a server is myserver.acme.uk, and the hosts file only registers the name myserver, then clients in the acme.co.uk domain have no trouble communicating with this host. However connections made by users in the acme.co.de domain may fail.
Also, ensure that the host name that you specify corresponds exactly to the host name you have, whether fully qualified or not.

Using Advanced Installation for Single-Computer Installation
9-2 Oracle Collaboration Suite Installation Guide
9.2 Using Advanced Installation for Single-Computer InstallationThis section contains the following topics:
■ Section 9.2.1, "Starting Single-Computer Installation"
■ Section 9.2.2, "Performing Single-Computer Installation"
9.2.1 Starting Single-Computer InstallationTo perform Oracle Collaboration Suite Infrastructure and Applications installation on a single computer, you must first start the Oracle Universal Installer. Refer to Section 3.4 for more details.
Table 9–1 Screens for Single-Computer installation
Step Screen Action
1. None Start the installer.
Refer to Section 3.4 for more information about starting the installer.
2. Select Installation Method
Select Advanced Installation.
Note: Refer to Section 1.7.1 for detailed information on Basic and Advanced installations.
Click Next.
3. Specify Inventory Directory and Credentials
This screen appears only if this is the first installation of any Oracle product on this computer.
Enter a full path to the inventory directory. Enter a directory that is different from the Oracle home directory for the product files.
Example: /opt/oracle/oraInventory
Specify operating system group name: Select the operating system group that will have write permission for the inventory directory.
Example: oinstall
Click Next.
4. Run orainstRoot.sh
This screen appears only if this is the first installation of any Oracle product on this computer.
Run the orainstRoot.sh script in a different shell as the root user. The script is located in the oraInventory directory.
After running the script, click Continue.
5. Summary Verify your selections and click Install.
6. Install Progress This screen displays the progress of the installation.
7. Run root.sh Note: Do not run the root.sh script until this dialog appears.
1. When you see this dialog, run the root.sh script in a different shell as the root user. The script is located in the Oracle home directory of this instance.
2. Click OK.
8. Configuration Assistants
This screen shows the progress of the configuration assistants. Configuration assistants configure components.
9. End of Installation Click Exit to quit the installer.

Using Advanced Installation for Single-Computer Installation
Installing Oracle Collaboration Suite on a Single Computer 9-3
9.2.2 Performing Single-Computer InstallationPerform the steps listed in Table 9–2 to install Oracle Collaboration Suite on a single computer:
Note: Oracle Universal Installer uses the /etc/nodenames file to determine the host name. The host name that you specified in the hosts file may or may not be fully qualified. However, host names that are not fully qualified may not be usable outside the domain.
For example, if the fully-qualified domain name for a server is myserver.acme.uk, and the hosts file only registers the name myserver, then clients in the acme.co.uk domain have no trouble communicating with this host. However connections made by users in the acme.co.de domain may fail.
Also, ensure that the host name that you specify corresponds exactly to the host name you have, whether fully qualified or not.
Note: You will not be prompted for an e-mail domain during this installation. This is because the e-mail domain is defaulted to the system on which you are performing the single-computer installation.
Table 9–2 Screens for Single-Computer installation
Step Screen Action
1. None Start the installer.
Refer to Section 3.4 for more information about starting the installer.
2. Select Installation Method
Select Advanced Installation.
Note: Refer to Section 1.7.1 for detailed information on Basic and Advanced installations.
Click Next.
2. Specify Inventory Directory and Credentials
This screen appears only if this is the first installation of any Oracle product on this computer.
Enter a full path to the inventory directory. Enter a directory that is different from the Oracle home directory for the product files.
Example: /opt/oracle/oraInventory
Specify operating system group name: Select the operating system group that will have write permission for the inventory directory.
Example: oinstall
Click Next.
3. Run orainstRoot.sh
This screen appears only if this is the first installation of any Oracle product on this computer.
Run the orainstRoot.sh script in a different shell as the root user. The script is located in the oraInventory directory.
After running the script, click Continue.

Using Advanced Installation for Single-Computer Installation
9-4 Oracle Collaboration Suite Installation Guide
4. Specify File Locations
(Advanced installation only)
Enter the full path of the source directory in the Path field for Source.
Enter a name to identify the Oracle home in the Name field for Destination. The name cannot contain spaces and has a maximum length of 16 characters.
Example: infra_home_10_1_1
Enter the full path to the destination directory in the Path field for Destination. This is the Oracle home. If the directory does not exist, the installer creates it. To create the directory beforehand, create it as the oracle user.
Do not create the directory as the root user.
Example: /home/oracle/infra_10_1_1
Click Next.
5. Select Product to Install
(Advanced installation only)
Select Oracle Collaboration Suite Infrastructure and Applications 10.1.1.0.2.
If you need to install support for additional languages, then click Product Languages. Refer to Section 1.8 for more details.
Click Next.
6. Product-specific Prerequisite Checks
(Advanced installation only)
The installer verifies requirements such as memory, disk space, and operating system version. If any check fails, make the required changes and click Retry. Refer to Chapter 2, "Preparing to Install Oracle Collaboration Suite" for the list of hardware and software requirements.
Note: If the kernel parameter check fails and you click Retry after making the required changes, the installer does not rerun the check. After changing the kernel parameters, select User Verified and proceed. To validate the changes, you may want to restart the installer.
Click Next.
7. Language Selection
(Advanced installation only)
This screen enables you to select the language in which Oracle Collaboration Suite components will run.
Select the required language or languages from the Available Languages list and add them to the Selected Languages list.
Click Next.
8. Collaboration Suite Infrastructure and Applications Methodology
(Advanced installation only)
Read the instructions on the screen carefully.
Click Next.
9. Select Components to Configure
(Advanced installation only)
Select the Applications components that you want to install.
Click Next.
10. Specify Namespace in Internet Directory
(Advanced installation only)
Select the suggested namespace, or enter a custom namespace for the location of the default Identity Management realm.
Ensure that the value shown in Suggested Namespace meets your deployment needs. If it does not, then enter the desired value in Custom Namespace.
Refer to Section 4.3.9 for more details.
Click Next.
Table 9–2 (Cont.) Screens for Single-Computer installation
Step Screen Action

Using Advanced Installation for Single-Computer Installation
Installing Oracle Collaboration Suite on a Single Computer 9-5
11. Specify Database Configuration Options
(Advanced installation only)
Enter a name for the Oracle Collaboration Suite 10g Database in the Global Database Name field. Append the domain name of your computer to the database name.
Example: orcl.mydomain.com
Enter the system identifier for Oracle Collaboration Suite Database in the SID field. Typically this is the same as the global database name, but without the domain name. The SID must be unique across all databases. The SID cannot be longer than eight characters.
Example: orcl
Click Next.
12. Specify Database Schema Passwords
(Advanced installation only)
Set passwords for privileged database accounts, which are used for database management and postinstallation tasks.
Refer to Section 4.3.8 for more details.
13. Specify Application Passwords
(Advanced installation only)
Depending on the type of installation you selected, enter a password for administrative accounts of:
■ Oracle Collaboration Suite 10g Infrastructure (ias_admin)
■ Oracle Collaboration Suite 10g Applications (ias_admin)
■ Guest Account (orclguest)
14. Specify Oracle Mail Domain Information
(Advanced installation only)
If you are installing the first instance of Oracle Mail, you must enter the domain name for the e-mail server, else select the domain name from the list.
Click Next.
15. Specify Port Configuration Options
(Advanced installation only)
To use default ports for the components, select Automatic.
If you do not want to use the default ports, then select Manually Specify Ports and select the component for which you want to specify the port.
Refer to Section 2.4.3 for more details about how to manually specify ports.
Click Next.
16. Summary Verify your selections and click Install.
17. Install Progress This screen displays the progress of the installation.
18. Run root.sh Note: Do not run the root.sh script until this dialog appears.
1. When you see this dialog, run the root.sh script in a different shell as the root user. The script is located in the Oracle home directory of this instance.
2. Click OK.
19. Configuration Assistants
This screen shows the progress of the configuration assistants. Configuration assistants configure components.
20. End of Installation Click Exit to quit the installer.
Table 9–2 (Cont.) Screens for Single-Computer installation
Step Screen Action

Using Advanced Installation for Single-Computer Installation
9-6 Oracle Collaboration Suite Installation Guide

Installing Oracle Collaboration Suite in High Availability Environments 10-1
10Installing Oracle Collaboration Suite in High
Availability Environments
This chapter contains the following sections:
■ Section 10.1, "Understanding High Availability Configurations: Overview and Common Requirements"
■ Section 10.2, "Preparing to Install Oracle Collaboration Suite in High Availability Environments"
■ Section 10.3, "Installing Oracle Calendar Server in High Availability Environments"
10.1 Understanding High Availability Configurations: Overview and Common Requirements
This section provides an overview of the high availability configurations supported by Oracle Collaboration Suite.
This section contains the following topics:
■ Section 10.1.1, "Understanding the Common High Availability Principles"
■ Section 10.1.2, "Overview of High Availability Configurations"
■ Section 10.1.3, "Installation Order for High Availability Configurations"
■ Section 10.1.4, "Requirements for High Availability Configurations"
10.1.1 Understanding the Common High Availability PrinciplesOracle Collaboration Suite High Availability Solutions installation includes the following primary components:
■ Oracle Collaboration Suite Database Tier
■ Identity Management Service
■ Oracle Calendar
■ Oracle Collaboration Suite Applications Tier
10.1.1.1 Oracle Collaboration Suite Database TierThe Oracle Collaboration Suite Database tier is built on Oracle Database 10g that serves as the repository for the Oracle Collaboration Suite schema information and OracleAS 10g Release 10.1.2.0.1 Metadata Repository. The default version of the database when installed from Oracle Collaboration Suite is 10.1.0.4.

Understanding High Availability Configurations: Overview and Common Requirements
10-2 Oracle Collaboration Suite Installation Guide
The processes in this tier are the database instance processes and the database listener.
For high availability, Oracle recommends that this database be deployed as an Oracle Real Application Clusters database in an active-active configuration.
Oracle home is installed on each node of the hardware cluster. All Oracle homes use a single shared oraInventory on each node.
The hardware requirements for the Oracle Collaboration Suite Database tier are as follows:
■ Hardware cluster with vendor clusterware or Oracle Cluster Ready Services or both
■ Shared storage for the Oracle Real Application Clusters database files and CRS registry and quorum device. Oracle Database files can be on RAW devices, Network Attached Storage (NAS), OCFS for Linux, or use Oracle Automatic Storage Management (ASM).
■ A virtual IP address for each cluster node
10.1.1.2 Identity Management ServiceThe Identity Management tier consists of the following:
■ Oracle Internet Directory tier
The Oracle Internet Directory tier may be colocated with the database tier or the OracleAS Single Sign-On tier or may be deployed separately. The colocation can be in terms of being on the same computer and in many cases, sharing the same Oracle home.
The main processes in this tier are the Oracle Internet Directory and Oracle Directory Integration and Provisioning processes.
For high availability, Oracle recommends that multiple instances of this tier be deployed or that the deployment be designed to fail over the service to any available computer. An active-active deployment of this tier requires a hardware load balancer.
■ OracleAS Single Sign-On tier
This tier is colocated with the Oracle Internet Directory tier or may be deployed separately. The colocation can be in terms of their being on the same computer and in many cases, sharing the same Oracle home. Also, typically the OracleAS Single Sign-On and Oracle Delegated Administration Services services are deployed together.
The main processes in this tier are the Oracle HTTP Server and the OC4J instances hosting the OracleAS Single Sign-On and Oracle Delegated Administration Services applications.
For high availability, Oracle recommends that multiple instances of this tier be deployed or that the deployment be designed to fail over the service to any available computer. An active-active deployment of this tier requires a hardware load balancer.
Oracle home is on each node of the hardware cluster. All Oracle homes use a single shared oraInventory on each node.
The hardware requirements for the Identity Management tier are as follows:
■ Single node
■ Local storage

Understanding High Availability Configurations: Overview and Common Requirements
Installing Oracle Collaboration Suite in High Availability Environments 10-3
■ A load balancer functions as a frontend of the nodes and routes requests to the Identity Management services on both nodes of the cluster
10.1.1.3 Oracle Calendar Oracle Calendar includes the file system-level database that stores all Calendar-related data. This database is not an Oracle Database, and therefore cannot provide the same high availability features of the Oracle Database.
To ensure an Oracle Collaboration Suite high availability solution, Oracle Calendar Server (one server for each calendar node) is placed on a Cold Failover Cluster because it is a single point of failure. This Cold Failover Cluster installation requires shared storage for the Oracle home and oraInventory directory trees. The Oracle Calendar Server file system database is contained under the Oracle home directory tree. To facilitate a cold failover cluster, a virtual IP address and host are required.
Oracle home and oraInventory are located on a dedicated shared storage of the hardware cluster. This Oracle home should have a separate oraInventory from the Oracle home of other components so that when the shared file system is failed over, the oraInventory is also failed over with it using the same mount point.
The hardware requirements for Oracle Calendar are as follows:
■ Hardware cluster with vendor clusterware. In case of Linux, Oracle Cluster Ready Services and the Red Hat Cluster Manager cannot coexist. As a result, the failover should be manual or Oracle Calendar should be put on a cluster separate from the Oracle Real Application Clusters database.
■ Shared storage for the Calendar Server ORACLE_HOME and oraInventory directory
■ A virtual IP address
10.1.1.4 Oracle Collaboration Suite Applications TierThis tier contains all the Oracle Collaboration Suite Applications components, except Oracle Calendar, that are installed independently on multiple nodes. Typically, the applications tiers are deployed in the demilitarized zone (DMZ). A load balancer virtual server, forms the front end for multiple applications tiers. Client requests to the Oracle Collaboration Suite Applications tiers are load balanced across the Applications nodes by the load balancer using the load balancer virtual server.
Oracle home is installed on each node of the hardware cluster. All Oracle homes use a single shared oraInventory on each node.
The hardware requirements for Applications tier are as follows:
■ Single node
■ Local storage
■ Load Balancer virtual server
10.1.2 Overview of High Availability ConfigurationsThis section provides a brief overview of the typical high availability configurations supported by Oracle Collaboration Suite. For a detailed description of the configurations, refer to the Oracle Collaboration Suite Deployment Guide.
Oracle Collaboration Suite supports the following types of high availability configurations:
■ Single Cluster Architecture

Understanding High Availability Configurations: Overview and Common Requirements
10-4 Oracle Collaboration Suite Installation Guide
■ Colocated Identity Management Architecture
■ Distributed Identity Management Architecture
Section 10.1.2.4 summarizes the differences among the high availability configurations.
10.1.2.1 Single Cluster ArchitectureThis is a minimal configuration where all Oracle Collaboration Suite High Availability components, Oracle Collaboration Suite Database, Identity Management, Oracle Calendar, and Applications, are installed on a single cluster. This architecture is not an out-of-box solution and requires multiple installations of Oracle Collaboration Suite and manual postinstallation configuration.
In this architecture, both Identity Management and Applications are configured as an active-active high availability configuration. The high availability configuration for Oracle Collaboration Suite Database is also active-active.
A Single Cluster Architecture configuration has the following characteristics:
■ Active nodes. All the nodes in a Single Cluster Architecture configuration are active. This means that all the nodes can handle requests. If a node fails, the remaining nodes handle all the requests.
■ Shared disk: Typically, you install Oracle Collaboration Suite on the shared disk. All nodes have access to the shared disk, but only one node mounts the shared disk at any given time. However, Oracle Collaboration Suite Database is not on the shared disk that is mounted by a node at any given time. Also, all nodes running the Oracle Real Application Clusters database must have concurrent access to the shared disk.
■ Hardware cluster. This can be vendor-specific clusterware, Oracle Cluster Ready Services, or both. For Linux, the hardware cluster is only limited to Oracle Cluster Ready Services.
■ Load balancer. You need a load balancer to load-balance the requests to all the active nodes. The load balancer is only required for Identity Management and Applications-related requests. The requests for Applications tier are routed through the virtual IP address and the requests for Oracle Real Application Clusters database are routed through Oracle Net using the virtual IP addresses for the cluster nodes.
Figure 10–1 illustrates a typical Single Cluster Architecture configuration.
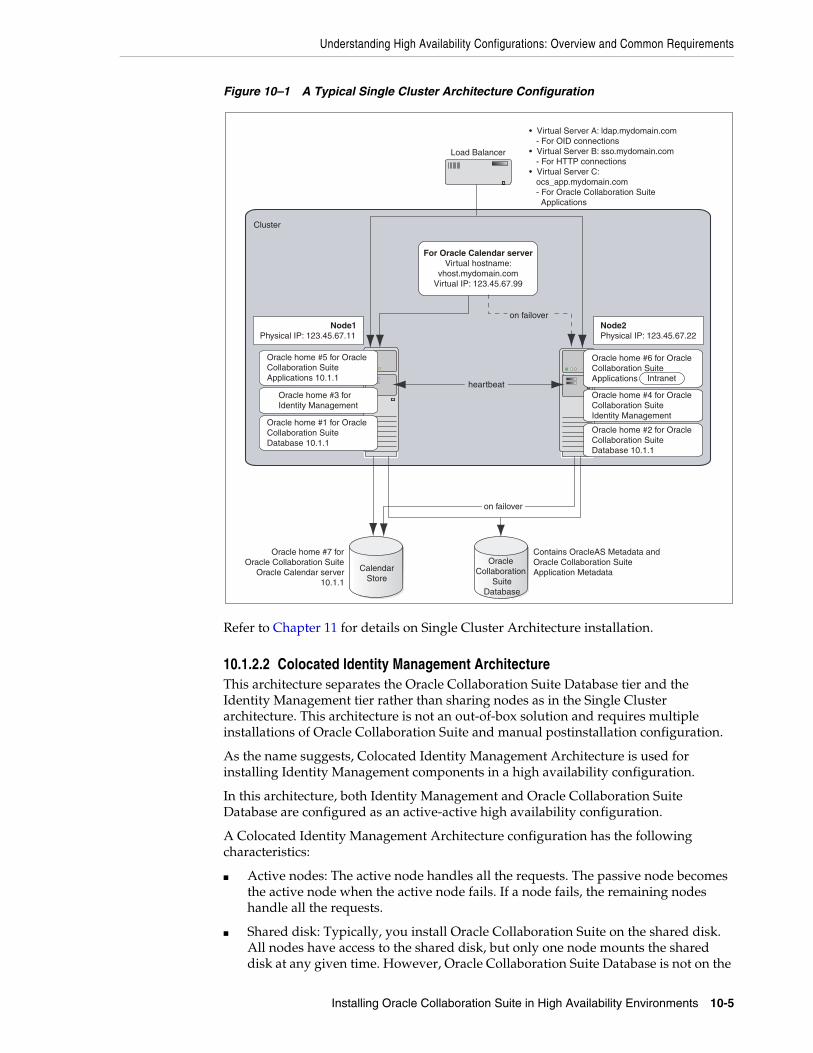
Understanding High Availability Configurations: Overview and Common Requirements
Installing Oracle Collaboration Suite in High Availability Environments 10-5
Figure 10–1 A Typical Single Cluster Architecture Configuration
Refer to Chapter 11 for details on Single Cluster Architecture installation.
10.1.2.2 Colocated Identity Management ArchitectureThis architecture separates the Oracle Collaboration Suite Database tier and the Identity Management tier rather than sharing nodes as in the Single Cluster architecture. This architecture is not an out-of-box solution and requires multiple installations of Oracle Collaboration Suite and manual postinstallation configuration.
As the name suggests, Colocated Identity Management Architecture is used for installing Identity Management components in a high availability configuration.
In this architecture, both Identity Management and Oracle Collaboration Suite Database are configured as an active-active high availability configuration.
A Colocated Identity Management Architecture configuration has the following characteristics:
■ Active nodes: The active node handles all the requests. The passive node becomes the active node when the active node fails. If a node fails, the remaining nodes handle all the requests.
■ Shared disk: Typically, you install Oracle Collaboration Suite on the shared disk. All nodes have access to the shared disk, but only one node mounts the shared disk at any given time. However, Oracle Collaboration Suite Database is not on the
• Virtual Server A: ldap.mydomain.com - For OID connections• Virtual Server B: sso.mydomain.com - For HTTP connections• Virtual Server C: ocs_app.mydomain.com - For Oracle Collaboration Suite Applications
Cluster
on failover
Load Balancer
For Oracle Calendar serverVirtual hostname:
vhost.mydomain.comVirtual IP: 123.45.67.99
Oracle home #7 forOracle Collaboration Suite
Oracle Calendar server10.1.1
CalendarStore
Node2Physical IP: 123.45.67.22
Node1Physical IP: 123.45.67.11
heartbeat
on failover
on failover
Oracle home #3 for Identity Management
Oracle home #5 for Oracle Collaboration SuiteApplications 10.1.1
Oracle home #1 for Oracle Collaboration SuiteDatabase 10.1.1
Oracle home #4 for Oracle Collaboration SuiteIdentity Management
Oracle home #2 for Oracle Collaboration Suite Database 10.1.1
Oracle home #6 for Oracle Collaboration SuiteApplications 10.1.1Intranet
Contains OracleAS Metadata and Oracle Collaboration SuiteApplication Metadata
Oracle Collaboration
SuiteDatabase

Understanding High Availability Configurations: Overview and Common Requirements
10-6 Oracle Collaboration Suite Installation Guide
shared disk that is mounted by a node at any given time. Also, all nodes running the Oracle Real Application Clusters database must have concurrent access to the shared disk.
■ Hardware cluster. This can either be vendor-specific clusterware or Oracle Cluster Ready Services if Oracle Real Application Clusters is used.
■ Load balancer. A hardware load balancer is a front end to the nodes with the Identity Management tier and load balances the Identity Management traffic.
■ Nonclustered servers. You need multiple nonclustered servers for the Identity Management tier.
■ Virtual IP and host name: You must set up a virtual IP and host name for the nodes. During installation, you provide the virtual host name. Clients use the virtual host name to access Oracle Collaboration Suite in an Active Failover Cluster Configuration (for example, the virtual host name is used in URLs). The virtual IP and host name points to an active node. If the active node fails, the virtual IP and host name switches to point to any other active node.
Figure 10–2 illustrates a typical Colocated Identity Management Architecture configuration.

Understanding High Availability Configurations: Overview and Common Requirements
Installing Oracle Collaboration Suite in High Availability Environments 10-7
Figure 10–2 A Typical Colocated Identity Management Architecture Configuration
Refer to Chapter 12 for details about Colocated Identity Management Architecture installation.
10.1.2.3 Distributed Identity Management ArchitectureThis configuration is similar to Colocated Identity Management Architecture except that the Identity Management components, Oracle Internet Directory and Oracle Application Server Single Sign-On, are distributed across multiple nonclustered servers in a demilitarized zone.
In this architecture, Oracle Internet Directory as well as Oracle Application Server Single Sign-On shares an active-active high availability configuration. However, the high availability configuration for Oracle Collaboration Suite Database can either be active-active or active-passive.
A Distributed Identity Management Architecture configuration has the following characteristics:
• Virtual Server A: ldap.mydomain.com - For OID connections• Virtual Server B: sso.mydomain.com - For HTTP connections• Virtual Server C: ocs_app.mydomain.com - For Oracle Collaboration Suite Applications
Load Balancer
Oracle home #6 for Oracle Collaboration SuiteApplications 10.1.1
Oracle home #4 for Identify Management
Oracle home #5 for Oracle Collaboration SuiteApplications 10.1.1
Oracle home #3 forIdentify Management
Machine 3 Machine 4On this tier, Identify Managementincludes:• Oracle Delegated Administration Services• OracleAS Single Sign-On• Oracle Internet Directory• Oracle Directory Integrated and Provisioning
Cluster
on failover
For Oracle Calendar serverVirtual hostname:
vhost.mydomain.comVirtual IP: 123.45.67.99
ExistingDatabase
Oracle home #7 forOracle Collaboration Suite
Oracle Calendar server10.1.1
CalendarStore
Oracle home #2 forexisting Database withOracle CollaborationSuite database
Oracle home #1 forexisting Database with
Oracle CollaborationSuite Database
Node2Physical IP: 123.45.67.22
Node1Physical IP: 123.45.67.11
heartbeat
on failover
on failover
This database could be a RealApplication Clusters Database or acold failover cluster database.
Firewall

Understanding High Availability Configurations: Overview and Common Requirements
10-8 Oracle Collaboration Suite Installation Guide
■ Active nodes: The active node handles all the requests.
■ Shared disk: Typically, you install Oracle Collaboration Suite on the shared disk. The active and passive nodes have access to the shared disk, but only one node (the active node) mounts the shared disk at any given time.
■ Hardware cluster. This can either be vendor-specific clusterware or Oracle Cluster Ready Services if Oracle Real Application Clusters is used.
■ Load balancer. You need a load balancer to load-balance the requests to all the active nodes. During installation, you enter the virtual server name configured on your load balancer. During run time, clients use the virtual server name to access the OracleAS Cluster (Identity Management) configuration. The load balancer then directs the request to the appropriate node.
■ Nonclustered servers. You need multiple nonclustered servers both for Oracle Internet Directory as well as Oracle Application Server Single Sign-On.
■ Virtual IP and host name: You must set up a virtual IP and host name for the nodes. During installation, you provide the virtual host name. Clients use the virtual host name to access the Oracle Collaboration Suite in an Active Failover Cluster Configuration (for example, the virtual host name is used in URLs). The virtual IP and host name points to an active node. If the active node fails, the virtual IP and host name switches to point to any other active node.
Figure 10–3 illustrates a typical Distributed Identity Management Architecture configuration.

Understanding High Availability Configurations: Overview and Common Requirements
Installing Oracle Collaboration Suite in High Availability Environments 10-9
Figure 10–3 A Typical Distributed Identity Management Architecture Configuration
Refer to Chapter 13 for details about Distributed Identity Management Architecture installation.
• Virtual Server B: sso.mydomain.com - For HTTP connections• Virtual Server C: ocs_app.mydomain.com - For Oracle Collaboration Suite Applications
Load Balancer
Oracle home #6 for Oracle Collaboration SuiteApplications 10.1.1
Oracle home #9 for Identify Management
Oracle home #5 for Oracle Collaboration SuiteApplications 10.1.1
Oracle home #8 forIdentify Management
Machine 5 Machine 6
On this tier, Identify Managementincludes:• Oracle Delegated Administration Services• OracleAS Single Sign-On
Cluster
on failover
For Oracle Calendar serverVirtual hostname:
vhost.mydomain.comVirtual IP: 123.45.67.99
ExistingDatabase
Oracle home #7 forOracle Collaboration Suite
Oracle Calendar Server10.1.1
CalendarStore
Oracle home #2 forexisting database withOracle CollaborationSuite Database
Oracle home #1 forexisting database with
Oracle CollaborationSuite Database
Node2Physical IP: 123.45.67.22
Node1Physical IP: 123.45.67.11
heartbeat
on failover
on failover
This database could be a RealApplication Clusters Database or acold failover cluster database.
Firewall
• Virtual Server A: ldap.mydomain.com - For OID connections
Load Balancer
Oracle home #4 for Identify Management
Oracle home #3 forIdentify Management
Machine 3 Machine 4
On this tier, Identify Managementincludes:• Oracle Internet Directory• Oracle Directory Integrated and Provisioning
Firewall
DMZ

Understanding High Availability Configurations: Overview and Common Requirements
10-10 Oracle Collaboration Suite Installation Guide
10.1.2.4 Summary of DifferencesTable 10–1 summarizes the differences among the high availability configurations.
10.1.3 Installation Order for High Availability ConfigurationsFor all high availability configurations, you install the components in the following order:
1. Oracle Collaboration Suite Database
2. Identity Management components
If you are distributing the Identity Management components, you install them in the following order:
a. Oracle Internet Directory and Oracle Directory Integration and Provisioning
b. Oracle Application Server Single Sign-On and Oracle Delegated Administration Services
3. Oracle Collaboration Suite application components
10.1.4 Requirements for High Availability ConfigurationsIf you are plan to install Oracle Collaboration Suite in high availability environments, remember the following requirements:
■ Database requirement
You need an existing Oracle Real Application Clusters database. You will install the OracleAS Metadata Repository on this database using the Metadata Repository Creation Assistant.
■ OracleAS Metadata Repository requirement
When you perform the installation on the first node, you must specify an OracleAS Metadata Repository that is not registered with any Oracle Internet Directory. The installer checks for this. If the installer finds that the OracleAS Metadata Repository is already registered with an Oracle Internet Directory, then it assumes that you are installing on subsequent nodes, and that you want to join the cluster that was created when you installed on the first node. It prompts you for the existing cluster name and the connect information for the Oracle Internet Directory.
■ Components requirement
Table 10–1 Differences Among the High Availability Configurations
Single Cluster Architecture
Colocated Identity Management Architecture
Distributed Identity Management Architecture
Node configuration Active-Active Active-Active Active-Active
Hardware cluster Yes Yes Yes
Virtual host name No Yes Yes
Load balancer Yes Yes Yes
Shared storage Yes Yes Yes
Nonclustered servers No Yes (Combined for the Identity Management tier)
Yes

Understanding High Availability Configurations: Overview and Common Requirements
Installing Oracle Collaboration Suite in High Availability Environments 10-11
Because the installer clusters the components in an Identity Management configuration, you must select the same components in the Select Configuration Options screen for all the nodes in the cluster.
For example, if you select Oracle Internet Directory, OracleAS Single Sign-On, and Oracle Delegated Administration Services for the installation on node 1, then you must select the same set of components in subsequent installations.
Clustering will fail if you select different components in each installation.
The requirements common to all high availability configurations are:
■ Check Minimum Number of Nodes
■ Check That Groups Are Defined Identically on All Nodes
■ Check the Properties of the oracle User
■ Check for Previous Oracle Installations on All Nodes
In addition to these common requirements, each configuration has its own specific requirements. Refer to the individual chapters for details.
10.1.4.1 Check Minimum Number of NodesYou need at least two nodes in a high availability configuration. If a node fails for any reason, the second node takes over.
10.1.4.2 Check That Groups Are Defined Identically on All NodesCheck that the /etc/group file on all nodes in the cluster contains the operating system groups that you plan to use. You should have one group for the oraInventory directory, and one or two groups for database administration. The group names and the group IDs must be the same for all nodes.
Refer to Section 2.5 for details.
10.1.4.3 Check the Properties of the oracle UserCheck that the oracle operating system user that you must log in as to install Oracle Collaboration Suite, has the following properties:
■ It belongs to the oinstall group and to the osdba group. The oinstall group is for the oraInventory directory, and the osdba group is a database administration group. Refer to Section 2.5 for details.
■ It has write privileges on remote directories.
10.1.4.4 Check for Previous Oracle Installations on All NodesCheck that all the nodes where you want to install Oracle Collaboration Suite in a high availability configuration do not have existing oraInventory directories.
You must do this because you want the installer to prompt you to enter a location for the oraInventory directory. The location of the existing oraInventory directory might not be ideal for the Oracle Collaboration Suite instance that you are about to install. For example, you want the oraInventory directory to be on the shared
Note: In addition to the requirements specific to the high availability configuration that you plan to use, you still must meet the requirements listed in Chapter 2.

Preparing to Install Oracle Collaboration Suite in High Availability Environments
10-12 Oracle Collaboration Suite Installation Guide
storage. If the installer finds an existing oraInventory directory, it will automatically use it and will not prompt you to enter a location.
To check if a node contains an oraInventory directory that could be detected by the installer:
1. On each node, check for the /var/opt/oracle/oraInst.loc file.
If a node does not contain the file, then it does not have an oraInventory directory that will be used by the installer. You can check the next node.
2. For nodes that contain the oraInst.loc file, rename the oracle directory to something else so that the installer does not see it. The installer then prompts you to enter a location for the oraInventory directory.
The following example renames the oracle directory to oracle.orig (you must be root to do this):
# suPassword: root_password# cd /var/opt# mv oracle oracle.orig
When you run the installer to install Oracle Collaboration Suite, the installer creates a new /var/opt/oracle directory and new files in it. You might need both oracle and oracle.orig directories. Do not delete either directory or rename one over the other.
The installer uses the /var/opt/oracle directory and its files. Be sure that the right oracle directory is in place before running the installer (for example, if you are deinstalling or expanding a product).
10.2 Preparing to Install Oracle Collaboration Suite in High Availability Environments
This section covers the following topics:
■ Section 10.2.1, "Preinstallation Steps"
■ Section 10.2.2, "About Oracle Internet Directory Passwords"
■ Section 10.2.3, "About Configuring SSL and Non-SSL Ports for Oracle HTTP Server"
10.2.1 Preinstallation StepsBefore installing an Identity Management configuration, you must set up the following tasks:
■ Use the Same Path for the Oracle Home Directory (Recommended)
■ Synchronize Clocks on All Nodes
■ Configure Virtual Server Names and Ports for the Load Balancer
■ Configure Your LDAP Virtual Server to Direct Requests to Node 1 Initially
■ Set Up Cookie Persistence on the Load Balancer
10.2.1.1 Use the Same Path for the Oracle Home Directory (Recommended)For all the nodes that will be running Identity Management components, use the same full path for the Oracle home. This practice is recommended, but not required.

Preparing to Install Oracle Collaboration Suite in High Availability Environments
Installing Oracle Collaboration Suite in High Availability Environments 10-13
10.2.1.2 Synchronize Clocks on All NodesSynchronize the system clocks on all nodes.
10.2.1.3 Configure Virtual Server Names and Ports for the Load BalancerConfigure your load balancer with two virtual server names and associated ports:
■ Configure a virtual server name for LDAP connections. For this virtual server, you must configure two ports: one for SSL and one for non-SSL connections.
■ Configure a virtual server name for HTTP connections. For this virtual server, you also must configure two ports: one for SSL and one for non-SSL connections.
The installer will prompt you for the virtual server names and port numbers.
In addition, check that the virtual server names are associated with IP addresses and are part of your DNS. The nodes that will be running Oracle Collaboration Suite must be able to access these virtual server names.
10.2.1.4 Configure Your LDAP Virtual Server to Direct Requests to Node 1 InitiallyNote that this procedure applies only to the LDAP virtual server configured on your load balancer. This does not apply to the HTTP virtual server configured on your load balancer.
Before you start the installation, configure your LDAP virtual server to direct requests to node 1 only. After you complete an installation on a node, then you can add that node to the virtual server.
For example, if you have three nodes:
1. Configure the LDAP virtual server to direct requests to node 1 only.
2. Install Identity Management components on node 1.
3. Install Identity Management components on node 2.
4. Add node 2 to the LDAP virtual server.
5. Install Identity Management components on node 3.
6. Add node 3 to the LDAP virtual server.
10.2.1.5 Set Up Cookie Persistence on the Load BalancerOn your load balancer, set up cookie persistence for HTTP traffic. Specifically, set up cookie persistence for URIs starting with /oiddas/. This is the URI for Oracle
Note: Ensure that the same ports that you configured for the LDAP virtual server are available on the nodes on which you will be installing Oracle Internet Directory.
The installer will configure Oracle Internet Directory to use the same port numbers that are configured on the LDAP virtual server. In other words, Oracle Internet Directory on all the nodes and the LDAP virtual server will use the same port number.
Note: The ports for the HTTP virtual server can be different from the Oracle HTTP Server Listen ports.

Preparing to Install Oracle Collaboration Suite in High Availability Environments
10-14 Oracle Collaboration Suite Installation Guide
Delegated Administration Services. If your load balancer does not allow you to set cookie persistence at the URI level, then set the cookie persistence for all HTTP traffic. In either case, set the cookie to expire when the browser session expires.
Refer to your load balancer documentation for details.
10.2.2 About Oracle Internet Directory PasswordsIn Identity Management configurations, you install Oracle Internet Directory on multiple nodes, and in each installation, you enter the instance password in the Specify Instance Name and ias_admin Password screen.
The password specified in the first installation is used as the password for the cn=orcladmin and orcladmin users not just in the first Oracle Internet Directory, but in all Oracle Internet Directory installations in the cluster.
This means that to access the Oracle Internet Directory on any node, you must use the password that you entered in the first installation. You cannot use the passwords that you entered in subsequent installations.
Accessing the Oracle Internet Directory includes:
■ Logging in to Oracle Delegated Administration Services (URL: http://hostname:port/oiddas)
■ Logging in to Oracle Application Server Single Sign-On (URL: http://hostname:port/pls/orasso)
■ Connecting to Oracle Internet Directory using the Oracle Directory Manager
You still need the passwords that you entered in installations for logging in to Application Server Control.
10.2.3 About Configuring SSL and Non-SSL Ports for Oracle HTTP ServerWhen you are installing Identity Management configurations, the installer displays the Specify HTTP Load Balancer Host and Listen Ports screen.
This screen has the following two sections:
■ In the load balancer section, you specify the HTTP virtual server name and port number of the load balancer. You also indicate whether the port is for SSL or non-SSL requests.
■ In the Oracle HTTP Server section, you specify the port number that you want for the Oracle HTTP Server Listen port. You also indicate whether the port is for SSL or non-SSL requests.
The virtual server and the Oracle HTTP Server Listen port can use different port numbers.
You can use this screen to set up the type of communication (SSL or non-SSL) between client, load balancer, and Oracle HTTP Server. Three cases are possible:
■ Case 1: Communications between clients and the load balancer use HTTP, and communications between the load balancer and Oracle HTTP Server also use HTTP. Refer to Section 10.2.3.1.
■ Case 2: Communications between clients and the load balancer use HTTPS (secure HTTP), and communications between the load balancer and Oracle HTTP Server also use HTTPS. Refer to Section 10.2.3.2.

Preparing to Install Oracle Collaboration Suite in High Availability Environments
Installing Oracle Collaboration Suite in High Availability Environments 10-15
■ Case 3: Communications between clients and the load balancer use HTTPS, but communications between the load balancer and Oracle HTTP Server use HTTP. Refer to Section 10.2.3.3.
10.2.3.1 Case 1: Client and the Load Balancer Use HTTP and the Load Balancer and Oracle HTTP Server Also Use HTTP for CommunicationTo set up this type of communication, specify the following values:
HTTP Listener: Port: Enter the port number that you want to use as the Oracle HTTP Server Listen port. This will be the value of the Listen directive in the httpd.conf file.Enable SSL: Do not select this option. The installer tries the default port number for the SSL port.
HTTP Load Balancer: Hostname: Enter the name of the virtual server on the load balancer configured to handle HTTP requests.
HTTP Load Balancer: Port: Enter the port number that the HTTP virtual server listens on. This will be the value of the Port directive in the httpd.conf file.Enable SSL: Do not select this option.
Table 10–2 lists the screen and configuration file values.
10.2.3.2 Case 2: Client and the Load Balancer Use HTTPS and the Load Balancer and Oracle HTTP Server Also Use HTTPS for CommunicationTo set up this type of communication, specify the following values:
HTTP Listener: Port: Enter the port number that you want Oracle HTTP Server to listen on. This will be the value of the Listen directive in the ssl.conf file.Enable SSL: Select this option.
HTTP Load Balancer: Hostname: Enter the name of the virtual server on the load balancer configured to handle HTTPS requests.
HTTP Load Balancer: Port: Enter the port number that the HTTP virtual server listens on. This will be the value of the Port directive in the ssl.conf file.Enable SSL: Select this option.
In opmn.xml, the installer sets the ssl-enabled line in the Oracle HTTP Server section to true.
Note: Because the values you specify in this dialog override the values specified in the staticports.ini file, you should not specify port numbers for the Oracle HTTP Server Listen port in the staticports.ini file.
Table 10–2 Case 1: Screen and Configuration File Values
Values in Screen Resulting Values in Configuration Files
HTTP Listener: Port: 8000
Enable SSL: Unchecked
HTTP Load Balancer: Port: 80
Enable SSL: Unchecked
In httpd.conf:
Port 80Listen 8000
In ssl.conf:
Port <default port number assigned by installer>Listen <default port number assigned by installer>

Installing Oracle Calendar Server in High Availability Environments
10-16 Oracle Collaboration Suite Installation Guide
Table 10–3 lists the screen and resulting configuration file values.
10.2.3.3 Case 3: Client and the Load Balancer Use HTTPS and the Load Balancer and Oracle HTTP Server Use HTTP for CommunicationTo set up this type of communication,specify the following values:
HTTP Listener: Port: Enter the port number that you want Oracle HTTP Server to listen on. This will be the value of the Listen directive in the httpd.conf file.Enable SSL: Do not select this option.
HTTP Load Balancer: Hostname: Enter the name of the virtual server on the load balancer configured to handle HTTPS requests.
HTTP Load Balancer: Port: Enter the port number that the HTTP virtual server listens on. This will be the value of the Port directive in the httpd.conf file.Enable SSL: Select this option.
The installer will change the following lines:
■ In opmn.xml, the installer sets the ssl-enabled line in the Oracle HTTP Server section to true.
■ In httpd.conf, the installer adds the following lines:
LoadModule certheaders_module libexec/mod_certheaders.soSimulateHttps on
Table 10–4 lists the screen and configuration file values.
10.3 Installing Oracle Calendar Server in High Availability EnvironmentsThis section describes how to install Oracle Calendar Server in Cold Failover configurations.
■ Section 10.3.1, "High Availability Configuration for Oracle Calendar"
Table 10–3 Case 2: Screen and Configuration File Values
Values in Screen Resulting Values in Configuration Files
HTTP Listener: Port: 90
Enable SSL: Checked
HTTP Load Balancer: Port: 443
Enable SSL: Checked
In httpd.conf:
Port <default port number assigned by installer>Listen <default port number assigned by installer>
In ssl.conf:
Port 443Listen 90
Table 10–4 Case 3: Screen and Configuration File Values
Values in Screen Resulting Values in Configuration Files
HTTP Listener: Port: 9000
Enable SSL: Unchecked
HTTP Load Balancer: Port: 443
Enable SSL: Checked
In httpd.conf:
Port 443Listen 9000
In ssl.conf:
Port <default port number assigned by installer>Listen <default port number assigned by installer>

Installing Oracle Calendar Server in High Availability Environments
Installing Oracle Collaboration Suite in High Availability Environments 10-17
■ Section 10.3.2, "Preinstallation Steps for Installing Oracle Calendar in High Availability Environments"
■ Section 10.3.3, "Installing Oracle Calendar"
10.3.1 High Availability Configuration for Oracle CalendarIn the Oracle Collaboration Suite high availability architectures, a Cold Failover Cluster configuration is used for the Oracle Calendar. In a Cold Failover Cluster configuration, you have an active and a passive node, and shared storage that can be accessed by either node.
During normal operation, the active node runs Oracle Calendar Server processes and manages requests from clients. If the active node fails, then a failover event occurs. The passive node takes over and becomes the active node. It mounts the shared storage and runs the processes.
10.3.2 Preinstallation Steps for Installing Oracle Calendar in High Availability Environments
Before installing Oracle Calendar Server in a high availability environment, perform the following tasks:
■ Section 10.3.2.1, "Check That Clusterware Is Running"
■ Section 10.3.2.2, "Map the Virtual Host Name and Virtual IP Address"
■ Section 10.3.2.3, "Set Up a File System That Can Be Mounted from Both Nodes"
■ Section 10.3.2.4, "Review Recommendations for Automatic Storage Management (ASM)"
10.3.2.1 Check That Clusterware Is RunningFor Cold Failover Cluster, each node in a cluster must be running hardware vendor clusterware. If you are running Oracle Cluster Ready Services, you still need the clusterware from the hardware vendor. Running Oracle Cluster Ready Services without the hardware vendor clusterware is not supported for Cold Failover Cluster.
To check that the clusterware is running, use the command appropriate for your clusterware.
10.3.2.2 Map the Virtual Host Name and Virtual IP AddressEach node in an Oracle Calendar Server Cold Failover Cluster configuration is associated with its own physical Internet Protocol (IP) address. In addition, the active node in the cluster is associated with a virtual host name and virtual IP address. This enables clients to access the Cold Failover Cluster using the virtual host name.
Virtual host names and virtual IP addresses are any valid host name and IP address in the context of the subnet containing the hardware cluster.
Note: Map the virtual host name and virtual IP address only to the active node. Do not map the virtual host name and IP address to both active and secondary nodes at the same time. When you fail over the current active node, only then do you map the virtual host name and IP address to the secondary node, which is now the active node.
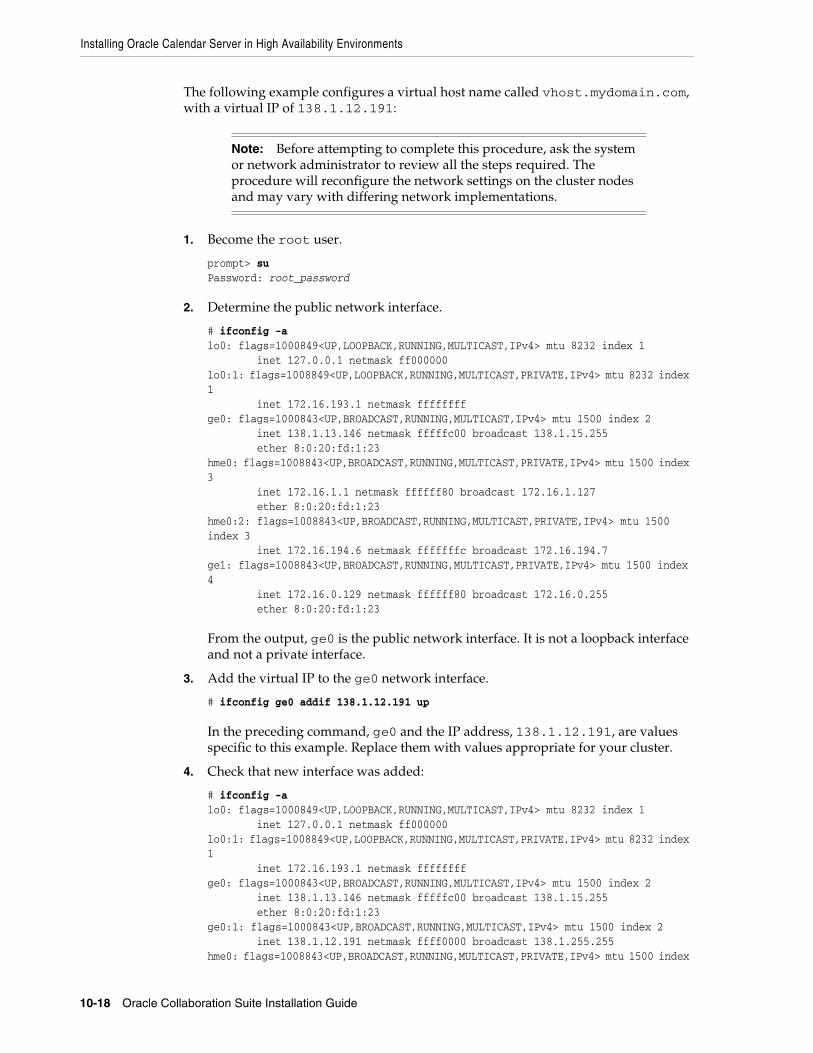
Installing Oracle Calendar Server in High Availability Environments
10-18 Oracle Collaboration Suite Installation Guide
The following example configures a virtual host name called vhost.mydomain.com, with a virtual IP of 138.1.12.191:
1. Become the root user.
prompt> suPassword: root_password
2. Determine the public network interface.
# ifconfig -alo0: flags=1000849<UP,LOOPBACK,RUNNING,MULTICAST,IPv4> mtu 8232 index 1 inet 127.0.0.1 netmask ff000000lo0:1: flags=1008849<UP,LOOPBACK,RUNNING,MULTICAST,PRIVATE,IPv4> mtu 8232 index 1 inet 172.16.193.1 netmask ffffffffge0: flags=1000843<UP,BROADCAST,RUNNING,MULTICAST,IPv4> mtu 1500 index 2 inet 138.1.13.146 netmask fffffc00 broadcast 138.1.15.255 ether 8:0:20:fd:1:23hme0: flags=1008843<UP,BROADCAST,RUNNING,MULTICAST,PRIVATE,IPv4> mtu 1500 index 3 inet 172.16.1.1 netmask ffffff80 broadcast 172.16.1.127 ether 8:0:20:fd:1:23hme0:2: flags=1008843<UP,BROADCAST,RUNNING,MULTICAST,PRIVATE,IPv4> mtu 1500 index 3 inet 172.16.194.6 netmask fffffffc broadcast 172.16.194.7ge1: flags=1008843<UP,BROADCAST,RUNNING,MULTICAST,PRIVATE,IPv4> mtu 1500 index 4 inet 172.16.0.129 netmask ffffff80 broadcast 172.16.0.255 ether 8:0:20:fd:1:23
From the output, ge0 is the public network interface. It is not a loopback interface and not a private interface.
3. Add the virtual IP to the ge0 network interface.
# ifconfig ge0 addif 138.1.12.191 up
In the preceding command, ge0 and the IP address, 138.1.12.191, are values specific to this example. Replace them with values appropriate for your cluster.
4. Check that new interface was added:
# ifconfig -alo0: flags=1000849<UP,LOOPBACK,RUNNING,MULTICAST,IPv4> mtu 8232 index 1 inet 127.0.0.1 netmask ff000000lo0:1: flags=1008849<UP,LOOPBACK,RUNNING,MULTICAST,PRIVATE,IPv4> mtu 8232 index 1 inet 172.16.193.1 netmask ffffffffge0: flags=1000843<UP,BROADCAST,RUNNING,MULTICAST,IPv4> mtu 1500 index 2 inet 138.1.13.146 netmask fffffc00 broadcast 138.1.15.255 ether 8:0:20:fd:1:23ge0:1: flags=1000843<UP,BROADCAST,RUNNING,MULTICAST,IPv4> mtu 1500 index 2 inet 138.1.12.191 netmask ffff0000 broadcast 138.1.255.255hme0: flags=1008843<UP,BROADCAST,RUNNING,MULTICAST,PRIVATE,IPv4> mtu 1500 index
Note: Before attempting to complete this procedure, ask the system or network administrator to review all the steps required. The procedure will reconfigure the network settings on the cluster nodes and may vary with differing network implementations.

Installing Oracle Calendar Server in High Availability Environments
Installing Oracle Collaboration Suite in High Availability Environments 10-19
3 inet 172.16.1.1 netmask ffffff80 broadcast 172.16.1.127 ether 8:0:20:fd:1:23hme0:2: flags=1008843<UP,BROADCAST,RUNNING,MULTICAST,PRIVATE,IPv4> mtu 1500 index 3 inet 172.16.194.6 netmask fffffffc broadcast 172.16.194.7ge1: flags=1008843<UP,BROADCAST,RUNNING,MULTICAST,PRIVATE,IPv4> mtu 1500 index 4 inet 172.16.0.129 netmask ffffff80 broadcast 172.16.0.255 ether 8:0:20:fd:1:23
The virtual IP appears in the ge0:1 entry. During installation, when you enter vhost.mydomain.com as the virtual host name in the Specify Virtual Hostname screen, the installer checks that vhost.mydomain.com is a valid interface.
On FailoverIf the active node fails, then the secondary node takes over. If you do not have a clusterware agent to map the virtual IP from the failed node to the secondary node, then you must do it manually. Remove the virtual IP mapping from the failed node and map it to the secondary node.
1. On the failed node, become superuser and remove the virtual IP.
If the failed node fails completely (that is, it does not boot up), you can skip this step and go to Step 2. If the node fails partially (for example, disk or memory problems), and you can still ping the node, you must perform this step.
prompt> suPassword: root_password# ifconfig ge0 removeif 138.1.12.191
"ge0" and the IP address are values specific to this example. Replace them with values appropriate for your cluster.
2. On the secondary node, add the virtual IP to the ge0 network interface.
# ifconfig ge0 addif 138.1.12.191 up
In the preceding command, ge0 and the IP address, 138.1.12.191, are values specific to this example. Replace them with values appropriate for your cluster.
3. On the secondary node, check that the new interface was added:
# ifconfig -a...ge0:1: flags=1000843<UP,BROADCAST,RUNNING,MULTICAST,IPv4> mtu 1500 index 2 inet 138.1.12.191 netmask ffff0000 broadcast 138.1.255.255...
10.3.2.3 Set Up a File System That Can Be Mounted from Both NodesAlthough the hardware cluster has shared storage, you must create a file system on this shared storage such that both nodes of the Oracle Calendar Server Cold Failover Cluster can mount this file system. You will use this file system for the following directories:
■ Oracle home directory for the Infrastructure
■ The oraInventory directory
For more information about disk space requirements, refer to Section 2.1.

Installing Oracle Calendar Server in High Availability Environments
10-20 Oracle Collaboration Suite Installation Guide
If you are running a volume manager on the cluster to manage the shared storage, refer to the volume manager documentation for steps to create a volume. Once a volume is created, you can create the file system on that volume.
If you do not have a volume manager, you can create a file system on the shared disk directly. Ensure that the hardware vendor supports this, that the file system can be mounted from either node of the Oracle Calendar Cold Failover Cluster, and that the file system is repairable from either node if a node fails.
To check that the file system can be mounted from either node, perform the following steps:
1. Set up and mount the file system from node 1.
2. Unmount the file system from node 1.
3. Mount the file system from node 2 using the same mount point that you used in Step 1.
4. Unmount the file system from node 2, and mount it on node 1, because you will be running the installer from node 1.
10.3.2.4 Review Recommendations for Automatic Storage Management (ASM)If you plan to use ASM instances for the OracleAS Metadata Repository database, consider these recommendations:
■ If you plan to use ASM with Oracle Database instances from multiple database homes on the same node, then you should run the ASM instance from an Oracle home that is different from the database homes.
■ The ASM home should be installed on every cluster node. This prevents the accidental removal of ASM instances that are in use by databases from other homes during the deinstallation of a database Oracle home.
10.3.3 Installing Oracle CalendarFigure 10–4 shows an Oracle Calendar Server high availability configuration.
Note: Only one node of the Oracle Calendar Cold Failover Cluster should mount the file system at any given time. File system configuration files on all nodes of the cluster should not include an entry for the automatic mount of the file system upon a node restart or execution of a global mount command. For example, on UNIX platforms, do not include an entry for this file system in /etc/fstab file.

Installing Oracle Calendar Server in High Availability Environments
Installing Oracle Collaboration Suite in High Availability Environments 10-21
Figure 10–4 Oracle Calendar High Availability Configuration
Figure 10–4 depicts:
■ Two nodes running clusterware.
■ Storage devices local to each node.
■ Storage device that can be accessed by both nodes. You install Infrastructure on this shared storage device.
During normal operation, one node ("node 1") acts as the active node. It mounts the shared storage to access Infrastructure, runs Oracle Collaboration Suite 10g Infrastructure processes, and handles all requests.
If the active node goes down for any reason, the clusterware fails over Oracle Collaboration Suite Infrastructure processes to the other node ("node 2"), which now becomes the active node. It mounts the shared storage, runs the processes, and handles all requests.
These nodes appear as one computer to clients through the use of a virtual address. To access the Oracle Collaboration Suite 10g Infrastructure, clients, including Applications tier components, use the virtual address associated with the cluster. The virtual address is associated with the active node (node 1 during normal operation, node 2 if node 1 goes down). Clients do not need to know which node (node 1 or node 2) is servicing requests.
You use the virtual host name in URLs that access the Infrastructure. For example, if vhost.mydomain.com is the virtual host name, the URLs for the Oracle HTTP Server and the Application Server Control would look like the following:
URL for: Example URL
Oracle HTTP Server, Welcome page http://vhost.mydomain.com:7777
Oracle HTTP Server, secure mode https://vhost.mydomain.com:4443
Application Server Control http://vhost.mydomain.com:1810

Installing Oracle Calendar Server in High Availability Environments
10-22 Oracle Collaboration Suite Installation Guide
To install Oracle Calendar in a Oracle Application Server Cold Failover Cluster configuration, perform the steps listed the following topics:
■ Installing Oracle Calendar Server in a Cold Failover Cluster Configuration
■ Performing the Postinstallation Steps
■ Installing Oracle Collaboration Suite Applications
10.3.3.1 Installing Oracle Calendar Server in a Cold Failover Cluster ConfigurationBefore installing Oracle Calendar in a Cold Failover Cluster configuration, make sure that the virtual IP address and host name is enabled on the install node.
To install Oracle Calendar in a Cold Failover Cluster configuration, follow the steps listed in Table 10–5.
Table 10–5 Installing Oracle Calendar Server in a Cold Failover Cluster Configuration
Step Screen Action
1. None Start the installer. Refer to Section 3.4, "Starting Oracle Universal Installer".
2. Select Installation Method
Select Advanced Installation.
Note: Refer to Section 1.7.1 for detailed information on Basic and Advanced installations.
Click Next.
3. Specify Inventory Directory and Credentials
(Advanced installation only)
This screen appears only if this is the first installation of any Oracle product on this computer.
Enter the full path for the inventory directory: Enter a full path to a directory for the installer files. Enter a directory that is different from the Oracle home directory for the product files.
Example: /private/oracle/oraInventory
Click OK.
4. UNIX Group Name
(Advanced installation only)
This screen appears only if this is the first installation of any Oracle product on this computer.
Enter the name of the operating system group to have write permission for the inventory directory.
Example: dba
Click Next.
5. Run orainstRoot.sh
(Advanced installation only)
This screen appears only if this is the first installation of any Oracle product on this computer.
Run the orainstRoot.sh script in a different shell as the root user. The script is located in the oraInventory directory.
Click Continue.
6. Specify File Locations
(Advanced installation only)
Enter the full path of the Source directory in the Path field for Source, if required.
Name: Enter a name to identify this Oracle home. The name cannot contain spaces, and has a maximum length of 16 characters.
Example: OH_apptier_10_1_1
Destination Path: Enter the full path to the destination directory. This is the Oracle home. If the directory does not exist, the installer creates it. To create the directory beforehand, create it as the oracle user; do not create it as the root user.
Example: /private/oracle/OH_apptier_10_1_1
Click Next.

Installing Oracle Calendar Server in High Availability Environments
Installing Oracle Collaboration Suite in High Availability Environments 10-23
7. Specify Hardware Cluster Installation Mode
(Advanced installation only)
This screen appears only if the computer is part of a hardware cluster.
When you are installing Oracle Collaboration Suite Applications, select Local Installation because hardware cluster is not supported for Oracle Collaboration Suite Applications.
Click Next.
8. Select a Product to Install
(Advanced installation only)
Select Oracle Collaboration Suite Applications 10.1.1.0.2 to install Oracle Collaboration Suite Applications.
If you need to install additional languages, click Product Languages. Refer to Section 1.8 for details.
Click Next.
9. Product-specific Prerequisite Checks
(Advanced installation only)
The installer verifies requirements such as memory, disk space, and operating system version. If any check fails, make the required changes and click Retry. Refer to Chapter 2 for the list of hardware and software requirements.
Click Next.
10. Select Components to Configure
(Advanced installation only)
Select the components that you would like to configure during the installation. The selected components will automatically start at the end of the installation.
Note: You can also configure any component after installation. Refer to Section 8.7 for more information.
Click Next.
11. Register with Oracle Internet Directory
(Advanced installation only)
Host: Enter the name of the computer where Oracle Internet Directory is running.
Port: Enter the port number at which Oracle Internet Directory is listening. If you do not know the port number, refer to Section 8.5.
Use SSL to connect to Oracle Internet Directory: Select this option if you want Oracle Collaboration Suite components to use only SSL to connect to Oracle Internet Directory.
Click Next.
12. Specify UserName and Password for Oracle Internet Directory
(Advanced installation only)
Username: Enter the user name to use to log in to Oracle Internet Directory.
Password: Enter the user password.
Click Next.
Note: Use cn=orcladmin as the user name if you are the Oracle Internet Directory Superuser.
13. OracleAS Metadata Repository
(Advanced installation only)
Database Connection String: Select the OracleAS Metadata Repository that you want to use for this Applications tier instance. The installer will register this instance with the selected OracleAS Metadata Repository.
Click Next.
14. Select Database for Components
(Advanced installation only)
This screen shows the database to be used for each of the components that were earlier selected in the "Select Components to Configure" screen.
Click Next.
Note: If multiple instances of Oracle Collaboration Suite Databases are available in Oracle Internet Directory, then you must click on the Database Name column and then select the correct database for each component from the drop-down list. However, when you click Next to go to the next screen, the selection might not be retained. To ensure that the selection is retained, you must click the Database Name column again after selecting the required database for each component.
Table 10–5 (Cont.) Installing Oracle Calendar Server in a Cold Failover Cluster
Step Screen Action

Installing Oracle Calendar Server in High Availability Environments
10-24 Oracle Collaboration Suite Installation Guide
10.3.3.2 Performing the Postinstallation StepsYou might have to perform the postinstallation steps for the following problems:
■ About the chmod Warning While the root.sh Script Is Running
About the chmod Warning While the root.sh Script Is RunningWhile the root.sh script is running, you might get a chmod: warning. This warning appears because corresponding set-ID is disabled on emtgtctl2 because set-ID requires the execute permission.
Ignore the warning and continue with the installation process.
10.3.3.3 Installing Oracle Collaboration Suite ApplicationsYou can install and run the Applications tiers on other nodes (nodes that are not running Infrastructure). During installation, you set up the Applications tiers to use services from the Oracle Collaboration Suite 10g Infrastructure installed on the shared storage device.
15. Specify Port Configuration Options
(Advanced installation only)
Select the method in which you want the ports to be configured for Oracle Collaboration Suite.
Click Next.
Note: If you manually configure the ports, then you must specify the port values for each port.
16. Specify Administrative Password and Instance Name
(Advanced installation only)
Instance Name: Specify the name of the OracleAS instance for the Oracle Collaboration Suite administrative accounts.
Administrative Password: Specify the initial password for the Oracle Collaboration Suite administrative accounts.
Confirm Password: Confirm the password.
Click Next.
17. Oracle Calendar Server Host Alias
(Advanced installation only)
Host or Alias: Specify either the host address or the alias of the Calendar server instance.
Click Next.
Note: Oracle recommends that you use alias in place of host name if later you want to move the calendar server instance or change the host name. Specify the host name if an alias is not configured.
18. Summary Verify your selections and click Install.
19. Install Progress This screen displays the progress of the installation.
20. Run root.sh Note: Do not run the root.sh script until this dialog appears.
1. When you see this dialog, run the root.sh script in a different shell as the root user. The script is located in the Oracle home directory of this instance.
2. Click OK.
21. Configuration Assistants This screen shows the progress of the configuration assistants. Configuration assistants configure components.
22. End of Installation Click Exit to quit the installer.
Table 10–5 (Cont.) Installing Oracle Calendar Server in a Cold Failover Cluster
Step Screen Action

Installing in High Availability Environments: Single Cluster Architecture 11-1
11Installing in High Availability Environments:
Single Cluster Architecture
This chapter contains the following sections:
■ Section 11.1, "Summary of Installation Steps"
■ Section 11.2, "Installing Oracle Collaboration Suite Single Cluster Architecture"
11.1 Summary of Installation StepsThe order for the installation of Oracle Collaboration Suite Single Cluster Architecture is as follows:
1. Install Oracle Cluster Ready Services. This is a prerequisite for the installation of Oracle Collaboration Suite Database in an Oracle Real Application Clusters database.
Apply the Oracle Cluster Ready Services 10.1.0.4.2 Patchset for your platform. The Oracle Cluster Ready Services 10.1.0.4.2 Patchset for your platform is located on the Oracle Database 10g Patchset (10.1.0.4.2) for Solaris Operating System (SPARC) DVD.
2. Install Oracle Collaboration Suite Database on RAC.
3. Configure load balancers for the Identity Management tier appropriately.
4. Install Identity Management on high availability nodes. The virtual server name of the load balancer must be specified in the Specify LDAP Virtual Host and Ports and the Specify HTTP Load Balancer Host and Ports screens during installation.
5. Run OCSdbSchemaReg.sh script on a database node. This script registers the database with Oracle Internet Directory and runs the component Configuration Assistants that create schema objects for each Oracle Collaboration Suite component.
6. Install Oracle Calendar Server in Cold Failover Cluster Configuration. It must use a virtual host name, such as vhost.mydomain.com. Install the oraInventory directory and ORACLE_HOME on a shared device that can be mounted to the other node for a cold failover.
7. Install Oracle Collaboration Suite Applications (without Oracle Calendar Server).
11.2 Installing Oracle Collaboration Suite Single Cluster Architecture This section contains the following topics:
■ Section 11.2.1, "Installing and Applying Patch to Oracle Cluster Ready Services"

Installing Oracle Collaboration Suite Single Cluster Architecture
11-2 Oracle Collaboration Suite Installation Guide
■ Section 11.2.2, "Installing the Oracle Collaboration Suite Database on RAC"
■ Section 11.2.3, "Configuring Load Balancers for Identity Management"
■ Section 11.2.4, "Installing Identity Management on High Availability Nodes"
■ Section 11.2.5, "Register the Oracle Collaboration Suite Database with Oracle Internet Directory and Execute Component Database Configuration Assistants"
■ Section 11.2.6, "Installing Oracle Calendar Server"
■ Section 11.2.7, "Installing the First Instance of Oracle Collaboration Suite Applications (without Oracle Calendar Server)"
■ Section 11.2.8, "Configuring the First Oracle Collaboration Suite Applications Tier with a Load Balancer"
■ Section 11.2.9, "Installing Subsequent Instance of Oracle Collaboration Suite Applications"
■ Section 11.2.10, "Post Installation Steps for Subsequent Instances of Oracle Collaboration Suite Applications to Work with the Load Balancer"
11.2.1 Installing and Applying Patch to Oracle Cluster Ready ServicesThis section explains the installation steps for Oracle Cluster Ready Services. It also explains the steps involved in applying the patch to Oracle Cluster Ready Services.
11.2.1.1 Installing Oracle Cluster Ready ServicesPerform the steps listed in Table 11–1 to install Oracle Cluster Ready Services.
For Installation steps for Cluster Ready Services, refer to the Oracle Real Application Clusters Installation and Configuration Guide at
http://otn.oracle.com/pls/db10g/portal.portal_demo3?selected=16
Install the Oracle Cluster Ready Services software from the Oracle Collaboration Suite Supplemental DVD.
Table 11–1 Installing Oracle Cluster Ready Services
Step Screen Action
1. Log in as the oracle user and set the ORACLE_BASE environment variable to specify the Oracle base directory that you created previously. For example:
/u01/app/oracle
2. Set the ORACLE_HOME environment variable to specify the CRS home directory that you created previously. For example:
/u01/crs/oracle/product/10.1.0/crs_1
3. Run the runInstaller command from the top-level directory of the Oracle Cluster Ready Services Release 1 CD-ROM or the crs directory on the DVD-ROM. These are separate CD-ROMs and DVD-ROMs that contain the Cluster Ready Services software.
4. Welcome page Click Next.

Installing Oracle Collaboration Suite Single Cluster Architecture
Installing in High Availability Environments: Single Cluster Architecture 11-3
5. Specify Inventory Directory and Credentials
(Advanced installation only)
This screen appears only if this is the first installation of any Oracle product on this computer.
Enter the full path for the inventory directory: Enter a full path to a directory for the installer files. Enter a directory that is different from the Oracle home directory for the product files.
Example: /private/oracle/oraInventory
Click OK.
6. UNIX Group Name
(Advanced installation only)
This screen appears only if this is the first installation of any Oracle product on this computer.
Enter the name of the operating system group to have write permission for the inventory directory.
Example: dba
Click Next.
7. Run orainstRoot.sh
(Advanced installation only)
This screen appears only if this is the first installation of any Oracle product on this computer.
Run the orainstRoot.sh script in a different shell as the root user. The script is located in the oraInventory directory.
Click Continue.
8. Specify File Locations
(Advanced installation only)
Enter the full path of the Source directory in the Path field for Source, if required.
Name: Enter a name to identify this Oracle home. The name cannot contain spaces, and has a maximum length of 16 characters.
Example: OH_apptier_10_1_1
Destination Path: Enter the full path to the destination directory. This is the Oracle home. If the directory does not exist, the installer creates it. To create the directory beforehand, create it as the oracle user; do not create it as the root user.
Example: /private/oracle/OH_apptier_10_1_1
Click Next.
9. Language Selection
(Advanced installation only)
Select the required language from the Available Languages list and add it to the Selected Languages list.
Click Next.
10. Cluster Configuration
(Advanced installation only)
Cluster Name: Specify the cluster name.
Specify the host name under Public Node Name. Similarly, specify the private name under Private Node Name. These names will be used to interconnect the node names within the cluster.
Note: The private name cannot be the same as the public name. However, the private name can be an IP address.
Click Next.
11. Specify Network Interface Usage
(Advanced installation only)
Select the interface name, subnet, and interface type for the node in the cluster from the respective drop-down list.
The interface that you mark private will only be used for RAC internode traffic.
Note: If there is more than one subnet associated with an interface, then specify the subnet that you want to associate with the interface type.
Table 11–1 (Cont.) Installing Oracle Cluster Ready Services
Step Screen Action

Installing Oracle Collaboration Suite Single Cluster Architecture
11-4 Oracle Collaboration Suite Installation Guide
11.2.1.2 Applying Oracle Cluster Ready Services 10.1.0.4.2 PatchsetAfter installing Oracle Cluster Ready Services, you must apply Oracle Cluster Ready Services 10.1.0.4.2 Patchset. The Oracle Cluster Ready Services 10.1.0.4.2 Patchset for your platform is located on the Oracle Database 10g Patchset (10.1.0.4.2) for Solaris Operating System (SPARC) DVD.
The steps to do so are listed in Table 11–2.
11.2.2 Installing the Oracle Collaboration Suite Database on RACTo install Oracle Collaboration Suite Database on clustered hardware, follow the steps listed in Table.
12. Oracle Cluster Registry
(Advanced installation only)
Specify OCR Location: Specify the shared raw device or the cluster file system file that will be visible to all nodes of the cluster.
Note: At least 100 MB of disk space is required for the OCR.
Click Next.
13. Voting Disk
(Advanced installation only)
Enter voting disk file name: Specify the raw device or the cluster file system file for voting disk that will be visible to all nodes of the cluster.
Click Next.
Note: At least 20 MB of disk space is required for the OCR.
14. Summary Verify your selections and click Install.
15. Install Progress This screen displays the progress of the installation.
16. Run root.sh Note: Do not run the root.sh script until this dialog box appears.
1. When you see this dialog box, run the root.sh script in a different shell as the root user. The script is located in this instance Oracle home directory.
2. Click OK.
17. Configuration Assistants This screen shows the progress of the configuration assistants. Configuration assistants configure components.
18. End of Installation Click Exit to quit the installer.
Table 11–2 Installing Oracle Cluster Ready Services
Step Screen Action
1. Welcome Click Next.
2. Specify File Locations Enter the full path of the Source directory in the Path field for Source, if required.
Destination Path: Enter the full path to the destination directory. This is the Oracle home.
Both source and destination will be same as that provided during the installation of Oracle Cluster Ready Services.
3. Selected Nodes Verify the nodes listed in the Node Names list and click Next.
4. Summary Verify your selections and click Install.
5. End of Installation Click Exit to quit the installer.
Table 11–1 (Cont.) Installing Oracle Cluster Ready Services
Step Screen Action
Installing Oracle Collaboration Suite Single Cluster Architecture
Installing in High Availability Environments: Single Cluster Architecture 11-5
11.2.2.1 Prerequisites for Selecting the Types of RAC storageThe following table shows the storage options supported for storing Oracle Cluster Ready Services (CRS) files, Oracle Database files, and Oracle Database recovery files. Oracle Database files include datafiles, control files, redo log files, the server parameter file, and the password file. Oracle CRS files include the Oracle Cluster Registry (OCR) and the CRS voting disk.
For all installations, you must choose the storage option that you want to use for Oracle CRS files and Oracle Database files. If you want to enable automated backups during the installation, you must also choose the storage option that you want to use for recovery files (the flash recovery area). You do not have to use the same storage option for each file type.
Use the following guidelines when choosing the storage options that you want to use for each file type:
■ You can choose any combination of the supported storage options for each file type as long as you satisfy any requirements listed for the chosen storage options.
■ Oracle recommends that you choose ASM as the storage option for database and recovery files.
■ For Standard Edition installations, ASM is the only supported storage option for database or recovery files.
■ You cannot use Automatic Storage Management to store Oracle CRS files, because these files must be accessible before any Oracle instance starts.
11.2.2.2 Review Recommendations for Automatic Storage Management (ASM)If you plan to use ASM instances for the OracleAS Metadata Repository database, consider these recommendations:
■ If you plan to use ASM with Oracle Database instances from multiple database homes on the same node, then you should run the ASM instance from an Oracle home that is different from the database homes.
■ The ASM home should be installed on every cluster node. This prevents the accidental removal of ASM instances that are in use by databases from other homes during the deinstallation of a database Oracle home.
Storage Option
File Types Supported
CRS Database Recovery
Automatic Storage Management No Yes Yes
Cluster file system
Note: Requires a supported cluster file system
Yes Yes Yes
NFS file system
Note: Currently supported only with Fujitsu PRIMECLUSTER and a certified NAS device (SPARC only)
Yes Yes Yes
Shared raw logical volumes (SPARC only) Yes Yes No
Shared raw partitions Yes Yes No

Installing Oracle Collaboration Suite Single Cluster Architecture
11-6 Oracle Collaboration Suite Installation Guide
11.2.2.3 Installation TasksTo install Oracle Collaboration Suite Database on RAC, follow the steps listed in Table 11–3.
Table 11–3 Installing Oracle Collaboration Suite Database
Step Screen Action
1. Welcome Click Next.
2. Specify File Locations Enter a name and path for the new Oracle home.
This new Oracle home will be the destination Oracle home for your Oracle Collaboration Suite Database.
Click Next.
3. Specify Hardware Cluster Installation Mode
Select Cluster Installation and the nodes where you want to install the Oracle software. The local node will always be selected.
Click Next.
4. Select a Product to Install Select Oracle Collaboration Suite Infrastructure 10.1.1.0.2.
Click Next.
5. Select Installation Type Select Collaboration Suite Database.
Click Next.
6. Product-specific Prerequisite Checks
Make sure all the checks complete successfully.
Click Next.
7. Database Creation Select Yes for Do you want to create a new database at this time?
Click Next.
8. Oracle Collaboration Suite Database Registration
Select No for Do you want to register the information store at this time?
Click Next.
9. Specify Database Identification
Enter the global database name and the SID that you want to use for this install in the Global Database Name and SID fields.
Click Next.
10. Specify Database Management Option
Select Use Grid Control for Database Management or Use Database Control for Database Management.
Click Next.
11. Specify Database File Storage Option
Select Automated Storage Management (ASM).
Click Next.
12. Specify Backup and Recovery Options
Select Do not enable Automated Backups. Oracle recommends that you disable automated backup. Note that if you enable automated backup, then this option will only backup the Oracle Collaboration Suite Database and not any other Oracle Collaboration Suite files.
Click Next.
13. Specify Database Schema Passwords
Enter password for each accounts or use the same password for all the accounts.
Click Next.
14. Summary Make sure all of the settings and choices are correct for your installation.
Click Install.
15. Install Progress This screen displays the progress of the installation.

Installing Oracle Collaboration Suite Single Cluster Architecture
Installing in High Availability Environments: Single Cluster Architecture 11-7
11.2.2.4 Postinstallation TasksThe postinstallation tasks involve troubleshooting any installation errors.
11.2.2.4.1 Troubleshooting the Installation Errors You might have to perform the postinstallation step to solve the following problem.
Oracle Collaboration Suite Database with ASM install fails at DBCA with ORA-15018 and ORA-15031. To resolve this error, download and replace the dbca.jar file in ORACLE_HOME/assistants/dbca/jlib before running root.sh.
11.2.3 Configuring Load Balancers for Identity ManagementThis section explains the implementation of load balancing for Identity Management in a high-availability environment.
11.2.3.1 Prerequisites for Installing Identity Management on High-Availability NodesThis section discusses the prerequisites for the installation of Identity Management on high-availability nodes.
11.2.3.1.1 Configuring the load balancer A load balancer should be configured to detect service down on a node and automatically stop traffic to that node. Also, the load balancer is recommended to be in a fault tolerant mode. This section provides instructions for configuring a load balancer for Identity Management.
To configure a load balancer for OracleAS Cluster (Identity Management), perform the following steps:
1. Verify that the load balancer virtual server name you select does not contain the physical hostnames of the nodes in the Identity Management.
When the installer copies files to different nodes in the Identity Management, it replaces the current hostname in the files with the hostname of the target node. Ensure that the load balancer's virtual server name does not contain the hostnames of the nodes in the cluster, or the installer might change the virtual server name of the load balancer as well.
For example, if you are installing on nodes named rac-1 and rac-2, be sure that the load balancer virtual server name does not contain "rac-1" or "rac-2". When the installer is installing files to rac-2, it searches for the string "rac-1" in the files and replaces it with "rac-2". If the load balancer's virtual server name happens to be
16. Run root.sh Note: Do not run the root.sh script until this dialog box appears.
1. When you see this dialog box, run the root.sh script in a different shell as the root user. The script is located in the Oracle home directory of this instance.
2. Click OK.
17. The Configuration Assistants
This screen shows the progress of the configuration assistants.
1. Oracle Net Configuration Assistant
2. Oracle Database Configuration Assistant
18. End of Installation Click Exit to quit the installer.
Table 11–3 (Cont.) Installing Oracle Collaboration Suite Database
Step Screen Action

Installing Oracle Collaboration Suite Single Cluster Architecture
11-8 Oracle Collaboration Suite Installation Guide
LB-rac-1x, the installer sees the string "rac-1" in the name and replaces it with "rac-2", thus mangling the virtual server name to LB-rac-2x.
2. Configure your load balancer with virtual server names and associated ports as follows:
a. Configure a virtual server name for LDAP connections. For this virtual server, you must configure one port for SSL connections and the other for non-SSL connections.
b. Configure a virtual server name for HTTP connections. For this virtual server, you must configure one port for SSL connections and the other for non-SSL connections.
c. Configure your LDAP server to direct response to the first node initially. This procedure applies only to the LDAP virtual server configured on the load balancer. Note that this procedure applies only to the LDAP virtual server configured on your load balancer. This does not apply to the HTTP virtual server configured on the load balancer.
d. The installer will prompt you for the virtual server names and port numbers.
3. After you complete installation on a node, then you can add that node to the virtual server. For example, if you have three nodes, then perform the following steps:
a. Configure the LDAP virtual server to direct requests to node 1 only.
b. Install Identity Management components on node 1.
c. Install Identity Management components on node 2.
d. Add node 2 to the LDAP virtual server.
e. Install Identity Management components on node 3.
f. Add node 3 to the LDAP virtual server.
4. Set up cookie persistence for HTTP traffic on the load balancer. Specifically, set up cookie persistence for URIs starting with /oiddas/. This is the URI for Oracle Delegated Administration Services. If your load balancer does not allow you to set cookie persistence at the URI level, then set the cookie persistence for all HTTP traffic. In either case, set the cookie to expire when the browser session expires. Refer to your load balancer documentation for details.
5. To configure the load balancer for automatic monitoring of the Oracle Internet Directory and OracleAS Single Sign-On, Oracle Delegated Administration Services, set up monitors for the following:
■ LDAP port
■ LDAP SSL port
■ HTTP or HTTPS listen port (depending on the deployment type)
It is recommended that these monitors use the respective protocols to monitor the services. That is LDAP for the LDAP port, LDAP over SSL for the LDAP SSL port, and HTTP/HTTPS for the web server port. If the load balancer does not offer one or all of these monitors, consult the load balancer documentation for details on the best method to set up the load balancer.
11.2.3.1.2 Synchronize the System Clocks on All Nodes Identity Management cluster nodes must all have their clocks synchronized for the Identity Management cluster to function properly.

Installing Oracle Collaboration Suite Single Cluster Architecture
Installing in High Availability Environments: Single Cluster Architecture 11-9
11.2.4 Installing Identity Management on High Availability NodesThis section describes how to install Identity Management on high availability nodes.
11.2.4.1 Installing First Instance of Identity ManagementTo install first instance of Identity Management, follow the steps listed in Table 11–4.
Table 11–4 Installing First Instance of Identity Management
Step Screen Action
1. Welcome Click Next.
2. Specify File Locations Enter a name and path for the new Oracle home.This new Oracle home will be the destination Oracle home for Identity Management.
Click Next.
3. Specify Hardware Cluster Installation Mode (optional)
Select Local Installation.
This screen will only show up if you are installing Identity Management on a cluster.
Click Next.
4. Select a Product to Install Select Oracle Collaboration Suite Infrastructure 10.1.1.0.2.
Click Next.
5. Select Installation Type Select Identity Management.
Click Next.
6. Product-specific Prerequisite Checks
Make sure all the checks complete successfully.
Click Next.
7. Select Configuration Options
Select Oracle Internet Directory.
Select OracleAS Single Sign-On.
Select OracleAS Delegated Administration Services.
Select OracleAS Directory Integration and Provisioning.
Do not select OracleAS Certificate Authority (OCA).
Select High Availability and Replication.
Click Next.
8. Specify repository Username: Enter the username to use to log in to the Oracle Collaboration Suite Database. The user must have DBA privileges.
Password: Enter the user password.
Hostname and Port: Enter the names of all the nodes where the Oracle Collaboration Suite Database is running and the port numbers.
Use the format:
Host1.domain.com:port1,Host2.domain.com:port2,…
Service Name: Enter the service name of the database. Note that the service name must include the database domain name.
Click Next.
9. Select High Availability or Replication Option
Select OracleAS Cluster (Identity Management).
Click Next.
10. Specify New Oracle Application Server Cluster Name
Specify a cluster name you want to create for the OracleAS Cluster (Identity Management) in the New Oracle Application Server Cluster Name field.
Click Next.

Installing Oracle Collaboration Suite Single Cluster Architecture
11-10 Oracle Collaboration Suite Installation Guide
11.2.4.2 Installing Subsequent Instance of Identity ManagementBefore installing the subsequent instance of Identity Management, you must perform the preinstallation tasks.
11. Specify Namespace in Internet Directory
Enter a new namespace for Oracle Internet Directory or select the Suggested Namespace:
dc=us,dc=oracle,dc=com
Click Next.
12. Specify LDAP Virtual Host and Ports
Hostname: Enter the fully qualified virtual server name of the LDAP virtual server configured on your load balancer.
SSL Port: Enter the SSL port number for Oracle Internet Directory.
Non-SSL Port: Enter the port number for Oracle Internet Directory.
Click Next.
13. Specify HTTP Load Balancer Host and Ports
HTTP Listener: Port: Enter the port number that you want Oracle HTTP Server to listen on.
Enable SSL: Select this option if you want to configure Oracle HTTP Server for SSL on this port.
HTTP Load Balancer: Hostname: Enter the name of the HTTP virtual server configured on your load balancer.
HTTP Load Balancer: Port: Enter the port of the HTTP virtual server.
Enable SSL: Select this option if this port is for SSL communications only.
Click Next.
14. Specify Port Configuration Options
Select Automatic Port Selection or Manual and enter the port numbers for.
■ Oracle HTTP Server Port
■ Oracle HTTP Server SSL port
Click Next.
This screen is an M12c regression. The fix will be in M13.
15. Guest Account Password Enter the password for the orclguest account.
Click Next.
16. Specify Instance Name and ias_admin Password
Instance Name: Enter a name for this Identity Management instance.
ias_admin Password and Confirm Password: Set the password for the ias_admin user. This is the administrative user for the instance.
Click Next.
17. Summary Verify your selection and click Install.
18. Install Progress This screen displays the progress of the installation.
19. Run root.sh Note: Do not run the root.sh script until this dialog box appears.
1. When you see this dialog box, run the root.sh script in a different shell as the root user. The script is located in the Oracle home directory of this instance.
2. Click OK.
20. The Configuration Assistant
This screen shows the progress of the configuration assistants.
21. End of Installation Click Exit to quit the installer.
Table 11–4 (Cont.) Installing First Instance of Identity Management
Step Screen Action

Installing Oracle Collaboration Suite Single Cluster Architecture
Installing in High Availability Environments: Single Cluster Architecture 11-11
Preinstallation TasksThe preinstallation tasks for the installation of subsequent instance of Identity Management are as follows:
■ Please ensure that the system time on this Identity Management node is in sync with the time on the other Identity Management nodes that are part of this Oracle Application Server Cluster (Identity Management) configuration. Failure to ensure this may result in unwanted instance failovers, inconsistent operational attributes in directory entries and potential inconsistent behavior of password state policies.
■ To install the current OracleAS (Identity Management) node correctly, setup your load balancer LDAP virtual server to direct requests to any existing OracleAS Cluster (Identity Management) node that is already running. After you complete the installation on this node, then you can add it to the load balancer LDAP virtual server.
Installation TasksTo install the subsequent instance of Identity Management, follow the steps listed in Table 11–5.
Table 11–5 Installing Subsequent instance of Identity Management
Step Screen Action
1. Welcome Click Next.
2. Specify File Locations Enter a name and path for the new Oracle home.This new Oracle home will be the destination Oracle home for your Identity Management.
Click Next.
3. Specify Hardware Cluster Installation Mode (optional)
Select Local Installation.
This screen will only show up if you are installing Oracle Collaboration Suite Identity Management on a cluster.
Click Next.
4. Select a Product to Install Select Oracle Collaboration Suite Infrastructure 10.1.1.0.2.
Click Next.
5. Select Installation Type Select Identity Management.
Click Next.
6. Product-specific Prerequisite Checks
Make sure all the checks complete successfully.
Click Next.
7. Select Configuration Options
Select Oracle Internet Directory.
Select OracleAS Single Sign-On.
Select OracleAS Delegated Administration Services.
Select OracleAS Directory Integration and Provisioning.
Do not select OracleAS Certificate Authority (OCA).
Select High Availability and Replication.
Click Next.

Installing Oracle Collaboration Suite Single Cluster Architecture
11-12 Oracle Collaboration Suite Installation Guide
8. Specify repository Username: Enter the username to use to log in to the Oracle Collaboration Suite Database. The user must have DBA privileges.
Password: Enter the user password.
Hostname and Port: Enter the names of all the nodes where the Oracle Collaboration Suite Database is running and the port numbers.
Use the format:
Host1.domain.com:port1,Host2.domain.com:port2,…
Service Name: Enter the service name of the database. Note that the service name must include the database domain name.
Click Next.
Warning: Please ensure that the system time on this Identity Management Node is in sync with the time on other Identity Management Nodes that are part of this Oracle Application Server Cluster (Identity Management) configuration. Failure to ensure this may result in unwanted instance failovers, inconsistent operational attributes in directory entries and potential inconsistent behavior of password state policies.
Click OK.
9. Specify Existing OracleAS Cluster Name.
Specify an existing OracleAS Cluster (Identity Management) name for the current instance to join. The cluster was created as part of the first Identity Management install.
Click Next and enter the ODS password.
10. Specify LDAP Virtual Host and Ports
Hostname: Enter the fully qualified virtual server name of the LDAP virtual server configured on your load balancer.
SSL PORT: Enter the SSL port number for Oracle Internet Directory.
Non-SSL Port: Enter the port number for Oracle Internet Directory.
Click Next.
Warning: To configure the current OracleAS (Identity Management) node correctly, setup your LDAP virtual server to direct requests to any existing OracleAS Cluster (IM) node that is already running. After you complete the installation on this node, then you can add it to the LDAP virtual server.
Click OK.
11. Specify Oracle Internet Directory Login
Username: Enter the username to log in to Oracle Internet Directory. You must log in as the Oracle Internet Directory superuser (cn=orcladmin).
Password: Enter the password for the username
Click Next.
12. Specify HTTP Load Balancer Host and Ports
HTTP Listener: Port: Enter the port number that you want Oracle HTTP Server to listen on.
Enable SSL: Select this option if you want to configure Oracle HTTP Server for SSL on this port.
HTTP Load Balancer: Hostname: Enter the name of the HTTP virtual server configured on your load balancer.
HTTP Load Balancer: Port: Enter the port of the HTTP virtual server.
Enable SSL: Select this option if this port is for SSL communications only.
Click Next.
Table 11–5 (Cont.) Installing Subsequent instance of Identity Management
Step Screen Action

Installing Oracle Collaboration Suite Single Cluster Architecture
Installing in High Availability Environments: Single Cluster Architecture 11-13
11.2.4.3 Postinstallation TasksThe postinstallation tasks involve troubleshooting the installation errors and performing manual postinstallation steps.
11.2.4.3.1 Troubleshooting the Installation Errors You might have to perform the postinstallation steps to solve the following problems:
■ During execution of root.sh script, the following error is encountered:
chmod: WARNING: Corresponding set-ID also disabled on emtgtcl2 since set-ID requires execute permission
Ignore this error.
11.2.4.3.2 Performing Manual Postinstallation steps Ensure that the load balancer is routing requests to all active Identity Management nodes.
11.2.5 Register the Oracle Collaboration Suite Database with Oracle Internet Directory and Execute Component Database Configuration Assistants
The Oracle Collaboration Suite Database needs to be registered in the Oracle Internet Directory for Oracle Collaboration Suite to work correctly. Additionally, the database schemas for each Oracle Collaboration Suite Applications component must be created in the Oracle Collaboration Suite Database. The ORACLE_HOME/install/OCSdbSchemaReg.sh script accomplishes both of these tasks. This script only needs to be run on a single database node.
13. Specify Port Configuration Options
Select Automatic Port Selection or Manual and enter the port numbers for.
■ Oracle HTTP Server Port
■ Oracle HTTP Server SSL port
Click Next.
This screen is an M12c regression. The fix will be in M13.
14. Guest Account Password Enter the password for the orclguest account.
Click Next.
15. Specify Instance Name and ias_admin Password
Instance Name: Enter a name for this Identity Management instance.
ias_admin Password and Confirm Password: Set the password for the ias_admin user. This is the administrative user for the instance.
Click Next.
16. Summary Verify your selection and click Install.
17. Install Progress This screen displays the progress of the installation.
18. Run root.sh Note: Do not run the root.sh script until this dialog box appears.
1. When you see this dialog box, run the root.sh script in a different shell as the root user. The script is located in the Oracle home directory of this instance.
2. Click OK.
19. The Configuration Assistant
This screen shows the progress of the configuration assistants.
20. End of Installation Click Exit to quit the installer.
Table 11–5 (Cont.) Installing Subsequent instance of Identity Management
Step Screen Action

Installing Oracle Collaboration Suite Single Cluster Architecture
11-14 Oracle Collaboration Suite Installation Guide
The OCSdbSchemaReg.sh script is located in ORACLE_HOME/install directory on the Oracle Collaboration Suite Database nodes.
■ Copy ORACLE_HOME/install/OCSdbSchemaReg.ini.sample to ORACLE_HOME/install/OCSdbSchemaReg.ini.
■ Modify the ORACLE_HOME/install/OCSdbSchemaReg.ini script with the appropriate values.
■ Run OCSdbSchemaReg.sh from ORACLE_HOME/install directory in RAC mode by entering multiple hosts in the $hostList option of the OCSdbSchemaReg.ini file from one of the Oracle Collaboration Suite Database machine.
■ Run the following script.
OCSdbSchemaReg.sh –f OCSdbSchemaReg.ini
11.2.6 Installing Oracle Calendar ServerThis section explains the installation and postinstallation tasks for Identity Management.
11.2.6.1 Preinstallation TasksBefore installing Oracle Calendar Server in a Cold Failover Cluster, perform the following procedures:
■ Section 11.2.6.1.1, "Check if the clusterware is running"
■ Section 11.2.6.1.2, "Map the virtual hostname and virtual IP address"
■ Section 11.2.6.1.3, "Set Up a File System That Can Be Mounted from Both Nodes"
11.2.6.1.1 Check if the clusterware is running For Cold Failover Clusters, each node in a cluster should be running hardware vendor clusterware. If you plan to install the Calendar Server on a cluster that is also running Oracle Cluster Ready Services (CRS), you still should have the clusterware from the hardware vendor to support an automated cold failover. Running CRS without the hardware vendor clusterware does not support Cold Failover Clusters.
To check that the clusterware is running, use the command appropriate for your clusterware.
11.2.6.1.2 Map the virtual hostname and virtual IP address Each node in a Cold Failover Clusters configuration is associated with its own physical IP address. In addition, the active node in the cluster is associated with a virtual hostname and virtual IP address. This enables clients to access the Cold Failover Clusters using the virtual hostname.
Virtual hostnames and virtual IP addresses are any valid hostname and IP address in the context of the subnet containing the hardware cluster.
The following example configures a virtual hostname called vhost.mydomain.com, with a virtual IP of 138.1.12.191:
Note: Map the virtual hostname and virtual IP address only to the active node. Do not map the virtual hostname and IP address to both active and secondary nodes at the same time. When you failover, only then do you map the virtual hostname and IP address to the secondary node, which is now the active node.

Installing Oracle Collaboration Suite Single Cluster Architecture
Installing in High Availability Environments: Single Cluster Architecture 11-15
1. Become the root user.
prompt> suPassword: root_password
2. Determine the public network interface.
# ifconfig -alo0: flags=1000849<UP,LOOPBACK,RUNNING,MULTICAST,IPv4> mtu 8232 index 1 inet 127.0.0.1 netmask ff000000lo0:1: flags=1008849<UP,LOOPBACK,RUNNING,MULTICAST,PRIVATE,IPv4> mtu 8232 index 1 inet 172.16.193.1 netmask ffffffffge0: flags=1000843<UP,BROADCAST,RUNNING,MULTICAST,IPv4> mtu 1500 index 2 inet 138.1.13.146 netmask fffffc00 broadcast 138.1.15.255 ether 8:0:20:fd:1:23hme0: flags=1008843<UP,BROADCAST,RUNNING,MULTICAST,PRIVATE,IPv4> mtu 1500 index 3 inet 172.16.1.1 netmask ffffff80 broadcast 172.16.1.127 ether 8:0:20:fd:1:23hme0:2: flags=1008843<UP,BROADCAST,RUNNING,MULTICAST,PRIVATE,IPv4> mtu 1500 index 3 inet 172.16.194.6 netmask fffffffc broadcast 172.16.194.7ge1: flags=1008843<UP,BROADCAST,RUNNING,MULTICAST,PRIVATE,IPv4> mtu 1500 index 4 inet 172.16.0.129 netmask ffffff80 broadcast 172.16.0.255 ether 8:0:20:fd:1:23
From the output, ge0 is the public network interface. It is not a loopback interface and not a private interface.
3. Add the virtual IP to the ge0 network interface.
# ifconfig ge0 addif 138.1.12.191 up
"ge0" and the IP address are values specific to this example. Replace them with values appropriate for your cluster.
4. Check that new interface was added:
# ifconfig -alo0: flags=1000849<UP,LOOPBACK,RUNNING,MULTICAST,IPv4> mtu 8232 index 1 inet 127.0.0.1 netmask ff000000lo0:1: flags=1008849<UP,LOOPBACK,RUNNING,MULTICAST,PRIVATE,IPv4> mtu 8232 index 1 inet 172.16.193.1 netmask ffffffffge0: flags=1000843<UP,BROADCAST,RUNNING,MULTICAST,IPv4> mtu 1500 index 2 inet 138.1.13.146 netmask fffffc00 broadcast 138.1.15.255 ether 8:0:20:fd:1:23ge0:1: flags=1000843<UP,BROADCAST,RUNNING,MULTICAST,IPv4> mtu 1500 index 2 inet 138.1.12.191 netmask ffff0000 broadcast 138.1.255.255hme0: flags=1008843<UP,BROADCAST,RUNNING,MULTICAST,PRIVATE,IPv4> mtu 1500 index 3 inet 172.16.1.1 netmask ffffff80 broadcast 172.16.1.127 ether 8:0:20:fd:1:23hme0:2: flags=1008843<UP,BROADCAST,RUNNING,MULTICAST,PRIVATE,IPv4> mtu 1500 index 3 inet 172.16.194.6 netmask fffffffc broadcast 172.16.194.7ge1: flags=1008843<UP,BROADCAST,RUNNING,MULTICAST,PRIVATE,IPv4> mtu 1500 index 4 inet 172.16.0.129 netmask ffffff80 broadcast 172.16.0.255 ether 8:0:20:fd:1:23

Installing Oracle Collaboration Suite Single Cluster Architecture
11-16 Oracle Collaboration Suite Installation Guide
The virtual IP appears in the ge0:1 entry. During installation, when you enter "vhost.mydomain.com" as the virtual hostname in the Specify Virtual Hostname screen, the installer checks that "vhost.mydomain.com" is a valid interface.
On Failover If the active node fails, then the secondary node takes over. If you do not have a clusterware agent to map the virtual IP from the failed node to the secondary node, then you must do it manually. You must remove the virtual IP mapping from the failed node, and map it to the secondary node.
1. On the failed node, if possible, become superuser and remove the virtual IP.
If the failed node fails completely (that is, it does not start), you can skip this step and go to step 2. If the node fails partially (for example, disk or memory problems), and the node is still pingable, you must perform this step.
prompt> suPassword: root_password# ifconfig ge0 removeif 138.1.12.191
"ge0" and the IP address are values specific to this example. Replace them with values appropriate for your cluster.
2. On the secondary node, add the virtual IP to the ge0 network interface.
# ifconfig ge0 addif 138.1.12.191 up
"ge0" and the IP address are values specific to this example. Replace them with values appropriate for your cluster.
3. On the secondary node, check that the new interface was added:
# ifconfig -a...ge0:1: flags=1000843<UP,BROADCAST,RUNNING,MULTICAST,IPv4> mtu 1500 index 2 inet 138.1.12.191 netmask ffff0000 broadcast 138.1.255.255...
11.2.6.1.3 Set Up a File System That Can Be Mounted from Both Nodes Although the hardware cluster has shared storage, you must create a file system on this shared storage such that both nodes of the Cold Failover Clusters can mount this file system. You will use this file system for the following directories:
■ Oracle home directory for the Infrastructure
■ The oraInventory directory
If you are running a volume manager on the cluster to manage the shared storage, refer to the volume manager documentation for steps to create a volume. Once a volume is created, you can create the file system on that volume.
If you do not have a volume manager, you can create a file system on the shared disk directly. Ensure that the hardware vendor supports this, that the file system can be mounted from either node of the Cold Failover Clusters, and that the file system is repairable from either node if a node fails.
To check that the file system can be mounted from either node, do the following steps:
1. Set up and mount the file system from node 1.
2. Unmount the file system from node 1.
3. Mount the file system from node 2 using the same mount point that you used in step 1.

Installing Oracle Collaboration Suite Single Cluster Architecture
Installing in High Availability Environments: Single Cluster Architecture 11-17
4. Unmount it from node 2, and mount it on node 1, because you will be running the installer from node 1.
11.2.6.2 Installation TasksBefore installing Oracle Calendar in a Cold Failover Clusters configuration, make sure that the virtual IP address and host name is enabled on the install node.
To install Oracle Calendar in a Cold Failover Clusters configuration, follow the steps listed in. Table 11–6
Note: Only one node of the Cold Failover Clusters should mount the file system at any given time. File system configuration files on all nodes of the cluster should not include an entry for the automatic mount of the file system upon a node restart or execution of a global mount command. For example, on UNIX platforms, do not include an entry for this file system in /etc/fstab file.
Table 11–6 Installing Oracle Calendar Server in Cold Failover Cluster Configuration
Step Screen Action
1. None Start the installer.
2. Welcome Click Next.
3. Specify Inventory Directory and Credentials
(Advanced installation only)
This screen appears only if this is the first installation of any Oracle product on this computer.
Enter the full path for the inventory directory: Enter a full path to a directory for the installer files. Enter a directory that is different from the Oracle home directory for the product files.
Example: /private/oracle/oraInventory
Click OK.
4. UNIX Group Name
(Advanced installation only)
This screen appears only if this is the first installation of any Oracle product on this computer.
Enter the name of the operating system group to have write permission for the inventory directory.
Example: dba
Click Next.
5. Run orainstRoot.sh
(Advanced installation only)
This screen appears only if this is the first installation of any Oracle product on this computer.
Run the orainstRoot.sh script in a different shell as the root user. The script is located in the oraInventory directory.
Click Continue.

Installing Oracle Collaboration Suite Single Cluster Architecture
11-18 Oracle Collaboration Suite Installation Guide
6. Specify File Locations
(Advanced installation only)
Enter the full path of the Source directory in the Path field for Source, if required.
Name: Enter a name to identify this Oracle home. The name cannot contain spaces, and has a maximum length of 16 characters.
Example: OH_apptier_10_1_1
Destination Path: Enter the full path to the destination directory. This is the Oracle home. If the directory does not exist, the installer creates it. To create the directory beforehand, create it as the oracle user; do not create it as the root user.
Example: /private/oracle/OH_apptier_10_1_1
Click Next.
7. Specify Hardware Cluster Installation Mode
(Advanced installation only)
This screen appears only if the computer is part of a hardware cluster.
When you are installing Oracle Collaboration Suite Applications, select Local Installation because hardware cluster is not supported for Oracle Collaboration Suite Applications.
Click Next.
8. Select a Product to Install
(Advanced installation only)
Select Oracle Collaboration Suite Applications 10.1.1.0.2.
If you need to install additional languages, click Product Languages.
Click Next.
9. Product-specific Prerequisite Checks
(Advanced installation only)
The installer verifies requirements such as memory, disk space, and operating system version. If any check fails, make the required changes and click Retry.
Click Next.
10. Select Components to Configure
(Advanced installation only)
Select Oracle Calendar Server.
Note: You can also configure any component after installation.
Click Next.
11. Register with Oracle Internet Directory
(Advanced installation only)
Host: Enter the LDAP virtual server name.
Port: Enter the non-SSL port number for the LDAP virtual server name.
Use SSL to connect to Oracle Internet Directory: Select this option if you want Oracle Collaboration Suite components to use only SSL to connect to Oracle Internet Directory.
Click Next.
12. Specify UserName and Password for Oracle Internet Directory
(Advanced installation only)
Username: Enter the user name to use to log in to Oracle Internet Directory.
Password: Enter the user password.
Click Next.
Note: Use cn=orcladmin as the user name if you are the Oracle Internet Directory Superuser.
13. OracleAS Metadata Repository
(Advanced installation only)
Select the Oracle Collaboration Suite Database from the list.
Click Next.
Table 11–6 (Cont.) Installing Oracle Calendar Server in Cold Failover Cluster Configuration
Step Screen Action

Installing Oracle Collaboration Suite Single Cluster Architecture
Installing in High Availability Environments: Single Cluster Architecture 11-19
11.2.6.3 Postinstallation tasksThe postinstallation tasks involve troubleshooting the installation errors and performing manual postinstallation steps.
11.2.6.3.1 Troubleshooting the Installation Errors You might have to perform the postinstallation steps to solve the following problems:
■ During execution of root.sh script, the following error is encountered:
chmod: WARNING: Corresponding set-ID also disabled on emtgtcl2 since set-ID requires execute permission
14. Select Database Components
(Advanced installation only)
Component Name: Oracle Calendar Server
Database Name: Name of the Oracle Collaboration Suite Database.
Click Next.
Note: If multiple instances of Oracle Collaboration Suite Databases are available in Oracle Internet Directory, then you must click on the Database Name column and then select the correct database for each component from the drop-down list. However, when you click Next to go to the next screen, the selection might not be retained. To ensure that the selection is retained, you must click the Database Name column again after selecting the required database for each component.
15. Specify Port Configuration Options
(Advanced installation only)
Select Automatic Port Selection or Manual and enter the port numbers for.
■ Web Cache HTTP Listen Port
■ Web Cache HTTP Listen SSL
Click Next.
Note: If you manually configure the ports, then you must specify the port values for each port.
16. Specify Administrative Password and Instance Name
(Advanced installation only)
Instance Name: Enter a name for this Calendar Server instance.
Administrative Password: Set the password for the administrative user. This is the administrative user for the Calendar Server instance.
Confirm Password: Confirm the password.
Click Next.
17. Oracle Calendar Server Host Alias
(Advanced installation only)
Host or Alias: Enter the virtual hostname for the Calendar Server instance.
Click Next.
Note: It is recommended that you use alias in place of host name if later you want to move the calendar server instance or change the host name. Specify the host name if an alias is not configured.
18. Summary Verify your selections and click Install.
19. Install Progress This screen displays the progress of the installation.
20. Run root.sh Note: Do not run the root.sh script until this dialog box appears.
1. When you see this dialog box, run the root.sh script in a different shell as the root user. The script is located in the Oracle home directory of this instance.
2. Click OK.
21. Configuration Assistants This screen shows the progress of the configuration assistants. Configuration assistants configure components.
22. End of Installation Click Exit to quit the installer.
Table 11–6 (Cont.) Installing Oracle Calendar Server in Cold Failover Cluster Configuration
Step Screen Action

Installing Oracle Collaboration Suite Single Cluster Architecture
11-20 Oracle Collaboration Suite Installation Guide
Ignore this error.
11.2.6.3.2 Performing Manual Postinstallation Steps You also have to perform the following additional postinstallation steps:
■ In ORACLE_HOME/ocal/misc/unison.ini file, add dir_connectmodel = ondemand entry under the [DAS] section.
■ Restart Oracle Calendar Server.
ORACLE_HOME/opmn/bin/opmnctl restartproc ias-component=CalendarServer
11.2.7 Installing the First Instance of Oracle Collaboration Suite Applications (without Oracle Calendar Server)
This section describes the installation of the first instance of Oracle Collaboration Suite Applications without Oracle Calendar Server.
Installation StepsTo install first instance of Oracle Collaboration Suite Applications, follow the steps listed in Table 11–7.
Table 11–7 Installing First Instance of Oracle Collaboration Suite Applications
Step Screen Action
1. Welcome Click Next.
2. Specify File Locations Enter a name and path for the new Oracle home. This new Oracle home will be the destination Oracle home for Oracle Collaboration Suite Applications.
Click Next.
4. Select a Product to Install Select Oracle Collaboration Suite Applications 10.1.1.0.2.
Click Next.
5. Product-specific Prerequisite Checks
Make sure all the checks complete successfully.
Click Next.
6. Select Components to Configure
Select Oracle Mail.
Select Oracle Mobile Collaboration.
Select Oracle Content Services.
Do not select Oracle Calendar Server.
Select Oracle Calendar Web Client.
Select Oracle Real-Time Collaboration.
Select Oracle Collaboration Suite Search.
Select Oracle Collaboration Suite Web Access.
Select Oracle Collaborative Portlets.
Select Oracle Workspaces.
Select Oracle Discussions.
Click Next.
7. Register with Oracle Internet Directory
Host: Enter the LDAP virtual server name.
Port: Enter the non-SSL port number for the LDAP virtual server name.
Click Next.

Installing Oracle Collaboration Suite Single Cluster Architecture
Installing in High Availability Environments: Single Cluster Architecture 11-21
8. Specify UserName and Password for Oracle Internet Directory
Username: Enter the username to log onto Oracle Internet Directory. You must log in as the Oracle Internet Directory superuser (cn=orcladmin).
Password: Enter the password for the username.
Click Next.
9. OracleAS Metadata Repository
Select Oracle Collaboration Suite Database from the list.
Click Next.
10. Select Database Components
Component Name: Oracle Mail, Oracle Discussions, Oracle Search, Oracle Real-Time Collaboration, Oracle Collaboration Suite Search, Oracle Workspaces, Oracle Content Services, Oracle Collaboration Suite Web Access
Database Name: Name of the Oracle Collaboration Suite Database.
Click Next.
11. Specify Port Configuration Options
Select Automatic Port Selection or Manual and enter the port numbers for.
■ Web Cache HTTP Listen Port
■ Web Cache HTTP Listen SSL
■ Oracle Mail IMAP4 port
■ Oracle Mail IMAP4 Secure port
■ Oracle Mail POP3 port
■ Oracle Mail POP3 Secure port
■ Oracle Mail SMTP port
■ Oracle Mail NNTP port
■ Oracle Mail NNTP Secure port
Click Next.
12. Specify Administrative Password and Instance Name
Instance Name: Enter a name for this Oracle Collaboration Suite Applications instance.
Administrative Password: Set the password for the administrative user. This is the administrative user for the Oracle Collaboration Suite Applications instance.
Click Next.
13. Specify Oracle Mail Domain Information
Mail Domain: Enter the domain that you want to use for Oracle Mail server.
Click Next.
14. Summary Verify your selection and click Install.
15. Install Progress This screen displays the progress of the installation.
16. Run root.sh Note: Do not run the root.sh script until this dialog box appears.
1. When you see this dialog box, run the root.sh script in a different shell as the root user. The script is located in the Oracle home directory of this instance.
2. Click OK.
17. The Configuration Assistants
This screen shows the progress of the configuration assistants.
18. End of Installation Click Exit to quit the installer.
Table 11–7 (Cont.) Installing First Instance of Oracle Collaboration Suite Applications
Step Screen Action

Installing Oracle Collaboration Suite Single Cluster Architecture
11-22 Oracle Collaboration Suite Installation Guide
11.2.8 Configuring the First Oracle Collaboration Suite Applications Tier with a Load Balancer
You can configure two or more Oracle Collaboration Suite Applications instances in a highly-available deployment by placing a load balancer in front of them. The load balancer publishes a single address for Oracle Collaboration Suite Applications while providing a redundant set of application servers that actually service requests. The load balancer can be configured to detect when one of the OCS Applications instances has failed and can then fail over requests to another instance.
Our configuration is as follows:
■ There are two Oracle Collaboration Suite Applications computers: ocs_apps1.mycompany.com and ocs_apps2.mycompany.com. Both application servers listen on non-SSL port 7777.
■ The Oracle Collaboration Suite Applications computers are configured to use the Single Sign-On server located at im_virtual.mycompany.com.
■ The effective host name of the Oracle Collaboration Suite Applications published to the user is apps_virtual.mycompany.com. A load balancer is configured to listen at this address, on port 80. It has been configured to load balance and fail over user requests between ocs_apps1.mycompany.com and ocs_apps2.mycompany.com.
■ The Single Sign-On server and Directory server are located at im_virtual.mycompany.com.
■ The Oracle Collaboration Suite Database (including Identity Management metadata) is located at ocs_store1.mycompany.com and ocs_store2.mycompany.com (2-node RAC).
11.2.8.1 Configure the Load BalancerTo setup the load balancer to work with the first mid-tier install, ensure that the following is configured:
1. A virtual server name (apps_virtual.mycompany.com) that listens for requests on port 80 and balances them to the Web Cache on Oracle Collaboration Suite Applications tier running on ocs_apps1.mycompany.com on port 7777 (an HTTP listening port).
2. A virtual server name (apps_virtual.mycompany.com) that listens for requests on port 7777 (an HTTP listening port), and balances them to the Web Cache on Oracle Collaboration Suite Applications tier on ocs_apps1.mycompany.com port 7777 (an HTTP listening port). Port 7777 on the load balancer receives the HTTP loop-back requests made by the Parallel Page Engine on ocs_apps1.mycompany.com. This 7777 port also receives requests from the Portal Metadata Repository for web providers design time messages. This configuration may require a Network Address Translation (NAT) rule in the load balancer in order for the loop-back request from the PPE to succeed.
3. A virtual server name (apps_virtual.mycompany.com) that listens for requests on port 9401 (Web Cache Invalidation Port) and balances them to the Web Cache on Oracle Collaboration Suite Applications tier on ocs_apps1.mycompany.com on port 9401 (Web Cache Invalidation Port). Port 9401 on the load balancer receives invalidation messages from the OracleAS Portal Repository when content that is cached in OracleAS Web Cache becomes stale. This configuration might require a NAT rule in the load balancer in order for the invalidation requests from the OracleAS Portal repository to succeed.

Installing Oracle Collaboration Suite Single Cluster Architecture
Installing in High Availability Environments: Single Cluster Architecture 11-23
4. A virtual server name (apps_virtual.mycompany.com) that listens for requests on port 25 (SMTP) and balances them to the Oracle Collaboration Suite Applications tier's SMTP port on ocs_apps1.mycompany.com on port 25 (an SMTP listening port). This virtual server on port 25 (SMTP) should also have simple persistence. Simple Persistence returns a client to the same node to which it connected previously. Simple persistence tracks connections based only on the client IP address.
5. The virtual server name (apps_virtual.mycompany.com) listens for requests on port 143 (Oracle Mail IMAP4 port) and balances them to the Oracle Collaboration Suite Applications tier on ocs_apps1.mycompany.com on port 25 (Oracle Mail IMAP4 port).
For security reason, port 9401 and 7777 on the load balancer should not be visible to external users.
11.2.8.2 Configure the Oracle HTTP Server with the Load BalancerThis step associates the components on which OracleAS Portal depends with load balancer virtual server name and port: apps_virtual.mycompany.com:80 as follows:
1. Access the Oracle Enterprise Manager – Oracle Collaboration Suite Control console.
2. Click the link for the ocs_apps1.mycompany.com installation.
3. Click the HTTP Server link.
4. Click the Administration link.
5. Click Advanced Server Properties.
6. Open the httpd.conf file.
7. Perform the following steps:
a. Add LoadModule certheaders_module directive.
LoadModule certheaders_module libexec/mod_certheaders.so
The LoadModule directives (in particular, the LoadModule rewrite_module directive) must appear in the httpd.conf file at a location preceding the VirtualHost directives. The server must load all modules before it can execute the directives in the VirtualHost container. It is a good idea to create the VirtualHost directives at the end of the httpd.conf file.
b. Add the following lines to create a NameVirtualHost directive and a VirtualHost container for apps_virtual.mycompany.com and port 80.
NameVirtualHost *:7778<VirtualHost *:7778>ServerName apps_virtual.mycompany.comPort 80ServerAdmin [email protected] OnRewriteOptions inherit</VirtualHost>
Note: apps_virtual.mycompany.com listens on 80 for external traffic, on port 7777 for Parallel Page Engine loop-back messages, and port 9401 for invalidation messages, and port 25 for SMTP traffic.

Installing Oracle Collaboration Suite Single Cluster Architecture
11-24 Oracle Collaboration Suite Installation Guide
c. Create a second VirtualHost container for apps_virtual.mycompany.com and port 7777.
<VirtualHost *:7778>ServerName apps_virtual.mycompany.comPort 7777ServerAdmin [email protected] OnRewriteOptions inherit</VirtualHost>
8. Save the httpd.conf file, and restart the Oracle HTTP Server when prompted.
11.2.8.3 Configure the Parallel Page Engine Loop-Back with the Load BalancerIn this step, you configure non-SSL loop-back communication between the load balancer and the Parallel Page Engine on ocs_apps1.mycompany.com.Before you start this configuration, ensure the following:
■ You are able to resolve apps_virtual.mycompany.com from ocs_apps1.mycompany.com such that it contacts the load balancer. To ensure you can resolve apps_virtual.mycompany.com, issue the following command from ocs_apps1.mycompany.com.
nslookup apps_virtual.mycompany.com
The IP address for the load balancer should be returned.
■ You are able to contact port 7777 on apps_virtual.mycompany.com from ocs_apps1.mycompany.com. Issue the following command on ocs_apps1.mycompany.com.
telnet apps_virtual.mycompany.com 7777
Verify that no connection failure message is returned.
To create the loop-back configuration, the steps are as follows:
1. Open the ORACLE_HOME/j2ee/OC4J_Portal/applications/portal/portal/WEB-INF/web.xml file.
2. Locate the Page servlet section.
3. Add the lines shown in bold.
<servlet><servlet-name>page</servlet-name> <servlet-class>oracle.webdb.page.ParallelServlet</servlet-class> <init-param> <param-name>useScheme</param-name> <param-value>http</param-value> </init-param> <init-param> <param-name>usePort</param-name> <param-value>7777</param-value> </init-param></servlet>
4. Save the web.xml file.
5. Issue this command in ORACLE_HOME/dcm/bin to update the DCM repository.
dcmctl updateConfig

Installing Oracle Collaboration Suite Single Cluster Architecture
Installing in High Availability Environments: Single Cluster Architecture 11-25
6. Issue these commands in ORACLE_HOME/opmn/bin to restart the OCS Applications instance.
opmnctl stopallopmnctl startall
11.2.8.4 Modify the Portal Dependency Settings (iasconfig.xml) FileThe Portal Dependency Settings file iasconfig.xml must contain the correct host, port, and farm name to enable access to OracleAS Portal and perform OracleAS Web Cache invalidation. To edit the file to include this information, the steps are as follows:
1. Create a backup copy of the ORACLE_HOME/portal/conf/iasconfig.xml file.
2. Open the ORACLE_HOME/portal/conf/iasconfig.xml file and perform the following steps:
a. Change the existing code as follows:
<IASConfig XSDVersion="1.0"> <IASFarm Name="Farm1.apps_virtual.mycompany.com" Host="apps_virtual.mycompany.com"> <WebCacheComponent ListenPort="80" InvalidationPort="9401" InvalidationUsername="invalidator" InvalidationPassword="welcome1" SSLEnabled="false" AdminPort="9400"/> </IASFarm> <IASInstance Name="ocsapps1.ocs_apps1.mycompany.com" Host="ocs_apps1.mycompany.com"> <WebCacheComponent ListenPort="7777" InvalidationPort="9401" InvalidationUsername="invalidator" InvalidationPassword="@BYGFsTxYCDGjfP5bbcU8MP20d5Tk6zo8tg==" SSLEnabled="false" AdminPort="9400"/> <EMComponent ConsoleHTTPPort="1156" SSLEnabled="false"/> </IASInstance> <IASInstance Name="iAS-1.im_virtual.mycompany.com" Host="im_virtual.mycompany.com"> <OIDComponent AdminPassword="@BUciwzx4JZPU/BOgKalC6ybcCpt3pVbr0w==" AdminDN="cn=orcladmin" SSLEnabled="false" LDAPPort="7389"/> </IASInstance> <PortalInstance DADLocation="/pls/portal" SchemaUsername="portal" SchemaPassword="@Bbronzw4685xLaz+WZP6DKVNVpwJLlYJ1w==" ConnectString="cn=orcl,cn=oraclecontext"> <WebCacheDependency ContainerType="IASFarm" Name="Farm1.apps_virtual.mycompany.com"/> <OIDDependency ContainerType="IASInstance" Name="iAS-1.im_virtual.mycompany.com"/> <EMDependency ContainerType="IASInstance" Name="ocsapps1.ocs_apps1.mycompany.com"/> </PortalInstance></IASConfig>
b. Save the iasconfig.xml file.
c. Encrypt any plain text passwords in the iasconfig.xml configuration file by setting the ORACLE_HOME environment variable, if necessary, and issuing the following command from ORACLE_HOME/portal/conf:
ptlconfig –encrypt

Installing Oracle Collaboration Suite Single Cluster Architecture
11-26 Oracle Collaboration Suite Installation Guide
11.2.8.5 Register the OracleAS Portal URLs with the Load BalancerIn this step, you register the OracleAS Portal URLs using the load balancer virtual server name and port instead of the OracleAS Web Cache hostname and port. Follow the steps in this section to use the OracleAS Portal Configuration Assistant to register the URLs.
1. Ensure that the ORACLE_HOME environment variable is set.
2. Register the URLs using the Portal Dependency Settings tool (available in ORACLE_HOME/portal/conf):
ptlconfig –dad dadname –wc –site
where dadname is the name of the OracleAS Portal Database Access Descriptor.
11.2.8.6 Reset the Oracle Enterprise Manager 10g LinkTo prevent access to Oracle Enterprise Manager 10g from the outside, the link provided by OracleAS Portal must be changed back to point to the internal server. To do this, issue the following command in ORACLE_HOME/portal/conf:
ptlconfig –dad dadname –em
where dadname is the name of the OracleAS Portal Database Access Descriptor.
11.2.8.7 Configure OracleAS Web Cache with the Load BalancerYou must configure a site definition, site alias, and a site-to-server mapping to make OracleAS Web Cache function correctly with the load balancer.
Use the Web Cache Manager, the graphical user interface provided for editing the configuration stored in webcache.xml file.
1. Access the Web Cache Administrator at: http://ocs_apps1.mycompany.com:9400/webcacheadmin. The Web Cache Administrator password dialog box appears.
2. Enter the OracleAS Web Cache administrator password. For the user name, enter ias_admin or administrator, and enter the OracleAS Web Cache administrator password.
3. Click the Site Definitions link in the Origin Servers, Sites and Load Balancing section. The Site Definitions window opens.
4. Click Add Site.
5. Enter the following information (leave other fields blank):
■ Host name: apps_virtual.mycompany.com
■ Port: 80
■ Client-side Certificate: Not required
■ Default Site: Yes
■ Create Alias from Site Name with/without www: No
Note: At installation time, the OracleAS Web Cache administrator password is set to the same password as the ias_admin password. The OracleAS Web Cache administrator password must be identical for all cache cluster members.

Installing Oracle Collaboration Suite Single Cluster Architecture
Installing in High Availability Environments: Single Cluster Architecture 11-27
6. Click Submit.
7. Select the radio button for the site for which the alias will be added (apps_virtual.mycompany.com)
8. Click Add Alias. The Add Alias for Site window opens.
9. Enter apps_virtual.mycompany.com for the host name and 7777 for the port. (7777 is the value for the usePort parameter in the web.xml file in the Parallel Page Engine configuration).
10. Click Submit. The alias is added. An alias is needed in the configuration because Portal sends invalidation messages with the value of the HOST attribute in the invalidation message the same as the site name (in this case, apps_virtual.mycompany.com:80), but OracleAS Web Cache caches the portal content keyed on a host:port combination such as apps_virtual.mycompany.com:7777; thus, the invalidation is not executed. Therefore, it is necessary to define an alias, so that OracleAS Web Cache manages the content caching so that it recognizes apps_virtual.mycompany.com:80 and apps_virtual.mycompany.com:7777 as one and the same, and thereby correctly invalidating OracleAS Portal content, although the content is keyed on a different host:port combination than the site name.
11. Click Add Alias. A window with host name and port fields opens.
12. Enter apps_virtual.mycompany.com for the host name and 80 for the port.
13. Click Submit. The alias is added.
14. Click Apply Changes.
15. Click the Site-to-Server Mapping link in the Origin Servers, Sites, and Load Balancing section. The Site-to-Server Mapping page appears, in which you map the site and site alias to an origin server.
16. Select the first mapping in the table and click Insert Above. The Edit/Add Site-to-Server Mapping page appears.
17. Select the Select From Site Definitions option.
18. Select apps_virtual.mycompany.com.
19. Select ocs_apps1.mycompany.com in the Select Application Web Servers section.
20. Click Submit.
21. Remove unused mappings or entries containing the wild card character *.
22. Click Apply Changes.
23. Click Restart.
11.2.8.8 Reregister mod_ossoThe steps for reregistering mod_osso are as follows:
Note: An alias for port 80 is needed because the HOST header sent by the browser will be apps_virtual.mycompany.com (without a port number appended to it). Since OracleAS Web Cache is listening on the HTTP port, it will assume that the port number is 80 and use this to determine the site-to-server mapping, and for any cache key creation.

Installing Oracle Collaboration Suite Single Cluster Architecture
11-28 Oracle Collaboration Suite Installation Guide
1. Set the ORACLE_HOME environment variable to the current Oracle home.
2. Execute the SSO registration script ORACLE_HOME/sso/bin/ssoreg.
ORACLE_HOME/sso/bin/ssoreg.sh \site_name ocsapps.apps_virtual.mycompany.com \mod_osso_url http://apps_virtual.mycompany.com \config_mod_osso TRUE \oracle_home_path ORACLE_HOME \config_file ORACLE_HOME/Apache/Apache/conf/osso/osso.conf \admin_info cn=orcladmin \virtualhost
A partner application, ocsapps.apps_virtual.mycompany.com, is created.
3. Log on to the OracleAS Single Sign-On Administration page as the Administrator, and use the Administer Partner Applications page to delete the entry for the partner application ocsapp1.ocs_apps1.mycompany.com.
11.2.8.9 Verify Connectivity for Invalidation Messages from the Database to OracleAS Web Cache on ocs_apps1.mycompany.com through the Load BalancerWhen an object is changed in the database, the application metadata repository database sends an invalidation message to Web Cache to invalidate that object if it exists in the cache. Since the target configuration has two instances of OracleAS Web Cache, the invalidation message must be load balanced across both OracleAS Web Cache instances. This is an example of component level load balancing.
Before you proceed with this verification, ensure that messages can be sent from the computer hosting the database to the load balancer. To do this, issue the following command from ocs_store1.mycompany.com and ocs_store2.mycompany.com:
telnet apps_virtual.mycompany.com 9401
Verify that no connection failure message is returned.
11.2.8.10 Enable Monitoring of the Frontend Host and Port Settings of the Load Balancer for OracleAS PortalThe steps to enable monotoring of the host at the front end of the load balancer and port settings for OracleAS Portal are as follows:
1. Open the ORACLE_HOME/sysman/emd/targets.xml file.
2. Locate the OracleAS Portal targets, for example, TYPE="oracle_portal".
3. Edit the PortalListeningHostPort property so that it points to the load balancer. For example: <Property NAME="PortalListeningHostPort" VALUE="http://apps_virtual.mycompany.com:80"/>
4. Save and close targets.xml file.
5. Reload the targets.xml file in the OracleAS Control Console by issuing this command in ORACLE_HOME/bin:
emctl reload
11.2.8.11 Configuring Real-Time Collaboration with Load Balancer
Note: Refer to Section 2.1.1, "Considerations for Real-Time Collaboration".

Installing Oracle Collaboration Suite Single Cluster Architecture
Installing in High Availability Environments: Single Cluster Architecture 11-29
For Real-Time Collaboration, set GlobalWebHost and GlobalWebPort properties to integrate with a load balancer.
A load balancer provides a single published address to the client browser, while distributing requests to multiple Oracle Real-Time Collaboration core component Application tiers that serve the request. It acts as a global Web host for all of the requests.
If you add a load balancer, set the following parameters:
1. GlobalWebHost is the name of the global Web host.
For example, multiple Application tiers could be placed behind a load balancer (ocs_apps1.mycompany.com, ocs_apps2.mycompany.com), but the Web host name you want to have appear in the URL used to join a conference is apps_virtual.mycompany.com.
Default Value: noneValid Value: a load balancer virtual server name.Scope: system, instance
2. GlobalWebPort is the HTTP port of the global Web host.
Default Value: 80Valid Value: Any port IDScope: system, instanceFor example, to reset the global Web host to listen on port 80 for HTTP requests run the following command:
ORACLE_HOME/imeeting/bin/rtcctlrtcctl> setProperty –system true –pname GlobalWebPort –pvalue 80
3. SmtpHost is the name of the SMTP host. To set the smtp host to apps_virtual.mycompany.com, run the following command:
ORACLE_HOME/imeeting/bin/rtcctlrtcctl> setProperty –system true –pname SmtpHost –pvalue "apps_virtual.mycompany.com"
Because the SMTP default port is 25, there is no need to set the SMTP port.
Restart OCS Applications using the following commands:
ORACLE_HOME/opmn/bin/opmnctl stopallORACLE_HOME/opmn/bin/opmnctl startall
11.2.8.12 Updating Oracle Collaboration Suite Service Registry Entries in Oracle Internet Directory to Use the Load BalancerYou can update the Oracle Collaboration Suite registry entries in Oracle Internet Directory by using the Oracle Directory Manager as follows:
Note: Once set, the only way to unset this property is to use the –pvaluenull true option with the SetProperty command. For example, to set the global Web host to apps_virtual.mycompany.com, run the following command:
ORACLE_HOME/imeeting/bin/rtcctlrtcctl> setProperty –system true –pname GlobalWebHost –pvalue "apps_virtual.mycompany.com"

Installing Oracle Collaboration Suite Single Cluster Architecture
11-30 Oracle Collaboration Suite Installation Guide
1. Start the Oracle Directory Manager.
ORACLE_HOME/bin/oidadmin
2. When you start Oracle Directory Manager, it will prompt you for connection information. Enter the following information to connect to your Oracle Internet Directory, typically hosted in the Oracle Collaboration Suite Database on your Oracle Collaboration Suite Infrastructure:
Host: <infrahost.yourdomain.com>Port: 389Username: cn=orcladminPassword: <password>
Port 389 is the default port used by Oracle Internet Directory. If you are using a different port, then enter the correct Oracle Internet Directory port.
If you have configured your Oracle Internet Directory to be accessed using SSL, select the SSL Enabled check box. Otherwise, leave it blank.
3. Select Login to log in to the Oracle Internet Directory. When the connection is successful, the Oracle Internet Directory management screen is displayed.
4. To access the Service Registry, drill down in to the Oracle Internet Directory by selecting the following items in the System Objects pane:
a. Select Entry Management.
b. Select cn=OracleContext.
c. Select cn=Services.
The System Objects pane displays a list of the Oracle Collaboration Suite Applications which have entries in the Service Registry. The Properties tab displays the properties of the cn=Services object.
5. To display URIs stored by each component in the Service Registry, select the component in the System Objects pane. Most components will contain a cn=VirtualServices object. This object contains one or more URIs used by other applications and OracleAS Portal to access that application. Applications store URIs in one or more child objects of the cn=VirtualServices object.
6. After you verify your configuration, update Oracle Collaboration Suite Service Registry entries in Oracle Internet Directory to use the load balancer virtual hostname as follows:
■ Oracle Calendar
dn: cn=OCAS_xxxxx,cn=VirtualServices,cn=Calendar,cn=Services,cn=OracleContextlabeleduri;syncserversecureurllabeleduri:syncserverurllabeleduri;webbaseurl
Note: Oracle Universal Installer seeds the Oracle Internet Directory with objects for every Oracle Collaboration Suite Applications during installation, even if you do not configure and deploy every application. These unconfigured application entries will not contain child objects of their cn=VirtualServices objects. The child objects, and the URIs they store, are created in the Service Registry by each component's Configuration Assistant when it first runs.

Installing Oracle Collaboration Suite Single Cluster Architecture
Installing in High Availability Environments: Single Cluster Architecture 11-31
labeleduri;webserviceurl
■ Oracle Collaborative Workspaces
dn:cn=<DBNAME>,cn=VirtualServices,cn=CollaborativeWorkspaces,cn=Services,cn=OracleContextlabeleduri;adminurllabeleduri;webbaseurllabeleduri:webui
■ Oracle Mail
dn: cn=emailadmin,cn=VirtualServices,cn=Email,cn=Services,cn=OracleContextlabeleduri;adminurl
dn: cn=imap,cn=VirtualServices,cn=Email,cn=Services,cn=OracleContextlabeleduri
dn: cn=smtp,cn=VirtualServices,cn=Email,cn=Services,cn=OracleContextlabeleduri
dn: cn=Webmail,cn=VirtualServices,cn=Email,cn=Services,cn=OracleContextlabeleduri;peopleurllabeleduri;webbaseurlorclraparameter;webbaseurl
dn: cn=webservice,cn=VirtualServices,cn=Email,cn=Services,cn=OracleContextlabeleduri;webservices
■ Oracle Content Services
dn: cn=FILES,cn=VirtualServices,cn=Files,cn=Services,cn=OracleContextlabeleduri;adminurllabeleduri;applicationurllabeleduri;s2swebserviceurllabeleduri;webdavurllabeleduri;webservicesurl
■ Oracle Collaboration Suite Client
dn:cn=IntegratedClient,cn=VirtualServices,cn=OCSClient,cn=Services,cn=OracleContextlabeleduri;baseurllabeleduri;popuplibraryurl
dn: cn=Search,cn=VirtualServices,cn=OCSClient,cn=Services,cn=OracleContextlabeleduri;webbaseurl
■ OracleAS Portal
dn:cn=ReturnToPortalURL,cn=VirtualServices,cn=Portal,cn=Services,cn=OracleContextlabeleduri;

Installing Oracle Collaboration Suite Single Cluster Architecture
11-32 Oracle Collaboration Suite Installation Guide
■ Oracle Discussions
dn:cn=Discussions:<DBNAME>:<MailDomain>,cn=VirtualServices,cn=ThreadedDiscusssions,cn=Services,cn=OracleContextlabeleduri;adminurllabeleduri;rsslabeleduri;webbaseurllabeleduri;webui
■ Oracle Mobile Collaboration
dn: cn=WIRELESS1,cn=VirtualServices,cn=Wireless,cn=Services,cn=OracleContextlabeleduri;adminurllabeleduri;calendarnotificationlistenerurllabeleduri;mobilesetupurllabeleduri;presencewebserviceurl
When you have finished editing the properties of an object, select Apply to save the new values in Oracle Internet Directory. If you decide to reject the changes you have made, select Revert to reset the displayed attributes to those currently stored in the Oracle Internet Directory.
7. Using opmnctl or Oracle Enterprise Manager 10g, restart the Oracle Collaboration Suite Infrastructure and all Oracle Collaboration Suite Applications tiers, to clear caches that may still be storing the old URIs and to load the new URIs you have entered.
Restart Oracle Collaboration Suite Applications using the following commands:
ORACLE_HOME/opmn/bin/opmnctl stopallORACLE_HOME/opmn/bin/opmnctl startall
There is no need to restart the Oracle Collaboration Suite Database.
11.2.8.13 Test the ConfigurationThe steps to test the configuration are as follows:
1. Access OracleAS Web Cache and Oracle HTTP Server through the load balancer with the following URL:
http://apps_virtual.mycompany.com
2. Test the connection to the Oracle Collaboration Suite Database through the load balancer, by accessing the following URL:
Note: In addition to changing the host name to use the load balancer virtual host name, the port should also match the listen port used in Step 1 in Section 11.2.8.1. In this example it was port 80 (the defualt port), which means the port specification can be removed. So, for example, the Oracle Internet Directory labeleduri for the Portal ReturnToPortalURL should change from
http://ocs_apps1.mycompany.com:7778/portal/page?_dad=portal&_schema=PORTAL&_pageid=
to
http://apps_virtual.mycompany.com/portal/page?_dad=portal&_schema=PORTAL&_pageid=

Installing Oracle Collaboration Suite Single Cluster Architecture
Installing in High Availability Environments: Single Cluster Architecture 11-33
http://apps_virtual.mycompany.com/pls/portal/htp.p?cbuf=test
The response should be test. If this succeeds, then the Oracle Collaboration Suite Applications tier can connect to the Oracle Collaboration Suite Database. If this test fails, then examine the Oracle HTTP Server ORACLE_HOME/Apache/Apache/logs/error_log file to determine the cause.
3. Test the OracleAS Portal using following URL (ensure that you can log in):
http://apps_virtual.mycompany.com/pls/portal
Verify that content is being cached in OracleAS Web Cache on ocs_apps1.mycompany.com, using Web Cache Administrator. Under Monitoring, click Popular Requests. Select Cached from the Filtered Objects drop-down list, and click Update.
If you accessed OracleAS Portal, portal content will appear. If there is no portal content, open another browser and log on to OracleAS Portal. Return to the Popular Requests page, and click Update to refresh the page content.
11.2.9 Installing Subsequent Instance of Oracle Collaboration Suite ApplicationsThis section describes the installation of the subsequent instance of Oracle Collaboration Suite Applications without Oracle Calendar Server and postinstallation tasks.
11.2.9.1 Installation TasksTo install the subsequent instance of Oracle Collaboration Suite Applications, follow the steps listed in Table 11–8.
Table 11–8 Installing Subsequent Instance of Oracle Collaboration Suite Applications
Step Screen Action
1. Welcome Click Next.
2. Specify File Locations Enter a name and path for the new Oracle home. This new Oracle home will be the destination Oracle home for Oracle Collaboration Suite Applications.
Click Next.
3. Specify Hardware Cluster Installation Mode (optional)
Select Local Installation. This screen will only show up if you are installing Identity Management on a cluster.
Click Next.
3. Select a Product to Install Select Oracle Collaboration Suite Applications 10.1.1.0.2.
Click Next.
4. Product-specific Prerequisite Checks
Make sure all the checks complete successfully.
Click Next.

Installing Oracle Collaboration Suite Single Cluster Architecture
11-34 Oracle Collaboration Suite Installation Guide
5. Select Components to Configure
Select Oracle Mail.
Select Oracle Mobile Collaboration.
Select Oracle Content Services.
Do not select Oracle Calendar Server.
Select Oracle Calendar Web Client.
Select Oracle Real-Time Collaboration.
Select Oracle Collaboration Suite Search.
Select Oracle Collaboration Suite Web Access.
Do not select Oracle Collaborative Portlets.
Select Oracle Workspaces.
Select Oracle Discussions.
Click Next.
6. Register with Oracle Internet Directory
Host: Enter the LDAP virtual server name.
Port: Enter the non-SSL port number for the LDAP virtual server name.
Click Next.
7. Specify UserName and Password for Oracle Internet Directory
Username: Enter the username to log in to Oracle Internet Directory. You must log in as the Oracle Internet Directory superuser (cn=orcladmin).
Password: Enter the password for the username.
Click Next.
8. OracleAS Metadata Repository
Select Oracle Collaboration Suite Database from the list.
Click Next.
Error: The installation has detected that Oracle Collaborative Portlets has already been configured in the Metadata Repository you have selected. Oracle Collaborative Portlets will be unselected for this configuration.
This screen will only show up if you selected Oracle Collaborative Portlets from the Select Components to Configure screen.
Click Yes.
9. Select Database Components
Component Name: Oracle Mail, Oracle Discussions, Oracle Search, Oracle Real-Time Collaboration, Oracle Collaboration Suite Search, Oracle Workspaces, Oracle Content Services, Oracle Collaboration Suite Web Access
Database Name: Name of the Oracle Collaboration Suite Database.
Click Next.
10. Specify Port Configuration Options
Select Automatic Port Selection or Manual and enter the port numbers for.
■ Web Cache HTTP Listen Port
■ Web Cache HTTP Listen SSL
■ Oracle Mail IMAP4 port
■ Oracle Mail IMAP4 Secure port
■ Oracle Mail POP3 port
■ Oracle Mail POP3 Secure port
■ Oracle Mail SMTP port
■ Oracle Mail NNTP port
■ Oracle Mail NNTP Secure port
Click Next.
Table 11–8 (Cont.) Installing Subsequent Instance of Oracle Collaboration Suite Applications
Step Screen Action

Installing Oracle Collaboration Suite Single Cluster Architecture
Installing in High Availability Environments: Single Cluster Architecture 11-35
11.2.9.2 Postinstallation tasksThe postinstallation tasks involve troubleshooting the installation errors and performing manual postinstallation steps.
11.2.9.2.1 Troubleshooting the Installation Errors You might have to perform the postinstallation steps to solve the following problems:
■ The index.jsp packaged in the welcome.ear has the incorrect Portal URL. In ORACLE_HOME/j2ee/OC4J_OCSClient/applications/welcome/welcome-web/index.jsp change URL portalUrl = new URL("http", request.getServerName(), request.getServerPort(), ""); to URL portalUrl = new URL("http", request.getServerName(), request.getServerPort(), "/pls/portal");
■ Oracle Calendar Home Page cannot be accessed through orclguest account. To resolve this error, the steps are as follows:
1. Stop all fast CGI (FCGI) processes using Oracle OCAS Control (ocasctl). When OCS Application tier is started or stopped using OPMN control (opmnctl), OCAS is not started or stopped because OCAS is not integrated with OPMN.
ORACLE_HOME/ocas/bin/ocasctl -stopall
2. Start the FCGI processes.
ORACLE_HOME/ocas/bin/ocasctl –start –t ochecklet –p 8020 –n 1ORACLE_HOME/ocasctl –start –t ocas –p 8010 –n 5
The default ports are 8010 and 8020. The valid range is 8010-8020.
11. Specify Administrative Password and Instance Name
Instance Name: Enter a name for this Oracle Collaboration Suite Applications instance.
Administrative Password: Set the password for the administrative user. This is the administrative user for the Oracle Collaboration Suite Applications instance.
Click Next.
12. Specify Oracle Mail Domain Information
Local Domain: Select it from the list.
Select the same domain as in the first Oracle Collaboration Suite Applications installation.
Click Next.
13. Summary Verify your selection and click Install.
14. Install Progress This screen displays the progress of the installation.
15. Run root.sh Note: Do not run the root.sh script until this dialog box appears.
1. When you see this dialog box, run the root.sh script in a different shell as the root user. The script is located in the Oracle home directory of this instance.
2. Click OK.
16. The Configuration Assistants
This screen shows the progress of the configuration assistants.
17. End of Installation Click Exit to quit the installer.
Table 11–8 (Cont.) Installing Subsequent Instance of Oracle Collaboration Suite Applications
Step Screen Action

Installing Oracle Collaboration Suite Single Cluster Architecture
11-36 Oracle Collaboration Suite Installation Guide
3. Verify the status of the FCGI processes:
ORACLE_HOME/ocas/bin/ocasctl –status
■ When you log on to Portal as a newly created user, the calendar portlet shows "Service temporarily unable due to maintenance message".
1. Click the Oracle Calendar link and go to the Oracle Calendar view page.
2. Click the Return to Portal link and the porlet should show up correctly.
■ When accessing workspaces, user cannot be found in LDAP directory. To resolve this error, run the following command:
$ORACLE_HOME/opmn/bin/opmnctl restartproc process-type=OC4J_OCSClient
11.2.9.2.2 Performing Manual Postinstallation Steps You also have to perform the following additional postinstallation steps for Oracle Mail and Oracle Mobile Collaboration:
■ For Oracle mail, the steps are as follows:
1. Get the user ID and group ID of the owner of the Oracle Collaboration Suite Applications.
2. Start LISTENER_ES as root, if the port that you are using is a privileged port (< 1024).. Make sure ORACLE_HOME, LD_LIBRARY_PATH and PATH environment variables are set correctly.
ORACLE_HOME/bin/tnslsnr listener_es –user <userid> -group <group_id> &
■ To enable Oracle Mobile Collaboration Calendar notifications, the steps are as follows:
1. Log in to Enterprise Manager. Go to System Components, Wireless, Site Administration.
2. Expand Component Configuration section and click XMS Configuration.
3. Under XMS Center, ensure that Enable XMSC is checked.
4. Go to System Components, Wireless, Notification eng xxxx. Click Enable/Disable link and make sure Notification engine is enabled.
5. Restart the wireless component.
11.2.10 Post Installation Steps for Subsequent Instances of Oracle Collaboration Suite Applications to Work with the Load Balancer
You can configure two or more Oracle Collaboration Suite Applications instances in a highly-available deployment by placing a load balancer in front of them. The load balancer publishes a single address for Oracle Collaboration Suite Applications while providing a redundant st of application servers that actually service requests. The load balancer can be configured to detect when one of the Oracle Collaboration Suite Applications instances has failed and can then fail over requests to another instance.
The details of the configuration are as follows:
■ There are two Oracle Collaboration Suite Applications computers: ocs_apps1.mycompany.com and ocs_apps2.mycompany.com. Both application servers listen on non-SSL port 7777.

Installing Oracle Collaboration Suite Single Cluster Architecture
Installing in High Availability Environments: Single Cluster Architecture 11-37
■ The Oracle Collaboration Suite Applications computers are configured to use the Single Sign-On server located at im_virtual.mycompany.com.
■ The effective host name of the Oracle Collaboration Suite Applications published to the user is apps_virtual.mycompany.com. A load balancer is configured to listen at this address, on port 80. It has been configured to load balance and fail over user requests between ocs_apps1.mycompany.com and ocs_apps2.mycompany.com.
■ The Single Sign-On server and Directory server are located at im_virtual.mycompany.com.
■ The Oracle Collaboration Suite Database (including Identity Management metadata) is located at ocs_store1.mycompany.com and ocs_store2.mycompany.com (2-node RAC).
The postinstallation steps are follows:
1. Enable Portal
2. Configure the Oracle HTTP Server with the Load Balancer
3. Configure the Parallel Page Engine Loop-Back with the Load Balancer
4. Modify the Portal Dependency Settings (iasconfig.xml) File
5. Reregister mod_ossoConfigure OracleAS Web Cache Clusters
6. Configure OracleAS Web Cache ClustersEnable Monitoring of the Frontend Host and Port Settings of the Load Balancer for OracleAS Portal
7. Enable Monitoring of the Frontend Host and Port Settings of the Load Balancer for OracleAS Portal
8. Enable Session Binding on OracleAS Web Cache Clusters
9. Configure Collaborative Portlets
10. Configure Oracle Collaboration Suite Mobile Collaboration
11. Configure Oracle Discussions
12. Test the Configuration
11.2.10.1 Enable PortalThe first task is to configure OracleAS Portal, using the Oracle Enterprise Manager 10g Collaboration Suites Control Console. Follow these steps to configure OracleAS Portal, beginning on the Oracle Collaboration Suite page:
1. Click Configure Component. The Select Component page appears.
2. Select portal from the list.
3. Click Continue. The configuration process may take 10-20 minutes to complete.
Before you continue with the OracleAS Portal application server configuration, ensure that the following is configured:
■ You are able to resolve apps_virtual.mycompany.com from ocs_apps2.mycompany.com, such that it contacts the load balancer. To ensure you can resolve apps_virtual.mycompany.com by running the following command:
nslookup apps_virtual.mycompany.com
The IP address for the virtual server name should be returned.

Installing Oracle Collaboration Suite Single Cluster Architecture
11-38 Oracle Collaboration Suite Installation Guide
■ You are able to contact port 7777 on apps_virtual.mycompany.com from ocs_apps2.mycompany.com. Run the following command on ocs_app2.mycompany.com:
telnet apps_virtual.mycompany.com 7777
Verify that no connection failure message is returned.
11.2.10.2 Configure the Oracle HTTP Server with the Load BalancerThis step associates the components on which OracleAS Portal depends with load balancer virtual server name and port: apps_virtual.mycompany.com:80. The steps to configure the Oracle HTTP Server with the Load Balancer are as follows:
1. Access the Oracle Enterprise Manager – Oracle Collaboration Suite Control console.
2. Click the link for the ocs_apps2.mycompany.com installation.
3. Click the HTTP Server link.
4. Click the Administration link.
5. Click Advanced Server Properties.
6. Open the httpd.conf file.
7. Perform the following steps:
a. Add LoadModule certheaders_module directive.
LoadModule certheaders_module libexec/mod_certheaders.so
b. Add the following lines to create a NameVirtualHost directive and a VirtualHost container for apps_virtual.mycompany.com and port 80.
NameVirtualHost *:7778<VirtualHost *:7778>ServerName apps_virtual.mycompany.comPort 80ServerAdmin [email protected] OnRewriteOptions inherit</VirtualHost>
c. Create a second VirtualHost container for ocs_apps2.mycompany.com and port 7777.
<VirtualHost *:7778>ServerName ocs_apps2.mycompany.comPort 7777ServerAdmin [email protected] OnRewriteOptions inherit
Note: The LoadModule directives (in particular, the LoadModule rewrite_module directive) must appear in the httpd.conf file at a location preceding the VirtualHost directives. The server must load all modules before it can execute the directives in the VirtualHost container. It is a good idea to create the VirtualHost directives at the end of the httpd.conf file.

Installing Oracle Collaboration Suite Single Cluster Architecture
Installing in High Availability Environments: Single Cluster Architecture 11-39
</VirtualHost>
8. Save the httpd.conf file, and restart the Oracle HTTP Server when prompted.
9. Copy the dads.conf file from ocs_apps1.mycompany.com to ORACLE_HOME/Apache/modplsql/conf directory of ocs_apps2.mycompany.com.
11.2.10.3 Configure the Parallel Page Engine Loop-Back with the Load BalancerIn this step, you configure non-SSL loop-back communication between the load balancer and the Parallel Page Engine on ocs_apps1.mycompany.com and ocs_apps2.mycompany.com. If the OracleAS Web Cache on ocs_app1.mycompany.com is down, the Parallel Page Engine can loop back to the OracleAS Web Cache on ocs_apps2.mycompany.com through the load balancer to reach mod_plsql.
The steps to create the loop-back configuration are as follows:
1. Open the ORACLE_HOME/j2ee/OC4J_Portal/applications/portal/portal/WEB-INF/web.xml file.
2. Locate the Page servlet section.
3. Add the lines shown in bold.
<servlet><servlet-name>page</servlet-name> <servlet-class>oracle.webdb.page.ParallelServlet</servlet-class> <init-param> <param-name>useScheme</param-name> <param-value>http</param-value> </init-param> <init-param> <param-name>usePort</param-name> <param-value>7777</param-value> </init-param></servlet>
4. Save the web.xml file.
5. Save the manual configuration changes in the DCM repository by running the following command on ocs_apps2.mycompany.com in ORACLE_HOME/dcm/bin:
dcmctl updateConfig
6. Restart all components on ocs_apps2.mycompany.com by running the following command in ORACLE_HOME/opmn/bin:
opmnctl stopallopmnctl startall
11.2.10.4 Modify the Portal Dependency Settings (iasconfig.xml) FileThe Portal Dependency Settings file iasconfig.xml must contain the correct host, port, and farm name to enable access to OracleAS Portal and perform OracleAS Web Cache invalidation. Follow the steps to edit the file to include this information:
1. Create a backup copy of the ORACLE_HOME/portal/conf/iasconfig.xml file.
Installing Oracle Collaboration Suite Single Cluster Architecture
11-40 Oracle Collaboration Suite Installation Guide
2. Copy the iasconfig.xml file in ocs_apps1.mycompany.com to ORACLE_HOME/portal/conf of ocs_apps2.mycompany.com.
3. Overwrite the file on ocs_apps2.mycompany.com when prompted.
11.2.10.5 Reregister mod_ossoThe steps for reregistering mod_osso are:
1. Back up the ORACLE_HOME/Apache/Apache/conf/osso/conf file.
2. Use the FTP binary mode to copy the osso.conf file of ocs_apps1.mycompany.com to ORACLE_HOME/Apache/Apache/conf of ocs_apps2.mycompany.com.
3. Synchronize the DCM repository with the file by FTP using the following command:
ORACLE_HOME/Apache/Apache/bin/ssotransfer ORACLE_HOME/Apache/Apache/conf/osso/osso.conf
4. Restart the components on ocs_apps2.mycompany.com by running the commands in ORACLE_HOME/opmn/bin of ocs_apps2.mycompany.com:
opmnctl stopallopmnctl startall
5. Log in to the OracleAS Single Sign-On Administration page as the Administrator, and use the Administer Partner Applications page to delete the entry for the partner application ocsapp1.ocs_apps2.mycompany.com.
11.2.10.6 Configure OracleAS Web Cache ClustersTo cluster the OracleAS Web Cache instances, you will perform the configuration steps on ocs_apps1.mycompany.com and propagate them to ocs_apps2.mycompany.com.
From the Oracle Enterprise Manager Collaboration Suite Control Console, you can access the Web Cache Manager, the graphical user interface provided for editing the configuration stored in the webcache.xml file. Start the Oracle Collaboration Suite Applications instance on ocs_apps1.mycompany.com, then follow the steps to access the Web Cache Manager from the System Components page.
1. Access the Web Cache Administrator at the following URL:
http://ocs_apps1.mycompany.com:9400/webcacheadmin
The Web Cache Administrator password dialog box appears.
2. For the user name, enter ias_admin or administrator, and enter the OracleAS Web cache administrator password.
Note: This does not create any new partner applications. It enables the partner application ocsapps.apps_virtual.mycompany.com for ocs_apps1.mycompany.com and ocs_apps2.mycompany.com.

Installing Oracle Collaboration Suite Single Cluster Architecture
Installing in High Availability Environments: Single Cluster Architecture 11-41
The Web Cache Manager page appears.
3. Click Clustering in the Properties section. The Clustering page appears.
4. In the Cluster Members table, click Add. The Add Cache to Cluster page appears.
5. Enter the following information for ocs_apps2.mycompany.com:
Host Name: ocs_apps2.mycompany.comAdmin. Port: 9400Protocol for Admin. Port: HTTPCache Name: ocs_apps2.mycompany.com-WebcacheCapacity: 20
6. Click Submit.
7. Click the Origin Server link in the Origin Servers, Sites, and Load Balancing section. The Origin Server page appears.
8. Click Add under the Application Web Servers table.
9. Enter the following information:
Hostname: ocs_apps2.mycompany.comPort: 7778Routing: ENABLECapacity: 30Failover Threshold: 5Ping URL: /Ping Interval: 10Protocol: HTTP
10. Click Submit.
11. Click the Site-to-Server Mapping link in the Origin Servers, Sites and Load Balancing section. The Site-to-Server Mapping page appears.
12. Select the mapping for the Load Balancer site (apps_virtual.mycompany.com) from the table and click Edit Selected. The Edit/Add Site-to-Server mapping page appears.
13. In the Select Application Web Servers section, select an application Web server specified in the Origin Servers page for ocs_apps2.mycompany.com (ocs_apps1.mycompany.com is already mapped).
14. Click Submit.
15. Click Apply Changes.
16. In the Cache Operations page, click Propagate. The changes are propagated to ocs_apps2.mycompany.com.
17. Click Restart. OracleAS Web Cache is restarted on ocs_apps1.mycompany.com and ocs_apps2.mycompany.com. OracleAS Web Cache on ocs_apps1.mycompany.com begins to balance requests to the Oracle HTTP Server and OC4J_Portal instances on ocs_apps2.mycompany.com.
Note: At installation time, the OracleAS Web Cache administrator password is set to the same password as the ias_admin password. The OracleAS Web Cache administrator password must be identical for all cache cluster members.

Installing Oracle Collaboration Suite Single Cluster Architecture
11-42 Oracle Collaboration Suite Installation Guide
11.2.10.7 Enable Monitoring of the Frontend Host and Port Settings of the Load Balancer for OracleAS PortalThe steps are as follows:
1. Open the ORACLE_HOME/sysman/emd/targets.xml file.
2. Locate the OracleAS Portal targets, for example, TYPE="oracle_portal".
3. Edit the PortalListeningHostPort property so that it points to the load balancer. For example:
<Property NAME="PortalListeningHostPort" VALUE="http://apps_virtual.mycompany.com:80"/>
4. Save and close targets.xml file.
5. Reload the targets.xml file in the Oracle Collaboration Suite Control Console by running the following command in ORACLE_HOME/bin:
emctl reload
11.2.10.8 Enable Session Binding on OracleAS Web Cache ClustersThe session binding feature in OracleAS Web Cache is used to bind user sessions to a given origin server to maintain state for a period of time. Enabling session binding forces all the user requests to go to a give OracleAS Portal middle-tier, resulting in a better cache hit ratio for the portal cache. For this reason, session binding is required although almost all components running in a given OracleAS Portal middle tier are stateless.
To enable session binding in OracleAS Web Cache, the steps on ocs_apps1.mycompany.com or ocs_apps2.mycompany.com are as follows:
1. Access the Web cache Administrator at the following URL:
http://ocs_apps1.mycompany.com:9400
The Web Cache Administrator password dialog box appears.
2. Enter the OracleAS Web Cache administrator password.
The Web Cache Manager page appears.
3. Click the Session Binding link in the Origin Servers, Sites, and Load Balancing section. The Session Binding page appears.
4. Select the Load Balancing Router site, apps_virtual.mycompany.com:80 from the table and click Edit Selected. The Edit Session Binding window opens.
5. Select Any Set-Cookie from the Please select a session list.
6. Select Cookie-based from the Please select a session binding mechanism list.
7. Click Submit.
8. Click Apply Changes.
Note: At installation time, the OracleAS Web Cache administrator password is set to the same password as the ias_admin password. The OracleAS Web Cache administrator password must be identical for all cache cluster members.

Installing Oracle Collaboration Suite Single Cluster Architecture
Installing in High Availability Environments: Single Cluster Architecture 11-43
9. On the Cache Options page, click Propagate.The changes are propagated to the OracleAS Web Cache instance on the other computer.
10. Click Restart. OracleAS Web Cache is restarted on ocs_apps1.mycompany.com and ocs_apps2.mycompany.com.
11.2.10.9 Configure Collaborative PortletsConfigure Collaborative Portlets from Oracle Enterprise Manager 10g Application Server Control Console. The Configure Component button appears above the System Components table if you have installed, but not configured, some components.
To configure Collaborative Portlets, perform the following steps:
1. On the Oracle Collaboration Suite home page, click Configure Component.
2. Select Collaborative Portlets from the drop-down list on the Select Component page, and click Continue.
3. Enter the following values:
Oracle Internet Directory Administrative PasswordHost Name: Load Balancer Virtual Server Name – apps_virtual.mycompany.comWeb Cache Listen Port: Load Balancer Virtual Server Name’s port – Port 80Web Cache Invalidation Port: Refer to ORACLE_HOME/install/portlist.ini – 9401
4. Click Continue. The configuration process may take 10-15 minutes to complete.
5. Restart the components on ocs_apps2.mycompany.com by running the following commands in ORACLE_HOME/opmn/bin of ocs_apps2.mycompany.com:
opmnctl stopallopmnctl startall
11.2.10.10 Configure Oracle Collaboration Suite Mobile CollaborationConfigure the URLs of the current OracleAS Wireless Instance on each Oracle Collaboration Suite Applications tier. Configuring Oracle Collaboration Suite Mobile Collaboration enables you to define the instance URLs for an application server, or direct an application server to use the URLs defined for the entire OracleAS Wireless site.The steps are as follows:
1. Access the Oracle Enterprise Manager – Oracle Collaboration Suite Control console.
2. Click the link for the ocs_apps1.mycompany.com installation.
3. Click the Wireless link under System Components.
4. Click the Instance URLs link under Instance Configuration.
5. Modify the Wireless Instance URLs to point to the load balancer’s virtual server name (apps_virtual.mycompany.com)
Repeat the preceding steps for each Oracle Collaboration Suite Applications tier.
11.2.10.11 Configure Oracle DiscussionsWhen deploying Oracle Discussions in more than one Applications tier with a load balancer at the front end, please ensure to turn on session affinity in your load balancer. Oracle Discussions requires that once a user establishes a session with one OC4J instance, all the following requests must go to the same OC4J instance. In case of

Installing Oracle Collaboration Suite Single Cluster Architecture
11-44 Oracle Collaboration Suite Installation Guide
a failover, the original Applications tier is not available anymore and the requests are transferred to the second Applications tier. Oracle Discussions automatically re-creates a new user session in the new OC4J instance. There is no loss of data except that of the currently executing operation when the first Applications tier goes offline.
11.2.10.12 Test the ConfigurationTo ensure that it is working as it should, perform the following tests:
1. Ensure that all components on ocs_apps2.mycompany.com are running.
a. Run the following command from ORACLE_HOME/opmn/bin to query the status of the components:
opmnctl status
b. If necessary, run the following command in ORACLE_HOME/opmn/bin:
opmnctl startall
2. Stop all components on ocs_apps1.mycompany.com by running the following command in ORACLE_HOME/opmn/bin:
opmnctl stopall
3. Access OracleAS Web Cache and Oracle HTTP Server through the load balancer with the following URL:
http://apps_virtual.mycompany.com
4. Test the connection to the Oracle Collaboration Suite Database through the load balancer, by accessing the following URL:
http://apps_virtual.mycompany.com/pls/portal/htp.p?cbuf=test
The response should be test. If this succeeds, then the Oracle Collaboration Suite Applications tier can connect to the Oracle Collaboration Suite Database. If this test fails, then examine the ORACLE_HOME/Apache/Apache/logs/error_log file of Oracle HTTP Server to determine the cause.
5. Test the OracleAS Portal using following URL (ensure that you can log in):
http://apps_virtual.mycompany.com/pls/portal
6. Verify that content is being cached in OracleAS Web Cache on ocs_apps1.mycompany.com, using Web Cache Administrator. Under Monitoring, click Popular Requests. Select Cached from the Filtered Objects drop-down list, and click Update.
If you accessed OracleAS Portal, portal content will appear. If there is no portal content, open another browser and log in to OracleAS Portal. Return to the Popular Requests page, and click Update to refresh the page content.
7. Repeat steps 3 through 6, by ensuring that all components on ocs_apps1.mycompany.com are running, and all components on ocs_apps2.mycompany.com are stopped and vice versa.

Installing in High Availability Environments: Colocated Identity Management Architecture 12-1
12Installing in High Availability Environments:
Colocated Identity Management Architecture
This chapter contains the following sections:
■ Section 12.1, "Summary of Installation Steps"
■ Section 12.2, "Installing Oracle Collaboration Suite Colocated Identity Management Architecture"
12.1 Summary of Installation StepsThe order for the installation of Oracle Collaboration Suite Colocated Identity Management Architecture is as follows:
1. Install Oracle Cluster Ready Services. This is a prerequisite for the installation of Oracle Collaboration Suite Database in an Oracle Real Application Clusters database.
Apply the Oracle Cluster Ready Services 10.1.0.4.2 Patchset for your platform.The Oracle Cluster Ready Services 10.1.0.4.2 Patchset for your platform is located on the Oracle Database 10g Patchset (10.1.0.4.2) for Solaris Operating System (SPARC) DVD.
2. Install Oracle Collaboration Suite Database on RAC.
3. Configure load balancers for the Identity Management tier appropriately.
4. Install Identity Management on high availability nodes. The virtual server name of the load balancer must be specified in the Specify LDAP Virtual Host and Ports and the Specify HTTP Load Balancer Host and Ports screens during installation.
5. Run OCSdbSchemaReg.sh script on a database node. This script registers the database with Oracle Internet Directory and runs the component Configuration Assistants that create schema objects for each Oracle Collaboration Suite component.
6. Install Oracle Calendar Server in Cold Failover Cluster Configuration. It must use a virtual host name, such as vhost.mydomain.com. Install the oraInventory directory and ORACLE_HOME on a shared device that can be mounted to the other node for a cold failover.
7. Install Oracle Collaboration Suite Applications (without Oracle Calendar Server).

Installing Oracle Collaboration Suite Colocated Identity Management Architecture
12-2 Oracle Collaboration Suite Installation Guide
12.2 Installing Oracle Collaboration Suite Colocated Identity Management Architecture
This section contains the following topics:
■ Section 12.2.1, "Installing and Applying Patch to Oracle Cluster Ready Services"
■ Section 12.2.2, "Installing the Oracle Collaboration Suite Database on RAC"
■ Section 12.2.3, "Configuring Load Balancers for Identity Management"
■ Section 12.2.4, "Installing Identity Management on High Availability Nodes"
■ Section 12.2.5, "Register the Oracle Collaboration Suite Database with Oracle Internet Directory and Execute Component Database Configuration Assistants"
■ Section 12.2.6, "Installing Oracle Calendar Server"
■ Section 12.2.7, "Installing the First Instance of Oracle Collaboration Suite Applications (without Oracle Calendar Server)"
■ Section 12.2.8, "Configuring the First Oracle Collaboration Suite Applications Tier with a Load Balancer"
■ Section 12.2.9, "Installing Subsequent Instance of Oracle Collaboration Suite Applications"
■ Section 12.2.10, "Post Installation Steps to Redeploy Oracle Collaboration Suite Applications with a Load Balancer"
12.2.1 Installing and Applying Patch to Oracle Cluster Ready ServicesThis section explains the installation steps for Oracle Cluster Ready Services. It also explains the steps involved in applying the patch to Oracle Cluster Ready Services.
12.2.1.1 Installing Oracle Cluster Ready ServicesPerform the steps listed in Table 12–1 to install Oracle Cluster Ready Services.
For Oracle Cluster Ready Services Installation steps, refer to Oracle Real Application Clusters Installation and Configuration Guide at
http://otn.oracle.com/pls/db10g/portal.portal_demo3?selected=16.
Install the Oracle Cluster Ready Services software from the Oracle Collaboration Suite Supplemental DVD.
Table 12–1 Installing Oracle Cluster Ready Services
Step Screen Action
1. None Log in as the oracle user and set the ORACLE_BASE environment variable to specify the Oracle base directory that you created previously. For example:
/u01/app/oracle
2. None Set the ORACLE_HOME environment variable to specify the Oracle Cluster Ready Services home directory that you created previously. For example:
/u01/crs/oracle/product/10.1.0/crs_1
3. None Run the runInstaller command from the top-level directory of the Oracle Cluster Ready Services Release 1 CD-ROM or the crs directory on the DVD-ROM. These are separate CD-ROMs and DVD-ROMs that contain the Cluster Ready Services software.
4. Welcome page Click Next.

Installing Oracle Collaboration Suite Colocated Identity Management Architecture
Installing in High Availability Environments: Colocated Identity Management Architecture 12-3
5. Specify Inventory Directory and Credentials
(Advanced installation only)
This screen appears only if this is the first installation of any Oracle product on this computer.
Enter the full path for the inventory directory: Enter a full path to a directory for the installer files. Enter a directory that is different from the Oracle home directory for the product files.
Example: /private/oracle/oraInventory
Click OK.
6. UNIX Group Name
(Advanced installation only)
This screen appears only if this is the first installation of any Oracle product on this computer.
Enter the name of the operating system group to have write permission for the inventory directory.
Example: dba
Click Next.
7. Run orainstRoot.sh
(Advanced installation only)
This screen appears only if this is the first installation of any Oracle product on this computer.
Run the orainstRoot.sh script in a different shell as the root user. The script is located in the oraInventory directory.
Click Continue.
8. Specify File Locations
(Advanced installation only)
Enter the full path of the Source directory in the Path field for Source, if required.
Name: Enter a name to identify this Oracle home. The name cannot contain spaces, and has a maximum length of 16 characters.
Example: OH_apptier_10_1_1
Destination Path: Enter the full path to the destination directory. This is the Oracle home. If the directory does not exist, the installer creates it. To create the directory beforehand, create it as the oracle user; do not create it as the root user.
Example: /private/oracle/OH_apptier_10_1_1
Click Next.
9. Language Selection
(Advanced installation only)
Select the required language from the Available Languages list and add it to the Selected Languages list.
Click Next.
10. Cluster Configuration
(Advanced installation only)
Cluster Name: Specify the cluster name.
Specify the host name under Public Node Name. Similarly, specify the private name under Private Node Name. These names will be used to interconnect the node names within the cluster.
Note: The private name cannot be the same as the public name. However, the private name can be an IP address.
Click Next.
11. Specify Network Interface Usage
(Advanced installation only)
Select the interface name, subnet, and interface type for the node in the cluster from the respective drop-down list.
The interface that you mark private will only be used for RAC internode traffic.
Note: If there is more than one subnet associated with an interface, then specify the subnet that you want to associate with the interface type.
Table 12–1 (Cont.) Installing Oracle Cluster Ready Services
Step Screen Action

Installing Oracle Collaboration Suite Colocated Identity Management Architecture
12-4 Oracle Collaboration Suite Installation Guide
12.2.1.2 Applying Oracle Cluster Ready Services 10.1.0.4.2 PatchsetAfter installing Oracle Cluster Ready Services, you must apply Oracle Cluster Ready Services 10.1.0.4.2 Patchset. The Oracle Cluster Ready Services 10.1.0.4.2 Patchset for your platform is located on the Oracle Database 10g Patchset (10.1.0.4.2) for Solaris Operating System (SPARC) DVD.
The steps to do so are listed in Table 12–2.
12.2.2 Installing the Oracle Collaboration Suite Database on RACTo install Oracle Collaboration Suite Database on clustered hardware, follow the steps listed in Table.
12. Oracle Cluster Registry
(Advanced installation only)
Specify OCR Location: Specify the shared raw device or the cluster file system file that will be visible to all nodes of the cluster.
Note: At least 100 MB of disk space is required for the OCR.
Click Next.
13. Voting Disk
(Advanced installation only)
Enter voting disk file name: Specify the raw device or the cluster file system file for voting disk that will be visible to all nodes of the cluster.
Click Next.
Note: At least 20 MB of disk space is required for the OCR.
14. Summary Verify your selections and click Install.
15. Install Progress This screen displays the progress of the installation.
16. Run root.sh Note: Do not run the root.sh script until this dialog box appears.
1. When you see this dialog box, run the root.sh script in a different shell as the root user. The script is located in this instance Oracle home directory.
2. Click OK.
17. Configuration Assistants This screen shows the progress of the configuration assistants. Configuration assistants configure components.
18. End of Installation Click Exit to quit the installer.
Table 12–2 Installing Oracle Cluster Ready Services
Step Screen Action
1. Welcome Click Next.
2. Specify File Locations Enter the full path of the Source directory in the Path field for Source, if required.
Destination Path: Enter the full path to the destination directory. This is the Oracle home.
Both source and destination will be same as that provided during the installation of Oracle Cluster Ready Services.
3. Selected Nodes Verify the nodes listed in the Node Names list and click Next.
4. Summary Verify your selections and click Install.
5. End of Installation Click Exit to quit the installer.
Table 12–1 (Cont.) Installing Oracle Cluster Ready Services
Step Screen Action

Installing Oracle Collaboration Suite Colocated Identity Management Architecture
Installing in High Availability Environments: Colocated Identity Management Architecture 12-5
12.2.2.1 Prerequisites for Selecting the Types of RAC storageThe following table shows the storage options supported for storing Oracle Cluster Ready Services files, Oracle Database files, and Oracle Database recovery files. Oracle Database files include datafiles, control files, redo log files, the server parameter file, and the password file. Oracle Cluster Ready Services files include the Oracle Cluster Registry (OCR) and the Oracle Cluster Ready Services voting disk.
For all installations, you must choose the storage option that you want to use for Oracle Cluster Ready Services files and Oracle Database files. If you want to enable automated backups during the installation, you must also choose the storage option that you want to use for recovery files (the flash recovery area). You do not have to use the same storage option for each file type.
Use the following guidelines when choosing the storage options that you want to use for each file type:
■ You can choose any combination of the supported storage options for each file type as long as you satisfy any requirements listed for the chosen storage options.
■ Oracle recommends that you choose ASM as the storage option for database and recovery files.
■ For Standard Edition installations, ASM is the only supported storage option for database or recovery files.
■ You cannot use Automatic Storage Management to store Oracle Cluster Ready Services files, because these files must be accessible before any Oracle instance starts.
12.2.2.2 Review Recommendations for Automatic Storage Management (ASM)If you plan to use ASM instances for the OracleAS Metadata Repository database, consider these recommendations:
■ If you plan to use ASM with Oracle Database instances from multiple database homes on the same node, then you should run the ASM instance from an Oracle home that is different from the database homes.
Note: If you enable automated backup, then this option will only backup the Oracle Collaboration Suite Database and not any other Oracle Collaboration Suite files.
Storage Option
File Types Supported
CRS Database Recovery
Automatic Storage Management No Yes Yes
Cluster file system
Note: Requires a supported cluster file system
Yes Yes Yes
NFS file system
Note: Currently supported only with Fujitsu PRIMECLUSTER and a certified NAS device (SPARC only)
Yes Yes Yes
Shared raw logical volumes (SPARC only) Yes Yes No
Shared raw partitions Yes Yes No

Installing Oracle Collaboration Suite Colocated Identity Management Architecture
12-6 Oracle Collaboration Suite Installation Guide
■ The ASM home should be installed on every cluster node. This prevents the accidental removal of ASM instances that are in use by databases from other homes during the deinstallation of a database Oracle home.
12.2.2.3 Installation TasksTo install Oracle Collaboration Suite Database on RAC, follow the steps listed in Table 12–3.
Table 12–3 Installing Oracle Collaboration Suite Database
Step Screen Action
1. Welcome Click Next.
2. Specify File Locations Enter a name and path for the new Oracle home.
This new Oracle home will be the destination Oracle home for your Oracle Collaboration Suite Database.
Click Next.
3. Specify Hardware Cluster Installation Mode
Select Cluster Installation and the nodes where you want to install the Oracle software. The local node will always be selected.
Click Next.
4. Select a Product to Install Select Oracle Collaboration Suite Infrastructure 10.1.1.0.2.
Click Next.
5. Select Installation Type Select Collaboration Suite Database.
Click Next.
6. Product-specific Prerequisite Checks
Make sure all the checks complete successfully.
Click Next.
7. Database Creation Select Yes for Do you want to create a new database at this time?
Click Next.
8. Oracle Collaboration Suite Database Registration
Select No for Do you want to register the information store at this time?
Click Next.
9. Specify Database Identification
Enter the global database name and the SID that you want to use for this install in the Global Database Name and SID fields.
Click Next.
10. Specify Database Management Option
Select Use Grid Control for Database Management or Use Database Control for Database Management.
Click Next.
11. Specify Database File Storage Option
Select Automated Storage Management (ASM).
Click Next.
12. Specify Backup and Recovery Options
Select Do not enable Automated Backups. Oracle recommends that you disable automated backup. Note that if you enable automated backup, then this option will only backup the Oracle Collaboration Suite Database and not any other Oracle Collaboration Suite files.
Click Next.
13. Specify Database Schema Passwords
Enter password for each accounts or use the same password for all the accounts.
Click Next.
14. Summary Make sure all of the settings and choices are correct for your installation.
Click Install.

Installing Oracle Collaboration Suite Colocated Identity Management Architecture
Installing in High Availability Environments: Colocated Identity Management Architecture 12-7
12.2.2.4 Postinstallation TasksThe postinstallation tasks involve troubleshooting any installation errors.
12.2.2.4.1 Troubleshooting the Installation Errors You might have to perform the postinstallation step to solve the following problem.
Oracle Collaboration Suite Database with ASM install fails at DBCA with ORA-15018 and ORA-15031. To resolve this error, download and replace the dbca.jar file in ORACLE_HOME/assistants/dbca/jlib before running root.sh.
12.2.3 Configuring Load Balancers for Identity ManagementThis section explains the implementation of load balancing for Identity Management in a high-availability environment.
12.2.3.1 Prerequisites for Installing Identity Management on High-Availability NodesThis section discusses the prerequisites for the installation of Identity Management on high-availability nodes.
12.2.3.1.1 Configuring the load balancer A load balancer should be configured to detect service down on a node and automatically stop traffic to that node. Also, the load balancer is recommended to be in a fault tolerant mode. This section provides instructions for configuring a load balancer for Identity Management.
To configure a load balancer for OracleAS Cluster (Identity Management), perform the following steps:
1. Verify that the load balancer virtual server name you select does not contain the physical hostnames of the nodes in the Identity Management.
When the installer copies files to different nodes in the Identity Management, it replaces the current hostname in the files with the hostname of the target node. Ensure that the load balancer's virtual server name does not contain the hostnames of the nodes in the cluster, or the installer might change the virtual server name of the load balancer as well.
For example, if you are installing on nodes named rac-1 and rac-2, be sure that the load balancer virtual server name does not contain "rac-1" or "rac-2". When the installer is installing files to rac-2, it searches for the string "rac-1" in the files and replaces it with "rac-2". If the load balancer's virtual server name happens to be
15. Install Progress This screen displays the progress of the installation.
16. Run root.sh Note: Do not run the root.sh script until this dialog box appears.
1. When you see this dialog box, run the root.sh script in a different shell as the root user. The script is located in the Oracle home directory of this instance.
2. Click OK.
17. The Configuration Assistants
This screen shows the progress of the configuration assistants.
1. Oracle Net Configuration Assistant
2. Oracle Database Configuration Assistant
18. End of Installation Click Exit to quit the installer.
Table 12–3 (Cont.) Installing Oracle Collaboration Suite Database
Step Screen Action
Installing Oracle Collaboration Suite Colocated Identity Management Architecture
12-8 Oracle Collaboration Suite Installation Guide
LB-rac-1x, the installer sees the string "rac-1" in the name and replaces it with "rac-2", thus mangling the virtual server name to LB-rac-2x.
2. Configure your load balancer with virtual server names and associated ports as follows:
a. Configure a virtual server name for LDAP connections. For this virtual server, you must configure one port for SSL connections and the other for non-SSL connections.
b. Configure a virtual server name for HTTP connections. For this virtual server, you must configure one port for SSL connections and the other for non-SSL connections.
c. Configure your LDAP server to direct response to the first node initially. This procedure applies only to the LDAP virtual server configured on the load balancer. Note that this procedure applies only to the LDAP virtual server configured on your load balancer. This does not apply to the HTTP virtual server configured on the load balancer.
d. The installer will prompt you for the virtual server names and port numbers.
3. After you complete installation on a node, then you can add that node to the virtual server. For example, if you have three nodes, then perform the following steps:
a. Configure the LDAP virtual server to direct requests to node 1 only.
b. Install Identity Management components on node 1.
c. Install Identity Management components on node 2.
d. Add node 2 to the LDAP virtual server.
e. Install Identity Management components on node 3.
f. Add node 3 to the LDAP virtual server.
4. Set up cookie persistence for HTTP traffic on the load balancer. Specifically, set up cookie persistence for URIs starting with /oiddas/. This is the URI for Oracle Delegated Administration Services. If your load balancer does not allow you to set cookie persistence at the URI level, then set the cookie persistence for all HTTP traffic. In either case, set the cookie to expire when the browser session expires. Refer to your load balancer documentation for details.
5. To configure the load balancer for automatic monitoring of the Oracle Internet Directory and OracleAS Single Sign-On, Oracle Delegated Administration Services, set up monitors for the following:
■ LDAP port
■ LDAP SSL port
■ HTTP or HTTPS listen port (depending on the deployment type)
It is recommended that these monitors use the respective protocols to monitor the services. That is LDAP for the LDAP port, LDAP over SSL for the LDAP SSL port, and HTTP/HTTPS for the web server port. If the load balancer does not offer one or all of these monitors, consult the load balancer documentation for details on the best method to set up the load balancer.
12.2.3.1.2 Synchronize the System Clocks on All Nodes Identity Management cluster nodes must all have their clocks synchronized for the Identity Management cluster to function properly.

Installing Oracle Collaboration Suite Colocated Identity Management Architecture
Installing in High Availability Environments: Colocated Identity Management Architecture 12-9
12.2.4 Installing Identity Management on High Availability NodesThis section describes how to install Identity Management on high availability nodes.
12.2.4.1 Installing First Instance of Identity ManagementTo install first instance of Identity Management, follow the steps listed in Table 12–4.
Table 12–4 Installing First Instance of Identity Management
Step Screen Action
1. Welcome Click Next.
2. Specify File Locations Enter a name and path for the new Oracle home.This new Oracle home will be the destination Oracle home for Identity Management.
Click Next.
3. Specify Hardware Cluster Installation Mode (optional)
Select Local Installation.
This screen will only show up if you are installing Identity Management on a cluster.
Click Next.
4. Select a Product to Install Select Oracle Collaboration Suite Infrastructure 10.1.1.0.2.
Click Next.
5. Select Installation Type Select Identity Management.
Click Next.
6. Product-specific Prerequisite Checks
Make sure all the checks complete successfully.
Click Next.
7. Select Configuration Options
Select Oracle Internet Directory.
Select OracleAS Single Sign-On.
Select OracleAS Delegated Administration Services.
Select OracleAS Directory Integration and Provisioning.
Do not select OracleAS Certificate Authority (OCA).
Select High Availability and Replication.
Click Next.
8. Specify repository Username: Enter the username to use to log in to the Oracle Collaboration Suite Database. The user must have DBA privileges.
Password: Enter the user password.
Hostname and Port: Enter the names of all the nodes where the Oracle Collaboration Suite Database is running and the port numbers.
Use the format:
Host1.domain.com:port1,Host2.domain.com:port2,…
Service Name: Enter the service name of the database. Note that the service name must include the database domain name.
Click Next.
9. Select High Availability or Replication Option
Select OracleAS Cluster (Identity Management).
Click Next.
10. Specify New Oracle Application Server Cluster Name
Specify a cluster name you want to create for the OracleAS Cluster (Identity Management) in the New Oracle Application Server Cluster Name field.
Click Next.

Installing Oracle Collaboration Suite Colocated Identity Management Architecture
12-10 Oracle Collaboration Suite Installation Guide
12.2.4.2 Installing Subsequent Instance of Identity ManagementBefore installing the subsequent instance of Identity Management, you must perform the preinstallation tasks.
11. Specify Namespace in Internet Directory
Enter a new namespace for Oracle Internet Directory or select the Suggested Namespace:
dc=us,dc=oracle,dc=com
Click Next.
12. Specify LDAP Virtual Host and Ports
Hostname: Enter the fully qualified virtual server name of the LDAP virtual server configured on your load balancer.
SSL Port: Enter the SSL port number for Oracle Internet Directory.
Non-SSL Port: Enter the port number for Oracle Internet Directory.
Click Next.
13. Specify HTTP Load Balancer Host and Ports
HTTP Listener: Port: Enter the port number that you want Oracle HTTP Server to listen on.
Enable SSL: Select this option if you want to configure Oracle HTTP Server for SSL on this port.
HTTP Load Balancer: Hostname: Enter the name of the HTTP virtual server configured on your load balancer.
HTTP Load Balancer: Port: Enter the port of the HTTP virtual server.
Enable SSL: Select this option if this port is for SSL communications only.
Click Next.
14. Specify Port Configuration Options
Select Automatic Port Selection or Manual and enter the port numbers for.
■ Oracle HTTP Server Port
■ Oracle HTTP Server SSL port
Click Next.
This screen is an M12c regression. The fix will be in M13.
15. Guest Account Password Enter the password for the orclguest account.
Click Next.
16. Specify Instance Name and ias_admin Password
Instance Name: Enter a name for this Identity Management instance.
ias_admin Password and Confirm Password: Set the password for the ias_admin user. This is the administrative user for the instance.
Click Next.
17. Summary Verify your selection and click Install.
18. Install Progress This screen displays the progress of the installation.
19. Run root.sh Note: Do not run the root.sh script until this dialog box appears.
1. When you see this dialog box, run the root.sh script in a different shell as the root user. The script is located in the Oracle home directory of this instance.
2. Click OK.
20. The Configuration Assistant
This screen shows the progress of the configuration assistants.
21. End of Installation Click Exit to quit the installer.
Table 12–4 (Cont.) Installing First Instance of Identity Management
Step Screen Action

Installing Oracle Collaboration Suite Colocated Identity Management Architecture
Installing in High Availability Environments: Colocated Identity Management Architecture 12-11
Preinstallation TasksThe preinstallation tasks for the installation of subsequent instance of Identity Management are as follows:
■ Please ensure that the system time on this Identity Management node is in sync with the time on the other Identity Management nodes that are part of this OracleAS Cluster (Identity Management) configuration. Failure to ensure this may result in unwanted instance failovers, inconsistent operational attributes in directory entries and potential inconsistent behavior of password state policies.
■ To install the current OracleAS (Identity Management) node correctly, setup your load balancer LDAP virtual server to direct requests to any existing OracleAS Cluster (Identity Management) node that is already running. After you complete the installation on this node, you can add it to the load balancer LDAP virtual server.
Installation TasksTo install the subsequent instance of Identity Management, follow the steps listed in Table 12–5.
Table 12–5 Installing Subsequent instance of Identity Management
Step Screen Action
1. Welcome Click Next.
2. Specify File Locations Enter a name and path for the new Oracle home.This new Oracle home will be the destination Oracle home for your Identity Management.
Click Next.
3. Specify Hardware Cluster Installation Mode (optional)
Select Local Installation.
This screen will only show up if you are installing Oracle Collaboration Suite Identity Management on a cluster.
Click Next.
4. Select a Product to Install Select Oracle Collaboration Suite Infrastructure 10.1.1.0.2.
Click Next.
5. Select Installation Type Select Identity Management.
Click Next.
6. Product-specific Prerequisite Checks
Make sure all the checks complete successfully.
Click Next.
7. Select Configuration Options
Select Oracle Internet Directory.
Select OracleAS Single Sign-On.
Select OracleAS Delegated Administration Services.
Select OracleAS Directory Integration and Provisioning.
Do not select OracleAS Certificate Authority (OCA).
Select High Availability and Replication.
Click Next.

Installing Oracle Collaboration Suite Colocated Identity Management Architecture
12-12 Oracle Collaboration Suite Installation Guide
8. Specify repository Username: Enter the username to use to log in to the Oracle Collaboration Suite Database. The user must have DBA privileges.
Password: Enter the user password.
Hostname and Port: Enter the names of all the nodes where the Oracle Collaboration Suite Database is running and the port numbers.
Use the format:
Host1.domain.com:port1,Host2.domain.com:port2,…
Service Name: Enter the service name of the database. Note that the service name must include the database domain name.
Click Next.
Warning: Please ensure that the system time on this Identity Management Node is in sync with the time on other Identity Management Nodes that are part of this Oracle Cluster (Identity Management) configuration. Failure to ensure this may result in unwanted instance failovers, inconsistent operational attributes in directory entries and potential inconsistent behavior of password state policies.
Click OK.
9. Specify Existing OracleAS Cluster Name.
Specify an existing OracleAS Cluster (Identity Management) name for the current instance to join. The cluster was created as part of the first Identity Management install.
Click Next and enter the ODS password.
10. Specify LDAP Virtual Host and Ports
Hostname: Enter the fully qualified virtual server name of the LDAP virtual server configured on your load balancer.
SSL PORT: Enter the SSL port number for Oracle Internet Directory.
Non-SSL Port: Enter the port number for Oracle Internet Directory.
Click Next.
Warning: To configure the current OracleAS (Identity Management) node correctly, setup your LDAP virtual server to direct requests to any existing OracleAS Cluster (Identity Management) node that is already running. After you complete the installation on this node, then you can add it to the LDAP virtual server.
Click OK.
11. Specify Oracle Internet Directory Login
Username: Enter the username to log in to Oracle Internet Directory. You must log in as the Oracle Internet Directory superuser (cn=orcladmin).
Password: Enter the password for the username
Click Next.
12. Specify HTTP Load Balancer Host and Ports
HTTP Listener: Port: Enter the port number that you want Oracle HTTP Server to listen on.
Enable SSL: Select this option if you want to configure Oracle HTTP Server for SSL on this port.
HTTP Load Balancer: Hostname: Enter the name of the HTTP virtual server configured on your load balancer.
HTTP Load Balancer: Port: Enter the port of the HTTP virtual server.
Enable SSL: Select this option if this port is for SSL communications only.
Click Next.
Table 12–5 (Cont.) Installing Subsequent instance of Identity Management
Step Screen Action

Installing Oracle Collaboration Suite Colocated Identity Management Architecture
Installing in High Availability Environments: Colocated Identity Management Architecture 12-13
12.2.4.3 Postinstallation TasksThe postinstallation tasks involve troubleshooting the installation errors and performing manual postinstallation steps.
12.2.4.3.1 Troubleshooting the Installation Errors You might have to perform the postinstallation steps to solve the following problems:
■ During execution of root.sh script, the following error is encountered:
chmod: WARNING: Corresponding set-ID also disabled on emtgtcl2 since set-ID requires execute permission
Ignore this error.
12.2.4.3.2 Performing Manual Postinstallation steps Ensure that the load balancer is routing requests to all active Identity Management nodes.
12.2.5 Register the Oracle Collaboration Suite Database with Oracle Internet Directory and Execute Component Database Configuration Assistants
The Oracle Collaboration Suite Database needs to be registered in the Oracle Internet Directory for Oracle Collaboration Suite to work correctly. Additionally, the database schemas for each Oracle Collaboration Suite Applications component must be created in the Oracle Collaboration Suite Database. The ORACLE_HOME/install/OCSdbSchemaReg.sh script accomplishes both of these tasks. This script only needs to be run on a single database node.
13. Specify Port Configuration Options
Select Automatic Port Selection or Manual and enter the port numbers for.
■ Oracle HTTP Server Port
■ Oracle HTTP Server SSL port
Click Next.
This screen is an M12c regression. The fix will be in M13.
14. Guest Account Password Enter the password for the orclguest account.
Click Next.
15. Specify Instance Name and ias_admin Password
Instance Name: Enter a name for this Identity Management instance.
ias_admin Password and Confirm Password: Set the password for the ias_admin user. This is the administrative user for the instance.
Click Next.
16. Summary Verify your selection and click Install.
17. Install Progress This screen displays the progress of the installation.
18. Run root.sh Note: Do not run the root.sh script until this dialog box appears.
1. When you see this dialog box, run the root.sh script in a different shell as the root user. The script is located in the Oracle home directory of this instance.
2. Click OK.
19. The Configuration Assistant
This screen shows the progress of the configuration assistants.
20. End of Installation Click Exit to quit the installer.
Table 12–5 (Cont.) Installing Subsequent instance of Identity Management
Step Screen Action

Installing Oracle Collaboration Suite Colocated Identity Management Architecture
12-14 Oracle Collaboration Suite Installation Guide
The OCSdbSchemaReg.sh script is located in ORACLE_HOME/install directory on the Oracle Collaboration Suite Database nodes.
■ Copy ORACLE_HOME/install/OCSdbSchemaReg.ini.sample to ORACLE_HOME/install/OCSdbSchemaReg.ini.
■ Modify the ORACLE_HOME/install/OCSdbSchemaReg.ini script with the appropriate values.
■ Run OCSdbSchemaReg.sh from ORACLE_HOME/install directory in RAC mode by entering multiple hosts in the $hostList option of the OCSdbSchemaReg.ini file from one of the Oracle Collaboration Suite Database machine.
■ Run the following script.
OCSdbSchemaReg.sh –f OCSdbSchemaReg.ini
12.2.6 Installing Oracle Calendar ServerThis section explains the installation and postinstallation tasks for Identity Management.
12.2.6.1 Preinstallation TasksBefore installing Oracle Calendar Server in a Cold Failover Cluster, perform the following procedures:
■ Section 12.2.6.1.1, "Check if the clusterware is running"
■ Section 12.2.6.1.2, "Map the virtual hostname and virtual IP address"
■ Section 12.2.6.1.3, "Set Up a File System That Can Be Mounted from Both Nodes"
12.2.6.1.1 Check if the clusterware is running For Cold Failover Cluster, each node in a cluster should be running hardware vendor clusterware. If you plan to install the Calendar Server on a cluster that is also running Oracle Cluster Ready Services, you still should have the clusterware from the hardware vendor to support an automated cold failover. Running Oracle Cluster Ready Services without the hardware vendor clusterware does not support Cold Failover Cluster. In Linux, a RAC database that is running CRS and vendor clusterware cannot coexist. Therefore, if you want to have an automated cold failover per the vendor clusterware on Linux, then the installation of Calendar Server Oracle Application Server Cold Failover Cluster must be on a separate cluster from the RAC database.
To check that the clusterware is running, use the command appropriate for your clusterware.
12.2.6.1.2 Map the virtual hostname and virtual IP address Each node in a Cold Failover Cluster configuration is associated with its own physical IP address. In addition, the active node in the cluster is associated with a virtual hostname and virtual IP address. This enables clients to access the Cold Failover Cluster using the virtual hostname.
Virtual hostnames and virtual IP addresses are any valid hostname and IP address in the context of the subnet containing the hardware cluster.

Installing Oracle Collaboration Suite Colocated Identity Management Architecture
Installing in High Availability Environments: Colocated Identity Management Architecture 12-15
The following example configures a virtual hostname called vhost.mydomain.com, with a virtual IP of 138.1.12.191:
1. Become the root user.
prompt> suPassword: root_password
2. Determine the public network interface.
# ifconfig -alo0: flags=1000849<UP,LOOPBACK,RUNNING,MULTICAST,IPv4> mtu 8232 index 1 inet 127.0.0.1 netmask ff000000lo0:1: flags=1008849<UP,LOOPBACK,RUNNING,MULTICAST,PRIVATE,IPv4> mtu 8232 index 1 inet 172.16.193.1 netmask ffffffffge0: flags=1000843<UP,BROADCAST,RUNNING,MULTICAST,IPv4> mtu 1500 index 2 inet 138.1.13.146 netmask fffffc00 broadcast 138.1.15.255 ether 8:0:20:fd:1:23hme0: flags=1008843<UP,BROADCAST,RUNNING,MULTICAST,PRIVATE,IPv4> mtu 1500 index 3 inet 172.16.1.1 netmask ffffff80 broadcast 172.16.1.127 ether 8:0:20:fd:1:23hme0:2: flags=1008843<UP,BROADCAST,RUNNING,MULTICAST,PRIVATE,IPv4> mtu 1500 index 3 inet 172.16.194.6 netmask fffffffc broadcast 172.16.194.7ge1: flags=1008843<UP,BROADCAST,RUNNING,MULTICAST,PRIVATE,IPv4> mtu 1500 index 4 inet 172.16.0.129 netmask ffffff80 broadcast 172.16.0.255 ether 8:0:20:fd:1:23
From the output, ge0 is the public network interface. It is not a loopback interface and not a private interface.
3. Add the virtual IP to the ge0 network interface.
# ifconfig ge0 addif 138.1.12.191 up
"ge0" and the IP address are values specific to this example. Replace them with values appropriate for your cluster.
4. Check that new interface was added:
# ifconfig -alo0: flags=1000849<UP,LOOPBACK,RUNNING,MULTICAST,IPv4> mtu 8232 index 1 inet 127.0.0.1 netmask ff000000lo0:1: flags=1008849<UP,LOOPBACK,RUNNING,MULTICAST,PRIVATE,IPv4> mtu 8232 index 1 inet 172.16.193.1 netmask ffffffffge0: flags=1000843<UP,BROADCAST,RUNNING,MULTICAST,IPv4> mtu 1500 index 2 inet 138.1.13.146 netmask fffffc00 broadcast 138.1.15.255 ether 8:0:20:fd:1:23ge0:1: flags=1000843<UP,BROADCAST,RUNNING,MULTICAST,IPv4> mtu 1500 index 2 inet 138.1.12.191 netmask ffff0000 broadcast 138.1.255.255
Note: Map the virtual hostname and virtual IP address only to the active node. Do not map the virtual hostname and IP address to both active and secondary nodes at the same time. When you failover, only then do you map the virtual hostname and IP address to the secondary node, which is now the active node.

Installing Oracle Collaboration Suite Colocated Identity Management Architecture
12-16 Oracle Collaboration Suite Installation Guide
hme0: flags=1008843<UP,BROADCAST,RUNNING,MULTICAST,PRIVATE,IPv4> mtu 1500 index 3 inet 172.16.1.1 netmask ffffff80 broadcast 172.16.1.127 ether 8:0:20:fd:1:23hme0:2: flags=1008843<UP,BROADCAST,RUNNING,MULTICAST,PRIVATE,IPv4> mtu 1500 index 3 inet 172.16.194.6 netmask fffffffc broadcast 172.16.194.7ge1: flags=1008843<UP,BROADCAST,RUNNING,MULTICAST,PRIVATE,IPv4> mtu 1500 index 4 inet 172.16.0.129 netmask ffffff80 broadcast 172.16.0.255 ether 8:0:20:fd:1:23
The virtual IP appears in the ge0:1 entry. During installation, when you enter "vhost.mydomain.com" as the virtual hostname in the Specify Virtual Hostname screen, the installer checks that "vhost.mydomain.com" is a valid interface.
On Failover If the active node fails, then the secondary node takes over. If you do not have a clusterware agent to map the virtual IP from the failed node to the secondary node, then you must do it manually. You must remove the virtual IP mapping from the failed node, and map it to the secondary node.
1. On the failed node, if possible, become superuser and remove the virtual IP.
If the failed node fails completely (that is, it does not start), you can skip this step and go to step 2. If the node fails partially (for example, disk or memory problems), and the node is still pingable, you must perform this step.
prompt> suPassword: root_password# ifconfig ge0 removeif 138.1.12.191
"ge0" and the IP address are values specific to this example. Replace them with values appropriate for your cluster.
2. On the secondary node, add the virtual IP to the ge0 network interface.
# ifconfig ge0 addif 138.1.12.191 up
"ge0" and the IP address are values specific to this example. Replace them with values appropriate for your cluster.
3. On the secondary node, check that the new interface was added:
# ifconfig -a...ge0:1: flags=1000843<UP,BROADCAST,RUNNING,MULTICAST,IPv4> mtu 1500 index 2 inet 138.1.12.191 netmask ffff0000 broadcast 138.1.255.255...
12.2.6.1.3 Set Up a File System That Can Be Mounted from Both Nodes Although the hardware cluster has shared storage, you must create a file system on this shared storage such that both nodes of the OracleAS Cold Failover Cluster can mount this file system. You will use this file system for the following directories:
■ Oracle home directory for the Infrastructure
■ The oraInventory directory
If you are running a volume manager on the cluster to manage the shared storage, refer to the volume manager documentation for steps to create a volume. Once a volume is created, you can create the file system on that volume.

Installing Oracle Collaboration Suite Colocated Identity Management Architecture
Installing in High Availability Environments: Colocated Identity Management Architecture 12-17
If you do not have a volume manager, you can create a file system on the shared disk directly. Ensure that the hardware vendor supports this, that the file system can be mounted from either node of the OracleAS Cold Failover Cluster, and that the file system is repairable from either node if a node fails.
To check that the file system can be mounted from either node, do the following steps:
1. Set up and mount the file system from node 1.
2. Unmount the file system from node 1.
3. Mount the file system from node 2 using the same mount point that you used in step 1.
4. Unmount it from node 2, and mount it on node 1, because you will be running the installer from node 1.
12.2.6.2 Installation TasksBefore installing Oracle Calendar Server in a OracleAS Cold Failover Cluster configuration, make sure that the virtual IP address and host name is enabled on the install node.
To install Oracle Calendar in a Cold Failover Cluster configuration, follow the steps listed in Table 12–6.
Note: Only one node of the OracleAS Cold Failover Cluster should mount the file system at any given time. File system configuration files on all nodes of the cluster should not include an entry for the automatic mount of the file system upon a node restart or execution of a global mount command. For example, on UNIX platforms, do not include an entry for this file system in /etc/fstab file.
Table 12–6 Installing Oracle Calendar Server in Cold Failover Cluster Configuration
Step Screen Action
1. None Start the installer.
2. Welcome Click Next.
3. Specify Inventory Directory and Credentials
(Advanced installation only)
This screen appears only if this is the first installation of any Oracle product on this computer.
Enter the full path for the inventory directory: Enter a full path to a directory for the installer files. Enter a directory that is different from the Oracle home directory for the product files.
Example: /private/oracle/oraInventory
Click OK.
4. UNIX Group Name
(Advanced installation only)
This screen appears only if this is the first installation of any Oracle product on this computer.
Enter the name of the operating system group to have write permission for the inventory directory.
Example: dba
Click Next.

Installing Oracle Collaboration Suite Colocated Identity Management Architecture
12-18 Oracle Collaboration Suite Installation Guide
5. Run orainstRoot.sh
(Advanced installation only)
This screen appears only if this is the first installation of any Oracle product on this computer.
Run the orainstRoot.sh script in a different shell as the root user. The script is located in the oraInventory directory.
Click Continue.
6. Specify File Locations
(Advanced installation only)
Enter the full path of the Source directory in the Path field for Source, if required.
Name: Enter a name to identify this Oracle home. The name cannot contain spaces, and has a maximum length of 16 characters.
Example: OH_apptier_10_1_1
Destination Path: Enter the full path to the destination directory. This is the Oracle home. If the directory does not exist, the installer creates it. To create the directory beforehand, create it as the oracle user; do not create it as the root user.
Example: /private/oracle/OH_apptier_10_1_1
Click Next.
7. Specify Hardware Cluster Installation Mode
(Advanced installation only)
This screen appears only if the computer is part of a hardware cluster.
When you are installing Oracle Collaboration Suite Applications, select Local Installation because hardware cluster is not supported for Oracle Collaboration Suite Applications.
Click Next.
8. Select a Product to Install
(Advanced installation only)
Select Oracle Collaboration Suite Applications 10.1.1.0.2.
If you need to install additional languages, click Product Languages.
Click Next.
9. Product-specific Prerequisite Checks
(Advanced installation only)
The installer verifies requirements such as memory, disk space, and operating system version. If any check fails, make the required changes and click Retry.
Click Next.
10. Select Components to Configure
(Advanced installation only)
Select Oracle Calendar Server.
Note: You can also configure any component after installation.
Click Next.
11. Register with Oracle Internet Directory
(Advanced installation only)
Host: Enter the LDAP virtual server name.
Port: Enter the non-SSL port number for the LDAP virtual server name.
Use SSL to connect to Oracle Internet Directory: Select this option if you want Oracle Collaboration Suite components to use only SSL to connect to Oracle Internet Directory.
Click Next.
12. Specify UserName and Password for Oracle Internet Directory
(Advanced installation only)
Username: Enter the user name to use to log in to Oracle Internet Directory.
Password: Enter the user password.
Click Next.
Note: Use cn=orcladmin as the user name if you are the Oracle Internet Directory Superuser.
13. OracleAS Metadata Repository
(Advanced installation only)
Select the Oracle Collaboration Suite Database from the list.
Click Next.
Table 12–6 (Cont.) Installing Oracle Calendar Server in Cold Failover Cluster Configuration
Step Screen Action

Installing Oracle Collaboration Suite Colocated Identity Management Architecture
Installing in High Availability Environments: Colocated Identity Management Architecture 12-19
12.2.6.3 Postinstallation tasksThe postinstallation tasks involve troubleshooting the installation errors and performing manual postinstallation steps.
12.2.6.3.1 Troubleshooting the Installation Errors You might have to perform the postinstallation steps to solve the following problems:
■ During execution of root.sh script, the following error is encountered:
chmod: WARNING: Corresponding set-ID also disabled on emtgtcl2 since set-ID requires execute permission
14. Select Database Components
(Advanced installation only)
Component Name: Oracle Calendar Server
Database Name: Name of the Oracle Collaboration Suite Database.
Click Next.
Note: If multiple instances of Oracle Collaboration Suite Databases are available in Oracle Internet Directory, then you must click on the Database Name column and then select the correct database for each component from the drop-down list. However, when you click Next to go to the next screen, the selection might not be retained. To ensure that the selection is retained, you must click the Database Name column again after selecting the required database for each component.
15. Specify Port Configuration Options
(Advanced installation only)
Select Automatic Port Selection or Manual and enter the port numbers for.
■ Web Cache HTTP Listen Port
■ Web Cache HTTP Listen SSL
Click Next.
Note: If you manually configure the ports, then you must specify the port values for each port.
16. Specify Administrative Password and Instance Name
(Advanced installation only)
Instance Name: Enter a name for this Calendar Server instance.
Administrative Password: Set the password for the administrative user. This is the administrative user for the Calendar Server instance.
Confirm Password: Confirm the password.
Click Next.
17. Oracle Calendar Server Host Alias
(Advanced installation only)
Host or Alias: Enter the virtual hostname for the Calendar Server instance.
Click Next.
Note: It is recommended that you use alias in place of host name if later you want to move the calendar server instance or change the host name. Specify the host name if an alias is not configured.
18. Summary Verify your selections and click Install.
19. Install Progress This screen displays the progress of the installation.
20. Run root.sh Note: Do not run the root.sh script until this dialog box appears.
1. When you see this dialog box, run the root.sh script in a different shell as the root user. The script is located in the Oracle home directory of this instance.
2. Click OK.
21. Configuration Assistants This screen shows the progress of the configuration assistants. Configuration assistants configure components.
22. End of Installation Click Exit to quit the installer.
Table 12–6 (Cont.) Installing Oracle Calendar Server in Cold Failover Cluster Configuration
Step Screen Action

Installing Oracle Collaboration Suite Colocated Identity Management Architecture
12-20 Oracle Collaboration Suite Installation Guide
Ignore this error.
12.2.6.3.2 Performing Manual Postinstallation Steps You also have to perform the following additional postinstallation steps:
■ In ORACLE_HOME/ocal/misc/unison.ini file, add dir_connectmodel = ondemand entry under the [DAS] section.
■ Restart Oracle Calendar Server.
ORACLE_HOME/opmn/bin/opmnctl restartproc ias-component=CalendarServer
12.2.7 Installing the First Instance of Oracle Collaboration Suite Applications (without Oracle Calendar Server)
This section describes the installation of the first instance of Oracle Collaboration Suite Applications without Oracle Calendar Server.
Installation StepsTo install first instance of Oracle Collaboration Suite Applications, follow the steps listed in Table 12–7.
Table 12–7 Installing First Instance of Oracle Collaboration Suite Applications
Step Screen Action
1. Welcome Click Next.
2. Specify File Locations Enter a name and path for the new Oracle home. This new Oracle home will be the destination Oracle home for Oracle Collaboration Suite Applications.
Click Next.
4. Select a Product to Install Select Oracle Collaboration Suite Applications 10.1.1.0.2.
Click Next.
5. Product-specific Prerequisite Checks
Make sure all the checks complete successfully.
Click Next.
6. Select Components to Configure
Select Oracle Mail.
Select Oracle Mobile Collaboration.
Select Oracle Content Services.
Do not select Oracle Calendar Server.
Select Oracle Calendar Web Client.
Select Oracle Real-Time Collaboration.
Select Oracle Collaboration Suite Search.
Select Oracle Collaboration Suite Web Access.
Select Oracle Collaborative Portlets.
Select Oracle Workspaces.
Select Oracle Discussions.
Click Next.
7. Register with Oracle Internet Directory
Host: Enter the LDAP virtual server name.
Port: Enter the non-SSL port number for the LDAP virtual server name.
Click Next.

Installing Oracle Collaboration Suite Colocated Identity Management Architecture
Installing in High Availability Environments: Colocated Identity Management Architecture 12-21
8. Specify UserName and Password for Oracle Internet Directory
Username: Enter the username to log onto Oracle Internet Directory. You must log in as the Oracle Internet Directory superuser (cn=orcladmin).
Password: Enter the password for the username.
Click Next.
9. OracleAS Metadata Repository
Select Oracle Collaboration Suite Database from the list.
Click Next.
10. Select Database Components
Component Name: Oracle Mail, Oracle Discussions, Oracle Search, Oracle Real-Time Collaboration, Oracle Collaboration Suite Search, Oracle Workspaces, Oracle Content Services, Oracle Collaboration Suite Web Access
Database Name: Name of the Oracle Collaboration Suite Database.
Click Next.
11. Specify Port Configuration Options
Select Automatic Port Selection or Manual and enter the port numbers for.
■ Web Cache HTTP Listen Port
■ Web Cache HTTP Listen SSL
■ Oracle Mail IMAP4 port
■ Oracle Mail IMAP4 Secure port
■ Oracle Mail POP3 port
■ Oracle Mail POP3 Secure port
■ Oracle Mail SMTP port
■ Oracle Mail NNTP port
■ Oracle Mail NNTP Secure port
Click Next.
12. Specify Administrative Password and Instance Name
Instance Name: Enter a name for this Oracle Collaboration Suite Applications instance.
Administrative Password: Set the password for the administrative user. This is the administrative user for the Oracle Collaboration Suite Applications instance.
Click Next.
13. Specify Oracle Mail Domain Information
Mail Domain: Enter the domain that you want to use for Oracle Mail server.
Click Next.
14. Summary Verify your selection and click Install.
15. Install Progress This screen displays the progress of the installation.
16. Run root.sh Note: Do not run the root.sh script until this dialog box appears.
1. When you see this dialog box, run the root.sh script in a different shell as the root user. The script is located in the Oracle home directory of this instance.
2. Click OK.
17. The Configuration Assistants
This screen shows the progress of the configuration assistants.
18. End of Installation Click Exit to quit the installer.
Table 12–7 (Cont.) Installing First Instance of Oracle Collaboration Suite Applications
Step Screen Action

Installing Oracle Collaboration Suite Colocated Identity Management Architecture
12-22 Oracle Collaboration Suite Installation Guide
12.2.8 Configuring the First Oracle Collaboration Suite Applications Tier with a Load Balancer
You can configure two or more Oracle Collaboration Suite Applications instances in a highly-available deployment by placing a load balancer in front of them. The load balancer publishes a single address for Oracle Collaboration Suite Applications while providing a redundant set of application servers that actually service requests. The load balancer can be configured to detect when one of the Oracle Collaboration Suite Applications instances has failed and can then fail over requests to another instance.
Our configuration is as follows:
■ There are two Oracle Collaboration Suite Applications computers: ocs_apps1.mycompany.com and ocs_apps2.mycompany.com. Both application servers listen on non-SSL port 7777.
■ The Oracle Collaboration Suite Applications computers are configured to use the Single Sign-On server located at im_virtual.mycompany.com.
■ The effective host name of the Oracle Collaboration Suite Applications published to the user is apps_virtual.mycompany.com. A load balancer is configured to listen at this address, on port 80. It has been configured to load balance and fail over user requests between ocs_apps1.mycompany.com and ocs_apps2.mycompany.com.
■ The Single Sign-On server and Directory server are located at im_virtual.mycompany.com.
■ The Oracle Collaboration Suite Database (including Identity Management metadata) is located at ocs_store1.mycompany.com and ocs_store2.mycompany.com (2-node RAC).
12.2.8.1 Configure the Load BalancerTo setup the load balancer to work with the first mid-tier install, ensure that the following is configured:
1. A virtual server name (apps_virtual.mycompany.com) that listens for requests on port 80 and balances them to the Web Cache on Oracle Collaboration Suite Applications tier running on ocs_apps1.mycompany.com on port 7777 (an HTTP listening port).
2. A virtual server name (apps_virtual.mycompany.com) that listens for requests on port 7777 (an HTTP listening port), and balances them to the Web Cache on Oracle Collaboration Suite Applications tier on ocs_apps1.mycompany.com port 7777 (an HTTP listening port). Port 7777 on the load balancer receives the HTTP loop-back requests made by the Parallel Page Engine on ocs_apps1.mycompany.com. This 7777 port also receives requests from the Portal Metadata Repository for web providers design time messages. This configuration may require a Network Address Translation (NAT) rule in the load balancer in order for the loop-back request from the PPE to succeed.
3. A virtual server name (apps_virtual.mycompany.com) that listens for requests on port 9401 (Web Cache Invalidation Port) and balances them to the Web Cache on Oracle Collaboration Suite Applications tier on ocs_apps1.mycompany.com on port 9401 (Web Cache Invalidation Port). Port 9401 on the load balancer receives invalidation messages from the OracleAS Portal Repository when content that is cached in OracleAS Web Cache becomes stale. This configuration might require a NAT rule in the load balancer in order for the invalidation requests from the OracleAS Portal repository to succeed.

Installing Oracle Collaboration Suite Colocated Identity Management Architecture
Installing in High Availability Environments: Colocated Identity Management Architecture 12-23
4. A virtual server name (apps_virtual.mycompany.com) that listens for requests on port 25 (SMTP) and balances them to the Oracle Collaboration Suite Applications tier's SMTP port on ocs_apps1.mycompany.com on port 25 (an SMTP listening port). This virtual server on port 25 (SMTP) should also have simple persistence. Simple Persistence returns a client to the same node to which it connected previously. Simple persistence tracks connections based only on the client IP address.
5. The virtual server name (apps_virtual.mycompany.com) listens for requests on port 143 (Oracle Mail IMAP4 port) and balances them to the Oracle Collaboration Suite Applications tier on ocs_apps1.mycompany.com on port 25 (Oracle Mail IMAP4 port).
For security reason, port 9401 and 7777 on the load balancer should not be visible to external users.
12.2.8.2 Configure the Oracle HTTP Server with the Load BalancerThis step associates the components on which OracleAS Portal depends with load balancer virtual server name and port: apps_virtual.mycompany.com:80 as follows:
1. Access the Oracle Enterprise Manager – Oracle Collaboration Suite Control console.
2. Click the link for the ocs_apps1.mycompany.com installation.
3. Click the HTTP Server link.
4. Click the Administration link.
5. Click Advanced Server Properties.
6. Open the httpd.conf file.
7. Perform the following steps:
a. Add LoadModule certheaders_module directive.
LoadModule certheaders_module libexec/mod_certheaders.so
The LoadModule directives (in particular, the LoadModule rewrite_module directive) must appear in the httpd.conf file at a location preceding the VirtualHost directives. The server must load all modules before it can execute the directives in the VirtualHost container. It is a good idea to create the VirtualHost directives at the end of the httpd.conf file.
b. Add the following lines to create a NameVirtualHost directive and a VirtualHost container for apps_virtual.mycompany.com and port 80.
NameVirtualHost *:7778<VirtualHost *:7778>ServerName apps_virtual.mycompany.comPort 80ServerAdmin [email protected] OnRewriteOptions inherit</VirtualHost>
Note: apps_virtual.mycompany.com listens on 80 for external traffic, on port 7777 for Parallel Page Engine loop-back messages, and port 9401 for invalidation messages, and port 25 for SMTP traffic.

Installing Oracle Collaboration Suite Colocated Identity Management Architecture
12-24 Oracle Collaboration Suite Installation Guide
c. Create a second VirtualHost container for apps_virtual.mycompany.com and port 7777.
<VirtualHost *:7778>ServerName apps_virtual.mycompany.comPort 7777ServerAdmin [email protected] OnRewriteOptions inherit</VirtualHost>
8. Save the httpd.conf file, and restart the Oracle HTTP Server when prompted.
12.2.8.3 Configure the Parallel Page Engine Loop-Back with the Load BalancerIn this step, you configure non-SSL loop-back communication between the load balancer and the Parallel Page Engine on ocs_apps1.mycompany.com.Before you start this configuration, ensure the following:
■ You are able to resolve apps_virtual.mycompany.com from ocs_apps1.mycompany.com such that it contacts the load balancer. To ensure you can resolve apps_virtual.mycompany.com, issue the following command from ocs_apps1.mycompany.com.
nslookup apps_virtual.mycompany.com
The IP address for the load balancer should be returned.
■ You are able to contact port 7777 on apps_virtual.mycompany.com from ocs_apps1.mycompany.com. Issue the following command on ocs_apps1.mycompany.com.
telnet apps_virtual.mycompany.com 7777
Verify that no connection failure message is returned.
To create the loop-back configuration, the steps are as follows:
1. Open the ORACLE_HOME/j2ee/OC4J_Portal/applications/portal/portal/WEB-INF/web.xml file.
2. Locate the Page servlet section.
3. Add the lines shown in bold.
<servlet><servlet-name>page</servlet-name> <servlet-class>oracle.webdb.page.ParallelServlet</servlet-class> <init-param> <param-name>useScheme</param-name> <param-value>http</param-value> </init-param> <init-param> <param-name>usePort</param-name> <param-value>7777</param-value> </init-param></servlet>
4. Save the web.xml file.
5. Issue this command in ORACLE_HOME/dcm/bin to update the DCM repository.
dcmctl updateConfig

Installing Oracle Collaboration Suite Colocated Identity Management Architecture
Installing in High Availability Environments: Colocated Identity Management Architecture 12-25
6. Issue these commands in ORACLE_HOME/opmn/bin to restart the Oracle Collaboration Suite Applications instance.
opmnctl stopallopmnctl startall
12.2.8.4 Modify the Portal Dependency Settings (iasconfig.xml) FileThe Portal Dependency Settings file iasconfig.xml must contain the correct host, port, and farm name to enable access to OracleAS Portal and perform OracleAS Web Cache invalidation. To edit the file to include this information, the steps are as follows:
1. Create a backup copy of the ORACLE_HOME/portal/conf/iasconfig.xml file.
2. Open the ORACLE_HOME/portal/conf/iasconfig.xml file and perform the following steps:
a. Change the existing code as follows:
<IASConfig XSDVersion="1.0"> <IASFarm Name="Farm1.apps_virtual.mycompany.com" Host="apps_virtual.mycompany.com"> <WebCacheComponent ListenPort="80" InvalidationPort="9401" InvalidationUsername="invalidator" InvalidationPassword="welcome1" SSLEnabled="false" AdminPort="9400"/> </IASFarm> <IASInstance Name="ocsapps1.ocs_apps1.mycompany.com" Host="ocs_apps1.mycompany.com"> <WebCacheComponent ListenPort="7777" InvalidationPort="9401" InvalidationUsername="invalidator" InvalidationPassword="@BYGFsTxYCDGjfP5bbcU8MP20d5Tk6zo8tg==" SSLEnabled="false" AdminPort="9400"/> <EMComponent ConsoleHTTPPort="1156" SSLEnabled="false"/> </IASInstance> <IASInstance Name="iAS-1.im_virtual.mycompany.com" Host="im_virtual.mycompany.com"> <OIDComponent AdminPassword="@BUciwzx4JZPU/BOgKalC6ybcCpt3pVbr0w==" AdminDN="cn=orcladmin" SSLEnabled="false" LDAPPort="7389"/> </IASInstance> <PortalInstance DADLocation="/pls/portal" SchemaUsername="portal" SchemaPassword="@Bbronzw4685xLaz+WZP6DKVNVpwJLlYJ1w==" ConnectString="cn=orcl,cn=oraclecontext"> <WebCacheDependency ContainerType="IASFarm" Name="Farm1.apps_virtual.mycompany.com"/> <OIDDependency ContainerType="IASInstance" Name="iAS-1.im_virtual.mycompany.com"/> <EMDependency ContainerType="IASInstance" Name="ocsapps1.ocs_apps1.mycompany.com"/> </PortalInstance></IASConfig>
b. Save the iasconfig.xml file.
c. Encrypt any plain text passwords in the iasconfig.xml configuration file by setting the ORACLE_HOME environment variable, if necessary, and issuing the following command from ORACLE_HOME/portal/conf.
ptlconfig –encrypt

Installing Oracle Collaboration Suite Colocated Identity Management Architecture
12-26 Oracle Collaboration Suite Installation Guide
12.2.8.5 Register the OracleAS Portal URLs with the Load BalancerIn this step, you register the OracleAS Portal URLs using the load balancer virtual server name and port instead of the OracleAS Web Cache hostname and port. Follow the steps in this section to use the OracleAS Portal Configuration Assistant to register the URLs.
1. Ensure that the ORACLE_HOME environment variable is set.
2. Register the URLs using the Portal Dependency Settings tool (available in ORACLE_HOME/portal/conf):
ptlconfig –dad dadname –wc –site
where dadname is the name of the OracleAS Portal Database Access Descriptor.
12.2.8.6 Reset the Oracle Enterprise Manager 10g LinkTo prevent access to Oracle Enterprise Manager 10g from the outside, the link provided by OracleAS Portal must be changed back to point to the internal server. To do this, issue the following command in ORACLE_HOME/portal/conf:
ptlconfig –dad dadname –em
where dadname is the name of the OracleAS Portal Database Access Descriptor.
12.2.8.7 Configure OracleAS Web Cache with the Load BalancerYou must configure a site definition, site alias, and a site-to-server mapping to make OracleAS Web Cache function correctly with the load balancer.
Use the Web Cache Manager, the graphical user interface provided for editing the configuration stored in webcache.xml file.
1. Access the Web Cache Administrator at: http://ocs_apps1.mycompany.com:9400/webcacheadmin. The Web Cache Administrator password dialog box appears.
2. Enter the OracleAS Web Cache administrator password. For the user name, enter ias_admin or administrator, and enter the OracleAS Web Cache administrator password.
3. Click the Site Definitions link in the Origin Servers, Sites and Load Balancing section. The Site Definitions window opens.
4. Click Add Site.
5. Enter the following information (leave other fields blank):
■ Host name: apps_virtual.mycompany.com
■ Port: 80
■ Client-side Certificate: Not required
■ Default Site: Yes
■ Create Alias from Site Name with/without www: No
Note: At installation time, the OracleAS Web Cache administrator password is set to the same password as the ias_admin password. The OracleAS Web Cache administrator password must be identical for all cache cluster members.

Installing Oracle Collaboration Suite Colocated Identity Management Architecture
Installing in High Availability Environments: Colocated Identity Management Architecture 12-27
6. Click Submit.
7. Select the radio button for the site for which the alias will be added (apps_virtual.mycompany.com)
8. Click Add Alias. The Add Alias for Site window opens.
9. Enter apps_virtual.mycompany.com for the host name and 7777 for the port. (7777 is the value for the usePort parameter in the web.xml file in the Parallel Page Engine configuration).
10. Click Submit. The alias is added. An alias is needed in the configuration because Portal sends invalidation messages with the value of the HOST attribute in the invalidation message the same as the site name (in this case, apps_virtual.mycompany.com:80), but OracleAS Web Cache caches the portal content keyed on a host:port combination such as apps_virtual.mycompany.com:7777; thus, the invalidation is not executed. Therefore, it is necessary to define an alias, so that OracleAS Web Cache manages the content caching so that it recognizes apps_virtual.mycompany.com:80 and apps_virtual.mycompany.com:7777 as one and the same, and thereby correctly invalidating OracleAS Portal content, although the content is keyed on a different host:port combination than the site name.
11. Click Add Alias. A window with host name and port fields opens.
12. Enter apps_virtual.mycompany.com for the host name and 80 for the port.
13. Click Submit. The alias is added.
14. Click Apply Changes.
15. Click the Site-to-Server Mapping link in the Origin Servers, Sites, and Load Balancing section. The Site-to-Server Mapping page appears, in which you map the site and site alias to an origin server.
16. Select the first mapping in the table and click Insert Above. The Edit/Add Site-to-Server Mapping page appears.
17. Select the Select From Site Definitions option.
18. Select apps_virtual.mycompany.com.
19. Select ocs_apps1.mycompany.com in the Select Application Web Servers section.
20. Click Submit.
21. Remove unused mappings or entries containing the wild card character *.
22. Click Apply Changes.
23. Click Restart.
12.2.8.8 Reregister mod_ossoThe steps for reregistering mod_osso are as follows:
Note: An alias for port 80 is needed because the HOST header sent by the browser will be apps_virtual.mycompany.com (without a port number appended to it). Since OracleAS Web Cache is listening on the HTTP port, it will assume that the port number is 80 and use this to determine the site-to-server mapping, and for any cache key creation.

Installing Oracle Collaboration Suite Colocated Identity Management Architecture
12-28 Oracle Collaboration Suite Installation Guide
1. Set the ORACLE_HOME environment variable to the current Oracle home.
2. Execute the SSO registration script ORACLE_HOME/sso/bin/ssoreg.
ORACLE_HOME/sso/bin/ssoreg.sh \site_name ocsapps.apps_virtual.mycompany.com \mod_osso_url http://apps_virtual.mycompany.com \config_mod_osso TRUE \oracle_home_path ORACLE_HOME \config_file ORACLE_HOME/Apache/Apache/conf/osso/osso.conf \admin_info cn=orcladmin \virtualhost
A partner application, ocsapps.apps_virtual.mycompany.com, is created.
3. Log on to the OracleAS Single Sign-On Administration page as the Administrator, and use the Administer Partner Applications page to delete the entry for the partner application ocsapp1.ocs_apps1.mycompany.com.
12.2.8.9 Verify Connectivity for Invalidation Messages from the Database to OracleAS Web Cache on ocs_apps1.mycompany.com through the Load BalancerWhen an object is changed in the database, the application metadata repository database sends an invalidation message to Web Cache to invalidate that object if it exists in the cache. Since the target configuration has two instances of OracleAS Web Cache, the invalidation message must be load balanced across both OracleAS Web Cache instances. This is an example of component level load balancing.
Before you proceed with this verification, ensure that messages can be sent from the computer hosting the database to the load balancer. To do this, issue the following command from ocs_store1.mycompany.com and ocs_store2.mycompany.com:
telnet apps_virtual.mycompany.com 9401
Verify that no connection failure message is returned.
12.2.8.10 Enable Monitoring of the Frontend Host and Port Settings of the Load Balancer for OracleAS PortalThe steps to enable monotoring of the host at the front end of the load balancer and port settings for OracleAS Portal are as follows:
1. Open the ORACLE_HOME/sysman/emd/targets.xml file.
2. Locate the OracleAS Portal targets, for example, TYPE="oracle_portal".
3. Edit the PortalListeningHostPort property so that it points to the load balancer. For example: <Property NAME="PortalListeningHostPort" VALUE="http://apps_virtual.mycompany.com:80"/>
4. Save and close targets.xml file.
5. Reload the targets.xml file in the OracleAS Control Console by issuing this command in ORACLE_HOME/bin:
emctl reload
12.2.8.11 Configuring Oracle Real-Time Collaboration with Load Balancer
Note: Refer to Section 2.1.1 for more details.

Installing Oracle Collaboration Suite Colocated Identity Management Architecture
Installing in High Availability Environments: Colocated Identity Management Architecture 12-29
For Real-Time Collaboration, set GlobalWebHost and GlobalWebPort properties to integrate with a load balancer.
A load balancer provides a single published address to the client browser, while distributing requests to multiple Oracle Real-Time Collaboration core component Application tiers that serve the request. It acts as a global Web host for all of the requests.
If you add a load balancer, set the following parameters:
1. GlobalWebHost is the name of the global Web host.
For example, multiple Application tiers could be placed behind a load balancer (ocs_apps1.mycompany.com, ocs_apps2.mycompany.com), but the Web host name you want to have appear in the URL used to join a conference is apps_virtual.mycompany.com.
Default Value: noneValid Value: a load balancer virtual server name.Scope: system, instance
2. GlobalWebPort is the HTTP port of the global Web host.
Default Value: 80Valid Value: Any port IDScope: system, instanceFor example, to reset the global Web host to listen on port 80 for HTTP requests run the following command:
ORACLE_HOME/imeeting/bin/rtcctlrtcctl> setProperty –system true –pname GlobalWebPort –pvalue 80
3. SmtpHost is the name of the SMTP host. To set the smtp host to apps_virtual.mycompany.com, run the following command:
ORACLE_HOME/imeeting/bin/rtcctlrtcctl> setProperty –system true –pname SmtpHost –pvalue "apps_virtual.mycompany.com"
Because the SMTP default port is 25, there is no need to set the SMTP port.
Restart Oracle Collaboration Suite Applications using the following commands:
ORACLE_HOME/opmn/bin/opmnctl stopallORACLE_HOME/opmn/bin/opmnctl startall
12.2.8.12 Updating Oracle Collaboration Suite Service Registry Entries in Oracle Internet Directory to Use the Load BalancerYou can update the Oracle Collaboration Suite registry entries in Oracle Internet Directory by using the Oracle Directory Manager as follows:
Note: Once set, the only way to unset this property is to use the –pvaluenull true option with the SetProperty command. For example, to set the global Web host to apps_virtual.mycompany.com, run the following command:
ORACLE_HOME/imeeting/bin/rtcctlrtcctl> setProperty –system true –pname GlobalWebHost –pvalue "apps_virtual.mycompany.com"

Installing Oracle Collaboration Suite Colocated Identity Management Architecture
12-30 Oracle Collaboration Suite Installation Guide
1. Start the Oracle Directory Manager.
ORACLE_HOME/bin/oidadmin
2. When you start Oracle Directory Manager, it will prompt you for connection information. Enter the following information to connect to your Oracle Internet Directory, typically hosted in the Oracle Collaboration Suite Database on your Oracle Collaboration Suite Infrastructure:
Host: <infrahost.yourdomain.com>Port: 389Username: cn=orcladminPassword: <password>
Port 389 is the default port used by Oracle Internet Directory. If you are using a different port, then enter the correct Oracle Internet Directory port.
If you have configured your Oracle Internet Directory to be accessed using SSL, select the SSL Enabled check box. Otherwise, leave it blank.
3. Select Login to log in to the Oracle Internet Directory. When the connection is successful, the Oracle Internet Directory management screen is displayed.
4. To access the Service Registry, drill down in to the Oracle Internet Directory by selecting the following items in the System Objects pane:
a. Select Entry Management.
b. Select cn=OracleContext.
c. Select cn=Services.
The System Objects pane displays a list of the Oracle Collaboration Suite Applications which have entries in the Service Registry. The Properties tab displays the properties of the cn=Services object.
5. To display URIs stored by each component in the Service Registry, select the component in the System Objects pane. Most components will contain a cn=VirtualServices object. This object contains one or more URIs used by other applications and OracleAS Portal to access that application. Applications store URIs in one or more child objects of the cn=VirtualServices object.
6. After you verify your configuration, update Oracle Collaboration Suite Service Registry entries in Oracle Internet Directory to use the load balancer virtual hostname as follows:
■ Oracle Calendar
dn: cn=OCAS_xxxxx,cn=VirtualServices,cn=Calendar,cn=Services,cn=OracleContextlabeleduri;syncserversecureurllabeleduri:syncserverurl
Note: The Oracle Universal Installer seeds the Oracle Internet Directory with objects for every Oracle Collaboration Suite Applications during installation, even if you do not configure and deploy every application. These unconfigured application entries will not contain child objects of their cn=VirtualServices objects. The child objects, and the URIs they store, are created in the Service Registry by each component's Configuration Assistant when it first runs.

Installing Oracle Collaboration Suite Colocated Identity Management Architecture
Installing in High Availability Environments: Colocated Identity Management Architecture 12-31
labeleduri;webbaseurllabeleduri;webserviceurl
■ Collaborative Workspaces
dn:cn=<DBNAME>,cn=VirtualServices,cn=CollaborativeWorkspaces,cn=Services,cn=OracleContextlabeleduri;adminurllabeleduri;webbaseurllabeleduri:webui
■ Oracle Mail
dn: cn=emailadmin,cn=VirtualServices,cn=Email,cn=Services,cn=OracleContextlabeleduri;adminurl
dn: cn=imap,cn=VirtualServices,cn=Email,cn=Services,cn=OracleContextlabeleduri
dn: cn=smtp,cn=VirtualServices,cn=Email,cn=Services,cn=OracleContextlabeleduri
dn: cn=Webmail,cn=VirtualServices,cn=Email,cn=Services,cn=OracleContextlabeleduri;peopleurllabeleduri;webbaseurlorclraparameter;webbaseurl
dn: cn=webservice,cn=VirtualServices,cn=Email,cn=Services,cn=OracleContextlabeleduri;webservices
■ Oracle Content Services
dn: cn=FILES,cn=VirtualServices,cn=Files,cn=Services,cn=OracleContextlabeleduri;adminurllabeleduri;applicationurllabeleduri;s2swebserviceurllabeleduri;webdavurllabeleduri;webservicesurl
■ Oracle Collaboration Suite Client
dn:cn=IntegratedClient,cn=VirtualServices,cn=OCSClient,cn=Services,cn=OracleContextlabeleduri;baseurllabeleduri;popuplibraryurl
dn: cn=Search,cn=VirtualServices,cn=OCSClient,cn=Services,cn=OracleContextlabeleduri;webbaseurl
■ OracleAS Portal
dn:cn=ReturnToPortalURL,cn=VirtualServices,cn=Portal,cn=Services,cn=OracleContextlabeleduri;

Installing Oracle Collaboration Suite Colocated Identity Management Architecture
12-32 Oracle Collaboration Suite Installation Guide
■ Oracle Discussions
dn:cn=Discussions:<DBNAME>:<MailDomain>,cn=VirtualServices,cn=ThreadedDiscusssions,cn=Services,cn=OracleContextlabeleduri;adminurllabeleduri;rsslabeleduri;webbaseurllabeleduri;webui
■ Oracle Collaboration Suite Mobile Collaboration
dn:cn=WIRELESS1,cn=VirtualServices,cn=Wireless,cn=Services,cn=OracleContextlabeleduri;adminurllabeleduri;calendarnotificationlistenerurllabeleduri;mobilesetupurllabeleduri;presencewebserviceurl
When you have finished editing the properties of an object, select Apply to save the new values in Oracle Internet Directory. If you decide to reject the changes you have made, select Revert to reset the displayed attributes to those currently stored in the Oracle Internet Directory.
7. Using opmnctl or Oracle Enterprise Manager 10g, restart the Oracle Collaboration Suite Infrastructure and all Oracle Collaboration Suite Applications tiers, to clear caches that may still be storing the old URIs and to load the new URIs you have entered.
Restart Oracle Collaboration Suite Applications using the following commands:
ORACLE_HOME/opmn/bin/opmnctl stopallORACLE_HOME/opmn/bin/opmnctl startall
There is no need to restart the Oracle Collaboration Suite Database.
12.2.8.13 Test the ConfigurationThe steps to test the configuration are as follows:
1. Access OracleAS Web Cache and Oracle HTTP Server through the load balancer with the following URL:
http://apps_virtual.mycompany.com
2. Test the connection to the Oracle Collaboration Suite Database through the load balancer, by accessing the following URL:
Note: In addition to changing the host name to use the load balancer virtual host name, the port should also match the listen port used in Step 1 in Section 12.2.8.1. In this example it was port 80 (the defualt port), which means the port specification can be removed. So, for example, the Oracle Internet Directory labeleduri for the Portal ReturnToPortalURL should change from
http://ocs_apps1.mycompany.com:7778/portal/page?_dad=portal&_schema=PORTAL&_pageid=
to
http://apps_virtual.mycompany.com/portal/page?_dad=portal&_schema=PORTAL&_pageid=

Installing Oracle Collaboration Suite Colocated Identity Management Architecture
Installing in High Availability Environments: Colocated Identity Management Architecture 12-33
http://apps_virtual.mycompany.com/pls/portal/htp.p?cbuf=test
The response should be test. If this succeeds, then the Oracle Collaboration Suite Applications tier can connect to the Oracle Collaboration Suite Database. If this test fails, then examine the Oracle HTTP Server ORACLE_HOME/Apache/Apache/logs/error_log file to determine the cause.
3. Test the OracleAS Portal using following URL (ensure that you can log in):
http://apps_virtual.mycompany.com/pls/portal
Verify that content is being cached in OracleAS Web Cache on ocs_apps1.mycompany.com, using Web Cache Administrator. Under Monitoring, click Popular Requests. Select Cached from the Filtered Objects drop-down list, and click Update.
If you accessed OracleAS Portal, portal content will appear. If there is no portal content, open another browser and log on to OracleAS Portal. Return to the Popular Requests page, and click Update to refresh the page content.
12.2.9 Installing Subsequent Instance of Oracle Collaboration Suite ApplicationsThis section describes the installation of the subsequent instance of Oracle Collaboration Suite Applications without Oracle Calendar Server and postinstallation tasks.
12.2.9.1 Installation TasksTo install the subsequent instance of Oracle Collaboration Suite Applications, follow the steps listed in Table 12–8.
Table 12–8 Installing Subsequent Instance of Oracle Collaboration Suite Applications
Step Screen Action
1. Welcome Click Next.
2. Specify File Locations Enter a name and path for the new Oracle home. This new Oracle home will be the destination Oracle home for Oracle Collaboration Suite Applications.
Click Next.
3. Specify Hardware Cluster Installation Mode (optional)
Select Local Installation. This screen will only show up if you are installing Identity Management on a cluster.
Click Next.
3. Select a Product to Install Select Oracle Collaboration Suite Applications 10.1.1.0.2.
Click Next.
4. Product-specific Prerequisite Checks
Make sure all the checks complete successfully.
Click Next.

Installing Oracle Collaboration Suite Colocated Identity Management Architecture
12-34 Oracle Collaboration Suite Installation Guide
5. Select Components to Configure
Select Oracle Mail.
Select Oracle Mobile Collaboration.
Select Oracle Content Services.
Do not select Oracle Calendar Server.
Select Oracle Calendar Web Client.
Select Oracle Real-Time Collaboration.
Select Oracle Collaboration Suite Search.
Select Oracle Collaboration Suite Web Access.
Do not select Oracle Collaborative Portlets.
Select Oracle Workspaces.
Select Oracle Discussions.
Click Next.
6. Register with Oracle Internet Directory
Host: Enter the LDAP virtual server name.
Port: Enter the non-SSL port number for the LDAP virtual server name.
Click Next.
7. Specify UserName and Password for Oracle Internet Directory
Username: Enter the username to log in to Oracle Internet Directory. You must log in as the Oracle Internet Directory superuser (cn=orcladmin).
Password: Enter the password for the username.
Click Next.
8. OracleAS Metadata Repository
Select Oracle Collaboration Suite Database from the list.
Click Next.
Error: The installation has detected that Oracle Collaborative Portlets has already been configured in the Metadata Repository you have selected. Oracle Collaborative Portlets will be unselected for this configuration.
This screen will only show up if you selected Oracle Collaborative Portlets from the Select Components to Configure screen.
Click Yes.
9. Select Database Components
Component Name: Oracle Mail, Oracle Discussions, Oracle Search, Oracle Real-Time Collaboration, Oracle Collaboration Suite Search, Oracle Workspaces, Oracle Content Services, Oracle Collaboration Suite Web Access
Database Name: Name of the Oracle Collaboration Suite Database.
Click Next.
10. Specify Port Configuration Options
Select Automatic Port Selection or Manual and enter the port numbers for.
■ Web Cache HTTP Listen Port
■ Web Cache HTTP Listen SSL
■ Oracle Mail IMAP4 port
■ Oracle Mail IMAP4 Secure port
■ Oracle Mail POP3 port
■ Oracle Mail POP3 Secure port
■ Oracle Mail SMTP port
■ Oracle Mail NNTP port
■ Oracle Mail NNTP Secure port
Click Next.
Table 12–8 (Cont.) Installing Subsequent Instance of Oracle Collaboration Suite Applications
Step Screen Action

Installing Oracle Collaboration Suite Colocated Identity Management Architecture
Installing in High Availability Environments: Colocated Identity Management Architecture 12-35
12.2.9.2 Postinstallation tasksThe postinstallation tasks involve troubleshooting the installation errors and performing manual postinstallation steps.
12.2.9.2.1 Troubleshooting the Installation Errors You might have to perform the postinstallation steps to solve the following problems:
■ The index.jsp packaged in the welcome.ear has the incorrect Portal URL. In ORACLE_HOME/j2ee/OC4J_OCSClient/applications/welcome/welcome-web/index.jsp change URL portalUrl = new URL("http", request.getServerName(), request.getServerPort(), ""); to URL portalUrl = new URL("http", request.getServerName(), request.getServerPort(), "/pls/portal");
■ Oracle Calendar Home Page cannot be accessed through orclguest account. To resolve this error, the steps are as follows:
1. Stop all fast CGI (FCGI) processes using Oracle OCAS Control (ocasctl). When Oracle Collaboration Suite Applications tier is started or stopped using OPMN control (opmnctl), OCAS is not started or stopped because OCAS is not integrated with OPMN.
ORACLE_HOME/ocas/bin/ocasctl -stopall
2. Start the FCGI processes.
ORACLE_HOME/ocas/bin/ocasctl –start –t ochecklet –p 8020 –n 1ORACLE_HOME/ocasctl –start –t ocas –p 8010 –n 5
The default ports are 8010 and 8020. The valid range is 8010-8020.
11. Specify Administrative Password and Instance Name
Instance Name: Enter a name for this Oracle Collaboration Suite Applications instance.
Administrative Password: Set the password for the administrative user. This is the administrative user for the Oracle Collaboration Suite Applications instance.
Click Next.
12. Specify Oracle Mail Domain Information
Local Domain: Select it from the list.
Select the same domain as in the first Oracle Collaboration Suite Applications installation.
Click Next.
13. Summary Verify your selection and click Install.
14. Install Progress This screen displays the progress of the installation.
15. Run root.sh Note: Do not run the root.sh script until this dialog box appears.
1. When you see this dialog box, run the root.sh script in a different shell as the root user. The script is located in the Oracle home directory of this instance.
2. Click OK.
16. The Configuration Assistants
This screen shows the progress of the configuration assistants.
17. End of Installation Click Exit to quit the installer.
Table 12–8 (Cont.) Installing Subsequent Instance of Oracle Collaboration Suite Applications
Step Screen Action

Installing Oracle Collaboration Suite Colocated Identity Management Architecture
12-36 Oracle Collaboration Suite Installation Guide
3. Verify the status of the FCGI processes:
ORACLE_HOME/ocas/bin/ocasctl –status
■ When you log on to Portal as a newly created user, the calendar portlet shows "Service temporarily unable due to maintenance message".
1. Click the Oracle Calendar link and go to the Oracle Calendar view page.
2. Click the Return to Portal link and the porlet should show up correctly.
■ When accessing workspaces, user cannot be found in LDAP directory. To resolve this error, run the following command:
$ORACLE_HOME/opmn/bin/opmnctl restartproc process-type=OC4J_OCSClient
12.2.9.2.2 Performing Manual Postinstallation Steps You also have to perform the following additional postinstallation steps for Oracle Mail and Oracle Mobile Collaboration:
■ For Oracle mail, the steps are as follows:
1. Get the user ID and group ID of the owner of the Oracle Collaboration Suite Applications.
2. Start LISTENER_ES as root, if the port that you are using is a privileged port (< 1024). Ensure ORACLE_HOME, LD_LIBRARY_PATH and PATH environment variables are set correctly.
ORACLE_HOME/bin/tnslsnr listener_es –user <userid> -group <group_id> &
■ To enable Oracle Mobile Collaboration Calendar notifications, the steps are as follows:
1. Log in to Enterprise Manager. Go to System Components, Wireless, Site Administration.
2. Expand Component Configuration section and click XMS Configuration.
3. Under XMS Center, ensure that Enable XMSC is checked.
4. Go to System Components, Wireless, Notification eng xxxx. Click Enable/Disable link and make sure Notification engine is enabled.
5. Restart the wireless component.
12.2.10 Post Installation Steps to Redeploy Oracle Collaboration Suite Applications with a Load Balancer
You can configure two or more Oracle Collaboration Suite Applications instances in a highly-available deployment by placing a load balancer in front of them. The load balancer publishes a single address for Oracle Collaboration Suite Applications while providing a redundant st of application servers that actually service requests. The load balancer can be configured to detect when one of the Oracle Collaboration Suite Applications instances has failed and can then fail over requests to another instance.
The details of the configuration are as follows:
■ There are two Oracle Collaboration Suite Applications computers: ocs_apps1.mycompany.com and ocs_apps2.mycompany.com. Both application servers listen on non-SSL port 7777.

Installing Oracle Collaboration Suite Colocated Identity Management Architecture
Installing in High Availability Environments: Colocated Identity Management Architecture 12-37
■ The Oracle Collaboration Suite Applications computers are configured to use the Single Sign-On server located at im_virtual.mycompany.com.
■ The effective host name of the Oracle Collaboration Suite Applications published to the user is apps_virtual.mycompany.com. A load balancer is configured to listen at this address, on port 80. It has been configured to load balance and fail over user requests between ocs_apps1.mycompany.com and ocs_apps2.mycompany.com.
■ The Single Sign-On server and Directory server are located at im_virtual.mycompany.com.
■ The Oracle Collaboration Suite Database (including Identity Management metadata) is located at ocs_store1.mycompany.com and ocs_store2.mycompany.com (2-node RAC).
The postinstallation steps are follows:
1. Enable Portal
2. Configure the Oracle HTTP Server with the Load Balancer
3. Configure the Parallel Page Engine Loop-Back with the Load Balancer
4. Modify the Portal Dependency Settings (iasconfig.xml) File
5. Reregister mod_osso
6. Configure OracleAS Web Cache Clusters
7. Enable Monitoring of the Frontend Host and Port Settings of the Load Balancer for OracleAS Portal
8. Enable Session Binding on OracleAS Web Cache Clusters
9. Configure Collaborative Portlets
10. Configure Oracle Collaboration Suite Mobile Collaboration
11. Configuring Oracle Discussions
12. Test the Configuration
12.2.10.1 Enable PortalThe first task is to configure OracleAS Portal, using the Oracle Enterprise Manager 10g Collaboration Suites Control Console. Follow these steps to configure OracleAS Portal, beginning on the Oracle Collaboration Suite page:
1. Click Configure Component. The Select Component page appears.
2. Select portal from the list.
3. Click Continue. The configuration process may take 10-20 minutes to complete.
Before you continue with the OracleAS Portal application server configuration, ensure that the following is configured:
■ You are able to resolve apps_virtual.mycompany.com from ocs_apps2.mycompany.com, such that it contacts the load balancer. To ensure you can resolve apps_virtual.mycompany.com by running the following command:
nslookup apps_virtual.mycompany.com
The IP address for the virtual server name should be returned.

Installing Oracle Collaboration Suite Colocated Identity Management Architecture
12-38 Oracle Collaboration Suite Installation Guide
■ You are able to contact port 7777 on apps_virtual.mycompany.com from ocs_apps2.mycompany.com. Run the following command on ocs_app2.mycompany.com:
telnet apps_virtual.mycompany.com 7777
Verify that no connection failure message is returned.
12.2.10.2 Configure the Oracle HTTP Server with the Load BalancerThis step associates the components on which OracleAS Portal depends with load balancer virtual server name and port: apps_virtual.mycompany.com:80. The steps to configure the Oracle HTTP Server with the Load Balancer are as follows:
1. Access the Oracle Enterprise Manager – Oracle Collaboration Suite Control console.
2. Click the link for the ocs_apps2.mycompany.com installation.
3. Click the HTTP Server link.
4. Click the Administration link.
5. Click Advanced Server Properties.
6. Open the httpd.conf file.
7. Perform the following steps:
a. Add LoadModule certheaders_module directive.
LoadModule certheaders_module libexec/mod_certheaders.so
b. Add the following lines to create a NameVirtualHost directive and a VirtualHost container for apps_virtual.mycompany.com and port 80.
NameVirtualHost *:7778<VirtualHost *:7778>ServerName apps_virtual.mycompany.comPort 80ServerAdmin [email protected] OnRewriteOptions inherit</VirtualHost>
c. Create a second VirtualHost container for ocs_apps2.mycompany.com and port 7777.
<VirtualHost *:7778>ServerName ocs_apps2.mycompany.comPort 7777ServerAdmin [email protected] OnRewriteOptions inherit
Note: The LoadModule directives (in particular, the LoadModule rewrite_module directive) must appear in the httpd.conf file at a location preceding the VirtualHost directives. The server must load all modules before it can execute the directives in the VirtualHost container. It is a good idea to create the VirtualHost directives at the end of the httpd.conf file.

Installing Oracle Collaboration Suite Colocated Identity Management Architecture
Installing in High Availability Environments: Colocated Identity Management Architecture 12-39
</VirtualHost>
8. Save the httpd.conf file, and restart the Oracle HTTP Server when prompted.
9. Copy the dads.conf file from ocs_apps1.mycompany.com to ORACLE_HOME/Apache/modplsql/conf directory of ocs_apps2.mycompany.com.
12.2.10.3 Configure the Parallel Page Engine Loop-Back with the Load BalancerIn this step, you configure non-SSL loop-back communication between the load balancer and the Parallel Page Engine on ocs_apps1.mycompany.com and ocs_apps2.mycompany.com. If the OracleAS Web Cache on ocs_app1.mycompany.com is down, the Parallel Page Engine can loop back to the OracleAS Web Cache on ocs_apps2.mycompany.com through the load balancer to reach mod_plsql.
The steps to create the loop-back configuration are as follows:
1. Open the ORACLE_HOME/j2ee/OC4J_Portal/applications/portal/portal/WEB-INF/web.xml file.
2. Locate the Page servlet section.
3. Add the lines shown in bold.
<servlet><servlet-name>page</servlet-name> <servlet-class>oracle.webdb.page.ParallelServlet</servlet-class> <init-param> <param-name>useScheme</param-name> <param-value>http</param-value> </init-param> <init-param> <param-name>usePort</param-name> <param-value>7777</param-value> </init-param></servlet>
4. Save the web.xml file.
5. Save the manual configuration changes in the DCM repository by running the following command on ocs_apps2.mycompany.com in ORACLE_HOME/dcm/bin:
dcmctl updateConfig
6. Restart all components on ocs_apps2.mycompany.com by running the following command in ORACLE_HOME/opmn/bin:
opmnctl stopallopmnctl startall
12.2.10.4 Modify the Portal Dependency Settings (iasconfig.xml) FileThe Portal Dependency Settings file iasconfig.xml must contain the correct host, port, and farm name to enable access to OracleAS Portal and perform OracleAS Web Cache invalidation. Follow the steps to edit the file to include this information:
1. Create a backup copy of the ORACLE_HOME/portal/conf/iasconfig.xml file.

Installing Oracle Collaboration Suite Colocated Identity Management Architecture
12-40 Oracle Collaboration Suite Installation Guide
2. Copy the iasconfig.xml file in ocs_apps1.mycompany.com to ORACLE_HOME/portal/conf of ocs_apps2.mycompany.com.
3. Overwrite the file on ocs_apps2.mycompany.com when prompted.
12.2.10.5 Reregister mod_ossoThe steps for reregistering mod_osso are:
1. Back up the ORACLE_HOME/Apache/Apache/conf/osso/conf file.
2. Use the FTP binary mode to copy the osso.conf file of ocs_apps1.mycompany.com to ORACLE_HOME/Apache/Apache/conf of ocs_apps2.mycompany.com.
3. Synchronize the DCM repository with the file by FTP using the following command:
ORACLE_HOME/Apache/Apache/bin/ssotransfer ORACLE_HOME/Apache/Apache/conf/osso/osso.conf
4. Restart the components on ocs_apps2.mycompany.com by running the commands in ORACLE_HOME/opmn/bin of ocs_apps2.mycompany.com:
opmnctl stopallopmnctl startall
5. Log in to the OracleAS Single Sign-On Administration page as the Administrator, and use the Administer Partner Applications page to delete the entry for the partner application ocsapp1.ocs_apps2.mycompany.com.
12.2.10.6 Configure OracleAS Web Cache ClustersTo cluster the OracleAS Web Cache instances, you will perform the configuration steps on ocs_apps1.mycompany.com and propagate them to ocs_apps2.mycompany.com.
From the Oracle Enterprise Manager Collaboration Suite Control Console, you can access the Web Cache Manager, the graphical user interface provided for editing the configuration stored in the webcache.xml file. Start the Oracle Collaboration Suite Applications instance on ocs_apps1.mycompany.com, then follow the steps to access the Web Cache Manager from the System Components page.
1. Access the Web Cache Administrator at the following URL:
http://ocs_apps1.mycompany.com:9400/webcacheadmin
The Web Cache Administrator password dialog box appears.
2. For the user name, enter ias_admin or administrator, and enter the OracleAS Web cache administrator password.
Note: This does not create any new partner applications. It enables the partner application ocsapps.apps_virtual.mycompany.com for ocs_apps1.mycompany.com and ocs_apps2.mycompany.com.

Installing Oracle Collaboration Suite Colocated Identity Management Architecture
Installing in High Availability Environments: Colocated Identity Management Architecture 12-41
The Web Cache Manager page appears.
3. Click Clustering in the Properties section. The Clustering page appears.
4. In the Cluster Members table, click Add. The Add Cache to Cluster page appears.
5. Enter the following information for ocs_apps2.mycompany.com:
Host Name: ocs_apps2.mycompany.comAdmin. Port: 9400Protocol for Admin. Port: HTTPCache Name: ocs_apps2.mycompany.com-WebcacheCapacity: 20
6. Click Submit.
7. Click the Origin Server link in the Origin Servers, Sites, and Load Balancing section. The Origin Server page appears.
8. Click Add under the Application Web Servers table.
9. Enter the following information:
Hostname: ocs_apps2.mycompany.comPort: 7778Routing: ENABLECapacity: 30Failover Threshold: 5Ping URL: /Ping Interval: 10Protocol: HTTP
10. Click Submit.
11. Click the Site-to-Server Mapping link in the Origin Servers, Sites and Load Balancing section. The Site-to-Server Mapping page appears.
12. Select the mapping for the Load Balancer site (apps_virtual.mycompany.com) from the table and click Edit Selected. The Edit/Add Site-to-Server mapping page appears.
13. In the Select Application Web Servers section, select an application Web server specified in the Origin Servers page for ocs_apps2.mycompany.com (ocs_apps1.mycompany.com is already mapped).
14. Click Submit.
15. Click Apply Changes.
16. In the Cache Operations page, click Propagate. The changes are propagated to ocs_apps2.mycompany.com.
17. Click Restart. OracleAS Web Cache is restarted on ocs_apps1.mycompany.com and ocs_apps2.mycompany.com. OracleAS Web Cache on ocs_apps1.mycompany.com begins to balance requests to the Oracle HTTP Server and OC4J_Portal instances on ocs_apps2.mycompany.com.
Note: At installation time, the OracleAS Web Cache administrator password is set to the same password as the ias_admin password. The OracleAS Web Cache administrator password must be identical for all cache cluster members.
Installing Oracle Collaboration Suite Colocated Identity Management Architecture
12-42 Oracle Collaboration Suite Installation Guide
12.2.10.7 Enable Monitoring of the Frontend Host and Port Settings of the Load Balancer for OracleAS PortalThe steps are as follows:
1. Open the ORACLE_HOME/sysman/emd/targets.xml file.
2. Locate the OracleAS Portal targets, for example, TYPE="oracle_portal".
3. Edit the PortalListeningHostPort property so that it points to the load balancer. For example:
<Property NAME="PortalListeningHostPort" VALUE="http://apps_virtual.mycompany.com:80"/>
4. Save and close targets.xml file.
5. Reload the targets.xml file in the Oracle Collaboration Suite Control Console by running the following command in ORACLE_HOME/bin:
emctl reload
12.2.10.8 Enable Session Binding on OracleAS Web Cache ClustersThe session binding feature in OracleAS Web Cache is used to bind user sessions to a given origin server to maintain state for a period of time. Enabling session binding forces all the user requests to go to a give OracleAS Portal middle-tier, resulting in a better cache hit ratio for the portal cache. For this reason, session binding is required although almost all components running in a given OracleAS Portal middle tier are stateless.
To enable session binding in OracleAS Web Cache, the steps on ocs_apps1.mycompany.com or ocs_apps2.mycompany.com are as follows:
1. Access the Web cache Administrator at the following URL:
http://ocs_apps1.mycompany.com:9400
The Web Cache Administrator password dialog box appears.
2. Enter the OracleAS Web Cache administrator password.
The Web Cache Manager page appears.
3. Click the Session Binding link in the Origin Servers, Sites, and Load Balancing section. The Session Binding page appears.
4. Select the Load Balancing Router site, apps_virtual.mycompany.com:80 from the table and click Edit Selected. The Edit Session Binding window opens.
5. Select Any Set-Cookie from the Please select a session list.
6. Select Cookie-based from the Please select a session binding mechanism list.
7. Click Submit.
8. Click Apply Changes.
Note: At installation time, the OracleAS Web Cache administrator password is set to the same password as the ias_admin password. The OracleAS Web Cache administrator password must be identical for all cache cluster members.

Installing Oracle Collaboration Suite Colocated Identity Management Architecture
Installing in High Availability Environments: Colocated Identity Management Architecture 12-43
9. On the Cache Options page, click Propagate.The changes are propagated to the OracleAS Web Cache instance on the other computer.
10. Click Restart. OracleAS Web Cache is restarted on ocs_apps1.mycompany.com and ocs_apps2.mycompany.com.
12.2.10.9 Configure Collaborative PortletsConfigure Collaborative Portlets Configure Components from Oracle Enterprise Manager 10g Application Server Control Console. The Configure Component button appears above the System Components table if you have installed, but not configured, some components.
To configure Collaborative Portlets, perform the following steps:
1. On the Oracle Collaboration Suite home page, click Configure Component.
2. Select Collaborative Portlets from the drop-down list on the Select Component page, and click Continue.
3. Enter the following values:
OID Administrative PasswordHost Name: Load Balancer Virtual Server Name – apps_virtual.mycompany.comWeb Cache Listen Port: Load Balancer Virtual Server Name’s port – Port 80Web Cache Invalidation Port: Refer to ORACLE_HOME/install/portlist.ini – 9401
4. Click Continue. The configuration process may take 10-15 minutes to complete.
5. Restart the components on ocs_apps2.mycompany.com by running the following commands in ORACLE_HOME/opmn/bin of ocs_apps2.mycompany.com:
opmnctl stopallopmnctl startall
12.2.10.10 Configure Oracle Collaboration Suite Mobile CollaborationConfigure the URLs of the current OracleAS Wireless Instance on each Oracle Collaboration Suite Applications tier. Configuring Oracle Collaboration Suite Mobile enables you to define the instance URLs for an application server, or direct an application server to use the URLs defined for the entire OracleAS Wireless site.The steps are as follows:
1. Access the Oracle Enterprise Manager – Oracle Collaboration Suite Control console.
2. Click the link for the ocs_apps1.mycompany.com installation.
3. Click the Wireless link under System Components.
4. Click the Instance URLs link under Instance Configuration.
5. Modify the Wireless Instance URLs to point to the load balancer’s virtual server name (apps_virtual.mycompany.com)
Repeat the preceding steps for each Oracle Collaboration Suite Applications tier.
12.2.10.11 Configuring Oracle DiscussionsWhen deploying Oracle Discussions in more than one Applications tier with a load balancer at the front end, please ensure to turn on session affinity in your load balancer. Oracle Discussions requires that once a user establishes a session with one

Installing Oracle Collaboration Suite Colocated Identity Management Architecture
12-44 Oracle Collaboration Suite Installation Guide
OC4J instance, all the following requests must go to the same OC4J instance. In case of a failover, the original Applications tier is not available anymore and the requests are transferred to the second Applications tier. Oracle Discussions automatically re-creates a new user session in the new OC4J instance. There is no loss of data except that of the currently executing operation when the first Applications tier goes offline.
12.2.10.12 Test the ConfigurationTo ensure that it is working as it should, perform the following tests:
1. Ensure that all components on ocs_apps2.mycompany.com are running.
a. Run the following command from ORACLE_HOME/opmn/bin to query the status of the components:
opmnctl status
b. If necessary, run the following command in ORACLE_HOME/opmn/bin:
opmnctl startall
2. Stop all components on ocs_apps1.mycompany.com by running the following command in ORACLE_HOME/opmn/bin:
opmnctl stopall
3. Access OracleAS Web Cache and Oracle HTTP Server through the load balancer with the following URL:
http://apps_virtual.mycompany.com
4. Test the connection to the Oracle Collaboration Suite Database through the load balancer, by accessing the following URL:
http://apps_virtual.mycompany.com/pls/portal/htp.p?cbuf=test
The response should be test. If this succeeds, then the Oracle Collaboration Suite Applications tier can connect to the Oracle Collaboration Suite Database. If this test fails, then examine the ORACLE_HOME/Apache/Apache/logs/error_log file of Oracle HTTP Server to determine the cause.
5. Test the OracleAS Portal using following URL (ensure that you can log in):
http://apps_virtual.mycompany.com/pls/portal
6. Verify that content is being cached in OracleAS Web Cache on ocs_apps1.mycompany.com, using Web Cache Administrator. Under Monitoring, click Popular Requests. Select Cached from the Filtered Objects drop-down list, and click Update.
If you accessed OracleAS Portal, portal content will appear. If there is no portal content, open another browser and log in to OracleAS Portal. Return to the Popular Requests page, and click Update to refresh the page content.
7. Repeat steps 3 through 6, by ensuring that all components on ocs_apps1.mycompany.com are running, and all components on ocs_apps2.mycompany.com are stopped and vice versa.

Installing in High Availability Environments: Distributed Identity Management Architecture 13-1
13Installing in High Availability Environments:
Distributed Identity ManagementArchitecture
This chapter contains the following sections:
■ Section 13.1, "Summary of Installation Steps"
■ Section 13.2, "Installing Oracle Collaboration Suite Distributed Identity Management Architecture"
13.1 Summary of Installation StepsThe order for the installation of Oracle Collaboration Suite Distributed Identity Management Architecture is as follows:
1. Install Oracle Cluster Ready Services. This is a prerequisite for the installation of Oracle Collaboration Suite Database in an Oracle Real Application Clusters database.
Apply the Oracle Cluster Ready Services 10.1.0.4.2 Patchset for your platform.The Oracle Cluster Ready Services 10.1.0.4.2 Patchset for your platform is located on the Oracle Database 10g Patchset (10.1.0.4.2) for Solaris Operating System (SPARC) DVD.
2. Install Oracle Collaboration Suite Database on RAC.
3. Configure load balancers for the Identity Management tier appropriately.
4. Install Identity Management on high availability nodes. The virtual server name of the load balancer must be specified in the Specify LDAP Virtual Host and Ports and the Specify HTTP Load Balancer Host and Ports screens during installation.
5. Run OCSdbSchemaReg.sh script on a database node. This script registers the database with Oracle Internet Directory and runs the component Configuration Assistants that create schema objects for each Oracle Collaboration Suite component.
6. Install Oracle Calendar Server in Cold Failover Cluster Configuration. It must use a virtual host name, such as vhost.mydomain.com. Install the oraInventory directory and ORACLE_HOME on a shared device that can be mounted to the other node for a cold failover.
7. Install Oracle Collaboration Suite Applications (without Oracle Calendar Server).

Installing Oracle Collaboration Suite Distributed Identity Management Architecture
13-2 Oracle Collaboration Suite Installation Guide
13.2 Installing Oracle Collaboration Suite Distributed Identity Management Architecture
This section contains the following topics:
■ Section 13.2.1, "Installing and Applying Patch to Oracle Cluster Ready Services"
■ Section 13.2.2, "Installing the Oracle Collaboration Suite Database on RAC"
■ Section 13.2.3, "Configuring Load Balancers for Identity Management"
■ Section 13.2.4, "Installing Identity Management on High Availability Nodes"
■ Section 13.2.5, "Register the Oracle Collaboration Suite Database with Oracle Internet Directory and Execute Component Database Configuration Assistants"
■ Section 13.2.6, "Installing Oracle Calendar Server"
■ Section 13.2.7, "Installing the First Instance of Oracle Collaboration Suite Applications (without Oracle Calendar Server)"
■ Section 13.2.8, "Configuring the First Oracle Collaboration Suite Applications Tier with a Load Balancer"
■ Section 13.2.9, "Installing Subsequent Instance of Oracle Collaboration Suite Applications"
■ Section 13.2.10, "Post Installation Steps to Redeploy Oracle Collaboration Suite Applications with a Load Balancer"
13.2.1 Installing and Applying Patch to Oracle Cluster Ready ServicesThis section explains the installation steps for Oracle Cluster Ready Services. It also explains the steps involved in applying the patch to Oracle Cluster Ready Services.
13.2.1.1 Installing Oracle Cluster Ready ServicesPerform the steps listed in Table 13–1 to install Oracle Cluster Ready Services.
For Oracle Cluster Ready Services Installation steps, refer to Oracle Real Application Clusters Installation and Configuration Guide at
http://otn.oracle.com/pls/db10g/portal.portal_demo3?selected=16.
Install the Oracle Cluster Ready Services software from the Oracle Collaboration Suite Supplemental DVD.
Table 13–1 Installing Oracle Cluster Ready Services
Step Screen Action
1. None Log in as the oracle user and set the ORACLE_BASE environment variable to specify the Oracle base directory that you created previously. For example:
/u01/app/oracle
2. None Set the ORACLE_HOME environment variable to specify the Oracle Cluster Ready Services home directory that you created previously. For example:
/u01/crs/oracle/product/10.1.0/crs_1
3. None Run the runInstaller command from the top-level directory of the Oracle Cluster Ready Services Release 1 CD-ROM or the crs directory on the DVD-ROM. These are separate CD-ROMs and DVD-ROMs that contain the Cluster Ready Services software.
4. Welcome page Click Next.

Installing Oracle Collaboration Suite Distributed Identity Management Architecture
Installing in High Availability Environments: Distributed Identity Management Architecture 13-3
5. Specify Inventory Directory and Credentials
(Advanced installation only)
This screen appears only if this is the first installation of any Oracle product on this computer.
Enter the full path for the inventory directory: Enter a full path to a directory for the installer files. Enter a directory that is different from the Oracle home directory for the product files.
Example: /private/oracle/oraInventory
Click OK.
6. UNIX Group Name
(Advanced installation only)
This screen appears only if this is the first installation of any Oracle product on this computer.
Enter the name of the operating system group to have write permission for the inventory directory.
Example: dba
Click Next.
7. Run orainstRoot.sh
(Advanced installation only)
This screen appears only if this is the first installation of any Oracle product on this computer.
Run the orainstRoot.sh script in a different shell as the root user. The script is located in the oraInventory directory.
Click Continue.
8. Specify File Locations
(Advanced installation only)
Enter the full path of the Source directory in the Path field for Source, if required.
Name: Enter a name to identify this Oracle home. The name cannot contain spaces, and has a maximum length of 16 characters.
Example: OH_apptier_10_1_1
Destination Path: Enter the full path to the destination directory. This is the Oracle home. If the directory does not exist, the installer creates it. To create the directory beforehand, create it as the oracle user; do not create it as the root user.
Example: /private/oracle/OH_apptier_10_1_1
Click Next.
9. Language Selection
(Advanced installation only)
Select the required language from the Available Languages list and add it to the Selected Languages list.
Click Next.
10. Cluster Configuration
(Advanced installation only)
Cluster Name: Specify the cluster name.
Specify the host name under Public Node Name. Similarly, specify the private name under Private Node Name. These names will be used to interconnect the node names within the cluster.
Note: The private name cannot be the same as the public name. However, the private name can be an IP address.
Click Next.
11. Specify Network Interface Usage
(Advanced installation only)
Select the interface name, subnet, and interface type for the node in the cluster from the respective drop-down list.
The interface that you mark private will only be used for RAC internode traffic.
Note: If there is more than one subnet associated with an interface, then specify the subnet that you want to associate with the interface type.
Table 13–1 (Cont.) Installing Oracle Cluster Ready Services
Step Screen Action

Installing Oracle Collaboration Suite Distributed Identity Management Architecture
13-4 Oracle Collaboration Suite Installation Guide
13.2.1.2 Applying Oracle Cluster Ready Services 10.1.0.4.2 PatchsetAfter installing Oracle Cluster Ready Services, you must apply Oracle Cluster Ready Services 10.1.0.4.2 Patchset.The Oracle Cluster Ready Services 10.1.0.4.2 Patchset for your platform is located on the Oracle Database 10g Patchset (10.1.0.4.2) for Solaris Operating System (SPARC) DVD.
The steps to do so are listed in the Table 13–2.
13.2.2 Installing the Oracle Collaboration Suite Database on RACTo install Oracle Collaboration Suite Database on clustered hardware, follow the steps listed in Table.
12. Oracle Cluster Registry
(Advanced installation only)
Specify OCR Location: Specify the shared raw device or the cluster file system file that will be visible to all nodes of the cluster.
Note: At least 100 MB of disk space is required for the OCR.
Click Next.
13. Voting Disk
(Advanced installation only)
Enter voting disk file name: Specify the raw device or the cluster file system file for voting disk that will be visible to all nodes of the cluster.
Click Next.
Note: At least 20 MB of disk space is required for the OCR.
14. Summary Verify your selections and click Install.
15. Install Progress This screen displays the progress of the installation.
16. Run root.sh Note: Do not run the root.sh script until this dialog box appears.
1. When you see this dialog box, run the root.sh script in a different shell as the root user. The script is located in this instance Oracle home directory.
2. Click OK.
17. Configuration Assistants This screen shows the progress of the configuration assistants. Configuration assistants configure components.
18. End of Installation Click Exit to quit the installer.
Table 13–2 Installing Oracle Cluster Ready Services
Step Screen Action
1. Welcome Click Next.
2. Specify File Locations Enter the full path of the Source directory in the Path field for Source, if required.
Destination Path: Enter the full path to the destination directory. This is the Oracle home.
Both source and destination will be same as that provided during the installation of Oracle Cluster Ready Services.
3. Selected Nodes Verify the nodes listed in the Node Names list and click Next.
4. Summary Verify your selections and click Install.
5. End of Installation Click Exit to quit the installer.
Table 13–1 (Cont.) Installing Oracle Cluster Ready Services
Step Screen Action

Installing Oracle Collaboration Suite Distributed Identity Management Architecture
Installing in High Availability Environments: Distributed Identity Management Architecture 13-5
13.2.2.1 Prerequisites for Selecting the Types of RAC storageThe following table shows the storage options supported for storing Oracle Cluster Ready Services files, Oracle Database files, and Oracle Database recovery files. Oracle Database files include datafiles, control files, redo log files, the server parameter file, and the password file. Oracle Cluster Ready Services files include the Oracle Cluster Registry (OCR) and the Oracle Cluster Ready Services voting disk.
For all installations, you must choose the storage option that you want to use for Oracle Cluster Ready Services files and Oracle Database files. If you want to enable automated backups during the installation, you must also choose the storage option that you want to use for recovery files (the flash recovery area). You do not have to use the same storage option for each file type.
Use the following guidelines when choosing the storage options that you want to use for each file type:
■ You can choose any combination of the supported storage options for each file type as long as you satisfy any requirements listed for the chosen storage options.
■ Oracle recommends that you choose ASM as the storage option for database and recovery files.
■ For Standard Edition installations, ASM is the only supported storage option for database or recovery files.
■ You cannot use Automatic Storage Management to store Oracle Cluster Ready Services files, because these files must be accessible before any Oracle instance starts.
13.2.2.2 Review Recommendations for Automatic Storage Management (ASM)If you plan to use ASM instances for the OracleAS Metadata Repository database, consider these recommendations:
■ If you plan to use ASM with Oracle Database instances from multiple database homes on the same node, then you should run the ASM instance from an Oracle home that is different from the database homes.
■ The ASM home should be installed on every cluster node. This prevents the accidental removal of ASM instances that are in use by databases from other homes during the deinstallation of a database Oracle home.
Storage Option
File Types Supported
CRS Database Recovery
Automatic Storage Management No Yes Yes
Cluster file system
Note: Requires a supported cluster file system
Yes Yes Yes
NFS file system
Note: Currently supported only with Fujitsu PRIMECLUSTER and a certified NAS device (SPARC only)
Yes Yes Yes
Shared raw logical volumes (SPARC only) Yes Yes No
Shared raw partitions Yes Yes No

Installing Oracle Collaboration Suite Distributed Identity Management Architecture
13-6 Oracle Collaboration Suite Installation Guide
13.2.2.3 Installation TasksTo install Oracle Collaboration Suite Database on RAC, follow the steps listed in Table 13–3.
Table 13–3 Installing Oracle Collaboration Suite Database
Step Screen Action
1. Welcome Click Next.
2. Specify File Locations Enter a name and path for the new Oracle home.
This new Oracle home will be the destination Oracle home for your Oracle Collaboration Suite Database.
Click Next.
3. Specify Hardware Cluster Installation Mode
Select Cluster Installation and the nodes where you want to install the Oracle software. The local node will always be selected.
Click Next.
4. Select a Product to Install Select Oracle Collaboration Suite Infrastructure 10.1.1.0.2.
Click Next.
5. Select Installation Type Select Collaboration Suite Database.
Click Next.
6. Product-specific Prerequisite Checks
Make sure all the checks complete successfully.
Click Next.
7. Database Creation Select Yes for Do you want to create a new database at this time?
Click Next.
8. Oracle Collaboration Suite Database Registration
Select No for Do you want to register the information store at this time?
Click Next.
9. Specify Database Identification
Enter the global database name and the SID that you want to use for this install in the Global Database Name and SID fields.
Click Next.
10. Specify Database Management Option
Select Use Grid Control for Database Management or Use Database Control for Database Management.
Click Next.
11. Specify Database File Storage Option
Select Automated Storage Management (ASM).
Click Next.
12. Specify Backup and Recovery Options
Select Do not enable Automated Backups. Oracle recommends that you disable automated backup. Note that if you enable automated backup, then this option will only backup the Oracle Collaboration Suite Database and not any other Oracle Collaboration Suite files.
Click Next.
13. Specify Database Schema Passwords
Enter password for each accounts or use the same password for all the accounts.
Click Next.
14. Summary Make sure all of the settings and choices are correct for your installation.
Click Install.
15. Install Progress This screen displays the progress of the installation.

Installing Oracle Collaboration Suite Distributed Identity Management Architecture
Installing in High Availability Environments: Distributed Identity Management Architecture 13-7
13.2.2.4 Postinstallation TasksThe postinstallation tasks involve troubleshooting any installation errors.
13.2.2.4.1 Troubleshooting the Installation Errors You might have to perform the postinstallation step to solve the following problem.
Oracle Collaboration Suite Database with ASM install fails at DBCA with ORA-15018 and ORA-15031. To resolve this error, download and replace the dbca.jar file in ORACLE_HOME/assistants/dbca/jlib before running root.sh.
13.2.3 Configuring Load Balancers for Identity ManagementThis section explains the implementation of load balancing for Identity Management in a high-availability environment.
13.2.3.1 Prerequisites for Installing Identity Management on High-Availability NodesThis section discusses the prerequisites for the installation of Identity Management on high-availability nodes.
13.2.3.1.1 Configuring the load balancer A load balancer should be configured to detect service down on a node and automatically stop traffic to that node. Also, the load balancer is recommended to be in a fault tolerant mode. This section provides instructions for configuring a load balancer for Identity Management.
To configure a load balancer for OracleAS Cluster (Identity Management), perform the following steps:
1. Verify that the load balancer virtual server name you select does not contain the physical host names of the nodes in the Identity Management.
When the installer copies files to different nodes in the Identity Management, it replaces the current hostname in the files with the hostname of the target node. Ensure that the load balancer's virtual server name does not contain the hostnames of the nodes in the cluster, or the installer might change the virtual server name of the load balancer as well.
For example, if you are installing on nodes named rac-1 and rac-2, be sure that the load balancer virtual server name does not contain "rac-1" or "rac-2". When the installer is installing files to rac-2, it searches for the string "rac-1" in the files and replaces it with "rac-2". If the load balancer's virtual server name happens to be LB-rac-1x, the installer sees the string "rac-1" in the name and replaces it with "rac-2", thus mangling the virtual server name to LB-rac-2x.
16. Run root.sh Note: Do not run the root.sh script until this dialog box appears.
1. When you see this dialog box, run the root.sh script in a different shell as the root user. The script is located in the Oracle home directory of this instance.
2. Click OK.
17. The Configuration Assistants
This screen shows the progress of the configuration assistants.
18. End of Installation Click Exit to quit the installer.
Table 13–3 (Cont.) Installing Oracle Collaboration Suite Database
Step Screen Action

Installing Oracle Collaboration Suite Distributed Identity Management Architecture
13-8 Oracle Collaboration Suite Installation Guide
2. Configure your load balancer with virtual server names and associated ports as follows:
a. Configure a virtual server name for LDAP connections. For this virtual server, you must configure one port for SSL connections and the other for non-SSL connections.
b. Configure a virtual server name for HTTP connections. For this virtual server, you must configure one port for SSL connections and the other for non-SSL connections.
c. Configure your LDAP server to direct response to the first node initially. Note that this procedure applies only to the LDAP virtual server configured on your load balancer. This does not apply to the HTTP virtual server configured on the load balancer.
d. The installer will prompt you for the virtual server names and port numbers.
3. After you complete installation on a node, then you can add that node to the virtual server. For example, if you have three nodes, then perform the following steps:
a. Configure the LDAP virtual server to direct requests to node 1 only.
b. Install Identity Management components on node 1.
c. Install Identity Management components on node 2.
d. Add node 2 to the LDAP virtual server.
e. Install Identity Management components on node 3.
f. Add node 3 to the LDAP virtual server.
4. Set up cookie persistence for HTTP traffic on the load balancer. Specifically, set up cookie persistence for URIs starting with /oiddas/. This is the URI for Oracle Delegated Administration Services. If your load balancer does not allow you to set cookie persistence at the URI level, then set the cookie persistence for all HTTP traffic. In either case, set the cookie to expire when the browser session expires. Refer to your load balancer documentation for details.
5. To configure the load balancer for automatic monitoring of the Oracle Internet Directory and OracleAS Single Sign-On, Oracle Delegated Administration Services, set up monitors for the following:
■ LDAP port
■ LDAP SSL port
■ HTTP or HTTPS listen port (depending on the deployment type)
It is recommended that these monitors use the respective protocols to monitor the services. That is LDAP for the LDAP port, LDAP over SSL for the LDAP SSL port, and HTTP/HTTPS for the web server port. If the load balancer does not offer one or all of these monitors, consult the load balancer documentation for details on the best method to set up the load balancer.
13.2.3.1.2 Synchronize the System Clocks on All Nodes Identity Management cluster nodes must all have their clocks synchronized for the Identity Management cluster to function properly.
13.2.4 Installing Identity Management on High Availability NodesThis section describes how to install Identity Management on high availability nodes.

Installing Oracle Collaboration Suite Distributed Identity Management Architecture
Installing in High Availability Environments: Distributed Identity Management Architecture 13-9
13.2.4.1 Installing First Instance of Oracle Internet Directory and Directory Integration and ProvisioningTo install the first instance of Identity Management that consists of Oracle Internet Directory and Directory Integration and Provisioning, follow the steps listed in Table 13–4.
Table 13–4 Installing First Instance of Oracle Internet Directory and Directory Integration and Provisioning
Step Screen Action
1. Welcome Click Next.
2. Specify File Locations Enter a name and path for the new Oracle home.This new Oracle home will be the destination Oracle home for Identity Management.
Click Next.
3. Specify Hardware Cluster Installation Mode (optional)
Select Local Installation.
This screen will only show up if you are installing Identity Management on a cluster.
Click Next.
4. Select a Product to Install Select Oracle Collaboration Suite Infrastructure 10.1.1.0.2.
Click Next.
5. Select Installation Type Select Identity Management.
Click Next.
6. Product-Specific Prerequisite Checks
Make sure all the checks complete successfully.
Click Next.
7 Language Selection Select the languages. Click Next.
8. Select Configuration Options
Select Oracle Internet Directory.
Select OracleAS Directory Integration and Provisioning.
Do not select OracleAS Certificate Authority (OCA).
Select High Availability and Replication.
Click Next.
8. Specify repository Username: Enter the username to use to log in to the Oracle Collaboration Suite Database. The user must have DBA privileges.
Password: Enter the user password.
Hostname and Port: Enter the names of all the nodes where the Oracle Collaboration Suite Database is running and the port numbers.
Use the format:
Host1.domain.com:port1,Host2.domain.com:port2,…
Service Name: Enter the service name of the database. Note that the service name must include the database domain name.
Click Next.
9. Select High Availability or Replication Option
Select OracleAS Cluster (Identity Management).
Click Next.
10. Specify New Oracle Application Server Cluster Name
Specify a cluster name you want to create for the OracleAS Cluster (Identity Management) in the New Oracle Application Server Cluster Name field.
Click Next.

Installing Oracle Collaboration Suite Distributed Identity Management Architecture
13-10 Oracle Collaboration Suite Installation Guide
13.2.4.2 Installing Second Instance of Oracle Internet Directory and Directory Integration and ProvisioningBefore installing the subsequent instance of Identity Management, you must perform the preinstallation tasks.
Preinstallation TasksThe preinstallation tasks for the installation of subsequent instance of Identity Management are as follows:
■ Please ensure that the system time on this Identity Management node is in sync with the time on the other Identity Management nodes that are part of this Oracle Cluster (Identity Management) configuration. Failure to ensure this may result in unwanted instance failovers, inconsistent operational attributes in directory entries and potential inconsistent behavior of password state policies.
■ To install the current OracleAS (Identity Management) node correctly, setup your load balancer LDAP virtual server to direct requests to any existing OracleAS Cluster (Identity Management) node that is already running. After you complete the installation on this node, then you can add it to the load balancer LDAP virtual server.
Installation TasksTo install the second instance of Identity Management that consists of Oracle Internet Directory and Directory Integration and Provisioning, follow the steps listed in Table 13–5.
11. Specify Namespace in Internet Directory
Enter a new namespace for Oracle Internet Directory or select the Suggested Namespace:
dc=us,dc=oracle,dc=com
Click Next.
12. Specify Port Configuration Options
Select Manual Port Selection option.
Oracle HTTP Server port: 7777
Oracle HTTP Server SSL port: 4443
Oracle Internet Directory port: 7389
Oracle Internet Directory (SSL) port: 4636
Click Next.
13. Guest Account Password Enter the password for the orclguest account.
Click Next.
14. Specify Instance Name and ias_admin Password
Instance Name: Enter a name for this Identity Management instance.
ias_admin Password and Confirm Password: Set the password for the ias_admin user. This is the administrative user for the instance.
Click Next.
15. Summary Verify your selection and click Install.
16. The Configuration Assistant
This screen shows the progress of the configuration assistants.
Table 13–4 (Cont.) Installing First Instance of Oracle Internet Directory and Directory Integration and
Step Screen Action

Installing Oracle Collaboration Suite Distributed Identity Management Architecture
Installing in High Availability Environments: Distributed Identity Management Architecture 13-11
Table 13–5 Installing Second Instance of Oracle Internet Directory and Directory Integration and Provisioning
Step Screen Action
1. Welcome Click Next.
2. Specify File Locations Enter a name and path for the new Oracle home.This new Oracle home will be the destination Oracle home for your Identity Management.
Click Next.
3. Specify Hardware Cluster Installation Mode (optional)
Select Local Installation.
This screen will only show up if you are installing Oracle Collaboration Suite Identity Management on a cluster.
Click Next.
4. Select a Product to Install Select Oracle Collaboration Suite Infrastructure 10.1.1.0.2.
Click Next.
5. Select Installation Type Select Identity Management.
Click Next.
6. Product-specific Prerequisite Checks
Make sure all the checks complete successfully.
Click Next.
7 Language Selection Select the languages. Click Next.
8. Select Configuration Options
Select Oracle Internet Directory.
Select OracleAS Directory Integration and Provisioning.
Do not select OracleAS Certificate Authority (OCA).
Select High Availability and Replication.
Click Next.
9. Specify repository Username: Enter the username to use to log in to the Oracle Collaboration Suite Database. The user must have DBA privileges.
Password: Enter the user password.
Hostname and Port: Enter the names of all the nodes where the Oracle Collaboration Suite Database is running and the port numbers.
Use the format:
Host1.domain.com:port1^Host2.domain.com:port2^…
Service Name: Enter the service name of the database. Note that the service name must include the database domain name.
Click Next.
Warning: Please ensure that the system time on this Identity Management Node is in sync with the time on other Identity Management Nodes that are part of this Oracle Cluster (Identity Management) configuration. Failure to ensure this may result in unwanted instance failovers, inconsistent operational attributes in directory entries and potential inconsistent behavior of password state policies.
Click OK.
10. Specify ODS password Enter the password for ODS schema.
11. Specify Oracle Internet Directory Login
Username: Enter the username to log in to Oracle Internet Directory. You must log in as the Oracle Internet Directory superuser (cn=orcladmin).
Password: Enter the password for the username
Click Next.

Installing Oracle Collaboration Suite Distributed Identity Management Architecture
13-12 Oracle Collaboration Suite Installation Guide
13.2.4.3 Postinstallation TasksThe postinstallation tasks involve troubleshooting the installation errors and performing manual postinstallation steps.
13.2.4.3.1 Troubleshooting the Installation Errors You might have to perform the postinstallation steps to solve the following problems:
■ During execution of root.sh script, the following error is encountered:
chmod: WARNING: Corresponding set-ID also disabled on emtgtcl2 since set-ID requires execute permission
Ignore this error.
13.2.4.3.2 Performing Manual Postinstallation steps Ensure that the load balancer is routing requests to all active Identity Management nodes.
13.2.4.4 Installing First Instance of Delegated Administration Services and OracleAS Single Sign-OnTo install the first instance of Delegated Administration Services and OracleAS Single Sign-On, follow the steps listed in Table 13–6.
12. Guest Account Password Enter the password for the orclguest account.
Click Next.
13. Specify Instance Name and ias_admin Password
Instance Name: Enter a name for this Identity Management instance.
ias_admin Password and Confirm Password: Set the password for the ias_admin user. This is the administrative user for the instance.
Click Next.
14. Summary Verify your selection and click Install.
15. The Configuration Assistant
This screen shows the progress of the configuration assistants.
Table 13–6 Installing First Instance of Delegated Administration Services and OracleAS Single Sign-On
Step Screen Action
1. Welcome Click Next.
2. Specify File Locations Enter a name and path for the new Oracle home.This new Oracle home will be the destination Oracle home for your Identity Management.
Click Next.
3. Specify Hardware Cluster Installation Mode (optional)
Select Local Installation.
This screen will only show up if you are installing Oracle Collaboration Suite Identity Management on a cluster.
Click Next.
4. Select a Product to Install Select Oracle Collaboration Suite Infrastructure 10.1.1.0.2.
Click Next.
5. Select Installation Type Select Identity Management.
Click Next.
Table 13–5 (Cont.) Installing Second Instance of Oracle Internet Directory and Directory Integration and Provisioning
Step Screen Action

Installing Oracle Collaboration Suite Distributed Identity Management Architecture
Installing in High Availability Environments: Distributed Identity Management Architecture 13-13
13.2.4.5 Installing Second Instance of Delegated Administration Services and OracleAS Single Sign-OnTo install the second instance of Delegated Administration Services and OracleAS Single Sign-On, follow the steps listed in Table 13–7.
6. Product-specific Prerequisite Checks
Make sure all the checks complete successfully.
Click Next.
7 Language Selection Select the languages. Click Next.
8. Select Configuration Options
Select Oracle Application Server SSO..
Select Oracle Application Server DAS.
Select High Availability and Replication.
Click Next.
9. Select High Availability Option
Select Oracle AS Cluster (Identity Management).
Click Next.
10. Create or Join an Oracle Application Server Cluster
Select Create a New Oracle Application Server Cluster.
Click Next.
11. Specify New Oracle Application Server Cluster Name
Enter the Application Server Cluster Name.
(for example: AppServer_crs).
Click Next.
12. Specify LDAP Virtual Host and Ports
Hostname: Enter the fully qualified virtual server name of the LDAP virtual server configured on your load balancer (for example: im_virtual.mycompany.com).
SSL PORT: Enter the SSL port number for Oracle Internet Directory (for example, 4636)
Non-SSL PORT: Enter the SSL port number for Oracle Internet Directory. (for example, 7389)
Click Next.
13. Specify Oracle Internet Directory Login
Enter the password for login to Oracle Internet Directory.
Click Next.
14. Specify HTTP Load Balancer Host and Ports
HTTP Listener: Port: Enter the port number that you want Oracle HTTP Server to listen on (for example, 7777).
HTTP Load Balancer: Hostname: Enter the name of the HTTP virtual server configured on your load balancer (for example, im_virtual.mycompany.com).
HTTP Load Balancer: Port: Enter the port of the HTTP virtual server (for example, 7777)
Click Next.
15. Specify Instance Name and ias_admin Password
Instance Name: Enter a name for this Identity Management instance.
ias_admin Password and Confirm Password: Set the password for the ias_admin user. This is the administrative user for the instance.
Click Next.
16. Summary Verify your selection and click Install.
17. The Configuration Assistant
This screen shows the progress of the configuration assistants.
Table 13–6 (Cont.) Installing First Instance of Delegated Administration Services and OracleAS Single
Step Screen Action

Installing Oracle Collaboration Suite Distributed Identity Management Architecture
13-14 Oracle Collaboration Suite Installation Guide
Table 13–7 Installing Second Instance of Delegated Administration Services and Single Sign-On
Step Screen Action
1. Welcome Click Next.
2. Specify File Locations Enter a name and path for the new Oracle home.This new Oracle home will be the destination Oracle home for your Identity Management.
Click Next.
3. Specify Hardware Cluster Installation Mode (optional)
Select Local Installation.
This screen will only show up if you are installing Oracle Collaboration Suite Identity Management on a cluster.
Click Next.
4. Select a Product to Install Select Oracle Collaboration Suite Infrastructure 10.1.1.0.2.
Click Next.
5. Select Installation Type Select Identity Management.
Click Next.
6. Product-specific Prerequisite Checks
Make sure all the checks complete successfully.
Click Next.
7 Language Selection Select the languages. Click Next.
8. Select Configuration Options
Select Oracle Application Server SSO..
Select Oracle Application Server DAS.
Select High Availability and Replication.
Click Next.
9. Select High Availability Option
Select Oracle AS Cluster (Identity Management).
Click Next.
10. Create or Join an Oracle Application Server Cluster
Select Create a New Oracle Application Server Cluster.
Click Next.
11. Specify New Oracle Application Server Cluster Name
Enter the Application Server Cluster Name that you had entered during the installation of the first instance of Delegated Administration Services and OracleAS Single Sign-On.
Click Next.
12. Specify LDAP Virtual Host and Ports
Hostname: Enter the fully qualified virtual server name of the LDAP virtual server configured on your load balancer (for example: im_virtual.mycompany.com).
SSL PORT: Enter the SSL port number for Oracle Internet Directory (for example, 4636)
Non-SSL PORT: Enter the SSL port number for Oracle Internet Directory. (for example, 7389)
Click Next.
13. Specify Oracle Internet Directory Login
Enter the password for login to Oracle Internet Directory.
Click Next.

Installing Oracle Collaboration Suite Distributed Identity Management Architecture
Installing in High Availability Environments: Distributed Identity Management Architecture 13-15
13.2.5 Register the Oracle Collaboration Suite Database with Oracle Internet Directory and Execute Component Database Configuration Assistants
The Oracle Collaboration Suite Database needs to be registered in the Oracle Internet Directory for Oracle Collaboration Suite to work correctly. Additionally, the database schemas for each Oracle Collaboration Suite Applications component must be created in the Oracle Collaboration Suite Database. The ORACLE_HOME/install/OCSdbSchemaReg.sh script accomplishes both of these tasks. This script only needs to be run on a single database node.
The OCSdbSchemaReg.sh script is located in ORACLE_HOME/install directory on the Oracle Collaboration Suite Database nodes.
■ Copy ORACLE_HOME/install/OCSdbSchemaReg.ini.sample to ORACLE_HOME/install/OCSdbSchemaReg.ini.
■ Modify the ORACLE_HOME/install/OCSdbSchemaReg.ini script with the appropriate values.
■ Run OCSdbSchemaReg.sh from ORACLE_HOME/install directory in RAC mode by entering multiple hosts in the $hostList option of the OCSdbSchemaReg.ini file from one of the Oracle Collaboration Suite Database machine.
■ Run the following script.
OCSdbSchemaReg.sh –f OCSdbSchemaReg.ini
13.2.6 Installing Oracle Calendar ServerThis section explains the installation and postinstallation tasks for Identity Management.
13.2.6.1 Preinstallation TasksBefore installing Oracle Calendar Server in a Cold Failover Cluster, perform the following procedures:
■ Section 13.2.6.1.1, "Check if the clusterware is running"
14. Specify HTTP Load Balancer Host and Ports
HTTP Listener: Port: Enter the port number that you want Oracle HTTP Server to listen on (for example, 7777).
HTTP Load Balancer: Hostname: Enter the name of the HTTP virtual server configured on your load balancer (for example, im_virtual.mycompany.com).
HTTP Load Balancer: Port: Enter the port of the HTTP virtual server (for example, 7777)
Click Next.
15. Specify Instance Name and ias_admin Password
Instance Name: Enter a name for this Identity Management instance.
ias_admin Password and Confirm Password: Set the password for the ias_admin user. This is the administrative user for the instance.
Click Next.
16. Summary Verify your selection and click Install.
17. The Configuration Assistant
This screen shows the progress of the configuration assistants.
Table 13–7 (Cont.) Installing Second Instance of Delegated Administration Services and Single Sign-On
Step Screen Action

Installing Oracle Collaboration Suite Distributed Identity Management Architecture
13-16 Oracle Collaboration Suite Installation Guide
■ Section 13.2.6.1.2, "Map the virtual hostname and virtual IP address"
■ Section 13.2.6.1.3, "Set Up a File System That Can Be Mounted from Both Nodes"
13.2.6.1.1 Check if the clusterware is running For Cold Failover Cluster, each node in a cluster should be running hardware vendor clusterware. If you plan to install the Calendar Server on a cluster that is also running Oracle Cluster Ready Services (CRS), you still should have the clusterware from the hardware vendor to support an automated cold failover. Running CRS without the hardware vendor clusterware does not support Cold Failover Cluster.
To check that the clusterware is running, use the command appropriate for your clusterware.
13.2.6.1.2 Map the virtual hostname and virtual IP address Each node in a Cold Failover Cluster configuration is associated with its own physical IP address. In addition, the active node in the cluster is associated with a virtual hostname and virtual IP address. This enables clients to access the Cold Failover Cluster using the virtual hostname.
Virtual hostnames and virtual IP addresses are any valid hostname and IP address in the context of the subnet containing the hardware cluster.
The following example configures a virtual hostname called vhost.mydomain.com, with a virtual IP of 138.1.12.191:
1. Become the root user.
prompt> suPassword: root_password
2. Determine the public network interface.
# ifconfig -alo0: flags=1000849<UP,LOOPBACK,RUNNING,MULTICAST,IPv4> mtu 8232 index 1 inet 127.0.0.1 netmask ff000000lo0:1: flags=1008849<UP,LOOPBACK,RUNNING,MULTICAST,PRIVATE,IPv4> mtu 8232 index 1 inet 172.16.193.1 netmask ffffffffge0: flags=1000843<UP,BROADCAST,RUNNING,MULTICAST,IPv4> mtu 1500 index 2 inet 138.1.13.146 netmask fffffc00 broadcast 138.1.15.255 ether 8:0:20:fd:1:23hme0: flags=1008843<UP,BROADCAST,RUNNING,MULTICAST,PRIVATE,IPv4> mtu 1500 index 3 inet 172.16.1.1 netmask ffffff80 broadcast 172.16.1.127 ether 8:0:20:fd:1:23hme0:2: flags=1008843<UP,BROADCAST,RUNNING,MULTICAST,PRIVATE,IPv4> mtu 1500 index 3 inet 172.16.194.6 netmask fffffffc broadcast 172.16.194.7ge1: flags=1008843<UP,BROADCAST,RUNNING,MULTICAST,PRIVATE,IPv4> mtu 1500 index 4 inet 172.16.0.129 netmask ffffff80 broadcast 172.16.0.255 ether 8:0:20:fd:1:23
Note: Map the virtual hostname and virtual IP address only to the active node. Do not map the virtual hostname and IP address to both active and secondary nodes at the same time. When you failover, only then do you map the virtual hostname and IP address to the secondary node, which is now the active node.

Installing Oracle Collaboration Suite Distributed Identity Management Architecture
Installing in High Availability Environments: Distributed Identity Management Architecture 13-17
From the output, ge0 is the public network interface. It is not a loopback interface and not a private interface.
3. Add the virtual IP to the ge0 network interface.
# ifconfig ge0 addif 138.1.12.191 up
"ge0" and the IP address are values specific to this example. Replace them with values appropriate for your cluster.
4. Check that new interface was added:
# ifconfig -alo0: flags=1000849<UP,LOOPBACK,RUNNING,MULTICAST,IPv4> mtu 8232 index 1 inet 127.0.0.1 netmask ff000000lo0:1: flags=1008849<UP,LOOPBACK,RUNNING,MULTICAST,PRIVATE,IPv4> mtu 8232 index 1 inet 172.16.193.1 netmask ffffffffge0: flags=1000843<UP,BROADCAST,RUNNING,MULTICAST,IPv4> mtu 1500 index 2 inet 138.1.13.146 netmask fffffc00 broadcast 138.1.15.255 ether 8:0:20:fd:1:23ge0:1: flags=1000843<UP,BROADCAST,RUNNING,MULTICAST,IPv4> mtu 1500 index 2 inet 138.1.12.191 netmask ffff0000 broadcast 138.1.255.255hme0: flags=1008843<UP,BROADCAST,RUNNING,MULTICAST,PRIVATE,IPv4> mtu 1500 index 3 inet 172.16.1.1 netmask ffffff80 broadcast 172.16.1.127 ether 8:0:20:fd:1:23hme0:2: flags=1008843<UP,BROADCAST,RUNNING,MULTICAST,PRIVATE,IPv4> mtu 1500 index 3 inet 172.16.194.6 netmask fffffffc broadcast 172.16.194.7ge1: flags=1008843<UP,BROADCAST,RUNNING,MULTICAST,PRIVATE,IPv4> mtu 1500 index 4 inet 172.16.0.129 netmask ffffff80 broadcast 172.16.0.255 ether 8:0:20:fd:1:23
The virtual IP appears in the ge0:1 entry. During installation, when you enter "vhost.mydomain.com" as the virtual hostname in the Specify Virtual Hostname screen, the installer checks that "vhost.mydomain.com" is a valid interface.
On Failover If the active node fails, then the secondary node takes over. If you do not have a clusterware agent to map the virtual IP from the failed node to the secondary node, then you must do it manually. You must remove the virtual IP mapping from the failed node, and map it to the secondary node.
1. On the failed node, if possible, become superuser and remove the virtual IP.
If the failed node fails completely (that is, it does not start), you can skip this step and go to step 2. If the node fails partially (for example, disk or memory problems), and the node is still pingable, you must perform this step.
prompt> suPassword: root_password# ifconfig ge0 removeif 138.1.12.191
"ge0" and the IP address are values specific to this example. Replace them with values appropriate for your cluster.
2. On the secondary node, add the virtual IP to the ge0 network interface.
# ifconfig ge0 addif 138.1.12.191 netmask 255.255.252.0 up

Installing Oracle Collaboration Suite Distributed Identity Management Architecture
13-18 Oracle Collaboration Suite Installation Guide
"ge0" and the IP address are values specific to this example. Replace them with values appropriate for your cluster.
3. On the secondary node, check that the new interface was added:
# ifconfig -a...
13.2.6.1.3 Set Up a File System That Can Be Mounted from Both Nodes Although the hardware cluster has shared storage, you must create a file system on this shared storage such that both nodes of the Cold Failover Cluster can mount this file system. You will use this file system for the following directories:
■ Oracle home directory for Infrastructure
■ The oraInventory directory
If you are running a volume manager on the cluster to manage the shared storage, refer to the volume manager documentation for steps to create a volume. Once a volume is created, you can create the file system on that volume.
If you do not have a volume manager, you can create a file system on the shared disk directly. Ensure that the hardware vendor supports this, that the file system can be mounted from either node of the Cold Failover Cluster, and that the file system is repairable from either node if a node fails.
To check that the file system can be mounted from either node, do the following steps:
1. Set up and mount the file system from node 1.
2. Unmount the file system from node 1.
3. Mount the file system from node 2 using the same mount point that you used in step 1.
4. Unmount it from node 2, and mount it on node 1, because you will be running the installer from node 1.
13.2.6.2 Installation TasksBefore installing Oracle Calendar in a Cold Failover Cluster configuration, make sure that the virtual IP address and host name is enabled on the install node.
To install Oracle Calendar in Cold Failover Cluster configuration, follow the steps listed in Table 13–8.
Note: Only one node of the Cold Failover Cluster should mount the file system at any given time. File system configuration files on all nodes of the cluster should not include an entry for the automatic mount of the file system upon a node restart or execution of a global mount command. For example, on UNIX platforms, do not include an entry for this file system in /etc/fstab file.

Installing Oracle Collaboration Suite Distributed Identity Management Architecture
Installing in High Availability Environments: Distributed Identity Management Architecture 13-19
Table 13–8 Installing Oracle Calendar Server in Cold Failover Cluster Configuration
Step Screen Action
1. None Start the installer.
2. Welcome Click Next.
3. Specify Inventory Directory and Credentials
(Advanced installation only)
This screen appears only if this is the first installation of any Oracle product on this computer.
Enter the full path for the inventory directory: Enter a full path to a directory for the installer files. Enter a directory that is different from the Oracle home directory for the product files.
Example: /private/oracle/oraInventory
Click OK.
4. UNIX Group Name
(Advanced installation only)
This screen appears only if this is the first installation of any Oracle product on this computer.
Enter the name of the operating system group to have write permission for the inventory directory.
Example: dba
Click Next.
5. Run orainstRoot.sh
(Advanced installation only)
This screen appears only if this is the first installation of any Oracle product on this computer.
Run the orainstRoot.sh script in a different shell as the root user. The script is located in the oraInventory directory.
Click Continue.
6. Specify File Locations
(Advanced installation only)
Enter the full path of the Source directory in the Path field for Source, if required.
Name: Enter a name to identify this Oracle home. The name cannot contain spaces, and has a maximum length of 16 characters.
Example: OH_calserver_10_1_1
Destination Path: Enter the full path to the destination directory. This is the Oracle home. If the directory does not exist, the installer creates it. To create the directory beforehand, create it as the oracle user. Do not create it as the root user.
Example: /private/oracle/OH_calserver_10_1_1
Click Next.
7. Specify Hardware Cluster Installation Mode
(Advanced installation only)
This screen appears only if the computer is part of a hardware cluster.
When you are installing Oracle Collaboration Suite Applications, select Local Installation because hardware cluster is not supported for Oracle Collaboration Suite Applications.
Click Next.
8. Select a Product to Install
(Advanced installation only)
Select Oracle Collaboration Suite Applications 10.1.1.0.2.
If you need to install additional languages, click Product Languages.
Click Next.
9. Product-specific Prerequisite Checks
(Advanced installation only)
The installer verifies requirements such as memory, disk space, and operating system version. If any check fails, make the required changes and click Retry.
Click Next.

Installing Oracle Collaboration Suite Distributed Identity Management Architecture
13-20 Oracle Collaboration Suite Installation Guide
10. Select Components to Configure
(Advanced installation only)
Select Oracle Calendar Server.
Note: You can also configure any component after installation.
Click Next.
11. Register with Oracle Internet Directory
(Advanced installation only)
Host: Enter the LDAP virtual server name.
Port: Enter the non-SSL port number for the LDAP virtual server name.
Use SSL to connect to Oracle Internet Directory: Select this option if you want Oracle Collaboration Suite components to use only SSL to connect to Oracle Internet Directory.
Click Next.
12. Specify UserName and Password for Oracle Internet Directory
(Advanced installation only)
Username: Enter the user name to use to log in to Oracle Internet Directory.
Password: Enter the user password.
Click Next.
Note: Use cn=orcladmin as the user name if you are the Oracle Internet Directory Superuser.
13. OracleAS Metadata Repository
(Advanced installation only)
Select the Oracle Collaboration Suite Database from the list.
Click Next.
14. Select Database Components
(Advanced installation only)
Component Name: Oracle Calendar Server
Database Name: Name of the Oracle Collaboration Suite Database.
Click Next.
Note: If multiple instances of Oracle Collaboration Suite Databases are available in Oracle Internet Directory, then you must click on the Database Name column and then select the correct database for each component from the drop-down list. However, when you click Next to go to the next screen, the selection might not be retained. To ensure that the selection is retained, you must click the Database Name column again after selecting the required database for each component.
15. Specify Port Configuration Options
(Advanced installation only)
Select Automatic Port Selection or Manual and enter the port numbers for.
■ Web Cache HTTP Listen Port
■ Web Cache HTTP Listen SSL
Click Next.
Note: If you manually configure the ports, then you must specify the port values for each port.
16. Specify Administrative Password and Instance Name
(Advanced installation only)
Instance Name: Enter a name for this Calendar Server instance.
Administrative Password: Set the password for the administrative user. This is the administrative user for the Calendar Server instance.
Confirm Password: Confirm the password.
Click Next.
17. Oracle Calendar Server Host Alias
(Advanced installation only)
Host or Alias: Enter the virtual hostname for the Calendar Server instance.
Click Next.
Note: It is recommended that you use alias in place of host name if later you want to move the calendar server instance or change the host name. Specify the host name if an alias is not configured.
18. Summary Verify your selections and click Install.
Table 13–8 (Cont.) Installing Oracle Calendar Server in Cold Failover Cluster Configuration
Step Screen Action

Installing Oracle Collaboration Suite Distributed Identity Management Architecture
Installing in High Availability Environments: Distributed Identity Management Architecture 13-21
13.2.6.3 Postinstallation tasksThe postinstallation tasks involve troubleshooting the installation errors and performing manual postinstallation steps.
13.2.6.3.1 Troubleshooting the Installation Errors You might have to perform the postinstallation steps to solve the following problems:
■ During execution of root.sh script, the following error is encountered:
chmod: WARNING: Corresponding set-ID also disabled on emtgtcl2 since set-ID requires execute permission
Ignore this error.
13.2.6.3.2 Performing Manual Postinstallation Steps You also have to perform the following additional postinstallation steps:
■ In ORACLE_HOME/ocal/misc/unison.ini file, add dir_connectmodel = ondemand entry under the [DAS] section.
■ Restart Oracle Calendar Server.
ORACLE_HOME/opmn/bin/opmnctl restartproc ias-component=CalendarServer
13.2.7 Installing the First Instance of Oracle Collaboration Suite Applications (without Oracle Calendar Server)
This section describes the installation of the first instance of Oracle Collaboration Suite Applications without Oracle Calendar Server.
Installation StepsTo install first instance of Oracle Collaboration Suite Applications, follow the steps listed in Table 13–9.
19. Install Progress This screen displays the progress of the installation.
20. Run root.sh Note: Do not run the root.sh script until this dialog box appears.
1. When you see this dialog box, run the root.sh script in a different shell as the root user. The script is located in the Oracle home directory of this instance.
2. Click OK.
21. Configuration Assistants This screen shows the progress of the configuration assistants. Configuration assistants configure components.
22. End of Installation Click Exit to quit the installer.
Table 13–8 (Cont.) Installing Oracle Calendar Server in Cold Failover Cluster Configuration
Step Screen Action

Installing Oracle Collaboration Suite Distributed Identity Management Architecture
13-22 Oracle Collaboration Suite Installation Guide
Table 13–9 Installing First Instance of Oracle Collaboration Suite Applications
Step Screen Action
1. Welcome Click Next.
2. Specify File Locations Enter a name and path for the new Oracle home. This new Oracle home will be the destination Oracle home for Oracle Collaboration Suite Applications.
Click Next.
4. Select a Product to Install Select Oracle Collaboration Suite Applications 10.1.1.0.2.
Click Next.
5. Product-specific Prerequisite Checks
Make sure all the checks complete successfully.
Click Next.
6. Select Components to Configure
Select Oracle Mail.
Select Oracle Mobile Collaboration.
Select Oracle Content Services.
Do not select Oracle Calendar Server.
Select Oracle Calendar Web Client.
Select Oracle Real-Time Collaboration.
Select Oracle Collaboration Suite Search.
Select Oracle Collaboration Suite Web Access.
Select Oracle Collaborative Portlets.
Select Oracle Workspaces.
Select Oracle Discussions.
Click Next.
7. Register with Oracle Internet Directory
Host: Enter the LDAP virtual server name.
Port: Enter the non-SSL port number for the LDAP virtual server name.
Click Next.
8. Specify UserName and Password for Oracle Internet Directory
Username: Enter the username to log onto Oracle Internet Directory. You must log in as the Oracle Internet Directory superuser (cn=orcladmin).
Password: Enter the password for the username.
Click Next.
9. OracleAS Metadata Repository
Select Oracle Collaboration Suite Database from the list.
Click Next.
10. Select Database Components
Component Name: Oracle Mail, Oracle Discussions, Oracle Search, Oracle Real-Time Collaboration, Oracle Collaboration Suite Search, Oracle Workspaces, Oracle Content Services, Oracle Collaboration Suite Web Access
Database Name: Name of the Oracle Collaboration Suite Database.
Click Next.

Installing Oracle Collaboration Suite Distributed Identity Management Architecture
Installing in High Availability Environments: Distributed Identity Management Architecture 13-23
13.2.8 Configuring the First Oracle Collaboration Suite Applications Tier with a Load Balancer
You can configure two or more Oracle Collaboration Suite Applications instances in a highly-available deployment by placing a load balancer in front of them. The load balancer publishes a single address for Oracle Collaboration Suite Applications while providing a redundant set of application servers that actually service requests. The load balancer can be configured to detect when one of the OCS Applications instances has failed and can then fail over requests to another instance.
Our configuration is as follows:
■ There are two Oracle Collaboration Suite Applications computers: ocs_apps1.mycompany.com and ocs_apps2.mycompany.com. Both application servers listen on non-SSL port 7777.
■ The Oracle Collaboration Suite Applications computers are configured to use the Single Sign-On server located at im_virtual.mycompany.com.
11. Specify Port Configuration Options
Select Automatic Port Selection or Manual and enter the port numbers for.
■ Web Cache HTTP Listen Port
■ Web Cache HTTP Listen SSL
■ Oracle Mail IMAP4 port
■ Oracle Mail IMAP4 Secure port
■ Oracle Mail POP3 port
■ Oracle Mail POP3 Secure port
■ Oracle Mail SMTP port
■ Oracle Mail NNTP port
■ Oracle Mail NNTP Secure port
Click Next.
12. Specify Administrative Password and Instance Name
Instance Name: Enter a name for this Oracle Collaboration Suite Applications instance.
Administrative Password: Set the password for the administrative user. This is the administrative user for the Oracle Collaboration Suite Applications instance.
Click Next.
13. Specify Oracle Mail Domain Information
Mail Domain: Enter the domain that you want to use for Oracle Mail server.
Click Next.
14. Summary Verify your selection and click Install.
15. Install Progress This screen displays the progress of the installation.
16. Run root.sh Note: Do not run the root.sh script until this dialog box appears.
1. When you see this dialog box, run the root.sh script in a different shell as the root user. The script is located in the Oracle home directory of this instance.
2. Click OK.
17. The Configuration Assistants
This screen shows the progress of the configuration assistants.
18. End of Installation Click Exit to quit the installer.
Table 13–9 (Cont.) Installing First Instance of Oracle Collaboration Suite Applications
Step Screen Action

Installing Oracle Collaboration Suite Distributed Identity Management Architecture
13-24 Oracle Collaboration Suite Installation Guide
■ The effective host name of the Oracle Collaboration Suite Applications published to the user is apps_virtual.mycompany.com. A load balancer is configured to listen at this address, on port 80. It has been configured to load balance and fail over user requests between ocs_apps1.mycompany.com and ocs_apps2.mycompany.com.
■ The Single Sign-On server and Directory server are located at im_virtual.mycompany.com.
■ The Oracle Collaboration Suite Database (including Identity Management metadata) is located at ocs_store1.mycompany.com and ocs_store2.mycompany.com (2-node RAC).
13.2.8.1 Configure the Load BalancerTo setup the load balancer to work with the first mid-tier install, ensure that the following is configured:
1. A virtual server name (apps_virtual.mycompany.com) that listens for requests on port 80 and balances them to the Web Cache on Oracle Collaboration Suite Applications tier running on ocs_apps1.mycompany.com on port 7777 (an HTTP listening port).
2. A virtual server name (apps_virtual.mycompany.com) that listens for requests on port 7777 (an HTTP listening port), and balances them to the Web Cache on Oracle Collaboration Suite Applications tier on ocs_apps1.mycompany.com port 7777 (an HTTP listening port). Port 7777 on the load balancer receives the HTTP loop-back requests made by the Parallel Page Engine on ocs_apps1.mycompany.com. This 7777 port also receives requests from the Portal Metadata Repository for web providers design time messages. This configuration may require a Network Address Translation (NAT) rule in the load balancer in order for the loop-back request from the PPE to succeed.
3. A virtual server name (apps_virtual.mycompany.com) that listens for requests on port 9401 (Web Cache Invalidation Port) and balances them to the Web Cache on Oracle Collaboration Suite Applications tier on ocs_apps1.mycompany.com on port 9401 (Web Cache Invalidation Port). Port 9401 on the load balancer receives invalidation messages from the OracleAS Portal Repository when content that is cached in OracleAS Web Cache becomes stale. This configuration might require a NAT rule in the load balancer in order for the invalidation requests from the OracleAS Portal repository to succeed.
4. A virtual server name (apps_virtual.mycompany.com) that listens for requests on port 25 (SMTP) and balances them to the Oracle Collaboration Suite Applications tier's SMTP port on ocs_apps1.mycompany.com on port 25 (an SMTP listening port). This virtual server on port 25 (SMTP) should also have simple persistence. Simple Persistence returns a client to the same node to which it connected previously. Simple persistence tracks connections based only on the client IP address.
5. The virtual server name (apps_virtual.mycompany.com) listens for requests on port 143 (Oracle Mail IMAP4 port) and balances them to the Oracle Collaboration Suite Applications tier on ocs_apps1.mycompany.com on port 25 (Oracle Mail IMAP4 port).
Note: apps_virtual.mycompany.com listens on 80 for external traffic, on port 7777 for Parallel Page Engine loop-back messages, and port 9401 for invalidation messages, and port 25 for SMTP traffic.

Installing Oracle Collaboration Suite Distributed Identity Management Architecture
Installing in High Availability Environments: Distributed Identity Management Architecture 13-25
For security reason, port 9401 and 7777 on the load balancer should not be visible to external users.
13.2.8.2 Configure the Oracle HTTP Server with the Load BalancerThis step associates the components on which OracleAS Portal depends with load balancer virtual server name and port: apps_virtual.mycompany.com:80 as follows:
1. Access the Oracle Enterprise Manager – Oracle Collaboration Suite Control console.
2. Click the link for the ocs_apps1.mycompany.com installation.
3. Click the HTTP Server link.
4. Click the Administration link.
5. Click Advanced Server Properties.
6. Open the httpd.conf file.
7. Perform the following steps:
a. Add LoadModule certheaders_module directive.
LoadModule certheaders_module libexec/mod_certheaders.so
The LoadModule directives (in particular, the LoadModule rewrite_module directive) must appear in the httpd.conf file at a location preceding the VirtualHost directives. The server must load all modules before it can execute the directives in the VirtualHost container. It is a good idea to create the VirtualHost directives at the end of the httpd.conf file.
b. Add the following lines to create a NameVirtualHost directive and a VirtualHost container for apps_virtual.mycompany.com and port 80.
NameVirtualHost *:7778<VirtualHost *:7778>ServerName apps_virtual.mycompany.comPort 80ServerAdmin [email protected] OnRewriteOptions inherit</VirtualHost>
c. Create a second VirtualHost container for apps_virtual.mycompany.com and port 7777.
<VirtualHost *:7778>ServerName apps_virtual.mycompany.comPort 7777ServerAdmin [email protected] OnRewriteOptions inherit</VirtualHost>
8. Save the httpd.conf file, and restart the Oracle HTTP Server when prompted.
13.2.8.3 Configure the Parallel Page Engine Loop-Back with the Load BalancerIn this step, you configure non-SSL loop-back communication between the load balancer and the Parallel Page Engine on ocs_apps1.mycompany.com.Before you start this configuration, ensure the following:

Installing Oracle Collaboration Suite Distributed Identity Management Architecture
13-26 Oracle Collaboration Suite Installation Guide
■ You are able to resolve apps_virtual.mycompany.com from ocs_apps1.mycompany.com such that it contacts the load balancer. To ensure you can resolve apps_virtual.mycompany.com, issue the following command from ocs_apps1.mycompany.com.
nslookup apps_virtual.mycompany.com
The IP address for the load balancer should be returned.
■ You are able to contact port 7777 on apps_virtual.mycompany.com from ocs_apps1.mycompany.com. Issue the following command on ocs_apps1.mycompany.com.
telnet apps_virtual.mycompany.com 7777
Verify that no connection failure message is returned.
To create the loop-back configuration, the steps are as follows:
1. Open the ORACLE_HOME/j2ee/OC4J_Portal/applications/portal/portal/WEB-INF/web.xml file.
2. Locate the Page servlet section.
3. Add the lines shown in bold.
<servlet><servlet-name>page</servlet-name> <servlet-class>oracle.webdb.page.ParallelServlet</servlet-class> <init-param> <param-name>useScheme</param-name> <param-value>http</param-value> </init-param> <init-param> <param-name>usePort</param-name> <param-value>7777</param-value> </init-param></servlet>
4. Save the web.xml file.
5. Issue this command in ORACLE_HOME/dcm/bin to update the DCM repository.
dcmctl updateConfig
6. Issue these commands in ORACLE_HOME/opmn/bin to restart the OCS Applications instance.
opmnctl stopallopmnctl startall
13.2.8.4 Modify the Portal Dependency Settings (iasconfig.xml) FileThe Portal Dependency Settings file iasconfig.xml must contain the correct host, port, and farm name to enable access to OracleAS Portal and perform OracleAS Web Cache invalidation. To edit the file to include this information, the steps are as follows:
1. Create a backup copy of the ORACLE_HOME/portal/conf/iasconfig.xml file.
2. Open the ORACLE_HOME/portal/conf/iasconfig.xml file and perform the following steps:
a. Change the existing code as follows:

Installing Oracle Collaboration Suite Distributed Identity Management Architecture
Installing in High Availability Environments: Distributed Identity Management Architecture 13-27
<IASConfig XSDVersion="1.0"> <IASFarm Name="Farm1.apps_virtual.mycompany.com" Host="apps_virtual.mycompany.com"> <WebCacheComponent ListenPort="80" InvalidationPort="9401" InvalidationUsername="invalidator" InvalidationPassword="welcome1" SSLEnabled="false" AdminPort="9400"/> </IASFarm> <IASInstance Name="ocsapps1.ocs_apps1.mycompany.com" Host="ocs_apps1.mycompany.com"> <WebCacheComponent ListenPort="7777" InvalidationPort="9401" InvalidationUsername="invalidator" InvalidationPassword="@BYGFsTxYCDGjfP5bbcU8MP20d5Tk6zo8tg==" SSLEnabled="false" AdminPort="9400"/> <EMComponent ConsoleHTTPPort="1156" SSLEnabled="false"/> </IASInstance> <IASInstance Name="iAS-1.im_virtual.mycompany.com" Host="im_virtual.mycompany.com"> <OIDComponent AdminPassword="@BUciwzx4JZPU/BOgKalC6ybcCpt3pVbr0w==" AdminDN="cn=orcladmin" SSLEnabled="false" LDAPPort="7389"/> </IASInstance> <PortalInstance DADLocation="/pls/portal" SchemaUsername="portal" SchemaPassword="@Bbronzw4685xLaz+WZP6DKVNVpwJLlYJ1w==" ConnectString="cn=orcl,cn=oraclecontext"> <WebCacheDependency ContainerType="IASFarm" Name="Farm1.apps_virtual.mycompany.com"/> <OIDDependency ContainerType="IASInstance" Name="iAS-1.im_virtual.mycompany.com"/> <EMDependency ContainerType="IASInstance" Name="ocsapps1.ocs_apps1.mycompany.com"/> </PortalInstance></IASConfig>
b. Save the iasconfig.xml file.
c. Encrypt any plain text passwords in the iasconfig.xml configuration file by setting the ORACLE_HOME environment variable, if necessary, and issuing the following command from ORACLE_HOME/portal/conf.
ptlconfig –encrypt
13.2.8.5 Register the OracleAS Portal URLs with the Load BalancerIn this step, you register the OracleAS Portal URLs using the load balancer virtual server name and port instead of the OracleAS Web Cache hostname and port. Follow the steps in this section to use the OracleAS Portal Configuration Assistant to register the URLs.
1. Ensure that the ORACLE_HOME environment variable is set.
2. Register the URLs using the Portal Dependency Settings tool (available in ORACLE_HOME/portal/conf):
ptlconfig –dad dadname –wc –site
where dadname is the name of the OracleAS Portal Database Access Descriptor.
13.2.8.6 Reset the Oracle Enterprise Manager 10g LinkTo prevent access to Oracle Enterprise Manager 10g from the outside, the link provided by OracleAS Portal must be changed back to point to the internal server. To do this, issue the following command in ORACLE_HOME/portal/conf:
ptlconfig –dad dadname –em

Installing Oracle Collaboration Suite Distributed Identity Management Architecture
13-28 Oracle Collaboration Suite Installation Guide
where dadname is the name of the OracleAS Portal Database Access Descriptor.
13.2.8.7 Configure OracleAS Web Cache with the Load BalancerYou must configure a site definition, site alias, and a site-to-server mapping to make OracleAS Web Cache function correctly with the load balancer.
Use the Web Cache Manager, the graphical user interface provided for editing the configuration stored in webcache.xml file.
1. Access the Web Cache Administrator at: http://ocs_apps1.mycompany.com:9400/webcacheadmin. The Web Cache Administrator password dialog box appears.
2. Enter the OracleAS Web Cache administrator password. For the user name, enter ias_admin or administrator, and enter the OracleAS Web Cache administrator password.
3. Click the Site Definitions link in the Origin Servers, Sites and Load Balancing section. The Site Definitions window opens.
4. Click Add Site.
5. Enter the following information (leave other fields blank):
■ Host name: apps_virtual.mycompany.com
■ Port: 80
■ Client-side Certificate: Not required
■ Default Site: Yes
■ Create Alias from Site Name with/without www: No
6. Click Submit.
7. Select the radio button for the site for which the alias will be added (apps_virtual.mycompany.com)
8. Click Add Alias. The Add Alias for Site window opens.
9. Enter apps_virtual.mycompany.com for the host name and 7777 for the port. (7777 is the value for the usePort parameter in the web.xml file in the Parallel Page Engine configuration).
10. Click Submit. The alias is added. An alias is needed in the configuration because Portal sends invalidation messages with the value of the HOST attribute in the invalidation message the same as the site name (in this case, apps_virtual.mycompany.com:80), but OracleAS Web Cache caches the portal content keyed on a host:port combination such as apps_virtual.mycompany.com:7777; thus, the invalidation is not executed. Therefore, it is necessary to define an alias, so that OracleAS Web Cache manages the content caching so that it recognizes apps_virtual.mycompany.com:80 and apps_virtual.mycompany.com:7777 as one and the same, and thereby
Note: At installation time, the OracleAS Web Cache administrator password is set to the same password as the ias_admin password. The OracleAS Web Cache administrator password must be identical for all cache cluster members.

Installing Oracle Collaboration Suite Distributed Identity Management Architecture
Installing in High Availability Environments: Distributed Identity Management Architecture 13-29
correctly invalidating OracleAS Portal content, although the content is keyed on a different host:port combination than the site name.
11. Click Add Alias. A window with host name and port fields opens.
12. Enter apps_virtual.mycompany.com for the host name and 80 for the port.
13. Click Submit. The alias is added.
14. Click Apply Changes.
15. Click the Site-to-Server Mapping link in the Origin Servers, Sites, and Load Balancing section. The Site-to-Server Mapping page appears, in which you map the site and site alias to an origin server.
16. Select the first mapping in the table and click Insert Above. The Edit/Add Site-to-Server Mapping page appears.
17. Select the Select From Site Definitions option.
18. Select apps_virtual.mycompany.com.
19. Select ocs_apps1.mycompany.com in the Select Application Web Servers section.
20. Click Submit.
21. Remove unused mappings or entries containing the wild card character *.
22. Click Apply Changes.
23. Click Restart.
13.2.8.8 Reregister mod_ossoThe steps for reregistering mod_osso are as follows:
1. Set the ORACLE_HOME environment variable to the current Oracle home.
2. Execute the SSO registration script ORACLE_HOME/sso/bin/ssoreg.
ORACLE_HOME/sso/bin/ssoreg.sh \site_name ocsapps.apps_virtual.mycompany.com \mod_osso_url http://apps_virtual.mycompany.com \config_mod_osso TRUE \oracle_home_path ORACLE_HOME \config_file ORACLE_HOME/Apache/Apache/conf/osso/osso.conf \admin_info cn=orcladmin \virtualhost
A partner application, ocsapps.apps_virtual.mycompany.com, is created.
3. Log on to the OracleAS Single Sign-On Administration page as the Administrator, and use the Administer Partner Applications page to delete the entry for the partner application ocsapp1.ocs_apps1.mycompany.com.
Note: An alias for port 80 is needed because the HOST header sent by the browser will be apps_virtual.mycompany.com (without a port number appended to it). Since OracleAS Web Cache is listening on the HTTP port, it will assume that the port number is 80 and use this to determine the site-to-server mapping, and for any cache key creation.
Installing Oracle Collaboration Suite Distributed Identity Management Architecture
13-30 Oracle Collaboration Suite Installation Guide
13.2.8.9 Verify Connectivity for Invalidation Messages from the Database to OracleAS Web Cache on ocs_apps1.mycompany.com through the Load BalancerWhen an object is changed in the database, the application metadata repository database sends an invalidation message to Web Cache to invalidate that object if it exists in the cache. Since the target configuration has two instances of OracleAS Web Cache, the invalidation message must be load balanced across both OracleAS Web Cache instances. This is an example of component level load balancing.
Before you proceed with this verification, ensure that messages can be sent from the computer hosting the database to the load balancer. To do this, issue the following command from ocs_store1.mycompany.com and ocs_store2.mycompany.com:
telnet apps_virtual.mycompany.com 9401
Verify that no connection failure message is returned.
13.2.8.10 Enable Monitoring of the Frontend Host and Port Settings of the Load Balancer for OracleAS PortalThe steps to enable monotoring of the host at the front end of the load balancer and port settings for OracleAS Portal are as follows:
1. Open the ORACLE_HOME/sysman/emd/targets.xml file.
2. Locate the OracleAS Portal targets, for example, TYPE="oracle_portal".
3. Edit the PortalListeningHostPort property so that it points to the load balancer. For example: <Property NAME="PortalListeningHostPort" VALUE="http://apps_virtual.mycompany.com:80"/>
4. Save and close targets.xml file.
5. Reload the targets.xml file in the OracleAS Control Console by issuing this command in ORACLE_HOME/bin:
emctl reload
13.2.8.11 Configuring Real-Time Collaboration with Load Balancer
For Real-Time Collaboration, set GlobalWebHost and GlobalWebPort properties to integrate with a load balancer.
A load balancer provides a single published address to the client browser, while distributing requests to multiple Oracle Real-Time Collaboration core component Application tiers that serve the request. It acts as a global Web host for all of the requests.
If you add a load balancer, set the following parameters:
1. GlobalWebHost is the name of the global Web host.
For example, multiple Application tiers could be placed behind a load balancer (ocs_apps1.mycompany.com, ocs_apps2.mycompany.com), but the Web host name you want to have appear in the URL used to join a conference is apps_virtual.mycompany.com.
Default Value: none
Note: Refer to Section 2.1.1, "Considerations for Real-Time Collaboration".

Installing Oracle Collaboration Suite Distributed Identity Management Architecture
Installing in High Availability Environments: Distributed Identity Management Architecture 13-31
Valid Value: a load balancer virtual server name.Scope: system, instance
2. GlobalWebPort is the HTTP port of the global Web host.
Default Value: 80Valid Value: Any port IDScope: system, instanceFor example, to reset the global Web host to listen on port 80 for HTTP requests run the following command:
ORACLE_HOME/imeeting/bin/rtcctlrtcctl> setProperty –system true –pname GlobalWebPort –pvalue 80
3. SmtpHost is the name of the SMTP host. To set the smtp host to apps_virtual.mycompany.com, run the following command:
ORACLE_HOME/imeeting/bin/rtcctlrtcctl> setProperty –system true –pname SmtpHost –pvalue "apps_virtual.mycompany.com"
Because the SMTP default port is 25, there is no need to set the SMTP port.
Restart Oracle Collaboration Suite Applications using the following commands:
ORACLE_HOME/opmn/bin/opmnctl stopallORACLE_HOME/opmn/bin/opmnctl startall
13.2.8.12 Updating Oracle Collaboration Suite Service Registry Entries in Oracle Internet Directory to Use the Load BalancerYou can update the Oracle Collaboration Suite registry entries in Oracle Internet Directory by using the Oracle Directory Manager as follows:
1. Start the Oracle Directory Manager.
ORACLE_HOME/bin/oidadmin
2. When you start Oracle Directory Manager, it will prompt you for connection information. Enter the following information to connect to your Oracle Internet Directory, typically hosted in the Oracle Collaboration Suite Database on your Oracle Collaboration Suite Infrastructure:
Host: <infrahost.yourdomain.com>Port: 389Username: cn=orcladminPassword: <password>
Port 389 is the default port used by Oracle Internet Directory. If you are using a different port, then enter the correct Oracle Internet Directory port.
Note: Once set, the only way to unset this property is to use the –pvaluenull true option with the SetProperty command. For example, to set the global Web host to apps_virtual.mycompany.com, run the following command:
ORACLE_HOME/imeeting/bin/rtcctlrtcctl> setProperty –system true –pname GlobalWebHost –pvalue "apps_virtual.mycompany.com"

Installing Oracle Collaboration Suite Distributed Identity Management Architecture
13-32 Oracle Collaboration Suite Installation Guide
If you have configured your Oracle Internet Directory to be accessed using SSL, select the SSL Enabled check box. Otherwise, leave it blank.
3. Select Login to log in to the Oracle Internet Directory. When the connection is successful, the Oracle Internet Directory management screen is displayed.
4. To access the Service Registry, drill down in to the Oracle Internet Directory by selecting the following items in the System Objects pane:
a. Select Entry Management.
b. Select cn=OracleContext.
c. Select cn=Services.
The System Objects pane displays a list of the Oracle Collaboration Suite Applications which have entries in the Service Registry. The Properties tab displays the properties of the cn=Services object.
5. To display URIs stored by each component in the Service Registry, select the component in the System Objects pane. Most components will contain a cn=VirtualServices object. This object contains one or more URIs used by other applications and OracleAS Portal to access that application. Applications store URIs in one or more child objects of the cn=VirtualServices object.
6. After you verify your configuration, update Oracle Collaboration Suite Service Registry entries in Oracle Internet Directory to use the load balancer virtual hostname as follows:
■ Oracle Calendar
dn: cn=OCAS_xxxxx,cn=VirtualServices,cn=Calendar,cn=Services,cn=OracleContextlabeleduri;syncserversecureurllabeleduri:syncserverurllabeleduri;webbaseurllabeleduri;webserviceurl
■ Oracle Collaborative Workspaces
dn:cn=<DBNAME>,cn=VirtualServices,cn=CollaborativeWorkspaces,cn=Services,cn=OracleContextlabeleduri;adminurllabeleduri;webbaseurllabeleduri:webui
■ Oracle Mail
dn: cn=emailadmin,cn=VirtualServices,cn=Email,cn=Services,cn=OracleContextlabeleduri;adminurl
dn: cn=imap,cn=VirtualServices,cn=Email,cn=Services,cn=OracleContext
Note: The Oracle Universal Installer seeds the Oracle Internet Directory with objects for every Oracle Collaboration Suite Applications during installation, even if you do not configure and deploy every application. These unconfigured application entries will not contain child objects of their cn=VirtualServices objects. The child objects, and the URIs they store, are created in the Service Registry by each component's Configuration Assistant when it first runs.

Installing Oracle Collaboration Suite Distributed Identity Management Architecture
Installing in High Availability Environments: Distributed Identity Management Architecture 13-33
labeleduri
dn: cn=smtp,cn=VirtualServices,cn=Email,cn=Services,cn=OracleContextlabeleduri
dn: cn=Webmail,cn=VirtualServices,cn=Email,cn=Services,cn=OracleContextlabeleduri;peopleurllabeleduri;webbaseurlorclraparameter;webbaseurl
dn: cn=webservice,cn=VirtualServices,cn=Email,cn=Services,cn=OracleContextlabeleduri;webservices
■ Oracle Content Services
dn: cn=FILES,cn=VirtualServices,cn=Files,cn=Services,cn=OracleContextlabeleduri;adminurllabeleduri;applicationurllabeleduri;s2swebserviceurllabeleduri;webdavurllabeleduri;webservicesurl
■ Oracle Collaboration Suite Client
dn:cn=IntegratedClient,cn=VirtualServices,cn=OCSClient,cn=Services,cn=OracleContextlabeleduri;baseurllabeleduri;popuplibraryurl
dn: cn=Search,cn=VirtualServices,cn=OCSClient,cn=Services,cn=OracleContextlabeleduri;webbaseurl
■ OracleAS Portal
dn:cn=ReturnToPortalURL,cn=VirtualServices,cn=Portal,cn=Services,cn=OracleContextlabeleduri;
■ Oracle Discussions
dn:cn=Discussions:<DBNAME>:<MailDomain>,cn=VirtualServices,cn=ThreadedDiscusssions,cn=Services,cn=OracleContextlabeleduri;adminurllabeleduri;rsslabeleduri;webbaseurl
Note: In addition to changing the host name to use the load balancer virtual host name, the port should also match the listen port used in Step 1 in Section 13.2.8.1. In this example it was port 80 (the defualt port), which means the port specification can be removed. So, for example, the Oracle Internet Directory labeleduri for the Portal ReturnToPortalURL should change from
http://ocs_apps1.mycompany.com:7778/portal/page?_dad=portal&_schema=PORTAL&_pageid=
to
http://apps_virtual.mycompany.com/portal/page?_dad=portal&_schema=PORTAL&_pageid=

Installing Oracle Collaboration Suite Distributed Identity Management Architecture
13-34 Oracle Collaboration Suite Installation Guide
labeleduri;webui
■ Oracle Mobile Collaboration
dn: cn=WIRELESS1,cn=VirtualServices,cn=Wireless,cn=Services,cn=OracleContextlabeleduri;adminurllabeleduri;calendarnotificationlistenerurllabeleduri;mobilesetupurllabeleduri;presencewebserviceurl
When you have finished editing the properties of an object, select Apply to save the new values in Oracle Internet Directory. If you decide to reject the changes you have made, select Revert to reset the displayed attributes to those currently stored in the Oracle Internet Directory.
7. Using opmnctl or Oracle Enterprise Manager 10g, restart the Oracle Collaboration Suite Infrastructure and all Oracle Collaboration Suite Applications tiers, to clear caches that may still be storing the old URIs and to load the new URIs you have entered.
Restart Oracle Collaboration Suite Applications using the following commands:
ORACLE_HOME/opmn/bin/opmnctl stopallORACLE_HOME/opmn/bin/opmnctl startall
There is no need to restart the Oracle Collaboration Suite Database.
13.2.8.13 Test the ConfigurationThe steps to test the configuration are as follows:
1. Access OracleAS Web Cache and Oracle HTTP Server through the load balancer with the following URL:
http://apps_virtual.mycompany.com
2. Test the connection to the Oracle Collaboration Suite Database through the load balancer, by accessing the following URL:
http://apps_virtual.mycompany.com/pls/portal/htp.p?cbuf=test
The response should be test. If this succeeds, then the Oracle Collaboration Suite Applications tier can connect to the Oracle Collaboration Suite Database. If this test fails, then examine the Oracle HTTP Server ORACLE_HOME/Apache/Apache/logs/error_log file to determine the cause.
3. Test the OracleAS Portal using following URL (ensure that you can log in):
http://apps_virtual.mycompany.com/pls/portal
Verify that content is being cached in OracleAS Web Cache on ocs_apps1.mycompany.com, using Web Cache Administrator. Under Monitoring, click Popular Requests. Select Cached from the Filtered Objects drop-down list, and click Update.
If you accessed OracleAS Portal, portal content will appear. If there is no portal content, open another browser and log on to OracleAS Portal. Return to the Popular Requests page, and click Update to refresh the page content.

Installing Oracle Collaboration Suite Distributed Identity Management Architecture
Installing in High Availability Environments: Distributed Identity Management Architecture 13-35
13.2.9 Installing Subsequent Instance of Oracle Collaboration Suite ApplicationsThis section describes the installation of the subsequent instance of Oracle Collaboration Suite Applications without Oracle Calendar Server and postinstallation tasks.
13.2.9.1 Installation TasksTo install the subsequent instance of Oracle Collaboration Suite Applications, follow the steps listed in Table 13–10.
Table 13–10 Installing Subsequent Instance of Oracle Collaboration Suite Applications
Step Screen Action
1. Welcome Click Next.
2. Specify File Locations Enter a name and path for the new Oracle home. This new Oracle home will be the destination Oracle home for Oracle Collaboration Suite Applications.
Click Next.
3. Specify Hardware Cluster Installation Mode (optional)
Select Local Installation. This screen will only show up if you are installing Identity Management on a cluster.
Click Next.
3. Select a Product to Install Select Oracle Collaboration Suite Applications 10.1.1.0.2.
Click Next.
4. Product-specific Prerequisite Checks
Make sure all the checks complete successfully.
Click Next.
5. Select Components to Configure
Select Oracle Mail.
Select Oracle Mobile Collaboration.
Select Oracle Content Services.
Do not select Oracle Calendar Server.
Select Oracle Calendar Web Client.
Select Oracle Real-Time Collaboration.
Select Oracle Collaboration Suite Search.
Select Oracle Collaboration Suite Web Access.
Do not select Oracle Collaborative Portlets.
Select Oracle Workspaces.
Select Oracle Discussions.
Click Next.
6. Register with Oracle Internet Directory
Host: Enter the LDAP virtual server name.
Port: Enter the non-SSL port number for the LDAP virtual server name.
Click Next.
7. Specify UserName and Password for Oracle Internet Directory
Username: Enter the username to log in to Oracle Internet Directory. You must log in as the Oracle Internet Directory superuser (cn=orcladmin).
Password: Enter the password for the username.
Click Next.
8. OracleAS Metadata Repository
Select Oracle Collaboration Suite Database from the list.
Click Next.

Installing Oracle Collaboration Suite Distributed Identity Management Architecture
13-36 Oracle Collaboration Suite Installation Guide
13.2.9.2 Postinstallation tasksThe postinstallation tasks involve troubleshooting the installation errors and performing manual postinstallation steps.
Error: The installation has detected that Oracle Collaborative Portlets has already been configured in the Metadata Repository you have selected. Oracle Collaborative Portlets will be unselected for this configuration.
This screen will only show up if you selected Oracle Collaborative Portlets from the Select Components to Configure screen.
Click Yes.
9. Select Database Components
Component Name: Oracle Mail, Oracle Discussions, Oracle Search, Oracle Real-Time Collaboration, Oracle Collaboration Suite Search, Oracle Workspaces, Oracle Content Services, Oracle Collaboration Suite Web Access
Database Name: Name of the Oracle Collaboration Suite Database.
Click Next.
10. Specify Port Configuration Options
Select Automatic Port Selection or Manual and enter the port numbers for.
■ Web Cache HTTP Listen Port
■ Web Cache HTTP Listen SSL
■ Oracle Mail IMAP4 port
■ Oracle Mail IMAP4 Secure port
■ Oracle Mail POP3 port
■ Oracle Mail POP3 Secure port
■ Oracle Mail SMTP port
■ Oracle Mail NNTP port
■ Oracle Mail NNTP Secure port
Click Next.
11. Specify Administrative Password and Instance Name
Instance Name: Enter a name for this Oracle Collaboration Suite Applications instance.
Administrative Password: Set the password for the administrative user. This is the administrative user for the Oracle Collaboration Suite Applications instance.
Click Next.
12. Specify Oracle Mail Domain Information
Local Domain: Select it from the list.
Select the same domain as in the first Oracle Collaboration Suite Applications installation.
Click Next.
13. Summary Verify your selection and click Install.
14. Install Progress This screen displays the progress of the installation.
15. Run root.sh Note: Do not run the root.sh script until this dialog box appears.
1. When you see this dialog box, run the root.sh script in a different shell as the root user. The script is located in the Oracle home directory of this instance.
2. Click OK.
16. The Configuration Assistants
This screen shows the progress of the configuration assistants.
17. End of Installation Click Exit to quit the installer.
Table 13–10 (Cont.) Installing Subsequent Instance of Oracle Collaboration Suite Applications
Step Screen Action

Installing Oracle Collaboration Suite Distributed Identity Management Architecture
Installing in High Availability Environments: Distributed Identity Management Architecture 13-37
13.2.9.2.1 Troubleshooting the Installation Errors You might have to perform the postinstallation steps to solve the following problems:
■ The index.jsp packaged in the welcome.ear has the incorrect Portal URL. In ORACLE_HOME/j2ee/OC4J_OCSClient/applications/welcome/welcome-web/index.jsp change URL portalUrl = new URL("http", request.getServerName(), request.getServerPort(), ""); to URL portalUrl = new URL("http", request.getServerName(), request.getServerPort(), "/pls/portal");
■ Oracle Calendar Home Page cannot be accessed through orclguest account. To resolve this error, the steps are as follows:
1. Stop all fast CGI (FCGI) processes using Oracle OCAS Control (ocasctl). When OCS Application tier is started or stopped using OPMN control (opmnctl), OCAS is not started or stopped because OCAS is not integrated with OPMN.
ORACLE_HOME/ocas/bin/ocasctl -stopall
2. Start the FCGI processes.
ORACLE_HOME/ocas/bin/ocasctl –start –t ochecklet –p 8020 –n 1ORACLE_HOME/ocasctl –start –t ocas –p 8010 –n 5
The default ports are 8010 and 8020. The valid range is 8010-8020.
3. Verify the status of the FCGI processes:
ORACLE_HOME/ocas/bin/ocasctl –status
■ When you log on to Portal as a newly created user, the calendar portlet shows "Service temporarily unable due to maintenance message".
1. Click the Oracle Calendar link and go to the Oracle Calendar view page.
2. Click the Return to Portal link and the porlet should show up correctly.
■ When accessing workspaces, user cannot be found in LDAP directory. To resolve this error, run the following command:
$ORACLE_HOME/opmn/bin/opmnctl restartproc process-type=OC4J_OCSClient
13.2.9.2.2 Performing Manual Postinstallation Steps You also have to perform the following additional postinstallation steps for Oracle Mail and Oracle Mobile Collaboration:
■ For Oracle mail, the steps are as follows:
1. Get the user ID and group ID of the owner of the Oracle Collaboration Suite Applications.
2. Start LISTENER_ES as root, if the port that you are using is a privileged port (< 1024). Make sure ORACLE_HOME, LD_LIBRARY_PATH and PATH environment variables are set correctly.
ORACLE_HOME/bin/tnslsnr listener_es –user <userid> -group <group_id> &
■ To enable Oracle Mobile Collaboration Calendar notifications, the steps are as follows:

Installing Oracle Collaboration Suite Distributed Identity Management Architecture
13-38 Oracle Collaboration Suite Installation Guide
1. Log in to Enterprise Manager. Go to System Components, Wireless, Site Administration.
2. Expand Component Configuration section and click XMS Configuration.
3. Under XMS Center, ensure that Enable XMSC is checked.
4. Go to System Components, Wireless, Notification eng xxxx. Click Enable/Disable link and make sure Notification engine is enabled.
5. Restart the wireless component.
13.2.10 Post Installation Steps to Redeploy Oracle Collaboration Suite Applications with a Load Balancer
You can configure two or more Oracle Collaboration Suite Applications instances in a highly-available deployment by placing a load balancer in front of them. The load balancer publishes a single address for Oracle Collaboration Suite Applications while providing a redundant st of application servers that actually service requests. The load balancer can be configured to detect when one of the Oracle Collaboration Suite Applications instances has failed and can then fail over requests to another instance.
The details of the configuration are as follows:
■ There are two Oracle Collaboration Suite Applications computers: ocs_apps1.mycompany.com and ocs_apps2.mycompany.com. Both application servers listen on non-SSL port 7777.
■ The Oracle Collaboration Suite Applications computers are configured to use the Single Sign-On server located at im_virtual.mycompany.com.
■ The effective host name of the Oracle Collaboration Suite Applications published to the user is apps_virtual.mycompany.com. A load balancer is configured to listen at this address, on port 80. It has been configured to load balance and fail over user requests between ocs_apps1.mycompany.com and ocs_apps2.mycompany.com.
■ The Single Sign-On server and Directory server are located at im_virtual.mycompany.com.
■ The Oracle Collaboration Suite Database (including Identity Management metadata) is located at ocs_store1.mycompany.com and ocs_store2.mycompany.com (2-node RAC).
The postinstallation steps are follows:
1. Enable Portal
2. Configure the Oracle HTTP Server with the Load Balancer
3. Configure the Parallel Page Engine Loop-Back with the Load Balancer
4. Modify the Portal Dependency Settings (iasconfig.xml) File
5. Reregister mod_ossoConfigure OracleAS Web Cache Clusters
6. Configure OracleAS Web Cache Clusters
7. Enable Monitoring of the Frontend Host and Port Settings of the Load Balancer for OracleAS Portal
8. Enable Session Binding on OracleAS Web Cache Clusters
9. Configure Collaborative Portlets

Installing Oracle Collaboration Suite Distributed Identity Management Architecture
Installing in High Availability Environments: Distributed Identity Management Architecture 13-39
10. Configure Oracle Collaboration Suite Mobile Collaboration
11. Configure Oracle Discussions
12. Test the Configuration
13.2.10.1 Enable PortalThe first task is to configure OracleAS Portal, using the Oracle Enterprise Manager 10g Collaboration Suites Control Console. Follow these steps to configure OracleAS Portal, beginning on the Oracle Collaboration Suite page:
1. Click Configure Component. The Select Component page appears.
2. Select portal from the list.
3. Click Continue. The configuration process may take 10-20 minutes to complete.
Before you continue with the OracleAS Portal application server configuration, ensure that the following is configured:
■ You are able to resolve apps_virtual.mycompany.com from ocs_apps2.mycompany.com, such that it contacts the load balancer. To ensure you can resolve apps_virtual.mycompany.com by running the following command:
nslookup apps_virtual.mycompany.com
The IP address for the virtual server name should be returned.
■ You are able to contact port 7777 on apps_virtual.mycompany.com from ocs_apps2.mycompany.com. Run the following command on ocs_app2.mycompany.com:
telnet apps_virtual.mycompany.com 7777
Verify that no connection failure message is returned.
13.2.10.2 Configure the Oracle HTTP Server with the Load BalancerThis step associates the components on which OracleAS Portal depends with load balancer virtual server name and port: apps_virtual.mycompany.com:80. The steps to configure the Oracle HTTP Server with the Load Balancer are as follows:
1. Access the Oracle Enterprise Manager – Oracle Collaboration Suite Control console.
2. Click the link for the ocs_apps2.mycompany.com installation.
3. Click the HTTP Server link.
4. Click the Administration link.
5. Click Advanced Server Properties.
6. Open the httpd.conf file.
7. Perform the following steps:
a. Add LoadModule certheaders_module directive.
LoadModule certheaders_module libexec/mod_certheaders.so

Installing Oracle Collaboration Suite Distributed Identity Management Architecture
13-40 Oracle Collaboration Suite Installation Guide
b. Add the following lines to create a NameVirtualHost directive and a VirtualHost container for apps_virtual.mycompany.com and port 80.
NameVirtualHost *:7778<VirtualHost *:7778>ServerName apps_virtual.mycompany.comPort 80ServerAdmin [email protected] OnRewriteOptions inherit</VirtualHost>
c. Create a second VirtualHost container for ocs_apps2.mycompany.com and port 7777.
<VirtualHost *:7778>ServerName ocs_apps2.mycompany.comPort 7777ServerAdmin [email protected] OnRewriteOptions inherit</VirtualHost>
8. Save the httpd.conf file, and restart the Oracle HTTP Server when prompted.
9. Copy the dads.conf file from ocs_apps1.mycompany.com to ORACLE_HOME/Apache/modplsql/conf directory of ocs_apps2.mycompany.com.
13.2.10.3 Configure the Parallel Page Engine Loop-Back with the Load BalancerIn this step, you configure non-SSL loop-back communication between the load balancer and the Parallel Page Engine on ocs_apps1.mycompany.com and ocs_apps2.mycompany.com. If the OracleAS Web Cache on ocs_app1.mycompany.com is down, the Parallel Page Engine can loop back to the OracleAS Web Cache on ocs_apps2.mycompany.com through the load balancer to reach mod_plsql.
The steps to create the loop-back configuration are as follows:
1. Open the ORACLE_HOME/j2ee/OC4J_Portal/applications/portal/portal/WEB-INF/web.xml file.
2. Locate the Page servlet section.
3. Add the lines shown in bold.
<servlet><servlet-name>page</servlet-name> <servlet-class>oracle.webdb.page.ParallelServlet</servlet-class> <init-param> <param-name>useScheme</param-name> <param-value>http</param-value> </init-param>
Note: The LoadModule directives (in particular, the LoadModule rewrite_module directive) must appear in the httpd.conf file at a location preceding the VirtualHost directives. The server must load all modules before it can execute the directives in the VirtualHost container. It is a good idea to create the VirtualHost directives at the end of the httpd.conf file.

Installing Oracle Collaboration Suite Distributed Identity Management Architecture
Installing in High Availability Environments: Distributed Identity Management Architecture 13-41
<init-param> <param-name>usePort</param-name> <param-value>7777</param-value> </init-param></servlet>
4. Save the web.xml file.
5. Save the manual configuration changes in the DCM repository by running the following command on ocs_apps2.mycompany.com in ORACLE_HOME/dcm/bin:
dcmctl updateConfig
6. Restart all components on ocs_apps2.mycompany.com by running the following command in ORACLE_HOME/opmn/bin:
opmnctl stopallopmnctl startall
13.2.10.4 Modify the Portal Dependency Settings (iasconfig.xml) FileThe Portal Dependency Settings file iasconfig.xml must contain the correct host, port, and farm name to enable access to OracleAS Portal and perform OracleAS Web Cache invalidation. Follow the steps to edit the file to include this information:
1. Create a backup copy of the ORACLE_HOME/portal/conf/iasconfig.xml file.
2. Copy the iasconfig.xml file in ocs_apps1.mycompany.com to ORACLE_HOME/portal/conf of ocs_apps2.mycompany.com.
3. Overwrite the file on ocs_apps2.mycompany.com when prompted.
13.2.10.5 Reregister mod_ossoThe steps for reregistering mod_osso are:
1. Back up the ORACLE_HOME/Apache/Apache/conf/osso/conf file.
2. Use the FTP binary mode to copy the osso.conf file of ocs_apps1.mycompany.com to ORACLE_HOME/Apache/Apache/conf of ocs_apps2.mycompany.com.
3. Synchronize the DCM repository with the file by FTP using the following command:
ORACLE_HOME/Apache/Apache/bin/ssotransfer ORACLE_HOME/Apache/Apache/conf/osso/osso.conf
4. Restart the components on ocs_apps2.mycompany.com by running the commands in ORACLE_HOME/opmn/bin of ocs_apps2.mycompany.com:
opmnctl stopallopmnctl startall
Note: This does not create any new partner applications. It enables the partner application ocsapps.apps_virtual.mycompany.com for ocs_apps1.mycompany.com and ocs_apps2.mycompany.com.

Installing Oracle Collaboration Suite Distributed Identity Management Architecture
13-42 Oracle Collaboration Suite Installation Guide
5. Log in to the OracleAS Single Sign-On Administration page as the Administrator, and use the Administer Partner Applications page to delete the entry for the partner application ocsapp1.ocs_apps2.mycompany.com.
13.2.10.6 Configure OracleAS Web Cache ClustersTo cluster the OracleAS Web Cache instances, you will perform the configuration steps on ocs_apps1.mycompany.com and propagate them to ocs_apps2.mycompany.com.
From the Oracle Enterprise Manager Collaboration Suite Control Console, you can access the Web Cache Manager, the graphical user interface provided for editing the configuration stored in the webcache.xml file. Start the Oracle Collaboration Suite Applications instance on ocs_apps1.mycompany.com, then follow the steps to access the Web Cache Manager from the System Components page.
1. Access the Web Cache Administrator at the following URL:
http://ocs_apps1.mycompany.com:9400/webcacheadmin
The Web Cache Administrator password dialog box appears.
2. For the user name, enter ias_admin or administrator, and enter the OracleAS Web cache administrator password.
The Web Cache Manager page appears.
3. Click Clustering in the Properties section. The Clustering page appears.
4. In the Cluster Members table, click Add. The Add Cache to Cluster page appears.
5. Enter the following information for ocs_apps2.mycompany.com:
Host Name: ocs_apps2.mycompany.comAdmin. Port: 9400Protocol for Admin. Port: HTTPCache Name: ocs_apps2.mycompany.com-WebcacheCapacity: 20
6. Click Submit.
7. Click the Origin Server link in the Origin Servers, Sites, and Load Balancing section. The Origin Server page appears.
8. Click Add under the Application Web Servers table.
9. Enter the following information:
Hostname: ocs_apps2.mycompany.comPort: 7778Routing: ENABLECapacity: 30Failover Threshold: 5Ping URL: /Ping Interval: 10Protocol: HTTP
Note: At installation time, the OracleAS Web Cache administrator password is set to the same password as the ias_admin password. The OracleAS Web Cache administrator password must be identical for all cache cluster members.

Installing Oracle Collaboration Suite Distributed Identity Management Architecture
Installing in High Availability Environments: Distributed Identity Management Architecture 13-43
10. Click Submit.
11. Click the Site-to-Server Mapping link in the Origin Servers, Sites and Load Balancing section. The Site-to-Server Mapping page appears.
12. Select the mapping for the Load Balancer site (apps_virtual.mycompany.com) from the table and click Edit Selected. The Edit/Add Site-to-Server mapping page appears.
13. In the Select Application Web Servers section, select an application Web server specified in the Origin Servers page for ocs_apps2.mycompany.com (ocs_apps1.mycompany.com is already mapped).
14. Click Submit.
15. Click Apply Changes.
16. In the Cache Operations page, click Propagate. The changes are propagated to ocs_apps2.mycompany.com.
17. Click Restart. OracleAS Web Cache is restarted on ocs_apps1.mycompany.com and ocs_apps2.mycompany.com. OracleAS Web Cache on ocs_apps1.mycompany.com begins to balance requests to the Oracle HTTP Server and OC4J_Portal instances on ocs_apps2.mycompany.com.
13.2.10.7 Enable Monitoring of the Frontend Host and Port Settings of the Load Balancer for OracleAS PortalThe steps are as follows:
1. Open the ORACLE_HOME/sysman/emd/targets.xml file.
2. Locate the OracleAS Portal targets, for example, TYPE="oracle_portal".
3. Edit the PortalListeningHostPort property so that it points to the load balancer. For example:
<Property NAME="PortalListeningHostPort" VALUE="http://apps_virtual.mycompany.com:80"/>
4. Save and close targets.xml file.
5. Reload the targets.xml file in the Oracle Collaboration Suite Control Console by running the following command in ORACLE_HOME/bin:
emctl reload
13.2.10.8 Enable Session Binding on OracleAS Web Cache ClustersThe session binding feature in OracleAS Web Cache is used to bind user sessions to a given origin server to maintain state for a period of time. Enabling session binding forces all the user requests to go to a give OracleAS Portal middle-tier, resulting in a better cache hit ratio for the portal cache. For this reason, session binding is required although almost all components running in a given OracleAS Portal middle tier are stateless.
To enable session binding in OracleAS Web Cache, the steps on ocs_apps1.mycompany.com or ocs_apps2.mycompany.com are as follows:
1. Access the Web cache Administrator at the following URL:
http://ocs_apps1.mycompany.com:9400
The Web Cache Administrator password dialog box appears.

Installing Oracle Collaboration Suite Distributed Identity Management Architecture
13-44 Oracle Collaboration Suite Installation Guide
2. Enter the OracleAS Web Cache administrator password.
The Web Cache Manager page appears.
3. Click the Session Binding link in the Origin Servers, Sites, and Load Balancing section. The Session Binding page appears.
4. Select the Load Balancing Router site, apps_virtual.mycompany.com:80 from the table and click Edit Selected. The Edit Session Binding window opens.
5. Select Any Set-Cookie from the Please select a session list.
6. Select Cookie-based from the Please select a session binding mechanism list.
7. Click Submit.
8. Click Apply Changes.
9. On the Cache Options page, click Propagate.The changes are propagated to the OracleAS Web Cache instance on the other computer.
10. Click Restart. OracleAS Web Cache is restarted on ocs_apps1.mycompany.com and ocs_apps2.mycompany.com.
13.2.10.9 Configure Collaborative PortletsConfigure Collaborative Portlets Configure Components from Oracle Enterprise Manager 10g Application Server Control Console. The Configure Component button appears above the System Components table if you have installed, but not configured, some components.
To configure Collaborative Portlets, perform the following steps:
1. On the Oracle Collaboration Suite home page, click Configure Component.
2. Select Collaborative Portlets from the drop-down list on the Select Component page, and click Continue.
3. Enter the following values:
Oracle Internet Directory Administrative PasswordHost Name: Load Balancer Virtual Server Name – apps_virtual.mycompany.comWeb Cache Listen Port: Load Balancer Virtual Server Name’s port – Port 80Web Cache Invalidation Port: Refer to ORACLE_HOME/install/portlist.ini – 9401
4. Click Continue. The configuration process may take 10-15 minutes to complete.
5. Restart the components on ocs_apps2.mycompany.com by running the following commands in ORACLE_HOME/opmn/bin of ocs_apps2.mycompany.com:
opmnctl stopallopmnctl startall
Note: At installation time, the OracleAS Web Cache administrator password is set to the same password as the ias_admin password. The OracleAS Web Cache administrator password must be identical for all cache cluster members.
Installing Oracle Collaboration Suite Distributed Identity Management Architecture
Installing in High Availability Environments: Distributed Identity Management Architecture 13-45
13.2.10.10 Configure Oracle Collaboration Suite Mobile CollaborationConfigure the URLs of the current OracleAS Wireless Instance on each Oracle Collaboration Suite Applications tier. Configuring Oracle Collaboration Suite Mobile Collaboration enables you to define the instance URLs for an application server, or direct an application server to use the URLs defined for the entire OracleAS Wireless site.The steps are as follows:
1. Access the Oracle Enterprise Manager – Oracle Collaboration Suite Control console.
2. Click the link for the ocs_apps1.mycompany.com installation.
3. Click the Wireless link under System Components.
4. Click the Instance URLs link under Instance Configuration.
5. Modify the Wireless Instance URLs to point to the load balancer’s virtual server name (apps_virtual.mycompany.com)
Repeat the preceding steps for each Oracle Collaboration Suite Applications tier.
13.2.10.11 Configure Oracle DiscussionsWhen deploying Oracle Discussions in more than one Applications tier with a load balancer at the front end, please ensure to turn on session affinity in your load balancer. Oracle Discussions requires that once a user establishes a session with one OC4J instance, all the following requests must go to the same OC4J instance. In case of a failover, the original Applications tier is not available anymore and the requests are transferred to the second Applications tier. Oracle Discussions automatically re-creates a new user session in the new OC4J instance. There is no loss of data except that of the currently executing operation when the first Applications tier goes offline.
13.2.10.12 Test the ConfigurationTo ensure that it is working as it should, perform the following tests:
1. Ensure that all components on ocs_apps2.mycompany.com are running.
a. Run the following command from ORACLE_HOME/opmn/bin to query the status of the components:
opmnctl status
b. If necessary, run the following command in ORACLE_HOME/opmn/bin:
opmnctl startall
2. Stop all components on ocs_apps1.mycompany.com by running the following command in ORACLE_HOME/opmn/bin:
opmnctl stopall
3. Access OracleAS Web Cache and Oracle HTTP Server through the load balancer with the following URL:
http://apps_virtual.mycompany.com
4. Test the connection to the Oracle Collaboration Suite Database through the load balancer, by accessing the following URL:
http://apps_virtual.mycompany.com/pls/portal/htp.p?cbuf=test
The response should be test. If this succeeds, then the Oracle Collaboration Suite Applications tier can connect to the Oracle Collaboration Suite Database. If this

Installing Oracle Collaboration Suite Distributed Identity Management Architecture
13-46 Oracle Collaboration Suite Installation Guide
test fails, then examine the ORACLE_HOME/Apache/Apache/logs/error_log file of Oracle HTTP Server to determine the cause.
5. Test the OracleAS Portal using following URL (ensure that you can log in):
http://apps_virtual.mycompany.com/pls/portal
6. Verify that content is being cached in OracleAS Web Cache on ocs_apps1.mycompany.com, using Web Cache Administrator. Under Monitoring, click Popular Requests. Select Cached from the Filtered Objects drop-down list, and click Update.
If you accessed OracleAS Portal, portal content will appear. If there is no portal content, open another browser and log in to OracleAS Portal. Return to the Popular Requests page, and click Update to refresh the page content.
7. Repeat steps 3 through 6, by ensuring that all components on ocs_apps1.mycompany.com are running, and all components on ocs_apps2.mycompany.com are stopped and vice versa.

Silent and Noninteractive Installation 14-1
14Silent and Noninteractive Installation
This chapter guides you through silent and noninteractive installation of Oracle Collaboration Suite.
This chapter contains the following sections:
■ Section 14.1, "Introduction to Noninteractive Installations"
■ Section 14.2, "Installation Requirements"
■ Section 14.3, "Installing Oracle Application Server Certificate Authority"
■ Section 14.4, "Creating Files for Silent and Noninteractive Installation"
■ Section 14.5, "Selecting a Response File"
■ Section 14.6, "Editing the Response File"
■ Section 14.8, "Specifying a Response File and Starting the Installation"
■ Section 14.7, "Creating a Response File Using the Record Mode in the Installer"
■ Section 14.9, "Running the root.sh Script"
■ Section 14.10, "Error Handling"
■ Section 14.11, "Deinstallation"
■ Section 14.12, "Using Configuration Assistants in Noninteractive Mode"
14.1 Introduction to Noninteractive InstallationsOracle Collaboration Suite features the following two noninteractive methods of installation:
■ Section 14.1.1, "Silent Installation"
■ Section 14.1.2, "Noninteractive Installation"
14.1.1 Silent InstallationSilent installation eliminates the need to monitor the Oracle Collaboration Suite installation because there is no graphical output and no input by the user. It is accomplished by supplying Oracle Universal Installer with a response file and specifying the -silent flag on the command line.
You should use silent installation of Oracle Collaboration Suite when you want similar installations on more than one computer. Additionally, you can use silent installation when performing the Oracle Collaboration Suite installation from a remote location using the command line.

Installation Requirements
14-2 Oracle Collaboration Suite Installation Guide
The response file used in a silent installation is a text file. Oracle Universal Installer uses variables and values specified in the response file to provide answers to all of its user prompts. Therefore, you must include responses for all of the prompts in the response file.
If this is a first-time installation of Oracle Collaboration Suite, you must manually create the following three files before starting installation:
■ oraInst.loc
■ oratab
These files are used by Oracle Universal Installer during the installation.
After any silent Oracle Collaboration Suite installation, run the root.sh script. The root.sh script detects settings of environmental variables and enables you to enter the full path of the local bin directory.
14.1.2 Noninteractive InstallationNoninteractive installations of Oracle Collaboration Suite display a graphical output. If you have not provided responses to all of the user prompts, then you may need to enter information during the installation.
Noninteractive installation of Oracle Collaboration Suite is also accomplished by supplying the Oracle Universal Installer with a response file, but without specifying the -silent flag on the command line. Oracle Universal Installer uses the variables and values contained in the response file to provide answers to some or all of its user prompts.
If this is a first-time installation of Oracle Collaboration Suite, then you must manually create oraInst.loc oratab files before starting the installation. These files are used by Oracle Universal Installer during the installation.
After any noninteractive Oracle Collaboration Suite installation, run the root.sh script. The root.sh script detects settings of environmental variables and enables you to enter the full path of the local bin directory.
Use noninteractive installation of Oracle Collaboration Suite when there are specific screens you want to observe during installation.
14.2 Installation RequirementsFor a complete list of installation requirements, refer to Chapter 2.
14.3 Installing Oracle Application Server Certificate AuthorityIf you are installing OracleAS Certificate Authority, check the following:
■ If you are installing OracleAS Certificate Authority against an existing Oracle Internet Directory, then ensure that the Oracle Internet Directory has Oracle
See Also:
■ Section 14.4
■ Section 2.7.4 for more information about remote installation
See Also: Section 14.8 for information about executing a response file

Selecting a Response File
Silent and Noninteractive Installation 14-3
Application Server Single Sign-On configured. If not, the OracleAS Certificate Authority Configuration Assistant will fail.
■ If you are installing OracleAS Certificate Authority with a new Oracle Internet Directory, then ensure that you are also configuring OracleAS Single Sign-On. If not, the OracleAS Certificate Authority Configuration Assistant will fail.
In interactive mode, the installer performs the checks for you and displays a warning if the requirements are not met. However, in silent or noninteractive mode, the installer is not able to display a warning.
14.4 Creating Files for Silent and Noninteractive InstallationIf the oraInst.loc and oratab files do not exist on your computer, you must create them before starting silent installation of Oracle Collaboration Suite. They are used by the Oracle Universal Installer during silent installation.
Table 14–1 lists the appropriate directory location for this platform.
14.4.1 oraInst.loc File CreationAs the root user, create the oraInst.loc file in the appropriate directory. Ensure that the file has read and write permissions set for the oracle user group because the oracle user group is the group performing the installation. The oraInst.loc file should have the following text input:
inst_group=oracle_user_groupinventory_loc=ORACLE_BASE/oraInventory
In this text input, inventory_loc is the location for inventory files and $ORACLE_HOME is the absolute directory path. For example, if your $ORACLE_BASE is /private2/oracle/ocs, then the content of the file is:
inst_group=oracle_user_groupinventory_loc=/private2/oracle/ocs/oraInventory
14.4.2 oratab File CreationCreate the oratab file in the appropriate directory. Ensure that the file is empty and has read and write permissions for the oracle user group.
14.5 Selecting a Response FileBefore performing a silent or noninteractive installation, you must provide information specific to your installation in a response file. The installer will fail if you attempt an installation using a response file that is not configured correctly. Response files are text files that you can create or edit in a text editor.
Table 14–1 oratab and oraInst.loc File Locations
oratab oraInst.loc
/var/opt/oracle/ /var/opt/oracle
Note: If inventory_loc is not located in your Oracle home, then ensure that the directory where it is located has read and write permissions set for oracle_user_group.
Editing the Response File
14-4 Oracle Collaboration Suite Installation Guide
The Oracle Collaboration Suite DVD Pack provides templates for the Oracle Universal Installer response files for the installations shown in Table 14–2.
Response files are located in the /response directory on Disk 1 of the Oracle Collaboration Suite DVD pack. You must edit the response file according to your requirements for silent or noninteractive installation.
To use a response file, first copy it from the DVD to your system.
For example:
1. Go to the /response directory (on the first DVD of the Oracle Collaboration Suite installation DVD set).
2. Copy the oracle.ocs.infrastructure.Infrastructure.rsp file to your system hard drive:
# cp oracle.ocs.infrastructure.Infrastructure.rsp private/ocs_infr_cd1/response/infrastructure.rsp
14.6 Editing the Response FileUse any text editor to edit the response file to include information specific for your system. The response file text identifies information that you must provide.
You must specify values for variables in your response file. Each variable listed in the response file is associated with a comment, which identifies the variable type. For example:
string = "Sample Value"Boolean = True or FalseNumber = 1000StringList = {"StringValue 1", "String Value 2"}
The values that are given as <Value Required> must be specified for silent installation.
Remove the comment from the variable values in the response file before starting the Oracle Collaboration Suite installation.
Table 14–2 Response Files
For This Installation... The File Name Is...
Oracle Collaboration Suite 10g Infrastructure
infra_complete.rsp
Oracle Collaboration Suite 10g Infrastructure: Oracle Collaboration Suite 10g Database only
infra_dbonly.rsp
Oracle Collaboration Suite 10g Infrastructure: Identity Management only
infra_imonly.rsp
Oracle Collaboration Suite 10g Infrastructure: Enabling customer Database as Oracle Collaboration Suite Database
infra_enabledb.rsp
Oracle Collaboration Suite 10g Infrastructure and Oracle Collaboration Suite 10g Infrastructure (Single-computer installation)
infra_and_apps.rsp
Oracle Collaboration Suite Applications ocs_apps.rsp

Specifying a Response File and Starting the Installation
Silent and Noninteractive Installation 14-5
14.7 Creating a Response File Using the Record Mode in the InstallerYou can run the installer in record mode to save your inputs to a file that you can use later as a response file. This feature is useful if you need to perform the same installation on different computers.
To run the installer in record mode:
1. Start the installer with the -record and -destinationFile parameters.
# /path/to/runInstaller -record -destinationFile newResponseFile
Replace newResponseFile with the full path to the response file that you want the installer to create.
Example: /response/infrastructure.rsp.
2. Enter your values in the installer screens. The installer will write these values to the file specified in the -destinationFile parameter.
When you get to the Summary screen, the installer automatically writes all the values that you supplied to the specified file. At this point, you can complete the installation on this computer, or you can exit without performing the installation.
14.8 Specifying a Response File and Starting the InstallationBefore you specify a response file, ensure that all the values in the response file are correct. Refer to Section 14.6 for more information.
To make Oracle Universal Installer use the response file at installation time, specify the location of the response file as a parameter when starting Oracle Universal Installer:
# ./runInstaller -responseFile absolute_path_and_filename
In noninteractive mode, the DISPLAY environment variable must be set as described in Section 2.7.4. To make the installer use the response file, specify the location of the response file that you want to use as a parameter when starting the installer.
To perform a noninteractive installation:
# setenv DISPLAY hostname:0.0# ./runInstaller -responseFile absolute_path_and_filename
To perform a silent installation, use the -silent parameter:
# ./runInstaller -silent -responseFile absolute_path_and_filename
The success or failure of the noninteractive installation is logged in installActions.log. The success or failure of the silent installation is logged in silentInstall.log. The log files are created in the oraInventory directory during installation.
See Also:
■ Section 14.6
■ Section 3.4
■ Section 3.3.1

Running the root.sh Script
14-6 Oracle Collaboration Suite Installation Guide
14.9 Running the root.sh ScriptWhen performing a silent or noninteractive installation, you must run the root.sh script after any silent installation of Oracle Collaboration Suite.
For a silent Oracle Collaboration Suite Infrastructure and Applications installation on a single computer, you must run the root.sh script in each Oracle home for Infrastructure as well as the Applications tier.
Similarly, for a noninteractive Oracle Collaboration Suite Infrastructure and Applications installation on a single computer that is response file driven but not run with the -silent parameter, if you have not set the SHOW_ROOTSH_CONFIRMATION parameter in the response file to FALSE, then you will be prompted to run the root.sh script. In this case, you must run the root.sh script in each Oracle home for Infrastructure as well as the Applications tier.
14.9.1 root.sh and Silent InstallationDuring any silent Oracle Collaboration Suite installation, you are not prompted to run the root.sh script. You must run the root.sh script after the silent installation.
Use the following steps to run the root.sh script.
1. Log in as the root user.
2. Run the root.sh script in the Oracle home directory.
# $ORACLE_HOME/root.sh
In this command, $ORACLE_HOME is the absolute directory path.
3. Exit the root user.
14.9.1.1 Oracle HTTP ServerDuring silent installation, Oracle Universal Installer attempts to start Oracle HTTP Server. However, Oracle HTTP Server does not start until the root.sh script is run. Ignore any error messages generated because of the inability to start Oracle HTTP Server.
After running the root.sh script, restart Oracle HTTP Server as follows:
$ORACLE_HOME/opmn/bin opmnctl stopproc ias-component=HTTP_Server$ORACLE_HOME/opmn/bin opmnctl startproc ias-component=HTTP_Server
Warning: During installation, response files may be copied to subdirectories under $ORACLE_HOME in order to install some Collaboration Suite components. When the installation completes successfully, these copies are removed. If the installation fails, however, these copies may not be removed. If you have provided passwords or other sensitive information in your response files, Oracle recommends that you delete any copies of the response files that remain in your file system.
Note: After the silent or noninteractive installation is complete, you must verify the log files (in the $ORACLE_BASE/oraInventory/logs directory) to see if any errors occurred during the installation.

Error Handling
Silent and Noninteractive Installation 14-7
14.9.1.2 Using Oracle HTTP Server on a Different PortTo use Oracle HTTP Server on a port number that is less than 1024, do not run the root.sh script. Instead, run the following script as the root user:
$ORACLE_HOME/Apache/Apache/bin/root_sh_append.sh
In the preceding command, $ORACLE_HOME is the absolute directory path.
The root_sh_append.sh script sets the necessary permissions for the Oracle HTTP Server to be run on a port less than 1024.
14.9.2 root.sh and Noninteractive InstallationDuring noninteractive installation of Oracle Collaboration Suite, Oracle Universal Installer prompts you to run the root.sh script.
Perform the following steps to run the root.sh script:
1. Log on as the root user.
2. Run the root.sh script in the Oracle home directory.
# $ORACLE_HOME/root.sh
In the preceding command, $ORACLE_HOME is the absolute directory path.
3. Exit the root user.
For noninteractive installation, after you see the "Finished running generic part of the root.sh script" and "Now product-specific root actions will be performed" messages, exit the root user and return to the current installation screen.
The root.sh script detects:
■ Settings of the ORACLE_OWNER, ORACLE_HOME, and ORACLE_SID environment variables
■ Full path of the local bin directory. You can accept the default or change to a different local bin directory.
14.10 Error HandlingThe success or failure of a silent or noninteractive installation is logged in the silentInstall.log file. This file is created in the oraInventory/log directory.
Values for variables that are of the wrong context, format, or type are treated as if no value were specified. Variables that are outside any section are ignored.
If you attempt a silent or noninteractive installation with an incorrect or incomplete response file, or Oracle Universal Installer encounters an error, such as insufficient disk space, the installation fails.
If you attempt a noninteractive installation without specifying a response file, the installation fails.
If you perform a silent installation with the staticports.ini file for ports less than 1024, the OPMN Configuration Assistant fails, and all the remaining configuration assistants do not run.
See Also: Appendix I

Deinstallation
14-8 Oracle Collaboration Suite Installation Guide
Before you run the configuration assistants from the command line, perform the following steps:
1. Start the installation using the following command:
./runInstaller -silent -responseFile absolute_path_to_response_file
Ensure that you keep the console open. This is because installation status messages are displayed on the console as well as are logged in the inventory logs.
2. Locate the string "The installation of Oracle Collaboration Suite Infrastructure was successful". This string can also be located in the silentInstall<time_stamp>.log or installAction<time_stamp>.log files.
3. Open a new terminal window, log in as root and run the $ORACLE_HOME/infra/root.sh script.
4. Open the $ORACLE_HOME/cfgtoollogs/configToolCommands, which is generated automatically. Search and replace all occurrences of *Protected value, not to be logged* with the passwords you have in the response file.
5. Ensure that the following environment variables are set:
■ $ORACLE_HOME
■ LD_LIBRARY_PATH (to $ORACLE_HOME/lib32 and $ORACLE_HOME/network/lib32)
■ LD_LIBRARY_PATH_64 ($ORACLE_HOME/lib and $ORACLE_HOME/network/lib)
6. Run the configuration assistants from the command line to rerun all the failed and skipped configuration assistants. The command for running the configuration assistants is:
$ORACLE_HOME/cfgtoollogs/configToolCommands
14.11 DeinstallationIf your silent or noninteractive installation fails, you must completely deinstall any files remaining from your Oracle Collaboration Suite installation attempt.
You can perform a silent deinstallation of Oracle Collaboration Suite by supplying a silent deinstallation parameter to the response file you used for installation. Add the following parameter to your installation response file:
REMOVE_HOMES={"<ORACLE_HOME to be removed>"}
To perform a silent deinstallation, use the -silent parameter when you enter the following command:
# ./runInstaller -silent -responseFile absolute_path_and_filename
14.12 Using Configuration Assistants in Noninteractive ModeAll the Oracle Collaboration Suite configuration assistants, except for the configuration assistant for Oracle Content Services can be run in the noninteractive mode.
To use a configuration assistant in noninteractive mode, do one of the following:
See Also: Appendix H for detailed information on deinstallation of Oracle Collaboration Suite and its components
Using Configuration Assistants in Noninteractive Mode
Silent and Noninteractive Installation 14-9
■ Run the configuration assistant in standalone mode using the following command format:
# assistant_name [-silent] -responseFile filename
In the preceding command, assistant_name is the configuration assistant that you want to run and filename is the response file for that assistant.
■ Configure an Oracle Universal Installer response file to start the noninteractive configuration assistant.
If you perform an Oracle Collaboration Suite Database installation in noninteractive mode, then Oracle Net Configuration Assistant does not configure your system at the end of the installation. After the installation, run the Oracle Net configuration with the Oracle Net Configuration Assistant by executing the netca command from the Oracle home directory or use the netca.rsp response file.
14.12.1 Response File Error HandlingOracle Universal Installer or most of the configuration assistants validate the response file at run time. If the validation fails, the noninteractive installation or configuration process ends. Oracle Universal Installer treats values for parameters that are of the wrong context, format, or type as if no value was specified in the file. Variables that are outside any section are also ignored.
Information about a failure is recorded in the log file of the installation session.
Note: Oracle Universal Installer or a configuration assistant fails if you attempt a noninteractive session without configuring a response file. Refer to Appendix I for more information about troubleshooting a failed noninteractive installation.
See Also:
■ Oracle Universal Installer Concepts Guide for more information about preparing and using noninteractive installation and configuration assistant response file scripts. This manual is available on Oracle Technology Network at
http://www.oracle.com/technology/documentation
■ OracleMetaLink if you are an Oracle Support customer. You can find new bulletins and responses to questions about noninteractive installation and configuration at the following Web site:
http://metalink.oracle.com
See Also: Section 3.3.1 for more information about the oraInventory directory and installation log files

Using Configuration Assistants in Noninteractive Mode
14-10 Oracle Collaboration Suite Installation Guide

Postinstallation Tasks for Oracle Collaboration Suite 15-1
15Postinstallation Tasks for Oracle
Collaboration Suite
This chapter contains the following sections:
■ Section 15.1, "Setting Environment Variables"
■ Section 15.2, "Modifying Password Settings for Oracle Internet Directory"
■ Section 15.3, "Enabling SSL"
■ Section 15.4, "Performing Component-Specific Tasks"
15.1 Setting Environment VariablesAfter the installation is complete, you might need to set the environment variables listed in the following section. These environment variables are required for proper functioning of some Oracle Collaboration Suite commands. Variables that you must set are listed in the following table:
Variable Name Bourne, Korn, or Derivative Shells C Shell
ORACLE_HOME ORACLE_HOME=/u01/oracle/product/ocs; export ORACLE_HOME
setenv ORACLE_HOME /u01/oracle/product/ocs
PATH
PATH needs to include ORACLE_HOME/bin.
PATH=$ORACLE_HOME/bin:$PATH; export PATH
setenv PATH $ORACLE_HOME/bin:$PATH
DISPLAY
DISPLAY must point to a running X server. Do not use X emulation on your client computer to start server processes. Run X server instead.
DISPLAY= X server:display_number.screen_number; export DISPLAY
For example:
DISPLAY= localhost:0.0; export DISPLAY
setenv DISPLAY X server:display_number.screen_number
For example:
setenv DISPLAY localhost:0.0
LD_LIBRARY_PATH
LD_LIBRARY_PATH must include $ORACLE_HOME/lib
LD_LIBRARY_PATH=$ORACLE_HOME/lib32:$ORACLE_HOME/lib;export LD_LIBRARY_PATH
setenv LD_LIBRARY_PATH $ORACLE_HOME/lib32:$ORACLE_HOME/lib

Modifying Password Settings for Oracle Internet Directory
15-2 Oracle Collaboration Suite Installation Guide
15.2 Modifying Password Settings for Oracle Internet DirectoryBeginning with Oracle Internet Directory 10g (9.0.4), the default password expiry time, which is assigned to the pwdmaxage attribute, is set to 60 days.
To change the default value, perform the following steps:
1. Unlock the cn=orcladmin super user account before you can modify password policies. Use the oidpasswd utility to unlock the super user account as follows:
oidpasswd connect=ocsdb unlock_su_acct=trueOID DB user password:OID super user account unlocked successfully.
This unlocks only the superuser account, cn=orcladmin. Do not confuse this account with the cd=orcladmin account within the default realm cn=orcladmin,cn=users,dc=xxxxx,dc=yyyyy. These are two separate accounts.
2. Start an Oracle Internet Directory 10g (10.1.2) version of Oracle Directory Manager and navigate to Password Policy Management. You will see two entries: cn=PwdPolicyEntry and the password policy for your realm—for example, password_policy_entry,dc=acme,dc=com.
Change the pwdmaxage attribute in each password policy to an appropriate value:
■ 5184000 = 60 days (default)
NLS_LANG (optional, for globalization support)
NLS_LANG=language_territory.characterset; export NLS_LANG
For example:
de_de.WE8ISO8859P15; export NLS_LANG
setenv NLS_LANG language_territory.characterset
For example:
setenv de_de.WE8ISO8859P15
ORA_NLS
ORA_NLS is the location of the globalization support-specific message files.
ORA_NLS=$ORACLE_HOME/ocommon/nls/admin/data; export ORA_NLS
setenv ORA_NLS $ORACLE_HOME/ocommon/nls/admin/data
TNS_ADMIN
TNS_ADMIN is the location of the SQL*Net configuration files tnsnames.ora, listener.ora, sqlnet.ora and by default these are located in $ORACLE_HOME/network/admin.
TNS_ADMIN=$ORACLE_HOME/network/admin; export TNS_ADMIN
setenv TNS_ADMIN $ORACLE_HOME/network/admin
Note: You can source the $ORACLE_HOME/bin/oraenv or $ORACLE_HOME/bin/coraenv scripts (depending on their current shell) to set the ORACLE_HOME and ORACLE_SID variables. These scripts will also add $ORACLE_HOME/bin in to the PATH variable.
Variable Name Bourne, Korn, or Derivative Shells C Shell

Enabling SSL
Postinstallation Tasks for Oracle Collaboration Suite 15-3
■ 7776000 = 90 days
■ 10368000 = 120 days
■ 15552000 = 180 days
■ 31536000 = 1 year
3. Start the Oracle Directory Manager and navigate to the realm-specific orcladmin account. Find the userpassword attribute and assign a new value. You should then be able to start any Oracle component that uses Oracle Application Server Single Sign-On and log in as orcladmin.
Rerun the odisrvreg utility to reset the randomly generated password for Directory Integration and Provisioning:
odisrvreg -D cn=orcladmin -w welcome1 -p 3060Already Registered...Updating DIS password...DIS registration successful.
4. Reregister the connector:
odisrvreg -p port -D cn=orcladmin -w passwd
15.3 Enabling SSLYou may want to enable Secure Sockets Layer (SSL) depending on your security requirements. To enable SSL, perform the following steps:
1. Run the following script on the computer where Infrastructure is installed:
$ORACLE_HOME/bin/SSLConfigTool -config_w_default -opwd orcladmin_user_password
2. Run the following script on the computer where Applications tier is installed:
$ORACLE_HOME/bin/midtierSSLConfigTool.sh oid_hostname oid_port oid_ admin_dnoid_admin_password http_server_SSL_port https hostname_of_the_computer_to_be_used true/false
In the preceding syntax, arguments for the script are:
■ oid_hostname: The host name of the Oracle Internet Directory computer the Applications tier is associated with.
■ oid_port: The port that the Oracle Internet Directory server is listening on.
■ oid_admin_dn: The administrative DN (Distinguished Name) for the Oracle Internet Directory admin user (cn=orcladmin).
■ oid_admin_password: The password for the Oracle Internet Directory admin user.
See Also: Oracle Identity Management Integration Guide
Note: For detailed information on SSLConfigTool, refer to Oracle Applicaton Server Administrator's Guide at
http://www.oracle.com/technology/documentation/index.html

Performing Component-Specific Tasks
15-4 Oracle Collaboration Suite Installation Guide
■ http_server_SSL_port: The SSL port that was configured during the installation. This value can be found in the $ORACLE_HOME/install/portlist.ini file as the Oracle HTTP Server SSL port value.
■ https: The indication that the HTTPS communication protocol will be used for Oracle HTTP Server.
■ hostname_of_the_machine: The host name that the computer is using with reference to its Oracle Collaboration Suite configuration. This may be the local host name or a load balancer virtual host name, as the case may be.
■ true/false: The boolean value indicates whether you are connecting to the Oracle Internet Directory SSL port or not. If the value is set to true, then it indicates that you are connecting to the Oracle Internet Directory SSL port. If the value is set to false, then it indicates that you are connecting to the Oracle Internet Directory non-SSL port.
15.4 Performing Component-Specific TasksThis section contains the following topics:
■ Section 15.4.1, "Configuring Oracle Mail and TNS Listener"
■ Section 15.4.2, "Configuring Oracle Collaboration Suite Search"
15.4.1 Configuring Oracle Mail and TNS ListenerAfter you have successfully installed Oracle Collaboration Suite Applications and if you have installed Oracle Mail as a part of the Applications tier, then perform the following steps:
1. Log in as the oracle user.
2. Set the ORACLE_HOME and PATH variables.
3. Obtain the values of uid and groupid using the following command:
prompt> iduid=509(oracle) gid=510(oinstall) groups=510(oinstall),511(dba)
4. Switch to the root user.
5. Start the TNS listener using the following command:
tnslsnr listener_es -user user_id -group group_id &
In the preceding command, user_id and group_id are the IDs of user that owns the installation. Here, assuming the oracle user installed Oracle Collaboration Suite, user_id refers to the value 509 and group_id refers to the value 510, as shown in Step 3.
15.4.2 Configuring Oracle Collaboration Suite SearchPerform the following steps, using your own set of values for the host name, port, user name, password, and SID:
1. Add the following entry to the $ORACLE_HOME/oc4j/j2ee/OC4J_OCSADMIN/config/data-sources.xml file:
<data-source class="oracle.jdbc.pool.OracleConnectionCacheImpl"

Performing Component-Specific Tasks
Postinstallation Tasks for Oracle Collaboration Suite 15-5
name="UltraSearchDS" location="jdbc/UltraSearchPooledDS" username="username" password="password" url="jdbc:oracle:thin:@database_host:oracle_port:oracle_sid" />
In the preceding syntax, the variables are:
■ username and password: The Oracle Database user name and password of the Oracle Collaboration Suite Search instance owner.
■ database_host: The host name of the computer hosting the Oracle Database instance.
■ oracle_port: The port on which the Oracle Database instance is available.
■ oracle_sid: The SID of the Oracle Database.
If you are adding the data source to the default Oracle Collaboration Suite Search instance username, then make sure to unlock it first.
2. Restart the OC4J_OCSADMIN instance as follows:
$ORACLE_HOME/opmn/bin/opmnctl startproc instancename=OC4J_OCSADMIN
3. Set the wk_test password in the Oracle Collaboration Suite Database, as follows:
SQLPLUS> alter user wk_test identified by wk_test account unlock;
Note: The URL of the JDBC data source can be provided in the form of jdbc:oracle:thin:@hostname:port:sid or in the form of a TNS keyword-value syntax.

Performing Component-Specific Tasks
15-6 Oracle Collaboration Suite Installation Guide
End-User Documentation Portal Installation 16-1
16End-User Documentation Portal Installation
The End-User Documentation Portal is a set of customizable HyperText Markup Language (HTML) pages that provides an overview of Oracle Collaboration Suite clients and the information for downloading, installing, and configuring each Oracle Collaboration Suite client. The End-User Documentation Portal also includes links to the Frequently Asked Questions (FAQ) and Troubleshooting site on the Oracle Technology Network (OTN) and Oracle Collaboration Suite end-user tutorials.
It is recommended that you install and use the End-User Documentation Portal to provide the end-users with all the information they need to run the Oracle Collaboration Suite clients.
This chapter contains the following sections:
■ Section 16.1, "Installing the End-User Documentation Portal"
■ Section 16.2, "Deploying the End-User Documentation Portal Package"
■ Section 16.3, "Restricting Access to End-User Documentation Portal Administration Panel"
■ Section 16.4, "Securing End-User Documentation Portal Administration Panel with Apache Authentication"
16.1 Installing the End-User Documentation PortalThis section explains the installation process for End-User Documentation Portal. Installing the End-User Documentation Portal involves the following steps:
■ Section 16.1.1, "Testing PHP"
■ Section 16.1.2, "Installing the DOM XML Extension"
16.1.1 Testing PHPPHP is an HTML embedded scripting language. The End-User Documentation Portal requires PHP version 4.3.x or later but will not work with PHP 5.0 or later version. It is installed with Oracle Collaboration Suite and is already compiled. The steps for testing PHP are as follows:
1. Navigate to http://localhost and locate the name of the directory on your machine that the URL points to. By default, the directory is htdocs. In this directory, create a new file called info.php, that consists of the following test script:
<?php phpinfo();?>

Installing the End-User Documentation Portal
16-2 Oracle Collaboration Suite Installation Guide
2. Check if the test script works by navigating to http://localhost/info.php. A PHP page comes up if the etst script is successful. A part of this page is shown in Figure 16–1:
Figure 16–1 Default PHP Page
There are many other tables that follow the table shown in Figure 16–1. These tables describe the extensions that were installed in the PHP installation.
16.1.2 Installing the DOM XML ExtensionThe DOM XML extension is a PHP extension. It is a compiled library.
The steps to install the DOM XML extension are as follows:
1. Ensure that you have libxml version 2.4.14 or later installed on your system. If you do not have libxml, then download the GNOME XML library. To install libxml, from source, on your system, perform the following steps:
a. Gunzip the libxml source using the following command:
gunzip libxml2-2.4.x.x.tar.gz
This will give you libxml2-2.4.x.x.tar.
b. Untar the file using the following command:
tar -xvf libxml2-2.4.x.x.tar
c. In the extracted directory, run the following command to create the required makefiles:
./configure
d. To create the libxml libraries and to place the files in appropriate positions, run the following commands:
makemake install
2. Download php-4.3.9.tar.gz from http://www.php.net/downloads.php.
Place it at any location.

Deploying the End-User Documentation Portal Package
End-User Documentation Portal Installation 16-3
3. Gunzip php-4.3.9.tar.gz using the following command:
gunzip php-4.3.9.tar.gz
This will give you php-4.3.9.tar.
4. Untar using tar -xvf php-4.3.9.tar.
5. Navigate to the php-4.3.9 directory. Execute the configure script for PHP.
When you execute this script, you must add the option --with-dom[=DIR], where DIR is the libxml install directory. For example, if libxml is installed in the /usr/local/lib/ directory, then you must call the configure script as follows:
./configure --with-apxs=$ORACLE_HOME/Apache/Apache/bin/apxs --prefix=$ORACLE_HOME --with-config-file-path=$ORACLE_HOME/Apache/Apache/conf --with-zlib-dir=/usr/lib --with-dom=/usr/local/lib/
6. Run the following commands to create executable of PHP and to place the files in appropriate locations:
makemake install
7. Now that all the files are in the appropriate locations, Apache must be configured to load the PHP module and service the requests for the .php, .phtml, and .phps suffixes.
a. Navigate to the $ORACLE_HOME/Apache/Apache/conf.
b. Edit the httpd.conf file as follows:
...# Dynamic Shared Object (DSO) Support. . .LoadModule . . . ...LoadModule php4_module libexec/libphp4.so...# Document types.. . . # And for PHP 4.x, use:. . . AddType application/x-httpd-php .php .phtmlAddType application/x-httpd-php-source .phps.
8. Restart Apache for the changes to come in to effect.
9. Navigate to the $ORACLE_HOME/Apache/Apache/bin. Run the following command:
./apachectl restart
10. Check if the extension is installed by navigating to http://localhost/info.php and searching the domxml table. If you find the domxml table, then it means that the DOM XML extension has been installed.
16.2 Deploying the End-User Documentation Portal PackageThe steps for unzipping and deploying the End-User Documentation Portal package are as follows:

Restricting Access to End-User Documentation Portal Administration Panel
16-4 Oracle Collaboration Suite Installation Guide
1. Unzip the contents of eudp.zip from the DVD/Doc/EUDP directory in to the htdocs directory, or the directory to which http://localhost/ points.
2. In a browser window, navigate to http://localhost/eudp/admin/view.php to test whether the End-User Documentation Portal administration tool works.
For instructions on how to use the End-User Documentation Portal administration tool and how to customize the content, refer to Chapter 5 of Oracle Collaboration Suite Administrator's Guide.
16.3 Restricting Access to End-User Documentation Portal Administration Panel
To prevent users other than the administrator from accessing the End-User Documentation Portal administration panel, use htpasswd utility of Apache server to protect the eudp/admin directory. After you have protected this directory, users will see a dialog requesting a user name and password when they try to access view.php. See the documentation of Apache server for more information about restricting access to directories.
16.4 Securing End-User Documentation Portal Administration Panel with Apache Authentication
The following steps show you how to secure the admin directory in eudp with Apache basic authentication.
When a user tries to access the admin directory (in particular, the view.php file), then the user will be prompted for a user name and password.
Performing the following steps on a local installation of the End-User Documentation Portal:
1. Create a file called.htaccess in the eudp/admin directory that contains the following directives:
AuthType BasicAuthName "End-User Documentation Portal Administration Panel"AuthUserFile "/apache_directory/htdocs/eudp/.htpassword"AuthGroupFile /dev/nullrequire user administrator
/apache_directory is the location where you have installed Apache server and administrator is the user name of the administrator of the End-User Documentation Portal.
2. Create AuthUserFile called.htpassword. You must create this file in the same directory as specified in "htaccess". Run the htpasswd utility as follows:
/apache_directory/bin/htpasswd -c \/apache_directory/htdocs/eudp/.htpassword administrator
The htpasswd command will prompt you for a password.
Note: You cannot perform the following steps remotely.

Securing End-User Documentation Portal Administration Panel with Apache Authentication
End-User Documentation Portal Installation 16-5
3. Enable the directives found in htaccess files. Locate the <Directory> tag in the Apache httpd.conf file and change the AllowOverride directive to the AuthConfig option instead of None:
<Directory "/apache_directory/htdocs">#........Other directives................AllowOverride AuthConfig</Directory>
4. Save the changes you made to the httpd.conf file.
5. Restart the Apache server.

Securing End-User Documentation Portal Administration Panel with Apache Authentication
16-6 Oracle Collaboration Suite Installation Guide
What’s New in the Installation A-1
AWhat’s New in the Installation
This appendix describes new features of Oracle Collaboration Suite installation. This appendix is most useful to users who have installed earlier releases of Oracle Collaboration Suite.
To see the list of new features of Oracle Collaboration Suite, visit the Oracle Technology Network site at:
http://www.oracle.com/technology/index.html.
The contents of this appendix are:
■ Section A.1, "No Manual Configuration"
■ Section A.2, "Option of Changing Ports During Installation"
■ Section A.3, "Improved Oracle Collaboration Suite Infrastructure and Applications Installation on a Single Computer"
■ Section A.4, "Changes in Oracle Collaboration Suite Database (Previously Known as Information Storage)"
■ Section A.5, "Changes in Applications Tier Installation"
■ Section A.6, "Support for High Availability Configurations"
■ Section A.7, "Support for Secure Installation"
■ Section A.8, "Enhancements in Configuration Assistants"
■ Section A.9, "More Prerequisite Checks"
■ Section A.10, "Support for Generating Installation Statistics"
■ Section A.11, "Changed Terminology"
■ Section A.12, "Oracle Collaboration Suite Database Uses Oracle 10g Database"
■ Section A.13, "Support for Oracle Internet Directory Replication"
A.1 No Manual ConfigurationEarlier versions of Oracle Collaboration Suite required manual configuration of Applications tier components after installation.
In Oracle Collaboration Suite, the main installation takes care of all tasks that were previously identified as postinstallation tasks for each Applications tier component.

Option of Changing Ports During Installation
A-2 Oracle Collaboration Suite Installation Guide
A.2 Option of Changing Ports During InstallationIn earlier versions, the installation process dynamically assigned a free TCP port value based on a range of ports registered to each component. There might be times when you would not want to have the installation dynamically determine the port values and would rather be able to specify the ports to be used for the installation.
In Oracle Collaboration Suite 10g, you can specify custom port numbers for components, instead of having the installer assign default port numbers. This feature is called the static ports feature. To use static ports, you must set up a file with component names and desired port numbers. The installer uses the values from the file instead of the default port numbers.
Refer to Section 2.4.3 for more information about custom port numbers and the static ports feature.
A.3 Improved Oracle Collaboration Suite Infrastructure and Applications Installation on a Single Computer
In earlier versions, single-computer installation was supported only on the Windows and Linux platforms. The installation process required you to provide information before installation of each tier.
In Oracle Collaboration Suite 10g, single-computer installation is available for all platforms. Unlike earlier releases, it enables you to enter all required information at the beginning of the installation.
A.4 Changes in Oracle Collaboration Suite Database (Previously Known as Information Storage)
Oracle Collaboration Suite Database, which was previously known as Information Storage, now combines all schemas required by Oracle Collaboration Suite in to a single database. Data is registered in Oracle Internet Directory during the installation of Oracle Collaboration Suite Database.
A.5 Changes in Applications Tier InstallationThe following functionalities have been added to the Applications tier of Oracle Collaboration Suite:
■ Support for Oracle Mail configuration
This removes the need to perform Oracle Mail-related postinstallation steps.
■ Support for Oracle Content Services configuration
This removes the need to start the configuration assistant in the interactive mode during a typical installation.
■ Support for selection of Oracle Collaboration Suite Databases to be used for components that you select
■ Support for selection of well-known ports during the installation
In addition, the installation ensures that the Identity Management pointed to during installation is release 9.0.4.1 or later. This is required for all components to register properly in Oracle Internet Directory.

Support for Generating Installation Statistics
What’s New in the Installation A-3
Also, Federated Search has been incorporated in to the installation process and combined with Oracle Ultra Search, and the search option is now called Oracle Collaboration Suite Search.
A.6 Support for High Availability ConfigurationsIn this release, Oracle Collaboration Suite supports the following high availability environments:
■ Oracle Calendar Cold Failover Cluster
■ Distributed Identity Management Architecture
■ Colocated Identity Management Architecture
■ Single Cluster Architecture
In addition, for each environment, you can distribute the Oracle Collaboration Suite Database and Identity Management components over several computers. In earlier releases, you had to install all the components on the same computer.
A.7 Support for Secure InstallationYou can specify that components connect to Oracle Internet Directory using Secure Socket Layer (SSL) only.
A.8 Enhancements in Configuration AssistantsManual configuration is not required for Oracle Collaboration Suite 10g Release 1 (10.1.1.0.2). The configuration assistants perform nearly all the postinstallation tasks. Also, now configuration assistants:
■ Write log files in a central location
■ Write descriptive error messages in the log files
A.9 More Prerequisite ChecksThe installer performs more prerequisite checks to ensure that your computer meets the minimum requirements.
A.10 Support for Generating Installation StatisticsThe installer now provides command-line options for monitoring resources used for installation. The following options are supported:
■ -printtime prints the time taken for installation.
■ -printmemory prints the memory used for installation.
■ -printdiskusage prints the disk space used for installation.
Example: the following command prints information for all three items:
runInstaller -printtime -printmemory -printdiskusage
Note: The configuration assistant for Oracle Content Services does not write to a central location. Also, you cannot run the configuration assistant for Oracle Content Services standalone.

Changed Terminology
A-4 Oracle Collaboration Suite Installation Guide
A.11 Changed TerminologyTable A–1 lists terms updated in Oracle Collaboration Suite 10g (10.1.1.0.2). The Oracle Collaboration Suite 10g documentation set uses these new terms.
A.12 Oracle Collaboration Suite Database Uses Oracle 10g DatabaseIn earlier releases, the installer created an Oracle9i Release 1 (9.0.1.3) Database and loaded the Oracle Collaboration Suite Database in that database.
In this release, the installer creates an Oracle 10g Database for Oracle Collaboration Suite Database.
To configure this database during installation, the installer displays these new screens:
■ Specify Database Configuration Options
■ Specify Database Schema Passwords
For details, refer to Section 4.4.2.
A.13 Support for Oracle Internet Directory ReplicationIn this release, you can install the master Oracle Internet Directory, as well as Oracle Internet Directory replicas, using the installer.
Table A–1 Changed Terminology
Term in Release 2 (9.0.4.2) Term in 10g (10.1.1.0.2)
Information Storage Oracle Collaboration Suite Database
Integrated Web Client Oracle Collaboration Suite Web Access
Oracle Files Oracle Content Services
Middle tier Applications tier
No corresponding name Client tier
Oracle Email Oracle Mail
Oracle Ultra Search Oracle Collaboration Suite Search
Oracle Wireless Oracle Mobile Collaboration

Installation Checklists for Oracle Collaboration Suite B-1
BInstallation Checklists for Oracle
Collaboration Suite
This appendix provides checklists for the two installations of Oracle Collaboration Suite. These checklists identify the types of information you are prompted to enter for each installation.
This appendix contains the following topics:
■ Oracle Collaboration Suite 10g Infrastructure Installation Checklist
■ Oracle Collaboration Suite 10g Applications Installation Checklist
B.1 Oracle Collaboration Suite 10g Infrastructure Installation ChecklistTable B–1 lists required information for Infrastructure installation.
Enter your values for the listed installation information in the Your Information column before beginning.
Table B–1 Oracle Collaboration Suite 10g Infrastructure Installation Information
Information Example Values Your Information
Oracle Base Directory /private/oracle/oraInventory
Oracle home Location /private/oracle/ocsinfra
OSDBA Group (Refer to Section 2.5)
svrtech
OSOPER Group (Refer to Section 2.5)
svrtech
Instance Name infra_instance
ias_admin Password oracle1
Oracle Application Server Single Sign-On Server Host Name
ocs.us.oracle.com
Oracle Application Server Single Sign-On Port Number (Refer to Appendix G)
7777
Oracle Internet Directory Host Name
ocs.us.oracle.com

Oracle Collaboration Suite 10g Applications Installation Checklist
B-2 Oracle Collaboration Suite Installation Guide
B.2 Oracle Collaboration Suite 10g Applications Installation ChecklistTable B–2 lists required information for an Applications installation.
Enter your values for the listed installation information in the Your Information column before beginning the installation.
Oracle Internet Directory Port Number (Refer to Appendix G)
3061
Oracle Internet Directory Username
cn=orcladmin
Oracle Internet Directory Password
oracleadmin
Database Character Set UTF8
Table B–2 Oracle Collaboration Suite Applications Installation Information
Information Example Values Your Information
Oracle home Location /private/oracle/ocsapp
OSDBA Group (Refer to Section 2.5)
svrtech
OSOPER Group (Refer to Section 2.5)
svrtech
Multilingual Support (Refer to Section 3.4)
runInstaller
Instance Name app_instance
ias_admin Password oracle1
Oracle Application Server Single Sign-On Server Host Name
ocs.us.oracle.com
Oracle Application Server Single Sign-On Port Number (Refer to Appendix G)
7777
Oracle Internet Directory Host Name
ocs.us.oracle.com
Oracle Internet Directory Port Number (Refer to Appendix G)
3061
Oracle Internet Directory Username
cn=orcladmin
Oracle Internet Directory Password
oracleadmin
Table B–1 (Cont.) Oracle Collaboration Suite 10g Infrastructure Installation Information
Information Example Values Your Information

Oracle Collaboration Suite 10g Applications Installation Checklist
Installation Checklists for Oracle Collaboration Suite B-3
Applications Tier Components that Were Configured During the installation
Table B–2 (Cont.) Oracle Collaboration Suite Applications Installation Information
Information Example Values Your Information

Oracle Collaboration Suite 10g Applications Installation Checklist
B-4 Oracle Collaboration Suite Installation Guide

Installing Oracle Calendar Standalone C-1
CInstalling Oracle Calendar Standalone
This appendix describes requirements and procedures for installing the components of Oracle Calendar standalone, including:
■ Oracle Calendar server
This component is required to run other components of Oracle Calendar. It is complemented by Oracle Calendar Administrator.
■ Oracle Calendar SDK
This component is a tool for developing applications for Oracle Calendar.
■ Oracle Calendar application system
Oracle Calendar includes several components that are managed in an application server framework called the Oracle Calendar application system. It controls the following components:
– Oracle Calendar Web client
– Oracle Calendar Web services
– Oracle Mobile Data Sync
You can install the Oracle Calendar server and the Oracle Calendar application system components on the same host or on multiple, separate hosts across a network.
This appendix contains the following sections:
■ Section C.1, "System Requirements"
■ Section C.2, "Preinstallation"
■ Section C.3, "Installation"
■ Section C.4, "Upgrades"
■ Section C.5, "Postinstallation Configuration"
■ Section C.6, "Oracle Calendar Deinstallation"
■ Section C.7, "General Issues and Workarounds"
C.1 System RequirementsYou can install Oracle Calendar server and the Oracle Calendar application system components together or separately. The following sections list requirements common to both components and separate to each.
This section contains the following topics:

System Requirements
C-2 Oracle Collaboration Suite Installation Guide
■ Section C.1.1, "Common Requirements"
■ Section C.1.2, "Oracle Calendar Server Requirements"
■ Section C.1.3, "Oracle Calendar Application System Requirements"
C.1.1 Common RequirementsThe common requirements for installing the Oracle Calendar server and the Oracle Calendar application system components together or separately are as follows:
■ Operating system: As described in Chapter 2 in the requirements for Oracle Collaboration Suite
■ Colors: A minimum of 256 display colors
■ Disk space: Up to 500 MB free disk space
■ Patches: The same patches apply as are listed in the requirements for Oracle Collaboration Suite. Refer to Section 2.2 for packages and patches requirements.
C.1.2 Oracle Calendar Server RequirementsThe requirements for installing the Oracle Calendar server Release 1 (10.1.1.0.2) are as follows:
■ Privileges
During the installation, you might need to run some scripts with root privileges. For more information, refer to Oracle Universal Installer Help.
■ RAM
A minimum of 512 MB of RAM or more is needed for computers handling a large number of users or services.
To calculate your exact requirements, refer to the Oracle Calendar Administrator's Guide.
■ Disk Space
At least 500 MB of disk space that includes disk space for the Oracle Calendar database and log files.
■ Messaging Server
A Simple Mail Transfer Protocol (SMTP) server for mail notifications.
■ Web Browser
You need one of the following Web browsers to be able to use Oracle Calendar Administrator:
– Netscape 7.0 or later
– Mozilla 1.2 or later
■ Kernel Parameters
Refer to the Oracle Calendar Administrator's Guide for details on the kernel parameters needed to run Oracle Calendar server.

Preinstallation
Installing Oracle Calendar Standalone C-3
C.1.3 Oracle Calendar Application System RequirementsThe requirements for installing Oracle Calendar application system are as follows:
■ Web Server
Oracle HTTP Server or Apache Web Server. Standalone installations of Oracle Calendar support the following versions of Apache with mod_fastcgi.
– Apache 1.3.26 and later with mod_fastcgi 2.2.12
– Apache 2.0.53 and later with mod_fastcgi 2.4.2
■ RAM
At least 512 MB RAM or more is recommended for computers handling a large number of users.
■ Disk Space
At least 100 MB of disk space for installation plus 200 MB for operation, including the disk space for linkdb and sessiondb. More disk space may be required for heavy deployments.
■ Oracle Calendar Web Client Browsers
The following browsers can be used to use the Oracle Calendar Web client component of the Oracle Calendar application system:
Solaris
– Mozilla 1.7
– Firefox 1.0
C.2 PreinstallationThis section contains important information you must know before installing the Oracle Calendar server and the Oracle Calendar application system components.
This section contains the following topics:
■ Section C.2.1, "Setting Up Your Directory Server"
■ Section C.2.2, "Planning Separate Installations of the Oracle Calendar Application System and the Oracle Calendar Server"
Caution: Ensure that you set the shmsys:shminfo_shmmin parameter to 1. This is different from other parameters, whose values are generally a maximum or sum of the existing value and the Calendar requirement. If you do not set shmsys:shminfo_shmmin to 1, you will not be able to start the Oracle Calendar server after installation.
Note: To use the Oracle Calendar Web client in standard mode, you must enable Javascript. Javascript is not necessary when using the Oracle Calendar Web client in accessible mode

Preinstallation
C-4 Oracle Collaboration Suite Installation Guide
C.2.1 Setting Up Your Directory ServerWhen installed in standalone mode, Oracle Calendar server can be used with a third-party external directory server. Support for the Lightweight Directory Access Protocol (LDAP) is offered through separate connectors:
■ LDAP Connector 10.1.1.0.2 for Sun ONE Directory Server
■ LDAP Connector 10.1.1.0.2 for OpenLDAP
■ LDAP Connector 10.1.1.0.2 for Syntegra Aphelion Directory Server
Before installing Oracle Calendar server, you must use your LDAP connector to extend the directory schema.
Directory servers contain schemas that define the information they store. These schemas consist, among other things, of objects and attributes. The directory server schema needs to be extended to include objects and attributes needed by the Oracle Calendar server. For a list of the extensions to the Oracle Calendar server schema, refer to the Oracle Calendar Reference Manual.
This section contains the following topics:
■ Terminology for Directory Servers
■ Setting Up a Sun ONE Directory Server
■ Setting Up an OpenLDAP Directory Server
■ Setting Up a Syntegra Aphelion Directory Server
C.2.1.1 Terminology for Directory ServersTable C–1 determines the correlation between the directory server parameters required during installation and the terminology used for each product.
Note: If you have a previous version of Oracle Calendar server installed, refer to Section C.4, for information on working with other versions.
Table C–1 Oracle Calendar and Directory Server Concordance
Definition of Concept Oracle CalendarSun ONE Directory Server
Syntegra Aphelion Directory Server
OpenLDAP Directory Server
Computer on which directory server is installed
LDAP host Directory Server host Not applicable LDAP host
Port number for directory server connections
LDAP port Directory Server port number
LDAP daemon port LDAP port
The point in the directory hierarchy from which searches are performed
BaseDN BaseDN or Directory suffix or search root
DN located beneath context prefix
BaseDN
Superuser for the directory (user with unrestricted access)
SuperUserDN RootDN or Unrestricted user
ManagerDN RootDN or Unrestricted user

Preinstallation
Installing Oracle Calendar Standalone C-5
C.2.1.2 Setting Up a Sun ONE Directory ServerTo set up a Sun ONE or iPlanet 5.x Directory Server, perform the following steps:
1. Extract the files from the tar file ldapc_10.1.1.0.2_SunOne_unix.tar included in /calendar_standalone/Disk1/ldapc10.1.1.0.2_SunOne_unix_en_rtm1.tar.
2. Locate the SunOne/calendar-schema.ldif file.
3. Use this file with the ldapmodify utility to modify the directory entries as follows:
% ldapmodify -h host -p port -D Directory_Manager_DN -w Directory_Manager_Password -f "calendar-schema.ldif"
4. Verify that no error is reported.
C.2.1.3 Setting Up an OpenLDAP Directory ServerTo set up an OpenLDAP Directory Server version 2.x or later, perform the following steps:
1. Extract the files from the ldapc_10.1.1.0.2_openldap_unix.tar tar file, which is included in the Oracle Calendar package.
2. Find the file openldap/calendar.schema.
3. Locate the OpenLDAP configuration directory.
It is usually set to /usr/local/etc/openldap. This directory will be used in the next steps.
4. Copy the file calendar.schema to /usr/local/etc/openldap/schema, assuming that the configuration directory is in /usr/local/etc/openldap.
5. Open the /usr/local/etc/openldap/slapd.conf file for editing.
6. Locate the line that contains:
include /usr/local/etc/openldap/schema/cosine.schema
7. Add the following line if it has not been added already:
include /usr/local/etc/openldap/schema/inetorgperson.schema
8. Add the following line:
include /usr/local/etc/openldap/schema/calendar.schema
9. Add the following line in the database section:
Password for unrestricted access
SuperUserDN password
RootDN or unrestricted user password
ManagerDN Password
RootDN or unrestricted user password
The "parent" entry, offset from the baseDN, for the 6 reserved Oracle Calendar users
Oracle Calendar Administrators ParentDN
Not applicable Not applicable Not applicable
A new group, offset from the baseDN, for the 6 reserved Oracle Calendar users
Oracle Calendar Administrators GroupDN
Not applicable Not applicable Not applicable
Table C–1 (Cont.) Oracle Calendar and Directory Server Concordance
Definition of Concept Oracle CalendarSun ONE Directory Server
Syntegra Aphelion Directory Server
OpenLDAP Directory Server

Preinstallation
C-6 Oracle Collaboration Suite Installation Guide
index ctcalxitemid pres,eq
10. Restart slapd server.
C.2.1.4 Setting Up a Syntegra Aphelion Directory ServerTo set up the Syntegra Aphelion Directory Server, perform the following steps:
1. Extract the files from the tar file ldapc_10.1.1.0.0_syntegra_unix.tar, included in the Oracle Calendar package to a temporary directory. The temporary directory must contain the following files:
syntegra/oidtable.gen_cstsyntegra/oidtable.oc_cstsyntegra/oidtable.at_cst
2. To prepare the Syntegra Aphelion Directory Server, you must install the files mentioned in Step1 to configure ctCal directory objects. Append the content of these files (containing the object identifier numbers for Oracle Calendar schemas, the object classes, and the attributes) to the corresponding Syntegra Aphelion (object identifier) table files:
/usr/var/osi/oidtable.gen/usr/var/osi/oidtable.oc/usr/var/osi/oidtable.at
3. Restart the directory server to allow the configuration changes to take effect.
C.2.2 Planning Separate Installations of the Oracle Calendar Application System and the Oracle Calendar Server
You can install and configure the Oracle Calendar application system and the Oracle Calendar server on the same host. Both components are configured to see the host and port of each other. However, for large deployments, it is best to install the Oracle Calendar server and the Oracle Calendar application system on separate hosts. You can do this by running the Oracle Universal Installer on each host and selecting the components you want to install.
You should start by installing the Oracle Calendar server. Enter a temporary value when prompted for the host name and port of the Oracle Calendar application system. When you install the Oracle Calendar application system, you must enter information on the server you have just installed. Then, edit the configuration file of the server to enable resource approval, as described in Section C.5.3.4.
For more information on editing Oracle Calendar configuration files, refer to the Oracle Calendar Reference Manual.
Note: For security reasons, it is recommended that the Oracle Mobile Data Sync component only be accessible through SSL (https) connections. You may also want to install Oracle Mobile Data Sync on a separate host for easier accessibility from mobile devices. Keep in mind that some phones support VPN access through a firewall, while others do not.
It is also recommended that you use Calendar Web services through SSL connections.

Installation
Installing Oracle Calendar Standalone C-7
C.3 InstallationThis section explains how to install Oracle Calendar standalone components on UNIX-based systems. This section contains the following topics:
■ Section C.3.1, "Installing Oracle Calendar Server and the Oracle Calendar Application System"
■ Section C.3.2, "Installing Oracle Calendar Server Only"
■ Section C.3.3, "Installing Oracle Calendar Application System Only"
■ Section C.3.4, "Manually Running the Oracle Calendar Server Configuration Assistant"
■ Section C.3.5, "Manually Starting and Stopping the Oracle Calendar Application System"
C.3.1 Installing Oracle Calendar Server and the Oracle Calendar Application SystemPerform the following tasks to install Oracle Calendar server and the Oracle Calendar application system:
1. Extract or copy the Oracle Calendar installation files to a temporary directory.
2. In your temporary directory, navigate to the./calendar_standalone/Disk1 subdirectory
3. Start Oracle Universal Installer using the following command:
./calendar_standalone/Disk1/runInstaller
4. Click Next on the Welcome screen and follow the installation instructions.
On the Specify File Locations screen, ensure that the default path selected reflects the path to products.xml.
Also in the Specify File Locations screen, enter an ORACLE_HOME name and path, then click Next. The path you enter can be up to 74122 characters long.
If you have a previous version of Oracle Calendar installed and you want to upgrade it, do not overwrite it.
5. Select the components you want to install and click Next. The components are:
■ Oracle Calendar Administrator
■ Oracle Calendar server
■ Oracle Calendar SDK
■ Oracle Calendar application system
■ Oracle Mobile Data Sync
■ Oracle Calendar Web services
■ Oracle Calendar Web client
Oracle Calendar will be installed in the following locations:
Note: Oracle Calendar Web client, Oracle Mobile Data Sync, and Oracle Calendar Web services cannot be installed unless you select Oracle Calendar application system.

Installation
C-8 Oracle Collaboration Suite Installation Guide
6. If the kernel parameters on your computer are not sufficient to run the Oracle Calendar installation, then an information dialog box appears listing the parameters you might have to change. Make the required changes and then restart the computer. Next, restart the installation.
For details on calculating required kernel parameters, refer to Appendix B, "Adjusting Calendar Kernel Parameters," in the Oracle Calendar Administrator's Guide.
7. Select the language for running Oracle Calendar and click Next.
8. Select the directory server you want to use and click Next.
Enter directory server configuration information such as Host, Port, and Base DN, as described in Section C.2.1.
9. After entering your directory server information, enter a password in the fields of the Oracle Calendar Administrative Password screen.
10. In the Oracle Calendar Node-ID screen, enter a Node ID. This must be a unique value between 1 and 49999.
11. If this is your first installation of Oracle Calendar server, then select Yes in the Oracle Calendar Master Node screen to make the current installation the master node.
12. Click Next and follow the remaining instructions to complete the installation.
13. To upgrade data from a previous version of Oracle Calendar, go to Section C.4. Otherwise, go to Section C.5.
Handling Oracle Calendar Application System Configuration Assistant FailureIf the $ORACLE_HOME path is greater than 50 bytes, the Oracle Calendar application system configuration assistant fails to restart Oracle HTTP Server. Perform the following tasks to resolve this issue:
1. Do not close the Oracle Universal Installer window.
2. Log on to the Applications tier using the same user ID that you used to start the installation.
3. Edit the $ORACLE_HOME/Apache/Apache/conf/httpd.conf file. Locate the occurrence of <IfModule mod_fastcgi.c> and add the following line after it:
Component Location
Oracle Calendar $ORACLE_HOME/ocal/
Oracle Calendar Administrator
$ORACLE_HOME/ocad/
Oracle Calendar application system
$ORACLE_HOME/ocas/
Note: Select Internal if you do not have a directory server.
Note: You must have one master node on your network for Web Services and Oracle Mobile Data Sync to work.

Installation
Installing Oracle Calendar Standalone C-9
FastCgiIpcDir /tmp
As a result, the file should have the following lines:
<If Module mod_fastcgi.c>FastCgiIpcDir /tmp
4. Return to Oracle Universal Installer and run the Oracle Calendar application system configuration assistant again.
C.3.2 Installing Oracle Calendar Server OnlyThe procedure for installing only the Oracle Calendar server is similar to the procedure described in Section C.3.1, with one difference. In Step 5 you must select only the following components:
■ Oracle Calendar Administrator
■ Oracle Calendar Server
■ Oracle Calendar SDK
C.3.3 Installing Oracle Calendar Application System OnlyThe procedure for installing only Oracle Calendar application system and its components is similar to that described in Section C.3.1 on page C-7, with the following differences.
■ In Step 5, you must select only the following components:
– Oracle Calendar application system
– Oracle Mobile Data Sync
– Oracle Calendar Web services
– Oracle Calendar Web client
■ After Step 5, you will be prompted to enter the Host, Port, and Node-ID for Oracle Calendar only. If you do not know these values, you can enter temporary values and later edit the ocas.conf file in Oracle Calendar application system with the correct values. For example:
[CONNECTION]mnode=Host:Engine_Port,node
C.3.4 Manually Running the Oracle Calendar Server Configuration AssistantThe Oracle Collaboration Suite installation program runs an Oracle Calendar server configuration assistant, a tool that configures Oracle Calendar standalone to work with your system. If you encounter an error during installation because of a problem with your setup (for example, if a host URL you specified could not be read) you should manually run this configuration assistant once you have fixed the problem.
To manually run the configuration assistant:
Note: If you are unable to run the Oracle Calendar application system configuration assistant again, perform Steps 2 and 3, then restart Oracle HTTP Server using the following command:
opmnctl restartproc ias-component=HTTP_Server

Installation
C-10 Oracle Collaboration Suite Installation Guide
1. Set ORACLE_HOME to the directory where Oracle Calendar is installed.
2. Set library path as:
$ORACLE_HOME/lib:$ORACLE_HOME/ocal/sbin
Set library path as:
$ORACLE_HOME/lib32:$ORACLE_HOME/ocal/sbin
3. If required, set the value of the LD_LIBRARY_PATH parameter to the following:
$ORACLE_HOME/lib32:$ORACLE_HOME/lib:$ORACLE_HOME/ocal/lib
4. Open the following log file:
$ORACLE_HOME/cfgtoollogs/configtoolsDATE_TIME.log
5. Locate the configuration assistant header. It might look similar to the following:
---------------Launched configuration assistant 'Calendar Server Configuration Assistant'---------------
6. Under the header, copy the command that was created during installation. The command beginning will be similar to the following:
/home/myuser/oracle_home/jre...
The command ending will be similar to the following:
... -epw -DSDS OID -portDAS 5736 -DSmgrdn cn=orcladmin -emgrp -mnme -ePIM -eimt -eclient -tzkey MEZ-1MESZ -silent
7. Run the command you copied. Replace the following parameters:
C.3.5 Manually Starting and Stopping the Oracle Calendar Application SystemThe Oracle Calendar application system often requires a restart after a configuration file has been modified. Follow these steps to check the status of, start and stop the Oracle Calendar application system when deployed with Oracle Collaboration Suite:
1. To check the status of the Oracle Calendar application system, use the ocasctl command-line utility and:
$ORACLE_HOME/ocas/bin/ocasctl -status
2. To start the Oracle Calendar application system, use the ocasctl command-line utility, with the options specified as follows:
$ORACLE_HOME/ocas/bin/ocasctl -start -t ochecklet -p 8020 -n 1$ORACLE_HOME/ocas/bin/ocasctl -start -t ocas -p 8010 -n 5
Parameter Replace with, When Running Manually
-encnodepw -nodepw <ias_admin_password>
-encDSmgrp -DSmgrp <DSMgrdn_user_password>
(The DSMgrdn user is specified in the command line. For example, -DSmgrdn cn=orcladmin.)

Postinstallation Configuration
Installing Oracle Calendar Standalone C-11
3. To stop the Oracle Calendar application system, use the ocasctl command-line utility:
$ORACLE_HOME/ocas/bin/ocasctl -stopall
C.4 UpgradesRefer to Oracle Collaboration Suite Upgrade Guide for more details on upgrading your data for Oracle Calendar server and Oracle Calendar application system.
C.5 Postinstallation ConfigurationThis section describes procedures necessary to configure a standalone installation of Oracle Calendar.
This section contains the following topics:
■ Section C.5.1, "Configuring the Oracle Calendar Application System and Oracle Calendar Administrator"
■ Section C.5.2, "Configuring the Directory Server"
■ Section C.5.3, "Configuring the Oracle Calendar Server"
■ Section C.5.4, "Checking and Configuring the Oracle Calendar Application System"
■ Section C.5.5, "Configuring Oracle Calendar E-mail Delivery"
■ Section C.5.6, "Configuring Oracle Calendar Web Client with a Traditional Node Network"
C.5.1 Configuring the Oracle Calendar Application System and Oracle Calendar Administrator
If you are using an Apache Web server or Oracle HTTP Server, add the following line to the httpd.conf file of the Web server to recognize the Oracle Calendar Administrator:
include $ORACLE_HOME/ocad/config/ocad.conf
In addition, make the following changes to your httpd.conf file so that you can use the Oracle Calendar application system:
■ Include $ORACLE_HOME/ocas/conf/ocal.conf
■ Set the system library search path to include $ORACLE_HOME/lib on Solaris and Linux, or $ORACLE_HOME/lib32 on HP
■ Set the ORACLE_HOME environment variable to the directory where Oracle Calendar is installed
Note: Ports 8010 and 8020 are default port numbers for OCAS and ochecklet. The valid range is 8010 through 8020.
Note: Ensure that you have read access to ocad.conf

Postinstallation Configuration
C-12 Oracle Collaboration Suite Installation Guide
Restart the Web server after you make the changes.
C.5.2 Configuring the Directory ServerIf, during installation, you selected a directory server to use with Oracle Calendar, the Oracle Calendar Administrator must be granted certain access rights.
This section contains the following topics:
■ Configuring a Sun ONE Directory Server
■ Configuring an OpenLDAP
■ Syntegra Aphelion Directory Server
C.5.2.1 Configuring a Sun ONE Directory ServerTo grant access rights to the Oracle Calendar Administrator on a Sun ONE Directory Server, run the unidsacisetup utility with the -w option. For more details on this utility, refer to Appendix E, "Calendar Server Utilities," in the Oracle Calendar Reference Manual.
C.5.2.2 Configuring an OpenLDAPTo grant access rights to the Oracle Calendar Administrator on an OpenLDAP Directory Server use the base DN (example: "dc=visioncorp,dc=com") and the Oracle Calendar Administrator parent DN (example: "ou=OracleCalendarAdministrator"). For example:
1. Edit the /usr/local/etc/openldap/slapd.conf file.
2. In the database section, add this information with the correct base DN and Oracle Calendar Administrator parent DN:
access to dn="(.*,)?dc=acme,dc=com"by dn="(.*,)?ou=OracleCalendarAdministrator,dc=acme,dc=com" write
C.5.2.3 Syntegra Aphelion Directory ServerTo grant access rights to the Oracle Calendar Administrator on the Syntegra Aphelion Directory Server, perform the following steps:
1. Use the Syntegra Aphelion Web application and sign in as a Directory Manager.
2. Click the LDE where Oracle Calendar is installed.
3. Click Manage.
4. Expand the Access Control folder.
5. Click Advance Access Control.
6. In the right pane, click Add New Access Control Policy.
7. In the Modify Access Control Policy text area, type the following:
to dn=.*BASEDN by dn=.*,ADMINDN,BASEDN write
Note: If you customized your original installation in a similar manner, then you may have to resolve conflicting settings.

Postinstallation Configuration
Installing Oracle Calendar Standalone C-13
In the preceding example, BASEDN is the value of the [LDAP]basedn parameter and ADMINDN is the value of the [LDAP]admin parameter in the $ORACLE_HOME/ocal/misc/unison.ini configuration file.
For more details on these parameters, refer to Appendix C, "Calendar Server Parameters," in the Oracle Calendar Reference Manual.
8. Click Apply for the change to take effect.
C.5.3 Configuring the Oracle Calendar ServerThis section describes configuration changes you might need to make to Oracle Calendar after installing or upgrading.
This section contains the following topics:
■ Starting and Stopping the Oracle Calendar Server
■ Checking Port Values
■ Opening and Configuring Oracle Calendar Administrator
■ Setting Up Resource Approval
■ Working with LD_LIBRARY_PATH
■ Working with Security Mechanisms
C.5.3.1 Starting and Stopping the Oracle Calendar ServerStart the Oracle Calendar server with the following command:
$ORACLE_HOME/ocal/bin/unistart
Stop the Oracle Calendar server with the following command:
$ORACLE_HOME/ocal/bin/unistop -y
C.5.3.2 Checking Port ValuesThe default ports used by Oracle Calendar are:
If these ports are already in use, the installation will use the next available port. Please verify unison.ini for the values used by Oracle Calendar.
C.5.3.3 Opening and Configuring Oracle Calendar AdministratorUse Oracle Calendar Administrator to manage users, events, resources, and public agendas, as well as to perform administrative tasks. By default, it opens in the following URL:
http://Oracle_Calendar_Administrator_host:http_port/ocad-bin/ocad.cgi?object=nodeadm
Port Number Function
5730 Oracle Calendar Engine
5731 Synchronous Network Connector
5732 Directory Access Server
5734 Oracle Calendar Server Manager

Postinstallation Configuration
C-14 Oracle Collaboration Suite Installation Guide
To log on to Oracle Calendar Administrator, enter the Oracle Calendar administrative password you chose during installation. Do not enter a user name with this password.
In some cases, you may want to run Oracle Calendar Administrator on a non-Apache Web server. If so, you should make the following changes to your Web server:
■ Set the system library search path to include $ORACLE_HOME/lib32, $ORACLE_HOME/lib, $ORACLE_HOME/ocal/lib (lib32 for other platforms, such as hp-ux PA-RISC (64-bit)), and $ORACLE_HOME/ocad/bin.
■ Set the ORACLE_HOME environment variable to the directory where Oracle Calendar is installed.
■ Configure a script alias, such as ocad-bin, to $ORACLE_HOME/ocad/bin/ocad.cgi. This alias must have the permissions to run ocad.cgi.
■ Configure the ocad-templates script alias to $ORACLE_HOME/ocad/templates. This alias must be named ocad-templates, and must have the permissions to read.html, .js, and .css files.
The Web server identity must have access to server directories as follows:
The $ORACLE_HOME/ocad/bin/ocad.cgi program must have the permissions needed to read or write files in $ORACLE_HOME/ocad/sessions. This can be configured in the $ORACLE_HOME/ocad/bin/ocad.ini file.
You can find required settings for your server in the $ORACLE_HOME/ocad/config/ocad.conf file.
C.5.3.4 Setting Up Resource ApprovalIf you intend to use the resource approval feature (on any Web server), you must set it up as follows:
1. Create or modify a resource with NOTIFY-APPROVER set to TRUE and APPROVER-EMAIL set to e-mail of the approver. For example, in ocal/bin:
uniuser -resource -add R=Resource_Approval/NOTIFY-APPROVER=TRUE/[email protected]/psw=password -n 4313 -p test1
2. Assign Resource designate rights in ocal/bin as follows:
uniaccessrights -mod -designate ALL=TRUE -grantee S=Designate/NODE-ID=4313
-grantor R=Resource_Approval -n 4313 -p test1
3. Also ensure that the RESOURCE_APPROVAL section exists in unison.ini, which is located in ocal/misc, with the URL parameter. For example:
[RESOURCE_APPROVAL]url=http://server:port/ocas-bin/ocas.fcgi?sub=web
4. If you changed the resource approval URL, restart Oracle Calendar.
Folder Permissions
$ORACLE_HOME/ocad/bin/ Read, Write, Execute
$ORACLE_HOME/ocad/sessions/ Read, Write
$ORACLE_HOME/ocad/temp/ Read

Postinstallation Configuration
Installing Oracle Calendar Standalone C-15
C.5.3.5 Working with LD_LIBRARY_PATHAny values added to the LD_LIBRARY_PATH environment variables, for example to configure security mechanisms, are deleted by Oracle Calendar. Instead, add the values to the OCAL_ADDITIONAL_LIBPATH variable.
C.5.3.6 Working with Security MechanismsSome security mechanisms require that you set the OCAL_ADDITIONAL_LIBPATH environment variable to include the paths to their libraries.
If you are using GSSAPI or Kerberos 5, you must include the path to the five shared libraries required by libaut_gssapi.so. For more information about Kerberos 5 Authentication with Oracle Calendar refer to Oracle Collaboration Suite Security Guide
Each path must be separated by a semicolon (;). For example:
For C shell:
setenv OCAL_ADDITIONAL_LIBPATH/usr/local/kerberos/krb5/lib;/usr/local/sasl/sasl-1.5.27/lib
For Bourne shells:
OCAL_ADDITIONAL_LIBPATH=/usr/local/kerberos/krb5/lib;/usr/local/sasl/sasl-1.5.27/libexport OCAL_ADDITIONAL_LIBPATH
C.5.4 Checking and Configuring the Oracle Calendar Application SystemTo start the Oracle Calendar application system, use the following commands:
$ORACLE_HOME/ocas/bin/ocasctl -start$ORACLE_HOME/ocas/bin/ocasctl -start -t ochecklet
This section explains how to check the status of the Oracle Calendar application system and make configuration changes to it, if necessary.
This section contains the following topics:
■ Checking the Status of the Oracle Calendar Application System
■ Configuring the Oracle Calendar Application System
C.5.4.1 Checking the Status of the Oracle Calendar Application SystemTo see if the Oracle Calendar application system and its components are running, open the system page at http://server:port/ocas-bin/ocas.fcgi?sub=sys. If a component is not running, it will not appear in the system page.
To connect to a component with an appropriate client, use the following URLs:
C.5.4.2 Configuring the Oracle Calendar Application SystemThe Oracle Calendar application system and its components are controlled with the following configuration files under $ORACLE_HOME/ocas/conf:
Component URL
Oracle Mobile Data Sync http://host:port/ocst-bin/ocas.fcgi
Web services http://host:port/ocws-bin/ocas.fcgi
Oracle Calendar Web client http://host:port/ocas-bin/ocas.fcgi?sub=web

Postinstallation Configuration
C-16 Oracle Collaboration Suite Installation Guide
ocas.conf: Oracle Calendar application system
ocws.conf: Web services
ocst.conf: Oracle Mobile Data Sync
ocwc.conf: Oracle Calendar Web client
ocal.conf: Web server FastCGI directives, included from httpd.conf
Consider the following configuration options, depending on your environment:
■ Run several instances of ocas.fcgi. The number of instances depends on setup and load. You can configure this in ocal.conf.
■ You must run one instance of ochecklet.fcgi for each installation or host. This is also configured in ocal.conf.
■ To redirect the Web client from a custom URL, add the following statement to ocal.conf:
<Location /calendar> Redirect permanent /calendar \ http://<host>:<port>/ocas-bin/ocas.fcgi?sub=web</Location>
■ Ensure that the linkdb and sessiondb variables in all hosts files for Oracle Calendar application system refer to the same path. For example, they should refer to the same NFS mount.
■ Set authentication, compression, and encryption (ACE) values in the conf file of each component. The AUTH Web settings for all products should be configured in the [ACE_PLUGINS_CLIENT] section of ocas.conf.
■ If you experience any problems, check for error messages in:
$ORACLE_HOME/ocas/logs/ocas_log
Ensure that you restart the Oracle Calendar application system after any changes to the conf files.
C.5.5 Configuring Oracle Calendar E-mail DeliveryIf e-mail sent by Oracle Calendar appears to come from the server rather than the desired domain name, then make the following change to sendmail.cf in the /etc/mail directory.
# who I masquerade as (null for no masquerading) (see also $=M)DMdomainname
In this example, domainname is the mail domain name from which the e-mail will be sent.
C.5.6 Configuring Oracle Calendar Web Client with a Traditional Node NetworkIf Oracle Calendar server is not configured in a master-node environment, the following changes must to be made to ensure a successful connection from the Oracle Calendar Web client to Oracle Calendar:
1. Use a text editor to open the $ORACLE_HOME/ocas/conf/ocas.conf configuration file.
2. Modify the value of the [system] connection parameter to TRADITIONAL, as in the following example:

Postinstallation Configuration
Installing Oracle Calendar Standalone C-17
[system]connection = TRADITIONAL
3. Put the [connection] mnode parameter in a comment, as in the following example:
[connection]#mnode = hostname.domain.com:5730,1
4. In the [connection] section, add the following parameter for each node in your node network:
<server#> = <host>:<port>,<node>,<alias>
In the preceding syntax, <alias> is optional.
5. If more than one server node specification appears in the [connection] section, then you must set the [modules] serverlist_login parameter in the $ORACLE_HOME/ocas/conf/ocwc.conf file to TRUE, as in the following example.
[modules]serverlist_login = TRUE
A Sample ScenarioThis section provides an example of how to configure Oracle Calendar Web client for use with a traditional node network.
An Oracle Calendar server has been installed on the myhost.com host with the [ENG] port defined as 5730 in the $ORACLE_HOME/ocal/misc/unison.ini file. The Oracle Calendar server consists of the three following nodes in a node network:
■ 100. The node alias of this node is Law.
■ 300. The node alias of this node is Medicine.
■ 500. The node alias of this node is Music.
These nodes are configured in a traditional environment without a masternode. The Oracle Calendar application system has been installed, and the Oracle Calendar server administrator wants to offer the Calendar service through the Oracle Calendar Web client to all three nodes.
To do so, the Oracle Calendar server administrator must configure the $ORACLE_HOME/ocas/conf/ocas.conf as follows:
[system]connection = TRADITIONAL
[connection]#mnode = hostname.domain.com:5730,1server1 = myhost.domain.com:5730,100,Lawserver2 = myhost.domain.com:5730,300,Medicineserver3 = myhost.domain.com:5730,500,Music
The Oracle Calendar server administrator must also change the $ORACLE_HOME/ocas/conf/ocwc.conf file as follows:
[modules]serverlist_login = TRUE

Oracle Calendar Deinstallation
C-18 Oracle Collaboration Suite Installation Guide
C.6 Oracle Calendar DeinstallationThe following steps describe how to deinstall the Oracle Calendar server and Oracle Calendar application system from a host.
1. Stop Oracle Calendar server using the unistop -y command.
2. Stop the Oracle Calendar application system using the ocasctl -stopall command.
3. In the directory server, use LDIF update commands to remove the Oracle Calendar attributes from your Oracle Calendar users.
4. In the directory server, remove all ctCal objects for the Oracle Calendar nodes that were on this server. Use the ldapsearch and ldapdelete commands and refer to the directory server documentation for proper syntax.
5. In the directory server, remove all relevant Oracle Calendar administrative groups and Access Control Lists (ACLs) from the database. Clean up your LDIF file with a manual edit LDIF or use LDIF update statements.
6. Remove Oracle Calendar components using Oracle Universal Installer. Start Oracle Universal Installer with the command:
./runInstaller
7. Delete the calendar_server_path.
8. Delete the client_path.
C.7 General Issues and WorkaroundsThis section describes general issues and their workarounds for Oracle Calendar and the Oracle Calendar application system. Issues are discussed in the following sections:
■ Section C.7.1, "Oracle Calendar Server Issues"
■ Section C.7.2, "Oracle Calendar Application System Issues"
C.7.1 Oracle Calendar Server IssuesThis section includes the following topics:
■ Installation
■ Reinstallation
■ Coexistence and Upgrades
■ Designates
■ Other Issues
C.7.1.1 InstallationBlank [LCK] and [LIC] sections will be added to the unison.ini file of a fresh installation of a standalone Oracle Calendar and upgraded standalone server, standalone Oracle Calendar or upgraded standalone server, or both. Do not remove these sections.
Note: Oracle Calendar Web services and Oracle Mobile Data Sync will work only with a master node.

General Issues and Workarounds
Installing Oracle Calendar Standalone C-19
C.7.1.2 ReinstallationWhen reinstalling components of Oracle Calendar, ensure that you install the Oracle Calendar component in a fresh directory. Other components can be installed or added to their existing paths.
C.7.1.3 Coexistence and UpgradesAlthough earlier 9.0.4.x versions of clients may be used with the Oracle Calendar server (10.1.1.0.2), some newer features might not be available and may behave differently in a coexistence environment, where different versions of the clients are used for deployment.
Refer to Chapter 1 of Oracle Calendar Administrator's Guide for more information.
You must consider the following issues related to the coexistence and upgrade scenarios:
■ Clients
Versions of the Oracle clients that work with the Oracle Calendar server 10.1.1.0.2 include:
– Oracle Calendar Desktop client for Windows 6.0.5
– Oracle Calendar Desktop client for Mac version 5.2.3
– Oracle Calendar Desktop client version 5.0.2 for Linux x86 or Solaris Operating Environment (SPARC 32-bit)
– Oracle Connector for Outlook version 3.3 and later
The preceding clients only support passwords of 15 characters or less. If you assign a password longer than 15 characters, the users will not be able to sign in.
If you only wish to support new clients, set the value of the cs-standard_coexistence parameter in the unison.ini file to false.
■ Servers
Consider the following issues related to the servers:
– Coexistence may cause odd error messages on an old Oracle CorporateTime Server (5.x) installation. This is because the old server may not understand the features of the new server.
– There is no event coexistence between different Oracle Calendar versions. Release 1 (9.0.3) users will only see Release 1 (9.0.3) event calendars and 10g Release 1 (10.1.1.0.2) users will only see 10g Release 1 (10.1.1.0.2) event calendars.
■ Node Networks
Consider the following issues related to the node networks:
– Node networks can only be created with version Oracle CorporateTime Server 5.3 and up of Oracle Calendar.
Note: Users of older clients should upgrade to the latest versions, available at
http://metalink.oracle.com
General Issues and Workarounds
C-20 Oracle Collaboration Suite Installation Guide
– If you must create a node network, use the nodes.ini file and the uninode commands on the most recent version (10.1.1.0.2) of the server within the network.
■ Administration Utilities
Consider the following issues related to the administration utilities:
– Do not use version 10.1.1.0.2 utilities to administer an Oracle CorporateTime Server 5.x instance. The only exception to this is when moving users; the moveuser utility must be from the latest server version (10.1.1.0.2), even if moving a user between two nodes that are both on old server nodes (Oracle CorporateTime Server 5.x).
– Do not use Oracle CorporateTime Server 5.x utilities to administer Oracle Calendar server 10.1.1.0.2.
■ Mapping Parameters
Mapping parameters have been added to the 10.1.1.0.2 server unison.ini for coexistence and upgrades. Oracle CorporateTime servers 5.x map O for EMAIL and P for UID. However, Oracle Calendar servers 10.1.1.0.2 do not need this mapping anymore. Parameters added to a Oracle Calendar server 10.1.1.0.2 do not affect it.
The new parameters include:
[ENG]usermailmap = Oitemuidmap = Presourcemailmap = Ousersmscprefmap = OU3usermobiletypemap = Nusermobilemap = R
For version coexistence, the parameters are added automatically to the Oracle Calendar servers 10.1.1.0.2 unison.ini file during an upgrade. In such case, verify that these parameters are correct.
C.7.1.4 DesignatesConsider the following issues related to designates:
■ Listing Designates
Windows clients cannot list designates of remote resources.
■ Creating Events as a Designate
Users may get an error when creating an event while working as a designate. However, the event will be properly created.
■ Remote Designate
The Remote Designate feature can only be used with the Oracle Calendar Web client and the Oracle Calendar SDK.
C.7.1.5 Other IssuesYou must also consider the following miscellaneous issues:
■ Moving Users
Do not move users that have at some point used the Oracle Calendar Web client. Trying to move such a user may fail and cause some events to be duplicated.

General Issues and Workarounds
Installing Oracle Calendar Standalone C-21
■ UID
A numeric Unique Identifier (UID) will be created by the system for a user without an existing UID.
■ Remote Users
When a remote user is invited to meeting, the status of the meeting owner is not correctly displayed to the remote user. The status of the owner will be shown as will confirm later instead of will attend. This is a server issue.
C.7.2 Oracle Calendar Application System IssuesThis section includes the following topics:
■ Installation-Related Issues
■ Upgrade-Related Issues
C.7.2.1 Installation-Related IssuesWhen installing the standalone package of the Oracle Calendar application system on a computer where Oracle Calendar is already installed, you will not be prompted to enter server information during the installation. After the Oracle Calendar application system is installed, you must open the [connection] section of ocas.conf and replace
mnode=,with mnode=host:engine_port,node
C.7.2.2 Upgrade-Related IssuesConsider the following issues while you install the Oracle Calendar application system:
■ Multiple Upgrades
When the Oracle Calendar application system upgrade assistant is run more than once, multiple include lines may be inserted in httpd.conf. This can cause the Web server to not start properly.
To resolve this problem, remove the duplicated include lines from the conf file. Typically, the lines look like the following:
include full_path_of_install_home/ocas/conf/ocal.conf
■ Blank Lines in ocas.conf and ocwc.conf Files
Blank lines in ocas.conf and ocwc.conf files in your release 10.1.1.0.2 installation will be removed by the upgrade assistant. To preserve them, replace them with # prior to running the assistant.
■ Configuration Parameters
The upgrade assistant tries to upgrade parameter values that you have set in your ocas.conf , ocws.conf, and ocwc.conf configuration files. Some parameters may not get updated, with the values in 10.1.1.0.2 version being retained to maintain consistency in the Calendar Web client. The ocst.conf file is not upgraded and the 10.1.1.0.2 version of this file is required to ensure correct operation of Mobile Data Sync.

General Issues and Workarounds
C-22 Oracle Collaboration Suite Installation Guide

Installing Oracle Collaboration Suite Clients D-1
DInstalling Oracle Collaboration Suite Clients
You might want to install Oracle Collaboration Suite clients on various platforms that can communicate successfully with the servers on which Oracle Collaboration Suite components are installed. This chapter explains the procedure for installing Oracle Collaboration Suite clients on different platforms.
The chapter contains the following sections:
■ Section D.1, "Installing Oracle Calendar Clients"
■ Section D.2, "Installing Oracle Connector for Outlook"
■ Section D.3, "Installing Oracle Real-Time Collaboration Clients"
D.1 Installing Oracle Calendar ClientsThis section discusses the installation of Oracle Calendar clients. It contains the following topics:
■ Section D.1.1, "Installing the Oracle Calendar Desktop Client"
■ Section D.1.2, "Installing Oracle Calendar Sync"
■ Section D.3, "Installing Oracle Real-Time Collaboration Clients"
The installation files for these clients can be found in the /client folder on the Oracle Collaboration Suite DVD.
D.1.1 Installing the Oracle Calendar Desktop ClientThis section discusses the installation of the Oracle Calendar desktop client for Windows, Macintosh, Linux, and Solaris platforms. It contains the following topics:
■ Installing the Oracle Calendar Desktop Client for Linux
■ Installing the Oracle Calendar Desktop Client for Macintosh
■ Installing the Oracle Calendar Desktop Client for Solaris
■ Installing the Oracle Calendar Desktop Client for Windows
D.1.1.1 Installing the Oracle Calendar Desktop Client for LinuxTable D–1 lists the system requirements for installing the Oracle Calendar desktop client on different Linux platforms.

Installing Oracle Calendar Clients
D-2 Oracle Collaboration Suite Installation Guide
To install the Oracle Calendar desktop client for Linux:
1. Unpack the distribution archive in a temporary directory, as follows:
gtar zxvf /tmp/cal_linux_1011.tar.gz
2. Change to the OracleCalendar_inst directory, as follows:
cd OracleCalendar_inst
3. If you want to install using a full graphical interface, run gui_install.sh.
4. If you prefer to install using a text mode interface, run text_install.sh. You will be prompted for installation and shortcut directories.
Installing the Oracle Calendar Desktop Client for Linux in Silent Mode1. Unpack the distribution archive in a temporary directory, as follows:
gtar zxvf /tmp/cal_linux_1011.tar.gz
2. Create the directory OracleCalendar_inst.
3. Change to the OracleCalendar_inst directory, as follows:
cd OracleCalendar_inst
4. To install the Oracle Calendar desktop client for Linux with no user interaction, run ./silent_install.sh.
In the directory OracleCalendar_inst/ocal.conf is a file called silent.properties which defines where the installation is done. To alter the location where the Oracle Calendar desktop client is installed, define new paths for the following parameters:
■ USER_INSTALL_DIR
■ USER_SHORTCUTS
Table D–1 System Requirements for Installing the Oracle Calendar Desktop Client for Linux
Item Requirement
Operating Systems One of the following:
■ Red Hat Linux 9 or higher
■ SUSE Linux 9 or higher
■ Linux x86 with kernel 2.4.9 or higher
Note: You need Netscape Navigator 4.0 or higher, or Mozilla, to use the Oracle Calendar desktop client online help. The directory that contains the Netscape or Mozilla executable file must be set in the installation path you specify.
Disk Space 40 MB
RAM 128 MB
Calendar Servers One of the following:
■ Oracle Calendar server 5.4
■ Oracle Calendar server 5.5
■ Oracle Calendar server 9.0.4.x
■ Oracle Calendar server 10.1.1.x (10gR1)

Installing Oracle Calendar Clients
Installing Oracle Collaboration Suite Clients D-3
D.1.1.2 Installing the Oracle Calendar Desktop Client for MacintoshTable D–2 lists the system requirements for installing the Oracle Calendar desktop client on the Macintosh platform.
To install the Oracle Calendar desktop client for Macintosh:
1. Double-click cal_mac_OSX_1011.dmg.The Oracle Calendar mounted disk appears.
2. Double-click the Oracle Calendar mounted disk icon.
3. Select the Oracle Calendar and readme files and drag them to the folder where you want to install the Oracle Calendar desktop client for Macintosh.
The installer extracts the application and copies the Readme.htm file in to the destination folder you select.
The installer also extracts all shared libraries to /Library/CFMSupport.
The installer copies Oracle Calendar Help to /Library/Documentation/Help.
D.1.1.3 Installing the Oracle Calendar Desktop Client for SolarisTable D–3 lists the system requirements for installing the Oracle Calendar desktop client on the Solaris platform.
Table D–2 System Requirements for Installing the Oracle Calendar Desktop Client for Macintosh
item Requirement
Operating Systems Mac OS 10.1.5 to 10.4
Disk Space 50 MB minimum
RAM 128 MB minimum
256 MB recommended
Calendar Servers One of the following:
■ Oracle Calendar server 5.4
■ Oracle Calendar server 5.5
■ Oracle Calendar server 9.0.4.x
■ Oracle Calendar server 10.1.1.x (10gR1)
Note: You must have administrative privileges on the computer on which you want to install the Oracle Calendar desktop client.
Note: Oracle recommends installing the Oracle Calendar desktop client for Macintosh in your Applications folder. If you choose to install in the Applications folder, you may be prompted to enter an administrator password.

Installing Oracle Calendar Clients
D-4 Oracle Collaboration Suite Installation Guide
To install the Oracle Calendar desktop client on Solaris:
1. Unpack the distribution archive in to a temporary directory, as follows:
gtar zxvf /tmp/cal_solaris_1011.tar.gz
2. Change to the OracleCalendar_inst directory, as follows:
cd OracleCalendar_inst
3. If you want to install using a full graphical interface, run gui_install.sh. To install using a text mode interface, run text_install.sh.
4. If you prefer to install using a text mode interface, run text_install.sh.You will be prompted for installation and shortcut directories.
Installing the Oracle Calendar Desktop Client for Solaris in Silent Mode1. Unpack the distribution archive in a temporary directory, as follows:
gtar zxvf /tmp/cal_solaris_1011.tar.gz
2. Create the directory OracleCalendar_inst.
3. Change to the OracleCalendar_inst directory, as follows:
cd OracleCalendar_inst
4. To install the Oracle Calendar desktop client for Linux with no user interaction, run ./silent_install.sh.
In the directory OracleCalendar_inst/ocal.conf is a file called silent.properties which defines where the installation is done. To alter the location where the Oracle Calendar desktop client for Solaris is installed, define new paths for the following parameters:
■ USER_INSTALL_DIR
■ USER_SHORTCUTS
Table D–3 System Requirements for Installing the Oracle Calendar Desktop Client for Solaris
Item Requirement
Operating Systems Solaris 8, 9 (SPARC only)
Note: You need Netscape Navigator 4.0 or higher, or Mozilla, to use the Oracle Calendar desktop client online help. The directory that contains the Netscape or Mozilla executable file must be set in the installation path you specify.
Disk Space 50 MB
RAM 128 MB
Calendar Servers One of the following:
■ Oracle Calendar server 5.4
■ Oracle Calendar server 5.5
■ Oracle Calendar server 9.0.4.x
■ Oracle Calendar server 10.1.1.x (10gR1)
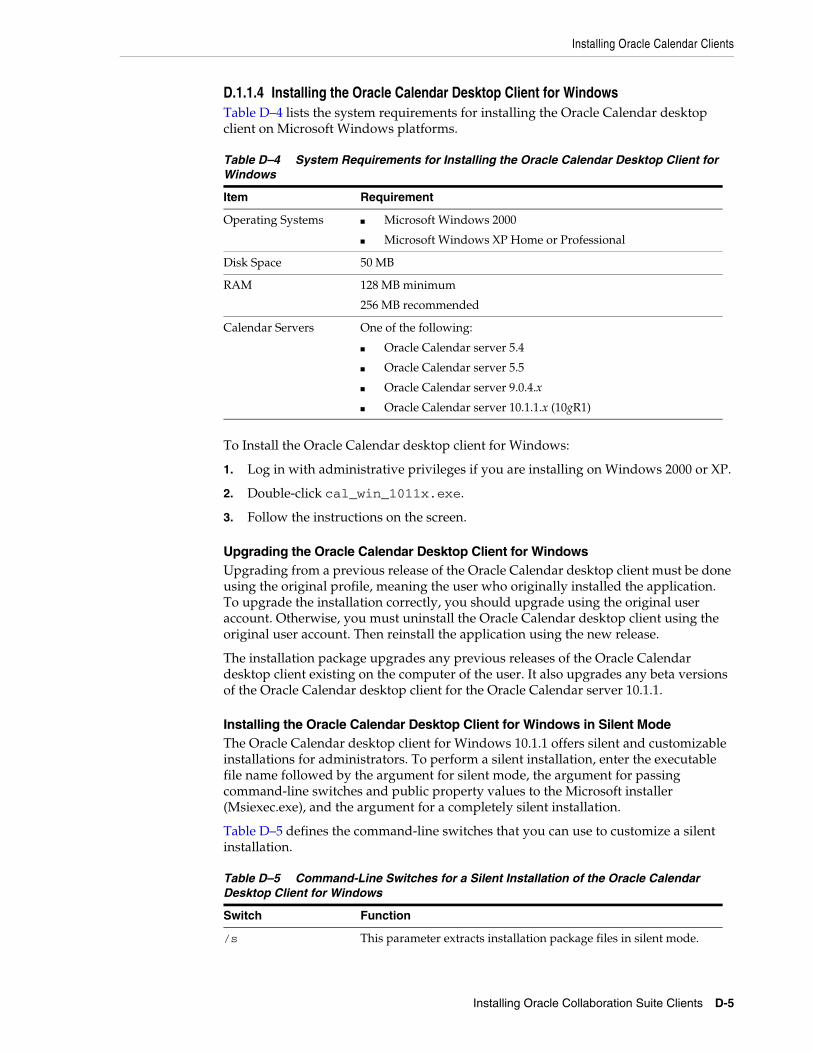
Installing Oracle Calendar Clients
Installing Oracle Collaboration Suite Clients D-5
D.1.1.4 Installing the Oracle Calendar Desktop Client for WindowsTable D–4 lists the system requirements for installing the Oracle Calendar desktop client on Microsoft Windows platforms.
To Install the Oracle Calendar desktop client for Windows:
1. Log in with administrative privileges if you are installing on Windows 2000 or XP.
2. Double-click cal_win_1011x.exe.
3. Follow the instructions on the screen.
Upgrading the Oracle Calendar Desktop Client for WindowsUpgrading from a previous release of the Oracle Calendar desktop client must be done using the original profile, meaning the user who originally installed the application. To upgrade the installation correctly, you should upgrade using the original user account. Otherwise, you must uninstall the Oracle Calendar desktop client using the original user account. Then reinstall the application using the new release.
The installation package upgrades any previous releases of the Oracle Calendar desktop client existing on the computer of the user. It also upgrades any beta versions of the Oracle Calendar desktop client for the Oracle Calendar server 10.1.1.
Installing the Oracle Calendar Desktop Client for Windows in Silent ModeThe Oracle Calendar desktop client for Windows 10.1.1 offers silent and customizable installations for administrators. To perform a silent installation, enter the executable file name followed by the argument for silent mode, the argument for passing command-line switches and public property values to the Microsoft installer (Msiexec.exe), and the argument for a completely silent installation.
Table D–5 defines the command-line switches that you can use to customize a silent installation.
Table D–4 System Requirements for Installing the Oracle Calendar Desktop Client for Windows
Item Requirement
Operating Systems ■ Microsoft Windows 2000
■ Microsoft Windows XP Home or Professional
Disk Space 50 MB
RAM 128 MB minimum
256 MB recommended
Calendar Servers One of the following:
■ Oracle Calendar server 5.4
■ Oracle Calendar server 5.5
■ Oracle Calendar server 9.0.4.x
■ Oracle Calendar server 10.1.1.x (10gR1)
Table D–5 Command-Line Switches for a Silent Installation of the Oracle Calendar Desktop Client for Windows
Switch Function
/s This parameter extracts installation package files in silent mode.

Installing Oracle Calendar Clients
D-6 Oracle Collaboration Suite Installation Guide
For example, to install cal_win_1011x.exe in silent mode and pass the command-line switches and values to the Microsoft installer, without any user interface or prompts, enter the following command:
cal_win_1011x.exe /s /v"qn"
Extracting Installation Package Files in Administrative ModeTo extract the installation package files, run cal_win_1011x.exe in administrative mode, as follows:
cal_win_1011x.exe /a
The following files are extracted when you run cal_win_1011x.exe in administrative mode:
■ The Oracle Calendar.msi package
■ Various redistributable files
■ A folder hierarchy identical to the one in the installed product, containing the files OCal.exe and unison.ini
Table D–6 provides definitions for the extracted files.
/v This parameter passes command-line switches and values to the Microsoft installer (Msiexec.exe).
/qn This parameter specifies a completely silent installation with no user interface.
/qb This parameter provides basic user feedback during the installation such as progress indicators, but prevents users from modifying any installation parameters or information. For example, users can see the progress indicator while files are being copied, but are not allowed to specify the destination path.
Notes:
■ Command-line switches are not case-sensitive.
For more information on the levels of user interaction available with the Microsoft Windows Installer /q option, refer to the Microsoft Windows Installer documentation available at
http://msdn.microsoft.com/library/default.asp?url=/library/en-us/msi/setup/command_line_options.asp
■ The V switch should always be the last option specified in the command line.
Note: If you have an earlier release of the Oracle Calendar desktop client, then the new version will overwrite it.
Table D–5 (Cont.) Command-Line Switches for a Silent Installation of the Oracle Calendar Desktop Client for Windows
Switch Function

Installing Oracle Calendar Clients
Installing Oracle Collaboration Suite Clients D-7
D.1.1.5 Customizing the Oracle Calendar Initialization FileYou can specify the calendar preferences and setup information by using the client-side unison.ini file.
When you install the Oracle Calendar desktop client, you can provide the installer with a template unison.ini file preset with a variety of preferences and other information. The template unison.ini file is used only if no previous unison.ini file exists. After a personal unison.ini file is created for a user, subsequent client upgrades will not remove or replace it. In other words, the ability to preset unison.ini preferences for the client installer is only available for users who have not yet used any version of the Oracle Calendar desktop client on the current computer. There are two reasons for this:
The user upgrading the application will not necessarily be able to view or modify the unison.ini files stored in the profile folders of other users. In other words, the installer cannot locate all the unison.ini files on the current computer and therefore will not be able to replace them with the new template.
All user preferences not specified in the template unison.ini file or stored directly on the Oracle Calendar server are lost if the previous unison.ini file of the user is replaced.
D.1.2 Installing Oracle Calendar SyncThis section discusses the installation of Oracle Calendar Sync for Palm and Oracle Calendar Sync for Pocket PC. It contains the following topics:
■ Installing Oracle Calendar Sync for Palm for Macintosh
■ "Installing Oracle Calendar Sync for Palm for Windows"
■ "Installing Oracle Calendar Sync for Pocket PC"
D.1.2.1 Installing Oracle Calendar Sync for Palm for MacintoshThis section contains the following topics:
■ System Requirements for Oracle Calendar Sync for Palm for Macintosh
■ Oracle Calendar Sync for Palm for Macintosh Preinstallation Instructions
■ Installing Oracle Calendar Sync for Palm for Macintosh
System Requirements for Oracle Calendar Sync for Palm for Macintosh Table D–7 lists the system requirements for installing Oracle Calendar Sync for Palm on Macintosh platforms.
Table D–6 Files Extracted While Running cal_win_1011x.exe in Administrative Mode
Files Description
Oracle Calendar.msi This file is the main installer package that runs in the MSI installer engine.
OCal.exe This file contains the InstallShield setup scripts. It is the InstallShield wrapper that runs the MSI installer engine with the Oracle Calendar 10.1.1.msi file. This file installs the MSI installer engine if it does not already have the same.
unison.ini This is a template file for user preferences.

Installing Oracle Calendar Clients
D-8 Oracle Collaboration Suite Installation Guide
Oracle Calendar Sync for Palm for Macintosh Preinstallation InstructionsIf you already have a previous release of Oracle Calendar Sync installed on your computer, or if you are changing your device, Oracle recommends that you perform a full synchronization before you install Oracle Calendar Sync for Palm for Macintosh.
If you have a Beta release of Oracle Calendar Sync installed, or you have release 2.1.4 or an earlier release of Oracle Corporate Sync installed, then you must do the following before installing Oracle Calendar Sync for Palm for Macintosh, to protect your data.
1. Remove the Oracle Calendar Sync application (also known as CS Setup) from your Palm organizer.
2. Purge all items from your Date Book and To Do List. If you do not do this, duplicate items will be created when you perform the first HotSync after the installation. Apply the following guidelines when purging data:
Table D–7 System Requirements for Installing Oracle Calendar Sync for Palm for Macintosh
Item Requirement
Operating Systems Mac OS 10.2.x to 10.4.1
Disk Space 5 MB
Note: If the Oracle Calendar desktop client for Macintosh is already installed, 15 MB of disk space is required.
RAM 8 MB minimum
64 MB recommended
Calendar Servers One of the following:
■ Oracle Calendar server 5.4
■ Oracle Calendar server 5.5
■ Oracle Calendar server 9.0.4.x
■ Oracle Calendar server 10.1.1.x (10gR1)
Palm Desktop 4.0 to 4.2.1
Note: Later releases of Palm Desktop may be compatible, but were not certified at the time Oracle Calendar Sync 10.1.1 was released.
Devices The following devices are certified for compatibility with Oracle Calendar Sync for Palm for Macintosh. Similar devices may also be compatible.
■ Tungsten T
■ Tungsten T3
■ Zire 31
■ Zire 72
■ Treo 600
■ Sony Clie PEG-TG50C
The following devices do not work with Oracle Calendar Sync for Palm for Macintosh.
■ Tungsten T5
■ Tungsten E2
■ Treo 650
■ LifeDrive Mobile Manager

Installing Oracle Calendar Clients
Installing Oracle Collaboration Suite Clients D-9
■ Ensure that Save archive copy on PC is selected.
■ To Do items that have not been marked as completed must be manually deleted.
■ To delete the Date Book events, advance the date on your organizer by several years, then purge data. For example, change organizer date to 2015, then purge all events older than 1 week to delete all events from the past until the year 2015.
Installing Oracle Calendar Sync for Palm for MacintoshTo install Oracle Calendar Sync for Palm for Macintosh, perform the following steps:
1. Run cal_syncpalm_macOSX.hqx. This creates the Oracle Calendar Sync installer.
2. Double-click Oracle Calendar Sync Install. The installer first checks for existing Oracle Calendar Sync files and then installs the program. Depending on your setup, this may take several minutes.
3. Start the HotSync Manager.
4. From the HotSync menu, choose Conduit Settings. A list of synchronizable items appears.
5. Select a user name from the User menu (if there is only one user name, it is selected by default).
6. Choose how you want Oracle Calendar Events and Tasks to be synchronized by double-clicking each item.A dialog box appears with the following choices:
■ Synchronize the files: Synchronizes all information that exists on both your Palm organizer and on the Oracle Calendar server.
■ Macintosh overwrites hand-held: Information in your Oracle Calendar Agenda overwrites Events, Tasks, or Addresses on the Palm organizer.
■ Do Nothing: The specified Entry type is not synchronized.
7. Exit the Conduit Settings dialog box.
8. If you already have Calendar Sync software installed on your computer and you have data stored in Palm Desktop, then you must install Oracle Calendar Sync for Palm on your mobile device. Start the HotSync Manager on your desktop computer.
9. From the HotSync menu on your desktop, select Install Handheld Files.
10. Select the user from the list in the Install Handheld Files dialog box.
11. Click Add To List.
12. From the Applications menu, select Palm and then Add-on.
13. Click Oracle Calendar Sync.prc.
Note: Some error messages might be logged in the install log. You can ignore these messages.
Note: Set Calendar, Contacts, and Tasks to Do Nothing if you want to synchronize with the Oracle Calendar server.
Installing Oracle Calendar Clients
D-10 Oracle Collaboration Suite Installation Guide
14. Click Add file. The file is added to the list.
15. Close the Install Handheld Files dialog box.
16. Connect your Palm device to your computer.
17. From your device, initiate synchronization. Oracle Calendar Sync for Palm is automatically installed on your device. Following a first synchronization, a new application called Oracle Setup appears on your device.
18. Open Oracle Setup on your Palm organizer and enter your Oracle Calendar server sign-in settings:
1. User: Enter the user name.
2. Password: Enter your password.
3. Server: Enter the domain name or the IP address of your calendar server.
4. Node: Many server configurations do not require you to specify a node. However, if synchronization fails, view the message log.
Notes:
■ If you want to synchronize your address book, then you must download the offline files. Sign in to the Oracle Calendar desktop client once before synchronization and download the offline files when prompted.
■ Before you perform a synchronization, make sure you are not signed in to the Oracle Calendar desktop client.
19. Before you begin using Oracle Calendar Sync for Palm, verify that your Palm device is set to the correct date. An incorrect date leads to unexpected results when performing a synchronization.
Troubleshooting the Oracle Calendar Sync for Palm for Macintosh InstallationAfter installing Oracle Calendar Sync for Palm for Macintosh, you may have difficulties performing a HotSync operation. This may be because of a conflict with Palm Desktop files. To troubleshoot this problem, perform the following tasks:
1. Delete the Users directory located at /Users/your_user_name/Documents/Palm/Users
In the preceding example, your_user_name is the user name you used to log in.
2. Delete the com.palm.Desktop.plist file located at /Users/your_user_name/Library/Preferences.
3. Delete the following files, which are located in the /Users/your_user_name/Library/Preferences/ByHost directory:
■ com.palm.HS.T.S.xxxxxxxx.plist
■ com.palm.HS.T.PC.xxxxxxxx.plist
■ com.palm.HS.T.USB.xxxxxxxx.plist
4. Start HotSync Manager. You will be prompted for a user name.
5. Enter your user name and any other necessary HotSync information.
Note: Before you perform a synchronization, make sure you are not signed in to the Oracle Calendar desktop client.

Installing Oracle Calendar Clients
Installing Oracle Collaboration Suite Clients D-11
6. Close HotSync Manager, and perform a HotSync.
D.1.2.2 Installing Oracle Calendar Sync for Palm for WindowsThis section contains the following topics:
■ System Requirements for Oracle Calendar Sync for Palm for Windows
■ Installing Oracle Calendar Sync for Palm for Windows
■ Selecting Conduits for Synchronization
System Requirements for Oracle Calendar Sync for Palm for WindowsTable D–8 lists the system requirements for installing Oracle Calendar Sync for Palm on Microsoft Windows.
Table D–8 System Requirements for Installing Oracle Calendar Sync for Palm for Windows
Item Requirement
Operating Systems ■ Microsoft Windows 2000
■ Microsoft Windows XP Home or Professional
Disk Space 75 MB
RAM 128 MB
Calendar Servers ■ Oracle Calendar server 5.4
■ Oracle Calendar server 5.5
■ Oracle Calendar server 9.0.4.x
■ Oracle Calendar server 10.1.1.x (10gR1)
Software Palm Desktop
■ 3.1 to 4.1.4
■ Note: Later releases of Palm Desktop may be compatible, but were not certified at the time Oracle Calendar Sync 10.1.1 was released.
Microsoft .NET
■ Microsoft .NET Framework 1.1
Devices The following devices (for Palm operating systems 4.1 to 5.4 inclusive) are certified for compatibility with Oracle Calendar Sync for Palm for Windows. Similar devices may also be compatible.
■ Tungsten T
■ Tungsten T3
■ Tungsten T5
■ Zire 31
■ Zire 72
■ Treo 600
■ Treo 650
■ Sony Clie PEG-TG50C

Installing Oracle Calendar Clients
D-12 Oracle Collaboration Suite Installation Guide
Installing Oracle Calendar Sync for Palm for WindowsIf you have a previous version of Oracle Calendar Sync installed, or if you are changing device, Oracle recommends that you perform a full synchronization before you install Oracle Calendar Sync for Palm for Windows.
1. Before you install Oracle Calendar Sync for Palm on your computer, verify that your Palm device is set to the correct date. An incorrect date leads to unexpected results when performing a synchronization.
2. Run the cal_syncpalm_win_1011.exe file provided with the distribution package and follow the InstallShield instructions on the screen.
3. Select an installation type, Complete or Custom.
Notes:
■ A Complete installation replaces the Date Book, To Do List, and Address conduits to synchronize with Oracle Calendar’s Events, Tasks, and Address Book respectively.
■ In a Custom installation, there is no difference between This feature will be installed on local hard drive and This feature, and all subfeatures, will be installed on local hard drive. Select the conduits you want to install. For example, you can synchronize the Palm Date Book with Oracle Calendar while keeping your existing conduit settings for To Do List and Address so they can synchronize with the Palm desktop.
4. Enter the following Sign In settings in the Synchronization Settings dialog box:
1. User: Enter the user name.
2. Password: Enter your password.
3. Server: Enter the domain name or the IP address of your calendar server.
4. Node: Most server configurations do not require you to specify a node. However, if synchronization fails, view the message log.
5. Ensure that your device is in its cradle, then perform a synchronization. The first time you perform synchronization after installation, a full synchronization is performed.
Selecting Conduits for SynchronizationUse the Custom dialog box to view or change the HotSync Manager conduits and actions for each user name.
To select a conduit for synchronization:
1. To display the Custom dialog box, select Custom from the HotSync Manager menu.
2. Select a conduit from the list and click Change to select how you want to synchronize your Calendar, Tasks, and Contact information.
Note: If you do not have the server information and you are using Oracle Connector for Outlook or the Oracle Calendar desktop client, check for the server name in the Oracle Connector for Outlook Profile Settings dialog box or the Connection Manager dialog box respectively.

Installing Oracle Calendar Clients
Installing Oracle Collaboration Suite Clients D-13
If you are using a recent Palm device, you may notice that the three conduits — Date Book, To Do List, and Address — are duplicated in the form of Calendar, Tasks, and Contacts. Choosing to synchronize two conduits with similar data produces an error. For example, you should not synchronize both Calendar and Date Book. You must disable one set of conduits (for example, Date Book, To Do List, and Address) before initiating the next synchronization.
Older Palm operating systems (for example, Palm OS 3.1-5.0) continue to synchronize their files with the Date Book, To Do List, and Address conduits. One device that uses this operating system is the Treo 600.
Newer Palm operating systems (for example, Palm OS 5.2 and later) synchronize their files with the Calendar, Tasks, and Contacts conduits. Devices that use these operating systems include Tungsten T, Tungsten T3, Zire 31, and Zire 72.
D.1.2.3 Installing Oracle Calendar Sync for Pocket PCThis section includes the following topics:
■ System Requirements for Oracle Calendar Sync for Pocket PC
■ Installing Oracle Calendar Sync for Pocket PC
System Requirements for Oracle Calendar Sync for Pocket PCTable D–9 discusses system requirements for installing Oracle Calendar Sync for Pocket PC on Microsoft Windows.
Table D–9 System Requirements for Installing Oracle Calendar Sync on Pocket PC
Item Requirement
Operating Systems ■ Microsoft Windows 2000
■ Microsoft Windows XP Home or Professional
Disk Space 75 MB
RAM 128 MB
Calendar Servers ■ Oracle Calendar server 5.4
■ Oracle Calendar server 5.5
■ Oracle Calendar server 9.0.4.x
■ Oracle Calendar server 10.1.1.x (10gR1)
Pocket PC Pocket PC devices with any of the following processors:
■ Multiprocessor without Interlocked Pipeline Stages (MIPS)
■ SH3 (a processor developed by Hitachi Corporation that can be found in the Pocket PC)
■ Advanced RISC Machine (ARM), or
■ XScale (a next-generation ARM-based processor from Intel that can operate between 300 and 400MHz)

Installing Oracle Calendar Clients
D-14 Oracle Collaboration Suite Installation Guide
Installing Oracle Calendar Sync for Pocket PCIf you have a previous version of Oracle Calendar Sync installed, or if you are changing device, Oracle recommends that you perform a full synchronization before you install Oracle Calendar Sync for Pocket PC.
1. Before you install Oracle Calendar Sync for Pocket PC on your computer, verify that your Pocket PC is set to the correct date. An incorrect date leads to unexpected results when performing a synchronization.
2. Verify that ActiveSync is installed on your computer.
3. Run the cal_syncppc_win_1011.exe file provided with the distribution package and follow the InstallShield instructions on the screen.
4. Select an installation type, Complete or Custom.
Notes:
■ A Complete installation replaces the Calendar, Tasks, and Contacts conduits to synchronize with Oracle Calendar’s Events, Tasks, and Address Book respectively.
■ In a Custom installation, there is no difference between This feature will be installed on local hard drive and This feature, and all subfeatures, will be installed on local hard drive. Select the conduits you want to install. For example, you can synchronize the Pocket PC Calendar with Oracle Calendar while keeping your existing conduit settings for Tasks and Contacts so they can synchronize with Microsoft Outlook.
5. When prompted by the application, install Oracle Calendar Sync Helper files. Your pocket PC device must be connected to install these files.
Software ActiveSync
■ Version 3.0 to 3.8, as appropriate for your device.If you are running an older release of Microsoft ActiveSync, check the vendor site for updates.
Note: Later releases of Microsoft ActiveSync may be compatible, but were not certified at the time Oracle Calendar Sync 10.1.1 was released.
Microsoft .NET
■ Microsoft .NET Framework 1.1
Devices The following devices are certified for compatibility with Oracle Calendar Sync for Pocket PC. Similar devices running the same Pocket PC operating system with MIPS, SH3, ARM, or XScale processor may also be compatible.
■ Dell Axim X50 (Windows Mobile 2003 - Second Edition)
■ HP iPAQ H1910 (Pocket PC 2002)
■ HP iPAQ 3600 (Pocket PC 2002)
■ HP iPAQ h5550 series (Windows Mobile 2003 - Premium Edition)
■ HP iPAQ h6300 series (Windows Mobile 2003 - Phone Edition)
Table D–9 (Cont.) System Requirements for Installing Oracle Calendar Sync on Pocket
Item Requirement

Installing Oracle Connector for Outlook
Installing Oracle Collaboration Suite Clients D-15
6. Follow the remaining instructions on the screen to complete the installation.
7. Check your mobile device screen for any additional steps required to complete the installation.
8. Enter the following Sign In settings in the Synchronization Settings dialog box:
1. User: Enter your user name.
2. Password: Enter your password.
3. Server: Enter the domain name or the IP address of your calendar server.
4. Node: Most server configurations do not require you to specify a node. However, if synchronization fails, view the message log.
9. Synchronize your device. The ActiveSync Partnership Wizard starts.
10. Follow the onscreen instructions to create a new ActiveSync Partnership.
11. From the lists, select Oracle Calendar as your personal information manager for the Calendar, Contacts, and Tasks conduits.
12. Open Microsoft ActiveSync if it does not open automatically.
13. Click Sync if synchronization is not automatically initiated. The first time you synchronize, a full synchronization occurs.
14. From the Microsoft ActiveSync dialog box, click Options.
15. Select the Schedule tab in the Options dialog box.
16. Select when you want ActiveSync to synchronize information between the mobile device and the desktop computer. The three options are:
■ Continuously while the device is connected
■ Only upon connection
■ Manually
D.2 Installing Oracle Connector for OutlookThis section contains the following topics:
■ Section D.2.1, "System Requirements"
Note: To connect and install the Helper files later, click Start, then Programs, Oracle Calendar Sync for Pocket PC, then Install Device Files.
Note: If you do not have the server information and you are using Oracle Connector for Outlook or the Oracle Calendar desktop client, check for the server name in the Oracle Connector for Outlook Profile Settings dialog box or the Connection Manager dialog box respectively.
Note: Oracle Calendar Sync for Pocket PC supports all three desktop scheduling modes, but we recommend choosing Manually if you want to control when synchronization occurs.

Installing Oracle Connector for Outlook
D-16 Oracle Collaboration Suite Installation Guide
■ Section D.2.2, "Preinstallation Requirements"
■ Section D.2.3, "Installing Oracle Connector for Outlook on the Desktop"
■ Section D.2.4, "Installing Oracle Connector for Outlook in Interactive Mode"
■ Section D.2.5, "Installing Oracle Connector for Outlook in Silent Mode"
■ Section D.2.7, "Using the Configuration Wizard to Configure Oracle Connector for Outlook"
D.2.1 System RequirementsTable D–10 lists the system requirements for installing Oracle Connector for Outlook.
Table D–10 System Requirements for Oracle Connector for Outlook
Hardware Component Requirement
Operating Systems ■ Microsoft Windows NT 4.0
■ Microsoft Windows 2000
■ Microsoft Windows XP
■ Note: Administrative privileges are required to install Oracle Connector for Outlook on Microsoft Windows NT, Microsoft Windows 2000, and Microsoft Windows XP.
Disk Space Free disk space approximately equivalent to the size of the user’s Internet Message Access Protocol 4 (IMAP4) mailbox.
RAM Refer to the RAM requirements for Microsoft Outlook client.
Microsoft Outlook ■ Microsoft Outlook 2000
■ Microsoft Outlook 2002 with Service Pack 2 (SP2 or higher)
■ Microsoft Outlook 2003
Note: Native Language version or Multilingual User Interface Pack (MUI) is required for non-English version localization.
Refer Table D–11 for a list of supported languages.
Calendar Servers ■ Oracle CorporateTime server 5.4
■ Oracle Calendar server 5.5
■ Oracle Calendar server 9.0.4.x
■ Oracle Calendar server 10.1.1.x (10gR1)
E-mail Servers ■ Simple Mail Transfer Protocol (SMTP) server for outgoing mail included with Oracle Collaboration Suite
■ Oracle IMAP4 Server 9.0.3 or higher
■ Other e-mail servers implemented based on the open standards of SMTP, and Internet Message Access Protocol 4 (IMAP4) reference implementations of Cyrus and University of Washington.
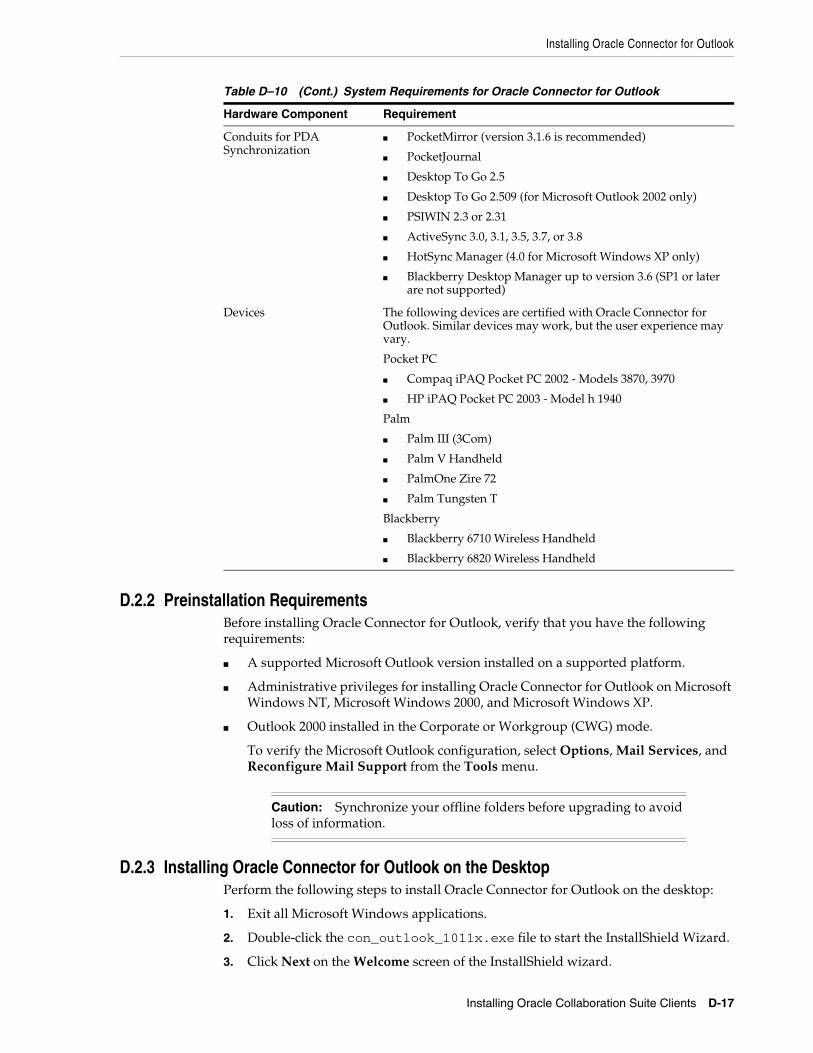
Installing Oracle Connector for Outlook
Installing Oracle Collaboration Suite Clients D-17
D.2.2 Preinstallation RequirementsBefore installing Oracle Connector for Outlook, verify that you have the following requirements:
■ A supported Microsoft Outlook version installed on a supported platform.
■ Administrative privileges for installing Oracle Connector for Outlook on Microsoft Windows NT, Microsoft Windows 2000, and Microsoft Windows XP.
■ Outlook 2000 installed in the Corporate or Workgroup (CWG) mode.
To verify the Microsoft Outlook configuration, select Options, Mail Services, and Reconfigure Mail Support from the Tools menu.
D.2.3 Installing Oracle Connector for Outlook on the DesktopPerform the following steps to install Oracle Connector for Outlook on the desktop:
1. Exit all Microsoft Windows applications.
2. Double-click the con_outlook_1011x.exe file to start the InstallShield Wizard.
3. Click Next on the Welcome screen of the InstallShield wizard.
Conduits for PDA Synchronization
■ PocketMirror (version 3.1.6 is recommended)
■ PocketJournal
■ Desktop To Go 2.5
■ Desktop To Go 2.509 (for Microsoft Outlook 2002 only)
■ PSIWIN 2.3 or 2.31
■ ActiveSync 3.0, 3.1, 3.5, 3.7, or 3.8
■ HotSync Manager (4.0 for Microsoft Windows XP only)
■ Blackberry Desktop Manager up to version 3.6 (SP1 or later are not supported)
Devices The following devices are certified with Oracle Connector for Outlook. Similar devices may work, but the user experience may vary.
Pocket PC
■ Compaq iPAQ Pocket PC 2002 - Models 3870, 3970
■ HP iPAQ Pocket PC 2003 - Model h 1940
Palm
■ Palm III (3Com)
■ Palm V Handheld
■ PalmOne Zire 72
■ Palm Tungsten T
Blackberry
■ Blackberry 6710 Wireless Handheld
■ Blackberry 6820 Wireless Handheld
Caution: Synchronize your offline folders before upgrading to avoid loss of information.
Table D–10 (Cont.) System Requirements for Oracle Connector for Outlook
Hardware Component Requirement

Installing Oracle Connector for Outlook
D-18 Oracle Collaboration Suite Installation Guide
4. Enter your name in the User Name field and your company name in the Organization field. Click Next.
5. Click Next to install in the default folder. To install Oracle Connector for Outlook in a different folder, click Change and navigate to that folder.
6. Select the languages you want to install.
You can also add more languages after the installation.
For information on how to modify the languages, refer to Section D.2.4.3.
7. If you want to review your input from the previous screens, click Back. Otherwise, click Install.
8. Click Finish to start the Configuration wizard. If you intend to configure Oracle Connector for Outlook later, deselect Start Configuration, which is selected by default.
D.2.4 Installing Oracle Connector for Outlook in Interactive ModeYou can install Oracle Connector for Outlook in interactive or silent mode.
In an interactive installation, the installation wizard guides you through the installation process. Interactive installations can be performed by using either the con_outlook_1011x.exe file or the con_outlook.msi package.
To install using the con_outlook.msi package, extract it from the con_outlook_1011x.exe file using the /admin command.
You can extract the con_outlook_msi package to multiple files or a single file. Use the following command to extract the installation package to multiple files:
con_outlook_1011x.exe/admin image=cd
The multiple files comprise an msi file, the Oracle Connector for Outlook files, and the .mst files that contain the transformation for the installation language.
Use the following command to extract the installation package to a single file:
con_outlook_1011x.exe/admin image=msi
D.2.4.1 Specifying the Installation Language for a First-Time Installation of Oracle Connector for OutlookThe instructions in this section are for a first-time installation. When you run con_outlook_1011x.exe, the installation wizard determines the language of the operating system and starts the installation wizard in that language.
If the language used by the operating system is not supported by Oracle Connector for Outlook, the installation wizard is started in English. In addition, the Add/Remove Languages dialog box lists the languages supported by Oracle Connector for Outlook. You can select the languages you want in addition to English. However, you cannot remove English language support because it serves as a reliable backup in case of failure in other languages.
Follow these steps if you do not have a previous version of Oracle Connector for Outlook installed:
Note: If you have upgraded your Microsoft Outlook installation, then you must reinstall Oracle Connector for Outlook.

Installing Oracle Connector for Outlook
Installing Oracle Collaboration Suite Clients D-19
■ If you want to run the installation wizard in a language other than the language of the destination computer’s operating system, run con_outlook_1011x.exe with the following language command:
con_outlook_1011x.exe/Lang {setup_lang_id_no}
where {setup_lang_id_no} is the ID number of the language you want to specify for the installation wizard. For example, to run the installation wizard in French, enter the following command:
con_outlook_1011x.exe/Lang 1036
If you prefer to run the installation directly from the .msi package, enter the following command to apply the appropriate transformation:
msiexec/i "con_outlook.msi" TRANSFORMS=:{setup_lang_id_no}
In the preceding command, setup_lang_id_no is the ID number of the language that you want to use for the installation. For example, to run the installation wizard in French, enter the following command for the installation package contained in a single file:
msiexec/i "con_outlook.msi" TRANSFORMS=:{setup_lang_id_no}
If the installation package is extracted to multiple files, use the following command to run the installation wizard (French is used in this example):
msiexec/i "con_outlook.msi" TRANSFORMS=:1036.mst
Table D–11 lists the languages supported by Oracle Connector for Outlook and their ID numbers.
Note: You can select the language used to run the installer only for a first-time installation. The installation wizard will run in this language the next time you repair, modify, remove, or upgrade Oracle Connector for Outlook.
Table D–11 Languages Supported by Oracle Connector for Outlook
Language Name ID Number
English US 1033
Chinese (Simplified) 2052
Chinese (Traditional) 1028
Czech 1029
Danish 1030
Dutch (Netherlands) 1043
Finnish 1035
French 1036
German 1031
Greek 1032
Hungarian 1038
Italian 1040
Japanese 1041

Installing Oracle Connector for Outlook
D-20 Oracle Collaboration Suite Installation Guide
D.2.4.2 Upgrading Oracle Connector for OutlookYou can use the con_outlook_1011x.exe file or the con_outlook.msi package to upgrade the existing version of Oracle Connector for Outlook.
To upgrade using con_outlook_1011x.exe, run con_outlook_1011x.exe and follow the instructions on the screen.
To upgrade using con_outlook.msi, use one of the following commands, depending on the version you are upgrading from:
■ If you are upgrading from version 10.1.1:
msiexec/i "con_outlook.msi" REINSTALL=ALL REINSTALLMODE=vomus
■ If you are upgrading from version 9.0.4.2.x:
msiexec/i "con_outlook.msi"
Determining the Installation Language for an UpgradeWhen you run the con_outlook_1011x.exe or con_outlook.msi, the installation language used for the upgrade is determined based on the current version of Oracle Connector for Outlook.
If you are upgrading from Oracle Connector for Outlook 9.0.4.2.x or earlier, the language used in the operating system of the destination computer is detected and the upgrade wizard is started in that language. However, if you are upgrading from Oracle Connector for Outlook 10.1.1 or later, the installation language used is the same as the one used in the first-time installation.
D.2.4.3 Modifying, Repairing, or Removing Oracle Connector for OutlookYou can modify, repair, or remove Oracle Connector for Outlook installation by using the InstallShield wizard.
Korean 1042
Norwegian 1044
Polish 1045
Portuguese (Brazil) 1046
Portuguese (Portugal) 2070
Romanian 1048
Russian 1049
Spanish 1034
Swedish 1053
Turkish 1055
Note: Configuring a Member Application Programming Interface (MAPI) profile to be used with Oracle Connector for Outlook is not part of the installation process.
Table D–11 (Cont.) Languages Supported by Oracle Connector for Outlook
Language Name ID Number

Installing Oracle Connector for Outlook
Installing Oracle Collaboration Suite Clients D-21
Modifying the Selection of Installed Languages in Oracle Connector for OutlookTo modify the language settings of Oracle Connector for Outlook, perform one of the following tasks:
■ Run con_outlook_1011x.exe or con_outlook.msi. Select Modify in the Program Maintenance screen.
■ Double-click Add or Remove Programs in the Control Panel. Click Change. Select Modify from the Program Maintenance screen.
■ From the Start menu, select Oracle Connector For Outlook, and then Add or Remove Languages.
Repairing Oracle Connector for OutlookTo repair the Oracle Connector for Outlook installation, perform one of the following tasks:
■ Run con_outlook_1011x.exe or con_outlook.msi. Select Repair from the Program Maintenance screen.
■ Double-click Add or Remove Programs in the Control Panel. Click Change. Select Repair from the Program Maintenance screen.
Removing Oracle Connector for OutlookTo remove Oracle Connector for Outlook, perform one of the following tasks:
■ Run con_outlook_1011x.exe or con_outlook.msi. On the Program Maintenance screen, click Remove.
■ Double-click Add or Remove Programs in the Control Panel. Click Remove.
D.2.4.4 Troubleshooting an Oracle Connector for Outlook InstallationWhen you install Oracle Connector for Outlook using con_outlook_1011x.exe, a log file called ocsetup.log is generated in the Temp folder.
This log file is a useful source of information for troubleshooting installation failures. It records all events and errors during installation with brief descriptions and messages explaining the possible causes of a failed installation.
To generate the log file in a different location, enter the following command:
con_outlook_1011x.exe/path
In the preceding command, path represents the complete path of the log file.
When you install Oracle Connector for Outlook using con_outlook.msi, enable logging policy or use the /L option if you are using the msiexec.exe file.
Note: When you repair the Oracle Connector for Outlook installation, registry keys that were deleted or corrupted are automatically reinstalled.
Note: When you install using a language other than English, the log file is generated partially in English and partially in the installation language you selected.

Installing Oracle Connector for Outlook
D-22 Oracle Collaboration Suite Installation Guide
D.2.5 Installing Oracle Connector for Outlook in Silent ModeYou can install Oracle Connector for Outlook in the silent mode. This mode requires no user participation.
To install in silent mode, you can use an initialization file that contains all the required installation information. However, if you do not specify an initialization file, Oracle Connector for Outlook is installed with the default settings.
You can install Oracle Connector for Outlook in silent mode by using the con_outlook_1011x.exe file or the con_outlook.msi package.
To install Oracle Connector for Outlook in silent mode using the con_outlook_1011x.exe file, enter the following command:
con_outlook_1011x.exe/s Path
In the preceding command, Path represents the actual path to the initialization file.
To install Oracle Connector for Outlook in silent mode using the MSI package, enter the following command:
msiexec /i "con_outlook.msi" /qn SILENTINIPATH={Path}
In the preceding command, Path represents the actual path to the initialization file.
D.2.5.1 The Initialization FileExample D–1 displays a sample initialization file used for silent installation of Oracle Connector for Outlook.
Example D–1 Example of the initialization File for Oracle Connector for Outlook
[General]UserName-OCFOUSERCompany=ORACLEInstallPath="C:\Program Files\Oracle\Outlook Connector"
[Settings]ForceReboot=0DisablePwd=1HideCalendarPwdMenu=1NoServerMail=3DisableCfgUI=1NoDesktopShortcut=1
[Languages];English US1033=us;Chinese (PRC) (S)2052=zhs,_936;Chinese (Singapore) (S)4100=zhs,_936;Chinese (Hong Kong) (T)3076=zht,_950;Chinese (Macau) (T)
Note: With the exception of the Languages section, the parameters in the initialization file can only be configured for first-time installations. If you have already installed Oracle Connector for Outlook, you can only modify the settings after uninstalling the application.

Installing Oracle Connector for Outlook
Installing Oracle Collaboration Suite Clients D-23
5124=zht,_950;Chinese (Taiwan) (T)1028=zht,_950;Czech1029=cs;Danish1030=dk;Dutch (Netherlands)1043=nl;Finnish1035=sf;French1036=f;German1031=d;Greek1032=el;Hungarian1038=hu;Italian1041=i;Japanese1041=ja;Korean1042=ko;Norwegian (Bokmal)1044=n;Polish1045=pl;Portuguese (brazilian)1046=ptb;Portuguese2070=pt;Romanian1048=ro;Russian1049=ru;Spanish1034=e;Swedish1053=s;Turkish1055=tr
[OcConfigWizard]Path=c:\PRFNAME.prf
D.2.5.2 Configuring the Initialization FileYou can configure the following sections in the initialization file:
■ The General Section
■ The Settings Section
■ The Languages Section
■ The OcConfigWizard Section

Installing Oracle Connector for Outlook
D-24 Oracle Collaboration Suite Installation Guide
The General SectionIn the General section, you can specify the name of the user Oracle Connector for Outlook is registered to, the company name, and the location where you want to install Oracle Connector for Outlook.
The following snippet of the initialization file shows the parameters and values in the General section:
[General]UserName=OCFOUSERCompany=ORACLEInstallPath="C:Program Files\Oracle\Outlook Connector"
The Settings SectionIn the Settings section, you can:
■ Force your computer to restart after the installation by setting the ForceReboot parameter to 1.
■ Disable the option to save your password by setting the DisablePwd parameter to 1.
■ Hide the Change Calendar pwd menu item by setting the HideCalendarPwdMenu parameter to 1.
■ Remove the Oracle Connector Configuration Wizard shortcut from the desktop by setting the NoDesktopShortcut parameter to 1.
■ Disable specific mail server functions by setting the NoServerMail parameter to one of the following values:
– 0 for no restriction (default value)
– 1 for no IMAP or SMTP
– 2 for no SMTP
– 3 for no SMTP
The following excerpt from the initialization file shows the parameters and values in the Settings section:
[Settings]ForceReboot=0DisablePwd=1HideCalendarPwdMenu=1NoServerMail=3DisableCfgUI=1NoDesktopShortcut=1
The Languages SectionIn the Languages section, you can specify additional languages that Oracle Connector for Outlook will support during installation.
Refer to Table D–11 for a list of supported languages.
You can add or delete languages in silent mode, by modifying the Languages section. This is valid as long as you consistently use the same installation package.

Installing Oracle Connector for Outlook
Installing Oracle Collaboration Suite Clients D-25
The OcConfigWizard SectionIn the OcConfigWizard section, you can specify the path where the PRF file is located. the PRF file contains the user profile information. Oracle Connector for Outlook uses the PRF file to configure user profiles.
The following snippet of the initialization file shows the parameters and values in the OcConfigWizard section:
[OcConfigWizard]Path=c:\MyPrfName.prf
D.2.5.3 Upgrading, Maintaining, or Removing Oracle Connector for Outlook in Silent ModeYou can upgrade to a new version of Oracle Connector for Outlook in silent mode. When you run the new installation package in silent mode, it upgrades the installation of Oracle Connector for Outlook to the new version without using the INI settings in the initialization file.
To maintain visual feedback during silent installations, enter the following command:
con_outlook_1011x.exe/s UI=value path
In the preceding command, value represents the UI parameter value and path represents the complete path to the initialization file.
Table D–12 lists the UI parameter values for configuring visual feedback.
To uninstall Oracle Connector for Outlook in silent mode, enter the following command:
Msiexec.exe /x {0AF6C5A4-E29B-4D1E-B6FF-D73F4FBB44DA} /qn
The preceding command passes the necessary command-line switches and values to the Microsoft installer to uninstall Oracle Connector for Outlook in silent mode. This command is the silent-mode equivalent of uninstalling the application through Add or Remove Programs in the Control Panel.
In the command, /x instructs the Microsoft installer to uninstall Oracle Connector for Outlook, whose product code is specified in the brackets {} and /qn specifies a completely silent mode.
D.2.6 Installing Oracle Connector for Outlook with Additional PrivilegesAs an administrator, you can use one of the following methods to enable users to install Oracle Connector for Outlook:
■ Setting the AlwaysInstall Elevated Policy
Table D–12 UI Parameter Values for Configuring Visual Feedback
UI Parameter Values Visual Feedback
1 There is no UI, except for a single dialog box at the end of the installation, indicating that the installation was successful.
2 A basic UI is provided.
3 A basic UI is provided in addition to a modal dialog box at the end of the installation, indicating successful installation. The modal dialog box is not displayed if the user cancels the installation.

Installing Oracle Connector for Outlook
D-26 Oracle Collaboration Suite Installation Guide
■ Performing an Advertised Installation of Oracle Connector for Outlook
■ Deploying the Oracle Connector for Outlook Package Using Group Policy
When using one of these methods, you must use the MSI package included with con_outlook_1011x.exe.
D.2.6.1 Setting the AlwaysInstall Elevated PolicyBy setting the AlwaysInstalledElevated policy on the user’s computer, you give users appropriate installation privileges to install Oracle Connector for Outlook. However, setting this policy can expose the user’s computer to security risks because this method enables the user to access secure locations on the computer.
To configure elevated installation privileges, set the AlwaysInstallElevated value to 1 under the following key in the registry:
HKEY_LOCAL_MACHINE\Software\Policies\Microsoft\Windows\Installer
If Oracle Connector for Outlook is installed with elevated installation privileges as part of an installation performed on each computer, the AlwaysInstallElevated policy can be removed without affecting future repairs to the installation. The user will still be able to repair the Oracle Connector for Outlook installation with elevated privileges.
D.2.6.2 Performing an Advertised Installation of Oracle Connector for OutlookWhen advertising an installation of Oracle Connector for Outlook on a user’s computer, Oracle Connector for Outlook shortcuts are installed, its icons appear in the Start menu, and the file types become registered, but the product's files are not actually installed until the user accesses one of these items to start the application. You can advertise Oracle Connector for Outlook on the user’s computer, but only if one of the following operating systems is running on it:
■ Microsoft Windows 2000
■ Microsoft Windows XP
■ Microsoft Windows 2003
To advertise an installation of the Oracle Connector for Outlook package on each user’s computer, enter the following command:
Msiexec.exe -jm "con_outlook.msi" ALLUSERS=1
When you run this command, the Oracle Connector Configuration Wizard option will be available from the Oracle Connector For Outlook program submenu. You can then run the installation with elevated privileges by selecting this shortcut.
D.2.6.3 Deploying the Oracle Connector for Outlook Package Using Group PolicyYou can use the included tools to install and maintain software applications by using Group Policy on Microsoft Windows 2000 or later.
An administrator can advertise Oracle Connector for Outlook on the local computer by assigning the con_outlook.msi package to users’ computers through Active Directory and Group Policy.
Assigning Oracle Connector for OutlookAssigning Oracle Connector for Outlook is the easiest way to use Group Policy to manage an installation package. With this method, Oracle Connector for Outlook is automatically installed on the computer of the user the first time a designated

Installing Oracle Connector for Outlook
Installing Oracle Collaboration Suite Clients D-27
computer is started and Group Policy is applied. Oracle Connector for Outlook is then available to all users of this computer.
Using this installation setup, users with no administrative privileges can also modify the supported Oracle Connector for Outlook languages by selecting Add or Remove Languages from the Program menu. Users can also repair their installation of Oracle Connector for Outlook, but only an administrator can permanently remove the application.
Applying a Transform to Oracle Connector for OutlookWhen you use Group Policy to assign the con_outlook.msi package, you can still control the installation of Oracle Connector for Outlook with a silent initialization file. This is done by applying a transform (MST file) to the original Oracle Connector for Outlook package (MSI file).
A transform should only change the SILENTINIPATH public property of the original con_outlook.msi package. This public property must include the path to the initialization file. The path can also point a network location.
The structure of the initialization file is the same as the one used for the silent installation.
You can create a transform by using a third-party application like Orca, InstallShield, or Wise Solutions. You can also specify the trans parameter with the admin switch when you extract the con_outlook.msi package with the following command:
con_outlook_1011x.exe/admin image=cd trans=INI_path
In the preceding command, INI_path represents the actual path to the initialization file.
This command creates a transform called silent.msi along with the other language transforms. If the image=msi parameter is used instead, an embedded transform called silent is created.
D.2.7 Using the Configuration Wizard to Configure Oracle Connector for OutlookThe configuration wizard is a standalone application that can be started from the command prompt or from Windows Explorer. The configuration wizard is useful for both administrators and end users because it integrates the creation and configuration of PRF files and profiles.
The following list describes various uses of the configuration wizard:
■ You can start the configuration wizard in interactive mode.
■ You can start the configuration wizard in silent mode. You can use an existing PRF file with all the required settings information to create and configure the first profile for the user.
See Also: Section D.2.5.2 for more information on configuring initialization files.
See Also: Refer to the following URL for a step-by-step guide to software installation and maintenance
http://www.microsoft.com/windows2000/techinfo/planning/management/swinstall.asp

Installing Oracle Connector for Outlook
D-28 Oracle Collaboration Suite Installation Guide
■ As an administrator, you can use the configuration wizard to generate the PRF files to save the updated settings.
■ As an administrator, you can use the configuration wizard to back up the Oracle Connector for Outlook settings for an existing profile and restore these settings later.
■ As a user, you can use the configuration wizard to modify profile settings. You can use the template PRF file distributed by the administrator for this purpose.
The configuration wizard only works with Oracle Connector for Outlook settings. While configuring a profile, it only configures the Oracle Connector for Outlook settings. You can run only one instance of the configuration wizard at a time. If you try to invoke the configuration wizard a second time, the instance previously started will be displayed in the foreground.
The configuration wizard can be invoked in three different modes:
■ Interactive Profile Creation and Configuration Mode
■ Interactive PRF File Creation Mode
■ Silent Profile Creation Mode
D.2.7.1 Interactive Profile Creation and Configuration ModeThe interactive profile creation and configuration mode is the default mode. You can use this mode to specify settings and create or modify a profile.
Use the following command-line options to configure the configuration wizard:
■ Enter L (not case-sensitive) at the command line to specify the language of the configuration wizard. The language that you specify must be installed during the installation of Oracle Connector for Outlook. For example, to run the configuration wizard in German, use the following command:
ocprofwiz -L 1031
■ Enter D (not case-sensitive) at the command line to ensure that Set as Default Profile is selected by default on the final screen of the configuration wizard. The command to do so is:
ocprofwiz -D
Close Microsoft Outlook before starting the configuration wizard. You can configure an existing profile or create a new profile by using the Profile Settings screen of the configuration wizard. However, you can configure only one profile in one session. You can also remove an existing profile on the Profile Settings screen.
You can view or modify settings for the selected user profile on the Service Settings screen. All non-password fields must be filled to enable Next. If Microsoft Outlook is open and you are using the same profile while you are configuring profile settings, the fields on the Service Settings screen are disabled. To configure advanced settings, click More Settings. When the Congratulations screen is displayed, verify that Set as Default Profile is selected. The Outlook Address Book service is added to a new profile by default.
D.2.7.2 Interactive PRF File Creation ModeIn the interactive PRF file creation mode, administrators can create a PRF file by starting with a blank template, or importing information from an existing profile or PRF file.

Installing Oracle Connector for Outlook
Installing Oracle Collaboration Suite Clients D-29
The final PRF file contains user profile information, and settings information, which can be used by the configuration wizard or by the NewProf.exe file.
By default, the PRF file created is a blank template. For security reasons, password fields are not saved in the resulting PRF file if information is imported from an existing profile.
The Outlook Address Book information in the Service List section is added to the output PRF file, depending on the source template used. In the profile template, where information is imported from an existing profile, it depends on whether or not the profile has Outlook Address Book service. In the PRF template, where information is imported from an existing PRF file, it again depends on whether or not the PRF contains an Outlook Address Book information in the Service List section.
You can configure interactive PRF file creation with the following command-line switches:
■ Enter P (not case-sensitive) at the command line to run the configuration wizard in the interactive PRF file creation mode, as follows.
ocprofwiz -P
■ Use the L (not case-sensitive) switch at the command line to specify the language. For example, to run the configuration wizard in the german language, use the following command:
ocprofwiz -P -L 1031
The language you specify must have been installed during the installation of Oracle Connector for Outlook.
Before you start the configuration wizard, close Microsoft Outlook. In the PRF Configuration Settings screen, specify the source template for the PRF file and the location where you want to save the new PRF file.
If you select Empty PRF File as the source template, you must manually specify the settings. If you select Existing PRF File as the source template, initial settings information is imported from the source PRF file. If you select the MAPI profile to import settings from an existing profile, initial settings information is imported from the source profile.
In the Profile Options screen, configure the settings for the General section of the new PRF file. The following parameters show the relationship between the fields in the Profile Options screen and the settings in the General section of the PRF file:
■ ProfileName: Profile Name
■ DefaultStore: Default Store
■ DefaultProfile=Yes/No: Use this profile as the default MAPI profile.
■ Overwrite Profile=Yes/No: Overwrite existing profile with the same name.
You can view or modify Oracle Connector for Outlook settings in the Service Settings screen. To configure advanced settings, click More Settings. The Oracle Connector for Outlook settings information will be saved to the new PRF file. In the Congratulations screen, if View PRF file is selected, then the wizard displays the newly created PRF file. You can then verify the information or modify parameters in the PRF file.
D.2.7.3 Silent Profile Creation ModeAn existing PRF file is used as the template for creating a corresponding profile. When installing Oracle Connector for Outlook in silent mode, you can start the configuration

Installing Oracle Real-Time Collaboration Clients
D-30 Oracle Collaboration Suite Installation Guide
wizard after the installation is complete. The configuration wizard reads information from an existing PRF file and creates a new profile, or modifies an existing profile, with the appropriate settings.
The Outlook Address Book service is imported in to the profile if it is listed in the Service List section. (Limited support is also available for some other types of message services.)
To run the configuration wizard in silent profile creation mode, use the S (not case-sensitive) switch at the command line, as follows:
ocprofwiz -S "C:\Program Files\Oracle\Outlook Connector\source.prf"
When Oracle Connector for Outlook is configured in silent mode, a log file is created to record success and error information. This log file is stored in a temporary folder on the computer. For example:
C:\Documents and Settings\user\Local Settings\Temp\ocfoConfigWizardLog\ocfoConfigWizard.log
In the preceding command, user represents the login name of the local user.
We recommend that you use a PRF file generated by the Oracle Connector for Outlook configuration wizard. Most of the parameters in the PRF file can be configured through the Configuration wizard in the interactive PRF file creation mode. If you modify a value manually, then you must verify that the new value falls within the valid range of values.
D.3 Installing Oracle Real-Time Collaboration ClientsThis section contains the following topics:
■ Section D.3.1, "System Requirements for Oracle Real-Time Collaboration Clients"
■ Section D.3.2, "Installing the Oracle Web Conferencing Client"
■ Section D.3.3, "Installing the RTC Messenger Client"
D.3.1 System Requirements for Oracle Real-Time Collaboration ClientsTable D–13 lists the system requirements for installing Oracle Real-Time Collaboration Clients on various Microsoft Windows platforms.
Notes:
■ If you are configuring Oracle Connector for Outlook in silent mode, then you must check the log file to verify the results. Both, successful imports of information in to the profile and errors is recorded in the log file.
■ The configuration wizard may write some information to the log file in interactive profile creation and configuration mode and interactive PRF file creation mode. Usually, high-level warning messages are displayed and low-level technical information is recorded in the log file.

Installing Oracle Real-Time Collaboration Clients
Installing Oracle Collaboration Suite Clients D-31
D.3.2 Installing the Oracle Web Conferencing ClientTo install the Oracle Web Conferencing client:
1. Uninstall previous Oracle Web Conferencing clients. Select Add or Remove Programs from the Microsoft Windows Control panel and remove the previous Oracle Web Conferencing client versions.
2. Open the Real-Time Collaboration Web Application page and click Home.
3. Click New User.
4. Click the Download icon that is displayed next to Web Conferencing.
5. Follow the onscreen instructions to install the Oracle Web Conferencing client.
D.3.3 Installing the RTC Messenger ClientTo install the RTC Messenger client:
1. Uninstall previous Oracle Web Conferencing clients. Select Add or Remove Programs from the Microsoft Windows Control panel and remove the previous Oracle Web Conferencing client versions.
2. Open the Real-Time Collaboration Web Application page and click Login.
3. Enter your Single Sign-on login and password.
Table D–13 System Requirements for Installing Oracle Real-Time Collaboration Client
Item Requirement
Operating Systems ■ Microsoft Windows 98
■ Microsoft Windows NT 4.0
■ Microsoft Windows 2000
■ Microsoft Windows XP
Privileges You must have administrative privileges on your computer to install Real-Time Collaboration clients.
Screen Resolution 1024 x 768 pixels (required for Web Conferencing only)
Browser Any one of the followings:
■ Internet Explorer 5.5 or later
■ Netscape 4.75 or later
■ Mozilla 1.0 or later
■ Firefox 1.1 or later
Notes:
■ All listed browsers can perform tasks in the Real-Time Collaboration Web Application pages, and use the conference whiteboard and desktop sharing features. Netscape 4.X browsers (prior to Netscape 4.75) can use most Web Application features, but they cannot use the Schedule tab to schedule a conference.
■ Only Internet Explorer 5.5 browser or later can share documents in document presentation mode, stream voice data in a conference over PSTN, or play back a recorded conference. For this, JVM must be installed and enabled.
Java Virtual Machine ■ Microsoft JVM 1.1.4 build 3740 or higher
■ Sun JVM 1.3.1 or higher

Installing Oracle Real-Time Collaboration Clients
D-32 Oracle Collaboration Suite Installation Guide
4. Click Download RTC Messenger.
5. Click the Download icon that is displayed next to the Oracle RTC Messenger.
6. Follow the instructions on the screen to install the RTC Messenger client. After successful installation of the RTC Messenger client, you will be prompted to sign in.
7. Enter your Single Sign-on login and password, and click OK to start the RTC Messenger.

Using Command-Line Options and Variables E-1
EUsing Command-Line Options and Variables
This appendix explains the command-line options and variables that can be used to run the Oracle Universal Installer for installing Oracle Collaboration Suite. It contains the following topics:
This section contains the following topics:
■ Section E.1, "Running Prerequisite Checks"
■ Section E.2, "Starting Oracle Universal Installer"
■ Section E.3, "Specifying Custom Ports"
E.1 Running Prerequisite ChecksYou can just run the prerequisite checks without having to install Oracle Collaboration Suite components by using the following command:
./runInstaller -prereqChecker PREREQ_CONFIG_LOCATION=path_to_/stage/prereq -entryPoint entry_point
In the preceding syntax, the value of entry_point can be any of the following:
■ oracle.ocs.infrastructure_Infrastructure: Used for checking the prerequisites for Oracle Collaboration Suite 10g Infrastructure.
■ oracle.ocs.infrastructure_Infrastructure_ID: Used for checking the prerequisites for Infrastructure.
■ oracle.ocs.infrastructure_Infrastructure_DB: Used for checking the prerequisites for Oracle Collaboration Suite 10g Database.
■ oracle.ocs.infrastructure_Infrastructure_EnableDB: Used for checking the prerequisites for enabling Oracle Collaboration Suite Database in an existing database.
■ oracle.ocs.midtier_Portals: Used for checking the prerequisites for Oracle Collaboration Suite portal.
■ oracle.ocs.onebox_Complete: Used for checking the prerequisites for Infrastructure and Oracle Collaboration Suite 10g Applications.
E.2 Starting Oracle Universal InstallerYou can start the Oracle Universal Installer by using the following command:
runInstaller [options] [CommandLineVariable=Value]

Specifying Custom Ports
E-2 Oracle Collaboration Suite Installation Guide
In the preceding syntax, [options] can have the following values:
■ -help: Used for displaying the help topics for using the command.
■ -silent: Used for silent mode operations. The input parameters can include a response file name or list of command-line variable value pairs.
■ -responseFile <Path>: Used for specifying the response file name and path.
■ -formCluster: Used for installing the Oracle clusterware to form the cluster.
■ -remoteshell <Path>: Used only for installing clusters. This parameter specifies the path to the remote shell program on the local cluster node.
■ -remotecp <Path>: Used only for installing clusters. This parameter specifies the path to the remote copy program on the local cluster cluster.
■ -record -destinationFile <Path>: Used for the record mode operation. This parameter specifies the destination file path, where information is recorded.
■ -deinstall: Used for uninstallation operations.
■ -debug: Used for retrieving the debug information from OUI.
■ -ignoreSysPrereqs: Used for ignoring the results of system prerequisite checks.
■ -executeSysPrereqs: Used for executing system prerequisite checks and exiting. A subset of the checks described in Section 2.10 will be performed by this option.
■ -paramFile: Used for specifying the location of oraparam.ini file to be used by Oracle Universal Installer.
■ -clone: Used for creating an Oracle_Home copy that matches its current environment.
■ -force: Used for allowing silent mode installation in to a nonempty directory.
■ -noconsole: Used for suppressing the display of messages to console.
■ -removeAllPatches: Used for removing all interim patches from the Oracle_Home directory.
■ -ignorePatchConflicts: Used for ignoring all conflicts with existing interim patches during an upgrade. The conflicting interim patches are removed from the Oracle_Home directory.
■ -addNode: Used for adding nodes to the installation.
■ -removeHome: Used for removing Oracle_Home directories from the Oracle Universal Installer inventory.
E.3 Specifying Custom PortsFor Oracle Collaboration Suite installation, you can specify custom port numbers in the following two ways:
■ By using the Ports Configuration Options Screen during the installation
■ By using the staticports.ini file
The Ports Configuration Screen enables you to select custom port numbers only for a few well-known ports. On the other hand, the staticports.ini file provides a wider range of the ports that can be used during installation.
Specifying Custom Ports
Using Command-Line Options and Variables E-3
A sample staticports.ini file is located in the /response directory of the Oracle Collaboration Suite DVD.
The command-line options used to specify staticports.ini file are as follows:
■ Use the following command for single-computer installation:
./runInstaller oracle.ocs.onebox:s_staticPorts=path_to_your_ini_file
■ Use the following command for all types of Infrastructure installations:
./runInstaller oracle.ocs.infrastructure:s_staticPorts=path_to_your_ini_file
■ Use the following command for Applications installation:
./runInstaller oracle.ocs.midtier:s_staticPorts=path_to_your_ini_file
Note: If you pass the path to the staticports.ini file as a parameter while running the runInstaller command, then the Ports Configuration Options screen will not appear during the installation.

Specifying Custom Ports
E-4 Oracle Collaboration Suite Installation Guide

URLs for Components F-1
FURLs for Components
Use the URLs and login IDs shown in Table F–1 to access components after installation.
The URLs in the table use the default ports. The components in your environment might use different ports. To determine the port numbers for components, refer to the ORACLE_HOME/install/portlist.ini file.
Table F–1 URLs for Components
Component URL or Path Entry in portlist.ini Login and Password
Oracle Collaboration Suite Welcome Pages
http://host:7777/welcome/index.jsp Oracle HTTP Server port or Web Cache Listen port
Not applicable
Oracle HTTP Server http://host:7778 (with Web Cache) Oracle HTTP Server Listen port
Not applicable
OracleAS Web Cache Manager
http://host:4000/webcacheadmin Web Cache Administration port
administrator or ias_admin
Password: use the password for ias_admin that you supplied during installation.
OracleAS Portal http://host:7777/pls/portal Web Cache Listen port
portal
Password: use the password for ias_admin that you supplied during installation.
OracleAS UDDI Registry
http://host:7777/uddi Web Cache Listen port
Not applicable
Oracle Application Server Single Sign-On Administration Pages
http://host:7777/pls/orasso Oracle HTTP Server Listen port
orcladmin
Password: The default password for orcladmin is the same as the password for ias_admin, which you specified during installation.
Oracle Enterprise Manager Application Server Control
http://host:1810 Application Server Control port
ias_admin
Password: Use the ias_admin password you supplied during installation.

F-2 Oracle Collaboration Suite Installation Guide
Oracle Internet Directory Manager
ORACLE_HOME/bin/oidadmin Not Applicable orcladmin
Password: The default password for orcladmin is the same as the password for ias_admin, which you specified during installation.
Oracle Delegated Administration Services
http://host:7777/oiddas Oracle HTTP Server Listen port
orcladmin
Password: The default password for orcladmin is the same as the password for ias_admin, which you specified during installation.
Oracle Application Server Certificate Authority Administration Interface
http://host:4400/oca/admin Oracle Certificate Authority SSL Server Authentication port
Certificate Authority Administrator
Password: Use the password you supplied for the Oracle Application Server Certificate Authority administrator during installation.
Oracle Mail User URL:
http://host:7777/um
Admin URL:
http://host:7777/um
None For users:
orcladmin
Password: The default password for orcladmin is the same as the password for ias_admin, which you specified during installation.
Oracle Calendar Server
User URL:
http://host:7777/ocas-bin/ocas.fcgi?sub=web
Admin URL:
http://host:7777/ocad-bin/ocad.cgi?object=nodeadm
None For administration:
orcladmin
Password: The default password for orcladmin is the same as the password for ias_admin, which you specified during installation.
Oracle Content Services
User URL:
http://host:7777/content/app/
None For administration:
orcladmin
Password: The default password for orcladmin is the same as the password for ias_admin, which you specified during installation.
Table F–1 (Cont.) URLs for Components
Component URL or Path Entry in portlist.ini Login and Password

URLs for Components F-3
Oracle Discussions User URL:
http://host:7777/discussions/app
None For administration:
orcladmin
Password: The default password for orcladmin is the same as the password for ias_admin, which you specified during installation.
Oracle Mobile Collaboration
Admin URL:
http://host:7777/webtool/login.uix
Web Cache Listen port
Oracle Real-Time Collaboration
User URL:
http://host:7777/imtapp/app/prelogin.uix
Admin URL:
http://host:7777/imtapp/app/prelogin.uix
None For administration:
orcladmin
Password: The default password for orcladmin is the same as the password for ias_admin, which you specified during installation.
Oracle Collaboration Suite Search
User URL:
http://host:7777/search
Admin URL:
http://host:7777/search
None For administration:
orcladmin
Password: The default password for orcladmin is the same as the password for ias_admin, which you specified during installation.
Oracle Voicemail & Fax
Admin URL:
http://host:7777/um/
None
Oracle Web Access Client
Admin URL:
http://host:7777/ocsclient
None For administration:
orcladmin
Password: The default password for orcladmin is the same as the password for ias_admin, which you specified during installation.
Oracle Workspaces Admin URL:
http://host:7777/workspaces
None For administration:
orcladmin
Password: The default password for orcladmin is the same as the password for ias_admin, which you specified during installation.
Table F–1 (Cont.) URLs for Components
Component URL or Path Entry in portlist.ini Login and Password

F-4 Oracle Collaboration Suite Installation Guide

Default Port Numbers for Oracle Collaboration Suite Components G-1
GDefault Port Numbers for Oracle
Collaboration Suite Components
By default, the installer assigns port numbers to components from a set of default port numbers. This appendix contains a list of these port numbers.
To use a different set of port numbers, create a file called staticports.ini, in which you list the port numbers that you want to use.
Refer to Section 2.4.3 for details.
G.1 Method of Assigning Default Port NumbersThe installer assigns default port numbers to each component using the following method:
1. The installer checks if the default port number is in use. If it is not in use, the installer assigns it to the component.
2. If the default port number is already in use by an Oracle product or by any running application, the installer tries the lowest number in the port number range. It keeps trying the port numbers in the range until it finds one that is available.
G.2 Default Port NumbersTable G–1 lists the default port numbers for components. The last column, Name in staticports.ini, specifies the component name as it appears in the staticports.ini file, which enables you to override the default port numbers. Refer to Section 2.4.3 for details.
Table G–1 Default Port Numbers and Ranges (Grouped by Component)
Component Default PortPort Number Range Name in staticports.ini
Oracle Process Manager and Notification Server (OPMN)
Oracle Notification Server Request Port
6003 6003 to 6099 Oracle Notification Server Request port
Oracle Notification Server Local Port 6100 6100 to 6199 Oracle Notification Server Local port

Default Port Numbers
G-2 Oracle Collaboration Suite Installation Guide
Oracle Notification Server Remote Port
6200 6200 to 6299 Oracle Notification Server Remote port
Containers for J2EE (OC4J)
OC4J AJP 3301 3301 to 3400 Cannot be set through staticports.ini
OC4J RMI 3201 3201 to 3300 Cannot be set through staticports.ini
JMS 3701 3701 to 3800 Cannot be set through staticports.ini
IIOP 3401 3401 to 3500 Cannot be set through staticports.ini
IIOPS1 3501 3501 to 3600 Cannot be set through staticports.ini
IIOPS2 3601 3601 to 3700 Cannot be set through staticports.ini
Oracle HTTP Server
Listener (OracleAS Web Cache not configured)
Applications tier: 80
Infrastructure: 7777
7777 to 7877 Oracle HTTP Server Listen port
Oracle HTTP Server Listener (SSL) Applications tier: 443
Infrastructure: 4443
4443 to 4543 Oracle HTTP Server Listen (SSL) port
Oracle HTTP Server Listener (non-SSL, OracleAS Web Cache configured)
Applications tier: 80
Infrastructure: 7777
7777 to 7877 Oracle HTTP Server port
Oracle HTTP Server Listener (SSL, OracleAS Web Cache configured)
Applications tier: 443
Infrastructure: 4443
4443 to 4543 Oracle HTTP Server SSL port
Java Object Cache 7000 7000 to 7099 Java Object Cache port
DCM Java Object Cache 7100 7100 to 7199 DCM Java Object Cache port
SOAP server 9998 9998 to 9999 Cannot be set through staticports.ini
Port Tunneling 7501 7501 to 7599 Cannot be set through staticports.ini
Oracle HTTP Server Diagnostic port 7200 7200 to 7299 Oracle HTTP Server Diagnostic port
OracleAS Portal
OracleAS Portal Uses the same port as Oracle HTTP Server
None Uses the same port as Oracle HTTP Server
OracleAS Single Sign-On
Oracle Application Server Single Sign-On
Uses the same port as Oracle HTTP Server
None Uses the same port as Oracle HTTP Server
Table G–1 (Cont.) Default Port Numbers and Ranges (Grouped by Component)
Component Default PortPort Number Range Name in staticports.ini

Default Port Numbers
Default Port Numbers for Oracle Collaboration Suite Components G-3
OracleAS Web Cache
OracleAS Web Cache - HTTP Listener 80 7777 to 7877 Web Cache HTTP Listen port
OracleAS Web Cache - HTTP Listener (SSL)
443 4443 to 4543 Web Cache HTTP Listen (SSL) port
OracleAS Web Cache Administration 4000 4000 to 4300 Web Cache Administration port
OracleAS Web Cache Invalidation 4001 4000 to 4300 Web Cache Invalidation port
OracleAS Web Cache Statistics 4002 4000 to 4300 Web Cache Statistics port
Oracle Enterprise Manager Application Server Control
Application Server Control 1156 1810 to 1829 Application Server Control port
Oracle Management Agent 1157 1830 to 1849 Cannot be set through staticports.ini
Application Server Control (RMI) 1850 1850 to 1869 Application Server Control RMI port
Application Server Control (SSL) 1810 1810 to 1829 This port number is assigned after installation, when you configure Application Server Control for SSL.
Refer to the Oracle Collaboration Suite Administrator's Guide for details.
Oracle Enterprise Manager Console HTTP port (orcl)
5500 None Cannot be set through staticports.ini
Oracle Enterprise Manager Agent port (orcl)
1831 None Cannot be set through staticports.ini
Log Loader 44000 44000 to 44099 Log Loader port
Oracle Internet Directory
Oracle Internet Directory 389 3060 to 3129 Oracle Internet Directory port
Oracle Internet Directory (SSL) 636 3130 to 3199 Oracle Internet Directory (SSL) port
OracleAS Certificate Authority
Server Authentication Virtual Host 4400 4400 to 4419 Oracle Certificate Authority SSL Server Authentication port
Mutual Authentication Virtual Host 4401 4400 to 4419 Oracle Certificate Authority SSL Mutual Authentication port
Table G–1 (Cont.) Default Port Numbers and Ranges (Grouped by Component)
Component Default PortPort Number Range Name in staticports.ini

Default Port Numbers
G-4 Oracle Collaboration Suite Installation Guide
Oracle Mail
Oracle Mail 5100 5100 to 5200 Cannot be set through staticports.ini
IMAP4 143 Fixed Oracle Mail IMAP4 port
IMAP4 (SSL) 993 Fixed Oracle Mail IMAP4 Secure port
POP3 110 Fixed Oracle Mail POP3 port
POP3 (SSL) 995 Fixed Oracle Mail POP3 Secure port
SMTP 25 Fixed Oracle Mail SMTP port
NNTP 119 Fixed Oracle Mail NNTP port
NNTP (SSL) 563 Fixed Oracle Mail NNTP Secure port
Oracle Calendar
Oracle Calendar 5730 Fixed Oracle Calendar server
Oracle Calendar Server Manager 5734 Fixed Oracle Calendar server manager (CSM)
Oracle Content Services
Oracle Content Services Node Manager
Dynamically assigned 53140 to 53899 Cannot be set through staticports.ini
Oracle Content Services HTTP Node Manager
Dynamically assigned 53140 to 53899 Cannot be set through staticports.ini
Oracle Mobile Collaboration
Wireless Notification Dispatcher Calendar
9100 9100 to 9199 Wireless PIM Notification Dispatcher
Oracle Real-Time Collaboration
Redirector Server Any Not Applicable RTC Redirector Server port
Redirector to Multiplexer 1025 Any RTC Redirector MX port
Redirector to Oracle Presence Server 5222 5222 RTC Redirector XMPP port
Redirector to Presence Server (SSL) 5223 5223 RTC Redirector XMPP Secure port
Process Manager 1027 Any RTC process monitor port
Oracle Voicemail & Fax
Table G–1 (Cont.) Default Port Numbers and Ranges (Grouped by Component)
Component Default PortPort Number Range Name in staticports.ini

Default Port Numbers
Default Port Numbers for Oracle Collaboration Suite Components G-5
Netmerge CCS 2019 2019 to 2020 Cannot be set through staticports.ini
Voicemail & Fax Services None 7001 to 8000 Cannot be set through staticports.ini
SMDI Monitor Service 7000 7001 to 8000 Cannot be set through staticports.ini
Table G–1 (Cont.) Default Port Numbers and Ranges (Grouped by Component)
Component Default PortPort Number Range Name in staticports.ini

Default Port Numbers
G-6 Oracle Collaboration Suite Installation Guide

Deinstallation and Reinstallation H-1
HDeinstallation and Reinstallation
This appendix guides you through the deinstallation and reinstallation process for Oracle Collaboration Suite.
■ Section H.1, "The Deconfig Tool"
■ Section H.2, "Overview of the Deinstallation Procedure"
■ Section H.3, "Deinstalling Applications Tiers"
■ Section H.4, "Deinstalling Oracle Collaboration Suite Database"
■ Section H.5, "Deinstalling Oracle Collaboration Suite Infrastructure"
■ Section H.6, "Deinstalling a Single-Computer Installation"
■ Section H.7, "Harmless Errors in the Log File"
■ Section H.8, "Cleaning Up Oracle Collaboration Suite Processes"
■ Section H.9, "Reinstallation"
H.1 The Deconfig ToolYou must run the Deconfig tool as a part of the deinstallation procedure. This tool removes entries in OracleAS Metadata Repository and Oracle Internet Directory for the Oracle Collaboration Suite instance that you want to deinstall.
To run the Deconfig tool, use the following commands.
prompt> cd $ORACLE_HOME/binprompt> ./ocsdeconfig.sh [-u oid_user] [-w password]
If you run the tool without any parameters, it prompts you for the necessary information.
Running the ./ocsdeconfig.sh command calls the ocsdeconfig.pl script, which passes the Oracle Internet Directory information to the DeconfigureWrapper.
Note: You will need to set the ORACLE_HOME and ORACLE_SID variables before starting the deinstallation process.

Overview of the Deinstallation Procedure
H-2 Oracle Collaboration Suite Installation Guide
H.1.1 Parameters
-u oid_userSpecify the Oracle Internet Directory user.
You can specify the Oracle Internet Directory user using the simple name of the user or the distinguished name (DN) of the user. For example, the simple name of the user can be [email protected], which corresponds to the DN cn=jdoe,l=us,dc=mycompany,dc=com.
The Oracle Internet Directory user must have privileges for deinstalling the components that are configured in the Oracle Collaboration Suite instance that you want to deinstall. These privileges are the same as for installing and configuring the component.
For example, if you are deinstalling an Oracle Collaboration Suite 10g Infrastructure instance that is running Oracle Delegated Administration Services and Oracle Application Server Single Sign-On, make sure the user has privileges to configure these components.
To run the tool as the Oracle Internet Directory superuser, be sure to use cn=orcladmin, and not just orcladmin. These are two different users.
-w passwordSpecify the password for the Oracle Internet Directory user.
-dbp sys_db_passwordSpecify the password for the SYS user in the database. This is the OracleAS Metadata Repository database used by Oracle Internet Directory.
This value is required only if you are deinstalling an Identity Management-only instance that has Oracle Internet Directory configured.
If you specify this parameter and it is not needed, the password value is simply not used.
-help or -hYou can also run the Deconfig tool with the -h or -help parameter to display help:
prompt> $ORACLE_HOME/perl/bin/perl ocsdeconfig.pl -h - or -prompt> $ORACLE_HOME/perl/bin/perl ocsdeconfig.pl -help
H.1.2 Log Files Generated by the Deconfig ToolThe Deconfig tool writes its log file to the ORACLE_HOME/cfgtoollogs/OCSDeconfigureWrapper.log file.
H.2 Overview of the Deinstallation ProcedureFollow these high-level steps to deinstall Oracle Collaboration Suite (the details are provided in later sections):
1. Deinstall Applications tier instances first.
a. Run the Deconfig tool on the instance.
b. Run the installer and click the Deinstall Products button.

Overview of the Deinstallation Procedure
Deinstallation and Reinstallation H-3
c. Clean up any remaining files.
2. Then deinstall the Infrastructure instances.
a. Run the installer and click the Deinstall Products button.
b. Clean up any remaining files.
c. Delete the Oracle home.
Notes:
■ If you used Metadata Repository Creation Assistant to install the OracleAS Metadata Repository on an existing database, and you want to remove the OracleAS Metadata Repository, select the Remove option in Metadata Repository Creation Assistant. You can also use Metadata Repository Creation Assistant to remove the registration from Oracle Internet Directory.
■ If you remove an Infrastructure instance, all Applications tier instances that depend on that Infrastructure will no longer work.
If you want to keep the Applications tier instances, you can configure them to use services from another Infrastructure. Refer to the Oracle Collaboration Suite Administrator's Guide for details.
Items to Remove or Clean UpTo deinstall Oracle Collaboration Suite instances, you must clean up the items listed in Table H–1. The procedures are described later in this appendix.
Note: If you plan to deinstall Oracle Collaboration Suite using Oracle Universal Installer, you will not be able to select Oracle Collaboration Suite components individually. All Oracle Collaboration Suite components, Oracle Collaboration Suite Infrastructure, Oracle Collaboration Suite Database, and Oracle Collaboration Suite Applications, will be deinstalled.
Table H–1 Items to Deinstall
Item to Clean Up Tool to Use
Files from the Oracle home directory Installer
If the installer does not remove all the files, you can remove the remaining files using the rm command.
Entries for the deleted instance in the Inventory directory
Installer
Instance name from farm page Installer
Entries for the deleted instance in the /var/opt/oracle or /etc directory
You must remove the entries manually. Refer to:
■ Step 7 on page H-5 if you are deinstalling Applications tiers.
■ Step 7 on page H-6 if you are deinstalling Oracle Collaboration Suite Database.
■ Step 8 on page H-8 if you are deinstalling Infrastructure.
Entries for the deleted instance in Oracle Internet Directory
Deconfig tool
Deinstalling Applications Tiers
H-4 Oracle Collaboration Suite Installation Guide
The installer does not permit custom deinstallation of individual components.
H.3 Deinstalling Applications TiersThe following component-specific deconfiguration occurs when you deinstall an Applications tier instance:
■ Oracle Real-Time Collaboration
■ Oracle Discussions
■ Oracle Workspaces
■ Oracle Collaboration Suite Web Access
■ Oracle Mobile Collaboration
■ Oracle Content Services
■ Oracle Calendar Server
■ Oracle Calendar Web client
■ Oracle Mail
■ Oracle Collaboration Suite Search
To deinstall an Applications tier:
1. Log in as the operating system user who installed the instance you want to deinstall.
2. Stop all processes associated with the instance you want to deinstall.
Refer to Oracle Collaboration Suite Administrator's Guide for details on how to stop the processes.
3. Run the Deconfig tool.
prompt> cd $ORACLE_HOME/binprompt> ./ocsdeconfig.sh [parameters]
Refer to Section H.1 for parameter details.
4. Start the installer.
prompt> $ORACLE_HOME/oui/bin/runInstaller
5. Follow these steps in the installer:
a. Welcome screen: Click Deinstall Products.
b. Inventory screen: Select the instance you want to deinstall, and click Remove.
c. Confirmation screen: Verify the components selected for deinstallation. Click Yes to continue.
d. Deinstallation Progress screen: Monitor the progress of the deinstallation.
e. Exit the installer when the deinstallation is complete.
Note: If you are running this deinstallation procedure on Solaris 5.10, then you must run the installer from the Oracle Collaboration Suite DVD and not from $ORACLE_HOME/oui/bin.

Deinstalling Oracle Collaboration Suite Database
Deinstallation and Reinstallation H-5
6. Delete any remaining files in the Oracle home directory of the deleted instance.
prompt> rm -rf $ORACLE_HOME
7. Remove the line for the deinstalled Applications tier from the /etc/oratab file.
Toward the end of the file, you should see lines that specify the Oracle home directory. Remove the line for the Oracle home that you deinstalled. The line would look like the following:
*:/$ORACLE_HOME/infra:N
In the preceding example, ORACLE_HOME is the Oracle home of the Oracle Collaboration Suite Database.
H.4 Deinstalling Oracle Collaboration Suite DatabaseYou can use the ocsdeconfig tool for deinstalling Oracle Collaboration Suite.
The following component-specific deconfiguration occurs when you deinstall Oracle Collaboration Suite using the ocsdeconfig tool:
■ Oracle Content Services
■ Oracle Collaboration Suite Web Access
■ Oracle Voicemail & Fax (Windows only)
■ Oracle Mail
■ Oracle Workspaces
■ Oracle Calendar Server
■ Oracle Real-Time Collaboration
To deinstall Oracle Collaboration Suite in silent mode:
1. Log in as the operating system user who installed the instance you want to deinstall.
2. Stop all processes associated with the instance you want to deinstall.
Refer to the Oracle Collaboration Suite Administrator's Guide for details on how to stop the processes.
3. Run the Deconfig tool.
prompt> cd $ORACLE_HOME/binprompt> ./ocsdeconfig.sh -u oid-user-name –w password
Refer to Section H.1 for parameter details.
4. Start the installer.
prompt> $ORACLE_HOME/oui/bin/runInstaller
Note: Note that Portal entries in Oracle Internet Directory are not removed by the Deconfig tool or the installer.

Deinstalling Oracle Collaboration Suite Infrastructure
H-6 Oracle Collaboration Suite Installation Guide
5. Follow these steps in the installer.
a. Welcome screen: Click Deinstall Products.
b. Inventory screen: Select the instance you want to deinstall, and click Remove.
c. Confirmation screen: Verify the components selected for deinstallation. Click Yes to continue.
d. Deinstallation Progress screen: Monitor the progress of the deinstallation.
e. Exit the installer when the deinstallation is complete.
6. Delete any remaining files in the Oracle home directory of the deleted instance.
prompt> rm -rf $ORACLE_HOME
7. Remove the line for the deinstalled Oracle Collaboration Suite Database from the /etc/oratab file.
Toward the end of the file, you should see lines that specify the Oracle home directory. Remove the line for the Oracle home that you deinstalled. The line would look like the following:
SID:/$ORACLE_HOME/infra:N*:/$ORACLE_HOME/infra:N
In the preceding example, SID is the system identifier for the Oracle Collaboration Suite Database that you have removed and ORACLE_HOME is the Oracle home of the Oracle Collaboration Suite Database.
H.5 Deinstalling Oracle Collaboration Suite InfrastructureThis section describes how to deinstall Infrastructure instances.
H.5.1 Deinstallation OrderThe Infrastructure instance could contain all the Infrastructure components, or it could contain only a subset of the components, because you have a distributed Infrastructure installation. Here are some common scenarios and their deinstallation order:
If you have an Identity Management + OracleAS Metadata Repository instance, you have only one instance to deinstall.
If you have a distributed Identity Management:
1. Deinstall the instance or instances that are running Oracle Application Server Single Sign-On, Oracle Delegated Administration Services, Oracle Directory Integration and Provisioning, and Oracle Application Server Certificate Authority.
2. Deinstall the instance running Oracle Internet Directory.
Note: If you are running this deinstallation procedure on Solaris 5.10, then you must run the installer from the Oracle Collaboration Suite DVD and not from $ORACLE_HOME/oui/bin.
Note: Note that OracleAS Portal entries in Oracle Internet Directory are not removed by the Deconfig tool or the installer.

Deinstalling Oracle Collaboration Suite Infrastructure
Deinstallation and Reinstallation H-7
H.5.2 Deinstallation StepsThe deinstallation steps for Infrastructure are as follows:
1. Log in as the operating system user who installed the instance you want to deinstall.
2. If Oracle Application Server Certificate Authority is configured on the instance you want to deinstall, run the following commands:
prompt> $ORACLE_HOME/oca/bin/ocactl stopprompt> $ORACLE_HOME/oca/bin/cmdeinst ocaAdminPassword oidAdminPassword
Replace ocaAdminPassword with the password of the Oracle Application Server Certificate Authority administrator.
Replace oidAdminPassword with the password of the Oracle Internet Directory user who installed Oracle Application Server Certificate Authority. The user must belong to the following groups:
■ Trusted Application Admins
■ iAS Admins
■ Repository Owners group for the metadata repository used by Oracle Application Server Certificate Authority
The ocactl stop command stops OCA services. The cmdeinst command performs the following actions:
■ Removes Oracle Application Server Certificate Authority entries from Oracle Internet Directory
■ Removes data from tables in the oca schema
■ Removes Oracle Application Server Certificate Authority files created by the Oracle Application Server Certificate Authority Configuration Assistant during installation
3. If Oracle Directory Integration and Provisioning is configured and running in the instance you want to deinstall, stop the Oracle Directory Integration and Provisioning server.
Ensure that Oracle Internet Directory is running.
You can stop Oracle Directory Integration and Provisioning by running the following command:
prompt> cd $ORACLE_HOME/binprompt> oidctl connect=db_connect_string server=odisrv instance=1 stop
In the preceding command, db_connect_string is the service name as listed in the file ORACLE_HOME/network/admin/tnsnames.ora.
For any additional Oracle Directory Integration and Provisioning servers that you started, you must stop them too. Refer to the instructions in the Oracle Identity Management Integration Guide.
4. If Oracle Internet Directory is configured as a replica, you must delete this node from the directory replication group (DRG). Refer to Chapter 25, "Oracle Internet Directory Replication Administration", in the Oracle Internet Directory Administrator's Guide for steps.
5. Start the installer.
prompt> $ORACLE_HOME/oui/bin/runInstaller

Deinstalling a Single-Computer Installation
H-8 Oracle Collaboration Suite Installation Guide
6. Follow these steps in the installer.
a. Welcome screen: Click Deinstall Products.
b. Inventory screen: Select the instance you want to deinstall, and click Remove.
c. Confirmation screen: Verify the components selected for deinstallation. Click Yes to continue.
d. Deinstallation Progress screen: Monitor the progress of the deinstallation.
e. Exit the installer when the deinstallation is complete.
7. Delete any remaining files in the Oracle home directory of the deleted instance.
prompt> rm -rf $ORACLE_HOME
8. Remove lines for the deinstalled infrastructure instance from the /etc/oratab file.
Toward the end of the file, you should see lines that specify the Oracle home directory. If you are deinstalling an infrastructure instance that contains a metadata repository, there will be two lines in the file:
■ One line that begins with a *
■ One line that begins with the database SID
Remove both lines.
For example, if the infrastructure instance is installed in /private1/infra, and it includes a metadata repository whose SID is orcl, the lines would look like the following:
orcl:/private1/infra:N*:/private1/infra:N
H.6 Deinstalling a Single-Computer InstallationPerform the following tasks to deinstall a Oracle Collaboration Suite Infrastructure and Applications installation on a single computer:
1. Log in as the operating system user who installed the instance you want to deinstall.
2. Start the installer, as follows:
prompt> $ORACLE_HOME/oui/bin/runInstaller
Note: If you are running this deinstallation procedure on Solaris 5.10, then you must run the installer from the Oracle Collaboration Suite DVD and not from $ORACLE_HOME/oui/bin.
Note: If you are running this deinstallation procedure on Solaris 5.10, then you must run the installer from the Oracle Collaboration Suite DVD and not from $ORACLE_HOME/oui/bin.

Cleaning Up Oracle Collaboration Suite Processes
Deinstallation and Reinstallation H-9
3. On the Select Installation Method screen, select the Advanced Installation option and click Next.
4. On the Specify File Locations screen, click Installed Products.
5. The Inventory dialog box appears. For a single-computer installation, you will find the following items under Oracle Homes:
■ onebox_apps
■ onebox_infra
■ onebox
These items should be removed in the order they are listed in the preceding list.
6. Select onebox_apps and click Remove. Next, select onebox_infra and click Remove. Finally, select onebox and click Remove.
7. Exit the Installer.
H.7 Harmless Errors in the Log FileIf you get the following "unable to delete file" and "unable to find make file" errors in the oraInstalltimestamp.err file after you deinstall Web Cache or Oracle Mobile Collaboration instances, these are harmless error messages.
Ignoring Exception during de-install oracle.sysman.oii.oiil.OiilDeinstallException:An error occurred during runtime. oracle.sysman.oii.oiil.OiilDeinstallException:An error occurred during runtime....Ignoring Exception during de-install oracle.sysman.oii.oiil.OiilDeinstallException:Unable to delete file /home/j2ee/sysman/emd/targets.xmloracle.sysman.oii.oiil.OiilDeinstallException: Unable to delete file/home/j2ee/sysman/emd/targets.xmlat instantiateFileEx.deinstallAction(instantiateFileEx.java:935)...Ignoring Exception during de-installoracle.sysman.oii.oiil.OiilDeinstallException:Unable to find make file:/home/j2ee/network/lib/ins_net_client.mkoracle.sysman.oii.oiil.OiilDeinstallException: Unable to find make file:/home/j2ee/network/lib/ins_net_client.mkat ssmakeux.deinstallAction(ssmakeux.java:246)...
H.8 Cleaning Up Oracle Collaboration Suite ProcessesIf you forgot to shut down Oracle Collaboration Suite processes before starting the installation, you must stop the processes, because the files for these processes are deleted. To check for processes that are still running, run the ps command:
prompt> ps -ef
To stop a process, use the kill command:
prompt> kill -9 process_id
You can determine the process_id from the ps command.
If you need to shut down the dcmctl shell process, then exit the shell by typing exit.

Reinstallation
H-10 Oracle Collaboration Suite Installation Guide
H.9 ReinstallationThe installer does not allow reinstallation of an Oracle Collaboration Suite instance in a directory that already contains an Oracle Collaboration Suite instance. To reinstall Oracle Collaboration Suite in the same directory, you must deinstall and then install it.

Troubleshooting I-1
ITroubleshooting
This appendix describes common installation problems and solutions.
This appendix contains the following sections:
■ Section I.1, "Verifying Requirements"
■ Section I.2, "Troubleshooting User Interface Problems"
■ Section I.3, "Troubleshooting Installation Errors"
■ Section I.4, "Troubleshooting Configuration Assistants"
■ Section I.5, "Troubleshooting Administration Errors After Installation"
■ Section I.6, "Troubleshooting Oracle Collaboration Suite Web Client Configuration"
■ Section I.7, "Troubleshooting Oracle Real Application Clusters"
■ Section I.8, "Need More Help?"
I.1 Verifying RequirementsReview the following information before performing any of the troubleshooting steps in this appendix:
■ Ensure that the computer meets the requirements specified in Chapter 2.
■ Ensure that you have completed all of the preinstallation tasks specified in Chapter 3.
I.1.1 Checking DependenciesIf you are installing Oracle Collaboration Suite Applications, check that the Infrastructure that you want to associate the Oracle Collaboration Suite Applications with is running during installation.
I.1.2 Reading the Release NotesRead the Oracle Collaboration Suite Release Notes for Solaris Operating System prior to installing Oracle Collaboration Suite. The release notes are available with the platform-specific documentation. The most current version of the release notes is available on Oracle Technology Network at
http://www.oracle.com/technology/index.html
Troubleshooting User Interface Problems
I-2 Oracle Collaboration Suite Installation Guide
I.2 Troubleshooting User Interface Problems If you are serving non-English content and forgot to install additional languages as explained in Section 1.8, the user interface might not be displayed properly because the required fonts were not installed. You can fix this by installing the fonts from the Oracle Metadata Repository Creation Assistant and Utilities CD-ROM. The steps to do so are as follows:
1. Insert and mount the Oracle Collaboration Suite CD-ROM.
2. Copy the contents of the utilities/fonts directory on the CD-ROM to the ORACLE_HOME/jdk/jre/lib/fonts directory.
I.3 Troubleshooting Installation ErrorsIf you encounter an error during the installation of Oracle Collaboration Suite:
■ If you entered incorrect information about one of the installation screens, return to that screen by clicking Back until you see the screen.
■ Exit the installer only to access the component log files. The log files located in the ORACLE_HOME/cfgtoollogs directory are inaccessible if the installer is still in use.
■ If you encounter an error while the installer is copying or linking files, perform the following tasks:
1. Note the error and review the installation logs for causes:
– oraInventory_location/logs/installActionstimestamp.log
– oraInventory_location/logs/oraInstalltimestamp.err
– oraInventory_location/logs/oraInstalltimestamp.out
2. Remove the failed installation by following the steps in Appendix H.
3. Correct the issue that caused the error.
4. Restart the installation.
I.4 Troubleshooting Configuration AssistantsThis section contains the following topics:
■ Section I.4.1, "General Tips"
■ Section I.4.2, "Configuration Assistant Result Codes"
■ Section I.4.3, "Failure During Component Configuration and Startup"
■ Section I.4.4, "Irrecoverable Errors"
I.4.1 General TipsTo troubleshoot errors that occur when configuration assistants are running:
■ Review the installation log files listed in Section I.3.
■ Review the configuration assistant log files located in the ORACLE_HOME/cfgtoollogs directory for a specific Oracle Collaboration Suite configuration assistant. Try to fix the issue that caused the error.

Troubleshooting Configuration Assistants
Troubleshooting I-3
■ If you see a "Fatal Error. Reinstall" message, try to find the cause of the problem by analyzing the log files. Refer to Section I.4.4 for further instructions.
I.4.2 Configuration Assistant Result CodesConfiguration assistant failures are noted at the bottom of the installation screen. The configuration assistant interface displays additional information, if applicable. The execution status of the configuration assistant is identified by these result codes:
Result codes are written to the following log file:
oraInventory_location/logs/installActionstimestamp.log
I.4.3 Failure During Component Configuration and StartupDuring the installation, configuration assistants run when the Configuration Assistants screen appears. If a configuration assistant fails, try the following procedure to correct the problem:
1. Review the installation log files.
2. Review the log files for each configuration assistant located in the ORACLE_HOME/cfgtoollogs directory (Example: /data/mtier/cfgtoollogs or /data/infra/cfgtoollogs ).
3. Refer to the following.
a. If the failed configuration assistant has any dependencies, then run the dependencies again. You must do this even if the dependency completed successfully.
b. Run the failed configuration assistant again. If you are using the installer, select the configuration assistant and click Retry.
If the configuration assistant fails again after you click Retry, then remove the /temp/EM_CONFIG_INSTALL.lk file and try rerunning the configuration assistant.
If the configuration assistant fails again after you click Retry, then remove the component entry from the ORACLE_HOME/sysman/emd/targets.xml file.
c. If an optional configuration assistant fails, and it does not have any dependencies, run the remaining configuration assistants. Uncheck the cancelled optional configuration assistant, highlight and check the next listed configuration assistant, and click Retry.
d. If configuration assistant failure occurs when you are running configuration assistant execution commands from Oracle Universal Installer or on the command line, then rerun the configuration assistant execution command again.
Status Result Code
Configuration Assistant Succeeded 0
Configuration Assistant Failed 1
Configuration Assistant Cancelled -1

Troubleshooting Administration Errors After Installation
I-4 Oracle Collaboration Suite Installation Guide
You can use the generated script file named configToolCommands located in the ORACLE_HOME/cfgtoollogs directory to execute the failed configuration assistant again. The configToolCommands script is generated after you exit the installer. During silent or noninteractive installation, the configToolCommands script is generated immediately after configuration assistant failure.
You must perform the following tasks before using the generated script:
1. Open the autogenerated $ORACLE_HOME/cfgtoollogs/configToolCommands script in an editor. Search and replace all occurrences of *Protected value, not to be logged* with the passwords you specified during the installation. If it is a common password, then it becomes simpler and you just have to replace all occurrences of the preceding string with that common password.
2. Set the ORACLE_HOME environment variable to the ORACLE_HOME path.
3. Append the LD_LIBRARY_PATH environment variable with $ORACLE_HOME/lib32:$ORACLE_HOME/lib:$ORACLE_HOME/network/lib32:$ORACLE_HOME/network/lib and LD_LIBRARY_PATH_64 with $ORACLE_HOME/lib:$ORACLE_HOME/network/lib.
4. Run the $ORACLE_HOME/cfgtoollogs/configToolCommands script to rerun all the failed and skipped configuration assistants.
■ Set the ORACLE_HOME environment variable to the ORACLE_HOME path.
■ Append the LD_LIBRARY_PATH environment variable with $ORACLE_HOME/lib32:$ORACLE_HOME/lib:$ORACLE_HOME/network/lib32:$ORACLE_HOME/network/lib.
I.4.4 Irrecoverable ErrorsSome configuration assistant failures are Irrecoverable (fatal). You cannot recover from an Irrecoverable error by correcting the problem and continuing. You must remove the current installation and reinstall Oracle Collaboration Suite. The following tasks describe the recovery procedure:
1. Deinstall the failed installation using the procedure described in Appendix H.
2. Correct the cause of the Irrecoverable error.
3. Reinstall Oracle Collaboration Suite.
4. If the error reoccurs, then you must remove all Oracle installations from your computer.
I.5 Troubleshooting Administration Errors After InstallationThis section explains some errors that you may encounter after installation.
I.5.1 Failure to Restart Oracle CalendarThis error may occur if you shut down the system after installation and try running opmn to restart all processes.
Note: If the description of a configuration assistant includes an "Initial Tasks" section, you must perform these tasks before running the configuration assistant.

Troubleshooting Oracle Collaboration Suite Web Client Configuration
Troubleshooting I-5
You must run ocasctl to restart Oracle Calendar clients.
I.6 Troubleshooting Oracle Collaboration Suite Web Client ConfigurationIf a user logs in to Oracle Collaboration Suite and sees a generic OracleAS Portal page instead of the Oracle Collaboration Suite Home page, do the following:
1. Ensure that the user is a member of the Oracle Collaboration Suite Users group, as follows:
a. Log in to Oracle Delegated Administration Services as orcladmin at the following URL:
http://host_name:port_number/oiddas/
b. Click the Directory tab.
c. Search for the user by user ID (orclguest, for example).
d. Select the user from the search results, and click Edit.
e. Scroll down to the Public Groups Assignment section, and ensure that the user is a member of the Oracle Collaboration Suite Users group.
If the user is not a member, select the Oracle Collaboration Suite Users box, and click Apply.
f. Log out of Oracle Delegated Administration Services.
2. Ensure that the Oracle Collaboration Suite Users group is the user's default group, as follows:
a. Log in to OracleAS Portal as the user in question. For example, go to http://host_name:port_number/, click End User Login, and log in as orclguest.
b. If the Oracle Collaboration Suite Home page appears, the user is now correctly provisioned and the rest of this procedure is unnecessary.
c. If the OracleAS Portal Welcome page appears, click Account Info.
d. On the Account Info page, ensure that the user's default group is set to OCS_PORTAL_USERS.
If it is not, manually enter OCS_PORTAL_USERS for the user's default group, and click Apply.
e. Ensure that the user's Default Home Page is blank.
f. Click the Home global button. You should see the Oracle Collaboration Suite Home page. If not, proceed to Step 3.
3. If the Oracle Collaboration Suite Home page still does not appear, do the following:
a. Log in to OracleAS Portal as the user in question. For example, go to http://host_name:port_number/, click End User Login, and log in as orclguest.
See Also: Oracle Collaboration Suite Administrator's Guide
Note: In a typical installation, Oracle Delegated Administration Services is located where the Infrastructure is installed.

Troubleshooting Oracle Real Application Clusters
I-6 Oracle Collaboration Suite Installation Guide
b. When the OracleAS Portal Welcome page appears, click Account Info.
c. On the Account Info page, ensure that the user's default group is set to OCS_PORTAL_USERS.
If it is not, manually enter OCS_PORTAL_USERS for the user's default group, and click Apply.
d. Click the Browse Pages icon next to the Default Home Page field.
e. Locate the OCS_V2_PAGE_GROUP page group, and click to expand it.
f. Locate the Oracle Collaboration Suite Home page, and click Return Object.
g. Click Apply.
h. Click the Home global button and the correct home page should appear.
I.7 Troubleshooting Oracle Real Application ClustersTo ensure that the installation succeeds on the remote nodes you choose, select a path for Oracle home that is the same on all chosen nodes and is writable. Otherwise, installation on the remote nodes fails. No error message indicates this failure.
I.8 Need More Help?If this appendix does not solve the problem you encountered, try these other sources:
■ Oracle Collaboration Suite Release Notes, available on the Oracle Technology Network at
http://www.oracle.com/technology/documentation
■ OracleMetaLink at
http://metalink.oracle.com
If you do not find a solution for your problem, open a service request.

Sample Load Balancer Configuration For High Availability Installations J-1
JSample Load Balancer Configuration For
High Availability Installations
This appendix describes a sample load balancer configuration for Oracle Collaboration Suite high availability installations.
In this sample configuration, the following four Identity Management nodes are used:
■ oid1
■ oid2
■ sso1
■ sso2
There are two Oracle Collaboration Suite Applications nodes in this sample configuration:
■ apps1
■ apps2
The configuration details are mentioned in Table J–1.
Note: In a Distributed Identity Management installation, all the preceding four nodes are required. However, for a Single Cluster or Colocated Identity Management installation, only two nodes are required and therefore, the names, oid1 and sso1 are interchangeable and similarly, the names oid2 and sso2 are interchangeable.
Table J–1 Sample Load Balancer Configuration Details for Oracle Collaboration Suite High Availability Installations
Virtual Server Nodes MonitorPersistence Settings Purpose
im_virtual.mycompany.com:7389
oid1.mycompany.com:7389
oid2.mycompany.com:7389
ldap No persistence required
High Availability of Oracle Internet Directory
im_virtual.mycompany.com:7777
sso1.mycompany.com:7777
sso2.mycompany.com:7777
http Active HTTP Cookie persistence
High Availability of OracleAS Single Sign-On

J-2 Oracle Collaboration Suite Installation Guide
im_virtual.mycompany.com:4636
oid1.mycompany.com:4636
oid2.mycompany.com:4636
ldap No persistence required
High Availability of Oracle Internet Directory Secure Sockets Layer (SSL)
im_virtual.mycompany.com:4443
sso1.mycompany.com:4443
sso2.mycompany.com:4443
https Active HTTP Cookie persistence
High Availability of OracleAS Single Sign-On SSL
apps_virtual.mycompany.com:80
apps1.mycompany.com:7778
apps2.mycompany.com:7778
tcp No persistence required
In Oracle Collaboration Suite Applications tier, port 7778 should match the Oracle HTTP Server port in the $ORACLE_HOME/install/portlist.ini file. If the Applications tier is sharing the same node as that of highly available Identity Management, then it will be 7778 by default, unless overridden by the user who is installing the product.
apps_virtual.mycompany.com:25
apps1.mycompany.com:25apps2.mycompany.com:25
tcp No persistence required
On some load balancers, the port number for SMTP is 25.
apps_virtual.mycompany.com:143
apps1.mycompany.com:143
apps2.mycompany.com:143
tcp No persistence required
On some load balancers, the port number for IMAP is 143.
apps_virtual.mycompany.com:110
apps1.mycompany.com:110
apps2.mycompany.com:110
tcp No persistence required
On some load balancers, the port number for POP is 110.
apps_virtual.mycompany.com:9401
apps1.mycompany.com:9401
apps2.mycompany.com:9401
tcp No persistence required
In Oracle Collaboration Suite Applications tier, port 9401 should match the Web Cache Invalidation port in the $ORACLE_HOME/install/portlist.ini file.
Table J–1 (Cont.) Sample Load Balancer Configuration Details for Oracle Collaboration Suite High Availability Installations
Virtual Server Nodes MonitorPersistence Settings Purpose

Sample Load Balancer Configuration For High Availability Installations J-3
apps_virtual.mycompany.com:7778
apps1.mycompany.com:7778
apps2.mycompany.com:7778
tcp No persistence required
In Oracle Collaboration Suite Applications tier, port 7778 should match the Web Cache HTTP Listen port in $ORACLE_HOME/install/portlist.ini. If the Applications tier is sharing the same node as that of highly available Identity Management, then it will be 7778 by the user who is installing the product.
Table J–1 (Cont.) Sample Load Balancer Configuration Details for Oracle Collaboration Suite High Availability Installations
Virtual Server Nodes MonitorPersistence Settings Purpose

J-4 Oracle Collaboration Suite Installation Guide

Glossary-1
Glossary
Applications tier
The tier of Oracle Collaboration Suite that runs the server applications that provide specific functionality to end users. The term "Applications tier" replaces the term "middle tier" that was used in previous releases. Each Applications tier corresponds to an instance of Oracle Application Server. See also Oracle Collaboration Suite Applications.
Client tier
The tier of Oracle Collaboration Suite that consists of the end-user applications that reside on client devices, such as desktops, laptops, wireless phones, and PDAs. See also Oracle Collaboration Suite Applications.
Infrastructure tier
The tier of Oracle Collaboration Suite that consists of the components that provide services, such as identity management and metadata storage, for the Applications tier. Components of the Infrastructure tier include Oracle Collaboration Suite Database and Oracle Identity Management. See also Oracle Collaboration Suite Infrastructure.
Oracle Collaboration Suite
An integrated suite of software applications to enable communication, messaging, and content sharing in an enterprise environment. At an architectural level, it includes three tiers: an Applications tier, which consists of server applications that provide the basic functionality, a Client tier, which consists of applications on desktops, laptops, and wireless devices, and an Infrastructure tier, which provides centralized services, such as identity management and metadata storage, for the applications.
Oracle Collaboration Suite Applications
The applications that make up Oracle Collaboration Suite, namely:
■ Oracle Calendar
■ Oracle Collaboration Suite Search
■ Oracle Content Services
■ Oracle Discussions
■ Oracle Mail
■ Oracle Mobile Collaboration
■ Oracle Real-Time Collaboration
■ Oracle Voicemail & Fax

Oracle Collaboration Suite Database
Glossary-2
■ Oracle Workspaces
Each of the preceding applications is a component of Oracle Collaboration Suite Applications. These applications rely on the services provided by the Infrastructure tier. See also Applications tier.
Oracle Collaboration Suite Database
The default database included with Oracle Collaboration Suite to hold application data and metadata. The Oracle Collaboration Suite Database is part of the Oracle Collaboration Suite Infrastructure.
Oracle Collaboration Suite Infrastructure
The underlying components that support Oracle Collaboration Suite and provide centralized product metadata and security services, configuration information, and data repositories for Oracle Collaboration Suite Applications. Oracle Collaboration Suite Infrastructure uses and builds on OracleAS Infrastructure. It includes the Oracle Collaboration Suite Database and Oracle Identity Management. See also Infrastructure tier.
Oracle Identity Management
An integrated set of components that provide distributed security to Oracle products and make it possible to centrally and securely manage enterprise identities and their access to applications in the enterprise. It includes the following components: Oracle Internet Directory, Oracle Directory Integration and Provisioning, Oracle Delegated Administration Services, OracleAS Single Sign-On, and Oracle Application Server Certificate Authority.

Index-1
Index
Numerics256-color requirement, 2-3
Aadding users to groups
using Deployment Delegation Console, 6-9using Oracle Directory Manager, 6-7
additional languages, 1-8advanced installation, 1-7
Oracle Collaboration Suite Applications, 1-8Oracle Collaboration Suite Infrastructure, 1-8Oracle Collaboration Suite Infrastructure and
Applications, 1-8applying a transform
Oracle Connector for Outlook, D-27applying patchset
10g Release 1 (10.1.0.4.2), 5-2architecture
colocated identity management, 10-5distributed identity management, 10-7single cluster, 10-4
assigning Oracle Connector for Outlook, D-26Automatic Storage Management, 10-20, 11-5, 12-5,
13-5storage option for datafiles, 11-5, 12-5, 13-5
Bbasic installation, 1-5, 9-1
CCD-ROM
copying to a hard drive, 2-25installing from a remote CD-ROM drive, 2-26
CD-ROM mountingon Solaris, 3-2
Check, 13-16chmod warning, 10-24CLASSPATH environment variable, 2-22clock synchronization requirements
for installing Oracle Internet Directory, 7-4cluster file system
storage option for datafiles, 11-5, 12-5, 13-5Cold Failover Cluster
configuration, 10-22failover, 10-19, 11-16, 12-16, 13-17for Oracle Calendar Server, 4-10URLs, 10-21virtual hostname, 10-21
collaborative portletsconfiguring, 11-43, 12-43, 13-44
colocated identity managementarchitecture, 10-5
command-line switchesconfiguring .prf file creation, D-29
compatibilitywith earlier versions, 1-2with Oracle database, 2-16
component dependencies, 8-2on an Existing Instance of Oracle Collaborative
Portlets, 8-3on an Existing Instance of OracleAS Portal, 8-3Oracle Mail, 8-2
component installation screens, 8-9components
default port numbers, G-1middle-tier components, 8-1ports used, 8-4URLs for, F-1
conduits for Synchronization, D-12configuration assistants
using in noninteractive mode, 14-8configuring
e-mail, C-16initialization, D-23Load Balancer, 13-24load balancer, 11-22, 12-22OpenLDAP directory server, C-12Oracle Calendar administrator, C-11, C-13Oracle Calendar application system, C-11, C-15Oracle Calendar Server, C-13Oracle Calendar Web client, C-16Oracle Connector for Outlook, D-27Oracle HTTP server
with Load Balancer, 13-25with load balancer, 11-23, 12-23
OracleAS Web cachewith load balancer, 11-26, 12-26, 13-28
parallel page engine loop-backwith load balancer, 11-24, 12-24, 13-25

Index-2
.prf file creation, D-29Real-Time Collaboration, 11-28, 12-28, 13-30Sun ONE directory server, C-12Syntegra Aphelion directory server, C-12
configuring Oracle Calendar directory servers, C-12copying CD-ROMs or DVD to a hard drive, 2-25CPU requirements, 2-2creating a response file
using the Record Mode in the installer, 14-5creating files
for silent and noninteractive installation, 14-3custom ports
See static ports, 2-11specifying, E-2
Ddatabase
character set, B-2database administrator groups, 2-20database administrators
groups, 2-20database registration, 4-8database requirements
for installing Oracle Internet Directory, 7-3datafiles
storage options, 11-5, 12-5, 13-5dba group, 2-20deconfig tool, H-1
log files, H-2parameters, H-2
default port numbers, 2-11, G-1default users in Oracle Internet Directory, 6-1deinstallation, 14-8
deconfig tool, H-1of middle tiers, H-4Oracle Collaboration Suite Infrastructure, H-6overview, H-2
deployingEnd-User Documentation Portal, 16-3
directories where installer writes files, 1-11directory servers, C-4
OpenLDAP, C-5Sun ONE, C-5Syntegra Aphelion, C-6terminology, C-4
disk space requirements, 2-3DISPLAY environment variable, 2-22distributed identity management architecture, 10-7DOM XML Extension
installing, 16-2DVD
copying to a hard drive, 2-25installing from a remote DVD drive, 2-26
Eeject command
for Solaris, 3-2End-User Documentation Portal
deploying, 16-3installing, 16-1restricting access to admistration panel, 16-4securing administration panel with Apache
authentication, 16-4environment variables, 2-22
CLASSPATH, 2-22DISPLAY, 2-22more information about, 2-22ORACLE_HOME, 2-22ORACLE_SID, 2-22PATH, 2-22set in .profile file, 2-22shared library path, 2-22su command and, 2-22TMP, 2-23TNS_ADMIN, 2-23
errorsstatic ports, 2-14
/etc/hosts file, 2-24expanding the Applications tier, 8-5
Ffailover
Cold Failover Cluster, 10-19, 11-16, 12-16, 13-17file system, 10-19
storage option for datafiles, 11-5, 12-5, 13-5files
iasconfig.xml, 11-25, 13-26iasconfig.xml file, 11-39, 12-25, 12-39, 13-41installation logs, 14-5noninteractive installation logs, 14-7ocad.conf, C-11ocas.conf, C-9oraInst.loc, 14-3oratab, 14-3Portal Dependency Settings file, 11-25, 11-39,
12-25, 12-39, 13-26, 13-41PRF file, D-28root.sh, 14-6, 14-7slapd.conf, C-12staticports.ini, 2-15
GGeneral section, initialization file in Oracle Connector
for Outlook, D-24groups
for configuring components, 6-4for database administrators, 2-20for deinstalling components, 6-4for installing Oracle Collaboration Suite
database, 6-7for Inventory directory, 2-19operating system, 2-18Oracle Collaboration Suite
groups for installing database, 6-7groups (operating system)
See operating system groups

Index-3
groups command, 2-21
Hhardware requirements, 2-1hardware requirements for Solaris systems, 2-2high availability
configurations, 10-3options, 4-10preinstallation steps, 10-12
clock synchronization, 10-13configure
LDAP virtual server, 10-13
ports for load balance, 10-13
virtual server names, 10-13path for Oracle home, 10-12set up cookie persistence on the load
balancer, 10-13principles, 10-1
high availability configurationsummary of differences, 10-10
high availability configurationscommon requirements, 10-1installation order, 10-10overview, 10-1requirements, 10-10
identical group definition, 10-11minimum number of nodes, 10-11previous Oracle installations, 10-11properties of the Oracle user, 10-11
httpd.conf file, 2-15
Iias_admin password, B-1, B-2ias_admin user, 1-10iasconfig.xml file, 11-25, 11-39, 12-25, 12-39, 13-26,
13-41Identity Management
configuring load balancers for, 11-7, 12-7existing instance from Oracle Application
Server, 4-33installing on high availability nodes, 13-8
identity managementinstalling on high availability nodes, 11-9, 12-9
Identity Management architectureinstallation order, 13-1
Identity Management componentsinstalling separately, 4-6
Identity Management default realm location, 2-24Infrastructure
installation, 4-20installation order, 4-2installation types, 4-1
initialization file, D-22configuring, D-23
installationlog file location, 3-4mount options for, 3-1Oracle Calendar Desktop Client for Linux, D-2,
D-4Oracle Calendar Sync for Palm for
Macintosh, D-9Oracle Collaboration Suite Applications, 1-8Oracle Collaboration Suite Infrastructure, 1-8Oracle Collaboration Suite Infrastructure and
Applications, 1-8screens, 4-15
installation checklistsfor Oracle Collaboration Suite, B-2for Oracle Collaboration Suite 10g
Applications, B-2for Oracle Collaboration Suite 10g
Infrastructure, B-1for Oracle Collaboration Suite Infrastructure, B-1
installation order, 1-2Oracle Internet Directory, 7-4
installation screens, 4-12OracleAS Certificate Authority, 4-18
installation stepsOracle Collaboration Suite Applications
without Oracle Calendar Server, 11-20, 12-20, 13-21
installation tasks10g Release 1 (10.1.0.4.2) patchset, 5-10Oracle Calendar Server, 11-17, 12-17, 13-18Oracle Collaboration Suite
in an existing database, 5-21installation types, 1-4
advanced installation, 1-7basic installation, 1-5
installationsnoninteractive error handling, 14-9noninteractive install and Oracle Net, 14-9noninteractive log files, 14-5, 14-7
installerprerequisite checks, 2-28
installingcomponents on separate computers, 4-4DOM XML Extension, 16-2End-User Documentation Portal, 16-1from a hard drive, 3-3from CD-ROMs, 3-1Identity Management components, 4-3
excluding Oracle Internet Directory, 4-23including Oracle Internet Directory, 4-25
Identity Management on high availability nodesfirst instance, 13-8, 13-9subsequent instance, 13-10
identity management on high availability nodesfirst instance, 11-9, 12-9subsequent instance, 11-10, 12-10
Infrastructure, 4-20existing instance of Oracle Internet
Directory, 4-27on multihomed computers, 2-25on NFS-mounted storage, 2-27on remote computers, 2-27Oracle Calendar application system, C-7Oracle Calendar application system only, C-9

Index-4
Oracle Calendar Desktop Client for Linux, D-1Oracle Calendar Desktop Client for
Macintosh, D-3Oracle Calendar Desktop Client for Solaris, D-3Oracle Calendar Desktop Client for
Windows, D-5Oracle Calendar desktop clients, D-1Oracle Calendar Server, 11-14, 12-14, 13-15Oracle Calendar server, C-7Oracle Calendar server only, C-9Oracle Calendar Sync, D-7Oracle Calendar Sync for Palm for
Macintosh, D-7Oracle Calendar Sync for Palm for
Windows, D-11Oracle Calendar Sync for Pocket PC, D-13, D-14Oracle Cluster Ready Services, 11-2, 12-2, 13-2Oracle Collaboration Suite
in an existing database, 5-20on RAC, 11-6, 12-6, 13-6
Oracle Collaboration Suite 10g Calendar, 10-20Oracle Collaboration Suite 10g Infrastructure, 4-3Oracle Collaboration Suite Database, 4-3
existing database, 4-23in an Existing Database, 5-2new database, 4-22with Identity Management components in new
database, 4-21Oracle Collaboration Suite in high availability
environments, 10-24Oracle Connector for Outlook, D-15, D-18, D-22
additional privileges, D-25specifying language for first-time
installation, D-18Oracle Internet Directory, 4-25, 4-26Oracle Real-Time Collaboration Clients, D-30OracleAS Certificate Authority and Oracle
Collaboration Suite Database, 4-29RTC Messenger client, D-31Web conference client, D-31
installing Oracle Calendar Desktop ClientLinux, D-1Macintosh, D-3Windows, D-5
installing Oracle Calendar Sync for PalmMacintosh, D-7Windows, D-11
installing Oracle Collaboration Suite 10g Calendar standalone
installation steps, C-7postinstallation configuration, C-11preinstallation steps, C-3system requirements, C-1
installing Oracle Connector for Outlookon the desktop, D-17using the .msi package, D-19
installing Oracle productsfirst time, 1-4
instance names, 1-9, B-1, B-2inventory directory
creating a group for, 2-19determine where it is, 2-19
IP address requirement, 2-2
JJ2SE patch cluster, 2-4
Kkernel parameter settings for Solaris Operating
Environment (SPARC 32-Bit) systems, 2-7kernel parameters, 2-7
LLanguages section, initialization file in Oracle
Connector for Outlook, D-24languages, Oracle Connector for Outlook installation
wizard, D-19Linux
installing Oracle Calendar desktop client, D-1load balancer, 11-26, 11-28, 12-26, 12-28, 13-27, 13-30load balancers, 11-7, 11-22, 11-24, 11-26, 11-28, 11-42,
12-7, 12-22, 12-24, 12-26, 12-28, 12-42, 13-25, 13-28, 13-30, 13-43
MMacintosh
installing Oracle Calendar desktop client, D-3installing Oracle Calendar Sync for Palm, D-7troubleshooting Oracle Calendar Sync for
Palm, D-10maintaining
Oracle Connector for Outlook, D-25memory requirements, 2-2
reducing, 2-4middle tiers
components, 8-1, 8-2deinstalling, H-4using upgraded Internet Directory, 8-4See also J2EE and Web Cache middle tierSee also Portal and Wireless middle tier
mod_ossoreregistering, 11-27, 11-40, 12-27, 12-40, 13-29,
13-41modifying
Oracle Connector for Outlook, D-20monitor requirements, 2-3mount command
for Solaris, 3-2required privileges, 3-1
mount optionsinstallation, 3-1
.msi package, to run the Oracle Connector for Outlook installation, D-19
msi package, to run the Oracle Connector for Outlook installation, D-19
multihomed computersinstalling on, 2-25

Index-5
NNetwork Appliance filers, 2-27network requirement, 2-2Network Topics, 2-25network topics
installing from a remote CD-ROM or DVD drive, 2-26
NFS-mounted storage, 2-27remote installations, 2-27
new installation featureschanged terminology, A-4changes in Applications Tier installation, A-2changes in Oracle Collaboration Suite
database, A-2enhancements in configuration assistant, A-3improved single-box installation, A-2more prerequisite checks, A-3no manual configuration, A-1option of changing ports during installation, A-2Oracle Collaboration Suite Database uses Oracle
Collaboration Suite 10g Database, A-4support for generating installation statistics, A-3support for high availability configurations, A-3support for Oracle Internet Directory
replication, A-4support for secure installation, A-3
NFS-mounted storageinstalling on, 2-27
NIS and NIS+support for, 2-28
node IDsselecting, 8-5
noninteractive installation, 14-2noninteractive installations
error handling, 14-7introduction, 14-1overview, 14-2requirements, 14-2
not connecting a node, 8-5
OOcConfigWizard section, INI file in Oracle Connector
for Outlook, D-25OCSdbSchemaReg script, 4-30
arguments and parameters, 4-31functions, 4-32
oinstall group, 1-4, 2-19OpenLDAP directory server
configuring, C-12setting up, C-5
operating system groups, 2-18creating, 2-19dba group, 2-20for database administrators, 2-20for Inventory directory, 2-19groups command, 2-21oinstall group, 2-19OSDBA group, 2-20OSOPER group, 2-20
operating system packages, 2-6pkginfo command, 2-6
operating system patches, 2-4requirements failed, 2-6showrev command, 2-5Solaris 8, 2-5Solaris 9, 2-5
operating system users, 2-20creating, 2-21groups command, 2-21oracle user, 2-20
Oracle Application Server instances, 1-9Oracle Application Server Single Sign-On
accessing, 7-9Oracle Calendar
application systemseparate installation, C-6
configuring administrator, C-11configuring application system, C-11customizing the initialization file, D-7e-mail
configuring for standalone, C-16extracting files from the installation package, D-6ocad.conf file, C-11ocas.conf file, C-9OpenLDAP directory server
configuring, C-12server
separate installation, C-6slapd.conf file, C-12standalone, C-1
deinstallation, C-18directory servers, C-4, C-12issues and workarounds, C-18upgrades, C-11
Sun ONE directory serverconfiguring, C-12
Syntegra Aphelion directory serverconfiguring, C-12
Oracle Calendar administratoropening and configuring, C-13
Oracle Calendar application systemchecking the status, C-15configuring, C-15installing, C-7, C-9issues and workarounds, C-21starting and stopping, C-10
Oracle Calendar Application System Configuration Assistant
troubleshooting, C-8Oracle Calendar Desktop Client
installing for Linux, D-1installing for Macintosh, D-3installing for Solaris, D-3installing for Windows, D-5
Oracle Calendar desktop clientsinstalling, D-1
Oracle Calendar Server, 10-3configuring, C-13high availability configuration, 10-17

Index-6
installation tasks, 11-17, 12-17, 13-18installing, 11-14, 12-14, 13-15installing in high availability environments, 10-16postinstallation tasks, 11-19, 12-19, 13-21preinstallation tasks, 12-14, 13-15
checking the clusterware, 12-14, 13-16mapping the IP address, 12-14, 13-16mapping the virtual host name, 12-14, 13-16setting up file system, 11-16, 12-16, 13-18
starting and stopping, C-13steps before installing in high availability
environments, 10-17Oracle Calendar server
checking port values, C-13configuration assistant, C-9installing, C-7, C-9issues and workarounds, C-18path variable
working with, C-15preinstallation tasks, 11-14
checking the clusterware, 11-14mapping the IP address, 11-14mapping the virtual host name, 11-14
security mechanism configuration, C-15Oracle Calendar sever
Resource Approval, C-14Oracle Calendar Sync
installing, D-7Oracle Calendar Sync for Palm, D-7
installation for Macintosh, D-7installation for Windows, D-12system requirements for Windows, D-11
Oracle Calendar Sync for Pocket PCinstalling, D-13, D-14system requirements, D-13
Oracle Calendar Web clientconfiguring with a traditional node
network, C-16Oracle Cluster Ready Services
applying 10.1.0.4.2 Patchset, 11-4, 12-4, 13-4patches, 12-2
Oracle Collaboration SuiteApplications and Infrastructure, 8-1Applications tier, 10-3CD pack, 1-2colocated Identity Management architecture
installing, 12-2Database tier, 10-1distributed Identity Management Architecture
installing, 13-2Identity Management tier, 10-2in high availability environments
installing, 10-24postinstallation tasks, 10-24
installation location, 1-2installation types, 1-4installing
on RAC, 11-6, 12-6, 13-6installing on RAC
RAC storage types, 11-5, 12-5, 13-5
instance namesusing, 1-9
multiple databases, 4-9Oracle home, 1-3postinstallation tasks
on RAC, 11-7, 12-7, 13-7registry entries, updating, 11-29, 13-31single cluster architecture
installing, 11-1Web client
troubleshooting, I-5Oracle Collaboration Suite 10g Applications
screens, 8-6Oracle Collaboration Suite 10g Calendar
installing, 10-20Oracle Collaboration Suite 10g Infrastructure
installing, 4-3Oracle Collaboration Suite Applications
installation, 1-8installing first instance
without Oracle Calendar Server, 11-20, 12-20, 13-21
installing subsequent instances, 11-33, 13-35installation tasks, 11-33, 12-33, 13-35postinstallation tasks, 11-35, 12-35, 13-36
installing subsequent instances of, 12-33redeploying, 11-36, 13-38
configuring collaborative portlets, 11-43, 12-43, 13-44
configuring Oracle Collaboration Suite Mobile Collaboration, 11-43, 12-43, 13-45
configuring Oracle Discussions, 11-43, 12-43, 13-45
configuring Oracle Web cache clusters, 11-40, 12-40, 13-42
configuring the Oracle HTTP Server with the load balancer, 11-38, 12-38, 13-39
configuring the parallel page engine loop-back with the load balancer, 11-39, 12-39, 13-40
enabling frontend host and port settings, 11-42, 12-42, 13-43
enabling portal, 11-37, 12-37, 13-39enabling session binding on OracleAS Web
cache clusters, 11-42, 12-42, 13-43modifying portal dependency settings, 11-39,
12-39, 13-41reregestering mod_osso, 11-40, 12-40, 13-41testing the configuration, 11-44, 12-44, 13-45
redeploying with a load balancer, 12-36Oracle Collaboration Suite Applications tier
configuring, 11-22configuring with a load balancer, 12-22
Oracle Collaboration Suite cleaning up processes, H-9
Oracle Collaboration Suite Databaseinstalling on RAC, 11-4, 13-4, 13-7RAC, installing on, 12-4
Oracle Collaboration Suite database, 11-13, 13-15registering with Oracle Internet Directory, 12-13
Oracle Collaboration Suite Infrastructure

Index-7
deinstalling, H-6installation, 1-8
Oracle Collaboration Suite Mobile Collaborationconfiguring, 11-43, 12-43, 13-45
Oracle Collaboration Suite serviceupdating registry entries in Oracle Internet
Directory, 12-29Oracle Connector for Outlook
applying a transform, D-27assigning, D-26configuration wizard, D-27deploying using group policy, D-26desktop installation, D-17installation wizard language, D-19installing, D-18, D-22installing on the desktop, D-17installing with additional privileges, D-25maintaining, D-25modifying, D-20performing an advertised installation, D-26preinstallation requirements, D-17removing, D-20, D-21, D-25repairing, D-20setting the AlwaysInstall Elevated policy, D-26troubleshooting, D-21upgrading, D-20, D-25
Oracle Databasedatafile storage options, 11-5, 12-5, 13-5
Oracle databasecompatibility with, 2-16
Oracle Delegated Administration Servicesaccessing, 7-9
Oracle Delegated Administration Services components, 4-7
Oracle Directory Integration and Provisioning components, 4-7
Oracle Discussionsconfiguring, 11-43, 12-43, 13-45
Oracle Enterprise Manager 10g, 11-26, 12-26, 13-27Oracle home, 1-3Oracle home location, B-1, B-2Oracle HTTP Server
configuring SSL and Non-SSL Ports for, 10-14possible cases, 10-15, 10-16
configuring static ports, 2-15configuring to use ports 80 and 443 with OracleAS
Web Cache as the front end, 2-16configuring to use ports 80 and 443 without
OracleAS Web Cache as the front end, 2-16configuring with a load balancer, 11-38, 12-38,
13-39Oracle HTTP server, 14-6
using on a different port, 14-7Oracle Internet Directory, 4-7, 12-13
adding users to groups in, 6-7clock synchronization requirements for
installing, 7-4contents of a new, 6-10creating users in, 6-7database requirements for installing, 7-3
default users in, 6-1global groups, 6-2groups for each component, 6-3groups for each Oracle Collaboration Suite
database, 6-3groups in, 6-2host name, B-1, B-2installation order, 7-4installing a master Oracle Internet Directory, 7-4installing a replica, 7-5
against an existing database, 7-7overview, 7-5with new database, 7-5
namespace, specifying, 4-11overview of replication, 7-1passwords, 10-14port number, B-2requirements for installing in replication
mode, 7-3super user name, B-2super user password, B-2user name and realm for logging in to, 6-10using upgraded, 8-4
Oracle inventory directory, B-1Oracle Net
noninteractive install, 14-9Oracle Real Application Clusters
troubleshooting, I-6Oracle Real-Time Collaboration
considerations, 2-3Oracle Real-Time Collaboration Clients
installation, D-30system requirements, D-30
Oracle Universal Installer, 3-4additional installations, 3-4first few screens (middle tier), 8-6last few screens (middle tier), 8-11overview, 3-3starting, 3-5, E-1
oracle user, 1-4, 2-20Oracle Web cache clusters
enabling session binding, 11-42, 12-42, 13-43ORACLE_HOME environment variable, 2-22ORACLE_SID environment variable, 2-22Oracle9iAS Single Sign-On
port number, B-1port numbers, B-2server host name, B-1, B-2
OracleAS Certificate Authorityinstallation screens, 4-18installing, 14-2
OracleAS Metadata Repositoryport 1521, 2-13
OracleAS Portalenabling, 11-37, 12-37, 13-39enabling frontend host and port settings, 11-42,
12-42, 13-43existing instance from Oracle Application
Server, 4-33load balancer

Index-8
forntend and port settings, 11-28, 12-28, 13-30URLs, 11-26, 12-26, 13-27
OracleAS Single Sign-Onspecifying host name on command-line, 2-25
OracleAS Web Cacheconfiguring static ports, 2-15
OracleAS Web cache, 11-28, 12-28, 13-30configuring with load balancer, 11-26, 12-26,
13-28testing the configuration, 11-32, 12-32, 13-34
OracleAs Web cacheconfiguring clusters, 11-40, 12-40, 13-42
oraInst.loc file, 2-19creating, 14-3
orainstRoot.shrunning, 9-2, 9-3
oraInventory directory, 2-19installation log files, 3-4location, 3-4, B-1
oratab filecreating, 14-3
order of installation, 1-2OSDBA group, 2-20OSOPER group, 2-20overview
Oracle Universal Installer, 3-3
Ppackages
See operating system packagesparallel page engine loop-back
configuring with a load balancer, 11-39, 12-39, 13-40
password randomizing, 4-8password restrictions, 1-10patches
See operating system.See operating system patches
PATH environment variable, 2-22PHP
testing, 16-1pkginfo command, 2-6port 1521, 2-13, 2-18
already in use, 2-16Portal Dependency Settings file, 11-39, 12-25, 12-39,
13-41portlist.ini file, 2-13ports, 2-10
1521, 2-16assigned to components, 8-4checking they are in use, 2-11choosing port numbers, 2-13component ports, 4-11custom ports, 4-11default port numbers, 2-11determining numbers, 4-11list of default port numbers, G-1static, 2-14static ports, 2-11
postinstallation tasks10g Release 1 (10.1.0.4.2) patchset, 5-13enabling SSL, 15-3modifying password settings for Oracle Internet
Directory, 15-2Oracle Calendar Server, 11-19, 12-19, 13-21Oracle Collaboration Suite
on RAC, 11-7, 12-7, 13-7Oracle Collaboration Suite in high availability
environments, 10-24performing component-specific tasks, 15-4setting environment variables, 15-1
preinstallationOracle Calendar Sync for Palm for
Macintosh, D-8preinstallation requirements
10g Release 1 (10.1.0.4.2) patchset, 5-2preinstallation requirements, Oracle Connector for
Outlook, D-17preinstallation tasks
10g Release 1 (10.1.0.4.2) patchset, 5-2installing Oracle Calendar in high hvailability
environmentschecking Clusterware, 10-17mapping the virtual host name, 10-17mapping the virtual IP address, 10-17
Oracle Calendar Server, 12-14, 13-15checking the clusterware, 12-14, 13-16mapping the IP address, 12-14, 13-16mapping the virtual host name, 12-14, 13-16setting up file system, 11-16, 12-16, 13-18
Oracle Calendar server, 11-14checking the clusterware, 11-14mapping the IP address, 11-14mapping the virtual host name, 11-14
Oracle Collaboration Suitein an existing database, 5-20
Oracle Collaboration Suite Applications, 8-6preparing to install
Oracle Collaboration Suite Databasein an existing database, 5-1
prerequisite checks, 2-28, E-1command, E-1
prerequisitesinstalling Identity Management on high
availability nodes, 13-7configuring the load balancer, 13-7synchronize the system clocks, 13-8
installing identity management on high availability nodes, 11-7, 12-7
configuring the load balancer, 11-7, 12-7synchronize the system clocks, 11-8, 12-8
PRF filecreation mode, D-28
.prf filecreating for Oracle Connector for Outlook, D-29
prf filecreating for Oracle Connector for Outlook, D-29
processor, 2-2profile creation, D-28

Index-9
silent mode, D-29.profile file, 2-22
Rr, 11-8RAC, 11-4, 13-4, 13-7RAM requirements, 2-2raw devices
storage option for datafiles, 11-5, 12-5, 13-5Real-Time Collaboration
configuring, 11-28, 12-28, 13-30Record Mode
creating a response file, 14-5registering with Oracle Internet Directory, 11-13,
13-15reinstallation, H-10remote computers
installing on, 2-27remote installations, 2-26, 2-27removing
Oracle Connector for Outlook, D-20, D-21, D-25repairing
Oracle Connector for Outlook, D-20, D-21replication types
advanced replication, 7-2fan-out replication, 7-2LDAP replication, 7-2multimaster replication, 7-2
requirementsdisk space, 2-3environment variables, 2-22IP address, 2-2memory, 2-2monitor, 2-3network, 2-2operating system packages, 2-6operating system patches, 2-4processor, 2-2swap space, 2-3
response files, 14-1, 14-4editing, 14-4error handling, 14-9selecting, 14-3specifying, 14-5
root user, 1-11logging in as, 1-11
root.sh, 14-6, 14-7running, 1-11
root.sh script, 1-11running, 14-6
RTC Messenger client, installing, D-31runInstaller command
OUI_HOSTNAME parameter, 2-25
Sscreens
first few (middle tier), 8-6last few (middle tier), 8-11
scriptsroot.sh, 14-6
semmns parameterminimum value for, 2-9
shared library path environment variable, 2-22showrev command, 2-5SID, 1-6silent and noninteractive installation
creating files, 14-3silent installation, 14-1, 14-6, 14-7
Oracle Calendar Desktop Client for Linux, D-2Oracle Calendar Desktop Client for Solaris, D-4Oracle Calendar Desktop Client for
Windows, D-5silent installations, 14-1silent mode
installing Oracle Calendar Desktop Client for Linux, D-2
installing Oracle Calendar Desktop Client for Solaris, D-4
installing Oracle Calendar Desktop Client for Windows, D-5
silentInstall.log file, 14-5, 14-7single cluster architecture, 10-4single cluster srchitecture
installation order, 11-1single-box installation
performing, 9-3starting, 9-2
single-computer installation, 9-1Solaris
mount commands, 3-2Solaris 8, patches required for, 2-5Solaris 9, patches required for, 2-5Solaris Management Console
creating groups using, 2-19creating users using, 2-21
Solaris Operating Environment (SPARC 32-Bit)kernel parameter settings for, 2-7
Solaris systemshardware requirements, 2-2
Solaris, installing Oracle Calendar Desktop Client, D-3
Specify Namespace in Internet Directory screen, 2-24
specifyingresponse files, 14-5
specifying Oracle Calendar Server node ID during the installation, 8-5
SSLconnecting to Oracle Internet Directory
through, 1-12starting
Oracle Universal Installer, 3-5static ports, 2-11
errors, 2-14for Oracle HTTP Server, 2-15for OracleAS Web Cache, 2-15
staticports.ini file, 2-11, 2-15creating, 2-13

Index-10
format, 2-11location on CD-ROM and DVD, 2-13
su command, 2-22Sun ONE directory server
configuring, C-12setting up, C-5
swap space requirement, 2-3Syntegra Aphelion directory server
configuring, C-12setting up, C-6
SYS userpassword restrictions, 4-10
system requirementscommon, C-2installing Oracle Connector for Outlook, D-16Oracle Calendar Application, C-3Oracle Calendar Server, C-2Oracle Calendar Sync for Palm for
Macintosh, D-7Oracle Calendar Sync for Palm for
Windows, D-11Oracle Calendar Sync for Pockets PC, D-13Oracle Real-Time Collaboration Clients, D-30
SYSTEM userpassword restrictions, 4-10
Tthe Parallel Page Engine loop-back
configuring with the load balancer, 11-24, 12-24, 13-25
/tmp directory, 2-23space required in, 2-3
TMP environment variable, 2-23TNS_ADMIN environment variable, 2-23Troubleshooting
installation errors, 11-7, 12-7, 13-7troubleshooting
administration errors after installation, I-4configuration assistants, I-2installation errors, 11-13, 12-13, 13-12, I-2Oracle Calendar Application System Configuration
Assistant, C-8Oracle Collaboration Suite
Web client, I-5Oracle Connector for Outlook, D-21Oracle Real Application Clusters, I-6response files, 14-7user interface problems, I-2
types of installation, 4-2
Uunmount command
for Solaris, 3-3required privileges, 3-1
upgradingOracle Connector for Outlook, D-20, D-25
upgrading and expanding Oracle Collaboration Suite 10g Applications at the same time, 8-5
URLs for components, F-1users (operating system)
See operating system users
V/var/opt/oracle directory
oraInst.loc file, 2-19virtual host name
Cold Failover Cluster, 10-21virtual server
configuring HTTP for OracleAS Cluster (Identity Management), 10-13
configuring LDAP virtual server for OracleAS Cluster (Identity Management), 10-13
Wwarnings
chmod, 10-24Web conference client, installing, D-31Windows
installing Oracle Calendar desktop client, D-5