installation and servicing instructions...supplied by spares.co tel. 0161 620 6677 718 55 165 335...
TRANSCRIPT

Supplied By www.heating spares.co Tel. 0161 620 6677
Format C
Installation and servicing instructions
GBPLEASE LEAVE THIS INSTRUCTION
WITH THE USER

Supplied By www.heating spares.co Tel. 0161 620 6677
Format 80 C: Gas Council number 47-719-12
Format 100 C:Gas Council number 47-719-13
Format 110 C:Gas Council number 47-719-21
These appliances comply with the S.E.D.B.U.K. scheme, band “D”
SIME COMBINATION BOILERSInstaller checklist
Please remember to carry out the following checks after installation. This will achieve complete customer satis-
faction, and avoid unnecessary service calls. A charge will be made for a service visit where the fault is not due to
a manufacturing defect.
– Has a correct by-pass been fitted and adjusted?
– Has the system been flushed in accordance with the guidelines given in BS7593 “Treatment of water in domes-
tic hot water central heating systems”?
– Is the system and boiler full of water, and the correct pressure showing on the pressure gauge?
– Is the Auto Air Vent open?
– Has the pump been rotated manually?
– Is the gas supply working pressure correct?
– Is the boiler wired correctly? (See installation manual).
– Has the D.H.W. flow rate been set to the customer requirements?
– Has the customer been fully advised on the correct use of the boiler, system and controls?
– Has the log book provided been completed?
Please refer to commissioning instructions for filling in the log book
Note: All CORGI registered installers carry a CORGI ID Card. You can check your installer is CORGI Registered by calling 01256 372300
IPX4D

Supplied By www.heating spares.co Tel. 0161 620 6677
1 TECHNICAL FEATURES AND DIMENSIONS
1.1 INTRODUCTION . . . . . . . . . . . . . . . . . . . . . . . . . . . . . . . . . . . . . . . . . . . . . . . . . . . . . . . . . . . . . . . . . . . . . . . . . . . . . 11.2 DIMENSIONAL DETAILS1.3 GENERAL DATA . . . . . . . . . . . . . . . . . . . . . . . . . . . . . . . . . . . . . . . . . . . . . . . . . . . . . . . . . . . . . . . . . . . . . . . . . . . . . 21.4 HYDRAULIC CIRCUIT . . . . . . . . . . . . . . . . . . . . . . . . . . . . . . . . . . . . . . . . . . . . . . . . . . . . . . . . . . . . . . . . . . . . . . . . . 31.5 INTERNAL VIEW . . . . . . . . . . . . . . . . . . . . . . . . . . . . . . . . . . . . . . . . . . . . . . . . . . . . . . . . . . . . . . . . . . . . . . . . . . . . . 4
2 GENERAL REQUIREMENTS FOR INSTALLATION
2.1 STATUTORY REQUIREMENTS . . . . . . . . . . . . . . . . . . . . . . . . . . . . . . . . . . . . . . . . . . . . . . . . . . . . . . . . . . . . . . . . . 52.2 BOILER POSITION2.3 FLUE TERMINAL POSITION2.4 VENTILATION REQUIREMENTS . . . . . . . . . . . . . . . . . . . . . . . . . . . . . . . . . . . . . . . . . . . . . . . . . . . . . . . . . . . . . . . . 62.5 GAS SUPPLY2.6 ELECTRICITY SUPPLY2.7 EXTERNAL CONTROLS2.8 WATER SYSTEMS - GENERAL2.9 REQUIREMENTS FOR SEALED WATER SYSTEMS2.10 D.H.W. SYSTEMS . . . . . . . . . . . . . . . . . . . . . . . . . . . . . . . . . . . . . . . . . . . . . . . . . . . . . . . . . . . . . . . . . . . . . . . . . . . . 8
3 INSTALLING THE BOILER
3.1 FIXING THE WALL MOUNTING BRACKET . . . . . . . . . . . . . . . . . . . . . . . . . . . . . . . . . . . . . . . . . . . . . . . . . . . . . . . 93.2 HANGING THE BOILER3.3 FLUE DUCTS PREPARATION3.4 FLUE AND TERMINAL INSTALLATION . . . . . . . . . . . . . . . . . . . . . . . . . . . . . . . . . . . . . . . . . . . . . . . . . . . . . . . . . . . 103.5 SEPARATE DUCTS . . . . . . . . . . . . . . . . . . . . . . . . . . . . . . . . . . . . . . . . . . . . . . . . . . . . . . . . . . . . . . . . . . . . . . . . . . . 123.6 WATER CONNECTIONS . . . . . . . . . . . . . . . . . . . . . . . . . . . . . . . . . . . . . . . . . . . . . . . . . . . . . . . . . . . . . . . . . . . . . . . 133.7 GAS CONNECTIONS3.8 SAFETY VALVE CONNECTION3.9 WIRING INSTRUCTIONS
4 COMMISSIONING AND TESTING
4.1 FILLING THE WATER SYSTEM . . . . . . . . . . . . . . . . . . . . . . . . . . . . . . . . . . . . . . . . . . . . . . . . . . . . . . . . . . . . . . . . . 154.2 COMMISSIONING THE BOILER4.3 SETTING THE C.H. INPUT4.4 SETTING THE D.H.W. FLOWRATE . . . . . . . . . . . . . . . . . . . . . . . . . . . . . . . . . . . . . . . . . . . . . . . . . . . . . . . . . . . . . . 164.5 FINAL CHECKS4.6 USER’S INSTRUCTIONS
5 ROUTINE SERVICING INSTRUCTIONS
5.1 MAIN BURNER ASSEMBLY . . . . . . . . . . . . . . . . . . . . . . . . . . . . . . . . . . . . . . . . . . . . . . . . . . . . . . . . . . . . . . . . . . . 175.2 FAN ASSEMBLY5.3 HEAT EXCHANGER5.4 WATER FLOW SWITCH5.5 CHIMNEY SWEEP FUNCTION . . . . . . . . . . . . . . . . . . . . . . . . . . . . . . . . . . . . . . . . . . . . . . . . . . . . . . . . . . . . . . . . . 185.6 RE-ASSEMBLY5.7 RE-COMMISSIONING5.8 CLEANING THE C.H. WATER FILTER
CONTENTS

Supplied By www.heating spares.co Tel. 0161 620 6677
6 FAULT FINDING
6.1 EARTH CONTINUITY CHECK . . . . . . . . . . . . . . . . . . . . . . . . . . . . . . . . . . . . . . . . . . . . . . . . . . . . . . . . . . . . . . . . . . 196.2 SHORT CIRCUIT CHECK6.3 POLARITY CHECK6.4 RESISTANCE TO EARTH CHECK6.5 FAULT FINDING LEDS6.6 C.H. MODE - FAULT FINDING . . . . . . . . . . . . . . . . . . . . . . . . . . . . . . . . . . . . . . . . . . . . . . . . . . . . . . . . . . . . . . . . . . 206.7 D.H.W. MODE - FAULT FINDING . . . . . . . . . . . . . . . . . . . . . . . . . . . . . . . . . . . . . . . . . . . . . . . . . . . . . . . . . . . . . . . . 21
7 WIRING & FUNCTIONAL DIAGRAM
7.1 ILLUSTRATED FLOW WIRING DIAGRAM . . . . . . . . . . . . . . . . . . . . . . . . . . . . . . . . . . . . . . . . . . . . . . . . . . . . . . . . 22
8 REPLACEMENT OF PARTS
8.1 HEAT EXCHANGER . . . . . . . . . . . . . . . . . . . . . . . . . . . . . . . . . . . . . . . . . . . . . . . . . . . . . . . . . . . . . . . . . . . . . . . . . . . 238.2 COMBUSTION CHAMBER INSULATION8.3 FAN ASSEMBLY8.4 MAIN BURNER8.5 IGNITION/DETECTION ELECTRODE8.6 GAS VALVE8.7 AIR PRESSURE SWITCH . . . . . . . . . . . . . . . . . . . . . . . . . . . . . . . . . . . . . . . . . . . . . . . . . . . . . . . . . . . . . . . . . . . . . . 248.8 OVERHEAT THERMOSTAT8.9 THERMISTOR8.10 DRIVER PCB8.11 PUMP MOTOR8.12 D.H.W. HEAT EXCHANGER . . . . . . . . . . . . . . . . . . . . . . . . . . . . . . . . . . . . . . . . . . . . . . . . . . . . . . . . . . . . . . . . . . . . 258.13 DIVERTOR VALVE - COMPLETE8.14 DIVERTOR VALVE - MICROSWITCH ASSEMBLY8.15 C.H. EXPANSION VESSEL8.16 PRESSURE/TEMPERATURE GAUGE8.17 SAFETY VALVE8.18 AUTOMATIC AIR VENT8.19 TIME CLOCK
9 EXPLODED VIEWS
9.1 HYDRAULIC CIRCUIT . . . . . . . . . . . . . . . . . . . . . . . . . . . . . . . . . . . . . . . . . . . . . . . . . . . . . . . . . . . . . . . . . . . . . . . . . 269.2 DIVERTOR VALVE . . . . . . . . . . . . . . . . . . . . . . . . . . . . . . . . . . . . . . . . . . . . . . . . . . . . . . . . . . . . . . . . . . . . . . . . . . . . 279.3 COMBUSTION CIRCUIT . . . . . . . . . . . . . . . . . . . . . . . . . . . . . . . . . . . . . . . . . . . . . . . . . . . . . . . . . . . . . . . . . . . . . . . 289.4 STRUCTURAL COMPONENTS AND CONTROL & REGULATION . . . . . . . . . . . . . . . . . . . . . . . . . . . . . . . . . . . . . 29
Supplied By www.heating spares.co Tel. 0161 620 6677
71
8
55
165
335
125 60
ø 6
0/
10
0
70
0
K
11
0
L
55
70 70 70 70 ==A B D EC
22
1.1 INTRODUCTION
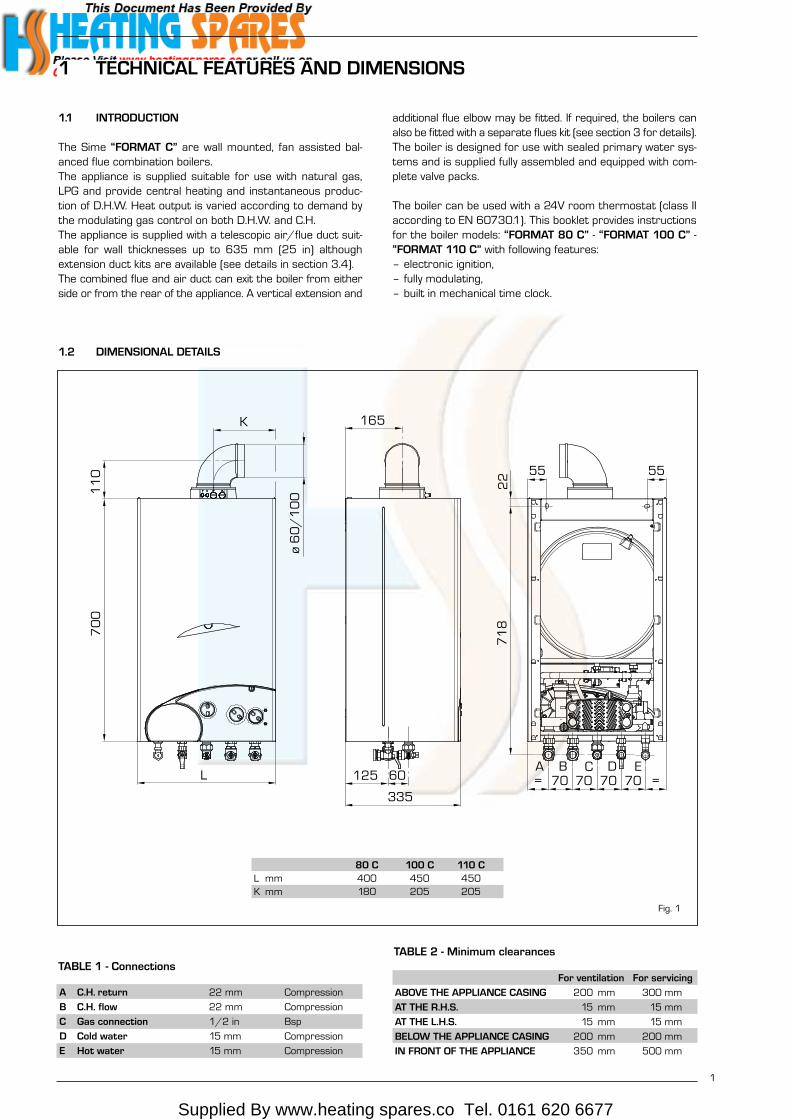
The Sime “FORMAT C” are wall mounted, fan assisted bal-anced flue combination boilers.The appliance is supplied suitable for use with natural gas,LPG and provide central heating and instantaneous produc-tion of D.H.W. Heat output is varied according to demand bythe modulating gas control on both D.H.W. and C.H. The appliance is supplied with a telescopic air/flue duct suit-able for wall thicknesses up to 635 mm (25 in) althoughextension duct kits are available (see details in section 3.4).The combined flue and air duct can exit the boiler from eitherside or from the rear of the appliance. A vertical extension and
additional flue elbow may be fitted. If required, the boilers canalso be fitted with a separate flues kit (see section 3 for details).The boiler is designed for use with sealed primary water sys-tems and is supplied fully assembled and equipped with com-plete valve packs.
The boiler can be used with a 24V room thermostat (class IIaccording to EN 60730.1). This booklet provides instructionsfor the boiler models: “FORMAT 80 C” - “FORMAT 100 C” -“FORMAT 110 C” with following features:– electronic ignition,– fully modulating,– built in mechanical time clock.
1
1 TECHNICAL FEATURES AND DIMENSIONS
TABLE 2 - Minimum clearances
For ventilation For servicing
ABOVE THE APPLIANCE CASING 200 mm 300 mm
AT THE R.H.S. 15 mm 15 mm
AT THE L.H.S. 15 mm 15 mm
BELOW THE APPLIANCE CASING 200 mm 200 mm
IN FRONT OF THE APPLIANCE 350 mm 500 mm
TABLE 1 - Connections
A C.H. return 22 mm Compression
B C.H. flow 22 mm Compression
C Gas connection 1/2 in Bsp
D Cold water 15 mm Compression
E Hot water 15 mm Compression
1.2 DIMENSIONAL DETAILS
80 C 100 C 110 CL mm 400 450 450K mm 180 205 205
Fig. 1

Supplied By www.heating spares.co Tel. 0161 620 6677
2
1.3 GENERAL DATA
MODE OUTPUT INPUT (G.C.V.) BURNER PRESS. (Nat. gas) BURNER PRESS. (Butane/Propane)
kW Btu/h kW Btu/h mbar inwg mbar inwg
CENTRAL HEATING RANGE 9.0 31,000 12.0 42,000 2.4 0.9 5.9/7.7 2.4/3.1
10.6 36,000 14.1 48,000 3.2 1.3 7.9/10.3 3.2/4.1
12.3 42,000 16.2 55,000 4.1 1.7 10.2/13.2 4.1/5.3
14.1 48,000 18.2 62,000 5.2 2.1 12.7/16.3 5.1/6.5
X* (G20-G31) 15.9 54,000 20.3 69,000 6.3 2.5 15.4/19.6 6.2/7.9
X* (G30) 17.7 60,000 22.4 76,000 7.5 3.0 18.4/23.2 7.4/9.3
19.6 67,000 24.5 84,000 8.9 3.6 21.5/26.9 8.6/10.8
21.5 73,000 26.6 90,000 10.3 4.1 24.8/30.8 10.0/12.4
23.4 80,000 28.7 98,000 11.8 4.7 28.5/36.5 11.4/14.7
DOMESTIC HOT WATER Max. 23.4 80,000 28.7 98,000 11.8 4.7 28.5/36.5 11.4/14.7
Min. 9.0 31,000 12.0 42,000 2.4 0.9 5.9/7.7 2.4/3.1
* Factory setting
TABLE 3a - Nominal boiler ratings (5 minutes after lighting) for “FORMAT 80 C”
MODE OUTPUT INPUT (G.C.V.) BURNER PRESS. (Nat. gas) BURNER PRESS. (Butane/Propane)
kW Btu/h kW Btu/h mbar inwg mbar inwg
CENTRAL HEATING RANGE 11.4 39,000 15.0 51,000 2.6 1.0 5.5/7.1 2.2/2.9
13.5 46,000 17.5 60,000 3.5 1.4 7.4/9.4 3.0/3.8
15.6 53,000 20.0 68,000 4.5 1.8 9.7/12.1 3.9/4.8
17.7 60,000 22.5 77,000 5.6 2.3 12.2/14.9 4.9/6.0
X* (G20-G31) 19.8 68,000 25.0 86,000 6.8 2.7 14.9/18.0 6.0/7.2
X* (G30) 22.0 75,000 27.6 94,000 8.2 3.3 17.9/21.3 7.2/8.6
24.2 83,000 30.1 103,000 9.6 3.8 21.2/24.8 8.5/10.0
26.5 90,000 32.6 111,000 11.1 4.5 24.7/28.5 9.9/11.4
28.8 98,000 35.1 120,000 12.7 5.1 28.5/36.5 11.4/14.7
DOMESTIC HOT WATER Max. 28.8 98,000 35.1 120,000 12.7 5.1 28.5/36.5 11.4/14.7
Min. 11.4 39,000 15.0 51,000 2.6 1.0 5.5/7.1 2.2/2.9
* Factory setting
TABLE 3b - Nominal boiler ratings (5 minutes after lighting) for “FORMAT 100 C”
MODE OUTPUT INPUT (G.C.V.) BURNER PRESS. (Nat. gas) BURNER PRESS. (Butane/Propane)
kW Btu/h kW Btu/h mbar inwg mbar inwg
CENTRAL HEATING RANGE 11.2 38,000 15.0 51,000 2.2 0.9 4.5/5.8 1.8/2.3
13.6 46,000 17.9 61,000 3.1 1.3 6.4/8.2 2.6/3.3
16.0 55,000 20.9 72,000 4.2 1.7 8.5/11.0 3.4/4.4
18.5 63,000 23.9 81,000 5.4 2.2 11.0/14.1 4.4/5.7
X* (G20-G31) 21.0 72,000 26.8 92,000 6.8 2.7 13.7/17.6 5.5/7.1
X* (G30) 23.6 80,000 29.8 101,000 8.3 3.3 16.7/21.4 6.7/8.6
26.2 89,000 32.7 111,000 10.0 4.0 20.0/25.6 8.0/10.3
28.9 99,000 35.7 122,000 11.8 4.7 23.5/30.0 9.4/12.0
31.6 108,000 38.6 132,000 13.7 5.5 28.2/36.2 11.3/14.5
DOMESTIC HOT WATER Max. 31.6 108,000 38.6 132,000 13.7 5.5 28.2/36.2 11.3/14.5
Min. 11.2 38,000 15.0 51,000 2.2 0.9 4.5/5.8 1.8/2.3
* Factory setting
TABLE 3c - Nominal boiler ratings (5 minutes after lighting) for “FORMAT 110 C”
Supplied By www.heating spares.co Tel. 0161 620 6677
3
1
2
3
4
22
5
7
8
11
14
10
9
6
1612
18
1513
192120
17
U E G M R
27
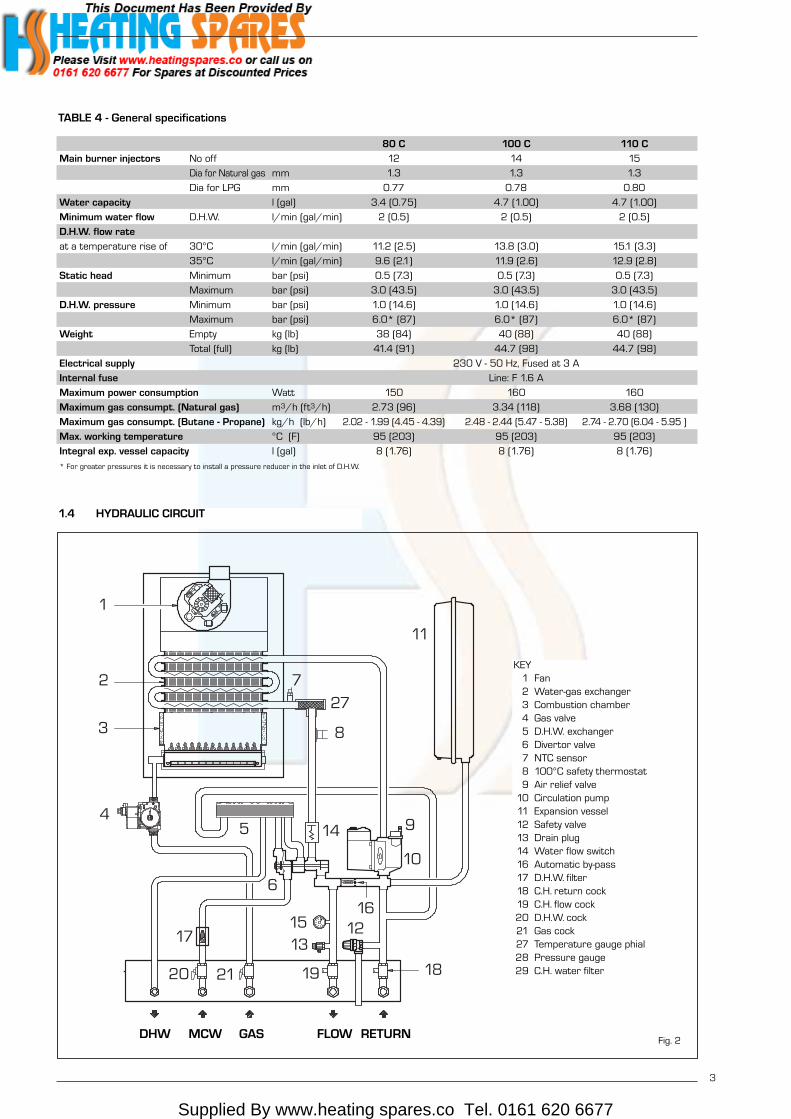
1.4 HYDRAULIC CIRCUIT
KEY1 Fan2 Water-gas exchanger3 Combustion chamber4 Gas valve5 D.H.W. exchanger6 Divertor valve7 NTC sensor8 100°C safety thermostat9 Air relief valve
10 Circulation pump11 Expansion vessel12 Safety valve13 Drain plug14 Water flow switch16 Automatic by-pass17 D.H.W. filter18 C.H. return cock19 C.H. flow cock20 D.H.W. cock21 Gas cock27 Temperature gauge phial28 Pressure gauge29 C.H. water filter
80 C 100 C 110 C
Main burner injectors No off 12 14 15
Dia for Natural gas mm 1.3 1.3 1.3
Dia for LPG mm 0.77 0.78 0.80
Water capacity l (gal) 3.4 (0.75) 4.7 (1.00) 4.7 (1.00)
Minimum water flow D.H.W. l/min (gal/min) 2 (0.5) 2 (0.5) 2 (0.5)
D.H.W. flow rate
at a temperature rise of 30°C l/min (gal/min) 11.2 (2.5) 13.8 (3.0) 15.1 (3.3)
35°C l/min (gal/min) 9.6 (2.1) 11.9 (2.6) 12.9 (2.8)
Static head Minimum bar (psi) 0.5 (7.3) 0.5 (7.3) 0.5 (7.3)
Maximum bar (psi) 3.0 (43.5) 3.0 (43.5) 3.0 (43.5)
D.H.W. pressure Minimum bar (psi) 1.0 (14.6) 1.0 (14.6) 1.0 (14.6)
Maximum bar (psi) 6.0* (87) 6.0* (87) 6.0* (87)
Weight Empty kg (lb) 38 (84) 40 (88) 40 (88)
Total (full) kg (lb) 41.4 (91) 44.7 (98) 44.7 (98)
Electrical supply 230 V - 50 Hz, Fused at 3 A
Internal fuse Line: F 1.6 A
Maximum power consumption Watt 150 160 160
Maximum gas consumpt. (Natural gas) m3/h (ft3/h) 2.73 (96) 3.34 (118) 3.68 (130)
Maximum gas consumpt. (Butane - Propane) kg/h (lb/h) 2.02 - 1.99 (4.45 - 4.39) 2.48 - 2.44 (5.47 - 5.38) 2.74 - 2.70 (6.04 - 5.95 )
Max. working temperature °C (F) 95 (203) 95 (203) 95 (203)
Integral exp. vessel capacity l (gal) 8 (1.76) 8 (1.76) 8 (1.76)
* For greater pressures it is necessary to install a pressure reducer in the inlet of D.H.W.
TABLE 4 - General specifications
Fig. 2DHW MCW GAS FLOW RETURN
Supplied By www.heating spares.co Tel. 0161 620 6677
4
6
1211
109
8
7
5
4
3
2
1
13
14
19
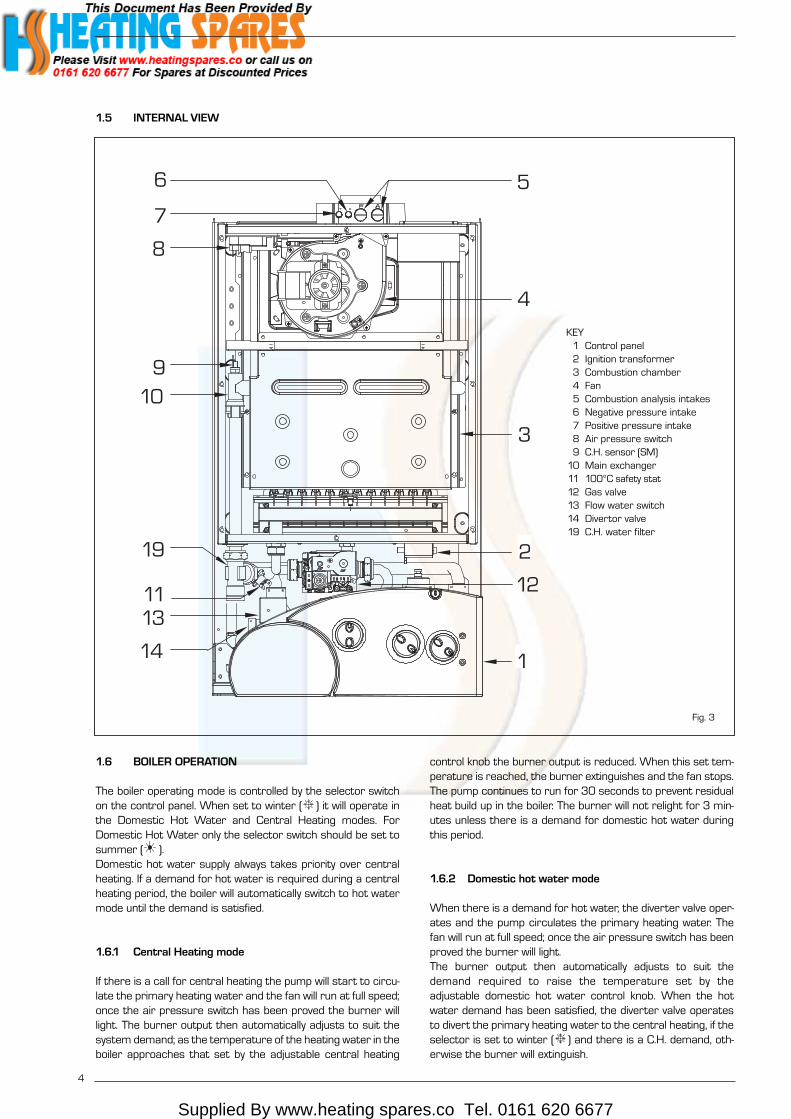
1.5 INTERNAL VIEW
KEY1 Control panel2 Ignition transformer3 Combustion chamber4 Fan5 Combustion analysis intakes6 Negative pressure intake7 Positive pressure intake8 Air pressure switch9 C.H. sensor (SM)
10 Main exchanger11 100°C safety stat12 Gas valve13 Flow water switch14 Divertor valve19 C.H. water filter
Fig. 3
1.6 BOILER OPERATION
The boiler operating mode is controlled by the selector switchon the control panel. When set to winter ( ) it will operate inthe Domestic Hot Water and Central Heating modes. ForDomestic Hot Water only the selector switch should be set tosummer ( ).Domestic hot water supply always takes priority over centralheating. If a demand for hot water is required during a centralheating period, the boiler will automatically switch to hot watermode until the demand is satisfied.
1.6.1 Central Heating mode
If there is a call for central heating the pump will start to circu-late the primary heating water and the fan will run at full speed;once the air pressure switch has been proved the burner willlight. The burner output then automatically adjusts to suit thesystem demand; as the temperature of the heating water in theboiler approaches that set by the adjustable central heating
control knob the burner output is reduced. When this set tem-perature is reached, the burner extinguishes and the fan stops.The pump continues to run for 30 seconds to prevent residualheat build up in the boiler. The burner will not relight for 3 min-utes unless there is a demand for domestic hot water duringthis period.
1.6.2 Domestic hot water mode
When there is a demand for hot water, the diverter valve oper-ates and the pump circulates the primary heating water. Thefan will run at full speed; once the air pressure switch has beenproved the burner will light.The burner output then automatically adjusts to suit thedemand required to raise the temperature set by theadjustable domestic hot water control knob. When the hotwater demand has been satisfied, the diverter valve operatesto divert the primary heating water to the central heating, if theselector is set to winter ( ) and there is a C.H. demand, oth-erwise the burner will extinguish.

Supplied By www.heating spares.co Tel. 0161 620 6677
5
2.1 STATUTORY REQUIREMENTS
GAS SAFETY (INSTALLATION AND USE) REGULATIONS (asamended). It is the law that all gas appliances are installed bya registered person, in accordance with the above regula-tions. Failure to install appliances correctly could lead to pros-ecution. It is in your own interest, and that of safety, to ensurethat the law is complied with.In addition to the above regulations, this appliance must beinstalled in accordance with the current IEE WiringRegulations (BS 7671), Local Building Regulations, theBuilding Standards (Scotland) (Consolidation) Regulations,Byelaws of the local water undertaking, and Health and SafetyDocument No 635 “The Electricity at Work Regulations1989”. It should also be in accordance with the relevant rec-ommendations in the current editions of the following BritishStandards and Codes of Practice: BS5449, BS5546,BS5440:1, BS5440:2, BS6798, BS6891, and BG.DM2,BS7074, and BS5482 for propane installations.
Manufacturer’s instructions must NOT be taken in any wayas over-riding statutory obligations.
2.2 BOILER POSITION
In siting the combination boiler, the following limitations MUSTbe observed:– The boiler is not suitable for external installation. The posi-
tion selected for installation should be within the building,unless otherwise protected by a suitable enclosure, andMUST allow adequate space for installation, servicing, andoperation of the appliance, and for air circulation around it(section 2.4).
– This position MUST allow for a suitable flue termination tobe made. The combination boiler must be installed on aflat vertical wall which is capable of supporting the weightof the appliance, and any ancillary equipment.
– If the combination boiler is to be fitted in a timber framedbuilding it should be fitted in accordance with the Instituteof Gas Engineers document for Gas Installations In TimberFrame Housing, Reference 16E/UP/7: 1998. If in doubt,advice must be sought from the gas supplier.
– If the appliance is installed in a room containing a bath orshower, any electrical switch or control utilising mainselectricity must be so situated that it cannot be touchedby a person using the bath or shower. Attention is drawnto the requirements of the current I.E.E. Wiring Regula-tions (BS 7671), and in Scotland the electrical provisionsof the Building Regulations applicable in Scotland.
– A compartment used to enclose the appliance MUST bedesigned and constructed specifically for this purpose. Anexisting cupboard, or compartment, may be used provid-ed it is modified accordingly.
– Where installation will be in an unusual location, specialprocedures may be necessary. BS6798 gives detailedguidance on this aspect.
2.3 FLUE TERMINAL POSITION
Detailed recommendations for flue installation are given inBS5440:1. The following notes are for general guidance:– The boiler MUST be installed so that the terminal is
exposed to the external air.– It is important that the position of the terminal allows free
passage of air across it at all times.– It is ESSENTIAL TO ENSURE, in practice that products of
combustion discharging from the terminal cannot re-enter the building, or any other adjacent building, throughventilators, windows, doors, other sources of natural airinfiltration, or forced ventilation/air conditioning. If thisdoes occur, the appliance MUST be turned OFF IMMEDI-ATELY and the gas supplier consulted.
– The minimum acceptable dimensions from the terminal toobstructions and ventilation openings are specified in fig. 4.
– If the terminal discharges into a pathway or passagewaycheck that combustion products will not cause nuisanceand that the terminal will not obstruct the passageway.
– Where the lowest part of the terminal is fitted less than 2m (78 in) above ground, above a balcony or above a flatroof to which people have access, the terminal MUST beprotected by a purpose designed guard.
– Where the terminal is fitted within 850 mm (34 in) of aplastic or painted gutter, or 450 mm (18 in) of paintedeaves, an aluminium shield at least 1,500 mm (59 in) longmust be fitted to the underside of the painted surface.
– The air inlet/outlet flue duct MUST NOT be closer than25 mm (1 in) to combustible material.
– In certain weather conditions the terminal may emit aplume of steam. This is normal but positions where thiswould cause a nuisance should be avoided.
2 GENERAL REQUIREMENTS FOR INSTALLATION
Fig. 4
TABLE 5
Terminal position Minimum spacing in mmA Directly below an openable window, 300
air vent or any other ventilation openingB Below guttering, drain pipes or soil pipes 25*C/D Below eaves, balconies or carport roof 25*E From vertical drain pipes or soil pipes 75F From internal or external corners 25G Above adjacent ground, 300
roof or balcony levelH From a surface facing the terminal 600I From a terminal facing the terminal 1,200J From an opening in the carport 1,200
(e.g. door, window into dwelling)K Vertically from a terminal on the same wall 1,500L Horizontally from a terminal on the same wall 300M Horizontally from a vertical terminal to a wall 300N Horizontally from an openable 300
window or other openingP Above an openable window or other opening 300* With “heat shield” installed in accordance to BS 5440 Pt1.

Supplied By www.heating spares.co Tel. 0161 620 6677
6
2.4 VENTILATION REQUIREMENTS
Detailled recommendations for air supply are given inBS5440:2. The following notes are for general guidance:– It is not necessary to have a purpose provided air vent in the
room or compartment in which the appliance is installed.
2.5 GAS SUPPLY
– The gas installation should be in accordance withBS6891. The gas required for the boiler is specified inTable 4.
– Ensure that the pipework from the meter to the applianceis of adequate size.
– The governor at the meter must give a constant outletpressure of 20 mbar (8 inwg) for natural gas and 30 - 37mbar (12 - 15 inwg) for LPG, when the appliance is running.
– The gas supply line should be purged.NOTE: Before purging open all doors and windows, alsoextinguish any cigarettes, pipes, and any other nakedflames.
– The complete installation must be tested for gas soundness.
2.6 ELECTRICITY SUPPLY
The appliance MUST be earthed. A mains supply of 230 V -50 Hz single phase is required. All external controls andwiring MUST be suitable for mains voltage.
Wiring should be in 3 core PVC insulated cable NOT LESSthan 0.75 mm2 (24 x 0.2 mm) to BS6500, Table 16. Wiringexternal to the boiler MUST be in accordance with currentl.E.E. Wiring Regulations (BS 7671) and local regulations. Thesupply connection to the flying lead provided MUST be madeto a fused double pole switch, having a 3 mm (1/8 in) contactseparation in both poles, serving only the boiler and systemcontrols; the fuse rating should be 3 amp. This connectionshould be readily accessible and be made adjacent to the boil-er (except in the case of bathroom installations for domesticboilers where the point of connection to the mains MUST beoutside of the bathroom).
2.7 EXTERNAL CONTROLS (Refer to section 3.9)
The boiler is intended for use with a 24 V room thermostat.The connection is made inside the control box as described insection 3.9.
2.8 WATER SYSTEMS - GENERAL
– This appliance is designed for connection to sealed cen-tral heating water systems.
– Check that the mains water pressure is sufficient to pro-duce the required D.H.W. flow rate, but does not exceedthe maximum D.H.W. pressure (Table 4). Where mainspressure exceed 6 bar a pressure reducing valve mustbe fitted in the D.H.W. inlet.
2.8.1 Treatment of Water Circulating Systems
– All recirculatory systems will be subject to corrosion
unless an appropriate water treatment is applied. Thismeans that the efficiency of the system will deteriorate ascorrosion sludge accumulates within the system, riskingdamage to pump and valves, boiler noise and circulationproblems.
– For optimum performance after installation this boilerand its associated central heating system must beflushed in accordance with the guidelines given in BS7593 “Treatment of water in domestic hot water centralheating systems”.
– This must involve the use of a proprietary cleanser, suchas BetzDearborn Sentinel X300 or X400, or FernoxSuperfloc. Full instructions are supplied with the products,but for immediate information please contact BetzDear-born (0151 420 9563) or Fernox (01799 550 811)directly.
– For long term protection against corrosion and scale,after flushing it is recommended that an inhibitor such asBetzDearborn Sentinel X100, or Fernox MB-1 or Copal isdosed in accordance with the guidelines given in BS7593.Failure to flush and add inhibitor to the system mayinvalidate the appliance warranty.
– It is important to check the inhibitor concentration afterinstallation, system modification and at every service inaccordance with the manufacturer’s instructions. (Testkits are available from inhibitor stockists).
2.9 REQUIREMENTS FOR SEALED WATER SYSTEMS
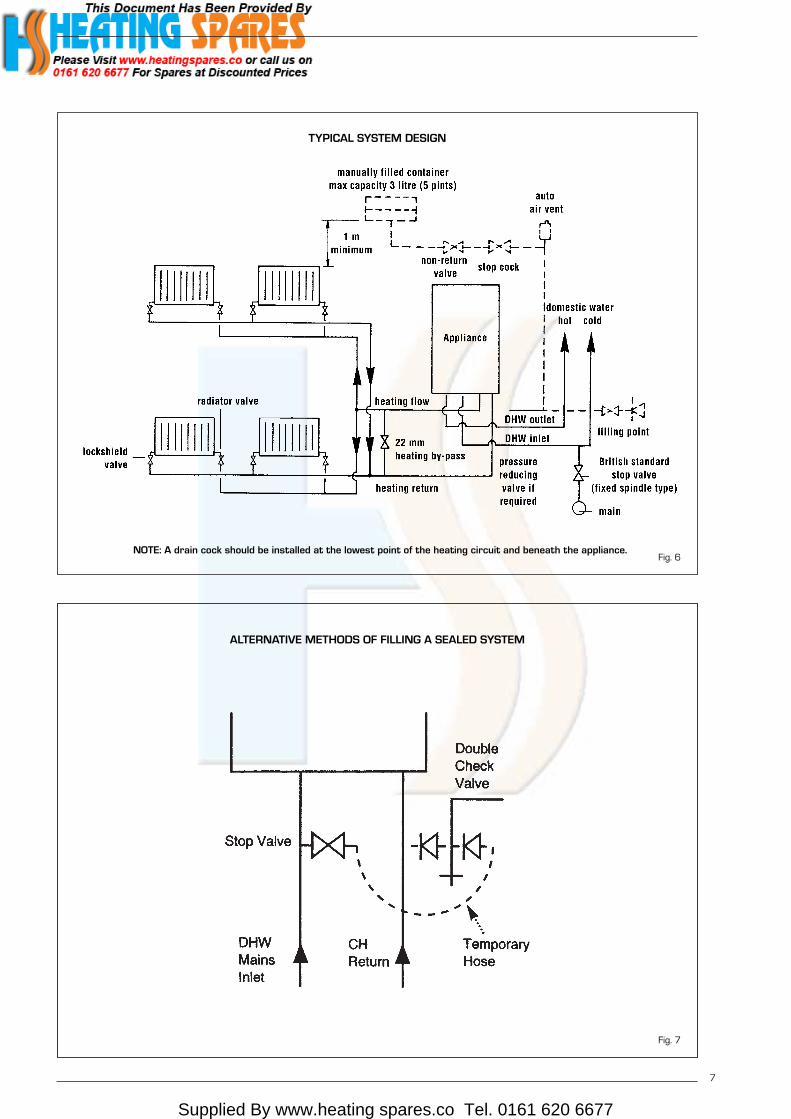
The heating system design should be based on the followinginformation:a) The available pump head is given in fig. 5.b) The burner starts when the C.H. flow reaches 400÷450
l/h. This safety condition is ensured by the flow switch.c) The appliance is equipped with an internal by-pass that
operates with system heads (H) greater than 3 m. Themaximum flow through the by-pass is about 300 l/h. Ifthermostatic radiator valves are to be installed, at leastone radiator should be without a thermostatic valve (usu-ally the bathroom radiator).
d) A sealed system must only be filled by a competent per-son using one of the approved methods shown in fig. 7.
0 200 1600140012001000800600400
PORTATA (l/h)
PR
EVA
LEN
ZA
RES
IDU
A (m
bar)
500
400
100
200
300
30 - 35
25
Form
at.z
ip
KEY1 Available Head for “80 C - 100 C” models2 Available Head for “110 C” model
Flow rate (l/sec)
Ava
ilabl
e he
ad (
mba
r)
Fig. 5
1
2
Supplied By www.heating spares.co Tel. 0161 620 6677
7
TYPICAL SYSTEM DESIGN
ALTERNATIVE METHODS OF FILLING A SEALED SYSTEM
NOTE: A drain cock should be installed at the lowest point of the heating circuit and beneath the appliance.Fig. 6
Fig. 7

Supplied By www.heating spares.co Tel. 0161 620 6677
8
The system design should incorporate the connectionsappropriate to one of these methods.
e) The following paragraphs outline the specifications of theitems fitted to the boiler.
2.9.1 Pump
The available head shown in fig. 5 is that in excess of the appli-ance hydraulic resistance, i.e. that available for the system atany given heating load up to the maximum output in C.H.mode. Never reduce the pump speed below maximum as thiswill reduce D.H.W. output. The pump speed is indicated on theside of the pump speed selector switch (if fitted).
2.9.2 System volume (total water content)
The following Table gives the maximum system volume thatthe integral expansion vessel can sustain under differentcharge pressure conditions. If the system volume exceeds that shown, an additional expan-sion vessel must be fitted and connected to the heating systemprimary return pipe as close as possible to the appliance. If an extra vessel is required, ensure that the total capacity ofboth vessels is adequate. Further details are available in thecurrent issues of BS5449 and BS6798.
NOTE: If the pressure gauge indicates 2.65 bar or greaterwhen the appliance is at maximum temperature with allradiators in circulation an extra expansion vessel isrequired.
2.9.3 Pressure gauge
A pressure gauge is mounted on the appliance facia panel.
2.9.4 Safety valve
A safety valve set at 3 bar (43.5 psi) is fitted to the appliance
and a discharge pipe is routed to outside of the appliance. Thisdischarge pipe should be extended to terminate safely awayfrom the appliance and where a discharge would not causedamage to persons or property but would be detected. Thepipe should be able to withstand boiling water, be a minimumof 15 mm in diameter, and installed with a continuous fall.
2.10 D.H.W. SYSTEMS
– Check that the mains supply pressure is within the pre-scribed limits (Table 4).If necessary, a pressure reducing valve should be fitted tothe mains supply before the D.H.W. inlet connection.
– A maximum D.H.W. flow rate of: 10.3 l/m (2.3 gpm) for“FORMAT 80 C”, 13 l/m (2.9 gpm) for “FORMAT 100 C”and 14 l/m (3.1 gpm) for “FORMAT 110 C” is recom-mended. Higher flow rates will not damage the appliancebut may lower the water temperature below an accept-able level.
– If the appliance is installed in an area where the tempo-rary hardness of the water supply is high, say over 150ppm, the fitting of an in line scale inhibitor may be anadvantage. Consult the Local Water Undertaking if indoubt.
– Devices capable of preventing the flow of expansion water:e.g. non return valves and/or loose-jumpered stop cocksshould not be fitted unless separate arrangements aremade for expansion water.
– For specific information relating to fittings (eg. Showers,washing machines etc.) suitable for connection in theD.H.W. circuit, consult the Local Water Undertaking, how-ever the following information is given for guidance.
2.10.1 Domestic hot/cold water supply taps and mixing taps
All equipment designed for use at mains water pressure issuitable.
2.10.2 Showers
If a shower control is supplied from the appliance it should beof the thermostatic or pressure balanced type. Thermostatictype shower valves provide the best comfort and guardagainst water at too high temperature. Existing controls maynot be suitable, refer to the shower valve manufacturer.
2.10.3 Bidets
Providing that the appliance is of the over-rim flushing type, theoutlets are shrouded and it is impossible to attach a temporaryhand held spray, no anti syphonage device is necessary.
Vessel charge and initial system
pressure
Total water content of system
using 8 l (1.76 gal) capacity expan-
sion vessel supplied with appliance
For systems having a larger capaci-
ty multiply the total system capacity
in litres (gal) by the factor to obtain
the total minimum expansion vessel
capacity required litres (gal)
bar
psi
l
gal
0.5
7.3
96
21.1
.0833
1.5
21.8
51
11.2
.156
1.0
14.5
74
16.2
.109
TABLE 6

Supplied By www.heating spares.co Tel. 0161 620 6677
9
Appliance package:
– combination boiler (assembled);– installation and servicing instructions;– users instructions;– wall mounting templates (paper);– wall mounting bracket;– fixing screws with wall plugs;– plastic bags containing:
– gas service cock;– C.H. F/R isolation valves;– D.H.W. isolation valve;– D.H.W. elbow connection;– associated fixing screws;– associated gaskets;– safety valve discharge pipe.
3.1 FIXING THE WALL MOUNTING BRACKET
Before installing the appliance ensure that the chosen loca-tion is suitable (section 2.2) and that the requirements forflue position, (section 2.3), and minimum clearances, (Table 2)are satisfied. These minimum clearances are essential to pro-vide access for servicing, and are included on the wall mount-ing templates.– Open the paper wall mounting templates. If a rear flue is
to be used, discard the side templates and secure therear template in the desired position. For a side flue appli-cation, secure both the rear and appropriate side tem-plate in position.
– Mark the position of the two wall mounting bracket fixingholes and the flue/air duct hole on the appropriate wall(s).
– Remove the template(s) and drill the two fixing holes usinga 10 mm masonry drill. Fit the plastic plugs provided.
– Cut the hole in the wall for the flue/air duct. The diame-ter should not be less than 100 mm (4 in) and must behorizontal. Refer to fig. 12-14.
– Accurately measure the wall thickness, and note thisdimension for later use.
– Secure the wall mounting bracket in position using thescrews provided. Ensure that it is the correct way up, asindicated in fig. 8.
3.2 HANGING THE BOILER
– Lift the appliance into position. The upper cross memberlocates onto the wall mounting bracket.
– Screw in the wall mounting bracket adjusting screws untilthe appliance is secure and vertical.
3.3 FLUE DUCTS PREPARATION
3.3.1 Flue/air duct lenghts
– Determine whether an extension duct is required with ref-erence to the Z dimension shown in figs. 10-11.
– If no extension ducts are required, procede to 3.4.– If an extension duct or ducts is/are to be used, the flue and
air ducts should be joined before proceeding to the next sec-tion. The extension ducts should be joined to each other andto the standard ducts using the following procedure (fig. 9);
– For the flue ducts in turn, push the plain end of the stan-
dard and (if using two or three extensions) extension ductinto the swaged end of the extension duct(s).
– Push an air duct in to the clamp. Join the air ducts (largerducts) and tighten the screws an the clamp to connect them.
3.3.2 Cutting the flue/air duct extensionto the correct length
Rear flue outlet (Only - fig. 10)
– Select the air duct (larger duct) and starting at the formedend, ‘mark off’ the length to be cut which is the wall thick-ness X + 90 mm (3 1/2 in).
3 INSTALLING THE BOILER
Fig. 8
Fig. 9
Fig. 10
KEY1 Wall mounting bracket2 Plastic wall plug (2 Off)
3 Woodscrew (2 Off)4 Washer (2 Off)5 Adjustment screw (2 Off)

Supplied By www.heating spares.co Tel. 0161 620 6677
10
Side flue outlet (Only - fig. 11)
Right hand side– Select the air duct (larger duct) and starting at the formed
end, ‘mark off’ the length to be cut which is the wall thick-ness X + the clearance Y plus 105 mm (4 1/8 in) for the“FORMAT 80 C” model and 130 mm (5 1/8 in) for the“FORMAT 100 C” and “FORMAT 110 C”models.
Left hand side– Select the air duct (larger duct) and starting at the formed
end, ‘mark off’ the length to be cut which is the wall thick-ness X + the clearance Y plus 145 mm (5 3/4 in) for the“FORMAT 80 C” model and 170 mm (6 3/4 in) for the“FORMAT 100 C” and “FORMAT 110 C”models.
All installations
– Cut the air duct square to the mark and remove all burrsand sharp edges.
– Hold the air duct at the plain end, and slide the flue duct(small duct) inside the air duct (terminal first) until it stopsagainst the terminal, then mark off the length to be cutwhich leaves 20 mm protruding flue duct.
– Remove and cut the flue duct square to the mark andremove all burrs and sharp edges.
3.4 FLUE AND TERMINAL INSTALLATION
3.4.1 Telescopic flue
– Push the flue duct assembly into the air duct until it stopsagainst the terminal.
– Fit the rubber sealing ring (E) into the swaged groove inthe air duct as shown in fig. 12. Ensure that it is the cor-rect way around.
– From inside or outside the building, slide the duct assem-bly into the wall until the sealing ring forms a good sealagainst the outside wall.
– With reference to fig. 12, slide on the rubber ring (D),check that the rubber sealing ring (E) is pulled up to thewall and that the duct assembly is horizontal.
– Push the junction collar (B) over the air duct until the airduct touches the inner part of the collar where the diame-ter becomes smaller.
– Push the elbow socket into the junction collar and ontothe flue duct.
– Fit the jointing clamp (G) over the juction collar.– Place the gasket (F) under the flange of the elbow and fit
the elbow onto the flue manifold, taking care to ensurethat the silicon seal on the elbow correctly engages andforms a seal at its joint with the manifold.
– Secure the elbow onto the air/exhaust manifold using thefour screws provided.
3.4.2 Standard flue
– Push the flue duct assembly into the air duct until theexternal swaged ring on the flue terminal stops againstthe internal swage on the air duct (fig. 13).
– Fit the rubber sealing ring into the swaged groove in the air ductas shown in fig. 14. Ensure that it is the correct way around.
– From inside or outside the building, slide the duct assem-bly into the wall until the sealing ring forms a good sealagainst the outside wall.
– With reference to fig. 14, slide on the aluminium retentionring (D), check that the rubber sealing ring (E) is pulled up tothe wall and that the duct assembly is horizontal, thensecure the aluminium retention ring to the air duct using thetwo screws (H) provided. Do not overtighten the screws.
– Push the junction collar (B) over the air duct until the airduct touches the inner part of the collar where the diame-ter becomes smaller.
– Push the elbow socket into the junction collar and onto theflue duct.
– Fit the jointing clamp (I) over the junction collar.– Remove the six fixing screws securing the sealed chamber
Fig. 11
KEYA ElbowB Junction collarC Outer ductD Inner rubber sealing ring
E Outer rubber sealing ringF Neoprene gasketG Protective jointing clampH Inner lip seal
Fig. 12

Supplied By www.heating spares.co Tel. 0161 620 6677
front panel then remove the panel.– Place the gasket (G) under the flange of the elbow and fit
the elbow onto the top of the appliance, taking care toensure that the silicon seal on the fan outlet correctlyengages and forms a seal at its joint with the elbow. Thismust be checked from inside the sealed chamber.
– Secure the elbow onto the top of the appliance using thefour screws and washers provided, and refit the sealedchamber front panel.
3.4.3 Coaxial flue diaphragm
The boiler is normally supplied with a Ø 87.5 diaphragm. Wayof use and optional diaphragm to be used with vertical ductsis shown in fig. 15.
3.4.4 Coaxial flue specifications
With the elbow supplied in the kit the maximum length of theflue must not exceed following measures:
Each additional 90° elbow installed reduces the availablelenght by 0.9 metres, each additional 45° elbow reducesthe available lenght by 0.45 metres.NOTE: Sime flue systems are suitable for installation withSE-duct systems.
11
Push flue duct and terminal into air duct from this end.
Fig. 13
KEYA Elbow flangeB Junction collarC Outer ductD Aluminium ringE Rubber sealing ring
F Inner duct c/w terminalG Gasket ø 95/125 x 2H Fixing screwI Protective jointing clampJ Inner “O” ring
Z
Fig. 14
Fig. 15
Horizontal VerticalFORMAT 80 C 3.4 5.0FORMAT 100 C 3.0 5.0FORMAT 110 C 3.0 5.0
max 3,4 m "80 C"max 3,0 m "100 C - 110 C"
min
1,3
m -
max
5 m
IMPORTANT: each additional90°elbow reduces the availa-ble length by 0.9 metres.
Fig. 16
HORIZONTAL FLUE DUCTS:install diaphragm ø 87.5 only if the coaxial flue is less than1.8 metres long for model “FORMAT 80 C” or 1.5 metreslong for models “FORMAT 100 C” and “FORMAT 110 C”.
VERTICAL FLUE DUCTSUse the following diaphragms, depending on flue lengthand without any additional elbow:
Flue ducts lenght Diaphragm to be usedFrom 1.3 to 2.5 m optional ø 86From 2.5 to 4 m standard ø 87.5From 4 to 5 m none
DIAPHRAGM
Supplied By www.heating spares.co Tel. 0161 620 6677
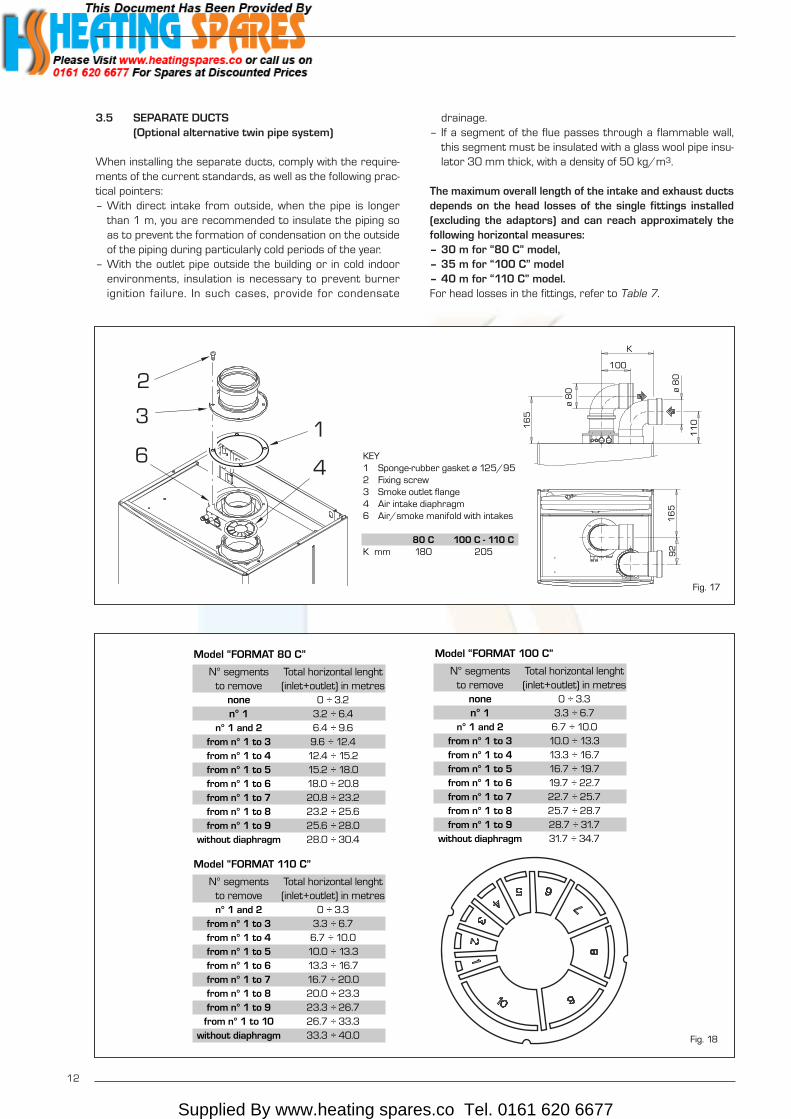
3.5 SEPARATE DUCTS(Optional alternative twin pipe system)
When installing the separate ducts, comply with the require-ments of the current standards, as well as the following prac-tical pointers:– With direct intake from outside, when the pipe is longer
than 1 m, you are recommended to insulate the piping soas to prevent the formation of condensation on the outsideof the piping during particularly cold periods of the year.
– With the outlet pipe outside the building or in cold indoorenvironments, insulation is necessary to prevent burnerignition failure. In such cases, provide for condensate
drainage.– If a segment of the flue passes through a flammable wall,
this segment must be insulated with a glass wool pipe insu-lator 30 mm thick, with a density of 50 kg/m3.
The maximum overall length of the intake and exhaust ductsdepends on the head losses of the single fittings installed(excluding the adaptors) and can reach approximately thefollowing horizontal measures:– 30 m for “80 C” model,– 35 m for “100 C” model– 40 m for “110 C” model.For head losses in the fittings, refer to Table 7.
12
1
2
3
46
16
5
11
016
5
K
ø 8
0
ø 8
0
100
92
Fig. 17
KEY1 Sponge-rubber gasket ø 125/952 Fixing screw3 Smoke outlet flange4 Air intake diaphragm6 Air/smoke manifold with intakes
80 C 100 C - 110 CK mm 180 205
Fig. 18
Model “FORMAT 100 C”
N° segments Total horizontal lenghtto remove (inlet+outlet) in metres
none 0 ÷ 3.3n° 1 3.3 ÷ 6.7
n° 1 and 2 6.7 ÷ 10.0from n° 1 to 3 10.0 ÷ 13.3from n° 1 to 4 13.3 ÷ 16.7from n° 1 to 5 16.7 ÷ 19.7from n° 1 to 6 19.7 ÷ 22.7from n° 1 to 7 22.7 ÷ 25.7from n° 1 to 8 25.7 ÷ 28.7from n° 1 to 9 28.7 ÷ 31.7
without diaphragm 31.7 ÷ 34.7
Model “FORMAT 80 C”
N° segments Total horizontal lenghtto remove (inlet+outlet) in metres
none 0 ÷ 3.2n° 1 3.2 ÷ 6.4
n° 1 and 2 6.4 ÷ 9.6from n° 1 to 3 9.6 ÷ 12.4from n° 1 to 4 12.4 ÷ 15.2from n° 1 to 5 15.2 ÷ 18.0from n° 1 to 6 18.0 ÷ 20.8from n° 1 to 7 20.8 ÷ 23.2from n° 1 to 8 23.2 ÷ 25.6from n° 1 to 9 25.6 ÷ 28.0
without diaphragm 28.0 ÷ 30.4
Model “FORMAT 110 C”
N° segments Total horizontal lenghtto remove (inlet+outlet) in metresn° 1 and 2 0 ÷ 3.3
from n° 1 to 3 3.3 ÷ 6.7from n° 1 to 4 6.7 ÷ 10.0from n° 1 to 5 10.0 ÷ 13.3from n° 1 to 6 13.3 ÷ 16.7from n° 1 to 7 16.7 ÷ 20.0from n° 1 to 8 20.0 ÷ 23.3from n° 1 to 9 23.3 ÷ 26.7
from n° 1 to 10 26.7 ÷ 33.3without diaphragm 33.3 ÷ 40.0
Supplied By www.heating spares.co Tel. 0161 620 6677
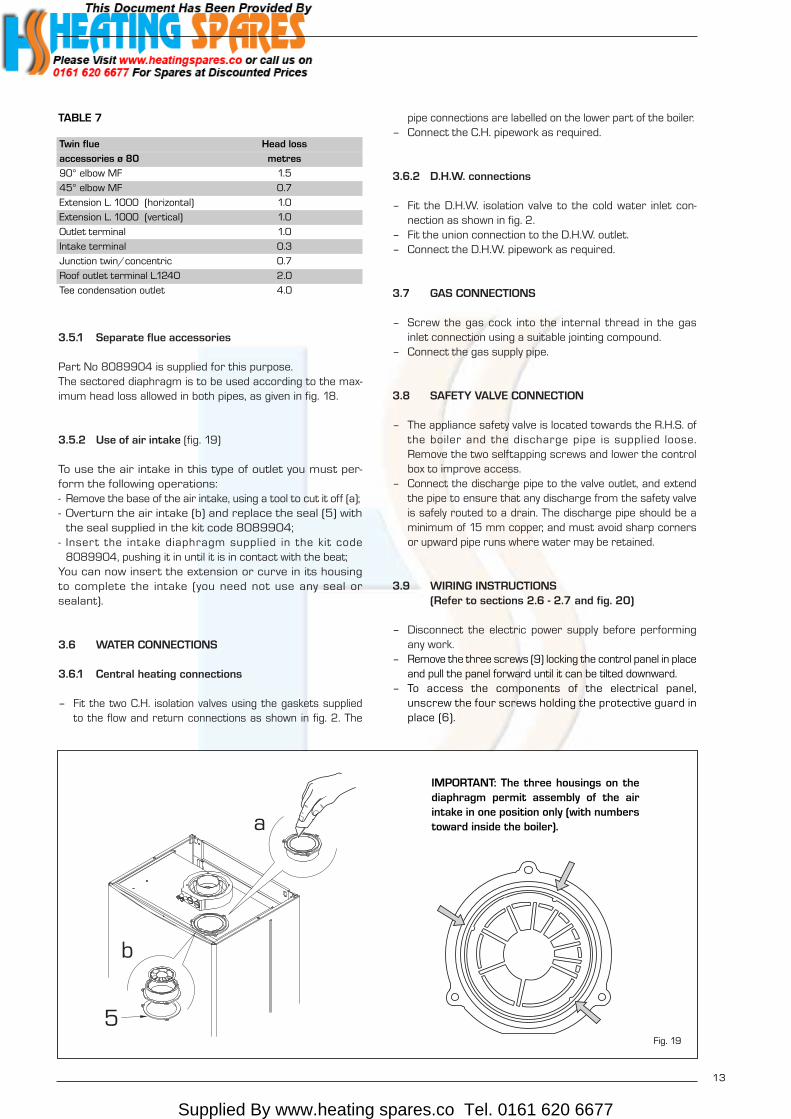
3.5.1 Separate flue accessories
Part No 8089904 is supplied for this purpose.The sectored diaphragm is to be used according to the max-imum head loss allowed in both pipes, as given in fig. 18.
3.5.2 Use of air intake (fig. 19)
To use the air intake in this type of outlet you must per-form the following operations:- Remove the base of the air intake, using a tool to cut it off (a);- Overturn the air intake (b) and replace the seal (5) with
the seal supplied in the kit code 8089904;- Insert the intake diaphragm supplied in the kit code
8089904, pushing it in until it is in contact with the beat;You can now insert the extension or curve in its housingto complete the intake (you need not use any seal orsealant).
3.6 WATER CONNECTIONS
3.6.1 Central heating connections
– Fit the two C.H. isolation valves using the gaskets suppliedto the flow and return connections as shown in fig. 2. The
pipe connections are labelled on the lower part of the boiler.– Connect the C.H. pipework as required.
3.6.2 D.H.W. connections
– Fit the D.H.W. isolation valve to the cold water inlet con-nection as shown in fig. 2.
– Fit the union connection to the D.H.W. outlet.– Connect the D.H.W. pipework as required.
3.7 GAS CONNECTIONS
– Screw the gas cock into the internal thread in the gasinlet connection using a suitable jointing compound.
– Connect the gas supply pipe.
3.8 SAFETY VALVE CONNECTION
– The appliance safety valve is located towards the R.H.S. ofthe boiler and the discharge pipe is supplied loose.Remove the two selftapping screws and lower the controlbox to improve access.
– Connect the discharge pipe to the valve outlet, and extendthe pipe to ensure that any discharge from the safety valveis safely routed to a drain. The discharge pipe should be aminimum of 15 mm copper, and must avoid sharp cornersor upward pipe runs where water may be retained.
3.9 WIRING INSTRUCTIONS(Refer to sections 2.6 - 2.7 and fig. 20)
– Disconnect the electric power supply before performingany work.
– Remove the three screws (9) locking the control panel in placeand pull the panel forward until it can be tilted downward.
– To access the components of the electrical panel,unscrew the four screws holding the protective guard inplace (6).
13
TABLE 7
Twin flue Head loss
accessories ø 80 metres
90° elbow MF 1.5
45° elbow MF 0.7
Extension L. 1000 (horizontal) 1.0
Extension L. 1000 (vertical) 1.0
Outlet terminal 1.0
Intake terminal 0.3
Junction twin/concentric 0.7
Roof outlet terminal L.1240 2.0
Tee condensation outlet 4.0
Fig. 19
a
b
5
IMPORTANT: The three housings on thediaphragm permit assembly of the airintake in one position only (with numberstoward inside the boiler).

Supplied By www.heating spares.co Tel. 0161 620 6677
– To gain access to connector “TA”, remove the controlpanel cover (7) and connect the room stat to the termi-nals 10-11 after having removed the jumper.The thermostat or timer-thermostat, recommended forbetter room temperature control, must be class II asspecified by standard EN 60730.1 (clean contact).
– Carry out electrical system checks through a suitable testmeter: earth continuity, polarity, resistance to earth andshort circuit.
– Re-secure control box.– Ensure sufficient length of cable to allow access to control
panel.
14
4
1 2 3
56 7
8
9
Fig. 20
KEY1 Temperature and pressure gauge2 Time programmer housing3 Rotary switch4 Main PCB5 Earth faston6 Control panel protection7 Cover (TA)8 Connector (TA)9 Fixing screw
ATTENTION: After having removed the three fixingscrews, tilt the panel downward to gain access.

Supplied By www.heating spares.co Tel. 0161 620 6677
SIME SUPPORT THE BENCHMARK INITIATIVE
All relevant sections of the logbook must be filled in at thetime of installation and thereafter service information on theback page of the logbook. Commissioning of the boiler is notcomplete until the logbook is filled in.Before commissioning the appliance, the whole gas installa-tion including the meter MUST be purged and tested for gassoundness in accordance with BS6891.IMPORTANT: open all doors and windows, extinguish nakedlights, and DO NOT SMOKE whilst purging the gas line.Before commencing the commissioning procedure, ensurethat the gas service cock is turned on, the electricity sup-ply is isolated, and that the D.H.W. and C.H. isolation valvesare in the closed position.
4.1 FILLING THE WATER SYSTEM
– Open the C.H. flow and C.H. return valves (19 - 18 fig. 2). – Loosen the automatic air vent cap (9 fig. 2).– Open all radiator valves and system air vents. Fill the sys-
tem with water using one of the approved methodsdescribed in section 2.9 to about 0.5 bar greater thanthe system design pressure. Close all air vents. Do notclose the A.A.V. the one near the pump!
– Check the system for water soundness.– Completely drain the appliance and heating system, thorough-
ly flush the system, and refill the system design pressure.– Open the D.H.W. inlet valve, open any hot tap, clear of air
bubbles. Close hot tap.
4.2 COMMISSIONING THE BOILER
– Remove the screw and connect a pressure gauge to theburner pressure test point on the gas valve (fig. 21).
– Ensure that the rotary switch on the facia panel is set to theSUMMER position “ ” (D.H.W. Only), turn the D.H.W. ther-mostat to maximum (fully clockwise), and turn on the electri-cal supply. Fully open any D.H.W. tap and the burner will light.
– Allow the boiler to run for at least 5 minutes and checkthat the burner pressure is as stated in section 1.3. TheD.H.W. burner pressure is factory set and should notrequire adjusting. If the burner pressure is low, check thatthe appliance has not begun to modulate (this will occur ifthe D.H.W. flow rate is low. If modulation is suspected, openall D.H.W. taps to maximise flow and recheck burner pres-sure). Check also the inlet pressure with the burner alight;
this should be 20 mbar +/– 1.0 mbar standing pressure& the working inlet pressure limited to a loss no greaterthan 1.0 mbar for natural gas. If it is necessary to adjustthe D.H.W. burner pressure the method is described insection 8.6.
– Reduce the D.H.W. draw off rate to the minimum neces-sary to maintain the burner alight by carefully adjustingthe D.H.W. inlet valve and check that the burner pressuredecreases in response to D.H.W. temperature rise. Fullyopen the inlet valve.
– Close the D.H.W. tap and ensure that the burner is extin-guished and the pump stops.
4.3 SETTING THE C.H. INPUT
– Turn the rotary switch to the WINTER position “" andensure that the room thermostat (if fitted) is calling forheat. Turn the C.H. thermostat knob to maximum (fullyclockwise) and the burner will light.
– Allow the boiler to run for at least 5 minutes and checkthe burner pressure. The heating input is factory set asstated in Table 3.
– If the heating output is to be adjusted, proceed as follows:– refer to section 1.3 and establish the desired burner
pressure;– remove (pull forwards) the C.H. knob protecting the
potentiometer;– set the burner pressure as required using a small
screwdriver on potentiometer (1 fig. 22). Rotate thescrew anti-clockwise to reduce the burner pressure;
– operate the rotary switch between SUMMER and WIN-TER position a few times and check that the correctburner pressure is maintained.
– Replace the C.H. knob over potentiometer.– To set the time clock see the user instructions.
4.3.1 Ignition gas pressure trimmer (6 fig. 22)
Trimmer to vary the pressure level upon ignition (STEP), ofthe gas valve. According to the type of gas for which the boiler is equip-ped, the trimmer must be regulated so as to obtain apressure of approx. 3 mbar at the burner for methane gasand 7 mbar for butane gas (G30) and propane gas (G31). To increase pressure, turn the trimmer clockwise; to redu-ce pressure, turn the trimmer counterclockwise.
15
4 COMMISSIONING AND TESTING
BURNER PRESSURETEST POINT
Fig. 21
1 6KEY1 “Heating output” trimmer6 “Ignition pressure” trimmer
NOTE: To gain access to trimmers (1) and (6), takeoff the central heating potentiometer knob. Fig. 22

Supplied By www.heating spares.co Tel. 0161 620 6677
16
The slow ignition pressure level can be set during the first10 seconds following burner ignition. After setting the pressure level upon ignition (STEP)according to the type of gas, check that the pressurefor heating is still at the value previously set.
4.4 SETTING THE D.H.W. FLOWRATE
A restrictor nut is fitted into the diverting valve to reduce theD.H.W. flow to that which will give an acceptable D.H.W. tem-perature. To set the D.H.W. flow, procede as follows:– select Summer position “ ” and turn the D.H.W. thermo-
stat to max.;– fully open the D.H.W. tap furthest from the boiler;– check that the boiler is firing at maximum burner pressure;– adjust the D.H.W. flowrate by turning the restrictor lever
on the divertor valve until a D.H.W. temperature rise ofapprox 35°C is achieved. This corresponds to theflowrates shown in Table 4;
– turn off the tap;– remove the pressure gauge and refit the sealing screw;
Remember that the flow rates and corresponding temperaturesof use of hot water, given in Table 4, have been obtained by posi-tioning the selector of the circulation pump on the maximum value.Should there be any reduction in the D.H.W. flow rate, the filterinstalled on the inlet to the pressure switch valve may needcleaning. To gain access to the filter, first close the cold waterisolation valve (20, figure 2), drain the D.H.W. circuit via the low-est tap, make provision to collect a small discharge of water,then loosen the brass swivel connection to access the filter.
4.5 FINAL CHECKS
– Re-light and test for gas soundness.– Re-fit the casing front panel and securing brackets.– Set the C.H. and D.H.W. potentiometers to the required
settings.– Ensure that the time clock is set at the desired time peri-
ods. Set the room thermostat (if fitted) to the requiredsetting.
4.6 USER’S INSTRUCTIONS
Upon completion of commissioning and testing the system,the installer should:– Give the “Users Instructions” to the householder and
emphasise their responsibilities under the “Gas Safety(Installation and Use) Regulations 1996 (as amended)”.
– Explain and demonstrate the lighting and shutdown proce-dures.
– Advise the householder on the efficient use of the system,including the use and adjustment of all system controlsfor both D.H.W. and C.H.
– Advise the user of the precautions necessary to preventdamage to the system, and to the building, in the event ofthe system remaining inoperative during frost conditions.
– Explain the function of the boiler overheat thermostat, andhow to reset it. Emphasise that if cut-out persists, the boil-er should be turned off and the installer or service engi-neer consulted.
– Stress the importance of an annual service by a regis-tered heating engineer.

Supplied By www.heating spares.co Tel. 0161 620 6677
17
To ensure continued efficient operation of the appliance, it isrecommended that it is checked and serviced as necessaryat regular intervals. The frequency of servicing will dependupon the particular installation conditions and usage but ingeneral once a year should be adequate.It is the law that any service work must be carried out by reg-istered personnel (C.O.R.G.I.). Before commencing any serviceoperation, ISOLATE the mains electrical supply, and TURN OFFthe gas supply at the main service cock. Service the applianceby following the full procedure detailed below.
5.1 MAIN BURNER ASSEMBLY
– Remove the casing as showed in fig. 23.– Remove the 8 fixing screws securing the sealed chamber
front panel then remove the panel.– Unscrew the 7 screws securing the combustion chamber
front panel and remove the panel, taking care not to dam-age the insulation.
– Remove the electrode by unscrewing it from the burnermanifold.
– Unscrew the burner manifold union and locking nut. Liftthe front of the burner to disengage manifold thread andthen lift the burner clear.
– Remove the burner manifold by disconnecting the fourscrews.
– Inspect and if necessary, clean the injectors, electrodes,and the main burner bars.
5.2 FAN ASSEMBLY
– Disconnect the electrical connections to the fan. Note theposition of the earth conductor.
– Remove the three screws securing the fan.
– Tilt the fan forwards and remove in a downwards direction.– Inspect the fan assembly and clean if necessary.
5.3 HEAT EXCHANGER
– Inspect the heat exchanger, and clean if necessary.
5.4 WATER FLOW SWITCH
– Revome the cover from the micro assembly to gainaccess to the flow switch spindle.
– Ensure the spindle is free to move (see fig. 25).– Re-assemble the cover.
5 ROUTINE SERVICING INSTRUCTIONS
8 SEALED CHAMBER SCREWS
BURNER MANIFOLD
UNION
3 FAN FIXING SCREWS
7 COMBUSTION CHAMBER
FRONT PANEL SCREWS
MAIN EXCHANGER
Fig. 24
1
2
Fig. 23
SCREWS
Fig. 25

Supplied By www.heating spares.co Tel. 0161 620 6677
18
5.5 CHIMNEY SWEEP FUNCTION(combustion analysis)
To carry out the verification of combustion in the boiler turnthe selector and stop on the position ( ) until thegreen/orange led starts to flash intermittently.From that moment the boiler will start functioning in heatingmode at the maximum power, with switching off at 80°C andrestarting at 70°C.Before activating the chimney sweep function make surethat the radiator valves or eventual zone valves are open.The test may be carried out also during D.H.W. mode.To do so it is enough, after having activated the chimneysweep function, to take some hot water from one or moreoutlets.Even in this condition the boiler functions at the maximumtemperature always with the primary controlled between80°C and 70°C. During the entire duration of the testing thehot water taps must remain open.After verifying the combustion the boiler should be switchedoff by placing the selector on the OFF position; then return theselector to the desired function.
ATTENTION: After about 15 minutes, or once the hotwater request has been fulfilled, the chimney sweep func-tion automatically deactivates.
5.6 RE-ASSEMBLY
– Re-assemble all the components in reverse order andreplace all the gaskets fitted in the gas line. Ensure that all seals are correctly fitted and that the pres-sure sensing line is correctly fitted.
Check that the fan earth connection is correctly re-fitted.Note that the fan polarity (Line and Neutral) is immaterial.
– Check for gas soundness before fitting the casing.
5.7 RE-COMMISSIONING
– Turn on the gas supply, and check for gas soundnesswhilst the appliance is running.
– Check the operation of the appliance in both C.H. andD.H.W. mode and ensure in both cases that the burnerpressure after at least 5 minutes running is as stated onthe data plate or in Table 3.Adjust if necessary as described in section 8.
When any service or replacement of electrical componentswhich has required the breaking and re-making of electricalconnections has taken place, the following tests must berepeated:– earth continuity;– short circuit;– polarity;– resistance to earth.
5.8 CLEANING THE C.H. WATER FILTER (fig. 25/a)
To clean the filter, close the delivery/return on/off taps, turn off thepower to the control panel, remove the casing and empty the boilerusing the drain provided (13 fig. 2) until the hydrometer shows “zero”.Place a container for collection underneath the filter, unscrew the capand proceed to clean the filter, removing impurities and limestonedeposits. Check the seal o-ring before reassembling the cap with thefilter.
Fig. 25/a

Supplied By www.heating spares.co Tel. 0161 620 6677
19
6.1 EARTH CONTINUITY CHECK
Appliances must be electrically disconnected, meter set on Ω(ohm) x 1 scale and adjust zero if necessary. Tests leads fromany appliance earth point (e.g. inside control box) see wiringdiagrams (section 7) to earth pin on plug. Resistance shouldbe less than 1 Ω (ohm). If the resistance is greater than 1 Ω(ohm) check all earth wires for continuity and all contacts areclean and tight. If the resistance to earth is still greater than1 Ω (ohm) then this should be investigated futher.
6.2 SHORT CIRCUIT CHECK
Switches turned FULL ON - meter set on Ω (ohms) x 1 scale.Test leads from L to N on appliance terminal block, if meterreads 0 then there is a short circuit.Meter set on Ω (ohm) x 100 scale. Repeat it with leads fromL to E. If meter reads less than infinity (∞) there is a fault.
NOTE: Should it be found that the fuse has failed but nofault is indicated, a detailed continuity check (i.e. by discon-necting and checking each component) is required to tracethe faulty component.It is possible that a fault could occur as a result of localburning/arcing but no fault could be found under test.However, a detailed visual inspection should reveal evi-dence of burning around the fault.
6.3 POLARITY CHECK
Appliance reconnected to mains supply and meter set on300 V ac scale. Test at appliance terminal block.– Test leads from L to N meter reads approx.: 240 V ac.– Test leads from L to E “ ” meter reads approx. 240 V ac.– Test leads from N to E “ ” meter reads from 0 to 15 V ac.
6.4 RESISTANCE TO EARTH CHECK
Appliance must be disconnected from main supply and meteron Ω (ohm) x 100 scale. All switches including thermostat on test leads from L to E - ifmeter reads other than infinity (∞) there is a fault whichshould be isolated. A detailed continuity check is required totrace the faulty component.
IMPORTANT: These series of checks are the first electrical checks to becarried out during a fault finding procedure. On completionof the service/fault finding task which has required the
breaking and remaking of electrical connections then thechecks 6.1 Earth continuity, 6.3 Polarity and 6.4Resistance to earth must be repeated.
6.5 FAULT FINDING LEDS
The indicator leds signalling irregular and/or incorrect oper-ation of the equipment are indicated in fig. 26.Before commencing any service operation, ISOLATE themains electrical supply, and TURN OFF the gas supply at themain service cock. It is the law that any service work must becarried out by registered personnel (C.O.R.G.I.).
6 FAULT FINDING
Fig. 26
Bi-colour green led off if power is cut-off
Bi-colour orange led: C.H. sensor fault
Bi-colour orange led flashing: insufficient system pressure
Green led flashing: fan/smoke pressure switch failure
Red led on, ignition lock-out/safety and smokes stats
tripped: turn the selector switch briefly to the position
marked ( ) to restore functioning
Supplied By www.heating spares.co Tel. 0161 620 6677
20
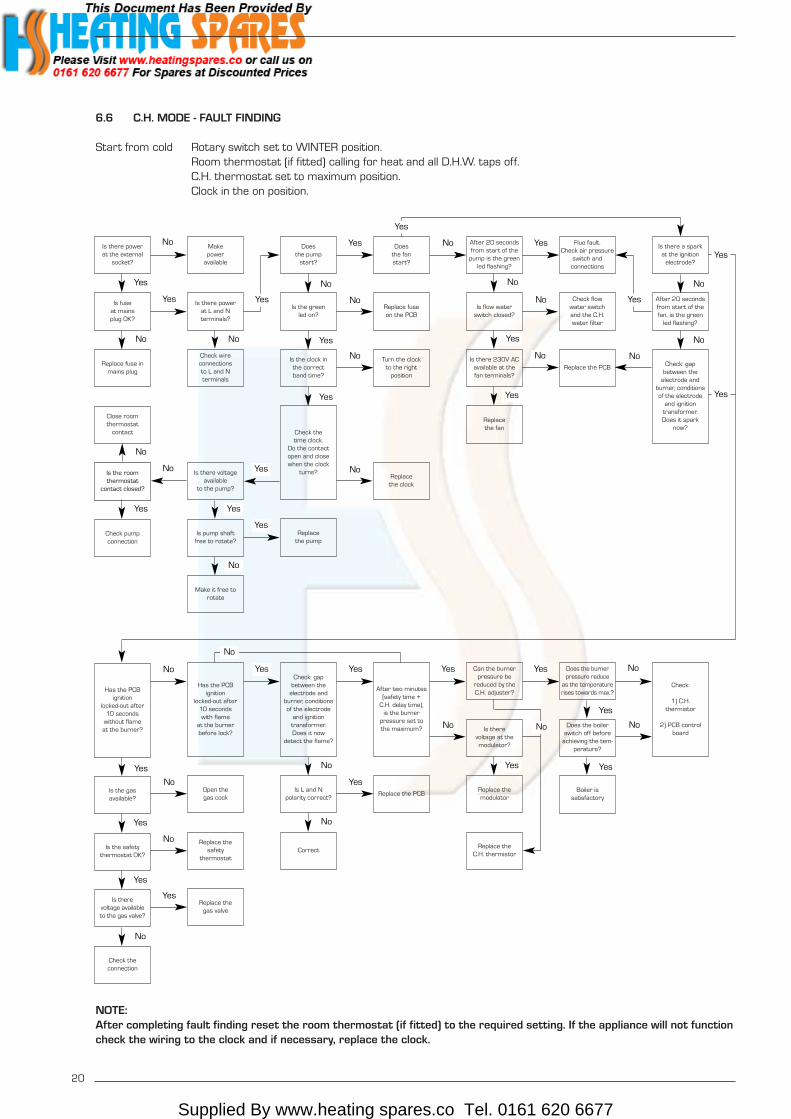
6.6 C.H. MODE - FAULT FINDING
Start from cold Rotary switch set to WINTER position.Room thermostat (if fitted) calling for heat and all D.H.W. taps off.C.H. thermostat set to maximum position.Clock in the on position.
NOTE:After completing fault finding reset the room thermostat (if fitted) to the required setting. If the appliance will not functioncheck the wiring to the clock and if necessary, replace the clock.
Is there power at the external
socket?
Make power
available
Does the pump
start?
After 20 secondsfrom start of the
pump is the greenled flashing?
Is flow waterswitch closed?
Does the fan start?
Is there a spark at the ignition
electrode?
Is fuse at mains plug OK?
Is there power at L and N terminals?
Is the greenled on?
Check flowwater switchand the C.H.water filter
Flue fault.Check air pressure
switch and connections
After 20 secondsfrom start of thefan, is the green
led flashing?
Replace fuseon the PCB
Replace fuse inmains plug
Check wire connections to L and N terminals
Is the clock in the correct band time?
Check the time clock.
Do the contact open and closewhen the clock
turns?
Is there 230V ACavailable at the fan terminals?
Replace the PCB Check: gapbetween the
electrode andburner, conditionsof the electrode
and ignitiontransformer.Does it spark
now?
Turn the clock to the right
position
Close room thermostat
contact
Replace the fan
Is there voltageavailable
to the pump?
Replace the clock
Check pump connection
Is pump shaft free to rotate?
Replace the pump
Make it free torotate
Has the PCB ignition
locked-out after 10 seconds
without flame at the burner?
Has the PCB ignition
locked-out after 10 seconds with flame
at the burnerbefore lock?
Check: gapbetween the
electrode andburner, conditionsof the electrode
and ignitiontransformer.Does it now
detect the flame?
Can the burner pressure be
reduced by theC.H. adjuster?
Does the burner pressure reduce
as the temperaturerises towards max.?
Check:
1) C.H. thermistor
2) PCB controlboard
After two minutes(safety time +
C.H. delay time),is the burner
pressure set tothe maximum? Is there
voltage at themodulator?
Does the boilerswitch off before
achieving the tem-perature?
Is the gasavailable?
Open thegas cock
Is L and Npolarity correct?
Replace themodulator
Replace the PCB
Is the safety thermostat OK?
Replace thesafety
thermostatCorrect
Replace theC.H. thermistor
Is there voltage availableto the gas valve?
Replace thegas valve
Check theconnection
Boiler issatisfactory
Yes
No
Is the room thermostat
contact closed?
Yes
No
Yes
No
Yes
No
No
Yes
No
Yes
No
Yes
Yes
Yes
YesNo
Yes
No
Yes
Yes
Yes
Yes
Yes
Yes No Yes
No
No
No
No
No
No Yes Yes Yes Yes No
Yes
Yes
No
No
No
No
Yes
Yes
Yes
No
Yes
No
No Yes
No
No
No
No

Supplied By www.heating spares.co Tel. 0161 620 6677
21
6.7 D.H.W. MODE - FAULT FINDING
Start from cold - rotary switch set to SUMMER position, D.H.W. thermostat set to maximum, and all D.H.W. taps OFF.
Is there power at the external
socket?
Make power
available
Does the pump
start?
Does the fan start?
Is there a spark at the ignition
electrode?
Is fuse at mains plug OK?
Replace3 amp fuse
Replace fuse onthe PCB
Is the greenled on?
After 20 secondsfrom start of the
pump is the greenled flashing?
Flue fault.Check air pressure
switch andconnections
After 20 secondsfrom start of thefan, is the green
led flashing?
Make it free to rotate
Is there power at L and N terminals?
Check wire connections to L and N terminals
Is there voltage available
at the pump?
Is flow waterswitch closed?
Check flowwater switchand the C.H.water filter
Check: gapbetween the
electrode andburner, conditionof the electrode
and ignitiontransformer.Does it spark
now?
Is pump shaft free to rotate?
Open any D.H.W. tap to give flow 2.8 l/min. Can you
get the desired flow at the
D.H.W. taps?
Are D.H.W.microswitches
operating?
Check pump connection
Is there 230V acavailable at the fan
terminals?Replace the PCB
Replace the pump
Replace thedivertor valve
Replace the fan
Check filter at inletof hydraulic group
Has the PCB ignition
locked-out after 10 seconds
without flame at the burner?
Has the PCB ignition
locked-out after10 seconds with flame
at the burnerbefore lock?
Is the gas available?
Open the gas cock
Is the safety thermostat OK?
Replace thesafety thermostat
Is there voltageavailable to
the gas valve?
Check the connection
Replace thegas valve
No Yes YesYes
Yes
Yes
Yes
No
No No
No
Yes
No
Yes
Yes
No
Yes
No
No
Yes
No No No
No
Yes
Yes
No
Yes
No
No No
Yes
Yes
No
Yes
Yes
Yes
No
No
No
Yes
Check: gapbetween the
electrode andburner, conditionsof the electrode
and ignitiontransformer.Does it now
detect the flame?
Can the burner pressure be
reduced by theD.H.W. adjuster?
Does the burner pressure reduce
as the temperaturerises towards max.?
Check:
1) C.H. thermistor
2) PCB controlboard
Is the burnerpressure set tothe maximum?
Is therevoltage at themodulator?
Replace theC.H. thermistor
Does the boilerswitch off before
achieving the tem-perature?
Is L and Npolarity correct?
Replace themodulator
Replace the PCB
Correct
Boiler issatisfactory
Yes
Yes Yes Yes Yes No
Yes
Yes
No
No
No
No
Yes
No
No No
Supplied By www.heating spares.co Tel. 0161 620 6677
22
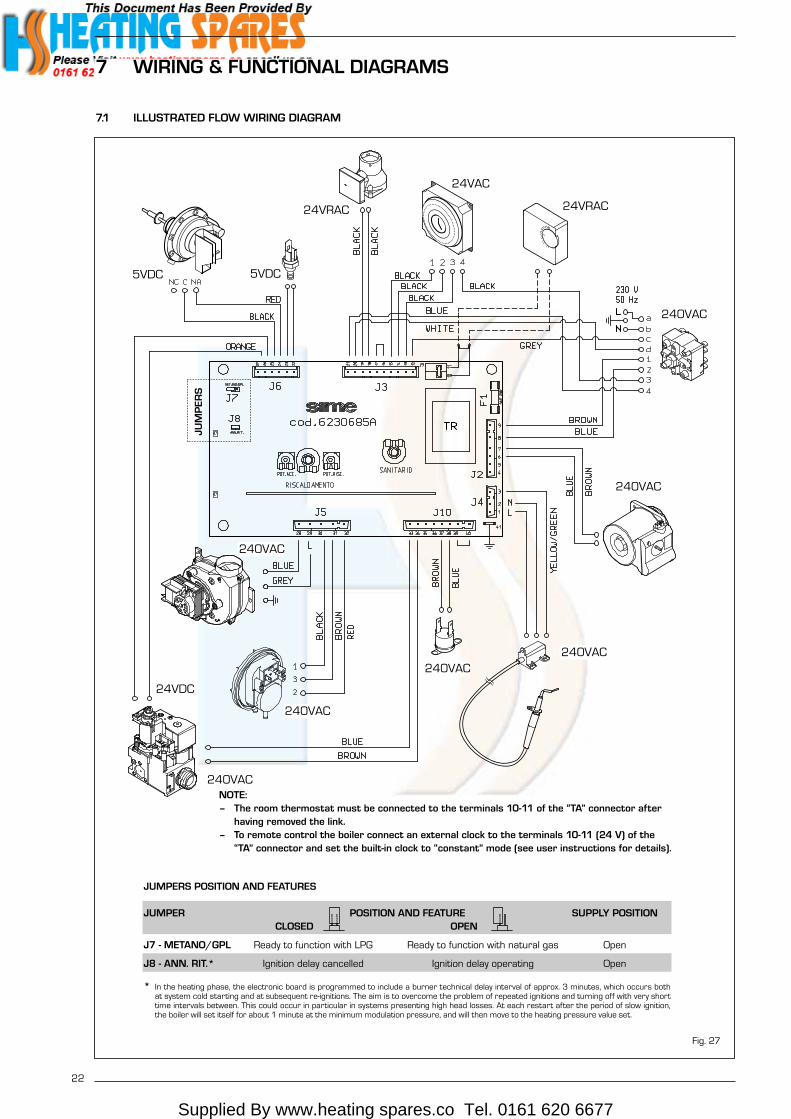
7 WIRING & FUNCTIONAL DIAGRAMS
7.1 ILLUSTRATED FLOW WIRING DIAGRAM
5VDC 5VDC
24VRAC
24VAC
24VRAC
240VAC
240VAC
240VAC240VAC
240VAC
240VAC
24VDC
240VAC
NOTE:– The room thermostat must be connected to the terminals 10-11 of the “TA” connector after
having removed the link.– To remote control the boiler connect an external clock to the terminals 10-11 (24 V) of the
“TA” connector and set the built-in clock to “constant” mode (see user instructions for details).
Fig. 27
JUMPERS POSITION AND FEATURES
JUMPER POSITION AND FEATURE SUPPLY POSITIONCLOSED OPEN
J7 - METANO/GPL Ready to function with LPG Ready to function with natural gas Open
J8 - ANN. RIT.* Ignition delay cancelled Ignition delay operating Open
* In the heating phase, the electronic board is programmed to include a burner technical delay interval of approx. 3 minutes, which occurs bothat system cold starting and at subsequent re-ignitions. The aim is to overcome the problem of repeated ignitions and turning off with very shorttime intervals between. This could occur in particular in systems presenting high head losses. At each restart after the period of slow ignition,the boiler will set itself for about 1 minute at the minimum modulation pressure, and will then move to the heating pressure value set.
JUM
PER
S

Supplied By www.heating spares.co Tel. 0161 620 6677
8.1 HEAT EXCHANGER
– Remove the fan as described in section 8.3.– Disconnect the pressure sensing pipe from the flue box,
lift the collector hood assembly, tilt forwards, and removethe hood.
– Isolate the C.H. flow and return valves.– Drain the heat exchanger using the drain cock (at the bot-
tom RHS of the appliance)– Unclip the heat exchanger securing clips and unscrew
completely the expansion vessel nut.– Disconnect the pipes from the exchanger and lift out the
heat exchanger.– Re-assemble in reverse order, ensuring that the heat
exchanger seals and clips are correctly located and thatthe pressure sensing pipe is correctly re-fitted. The fanpolarity is not important except the earth conductor (G/Ywhich is marked on the appliance).
– Refill, and re-commission the system as described in sec-tion 4.
8.2 COMBUSTION CHAMBER INSULATION
The design of this appliance is such that the rear and sideinsulation should not require replacement unless mechanical-ly damaged.IMPORTANT: When handling insulation panels, take care toavoid producing or inhaling dust particles. When removingold or damaged insulation panels, dampen with water tominimise dust.To replace the insulation front panel, proceed as follows:– remove the combust ion chamber front panel as
described in section 5.1;– replace the front insulation panel and glue it into position
on the front panel using the glue supplied. Re-assemble inreverse order.
Should the rear or side panels become damaged, replacethem as follows.– remove the heat exchanger as described in section 8.1;– remove the side insulation panels followed by the rear
panel;– re-assemble in reverse order, refill, and recommission the
system as described in section 4.
8.3 FAN ASSEMBLY
– Remove the casing front panel and sealed chamber frontpanel as described in section 5.1.
– Disconnect the electrical connections and the pressuresensing pipes to the fan. Note the position of the earthconductor.
– Unscrew the three screws securing the fan.– Drop and tilt the fan forwards and remove in a down-
wards direction.– Re-assemble in reverse order. Ensure that the earth con-
nection is correctly refitted. Note that the polarity (Lineand Neutral) is immaterial.
8.4 MAIN BURNER
– Remove the main burner by following section 5.1.– Transfer the ignition electrode onto the new burner
assembly.– Re-assemble in reverse order. Check the electrode gaps
(fig. 28) and test for gas soundness. – Re-commission the appliance as described in section 4.
8.5 IGNITION/DETECTION ELECTRODE
– Remove the casing front panel and sealed chamber frontpanel as described in section 5.1.
– Unscrew the single screw securing the electrode in posi-tion, and release the electrode from the burner.
– Remove the electrode and disconnect its cable from theignition transformer.
– Replace the electrode and re-assemble in reverse order.
8.6 GAS VALVE
– Remove the casing front panel as described in section 5.1.– Disconnect the two leads from the modulating solenoid
and disconnect the valve connector (one screw).– Unscrew the nut between the inlet pipe and the valve.– Unscrew the burner manifold nut underneath the
sealed chamber, and withdraw the gas valve completewith outlet pipe.
– Transfer the outlet pipe onto the new gas valve, using anew gasket (supplied with the valve).
– Fit the new gas valve assembly into the appliance usingthe other new gasket supplied on the valve inlet, and re-assemble in reverse order.
– Re-light the appliance, check for gas soundness, and re-commission in accordance with section 4.
In addition it will be necessary to set the D.H.W. and C.H.heat inputs, with reference to fig. 29, as follows:Note that it is necessary to set the MAXIMUM PRESSURE FIRST.– Connect a pressure gauge to the burner pressure
test point.– Remove the sealing cap of the proportioning unit (C) by
rotating it ⁄ turn anticlockwise.– Adjust DHW potentiometer to maximum, then fully open
any DHW tap to light the boiler.– Using a 10 mm spanner, turn nut (B) to attain the maxi-
mum pressure in Table 3. Turn the nut clockwise to increase or anti-clockwise todecrease the burner pressure.
– Turn the main selector switch on and off a few times (with
23
8 REPLACEMENT OF PARTS
Fig. 28
4±
0.5
IGNITION/DETECTION
ELECTRODE

Supplied By www.heating spares.co Tel. 0161 620 6677
the hot tap still open) and check that the pressure returnsto the correct (set) maximum value (as in Table 3).
– Set the minimum burner pressure by first isolating theelectricity supply and disconnecting one of the modulat-ing solenoid leads, then restore the electricity supply andfully open a DHW tap to light the appliance at minimumgas rate.
– Set the minimum pressure with reference to Tables 3 byholding nut (B) in position with a 10 mm spanner and rotat-ing the plastic screw (A) with a screwdriver until the correctpressure is obtained. Turn the screw clockwise to increasethe pressure or anti-clockwise to decrease it. It is essentialthat the max pressure has been set prior to adjusting theminimum pressure. Check that the minimum pressure iscorrectly set by turning on and off the D.H.W. inlet valve sev-eral times and ensuring that the pressure returns to thatpreviously adjusted;
– Isolate the power supply, re-connect the modulation lead,restore the power and re-check the maximum pressure,then re-fit the plastic cover (1).
– Reduce the D.H.W. draw off rate to the minimum nec-essary to maintain the burner alight by carefully adjustingthe D.H.W. Inlet valve and check that the burner pressuredecreases in response to D.H.W. temperature rise. Fullyopen the inlet valve;
– Close the D.H.W. tap and ensure that the burner is extin-guished and the pump stops.
– Adjust the Central Heating maximum pressure asdescribed in section 4.3, then complete the re-commis-sioning as described in 4.4 and 4.5.
8.7 AIR PRESSURE SWITCH
– Remove the casing front panel and sealed chamber frontpanel as described in section 5.1.
– Disconnect the pressure sensing pipe from the switch.– Remove the switch (two screws) and fit the new one.– Transfer the electrical connections one at a time (to ensure
that they are not incorrectly re-fitted) to the new switch.
– Re-assemble in reverse order referring to the wiring dia-grams (section 7) if necessary. Ensure that the pressuresensing lead is correctly connected to the low pressureconnection on the pressure switch (marked P2).
8.8 OVERHEAT THERMOSTAT
The overheat thermostat is situated on the flow pipe, belowthe sealed chamber (11 fig. 3).– Remove the casing front panel as described in section 5.1.– Disconnect the two overheat thermostat wires.– Unscrew the two limit thermostat fixing screws and
remove the thermostat.– Replace the thermostat and spread heat sink compound
(supplied) over the base of the new one.– Re-assemble in reverse order. (Polarity is immaterial).
8.9 THERMISTOR
The thermistor is placed over the main exchanger. – Remove the casing front panel as described in section 5.1.– Isolate the C.H. flow and return valves (19 - 18 fig. 2), and
drain the appliance through the drain plug (13 fig. 2).– Pull off the electric connection, and unscrew the thermis-
tor from the exchanger.– Replace the thermistor and re-assemble in reverse order.Table 8 shows the resistance values (Ω) that are obtainedon the sensor as the temperature varies.
8.10 DRIVER PCB
– Remove the casing front panel as described in section 5.1.– Open the control panel protecting cover by removing the
four fixing screw.– Pull off the potentiometer knobs.– Release the PCB (four screws), transfer all connections
onto the new PCB, and re-assemble in reverse order.– Re-set the CH burner pressure as described in section 4.3.
8.11 PUMP MOTOR
– Remove the casing front panel as described in section 5.1.– Unplug the electrical connection plug.– Isolate the C.H. flow and return valves (19 - 18 fig. 2), and
drain the appliance through the drain plug (13 fig 2).– Unscrew the four fixing screws on the motor.– Replace the pump motor and re-assemble in reverse
order. If the new pump is fitted with a speed adjuster,ensure that the speed is set to maximum.
– Refill and commission the system as described in section 4.1.
24
Temperature (°C) Resistance (Ω)
20 12,09030 8,31340 5,82850 4,16160 3,02170 2,22980 1,669
TABLE 8
KEYA Plastic screwB NutC Sealing cap
Fig. 29

Supplied By www.heating spares.co Tel. 0161 620 6677
8.12 D.H.W. HEAT EXCHANGER
– Remove the casing front panel as described in section 5.1.– Isolate the C.H. flow and return valves, and the D.H.W. iso-
lation valve (19 - 18 - 20 fig. 2).– Drain the appliance through the drain plug (13 fig 2).– Drain the D.H.W. circuit by opening any D.H.W. tap below
the level of the boiler.– Lift off the microswitch assembly.– Remove the three screws fixing the D.H.W. heat exchang-
er and remove the heat exchanger.– Fit new heat exchanger and re-assemble in reverse order
using the new gaskets supplied with the heat exchanger.– Refill and re-commission the system as described in sec-
tion 4.1.
8.13 DIVERTOR VALVE - COMPLETE
– Remove the casing front panel as described in section 5.1.– Isolate the C.H. flow and return valves, and the D.H.W. iso-
lation valve (19 - 18 - 20 fig. 2).– Drain the appliance through the drain plug (13 fig 2)– Drain the D.H.W. circuit by opening any D.H.W. tap below
the level of the boiler.– Lift off the microswitch assembly.– Remove the three screws fixing the D.H.W. heat exchang-
er and remove the heat exchanger.– Pull out the divertor valve circlip and remove the valve.– Transfer the electrical connections onto the new valve. If
necessary. refer to the wiring diagrams in section 7.– Re-assemble in reverse order, using the new gaskets sup-
plied with the valve.– Refill and re-commission the system as described in section 4.1.
8.14 DIVERTOR VALVE - MICROSWITCH ASSEMBLY
– Remove the casing front panel as described in section 5.1.– Remove the two screws pivot the control box downwards.– Lift off the microswitch assembly.– Transfer the electr ical connections onto the new
microswitch assembly. If necessary refer to the wiring dia-grams in section 7.
– Re-assemble in reverse order.
8.15 C.H. EXPANSION VESSEL
Replacement is not recommended if a rear flue outlet is usedor if the clearance above the casing is less than 300 mm.– Remove the casing front panel as described in section 5.1.– Isolate the C.H. flow and return valves (17 - 18 fig. 2), and
drain the appliance through the drain plug (13 fig. 2).– Unscrew the expansion vessel union on the C.H. return
pipe.– If a rear flue outlet is used it is necessary to disengage
the flue and air duct temporarily. Refer to section 3.5.– Remove the adjusting screws on the wall mounting brack-
et thereby allowing the appliance to move slightly for-
wards at the top.– Lift the expansion vessel out of the appliance through
the top.– Replace the expansion vessel and re-assemble in reverse
order. Re-pressurise and re-commission the system asdescribed in section 4.1.
8.16 PRESSURE/TEMPERATURE GAUGE
– Remove the casing front panel as described in section 5.1.– Isolate the C.H. flow and return valves (19 - 18 fig. 2).– Drain the appliance through the drain point (13 fig. 2).– Remove the circlip securing the pressure sensor to the
hydraulic group and pull out the sensor.– Remove the fixing spring of the thermometer bulb from
the C.H. flow pipe.– Squeeze the gauge to depress the retaining clips, then
ease the gauge forwards.– Reassemble in reverse order.
Refill and re-commission the system as described in sec-tion 4.1.
8.17 SAFETY VALVE
– Remove the casing front panel as described in section 5.1.– Isolate the C.H. flow and return valves (19 - 18 fig. 2).– Drain the appliance through the drain point (13 fig. 2)– Remove the circlip securing the valve to the hydraulic
group and remove the valve.– Fit the new safety valve and re-assemble in reverse order.
Refill and re-commission the system as described in sec-tion 4.1.
8.18 AUTOMATIC AIR VENT
– Remove the casing front panel as described in section 5.1.– Isolate the C.H. flow and return valves (19 - 18 fig. 2).– Drain the appliance through the drain point (13 fig. 2).– Remove the circlip securing the automatic air vent to the
hydraulic group.– Fit the new automatic air vent and re-assemble in reverse
order. Refill and re-commission the system as describedin section 4.1.
8.19 TIME CLOCK
– Remove the casing front panel as described in section 5.1.– Open the control panel protecting cover by removing the
four fixing screws.– Pull off the electrical connections at the back of the clock.– Remove the two screws securing the plastic frame of the
time clock to the facia panel.– Remove the plastic frame and pull out the time clock.– Re-assemble in reverse order and test the operation of
the new clock.– Set it to the desired settings as described in section 4.3.
25
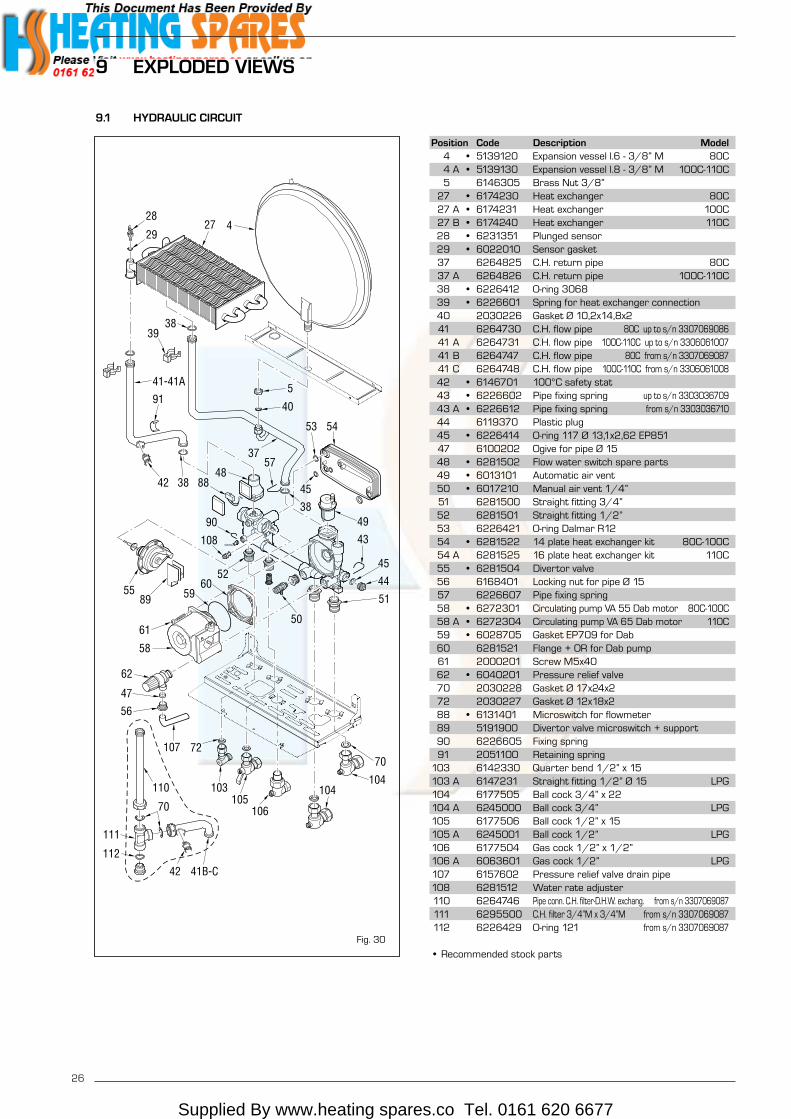
Supplied By www.heating spares.co Tel. 0161 620 6677
26
9 EXPLODED VIEWS
60
108
49
104
54
44
43
51
45
29
2827
90
52
4888
45
3757
53
40
3839
41-41A
91
3842
38
104
70
105106
103
72
5589
107
5061
58
47
59
56
62
4
5
42
70
41B-C
110
112
111
Fig. 30
Position Code Description Model4 • 5139120 Expansion vessel l.6 - 3/8” M 80C4 A • 5139130 Expansion vessel l.8 - 3/8” M 100C-110C 5 6146305 Brass Nut 3/8”
27 • 6174230 Heat exchanger 80C27 A • 6174231 Heat exchanger 100C 27 B • 6174240 Heat exchanger 110C 28 • 6231351 Plunged sensor29 • 6022010 Sensor gasket 37 6264825 C.H. return pipe 80C37 A 6264826 C.H. return pipe 100C-110C 38 • 6226412 O-ring 3068 39 • 6226601 Spring for heat exchanger connection40 2030226 Gasket Ø 10,2x14,8x241 6264730 C.H. flow pipe 80C up to s/n 330706908641 A 6264731 C.H. flow pipe 100C-110C up to s/n 330606100741 B 6264747 C.H. flow pipe 80C from s/n 330706908741 C 6264748 C.H. flow pipe 100C-110C from s/n 330606100842 • 6146701 100°C safety stat 43 • 6226602 Pipe fixing spring up to s/n 330303670943 A • 6226612 Pipe fixing spring from s/n 330303671044 6119370 Plastic plug45 • 6226414 O-ring 117 Ø 13,1x2,62 EP85147 6100202 Ogive for pipe Ø 15 48 • 6281502 Flow water switch spare parts 49 • 6013101 Automatic air vent50 • 6017210 Manual air vent 1/4”51 6281500 Straight fitting 3/4” 52 6281501 Straight fitting 1/2” 53 6226421 O-ring Dalmar R12 54 • 6281522 14 plate heat exchanger kit 80C-100C54 A 6281525 16 plate heat exchanger kit 110C 55 • 6281504 Divertor valve56 6168401 Locking nut for pipe Ø 15 57 6226607 Pipe fixing spring58 • 6272301 Circulating pump VA 55 Dab motor 80C-100C58 A • 6272304 Circulating pump VA 65 Dab motor 110C59 • 6028705 Gasket EP709 for Dab60 6281521 Flange + OR for Dab pump61 2000201 Screw M5x40 62 • 6040201 Pressure relief valve 70 2030228 Gasket Ø 17x24x272 2030227 Gasket Ø 12x18x288 • 6131401 Microswitch for flowmeter 89 5191900 Divertor valve microswitch + support90 6226605 Fixing spring 91 2051100 Retaining spring
103 6142330 Quarter bend 1/2” x 15103 A 6147231 Straight fitting 1/2” Ø 15 LPG104 6177505 Ball cock 3/4” x 22 104 A 6245000 Ball cock 3/4” LPG105 6177506 Ball cock 1/2” x 15 105 A 6245001 Ball cock 1/2” LPG106 6177504 Gas cock 1/2” x 1/2”106 A 6063601 Gas cock 1/2” LPG107 6157602 Pressure relief valve drain pipe108 6281512 Water rate adjuster110 6264746 Pipe conn. C.H. filter-D.H.W. exchang. from s/n 3307069087111 6295500 C.H. filter 3/4”M x 3/4”M from s/n 3307069087112 6226429 O-ring 121 from s/n 3307069087
• Recommended stock parts
9.1 HYDRAULIC CIRCUIT
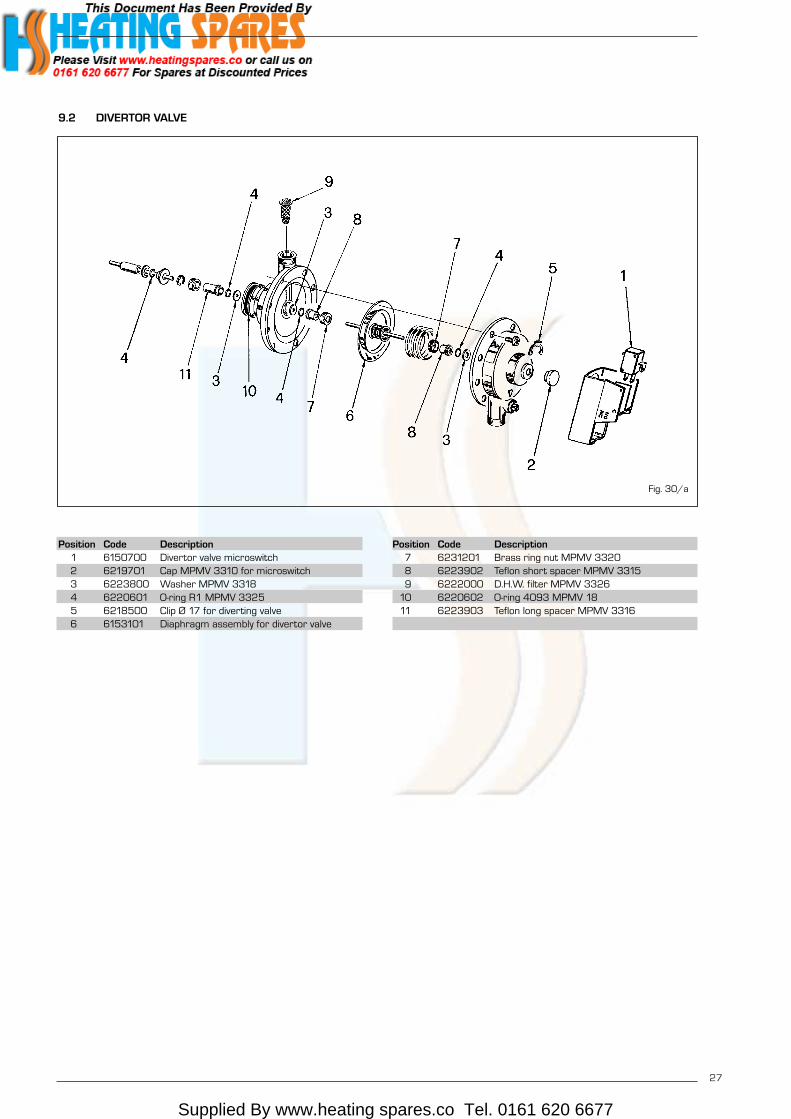
Supplied By www.heating spares.co Tel. 0161 620 6677
27
Position Code Description1 6150700 Divertor valve microswitch2 6219701 Cap MPMV 3310 for microswitch3 6223800 Washer MPMV 33184 6220601 O-ring R1 MPMV 33255 6218500 Clip Ø 17 for diverting valve6 6153101 Diaphragm assembly for divertor valve
Position Code Description7 6231201 Brass ring nut MPMV 33208 6223902 Teflon short spacer MPMV 33159 6222000 D.H.W. filter MPMV 3326
10 6220602 O-ring 4093 MPMV 1811 6223903 Teflon long spacer MPMV 3316
9.2 DIVERTOR VALVE
Fig. 30/a
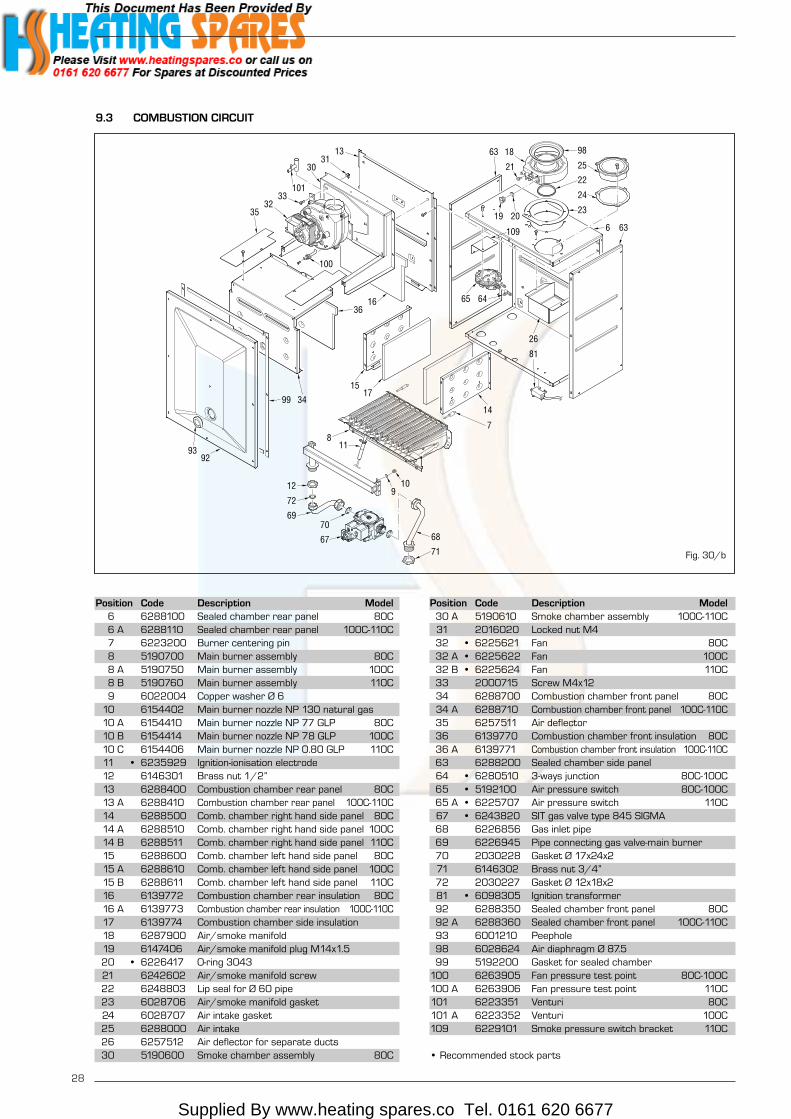
Supplied By www.heating spares.co Tel. 0161 620 6677
28
101
19 20
21
1825
98
24
22
23
6 63
65 64
81
26
3113
30
3332
1636
9392
349914
7
1517
811
72
12
6970
67 68
71
910
35
100
63
109
Position Code Description Model6 6288100 Sealed chamber rear panel 80C6 A 6288110 Sealed chamber rear panel 100C-110C 7 6223200 Burner centering pin8 5190700 Main burner assembly 80C8 A 5190750 Main burner assembly 100C 8 B 5190760 Main burner assembly 110C 9 6022004 Copper washer Ø 6
10 6154402 Main burner nozzle NP 130 natural gas 10 A 6154410 Main burner nozzle NP 77 GLP 80C10 B 6154414 Main burner nozzle NP 78 GLP 100C 10 C 6154406 Main burner nozzle NP 0.80 GLP 110C 11 • 6235929 Ignition-ionisation electrode 12 6146301 Brass nut 1/2”13 6288400 Combustion chamber rear panel 80C13 A 6288410 Combustion chamber rear panel 100C-110C14 6288500 Comb. chamber right hand side panel 80C14 A 6288510 Comb. chamber right hand side panel 100C14 B 6288511 Comb. chamber right hand side panel 110C15 6288600 Comb. chamber left hand side panel 80C15 A 6288610 Comb. chamber left hand side panel 100C 15 B 6288611 Comb. chamber left hand side panel 110C 16 6139772 Combustion chamber rear insulation 80C16 A 6139773 Combustion chamber rear insulation 100C-110C17 6139774 Combustion chamber side insulation18 6287900 Air/smoke manifold19 6147406 Air/smoke manifold plug M14x1.5 20 • 6226417 O-ring 3043 21 6242602 Air/smoke manifold screw22 6248803 Lip seal for Ø 60 pipe23 6028706 Air/smoke manifold gasket 24 6028707 Air intake gasket 25 6288000 Air intake26 6257512 Air deflector for separate ducts30 5190600 Smoke chamber assembly 80C
Position Code Description Model30 A 5190610 Smoke chamber assembly 100C-110C 31 2016020 Locked nut M4 32 • 6225621 Fan 80C32 A • 6225622 Fan 100C 32 B • 6225624 Fan 110C 33 2000715 Screw M4x12 34 6288700 Combustion chamber front panel 80C34 A 6288710 Combustion chamber front panel 100C-110C35 6257511 Air deflector 36 6139770 Combustion chamber front insulation 80C36 A 6139771 Combustion chamber front insulation 100C-110C63 6288200 Sealed chamber side panel 64 • 6280510 3-ways junction 80C-100C 65 • 5192100 Air pressure switch 80C-100C 65 A • 6225707 Air pressure switch 110C 67 • 6243820 SIT gas valve type 845 SIGMA68 6226856 Gas inlet pipe69 6226945 Pipe connecting gas valve-main burner 70 2030228 Gasket Ø 17x24x271 6146302 Brass nut 3/4”72 2030227 Gasket Ø 12x18x281 • 6098305 Ignition transformer92 6288350 Sealed chamber front panel 80C92 A 6288360 Sealed chamber front panel 100C-110C 93 6001210 Peephole98 6028624 Air diaphragm Ø 87.599 5192200 Gasket for sealed chamber
100 6263905 Fan pressure test point 80C-100C 100 A 6263906 Fan pressure test point 110C 101 6223351 Venturi 80C101 A 6223352 Venturi 100C 109 6229101 Smoke pressure switch bracket 110C
• Recommended stock parts
9.3 COMBUSTION CIRCUIT
Fig. 30/b

Supplied By www.heating spares.co Tel. 0161 620 6677
29
102
2
3 1
1
7596
87
73
85 97
8078
86
7977
76
78
8384
82
74
6646
9495
9.4 STRUCTURAL COMPONENTS AND CONTROL & REGULATIONS
Position Code Description Model1 6138570 Side frame part 2 6138770 Frame assembly upper support 80C2 A 6138771 Frame assembly upper support 100C-110C 3 6255430 Expansion vessel lower support 80C3 A 6255431 Expansion vessel lower support 100C-110C
46 6138870 Frame assembly lower side 80C46 A 6138880 Frame assembly lower side 100C-110C 66 2013304 Fastener for self tapping screw 73 6289800 Control panel 74 6273210 Guidelight - 2 ways out 75 6217005 Temperature and pressure gauge76 • 6230687 Main PCB with ignition77 • 6201501 Trimmer spindle Ø 5 78 • 6201505 Trimmer spindle Ø 6 79 • 6260701 Rotary switch 80 2211610 Earth faston
Position Code Description Model82 6289900 Control panel protecting cover83 6290300 Control panel cable cover 84 6290200 Room stat connection cover85 6290100 Knob Ø 40 86 6009585 Control panel bracket 87 6290001 Flap door 80C87 A 6290002 Flap door 100C 87 B 6290006 Flap door 110C 94 6287321 Casing 80C94 A 6287331 Casing 100C-110C 95 • 2013302 Fastener for self tapping screw 96 2004510 Screw 8Px7/8” 97 6112420 Control panel screw
102 • 6197709 Time programmer
• Recommended stock parts
Fig. 30/c

Supplied By www.heating spares.co Tel. 0161 620 6677

Supplied By www.heating spares.co Tel. 0161 620 6677
GAS CONVERSION
A kit is supplied upon request complete with the necessary change-over materials for operation with butanegas (G30) or propane gas (G31). Operate in the following manner for changing over from one gas to another:– Close the gas cock.– Slide out the burner unit.– Replace the main nozzles (6) supplied in a kit, inserting the copper washer (4). Use a ø 7 spanner to
perform this operation.– Remove the “MET/GPL” connector link on the main board and set it on “GPL”.– To set the values of maximum and minimum gas pressure, follow the instructions given in section 8.6.
When the working pressures have been adjusted, reseal the regulators.– After the conversion of the boiler, please stick onto the casing panel the plate showing the relevant fee-
ding gas which is included in the kit.
NOTE: When reassembling components which you have removed, replace gas seals; test all gas con-nections after assembly using soapy water or a product made specifically for the purpose, being surenot to use open flame. Conversion must be performed by authorised personnel only.
KEY1 Swivel connection 1/2”2 Locknut 1/2”3 Burner manifold4 Washer ø 6.15 Burners6 Nozzle M67 Screw
WARNING: To ensure a per-fect seal, always use thewasher (4) supplied in thekit when replacing nozzles,even in burner units forwhich it is not specified.
All descriptions and illustrations provided in this manual have been carefully prepared but we reserve the right to make changesand improvements in our products that may affect the accuracy of the information contained in this manual.
Supplied By www.heating spares.co Tel. 0161 620 6677
Cod
. 62
72
25
1B
- D
ocum
enta
tion
Dpt
.
Sime Ltd
Unit D2, Enterprise Way, Bradford Road, Bradford, West Yorkshire, BD10 8EW
Tel. 0870 9911114 - Fax 0870 9911115
www.sime.ltd.uk - e-mail: [email protected]