installation and operation manual - ewtnear.ewtn.com/downloads/engineering/manuals/wvrc- 4 plus...
TRANSCRIPT

Installation and Operation Manual
P R O B L E M S O LV E D
Due to the dynamic nature of product design, the information contained in this document is subject to change without notice. Broadcast Tools, Inc., assumes noresponsibility for errors and/or omissions contained in this document. Revisions of this information or new editions may be issued to incorporate such changes.
Broadcast Tools® is a registered trademark of Broadcast Tools, Inc.tiny TOOLS™ is a trademark of Broadcast Tools, Inc.
All Sentinel® labeled products are registered trademarks of Broadcast Tools, Inc.Copyright® 1989 - 2013 by Broadcast Tools, Inc. All rights reserved.
No part of this document may be reproduced or distributed without permission.
Visit www.broadcasttools.com for important product update information.
Manual update: 11/12/2013For firmware versions equal to or greater than
X_V2.01 / P_V02.11 / P_V1.03If you need a firmware upgrade, contact Broadcast Tools®
No part of this document may be reproduced or distributed without permission.ALL SPECIFICATIONS AND FEATURES FOR THIS PRODUCT ARE SUBJECT TO
CHANGE WITHOUT NOTICENOTE: We recommend the use of Chrome, Firefox or Safari as your browser.
WVRC-4 Plus Web Enabled, Dial-up Four Channel Site Remote Control System
IN
C
®
e-mail: [email protected] voice: 360.854.9559 fax: 866.783.1742
WVRC-4 Plus Installation and Operation Manual
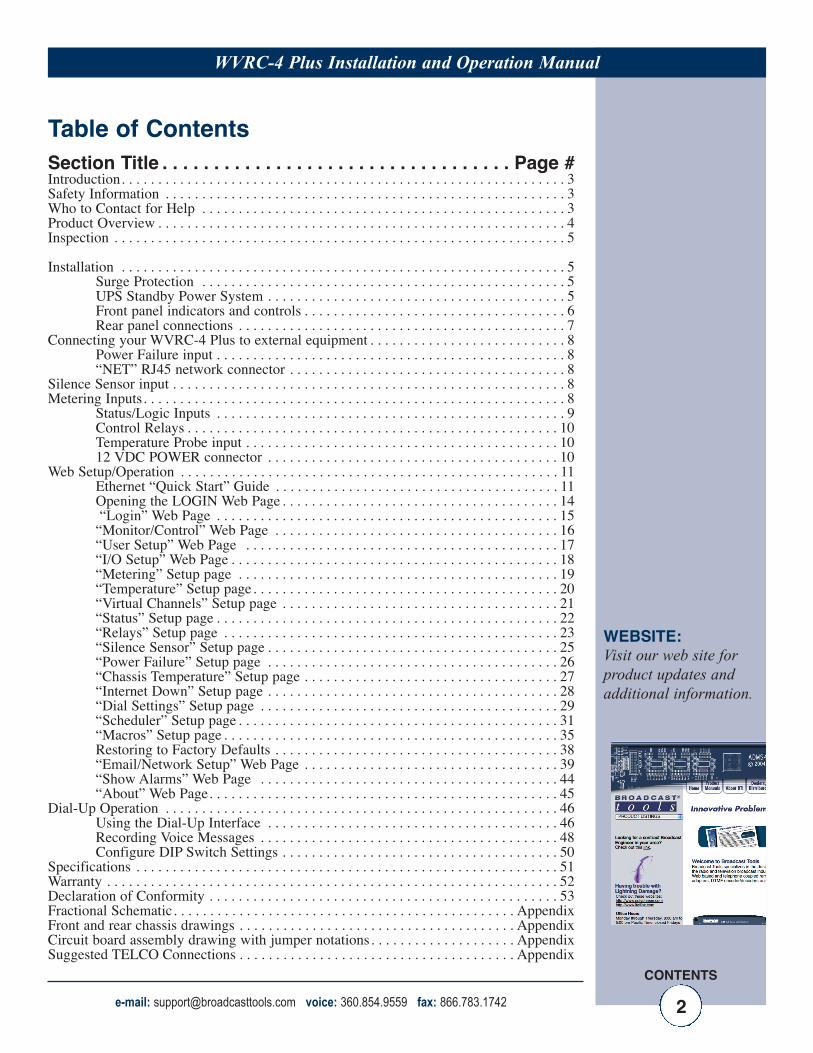
Table of ContentsSection Title . . . . . . . . . . . . . . . . . . . . . . . . . . . . . . . . . . Page #Introduction. . . . . . . . . . . . . . . . . . . . . . . . . . . . . . . . . . . . . . . . . . . . . . . . . . . . . . . . . . . . . 3Safety Information . . . . . . . . . . . . . . . . . . . . . . . . . . . . . . . . . . . . . . . . . . . . . . . . . . . . . . . 3Who to Contact for Help . . . . . . . . . . . . . . . . . . . . . . . . . . . . . . . . . . . . . . . . . . . . . . . . . . 3Product Overview . . . . . . . . . . . . . . . . . . . . . . . . . . . . . . . . . . . . . . . . . . . . . . . . . . . . . . . . 4Inspection . . . . . . . . . . . . . . . . . . . . . . . . . . . . . . . . . . . . . . . . . . . . . . . . . . . . . . . . . . . . . . 5
Installation . . . . . . . . . . . . . . . . . . . . . . . . . . . . . . . . . . . . . . . . . . . . . . . . . . . . . . . . . . . . . 5Surge Protection . . . . . . . . . . . . . . . . . . . . . . . . . . . . . . . . . . . . . . . . . . . . . . . . . . 5UPS Standby Power System . . . . . . . . . . . . . . . . . . . . . . . . . . . . . . . . . . . . . . . . . 5Front panel indicators and controls . . . . . . . . . . . . . . . . . . . . . . . . . . . . . . . . . . . . 6Rear panel connections . . . . . . . . . . . . . . . . . . . . . . . . . . . . . . . . . . . . . . . . . . . . . 7
Connecting your WVRC-4 Plus to external equipment . . . . . . . . . . . . . . . . . . . . . . . . . . . 8Power Failure input . . . . . . . . . . . . . . . . . . . . . . . . . . . . . . . . . . . . . . . . . . . . . . . . 8“NET” RJ45 network connector . . . . . . . . . . . . . . . . . . . . . . . . . . . . . . . . . . . . . . 8
Silence Sensor input . . . . . . . . . . . . . . . . . . . . . . . . . . . . . . . . . . . . . . . . . . . . . . . . . . . . . . 8Metering Inputs. . . . . . . . . . . . . . . . . . . . . . . . . . . . . . . . . . . . . . . . . . . . . . . . . . . . . . . . . . 8
Status/Logic Inputs . . . . . . . . . . . . . . . . . . . . . . . . . . . . . . . . . . . . . . . . . . . . . . . . 9Control Relays . . . . . . . . . . . . . . . . . . . . . . . . . . . . . . . . . . . . . . . . . . . . . . . . . . . 10Temperature Probe input . . . . . . . . . . . . . . . . . . . . . . . . . . . . . . . . . . . . . . . . . . . 1012 VDC POWER connector . . . . . . . . . . . . . . . . . . . . . . . . . . . . . . . . . . . . . . . . 10
Web Setup/Operation . . . . . . . . . . . . . . . . . . . . . . . . . . . . . . . . . . . . . . . . . . . . . . . . . . . . 11Ethernet “Quick Start” Guide . . . . . . . . . . . . . . . . . . . . . . . . . . . . . . . . . . . . . . . 11Opening the LOGIN Web Page . . . . . . . . . . . . . . . . . . . . . . . . . . . . . . . . . . . . . . 14“Login” Web Page . . . . . . . . . . . . . . . . . . . . . . . . . . . . . . . . . . . . . . . . . . . . . . . 15
“Monitor/Control” Web Page . . . . . . . . . . . . . . . . . . . . . . . . . . . . . . . . . . . . . . . 16“User Setup” Web Page . . . . . . . . . . . . . . . . . . . . . . . . . . . . . . . . . . . . . . . . . . . 17“I/O Setup” Web Page . . . . . . . . . . . . . . . . . . . . . . . . . . . . . . . . . . . . . . . . . . . . . 18“Metering” Setup page . . . . . . . . . . . . . . . . . . . . . . . . . . . . . . . . . . . . . . . . . . . . 19“Temperature” Setup page. . . . . . . . . . . . . . . . . . . . . . . . . . . . . . . . . . . . . . . . . . 20“Virtual Channels” Setup page . . . . . . . . . . . . . . . . . . . . . . . . . . . . . . . . . . . . . . 21“Status” Setup page . . . . . . . . . . . . . . . . . . . . . . . . . . . . . . . . . . . . . . . . . . . . . . . 22“Relays” Setup page . . . . . . . . . . . . . . . . . . . . . . . . . . . . . . . . . . . . . . . . . . . . . . 23“Silence Sensor” Setup page . . . . . . . . . . . . . . . . . . . . . . . . . . . . . . . . . . . . . . . . 25“Power Failure” Setup page . . . . . . . . . . . . . . . . . . . . . . . . . . . . . . . . . . . . . . . . 26“Chassis Temperature” Setup page . . . . . . . . . . . . . . . . . . . . . . . . . . . . . . . . . . . 27“Internet Down” Setup page . . . . . . . . . . . . . . . . . . . . . . . . . . . . . . . . . . . . . . . . 28“Dial Settings” Setup page . . . . . . . . . . . . . . . . . . . . . . . . . . . . . . . . . . . . . . . . . 29“Scheduler” Setup page . . . . . . . . . . . . . . . . . . . . . . . . . . . . . . . . . . . . . . . . . . . . 31“Macros” Setup page . . . . . . . . . . . . . . . . . . . . . . . . . . . . . . . . . . . . . . . . . . . . . . 35Restoring to Factory Defaults . . . . . . . . . . . . . . . . . . . . . . . . . . . . . . . . . . . . . . . 38“Email/Network Setup” Web Page . . . . . . . . . . . . . . . . . . . . . . . . . . . . . . . . . . . 39“Show Alarms” Web Page . . . . . . . . . . . . . . . . . . . . . . . . . . . . . . . . . . . . . . . . . 44“About” Web Page. . . . . . . . . . . . . . . . . . . . . . . . . . . . . . . . . . . . . . . . . . . . . . . . 45
Dial-Up Operation . . . . . . . . . . . . . . . . . . . . . . . . . . . . . . . . . . . . . . . . . . . . . . . . . . . . . . 46Using the Dial-Up Interface . . . . . . . . . . . . . . . . . . . . . . . . . . . . . . . . . . . . . . . . 46Recording Voice Messages . . . . . . . . . . . . . . . . . . . . . . . . . . . . . . . . . . . . . . . . . 48Configure DIP Switch Settings . . . . . . . . . . . . . . . . . . . . . . . . . . . . . . . . . . . . . . 50
Specifications . . . . . . . . . . . . . . . . . . . . . . . . . . . . . . . . . . . . . . . . . . . . . . . . . . . . . . . . . . 51Warranty . . . . . . . . . . . . . . . . . . . . . . . . . . . . . . . . . . . . . . . . . . . . . . . . . . . . . . . . . . . . . . 52Declaration of Conformity . . . . . . . . . . . . . . . . . . . . . . . . . . . . . . . . . . . . . . . . . . . . . . . . 53Fractional Schematic. . . . . . . . . . . . . . . . . . . . . . . . . . . . . . . . . . . . . . . . . . . . . . . AppendixFront and rear chassis drawings . . . . . . . . . . . . . . . . . . . . . . . . . . . . . . . . . . . . . . AppendixCircuit board assembly drawing with jumper notations. . . . . . . . . . . . . . . . . . . . AppendixSuggested TELCO Connections . . . . . . . . . . . . . . . . . . . . . . . . . . . . . . . . . . . . . . Appendix
WEBSITE:Visit our web site forproduct updates andadditional information.
2
CONTENTS

e-mail: [email protected] voice: 360.854.9559 fax: 866.783.1742 3
WVRC-4 Plus Installation and Operation Manual
INTRODUCTION
INTRODUCTIONThank you for your purchase of Broadcast Tools® WVRC-4 Plus Web enabled,
Dial-up Four Channel Site Remote Control System (referred to as the WVRC-4 Plus
throughout this manual). We’re confident that this product will give you many years of
dependable service. This manual is intended to give you all the information needed to install
and operate the Broadcast Tools® WVRC-4 Plus.
SAFETY INFORMATIONOnly qualified technical personnel should install the WVRC-4 Plus. Any attempt
to install this device by a person who is not technically qualified could result in a hazardouscondition to the installer or other personnel, and/or damage to the WVRC-4 Plus or otherequipment. Broadcast transmitters can operate at voltages that are potentially lethal. Pleaseensure that proper safety precautions have been made before installing this device. If youare unfamiliar with this type of equipment, please contact a properly qualified engineer tohandle the installation and setup of the WVRC-4 Plus.
For additional safety, it is strongly recommended that, in addition to setting the WVRC-4Plus in to “PGM” mode, the remote/local switch on any transmitter or high voltage equipmentshould also be set to local mode.
While the WVRC-4 Plus relays are physically capable of handling up to 250 VAC, thispractice is extremely dangerous and should never be attempted. The removable euroblock screwterminals are not designed to shield humans from potentially dangerous voltages. Contact withhigh voltages can cause serious injury or death. The maximum recommended voltage for theWVRC-4 Plus is 1 amp at 30 V. Switching of high voltages should only be done external from theWVRC-4 Plus and in a manner that isolates the voltages from accidental contact with humans.
WHO TO CONTACT FOR HELPIf you have any questions regarding your product or you need assistance, please
contact your distributor from whom you purchased this equipment.If you would like more information about Broadcast Tools® products, you may
reach us at:
Broadcast Tools, Inc.131 State StreetSedro-Woolley, WA 98284-1503 USAVoice: 360.854.9559Fax: 866.783.1742
Internet Home Page: www.broadcasttools.comE-mail: [email protected]
THANK YOU FOR CHOOSING BROADCAST TOOLS® BRAND PRODUCTS!
CAUTION!
Broadcast Tools®Products, as with anyelectronic device, canfail without warning.Do not use this productin applications where alife threatening condi-tion could result due tofailure. Serious injuryor death can occur if acommand channel isactivated while you areperforming maintenanceon your equipment. Ifyou are performingmaintenance on yourequipment, you shouldpress the “PGM” buttonon the front panel ofyour WVRC-4 Plusforcing the unit in tolocal mode. The “PGM”LED will illuminate.PGM mode prevents theunit from performingrelay commands.
NOTE:
This manual should beread thoroughly beforeinstallation and operation.
Find a contract BroadcastEngineer in your area?Check out this link:http://www.sbe.org/CCE_List.php

e-mail: [email protected] voice: 360.854.9559 fax: 866.783.1742 4
WVRC-4 Plus Installation and Operation Manual
OVERVIEW
PRODUCT OVERVIEWThe WVRC-4 Plus provides a cost-effective, one ½ rack-unit solution allow-
ing dial-up recordable voice response and/or web-enabled control and monitoringvia a web browser and/or smart phone. The WVRC-4 Plus was designed from auser’s point of view, so all of the basic functionality you need is included to controland monitor your site equipment, while including the accessories other manufactur-ers consider optional. In addition, the WVRC-4 Plus may be programmed for dial-up operation via the web interface. The WVRC-4 Plus is supplied with spokenwords and phrases in English, but the user is free to record words and phrases intheir language. Each analog, status, silence sensor, temperature sensor and powerfailure input can be configured to dial-out and/or email up to eight individual phonenumbers/email addresses, allowing different input alarms to be routed to differentcall-out numbers and/or email recipients. Event-driven and time-based automaticcommand capabilities, allows 50 user-defined macros to enable the WVRC-4 Plusto make corrective actions; 100-event program scheduler for relay control, DST cor-rection, macro actions and alarm muting. Support for basic SMTP authentication aswell as SNMP.
Features/Benefits; • NTP time base and/or battery-backed real time clock/calendar with accurately
better than ±2.0 minutes per year.*• Four “Virtual” metering channels.*• Single 1/8” T/R/S temperature probe port allowing Fahrenheit or Celsius tem-
perature monitoring within the range of -67°F to +257°F (-55°C TO +125°C).*• Internal temperature monitor.*• Jack for external power failure power supply.*• Silence Sensor function with remote telco audio monitoring.*• Simple telco hybrid with send and caller balanced audio I/O.*• Internet Down alarm feature which will allow voice alarms when internet con-
nection or DNS is lost.• Event-driven and time-based automatic command capabilities. This allows user-
defined macros to enable the WVRC-4 Plus to make corrective actions.• 100-event program scheduler for relay control and alarm muting.• Logging of all user selected input status with site ID information which may be
emailed from once an hour to once a day, along with hourly snap-shot func-tionality.
• Front panel I/O activity LED indicators.• Front panel local/operate switch with LED indicator.• Front panel RJ-11 telephone jack used for user voice response recording• Plug-in euro-block screw terminals for metering, status, relays, telco hybrid, and
stereo silence sensor.• Rear panel RJ-45, 10/100base-T LAN/Ethernet interface.• Rear panel RJ-11 telco POTS line jack.• Fused and surge protected universal power supply included.• Fully RFI proofed.• ½ rack-unit chassis.
* Denotes independent of the metering (analog) and status/logic channels.
WEBSITE:Visit our web site forproduct updates andadditional information.

e-mail: [email protected] voice: 360.854.9559 fax: 866.783.1742 5
WVRC-4 Plus Installation and Operation Manual
INSPECTION
INSPECTIONPlease examine your WVRC-4 Plus carefully for any damage that may have beensustained during shipping. If any is noted, please notify the shipper immediately andretain the packaging for inspection by the shipper. The package should contain theWVRC-4 Plus, 7-foot modular telephone cord, 7-foot BLUE straight-through CAT5 cable, 7-foot GRAY crossover CAT 5 cable and the 12 VDC @ 2.5 amp universalswitching power supply. Our quick-start guide is included, while the manual isavailable for download on our web site.
INSTALLATIONCAUTION! Installation of the WVRC-4 Plus in high RF environments should beperformed with care. Shielded cable is suggested for all monitoring and control con-nections with all shields tied to the station/site ground terminal. The station/siteground should be connected to the rear panel chassis ground (Chs Gnd) 6-32 chas-sis screw using an 18 or 20-gauge wire.
Surge ProtectionThe WVRC-4 Plus has built-in resistance to voltage changes, we recommend thatyou use a power surge protector or line conditioner on the incoming AC line.Lightning strikes and other high surges in voltage levels will damage your WVRC-4 Plus and connected equipment if it is not properly protected. For lightning pro-tection devices, check out www.polyphaser.com and www.itwlinx.com.
UPS Standby Power SystemWe recommend that you connect your WVRC-4 Plus to a UPS system. While alloperating and user parameters are stored in non-volatile EEPROM, brownout con-ditions and lightning induced spikes can disable or damage equipment. A UPS helpsminimize the risk to the WVRC-4 Plus and has the added benefit that it will then beable to notify you of the power outage by email and/or phone
e-mail: [email protected] voice: 360.854.9559 fax: 866.783.1742 6
WVRC-4 Plus Installation and Operation Manual
INSTALLATION
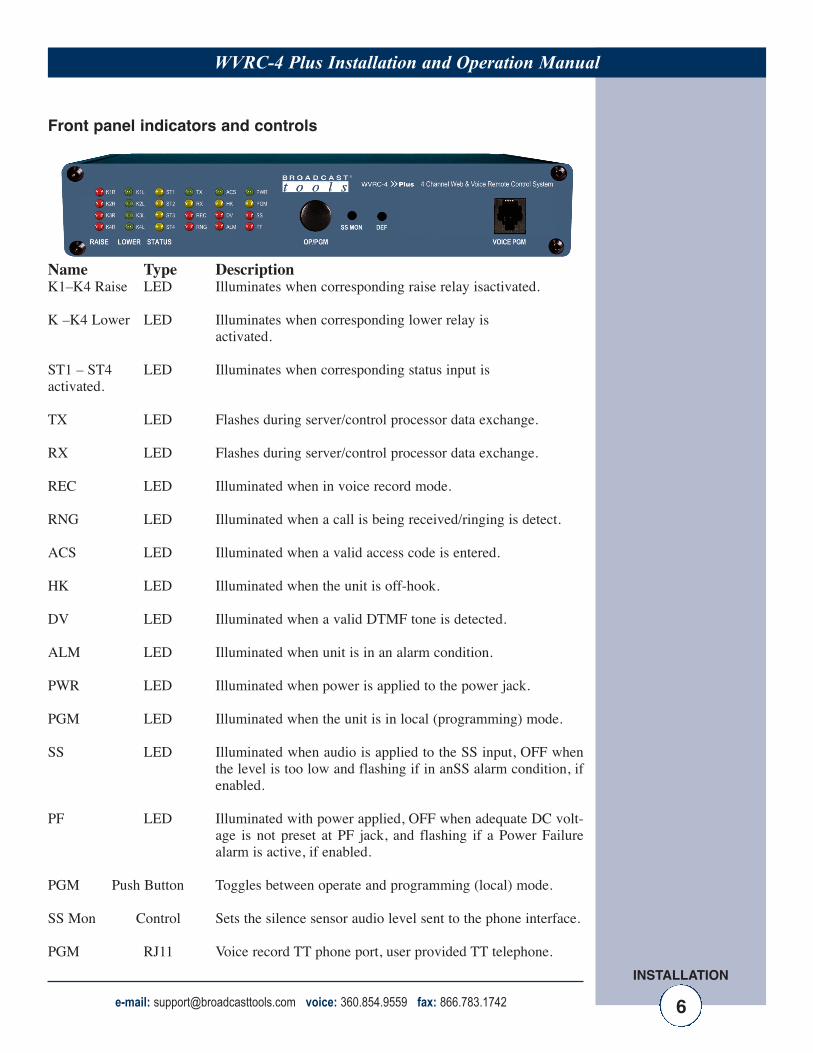
Front panel indicators and controls
Name Type DescriptionK1–K4 Raise LED Illuminates when corresponding raise relay isactivated.
K –K4 Lower LED Illuminates when corresponding lower relay isactivated.
ST1 – ST4 LED Illuminates when corresponding status input is activated.
TX LED Flashes during server/control processor data exchange.
RX LED Flashes during server/control processor data exchange.
REC LED Illuminated when in voice record mode.
RNG LED Illuminated when a call is being received/ringing is detect.
ACS LED Illuminated when a valid access code is entered.
HK LED Illuminated when the unit is off-hook.
DV LED Illuminated when a valid DTMF tone is detected.
ALM LED Illuminated when unit is in an alarm condition.
PWR LED Illuminated when power is applied to the power jack.
PGM LED Illuminated when the unit is in local (programming) mode.
SS LED Illuminated when audio is applied to the SS input, OFF whenthe level is too low and flashing if in anSS alarm condition, ifenabled.
PF LED Illuminated with power applied, OFF when adequate DC volt-age is not preset at PF jack, and flashing if a Power Failurealarm is active, if enabled.
PGM Push Button Toggles between operate and programming (local) mode.
SS Mon Control Sets the silence sensor audio level sent to the phone interface.
PGM RJ11 Voice record TT phone port, user provided TT telephone.

e-mail: [email protected] voice: 360.854.9559 fax: 866.783.1742 7
WVRC-4 Plus Installation and Operation Manual
INSTALLATION
Rear panel connections
Name Type DescriptionCHS GND #6 screw Chassis ground screw. Tie to station ground system.
PF 2.1mm Jack Power Failure power jack (optically-isolated). 6 - 12 VDC,center positive.
SS-LT/SS-RT Connector Unbalanced silence sensor audio input left/right, ground.
LAN/WAN RJ45 ETHERNET port 10/100baseT, LAN/WAN.
TELCO LINE RJ11 Connects to telephone line.
AN 1–4 Connector Analog (metering) inputs one thru four. (TOP).
AN GND Connector Analog (metering) ground reference terminals (TOP).
ST1A-4A Connector Status opto-isolators. When configured for DRY (factorydefault) this terminal is ground. When configured forWET (floating), this terminal is the anode via a 2.2K ohmcurrent limiting resistor. (BOTTOM)
ST1B-4B Connector Status opto-isolators. This terminal is always the cathode(BOTTOM)
K1NC-K4NC Connector Normally closed, dry relay contacts. Raise function (TOP)
K1CM-K4CM Connector Common (wiper), dry relay contact. Raise function (TOP)
K1NO-K4NO Connector Normally open, dry relay contact. Raise function (TOP)
K1NC-K4NC Connector Normally closed, dry relay contact. Lower function (BOT)
K1CM-K4CM Connector Common (wiper), dry relay contact. Lower function (BOT)
K1NO-K4NO Connector Normally open, dry relay contact. Lower function (BOT)
CONFIGURE Dipswitch Used to configure the unit. Refer to table of contents.
TEMP 3.5mm Jack Single temperature probe input jack. T/R/S.
12 VDC 2.1mm Jack System power supply input. 12 volts DC only.
WEBSITE:Visit our web site forproduct updates andadditional information.

e-mail: [email protected] voice: 360.854.9559 fax: 866.783.1742 8
WVRC-4 Plus Installation and Operation Manual
INSTALLATION
Connecting your WVRC-4 Plus to external equipment.
Chassis Ground screw (Chs Gnd)This 6-32 screw MUST be connected via a to the station/site ground system for theproper operation of this equipment.
Power Failure InputConnect a user supplied 6 to 12 volt DC only power source (center positive) to thepower failure input labeled PF. The barrel connector size is 2.1mm ID x 5.5mm OD.A 6 to 12 volts DC wall transformer of any current of 10 ma or more will power thisinput.
NOTE: The primary (120vac) of the power failure wall transformer should be con-nected to the utility company side of your service. An UPS is suggested to powerthe WVRC-4 Plus during power outages.
NETWORK connectorConnect one end of the supplied CAT5 (straight or x-over) cable to the desired ETH-ERNET (WAN/LAN) port.
Silence Sensor InputsConnect your unbalanced monaural or stereo audio source to the terminals labeled SS LT, SS GD and SS RT. The nominal input level is between be between -10 and+24 dBu. The input impedance is approximately 22K ohms. When the SS LT and/orSS RT input has audio applied and the silence sensor function is activated the frontpanel SS LED will illuminate. If the SS LED is out, the audio level is not presentor too low and if it’s flashing, it is in an alarm condition (if enabled).
Metering (analog) inputs
CAUTION! Metering (analog) input samples may be elevated several hundredvolts above ground on some external equipment. Permanent damage may occur tothe WVRC-4 Plus and/or external equipment if a high voltage source is connectedto the WVRC-4 Plus! Failure to observe this warning may also cause injury to theinstaller or other personnel. CAUTION! DO NOT CONNECT SAMPLE VOLT-AGES IN EXCESS OF POSITIVE 10 Volts DC OR DAMAGE MAY OCCURTO YOUR WVRC-4 Plus.

e-mail: [email protected] voice: 360.854.9559 fax: 866.783.1742 9
WVRC-4 Plus Installation and Operation Manual
INSTALLATION
Metering (analog) inputs (cont).
CAUTION! Floating GroundsExcept for the status/logic (wet) inputs, none of the WVRC-4 Plus’s metering (ana-log) inputs will accept a floating ground. Damage to the WVRC-4 Plus or yourequipment may result from connecting a floating ground output to the WVRC-4Plus. If you require metering equipment with inputs that have a floating ground, aDC isolation amplifier should be used.
Four metering (analog) input channels are available with the WVRC-4 Plus viaremovable euroblock screw terminals. Connect the positive side of the meteringsource to the desired channel terminal labeled MTRx (where x is the channel num-ber 1 through 4) and connect the metering source ground to the associated MGND(metering ground) terminals.
Each metering (analog) input can handle up to (positive only) 10 volts DC and mustbe ground referenced and connected to the associated MGND ground terminal.Inputs are self-calibrating and are based on an internal A/D converter with a preci-sion, low-drift voltage reference, so the reading should not drift over time or withtemperature. Metering setup is performed by connecting the sample voltage to theMTRx and MGND metering (analog) input, then calibrating for the desired value(reading) using the web interface.
NOTE: Valid sample voltages MUST be applied to the selected metering input inorder to perform calibration.
Status/Logic InputsEach status/logic input is optically isolated and can be configured to accept either acontact closure (DRY = default) or a (floating, WET) input. Attach your dry con-tacts to the desired status/logic channels StxA and STxB (where x is the status/logicinput channels 1 thru 4) terminals.
Each input is equipped with a four-position header (please refer to the jumper layoutin the appendix). IN-1 configures status/logic input one, IN-2 status/logic input two,IN-3, status/logic input three and IN-4, status/logic input four. Each jumper (IN-x,where x is the status/logic input) and the header pins 1,2,3,4 are used to configure forwet or dry operation. The factory default is jumpers between pins 1 & 2 and pins 3& 4 for DRY operation (switches, relay contacts, and open collector outputs.) In theDRY configuration, the “A” terminal is ground while the “B” terminal is the cathodeof the opto-isolator diode (pulled up to 5 volts through a 2.2K resistor).
To change a status/logic input to (floating) WET (user supplied voltage between 5and 24 vdc), remove both jumpers from JPx and place ONE jumper over pins 2 &3. Connect the positive voltage to terminal “A” (anode) and ground or minus volt-age to terminal “B” (cathode). NOTE: Please refer to the appendix for configu-ration examples and observe proper polarity.
WEBSITE:Visit our web site forproduct updates andadditional information.

e-mail: [email protected] voice: 360.854.9559 fax: 866.783.1742 10
WVRC-4 Plus Installation and Operation Manual
INSTALLATION
Raise and Lower Control Relays
Four raise and lower relays are supplied with SPDT (form C) dry contacts. Externalequipment to be controlled should be connected to the terminals labeled L1NO, L1CM, L1NC for the four SPDT lower relays and R1NO, R1CM, R1NC for the fourSPDT raise relays. NOTE: If mechanical latching relays are required, we suggestthe Broadcast Tools LR-5 or LP-5 Plus (4PDT & SPST) mechanical latching relay.
TEMPerature Probe Input Insert the temperature probe (25 foot cable) mini (3.5mm) plug in to the rear paneljack labeled “TEMP” -67°F to +257°F (-55°C TO +125°C). NOTE: The tempera-ture probe should only be installed or removed with the power supply disconnectedfrom the WVRC-4 Plus. Please contact the factory for the proper extension cable.Please limit the total length of cable to 50 feet.
12 V DC (Power) connectorConnect the supplied universal 12 volt DC only, 2.5 amp regulated power supplycord in to the WVRC-4 Plus’s power jack (center positive) labeled “12V DCPower”, then plug the transformer in to a source of 100 to 250 vac 50/60Hz. Verifythat the front panel green power led is illuminated.

e-mail: [email protected] voice: 360.854.9559 fax: 866.783.1742 11
WVRC-4 Plus Installation and Operation Manual
SET UP
Ethernet “Quick Start” guide
CAUTION! NEVER DOWNLOAD FIRMWARE UPDATES OR CHANGESTO THE XPORT WEBSERVER UNLESS INSTRUCTED TO DO SO BYBROADCAST TOOLS®. DOING SO DELETES ALL SOFTWARE ANDVOIDS ALL WARRANTIES FROM BROADCAST TOOLS®, INC.
NOTE: We recommend the use of the latest version of Firefox, Safari or Chrome asyour browser.
CAUTION! If you are not familiar with Ethernet enabled equipment, it may be use-ful to contact your IT department, network administrator or network consultant forassistance. Assigning an IP address already in use by another device may causeproblems with your network!
Instructions for changing the IP address of the computer that will be used for theconfiguration of this product are given here. Note that these instructions are specif-ically for computers with the Windows XP operating system. For setup using otheroperating systems, refer to the appropriate OS user’s manual.
WEBSITE:Visit our web site forproduct updates andadditional information.

e-mail: [email protected] voice: 360.854.9559 fax: 866.783.1742 12
WVRC-4 Plus Installation and Operation Manual
SET UP
Step 1: Open the control panel by clicking on the start menu, click on settings, thenclick on Control Panel. (Note that the control panel shown is in “Classic View”. If con-trol panel is in “Category View” select the “Classic View” option before proceeding.)
Step 2: Double click on the icon labeled Network Connections. The followingmenu will pop up.

Step 3: Right click on the icon labeled Local Area Connection. Another menu willappear. Select the option at the bottom of the menu labeled Properties. The LocalArea Connection Properties window will appear.
Step 4: On the Local Area Connection Properties page, double click on InternetProtocol (TCP/IP) to display properties.
Step 5: Before making any changes to the network settings, write down the currentsettings (or screen capture the page and print) so that they can be restored once the unitis configured. Next, select the radio button labeled “Use the following IP address” andtype in the IP address 192.168.1.60. Type in the subnet mask of 255.255.255.0. Leavethe default gateway field blank. Click OK to apply the new settings.
e-mail: [email protected] voice: 360.854.9559 fax: 866.783.1742 13
WVRC-4 Plus Installation and Operation Manual
SET UP
WEBSITE:Visit our web site forproduct updates andadditional information.
e-mail: [email protected] voice: 360.854.9559 fax: 866.783.1742 14
WVRC-4 Plus Installation and Operation Manual
SET UP
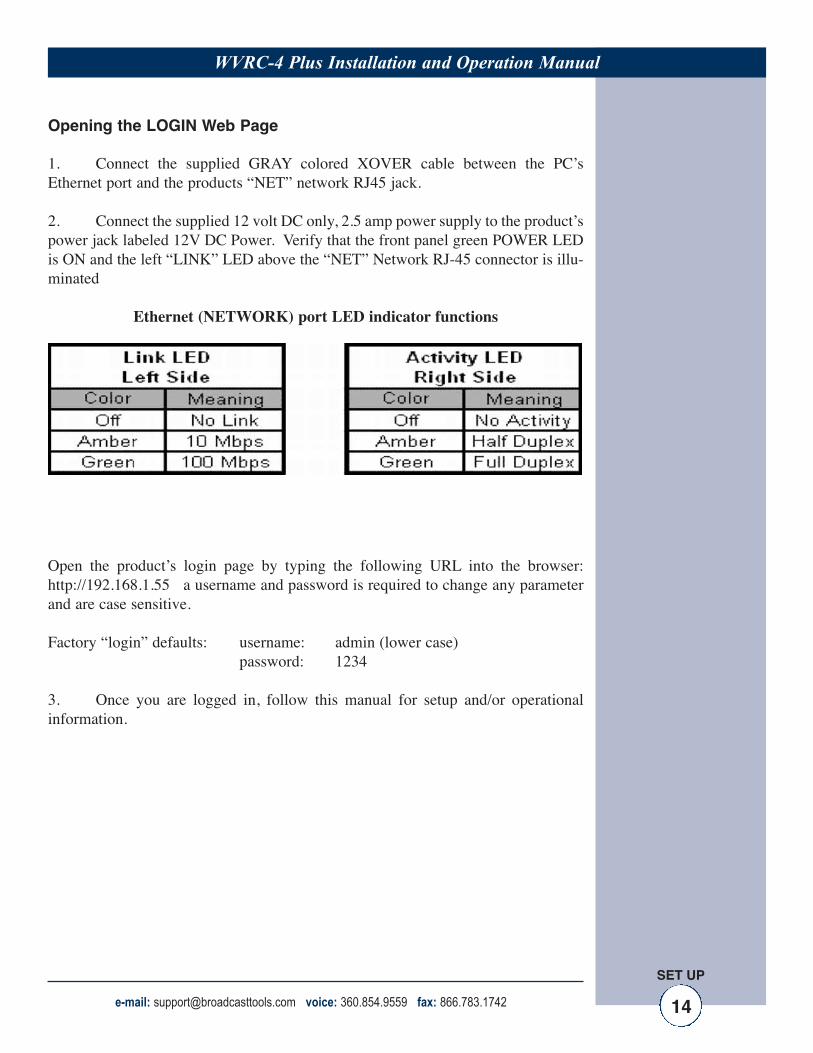
Opening the LOGIN Web Page
1. Connect the supplied GRAY colored XOVER cable between the PC’sEthernet port and the products “NET” network RJ45 jack.
2. Connect the supplied 12 volt DC only, 2.5 amp power supply to the product’spower jack labeled 12V DC Power. Verify that the front panel green POWER LEDis ON and the left “LINK” LED above the “NET” Network RJ-45 connector is illu-minated
Ethernet (NETWORK) port LED indicator functions
Open the product’s login page by typing the following URL into the browser:http://192.168.1.55 a username and password is required to change any parameterand are case sensitive.
Factory “login” defaults: username: admin (lower case) password: 1234
3. Once you are logged in, follow this manual for setup and/or operationalinformation.

e-mail: [email protected] voice: 360.854.9559 fax: 866.783.1742 15
WVRC-4 Plus Installation and Operation Manual
SET UP
“Login” Web Page
The Login screen displays the Username and Password entry points as well as thedate, time, and site ID.
You may view the password by checking the “Show Password” box.
After you have successfully logged in, the Monitor/Control page will be displayed.
WEBSITE:Visit our web site forproduct updates andadditional information.

e-mail: [email protected] voice: 360.854.9559 fax: 866.783.1742 16
WVRC-4 Plus Installation and Operation Manual
SET UP
“Monitor/Control” Web Page
The Monitor/Control page allows the monitoring and/or control of the WVRC-4Plus. The following is an explanation of each item on this page:
Queued Logs: Displays the number of queued log entries scheduled to be emailed.
Meters: Four metering (analog) input channels.
Virtual Channels: Four virtual metering channels.
Relays: Allows the user with admin or monitor/control access to controleach relay.
Status: Displays the current state of the four status/logic inputs.
Power Failure: Indicates state of power failure (PF) input.
Silence Sensor: Displays the silence sensor audio input status.
e-mail: [email protected] voice: 360.854.9559 fax: 866.783.1742 17
WVRC-4 Plus Installation and Operation Manual
SET UP
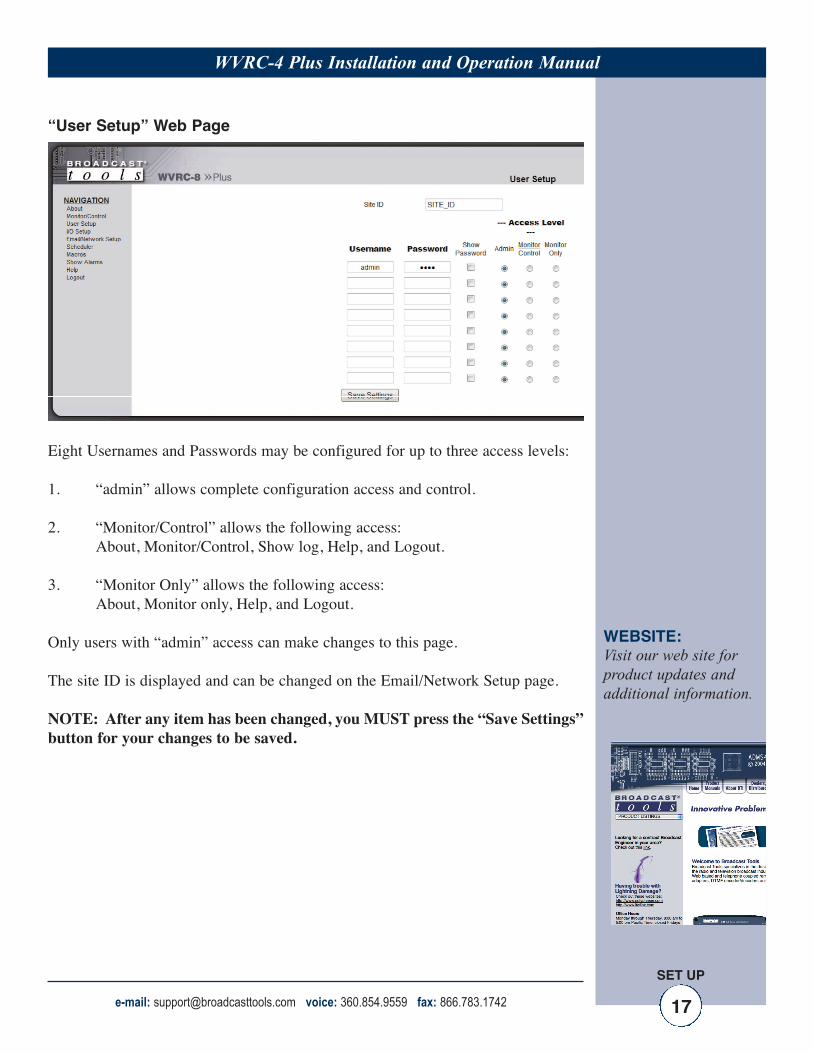
“User Setup” Web Page
Eight Usernames and Passwords may be configured for up to three access levels:
1. “admin” allows complete configuration access and control.
2. “Monitor/Control” allows the following access: About, Monitor/Control, Show log, Help, and Logout.
3. “Monitor Only” allows the following access:About, Monitor only, Help, and Logout.
Only users with “admin” access can make changes to this page.
The site ID is displayed and can be changed on the Email/Network Setup page.
NOTE: After any item has been changed, you MUST press the “Save Settings”button for your changes to be saved.
WEBSITE:Visit our web site forproduct updates andadditional information.

e-mail: [email protected] voice: 360.854.9559 fax: 866.783.1742 18
WVRC-4 Plus Installation and Operation Manual
SET UP
“I/O” Setup PageThe following terms and ideas will help in the configuration of this device.
Alarms: Alarms occur when an I/O Device falls into a specified threshold, thiscould be an analog value going above or below a set point, a relay turn-ing on or a digital input going high or low. Each I/O Device can be con-figured to dial-out to specified phone numbers and/or send emails whenit enters an alarm condition.
Emails: Each I/O device can be configured to send an email to up to 8 email recip-ients When the device enters or exits an alarm condition. Some deviceshave multiple alarm conditions, such as a High and a Low alarm state. Ifthe device is configured to send an Exit email then the recipients list thatwas used for entering the alarm state will also be used when exiting thealarm state.
Logs: The WVRC-4 offers two forms of logging. The first is the snapshot emaillog which compiles snapshots of all inputs and outputs with loggingenabled at a user defined interval. For example, the WVRC-4 Plus can beconfigured to record a snapshot of a metering input each hour and thenemail those compiled readings every 24 hours.
On the I/O Setup screen, choose from the top drop-down box the device to configure.

e-mail: [email protected] voice: 360.854.9559 fax: 866.783.1742 19
WVRC-4 Plus Installation and Operation Manual
SET UP
“I/O” Setup Page
Metering
Metering input selection: Select metering inputs 1 - 4 for configuration.
Meter Label: Used to identify the metering input source.
Meter Units: Units label in engineering units, such as V = Volts, A = Amps, W = Watts, etc.
Calibration: Enter the value of the desired meter reading.
NOTE: In order to calibrate, a valid DC sample voltage must be applied to each input thatyou are calibrating. The calibration value must be positive and can support a resolution upto 2 decimal places. The user MUST enter a calibration value and press the “Save Cal” but-ton in order to store the value. You do not need to press the “Save Settings” button to savethe calibration, only the other settings.Alarms High: This option enables the “High Trip Point” alarm.
Alarms Low: This option enables the “Low Trip Point” alarm.
Alarms Exit: This option enables the generation of an alarm after exiting a high orlow alarm state.
Email Addresses: This allows you to assign up to 8 email addresses to send alarm emailsto whenever the input enters an alarm state.
Log Device: Enables the email snapshot logging of the input.
Delay time: Specifies the delay time from when the input value is above or belowthe set alarm trip points and an alarm is generated. 0-999 seconds
Low trip point: This option specifies the LOW alarm set-point.
High trip point: This option specifies the HIGH alarm set-point.NOTE: After any item has been changed, you MUST press the “Save Settings” button for your changes to be saved.
WEBSITE:Visit our web site forproduct updates andadditional information.

e-mail: [email protected] voice: 360.854.9559 fax: 866.783.1742 20
WVRC-4 Plus Installation and Operation Manual
SET UP
“I/O” Setup Page - Temperature
Temperature Label: Identifies the temperature input source.
Alarms High: This option enables the “High Trip Point” alarm.
Alarms Low: This option enables the “Low Trip Point” alarm.
Alarms Exit: This option enables the generation of an alarm after exiting an alarm state.
Email Addresses: This allows you to assign up to 8 email addresses to send alarm emails towhenever the input generates an alarm.
Log Device: This enables the email snapshot logging of this input.
Delay Timer: Specifies the delay time from when the input value is above or below the setalarm trip points and an alarm is generated. 0-999 seconds
Low Temp: This option specifies the LOW alarm temperature set point.
High Temp: This option specifies the HIGH alarm temperature set point.
Temp Type: This option specifies what temperature scale will be used, Fahrenheit orCentigrade.
Hysteresis: Hysteresis (deadband), this option specifies the hysteresis used when eval-uating alarm conditions.
NOTE: Hysteresis prevents alarms from activating excessively due to normal fluctuationwhen the temperature is at a set alarm point. For example, if the hysteresis is set to 1 degree,and a high temp. alarm is set at 91 degrees, hysteresis ensures that once the high alarm is trig-gered, it won't go off until the temperature returns to below 91 degrees (90 - 1). This reducesproblems with small fluctuations in temperature readings triggering multiple alarms. Thehysteresis value is also used during low alarm conditions. If, for example, a low temp. alarmis set to 43 degrees and the hysteresis is set to 1 degree, then once the low alarm is triggered,it won't go off until the temperature returns a value higher than 44 degrees (43 + 1).NOTE: After any item has been changed, you MUST press the “Save Settings” but-ton for your changes to be saved.
e-mail: [email protected] voice: 360.854.9559 fax: 866.783.1742 21
WVRC-4 Plus Installation and Operation Manual
SET UP
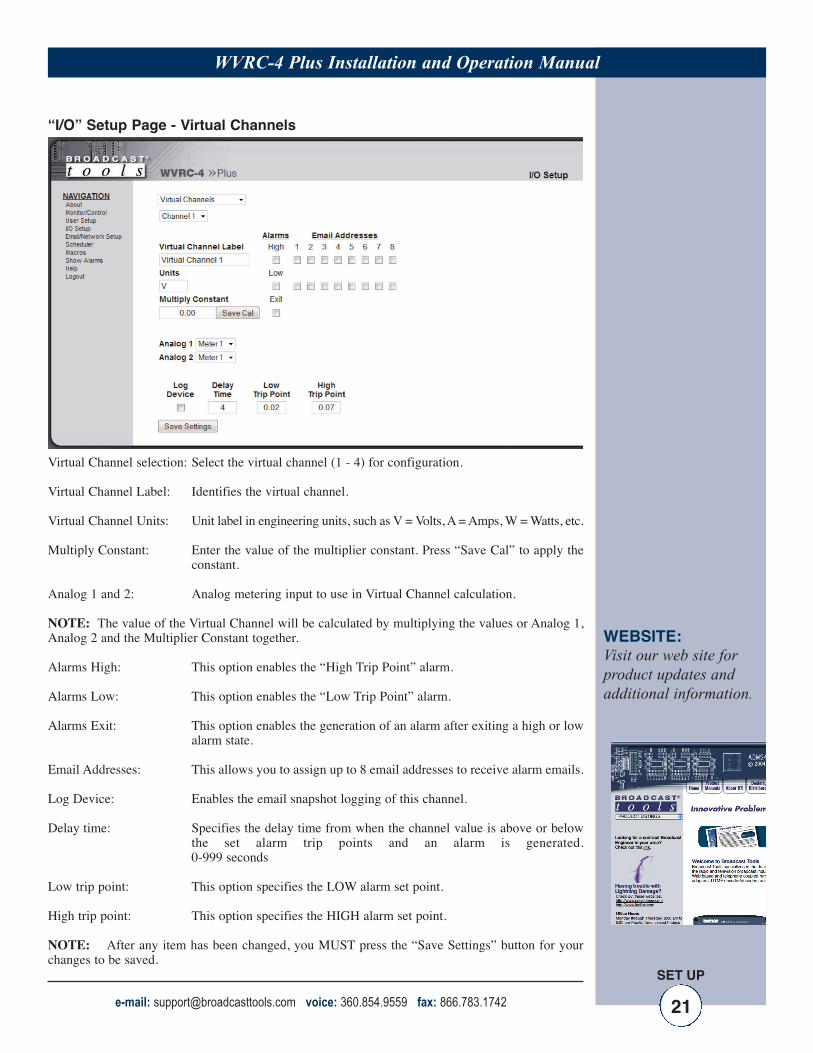
“I/O” Setup Page - Virtual Channels
Virtual Channel selection: Select the virtual channel (1 - 4) for configuration.
Virtual Channel Label: Identifies the virtual channel.
Virtual Channel Units: Unit label in engineering units, such as V = Volts, A = Amps, W = Watts, etc.
Multiply Constant: Enter the value of the multiplier constant. Press “Save Cal” to apply theconstant.
Analog 1 and 2: Analog metering input to use in Virtual Channel calculation.
NOTE: The value of the Virtual Channel will be calculated by multiplying the values or Analog 1,Analog 2 and the Multiplier Constant together.
Alarms High: This option enables the “High Trip Point” alarm.
Alarms Low: This option enables the “Low Trip Point” alarm.
Alarms Exit: This option enables the generation of an alarm after exiting a high or lowalarm state.
Email Addresses: This allows you to assign up to 8 email addresses to receive alarm emails.
Log Device: Enables the email snapshot logging of this channel.
Delay time: Specifies the delay time from when the channel value is above or belowthe set alarm trip points and an alarm is generated. 0-999 seconds
Low trip point: This option specifies the LOW alarm set point.
High trip point: This option specifies the HIGH alarm set point.
NOTE: After any item has been changed, you MUST press the “Save Settings” button for yourchanges to be saved.
WEBSITE:Visit our web site forproduct updates andadditional information.

e-mail: [email protected] voice: 360.854.9559 fax: 866.783.1742 22
WVRC-4 Plus Installation and Operation Manual
SET UP
“I/O” Setup Page - Status
Input Status Messages: Identifies the status input source and condition.
Alarms OFF: Enables an alarm when the input is OFF.
Alarms ON: Enables an alarm when the input is ON.
Email Addresses: This allows you to assign up to 8 email addresses toreceive alarm emails.
Normal Signal Level: This drop-down configures the input signal to be normal-ly High or normally Low. This is used to determine if aninput is ON or OFF.
NOTE: When the "Normal signal level" is set to HIGH = NO voltage is applied tothe input (WET or no closure when configured for DRY), it's considered OFF, whenvoltage IS applied (WET or completed closure set to DRY) to the input, it is con-sidered ON.
Log Device: This enables the email snapshot logging of this device.
Delay time: Specifies the delay time from when the input is ON orOFF and an alarm is generated. 0-999 seconds
Alarm LED: Sets the color of the “LED” visual indicator on theMonitor/Control page.
e-mail: [email protected] voice: 360.854.9559 fax: 866.783.1742 23
WVRC-4 Plus Installation and Operation Manual
SET UP
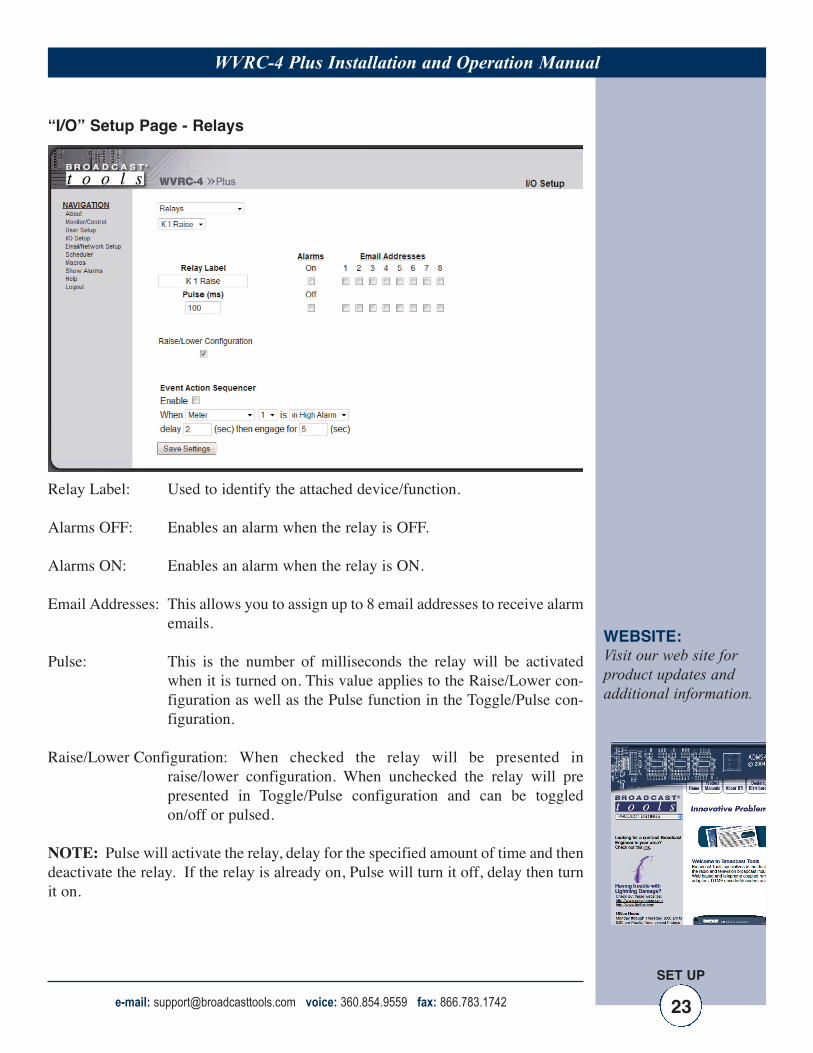
“I/O” Setup Page - Relays
Relay Label: Used to identify the attached device/function.
Alarms OFF: Enables an alarm when the relay is OFF.
Alarms ON: Enables an alarm when the relay is ON.
Email Addresses: This allows you to assign up to 8 email addresses to receive alarmemails.
Pulse: This is the number of milliseconds the relay will be activatedwhen it is turned on. This value applies to the Raise/Lower con-figuration as well as the Pulse function in the Toggle/Pulse con-figuration.
Raise/Lower Configuration: When checked the relay will be presented inraise/lower configuration. When unchecked the relay will prepresented in Toggle/Pulse configuration and can be toggledon/off or pulsed.
NOTE: Pulse will activate the relay, delay for the specified amount of time and thendeactivate the relay. If the relay is already on, Pulse will turn it off, delay then turnit on.
WEBSITE:Visit our web site forproduct updates andadditional information.
e-mail: [email protected] voice: 360.854.9559 fax: 866.783.1742 24
WVRC-4 Plus Installation and Operation Manual
SET UP
“I/O” Setup Page - Relays - Event Action Sequencer
Event action sequencer: Allows an alarm event from one of the inputs to automat-ically trigger the relay.
Enable: Enables the event action sequencer.
Action: When (meter, status, silence sensor, power failure or tem-perature) (input number) is (in ? condition) delay (xx)seconds then engage for (xx) seconds.
EXAMPLE: When (meter) (1) is (in High Alarm) delay(1) seconds then engage for (2) seconds.
In the above example: When [metering input] [1] is [in high alarm] for more than[10] seconds, (the desired relay) then engage for [pulse] 2 seconds.
NOTE: After any item has been changed, you MUST press the “Save Settings” but-ton for your changes to be saved.

e-mail: [email protected] voice: 360.854.9559 fax: 866.783.1742 25
WVRC-4 Plus Installation and Operation Manual
SET UP
“I/O” Setup Page - Silence Sensor
Label: Used to identify the audio source.
Alarms Enter: Enables an alarm for when silence is detected.
Alarms Exit: Enables an alarm for when the silence detector detects thataudio has returned.
Email Addresses: This allows you to assign up to 8 email addresses to receivesilence alarm emails.
Log Device: This enables the email snapshot logging of this input.
Delay Time: Specifies the delay time between detected silence and alarmactivation. The delay is entered in seconds (0 to 999).
Restore Time: The input audio must be above threshold for this amount oftime before it is counted as present. The delay is entered inseconds (0 to 999).
NOTE: After any item has been changed, you MUST press the “Save Settings” but-ton for your changes to be saved.
WEBSITE:Visit our web site forproduct updates andadditional information.

e-mail: [email protected] voice: 360.854.9559 fax: 866.783.1742 26
WVRC-4 Plus Installation and Operation Manual
SET UP
“I/O” Setup Page - Power Failure
Label: Used to identify the input.
Alarms Enter: This option enables an alarm if voltage is no longer presenton the PF input.
Alarms Exit: This option enables an alarm when voltage returns to the PFinput.
Email Addresses: This allows you to assign up to 8 email addresses to receivepower failure emails.
Log Device: This enables the email snapshot logging of this input.
Delay Time: This option specifies the wait time from when power failureis detected before an alarm is activated. The delay is enteredin seconds (0 to 999).
Alarm LED: Sets the color of the “LED” visual indicator on theMonitor/Control page when in an alarm condition.
NOTE: After any item has been changed, you MUST press the “Save Settings” but-ton for your changes to be saved.

e-mail: [email protected] voice: 360.854.9559 fax: 866.783.1742 27
WVRC-4 Plus Installation and Operation Manual
SET UP
“I/O” Setup Page - Chassis Temperature (WVRC-4 rev. K and above)
Alarms Enter: This option enables the “Temp High” alarm.
Alarms Exit: This option enables the generation of an alarm after exiting analarm state.
Email Addresses: This allows you to assign up to 8 email addresses to sendalarm emails to whenever the input generates an alarm.
Log Device: This enables the email snapshot logging of this input.
Delay Timer: Specifies the delay time from when the input value is abovethe set alarm trip point and an alarm is generated. 0-999 sec-onds
Temp High: This option specifies the HIGH alarm temperature set point.
Temperature Type: This option specifies what temperature scale will be used,Fahrenheit or Centigrade.
NOTE: After any item has been changed, you MUST press the “Save Settings” but-ton for your changes to be saved.
WEBSITE:Visit our web site forproduct updates andadditional information.

e-mail: [email protected] voice: 360.854.9559 fax: 866.783.1742 28
WVRC-4 Plus Installation and Operation Manual
SET UP
“I/O” Setup Page - Internet DownThe Internet Down alarm allows the WVRC-4 Plus to monitor the reachability of aspecified DNS address or IP address using an ICMP ping. The ICMP ping is acommonly used extension to the Internet Protocol (IP). ICMP supports packetscontaining error, control, and informational messages. The PING command, forexample, uses ICMP to test an Internet connection.
Alarms Enter: This option enables the “Internet Down” alarm when pingmonitoring of the ping address is lost.
Alarms Exit: This option enables an alarm after exiting an “InternetDown” condition.
Email Addresses: This allows you to configure up to 8 emails to be sentwhenever the device exits an “Internet Down” alarm.
Log Device: This enables the email logging of this device.
Ping Timeout: This specifies how long to wait for a ping response fromthe ping address before timeout(unreachable.)
Ping Monitor Interval: The interval at which the WVRC pings the ping addressin a non-alarm state.
Ping Alarm Interval: The interval at which the WVRC pings the ping addresswhile in an Internet Down alarm state.
Ping Address: Enter the DNS address or IP address that you wish tomonitor.
NOTE: After any item has been changed, you MUST press the “Save Settings” but-ton for your changes to be saved.
e-mail: [email protected] voice: 360.854.9559 fax: 866.783.1742 29
WVRC-4 Plus Installation and Operation Manual
SET UP
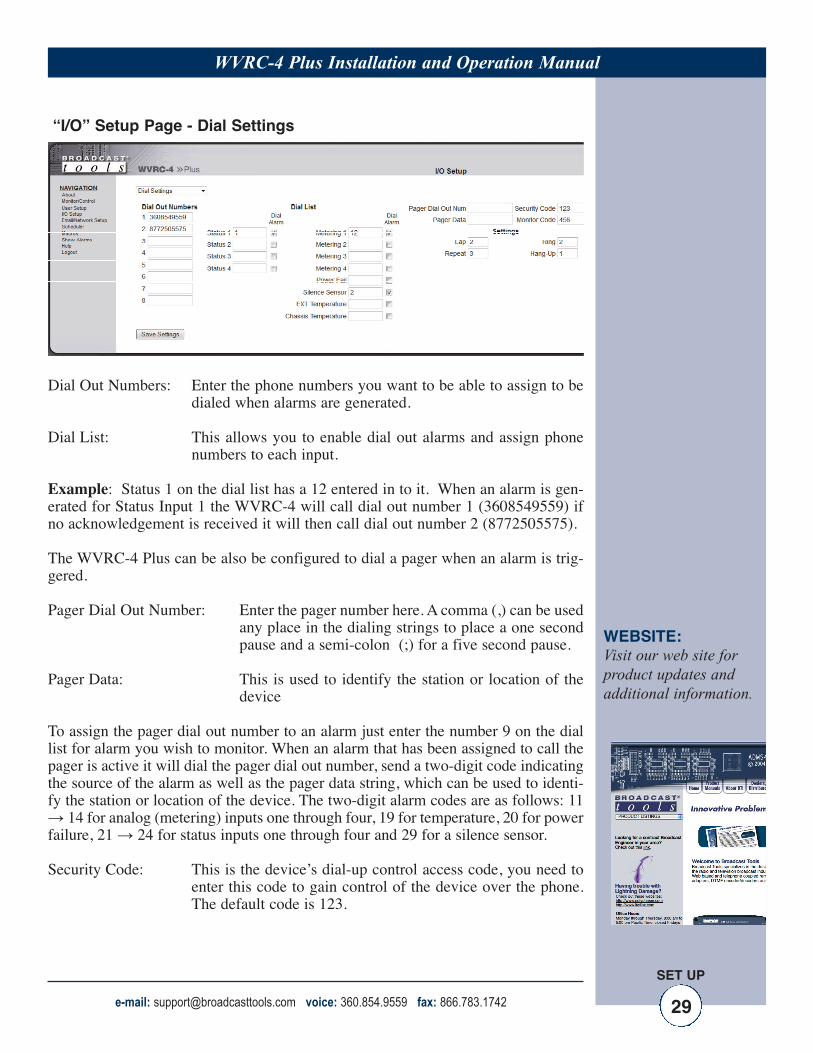
“I/O” Setup Page - Dial Settings
Dial Out Numbers: Enter the phone numbers you want to be able to assign to bedialed when alarms are generated.
Dial List: This allows you to enable dial out alarms and assign phonenumbers to each input.
Example: Status 1 on the dial list has a 12 entered in to it. When an alarm is gen-erated for Status Input 1 the WVRC-4 will call dial out number 1 (3608549559) ifno acknowledgement is received it will then call dial out number 2 (8772505575).
The WVRC-4 Plus can be also be configured to dial a pager when an alarm is trig-gered.
Pager Dial Out Number: Enter the pager number here. A comma (,) can be usedany place in the dialing strings to place a one secondpause and a semi-colon (;) for a five second pause.
Pager Data: This is used to identify the station or location of thedevice
To assign the pager dial out number to an alarm just enter the number 9 on the diallist for alarm you wish to monitor. When an alarm that has been assigned to call thepager is active it will dial the pager dial out number, send a two-digit code indicatingthe source of the alarm as well as the pager data string, which can be used to identi-fy the station or location of the device. The two-digit alarm codes are as follows: 11→ 14 for analog (metering) inputs one through four, 19 for temperature, 20 for powerfailure, 21 → 24 for status inputs one through four and 29 for a silence sensor.
Security Code: This is the device’s dial-up control access code, you need toenter this code to gain control of the device over the phone.The default code is 123.
WEBSITE:Visit our web site forproduct updates andadditional information.

e-mail: [email protected] voice: 360.854.9559 fax: 866.783.1742 30
WVRC-4 Plus Installation and Operation Manual
SET UP
“I/O” Setup Page - Dial Settings - Cont
Monitor Code: This dial-up access code allows users to monitor or poll the devicesinputs. No control functions can be performed unless a validSecurity access code has been entered. The default code is 456.
Lap: Specifies the number of times the WVRC-4 Plus will go throughall of the numbers in the dial list when calling out an alarm if itdoes not receive an acknowledgement.
NOTE: Alarms are acknowledged by pushing the star (*) key when an alarm iscalled out.
Ring: Specifies the number of rings required before the WVRC-4 Plusanswers an incoming call.
Repeat: Specifies the number of times the voice message will be repeatedwhen an alarm is called out.
Hang-Up: Specifies the number of minutes of inactivity required afteranswering a call before hanging up automatically if no CPC dis-connect has already been received.
NOTE: After any item has been changed, you MUST press the “Save Settings” but-ton for your changes to be saved.

e-mail: [email protected] voice: 360.854.9559 fax: 866.783.1742 31
WVRC-4 Plus Installation and Operation Manual
SET UP
“Scheduler” Setup Page
The Scheduler allows for complete control of your WVRC-4 Plus device by provid-ing the ability to schedule when alarms are enabled or disabled, pulse or togglerelays, execute macros and even adjust the time for daylight savings.
All 100 schedulable events can also be enabled or disabled; only enabled scheduleevents are processed. Each schedule event consists of 2 main components, theaction to do (event) and when to do it (date/time).
Schedule events are enter in the "Scheduler" menu shown above. Empty/unusedschedule slots will have the text "Click for new schedule" listed in the "Event" col-umn. When you select a cell in the scheduler table it will transform into the avail-able options for that cell. Blue colored cells are unselected and are saved while Redcolored cells are unselected and are not saved. Yellow colored cells are selected.There can only be one selected cell at a time and changing some cells may changeother cells. It is best to work left to right when configuring a schedule event.
To select a cell just click in the cell box and it will transform, the background willbe yellow and you should have either drop down boxes or checkboxes to select from.To unselect a cell, click inside the the yellow portion of the cell or onto another cell.Clicking on another cell will select that cell if it can be selected.
At the top and bottom of the "Scheduler" page are "refresh" and "save" buttons. Allred cells on the scheduler page are in need of saving and will not be stored or exe-cuted until saved. To restore from the previously saved schedules click the "refresh"button.
The last 3 cells of each schedule event are the "Next Event", "Delete", and "Execute"items. "Next Event" lists the date and time that the event is scheduled to occur next."Delete" will delete the schedule but still requires saving before the change is per-manent. "Execute" will execute the action immediately regardless of whether or notit's enabled for scheduled to occur, ensure that you save before executing a schedulesince changes are not updated to the WVRC-4 Plus until the save button is pressed.
NOTE: The Scheduler page does not auto refresh, please click “refresh” to updatethe “Next Event” time.
WEBSITE:Visit our web site forproduct updates andadditional information.
e-mail: [email protected] voice: 360.854.9559 fax: 866.783.1742 32
WVRC-4 Plus Installation and Operation Manual
SET UP
“Scheduler” Setup Page – Actions – Cont
Enable/Disable Alarms: Alarms for every device that the WVRC-4 Plus monitorscan be enabled and disabled by the scheduler. Select the appropriate "Enable Alarm"or "Disable Alarm" from the "Event" drop down box on the Scheduler Setup Pageto configure this item. Then from the "Device" drop down box select from the 8monitored device types and its device number.
Pulse/Toggle: Relays can be pulsed or toggled from the scheduler as well. Select"Pulse" or "Toggle" from the "Event" drop down box on the Scheduler Setup Pageto configure this item. Then from the "Device" drop down box select the relay youwish to control. The Pulse duration is configured on the "Relay Setup Page" under"I/O Setup".
Adjust Time: To assist with daylight savings adjustment, the WVRC-4 Plus can addor subtract 1 hour from the time-zone offset. Time-zone offset is initially configuredunder "Email/Network Setup" and this adjustment will change that value at thescheduled time. Select "Adjust Time" from the "Event" drop down box then fromthe "Device" drop down box select either "-1 Hr" or "+1 Hr" to decrement or incre-ment the time-zone offset.

e-mail: [email protected] voice: 360.854.9559 fax: 866.783.1742 33
WVRC-4 Plus Installation and Operation Manual
SET UP
“Scheduler” Setup Page – Actions – cont
Execute Macro: The Scheduler can also execute either the true or false clause of anymacro defined under the "Macros" Setup page. Select "Execute Macro" from the"Event" drop down box then from the "Device" drop down box select the macronumber and either the "True Clause" or "False Clause" to be executed. The macrodoes not need to be enabled for the clause to be executed. If the clause is empty thenno action is taken.
Configuring Event Time:
Frequency: Scheduled events can be initiated either on a repeat or one-time basis. One-time events will be disabled after executing while repeat events will continue to berescheduled. Select either "Repeat" or "One Time" from the "Frequency" drop down.
Date: Selecting when an event occurs can be based on either an exact date(Month/Day) or based on specific days of the week and months in the year. Onetime events can only be scheduled for an exact date, while repeat events can bescheduled for either exact dates or day/months.
WEBSITE:Visit our web site forproduct updates andadditional information.

e-mail: [email protected] voice: 360.854.9559 fax: 866.783.1742 34
WVRC-4 Plus Installation and Operation Manual
SET UP
“Scheduler” Setup Page – Actions – cont
To select the Date for an "Exact Date" type choose the month and day from the twodrop down boxes under "Date"
To select the date for a "Day/Months" type choose the months and days of the weekby checking the checkboxes under "Date" for the days of the week and months ofthe year that you want this event to happen.
Time: Selecting the time of day an event occurs is accomplished using the "Time"column. Hours are referenced as Military Time and include 0-23 as well as "AllHours". When "All Hours" is selected the event will be scheduled for all hours onthe day it is schedule to execute, otherwise it is only scheduled for the specific hour.Events can also be configured to execute at a specific minute and second, though no"All Hours" options exist for minutes and seconds.
e-mail: [email protected] voice: 360.854.9559 fax: 866.783.1742 35
WVRC-4 Plus Installation and Operation Manual
SET UP
“Macros” Setup Page
The WVRC-4 Plus's macro system allows for the ability to trigger relay events basedon combinatorial logic of status and meter inputs. Each of the 50 available macroslots has a conditional statement as well as a true and false clause. When a macrois enabled it is evaluated every second and either the true or false clause is execut-ed, empty true and false clauses are allowed and no action is taken if they are empty.
Configuring Macros is accomplished from the "Macros" menu. When you select acell in the macro table it will transform into a text box. Blue colored cells are uns-elected and are saved while Red colored cells are unselected and are not saved.Yellow colored cells are selected. There can only be one selected cell at a time.
To select a cell just click in the cell box and it will transform, the background shouldbe yellow. To unselect a cell, click in the yellow portion of the cell or onto anothercell. Clicking on another cell will select that cell if it can be selected.
At the top and bottom of the "Macros" page are "refresh" and "save" buttons. Allred cells on the macro page are in need of saving and will not be executed untilsaved. To restore from the previously saved macros click the "refresh" button.
The last 2 cells of each schedule include the "Evaluation" and "Delete" items."Evaluation" shows the conditionals evaluated state at last refresh. "Delete" willdelete the macro but still requires saving before the change is permanent.
Macros can also be imported and exported by using the Import/Export buttons at thebottom of the page. When exporting macros, all 50 macros will be stored in a filethat can be downloaded and uploaded to another WVRC-4 Plus device or reloadedinto the same device.
WEBSITE:Visit our web site forproduct updates andadditional information.

e-mail: [email protected] voice: 360.854.9559 fax: 866.783.1742 36
WVRC-4 Plus Installation and Operation Manual
SET UP
Conditional:Conditional statements must be encompassed in open and closed parenthesis andadditional parenthesis are allowed within the statement in order to enforce evalua-tion order. Conditionals must be separated by the & or the | symbols to indicateBoolean AND and Boolean OR operations. If after evaluating every conditionalstatement and applying the AND and OR operators the conditional results as TRUEthen the TRUE clause will be executed, if the conditional results as FALSE then theFALSE clause will be executed.
Status: The status conditional takes 2 parameters, the status number and whether itis high or low. The following are valid status conditionals:S01HS02L
The first will evaluate as TRUE if Status Input 1 is high and will evaluate as FALSEif Status Input 1 is low. The second will evaluate as TRUE if Status Input 2 is lowand will evaluate as FALSE if Status Input 2 is high.
Since there are 4 status inputs S01x to S04x are allowed Status Conditionals.
Meters: The meter conditional takes 2 parameters, the meter number and whetherit is in high alarm or low alarm. The following are valid meter conditionals.M01HM01L
The first will evaluate as TRUE if Meter Input 1 is in high alarm and will evaluateas FALSE if Meter Input 1 is either in low alarm or not in an alarm. The second willevaluate as TRUE if Meter Input 2 is in low alarm and will evaluate as FALSE ifMeter Input 2 is either in high alarm or not in an alarm. Since there are 4 statusinputs M01x to M04x are allowed Meter Conditionals.
Relays: The relay conditional takes 2 parameters, the relay number and whether itis high or low. The following are valid relay conditionals:R01HR02L
The first will evaluate as TRUE if Relay 1 is high and will evaluate as FALSE if Relay1 is low. The second will evaluate as TRUE if Relay 2 is low and will evaluate asFALSE if Relay 2 is high.
Booleans: There are 99 Boolean variables that can be set in clauses and read as con-ditionals. At start-up all 99 Boolean variables default to FALSE. The Boolean con-ditional takes 2 parameters, the Boolean number and whether it is true or false. Thefollowing are valid Boolean conditionals:B01HB02L

e-mail: [email protected] voice: 360.854.9559 fax: 866.783.1742 37
WVRC-4 Plus Installation and Operation Manual
SET UP
The first will evaluate as TRUE if Boolean 1 is TRUE and will evaluate as FALSEif Boolean 1 is FALSE. The second will evaluate as TRUE if Boolean 2 is FALSEand will evaluate as FALSE if Boolean 2 is TRUE.
Local: The local switch can also be read. The following two conditions are the onlyallowed conditions for the Local switch.L00HL00L
The first will return TRUE if the local switch is high and FALSE if the local switchis low. The second will return TRUE if the local switch is low and will returnFALSE if the local switch is high.
Reset: When the system is resetting to default settings (only on boot) then the resetconditional is set to true. The following two conditions are the only allowed condi-tions for the Reset switch.R00HR00L
The first will return TRUE if the reset switch is high and FALSE if the reset switchis low. The second will return TRUE if the reset switch is low and will returnFALSE if the reset switch is high.
Clauses: Clauses perform actions such as setting a Boolean value, setting the stateof a relay or executing the event of a schedule. Each item in a clause statement isseparated by a comma and is executed in order from left to right.
Relays: Relays can be turned on, off or pulsed from a clause. The duration for therelay pulse is configured under "Relay Setup" on the "I/O Setup" page. The relayclause contains 3 parts, the 'R' the relay number and the action.R01H - will turn Relay 1 highR01L - will turn Relay 1 lowR01P - will pulse Relay 1
Turning a relay high or low that is already in that state will have no effect.
Booleans: Booleans can be set to TRUE or FALSE from a clause. B01T - will set Boolean 1 to TRUEB01F - will set Boolean 1 to FALSE
Events: Events on the Scheduler page can be executed from a macro clause, regard-less of whether or not the Schedule is enabled. Only the first 99 schedules can beexecuted from a clause.E01T - Will execute Event 1E01F - Will also execute Event 1The 3rd parameter of this operation has no bearing.
WEBSITE:Visit our web site forproduct updates andadditional information.

e-mail: [email protected] voice: 360.854.9559 fax: 866.783.1742 38
WVRC-4 Plus Installation and Operation Manual
SET UP
Restoring to Factory Defaults
NOTE: The WVRC-4 Plus factory defaults may be restored by holding the frontpanel “PGM” button IN, repowering the unit, wait for the SS and PF LED’s to flash,then release the “PGM” button.
WEBSITE:Visit our web site forproduct updates andadditional information.
e-mail: [email protected] voice: 360.854.9559 fax: 866.783.1742 39
WVRC-4 Plus Installation and Operation Manual
SET UP
“Email/Network Setup” Web Page

e-mail: [email protected] voice: 360.854.9559 fax: 866.783.1742 40
WVRC-4 Plus Installation and Operation Manual
SET UP
“Email/Network Setup” Web Page – Device Network Settings - cont
Device Address: Enter a static IP address here. Default: 192.168.1.55
Device Netmask: Enter the Netmask here: Default: 255.255.255.0
Gateway Address: Enter the Gateway IP here: Default: 192.168.1.1
DNS Server IP Address: Enter your DNS address here. Default: 192.168.1.1
HTTP Port: Normally Port 80 Default: 80
“Email/Network Setup” Web Page – SMTP Settings
SMTP Server Address: The user can enter either an IP address in thexxx.xxx.xxx.xxx format or a URI in the form: smtp.com-cast.net. In order to resolve the URI, a working DNS serv-er must be present.
SMTP Port: Normally Port 25 or 587. Default: 25
SMTP Return Address: Enter your return email here. If an email cannot be deliv-ered, a message stating why will be sent to this address.
NOTE: The user must enter the following items before an email can be successfullysent: SMTP Server Address, SMTP Port, SMTP Return Address, SMTP Host ID,SMTP username and SMTP password must be supplied if authentication is turned onand Recipient Address 1. The test email is sent to email recipient address 1.
The user must press the “Save Settings” button after entering the SMTP informationbefore attempting an email test. If authentication fails, the email is not sent, pleaseensure that the username and password are correct.
SMTP Host ID: Enter something here to identify the device.
SMTP Authentication: When checked, Base64 SMTP authentication is used.SSL/TLS is not supported.
SMTP Username: Enter user name here.
SMTP Password: Enter password here.
WEBSITE:Visit our web site forproduct updates andadditional information.

e-mail: [email protected] voice: 360.854.9559 fax: 866.783.1742 41
WVRC-4 Plus Installation and Operation Manual
SECTION TITLE
“Email/Network Setup” Web Page – Email Logging Settings - contLogging Email Address: Email address for the “Logging” email recipient
(may be different from the 8 “Alarm” RecipientAddresses. Logging emails and Daily emails aresent to this address.
Logging Email Snapshot Interval: The period in hours that a snapshot is taken of thesystem. The logging email is not sent on thisinterval.
Logging Email Update Interval: The period in hours that the logging snapshots areemailed. This email may contain multiple snap-shots if the Snapshot Interval is less than theUpdate Interval. Each snapshot will be identifiedby the date and time.
“Email/Network Setup” Web Page – Email Alarm SettingsEmail Alarms: Choose Immediate and/or Daily. If Immediate is
selected, then an email will be sent out as soon as analarm is generated. If Daily is selected, then eachalarm is queued and emailed as a digest every 24hours. The number of queued alarms is displayed onthe Monitor/Control page.
Daily Alarm Email Time: The time that queued alarms are sent. Queued alarmsare sent to the Logging Email Address only.
“Alarm” Recipient Address: Email addresses for up to 8 addresses. These addresscorrelate to the 8 email addresses selectable on eachI/O Device.
“Email/Network Setup” Web Page – SNMP Manager Settings
SNMP Manager IP Address: This is the IP address of the SNMP manager. The sys-tem only accepts SNMP requests from this IP address,and will send traps to this IP address only.
SNMP Manager Trap Port: This is the port number that SNMP trap messages willbe sent. Default port 162.
SNMP Read Community: This is the community name for Read-Only access.
SNMP Write Community: This is the community name for Read-Write access.
SNMP Enable Traps: When checked, trap messages will be sent. Whenunchecked, no trap messages will be sent.
NOTE: A cold-start trap will be sent when the unit boots up if the SNMP EnableTraps is checked, otherwise trap messages are sent when a device enters or exits analarm condition, depending on whether or not alarms are enabled.

e-mail: [email protected] voice: 360.854.9559 fax: 866.783.1742 42
WVRC-4 Plus Installation and Operation Manual
SET UP
“Email/Network Setup” Web Page – NTP Settings
NTP (Time) Server Address: Enter the NTP address here. Default: pool.ntp.orgNTP Port: Normally 123. Default: 123NTP Update Interval (Min): Interval between timing updates. Default: 30NTP Enabled: Must be enabled to sync . Default: Enabled
“Email/Network Setup” Web Page – Other Settings
Site ID: This is the Site Identifier that is display on the webieach email.
Monitor Refresh Time (Sec): Interval at which the Monitor page refreshes. Shorter times may increase network traffic.
MTU Size: The Maximum Transmission Unit (MTU) is thelargest physical packet size a network can transmit forTCP and UDP. Enter between 512 and 1400 bytes.The default is 1400 bytes.
Time Zone Offset from UTC:Sets the timezone. Default: -8
Set Time: The hour, minute, second, month, day and year boxescan be used to set the time of the RTC. The time isonly updated if you click “Save Time” and not whenyou “Save Settings”.
Enable Event Logging: Enabling these checkboxes will generate an alarm, butwill not send an email. If the system is configured forDaily Alarm emails, then that Daily Alarm email willcontain the Event Logging items as well.
Login: Whenever someone logs into the system, the user-name and date/time will be logged.
Email: Whenever an email is sent, the type of email anddate/time will be logged.
Reboot: Whenever the device boots, the date/time will belogged.
Alarms Cleared: Whenever the Daily Logs or Normal Alarms arecleared, the type of log cleared and date/time will bestored. When Daily Logs are sent, the Daily Logs arealso cleared; this will cause an event log as well.
WEBSITE:Visit our web site forproduct updates andadditional information.

e-mail: [email protected] voice: 360.854.9559 fax: 866.783.1742 43
WVRC-4 Plus Installation and Operation Manual
SET UP
“Email/Network Setup” Web Page – Controls
Save Settings: After pressing the “Save Settings” button, the device will reboot(If you changed the IP address, you must navigate your webbrowser to the new IP address (if the HTTP port was changedfrom port 80, be sure to add the new port number after the IP:xxx.xxx.xxx.xxx:port #). If you didn’t change the IP address, thenthe web page will return to the login screen after the devicereboots.
Reboot Device: When you press the “Reboot Device” button, the device resets,you must navigate your web browser to the new IP address.
Send Test Email: Press this button to send a test email. When the email hasCompleted, an alert box will pop-up indicating the status of theemail and an error condition if the email was not sent correctly.If an email was not sent correctly, please review your SMTP set-tings and correct as necessary.
NOTE: After you are done making changes to the Email/Network Setup page, youMUST press the “Save Settings” button to save your changes.
Reload Defaults: When you press the “Reload Defaults” button, the device resets,you must navigate your web browser to the new IP address (if theHTTP port was changed from port 80, be sure to add the new portnumber after the IP: xxx.xxx.xxx.xxx:port #).
Clear Daily Logs: When you press the “Clear Daily Logs” button, the daily logsstored in memory will be cleared. Keep in mind that if theAlarms Cleared Event is enabled, this event will post after thelogs are cleared.
Send Daily Logs: When you press the “Send Daily Logs” button, the system willsend the daily logs email and clear the log queue.
WEBSITE:Visit our web site forproduct updates andadditional information.
e-mail: [email protected] voice: 360.854.9559 fax: 866.783.1742 44
WVRC-4 Plus Installation and Operation Manual
SET UP
“Show Alarms” Web Page
This page displays current alarms.
Device : Displays which device and/or devices triggered the alarm.
Enter/Exit: Displays if the alarm is entering or exiting an alarm condition.
Date: Displays what date the alarm was logged.
Time: Displays what time the alarm was logged.
NOTE: With the “admin” access level, the user may control all functions.
With the “Monitor/Control” or “Monitor” only access level, the user may view the“Show Log”, enable/disable PC speaker sound and silence alarms.
NOTE: Adobe “Flash” must be installed and operating properly on your PC for the“Alarm Sound” to work when enabled
e-mail: [email protected] voice: 360.854.9559 fax: 866.783.1742 45
WVRC-4 Plus Installation and Operation Manual
SET UP
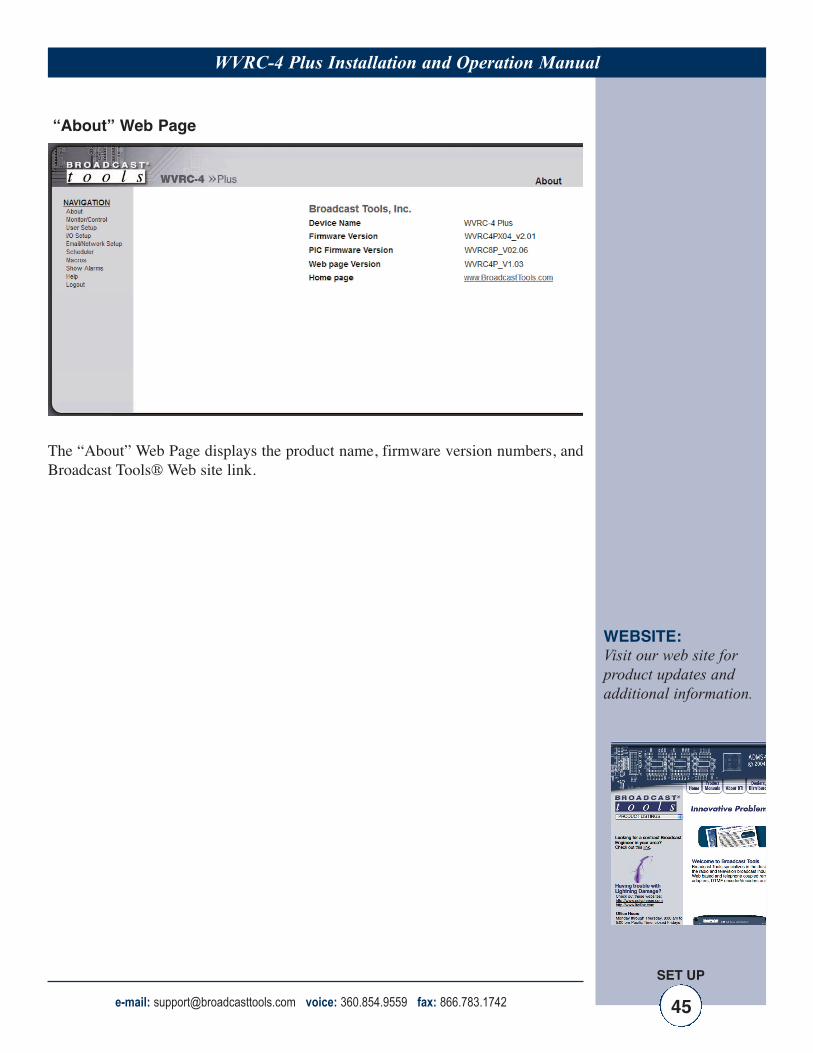
“About” Web Page
The “About” Web Page displays the product name, firmware version numbers, andBroadcast Tools® Web site link.
WEBSITE:Visit our web site forproduct updates andadditional information.
e-mail: [email protected] voice: 360.854.9559 fax: 866.783.1742 46
WVRC-4 Plus Installation and Operation Manual
OPERATION
Dial-Up OperationFor information on setting up the dial-up interface see the “Dial Settings” Setup page.
Using the Dial-Up InterfaceWhen the WVRC-4 Plus is called, it will answer after a user-defined number ofrings. When it answers, you will hear the greeting message followed by the alarmmessage if there is an active alarm. You will then be asked to enter the securityaccess code, which is “123” by default. Once a valid security code is entered“Access Accepted” Message will play and the access LED on the front panel willturn on. The addressed unit will then generate a DTMF “AB” tone which will causeany other units in parallel to hang up and you can begin controlling the device.
When the WVRC-4 Plus dials-out to notify the user of an alarm event it will speakthe greeting message followed by the alarm message and security access codeprompt. If you wish to acknowledge the alarm press the star (*) key after which youmay enter the security access code and control the WVRC-4 Plus or hang-up.
Control CommandsRaise and Lower Relays are controlled by entering the single digit channel number(1-4) of the relay you wish to control followed by * for Lower or # for Raise. Toquery the new analog (metering) value, press the channel number again.
NOTE: If DIP3 is OFF, the analog (metering) value for the selected channel will beplayed, and the associated relay message plus “raise” or “lower” will be played afterthe * or # is released. For more, refer to the table of contents for “Configure DIPSwitch Settings.” Example: To control raise/lower relays 2 after gaining access tothe device enter 2 on you keypad, which will select channel 2 and poll analog input2 then press # to pulse raise relay 2 or press * to pulse lower relay 2.
Poll Silence Sensor Status: 910
Poll Status Inputs: 911 - polls status input 1, 912 - polls status input 2, 914 pollsstatus input 4.
Poll Power Failure Status: 919
Manual Hang-up: 920 will cause the WVRC-4 Plus to hang up.
Poll Analog (metering) inputs: 921 - polls analog (metering) input 1, 922 - pollsanalog (metering) input 2 ….. 924 polls analog (metering) input 4.
Poll temperature probe reading: 929
Audio I/O functions are controlled with the following commands:07 – SS monitor audio to telco ON / Feeds Silence Sensor source audio (SS-LT/SS-RT) to the phone line.08 – SS monitor audio to telco OFF / Turns off feed.
WEBSITE:Visit our web site forproduct updates andadditional information.
e-mail: [email protected] voice: 360.854.9559 fax: 866.783.1742 47
WVRC-4 Plus Installation and Operation Manual
OPERATION
Using the Dial-Up Interface - cont.
Alarm Enable RegistersAll of the alarm call-outs can be enabled, disabled or polled remotely using DTMFcontrol. The status alarms can be controlled by entering 97 followed by the status number 1through 4 and 1 for enable, 0 of disable or 9 for poll.
The analog (metering) alarms can be controlled by entering 98 followed by the ana-log number 1 through 4, and 1 for enable, 0 for disable or 9 for poll.
Power fail, silence sensor and temperature are controlled with 99 followed by 1 forpower fail, 2 for silence sensor and 3 for temperature. 1 to enable, 0 to disable or 9to poll.
Some examples are listed below:
Enable Status 4 alarm: 9741Disable Status 4 alarm: 9740Poll Status 4 alarm enable: 9749
Enable Analog (metering) 4 alarm: 9841 Disable Analog (metering) 4 alarm: 9840Poll Analog 4 alarm enable: 9849
Enable Power Fail Alarm: 9911Disable Power Fail alarm: 9910Poll Power Fail alarm enable: 9919
Enable Silence Sensor Alarm: 9921 Disable Silence Sensor Alarm: 9920Poll Silence Sensor Alarm enable: 9929
Enable Temperature Sensor Alarm: 9931 Disable Temperature Sensor Alarm: 9930Poll Temperature Sensor Alarm enable: 9939

e-mail: [email protected] voice: 360.854.9559 fax: 866.783.1742 48
WVRC-4 Plus Installation and Operation Manual
PROGRAMMING
Dial-Up Programming
Recording Voice Messages:
The WVRC-4 Plus’s dial-up voice system is supplied with spoken words and phas-es in English, but the user is free to customize the voice system by recording wordsand phrases. The following steps are required to record voice messages into theWVRC-4 Plus.
NOTE: If the time allotted for the message you are recording elapses before the “PGM” button is pressed, it will turn off automatically.
1 - Connect a touch-tone telephone to either the front or rear panel RJ-11 jackslabeled “PGM”.
2 - Put the WVRC-4 Plus in to programming mode by pressing the front panel“PGM” button; this should illuminate the front panel “PGM” LED.
3 - Enter the two-digit address of the message you wish to program into connectedthe telephone. A list of available messages and their addresses is providedbelow.
4 - The red “REC” led will illuminate. As soon as it lights, begin speaking the newmessage into the telephone’s mouth piece.
5 - When finished, press the PGM button again, the “REC” and the “PGM” LEDswill extinguish.
Example: To record a new greeting message, press the “PGM” button, enter 00 onthe keypad, and speak the new greeting message, and then press the “PGM” buttonagain.
NOTE: The instructions above are for recording replacement voice messages. If you want to listen to a message without recording over it, preface the address withthe asterisk (*) key.
Example: To hear the current greeting message, press the “PGM” button and Enter *00. The current greeting message will play.
WEBSITE:Visit our web site forproduct updates andadditional information.

e-mail: [email protected] voice: 360.854.9559 fax: 866.783.1742 49
WVRC-4 Plus Installation and Operation Manual
PROGRAMMING
Message Address SecondsGreeting 00 10Alarm 01 2.6Normal 02 2.6Raise 03 2.6Lower 04 2.6Access Accepted 05 5Silence Alarm 06 5Power Fail Alarm 07 5High 08 5Low 09 5Status Input 1 11 5Status Input 2 12 5Status Input 3 13 5Status Input 4 14 5Analog Input 1 21 5Analog Input 2 22 5Analog Input 3 23 5Analog Input 4 24 5Engineering Unit 1 31 2.6Engineering Unit 2 32 2.6Engineering Unit 3 33 2.6Engineering Unit 4 34 2.6Number 0 40 2.6Number 1 41 2.6Number 2 42 2.6Number 3 43 2.6Number 4 44 2.6Number 5 45 2.6Number 6 46 2.6Number 7 47 2.6Number 8 48 2.6Number 9 49 2.6Relay 1 51 5Relay 2 52 5Relay 3 53 5Relay 4 54 5Temperature 60 2.6Degrees Celsius 61 2.6Degrees Fahrenheit 62 2.6Minus 63 2.6Enabled 64 2.6 Disabled 65 2.6Point 66 2.6Temperature Alarm 67 2.6Time 68 2.6Chassis Temp Alarm 69 2.6Internet Alarm 70 1.8

e-mail: [email protected] voice: 360.854.9559 fax: 866.783.1742 50
WVRC-4 Plus Installation and Operation Manual
SECTION TITLE
CONFIGURE DIP Switch settings:NOTE: The “UP” position is OFF
DIP 1 - Unused
DIP 2 - OFF = Voice Temperature in Fahrenheit, ON = Celsius.
DIP 3 - If OFF, description messages will be played when controlled via dial-up. If ON, raise and lower description messages will not be played.
DIP 4 - OFF = Xport control, ON = Control via DB9.
DIP 5 - OFF = Normal operation, ON = DB9 RS-232 to Xport web server.
DIP 6 - UnusedDIP 7 - Unused
DIP 8 - If OFF, input alarms are active. If ON, alarms will not respond.
WEBSITE:Visit our web site forproduct updates andadditional information.
e-mail: [email protected] voice: 360.854.9559 fax: 866.783.1742 51
WVRC-4 Plus Installation and Operation Manual
SPECIFICATIONS
Specifications
Ethernet Interface: RJ-45, 10Base-T or 100Base-TX, auto sensing with Link &activity indicator - Full/half duplex.
Control Logic: Micro with non-volatile memory and web server.
Temperature Sensor input: Probe (1 supplied) with 25-foot cable and 1/8” T/R/S plug. -67°Fto +257°F (-55°C TO +125°C).
Silence Sensor: Stereo unbalanced 22K ohm inputs. Input level: -10dBu to+24dBu. Note: Summed to monaural.
Control Relays: 8 SPDT (form C) dry contact relays.30 VDC @ 1amp.
CAUTION! For safety, never connect 120 Vac circuits to the above relays!
Metering (analog) inputs: Four - Single ended (ground referenced) 0 to 10 VDC inputrange. 47 K ohm input Z. 10-bit resolution.
Status/Logic inputs: Four - Optically Isolated. Internal jumpers for (WET), floating)external 5 to 24 VDC or internal 5 VDC source (DRY). Opencollector, contact closures to ground or external logic source.
Power Failure input: Optically-isolated, 6 to 12 VDC @ 10 ma, center positive. 2.1mmx 5.5mm coax type.
Connectors: Metering (analog), status, relays, telco hybrid audio, and silencesensor audio input: Removable euroblock screw terminals,2 x 2.1mm x 5.5mm coax type power jacks and one - 1/8” T/R/Smini-jack temp probe.
EMI / FCC Compliance: See the Declaration of Conformity page.Operation is subject to the following two conditions: 1) Thisdevice may not cause harmful interference, and 2) this devicemust accept any interference received, including that which maycause undesired operation.
Protocols: TCP/IP, UDP/IP, ARP, ICMP, SNMP, TFTP, Telnet, DHCP,BOOTP, HTTP, and AutoIP.
Required power supply (supplied): 12 Volt DC only @ 2.5 amp. 2.1mm ID x 5.5mm OD coaxialconnector, center positive. Surge protected. Universal (90 -264 vac / 50/60 Hz) with IEC input plug with domestic AC cord.
Size: 8.00" x 6.00” x 1.75", aluminum chassis and steel front panel.
Weight: 2.0 lb.
Options: * LR-5 or LR-5 Plus , 5-pole mechanical latching relay.
WEBSITE:Visit our web site forproduct updates andadditional information.

52
WVRC-4 Plus Installation and Operation Manual
LIMITED WARRANTY
LIMITED WARRANTY
The term “Buyer” as used in this document refers to and includes both (but only) (a) any person or entity who acquires such an item forthe purpose of resale to others (i.e., a dealer or distributor of an item), and (b) the first person or entity who acquires such an item forsuch person’s or entity’s own use.
Broadcast Tools warrants to each Buyer of any item manufactured by Broadcast Tools that the item will be free from defects in materi-als and workmanship at the time it is shipped by Broadcast Tools if the item is properly installed, used and maintained.
EXCLUSIVE REMEDIES
If Broadcast Tools is notified, in writing, of a failure of any item manufactured by Broadcast Tools to conform to the foregoing LimitedWarranty within one (1) year following the date of the Buyer’s acquisition of the item, and if the item is returned to Broadcast Tools inaccordance with Broadcast Tools’ instructions for confirmation by inspection of the defect (which at Broadcast Tools’ election mayinclude, without limitation, a requirement that the Buyer first obtain a Return Authorization number from Broadcast Tools, that the Buyerfurnish proof of purchase in the form of an invoice and/or receipt, and that the Buyer prepay all freight charges associated with any returnof the item to Broadcast Tools using such freight service as Broadcast Tools reasonably may specify), Broadcast Tools will repair orreplace the defective item, or will refund the purchase price paid by the Buyer for the item. Broadcast Tools shall have the exclusiveright to choose between these alternative remedies.
NO OTHER WARRANTIES OR REMEDIES
TO THE MAXIMUM EXTENT PERMITTED BY APPLICABLE LAW, BROADCAST TOOLS AND ITS SUPPLIERS DISCLAIM ALL OTHERWARRANTIES, EITHER EXPRESS OR IMPLIED, INCLUDING BUT NOT LIMITED TO IMPLIED WARRANTIES OF MERCHANTABIL-ITY OR FITNESS FOR A PARTICULAR PURPOSE; AND THE FOREGOING ALTERNATIVE REMEDIES SHALL BE EXCLUSIVE OFALL OTHER REMEDIES. THIS LIMITED WARRANTY GIVES YOU SPECIFIC LEGAL RIGHTS. YOU MAY HAVE OTHER RIGHTS,WHICH VARY FROM STATE/JURISDICTION TO STATE/JURISDICTION.
NO LIABILITY FOR CONSEQUENTIAL DAMAGES
TO THE MAXIMUM EXTENT PERMITTED BY APPLICABLE LAW, NEITHER BROADCAST TOOLS NOR ANY OF ITS SUPPLIERSSHALL HAVE ANY LIABILITY FOR ANY SPECIAL, INCIDENTAL, INDIRECT, CONSEQUENTIAL OR PUNITIVE DAMAGES WHATSO-EVER (INCLUDING, WITHOUT LIMITATION, ANY DAMAGES FOR LOST PROFITS, BUSINESS INTERRUPTION, LOSS OF DATA ORINFORMATION, COST OF CAPITAL, CLAIMS OF CUSTOMERS, OR ANY OTHER PECUNIARY LOSS) ARISING OUT OF THE USEOF OR THE INABILITY TO USE ANY ITEM SUPPLIED BY BROADCAST TOOLS, EVEN IF BROADCAST TOOLS HAS BEENADVISED OF THE POSSIBILITY OF SUCH DAMAGES HAVE ANY LIABILITY FOR ANY SPECIAL, INCIDENTAL, CONSEQUENTIAL,EXEMPLARY OR PUNITIVE DAMAGES. THIS LIMITATION OF LIABILITY APPLIES WHETHER A CLAIM IS ONE ALLEGINGBREACH OF A CONTRACT OR WARRANTY, NEGLIGENCE OR OTHER TORT, FOR THE VIOLATION OF ANY STATUTORY DUTY,THE FAILURE OF ANY LIMITED OR EXCLUSIVE REMEDY TO ACHIEVE ITS ESSENTIAL PURPOSE, OR ANY OTHER CLAIM OFANY NATURE. BECAUSE SOME STATES AND JURISDICTIONS DO NOT ALLOW THE EXCLUSION OR LIMITATION OF LIABILITYFOR INCIDENTAL OR CONSEQUENTIAL DAMAGES, THIS LIMITATION MAY NOT APPLY TO YOU.
Broadcast Tools, Inc.131 State Street
Sedro-Woolley, WA 98284 • USA
360.854.9559 voice • 866.783.1742 [email protected] e-mail
www.broadcasttools.com website
e-mail: [email protected] voice: 360.854.9559 fax: 866.783.1742

e-mail: [email protected] voice: 360.854.9559 fax: 866.783.1742 53
WVRC-4 Plus Installation and Operation Manual
DECLARATION
Declaration of Conformity
The XPORT Device contained in the WVRC-4 Plus conforms to the following standards:(according to ISO/IEC Guide 22 and EN 45014)
Manufacturer’s Name & Address:WVRC-4 Plus: Broadcast Tools, Inc. 131 State Street.Sedro Woolley, WA 98284-1503 USA
XPORT: Lantronix 15353 Barranca Parkway, Irvine, CA 92618 USADeclares that the following product:
Product Name Model: XPORT™ Device ServerConforms to the following standards or other normative documents:
Electromagnetic Emissions:EN55022: 1998 (IEC/CSPIR22: 1993) Radiated RF emissions, 30MHz-1000MHzConducted RF Emissions – Telecom Lines – 150KHz - 30MHzFCC Part 15, Subpart B, Class BIEC 1000-3-2/A14: 2000IEC 1000-3-3: 1994
Electromagnetic Immunity:EN55024: 1998 Information Technology Equipment-Immunity CharacteristicsDirect ESD, Contact DischargeIndirect ESDRadiated RF Electromagnetic Field TestElectrical Fast Transient/Burst ImmunityRF Common Mode Conducted SusceptibilityPower Frequency Magnetic Field Test
Manufacturer’s Contact:
WVRC-4 Plus.Broadcast Tools, Inc. 131 State StreetSedro Woolley, WA 98284-1503 USATel: 360.854.0608 Fax: 866.783.1742
XPORTLantronix:Director of Quality Assurance15353 Barranca Parkway, Irvine, CA 92618 USATel: 949.453.3990 Fax: 949.453.3995
WEBSITE:Visit our web site forproduct updates andadditional information.

e-mail: [email protected] voice: 360.854.9559 fax: 866.783.1742
Product_Name Installation and Operation Manual
54
APPENDIX

e-mail: [email protected] voice: 360.854.9559 fax: 866.783.1742
Product_Name Installation and Operation Manual
55
APPENDIX

e-mail: [email protected] voice: 360.854.9559 fax: 866.783.1742
Product_Name Installation and Operation Manual
56
APPENDIX

e-mail: [email protected] voice: 360.854.9559 fax: 866.783.1742
Product_Name Installation and Operation Manual
57
APPENDIX