installation and operating manual - legacy stoves
TRANSCRIPT

Installation and Operating ManualModel(s): Magnafire Series Coal Stoves Mark I, Mark II and Mark III
NOTICE: SAVE THESE INSTRUCTIONS
Report Number: 0536CS002SCertified To: UL 1482-2011, ULC S627-00
Legacy Stoves, A Division of:
Alternate Heating Systems 2393 Little Egypt RdHarrisonville, PA 172228
WARNING: HOTSURFACES!
Glass and other surfaces are hot during operation and cool down. Hot glass will cause burns.
• Do not touch glass until it is cooled• NEVER allow children to touch glass• Keep children away• CAREFULLY SUPERVISE children in same room as stove.• Alert children and adults to hazards of high temperatures. • High temperatures may ignite clothing or other flammable materials. Keep clothing, furniture, draperies and other
flammable materials away.
⚠SAFETY NOTICE - CAUTION!PLEASE READ THIS ENTIRE MANUAL BEFORE YOU INSTALL OR USE YOUR NEW ROOM HEATER.
FAILURE TO FOLLOW THESE INSTRUCTIONS MAY RESULT IN PROPERTY DAMAGE, BODILY INJURY, OR EVEN DEATH.
APPROVED FOR USE IN THE U.S. AND CANADA
IF THIS LEGACY STOVES PRODUCT IS NOT INSTALLED CORRECTLY, A HOUSE FIRE MAY RESULT.
FOR YOUR SAFETY, FOLLOW INSTALLATION DIRECTIONS PRECISELY. CONTACT LOCAL BUILDING OR FIRE OFFICIALS ABOUT RESTRICTIONS AND INSPECTION REQUIREMENTS FOR YOUR AREA. CONTACT YOUR LOCAL AUTHORITY (SUCH AS THE MUNICIPAL BUILDING DEPARTMENT, FIRE DEPARTMENT, FIRE PREVENTION BUREAU, ETC.) TO DETERMINE THE NEED FOR A PERMIT. DO NOT INSTALL IN A MOBILE HOME
CETTE GUIDE D’UTILISATION EST DISPONIBLE EN FRANCAIS. CHEZ VOTRE CONCESSIONNAIRE DE LEGACY STOVES HOME HEATING.
REV-140819


IntroductionThank you for purchasing a Legacy StovesTM Magnafire coal stove. The Magnafire series has been designed and built to last. Whether you’re heating a room or heating your whole house, you’ve made the right choice. Please read this entire instruction manual before attempting to install or operate your new stove. If you have further questions regarding your new stove, contact your Legacy StovesTM dealer. Follow these instructions and you will have many years of warmth and comfort enjoying your new coal stove.
If you are a first-time coal burner, keep in mind that you will not have instant success with maintaining a fire. No one does. Following these instructions should help you with the basic principals.
Please copy your serial number, from the label on the back of your stove, to the box below.
-4-
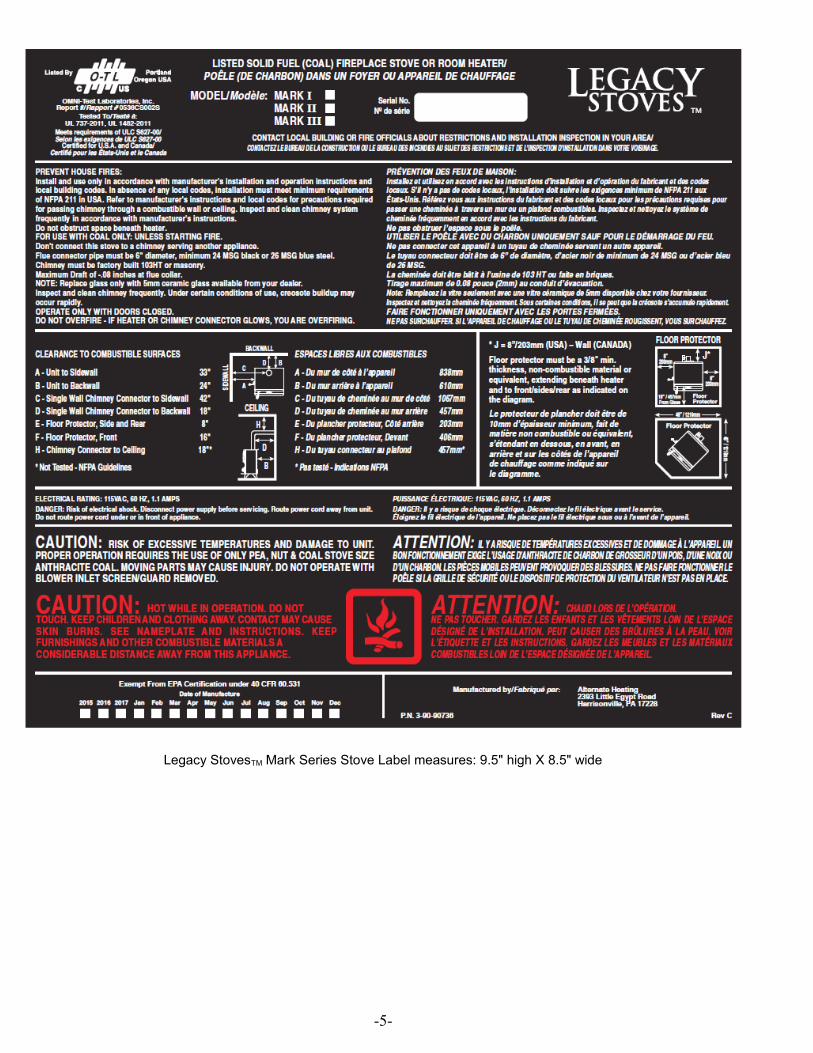
Legacy StovesTM Mark Series Stove Label measures: 9.5" high X 8.5" wide
-5-

Table of ContentsSAFETY NOTICE - CAUTION!⚠ ...............................................................................................................1
Introduction....................................................................................................................................................4Additional Warnings and Notices...................................................................................................................7Installation......................................................................................................................................................8
1. Safety Considerations............................................................................................................................81.1 KEEP CHILDREN AWAY-MAY CAUSE SERIOUS BURNS......................................................81.2 FUEL / FIRING INFORMATION..................................................................................................81.3 CURING PAINT.............................................................................................................................81.4 MOBILE HOMES..........................................................................................................................8
2. Assembly& Installation.........................................................................................................................82.1 UNPACKING AND INSPECTION OF PARTS.............................................................................82.2 LOCATING THE STOVE..............................................................................................................82.3 FLOOR PROTECTION..................................................................................................................82.4 ASSEMBLY....................................................................................................................................92.5 general information – installation checklist....................................................................................9
Venting..........................................................................................................................................................103. Venting and Chimneys.........................................................................................................................10
3.1 Types of Chimneys........................................................................................................................103.2 COMMON CHIMNEY PROBLEMS...........................................................................................103.3 What to do if you have a problem.................................................................................................113.4 Magnafire Chimney Specifics.......................................................................................................11
4. Grates..................................................................................................................................................144.1 Grate system and controls.............................................................................................................14
Operation......................................................................................................................................................155. Operating Instructions.........................................................................................................................15
5.1 Starting a Fireplace.......................................................................................................................155.2 Blower Operation..........................................................................................................................155.3 Loading.........................................................................................................................................155.4 Increasing Heat from a Low Fire..................................................................................................155.5 Shaking Ashes...............................................................................................................................155.6 Ashes and Their Removal.............................................................................................................155.7 Safety............................................................................................................................................165.8 Controlled Firing...........................................................................................................................16
6. Maintenance.........................................................................................................................................166.1 Periodic and Everyday Maintenance.............................................................................................166.2 Coal/Fuel Handling and Storage...................................................................................................176.3 Glass Doors – Maintenance..........................................................................................................176.4 Glass Doors – Glass Replacement................................................................................................17
7. Warranty Information...........................................................................................................................198. Service Parts........................................................................................................................................21
Service and Maintenance Log......................................................................................................................28Service and Maintenance Log......................................................................................................................29
-6-
Additional Warnings and NoticesThis appliance is also approved for installation into a shop.
MARK IMARK IIMARK III
CONTACT YOUR LOCAL BUILDING OFFICIALS ABOUT RESTRICTIONS AND INSTALLATION INSPECTION IN YOUR AREA
BARCODE LABEL
PREVENT HOUSE FIRES:Install and use only in accordance with manufacturer’s installation and operation instructions and local building codes. In absence of any local codes, installation must meet minimum requirements of NFPA 211 in USA. Refer to manufacturer’s instructions and local codes for precautions required for passing chimney through a combustible wall or ceiling. Inspect and clean chimney system frequently in accordance with manufacturer’s instructions.
FOR USE WITH COAL ONLY.Don’t connect this stove to a chimney serving another appliance.
Flue connector pipe must be 6” diameter, minimum 24 MSG black or 26 MSG blue steel.
Chimney must be factory built 103HT or masonry.
NOTE: Replace glass only with 5mm ceramic glass available from your dealer.
Inspect and clean chimney frequently. Under certain conditions of use, creosote buildup may occur rapidly.
-7-
CAUTION! STOVE IS HOT WHILE IN OPERATION. KEEP COMBUSTIBLES SUCH AS FURNITURE, FUEL, AND DRAPERIES AT LEAST 36 INCHES AWAY FROM THE APPLIANCE.
DO NOT LEAVE SMALL CHILDREN UNATTENDED WHILE IN THE ROOM WITH THIS HEATER.
ALWAYS WEAR GLOVES WHEN ATTENDING TO THE STOVE.
THIS STOVE IS NOT AN INCINERATOR. DO NOT BURN GARBAGE, PAINTED OR TREATED WOOD.
NEVER USE GASOLINE, LANTERN FUEL, KEROSENE, CHARCOAL LIGHTER FLUID, OR SIMILAR LIQUIDS TO START OR “FRESHEN UP” A FIRE IN THIS HEATER. KEEP ALL SUCH LIQUIDS WELL AWAY FROM THE HEATER WHILE IT IS IN USE.
DO NOT OVERFIRE - IF HEATER OR CHIMNEY CONNECTOR GLOWS, YOU ARE OVERFIRING.
Installation
1. Safety Considerations1.1 KEEP CHILDREN AWAY-MAY CAUSE SERIOUS BURNSCAUTION: All surfaces of the stove are hot while in operation. Do not touch. Keep Children Away. Wear gloves while tending stove. Serious burns will result if special care is not taken.
1.2 FUEL / FIRING INFORMATIONDANGER! FIRE HAZARD! DO NOT USE CHEMICALS OR FLUIDS TO START OR “FRESHEN UP” A FIRE. SEVERE BODILY INJURY AND/OR A FIRE IN THE HOME MAY RESULT. DO NOT BURN GARBAGE, GASOLINE, THINNERS, KEROSENE, OR FUEL OIL, ETC. AN EXPLOSION, A HOUSE FIRE OR PERSONAL INJURY COULD RESULT. KEEP ALL SUCH LIQUIDS WELL AWAY FROM THE STOVE WHILE IN USE.
This heater is approved for burning coal only. Use of any other fuel, except for the purpose of coal ignition, is a violation of U.S. law. When and if the chimney pipe or connector reaches 500˚ f. (maximum temperature), the stove is being overfired. It is recommended that you use magnetic thermometers on the stove and flue connector, to ensure safe operation. This stove consumes air when it is burning. If your house is especially tight, It is advisable that a nearby window be opened slightly while burning the stove. Information in this manual is manufacturer’s recommendations. If there is a discrepancy between these recommendations and your local code requirements, you must follow local codes.
1.3 CURING PAINT
During the first few hours of burning, a blue smoke will be observed rising from the painted surfaces of the stove. This is the paint beingcured, and will disappear over time. Increase the amount of fresh air in the room during this initial break-in period. This may be achieved by opening doors or windows.
1.4 MOBILE HOMES
This stove is not approved for use in mobile homes
2. Assembly& Installation2.1 UNPACKING AND INSPECTION OF PARTSInspect the stove for any visible damage. The blower and the shaker handle are packaged inside the stove.
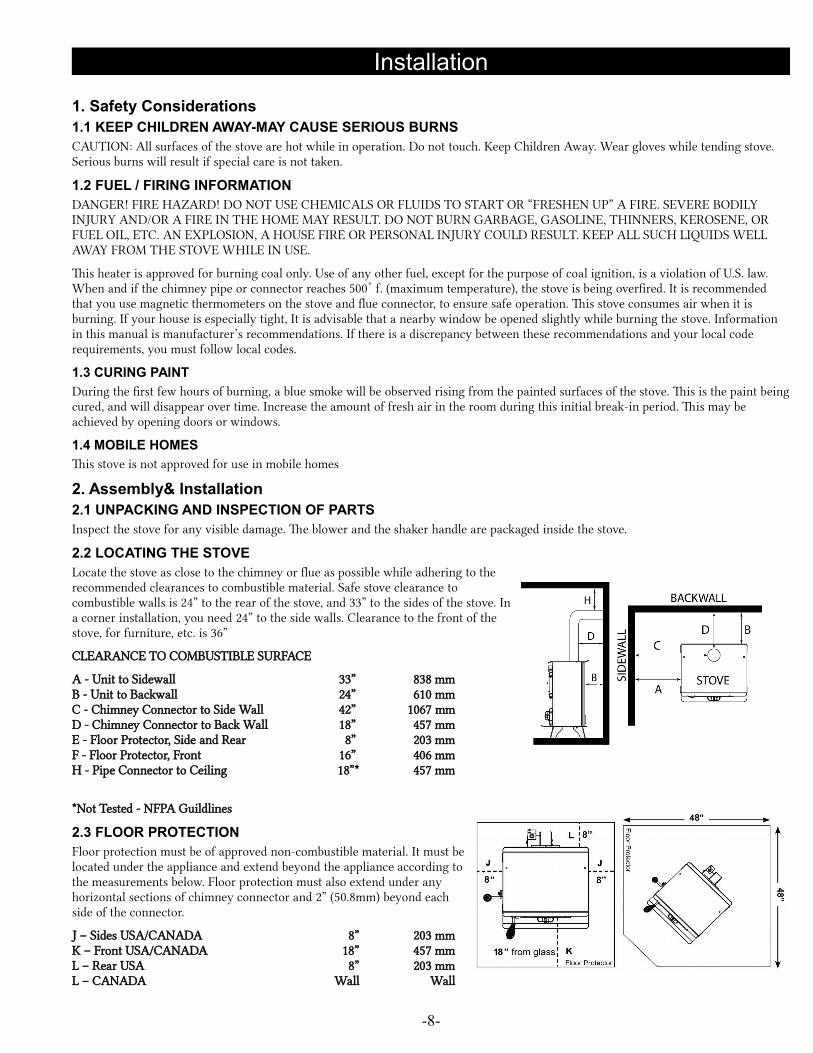
2.2 LOCATING THE STOVELocate the stove as close to the chimney or flue as possible while adhering to therecommended clearances to combustible material. Safe stove clearance tocombustible walls is 24” to the rear of the stove, and 33” to the sides of the stove. Ina corner installation, you need 24” to the side walls. Clearance to the front of thestove, for furniture, etc. is 36”
CLEARANCE TO COMBUSTIBLE SURFACE
A - Unit to Sidewall 33” 838 mmB - Unit to Backwall 24” 610 mmC - Chimney Connector to Side Wall 42” 1067 mmD - Chimney Connector to Back Wall 18” 457 mmE - Floor Protector, Side and Rear 8” 203 mmF - Floor Protector, Front 16” 406 mmH - Pipe Connector to Ceiling 18”* 457 mm
*Not Tested - NFPA Guildlines
2.3 FLOOR PROTECTIONFloor protection must be of approved non-combustible material. It must belocated under the appliance and extend beyond the appliance according tothe measurements below. Floor protection must also extend under anyhorizontal sections of chimney connector and 2” (50.8mm) beyond eachside of the connector.
J – Sides USA/CANADA 8” 203 mmK – Front USA/CANADA 18” 457 mmL – Rear USA 8” 203 mmL – CANADA Wall Wall
-8-

2.4 ASSEMBLYSlide the blower into the slotted bracket on the rear of the stove. The blower will rest atthe bottom of the slot.
The shaker handle bolts onto the shaker block using the bolts and lock washers provided.
The draft control is bolted through the hole in the center of the ash door as shown below.The knob should spin freely and open to a distance of about 1/4 inch from the doorsurface, while being able to close against the face of the door.
The Viewing Glass →
The viewing glass is installed between the door and the window frame. The glassgasket is installed only on the sides of the glass panel. The top and bottom of theglass are open to provide air-wash and secondary air to the firebox. The glassframe is secured to the door with four bolts.
The Mark III also has a top trim piece which bolts onto the top of the door.
Be sure the frame bolts and trim bolts are secured.
2.5 GENERAL INFORMATION – INSTALLATION CHECKLISTA) Have your stove installed by a trained installer. Preferably one who is certified by the National Fireplace Institute or similar
certification agency.
B) Before starting Installation, check for proper clearance to combustibles where the stove is going to be located. (See section 2.2)
C) Never vent a solid fuel burning appliance into a flue servinganother appliance.
D) Have the chimney inspected and thoroughly cleaned.Inspect that it is a Class “A” chimney either masonry orfactory built. If it is a manufactured chimney, ensure that itis installed as per the manufacturers requirements. be surethat the chimney is tall enough. Solid fuel chimneys fallunder a general rule, 16 ft. minimum height, 2 ft. taller thananything within 10 ft., and 3 ft. above where it passesthrough the roof line. The chimney must be capable of aminimum .06 inches of water column of draft when thestove is burning.
E) Limit the amount of connector pipe. Position the stove asclose to the flue as possible. (8 ft. or less) No more than two90° elbow fittings should be used. Any horizontal connectorpipe should have at least 1/4 in. of rise per foot in length. Abarometric damper may be installed to prevent excessive orerratic draft.
MANUAL DAMPERS OR “HEAT SAVERS” MUST NEVER BE INSTALLED IN THE FLUE PIPE. IMPROPER OPERATION COULD RESULT IN DEATH.
-9-

VentingChimney connectors shall not pass through an attic or roof space, closet or similar concealed space, or a floor or ceiling. Where passagethrough a wall, or partition of combustible construction is necessary, the installation shall conform to CAN/CSA-B365, Installation Code for Solid-Fuel-Burning Appliances and Equipment.
Where an existing chimney is used, it must be large enough to provide a draft adequate for removing gaseous products of combustion. From NFPA 211 2013:
1. The cross-sectional area of the chimney system must not be less than that of the flue collar. (For The Mark I and Mark III served by a round chimney, the diameter must be at least 6 inches)
2. Chimney systems which are completely internal below the roofline must be no more than three times the crosssectional area of the flue collar (28.3 in2 X 3 = 84.8 in2).
3. Chimney systems which are exposed to the exterior on one or more sides below the roofline must be no more than two times the cross-sectional area of the flue collar (28.3 in2 X 2 = 56.5 in2).
3. Venting and Chimneys3.1 TYPES OF CHIMNEYSThe chimney is one of the most important, yet the most neglected and misunderstood portion of any solid fuel burning appliance installation. Do not connect your stove to a chimney flue that already serves another heating device.
Under no circumstances should a manual flue damper be installed in the smoke pipe between the stove and the chimney.
There are three types of “Class A” chimneys:
1. Masonry with a tile liner, including brick, block, stone, etc. It must be supported by a ground-level foundation. 2. Insulated “Class A” manufactured chimney, listed and certified by a national test agency. 3. Triple-walled metal “Class A” chimney, listed and certified by a national test agency.
If your masonry chimney has not been used for some time, have it inspected by a qualified person (building inspector, fire department personnel, etc.). If a listed and certified manufactured chimney is to be used, make certain it is installed in accordance with the manufacturers instructions and all local codes. A coal stove can perform only as well as its venting system will allow it to.
CAUTION! THE CHIMNEY SELECTED MUST COMPLY WITH THE REQUIREMENTS FOR TYPE HT CHIMNEYS UL 103DO NOT USE MAKE-SHIFT COMPROMISES DURING INSTALLATION!
3.2 COMMON CHIMNEY PROBLEMSIn order to have a properly operating heating system, the chimney needs tobe capable of providing sufficient draft. The minimum required draft is .06inches of water column (WC). To measure the draft, drill a hole in theconnector pipe and attach a draft meter. First, check the draft above thebarometric damper (if installed). Then check it below the barometricdamper and make your damper adjustment to where it opens to prevent thedraft from going higher than the .06 in WC. If the chimney is incapable ofsupplying the necessary draft, it will need to be improved. Whether it needsto be raised to a taller height, a flue liner installed, or a different style of capplaced on the top, the improvement method will need to be determined.
Reasons for insufficient draft:
A) Leaking chimney - Air leaking in around a loose fitting cleanoutdoor, joints or seams in connector pipe are not secured properly,cracks or other defects in masonry.
B) Improper chimney height - Chimney does not extend to asufficient height above the roof line. (Remember the 3 ft.-2 ft.-10 ft.rule)
C) Obstructions in the chimney - Make sure the chimney has been cleaned. Different animals have been known to build nests in chimneys.
-10-
CAUTION! THE CHIMNEY MUST BE A “CLASS A” CHIMNEY IN GOOD WORKING CONDITION. THE USE OFALUMINUM “TYPE B” GAS VENT FOR SOLID FUELS IS UNSAFE, AND PROHIBITED BY THE NATIONAL FIRE
PROTECTION AGENCY (NFPA) CODE.
D) Trees or other topographical barriers - Trees that are taller than the house can cause the air currents to ?ow downward over the peak of the roof. This would lead to a down draft effect on the chimney. This can also be caused by adjacent buildings or structures. It could even be from a different peak on the same structure.
E) Improperly sized flue - Too small of a chimney is incapable of moving the volume of air necessary. Too large of a flue could have trouble warming up to create the necessary upward flow.
F) Chimney offsets - Offset chimneys should be avoided if possible. Not only can the offset affect draft, it is also a place for debristo collect over time.
G) Too many elbows - The flue connector has more than two elbows in it. Sometimes, depending on overall chimney performance, one elbow could be too many.
H) Vent sharing - No more than one heating appliance shall vent into a single flue.
THE MOST IMPORTANT THING TO REMEMBER ABOUT CHIMNEYS IS THEIR NEED FOR MAINTENANCE AND CLEANING.IF A CHIMNEY IS NOT CLEANED ON A FREQUENT BASIS, IT WILL AFFECT DRAFT, AS WELL AS BE A CONTRIBUTING
FACTOR TO A POTENTIAL CHIMNEY FIRE.
3.3 WHAT TO DO IF YOU HAVE A PROBLEM.If you have a chimney fire:
1. Be sure everyone is out of the house.2. Call the fire department.3. Close the draft control on the ash door and make sure both doors on the stove are closed and latched.4. Do not put water on the fire, this will cause unnecessary damage to the stove and flue. 5. Have the chimney inspected and repaired prior to building another fire.
Smoke puffs out of the stove:
1. Check previous suggestions for insufficient draft. 2. Check draft control for proper operation.3. Chimney may be too low. Increase height. 4. Add more fresh air to the room. Your home may be so tight that there is not enough oxygen getting to the ?re.5. Remember, open the draft control and crack the door open slightly before
reloading or checking the ?re.6. Check the ashes. The ash pan and firebox may be overloaded with ashes.7. Check the chimney cleanout door to ensure it closes properly.
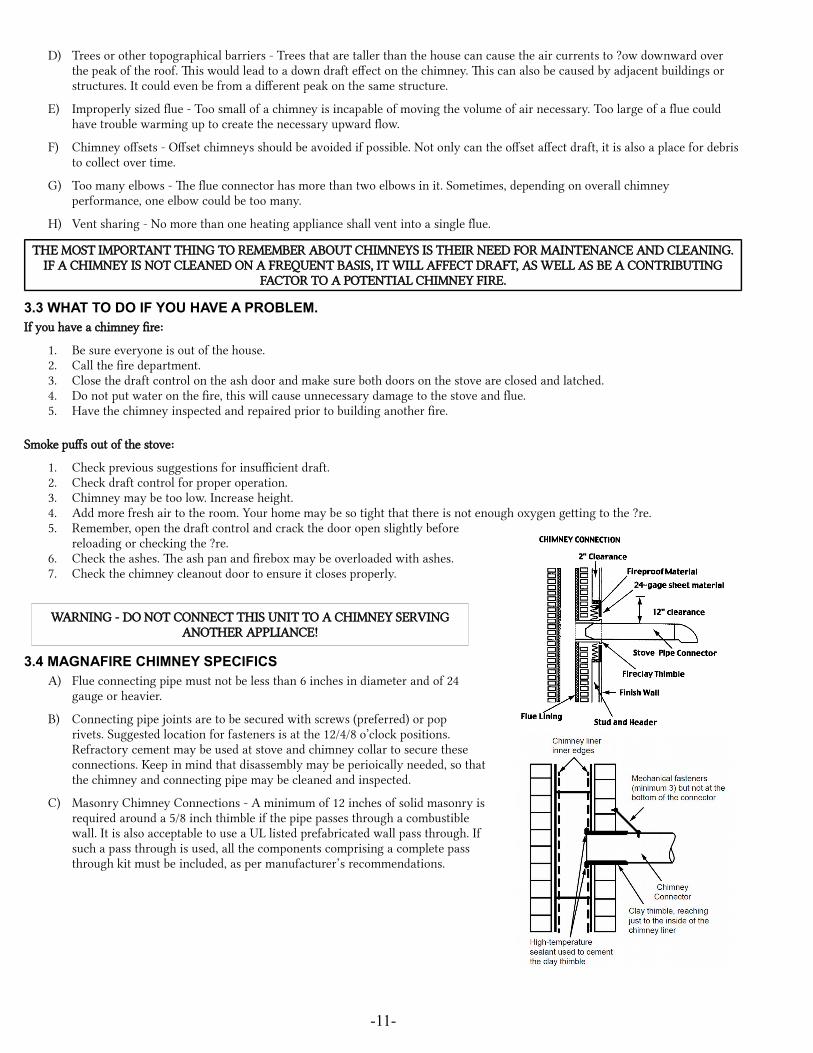
3.4 MAGNAFIRE CHIMNEY SPECIFICSA) Flue connecting pipe must not be less than 6 inches in diameter and of 24
gauge or heavier.
B) Connecting pipe joints are to be secured with screws (preferred) or poprivets. Suggested location for fasteners is at the 12/4/8 o’clock positions.Refractory cement may be used at stove and chimney collar to secure theseconnections. Keep in mind that disassembly may be perioically needed, so thatthe chimney and connecting pipe may be cleaned and inspected.
C) Masonry Chimney Connections - A minimum of 12 inches of solid masonry isrequired around a 5/8 inch thimble if the pipe passes through a combustiblewall. It is also acceptable to use a UL listed prefabricated wall pass through. Ifsuch a pass through is used, all the components comprising a complete passthrough kit must be included, as per manufacturer’s recommendations.
-11-
WARNING - DO NOT CONNECT THIS UNIT TO A CHIMNEY SERVINGANOTHER APPLIANCE!
D) Masonry Fireplace Chimney Connections - In some situations, a codecompliant chimney originally used for a masonry fireplace may be used.The chimney must be lined with the needs of the heating appliance inmind, including minimum and maximum sizes. The lining will complywith one of the following:
• Clay flue lining complying with the requirements of ASTM C315 orequivalent.
• Listed chimney lining systems complying with UL 1777.• Factory-built chimneys or chimney units listed for installation
within masonry chimneys.• Other approved materials that will resist corrosion, erosion,
softening, or cracking from flue gases and condensate attemperatures up to 1,800º F. (982º C)
Insulated liners work best for maintaining good draft. In addition to therequirements found in the previous paragraphs, it is important to be aware thatall clearances must be met, including those from the chimney connector tocombustibles. Do not forget to include floor protection in your plans. (SeeClearances and Floor Protection) Since many fireplaces have exposed woodenmantels and trim, pay special attention to the clearances necessary to thesematerials. If your fireplace chimney is behind a combustible wall, you must usean approved wall pass-through system to gain access to the masonry chimney.The chimney connector must enter the chimney at a place where it is lined, andthe fireplace must be made inoperable. For example, you might remove thedamper, replacing it with a secure, airtight, noncombustible seal (removable forinspection); this also satisfies the requirement that no room air must be allowedto enter the chimney.
-12-
WARNING!
DO NOT BURN ANY FUEL OTHER THAN COAL. NEVER USEHIGHLY VOLATILE SUBSTANCES IN YOUR STOVE, SUCH ASGASOLINE, WHICH COULD CAUSE AN EXPLOSION. KEEP ALLSUCH LIQUIDS AWAY FROM HEATER WHILE IN USE.
E) Manufactured Chimney Connections - When ventingusing a prefabricated chimney, be sure to contact localbuilding code authorities, and to follow themanufacturer’s instructions exactly.
USE ONLY THE MANUFACTURER’S PARTS. DO NOTUSE MAKESHIFT INSTALLATION TECHNIQUES. ALLPREFABRICATED CHIMNEYS MUST BE TESTED TOEITHER THE U.S. OR CANADIAN HIGHTEMPERATURE STANDARDS, UL 103 OR ULC S629.
Your manufactured chimney may contain more parts thanis shown at right. Include all required items in yourinstallation. A chimney cap (A) serves to keep rain andsnow from entering the chimney. An approved Class Achimney (B) is required for the Super Magnum Stoker.Wall Bands (C) must be deployed for support permanufacturer’s recommendations. A manufacturer’s WallSupport Kit (D) will contain required items for supportingthe chimney. Such kits will cost less than individual itemspurchased separately. A Bottom Cap (E) allows forcleaning. The arrow shows the location of the bottom endcap, but it is not visible on the drawing. A FinishingCollar (F) provides inside wall protection. A Wall Thimble(G) provides for required clearance between the chimneypipe passing through a flammable wall. The ChimneyConnector (H) must be approved single wall, or a lowclearance pipe, installed with required clearances in place.A Roof Brace (I) is required for chimneys that extendmore than a certain distance, as referenced by themanufacturer’s instructions, from the roof. Manufacturedchimneys may feature a built in “twist lock” at each joint,but a Joint Band (J) is still normally required to securepipe at the joint. An approved Chimney Pipe Adapter (K)is required. A Ceiling Support (L) will provide structuralsupport for the chimney and is typically part of a kit thatincludes items that maintain required clearances toflammables. A Storm Collar (M), and Adjustable Flashing(N) prevent water from entering the home by runningdown the outside of the chimney. Additional items or a kit(O) provide additional mounting support or fire protectionto the roof joists or other roof components.
F) Draft Regulation - Barometric Damper Setup
A stove and chimney combination that drafts well willoccasionally produce more draft than is desired. Excessivedraft can lead to overfiring. It will also lead to reducedefficiency, as more heat will end up going up the chimney.A barometric damper is required to limit maximum draftto -.08 column inches. The barometric damper needs to bethe same diameter as the stove collar. It is to be installedin the chimney connecting pipe as shown below.
-13-
Follow these steps to ensure safe and efficient operation of your Mark I or Mark III stove. You will need to start a fire in the appliance toestablish a draft in the chimney flue. Refer back to these instructions after reading the entire manual.
1. Drill a hole into the flue connector pipe, for the purpose of attaching a draft meter. This hole should be between the barometricdamper and the stove’s flue collar, and in an inconspicuous location, as it will be closed off after the test with a bolt.
2. Attach the draft meter to the hole in the connector. A great chimney will have draft without a fire or heat source. Set the barometric damper to maintain -.06 to -.08 (inches of water column).
3. Remove the draft meter from the connector pipe and seal the hole by threading in a screw or bolt. You may also want to apply a small dab of high-temperature silicone to the threads prior to installing.
4. Grates4.1 GRATE SYSTEM AND CONTROLSThe Grates are made of heavy-duty cast iron. The function of the grate system is to support the coal while allowing air flow through thefire. The grate system also allows removal of the ashes by shaking them through the grates. The grates are removable without the use of tools, once the fire bricks are removed, the grates simply lift out. Lift the right end higher to disengage from the shaking link. To re-install the grates, lower them, one at a time, left end first, be sure the grate hooks into the grate link as you drop it into place.
Your grates will last forever, as long as you keep your ashes cleaned out of the stove. When ashes are left to pile up against the underside of the grates, the air-flow is blocked. With no air flow through the grates, they will begin to sag from the intense heat. The grates are designed to accommodate three different sizes of anthracite coal. Pea is defined as being able to fit through a round screen hole of 9/16” to 7/8”. Nut or Chestnut is defined as being able to fit through a round screen hole of 7/8” to 1½”. Finally, Stove coal which is 1½” to 2½” in size. Pea or Nut you’ll find work the best for starting a fire, while all three sizes burn just as well. The external shaker handle allows for greater safety from burns, and the convenience of needing no extra tools.
-14-

Operation
5. Operating Instructions5.1 STARTING A FIREPLACEPlace seven or eight sheets of crumpled newspaper onto the top of the grates. Next, lay in some small kindling wood (approximately 3/4” or less) on top of the newspaper. Layer the kindling in a criss-cross fashion to allow for maximum air flow. Open the draft control to it’s full open position. Light the paper nearest the center of the door opening and close and latch the load door. After two to three minutes, open the load door an inch or two for a few seconds, then open it completely. This method is good practice to allow smoke to clear away from the load door. Add a few small pieces of firewood when the kindling is burning well. Close the door again and be sure the draft control remains open. The ash door itself may be opened for a short period to accelerate the process.
DO NOT LEAVE THE STOVE UNATTENDED WITH THE DOOR OPEN.
When a substantial bed of hot wood coals are built up, start adding small amounts of coal on top of the burning wood embers. (Pea or Nut sized coal will give the best results when starting a fire.) Keep the draft control open through the whole ignition process. As the coal begins to free-burn, continue adding small amounts until there is a solid bed of burning coal. Do not add too much at one time as you could smother the fire. Allow sufficient time between these small batches so that the coal can ignite thoroughly before more is added. Once a substantial bed is established, fill the firebox to the top of the bricks. A deep bed of coal will always burn better than a shallow bed. Adjust the draft control to the desired heat output. You’ll learn over time that the coal fire does not instantly change with aturn of the draft control. Make your adjustments in small increments and wait for the fire to stabilize. The normal range of control settings will be from closed, for extended burn times, to one full turn open.
NOTE: If the ash door was opened during the lighting process, it must be closed to prevent over-firing. Over-firing can cause dangerously high temperatures.
5.2 BLOWER OPERATIONUse of the blower will increase heat ouput of the stove. Be sure to use a 3-wire extension cord and to connect to a grounded outlet. Route the cord to avoid creating a trip hazard, as well as to avoid the risk of abrasion damage to the insulation on the cord. Inspect the power cord and extension cord at both the start and end of the season.
5.3 LOADINGCoal should never be added unless there is a reasonably hot fire. The coal bed should be bright and vigorous. If the fire is burning hot and there is a deep bed of hot coals, full loads of coal can be added at any time. However, if there is not a deep bed of coals, it is best to add in small batches as during lighting.
5.4 INCREASING HEAT FROM A LOW FIREEvery effort should be made to not let a coal fire burn so long that it begins to die. This causes the reloading process to be much longer, and there is a good possibility of losing the fire all together. Do not shake or stir a low fire. Open the draft control or the ash door to get the maximum air flow. Allow the fire to get reasonably hot. If there is not enough unburned coal to renew the fire, add a small amount. Continue adding coal in small amounts until a full bed is established. Now, shake the grates. (see next section “shaking ashes”)
5.5 SHAKING ASHESShaking should be done only when there is a hot fire. The frequency of shaking will depend on the rate of burning. Shaking should be done at least once per day but best results will come from shaking twice a day. When shaking, do just that. Do not rock the handle in long strokes, just shake it briskly until you see red hot ashes fall into the ash pan. Rocking the grates may allow pieces of coal to jam them in an open position.
DO NOT LEAVE THE STOVE UNATTENDED WITH THE DOOR OPEN
5.6 ASHES AND THEIR REMOVALAshes should be placed in a metal container with a tight fitting lid, pending final disposal. The closed container of ashes should be placed on a non-combustible floor or on the ground, well away from any combustible materials. If the ashes are disposed of by burial in soil or otherwise locally dispersed, they should be retained in the sealed container until all cinders have thoroughly cooled. Coal produces considerably more ash than wood. For equal heat output, coal will produce 7 to 10 times the ash of a wood fire.
CAUTION! ASHES SHOULD NEVER BE ALLOWED TO ACCUMULATE ABOVE THE TOP OF THE ASH PAN. ASHES IN CONTACT WITH THE BOTTOM OF THE GRATES ACT AS AN INSULATOR INTENSIFYING THE HEAT ON THE GRATES, ANDWILL CAUSE THE GRATES TO WARP. GRATE DAMAGE FROM ASH BUILD UP IS EASILY RECOGNIZED. PLEASE REFER TO YOUR WARRANTY TO SEE LEGACY STOVESTM LIMIT OF LIABILITY IN CASES OF ABUSE OR NEGLECT.
-15-

5.7 SAFETYWhenever a loading door is opened, it should always be cracked slightly to allow oxygen to enter and burn any gasses that may be present. Failure to do this may result in a sudden ignition of the gasses, leading to an explosion. A stove should never be filled with excess coal to where the exhaust is impeded. burning coal generates carbon monoxide. If the flue gas exit is blocked, the carbon monoxide can be forced out of the stove and into your living space, with fatal consequences.
CAUTION! DO NOT BANK THE FIRE SUCH THAT COAL WILL ROLL INTO THE LOAD DOOR OPENING, OR AGAINST THEGLASS!
With the exception of start-up or freshening a fire, the ash pan door should never be left open. NEVER LEAVE THE STOVE UNATTENDED WITH A DOOR OPEN. Serious damage to the stove can occur from overheating. Coal stoves should not be installed in a chimney that has a history of down-draft or flow reversal problems. These conditions can cause improper draft, resulting in carbon monoxide entering the living space rather than being drawn up the chimney. REMEMBER! COAL GASES ARE TOXIC! Sulfur dioxide,sulfur trioxide and other products of coal combustion may corrode stainless steel and masonry chimneys. Coal with high sulfur content will destroy chimneys especially fast if soot is left in the flue for extended periods. It is important to clean your chimney regularly.
5.8 CONTROLLED FIRING Also key to operational safety is avoiding overfiring the stove. This stove features a manually set air intake damper, mounted on the ashdoor. This consists of a cast, threaded dial, which when turned, allows for adjusting an air gap between the dial and the ash door. Once afire is established, the main factors determining the position of the intake damper are how much heat is needed and the need to limit overfiring. Stove parts or chimney connectors glowing red are a sure indicator that the damper should be closed down. A chimney connector thermometer is highly recommended for setting the maximum air setting. This can be placed in the first straight section of the chimney connector. As temperatures approach 450º F, limit air so as to reduce the intensity of the fire. Lower temperatures are an indicator of more efficient operation. Keep load doors and ash doors closed, except when attending to or starting fires. Maintain door gaskets in good condition, and inspect them before, during and after the heating season.
CAUTION! DO NOT REMOVE THE AIR INTAKE DAMPER CONTROL, OR MODIFY IT IN ANY WAY. DOING SO WILL VOIDYOUR WARRANTY, AS WELL AS PRESENT A FIRE HAZARD!
CAUTION! MAINTAIN LOAD DOOR AND ASH DOOR GASKETS TO AVOID OVERFIRING!
6. Maintenance6.1 PERIODIC AND EVERYDAY MAINTENANCEBlower: Monthly, remove the blower and clean the fan. If there are pets in your house, you may want to check this more frequently. Grates: Keep ash pan emptied twice a day.
INSPECT AND CLEAN STOVE, CONNECTING PIPE AND CHIMNEY EVERY TWO MONTHS.
Chimney and connector: Avoid chimney fires. Creosote may form in your venting system during the wood fired startup period, particularly if fires are restarted frequently. When coal is burned, the products of combustion combine with moisture to form a soot residue which accumulates on the flue lining. When ignited, this soot makes an extremely hot fire. The chimney connector and chimneyshould be inspected at least once evey two months during the heating season to determine if soot and or creosote buildup has occurred. The baffle area inside the stove, the chimney connecting pipe, and the chimney must be kept clean. Steel brushes are the safest for cleaning metal surfaces. Salt solutions and other chemicals may damage the metal surfaces.
WARNING! DO NOT STORE KINDLING FOR STARTING FIRES WITHIN CLEARANCES LISTED FOR COMBUSTIBLES.
To clean the chimney, use a stiff brush with an extendable handle. Start the brushfrom the top of the chimney and run it down through the flue. Continue brushinguntil the entire length of the chimney is cleaned. The debris will collect at thebottom of the chimney. Open the cleanout door or other access point and sweep thecollection into a metal container. The connector pipe can be brushed also, remove itfrom the stove if possible, to eliminate pushing the debris into the stove’s spiralchamber.
Ashes should be kept in a metal container with a tight fitting lid. The closedcontainer of ashes should be placed on a non-combustible floor or on the ground,well away from all combustible materials, pending final disposal. If the ashes aredisposed of by burial in soil or otherwise locally dispersed, they should be kept inthe closed container until all cinders have thoroughly cooled. Do not use this samecontainer for garbage, debris, or lawn waste.
-16-

6.2 COAL/FUEL HANDLING AND STORAGEReserve an area for storing coal that will serve to keep it dry. Coal does not deteriorate with moisture, but it is best if it is dry when loaded into the stove. Coal purchased in bags may have been dampened to control dust. If stored in below freezing temperatures, bring bags into a warmer area to allow for thawing. This assures that the coal can be added to the stove in a loose and free flowing form. Wood stored to be used for starting fires should be stored well beyond all clearances to combustibles and outside of all service areas needed to provide access to the stove. Very dry wood will assist greatly in starting fires.
6.3 GLASS DOORS – MAINTENANCEAir washing over the glass in the load doors is generally sufficient to clean them, allowing for an unobstructed view of the fire. Should itbe necessary to clean the glass, allow the fire to go out and clean the glass after it has cooled. Use a soft rag, dampened with a mild detergent to wipe the inside and outside of the glass, if needed. DO NOT use an abrasive cleaner. NEVER clean the glass when hot. When opening the load door, make sure the path of travel is unobstructed with anything that might impact the door glass. When closing the load door, never slam the door shut. Do not store items near the front of the stove that may fall and impact the glass and cause breakage.
WARNING! DO NOT USE ABRASIVE CLEANERS ON GLASS. DO NOT CLEAN GLASS WHEN HOT!
CAUTION! DO NOT OPERATE STOVE WITH BROKEN GLASS!
6.4 GLASS DOORS – GLASS REPLACEMENTShould the glass in the load door break, do NOT operate the stove with a broken glass. It will be necessary to replace the glass. NEVER replace the glass with a generic item. ALWAYS use the proper replacement part from your Legacy Stoves dealer. Refer to parts list nearend of this manual.
WARNING! DO NOT USE A SUBSTITUE PART TO REPLACE GLASS OR OTHER ITEMS ON YOUR STOVE. USE ONLYMANUFACTURER PROVIDED PARTS PURCHASED THROUGH YOUR DEALER.
To replace your glass, lift up on the load door to remove it from the front of the stove, and lay it frontside down on a flat surface lined with a thick cloth. Remove the four capscrews (designated as “A” below) that secure the glass retainer to the door.
CAUTION! WEAR GLOVES WHEN HANDLING BROKEN GLASS DURING THIS REPLACEMENT!
Lift the glass retainer from the door, then remove and discard the broken glass from the door.
-17-

Position the glass within the door, and reinstall the retainer and the four capscrews.
-18-

7. Warranty Information
Alternate Heating SystemsLIFETIME LIMITED WARRANTY
Alternate Heating Systems, on behalf of its hearth brands (”AHS”), extends the following warranty for AHS gas, wood, pellet, coal and electric hearth appliances that are purchased from an AHS authorized dealer.
WARRANTY COVERAGE:
AHS warrants to the original owner of the AHS appliance at the site of installation, and to any transferee taking ownership of the appliance at the site of installation within two years following the date of original purchase, that the AHS appliance will be free from defects in materials and workmanship at the time of manufacture. After installation, if covered components manufactured by AHS are found to be defective in materials or workmanship during the applicable warranty period, AHS will, at its option, repair or replace the covered components. AHS, at its own discretion, may fully discharge all of its obligations under such warranties by replacing the product itself or refunding the verified purchase price of the product itself. The maximum amount recoverable under this warranty is limited to the purchase price of the product. This warranty is subject to conditions, exclusions and limitations as described below.
WARRANTY PERIOD:
Warranty coverage begins on the date of original purchase. In the case of new home construction, warranty coverage begins on the date of first occupancy of the dwelling or six months after the sale of the product by an independent, authorized AHS dealer/ distributor, whichever occurs earlier. The warranty shall commence no later than 24 months following the date of product shipment from AHS, regardless of the installation or occupancy date. The warranty period for parts and labor for covered components is produced in the following table. The term “Limited Lifetime” in the table below isdefined as: 20 years from the beginning date of warranty coverage for gas appliances, and 10 years from the beginning date of warranty coverage for wood, pellet, and coal appliances. These time periods reflect the minimum expected useful lives of the designated components under normal operating conditions.
Page 1 of 2
-19-
Warranty Period AHS Manufactured Appliances and VentingComponents Covered
Parts Labor Coal and Wood Coal Venting
1 Year x x x
2 years x x
3 years x x Firebox and heat exchanger
90 Days x x x
See conditions, exclusions, and limitations on next page
All parts and material except as covered by Conditions, Exclusions, and Limitations listed
Igniters, electronic components, and glass
Factory-installed blowers
Limited Lifetime
All replacement parts beyond warranty period

WARRANTY CONDITIONS:
• This warranty only covers AHS appliances that are purchased through an AHS authorized dealer or distributor. A list of AHS authorized dealers is available on the AHS branded websites.
• This warranty is only valid while the AHS appliance remains at the site of original installation. • This warranty is only valid in the country in which the AHS authorized dealer or distributor that sold the appliance
resides. • Contact your installing dealer for warranty service. If the installing dealer is unable to provide necessary parts,
contact the nearest AHS authorized dealer or supplier. Additional service fees may apply if you are seeking warranty service from a dealer other than the dealer from whom you originally purchased the product.
• Check with your dealer in advance for any costs to you when arranging a warranty call. Travel and shipping charges for parts are not covered by this warranty.
WARRANTY EXCLUSIONS:
This warranty does not cover the following:
Changes in surface finishes as a result of normal use. As a heating appliance, some changes in color of interior and exterior surface finishes may occur. This is not a flaw and is not covered under warranty.
Damage to printed, plated, or enameled surfaces caused by fingerprints, accidents, misuse, scratches, melted items, or other external sources and residues left on the plated surfaces from the use of abrasive cleaners or polishes.
Repair or replacement of parts that are subject to normal wear and tear during the warranty period. These parts include: paint, wood, pellet and coal gaskets, firebricks, grates, flame guides, batteries and the discoloration of glass.
Minor expansion, contraction, or movement of certain parts causing noise. These conditions are normal and complaints related to this noise are not covered by this warranty.
Damages resulting from: (1) failure to install, operate, or maintain the appliance in accordance with the installation instructions, operating instructions, and listing agent identification label furnished with the appliance; (2) failure to install the appliance in accordance with local building codes; (3) shipping or improper handling; (4) improper operation, abuse, misuse, continued operation with damaged, corroded or failed components, accident, or improperly/ incorrectly performed repairs; (5) environmental conditions, inadequate ventilation, negative pressure, or drafting caused by tightly sealed constructions, insufficient make-up air supply, or handling devices such as exhaust fans or forced air furnaces or other such causes; (6) use of fuels other than those specified in the operating instructions; (7) installation or use of components not supplied with the appliance or any other components not expressly authorized and approved by AHS; (8) modification of the appliance not expressly authorized and approved by AHS in writing; and/or (9) interruptions or fluctuations of electrical power supply to the appliance.
Non-AHS venting components, hearth components or other accessories used in conjunction with the appliance.
Any part of a pre-existing fireplace system in which an insert or a decorative gas appliance is installed.
AHS’s obligation under this warranty does not extend to the appliance’s capability to heat the desired space. Information is provided to assist the consumer and the dealer in selecting the proper appliance for the application. Consideration mustbe given to appliance location and configuration, environmental conditions, insulation and air tightness of the structure.
This warranty is void if:
• The appliance has been over-fired or operated in atmospheres contaminated by chlorine, fluorine, or other damaging chemicals. Over-firing can be identified by, but not limited to, warped plates or tubes, rust colored cast iron, bubbling, cracking and discoloration of steel or enamel finishes.
• The appliance is subjected to prolonged periods of dampness or condensation. There is any damage to the appliance or other components due to water or weather damage which is the result of, but not limited to, improper chimney or venting installation.
LIMITATIONS OF LIABILITY:The owner’s exclusive remedy and AHS’s sole obligation under this warranty, under any other warranty, express or implied, or in contract, tort or otherwise, shall be limited to replacement, repair, or refund, as specified above. In no event will AHS be liable for any incidental or consequential damages caused by defects in the appliance. Some states do not allow exclusions or limitation of incidental or consequential damages, so these limitations may not apply to you. This warranty gives you specific rights; you may also have other rights, which vary from state to state. EXCEPT TO THE EXTENT PROVIDED BY LAW, AHS MAKES NO EXPRESS WARRANTIES OTHER THAN THE WARRANTY SPECIFIEDHEREIN. THE DURATION OF ANY IMPLIED WARRANTY IS LIMITED TO DURATION OF THE EXPRESSED WARRANTY SPECIFIED ABOVE.
Page 2 of 2
-20-

8. Service Parts
Service Parts – Mark I Magnafire Freestanding Coal Stove Beginning Mfrg Date: N/A1-90-03224-1 (Black w/Door) Ending Mfrg Date: Active
Retired Units1-70-03224-1 (Black), Ending Manufacturing Date: June 2011 1-70-03224-2 (Charcoal) Ending Manufacturing Date: June 2011 1-70-03224-3 (Goldenfire) Ending Manufacturing Date: June 2011
1-70-03224-4 (Metallic Blue) Ending Manufacturing Date: Jan 2010 1-70-03224-10 (Mojave Red) Ending Manufacturing Date: Jan 2010, 1-70-03224-12 (Forest Green) Ending Manufacturing Date: Jan 2010
Additional service parts on following page
-21-
Item Description Comments Part Number
1Load Door – Roped 1-10-08145ADoor Kit Assembly Black Classic 1-00-00139-1Door Kit Assembly – Gold No Longer Available 1-00-00139-4
2Glass Frame Cast 4-00-00038-1Glass Frame – Gold No Longer Available 3-00-00038-4
3-40-72510503 Spring Handle 1/2 Pkg of 3 3-40-00086-3-34 1-10-010015 Ash Door – Roped 1-10-08143A
Draft Control Cast 4-00-00109-1Draft Control – Gold No Longer Available 3-00-00109-4
IMPORTANT: THIS IS DATED INFORMATION. Parts must be ordered from a dealer. Provide model number and serial number when requesting service parts from your dealer.
Rect Glass 7-1/4 X 10-1/2
Short Shaker Handle Weldment
Service Parts (continued) Mark IBeginning Mfrg Date: N/AEnding Mfrg Date: Active
-22-
Item Description Comments Part Number
Ash Pan 1-10-65127
Baffle 2-00-00503B
Blower - 75cfm, 7ft Cord 3-21-07584
Brick 9” X 4-1/2” x 1-1/4”1-00-900450125
2 Pcs 3-40-900450-414
Brick Angles Qty 2 req 2-00-01100-2S
Brick Bracket 2-00-01006
Brick Set 1-00-0836
Door Handle – Cast 4-00-00042
Door Hinge Qty 4 req 2-00-07203D
Door Latch 2 Pcs 1-00-00036
Door Pin 3/8 X 1-7/8 (Ash Pan & Load Door) Pkg of 4 4-30-00138B
Gasket 1/2 IN Round Rope (Load Door – Ash Door) 20 FT 1-00-53500
Gasket Glue, 32 OZ 3-42-4583
Gasket, 5/8 IN Channel (Glass) 5 FT 1-00-98187
Grate Holder 2 – Cast Qty 2 req 3-00-00193
Grate Link 2 Cast 3-00-00203
Mag Grate 15 IN – Cast (2 per) 3-00-00208
Mag Leg – Cast 4-00-00044P
Shaker Bar Weldment 1-1/2 IN 1-10-02015W
Shaker Block 2-00-01037-1
IMPORTANT: THIS IS DATED INFORMATION. Parts must be ordered from a dealer. Provide model number and serial number when requesting service parts from your dealer.

Service Parts Mark II
Beginning Manufacturing Date: N/AEnding Manufacturing Date: Nov 2013
-23-
Item Description Comments Part Number
1Load Door – Roped 1-10-08140ADoor Kit Assembly Black Classic 1-00-00141-1Door Kit Assembly – Gold No Longer Available 1-00-00141-4
2Glass Frame Cast 4-00-00037-1Glass Frame – Gold No Longer Available 3-00-00037-4Rect Glass 8-1/2 IN X 14-15/16 IN 3-40-8501494Rect Glass 4-1/2 IN X 8-1/2 IN (Triple Frame) 3-40-450850
3 Spring Handle 1/2 Pkg of 3 3-40-00086-3-34 Short Shaker Handle Weldment 1-10-010015 Ash Door – Roped 4-00-00213D
Draft Control Cast 4-00-00109-1Draft Control – Gold No Longer Available 3-00-00109-4
Additional items on next page
IMPORTANT: THIS IS DATED INFORMATION. Parts must be ordered from a dealer. Provide model number and serial number when requesting service parts from your dealer.

Service Parts (continued) Mark II
Beginning Manufacturing Date: N/AEnding Manufacturing Date: Nov 2013
-24-
Item Description Comments Part Number
Ash Door, Roped 1-10-08142A
Ash Pan 1-10-00722
Baffle 2-00-00360B
Blower – 75cfm, 7ft Cord 3-21-07584
Brick 9” X 4-1/2” x 1-1/4”1-00-900450125
11 Pcs 3-40-900450-414
Brick, Set of Cut 1-00-00837
Brick Angle Qty 2 req 2-00-01100-2S
Brick Bracket 2-00-01006
Door Handle Cast 4-00-00042
Door Hinge Qty 4 req 2-00-07203D
Door Latch 2 Pcs 1-00-00036
Door Pin 3/8 X 1-7/8 (Ash Pan) Pkg of 4 4-30-00138B
Door Pin 3/8 X 2-1/4 (Load Door) Pkg of 4 4-30-00138A
Gasket 5/8 IN Channel (Glass) 5 FT 1-00-98187
Gasket 1/2 IN Round Rope (Load Door – Ash Door) 20 FT 1-00-53500
Gasket Glue, 32 OZ 3-42-4583
Gasket, 5/8 IN Channel (Glass) 5 FT 1-00-98187
Grate Holder – Cast Qty 2 req 3-00-00193
Grate Link 2 - Cast 3-00-00203
Hot Water Coil 3-10-49201
Hot Water Coil Hardware 3-10-49000
Mag Grate 20 IN – Cast Qty 2 Req 3-00-00211
Mag Leg – Cast 4-00-00044P
Screw, Hex Cap, 5/16-18 X 3/4 IN Grade 5 Zinc Plated Pkg of 100 3-30-1125-100
Shaker Bar Weldment 1-1/2 IN 1-10-02015W
Shaker Block 2-00-01037-1
Shaker Handle Mount 2-00-01037-2
Touch up Paint, Aerosol, BlackPre 008461796 3-42-1990
Post 008461796 3-42-19905Washer, Split Lock, 5/16 IN Zinc Plated Pkg of 100 3-30-0101-100
IMPORTANT: THIS IS DATED INFORMATION. Parts must be ordered from a dealer. Provide model number and serial number when requesting service parts from your dealer.

Service Parts Mark IIIMagnafire Freestanding Coal Stove Beginning Mfrg Date: N/A1-90-03227-1 (Black w/Door) Ending Mfrg Date: Active
Retired Units1-70-03227-1 (Black) Ending Manufacturing Date: June 20111-70-03227-2 (Charcoal) Ending Manufacturing Date: June 20111-70-03227-3 (Goldenfire) Ending Manufacturing Date: June 20111-70-03227-4 (Blue) Ending Manufacturing Date: Jan 20101-70-03227-5 (Honey Glo) Ending Manufacturing Date: June 20091-70-03227-10 (Mojave Red) Ending Manufacturing Date: Jan 20101-70-03227-12 (Forest Green) Ending Manufacturing Date: Jan 20101-90-03228-1 (Black) Ending Manuafcturing Date: Sept 2013
1-70-03228-1 (Black) Ending Manufacturing Date: June 20111-70-03228-2 (Charcoal) Ending Manufacturing Date: June 20111-70-03228-3 (Gold, Ending Manufacturing Date: June 20111-70-03228-4 (Blue) Ending Manufacturing Date: Jan 20101-70-03228-5 (Honey Glo) Ending Manufacturing Date: July 20091-70-03228-10 (Mojave Red) Ending Manufacturing Date: Jan 20101-70-03228-12 (Forest Green) Ending Manufacturing Date: Jan 2010
Additionalservice partson followingpage
-25-
Item Description Comments Part Number
1
Load Door – Roped 1-10-08140A
Door Kit Assembly Black Classic 1-00-00141-1
Door Kit Assembly – Gold No Longer Available 1-00-00141-4
2
Glass Frame Cast 4-00-00037-1
Glass Frame – Gold No Longer Available 3-00-00037-4
Rect Glass 4-1/2 X 8-1/2 Triple Frame Only 3-40-450850
Rect Glass 8-1/2 X 14-15/16 Single Pane (Current) 3-40-8501494
3 Spring Handle 1/2 Pkg of 3 3-40-00086-3-3
4 Short Shaker Handle Weldment 1-10-01001
5
Ash Door Cast 4-00-00213D
Draft Control Cast 4-00-00109-1
Draft Control – Gold No Longer Available 3-00-00109-4Draft Control HDW 3-30-45013301Draft Control HDW – Nut 3-30-80501313
IMPORTANT: THIS IS DATED INFORMATION. Parts must be ordered from a dealer. Provide model number and serial number when requesting service parts from your dealer.

Service Parts (continued) Mark IIIBeginning Mfrg Date: N/AEnding Mfrg Date: Active
-26-
Item Description Comments Part Number
Ash Door, Roped 1-10-08142A
Ash Pan 1-10-00723
Baffle 2-00-00378B
Blower – 135cfm, 7ft Cord 3-21-13584
Bolt, 1/4-20 X 1/2 IN Grade 8.2 Zinc SAE Flange Pkg of 50 3-30-2001-50
Brick 9” X 4-1/2” x 1-1/4”1-00-900450125
13 Pcs 3-40-900450-414
Brick, Set of Cut 1-00-00838
Brick Bracket 2-00-01006
Door Handle Cast 4-00-00042
Door Hinge Qty 4 req 2-00-07203D
Door Latch 2 Pcs 1-00-00036
Door Pin 3/8 X 1-7/8 (Ash Pan) Pkg of 4 4-30-00138B
Door Pin 3/8 X 2-1/4 (Load Door) Pkg of 4 4-30-00138A
Gasket 5/8 IN Channel (Glass) 5 FT 1-00-98187
Gasket 1/2 IN Round Rope (Load Door – Ash Door) 20 FT 1-00-53500
Gasket Glue, 32 OZ 3-42-4583
Gasket, 5/8 IN Channel (Glass) 5 FT 1-00-98187
Grate Holder – Cast Qty 2 req 3-00-00194
Grate Link - Cast 3-00-00204
Hot Water Coil 3-10-49201
Hot Water Coil Hardware 3-10-49000
Mag Grate 20 IN – Cast Qty 3 Req 3-00-00211
Mag Leg – Cast 4-00-00044P
Shaker Bar Weldment 1-1/2 IN 1-10-02015W
Shaker Block 2-00-01037-1
Shaker Handle Mount 2-00-01037-2
Side Brick Angle 2-00-01100-1D
Touch up Paint, Aerosol, BlackPre 008461796 3-42-1990
Post 008461796 3-42-19905
IMPORTANT: THIS IS DATED INFORMATION. Parts must be ordered from a dealer. Provide model number and serial number when requesting service parts from your dealer.

Service and Maintenance Log
Date of Service Performed By Description of Service
-27-

Service and Maintenance Log
Date of Service Performed By Description of Service
-28-

Advanced DesignOld Fashioned Values
(Signature of Boxer)
Your premium quality hearth product designed and assembledby the experienced and skilled members at Alternate Heating
Systems in Harrisonville, PA, USA.
-29-