installation & operation manual for vhm series arms with
TRANSCRIPT

DU-WS-0005 Rev B 6/28/13 GCX Corp. Page 1 of 13
3875 Cypress Drive Petaluma, CA 94954 800.228.2555 707.773.1100 Fax 707.773.1180 www.gcx.com
Installation & Operation Manual for VHM™ Series Arms with Rear Extension
VHM with 14”/35.6cm Extension VHM with 8”/20.3cm Extension Shown with VHM Arm below the Extension Shown with VHM Arm above the Extension
The purpose of this manual is to describe general installation, operation, and adjustment procedures for VHM™ Series Arms with rear extension. This manual should be used in conjunction with any instrument-specific installation guides. Please read this manual and all instrument-specific installation material before installing or using this product. Refer to qualified personnel. THE FRONT END PIVOT OF THE EXTENSION CAN BE ORIENTED WITH THE VHM ARM ABOVE OR BELOW THE EXTENSION (SEE PICTURES ABOVE). TO CHANGE THE ORIENTATION OF THE FRONT END PIVOT, REFER TO DOCUMENT: DU-WS-0005-7X. THIS DOCUMENT CAN BE OBTAINED BY CONTACTING GCX TECHNICAL SUPPORT 800-228-2555 OR +1 707-773-1100, OR VISIT OUR WEBSITE: WWW.GCX.COM/SUPPORT/SUPPORT ARMS.
Table of Contents
1.0. Installation, Operation, and Maintenance Warnings ........................................................................................2
Parts Reference ........................................................................................................................................................3
Tools Required ..........................................................................................................................................................3
2.0 Installing the VHM Arm in the Channel .............................................................................................................4
3.0 Mounting the Instrument on the VHM Arm .......................................................................................................5
4.0 Adjusting Counterbalance .................................................................................................................................6
5.0 Operating and Adjusting the VHM Arm .............................................................................................................7
6.0 Cable Management .......................................................................................................................................... 10
7.0 Routine Maintenance ....................................................................................................................................... 11
8.0 Cleaning the Mounting Assembly ................................................................................................................... 12
9.0 Troubleshooting the VHM Arm ........................................................................................................................ 13
VHM Arm
Extension

DU-WS-0005 Rev B 6/28/13 GCX Corp. Page 2 of 13
1.0. Installation, Operation, and Maintenance Warnings
This section contains warnings regarding the installation, operation, and maintenance of the VHM Arm. This section must be read in its entirety before installing, operating, and maintaining the VHM Arm. Failure to follow these warnings may result in damage to equipment or injury to personnel. Refer to qualified personnel.
Warnings
• Do not position the VHM Arm or mounted instrument above a patient. Note that the VHM Arm has a wide range of motion both up/down and side to side. Please consider carefully the instrument being mounted and the proximity of the mounting assembly to other equipment, hospital personnel, and the patient. GCX recommends that the hospital’s risk management personnel verify that the application is appropriate prior to installation and use of the VHM Arm.
• If the VHM Arm is wall mounted, verify that the channel has been installed and approved in accordance with the channel installation guide.
• VHM Arm with Extension must be mounted with the Cable Cover facing down (page 5).
• Ensure that the weight of the instrument being mounted does not exceed the load rating of the VHM Arm. Check the bottom surface of the Arm for the "Maximum Load" label (see 2.1 for label location).
• Do not attempt counterbalance adjustment unless the instrument and accessories are mounted on the Arm. Use caution while performing this procedure.
• The combination of VHM Arm and Extension presents a potential pinch hazard at all
points/positions where the VHM Arm and Extension can come into contact. The VHM Arm has a wide range of motion both up/down and side to side -- consider potential Pinch Points that may cause personal injury.
• Route cables away from potential pinch points. A service loop of cable may be needed to
accommodate all motion and to prevent cable binding, connector damage, or Cable Guide damage. Keep fingers outside of Cable Guide when installing cables
• The Height Locking Lever or Knob must be engaged when removing a mounted instrument from the VHM Arm.
• Stand to the side of the VHM Arm and mounted instrument and use caution when disengaging the Height Locking Lever. The total mounted load may have changed due to the addition or removal of equipment (other than primary instrument) while the Height Locking Lever was engaged. A change in the total load can cause a sudden downward or upward movement of the Arm when the Height Locking Lever is disengaged.

DU-WS-0005 Rev B 6/28/13 GCX Corp. Page 3 of 13
• The mounted device or arm may move suddenly due to normal wear or improper adjustment of the tilt and swivel functions (see Sections 4.0, 5.2, 5.4, 5.5, and 5.6) or ultimately, gas spring end of life. The VHM Arm must be inspected and adjusted at least two times per year. This inspection must include the following steps:
1) With the device mounted, release the height lock and move the arm through its entire vertical range of motion. The load should maintain its position at every point in the travel of arm. If necessary, the counterbalance mechanism may be adjusted in accordance with section 4.0.
2) Grasp the mounted device and swivel it left and right. The device should swivel with some tension or resistance, not loosely. If necessary, the swivel tension may be adjusted in accordance with section 5.5.
3) Grasp the Arm and pivot it from side to side at the channel attachment. The arm should pivot with some tension or resistance, not loosely. If necessary, the pivot tension may be adjusted in accordance with section 5.4. Repeat this check for the center pivot point (front-end of he Extension.
4) Grasp the mounted device and tilt it forward and back, through its entire range of motion. There should be enough tension or resistance in the tilt mechanism to prevent the device from tilting forward unexpectedly when in use. If necessary, the tilt tension may be adjusted in accordance with section 5.6.
5) Inspect fasteners for looseness. Tighten as required for optimal operation and safety.
6) Due to risk of personal injury or damage to the equipment, the VHM Arm housing must never be disassembled by non-GCX personnel. Failure to comply will void the warranty.
Failure to periodically inspect and adjust the Arm as instructed may result in damage to equipment or injury. If you do not intend to periodically inspect the arm, the Height Locking Lever should be removed entirely to reduce unexpected movement of the arm. If regularly inspected, the VHM Arm should function properly for 5 to 10 years. If you are unable to adjust the arm or require service, contact GCX technical support at 800-228-2555 or +1 707-773-1100.
Parts Reference
The following parts and hardware are included in this installation kit (Note: hardware not shown and additional hardware may be included with the specific VHM Arm):
Item # Description Qty
1 VHM Arm with Extension 1
2 Adjustable Stop 1
3 M8 x 10mm Socket Head Cap Screw (SHCS) (SAVE FOR FUTURE USE)
1
4 M6 Hex Wrench 1
5 1/8” Hex Wrench 1
6 5/32” Hex Wrench 1
7 1/2” Angled Socket Wrench 1
8 Extra Nylon Washer (SAVE FOR FUTURE USE) 1
9 Cable Guide 1
Tools Required
M6 Hex Wrench (provided)
1/8” Hex Wrench (provided)
5/32” Hex Wrench (provided)
1/2” Angled Socket Wrench (provided)
# 2 Phillips Screwdriver (not provided)

DU-WS-0005 Rev B 6/28/13 GCX Corp. Page 4 of 13
Height Locking Lever
2.0 Installing the VHM Arm in the Channel 2.1 Thread the Height Locking Lever, if provided*, clockwise into the mounting hole in the right side of the Arm (below
left). Turn Locking Lever clockwise to lock or counterclockwise to unlock. Installation Note: When the VHM Arm is properly counterbalanced for the weight load, the arm will stay in the desired vertical position unless moved by the user. Engagement of the Height Locking Lever is necessary while changing the location of the entire VHM Arm within the channel. Engagement of the Height Locking Lever is otherwise optional to prevent downward or upward movement. Refer to Section 4.0 (Adjusting Counterbalance) and Section 5.2 (Adjusting Height of the Mounted Instrument) for further information on use of the Height Locking Lever.
*VHM Arms with a Spring Lock are equipped at the factory with a Locking Knob (bottom of page).
VHM Arm with Spring Lock
This type of VHM Arm is designed for use with transport monitors only (devices that are normally removed from the arm other than for service). The Locking Knob is installed at the factory. Ensure Locking Knob is in locked position before attempting to mount VHM Arm in channel. Installation Note: For proper function of the locking mechanism, the arm must be properly adjusted to counterbalance the weight of the mounted instrument (see section 4.0).
Note: Locking Knob operates by pulling and releasing Knob.
Locking Knob
Note: The Height Locking Lever is a multi-position clamping lever that operates by lifting, rotating, and releasing the handle.
Maximum Load Label
PULL

DU-WS-0005 Rev B 6/28/13 GCX Corp. Page 5 of 13
Tilt Limit Screw
Tilt Adjustment Lever
2.2 Install Adjustable Stop in top of Channel, slide to desired mounting position and tighten center screw (A). 2.3 Guide the Channel Slide (rear of Extension) into the top of the Channel and lower to desired mounting position (A). 2.4 Using the 1/8'' hex wrench provided, tighten the (4) Set Screws in the Channel Slide to secure position (B).
3.0 Mounting the Instrument on the VHM Arm
Most instruments will require the attachment of an instrument-specific Mounting Adapter provided by GCX or by the instrument supplier. Install the Mounting Adapter in accordance with the installation guide included with the Adapter. 3.1 Orientation of the Mounting Plate
The Mounting Plate Assembly should have either a Tilt Adjustment Lever installed for rear-mounted instruments or a Tilt Limit Screw for bottom-mounted instruments. In some cases, it may be necessary to remove or install either the Tilt Adjustment Lever or the Tilt Limit Screw prior to mounting the instrument. If the orientation of the Mounting Plate Assembly is not compatible with the instrument Mounting Adapter, refer to the procedures below and perform the appropriate modification.
Tilt Adjustment Lever: Insert and rotate clockwise to install. Rotate counterclockwise to remove. VESA Mounting Plate shown. Refer to Section 5.6 for Tilt
Adjustment procedure.
Tilt Limit Screw: Typically installed for bottom-mounted instruments, or removed for rear-mounted instruments. A 1/4'' hex wrench is provided with VHM Arm for
removal/installation of Tilt Limit Screw. Slide-in Mounting
Plate shown.
Note: The Tilt Adjustment Lever is a multi-
position clamping lever that operates by lifting, rotating, and releasing the handle.
Warning
VHM Extension must be mounted with the Cable Cover facing down.
Cable Cover
A
Channel Slide
B
Set Screws
Set Screws
Adjustable
Stop
DU-WS-0005 Rev B 6/28/13 GCX Corp. Page 6 of 13
M4 Screws (2)
M4 Screws (2)
Mounting Plate
Mounting Adapter
Plunger
Nylon Screws
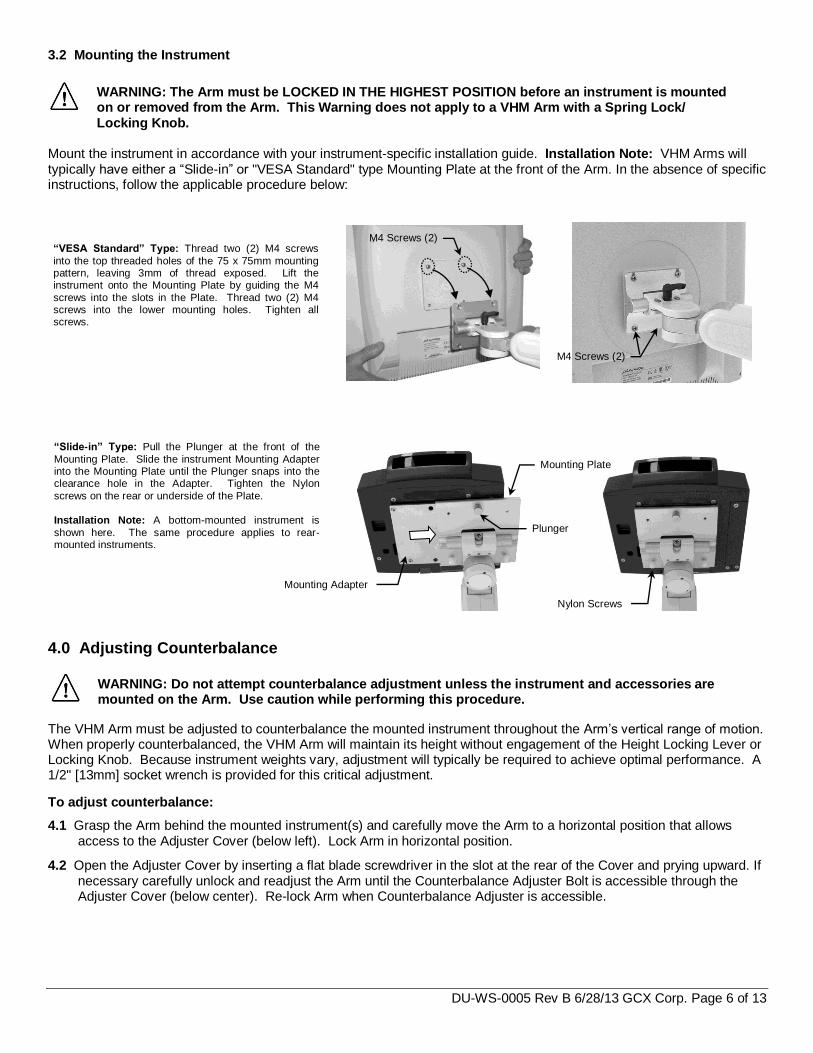
3.2 Mounting the Instrument
Mount the instrument in accordance with your instrument-specific installation guide. Installation Note: VHM Arms will typically have either a “Slide-in” or "VESA Standard" type Mounting Plate at the front of the Arm. In the absence of specific instructions, follow the applicable procedure below:
4.0 Adjusting Counterbalance
The VHM Arm must be adjusted to counterbalance the mounted instrument throughout the Arm’s vertical range of motion. When properly counterbalanced, the VHM Arm will maintain its height without engagement of the Height Locking Lever or Locking Knob. Because instrument weights vary, adjustment will typically be required to achieve optimal performance. A 1/2" [13mm] socket wrench is provided for this critical adjustment.
To adjust counterbalance:
4.1 Grasp the Arm behind the mounted instrument(s) and carefully move the Arm to a horizontal position that allows access to the Adjuster Cover (below left). Lock Arm in horizontal position.
4.2 Open the Adjuster Cover by inserting a flat blade screwdriver in the slot at the rear of the Cover and prying upward. If necessary carefully unlock and readjust the Arm until the Counterbalance Adjuster Bolt is accessible through the Adjuster Cover (below center). Re-lock Arm when Counterbalance Adjuster is accessible.
“Slide-in” Type: Pull the Plunger at the front of the
Mounting Plate. Slide the instrument Mounting Adapter into the Mounting Plate until the Plunger snaps into the clearance hole in the Adapter. Tighten the Nylon
screws on the rear or underside of the Plate. Installation Note: A bottom-mounted instrument is
shown here. The same procedure applies to rear-mounted instruments.
“VESA Standard” Type: Thread two (2) M4 screws
into the top threaded holes of the 75 x 75mm mounting pattern, leaving 3mm of thread exposed. Lift the instrument onto the Mounting Plate by guiding the M4
screws into the slots in the Plate. Thread two (2) M4 screws into the lower mounting holes. Tighten all screws.
WARNING: Do not attempt counterbalance adjustment unless the instrument and accessories are mounted on the Arm. Use caution while performing this procedure.
WARNING: The Arm must be LOCKED IN THE HIGHEST POSITION before an instrument is mounted on or removed from the Arm. This Warning does not apply to a VHM Arm with a Spring Lock/ Locking Knob.

DU-WS-0005 Rev B 6/28/13 GCX Corp. Page 7 of 13
WARNING
• Do not attempt to adjust height without instrument being mounted on Arm.
• Stand to the side of the VHM Arm and mounted instrument and use caution when disengaging the Height Locking Lever. The total mounted load may have changed due to the addition or removal of equipment (other than primary instrument) while the Height Locking Lever was engaged. A change in the total load can cause a sudden downward or upward movement of the Arm when the Height Locking Lever
is disengaged.
4.3 With the 1/2" [13mm] socket wrench on the Adjuster Bolt, carefully unlock the VHM Arm. Turn the Adjuster Bolt counterclockwise (CCW) to increase counterbalance force, or clockwise (CW) to decrease counterbalance force. Counterbalance is correctly adjusted when the mounted instrument can be moved up or down with minimal force and does not rise or fall after releasing the VHM Arm.
4.4 Close the Adjuster Cover. Be sure the Adjuster Cover is fully/properly seated and flush to avoid contact with other components on the Arm during movement of the Arm.
5.0 Operating and Adjusting the VHM Arm
Check pivot, tilt, and front swivel mechanisms for proper tension. Refer to the applicable section and follow the adjustment procedure.
5.1 Counterbalance Adjustment – See Section 4.0
5.2 Adjusting Height of the Mounted Instrument
A Height Locking Lever
Adjuster Cover
B
Counterbalance Adjuster Bolt
C CW Decreases Force CCW Increases Force
CW
CCW
1/2” [13mm] Socket Wrench
DU-WS-0005 Rev B 6/28/13 GCX Corp. Page 8 of 13
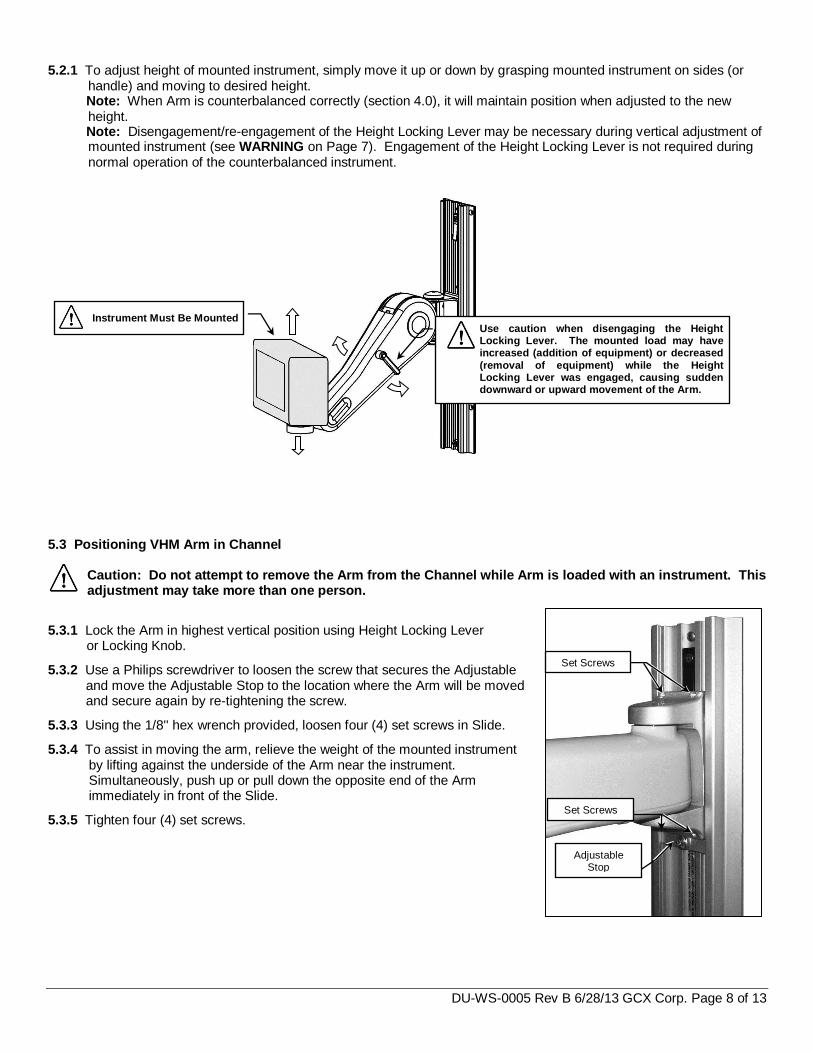
5.2.1 To adjust height of mounted instrument, simply move it up or down by grasping mounted instrument on sides (or
handle) and moving to desired height. Note: When Arm is counterbalanced correctly (section 4.0), it will maintain position when adjusted to the new height. Note: Disengagement/re-engagement of the Height Locking Lever may be necessary during vertical adjustment of mounted instrument (see WARNING on Page 7). Engagement of the Height Locking Lever is not required during normal operation of the counterbalanced instrument.
5.3 Positioning VHM Arm in Channel
Caution: Do not attempt to remove the Arm from the Channel while Arm is loaded with an instrument. This adjustment may take more than one person.
5.3.1 Lock the Arm in highest vertical position using Height Locking Lever or Locking Knob.
5.3.2 Use a Philips screwdriver to loosen the screw that secures the Adjustable and move the Adjustable Stop to the location where the Arm will be moved and secure again by re-tightening the screw.
5.3.3 Using the 1/8'' hex wrench provided, loosen four (4) set screws in Slide.
5.3.4 To assist in moving the arm, relieve the weight of the mounted instrument by lifting against the underside of the Arm near the instrument. Simultaneously, push up or pull down the opposite end of the Arm immediately in front of the Slide.
5.3.5 Tighten four (4) set screws.
Instrument Must Be Mounted
Use caution when disengaging the Height Locking Lever. The mounted load may have increased (addition of equipment) or decreased
(removal of equipment) while the Height Locking Lever was engaged, causing sudden downward or upward movement of the Arm.
Set Screws
Adjustable Stop
Set Screws

DU-WS-0005 Rev B 6/28/13 GCX Corp. Page 9 of 13
5.4 Pivoting the VHM Arm and Adjusting Pivot Tension 5.4.1 To pivot Arm at Channel or at the front-end of Extension and simply
push on side of Arm.
5.4.2 The VHM Extension has two (2) adjustable pivot points (front and rear of Extension) . The Pivot Tension at each pivot point can be adjusted by tightening or loosening the Pivot Tension Adjustment Screw with a #2 Phillips screwdriver. For optimal Arm/Extension performance and ease of movement, the rear pivot tension should be adjusted slightly tighter than the front pivot tension. DO NOT REMOVE PIVOT TENSION ADJUSTMENT SCREW, or torque the Pivot Tension Adjustment Screws more than 30 in-lbs. [3.4 N-m]..
5.5 Swiveling the Mounted Instrument and Adjusting Swivel Tension 5.5.1 To swivel mounted instrument, simply push or pull instrument from side to
side.
5.5.2 To adjust swivel tension, tighten or loosen the Swivel Tension Nut using the 1/2'' [13 mm] socket wrench provided. Installation Note: It may be necessary to remove an existing down post from the swivel cup to gain access to the Swivel Tension Nut.
Warning: Swivel tension nut must be torqued to a minimum of 20 in-lbs [2.3 N-m].
Swivel Tension Nut
Front Pivot Tension
Adjustment Screw
Rear Pivot Tension
Adjustment Screw
Front Pivot
Rear Pivot
Swivel Point

DU-WS-0005 Rev B 6/28/13 GCX Corp. Page 10 of 13
Cable Guide
5.6 Adjusting Tilt Tension and Tilting the Mounted Instrument In most configurations, the mounted instrument may be tilted and tilt tension may be adjusted. 5.6.1 Adjust tilt tension by equally tightening or loosening two (2) Tension Adjustment Screws with the 5/32'' hex wrench
provided. Once overall tilt tension is set, use Tilt Adjustment Lever to fine tune/lock tilt position.
5.6.2 Adjust tilt by loosening the Tilt Adjustment Lever (see Note below). Grasp the device and tilt to desired angle. Tighten Tilt Adjustment Lever to lock position.
Warning: Tilt tension screws must be torqued to a minimum of 35 in-lbs [4.0 N-m].
6.0 Cable Management
6.1 A Cable Guide is provided to facilitate routing of cables along the underside of the arm. Squeeze the Cable Guide until its edges snap into the grooves in the bottom surface of the arm. Leave some extra cable loose at the front and rear of the arm to prevent cable binding, connector damage, or Cable Guide damage.
Tilt Adjustment Lever Tension Adjustment Screws (2)
Note: The Tilt Adjustment Lever is a multi-position clamping lever that operates by lifting, rotating, and releasing the handle.

DU-WS-0005 Rev B 6/28/13 GCX Corp. Page 11 of 13
6.2. An open cavity beneath the extension with flexible a Cable Cover manages cables going between the channel and rear of the VHM arm. To install cables, push cables into cavity along the center seam of the Cable Cover. Leave some extra cable loose at the front and rear of the Extension to prevent cable binding or damage.
7.0 Routine Maintenance The mounted device or arm may move suddenly due to normal wear or improper adjustment of the tilt and swivel functions (see Sections 4.0, 5.2, 5.4, 5.5, and 5.6) or ultimately, gas spring end of life. The VHM Arm must be inspected and adjusted at least two times per year. This inspection must include the following steps: 7.1 With the device mounted, release the height lock and move the arm through its entire vertical range of motion. The load should maintain its position at every point in the travel of arm. If necessary, the counterbalance mechanism may be adjusted in accordance with section 4.0. 7.2 Grasp the mounted device and swivel it from side to side. The device should swivel with some tension or resistance, not loosely. If necessary, the swivel tension may be adjusted in accordance with section 5.5. 7.3 Grasp the Arm and pivot it from side to side at the channel attachment and at the center point where the VHM Arm is connected to the Extension. The arm should pivot with some tension or resistance, not loosely. If necessary, the pivot tension may be adjusted in accordance with section 5.4. 7.4 Grasp the mounted device and tilt it forward and back, through its entire range of motion. There should be enough tension or resistance in the tilt mechanism to prevent the device from tilting forward unexpectedly when in use. If necessary, the tilt tension may be adjusted in accordance with section 5.6. 7.5 Inspect fasteners for looseness. Tighten as required for optimal operation and safety. 7.6 Due to risk of personal injury or damage to the equipment, the VHM Arm housing must never be disassembled by non-GCX personnel. Failure to comply will void the warranty. Failure to periodically inspect and adjust the Arm as instructed may result in damage to equipment or injury. If you do not intend to periodically inspect the arm, the Height Locking Lever should be removed entirely to reduce unexpected movement of the arm. If regularly inspected, the VHM Arm should function properly for 5 to 10 years. If you are unable to adjust the arm or require service, contact GCX technical support at 1-800-288-2555 or +1 707-773-1100.
Cable Cover
Warning: Route cables away from potential pinch points. A service loop of cable may be needed to
accommodate all motion and to prevent cable binding, connector damage, or Cable Guide damage.
Caution: Keep fingers outside of Cable Guide when installing cables.

DU-WS-0005 Rev B 6/28/13 GCX Corp. Page 12 of 13
8.0 Cleaning the Mounting Assembly CAUTION: GCX makes no claims regarding the efficacy of the listed chemicals or processes as a means for controlling infection. Consult your hospital’s infection control officer or epidemiologist. To clean or sterilize mounted instruments or accessory equipment, refer to the specific instructions delivered with those products. 8.1 The mounting assembly may be cleaned with most mild, non-abrasive solutions commonly used in the hospital
environment (e.g. diluted bleach, ammonia, or alcohol solutions). 8.2 The surface finish will be permanently damaged by strong chemicals and solvents such as acetone and
trichloroethylene. 8.3 Steel wool or other abrasive material should never be used. 8.4 Damage caused by the use of unapproved substances or processes will not be covered by the warranty. We
recommend testing any cleaning solution on a small area of the arm that is not visible, to verify compatibility. 8.5 Never submerge or allow liquids to enter the arm. Wipe any cleaning agents off of the arm immediately using a
water-dampened cloth. Dry the arm thoroughly after cleaning.

DU-WS-0005 Rev B 6/28/13 GCX Corp. Page 13 of 13
9.0 Troubleshooting the VHM Arm
Symptom Possible Cause Remedy
Mounted instrument does not appear level or parallel to the floor.
Channel not plumb. Check with level. Adjust Channel to plumb, or reinstall Channel.
Weight of instrument not compatible with Load Rating of the Arm.
Mount instrument on arm with compatible Load Rating (section 2.1).
Swivel hardware loose. Adjust Swivel Tension (section 5.5).
Pivot hardware loose. Adjust Pivot Tension (section 5.4).
Mounting surface (e.g. wall, side of anesthesia machine, etc.) not structurally sound (does not hold mounting hardware).
Mounting surface must be reinforced or Channel must be relocated.
Channel loose at mounting surface. Check for plumb and tighten, or relocate (re-install) Channel.
Set Screws (4) in Slide are loose. Reposition Arm and tighten Slide set screws (section 2.0).
Instrument drifts up or down when the Arm is unlocked.
Arm not counterbalanced correctly for weight of the instrument.
Perform counterbalance adjustment (section 4.0).
Weight of mounted instrument (load) not compatible with Load Rating of Arm.
Use arm with compatible Load Rating (section 2.1), and perform counterbalance adjustment (section 4.0).
Arm pivots too freely. Pivot Tension Adjustment Screw too loose at front or rear of Extension.
Adjust Pivot Tension (section 5.4).
Arm does not pivot easily. Pivot Tension Adjustment Screw too tight at front or rear of Extension.
Instrument swivels too freely. Swivel Tension Nut too loose.
Adjust Swivel Tension (section 5.5).
Instrument difficult to swivel. Swivel Tension Nut too tight.
Instrument difficult to tilt. Tilt Adjustment Lever too tight.
Adjust Tilt Tension (section 5.6). Excessive tilt tension.
Instrument will not maintain tilt position.
Tilt Adjustment Lever too loose.
Insufficient tilt tension.
Arm difficult to move up or down when unlocked.
Arm not counterbalanced correctly for weight of mounted instrument.
Perform counterbalance adjustment (section 4.0).
Arm inadvertently slides down Channel.
Set Screws (4) in Slide are loose. Reposition Arm and tighten Slide set screws (section 2.0).
Locking Knob (Arms with Spring Lock) will not pull out (release).
Arm not counterbalanced correctly for weight of mounted instrument.
Perform counterbalance adjustment (section 4.0).
Weight of mounted instrument (load) not compatible with Load Rating of Arm.
Check Arm load rating (section 2.1).
Counterbalance Adjustement Bolt difficult to adjust.
Arm not locked in a horizontal position. Reposition Arm and lock in horizontal position (section 4.0).