install and maintain a toilet pdf - skillscommons
TRANSCRIPT
INSTALL AND MAINTAIN A TOILET A handout containing the highlights of the video titled Install and Maintain a Toilet
Setting up the toilet tank
Parts of the toilet tank
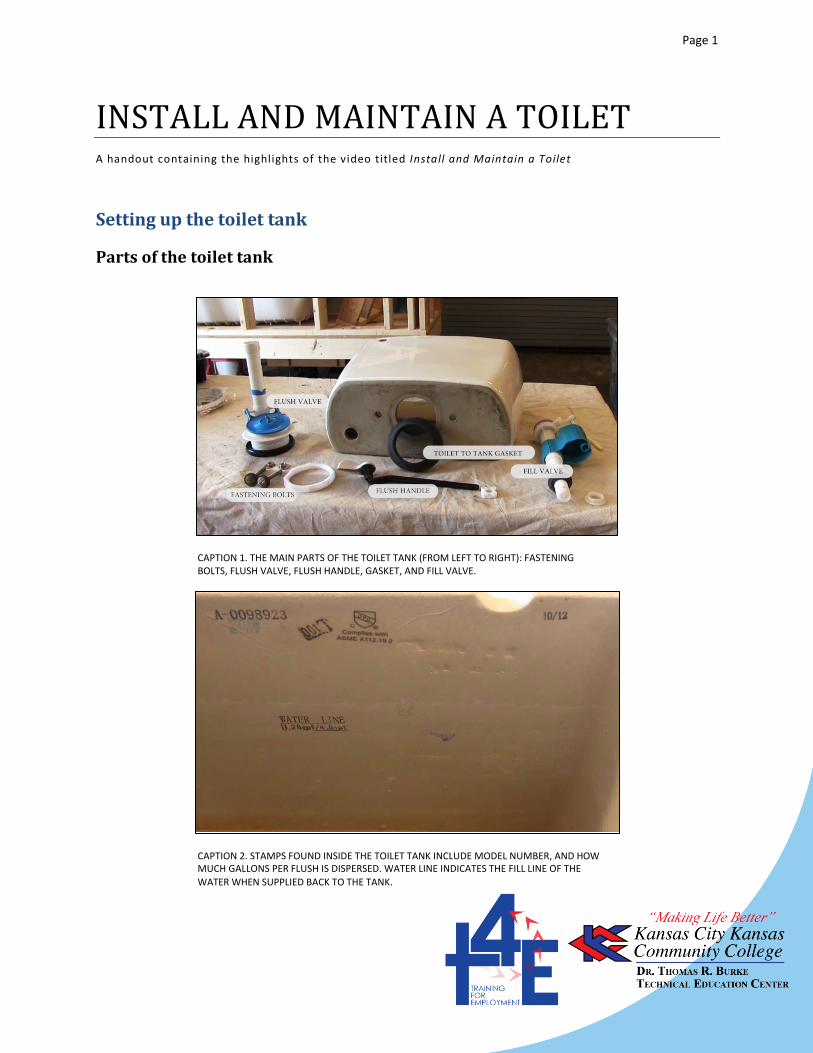
CAPTION 1. THE MAIN PARTS OF THE TOILET TANK (FROM LEFT TO RIGHT): FASTENING BOLTS, FLUSH VALVE, FLUSH HANDLE, GASKET, AND FILL VALVE.
CAPTION 2. STAMPS FOUND INSIDE THE TOILET TANK INCLUDE MODEL NUMBER, AND HOW MUCH GALLONS PER FLUSH IS DISPERSED. WATER LINE INDICATES THE FILL LINE OF THE WATER WHEN SUPPLIED BACK TO THE TANK.
Page 1

Installing the parts of the toilet tank
1. Attach the flush valve gasket onto the bottom of the flush valve.
CAPTION 3. GASKET IS ATTACHED TO THE BOTTOM OF THE FLUSH VALVE.
2. Put the flush valve with the rubber gasket inside the tank, pulling the flush valvethrough the tank hole. Hold it in place and install the nut, tightening it by hand.
CAPTION 4. THE INSTRUCTOR INSTALLING THE FLUSH VALVE.
Page 2

3. With a pair of wide-mouth channel locks, grip the nut and turn it slowly to tighten thenut to the flush valve.
CAPTION 5. NUT IS TIGHTENED TO THE FLUSH VALVE.
4. Cover the flush valve nut with the tank to bowl gasket to seal off the joint between thetank and the bowl.
CAPTION 6. GASKET IS PLACED TO SEAL THE JOINT.
Page 3

5. Put the fill valve inside the tank and pull the end through the fill valve hole. Thread thenut on. Hand-tighten.
CAPTION 7. FILL VALVE IS INSTALLED ON THE TOILET TANK.
6. With a crescent wrench, slowly turn and tighten the nut around the fill valve.
CAPTION 8. NUT FOR THE FILL VALVE IS TIGHTENED WITH A CRESCENT WRENCH.
Page 4

7. Insert the bolt inside the tank and hold it in place.
CAPTION 9. THE INSTRUCTOR INSTALLS ONE OF THE TWO BOLTS ON THE TANK.
8. Put the washer on first, then the nut. Hand-tighten.
CAPTION 10. (FROM LEFT TO RIGHT) THE INSTALLED FILL VALVE, BOLT, AND FLUSH VALVE.
Page 5

9. With a flathead screwdriver, hold the top of the bolt (inside the tank). Tighten the nutaround the bolt with a crescent wrench. Repeat steps 7-9 for the other bolt.
CAPTION 11. THE INSTRUCTOR TIGHTENS THE NUT AROUND THE BOLT USING A CRESCENT WRENCH.
CAPTION 12. BOTTOM VIEW OF THE TOILET TANK WITH ITS INSTALLED PARTS.
Page 6

CAPTION 13. INSIDE VIEW OF THE FINISHED TOILET TANK, WITH THE FLUSH HANDLE ALREADY INSTALLED.
Additional steps and tips before installing the toilet bowl and tank
Before replacing an old toilet with a new one, make sure you remove the water inside the bowl and the tank first before you disassemble and remove the toilet fixture.
CAPTION 14. A SHOP VACUUM IS USED TO DRAIN THE WATER INSIDE THE TOILET BOWL.
Page 7

When installing a toilet, check the flange. Make sure it is the proper distance from the finished wall. The ideal distance is 12-12.5 inches. Give yourself a little room and use 13 inches from the
finished wall to the center of the flange or waste line.
CAPTION 15. CENTER OF FLANGE IS AT 13 INCHES.
Installing a new compression fitting on the supply line
1. Replace the old compression fitting before installing the new toilet fixture. With aferrule removing tool, tighten the nut to the ferrule removing tool. Remove the oldferrule.
CAPTION 16. THE INSTRUCTOR IS READY TO REMOVE THE OLD FERRULE WITH A FERRULE REMOVING TOOL.
Page 8

2. Cut and remove the indented part of the copper pipe where the old ferrule was. Using apipe cutter, set the cutter right behind where the old ferrule was. Turn the tool aroundthe pipe. Tighten the pipe cutter with each turn around the pipe, scoring the pipe eachtime. Make sure you do not leave any dents.
CAPTION 17. THE DENTED PART OF THE PIPE IS REMOVED.
3. With an emery cloth, clean the pipe so soot and other debris do not get trappedbetween the new ferrule and the pipe.
CAPTION 18. EMERY CLOTH IS USED TO CLEAN THE PIPE END.
Page 9

4. Place the new nut and ferrule on the pipe, followed by the fitting. Hand-tighten the nutto the fitting, with the ferrule in-between.
CAPTION 19. THE NUT, FERRULE, AND FITTING ARE PLACED ON THE PIPE.
CAPTION 20. THE NUT IS TIGHTENED DOWN ONTO THE FITTING. THE FERRULE (NOT SEEN IN PHOTO) WILL WRAP AROUND THE PIPE AS THE NUT IS TIGHTENED DOWN.
Page 10

5. Hold the fitting in place, and start tightening the nut to the fitting with a wrench. Thispresses the ferrule around the pipe.
CAPTION 21. THE INSTRUCTOR POINTS AT THE FITTING, WITH A ONE-STOP WRENCH HOLDING IT IN PLACE, AND A CRESCENT WRENCH POSITIONED ON THE NUT.
6. Connect the toilet supply line. Hand-tighten first, then use controlled turns when using awrench.
CAPTION 22. THE INSTRUCTOR SHOWS THE TYPE OF TOILET SUPPLY LINE HE WILL BE INSTALLING.
Page 11

CAPTION 23. THE TOILET SUPPLY LINE IS BEING INSTALLED.
Securing the bowl to the flange/waste line
1. Put a wax ring on the flange. This will seal the bowl to the flange. Before putting the waxgasket on, make sure the bolts on the flange are in the narrow portion of the slots onthe flange.
CAPTION 24. THE WAX RING IS SET ON THE FLANGE, WITH THE TWO BOLTS IN PLACE.
Page 12

2. Set the bowl on top of the flange. (Tip: Not having the tank installed on the toilet bowlyet makes it easier to install the toilet bowl.)
CAPTION 25. THE TOILET BOWL IS SET ON TOP OF THE FLANGE.
3. Place the bolts through the toilet bowl fixture. Put the base for the cap first, then thewasher, then the nut.
CAPTION 26. THE INSTRUCTOR STARTS INSTALLING THE BOLT ON ONE SIDE OF THE TOILET BOWL.
Page 13

Installing the tank to the toilet bowl
1. Before setting up the tank on the bowl, make sure that the gasket is on the exteriorportion of the flush valve. Place the bolts attached to the tank through the housing thatare on the bowl.
CAPTION 27. THE INSTRUCTOR SETS THE TOILET TANK ON THE INSTALLED TOILET BOWL.
2. Put the washer and the nut. Hand-tighten the nut to the bolt. Do the same for the otherbolt on the other side of the tank. Tighten the nut with a socket head wrench. Makesure the tank is now secure.
CAPTION 28. THE INSTRUCTOR TIGHTENS THE BOLTS ON THE TANK TO THE TOILET BOWL.
Page 14

3. Attach the supply line to the fill valve on the tank.
CAPTION 29. THE TOILET SUPPLY IS BEING CONNECTED TO THE FILL VALVE
Looking for other learning materials?
The Residential Plumbing and Repair iTunes U course has videos and other learning materials for you to view. You can download iTunes for free to view the course and course materials. Closed-captioned videos are available at T4E's YouTube page.
Disclaimer and License information
This workforce product was funded by a grant awarded by the U.S. Department of Labor’s Employment and Training Administration. The product was created by the grantee and does not necessarily reflect the official position of the U.S. Department of Labor. The U.S. Department of Labor makes no guarantees, warranties, or assurances of any kind, express or implied, with respect to such information, including any information on linked sites and including, but not limited to, accuracy of the information or its completeness, timeliness, usefulness, adequacy, continued availability, or ownership.
Unless otherwise noted, this work is licensed under the Creative Commons Attribution 4.0 International License. To view a copy of this license, go to http://creativecommons.org/licenses/by/4.0/ on your web browser.
Page 15