instalacija android studio razvojnog sistema https ... · android studio uses gradle to compile and...
TRANSCRIPT
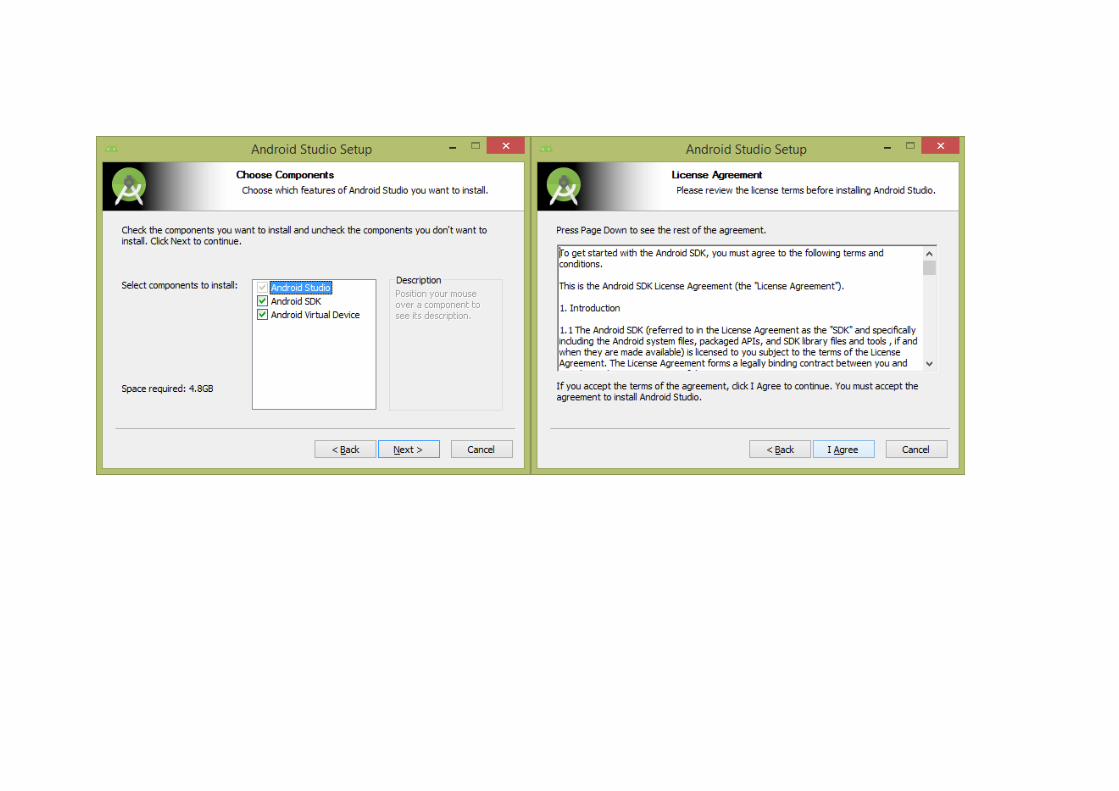
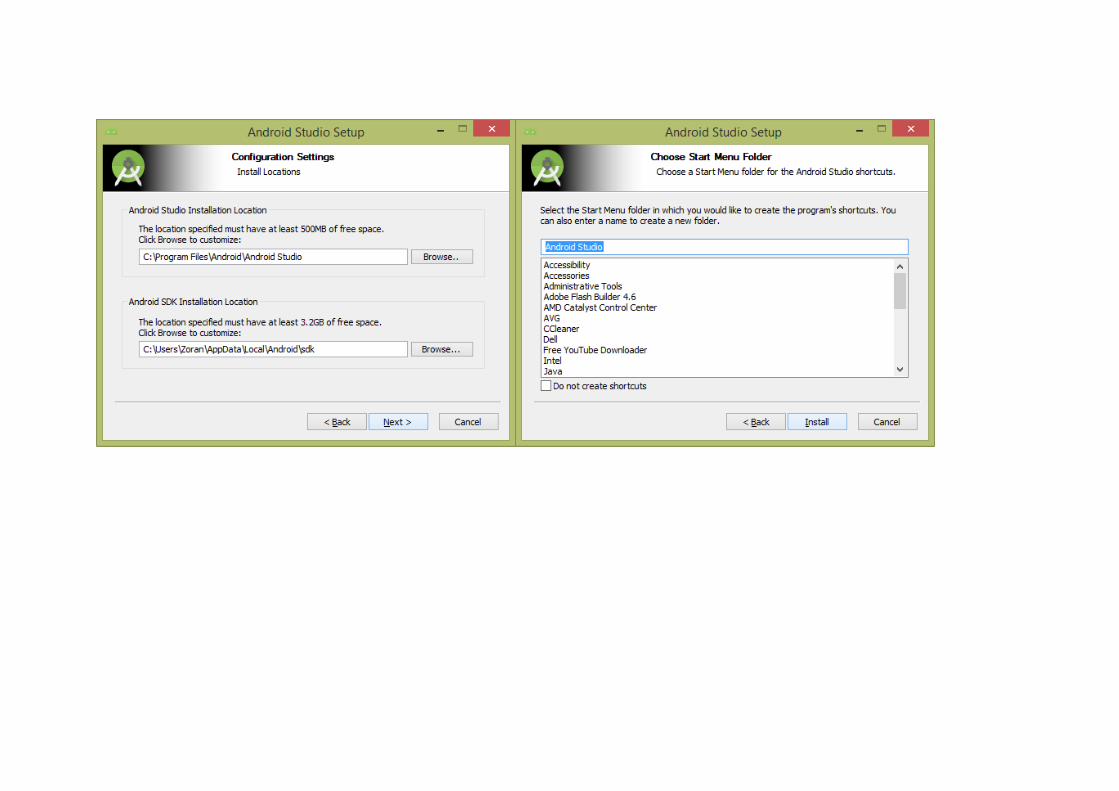
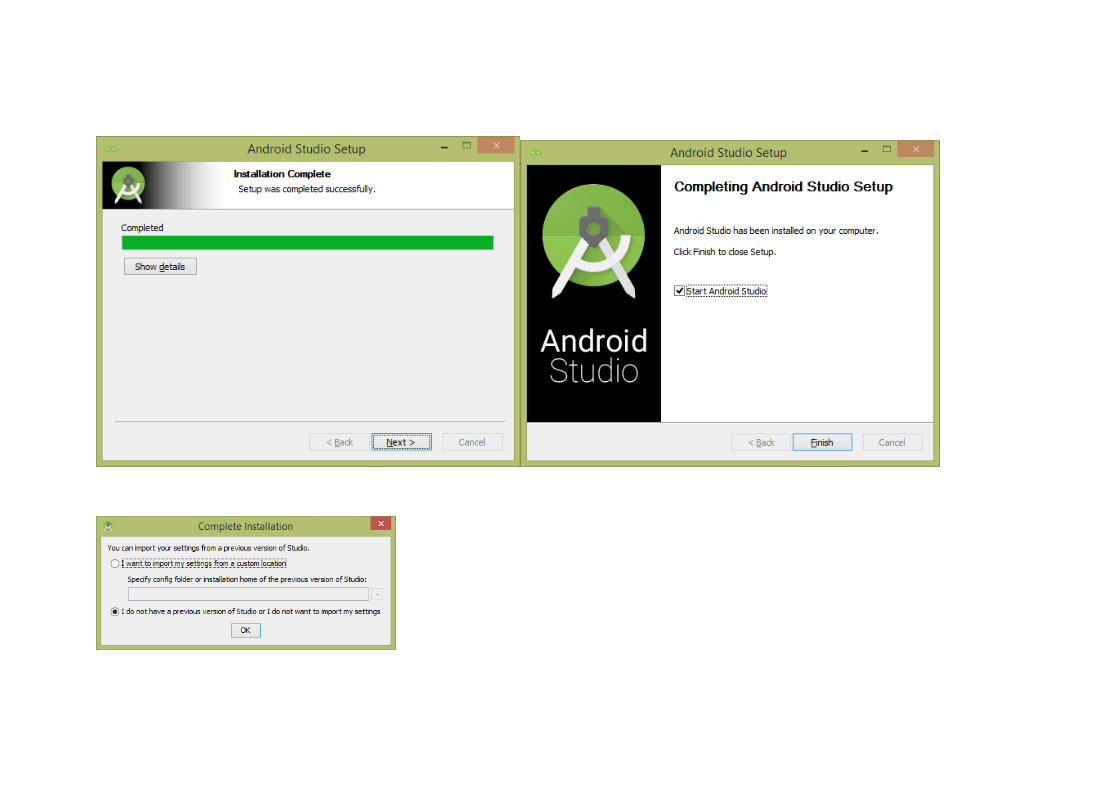
INSTALACIJA ANDROID STUDIO RAZVOJNOG SISTEMA
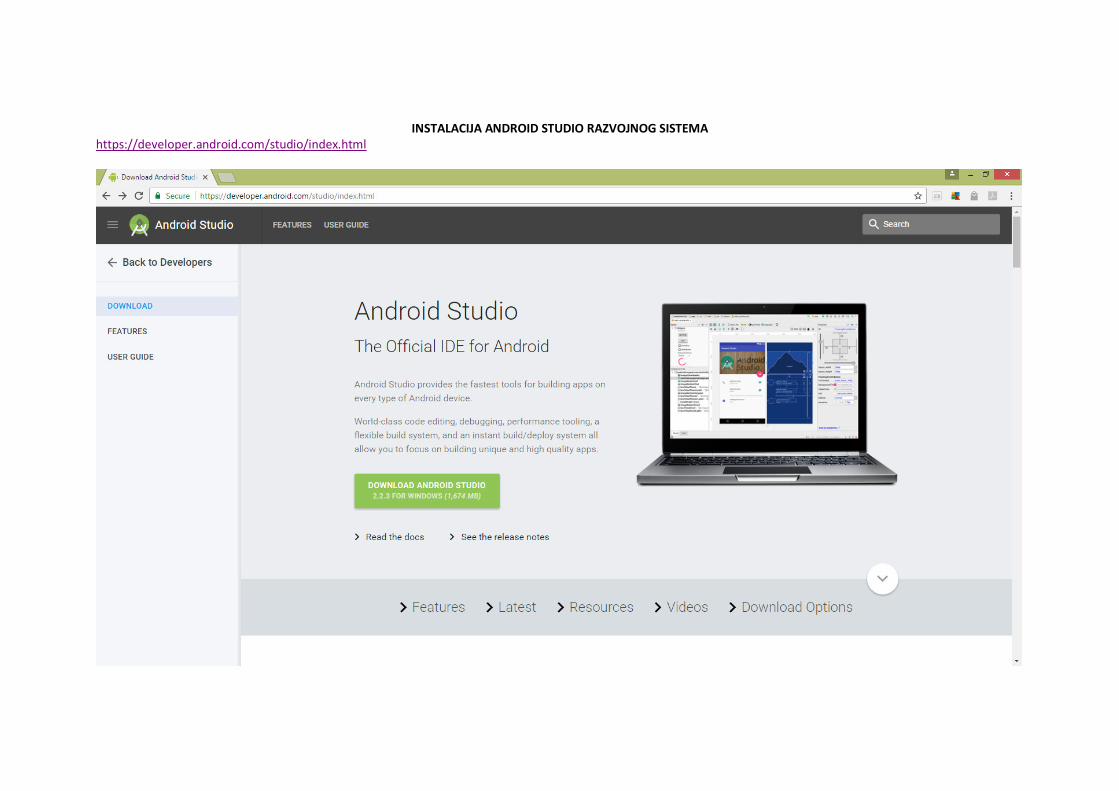
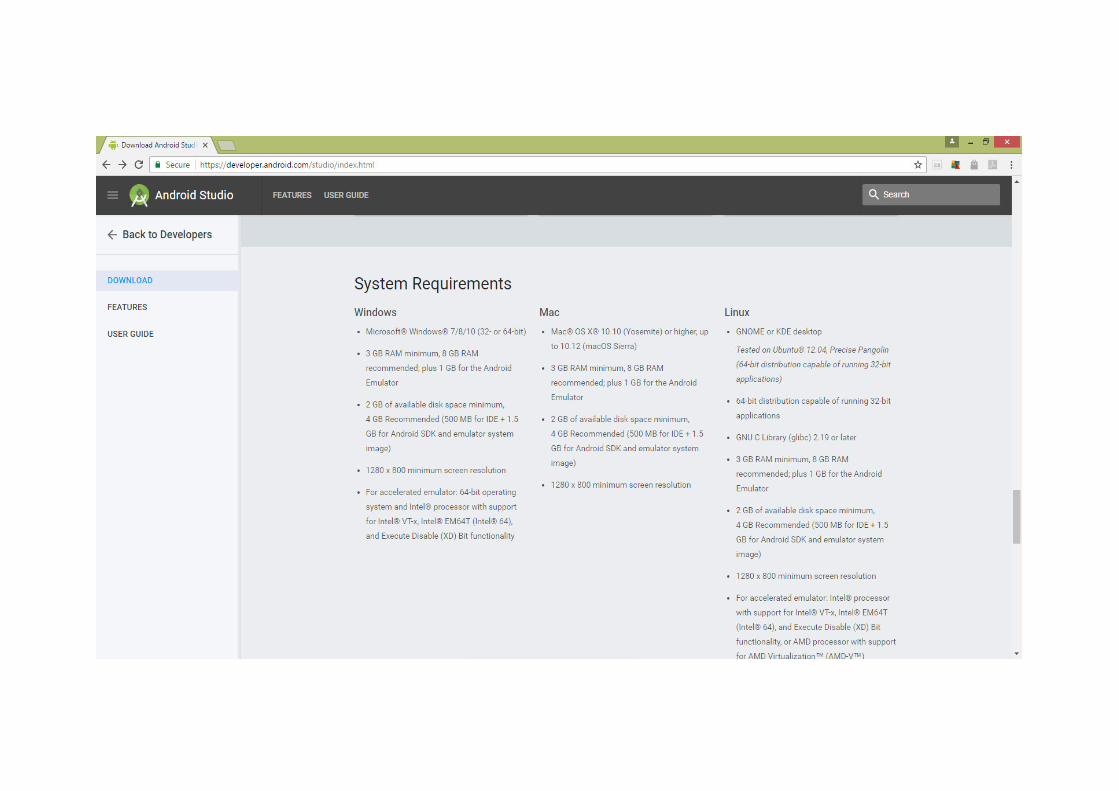
https://developer.android.com/studio/index.html
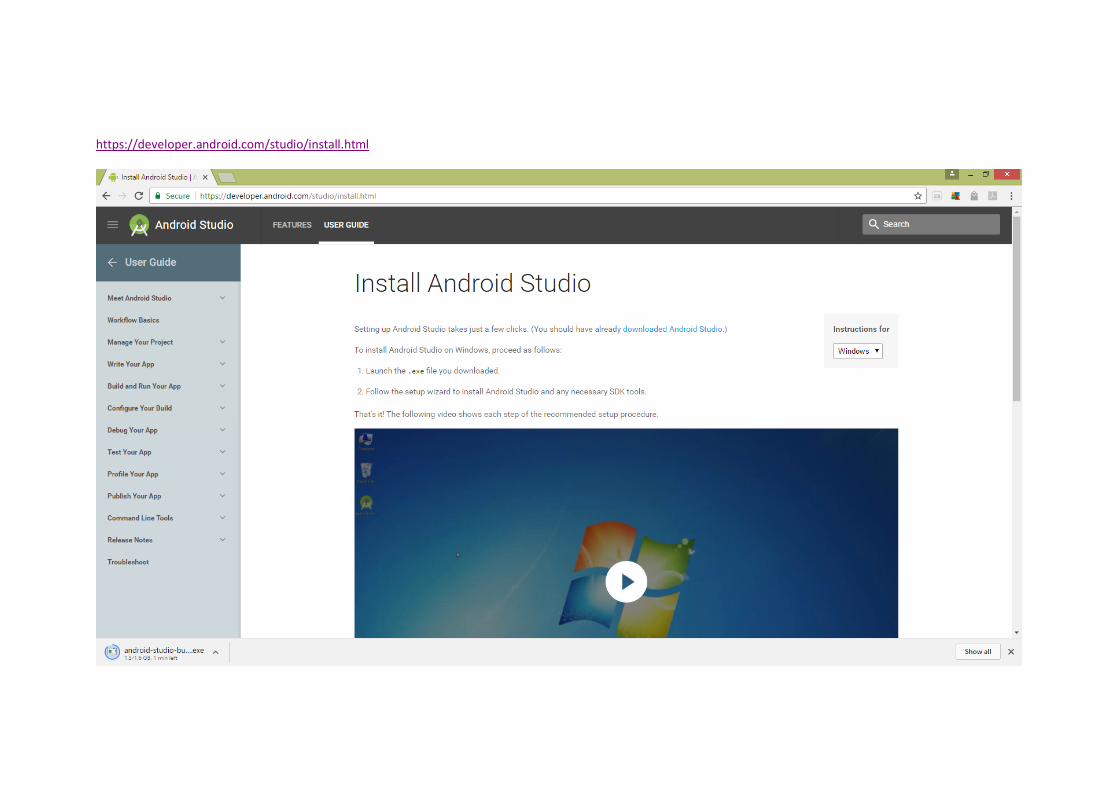
https://developer.android.com/studio/install.html
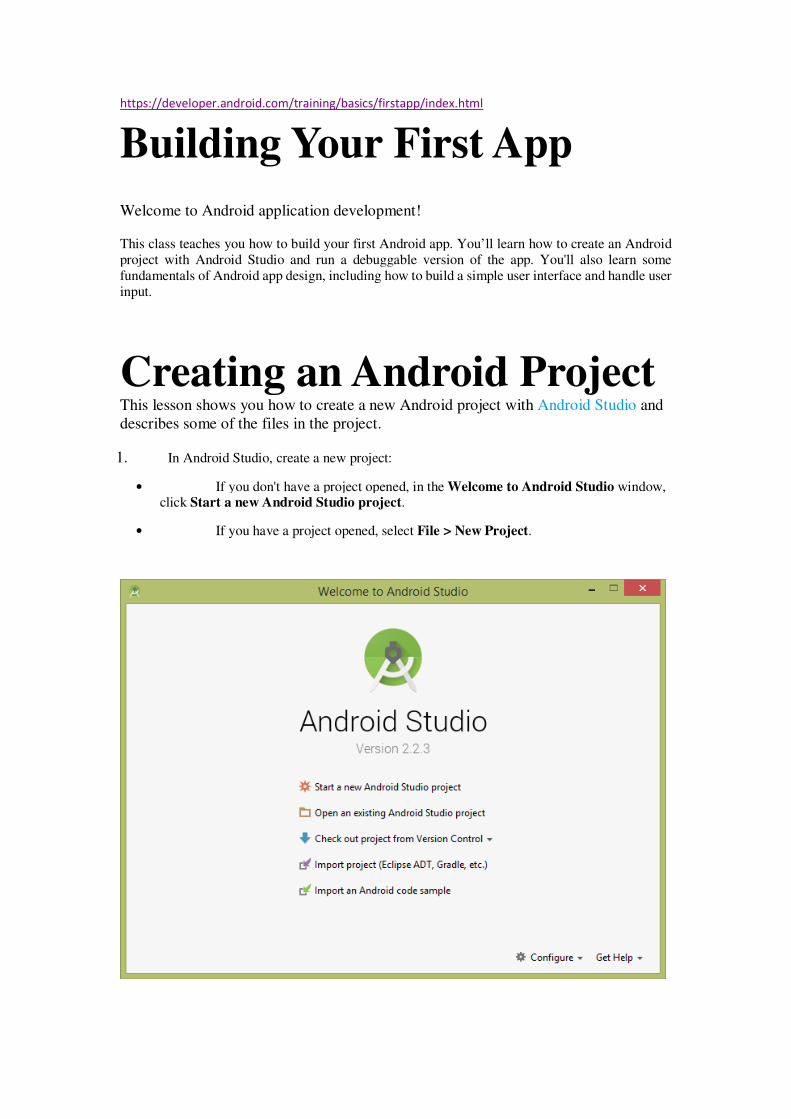
https://developer.android.com/training/basics/firstapp/index.html
Building Your First App
Welcome to Android application development!
This class teaches you how to build your first Android app. You’ll learn how to create an Android
project with Android Studio and run a debuggable version of the app. You'll also learn some
fundamentals of Android app design, including how to build a simple user interface and handle user
input.
Creating an Android Project This lesson shows you how to create a new Android project with Android Studio and
describes some of the files in the project.
1. In Android Studio, create a new project:
• If you don't have a project opened, in the Welcome to Android Studio window, click Start a new Android Studio project.
• If you have a project opened, select File > New Project.

2. In the New Project screen, enter the following values:
• Application Name: "My First App"
• Company Domain: "example.com"
Android Studio fills in the package name and project location for you, but you can edit these if
you'd like.
3. Click Next.
4. In the Target Android Devices screen, keep the default values and click Next.
The Minimum Required SDK is the earliest version of Android that your app supports, which
is indicated by the API level. To support as many devices as possible, you should set this to the
lowest version available that allows your app to provide its core feature set. If any feature of
your app is possible only on newer versions of Android and it's not critical to the core feature set,
enable that feature only when running on the versions that support it (see Supporting Different
Platform Versions).

5. In the Add an Activity to Mobile screen, select Empty Activity and click Next.

6. In the Customize the Activity screen, keep the default values and click Finish.
Allow access

Close
After some processing, Android Studio opens and displays a "Hello World" app with default files.
You will add functionality to some of these files in the following lessons.
Now take a moment to review the most important files. First, be sure that the Project window is
open (select View > Tool Windows > Project) and the Android view is selected from the drop-down list at the top.
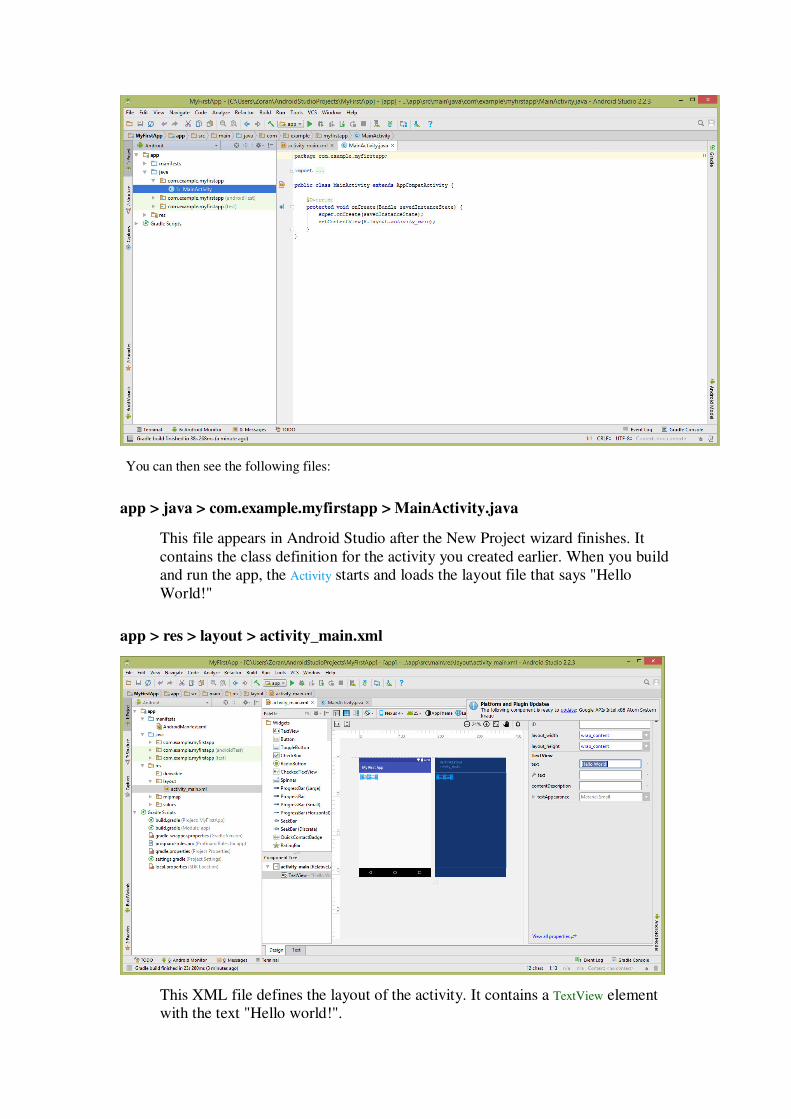
You can then see the following files:
app > java > com.example.myfirstapp > MainActivity.java
This file appears in Android Studio after the New Project wizard finishes. It
contains the class definition for the activity you created earlier. When you build
and run the app, the Activity starts and loads the layout file that says "Hello
World!"
app > res > layout > activity_main.xml
This XML file defines the layout of the activity. It contains a TextView element
with the text "Hello world!".
app > manifests > AndroidManifest.xml
The manifest file describes the fundamental characteristics of the app and
defines each of its components. You'll revisit this file as you follow these
lessons and add more components to your app.
Gradle Scripts > build.gradle
Android Studio uses Gradle to compile and build your app. There is
a build.gradle file for each module of your project, as well as a build.gradle file for
the entire project. Usually, you're only interested in the build.gradle file for the
module. in this case the app or application module. For more information about
this file, see Building Your Project with Gradle.
Running Your App
Run on a Real Device
Set up your device as follows:
1. Connect your device to your development machine with a USB cable. If you're developing on
Windows, you might need to install the appropriate USB driver for your device. For help
installing drivers, see the OEM USB Drivers document.
2. Enable USB debugging on your device by going to Settings > Developer options.
Note: On Android 4.2 and newer, Developer options is hidden by default. To
make it available, go to Settings > About phone and tap Build number seven
times. Return to the previous screen to find Developer options.
3.
Run the app from Android Studio as follows:
1. In Android Studio, select your project and click Run from the toolbar.
2. In the Select Deployment Target window, select your device, and click OK.
Android Studio installs the app on your connected device and starts it.
Run on an Emulator
Before you run your app on an emulator, you need to create an Android Virtual
Device (AVD) definition. An AVD definition defines the characteristics of an
Android phone, tablet, Android Wear, or Android TV device that you want to
simulate in the Android Emulator.
Create an AVD Definition as follows:

1. Launch the Android Virtual Device Manager by selecting Tools > Android > AVD Manager,
or by clicking the AVD Manager icon in the toolbar.
2. In the Your Virtual Devices screen, click Create Virtual Device.
3. In the Select Hardware screen, select a phone device, such as Nexus 6, and then click Next.

4. In the System Image screen, choose the desired system image for the AVD and click
Next.
If you don't have a particular system image installed, you can get it by clicking
the download link.
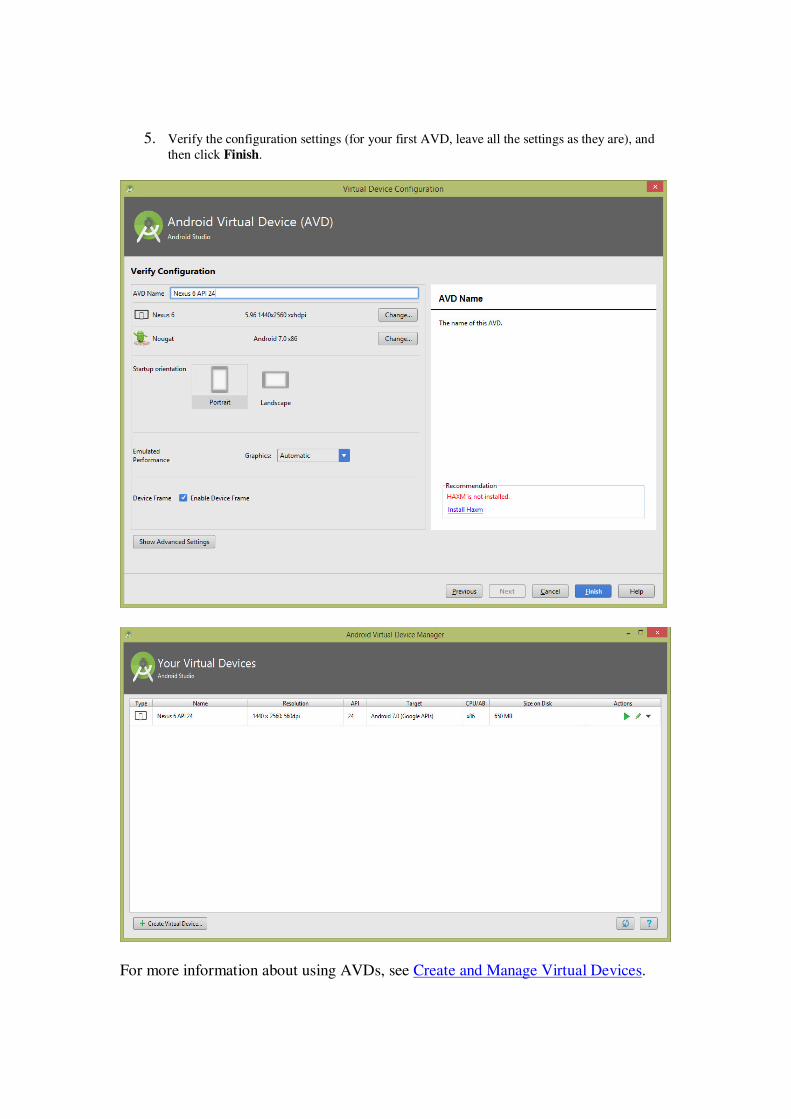
5. Verify the configuration settings (for your first AVD, leave all the settings as they are), and
then click Finish.
For more information about using AVDs, see Create and Manage Virtual Devices.

Run the app from Android Studio as follows:
1. In Android Studio, select your project and click Run from the toolbar.
2. In the Select Deployment Target window, select your emulator and click OK.
It can take a few minutes for the emulator to start. You may have to unlock the screen.
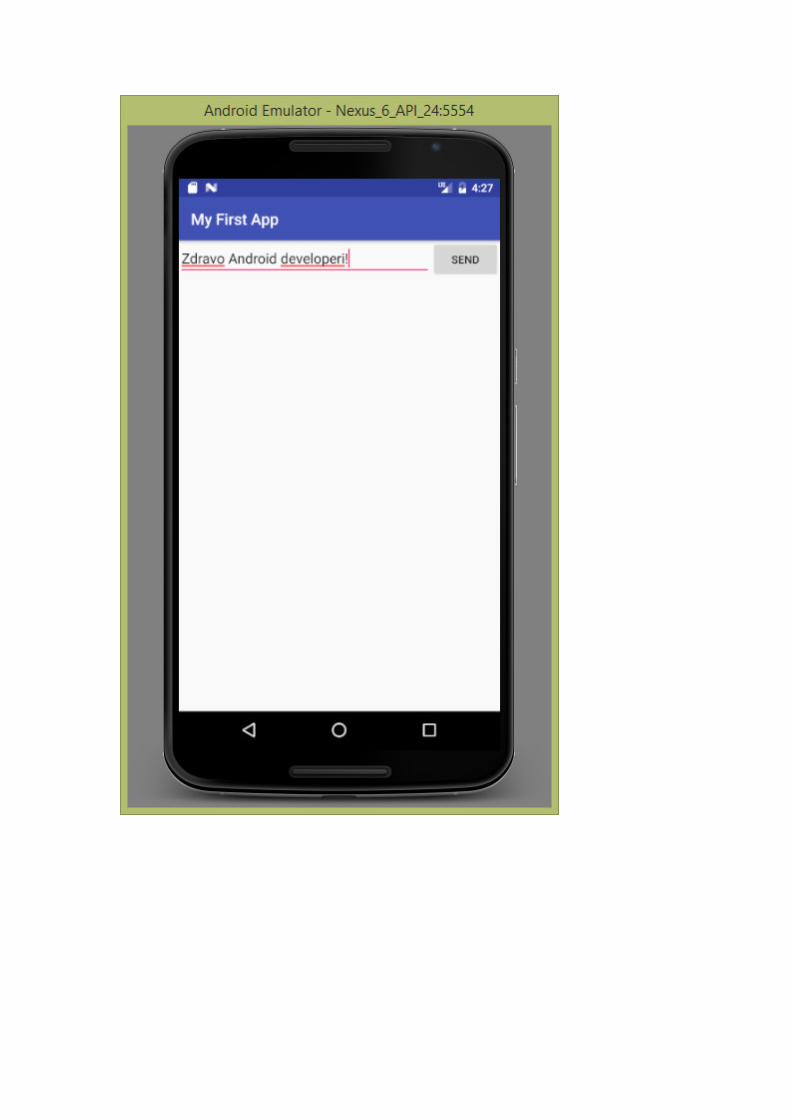
When you do, My First App appears on the emulator screen.
That's how you build and run your Android app on the emulator!

https://developer.android.com/training/basics/firstapp/building-ui.html

Building a Simple User Interface
In this lesson, you create a layout in XML that includes a text field and a button. In
the next lesson, your app responds when the button is pressed by sending the content
of the text field to another activity.
The graphical user interface for an Android app is built using a hierarchy of View and
ViewGroup objects. View objects are usually UI widgets such as buttons or text fields.
ViewGroup objects are invisible view containers that define how the child views are
laid out, such as in a grid or a vertical list.
Android provides an XML vocabulary that corresponds to the subclasses of View and
ViewGroup so you can define your UI in XML using a hierarchy of UI elements.
Layouts are subclasses of the ViewGroup. In this exercise, you'll work with a
LinearLayout.
Figure 1. Illustration of how ViewGroup objects form branches in the layout and
contain other View objects.
Create a Linear Layout
1. In Android Studio's Project window, open app > res > layout > activity_main.xml.
This XML file defines the layout of your activity. It contains the default
"Hello World" text view.
2. When you open a layout file, you’re first shown the design editor in the Layout Editor. For this lesson, you work directly with the XML, so click the Text tab at the bottom of the
window to switch to the text editor.
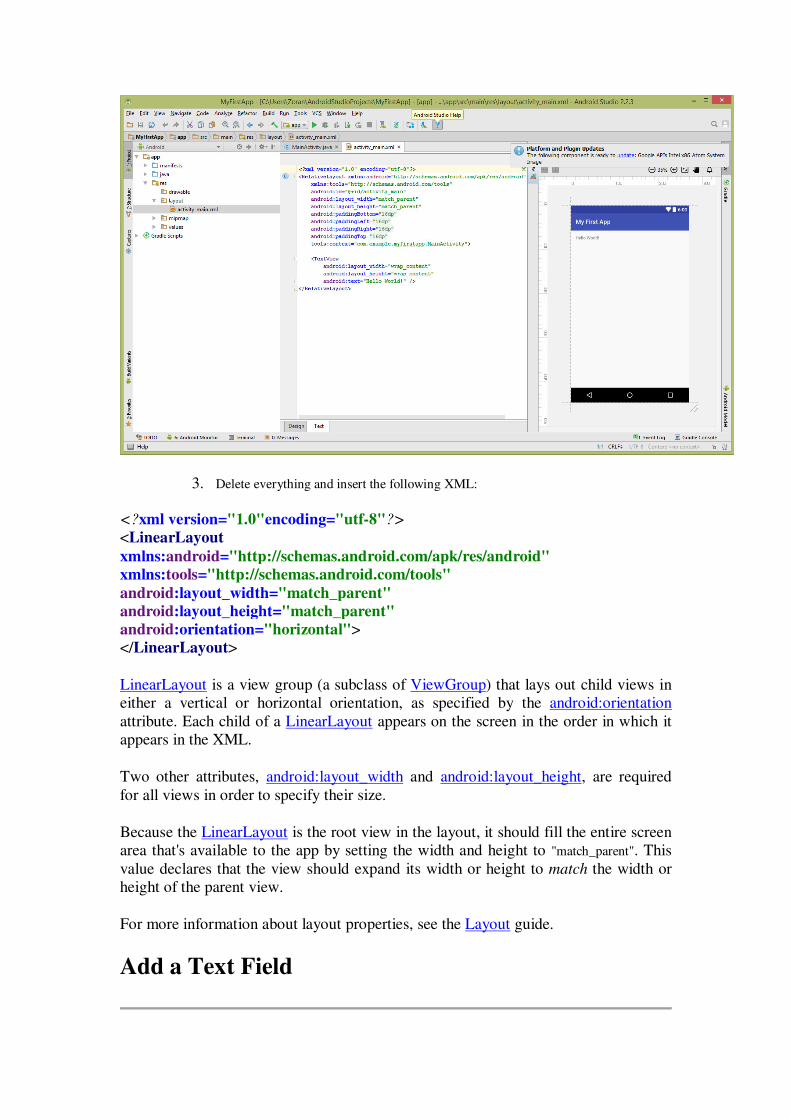
3. Delete everything and insert the following XML:
<?xml version="1.0"encoding="utf-8"?>
<LinearLayout
xmlns:android="http://schemas.android.com/apk/res/android"
xmlns:tools="http://schemas.android.com/tools"
android:layout_width="match_parent"
android:layout_height="match_parent"
android:orientation="horizontal">
</LinearLayout>
LinearLayout is a view group (a subclass of ViewGroup) that lays out child views in
either a vertical or horizontal orientation, as specified by the android:orientation
attribute. Each child of a LinearLayout appears on the screen in the order in which it
appears in the XML.
Two other attributes, android:layout_width and android:layout_height, are required
for all views in order to specify their size.
Because the LinearLayout is the root view in the layout, it should fill the entire screen
area that's available to the app by setting the width and height to "match_parent". This
value declares that the view should expand its width or height to match the width or
height of the parent view.
For more information about layout properties, see the Layout guide.
Add a Text Field

In the activity_main.xml file, within the <LinearLayout> element, add the following
<EditText> element:
<LinearLayout
xmlns:android="http://schemas.android.com/apk/res/android"
xmlns:tools="http://schemas.android.com/tools"
android:layout_width="match_parent"
android:layout_height="match_parent"
android:orientation="horizontal">
<EditText android:id="@+id/edit_message"
android:layout_width="wrap_content"
android:layout_height="wrap_content"
android:hint="@string/edit_message" /> </LinearLayout>
Don't worry about the error that appears for @string/edit_message; you'll fix that soon.
Here is a description of the attributes in the <EditText> you added:
android:id
This provides a unique identifier for the view, which you can use to reference
the object from your app code, such as to read and manipulate the object
(you'll see this in the next lesson).

The at sign (@) is required when you're referring to any resource object from XML. It
is followed by the resource type (id in this case), a slash, then the resource name
(edit_message).
The plus sign (+) before the resource type is needed only when you're defining a
resource ID for the first time. When you compile the app, the SDK tools use the ID
name to create a new resource ID in your project's R.java file that refers to the
EditText element. With the resource ID declared once this way, other references to
the ID do not need the plus sign. Using the plus sign is necessary only when
specifying a new resource ID and not needed for concrete resources such as strings or
layouts. See the sidebox for more information about resource objects.
android:layout_width and android:layout_height
Instead of using specific sizes for the width and height, the "wrap_content"
value specifies that the view should be only as big as needed to fit the contents
of the view. If you were to instead use "match_parent", then the EditText
element would fill the screen, because it would match the size of the parent
LinearLayout. For more information, see the Layouts guide.
android:hint
This is a default string to display when the text field is empty. Instead of using
a hard-coded string as the value, the "@string/edit_message" value refers to a
string resource defined in a separate file. Because this refers to a concrete
resource (not just an identifier), it does not need the plus sign. However,
because you haven't defined the string resource yet, you’ll see a compiler error
at first. You'll fix this in the next section by defining the string.
Note: This string resource has the same name as the element ID: edit_message.
However, references to resources are always scoped by the resource type (such as id
or string), so using the same name does not cause collisions.
Add String Resources
By default, your Android project includes a string resource file at res > values >
strings.xml. Here, you'll add two new strings.
1. From the Project window, open res > values > strings.xml.

2. Add two strings so that your file looks like this:
<?xml version="1.0" encoding="utf-8"?>
<resources>
<string name="app_name">My First App</string>
<string name="edit_message">Enter a message</string>
<string name="button_send">Send</string>
</resources>
For text in the user interface, always specify each string as a resource. String
resources allow you to manage all UI text in a single location, which makes the text
easier to find and update. Externalizing the strings also allows you to localize your
app to different languages by providing alternative definitions for each string
resource.
For more information about using string resources to localize your app for other
languages, see the Supporting Different Devices class.

Add a Button
Go back to the activity_main.xml file and add a button after the <EditText>. Your file
should look like this:
<LinearLayout
xmlns:android="http://schemas.android.com/apk/res/android"
xmlns:tools="http://schemas.android.com/tools"
android:orientation="horizontal"
android:layout_width="match_parent"
android:layout_height="match_parent">
<EditText android:id="@+id/edit_message"
android:layout_width="wrap_content"
android:layout_height="wrap_content"
android:hint="@string/edit_message" />
<Button
android:layout_width="wrap_content"
android:layout_height="wrap_content"
android:text="@string/button_send" /> </LinearLayout>

Note: This button doesn't need the android:id attribute, because it won't be referenced
from the activity code.
The layout is currently designed so that both the EditText and Button widgets are only
as big as necessary to fit their content, as figure 2 shows.
Figure 2. The EditText and Button widgets have their widths set to "wrap_content".
This works fine for the button, but not as well for the text field, because the user
might type something longer. It would be nice to fill the unused screen width with the
text field. You can do this inside a LinearLayout with the weight property, which you
can specify using the android:layout_weight attribute.
The weight value is a number that specifies the amount of remaining space each view
should consume, relative to the amount consumed by sibling views. This works kind
of like the amount of ingredients in a drink recipe: "2 parts soda, 1 part syrup" means
two-thirds of the drink is soda. For example, if you give one view a weight of 2 and
another one a weight of 1, the sum is 3, so the first view fills 2/3 of the remaining

space and the second view fills the rest. If you add a third view and give it a weight of
1, then the first view (with weight of 2) now gets 1/2 the remaining space, while the
remaining two each get 1/4.
The default weight for all views is 0, so if you specify any weight value greater than 0
to only one view, then that view fills whatever space remains after all views are given
the space they require.
Make the Input Box Fill in the Screen Width
In activity_main.xml, modify the <EditText> so that the attributes look like this:
<EditText android:id="@+id/edit_message"
android:layout_weight="1"
android:layout_width="0dp"

android:layout_height="wrap_content"
android:hint="@string/edit_message" />
Setting the width to zero (0dp) improves layout performance because using
"wrap_content" as the width requires the system to calculate a width that is ultimately
irrelevant because the weight value requires another width calculation to fill the
remaining space.
Figure 3. The EditText widget is given all the layout weight, so it fills the remaining
space in the LinearLayout.
Here’s how your complete activity_main.xmllayout file should now look:
<?xml version="1.0" encoding="utf-8"?>
<LinearLayout xmlns:android="http://schemas.android.com/apk/res/android"
xmlns:tools="http://schemas.android.com/tools"
android:orientation="horizontal"
android:layout_width="match_parent"
android:layout_height="match_parent">

<EditText android:id="@+id/edit_message"
android:layout_weight="1"
android:layout_width="0dp"
android:layout_height="wrap_content"
android:hint="@string/edit_message" />
<Button
android:layout_width="wrap_content"
android:layout_height="wrap_content"
android:text="@string/button_send" />
</LinearLayout>
To see how the app now looks on your device or emulator, click Run in the
toolbar.
Starting Another Activity
So, you have an app that shows an activity (a single screen) with a text field and a
button. Now, you’ll add some code to MainActivity that starts a new activity when the
user clicks the Send button.
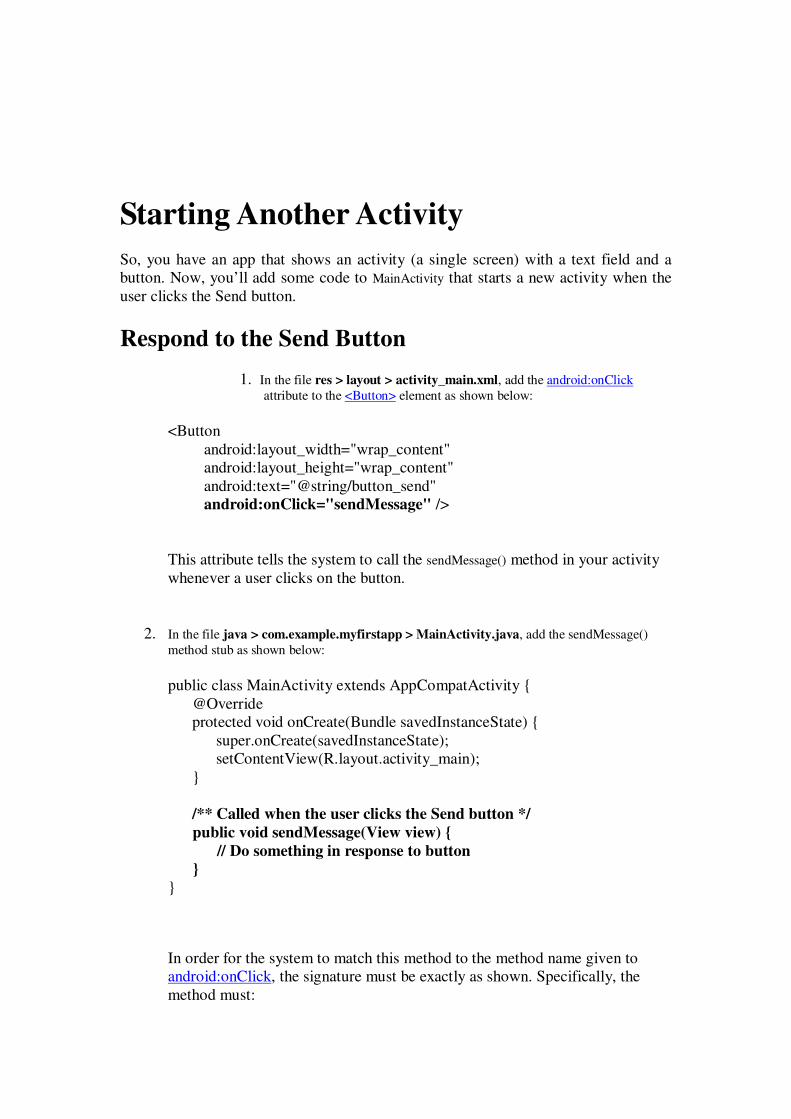
Respond to the Send Button
1. In the file res > layout > activity_main.xml, add the android:onClick
attribute to the <Button> element as shown below:
<Button
android:layout_width="wrap_content"
android:layout_height="wrap_content"
android:text="@string/button_send"
android:onClick="sendMessage" />
This attribute tells the system to call the sendMessage() method in your activity
whenever a user clicks on the button.
2. In the file java > com.example.myfirstapp > MainActivity.java, add the sendMessage()
method stub as shown below:
public class MainActivity extends AppCompatActivity {
@Override
protected void onCreate(Bundle savedInstanceState) {
super.onCreate(savedInstanceState);
setContentView(R.layout.activity_main);
}
/** Called when the user clicks the Send button */
public void sendMessage(View view) {
// Do something in response to button
}
}
In order for the system to match this method to the method name given to
android:onClick, the signature must be exactly as shown. Specifically, the
method must:

1. Be public
2. Have a void return value
3. Have a View as the only parameter (this will be the View that was clicked)
Next, you’ll fill in this method to read the contents of the text field and deliver that
text to another activity.
Build an Intent
An Intent is an object that provides runtime binding between separate components
(such as two activities). The Intent represents an app’s "intent to do something." You
can use intents for a wide variety of tasks, but in this lesson, your intent starts another
activity.
In MainActivity.java, add the code shown below to sendMessage():
public class MainActivity extends AppCompatActivity {
public final static String EXTRA_MESSAGE =
"com.example.myfirstapp.MESSAGE";

@Override
protected void onCreate(Bundle savedInstanceState) {
super.onCreate(savedInstanceState);
setContentView(R.layout.activity_main);
}
/** Called when the user clicks the Send button */
public void sendMessage(View view) {
Intent intent = new Intent(this, DisplayMessageActivity.class);
EditText editText = (EditText) findViewById(R.id.edit_message);
String message = editText.getText().toString();
intent.putExtra(EXTRA_MESSAGE, message);
startActivity(intent); }
}
Android Studio will display Cannot resolve symbol errors because this code
references classes that are not imported. You can solve some of these with Android
Studio's "import class" functionality by pressing Alt + Enter (or Option + Return on
Mac). Your imports should end up as the following:
import android.content.Intent;
import android.support.v7.app.AppCompatActivity;
import android.os.Bundle;
import android.view.View;
import android.widget.EditText;
An error remains for DisplayMessageActivity, but that's okay; you'll fix that in the next
section.

There’s a lot going on in sendMessage(), so let’s explain what's going on.
The Intent constructor takes two parameters:
• A Context as its first parameter (this is used because the Activity class is a subclass of
Context)
• The Class of the app component to which the system should deliver the Intent (in this
case, the activity that should be started).
Note: The reference to DisplayMessageActivity will raise an error in Android
Studio because the class doesn’t exist yet. Ignore the error for now; you’ll
create the class soon.
The putExtra() method adds the EditText's value to the intent. An Intent can carry data
types as key-value pairs called extras. Your key is a public constant EXTRA_MESSAGE
because the next activity uses the key to retrieve the text value. It's a good practice to
define keys for intent extras using your app's package name as a prefix. This ensures
the keys are unique, in case your app interacts with other apps.
The startActivity() method starts an instance of the DisplayMessageActivity specified by
the Intent. Now you need to create the class.
Create the Second Activity
1. In the Project window, right-click the app folder and select New > Activity >
Empty Activity.
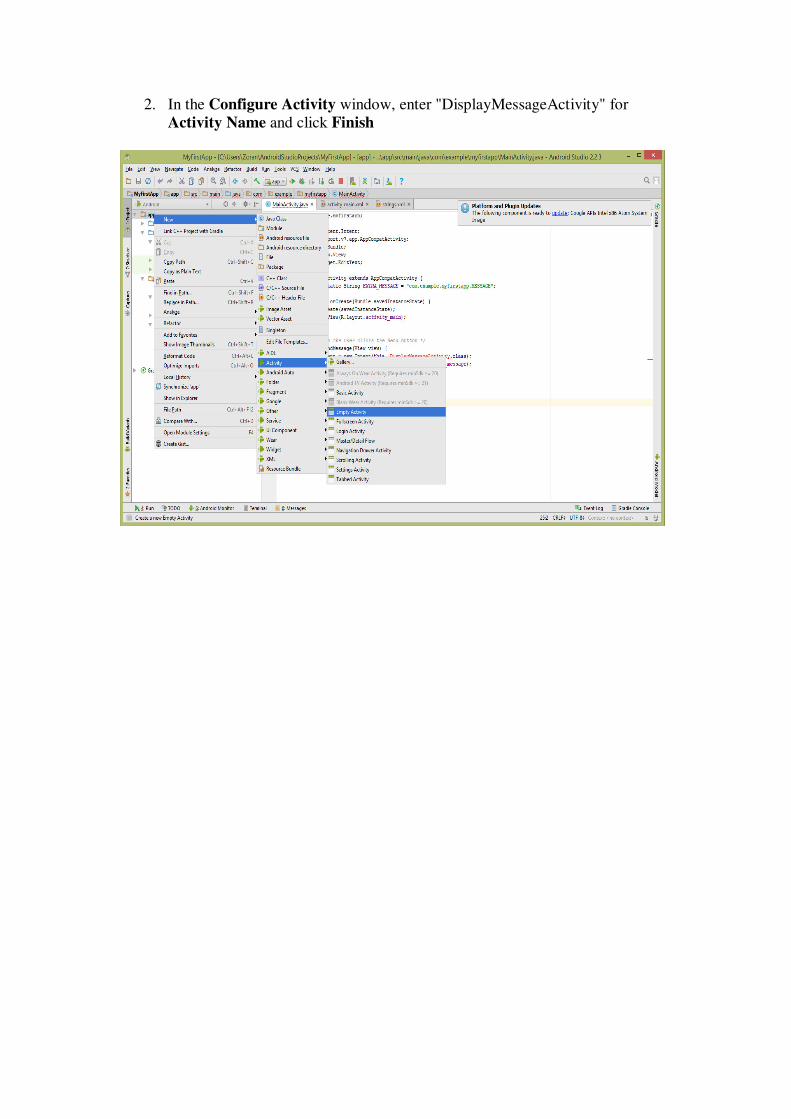
2. In the Configure Activity window, enter "DisplayMessageActivity" for
Activity Name and click Finish
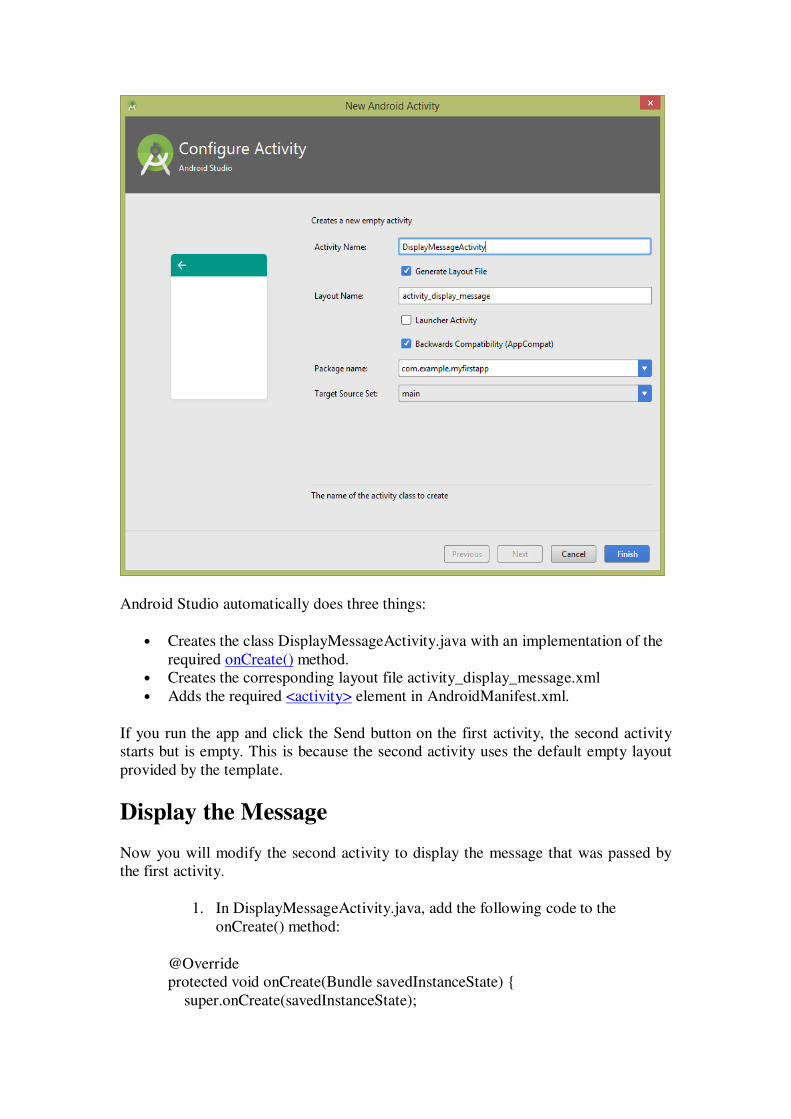
Android Studio automatically does three things:
• Creates the class DisplayMessageActivity.java with an implementation of the
required onCreate() method.
• Creates the corresponding layout file activity_display_message.xml
• Adds the required <activity> element in AndroidManifest.xml.
If you run the app and click the Send button on the first activity, the second activity
starts but is empty. This is because the second activity uses the default empty layout
provided by the template.
Display the Message
Now you will modify the second activity to display the message that was passed by
the first activity.
1. In DisplayMessageActivity.java, add the following code to the
onCreate() method:
@Override
protected void onCreate(Bundle savedInstanceState) {
super.onCreate(savedInstanceState);
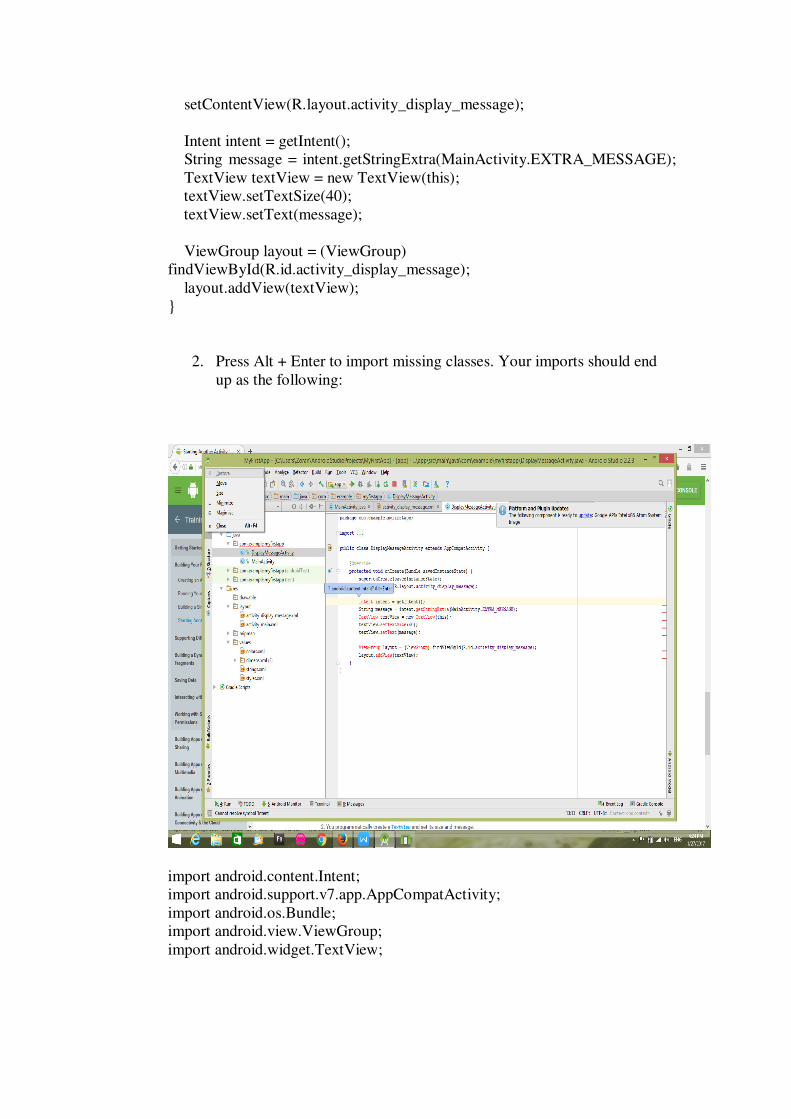
setContentView(R.layout.activity_display_message);
Intent intent = getIntent();
String message = intent.getStringExtra(MainActivity.EXTRA_MESSAGE);
TextView textView = new TextView(this);
textView.setTextSize(40);
textView.setText(message);
ViewGroup layout = (ViewGroup)
findViewById(R.id.activity_display_message);
layout.addView(textView);
}
2. Press Alt + Enter to import missing classes. Your imports should end
up as the following:
import android.content.Intent;
import android.support.v7.app.AppCompatActivity;
import android.os.Bundle;
import android.view.ViewGroup;
import android.widget.TextView;

There’s a lot going on here, so let’s explain:
1. The call getIntent() grabs the intent that started the activity. Every Activity is
invoked by an Intent, regardless of how the user navigated there. The call
getStringExtra() retrieves the data from the first activity.
2. You programmatically create a TextView and set its size and message.
3. You add the TextView to the layout identified by
R.id.activity_display_message. You cast the layout to ViewGroup because it
is the superclass of all layouts and contains the addView() method.
Note: The XML layout generated by previous versions of Android Studio might not
include the android:id attribute. The call findViewById() will fail if the layout does not
have the android:id attribute. If this is the case, open activity_display_message.xml and add
the attribute android:id="@+id/activity_display_message" to the layout element.
You can now run the app. When it opens, type a message in the text field, and click
Send. The second activity replaces the first one on the screen, showing the message
you entered in the first activity.
That's it, you've built your first Android app!