inspiration book - files.ctctcdn.comfiles.ctctcdn.com/48ba0d2a001/662ee228-2f37-4875... ·...
TRANSCRIPT

Inspiration BookGift Giving
www.tayloredexpressions.com

TE Dies:Sack It To You
Sack It - ReindeerHeart Stacklets
Very Merry OutlinesLittle Bits - Holly
TE Cardstock:Toffee
Chocolate TruffleOreo
Cherry PopSugar CubeSweet Basil
Other:Gold and Red Glitter
Sticky TapeLiquid Adhesive
Cello BagRibbon
Dog Treats
1. Die cut the box using the Sack It To You die. Cut 2 pieces out of Toffee cardstock.
2. Before assembling the box, die cut a window in one of the sides using the Heart Stacklets die.
3. Die cut the following pieces using Sack it - Reindeer dies
- Ears out of Chocolate Truffle cardstock - Eyes and handle out of Oreo cardstock - Nose out of Cherry Pop cardstock and coat in red glitter - Antlers out of Sugar Cube cardstock and coat in gold glitter
4. Attach the ears, eyes and nose to the same panel from which you die cut the heart.
5. Assemble the box using a strong adhesive.
6. Fill a cello bag with dog treats, tie with ribbon and put into box.
7. Die cut holly for the bag using the Very Merry Outlines dies (Sweet Basil cardstock) and the “eye”.
8. Adhere the antlers and handle to the box.
9. Die cut holly for the box using the Little Bits - Holly die out of Sweet Basil and Cherry Pop cardstock and adhere next to the window.
Supplies
Reindeer Dog Treats by Charmaine Ikach
www.tayloredexpressions.com

www.tayloredexpressions.com
TE StampsWine a Little
TE DiesStitched Banner Stacklets
Bottled UpWine and Dine
TE CardstockMetallic Neutrals (Gold)
Shimmer WhiteBlue
InkMemento Danube Blue (sentiment)
VersaColor Pigment Ink-Vanilla (flourishes and bottle)
OtherGlitter
Foam TapeScissors
Liquid AdhesiveMetallic Twine-Gold
Enamel Dots
Wine Bottle Tag Supplies
1. Die cut the following pieces: - Stitched Banner Stacklets from blue cardstock - Bottled Up tag from Metallic Neutrals (Gold) and the label from Shimmer White.
2. Stamp wine bottle with vanilla pigment ink, cut out with die, and add glitter.
3. Stamp wine glasses with blue ink, hand-cut, and add glitter.
4. Stamp flourishes on blue banner with vanilla pigment ink, add glitter and shake off excess.
5. Stamp sentiment on label with blue ink, stamp flourishes with vanilla pigment ink, and add enamel dots.
6. Assemble tag as shown with the following notes: - Adhere blue banner to gold tag with liquid adhesive. - Adhere label with foam tape. - Adhere wine glasses and wine bottle to tag with foam tape.
Wine Bottle Tag by Joan Ervin

www.tayloredexpressions.com
TE StampsWine a Little
TE DiesStitched Banner Stacklets
Stitched Rectangle Stacklets
TE CardstockMetallic Neutrals (Gold)
Shimmer White Sugar Cube
Blue
InkMemento Danube Blue
VersaColor Pigment Ink-Vanilla
OtherGlitter
Foam TapeScissors
Liquid AdhesiveMetallic Twine-Gold
Gift Bag Supplies
Matching Gift Bag by Joan Ervin
1. Die cut the following pieces:
- Stitched Rectangle Stacklets (the largest die cut) from Sugar Cube cardstock, the middle die cut from Metallic Neutrals (gold) and the smallest die cut from blue cardstock - Stitched Banner Stacklets from Shimmer White cardstock
2. Stamp sentiment on banner with blue ink. When dry, stamp flourishes on banner with vanilla ink and add twine.
3. Stamp wine glasses, hand-cut, add glitter, and adhere to banner with foam tape.
4. Stamp flourishes on blue layer with vanilla pigment ink, add glitter, and shake off excess.
5. Assemble as shown with the following notes: - Adhere gold layer to white layer with foam tape. Then adhere blue layer to gold layer with liquid adhesive. - Adhere banner with foam tape - Adhere to bag with foam tape.
www.tayloredexpressions.com
1. Die cut the following pieces:
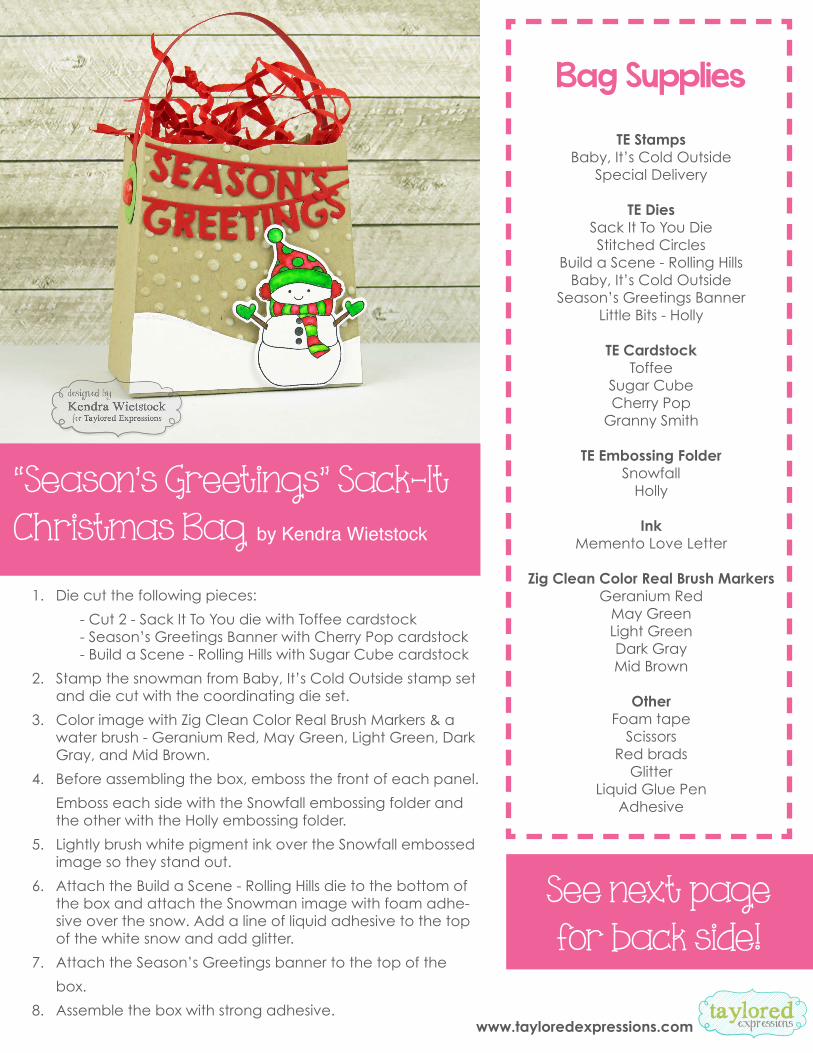
- Cut 2 - Sack It To You die with Toffee cardstock - Season’s Greetings Banner with Cherry Pop cardstock - Build a Scene - Rolling Hills with Sugar Cube cardstock
2. Stamp the snowman from Baby, It’s Cold Outside stamp set and die cut with the coordinating die set.
3. Color image with Zig Clean Color Real Brush Markers & a water brush - Geranium Red, May Green, Light Green, Dark Gray, and Mid Brown.
4. Before assembling the box, emboss the front of each panel.
Emboss each side with the Snowfall embossing folder and the other with the Holly embossing folder.
5. Lightly brush white pigment ink over the Snowfall embossed image so they stand out.
6. Attach the Build a Scene - Rolling Hills die to the bottom of the box and attach the Snowman image with foam adhe-sive over the snow. Add a line of liquid adhesive to the top of the white snow and add glitter.
7. Attach the Season’s Greetings banner to the top of the
box.
8. Assemble the box with strong adhesive.
TE StampsBaby, It’s Cold Outside
Special Delivery
TE Dies Sack It To You Die Stitched Circles
Build a Scene - Rolling Hills Baby, It’s Cold Outside
Season’s Greetings Banner Little Bits - Holly
TE Cardstock Toffee
Sugar Cube Cherry Pop
Granny Smith
TE Embossing Folder Snowfall
Holly
Ink Memento Love Letter
Zig Clean Color Real Brush Markers
Geranium Red May Green Light Green Dark Gray Mid Brown
Other
Foam tapeScissors
Red bradsGlitter
Liquid Glue Pen Adhesive
“Season’s Greetings” Sack-ItChristmas Bag by Kendra Wietstock
See next pagefor back side!
Bag Supplies

www.tayloredexpressions.com
“Season’s Greetings” Sack-It Christmas BagPart Two: Holly Side by Kendra Wietstock
1. For the Holly side of the box, stamp the “No Peeking” sentiment from the Special Delivery stamp set in Memento Love Letter ink and trim with Stitched Circle die.
2. Trim an additional Stitched Circle in Cherry Pop cardstock.
3. Add holly embellishment using the Little Bits - Holly die trimmed with Cherry Pop and Granny Smith cardstock.
4. Attach a handle to the box using Cherry Pop cardstock, Granny Smith Stitched Circles and red brads.
TE StampsBaby, It’s Cold Outside
Special Delivery
TE Dies Sack It To You Die Stitched Circles
Build a Scene - Rolling Hills Baby, It’s Cold Outside
Season’s Greetings Banner Little Bits - Holly
TE Cardstock
Toffee Sugar Cube Cherry Pop
Granny Smith
Ink Memento Love Letter
Zig Clean Color Real Brush Markers Geranium Red
May Green Light Green Dark Gray Mid Brown
TE Embossing Folder Snowfall
Holly
Other Foam tape
ScissorsRed brads
Glitter Liquid Glue Pen
Adhesive
Bag Supplies

www.tayloredexpressions.com
1. Die cut tag front frame with the Build a Tag 5 tag die and the tombstone-shaped die centered inside from Cookie Monster cardstock.
2. Stamp and heat-emboss sentiment from Little Bits - Christmas on Cherry Pop cardstock.
3. Die cut sentiment with Build a Tag 3 banner.
4. Die cut full tag with Build a Tag 5 tag die from Cookie Monster and Salt Water Taffy cardstock.
5. Dry emboss Salt Water Taffy cardstock tag with the Snowfall Embossing Folder.
6. Cut Little Bits - Penguin from Sugar Cube, Oreo, Lemon Meringue and Cookie Monster cardstock. Cut hat with Little Bits - Christmas Confetti from Cherry Pop and assemble the penguin.
7. Cut Build a Scene - Central park from Sugar Cube cardstock.
8. Adhere dry-embossed tag to back tag. Adhere rolling hill and trees to dry-embossed background using foam adhesive to add depth. Attach tag front frame, banner and penguin.
Window Holiday Tagsby Jean Manis
Penguin Tag SuppliesTE Stamps
Little Bits of ChristmasSmall Packages
TE DiesBuild a Tag 3Build a Tag 4
Little Bits - ReindeerLittle Bits - Penguin
Little Bits - Chirstmas ConfettiBuild a Scene - Rolling Hills
Build a Scene - Winter TreesBuild a Scene - Central Park
TE CardstockSugar Cube
Cookie MonsterOreo
Lemon MeringueCherry Pop
Salt Water TaffyChocolate Truffle
Sweet Basil
TE Patterned PaperBuild a Scene Christmas
TE Embossing FolderSnowfall
TE Sequins
Build a Scene - Christmas
OtherFoam AdhesiveLiquid Adhesive
VersamarkZing!
Embossing Powder - WhiteClear Plastic Sheets
Penguin Tag

www.tayloredexpressions.comwww.tayloredexpressions.com
Window Holiday Tagsby Jean Manis
Reindeer Tag SuppliesTE Stamps
Little Bits of ChristmasSmall Packages
TE DiesBuild a Tag 3Build a Tag 4
Little Bits - ReindeerLittle Bits - Penguin
Little Bits - Chirstmas ConfettiBuild a Scene - Rolling Hills
Build a Scene - Winter TreesBuild a Scene - Central Park
TE CardstockSugar Cube
Cookie MonsterOreo
Lemon MeringueCherry Pop
Salt Water TaffyChocolate Truffle
Sweet Basil
TE Patterned PaperBuild a Scene Christmas
TE Embossing FolderSnowfall
TE Sequins
Build a Scene - Christmas
OtherFoam AdhesiveLiquid Adhesive
VersamarkZing!
Embossing Powder - WhiteClear Plastic Sheets
Reindeer Tag1. Die cut tag front frame with the Build a Tag 5 tag die and the tombstone-shaped die centered
inside from Cherry Pop cardstock.
2. Stamp and heat-emboss sentiment from Small Packages on Sweet Basil cardstock.
3. Die cut sentiment with Build a Tag 3 banner.
4. Die cut full tag with Build a Tag 5 tag die from a sheet of Build a Scene Christmas patterned paper, a clear plastic sheet and Cherry Pop cardstock.
5. Cut Little Bits - Reindeer from Chocolate Truffle cardstock.
6. Adhere clear plastic sheet to Cherry Pop tag front frame with liquid adhesive. Once dry, attach foam adhesive to back of the clear plastic sheet. Fill with sequins. Adhere pattered paper tag to foam adhesive.
7. Attach Cherry Pop tag to back. Attach sentiment banner and reindeer to front.
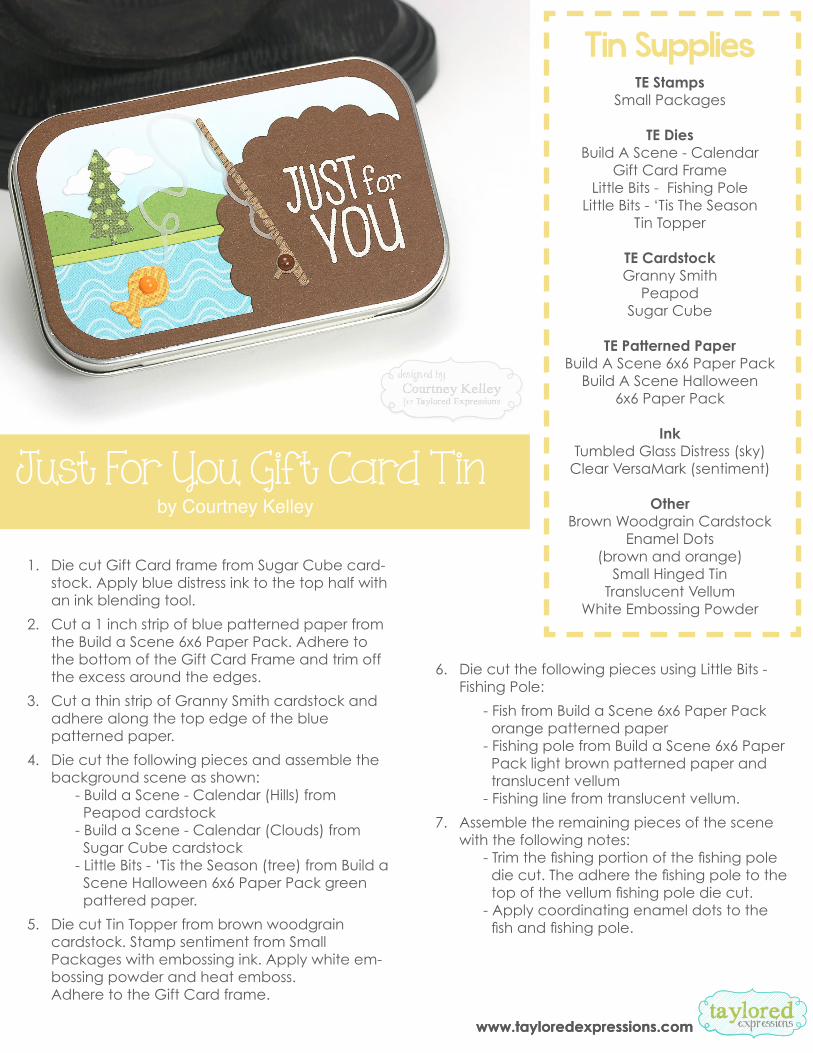
Just For You Gift Card Tinby Courtney Kelley
TE StampsSmall Packages
TE DiesBuild A Scene - Calendar
Gift Card FrameLittle Bits - Fishing Pole
Little Bits - ‘Tis The SeasonTin Topper
TE CardstockGranny Smith
PeapodSugar Cube
TE Patterned PaperBuild A Scene 6x6 Paper Pack
Build A Scene Halloween 6x6 Paper Pack
InkTumbled Glass Distress (sky)
Clear VersaMark (sentiment)
OtherBrown Woodgrain Cardstock
Enamel Dots (brown and orange)
Small Hinged TinTranslucent Vellum
White Embossing Powder
Tin Supplies
1. Die cut Gift Card frame from Sugar Cube card-stock. Apply blue distress ink to the top half with an ink blending tool.
2. Cut a 1 inch strip of blue patterned paper from the Build a Scene 6x6 Paper Pack. Adhere to the bottom of the Gift Card Frame and trim off the excess around the edges.
3. Cut a thin strip of Granny Smith cardstock and adhere along the top edge of the blue patterned paper.
4. Die cut the following pieces and assemble the background scene as shown: - Build a Scene - Calendar (Hills) from Peapod cardstock - Build a Scene - Calendar (Clouds) from Sugar Cube cardstock - Little Bits - ‘Tis the Season (tree) from Build a Scene Halloween 6x6 Paper Pack green pattered paper.
5. Die cut Tin Topper from brown woodgrain cardstock. Stamp sentiment from Small Packages with embossing ink. Apply white em-bossing powder and heat emboss. Adhere to the Gift Card frame.
6. Die cut the following pieces using Little Bits - Fishing Pole:
- Fish from Build a Scene 6x6 Paper Pack orange patterned paper - Fishing pole from Build a Scene 6x6 Paper Pack light brown patterned paper and translucent vellum - Fishing line from translucent vellum.
7. Assemble the remaining pieces of the scene with the following notes: - Trim the fishing portion of the fishing pole die cut. The adhere the fishing pole to the top of the vellum fishing pole die cut. - Apply coordinating enamel dots to the fish and fishing pole.
www.tayloredexpressions.comwww.tayloredexpressions.com

1. Cut Tag Pocket and Tag Insert (using Tag Stacklets 1) from Sugar Cube cardstock.
2. Die cut a circle for the shaker window in the Tag Pocket using Stitched Circle Stacklets.
3. Die cut the following pieces:
- Die cut the sun from Little Bits - Sun & Clouds from Lemon Meringue cardstock. - Die cut clouds from Little Bits - Sun & Clouds from Salt Water Taffy cardstock. - Die cut Build a Scene - Rolling Hills from Granny Smith and Peapod cardstock. - Using Tag Stacklets 1, die cut green pieces down to size, to layer on the tag insert. - Die cut Little Bits - Cupcake from Rainbow Brights patterned paper and Toffee cardstock. - Color Toffee piece (bottom part of cupcake with Copic E43)
4. Cut a small square to fit just outside of the circle for the shaker winder from a page protector.
5. Using 1/8” double-sided tape, add some sequins from TE Sequins Rainbow Brights to the square page protector, and create a shaker pocket, by adhering the edges closed.
6. Using 1/8” double-sided tape or liquid adhesive, adhere the shaker pocket to the inside of the Tag Pocket.
7. Stamp and die cut bunny with cupcake from Party Grumplings & Die Combo
8. Color image with Copics using BG11, BG53, RV17, T0, T1, and T3.
9. Stamp “Feeling Old..” sentiment onto the Granny Smith piece.
10. Stamp “happy birthday” on to the Tag pocket.
11. Assemble the Tag Pocket as shown using foam tape for the Little Bits - Sun and double-sided tape or liquid adhesive for the rest of the Tag Pocket.
12. Punch a small hole in the Tag Pocket and finish with twine.
www.tayloredexpressions.comwww.tayloredexpressions.com
TE StampsParty Grumplings and Die
Combo
TE DiesTag Pocket
Tag Stacklets 1Stitched Circle Stacklets
Build a Scene – Rolling HillsLittle Bits - Cupcake
Little Bits - Sun & Clouds
TE Paper PackRainbow Brights
TE CardstockSugar Cube
Salt Water TaffyLemon Meringue
PeapodGranny Smith
Toffee
InkMemento Tuxedo Black
Copic MarkersBG11BG53RV17R11T0T1T3
E43
OtherDouble-Sided Tape
Foam TapeScissors
MISTI or Stamp-a-ma-jig (for the sentiments)
Page Protector
Party Grumplings
Tag Supplies
by Shelly Mercado

Christmas Gift Card Tin by Kerri Michaud
Tin Supplies
1. Using the Tin Topper die, cut a piece of Peapod cardstock for the frame.
2. Cut a piece of Build a Scene - Christmas patterned paper using the Gift Card frame die.
3. Layer the Peapod frame over the patterned paper.
4. Using a circle die, cut a piece of Sugar Cube cardstock.
5. Stamp the sentiment from Small Packages using Memento Tuxedo Black ink.
6. Color in the 25 with Copic markers and then sponge around the sentiment using aqua ink. Adhere inside the scallop frame.
7. Using the Mini Mix & Match Bow dies, cut some Aqua Mist felt. Assemble the bow and then add the button. Super simple!
TE StampsSmall Packages
TE DiesTin Topper Die
Gift Card Frame DieMini Mix & Match Bows
Circle Nestability
TE CardstockPeapod
Sugar Cube
TE Patterned PaperBuild a Scene Christmas
InkMemento Tuxedo Black
CopicsR29R24
OtherButton
Liquid AdhesiveAqua Mist Felt
www.tayloredexpressions.com

www.tayloredexpressions.com
Gifts from Jolly Santa by Kim Singdahlsen
1. Cut Bottled Up die using Salt Water Taffy cardstock; score to hang from the neck of a wine bottle; emboss with Bead Board Embossing Folder.
2. For Santa, die cut the following pieces: - Second largest Stitched Circle Stacklet from flesh-colored cardstock. - Individual pieces from Roly Poly - Santa die in Cherry Pop, Sugar Cube, Oreo, Cupcake and Dijon as shown in the photo. - Little Bits - Champagne Flute die from Cookie Monster. - Large tag in Bottled Up die set from patterned green paper.
3. Assemble Santa as shown. Notes: Cut three small circles from Cupcake for the rosy cheeks and one behind the beard for his lips. Fold one glove slightly to hold the champagne flute.
4. Stamp and emboss sentiment from Sing of the Season on green tag.
5. Adhere Santa and tag to Bottled Up die cut as shown.
6. For the tag, die cut the following pieces:
- Second largest Stitched Circle Stacklet from Sugar Cube cardstock. - Pants from Roly Poly - Santa in Cherry Pop, then trim off sleeves. - Belt and buckles from Oreo and Dijon.
7. Stamp “to/from” from Special Delivery on white circle. Color hearts with Copics. Note: Stamp the “to” and “from” separately to line up inside the curve of the circle.
8. Assemble tag as shown.
TE Stamps: Sing of the Season
(jolly sentiment)Special Delivery (to/from)
TE DiesRoly Poly - Santa
Stitched Circle StackletsBottled Up
Little Bits- Champagne Flutes
TE CardstockSugar Cube
Oreo Salt Water Taffy
Cherry Pop Cookie Monster
CupcakeDijon
Scrap of flesh-colored paper
Patterned PaperAny bright green
(Taylored Expressions offers great options. This piece
comes Build a Scene Halloween.)
Copic MarkersYG03BG13
(To color in the hearts on the tag)
Embossing FolderBead Board
OtherWhite Embossing
Powder
InkMemento Tuxedo Black
Versamark
Gift Set Supplies