inspiration 9 visual diagramming software how to use the program in the skills center room 801
TRANSCRIPT
Inspiration 9Inspiration 9Visual Diagramming Software
HOW TO USE THE PROGRAM IN THE SKILLS
CENTERROOM 801

WHAT IS INSPIRATION?WHAT IS INSPIRATION?Inspiration is a visual thinking and learning tool
students can use to plan, research & complete projects.
With Diagram and Outline Modes, learners create graphic diagrams that generate the conventional outlines used to expand topics into writing.
START THE PROGRAMSTART THE PROGRAM
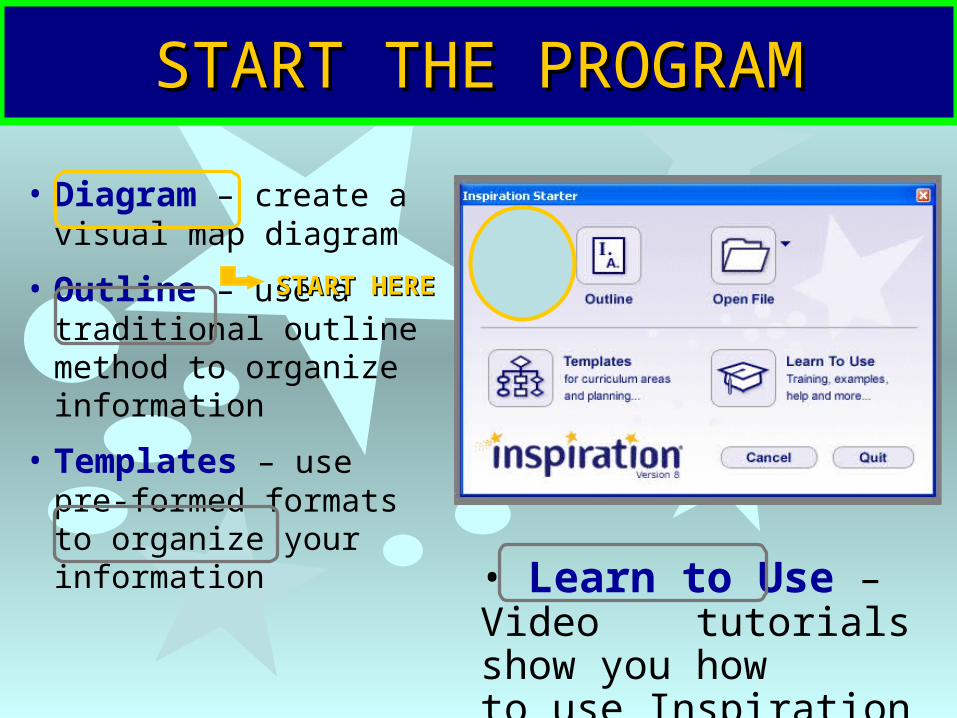
• Diagram – create a visual map diagram
• Outline – use a traditional outline method to organize information
• Templates – use pre-formed formats to organize your information
• Learn to Use – Video tutorials show you how to use Inspiration
START START HEREHERE

START YOUR DIAGRAMSTART YOUR DIAGRAM
• To begin, type in your main idea in the bubble provided.
• Then choose a tool from the toolbar to add more ideas to your map.– Rapid Fire– Create
• Keep adding more related concepts!
Before using Inspiration make sure to read the material you will be basing your diagrams on.
INSPIRATION TOOLSINSPIRATION TOOLS(using the toolbar at the top of the screen)(using the toolbar at the top of the screen)
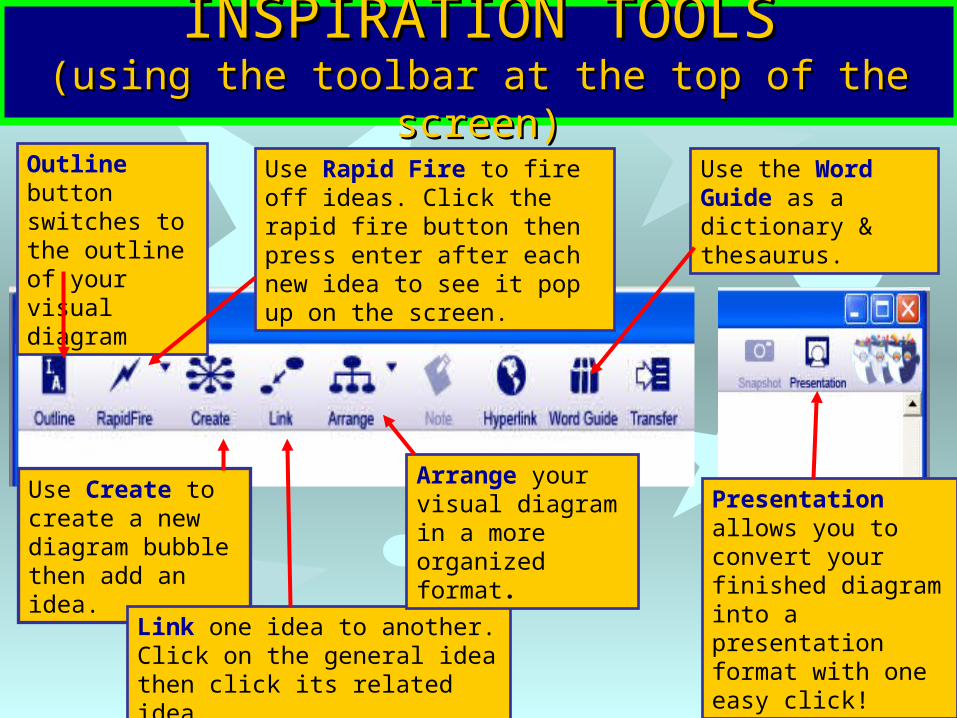
Outline button switches to the outline of your visual diagram
Use Rapid Fire to fire off ideas. Click the rapid fire button then press enter after each new idea to see it pop up on the screen.
Use Create to create a new diagram bubble then add an idea.
Link one idea to another. Click on the general idea then click its related idea.
Arrange your visual diagram in a more organized format.
Use the Word Guide as a dictionary & thesaurus.
Presentation allows you to convert your finished diagram into a presentation format with one easy click!

INSPIRATION TOOLSINSPIRATION TOOLS(additional tools)(additional tools)
The Drawing Toolbar allows you to change the format and style of your shapes. You can also zoom in on and center your map on the screen.
Symbol Palette allows you to change the shape or image of an idea symbol.
The Idea Symbol is where you type in your information.
The Note tool allows you to include information that is not visible in the diagram but that can be included later. (similar to a Post It)

INSPIRATION TOOLSINSPIRATION TOOLS(relationship tools)(relationship tools)
1. Indicate relationships between ideas by using the linking phrases tool. To use: Right click on a link and choose a phrase OR type your own.
2. Include notes for added information about an idea.
=
1
2

WHAT IS A TEMPLATE?WHAT IS A TEMPLATE?
Templates offer a pre-established framework for organizing information & ideas
Areas covered include: Language Arts Science Social Studies Thinking Skills Planning Topics

USE A TEMPLATEUSE A TEMPLATEGo to File, Open Template or
select Template from the Inspiration Starter Menu
Select the Template area you want to view and click Open
Once the template opens, read through the prompts inside of the idea symbol
Select an idea symbol then type in the requested information into that symbol.

WHAT IS AN OUTLINE?WHAT IS AN OUTLINE?The outline helps you put ideas about your
topic in a numbered and organized format. You may use the outline as a guide when
creating your writing sample.
Spell Check your document before printing by clicking on:
Tools, then Spell Check
Use the Outline Toolbar to Insert Topics & Subtopics & to move your topics to the left or right to increase or decrease the importance of the topic.

SAVE YOUR DIAGRAMSAVE YOUR DIAGRAM
1. Click on File, Save As2. Navigate to your student
number ‘H’ drive i.e.. 00112288$ on ‘FCStudent’ (H:)
3. Name your diagram & click Save.
To continue to work on your diagram later, make sure to Save your file:
You may also save your Inspiration file to a removable disk drive.

PRINT YOUR DIAGRAMPRINT YOUR DIAGRAM(using Setup Options)(using Setup Options)
Click on File, then Page Setup to change printing options including: 1. Type a Header or Footer with
your class information.
2. Change your page orientation to Landscape or Portrait in the Layout tab.
3. Print a crowded diagram onto two pages by clicking on the Scale to 2 pages button in the Layout tab.
Click the Print button once you have set your options.
1
2
3

TRANSFER YOUR DIAGRAMTRANSFER YOUR DIAGRAM
To print outside the lab:1. Transfer your diagram to a word
processing program by clicking the Transfer tool from the Menu Bar.
2. Select your transfer options and click OK. Then, choose your preferred word processing program.
3. Edit your transferred outline. You will not be able to edit the diagram in the word processing program.
Print your document.

ASK QUESTIONS!ASK QUESTIONS!
• Instructors and
• Instructional Assistants are here to answer your questions!
Learn more at inspiration.com
Remember: To print in the Skills Center youmust first purchase printing at the bookstore, then present your receipt to Skills Center staff.