infinium hd assay gemini protocol guide (11311007)
TRANSCRIPT

ILLUMINA PROPRIETARYCatalog # WG-901-3002Part # 11311007 Rev. A
Infinium® HD AssayGemini Protocol GuideFOR RESEARCH ONLY


Notice
This publication and its contents are proprietary to Illumina, Inc., and are intended solely
for the contractual use of its customers and for no other purpose than to operate the
system described herein. This publication and its contents shall not be used or distributed
for any other purpose and/or otherwise communicated, disclosed, or reproduced in any
way whatsoever without the prior written consent of Illumina, Inc.
For the proper operation of this system and/or all parts thereof, the instructions in this
guide must be strictly and explicitly followed by experienced personnel. All of the contents
of this guide must be fully read and understood prior to operating the system or any of the
parts thereof.
FAILURE TO COMPLETELY READ AND FULLY UNDERSTAND AND FOLLOW ALL OF THE
CONTENTS OF THIS GUIDE PRIOR TO OPERATING THIS SYSTEM, OR PARTS THEREOF,
MAY RESULT IN DAMAGE TO THE EQUIPMENT, OR PARTS THEREOF, AND INJURY TO
ANY PERSONS OPERATING THE SAME.
Illumina, Inc. does not assume any liability arising out of the application or use of any
products, component parts, or software described herein. Illumina, Inc. further does not
convey any license under its patent, trademark, copyright, or common-law rights nor the
similar rights of others. Illumina, Inc. further reserves the right to make any changes in any
processes, products, or parts thereof, described herein without notice. While every effort
has been made to make this guide as complete and accurate as possible as of the
publication date, no warranty or fitness is implied, nor does Illumina accept any liability for
damages resulting from the information contained in this guide.
© 2008 Illumina, Inc. All rights reserved. Illumina, Solexa, Making Sense Out of Life, Oligator, Sentrix, GoldenGate, DASL, BeadArray, Array of Arrays, Infinium, BeadXpress, VeraCode, IntelliHyb, iSelect, CSPro, iScan, and GenomeStudio are
registered trademarks or trademarks of Illumina. All other brands and names contained
herein are the property of their respective owners.
Infinium HD Assay Gemini Protocols iii


Revision History
Catalog #Part #, Revision Letter
Date
Catalog # WG-901-3002Part # 11311007, Rev. A
October 2008
Infinium HD Assay Gemini Protocols v


Table of Contents
Chapter 1 Overview . . . . . . . . . . . . . . . . . . . . . . . . . . . . . . . . . . 1
Introduction . . . . . . . . . . . . . . . . . . . . . . . . . . . . . . . . . . . . . . . . . . . . . . . . . . 2
Audience and Purpose. . . . . . . . . . . . . . . . . . . . . . . . . . . . . . . . . . . . . . . . . . 3
The Infinium HD Assay Gemini . . . . . . . . . . . . . . . . . . . . . . . . . . . . . . . . . . . 4
The HD BeadChip . . . . . . . . . . . . . . . . . . . . . . . . . . . . . . . . . . . . . . . . . . . . . 8
Illumina Lab Protocols . . . . . . . . . . . . . . . . . . . . . . . . . . . . . . . . . . . . . . . . . . 8
Tracking Tools . . . . . . . . . . . . . . . . . . . . . . . . . . . . . . . . . . . . . . . . . . . . . . . . 8
Tecan GenePaint . . . . . . . . . . . . . . . . . . . . . . . . . . . . . . . . . . . . . . . . . . . . . 10
BeadArray Reader, iScan, and AutoLoader2 . . . . . . . . . . . . . . . . . . . . . . . . 11
GenomeStudio Integrated Informatics Platform . . . . . . . . . . . . . . . . . . . . . 11
Technical Assistance . . . . . . . . . . . . . . . . . . . . . . . . . . . . . . . . . . . . . . . . . . 12
. . . . . . . . . . . . . . . . . . . . . . . . . . . . . . . . . . . . . . . . . . . . . . . . . . . . . . . . . . . 12
Chapter 2 Infinium HD Assay Gemini Manual Protocol . . . . . . 13
Introduction . . . . . . . . . . . . . . . . . . . . . . . . . . . . . . . . . . . . . . . . . . . . . . . . . 14
Infinium HD Assay Gemini Manual Workflow. . . . . . . . . . . . . . . . . . . . . . . . 14
Equipment, Materials, and Reagents . . . . . . . . . . . . . . . . . . . . . . . . . . . . . . 16
Quantitate DNA (Optional) . . . . . . . . . . . . . . . . . . . . . . . . . . . . . . . . . . . . . 18
Make the AMP3 Plate. . . . . . . . . . . . . . . . . . . . . . . . . . . . . . . . . . . . . . . . . . 27
Incubate the AMP3 Plate . . . . . . . . . . . . . . . . . . . . . . . . . . . . . . . . . . . . . . . 30
Fragment the AMP3 Plate . . . . . . . . . . . . . . . . . . . . . . . . . . . . . . . . . . . . . . 31
Precipitate the AMP3 Plate . . . . . . . . . . . . . . . . . . . . . . . . . . . . . . . . . . . . . 34
Resuspend the AMP3 Plate . . . . . . . . . . . . . . . . . . . . . . . . . . . . . . . . . . . . . 37
Hybridize Duo BeadChip . . . . . . . . . . . . . . . . . . . . . . . . . . . . . . . . . . . . . . . 39
Wash BeadChips . . . . . . . . . . . . . . . . . . . . . . . . . . . . . . . . . . . . . . . . . . . . . 50
Single-Base Extension and Stain HD BeadChip. . . . . . . . . . . . . . . . . . . . . . 59
Image BeadChip on the iScan System. . . . . . . . . . . . . . . . . . . . . . . . . . . . . 74
Image BeadChip on the BeadArray Reader. . . . . . . . . . . . . . . . . . . . . . . . . 82
GenomeStudio Integrated Informatics Platform . . . . . . . . . . . . . . . . . . . . . 90
Chapter 3 Infinium HD Assay Gemini Automated Protocol . . . 91
Introduction . . . . . . . . . . . . . . . . . . . . . . . . . . . . . . . . . . . . . . . . . . . . . . . . . 92
Infinium HD Assay Gemini Automated Workflow . . . . . . . . . . . . . . . . . . . . 92
Equipment, Materials, and Reagents . . . . . . . . . . . . . . . . . . . . . . . . . . . . . . 94
Quantitate DNA (Optional) . . . . . . . . . . . . . . . . . . . . . . . . . . . . . . . . . . . . . 97
Make the AMP3 Plate. . . . . . . . . . . . . . . . . . . . . . . . . . . . . . . . . . . . . . . . . 106
Make Multiple AMP3 Plates . . . . . . . . . . . . . . . . . . . . . . . . . . . . . . . . . . . . 113
Incubate the AMP3 Plate . . . . . . . . . . . . . . . . . . . . . . . . . . . . . . . . . . . . . . 119
Infinium HD Assay Gemini Protocols 1

2 Table of Contents
Fragment the AMP3 Plate . . . . . . . . . . . . . . . . . . . . . . . . . . . . . . . . . . . . . 121
Precipitate the AMP3 Plate . . . . . . . . . . . . . . . . . . . . . . . . . . . . . . . . . . . . 125
Resuspend the AMP3 Plate . . . . . . . . . . . . . . . . . . . . . . . . . . . . . . . . . . . . 132
Hybridize Duo BeadChip . . . . . . . . . . . . . . . . . . . . . . . . . . . . . . . . . . . . . . 136
Wash BeadChips . . . . . . . . . . . . . . . . . . . . . . . . . . . . . . . . . . . . . . . . . . . . 152
Single-Base Extension and Stain HD BeadChip. . . . . . . . . . . . . . . . . . . . . 163
Image BeadChip on the iScan System. . . . . . . . . . . . . . . . . . . . . . . . . . . . 190
Image BeadChip on the BeadArray Reader. . . . . . . . . . . . . . . . . . . . . . . . 198
GenomeStudio Integrated Informatics Platform . . . . . . . . . . . . . . . . . . . . 206
Index . . . . . . . . . . . . . . . . . . . . . . . . . . . . . . . . . . . . . . . . 207
Catalog # WG-901-3002
Part # 11311007 Rev A

List of Tables
Table 1 Sample Sheet Guidelines . . . . . . . . . . . . . . . . . . . . . . . . . . . . . . . . . . . . . . . . 9
Table 2 Illumina Customer Support Contacts . . . . . . . . . . . . . . . . . . . . . . . . . . . . . . 12
Table 3 Illumina-Supplied Equipment. . . . . . . . . . . . . . . . . . . . . . . . . . . . . . . . . . . . 16
Table 4 User-Supplied Equipment . . . . . . . . . . . . . . . . . . . . . . . . . . . . . . . . . . . . . . 16
Table 5 Illumina-Supplied Reagents . . . . . . . . . . . . . . . . . . . . . . . . . . . . . . . . . . . . . 16
Table 6 Concentrations of Lambda DNA . . . . . . . . . . . . . . . . . . . . . . . . . . . . . . . . . 20
Table 7 Volumes for PicoGreen Reagents . . . . . . . . . . . . . . . . . . . . . . . . . . . . . . . . 21
Table 8 Illumina BeadArray Reader Indicators . . . . . . . . . . . . . . . . . . . . . . . . . . . . . 83
Table 9 User-Supplied Equipment . . . . . . . . . . . . . . . . . . . . . . . . . . . . . . . . . . . . . . 94
Table 10 Illumina-Supplied Materials . . . . . . . . . . . . . . . . . . . . . . . . . . . . . . . . . . . . . 94
Table 11 User-Supplied Materials . . . . . . . . . . . . . . . . . . . . . . . . . . . . . . . . . . . . . . . . 95
Table 12 Illumina-Supplied Reagents . . . . . . . . . . . . . . . . . . . . . . . . . . . . . . . . . . . . . 95
Table 13 Concentrations of Lambda DNA . . . . . . . . . . . . . . . . . . . . . . . . . . . . . . . . . 99
Table 14 Volumes for PicoGreen Reagents . . . . . . . . . . . . . . . . . . . . . . . . . . . . . . . 100
Table 15 List of Reactions . . . . . . . . . . . . . . . . . . . . . . . . . . . . . . . . . . . . . . . . . . . . . 171
Table 16 Illumina BeadArray Reader Indicators . . . . . . . . . . . . . . . . . . . . . . . . . . . . 199
Infinium HD Assay Gemini Protocols 3

4 List of Tables
Catalog # WG-901-3002
Part # 11311007 Rev A

List of Figures
Chapter 1 Overview . . . . . . . . . . . . . . . . . . . . . . . . . . . . . . . . . . 1
Figure 1 Denaturing and Neutralizing DNA. . . . . . . . . . . . . . . . . . . . . . . . . . . . . . . . . 4
Figure 2 Incubating DNA to Amplify . . . . . . . . . . . . . . . . . . . . . . . . . . . . . . . . . . . . . . 4
Figure 3 Fragmenting DNA . . . . . . . . . . . . . . . . . . . . . . . . . . . . . . . . . . . . . . . . . . . . . 5
Figure 4 Precipitating DNA . . . . . . . . . . . . . . . . . . . . . . . . . . . . . . . . . . . . . . . . . . . . . 5
Figure 5 Resuspending DNA . . . . . . . . . . . . . . . . . . . . . . . . . . . . . . . . . . . . . . . . . . . . 5
Figure 6 Hybridizing DNA to BeadChip. . . . . . . . . . . . . . . . . . . . . . . . . . . . . . . . . . . . 6
Figure 7 Washing BeadChip . . . . . . . . . . . . . . . . . . . . . . . . . . . . . . . . . . . . . . . . . . . . 6
Figure 8 Extending and Staining BeadChip. . . . . . . . . . . . . . . . . . . . . . . . . . . . . . . . . 7
Figure 9 Imaging BeadChip . . . . . . . . . . . . . . . . . . . . . . . . . . . . . . . . . . . . . . . . . . . . . 7
Figure 10 Sample Sheet Example . . . . . . . . . . . . . . . . . . . . . . . . . . . . . . . . . . . . . . . . 10
Chapter 2 Infinium HD Assay Gemini Manual Protocol. . . . . . . 13
Figure 11 Infinium HD Assay Gemini Manual Workflow. . . . . . . . . . . . . . . . . . . . . . . . 15
Figure 12 Dilution of Stock Lambda DNA Standard . . . . . . . . . . . . . . . . . . . . . . . . . . 19
Figure 13 Serial Dilutions of Lambda DNA . . . . . . . . . . . . . . . . . . . . . . . . . . . . . . . . . 20
Figure 14 Standard QDNA Plate with PicoGreen . . . . . . . . . . . . . . . . . . . . . . . . . . . . 22
Figure 15 Sample QDNA Plate with PicoGreen. . . . . . . . . . . . . . . . . . . . . . . . . . . . . . 22
Figure 16 Load the Illumina QDNA Protocol in SoftMax Pro. . . . . . . . . . . . . . . . . . . . 23
Figure 17 Select the Lambda Standard Screen . . . . . . . . . . . . . . . . . . . . . . . . . . . . . . 24
Figure 18 Read the Standard QDNA Plate . . . . . . . . . . . . . . . . . . . . . . . . . . . . . . . . . 24
Figure 19 View Standard Curve . . . . . . . . . . . . . . . . . . . . . . . . . . . . . . . . . . . . . . . . . . 25
Figure 20 Read the Sample QDNA Plate. . . . . . . . . . . . . . . . . . . . . . . . . . . . . . . . . . . 26
Figure 21 Denaturing and Neutralizing DNA. . . . . . . . . . . . . . . . . . . . . . . . . . . . . . . . 27
Figure 22 Distributing Sample to AMP3 Plate Wells . . . . . . . . . . . . . . . . . . . . . . . . . . 29
Figure 23 Incubating DNA to Amplify . . . . . . . . . . . . . . . . . . . . . . . . . . . . . . . . . . . . . 30
Figure 24 Fragmenting DNA . . . . . . . . . . . . . . . . . . . . . . . . . . . . . . . . . . . . . . . . . . . . 31
Figure 25 Distributing Sample in AMP3 Plate . . . . . . . . . . . . . . . . . . . . . . . . . . . . . . . 32
Figure 26 Securing Plates to Vortexer Platform with Velcro Straps . . . . . . . . . . . . . . . 32
Figure 27 Precipitating DNA . . . . . . . . . . . . . . . . . . . . . . . . . . . . . . . . . . . . . . . . . . . . 34
Figure 28 Balancing AMP3 Plate in Centrifuge . . . . . . . . . . . . . . . . . . . . . . . . . . . . . . 35
Figure 29 Uncovered AMP3 Plate Inverted for Air Drying . . . . . . . . . . . . . . . . . . . . . . 36
Figure 30 Resuspending DNA . . . . . . . . . . . . . . . . . . . . . . . . . . . . . . . . . . . . . . . . . . . 37
Figure 31 Hybridizing DNA to BeadChip. . . . . . . . . . . . . . . . . . . . . . . . . . . . . . . . . . . 39
Figure 32 BeadChip Hyb Cartridge Components . . . . . . . . . . . . . . . . . . . . . . . . . . . . 41
Figure 33 Hyb Chamber and Gasket . . . . . . . . . . . . . . . . . . . . . . . . . . . . . . . . . . . . . . 41
Infinium HD Assay Gemini Protocols 5

6 List of Figures
Figure 34 Placing Gasket into Hyb Chamber. . . . . . . . . . . . . . . . . . . . . . . . . . . . . . . . 41
Figure 35 Hyb Chamber with Gasket in Place . . . . . . . . . . . . . . . . . . . . . . . . . . . . . . . 42
Figure 36 Dispensing PB2 into Hyb Chamber Reservoirs . . . . . . . . . . . . . . . . . . . . . . 42
Figure 37 Sealing the Hyb Chamber . . . . . . . . . . . . . . . . . . . . . . . . . . . . . . . . . . . . . . 43
Figure 38 Consolidating Sample Back Into Original Sample Well. . . . . . . . . . . . . . . . 44
Figure 39 Placing BeadChips into Hyb Chamber Inserts . . . . . . . . . . . . . . . . . . . . . . . 44
Figure 40 Distributing Sample to BeadChips (Pattern) . . . . . . . . . . . . . . . . . . . . . . . . 45
Figure 41 Dispensing Sample onto BeadChip (Photo). . . . . . . . . . . . . . . . . . . . . . . . . 46
Figure 42 Placing Hyb Chamber Inserts into Hyb Chamber . . . . . . . . . . . . . . . . . . . . 46
Figure 43 Securing Hyb Chamber Lid . . . . . . . . . . . . . . . . . . . . . . . . . . . . . . . . . . . . . 47
Figure 44 Hyb Chamber Correctly Placed in Hyb Oven . . . . . . . . . . . . . . . . . . . . . . . 47
Figure 45 Two Hyb Chambers Correctly Placed in Hyb Oven . . . . . . . . . . . . . . . . . . . 48
Figure 46 Incorrectly Placed Hyb Chamber . . . . . . . . . . . . . . . . . . . . . . . . . . . . . . . . . 48
Figure 47 Washing BeadChip . . . . . . . . . . . . . . . . . . . . . . . . . . . . . . . . . . . . . . . . . . . 50
Figure 48 Wash Rack in Wash Dish Containing PB1 . . . . . . . . . . . . . . . . . . . . . . . . . . 51
Figure 49 Removing the Coverseal . . . . . . . . . . . . . . . . . . . . . . . . . . . . . . . . . . . . . . . 52
Figure 50 Placing BeadChips in Wash Dish Containing PB1 . . . . . . . . . . . . . . . . . . . . 53
Figure 51 Placing Black Frames into Multi-Sample BeadChip Alignment Fixture . . . . 54
Figure 52 Placing BeadChip into Black Frame on Alignment Fixture . . . . . . . . . . . . . 54
Figure 53 Placing Clear Plastic Spacer onto BeadChip . . . . . . . . . . . . . . . . . . . . . . . . 55
Figure 54 Placing Alignment Bar onto Alignment Fixture . . . . . . . . . . . . . . . . . . . . . . 55
Figure 55 Placing Glass Back Plate onto BeadChip . . . . . . . . . . . . . . . . . . . . . . . . . . . 56
Figure 56 Securing Flow-Through Chamber Assembly with Metal Clamps. . . . . . . . . 57
Figure 57 Trimming Spacer Ends from Flow-Through Chamber Assembly . . . . . . . . . 57
Figure 58 Extending and Staining BeadChip. . . . . . . . . . . . . . . . . . . . . . . . . . . . . . . . 59
Figure 59 XStain HD BeadChip Reagent Tubes and Bottles . . . . . . . . . . . . . . . . . . . . 61
Figure 60 Water Circulator Connected to Chamber Rack . . . . . . . . . . . . . . . . . . . . . . 62
Figure 61 Illumina Temperature Probe in Chamber Rack . . . . . . . . . . . . . . . . . . . . . . 63
Figure 62 Dispensing RA1 into Each Flow-Through Chamber . . . . . . . . . . . . . . . . . . 64
Figure 63 PB1 and XC4 Wash Dishes with Staining Rack . . . . . . . . . . . . . . . . . . . . . . 66
Figure 64 Staining Rack Locking Arms and Tab. . . . . . . . . . . . . . . . . . . . . . . . . . . . . . 66
Figure 65 Removing Metal Clamps from Flow-Through Chamber . . . . . . . . . . . . . . . 67
Figure 66 Washing BeadChips in PB1 . . . . . . . . . . . . . . . . . . . . . . . . . . . . . . . . . . . . . 68
Figure 67 Moving BeadChips from PB1 to XC4. . . . . . . . . . . . . . . . . . . . . . . . . . . . . . 69
Figure 68 Staining Rack in Correct Orientation . . . . . . . . . . . . . . . . . . . . . . . . . . . . . . 70
Figure 69 Moving the Staining Rack from XC4 to Tube Rack . . . . . . . . . . . . . . . . . . . 70
Figure 70 Removing Staining Rack Handle . . . . . . . . . . . . . . . . . . . . . . . . . . . . . . . . . 71
Figure 71 Placing BeadChips on Tube Rack . . . . . . . . . . . . . . . . . . . . . . . . . . . . . . . . 71
Figure 72 Testing Vacuum Seal . . . . . . . . . . . . . . . . . . . . . . . . . . . . . . . . . . . . . . . . . . 72
Figure 73 Initialize iScan Reader . . . . . . . . . . . . . . . . . . . . . . . . . . . . . . . . . . . . . . . . . 75
Figure 74 Welcome Window . . . . . . . . . . . . . . . . . . . . . . . . . . . . . . . . . . . . . . . . . . . . 76
Figure 75 Scan BeadChip Barcodes. . . . . . . . . . . . . . . . . . . . . . . . . . . . . . . . . . . . . . . 77
Figure 76 Deselect BeadChip Sections . . . . . . . . . . . . . . . . . . . . . . . . . . . . . . . . . . . . 78
Figure 77 Review Window with Failed Stripes . . . . . . . . . . . . . . . . . . . . . . . . . . . . . . . 79
Figure 78 Monitor the Scan . . . . . . . . . . . . . . . . . . . . . . . . . . . . . . . . . . . . . . . . . . . . . 81
Figure 79 Illumina BeadArray Reader. . . . . . . . . . . . . . . . . . . . . . . . . . . . . . . . . . . . . . 83
Figure 80 BeadScan Welcome Screen . . . . . . . . . . . . . . . . . . . . . . . . . . . . . . . . . . . . . 84
Figure 81 Select BeadChip Docking Fixture . . . . . . . . . . . . . . . . . . . . . . . . . . . . . . . . 84
Figure 82 Enter Data Repository and Decode Data Paths. . . . . . . . . . . . . . . . . . . . . . 85
Figure 83 Place BeadChips into Illumina BeadArray Reader Tray . . . . . . . . . . . . . . . . 85
Figure 84 BeadArray Reader Tile Process . . . . . . . . . . . . . . . . . . . . . . . . . . . . . . . . . . 86
Figure 85 BeadArray Reader Tilt & Align Processes . . . . . . . . . . . . . . . . . . . . . . . . . . 87
Catalog # WG-901-3002
Part # 11311007 Rev A

List of Figures 7
Figure 86 BeadArray Reader Scan Process . . . . . . . . . . . . . . . . . . . . . . . . . . . . . . . . . 88
Figure 87 Scan Completed and Scan Completed with Warnings Screens . . . . . . . . . 88
Figure 88 Exit the BeadArray Reader Software . . . . . . . . . . . . . . . . . . . . . . . . . . . . . . 89
Figure 89 Wiping Edges of BeadChip . . . . . . . . . . . . . . . . . . . . . . . . . . . . . . . . . . . . . 90
Chapter 3 Infinium HD Assay Gemini Automated Protocol . . . 91
Figure 90 Infinium HD Assay Gemini Automated Workflow . . . . . . . . . . . . . . . . . . . . 93
Figure 91 Dilution of Stock Lambda DNA Standard . . . . . . . . . . . . . . . . . . . . . . . . . . 99
Figure 92 Serial Dilutions of Lambda DNA . . . . . . . . . . . . . . . . . . . . . . . . . . . . . . . . 100
Figure 93 DNA Plate Selection Dialog Box . . . . . . . . . . . . . . . . . . . . . . . . . . . . . . . . 101
Figure 94 Make Quant Screen . . . . . . . . . . . . . . . . . . . . . . . . . . . . . . . . . . . . . . . . . . 102
Figure 95 Infinium Fluorometry Analysis Main Screen . . . . . . . . . . . . . . . . . . . . . . . . 104
Figure 96 Number of Sample QNT Plates . . . . . . . . . . . . . . . . . . . . . . . . . . . . . . . . . 104
Figure 97 Sample QNT Data . . . . . . . . . . . . . . . . . . . . . . . . . . . . . . . . . . . . . . . . . . . 105
Figure 98 Denaturing and Neutralizing DNA. . . . . . . . . . . . . . . . . . . . . . . . . . . . . . . 106
Figure 99 Tecan Eight-Tip Robot (Make AMP3 Setup) . . . . . . . . . . . . . . . . . . . . . . . 108
Figure 100 Selecting the DNA Plate Type . . . . . . . . . . . . . . . . . . . . . . . . . . . . . . . . . . 109
Figure 101 Make AMP3 Basic Run Parameters . . . . . . . . . . . . . . . . . . . . . . . . . . . . . . 110
Figure 102 Securing Plates to Vortexer Platform with Velcro Straps . . . . . . . . . . . . . . 110
Figure 103 Selecting Project or Batch for Make AMP3 . . . . . . . . . . . . . . . . . . . . . . . . 111
Figure 104 Make AMP3 Screen with Project and Batch Selected . . . . . . . . . . . . . . . . 112
Figure 105 Tecan Eight-Tip Robot (Make Multi AMP3 Setup) . . . . . . . . . . . . . . . . . . . 115
Figure 106 Selecting Project for Make Multi AMP3. . . . . . . . . . . . . . . . . . . . . . . . . . . 116
Figure 107 Selecting Batches. . . . . . . . . . . . . . . . . . . . . . . . . . . . . . . . . . . . . . . . . . . . 116
Figure 108 Make Multi AMP3 Screen . . . . . . . . . . . . . . . . . . . . . . . . . . . . . . . . . . . . . 117
Figure 109 Incubating DNA to Amplify . . . . . . . . . . . . . . . . . . . . . . . . . . . . . . . . . . . . 119
Figure 110 (Infinium LIMS) Verifying AMP3 for Incubation . . . . . . . . . . . . . . . . . . . . . 119
Figure 111 Fragmenting DNA . . . . . . . . . . . . . . . . . . . . . . . . . . . . . . . . . . . . . . . . . . . 121
Figure 112 Tecan Eight-Tip Robot (Fragment AMP3 Setup) . . . . . . . . . . . . . . . . . . . . 122
Figure 113 Fragment AMP3 Screen. . . . . . . . . . . . . . . . . . . . . . . . . . . . . . . . . . . . . . . 123
Figure 114 Precipitating DNA . . . . . . . . . . . . . . . . . . . . . . . . . . . . . . . . . . . . . . . . . . . 125
Figure 115 Tecan Eight-Tip Robot (Precip AMP3 Setup) . . . . . . . . . . . . . . . . . . . . . . . 126
Figure 116 (Infinium LIMS) Verifying AMP3 for Centrifugation . . . . . . . . . . . . . . . . . . 127
Figure 117 Precip AMP3 Screen . . . . . . . . . . . . . . . . . . . . . . . . . . . . . . . . . . . . . . . . . 128
Figure 118 Balancing AMP3 Plate in Centrifuge . . . . . . . . . . . . . . . . . . . . . . . . . . . . . 130
Figure 119 Uncovered AMP3 Plate Inverted for Air Drying . . . . . . . . . . . . . . . . . . . . . 131
Figure 120 Resuspending DNA . . . . . . . . . . . . . . . . . . . . . . . . . . . . . . . . . . . . . . . . . . 132
Figure 121 Tecan Eight-Tip Robot (Resuspend AMP3 Setup) . . . . . . . . . . . . . . . . . . . 133
Figure 122 Resuspend AMP3 Screen. . . . . . . . . . . . . . . . . . . . . . . . . . . . . . . . . . . . . . 134
Figure 123 Hybridizing DNA to BeadChip. . . . . . . . . . . . . . . . . . . . . . . . . . . . . . . . . . 136
Figure 124 Guide-A Robot Tip Alignment Guide . . . . . . . . . . . . . . . . . . . . . . . . . . . . 138
Figure 125 BeadChip Hyb Cartridge Components . . . . . . . . . . . . . . . . . . . . . . . . . . . 139
Figure 126 Hyb Chamber and Gasket . . . . . . . . . . . . . . . . . . . . . . . . . . . . . . . . . . . . . 139
Figure 127 Placing Gasket into Hyb Chamber. . . . . . . . . . . . . . . . . . . . . . . . . . . . . . . 139
Figure 128 Hyb Chamber with Gasket in Place . . . . . . . . . . . . . . . . . . . . . . . . . . . . . . 140
Figure 129 Dispensing PB2 into Hyb Chamber Reservoirs . . . . . . . . . . . . . . . . . . . . . 140
Figure 130 Sealing the Hyb Chamber . . . . . . . . . . . . . . . . . . . . . . . . . . . . . . . . . . . . . 141
Figure 131 Placing Alignment Fixtures and AMP3 Plate onto Robot Bed . . . . . . . . . . 142
Figure 132 (Infinium LIMS) Verifying AMP3 and BeadChips for Hyb . . . . . . . . . . . . . . 143
Figure 133 Placing BeadChips into Robot Alignment Fixture . . . . . . . . . . . . . . . . . . . 144
Figure 134 Four Stacked Robot Alignment Fixtures . . . . . . . . . . . . . . . . . . . . . . . . . . 145
Infinium HD Assay Gemini Protocols

8 List of Figures
Figure 135 Hyb Duo BeadChip Screen . . . . . . . . . . . . . . . . . . . . . . . . . . . . . . . . . . . . 145
Figure 136 Full set of Robot Tip Alignment Guides on Robot Bed . . . . . . . . . . . . . . . 146
Figure 137 Placing Hyb Chamber Inserts into Hyb Chamber . . . . . . . . . . . . . . . . . . . 148
Figure 138 Securing Hyb Chamber Lid . . . . . . . . . . . . . . . . . . . . . . . . . . . . . . . . . . . . 148
Figure 139 Hyb Chamber Correctly Placed in Hyb Oven . . . . . . . . . . . . . . . . . . . . . . 149
Figure 140 Two Hyb Chambers Correctly Placed in Hyb Oven . . . . . . . . . . . . . . . . . . 149
Figure 141 Incorrectly Placed Hyb Chamber . . . . . . . . . . . . . . . . . . . . . . . . . . . . . . . . 150
Figure 142 Washing BeadChip . . . . . . . . . . . . . . . . . . . . . . . . . . . . . . . . . . . . . . . . . . 152
Figure 143 (Infinium LIMS) Verifying Reagents and BeadChips for Washing. . . . . . . . 154
Figure 144 Wash Rack in Wash Dish Containing PB1 . . . . . . . . . . . . . . . . . . . . . . . . . 155
Figure 145 Removing the Coverseal . . . . . . . . . . . . . . . . . . . . . . . . . . . . . . . . . . . . . . 156
Figure 146 Placing BeadChips in Wash Dish Containing PB1 . . . . . . . . . . . . . . . . . . . 156
Figure 147 Placing Black Frames into Multi-Sample BeadChip Alignment Fixture . . . 157
Figure 148 Placing BeadChip into Black Frame on Alignment Fixture . . . . . . . . . . . . 158
Figure 149 Placing Clear Plastic Spacer onto BeadChip . . . . . . . . . . . . . . . . . . . . . . . 158
Figure 150 Placing Alignment Bar onto Alignment Fixture . . . . . . . . . . . . . . . . . . . . . 159
Figure 151 Placing Glass Back Plate onto BeadChip . . . . . . . . . . . . . . . . . . . . . . . . . . 159
Figure 152 Securing Flow-Through Chamber Assembly with Metal Clamps. . . . . . . . 160
Figure 153 Trimming Spacer Ends from Flow-Through Chamber Assembly . . . . . . . . 161
Figure 154 Extending and Staining BeadChip. . . . . . . . . . . . . . . . . . . . . . . . . . . . . . . 163
Figure 155 Water Circulator Connected to Chamber Rack . . . . . . . . . . . . . . . . . . . . . 166
Figure 156 Illumina Temperature Probe in Chamber Rack . . . . . . . . . . . . . . . . . . . . . 167
Figure 157 Tecan Eight-Tip Robot (XStain HD BeadChip Setup) . . . . . . . . . . . . . . . . 168
Figure 158 XStain HD BeadChip Screen . . . . . . . . . . . . . . . . . . . . . . . . . . . . . . . . . . . 169
Figure 159 Entering Stain Temperature. . . . . . . . . . . . . . . . . . . . . . . . . . . . . . . . . . . . 170
Figure 160 Adjusting Chamber Rack to 44°C Message. . . . . . . . . . . . . . . . . . . . . . . . 170
Figure 161 Load BeadChips Message . . . . . . . . . . . . . . . . . . . . . . . . . . . . . . . . . . . . . 170
Figure 162 (Infinium LIMS) Verifying Reagents and BeadChips for Coating . . . . . . . . 172
Figure 163 PB1 & XC4 Wash Dishes with Staining Rack . . . . . . . . . . . . . . . . . . . . . . . 174
Figure 164 Staining Rack Locking Arms and Tabs . . . . . . . . . . . . . . . . . . . . . . . . . . . . 174
Figure 165 Removing Metal Clamps from Flow-Through Chamber . . . . . . . . . . . . . . 175
Figure 166 Washing BeadChips in PB1 . . . . . . . . . . . . . . . . . . . . . . . . . . . . . . . . . . . . 176
Figure 167 Moving BeadChips from PB1 to XC4. . . . . . . . . . . . . . . . . . . . . . . . . . . . . 177
Figure 168 Staining Rack in Correct Orientation . . . . . . . . . . . . . . . . . . . . . . . . . . . . . 178
Figure 169 Moving BeadChip Carrier from XC4 to Tube Rack . . . . . . . . . . . . . . . . . . 178
Figure 170 Placing BeadChips on Tube Rack . . . . . . . . . . . . . . . . . . . . . . . . . . . . . . . 179
Figure 171 Removing Staining Rack Handle . . . . . . . . . . . . . . . . . . . . . . . . . . . . . . . . 179
Figure 172 PB1 and XC4 Wash Dishes with Staining Rack . . . . . . . . . . . . . . . . . . . . . 180
Figure 173 Staining Rack Locking Arms and Tabs . . . . . . . . . . . . . . . . . . . . . . . . . . . . 181
Figure 174 Removing Metal Clamps from Flow-Through Chamber . . . . . . . . . . . . . . 181
Figure 175 Washing BeadChips in PB1 . . . . . . . . . . . . . . . . . . . . . . . . . . . . . . . . . . . . 182
Figure 176 Moving BeadChips from PB1 to XC4. . . . . . . . . . . . . . . . . . . . . . . . . . . . . 183
Figure 177 Staining Rack in Correct Orientation . . . . . . . . . . . . . . . . . . . . . . . . . . . . . 184
Figure 178 Moving BeadChip Carrier from XC4 to Tube Rack . . . . . . . . . . . . . . . . . . 185
Figure 179 Placing BeadChips on Tube Rack . . . . . . . . . . . . . . . . . . . . . . . . . . . . . . . 185
Figure 180 Moving BeadChip Carrier from XC4 to Tube Rack . . . . . . . . . . . . . . . . . . 186
Figure 181 Removing Staining Rack Handle . . . . . . . . . . . . . . . . . . . . . . . . . . . . . . . . 187
Figure 182 Testing Vacuum Seal . . . . . . . . . . . . . . . . . . . . . . . . . . . . . . . . . . . . . . . . . 188
Figure 183 Initialize iScan Reader . . . . . . . . . . . . . . . . . . . . . . . . . . . . . . . . . . . . . . . . 191
Figure 184 Welcome Window . . . . . . . . . . . . . . . . . . . . . . . . . . . . . . . . . . . . . . . . . . . 192
Figure 185 Scan BeadChip Barcodes. . . . . . . . . . . . . . . . . . . . . . . . . . . . . . . . . . . . . . 193
Figure 186 Deselect BeadChip Sections . . . . . . . . . . . . . . . . . . . . . . . . . . . . . . . . . . . 194
Catalog # WG-901-3002
Part # 11311007 Rev A
List of Figures 9
Figure 187 Review Window with Failed Stripes . . . . . . . . . . . . . . . . . . . . . . . . . . . . . . 195
Figure 188 Monitor the Scan . . . . . . . . . . . . . . . . . . . . . . . . . . . . . . . . . . . . . . . . . . . . 197
Figure 189 Illumina BeadArray Reader. . . . . . . . . . . . . . . . . . . . . . . . . . . . . . . . . . . . . 199
Figure 190 BeadScan Welcome Screen . . . . . . . . . . . . . . . . . . . . . . . . . . . . . . . . . . . . 200
Figure 191 Select BeadChip Docking Fixture . . . . . . . . . . . . . . . . . . . . . . . . . . . . . . . 200
Figure 192 Enter Data Repository and Decode Data Paths. . . . . . . . . . . . . . . . . . . . . 201
Figure 193 Place BeadChips into Illumina BeadArray Reader Tray . . . . . . . . . . . . . . . 201
Figure 194 BeadArray Reader Tile Process . . . . . . . . . . . . . . . . . . . . . . . . . . . . . . . . . 202
Figure 195 BeadArray Reader Tilt & Align Processes . . . . . . . . . . . . . . . . . . . . . . . . . 203
Figure 196 BeadArray Reader Scan Process . . . . . . . . . . . . . . . . . . . . . . . . . . . . . . . . 204
Figure 197 Scan Completed and Scan Completed with Warnings Screens . . . . . . . . 204
Figure 198 Exit the BeadArray Reader Software . . . . . . . . . . . . . . . . . . . . . . . . . . . . . 205
Figure 199 Wiping Edges of BeadChip . . . . . . . . . . . . . . . . . . . . . . . . . . . . . . . . . . . . 206
Infinium HD Assay Gemini Protocols

10 List of Figures
Catalog # WG-901-3002
Part # 11311007 Rev A

Chapter 1
Overview
Topics2 Introduction
3 Audience and Purpose
4 The Infinium HD Assay Gemini
8 The HD BeadChip
8 Illumina Lab Protocols
8 Tracking Tools
10 Tecan GenePaint
11 BeadArray Reader, iScan, and AutoLoader2
11 GenomeStudio Integrated Informatics Platform
12 Technical Assistance
Infinium HD Assay Gemini Protocols 1

2 CHAPTER 1
Overview
Introduction
The Illumina® Infinium® HD Assay Gemini protocol revolutionizes DNA analysis by streamlining sample preparation and enabling unlimited multiplexing. Using Infinium I and Infinium II probe designs and dual color channel approach, the Infinium HD Assay Gemini protocol scales DNA analysis to more than a million SNPs and CNV markers per sample, dependent only on the number of features (bead types) on the array.
The Infinium HD Assay Gemini protocol accomplishes this unlimited multiplexing by combining whole-genome amplification (WGA) sample preparation with direct, array-based capture and enzymatic scoring of the SNP loci. Locus discrimination is provided by a combination of sequence-specific hybridization capture and array-based, single-base primer extension. In the case of Infinium II probe design, the 3' end of the primer is positioned directly adjacent to the SNP locus, or the non-polymorphic assay locus in the case of non-polymorphic probes. In the case of Infinium I probe design, the 3' end of the primer overlaps with the SNP site. If there is a perfect match, extension occurs and signal is generated. If there is a mismatch, extension does not occur and no signal is generated.
Extension of the primer incorporates a biotin nucleotide or a dinitrophenyl-labeled nucleotide. C and G nucleotides are biotin-labeled; A and T nucleotides are dinitrophenyl labeled. Signal amplification of the incorporated label further improves the overall signal-to-noise ratio of the assay.
The Illumina Infinium HD Assay Gemini protocol offers:
Effectively unlimited loci multiplexing
High call rate and accuracy
Genome-wide marker selection
Minimal risk of carryover contamination
Low DNA input of 400 ng
Walk-away automation using Tecan Genesis or Freedom EVO Robots and
Tecan GenePaint system
Infinium LIMS automation
Compatibility with both Illumina iScan™ System and
BeadArray™ Reader
Multi-sample BeadChip format
Catalog # WG-901-3002
Part # 11311007 Rev A

Audience and Purpose 3
Audience and Purpose
This guide is for laboratory technicians running the Infinium HD Assay Gemini with Illumina multi-sample DNA Analysis BeadChips. The guide documents the laboratory protocols associated with the assay. Follow all of the protocols in the order shown.
Chapter 2, Infinium HD Assay Gemini Manual Protocol explains how to run the assay manually in the lab.
Chapter 3, Infinium HD Assay Gemini Automated Protocol explains how to automate the protocol with the aid of the Tecan eight-tip robot.
Important Note Before following any of the procedures in this guide, read the Infinium Assay Lab Setup and Procedures Guide, which explains how to equip and run an Infinium HD Assay Gemini laboratory. The guide includes important information on the following topics:
Prevention of amplification product contamination
Safety precautions
Equipment, materials, and reagents
Standard lab procedures
Robot use
BeadChip Imaging
System maintenance
GenomeStudio™ controls
Troubleshooting
The instructions apply equally to all whole-genome genotyping chips provided by Illumina. All of the Infinium HD Assay Gemini Protocol guides assume that you have already set up the laboratory space and are familiar with the standard procedures and safety precautions.
Infinium HD Assay Gemini Protocols

4 CHAPTER 1
Overview
The Infinium HD Assay Gemini
This section describes and illustrates the assay protocol. The assay requires only 400 ng of DNA sample as input.
Amplify DNA The DNA samples are denatured and neutralized to prepare them for amplification.
Figure 1 Denaturing and Neutralizing DNA
See Make the AMP3 Plate on page 27 for manual processing. See Make the AMP3 Plate on page 106 for automated processing.
Incubate DNA The denatured DNA is isothermally amplified in an overnight step. The whole-genome amplification uniformly increases the amount of the DNA sample by several thousand-fold without introducing large amounts of amplification bias.
Figure 2 Incubating DNA to Amplify
See Incubate the AMP3 Plate on page 30 for manual processing. See Incubate the AMP3 Plate on page 119 for automated process-ing.
Catalog # WG-901-3002
Part # 11311007 Rev A

The Infinium HD Assay Gemini 5
Fragment DNA The amplified product is fragmented by a controlled enzymatic process that does not require gel electrophoresis. The process uses end-point fragmentation to avoid overfragmenting the sample.
Figure 3 Fragmenting DNA
See Fragment the AMP3 Plate on page 31 for manual processing. See Fragment the AMP3 Plate on page 121 for automated process-ing.
Precipitate DNA After an isopropanol precipitation, the fragmented DNA is collected by centrifugation at 4ºC.
Figure 4 Precipitating DNA
See Precipitate the AMP3 Plate on page 34 for manual processing. See Precipitate the AMP3 Plate on page 125 for automated process-ing.
Resuspend DNA The precipitated DNA is resuspended in hybridization buffer.
Figure 5 Resuspending DNA
See Resuspend the AMP3 Plate on page 37 for manual processing. See Resuspend the AMP3 Plate on page 132 for automated process-ing.
Infinium HD Assay Gemini Protocols

6 CHAPTER 1
Overview
Hybridize to BeadChip
The BeadChip is prepared for hybridization in a capillary flow-through chamber. Samples are applied to a Beadchip divided into halves by an IntelliHyb® seal (or gasket). The loaded BeadChip is incubated overnight in the Illumina Hybridization Oven. The amplified and fragmented DNA samples anneal to locus-specific 50mers (covalently linked to one of over 1,100,000 bead types) during hybridization.
Figure 6 Hybridizing DNA to BeadChip
See Hybridize Duo BeadChip on page 39 for manual processing. See Hybridize Duo BeadChip on page 136 for automated process-ing.
Wash BeadChip Unhybridized and non-specifically hybridized DNA is washed away, and the BeadChip is prepared for staining and extension.
Figure 7 Washing BeadChip
See Wash BeadChips on page 50 for manual processing. See Wash BeadChips on page 152 for automated processing.
(gDNA )
(gDNA )
(ident ical p robesper bead t ype)
Catalog # WG-901-3002
Part # 11311007 Rev A

The Infinium HD Assay Gemini 7
Extend and Stain (XStain)
BeadChip
Single-base extension of the oligos on the BeadChip, using the captured DNA as a template, incorporates detectable labels on the BeadChip and determines the genotype call for the sample.
Figure 8 Extending and Staining BeadChip
See Single-Base Extension and Stain HD BeadChip on page 59 for manual processing. See Single-Base Extension and Stain HD BeadChip on page 163 for automated processing.
Image BeadChip The Illumina iScan or BeadArray Reader scans the BeadChip, using a laser to excite the fluorophore of the single-base extension product on the beads. The scanner records high-resolution images of the light emitted from the fluorophores.
Figure 9 Imaging BeadChip
See the chapter on imaging BeadChips in the Infinium Assay Lab Setup and Procedures Guide.
(gDNA)
*Stain in green channel*Stain in red channel
(gDNA)
T*
G
A
C*
Infinium HD Assay Gemini Protocols

8 CHAPTER 1
Overview
The HD BeadChip
Illumina Infinium HD BeadChips are sophisticated silicon-based array devices. The quadrants of the slide are separated by an IntelliHyb seal so that you can run multiple samples simultaneously.
Each individual array in the matrix may hold over 1,100,000 different bead types. Distinct oligonucleotide probe sequences are attached to each bead type. Mixed pools of beads are assembled into the microwells of the BeadChip substrate. Because the microwells outnumber the distinct probe sequences, multiple copies of each bead type are present in the array. This built-in redundancy improves robustness and measurement precision. The BeadChip manufacturing process includes hybridization-based quality control of each array feature, allowing consistent production of high-quality, reproducible arrays.
Illumina Lab Protocols
Illumina lab protocols are designed to promote efficiency and minimize the risk of contamination. The Infinium Assay Lab Setup and Procedures Guide documents standard operating procedures and tools for an Infinium assay lab and explains how to set up and maintain separate pre- and post-amplification areas.
Chapter 2, Infinium HD Assay Gemini Manual Protocol and Chapter 3, Infinium HD Assay Gemini Automated Protocol, show how to perform the assay protocol with clearly divided pre- and post-amplification processes.
Tracking Tools
Illumina provides the following tools for sample tracking and guidance in the lab:
Experienced User Cards to guide you through the protocols. There are
separate sets of cards for the manual and automated processes.
Lab Tracking Form to map DNA samples to BeadChips and record the
barcode of each reagent and plate used in the protocol.
Sample Sheet template to record information about your samples for
later use in data analysis.
All of these documents are available on your Documentation CD for printing and reference.
Sample Sheet To effectively track your samples and assay, Illumina recommends you create a Sample Sheet. The Sample Sheet will later be used by the GenomeStudio™ application for data analysis. For instructions on data analysis, see the GenomeStudio Genotyping Module User Guide.
Create your Sample Sheet according to the guidelines provided in Table 1.
Catalog # WG-901-3002
Part # 11311007 Rev A
Tracking Tools 9
.
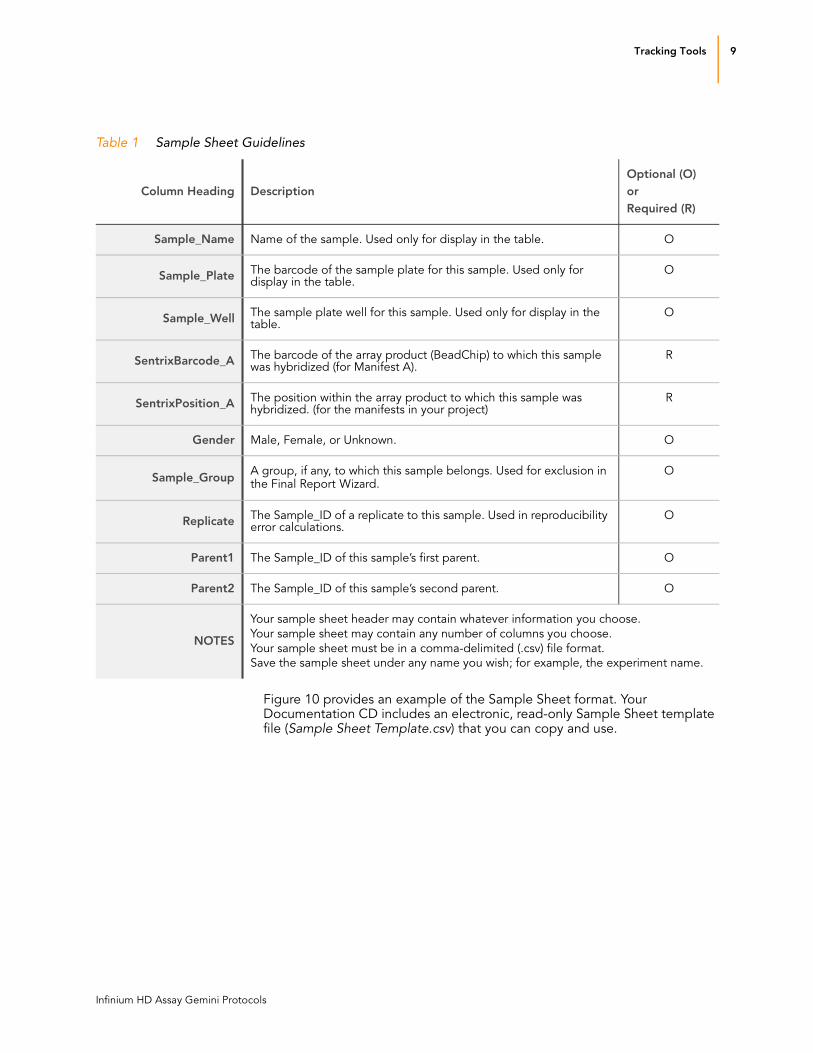
Figure 10 provides an example of the Sample Sheet format. Your Documentation CD includes an electronic, read-only Sample Sheet template file (Sample Sheet Template.csv) that you can copy and use.
Table 1 Sample Sheet Guidelines
Column Heading DescriptionOptional (O)orRequired (R)
Sample_Name Name of the sample. Used only for display in the table. O
Sample_Plate The barcode of the sample plate for this sample. Used only for display in the table.
O
Sample_Well The sample plate well for this sample. Used only for display in the table.
O
SentrixBarcode_A The barcode of the array product (BeadChip) to which this sample was hybridized (for Manifest A).
R
SentrixPosition_A The position within the array product to which this sample was hybridized. (for the manifests in your project)
R
Gender Male, Female, or Unknown. O
Sample_Group A group, if any, to which this sample belongs. Used for exclusion in the Final Report Wizard.
O
Replicate The Sample_ID of a replicate to this sample. Used in reproducibility error calculations.
O
Parent1 The Sample_ID of this sample’s first parent. O
Parent2 The Sample_ID of this sample’s second parent. O
NOTES
Your sample sheet header may contain whatever information you choose.
Your sample sheet may contain any number of columns you choose.
Your sample sheet must be in a comma-delimited (.csv) file format.
Save the sample sheet under any name you wish; for example, the experiment name.
Infinium HD Assay Gemini Protocols

10 CHAPTER 1
Overview
Figure 10 Sample Sheet Example
Tecan GenePaint
The Infinium HD Assay Gemini uses Tecan's GenePaint automated slide processor to process BeadChips. The GenePaint system employs a capillary gap flow-through chamber to enable reagent entrapment and exchange over the BeadChip’s active surface. Washing, blocking, extension, and signal amplification are all performed by simple reagent additions to the flow cell. Addition of a new reagent displaces the entrapped reagent from the flow cell. For maximum flexibility, these additions can be performed either manually or via the Tecan Genesis or Tecan Freedom Evo robots. The optional automated robotic processing and single-use reagent tube barcoding assure maximum consistency from slide to slide.
WARNINGDo not run any other programs or applications while using the Tecan robot. Your computer and the robot may lock up and stop a run.
Catalog # WG-901-3002
Part # 11311007 Rev A

BeadArray Reader, iScan, and AutoLoader2 11
BeadArray Reader, iScan, and AutoLoader2
BeadChips are imaged using either the Illumina iScan System or BeadArray Reader. Both of these are two-channel high-resolution laser imagers that scan BeadChips at two wavelengths simultaneously and create an image file for each channel (i.e., two per array). The iScan System incorporates advanced optics and sensors to support much higher throughput than the BeadArray Reader, while providing equally high data quality.
The GenomeScan (or BeadScan, for BeadArray Reader) software determines intensity values for each bead type and creates data files for each channel. GenomeStudio uses this data file in conjunction with the individual bead pool map (*.bpm) or manifest file (*.bgx) to analyze the data from the assay.
Loading and unloading the iScan System can be automated with the optional AutoLoader2. AutoLoader2 is fully integrated with GenomeScan software and Infinium LIMS, and contains an email alert system. The AutoLoader2 places carriers with up to four BeadChips in the iScan Reader tray, so that the iScan Reader can scan the BeadChips. The AutoLoader2 supports unattended processing of up to 48 carriers at a time in a single-reader or dual-reader configuration.
For instructions on imaging the BeadChip, see the Infinium Assay Lab Setup and Procedures Guide. For instructions on using the iScan System, see the iScan and AutoLoader2 System Guide. For instructions on using the BeadArray Reader, see the Illumina BeadArray Reader User Guide.
GenomeStudio Integrated Informatics Platform
GenomeStudio, Illumina’s new integrated data analysis software platform, provides a common environment for analyzing data obtained from microarray and sequencing technologies. Within this common environment, or framework, the GenomeStudio software modules allow you to perform application-specific analyses. The GenomeStudio Genotyping Module, included with your Illumina Infinium Assay system, is an application for extracting genotyping data from intensity data files (*.idat files) collected from systems such as the Illumina iScan System or BeadArray Reader.
Data analysis features of the GenomeStudio Genotyping Module include:
Choice of assay analysis within a single application
Data tables for information management and manipulation
Plotting and graphing tools
Whole-genome display of sample data in the IGV (Illumina Genome
Viewer)
Data visualization of one or more samples in the ICB (Illumina
Chromosome Browser)
Data normalization
Custom report file formats
Genotype calling
Clustering
Infinium HD Assay Gemini Protocols
12 CHAPTER 1
Overview
Detection of LOH (loss of heterozygosity)
Analysis of structural variation including CNV (copy number variation)
The GenomeStudio Genotyping Module can be fully integrated with the Infinium LIMS server.
For feature descriptions and instructions on using the GenomeStudio platform to visualize and analyze genotyping data, see the GenomeStudio Framework User Guide and the GenomeStudio Genotyping Module User Guide.
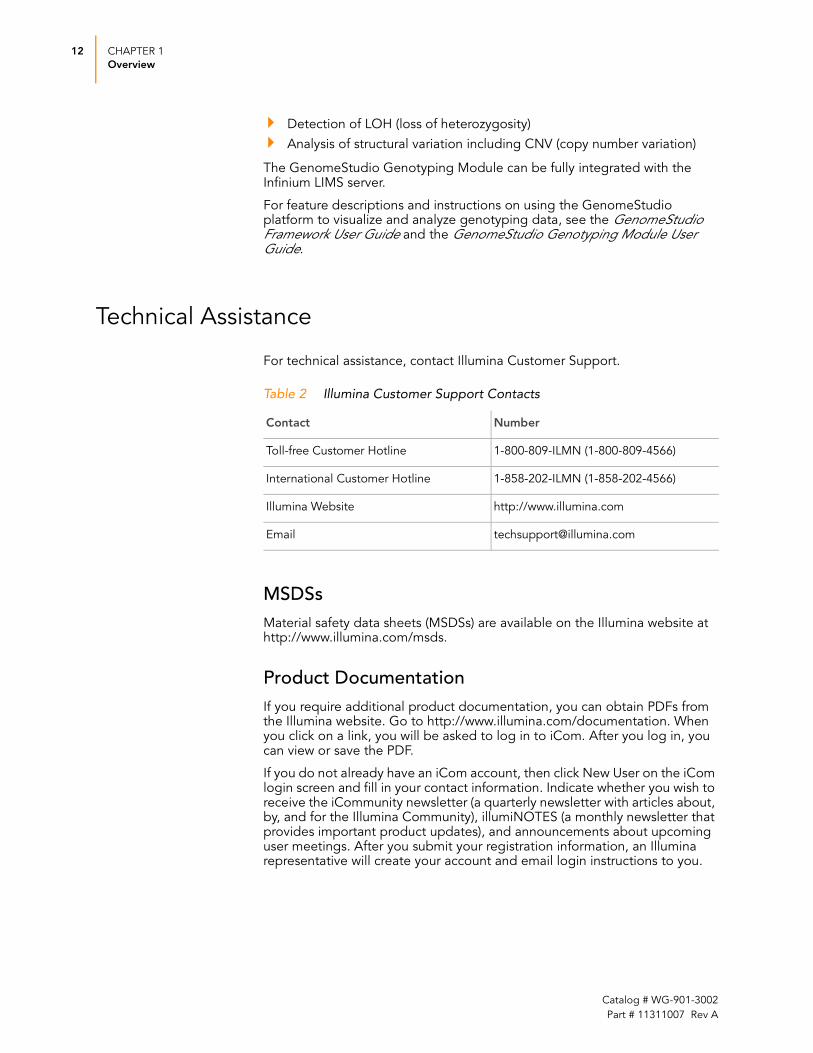
Technical Assistance
For technical assistance, contact Illumina Customer Support.
MSDSsMaterial safety data sheets (MSDSs) are available on the Illumina website at http://www.illumina.com/msds.
Product DocumentationIf you require additional product documentation, you can obtain PDFs from the Illumina website. Go to http://www.illumina.com/documentation. When you click on a link, you will be asked to log in to iCom. After you log in, you can view or save the PDF.
If you do not already have an iCom account, then click New User on the iCom login screen and fill in your contact information. Indicate whether you wish to receive the iCommunity newsletter (a quarterly newsletter with articles about, by, and for the Illumina Community), illumiNOTES (a monthly newsletter that provides important product updates), and announcements about upcoming user meetings. After you submit your registration information, an Illumina representative will create your account and email login instructions to you.
Table 2 Illumina Customer Support Contacts
Contact Number
Toll-free Customer Hotline 1-800-809-ILMN (1-800-809-4566)
International Customer Hotline 1-858-202-ILMN (1-858-202-4566)
Illumina Website http://www.illumina.com
Email [email protected]
Catalog # WG-901-3002
Part # 11311007 Rev A

Chapter 2
Infinium HD Assay Gemini
Manual Protocol
Topics14 Introduction
14 Infinium HD Assay Gemini Manual Workflow
16 Equipment, Materials, and Reagents
18 Quantitate DNA (Optional)
27 Make the AMP3 Plate
30 Incubate the AMP3 Plate
31 Fragment the AMP3 Plate
37 Resuspend the AMP3 Plate
39 Hybridize Duo BeadChip
50 Wash BeadChips
59 Single-Base Extension and Stain HD BeadChip
74 Image BeadChip on the iScan System
82 Image BeadChip on the BeadArray Reader
90 GenomeStudio Integrated Informatics Platform
Infinium HD Assay Gemini Protocols 13
14 CHAPTER 2
Infinium HD Assay Gemini Manual Protocol
Introduction
This chapter describes pre- and post-amplification manual laboratory protocols for Illumina Infinium HD Assay Gemini BeadChips. Follow the protocols in the order shown.
Infinium HD Assay Gemini Manual Workflow
Figure 11 graphically represents the Illumina Infinium HD Assay Gemini manual workflow. These protocols describe the procedure for preparing sixteen DNA samples. To process 48 or 96 samples, scale up the protocols accordingly.
Catalog # WG-901-3002
Part # 11311007 Rev A

Infinium HD Assay Gemini Manual Workflow 15
Figure 11 Infinium HD Assay Gemini Manual Workflow
Day 2 Day 3
Make AMP3Hands-on:
~20 min/16 samples
Incubation: 20–24 hours
Reagents0.1N NaOH
MP1
AMM
OutputAMP3 Plate with
Amplified DNA
XStain HDBeadChip
Hands-on: ~3 hours
Dry: 60 min
ReagentsRA1
95% Formamide /
1 mM EDTA
PB1
XC1
XC2
XC3
XC4
TEM
STM
ATM
OutputBeadChip
Precip AMP3
Hands-on: ~30 min/plate
Incubation: 50 min
Dry: 60 min
Reagents2-propanol
PA1
OutputAMP3 Plate
Fragment AMP3Hands-on: ~30 min
Incubation: 60 min
ReagentsFRG
OutputAMP3 Plate
Resuspend AMP3
Hands-on: ~30 min
Incubation: 60 min
ReagentsRA1
OutputAMP3 Plate
Hyb Duo BeadChipHands-on:
~30 min/8 BeadChips
Incubation: 16–24 hours
ReagentsPB2
OutputBeadChip
Wash BeadChipHands-on:
~20 min/8 BeadChips
ReagentsPB1
OutputBeadChip
Image BeadChip
iScan System Scan Time:35 min/BeadChip
BeadArray Reader ScanTime: 45 min/BeadChip
OutputImage and Data Files
Day 1
Quantitate DNA
Hands-on: 30 min/plate
Fluorometer: 5 min/plate
ReagentsLambda DNA
PicoGreen dsDNA
1X TE
OutputSample QDNA Plate with
Quantitated DNA
Pre-Amp
Optional
Infinium LIMS
Post-Amp
Cold Storage
Option
Overnight
Incubation
Fill in the lab tracking
form and the sample
sheet as you perform
the assay
Infinium HD Assay Gemini Protocols

16 CHAPTER 2
Infinium HD Assay Gemini Manual Protocol
Equipment, Materials, and Reagents
These items are specific to the two-sample, manual BeadChip assay. For a list of other equipment, materials, and reagents needed in an Infinium HD Assay Gemini lab, see the Infinium Assay Lab Setup and Procedures Guide.
Equipment Illumina-Supplied
Materials User-Supplied
Illumina-SuppliedAMP3 barcode labels
WG#-DNA barcode labels
Reagents Illumina-Supplied
Table 3 Illumina-Supplied Equipment
Item Part #
Multi-Sample BeadChip Alignment Fixture Illumina part # 218528
Table 4 User-Supplied Equipment
Item Source
Vacuum desiccator (1 per 8 BeadChips processed simultaneously) VWR Catalog # 24988-197
Vacuum tubing VWR Catalog # 62995-335
Tube racks for vacuum desiccators (must fit internal dimensions of vacuum desiccator)
VWR Catalog # 60916-748
Vacuum source (greater than 508 mm Hg (0.68 bar))
Vacuum gauge for vacuum desiccator (Recommended)
Table 5 Illumina-Supplied Reagents
Item Part #
MP1—Neutralization solution 11190751
AMM—Amplification Master Mix 11192044
FRG—Fragmentation solution 11190022
PA1—Precipitation solution 11190031
Catalog # WG-901-3002
Part # 11311007 Rev A

Equipment, Materials, and Reagents 17
RA1—Resuspension, hybridization, and wash solution 11191914
PB1—Reagent used to prepare BeadChips for hybridization 11191922
PB2—Humidifying buffer used during hybridization 11191130
XC1—XStain BeadChip solution 1 11208288
XC2—XStain BeadChip solution 2 11208296
TEM—Two-Color Extension Master Mix 11208309
XC3 (80 ml)—XStain BeadChip solution 3 11208392
XC3 (240 ml)—XStain BeadChip solution 3 11208421
STM—Superior Two-Color Master Mix 11288046
ATM—Anti-Stain Two-Color Master Mix 11208317
XC4—XStain BeadChip solution 4 11208430
Table 5 Illumina-Supplied Reagents
Item Part #
Infinium HD Assay Gemini Protocols

18 CHAPTER 2
Infinium HD Assay Gemini Manual Protocol
Quantitate DNA (Optional)
This process uses the PicoGreen dsDNA quantitation reagent to quantitate double-stranded DNA samples before bilsulfite conversion. You can quantitate up to six plates, each containing up to 96 samples. If you already know the concentration, proceed to Make the AMP3 Plate on page 27.
Illumina recommends the Molecular Probes PicoGreen assay to quantitate dsDNA samples. The PicoGreen assay can quantitate small DNA volumes, and measures DNA directly. Other techniques may pick up contamination such as RNA and proteins. Illumina recommends using a spectrofluorometer because fluorometry provides DNA-specific quantification. Spectrophotometry might also measure RNA and yield values that are too high.
Estimated Time Hands-on time: ~20 minutes per plate, plus 10 minutes to prepare the PicoGreen
Spectrofluorometer read time: ~5 minutes per plate
Consumables
Preparation Thaw PicoGreen to room temperature for 60 minutes in a light-
impermeable container.
Hand-label the microtiter plate “Standard DNA.”
Hand-label one of the Fluotrac plates “Standard QDNA.”
Hand-label the other Fluotrac plate “Sample QDNA.” This plate will
contain the quantitated DNA.
In the Sample Sheet, enter the Sample_Name (optional) and
Sample_Plate for each Sample_Well.
Steps In this section, you will perform the following steps:
Make a Standard DNA plate with serial dilutions of stock Lambda DNA.
Dilute PicoGreen with 1X TE.
Create a Standard QDNA Fluotrac plate containing serial dilutions of
DNA plus diluted PicoGreen.
Item Quantity Storage Supplied By
PicoGreen dsDNA quantitation reagent
See Instructions 2 to 8°C User
1X TE See Instructions Room temperature
User
Lambda DNA See Instructions 2 to 8°C User
96-well 0.65 ml microtiter plate
1 per 96 samples User
Fluotrac 200 96-well flat-bottom plate
1 per Std DNA plate
1 per Sample DNA plate
User
Catalog # WG-901-3002
Part # 11311007 Rev A

Quantitate DNA (Optional) 19
Create a Sample QDNA plate by adding diluted PicoGreen to the
sample DNA you plan to assay.
Make Standard DNA PlateIn this process, you create a Standard DNA plate with serial dilutions of stock Lambda DNA in the wells of column 1 (Figure 12).
1. Add stock Lambda DNA to well A1 in the plate labelled “Standard DNA”
and dilute it to 75 ng/μl in a final volume of 233.3 μl. Pipette up and
down several times.
a. Use the following formula to calculate the amount of stock Lambda
DNA to add to A1:
b. Dilute the stock DNA in well A1 using the following formula:
2. Add 66.7 μl 1X TE to well B1.
3. Add 100 μl 1X TE to wells C, D, E, F, G, and H of column 1.
Figure 12 Dilution of Stock Lambda DNA Standard
4. Transfer 133.3 μl of Lambda DNA from well A1 into well B1. Pipette up
and down several times.
5. Change tips. Transfer 100 μl from well B1 into well C1. Pipette up and
down several times.
(233.3 μl) X (75 ng/μl) = μl of stock Lambda DNA to add to A1
(stock Lambda DNA concentration)
μl of 1X TE to add to A1 = 233.3 μl - μl of stock Lambda DNA in well A1
A B C D E F G H
75 ng/µl
Microtiter Plate
λ DNA 1X TE
66.7 µl
100 µl
100 µl
100 µl
100 µl
100 µl
100 µl
Infinium HD Assay Gemini Protocols

20 CHAPTER 2
Infinium HD Assay Gemini Manual Protocol
6. Repeat for wells D1, E1, F1, and G1, changing tips each time. Do not transfer from well G1 to H1. Well H1 serves as the blank 0 ng/μl
Lambda DNA.
Figure 13 Serial Dilutions of Lambda DNA
7. Cover the Standard DNA plate with an adhesive seal.
8. Proceed to Dilute PicoGreen.
Dilute PicoGreenThe diluted PicoGreen will be added to both the Standard QDNA and Sample QDNA plates, to make the DNA fluoresce when read with the spectrofluorometer.
Table 6 Concentrations of Lambda DNA
Row-Column Concentration (ng/μl) Final Volume in Well (μl)
A1 75 100
B1 50 100
C1 25 100
D1 12.5 100
E1 6.25 100
F1 3.125 100
G1 1.5262 200
H1 0 100
Standard DNA Plate with Serial Dilutions of Stock Lambda DNA
100 ng/µl 100µl
100µl
100µl
100µl
100µl
100µl
200µl
100µl
50 ng/µl
25 ng/µl
12.5 ng/µl
6.25 ng/µl
3.125 ng/µl
1.526 ng/µl
0 ng/µl
Catalog # WG-901-3002
Part # 11311007 Rev A

Quantitate DNA (Optional) 21
1. Prepare a 1:200 dilution of PicoGreen into 1X TE, using a sealed 100 ml
or 250 ml Nalgene bottle wrapped in aluminum foil.
Refer to Table 7 to identify the volumes needed to produce diluted reagent for multiple 96-well QDNA plates. For fewer than 96 DNA sam-ples, scale down the volumes.
2. Cap the foil-wrapped bottle and vortex to mix.
Create Standard QDNA Plate with Diluted PicoGreenIn this process you transfer the serial dilutions from the Standard DNA plate into the Standard QDNA Fluotrac plate and add diluted PicoGreen.
1. Pour the PicoGreen/1X TE dilution into a clean reagent reservoir.
2. Using a multichannel pipette, transfer 195 μl PicoGreen/1X TE dilution
into each well of columns 1 and 2 of the Fluotrac plate labelled
“Standard QDNA“ (Figure 14).
3. Add 2 μl of each stock Lambda DNA dilution from the Standard DNA
plate to columns 1 and 2 of the Standard QDNA Fluotrac plate.
CAUTIONPicoGreen reagent degrades quickly in the presence of light. Do not use glass containers for PicoGreen reagent.
Table 7 Volumes for PicoGreen Reagents
# QDNA Plates PicoGreen Volume (μl) 1X TE Volume (ml)
1 115 23
2 215 43
3 315 63
Infinium HD Assay Gemini Protocols
22 CHAPTER 2
Infinium HD Assay Gemini Manual Protocol
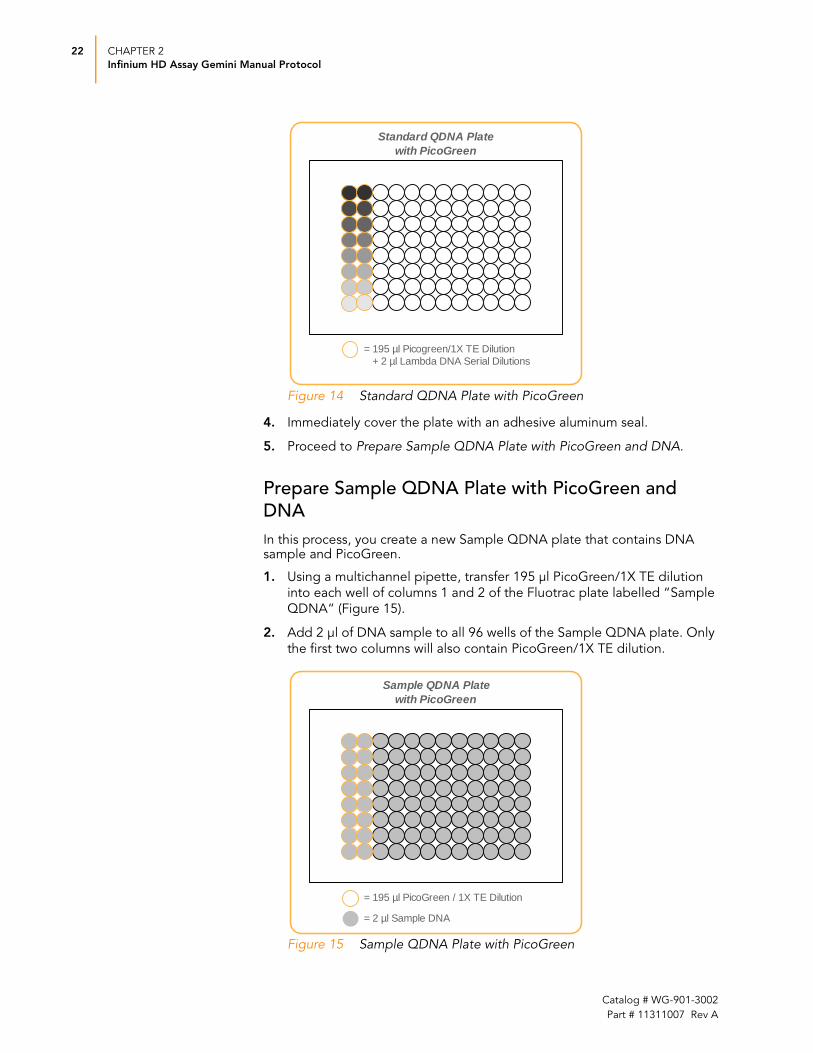
Figure 14 Standard QDNA Plate with PicoGreen
4. Immediately cover the plate with an adhesive aluminum seal.
5. Proceed to Prepare Sample QDNA Plate with PicoGreen and DNA.
Prepare Sample QDNA Plate with PicoGreen and DNAIn this process, you create a new Sample QDNA plate that contains DNA sample and PicoGreen.
1. Using a multichannel pipette, transfer 195 μl PicoGreen/1X TE dilution
into each well of columns 1 and 2 of the Fluotrac plate labelled “Sample
QDNA“ (Figure 15).
2. Add 2 μl of DNA sample to all 96 wells of the Sample QDNA plate. Only
the first two columns will also contain PicoGreen/1X TE dilution.
Figure 15 Sample QDNA Plate with PicoGreen
Standard QDNA Plate with PicoGreen
= 195 µl Picogreen/1X TE Dilution + 2 µl Lambda DNA Serial Dilutions
Sample QDNA Plate with PicoGreen
= 195 µl PicoGreen / 1X TE Dilution
= 2 µl Sample DNA
Catalog # WG-901-3002
Part # 11311007 Rev A
Quantitate DNA (Optional) 23
3. Immediately cover the plate with an adhesive aluminum seal.
4. Proceed to Read QDNA Plate.
Read QDNA PlateIn this process, you use the Gemini XS or XPS Spectrofluorometer to read the Standard QDNA and Sample QDNA plates. The spectrofluorometer creates a standard curve from the known concentrations in the Standard QDNA plate, which you use to determine the concentration of DNA in the Sample QDNA plates. For the best genotyping performance, Illumina recommends a minimum concentration of 50 ng/μl.
1. Turn on the spectrofluorometer. At the PC, open the SoftMax Pro
program.
2. Load the Illumina QDNA.ppr file from the installation CD that came with
your system.
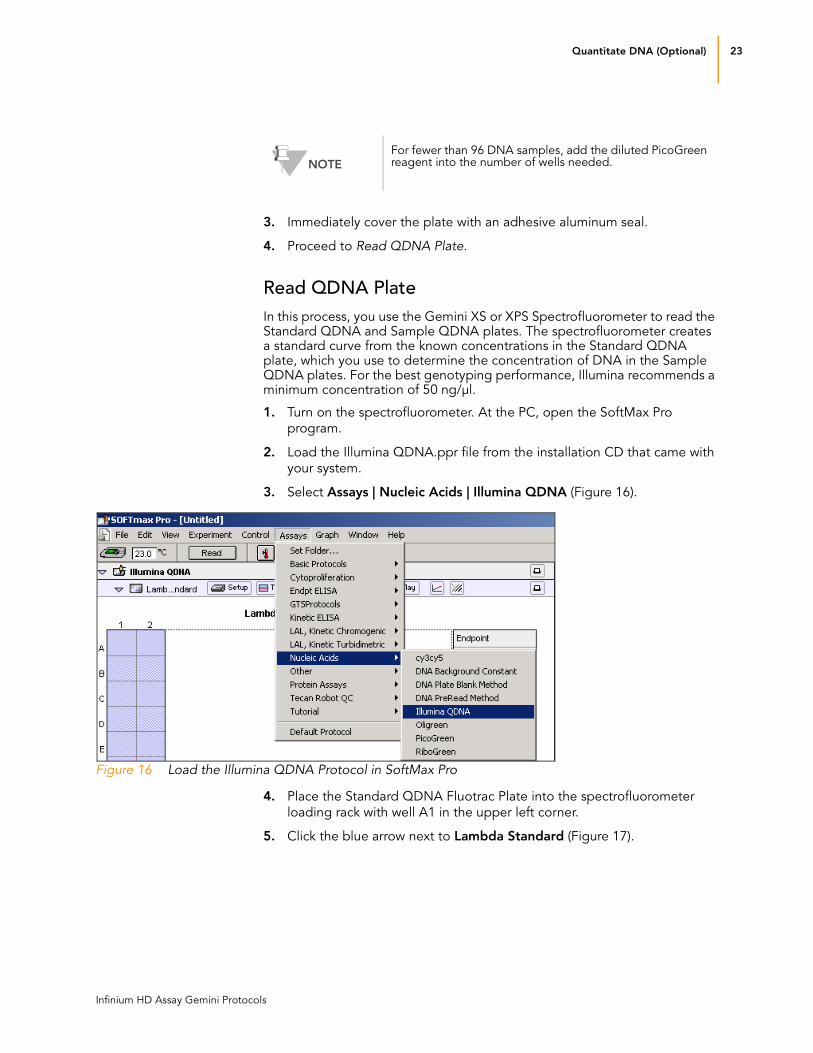
3. Select Assays | Nucleic Acids | Illumina QDNA (Figure 16).
Figure 16 Load the Illumina QDNA Protocol in SoftMax Pro
4. Place the Standard QDNA Fluotrac Plate into the spectrofluorometer
loading rack with well A1 in the upper left corner.
5. Click the blue arrow next to Lambda Standard (Figure 17).
NOTEFor fewer than 96 DNA samples, add the diluted PicoGreen reagent into the number of wells needed.
Infinium HD Assay Gemini Protocols

24 CHAPTER 2
Infinium HD Assay Gemini Manual Protocol
Figure 17 Select the Lambda Standard Screen
6. Click Read in the SoftMax Pro interface (Figure 18) to begin reading the
Standard QDNA Plate.
Figure 18 Read the Standard QDNA Plate
7. When the software finishes reading the data, remove the plate from the
drawer.
8. Click the blue arrow next to Standard Curve to view the standard curve
graph (Figure 19).
9. If the standard curve is acceptable, continue with the sample plate.
Otherwise, click Standard Curve again.
Catalog # WG-901-3002
Part # 11311007 Rev A

Quantitate DNA (Optional) 25
Figure 19 View Standard Curve
10. Place the first Sample QDNA plate in the spectrofluorometer with well
A1 in the upper left corner.
11. Click the blue arrow next to QDNA#1 then click Read (Figure 20).
Infinium HD Assay Gemini Protocols

26 CHAPTER 2
Infinium HD Assay Gemini Manual Protocol
Figure 20 Read the Sample QDNA Plate
12. When the software finishes reading the plate, remove the plate from the
drawer.
13. Repeat steps 10 through 12 to quantitate all Sample QDNA plates.
14. Once all plates have been read, click File | Save to save the output data
file (*.pda).
15. When you have saved the *.pda file, click File | Import/Export | Export and export the file as a *.txt file. You can open the *.txt file in Microsoft
Excel for data analysis.
16. Do one of the following:
• Proceed to Make the AMP3 Plate on page 27.
• Store the quantitated DNA at 2 to 8ºC for up to one month.
Catalog # WG-901-3002
Part # 11311007 Rev A

Make the AMP3 Plate 27
Make the AMP3 Plate
This process creates a AMP3 plate for DNA amplification. The DNA sample is denatured with NaOH and then neutralized with MP1 reagent. The last reagent added is AMM (Amplification Master Mix).
Figure 21 Denaturing and Neutralizing DNA
Estimated Time Hands-on time: ~20 minutes per 16 samples
Incubation time: ~20–24 hours
Consumables
Preparation Preheat the Illumina Hybridization Oven in the post-amp area to 37°C
and allow the temperature to equilibrate.
Apply an AMP3 barcode label to a new MIDI plate.
Thaw MP1 and AMM tubes to room temperature. Gently invert to mix,
then pulse centrifuge to 280 xg.
Thaw DNA samples to room temperature.
Enter the Sample_Name (optional) and Sample_Plate for each
Sample_Well in the sample sheet.
On the lab tracking form, record:
• Date/Time
• Operator
Item Quantity Storage Supplied By
MP1 1 tube per 16 samples
-15 to -25°C Illumina
AMM 1 tube per 16 samples
-15 to -25°C Illumina
0.1N NaOH 15 ml for 16–48 samples
2 to 8°C User
96-well 0.8 ml microtiter plate (MIDI)
1 plate per 48 samples
User
WG#-DNA plate with up to 96 DNA samples (50 ng/μl)
1 plate for up to 48 samples
-15 to -25°C User
Infinium HD Assay Gemini Protocols

28 CHAPTER 2
Infinium HD Assay Gemini Manual Protocol
• WG#-DNA plate barcode
• AMP3 plate barcode
• MP1 tube barcode(s)
• AMM tube barcode(s)
Steps 1. If you do not already have a WG#-DNA plate, create one by adding
DNA, normalized to 50 ng/μl, into either a:
• MIDI plate: 40 μl to each WG#-DNA plate well
• TCY plate: 30 μl to each WG#-DNA plate well
Apply a barcode label to the new WG#-DNA plate.
2. Vortex the WG#-DNA plate at 1600 rpm (actual vortex speed) for
1 minute.
3. Centrifuge to 280 xg for 1 minute.
4. Transfer 8 μl DNA sample, into each well in the following AMP3 plate
columns:
• Column 1 (8 samples)
• Columns 1 and 3 (16 samples)
• Columns 1, 3, 5, 7, 9, and 11 (48 samples)
5. Dispense 8 μl 0.1N NaOH into each well that contains DNA (Figure 22).
NOTE
To record information about your assay such as operator information, start and stop times, and barcodes, use the lab tracking form provided on your documentation CD. This form can be filled out and saved online, or printed and filled in by hand.
CAUTIONTo ensure optimal performance of sample and lab equipment, use aerosol filter tips when pipetting DNA.
Catalog # WG-901-3002
Part # 11311007 Rev A

Make the AMP3 Plate 29
Figure 22 Distributing Sample to AMP3 Plate Wells
6. Incubate for 10 minutes at room temperature.
7. Record each DNA sample in the lab tracking form.
8. Dispense 135 μl MP1 into each well containing sample.
9. Dispense 150 μl AMM into each well containing sample.
10. Seal the plate with a cap mat.
11. Invert the sealed plate at least 10 times to mix contents.
12. Pulse centrifuge to 280 xg.
13. Discard unused reagents in accordance with facility standards.
14. Proceed immediately to Incubate the AMP3 Plate on page 30.
WG1
1234
5678
9-D
NA
WG#-DNA Plate AMP3 Plate
WG1
1234
5678
9-A
MP
3
A
B
C
D
E
F
G
1 32
H
4 65 7 8 9 10 11 12
Sam
ple
s 1 t
o 8
Sam
ple
s 9 t
o 1
6
Sam
ple
s 17 t
o 2
4
Sam
ple
s 25 t
o 3
2
Sam
ple
s 33 t
o 4
0
Sam
ple
s 41 t
o 4
8
Sam
ple
s 25 t
o 3
2
Sam
ple
s 25 t
o 3
2Sam
ple
s 33 t
o 4
0Sam
ple
s 41 t
o 4
8
A
B
C
D
E
F
G
1 32
H
4 65 7 8 9 10 11 12
Sam
ple
s 1 t
o 8
Sam
ple
s 9 t
o 1
6Sam
ple
s 17 t
o 2
4
Infinium HD Assay Gemini Protocols

30 CHAPTER 2
Infinium HD Assay Gemini Manual Protocol
Incubate the AMP3 Plate
This process uniformly amplifies the genomic DNA, generating a sufficient quantity of each individual DNA sample to be used twice in the Infinium HD Assay Gemini.
Figure 23 Incubating DNA to Amplify
Incubation Time ~20–24 hours.
Steps 1. Incubate the AMP3 plate in the Illumina Hybridization Oven for at least
20 and no more than 24 hours at 37°C.
2. On the lab tracking form, record the start and stop times.
3. Proceed to Fragment the AMP3 Plate on page 31.
NOTE
To record information about your assay such as operator information, start and stop times, and barcodes, use the lab tracking form provided on your documentation CD. This form can be filled out and saved online, or printed and filled in by hand.
Catalog # WG-901-3002
Part # 11311007 Rev A

Fragment the AMP3 Plate 31
Fragment the AMP3 Plate
This process enzymatically fragments the amplified DNA samples. An end-point fragmentation is used to prevent over-fragmentation.
Figure 24 Fragmenting DNA
Estimated Time Hands-on time: ~30 minutes per 48 samples
Incubation time: 1 hour
Consumables
Preparation Preheat the heat block with the MIDI plate insert to 37°C.
Thaw the FRG tube to room temperature. Invert several times to mix
contents. Pulse centrifuge to 280 xg for 1 minute.
On the lab tracking form, record:
• Date/Time
• Operator
• FRG tube barcode(s)
Remove the AMP3 plate from the Illumina Hybridization Oven.
Steps 1. Centrifuge the plate to 50 xg for 1 minute.
2. Remove the cap mat.
Item Quantity Storage Supplied By
FRG 1 tube per 16 samples -15 to -25°C Illumina
NOTE
To record information about your assay such as operator information, start and stop times, and barcodes, use the lab tracking form provided on your documentation CD. This form can be filled out and saved online, or printed and filled in by hand.
NOTE
When you remove a cap mat, set it aside, upside down, in a safe location for use later in the protocol. When you place the cap mat back on the plate, be sure to match it to its original plate and orient it correctly.
Infinium HD Assay Gemini Protocols

32 CHAPTER 2
Infinium HD Assay Gemini Manual Protocol
3. Thoroughly pipette-mix all wells containing sample to evenly distribute
precipitate.
4. Split the sample into 1 additional well, for a total of 2 wells per sample.
Each well should contain 150 μl.
For example, move 150 μl sample from A1 into A2.
• Divide DNA sample in A1 into A2, A3, and A4.
• Divide DNA sample in A5 into A6, A7, and A8.
• Divide DNA sample in A9 into A10, A11, and A12.
Follow this pattern for rows B–H, columns 1, 5, and 9 (see Figure 25).
Figure 25 Distributing Sample in AMP3 Plate
5. Dispense 50 μl FRG to each well containing sample.
6. Seal the AMP3 plate with the cap mat.
7. Place the sealed plate on the vortexer and secure it with the provided
Velcro straps (Figure 26).
Figure 26 Securing Plates to Vortexer Platform with Velcro Straps
WG1
1234
5678
9-A
MP
3
AMP3 Plate
A
B
C
D
E
F
G
1 32
H
4 65 7 8 9 10 11 12
Sam
ple
s 1 t
o 8
Sam
ple
s 9 t
o 1
6
Sam
ple
s 17 t
o 2
4
Sam
ple
s 25 t
o 3
2
Sam
ple
s 33 t
o 4
0
Sam
ple
s 41 t
o 4
8
Catalog # WG-901-3002
Part # 11311007 Rev A

Fragment the AMP3 Plate 33
8. Vortex the AMP3 plate at 1600 rpm for 1 minute.
9. Centrifuge the plate to 50 xg for 1 minute at 22°C.
10. Incubate the sealed plate on the 37°C heat block for 1 hour.
11. On the lab tracking form, record the start and stop times.
12. Discard unused reagents in accordance with facility standards.
13. Do one of the following:
• Proceed to Precipitate the AMP3 Plate on page 34. Leave the plate
in 37°C heat block until setup is complete.
• Store the sealed AMP3 plate at -15 to -25°C if you do not plan to
proceed to the next step immediately.
This is a good stopping point in the process.
Infinium HD Assay Gemini Protocols

34 CHAPTER 2
Infinium HD Assay Gemini Manual Protocol
Precipitate the AMP3 Plate
Add PA1 and 2-propanol to the AMP3 plate to precipitate the DNA samples.
Figure 27 Precipitating DNA
Estimated Time Hands-on time: ~30 minutes per 48 samples
Incubation time: 2 hours
Consumables
Preparation Do one of the following:
• If you froze the AMP3 plate after fragmentation, thaw it to room
temperature. Centrifuge to 280 xg for 1 minute.
• If you proceeded immediately from Fragment AMP3, leave the plate
in the 37°C heat block until setup is complete.
Thaw PA1 to room temperature. Centrifuge to 280 xg for 1 minute.
Preheat the heat block to 37°C, if it is not already.
Turn on the heat sealer.
In preparation for the 4°C spin, set the centrifuge to 4°C.
On the lab tracking form, record:
• Date/Time
• Operator
• PA1 tube barcode(s)
• 2-propanol lot number and date opened
Item Quantity Storage Supplied By
PA1 1 tube per 16 samples
2 to 8°C Illumina
100% 2-propanol 12 ml per 16 samples
40 ml per 48 samples
Room temperature
User
NOTE
To record information about your assay such as operator information, start and stop times, and barcodes, use the lab tracking form provided on your documentation CD. This form can be filled out and saved online, or printed and filled in by hand.
Catalog # WG-901-3002
Part # 11311007 Rev A

Precipitate the AMP3 Plate 35
Steps 1. Dispense 100 μl PA1 to each well containing sample.
2. Seal the plate with the cap mat.
3. Vortex the plate at 1600 rpm for 1 minute.
4. Centrifuge to 50 xg at 22°C for 1 minute.
5. Incubate at 37°C for 5 minutes.
6. Add 300 μl 100% 2-propanol to each well containing sample.
7. Seal the plate with a new, dry cap mat, taking care not to shake the plate
in any way until the heat-seal is fully seated.
8. Invert at least 10 times to mix contents.
9. Incubate at 4°C for 30 minutes.
10. Place the sealed AMP3 plate in the centrifuge opposite another plate of
equal weight (Figure 28).
Figure 28 Balancing AMP3 Plate in Centrifuge
11. Centrifuge to 3000 xg at 4°C for 20 minutes. When the spin finishes,
immediately remove the AMP3 plate from the centrifuge.
Perform the next steps immediately, to avoid dislodging the blue pellet. If any delay occurs, repeat the 20-minute centrifugation before proceed-ing.
12. Remove the cap mat.
13. Decant the supernatant by quickly inverting the AMP3 plate and
smacking it down onto an absorbent pad appropriate for 2-propanol
disposal.
14. Tap the plate firmly on the pad several times over a period of 1 minute or
until all wells are completely devoid of liquid.
Plate of Equal Weight for Balance
Sealed AMP3 Plate
Infinium HD Assay Gemini Protocols

36 CHAPTER 2
Infinium HD Assay Gemini Manual Protocol
15. Place the inverted, uncovered plate on a tube rack for 1 hour at room
temperature to air dry the pellet (Figure 29).
At this point, blue pellets should be present at the bottoms of the wells.
Figure 29 Uncovered AMP3 Plate Inverted for Air Drying
16. On the lab tracking form, record the start and stop times.
17. Discard unused reagents in accordance with facility standards.
18. Do one of the following:
• Proceed to Resuspend the AMP3 Plate on page 37.
• Heat-seal the AMP3 plate and store it at -15 to -25°C for up to 24
hours or -80°C for long-term storage.
This is a good stopping point in the process.
CAUTIONKeep plate inverted. To ensure optimal performance while decanting. Do not allow supernatant in wells to pour into other wells.
CAUTIONDo not over-dry the pellet. Pellets that are over-dried will be difficult to resuspend. Poorly resuspended samples will lead to poor genotyping results.
Catalog # WG-901-3002
Part # 11311007 Rev A

Resuspend the AMP3 Plate 37
Resuspend the AMP3 Plate
Add RA1 to the AMP3 plate to resuspend the precipitated DNA samples.
Figure 30 Resuspending DNA
Estimated Time Hands-on time: ~30 minutes per 48 samples
Incubation time: 1 hour
Consumables
Preparation RA1 is shipped frozen. Gradually warm the RA1 reagent to room
temperature. Gently mix to dissolve any crystals that may be present.
If you stored the AMP3 plate at -15 to -25°C, thaw it to room
temperature. Remove the cap mat and discard it.
Preheat the Illumina Hybridization Oven to 48°C.
Turn on the heat sealer to preheat. Allow 20 minutes.
On the lab tracking form, record:
• Date/Time
• Operator
• RA1 bottle barcode(s)
Item Quantity Storage Supplied By
RA1 9 ml per 48 samples -15 to -25°C Illumina
WARNINGWARNING
This protocol involves the use of an aliphatic amide that is a probable reproductive toxin. Personal injury can occur through inhalation, ingestion, skin contact, and eye contact. Dispose of containers and any unused contents in accordance with the governmental safety standards for your region.
NOTE
Only pour out the recommended volume of RA1 needed for the suggested number of samples listed in the consumables table. Additional RA1 is used later in the XStain HD BeadChip step.
Infinium HD Assay Gemini Protocols

38 CHAPTER 2
Infinium HD Assay Gemini Manual Protocol
Steps 1. Add 46 μl RA1 to each well of the AMP3 plate containing a DNA pellet.
2. Heat-seal the AMP3 plate with a foil seal.
3. Incubate it in the Illumina Hybridization Oven for 1 hour at 48°C.
4. On the lab tracking form, record the start and stop times.
5. Vortex the plate at 1800 rpm for 1 minute.
6. Pulse centrifuge to 280 xg.
If you stored the pellets at -15 to -25°C for more than 72 hours after the Precip AMP3 process, you may need to repeat steps 3 to 6 until the pel-lets are completely resuspended.
7. Do one of the following:
• Proceed to Hybridize Duo BeadChip on page 39. If you plan to do so
immediately, it is safe to leave the RA1 at room temperature.
• Store the sealed AMP3 plate and the RA1 at -15 to -25°C (-80°C if
storing for more than 24 hours).
This is a good stopping point in the process.
NOTE
To record information about your assay such as operator information, start and stop times, and barcodes, use the lab tracking form provided on your documentation CD. This form can be filled out and saved online, or printed and filled in by hand.
Catalog # WG-901-3002
Part # 11311007 Rev A

Hybridize Duo BeadChip 39
Hybridize Duo BeadChip
In this process, you dispense the resuspended, denatured DNA samples onto BeadChips. First, the BeadChips are placed into Hyb Chamber inserts. Each slide is loaded with two DNA samples. Place the inserts into the Hyb Chambers. Incubate the Hyb Chambers in the Illumina Hybridization Oven for 16–24 hours at 48°C.
Figure 31 Hybridizing DNA to BeadChip
Estimated Time Hands-on time:
• ~30 minutes for 8 BeadChips (16 samples)
• ~45 minutes for 16 BeadChips (32 samples)
• ~1 hour for 24 BeadChips (48 samples)
Incubation time: 16–24 hours
Consumables
Preparation Preheat the heat block to 95°C.
Preheat the Illumina Hybridization Oven to 48°C and set the rocker
speed to 5.
(gDNA )
(gDNA )
(ident ical p robesper bead t ype)
ItemQuantity(per 16 samples)
Storage Supplied By
PB2 2 tubes Room temperature
Illumina
BeadChips 8 Illumina
Hyb Chambers 2 Illumina
Hyb Chamber gaskets 2 Illumina
Hyb Chamber inserts 8 Illumina
NOTE
Thaw all reagents completely at room temperature and allow to equilibrate. Once thawed, gently invert each tube several times to thoroughly mix the reagent. Pulse centrifuge each tube to 280 xg to eliminate bubbles and collect reagent at the bottom of the tube.
Infinium HD Assay Gemini Protocols

40 CHAPTER 2
Infinium HD Assay Gemini Manual Protocol
If you plan to perform the XStain process tomorrow, begin thawing the
XC4 reagent. For instructions, see Resuspend XC4 Reagent for XStain HD BeadChip on page 49.
Prepare the Illumina Hybridization Oven as follows:
a. Preheat the oven to 48°C:
— Press the "F" button once to change the display to TSET.
— Press the "S" button to enter the set-temperature mode, and then use the Increment/Decrement dial to set the oven to 48°C.
— Press the "S" button again to set 48°C as the temperature.b. Set the rocker speed to 5:
— Press the "F" button twice until SPd is indicated on the display.
— Press the "S" button to enter the rocker speed mode.
— Use the Increment/Decrement dial to set the rocker speed to "5".
— Press the "S" button again.
On the lab tracking form, record:
• Date/Time
• Operator
• Robot
• PB2 tube barcode(s)
Calibrate the Illumina Hybridization Oven with the Full-Scale Plus digital
thermometer supplied with your system.
Steps This protocol includes the following steps:
Assemble Hyb Chambers on page 40
Hybridize Sample to Duo BeadChip on page 43
Load BeadChip on page 44
Set Up Duo BeadChip for Hyb on page 46
Assemble Hyb Chambers1. For every 4 BeadChips, place the following items on the bench top
(Figure 32):
• BeadChip Hyb Chambers (1)
NOTE
To record information about your assay such as operator information, start and stop times, and barcodes, use the lab tracking form provided on your documentation CD. This form can be filled out and saved online, or printed and filled in by hand.
NOTE
Perform the Hyb Chamber assembly near the Hyb Oven to minimize the distance you need to move the BeadChip-loaded Hyb Chamber. Take care to keep the Hyb Chamber steady and level when lifting and moving. Avoid shaking and keep the Hyb Chamber parallel to the lab bench at all times.
Catalog # WG-901-3002
Part # 11311007 Rev A

Hybridize Duo BeadChip 41
• Hyb Chamber Gaskets (1)
• BeadChip Hyb Chamber Inserts (4)
Figure 32 BeadChip Hyb Cartridge Components
2. Place the BeadChip Hyb Chamber gasket into the BeadChip Hyb
Chambers:
a. Match the wider edge of the Hyb Chamber gasket to the barcode-
ridge side of the Hyb Chamber (Figure 33).
Figure 33 Hyb Chamber and Gasket
b. Lay the gasket into the Hyb Chamber (Figure 34), and then press it
down all around.
Figure 34 Placing Gasket into Hyb Chamber
Hyb Chamber Lid
Hyb Chamber Gasket
Hyb Chamber InsertsHyb Chamber
Reservoirs
Barcode Ridges
Narrower Edge
Wider Edge
Infinium HD Assay Gemini Protocols

42 CHAPTER 2
Infinium HD Assay Gemini Manual Protocol
c. Make sure the Hyb Chamber gasket is properly seated (Figure 35).
Figure 35 Hyb Chamber with Gasket in Place
3. Dispense 400 μl PB2 into each of the humidifying buffer reservoirs in the
Hyb Chamber (Figure 36).
Figure 36 Dispensing PB2 into Hyb Chamber Reservoirs
4. Close and lock the BeadChip Hyb Chamber lid (Figure 37).
a. Seat the lid securely on the bottom plate.
b. Snap two clamps shut, diagonally across from each other.
c. Snap the other two clamps.
Catalog # WG-901-3002
Part # 11311007 Rev A

Hybridize Duo BeadChip 43
Figure 37 Sealing the Hyb Chamber
5. Leave the closed Hyb Chamber on the bench at room temperature until
the BeadChips are loaded with DNA sample.
Hybridize Sample to Duo BeadChipIn this step, you will denature and consolidate the DNA sample.
1. Place the resuspended AMP3 plate on the heat block to denature the
samples at 95°C for 20 minutes.
2. Remove the BeadChips from 2 to 8°C storage but do not unpackage.
3. After the 20-minute incubation, pulse centrifuge the AMP3 plate to
280 xg. Remove the foil seal.
4. Combine the two separate wells back into the original well. Refer to
Figure 38:
a. Combine contents of well A2 back into well A1.
b. Combine contents of well A4 back into well A3.
c. Combine contents of well A6 back into well A5.
d. Combine contents of well A8 back into well A7.
e. Combine contents of well A10 back into well A9.
f. Combine contents of well A12 back into well A11.
g. Repeat for rows B–H.
CAUTIONDo not unpackage the BeadChips until you are ready to begin hybridization.
Infinium HD Assay Gemini Protocols

44 CHAPTER 2
Infinium HD Assay Gemini Manual Protocol
Figure 38 Consolidating Sample Back Into Original Sample Well
Load BeadChip1. Just before loading DNA samples, remove all BeadChips from their
packages.
2. Place each BeadChip in a Hyb Chamber insert, orienting the barcode
end so that it matches the barcode symbol on the Hyb Chamber insert
(Figure 39). Make sure you place each BeadChip into the Hyb Chamber
insert prior to loading the DNA sample.
Figure 39 Placing BeadChips into Hyb Chamber Inserts
3. Dispense 84 μl of each DNA sample into the appropriate BeadChip inlet
port according to the lab tracking form. See Figure 40 for a diagram and
Figure 41 for a photo of the BeadChip.
CAUTIONHold the BeadChip by the ends with your thumb and forefinger (thumb at the barcode end). Avoid contacting the beadstripe area and sample inlets.
AMP3 Plate
WG1
1234
5678
9-A
MP
3
A
B
C
D
E
F
G
1 32
H
4 65 7 8 9 10 11 12
Sam
ple
s 1 t
o 8
Sam
ple
s 9 t
o 1
6
Sam
ple
s 17 t
o 2
4
Sam
ple
s 25 t
o 3
2
Sam
ple
s 33 t
o 4
0
Sam
ple
s 41 t
o 4
8
CAUTIONLoad samples by directly placing pipette tips to the array surface. To avoid evaporation, proceed immediately to the next step as soon as all arrays have received sample.
Catalog # WG-901-3002
Part # 11311007 Rev A

Hybridize Duo BeadChip 45
a. Load samples in the A1 and B1 wells of the AMP3 plate into the first
BeadChip.
b. Load samples in C1 and D1 into the second BeadChip.
c. Load samples in E1 and F1 into the third BeadChip.
d. Load samples in G1 and H1 into the fourth BeadChip.
Repeat the same pattern to transfer sample from column 3 to BeadChips 5–8, and from column 5 to BeadChips 9–12.
Figure 40 Distributing Sample to BeadChips (Pattern)
A B C D E F G H
AMP3
Plat
e
123456789101112
Two-SampleBeadChips
4, 8,12
G1 H1
Two-SampleBeadChips
3, 7,11
E1 F1
Two-SampleBeadChips
2,6,10
C1 D1
Two-SampleBeadChips
1, 5, 9
A1 B1
WG1123456789-AMP3
1123456789112345678911234567891123456789
18,13 14, , 22, 17, , 21 , , , , , ,1 1 23 1 2 26 095 4
Infinium HD Assay Gemini Protocols

46 CHAPTER 2
Infinium HD Assay Gemini Manual Protocol
Figure 41 Dispensing Sample onto BeadChip (Photo)
4. On the lab tracking form, record the BeadChip barcodes associated with
each sample well.
5. Visually inspect all sections of the BeadChips to ensure the DNA sample
covers all of each bead stripe. Record any sections that are not
completely covered.
Set Up Duo BeadChip for Hyb
1. Load the Hyb Chamber inserts containing BeadChips into the Illumina
Hyb Chamber (Figure 42). Position the barcode end over the ridges
indicated on the Hyb Chamber.
Figure 42 Placing Hyb Chamber Inserts into Hyb Chamber
CAUTION
For optimal performance, keep the Hyb Chamber inserts containing BeadChips steady and level when lifting or moving. Avoid shaking and keep parallel to the lab bench at all times. Avoid contacting the beadstripe area and sample inlets.
Catalog # WG-901-3002
Part # 11311007 Rev A

Hybridize Duo BeadChip 47
2. Place the back side of the lid onto the Hyb Chamber and then slowly
bring down the front end to avoid dislodging the Hyb Chamber inserts
(Figure 43).
3. Close the clamps on both sides of the Hyb Chamber.
Figure 43 Securing Hyb Chamber Lid
4. Place the Hyb Chamber into the 48°C Illumina Hybridization Oven so
that the clamps of the Hyb Chamber face the left and right side of the
oven. The Illumina logo on top of the Hyb Chamber should be facing
you.
Figure 44 Hyb Chamber Correctly Placed in Hyb Oven
5. If you are loading multiple Hyb Chambers, stack them on top of each
other. You can stack up to 3 Hyb Chambers, for a total of 6 in the Hyb
Oven.
NOTE
For optimal performance, keep the Hyb Chamber steady and level when lifting or moving. Avoid shaking the Hyb Chamber, keep the Hyb Chamber parallel to the lab bench while you transfer it to the Illumina Hybridization Oven.
Infinium HD Assay Gemini Protocols

48 CHAPTER 2
Infinium HD Assay Gemini Manual Protocol
Figure 45 Two Hyb Chambers Correctly Placed in Hyb Oven
Figure 46 Incorrectly Placed Hyb Chamber
6. Start the rocker (optional).
NOTE
If you are stacking multiple Hyb Chambers in the Illumina Hybridization Oven, make sure the feet of the top Hyb Chamber fit into the matching indents on top of the next Hyb Chamber. This will hold the Hyb Chambers in place while they are rocking.
Catalog # WG-901-3002
Part # 11311007 Rev A

Hybridize Duo BeadChip 49
7. Incubate at 48°C for at least 16 hours but no more than 24 hours.
Resuspend XC4 Reagent for XStain HD BeadChipKeep the XC4 in the bottle in which it was shipped until ready for use. In preparation for the XStain protocol, follow these steps to resuspend the XC4 reagent:
1. Add 330 ml 100% EtOH to the XC4 bottle. The final volume will be
350 ml
Each XC4 bottle (350 ml) has enough solution to process up to 24 Bead-Chips.
2. Shake vigorously for 15 seconds.
3. Leave the bottle upright on the lab bench overnight.
4. Shake again to ensure that the pellet is completely resuspended. If any
coating is visible, vortex at 1625 rpm until it is in complete suspension.
Once resuspended with 330 ml 100% EtOH, use XC4 at room tempera-ture. You can store it at 2 to 8°C overnight, but thaw it again before use.
5. Proceed to Wash BeadChips on page 50.
NOTE
If the XC4 was not left to resuspend overnight, you can still proceed with the assay. Add the EtOH and put the XC4 on its side on a rocker to resuspend. Leave it there until the BeadChips are ready for coating.
Infinium HD Assay Gemini Protocols

50 CHAPTER 2
Infinium HD Assay Gemini Manual Protocol
Wash BeadChips
In this process you prepare the BeadChips for the XStain HD BeadChip process. First, you remove the IntelliHyb Seals from the BeadChips and wash the BeadChips in two separate PB1 reagent washes. Next, you assemble the BeadChips into the Flow-Through Chambers under PB1 buffer.
Figure 47 Washing BeadChip
Estimated Time Hands-on time:
• 20 minutes per 8 BeadChips (16 samples)
• 30 minutes per 16 BeadChips (32 samples)
• 50 minutes per 24 BeadChips (48 samples)
ConsumablesItem
Quantity(per 8 BeadChips)
Storage Supplied By
PB1 550 ml Room temperature
Illumina
Multi-Sample BeadChip Alignment Fixture
1 Illumina
Te-Flow Flow-Through Chambers (with black frames, spacers, glass back plates, and clamps)
1 per BeadChip Illumina
Wash Dish 8 BeadChips: 2 dishes
24 BeadChips: 6 dishes
Illumina
Wash Rack 8 BeadChips: 1 rack
24 BeadChips: 3 racks
Illumina
Catalog # WG-901-3002
Part # 11311007 Rev A

Wash BeadChips 51
Preparation Fill 2 wash dishes with PB1 (200 ml per wash dish). Label each dish
“PB1”.
Fill the BeadChip Alignment Fixture with 150 ml PB1.
Separate the clear plastic spacers from the white backs.
Clean the glass back plates according to the directions in the Infinium Assay Lab Setup and Procedures Guide.
On the lab tracking form record:
• Date/Time
• Operator
• Robot
• PB1 bottle barcode
Steps Wash BeadChip1. Remove each Hyb Chamber from the Illumina Hybridization Oven.
2. Attach the wire handle to the rack and submerge the wash rack in the
first wash dish containing 200 ml PB1 (Figure 48).
3. Remove the Hyb Chamber inserts from the Hyb Chambers.
4. Remove BeadChips from the Hyb Chamber inserts one at a time.
Figure 48 Wash Rack in Wash Dish Containing PB1
NOTE
Only pour out the recommended volume of PB1 needed for the suggested number of samples listed in the consumables table. Additional PB1 is used later in the XStain HD BeadChip step. One bottle of PB1 should be used per 8 BeadChips.
NOTE
To record information about your assay such as operator information, start and stop times, and barcodes, use the lab tracking form provided on your documentation CD. This form can be filled out and saved online, or printed and filled in by hand.
Infinium HD Assay Gemini Protocols

52 CHAPTER 2
Infinium HD Assay Gemini Manual Protocol
5. Remove the IntelliHyb seal from each BeadChip as follows:
a. Using powder-free gloved hands, hold the BeadChip in one hand
with your thumb and forefinger on the long edges of the BeadChip.
The BeadChip may also be held with the thumb and forefinger on
the short edges of the BeadChip. In either case avoid contact with
the sample inlets. The barcode should be facing up and be closest to
you, and the top side of the BeadChip should be angled slightly
away from you.
b. Remove the entire seal in a single, rapid motion by pulling it off in a
diagonal direction. Start with a corner on the barcode end and pull
with a continuous upward motion away from you and towards the
opposite corner on the top side of the BeadChip. Do not stop and
start the pulling action. Do not touch the exposed active areas.
c. Discard the seal.
Figure 49 Removing the Coverseal
6. Immediately and carefully slide each BeadChip into the wash rack one at
a time, making sure that the BeadChip is completely submerged in the
PB1 (Figure 50).
CAUTIONTo ensure no solution splatters on you, Illumina recommends removing the coverseal over an absorbent cloth or paper towels, preferably in a hood.
CAUTIONDo not touch the arrays!
Catalog # WG-901-3002
Part # 11311007 Rev A

Wash BeadChips 53
Figure 50 Placing BeadChips in Wash Dish Containing PB1
7. Repeat steps 5 and 6 until all BeadChips are transferred to the
submerged wash rack. The wash rack holds up to 8 BeadChips.
8. Once all BeadChips are in the wash rack, move the wash rack up and
down for 1 minute, breaking the surface of the PB1 with gentle, slow
agitation.
9. Move the wash rack to the other wash dish containing PB1. Make sure
the BeadChips are completely submerged.
10. Move the wash rack up and down for 1 minute, breaking the surface of
the PB1 with gentle, slow agitation.
11. If you are processing more than 8 BeadChips:
a. Complete the steps in the next section, Assemble Flow-Through Chambers, for the first eight BeadChips.
b. Place the assembled Flow-Through Chambers of the first eight
BeadChips on the lab bench in a horizontal position.
c. Repeat steps 3 through 11 from this section for any additional
BeadChips. Use new PB1 for each set of eight BeadChips.
NOTE
Keep them in a horizontal position on the lab bench until all assembled Flow-Through Chambers are ready to be loaded into the Do not place the Flow-Through Chambers in the Chamber Rack until all necessary steps are completed.
CAUTIONIt is important to wash the reservoirs immediately and thoroughly to ensure that no traces of PB2 remain in the wells.
Infinium HD Assay Gemini Protocols
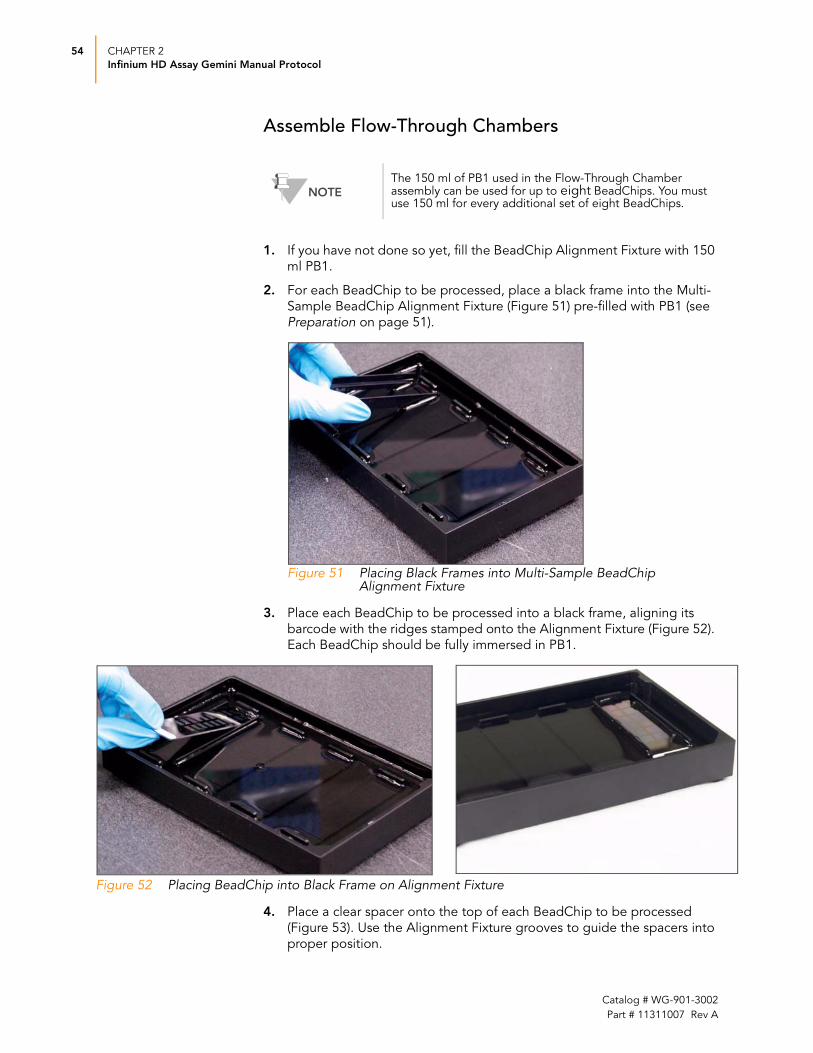
54 CHAPTER 2
Infinium HD Assay Gemini Manual Protocol
Assemble Flow-Through Chambers
1. If you have not done so yet, fill the BeadChip Alignment Fixture with 150
ml PB1.
2. For each BeadChip to be processed, place a black frame into the Multi-
Sample BeadChip Alignment Fixture (Figure 51) pre-filled with PB1 (see
Preparation on page 51).
Figure 51 Placing Black Frames into Multi-Sample BeadChip Alignment Fixture
3. Place each BeadChip to be processed into a black frame, aligning its
barcode with the ridges stamped onto the Alignment Fixture (Figure 52).
Each BeadChip should be fully immersed in PB1.
Figure 52 Placing BeadChip into Black Frame on Alignment Fixture
4. Place a clear spacer onto the top of each BeadChip to be processed
(Figure 53). Use the Alignment Fixture grooves to guide the spacers into
proper position.
NOTEThe 150 ml of PB1 used in the Flow-Through Chamber assembly can be used for up to eight BeadChips. You must use 150 ml for every additional set of eight BeadChips.
Catalog # WG-901-3002
Part # 11311007 Rev A

Wash BeadChips 55
Figure 53 Placing Clear Plastic Spacer onto BeadChip
5. Place the Alignment Bar onto the Alignment Fixture (Figure 54).
Figure 54 Placing Alignment Bar onto Alignment Fixture
NOTEBe sure to use the clear plastic spacers, not the white ones.
Clear Spacer
Groove for Positioning Spacer
White Spacer Back
Do Not Use
Infinium HD Assay Gemini Protocols

56 CHAPTER 2
Infinium HD Assay Gemini Manual Protocol
6. Use a laboratory air gun to quickly remove any accumulated dust from
the glass back plates just before placing them onto the BeadChips.
7. Place a clean glass back plate on top of the clear spacer covering each
BeadChip. The plate reservoir should be at the barcode end of the
BeadChip, facing inward to create a reservoir against the BeadChip
surface (Figure 55).
Figure 55 Placing Glass Back Plate onto BeadChip
8. Attach the metal clamps to the Flow-Through Chambers as follows
(Figure 56):
a. Gently push the glass back plate up against the Alignment Bar with
one finger.
b. Place the first metal clamp around the Flow-Through Chamber so
that the clamp is about 5 millimeters from the top edge.
c. Place the second metal clamp around the Flow-Through Chamber at
the barcode end, about 5 millimeters from the reagent reservoir.
Reservoir at Barcode End of Glass Back Plate
Glass Back Plate in Position
Catalog # WG-901-3002
Part # 11311007 Rev A

Wash BeadChips 57
Figure 56 Securing Flow-Through Chamber Assembly with Metal Clamps
9. Using scissors, trim the ends of the clear plastic spacers from the Flow-
Through Chamber assembly (Figure 57):
Figure 57 Trimming Spacer Ends from Flow-Through Chamber Assembly
First Clamp 5 mm from the Top
Edge
Second Clamp 5 mm from
Reagent Reservoir
Glass Back Plate Pressed Against
Alignment Bar
Trim Spacer at Non-Barcode End of Flow-Through Chamber
Trim Spacer at Barcode End of Flow-Through Chamber
Infinium HD Assay Gemini Protocols

58 CHAPTER 2
Infinium HD Assay Gemini Manual Protocol
10. Immediately wash the Hyb Chamber reservoirs with dH2O and scrub
them with a small cleaning brush, ensuring that no PB2 remains.
11. Discard unused reagents in accordance with facility standards.
12. Proceed to Single-Base Extension and Stain HD BeadChip on page 59.
CAUTION
Place all assembled Flow-Through Chambers on the lab bench in a horizontal position while you perform the preparation steps for XStain HD BeadChip. Do not place the Flow-Through Chambers in the Chamber Rack until the preparation is complete.
Catalog # WG-901-3002
Part # 11311007 Rev A

Single-Base Extension and Stain HD BeadChip 59
Single-Base Extension and Stain HD BeadChip
In this process, RA1 reagent is used to wash away unhybridized and non-specifically hybridized DNA sample. TEM reagent is dispensed into the Flow-Through Chambers to extend primers hybridized to DNA on the BeadChip. This reaction incorporates labeled nucleotides into the extended primers. 95% formamide/1 mM EDTA is then added to remove the hybridized DNA.
After neutralization using the XC3 reagent, the labeled, extended primers undergo a multi-layer staining process on the Chamber Rack. Finally, the BeadChips are removed from the Flow-Through Chambers, washed in the PB1 reagent, coated with XC4, and dried.
Figure 58 Extending and Staining BeadChip
Estimated Time Hands-on time: ~3 hours for 8–24 BeadChips
Dry time: 55 minutes
Consumables
(gDNA)
*Stain in green channel*Stain in red channel
(gDNA)
T*
G
A
C*
Item Quantity Storage Supplied By
RA1 10 ml for 1–8 BeadChips
20 ml for 9–16 BeadChips
30 ml for 17–24 BeadChips
-15 to -25°C Illumina
XC1 2 tubes (per 8 BeadChips)
-15 to -25°C Illumina
XC2 2 tubes
(per 8 BeadChips)
-15 to -25°C Illumina
TEM 2 tubes
(per 8 BeadChips)
-15 to -25°C Illumina
XC3 50 ml for 1–8 BeadChips
100 ml for 9–16 BeadChips
150 ml for 24 BeadChips
Room temperature
Illumina
STM (Make sure that all STM tubes indicate the same stain temperature on the label)
2 tubes
(per 8 BeadChips)
-15 to -25°C Illumina
Infinium HD Assay Gemini Protocols
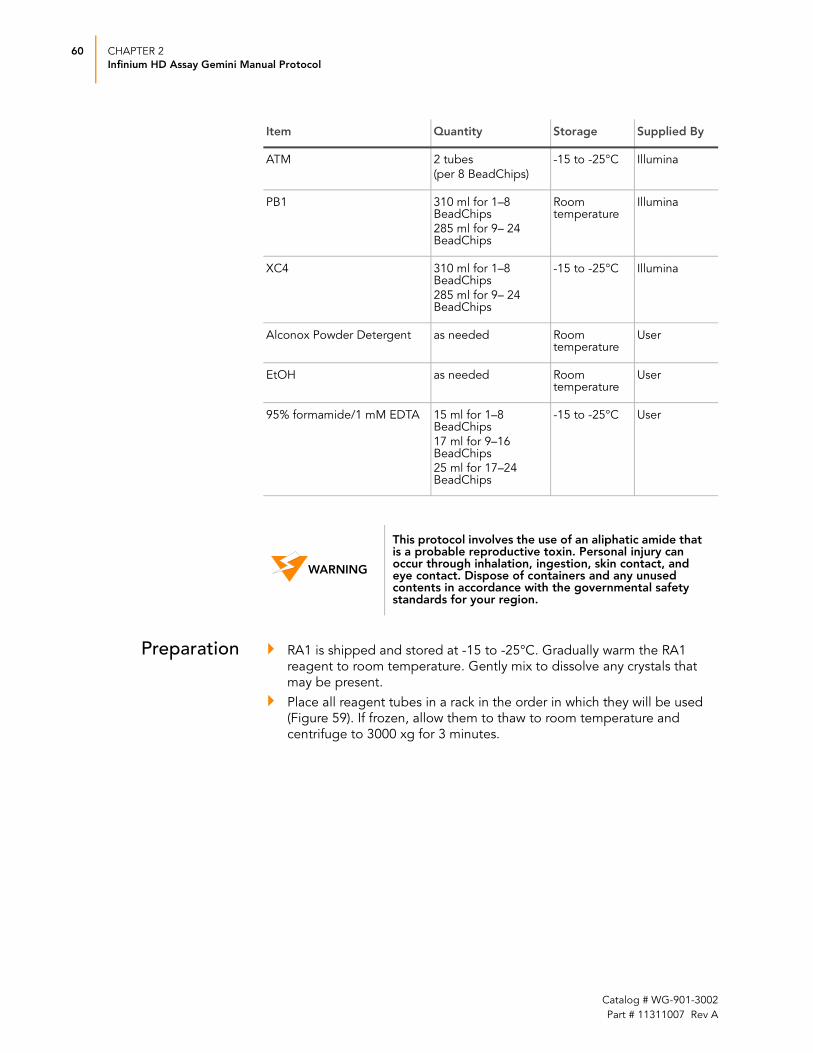
60 CHAPTER 2
Infinium HD Assay Gemini Manual Protocol
Preparation RA1 is shipped and stored at -15 to -25°C. Gradually warm the RA1
reagent to room temperature. Gently mix to dissolve any crystals that
may be present.
Place all reagent tubes in a rack in the order in which they will be used
(Figure 59). If frozen, allow them to thaw to room temperature and
centrifuge to 3000 xg for 3 minutes.
ATM 2 tubes
(per 8 BeadChips)
-15 to -25°C Illumina
PB1 310 ml for 1–8 BeadChips
285 ml for 9– 24 BeadChips
Room temperature
Illumina
XC4 310 ml for 1–8 BeadChips
285 ml for 9– 24 BeadChips
-15 to -25°C Illumina
Alconox Powder Detergent as needed Room temperature
User
EtOH as needed Room temperature
User
95% formamide/1 mM EDTA 15 ml for 1–8 BeadChips
17 ml for 9–16 BeadChips
25 ml for 17–24 BeadChips
-15 to -25°C User
WARNINGWARNING
This protocol involves the use of an aliphatic amide that is a probable reproductive toxin. Personal injury can occur through inhalation, ingestion, skin contact, and eye contact. Dispose of containers and any unused contents in accordance with the governmental safety standards for your region.
Item Quantity Storage Supplied By
Catalog # WG-901-3002
Part # 11311007 Rev A

Single-Base Extension and Stain HD BeadChip 61
Figure 59 XStain HD BeadChip Reagent Tubes and Bottles
Dispense all bottled reagents into disposable reservoirs, as they are
needed.
On the lab tracking form, record:
• Date/Time
• Operator
• RA1 barcode
• XC3 barcode
• XC1 barcode(s)
• XC2 barcode(s)
• TEM barcode(s)
• STM barcode(s)
• ATM barcode(s)
• PB1 barcode
• XC4 barcode(s)
Set Up the Chamber Rack1. Ensure the water circulator reservoir is filled with water to the appropriate
level. See the VWR Operator’s Manual, VWR part # 110-229.
2. Turn on the water circulator and set it to a temperature that brings the
Chamber Rack to 44°C at equilibrium.
This temperature may vary depending on facility ambient conditions.
RA1
95% Formamide / 1 mM EDTA
XC1
XC2
XC3
XC4
STM
ATM
TEM
PB1
Infinium HD Assay Gemini Protocols

62 CHAPTER 2
Infinium HD Assay Gemini Manual Protocol
Figure 60 Water Circulator Connected to Chamber Rack
3. The temperature displayed on the water circulator LCD screen may differ
from the actual temperature in the Chamber Rack. Confirm this using the
temperature probe for the Chamber Rack.
4. Remove the bubbles trapped in the Chamber Rack. You must do this
every time you run this process. Follow instructions in the Te-Flow (Tecan
Flow-Through Module) Operating Manual, Tecan Doc ID 391584.
5. Use the Illumina temperature probe in several locations to ensure that
the Chamber Rack is at 44°C (Figure 61).
Do not leave the temperature probe in the first three rows of the Cham-ber Rack. Reserve this space for BeadChips.
Reservoir Cover
Chamber Rack on Robot Bed
Water Circulator with Programmable Temperature Control
(Blowup)
Catalog # WG-901-3002
Part # 11311007 Rev A

Single-Base Extension and Stain HD BeadChip 63
Figure 61 Illumina Temperature Probe in Chamber Rack
6. For accurate temperature measurement, ensure the temperature probe is
touching the floor of the Chamber Rack.
Steps This protocol includes the following steps:
Single-Base Extension on page 63
Stain BeadChip on page 64
Wash and Coat 8 BeadChips on page 65
Single-Base Extension1. When the Chamber Rack reaches 44°C, quickly place each Flow-Through
Chamber assembly into the Chamber Rack.
For 4 BeadChips, place the Flow-Through Chambers in every other posi-tion, starting at 1, in the first row of the Chamber Rack. For larger num-bers of BeadChips, fill all positions in the first row, then the second and third.
2. Ensure each Flow-Through Chamber is properly seated on its rack to
allow adequate heat exchange between the rack and the chamber.
3. On the lab tracking form, record the Chamber Rack position for each
BeadChip.
4. Into the reservoir of each Flow-Through Chamber, dispense:
a. 150 μl RA1 (Figure 62). Incubate for 30 seconds. Repeat 5 times.
Temperature Probe
Temperature Probe in Chamber Rack
CAUTIONThe remaining steps must be performed without interruption.
Infinium HD Assay Gemini Protocols

64 CHAPTER 2
Infinium HD Assay Gemini Manual Protocol
Figure 62 Dispensing RA1 into Each Flow-Through Chamber
b. 450 μl XC1. Incubate for 10 minutes.
c. 450 μl XC2. Incubate for 10 minutes.
d. 200 μl TEM. Incubate for 15 minutes.
e. 450 μl 95% formamide/1 mM EDTA. Incubate for 1 minute. Repeat
once.
f. Incubate 5 minutes.
g. Begin ramping the Chamber Rack temperature to the temperature
indicated on the STM tube, or to 37°C if none is shown.
h. 450 μl XC3. Incubate for 1 minute. Repeat once.
5. Wait until the Chamber Rack reaches the correct temperature.
Stain BeadChip1. If you plan to image the BeadChip immediately after the staining
process, turn on the Illumina iScan or BeadArray Reader now to allow the
lasers to stabilize.
2. Into the reservoir of each Flow-Through Chamber, dispense:
a. 250 μl STM and incubate for 10 minutes.
b. 450 μl XC3 and incubate for 1 minute. Repeat once, and then wait
5 minutes.
c. 250 μl ATM and incubate for 10 minutes.
d. 450 μl XC3 and incubate for 1 minute. Repeat once, and then wait
5 minutes.
e. 250 μl STM and incubate for 10 minutes.
CAUTIONDo not allow pipette tips to contact the BeadChip surface. Touch off in the reservoir of the glass back plate.
Pipette tip must not contact BeadChip surface
Catalog # WG-901-3002
Part # 11311007 Rev A

Single-Base Extension and Stain HD BeadChip 65
f. 450 μl XC3 and incubate for 1 minute. Repeat once, and then wait
5 minutes.
g. 250 μl ATM and incubate for 10 minutes.
h. 450 μl XC3 and incubate for 1 minute. Repeat once, and then wait
5 minutes.
i. 250 μl STM and incubate for 10 minutes.
j. 450 μl XC3 and incubate for 1 minute. Repeat once, and then wait
5 minutes.
3. Immediately remove the Flow-Through Chambers from the Chamber
Rack and place horizontally on a lab bench at room temperature.
Wash and Coat 8 BeadChips Before starting the Wash and Coat process, please read these important notes:
Take the utmost care to minimize the chance of lint or dust entering the
wash dishes, which could transfer to the BeadChips. Place wash dish
covers on wash dishes when stored or not in use. Clean wash dishes with
low-pressure air to remove particulates before use.
In preparation for XC4 BeadChip coating, wash the tube racks and wash
dishes thoroughly before and after use. Rinse with DI water. Immediately
following wash, place racks and wash dishes upside down on a wash rack
to dry.
Place Kimwipes in three layers on the lab bench. Place a tube rack on top
of these Kimwipe layers. Do not place on absorbent lab pads. You will
place the staining rack containing BeadChips on this tube rack after
removing it from the XC4 wash dish.
Prepare an additional clean tube rack that fits the internal dimensions of
vacuum desiccator for removal of the BeadChips. Allow one rack per
8 BeadChips. No Kimwipes are required under this tube rack.
1. Place the following equipment on the lab bench:
• 1 staining rack
• 1 vacuum desiccator
• 1 tube rack
• Self-locking tweezers
• Large Kimwipes
• Vacuum hose
2. Set up two top-loading wash dishes, labeled as shown (Figure 63).
3. To indicate the fill volume before filling wash dishes with PB1 and XC4,
pour 310 ml water into the wash dishes and mark the water level on the
side. Empty the water from the wash dish. This enables you to pour
reagent directly from the PB1 and XC4 bottles into the wash dishes,
minimizing contaminant transfer from labware to wash dishes.
Infinium HD Assay Gemini Protocols

66 CHAPTER 2
Infinium HD Assay Gemini Manual Protocol
Figure 63 PB1 and XC4 Wash Dishes with Staining Rack
4. Pour 310 ml PB1 into the wash dish labeled “PB1.”
5. Submerge the unloaded staining rack into the wash dish with the locking
arms facing you. This orients the staining rack so that you can safely
remove the BeadChips.
Figure 64 Staining Rack Locking Arms and Tab
Let the staining rack sit in the wash dish. You will use it to carry the Bead-Chips after disassembling the Flow-Through Chambers.
6. One at a time, disassemble each Flow-Through Chamber:
a. Use the dismantling tool to remove the two metal clamps (Figure 65).
CAUTIONIf the staining rack handle is not correctly oriented, the BeadChips may be damaged when you remove the staining rack handle.
Staining Rack
Wash Dishes
Locking Arms
Tab
Catalog # WG-901-3002
Part # 11311007 Rev A

Single-Base Extension and Stain HD BeadChip 67
Figure 65 Removing Metal Clamps from Flow-Through Chamber
b. Remove the glass back plate and set it aside.
c. When you finish the XStain HD BeadChip protocol, clean the glass
back plates as described in the Infinium Assay Lab Setup and Procedures Guide.
d. Remove the spacer. To avoid damaging the stripes on the BeadChip,
pull the spacer out so that the long sides slide along the sides of the
BeadChip.
e. Remove the BeadChip.
7. Place BeadChips in the staining rack while it is submerged in PB1. Put
four BeadChips above the staining rack handle and four below.
If necessary, briefly lift the staining rack out of the wash dish to seat the BeadChip. Replace it immediately after inserting the BeadChip.
8. Ensure that the BeadChip barcodes are correctly positioned in the
staining rack, with the labels facing away from you. This is essential for
proper handling and coating.
9. Ensure that the BeadChips are completely submerged.
10. Move the staining rack up and down 10 times, breaking the surface of
the PB1.
CAUTIONIt is important to use the dismantling tool to avoid chipping the glass back plates.
CAUTIONDo not touch the face of the BeadChips. Handle them by the barcode end or by the edges.
CAUTIONDo not allow the BeadChips to dry. Submerge each BeadChip in the wash dish as soon as possible.
Infinium HD Assay Gemini Protocols

68 CHAPTER 2
Infinium HD Assay Gemini Manual Protocol
Figure 66 Washing BeadChips in PB1
11. Allow the BeadChips to soak for an additional 5 minutes.
12. Pour 310 ml XC4 into the dish labeled “XC4,” and cover the dish to
prevent any lint or dust from falling into the solution.
13. Remove the staining rack from the PB1 dish and place it directly into the
wash dish containing XC4 (Figure 67). The barcode labels on the
BeadChips must face away from you, while the locking arms on the
handle face towards you, for proper handling and coating.
NOTE
If the top edges of the BeadChips begin to touch during either PB1 or XC4 washes, gently move the staining rack back and forth to separate the slides. It is important for the solution to circulate freely between all BeadChips.
CAUTIONDo not leave the BeadChips submerged in PB1 for longer than 30 minutes.
NOTEUse the XC4 within 10 minutes after filling the wash dish.
Catalog # WG-901-3002
Part # 11311007 Rev A

Single-Base Extension and Stain HD BeadChip 69
Figure 67 Moving BeadChips from PB1 to XC4
14. Move the staining rack up and down 10 times, breaking the surface of
the XC4.
15. Allow the BeadChips to soak for an additional 5 minutes.
16. Prepare a clean tube rack for the staining rack by placing two folded
Kimwipes under the tube rack.
17. Prepare one additional tube rack per 8 BeadChips that fits the internal
dimensions of the vacuum desiccator.
18. Remove the staining rack in one smooth, rapid motion and place it
directly on prepared tube rack, making sure the barcodes face up and
the locking arms and tab face down (Figure 68).
NOTE
If the top edges of the BeadChips begin to touch during either PB1 or XC4 washes, gently move the staining rack back and forth to separate the slides. It is important for the solution to circulate freely between all BeadChips.
CAUTIONUse XC4 only once. To process subsequent BeadChips, use a new, clean wash dish with fresh XC4.
Infinium HD Assay Gemini Protocols

70 CHAPTER 2
Infinium HD Assay Gemini Manual Protocol
Figure 68 Staining Rack in Correct Orientation
19. To ensure uniform coating, place the staining rack on the center of the
tube rack, avoiding the raised edges.
Figure 69 Moving the Staining Rack from XC4 to Tube Rack
20. For the top four BeadChips, working top to bottom:
a. Continuing to hold the staining rack handle, carefully grip each
BeadChip at its barcode end with self-locking tweezers.
b. Place the BeadChip on a tube rack with the barcode facing up and
towards you (Figure 71).
21. Holding the top of the staining rack in position, gently remove the
staining rack handle by grasping the handle between the thumb and
NOTEThe XC4 coat is slippery and makes the BeadChips difficult to hold. The self-locking tweezers grip the BeadChip firmly and help prevent damage.
Catalog # WG-901-3002
Part # 11311007 Rev A

Single-Base Extension and Stain HD BeadChip 71
forefinger. Push the tab up with your thumb and push the handle away
from you (unlocking the handle), then pull up the handle and remove
(Figure 70).
Figure 70 Removing Staining Rack Handle
22. Remove the remaining BeadChips to the tube rack as shown in Figure
71, with six BeadChips on top of the rack and two BeadChips on the
bottom. The barcode ends should be towards you, and the BeadChips
should be completely horizontal.
Figure 71 Placing BeadChips on Tube Rack
CAUTIONTo prevent wicking and uneven drying, do not allow the BeadChips to rest on the edge of the tube rack or to touch each other while drying.
Tab
Handle
Infinium HD Assay Gemini Protocols

72 CHAPTER 2
Infinium HD Assay Gemini Manual Protocol
23. Place the tube rack in the vacuum desiccator. Each dessicator can hold
one tube rack (Eight BeadChips) (Figure 72).
24. Remove the red plug from the three-way valve before applying vacuum
pressure.
25. Start the vacuum, using at least 508 mm Hg (0.68 bar).
26. To ensure that the dessicator is properly sealed, gently lift the lid of the
vacuum desiccator. It should not lift off the desiccator base.
Figure 72 Testing Vacuum Seal
27. Dry under vacuum for 50–55 minutes.
Drying times may vary according to room temperature and humidity.
28. Release the vacuum by turning the handle very slowly.
29. Store desiccator with the red valve plug in the desiccator’s three-way
valve to stop accumulation of dust and lint within the valve port.
30. Touch the borders of the chips (do not touch the stripes) to ensure that
the etched, bar-coded side of the BeadChips are dry to the touch.
31. If the underside feels tacky, manually clean the underside of the
BeadChip to remove any excess XC4. The bottom two BeadChips are
the most likely to have some excess.
a. Wrap a pre-saturated Prostat EtOH Wipe around your index finger.
WARNINGWARNING
Air should enter the desiccator very slowly to avoid disturbing the contents. Improper use of the vacuum desiccator can result in damage to the BeadChips. This is especially true if you remove the valve plug while a vacuum is applied. For detailed vacuum desiccator instructions, see the documentation included with the desiccator.
Catalog # WG-901-3002
Part # 11311007 Rev A

Single-Base Extension and Stain HD BeadChip 73
b. Hold the BeadChip at a downward angle to prevent excess EtOH
from dripping from the wipe onto the stripes.
c. Wipe along the underside of the BeadChip five or six times, until the
surface is clean and smooth.ti
32. Clean the glass back plates. For instructions, see the Infinium Assay Lab Setup and Procedures Guide.
33. Clean the Hyb Chambers:
a. Remove the rubber gaskets from the Hyb Chambers.
b. Rinse all Hyb Chamber components with DI water.
c. Thoroughly rinse the humidifying buffer reservoirs.
34. Discard unused reagents in accordance with facility standards.
35. Do one of the following:
• Proceed to Image BeadChip on the iScan System on page 74 or
Image BeadChip on the BeadArray Reader on page 82.
• Store the BeadChips in the Illumina BeadChip Slide Storage Box
inside a vacuum desiccator at room temperature. Image the
BeadChips within 72 hours.
CAUTIONDo not touch the stripes.
Infinium HD Assay Gemini Protocols

74 CHAPTER 2
Infinium HD Assay Gemini Manual Protocol
Image BeadChip on the iScan System
The iScan Reader uses a laser to excite the fluor of the single-base extension product on the beads of the BeadChip sections. Light emissions from these fluors are then recorded in high-resolution images of the BeadChip sections. Data from these images are analyzed using Illumina’s GenomeStudio Genotyping Module.
Estimated Time Scanning: 35 minutes per BeadChip
Preparation On the lab tracking form, record the following for each BeadChip:
• Scanner ID
• Scan date
For more information about the iScan System, GenomeScan software, or
AutoLoader2, see the iScan and AutoLoader2 System Guide.
Steps OverviewThe GenomeScan software leads you through the BeadChip scanning process, which is as follows:
1. Turn on the iScan Reader, boot up the iScan PC, and start the
GenomeScan application.
2. Load the BeadChips to be scanned, and copy their decode data into the
Input Path.
3. Check the scan settings and input/output paths, making modifications if
necessary.
4. If you wish, remove BeadChip sections or entire BeadChips from the
scan.
5. Start the scan and monitor its progress.
6. Review the scan metrics.
NOTE
To record information about your assay such as operator information, start and stop times, and barcodes, use the lab tracking form provided on your documentation CD. This form can be filled out and saved online, or printed and filled in by hand.
CAUTION
Turn on the iScan Reader before launching the GenomeScan software. If the software is launched when the instrument is turned off, an error message will alert you that the hardware is missing.
Catalog # WG-901-3002
Part # 11311007 Rev A

Image BeadChip on the iScan System 75
Starting Up the iScan System1. Turn on the iScan Reader and the attached PC.
2. Let the iScan Reader warm up for at least 5 minutes before beginning a
scan. It is fine to use the GenomeScan software during this time.
3. For each BeadChip you plan to scan, copy the contents of the mini-CD
provided with the BeadChip into the Decode folder. The folder name
should be the BeadChip barcode (for example, 4264011131).
If there is no decode folder, follow the instructions in Setting Up Input and Output Paths on page 79.
4. Double-click the GenomeScan icon on the desktop.
The Welcome window appears (Figure 73). The GenomeScan software automatically connects to the iScan Reader and initializes it. When the reader is initialized, the red dot in the status bar turns green, and the sta-tus changes to Initialized.
Figure 73 Initialize iScan Reader
5. Set the LIMS dropdown list to None and enter your Windows user name
(Figure 74).
Infinium HD Assay Gemini Protocols

76 CHAPTER 2
Infinium HD Assay Gemini Manual Protocol
Figure 74 Welcome Window
6. Click Start.
The iScan Reader tray opens.
Loading BeadChips and Starting the Scan1. Load the BeadChips into their carrier and place the carrier into the iScan
Reader tray. Click Next.
The tray closes and the iScan Reader begins scanning the barcodes (Figure 75).
Catalog # WG-901-3002
Part # 11311007 Rev A

Image BeadChip on the iScan System 77
Figure 75 Scan BeadChip Barcodes
When the iScan Reader has read all of the barcodes, the Setup window displays the barcode, description, and scan setting for each BeadChip in the position corresponding to its location in the tray. You can click any barcode to view an image of the corresponding BeadChip.
For more information about the scan settings, see the iScan and AutoLoader2 System Guide.
2. If you do not want to scan certain sections of a BeadChip, click the
barcode to display an image of the corresponding BeadChip in the
Setup window. Click any BeadChip section to remove it from the scan
(Figure 76). The section will no longer be highlighted blue.
Infinium HD Assay Gemini Protocols

78 CHAPTER 2
Infinium HD Assay Gemini Manual Protocol
Figure 76 Deselect BeadChip Sections
3. If you want to remove an entire BeadChip from the scan, delete the
barcode from the Setup window.
4. To begin scanning the BeadChips, click Scan.
Scanning should take 8–10 minutes per BeadChip.
As the scan progresses, status icons and messages are displayed in the bottom left corner of window. For more information about what happens during the scan, see During the Scan on page 80.
5. At the end of the scan, a Review window appears (Figure 77). The Scan
Metrics table at the top shows the intensity values, registration, and focus
metrics for each stripe on the BeadChip.
Sections that will not be scanned
Catalog # WG-901-3002
Part # 11311007 Rev A

Image BeadChip on the iScan System 79
Figure 77 Review Window with Failed Stripes
You can also review scan metrics for any BeadChip in the Output Path folder. Scan metrics are in a document titled Barcode_qc.txt, where “Bar-code” represents the barcode number for a single BeadChip.
The focus metric ranges between 0 and 1. High focus scores indicate a sharp, well defined image, leading to high bead intensity values.
6. If any stripes fail to scan successfully they are highlighted in red on the
screen. The window contains a Rescan button. Click Rescan to
automatically rescan all failed areas on the BeadChips in the carrier.
7. When you finish reviewing the data, click Done to return to the Start
window.
If you click Done on the Review window without rescanning failed sec-tions, no *.idat files will be saved for those sections. The entire sample section will have to be rescanned to generate *.idat files.
When you return to the Start window, images from the scan are no longer available to be viewed in the GenomeScan software. Use another pro-gram such as Illumina’s GenomeStudio software to view images from the scan.
Setting Up Input and Output PathsThis step should only occur once, when you install the GenomeScan software on the iScan PC. After that, all scans use these paths.
1. Create a folder on the iScan PC D drive to contain the decode (*.dmap)
and Sentrix descriptor (*.sdf) files that came on each BeadChip CD (for
Infinium HD Assay Gemini Protocols

80 CHAPTER 2
Infinium HD Assay Gemini Manual Protocol
example, D:\Decode). The GenomeScan software refers to this folder as
the Input Path.
2. Create another folder on the iScan PC D_drive where you want
GenomeScan to store the image data from the scan (for example,
D:\ImageData).
During the scan, GenomeScan automatically creates subfolders named with each BeadChip’s barcode number. The folder will be populated with image files (*.jpg or *.tif), scan metrics (*.txt), and intensity data files (*.idat) for each BeadChip. If the images are in *.tif format, the output path will also contain bead location files (*.locs).
During the Scan
Calibration
The iScan System begins with a calibration step, which may take several minutes to complete. The BeadChips are automatically tilted and aligned to ensure that they are in the optimal position for the scan.
Tilt—The iScan Reader autofocus feature records the Z-position (height)
of three corners of the BeadChip to determine its current tilt, and then
adjusts the BeadChip until it is flat.
Align—The iScan Reader identifies the X-Y position (lateral location) of
the fiducials (focus points) on the BeadChip edges, and then adjusts the
optics.
If there are defective or dirty sections at any of the three alignment corners, the software attempts to use alternate sections until satisfactory calibration is achieved. If no alternate sections are available, calibration fails and an error message is displayed.
Hard Drive Space
Before beginning a scan, the GenomeScan software checks the hard drive to ensure sufficient space is available. If sufficient disk space is not available, an error message is displayed, and the arrays will not be scanned.
Monitoring the Scan
After calibration, the iScan Reader begins scanning. You can view the progress of the scan in the Scan window (Figure 78).
Catalog # WG-901-3002
Part # 11311007 Rev A
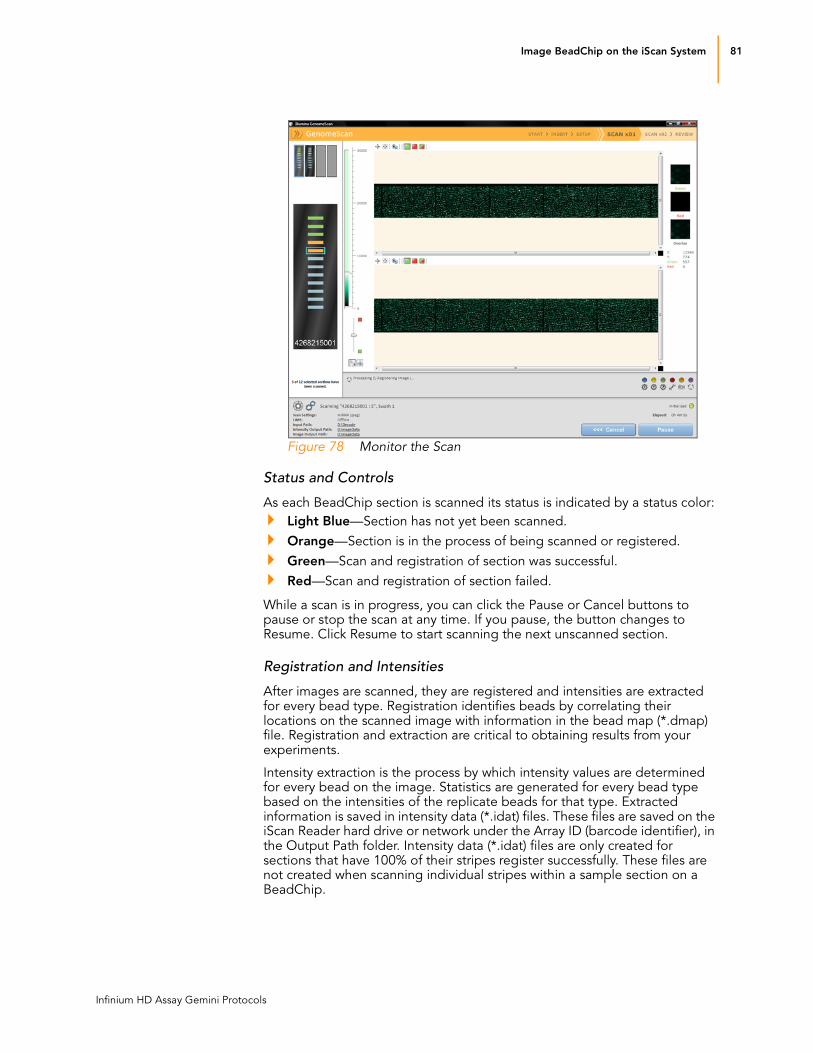
Image BeadChip on the iScan System 81
Figure 78 Monitor the Scan
Status and Controls
As each BeadChip section is scanned its status is indicated by a status color:
Light Blue—Section has not yet been scanned.
Orange—Section is in the process of being scanned or registered.
Green—Scan and registration of section was successful.
Red—Scan and registration of section failed.
While a scan is in progress, you can click the Pause or Cancel buttons to pause or stop the scan at any time. If you pause, the button changes to Resume. Click Resume to start scanning the next unscanned section.
Registration and Intensities
After images are scanned, they are registered and intensities are extracted for every bead type. Registration identifies beads by correlating their locations on the scanned image with information in the bead map (*.dmap) file. Registration and extraction are critical to obtaining results from your experiments.
Intensity extraction is the process by which intensity values are determined for every bead on the image. Statistics are generated for every bead type based on the intensities of the replicate beads for that type. Extracted information is saved in intensity data (*.idat) files. These files are saved on the iScan Reader hard drive or network under the Array ID (barcode identifier), in the Output Path folder. Intensity data (*.idat) files are only created for sections that have 100% of their stripes register successfully. These files are not created when scanning individual stripes within a sample section on a BeadChip.
Infinium HD Assay Gemini Protocols

82 CHAPTER 2
Infinium HD Assay Gemini Manual Protocol
Image BeadChip on the BeadArray Reader
The Illumina BeadArray Reader uses a laser to excite the fluor of the hybridized single-stranded product on the beads of the BeadChip sections. Light emissions from these fluors are then recorded in high-resolution images of the BeadChip sections. Data from these images are analyzed using Illumina’s GenomeStudio Genotyping Module.
Estimated Time 1–2 hours warmup for the BeadArray Reader (first use of the day only)
45 minutes to scan each BeadChip using BeadScan 3.2 FastScan settings
Preparation If this is the first time the BeadArray Reader is being used today, follow
the steps described in this section.
On the lab tracking form, record the following for each BeadChip:
• Scanner ID
• Scan date
Initializing the BeadArray
Reader (Daily)
If this is the first time the scanner is being used today, follow these steps.
Refer to Figure 79 throughout this protocol.
NOTE
To record information about your assay such as operator information, start and stop times, and barcodes, use the lab tracking form provided on your documentation CD. This form can be filled out and saved online, or printed and filled in by hand.
Catalog # WG-901-3002
Part # 11311007 Rev A

Image BeadChip on the BeadArray Reader 83
Figure 79 Illumina BeadArray Reader
1. Locate the power switch on the lower-left side of the BeadArray Reader
back panel and turn it to the ON position.
2. Wait for the ready indicator to stop flashing.
3. Open the BeadScan software.
4. Log in and click Scan (Figure 80).
Scanning indicators
Top button closes tray
Bottom button opens tray
Attention (attn!) indicator
Loaded indicator
Ready indicator
Power indicator
Tray in closed position
Table 8 Illumina BeadArray Reader Indicators
Indicator Description
Scanning (seven lights) Flash blue in sequence when the BeadArray Reader is scanning.
Attention Turns solid amber to indicate a hardware problem. Check the BeadArray Reader PC for an error message. You may need to cycle the power on the BeadArray Reader.
Loaded Not currently used.
Ready Flashes green during startup. Turns solid green when the BeadArray Reader is ready for use and when it is busy.
Power Turns solid green when the BeadArray Reader is on.
Infinium HD Assay Gemini Protocols
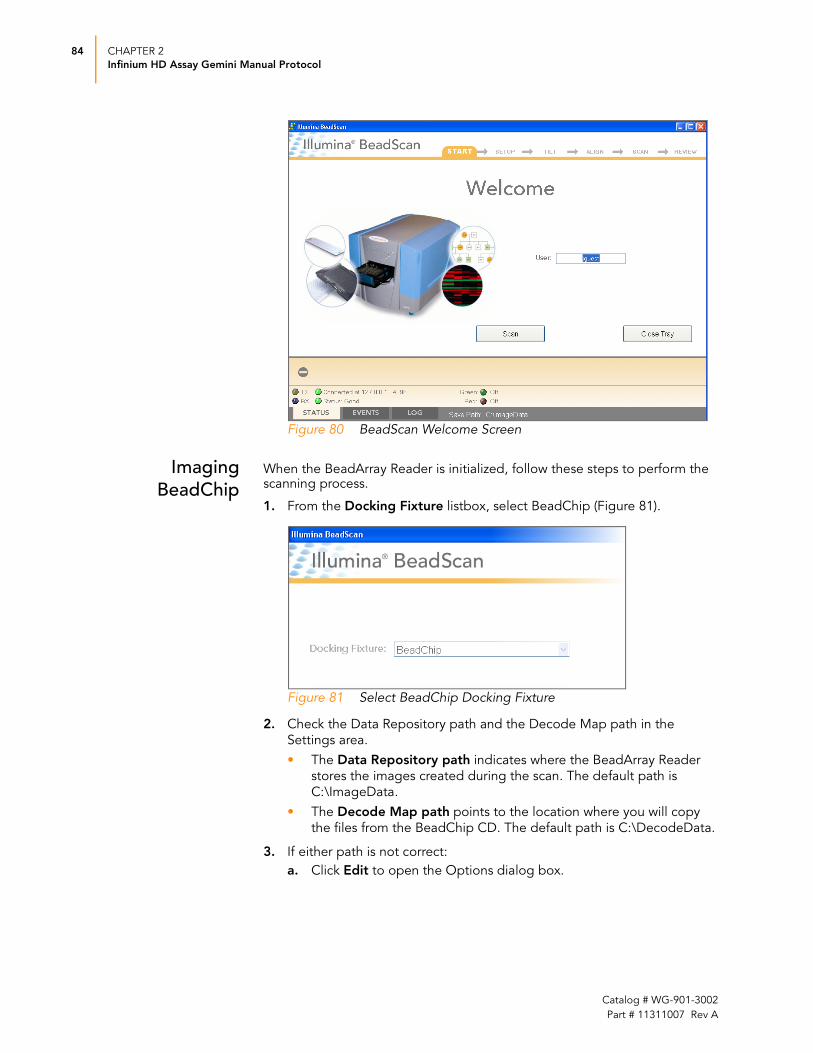
84 CHAPTER 2
Infinium HD Assay Gemini Manual Protocol
Figure 80 BeadScan Welcome Screen
Imaging BeadChip
When the BeadArray Reader is initialized, follow these steps to perform the scanning process.
1. From the Docking Fixture listbox, select BeadChip (Figure 81).
Figure 81 Select BeadChip Docking Fixture
2. Check the Data Repository path and the Decode Map path in the
Settings area.
• The Data Repository path indicates where the BeadArray Reader
stores the images created during the scan. The default path is
C:\ImageData.
• The Decode Map path points to the location where you will copy
the files from the BeadChip CD. The default path is C:\DecodeData.
3. If either path is not correct:
a. Click Edit to open the Options dialog box.
Catalog # WG-901-3002
Part # 11311007 Rev A

Image BeadChip on the BeadArray Reader 85
Figure 82 Enter Data Repository and Decode Data Paths
b. Click Browse to navigate to and select the Data Repository path and
the Decode Map path.
c. Select or clear the Save Compressed Images check box.
Compressed images use the JPG format. Uncompressed images use
the TIFF format and may be 75 MB or more.
d. After changing settings, click either Save for this Scan or
Save for All Scans.
4. Copy the decode map (*.dmap) files for each BeadChip from the
BeadChip CD to the Decode Map path directory.
5. For each BeadChip:
a. Place the BeadChip into the BeadArray Reader tray.
b. Using the hand-held barcode scanner, scan the BeadChip barcode.
The barcode appears on the screen in the position corresponding to
the BeadChip position in the tray.
c. If either the Sentrix Type or Scan Settings are not correct, click
Browse (...) to open the Select Scan Settings dialog box.
d. Select the appropriate scan method and click Select.
6. Make sure that the BeadChips are properly seated in the BeadArray
Reader tray (Figure 83).
Figure 83 Place BeadChips into Illumina BeadArray Reader Tray
Infinium HD Assay Gemini Protocols

86 CHAPTER 2
Infinium HD Assay Gemini Manual Protocol
7. Click Scan.
Scanning ProcessBeadScan begins the BeadArray Reader Tilt and Align processes (Figure 85):
• Tilt—The BeadArray Reader Autofocus feature records the
Z-position (height) of three corners of the BeadChip to determine its
current tilt, and then adjusts the BeadChip until it is flat.
Figure 84 BeadArray Reader Tile Process
• Align—The BeadArray Reader identifies the X-Y position (lateral
location) of the fiducials (focus points) on the BeadChip edges, and
then adjusts the optics.
First Corner
Status Bar Describes Activity and Status
Autofocus Laser
Catalog # WG-901-3002
Part # 11311007 Rev A

Image BeadChip on the BeadArray Reader 87
Figure 85 BeadArray Reader Tilt & Align Processes
Once the Tilt and Align processes are complete, the Scan process begins (Figure 86). Hover over any of the green dots in the closeup image to see
the relative intensity and the XY position.1 The red value should be at or close to zero, because this is a one-color assay.
Fiducial
Status Bar Describes Activity and Status
“+” Indicates that Fiducial was Successfully Located
1. The 0/0 position is at the upper left corner of the BeadChip, with X increasing right-
wards and Y increasing downwards.
Infinium HD Assay Gemini Protocols

88 CHAPTER 2
Infinium HD Assay Gemini Manual Protocol
Figure 86 BeadArray Reader Scan Process
As the BeadArray Reader scans, the front panel blue Scanning indicator lights flash in sequence (see Figure 10 on page 25).
When the BeadArray Reader finishes scanning, a green message screen appears if the scan was successful, or a red message if it completed with any warnings. These screens are designed to be visible from across the lab.
Figure 87 Scan Completed and Scan Completed with Warnings Screens
If Scan is Successful1. Click OK on the Scan Completed message to view the next screen.
2. Click Done in the Review pane.
Section Already Scanned (Outlined in Green)
Section Being Scanned (Whole BeadChip)
Section Being Scanned (Closeup)
Intensity Data for Spot Underneath Mouse Pointer
Extraction Results Summary
Section Being Scanned (Outlined in Red)
Catalog # WG-901-3002
Part # 11311007 Rev A

Image BeadChip on the BeadArray Reader 89
3. When the application returns to the Welcome screen, click Open Tray.
The BeadArray Reader tray, loaded with the scanned BeadChips, will
eject.
4. Remove the BeadChips from the tray.
5. Do one of the following:
If you have more BeadChips to scan, repeat the scanning process.
If this is the last use of the day:
a. Wipe the BeadArray Reader tray with a lint-free, absorbent towel.
Pay particular attention to the tray edges where reagent may have
wicked out.
b. Close the tray.
c. Turn the power switch at the back of the scanner to the OFF position.
d. Shut down the BeadArray Reader BeadScan software. To exit,
right-click near the Illumina logo and click Exit (Figure 88).
Figure 88 Exit the BeadArray Reader Software
If Scan is not SuccessfulRe-scan the array. For more information, refer to the Illumina BeadArray Reader User Guide.
If the scanner was unable to locate the alignment fiducials (focus points), you may need to clean the edges of the BeadChip before re-scanning.
Infinium HD Assay Gemini Protocols

90 CHAPTER 2
Infinium HD Assay Gemini Manual Protocol
Clean BeadChip Edges
1. To clean the BeadChips, wrap a Prostat EtOH presaturated wipe around
your index finger. Place the wipe against the edge of BeadChip, no
further than 2 mm from the edge of the slide (Figure 89 inset).
Figure 89 Wiping Edges of BeadChip
2. Wipe along the edge of each BeadChip five or six times (Figure 89), until
the surface is clean and smooth and no streaks are visible.
To completely remove the coating along the edges and back of Bead-Chip, you may need to use a different part of the ProStat EtOH wipe.
GenomeStudio Integrated Informatics Platform
The GenomeStudio Genotyping Module, included with your Illumina Infinium Assay system, is an application for extracting genotyping data from intensity data files (*.idat files) collected from systems such as the Illumina iScan System or BeadArray Reader.
For feature descriptions and instructions on using the GenomeStudio platform to visualize and analyze genotyping data, see the GenomeStudio Framework User Guide and the GenomeStudio Genotyping Module User Guide.
CAUTIONThe wipe should not pass over the etched stripes on the BeadChip.
CAUTIONAny remaining visible streaks may lead to alignment errors.
Etched Stripes
Catalog # WG-901-3002
Part # 11311007 Rev A

Chapter 3
Infinium HD Assay Gemini
Automated Protocol
Topics92 Introduction
92 Infinium HD Assay Gemini Automated Workflow
94 Equipment, Materials, and Reagents
97 Quantitate DNA (Optional)
106 Make the AMP3 Plate
113 Make Multiple AMP3 Plates
119 Incubate the AMP3 Plate
121 Fragment the AMP3 Plate
125 Precipitate the AMP3 Plate
132 Resuspend the AMP3 Plate
136 Hybridize Duo BeadChip
152 Wash BeadChips
163 Single-Base Extension and Stain HD BeadChip
190 Image BeadChip on the iScan System
198 Image BeadChip on the BeadArray Reader
206 GenomeStudio Integrated Informatics Platform
Infinium HD Assay Gemini Protocols 91

92 CHAPTER 3
Infinium HD Assay Gemini Automated Protocol
Introduction
This chapter describes pre- and post-amplification automated laboratory protocols for the Illumina Infinium HD Assay Gemini BeadChips. Follow the protocols in the order shown.
Some of the tasks in this chapter make reference to Infinium LIMS (Laboratory Information Management System). If you are not running Infinium LIMS, disregard those instructions. For information about how to use Infinium LIMS, see the Infinium LIMS User Guide.
Infinium HD Assay Gemini Automated Workflow
Figure 90 graphically represents the Illumina Infinium HD Assay Gemini automated workflow, with or without Infinium LIMS. These protocols describe the procedure for preparing eight DNA samples. To process 48 or 96 samples, scale up the protocols accordingly.
Catalog # WG-901-3002
Part # 11311007 Rev A
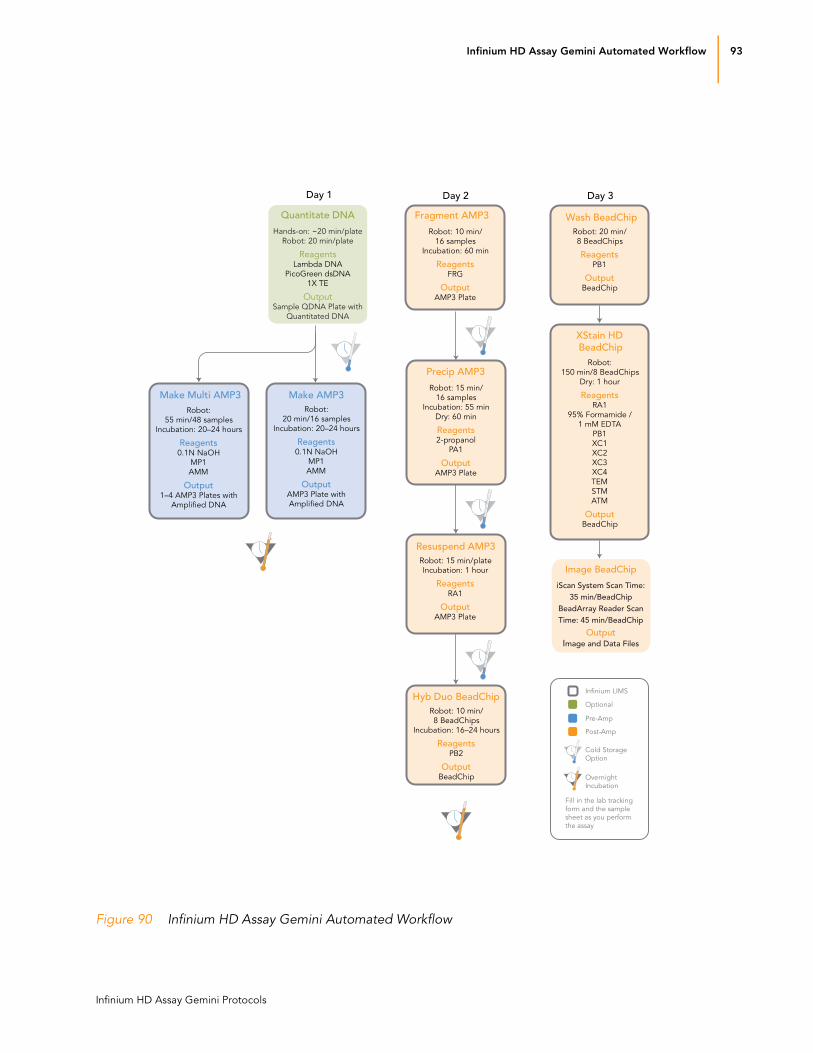
Infinium HD Assay Gemini Automated Workflow 93
Figure 90 Infinium HD Assay Gemini Automated Workflow
Day 1 Day 2 Day 3
Make AMP3Robot:
20 min/16 samples
Incubation: 20–24 hours
Reagents0.1N NaOH
MP1
AMM
OutputAMP3 Plate with
Amplified DNA
Make Multi AMP3Robot:
55 min/48 samples
Incubation: 20–24 hours
Reagents0.1N NaOH
MP1
AMM
Output1–4 AMP3 Plates with
Amplified DNA
XStain HDBeadChip
Robot:
150 min/8 BeadChips
Dry: 1 hour
ReagentsRA1
95% Formamide /
1 mM EDTA
PB1
XC1
XC2
XC3
XC4
TEM
STM
ATM
OutputBeadChip
Precip AMP3
Robot: 15 min/
16 samples
Incubation: 55 min
Dry: 60 min
Reagents2-propanol
PA1
OutputAMP3 Plate
Fragment AMP3
Robot: 10 min/
16 samples
Incubation: 60 min
ReagentsFRG
OutputAMP3 Plate
Resuspend AMP3Robot: 15 min/plate
Incubation: 1 hour
ReagentsRA1
OutputAMP3 Plate
Hyb Duo BeadChipRobot: 10 min/
8 BeadChips
Incubation: 16–24 hours
ReagentsPB2
OutputBeadChip
Wash BeadChipRobot: 20 min/
8 BeadChips
ReagentsPB1
OutputBeadChip
Pre-Amp
Optional
Infinium LIMS
Post-Amp
Cold Storage
Option
Overnight
Incubation
Fill in the lab tracking
form and the sample
sheet as you perform
the assay
Quantitate DNA
Hands-on: ~20 min/plate
Robot: 20 min/plate
ReagentsLambda DNA
PicoGreen dsDNA
1X TE
OutputSample QDNA Plate with
Quantitated DNA
Image BeadChip
iScan System Scan Time:35 min/BeadChip
BeadArray Reader ScanTime: 45 min/BeadChip
OutputImage and Data Files
Infinium HD Assay Gemini Protocols

94 CHAPTER 3
Infinium HD Assay Gemini Automated Protocol
Equipment, Materials, and Reagents
These items are specifically required for the Infinium HD Assay Gemini. For a list of other equipment, materials, and reagents needed in an Infinium Assay lab, see the Infinium Assay Lab Setup and Procedures Guide.
Equipment User-Supplied
Illumina-Supplied
Table 9 User-Supplied Equipment
Item Source
Vacuum desiccator (1 per 8 BeadChips processed simultaneously) VWR Catalog # 24988-197
Vacuum tubing VWR Catalog # 62995-335
2 Tecan eight-tip robots (one for pre- and one for post-amplification processes)
Non-LIMS customers
• SC-30-401 (110V) - North America and Japan
• SC-30-402 (220V) - EU and Asia Pacific (Except Japan)
Infinium LIMS customers
• SC-30-403 (110V) - North America and Japan
• SC-30-404 (220V) - EU and Asia Pacific (Except Japan)
Forceps VWR International, Catalog # 25601-008
Auto-desiccator cabinet (Optional—allows scanning of BeadChips up to three days after processing)
VWR International, Catalog # 74950-342
Table 10 Illumina-Supplied Materials
Item Catalog or Part #
Multi-Sample BeadChip Alignment Fixture Part # 218528
Robot BeadChip Alignment Fixture (6) Part # 222691
Robot Tip Alignment Guide Part # 11310856
Catalog # WG-901-3002
Part # 11311007 Rev A

Equipment, Materials, and Reagents 95
Materials User-Supplied
Illumina-SuppliedAMP3 barcode labels
WG#-DNA barcode labels
QNT barcode labels
Reagents Illumina-Supplied
Table 11 User-Supplied Materials
Item Source
96-well, black, flat-bottom Fluotrac 200 plates Greiner, catalog # 655076
Foil adhesive seals (Microseal “F”) MJ Research, Catalog # MSF-1001
Aluminum foil
Reservoir, full, 150 ml Beckman Coulter, catalog # 372784
Reservoir, half, 75 ml Beckman Coulter, catalog # 372786
Reservoir, quarter, 40 ml Beckman Coulter, catalog # 372790
Reservoir frame Beckman Coulter, catalog # 372795
Tube racks for vacuum desiccator (1 for every 8 BeadChips to be processed simultaneously; must fit internal dimensions of vacuum desiccator)
VWR catalog # 66023-526
Vacuum source (greater than 508 mm Hg (0.68 bar)
(Recommended) Vacuum gauge for vacuum desiccator
Table 12 Illumina-Supplied Reagents
Item Part #
MP1—Neutralization solution 11190751
AMM—Amplification Master Mix 11192044
FRG—Fragmentation solution 11190022
PA1—Precipitation solution 11190031
RA1—Resuspension, hybridization, and wash solution 11191914
PB1—Reagent used to prepare BeadChips for hybridization 11191922
PB2—Humidifying buffer used during hybridization 11191130
Infinium HD Assay Gemini Protocols

96 CHAPTER 3
Infinium HD Assay Gemini Automated Protocol
XC1—XStain BeadChip solution 1 11208288
XC2—XStain BeadChip solution 2 11208296
TEM—Two-Color Extension Master Mix 11208309
XC3 (80 ml)—XStain BeadChip solution 3 11208392
XC3 (240 ml)—XStain BeadChip solution 3 11208421
STM—Superior Two-Color Master Mix 11288046
ATM—Anti-Stain Two-Color Master Mix 11208317
XC4—XStain BeadChip solution 4 11208430
Table 12 Illumina-Supplied Reagents
Item Part #
Catalog # WG-901-3002
Part # 11311007 Rev A

Quantitate DNA (Optional) 97
Quantitate DNA (Optional)
This process uses the PicoGreen dsDNA quantitation reagent to quantitate double-stranded DNA samples before bisulfite conversion. You can quantitate up to three plates, each containing up to 96 samples. If you already know the concentration and your are not running Infinium LIMS (Laboratory Information Management System), Proceed to Make the AMP3 Plate on page 106 or Make Multiple AMP3 Plates on page 113.
If you are running Infinium LIMS, for information about how to use Infinium LIMS, see the Infinium LIMS User Guide.
Illumina recommends the Molecular Probes PicoGreen assay to quantitate dsDNA samples. The PicoGreen assay can quantitate small DNA volumes, and measures DNA directly. Other techniques may pick up contamination such as RNA and proteins. Illumina recommends using a spectrofluorometer because fluorometry provides DNA-specific quantification. Spectrophotometry might also measure RNA and yield values that are too high.
Estimated Time Hands-on time: ~20 minutes per plate
Robot: 20 minutes per plate
Consumables
Preparation Thaw PicoGreen to room temperature in a light-impermeable container.
Follow the instructions for preparing the robot before each use in the
Infinium Assay Lab Setup and Procedures Guide.
Item Quantity Storage Supplied By
PicoGreen dsDNA quantitation reagent
See Instructions -15 to -25°C User
1X TE (10 mM Tris-HCl pH8.0, 1 mM EDTA (TE))
See Instructions Room temperature
User
Lambda DNA See Instructions 2 to 8°C User
96-well 0.65 ml microtiter plate
1 per 96 samples User
Fluotrac 200 96-well flat-bottom plate
1 per Std DNA plate
1 per Sample DNA plate
User
WG#-DNA plate with DNA samples
8, 16, 24, 32, 48, or 96 DNA samples in 1 to 3 plates
2 to 8°C User
NOTE
PicoGreen is susceptible to differential contaminants. False positives may occur for whole-genome amplification. Therefore, it is important to quantitate the input into the whole-genome amplification reaction.
Infinium HD Assay Gemini Protocols

98 CHAPTER 3
Infinium HD Assay Gemini Automated Protocol
Thaw the sample DNA plates to room temperature.
Apply a QNT barcode label to a new Fluotrac plate for each WG#-DNA
plate to be quantified.
Hand-label the microtiter plate “Standard DNA.”
Hand-label one of the Fluotrac plates “Standard QNT.”
In the Sample Sheet, enter the Sample_Name (optional) and
Sample_Plate for each Sample_Well.
Steps In this section, you will perform the following steps:
Make a Standard DNA plate with serial dilutions of stock Lambda DNA.
Dilute PicoGreen with 1X TE.
Create a Standard QNT Fluotrac plate containing serial dilutions of DNA
plus diluted PicoGreen.
Create a QNT plate by adding diluted PicoGreen to the sample DNA you
plan to assay.
Make Standard DNA PlateIn this process, you create a Standard DNA plate with serial dilutions of stock Lambda DNA in the wells of column 1 (Figure 91).
1. Add stock Lambda DNA to well A1 in the plate labelled “Standard DNA”
and dilute it to 75 ng/μl in a final volume of 233.3 μl. Pipette up and
down several times.
a. Use the following formula to calculate the amount of stock Lambda
DNA to add to A1:
b. Dilute the stock DNA in well A1 using the following formula:
2. Add 66.7 μl 1X TE to well B1.
3. Add 100 μl 1X TE to wells C, D, E, F, G, and H of column 1.
(233.3 μl) X (75 ng/μl) = μl of stock Lambda DNA to add to A1
(stock Lambda DNA concentration)
μl of 1X TE to add to A1 = 233.3 μl - μl of stock Lambda DNA in well A1
Catalog # WG-901-3002
Part # 11311007 Rev A

Quantitate DNA (Optional) 99
Figure 91 Dilution of Stock Lambda DNA Standard
4. Transfer 133.3 μl of Lambda DNA from well A1 into well B1. Pipette up
and down several times.
5. Change tips. Transfer 100 μl from well B1 into well C1. Pipette up and
down several times.
6. Repeat for wells D1, E1, F1, and G1, changing tips each time. Do not transfer from well G1 to H1. Well H1 serves as the blank 0 ng/μl
Lambda DNA.
Table 13 Concentrations of Lambda DNA
Row-Column Concentration (ng/μl) Final Volume in Well (μl)
A1 75 100
B1 50 100
C1 25 100
D1 12.5 100
E1 6.25 100
F1 3.125 100
G1 1.5262 200
H1 0 100
A B C D E F G H
75 ng/µl
Microtiter Plate
λ DNA 1X TE
66.7 µl
100 µl
100 µl
100 µl
100 µl
100 µl
100 µl
Infinium HD Assay Gemini Protocols

100 CHAPTER 3
Infinium HD Assay Gemini Automated Protocol
Figure 92 Serial Dilutions of Lambda DNA
7. Cover the Standard DNA plate with cap mat.
8. Proceed to Dilute PicoGreen.
Dilute PicoGreenDiluted PicoGreen will be added to both the Standard QNT and QNT plates, intercalating into available dsDNA and fluorescing upon excitation in a spectrofluorometer.
1. Prepare a 1:200 dilution of PicoGreen into 1X TE, using a sealed 100 ml
or 250 ml Nalgene bottle wrapped in aluminum foil.
Refer to Table 14 to identify the volumes needed to produce diluted reagent for up to three 96-well QNT plates. For fewer than 96 DNA sam-ples, scale down the volumes.
2. Cap the foil-wrapped bottle and vortex to mix.
CAUTION
PicoGreen reagent degrades quickly in the presence of light. Also, do not use glass containers for PicoGreen reagent, because it adheres to glass, thereby lowering its effective concentration in solution and effecting the upper response range accuracy.
Table 14 Volumes for PicoGreen Reagents
# QNT Plates PicoGreen Volume (μl) 1X TE Volume (ml)
1 125 25
2 230 45
3 325 65
Standard DNA Plate with Serial Dilutions of Stock Lambda DNA
100 ng/µl 100µl
100µl
100µl
100µl
100µl
100µl
200µl
100µl
50 ng/µl
25 ng/µl
12.5 ng/µl
6.25 ng/µl
3.125 ng/µl
1.526 ng/µl
0 ng/µl
Catalog # WG-901-3002
Part # 11311007 Rev A

Quantitate DNA (Optional) 101
Create Standard QNT Standard and Sample PlatesIn this process, PicoGreen is distributed to Standard QNT and Sample QNT Fluotrac plates and mixed with aliquots of DNA from the respective DNA plates.
1. At the robot PC, select DNA Quant | Make Quant.
2. In the DNA Plate Selection dialog box, select the plate type of the
Standard DNA and Sample DNA plates. They should all be MIDI plates,
TCY plates or ABGN plates. Roll the mouse pointer over each picture to
see a description of the plate.
Figure 93 DNA Plate Selection Dialog Box
3. In the Basic Run Parameters pane, enter the Number of DNA/QNT plates (1, 2, or 3 pairs) and the Number of DNA Samples.
The robot PC updates the Required Run Item(s) and the bed map to show the correct position of items on the robot bed. All barcodes must face to the right.
WARNINGDo not run any other programs or applications while using the Tecan robot. Your computer and the robot may lock up and stop a run.
Infinium HD Assay Gemini Protocols

102 CHAPTER 3
Infinium HD Assay Gemini Automated Protocol
Figure 94 Make Quant Screen
4. Vortex each plate for 1 minute.
5. Centrifuge the WG#-DNA Sample plate to 280 xg for 1 minute.
6. Vortex the Standard DNA plate at 1450 rpm for 1 minute.
7. Centrifuge the Standard DNA plate to 280 xg for 1 minute.
8. Place the WG#-DNA Sample, Standard DNA, Standard QNT, and QNT
Sample plates on the robot bed according to the robot bed map. Place
well A1 at the top-left corner of its robot bed carrier. Remove any plate
seals.
9. Pour the PicoGreen dilution into half reservoir A and place it on the robot
bed.
10. Make sure that all items are placed properly on the robot bed, that all
seals have been removed, and that all the barcodes face to the right.
11. On the lab tracking form, record the position of the plates on the robot
bed.
12. If you are not using LIMS, clear the Use Barcodes checkbox.
13. Click Run. Observe the beginning of the robot run to ensure there are no
problems.
The robot transfers 195 μl of diluted PicoGreen to all Fluotrac plates, then transfers 2 μl aliquots of DNA from Standard DNA plate to Standard Quant plate and from WG#-DNA plate to sample QNT plates.
The robot PC sounds an alert and displays a message when the process is complete.
14. Click OK in the message box.
Catalog # WG-901-3002
Part # 11311007 Rev A

Quantitate DNA (Optional) 103
15. On the lab tracking form, record:
• Date/Time
• Operator
• Robot
• The QNT barcode that corresponds to each WG#-DNA barcode
• The Standard QNT plate that corresponds to each Standard DNA
plate
16. After the robot finishes, immediately seal all plates:
a. Place foil adhesive seals over Sample QNT and Standard QNT
plates.
b. Place cap mats on WG#-DNA Sample and Standard DNA plates.
17. Discard unused reagents in accordance with facility requirements.
18. Store the WG#-DNA and Standard DNA plates at 2 to 8ºC or -15 to -25ºC.
19. Centrifuge the Sample QNT Plate and Standard QNT plates to 280 xg
for 1 minute.
20. Proceed to Read QNT Plate.
Read QNT PlateIn this process, you use the Gemini XS or XPS Spectrofluorometer along with the Infinium Fluorometry Analysis software to read the Standard QNT and Sample QNT plates. You use the software to create a standard curve based on the quantities of Standard DNA with PicoGreen. Then you read the Sample QNT plates to compare their data against the standard curve to obtain the concentration of sample DNA. For the best genotyping performance, Illumina recommends a minimum concentration of 50 ng/μl.
1. Turn on the spectrofluorometer. At the PC, open the Infinium
Fluorometry Analysis program.
2. Select Reader Tasks | Read Quant.
Infinium HD Assay Gemini Protocols
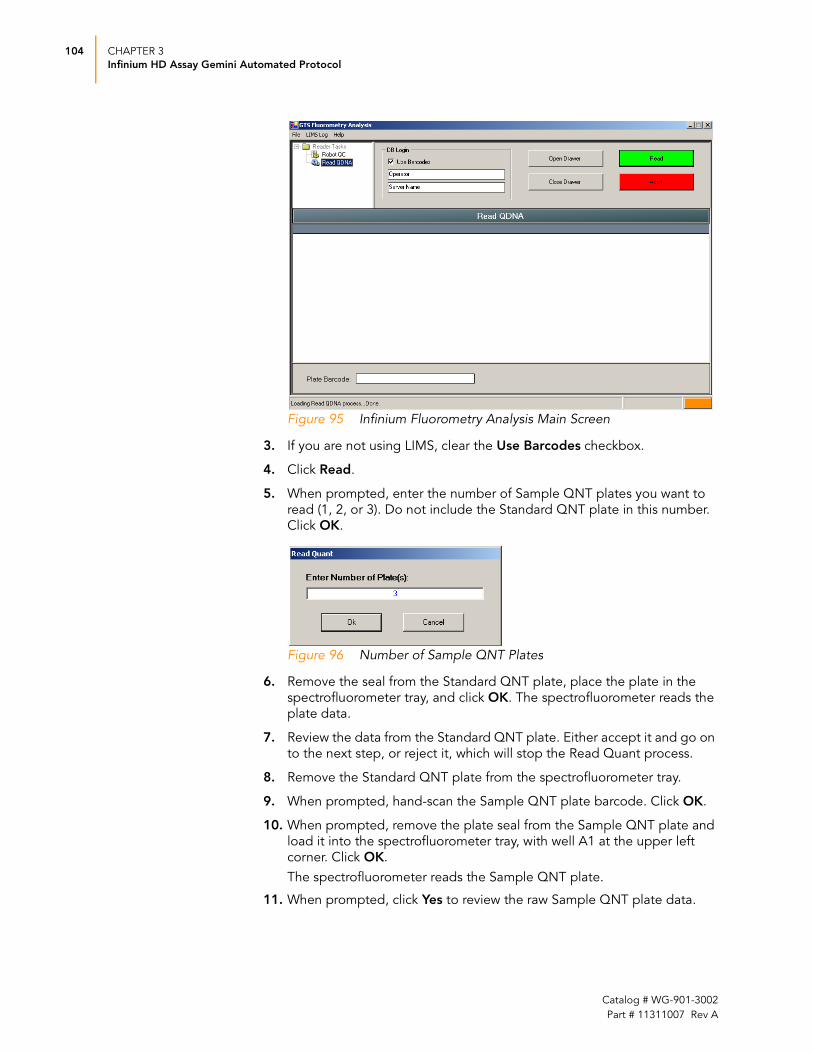
104 CHAPTER 3
Infinium HD Assay Gemini Automated Protocol
Figure 95 Infinium Fluorometry Analysis Main Screen
3. If you are not using LIMS, clear the Use Barcodes checkbox.
4. Click Read.
5. When prompted, enter the number of Sample QNT plates you want to
read (1, 2, or 3). Do not include the Standard QNT plate in this number.
Click OK.
Figure 96 Number of Sample QNT Plates
6. Remove the seal from the Standard QNT plate, place the plate in the
spectrofluorometer tray, and click OK. The spectrofluorometer reads the
plate data.
7. Review the data from the Standard QNT plate. Either accept it and go on
to the next step, or reject it, which will stop the Read Quant process.
8. Remove the Standard QNT plate from the spectrofluorometer tray.
9. When prompted, hand-scan the Sample QNT plate barcode. Click OK.
10. When prompted, remove the plate seal from the Sample QNT plate and
load it into the spectrofluorometer tray, with well A1 at the upper left
corner. Click OK.
The spectrofluorometer reads the Sample QNT plate.
11. When prompted, click Yes to review the raw Sample QNT plate data.
Catalog # WG-901-3002
Part # 11311007 Rev A

Quantitate DNA (Optional) 105
Microsoft Excel opens automatically at the same time and displays the quantitation data for the Sample QNT plate. There are three tabs in the file:
• SQNT_STD—Generates the standard curve by plotting the Relative
Fluorescence (RF) values measured in the Standard QNT plate
against assumed concentrations in the Standard DNA Plate.
• QNT—Plots the concentration (ng/μl) of each well of the Sample
QNT Plate as derived from the standard curve.
• Data—A readout of the raw data values for the Standard QNT plate
and the Sample QNT Plate.
Figure 97 Sample QNT Data
The Infinium Fluorometry Analysis software prompts you to indicate whether you wish to save the QNT data shown in the Excel file.
12. If you entered more than one Sample QNT plate to read, repeat steps 9
to 11 for each additional plate.
13. Discard the QNT plates and reagents in accordance with facility
requirements.
14. Do one of the following:
• Proceed to Make the AMP3 Plate on page 106 or Make Multiple AMP3 Plates on page 113.
• Store the Sample DNA plate at 2 to 8ºC for up to one month.
Infinium HD Assay Gemini Protocols

106 CHAPTER 3
Infinium HD Assay Gemini Automated Protocol
Make the AMP3 Plate
This process creates an AMP3 plate for DNA amplification. DNA samples are added to designated well locations, and then 0.1N NaOH is added, denaturing the DNA. Neutralization occurs when the MP1 reagent is added. Finally, the robot adds AMM (Amplification Master Mix) to the DNA samples.
Figure 98 Denaturing and Neutralizing DNA
Estimated Time Robot time:
• 20 minutes per 16 samples
• 30 minutes per 32 samples
• 55 minutes for 48 samples
ConsumablesItem Quantity Storage Supplied By
0.1N NaOH 15 ml per 16–48 samples
2 to 8°C User
WG#-DNA plate with up to 96 DNA samples (50 ng/μl)
1 plate -15 to -25°C User
MP1 1 tube per 16 samples
-15 to -25°C Illumina
AMM 1 tube per 16 samples
-15 to -25°C Illumina
96-well 0.8 ml microtiter plate (MIDI)
1 plate for up to 48 samples
User
NOTE
Thaw all reagents completely at room temperature and allow to equilibrate. Once thawed, gently invert each tube several times to thoroughly mix the reagent. Pulse centrifuge each tube to 280 xg to eliminate bubbles and collect reagent at the bottom of the tube.
Catalog # WG-901-3002
Part # 11311007 Rev A

Make the AMP3 Plate 107
Preparation In preparation for Incubate AMP3, preheat the Illumina Hybridization
Oven in the post-amp area to 37°C and allow the temperature to
equilibrate.
Thaw DNA samples to room temperature.
Apply an AMP3 barcode to a new MIDI plate.
In the Sample Sheet, enter the Sample_Name (optional) and
Sample_Plate for each Sample_Well.
On the lab tracking form, record:
• Date/Time
• Operator
• Robot
• WG#-DNA plate barcode
• AMP3 plate barcode
• MP1 tube barcode(s)
• AMM tube barcode(s)
Prepare the Robot
For instructions on preparing the robot for use in a protocol see the Infinium Assay Lab Setup and Procedures Guide.
Refer to Figure 99 throughout this protocol. Note that the barcodes all face to the right.
NOTE
To record information about your assay such as operator information, start and stop times, and barcodes, use the lab tracking form provided on your documentation CD. This form can be filled out and saved online, or printed and filled in by hand.
Infinium HD Assay Gemini Protocols

108 CHAPTER 3
Infinium HD Assay Gemini Automated Protocol
Figure 99 Tecan Eight-Tip Robot (Make AMP3 Setup)
Steps 1. If you do not already have a WG#-DNA plate, dispense DNA into either
a:
• MIDI plate: 40 μl to each WG#-DNA plate well
• TCY plate: 30 μl to each WG#-DNA plate well
Apply a barcode label to the new WG#-DNA plate.
2. At the robot PC, select AMP3 Tasks | Make AMP3.
If you want to process multiple AMP3 plates at once, see Make Multiple AMP3 Plates on page 113.
3. Select the WG#-DNA plate type (MIDI or TCY).
MP1 Tube
AMM Tube
AMP3 Plate
WG#-DNA Plate (MIDI)
NaOH in Quarter Reservoir
Catalog # WG-901-3002
Part # 11311007 Rev A

Make the AMP3 Plate 109
e
te
Plate
Figure 100 Selecting the DNA Plate Type
4. (Non-Infinium LIMS only) Make sure the Use Barcodes check box is
cleared. In the Basic Run Parameters pane, enter the Number of DNA samples (16, 32, or 48) that are in the plate. This value must match the
number of DNAs in the plate and the number of DNAs identified in the
DNA manifest.
The robot PC updates the Required Run Item(s) and the bed map to show the correct position of items on the robot bed.
NOTEDo not mix plate types on the robot bed.
NOTEIf you are using Infinium LIMS, you cannot change the number of DNA samples on this screen. However, the LIMS software processes the correct number of samples.
MIDI Plat
TCY Pla
ABGN
Infinium HD Assay Gemini Protocols

110 CHAPTER 3
Infinium HD Assay Gemini Automated Protocol
Figure 101 Make AMP3 Basic Run Parameters
5. Remove the caps. Place the MP1 and AMM tubes in the robot tube rack
according to the robot bed map (Figure 101).
6. Place a quarter reservoir on the robot bed according to the bed map,
and add 15 ml 0.1N NaOH (Figure 101).
7. Place the sealed WG#-DNA plate on the vortexer and secure it with the
provided Velcro straps (Figure 102).
Figure 102 Securing Plates to Vortexer Platform with Velcro Straps
8. Vortex the sealed WG#-DNA plate at 1600 pm for 1 minute.
9. Centrifuge to 280 xg for 1 minute at 22°C.
10. Place the AMP3 and WG#-DNA plates on the robot bed according to the
bed map (Figure 101). Remove all plate seals.
Highlighted Tubes
Robot Bed Map
Basic Run Parameters
Catalog # WG-901-3002
Part # 11311007 Rev A

Make the AMP3 Plate 111
11. In the lab tracking form, record the plate positions on the robot bed.
12. Make sure that all items are placed properly on the robot bed, that all
caps and seals have been removed, and that all the barcodes face to the
right.
13. (Non-Infinium LIMS only) At the robot PC, click Run. Observe the robot
start to run to ensure that there are no problems.
After the robot adds the 0.1N NaOH to the DNA in the AMP3 plate, the Make AMP3 Wait for reaction time message appears. The wait time for this reaction is 10 minutes.
The robot PC sounds an alert and displays a message when the process is complete.
14. (Infinium LIMS only) Make sure the Use Barcodes check box is checked
and click Run.
a. Log in when prompted.
After the robot initializes, the Make AMP3 screen appears after a moment.
Figure 103 Selecting Project or Batch for Make AMP3
b. Do one of the following:
— Select your current project. The available batches appear in the Sample Batch ID pane. Select a batch to see the associated DNA plate appear in the DNA Plate pane.
NOTE
When you remove a cap mat, set it aside, upside down, in a safe location for use later in the protocol. When you place the cap mat back on the plate, be sure to match it to its original plate and orient it correctly.
Infinium HD Assay Gemini Protocols

112 CHAPTER 3
Infinium HD Assay Gemini Automated Protocol
Figure 104 Make AMP3 Screen with Project and Batch Selected
— Use the Search box to search for a specific Batch ID or DNA Plate.c. Select the batches you want to run and click OK.
The robot PC updates the Required Run Item(s) and the bed map to show the correct position of items on the robot bed. All barcodes must face to the right.
15. Click OK in the message box. Remove the AMP3 plate from the robot
bed and seal with the 96-well cap mat.
16. Invert the sealed AMP3 plate at least 10 times to mix the contents.
17. Pulse centrifuge to 280 xg.
18. Record each DNA sample in the lab tracking form.
19. Discard unused reagents in accordance with facility standards.
20. Proceed immediately to Incubate the AMP3 Plate on page 119.
Catalog # WG-901-3002
Part # 11311007 Rev A

Make Multiple AMP3 Plates 113
Make Multiple AMP3 Plates
This process creates up to two AMP3 plates for DNA amplification, allowing you to run 48 or 96 samples. First, DNA samples are added to designated well locations, and then 0.1N NaOH is added, denaturing the DNA. Neutralization occurs when the MP1 reagent is added. AMM (Amplification Master Mix) is then added to the DNA samples.
This feature may not be available on systems that are not running Infinium LIMS (Laboratory Information Management System). For information about how to use Infinium LIMS, see the Infinium LIMS User Guide.
Estimated Time
Robot:
70 minutes for 48 samples
140 minutes for 96 samples
Consumables
Preparation In preparation for the Incubate AMP3 process, preheat the Illumina
Hybridization Oven in the post-amp area to 37°C and allow the
temperature to equilibrate.
Apply an AMP3 barcode label to each new storage plate.
In the Sample Sheet, enter the Sample_Name (optional) and
Sample_Plate for each Sample_Well.
Item Quantity Storage Supplied By
MP1 3 tubes per 48 samples
-15 to -25°C Illumina
AMM 3 tubes per 48 samples
-15 to -25°C Illumina
0.1N NaOH 15 ml per 48 samples
2 to 8°C User
WG#-DNA plate, thawed to room temperature, with 48–96 DNA samples
1 plate -15 to -25°C User
96-well 0.2 ml microtiter plate (MIDI or TCY)
1 plate for up to 48 samples; up to 2 plates total
-15 to -25°C User
NOTE
Thaw all reagents completely at room temperature and allow to equilibrate. Once thawed, gently invert each tube several times to thoroughly mix the reagent. Pulse centrifuge each tube to 280 xg to eliminate bubbles and collect reagent at the bottom of the tube.
Infinium HD Assay Gemini Protocols

114 CHAPTER 3
Infinium HD Assay Gemini Automated Protocol
On the lab tracking form, record:
• Date/Time
• Operator
• Robot
• WG#-DNA plate barcode
• AMP3 plate barcodes
• MP1 tube barcode(s)
• AMM tube barcode(s)
Prepare the RobotFor instructions on preparing the robot for use in a protocol see the Infinium Assay Lab Setup and Procedures Guide.
Refer to Figure 105 throughout this protocol. Note that all of the barcodes face to the right.
NOTE
To record information about your assay such as operator information, start and stop times, and barcodes, use the lab tracking form provided on your documentation CD. This form can be filled out and saved online, or printed and filled in by hand.
Catalog # WG-901-3002
Part # 11311007 Rev A

Make Multiple AMP3 Plates 115
Figure 105 Tecan Eight-Tip Robot (Make Multi AMP3 Setup)
Steps 1. If you do not already have a WG#-DNA plate, dispense DNA into either
a:
• MIDI plate: 40 μl to each WG#-DNA plate well
• TCY plate: 30 μl to each WG#-DNA plate well
Apply a barcode label to the new WG#-DNA plate.
2. At the robot PC, select AMP3 Tasks | Make Multi AMP3.
3. In the DNA Plate Selection dialog box, select the plate type.
4. If you are not using Infinium LIMS, skip ahead to step 6.
5. If you are using Infinium LIMS, click Run.
a. Log in when prompted.
The Make Multi AMP3 screen appears after a moment.
MP1 Tubes
AMM Tubes
NaOH in Quarter Reservoir
AMP3 Plates
WG#-DNA Plate Position
NOTEDo not mix plate types on the robot bed.
Infinium HD Assay Gemini Protocols

116 CHAPTER 3
Infinium HD Assay Gemini Automated Protocol
Figure 106 Selecting Project for Make Multi AMP3
b. Scan or type the DNA plate barcode into the Search For text box,
and then click Search.
c. Select up to four batches and click OK.
Figure 107 Selecting Batches
The robot PC updates the Required Run Item(s) and the bed map to show the correct position of items on the robot bed. All barcodes must face to the right.
6. (Non-Infinium LIMS only) In the Basic Run Parameters pane, enter the
Number of DNA samples (48 or 96).
Catalog # WG-901-3002
Part # 11311007 Rev A
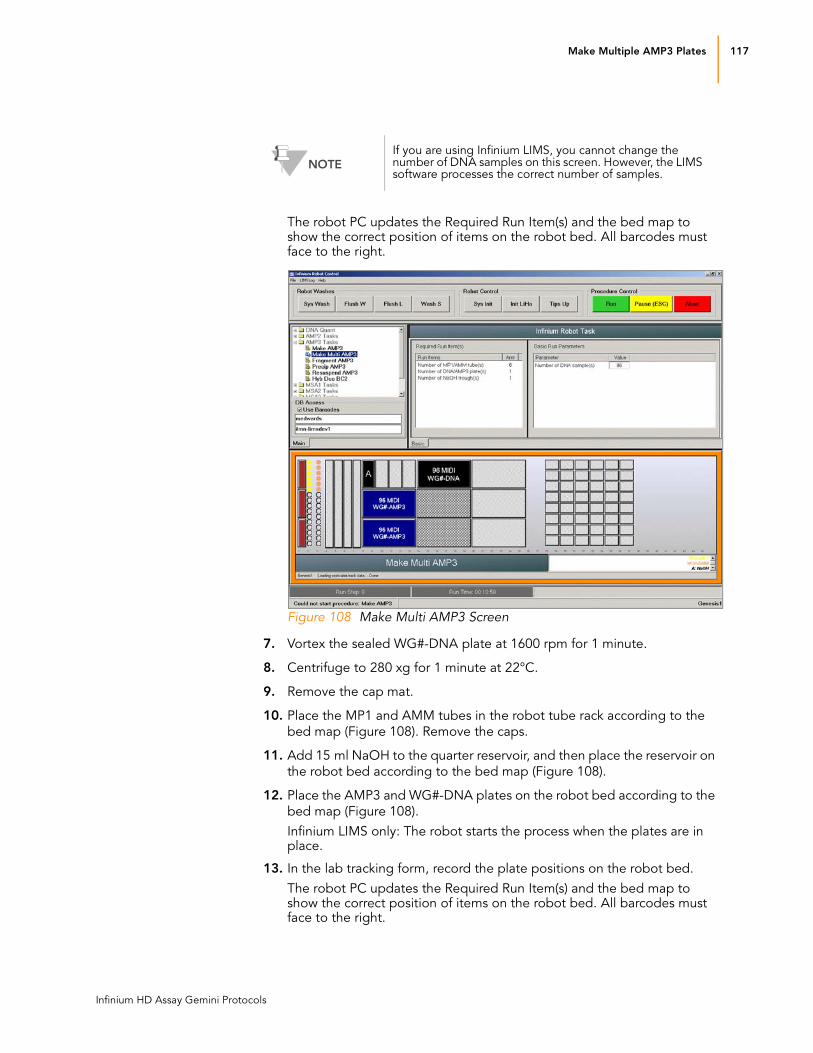
Make Multiple AMP3 Plates 117
The robot PC updates the Required Run Item(s) and the bed map to show the correct position of items on the robot bed. All barcodes must face to the right.
Figure 108 Make Multi AMP3 Screen
7. Vortex the sealed WG#-DNA plate at 1600 rpm for 1 minute.
8. Centrifuge to 280 xg for 1 minute at 22°C.
9. Remove the cap mat.
10. Place the MP1 and AMM tubes in the robot tube rack according to the
bed map (Figure 108). Remove the caps.
11. Add 15 ml NaOH to the quarter reservoir, and then place the reservoir on
the robot bed according to the bed map (Figure 108).
12. Place the AMP3 and WG#-DNA plates on the robot bed according to the
bed map (Figure 108).
Infinium LIMS only: The robot starts the process when the plates are in place.
13. In the lab tracking form, record the plate positions on the robot bed.
The robot PC updates the Required Run Item(s) and the bed map to show the correct position of items on the robot bed. All barcodes must face to the right.
NOTEIf you are using Infinium LIMS, you cannot change the number of DNA samples on this screen. However, the LIMS software processes the correct number of samples.
Infinium HD Assay Gemini Protocols

118 CHAPTER 3
Infinium HD Assay Gemini Automated Protocol
14. (Non-Infinium LIMS only) At the robot PC, clear the Use Barcodes check
box and click Run. Observe the robot start to run to ensure that there are
no problems.
After the robot has added the 0.1N NaOH to the DNA in the AMP3 plates, the Make Multi AMP3 Wait for reaction time message appears. Wait time for this reaction is 10 minutes per plate.
The robot PC sounds an alert and displays a message when the process is complete.
15. Click OK in the message box. Remove the AMP3 plates from the robot
bed and seal them with the 96-well cap mats.
16. Invert each sealed AMP3 plate at least 10 times to mix contents.
17. Pulse centrifuge the plates to 280 xg.
18. Discard unused reagents in accordance with facility standards.
19. Proceed immediately to Incubate the AMP3 Plate on page 119.
Catalog # WG-901-3002
Part # 11311007 Rev A

Incubate the AMP3 Plate 119
Incubate the AMP3 Plate
This process incubates the AMP3 plate for 20–24 hours at 37°C in the Illumina Hybridization Oven. It generates a sufficient quantity of each individual DNA sample to be used twice in the Infinium HD Assay Gemini.
Figure 109 Incubating DNA to Amplify
Estimated Time 20–24 hours.
Preparation Verify AMP3 for Incubation (Infinium LIMS only)1. In the Infinium LIMS left sidebar, click Infinium HD Gemini | Incubate
AMP3.
2. Scan the barcode of the AMP3 plate and click Verify.
Figure 110 (Infinium LIMS) Verifying AMP3 for Incubation
Infinium HD Assay Gemini Protocols

120 CHAPTER 3
Infinium HD Assay Gemini Automated Protocol
3. If the AMP3 plate is queued for incubation, a blue confirmation message
appears at the top of the window. Proceed with incubation.
4. If the AMP3 plate is not queued for incubation, a red error message
appears at the top of the window. Do not proceed with incubation.
Instead, follow these steps to troubleshoot the problem:
a. Click the Reports tab in the upper-right corner.
b. In the left sidebar, click Tracking | Get Queue Status.
c. Scan the plate barcode and click Go.
d. Note what step the plate is queued for, and proceed with that step.
For information about how to use Infinium LIMS, see the Infinium LIMS User Guide.
Steps 1. Incubate the AMP3 plate in the Illumina Hybridization Oven for at least
20 but no more than 24 hours at 37°C.
2. On the lab tracking form, record the start and stop times.
3. If you are using Infinium LIMS:
a. In the Infinium LIMS left sidebar, click Infinium HD Gemini | Incubate AMP3.
b. Scan the barcode of the AMP3 plate and click Save. Infinium LIMS
records the data and queues the plate for fragmentation.
4. Proceed to Fragment the AMP3 Plate on page 121.
Catalog # WG-901-3002
Part # 11311007 Rev A

Fragment the AMP3 Plate 121
Fragment the AMP3 Plate
This process enzymatically fragments the amplified DNA samples. An end-point fragmentation is used to prevent over-fragmentation.
Figure 111 Fragmenting DNA
Estimated Time Robot time:
• 10 minutes per 16 samples
• 15 minutes per 32 samples
• 35 minutes per 48 samples
Consumables
Preparation Preheat the heat block with the MIDI plate insert to 37°C.
On the lab tracking form, record:
• Date/Time
• Operator
• Robot
• FRG tube barcode(s)
Item Quantity Storage Supplied By
FRG 1 tube per 16 samples
-15 to -25°C Illumina
NOTE
Thaw all reagents completely at room temperature and allow to equilibrate. Once thawed, gently invert each tube several times to thoroughly mix the reagent. Pulse centrifuge each tube to 280 xg to eliminate bubbles and collect reagent at the bottom of the tube.
Infinium HD Assay Gemini Protocols

122 CHAPTER 3
Infinium HD Assay Gemini Automated Protocol
Prepare the RobotFor instructions on preparing the robot for use in a protocol see the Infinium Assay Lab Setup and Procedures Guide.
Refer to Figure 112 throughout this protocol. Note that the barcodes all face to the right.
Figure 112 Tecan Eight-Tip Robot (Fragment AMP3 Setup)
Steps Set Up the Robot1. Centrifuge the AMP3 plate to 50 xg for 1 minute.
2. At the robot PC, select AMP3 Tasks | Fragment AMP3.
3. (Non-Infinium LIMS only) In the Basic Run Parameters pane, enter the
Number of DNA samples and the Number of AMP3 Plates.
The robot PC updates the Required Run Item(s) and the bed map to show the correct position of items on the robot bed. All barcodes must face to the right.
NOTE
To record information about your assay such as operator information, start and stop times, and barcodes, use the lab tracking form provided on your documentation CD. This form can be filled out and saved online, or printed and filled in by hand.
FRG Tube
AMP3 Plate
NOTEIf you are using Infinium LIMS, you cannot change the number of DNA samples on this screen. However, the LIMS software processes the correct number of samples.
Catalog # WG-901-3002
Part # 11311007 Rev A

Fragment the AMP3 Plate 123
Figure 113 Fragment AMP3 Screen
4. Remove any plate seals. Place the AMP3 plate on the robot bed
according to the robot bed map (Figure 113).
5. Remove the caps. Place the FRG tubes in the robot tube rack according
to the robot bed map.
6. In the lab tracking form, record the plate positions on the robot bed.
7. Make sure to properly place all items on the robot bed, that all caps and
seals have been removed, and that all the barcodes face to the right.
Start the Robot1. At the robot PC:
a. If you are not running Infinium LIMS, clear the Use Barcodes check
box.
b. Click Run to start the process.
c. Log in if prompted.
d. Observe the robot start to run to ensure that there are no problems.
The robot PC sounds an alert and displays a message when the process is complete.
2. Click OK in the message box. Remove the AMP3 plate from the robot
bed and seal with the 96-well cap mat.
3. Vortex the plate at 1600 rpm for 1 minute.
4. Centrifuge to 50 xg for 1 minute at 22°C.
5. Incubate on the heat block for 1 hour at 37°C.
6. On the lab tracking form, record the start and stop times.
Infinium HD Assay Gemini Protocols

124 CHAPTER 3
Infinium HD Assay Gemini Automated Protocol
7. Discard unused reagents in accordance with facility standards.
8. Do one of the following:
• Proceed to Precipitate the AMP3 Plate on page 125. Leave plate in
the 37°C heat block until preparation is complete.
• Store the sealed AMP3 plate at -15 to -25°C if you do not plan to
proceed to the next step immediately.
This is a good stopping point in the process.
Catalog # WG-901-3002
Part # 11311007 Rev A

Precipitate the AMP3 Plate 125
Precipitate the AMP3 Plate
In this process, PA1 and 2-propanol are added to the AMP3 plate to precipitate the DNA samples.
Figure 114 Precipitating DNA
Estimated Time Robot time:
• 15 minutes per 16 samples
• 20 minutes per 32 samples
• 30 minutes per 48 samples
Dry time: 1 hour
Consumables
Preparation If you froze the AMP3 plate after fragmentation, thaw it to room
temperature. Centrifuge to 50 xg for 1 minute.
Preheat the heat block to 37°C, if it is not already.
In preparation for the 4°C spin, set the centrifuge to 4°C.
Thaw PA1 to room temperature. Centrifuge to 280 xg for 1 minute.
Preheat the heat sealer. Allow 20 minutes.
On the lab tracking form, record:
• Date/Time
• Operator
• Robot
• PA1 tube barcode(s)
• 2-propanol lot number and date opened
Item Quantity Storage Supplied By
PA1 1 tube per 16 samples
2 to 8°C Illumina
100% 2-propanol 40 ml Room temperature
User
Infinium HD Assay Gemini Protocols

126 CHAPTER 3
Infinium HD Assay Gemini Automated Protocol
Prepare the RobotFor instructions on preparing the robot for use in a protocol see the Infinium Assay Lab Setup and Procedures Guide.
Refer to Figure 115 throughout this protocol. Note that all of the barcodes face to the right.
Figure 115 Tecan Eight-Tip Robot (Precip AMP3 Setup)
Verify AMP3 for Centrifugation (Infinium LIMS only)1. In the Infinium LIMS left sidebar, click Infinium HD Gemini | Spin AMP3.
2. Scan the barcode of the AMP3 plate and click Verify. You can scan up to
four plates.
NOTE
To record information about your assay such as operator information, start and stop times, and barcodes, use the lab tracking form provided on your documentation CD. This form can be filled out and saved online, or printed and filled in by hand.
PA1 in Half Reservoir
2-propanol in Full Reservoir
AMP3 Plate
Catalog # WG-901-3002
Part # 11311007 Rev A

Precipitate the AMP3 Plate 127
Figure 116 (Infinium LIMS) Verifying AMP3 for Centrifugation
3. If the AMP3 plate is queued for centrifugation, a blue confirmation
message appears at the top of the window. Proceed to precipitation.
4. If the AMP3 plate is not queued for centrifugation, a red error message
appears at the top of the window. Do not proceed with centrifugation.
Instead, follow these steps to troubleshoot the problem:
a. Click the Reports tab in the upper-right corner.
b. In the left sidebar, click Tracking | Get Queue Status.
c. Scan the plate barcode and click Go.
d. Note what step the plate is queued for, and proceed with that step.
For information about how to use Infinium LIMS, see the Infinium LIMS User Guide.
Steps Set Up the Robot1. At the robot PC, select AMP3 Tasks | Precip AMP3.
2. (Non-Infinium LIMS only) In the Basic Run Parameters pane, enter the
Number of DNA samples and the Number of AMP3 plates (1 to 4).
The robot PC updates the Required Run Item(s) and the bed map to show the correct position of items on the robot bed. All barcodes must face to the right.
NOTEIf you are using Infinium LIMS, you cannot change the number of DNA samples on this screen. However, the LIMS software processes the correct number of samples.
Infinium HD Assay Gemini Protocols

128 CHAPTER 3
Infinium HD Assay Gemini Automated Protocol
Figure 117 Precip AMP3 Screen
3. Centrifuge the sealed AMP3 plate to 50 xg for 1 minute at 22°C.
4. Place the AMP3 plate on the robot bed according to the robot bed map
(Figure 117). Remove the plate seal.
5. Place a half reservoir in the reservoir frame, according to the robot bed
map (Figure 117), and add PA1 as follows:
• 16 samples: 1 tube
• 32 samples: 2 tubes
• 48 samples: 3 tubes
Catalog # WG-901-3002
Part # 11311007 Rev A

Precipitate the AMP3 Plate 129
6. Place a full reservoir in the reservoir frame, according to the robot bed
map, and add 2-propanol as follows:
• 16 samples: 20 ml
• 32 samples: 30 ml
• 48 samples: 40 ml
7. In the lab tracking form, record the plate position on the robot bed.
8. Make sure that all items are placed properly on the robot bed, that all
caps and seals have been removed, and that all the barcodes face to the
right.
Start the Robot1. At the robot PC:
a. If you are not running Infinium LIMS, clear the Use Barcodes check
box.
b. Click Run to start the process.
c. Log in if prompted.
d. Observe the robot start to run to ensure that there are no problems.
2. When prompted, remove the AMP3 plate from the robot bed. Do not click OK in the message box yet.
3. Seal the AMP3 plate with the same cap mat removed earlier.
4. Vortex the plate at 1600 rpm for 1 minute.
5. Incubate at 37°C for 5 minutes.
6. Centrifuge to 50 xg at room temperature for 1 minute.
7. Return the AMP3 plate to the robot bed according to the robot bed map
(Figure 117). Remove the plate seal and discard it.
8. At the robot PC, click OK to restart the run.
The robot PC sounds an alert and displays a message when the process is complete.
9. In preparation for the 4°C spin, set centrifuge to 4°C.
10. Click OK in the message box. Remove the AMP3 plate from the robot
bed and carefully seal with a new, dry cap mat, taking care not to shake
the plate in any way until the cap mat is fully seated.
11. Invert each plate at least 10 times to mix contents thoroughly.
12. Incubate for 30 minutes at 4°C.
13. Place the sealed AMP3 plate in the centrifuge opposite another plate of
equal weight (Figure 118).
Infinium HD Assay Gemini Protocols

130 CHAPTER 3
Infinium HD Assay Gemini Automated Protocol
Figure 118 Balancing AMP3 Plate in Centrifuge
14. Centrifuge to 3000 xg for 20 minutes at 4°C.
15. Immediately remove the AMP3 plate from the centrifuge.
Perform the next step immediately to avoid dislodging the blue pellet. If any delay occurs, repeat steps 14 through 15 before proceeding.
16. Remove the cap mat and discard it.
17. Decant supernatant by quickly inverting the AMP3 plate and smacking it
down onto an absorbent pad appropriate for 2-propanol disposal.
18. Tap the plate firmly on the pad several times over a period of 1 minute or
until all wells are completely devoid of liquid.
19. Place the inverted, uncovered plate on a tube rack for 1 hour at 22°C to
air dry the pellet (Figure 119).
At this point, blue pellets should be present at the bottoms of the wells.
CAUTIONTo ensure optimal performance, do not allow supernatant in wells to pour into other wells. Keep the plate inverted.
Plate of Equal Weight for Balance
Sealed AMP3 Plate
Catalog # WG-901-3002
Part # 11311007 Rev A

Precipitate the AMP3 Plate 131
Figure 119 Uncovered AMP3 Plate Inverted for Air Drying
20. On the lab tracking form, record the start and stop times.
21. If you are using Infinium LIMS:
a. In the Infinium LIMS left sidebar, click Infinium HD Gemini | Spin AMP3.
b. Scan the barcode of the AMP3 plate and click Save. Infinium LIMS
records the data and queues the plate for resuspension.
22. Discard unused reagents in accordance with facility standards.
23. Do one of the following:
• Proceed immediately to Resuspend the AMP3 Plate on page 132.
• Heat-seal the AMP3 plate and store it at -15 to -25°C for the
following day or -80°C for long-term storage.
This is a good stopping point in the process.
CAUTIONDo not over-dry the pellet. Pellets that are over-dried will be difficult to resuspend. Poorly resuspended samples will lead to poor genotyping results.
Infinium HD Assay Gemini Protocols

132 CHAPTER 3
Infinium HD Assay Gemini Automated Protocol
Resuspend the AMP3 Plate
In this process, RA1 is added to the AMP3 plate to resuspend the precipitated DNA samples.
Figure 120 Resuspending DNA
Estimated Time Robot time: 15 minutes per 48 samples
Incubation time: 1 hour
Consumables
Preparation Gradually warm the RA1 reagent to room temperature. Gently mix to
dissolve any crystals.
If you stored the AMP3 plate at -15 to -25°C, thaw it to room
temperature. Remove the cap mat and discard it.
Preheat the Illumina Hybridization Oven to 48°C.
Preheat the heat sealer. Allow 20 minutes.
On the lab tracking form, record:
• Date/Time
• Operator
• Robot
Item Quantity Storage Supplied By
RA1 9 ml per 48 samples -15 to -25°C Illumina
NOTE
Only pour out the recommended volume of RA1 needed for the suggested number of samples listed in the consumables table. Additional RA1 is used later in the XStain HD BeadChip step.
WARNING
This protocol involves the use of an aliphatic amide that is a probable reproductive toxin. Personal injury can occur through inhalation, ingestion, skin contact, and eye contact. Dispose of containers and any unused contents in accordance with the governmental safety standards for your region.
Catalog # WG-901-3002
Part # 11311007 Rev A

Resuspend the AMP3 Plate 133
• RA1 bottle barcode(s)
Prepare the RobotFor instructions on preparing the robot for use in a protocol see the Infinium Assay Lab Setup and Procedures Guide.
Refer to Figure 121 throughout this protocol. Note that all of the barcodes face to the right.
Figure 121 Tecan Eight-Tip Robot (Resuspend AMP3 Setup)
Steps Set Up the Robot1. At the robot PC, select AMP3 Tasks | Resuspend AMP3.
2. (Non-Infinium LIMS only) In the Basic Run Parameters pane, enter the
Number of DNA samples and the Number of AMP3 plates (1 to 4).
The robot PC updates the Required Run Item(s) and the bed map to show the correct position of items on the robot bed. All barcodes must face to the right.
NOTE
To record information about your assay such as operator information, start and stop times, and barcodes, use the lab tracking form provided on your documentation CD. This form can be filled out and saved online, or printed and filled in by hand.
RA1 in Quarter Reservoir
AMP3 Plate
NOTEIf you are using Infinium LIMS, you cannot change the number of DNA samples on this screen. However, the LIMS software processes the correct number of samples.
Infinium HD Assay Gemini Protocols
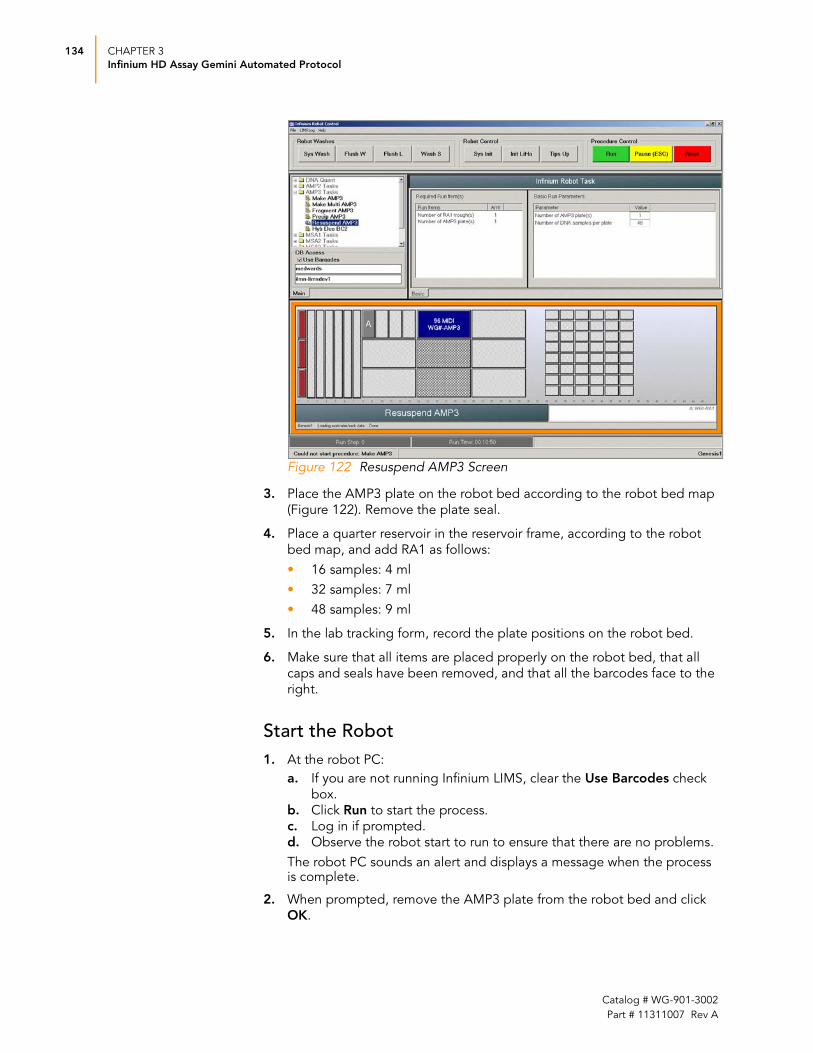
134 CHAPTER 3
Infinium HD Assay Gemini Automated Protocol
Figure 122 Resuspend AMP3 Screen
3. Place the AMP3 plate on the robot bed according to the robot bed map
(Figure 122). Remove the plate seal.
4. Place a quarter reservoir in the reservoir frame, according to the robot
bed map, and add RA1 as follows:
• 16 samples: 4 ml
• 32 samples: 7 ml
• 48 samples: 9 ml
5. In the lab tracking form, record the plate positions on the robot bed.
6. Make sure that all items are placed properly on the robot bed, that all
caps and seals have been removed, and that all the barcodes face to the
right.
Start the Robot1. At the robot PC:
a. If you are not running Infinium LIMS, clear the Use Barcodes check
box.
b. Click Run to start the process.
c. Log in if prompted.
d. Observe the robot start to run to ensure that there are no problems.
The robot PC sounds an alert and displays a message when the process is complete.
2. When prompted, remove the AMP3 plate from the robot bed and click OK.
Catalog # WG-901-3002
Part # 11311007 Rev A
Resuspend the AMP3 Plate 135
3. Apply a foil heat seal to the AMP3 plate by firmly holding the heat sealer
sealing block down for 3 seconds.
4. Place the sealed plate in the Illumina Hybridization Oven and incubate
for 1 hour at 48°C.
5. In the lab tracking form, record the start and stop times.
6. Vortex the sealed plate at 1800 rpm for 1 minute.
7. Pulse centrifuge to 280 xg.
8. Discard unused reagents in accordance with facility standards.
9. Do one of the following:
• Proceed to Hybridize Duo BeadChip on page 136. If you do so
immediately, it is safe to leave the RA1 at room temperature.
• Store the sealed AMP3 plate and the RA1 at -15 to -25°C (-80°C if
storing for more than 24 hours).
This is a good stopping point in the process.
CAUTION
If you stored the DNA pellets at -15 to -25°C for more than 72 hours after Precip AMP3, you may need to repeat the vortexing and centrifugation until the pellets are completely resuspended.
Infinium HD Assay Gemini Protocols

136 CHAPTER 3
Infinium HD Assay Gemini Automated Protocol
Hybridize Duo BeadChip
In this process, the resuspended DNA samples are denatured and dispensed onto BeadChips using the robot. DNA-loaded BeadChips are placed into inserts, which are then positioned into the Hyb Chambers.
The Hyb Chambers are hybridized in the Illumina Hybridization Oven for 16–24 hours at 48°C.
Figure 123 Hybridizing DNA to BeadChip
Estimated Time Robot time:
• 10 minutes per 8 BeadChips (16 samples)
• 30 minutes per 16 BeadChips (32 samples)
• 60 minutes per 24 BeadChips (48 samples)
Incubation time: 16–24 hours
Consumables
(gDNA )
(gDNA )
(ident ical p robesper bead t ype)
ItemQuantity(per 16 Samples)
Storage Supplied By
PB2 2 tubes Room temperature
Illumina
BeadChips 8 Illumina
Hyb Chambers 2 Illumina
Hyb Chamber gaskets 2 Illumina
Hyb Chamber inserts 8 Illumina
Robot BeadChip Alignment Fixture
4 Illumina
Robot Tip Alignment Guide 4 Illumina
1% aqueous Alconox As needed User
NOTE
Thaw all reagents completely at room temperature and allow to equilibrate. Once thawed, gently invert each tube several times to thoroughly mix the reagent. Pulse centrifuge each tube to 280 xg to eliminate bubbles and collect reagent at the bottom of the tube.
Catalog # WG-901-3002
Part # 11311007 Rev A

Hybridize Duo BeadChip 137
Preparation Preheat the heat block to 95°C.
Preheat the Illumina Hybridization Oven to 48°C and set the rocker
speed to 5.
If you plan to perform the XStain process tomorrow, begin thawing the
XC4 reagent. For instructions, see Resuspend XC4 Reagent for XStain HD BeadChip on page 150.
Prepare the Illumina Hybridization Oven as follows:
a. Preheat the oven to 48°C:
— Press the "F" button once to change the display to TSET.
— Press the "S" button to enter the set-temperature mode, and then use the Increment/Decrement dial to set the oven to 48°C.
— Press the "S" button again to set 48°C as the temperature.b. Set the rocker speed to 5:
— Press the "F" button twice until SPd is indicated on the display.
— Press the "S" button to enter the rocker speed mode.
— Use the Increment/Decrement dial to set the rocker speed to "5".
— Press the "S" button again.
Calibrate the Illumina Hybridization Oven with the Full-Scale Plus digital
thermometer supplied with your system.
On the lab tracking form, record:
• Date/Time
• Operator
• Robot
• PB2 tube barcode(s)
Steps Prepare Robot Tip Alignment Guides1. Wash and dry the Robot Tip Alignment Guides prior to each use. See
Wash Robot Tip Alignment Guides at the end of the Hyb Duo BeadChip
steps (page 151) for washing instructions.
2. Make sure you have the correct Robot Tip Alignment Guide for the
Gemini assay. The guide barcode should say Guide-A on it (Figure 124).
NOTE
To record information about your assay such as operator information, start and stop times, and barcodes, use the lab tracking form provided on your documentation CD. This form can be filled out and saved online, or printed and filled in by hand.
Infinium HD Assay Gemini Protocols

138 CHAPTER 3
Infinium HD Assay Gemini Automated Protocol
Figure 124 Guide-A Robot Tip Alignment Guide
Prepare Hyb Chambers
1. For every 8 BeadChips, place the following items on the bench top
(Figure 125):
• BeadChip Hyb Chambers (2)
• Hyb Chamber Gaskets (2)
• Robot BeadChip Alignment Fixtures (4)
• BeadChip Hyb Chamber Inserts (8)
• Robot Tip Alignment Guides (4)
NOTE
Perform the Hyb Chamber assembly near the Robot to minimize the distance you need to transfer the BeadChips. Keep the Hyb Chamber steady and level when lifting and moving. Avoid shaking and keep the Hyb Chamber parallel to the lab bench at all times.
Catalog # WG-901-3002
Part # 11311007 Rev A

Hybridize Duo BeadChip 139
Figure 125 BeadChip Hyb Cartridge Components
2. Place the gasket into the Hyb Chambers:
a. Match the wider edge of the gasket to the barcode-ridge side of the
Hyb Chamber (Figure 126).
Figure 126 Hyb Chamber and Gasket
b. Lay the gasket into the Hyb Chamber (Figure 127), and then press it
down all around.
Figure 127 Placing Gasket into Hyb Chamber
Hyb Chamber Gasket
Robot BeadChip Alignment Fixture
Hyb Chamber Inserts
Hyb Chamber Lid
Hyb Chamber
Barcode Ridges
Narrower Edge
Wider Edge
Reservoirs
Infinium HD Assay Gemini Protocols

140 CHAPTER 3
Infinium HD Assay Gemini Automated Protocol
c. Make sure the gasket is properly seated (Figure 128).
Figure 128 Hyb Chamber with Gasket in Place
3. Dispense 400 μl PB2 into each of the 8 humidifying buffer reservoirs in
the Hyb Chamber (Figure 129).
Figure 129 Dispensing PB2 into Hyb Chamber Reservoirs
4. Remove the BeadChips from 2 to 8°C storage but do not unpackage.
5. Close and lock the BeadChip Hyb Chamber lid (Figure 130).
a. Seat the lid securely on the bottom plate.
b. Snap two clamps shut, diagonally across from each other.
c. Snap the other two clamps.
Catalog # WG-901-3002
Part # 11311007 Rev A

Hybridize Duo BeadChip 141
Figure 130 Sealing the Hyb Chamber
6. Leave the closed Hyb Chamber on the bench at room temperature until
the BeadChips are loaded with DNA sample.
Prepare the RobotFor instructions on preparing the robot for use in a protocol and ensuring that the Chamber Rack is properly installed on the post-amplification robot bed, see the Infinium Assay Lab Setup and Procedures Guide.
NOTE
Robot QC procedures should be performed on a regular basis before running samples. See the Using the Robot chapter of the Infinium Assay Lab Setup and Procedures Guide for Robot QC instructions.
Infinium HD Assay Gemini Protocols

142 CHAPTER 3
Infinium HD Assay Gemini Automated Protocol
Refer to Figure 131 throughout this protocol. Note that all of the plate barcodes face to the right.
Figure 131 Placing Alignment Fixtures and AMP3 Plate onto Robot Bed
Verify AMP3 and BeadChips for Hyb (Infinium LIMS only)1. In the Infinium LIMS left sidebar, click Infinium HD Gemini | Confirm
BeadChips for Hyb.
2. Scan the barcode of the AMP3 plate.
3. Scan the barcodes of all the BeadChips you plan to hybridize with the
plate. You can scan up to 24 BeadChips.
4. Click Verify.
AMP3 Plate
Robot BeadChip Alignment Fixtures
NOTEOnly scan BeadChips that have been accessioned into the system. The BeadChip type must match the type associated with this batch in Infinium LIMS.
Catalog # WG-901-3002
Part # 11311007 Rev A

Hybridize Duo BeadChip 143
Figure 132 (Infinium LIMS) Verifying AMP3 and BeadChips for Hyb
5. If the AMP3 plate and BeadChips are queued for hybridization, a blue
confirmation message appears at the top of the window. Proceed to
loading the BeadChips.
If the AMP3 plate is not queued for hybridization, if any of the BeadChips have not been accessioned into the system, or if any of the BeadChips are the wrong type, a red error message appears at the top of the win-dow. The error message indicates the first incorrect barcode it finds. Do not proceed with hybridization.
6. If the plate is not queued for hybridization:
a. Click the Reports tab in the upper-right corner.
b. In the left sidebar, click Tracking | Get Queue Status.
c. Scan the plate barcode and click Go.
d. If the plate is queued for another step, proceed with that step.
7. If one of the BeadChips is not accessioned into the system, accession it
and then repeat the verification step.
8. If one of the BeadChips is not the right type for this batch, accession one
that is the right type and repeat the verification step.
9. When the verification is successful, proceed to Load the BeadChips on
page 144.
For information about how to use Infinium LIMS, see the Infinium LIMS User Guide.
Infinium HD Assay Gemini Protocols

144 CHAPTER 3
Infinium HD Assay Gemini Automated Protocol
Load the BeadChips
1. Place the resuspended AMP3 plate on the heat block at 95°C for
20 minutes, to denature the samples.
2. Pulse centrifuge the AMP3 plate to 280 xg for 1 minute.
3. Remove all BeadChips from their packages.
4. Place two BeadChips into each Robot BeadChip Alignment Fixture so
that the barcode lines up with the ridges on the fixture.
Figure 133 Placing BeadChips into Robot Alignment Fixture
5. Stack the Robot BeadChip Alignment Fixtures and carry them to the
robot.
NOTE
Make sure the Robot Tip Alignment Guide inserts are washed and thoroughly dried before you begin the following steps. See Wash Robot Tip Alignment Guides at the end of the Hyb Multi BeadChip section.
CAUTIONDo not unpackage the BeadChips until you are ready to begin hybridization.
CAUTIONHandle BeadChips only by the edges or by the barcode end.
Catalog # WG-901-3002
Part # 11311007 Rev A

Hybridize Duo BeadChip 145
Figure 134 Four Stacked Robot Alignment Fixtures
Set Up the Robot1. At the robot PC, select AMP3 Tasks | Hyb Duo BeadChip.
2. (Non-LIMS only) In the Basic Run Parameters pane, enter the Number of BeadChips.
You can only dispense samples from one AMP3 plate at a time. To pro-cess additional AMP3 plates, repeat the Load the BeadChips section on page 144.
The robot PC updates the Required Run Item(s) and the bed map to show the correct position of items on the robot bed.
Figure 135 Hyb Duo BeadChip Screen
Infinium HD Assay Gemini Protocols

146 CHAPTER 3
Infinium HD Assay Gemini Automated Protocol
3. Place the Robot BeadChip Alignment Fixtures onto the robot bed
according to the bed map (Figure 135). Do one of the following:
• For 8 samples, position the two Robot BeadChip alignment fixtures
in the top row.
• For 24 samples, use all six positions on the robot bed.
4. Place the AMP3 plate onto the robot bed according to the bed map and
remove the foil seal.
5. On the lab tracking form, record the plate and fixture positions on the
robot bed, and record the BeadChip barcodes associated with each well.
6. Make sure that all items are placed properly on the robot bed, that all
caps and seals have been removed, and that all the barcodes face to the
right.
Start the Robot1. At the robot PC, click Run.
2. (Infinium LIMS only) The robot scans the barcodes on the BeadChips to
confirm the correct BeadChips are loaded. Once the correct BeadChips
are confirmed, the Robot pauses.
3. Place a Robot Tip Alignment Guide on top of each Robot BeadChip
Alignment Fixture. The Guide-A barcode should be upside down and
facing away from you when properly placed on the Robot BeadChip
Alignment Fixture.
4. At the robot PC, click OK to confirm you have placed a Robot Tip
Alignment Guide on top of each Robot BeadChip Alignment Fixture.
Figure 136 Full set of Robot Tip Alignment Guides on Robot Bed
5. (Infinium LIMS only) The Robot scans the barcode on the Robot Tip
Alignment Guide to confirm the correct guide is being used.
Catalog # WG-901-3002
Part # 11311007 Rev A

Hybridize Duo BeadChip 147
6. The robot dispenses the sample onto the BeadChips, following the
layout shown in the lab tracking form. The robot PC sounds an alert and
displays a message when the process is complete.
Click OK in the message box.
7. Carefully remove each Robot Tip Alignment Guide from the robot bed
and set it to the side. Next, carefully remove the Robot BeadChip
Alignment Fixtures from the robot bed and visually inspect all sections of
the BeadChips. Ensure DNA sample covers all of the sections of each
bead stripe. Record any sections that are not completely covered.
8. If you are running 12 BeadChips or fewer, discard the AMP3 plate and
proceed to Set Up Duo BeadChip for Hyb on page 148.
9. If you are running 13 BeadChips or more, the Infinium Robot Control
application prompts you to place a new set of BeadChips on the robot
deck. Before you place the next set of samples on the Robot bed,
immediately assemble the Hyb Chambers for the first set of 12
BeadChips as described in the steps on page 148. Leave the assembled
Hyb Chambers of the first 12 BeadChips on the lab bench in a horizontal
position.
10. Replace the Robot Tip Alignment Guides used for the first set of
BeadChips with a new set of Robot Tip Alignment Guides that have been
washed and dried.
11. After you have completed the steps for the first set of 12 BeadChips,
place the new set of BeadChips on the robot bed according to the bed
map and click OK.
12. When prompted, place a new set of Robot Tip Alignment Guides that
have been washed and dried on top of each Robot BeadChip Alignment
Fixture and click OK to start the next run.
13. Continue on to Set Up Duo BeadChip for Hyb on page 148.
NOTEIn the rare occasion the Robot scanner fails to read a barcode, use the hand scanner attached to the PC to manually scan the barcode.
NOTE
For optimal performance, the Robot Tip Alignment Guides should be washed and dried after every run. See Wash Robot Tip Alignment Guides at the end of this section for wash instructions.
Infinium HD Assay Gemini Protocols

148 CHAPTER 3
Infinium HD Assay Gemini Automated Protocol
Set Up Duo BeadChip for Hyb1. Ensure the Illumina Hybridization Oven is set to 48°C.
2. Carefully remove each BeadChip from the Robot BeadChip Alignment
Fixtures when the robot finishes. Place each BeadChip in a Hyb Chamber
insert, orienting the barcode end so that it matches the barcode symbol
on the insert (Figure 137).
Figure 137 Placing Hyb Chamber Inserts into Hyb Chamber
3. Place the back side of the lid onto the Hyb Chamber and then slowly
bring down the front end to avoid dislodging the Hyb Chamber inserts
(Figure 138).
4. Close the clamps on both sides of the Hyb Chamber.
Figure 138 Securing Hyb Chamber Lid
CAUTION
Hold the BeadChip by the ends with your thumb and forefinger (thumb at the barcode end). Do not hold the BeadChip by the sides near the sample inlets. Avoid contacting the beadstripe area and sample inlets.
CAUTION
For optimal performance, keep the BeadChips steady and level when lifting or moving. Avoid shaking and keep parallel to the lab bench at all times. Avoid contacting the beadstripe area and sample inlets.
Catalog # WG-901-3002
Part # 11311007 Rev A

Hybridize Duo BeadChip 149
5. Place the Hyb Chamber in the 48°C Illumina Hybridization Oven so that
the clamps of the Hyb Chamber face the left and right sides of the oven.
The Illumina logo on top of the Hyb Chamber should be facing you.
Figure 139 Hyb Chamber Correctly Placed in Hyb Oven
Figure 140 Two Hyb Chambers Correctly Placed in Hyb Oven
NOTE
For optimal performance, take care to keep the Hyb Chamber steady and level when lifting or moving. Avoid shaking the Hyb Chamber, and keep the Hyb Chamber parallel to the lab bench while you transfer it to the Illumina Hybridization Oven.
Infinium HD Assay Gemini Protocols
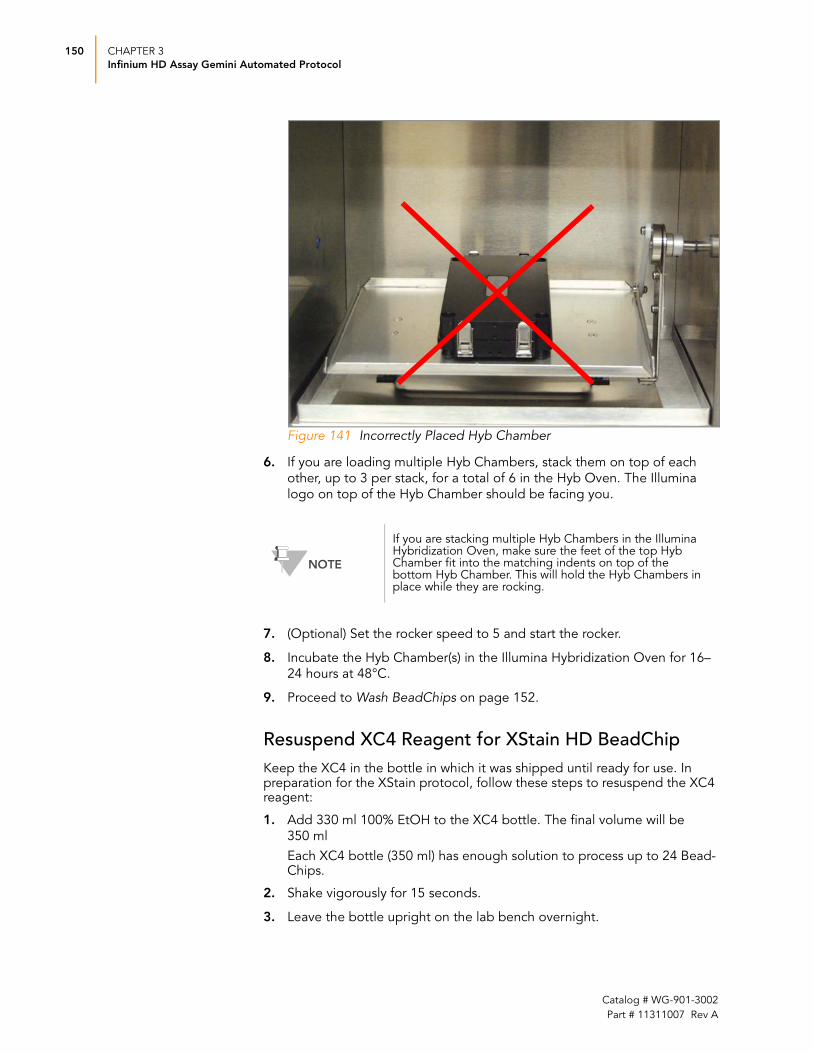
150 CHAPTER 3
Infinium HD Assay Gemini Automated Protocol
Figure 141 Incorrectly Placed Hyb Chamber
6. If you are loading multiple Hyb Chambers, stack them on top of each
other, up to 3 per stack, for a total of 6 in the Hyb Oven. The Illumina
logo on top of the Hyb Chamber should be facing you.
7. (Optional) Set the rocker speed to 5 and start the rocker.
8. Incubate the Hyb Chamber(s) in the Illumina Hybridization Oven for 16–
24 hours at 48°C.
9. Proceed to Wash BeadChips on page 152.
Resuspend XC4 Reagent for XStain HD BeadChipKeep the XC4 in the bottle in which it was shipped until ready for use. In preparation for the XStain protocol, follow these steps to resuspend the XC4 reagent:
1. Add 330 ml 100% EtOH to the XC4 bottle. The final volume will be
350 ml
Each XC4 bottle (350 ml) has enough solution to process up to 24 Bead-Chips.
2. Shake vigorously for 15 seconds.
3. Leave the bottle upright on the lab bench overnight.
NOTE
If you are stacking multiple Hyb Chambers in the Illumina Hybridization Oven, make sure the feet of the top Hyb Chamber fit into the matching indents on top of the bottom Hyb Chamber. This will hold the Hyb Chambers in place while they are rocking.
Catalog # WG-901-3002
Part # 11311007 Rev A
Hybridize Duo BeadChip 151
4. Shake again to ensure that the pellet is completely resuspended. If any
coating is visible, vortex at 1625 rpm until it is in complete suspension.
Once resuspended with 330 ml 100% EtOH, use XC4 at room tempera-ture. You can store it at 2 to 8°C overnight, but thaw it again before use.
Wash Robot Tip Alignment Guides1. Soak the Robot Tip Alignment Guides in a 1% aqueous Alconox solution
(one part Alconox to 99 parts water) using a 400 ml Pyrex beaker for 5
minutes.
2. After the 5 minute soak in the 1% Alconox solution, thoroughly rinse the
Robot Tip Alignment Guides with DiH2O at least three times to remove
any residual detergent. Make sure the DiH2O runs through all the tip
guide channels.
3. Dry the Robot Tip Alignment Guides, especially the channels, using a
Kimwipe or lint-free paper towels. Use a laboratory air gun to ensure they
are dry. Be sure to inspect the channels, including the top and bottom of
the insert. Robot Tip Alignment Guides should be completely dry and
free of any residual contaminates before next use.
NOTE
If the XC4 was not left to resuspend overnight, you can still proceed with the assay. Add the EtOH and put the XC4 on its side on a rocker to resuspend. Leave it there until the BeadChips are ready for coating.
NOTEDo not use bleach or ethanol to clean the Robot Tip Alignment Guides.
Infinium HD Assay Gemini Protocols

152 CHAPTER 3
Infinium HD Assay Gemini Automated Protocol
Wash BeadChips
In this process you prepare the BeadChips for the XStain HD BeadChip process. First, you remove the IntelliHyb Seals from the BeadChips and wash the BeadChips in two separate PB1 reagent washes to remove unhybridized and non-specifically hybridized DNA. The BeadChips are then assembled into Flow-Through Chambers under the PB1 buffer.
Figure 142 Washing BeadChip
Estimated Time Hands-on time:
• 20 minutes per 8 BeadChips (16 samples)
• 30 minutes per 16 BeadChips (32 samples)
• 50 minutes per 24 BeadChips (48 samples)
ConsumablesItem
Quantity(per 8 BeadChips)
Storage Supplied By
PB1 550 ml Room temperature
Illumina
Multi-Sample BeadChip Alignment Fixture
1 Illumina
Te-Flow Flow-Through Chambers (with Black Frames, Spacers, Glass Back Plates, and Clamps)
1 per BeadChip Illumina
Wash Dish 8 BeadChips: 2 dishes
24 BeadChips: 6 dishes
Illumina
Wash Rack 8 BeadChips: 1 rack
24 BeadChips: 3 racks
Illumina
Catalog # WG-901-3002
Part # 11311007 Rev A

Wash BeadChips 153
Preparation Fill 2 wash dishes with PB1 (200 ml per wash dish). Label each dish
“PB1”.
Fill the BeadChip Alignment Fixture with 150 ml PB1.
Separate the clear plastic spacers from the white backs.
Clean the glass back plates according to the directions in the Infinium Assay Lab Setup and Procedures Guide.
On the lab tracking form, record:
• Date/Time
• Operator
• Robot
• PB1 bottle barcode
Verify Reagents and BeadChips for Washing (Infinium LIMS only)1. In the Infinium LIMS left sidebar, click Infinium HD Gemini |
Wash BeadChip.
2. Scan the barcode(s) of the PB1.
NOTE
Only pour out the recommended volume of PB1 needed for the suggested number of samples listed in the consumables table. Additional PB1 is used later in the XStain HD BeadChip step. One bottle of PB1 should be used per 8 BeadChips.
WARNING
This protocol involves the use of an aliphatic amide that is a probable reproductive toxin. Personal injury can occur through inhalation, ingestion, skin contact, and eye contact. Dispose of containers and any unused contents in accordance with the governmental safety standards for your region.
NOTE
Thaw all reagents completely at room temperature and allow to equilibrate. Once thawed, gently invert each tube several times to thoroughly mix the reagent. Pulse centrifuge each tube to 280 xg to eliminate bubbles and collect reagent at the bottom of the tube.
NOTE
To record information about your assay such as operator information, start and stop times, and barcodes, use the lab tracking form provided on your documentation CD. This form can be filled out and saved online, or printed and filled in by hand.
Infinium HD Assay Gemini Protocols

154 CHAPTER 3
Infinium HD Assay Gemini Automated Protocol
3. Scan the BeadChip barcodes.
4. Click Verify.
Figure 143 (Infinium LIMS) Verifying Reagents and BeadChips for Washing
5. If the reagents are correct and BeadChips are queued for washing, a blue
confirmation message appears at the top of the window. Proceed to the
wash step.
6. If any of the reagents are invalid, check the reagent type before re-
scanning. The reagent name (e.g., PB1) appears at the end of the
barcode. Make sure to scan the correct reagent into each box.
7. If any of the BeadChips are not queued for washing, a red error message
appears at the top of the window. The error message indicates the first
incorrect barcode it finds. Do not proceed with washing. Instead, follow
these steps to troubleshoot the problem:
a. Click the Reports tab in the upper-right corner.
b. In the left sidebar, click Tracking | Get Queue Status.
c. Scan the BeadChip barcode that appeared in the error message and
click Go.
d. Note what step the BeadChip is queued for, and proceed with that
step.
For information about how to use Infinium LIMS, see the Infinium LIMS User Guide.
Catalog # WG-901-3002
Part # 11311007 Rev A

Wash BeadChips 155
Steps Wash BeadChip1. Remove each Hyb Chamber from the Illumina Hybridization Oven.
2. Attach the wire handle to the rack and submerge the wash rack in the
first wash dish containing 200 ml PB1 (Figure 144).
3. Remove the Hyb Chamber inserts from the Hyb Chambers.
4. Remove BeadChips from the Hyb Chamber inserts one at a time.
Figure 144 Wash Rack in Wash Dish Containing PB1
5. Remove the IntelliHyb seal from each BeadChip as follows:
a. Wearing powder-free gloves, hold the BeadChip in one hand with
your thumb and forefinger on the long edges of the BeadChip. The
BeadChip may also be held with the thumb and forefinger on the
short edges of the BeadChip. In either case avoid contact with the
sample inlets. The barcode should be facing up and be closest to
you, and the top side of the BeadChip should be angled slightly
away from you.
b. Remove the entire seal in a single, rapid motion by pulling it off in a
diagonal direction. Start with a corner on the barcode end and pull
with a continuous upward motion away from you and towards the
opposite corner on the top side of the BeadChip. Do not stop and
start the pulling action. Do not touch the exposed active areas.
c. Discard the seal.
CAUTIONTo ensure no solution splatters on you, Illumina recommends removing the coverseal over an absorbent cloth or paper towels, preferably in a hood.
Infinium HD Assay Gemini Protocols

156 CHAPTER 3
Infinium HD Assay Gemini Automated Protocol
Figure 145 Removing the Coverseal
6. Immediately and carefully slide each BeadChip into the wash rack one at
a time, making sure that the BeadChip is completely submerged in the
PB1 (Figure 146).
Figure 146 Placing BeadChips in Wash Dish Containing PB1
7. Repeat steps 5 and 6 until all BeadChips are transferred to the
submerged wash rack. The wash rack holds up to 8 BeadChips.
8. Once all BeadChips are in the wash rack, move the wash rack up and
down for 1 minute, breaking the surface of the PB1 with gentle, slow
agitation.
9. Move the wash rack to the other wash dish containing PB1. Make sure
the BeadChips are completely submerged.
10. Move the wash rack up and down for 1 minute, breaking the surface of
the PB1 with gentle, slow agitation.
CAUTIONDo not touch the arrays!
Catalog # WG-901-3002
Part # 11311007 Rev A

Wash BeadChips 157
11. If you are processing more than 8 BeadChips:
a. Complete the steps in the next section, Assemble Flow-Through Chambers, for the first eight BeadChips.
b. Place the assembled Flow-Through Chambers of the first eight
BeadChips on the lab bench in a horizontal position.
c. Repeat steps 3 through 11 from this section for any additional
BeadChips. Use new PB1 for each set of eight BeadChips.
Assemble Flow-Through Chambers
1. If you have not done so yet, fill the BeadChip Alignment Fixture with 150
ml PB1.
2. For each BeadChip to be processed, place a black frame into the Multi-
Sample BeadChip Alignment Fixture (Figure 147) pre-filled with PB1 (see
Preparation on page 153).
Figure 147 Placing Black Frames into Multi-Sample BeadChip Alignment Fixture
NOTE
Keep them in a horizontal position on the lab bench until all assembled Flow-Through Chambers are ready to be loaded into the Chamber Rack. Do not place the Flow-Through Chambers in the Chamber Rack until all necessary steps are completed.
CAUTIONIt is important to wash the reservoirs immediately and thoroughly to ensure that no traces of PB2 remain in the wells.
NOTEThe 150 ml of PB1 used in the Flow-Through Chamber assembly can be used for up to eight BeadChips. You must use 150 ml for every additional set of eight BeadChips.
Infinium HD Assay Gemini Protocols

158 CHAPTER 3
Infinium HD Assay Gemini Automated Protocol
3. Place each BeadChip to be processed into a black frame, aligning its
barcode with the ridges stamped onto the Alignment Fixture (Figure
148). Each BeadChip should be fully immersed in PB1.
Figure 148 Placing BeadChip into Black Frame on Alignment Fixture
4. Place a clear spacer onto the top of each BeadChip to be processed
(Figure 149). Use the Alignment Fixture grooves to guide the spacers
into proper position.
Figure 149 Placing Clear Plastic Spacer onto BeadChip
5. Place the Alignment Bar onto the Alignment Fixture (Figure 150).
NOTEBe sure to use the clear plastic spacers, not the white ones.
Clear Spacer
Groove for Positioning Spacer
White Spacer Back
Do Not Use
Catalog # WG-901-3002
Part # 11311007 Rev A

Wash BeadChips 159
Figure 150 Placing Alignment Bar onto Alignment Fixture
6. Use a laboratory air gun to quickly remove any accumulated dust from
the glass back plates just before placing them onto the BeadChips.
7. Place a clean glass back plate on top of the clear spacer covering each
BeadChip. The plate reservoir should be at the barcode end of the
BeadChip, facing inward to create a reservoir against the BeadChip
surface (Figure 151).
Figure 151 Placing Glass Back Plate onto BeadChip
Reservoir at Barcode End of Glass Back Plate
Glass Back Plate in Position
Infinium HD Assay Gemini Protocols
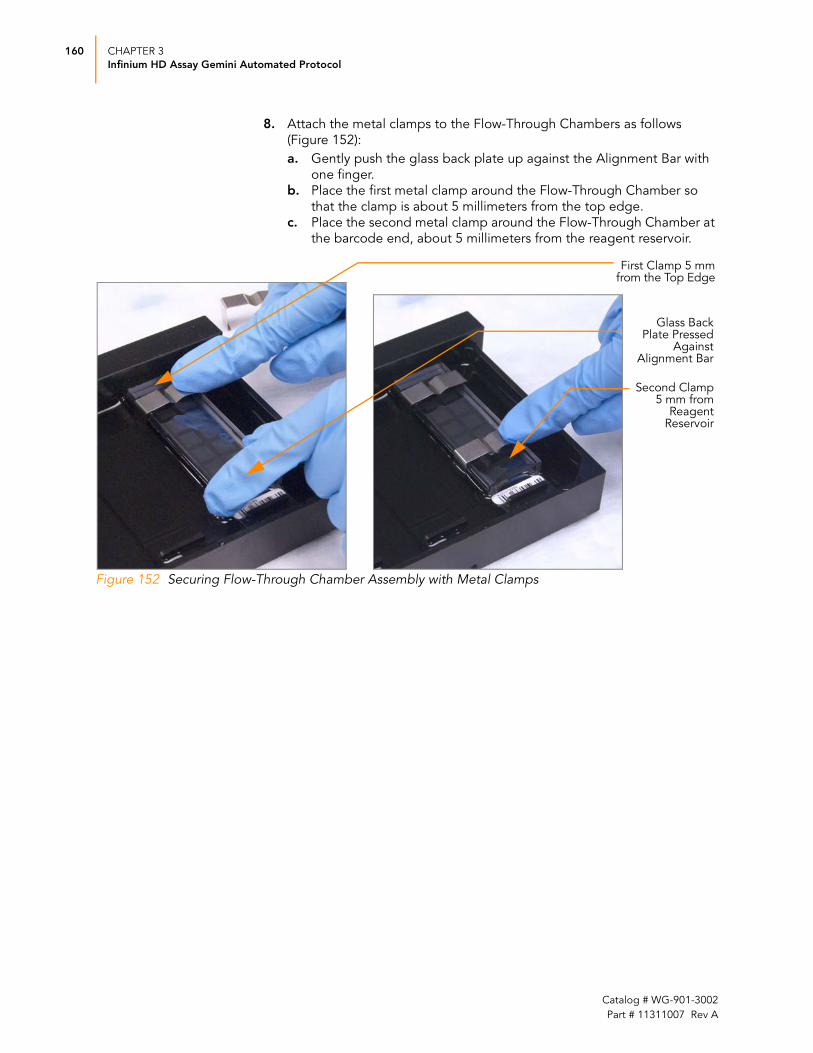
160 CHAPTER 3
Infinium HD Assay Gemini Automated Protocol
8. Attach the metal clamps to the Flow-Through Chambers as follows
(Figure 152):
a. Gently push the glass back plate up against the Alignment Bar with
one finger.
b. Place the first metal clamp around the Flow-Through Chamber so
that the clamp is about 5 millimeters from the top edge.
c. Place the second metal clamp around the Flow-Through Chamber at
the barcode end, about 5 millimeters from the reagent reservoir.
Figure 152 Securing Flow-Through Chamber Assembly with Metal Clamps
First Clamp 5 mm from the Top Edge
Second Clamp 5 mm from
Reagent Reservoir
Glass Back Plate Pressed
Against Alignment Bar
Catalog # WG-901-3002
Part # 11311007 Rev A

Wash BeadChips 161
9. Using scissors, trim the ends of the clear plastic spacers from the Flow-
Through Chamber assembly (Figure 153):
Figure 153 Trimming Spacer Ends from Flow-Through Chamber Assembly
10. Immediately wash the Hyb Chamber reservoirs with dH2O and scrub
them with a small cleaning brush, ensuring that no PB2 remains.
11. If you are using Infinium LIMS:
a. In the Infinium LIMS left sidebar, click Infinium HD Gemini | Wash BeadChip.
b. Scan the reagent barcodes and the BeadChip barcodes. Click Save.
Infinium LIMS records the data and queues the BeadChips for the
next step.
12. Discard unused reagents in accordance with facility standards.
13. If you are using Infinium LIMS:
a. In the Infinium LIMS left sidebar, click Infinium HD Gemini | Wash BeadChip.
Trim Spacer at Non-Barcode End of Flow-Through Chamber
Trim Spacer at Barcode End of Flow-Through Chamber
CAUTION
Place all assembled Flow-Through Chambers on the lab bench in a horizontal position while you perform the preparation steps for XStain HD BeadChip. Do not place the Flow-Through Chambers in the Chamber Rack until the preparation is complete.
Infinium HD Assay Gemini Protocols

162 CHAPTER 3
Infinium HD Assay Gemini Automated Protocol
b. Scan the reagent barcodes and BeadChip barcodes. Click Save.
Infinium LIMS records the data and queues the BeadChips for the
next step, Single-Base Extension and Stain HD BeadChip.
14. Proceed to Single-Base Extension and Stain HD BeadChip on page 163.
Catalog # WG-901-3002
Part # 11311007 Rev A

Single-Base Extension and Stain HD BeadChip 163
Single-Base Extension and Stain HD BeadChip
Following hybridization, RA1 reagent is used to wash away any remaining unhybridized and non-specifically hybridized DNA sample. XC1 and XC2 are added to condition the BeadChip surface for the extension reaction. TEM reagents are dispensed into the Flow-Through Chambers to perform single-base extension of primers hybridized to DNA on the BeadChip. This reaction incorporates labeled nucleotides into the extended primers. 95% formamide/1 mM EDTA is added to remove the hybridized DNA. After neutralization using the XC3 reagent, the labeled extended primers undergo a multi-layer staining process on the Chamber Rack. Next, the Flow-Through Chambers are disassembled. The BeadChips are washed in the PB1 reagent, and then coated with XC4 reagent and dried.
Figure 154 Extending and Staining BeadChip
Estimated Time Robot time:
• 2 hours and 30 minutes per 8 BeadChips (16 samples)
• 2 hours and 40 minutes per 16 BeadChips (32 samples)
• 2 hours and 50 minutes per 24 BeadChips (48 samples)
Dry time: 55 minutes
Consumables
(gDNA)
*Stain in green channel*Stain in red channel
(gDNA)
T*
G
A
C*
Item Quantity Storage Supplied By
RA1 10 ml for 1–8 BeadChips
20 ml for 9–16 BeadChips
30 ml for 17–24 BeadChips
-15 to -25°C Illumina
XC1 2 tubes (per 8 BeadChips)
-15 to -25°C Illumina
XC2 2 tubes
(per 8 BeadChips)
-15 to -25°C Illumina
TEM 2 tubes
(per 8 BeadChips)
-15 to -25°C Illumina
Infinium HD Assay Gemini Protocols

164 CHAPTER 3
Infinium HD Assay Gemini Automated Protocol
Preparation RA1 is shipped frozen. Gradually warm the RA1 reagent to room
temperature. Gently mix to dissolve any crystals that may be present.
Place all reagent tubes to be used in the assay in a tube rack; if frozen,
thaw to room temperature and centrifuge to 3000 xg for 3 minutes.
On the lab tracking form, record:
• Date/Time
• Operator
• Robot
• RA1 barcode
XC3 50 ml for 1–8 BeadChips
100 ml for 9–16 BeadChips
150 ml for 24 BeadChips
Room temperature
Illumina
STM (Make sure that all STM tubes indicate the same stain temperature on the label)
2 tubes
(per 8 BeadChips)
-15 to -25°C Illumina
ATM 2 tubes
(per 8 BeadChips)
-15 to -25°C Illumina
PB1 310 ml for 1–8 BeadChips
285 ml for 9– 24 BeadChips
Room temperature
Illumina
XC4 310 ml for 1–8 BeadChips
285 ml for 9– 24 BeadChips
-15 to -25°C Illumina
Alconox Powder Detergent as needed User
EtOH as needed Room temperature
User
95% formamide/1 mM EDTA 15 ml for 1–8 BeadChips
17 ml for 9–16 BeadChips
25 ml for 17–24 BeadChips
-15 to -25°C User
WARNING
This protocol involves the use of an aliphatic amide that is a probable reproductive toxin. Personal injury can occur through inhalation, ingestion, skin contact, and eye contact. Dispose of containers and any unused contents in accordance with the governmental safety standards for your region.
Item Quantity Storage Supplied By
Catalog # WG-901-3002
Part # 11311007 Rev A

Single-Base Extension and Stain HD BeadChip 165
• XC3 barcode
• XC1 barcode(s)
• XC2 barcode(s)
• TEM barcode(s)
• STM barcode(s)
• ATM barcode(s)
• PB1 barcode
• XC4 barcode(s)
NOTE
To record information about your assay such as operator information, start and stop times, and barcodes, use the lab tracking form provided on your documentation CD. This form can be filled out and saved online, or printed and filled in by hand.
Infinium HD Assay Gemini Protocols

166 CHAPTER 3
Infinium HD Assay Gemini Automated Protocol
Set Up the Chamber Rack1. Ensure the water circulator reservoir is filled with water to the appropriate
level. See the VWR Operator’s Manual.
2. Turn on the water circulator and set it to a temperature that brings the
Chamber Rack to 44°C at equilibrium.
This temperature may vary depending on facility ambient conditions.
Figure 155 Water Circulator Connected to Chamber Rack
3. The temperature displayed on the water circulator LCD screen may differ
from the actual temperature on the Chamber Rack. Confirm this using
the temperature probe for the Chamber Rack.
4. Remove the bubbles trapped in the Chamber Rack. You must do this
every time you run this process. Follow instructions in the Te-Flow (Tecan Flow-Through Module) Operating Manual.
5. Use the Illumina Temperature Probe in several locations to ensure that
the Chamber Rack is at 44°C (Figure 156).
Do not leave the temperature probe in the first three rows of the Cham-ber Rack. Reserve this space for BeadChips.
Reservoir Cover
Chamber Rack on Robot Bed
Water Circulator with Programmable Temperature Control
(Blowup)
Catalog # WG-901-3002
Part # 11311007 Rev A

Single-Base Extension and Stain HD BeadChip 167
Figure 156 Illumina Temperature Probe in Chamber Rack
6. For accurate temperature measurement, ensure the Temperature Probe
is touching the base of the Chamber Rack.
Temperature Probe
Temperature Probe in Chamber Rack
Infinium HD Assay Gemini Protocols

168 CHAPTER 3
Infinium HD Assay Gemini Automated Protocol
Prepare the RobotFor instructions on preparing the robot for use in a protocol and ensuring that the Chamber Rack is properly installed on the post-amplification robot bed, see the Infinium Assay Lab Setup and Procedures Guide.
Refer to Figure 157 throughout this protocol.
Figure 157 Tecan Eight-Tip Robot (XStain HD BeadChip Setup)
Steps Single-Base Extension and Stain (XStain)
1. Slide the Chamber Rack into column 28 on the robot bed. Ensure that it
is seated properly.
2. At the robot PC, select Infinium II Chemistry | XStain HD BeadChip.
3. (Non–LIMS only) In the Basic Run Parameters pane, enter the Number of BeadChips (up to 24).
The robot PC updates the Required Run Item(s) and the bed map to show the correct position of items on the robot bed.
RA1 in Half Reservoir
95% Formamide/1 mM EDTA in Quarter Reservoir
XC3 in Full Reservoir
24 BeadChips in Chamber RackXC1
XC2
TEM
STM
ATM
CAUTIONThe remaining steps must be performed without interruption.
Catalog # WG-901-3002
Part # 11311007 Rev A

Single-Base Extension and Stain HD BeadChip 169
Figure 158 XStain HD BeadChip Screen
4. Place a quarter reservoir in the reservoir frame according to the robot
bed map (Figure 158), and add 95% formamide/1 mM EDTA as follows:
• 8 BeadChips: 15 ml
• 16 BeadChips: 20 ml
• 24 BeadChips: 25 ml
5. Place a half reservoir in the reservoir frame according to the robot bed
map, and add RA1 as follows:
• 8 BeadChips: 10 ml
• 16 BeadChips: 20 ml
• 24 BeadChips: 30 ml
6. Place a full reservoir in the reservoir frame according to the robot bed
map, and add XC3 as follows:
• 8 BeadChips: 50 ml
• 16 BeadChips: 100 ml
• 24 BeadChips: 150 ml
7. Place the XC1, XC2, TEM, STM, and ATM tubes in the robot tube rack
according to the robot bed map. Remove the caps.
8. Make sure that all items are placed properly on the robot bed, that all
caps and seals have been removed, and that all the barcodes face to the
right.
Infinium HD Assay Gemini Protocols

170 CHAPTER 3
Infinium HD Assay Gemini Automated Protocol
Start the Robot1. At the robot PC:
a. If you are not running Infinium LIMS, clear the Use Barcodes check
box.
b. Click Run to start the process.
c. Log in if prompted.
d. When prompted (Figure 159), enter the stain temperature. The
correct temperature is indicated on the STM tube. If no temperature
is listed, enter 37ºC.
Figure 159 Entering Stain Temperature
e. Observe the robot start to run to ensure that there are no problems.
2. When prompted (Figure 160), wait for the Chamber Rack to reach 44°C.
Do not load the BeadChips or click OK yet.
Figure 160 Adjusting Chamber Rack to 44°C Message
3. When the temperature probe registers 44°C, click OK.
4. When prompted (Figure 161), load the BeadChips click OK.
Figure 161 Load BeadChips Message
5. Quickly place each Flow-Through Chamber into the Chamber Rack
according to the robot bed map.
6. Ensure each Flow-Through Chamber is properly seated to allow
adequate heat exchange between the rack and the chamber.
7. On the lab tracking form, record the chamber rack position for each
BeadChip.
Catalog # WG-901-3002
Part # 11311007 Rev A

Single-Base Extension and Stain HD BeadChip 171
8. At the robot PC, click OK. A series of reactions begins, each with a wait
time. Message boxes on the robot PC tell you which reaction is occurring
and how long the wait time is.
9. When prompted, immediately remove the Flow-Through Chambers from
the Chamber Rack. Place them horizontally on the lab bench at room
temperature.
The robot PC sounds an alert and displays a message when the process is complete.
10. Click OK to finish the process.
Verify Reagents and BeadChips for Coating (Infinium LIMS only)1. In the Infinium LIMS left sidebar, click Infinium HD Gemini |
Coat BeadChip.
2. Scan the barcode(s) of the PB1.
Table 15 List of Reactions
# Reagent Wait Time
1 RA1 3 minutes
2 XC1 10 minutes
3 XC2 10 minutes
4 TEM 15 minutes
5 Formamide/EDTA
7 minutes
6 XC3 2 minutes
7 STM 10 minutes
8 XC3 7 minutes
9 ATM 10 minutes
10 XC3 7 minutes
11 STM 10 minutes
12 XC3 7 minutes
13 ATM 10 minutes
14 XC3 7 minutes
15 STM 10 minutes
16 XC3 7 minutes
Infinium HD Assay Gemini Protocols

172 CHAPTER 3
Infinium HD Assay Gemini Automated Protocol
3. Scan the barcode(s) of the XC4.
4. Scan the BeadChip barcodes.
5. Click Verify.
Figure 162 (Infinium LIMS) Verifying Reagents and BeadChips for Coating
6. If the reagents are correct and the BeadChips are queued for coating, a
blue confirmation message appears at the top of the window. Proceed to
the wash and coat step.
7. If any of the reagents are invalid, check the reagent type before re-
scanning. The reagent name (e.g., PB1) appears at the end of the
barcode. Make sure to scan the correct reagent into each box.
8. If any of the BeadChips are not queued for coating, a red error message
appears at the top of the window. The error message indicates the first
incorrect barcode it finds. Do not proceed with coating. Instead, follow
these steps to troubleshoot the problem:
a. Click the Reports tab in the upper-right corner.
b. In the left sidebar, click Tracking | Get Queue Status.
c. Scan the BeadChip barcode that appeared in the error message and
click Go.
d. Note what step the BeadChip is queued for, and proceed with that
step.
Catalog # WG-901-3002
Part # 11311007 Rev A

Single-Base Extension and Stain HD BeadChip 173
Wash and Coat 8 BeadChips Follow these best practices to optimize the wash and coat process.
Take the utmost care to minimize the chance of lint or dust entering the
wash dishes, which could transfer to the BeadChips. Place wash dish
covers on wash dishes when stored or not in use. Clean wash dishes with
low-pressure air to remove particulates prior to use.
In preparation for XC4 BeadChip coating, wash tube racks and wash
dishes thoroughly before and after use. Rinse with DI water. Immediately
following wash, place racks and wash dishes upside down on a wash rack
to dry.
Place three layers of Kimwipes on the lab bench. Place a tube rack on top
of these Kimwipe layers (do not place on absorbent lab pads). The
staining rack containing BeadChips will be placed on this tube rack after
you remove it from the XC4 wash dish.
Prepare an additional clean tube rack (Illumina-provided from VWR
catalog # 60916-748, must fit internal dimensions of vacuum desiccator)
for removal of the BeadChips. Allow one rack per 8 BeadChips. No
Kimwipes are required under this tube rack.
1. Lay out the following equipment on the lab bench:
• 1 staining rack
• 1 vacuum desiccator
• 1 tube rack
• Self-locking tweezers
• Large Kimwipes
• Vacuum hose
2. Set up two top-loading wash dishes, labeled as shown in Figure 163.
3. To indicate the fill volume before filling wash dishes with PB1 and XC4,
pour 310 ml water into the wash dishes and mark the water level on the
side. Empty the water from the wash dish. This enables you to pour
reagent directly from the PB1 and XC4 bottles into the wash dishes,
minimizing contaminant transfer from labware to wash dishes.
Infinium HD Assay Gemini Protocols
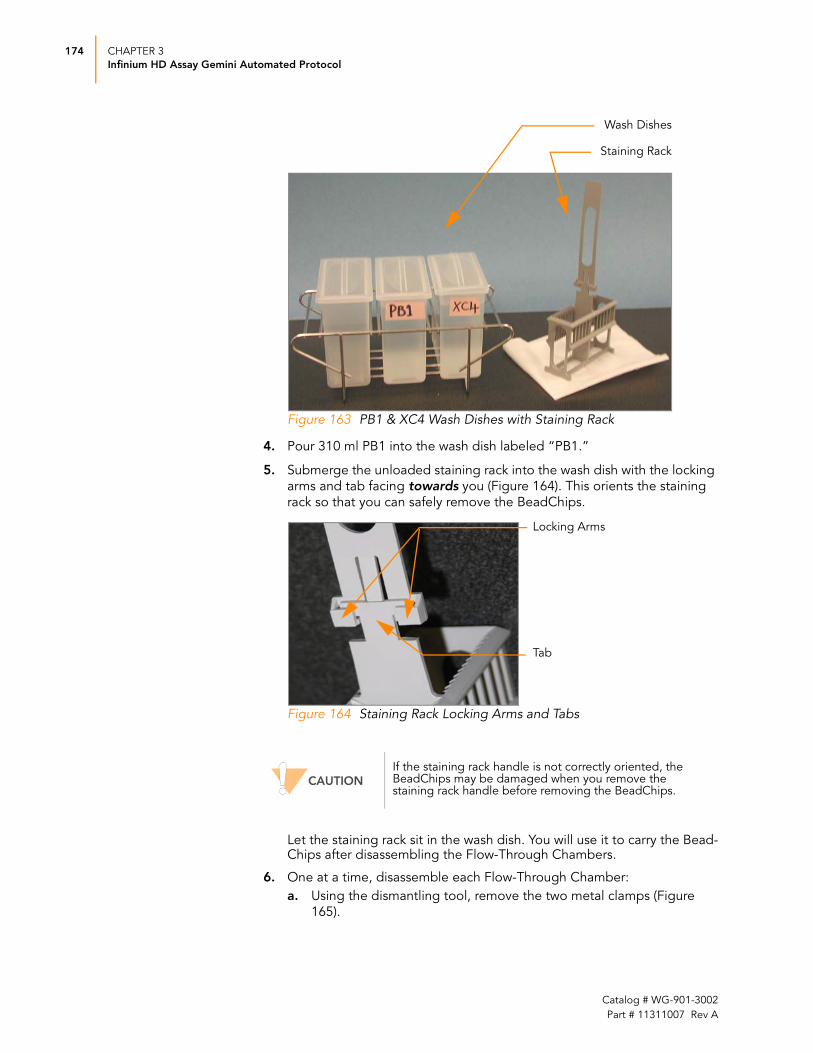
174 CHAPTER 3
Infinium HD Assay Gemini Automated Protocol
Figure 163 PB1 & XC4 Wash Dishes with Staining Rack
4. Pour 310 ml PB1 into the wash dish labeled “PB1.”
5. Submerge the unloaded staining rack into the wash dish with the locking
arms and tab facing towards you (Figure 164). This orients the staining
rack so that you can safely remove the BeadChips.
Figure 164 Staining Rack Locking Arms and Tabs
Let the staining rack sit in the wash dish. You will use it to carry the Bead-Chips after disassembling the Flow-Through Chambers.
6. One at a time, disassemble each Flow-Through Chamber:
a. Using the dismantling tool, remove the two metal clamps (Figure
165).
CAUTIONIf the staining rack handle is not correctly oriented, the BeadChips may be damaged when you remove the staining rack handle before removing the BeadChips.
Staining Rack
Wash Dishes
Locking Arms
Tab
Catalog # WG-901-3002
Part # 11311007 Rev A

Single-Base Extension and Stain HD BeadChip 175
Figure 165 Removing Metal Clamps from Flow-Through Chamber
b. Remove the glass back plate.
c. Set the glass back plates aside. When you finish the XStain BeadChip
protocol, clean the glass back plates as described in the Infinium Assay Lab Setup and Procedures Guide.
d. Remove the spacer.
e. Remove the BeadChip.
7. Place BeadChips in the staining rack while it is submerged in PB1. Put all
four BeadChips above the staining rack handle. The BeadChip barcodes
should face away from you, while the locking arms on the handle face towards you.
If necessary, briefly lift the staining rack out of the wash dish to seat the BeadChip. Replace it immediately after inserting the BeadChip.
8. Ensure that the BeadChips are completely submerged.
9. Move the staining rack up and down 10 times, breaking the surface of
the PB1 (Figure 166).
CAUTIONIt is important to use the dismantling tool to avoid chipping the glass back plates.
CAUTIONDo not touch the face of the BeadChips. Handle them by the barcode end or by the edges.
CAUTIONDo not allow the BeadChips to dry. Submerge each BeadChip in the wash dish as soon as possible.
Infinium HD Assay Gemini Protocols

176 CHAPTER 3
Infinium HD Assay Gemini Automated Protocol
Figure 166 Washing BeadChips in PB1
10. Allow the BeadChips to soak for an additional 5 minutes.
11. Pour 310 ml XC4 into the dish labeled “XC4,” and cover the dish to
prevent any lint or dust from falling into the solution.
12. Remove the staining rack from the dish containing PB1 and place it
directly into the wash dish containing XC4 (Figure 167). The barcode
labels on the BeadChips must face away from you, while the locking
arms on the handle face towards you, for proper handling and coating.
NOTE
If the top edges of the BeadChips begin to touch during either PB1 or XC4 washes, gently move the staining rack back and forth to separate the slides. It is important for the solution to circulate freely between all BeadChips.
NOTEDo not leave the BeadChips submerged in PB1 for longer than 30 minutes.
NOTEUse the XC4 within 10 minutes after filling the wash dish.
Catalog # WG-901-3002
Part # 11311007 Rev A

Single-Base Extension and Stain HD BeadChip 177
Figure 167 Moving BeadChips from PB1 to XC4
13. Slowly move the staining rack up and down 10 times, breaking the
surface of the reagent.
14. Soak for 5 minutes.
15. Prepare a clean tube rack for the staining rack by placing two folded
Kimwipes under the tube rack.
16. Prepare one additional tube rack (Illumina-provided from VWR catalog #
60916-748) that fits the internal dimensions of the vacuum desiccator.
17. Remove the staining rack in one smooth, rapid motion and place it
directly on the prepared tube rack, making sure the barcodes face up
and the locking arms and tab face down (Figure 168, showing
8 BeadChips).
NOTE
If the top edges of the BeadChips begin to touch during either PB1 or XC4 washes, gently move the staining rack back and forth to separate the slides. It is important for the solution to circulate freely between all BeadChips.
CAUTIONDo not touch the stripes with the wipe or allow EtOH to drip onto the stripes.
CAUTIONUse XC4 only once. To process subsequent BeadChips, use a new, clean wash dish with fresh XC4.
Infinium HD Assay Gemini Protocols
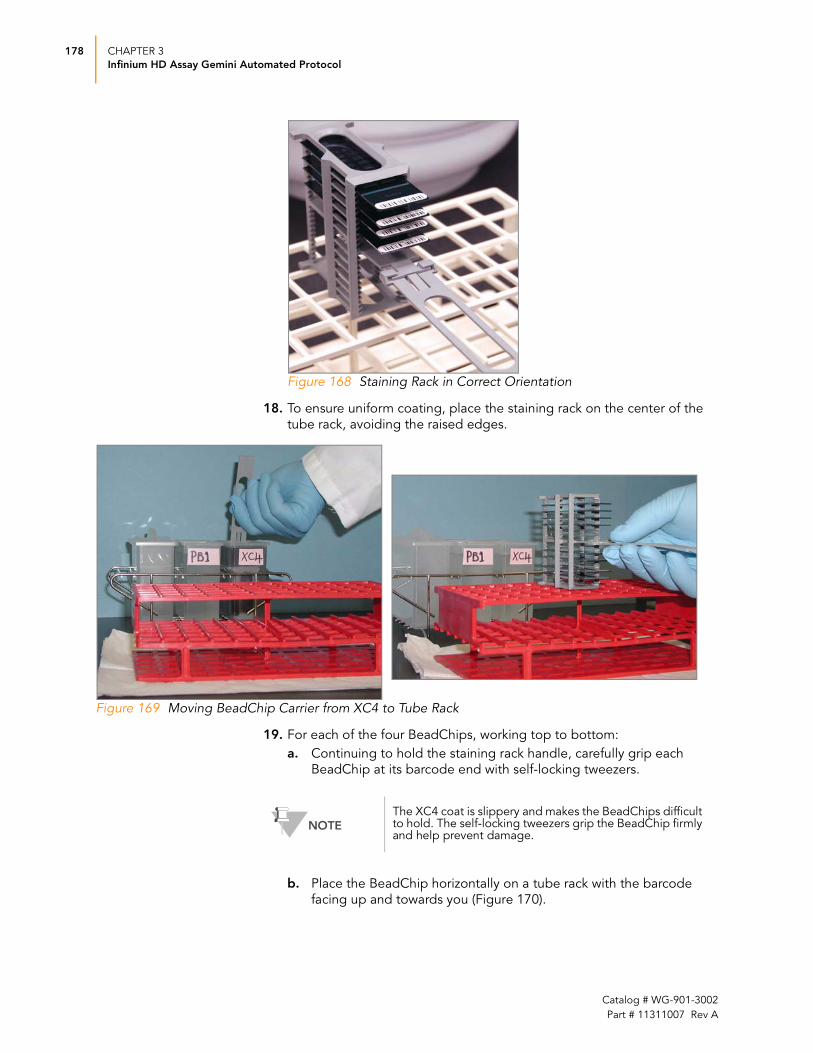
178 CHAPTER 3
Infinium HD Assay Gemini Automated Protocol
Figure 168 Staining Rack in Correct Orientation
18. To ensure uniform coating, place the staining rack on the center of the
tube rack, avoiding the raised edges.
Figure 169 Moving BeadChip Carrier from XC4 to Tube Rack
19. For each of the four BeadChips, working top to bottom:
a. Continuing to hold the staining rack handle, carefully grip each
BeadChip at its barcode end with self-locking tweezers.
b. Place the BeadChip horizontally on a tube rack with the barcode
facing up and towards you (Figure 170).
NOTEThe XC4 coat is slippery and makes the BeadChips difficult to hold. The self-locking tweezers grip the BeadChip firmly and help prevent damage.
Catalog # WG-901-3002
Part # 11311007 Rev A

Single-Base Extension and Stain HD BeadChip 179
Figure 170 Placing BeadChips on Tube Rack
20. Holding the top of the staining rack in position, grasp the handle
between your thumb and forefinger. Push the tab up and push the
handle away from you to unlock it. Pull up the handle and remove (Figure 171).
Figure 171 Removing Staining Rack Handle
CAUTIONTo prevent wicking and uneven drying, do not allow the BeadChips to rest on the edge of the tube rack or to touch each other while drying.
Tab
Handle
Infinium HD Assay Gemini Protocols

180 CHAPTER 3
Infinium HD Assay Gemini Automated Protocol
21. Dry the BeadChips:
a. Place the tube rack with the BeadChips (Figure 179) into the
desiccator. Check the vacuum pressure and make sure that the valve
is securely attached.
b. Start the vacuum, using at least 508 mm Hg (0.68 bar).
c. To ensure that the dessicator is properly sealed, gently lift the lid of
the vacuum desiccator. It should not lift off the desiccator base.
d. Dry under vacuum for 50–55 minutes.
Drying times may vary according to room temperature and humidity.
22. Proceed to step 37, page 188.
Wash and Coat 24 BeadChips
Equipment Needed1. Place the following items on the bench:
1 staining rack
3 vacuum desiccators (1 per 8 BeadChips)
3 tube racks (1 per 8 BeadChips)
Self-locking tweezers
Large Kimwipes
Vacuum hose
2. Set up two top-loading wash dishes, labeled as shown in Figure 172.
3. To indicate the fill volume before filling wash dishes with PB1 and XC4,
pour 285 ml water into the wash dishes and mark the water level on the
side. Empty the water from the wash dish. This enables you to pour
reagent directly from the PB1 and XC4 bottles into the wash dishes,
minimizing contaminant transfer from labware to wash dishes.
Figure 172 PB1 and XC4 Wash Dishes with Staining Rack
4. Pour 285 ml PB1 into the wash dish labeled “PB1.”
Staining Rack
Wash Dishes
Catalog # WG-901-3002
Part # 11311007 Rev A
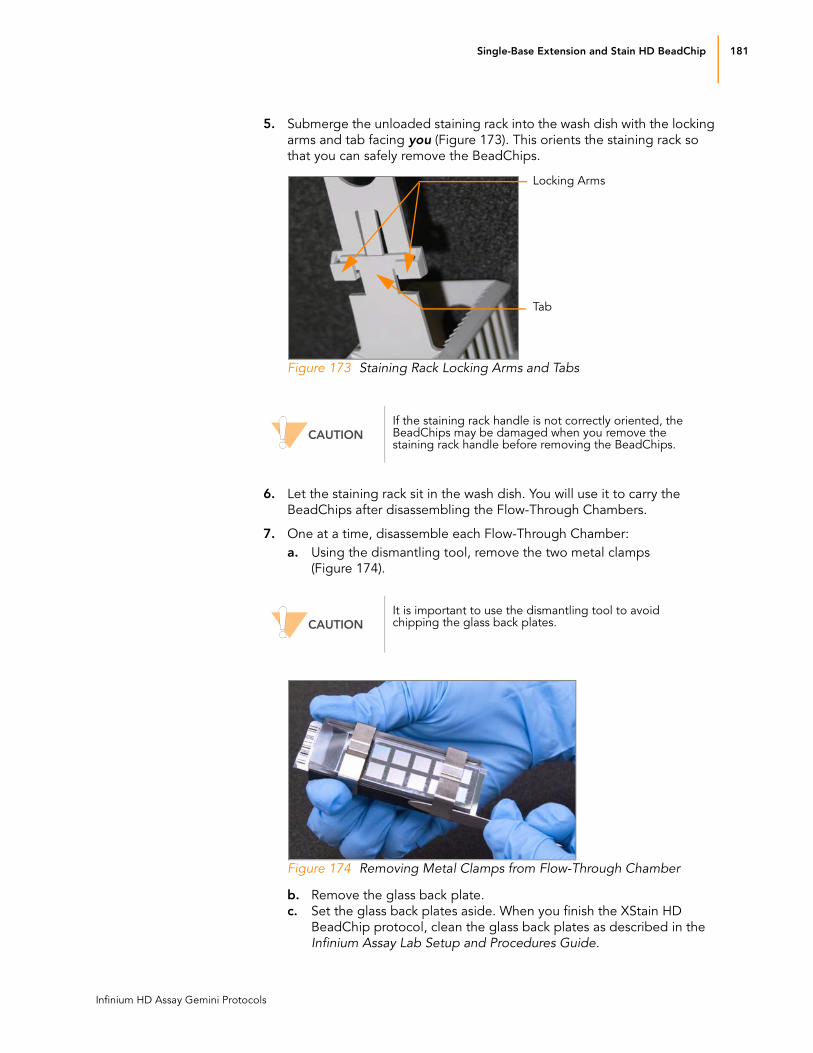
Single-Base Extension and Stain HD BeadChip 181
5. Submerge the unloaded staining rack into the wash dish with the locking
arms and tab facing you (Figure 173). This orients the staining rack so
that you can safely remove the BeadChips.
Figure 173 Staining Rack Locking Arms and Tabs
6. Let the staining rack sit in the wash dish. You will use it to carry the
BeadChips after disassembling the Flow-Through Chambers.
7. One at a time, disassemble each Flow-Through Chamber:
a. Using the dismantling tool, remove the two metal clamps (Figure 174).
Figure 174 Removing Metal Clamps from Flow-Through Chamber
b. Remove the glass back plate.
c. Set the glass back plates aside. When you finish the XStain HD
BeadChip protocol, clean the glass back plates as described in the
Infinium Assay Lab Setup and Procedures Guide.
CAUTIONIf the staining rack handle is not correctly oriented, the BeadChips may be damaged when you remove the staining rack handle before removing the BeadChips.
CAUTIONIt is important to use the dismantling tool to avoid chipping the glass back plates.
Locking Arms
Tab
Infinium HD Assay Gemini Protocols

182 CHAPTER 3
Infinium HD Assay Gemini Automated Protocol
d. Remove the spacer.
e. Remove the BeadChip.
8. Place BeadChips in the staining rack while it is submerged in PB1. Place
12 BeadChips above the handle and 12 below. The BeadChip barcodes
should face away from you, while the locking arms and tab face towards you.
If necessary, briefly lift the staining rack out of the wash dish to seat the BeadChip. Replace it immediately after inserting the BeadChip.
9. Ensure that the BeadChips are completely submerged.
10. Move the staining rack up and down 10 times, breaking the surface of
the PB1 (Figure 175).
11. Allow the BeadChips to soak for an additional 5 minutes.
Figure 175 Washing BeadChips in PB1
CAUTIONDo not touch the face of the BeadChips. Handle them by the barcode end or by the edges.
CAUTIONDo not allow the BeadChips to dry. Submerge each BeadChip in the wash dish as soon as possible.
NOTE
If the top edges of the BeadChips begin to touch during either PB1 or XC4 washes, gently move the staining rack back and forth to separate the slides. It is important for the solution to circulate freely between all BeadChips.
Catalog # WG-901-3002
Part # 11311007 Rev A

Single-Base Extension and Stain HD BeadChip 183
12. Pour 285 ml XC4 into the dish labeled “XC4,” and cover the dish to
prevent any lint or dust from falling into the solution. Place the bottle
with excess XC4 in a readily available location for topping off the “XC4”
wash dish during the coating procedure.
13. Remove the staining rack from the dish containing PB1 and place it
directly into the wash dish containing XC4 (Figure 176). The barcode
labels on the BeadChips must face away from you, while the locking arms
on the handle face towards you, for proper handling and coating.
14. Move the staining rack up and down 10 times, breaking the surface of
the XC4.
Figure 176 Moving BeadChips from PB1 to XC4
15. Allow the BeadChips to soak for an additional 5 minutes.
NOTEDo not leave the BeadChips submerged in PB1 for longer than 30 minutes.
NOTEUse the XC4 within 10 minutes after filling the wash dish.
NOTE
If the top edges of the BeadChips begin to touch during either PB1 or XC4 washes, gently move the staining rack back and forth to separate the slides. It is important for the solution to circulate freely between all BeadChips.
Infinium HD Assay Gemini Protocols

184 CHAPTER 3
Infinium HD Assay Gemini Automated Protocol
16. Prepare a clean tube rack for the staining rack by placing two folded
Kimwipes under the tube rack.
17. Prepare one additional tube rack per 8 BeadChips (Illumina-provided
from VWR catalog # 60916-748) that fits the internal dimensions of the
vacuum desiccator.
18. Remove the staining rack in one smooth, rapid motion and place it
directly on the prepared tube rack, making sure the barcodes face up
and the locking arms and tab face down (Figure 178).
Figure 177 Staining Rack in Correct Orientation
19. To ensure uniform coating, place the staining rack on the center of the
tube rack, avoiding the raised edges.
CAUTIONUse XC4 only once. To process subsequent BeadChips, use a new, clean wash dish with fresh XC4.
Catalog # WG-901-3002
Part # 11311007 Rev A

Single-Base Extension and Stain HD BeadChip 185
Figure 178 Moving BeadChip Carrier from XC4 to Tube Rack
20. For the first eight BeadChips, working top to bottom:
a. Continuing to hold the staining rack handle, carefully grip each
BeadChip at its barcode end with self-locking tweezers.
b. Put the eight BeadChips on the tube rack as shown in Figure 179,
with six BeadChips on top of the rack and two BeadChips on the
bottom. The barcode ends should be towards you, and the
BeadChips should be completely horizontal.
Figure 179 Placing BeadChips on Tube Rack
NOTEThe XC4 coat is slippery and makes the BeadChips difficult to hold. The self-locking tweezers grip the BeadChip firmly and help prevent damage.
CAUTIONTo prevent wicking and uneven drying, do not allow the BeadChips to rest on the edge of the tube rack or to touch each other while drying.
Infinium HD Assay Gemini Protocols

186 CHAPTER 3
Infinium HD Assay Gemini Automated Protocol
21. Return the staining rack to the XC4 wash dish and top off the dish until
the BeadChips are completely covered with remaining XC4 reagent.
22. Soak the BeadChips for 10 seconds.
23. Dry the first 8 BeadChips:
a. Place the tube rack with the first 8 BeadChips (Figure 179) into the
desiccator. Check the vacuum pressure and make sure that the valve
is securely attached.
b. Start the vacuum, using at least 508 mm Hg (0.68 bar).
c. To ensure that the dessicator is properly sealed, gently lift the lid of
the vacuum desiccator. It should not lift off the desiccator base.
d. Dry under vacuum for 50–55 minutes.
Drying times may vary according to room temperature and humidity.
24. Remove the staining rack with the remaining BeadChips in one rapid
motion from the XC4 wash dish and place it directly on the tube rack.
Ensure that the BeadChips are horizontal with the barcodes facing up.
Figure 180 Moving BeadChip Carrier from XC4 to Tube Rack
25. Remove the four BeadChips that remain above the staining rack handle
and place them on the tube rack.
26. Holding the top of the staining rack in position, grasp the handle
between your thumb and forefinger. Push the tab up with your thumb
and push the handle away from you to unlock it. Pull up the handle and
remove (Figure 181).
Catalog # WG-901-3002
Part # 11311007 Rev A

Single-Base Extension and Stain HD BeadChip 187
Figure 181 Removing Staining Rack Handle
27. Place BeadChips on the tube rack as shown in Figure 179 until there are
six BeadChips on top of the rack and two BeadChips on the bottom. The
barcode ends should be towards you, and the BeadChips should be
completely horizontal.
28. Return the staining rack with the last 8 BeadChips to the XC4 wash dish
and top off the wash dish until BeadChips are completely covered with
remaining XC4 reagent.
29. Soak BeadChips for 10 seconds.
30. Dry the second set of 8 BeadChips:
a. Place the tube rack with the second set of 8 BeadChips (Figure 179)
into the desiccator. Check the vacuum pressure and make sure that
the valve is securely attached.
b. Start the vacuum, using at least 508 mm Hg (0.68 bar).
c. To ensure that the dessicator is properly sealed, gently lift the lid of
the vacuum desiccator. It should not lift off the desiccator base.
d. Dry under vacuum for 50–55 minutes.
31. Remove staining rack with the remaining 8 BeadChips in one rapid
motion from the XC4 wash dish and place it directly on tube rack. Ensure
that the BeadChips are horizontal with the barcodes facing up.
32. Place BeadChips on the tube rack as shown in Figure 179 until there are
six BeadChips on top of the rack and two BeadChips on the bottom. The
barcode ends should be towards you, and the BeadChips should be
completely horizontal.
Tab
Handle
Infinium HD Assay Gemini Protocols

188 CHAPTER 3
Infinium HD Assay Gemini Automated Protocol
33. Place the tube rack with the third set of 8 BeadChips (Figure 179) into
the desiccator. Check the vacuum pressure and make sure that the valve
is securely attached.
34. Start the vacuum, using at least 508 mm Hg (0.68 bar).
35. To ensure that the dessicator is properly sealed, gently lift the lid of the
vacuum desiccator. It should not lift off the desiccator base.
Figure 182 Testing Vacuum Seal
36. Dry under vacuum for 50–55 minutes.
37. Release the vacuum by turning the handle very slowly.
38. Store the desiccator with the red valve plug in the desiccator’s three-way
valve to stop accumulation of dust and lint within the valve port. Remove
the red plug from the three-way valve before applying vacuum pressure.
39. Touch the borders of the chips (do not touch the stripes) to ensure that
the etched, bar-coded side of the BeadChips are dry to the touch.
40. If the underside feels tacky, manually clean the underside of the
BeadChip to remove any excess XC4. The bottom two BeadChips are
the most likely to have some excess.
a. Hold the BeadChip at a downward angle to prevent excess EtOH
from dripping from the wipe onto the stripes.
b. Wrap a pre-saturated Prostat EtOH Wipe around your index finger.
WARNING
Air should enter the desiccator very slowly to avoid disturbing the contents. Improper use of the vacuum desiccator can result in damage to the BeadChips. This is especially true if you remove the valve plug while a vacuum is applied. For detailed vacuum desiccator instructions, see the documentation included with the desiccator.
Catalog # WG-901-3002
Part # 11311007 Rev A

Single-Base Extension and Stain HD BeadChip 189
c. Wipe along the underside of the BeadChip five or six times, until the
surface is clean and smooth.
41. If you are using Infinium LIMS:
a. In the Infinium LIMS left sidebar, click Infinium HD Gemini | Coat BeadChip.
• Scan the reagent barcodes and BeadChip barcodes and click Save.
Infinium LIMS records the data and queues the BeadChips for the
next step, Image BeadChip on the iScan System on page 190 or
Image BeadChip on the BeadArray Reader on page 198.
42. Clean the glass back plates. For instructions, see the Infinium Assay Lab Setup and Procedures Guide.
43. Clean the Hyb Chambers:
a. Remove the rubber gaskets from the Hyb Chambers.
b. Rinse all Hyb Chamber components with DI water.
c. Thoroughly rinse the humidifying buffer reservoirs.
44. Discard unused reagents in accordance with facility standards.
45. Do one of the following:
• Proceed to Image BeadChip on the iScan System on page 190 or
Image BeadChip on the BeadArray Reader on page 198.
• Store the BeadChips in the Illumina BeadChip Slide Storage Box
inside a vacuum desiccator at room temperature. Image the
BeadChips within 72 hours.
CAUTIONDo not touch the stripes.
Infinium HD Assay Gemini Protocols

190 CHAPTER 3
Infinium HD Assay Gemini Automated Protocol
Image BeadChip on the iScan System
The iScan Reader uses a laser to excite the fluor of the single-base extension product on the beads of the BeadChip sections. Light emissions from these fluors are then recorded in high-resolution images of the BeadChip sections. Data from these images are analyzed using Illumina’s GenomeStudio Genotyping Module.
Estimated Time Scanning: 35 minutes per BeadChip
Preparation On the lab tracking form, record the following for each BeadChip:
• Scanner ID
• Scan date
For more information about the iScan System, GenomeScan software, or
AutoLoader2, see the iScan and AutoLoader2 System Guide.
Steps OverviewThe GenomeScan software leads you through the BeadChip scanning process, which is as follows:
1. Turn on the iScan Reader, boot up the iScan PC, and start the
GenomeScan application.
2. Load the BeadChips to be scanned, and copy their decode data into the
Input Path.
3. Check the scan settings and input/output paths, making modifications if
necessary.
4. If you wish, remove BeadChip sections or entire BeadChips from the
scan.
5. Start the scan and monitor its progress.
6. Review the scan metrics.
NOTE
To record information about your assay such as operator information, start and stop times, and barcodes, use the lab tracking form provided on your documentation CD. This form can be filled out and saved online, or printed and filled in by hand.
CAUTION
Turn on the iScan Reader before launching the GenomeScan software. If the software is launched when the instrument is turned off, an error message will alert you that the hardware is missing.
Catalog # WG-901-3002
Part # 11311007 Rev A

Image BeadChip on the iScan System 191
Starting Up the iScan System1. Turn on the iScan Reader and the attached PC.
2. Let the iScan Reader warm up for at least 5 minutes before beginning a
scan. It is fine to use the GenomeScan software during this time.
3. For each BeadChip you plan to scan, copy the contents of the mini-CD
provided with the BeadChip into the Decode folder. The folder name
should be the BeadChip barcode (for example, 4264011131).
If there is no decode folder, follow the instructions in Setting Up Input and Output Paths on page 195.
4. Double-click the GenomeScan icon on the desktop.
The Welcome window appears (Figure 183). The GenomeScan software automatically connects to the iScan Reader and initializes it. When the reader is initialized, the red dot in the status bar turns green, and the sta-tus changes to Initialized.
Figure 183 Initialize iScan Reader
5. Set the LIMS dropdown list to None and enter your Windows user name
(Figure 184).
Infinium HD Assay Gemini Protocols

192 CHAPTER 3
Infinium HD Assay Gemini Automated Protocol
Figure 184 Welcome Window
6. Click Start.
The iScan Reader tray opens.
Loading BeadChips and Starting the Scan1. Load the BeadChips into their carrier and place the carrier into the iScan
Reader tray. Click Next.
The tray closes and the iScan Reader begins scanning the barcodes (Figure 185).
Catalog # WG-901-3002
Part # 11311007 Rev A

Image BeadChip on the iScan System 193
Figure 185 Scan BeadChip Barcodes
When the iScan Reader has read all of the barcodes, the Setup window displays the barcode, description, and scan setting for each BeadChip in the position corresponding to its location in the tray. You can click any barcode to view an image of the corresponding BeadChip.
For more information about the scan settings, see the iScan and AutoLoader2 System Guide.
2. If you do not want to scan certain sections of a BeadChip, click the
barcode to display an image of the corresponding BeadChip in the
Setup window. Click any BeadChip section to remove it from the scan
(Figure 186). The section will no longer be highlighted blue.
Infinium HD Assay Gemini Protocols

194 CHAPTER 3
Infinium HD Assay Gemini Automated Protocol
Figure 186 Deselect BeadChip Sections
3. If you want to remove an entire BeadChip from the scan, delete the
barcode from the Setup window.
4. To begin scanning the BeadChips, click Scan.
Scanning should take 8–10 minutes per BeadChip.
As the scan progresses, status icons and messages are displayed in the bottom left corner of window. For more information about what happens during the scan, see During the Scan on page 196.
5. At the end of the scan, a Review window appears (Figure 187). The Scan
Metrics table at the top shows the intensity values, registration, and focus
metrics for each stripe on the BeadChip.
Sections that will not be scanned
Catalog # WG-901-3002
Part # 11311007 Rev A
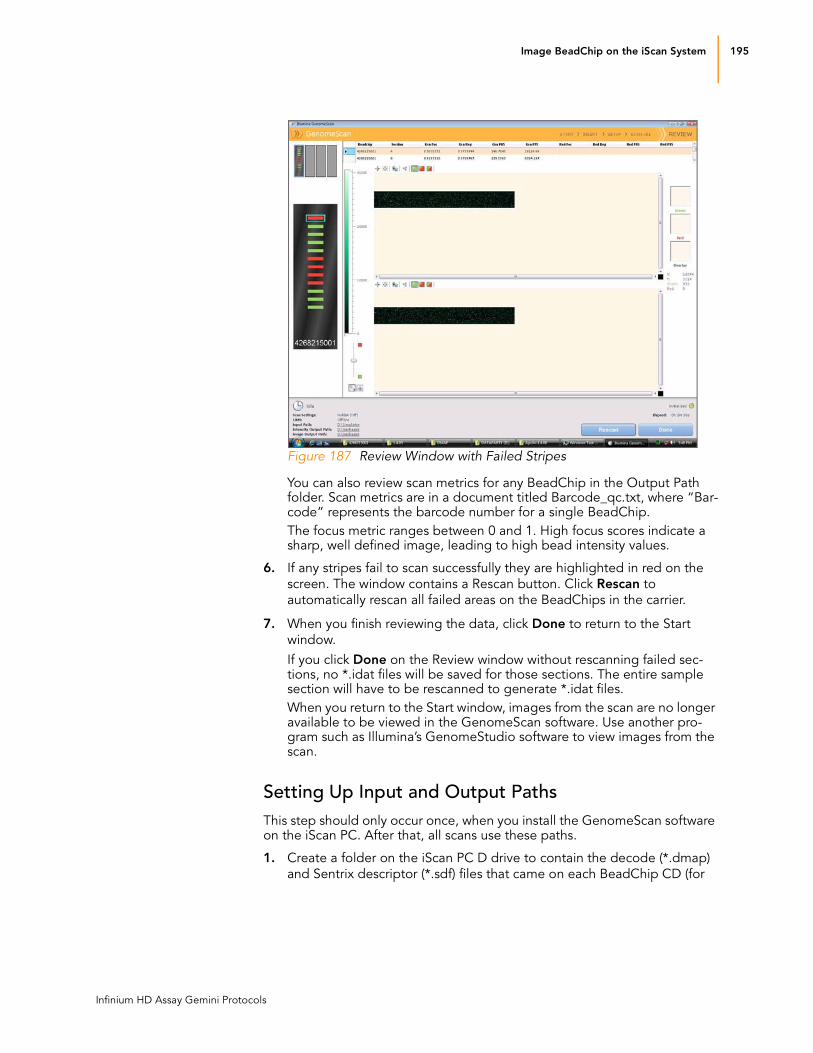
Image BeadChip on the iScan System 195
Figure 187 Review Window with Failed Stripes
You can also review scan metrics for any BeadChip in the Output Path folder. Scan metrics are in a document titled Barcode_qc.txt, where “Bar-code” represents the barcode number for a single BeadChip.
The focus metric ranges between 0 and 1. High focus scores indicate a sharp, well defined image, leading to high bead intensity values.
6. If any stripes fail to scan successfully they are highlighted in red on the
screen. The window contains a Rescan button. Click Rescan to
automatically rescan all failed areas on the BeadChips in the carrier.
7. When you finish reviewing the data, click Done to return to the Start
window.
If you click Done on the Review window without rescanning failed sec-tions, no *.idat files will be saved for those sections. The entire sample section will have to be rescanned to generate *.idat files.
When you return to the Start window, images from the scan are no longer available to be viewed in the GenomeScan software. Use another pro-gram such as Illumina’s GenomeStudio software to view images from the scan.
Setting Up Input and Output PathsThis step should only occur once, when you install the GenomeScan software on the iScan PC. After that, all scans use these paths.
1. Create a folder on the iScan PC D drive to contain the decode (*.dmap)
and Sentrix descriptor (*.sdf) files that came on each BeadChip CD (for
Infinium HD Assay Gemini Protocols

196 CHAPTER 3
Infinium HD Assay Gemini Automated Protocol
example, D:\Decode). The GenomeScan software refers to this folder as
the Input Path.
2. Create another folder on the iScan PC D_drive where you want
GenomeScan to store the image data from the scan (for example,
D:\ImageData).
During the scan, GenomeScan automatically creates subfolders named with each BeadChip’s barcode number. The folder will be populated with image files (*.jpg or *.tif), scan metrics (*.txt), and intensity data files (*.idat) for each BeadChip. If the images are in *.tif format, the output path will also contain bead location files (*.locs).
During the Scan
Calibration
The iScan System begins with a calibration step, which may take several minutes to complete. The BeadChips are automatically tilted and aligned to ensure that they are in the optimal position for the scan.
Tilt—The iScan Reader autofocus feature records the Z-position (height)
of three corners of the BeadChip to determine its current tilt, and then
adjusts the BeadChip until it is flat.
Align—The iScan Reader identifies the X-Y position (lateral location) of
the fiducials (focus points) on the BeadChip edges, and then adjusts the
optics.
If there are defective or dirty sections at any of the three alignment corners, the software attempts to use alternate sections until satisfactory calibration is achieved. If no alternate sections are available, calibration fails and an error message is displayed.
Hard Drive Space
Before beginning a scan, the GenomeScan software checks the hard drive to ensure sufficient space is available. If sufficient disk space is not available, an error message is displayed, and the arrays will not be scanned.
Monitoring the Scan
After calibration, the iScan Reader begins scanning. You can view the progress of the scan in the Scan window (Figure 188).
Catalog # WG-901-3002
Part # 11311007 Rev A

Image BeadChip on the iScan System 197
Figure 188 Monitor the Scan
Status and Controls
As each BeadChip section is scanned its status is indicated by a status color:
Light Blue—Section has not yet been scanned.
Orange—Section is in the process of being scanned or registered.
Green—Scan and registration of section was successful.
Red—Scan and registration of section failed.
While a scan is in progress, you can click the Pause or Cancel buttons to pause or stop the scan at any time. If you pause, the button changes to Resume. Click Resume to start scanning the next unscanned section.
Registration and Intensities
After images are scanned, they are registered and intensities are extracted for every bead type. Registration identifies beads by correlating their locations on the scanned image with information in the bead map (*.dmap) file. Registration and extraction are critical to obtaining results from your experiments.
Intensity extraction is the process by which intensity values are determined for every bead on the image. Statistics are generated for every bead type based on the intensities of the replicate beads for that type. Extracted information is saved in intensity data (*.idat) files. These files are saved on the iScan Reader hard drive or network under the Array ID (barcode identifier), in the Output Path folder. Intensity data (*.idat) files are only created for sections that have 100% of their stripes register successfully. These files are not created when scanning individual stripes within a sample section on a BeadChip.
Infinium HD Assay Gemini Protocols
198 CHAPTER 3
Infinium HD Assay Gemini Automated Protocol
Image BeadChip on the BeadArray Reader
The Illumina BeadArray Reader uses a laser to excite the fluor of the hybridized single-stranded product on the beads of the BeadChip sections. Light emissions from these fluors are then recorded in high-resolution images of the BeadChip sections. Data from these images are analyzed using Illumina’s GenomeStudio Genotyping Module.
Estimated Time 1–2 hours warmup for the BeadArray Reader (first use of the day only)
45 minutes to scan each BeadChip using BeadScan 3.2 FastScan settings
Preparation If this is the first time the BeadArray Reader is being used today, follow
the steps described in this section.
On the lab tracking form, record the following for each BeadChip:
• Scanner ID
• Scan date
Initializing the BeadArray
Reader (Daily)
If this is the first time the scanner is being used today, follow these steps.
Refer to Figure 189 throughout this protocol.
NOTE
To record information about your assay such as operator information, start and stop times, and barcodes, use the lab tracking form provided on your documentation CD. This form can be filled out and saved online, or printed and filled in by hand.
Catalog # WG-901-3002
Part # 11311007 Rev A

Image BeadChip on the BeadArray Reader 199
Figure 189 Illumina BeadArray Reader
1. Locate the power switch on the lower-left side of the BeadArray Reader
back panel and turn it to the ON position.
2. Wait for the ready indicator to stop flashing.
3. Open the BeadScan software.
4. Log in and click Scan (Figure 190).
Scanning indicators
Top button closes tray
Bottom button opens tray
Attention (attn!) indicator
Loaded indicator
Ready indicator
Power indicator
Tray in closed position
Table 16 Illumina BeadArray Reader Indicators
Indicator Description
Scanning (seven lights) Flash blue in sequence when the BeadArray Reader is scanning.
Attention Turns solid amber to indicate a hardware problem. Check the BeadArray Reader PC for an error message. You may need to cycle the power on the BeadArray Reader.
Loaded Not currently used.
Ready Flashes green during startup. Turns solid green when the BeadArray Reader is ready for use and when it is busy.
Power Turns solid green when the BeadArray Reader is on.
Infinium HD Assay Gemini Protocols

200 CHAPTER 3
Infinium HD Assay Gemini Automated Protocol
Figure 190 BeadScan Welcome Screen
Imaging BeadChip
When the BeadArray Reader is initialized, follow these steps to perform the scanning process.
1. From the Docking Fixture listbox, select BeadChip (Figure 191).
Figure 191 Select BeadChip Docking Fixture
2. Check the Data Repository path and the Decode Map path in the
Settings area.
• The Data Repository path indicates where the BeadArray Reader
stores the images created during the scan. The default path is
C:\ImageData.
• The Decode Map path points to the location where you will copy
the files from the BeadChip CD. The default path is C:\DecodeData.
3. If either path is not correct:
a. Click Edit to open the Options dialog box.
Catalog # WG-901-3002
Part # 11311007 Rev A

Image BeadChip on the BeadArray Reader 201
Figure 192 Enter Data Repository and Decode Data Paths
b. Click Browse to navigate to and select the Data Repository path and
the Decode Map path.
c. Select or clear the Save Compressed Images check box.
Compressed images use the JPG format. Uncompressed images use
the TIFF format and may be 75 MB or more.
d. After changing settings, click either Save for this Scan or
Save for All Scans.
4. Copy the decode map (*.dmap) files for each BeadChip from the
BeadChip CD to the Decode Map path directory.
5. For each BeadChip:
a. Place the BeadChip into the BeadArray Reader tray.
b. Using the hand-held barcode scanner, scan the BeadChip barcode.
The barcode appears on the screen in the position corresponding to
the BeadChip position in the tray.
c. If either the Sentrix Type or Scan Settings are not correct, click
Browse (...) to open the Select Scan Settings dialog box.
d. Select the appropriate scan method and click Select.
6. Make sure that the BeadChips are properly seated in the BeadArray
Reader tray (Figure 193).
Figure 193 Place BeadChips into Illumina BeadArray Reader Tray
Infinium HD Assay Gemini Protocols

202 CHAPTER 3
Infinium HD Assay Gemini Automated Protocol
7. Click Scan.
Scanning ProcessBeadScan begins the BeadArray Reader Tilt and Align processes (Figure 195):
• Tilt—The BeadArray Reader Autofocus feature records the
Z-position (height) of three corners of the BeadChip to determine its
current tilt, and then adjusts the BeadChip until it is flat.
Figure 194 BeadArray Reader Tile Process
• Align—The BeadArray Reader identifies the X-Y position (lateral
location) of the fiducials (focus points) on the BeadChip edges, and
then adjusts the optics.
First Corner
Status Bar Describes Activity and Status
Autofocus Laser
Catalog # WG-901-3002
Part # 11311007 Rev A

Image BeadChip on the BeadArray Reader 203
Figure 195 BeadArray Reader Tilt & Align Processes
Once the Tilt and Align processes are complete, the Scan process begins (Figure 196). Hover over any of the green dots in the closeup image to
see the relative intensity and the XY position.1 The red value should be at or close to zero, because this is a one-color assay.
Fiducial
Status Bar Describes Activity and Status
“+” Indicates that Fiducial was Successfully Located
1. The 0/0 position is at the upper left corner of the BeadChip, with X increasing right-
wards and Y increasing downwards.
Infinium HD Assay Gemini Protocols

204 CHAPTER 3
Infinium HD Assay Gemini Automated Protocol
Figure 196 BeadArray Reader Scan Process
As the BeadArray Reader scans, the front panel blue Scanning indicator lights flash in sequence (see Figure 10 on page 25).
When the BeadArray Reader finishes scanning, a green message screen appears if the scan was successful, or a red message if it completed with any warnings. These screens are designed to be visible from across the lab.
Figure 197 Scan Completed and Scan Completed with Warnings Screens
If Scan is Successful1. Click OK on the Scan Completed message to view the next screen.
2. Click Done in the Review pane.
Section Already Scanned (Outlined in Green)
Section Being Scanned (Whole BeadChip)
Section Being Scanned (Closeup)
Intensity Data for Spot Underneath Mouse Pointer
Extraction Results Summary
Section Being Scanned (Outlined in Red)
Catalog # WG-901-3002
Part # 11311007 Rev A

Image BeadChip on the BeadArray Reader 205
3. When the application returns to the Welcome screen, click Open Tray.
The BeadArray Reader tray, loaded with the scanned BeadChips, will
eject.
4. Remove the BeadChips from the tray.
5. Do one of the following:
If you have more BeadChips to scan, repeat the scanning process.
If this is the last use of the day:
a. Wipe the BeadArray Reader tray with a lint-free, absorbent towel.
Pay particular attention to the tray edges where reagent may have
wicked out.
b. Close the tray.
c. Turn the power switch at the back of the scanner to the OFF position.
d. Shut down the BeadArray Reader BeadScan software. To exit,
right-click near the Illumina logo and click Exit (Figure 198).
Figure 198 Exit the BeadArray Reader Software
If Scan is not SuccessfulRe-scan the array. For more information, refer to the Illumina BeadArray Reader User Guide.
If the scanner was unable to locate the alignment fiducials (focus points), you may need to clean the edges of the BeadChip before re-scanning.
Infinium HD Assay Gemini Protocols

206 CHAPTER 3
Infinium HD Assay Gemini Automated Protocol
Clean BeadChip Edges
1. To clean the BeadChips, wrap a Prostat EtOH presaturated wipe around
your index finger. Place the wipe against the edge of BeadChip, no
further than 2 mm from the edge of the slide (Figure 199 inset).
Figure 199 Wiping Edges of BeadChip
2. Wipe along the edge of each BeadChip five or six times (Figure 199),
until the surface is clean and smooth and no streaks are visible.
To completely remove the coating along the edges and back of Bead-Chip, you may need to use a different part of the ProStat EtOH wipe.
GenomeStudio Integrated Informatics Platform
The GenomeStudio Genotyping Module, included with your Illumina Infinium Assay system, is an application for extracting genotyping data from intensity data files (*.idat files) collected from systems such as the Illumina iScan System or BeadArray Reader.
For feature descriptions and instructions on using the GenomeStudio platform to visualize and analyze genotyping data, see the GenomeStudio Framework User Guide and the GenomeStudio Genotyping Module User Guide.
CAUTIONThe wipe should not pass over the etched stripes on the BeadChip.
CAUTIONAny remaining visible streaks may lead to alignment errors.
Etched Stripes
Catalog # WG-901-3002
Part # 11311007 Rev A

Index
Numerics0.1N NaOH 27, 106, 113
1% aqueous Alconox 136
100% 2-propanol 34, 125
1X TE 18
1X TE (10 mM Tris-HCl pH8.0, 1 mM
EDTA (TE)) 97
95% formamide/1 mM EDTA 60, 164
Aaccessioned BeadChips 142
Alconox Powder Detergent 60, 164
align BeadArray Reader 86, 202
alignment errors 90, 206
AMM 27, 106, 113
amplification
contamination, general precautions 3
make AMP2 plate (automated pro-
tocol) 106
multiple plates 113
amplified DNA. See DNA
Amplify DNA 4array ID 81, 197
arrays 8ATM 60, 164
AutoLoader2 11
Bbarcode_qc.txt file 79, 195
barcodes
scan BeadChips 85, 201
bead location files (*.locs) 79, 195
BeadArray Reader 11
align 86, 202
image of 82, 198
initialize 82, 198
successful scan 88, 204
tilt 86, 202
unsuccessful scan 89, 205
warmup time 82, 198
BeadChips
accessioned 142
barcodes 85, 201
clean underside 72
confirm for Hyb 142
decode map path 79, 195
description 8dry (automated protocol, 4 Bead-
Chips) 180
dry (automated protocol, 24 Bead-
Chips) 186
dry (manual protocol) 72
handling 67
hybridize (automated protocol) 136
hybridize (manual protocol) 39
image 3image of scanning in progress 88,
204
load (manual protocol) 44
remove from scan 78, 194
remove sections from scan 77, 193
uneven drying, prevent 71
wash 152
wash and coat 4 BeadChips (auto-
mated protocol) 173
wash and coat 8 BeadChips (manual
protocol) 65
wash and coat 24 BeadChips (auto-
mated protocol) 180
wicking, prevent 71
XStain (automated protocol) 163
XStain (manual protocol) 59
BeadScan 3.2 FastScan 82, 198
Ccalibrate
iScan System 80, 196
cancel scan 81, 197
centrifuge, balancing 35
Chamber Rack
calibrate 62, 166
set up (automated protocol) 164
set up (manual protocol) 60
coating, verify reagents and BeadChips 171
compressed images 85, 201
contamination
amplification 3
Infinium HD Assay Gemini Protocols 207
208 Index
customer support 12
Ddata analysis 11, 90, 206
data repository path 85, 201
decode map files (*.dmap) 79, 195
decode map path 79, 85, 195, 201
differential analysis 11, 90, 206
dismantling tool 66
DNA
amplify 106
distribute in WG#-AMP2 wells 32
track 8WG#-AMP2 plate, distributing to 29
documentation 12
dry BeadChips
automated protocol, 4 BeadChips 180
automated protocol, 24 BeadChips 186
manual protocol 72
drying, uneven 71
Eend-point fragmentation 31
equipment
automated protocol 94
EtOH 60, 164
experienced user cards 8Extend and Stain (XStain) BeadChip 7
Ffailed stripes 79, 195
fiducials 86, 202
Flow-Through Chambers
assemble (automated protocol) 54
disassemble (automated protocol) 174
disassemble (manual protocol) 66
single-base extension 63
stain 64
focus score 79, 195
formamide warning 37
fragment amplified DNA
automated protocol 121
manual protocol 31
Fragment DNA 5FRG 31, 121
Ggene analysis 11, 90, 206
GenomeStudio 3, 11, 90, 206
GenomeStudio integrated informatics
platform 11, 90, 206
Hhard drive space 80, 196
help, technical 12
http
//www.illumina.com/documenta-
tion 12
Hyb. See hybridize BeadChips
hybridize BeadChips
automated protocol 136
load (manual protocol) 44
manual protocol 39
Hybridize to BeadChip 6
IImage BeadChip 7image BeadChips
compressed images 85, 201
image of scanning in progress 88, 204
successful scan 88, 204
unsuccessful scan 89, 205
image files
data repository folder 79, 195
incubate amplified DNA
automated protocol 119
manual protocol 30
Incubate DNA 4Infinium Assay automated workflow 92
Infinium Assay manual workflow 14
Infinium LIMS
coating, verify reagents and Bead-
Chips 171
Hyb, confirm BeadChips and AMP2 142
spin AMP2 126
user guide 92
initialize BeadArray Reader 82, 198
input path 79, 195
intensity 81, 197
intensity data files (*.idat) 79, 81, 195, 197
iScan System 11
calibrate 80, 196
initialize 75, 191
status and software controls 81, 197
warmup time 75, 191
JJPG images, compressed 85, 201
Catalog # WG-901-3002
Part # 11311007 Rev A

Index 209
LLab Setup and Procedures guide 3Lambda DNA 18, 97
LIMS 75, 191
load BeadChips
manual protocol 44
location files (*.locs) 79, 195
Mmake AMP2
automated protocol 106
make multiple AMP2 113
material safety data sheet (MSDS) 12
materials
automated protocol 95
manual protocol 16
MP1 27, 106, 113
Ooutput path 79, 195
PPA1 34, 125
pause scan 81, 197
PB1 50, 60, 152, 164
PB2 39, 136
PicoGreen dsDNA quantitation reagent 18, 97
plates
AMP2 (automated protocol) 106
multiple AMP2 113
precipitate amplified DNA
automated protocol 125
manual protocol 34
Precipitate DNA 5protocols
experienced user cards 8
Qquantitate RNA 18, 97
RRA1 37, 59, 132, 163
reagents
automated protocol 95
manual protocol 16
registration 81, 197
resuspend amplified DNA
automated protocol 132
Resuspend DNA 5Review window 79, 195
RiboGreen RNA quantitation kit 18, 97
RNA
ribosomal RNA 18, 97
robot
fragment AMP2 setup 122
hybridization setup 142
instructions for use 3make AMP2 setup 108
precip AMP2 setup 126
resuspend AMP2 setup 133
XStain BC2 setup 168
Robot BeadChip alignment fixture 142
Ssafety precautions 3Sample QRNA plate 18, 97
sample sheet 8samples. See DNA
scan metrics 78, 79, 194, 195
scanner. See BeadArray Reader
sections, BeadChip, remove from scan 77, 193
self-locking tweezers 70
Sentrix descriptor files (*.sdf) 79, 195
spin AMP2, verify plate 126
staining rack
remove safely 71
Standard QRNA plate 18, 97
statistics 81, 197
STM 59, 164
stripes, failed 79, 195
TTecan GenePaint 10
Tecan robot 10
technical assistance 12
TEM 59, 163
TIFF images, uncompressed 85, 201
tilt and align process 80, 196
tilt BeadArray Reader 86, 202
track sample DNA 8troubleshooting 3tweezers, self-locking 70
Vvacuum desiccator
automated protocol, 4 BeadChips 180
automated protocol, 24 BeadChips 186
manual protocol 72
WWash BeadChip 6
Infinium HD Assay Gemini Protocols

210 Index
wash BeadChips 152
4 BeadChips (automated protocol) 173
8 BeadChips (manual protocol) 65
24 BeadChips (automated protocol) 180
BeadChips, verify in Infinium LIMS 153
clean underside 72
reagents, verify in Infinium LIMS 153
self-locking tweezers 70
water circulator 60
WG#-AMP2 plate
distribute DNA 32
fragment (automated protocol) 121
fragment (manual protocol) 31
incubate (automated protocol) 119
incubate (manual protocol) 30
make (automated protocol) 106
precipitate 34, 125
resuspend (automated protocol) 132
wicking 71
XXC1 59, 163
XC2 59, 163
XC3 59, 164
XC4 60, 164
XStain BeadChip 7XStain BeadChips
automated protocol 163
manual protocol 59
single-base extension 63
stain 64
Catalog # WG-901-3002
Part # 11311007 Rev A


Illumina, Inc.
9885 Towne Centre Drive
San Diego, CA 92121-1975
+1.800.809.ILMN (4566)
+1.858.202.4566 (outside North America)
www.illumina.com