inferno 24 reference manual - miva merchantamberdi.mivamerchant.net/pdf/inf-24 reference manual...
TRANSCRIPT

EFF
EC
TIV
E 2
006
/06
INF-
24 R
EF-
MA
NL
CUSTOMER SERVICE 1-800 38 ROTIS
1HARDT EQUIPMENT MANUFACTURING INC. 2025 52 AVE., LACHINE (MONTREAL), QUEBEC, CANADA H8T 3C3 TEL. (514) 631-7271 FAX (514) 631-7273
INFERNO 24REFERENCE
MANUAL


INTRODUCTIONABOUT THIS MANUAL 4CUSTOMER SERVICE PROGRAM 5WARRANTY CONDITIONS 6UL LISTING AND SAFETY WARNING 7
SPECIFICATIONSINFERNO 24 8LOCATION OF COMPONENTS AND CONNECTIONS 9
DELIVERY INFORMATIONPRE-SHIPPING SPECIFICATIONS 10INVENTORY CHECKLIST 11
INSTALLATION INFORMATIONORDER OF INSTALLATION 12VENTING INFORMATION 12POSITIONING OF THE ROTISSERIE 13CONNECTION OF ELECTRICAL SUPPLY 14INSTALLATION OF GAS SUPPLY 16INSTALLATION OF WATER SUPPLY 16INSTALLATION OF DRAIN 17INSTALLATION OF OVERFLOW 17PLACEMENT OF GRATE SECTIONS & LOGS 18
OPERATION INFORMATIONPRIOR TO STARTING THE ROTISSERIE 19MORNING STARTUP 19PREHEATING 19OPERATION 19INSERTION OF SKEWERS 20REMOVAL OF SKEWERS 21
MAINTENANCECLEANING THROUGHOUT THE DAY 22CLEANING AT THE END OF THE DAY 22MAINTENANCE EVERY MONTH 23MAINTENANCE EVERY TWO MONTHS 236 MONTH PREVENTATIVE MAINTENANCE 24
TROUBLESHOOTING25
EFF
EC
TIV
E 2
006
/06
INF-
24 R
EF-
MA
NL
CUSTOMER SERVICE 1-800 38 ROTIS
3HARDT EQUIPMENT MANUFACTURING INC. 2025 52 AVE., LACHINE (MONTREAL), QUEBEC, CANADA H8T 3C3 TEL. (514) 631-7271 FAX (514) 631-7273

EFF
EC
TIV
E 2
006
/06
INF-
24 R
EF-
MA
NL
INTRODUCTION
ABOUT THIS MANUALThis manual must be retained for future reference. This manual contains informationnecessary for the installation and operation of the HARDT Inferno rotisserie. To help thereader in the utilization of this manual certain information has been highlighted using thefollowing convention.
SPECIFIES INFORMATION THAT REFERS TO ACTIONS WHICH MAY HAVE CON-SEQUENCES POTENTIALLY DANGEROUS TO THE OPERATOR AND/OR THEROTISSERIE.
Specifies information necessary for the proper installation and functioning of therotisserie.
Specifies additional important information
POST IN A PROMINENT LOCATION:
FOR YOUR SAFETYDO NOT STORE OR USE GASOLINE OR OTHER FLAMMABLE VAPORS ANDLIQUIDS IN THE VICINITY OF THIS OR ANY OTHER APPLIANCE.KEEP THE AREA AROUND THE APPLIANCE FREE FROM ANY COMBUSTIBLEMATERIAL.
IMPROPER INSTALLATION, ADJUSTMENT ALTERATION, MAINTENANCE CANCAUSE PROPERTY DAMAGE, INJURY OR DEATH. READ THE INSTALLATIONINSTRUCTIONS THOROUGHLY BEFORE INSTALLING OR SERVICING THISEQUIPMENT.
Never obstruct the flow of combustion or ventilation air.
IN THE EVENT THE USER SMELLS GAS:
SHUT OFF THE MAIN GAS VALVE TO THE BUILDING.
DO NOT TOUCH ANY ELECTRICAL APPLIANCE.
DO NOT TOUCH ANY ELECTRICAL SWITCH.
DO NOT USE ANY TELEPHONE IN YOUR BUILDING.
EXTINGUISH ANY OPEN FLAME.
IMMEDIATELY CALL YOUR GAS SUPPLIER FROM A NEIGHBOR’S PHONE. FOLLOW THE GAS SUPPLIER’S INSTRUCTIONS.
IF YOU CANNOT REACH YOUR GAS SUPPLIER CALL THE FIRE DEPARTMENT.
CUSTOMER SERVICE 1-800 38 ROTIS
4HARDT EQUIPMENT MANUFACTURING INC. 2025 52 AVE., LACHINE (MONTREAL), QUEBEC, CANADA H8T 3C3 TEL. (514) 631-7271 FAX (514) 631-7273

CUSTOMER SERVICE PROGRAM We at HARDT Equipment have developed a Customer Service Program to ensure fastresponse time and efficient flow of information. Our authorized service companies arerequired to attend a yearly training session to ensure they are up to date on the latestinformation.
Here are some of the proactive steps in our Customer Service Program.• Our authorized service companies provide service in the 50 states and Canada. All
our service companies stock parts.• We are committed to a 4 hour service response time for units that are in a "down"
situation.• We are available 24 hours per day, 7 days per week including holidays.• We remind you, with a call every 6 months, to have the drive maintenance
performed.
What to do if a service issue occurs:• FIRST call should be to HARDT technical support at 800-387-6847 (24hrs per day,
7 days per week including holidays).• Technical support will diagnose the problem and forward specific information to our
technician. This will allow the call to be handled in more effective manner.
Please remember that during the WARRANTY period, all service calls MUST be direct-ed to Hardt for approval before contacting the service company.
EFF
EC
TIV
E 2
006
/06
INF-
24 R
EF-
MA
NL
CUSTOMER SERVICE 1-800 38 ROTIS
5HARDT EQUIPMENT MANUFACTURING INC. 2025 52 AVE., LACHINE (MONTREAL), QUEBEC, CANADA H8T 3C3 TEL. (514) 631-7271 FAX (514) 631-7273

EFF
EC
TIV
E 2
006
/06
INF-
24 R
EF-
MA
NL
WARRANTY CONDITIONSHARDT EQUIPMENT MANUFACTURING WARRANTS ITS PRODUCTS TO BE FREEFROM DEFECTS IN MATERIAL AND WORKMANSHIP UNDER NORMAL USE AND SER-VICE FOR A PERIOD OF TWO YEARS FROM DATE OF ORIGINAL INSTALLATION OR 8WEEKS AFTER THE ROTISSERIE IS SHIPPED, WHICHEVER COMES FIRST. THISWARRANTY IS APPLICABLE TO THE INITIAL END USER AND IS NOT TRANSFERRABLE.
Warranty is conditional on proper installation as per the instructions in the 'INSTALLA-TION INFORMATION' section of this guide. Should the rotisserie be improperly installedand service be required as a result, all charges will be invoiced to the individual whorequested the service. HARDT reserves the right to void the warranty if unauthorizedservice is performed or if the equipment has not been paid for in full.
Warranty is conditional on proper maintenance and cleaning as per the 'MAINTENANCE'section of this manual. Improper or insufficient maintenance or cleaning will causepremature deterioration of components and the replacement of these will not be coveredunder warranty. Please read the 'MAINTENANCE' section carefully.
Work performed under warranty must be performed by service representatives autho-rized by HARDT. Should other service companies be used, authorization must beobtained from HARDT prior to the commencement of any service.
During the warranty period, specified parts changed by authorized service companiesmust be returned to HARDT to determine if they are covered under warranty. A copy ofthe service sheet explaining the problem and the corrective measure taken must beincluded with the invoice along with the Return Authorization Number given by HARDT.
Warranty includes labor, material, travel expenses, and material freight charges: Laboris limited to straight-time. Overtime charges cover only time and one half in emergen-cies when the rotisserie is completely non-operational. Travel expenses are limited to150 miles and 2 hours travel, per call.
WARRANTY DOES NOT INCLUDE:• Problems arising from improper use or installation; including high or low voltage, high
or low gas pressure, improper venting, and/or poor maintenance.• Service calls pertaining to problems with temperature will be limited to those in which
the rotisserie has a malfunctioning thermostat or is experiencing insufficient heat prob-lems. Warranty will not include service calls that can be avoided by adjusting the ther-mostat and verifying the temperature in the rotisserie by the thermometer.
• Service calls pertaining to problems with adjustment, cleanliness, drying or alignmentof igniters.
• The replacement of either or both burners, the igniter, or the ceramic radiants thatwere damaged as a result of contact with chemicals, liquids or solid objects.Chemicals or liquids of any kind (including water) should NEVER come in contact withthe burners, the igniter, or the ceramic radiants.
• The replacement of the glass. (All rotisseries are fully heat tested prior to shipment. Glass break-age is a result of sharp, abrupt contact. Please exercise caution during operation.)
• The replacement of light bulbs.• Lost revenue or expenses incurred due to equipment failure.• Calls made directly to our service companies (without an authorization number from HARDT).
SPARE PARTS WARRANTYHARDT Equipment Manufacturing Inc, grants an operation warranty of 3 months on orig-inal HARDT spare parts. In cases of failure within this period, HARDT will supply areplacement part.
CUSTOMER SERVICE 1-800 38 ROTIS
6HARDT EQUIPMENT MANUFACTURING INC. 2025 52 AVE., LACHINE (MONTREAL), QUEBEC, CANADA H8T 3C3 TEL. (514) 631-7271 FAX (514) 631-7273

UL LISTING AND SAFETY WARNINGThe HARDT Inferno rotisserie is listed by UL, ULC, AGA, CGA, NSF and CE. The UL orULC label is the only evidence provided by UL or ULC to identify products manufacturedunder the respective listing and follow up service programs. Consult the authority hav-ing jurisdiction to determine what regulations are in force for appliances of this type.
POST IN A PROMINENT LOCATION THE INSTRUCTIONS TO BE FOLLOWED IN THEEVENT THE USER SMELLS GAS. THIS INFORMATION SHOULD BE AVAILABLEFROM YOUR LOCAL GAS SUPPLIER.
FOR YOUR SAFETY!DO NOT STORE OR USE GASOLINE OR OTHER FLAMMABLE VAPORS ANDLIQUIDS IN THE VICINITY OF THIS OR ANY OTHER APPLIANCE.
KEEP THE AREA AROUND THE APPLIANCE FREE FROM ANY COMBUSTIBLEMATERIAL.
IMPROPER INSTALLATION, ADJUSTMENT, ALTERATION, OR MAINTENANCE CANCAUSE PROPERTY DAMAGE, INJURY OR DEATH. READ THE INSTALLATIONINSTRUCTIONS THOROUGHLY BEFORE INSTALLING OR SERVICING THISEQUIPMENT.
AN ADEQUATE AIR SUPPLY MUST BE SUPPLIED TO THE UNIT AT ALL TIMESDURING THE OPERATION TO ENSURE A PROPER FLOW OF COMBUSTION ANDVENTILATION AIR.
IF YOU SMELL GAS CALL YOUR LOCAL GAS SUPPLIER.
The rotisserie’s identification plate and serial number can be found as shown below.
EFF
EC
TIV
E 2
006
/06
INF-
24 R
EF-
MA
NL
CUSTOMER SERVICE 1-800 38 ROTIS
7HARDT EQUIPMENT MANUFACTURING INC. 2025 52 AVE., LACHINE (MONTREAL), QUEBEC, CANADA H8T 3C3 TEL. (514) 631-7271 FAX (514) 631-7273
SERIAL NUMBER PLATE
IDENTIFICATION PLATE

EFF
EC
TIV
E 2
006
/06
INF-
24 R
EF-
MA
NL
SPECIFICATIONSINFERNO 24
DROP-DOWN DOOR SWING DOOR
Hardt improves its products continuously and reserves the right to change specifications without notice.
CONNECTIONS:Gas: Minimum supply pressure:
Natural: 7" WCPropane: 11" WCManifold pressure:Natural: front: 4½" WC
rear: 4" WCPropane: front: 10" WC
rear: 10" WCMaximum rating: 120,000 Btu/hConnection: ¾" NPT male
Electrical: 120V 1PH 60Hz 7.5AVenting: Free vent under hood / canopyWater Inlet: ½" NPT coupling (preferably hot water)
Drain and Overflow: 1½" NPT connection
SHIPPING WEIGHT:Approx. 1130 lbs.
CLEARANCES:Control side (right): 3" for units with casters or 12" forunits without casters to allow access to motor.Opposite side (left): 3"Back: 3"
All measurements are in inches.
CUSTOMER SERVICE 1-800 38 ROTIS
8HARDT EQUIPMENT MANUFACTURING INC. 2025 52 AVE., LACHINE (MONTREAL), QUEBEC, CANADA H8T 3C3 TEL. (514) 631-7271 FAX (514) 631-7273
FEATURE X Position Y Position ElevationDrain Connection 34 ½ 4 1/8 40Electrical Connection 3 16 3/8 40Gas Connection 6 6 5/8 40Overflow Connection 28 ½ 4 1/8 40Water Inlet Connection 4 22 40

LOCATION OF COMPONENTS AND CONNECTIONS
NOT VISIBLEIGNITERS: Igniter for I/R burner located in the right top front corner of the cooking
compartment. The igniter for rear burner is located at the rear right ofthe cooking compartment just behind the water pan.
EFF
EC
TIV
E 2
006
/06
INF-
24 R
EF-
MA
NL
CUSTOMER SERVICE 1-800 38 ROTIS
9HARDT EQUIPMENT MANUFACTURING INC. 2025 52 AVE., LACHINE (MONTREAL), QUEBEC, CANADA H8T 3C3 TEL. (514) 631-7271 FAX (514) 631-7273

EFF
EC
TIV
E 2
006
/06
INF-
24 R
EF-
MA
NL
DELIVERY INFORMATION
PRE-SHIPPING INFORMATIONThe information below is designed to prepare the general contractor for the arrival of theHARDT Inferno Rotisserie. Please ensure that the appropriate personnel have reviewedthis information prior to the rotisserie’s arrival.
It is very important to note that the rotisserie crate should be received as “Subjectto Verification” (i.e., write it on the waybill when signing for the shipment), as youwill only be uncrating it after the transport truck has left. This will allow you theopportunity to make a claim against the transport firm should the rotisserie or itscomponents have been damaged in transit.
To remove the rotisserie from the truck you will require a forklift. The transport companywill call 24 hours prior to delivery to allow for preparation.
TAKE CARE WHEN HANDLING THE CRATE AS IT IS TOP HEAVY.
THE UNIT SHOULD BE DRAGGED AS LITTLE AS POSSIBLE AS THIS MAY CAUSEVIBRATIONS THAT MAY DAMAGE THE ELECTRONIC IGNITION SYSTEM.
DIMENSIONS / WEIGHTS:Crated with Accessories: 88” H x 48” W x 44” D Approx. 1130 lbsFOB Montreal.
The rotisserie door may need to be removed from the crate for it to enter through a stan-dard doorway. See the SPECIFICATIONS section for precise dimensions.
Please do not uncrate the rotisserie until ready to install in order to prevent the loss ofany parts or accessories shipped with the unit. An inventory checklist is provided onpage 12 to help you verify the contents of the shipment. Call HARDT if you have anyquestions.
To connect the rotisserie once it is in position you will require:1) AN ELECTRICIAN2) THE LOCAL GAS COMPANY3) A PLUMBER (If permanently connected)
Please refer to the 'INSTALLATION INFORMATION' section for the order in which therotisserie is to be connected once it is in place, as well as other important installationinformation.
If you require any information in addition to that described above please contact aCustomer Service Representative at the above Customer Service 1-800 number.
CUSTOMER SERVICE 1-800 38 ROTIS
10HARDT EQUIPMENT MANUFACTURING INC. 2025 52 AVE., LACHINE (MONTREAL), QUEBEC, CANADA H8T 3C3 TEL. (514) 631-7271 FAX (514) 631-7273
INVENTORY CHECKLISTThe Inferno rotisserie is shipped with its accessories packed as described below. Pleaseverify that all the components listed have arrived in good condition after transport. Theinventory checklist is intended to clarify what parts have been shipped and where theycan be located.
Skewers: Inside the main rotisserie compartment (# of pieces depends on quantity ordered). [ ]Cleaning shield: Inside the main rotisserie compartment [ ]Firepit: Inside the main rotisserie compartment [ ]Flue 18": Inside the main rotisserie compartment [ ]Plumbing parts (installed) [ ]Reference manual (taped to shaft) [ ]Logs: Inside accessory box [ ]Strainer: Inside accessory box [ ]Brushes for cleaning: Inside accessory box (if ordered) [ ]
If you require any information in addition to that described in this guide please contact aCustomer Service Representative at the above Customer Service 1-800 number.
EFF
EC
TIV
E 2
006
/06
INF-
24 R
EF-
MA
NL
CUSTOMER SERVICE 1-800 38 ROTIS
11HARDT EQUIPMENT MANUFACTURING INC. 2025 52 AVE., LACHINE (MONTREAL), QUEBEC, CANADA H8T 3C3 TEL. (514) 631-7271 FAX (514) 631-7273
EFF
EC
TIV
E 2
006
/06
INF-
24 R
EF-
MA
NL
INSTALLATION INFORMATION
ORDER OF INSTALLATIONWarranty is conditional on proper installation as per the instructions in this section.Should the rotisserie be improperly installed and service be performed, all charges willbe invoiced to the individual who requested the service. Please call our CustomerService department if you have any questions whatsoever.
1. Install the ventilation hood or the ducting for a direct venting setup. 2. Place the HARDT Inferno rotisserie in position as described on the following page.3. Connect the gas, electricity, and plumbing to the rotisserie.
VENTING INFORMATIONThe INFERNO rotisserie is designed to be direct vented or to be used with a hood /canopy type vent. Please contact a hood supplier that manufactures hoods that conformto YOUR design as well as local codes. In either case the INFERNO rotisserie isequipped with an 18” long by 8” diameter flue riser that is necessary for proper opera-tion.
The HARDT INFERNO rotisserie must vent freely. Do not install the hood andmake-up air in a way that air is being blown into or pulled out of the rotisserie.Either of these events will greatly affect the rotisserie’s operation. The hoodshould remove the exhaust gases without disturbing the air within the rotisserie.
Hood Specification RecommendationsWe recommend a Type 1 / Class A grease hood with filters. It is normally equipped witha fire suppression system. Per local authorities and codes, NFPA 96 recommends thatall rotisseries that produce grease laden vapors should be vented to a Type 1 / Class Ahood. Other equipment that would fall into this category would be fryers and griddles.The hood should have at least 12" of overhang canopy on sides and front (this may varyas per local code).
The lower lip of the canopy should be no more than 6 inches above the top of theunit. If the clearance exceeds this dimension it may allow drafts which willinterfere with the unit's operation and efficiency.
If the unit is installed on casters, so as to be mobile for service, ensure that thefire suppression nozzles do not prevent it from moving.
Exhaust 950 CFM is recommended for INFERNO 24 model rotisseries.
SupplyWhen a plenum is used for make up air, the supply riser should be 600 CFM.
Balancing Hood InformationBalance the hood as well as the store environment, as per NFPA # 96.
CUSTOMER SERVICE 1-800 38 ROTIS
12HARDT EQUIPMENT MANUFACTURING INC. 2025 52 AVE., LACHINE (MONTREAL), QUEBEC, CANADA H8T 3C3 TEL. (514) 631-7271 FAX (514) 631-7273

POSITIONING OF THE ROTISSERIEDo not locate the rotisserie in an area where the right (control) side is next to fry-ers, broilers or any other appliance that emits grease, smoke, humidity, flour etc.
As the venturi for the burner is behind the control panel, precautions should betaken to prevent the above mentioned particles from entering the burner and caus-ing it to malfunction.
Once the hood installation has been completed the rotisserie can be placed in position.To operate properly, the rotisserie should be positioned on a level surface in a draft-freearea where the temperatures remain above 45 degrees Fahrenheit.
To allow for sufficient cooling the required minimum clearances to combustible and non-combustible surfaces are:Left (non-motor) side: 3”Back: 3”Right (motor) side: 3” (12” if unit is not equipped with casters. This is the minimum
necessary for adequate access to the service compartment)
Failure to conform to minimum clearances may result in service not being able tobe performed!
A clearance of less than 12” on the control side requires the use of casters andquick disconnect connections for both the gas and the water supplies.
ON UNITS EQUIPPED WITH CASTERS, THE FRONT 2 CASTERS ARE EQUIPPEDWITH BRAKES. THESE SHOULD BE KEPT LOCKED TO PREVENT THEROTISSERIE FROM BEING MOVED ACCIDENTALLY.
EFF
EC
TIV
E 2
006
/06
INF-
24 R
EF-
MA
NL
CUSTOMER SERVICE 1-800 38 ROTIS
13HARDT EQUIPMENT MANUFACTURING INC. 2025 52 AVE., LACHINE (MONTREAL), QUEBEC, CANADA H8T 3C3 TEL. (514) 631-7271 FAX (514) 631-7273
3”
3”
3” or 12”(see below)
RESTRAINING CABLEATTACHMENT POINT

EFF
EC
TIV
E 2
006
/06
INF-
24 R
EF-
MA
NL
CONNECTION OF ELECTRICAL SUPPLYThe rotisserie runs on 120v 60HZ 7.5A 1-phase. The electrical connection to the rotis-serie is made at the contact block located within the junction box beneath the motorcompartment. The contact block is labeled B / W / G (Black, White, Ground). A circuitbreaker is located on the motor side behind the front leg. The INFERNO rotisserie issupplied with a 6’ long power cordIN THE USA: The appliance must be electrically grounded in accordance with local
codes, or in the absence of local codes, with the NATIONAL ELECTRI-CAL CODE, ANSI / NFPA 70.
IN CANADA: Electrical installation and grounding shall be in accordance with thecurrent CSA C22.2 CANADIAN ELECTRICAL CODE or local codes.
CUSTOMER SERVICE 1-800 38 ROTIS
14HARDT EQUIPMENT MANUFACTURING INC. 2025 52 AVE., LACHINE (MONTREAL), QUEBEC, CANADA H8T 3C3 TEL. (514) 631-7271 FAX (514) 631-7273

EFF
EC
TIV
E 2
006
/06
INF-
24 R
EF-
MA
NL
CUSTOMER SERVICE 1-800 38 ROTIS
15HARDT EQUIPMENT MANUFACTURING INC. 2025 52 AVE., LACHINE (MONTREAL), QUEBEC, CANADA H8T 3C3 TEL. (514) 631-7271 FAX (514) 631-7273

EFF
EC
TIV
E 2
006
/06
INF-
24 R
EF-
MA
NL
INSTALLATION OF GAS SUPPLYIN THE USA: Installation must conform to local codes, or in the absence of local codes,
with the NATIONAL FUEL GAS CODE, ANSI Z223.1.IN CANADA: Installation for Natural gas must be in accordance with current code
CAN/CGA B149.1.Propane gas installation must be in accordance with current codeCAN/CGA B149.2 and/or local codes.
NATURAL GAS Minimum inlet pressure 7" W.C.Manifold pressure (front): 4½" W.C.Manifold pressure (rear): 4" W.C.
PROPANE GAS Minimum inlet pressure 11" W.C.Manifold pressure (front + rear): 11" W.C.
Maximum rating: Inferno 24 120,000 Btu/hConnection: ¾" NPT male
INSTALLATION OF WATER SUPPLYWhen a direct connection to a permanent water supply is desired the water sourceshould be connected to the copper pipe on the rotisserie. A valve (not supplied) shouldbe installed between the copper pipe on the rotisserie and the water supply.
When installing a permanent water supply, make sure that the main valve isinstalled in an easily accessible location, preferably at the front of the rotisserie.
For a manual supply of water, either by hose or bucket, the copper pipe must be plugged. In either case it is recommended to use hot water as it reduces warm-up time andfacilitates cleaning.
Local ordinances may require a backflow prevention device. Consult the authority havingjurisdiction to determine what regulations are in force for appliances of this type.
UNITS WITH CASTERSAs an option the unit may be ordered with casters. When supplied with this option it isrequired that the rotisserie be equipped with ‘Quick Disconnect’ gas installation hard-ware. In this case connect the rotisserie to the gas supply using the instructions sup-plied in the ‘Quick Disconnect’ kit.When using the ‘Quick Disconnect’ hardware, the rotisserie must be equipped with aconnector that complies with the Standard for Connectors for Movable Gas Appliances,ANSI Z21.69 or Connectors for Movable Gas Appliances, CAN/CGA-6.16The Dormont ‘Quick Disconnect’ kit which may be purchased from Hardt is a quick-dis-connect device that complies with the Standard for Quick Disconnect Devices for Usewith Gas Fuel, CAN1-6.9.
A RESTRAINING DEVICE MUST BE INSTALLED SUCH THAT THE ROTISSERIEMOVEMENT IS LIMITED WITHOUT RELYING ON THE CONNECTOR AND THEQUICK DISCONNECT DEVICE OR ITS ASSOCIATED PIPING. The restraining cablefor the Dormont kit attaches at the point shown in the diagram on page 13.
All gas installations must be performed by a licensed professional. Check local ordi-nances for applicable regulations.
CUSTOMER SERVICE 1-800 38 ROTIS
16HARDT EQUIPMENT MANUFACTURING INC. 2025 52 AVE., LACHINE (MONTREAL), QUEBEC, CANADA H8T 3C3 TEL. (514) 631-7271 FAX (514) 631-7273

INSTALLATION OF DRAINThere are two holes in the rotisserie's water pan. One is for the drain and the other is forthe overflow. The drain hole is the one located at the back of the rotisserie's water pan.Underneath the rotisserie place the two rubber washers onto the flat portion of the drainelbow and line up the drain elbow with the back hole of the rotisserie's water pan.Inside the rotisserie, insert the strainer into the back hole of the water pan and tightenthe strainer into the drain elbow. Weld the drain valve in the location most accessible to the employees.
When installing a rotisserie equipped with casters, make sure that for it to remainmobile for servicing the drain is not hard plumbed into the floor.
Please consult the authority having jurisdiction to determine what regulations are in forceregarding the disposal of grease laden water.
INSTALLATION OF OVERFLOWThe overflow is located in the front of the two holes in the rotisserie's water pan. Underneath the rotisserie, place two rubber washers onto the flat portion of the overflowdrain elbow and line it up with the front hole of the rotisserie's water pan.Inside the rotisserie insert the overflow strainer into the front hole of the water pan andtighten it into the overflow drain elbow. (If the overflow is connected to the drain pipe itmust join the drain only after the drain valve.)
Please consult the authority having jurisdiction to determine what regulations are in forceregarding the disposal of grease laden water.
EFF
EC
TIV
E 2
006
/06
INF-
24 R
EF-
MA
NL
CUSTOMER SERVICE 1-800 38 ROTIS
17HARDT EQUIPMENT MANUFACTURING INC. 2025 52 AVE., LACHINE (MONTREAL), QUEBEC, CANADA H8T 3C3 TEL. (514) 631-7271 FAX (514) 631-7273
EFF
EC
TIV
E 2
006
/06
INF-
24 R
EF-
MA
NL
PLACEMENT OF GRATE SECTIONS & LOGS
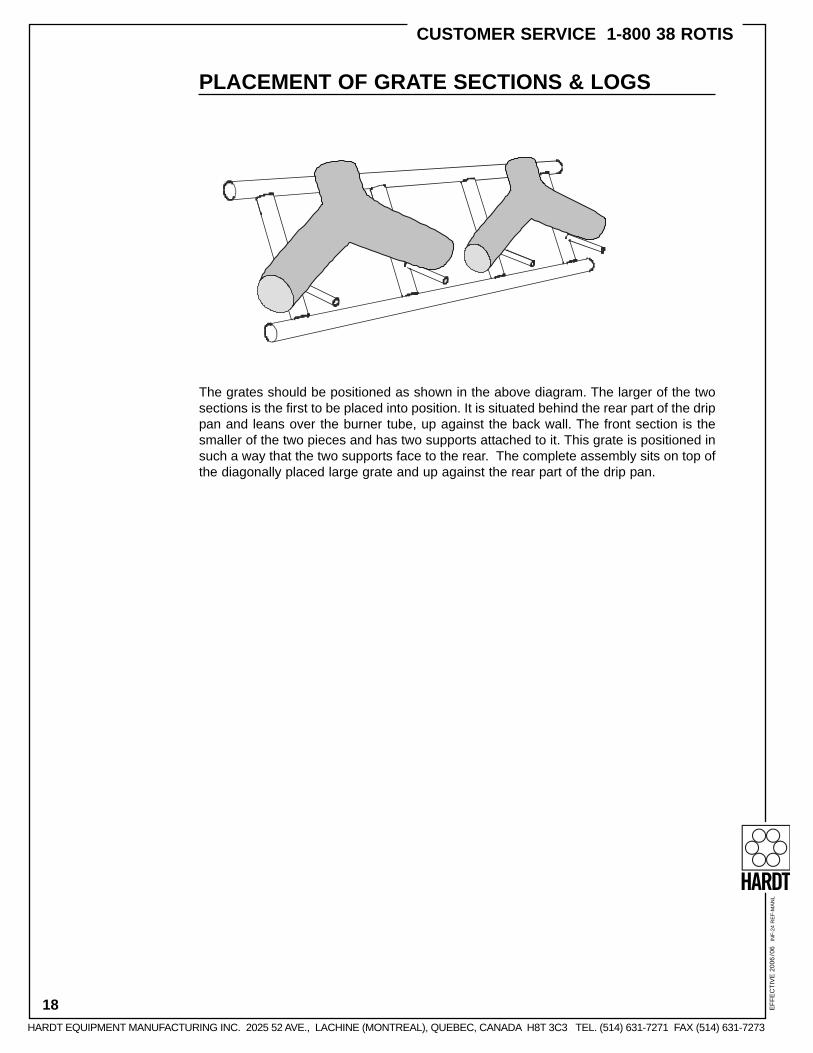
The grates should be positioned as shown in the above diagram. The larger of the twosections is the first to be placed into position. It is situated behind the rear part of the drippan and leans over the burner tube, up against the back wall. The front section is thesmaller of the two pieces and has two supports attached to it. This grate is positioned insuch a way that the two supports face to the rear. The complete assembly sits on top ofthe diagonally placed large grate and up against the rear part of the drip pan.
CUSTOMER SERVICE 1-800 38 ROTIS
18HARDT EQUIPMENT MANUFACTURING INC. 2025 52 AVE., LACHINE (MONTREAL), QUEBEC, CANADA H8T 3C3 TEL. (514) 631-7271 FAX (514) 631-7273

OPERATIONSHOULD THE ROTISSERIE NOT LIGHT ON THE FIRST TRY, OPEN THE DOOR ANDALLOW A ONE MINUTE PERIOD BEFORE RELIGHTING.
PRIOR TO STARTING THE ROTISSERIEIt is recommended to wrap the center shaft in aluminum foil. This will facilitate cleanupof the rotisserie after daily use.Close the drain valve and fill the drip pan, preferably with hot water. The water in therotisserie will serve to diffuse the drippings and facilitate cleanup as well as provide mois-ture during the cooking process.
MORNING STARTUPOpen the rotisserie door and verify that:1. The thermometer probe is clean. Clean if necessary.2. The thermostat probe is clean. Clean if necessary.3. The light lenses are clean. Clean if necessary.4. The ‘AT END OF THE DAY’ cleaning was performed properly. If not done, do it now.
PREHEATING1. Verify that the door is closed.2. Set the thermostat to the OFF position. (This is to ensure that initially only the rear burner lights.)
3. Set the timer to 30 minutes.4. Pull the MAIN ON /OFF switch (Red Button) to the “ON” position. (The back burner will light.)
5. After approximately 5 minutes set the thermostat to the temperature setting at whichyou will be cooking. (The front burner will light.)
Allow the rotisserie to become preheated to the desired temperature. Sufficient pre-heating minimizes and excessive temperature drop while the rotisserie is being loaded,and prolongation of the cooking time of the first load.While the rotisserie is being preheated, prepare the product.
OPERATIONNEVER STICK YOUR HANDS OR ANY OTHER OBJECTS INTO THE ROTATINGDRIVE WHEN LOADING SKEWERS.
ALWAYS USE INSULATED OVEN MITTS OR SKEWER FORKS WHEN HANDLINGSKEWERS NEAR THE HOT ROTISSERIE.
1. When the oven is preheated, load the desired amount of skewers into the rotisserie. 2. Set the thermostat to the desired temperature setting.3. Set the timer to the desired cooking duration.4. At the end of the cooking cycle, measure the internal temperature of the chickens. It
should be 185 degrees F.
EFF
EC
TIV
E 2
006
/06
INF-
24 R
EF-
MA
NL
CUSTOMER SERVICE 1-800 38 ROTIS
19HARDT EQUIPMENT MANUFACTURING INC. 2025 52 AVE., LACHINE (MONTREAL), QUEBEC, CANADA H8T 3C3 TEL. (514) 631-7271 FAX (514) 631-7273

EFF
EC
TIV
E 2
006
/06
INF-
24 R
EF-
MA
NL
INSERTION OF SKEWERSCROSS CONTAMINATION IS VERY DANGEROUS! DO NOT LOAD FRESH PRODUCT INTO THE ROTISSERIE UNTIL THE COOKINGCYCLE IS COMPLETE AND ALL THE COOKED PRODUCT HAS BEEN REMOVEDFROM THE ROTISSERIE.
When the rotisserie has reached its operating temperature the skewers can be loadedinto the rotisserie. Opening the door will cause the burner to shut off and the drive to stop rotating. TheManual Switch (Green button, located on the front of the control panel) actuates the drivemechanism without igniting the burner. Press and hold this switch until the desiredsocket on the drive drum is easily accessible at the front of the rotisserie.
The above sketch illustrates the insertion of the loaded skewers into the drive sockets.
A) The pointed end (1) of the skewer is inserted into the hole (3) in the support plate atthe left side of the rotisserie.
B) The hexagonal end (2) is then raised and inserted into the drive socket slot (4) in theright hand drive drum.
C) The hexagonal end (2) must be slid into the socket as far to the right as possible tomake certain that the shoulder on the pointed end is inside the face of the supportplate. This prevents the skewer from slipping out of the drive drum socket.
IF YOU HAVE PURCHASED BASKETS OR ROAST SKEWERS, YOU MAY HAVE TOSKIP SOCKETS WHEN COOKING. PLEASE CONTACT OUR FIELD APPLICATIONSTEAM AT 1-800-387-6847 TO DISCUSS YOUR PARTICULAR SITUATION.
NEVER PLACE THE SKEWERS (OR BASKETS) INTO THE ROTISSERIE WITH THEGROOVE IN THE SKEWER’S POINTED END RESTING ON THE SUPPORT PLATE.THE GROOVE IS ONLY FOR HANGING THE SKEWER ON THE OPTIONAL WALLMOUNTED SKEWER RACK.
To prevent unnecessary losses of heat that will increase cooking time, the doorsshould not be opened until the end of the cooking cycle. The end of the cookingcycle is indicated by the sound of the ‘end of cook’ buzzer.
CUSTOMER SERVICE 1-800 38 ROTIS
20HARDT EQUIPMENT MANUFACTURING INC. 2025 52 AVE., LACHINE (MONTREAL), QUEBEC, CANADA H8T 3C3 TEL. (514) 631-7271 FAX (514) 631-7273

REMOVAL OF SKEWERSTo remove the skewers, open the doors to stop the skewer rotation and shut off theflame. Use the Manual Switch (Green button) to activate the drive motor alone and bringthe desired skewer to the front and center of the door opening where it is readily acces-sible. Reverse the insertion process by raising the pointed end slightly so that the shoul-der is level with the hole in the support plate and push the skewer to the left until thehexagonal end is free from the drive socket. Remove the skewer. If the rotisserie willnot be used it should be cleaned as described in the “CLEANING” section.
We recommend leaving the doors OPEN when the rotisserie is not in use. If thedoors remains closed, as the rotisserie cools, humidity will condense around theigniter causing the rotisserie to go into ‘Safety Lockout’.
IN THE EVENT OF A PROLONGED POWER FAILURE, THE ROTISSERIE MUST BESHUT OFF BY PUSHING IN THE MAIN ON/OFF SWITCH (RED BUTTON).
EFF
EC
TIV
E 2
006
/06
INF-
24 R
EF-
MA
NL
CUSTOMER SERVICE 1-800 38 ROTIS
21HARDT EQUIPMENT MANUFACTURING INC. 2025 52 AVE., LACHINE (MONTREAL), QUEBEC, CANADA H8T 3C3 TEL. (514) 631-7271 FAX (514) 631-7273

EFF
EC
TIV
E 2
006
/06
INF-
24 R
EF-
MA
NL
MAINTENANCEYour HARDT rotisserie was built using only the highest quality products. All bushings,as well as the complete drive train, are permanently lubricated and do not require anygreasing or oiling. The most important maintenance is the daily cleaning as describedin the sections below.
DISCONNECT POWER SUPPLY TO THE ROTISSERIE BEFORE SERVICING.
ALWAYS SHUT-OFF THE CIRCUIT BREAKER WHEN CLEANING INSIDE THE ROTISSERIE.
CLEANING THROUGHOUT THE DAYIt is highly recommended to clean the rotisserie glass with a wet cloth at the end of eachcooking cycle. This procedure keeps the glass clean without scratching it. Dependingon the volume of product cooked, changing the water during the day may be desired.
CLEANING AT THE END OF THE DAYOPEN THE DOOR AND ALLOW THE ROTISSERIE TO COOL DOWN UNTIL IT ISSAFE TO TOUCH.
NEVER SPRAY CHEMICALS OR LIQUIDS OF ANY KIND (INCLUDING WATER) INTHE DIRECTION OF THE BURNER OR THE IGNITER (INSIDE, UPPER FRONT), THECERAMIC RADIANTS OR THE EXTERIOR OF THE ROTISSERIE. Should any liq-uids come in contact with the burner while it is still hot, the ceramics in the burn-er might crack and the burner will have to be replaced. If chemicals come in con-tact with the igniter, the igniter will corrode, the rotisserie will malfunction, and theigniter will have to be replaced. To avoid damage, when cleaning the drive plateor applying degreaser, first do the bottom half of the drive plate, then rotate thedrive halfway by pushing the green button, and then do the other half.
Hang the cleaning shield that is supplied with each rotisserie on the inside back wall ofthe unit so that it protects the rear burner. It should be positioned closest to the right sideto protect the igniter from water or chemical spray. Remove the aluminum foil used towrap the center shaft. Spray an approved degreaser on the interior of the warm rotis-serie. Allow it to work and rinse clean.
Spray the area in and around the drive sockets and the hole in the drive ring withan approved degreaser.
After the grease melts, use the small bristle brush to remove any buildup from aroundand inside the sockets, then rinse with water. In doing this simple operation you will elim-inate the blockage of the sockets due to the accumulation of dry hard carbon.The glass on both the doors as well as the glass protecting the oven’s interior light shouldbe cleaned daily as the buildup of burnt carbon is very difficult to remove from temperedglass. The thermostat and thermometer probes must be wiped clean as carbon buildup willcause improper readings.The igniters should be inspected at this time also to ensure that they are free of carbonand grease buildup. If they are dirty use a dry paper towel to wipe them clean.
CUSTOMER SERVICE 1-800 38 ROTIS
22HARDT EQUIPMENT MANUFACTURING INC. 2025 52 AVE., LACHINE (MONTREAL), QUEBEC, CANADA H8T 3C3 TEL. (514) 631-7271 FAX (514) 631-7273

AVOID USING SCOURING PADS OR CLEANERS WITH GRIT AS TEMPEREDGLASS IS EASILY SCRATCHED.
After cleaning, always leave the door open to allow the humidity to escape as itwill condense around the igniter causing starting problems the next morning.
If parts returned are found to have not been adequately maintained, they will NOT becovered by our warranty plan. Warranty does not cover damage caused by the aboveor any other misuse.
MAINTENANCE EVERY MONTHOnce a month the rear burner should be cleaned.
1) Make sure the unit is cool to work on, that there is no water in the waterpan and thatthe power is turned off (either at the switch on the wall controlling the unit or on thecircuit breaker of the machine, found just beneath the waterpan near the controlpanel). We recommend you place a sheet of cardboard in the waterpan to preventit being scratched or damaged when the pieces are being moved.
2) Remove the ceramic logs from the rear grate. Be careful, they are fragile. (If theyare covered with grease, simply turn them around when replacing them. The nextday you can turn them back and they will have been cleaned by the flame.)
3) The rear grate must be lifted over the lip of the back of the waterpan, then slid underthe spit support and drive plate rings and out the front of the rotisserie. Once out, anygrease deposits can be scraped off with a scraper.
4) Use a step-stool to elevate yourself so you can easily inspect the back burner to seeif all the holes are open. If some are clogged, use a stiff bristle brush on the surfaceto loosen the debris and a long straight object (such as a coat hanger, paper clip orsmall jewelers screwdriver) to clear any blocked holes. This is the area in the unitthat acts as a flame sensor.
5) The grate can now be re-installed. 7) Replace the ceramic logs (as shown in the diagram on page 19). They need to be
angled at a 60 degree angle starting with a large one, then a small one etc, from leftto right.
8) The job is complete, remove the cardboard and turn the power switch or circuit-breaker back on. Clean up any debris from the area in and around the rotisserie asit may block the drain.
MAINTENANCE EVERY TWO MONTHSEvery two months, when the oven is cool, remove the ceramic logs and their support.Verify that the rear burner is clean and that its holes are not blocked. If any of the burn-er holes are blocked, use a thin metal rod (such as a coat hanger) to clear them.Unscrew the external thermometer and check its calibration. When the probe isimmersed in the boiling water the dial should read 212°F.Verify that the cleaning of the inside of the drive sockets is being properly done. Cleanif necessary. Black carbon buildup around the exterior of the sockets is the first sign ofimproper or insufficient cleaning.
EFF
EC
TIV
E 2
006
/06
INF-
24 R
EF-
MA
NL
CUSTOMER SERVICE 1-800 38 ROTIS
23HARDT EQUIPMENT MANUFACTURING INC. 2025 52 AVE., LACHINE (MONTREAL), QUEBEC, CANADA H8T 3C3 TEL. (514) 631-7271 FAX (514) 631-7273

EFF
EC
TIV
E 2
006
/06
INF-
24 R
EF-
MA
NL
6 MONTH PREVENTATIVE MAINTENANCEHardt recommends that a preventative maintenance be performed on the drive systemevery six months. If you would like to schedule a preventative maintenance please call our Customer ser-vice team at 1-800-387-6847 to arrange one today
Maintenance other than that described in this manual should be performed by yourHARDT authorized service representative. This should not be necessary if the cleaningprocedures are correctly followed.
For any technical assistance, or if you require information additional to that describedabove, please contact a HARDT Customer Service Representative at the aboveCustomer Service 1-800 number, available 24 hours per day, 7 days per week.We can also be reached at 514-631-7271, Monday to Friday - 8:30 AM to 6:00 PM EST.
CUSTOMER SERVICE 1-800 38 ROTIS
24HARDT EQUIPMENT MANUFACTURING INC. 2025 52 AVE., LACHINE (MONTREAL), QUEBEC, CANADA H8T 3C3 TEL. (514) 631-7271 FAX (514) 631-7273

TROUBLESHOOTINGPROBLEMRotisserie does not operate when Main ON/OFF Switch (Red button) is pulled.
SOLUTIONA) Check rotisserie electrical cord is connected properly. B) Check if the circuit breaker is in the ‘ON’ position.C) If both A and B are OK, call our service department.
PROBLEMMain ON/OFF switch (Red button) is pulled, drive drum rotates but after 11 seconds thealarm buzzer sounds. Rotisserie has gone into SAFETY LOCKOUT.
SOLUTIONA) Verify that the startup procedure is being followed correctly.B) If the rotisserie again goes into safety lockout, turn the rotisserie “OFF” by pushing
in the Main ON/OFF Switch (Red button). Open the door of the rotisserie. If the doorhas been closed all night, humidity may have condensed around the igniter. Get apaper towel and gently clean the igniter. This procedure will clean and de-humidifythe ignition. Turn the rotisserie “ON” by pulling the Main ON/OFF Switch.
C) If the rotisserie again goes into safety lockout note which burner (front or back) doesnot ignite or stay lit. Turn the rotisserie OFF by pushing in the Main ON/OFF Switch.Depending on which burner is not working check the gap at the tip of the appropriateigniter. The gap should be between 1/8" and 3/16” in size as shown below. Verifythat the igniter and the area of the burner that is near the igniter are clean.
D) If the rotisserie again goes into safety lockout, switch the rotisserie OFF for 1 minute.Check that the gas valve on the rotisserie and that the main gas supply valve areboth open. To check the main gas supply valve, try another gas powered applianceconnected to the same line. Pull the Main ON/OFF Switch to turn the rotisserie ON.
BURNER SURFACE
BRASS IGNITER SUPPORT
IGNITER
APPROX. ½" TO PREVENT SPARK JUMPING
(13 mm)
IGNITER PROBES
TIP SETTING:1/8" to 3/16"
CLEARANCE(3 mm to 5 mm)
¼“ to ½" CLEARANCE FROM IGNITER TIP
TO BURNER
(6 mm to 13 mm)
ENSURE THAT BOTH THE IGNITER PROBES ARE WELL CLEANED WITH STEEL WOOL.
VERIFY THAT THE BURNER HOLES NEAR THE IGNITER ARE FREE OF ANY OBSTRUCTIONS.
EFF
EC
TIV
E 2
006
/06
INF-
24 R
EF-
MA
NL
CUSTOMER SERVICE 1-800 38 ROTIS
25HARDT EQUIPMENT MANUFACTURING INC. 2025 52 AVE., LACHINE (MONTREAL), QUEBEC, CANADA H8T 3C3 TEL. (514) 631-7271 FAX (514) 631-7273
EFF
EC
TIV
E 2
006
/06
INF-
24 R
EF-
MA
NL
PROBLEMHalogen light bulb is burned out.
SOLUTIONUnscrew (counterclockwise) the protective glass lens of the defective bulb and pull outthe bulb.
The Halogen bulbs should not be touched with bare fingers as the oil from yourhands will reduce the life of the bulb. If the bulb is accidentally touched it shouldbe cleaned with rubbing alcohol (isopropyl alcohol). When shipped, the service bulbs are in a plastic bag. One should use clean glovesor a plastic bag or wrapper when taking a bulb out of the bag and inserting it intothe lamp holder.
To replace the Halogen light, insert the bulb into its socket using the described handlingmethod. Once it is in place screw the protective glass lens over the bulb.
If problems other than those described above arise, DO NOT ATTEMPT TO FIX THEMYOURSELVES. For any technical assistance, please contact a HARDT CustomerService Representative at the above Customer Service 1-800 number, available 24hours per day, 7 days per week.We can also be reached at 514-631-7271, Monday to Friday - 8:30 AM to 6:00 PM EST.
CUSTOMER SERVICE 1-800 38 ROTIS
26HARDT EQUIPMENT MANUFACTURING INC. 2025 52 AVE., LACHINE (MONTREAL), QUEBEC, CANADA H8T 3C3 TEL. (514) 631-7271 FAX (514) 631-7273