indian river soil & waterindian river soil & water...
TRANSCRIPT

Indian River Soil & WaterIndian River Soil & Water Conservation District
Small Farm Ranchette and CountrySmall Farm, Ranchette and Country Estate Best Management Practices
Manual

TABLE OF CONTENTS
I. OPENING STATEMENT …………………………………………………1
II. DRAINAGE AND RUNOFF MANAGEMENT Erosion and Sediment Control Aquatic Plants………………………………………………………2 Field Borders……………………………………………………….3 Filter Strips…………………………………………………............5 Grassed Waterways…………………………………………...........8 Permanent Vegetative Control……………………………………..9 Runoff Water Management……………………………………….10 Sediment Basins…………………………………………………..11 Sediment Transport……………………………………………….13 Water Control Structure…………………………………………..15 Waterway…………………………………………………………17
Water retention, Water Filtration Collection Basins…………………………………………………20 Constructed Wetlands…………………………………………….22 Off-Site Discharges after Excessive Rainfall…………………………25
III. PONDS AND RETENTION AREAS Purpose…............................................................................................27
Design and construction considerations ……………….……………27 Pond Capacity……………………………………………………….28 Multipurpose considerations………………………………………...31 Fish considerations………………………..…………………………32 Fire protection……………………………………………………….33 Wildlife management………………………………………………..35
IV. IRRIGATION MANAGEMENT………………………………………..37
Landscape Irrigation Evaluation as a Water Conservation Practice…40 Advantages of a rain barrel…………………………………………..50 How to make a rain barrel……………………………………………51
V. NUTRIENT/FERTILIZER MANAGEMENT Purpose……………………………………………………………….52 Management………………………………………………………….53 Budget…………………………………………………………….53 Timing of application…………………………………………….53 Optimal nutrient uptake…………………………………………..53 Preventing off-site nutrient movement...........................................54 Untreated buffer zones near bodies of water…………………………55
VI. PESTICIDE MANAGEMENT Pest control-legal issues………………………………………………56

Pest management………………………………………………………58 Pesticide selection………………………………………………….58 Pesticide application……………………………………………….58 Integrated Pest Management (IPM)…………………………………....60 Managing pesticide runoff……………………………………………..62 Weed Management…………………………………………………….63
VII. CROP AND LIVESTOCK/PASTURE MANAGEMENT Purpose/overview………………………………………………………65 Water Tanks……………………………………………………………68 Fencing…………………………………………………………………70 Water way (ditch or canal) protection………………………………….71 Waste management systems……………………………………………74 Waste storage ponds……………………………………………………74 The A, B, C’s of Equine composting…………………………………...75
VIII. WELL PROTECTION………………….………………………………….84
IX. WILDLIFE HABITAT……………………………………………………..86
X. THE WHOLE FARM APPROACH What is the whole farm approach? …………………………………….88
XI. OTHER ITEMS Importance of maintaining healthy landscapes and turf………………..90 Sample plan of operations………………………………………………91
XII. LOCAL AGENCY INFORMATION………………………………………..93

Opening Statement The primary focus of this manual is to address the expansion of “Small Farms, Ranchettes, and Country Estates” in rural areas by providing relevant information that facilitates the implementation of Best Management Practices (BMPs).
The rural landscape of Indian River County is undergoing significant changes, due to growth, which can have an impact on existing agricultural operations and the environment. These changes and impacts can be minimal if appropriate BMPs are properly planned for and implemented. The information provided within this manual can assist the landowner to make good, logical decisions based on the latest science based BMPs to pursue their rural lifestyle without creating adverse impacts. Many of the parcels currently being developed are on land that once was in citrus production for many years. Other properties are on ranch land, which as pasture, is nearer to its former natural state. Depending on the intended land use, the new owner of the property will need to understand the characteristics of his land and soil in order to make wise decisions about the development and eventual impact of their actions. Awareness and direction in compliance with the permitting process are included in the manual. Best Management Practices or BMPs are implemented by landowners on a voluntary basis and can save valuable resources while protecting our surrounding environment. Appropriate BMPs implemented are based on the particular intended land use as well as the specific nature of the location, but it is always the landowner’s responsibility to make the best decisions that will enhance his property while protecting the environment and the sustainability of his operation. It is our hope that this manual will provide the best information possible for the landowner to make these important decisions for his land.
AQUATIC PLANTS Purpose Where there is water, there are weeds. Aquatic plants maintain a balance of nature, offering food, protection, oxygen, and shelter to aquatic species. In addition, aquatic plants may be beneficial in removing nutrients and pesticides from surface water. However, maintaining a balance in the aquatic system while sustaining crop success and avoiding loss of income can be a challenge. Over-abundant aquatic weed growth (pictured below) can clog or restrict drainage following heavy rains, resulting in severe root pruning with increased disease. The discharge of floating aquatic vegetation from drainage ditches results in additional ditch and canal maintenance costs. A serious problem with excess aquatic weed growth is the amount of nutrient-rich organic sediments transported into the Indian River Lagoon during storm events.
Aquatic weeds in drainage ditch.
As aquatic weeds decompose, nutrients are released back into the water from whence they came. The organic particles that result from decomposition are lightweight and are readily transported in drainage discharge water. As these particles are discharged into the Indian River Lagoon, they remain suspended and contribute to the "ooze" that accumulates. The particles are easily distributed in the water column by wind or wave action. The organic particles contribute to the turbidity of the water and block light from penetrating into the water. As a result, there is a reduction in sea grasses and other species of aquatic life in the affected areas. Aquatic plants are the most visible of the identified concerns for the Indian River Lagoon since they can be plainly seen in canals.

Field Borders look like a picture frame around a field. They control erosion and filter water leaving the cropland at field edges and the ends of crop rows, and are also turning areas for equipment.
HOW IT WORKS:
Strips of grass or native vegetation at field edges and the ends of rows give permanent erosion control and trap silt and sediment coming off the cropland. They replace crop end rows, which would run up and down a hill and erode easily.
HOW IT HELPS: • It helps a farm's water quality and water quality entering the Indian River Lagoon, the
SJRWMD and the Upper St. Johns River Basin because it slows water flow, filters runoff, and reduces sheet and rill erosion.
• On sloping land, an owner is not tempted to run end rows up and down a hill. Doing so
would start a gully, which costs more money in the long run.
• Provides a permanent place to turn equipment around.

• Grass and legume grown on these borders may be harvested in many cases. • They provide a natural travel lane around a field.
• They can provide food and cover for wildlife.
THINGS TO KNOW: • Research shows that farms with native plant field borders and filter strips support
substantially more quail, rabbits, and songbirds than do farms without these features. • Field borders should be wide enough to turn equipment. • Field border plants should be selected to the soil type. • Avoid herbicide drift from adjacent cropland. CONSIDER THIS, TOO: • Rarely do field borders need fertilizer because the trapped nutrients are used by the
vegetation. Keep an eye on fertility levels. • Crops on field edges often do poorly due to tree shading and competition for nutrients,
and may actually cost more than they return. Use these poor crop sites for field borders.
• Field borders work best with:
Conservation Tillage Contour Farming Contour Stripcropping Crop Rotation Terraces Wildlife Habitat
MAINTENANCE: • Repair rills and small channels that may develop, and reseed as necessary. • Control grazing if livestock have access to field borders.
• Shut off spray equipment when turning on a field border.
• Delay mowing until nesting birds leave, generally mid-April through mid-September.
• Let native plants reseed themselves. This continues the vegetative cover and can save
money.

HOW IT WORKS: Strips of grass or native vegetation slow down water flow and trap contaminants like sediment, chemicals, and nutrients. Filtered runoff then enters water bodies. HOW IT HELPS: • Filter strips are a stream's last line of defense because they help remove contaminants from
the runoff. Even the best conservation measures allow some soil, chemical, and nutrient movement during heavy rains.
• They promote a greater diversity of farm wildlife. Native vegetation provides cover and
nesting for small animals and birds near water. THINGS TO KNOW: • Forested filter strips are better for removing nutrients from the runoff, while grass filter
Filter Strips use grass or other vegetation to filter runoff and remove sediment before it can reach
water bodies.

strips excel at removing sediment. The best system is a combination of both.
• Filter strips should be at least 12 feet wide on gentle slopes; wider on steeper slopes. Other factors that determine width include soil type and plants used.
• The right plant density is even more important than the strip width. Plants need to be
dense enough to trap sediments, and plant density needs to increase with the clay content of the soil.
• For easy maintenance, strip width should be in multiples of farm equipment width. For
example, use 16, 24, or 32-foot wide strips if equipment is 8- feet wide.
• Avoid herbicide drift from adjacent cropland. CONSIDER THIS, TOO: • Research shows that farms with native plant filter strips and field borders support
substantially more quail, rabbits, and songbirds than do farms without these features. • Be sure to install adequate conservation measures above the filter strip to reduce sediment
buildup.
• Use filter strip plants adapted to your soil type.
• Rarely do filter strips need fertilizer because the trapped nutrients are used by the vegetation.
• They are also effective as grass middles in orchards.
• Filter strips work best with:
Contour Stripcropping Conservation Tillage Constructed Wetlands Crop Rotation Farm Ponds Nutrient Management Pesticide Application Runoff Management Stream Protection Well Protection Wetlands Wildlife Habitat
MAINTENANCE: • Repair rills and small channels that may develop, and reseed as necessary.
• Control grazing if livestock have access to filter strips. • Remove trapped sediment as needed.

• Shut off spray equipment when crossing a filter strip.
• Delay mowing until nesting birds leave, generally mid-April through mid-September.
• As in Field Borders, let native plants reseed themselves. This continues the vegetative cover and can save you money.
RELATIVE COST:
There is a low out-of-pocket cost for this practice.
Note: Field borders and filter strips are excellent wildlife habitat when managed correctly. An area 16 feet wide and ½ mile long results in less than one acre taken from crop production.

Grassed Waterways A grass waterway is natural or constructed, channel-shaped or graded to required dimensions and established with suitable vegetation for the stable conveyance of runoff.
Grass waterways provide for the uniform movement of water resulting in reduced sediment and other
substances delivered to collection basins. This practice may reduce the erosion in a concentrated flow area, such as in a gully or in temporary gullies. It may also reduce the amount of sediment and substances delivered to collection basins, surrounding lakes, and streams. Vegetation may act as a filter in removing some of the sediment delivered to the waterway, although this is not the primary function of a grass waterway. Grassed waterways should not be used as travel lanes and vegetation must be maintained to prevent erosion and control runoff. Grass waterways provide for the uniform movement of water resulting in reduced sediment and other substances delivered to collection basins. Grass waterways should not be used as travel lanes and vegetation must be maintained. They are, however, ideal to help provide drainage for water run off of roadways and to channel runoff water to temporary retention areas for further filtering before leaving the property.

Permanent Vegetative Control Permanent vegetative control is defined as controlling runoff and erosion on disturbed areas by establishing a perennial vegetative cover. The purpose of permanent vegetation is to reduce erosion and decrease sediment yield from disturbed areas, and to permanently stabilize such areas in a manner that is economical, adapts to site conditions, and allows selection of the most appropriate plant materials. Permanent vegetative establishment will stabilize disturbed areas, reducing erosion and sediment loss.
Permanent vegetation establishment will stabilize disturbed areas, reducing erosion and sediment loss.

Runoff Water Management Erosion is the process by which the land surface is worn away by the action of water, wind, ice or gravity. Water flowing over exposed soil picks up detached soil particles and debris that may possess chemicals harmful to receiving waters. As the velocity of flowing water increases, additional soil particles are detached and transported. Water flows have tendency to concentrate, creating small channels and eventually gullies of varying widths and depths. Sedimentation is the process by which soil particles settle out of suspension as the velocity of water decreases. The larger and heavier particles, gravel and sand, settle out more rapidly than fine silt and clay particles. It is difficult to totally eliminate the transportation of these fine particles even with the most effective erosion control program. Container nurseries are especially susceptible to erosion during times of new development and prior to filling empty container beds.
Container nursery beds are especially susceptible to erosion during development and when the beds are empty.
A plan for erosion and sediment control should be developed which explains and stipulates the measures and actions to be taken to control potential erosion and sedimentation problems. The plan should serve as a blueprint for the location, installation, and maintenance of practices to control all anticipated erosion, and prevent sediment from leaving the nursery. This plan should be developed in cooperation with the local Natural Resources Conservation Service (NRCS) personnel and the NRCS Field Office Technical Guide. In addition, each individual state may have more specific information. An example is the Alabama Handbook for Erosion Control, Sediment Control, and Storm water Management on Construction Sites and Urban Areas.
A plan for erosion and sediment control should be developed for each container nursery.

Sediment Basins trap runoff water temporarily and let sediment settle out.
HOW IT WORKS: A small dam built in a terrace or waterway stops running water and allows the sediment to settle out of the water. The clear water soaks into the ground, or a perforated pipe lets it drain away slowly.
HOW IT HELPS:
• Basins keep sediment out of streams. This helps water quality because much of the nutrients and pesticides are attached to the sediment.
• By holding the runoff, sediment basins give sunlight a chance to break down some of the
pesticides.
• They control gully erosion in fields.
• Grassed sediment basins provide some cover for wildlife.

THINGS TO KNOW:
• Sediment basins are good on fields that have irregular topography. • They don't correct the erosion problem at its source, but they do remove sediment from
runoff. CONSIDER THIS, TOO:
• Since sediment basins increase water infiltration, nutrient and pesticide management are important to avoid ground water contamination.
• Sediment basins work best with:
Conservation Tillage Contour Farming Contour Stripcropping Critical Area Planting Diversion Filter Strips Nutrient Management Pesticide Application Terraces Waterway
MAINTENANCE:
• Remove accumulated sediment before it fills the basin. • Check the basin after each big storm, and make any needed repairs.
• Keep the basin outlet clear of trash.
RELATIVE COST: Contact the local District Conservationist to discuss.
Note: Soils form in layers. Soil scientists call these layers "horizons."

SEDIMENT TRANSPORT Purpose Suspended solids or sediments are recognized forms of water pollution and often result in loss of ditch or canal capacity. Sediment losses may also be associated with reductions in water clarity, which may lead to a reduction in dissolved oxygen levels due to decreased light penetration and photosynthesis. These solids originate from four primary sources: 1) soil particles eroded into ditches; 2) soil particles eroded from ditches; 3) plant material washed into the ditches; and 4) plant and biological material growing within the ditches and canals. Estimates of up to 75% of water quality parameters such as nutrients, pesticides, and metals have been associated with sediments. In addition to potential downstream water quality impacts, the build-up of silts and sediments in the grove/farm-level, secondary, and primary drainage canals reduces ditch and canal cross-section. This reduction in cross-sectional area results in higher water velocities, as compared to the same volume in an unfilled ditch or canal. This higher water velocity (compared to unfilled ditches/ canals) may induce greater amounts of erosion of fine and coarse particles from ditch and canal banks. The presence of shoals and sandbars are good indicators of soil losses. Field erosion also results in site degradation resulting in increased costs for ditch-cleaning and reshaping of beds and furrows. In order to minimize effects of sediment transport in surface water, efforts should focus on keeping soils in the fields and along canal and ditch banks. Minimizing downstream transport of sediments from groves and canal/ditch banks requires an integrated approach of managing erosion at the grove-level, the secondary canal system level (i.e. Indian River Farms Water Control District, St. Johns Water Control District, Sebastian River Water Control District, Fellsmere Farms Water Control District, Delta Farms Water Control District and/or privately owned and operated water control systems that all feed into the St. Johns River Water Management District system). Erosion control measures for the secondary and primary canal systems are beyond the scope of this document. This document focuses on practices that can help reduce sediment losses at the individual property owner’s level. It should be noted that maximum sediment losses from a property are expected during the construction of new construction or renovation process. Losses from mature, well managed established properties will be much lower. The following sections describe BMPs that are applicable for water conveyances within individually owned properties. The selection and implementation of particular BMPs must be based upon site-specific circumstances and management styles. Following the brief description of each BMP are sections containing detailed descriptions of the BMP and/or techniques for reaching the BMP objective(s).
NOTE: Water conveyances within an individual property are defined as follows:
• Water furrow - typically a 2-3 ft deep ditch with gently sloping sides. They are used to transport water away from the root zone.

• Lateral ditch - Lateral drainage ditches are cut at right angles to the beds. They accept drainage from the water furrows.
• Collector Ditch – A collector ditch collects water from several lateral ditches.
• Retention Area or Pond: A retention area or pond collects rainwater that can be used
for irrigation.

Water Control Structure Allows water to drop safely to a lower elevation
HOW IT WORKS: Concrete, metal, or rock structures protect the soil from erosion caused by concentrated, flowing water.
HOW IT HELPS:
• It improves water quality because it stops gully erosion and reduces sediment reaching streams.
• Fish habitat improves when sediment stays out of streams and ponds.
THINGS TO KNOW:
• It dissipates or absorbs the energy of flowing water, and acts as a permanent barrier between the water and soil.
• It can be used as a stable outlet for other conservation practices.
• It can be designed to blend in with the landscape.
• Install soil conservation measures above a grade control structure to keep sediment out.

CONSIDER THIS, TOO:
• It can be used anywhere that concentrated flowing water is causing erosion and is especially effective in stopping a gully or in stabilizing road ditches.
• It can be relatively expensive and is usually used where other methods won't work or have failed.
• Proper design is important; there are a lot of variables involved. Call the Conservation District office for guidance with design.
• Grade control structures work best with:
Runoff Management Sediment Basins Waterway
MAINTENANCE:
• Clean out accumulated sediment as needed.
• Keep water flow within the structure to prevent side cutting and erosion.
• Keep any trash racks clear of debris.
RELATIVE COST: Contact the local Conservation District to discuss. Note: Soils have names just as plants and animals do and are classified in much the same way.

A Waterway prevents gullies from forming by safely directing excess water from a field.
HOW IT WORKS: A natural drainageway is graded and shaped to form a shallow, wide channel. Then the area is seeded to grass. This protects the soil, slows the water, and guides it off the field, greatly reducing gully erosion.
HOW IT HELPS:
. Grass cover protects the drainageway from gully erosion.
. Vegetation acts as a filter to remove sediment from runoff. This is especially important because sediment clogs streams and also carries phosphates and pesticides that can hurt water quality.
. Vegetation provides cover and nesting for small animals and birds, especially when including native warm-season grasses in the seeding mix.

THINGS TO KNOW:
. Vegetation can be difficult to establish. Drill grass seed across the slope or at least in a zigzag pattern. If seed is broadcast, cover lightly with a harrow in the same way.
. A firm seedbed will greatly increase the chance of getting a good stand. If a footprint is less than a half-inch deep, a firm seedbed is present.
. Mulch the area with straw to protect it until a stand is established. "Crimp" it in with a disk (zigzag pattern), or use other methods so it doesn't wash away.
. When your particular grass is out of season, plant a cool season small grain in the winter or a millet in the summer, then establish the permanent grass later using a no-till drill. Tip: Check with the Conservation District about no-till drill rentals.
. A seeding mixture, rather than a single species, improves chances of success. The mix should provide both immediate and long term cover.
CONSIDER THIS, TOO:
. Stabilize the outlet end of the waterway to protect it from the concentrated runoff.
. Install other conservation practices above the waterway to prevent filling it with sediment.
. Some components of this system cannot be completed in one growing season, because they may rely on the full performance of an earlier component.
. Waterways work best with:
Contour Farming Contour Stripcropping Conservation Tillage Diversion Grade Control Structure Sediment Basins Terraces Wildlife Habitat
MAINTENANCE:
. Lift tillage equipment off the ground and shut off spray equipment when crossing a waterway.
. Don't use the waterway as a roadway!

. Seed row crop patterns perpendicular to the waterway. Then use the waterway as a turn area if needed.
. Don't plant end rows along edges of the waterway. A new gully could form.
. Fertilize as needed and mow periodically. RELATIVE COST: Contact the local District Conservationist to discuss.

Collection Basins (This information is applicable only if there is an intense level of nutrient and pesticide use.)
Use of collection basins may be a primary means of reducing potential water quality problems. Several states have endorsed this concept with varying degrees of regulation. The goal of each operation should be that no irrigation water leaves the property. Evaluation of each site will determine if collection basins are necessary or possible.
Collection basins should be developed to collect the irrigation return flow During the irrigation season, to the maximum extent practicable, all irrigation return flows should be re-circulated with no discharge back to public waters. As a general rule, newly constructed water collection and recycling facilities should be designed to accommodate the irrigation return flow. If irrigation return flow is used for another irrigation practice not associated with the container nursery, it is considered equivalent to recirculation, provided no discharge to public waters occurs.

This schematic shows the potential means and movement of water in container nursery production
facilities Collection basins should be constructed with clay-like materials with good sealing characteristics or be lined with an acceptable membrane liner. These basins should be constructed with an emergency overflow to prevent dike damage in the event of overtopping. Basins or other structures that are planned for construction must have all necessary state and local permits. Where rainwater is allowed to discharge from the property, it must be considered in the design of the water collection basin. The Natural Resources Conservation Service Field Technical Guide can provide design criteria and expertise to help the owner develop the best plans for a nursery collection or retention basin. Collection basins are a primary means for reducing the potential of chemical laden water leaving the container nursery site. If rainwater is discharged from the property, it must be considered in the design of the collection basin.

Constructed Wetlands provide a simple and low maintenance
way to help treat farm wastes and storm water runoff.
HOW IT WORKS:
Natural processes clean wastewater as it flows through specially constructed basins that contain water, soil, and plants.
HOW IT HELPS: • It helps water quality in several ways:
- wetland plants recycle excess nutrients, and microorganisms convert excess nitrogen into a less harmful form.
- it physically traps sediment because it slows the water flow. - it reduces pathogens.
• It can greatly reduce the land requirements for waste disposal. • It reduces wastewater volume by evapotranspiration.
• It can be used in operations where land owners and managers cannot use the nutrients for
crop production.

THINGS TO KNOW: • It uses the same natural processes to purify water that natural wetlands use.
• It runs on plants and microbes, which are free, instead of consuming power and
chemicals.
• It can be a component of any waste management system and is suited for small farms.
• Constructed wetlands can be built almost anywhere by shaping the land surface and sealing the basin to collect water.
• They work best when used in conjunction with lagoons.
• This is a no-discharge system where the effluent can be used to irrigate crops or reused in
the waste management system.
• There's little odor, and it will attract wetland wildlife. CONSIDER THIS, TOO: • Plan ahead to select the right plant types and build at the right time of year. • Check for any needed permits before starting. The design should always be approved by
your local Soil and Water Conservation District office
• Never build a constructed wetland in a floodplain. . Multi-celled systems need gently sloping land so they can drain from one cell to the next.
• It's not designed for large-scale solid manure disposal.
• Constructed wetlands work best with:
Diversion Filter Strips Nutrient Management Manure Storage Runoff Management Waste Management
MAINTENANCE:
• Use conservation measures above constructed wetlands to control erosion at the source.
• Keep livestock and burrowing animals out.

• Clean pipes and valves that may clog with salts and sediment buildup.
RELATIVE COST: Contact the local District Conservationist to discuss this conservation practice and other ways to operate a small farm, ranchette or country estate more efficiently while at the same time protecting the natural resources.
Note: All storm water coming off our land in our coastal community enters the Indian River Lagoon. Manure from a 200-cow dairy operation produces as much nitrogen as is in the sewage from a community of 5,000 - 10,000 people.

Off-Site Discharges after Excessive Rainfall Water Table Management Water table control can be managed more efficiently by: having sufficient hydraulic capacity in the ditch/canal system, using water control structures on culverts, laser land leveling where appropriate, constructing and maintaining a properly designed drainage system, and actively monitoring the water table. Scheduling Irrigation and Drainage Drainage and irrigation schedules should focus on optimal crop production that encourages deep rooting by maintaining a water table that minimizes water quantity and quality impacts. During intense rainfall periods, when drainage rates are insufficient to prevent upward fluctuations of the water table, root pruning can occur. Therefore, irrigation and drainage practices should be focused on maintaining a well-defined root zone that can be managed during both drought and wet periods. Moderate Discharge Rate Adjust the rate of discharge proportionate to the rate of lateral movement of water through soils. This can lessen the turbulence, reduce sediment movement, reduce erosion, and moderate the impacts on the receiving water body. Water Furrow Maintenance Maintain a consistent bottom slope on water furrows between beds to achieve uniform drainage. Avoid rutting and sloughing of water furrow areas. Monitor Soil Moisture Use tensiometers and water table observation wells for irrigation and drainage management to avoid excess soil moisture depletion and minimize water volume requirements during irrigation cycles. Drainage Management Plan Implement and maintain a written drainage management plan that provides specific re-sponses to various types and levels of rainfall. The goal of the plan should be a reduction in volume of off-site discharge while maintaining a healthy environment for citrus production. The plan should include target water table levels and pump or drainage structure operating procedures that will be used for typical and extreme rainfall events. Consideration should be given to the use of existing canals and ditches for temporary water storage. USDA-NRCS Conservation Plans can be used to help develop drainage management plans. Drainage Rate and Volume Drainage rates and the volume of water released or discharged following intense rainfall events should provide an adequately drained root zone while minimizing off-site impacts. When the water table approaches the target level, off-site discharges should be moderated. Depending on the design, this may require reducing pump rpm, adjusting the discharge structure, or pulse drainage (discharging for short periods of time and then allowing for

recharge in the ditches). If adequate drainage in one portion of a grove results in water tables that are below target levels in another area, ditch cleaning, drainage system redesign, or auxiliary pumps may be needed to achieve more uniform drainage. Discharge Structures Structures and/or pumps that regulate off-site water discharge should be adequately designed, constructed, and maintained so that target water table levels within your property can be achieved. If safety or operational concerns prevent structures from being adjusted to regulate discharges during storm drainage events, they should be rehabilitated or replaced. (i.e. modifying riser-board structures to allow easier water level control ) Detention On-site detention should be utilized, where possible, to reduce both the rate and volume of off-site discharges following heavy rains. Detention areas allow all or a portion of the drainage water to be temporarily stored on-site. The excess water can be stored for use or released later at low flow rates.
Ponds supply water for livestock, recreation, aesthetic use and wildlife.
HOW IT HELPS: • It helps prevent soil erosion and protects water quality by collecting and storing runoff water. • It helps pasture management by providing livestock a steady water supply. • It provides water for irrigation and fire emergencies with dry hydrant and adds beauty and value
to a farm or country estate. • It holds floodwater and reduces downstream flood damage. POND DESIGN AND CONSTRUCTION The first step in determining a design is to consider the purposes for which the pond will be used. A pond built for drainage or watering livestock is not necessarily the best design for a fish pond. If the pond serves more than a single purpose, construction should reflect its primary purpose.
Ponds used primarily for agricultural purposes such as water storage or watering animals should be designed to minimize adverse impacts that farming activities may have on water quality. Livestock access should be limited to a small area to reduce erosion and prevent high turbidity levels. Runoff from crop fields should be diverted with swales or berms to prevent excessive nutrient loading, siltation and contamination by pesticides. Information on planning, design and construction of ponds is available from the United States Department of Agriculture. Contact the local Soil Conservation Service agent and ask for Agriculture Handbook Number 590. Most ponds constructed in Florida consist of a hole excavated in fairly level ground and require minimal site maintenance. A second type is constructed where ground elevations vary significantly and requires an embankment to impound water.

The local Soil Conservation District agent can provide detailed pond construction information about site selection, soil permeability, whether a plastic liner is needed and locations for soil analysis. This information is essential in determining a pond's natural fertility, pH and ability to retain water. If possible, design a pond to allow complete draining. Dewatering is accomplished easily in embankment ponds through a standpipe/spillway system, while a water pump can be used in excavated ponds. The ability to dewater allows for fish population renovation, bottom improvement and vegetation management. Ponds designed primarily for fishing should incorporate as much shoreline as possible. The amount of available shoreline can be increased by use of peninsulas and islands in construction. Such construction increases the "edge effect," which results in concentration of sport-fish and improves fishing success. Ponds should be constructed with steep slopes (20- to 30-degree grade) to a depth of 8 to 15 feet. Steep shorelines will naturally limit the growth of aquatic plants. A narrow band of vegetation benefits the pond by providing fish habitat and preventing shoreline erosion. However, excessive plant growth can cause problems. Sodding or stabilizing the land adjacent to the pond immediately after construction also will reduce erosion. Digging ponds deeper than 15 feet does not increase fish production, and deep ponds can develop serious water quality problems if thermal stratification occurs. A well-designed fish pond where the bottom contours are irregular creates what fishermen call "structure." Fish tend to congregate in these areas, making it easy for anglers to catch them. A landowner or manager can create structure during pond construction by leaving elevated outcroppings or rock piles or by installing fish attractors made of tree limbs. Regardless of its purpose, a pond's appearance can be improved by using appropriate principles and techniques of design. Good design includes consideration of size, site visibility, relationship to the surrounding landscape and use patterns, and shoreline configuration. POND CAPACITY Estimate pond capacity to be sure that enough water is stored in the pond to satisfy the intended use requirements. A simple method follows:
• Establish the normal pond-full water elevation and stake the waterline at this elevation. • Measure the width of the valley at this elevation at regular intervals and use these
measurements to compute the pond-full surface area in acres. • Multiply the surface area by 0.4 times the maximum water depth in feet measured at the
dam. For example, a pond with a surface area of 3.2 acres and a depth of 12.5 feet at the dam has an approximate capacity of 16 acre-feet (0.4 x 3.2 x 12.5 = 16 acre-feet) [1 acre-foot = 325,651 gallons]. Alternative pond sites should be evaluated for potential visibility and compatibility with surrounding landscape characteristics and use patterns. Identify major viewpoints (points from which the site is viewed) and draw the important sight lines with cross sections, where needed, to determine visibility. If feasible, locate the pond so that the major sight line crosses the longest dimension of

water surface. The pond should be placed so that a viewer will see the water first before noticing the dam, pipe inlet, or spillway. Often, minor changes in the dam alignment and spillway location can shift these elements out of view and reduce their prominence. If possible, locate a pond so that some existing trees and shrubs remain along part of the shoreline. Vegetation adds aesthetic value by casting reflections on the water, provides shade on summer days, and helps blend the pond into the surrounding landscape. A pond can often be located and designed so that an island is created for recreation, wildlife habitat, or visual interest. In addition to the more typical farm and residential sites, ponds can be located on poor quality landscapes to rehabilitate abandoned road borrow areas, dumping sites, abandoned rural mines, and other low production areas.
The illustration below shows a preliminary study of two alternative sites for a pond to be used for livestock water, irrigation, and recreation:
* Viewpoints - Sight lines
Vegetable garden
THINGS TO KNOW: • Check for needed environmental permits before working near streams or wet areas. Call the
Conservation District. • Perform a thorough site and soils check before building to be sure the location is suitable. Again,
call the Conservation District. • Install soil conservation measures above the pond so sediment doesn't fill it up. Be careful about
spray drift from adjacent fields.
CONSIDER THIS, TOO:
//////////////////////////////////////////////////////////////////////////////

• Control livestock entry to reduce sediment and excess nutrients in the pond. • Divert runoff from barnyards or feeding areas away from the pond, or at least install Filter Strips
to help clean the runoff. • Ponds work best with:
Conservation Tillage Contour Farming Diversion Filter Strips Runoff Management Soil Surveys Soil Testing Stream Protection Wildlife Habitat
MAINTENANCE: • Inspect the pond regularly, and repair eroded spots promptly. • Remove burrowing animals from the edges. • Keep spillways and overflows clear of debris. • Maintain a filter strip around the pond. RELATIVE COST: Contact the local Conservation District to discuss.
Note: Water is the only substance necessary to all life; many organisms can live without oxygen, but none can live without water.
Pond Multiple Purposes
An owner may wish to use the water in the pond for more than one purpose; for example, to provide water for recreational uses, livestock watering, fish production, and spraying field crops. If so, two additional factors must be considered. First, in estimating your water requirements you must total the amounts needed for each purpose and be sure that you provide a supply adequate for all the intended uses. Second, make sure that the purposes for which the water is to be used are compatible. For example, many wells in Indian River County are too salty for fish and livestock. Some combinations, such as irrigation and recreation, generally are not compatible. The owner would probably use most of the water during the irrigation season, making boating and swimming impractical. Ponds used temporarily for grade control or as sediment basins associated with construction sites can be converted later into permanent ponds by cleaning out the sediment, treating the shoreline, and adding landscape measures. If a sediment basin is to be cleaned and reconstructed as a water element, the standards for dam design should be used. This pond, which served as a sediment basin while homes in the background were being constructed, now adds variety and value to the community.

Fish Production Many land users are finding that fish production is profitable and/or a recreational outsource. A properly built and managed pond can yield from 100 to 300 pounds of fish annually for each acre of water surface. A good fish pond can also provide recreation and can be an added source of income should an owner wish to open it to people in the community for a fee. Ponds that have a surface area of a quarter acre to several acres can be managed for good fish production. Ponds of less than 2 acres are popular because they are less difficult to manage than larger ones. A minimum depth of 8 feet over an area of approximately 1,000 square feet is needed for best management with littoral zone for fish beds. The county limits pond and water hole depth to a maximum of 12 feet.

Fire Protection A dependable water supply is needed for fighting fire. If a pond is located close to a house, barn, or other building, provide a centrifugal pump with a power unit and a hose long enough to reach all sides of all the buildings. Also provide for one or more dry hydrants (figs. 1 and 2), in the event of a major fire requiring Fire Department support. (Check with local Fire Marshall on approved design and capacity.) Although water-storage requirements for fire protection are not large, the withdrawal rate for fire fighting is high. A satisfactory fire stream should be at least 250 gallons per minute with pressure at the nozzle of at least 50 pounds per square inch. Fire nozzles generally are 1 inch to 1-1/2 inches in diameter. Use good quality rubber-lined fire hoses, 2-1/2 to 3 inches in diameter. Preferably, the hose should be no more than 600 feet long. A typical fire hose line consists of 500 feet of 3-inch hose and a 1-1/8 inch smooth nozzle. A centrifugal pump operating at 63 pounds per square inch provides a stream of 265 gallons per minute with a nozzle pressure of 50 pounds per square inch. Such a stream running for 5 hours requires 1/4 acre-foot of water. If the property is located in an area protected by a rural fire fighting organization, provide enough storage to operate several such streams. One acre-foot of storage is enough for four streams. The owner may want to consult with the County’s Fire Department for further considerations. Your local dealer in pumps, engines, and similar equipment can furnish the information you need about pump size, capacity, and engine horsepower.

Figure 1 - A dry hydrant is needed when a pond is close enough to a home or barn to furnish water for fire fighting
Figure 2 - Details of a dry hydrant installation A 4.5-inch bronze cap-steamer hose connection is added to a bronze nipple 4.5-inch in steamer to 4 or 6 inch pipe. A 4- or 6-inch pipe elbow is connected to a 4- or 6-inch pipe riser, which is 24 inches above the ground level. 24 inch
A cast iron elbow is needed at above connection. The underground pipe is 4- or 6-inch galvanized steel or other equally durable pipe and is referred to as the ‘suction pipe’.

WILDLIFE MANAGEMENT
The availability of water, food and cover may attract many types of wildlife to your pond. Many species add to the natural beauty and enjoyment of the pond while others may cause problems.
Most birds are an aesthetic asset to ponds. Wading birds such as herons, egrets, ibis and even wood storks may visit a pond to feed. These birds will eat small fish but will not affect the fishery. Cormorants and Anhinga swim underwater in pursuit of small fish. An osprey or eagle may grab a large game fish, but their effects are insignificant. Bird boxes may attract many desirable species such as insect-eating purple martins, blackbirds and swallows. Discourage domesticated ducks from using your pond. Their droppings can cause poor water quality.
Most people are afraid of snakes, and the feeling is mutual. Pond owners should learn to identify venomous snakes. Non-venomous water snakes are much more common, and they feed on a variety of animals including rats and mice. Most snakes prefer overgrown banks, so routine mowing should eliminate their desired habitat. Frogs are very vocal at night when pond owners are trying to sleep. Frog density in the pond will be very low when bass are managed properly.
Many people incorrectly assume turtles are harmful to a fish population. The diet of most turtles consists primarily of vegetation and dead animals. A few species such as alligator

snapping and soft-shell turtles do feed primarily upon fish, but their predation is not detrimental to the total fish population. Turtles can be caught for food. Contact your local agricultural extension office for information concerning the taking of turtles.
Alligators are migratory at times and will find your pond sooner or later. Their presence is of little concern unless they lose their fear of humans. Feeding alligators is dangerous and strictly prohibited by state and federal laws. They do not affect recreational fisheries and will usually leave the pond in search of mates. If the landowner or manager observes an alligator more than 4 feet long that displays bold or aggressive behavior, call the local Animal Control office and request its removal.
Otters are cute and fun to observe, but unfortunately, they can harm the fish population of a small pond. Details concerning otter removal are available from any agricultural extension office.
Irrigation Management meets the crop's water needs, minimizes runoff, and protects the soil from erosion.
Monitor crops’ need for water by using Water Table Observation Wells (left) and
tensiometers (right). Photo is courtesy of Florida Research Center for Sustainable Agriculture.
HOW IT WORKS: Crops are not irrigated randomly. Managed irrigation takes into account available soil water, rainfall history, crop needs, and other information.
HOW IT HELPS: • It helps water quality by preventing over-watering and affording irrigation only to meet
crop needs. That helps because:
- silt and sediment are not washed into ditches and canals.

- nutrients and pesticides stay in the field. - surface water contamination moving from the farm is minimized. - fertilizers and pesticides that are still active are not lost and continue to give the
benefits that you paid for while the surface water moving from the farm is not polluted.
• It conserves water use, which is especially important during droughts. • Proper water use can mean higher yields and greater profits. THINGS TO KNOW:
• Know when to irrigate, and how long. Then set the system accordingly. • Over-application wastes water, energy, and money, and raised maintenance costs.
• Use soil moisture meters, such as tensiometers and Water Table Observation Wells to
know how much available water is in the soil right now.
• Computer software makes juggling all the variables much easier if the irrigation application is large enough to justify it.
• Timing is important. Don't use micro irrigation to inject chemicals when they are
vulnerable to loss.
• Know the soil. Don't exceed the infiltration rate or the amount it can hold in the root zone. The excess will run off, degrading water quality entering the Indian River Lagoon, SJRWMD and the Upper St. Johns River Basin.
CONSIDER THIS, TOO: • Use an irrigation system that suits your needs, including micro sprinklers or drip
irrigation. There are different types within each system. • Where practical, laser leveling fields can reduce runoff and cut water use by one-third.
• When injecting nutrients or pesticides into the irrigation system, use an approved
injection system equipped with check valve and anti-siphon device to prevent well contamination when applying nutrients or pesticides.
• Irrigation water can be tested where problems with salinity or nutrients are suspected.
Call the local Cooperative Extension Service.
• Irrigation management works best with:

Micro and Drip Irrigation Filter Strips Keeping Good Records Nutrient Management Runoff Management Setting Realistic Yield Goals Soil Surveys
MAINTENANCE:
• Occasionally check to see if the water is uniformly applied. Nozzles wear out.
• Calibrate any soil moisture meters regularly.
• Maintain the equipment on a regular schedule. RELATIVE COST: Contact the local District Conservationist to discuss. Note: Irrigated farmland in the U.S. rose from 30 million acres in 1950 to 51 million acres in 1992.

Landscape Irrigation Evaluation As A Water Conservation Practice
The following article was taken from the Landscape & Garden Section of the Proc. Fla. State Hort.
Soc. 117: 249-253. Abstract. In 2001, Indian River County’s Orchid Island Golf and Beach Resort was unable to continue new home construction because their irrigation water use exceeded their consumptive use permit. An evaluation of their irrigation systems and landscapes was conducted by a team of the local USDA/NRCS Mobile Irrigation Lab technician and UF/IFAS County Extension Agents. The analysis revealed that time clocks were set at initial landscape installation rates, and irrigation systems had continued to operate at these levels for several years. Recommendations were developed for this community that included the use of the following key irrigation practices: calibrating irrigation equipment, correcting distribution problems, cleaning and adjusting sprinkler heads, and installing or repairing automatic rainfall shut-off devices. Recommendations were imple-mented during the late spring high water demand period, and resulted in a 57% drop in annual water use. Presentations were made to the property owners and landscapers. A follow-up of practice adoption and water consumption rates shows that an on-going community education program is necessary to impact water conservation. Mobile Irrigation Labs (MIL) were developed to help people conserve water and protect water quality, two top priorities in Florida. They are particularly useful where regulations and consumptive use restrictions continue to increase. The MIL technicians provide on-site evaluations of individual irrigation systems and work with property owners to develop irrigation water management plans. The plans include recommendations to improve system performance and teaching irrigation managers how to operate their irrigation systems more effectively. (Holzworth, 2004.) A partnership between the UF/IFAS Extension programs in Water Quality and Environmental Horticulture and the Urban MILs can demonstrate a team approach in teaching Floridians how to use their water resources wisely. According to the South Florida Water Management District, in the last four years MILs in south Florida have saved over 3.3 billion gallons per year. (SFWMD, 2003.) Individual homeowners receiving urban MIL evaluations reportedly saved over 4,500 gallons of water per month and $7.00 in water costs (SFWMD, 2003.) When recommendations to modify the irrigation systems are made, retrofitting costs of $200 are paid back in 29 months. Authored by: Janet Bargar, University of Florida, IFAS, Indian River County Extension Service, Vero Beach, FL 32960 Elwood Holzworth, USDA, Natural Resources Conservation Service, Mobile Irrigation Laboratory, Vero Beach, FL 32960 Corresponding author: Daniel F. Culbert, University of Florida, IFAS Okeechobee County Extension Service, Okeechobee, FL 34972 Additional Index Words: Consumptive use permit, Florida Yards and Neighborhoods, irrigation water management, Mobile Irrigation Lab, water management districts.

Irrigation Water Management (IWM) as defined by the USDA MILs is applying water according to crop needs in an amount that can be stored in the plant root zone. Irrigation is applied when available soil moisture is depleted 30-50%, depending on time of year. The length of irrigation time is the time it takes to refill the root-zone. The amount of water to be applied is generally ¼” – ½” on turf grass, depending on depth of root-zone. The frequency of irrigation is 1-2 times per week depending on time of year, age of planting and long-term behavior of the irrigated turf (Culbert, et al., 2001.) Proper IWM considers available water capacity (AWC) as the portion of water in a soil that can be readily absorbed by plant roots of a crop. Soil moisture depletion is the amount of water required to raise the content of the crop root-zone to field capacity. Field capacity is the amount of water a well-drained soil holds after free water has drained because of gravity. For a coarse textured soil, drainage occurs soon after irrigation (or rain) because of relatively large pores and low soil particle surface tension; for a fine textured soil, drainage takes much longer because of smaller pores. (Culbert, et al., 2001.) Major soil properties that affect the field capacity are texture, structure, bulk density and the strata within the profile that restrict water movement. Generally fine textured soils can hold more water than course textured soils, while soils can hold more water than course textured soils, while soils with large amount of organic matter hold water longer than sandy soils. Compaction increases soil density, reduces pore space and decreases permeability. Restrictive layers can restrict root development and water movement lower in the soil. (Culbert, et al., 2001.) With rapid development of residential areas continuing in Florida, water management districts are scrutinizing the use of landscape irrigation water. Developers must apply for a consumptive use permit (CUP) to allow them to use either surface or groundwater resources in landscapes or for potable water. Water management districts, the Florida Department of Environmental Protection and local governments have embraced programs such as the Florida Yards & Neighborhoods Program as a way to reduce landscape irrigation water use and stormwater runoff. One of the many urban developments in Florida is a 412-acre golf and residential community that has also incorporated itself as a municipality in Indian River County. The Orchid Island Golf and Beach Club has 156 acres of golf course and 122 acres of residential and common areas under-irrigation. This community constitutes the major portion of the Town of Orchid, located on the barrier island north of Vero Beach, and is an upscale development of single-family homes, courtyard homes and condominiums which include many recreational amenities that are attractive to affluent retirees. The St. Johns River Water Management District regulates irrigation water use in this area of Florida. Their staff recommended that Orchid be issued a CUP in February 2000 in the amount of 258.2 million gallons per year (mgy) of stormwater and non-potable ground water for irrigation of the golf course, residential and common areas. (Knight, McGuire & Associates, 2000.) Of this amount, 77% (198.8 mgy) was designed to come from stormwater retained in internal lakes. The balance comes from two 10 inch artesian wells that draw from the Floridian aquifer from depths of 750 and 800 feet. The permit

allows the community’s wells to be opened only when needed to maintain pond water levels, especially during periods of drought. This community installed an irrigation system that is segmented into golf course use and residential/common area systems, each powered by independent pumping stations. The urban landscape use pump has a capacity of 550 gallons per minute (gpm), and supplies irrigation water throughout the 283 home sites and 10 beach condos. This irrigation water is not metered, and the system costs are handled through the Property Owners Association (POA). The residents’ potable water is supplied by the county utility system through individual meters. Materials and Methods In January 2001, the County Extension office was asked to provide assistance to the Orchid Island Golf and Beach Club with their irrigation system. Agents from the local University of Florida County Extension Service invited the local urban MIL technician to an initial meeting with members of the property management team and a POA representative on January 15, 2001. The property managers provided an overview of water use and rainfall statistics in the community (Table l). The water use values revealed that the community was currently using 207% more water in the urban landscapes than their CUP allowed despite being at only 60% build out and with all common area landscapes installed.
Table 1 - Annual Urban Water Use - Orchid Island Golf & Beach Club, 1999-2003 Percent of Percent of Year Net water usez Permitted Annual use permitted Annual normal
water usez over permittedz water use rainfallyw rainfallx 1999 160,192,000 110,789,000 49,403,000 5% 47 -8.03%2000 215,818,000 110,789,000 105,029,000 95% 44.33 -13.77%2001 340,321,000 110,789,000 229,532,000 207% 52.35 1.82%2002 108,474,000 110,789,000 -2,315,000 -2% 89.15 73.40%2003 155,822,301 110,789,000 45,033,301 41% 47.97 -6.69%
zWater in gallons yRainfall in inches xBased on normal rainfall of 51.51” (NOAA) wValues for 1999-2001 from Bayer Labs, Vero Beach; 2002-03 values from Orchid Island (on-site) Developers and landscape managers also revealed that the urban irrigation systems were calibrated to be within 2% of the manufacturer’s recommended rates at installation. Application decisions were based on the amount of moisture in the ground. The community irrigation system for Orchid’s homes and common grounds was independent of golf course irrigation system; the operating pressure for these urban uses was approximately 75 psi in daytime hours, while during night time high-use periods the pressure often dropped below 20 psi. There was some concern about salinity of the irrigation water, especially during drier months when well water from the Florida aquifer would be used. Prior to 2001, a
mysterious clogging of the system was also causing homeowners to run their systems for longer periods of time, further dropping water pressure and encouraging even longer run times, further wasting water. The major assistance requested of the Extension/MIL team was to develop homeowner recommendations on how long to water their landscapes. From the perspective of the developer, the question was how much water would be needed. A member of the POA board noted hat a monthly community newsletter was distributed to all property owners, and might be a way to get an educational message out to the community (Tench, 2001.) It was agreed that coring samples would be taken to determine soil water-holding capacities. Five basic kinds of landscape plans were found to represent the kinds of homes present in the development, so that only five evaluations would be necessary to develop irrigation schedules for all homes in the community. The amount of water needed to irrigate these five lots was then multiplied by the number of residences of that type to estimate all the water needs of the community. The team agreed that after evaluations were completed and recommendations developed that the group would meet again to review the recommendations. Recommendations would then be presented at the annual general meeting of the community’s POA. It was noted that implementation of these recommendations would be made gradually so that landscape quality would not be affected. Management also felt that implementation of the irrigation schedule could be done during the springtime, which is the season with the highest irrigation water demand. The following steps and calculations were used to determine run times:
1. The number of irrigation heads of each pattern (1/4 round, ½ round, full circle, side spray) was counted. Water was collected for a noted amount of time. The following calculations were then made:
a. Watering rate for each type of head (m1/sec) x 0.016 = n gpm. b. Number of heads x n gpm = total gpm for that type of spray pattern.
2. Measurements for each different kind of spray head pattern produced gpm rates for each zone. These rates were summed, and the total gpm was divided by the square footage of the zone. The product was converted to inches per hour by multiplying by 96.3.
3. The run time for each zone was determined by multiplying the total iph by 60
minutes to give the minutes of run time.
After run time and frequency recommendations were developed, it was recognized that implementation of these recommendations would also take the involvement of landscape maintenance professionals. At the time that this project was undertaken seven different landscape maintenance companies operated in Orchid. Representatives of these companies were invited to attend the POA annual meeting, and copies of the irrigation schedule were sent to these service providers.

One of the participants in the POA meeting was the property manager of the adjacent development of Windsor. He indicated that his residents had similar issues with water conservation. In this community, municipal (potable) water was used for landscape irrigation, and homeowners were motivated towards water conservation not by financial considerations, but by the high volumes of water used and recorded on their individual water meters. A second set of irrigation evaluations was conducted by the MIL, and a second set of irrigation run times was recommended to this community’s management office on August 3, 2001. A workshop was planned and held for landscape maintenance personnel on September 12, 2001 at Windsor. Thirteen participants were provided with background information and reference materials on irrigation water management and given hands-on practice in using these irrigation management and given hands-on practice in using these irrigation management techniques. A tool kit (Table 2) was assembled by the MIL and given to the property manager’s offices for use by landscape management personnel so they could perform these evaluations as needed.
Table 2 - Irrigation Evaluation Tool Kit soil core sampling tool
plastic gallon jug - catch bottle stopwatch
graduated cylinder - measuring device calculator
special hose and saddle pressure gauge
measuring tape or wheel
laminated worksheet with formulas Results On January 25, 26 and 29, 2001 the MIL technician and Horticultural Extension agent worked with the property’s irrigation manager to complete evaluations of five typical lots. Soil core samples taken showed that the soils consisted of a coarse yellow sand and slightly finer whiter sand. Cores taken near the beachfront condos indicated that some marly shell rock fill existed approximately six inches below grade. In some cases, soil core samples taken just after irrigation had been applied show wetness below the root-zone, indicating over-irrigation. Each irrigation zone was operated, the number of emitters was counted, the operating pressures were measured and the flow rates were calculated. Square footage of each zone was calculated (Culbert, et al., 2001). Using this information, irrigation run times for five typical lots were calculated (Table 3).

Table 3 - Orchid Island Irrigation System Evaluations Orchid Island Irrigation System Evaluations
Proposed Schedule for 5 Typical Lot Sizes Caribe Way
Zone Application Rate Flow (gpm) Time** Gallons per Event1 4.15 iph 27.37 8 218.962 2.71 iph 16.38 11 180.183 2.33 iph 33.62 13 437.064 3.26 iph 52.34 9 471.065 2.92 iph 30.36 10 303.60
Total 1610.86Club House Court
Zone Application Rate Flow (gpm) Time** Gallons per Event1 1.36 iph 20.84 22 458.482 1.75 iph 28.95 17 492.153 2.30 iph 221.63 13 281.194 .86 iph 18.79 36 657.65
Total 1889.47Indies
Zone Application Rate Flow (gpm) Time** Gallons per Event1 3.60 iph 135.80 8 1086.402 2.57 iph 83.50 12 1002.003 .81 iph 26.66 37 986.42
Total 3074.82Pembroke
Zone Application Rate Flow (gpm) Time** Gallons per Event1 3.70 iph 30.70 8 245.602 2.30 iph 20.85 13 271.053 4.98 iph 27.95 6 167.704 1.92 iph 8.50 16 136.005 1.38 iph 24.20 22 532.40
Total 1352.75White Pelican Circle
Zone Application Rate Flow (gpm) Time** Gallons per Event1 .85 iph 28.55 35 999.252 2.36 iph 32.07 13 416.913 .50 iph 22.90 52 1190.804 .61 iph 13.49 49 661.015 .98 iph 24.90 30 747.006 1.15 iph 14.15 26 367.907 4.47 iph 16.24 7 113.688 1.86 iph 23.14 16 370.249 1.00 iph 16.64 30 499.20
10 .47 iph 18.93 64 1211.5211 4.15 iph 19.49 8 155.92
Total 6733.43**Time - Minutes to operate each zone to apply .5" of water.

Frequency of each irrigation event needed was determined by applying irrigation water management (IWM) principles as used by USDA/MIL and University of Florida turfgrass researchers. For this community, a maximum of two irrigations per week was suggested as a compromise that would be easy for landscape managers to implement, yet would maintain available water capacity and allow for CUP levels to be followed. Observations of the landscape revealed other issues in this community that related to their urban irrigation water use. Timers were originally set from 15 to 30 minutes per zone and varied from 3 to 5 to 7 days per week. These settings, and interviews with homeowners and landscapers, indicated that most landscapes had been installed with timers set to apply irrigation rates typical fro newly established plant materials. It appeared that these delivery rates had not been adjusted as the plants became established. Very little root growth on St. Augustine turf was noted. Sprinklers sometimes were obstructed by shrubs, which caused pudding and runoff onto driveways and roads or resulted in dry spots in the landscape. It was recommended that landscapers and homeowners observe each zone in operation and adjust positioning/heights of sprinklers and/or prune shrubs and grass to avoid obstruction of spray pattern. Community water use values are summarized in Figure 1. This figure shows that a drop in consumption of irrigation water occurred between 2001 and 2002, with the amount in 2002 being 2% less than CUP levels. In 2003, consumption climbed 47% above permitted amounts.
Figure 1 – Net Water Use
Annual Total
0
50,000,000
100,000,000
150,000,000
200,000,000
250,000,000
300,000,000
350,000,000
1999 2000 2001 2002 2003
45%95%207%2%4%
340,321,000
215,818,000
160,192,000 Permitted gallons: 110,789,000
108,474,000
155,822,301
Gallons

Climatic records for 2001 showed that the community received nearly normal rainfall levels, while in 2002, levels 73% above normal were recorded in this community. From the information available, it is difficult to determine if the drop in irrigation water use was due to the irrigation recommendations made, or if excessive rainfall was the major factor in the drop in community water use. A follow-up evaluation of practice adoption was conducted in 2004 (Bargar, 2004). Of the 13 workshop participants, none of those attending were available to respond to questions about how the workshop may have affected their ability to evaluate irrigation systems. Comments received were that companies had gone out of business or that workshop attendees had moved out of the landscape maintenance employment. Comparing water consumption in Figure 1 to staffing patterns, it is noted that during the latter part of 2002 the newly hired Water Quality Extension Agent left the county, and that the County Extension Director/Horticulture Agent left this county in 2003. Without staff support, there was little opportunity for continued training of landscape maintenance personnel in irrigation management, nor was there staff available to monitor and assist these property managers. Conclusions Results from this project allowed the team to determine the total community water use levels, and these figures indicated fluctuations in consumption and their relationship to the CUP. The use of these procedures can show water management districts, property developers and property owners if they are in compliance with these regulations. Application of these procedures in other communities may reveal opportunities for property managers to act immediately on sudden spikes in water usage. These procedures can provide a method for management to demonstrate compliance with CUPs and request permit modifications. It is noted that continuous staffing of those available to provide irrigation educations programs may have played a role in the inability of this community to reduce their landscape irrigation water use. Without on-going programming and evaluation, irrigation efficiency and water conservation may be a function of weather patterns. Communities committed to water conservation will need to provide on-going training programs and support to property management and POAs to conserve water. Finally, another recommendation would be for property managers to “listen to the technicians”. In this case the irrigation specialist indicated to this evaluation team that he had informed management of a problem, but that they were slow to react. The data in this instance came in monthly reports. The CUP together with monthly usage figures can allow management to assess spikes in water use, which can serve to motivate changes in how urban landscape irrigation systems are operated.

Literature Cited for this report: Bargar, J., 2004. Results of survey regarding Landscape Irrigation at Windsor, Vero Beach: UF/IFAS Indian River County Extension Service, May 2004. Culbert, D., Scotto, L. and Holzworth, E., 2001. Windsor Water Conservation and Water Quality Workshop. (Program bulletin.) Vero Beach: Indian River County Extension Service, March 20, 2001. Culbert, D. and Holzworth, E., 2001. Water needs and scheduling of Orchid Island landscapes. (PowerPoint presentation notes.) Vero Beach: US/IFAS Indian River County Extension Service, March 20, 2001. 2001. Drought brings water-use restrictions to home. Vero Beach Press Journal, March 10, 2001, p. A7. Holzworth, E., 2004. Mobile Irrigation, Vero Beach. Summer 2000. Knight, McGuire & Associates, 2000. Orchid Island Golf & Beach Club – Report on Irrigation. Vero Beach, Summer 2000. Ibid. Community Water Usage Reports. Orchid: 1999-2004. South Florida Water Management District (SFWMD), 2003. Quick Facts on Mobil Irrigation Labs. West Palm Beach, FL. http://www.sfwmd.gov/images/pdfs/splash/spl_mobile_irrig.pdf Tench, J.R. 2001. The Overlook. Orchid: Orchid Island Golf & Beach Club, February 2001. (Monthly community newsletter.)

ADVANTAGES OF A RAIN BARREL*
Lawn and garden irrigation make up nearly 40% of total household water use in the summer. A rain barrel collects water and stores it for when you need it most – during periods of drought – to water plants, wash your car, etc. It provides an ample supply of free “soft water” that contains no chlorine, lime or calcium. A rain barrel will save most homeowners about 1,300 gallons of water during the peak summer months. Saving water not only helps the environment but also money and energy. Diverting water from storm drains also decreases the impact of runoff to streams and other water bodies in Indian River County. One inch of rain on a 1000 square foot of roof yields 625 gallons of water! Rain barrels are a great way to collect some of this water. Not only does this give free water, but rain water is better for plants. A rain barrel should be placed where the landowner or manager does not have access to a spigot. Keep the compost pile moist to promote the decomposition process throughout the year. Make a “compost tea” by putting some compost in an old pillowcase or pantyhose and put in the barrel. Add a bag of water-soluble fertilizer in the barrel to produce 50 gallons of fertilizer at a time rather than mixing a gallon at a time. Connecting a soaker hose to the barrel is a great way to water shallow-rooted plants. It takes about 8 to 10 hours to empty a barrel this way. Watering plants with warm water in a barrel reduces shock and damping off of transplants. Collecting rainwater in a barrel directs moisture away from building foundations. A full barrel will provide water to 240 square feet of garden space – the equivalent of a 1 cm rain shower. Workshops are provided throughout the year. Contact Christine Kelly-Begazo at the Agricultural Extension Service office at 772-770-5030. *Information provided by University of Florida, IFAS Extension, Janet Bargar, Water Quality Agent. Adapted from Hillsborough County Extension Material

NOTE: Barrels come in many sizes, shapes, and colors. A 55-gallon barrel can fill up with a 1/2-inch rainfall, depending on the size of
your roof.
White drums seem to disintegrate more quickly in the sun.
Barrels either have removable lids or are "sealed," with two small openings. It is easier to clean out debris with removable lid barrels. The "sealed" barrels have a flat bottom and may be more stable.
1. Drill 15/16-inch hole at the first even part of the barrel -about 6 to 8 inches from the barrel bottom
2. Screw 3/4-inch spigot about half-way into the hole -it will be a very snug fit. 3. Apply the PVC cement to the exposed threads and finish screwing spigot into the
drum.
4. If using a downspout, use a saber saw to cut a hole in the lid so that downspout fits snugly. Caulking can be applied where the downspout meets the barrel top.
5. Other options: If your house does not have downspouts, use an open lid barrel. Drill large screws or bolt into the drum, below the threads. Place a small-mesh screen over the top, with screen edges overlapping the screws. Place a bungee cord around the barrel, below the screws, to hold the screen in place.
6. Elevate barrel on two to three sets of concrete block lying on their sides. This will allow easy access to the spigot and provide more water pressure.
7. You may want to add an overflow downspout at the top of the barrel -or a second spigot- so that you can direct the overflow into a specific part of your yard.
Indian River County
1028 20th Place, Suite D
Vero Beach, FL 32960-5360
Phone: (772) 770-5030
Fax: (772) 770-5148
http:/ /indian.ifas. ufl.edu
HOW TO MAKE A RAIN BARREL ADAPTED FROM HILLSBOROUGH COUNTY EXTENSION MATERIAL
TOOLS: Electric or Hand Drill 15/16-inch Drill Bit Sabre or Hand Saw
SUPPLIES: Plastic Drum (preferably food grade)
3/4-inch male-thread spigot (with slant head) PVC Cement
DIRECTIONS: Be sure to only use barrels that have carried food products!
The Institute of Food and Agricultural Sciences (IF AS) is an Equal Opportunity Institution authorized to provide research, educational information and other services only to individuals and institutions that function without regard to race, color, sex, age, handicap or national origin. U.S. Department of Agriculture, Cooperative Extension Service, University of Florida, IF AS, Florida A&M, University Cooperative Extension Program, and Boards of County Commissioners Cooperating.
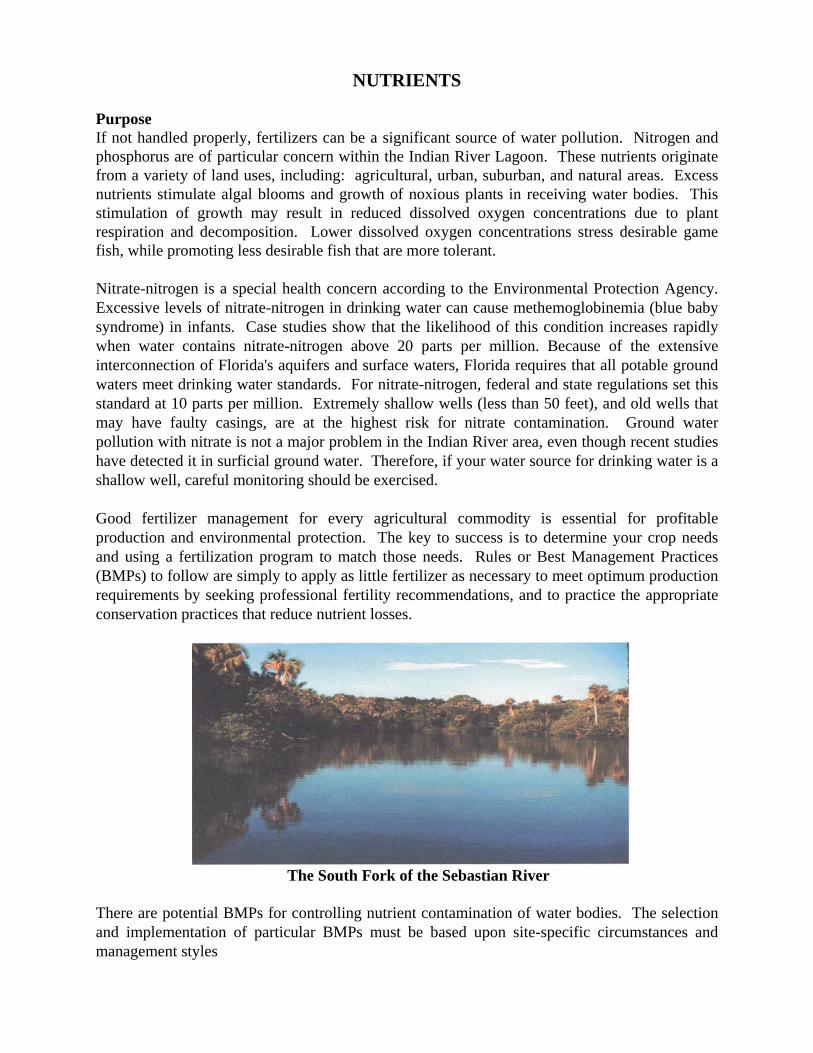
NUTRIENTS
Purpose If not handled properly, fertilizers can be a significant source of water pollution. Nitrogen and phosphorus are of particular concern within the Indian River Lagoon. These nutrients originate from a variety of land uses, including: agricultural, urban, suburban, and natural areas. Excess nutrients stimulate algal blooms and growth of noxious plants in receiving water bodies. This stimulation of growth may result in reduced dissolved oxygen concentrations due to plant respiration and decomposition. Lower dissolved oxygen concentrations stress desirable game fish, while promoting less desirable fish that are more tolerant. Nitrate-nitrogen is a special health concern according to the Environmental Protection Agency. Excessive levels of nitrate-nitrogen in drinking water can cause methemoglobinemia (blue baby syndrome) in infants. Case studies show that the likelihood of this condition increases rapidly when water contains nitrate-nitrogen above 20 parts per million. Because of the extensive interconnection of Florida's aquifers and surface waters, Florida requires that all potable ground waters meet drinking water standards. For nitrate-nitrogen, federal and state regulations set this standard at 10 parts per million. Extremely shallow wells (less than 50 feet), and old wells that may have faulty casings, are at the highest risk for nitrate contamination. Ground water pollution with nitrate is not a major problem in the Indian River area, even though recent studies have detected it in surficial ground water. Therefore, if your water source for drinking water is a shallow well, careful monitoring should be exercised. Good fertilizer management for every agricultural commodity is essential for profitable production and environmental protection. The key to success is to determine your crop needs and using a fertilization program to match those needs. Rules or Best Management Practices (BMPs) to follow are simply to apply as little fertilizer as necessary to meet optimum production requirements by seeking professional fertility recommendations, and to practice the appropriate conservation practices that reduce nutrient losses.
The South Fork of the Sebastian River
There are potential BMPs for controlling nutrient contamination of water bodies. The selection and implementation of particular BMPs must be based upon site-specific circumstances and management styles

Nutrient Management The purpose of this practice is to manage plant nutrients for optimum forage yields while minimizing the movement of nutrients to surface and ground water. Nutrient management considers the amount, source, form, placement, and timing of applications of nutrients. All sources of plant nutrients, such as organic and chemical fertilizer added and nutrient reserves within the soil are considered under this practice. Nutrient Budget A nutrient budget should be developed that considers all nutrient sources (soil residual, crop residues, organic and chemical fertilizer, and irrigation water) versus the required amounts of nutrients. Utilize forage analysis, soil testing or IFAS recommendations to determine what nutrients are needed. University of Florida, IFAS fertilizer recommendations for crop and forage crops should be followed. For bahia grass pastures, Florida's most common pasture forage, neither soil testing nor phosphorus and potassium fertilization is recommended for South Florida. Under most circumstances, only nitrogen is applied on bahia grass pastures. The amount of nitrogen to be applied is based on the intensity of use, but generally about 50 to 60 pounds of nitrogen/acre should be applied in late winter. This time correlates with a period of low to moderate rainfall and nitrogen fertilizer is least likely to be washed into surface waters. It is also the time ranches are most in need of forage. Other perennial grasses may need nitrogen in late winter and at other times through the year based on IFAS recommendations. The nutrient content of non-farm organic fertilizer (e.g. municipal sewage sludge) can be obtained from a sludge hauler or treatment plant. Applications must conform to standards developed by both the State of Florida and the U. S. Environmental Protection Agency. Extreme caution is recommended in applying municipal sludge to safeguard against applying any heavy metals inadvertently to your property. Timing of Nutrient Application To avoid nutrient losses through runoff, apply fertilizers during times with the least potential for leaching or surface runoff. Refer to the water budget (provided by NRCS) for your county to determine the times when the lowest potential for nutrient losses from rainfall occurs. Always make nutrient applications so that they coincide as closely as possible with periods of plant growth and nutrient uptake. Optimize Nutrient Uptake Maintain proper soil pH for optimum utilization of applied nutrients, while preventing toxic effects from other accumulated elements, such as copper. There are many publications with pH recommendations available at the local County Extension office.

Preventing Nutrient Movement Off-Site Include erosion control practices to minimize soil loss and runoff that can carry dissolved and soil-borne nutrients to surface waters. Filter strips along streams are very effective in reducing the levels of suspended solids and nutrients. Landowners and managers should try to prevent spreading fertilizers in ditches as this is a means of movement off-site. Also, the manager should place fertilizer loading sites away from ditches and canals where spills can contaminate the water. Fertilizers cost money and therefore you want to realize the full value of what you paid for in both material (actual fertilizer) and in its application. Landowners need to be sure not to waste fertilizers or throw them away as this could result in causing a pollution problem for the neighbors down stream. (Refer to NRCS Practice #590 when speaking with an NRCS representative.)

LEGAL ISSUES OF PESTICIDE USE
Definitions: A pest is anything that competes with humans, domestic animals, or desirable plants for food or water; injures humans, animals, desirable plants, structures, or possessions; spreads disease to humans, domestic animals, wildlife, or desirable plants; or annoys humans or domestic animals.
Types of pests include the following:
• Arthropods such as insects and arachnids; • Microbial organisms such as bacteria, fungi, viruses, and Mycoplasma; • Weeds, which are plants growing in an area where they are not wanted; • Nematodes; • Mollusks such as snails and slugs; and • Vertebrate pests.
Under Florida law (Chapter 482 Florida Statutes), Integrated Pest Management (IPM) is defined as the following:
. . . the selection, integration, and implementation of multiple pest control techniques based on predictable economic, ecological, and sociological consequences, making maximum use of naturally occurring pest controls, such as weather, disease agents, and parasitoids, using various biological, physical, chemical, and habitat modification methods of control, and using artificial controls only as required to keep particular pests from surpassing intolerable population levels predetermined from an accurate assessment of the pest damage potential and the ecological, sociological, and economic cost of other control measures.
Licensing Requirements for Pesticide Use in Lawn and Landscape Maintenance Not only should pesticides be used carefully, existing laws regarding pesticide applications and licensing requirements for conducting a business should also be complied with. There are three categories of licenses, (local occupational license, limited certification for commercial landscape maintenance license, or a pest control business license and a certified operator’s certificate) that could apply to persons who practice landscape maintenance as a business.
In most cases, if a person or company is providing services that only include mowing, edging, landscaping, and fertilizing, only a county or municipal occupational license is needed. (This does not apply to "weed and feed" applications.)
• If a person or company also applies any herbicide (even a granular product of a pesticide coated onto fertilizer), fungicide, or insecticide, to residential lawns or plant beds, a license for pesticide application is required from the Florida Department of Agriculture and Consumer Services (FDACS) Bureau of Entomology and Pest

Control. Failure to obtain a license can result in fines up to $5,000. This includes the application of "weed and feed" herbicide/fertilizer mixtures to lawns.
• If the only pesticides applied by a person or business are herbicides and "caution"-
labeled insecticides applied to plant beds or along the edges of pavement, then a limited certification for commercial landscape maintenance license is needed from the Bureau of Entomology and Pest Control. For this category, each applicator must have a license. This does NOT allow the application of pesticides to turf or the use of insecticides labeled "Warning" or "Danger," or the application of "weed and feed" herbicide/fertilizer mixtures to lawns.
• If any application of any pesticide is made to a lawn as part of a service provided by a
person or business, then a pest control business license and a certified operator’s certificate are needed from the Bureau of Entomology and Pest Control. This includes the application of "weed and feed" herbicide/fertilizer mixtures to lawns.
• Government employees and private business employees who are applicators also need
a pesticide license to make any applications to lawns or ornamental plants. This includes the application of "weed and feed" herbicide/fertilizer mixtures to lawns.
• Information on how to obtain these licenses can be obtained from FDACS Bureau of
Entomology and Pest Control at (850) 921-4177 or at http://doacs.state.fl.us/-aes-entlpestcntrllpcpagel.html.
• Applications of restricted use pesticides made to parks, cemeteries, and golf courses
require a license obtained through FDACS Bureau of Compliance Monitoring at (850) 488-3314 or at http://doacs.state.fl.us/-aes/compli.htm.

Proper Pesticides Management
This practice manages the types and amounts of pesticides applied in or on the soil or on plant foliage to minimize the impacts to surface and ground water. Pesticide application events should be strategically designed to target designated pest species and governed by the amount necessary to protect forage and livestock grown. Where feasible, pesticide application may be eliminated completely if adequate biological controls are available.
Pesticide Selection Pesticide recommendations change frequently. Registrations may be canceled or added at any time. Recommended rates or products that were valid at the start of the growing season may change. Check with the local Extension agent for the most recent recommendations, or access the computer based Florida Agriculture Information Retrieval System (FAIRS). Base pesticide selection on characteristics such as solubility, toxicity, degradation, and adsorption, considering site specific characteristics such as soil, geology, depth to water table, proximity to surface water, topography and climate, so that the potential for pollution of surface and groundwater is minimized. Also, landowners and managers should consider the effect of pesticide application on any beneficial organism that may be present. Using pesticides that have the least effect on beneficial organisms may allow longer periods between treatments, or eliminate completely the need for re-treating. Pesticide Application If applying restricted use pesticides, be fully trained and licensed according to the state law or hire someone who is appropriately certified. Read and follow all label directions and Material Safety Data Sheets (MSDS). Reduce the potential for ground and surface water contamination by reducing the amounts of application equipment rinsate as much as possible. Rinsing the sprayer is necessary only when changing from one pesticide to another pesticide in order to avoid crop injury, when moving to a new application site and the pesticide last used in the

sprayer is not registered for the new site, or when cleaning the sprayer for storage. Do not dump rinsate on the ground or discharge to surface waters or septic systems! Rinsate should be sprayed on fields where the pesticide was originally applied, as long as the maximum application rate for that pesticide is not exceeded. Another option is to store the rinsate and use it to dilute the same pesticide for the next application. Avoid mixing pesticides and loading or rinsing sprayers immediately adjacent to wells, since spills in these areas can easily contaminate water supplies. Run a long hose (100-200 feet) away and preferably downhill from the supply well to the mixing and sprayer loading-rinsing area. Install anti-siphon devices on all hoses used to fill sprayer tanks. By using erosion control practices that minimize soil loss and runoff, the movement of adsorbed pesticides to surface waters is also minimized. Field applications of pesticides should be minimized just prior to periods of anticipated heavy or sustained rainfall to prevent surface water contamination or accelerated leaching to groundwater and ineffective control of target organisms. Whenever possible, the landowner or manager should use integrated pest management (IPM) practices, including cultural, mechanical, biological and chemical methods. Consider the effects of the seasonal water budget on potential pesticide loss to surface or groundwater by using the Pesticide Evaluation Worksheet in Appendix C. A carefully selected application method reduces the potential for runoff or leaching. Foliar application and banding may be appropriate, depending on the specific situation. (Refer to NRCS Practice #595 when speaking with an NRCS representative.)

Integrated Pest Management (IPM) Integrated pest management (lPM) strategies should be used to minimize the amount of pesticides applied. In addition, pesticides should be applied efficiently and at times when runoff losses are unlikely by avoiding periods of anticipated rainfall. Use of IPM strategies is a key element of pesticide management. The following is a list of IPM strategies: Apply pesticides based on economic thresholds, i.e., apply pesticides when an economic threshold level has been reached as opposed to applying pesticides in anticipation of pest problems (some disease pathogens require preventative sprays on susceptible crops). Use periodic scouting to determine when pest problems reach the economic threshold.
Scouting is an essential component of any IPM program.
• Use less environmentally persistent, toxic, and/or mobile pesticides. • Maintain records on past pest problems, pesticide use, and other information for each
container area. • Use biological control for the following:

introduction and fostering of natural enemies of pests. preservation of predator habitats or rufugia. release of sterilized insects. example of biological agent: BT (Bacillus thuringiensis)
• Use pheromones for:
monitoring populations mass trapping disrupting mating or other behaviors of pests attracting predators/parasites
• Destroy pest breeding, refuge, and over wintering sites.
• Use spreader/stickers with fungicides and insecticidal sprays to increase efficiency and
reduce losses due to rain or irrigation.
For more information, please visit these valuable web sites: www.ipmnet.org www.attra.org/pest.html http://edis.ifas.ufl.edu/TOPIC_BOOK_Florida _Citrus_Pest_Management_Guide
http://edis.ifas.ufl.edu/advsearch.html (This site has a good search engine for IPM documents.)

Managing Pesticide Runoff Plants produced for the landscape require careful attention during production to maintain suitable plant quality. Landscape plants should be carefully selected taking into consideration both water and pest management needs, so as to minimize runoff. Container-grown landscape plants are grown under conditions that often favor development of pests that adversely affect plant growth. These pests may include weeds, insects, and diseases. In the past, pest control utilized preventative pesticide (herbicides, fungicides, or insecticides) applications. Current pest control involves scouting for pests on a regular basis, identifying the pest and selecting appropriate chemicals that are environmentally friendly and target existing pest problems. Other considerations are low volume applicators and proper sprayer calibration and nozzle adjustments. Training in proper pesticide application is offered by the local County Extension Office. Always read and follow the pesticide label.

HOW IT WORKS: Weeds are controlled with a planned program approach that maintains profits and helps protect water quality. HOW IT HELPS: • It controls weeds at the lowest possible cost by using the right practice at the right time.
• Smart herbicide use entails using the proper product correctly. This helps protect water
quality both on the farm and downstream.
• Spraying and tilling only when needed saves time, money, and maintenance.
THINGS TO KNOW: • The first step is proper weed identification.
• Spraying at the right growth stage can mean using less herbicide. That saves money
and helps kill the weeds easier.
• Make weed maps of each field and update yearly to monitor changes in infestations.
• Spray or cultivate only when weeds cross an "economic threshold," i.e., when
threatened crop losses cost more than spray or tillage operations. Landowners and
managers can contact the Cooperative Extension Service or the Conservation District
Weed Management is part of integrated pest management plan by protecting your fences, ditch banks, crops and the
environment.

office to help determine economic threshold.
• Use this economic threshold in all your pest management decisions. Don't do
"recreational mowing" or make unnecessary costly herbicide applications.
• Many weed species are valuable wildlife food and cover plants. They may be relatively
harmless to crop production unless they cross that economic threshold.
CONSIDER THIS, TOO: • Early scouting is especially important in conservation tillage fields.
• Healthy, vigorous crops will compete better for light, moisture, and nutrients without
excessive weeds and grasses.
• Avoid using the same herbicide repeatedly in the same field. This helps prevent
herbicide resistance and establishment of tolerant weed species.
• Cover Crops help keep weeds out and add organic matter to fields.
• Control weeds in pastures by timely mowing or grazing, rather than by herbicides.
Burning destroys organic matter, is less effective, and lets the soil erode.
• Weeds can be a challenge. For example a common cattail plant can produce one million
seeds and some species of pigweed can bear up to 600,000 viable seeds per plant.
• Weed management is a part of Integrated Pest Management, or IPM, and works best
with other measures such as:
Conservation Tillage Cover Crops Crop Rotation Field Scouting Keeping Good Records Pesticide Application Pesticide Handling Sprayer Calibration
RELATIVE COST: The degree of weed control is highly dependent on the type of crop and farming operation. Using the proper weed control program for your particular farm can always save money.

Pasture Management considers food, water, and herd size to maximize production and to lower sediment and nutrient runoff.
HOW IT WORKS: Pastures are managed to improve forage growth and quality, and to maximize animal production. HOW IT HELPS: • A well managed pasture has almost no soil erosion. This greatly reduces the amount of
chemicals and nutrients entering streams. • It protects a farm's water quality and water quality downstream. • Profits should rise because better forage quality increases feeding efficiency, plus it allows
more livestock on fewer acres. • It reduces costs and dependence on purchased feed.

• It helps ensure adequate forage throughout the year.
• It leads to higher forage yields, reduced fertilizer costs, and higher nutritional value for animals.
• It provides some food and cover for farm wildlife. • Good pasture management ensures strong, longer lasting stands. THINGS TO KNOW: • Soil type and animal needs determine forage choice. • Rotational grazing is a method that allows one pasture to begin regrowing while another is
being used. • Plan the paddocks or cells based on the recommended cutting interval for the forage. • Spot grazing is reduced by implementing pasture rotation. • Overstocking a pasture provides less nutrition per animal and damages the stand for future
use. Other consequences associated with overstocking a pasture include revenue loss and decreased water quality.
CONSIDER THIS, TOO: Plant cells are the factories that produce pasture growth. Overgrazing removes too many of these cells and reduces plant growth. • Cutting excess forage for hay will promote more nutritious new growth. • During good growth periods, omit some pastures or paddocks from the rotation. Cut these
pastures for hay to use during leaner times.
• Diversifying your pasture system with some native warm season grasses helps protect your forage supply against drought and improves wildlife habitat.
• Pasture management is a system of measures and includes:
Calibrate the Spreader Integrated Pest Management Keeping Good Records Nutrient Management Soil Testing Stream Crossings Stream Protection Waste Management Water Tanks Wildlife Habitat

MAINTENANCE: • Avoid overgrazing. Move animals to another pasture when the first pasture reaches
minimum grazing height. • Keep a reserve of hay or forage to use during periods of low pasture growth. • Test soil for fertility needs. • Mow at the right height and growth stage to keep a productive stand. • Control weeds. • Overseed bare areas when necessary.
RELATIVE COST: Since Pasture Management is a system of measures, the relative cost depends on the measures used. However, many need only an investment of time.
Note: Americans spend about 11 % of their disposable income on food. In France it's 26%, Mexico 32%, and in China 48%.

Water Tanks give livestock a protected place to drink.
HOW IT WORKS: Animals drink clean water from a tank instead of a ditch canal or pond. HOW IT HELPS: • It really helps a farm's water quality when you manage livestock's access to ditches or
canals. • Animals’ health may improve by drinking clean water. They are less likely to get foot
diseases if they don't stand in stagnate water. This lowers veterinary costs. • Reduce ditch bank erosion where animals used to enter the ditch or canal and you are
able to keep them out by providing alternate drinking water sources. • It gives opportunities to better manage the grazing, manure distribution, and resting
patterns.

THINGS TO KNOW: • Use gravel over geotextile fabric, or use concrete around the tank to keep a dry surface. • Even with a concrete pad, use geotextile fabric and gravel at the edge of the pad. A
concrete pad alone will only shift the site of the mud hole. • Locate the tank so that runoff doesn't enter nearby ditches and canals. Divert runoff
around the tank. • If the water supply comes from a potable water system, use an antisiphon device to
protect the water used for human consumption. CONSIDER THIS, TOO: • Livestock need an ample, clean, and convenient supply of fresh water; otherwise, it will
hold down potential performance.
• If possible, use more than one tank to distribute grazing and minimize pollution around the watering area.
• Animals will eventually prefer to drink from the tank instead of the ditch.
• Water tanks work best with: Diversions Filter Strips Pasture Management Stream Crossings Stream Protection Waste Management MAINTENANCE: • Put ordinary goldfish or minnows in the tank to control algae. • Maintain and repair the area around the tank pad to reduce wet areas and erosion. RELATIVE COST: Contact the local District Conservationist to discuss.
Note:

A dairy cow needs up to 36 gallons of water a day.

UNTREATED BUFFER ZONES NEAR BODIES OF WATER
Except when adjacent to a protective seawall, always leave a "Ring of Responsibility" around or along the shoreways of canals, lakes, or waterways. This avoids fertilizing too close to a body of water. It is important to ensure that fertilizers and other lawn chemicals do not come into direct contact with the water or with any structure bordering the water, such as a sidewalk, brick border, driveway, or street.
Leave a "Ring of Responsibility" as shown by the lighter green area, to prevent pollution.
This untreated buffer zone protects the water quality of the waterway. When applying liquid fertilizers, the Ring of Responsibility should be at least 3 feet from the edge of the water. The same is true for applying granular fertilizers with a fertilizer spreader that features a deflector shield. A deflector shield only allows fertilizer to be distributed on one side. This half-circle application (instead of the typical full-circle application of most fertilizer spreaders) allows for a more accurate fertilizer application. When applying fertilizer without a deflector shield, the Ring of Responsibility should extend at least 10 feet from the edge of the water.
Spreader with deflector shield installed.

Fencing Fences may be installed to allow for rotation, deferment, and resting of grazing lands. To reduce erosion and avoid water quality degradation through improved distribution of grazing animals and wildlife, strategic location of your fences needs to be considered before installation. Fence locations should allow livestock access to water and working pens. If this results in undesirable fence placement, then installation of alternative water sources should be investigated. Areas of difficult terrain or areas that receive periodic standing surface water such as swamps and marshes should be avoided if possible. The locations and construction of all fences and its materials should comply with local, state and federal laws. The landowner should obtain all required permits prior to construction or any land clearing activity that may be regulated. Regular inspection of fences should be part of the on-going management program. Inspection of fences after storm events is needed to maintain the intended use of the fence. (Refer to NRCS Practice #382 when speaking with an NRCS Representative.)

Waterway (Ditch or Canal) Protection Improves livestock health and water quality by managing
animals' access to and/or in wet areas on your property
HOW IT WORKS: Fenced off buffer zones prevent animals from trampling banks and stirring up sediment in the ditch or canal’s bottom bed area.
HOW IT HELPS: • It reduces sediment from bank erosion from entering the farm's drainage waterways.
• Grass strips or native vegetation provide cover and nesting for birds and small animals.
• It filters runoff going into drainage waterways.
• It provides better access for fishermen without damaging banks.
• Mature trees lower stream temperatures by shading drainage way segment bottoms.

This improves the overall fish habitat.
• It improves livestock health. Animals are less likely to get hoof diseases if they don't stand in streams. This lowers veterinary costs.
• Livestock have limited access, but better quality drinking water. THINGS TO KNOW: • As a general rule, livestock should be managed to restrict free and unlimited access to
drainage and waterways.
• Overstocked pastures will almost always cause serious bank damage to drainage ditches and canals and decrease water quality to down stream waterways.
• Ditch and canal banks can be planted or allowed to volunteer in trees, shrubs, and forbs, which greatly improves wildlife habitat and bank stability. However careful consideration to how ditches and canals can be accessed for future cleaning should also be considered.
CONSIDER THIS, TOO:
• Install riprap and gabions along the outside curves of ditches and canals. This protects the banks from heavy drainage water flows and reduces erosion.
• Secure needed environmental permits before working near any ditch, canal or open
waterway.
• Ditch, canal and open waterway protection works best with:
Filter Strips Pasture Management Water Tank Wildlife Habitat
MAINTENANCE:
• Maintain fences to provide animals’ access to water sources.
• Remove trees and brush that interfere with desirable bank vegetation.
• Remove fallen trees and other debris that may cause added water turbulence, which can start bank erosion.

• Don't damage buffer zones with herbicides from surrounding fields. RELATIVE COST: Contact the local Conservation District to discuss. Note:
Water is most dense at 39.2° F. (4° c.). That's why ice floats; at the freezing point of 32°, it's lighter than the surrounding water

Waste Management Systems A waste management system consists of a series of components designed to manage liquid and solid waste from a concentrated animal area. Runoff and seepage are collected and recycled to prevent discharge of pollutants. Physical components include debris basins, dikes, diversions, fencing, filter strips, grassed waterways, pond sealing, pumps, water control structures, and waste storage facilities. Management components to provide treatment and recycling include irrigation management, nutrient management and waste utilization. Depending on the size and scope of the property and waste management problem, part or all of these components may become necessary to control waste problems. (Refer to NRCS Practice #312 when speaking with an NRCS representative.) Waste Storage Ponds A waste storage pond is an impoundment made by excavation or earthfill for temporary storage of animal or other agricultural waste. By storing liquid and solid waste, the pond prevents nutrient runoff. (Refer to NRCS Practice #425 when speaking with an NRCS representative.)

The A, B, C’s of Equine Composting
Introduction Animal manure management is a complex topic of concern to all members of society. It combines the physical aspects of the product, environmental factors such as rainfall, temperature, and soil characteristics in concert with hydrologic features such as wells, ponds, waterways, and water table levels. A concerted management effort is a necessary consideration of all farm owners and managers to enhance the ecological impact of the animal enterprise. Nuisances associated with animal manure are less objectionable when consideration is given to the appearance of the animal facility and to cultivation of good public relations. Flies, odors and dust are the main nuisances associated with animal manures and the first two are more prevalent in humid regions or where wet manure is allowed to accumulate. These three nuisances can be reduced to a large extent when the manure is managed so as to contain no more than twenty five percent moisture. Moisture management can be an effective control process for flies, odor and dust. Proper planning and installation of a manure management system opens up opportunities for a variety of uses of manure as a source of energy, protein and soil nutrition. No system is right or wrong for every situation but the way manure is handled affects its value. It can become an economical asset or an environmental hazard. Land application of animal manure, as a compost, is an efficient use because of the lower cost compared to treatment methods. Compost nutrients assist and maintain soil fertility, soil density, increase water-holding capacity, lessen wind and water erosion, and improve aeration. There are two principal objectives in applying composted manure to land:
1. Insuring maximum utilization of the manure nutrients by crops. 2. Minimizing water pollution hazard.
Improving land production is still the most practical current use for most animal manures. The most effective methods of controlling run-off and leaching of contaminants from manure is to establish a composting system and utilize the end product in an efficient manner. Planning for efficient composting and use abrogates the need for highly complicated manure disposal systems. Although economics frequently dictate the actions that farm managers take regarding the manure, the tragic waste of manure by destructive disposal should be avoided whenever possible as a matter of good farm economics and good public interest. Equine Manure Manure production from the equine industry includes solid and liquid equine waste, used litter or bedding material and waste feed stuff. The quantity and consistency of this product is dependent upon several factors:
1. The size, age, and function of the horse. 2. The quality and quantity of consumed feed. 3. What type of feed consumed? 4. The animal’s environment. 5. Other climatic factors.
Nutrients in the manure are affected by these processes, which occur between the time and location of defecation and the point of final deposition. Management of manure on equine farms has become an increasing problem in recent years. With the increased number of horses on smaller acreage, it behooves equine farm owners to consider composting the manure as a benefit to their overall operation. Composted manure is an excellent source of organic matter for the soil. Manure Production & Disposal The horse is a non-ruminant herbivore that normally ingests high fiber forages for nutrition. The utilization of concentrates in the equine diet is a product of man’s domestication and use of the horse. The horse’s unique digestion system composed of the caecum and colon is what allows the ingestion and fermentation of the high fiber forages. The caecum and colon are the sites of production of the volatile fatty acids and amino acid synthesis. The end result of this digestive process is the nutritional requirement of the equine system and the production of waste in the form of feces and urine, also termed manure. This material, in many instances, must be handled on a daily basis. A 1000 pound horse will defecate from five to twelve times each day and produce on the average 37 pounds of feces and 2.5 gallons of urine daily. This amounts to about 50 pounds of raw waste per day or approximately 9 tons per year. A ton of fresh horse manure will have a nutrient composition of about 13 pounds of nitrogen, 13 pounds of potassium and 5 pounds of phosphorous plus other valuable trace elements. Soiled bedding can be twice the volume of the manure, depending on the type of bedding material, and may equate to a total of 60 to 70 pounds of manure and bedding per day. Animal waste from a stalled horse can easily fill a 12 foot x 12 foot area about 6 feet deep. Why Compost? Many horse farm operations will stockpile the manure and bedding also known as Equine Manure Residue (EMP) and consider it composting. This is incorrect. Stockpiles of manure can be ideal breeding sites for flies, and have unpleasant odors, whereas composting is almost odorless, and the high temperatures generated from composting will kill fly larva as well as parasites, harmful bacteria and weed seeds. Composting also will reduce the size of the pile almost in half during the composition process. Compost is a good soil enhancer that can be used on pastures or sold to local landscapers. The ability to store manure in a composting system reduces or eliminates the need to spread manure on a daily basis. The main reason to store manure is to allow its utilization or compost at

a time when it will have the greatest benefit to the soil. Manure which has been composted is much superior to the daily application of fresh manure to the soil. When compost is applied to the land, it serves to improve soil structure by both water retention and aeration. The nutrients supplied by composted material will be slowly released which allows the plants to use it over a much longer period of time. Composted manure will release approximately one-half of the nutrients in the first season and the remainder in subsequent years. Over time, the nutrients will be built up in the soil so that little or no fertilizer may be required. Benefits of composting horse manure:
• Reduces odors and flies. • Kills parasites, harmful bacteria and weed seeds. • Reduces size of pile. • Produces a valuable soil amendment. • Make nitrogen less soluble and more available to plants. • Improves soil tilth. • Improves water-holding capacity of sandy soils. • Improves soil structure, porosity and density.
What is Composting? Composting is a biological process that utilizes heat, moisture, oxygen and microbial organisms to decompose plant and animal matter. The decomposition process breaks down materials into a nutrient organic matter that can be applied as a soil conditioner or fertilizer to pasture or crop land. There are two types of composting systems: aerobic and anaerobic. Aerobic composting occurs in the presence of oxygen. Aerobic composting is faster than anaerobic composting, has less odor production and creates temperatures that will destroy parasites, pathogens and weed seeds. Anaerobic composting is slower, does not create high temperatures, and may have an objectionable odor.

The most important factors to consider when composting are:
1. Aeration 2. Moisture 3. Temperature 4. Carbon to nitrogen ratio (C:N) 1. Aeration Aeration is important because the microbes need oxygen while they are composting the plant material. Turning the compost pile or adding air will speed up the process. After a pile is formed, air within the pile is necessary to realize the high temperatures, to prevent odors and to hasten the composting process. If a tractor is available, then turning the pile at regular intervals in the early phase of the pile will enhance the decomposition process. Turning the pile will help air to reach all areas of the pile and introduces the outside of the pile to the high temperature near the center. If it is not possible to turn a pile, then the insertion of five-foot PVC pipes into the center of the pile will assist with aeration. Holes should be placed in the PVC pipes at a half inch in diameter at approximately six-inch intervals. 2. Moisture The composting process may fail if the proper moisture conditions are not maintained. An excess of water in the compost pile will block the air flow which results in the compaction of the pile. The excess moisture prevents the achievement of the high temperature required and slows the compositing process. There also may be an odor problem. The same adverse effects occur if there is too little moisture in the pile. A compost pile that is too dry will not be able to attain the correct temperature and decrease the composting organisms activity. One can determine the correct moisture level by utilizing the squeeze test. The squeeze test – a handful of material from the inside of the pile should feel damp and retain its shape after squeezing. If the materials crumble, then it is too dry. Likewise if the material drips moisture without being squeezed, then it is too wet. Covering the pile – during the rainy season, it may be beneficial to cover the compost pile with a tarp to prevent it from becoming too soggy. Covering the compost pile allows the regulation of the amount of moisture in the pile. Using a tarp to cover the pile is an efficient way to control the moisture content. Turning the compost pile may help to dry it out if it becomes too moist as turning releases moisture. The heat and air flow in the composting process will cause the evaporation of water from the pile. In hot months, the pile may become too dry and may require the addition of water via a garden hose. 3. Temperature The temperature of the pile is an important indicator of the composting process. A pile must be at least three feet high in order to create temperatures to kill the parasites, bacteria, and seeds of weeds. Long-stemmed thermometers are available that can be used to monitor the internal temperature of the pile. Most compost piles have a starting temperature range of 50ºF - 100ºF then gradually rise to about 135ºF to 160ºF. As the pile matures, the

temperature in the pile will gradually drop over several weeks to the surrounding air temperature. Low outside temperatures in the winter months will slow down the decomposition of the pile while higher temperatures in the spring and summer will speed up the composting process. A well maintained pile can be composted in one to three months in warmer months while it may require three to six months in the cooler months. Overheating of the pile should be avoided as temperatures above 160ºF will be detrimental to the composting organism and slow the entire process. 4. Carbon:Nitrogen Ratio The organisms responsible for the composting require carbon for energy (C) and nitrogen for growth (N). However, the ratio of these two components must be in the correct proportions for optimum results. The ideal carbon to nitrogen ratio is between 20:1 and 30:1 with carbon the large number. High carbon products are plant materials such as straw, shavings, sawdust and leaves. High nitrogen products are animal by-products such as manure. Horse manure by itself has a good ratio. However, if there is too much bedding in the compost pile, there will be an excess of carbon and insufficient nitrogen. The more bedding in the pile, the longer the period required for the composting process. Different bedding materials will decompose at different rates. Straw, hay, and shredded newspaper will compost more rapidly than shavings, peanut hulls or sawdust, which are higher in carbon. In piles that have excessive bedding material, the composting process can be enhanced by adding high nitrogen products such as grass clippings or chicken manure.
Size of Compost Piles Compost piles can be any size but they typically range in size depending on the number of horses on the premises and the amount of manure production. For larger operations, a large pile, which can be aerated with a tractor, may be desirable. For smaller operations, having smaller piles may be more efficient and easier to maintain. Suggested List of Materials
Concrete slab or suitable ground where leaching or run-off will not occur 6 posts – 4” x 4” x 8’ 60 boards – may be either 2” x 6” x 8’ or 1” x 6” x 8’ Post hold differ Hammer and nails PVC – 3 – 4 inch by 5’ with holes
This material will make two bins and will accommodate from five to twenty horses depending on the amount of time the horses spend in stalls. The bins should be a minimum of four feet in height and may be higher if desired.

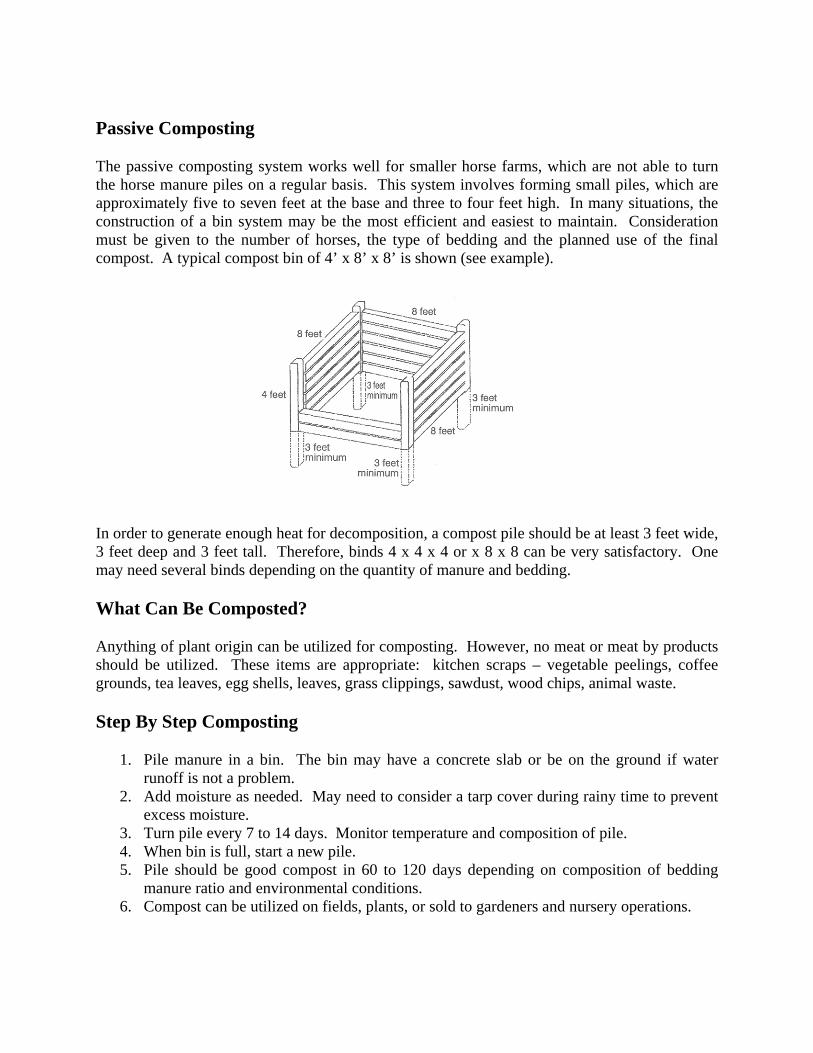
Passive Composting The passive composting system works well for smaller horse farms, which are not able to turn the horse manure piles on a regular basis. This system involves forming small piles, which are approximately five to seven feet at the base and three to four feet high. In many situations, the construction of a bin system may be the most efficient and easiest to maintain. Consideration must be given to the number of horses, the type of bedding and the planned use of the final compost. A typical compost bin of 4’ x 8’ x 8’ is shown (see example). In order to generate enough heat for decomposition, a compost pile should be at least 3 feet wide, 3 feet deep and 3 feet tall. Therefore, binds 4 x 4 x 4 or x 8 x 8 can be very satisfactory. One may need several binds depending on the quantity of manure and bedding. What Can Be Composted? Anything of plant origin can be utilized for composting. However, no meat or meat by products should be utilized. These items are appropriate: kitchen scraps – vegetable peelings, coffee grounds, tea leaves, egg shells, leaves, grass clippings, sawdust, wood chips, animal waste. Step By Step Composting
1. Pile manure in a bin. The bin may have a concrete slab or be on the ground if water runoff is not a problem.
2. Add moisture as needed. May need to consider a tarp cover during rainy time to prevent excess moisture.
3. Turn pile every 7 to 14 days. Monitor temperature and composition of pile. 4. When bin is full, start a new pile. 5. Pile should be good compost in 60 to 120 days depending on composition of bedding
manure ratio and environmental conditions. 6. Compost can be utilized on fields, plants, or sold to gardeners and nursery operations.

When is Compost Ready to Use? Finished compost is an earthy smelling, dark material that is evenly textured and crumbly. The composting process begins as soon as the manure is piled. If airflow and moisture are adequate, the microorganisms begin the process and the temperature of the pile increases. The process may require two to three months in summer and three to six months in winter. The temperature in the pile will drop as the composting process completes and a curing process begins. What to Do With Compost
Use compost in garden or landscape areas. Compost is good mulch for use around flowers, trees and shrubs. When using as mulch on trees and shrubs, start three inches from trunk and spread to outer edge about three inches deep.
Spread compost on pasture. Compost can be spread on pastures during the growing season. A thin layer about ¼ inch is sufficient. It can be put out with a spreader or by hand.
Sell compost. Nurseries, landscapers and organic farmers should be contacted as they frequently have a need for good compost.
Give away compost. Many people appreciate the use of good compost and will come and get it for free. A sign or an announcement in local newspapers is a good way to dispose of excess compost.

Compost Troubleshooting Guide
Condition or
Situation Possible Source
Or ReasonOther Clues Solution
Pile fails to heat Pile too dry Cannot squeeze water from material
Add water. Wet the pile
Material too wet Materials look or feel soggy. Pile slumps
Turn and / or cover pile
Not enough nitrogen Large amount of bedding
Add high nitrogen ingredients. Reduce bedding
Small size pile Pile height less than 3 feet
Enlarge or combine piles
Temperature falls consistently over several days
Low oxygen Temperature declines gradually rather than sharply
Turn and / or cover pile
Low moisture Cannot squeeze water from material
Add water
Odors Materials too wet, insufficient aeration
Low temperatures Turn pile, add PVC pipes, cover pile
Fly problem Flies breeding in composted manure
Cover pile with a tarp or a 6 inch layer of finished compost to prevent access
Information provided by Marion Soil and Water Conservation District, Ocala, Florida Dr. Thomas Lane, PhD

Well Protection reduces the risk of contaminating a family's drinking water.
Above photo is courtesy of Fl. Research Center for Sustainable Agriculture.
HOW IT WORKS: Forethought in planning a new well and using common sense when mixing farm chemicals protects a family's drinking water.
HOW IT HELPS: • Well protection increases the safety of potable well water. Most of the documented cases of
ground water pollution are caused at the wellhead. THINGS TO KNOW: • Always read and follow label directions for pesticides and other chemicals. • Mix farm chemicals and rinse containers at least 200 feet from the well and water bodies and
mix them on an impermeable surface so they can not get into the ground. • Keep fill hoses out of the spray mix tank • Use a backflow device to stop chemicals from siphoning back into the well.

• Be alert; don't let the spray tank overflow. • If the well is housed, never store farm chemicals in the well house. • Dispose of empty chemical containers according to regulations.
CONSIDER THIS, TOO: • The landowner and his/her family use the water supply. • Fueling and livestock areas should be as far as possible from the well. • Take your time when selecting a new well site; put it as far as possible from likely pollutants. • Properly seal abandoned wells to protect your water quality and eliminate the hazard of an
open hole. • Well protection works best with:
Diversion Filter Strips Integrated Pest Management Pesticide Handling Pesticide Loading Facility Runoff Management
MAINTENANCE: • Maintain filter strips around the well. • Repair the wellhead casing as needed. • Test the water periodically. Pollutants may enter from off-farm sources. • Repair any cracks in concrete pads used for chemical mixing, loading, or container washing,
so that chemicals stay out of the water supply. RELATIVE COST: Contact the local District Conservationist to discuss.

Wildlife Habitat creates, maintains, or improves food and cover for wildlife.
HOW IT WORKS: Planting trees, grasses, legumes, and shrubs that provide food and cover will attract wildlife to an area. Specific plants will attract specific kinds of wildlife.
HOW IT HELPS: • It helps water quality because ground cover helps reduce soil erosion, adds organic matter
to the soil, filters runoff, and increases infiltration. • It adds recreational and economic value, and beauty to the farm. • It gives raw, eroding areas a chance to heal and be useful.
THINGS TO KNOW:

• Look for good locations between fields and field edges, especially near water or a wetland.
• Spots that are barely turning a profit are often a good choice. • A diverse habitat will attract a wider variety of wildlife. • Smaller fields bordered by well-developed hedgerows attract more wildlife than large,
unbroken fields. • Unplanted strips on field borders create both food and cover for many wild animals. CONSIDER THIS, TOO: • Native grasses, legumes, and shrubs often provide excellent food and shelter for wildlife. • Include a planned food plot if possible. • Avoid high traffic areas so you don't endanger the attracted wildlife. • Wildlife habitat works best with:
Conservation Tillage Cover Crops Critical Area Planting Crop Rotation Field Borders Filter Strips Wetlands
MAINTENANCE: • Protect the area from grazing • Limit use of herbicides. If they are needed, then spot spray. • Avoid herbicides that would injure adjacent plants, especially those with wildlife
benefits. • Use prescribed burning, mowing, or disking when necessary.
RELATIVE COST: Contact the local District conservationist to discuss. Note: For over 60 years, Conservation Districts have provided the opportunity for citizens to have input into natural resource issues at the local, state, and national levels.

What is the Whole Farm Approach? The initial approach means just that - making decisions based on the effects on the entire farm including any homestead’s impact on the farm. Since the landowner can usually predict what these effects will be, he can plan his actions to fit into the larger picture off-site from his small farm, ranchette or country estate. That means he can squeeze the most from every dollar spent, and protect the soil and water sources at the same time.
For instance, a self-sustaining yield increase can occur after a few years of proper conservation tillage. The farm's surface water quality will also improve because less topsoil will wash in. The farm pond and fish life will then gain because fertilizers don't wash away, they stay in the field where they belong, and where the landowner paid for them to be. The ponds and ditches downstream will no longer become sediment traps, but instead will supply high quality water for farm animals and recreation.
The Little Things The yield increase and better water quality don't happen overnight. After a few years, the small farm ranchette or country estate will show significant improvement. As with most good

things in life, it all comes from doing the little things right. The big things will then take care of themselves with proper Best Management Practice implementation. Every conservation practice fits into the farm’s or ranchette’s picture like pieces of a jigsaw puzzle. That's why practices that don't seemingly relate to water quality will eventually have an impact; for example, Keeping Good Records, and Setting Realistic Yield Goals. They help the landowner or manager use less fertilizer while maintaining yields, which means you spend less money on fertilizer and protect water quality. Good Nutrient Management results in less fertilizer loss, which also improves water quality. Bonus: Some of the most beneficial practices, like Contour Farming or Field Scouting, take little or no financial investment.
This Best Management Practices manual will help by giving landowners the names of conservation measures that work best with other measures. Using conservation measures together in a system will give you the best results, and will also cost less in the long run.
First Things First Every good thing the landowner does on his small farm or ranchette has a positive ripple effect. The first step, though, in making the small farm or ranchette more productive and sustainable is having a good conservation plan. Since every small farm or ranchette is different, each farm's conservation plan will also be different. Landowners should contact the Conservation District to review conservation plans annually, or have one designed from scratch.
So what's another way to look at the whole farm approach? It's using several practices together in a planned way so the landowner doesn't merely think of conservation practices, but instead thinks of practicing conservation.

IMPORTANCE OF MAINTAINING
HEALTHY LANDSCAPES AND TURF
Well-planned, healthy landscapes designed with Florida-friendly landscape practices usually include trees, ornamentals, and a lawn of turf-grass or other ground cover. Native and well-adapted, noninvasive ornamentals contribute beauty and balance to a property, provide shade and wildlife habitat, and help to control erosion by diminishing the force of rainfall. Both the lawn and other landscape plantings reduce noise and glare, and modify temperatures. A healthy and vigorous turf with good plant density provides many benefits. Healthy grass is viewed as an aesthetic asset, and a growing body of evidence points to the positive health and environmental contributions made by lawns and other turf areas. Turf-grass plays a significant role in reducing water runoff in urban and suburban environments that have significant areas of impervious surfaces such as parking lots, sidewalks, and driveways. Dense turf reduces the velocity of runoff and allows greater infiltration into both the thatch and root zone, where microbes can begin breaking down the water contaminants. The turf-grass root zone is a unique soil system. A healthy root zone does the following:
• Improves soil structure and reduces soil compaction, allowing greater infiltration of rain or irrigation water;
• Improves soil processes that facilitate the biodegradation (breakdown) of various types of organic pollutants, air contaminants, and pesticides used in lawn care;
• Encourages soil-building processes through the decomposition of organic matter and formation of humus, and contributes to easier lawn care with fewer weeds and insects and less disease.
Treasure Coast landowners must keep in mind that all water leads to the Indian River Lagoon, SJRWMD and the Upper St. John’s River Basin.

Example Business Plan
Plan of Operations
Ranchette / Farm / Country Estate
For the Years 2008 to 2013 VISION:
A Vision Statement provides guidance for the organization over the long term. Vision statements often directly reflect deeply held core values such as honesty, integrity, passion for rural lifestyle, concern for the environment, etc. Vision Statements are unique to each organization.
MISSION:
A mission statement outlines the basic purpose of the ranch or estate and summarizes what is done, who it is done for, and how the organization conducts itself. The Mission Statement is also unique to each organization.
GOALS:
In general, goals and objectives describe conditions that the landowner hopes to achieve and reflects hopes and dreams for the landowner’s business or personal life. The following are examples of goals that a ranch or estate owner may have:
Quality of Life Operate the ranch or maintain the estate in a manner that will allow the landowner to spend quality time with family and friends. Detail the lifestyle and/or recreational expectations. Production (for income generating properties) Provide enough income to allow for growth of the ranch.
Landscape • Operate the ranch or maintain the estate so the aesthetic values of the property are
enhanced. • Operate the ranch or maintain the estate in a manner that will not diminish the natural
beauty of the property. OBJECTIVES: The following objectives have been set based on the resource inventory and an analysis of the resource information.
• Improve wetland areas.

Example Business Plan
• Improve wildlife habitat. • Improve availability of water. • Improve water quality • Reduce drainage and run off pollution. • Etc.
STRATEGY:
The strategy of the ranch or estate details the activities of the enterprise.
TACTICS:
Tactics include the tasks required to bring the ranch or estate closer to its goals and objectives. For this manual’s purpose the tactics would include all or some of the Best Management Practices outlined in this guide.

IRSWCD NRCS IFAS Building Comm. Dev. HealthDept. Mosquito Cont. SJRWMD I.R.Farms Fellsmere Property
Development andResource Concerns
770-5005 562-1923 770-5030 226-1260 226-1230 794-7440 562-2393800-295-
3264 562-2141
Sebastian
St. Johns
Drain. Districts
571-0640
Appraiser
226-1469Site Plan Approval X XPond Permit X XOffsite Drainage X X X X XSeptic X X XConservation Plan X XFarm animal stocking rates X XAnimal Waste Mgmt X X X XWetlands X X X X XFlood Zone Maps X XSoils Maps X XProject Development X X X XTaxes-Ag Exemption XEducational Workshops X XLandscape Advice XSoils Tests XWater Quality Tests X
Full Name Agency Listing:Indian River Soil & Water Conservation DistrictNatural Resources Conservation ServiceInstitute of Food & Agricultural Sciences-University of FloridaIndian River County Building DepartmentIndian River County Community Development DepartmentIndian River County Health DepartmentIndian River Mosquito Control DistrictSt. John's River Water Management DistrictIndian River Farms Water Control DistrictFellsmere Water Control District
www.ircgov.com
Responsible Agency/Department
Before you begin developing the property it may be a good idea to ask some questions about the following:
So, you want to live on 5 -10 acres…….
Zoning, Soils, Flood Zone, Wetlands, Drainage, Septic, Water Quality, Farm Animals, Building Permits, Mosquito Control, Taxes (exemptions)
Visit the website to learn more about property development and best management practicies.

Indian River County Property Appraiser