indian river broiler management...
TRANSCRIPT
Indian River® BroilerManagement Handbook
A n A v i a g e n B r a n d
2 0 1 4
®
02 03
Indian River Broiler Management Handbook
This Handbook
The purpose of this Handbook is to help Aviagen® customers to optimize the performance of their broiler stock. It is not intended to provide definitive information on every aspect of broiler stock management, but to draw attention to important issues which if overlooked may depress flock performance. The management objectives given in this Handbook have the purpose of maintaining flock health and welfare, and achieving good flock performance both live and through processing.
The information presented is a combination of data derived from internal research trials, published scientific knowledge and the expertise, practical experience and skills of the Aviagen Technical Transfer and Technical Service Teams. However, the guidance within this Handbook cannot wholly protect against performance variations which may occur for a number of reasons. Aviagen therefore, accepts no ultimate liability for the consequences of using this information to manage broiler stock.
Technical Services
For further information on the management of broiler stock please contact your local Aviagen Technical Service Department or Manager, or access www.aviagen.com online.
Using this Handbook
Finding a Topic
Orange tabs appear on the right-hand side of the Handbook. These tabs allow readers immediate access to those sections and topics in which they are particularly interested.
The Table of Contents gives the title and page number of each section and subsection.
An alphabetical Keyword Index is given at the end of the Handbook.
Key Points and Useful Information
Look for this symbol to find Key Points that emphasize important aspects of husbandry and critical procedures.
Look for this symbol to find suggestions for further Useful Information on specific topics in this Handbook. These documents can be found in the Technical Library of the Aviagen.com website unless otherwise stated.
Supplements to this Handbook
Supplements to this Handbook contain performance objectives that can be achieved with good management, nutritional, environmental, and health control; nutrition specifications are also available. All technical and management information can be found online at Aviagen.com, by contacting your local Aviagen representative, or by emailing [email protected].
Preface
02 03
Indian River Broiler Management Handbook
Table of Contents
5 Introduction7 Stockmanship
Section 1 - Chick Management11 Objective11 Principles11 Introduction12 Chick Quality and Broiler Performance15 Chick Management
Section 2 - Provision of Feed and Water25 Objective25 Principles25 Broiler Nutrition26 Supply of Nutrients27 Feeding Program29 Feed Form and Physical Feed Quality30 Testing Feed Physical Quality32 Whole Grain Feeding33 Feeding Under Hot Environmental Temperatures33 Environment34 Litter Quality35 Drinking Systems38 Feeding Systems
Section 3 - Broiler Nutrition41 Objective41 Principles42 Supply of Nutrients44 Macro Minerals46 Trace Minerals and Vitamins46 Non-Nutritive Feed Additives48 Broiler Diet Specifications48 Designing Broiler Feeding Programs49 Feed Quality51 Feed Processing and Feed Form52 Whole Grain Feeding53 Feeding Under Hot Environmental Temperatures54 Litter Quality55 Welfare and Environment
Contents
04 05
Indian River Broiler Management Handbook
04
Section 4 - Health and Biosecurity57 Objective57 Principles57 Bird Health and Biosecurity57 Biosecurity66 Decreasing the Risk of Disease68 Disease Investigation71 Disease Recognition
Section 5 - Housing and Environment73 Objective73 Principles73 Air74 Water74 Temperature74 Heating74 Housing and Ventilation Systems92 Lighting for Broilers97 Litter Management99 Stocking Density
Section 6 - Monitoring Live Weight and Uniformity of Performance101 Objective101 Principles101 Predictability of Live Weight102 Manual Weighing104 Automatic Weighing Systems104 Inconsistent Weight Data104 Flock Uniformity (CV%)107 Separate-Sex Growing
Section 7 - Pre-Processing Management109 Objective109 Principles109 Preparation for Catching111 Catching114 Transport115 Delivery
Appendices117 Appendix 1 - Production Records119 Appendix 2 - Conversion Tables122 Appendix 3 - Key Performance Parameters125 Appendix 4 - Feather Sexing126 Appendix 5 - Problem Solving128 Appendix 6 - Ventilation Rates and Calculations
Keyword Index131 Keyword Index
Contents
04 05
Indian River Broiler Management Handbook
Introduction
Introduction
Aviagen produces a range of breeds suitable for different sectors of the broiler market. This allows users to select the bird that best meets the needs of their particular operation. All Aviagen chickens are selected for a balanced range of characteristics in both parent stock and broiler birds. This approach ensures that the birds are capable of performing to the highest standards in a wide variety of environments. Characteristics of commercial importance such as growth rate, feed conversion ratio (FCR), livability, and meat yield are consistently improved with continued genetic advances also being made in bird welfare, leg health, cardiovascular fitness, and robustness.
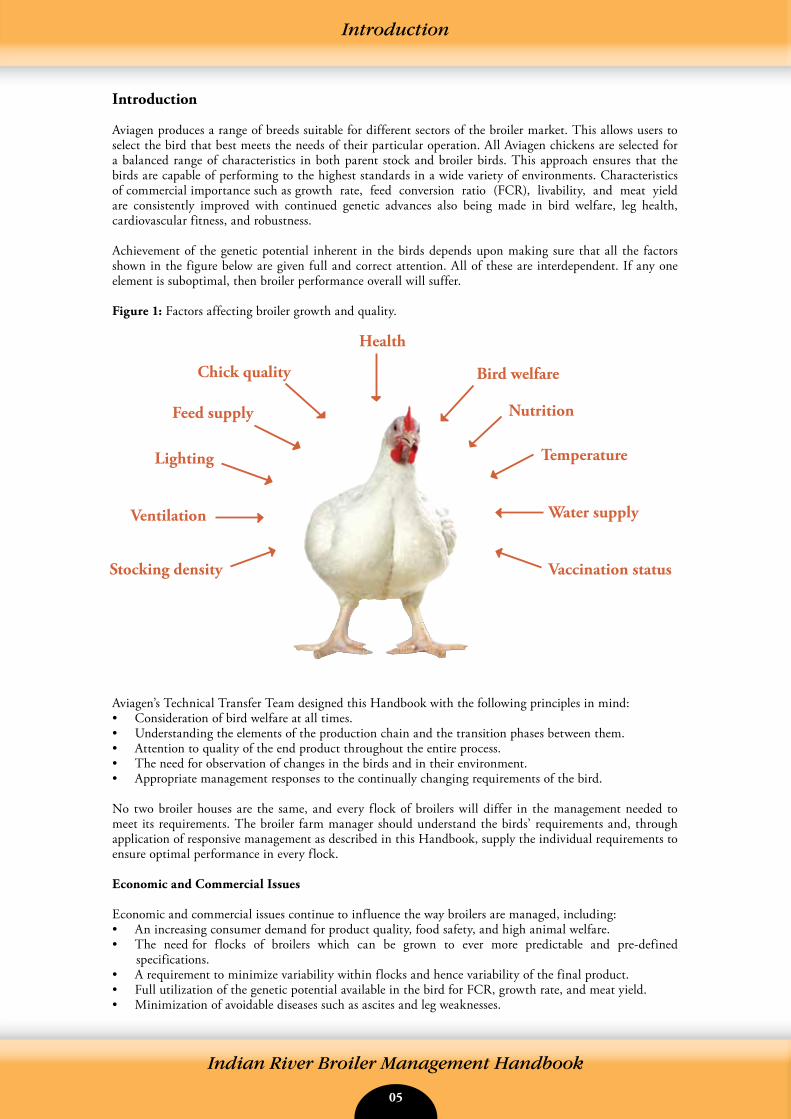
Achievement of the genetic potential inherent in the birds depends upon making sure that all the factors shown in the figure below are given full and correct attention. All of these are interdependent. If any one element is suboptimal, then broiler performance overall will suffer.
Figure 1: Factors affecting broiler growth and quality.
Aviagen’s Technical Transfer Team designed this Handbook with the following principles in mind:• Consideration of bird welfare at all times.• Understanding the elements of the production chain and the transition phases between them.• Attention to quality of the end product throughout the entire process.• The need for observation of changes in the birds and in their environment.• Appropriate management responses to the continually changing requirements of the bird.
No two broiler houses are the same, and every flock of broilers will differ in the management needed to meet its requirements. The broiler farm manager should understand the birds’ requirements and, through application of responsive management as described in this Handbook, supply the individual requirements to ensure optimal performance in every flock.
Economic and Commercial Issues
Economic and commercial issues continue to influence the way broilers are managed, including:• An increasing consumer demand for product quality, food safety, and high animal welfare.• The need for flocks of broilers which can be grown to ever more predictable and pre-defined
specifications.• A requirement to minimize variability within flocks and hence variability of the final product.• Full utilization of the genetic potential available in the bird for FCR, growth rate, and meat yield.• Minimization of avoidable diseases such as ascites and leg weaknesses.
Nutrition
Temperature
Water supply
Vaccination status
Health
Feed supply
Lighting
Ventilation
Stocking density
Chick quality Bird welfare
06 07
Indian River Broiler Management Handbook
Introduction
Meeting the requirements of the customer inside the processing plant is key to successful broiler management. A processing plant’s requirements will differ depending on the product mix they are selling and their need to meet tight product weight specifications in terms of both target weight and variation, and bird quality. Deviation from these specifications incur cost. Cost/benefit may however need to be assessed. For example, separate-sex growing and close monitoring of bird growth both give benefit at processing but add costs to production.
Good broiler welfare is complementary to good commercial performance. Well cared-for birds will more closely meet target kill weights and are less liable to downgrading in the processing plant.
Analyses of customer broiler data by Aviagen have consistently shown that increasing stocking density or reducing the time between flocks results in lower average daily gain and worsened FCR. Thus, while it may appear to be a financially attractive to increase the number of birds going through the production system, the impact of such changes need to be properly evaluated taking into account reduced growth, more variable performance, higher feed costs, and lower meat yields at the processing plant.
Broiler Production
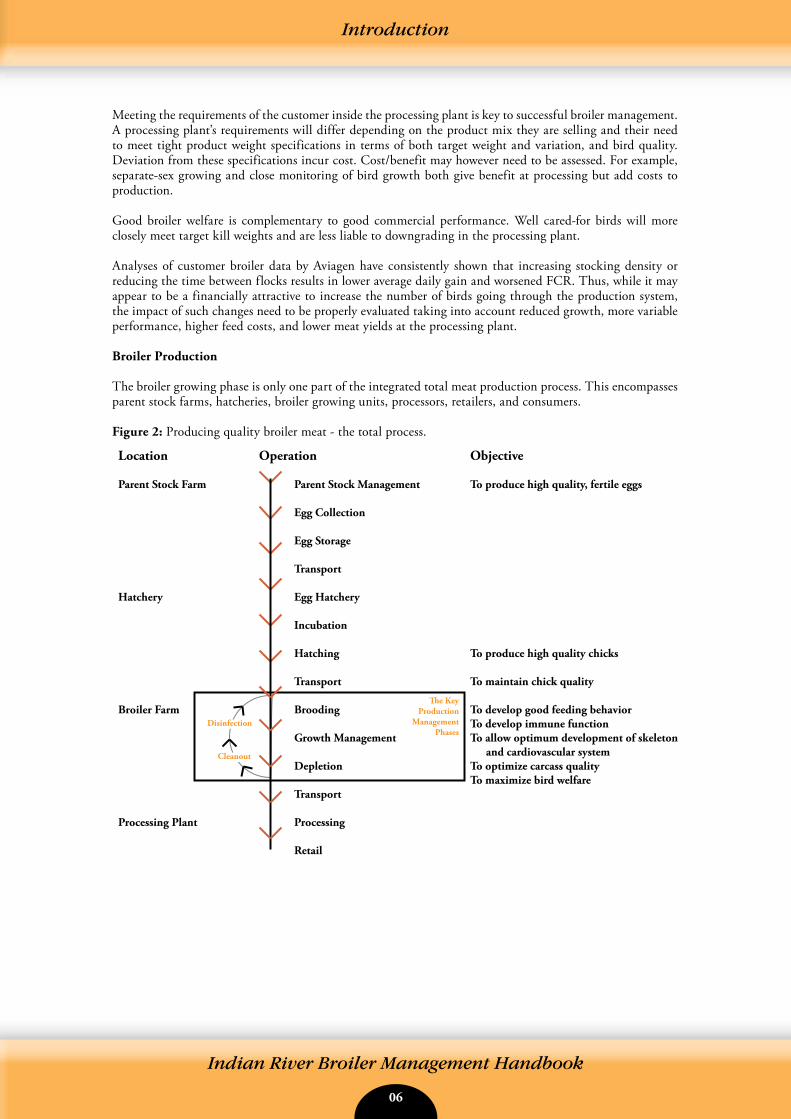
The broiler growing phase is only one part of the integrated total meat production process. This encompasses parent stock farms, hatcheries, broiler growing units, processors, retailers, and consumers. Figure 2: Producing quality broiler meat - the total process.
Location Operation Objective
Parent Stock Farm Parent Stock Management To produce high quality, fertile eggs Egg Collection
Egg Storage
Transport
Hatchery Egg Hatchery
Incubation
Hatching To produce high quality chicks
Transport To maintain chick quality
Broiler Farm Brooding To develop good feeding behavior To develop immune function Growth Management To allow optimum development of skeleton and cardiovascular system Depletion To optimize carcass quality To maximize bird welfare Transport
Processing Plant Processing
Retail
�e Key Production
Management Phases
Cleanout
Disinfection
06 07
Indian River Broiler Management Handbook
Introduction and Stockmanship
The objective of the broiler manager is to achieve the required flock performance in terms of bird welfare, live weight, feed conversion, uniformity, and meat yield within economic constraints. Broiler production is a sequential process, with ultimate performance being dependent on each step being completed successfully. For maximum performance to be attained, each stage must be assessed critically and improvements made wherever required.
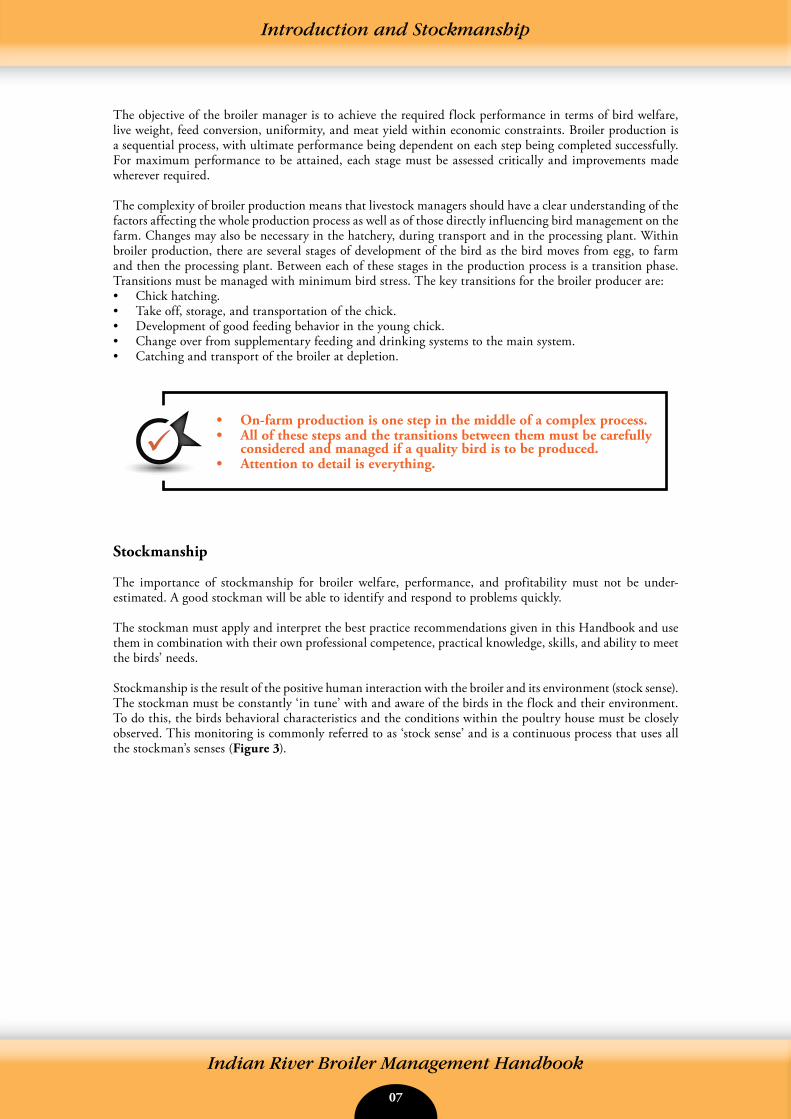
The complexity of broiler production means that livestock managers should have a clear understanding of the factors affecting the whole production process as well as of those directly influencing bird management on the farm. Changes may also be necessary in the hatchery, during transport and in the processing plant. Within broiler production, there are several stages of development of the bird as the bird moves from egg, to farm and then the processing plant. Between each of these stages in the production process is a transition phase. Transitions must be managed with minimum bird stress. The key transitions for the broiler producer are:• Chick hatching.• Take off, storage, and transportation of the chick.• Development of good feeding behavior in the young chick.• Change over from supplementary feeding and drinking systems to the main system.• Catching and transport of the broiler at depletion.
Stockmanship
The importance of stockmanship for broiler welfare, performance, and profitability must not be under- estimated. A good stockman will be able to identify and respond to problems quickly.
The stockman must apply and interpret the best practice recommendations given in this Handbook and use them in combination with their own professional competence, practical knowledge, skills, and ability to meet the birds’ needs.
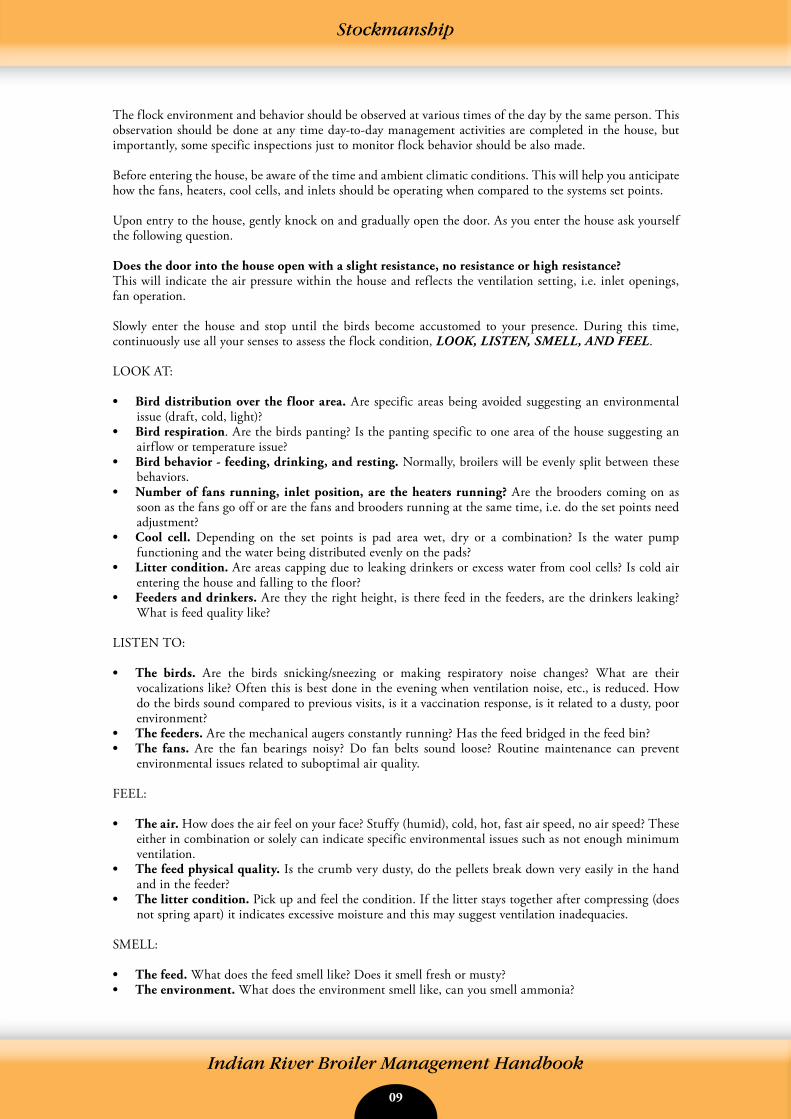
Stockmanship is the result of the positive human interaction with the broiler and its environment (stock sense). The stockman must be constantly ‘in tune’ with and aware of the birds in the flock and their environment. To do this, the birds behavioral characteristics and the conditions within the poultry house must be closely observed. This monitoring is commonly referred to as ‘stock sense’ and is a continuous process that uses all the stockman’s senses (Figure 3).
• On-farm production is one step in the middle of a complex process.• All of these steps and the transitions between them must be carefully
considered and managed if a quality bird is to be produced.• Attention to detail is everything.
08 09
Indian River Broiler Management Handbook
Stockmanship
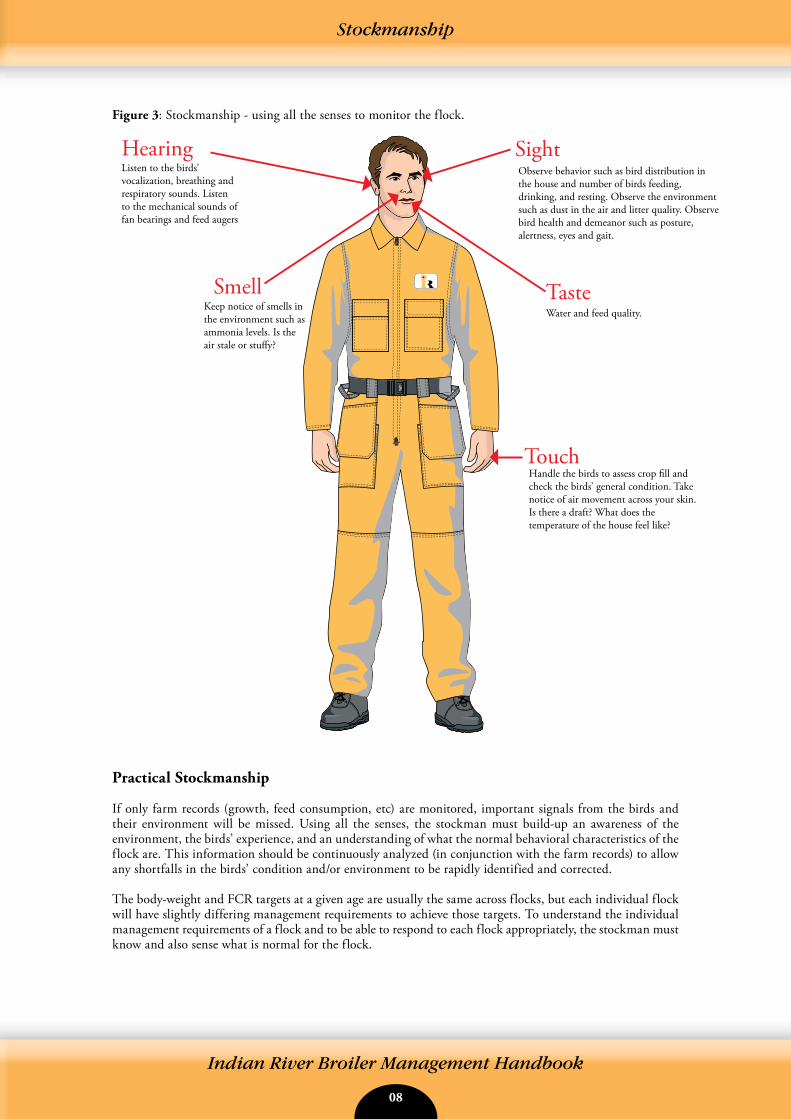
Figure 3: Stockmanship - using all the senses to monitor the flock.
Practical Stockmanship
If only farm records (growth, feed consumption, etc) are monitored, important signals from the birds and their environment will be missed. Using all the senses, the stockman must build-up an awareness of the environment, the birds’ experience, and an understanding of what the normal behavioral characteristics of the flock are. This information should be continuously analyzed (in conjunction with the farm records) to allow any shortfalls in the birds’ condition and/or environment to be rapidly identified and corrected.
The body-weight and FCR targets at a given age are usually the same across flocks, but each individual flock will have slightly differing management requirements to achieve those targets. To understand the individual management requirements of a flock and to be able to respond to each flock appropriately, the stockman must know and also sense what is normal for the flock.
Hearing Sight
Smell
Touch
Taste
Observe behavior such as bird distribution in the house and number of birds feeding, drinking, and resting. Observe the environment such as dust in the air and litter quality. Observe bird health and demeanor such as posture, alertness, eyes and gait.
Handle the birds to assess crop �ll and check the birds’ general condition. Take notice of air movement across your skin. Is there a draft? What does the temperature of the house feel like?
Water and feed quality.Keep notice of smells in the environment such as ammonia levels. Is the air stale or stu�y?
Listen to the birds’ vocalization, breathing and respiratory sounds. Listen to the mechanical sounds of fan bearings and feed augers
®
08 09
Indian River Broiler Management Handbook
Stockmanship
The flock environment and behavior should be observed at various times of the day by the same person. This observation should be done at any time day-to-day management activities are completed in the house, but importantly, some specific inspections just to monitor flock behavior should be also made.
Before entering the house, be aware of the time and ambient climatic conditions. This will help you anticipate how the fans, heaters, cool cells, and inlets should be operating when compared to the systems set points.
Upon entry to the house, gently knock on and gradually open the door. As you enter the house ask yourself the following question.
Does the door into the house open with a slight resistance, no resistance or high resistance?This will indicate the air pressure within the house and reflects the ventilation setting, i.e. inlet openings, fan operation.
Slowly enter the house and stop until the birds become accustomed to your presence. During this time, continuously use all your senses to assess the flock condition, LOOK, LISTEN, SMELL, AND FEEL.
LOOK AT:
• Bird distribution over the floor area. Are specific areas being avoided suggesting an environmental issue (draft, cold, light)?
• Bird respiration. Are the birds panting? Is the panting specific to one area of the house suggesting an airflow or temperature issue?
• Bird behavior - feeding, drinking, and resting. Normally, broilers will be evenly split between these behaviors.
• Number of fans running, inlet position, are the heaters running? Are the brooders coming on as soon as the fans go off or are the fans and brooders running at the same time, i.e. do the set points need adjustment?
• Cool cell. Depending on the set points is pad area wet, dry or a combination? Is the water pump functioning and the water being distributed evenly on the pads?
• Litter condition. Are areas capping due to leaking drinkers or excess water from cool cells? Is cold air entering the house and falling to the floor?
• Feeders and drinkers. Are they the right height, is there feed in the feeders, are the drinkers leaking? What is feed quality like?
LISTEN TO:
• The birds. Are the birds snicking/sneezing or making respiratory noise changes? What are their vocalizations like? Often this is best done in the evening when ventilation noise, etc., is reduced. How do the birds sound compared to previous visits, is it a vaccination response, is it related to a dusty, poor environment?
• The feeders. Are the mechanical augers constantly running? Has the feed bridged in the feed bin?• The fans. Are the fan bearings noisy? Do fan belts sound loose? Routine maintenance can prevent
environmental issues related to suboptimal air quality.
FEEL:
• The air. How does the air feel on your face? Stuffy (humid), cold, hot, fast air speed, no air speed? These either in combination or solely can indicate specific environmental issues such as not enough minimum ventilation.
• The feed physical quality. Is the crumb very dusty, do the pellets break down very easily in the hand and in the feeder?
• The litter condition. Pick up and feel the condition. If the litter stays together after compressing (does not spring apart) it indicates excessive moisture and this may suggest ventilation inadequacies.
SMELL:
• The feed. What does the feed smell like? Does it smell fresh or musty?• The environment. What does the environment smell like, can you smell ammonia?
10 11
Indian River Broiler Management Handbook
Stockmanship
After the initial entry into the house and observation of the flock and the environment, slowly walk the entire house, assessing the points above. Walking the entire house is important to ensure that there is minimal variation in the environment and the bird behavior throughout the house, and not just in the area you are standing. As you walk through the house, get down to bird level. Pick up any birds that do not move away from you. Are they sick? How many birds are affected? Assess the way the flock moves in front of and behind you. Do the birds move back to fill the space you have created by walking through?
Periodically stop to handle and assess individual birds for the following:• Eyes should be clear, no signs of irritation.• Skin should be unblemished with no scratches or hockburn marks.• Breast should be unblemished with no blisters.• Feathering should be clean with no feathers sticking out.• Leg health. What is the gait of the birds?• Feet and hocks should be clean with no irritation markings.• Vent should be clean with no signs of loose droppings.• Beak and tongue should have no nasal discharge (or feed sticking to beak), and no signs of tongue
discoloration.• Crop. Are they feeding? Does the crop contain litter? Is the crop very hard or soft? This will indicate the
water availability.• General demeanor and alertness.
These observations will help build a picture for each individual flock/house. Remember, no two flocks or houses are the same!
Compare this ‘stock sense’ information with actual farm records. Are the birds on target? If there are any irregularities they must be investigated and an action plan should be developed to address any issues that occur. Stock sense, combined with the stockman’s knowledge, experience, and skills in husbandry will produce a rounded technician who will also have personal qualities such as patience, dedication, and empathy when working with the birds. Good stockmanship will not only ensure that all birds are subject to the “Five Freedoms for Animal Welfare” (Figure 4), it will ensure efficiency and profitability.
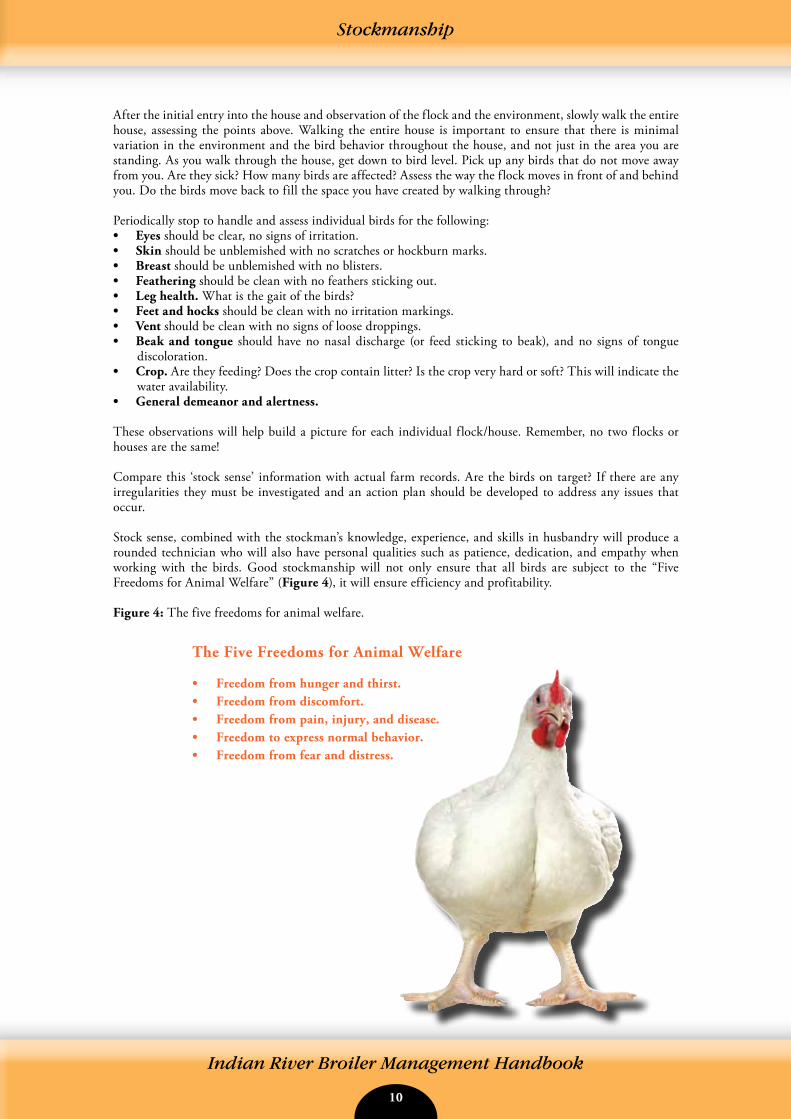
Figure 4: The five freedoms for animal welfare.
The Five Freedoms for Animal Welfare
• Freedom from hunger and thirst.• Freedom from discomfort.• Freedom from pain, injury, and disease.• Freedom to express normal behavior.• Freedom from fear and distress.
10 11
Indian River Broiler Management Handbook
Sect
ion
1
Chick Management
Objective
To promote early development of feeding and drinking behavior. This will allow the target body-weight profile to be achieved with maximum uniformity and good welfare.
Principles
Chicks should be delivered to the broiler farm as soon as possible after hatching and fed immediately. They must be provided with the correct environment and brooding conditions, which should be managed to meet all their nutritional and physiological requirements. This promotes early development of feeding and drinking behavior, and optimizing gut, organ, and skeletal development to support body-weight gain throughout the growing period.
Introduction
During the first 10 days of life, the chicks’ environment changes from that of the hatcher to that of the broiler house, and there are significant changes in how and from where the chick receives its nutrients.
In the final stages of incubation, and as a very new hatchling, the chick receives all of its nutrients from the egg yolk. Once on the farm, chicks must source their nutrients from feed in a sieved crumb or mini- pellet form in the automated feeding system and on paper on the house floor. The early environment (temperature, relative humidity, litter, access to feed and water) must make this transition as quick and as easy as possible so that the chicks can establish healthy feeding and drinking behaviors. As a new hatchling, the residual yolk provides the chick with a protective store of antibodies and nutrients until a feed source becomes available. If the chick receives feed promptly after hatch, growth will be initiated straight away and the residual yolk will mobilize as soon as feed enters the gut giving the chick a useful boost to growth. If feed is not provided promptly after hatch the chick will be reliant on the residual yolk for nutrients and growth will be delayed. Flocks in which some of the chicks have not started to eat for 1, 2, or 3 days will be uneven and the average flock weight at processing significantly reduced. Deficiencies in early management or environment will depress both current and final flock performance.
As a target, if the entire flock has coped well with the transition from hatchery to broiler house, and presuming that no environmental or nutritional factors are impeding growth, 7-day body weight should be at least 4 times greater than day-old chick weight.
Other Useful Information Available
Aviagen Poster: The First 24 HoursIndian River Be Smart: Broiler Management for Birds Grown to Low Kill Weights
Section 1 - Chick Management
12 13
Indian River Broiler Management Handbook
Chick Management
Chick Quality and Broiler Performance
Final broiler performance and profitability are dependent upon attention to detail throughout the entire production process. This involves good management of healthy parent stock, careful hatchery practice, and efficient delivery of chicks which are of good quality and uniformity.
Chick quality results from the interaction between parent stock management, parental health and nutrition, and incubation management. A good quality chick, if managed correctly, provides a good foundation for future broiler performance.
Planning
The expected delivery date, time, and number of chicks should be established with the supplier well in advance. This will ensure that the appropriate brooding set-up is in place and that chicks can be unloaded and placed as quickly as possible.
Placements of broiler flocks should be planned to ensure that differences in age and/or immune status of donor parent flocks are as small as possible. This will minimize variation in final broiler live weights. One donor flock age per house is ideal. If mixed flocks are unavoidable, keep similar parent flock ages together. Avoid mixing chicks from parent flocks under 30 weeks of age with chicks from parent flocks over 40 weeks of age.
Vaccination of donor parents maximizes maternal antibody protection in the offspring and is successful in protecting broilers against diseases which compromise performance (such as infectious bursal disease, chicken anaemia virus, and reovirus). Knowledge of the vaccination program of the donor flock provides an understanding of the initial health status of the broiler flock.
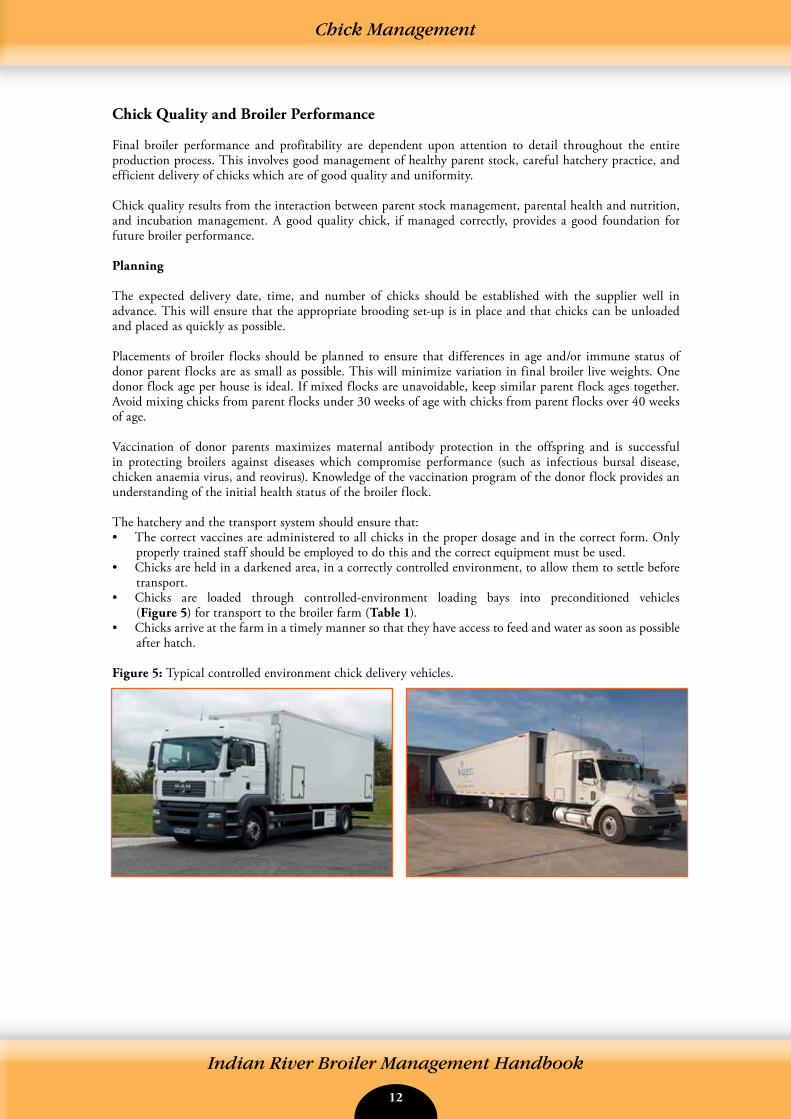
The hatchery and the transport system should ensure that:• The correct vaccines are administered to all chicks in the proper dosage and in the correct form. Only
properly trained staff should be employed to do this and the correct equipment must be used.• Chicks are held in a darkened area, in a correctly controlled environment, to allow them to settle before
transport.• Chicks are loaded through controlled-environment loading bays into preconditioned vehicles
(Figure 5) for transport to the broiler farm (Table 1).• Chicks arrive at the farm in a timely manner so that they have access to feed and water as soon as possible
after hatch.
Figure 5: Typical controlled environment chick delivery vehicles.
12 13
Indian River Broiler Management Handbook
Sect
ion
1
Chick Management
Table 1: Sumamry of optimum conditions - chick holding and transport.Temperature 22 to 28oC (71.6 to 81.4oF)+
Humidity Minimum 50% RH++
Air Exchange 0.71 m3/min (25 cfm) per 1000 chicks
NOTES: RH stands for relative humidity. CFM stands for cubic feet per minute.
+The conditions in the chick holding area or transport vehicle should be adjusted according to actual chick temperature. Chick vent temperatures should be 39.4 to 40.5°C (103 to 105°F). Alternatively, the temperature and humidity between the chicks could be monitored, using Table 2 for guidance. These conditions in the holding area or transport vehicle should give temperatures of 30-35°C (86-95°F) and RH of 70-80% amongst the chicks. It is more important to obtain chick vent temperature (or the recommended temperature and RH between the chicks) rather than just follow the advised temperature setting for the transport vehicle as settings may vary according to manufacturers recommendations. It is not uncommon to find data-loggers and other temperature and humidity measuring devices indicating the recommended conditions have been achieved, but the chick body temperatures are still not within the recommended range. When this happens corrective action needs to be taken to ensure the correct chick body temperatures are achieved.
++Humidity should be provided during long haul transport in cold weather when heaters are operational for long periods or where the air is dry.
Chick Quality
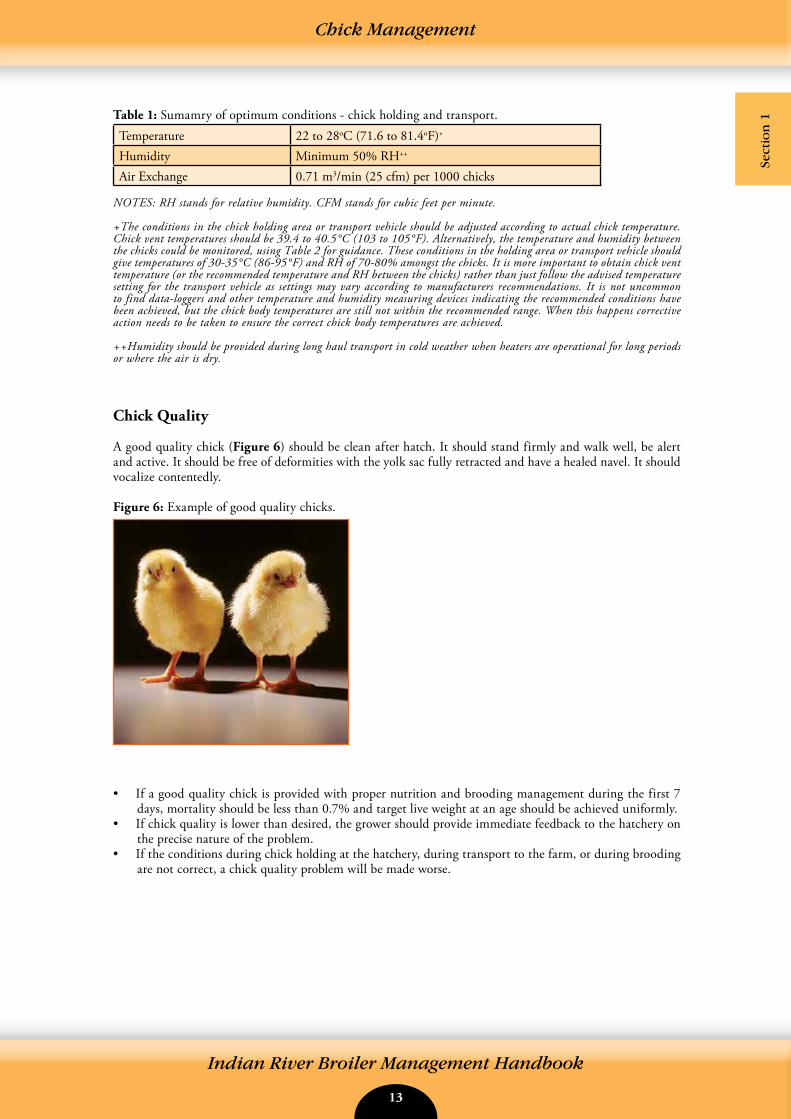
A good quality chick (Figure 6) should be clean after hatch. It should stand firmly and walk well, be alert and active. It should be free of deformities with the yolk sac fully retracted and have a healed navel. It should vocalize contentedly.
Figure 6: Example of good quality chicks.
• If a good quality chick is provided with proper nutrition and brooding management during the first 7 days, mortality should be less than 0.7% and target live weight at an age should be achieved uniformly.
• If chick quality is lower than desired, the grower should provide immediate feedback to the hatchery on the precise nature of the problem.
• If the conditions during chick holding at the hatchery, during transport to the farm, or during brooding are not correct, a chick quality problem will be made worse.
14 15
Indian River Broiler Management Handbook
Chick Management
Chick Vent Temperature
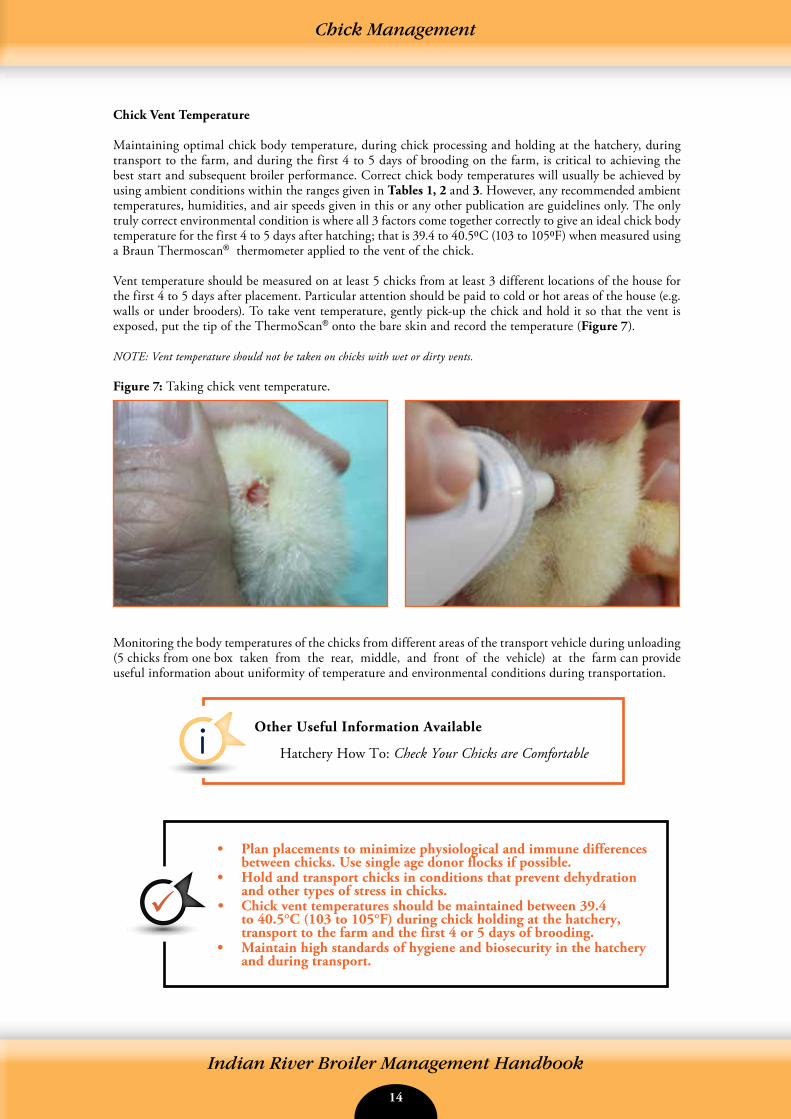
Maintaining optimal chick body temperature, during chick processing and holding at the hatchery, during transport to the farm, and during the first 4 to 5 days of brooding on the farm, is critical to achieving the best start and subsequent broiler performance. Correct chick body temperatures will usually be achieved by using ambient conditions within the ranges given in Tables 1, 2 and 3. However, any recommended ambient temperatures, humidities, and air speeds given in this or any other publication are guidelines only. The only truly correct environmental condition is where all 3 factors come together correctly to give an ideal chick body temperature for the first 4 to 5 days after hatching; that is 39.4 to 40.50C (103 to 1050F) when measured using a Braun Thermoscan® thermometer applied to the vent of the chick.
Vent temperature should be measured on at least 5 chicks from at least 3 different locations of the house for the first 4 to 5 days after placement. Particular attention should be paid to cold or hot areas of the house (e.g. walls or under brooders). To take vent temperature, gently pick-up the chick and hold it so that the vent is exposed, put the tip of the ThermoScan® onto the bare skin and record the temperature (Figure 7).
NOTE: Vent temperature should not be taken on chicks with wet or dirty vents.
Figure 7: Taking chick vent temperature.
Monitoring the body temperatures of the chicks from different areas of the transport vehicle during unloading (5 chicks from one box taken from the rear, middle, and front of the vehicle) at the farm can provide useful information about uniformity of temperature and environmental conditions during transportation.
Other Useful Information Available
Hatchery How To: Check Your Chicks are Comfortable
• Plan placements to minimize physiological and immune differences between chicks. Use single age donor flocks if possible.
• Hold and transport chicks in conditions that prevent dehydration and other types of stress in chicks.
• Chick vent temperatures should be maintained between 39.4 to 40.5°C (103 to 105°F) during chick holding at the hatchery, transport to the farm and the first 4 or 5 days of brooding.
• Maintain high standards of hygiene and biosecurity in the hatchery and during transport.
14 15
Indian River Broiler Management Handbook
Chick Management
Sect
ion
1Chick Management
Farm Preparation
BiosecurityIndividual sites should manage birds of a single age (that is they should be managed on the principles of “all-in/all-out”). Vaccination and cleaning programs are more difficult and less effective on multi-age sites and it is far more likely that health problems will occur and performance will be suboptimal.
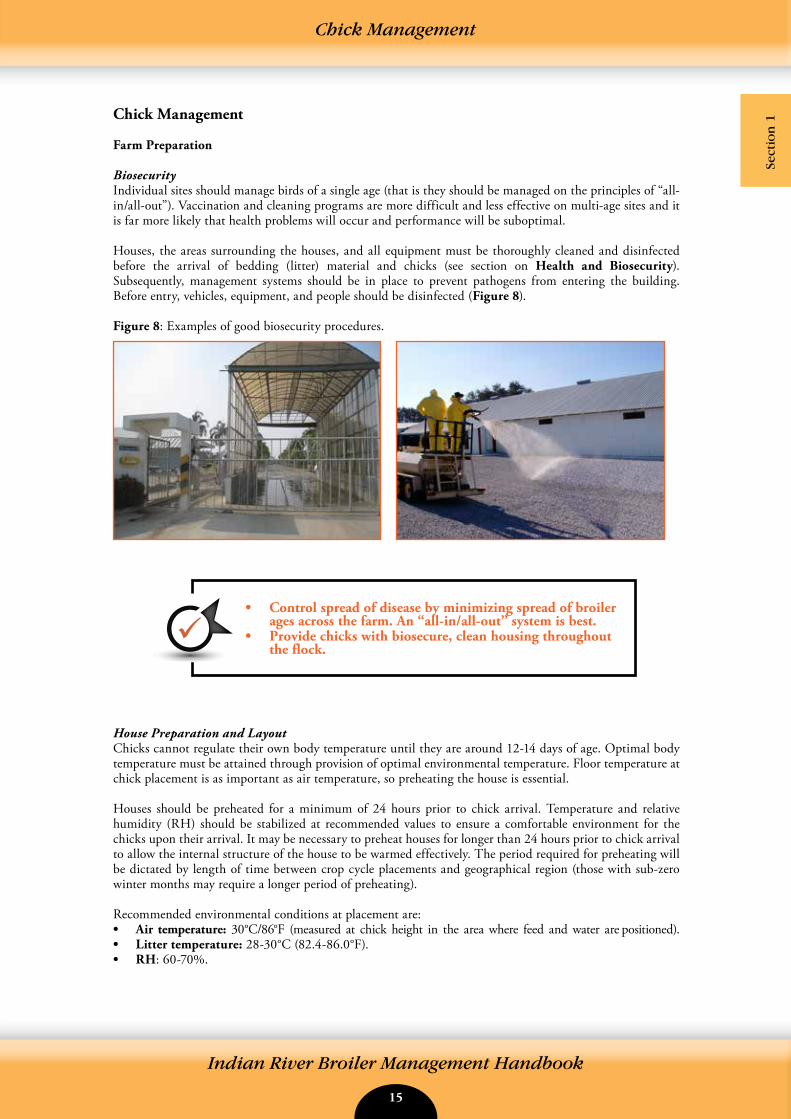
Houses, the areas surrounding the houses, and all equipment must be thoroughly cleaned and disinfected before the arrival of bedding (litter) material and chicks (see section on Health and Biosecurity). Subsequently, management systems should be in place to prevent pathogens from entering the building. Before entry, vehicles, equipment, and people should be disinfected (Figure 8).
Figure 8: Examples of good biosecurity procedures.
House Preparation and LayoutChicks cannot regulate their own body temperature until they are around 12-14 days of age. Optimal body temperature must be attained through provision of optimal environmental temperature. Floor temperature at chick placement is as important as air temperature, so preheating the house is essential.
Houses should be preheated for a minimum of 24 hours prior to chick arrival. Temperature and relative humidity (RH) should be stabilized at recommended values to ensure a comfortable environment for the chicks upon their arrival. It may be necessary to preheat houses for longer than 24 hours prior to chick arrival to allow the internal structure of the house to be warmed effectively. The period required for preheating will be dictated by length of time between crop cycle placements and geographical region (those with sub-zero winter months may require a longer period of preheating).
Recommended environmental conditions at placement are:• Air temperature: 30°C/86°F (measured at chick height in the area where feed and water are positioned).• Litter temperature: 28-30°C (82.4-86.0°F).• RH: 60-70%.
• Control spread of disease by minimizing spread of broiler ages across the farm. An “all-in/all-out” system is best.
• Provide chicks with biosecure, clean housing throughout the flock.
16 17
Indian River Broiler Management Handbook
Chick Management
Temperature and RH should be monitored regularly to ensure a uniform environment throughout the whole brooding area, but by far the best indicator of correct environmental conditions is chick behavior.
Prior to chick arrival, litter material should be spread evenly to a depth of 5 to 10 cm (2 to 4 in). Uneven bedding material can restrict access to feed and water and may lead to a loss in flock uniformity. Where adequate floor temperatures (28-30°C/82.4-86.0°F) are achieved, a minimum litter depth of 5 cm (2 in) can be used if litter disposal costs are an issue. Litter depths of less than 5 cm (2 in) are not advised as they will not provide adequate insulation from cold house floors, will have poorer moisture absorption, and will result in increased contact with manure. Inadequate litter depth also increases condensation levels from the house floor. In geographical regions with cold winter months, heat retention of concrete floors is much lower. Litter depths of 10 cm (4 in) are beneficial in providing greater insulation in these conditions, even where extended preheating is provided.
Adequate fresh, clean water must be available at all times to all birds with access points at an appropriate height (see section on Provision of Feed and Water). Nipple lines should be installed at 12 birds per nipple and bell drinkers at a minimum of 6 drinkers per 1,000 chicks. In addition, at placement, 10 supplementary mini-drinkers or trays per 1,000 chicks should also be provided. Water lines should be filled immediately prior to chick arrival and any airlocks removed. If using nipple lines, this can be done by tapping or shaking the lines until each nipple has a drop of water visible on it. This process will also help chicks to find water more quickly once placed in the brooding area. If using bell drinkers, all drinkers within the brooding area should be checked to ensure water is present. Do not give chilled water to chicks.
Initially, textured feed should be provided as a dust-free crumble or mini-pellet on feeder trays (1 per 100 chicks) and/or on paper (occupying at least 80% of the brooding area). At placement, chicks should be put directly onto paper so that feed is immediately found. If paper does not disintegrate naturally, it should be removed from the house from day 3 onwards.
Automated feeding and drinking systems should be placed in the vicinity of the paper.
For the first 7 days, provide 23 hours of light with 30-40 lux (3-4 fc) intensity and 1 hour of dark (less than1.4 lux or 0.04 fc) to help the chicks adapt to the new environment and encourage feed and water intake.
If mixing chicks from different parent flocks is unavoidable, chicks from different parent sources should be brooded in separate areas within the house. Chicks from a young donor flock of less than 30 weeks will, compared to an older flock of more than 50 weeks, require a start temperature of +1°C or 2°F warmer than the given temperature profile (Table 2). During early brooding, if a brooding ring is used to control chick movement, the area contained by the brooding ring should gradually be expanded from 3 days of age and the rings removed completely by 5-7 days of age.
• Preheat the house and stabilize temperature and humidity at least 24 hours prior to arrival of chicks.
• Spread litter evenly at an appropriate depth (5 to 10 cm/2 to 4 in).• Make feed and water available to the chicks immediately.• Provide 23 hours light for the first 7 days to encourage feed and
water intake.• Position supplementary feeders and drinkers near the main feeding
and drinking systems.
16 17
Indian River Broiler Management Handbook
Sect
ion
1
Chick Management
Brooding Set-upThere are two common systems of temperature control used for brooding broiler chicks:• Spot Brooding (canopy or radiant heaters). The heat source is local so chicks can move away to cooler
areas and thus select for themselves a preferred temperature.• Whole-House Brooding. The heat source is larger and more widely spread so chicks are less able to
move to select a preferred temperature. Whole-house brooding refers to situations where the whole-house or a defined part of the house is heated by a direct or indirect heat source and the aim is to achieve one temperature throughout the house or air space.
Other types of brooding and temperature control systems do exist. These include broiler house under floor heating systems, hatching within broiler houses, and hatch-brooding systems. These systems should be managed following manufacturers guidelines.
No matter what brooding system is used, the objective is to encourage both feed intake and activity as early as possible. Achieving the optimum temperature and relative humidity (RH) is critical. The ideal brooding temperatures are given in Table 2.
Table 2: Broiler house temperatures. After 27 days of age, temperature should remain at 20°C (68°F) or be altered in accordance with bird behavior.
Age(Days)
Whole-House Brooding Temp oC (oF)
Spot Brooding TempoC (oF)
Brooder Edge (A)
2 m (6.6 ft) from Brooder Edge (B)
Day-old 30 (86) 32 (90) 29 (84)
3 28 (82) 30 (86) 27 (81)6 27 (81) 28 (82) 25 (77)9 26 (79) 27 (81) 25 (77)12 25 (77) 26 (79) 25 (77)15 24 (75) 25 (77) 24 (75)18 23 (73) 24 (75) 24 (75)21 22 (72) 23 (73) 23 (73)24 21 (70) 22 (72) 22 (72)27 20 (68) 20 (68) 20 (68)
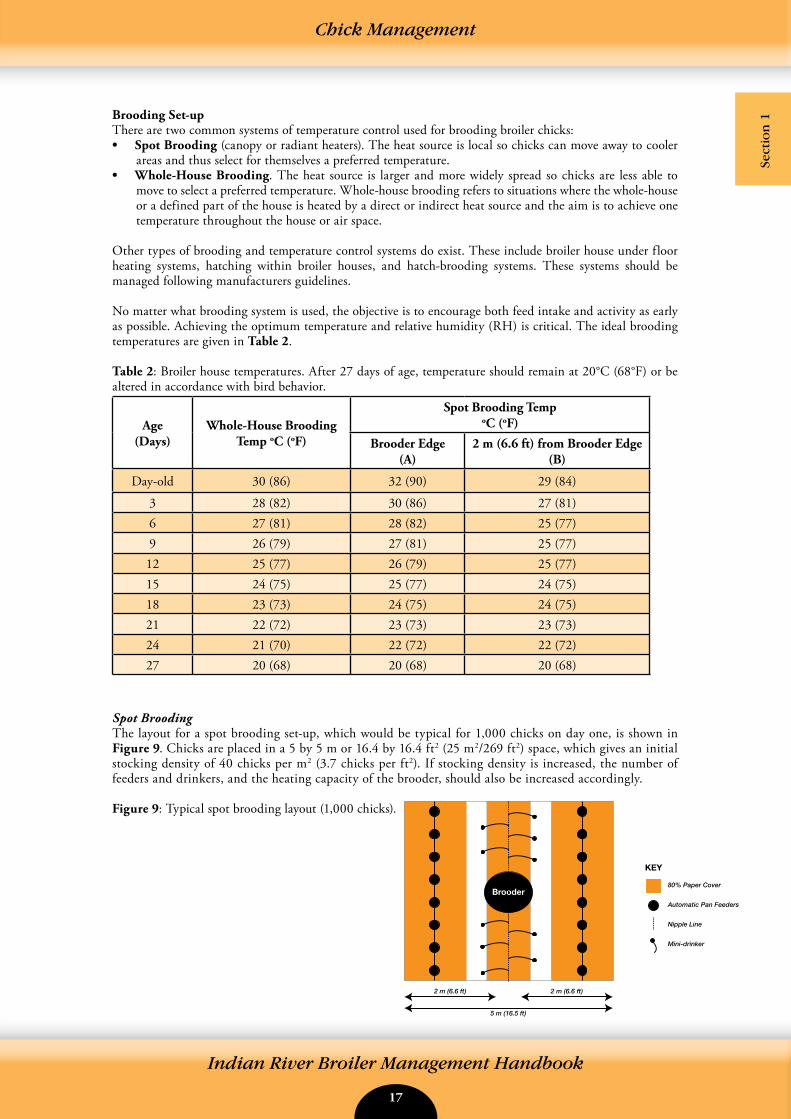
Spot BroodingThe layout for a spot brooding set-up, which would be typical for 1,000 chicks on day one, is shown in Figure 9. Chicks are placed in a 5 by 5 m or 16.4 by 16.4 ft2 (25 m2/269 ft2) space, which gives an initial stocking density of 40 chicks per m2 (3.7 chicks per ft2). If stocking density is increased, the number of feeders and drinkers, and the heating capacity of the brooder, should also be increased accordingly.
Figure 9: Typical spot brooding layout (1,000 chicks).
Brooder
KEY
80% Paper Cover
Automatic Pan Feeders
Nipple Line
Mini-drinker
2 m (6.6 ft) 2 m (6.6 ft)
5 m (16.5 ft)
18 19
Indian River Broiler Management Handbook
Chick Management
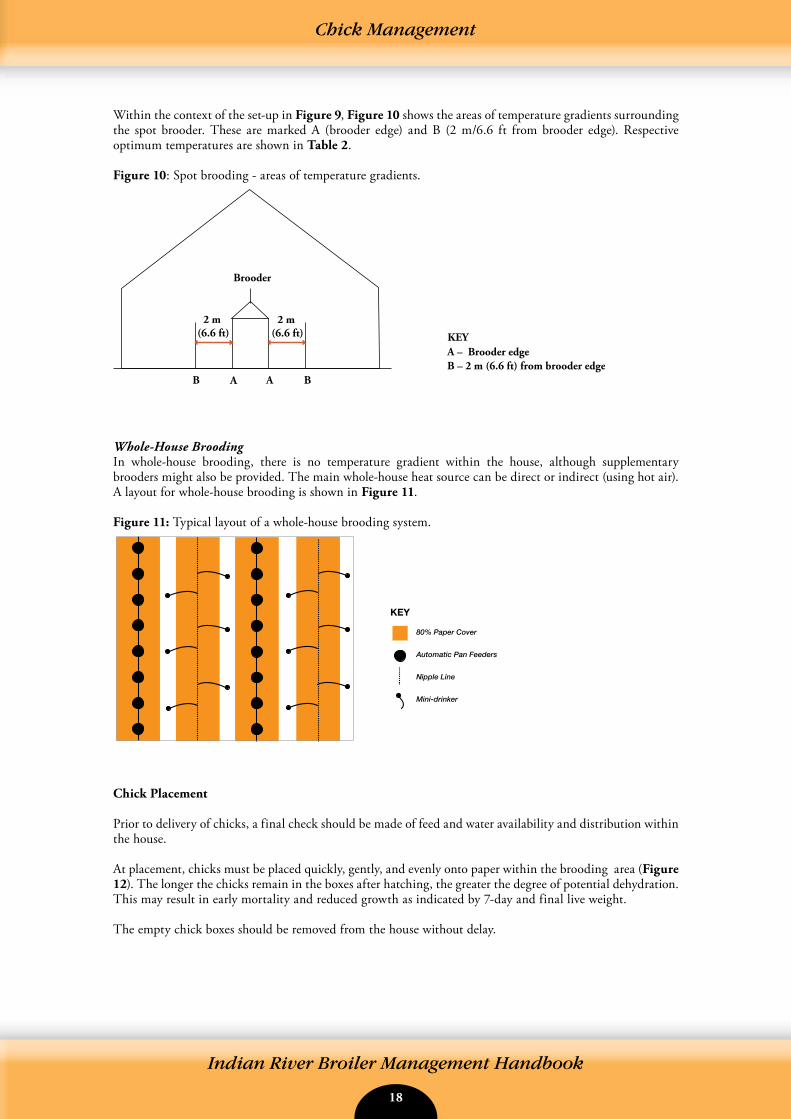
Within the context of the set-up in Figure 9, Figure 10 shows the areas of temperature gradients surrounding the spot brooder. These are marked A (brooder edge) and B (2 m/6.6 ft from brooder edge). Respective optimum temperatures are shown in Table 2.
Figure 10: Spot brooding - areas of temperature gradients.
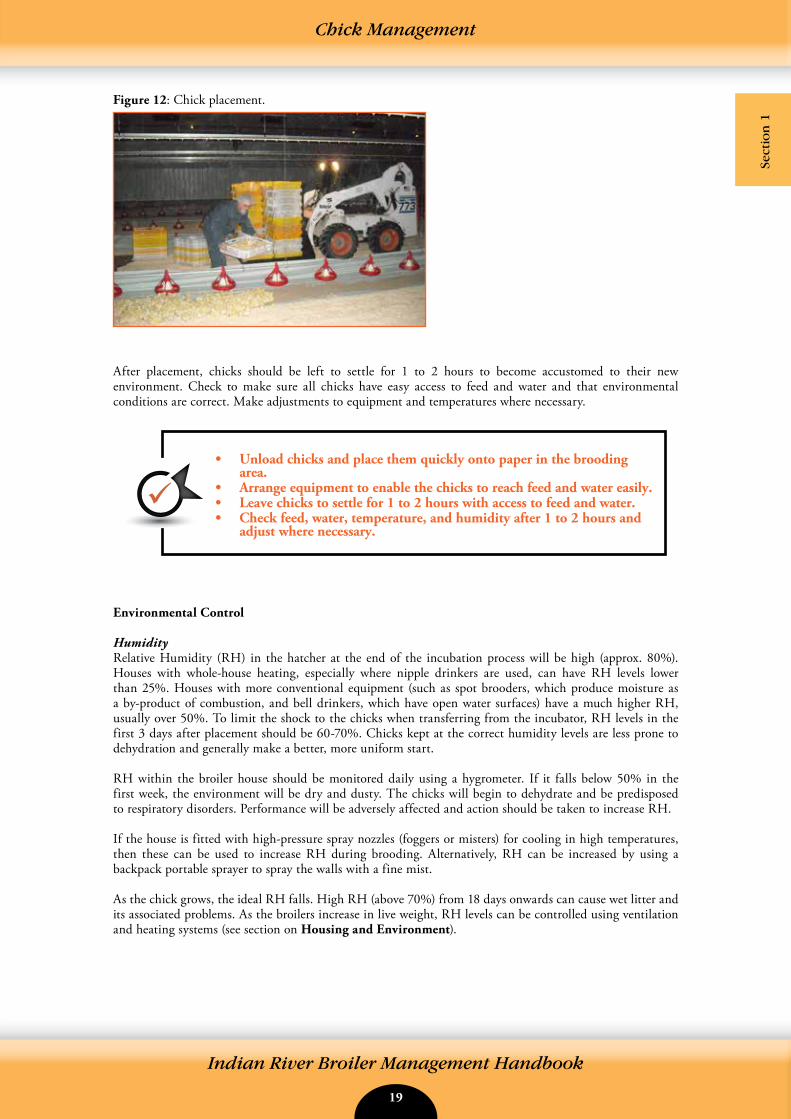
Whole-House BroodingIn whole-house brooding, there is no temperature gradient within the house, although supplementary brooders might also be provided. The main whole-house heat source can be direct or indirect (using hot air). A layout for whole-house brooding is shown in Figure 11.
Figure 11: Typical layout of a whole-house brooding system.
Chick Placement
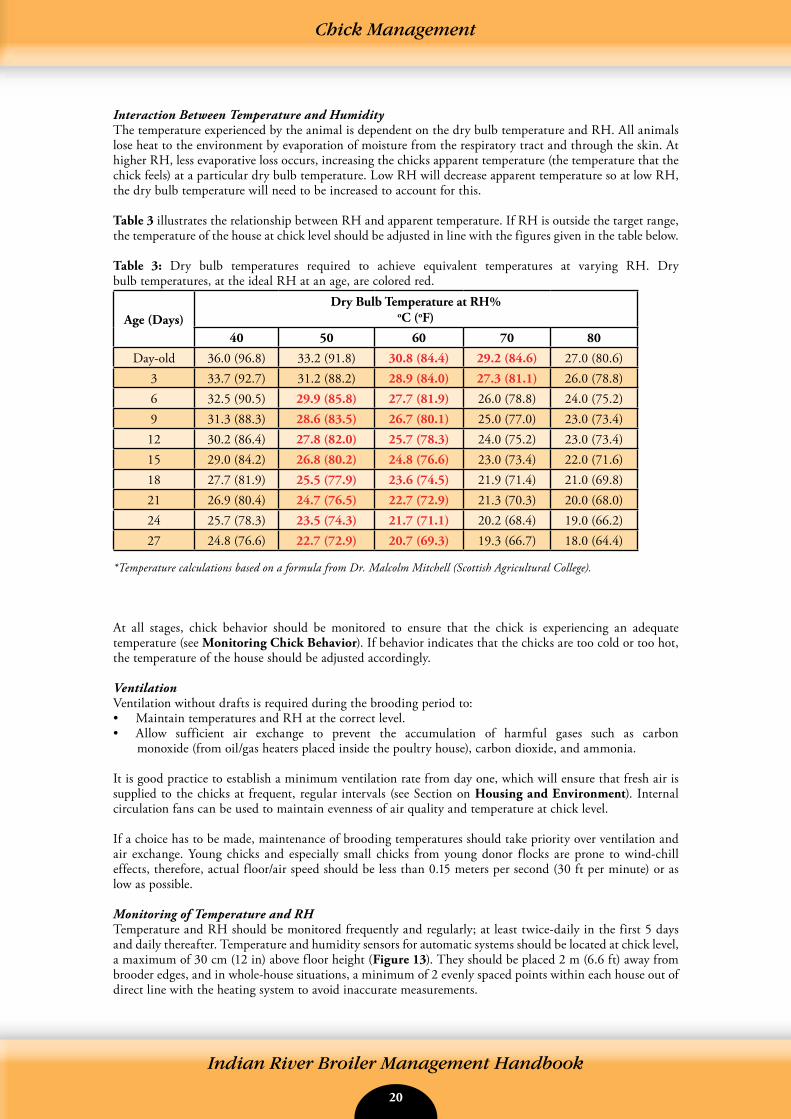
Prior to delivery of chicks, a final check should be made of feed and water availability and distribution within the house.
At placement, chicks must be placed quickly, gently, and evenly onto paper within the brooding area (Figure 12). The longer the chicks remain in the boxes after hatching, the greater the degree of potential dehydration. This may result in early mortality and reduced growth as indicated by 7-day and final live weight.
The empty chick boxes should be removed from the house without delay.
B A A B
Brooder
2 m (6.6 ft)
2 m (6.6 ft)
A – Brooder edge B – 2 m (6.6 ft) from brooder edge
KEY
KEY
80% Paper Cover
Automatic Pan Feeders
Nipple Line
Mini-drinker
18 19
Indian River Broiler Management Handbook
Sect
ion
1
Chick Management
Figure 12: Chick placement.
After placement, chicks should be left to settle for 1 to 2 hours to become accustomed to their new environment. Check to make sure all chicks have easy access to feed and water and that environmental conditions are correct. Make adjustments to equipment and temperatures where necessary.
Environmental Control
HumidityRelative Humidity (RH) in the hatcher at the end of the incubation process will be high (approx. 80%). Houses with whole-house heating, especially where nipple drinkers are used, can have RH levels lower than 25%. Houses with more conventional equipment (such as spot brooders, which produce moisture as a by-product of combustion, and bell drinkers, which have open water surfaces) have a much higher RH, usually over 50%. To limit the shock to the chicks when transferring from the incubator, RH levels in the first 3 days after placement should be 60-70%. Chicks kept at the correct humidity levels are less prone to dehydration and generally make a better, more uniform start.
RH within the broiler house should be monitored daily using a hygrometer. If it falls below 50% in the first week, the environment will be dry and dusty. The chicks will begin to dehydrate and be predisposed to respiratory disorders. Performance will be adversely affected and action should be taken to increase RH.
If the house is fitted with high-pressure spray nozzles (foggers or misters) for cooling in high temperatures, then these can be used to increase RH during brooding. Alternatively, RH can be increased by using a backpack portable sprayer to spray the walls with a fine mist.
As the chick grows, the ideal RH falls. High RH (above 70%) from 18 days onwards can cause wet litter and its associated problems. As the broilers increase in live weight, RH levels can be controlled using ventilation and heating systems (see section on Housing and Environment).
• Unload chicks and place them quickly onto paper in the brooding area.
• Arrange equipment to enable the chicks to reach feed and water easily.• Leave chicks to settle for 1 to 2 hours with access to feed and water.• Check feed, water, temperature, and humidity after 1 to 2 hours and
adjust where necessary.
20 21
Indian River Broiler Management Handbook
Chick Management
Interaction Between Temperature and HumidityThe temperature experienced by the animal is dependent on the dry bulb temperature and RH. All animals lose heat to the environment by evaporation of moisture from the respiratory tract and through the skin. At higher RH, less evaporative loss occurs, increasing the chicks apparent temperature (the temperature that the chick feels) at a particular dry bulb temperature. Low RH will decrease apparent temperature so at low RH, the dry bulb temperature will need to be increased to account for this.
Table 3 illustrates the relationship between RH and apparent temperature. If RH is outside the target range, the temperature of the house at chick level should be adjusted in line with the figures given in the table below. Table 3: Dry bulb temperatures required to achieve equivalent temperatures at varying RH. Dry bulb temperatures, at the ideal RH at an age, are colored red.
Age (Days)Dry Bulb Temperature at RH%
oC (oF)
40 50 60 70 80
Day-old 36.0 (96.8) 33.2 (91.8) 30.8 (84.4) 29.2 (84.6) 27.0 (80.6)3 33.7 (92.7) 31.2 (88.2) 28.9 (84.0) 27.3 (81.1) 26.0 (78.8)6 32.5 (90.5) 29.9 (85.8) 27.7 (81.9) 26.0 (78.8) 24.0 (75.2)9 31.3 (88.3) 28.6 (83.5) 26.7 (80.1) 25.0 (77.0) 23.0 (73.4)12 30.2 (86.4) 27.8 (82.0) 25.7 (78.3) 24.0 (75.2) 23.0 (73.4)15 29.0 (84.2) 26.8 (80.2) 24.8 (76.6) 23.0 (73.4) 22.0 (71.6)18 27.7 (81.9) 25.5 (77.9) 23.6 (74.5) 21.9 (71.4) 21.0 (69.8)21 26.9 (80.4) 24.7 (76.5) 22.7 (72.9) 21.3 (70.3) 20.0 (68.0)24 25.7 (78.3) 23.5 (74.3) 21.7 (71.1) 20.2 (68.4) 19.0 (66.2)27 24.8 (76.6) 22.7 (72.9) 20.7 (69.3) 19.3 (66.7) 18.0 (64.4)
*Temperature calculations based on a formula from Dr. Malcolm Mitchell (Scottish Agricultural College).
At all stages, chick behavior should be monitored to ensure that the chick is experiencing an adequate temperature (see Monitoring Chick Behavior). If behavior indicates that the chicks are too cold or too hot, the temperature of the house should be adjusted accordingly.
VentilationVentilation without drafts is required during the brooding period to:• Maintain temperatures and RH at the correct level.• Allow sufficient air exchange to prevent the accumulation of harmful gases such as carbon
monoxide (from oil/gas heaters placed inside the poultry house), carbon dioxide, and ammonia.
It is good practice to establish a minimum ventilation rate from day one, which will ensure that fresh air is supplied to the chicks at frequent, regular intervals (see Section on Housing and Environment). Internal circulation fans can be used to maintain evenness of air quality and temperature at chick level.
If a choice has to be made, maintenance of brooding temperatures should take priority over ventilation and air exchange. Young chicks and especially small chicks from young donor flocks are prone to wind-chill effects, therefore, actual floor/air speed should be less than 0.15 meters per second (30 ft per minute) or as low as possible.
Monitoring of Temperature and RHTemperature and RH should be monitored frequently and regularly; at least twice-daily in the first 5 days and daily thereafter. Temperature and humidity sensors for automatic systems should be located at chick level, a maximum of 30 cm (12 in) above floor height (Figure 13). They should be placed 2 m (6.6 ft) away from brooder edges, and in whole-house situations, a minimum of 2 evenly spaced points within each house out of direct line with the heating system to avoid inaccurate measurements.

20 21
Indian River Broiler Management Handbook
Sect
ion
1
Chick Management
Conventional thermometers should be used to cross-check the accuracy of electronic sensors controlling automatic systems. Automatic sensors should be calibrated at least once per flock.
Figure 13: Correct location for temperature and humidity sensors.
Monitoring Chick Behavior
Temperature and humidity should be monitored regularly, but by far the best indicator of correct brooding conditions is frequent and careful observation of chick behavior. In general, if chicks are spread evenly throughout the brooding area (Figure 14) this indicates the environment is comfortable for them and there is no requirement to adjust temperature and/or relative humidity.
• Achieve a humidity level of 60-70% for the first 3 days and above 50% for the remainder of the brooding period (until 10 days of age).
• Temperature is critical during brooding to stimulate activity and appetite. Temperature should be maintained as recommended.
• Adjust temperature settings if RH increases above or falls below recommendations while responding to changes in chick behavior.
• Monitor temperature and relative humidity regularly and check automatic equipment with manual measurements at chick level.
• Establish a minimum ventilation rate from day one to provide fresh air and remove waste gases.
• Avoid drafts.• Use chick behavior and chick vent temperatures to determine if
environmental conditions are correct.
22 23
Indian River Broiler Management Handbook
Chick Management
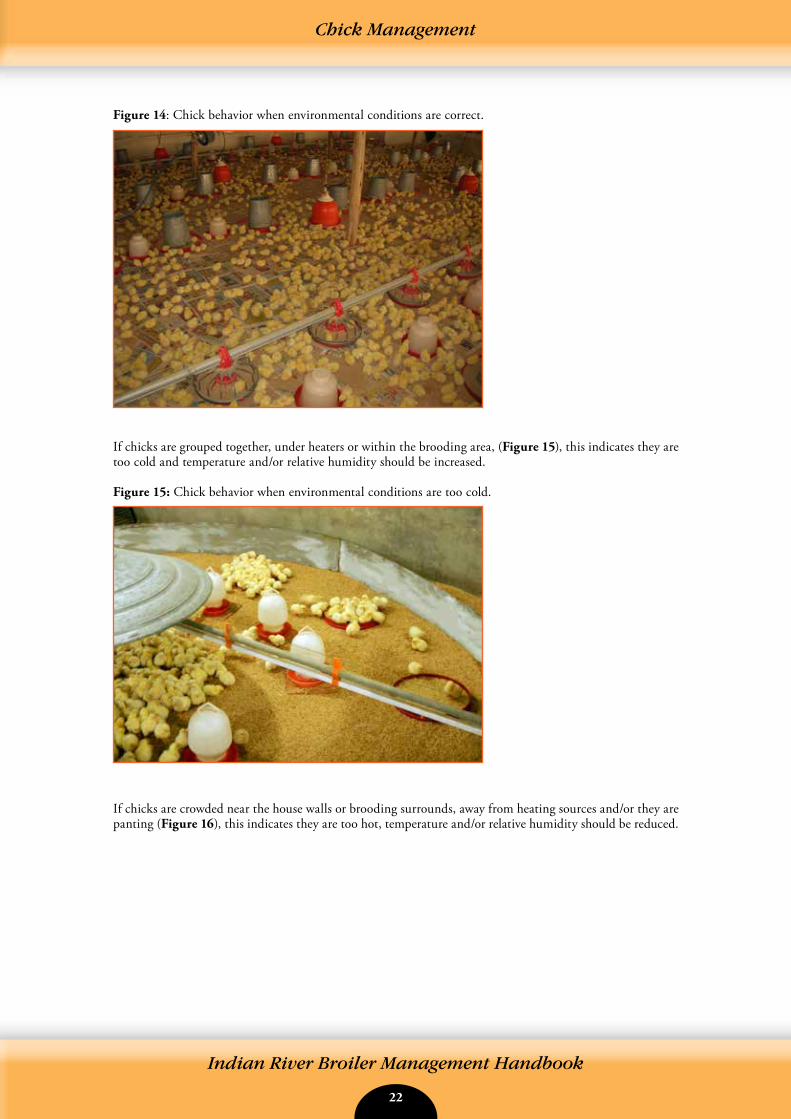
Figure 14: Chick behavior when environmental conditions are correct.
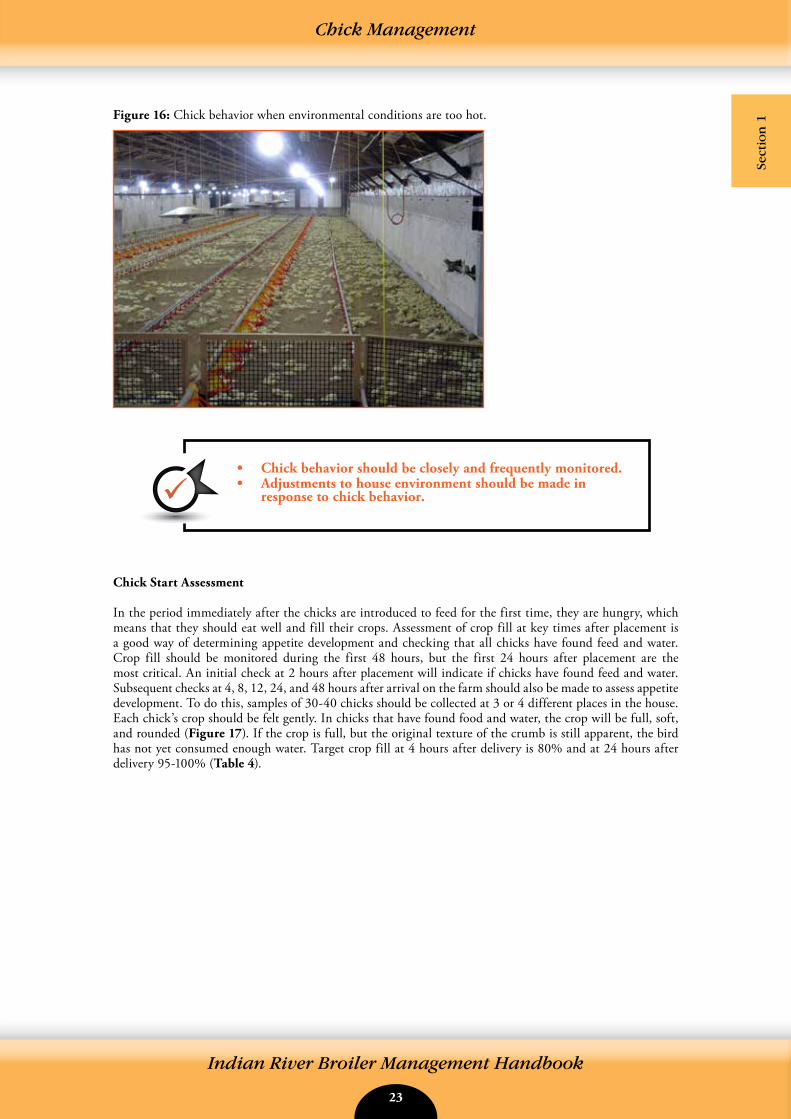
If chicks are grouped together, under heaters or within the brooding area, (Figure 15), this indicates they are too cold and temperature and/or relative humidity should be increased.
Figure 15: Chick behavior when environmental conditions are too cold.
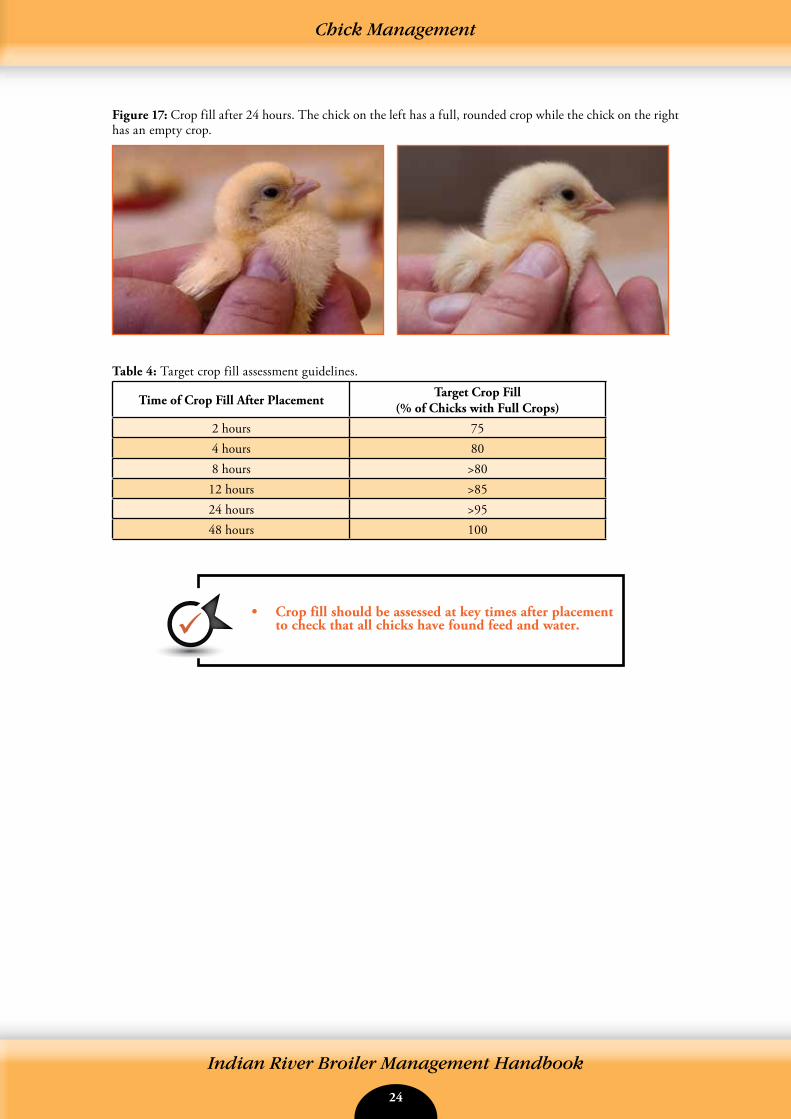
If chicks are crowded near the house walls or brooding surrounds, away from heating sources and/or they are panting (Figure 16), this indicates they are too hot, temperature and/or relative humidity should be reduced.
22 23
Indian River Broiler Management Handbook
Sect
ion
1
Chick Management
Figure 16: Chick behavior when environmental conditions are too hot.
Chick Start Assessment
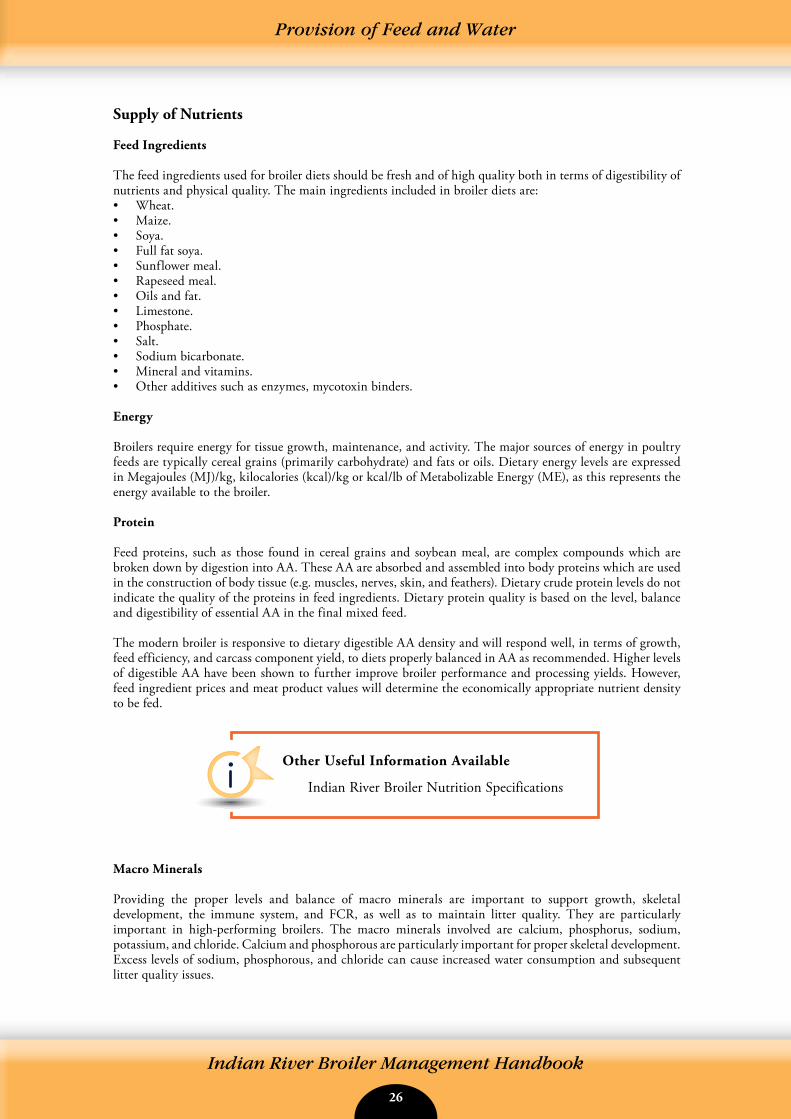
In the period immediately after the chicks are introduced to feed for the first time, they are hungry, which means that they should eat well and fill their crops. Assessment of crop fill at key times after placement is a good way of determining appetite development and checking that all chicks have found feed and water. Crop fill should be monitored during the first 48 hours, but the first 24 hours after placement are the most critical. An initial check at 2 hours after placement will indicate if chicks have found feed and water. Subsequent checks at 4, 8, 12, 24, and 48 hours after arrival on the farm should also be made to assess appetite development. To do this, samples of 30-40 chicks should be collected at 3 or 4 different places in the house. Each chick’s crop should be felt gently. In chicks that have found food and water, the crop will be full, soft, and rounded (Figure 17). If the crop is full, but the original texture of the crumb is still apparent, the bird has not yet consumed enough water. Target crop fill at 4 hours after delivery is 80% and at 24 hours after delivery 95-100% (Table 4).
• Chick behavior should be closely and frequently monitored.• Adjustments to house environment should be made in
response to chick behavior.
24 25
Indian River Broiler Management Handbook
Figure 17: Crop fill after 24 hours. The chick on the left has a full, rounded crop while the chick on the right has an empty crop.
Table 4: Target crop fill assessment guidelines.
Time of Crop Fill After Placement Target Crop Fill (% of Chicks with Full Crops)
2 hours 754 hours 808 hours >8012 hours >8524 hours >9548 hours 100
Chick Management
• Crop fill should be assessed at key times after placement to check that all chicks have found feed and water.

24 25
Indian River Broiler Management Handbook
Sect
ion
2
Section 2 - Provision of Feed and Water
Provision of Feed and Water
Objective
To provide the broiler’s lifetime nutrient requirements through appropriate broiler nutrition and broiler feeding programs so that biological performance can be maximized without compromising bird welfare or the environment.
The drinking and feeding systems, together with their management, will impact upon feed and water intake and the ability to supply a defined feeding program satisfactorily to the bird.
The nutritional information included in this section is targeted, in particular, towards farmers and live production personnel.
Principles
Feed represents the largest proportion of broiler production costs. To support optimum performance, broiler rations should be formulated to provide the correct balance of energy, protein and amino acids (AA), minerals, vitamins, and essential fatty acids. The right choice of feeding program will be dependent on the businesses objectives. For example, whether the focus is on maximizing profitability from live bird production, whole carcasses or yield of carcass components. For instance, a higher level of digestible amino acids may be beneficial for the production of portioned birds.
Recommended nutrient levels and feeding programs can be found in the Broiler Nutrition Specifications, which offer further information on:• The choice of feeding program for a range of production and market situations.• Optimum levels of nutrients for growth, feed efficiency, and meat processing yield.
Broiler Nutrition
Nutrition is the major impacting variable upon broiler productivity, profitability, and welfare. The formulation and balancing of diets requires specialist nutrition skills, but farm managers should be aware of the nutritional content of their feeds. Farm managers should consider routine analysis of the feeds they receive to determine if expected dietary nutrient contents are being achieved and that the feed is the best available for their particular production circumstances. Knowledge of the make-up of the diet being fed to the birds will mean that farm managers can ensure that:• Feed levels and consumption will provide adequate levels of daily nutrient intake (feed intake
multiplied by nutrient content).• There is proper and expected balance between feed nutrients.• Routine laboratory analysis of diets can be usefully interpreted and correct actions taken such as:
-- Alerting the provider of possible discrepancies.-- Appropriate management of feed programs.
Other Useful Information Available
Indian River Broiler Nutrition Specifications
26 27
Indian River Broiler Management Handbook
Provision of Feed and Water
Supply of Nutrients
Feed Ingredients
The feed ingredients used for broiler diets should be fresh and of high quality both in terms of digestibility of nutrients and physical quality. The main ingredients included in broiler diets are:• Wheat.• Maize.• Soya.• Full fat soya.• Sunflower meal.• Rapeseed meal.• Oils and fat.• Limestone.• Phosphate.• Salt.• Sodium bicarbonate.• Mineral and vitamins.• Other additives such as enzymes, mycotoxin binders.
Energy
Broilers require energy for tissue growth, maintenance, and activity. The major sources of energy in poultry feeds are typically cereal grains (primarily carbohydrate) and fats or oils. Dietary energy levels are expressed in Megajoules (MJ)/kg, kilocalories (kcal)/kg or kcal/lb of Metabolizable Energy (ME), as this represents the energy available to the broiler.
Protein
Feed proteins, such as those found in cereal grains and soybean meal, are complex compounds which are broken down by digestion into AA. These AA are absorbed and assembled into body proteins which are used in the construction of body tissue (e.g. muscles, nerves, skin, and feathers). Dietary crude protein levels do not indicate the quality of the proteins in feed ingredients. Dietary protein quality is based on the level, balance and digestibility of essential AA in the final mixed feed. The modern broiler is responsive to dietary digestible AA density and will respond well, in terms of growth, feed efficiency, and carcass component yield, to diets properly balanced in AA as recommended. Higher levels of digestible AA have been shown to further improve broiler performance and processing yields. However, feed ingredient prices and meat product values will determine the economically appropriate nutrient density to be fed.
Macro Minerals
Providing the proper levels and balance of macro minerals are important to support growth, skeletal development, the immune system, and FCR, as well as to maintain litter quality. They are particularly important in high-performing broilers. The macro minerals involved are calcium, phosphorus, sodium, potassium, and chloride. Calcium and phosphorous are particularly important for proper skeletal development. Excess levels of sodium, phosphorous, and chloride can cause increased water consumption and subsequent litter quality issues.
Other Useful Information Available
Indian River Broiler Nutrition Specifications
26 27
Indian River Broiler Management Handbook
Provision of Feed and Water
Sect
ion
2
Trace Minerals and Vitamins
Trace minerals and vitamins are required for all metabolic functions. The appropriate supplementary levels of these micro-nutrients depends on the feed ingredients used, the feed manufacturing process, feed handling logistics (e.g. storage conditions and length of time in farm feed bins), and local circumstances (e.g. soils can vary in their trace mineral content and feed ingredients grown in some geographic areas may be deficient in some elements). There are usually separate recommendations proposed for some vitamins, depending on the cereal grains (e.g. wheat versus maize) included in the diet.
Feeding Program
Starter Feeds
During the incubation period, the chick uses the egg as a nutrient supply. However, during the first few days of life post-hatch, chicks must undergo the physiological transition to obtain their nutrients from the supplied manufactured feed. At this time feed intake is at its lowest and nutrient intake requirements are at their highest for chicks. Not only must the proper dietary nutrient concentration be provided but also the right environmental conditions to establish and develop good chick appetite. An example of the guideline nutritional values for a Starter feed are given in Table 5.
Final body-weight performance is positively correlated with early growth rate (e.g. 7-day body weight); thereby ensuring chicks get off to a good start is critical. The Starter feed is normally fed for a period of 10 days but can be given for up to 14 days if target weights are not being achieved.
Chicks that don’t start well are more susceptible to disease challenges, compromised weight gain and environmental stressors. Feeding the recommended nutrient levels during the starter period will support good early growth and physiological development, ensuring body-weight objectives, good health and welfare are achieved.
Feed consumption during the first 10-14 days of the chick’s life represents a small proportion of the total feed consumed and feed cost to processing. Therefore, decisions on Starter formulations should be based primarily on promoting good biological performance and overall profitability rather than purely on individual diet costs.
Grower Feeds
Broiler Grower feed will normally be fed for 14-16 days. The transition from Starter feed to Grower feed will involve a change of texture from crumble/mini-pellets to pellets and also a change in nutrient density. Depending on the pellet size produced, it may be necessary to provide the first delivery of Grower as a crumb or mini-pellet to prevent any reduction in feed intake due to, for example, pellet size being too large for chicks when the first delivery of Grower is made.
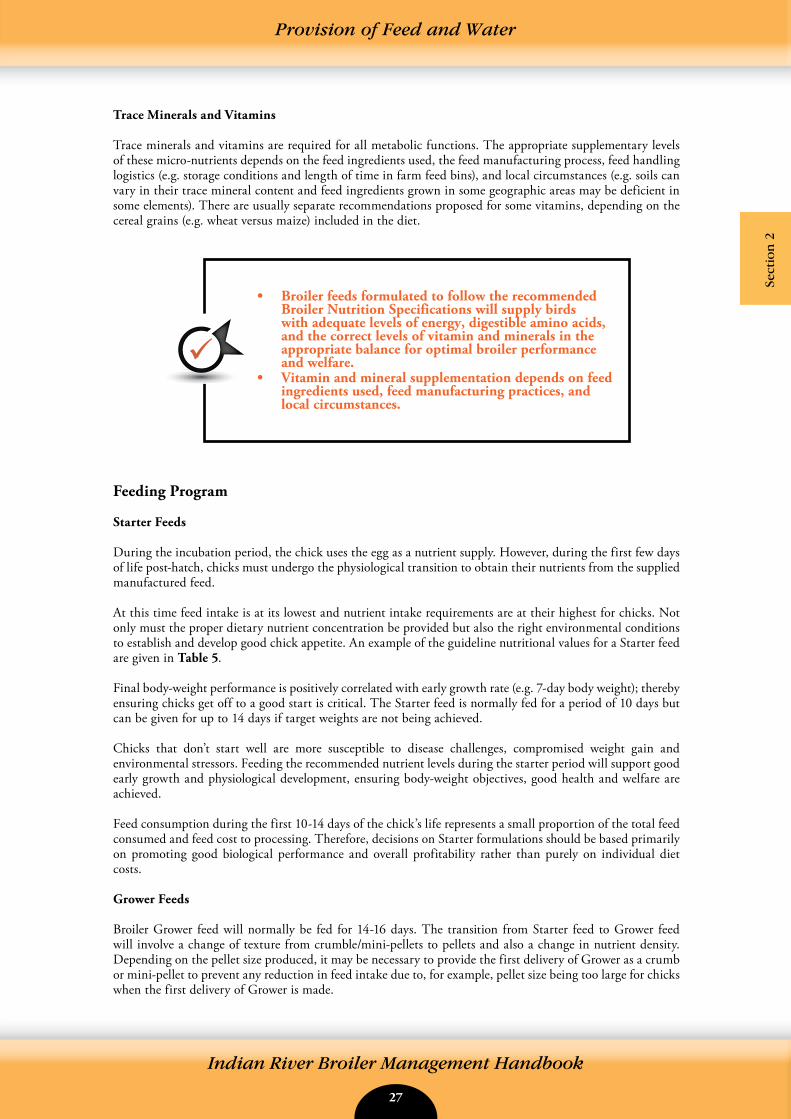
• Broiler feeds formulated to follow the recommended Broiler Nutrition Specifications will supply birds with adequate levels of energy, digestible amino acids, and the correct levels of vitamin and minerals in the appropriate balance for optimal broiler performance and welfare.
• Vitamin and mineral supplementation depends on feed ingredients used, feed manufacturing practices, and local circumstances.
28 29
Indian River Broiler Management Handbook
Provision of Feed and Water
During this time broiler daily growth rates continue to increase rapidly. This growth phase must be supported by adequate nutrient intake. To achieve optimum biological performance, the provision of the correct dietary nutrient density (see Table 5), especially energy and AA, is critical. The transition from Starter to Grower feed must be well managed to prevent any reduction in intake or growth.
Finisher Feeds
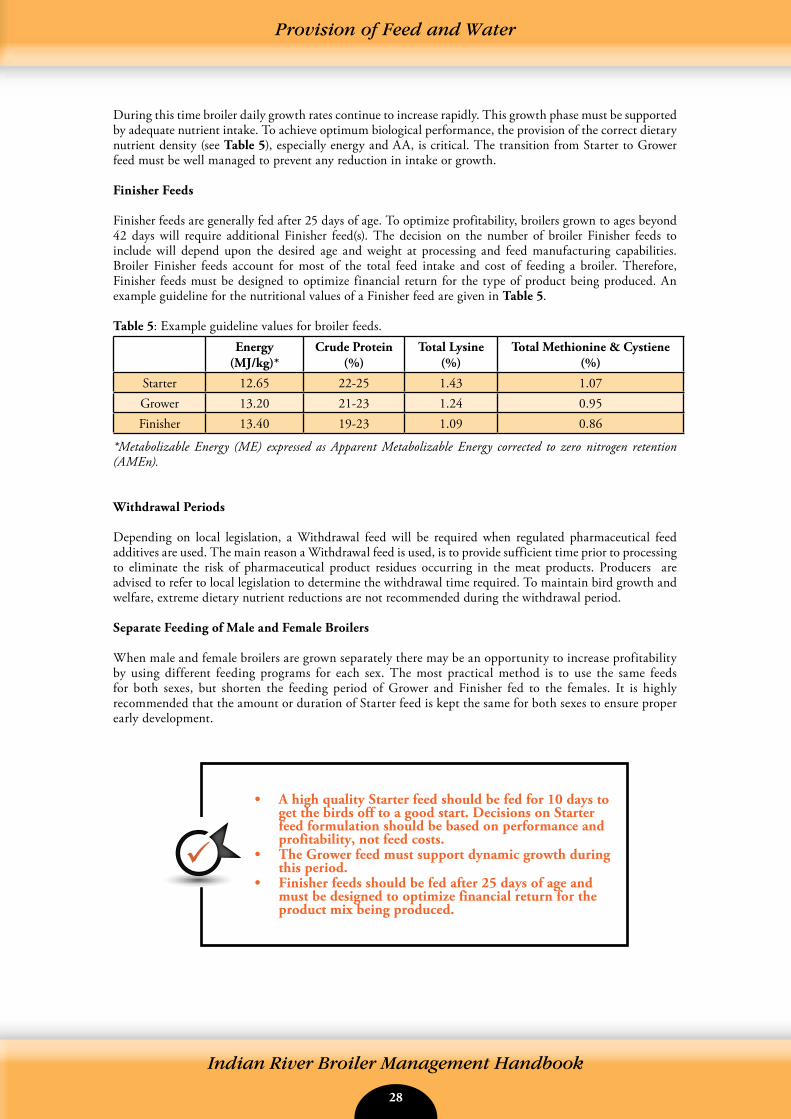
Finisher feeds are generally fed after 25 days of age. To optimize profitability, broilers grown to ages beyond 42 days will require additional Finisher feed(s). The decision on the number of broiler Finisher feeds to include will depend upon the desired age and weight at processing and feed manufacturing capabilities. Broiler Finisher feeds account for most of the total feed intake and cost of feeding a broiler. Therefore, Finisher feeds must be designed to optimize financial return for the type of product being produced. An example guideline for the nutritional values of a Finisher feed are given in Table 5.
Table 5: Example guideline values for broiler feeds.Energy
(MJ/kg)*Crude Protein
(%)Total Lysine
(%)Total Methionine & Cystiene
(%)
Starter 12.65 22-25 1.43 1.07Grower 13.20 21-23 1.24 0.95Finisher 13.40 19-23 1.09 0.86
*Metabolizable Energy (ME) expressed as Apparent Metabolizable Energy corrected to zero nitrogen retention (AMEn).
Withdrawal Periods
Depending on local legislation, a Withdrawal feed will be required when regulated pharmaceutical feed additives are used. The main reason a Withdrawal feed is used, is to provide sufficient time prior to processing to eliminate the risk of pharmaceutical product residues occurring in the meat products. Producers are advised to refer to local legislation to determine the withdrawal time required. To maintain bird growth and welfare, extreme dietary nutrient reductions are not recommended during the withdrawal period.
Separate Feeding of Male and Female Broilers
When male and female broilers are grown separately there may be an opportunity to increase profitability by using different feeding programs for each sex. The most practical method is to use the same feeds for both sexes, but shorten the feeding period of Grower and Finisher fed to the females. It is highly recommended that the amount or duration of Starter feed is kept the same for both sexes to ensure proper early development.
• A high quality Starter feed should be fed for 10 days to get the birds off to a good start. Decisions on Starter feed formulation should be based on performance and profitability, not feed costs.
• The Grower feed must support dynamic growth during this period.
• Finisher feeds should be fed after 25 days of age and must be designed to optimize financial return for the product mix being produced.
28 29
Indian River Broiler Management Handbook
Provision of Feed and Water
Sect
ion
2
Feed Form and Physical Feed Quality
Broiler growth is the result of dietary nutrient content and feed intake. Feed intake is affected by feed form. The best feed intake occurs on good quality crumble, mini-pellets or pellets. Feed which has an uneven particle size may increase feed wastage since the smaller particles easily fall from the birds’ beaks – especially in birds provided with constant access to feed. Chicks consuming higher levels of fines (particles below 1 mm in size) or mash feed will waste more feed. Feed spillage and wastage will substantially reduce feed efficiency.
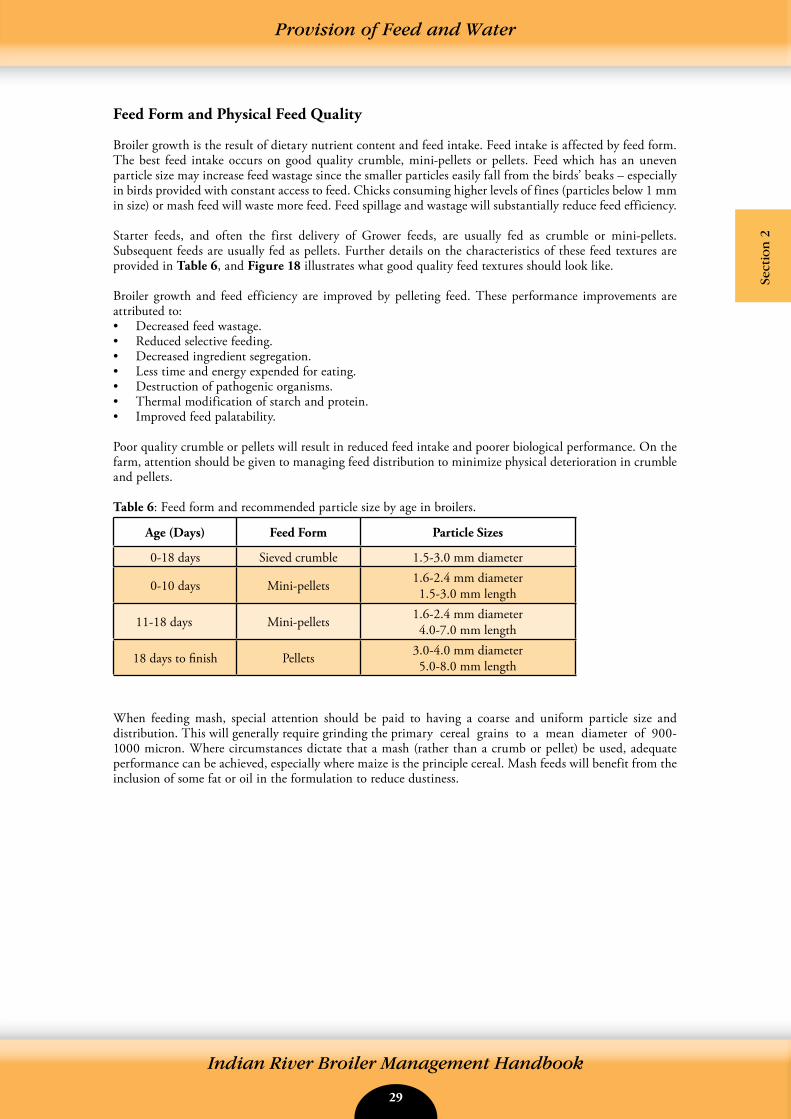
Starter feeds, and often the first delivery of Grower feeds, are usually fed as crumble or mini-pellets. Subsequent feeds are usually fed as pellets. Further details on the characteristics of these feed textures are provided in Table 6, and Figure 18 illustrates what good quality feed textures should look like.
Broiler growth and feed efficiency are improved by pelleting feed. These performance improvements are attributed to:• Decreased feed wastage.• Reduced selective feeding.• Decreased ingredient segregation.• Less time and energy expended for eating.• Destruction of pathogenic organisms.• Thermal modification of starch and protein.• Improved feed palatability. Poor quality crumble or pellets will result in reduced feed intake and poorer biological performance. On the farm, attention should be given to managing feed distribution to minimize physical deterioration in crumble and pellets.
Table 6: Feed form and recommended particle size by age in broilers.
Age (Days) Feed Form Particle Sizes
0-18 days Sieved crumble 1.5-3.0 mm diameter
0-10 days Mini-pellets 1.6-2.4 mm diameter1.5-3.0 mm length
11-18 days Mini-pellets 1.6-2.4 mm diameter4.0-7.0 mm length
18 days to finish Pellets 3.0-4.0 mm diameter5.0-8.0 mm length
When feeding mash, special attention should be paid to having a coarse and uniform particle size and distribution. This will generally require grinding the primary cereal grains to a mean diameter of 900- 1000 micron. Where circumstances dictate that a mash (rather than a crumb or pellet) be used, adequate performance can be achieved, especially where maize is the principle cereal. Mash feeds will benefit from the inclusion of some fat or oil in the formulation to reduce dustiness.
30 31
Indian River Broiler Management Handbook
Provision of Feed and Water
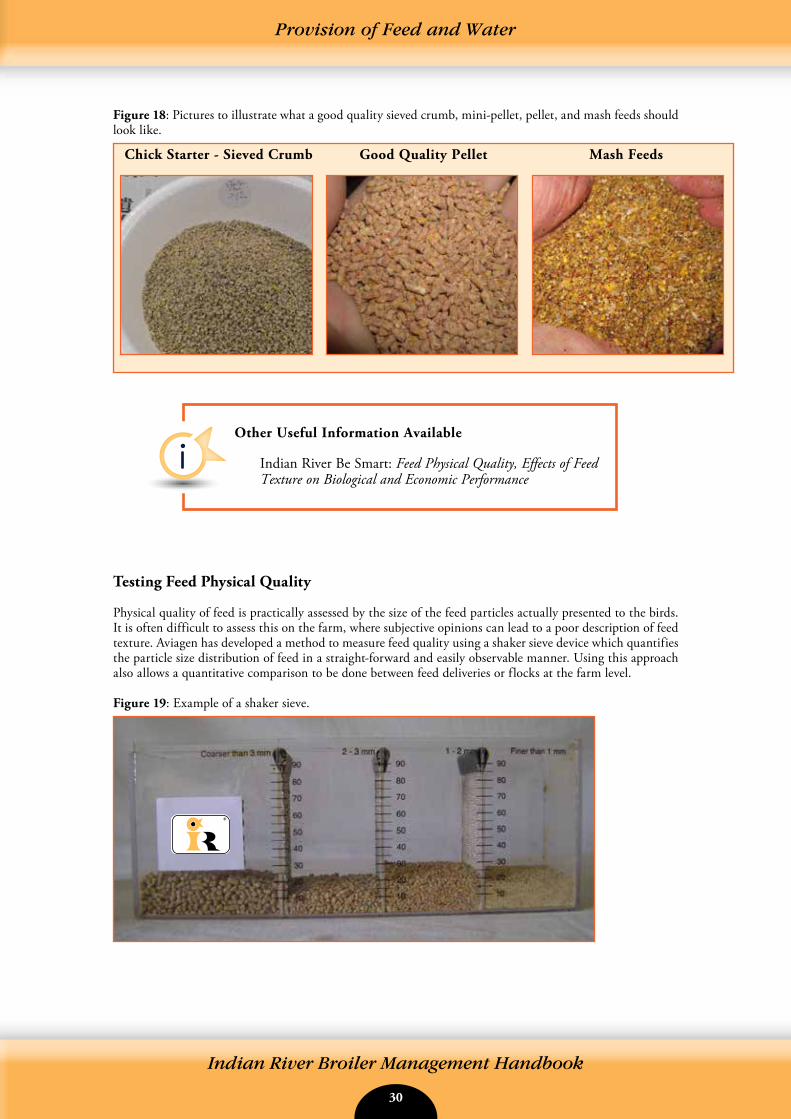
Figure 18: Pictures to illustrate what a good quality sieved crumb, mini-pellet, pellet, and mash feeds should look like.
Testing Feed Physical Quality
Physical quality of feed is practically assessed by the size of the feed particles actually presented to the birds. It is often difficult to assess this on the farm, where subjective opinions can lead to a poor description of feed texture. Aviagen has developed a method to measure feed quality using a shaker sieve device which quantifies the particle size distribution of feed in a straight-forward and easily observable manner. Using this approach also allows a quantitative comparison to be done between feed deliveries or flocks at the farm level.
Figure 19: Example of a shaker sieve.
Chick Starter - Sieved Crumb Good Quality Pellet Mash Feeds
Other Useful Information Available
Indian River Be Smart: Feed Physical Quality, Effects of Feed Texture on Biological and Economic Performance
®
30 31
Indian River Broiler Management Handbook
Provision of Feed and Water
Sect
ion
2
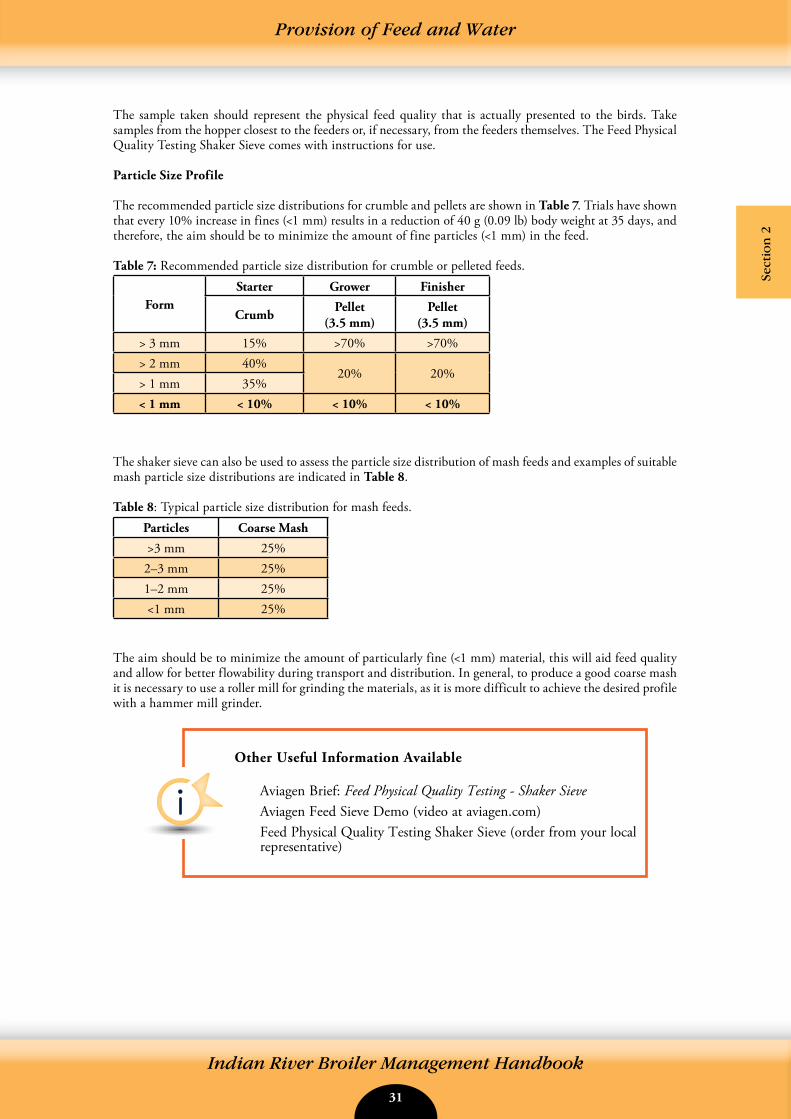
The sample taken should represent the physical feed quality that is actually presented to the birds. Take samples from the hopper closest to the feeders or, if necessary, from the feeders themselves. The Feed Physical Quality Testing Shaker Sieve comes with instructions for use.
Particle Size Profile
The recommended particle size distributions for crumble and pellets are shown in Table 7. Trials have shown that every 10% increase in fines (<1 mm) results in a reduction of 40 g (0.09 lb) body weight at 35 days, and therefore, the aim should be to minimize the amount of fine particles (<1 mm) in the feed.
Table 7: Recommended particle size distribution for crumble or pelleted feeds.
FormStarter Grower Finisher
Crumb Pellet(3.5 mm)
Pellet(3.5 mm)
> 3 mm 15% >70% >70%> 2 mm 40%
20% 20%> 1 mm 35%< 1 mm < 10% < 10% < 10%
The shaker sieve can also be used to assess the particle size distribution of mash feeds and examples of suitable mash particle size distributions are indicated in Table 8. Table 8: Typical particle size distribution for mash feeds.
Particles Coarse Mash
>3 mm 25%2–3 mm 25%1–2 mm 25%<1 mm 25%
The aim should be to minimize the amount of particularly fine (<1 mm) material, this will aid feed quality and allow for better flowability during transport and distribution. In general, to produce a good coarse mash it is necessary to use a roller mill for grinding the materials, as it is more difficult to achieve the desired profile with a hammer mill grinder.
Other Useful Information Available
Aviagen Brief: Feed Physical Quality Testing - Shaker Sieve Aviagen Feed Sieve Demo (video at aviagen.com)Feed Physical Quality Testing Shaker Sieve (order from your local representative)
32 33
Indian River Broiler Management Handbook
Provision of Feed and Water
Whole Grain Feeding
The feeding of a balancer feed with whole grain (wheat, oats, and barley – oats and barley should ideally be without husks) may reduce feed costs per ton, from savings in feed manufacture. Whole grain feeding supports a better gut microflora, enhances digestive efficiency and can improve litter condition. However, these must be offset against loss of eviscerated and breast meat yield, unless the pelleted balancer feed composition is adjusted to allow for the inclusion of whole grain.
The level of inclusion and the nutrient profile of the grain being utilized must be precisely accounted for in formulating the compound or balancer feed. If an appropriate adjustment is not made, live bird performance will be compromised as the diet will have an inappropriate nutrient balance. Caution must also be exercised when using anti-coccidial or other drugs in the feed to ensure legal usage levels (as defined by local policy guidelines) are not violated. Safe inclusion guides of whole grain are given in Table 9.
When feeding whole grain, treatment with organic acids to control Salmonella is necessary. The grain being fed must be of good quality and free from fungal/toxin contamination. Table 9: Safe inclusion levels of whole grain in broiler rations where the correct dietary nutrient balance is maintained. These guidelines should be used together with the Indian River Broiler Nutrient Specifications.
Ration Inclusion Rate of Whole Grain
Starter ZeroGrower Gradual increase to 15%Finisher Gradual increase to 20%
Whole grain must be removed from the feed 2 days before catching to avoid problems of contamination during evisceration at the processing plant.
Feed Additives
There are a number of feed additives that can be added to the diet which may support feeding and metabolism. These include:• Enzymes.• Medicines.• Growth promoters.• Pro and pre-biotics.• Feed preservatives and antioxidants.• Pelleting agents.
• Dilution of diets with whole grain may reduce performance if the compound feed nutrient levels are not properly adjusted.
32 33
Indian River Broiler Management Handbook
Provision of Feed and Water
Sect
ion
2
Feeding Under Hot Environmental Temperatures
Correctly balanced nutrient levels, together with the use of feed ingredients with higher levels of digestibility, will help to minimize the effects of heat-related stress.
Providing optimum feed form (good quality crumble and pellet) will minimize the energy expended to consume feed and thereby reduce the heat generated during feeding. Optimum feed form will also improve feed acceptability and help feed intake occur during cooler periods of the day or at night.
Providing an increase in the amount of feed energy derived from feed fats or oils (rather than carbohydrates) during hot weather has been shown to be beneficial due to reducing the heat produced when the diet is metabolized.
Providing sufficient access to cool water (approximately 150C/590F), which does not exceed acceptable levels of minerals and organic matter is vital (see section on Health and Biosecurity). The strategic use of vitamins (Vitamins A, C, D, E, and niacin) and electrolytes (sodium, potassium, and chloride), either through the feed or water, may help the bird deal with environmental stresses. Heat related stress increases the birds’ urinary and fecal excretion of mineral and trace elements and increased respiration rate depletes blood bicarbonate. Therefore, vitamin and trace mineral supplementation should be increased (provided legal limits defined by local legislation are not exceeded) to offset the anticipated decline in feed intake during periods of hot weather. Supplementation with sodium bicarbonate or potassium carbonate has been shown to be beneficial in reducing the effects of heat stress – probably due to their effect on water intake.
Environment
Nitrogen and ammonia emissions can be reduced by minimizing excess crude protein levels in the feed. This is most effectively achieved through formulating diets to meet recommended levels of digestible essential AA and utilizing synthetic AA.
Phosphorus excretion rates can be reduced by avoiding excess provision. Digestibility can be enhanced by the incorporation of phytase enzymes in to the diet.
• Providing correct balanced nutrient levels and using more digestible ingredients will help to minimize the effects of heat stress.
• Optimal feed form will minimize heat stress and allow feed intake to occur during the cooler period of the day.
• Ensure birds have access to feed during the cooler part of the day.
• Provide good quality cool water.• Consider the strategic use of vitamins and electrolytes to
help the birds deal with heat-related environmental stresses.
• Formulating feeds to balanced levels of digestible essential AA will minimize nitrogen excretion.
• Phosphorus excretion can be minimized by properly using phytase enzymes and feeding closely to the bird’s requirements.
34 35
Indian River Broiler Management Handbook
Provision of Feed and Water
Litter Quality
Lower litter moisture levels will produce less ammonia into the atmosphere, which helps reduce respiratory stress. Footpad dermatitis (FPD) incidence is also reduced with good litter quality.
In circumstances where management, health, and environmental practices are already good, the following nutritional strategies will help to maintain good litter quality.
Protein QualityFailure to supply the correct level of balanced protein, from good quality raw materials will result in high levels of uric acid being formed in the liver and excreted by the kidneys. This stimulates water intake, has a negative impact upon gut health and causes wet droppings which will result in wet litter and increases the risk of FPD. Formulating diets to match nutrient content with bird requirements will reduce the risk of wet litter. MineralsIncorrect supply and balance of dietary sodium, potassium, and chloride levels can potentially result in wet litter.
The addition of phytase enzyme to broiler diets not only promotes the release of phosphorous from plant material but also the release of other minerals. This must be accounted for when formulating diets with phytase if wet litter problems are to be avoided.
Raw Material DigestibilityThe use of raw materials that have a low digestibility, or are particularly high in fiber, should be minimized as these will have a negative effect upon gut integrity, excreta water content, and litter quality.
Anti-nutritional factors (e.g. trypsin inhibitors) should be minimized, and raw materials must be free from high levels of mycotoxin contamination. If it is impossible to avoid poor quality raw materials, then an appropriate mycotoxin binding product should be considered for inclusion in the feed mix.
The use of non-starch polysaccharide (NSP) enzymes can be an important tool for improving gut health and controlling litter quality. These enzymes reduce gut viscosity and will lead to drier litter.
Over the past number of years, particularly in areas of Western Europe, there has been a move to vegetarian (vegetable proteins) and antibiotic free diets, which makes a drier litter more difficult to maintain.
Fat QualityHighly digestible (unsaturated) fats will promote enteric health in the broiler. The use of poor quality fats often causes greasy or sticky litter which can lead to problems with FPD.
Feed Physical FormThe benefits to broiler live performance from feeding good quality crumble and pellets have been referred to earlier. A feed that is of poor physical quality with high levels of fines and dust not only leads to problems with broiler performance but could also lead to an increased ratio of water to feed intake, which in turn could lead to poor litter conditions and ultimately increase the risk of FPD.
Anti-Coccidial ProgramGenerally, there is a benefit to gut health from the use of anti-coccidials. These products typically improve gut integrity and maintain litter condition. If using a live vaccination for coccidiosis control in broilers, greater care and attention to gut health is required to ensure good litter condition is maintained.
34 35
Indian River Broiler Management Handbook
Provision of Feed and Water
Sect
ion
2
Other Useful Information Available
Aviagen Brief: Practical Considerations for Reducing the Risk of PododermatitisIndian River Be Smart: Broiler Foot Health – Controlling Footpad Dermatitis AviaTech: Management Tools to Reduce Footpad Dermatitis in Broilers
• Avoid diets that provide more crude protein (nitrogen) than the bird requires.
• Avoid excessive dietary electrolyte levels, sodium chloride, and potassium, as these will increase bird water intake and contribute to wet litter conditions.
• Avoid using poorly digestible feed ingredients in the diets.• Provide good-quality dietary feed fats and/or oils, as this
helps avoid enteric disorders which produce wet litter.• Provide a good quality crumb and pellet.• Provide an effective anti-coccidial program that improves
gut health and maintains good litter quality.
Drinking Systems
Birds should have unlimited access to clean, fresh, good quality drinking water at all times. However when water intake is naturally low, for example during dark periods when birds are inactive, control of water supply may help to reduce unnecessary water leakage and corresponding litter problems. Any such control must be managed with care; there must be no restriction in the amount of water offered to growing birds and a balance must be found between growth, welfare and potential Footpad Dermatitis (FPD) risk. Inadequate water supply, either in volume or in the number of drinking points, will result in reduced growth rate. To ensure that the flock is receiving sufficient water, the ratio of water to feed consumed each day should be monitored.
Changes in water consumption are an early indication of health and performance issues.
Cold (<5°C/41°F) or very warm (>30°C/86°F) water will reduce water intake. Ideal water temperature should be between 15°C (59°F) and 21°C (70°F). In hot weather, it is good practice to flush the drinker lines at regular intervals to ensure that the water is cool.
Adequate water storage must be provided on the farm, in case of failure of the mains supply. Ideally, sufficient storage to provide 24 hours water at maximum consumption is required.
Water consumption should be monitored daily using a water meter. Water meters must match flow rates with pressure. A minimum of one water meter is required per house, but preferably more to allow within-house zoning.
Water requirement will vary with feed consumption.
At 21°C (70°F), the birds are consuming sufficient water when the ratio of water volume (l) to feed weight (kg) remains close to:• 1.8:1 for bell drinkers.• 1.7:1 for nipple drinkers with cups.• 1.6:1 for nipple drinkers without cups.
36 37
Indian River Broiler Management Handbook
Provision of Feed and Water
Water requirement will also vary with ambient temperature. Birds will drink more water at higher ambient temperatures. Water requirement increases by approximately 6.5% per °C (per 2°F) over 21°C (70°F). In tropical areas prolonged, high temperatures will double daily water consumption.
All drinkers should be checked for height daily and adjusted if required. Drinkers should be maintained in a clean condition and in working order, free from any litter and fecal material. Any build-up of calcium deposit should be removed using a suitable cleaning product during the house clean-out process.
Nipple drinkers
Minimum nipple drinker requirements per 1,000 birds post-brooding are given in Table 10. Additional supplementary drinkers should be supplied (10 per 1,000 chicks) for the first 3 days.
The actual number of birds per nipple will depend on flow rates, depletion age, climate, and design. Water lines need to be managed daily during the flock to obtain optimum performance. Table 10: Minimum drinker requirements per 1,000 birds post-brooding.
Drinker Type Requirements
Nipple drinkers <3 kg (6.6 lbs) 12 birds per nipple>3 kg (6.6 lbs) 9 birds per nipple
Drinker line height should be started low at the beginning of the flock and increased as the birds get older. Drinker lines that are too high can restrict bird water consumption while water lines that are too low can result in wet litter.
In the initial stages of brooding, the nipple lines should be placed at a height at which the bird is able to drink. The back of the chick should form an angle of 35-45° with the floor while drinking is in progress. As the bird grows, the nipples should be raised so that the back of the bird forms an angle of approximately 75-85° with the floor and so that the birds are stretching slightly for the water (Figure 20). Birds should be reaching for, but not stretching or straining to reach the nipple, so that water will flow directly from the nipple into the beak. If the nipple is too low, birds may turn their heads to drink, causing water to fall onto the litter. For ease of access and optimum water availability, birds should, where possible, be grown using a 360° type nipple. This is particularly important where large birds (>3 kg/6.6 lbs) are being grown.
Figure 20: Correct nipple drinker height adjustment with bird age.
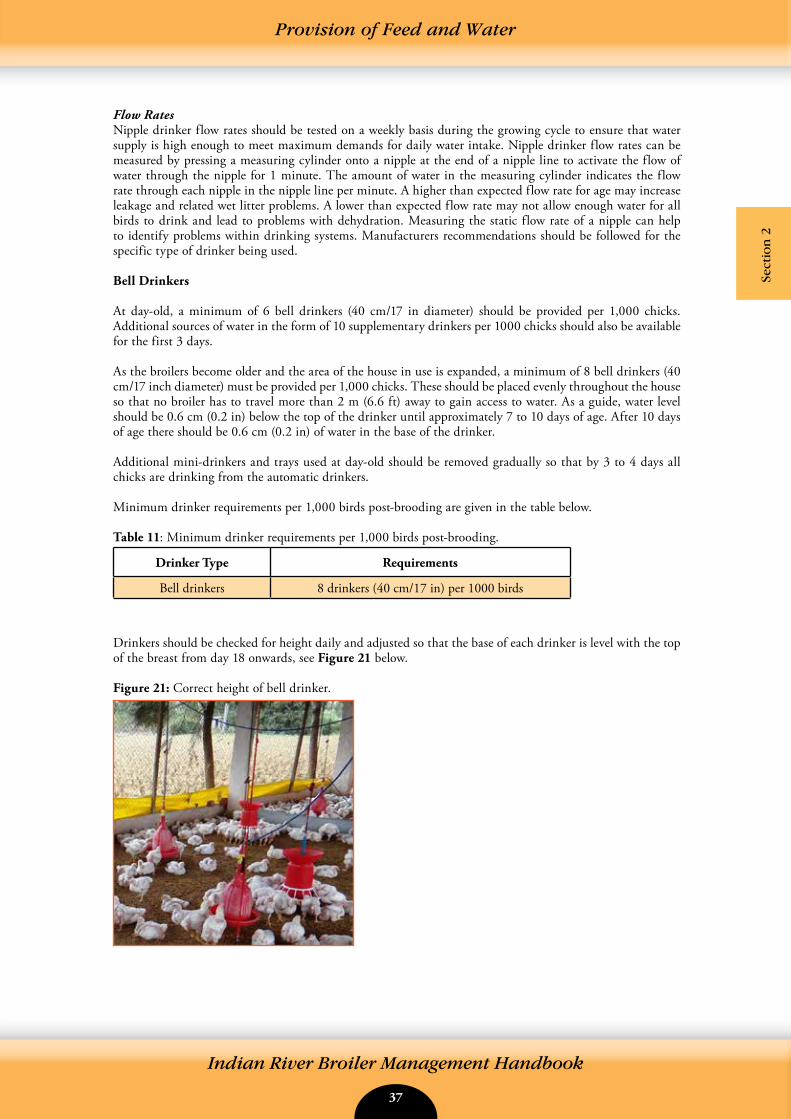
36 37
Indian River Broiler Management Handbook
Provision of Feed and Water
Sect
ion
2
Flow RatesNipple drinker flow rates should be tested on a weekly basis during the growing cycle to ensure that water supply is high enough to meet maximum demands for daily water intake. Nipple drinker flow rates can be measured by pressing a measuring cylinder onto a nipple at the end of a nipple line to activate the flow of water through the nipple for 1 minute. The amount of water in the measuring cylinder indicates the flow rate through each nipple in the nipple line per minute. A higher than expected flow rate for age may increase leakage and related wet litter problems. A lower than expected flow rate may not allow enough water for all birds to drink and lead to problems with dehydration. Measuring the static flow rate of a nipple can help to identify problems within drinking systems. Manufacturers recommendations should be followed for the specific type of drinker being used. Bell Drinkers
At day-old, a minimum of 6 bell drinkers (40 cm/17 in diameter) should be provided per 1,000 chicks. Additional sources of water in the form of 10 supplementary drinkers per 1000 chicks should also be available for the first 3 days.
As the broilers become older and the area of the house in use is expanded, a minimum of 8 bell drinkers (40 cm/17 inch diameter) must be provided per 1,000 chicks. These should be placed evenly throughout the house so that no broiler has to travel more than 2 m (6.6 ft) away to gain access to water. As a guide, water level should be 0.6 cm (0.2 in) below the top of the drinker until approximately 7 to 10 days of age. After 10 days of age there should be 0.6 cm (0.2 in) of water in the base of the drinker.
Additional mini-drinkers and trays used at day-old should be removed gradually so that by 3 to 4 days all chicks are drinking from the automatic drinkers.
Minimum drinker requirements per 1,000 birds post-brooding are given in the table below.
Table 11: Minimum drinker requirements per 1,000 birds post-brooding.
Drinker Type Requirements
Bell drinkers 8 drinkers (40 cm/17 in) per 1000 birds
Drinkers should be checked for height daily and adjusted so that the base of each drinker is level with the top of the breast from day 18 onwards, see Figure 21 below.
Figure 21: Correct height of bell drinker.
38 39
Indian River Broiler Management Handbook
Provision of Feed and Water
• Drinking water should be available to the birds 24 hours a day.• Provide supplementary drinkers for the first 3 days of a flock’s
life.• The feed to water ratio should be monitored daily to check that
water intake is sufficient.• Make allowances for increased water consumption at high
temperatures.• Flush drinker lines in hot weather to ensure that the water is as
cool as possible.• Adjust drinker heights daily.• Provide adequate drinker space and ensure that drinkers are
easily accessible to all birds.
Feeding Systems
For the first 10 days of life, feed should be provided in the form of sieved crumble or mini-pellets. Feed should be placed in flat trays or on paper sheeting so that it is readily accessible to the chicks. At least 80% of the floor should be covered with paper. Automatic feeding systems should be flooded with feed at chick placement allowing easier access to the starter feed. A total feed amount of approximately 40 g (1.5 oz) per bird should be measured out and fed onto the paper prior to chick placement. To encourage chick feeding behavior, top up the feed on the paper at regular intervals during the first 3-4 days of age.
The change to the main feeding system should be made gradually from day 4 or 5 as chicks begin to show more and more interest in the main feeding system. Transition to the main feeding system should be complete by day 6 or 7 and any feed trays should be removed by 7 days of age. When transition to the main feeding system is complete, feed should gradually be changed from a crumble or mini-pellet to a good quality pellet. Note that birds should not receive full pellets (3-4 mm) before 18 days of age.
Actual diets provided to the birds will depend on live weight, depletion age, climate, and type of house and equipment construction.
Table 12 shows typical feeding systems and recommended feeding space per bird. Insufficient feeding space will reduce growth rates and cause poor uniformity. The number of birds per feeding system will ultimately depend on the live weight at processing and design of the system. If using a lighting program to modify growth, particular attention should be paid to feeding space to allow for the extra competition created.
Table 12: Feeding space per bird for different feeder types.
Feeder Type Feeding Space
Pan feeders 45-80 birds per pan (the lower ratio for bigger birds [> 3.5 kg/7.7 lb])
Flat chain/auger 2.5 cm/bird (40 birds/meter of track),1 inch per bird (24 birds per feet of track)
Tube feeders 70 birds/tube (for a 38 cm/15 inch diameter feeder)
All types of feeders should be adjusted to ensure minimum spillage and optimum access for the birds. The base of the trough or pans should be level with the top of the breast (Figure 22). The height of pan and tube feeders may have to be adjusted individually. The height of chain feeders is adjustable by winch or feeder leg adjustment.

38 39
Indian River Broiler Management Handbook
Provision of Feed and Water
Sect
ion
2
Figure 22: Height of feeders.
Incorrect feeder height (too high/too low) will increase feed spillage. In addition to economic loss, when this happens, estimates of feed conversion will become inaccurate and the spilled feed, when eaten, is likely to carry a higher risk of bacterial contamination.
Feed should be distributed equally and uniformly throughout the feeding system to allow equal opportunity for all birds to eat at the same time. Uneven feed distribution can result in lowered performance, increased scratching damage associated with competition at feeders and increased feed spillage. Pan and tube feeder systems require adjustments to be made to each individual feeder. To ensure equal feed distribution, all depth adjustment settings should be set the same on each feed pan or tube.
Pan and tube feeders (if filled automatically) have the advantage that all are filled simultaneously, making feed available to the birds immediately. When chain feeders are used, however, feed distribution takes longer to accomplish and feed is not immediately available to all the birds.
With all feeding systems it is good practice to allow the birds to clear the feeders once daily by consuming all the feed available in the tracks or pans. This will reduce feed wastage which results in improved efficiency of feed use.
Adjustment of feed depth is easier with chain feeder systems, as a single adjustment to the hopper only is required. Careful maintenance of chain feeders will minimize incidence of leg damage to birds.
• Supplement the main feeding system using paper and/or trays over the first 3 days.
• Supply sufficient feeders for the number of birds in the house.
• Increase feeder space per bird if the lighting program is modified to allow for increased competition at the feeder.
• Adjust feeder height daily so that the lip of the feeder is level with the top of the breast.

40 41
Indian River Broiler Management Handbook
Notes
Notes
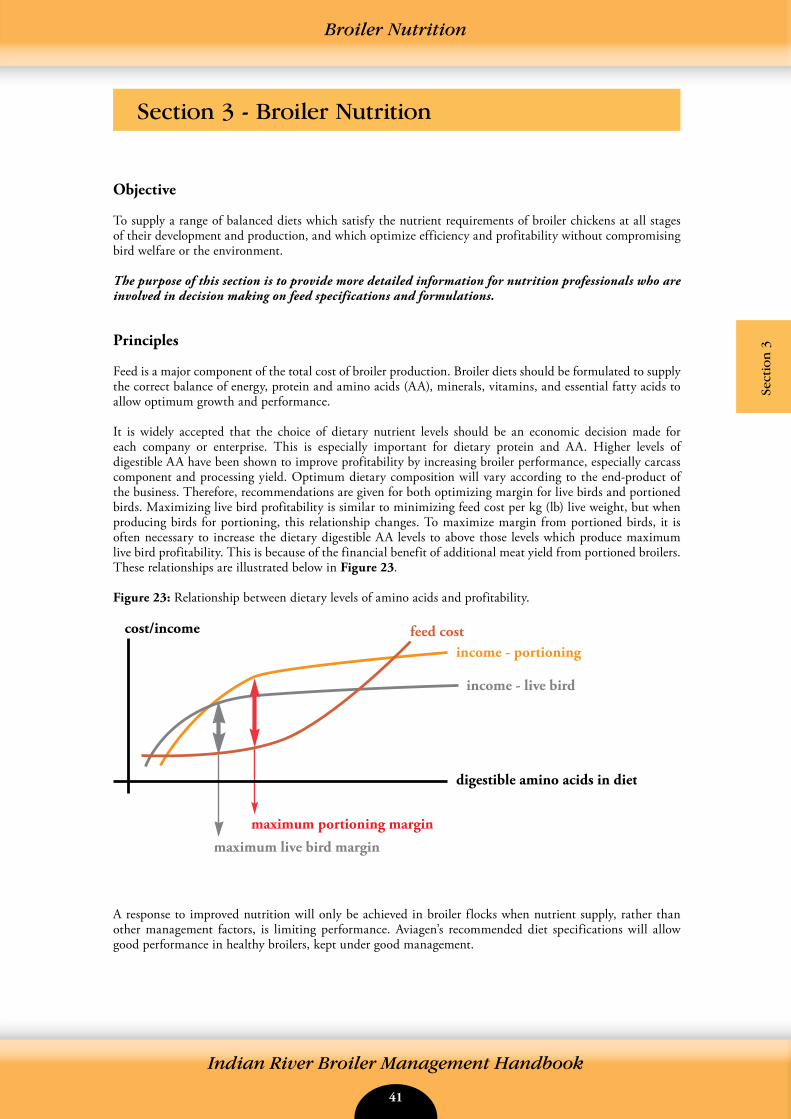
40 41
Indian River Broiler Management Handbook
Section 3 - Broiler Nutrition
Broiler Nutrition
Sect
ion
3
Objective
To supply a range of balanced diets which satisfy the nutrient requirements of broiler chickens at all stages of their development and production, and which optimize efficiency and profitability without compromising bird welfare or the environment.
The purpose of this section is to provide more detailed information for nutrition professionals who are involved in decision making on feed specifications and formulations.
Principles
Feed is a major component of the total cost of broiler production. Broiler diets should be formulated to supply the correct balance of energy, protein and amino acids (AA), minerals, vitamins, and essential fatty acids to allow optimum growth and performance.
It is widely accepted that the choice of dietary nutrient levels should be an economic decision made for each company or enterprise. This is especially important for dietary protein and AA. Higher levels of digestible AA have been shown to improve profitability by increasing broiler performance, especially carcass component and processing yield. Optimum dietary composition will vary according to the end-product of the business. Therefore, recommendations are given for both optimizing margin for live birds and portioned birds. Maximizing live bird profitability is similar to minimizing feed cost per kg (lb) live weight, but when producing birds for portioning, this relationship changes. To maximize margin from portioned birds, it is often necessary to increase the dietary digestible AA levels to above those levels which produce maximum live bird profitability. This is because of the financial benefit of additional meat yield from portioned broilers. These relationships are illustrated below in Figure 23.
Figure 23: Relationship between dietary levels of amino acids and profitability.
A response to improved nutrition will only be achieved in broiler flocks when nutrient supply, rather than other management factors, is limiting performance. Aviagen’s recommended diet specifications will allow good performance in healthy broilers, kept under good management.
digestible amino acids in diet
income - live bird
maximum live bird margin
maximum portioning margin
income - portioningfeed costcost/income
42 43
Indian River Broiler Management Handbook
Broiler Nutrition
Further information on recommended nutrient levels and feeding programs can be found in the current published Broiler Nutrition Specifications, which offer further information on:• The choice of feeding program for a range of production and market situations.• Optimum levels of nutrients for growth, feed efficiency, and processing yield.
Supply of Nutrients
Energy
The formulated energy content of broiler feeds is primarily determined by economic considerations. In practice, the choice of energy level will also be influenced by many interacting factors (e.g. supply of feed ingredients, milling constraints).
The conventional method of expressing the energy content of the feed is as the Apparent Metabolizable Energy level corrected to zero nitrogen retention (AMEn). Data on energy contents expressed in this way are available from many sources. Energy values quoted here are based on World Poultry Science Association (WPSA) tables.
The AMEn values of some ingredients, especially fats, are lower in young chicks than in adult birds. Formulating diets for broilers using chick AMEn takes account of this. Expressing energy content in terms of Net Energy overcomes the differences in the utilization of ME when it is derived from different substrates (e.g. fat, protein or carbohydrate) and used for different metabolic purposes. Adoption of these new energy systems improves the consistency and predictability of broiler performance.
Some typical energy levels for broiler feeds are indicated in the nutrition tables within the published Broiler Nutrition Specifications. This information is a practical guide and does not represent the requirements of the birds per se. Dietary energy levels which will give the best economic return should be determined under the local conditions in which the broilers are grown.
Protein and Amino Acids
Feed proteins are complex amino acid polymers which are broken down in the gut into individual AA. Dietary protein quality is based on the level, balance, and digestibility of essential AA in the final mixed feed. The actual levels of essential AA available to the bird are critical. Therefore, it is recommended that broiler feeds are formulated on the basis of digestible AA. The digestible AA levels quoted here are based on true fecal digestibility, as opposed to apparent fecal digestibility. When the apparent digestibility system is used, the recommendation should be adjusted accordingly.
Other Useful Information Available
Indian River Broiler Nutrition Specifications
• Optimum dietary energy levels will depend upon both bird requirement (which is affected by maintenance, growth, and environmental conditions) and economic considerations. Different producers may have different optima.
• Consider using chick AMEn in formulating broiler diets to reduce levels of less digestible raw materials.
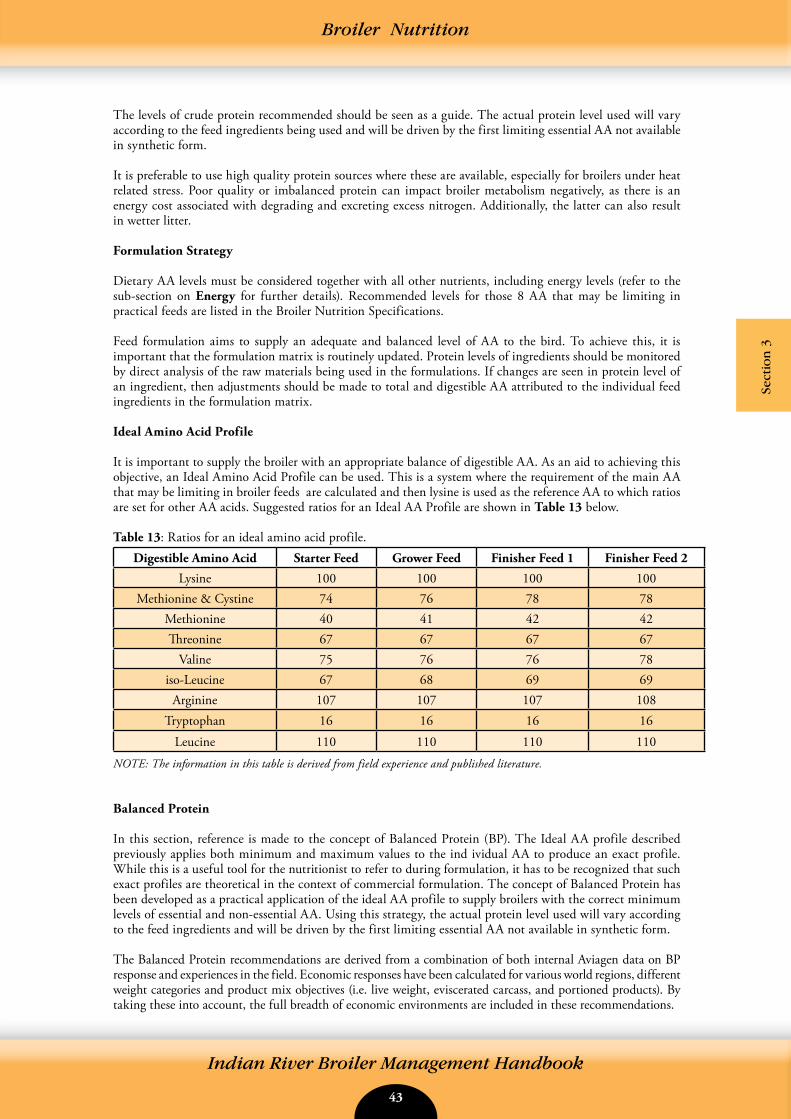
42 43
Indian River Broiler Management Handbook
Broiler Nutrition
Sect
ion
3
The levels of crude protein recommended should be seen as a guide. The actual protein level used will vary according to the feed ingredients being used and will be driven by the first limiting essential AA not available in synthetic form.
It is preferable to use high quality protein sources where these are available, especially for broilers under heat related stress. Poor quality or imbalanced protein can impact broiler metabolism negatively, as there is an energy cost associated with degrading and excreting excess nitrogen. Additionally, the latter can also result in wetter litter.
Formulation Strategy
Dietary AA levels must be considered together with all other nutrients, including energy levels (refer to the sub-section on Energy for further details). Recommended levels for those 8 AA that may be limiting in practical feeds are listed in the Broiler Nutrition Specifications.
Feed formulation aims to supply an adequate and balanced level of AA to the bird. To achieve this, it is important that the formulation matrix is routinely updated. Protein levels of ingredients should be monitored by direct analysis of the raw materials being used in the formulations. If changes are seen in protein level of an ingredient, then adjustments should be made to total and digestible AA attributed to the individual feed ingredients in the formulation matrix.
Ideal Amino Acid Profile
It is important to supply the broiler with an appropriate balance of digestible AA. As an aid to achieving this objective, an Ideal Amino Acid Profile can be used. This is a system where the requirement of the main AA that may be limiting in broiler feeds are calculated and then lysine is used as the reference AA to which ratios are set for other AA acids. Suggested ratios for an Ideal AA Profile are shown in Table 13 below.
Table 13: Ratios for an ideal amino acid profile.Digestible Amino Acid Starter Feed Grower Feed Finisher Feed 1 Finisher Feed 2
Lysine 100 100 100 100Methionine & Cystine 74 76 78 78
Methionine 40 41 42 42Threonine 67 67 67 67
Valine 75 76 76 78iso-Leucine 67 68 69 69
Arginine 107 107 107 108Tryptophan 16 16 16 16
Leucine 110 110 110 110
NOTE: The information in this table is derived from field experience and published literature.
Balanced Protein
In this section, reference is made to the concept of Balanced Protein (BP). The Ideal AA profile described previously applies both minimum and maximum values to the ind ividual AA to produce an exact profile. While this is a useful tool for the nutritionist to refer to during formulation, it has to be recognized that such exact profiles are theoretical in the context of commercial formulation. The concept of Balanced Protein has been developed as a practical application of the ideal AA profile to supply broilers with the correct minimum levels of essential and non-essential AA. Using this strategy, the actual protein level used will vary according to the feed ingredients and will be driven by the first limiting essential AA not available in synthetic form.
The Balanced Protein recommendations are derived from a combination of both internal Aviagen data on BP response and experiences in the field. Economic responses have been calculated for various world regions, different weight categories and product mix objectives (i.e. live weight, eviscerated carcass, and portioned products). By taking these into account, the full breadth of economic environments are included in these recommendations.
44 45
Indian River Broiler Management Handbook
Broiler Nutrition
Broiler Response to Protein and Amino Acids
The modern broiler is very responsive to dietary digestible AA levels and will respond very efficiently, in terms of growth and FCR, to the recommended levels in the Broiler Nutrition Specifications. Higher levels of digestible AA have been shown to improve profitability by increasing broiler performance and processing yield. This becomes particularly important when growing broilers for portioning of carcass components. Therefore, separate recommendations are given for optimizing portions margin (see Broiler Nutrition Specifications).
However, nutrient ingredient prices and meat product values will ultimately determine the appropriate nutrient density to be fed. To aid decisions on the appropriate nutrient density, when faced with variable market conditions, Aviagen has developed a bio-economical model called BEEP (Broiler Economics for Energy and Protein). It uses trials data collected from around the world over many years. Aviagen utilizes BEEP to assist customers in determining ME and AA density to optimize margin over feeding cost (MOFC) based upon market conditions and the desired product mix.
Macro Minerals
The provision of the correct levels of all major minerals in the appropriate balance is important for growing broilers successfully. The macro minerals involved are calcium, phosphorus, magnesium, sodium, potassium, and chloride.
Calcium
Calcium in the diet of broilers influences growth, feed efficiency, bone development, leg health, nerve function, and the immune system. It is vital that calcium is supplied in adequate quantities and on a consistent basis to achieve optimum performance.
These functions may require different calcium levels to allow optimum expression, so a compromise must be made when choosing a level of dietary calcium.
Other Useful Information Available
Aviagen Brief: Nutrition for Maximum Profit – Do the Math. Aviagen Model - BEEP (Broiler Economics for Energy and Protein).
• Formulate using digestible AA, following the ideal amino acid profile recommended (Table 13).
• Consider AA levels together with factors affecting feed intake (e.g. energy levels, feed intake control programs, feed form, feeder arrangement) when formulating broiler diets.
• Use high quality sources of protein, especially in circumstances when broilers are likely to experience heat related stress.
• Maintain updated ingredient AA and protein values on the formulation matrix.
• Balanced protein (BP) approach produces benefits in broiler and economic performance.
• The broiler is particularly responsive to dietary AA levels. Feeding to recommended levels provides an economic advantage.
44 45
Indian River Broiler Management Handbook
Broiler Nutrition
Sect
ion
3
The calcium levels recommended in the nutrition tables within the published Broiler Nutrition Specifications have been produced with the intention of maximizing broiler performance by best satisfying the various requirements of the different functions described above.
Phosphorus
Phosphorus, like calcium, is required in the correct form and quantity to optimize skeletal structure and growth. Phosphorus recommendations in the nutrition tables within the published Indian River Broiler Nutrition Specifications are based on the classical availability system, whereby inorganic phosphorus sources are described as being 100% available and plant sources are described as 33% available. Values of available phosphorus based on toe ash analysis have been found to show a correlation with the classical system. Digestible phosphorous is used in some countries as a way of more accurately assessing the phosphorus contribution of materials. Care should be taken to use consistent data on available phosphorus content of feed ingredients and bird requirements.
The use of phytase enzymes will increase the available phosphorus content of vegetable feed ingredients, and in general the use of such enzymes will be beneficial in broiler production. The reduction in phytate arising from the use of enzymes will increase availability of calcium and other minerals.
Calcium: Available Phosphorus
In most instances, a calcium : available phosphorus ratio of 2:1 is appropriate for broiler diets. However, there is information available which suggests that in Starter diets, a higher calcium : available phosphorus ratio (e.g. 2.1:1) is beneficial to performance and especially helpful in promoting excellent leg strength.
Magnesium
Magnesium requirements are normally met without the need for supplementation. Excessive magnesium (>0.5%) will cause scouring.
Sodium, Potassium, and Chloride
Sodium, potassium, and chloride are needed for a number of metabolic functions. Excessive levels of these minerals results in increased water intake and subsequent poorer litter quality. Shortages can affect feed intake, growth, and blood pH. It is important to control sodium and chloride levels as suggested in the nutrition tables within the published Indian River Broiler Nutrition Specifications. In particular, chloride should be accurately controlled by the use of sodium chloride and sodium bicarbonate or sesquicarbonate. In feed formulation, all dietary sources of chloride should be carefully identified (e.g. chloride contribution from lysine hydrochloride and choline chloride).
There are some circumstances when higher levels of sodium can be used to improve growth rates, notably in pre-starter products.
Dietary electrolyte balance (DEB) is important to broilers, especially in heat stress conditions. The anion content of both vitamin and mineral premixes should always be included in the calculation of ionic balance in finished feeds. With practical potassium levels of about 0.85% and the recommended levels of sodium and chloride, a DEB (sodium + potassium - chloride) of about 220-230 mEq/kg will be obtained. This is satisfactory and, as indicated, most emphasis should be given to the control of chloride levels.
• Provide adequate calcium for the bird, following the recommendations.
• Accurately describe phosphorus in feed ingredients and bird requirements in the same units.
• Control chloride levels accurately by using sodium chloride and, where necessary, sodium bicarbonate or sesquicarbonate as feed ingredients.
46 47
Indian River Broiler Management Handbook
Broiler Nutrition
Trace Minerals and Vitamins
Trace Minerals
Trace minerals (and vitamins) are needed for all metabolic functions. Appropriate trace mineral supplementation depends on feed ingredients utilized, the feed manufacturing process, and local circumstances. Conventional levels of supplementation are recommended for these nutrients. Care should be taken to ensure that suitable forms of each mineral are included in the premix. Generally speaking, organic trace elements have a higher biological availability. There is evidence that enhancement of the zinc and selenium status of broilers may improve feathering and immune response. Zinc has also been shown to improve footpad health.
Added Vitamins
A major source of variation in supplementation for some vitamins is from the cereal type utilized. Accordingly, in the nutrition tables within the published Broiler Nutrition Specifications, separate recommendations have been made for vitamin A, nicotinic acid, pantothenic acid, pyridoxine (B6), and biotin in maize and wheat- based feeds.
It should be noted that the recommendations for choline are given as a minimum specification in the complete feed.
Many circumstances (e.g. stress, disease) may make birds responsive to vitamin levels higher than those recommended in the nutrition tables within the published Broiler Nutrition Specifications. Increases in the levels of vitamins supplied, in the feed or via the water, must be based on local knowledge and experience. In general, the longer-term strategy should be to remove or reduce any stress factors, rather than to depend on prolonged use of excessive vitamin supplementation.
The basic requirement of broiler chickens for Vitamin E is 10-15 mg/kg. The need for extra supplementation will depend on the level and type of fat in the diet, the level of selenium, and the presence or absence of pro- and anti-oxidants. Thermal processing of feeds can result in the destruction of up to 20% of Vitamin E. Enhancement of immune response and improvements in the shelf-life of broiler meat are observed at Vitamin E levels up to 300 mg/kg. The levels suggested in the nutrition tables within the published Broiler Nutrition Specifications are suitable for the production of healthy broilers under normal conditions, but there may be situations (e.g. disease outbreaks) where higher levels of Vitamin E are justified.
Non-Nutritive Feed Additives
The feed may be used as a carrier for a wide range of additives, medicinal products, and other non- nutritive substances. It is not possible to give a comprehensive list and Aviagen does not recommend or endorse particular products. The more important classes of additives that might be considered for use in broiler feeds are listed below. Local legislation may control the use of these products. Producers, feed compounders, and nutritional consultants are advised to assure themselves of both the necessity and the real efficacy of the products used.
• Reduce or remove stressors rather than depend on excessive vitamin supplementation.
• Control total choline level, taking into account the contribution of feed ingredients. Avoid using choline chloride in vitamin supplements due to its aggressive action upon other vitamins.
46 47
Indian River Broiler Management Handbook
Broiler Nutrition
Sect
ion
3
Enzymes: Enzymes are now being routinely used in poultry feeds to improve digestibility of feed ingredients. In general, feed enzymes are available that act on carbohydrates, plant bound minerals and proteins.
Non-starch Polysaccharide (NSP) enzymes are economically beneficial in wheat-based feeds. These enzymes will also allow greater flexibility in the levels of barley to be included in the diet.
Increasingly, phytase enzymes are being used to enhance phytate phosphorus utilization. When using phytase, consideration must be given to dietary phosphorus levels, but also to calcium and other minerals.
The use of protease enzymes in diets to act upon vegetable-based proteins is developing and carbohydrase enzymes are reported to provide beneficial responses when used in maize-soya diets.
When adding enzymes before heat processing of broiler feeds, there is the potential for a loss in enzyme activity due to thermal damage to the enzyme. This may be avoided by spraying enzymes on the feed at the end of processing.
Medicinal and Prophylactic Drugs: A wide range of medicinal products may be administered through the feed in some parts of the world. Veterinary authorization in accordance with local regulations is essential. Antibiotic Growth Promoters/Digestion Enhancers: These products are still being used in some parts of the world. The mode of action is suggested to involve modification of the gut microflora.
Prebiotics: Prebiotics are a group of substances which may stimulate the growth of beneficial micro- organisms - at the expense of those which are considered to be harmful. Oligosaccharides presently form the largest group of these products.
Probiotics: Probiotics introduce live micro-organisms into the digestive tract to assist in establishing a stable and beneficial microflora. The objective is to try to provide the gut with positive, non-pathogenic micro- organisms which will then prevent colonization of pathogenic micro-organisms by competitive exclusion. Organic Acids: Organic acid products can be used to reduce feed bacterial contamination and can also promote the development of beneficial microflora in the digestive tract.
Absorbents: Absorbents are suggested to be able to bind mycotoxins. They are also suggested to have a beneficial effect on general bird health and nutrient absorption. There are a range of products available, including various clays and charcoal.
Antioxidants: Antioxidants can provide protection against nutrient (particularly vitamin) loss in feeds. Some feed ingredients (e.g. fish meal and fats/oils) need protection from oxidation. Vitamin premixes should be protected by an antioxidant unless optimum storage times and conditions are provided. Additional antioxidants may be added to the final feed where prolonged storage or inadequate storage conditions are unavoidable.
Anti-Mold Agents: Mold inhibitors may be added to feed ingredients or to finished diets to reduce fungal growth and mycotoxin production.
Pelleting Agents: Pelleting agents are used to improve pellet hardness. Examples of pellet binders include hemicellulose, bentonite, and guar gum.
Other products potentially used in broiler feed production include essential oils, nucleotides, glucans, and specialized plant extracts. In areas of the world where its use is legally permitted, formaldehyde is sometimes used to reduce feed microbial load.
48 49
Indian River Broiler Management Handbook
Broiler Nutrition
Broiler Diet Specifications
Full guidance on diet specifications for broilers are provided in the nutrition tables within the published Broiler Nutrition Specifications, for a range of popular production and market situations.
The most appropriate diet specifications will be designed to either minimize cost for live bird production or maximize margin over feed cost for portioned products required by the processing plant. Specifications may need to be modified for the specific market conditions. Factors to be considered are:• Final product – live bird, whole carcass, or carcass component yield.• Supply and price of feed ingredients.• Age and live weight at processing.• Yield and carcass quality.• Market requirements for skin color, shelf-life, etc.• Rearing mixed-sex or sex-separate flocks.
Designing Broiler Feeding Programs
Broiler Starter Feeds
The objective of the brooding period (0 to 10 days of age) is to establish good appetite and achieve maximum early growth. The aim is to achieve or exceed the 7-day target body weight. Broiler Starter feed should be given for at least the first 10 days, but is often extended up to 14 days of age if needed, to ensure target weights are achieved or exceeded. The Starter represents a small proportion of the total feed cost and decisions on Starter formulation should be based on overall performance and profitability rather than dietary cost per se.
The digestible AA levels recommended will allow the bird to achieve maximum early growth. This is particularly important in the production of small birds, in challenging conditions or when breast meat production is at a premium. In wheat-feeding areas the use of some maize may be beneficial. Total fat levels should be kept low (<5%) and saturated fats should be avoided, especially in combination with wheat.
Broiler Grower Feeds
Broiler Grower feed is generally fed for 14-16 days following the Starter. Transitioning from Starter to Grower diets will typically involve a change of feed texture from crumble or mini-pellets to pellets and also a change in nutrient density; it is important that these changes are smooth to prevent any reduction in intake or growth rate. Depending on the pellet size produced, it may be necessary to provide the first delivery of Grower as a crumb or mini-pellet to prevent any reduction in feed intake, for example due to, pellet size being too large for the chicks to eat at the first delivery of Grower. Full sized pellets (3-4 mm) should not be fed before 18 days of age. There is a continuing need for a good quality Grower feed to maximize performance.
Broiler Finisher Feeds
Broiler Finisher feeds are usually introduced after 25 days of age. Finisher feeds account for the major cost of feeding and economic principles should be applied to the formulation of these feeds in order to optimize the financial return for the type of product mix being produced. Changes in body composition can be rapid during this period and excessive fat deposition and loss of breast meat yield need to be considered.
To optimize profitability, broilers grown to ages beyond 42 days will require additional Finisher feed(s). Ultimately, the total number of diets fed to the broiler depends upon the desired processing weight, the length of the production period, the design of the feeding program, feed manufacturing capabilities, the feed mill finished feed bin capacity, and feed transportation logistics. Careful consideration of the total feed program design is critical to optimize profitability.
Withdrawal periods for drugs, based on local legislation, may dictate the use of a special withdrawal Finisher feed. This feed should be adjusted for the age of the birds, but the practice of extreme nutrient withdrawal during this period is not recommended.
48 49
Indian River Broiler Management Handbook
Broiler Nutrition
Sect
ion
3
The use of Starter, Grower, and Finisher feeds as described above form the classic phase feeding regime. An alternative to this classic system is the inclusion and use of specialized Pre-Starter products, in the early stages of production.
Pre-Starter Products
The anatomy and physiology of young chicks differs significantly from that of older broilers. During post-hatch the transformation from embryonic absorption of yolk to utilization of feed is accompanied by dramatic changes in the digestive tract. In the first few days after hatching, the pancreas and intestine increase in size almost 4 times quicker than the body as a whole. The digestive system of the young chick is immature, therefore, care must be taken to ensure that nutrient levels are optimal and raw materials used are highly digestible.
Use of special ‘Pre-Starter’ products, some of which contain more digestible raw materials, have been shown to be effective in promoting the early development of broilers and improving subsequent processing performance. Such products are often of superior physical quality and provide a feed intake response (see sub-section on Feed Processing and Feed Form).
Broiler chicks are rapidly developing at this age and the response to increased nutrient levels during the pre-starter period is well established. Feeding a Pre-Starter product to supply levels of AA above those recommended can provide an additional growth response. Although the use of Pre-Starter products involves an increase in feed cost, they are only used for the first few days. As feed intake is relatively low during this period, they have a small impact on overall production cost. Generally, there is a positive response in margin over feed cost (MOFC) as a result of improved overall broiler performance and increased revenue.
Some features of Pre-Starter products are listed below:• Use of highly digestible ingredients.• Higher nutrient levels, especially AA, Vitamin E, and zinc.• Use of pre- and pro-biotics.• Immunity stimulants: essential oils, nucleotides, etc.• Intake stimulants: feed form, high sodium, flavors, etc.
Feed Quality
Successful broiler production is dependent upon supplying feed of the highest achievable quality, in terms of ingredients used, processing procedures applied, and the feed form presented.
Feed Ingredients
Ingredients used to manufacture broiler feeds should be fresh and of high quality. When poorer quality ingredients are fed, non-utilizable nutrients must be catabolized and excreted by the birds, using up energy and creating metabolic stress. Cereals and vegetable feed ingredients are susceptible to fungal growth if stored in hot and humid conditions. Fungi can produce mycotoxins that, depending upon the degree of contamination, may impair broiler health, growth rate, and feed conversion. Litter condition may also be adversely affected, which in turn increases the risk of increased downgrading of broiler carcasses, footpad dermatitis, and hock burn. Long-term storage of ingredients, or storage under suboptimal conditions, may lead to the presence of spoilage products that reduce feed intake or have other detrimental effects on broiler performance and health. When freshness of ingredients cannot be assured, quality control becomes critical.
• Design broiler diets to maximize profitability of the whole production chain.
• Formulate Starter feeds to maximize performance rather than to minimize feed cost.
50 51
Indian River Broiler Management Handbook
The nutritional value of feed ingredients will vary with source, climate, season, and feed processing methods. The feed formulation matrix must be well maintained. Nutritional values attributed to feeds must accurately reflect the true nutritional values of the ingredients being used. This will require routine nutritional analyses of the ingredients used. This should be part of a quality control program, with the emphasis on ingredients, but also finished feed analysis.
In addition, visual examination and further biological testing for contamination (e.g. Salmonellae spp., mycotoxins) should be carried out.
The range of feed ingredients available for least-cost formulation must be suitable for broilers. In selecting ingredients for broiler diets, consideration should be given to their impact on nutrient balance, gastro- intestinal health, and bird physiology. Limits should be set on the inclusion of ingredients known to cause problems when consumed in excess (e.g. tapioca, low-protein soya meal). The use of several comparable feed ingredients in diet formulation will reduce dependency on any one. The greater the use of a single ingredient, the more important it is to have effective quality control of that ingredient.
Vitamin and Mineral Premixes
General recommendations for dietary supplementation of vitamins and trace minerals are provided in the published Broiler Nutrition Specifications. Occasionally, circumstances may arise which cause an increase in vitamin requirements. In these situations, the strategic use of water-soluble vitamin products should be considered as a possible supplementation to the vitamins already included in the feed.
Aviagen does not endorse the practice of removing vitamin or trace mineral premixes during the final stages of the birds’ life because of the associated welfare considerations.
Practical vitamin supplementation should take into account losses which might occur between premix manufacture and feeding. Selection and source of vitamin products, premixing, storage times, and conditions at all stages, and feed thermal processing are the most important factors in vitamin losses. To reduce oxidative losses, the exclusion of choline chloride, trace minerals, and salt from the vitamin premix is strongly recommended and all premixes should be stored under conditions which are cool, dry, and dark.
To maximize the efficacy of vitamin and mineral premixes, the incorporation of an antioxidant and careful inventory management are recommended.
• Feeds must use high quality, fresh ingredients, especially in Starter feeds.
• Maintain an accurate ingredient database for use in ration formulation based on results obtained from a routine analysis program.
• Individual raw material inclusion levels should be based on knowledge of any anti-nutritional factors within the ingredient and any concerns on quality and consistency.
• Ensure appropriate storage times and cool, dark storage conditions between manufacture of vitamin premixes and inclusion into the feed. Supplementary levels must take into account probable losses during feed thermal processing and storage.
• Exclude choline chloride, trace minerals and salt from the vitamin premix.
• Include an antioxidant in vitamin premixes.
Broiler Nutrition
50 51
Indian River Broiler Management Handbook
Sect
ion
3
Fat Sources
Fat, of either animal or vegetable origin, may be added to diets. Animal fats, other than poultry fat, contain more saturated fatty acids, which are less digestible, especially in the immature digestive system of the chick. In Starter and Grower feeds, it is advisable to use fats containing higher percentages of unsaturated fats. In Finisher diets the potential for high levels of unsaturated fats to have a detrimental effect on carcass greasiness and storage quality should also be considered. Combined moisture and impurities levels should be less than 1%. The presence of a significant amount of water promotes hydrolytic rancidity. Solid material residues from the rendering, extraction or fat recovery process can block filters and nozzles. It is important that the quality of fat ingredients are carefully controlled, see Table 14. Table 14: Required quality criteria for feed fats.
Criteria Required for Feed Fats
Moisture and impurities max 1%Monomeric fatty acids min 92%Non-elutable material max 8%
Free fatty acids max 15%*Oxidized fatty acids max 2%
Antioxidant Present
*If using blended fats containing acidulated soapstock, this specification can be adjusted to allow higher FFA found in this fat.
Feed Processing and Feed Form
Poultry feeds are formulated to a specific nutrient concentration to support bird performance. However, growth will be dependent upon feed intake, which in turn is influenced by feed form. The highest feed intake and best performance is achieved by feeding good quality crumble/mini-pellets/pellets. It is known that high levels of fines have a negative effect on intake, live weight and FCR. The Indian River broiler is responsive to feed form and recent data shows that reducing dietary fines, with a particle size smaller than 1.0 mm by up to 10%, can increase live weight for age by as much as 2%. Reductions in the energy expended in feeding activity by the bird can explain much of the live performance benefits of pelleting. Benefits will however also accrue due to saving in feed wastage and improvements in feed transportation.
Pellet durability may be improved by the use of raw materials with good binding ability such as wheat, barley, and rape, and the use of pellet binders.
Feed manufacturing processes will also have a substantial impact on pellet quality. Grinding of raw materials and feed thermal conditioning are regarded as the most influential factors affecting pellet quality. Thermal conditioning not only releases the natural bonding agents in the diet but will also improve nutrient digestibility and reduce microbial contamination. Depending of the degree of feed thermal processing, compensation should be made for any heat-induced vitamin degradation.
Addition of fat post-pelleting, rather than in the mixer, will have a further positive effect on pellet durability. Finished feed pellet durability should be tested in the feed mill prior to dispatch, aiming for a Holmen test result of 95% pellets after a 30 second test period or, for the Tumbling Can method, 98% pellets after a 10 minute test period.
• Supply unsaturated fats in Starter and Grower feeds.
Broiler Nutrition
52 53
Indian River Broiler Management Handbook
If durability results are consistently below these levels, then the feed manufacturing process should be reviewed. This review should consider the raw materials being used and the production process, in particular grinding, mixing, thermal processing, and pelleting; emphasis should be placed on reviewing mill maintenance. Feed Type and Form by Age in Broilers
Broiler growth and FCR will generally be better if the Starter feed is in a sieved crumble form or mini-pellet. If the Grower is introduced before 18 days of age, it should also be in a sieved crumble form or mini-pellet for the first delivery. After 18 days of age, the pellet should be 3.0-4.0 mm in diameter (see the Table 15 below). Feeding a pellet with a diameter >4 mm in either the Grower or Finisher periods, will reduce live performance.
Table 15: Feed type and form by age in broilers.
Age Feed Type Feed Form and Size
0-10 days Starter Sieved crumble 1.5-3.0 mm diameter orMini-pellets 1.6-2.4 mm diameter 1.5-3.0 mm length
11-18 days Grower (This is normally the first delivery of Grower feed).
Sieved crumble 1.5-3.0 mm diameter orMini-pellets 1.6-2.4 mm diameter 4.0-7.0 mm length
19-24 days Grower Pellets 3.0-4.0 mm diameter 5.0-8.0 mm length25 days to processing Finisher Pellets 3.0-4.0 mm diameter 5.0-8.0 mm length
Where producers are not able to pellet feed, the mash feed produced should be sufficiently coarse and of a uniform particle size. The cereal grain(s) used in mash feed should be ground so that the geometric mean diameter size is 900-1000 micron diameter. Mash feeds also benefit from the inclusion of oil or fat in the formulation, as this reduces dustiness and improves palatability. Producing mash feeds which conform to these recommendations will give it a better flow-ability, which will make transportation and distribution easier.
Extended use of crumb products beyond 15 days is not recommended as crumble will depress feed intake and growth/FCR compared to pelleted feed.
Whole Grain Feeding
The practice of presenting broilers with a mixture of compound feed (pellets) and whole wheat has been most widely used in some world areas (e.g. Europe). However, it should be feasible to use any whole cereal grain for this purpose.
The feeding of whole grain saves costs in feed manufacture and possibly in transport and may be used to facilitate a smoother transition of nutrient supply during the growing period. Whole grain feeding supports a better gut microflora, enhances digestive efficiency, and can improve litter condition. There is some evidence that the feeding of whole grain may increase coccidiosis resistance. These advantages must be set against the loss of carcass and breast meat yield. The whole grain used should be treated with organic acids to control Salmonellae spp., for which there will be a financial cost.
• Use crumb (before 15 days of age) or pelleted feed for optimum growth and FCR. Maximize pellet durability for best results.
• Ensure optimum particle size and appropriate cereal source when pelleting is not possible
Broiler Nutrition
52 53
Indian River Broiler Management Handbook
Sect
ion
3
The level of inclusion of whole grain should be accounted for in formulating the accompanying compound feed. The compound feed and the whole grain together supply the nutrient requirement of the bird. The broiler is responsive to the level of Balanced Protein in the diet and when the compound feed or balancer feed is not adjusted for the amount of whole grain added, birds will exhibit poorer growth and FCR, have less breast meat, and a higher fat content.
Both the amount of whole grain to be used and the composition of the compound (or balancer) feed must be considered carefully. The aim is to provide sufficient intakes of all nutrients from the combination of compound feed and grain. Individual birds satisfy, to some extent, their own nutrient requirements by selecting an appropriate mixture of the 2 feeds. Care must always be taken to ensure that intakes of micro- nutrients and any medications contained in the feed are sufficient at the dilution rates used. When feeding whole grain, the grain must be of good quality and free of fungal/toxin contamination.
Used together with the recommendations published in the Broiler Nutrition Specifications, safe inclusion rates of whole grain are given in Table 16 below.
Table 16: Safe inclusion rates of whole grain in broiler rations.
Ration Inclusion Rate of Grain
Starter ZeroGrower Gradual Increase to 15%Finisher Gradual Increase to 20%
NOTE: These inclusion rates are particularly applicable to wheat. It is possible to increase these inclusion rates provided care is taken to make suitable adjustments to the composition of the balancer feed to prevent excessive dilution of the overall diet.
Whole grain must be removed from the feed 2 days before processing to avoid evisceration problems at the processing plant.
Feeding Under Hot Environmental Temperatures
Feed and nutrition have a significant influence on how broilers respond to hot environmental temperatures. One of the most successful ways to aid the health, welfare, and performance of broilers during periods of heat-related stress is to employ good nutrition and feed management practices as described in this Handbook.
Good feed physical quality (crumble, pellets or mash) will minimize the energy expended to physically eat and reduce the heat generated during feeding activity. Optimal feed form will also increase compensatory feed intake more efficiently during the cooler periods of the day or night. It is usually best to encourage compensatory feed intake at night. Increasing nutrient intake during heat stress may have an adverse affect on livability, however, increasing dietary nutrient digestibility and the use of specific micro-ingredients have proven beneficial.
For protein, consideration should be given to increasing AA digestibility rather than AA density. Excess protein should be minimized and AA balanced by exploiting the use of synthetic amino acids instead of intact proteins.
• Account for the inclusion level of whole grain when formulating the compound feed.
• Maintain intakes of micro-nutrients and drugs at recommended and legal levels.
• Store grain carefully, avoiding high moisture contents and mycotoxin contamination. Treat with organic acid(s) to reduce the risk of microbiological contamination.
Broiler Nutrition
54 55
Indian River Broiler Management Handbook
Supplying energy in the diet using fats rather than carbohydrates is beneficial. Lipids yield 9 kcal of energy per gram while carbohydrates and proteins yield only 4 kcal of energy per gram. Thus, lipid contains 2.25 times as much energy as carbohydrate and is more digestible, resulting in less waste heat and a lower heat increment of feeding.
Heat-related stress that is severe enough to induce a higher respiratory rate (e.g. severe panting) and increased core body temperature, results in:• Increased urinary and fecal excretion of mineral and trace elements.• An abnormally high loss of blood carbon dioxide.• A decline in blood bicarbonate and in increase in blood pH.
Thus, heat-related stress may induce a metabolic requirement for bicarbonate. Under such conditions, the bird can benefit from being fed diets containing sodium bicarbonate or sodium sesquicarbonate such that these products supply ~ 50% of dietary sodium. Furthermore, nutritional intervention by feeding diets containing a dietary electrolyte balance (DEB; as defined by sodium + potassium – chloride) of 220-240 mEq/ kg can be beneficial in reducing heat-related mortality and improving growth during hot weather.
Vitamins E, D, A, C, and niacin are known to have a positive effect on the response of birds to heat stress. A general approach is to increase the level of vitamins by 1.25% per degree centigrade (2°F) as the temperature rises from 21 to 28°C (70 to 82°F). If the temperatures exceed 28°C (82°F), then further increases in vitamin levels should be made at the rate of 2.5% per degree centigrade (2°F). This guideline is dependent upon the vitamin levels used in the standard supplement. Supplementary vitamins should never be withdrawn from the diet.
Other additives shown to have benefits in improving heat tolerance are:Betaine – osmoregulator which increases efficiency of absorption of minerals and trace elements.Glucose – increases energy required for extreme temperature.Aspirin – increases birds tolerance to heat.
In heat-related stress situations, the choice of anti-coccidial should be considered carefully to avoid those associated with increased mortality via increased heat production.
Litter Quality
Litter quality directly affects bird health, welfare, and performance. Poor quality litter, with high moisture content, may result in increased ammonia levels within the broiler house. This has the potential to produce increased respiratory stress and increased levels of carcass damage. Poor quality litter also increases the risk of footpad dermatitis (FPD) and hock burn. Therefore, the maintenance of good litter quality is not only beneficial to the bird, but also to the producer.
There are a number of factors involved in litter quality, including ambient environment, bird husbandry, unit management, enteric condition, and nutrition.
Provided suitable management, health and environmental practices are followed, the following nutritional strategies will help to ensure litter quality is maintained.
Broiler Nutrition
54 55
Indian River Broiler Management Handbook
Sect
ion
3
Excess levels of crude protein in diets should be avoided and the diet formulation should be well balanced. The following formulation strategies can help maximize litter quality:• Formulate on a digestible AA basis.• Maintain feed formulation raw material matrix with relevant and updated values for ingredient protein
and, most importantly, digestible AA contents.• Use the Balanced Protein concept in diet formulation to ensure diets provide protein matched to the bird
requirement, avoiding excesses.• Balance salt levels to avoid increased water intake which can be a primary cause of wet litter. Aim for
a DEB target of 220-240 mEq/kg. Accurate descriptions of the sodium, chloride, and potassium levels of raw materials should be maintained in the formulation matrix and the recommendations for these minerals should be followed (see Broiler Nutrition Specifications).
• Ingredients of low digestibility, or of particularly high fiber level, should be avoided.• Providing a highly digestible form of dietary fat/oil will help avoid enteric issues. Fats of particularly poor
quality, and of low digestibility, must be avoided.• The use of exogenous enzymes may help reduce gut viscosity, which will improve litter quality. The
nutritionist should take care to ensure selection of the correct and appropriate enzyme. Refer to manufacturer recommendations when using enzyme(s) to ensure these additives are accurately added at the correct dosage and sequenced properly in the feed manufacturing process to allow good dispersion into the feed matrix and to minimize degradation due to feed thermal processing.
Welfare and Environment
All feed formulations should be produced with due consideration to bird welfare and potential environmental impact. As a general rule, the practices and nutritional strategies outlined in this section will form the basis of a successful welfare and environmental strategy. Some of the more important areas, where particular consideration is required, are outlined below.
Welfare
Balanced nutrition should be supplied to the broiler to maintain a practical and sensible growth profile and to prevent nutritional deficiencies. Protein needs to be supplied as a balance of digestible AA. Macro mineral levels must be supplied at adequate and balanced levels. Special reference should be made to calcium and phosphorus and the ratio of calcium to available phosphorus to avoid skeletal disorders. Equally, sodium levels are important along with DEB to avoid deficiencies and maintain good litter. Vitamins and trace minerals must be supplied at adequate levels to avoid metabolic disorders associated with deficiencies. Biotin and zinc have been identified as assisting in the prevention of pododermatitis. Maintaining good quality litter will also assist with limiting the incidence of pododermatitis (refer to the section on Litter Quality).
Environment
Minimizing excess crude protein levels in the feed by formulating to balanced levels of digestible AA, rather than to minimum crude protein levels, will minimize nitrogen excretion. The sub-section on Protein and Amino Acids fully explains the concepts of ideal AA profile and balanced protein, which can be used to reduce nitrogen excretion. Recent work has helped to add quantitative information to the extent of reductions in excretion. For example, it has been determined that a one-percentage point reduction in feed protein level (e.g. from 20% to 19%) results on average to a reduction in both nitrogen excretion and ammonia emission of 10%.
Phosphorus excretion can be reduced by feeding more closely to the birds’ requirement and utilizing phytase enzymes. Refer to the Macro Minerals section of this Handbook for further details on phosphorus nutrition.
It is important to bear in mind that, generally speaking, any nutritional practices which minimize FCR, thereby reducing the total amount of feed consumed and manure produced, will reduce the environmental impact of animal production.
Broiler Nutrition

56 57
Indian River Broiler Management Handbook
Notes
Notes
56 57
Indian River Broiler Management Handbook
Sect
ion
4
Section 4 - Health and Biosecurity
Health and Biosecurity
Objective
To achieve hygienic conditions within the poultry house, and to minimize the adverse effects of disease. To attain optimum performance and bird welfare, and to provide assurance on food safety issues.
Principles
Hygienic conditions within the poultry house are achieved through the implementation of correct biosecurity, cleaning, and vaccination programs.
Bird Health and Biosecurity
Poor bird health will have a negative impact on all aspects of flock management and production, including growth rate, feed conversion efficiency, condemnations, livability, and processing traits.
The flock must start with good quality and healthy day-old chicks. The chicks should be sourced from a minimal number of breeder flocks with similar health status. Ideally, one donor flock per house.
On-farm disease control programs involve:• Disease prevention (biosecurity and/or vaccination program).• Early detection of ill health (monitor health status and production parameters).• Treatment of identified disease conditions.
Biosecurity and vaccination are both integral to successful health management - biosecurity to prevent the introduction of disease and appropriate vaccination programs to address endemic disease.
Regular monitoring of production parameters is vital for early disease detection and targeted intervention. Early identification and action in one flock will help prevent disease in surrounding and successive flocks.
Production parameters, such as birds dead on arrival (D.O.A.), 7-day body weight, daily and weekly mortality, water consumption, average daily gain, feed conversion efficiency, and processing condemnations, should be reviewed closely and compared with company targets. When monitored production parameters fail to meet their established goals, a proper investigation should be conducted by trained personnel.
Biosecurity
A robust biosecurity program is critical to maintain flock health. Biosecurity will minimize flock exposure to disease-causing organisms. Understanding and following agreed biosecurity practices must be part of everyone’s job. Regular education and staff training is essential. When developing a biosecurity program, 3 components should be considered:
Farm Location: Farms should be located so that they are isolated from other poultry and livestock – at least3.2 km (2 miles) distance from the nearest poultry or other livestock facilities, and also from roads used to transport poultry. Single-age sites are preferable so that recycling of pathogens and live vaccine strains is limited.
Farm and House Design: Housing should be designed to minimize traffic flow, to facilitate cleaning and disinfection, and constructed to be bird and rodent proof. A barrier (fence) is necessary to prevent unauthorized access.
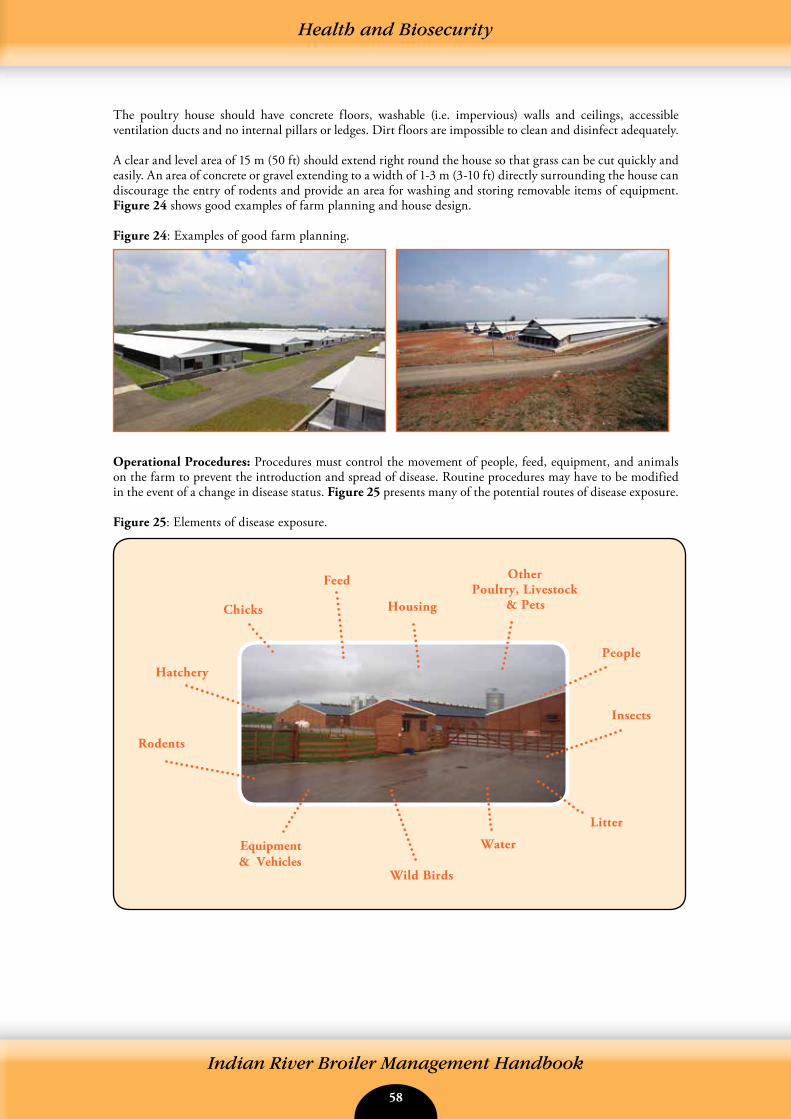
58 59
Indian River Broiler Management Handbook
Health and Biosecurity
The poultry house should have concrete floors, washable (i.e. impervious) walls and ceilings, accessible ventilation ducts and no internal pillars or ledges. Dirt floors are impossible to clean and disinfect adequately.
A clear and level area of 15 m (50 ft) should extend right round the house so that grass can be cut quickly and easily. An area of concrete or gravel extending to a width of 1-3 m (3-10 ft) directly surrounding the house can discourage the entry of rodents and provide an area for washing and storing removable items of equipment. Figure 24 shows good examples of farm planning and house design.
Figure 24: Examples of good farm planning.
Operational Procedures: Procedures must control the movement of people, feed, equipment, and animals on the farm to prevent the introduction and spread of disease. Routine procedures may have to be modified in the event of a change in disease status. Figure 25 presents many of the potential routes of disease exposure. Figure 25: Elements of disease exposure.
Chicks
Feed
Housing
Rodents
Water
Wild Birds
People
Litter
Insects
Hatchery
Equipment & Vehicles
Other Poultry, Livestock
& Pets
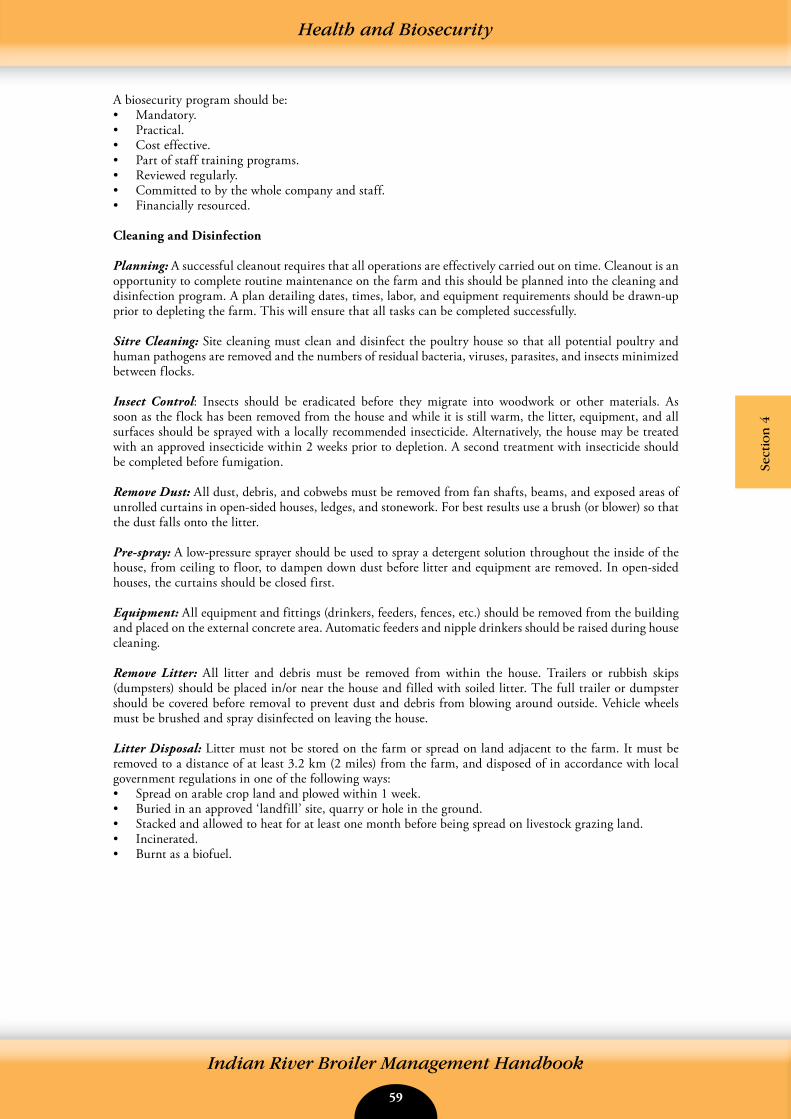
58 59
Indian River Broiler Management Handbook
Health and Biosecurity
Sect
ion
4
A biosecurity program should be:• Mandatory.• Practical.• Cost effective.• Part of staff training programs.• Reviewed regularly.• Committed to by the whole company and staff.• Financially resourced.
Cleaning and Disinfection
Planning: A successful cleanout requires that all operations are effectively carried out on time. Cleanout is an opportunity to complete routine maintenance on the farm and this should be planned into the cleaning and disinfection program. A plan detailing dates, times, labor, and equipment requirements should be drawn-up prior to depleting the farm. This will ensure that all tasks can be completed successfully.
Sitre Cleaning: Site cleaning must clean and disinfect the poultry house so that all potential poultry and human pathogens are removed and the numbers of residual bacteria, viruses, parasites, and insects minimized between flocks.
Insect Control: Insects should be eradicated before they migrate into woodwork or other materials. As soon as the flock has been removed from the house and while it is still warm, the litter, equipment, and all surfaces should be sprayed with a locally recommended insecticide. Alternatively, the house may be treated with an approved insecticide within 2 weeks prior to depletion. A second treatment with insecticide should be completed before fumigation. Remove Dust: All dust, debris, and cobwebs must be removed from fan shafts, beams, and exposed areas of unrolled curtains in open-sided houses, ledges, and stonework. For best results use a brush (or blower) so that the dust falls onto the litter.
Pre-spray: A low-pressure sprayer should be used to spray a detergent solution throughout the inside of the house, from ceiling to floor, to dampen down dust before litter and equipment are removed. In open-sided houses, the curtains should be closed first.
Equipment: All equipment and fittings (drinkers, feeders, fences, etc.) should be removed from the building and placed on the external concrete area. Automatic feeders and nipple drinkers should be raised during house cleaning.
Remove Litter: All litter and debris must be removed from within the house. Trailers or rubbish skips (dumpsters) should be placed in/or near the house and filled with soiled litter. The full trailer or dumpster should be covered before removal to prevent dust and debris from blowing around outside. Vehicle wheels must be brushed and spray disinfected on leaving the house.
Litter Disposal: Litter must not be stored on the farm or spread on land adjacent to the farm. It must be removed to a distance of at least 3.2 km (2 miles) from the farm, and disposed of in accordance with local government regulations in one of the following ways:• Spread on arable crop land and plowed within 1 week.• Buried in an approved ‘landfill’ site, quarry or hole in the ground.• Stacked and allowed to heat for at least one month before being spread on livestock grazing land.• Incinerated.• Burnt as a biofuel.
60 61
Indian River Broiler Management Handbook
Health and Biosecurity
Washing: Before washing starts check that all electricity in the house has been switched off to avoid the risk of electrical shock. A mains switch with lockout function and a suitable padlock should be used. A pressure washer with foam detergent should be used to remove the remaining dirt and debris from the house and equipment. Many different industrial detergents are available and manufacturer’s instructions should always be followed. The detergent used must be compatible with the disinfectant that will be used to disinfect the house later on. Following washing with detergent the house and equipment should be rinsed with clean fresh water, again using a pressure washer. Hot water should be used for cleaning and excess floor water removed using “squeegees” (a rubber-edged blade). Wastewater should be disposed of hygienically to avoid any recontamination of the house. All equipment, removed from the house must also be soaked, washed and rinsed. Cleaned equipment should then be stored under cover.
Inside the house, particular attention should be paid to the following places:• Fan boxes.• Fan shafts.• Fans.• Ventilation grills.• Tops of beams.• Ledges.• Water pipes.• Feed lines.
In order to ensure that inaccessible areas are properly washed, it is recommended that portable scaffolding and portable lights are used.
The outside of the building must also be washed and special attention given to:• Air inlets.• Gutters.• Concrete pathways. In open-sided housing, the inside and outside of curtains must be washed. Any items that cannot be washed (e.g. polythene, cardboard) must be destroyed.
When washing is complete, there should be no dirt, dust, debris, or litter present. Proper washing requires time and attention to detail.
Staff facilities and all staff equipment should also be thoroughly cleaned at this stage.
Cleaning Water and Feed Systems
All equipment within the house must be thoroughly cleansed and disinfected. After cleansing it is essential that the equipment is stored under cover to prevent recontamination.
The water system: The procedure for cleaning the water system is as follows:• Drain pipes and header tanks.• Flush lines with clean water.• Scrub header tanks to remove scale and biofilm deposit and drain to the exterior of the house.• Refill tank with fresh water and add an approved water sanitizer.• Run the sanitizer solution through the drinker lines from the header tank ensuring there are no air locks.
Make sure the sanitizer is approved for use with the drinker equipment and is used at the correct dilution.• Fill header tank to normal operating level with additional sanitizer solution at appropriate strength.
Replace lid. Allow disinfectant to remain for a minimum of 4 hours.• Drain and rinse with fresh water.• Refill with fresh water prior to chick arrival.

60 61
Indian River Broiler Management Handbook
Health and Biosecurity
Sect
ion
4
Biofilms will form inside water pipes and regular treatment (at least once per flock) to remove them is needed to prevent decreased water flow and bacterial contamination of drinking water. The use of a cleaner before the sanitizer is highly recommended before each growout. Pipe material will influence rate of biofilm formation. For example, biofilm tends to form quicker on alkathene pipes and plastic tanks. The use of vitamin and mineral treatments in drinking water can increase biofilm and aggregation of materials to the pipes. Physical cleaning of the inside of pipes to remove biofilms is not always possible; therefore, between flocks biofilms can be removed by using high levels (140 ppm) of chlorine or peroxygen compounds (chlorine dioxide applied at the appropriate level can also be used). These need to be flushed completely from the drinking system before birds drink. Cleaning may need to include acid scrubbing where the water mineral content (especially calcium or iron) is high. Metal pipes can be cleaned the same way but corrosion can cause leaks. Treatment of the birds drinking water before use should be considered for high mineral waters.
Evaporative cooling and fogging systems can be sanitized at cleanout using a bi-guanide sanitizer. Bi-guanides can also be used during production to ensure that the water used in these systems contains minimal bacteria reducing bacterial spread into the poultry house.
The feed system: The procedure for cleaning the feed system is as follows:• Empty, wash, and disinfect all feeding equipment, i.e. feed hoppers, track, chain, hanging feeders.• Empty bulk bins and connecting pipes and brush out where possible. Clean-out and seal all openings.• Fumigate wherever possible.
Repairs and Maintenance
A clean, empty house provides the ideal opportunity for repairs and maintenance to be completed. Once the house is empty, pay attention to the following tasks:• Repair cracks in the floor with concrete/cement.• Repair pointing (mortar joints) and cement rendering on wall structures.• Repair or replace damaged walls, curtains, and ceilings.• Carry out painting or white washing where required.• Ensure that all doors close and seal tightly.• Check efficiency of fans, ventilation, and heating systems, extraction and inlet openings, and all other
environmental control equipment.• Fan belt tightening and fan backdraft shutter maintenance.
Disinfection
Disinfection should not take place until the whole building (including the external area) is thoroughly cleaned and all repairs are complete and house and equipment are dry. Disinfectants are ineffective in the presence of dirt and organic matter and will lose efficiency when surfaces are wet because of dilution of the disinfectant.
Disinfectants, which are approved by regulatory agencies for use against specific poultry pathogens of both bacterial and viral origin, are most likely to be effective. Manufacturers’ instructions must be followed. Disinfectant should be applied using either a pressure-washer or a backpack sprayer.
Foam disinfectants allow greater contact time increasing the efficiency of disinfection. Heating houses to high temperatures after sealing can enhance disinfection.
Most disinfectants have no effect against sporulated coccidial oocysts. Where selective coccidial treatments are required, compounds producing ammonia should be used by suitably trained staff. These are applied to all clean internal surfaces and will be effective even after a short contact period of a few hours.
Formalin Fumigation
Where formalin fumigation is permitted, fumigation should be undertaken as soon as possible after disinfection has been completed. Surfaces should be damp (this can be done through the use of foggers to increase the RH of the house) and the houses warmed to a minimum of 21oC (70oF). Fumigation is ineffective at lower temperatures and at relative humidities of less than 65%.
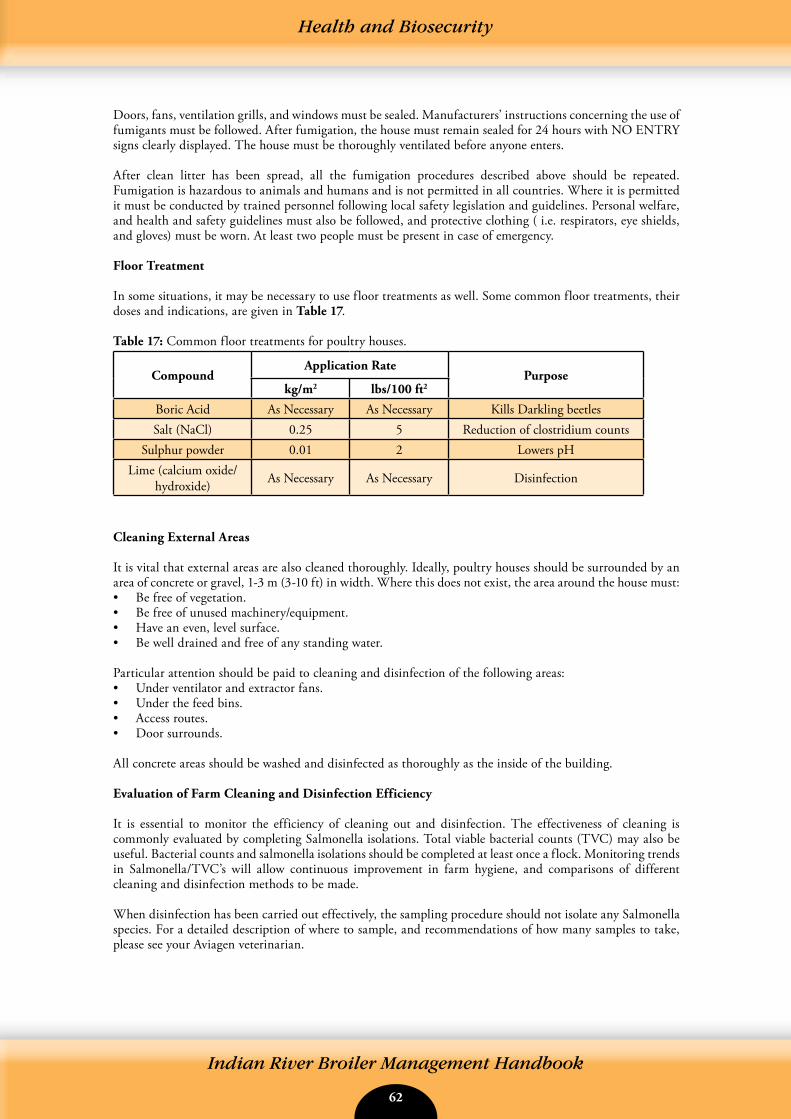
62 63
Indian River Broiler Management Handbook
Health and Biosecurity
Doors, fans, ventilation grills, and windows must be sealed. Manufacturers’ instructions concerning the use of fumigants must be followed. After fumigation, the house must remain sealed for 24 hours with NO ENTRY signs clearly displayed. The house must be thoroughly ventilated before anyone enters.
After clean litter has been spread, all the fumigation procedures described above should be repeated. Fumigation is hazardous to animals and humans and is not permitted in all countries. Where it is permitted it must be conducted by trained personnel following local safety legislation and guidelines. Personal welfare, and health and safety guidelines must also be followed, and protective clothing ( i.e. respirators, eye shields, and gloves) must be worn. At least two people must be present in case of emergency.
Floor Treatment
In some situations, it may be necessary to use floor treatments as well. Some common floor treatments, their doses and indications, are given in Table 17.
Table 17: Common floor treatments for poultry houses.
CompoundApplication Rate
Purposekg/m2 lbs/100 ft2
Boric Acid As Necessary As Necessary Kills Darkling beetlesSalt (NaCl) 0.25 5 Reduction of clostridium counts
Sulphur powder 0.01 2 Lowers pHLime (calcium oxide/
hydroxide) As Necessary As Necessary Disinfection
Cleaning External Areas
It is vital that external areas are also cleaned thoroughly. Ideally, poultry houses should be surrounded by an area of concrete or gravel, 1-3 m (3-10 ft) in width. Where this does not exist, the area around the house must:• Be free of vegetation.• Be free of unused machinery/equipment.• Have an even, level surface.• Be well drained and free of any standing water.
Particular attention should be paid to cleaning and disinfection of the following areas:• Under ventilator and extractor fans.• Under the feed bins.• Access routes.• Door surrounds.
All concrete areas should be washed and disinfected as thoroughly as the inside of the building.
Evaluation of Farm Cleaning and Disinfection Efficiency
It is essential to monitor the efficiency of cleaning out and disinfection. The effectiveness of cleaning is commonly evaluated by completing Salmonella isolations. Total viable bacterial counts (TVC) may also be useful. Bacterial counts and salmonella isolations should be completed at least once a flock. Monitoring trends in Salmonella/TVC’s will allow continuous improvement in farm hygiene, and comparisons of different cleaning and disinfection methods to be made.
When disinfection has been carried out effectively, the sampling procedure should not isolate any Salmonella species. For a detailed description of where to sample, and recommendations of how many samples to take, please see your Aviagen veterinarian.
62 63
Indian River Broiler Management Handbook
Sect
ion
4
Health and Biosecurity
• A clear program of hygiene management should be in place for site biosecurity, and site cleaning and disinfection.
• Adequate biosecurity should prevent disease from entering the farm via both humans and animals.
• Site cleaning must cover both the interior and exterior of the house, all equipment and external house areas as well as the feeding and drinking systems.
• Appropriate planning and evaluation of the cleaning and disinfection procedures must be in place.
Water Quality
Water should be clear with no organic or suspended matter. It should be monitored to ensure purity and freedom from pathogens. Specifically, water should be free from Pseudomonas species and Escherichia coli. There should be no more than one coliform/ml in any one sample and consecutive water samples must not contain any coliforms in more than 5% of samples taken.
Water quality criteria for poultry are given in Table 18. If water comes from a main supply there are usually less water quality issues. Water from wells however, may have excessive nitrate levels and high bacterial counts, due to run-off from fertilized fields.
Where bacterial counts are high, the cause should be established and rectified immediately. Chlorination to give between 3 and 5 ppm free chlorine at the drinker level is usually effective in controlling bacteria but this is dependent on the type of chlorine component used. Water pH should be kept between 5-7 in order for chlorine to be effective. Measuring the oxidation reduction potential (ORP) of the water is a good way to determine if your water sanitation program is working. An ORP meter meaures the amount of dissolved oxygen in the water and provides an indication of the cleanliness of the water and its ability to break down contaminants. The more contaminants in the water the lower the amount of oxygen will be. An ORP reading of 700-800 mV indicates that the water sanitation program using chlorine will be effective in controlling most potential challenges that are water borne or being spread through the birds via the water supply.
Ultraviolet light (applied at the point of drinking water entry to the house) can also be used to disinfect water. Manufacturers’ guidelines should be followed in establishing this procedure.
Hard water or water with high levels of iron (>3 mg/l) can cause blockages in drinker valves and pipes and support bacterial growth. Sediment will also block pipes and, where this is a problem, water should be filtered using a 40-50 micron (µm) filter.
A total water quality test should be done at least once a year, and more often if there are perceived water quality issues or performance problems. After house cleaning and prior to chick delivery, water should be sampled for bacterial contamination at the source, the storage tank, and the drinker points.
It is a good idea to routinely check the water supply on farm during a flock. This should be done by running the water out of the end of each nipple line and making a visual check for clarity. If water lines and water sanitation are not adequate, there will be a high level of particulate matter, visible to the eye and present in the water line when run-off into a bucket. Action should be taken to rectify this issue.
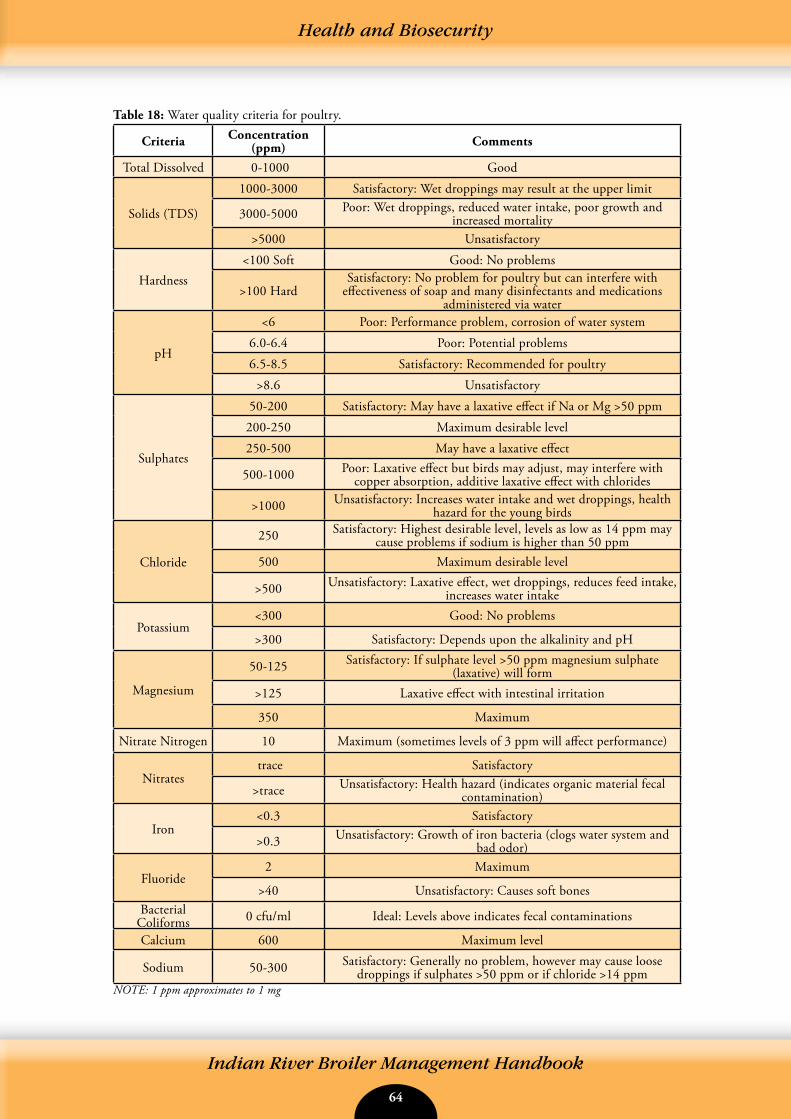
64 65
Indian River Broiler Management Handbook
Health and Biosecurity
Table 18: Water quality criteria for poultry.
Criteria Concentration (ppm) Comments
Total Dissolved 0-1000 Good
Solids (TDS)
1000-3000 Satisfactory: Wet droppings may result at the upper limit
3000-5000 Poor: Wet droppings, reduced water intake, poor growth and increased mortality
>5000 Unsatisfactory
Hardness <100 Soft Good: No problems
>100 Hard Satisfactory: No problem for poultry but can interfere with
effectiveness of soap and many disinfectants and medications administered via water
pH
<6 Poor: Performance problem, corrosion of water system6.0-6.4 Poor: Potential problems6.5-8.5 Satisfactory: Recommended for poultry
>8.6 Unsatisfactory
Sulphates
50-200 Satisfactory: May have a laxative effect if Na or Mg >50 ppm200-250 Maximum desirable level250-500 May have a laxative effect
500-1000 Poor: Laxative effect but birds may adjust, may interfere with copper absorption, additive laxative effect with chlorides
>1000 Unsatisfactory: Increases water intake and wet droppings, health hazard for the young birds
Chloride
250 Satisfactory: Highest desirable level, levels as low as 14 ppm may cause problems if sodium is higher than 50 ppm
500 Maximum desirable level
>500 Unsatisfactory: Laxative effect, wet droppings, reduces feed intake, increases water intake
Potassium <300 Good: No problems
>300 Satisfactory: Depends upon the alkalinity and pH
Magnesium
50-125 Satisfactory: If sulphate level >50 ppm magnesium sulphate (laxative) will form
>125 Laxative effect with intestinal irritation
350 Maximum
Nitrate Nitrogen 10 Maximum (sometimes levels of 3 ppm will affect performance)
Nitrates trace Satisfactory
>trace Unsatisfactory: Health hazard (indicates organic material fecal contamination)
Iron <0.3 Satisfactory
>0.3 Unsatisfactory: Growth of iron bacteria (clogs water system and bad odor)
Fluoride 2 Maximum
>40 Unsatisfactory: Causes soft bonesBacterial
Coliforms 0 cfu/ml Ideal: Levels above indicates fecal contaminations
Calcium 600 Maximum level
Sodium 50-300 Satisfactory: Generally no problem, however may cause loose droppings if sulphates >50 ppm or if chloride >14 ppm
NOTE: 1 ppm approximates to 1 mg
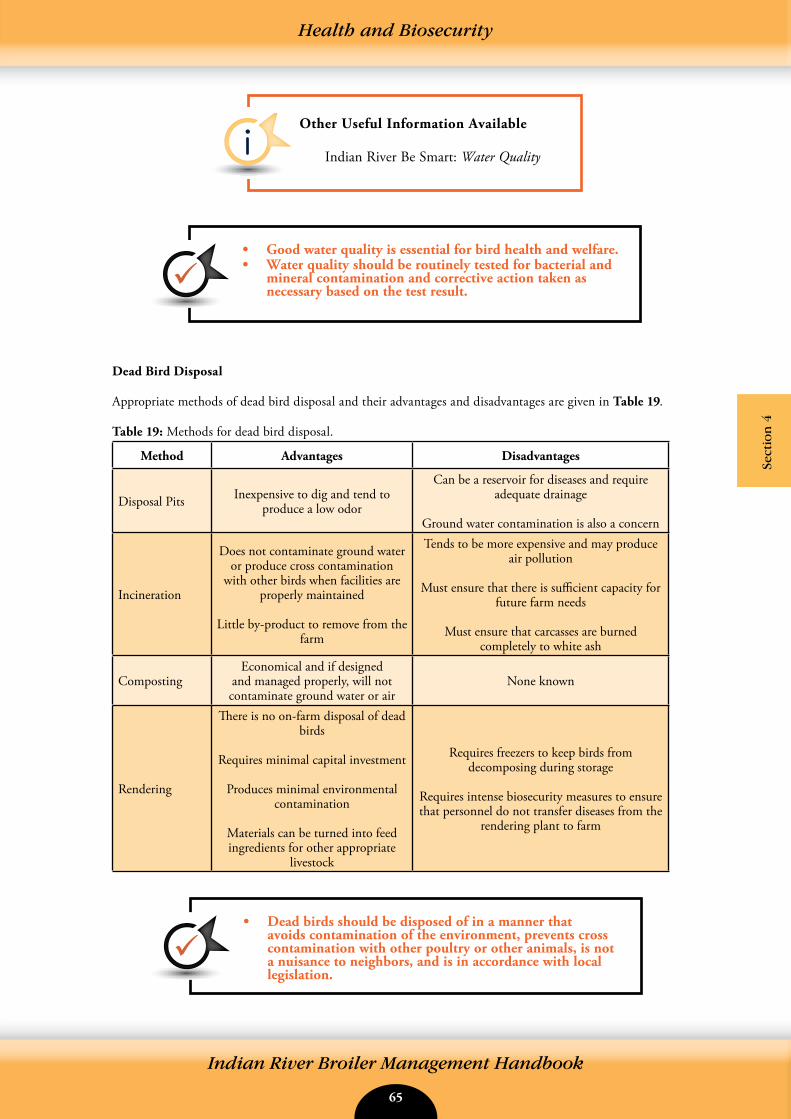
64 65
Indian River Broiler Management Handbook
Sect
ion
4
Health and Biosecurity
Other Useful Information Available
Indian River Be Smart: Water Quality
• Good water quality is essential for bird health and welfare.• Water quality should be routinely tested for bacterial and
mineral contamination and corrective action taken as necessary based on the test result.
Dead Bird Disposal
Appropriate methods of dead bird disposal and their advantages and disadvantages are given in Table 19.
Table 19: Methods for dead bird disposal.
Method Advantages Disadvantages
Disposal Pits Inexpensive to dig and tend to produce a low odor
Can be a reservoir for diseases and require adequate drainage
Ground water contamination is also a concern
Incineration
Does not contaminate ground water or produce cross contamination
with other birds when facilities are properly maintained
Little by-product to remove from the farm
Tends to be more expensive and may produce air pollution
Must ensure that there is sufficient capacity for future farm needs
Must ensure that carcasses are burned completely to white ash
CompostingEconomical and if designed
and managed properly, will not contaminate ground water or air
None known
Rendering
There is no on-farm disposal of dead birds
Requires minimal capital investment
Produces minimal environmental contamination
Materials can be turned into feed ingredients for other appropriate
livestock
Requires freezers to keep birds from decomposing during storage
Requires intense biosecurity measures to ensure that personnel do not transfer diseases from the
rendering plant to farm
• Dead birds should be disposed of in a manner that avoids contamination of the environment, prevents cross contamination with other poultry or other animals, is not a nuisance to neighbors, and is in accordance with local legislation.
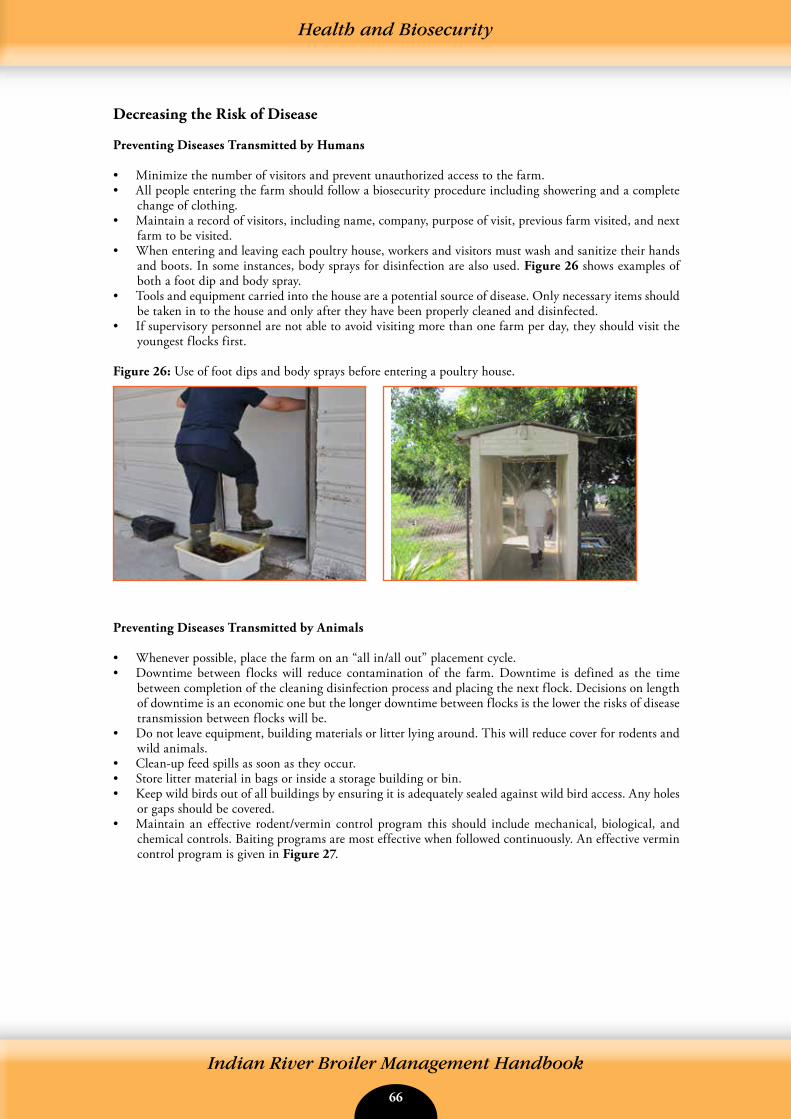
66 67
Indian River Broiler Management Handbook
Health and Biosecurity
Decreasing the Risk of Disease
Preventing Diseases Transmitted by Humans
• Minimize the number of visitors and prevent unauthorized access to the farm.• All people entering the farm should follow a biosecurity procedure including showering and a complete
change of clothing.• Maintain a record of visitors, including name, company, purpose of visit, previous farm visited, and next
farm to be visited.• When entering and leaving each poultry house, workers and visitors must wash and sanitize their hands
and boots. In some instances, body sprays for disinfection are also used. Figure 26 shows examples of both a foot dip and body spray.
• Tools and equipment carried into the house are a potential source of disease. Only necessary items should be taken in to the house and only after they have been properly cleaned and disinfected.
• If supervisory personnel are not able to avoid visiting more than one farm per day, they should visit the youngest flocks first.
Figure 26: Use of foot dips and body sprays before entering a poultry house.
Preventing Diseases Transmitted by Animals
• Whenever possible, place the farm on an “all in/all out” placement cycle.• Downtime between flocks will reduce contamination of the farm. Downtime is defined as the time
between completion of the cleaning disinfection process and placing the next flock. Decisions on length of downtime is an economic one but the longer downtime between flocks is the lower the risks of disease transmission between flocks will be.
• Do not leave equipment, building materials or litter lying around. This will reduce cover for rodents and wild animals.
• Clean-up feed spills as soon as they occur.• Store litter material in bags or inside a storage building or bin.• Keep wild birds out of all buildings by ensuring it is adequately sealed against wild bird access. Any holes
or gaps should be covered.• Maintain an effective rodent/vermin control program this should include mechanical, biological, and
chemical controls. Baiting programs are most effective when followed continuously. An effective vermin control program is given in Figure 27.
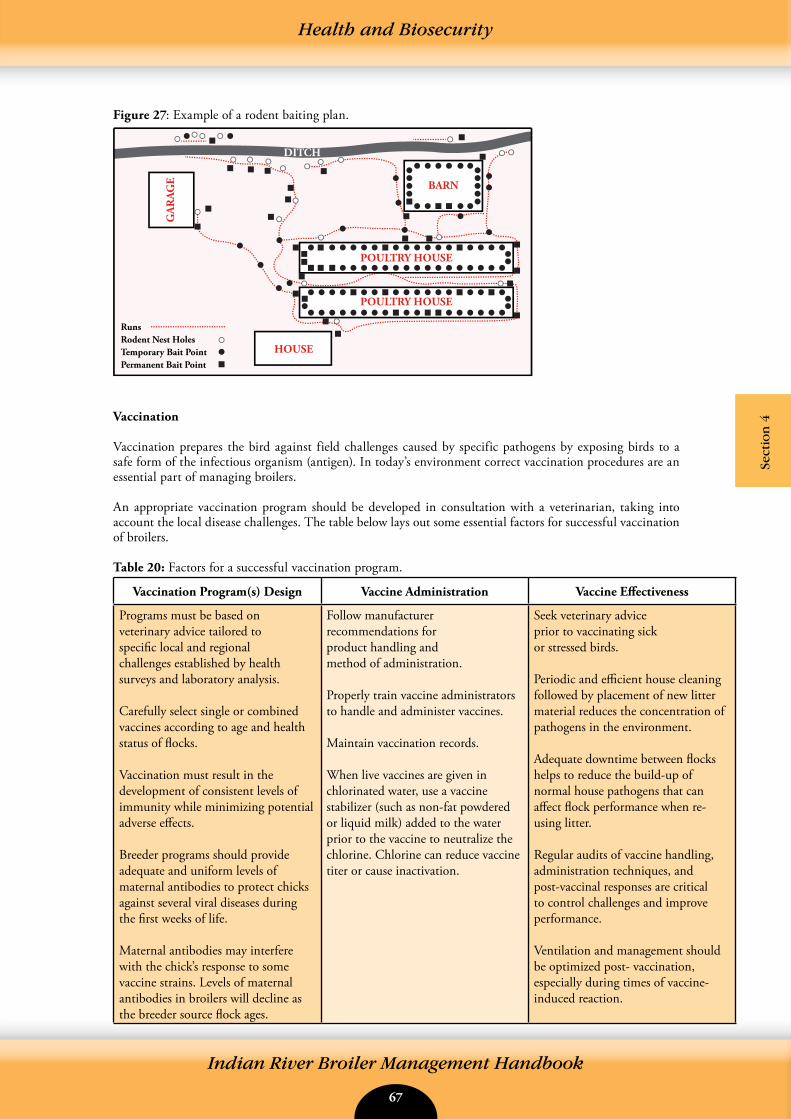
66 67
Indian River Broiler Management Handbook
Health and Biosecurity
Sect
ion
4
Figure 27: Example of a rodent baiting plan.
Vaccination
Vaccination prepares the bird against field challenges caused by specific pathogens by exposing birds to a safe form of the infectious organism (antigen). In today’s environment correct vaccination procedures are an essential part of managing broilers.
An appropriate vaccination program should be developed in consultation with a veterinarian, taking into account the local disease challenges. The table below lays out some essential factors for successful vaccination of broilers. Table 20: Factors for a successful vaccination program.
Vaccination Program(s) Design Vaccine Administration Vaccine Effectiveness
Programs must be based onveterinary advice tailored tospecific local and regionalchallenges established by healthsurveys and laboratory analysis.
Carefully select single or combined vaccines according to age and health status of flocks.
Vaccination must result in the development of consistent levels of immunity while minimizing potential adverse effects.
Breeder programs should provide adequate and uniform levels of maternal antibodies to protect chicks against several viral diseases during the first weeks of life.
Maternal antibodies may interfere with the chick’s response to some vaccine strains. Levels of maternal antibodies in broilers will decline as the breeder source flock ages.
Follow manufacturerrecommendations forproduct handling andmethod of administration.
Properly train vaccine administrators to handle and administer vaccines.
Maintain vaccination records.
When live vaccines are given in chlorinated water, use a vaccine stabilizer (such as non-fat powdered or liquid milk) added to the water prior to the vaccine to neutralize the chlorine. Chlorine can reduce vaccine titer or cause inactivation.
Seek veterinary adviceprior to vaccinating sickor stressed birds.
Periodic and efficient house cleaning followed by placement of new litter material reduces the concentration of pathogens in the environment.
Adequate downtime between flocks helps to reduce the build-up of normal house pathogens that can affect flock performance when re-using litter.
Regular audits of vaccine handling, administration techniques, and post-vaccinal responses are critical to control challenges and improve performance.
Ventilation and management should be optimized post- vaccination, especially during times of vaccine-induced reaction.
POULTRY HOUSE
POULTRY HOUSE
HOUSE
RunsRodent Nest HolesTemporary Bait PointPermanent Bait Point
BARN
DITCHG
AR
AGE
68 69
Indian River Broiler Management Handbook
Disease Investigation
Disease investigation requires knowledge of what to expect at what age and how to detect what is abnormal for the flock. It is important to be familiar with the normal production parameters or standards for the breed.
When health problems are seen or suspected in broiler flocks, veterinary advice should be sought immediately.
It is helpful to keep up-to-date with local and regional health concerns in order to be aware of any potential disease challenges.
A systematic approach is required when troubleshooting health issues on the farm. These are the things to look at:• Feed: availability, consumption, distribution, palatability, nutritional content, contaminants, and• toxins.• Light: adequate for efficient growth and development, uniform exposure and intensity.• Litter: material used, depth, distribution, moisture level, pathogen load, toxins and contaminant.• Air: speed, availability, humidity, temperature, contaminants (ammonia level and toxins), and barriers.• Water: availability, consumption, distribution, source, contaminants and toxins, pathogen load,
additives and sanitizers.• Space: bird density, limiting obstacles, limiting equipment, feed and water availability.• Sanitation: hygiene of premises, pest control, maintenance, cleaning and disinfection practices
(house and grounds, feeders, drinkers, feed bins.)• Security: biosecurity risks (house design and biosecurity practices).
Tables 21 and 22 highlight examples of mortality parameters possibly related to bird quality and bird health. The tables also suggest potential investigative actions using the approach for troubleshooting health issues outlined above.
Other Useful Information Available
Indian River Be Smart: Drinking Water Vaccination
• Vaccination programs for broilers should be developed in consultation with trained poultry veterinarians and must be based on local disease challenges and vaccine availability.
• Vaccination will be more effective when disease challenges are minimized through well-designed and implemented biosecurity and management programs.
• Vaccination alone cannot protect flocks against overwhelming disease challenges and poor management practices.
• Every bird must receive the intended dose of vaccine.• Breeder flock vaccination programs must be accounted for
when designing an appropriate vaccination program for broiler progeny.
Health and Biosecurity
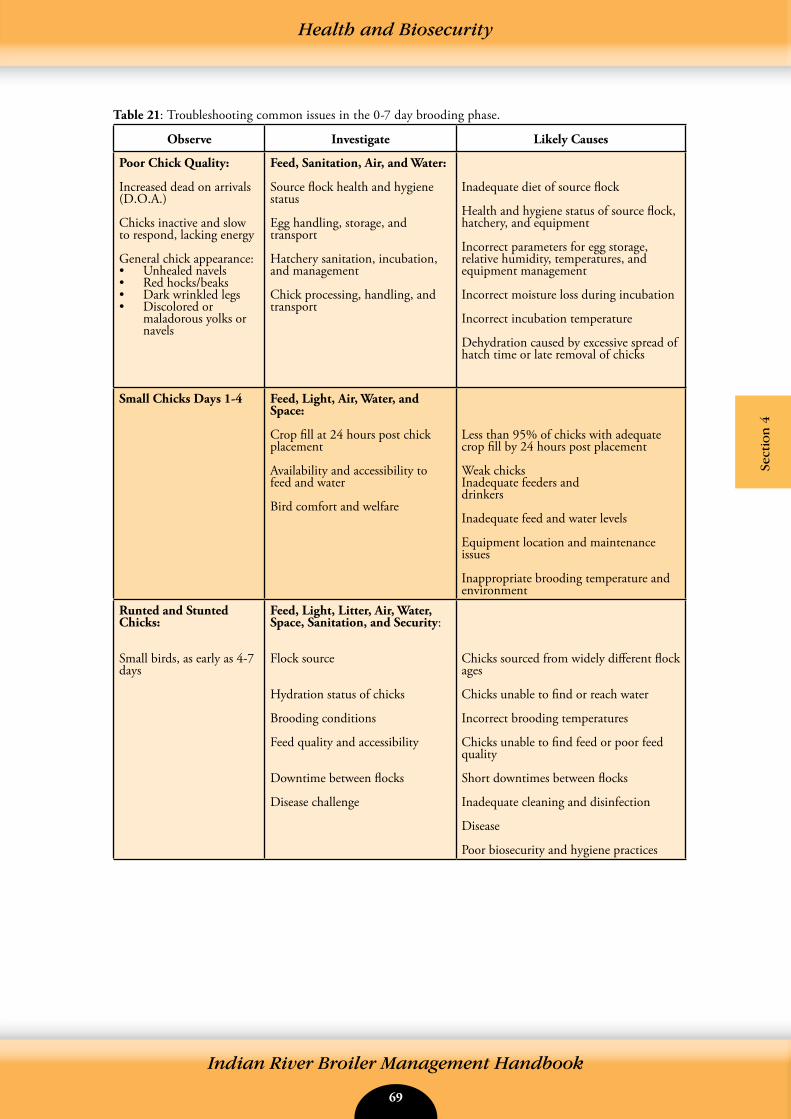
68 69
Indian River Broiler Management Handbook
Health and Biosecurity
Sect
ion
4
Table 21: Troubleshooting common issues in the 0-7 day brooding phase.
Observe Investigate Likely Causes
Poor Chick Quality:
Increased dead on arrivals (D.O.A.)
Chicks inactive and slow to respond, lacking energy
General chick appearance:• Unhealed navels• Red hocks/beaks• Dark wrinkled legs• Discolored or
maladorous yolks or navels
Feed, Sanitation, Air, and Water:
Source flock health and hygiene status
Egg handling, storage, and transport
Hatchery sanitation, incubation, and management
Chick processing, handling, and transport
Inadequate diet of source flock
Health and hygiene status of source flock, hatchery, and equipment
Incorrect parameters for egg storage, relative humidity, temperatures, and equipment management
Incorrect moisture loss during incubation
Incorrect incubation temperature
Dehydration caused by excessive spread of hatch time or late removal of chicks
Small Chicks Days 1-4 Feed, Light, Air, Water, and Space:
Crop fill at 24 hours post chick placement
Availability and accessibility to feed and water
Bird comfort and welfare
Less than 95% of chicks with adequate crop fill by 24 hours post placement
Weak chicks Inadequate feeders anddrinkers
Inadequate feed and water levels
Equipment location and maintenance issues
Inappropriate brooding temperature and environment
Runted and Stunted Chicks:
Small birds, as early as 4-7 days
Feed, Light, Litter, Air, Water, Space, Sanitation, and Security:
Flock source
Hydration status of chicks
Brooding conditions
Feed quality and accessibility
Downtime between flocks
Disease challenge
Chicks sourced from widely different flock ages
Chicks unable to find or reach water
Incorrect brooding temperatures
Chicks unable to find feed or poor feed quality
Short downtimes between flocks
Inadequate cleaning and disinfection
Disease
Poor biosecurity and hygiene practices
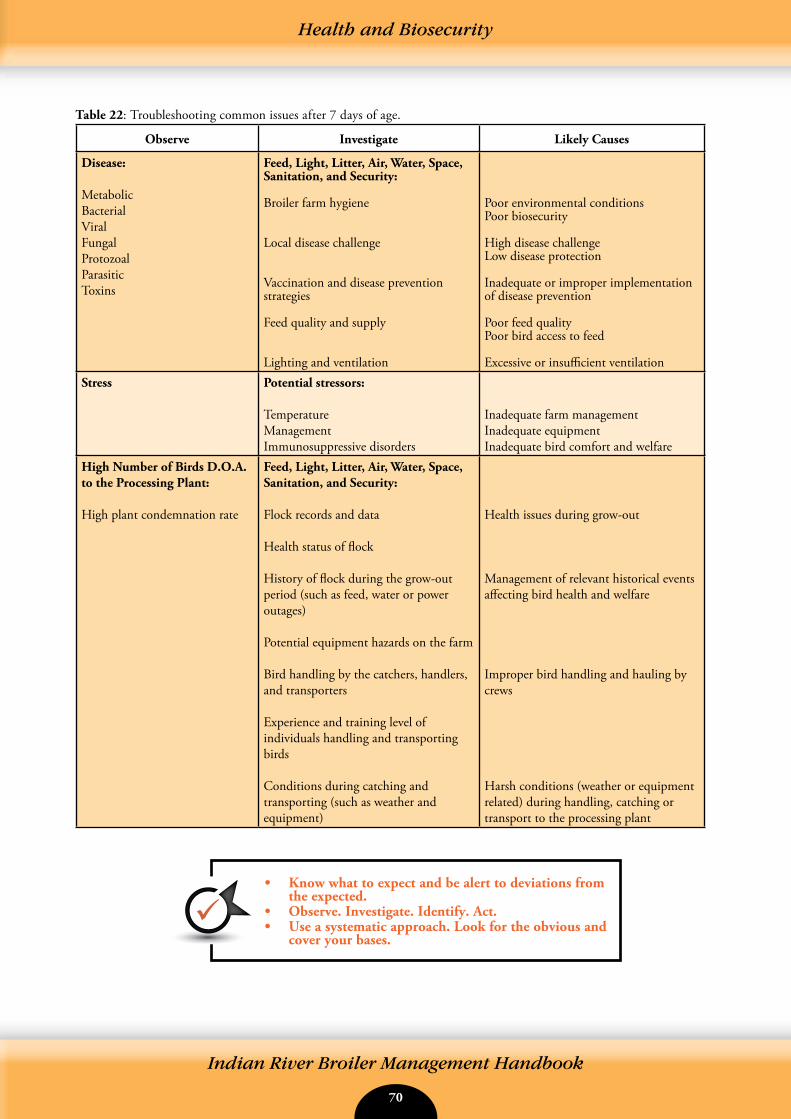
70 71
Indian River Broiler Management Handbook
Health and Biosecurity
Table 22: Troubleshooting common issues after 7 days of age.
Observe Investigate Likely Causes
Disease:
Metabolic Bacterial Viral Fungal Protozoal Parasitic Toxins
Feed, Light, Litter, Air, Water, Space, Sanitation, and Security:
Broiler farm hygiene
Local disease challenge
Vaccination and disease prevention strategies
Feed quality and supply
Lighting and ventilation
Poor environmental conditions Poor biosecurity
High disease challenge Low disease protection
Inadequate or improper implementation of disease prevention
Poor feed qualityPoor bird access to feed
Excessive or insufficient ventilationStress Potential stressors:
TemperatureManagement Immunosuppressive disorders
Inadequate farm management Inadequate equipment Inadequate bird comfort and welfare
High Number of Birds D.O.A. to the Processing Plant:
High plant condemnation rate
Feed, Light, Litter, Air, Water, Space, Sanitation, and Security:
Flock records and data
Health status of flock
History of flock during the grow-out period (such as feed, water or power outages)
Potential equipment hazards on the farm
Bird handling by the catchers, handlers, and transporters
Experience and training level of individuals handling and transporting birds
Conditions during catching and transporting (such as weather and equipment)
Health issues during grow-out
Management of relevant historical events affecting bird health and welfare
Improper bird handling and hauling by crews
Harsh conditions (weather or equipment related) during handling, catching or transport to the processing plant
• Know what to expect and be alert to deviations from the expected.
• Observe. Investigate. Identify. Act.• Use a systematic approach. Look for the obvious and
cover your bases.
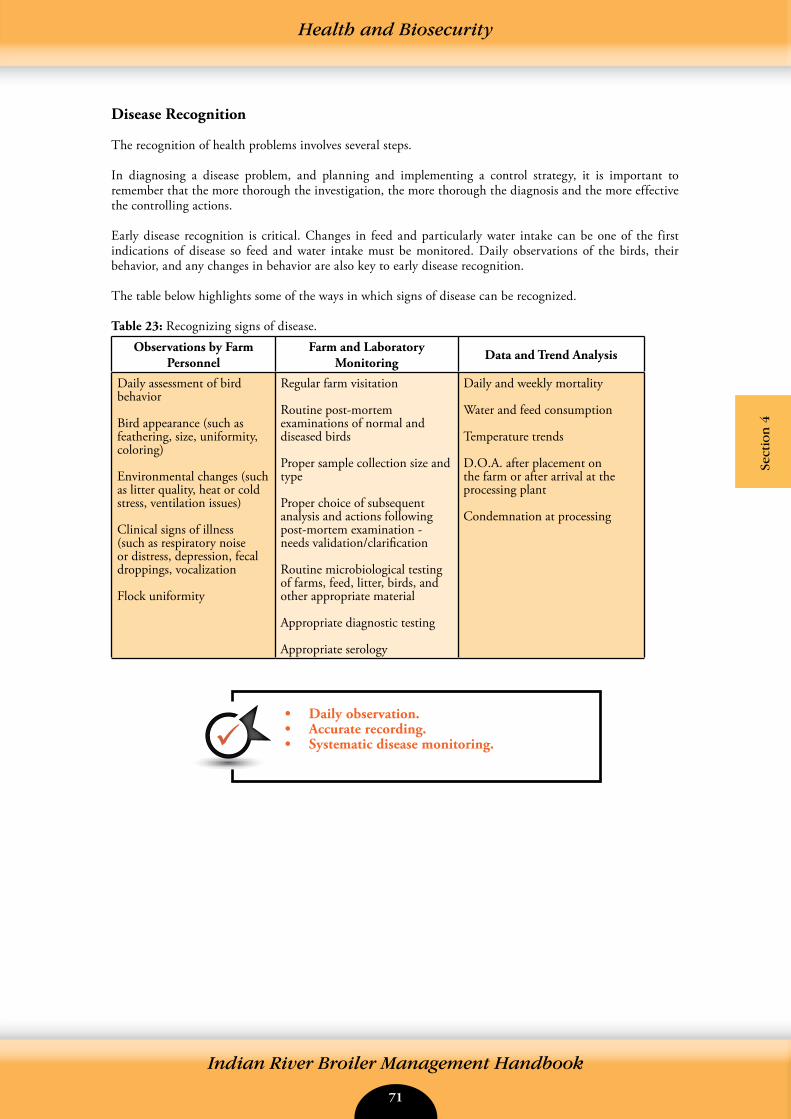
70 71
Indian River Broiler Management Handbook
Sect
ion
4
Disease Recognition
The recognition of health problems involves several steps.
In diagnosing a disease problem, and planning and implementing a control strategy, it is important to remember that the more thorough the investigation, the more thorough the diagnosis and the more effective the controlling actions.
Early disease recognition is critical. Changes in feed and particularly water intake can be one of the first indications of disease so feed and water intake must be monitored. Daily observations of the birds, their behavior, and any changes in behavior are also key to early disease recognition.
The table below highlights some of the ways in which signs of disease can be recognized.
Table 23: Recognizing signs of disease.Observations by Farm
PersonnelFarm and Laboratory
Monitoring Data and Trend Analysis
Daily assessment of bird behavior
Bird appearance (such as feathering, size, uniformity, coloring)
Environmental changes (such as litter quality, heat or cold stress, ventilation issues)
Clinical signs of illness (such as respiratory noise or distress, depression, fecal droppings, vocalization
Flock uniformity
Regular farm visitation
Routine post-mortem examinations of normal and diseased birds
Proper sample collection size and type
Proper choice of subsequent analysis and actions following post-mortem examination - needs validation/clarification
Routine microbiological testing of farms, feed, litter, birds, and other appropriate material
Appropriate diagnostic testing
Appropriate serology
Daily and weekly mortality
Water and feed consumption
Temperature trends
D.O.A. after placement on the farm or after arrival at the processing plant
Condemnation at processing
• Daily observation.• Accurate recording.• Systematic disease monitoring.
Health and Biosecurity

72 73
Indian River Broiler Management Handbook
Notes
Notes
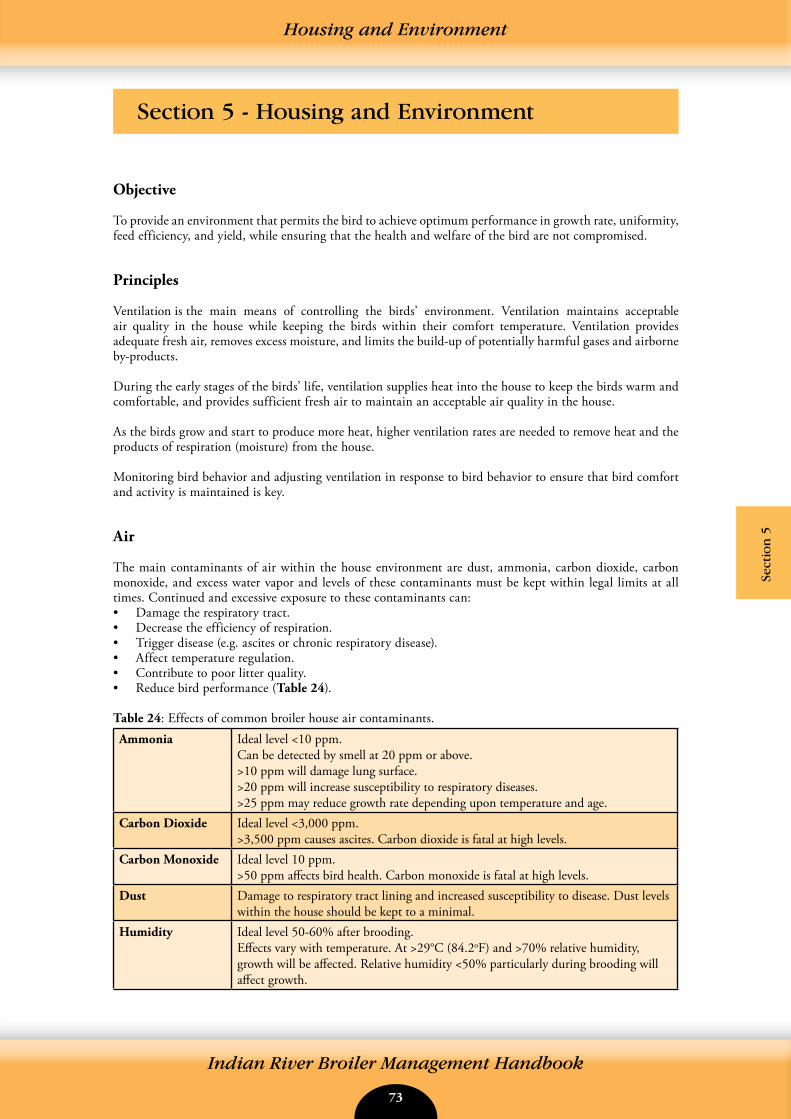
72 73
Indian River Broiler Management Handbook
Section 5 - Housing and Environment
Sect
ion
5
Housing and Environment
Objective
To provide an environment that permits the bird to achieve optimum performance in growth rate, uniformity, feed efficiency, and yield, while ensuring that the health and welfare of the bird are not compromised.
Principles
Ventilation is the main means of controlling the birds’ environment. Ventilation maintains acceptable air quality in the house while keeping the birds within their comfort temperature. Ventilation provides adequate fresh air, removes excess moisture, and limits the build-up of potentially harmful gases and airborne by-products.
During the early stages of the birds’ life, ventilation supplies heat into the house to keep the birds warm and comfortable, and provides sufficient fresh air to maintain an acceptable air quality in the house.
As the birds grow and start to produce more heat, higher ventilation rates are needed to remove heat and the products of respiration (moisture) from the house.
Monitoring bird behavior and adjusting ventilation in response to bird behavior to ensure that bird comfort and activity is maintained is key.
Air
The main contaminants of air within the house environment are dust, ammonia, carbon dioxide, carbon monoxide, and excess water vapor and levels of these contaminants must be kept within legal limits at all times. Continued and excessive exposure to these contaminants can:• Damage the respiratory tract.• Decrease the efficiency of respiration.• Trigger disease (e.g. ascites or chronic respiratory disease).• Affect temperature regulation.• Contribute to poor litter quality.• Reduce bird performance (Table 24). Table 24: Effects of common broiler house air contaminants.Ammonia Ideal level <10 ppm.
Can be detected by smell at 20 ppm or above.>10 ppm will damage lung surface.>20 ppm will increase susceptibility to respiratory diseases.>25 ppm may reduce growth rate depending upon temperature and age.
Carbon Dioxide Ideal level <3,000 ppm.>3,500 ppm causes ascites. Carbon dioxide is fatal at high levels.
Carbon Monoxide Ideal level 10 ppm.>50 ppm affects bird health. Carbon monoxide is fatal at high levels.
Dust Damage to respiratory tract lining and increased susceptibility to disease. Dust levels within the house should be kept to a minimal.
Humidity Ideal level 50-60% after brooding.Effects vary with temperature. At >29°C (84.2oF) and >70% relative humidity, growth will be affected. Relative humidity <50% particularly during brooding will affect growth.
74 75
Indian River Broiler Management Handbook
Housing and Environment
Water
Birds produce a substantial volume of water which passes into the environment. Removing this water from the house is an important function of the ventilation system.
A 2.3 kg (5.1 lb) bird will consume some 6.3 liters (1.7 gallons) of water in its lifetime and emit into the house atmosphere some 4.9 liters (1.3 gallons) of water. For 10,000 bird broiler flock this means that some 49,000 liters (12,944 gallons) of water will be lost to the environment as expired moisture or excreted in droppings. The ventilation system must remove this water load from the house.
Temperature
One of the aims of ventilation particularly early on in the production period is to help maintain appropriate house temperature so that birds are kept in their comfort zone. The recommended temperature profile is given in Section 1 (Chick Management) of this handbook. This is meant to be a guideline only, the actual set temperature will vary depending on relative humidity and should always be based on the visible comfort of the birds.
Heating
Every broiler house should have more than enough heating capacity to ensure that it can provide the required ventilation and maintain the house temperature at any time of the year.
The heat should be evenly spread throughout the house. Poor heat distribution can have a negative effect on bird uniformity. Where circulation fans are used to move and distribute heat around the house, care must be taken not to create air movement at bird level.
During the early stages of the production cycle, the heating should be set to operate close to the required house set point temperature. As the birds grow older and start to generate more body heat the difference between the house set point temperature and the temperature at which the heaters come on can be increased. The heater may be set to only operate if the house temperature falls to 1-2°C (2-4°F) below the house set point. These decisions and settings must be based on the visible reaction and comfort of the birds. While preheating the house prior to chick placement, it is advisable to run a certain amount of minimum ventilation. The amount of minimum ventilation will depend on the type of heating system being used. The purpose is to remove any harmful gases from the houses and to help with the distribution of the heat within the house prior to chick placement. Refer to the heater manufacturers guidelines for recommendations on the minimum ventilation rates required at this time.
Housing and Ventilation Systems
There are two basic types of ventilation system:
Natural Ventilation• Also known as “open-sided”, “curtain-sided”, or “natural” houses.• Fans may be used inside the house to circulate and move air.
Power Ventilation (Controlled/Closed environment housing)• These houses usually have either solid sidewalls or curtains that are kept closed during house
operation.• Fans and inlets are used to ventilate the house.
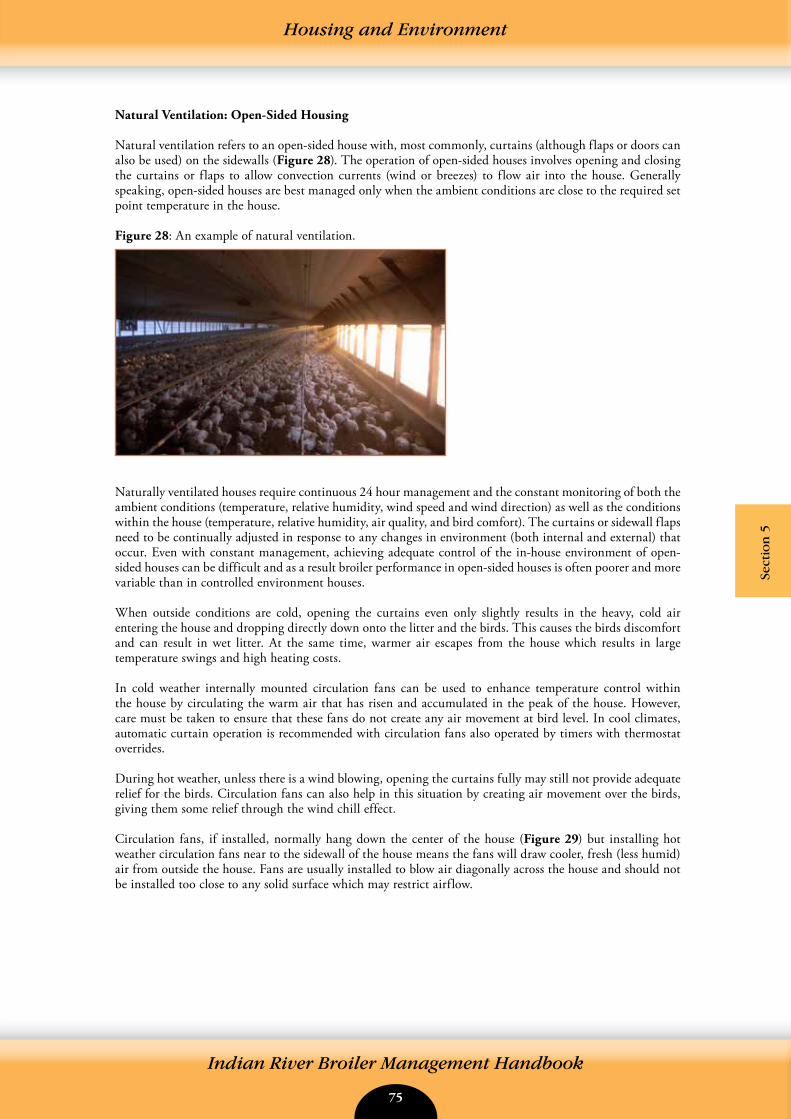
74 75
Indian River Broiler Management Handbook
Housing and Environment
Sect
ion
5
Natural Ventilation: Open-Sided Housing
Natural ventilation refers to an open-sided house with, most commonly, curtains (although flaps or doors can also be used) on the sidewalls (Figure 28). The operation of open-sided houses involves opening and closing the curtains or flaps to allow convection currents (wind or breezes) to flow air into the house. Generally speaking, open-sided houses are best managed only when the ambient conditions are close to the required set point temperature in the house.
Figure 28: An example of natural ventilation.
Naturally ventilated houses require continuous 24 hour management and the constant monitoring of both the ambient conditions (temperature, relative humidity, wind speed and wind direction) as well as the conditions within the house (temperature, relative humidity, air quality, and bird comfort). The curtains or sidewall flaps need to be continually adjusted in response to any changes in environment (both internal and external) that occur. Even with constant management, achieving adequate control of the in-house environment of open- sided houses can be difficult and as a result broiler performance in open-sided houses is often poorer and more variable than in controlled environment houses. When outside conditions are cold, opening the curtains even only slightly results in the heavy, cold air entering the house and dropping directly down onto the litter and the birds. This causes the birds discomfort and can result in wet litter. At the same time, warmer air escapes from the house which results in large temperature swings and high heating costs.
In cold weather internally mounted circulation fans can be used to enhance temperature control within the house by circulating the warm air that has risen and accumulated in the peak of the house. However, care must be taken to ensure that these fans do not create any air movement at bird level. In cool climates, automatic curtain operation is recommended with circulation fans also operated by timers with thermostat overrides.
During hot weather, unless there is a wind blowing, opening the curtains fully may still not provide adequate relief for the birds. Circulation fans can also help in this situation by creating air movement over the birds, giving them some relief through the wind chill effect.
Circulation fans, if installed, normally hang down the center of the house (Figure 29) but installing hot weather circulation fans near to the sidewall of the house means the fans will draw cooler, fresh (less humid) air from outside the house. Fans are usually installed to blow air diagonally across the house and should not be installed too close to any solid surface which may restrict airflow.
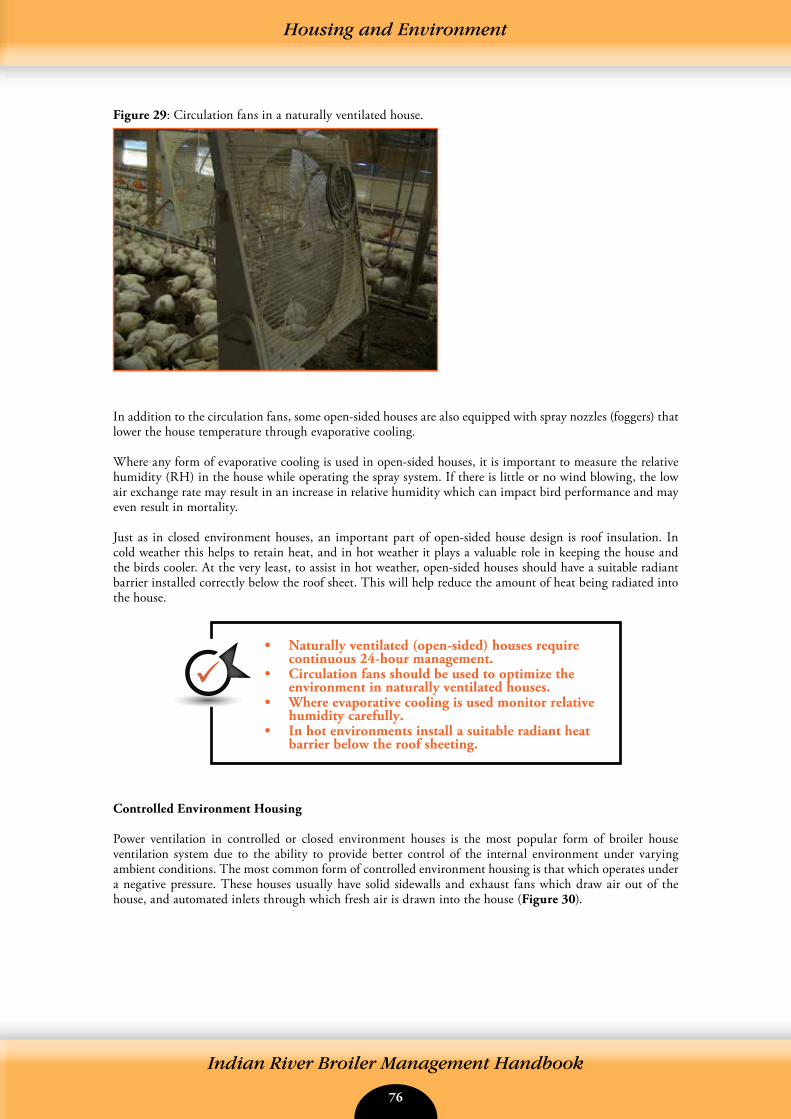
76 77
Indian River Broiler Management Handbook
Housing and Environment
Figure 29: Circulation fans in a naturally ventilated house.
In addition to the circulation fans, some open-sided houses are also equipped with spray nozzles (foggers) that lower the house temperature through evaporative cooling.
Where any form of evaporative cooling is used in open-sided houses, it is important to measure the relative humidity (RH) in the house while operating the spray system. If there is little or no wind blowing, the low air exchange rate may result in an increase in relative humidity which can impact bird performance and may even result in mortality.
Just as in closed environment houses, an important part of open-sided house design is roof insulation. In cold weather this helps to retain heat, and in hot weather it plays a valuable role in keeping the house and the birds cooler. At the very least, to assist in hot weather, open-sided houses should have a suitable radiant barrier installed correctly below the roof sheet. This will help reduce the amount of heat being radiated into the house.
Controlled Environment Housing
Power ventilation in controlled or closed environment houses is the most popular form of broiler house ventilation system due to the ability to provide better control of the internal environment under varying ambient conditions. The most common form of controlled environment housing is that which operates under a negative pressure. These houses usually have solid sidewalls and exhaust fans which draw air out of the house, and automated inlets through which fresh air is drawn into the house (Figure 30).
• Naturally ventilated (open-sided) houses require continuous 24-hour management.
• Circulation fans should be used to optimize the environment in naturally ventilated houses.
• Where evaporative cooling is used monitor relative humidity carefully.
• In hot environments install a suitable radiant heat barrier below the roof sheeting.
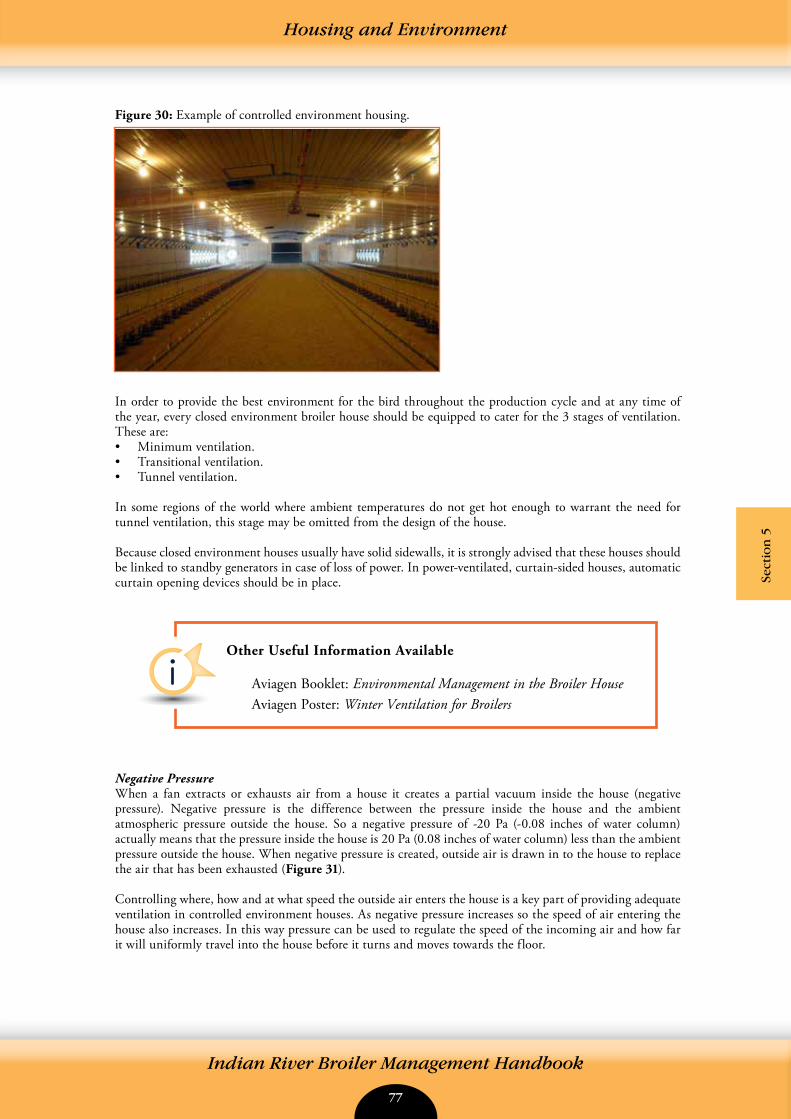
76 77
Indian River Broiler Management Handbook
Housing and Environment
Sect
ion
5
Figure 30: Example of controlled environment housing.
In order to provide the best environment for the bird throughout the production cycle and at any time of the year, every closed environment broiler house should be equipped to cater for the 3 stages of ventilation. These are:• Minimum ventilation.• Transitional ventilation.• Tunnel ventilation.
In some regions of the world where ambient temperatures do not get hot enough to warrant the need for tunnel ventilation, this stage may be omitted from the design of the house.
Because closed environment houses usually have solid sidewalls, it is strongly advised that these houses should be linked to standby generators in case of loss of power. In power-ventilated, curtain-sided houses, automatic curtain opening devices should be in place.
Negative PressureWhen a fan extracts or exhausts air from a house it creates a partial vacuum inside the house (negative pressure). Negative pressure is the difference between the pressure inside the house and the ambient atmospheric pressure outside the house. So a negative pressure of -20 Pa (-0.08 inches of water column) actually means that the pressure inside the house is 20 Pa (0.08 inches of water column) less than the ambient pressure outside the house. When negative pressure is created, outside air is drawn in to the house to replace the air that has been exhausted (Figure 31).
Controlling where, how and at what speed the outside air enters the house is a key part of providing adequate ventilation in controlled environment houses. As negative pressure increases so the speed of air entering the house also increases. In this way pressure can be used to regulate the speed of the incoming air and how far it will uniformly travel into the house before it turns and moves towards the floor.
Other Useful Information Available
Aviagen Booklet: Environmental Management in the Broiler House Aviagen Poster: Winter Ventilation for Broilers

78 79
Indian River Broiler Management Handbook
Housing and Environment
Figure 31: Diagram illustrating airflow through air inlets in negative pressure system.
During ventilation air should only enter the broiler house through a number of air inlets which are evenly spaced around the sidewalls of the house. One of the most critical components of a successful ventilation system is how airtight the house itself is. A well-sealed or airtight house should have no holes, cracks, gaps or any other form of opening, other than the ventilation inlets, through which air can enter the house. This will:• Give better control over where the air will enter the house.• Allow better control over how the air enters the house.• Make it easier to generate a negative pressure.
Monitoring air pressure will indicate how airtight a house is and air pressure should be monitored regularly. If house air pressure is found to decline over time it is an indication that the house is not properly sealed and that air leakage into the house is occurring. If this happens an investigation and appropriate corrective action should be taken (e.g. repair broken inlets). To determine how well sealed (or airtight) a house is, close all doors and inlets in the house and switch on one 122 cm (48 in)/127 cm (50 in) fan or two 91 cm (36 in) fans. The pressure within the house should not measure less than 37.5 Pa (0.15 inches of water column). Pressure can be measured anywhere in the house and should be consistent throughout the house.
Minimum Ventilation
Minimum ventilation brings fresh air into the house and exhausts any stale in-house air (to remove excess moisture and prevent the build-up of harmful gases), while maintaining the required in-house air temperature.
Some minimum amount of ventilation must be given at all times when there are birds present in the house - no matter what the outside temperature is. Minimum ventilation can be used during winter and summer and at any stage of the production cycle but is most commonly used during brooding and cool weather (i.e. whenever it is colder outside than the desired in-house set point temperature and the actual house temperature is at or below the required set point temperature). Minimum ventilation is not adequate for cooling birds during high temperatures and should create very little air movement at bird level, this is particularly important for young birds under 10 days of age.
• For a negative pressure system to operate successfully the house must be airtight (i.e. air must only enter through the air inlets).
• Pressure should be monitored over time. Corrective action must be taken immediately if any changes from desired pressure occurs.
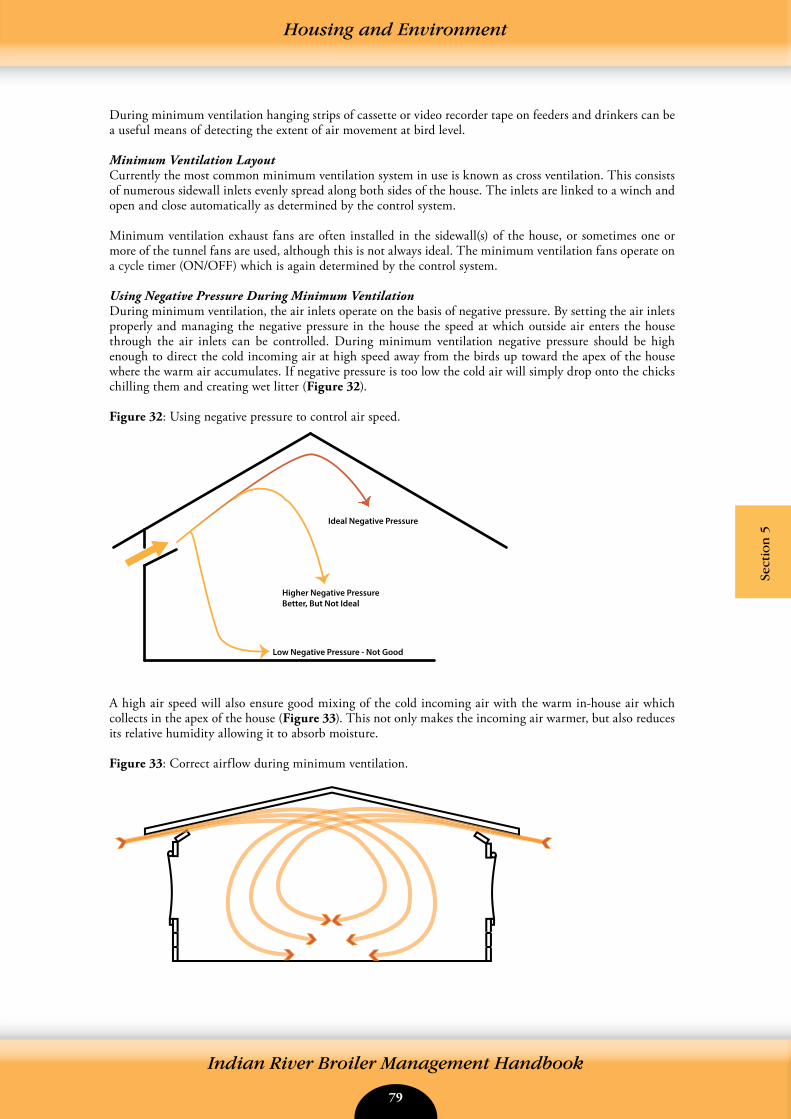
78 79
Indian River Broiler Management Handbook
Housing and Environment
Sect
ion
5
During minimum ventilation hanging strips of cassette or video recorder tape on feeders and drinkers can be a useful means of detecting the extent of air movement at bird level.
Minimum Ventilation LayoutCurrently the most common minimum ventilation system in use is known as cross ventilation. This consists of numerous sidewall inlets evenly spread along both sides of the house. The inlets are linked to a winch and open and close automatically as determined by the control system.
Minimum ventilation exhaust fans are often installed in the sidewall(s) of the house, or sometimes one or more of the tunnel fans are used, although this is not always ideal. The minimum ventilation fans operate on a cycle timer (ON/OFF) which is again determined by the control system.
Using Negative Pressure During Minimum VentilationDuring minimum ventilation, the air inlets operate on the basis of negative pressure. By setting the air inlets properly and managing the negative pressure in the house the speed at which outside air enters the house through the air inlets can be controlled. During minimum ventilation negative pressure should be high enough to direct the cold incoming air at high speed away from the birds up toward the apex of the house where the warm air accumulates. If negative pressure is too low the cold air will simply drop onto the chicks chilling them and creating wet litter (Figure 32).
Figure 32: Using negative pressure to control air speed.
A high air speed will also ensure good mixing of the cold incoming air with the warm in-house air which collects in the apex of the house (Figure 33). This not only makes the incoming air warmer, but also reduces its relative humidity allowing it to absorb moisture.
Figure 33: Correct airflow during minimum ventilation.
Ideal Negative Pressure
Higher Negative PressureBetter, But Not Ideal
Low Negative Pressure - Not Good
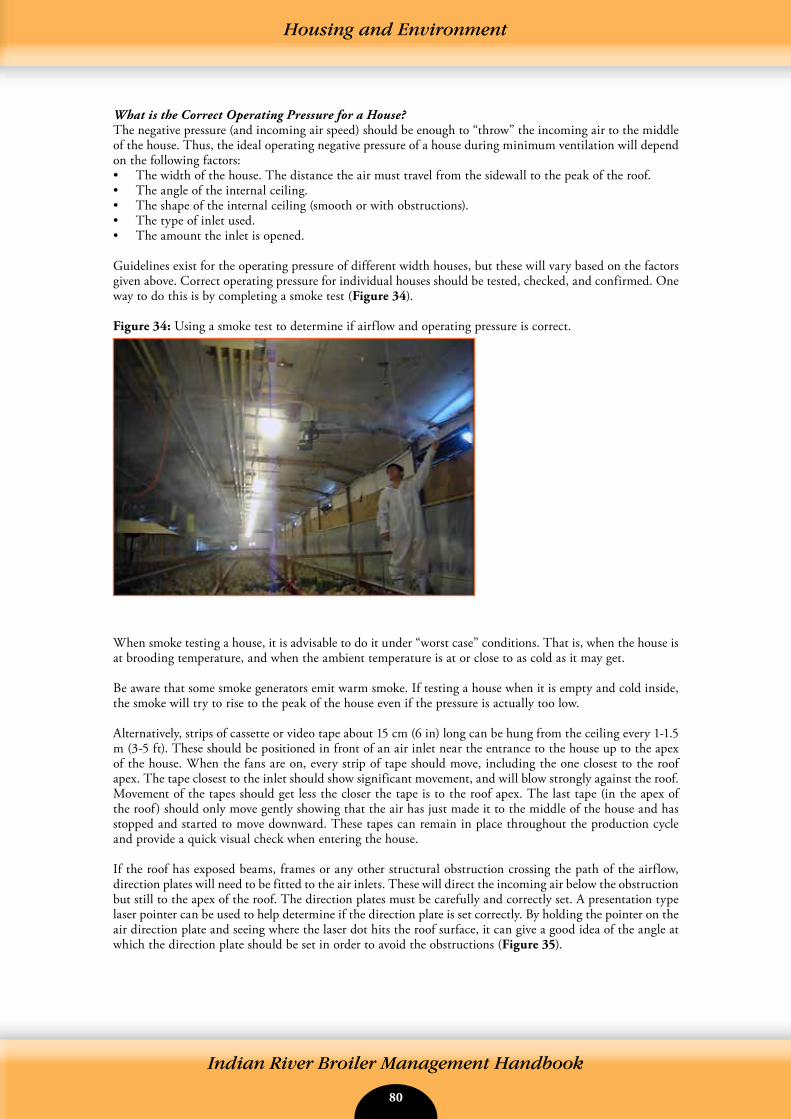
80 81
Indian River Broiler Management Handbook
Housing and Environment
What is the Correct Operating Pressure for a House?The negative pressure (and incoming air speed) should be enough to “throw” the incoming air to the middle of the house. Thus, the ideal operating negative pressure of a house during minimum ventilation will depend on the following factors:• The width of the house. The distance the air must travel from the sidewall to the peak of the roof.• The angle of the internal ceiling.• The shape of the internal ceiling (smooth or with obstructions).• The type of inlet used.• The amount the inlet is opened.
Guidelines exist for the operating pressure of different width houses, but these will vary based on the factors given above. Correct operating pressure for individual houses should be tested, checked, and confirmed. One way to do this is by completing a smoke test (Figure 34).
Figure 34: Using a smoke test to determine if airflow and operating pressure is correct.
When smoke testing a house, it is advisable to do it under “worst case” conditions. That is, when the house is at brooding temperature, and when the ambient temperature is at or close to as cold as it may get.
Be aware that some smoke generators emit warm smoke. If testing a house when it is empty and cold inside, the smoke will try to rise to the peak of the house even if the pressure is actually too low.
Alternatively, strips of cassette or video tape about 15 cm (6 in) long can be hung from the ceiling every 1-1.5 m (3-5 ft). These should be positioned in front of an air inlet near the entrance to the house up to the apex of the house. When the fans are on, every strip of tape should move, including the one closest to the roof apex. The tape closest to the inlet should show significant movement, and will blow strongly against the roof. Movement of the tapes should get less the closer the tape is to the roof apex. The last tape (in the apex of the roof) should only move gently showing that the air has just made it to the middle of the house and has stopped and started to move downward. These tapes can remain in place throughout the production cycle and provide a quick visual check when entering the house.
If the roof has exposed beams, frames or any other structural obstruction crossing the path of the airflow, direction plates will need to be fitted to the air inlets. These will direct the incoming air below the obstruction but still to the apex of the roof. The direction plates must be carefully and correctly set. A presentation type laser pointer can be used to help determine if the direction plate is set correctly. By holding the pointer on the air direction plate and seeing where the laser dot hits the roof surface, it can give a good idea of the angle at which the direction plate should be set in order to avoid the obstructions (Figure 35).
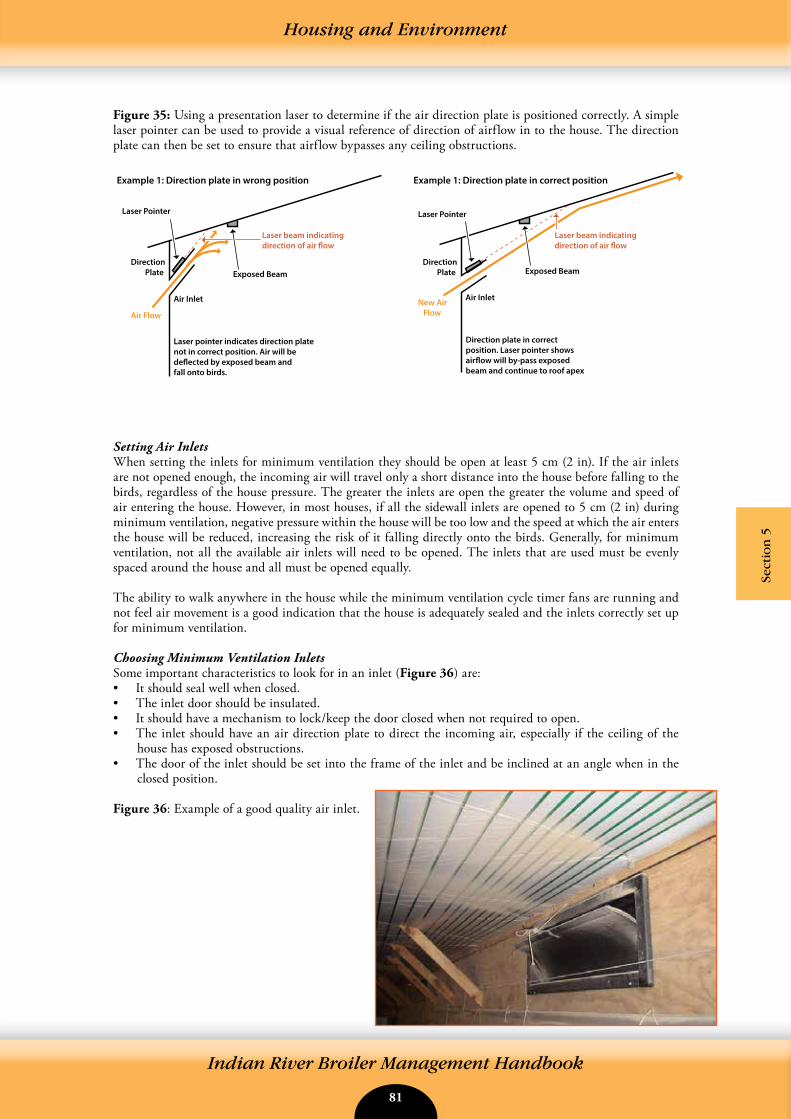
80 81
Indian River Broiler Management Handbook
Housing and Environment
Sect
ion
5
Figure 35: Using a presentation laser to determine if the air direction plate is positioned correctly. A simple laser pointer can be used to provide a visual reference of direction of airflow in to the house. The direction plate can then be set to ensure that airflow bypasses any ceiling obstructions.
Setting Air InletsWhen setting the inlets for minimum ventilation they should be open at least 5 cm (2 in). If the air inlets are not opened enough, the incoming air will travel only a short distance into the house before falling to the birds, regardless of the house pressure. The greater the inlets are open the greater the volume and speed of air entering the house. However, in most houses, if all the sidewall inlets are opened to 5 cm (2 in) during minimum ventilation, negative pressure within the house will be too low and the speed at which the air enters the house will be reduced, increasing the risk of it falling directly onto the birds. Generally, for minimum ventilation, not all the available air inlets will need to be opened. The inlets that are used must be evenly spaced around the house and all must be opened equally.
The ability to walk anywhere in the house while the minimum ventilation cycle timer fans are running and not feel air movement is a good indication that the house is adequately sealed and the inlets correctly set up for minimum ventilation.
Choosing Minimum Ventilation InletsSome important characteristics to look for in an inlet (Figure 36) are:• It should seal well when closed.• The inlet door should be insulated.• It should have a mechanism to lock/keep the door closed when not required to open.• The inlet should have an air direction plate to direct the incoming air, especially if the ceiling of the
house has exposed obstructions.• The door of the inlet should be set into the frame of the inlet and be inclined at an angle when in the
closed position.
Figure 36: Example of a good quality air inlet.
Example 1: Direction plate in wrong position Example 1: Direction plate in correct position
Laser Pointer
Direction Plate
Air Inlet Air Inlet
Laser pointer indicates direction platenot in correct position. Air will bede�ected by exposed beam andfall onto birds.
Exposed Beam Exposed Beam
Laser beam indicatingdirection of air �ow
Laser beam indicatingdirection of air �ow
Laser Pointer
Direction Plate
Direction plate in correctposition. Laser pointer showsair�ow will by-pass exposedbeam and continue to roof apex
New Air FlowAir Flow
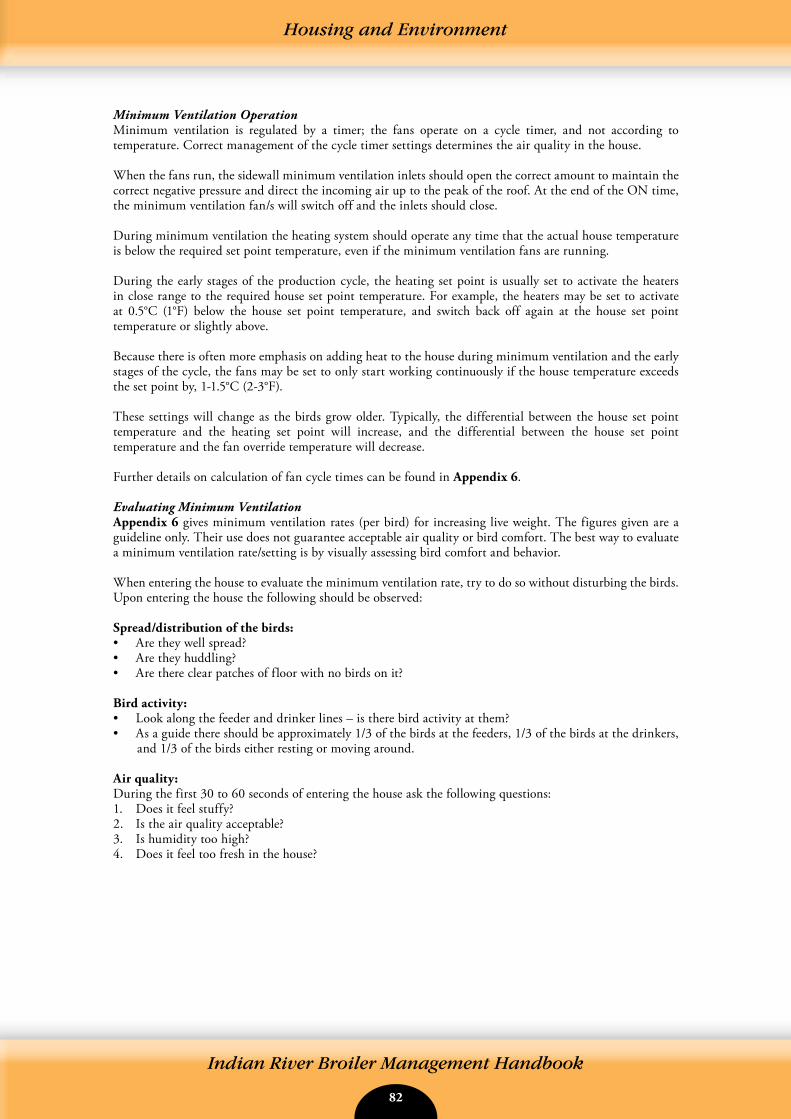
82 83
Indian River Broiler Management Handbook
Housing and Environment
Minimum Ventilation OperationMinimum ventilation is regulated by a timer; the fans operate on a cycle timer, and not according to temperature. Correct management of the cycle timer settings determines the air quality in the house.
When the fans run, the sidewall minimum ventilation inlets should open the correct amount to maintain the correct negative pressure and direct the incoming air up to the peak of the roof. At the end of the ON time, the minimum ventilation fan/s will switch off and the inlets should close.
During minimum ventilation the heating system should operate any time that the actual house temperature is below the required set point temperature, even if the minimum ventilation fans are running. During the early stages of the production cycle, the heating set point is usually set to activate the heaters in close range to the required house set point temperature. For example, the heaters may be set to activate at 0.5°C (1°F) below the house set point temperature, and switch back off again at the house set point temperature or slightly above.
Because there is often more emphasis on adding heat to the house during minimum ventilation and the early stages of the cycle, the fans may be set to only start working continuously if the house temperature exceeds the set point by, 1-1.5°C (2-3°F).
These settings will change as the birds grow older. Typically, the differential between the house set point temperature and the heating set point will increase, and the differential between the house set point temperature and the fan override temperature will decrease.
Further details on calculation of fan cycle times can be found in Appendix 6.
Evaluating Minimum VentilationAppendix 6 gives minimum ventilation rates (per bird) for increasing live weight. The figures given are a guideline only. Their use does not guarantee acceptable air quality or bird comfort. The best way to evaluate a minimum ventilation rate/setting is by visually assessing bird comfort and behavior.
When entering the house to evaluate the minimum ventilation rate, try to do so without disturbing the birds. Upon entering the house the following should be observed:
Spread/distribution of the birds:• Are they well spread?• Are they huddling?• Are there clear patches of floor with no birds on it?
Bird activity:• Look along the feeder and drinker lines – is there bird activity at them?• As a guide there should be approximately 1/3 of the birds at the feeders, 1/3 of the birds at the drinkers,
and 1/3 of the birds either resting or moving around.
Air quality:During the first 30 to 60 seconds of entering the house ask the following questions:1. Does it feel stuffy?2. Is the air quality acceptable?3. Is humidity too high?4. Does it feel too fresh in the house?
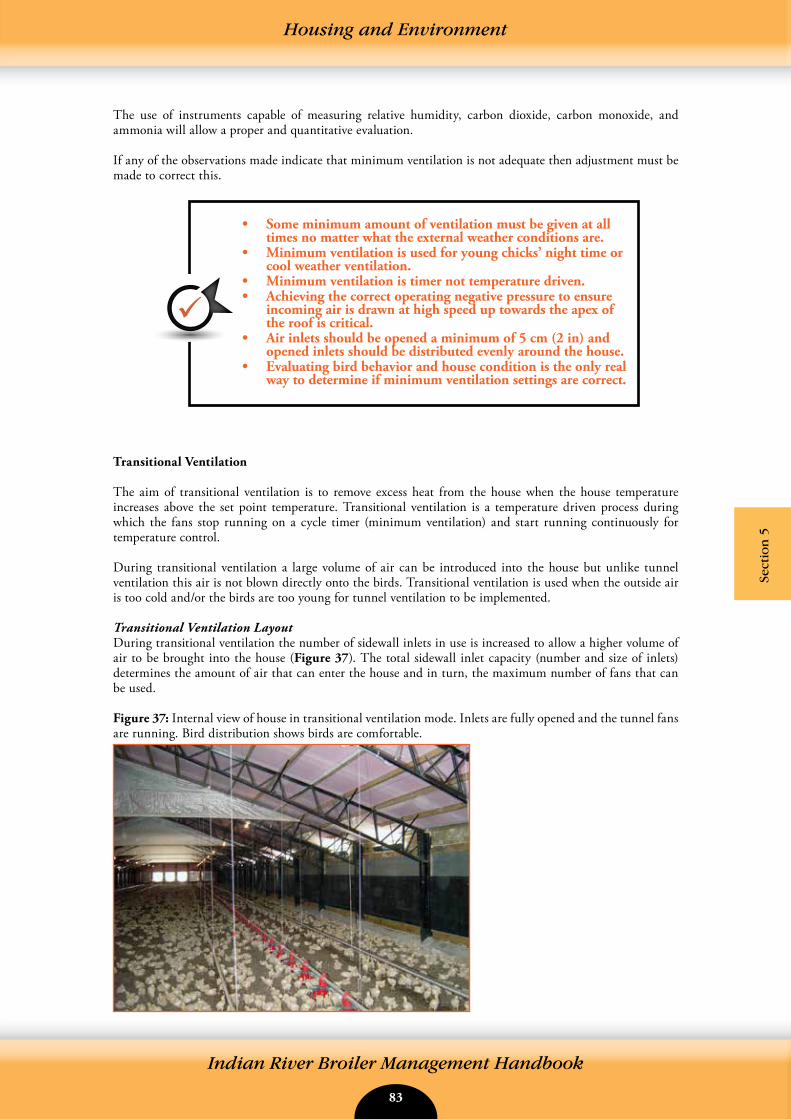
82 83
Indian River Broiler Management Handbook
The use of instruments capable of measuring relative humidity, carbon dioxide, carbon monoxide, and ammonia will allow a proper and quantitative evaluation.
If any of the observations made indicate that minimum ventilation is not adequate then adjustment must be made to correct this.
Transitional Ventilation
The aim of transitional ventilation is to remove excess heat from the house when the house temperature increases above the set point temperature. Transitional ventilation is a temperature driven process during which the fans stop running on a cycle timer (minimum ventilation) and start running continuously for temperature control.
During transitional ventilation a large volume of air can be introduced into the house but unlike tunnel ventilation this air is not blown directly onto the birds. Transitional ventilation is used when the outside air is too cold and/or the birds are too young for tunnel ventilation to be implemented.
Transitional Ventilation LayoutDuring transitional ventilation the number of sidewall inlets in use is increased to allow a higher volume of air to be brought into the house (Figure 37). The total sidewall inlet capacity (number and size of inlets) determines the amount of air that can enter the house and in turn, the maximum number of fans that can be used.
Figure 37: Internal view of house in transitional ventilation mode. Inlets are fully opened and the tunnel fans are running. Bird distribution shows birds are comfortable.
Housing and Environment
Sect
ion
5
• Some minimum amount of ventilation must be given at all times no matter what the external weather conditions are.
• Minimum ventilation is used for young chicks’ night time or cool weather ventilation.
• Minimum ventilation is timer not temperature driven.• Achieving the correct operating negative pressure to ensure
incoming air is drawn at high speed up towards the apex of the roof is critical.
• Air inlets should be opened a minimum of 5 cm (2 in) and opened inlets should be distributed evenly around the house.
• Evaluating bird behavior and house condition is the only real way to determine if minimum ventilation settings are correct.
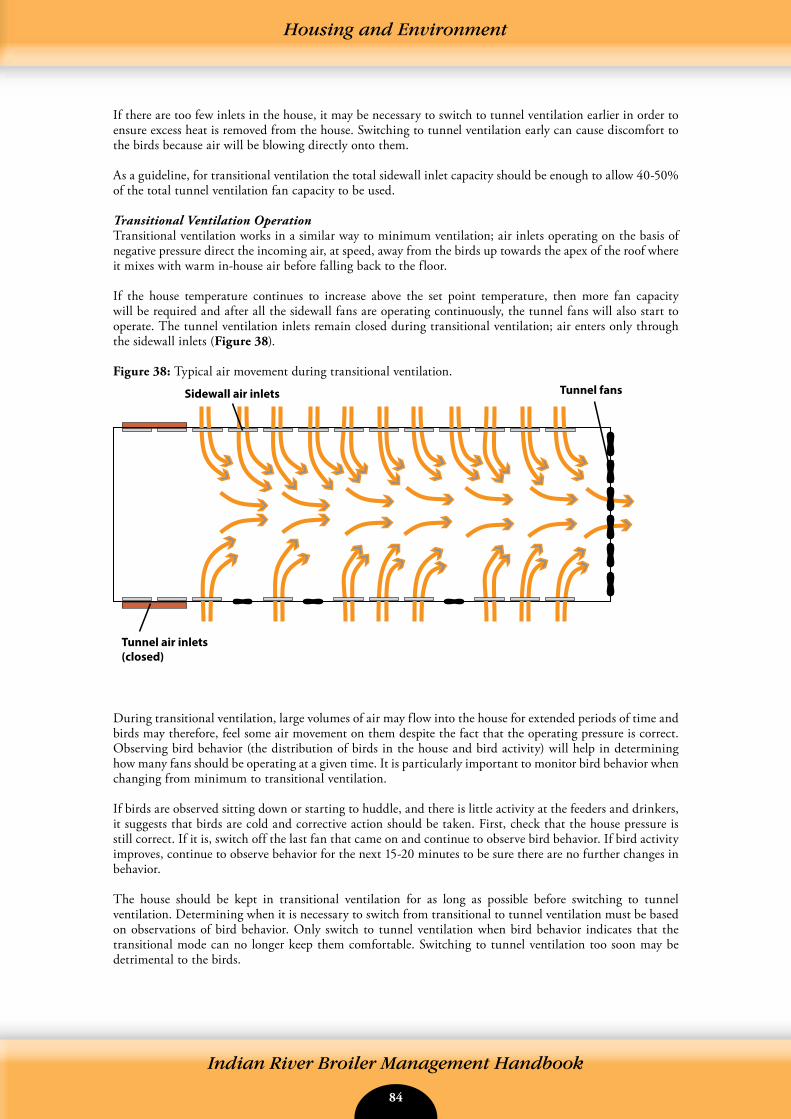
84 85
Indian River Broiler Management Handbook
Housing and Environment
If there are too few inlets in the house, it may be necessary to switch to tunnel ventilation earlier in order to ensure excess heat is removed from the house. Switching to tunnel ventilation early can cause discomfort to the birds because air will be blowing directly onto them.
As a guideline, for transitional ventilation the total sidewall inlet capacity should be enough to allow 40-50% of the total tunnel ventilation fan capacity to be used.
Transitional Ventilation OperationTransitional ventilation works in a similar way to minimum ventilation; air inlets operating on the basis of negative pressure direct the incoming air, at speed, away from the birds up towards the apex of the roof where it mixes with warm in-house air before falling back to the floor.
If the house temperature continues to increase above the set point temperature, then more fan capacity will be required and after all the sidewall fans are operating continuously, the tunnel fans will also start to operate. The tunnel ventilation inlets remain closed during transitional ventilation; air enters only through the sidewall inlets (Figure 38). Figure 38: Typical air movement during transitional ventilation.
During transitional ventilation, large volumes of air may flow into the house for extended periods of time and birds may therefore, feel some air movement on them despite the fact that the operating pressure is correct. Observing bird behavior (the distribution of birds in the house and bird activity) will help in determining how many fans should be operating at a given time. It is particularly important to monitor bird behavior when changing from minimum to transitional ventilation.
If birds are observed sitting down or starting to huddle, and there is little activity at the feeders and drinkers, it suggests that birds are cold and corrective action should be taken. First, check that the house pressure is still correct. If it is, switch off the last fan that came on and continue to observe bird behavior. If bird activity improves, continue to observe behavior for the next 15-20 minutes to be sure there are no further changes in behavior.
The house should be kept in transitional ventilation for as long as possible before switching to tunnel ventilation. Determining when it is necessary to switch from transitional to tunnel ventilation must be based on observations of bird behavior. Only switch to tunnel ventilation when bird behavior indicates that the transitional mode can no longer keep them comfortable. Switching to tunnel ventilation too soon may be detrimental to the birds.
Tunnel air inlets(closed)
Tunnel fansSidewall air inlets
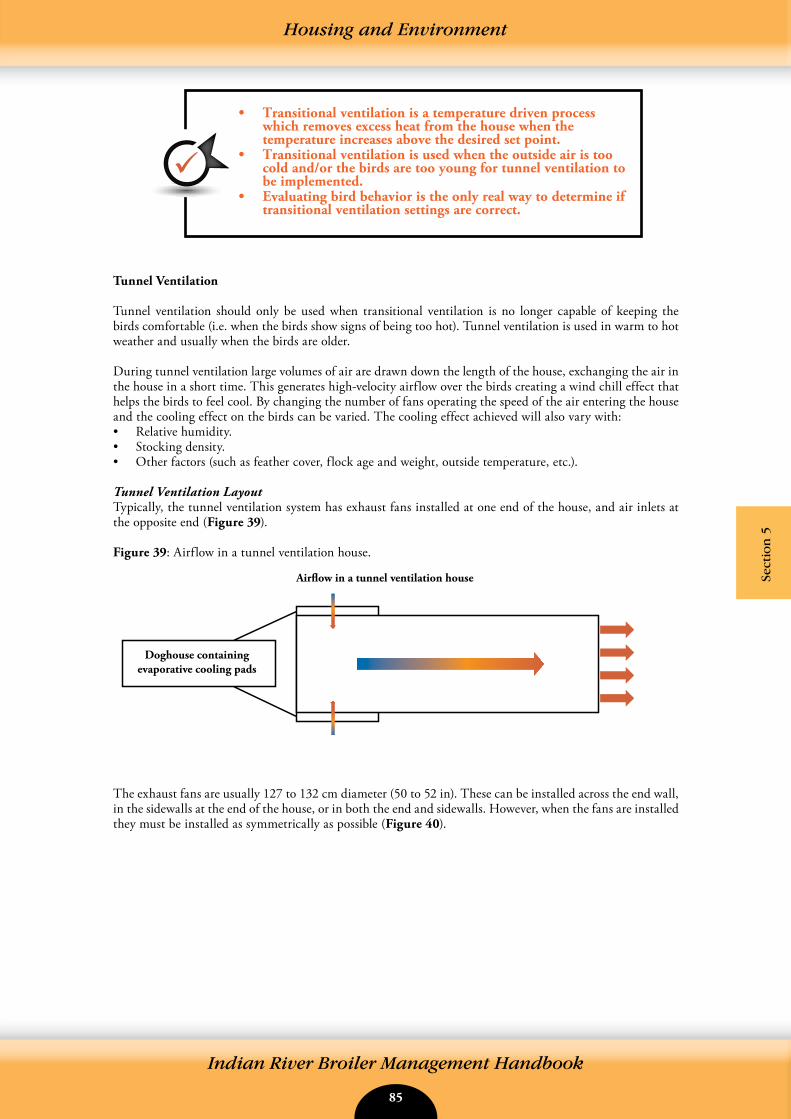
84 85
Indian River Broiler Management Handbook
Housing and Environment
Sect
ion
5
Tunnel Ventilation
Tunnel ventilation should only be used when transitional ventilation is no longer capable of keeping the birds comfortable (i.e. when the birds show signs of being too hot). Tunnel ventilation is used in warm to hot weather and usually when the birds are older.
During tunnel ventilation large volumes of air are drawn down the length of the house, exchanging the air in the house in a short time. This generates high-velocity airflow over the birds creating a wind chill effect that helps the birds to feel cool. By changing the number of fans operating the speed of the air entering the house and the cooling effect on the birds can be varied. The cooling effect achieved will also vary with:• Relative humidity.• Stocking density.• Other factors (such as feather cover, flock age and weight, outside temperature, etc.).
Tunnel Ventilation LayoutTypically, the tunnel ventilation system has exhaust fans installed at one end of the house, and air inlets at the opposite end (Figure 39).
Figure 39: Airflow in a tunnel ventilation house.
The exhaust fans are usually 127 to 132 cm diameter (50 to 52 in). These can be installed across the end wall, in the sidewalls at the end of the house, or in both the end and sidewalls. However, when the fans are installed they must be installed as symmetrically as possible (Figure 40).
• Transitional ventilation is a temperature driven process which removes excess heat from the house when the temperature increases above the desired set point.
• Transitional ventilation is used when the outside air is too cold and/or the birds are too young for tunnel ventilation to be implemented.
• Evaluating bird behavior is the only real way to determine if transitional ventilation settings are correct.
Air�ow in a tunnel ventilation house
Doghouse containingevaporative cooling pads
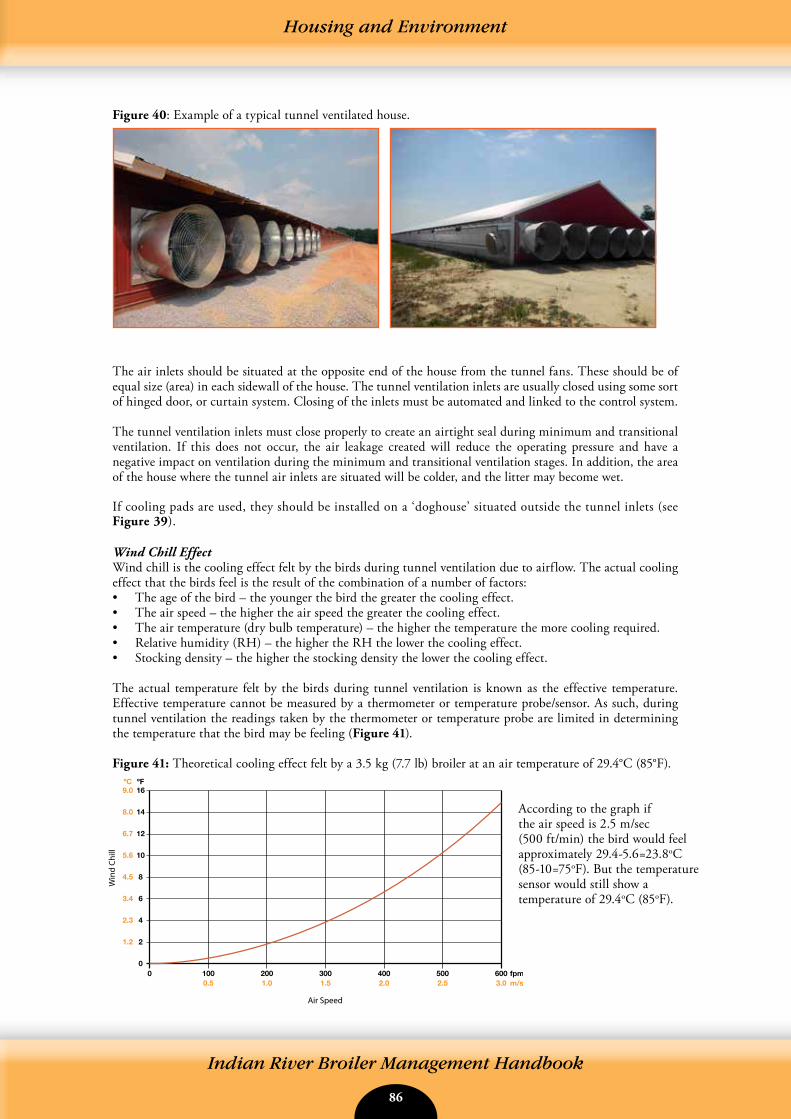
86 87
Indian River Broiler Management Handbook
Housing and Environment
Figure 40: Example of a typical tunnel ventilated house.
The air inlets should be situated at the opposite end of the house from the tunnel fans. These should be of equal size (area) in each sidewall of the house. The tunnel ventilation inlets are usually closed using some sort of hinged door, or curtain system. Closing of the inlets must be automated and linked to the control system.
The tunnel ventilation inlets must close properly to create an airtight seal during minimum and transitional ventilation. If this does not occur, the air leakage created will reduce the operating pressure and have a negative impact on ventilation during the minimum and transitional ventilation stages. In addition, the area of the house where the tunnel air inlets are situated will be colder, and the litter may become wet.
If cooling pads are used, they should be installed on a ‘doghouse’ situated outside the tunnel inlets (see Figure 39).
Wind Chill EffectWind chill is the cooling effect felt by the birds during tunnel ventilation due to airflow. The actual cooling effect that the birds feel is the result of the combination of a number of factors:• The age of the bird – the younger the bird the greater the cooling effect.• The air speed – the higher the air speed the greater the cooling effect.• The air temperature (dry bulb temperature) – the higher the temperature the more cooling required.• Relative humidity (RH) – the higher the RH the lower the cooling effect.• Stocking density – the higher the stocking density the lower the cooling effect.
The actual temperature felt by the birds during tunnel ventilation is known as the effective temperature. Effective temperature cannot be measured by a thermometer or temperature probe/sensor. As such, during tunnel ventilation the readings taken by the thermometer or temperature probe are limited in determining the temperature that the bird may be feeling (Figure 41).
Figure 41: Theoretical cooling effect felt by a 3.5 kg (7.7 lb) broiler at an air temperature of 29.4°C (85°F).
Win
d Ch
ill
Air Speed
According to the graph if the air speed is 2.5 m/sec(500 ft/min) the bird would feel approximately 29.4-5.6=23.8oC (85-10=75oF). But the temperaturesensor would still show atemperature of 29.4oC (85oF).
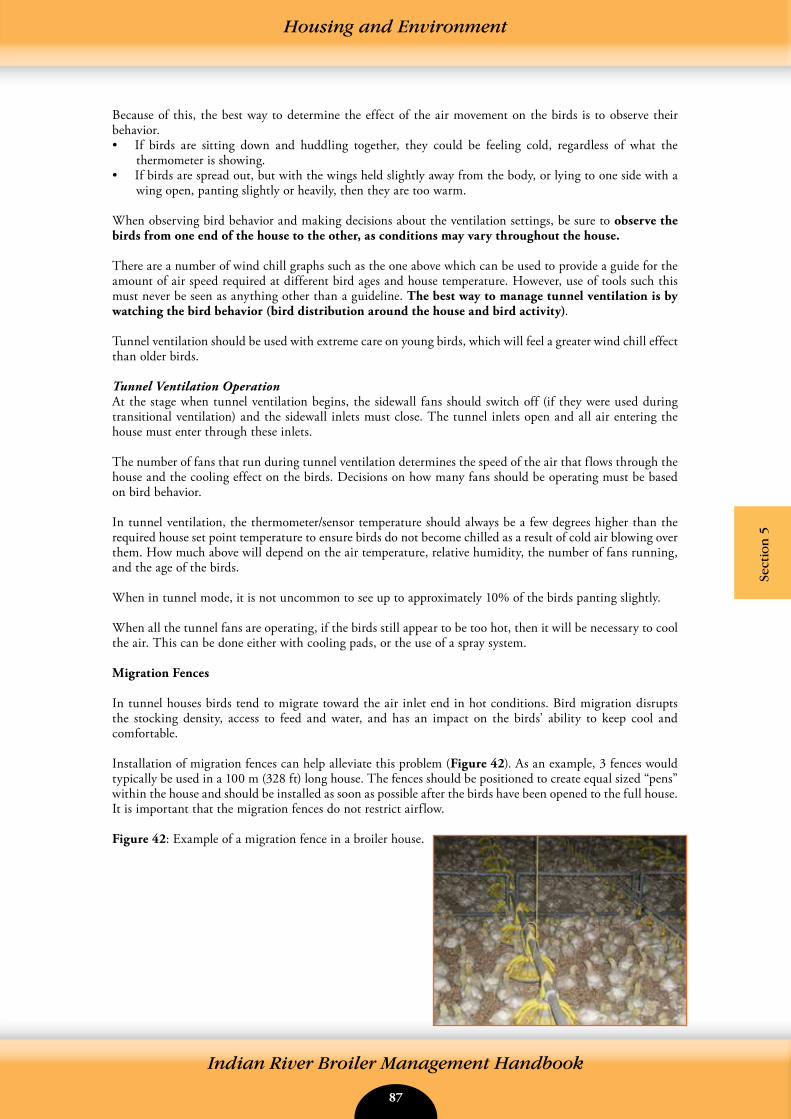
86 87
Indian River Broiler Management Handbook
Housing and Environment
Sect
ion
5
Because of this, the best way to determine the effect of the air movement on the birds is to observe their behavior.• If birds are sitting down and huddling together, they could be feeling cold, regardless of what the
thermometer is showing.• If birds are spread out, but with the wings held slightly away from the body, or lying to one side with a
wing open, panting slightly or heavily, then they are too warm. When observing bird behavior and making decisions about the ventilation settings, be sure to observe the birds from one end of the house to the other, as conditions may vary throughout the house.
There are a number of wind chill graphs such as the one above which can be used to provide a guide for the amount of air speed required at different bird ages and house temperature. However, use of tools such this must never be seen as anything other than a guideline. The best way to manage tunnel ventilation is by watching the bird behavior (bird distribution around the house and bird activity).
Tunnel ventilation should be used with extreme care on young birds, which will feel a greater wind chill effect than older birds.
Tunnel Ventilation OperationAt the stage when tunnel ventilation begins, the sidewall fans should switch off (if they were used during transitional ventilation) and the sidewall inlets must close. The tunnel inlets open and all air entering the house must enter through these inlets.
The number of fans that run during tunnel ventilation determines the speed of the air that flows through the house and the cooling effect on the birds. Decisions on how many fans should be operating must be based on bird behavior.
In tunnel ventilation, the thermometer/sensor temperature should always be a few degrees higher than the required house set point temperature to ensure birds do not become chilled as a result of cold air blowing over them. How much above will depend on the air temperature, relative humidity, the number of fans running, and the age of the birds.
When in tunnel mode, it is not uncommon to see up to approximately 10% of the birds panting slightly.
When all the tunnel fans are operating, if the birds still appear to be too hot, then it will be necessary to cool the air. This can be done either with cooling pads, or the use of a spray system.
Migration Fences
In tunnel houses birds tend to migrate toward the air inlet end in hot conditions. Bird migration disrupts the stocking density, access to feed and water, and has an impact on the birds’ ability to keep cool and comfortable.
Installation of migration fences can help alleviate this problem (Figure 42). As an example, 3 fences would typically be used in a 100 m (328 ft) long house. The fences should be positioned to create equal sized “pens” within the house and should be installed as soon as possible after the birds have been opened to the full house. It is important that the migration fences do not restrict airflow.
Figure 42: Example of a migration fence in a broiler house.
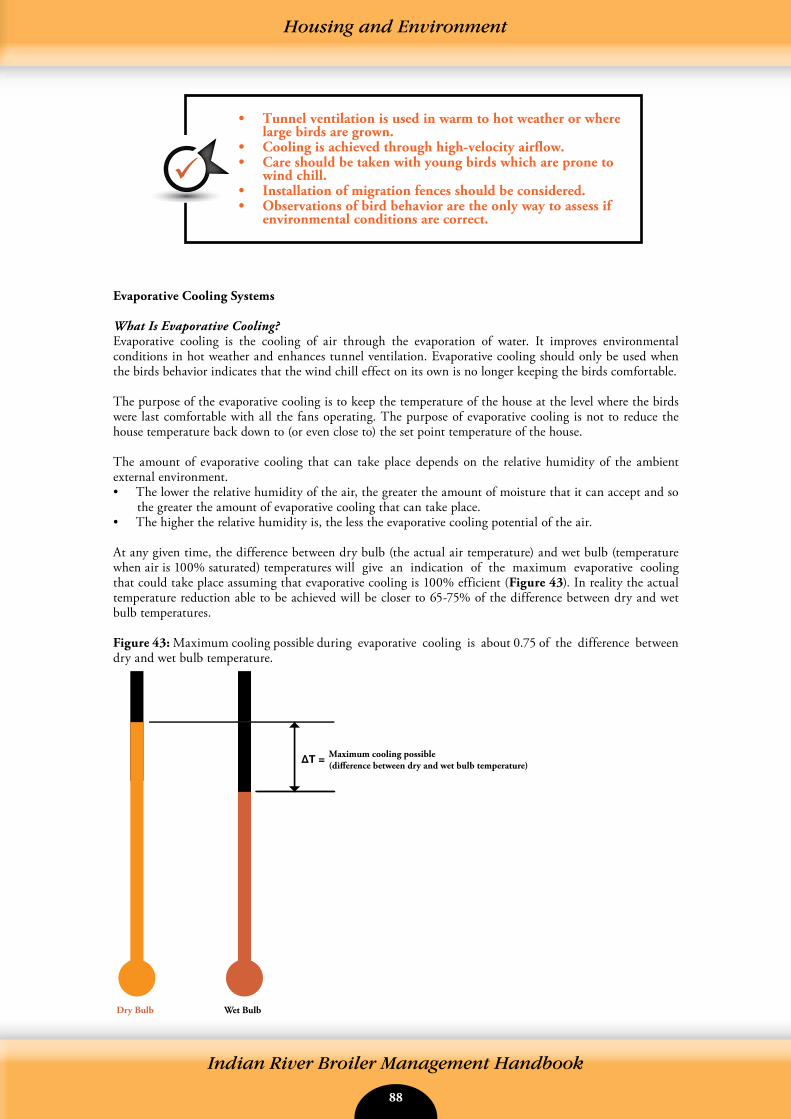
88 89
Indian River Broiler Management Handbook
Housing and Environment
• Tunnel ventilation is used in warm to hot weather or where large birds are grown.
• Cooling is achieved through high-velocity airflow.• Care should be taken with young birds which are prone to
wind chill.• Installation of migration fences should be considered.• Observations of bird behavior are the only way to assess if
environmental conditions are correct.
Evaporative Cooling Systems
What Is Evaporative Cooling?Evaporative cooling is the cooling of air through the evaporation of water. It improves environmental conditions in hot weather and enhances tunnel ventilation. Evaporative cooling should only be used when the birds behavior indicates that the wind chill effect on its own is no longer keeping the birds comfortable.
The purpose of the evaporative cooling is to keep the temperature of the house at the level where the birds were last comfortable with all the fans operating. The purpose of evaporative cooling is not to reduce the house temperature back down to (or even close to) the set point temperature of the house.
The amount of evaporative cooling that can take place depends on the relative humidity of the ambient external environment.• The lower the relative humidity of the air, the greater the amount of moisture that it can accept and so
the greater the amount of evaporative cooling that can take place.• The higher the relative humidity is, the less the evaporative cooling potential of the air.
At any given time, the difference between dry bulb (the actual air temperature) and wet bulb (temperature when air is 100% saturated) temperatures will give an indication of the maximum evaporative cooling that could take place assuming that evaporative cooling is 100% efficient (Figure 43). In reality the actual temperature reduction able to be achieved will be closer to 65-75% of the difference between dry and wet bulb temperatures.
Figure 43: Maximum cooling possible during evaporative cooling is about 0.75 of the difference between dry and wet bulb temperature.
Maximum cooling possible(di�erence between dry and wet bulb temperature)
Dry Bulb Wet Bulb
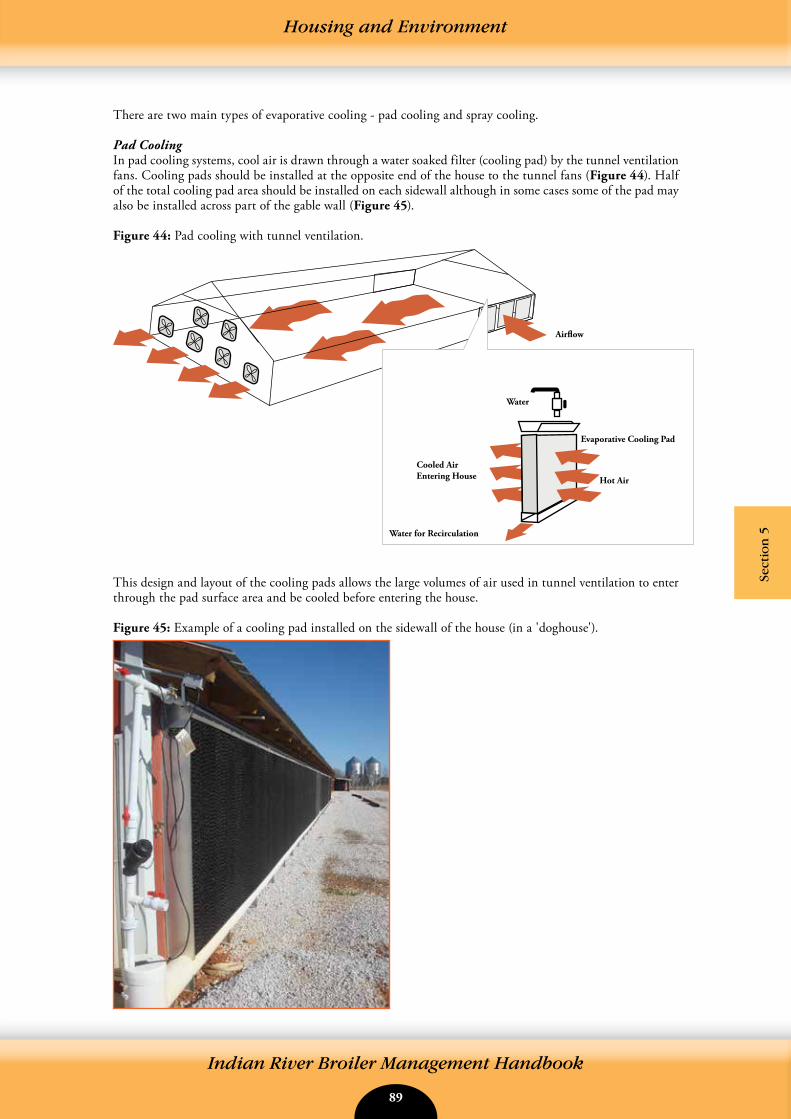
88 89
Indian River Broiler Management Handbook
Housing and Environment
Sect
ion
5
There are two main types of evaporative cooling - pad cooling and spray cooling.
Pad CoolingIn pad cooling systems, cool air is drawn through a water soaked filter (cooling pad) by the tunnel ventilation fans. Cooling pads should be installed at the opposite end of the house to the tunnel fans (Figure 44). Half of the total cooling pad area should be installed on each sidewall although in some cases some of the pad may also be installed across part of the gable wall (Figure 45).
Figure 44: Pad cooling with tunnel ventilation.
This design and layout of the cooling pads allows the large volumes of air used in tunnel ventilation to enter through the pad surface area and be cooled before entering the house.
Figure 45: Example of a cooling pad installed on the sidewall of the house (in a 'doghouse').
Air�ow
Water
Hot Air
Cooled Air Entering House
Water for Recirculation
Evaporative Cooling Pad
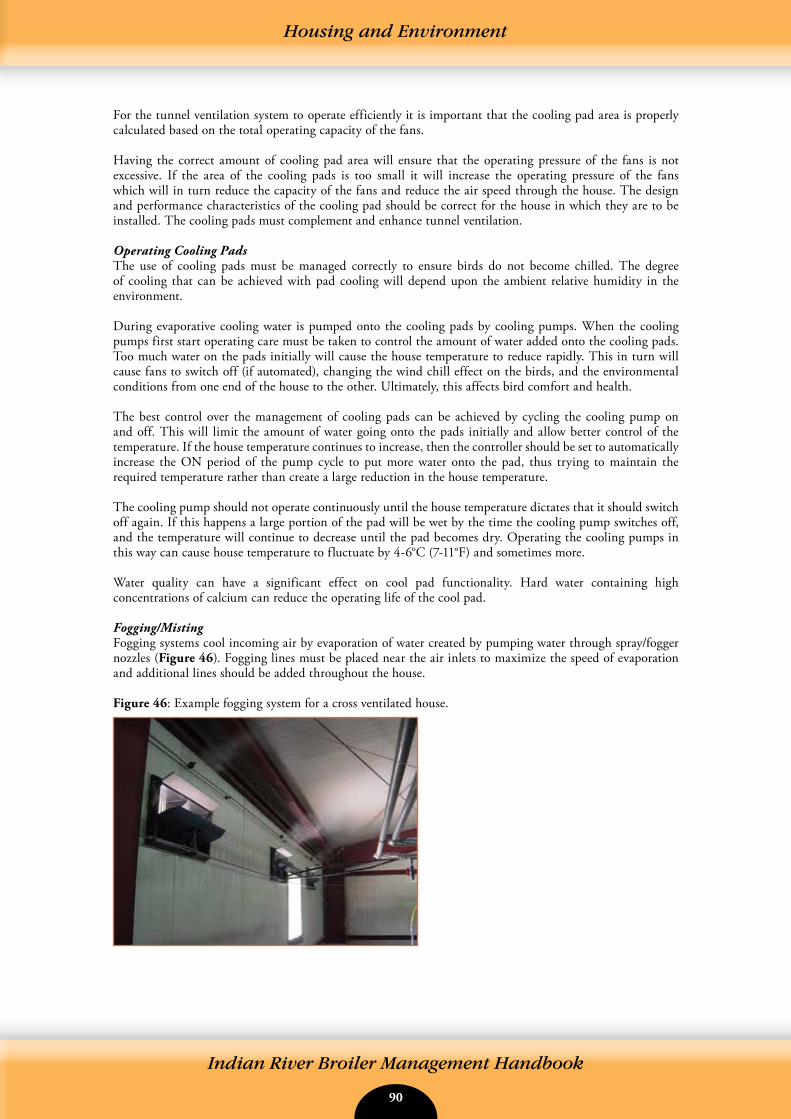
90 91
Indian River Broiler Management Handbook
For the tunnel ventilation system to operate efficiently it is important that the cooling pad area is properly calculated based on the total operating capacity of the fans.
Having the correct amount of cooling pad area will ensure that the operating pressure of the fans is not excessive. If the area of the cooling pads is too small it will increase the operating pressure of the fans which will in turn reduce the capacity of the fans and reduce the air speed through the house. The design and performance characteristics of the cooling pad should be correct for the house in which they are to be installed. The cooling pads must complement and enhance tunnel ventilation.
Operating Cooling PadsThe use of cooling pads must be managed correctly to ensure birds do not become chilled. The degree of cooling that can be achieved with pad cooling will depend upon the ambient relative humidity in the environment.
During evaporative cooling water is pumped onto the cooling pads by cooling pumps. When the cooling pumps first start operating care must be taken to control the amount of water added onto the cooling pads. Too much water on the pads initially will cause the house temperature to reduce rapidly. This in turn will cause fans to switch off (if automated), changing the wind chill effect on the birds, and the environmental conditions from one end of the house to the other. Ultimately, this affects bird comfort and health.
The best control over the management of cooling pads can be achieved by cycling the cooling pump on and off. This will limit the amount of water going onto the pads initially and allow better control of the temperature. If the house temperature continues to increase, then the controller should be set to automatically increase the ON period of the pump cycle to put more water onto the pad, thus trying to maintain the required temperature rather than create a large reduction in the house temperature.
The cooling pump should not operate continuously until the house temperature dictates that it should switch off again. If this happens a large portion of the pad will be wet by the time the cooling pump switches off, and the temperature will continue to decrease until the pad becomes dry. Operating the cooling pumps in this way can cause house temperature to fluctuate by 4-6°C (7-11°F) and sometimes more.
Water quality can have a significant effect on cool pad functionality. Hard water containing high concentrations of calcium can reduce the operating life of the cool pad.
Fogging/MistingFogging systems cool incoming air by evaporation of water created by pumping water through spray/fogger nozzles (Figure 46). Fogging lines must be placed near the air inlets to maximize the speed of evaporation and additional lines should be added throughout the house.
Figure 46: Example fogging system for a cross ventilated house.
Housing and Environment
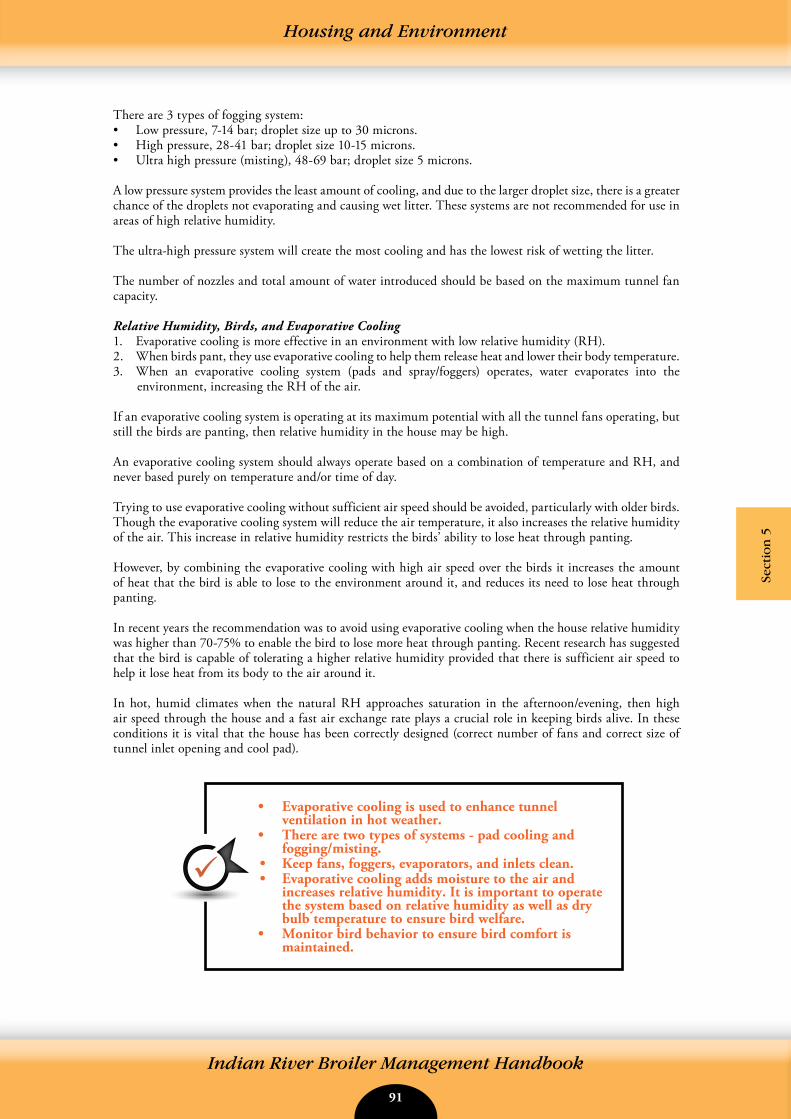
90 91
Indian River Broiler Management Handbook
There are 3 types of fogging system:• Low pressure, 7-14 bar; droplet size up to 30 microns.• High pressure, 28-41 bar; droplet size 10-15 microns.• Ultra high pressure (misting), 48-69 bar; droplet size 5 microns.
A low pressure system provides the least amount of cooling, and due to the larger droplet size, there is a greater chance of the droplets not evaporating and causing wet litter. These systems are not recommended for use in areas of high relative humidity.
The ultra-high pressure system will create the most cooling and has the lowest risk of wetting the litter.
The number of nozzles and total amount of water introduced should be based on the maximum tunnel fan capacity.
Relative Humidity, Birds, and Evaporative Cooling1. Evaporative cooling is more effective in an environment with low relative humidity (RH).2. When birds pant, they use evaporative cooling to help them release heat and lower their body temperature.3. When an evaporative cooling system (pads and spray/foggers) operates, water evaporates into the
environment, increasing the RH of the air.
If an evaporative cooling system is operating at its maximum potential with all the tunnel fans operating, but still the birds are panting, then relative humidity in the house may be high.
An evaporative cooling system should always operate based on a combination of temperature and RH, and never based purely on temperature and/or time of day.
Trying to use evaporative cooling without sufficient air speed should be avoided, particularly with older birds. Though the evaporative cooling system will reduce the air temperature, it also increases the relative humidity of the air. This increase in relative humidity restricts the birds’ ability to lose heat through panting.
However, by combining the evaporative cooling with high air speed over the birds it increases the amount of heat that the bird is able to lose to the environment around it, and reduces its need to lose heat through panting.
In recent years the recommendation was to avoid using evaporative cooling when the house relative humidity was higher than 70-75% to enable the bird to lose more heat through panting. Recent research has suggested that the bird is capable of tolerating a higher relative humidity provided that there is sufficient air speed to help it lose heat from its body to the air around it.
In hot, humid climates when the natural RH approaches saturation in the afternoon/evening, then high air speed through the house and a fast air exchange rate plays a crucial role in keeping birds alive. In these conditions it is vital that the house has been correctly designed (correct number of fans and correct size of tunnel inlet opening and cool pad).
• Evaporative cooling is used to enhance tunnel ventilation in hot weather.
• There are two types of systems - pad cooling and fogging/misting.
• Keep fans, foggers, evaporators, and inlets clean.• Evaporative cooling adds moisture to the air and
increases relative humidity. It is important to operate the system based on relative humidity as well as dry bulb temperature to ensure bird welfare.
• Monitor bird behavior to ensure bird comfort is maintained.
Housing and Environment
Sect
ion
5
92 93
Indian River Broiler Management Handbook
Lighting for Broilers
Lighting and how it is managed (hours of light and dark and how light is distributed throughout the day) can impact on both broiler productivity and welfare. Broilers benefit from having a defined pattern of light and dark (day and night) creating distinct periods for rest and activity. A number of important physiological and behavioral processes follow normal diurnal rhythms. Therefore, defined cycles of light and dark allow broilers to experience natural patterns of growth, development, and behavior.
Lighting programs should be simple in design and easy to implement. The optimal lighting program for a flock will depend on the individual flock circumstances and the market requirements. Lighting programs are subject to local legislation and these must be taken into account. However, there are a number of basic management points that should be met under all conditions – adjustments can then be made depending on the flock circumstances.
Lighting
There are four important components to a lighting program. These are:• Photoperiod length – the number of hours of light and dark given in a 24 hour period.• Photoperiod distribution – how the hours of light and dark are distributed throughout a 24 hour period.• Wavelength - color of the light.• Light Intensity – how bright the light provided is.
The interactive effects of these factors need to be taken into account when lighting broilers. For example, some production or welfare parameters (growth, FCR, mortality) may change as the distribution of light and dark changes. Also, as light intensity changes, so does wavelength.
Light Duration and Pattern
The lighting program used by many broiler growers in the past has been to provide what is essentially continuous lighting (a long continuous light period, followed by a short dark period of up to an hour). The belief was that if lights were on continually, birds would eat and drink more, and grow faster. This assumption has now been shown to be false. Not only does continuous or near-continuous light actually result in depressed market weights, it has negative impacts on broiler health and welfare as well.
Aviagen does not, therefore, recommend continuous or near continuous lighting for the life of the broiler flock.
Recent information from trials has suggested that:• After 7 days of age around 5 hours of darkness may be optimum (4-6 hours).• There is no reduction in growth rate to 39 days and possibly an increase to 49 days of age. Feed conversion
efficiency improves particularly in the later stages of growth.• Mortality due to sudden death syndrome (SDS or flips) and mortality and morbidity from ascites and
skeletal disorders are reduced.• Bird mobility is improved and the severity of footpad lesions may be reduced.• The proportion of meat as leg meat may be increased.• The welfare of the birds is improved as a more normal biological rhythm including rest is facilitated.
Other Useful Information Available
Aviagen Booklet: Lighting for Broilers
Housing and Environment
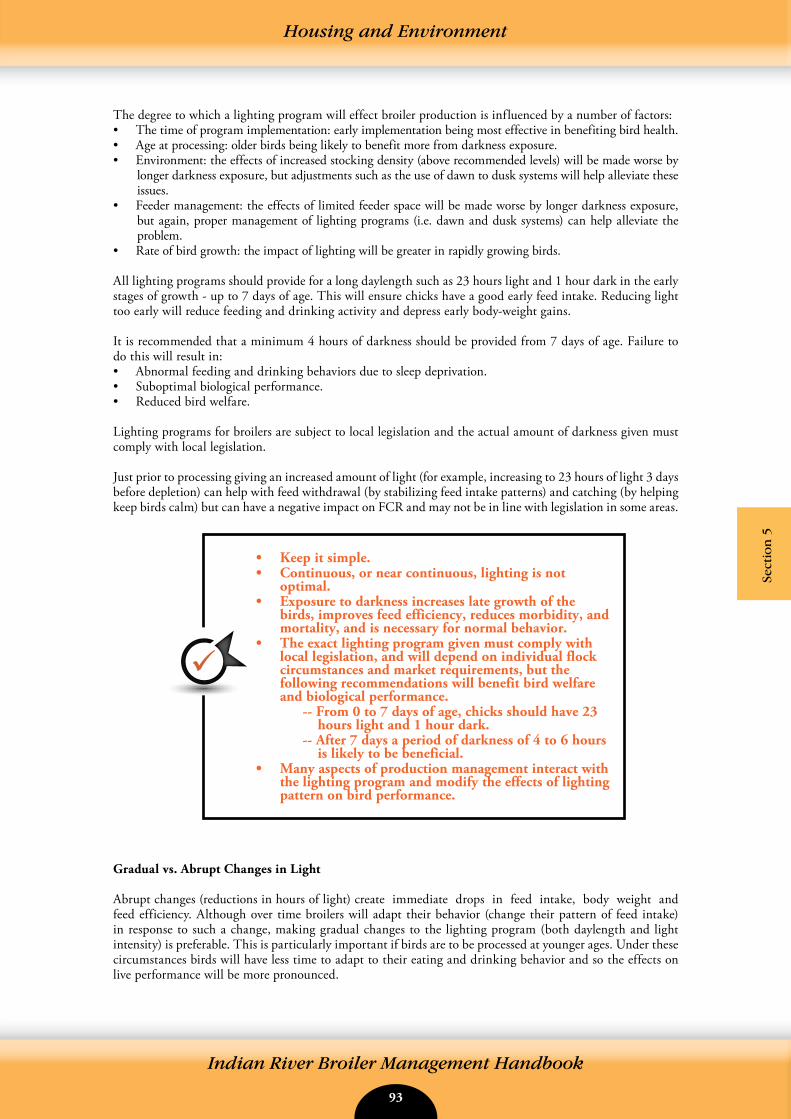
92 93
Indian River Broiler Management Handbook
The degree to which a lighting program will effect broiler production is influenced by a number of factors:• The time of program implementation: early implementation being most effective in benefiting bird health.• Age at processing: older birds being likely to benefit more from darkness exposure.• Environment: the effects of increased stocking density (above recommended levels) will be made worse by
longer darkness exposure, but adjustments such as the use of dawn to dusk systems will help alleviate these issues.
• Feeder management: the effects of limited feeder space will be made worse by longer darkness exposure, but again, proper management of lighting programs (i.e. dawn and dusk systems) can help alleviate the problem.
• Rate of bird growth: the impact of lighting will be greater in rapidly growing birds.
All lighting programs should provide for a long daylength such as 23 hours light and 1 hour dark in the early stages of growth - up to 7 days of age. This will ensure chicks have a good early feed intake. Reducing light too early will reduce feeding and drinking activity and depress early body-weight gains.
It is recommended that a minimum 4 hours of darkness should be provided from 7 days of age. Failure to do this will result in:• Abnormal feeding and drinking behaviors due to sleep deprivation.• Suboptimal biological performance.• Reduced bird welfare.
Lighting programs for broilers are subject to local legislation and the actual amount of darkness given must comply with local legislation.
Just prior to processing giving an increased amount of light (for example, increasing to 23 hours of light 3 days before depletion) can help with feed withdrawal (by stabilizing feed intake patterns) and catching (by helping keep birds calm) but can have a negative impact on FCR and may not be in line with legislation in some areas.
Gradual vs. Abrupt Changes in Light
Abrupt changes (reductions in hours of light) create immediate drops in feed intake, body weight and feed efficiency. Although over time broilers will adapt their behavior (change their pattern of feed intake) in response to such a change, making gradual changes to the lighting program (both daylength and light intensity) is preferable. This is particularly important if birds are to be processed at younger ages. Under these circumstances birds will have less time to adapt to their eating and drinking behavior and so the effects on live performance will be more pronounced.
• Keep it simple.• Continuous, or near continuous, lighting is not
optimal.• Exposure to darkness increases late growth of the
birds, improves feed efficiency, reduces morbidity, and mortality, and is necessary for normal behavior.
• The exact lighting program given must comply with local legislation, and will depend on individual flock circumstances and market requirements, but the following recommendations will benefit bird welfare and biological performance.
-- From 0 to 7 days of age, chicks should have 23 hours light and 1 hour dark.
-- After 7 days a period of darkness of 4 to 6 hours is likely to be beneficial.
• Many aspects of production management interact with the lighting program and modify the effects of lighting pattern on bird performance.
Housing and Environment
Sect
ion
5
94 95
Indian River Broiler Management Handbook
Housing and Environment
In addition to making gradual changes to the lighting program itself, making a gradual change to the state of night (darkness) or day (light) may also be beneficial. Feeding activity in broilers is at its highest level immediately after the lights go on, and for a period (of approximately 1 hour) before lights go off. The use of dawn to dusk systems (initiating day time or night time over a period of 15 to 45 minutes) will result in birds gradually moving towards the feeder and can help alleviate crowding.
Intermittent Lighting Programs
Intermittent lighting programs consist of blocks of time containing both light and dark periods, which are repeated throughout the day. Splitting the dark period into two or more sections may have impacts on some productivity parameters in broilers. Body weight at market age and percentage breast meat may be higher. With the use of intermittent lighting programs broilers are given discrete meals (i.e. short periods of feeding) followed by periods for digestion (i.e. dark periods) and the extra activity caused by a regular pattern of light and dark may be beneficial to leg health and carcass quality. If intermittent lighting programs are used, the protocol should be designed as simply as possible to allow for practical implementation and, in accordance with recommendations, at least one continuous block of at least 4 hours darkness should be given. Any intermittent lighting program must adhere to local legislation.
If an intermittent lighting program is used, adequate feeder and drinker space must be provided. It may also be necessary to stagger the ‘wake’ periods from house to house across the farm to ensure that the water supply is not pushed beyond its maximal limits.
Hot Weather Management
In hot weather conditions, and where environmental control capability is not available (such as in open- sided housing), the period without artificial light should be timed to maximize bird comfort. For example, feed can be removed for a time during the heat of the day and a period of lighting provided at night to allow birds to feed during this cooler period.
A continuous period of at least 4 hours dark must be provided during the night.
• When making changes to a lighting program, it is better to make small changes over a period of days (2-3 days) than to make one abrupt change.
• Using a dawn to dusk program in addition to a lighting program will result in birds waking or resting at the end of the day gradually, resulting in less crowding at the feeder.
• In hot weather or in open-sided housing, the period of artificial light should be given at a time which will maximize bird comfort.
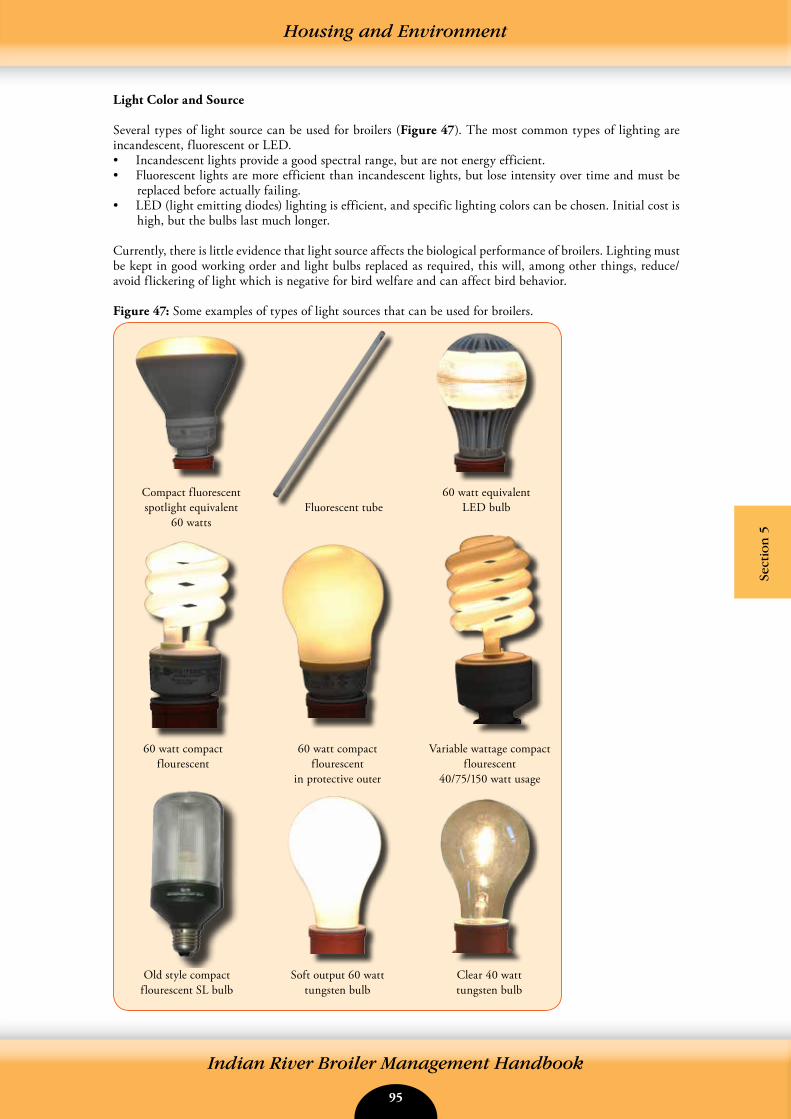
94 95
Indian River Broiler Management Handbook
Housing and Environment
Sect
ion
5
Light Color and Source
Several types of light source can be used for broilers (Figure 47). The most common types of lighting are incandescent, fluorescent or LED.• Incandescent lights provide a good spectral range, but are not energy efficient.• Fluorescent lights are more efficient than incandescent lights, but lose intensity over time and must be
replaced before actually failing.• LED (light emitting diodes) lighting is efficient, and specific lighting colors can be chosen. Initial cost is
high, but the bulbs last much longer.
Currently, there is little evidence that light source affects the biological performance of broilers. Lighting must be kept in good working order and light bulbs replaced as required, this will, among other things, reduce/avoid flickering of light which is negative for bird welfare and can affect bird behavior.
Figure 47: Some examples of types of light sources that can be used for broilers.
Compact fluorescent spotlight equivalent
60 wattsFluorescent tube
60 watt equivalent LED bulb
60 watt compact flourescent
60 watt compact flourescent
in protective outer
Variable wattage compact flourescent
40/75/150 watt usage
Soft output 60 watt tungsten bulb
Clear 40 watt tungsten bulb
Old style compact flourescent SL bulb
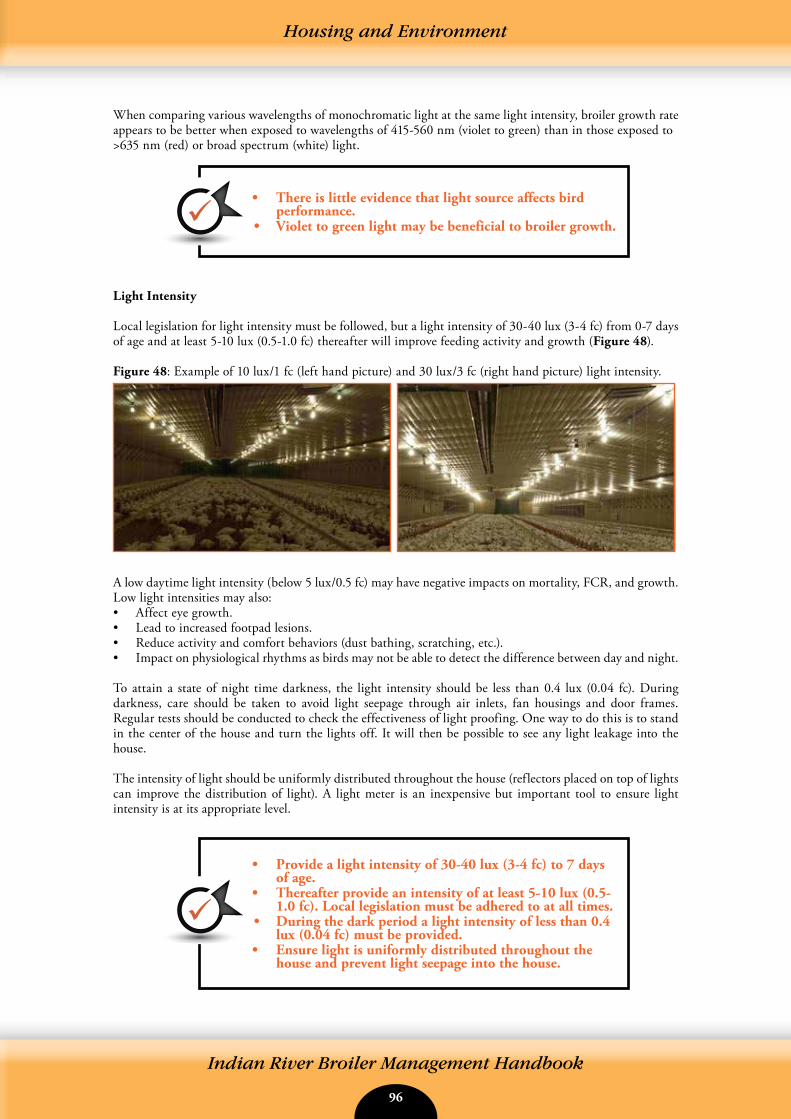
96 97
Indian River Broiler Management Handbook
Housing and Environment
When comparing various wavelengths of monochromatic light at the same light intensity, broiler growth rate appears to be better when exposed to wavelengths of 415-560 nm (violet to green) than in those exposed to>635 nm (red) or broad spectrum (white) light.
Light Intensity
Local legislation for light intensity must be followed, but a light intensity of 30-40 lux (3-4 fc) from 0-7 days of age and at least 5-10 lux (0.5-1.0 fc) thereafter will improve feeding activity and growth (Figure 48).
Figure 48: Example of 10 lux/1 fc (left hand picture) and 30 lux/3 fc (right hand picture) light intensity.
A low daytime light intensity (below 5 lux/0.5 fc) may have negative impacts on mortality, FCR, and growth. Low light intensities may also:• Affect eye growth.• Lead to increased footpad lesions.• Reduce activity and comfort behaviors (dust bathing, scratching, etc.).• Impact on physiological rhythms as birds may not be able to detect the difference between day and night.
To attain a state of night time darkness, the light intensity should be less than 0.4 lux (0.04 fc). During darkness, care should be taken to avoid light seepage through air inlets, fan housings and door frames. Regular tests should be conducted to check the effectiveness of light proofing. One way to do this is to stand in the center of the house and turn the lights off. It will then be possible to see any light leakage into the house.
The intensity of light should be uniformly distributed throughout the house (reflectors placed on top of lights can improve the distribution of light). A light meter is an inexpensive but important tool to ensure light intensity is at its appropriate level.
• There is little evidence that light source affects bird performance.
• Violet to green light may be beneficial to broiler growth.
• Provide a light intensity of 30-40 lux (3-4 fc) to 7 days of age.
• Thereafter provide an intensity of at least 5-10 lux (0.5-1.0 fc). Local legislation must be adhered to at all times.
• During the dark period a light intensity of less than 0.4 lux (0.04 fc) must be provided.
• Ensure light is uniformly distributed throughout the house and prevent light seepage into the house.
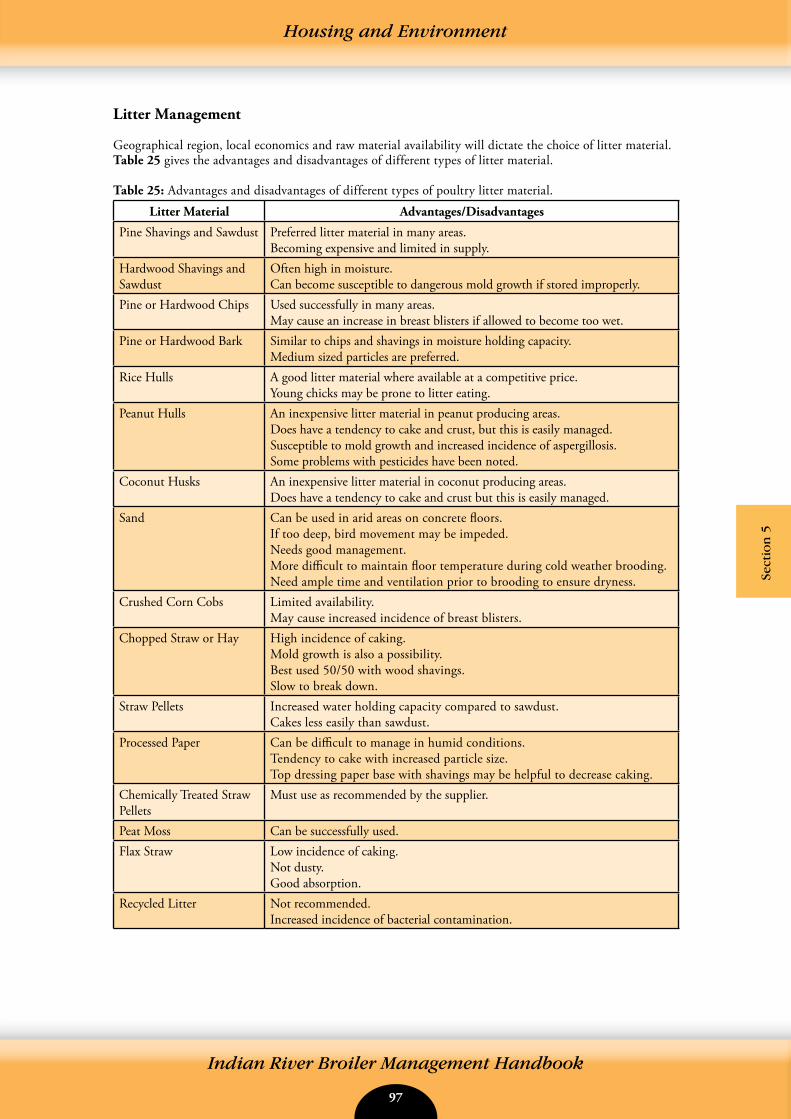
96 97
Indian River Broiler Management Handbook
Housing and Environment
Sect
ion
5
Litter Management
Geographical region, local economics and raw material availability will dictate the choice of litter material.Table 25 gives the advantages and disadvantages of different types of litter material.
Table 25: Advantages and disadvantages of different types of poultry litter material.
Litter Material Advantages/Disadvantages
Pine Shavings and Sawdust Preferred litter material in many areas. Becoming expensive and limited in supply.
Hardwood Shavings and Sawdust
Often high in moisture.Can become susceptible to dangerous mold growth if stored improperly.
Pine or Hardwood Chips Used successfully in many areas. May cause an increase in breast blisters if allowed to become too wet.
Pine or Hardwood Bark Similar to chips and shavings in moisture holding capacity.Medium sized particles are preferred.
Rice Hulls A good litter material where available at a competitive price.Young chicks may be prone to litter eating.
Peanut Hulls An inexpensive litter material in peanut producing areas.Does have a tendency to cake and crust, but this is easily managed.Susceptible to mold growth and increased incidence of aspergillosis.Some problems with pesticides have been noted.
Coconut Husks An inexpensive litter material in coconut producing areas.Does have a tendency to cake and crust but this is easily managed.
Sand Can be used in arid areas on concrete floors.If too deep, bird movement may be impeded.Needs good management.More difficult to maintain floor temperature during cold weather brooding.Need ample time and ventilation prior to brooding to ensure dryness.
Crushed Corn Cobs Limited availability.May cause increased incidence of breast blisters.
Chopped Straw or Hay High incidence of caking.Mold growth is also a possibility.Best used 50/50 with wood shavings.Slow to break down.
Straw Pellets Increased water holding capacity compared to sawdust.Cakes less easily than sawdust.
Processed Paper Can be difficult to manage in humid conditions.Tendency to cake with increased particle size.Top dressing paper base with shavings may be helpful to decrease caking.
Chemically Treated Straw Pellets
Must use as recommended by the supplier.
Peat Moss Can be successfully used.Flax Straw Low incidence of caking.
Not dusty.Good absorption.
Recycled Litter Not recommended.Increased incidence of bacterial contamination.
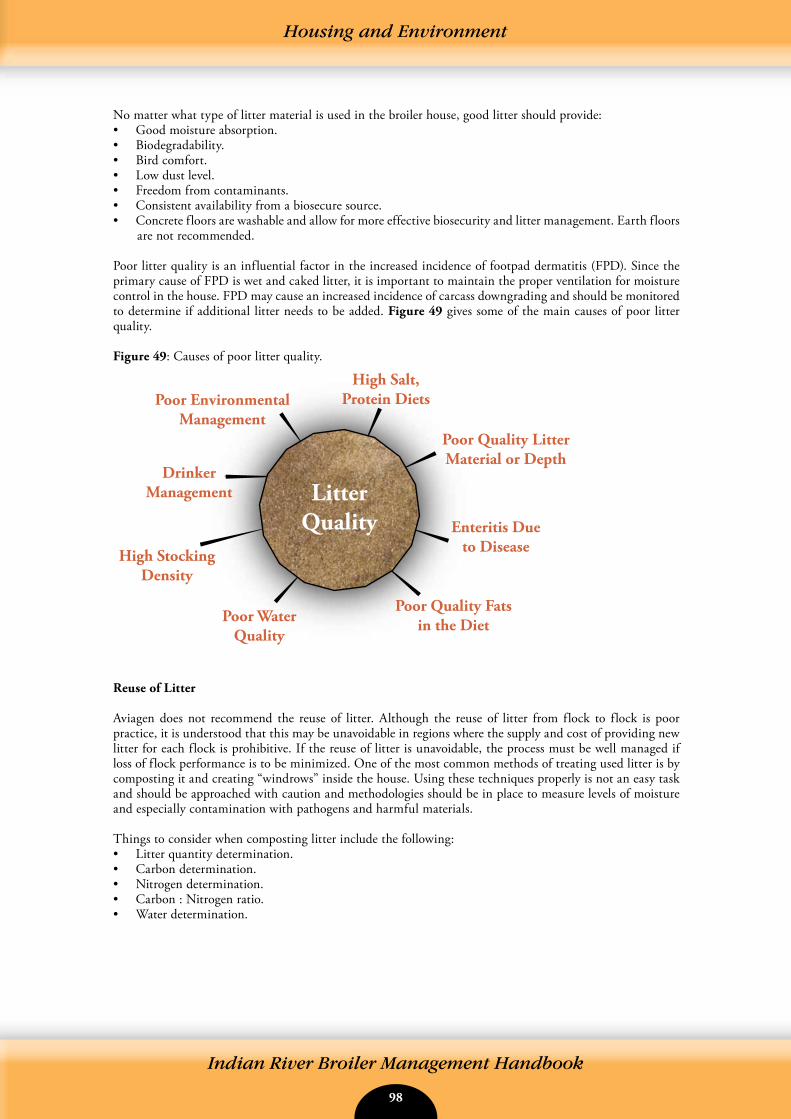
98 99
Indian River Broiler Management Handbook
No matter what type of litter material is used in the broiler house, good litter should provide:• Good moisture absorption.• Biodegradability.• Bird comfort.• Low dust level.• Freedom from contaminants.• Consistent availability from a biosecure source.• Concrete floors are washable and allow for more effective biosecurity and litter management. Earth floors
are not recommended.
Poor litter quality is an influential factor in the increased incidence of footpad dermatitis (FPD). Since the primary cause of FPD is wet and caked litter, it is important to maintain the proper ventilation for moisture control in the house. FPD may cause an increased incidence of carcass downgrading and should be monitored to determine if additional litter needs to be added. Figure 49 gives some of the main causes of poor litter quality. Figure 49: Causes of poor litter quality.
Reuse of Litter
Aviagen does not recommend the reuse of litter. Although the reuse of litter from flock to flock is poor practice, it is understood that this may be unavoidable in regions where the supply and cost of providing new litter for each flock is prohibitive. If the reuse of litter is unavoidable, the process must be well managed if loss of flock performance is to be minimized. One of the most common methods of treating used litter is by composting it and creating “windrows” inside the house. Using these techniques properly is not an easy task and should be approached with caution and methodologies should be in place to measure levels of moisture and especially contamination with pathogens and harmful materials.
Things to consider when composting litter include the following:• Litter quantity determination.• Carbon determination.• Nitrogen determination.• Carbon : Nitrogen ratio.• Water determination.
LitterQuality
Poor Environmental Management
DrinkerManagement
High Stocking Density
Poor WaterQuality
High Salt,Protein Diets
Poor Quality LitterMaterial or Depth
Enteritis Due to Disease
Poor Quality Fatsin the Diet
Housing and Environment
98 99
Indian River Broiler Management Handbook
Other Useful Information Available
Aviagen Brief: Reused Litter Treatments for Improved Bird Health
• Protect broilers from damage and provide a dry warm covering to the floor by using adequate quantities of a good quality litter material.
• Avoid nutritional causes of wet litter.• Ensure adequate ventilation and avoid excess moisture.• Choose a litter material that is absorbent, non-dusty, and clean.• Litter should be readily available at low cost from a reliable
source.• Use fresh litter for each crop to prevent reinfection by pathogen.• Litter storage facilities should be protected from the weather and
secure from access by vermin and wild birds.
Stocking Density
Stocking density is ultimately a decision based on economics and local welfare legislation.
Stocking density influences bird welfare, broiler performance, uniformity, and product quality.
Overstocking increases the environmental pressures on the broiler, compromises bird welfare, and will reduce profitability.
Quality of housing and the environmental control system determine the best stocking density. If stocking density is increased, ventilation, feeding space, and drinker availability must be adjusted.
The floor area needed for each broiler will depend on:• Target live weight and age at processing.• Climate and season.• Type and system of housing and equipment, particularly ventilation.• Local legislation.• Quality assurance certification requirements.
In certain regions of the world the legislation of stocking density is based simply on kg/m2 (or lb/ft2). An example of this would be based on EU recommendations.
Within the European Union, stocking densities are based on the EU Broiler Welfare Directive (2007):• 33 kg/m2 (6.7 lb/ft2) or• 39 kg/m2 (8.0 lb/ft2) if stricter standards are met or• 42 kg/m2 (8.6 lb/ft2) if exceptionally high welfare standards are met over a prolonged period of time.
An alternative, based on bird husbandry, takes into account bird number and bird mass in the floor area. An example of this would be recommendations from the National Chicken Council (2010) used in USA:• Below 4.5 lb (2.04 kg) maximum stocking density is 6.5 lb/ft2 (32 kg/m2).• 4.5-5.5 lb (2.04-2.49 kg) maximum stocking density is 7.5 lb/ft2 (37 kg/m2).• Above 5.5 lb (2.49 kg) maximum stocking density is 8.5 lb/ft2 (42 kg/m2).
Housing and Environment
Sect
ion
5
100 101
Indian River Broiler Management Handbook
It is important to make sure that local legislation for stocking density is adhered to.
Welfare standards refer to adequate provision of feed and water, sustainable good indoor climatic conditions, and minimal incidence of footpad dermatitis.
Stocking Density in Hot Climates
In hot conditions, the stocking density used will depend on ambient temperature and humidity. Make appropriate changes in accordance with house type and equipment capabilities.
Listed below are examples of stocking densities used in hot conditions.
In houses with controlled environment:• A maximum of 30 kg/m2 (6 lb/ft2) at processing.
In open-sided houses, with poor environmental control:• A maximum of 20-25 kg/m2 (4-5 lb/ft2) at processing.• At the hottest times of the year a maximum of 16-18 kg/m2 (3.2-3.7 lb/ft2).
In open-sided houses, with no environmental control:• It is not recommended to grow birds to live weights above 3 kg (6.6 lb).
• Adjust stocking density to allow for age and weight at which the flock is to be processed.
• Match stocking density to climate and housing system.• Reduce stocking density if target house temperatures cannot be
achieved due to hot climate or season.• Adjust ventilation and feeder and drinker space if stocking
density is increased.• Follow local legislation and requirements of quality assurance
standards set by product purchasers.
Housing and Environment
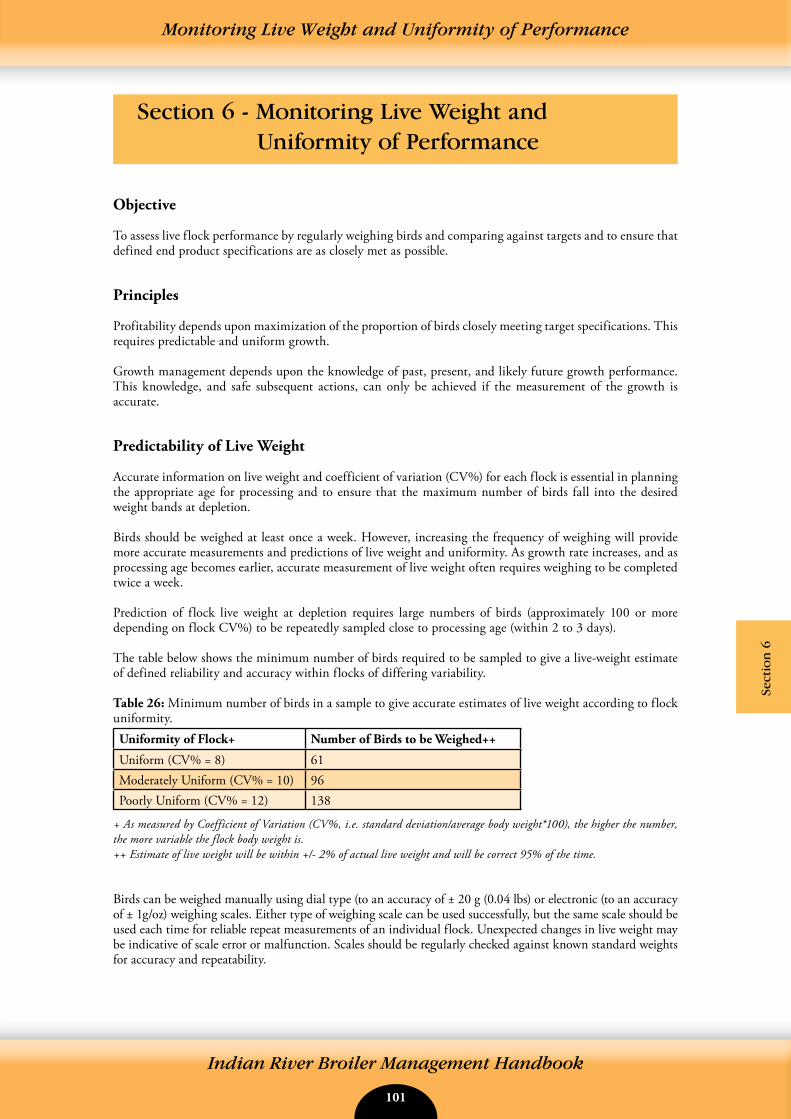
100 101
Indian River Broiler Management Handbook
Section 6 - Monitoring Live Weight and Uniformity of Performance
Monitoring Live Weight and Uniformity of Performance
Sect
ion
6
Objective
To assess live flock performance by regularly weighing birds and comparing against targets and to ensure that defined end product specifications are as closely met as possible.
Principles
Profitability depends upon maximization of the proportion of birds closely meeting target specifications. This requires predictable and uniform growth.
Growth management depends upon the knowledge of past, present, and likely future growth performance. This knowledge, and safe subsequent actions, can only be achieved if the measurement of the growth is accurate.
Predictability of Live Weight
Accurate information on live weight and coefficient of variation (CV%) for each flock is essential in planning the appropriate age for processing and to ensure that the maximum number of birds fall into the desired weight bands at depletion.
Birds should be weighed at least once a week. However, increasing the frequency of weighing will provide more accurate measurements and predictions of live weight and uniformity. As growth rate increases, and as processing age becomes earlier, accurate measurement of live weight often requires weighing to be completed twice a week.
Prediction of flock live weight at depletion requires large numbers of birds (approximately 100 or more depending on flock CV%) to be repeatedly sampled close to processing age (within 2 to 3 days).
The table below shows the minimum number of birds required to be sampled to give a live-weight estimate of defined reliability and accuracy within flocks of differing variability.
Table 26: Minimum number of birds in a sample to give accurate estimates of live weight according to flock uniformity.Uniformity of Flock+ Number of Birds to be Weighed++
Uniform (CV% = 8) 61Moderately Uniform (CV% = 10) 96Poorly Uniform (CV% = 12) 138
+ As measured by Coefficient of Variation (CV%, i.e. standard deviation/average body weight*100), the higher the number, the more variable the flock body weight is.++ Estimate of live weight will be within +/- 2% of actual live weight and will be correct 95% of the time.
Birds can be weighed manually using dial type (to an accuracy of ± 20 g (0.04 lbs) or electronic (to an accuracy of ± 1g/oz) weighing scales. Either type of weighing scale can be used successfully, but the same scale should be used each time for reliable repeat measurements of an individual flock. Unexpected changes in live weight may be indicative of scale error or malfunction. Scales should be regularly checked against known standard weights for accuracy and repeatability.
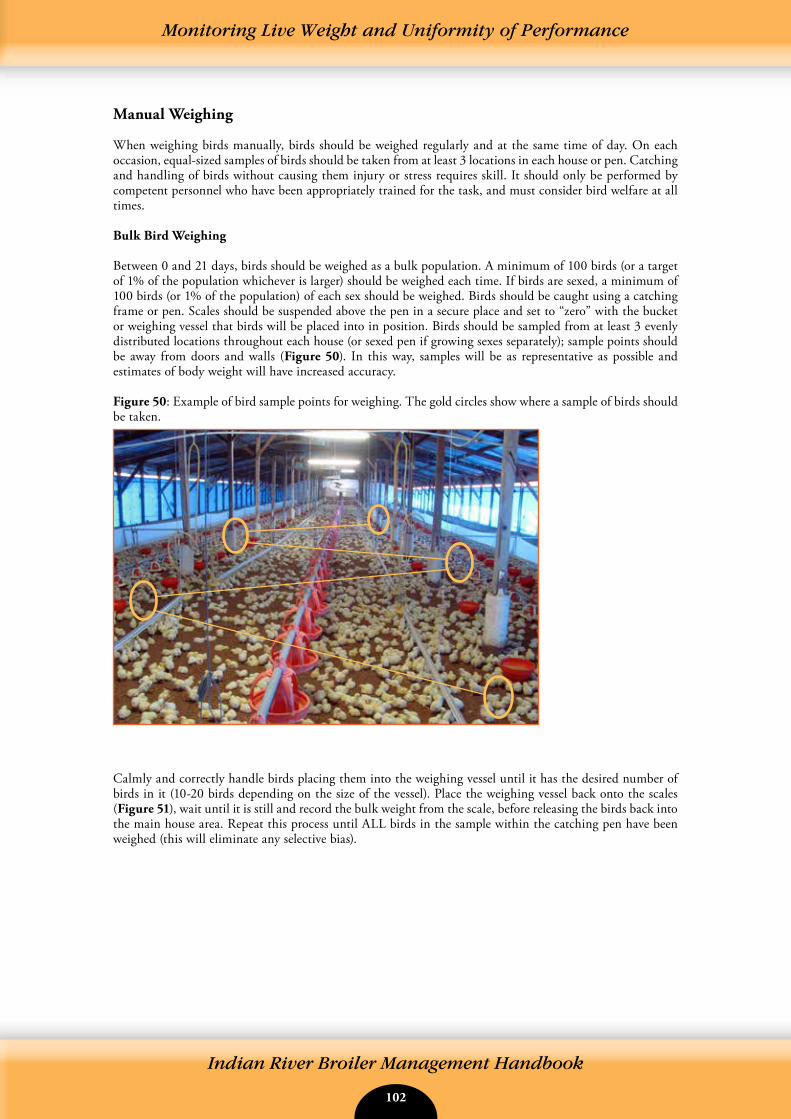
102 103
Indian River Broiler Management Handbook
Manual Weighing
When weighing birds manually, birds should be weighed regularly and at the same time of day. On each occasion, equal-sized samples of birds should be taken from at least 3 locations in each house or pen. Catching and handling of birds without causing them injury or stress requires skill. It should only be performed by competent personnel who have been appropriately trained for the task, and must consider bird welfare at all times.
Bulk Bird Weighing
Between 0 and 21 days, birds should be weighed as a bulk population. A minimum of 100 birds (or a target of 1% of the population whichever is larger) should be weighed each time. If birds are sexed, a minimum of 100 birds (or 1% of the population) of each sex should be weighed. Birds should be caught using a catching frame or pen. Scales should be suspended above the pen in a secure place and set to “zero” with the bucket or weighing vessel that birds will be placed into in position. Birds should be sampled from at least 3 evenly distributed locations throughout each house (or sexed pen if growing sexes separately); sample points should be away from doors and walls (Figure 50). In this way, samples will be as representative as possible and estimates of body weight will have increased accuracy.
Figure 50: Example of bird sample points for weighing. The gold circles show where a sample of birds should be taken.
Calmly and correctly handle birds placing them into the weighing vessel until it has the desired number of birds in it (10-20 birds depending on the size of the vessel). Place the weighing vessel back onto the scales (Figure 51), wait until it is still and record the bulk weight from the scale, before releasing the birds back into the main house area. Repeat this process until ALL birds in the sample within the catching pen have been weighed (this will eliminate any selective bias).
Monitoring Live Weight and Uniformity of Performance
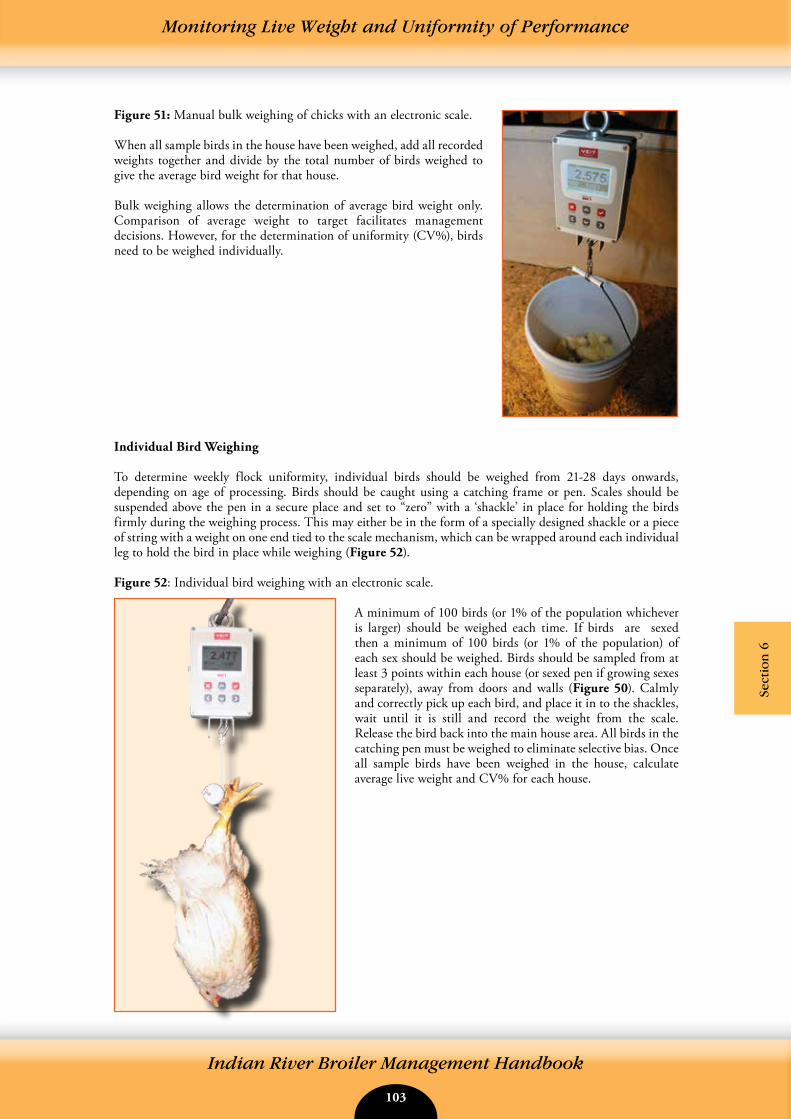
102 103
Indian River Broiler Management Handbook
Sect
ion
6
Figure 51: Manual bulk weighing of chicks with an electronic scale.
When all sample birds in the house have been weighed, add all recorded weights together and divide by the total number of birds weighed to give the average bird weight for that house.
Bulk weighing allows the determination of average bird weight only. Comparison of average weight to target facilitates management decisions. However, for the determination of uniformity (CV%), birds need to be weighed individually.
Individual Bird Weighing
To determine weekly flock uniformity, individual birds should be weighed from 21-28 days onwards, depending on age of processing. Birds should be caught using a catching frame or pen. Scales should be suspended above the pen in a secure place and set to “zero” with a ‘shackle’ in place for holding the birds firmly during the weighing process. This may either be in the form of a specially designed shackle or a piece of string with a weight on one end tied to the scale mechanism, which can be wrapped around each individual leg to hold the bird in place while weighing (Figure 52).
Figure 52: Individual bird weighing with an electronic scale.
A minimum of 100 birds (or 1% of the population whichever is larger) should be weighed each time. If birds are sexed then a minimum of 100 birds (or 1% of the population) of each sex should be weighed. Birds should be sampled from at least 3 points within each house (or sexed pen if growing sexes separately), away from doors and walls (Figure 50). Calmly and correctly pick up each bird, and place it in to the shackles, wait until it is still and record the weight from the scale. Release the bird back into the main house area. All birds in the catching pen must be weighed to eliminate selective bias. Once all sample birds have been weighed in the house, calculate average live weight and CV% for each house.
Monitoring Live Weight and Uniformity of Performance
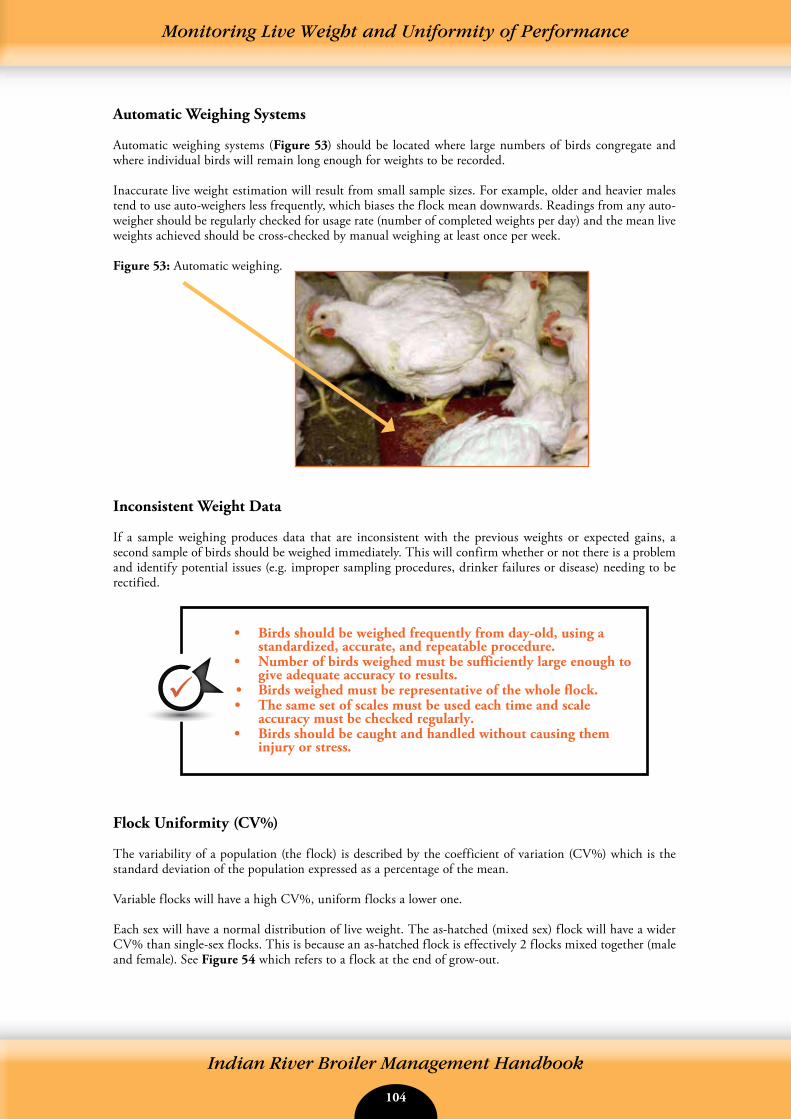
104 105
Indian River Broiler Management Handbook
Automatic Weighing Systems
Automatic weighing systems (Figure 53) should be located where large numbers of birds congregate and where individual birds will remain long enough for weights to be recorded.
Inaccurate live weight estimation will result from small sample sizes. For example, older and heavier males tend to use auto-weighers less frequently, which biases the flock mean downwards. Readings from any auto- weigher should be regularly checked for usage rate (number of completed weights per day) and the mean live weights achieved should be cross-checked by manual weighing at least once per week.
Figure 53: Automatic weighing.
Inconsistent Weight Data
If a sample weighing produces data that are inconsistent with the previous weights or expected gains, a second sample of birds should be weighed immediately. This will confirm whether or not there is a problem and identify potential issues (e.g. improper sampling procedures, drinker failures or disease) needing to be rectified.
Flock Uniformity (CV%)
The variability of a population (the flock) is described by the coefficient of variation (CV%) which is the standard deviation of the population expressed as a percentage of the mean.
Variable flocks will have a high CV%, uniform flocks a lower one.
Each sex will have a normal distribution of live weight. The as-hatched (mixed sex) flock will have a wider CV% than single-sex flocks. This is because an as-hatched flock is effectively 2 flocks mixed together (male and female). See Figure 54 which refers to a flock at the end of grow-out.
• Birds should be weighed frequently from day-old, using a standardized, accurate, and repeatable procedure.
• Number of birds weighed must be sufficiently large enough to give adequate accuracy to results.
• Birds weighed must be representative of the whole flock.• The same set of scales must be used each time and scale
accuracy must be checked regularly.• Birds should be caught and handled without causing them
injury or stress.
Monitoring Live Weight and Uniformity of Performance
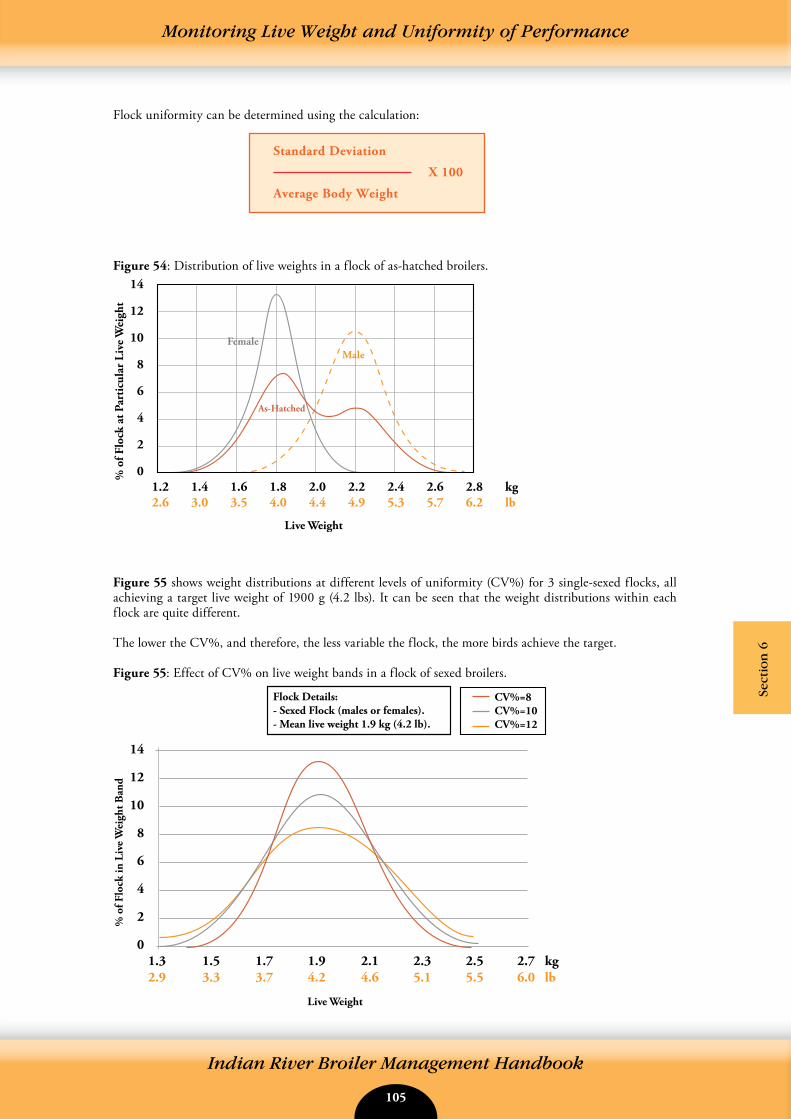
104 105
Indian River Broiler Management Handbook
Sect
ion
6
Flock uniformity can be determined using the calculation:
Figure 54: Distribution of live weights in a flock of as-hatched broilers.
Figure 55 shows weight distributions at different levels of uniformity (CV%) for 3 single-sexed flocks, all achieving a target live weight of 1900 g (4.2 lbs). It can be seen that the weight distributions within each flock are quite different.
The lower the CV%, and therefore, the less variable the flock, the more birds achieve the target.
Figure 55: Effect of CV% on live weight bands in a flock of sexed broilers.
Standard Deviation
X 100
Average Body Weight
1.2 1.4 1.6 1.8 2.0 2.2 2.4 2.6 2.8 kg2.6 3.0 3.5 4.0 4.4 4.9 5.3 5.7 6.2 lb
14
12
10
8
6
4
2
0
As-Hatched
FemaleMale
Live Weight
% o
f Flo
ck a
t Par
ticu
lar
Live
Wei
ght
1.3 1.5 1.7 1.9 2.1 2.3 2.5 2.7 kg2.9 3.3 3.7 4.2 4.6 5.1 5.5 6.0 lb
14
12
10
8
6
4
2
0
Live Weight
% o
f Flo
ck in
Liv
e W
eigh
t Ban
d
CV%=8CV%=10CV%=12
Flock Details:- Sexed Flock (males or females).- Mean live weight 1.9 kg (4.2 lb).
Monitoring Live Weight and Uniformity of Performance
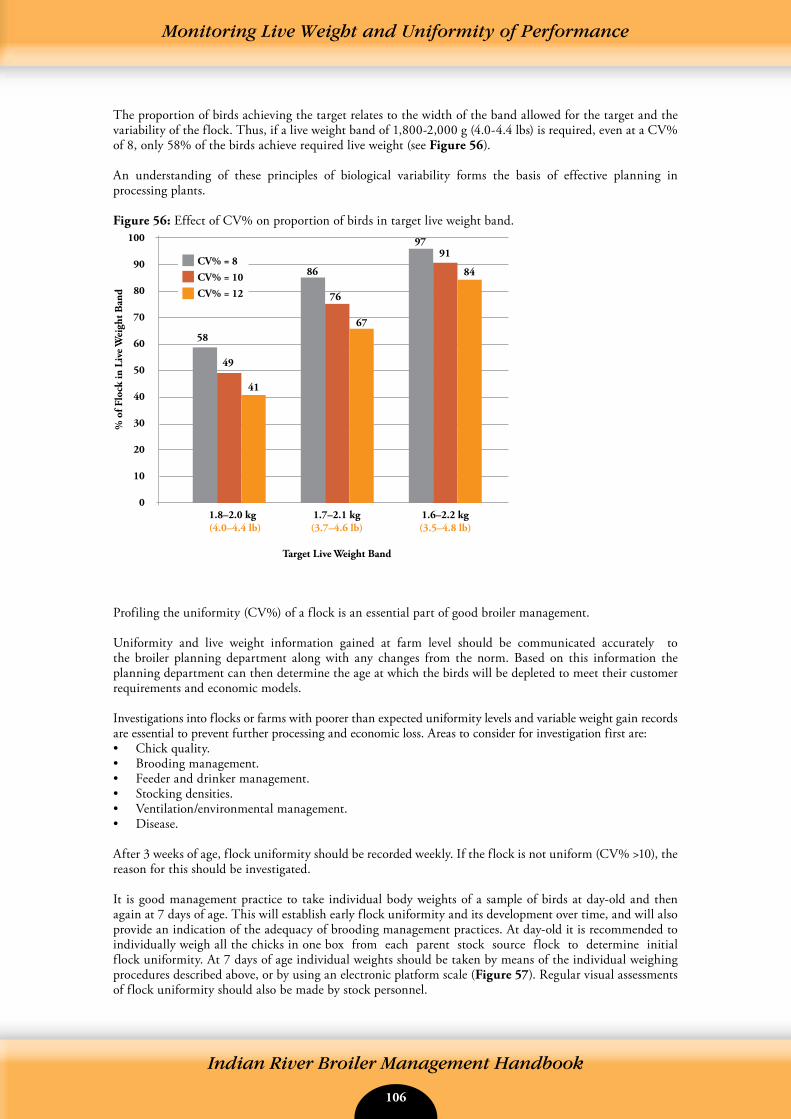
106 107
Indian River Broiler Management Handbook
Monitoring Live Weight and Uniformity of Performance
The proportion of birds achieving the target relates to the width of the band allowed for the target and the variability of the flock. Thus, if a live weight band of 1,800-2,000 g (4.0-4.4 lbs) is required, even at a CV% of 8, only 58% of the birds achieve required live weight (see Figure 56).
An understanding of these principles of biological variability forms the basis of effective planning in processing plants.
Figure 56: Effect of CV% on proportion of birds in target live weight band.
Profiling the uniformity (CV%) of a flock is an essential part of good broiler management.
Uniformity and live weight information gained at farm level should be communicated accurately to the broiler planning department along with any changes from the norm. Based on this information the planning department can then determine the age at which the birds will be depleted to meet their customer requirements and economic models.
Investigations into flocks or farms with poorer than expected uniformity levels and variable weight gain records are essential to prevent further processing and economic loss. Areas to consider for investigation first are:• Chick quality.• Brooding management.• Feeder and drinker management.• Stocking densities.• Ventilation/environmental management.• Disease.
After 3 weeks of age, flock uniformity should be recorded weekly. If the flock is not uniform (CV% >10), the reason for this should be investigated. It is good management practice to take individual body weights of a sample of birds at day-old and then again at 7 days of age. This will establish early flock uniformity and its development over time, and will also provide an indication of the adequacy of brooding management practices. At day-old it is recommended to individually weigh all the chicks in one box from each parent stock source flock to determine initial flock uniformity. At 7 days of age individual weights should be taken by means of the individual weighing procedures described above, or by using an electronic platform scale (Figure 57). Regular visual assessments of flock uniformity should also be made by stock personnel.
1.8–2.0 kg(4.0–4.4 lb)
1.7–2.1 kg(3.7–4.6 lb)
Target Live Weight Band
1.6–2.2 kg(3.5–4.8 lb)
100
90
80
70
60
50
40
30
20
10
0
% o
f Flo
ck in
Liv
e W
eigh
t Ban
d
CV% = 8CV% = 10CV% = 12
58
49
41
86
76
67
9791
84
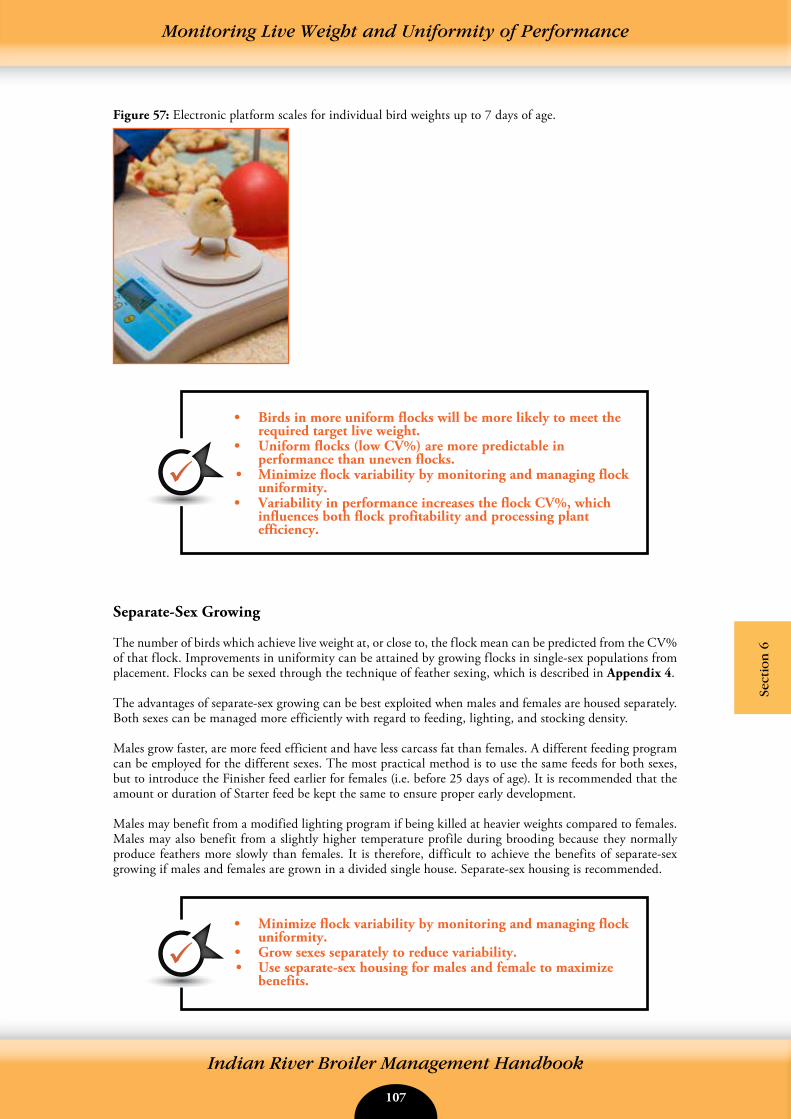
106 107
Indian River Broiler Management Handbook
Sect
ion
6
Monitoring Live Weight and Uniformity of Performance
Figure 57: Electronic platform scales for individual bird weights up to 7 days of age.
Separate-Sex Growing
The number of birds which achieve live weight at, or close to, the flock mean can be predicted from the CV% of that flock. Improvements in uniformity can be attained by growing flocks in single-sex populations from placement. Flocks can be sexed through the technique of feather sexing, which is described in Appendix 4.
The advantages of separate-sex growing can be best exploited when males and females are housed separately. Both sexes can be managed more efficiently with regard to feeding, lighting, and stocking density.
Males grow faster, are more feed efficient and have less carcass fat than females. A different feeding program can be employed for the different sexes. The most practical method is to use the same feeds for both sexes, but to introduce the Finisher feed earlier for females (i.e. before 25 days of age). It is recommended that the amount or duration of Starter feed be kept the same to ensure proper early development.
Males may benefit from a modified lighting program if being killed at heavier weights compared to females. Males may also benefit from a slightly higher temperature profile during brooding because they normally produce feathers more slowly than females. It is therefore, difficult to achieve the benefits of separate-sex growing if males and females are grown in a divided single house. Separate-sex housing is recommended.
• Birds in more uniform flocks will be more likely to meet the required target live weight.
• Uniform flocks (low CV%) are more predictable in performance than uneven flocks.
• Minimize flock variability by monitoring and managing flock uniformity.
• Variability in performance increases the flock CV%, which influences both flock profitability and processing plant efficiency.
• Minimize flock variability by monitoring and managing flock uniformity.
• Grow sexes separately to reduce variability.• Use separate-sex housing for males and female to maximize
benefits.
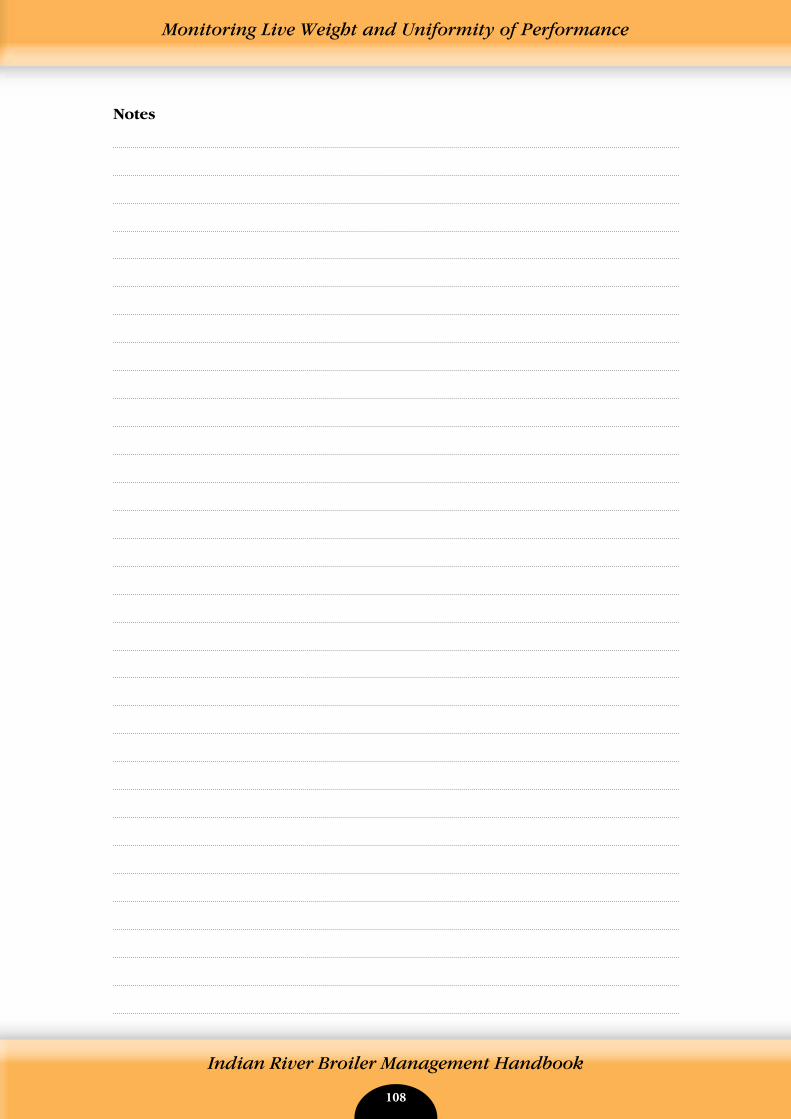
108 109
Indian River Broiler Management Handbook
Monitoring Live Weight and Uniformity of Performance
Notes
108 109
Indian River Broiler Management Handbook
Sect
ion
7
Section 7 - Pre-Processing Management
Pre-Processing Management
Objective
To manage the final phase of the production process so that broilers are transferred to the processor in optimum condition, ensuring that the processing requirements are met and high standards of bird welfare are maintained.
Principles
Bird quality, both at sale and at eating, will benefit from detailed attention to management of the environment and to the welfare of the birds:• During catching.• During handling between the broiler house and the transport system.• During transportation.• At the processing plant.
Production of high quality carcasses with good yield depends on the effective integration of the growing, catching, and processing operations.
Preparation for Catching
Light
It is essential to return to 23 hours of light prior to catching. This will ensure that the birds are calm during catching. Birds should receive at least 3 days on 23 hours of light prior to catching. Local legislation for light intensity should be adhered to, but the minimum is 5-10 lux.
Feed Withdrawal
Other Useful Information Available
Indian River Be Smart: Pre-Processing Handling in Broilers
Time in House Without Feed+
Catching Time+
Transport Time+
Holding (Lairage Time)
Feed Withdrawal Period =
110 111
Indian River Broiler Management Handbook
Feed withdrawal is necessary to allow the contents of the gastrointestinal tract (GIT) to be emptied before processing. This reduces the risk of fecal contamination during transportation and at the processing plant.
Feed withdrawal must provide a balance between food safety (by maximizing the removal of GIT contents) and the avoidance of excessive weight loss (by minimizing the time between the GIT contents being emptied and processing). To achieve this it is recommended that feed is removed from the birds 8 to 12 hours before processing.
An insufficient feed withdrawal period will result in the contents of the gut not being fully emptied prior to processing. This will lead to false estimates of live weight, and increase the risk of fecal contamination at the processing plant.
An excessive feed withdrawal period will result in unnecessary extra weight loss prior to processing. This will also reduce the likelihood of achieving target weight at the processing plant.
Feed withdrawal must complement the normal eating pattern of the flock and consider bird welfare. Broilers under good management with constant access to feed and water will normally eat and drink at a steady rate throughout the day. Eating will normally occur approximately every 4 hours, with drinking occurring several times during that 4-hour eating cycle.
It is important that feeding patterns are not disrupted in the last few days and in particular the last 24 hours prior to transportation. This can lead to aggressive and uncontrolled eating which will affect gut fill, emptying of the GIT and the effectiveness of feed withdrawal. The most common disruptions to feeding pattern are:• Feed availability (feed amount and feeding space).• Lighting program.• Temperature.
During feed withdrawal leaving the feeders down until the catching crews arrive may help to reduce litter eating.
After feed withdrawal has started the flock should not be disturbed, for example by excessive walking of the house or opening of doors.
Whole grain (such as whole wheat) should be removed 2 days before processing to avoid the presence of whole grain in the gut at processing.
Feed Withdrawal and Weight LossOnce the GIT is completely emptied, the rate of weight loss will increase as body protein and fat are mobilized to support metabolism. Water absorbed from body tissues may also accumulate in the digestive tract further reducing yield and meat quality and increasing the risk of fecal contamination in the processing plant.
Once the gut is completely emptied birds will lose between 0.1-0.5% of their body weight per hour, depending on:• Bird age – loss will be higher in older birds.• Sex – weight loss is higher in males.• House temperature – weight loss is increased at extremes of temperature (both high and low).• Disruption of eating patterns before feed withdrawal – this will lead to a variation in gut contents and
therefore, weight loss between birds.• Length of time in transport crates/modules – the more time spent in transport modules, the higher the
weight loss will be.• Holding temperature – high temperatures lead to increased weight loss.
This weight loss reduces both bird welfare and bird value and must be minimized.
A 3 kg (6.6 lb) bird will lose between 3 g (0.1 oz) and 15 g (0.5 oz) of weight if left for only 1 extra hour without feed after the GIT has
emptied. If the value of the meat is $1 per kg, this equates to a loss of between 0.3 and 1.5 cents per bird.
Pre-Processing Management
110 111
Indian River Broiler Management Handbook
Sect
ion
7
Monitoring Feed Withdrawal
Feed withdrawal plans must be monitored and reviewed regularly (every flock) and be modified promptly if problems occur. If feed withdrawal is not managed correctly there will be consequences for bird welfare, profitability, product safety, and shelf life.
Routine monitoring of feed withdrawal procedures is necessary to ensure they remain functional. The best way to monitor if feed withdrawal times are correct is visual observation. The presence of watery droppings from broilers awaiting processing, watery fluid in the small intestine, and litter in the crop and gizzard all indicate excessive withdrawal times (more than 12 hours). The presence of feed in the crop or fecal contamination at the processing plant indicates that the feed withdrawal period has been inadequate (less than 8 hours).
Water
Unlimited access to water should be provided until the point of catching. Without water birds may become dehydrated and the rate at which the GIT empties will be reduced.
Access to water will be facilitated by:• Use of multiple drinker lines.• Separation of birds into pens.• Where bell drinkers are used, the removal of individual drinkers progressively during catching.
Pharmaceuticals
If pharmaceutical products (e.g. coccidiostats, prescribed medicines) have been added to the diet for any reason, then these must be removed from the feed for a sufficient period of time prior to processing to eliminate pharmaceutical product residues in the meat.
Pharmaceutical companies advice, and local regulations for removal of coccidiostats and other prescribed medicines from the diet are specified in product data sheets and should be adhered to.
Where a thinning or partial depletion program is used, it may be necessary to increase the withdrawal period to satisfy the mandatory period prior to processing. Withdrawal periods must always relate to the time of first thinning.
Catching
Many causes of downgrading seen at processing will have occurred during the period when the birds were being caught and handled. Catching should be planned carefully and supervised closely. The handling of birds and the operation of machinery (such as harvesters and forklifts), must be carried out by trained, competent personnel. Bird welfare is paramount. During catching, birds should be kept calm and bird activity minimized to avoid bruising, scratching, wing damage, and other injuries.
• Allow 3 days on 23 hours light and one hour dark prior to catching.
• Correct timing of feed removal from the birds is that which ensures that the digestive tract is empty before processing commences.
• Monitor and review feed withdrawal plans regularly.• Remove whole grain from the ration 2 days before processing.• Delay the removal of drinkers for as long as possible.• Follow statutory withdrawal periods for pharmaceutical
products
Pre-Processing Management
112 113
Indian River Broiler Management Handbook
Pre-Processing Management
Pre-Catch
Prior to catching the following checks should be made.
Table 27: Check-list prior to catching.Pre-Catch Check Action
Time taken to catch and transport birds
Calculate the time taken to catch and transport birds and start the catch according to when the birds are scheduled to be processed.
Number of crates/modules Determine the number of crates/modules and trucks needed to transport the birds prior to catching.
Equipment Ensure all equipment used (including vehicles, crates, fencing, and nets), is clean, disinfected, and in good condition.
Condition of ground at entrance to poultry house
Repair, compact, and level the ground at the entrance to the poultry house (and any secondary roads leading to the house) to ensure a smooth exit for the loaded trucks.
Litter Replace wet litter to ease catching.Feeding equipment Remove feeding equipment from the house or re-position it to avoid
obstruction to the birds or personnel (raise feeding equipment to above head height).
Penning Within large houses, separate birds into pens.Light intensity Reduce light intensity during catching. Do not suddenly increase light
intensity. For nighttime catching, which is preferred, light intensity within the house should be reduced to as low a level as possible that will allow the birds to be caught safely. For daytime catching light intensity should be reduced as much as possible by the use of curtains over doors.
Light intensity must however be sufficient to allow safe and careful catching. The best results are achieved when birds are allowed to settle after lights have been dimmed and when there is minimum disturbance before catching.
Ventilation Maintain effective ventilation. The ventilation system should be monitored and adjusted carefully throughout the catching procedure to prevent heat build-up within the house and ensure adequate air movement over the birds. Birds should be monitored closely for signs of over-heating (panting).
Catch
Improperly completed and supervised catching (harvesting) can inflict damage by bruising, wing breakage, and internal bleeding of the legs. Review procedures regularly and have clear guidelines in place.
When catching by hand, broilers should be caught carefully and held by both shanks or around the body using both hands to hold the wings against the body (Figure 58). This will minimize distress, damage, and injury. Birds should not be carried by the neck or by the wings.
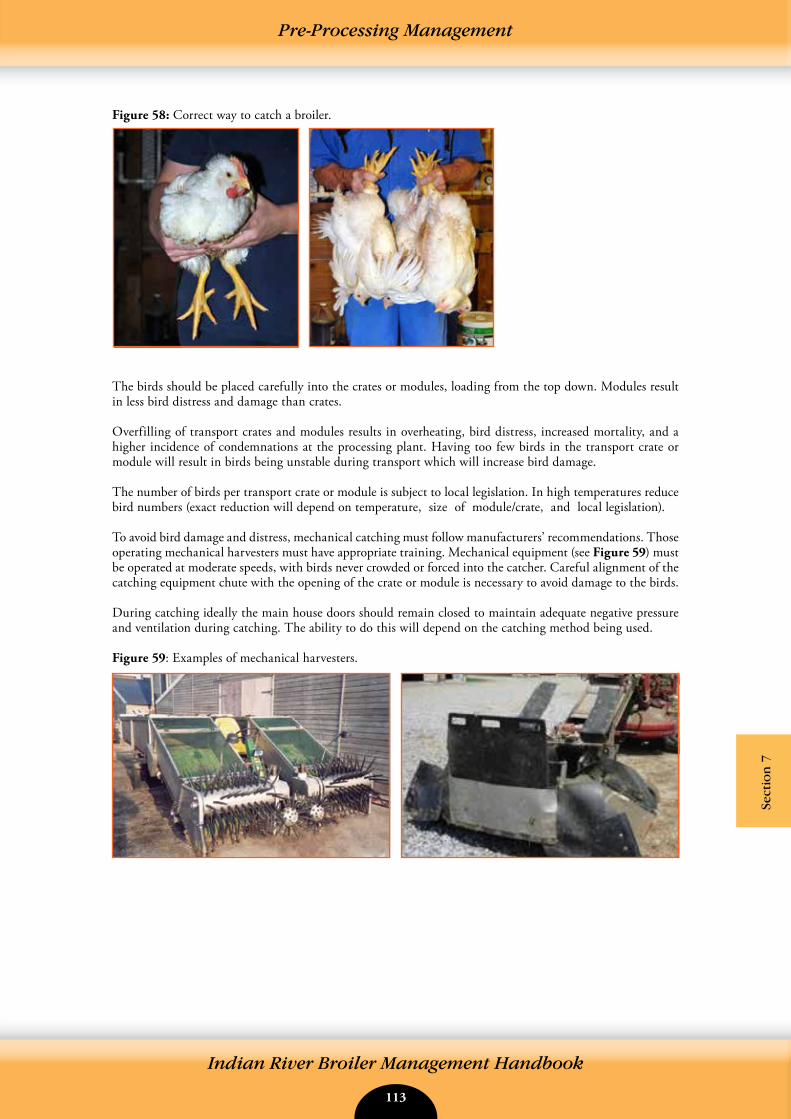
112 113
Indian River Broiler Management Handbook
Sect
ion
7
Pre-Processing Management
Figure 58: Correct way to catch a broiler.
The birds should be placed carefully into the crates or modules, loading from the top down. Modules result in less bird distress and damage than crates.
Overfilling of transport crates and modules results in overheating, bird distress, increased mortality, and a higher incidence of condemnations at the processing plant. Having too few birds in the transport crate or module will result in birds being unstable during transport which will increase bird damage.
The number of birds per transport crate or module is subject to local legislation. In high temperatures reduce bird numbers (exact reduction will depend on temperature, size of module/crate, and local legislation).
To avoid bird damage and distress, mechanical catching must follow manufacturers’ recommendations. Those operating mechanical harvesters must have appropriate training. Mechanical equipment (see Figure 59) must be operated at moderate speeds, with birds never crowded or forced into the catcher. Careful alignment of the catching equipment chute with the opening of the crate or module is necessary to avoid damage to the birds.
During catching ideally the main house doors should remain closed to maintain adequate negative pressure and ventilation during catching. The ability to do this will depend on the catching method being used.
Figure 59: Examples of mechanical harvesters.
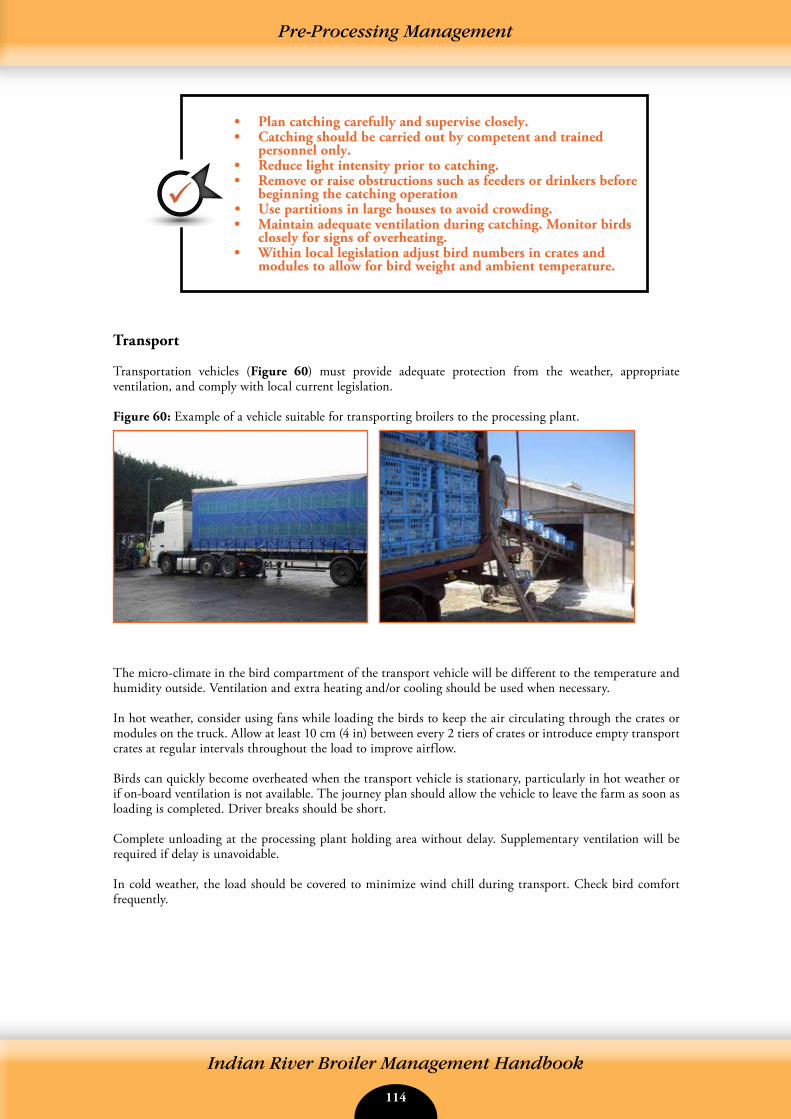
114 115
Indian River Broiler Management Handbook
• Plan catching carefully and supervise closely.• Catching should be carried out by competent and trained
personnel only.• Reduce light intensity prior to catching.• Remove or raise obstructions such as feeders or drinkers before
beginning the catching operation• Use partitions in large houses to avoid crowding.• Maintain adequate ventilation during catching. Monitor birds
closely for signs of overheating.• Within local legislation adjust bird numbers in crates and
modules to allow for bird weight and ambient temperature.
Transport
Transportation vehicles (Figure 60) must provide adequate protection from the weather, appropriate ventilation, and comply with local current legislation.
Figure 60: Example of a vehicle suitable for transporting broilers to the processing plant.
The micro-climate in the bird compartment of the transport vehicle will be different to the temperature and humidity outside. Ventilation and extra heating and/or cooling should be used when necessary.
In hot weather, consider using fans while loading the birds to keep the air circulating through the crates or modules on the truck. Allow at least 10 cm (4 in) between every 2 tiers of crates or introduce empty transport crates at regular intervals throughout the load to improve airflow.
Birds can quickly become overheated when the transport vehicle is stationary, particularly in hot weather or if on-board ventilation is not available. The journey plan should allow the vehicle to leave the farm as soon as loading is completed. Driver breaks should be short.
Complete unloading at the processing plant holding area without delay. Supplementary ventilation will be required if delay is unavoidable.
In cold weather, the load should be covered to minimize wind chill during transport. Check bird comfort frequently.
Pre-Processing Management
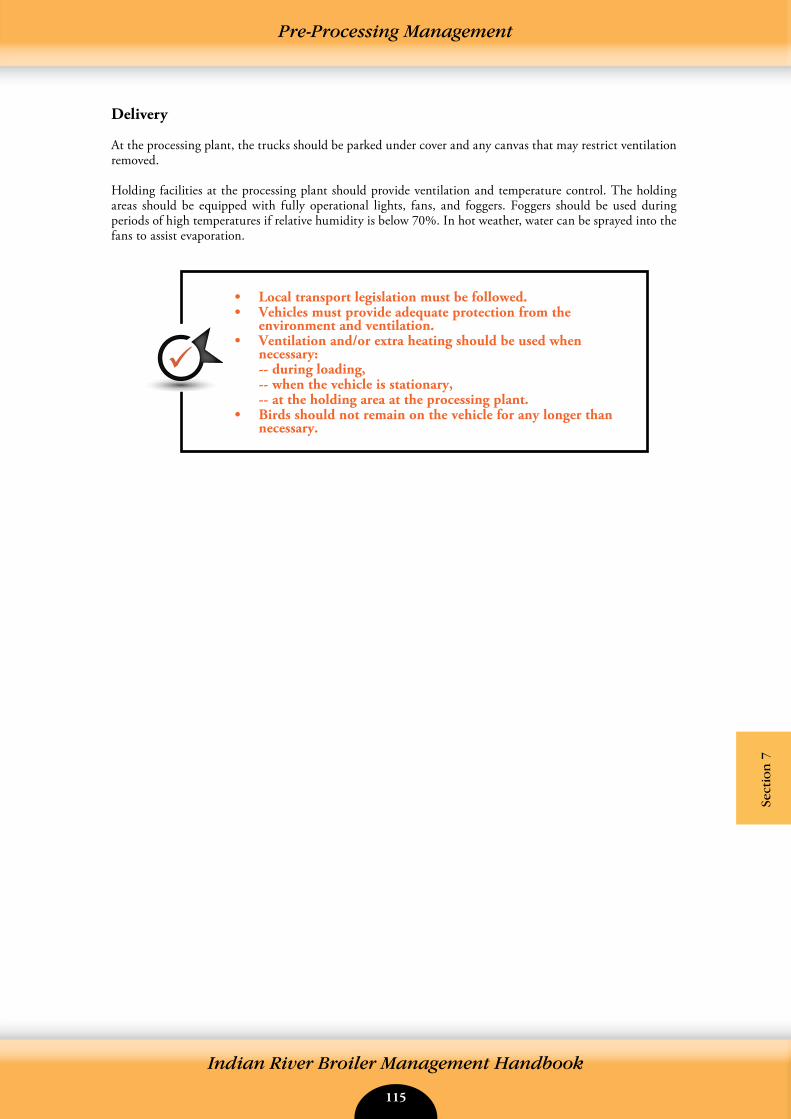
114 115
Indian River Broiler Management Handbook
Sect
ion
7
Delivery
At the processing plant, the trucks should be parked under cover and any canvas that may restrict ventilation removed.
Holding facilities at the processing plant should provide ventilation and temperature control. The holding areas should be equipped with fully operational lights, fans, and foggers. Foggers should be used during periods of high temperatures if relative humidity is below 70%. In hot weather, water can be sprayed into the fans to assist evaporation.
• Local transport legislation must be followed.• Vehicles must provide adequate protection from the
environment and ventilation.• Ventilation and/or extra heating should be used when
necessary:-- during loading,-- when the vehicle is stationary,-- at the holding area at the processing plant.
• Birds should not remain on the vehicle for any longer than necessary.
Pre-Processing Management

116 117
Indian River Broiler Management Handbook
Notes
Notes
116 117
Indian River Broiler Management Handbook
Ap
pen
dic
es
Appendix 1: Production Records
Appendices
Record keeping and analysis are essential to determine the effects of changes to nutrition, management, environment, and health status. Accurate production records are essential for the effective management.
Analysis and interpretation of production data (e.g. live weight, feed conversion efficiency, and mortality) are essential to the upgrading and improvement of performance.
Hygiene and disease status should be monitored.
It is good practice for all processes in a broiler operation to have standard operating protocols (SOP). These should include documentation of established procedures, records, record analysis, and monitoring systems.
Records Required in Broiler Production
Event Records Comment
Chick placement Number of day-olds
Flock of origin and flock age
Date and time of arrival
Chick quality
Crop fill
Live weight, uniformity, number of dead on arrival
Check crop fill percentage for ageMortality Daily
Weekly
Cumulative
Record by sex if possible
Record culls and reason for culling separately
Post-mortem records of excessive mortality
Scoring of coccidial lesions will indicate level of coccidial challenge
Record actual numbers and percentages
Particular importance should be paid to 7-day mortality
Medication Date
Amount
Batch number
As per veterinary instruction
Vaccination Date of vaccination
Vaccine type
Batch number
Any unexpected vaccine reaction should be recorded
Live weight Weekly average live weight
Weekly uniformity (CV%)
More frequent measurement is required when predicting processing weight.
Feed Date of delivery
Quantity
Feed type
Feed form
Date of starting feed withdrawal prior to catching
Accurate measurement of feed consumed is essential to measure FCR and to determine cost effectiveness of broiler operation
Check feed quality

118 119
Indian River Broiler Management Handbook
Appendices
Event Records Comments
Water Daily consumption
Water to feed ratio
Water quality
Level of chlorination
Plot daily consumption in graph form, preferably per house
Sudden fluctuation in water consumption is an early indicator of problems
Mineral and/or bacteriological especially where bore holes or open water reservoirs are used
Environment Temperature:• Floor temperature as well as
litter temperature -daily minimum -daily maximum -during brooding, 4 to 5 times per day -litter during brooding -external temperature (daily)
• Relative Humidity (daily)
Air quality
Litter quality
Last calibration of equipment and by who
Multiple locations should be monitored, especially in chick litter area
Automatic systems should be cross-checked manually each day
Ideally record dust, CO2, NH3 or as a minimum observe levels of dust and NH3
Depletion Number of birds removed
Time and date of removalInformation from processing plant
Carcass quality
Health inspection
Carcass composition
Type and % condemnationsCleaning out Total bacterial counts After disinfection, salmonella, staphylococcus
or E. coli may be monitored if requiredHouse inspection Record time of daily checks
Make note of any bird observations Behavior and environmental conditionsLighting program Dark and light period
Time on and time off
Intermittent or not
Visitors Who
Why
Date and reason for visit
Previous farm visits (place and date)
Should be completed for every visitor to ensure traceability
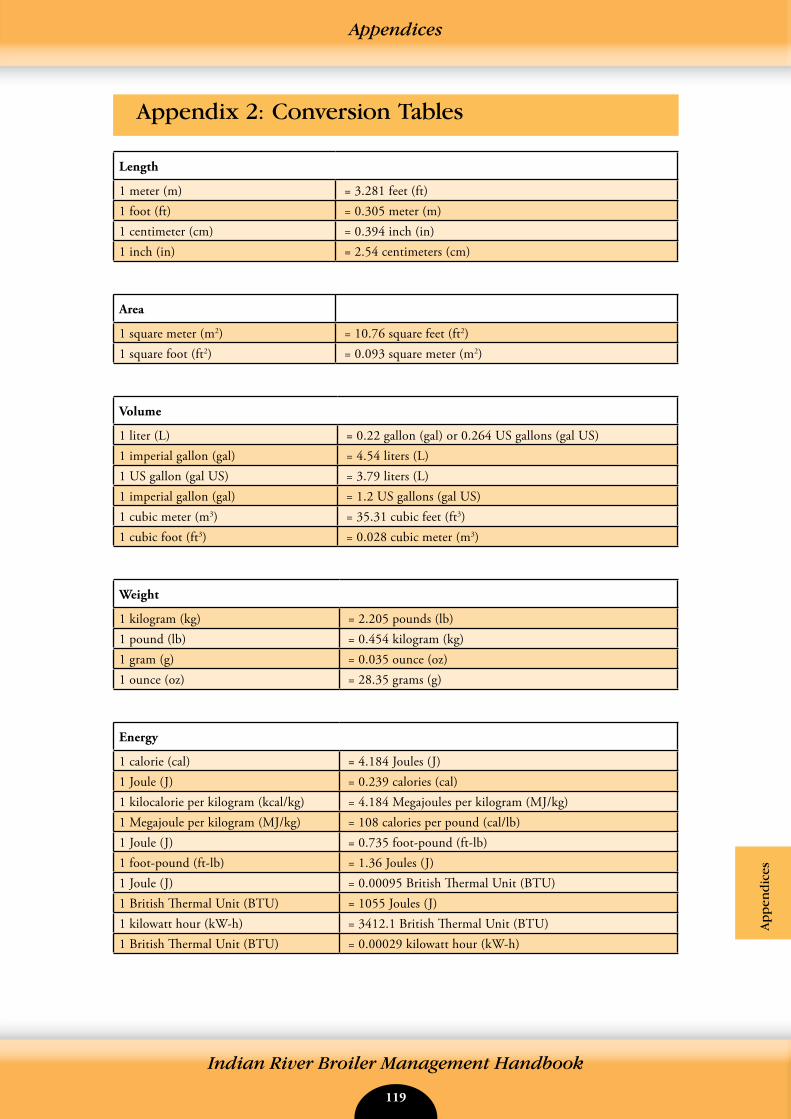
118 119
Indian River Broiler Management Handbook
Appendices
Ap
pen
dic
es
Appendix 2: Conversion Tables
Length
1 meter (m) = 3.281 feet (ft)1 foot (ft) = 0.305 meter (m)1 centimeter (cm) = 0.394 inch (in)1 inch (in) = 2.54 centimeters (cm)
Area
1 square meter (m2) = 10.76 square feet (ft2)1 square foot (ft2) = 0.093 square meter (m2)
Volume
1 liter (L) = 0.22 gallon (gal) or 0.264 US gallons (gal US)1 imperial gallon (gal) = 4.54 liters (L)1 US gallon (gal US) = 3.79 liters (L)1 imperial gallon (gal) = 1.2 US gallons (gal US)1 cubic meter (m3) = 35.31 cubic feet (ft3)1 cubic foot (ft3) = 0.028 cubic meter (m3)
Weight
1 kilogram (kg) = 2.205 pounds (lb)1 pound (lb) = 0.454 kilogram (kg)1 gram (g) = 0.035 ounce (oz)1 ounce (oz) = 28.35 grams (g)
Energy
1 calorie (cal) = 4.184 Joules (J)1 Joule (J) = 0.239 calories (cal)1 kilocalorie per kilogram (kcal/kg) = 4.184 Megajoules per kilogram (MJ/kg)1 Megajoule per kilogram (MJ/kg) = 108 calories per pound (cal/lb)1 Joule (J) = 0.735 foot-pound (ft-lb)1 foot-pound (ft-lb) = 1.36 Joules (J)1 Joule (J) = 0.00095 British Thermal Unit (BTU)1 British Thermal Unit (BTU) = 1055 Joules (J)1 kilowatt hour (kW-h) = 3412.1 British Thermal Unit (BTU)1 British Thermal Unit (BTU) = 0.00029 kilowatt hour (kW-h)
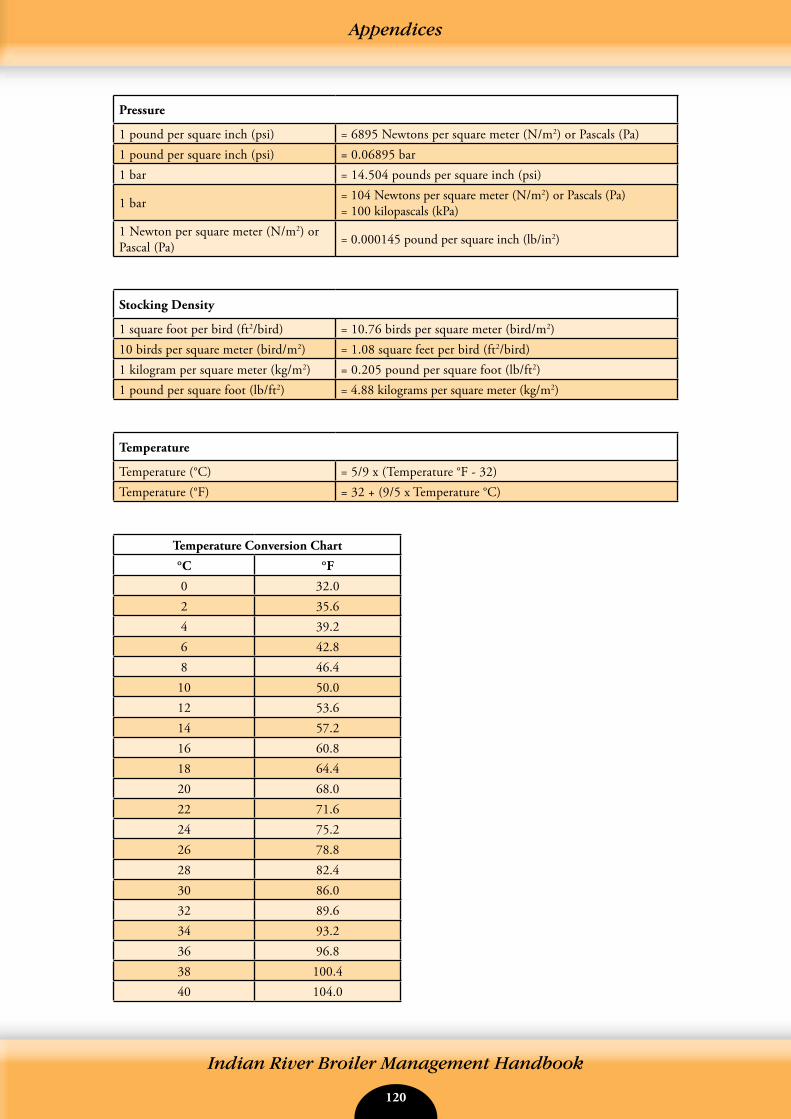
120 121
Indian River Broiler Management Handbook
Appendices
Pressure
1 pound per square inch (psi) = 6895 Newtons per square meter (N/m2) or Pascals (Pa)1 pound per square inch (psi) = 0.06895 bar1 bar = 14.504 pounds per square inch (psi)
1 bar = 104 Newtons per square meter (N/m2) or Pascals (Pa)= 100 kilopascals (kPa)
1 Newton per square meter (N/m2) or Pascal (Pa) = 0.000145 pound per square inch (lb/in2)
Stocking Density
1 square foot per bird (ft2/bird) = 10.76 birds per square meter (bird/m2) 10 birds per square meter (bird/m2) = 1.08 square feet per bird (ft2/bird) 1 kilogram per square meter (kg/m2) = 0.205 pound per square foot (lb/ft2) 1 pound per square foot (lb/ft2) = 4.88 kilograms per square meter (kg/m2)
Temperature
Temperature (°C) = 5/9 x (Temperature °F - 32) Temperature (°F) = 32 + (9/5 x Temperature °C)
Temperature Conversion Chart
°C °F
0 32.02 35.64 39.26 42.88 46.410 50.012 53.614 57.216 60.818 64.420 68.022 71.624 75.226 78.828 82.430 86.032 89.634 93.236 96.838 100.440 104.0
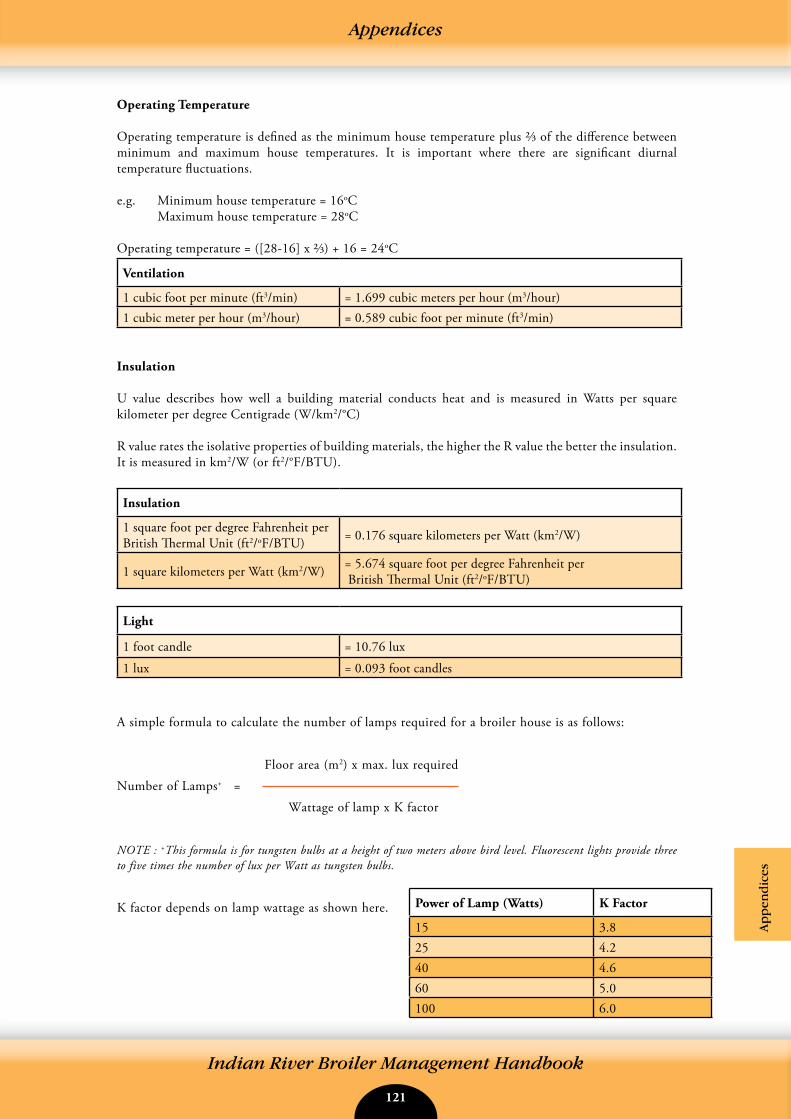
120 121
Indian River Broiler Management Handbook
Appendices
Ap
pen
dic
es
Operating Temperature
Operating temperature is defined as the minimum house temperature plus ⅔ of the difference between minimum and maximum house temperatures. It is important where there are significant diurnal temperature fluctuations.
e.g. Minimum house temperature = 16oC Maximum house temperature = 28oC
Operating temperature = ([28-16] x ⅔) + 16 = 24oC
Ventilation
1 cubic foot per minute (ft3/min) = 1.699 cubic meters per hour (m3/hour) 1 cubic meter per hour (m3/hour) = 0.589 cubic foot per minute (ft3/min)
Insulation
U value describes how well a building material conducts heat and is measured in Watts per square kilometer per degree Centigrade (W/km2/°C)
R value rates the isolative properties of building materials, the higher the R value the better the insulation. It is measured in km2/W (or ft2/°F/BTU).
Insulation
1 square foot per degree Fahrenheit per British Thermal Unit (ft2/oF/BTU) = 0.176 square kilometers per Watt (km2/W)
1 square kilometers per Watt (km2/W) = 5.674 square foot per degree Fahrenheit per British Thermal Unit (ft2/oF/BTU)
Light
1 foot candle = 10.76 lux
1 lux = 0.093 foot candles
A simple formula to calculate the number of lamps required for a broiler house is as follows:
Floor area (m2) x max. lux required
Number of Lamps+ =
Wattage of lamp x K factor
NOTE : +This formula is for tungsten bulbs at a height of two meters above bird level. Fluorescent lights provide three to five times the number of lux per Watt as tungsten bulbs.
K factor depends on lamp wattage as shown here. Power of Lamp (Watts) K Factor
15 3.825 4.240 4.660 5.0100 6.0
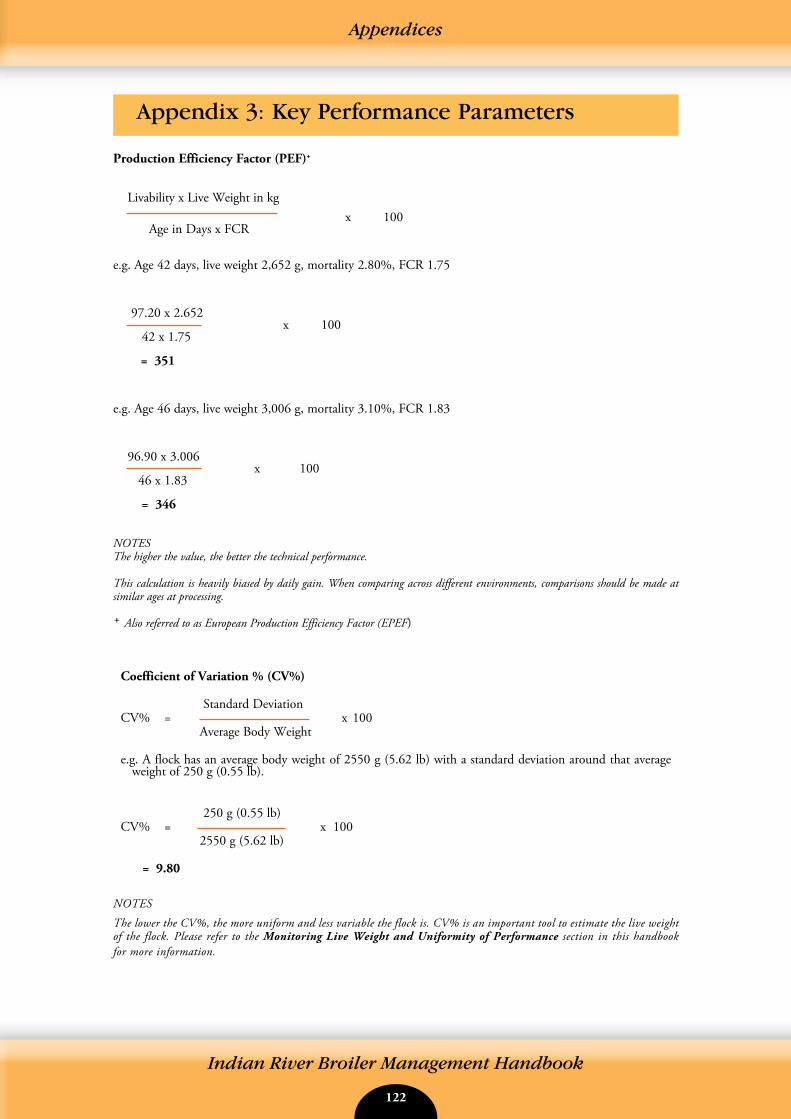
122 123
Indian River Broiler Management Handbook
Appendices
Appendix 3: Key Performance Parameters
Production Efficiency Factor (PEF)+
Livability x Live Weight in kg x 100 Age in Days x FCR
e.g. Age 42 days, live weight 2,652 g, mortality 2.80%, FCR 1.75
97.20 x 2.652 x 100 42 x 1.75
= 351
e.g. Age 46 days, live weight 3,006 g, mortality 3.10%, FCR 1.83
96.90 x 3.006 x 100 46 x 1.83
= 346
NOTESThe higher the value, the better the technical performance.
This calculation is heavily biased by daily gain. When comparing across different environments, comparisons should be made at similar ages at processing.
+ Also referred to as European Production Efficiency Factor (EPEF)
Coefficient of Variation % (CV%)
Standard DeviationCV% = x 100 Average Body Weight
e.g. A flock has an average body weight of 2550 g (5.62 lb) with a standard deviation around that average weight of 250 g (0.55 lb).
250 g (0.55 lb)CV% = x 100 2550 g (5.62 lb)
= 9.80
NOTES
The lower the CV%, the more uniform and less variable the flock is. CV% is an important tool to estimate the live weight of the flock. Please refer to the Monitoring Live Weight and Uniformity of Performance section in this handbook for more information.
122 123
Indian River Broiler Management Handbook
Appendices
Ap
pen
dic
es
Feed Conversion Ratio (FCR)
Total Feed Consumed FCR = Total Live Weight
e.g. A sample of 10 birds has a total live weight of 31480 g (69.34 lb) and they have consumed a total feed amount of 36,807 g (81.07 lb). The average feed conversion for this sample set would be calculated as follows:
36807 g (81.07 lb) FCR = 31480 g (69.34 lb)
= 1.169
Adjusted Feed Conversion Ratio (Adjusted FCR)
Target Body Weight - Actual Body WeightAdjusted FCR = Actual FCR + Factor
Depending on the units of measurement used, the factor in the above equation will change. For AH, a factor of 10 lb, 4.5 kg, or 4500 g should be used, depending on the unit of measurement. This equation provides a good estimation of adjusted FCR for broiler performance comparison. However, it is important to note that adjusting FCR to target weights beyond + or – 0.5 lb/0.227 kg/227 g of your actual weight can distort the comparison.
e.g (Unit is in g)
Target Body Weight - Actual Body WeightAdjusted FCR = Actual FCR + 4500 g
1350 g - 1290 gAdjusted FCR = 1.215 + 4500 g
= 1.215 + ( 60 g/4500 g) = 1.215 + 0.013 = 1.228 Adjusted FCR
e.g (Unit is in kg)
Target Body Weight - Actual Body WeightAdjusted FCR = Actual FCR +
4.5 kg
1.350 kg - 1.290 kg = 1.215 + 4.5 kg
= 1.215 + (0.06/4.5 kg) = 1.215 + 0.013 = 1.228 Adjusted FCR
e.g. (Unit is in lb)
124 125
Indian River Broiler Management Handbook
Appendices
Target Body Weight - Actual Body WeightAdjusted FCR = Actual FCR + 10 lbs
2.976 lb - 2.844 lb = 1.215 + 10 lb
= 1.215 + (0.13 lb/10 lb)
= 1.215 + 0.013
= 1.228 Adjusted FCR
NOTES
Adjusted FCR is a useful calculation when you want to measure how a flock is performing against a common target weight. It is also helpful when doing breed comparisons, as they can be analyzed at a specific target weight.
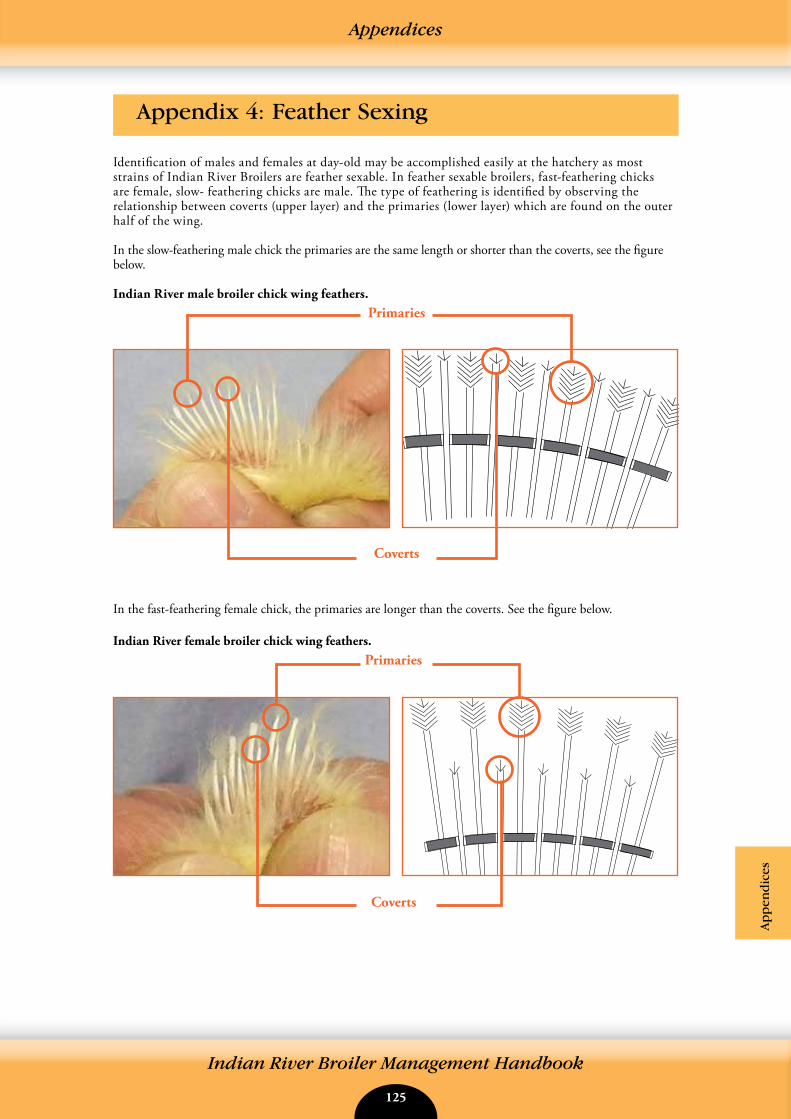
124 125
Indian River Broiler Management Handbook
Appendices
Appendix 4: Feather Sexing
Identification of males and females at day-old may be accomplished easily at the hatchery as most strains of Indian River Broilers are feather sexable. In feather sexable broilers, fast-feathering chicks are female, slow- feathering chicks are male. The type of feathering is identified by observing the relationship between coverts (upper layer) and the primaries (lower layer) which are found on the outer half of the wing.
In the slow-feathering male chick the primaries are the same length or shorter than the coverts, see the figure below.
Indian River male broiler chick wing feathers.
In the fast-feathering female chick, the primaries are longer than the coverts. See the figure below.
Indian River female broiler chick wing feathers.
Primaries
Coverts
Primaries
Coverts
Ap
pen
dic
es

126 127
Indian River Broiler Management Handbook
Appendices
Appendix 5: Problem Solving
Problem Possible Causes Action
High early mortality (>1% in first week)
Poor chick quality
Incorrect brooding
Disease
Appetite
Check hatchery practice and egg hygiene
Re-adjust brooders
Post mortems on dead chicks, take veterinary advice
Measure and achieve target crop fill levelsCheck feed availability - amount and space
High mortality (post 7 days)
Metabolic diseases (ascites, sudden death syndrome)
Infectious diseases
Leg problems
Check ventilation ratesCheck feed formulationAvoid excessive early growth ratesCheck hatchery ventilation
Establish cause (post mortem)Take veterinary advice on medication and vaccination
Check water consumptionCheck calcium, phosphorus, and Vitamin D levels in dietUse lighting programs to increase bird activity
Poor early growth and uniformity
Nutrition
Chick quality
Environmental conditions
Appetite
Disease
Check Starter ration - availability and nutritional and physical qualityCheck water supply - availability and quality
Check hatchery procedures - egg hygiene, storage, incubation conditions, hatch time, transport time and conditions
Check temperature and humidity profilesCheck daylengthCheck air quality - CO2, dust, minimum ventilation rate
Check poor stimulation of appetite - low proportion of birds with full crops
Post mortems on dead chicks, take veterinary advicePoor late growth and uniformity
Low nutrient intake
Infectious disease
Environmental conditions
Check feed nutritional and physical quality and formulationCheck feed intake and accessibilityExcessive early restrictionLighting program too restrictive
See high mortality
Check ventilation ratesCheck stocking densityCheck house temperaturesCheck water and feed availabilityCheck feeder and drinker space
Poor litter quality Nutrition
Environment
Infectious disease
Poor quality fats in dietExcess salts in dietExcess protein in diet
Insufficient litter depth at startInappropriate litter materialDrinker design and adjustment (spillage problems)Humidity too highStocking density too highInsufficient ventilationHouse temperature too low
Causing enteritis, take veterinary advice
continued...
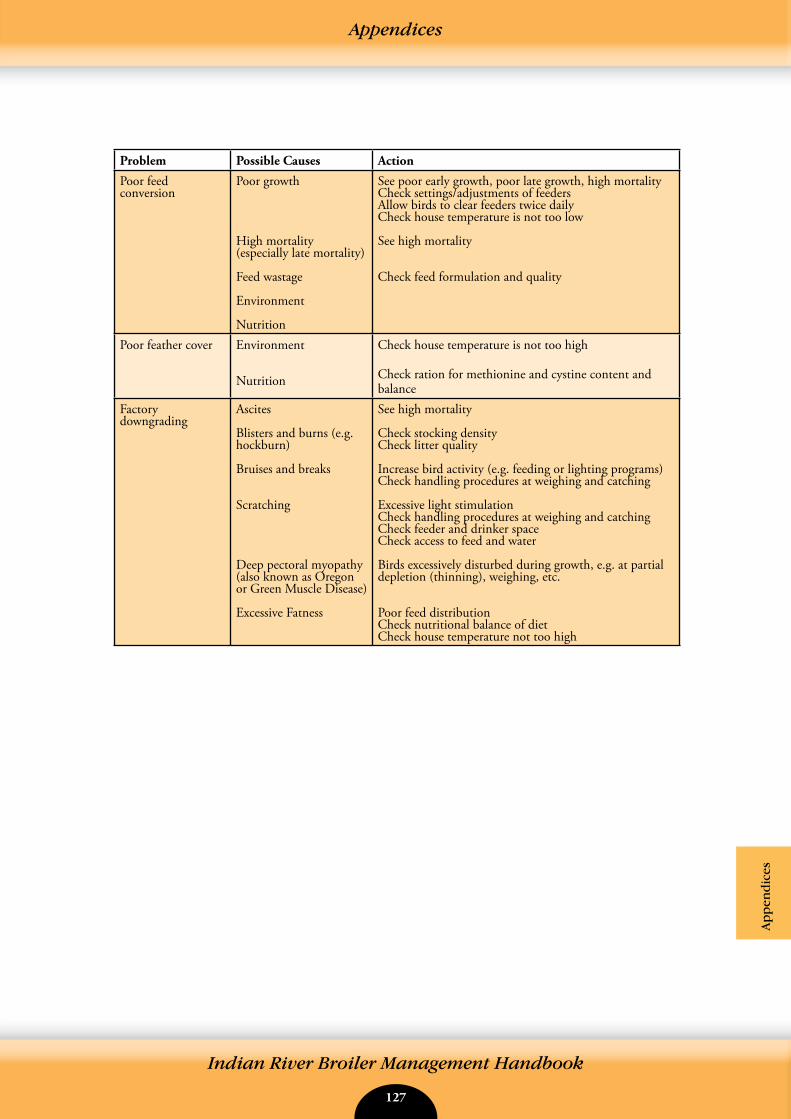
126 127
Indian River Broiler Management Handbook
Appendices
Problem Possible Causes Action
Poor feed conversion
Poor growth
High mortality (especially late mortality)
Feed wastage
Environment
Nutrition
See poor early growth, poor late growth, high mortalityCheck settings/adjustments of feeders Allow birds to clear feeders twice daily Check house temperature is not too low
See high mortality
Check feed formulation and quality
Poor feather cover Environment
Nutrition
Check house temperature is not too high
Check ration for methionine and cystine content and balance
Factory downgrading
Ascites
Blisters and burns (e.g. hockburn)
Bruises and breaks
Scratching
Deep pectoral myopathy (also known as Oregon or Green Muscle Disease)
Excessive Fatness
See high mortality
Check stocking densityCheck litter quality
Increase bird activity (e.g. feeding or lighting programs)Check handling procedures at weighing and catching
Excessive light stimulationCheck handling procedures at weighing and catchingCheck feeder and drinker spaceCheck access to feed and water
Birds excessively disturbed during growth, e.g. at partial depletion (thinning), weighing, etc.
Poor feed distributionCheck nutritional balance of dietCheck house temperature not too high
Ap
pen
dic
es
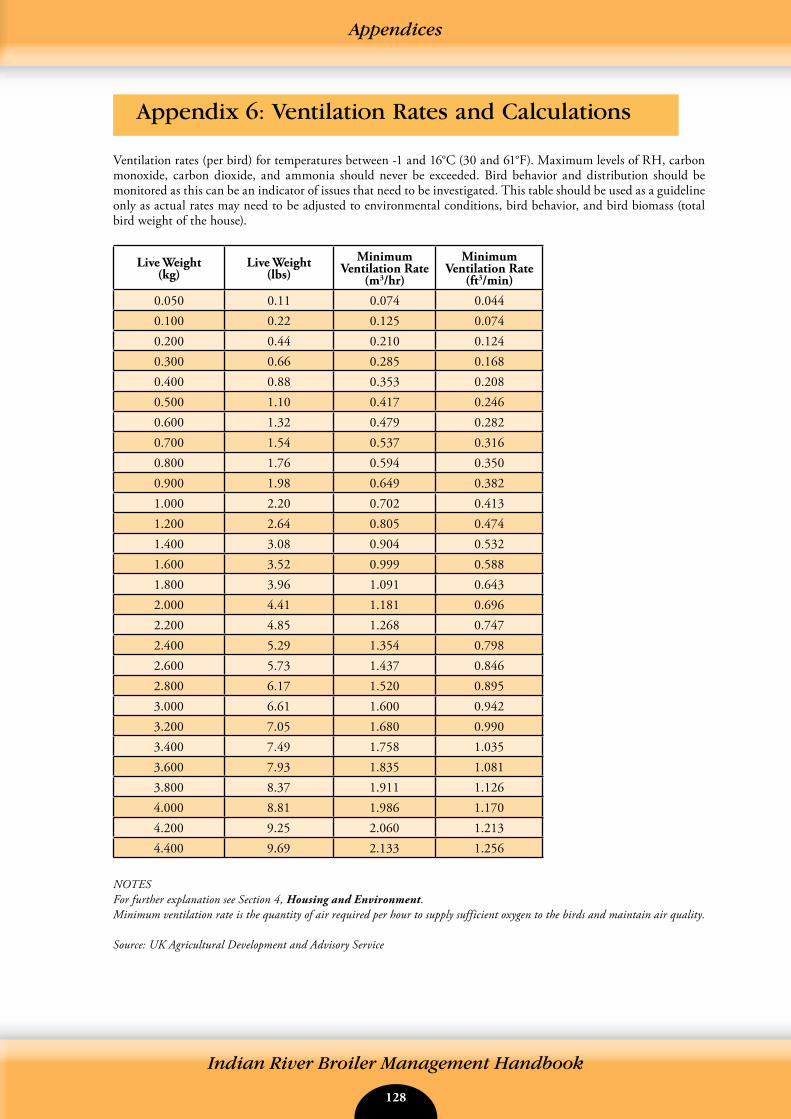
128 129
Indian River Broiler Management Handbook
Appendices
Appendix 6: Ventilation Rates and Calculations
Ventilation rates (per bird) for temperatures between -1 and 16°C (30 and 61°F). Maximum levels of RH, carbon monoxide, carbon dioxide, and ammonia should never be exceeded. Bird behavior and distribution should be monitored as this can be an indicator of issues that need to be investigated. This table should be used as a guideline only as actual rates may need to be adjusted to environmental conditions, bird behavior, and bird biomass (total bird weight of the house).
Live Weight (kg)
Live Weight (lbs)
Minimum Ventilation Rate
(m3/hr)
Minimum Ventilation Rate
(ft3/min)
0.050 0.11 0.074 0.0440.100 0.22 0.125 0.0740.200 0.44 0.210 0.1240.300 0.66 0.285 0.1680.400 0.88 0.353 0.2080.500 1.10 0.417 0.2460.600 1.32 0.479 0.2820.700 1.54 0.537 0.3160.800 1.76 0.594 0.3500.900 1.98 0.649 0.3821.000 2.20 0.702 0.4131.200 2.64 0.805 0.4741.400 3.08 0.904 0.5321.600 3.52 0.999 0.5881.800 3.96 1.091 0.6432.000 4.41 1.181 0.6962.200 4.85 1.268 0.7472.400 5.29 1.354 0.7982.600 5.73 1.437 0.8462.800 6.17 1.520 0.8953.000 6.61 1.600 0.9423.200 7.05 1.680 0.9903.400 7.49 1.758 1.0353.600 7.93 1.835 1.0813.800 8.37 1.911 1.1264.000 8.81 1.986 1.1704.200 9.25 2.060 1.2134.400 9.69 2.133 1.256
NOTESFor further explanation see Section 4, Housing and Environment.Minimum ventilation rate is the quantity of air required per hour to supply sufficient oxygen to the birds and maintain air quality.
Source: UK Agricultural Development and Advisory Service

128 129
Indian River Broiler Management Handbook
Appendices
Calculation for Minimum Ventilation Fan Timer Settings
To determine the interval fan timer settings for achieving minimum ventilation the following steps are employed.
Obtain the appropriate minimum ventilation rate as recommended in the table above. The exact rates will vary with breed, sex, and for each individual poultry house. Check with the company of manufacture and local Aviagen Technical Services Representatives for more specific information. The rates given in the previous table are for temperatures between -1 and 16°C (30 and 61°F). For lower temperatures a slightly lower rate may be required and for higher temperatures a slightly higher rate.
Fan Timer Setting Calculation
Step 1: Calculate the total ventilation rate required for the house (total cubic meters per hour [m3/h]) Total minimum ventilation = minimum ventilation rate per bird x the number of birds in the house.
Step 2: Calculate the percentage ON time of the fans.
total ventilation neededPercentage ON time = x 100 total operating fan capacity
Step 3: Calculate the actual ON time of the fans.
Actual ON time (min/sec) = percentage ON time (%) x fan cycle time (min/sec).
NOTE : Cycle time = ON time + OFF time.
Fan Timer Setting Calculation - Metric
Example: One house of 30,000 broilers weighing 800 g at 20 days of age. From the table on ventilation rates per bird for temperatures between -1 and 16oC (30 and 61oF), the theoretical minimum ventilation rate at 800 g is0.594 m³/hr per bird.
Step 1: Determine the required house ventilation rate.
Total house ventilation required = 0.594 m³/hr per bird x 30,000 birds = 17,820 m³/hr.
Step 2: Calculate the percentage ON time of the fans.
Assume the use of three 91 cm fans each with a capacity of 16,978 m³/hr (at the required operating pressure).
total ventilation neededPercentage ON time = x 100 total operating fan capacity
Total operating fan capacity = 16,978 m³/hr x 3 = 50,934 m³/hr. 17,820 m³/hrPercentage ON time = x 100 = 35% 50,934 m³/hr
Step 3: Calculate the actual ON time of the fans.
Assume that a 5 minute (300 second) cycle is used.
Actual ON time = 0.35 x 300 seconds = 105 seconds.
So, the fans should be ON for 105 seconds, and OFF for 195 seconds.
NOTE: This is purely a theoretical estimation of the minimum ventilation requirement. Actual fan and timer settings MUST be determined based on actual house conditions, air quality, and bird behavior.
Ap
pen
dic
es
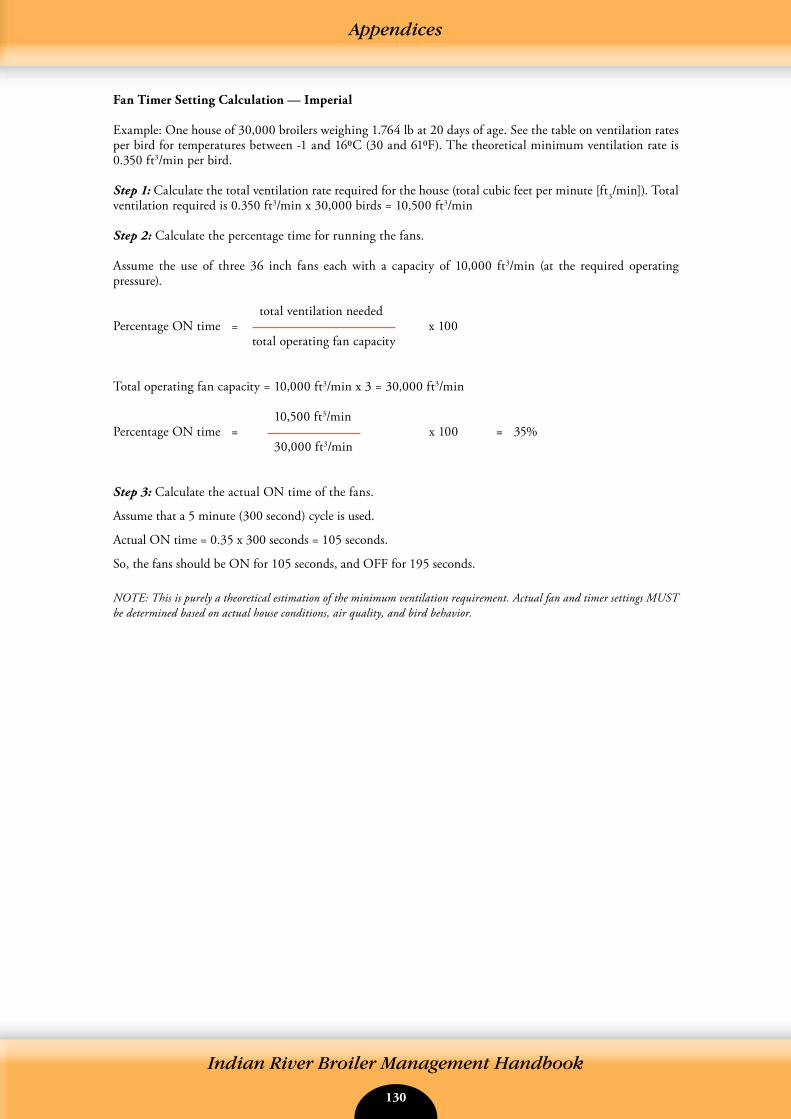
130 131
Indian River Broiler Management Handbook
Appendices
Fan Timer Setting Calculation — Imperial
Example: One house of 30,000 broilers weighing 1.764 lb at 20 days of age. See the table on ventilation rates per bird for temperatures between -1 and 160C (30 and 610F). The theoretical minimum ventilation rate is 0.350 ft3/min per bird.
Step 1: Calculate the total ventilation rate required for the house (total cubic feet per minute [ft3/min]). Total ventilation required is 0.350 ft3/min x 30,000 birds = 10,500 ft3/min
Step 2: Calculate the percentage time for running the fans.
Assume the use of three 36 inch fans each with a capacity of 10,000 ft3/min (at the required operating pressure).
total ventilation neededPercentage ON time = x 100 total operating fan capacity
Total operating fan capacity = 10,000 ft3/min x 3 = 30,000 ft3/min
10,500 ft3/minPercentage ON time = x 100 = 35% 30,000 ft3/min
Step 3: Calculate the actual ON time of the fans.
Assume that a 5 minute (300 second) cycle is used.
Actual ON time = 0.35 x 300 seconds = 105 seconds.
So, the fans should be ON for 105 seconds, and OFF for 195 seconds.
NOTE: This is purely a theoretical estimation of the minimum ventilation requirement. Actual fan and timer settings MUST be determined based on actual house conditions, air quality, and bird behavior.
130 131
Indian River Broiler Management Handbook
Absorbent 47Activity 17, 21, 51, 73, 82, 84, 87, 92, 94, 96, 111Additive 26, 28, 32, 46, 54, 55, 64, 68 Air exchange / flow / speed 8, 9, 13, 14, 15, 20, 68, 69, 74, 75, 76, 77, 78, 79, 80, 81, 82, 83, 84, 85, 86,
87, 88, 89, 90, 91, 112, 114Air inlet 60, 78, 79, 80, 81, 83, 84, 85, 86, 87, 90, 96 Air leakage / tightness / pressure 8, 9, 75, 77, 78, 86Air space 17 Air quality 8, 9, 13, 21, 65, 69, 70, 73, 75, 79, 82Alertness 8, 10, 13, 25, 70 All-in / all-out 15 Amino Acid 25, 27, 41, 42, 43, 44, 53, 55 Ammonia 8, 9, 20, 33, 34, 54, 55, 61, 68, 73, 83Anti-nutritional factor 34, 50 Antibiotic 34, 47 Antibody 12Antioxidant 32, 47, 50, 51Ascites 5, 73, 92Automated / automatic feeding 11, 16, 18, 37, 38,
39, 59 Automatic, ventilation 21, 75, 76, 77, 79, 88, 90Automatic, weigh scale 104, 108Bacteria 39, 47, 59, 61, 62, 63, 64, 65, 70, 97Baiting 66, 67Barrier 57, 68, 76Behavior 6, 7, 8, 9, 10, 11, 16, 17, 20, 21, 22, 23, 38,
71, 73, 82, 84, 85, 87, 88, 91, 92, 93, 95, 96Biofilm 60, 61 Biosecurity 14, 15, 33, 57, 58, 59, 60, 61, 62, 63, 64, 65,
66, 67, 68, 69, 70, 71, 98 Body temperature 13, 14, 15, 54, 91Body weight 8, 11, 27, 31, 48, 57, 93, 94, 101, 102,
105, 106, 110 Bore holes 118Breast 10, 32, 37, 38, 39, 48, 52, 53, 94, 97Breeder flock 57, 67, 68Brooding 6, 9, 11, 12, 13, 14, 16, 17, 18, 19, 20, 21,
22, 36, 37, 48, 69. 73, 78, 80, 97, 106, 107Calcium 26, 36, 44, 45, 47, 55, 61, 62, 64, 90Carbon dioxide / monoxide 20, 54, 73, 83Carcass 6, 25, 26, 41, 43, 44, 48, 49, 51, 52, 54, 65, 94,
98, 107, 109Catching 7, 32, 70, 93, 102, 103, 109, 110, 111, 112,
113, 114Chick, placement / quality 5, 6, 7, 11, 12, 13,
14, 15, 16, 17, 18, 19, 20, 21, 22, 23, 24, 27, 29, 30, 36, 37, 38, 41, 42, 46, 48, 49, 51, 57, 58, 60, 63, 67, 69, 74,
79, 83, 93, 97, 99, 103, 106Chilling 79Chloride / chlorine 26, 33, 34, 35, 44, 45, 46,
50, 54, 55, 61, 63, 64, 67 Cleaning / disinfection 6, 15, 36, 57, 58, 59, 60, 61,
62, 63, 64, 66, 67, 68, 69, 112 Coccidia / Coccidiostat 32, 34, 35, 54, 61, 111Coefficient of variation (CV) 101, 104 Coliform 63, 64 Comfort 10, 14, 15, 21, 69, 70, 73, 74, 75, 82, 83, 84,
85, 87, 88, 90, 91, 94, 96, 98, 114
Competition 38, 39Condemnation 57, 70, 71, 113Condensation 16Condition, bird 8, 9, 109Contamination, air / litter / feed 32, 34, 39, 47, 49,
50, 51, 53, 60, 61, 63, 64, 65, 66, 97, 98, 110, 111Controlled environment 12, 75, 76, 77, 100 Convection 75Cooling / cold 9, 13, 14, 16, 17, 19, 20, 22, 33, 35,
38, 50, 53, 61, 71, 75, 76, 78, 79, 80, 83, 84, 85, 86, 87, 88, 89, 90, 91, 94, 97, 114
Copper 64Crate 110, 112, 113, 114Crop 8, 10, 15, 23, 24, 59, 69, 99, 111Crude protein 26, 28, 33, 33, 35, 43, 55Crumb 9, 11, 16, 23, 27, 29, 30, 31, 33, 34, 35, 38,
48, 51, 52, 53 Curtain 59, 60, 61, 74, 75, 77, 86, 112Dark 12, 16, 35, 50, 62, 69, 92, 93, 94, 96, 111 Daylength 93, 94Dead bird disposal 65Dead on arrival (DOA) 57, 69Dehydration 14, 18, 19, 37, 69Density, stocking 5, 6, 17, 68, 85, 86, 87, 93, 98, 99,
100, 107Depletion 6, 7, 36, 38, 59, 93, 101, 111
Diagnosis of disease 71Diet 25, 26, 27, 28, 29, 32, 33, 34, 35, 38, 41, 42, 43, 44, 45, 46, 47, 48, 49, 50, 51, 53, 54, 55, 69, 98, 111
Direction plate 80, 81Disease 5, 10, 12 15, 27, 46, 57, 58, 63, 65, 66, 67,
68, 69, 70, 71, 73, 98, 104, 106 Disinfection 6, 57, 59, 61, 62, 63, 66, 68, 69Disposal 16, 59, 65Distribution, curve 104, 105 Distribution, birds / feed 8, 9, 18, 29, 30, 31, 39, 52,
68, 74, 82, 83, 84, 87Donor flock / Parent flock 12, 14, 16, 20, 57Downgrading 6, 49, 98, 111Downtime 66, 67, 69 Drainage 65 Drinker 9, 16, 17, 18, 19, 35, 36, 37, 38, 59, 60, 63,
68, 69, 79, 82, 84, 94, 98, 99, 100, 104, 106, 111, 114 Dust 8, 9, 16, 19, 29, 34, 52, 59, 60, 73, 96, 97, 98,
99Effective temperature 86Egg 6, 7, 11, 27, 69 Electronic weigh scale 101, 103, 106, 107Energy 25, 26, 27, 28, 29, 33, 41, 42, 43, 44, 49, 51, 53,
54, 69, 95Enteric disorder 34, 35, 54, 55Environment 5, 7, 8, 9, 10, 11, 12, 14, 15, 16, 19, 20,
21, 22, 23, 25, 27, 33, 34, 41, 42, 43, 53, 54, 55, 61, 65, 67, 69, 70, 71, 73, 74, 75, 76, 77, 78, 79, 80, 81, 82, 83,
84, 85, 86, 87, 88, 89, 90, 91, 92, 93, 94, 95, 96, 97, 98, 99, 100, 106, 109, 115
Enzyme 26, 32, 33, 34, 45, 47, 55 Evaporative cooling 20, 61, 76, 85, 88, 89, 90, 91Evisceration 32, 53
Keyword Index
Key
wo
rds
132 133
Indian River Broiler Management Handbook
Fans 9, 20, 60, 61, 62, 74, 75, 76, 78, 79, 80, 81, 82, 83, 84, 85, 86, 87, 88, 89, 90, 91,
114, 115Farm design 57Fats and oils, diet 25, 26, 29, 33, 34,
35, 41, 42, 46, 47, 48, 51, 52, 53, 54, 55, 67, 73, 98, 107, 110
Feathering 10, 46, 71, 85, 107Fecal excretion / contamination 33, 36, 42,
54, 64, 71, 110, 111 Feed, additives 26, 28, 32, 46, 54, 55, 68 Feed, allocation / distribution 5, 9, 16, 29,
30, 37, 38 Feed, cost 6, 25, 27, 28, 32, 41, 42, 46, 47Feed, efficiency / conversion 7, 25, 26, 28,
29, 32, 39, 41, 42, 44, 52, 57, 93 Feed, form / type / quality 8, 9, 11, 16, 28, 29,
30, 31, 34, 42, 43, 44, 45, 46, 47, 48, 49, 50, 51, 52, 53
Feed, formulation / ingredients / manufacture 25 25, 26, 27, 28, 29, 31, 32, 33, 34, 35, 39, 41, 42, 43, 44, 45, 46, 47, 48, 49, 50, 51, 52, 53, 54,
64, 65 Feed, intake / appetite / behavior 6, 7, 8, 9,
10, 11, 16, 17, 19, 23, 25, 27, 28, 29, 32, 33, 35, 38, 39, 43, 44, 45, 46, 47, 62, 89, 93
Feed, separate sexes 28, 102, 107Feed, storage / handling 27, 47, 49, 50 Feed, system / equipment 6, 7, 8, 9, 11, 16, 17,
18, 19, 25, 27, 30, 31, 32, 38, 39, 57, 58, 59, 60, 61, 112
Feed:water ratio 33, 34, 35, 37 Feed, waste 28, 29, 33, 38, 39, 54, 66 Feed, withdrawal 28, 32, 48, 93, 109,
110, 111 Feed-bin 9, 27, 48, 62, 68 Feeding management 15, 16, 19, 23, 24, 25,
27, 28, 32, 38, 39, 42, 47, 48, 49, 50, 51, 52, 66, 68, 82, 87, 92, 93, 94, 106
Feeding space 38, 68, 93, 99, 100, 106Feet 10 Female / male 28, 104, 105, 107Fencing 57, 59, 87, 88 Filter 51, 63, 89Fines 29, 31, 34, 51Flaps, ventilation 75 Flock 5, 6, 7, 8, 9, 10, 11, 12, 14, 15, 16, 20,
21, 30, 35, 36, 38, 41, 48, 57, 59, 61, 62, 63, 66, 67, 68, 69, 70, 71, 74, 85, 92, 93, 98, 100, 101,
103, 104, 105, 106, 107, 110, 111 Floor, feeding 9, 11, 38 Floor, hygiene 58, 59, 60, 61, 62, 97, 98 Floor, space 9, 82, 99Flow rate 35, 36, 37 Fluorescent light 95Fogging / misting 61, 90, 91 Foot Pad Dermatitis 34, 35, 46, 49, 54,
92, 96, 98, 100Formaldehyde / formalin 47, 61Fumigation 59, 61, 62
Fungal disease 32, 47, 49, 53, 70Gases 20, 21, 73, 74, 78Genetic potential 5Grading 6, 43, 49, 98, 111 Growth 5, 6, 8, 11, 18, 25, 26, 27, 28, 29,
32, 35, 38, 41, 42, 44, 45, 47, 48, 49, 51, 52, 53, 54, 55, 57, 63, 64, 68, 73, 92, 93, 96, 97, 101
Handling 27, 67, 69, 70, 102, 109, 111Hard water 63, 64, 90 Harvesting 112Hatchery 6, 7, 11, 12, 13, 14, 19, 58, 69Hauling 13, 70Head 36, 112Header 60 Health 5, 8, 10, 11, 12, 15, 27, 33, 34, 35, 41,
44, 46, 47, 49, 50, 53, 54, 57, 58, 59, 60, 61, 62, 63, 64, 65, 66, 67, 68, 69, 70, 71, 73, 90, 92, 93,
94, 99 Heat stress 33, 45, 53, 54 Heating 15, 16, 17, 19, 20, 22, 61, 74, 75,
82, 112, 113, 114, 115Hock 10, 19, 49, 54, 69 Holding time / area 13, 14, 109, 110, 114,
115Hot weather 33, 35, 38, 49, 53, 54, 75, 76,
85, 87, 88, 91, 94, 100, 114, 115 House design 57, 57, 68, 76Housing system 100Humidity 11, 13, 15, 16, 17, 19, 20, 21, 22, 68,
69, 73, 74, 75, 76, 79, 82, 83, 85, 86, 87, 88, 90, 91, 100, 114, 115
Hygiene 14, 62, 63, 68, 69, 70Immunity 6, 12, 14, 26, 44, 46, 49, 67, 70 Incandescent 95Incineration 65Incubation 6, 11, 12, 19, 27, 69Infection 99 Injury / injuries 10, 102, 104, 111, 112Inlets 9, 60, 74, 76, 78, 79, 80, 81, 82, 83, 84,
85, 86, 87, 90, 91, 96Insect 58, 59Insulation 16, 76 Iron 61, 63, 64Isolation 62 Laboratory analysis 25, 67, 71Leg 5, 10, 39, 44, 45, 69, 92, 94, 112 Legislation 28, 33, 46, 48, 62, 65, 92, 93, 94,
96, 99, 100, 109, 113, 114, 115Lighting 5, 8, 9, 16, 36, 38, 39, 60, 63, 68,
69, 70, 71, 75, 82, 87, 92, 93, 94, 95, 96, 107, 109, 110, 111, 112, 114, 115
Limestone 26Litter 8, 9, 10, 11, 15, 16, 19, 26, 32, 34, 35,
36, 37, 43, 45, 49, 52, 54, 55, 58, 59, 60, 62, 66, 67, 68, 69, 70, 71, 73, 75, 79, 86, 91, 97, 98, 99,
110, 111, 112 Live weight 7, 12, 13, 18, 19, 38, 41, 43, 48, 51,
82, 99, 100, 101, 102, 103, 104, 105, 106, 107, 108, 110
Lux 16, 96, 109
Keyword Index
132 133
Indian River Broiler Management Handbook
Lysine 28, 43, 62Magnesium 44, 45, 64Male / female 28, 104, 105, 107Mash 29, 30, 31, 52, 53 Meat yield 5, 6, 7, 25, 26, 28, 32, 41, 44, 46,
48, 52, 53, 92, 94, 110, 111 Medication 32, 46, 47, 53, 64, 111Metabolic 27, 42, 45, 46, 49, 54, 55, 70 Methionine 28, 43Micron 29, 52, 53, 63, 91Migration 87, 88 Mineral 25, 26, 27, 33, 34, 41, 44, 45, 46,
47, 50, 54, 55, 61, 65 Mini-drinker 16, 17, 18, 37 Mini-pellets 27, 29, 38, 48, 51, 52 Minimum ventilation 9, 21, 74, 77, 78, 79,
80, 81, 82, 83, 84, 86Misting / fogging 19, 61, 76, 90, 91, 115Mixing of chicks 12, 16Modules 110, 112, 113, 114Mold 47, 97Moisture 9, 16, 19, 20, 34, 51, 53, 54, 68, 69, 73,
74, 78, 79, 88, 91, 97, 98, 99 Monitoring 6, 7, 14, 20, 21, 57, 62, 71, 73, 75,
78, 101, 102, 103, 104, 105, 106, 107, 108, 111Mortality 13, 18, 54, 57, 64, 68, 71, 76, 92,
93, 96, 113 Multi-age site 15Musty 9Mycotoxin 26, 34, 47, 49, 50, 53Natural ventilation 74, 75Navel 13, 69Nipple drinker 16, 17, 18, 19, 35, 36, 37, 59,
63Nitrogen / nitrate 28, 33, 35, 42, 43, 55,
64, 98Normal distribution 104Nutrient composition / density / intake / recommendation 11, 25, 26, 27, 28, 29, 32, 33, 34, 41, 42, 43, 44, 46, 47, 48, 49, 50, 51, 52, 53Open-sided housing 59, 60, 74, 75, 76,
94, 100 Organic acids 32, 47, 52Organic matter, water 33, 61Overheating 113, 114Oxygen 61, 63Pad cooling 9, 85, 86, 87, 89, 90, 91 Pan feeder 17, 18, 38Panting 9, 22, 54, 87, 91, 112 Paper 11, 16, 17, 18, 19, 38, 39, 97Parasite 59, 70Parent flock / donor flock 12, 14, 16, 20, 57 Particle size, feed 29, 30, 31, 51, 52Pathogen 15, 29, 47, 57, 59, 61, 63, 67, 68, 98,
99Peat moss 97Pellet 9, 11, 16, 27, 29, 30, 31, 32, 33, 34, 35,
38, 47, 48, 51, 52, 53, 97Penning 112
Keyword Index
Key
wo
rds
Pest control 68, 97 Phosphorus 26, 33, 44, 45, 47, 55Photoperiod 92Phytase 33, 34, 45, 47, 55Placement 12, 14, 15, 16, 18, 19, 23, 24, 38,
66, 67, 69, 71, 74, 107 Platform weighing 106, 107 Pollution 65Population variation / uniformity 16, 38, 71,
73, 74, 99, 101, 102, 103, 104, 105, 106, 107, 108
Post-mortem 71Potassium 26, 33, 34, 35, 44, 45, 54, 55, 64 Power 70, 74, 76, 77 Prebiotic 47 Pre-catch 112Pressure 9, 19, 35, 59, 60, 61, 76, 77, 78, 79,
80, 81, 82, 83, 84, 86, 90, 91, 99, 113Probiotic 47Processing, birds 6, 7, 11, 14, 25, 38, 42, 44, 48, 49, 53, 57, 69, 70, 71, 93, 99, 100, 101, 103, 106,
107, 109, 110, 111, 112, 113, 114, 115Processing, feed 26, 27, 28, 32, 38, 46, 47, 48,
49, 50, 51, 52, 55Prophylactic 47 Protein 25, 26, 28, 29, 33, 34, 35, 41, 42,
43, 44, 47, 50, 53, 54, 55, 98, 110Protozoal disease 70Quality control of feed 49, 50 Radiant heat 17, 76Random sampling 62, 104Rapeseed 26, 51Raw material 34, 42, 43, 49, 50, 51, 52, 55,
97Rearing 48Records 8, 10, 14, 66, 67, 70, 71, 79, 102,
103, 104, 106Reflectors for light 96Regulations 47, 59, 111 Relative humidity 11, 13, 15, 17, 19, 21,
22, 69, 73, 74, 75, 76, 79, 83, 85, 86, 87, 88, 90, 91, 115
Rendering 51, 61, 65 Repairs and maintenance 61 Residues 28, 51, 111Respiration / respiratory 8, 9, 19, 20, 33, 34,
54, 62, 71, 73Rodent / vermin 57, 58, 66, 67, 99 Salmonella 32, 50, 52, 62 Salt / sodium 26, 33, 34, 35, 44, 45, 49, 54,
55, 50, 55, 62, 64, 98Sampling 23, 31, 62, 63, 71, 101, 102, 103,
104, 106 Sanitization 60, 61, 63, 66, 68, 69, 70 Sawdust 97Scratching 10, 39, 96, 111SDS Sudden Death Syndrome 92Security / biosecurity 14, 15, 33, 57, 58, 59,
60, 61, 62, 63, 64, 65, 66, 67, 68, 69, 70, 71, 98
134 135
Indian River Broiler Management Handbook
Notes
Sediment 63 Sensors, environment 20, 21, 86, 87Separate sex management 6, 28, 48, 102, 103,
104, 105, 107, 110Serological monitoring 71 Shank 112Sidewall 74, 75, 76, 77, 78, 79, 80, 81, 82, 83,
84, 85, 86, 87, 89 Single-age site 57Site 15, 57, 59, 63, 66Skeleton 6, 11, 26, 45, 55, 92 Sodium – see saltSoya 26, 47, 50Space 10, 17, 20, 38, 39, 68, 69, 70, 78, 81, 93,
94, 99, 100, 110Spillage 29, 38, 39, 66 Spot brooder 17, 18, 19Spray, disinfection 59, 61, 66Spray, cooling 19, 76, 87, 89, 90, 91, 115Standard deviation 70, 101, 104Stocking density 5, 6, 17, 85, 86, 87, 93, 98, 99,
100, 106, 107 Storage, eggs 6, 69Storage, feed 27, 47, 49, 50, 51, 63, 65, 66Storage, water 35, 63Straw 97Stress 7, 10, 14, 27, 33, 34, 43, 44, 45, 46, 49,
53, 54, 67, 70, 71, 102, 104, 112, 113Stunted chicks 69Sulphates 64Target 6, 8, 10, 11, 13, 20, 23, 24, 25, 27, 48, 55, 57, 99, 100, 101, 102, 103, 105, 106, 107, 110
Temperature 5, 8, 9, 11, 13, 14, 15, 16, 17, 18, 19, 20, 21, 22, 33, 35, 36, 38, 53, 54, 61, 68, 69, 70, 71, 73, 74, 75, 76, 77, 78, 80, 82, 83, 84,
85, 86, 87, 88, 90, 91, 97, 100, 107, 110, 113, 114, 115
Temperature, litter 15, 16 Temperature, sensor 86Thermostat 75 Thinning 111Timer 75, 79, 81, 82, 83Toxin 26, 32, 34, 47, 49, 50, 53, 68, 70 Trace mineral 27, 33, 46, 50, 54, 55, 64Track 38, 39, 61 Trailers 59Training 57, 59, 70, 113 Transitional ventilation 77, 83, 84, 85, 86, 87Transport 6, 7, 12, 13, 14, 31, 48, 51, 52, 57,
69, 70, 109, 110, 112, 113, 114, 115Tray 16, 37, 38, 39Trough 38Tube feeders 38, 39 Tunnel ventilation 77, 79, 83, 84, 85, 86,
87, 88, 89, 90, 91Uniformity 7, 11, 12, 14, 16, 38, 71, 73, 74, 99,
101, 102, 103, 104, 105, 106, 107, 108 Ultraviolet light 63 Vaccination 5, 9, 12, 15, 34, 57, 67, 68, 70
Vacuum, ventilation 77Variability / variation 5, 6, 10, 12, 25, 44,
46, 75, 95, 101, 104, 105, 106, 107, 110 Vehicle 12, 13, 14, 15, 58, 59, 112, 114, 115 Vent (cloaca) 10, 13, 14, 21 Ventilation 5, 9, 19, 20, 21, 58, 60, 61, 62, 67,
70, 71, 73, 74, 75, 76, 77, 78, 79, 80, 81, 82, 83, 84, 85, 86, 87, 88, 89, 90, 91, 97, 98, 99, 100,
106, 112, 113, 114, 115Vermin 57, 58, 66, 67 99 Virus / viral 12, 59, 61, 67, 70Visitor 66Vitamin 25, 26, 27, 33, 41, 45, 46, 47, 49, 50,
51, 54, 55, 61 Vocalization 8, 9, 71 Walk, chick 13 Walk, through 10, 81, 110 Washing 58, 60, 61, 62, 66, 98Waste, feed 28, 29, 39, 51 Waste, gasses 21Waste, heat 54Waste, water 60Water, cooling / environment 73, 74, 77,
87, 88, 89, 90, 91, 94, 115Water, provision 5, 8, 9, 10, 12, 15, 16, 18, 19,
23, 24, 25, 26, 27, 28, 33, 34, 35, 36, 37, 38, 45, 46, 50, 51, 55, 57, 60, 61, 63, 64, 67, 68, 69, 70,
71, 74, 87, 94, 98, 110, 111 Water, quality / contamination 8, 9, 16, 33,
35, 38, 46, 50, 59, 60, 61, 63, 64, 65, 90, 98 Water:feed ratio 34, 35, 38Wavelength 92, 96 Weak chick 69Weighing, bird 100, 101, 102, 103, 104, 105,
106, 107Weight, bird 5, 6, 7, 8, 11, 13, 18, 19, 27, 28,
31, 38, 41, 43, 48, 51, 57, 82, 85, 92, 93, 94, 99, 100, 101, 103, 104, 105, 106, 107, 108, 110, 114
Welfare 5, 6, 7, 10, 11, 25, 27, 28, 35, 41, 50, 53, 54, 55, 57, 62, 65, 69, 70, 73, 91, 92, 93, 95, 99,
100, 102, 109, 110, 111 Wet litter 9, 19, 34, 35, 36, 37, 43, 55, 64, 75,
79, 86, 91, 97, 98 99, 112Wheat 26, 27, 32, 47, 48, 51, 52, 53, 110 Whole-house brooding 17, 18, 19, 20Whole grain 32, 52, 53, 110, 111Wind, environment / chill 20, 75, 76,
85, 86, 87, 88, 90 98, 114Wing damage 111Withdrawal 28, 48, 93, 109, 110, 111Wood, litter 97Yolk 11, 13, 49, 69Zinc 46, 49, 55

134 135
Indian River Broiler Management Handbook
Notes
Notes

0814-AVNIR-011www.aviagen.com
®
Every attempt has been made to ensure the accuracy and relevance of the information presented. However, Aviagen accepts no liability for the consequences of using the information for the management of chickens.
For further information on the management of Indian River stock, please contact your local Technical Service Manager or the Technical Services Department.
Aviagen and the Aviagen logo, and Indian River and the Indian River's logo are registered trademarks of Aviagen in the US and other countries. All other trademarks or brands are registered by their respective owners.
© 2014 Aviagen.