in situ laser gas analyzers 5 sitrans sl - raeco€¦ · in situ laser gas analyzers sitrans sl...
TRANSCRIPT

Continuous gas analysis
In situ Laser Gas AnalyzersSITRANS SL
Operating Instructions
12/2010 A5E01132948-04
Introduction 1
Description
2
Application planning
3
Installing
4
Explosion protection
5
Commissioning
6
Operation
7
Interfaces to automation systems
8
Service and maintenance
9
Alarm, error, and system messages
10
Technical data
11
Dimension drawings
12
Spare parts and accessories
13
Appendix
A
List of abbreviations
B

Legal information Warning notice system
This manual contains notices you have to observe in order to ensure your personal safety, as well as to prevent damage to property. The notices referring to your personal safety are highlighted in the manual by a safety alert symbol, notices referring only to property damage have no safety alert symbol. These notices shown below are graded according to the degree of danger.
DANGER indicates that death or severe personal injury will result if proper precautions are not taken.
WARNING indicates that death or severe personal injury may result if proper precautions are not taken.
CAUTION with a safety alert symbol, indicates that minor personal injury can result if proper precautions are not taken.
CAUTION without a safety alert symbol, indicates that property damage can result if proper precautions are not taken.
NOTICE indicates that an unintended result or situation can occur if the corresponding information is not taken into account.
If more than one degree of danger is present, the warning notice representing the highest degree of danger will be used. A notice warning of injury to persons with a safety alert symbol may also include a warning relating to property damage.
Qualified Personnel The product/system described in this documentation may be operated only by personnel qualified for the specific task in accordance with the relevant documentation for the specific task, in particular its warning notices and safety instructions. Qualified personnel are those who, based on their training and experience, are capable of identifying risks and avoiding potential hazards when working with these products/systems.
Proper use of Siemens products Note the following:
WARNING Siemens products may only be used for the applications described in the catalog and in the relevant technical documentation. If products and components from other manufacturers are used, these must be recommended or approved by Siemens. Proper transport, storage, installation, assembly, commissioning, operation and maintenance are required to ensure that the products operate safely and without any problems. The permissible ambient conditions must be adhered to. The information in the relevant documentation must be observed.
Trademarks All names identified by ® are registered trademarks of the Siemens AG. The remaining trademarks in this publication may be trademarks whose use by third parties for their own purposes could violate the rights of the owner.
Disclaimer of Liability We have reviewed the contents of this publication to ensure consistency with the hardware and software described. Since variance cannot be precluded entirely, we cannot guarantee full consistency. However, the information in this publication is reviewed regularly and any necessary corrections are included in subsequent editions.
Siemens AG Industry Sector Postfach 48 48 90026 NÜRNBERG GERMANY
order number: A5E01132948 Ⓟ 12/2010
Copyright © Siemens AG 2008, 2009, 2010. Technical data subject to change

SITRANS SL Operating Instructions, 12/2010, A5E01132948-04 5
Table of contents
1 Introduction................................................................................................................................................ 9
1.1 Purpose of this documentation ......................................................................................................9 1.2 History ............................................................................................................................................9 1.3 Product versions ..........................................................................................................................10 1.4 General information .....................................................................................................................11 1.5 Special information and warnings................................................................................................11 1.6 Warranty conditions .....................................................................................................................12 1.7 Delivery information .....................................................................................................................12 1.8 Standards and regulations ...........................................................................................................12
2 Description............................................................................................................................................... 13 2.1 Overview ......................................................................................................................................13 2.2 Benefit ..........................................................................................................................................14 2.3 Range of application ....................................................................................................................15 2.4 Design ..........................................................................................................................................16 2.4.1 Transmitter and receiver units .....................................................................................................16 2.4.2 Display and control panel.............................................................................................................19 2.4.3 Cables for connection ..................................................................................................................20 2.4.4 Inputs/outputs...............................................................................................................................21 2.5 Functional description ..................................................................................................................22 2.5.1 Operating principle.......................................................................................................................22 2.5.2 Influences on the measurement...................................................................................................24 2.5.3 Maintenance and fault messages ................................................................................................28 2.5.4 Essential characteristics ..............................................................................................................29 2.6 Product characteristics.................................................................................................................30
3 Application planning................................................................................................................................. 31 3.1 Cable selection recommendations...............................................................................................31 3.2 Network and system integration...................................................................................................32 3.2.1 Overview ......................................................................................................................................32 3.2.2 Analog I/O and digital I/O system configuration...........................................................................33 3.2.3 PROFIBUS DP system configuration ..........................................................................................35 3.2.4 Modbus system configuration ......................................................................................................37

Table of contents
SITRANS SL 6 Operating Instructions, 12/2010, A5E01132948-04
4 Installing .................................................................................................................................................. 39 4.1 Safety information ....................................................................................................................... 39 4.2 Mounting...................................................................................................................................... 40 4.2.1 Mounting conditions .................................................................................................................... 40 4.2.2 Preparations................................................................................................................................ 41 4.2.3 Installation of process flanges..................................................................................................... 43 4.2.4 Installation of the sensors ........................................................................................................... 44 4.2.5 Installation of the purging tubes .................................................................................................. 45 4.3 Electric connections non Ex........................................................................................................ 46 4.3.1 System set-up (non Ex only) ....................................................................................................... 47 4.3.2 Screw terminals........................................................................................................................... 48 4.3.3 Connecting cables....................................................................................................................... 52 4.4 Alignment of SITRANS SL .......................................................................................................... 57 4.4.1 Alignment kit................................................................................................................................ 58 4.4.2 Alignment procedure ................................................................................................................... 59 4.5 Purging........................................................................................................................................ 64 4.5.1 Sensor side purging .................................................................................................................... 64 4.5.2 Process side purging................................................................................................................... 65 4.5.3 Purging set-up............................................................................................................................. 66
5 Explosion protection ................................................................................................................................ 67 5.1 ATEX........................................................................................................................................... 67 5.1.1 Safety information ....................................................................................................................... 67 5.1.2 Installation ATEX......................................................................................................................... 70 5.1.3 ATEX system set-up ................................................................................................................... 71 5.1.4 Electric connections in the ATEX system ................................................................................... 73 5.2 FM ............................................................................................................................................... 78 5.2.1 Introduction ................................................................................................................................. 78 5.2.2 Safety information ....................................................................................................................... 78 5.2.3 Installation of the FM version of SITRANS SL............................................................................ 81 5.2.4 FM system set-up........................................................................................................................ 82 5.2.5 Electric connections in the FM system........................................................................................ 84

Table of contents
SITRANS SL Operating Instructions, 12/2010, A5E01132948-04 7
6 Commissioning ........................................................................................................................................ 87 6.1 General information for commissioning .......................................................................................87 6.2 Starting SITRANS SL for the first time.........................................................................................88 6.2.1 Defining the path length ...............................................................................................................88 6.2.2 Further input parameters .............................................................................................................89 6.3 PROFIBUS configuration for SITRANS SL..................................................................................89 6.3.1 Cyclic data transfer ......................................................................................................................89 6.3.2 System integration .......................................................................................................................90 6.3.3 SIMATIC MPI cable installation ...................................................................................................90 6.3.4 PG/PC interface setting ...............................................................................................................91 6.3.5 Loading GSD file..........................................................................................................................92 6.3.6 Network configuration with SIMATIC Manager............................................................................95 6.3.7 Creation of a new project with SIMATIC Manager.......................................................................96 6.3.8 Hardware configuration..............................................................................................................101 6.4 Modbus configuration for SITRANS SL .....................................................................................106 6.4.1 Modbus settings.........................................................................................................................106 6.4.2 Byte and word ordering..............................................................................................................106 6.4.3 Supported Modbus functions .....................................................................................................107
7 Operation............................................................................................................................................... 109 7.1 General ......................................................................................................................................111 7.2 Measurement views ...................................................................................................................114 7.3 Menu system..............................................................................................................................115 7.3.1 The menu structure....................................................................................................................115 7.3.2 Configuration..............................................................................................................................116 7.3.3 Diagnostics.................................................................................................................................120 7.3.4 Service .......................................................................................................................................122 7.3.5 Communication ..........................................................................................................................125 7.3.6 Security ......................................................................................................................................127 7.3.7 Language ...................................................................................................................................128
8 Interfaces to automation systems .......................................................................................................... 129 8.1 PROFIBUS DP interface............................................................................................................129 8.1.1 PROFIBUS installation...............................................................................................................129 8.1.2 Device data base files (GSD).....................................................................................................131 8.1.3 Technical data............................................................................................................................131 8.1.4 Cyclic data transmission over PROFIBUS.................................................................................132 8.1.4.1 Cyclic data structure ..................................................................................................................132 8.1.4.2 Quality byte ................................................................................................................................133 8.2 Modbus interface .......................................................................................................................136 8.2.1 Modbus installation ....................................................................................................................136 8.2.2 SITRANS SL Modbus map for gas measurement .....................................................................137 8.2.3 Quality byte coding ....................................................................................................................138 8.2.4 Modbus adresses.......................................................................................................................141 8.2.4.1 Standard Modbus.......................................................................................................................141 8.2.4.2 Enron Modbus............................................................................................................................143 8.2.4.3 Modbus alarm list .......................................................................................................................146

Table of contents
SITRANS SL 8 Operating Instructions, 12/2010, A5E01132948-04
9 Service and maintenance ...................................................................................................................... 149 9.1 Instrument verification ............................................................................................................... 149 9.1.1 Verification with the verification tube......................................................................................... 150 9.1.1.1 Verification tube ........................................................................................................................ 150 9.1.1.2 Span verification........................................................................................................................ 151 9.1.2 Verification with a verification cell ............................................................................................. 157 9.1.2.1 Span verification........................................................................................................................ 157 9.1.3 Verification of systems used in hazardous areas ..................................................................... 159 9.2 Cleaning the optical parts of the sensor.................................................................................... 160
10 Alarm, error, and system messages ...................................................................................................... 163 10.1 Alarm......................................................................................................................................... 163 10.2 Alarm list.................................................................................................................................... 170 10.3 PROFIBUS diagnosis and alarms............................................................................................. 177 10.3.1 Diagnosis and alarm handling in PROFIBUS DP ..................................................................... 177 10.3.2 Meaning of the diagnosis information ....................................................................................... 178
11 Technical data ....................................................................................................................................... 181 11.1 Technical data........................................................................................................................... 181
12 Dimension drawings .............................................................................................................................. 187 12.1 Dimensional drawings ............................................................................................................... 187
13 Spare parts and accessories ................................................................................................................. 191 13.1 Spare parts................................................................................................................................ 191 13.2 Accessories............................................................................................................................... 193
A Appendix................................................................................................................................................ 195 A.1 Gas flow calculations ................................................................................................................ 195 A.2 ESD (ElectroStatic Discharge).................................................................................................. 196 A.3 Verification Sheets .................................................................................................................... 198 A.4 Service and support .................................................................................................................. 201 A.5 Returned deliveries ................................................................................................................... 202 A.5.1 Returned deliveries form........................................................................................................... 203 A.5.2 Decontamination declaration..................................................................................................... 204
B List of abbreviations............................................................................................................................... 205 Glossary ................................................................................................................................................ 209
SITRANS SL Operating Instructions, 12/2010, A5E01132948-04 9
Introduction 11.1 Purpose of this documentation
Before beginning work with this device, please study this manual carefully! It contains important information and data whose observation ensures proper device function and saves you servicing costs. The manual will help you to operate the device more easily and efficiently, allowing you to achieve reliable results.
1.2 History The following table shows the most important changes in the documentation compared to each previous edition: Edition Remark 01 03/2008
First edition
02 05/2009
Revision of contents and layout Illustrations of the device have been changed due to changes of the device
housing. All chapters have new enhanced contents, except the following chapters:
– NEW: " Network and system integration"" – NEW: "Process interfacing over an automation system (PLC, PC)" – NEW: "Spare parts and accessories" – NEW: "Service and support" – NEW: "Interfaces to automation systems" – NEW: "Glossary"
03 07/2010
Revision of contents and layout Carbon monoxide (CO) introduced as measuring gas
04 12/2010
Update of contents and layout

Introduction 1.3 Product versions
SITRANS SL 10 Operating Instructions, 12/2010, A5E01132948-04
1.3 Product versions The product version number is found under the article number on the nameplate (see following figure).

Introduction 1.4 General information
SITRANS SL Operating Instructions, 12/2010, A5E01132948-04 11
1.4 General information The product described in this manual has left the factory in a high quality and tested condition. In order to preserve this condition and to operate this product correctly and safely, it may only be used in the manner described by the manufacturer. Furthermore, proper transportation, storage, installation, operation and maintenance of the device is vital for ensuring correct and safe operation. This manual contains the information required for the intended use of the described product. It is addressed to technically qualified personnel who are specially trained or who have the relevant knowledge of automation technology (measuring and control systems). Knowledge and technically correct implementation of the safety notes and warnings contained in this manual are required for safe installation and commissioning, as well as for safety during the operation and maintenance of the described product. Only qualified personnel have the required professional knowledge for correctly interpreting the generally valid safety notes and warnings in this manual in each specific case and to act accordingly. This manual is an inherent part of the scope of delivery, despite the fact that it can be ordered separately for logistic reasons. Due to the variety of technical details, it is not possible to consider every single detail for all versions of the described product and for every conceivable case in the set-up, operation, maintenance and use in systems. For further information, or in the case of problems which are not covered in enough detail in this document, please request the required information from your local or responsible Siemens regional office.
Note In particular, before using the device for new research and development applications, we recommend that you first contact your Siemens representative or our application department to discuss the application in question.
1.5 Special information and warnings This manual provides you with information on using, installing, operating, and maintaining the device. Pay particular attention to all special information and warnings. Information of this type is set apart from the rest of the text and is marked with the corresponding pictograms. This information provides you with useful tips and helps to avoid faulty operation.
Introduction 1.6 Warranty conditions
SITRANS SL 12 Operating Instructions, 12/2010, A5E01132948-04
1.6 Warranty conditions We expressly point out that the product quality is exclusively and conclusively described in the sales contract. The content of this product documentation is neither a part of a previous or existing agreement, promise or legal relationship, nor is it intended to modify these. All obligations on the part of Siemens AG are contained in the respective sales contract, which also contains the complete and solely applicable liability provisions. The provisions defined in the sales contract for the responsibility for defects are neither extended nor limited by the remarks in this document.
1.7 Delivery information The respective scope of delivery is listed on the shipping documents – enclosed with the delivery – in accordance with the valid sales contract. When opening the packaging, please observe the corresponding information on the packaging material. Check the delivery for completeness and undamaged condition. In particular, you should compare the Order No. on the rating plates with the ordering data, if available. If possible, please retain the packaging material, since you can use it again in case of return deliveries.
1.8 Standards and regulations As far as possible, the harmonized European standards were the basis for the specification and production of this device. If no harmonized European standards have been applied, the standards and regulations for the Federal Republic of Germany are valid. When this product is used beyond the scope of these standards and regulations, the valid standards and regulations of the country of the operating company apply.
SITRANS SL Operating Instructions, 12/2010, A5E01132948-04 13
Description 22.1 Overview
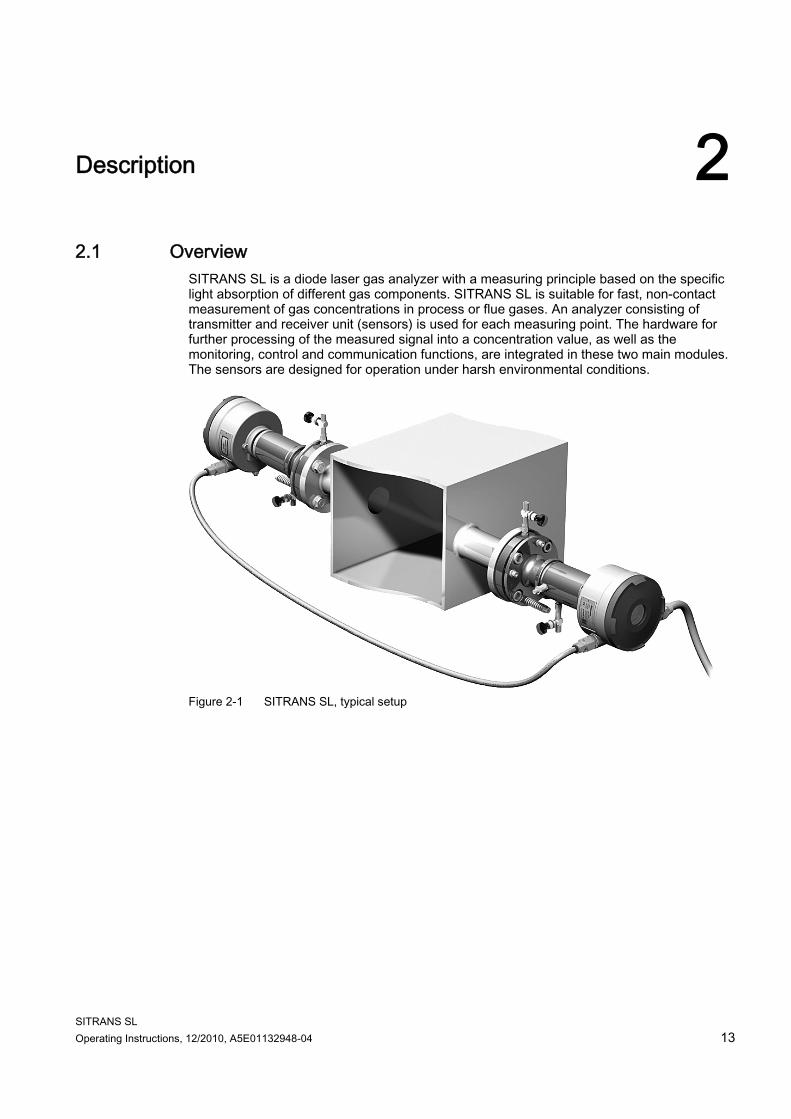
SITRANS SL is a diode laser gas analyzer with a measuring principle based on the specific light absorption of different gas components. SITRANS SL is suitable for fast, non-contact measurement of gas concentrations in process or flue gases. An analyzer consisting of transmitter and receiver unit (sensors) is used for each measuring point. The hardware for further processing of the measured signal into a concentration value, as well as the monitoring, control and communication functions, are integrated in these two main modules. The sensors are designed for operation under harsh environmental conditions.
Figure 2-1 SITRANS SL, typical setup

Description 2.2 Benefit
SITRANS SL 14 Operating Instructions, 12/2010, A5E01132948-04
2.2 Benefit The in-situ SITRANS SL gas analyzer features high operational availability, unique analytical selectivity, and a wide range of possible applications. SITRANS SL permits measurement of a gas component directly in the process: ● With high dust load ● In hot, humid, corrosive, explosive, or toxic gases ● In applications showing strong varying gas compositions ● Under harsh environmental conditions at the measuring point ● Highly selective, i.e. mostly without cross-sensitivities Special features of the SITRANS SL: ● Little installation effort ● Minimum maintenance requirements ● Extremely rugged design ● High long-term stability through built-in, maintenance-free reference gas cell ● Real-time measurements Moreover, the analyzer provides warning and error messages: ● When maintenance is required
– With large variations in the reference signal – With poor signal quality
● If the transmission violates an upper or lower limit
Description 2.3 Range of application
SITRANS SL Operating Instructions, 12/2010, A5E01132948-04 15
2.3 Range of application
Sections ● Chemical and petrochemical plants ● Power plants ● Waste incinerators ● Iron and steel industry
Applications ● Control of combustion processes ● Process optimization ● Plant and operator safety ● Process measurements in all types of power and combustion plants ● Process control ● Explosion protection ● Measurements in corrosive and toxic gases ● Quality control An overview of standard applications can be obtained from Technical data (Page 181), section 'Standard applications'.

Description 2.4 Design
SITRANS SL 16 Operating Instructions, 12/2010, A5E01132948-04
2.4 Design The SITRANS SL gas analyzer consists of a pair of cross-duct sensors - a transmitter unit and a receiver unit - both with the same dimensions. The complete analyzer is integrated in these two enclosures (pos. 1 and 7, fig. 2.2). The transmitter unit contains the laser source which light is transmitted to the receiver through the measurement path. The receiver unit contains a photodetector including electronics as well as a reference cell. The receiver unit is connected to the transmitter unit by means of a sensor connection cable. The connection cable of the receiver is used to connect the power supply and the communication interfaces. The receiver enclosure contains a local user interface (LUI) with an LC display which can be read through a window in the lid. The LUI is normally operated via a remote control panel.
2.4.1 Transmitter and receiver units Special features of the transmitter and receiver units: ● Two in situ cross duct sensors, designed as transmitter and receiver units, connected via
sensor connection cable ● Process interface which
– consists of identical assemblies for transmitter and receiver – is the interconnection between the transmitter/receiver units and the process
● Powder-coated aluminium; stainless steel ● Degree of protection IP65 ● Adjustable flanges ● Suitable for a flange connection to DN50/PN10-40, ANSI 4"/150 lbs ● Purging facilities on the process and the sensor sides, configurable application with
purging gas connections

Description 2.4 Design
SITRANS SL Operating Instructions, 12/2010, A5E01132948-04 17
Non Ex version and sensor connection cable kit
① Transmitter housing ⑨ Large cable gland (for cables with a diameter of
13 ... 18 mm) ② Transmitter tube unit ⑩, ⑪ Small cable gland (for cables with a diameter of
8 ... 12 mm) ③ Process interface ⑬ Reference cell inside the receiver unit ④ Customer flange (not included) ⑭ Remote control ⑤ Purging tube (accessory) Sensor connection cable kit (accessory), consisting of ⑥ Receiver tube unit ⑫ Sensor connection cable ⑦ Receiver housing ⑮ Receiver junction box ⑧ Connection cable (accessory) ⑯ Receiver junction box cable ⑰ Cable gland for Ethernet cable Figure 2-2 Connection of a non Ex system with the sensor connection cable kit (accessory)
The sensor connection cable is used to connect the transmitter unit to the receiver unit. This can be done either directly, or via a receiver junction box (see preceding figure). A sensor connection cable kit is available as accessory.
Description 2.4 Design
SITRANS SL 18 Operating Instructions, 12/2010, A5E01132948-04
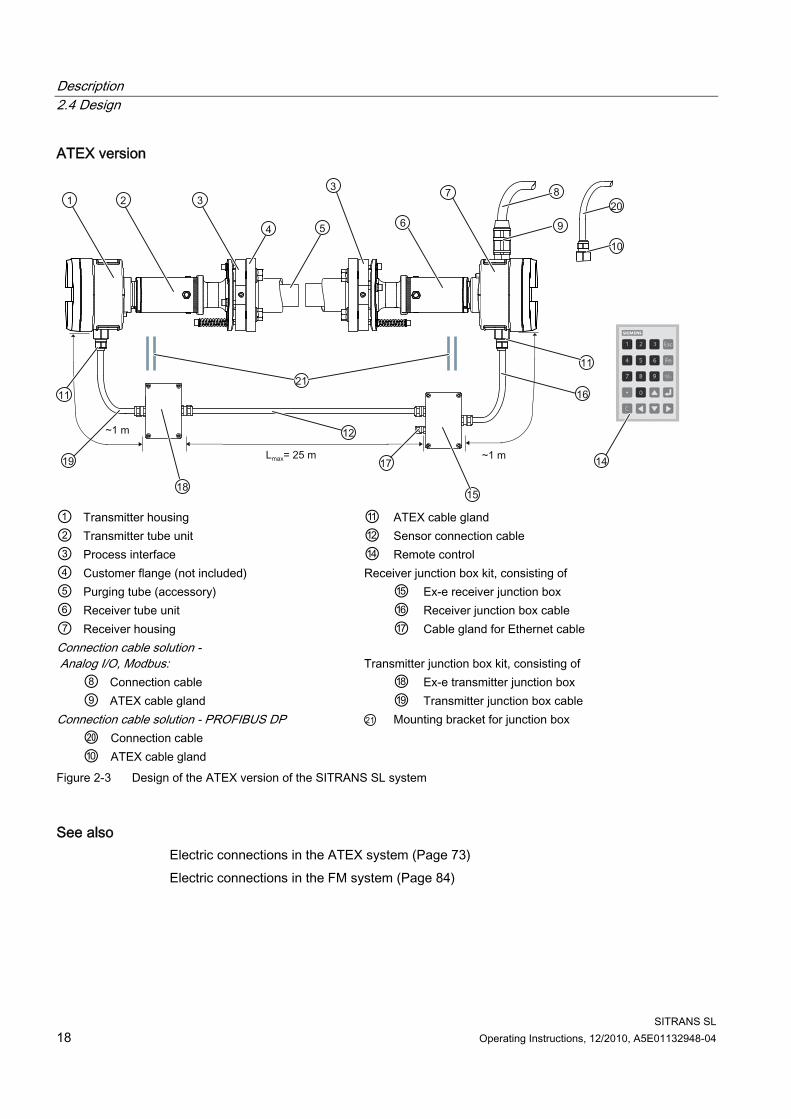
ATEX version
① Transmitter housing ⑪ ATEX cable gland ② Transmitter tube unit ⑫ Sensor connection cable ③ Process interface ⑭ Remote control ④ Customer flange (not included) Receiver junction box kit, consisting of ⑤ Purging tube (accessory) ⑮ Ex-e receiver junction box ⑥ Receiver tube unit ⑯ Receiver junction box cable ⑦ Receiver housing ⑰ Cable gland for Ethernet cable Connection cable solution - Analog I/O, Modbus:
Transmitter junction box kit, consisting of
⑧ Connection cable ⑱ Ex-e transmitter junction box ⑨ ATEX cable gland ⑲ Transmitter junction box cable Connection cable solution - PROFIBUS DP Mounting bracket for junction box ⑳ Connection cable ⑩ ATEX cable gland Figure 2-3 Design of the ATEX version of the SITRANS SL system
See also Electric connections in the ATEX system (Page 73) Electric connections in the FM system (Page 84)

Description 2.4 Design
SITRANS SL Operating Instructions, 12/2010, A5E01132948-04 19
2.4.2 Display and control panel Special features of the receiver unit: ● Display for simultaneous output of result and device status. ● LED backlighting of display. ● Menu-driven operation for parameterization and diagnostics. ● Remote operation via infrared interface for safe use in hazardous zones. ● Remote control using membrane keypad and softkeys which are easy to clean.
Figure 2-4 Local user interface (LUI) of SITRANS SL in the receiver unit (display of measured
value)
Figure 2-5 Remote contol keypad for SITRANS SL

Description 2.4 Design
SITRANS SL 20 Operating Instructions, 12/2010, A5E01132948-04
2.4.3 Cables for connection ● The SITRANS SL is normally delivered without cabling, except for the ATEX version. ● For non-Ex versions the accessory "sensor connection cable kit" is used to connect the
transmitter and receiver unit of the analyzer, while the connection cable is needed to connect the SITRANS SL electrically to your process control system. All materials used are flame-retardant.
● A sensor connection cable kit is available as an accessory and provides the sensor connection cable, i.e. the cable connecting receiver and transmitter of the SITRANS SL. The sensor connection cable is available in lengths of 5 m, 10 m or 25 m length according to your order.
● The sensor connection cable kit also provides the possibility of a permanent installation of an Ethernet cable.
● A protective hose should be used as UV protection for installations in open cable ducts or channel systems. It is available as an accessory.
● The statutory directives must be observed in the event of installation in hazardous areas. For cable specifications refer to section Cable selection recommendations (Page 31)
Electric connections in the ATEX system ● The system is delivered with pre-mounted cables. The connections inside the unit
housings are set up in the factory before delivery and modifications can only be done by certified technicians.
● The junction boxes mounted to the receiver and the transmitter provide connections for the sensor connection and the Ethernet cables.
● An Ex-e classified junction box is required to install the connection cable to your process control system. A suitable junction box is available as an accessory (not represented in the figure above).
● The sensor connection cable (⑫, fig. 2.3) is delivered with unprepared ends. It has to be prepared according to section Electric connections in the ATEX system (Page 73).
● The ATEX version of the SITRANS SL is delivered with a sensor connection cable of the ordered length. This sensor connection cable must be connected between the Ex-e junction boxes mounted on the receiver and the transmitter.
● All cable kits are part of the delivery and can be ordered separately as spare parts.
See also Transmitter and receiver units (Page 16)

Description 2.4 Design
SITRANS SL Operating Instructions, 12/2010, A5E01132948-04 21
2.4.4 Inputs/outputs ● 2 analog inputs (4 to 20 mA) for process gas temperature and pressure ● 2 analog outputs (4 to 20 mA) for gas concentration or for concentration and transmission ● 1 configurable binary input for quality information of external sensor ● 2 freely configurable binary outputs (display of faults, maintenance request, function
monitoring, alarms for limit violations of measured value or transmission) ● Optional: 1 PROFIBUS DP interface with:
– Output of gas concentration as cyclic data – Alarm output, alarm classification – Input for temperature and/or pressure data for compensation The PROFIBUS DP protocol provides DPV0, cyclic data. Measured values are provided with additional quality data.
Note The PROFIBUS DP hybrid cable provides an unused pair of wires to connect one of the analog or binary inputs or outputs mentioned above.
● Optional: 1 Modbus interface with: – Output of gas concentration as cyclic data – Alarm output, alarm classification – Input for temperature and/or pressure data for compensation
● 1 Ethernet 10Base-T port, only for service and maintenance. Using Ethernet, the analyzer supports the following software: – LDSComm (PC software for service and maintenance engineers) – SITRANS SL updater (PC software for service engineers)
Note For the non-Ex version the junction box of the sensor connection cable kit is required for permanent installation of an Ethernet cable.
WARNING
In hazardous environments, all electric cables may only be connected or disconnected with the permission of the plant manager (hot work permit)!

Description 2.5 Functional description
SITRANS SL 22 Operating Instructions, 12/2010, A5E01132948-04
2.5 Functional description
2.5.1 Operating principle SITRANS SL is a gas analyzer employing single line molecular absorption spectroscopy. A diode laser emits a beam of infrared light which passes through the process gas and is detected by a receiver unit. The wavelength of the laser diode output is tuned to a gas specific absorption line. The laser continuously scans this single absorption line with a very high spectral resolution (see following figure). The degree of absorption and the line shape are used for the evaluation. The measurement is free of cross-interferences, since the quasi-monochromatic laser light is absorbed very selectively by only one specific line in the scanned spectral range.
① Absorption line ② Laser line Figure 2-6 Typical spectral bandwidth of an absorption line compared to the bandwidth of the laser
light.
The field design of the SITRANS SL in-situ gas analyzer consists of a transmitter unit and a receiver unit. The light which is not absorbed by the sample is detected in the receiver. The concentration of the gas component is determined from the absorption. The individual dependencies of concentration, pressure and temperature are application specific. An internal reference cell is used to constantly check the stability of the spectrometer, thus assuring a continuous self-calibration of the analyzer. The self-calibration of the analyzer is therefore valid for the time period specified in the technical data without the necessity for external recalibration using calibration gases.

Description 2.5 Functional description
SITRANS SL Operating Instructions, 12/2010, A5E01132948-04 23
Configuration The main feature of the in-situ analytical procedure is that the physical measurement takes place directly in the stream of process gas and directly in the actual process gas line. All process parameters such as gas matrix, pressure, temperature, moisture, dust load, flow velocity and mounting orientation can influence the measuring properties of the SITRANS SL and therefore must be considered for each new application. The standard applications listed in the ordering data for the SITRANS SL are distinguished in that the typical process conditions are adequately well-known and documented. If you cannot find your application among the standard applications, please contact Siemens AG. We will be pleased to check your possible individual application of the SITRANS SL.
Figure 2-7 Typical cross-duct arrangement of the SITRANS SL
Purging gas flow is used to prevent contamination of the sensor optics on the process side. Purging tubes on the sensor heads, which slightly extend into the process gas stream, define the effective measuring path length.
See also Technical data (Page 181)

Description 2.5 Functional description
SITRANS SL 24 Operating Instructions, 12/2010, A5E01132948-04
2.5.2 Influences on the measurement
Dust load As long as the laser beam is able to generate a suitable detector signal, the dust load in the process gas does not influence the analytical result. By applying a dynamic background correction, measurements can be carried out without any negative impact. The influence of a high dust load is extremely complex, and depends on the optical path length and particle size. The optical damping increases exponentially at longer path lengths. Smaller particles also have a very large influence on the optical damping. With high dust load, long path length and small particle size, the technical support at Siemens AG should be consulted.
Temperature The temperature influence on the absorption line is compensated by the software. A temperature signal should be fed into the analyzer from an external temperature sensor. The signal is then used for mathematical correction of the influence of the temperature on the observed line strength. If the process gas temperature remains constant, a static correction can be carried out as an alternative. Without temperature compensation, the relative error caused by changes in the gas temperature has an extensive effect on the measurement. An external temperature signal is recommended in most cases.
Pressure The process gas pressure can affect the line shape of the molecular absorption line. For known pressure values, the SITRANS SL uses a special algorithm to adapt the line shape. Additionally, an external pressure signal can be fed to the analyzer to provide complete mathematical compensation for the pressure influence including the density effect (depending on application and gas). An external pressure signal is recommended in most cases.
Interferences The SITRANS SL is able to measure the desired gas components very selectively. In special cases, the composition of the process gas might have an influence on the shape of the absorption lines. This influence is compensated by analyzing the full shape of the detected signal curve applying specific algorithms.
Description 2.5 Functional description
SITRANS SL Operating Instructions, 12/2010, A5E01132948-04 25
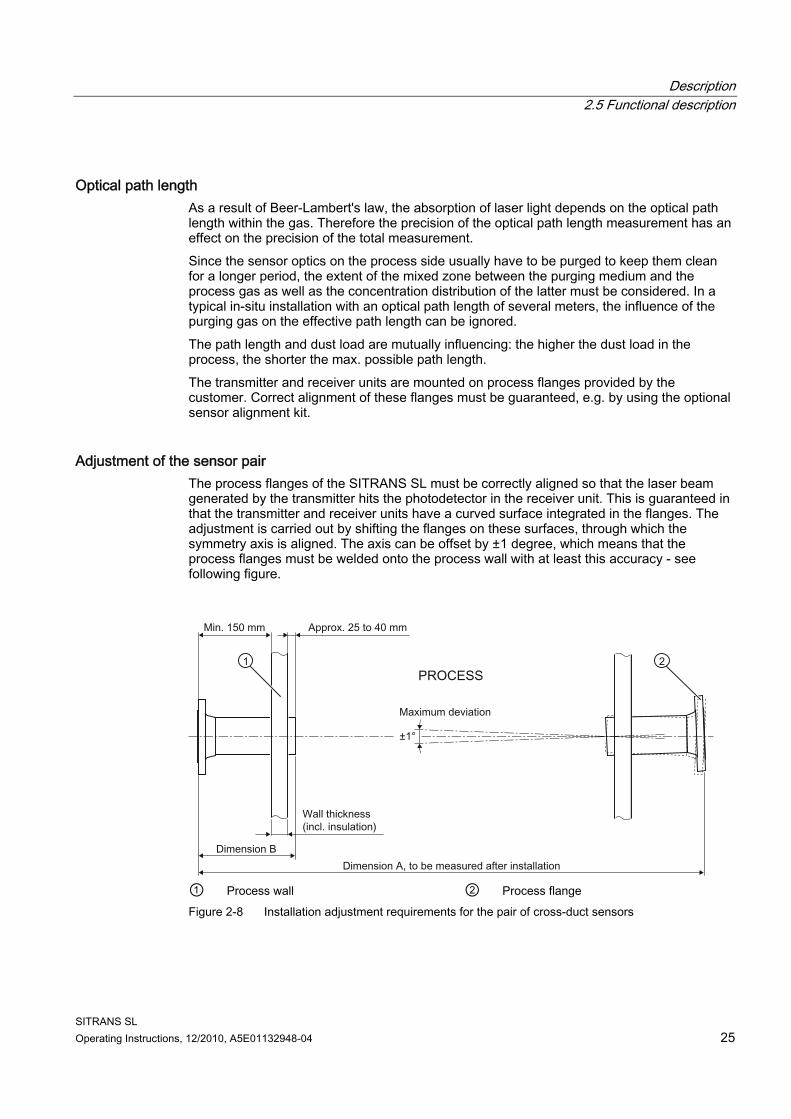
Optical path length As a result of Beer-Lambert's law, the absorption of laser light depends on the optical path length within the gas. Therefore the precision of the optical path length measurement has an effect on the precision of the total measurement. Since the sensor optics on the process side usually have to be purged to keep them clean for a longer period, the extent of the mixed zone between the purging medium and the process gas as well as the concentration distribution of the latter must be considered. In a typical in-situ installation with an optical path length of several meters, the influence of the purging gas on the effective path length can be ignored. The path length and dust load are mutually influencing: the higher the dust load in the process, the shorter the max. possible path length. The transmitter and receiver units are mounted on process flanges provided by the customer. Correct alignment of these flanges must be guaranteed, e.g. by using the optional sensor alignment kit.
Adjustment of the sensor pair The process flanges of the SITRANS SL must be correctly aligned so that the laser beam generated by the transmitter hits the photodetector in the receiver unit. This is guaranteed in that the transmitter and receiver units have a curved surface integrated in the flanges. The adjustment is carried out by shifting the flanges on these surfaces, through which the symmetry axis is aligned. The axis can be offset by ±1 degree, which means that the process flanges must be welded onto the process wall with at least this accuracy - see following figure.
① Process wall ② Process flange Figure 2-8 Installation adjustment requirements for the pair of cross-duct sensors

Description 2.5 Functional description
SITRANS SL 26 Operating Instructions, 12/2010, A5E01132948-04
Purging The easiest way to avoid condensation and dust deposits on the sensor windows is to purge them, e.g. with air. Purging must be selected depending on the application. The transmitted-light sensors can therefore be configured for the respective situation. The purging gas must not contain any concentrations of the measurement component. The presence of the gas in the sensor heads or the purging tubes may influence the measured concentration. Recommendations for suitable purging and quality requirements of the purging gases can be obtained from chapter Technical data (Page 181)
① Purging tube ⑤ Transmitter or receiver unit: optics tube ② Process flange (customer) ⑥ Transmitter or receiver unit: sensor head ③ Inlet for purging on the process side ⑦ Inlet for purging on sensor side if applicable ④ Outlet for purging on sensor side
if applicable ⑧ Process interface
Figure 2-9 Arrangement for purging on the sensor side of the SITRANS SL

Description 2.5 Functional description
SITRANS SL Operating Instructions, 12/2010, A5E01132948-04 27
Purging on process side For purging on the process side, the flow of purging gas can be adjusted between 0 and approx. 50 l/min at each sensor head using a needle valve (included in delivery).
Purging tubes The purging media used on the process side flows through the purging tubes into the process gas stream. The tubes extend into the process area by a few centimeters, usually perpendicular to the process gas stream. The effective measuring path in the process gas is defined as the distance between the ends of the two purging tubes. The standard length of the purging tubes is 340 mm. To enable sufficient pivoting, the process wall should be max. 150 mm thick.
① Purging tube ② Process wall l Path length Figure 2-10 Measurement of the optical path length between the ends of the purging gas tubes
Purging on sensor side Purging of sensors is always required for applications with oxygen as gas to be measured. The sensors are then continuously purged with nitrogen. The flow of purging gas required in this case is stated in the Technical data (Page 181).

Description 2.5 Functional description
SITRANS SL 28 Operating Instructions, 12/2010, A5E01132948-04
2.5.3 Maintenance and fault messages The SITRANS SL carries out continuous self-monitoring, and outputs alarms and warnings to indicate maintenance requirements or a system fault. The information is output as plain text on the LUI display, where symbols identify the category and the severity of the fault. Alarm categories: ● Maintenance (system must be cleaned or repaired) ● Process value (problem with external sensor, or process conditions outside the
permissible range for SITRANS SL) ● Configuration (SITRANS SL is not correctly configured) Severity: ● Fault (measurements could not be carried out) ● Warning (measurements may be inaccurate, or the system will soon shut down
measuring mode if an intervention is not made) ● Advanced warning/information (measurements are carried out) The two binary (relay) outputs can be configured freely for the alarm output. The response of the analog outputs in the event of an alarm is configurable; possible actions are: ● Off (current measured value is displayed) ● Last measured value (freezing of last value displayed) ● Standard level (setting to predefined value) ● 3 mA (Namur NE43 fault status) In addition, the transmission is available as an output variable.
Note Specific requirements for the measuring point might require the utilization of special sensor equipment. The possibilities for adapting the sensors are: Special materials for purging tubes (on request) Various types/sizes of sensor flanges Ex-proof sensor configurations
Description 2.5 Functional description
SITRANS SL Operating Instructions, 12/2010, A5E01132948-04 29
2.5.4 Essential characteristics ● Long-term stability through use of an internal reference cell; calibration interval at least
one year. ● Dynamic background correction for varying dust loads. ● Isolated analog signal outputs of 4 to 20 mA. ● Menu-driven operation. ● Selectable time constants (integration time). ● Password-protected user interface. ● I/O operation in accordance with NAMUR recommendations. ● Monitoring of overall optical transmission. ● Sensor enclosure resistant to wear and corrosion. ● Local operation using remote-control unit with numeric keypad and menu prompting.

Description 2.6 Product characteristics
SITRANS SL 30 Operating Instructions, 12/2010, A5E01132948-04
2.6 Product characteristics
Device-specific characteristics SITRANS SL is designed for measurement of various gases. Details can be obtained from chapter Technical Data, standard applications section
Transmission The system will have full performance when the transmission is within the range of 1 to 100 %.
Dust load The characteristics of the dynamic changes of optical visibility due to dust including turbulences is defined by the measurement situation. The influence of dust on the measurement is very complex and depends on the path length and particle size distribution, which in many cases is not known. Therefore no general limit for dust load can be given. However, the SITRANS SL is designed to function without interruptions even at low optical transmission. The experience indicates that the SITRANS SL systems can measure even at quasi-static changes of the received optical power of at least 30 dB. This corresponds under certain conditions to dust loads of up to 100 g/Nm3 at a path length of 1 m.
Gas analyzer functions The SITRANS SL can be operated as an independent unit providing the following functions: ● Output signals
The analyzer can output two measurement values: – gas concentration and – optical transmission level (through the measuring volume).
● Alarm functions The analyzer provides alarms/warnings for: – Transmission drop-off – Signal quality (if transmission is not sufficient as quality indicator) – Warnings for system deviations before actual error occurs – Alarms at system failure.
● Measurement inputs The analyzer needs to use readings from other sensors to compensate the measured concentration for varying temperature and pressure. If needed for future applications, it is also possible to compensate for interference from another gas component.
● Local User Interface (LUI) The LUI display is located in the receiver housing unit with a back light LCD visible through a window in the housing lid. It is operated using the IR remote control. The remote control is safe to use even in a hazardous environment.
SITRANS SL Operating Instructions, 12/2010, A5E01132948-04 31
Application planning 33.1 Cable selection recommendations
Cable selection recommendations
Note For a normal (non Ex) setup of SITRANS SL the cables are not part of the standard
delivery and should be ordered as an accessory. An Ethernet cable may be permanently connected via the receiver junction box. Ethernet
is needed for service and maintenance work. A permanently connected cable is recommended when the SITRANS SL is located at an inconvenient physical location.
With the receiver junction box mounted, the Ethernet jack inside the receiver unit may not be used, unless the wires connected to the Ethernet screw terminals inside the receiver housing have first been disconnected.
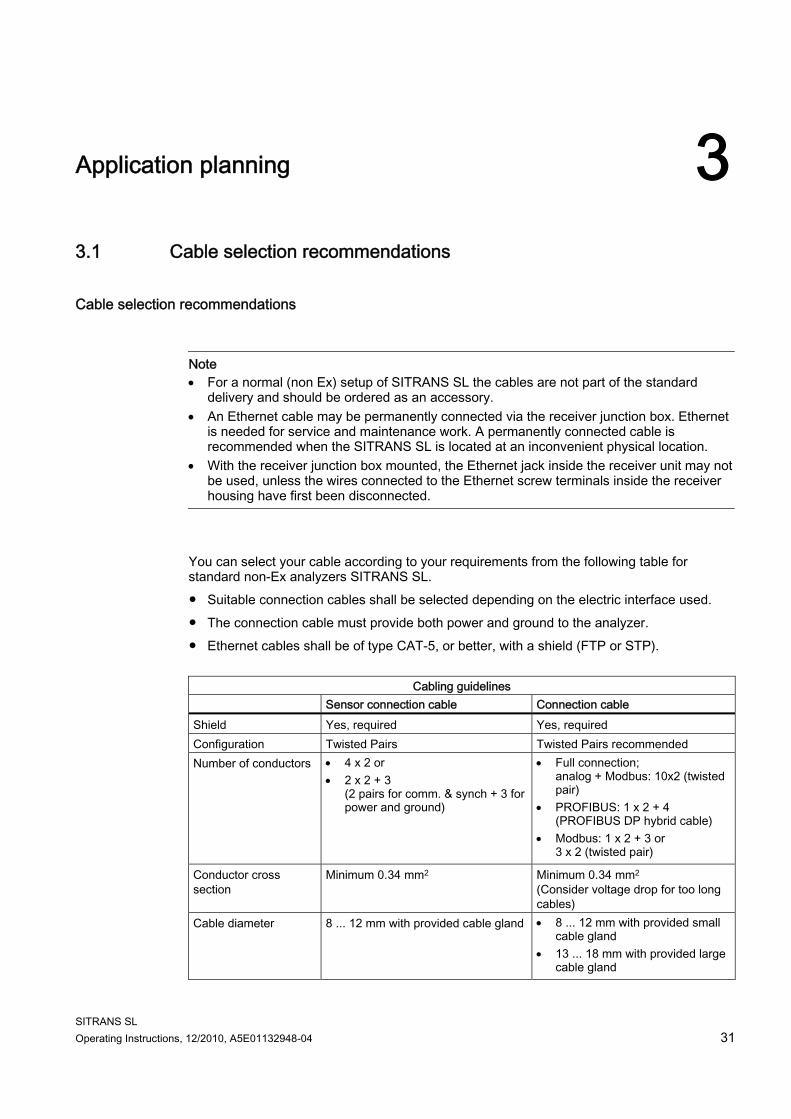
You can select your cable according to your requirements from the following table for standard non-Ex analyzers SITRANS SL. ● Suitable connection cables shall be selected depending on the electric interface used. ● The connection cable must provide both power and ground to the analyzer. ● Ethernet cables shall be of type CAT-5, or better, with a shield (FTP or STP).
Cabling guidelines Sensor connection cable Connection cable Shield Yes, required Yes, required Configuration Twisted Pairs Twisted Pairs recommended Number of conductors 4 x 2 or
2 x 2 + 3 (2 pairs for comm. & synch + 3 for power and ground)
Full connection; analog + Modbus: 10x2 (twisted pair)
PROFIBUS: 1 x 2 + 4 (PROFIBUS DP hybrid cable)
Modbus: 1 x 2 + 3 or 3 x 2 (twisted pair)
Conductor cross section
Minimum 0.34 mm2 Minimum 0.34 mm2
(Consider voltage drop for too long cables)
Cable diameter 8 ... 12 mm with provided cable gland 8 ... 12 mm with provided small cable gland
13 ... 18 mm with provided large cable gland
Application planning 3.2 Network and system integration
SITRANS SL 32 Operating Instructions, 12/2010, A5E01132948-04
3.2 Network and system integration
3.2.1 Overview The communication interface of SITRANS SL can be configured for transfer and processing of the measurement data as follows: ● Analog I/O and digital I/O system configuration; ● PROFIBUS DP system configuration; ● Modbus system configuration. The system configuration of the SITRANS SL is defined according to the communication code within its order number.
Note Setup of the SITRANS SL can be done via the local user interface LUI, or for service engineers, via the LDSComm software. LDSComm communicates with SITRANS SL via Ethernet using the TCP/IP protocol. The connection can be established locally or via modem dial-in using the remote service kit which is available as accessory.
See also Cable selection recommendations (Page 31)

Application planning 3.2 Network and system integration
SITRANS SL Operating Instructions, 12/2010, A5E01132948-04 33
3.2.2 Analog I/O and digital I/O system configuration
Figure 3-1 Example of a system configuration with analog I/O and digital I/O
System features: ● The SITRANS SL is controlled by the automation system via analog I/O and digital I/O. ● The measurement results of the SITRANS SL are output to the automation system via
analog output. ● The digital outputs can be used to indicate warnings and alarms and the digital input can
be used to evaluate errors of external pressure or temperature sensors. ● When external sensors are to be connected the first choice is to use analog input of the
automation system although direct connection via the analog input of SITRANS SL is also possible.
● A PC/PG used for the configuration of the automation system is connected to an automation system via an MPI cable.

Application planning 3.2 Network and system integration
SITRANS SL 34 Operating Instructions, 12/2010, A5E01132948-04
Necessary equipment Hardware Name Comment SITRANS SL Analyzer PLC (e.g. S7-315-2DP) Automation system Analog configuration From automation system to analyzer Siemens SIMATIC MPI Cable For PLC configuration I/O-module (e.g. SM374) – in/out16 (optional) For connecting external sensors External sensors (optional) For process gas temperature and pressure
Software Name Comment Automation system software (e.g. SIMATIC Manager Step 7)
For automation system configuration

Application planning 3.2 Network and system integration
SITRANS SL Operating Instructions, 12/2010, A5E01132948-04 35
3.2.3 PROFIBUS DP system configuration
Figure 3-2 Example of a system configuration with PROFIBUS DP
System features: ● The SITRANS SL is controlled by the automation system via PROFIBUS DP. ● The measurement results from the SITRANS SL are output to the automation system via
PROFIBUS DP. ● When external sensors are to be connected the first choice to do so is to use PROFIBUS
DP although connection via analog input of the automation system is also possible. ● A PC/PG used for the configuration of the automation system is connected to this
automation system via an MPI cable.

Application planning 3.2 Network and system integration
SITRANS SL 36 Operating Instructions, 12/2010, A5E01132948-04
Necessary equipment Hardware Name Comment SITRANS SL PROFIBUS Slave PLC (e.g. S7-315-2DP) PROFIBUS Master PROFIBUS Cable For PROFIBUS Master – Slave configuration Siemens SIMATIC MPI Cable For PLC configuration External sensors (optional) For process gas temperature and pressure
Software Name Comment PROFIBUS system software (e.g. SIMATIC Manager Step 7)
For automation system configuration

Application planning 3.2 Network and system integration
SITRANS SL Operating Instructions, 12/2010, A5E01132948-04 37
3.2.4 Modbus system configuration
Automation system with Modbus master
Figure 3-3 Example of a system configuration with modbus
System features: ● The SITRANS SL is controlled by the automation system via Modbus. ● The measurement results of the SITRANS SL are output to the automation system via
Modbus. ● When external sensors are to be connected the first choice is to use Modbus although
connection via the analog input of SITRANS SL is also possible. ● A PC/PG used for the configuration of the automation system is connected to this
automation systemvia an MPI cable.
Application planning 3.2 Network and system integration
SITRANS SL 38 Operating Instructions, 12/2010, A5E01132948-04
Necessary equipment Hardware Name Comment SITRANS SL Modbus Slave PLC (e.g. S7-315-2DP) Automation system Modbus module CP442-5 Modbus Master Modbus Cable For Modbus Master – Slave configuration Siemens SIMATIC MPI Cable For PLC configuration External sensors (optional) For process gas temperature and pressure
Software Name Comment Modbus system software (e.g. SIMATIC Manager Step 7)
For automation system configuration
See also Screw terminals (Page 48)

SITRANS SL Operating Instructions, 12/2010, A5E01132948-04 39
Installing 44.1 Safety information
Electric safety
WARNING It is essential that you observe the given information and warnings! Failure to do may result in death, severe injuries, and/or damage to equipment and environment.
The analyzer SITRANS SL meets all regulations specified in the present EU regulations (LVD regulation 2006/95/EC and EMC regulation 2004/108/EC) as well as those of the American market (FM approved version available).
Laser safety SITRANS SL is classified as a class 1 laser product. The emitted laser light is invisible (near infrared) and not hazardous to the unprotected eye. SITRANS SL has warning labels at appropriate positions according to EN 60825-1:2007.
WARNING Heat safety Some metal parts and piping placed near the sensors might be at elevated temperatures due to high temperature purging - either from steam or from air. To avoid severe burns these parts must either be isolated or equipped with protective metal sheets. Always use protective gloves in the vicinity of such hot parts.
WARNING Pressure safety It is possible to mount the SITRANS SL to processes with elevated pressure. Although the window of the process interface is burst-tested up to 8 MPa (80 bar), the customer should define a safety factor appropriate to his application.

Installing 4.2 Mounting
SITRANS SL 40 Operating Instructions, 12/2010, A5E01132948-04
Outdoor cabling
Note If cables are to be installed outdoors an UV protection shall be considered. A UV protective hose for outdoor use is available as accessory (see list of accessories in chapter (Page 193))
Liability Following commissioning, the total responsibility is with the owner.
4.2 Mounting
4.2.1 Mounting conditions During operation the permissible ambient temperature as stated in the must not be exceeded. If the unit is exposed to direct solar radiation ensure that the total temperature will not exceed the maximum permitted temperature. If these conditions cannot be fulfilled the SITRANS SL must be installed in a cabinet with a controlled environment.
CAUTION Avoid condensation As condensation is normally a problem when moving the device from outdoor to the inside of a building, the device should be adapted to the new ambient conditions for a couple of hours before starting it.
NOTICE The front (lid) side of the units must be accessible. To facilitate maintenance and service there shall be at least 60 cm of free space in front of SITRANS SL transmitter and receiver respectively. To meet the safety requirements for air convection and cooling there must be a free space of at least 10 cm around the SITRANS SL.
Supply voltage When the supply voltage is interrupted for more than 20 ms the unit performs an automatic restart. 120 sec after the restart the unit works properly again. With a slow rise of supply voltage the unit may stop working. A manual restart may be necessary.
Installing 4.2 Mounting
SITRANS SL Operating Instructions, 12/2010, A5E01132948-04 41
4.2.2 Preparations
CAUTION Risk of damage due to high temperature The temperature on the process side of the wedge window must not exceed 200 °C (392 °F).The maximum permissible temperature of the flange is 70 °C (158 °F). For these applications we recommend a process-side purging with a permanent temperature monitoring.
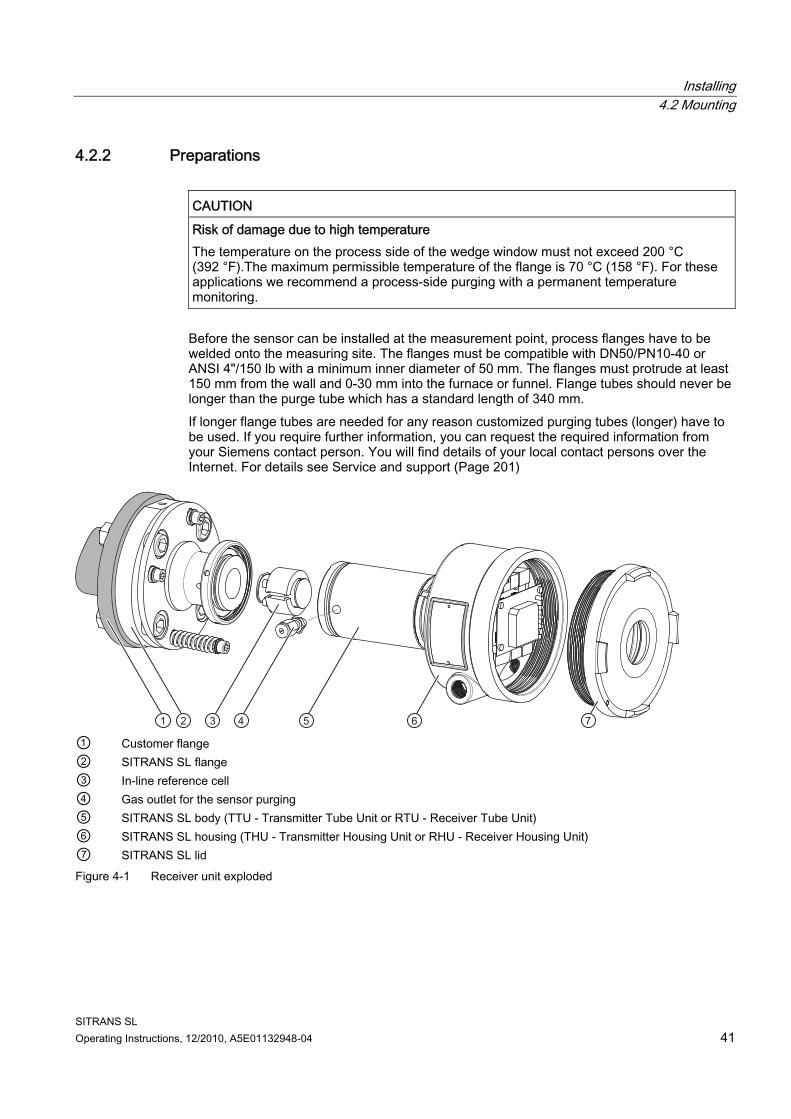
Before the sensor can be installed at the measurement point, process flanges have to be welded onto the measuring site. The flanges must be compatible with DN50/PN10-40 or ANSI 4"/150 lb with a minimum inner diameter of 50 mm. The flanges must protrude at least 150 mm from the wall and 0-30 mm into the furnace or funnel. Flange tubes should never be longer than the purge tube which has a standard length of 340 mm. If longer flange tubes are needed for any reason customized purging tubes (longer) have to be used. If you require further information, you can request the required information from your Siemens contact person. You will find details of your local contact persons over the Internet. For details see Service and support (Page 201)
① Customer flange ② SITRANS SL flange ③ In-line reference cell ④ Gas outlet for the sensor purging ⑤ SITRANS SL body (TTU - Transmitter Tube Unit or RTU - Receiver Tube Unit) ⑥ SITRANS SL housing (THU - Transmitter Housing Unit or RHU - Receiver Housing Unit) ⑦ SITRANS SL lid Figure 4-1 Receiver unit exploded
Installing 4.2 Mounting
SITRANS SL 42 Operating Instructions, 12/2010, A5E01132948-04
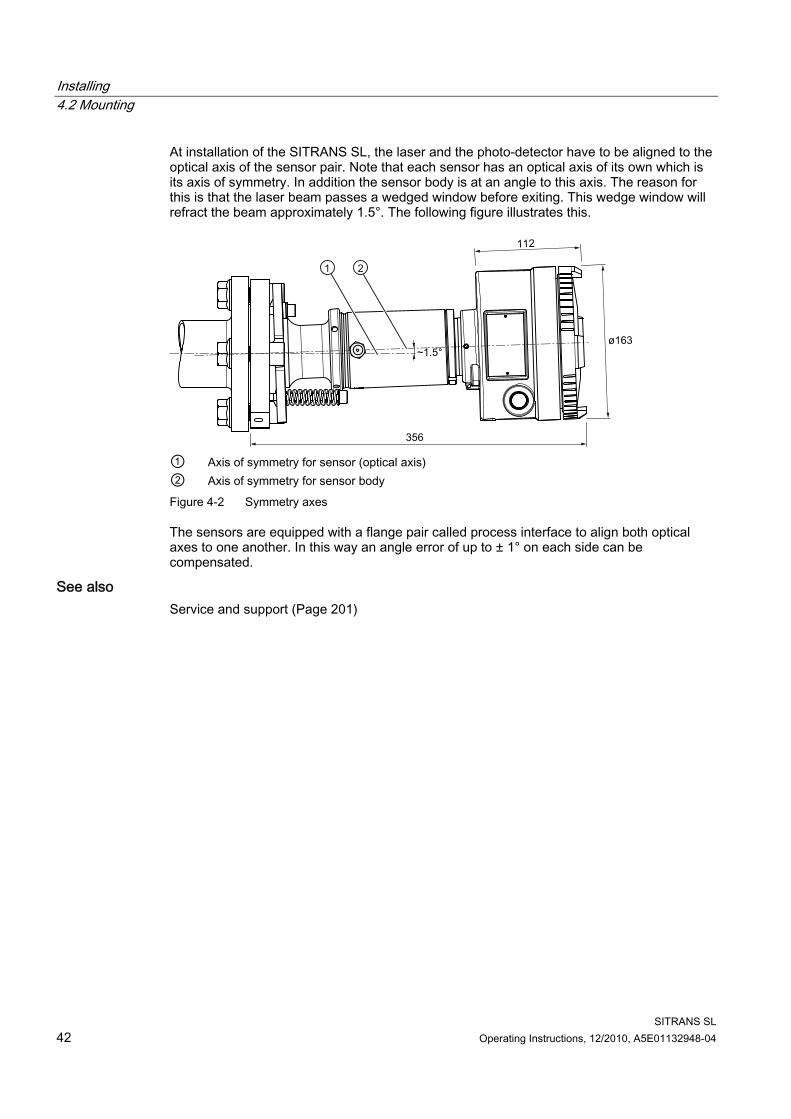
At installation of the SITRANS SL, the laser and the photo-detector have to be aligned to the optical axis of the sensor pair. Note that each sensor has an optical axis of its own which is its axis of symmetry. In addition the sensor body is at an angle to this axis. The reason for this is that the laser beam passes a wedged window before exiting. This wedge window will refract the beam approximately 1.5°. The following figure illustrates this.
① Axis of symmetry for sensor (optical axis) ② Axis of symmetry for sensor body Figure 4-2 Symmetry axes
The sensors are equipped with a flange pair called process interface to align both optical axes to one another. In this way an angle error of up to ± 1° on each side can be compensated.
See also Service and support (Page 201)

Installing 4.2 Mounting
SITRANS SL Operating Instructions, 12/2010, A5E01132948-04 43
4.2.3 Installation of process flanges
Preparation The amount to which the axis can be adjusted is ± 1° which means that the process flanges must be welded on the process wall to each other with this accuracy or better - see the following figure.
① Process wall ② Process flange Figure 4-3 Flange alignment
To be able to set the correct path length in SITRANS SL the dimension A in the 'Flange alignment' figure has to be measured after the flanges are mounted. The total length of the purging tube (dimension B), including the process flange must also be known. The path length can now be calculated as A - 2B.
CAUTION Failure to weld the process flanges within ±1° of the symmetry axis of the flange pair will result in the impossibility to align the sensor pair.

Installing 4.2 Mounting
SITRANS SL 44 Operating Instructions, 12/2010, A5E01132948-04
4.2.4 Installation of the sensors
Device position The SITRANS SL may be mounted in any direction. When mounting the sensors the large springs of the alignment flanges must face downwards. Proceed as follows: 1. Check that the flanges are installed properly. 2. Mount the receiver and transmitter, both with gaskets on the flanges and cross-tighten
the bolts. 3. Align the sensors as described in section Alignment of SITRANS SL (Page 57).
CAUTION
Do not install sensors that require purging before the purging media is accessible. Never leave a purged sensor with the purging media switched off since the process windows can be easily damaged.
Note The stability of the sensor alignment depends on the stability of the construction to which the customer’s flange is mounted. If the incinerator wall or smoke duct is subject to movements due to, for instance, thermal changes the sensors will need repeated realignment. This can be avoided by mounting the sensor pair on an external, more stable base, such as a concrete or steel support.
See also Technical data (Page 181)

Installing 4.2 Mounting
SITRANS SL Operating Instructions, 12/2010, A5E01132948-04 45
4.2.5 Installation of the purging tubes
Note The purging tubes are unsymmetrical with slanted ends and must be mounted such that the larger side of the tube end points against the direction of the process flow.
The purging tubes ① are mounted by clamping the purging tube flange ⑤ between the customer flange ② and the SITRANS SL process interface ④. The sealing is accomplished by the two process gaskets ③ as shown in the following figure.
When using an ANSI 4"/150 lbs process interface the purging tubes ① have to be clamped between the ANSI 4" adapter flange delivered with the system and the process interface ④.
① Purging tube ② Customer flange ③ Process gaskets ④ Process interface ⑤ Purging tube flange Figure 4-4 Purge tube mounting

Installing 4.3 Electric connections non Ex
SITRANS SL 46 Operating Instructions, 12/2010, A5E01132948-04
4.3 Electric connections non Ex
EMC and NAMUR The following must be observed regarding EMC and NAMUR:
CAUTION This is a Class A product. In a domestic environment this product may cause radio interferences in which case the user may be required to take adequate remedial measures
Operating SITRANS SL Since the device is delivered without cabling the user must provide this. An appropriate cable layout is described in section 3.1. The cables have to be connected according to the table in section 4.5.3. The following must be observed when operating SITRANS SL:
WARNING Never switch on or operate an analyzer with the lid open. The protective earth terminal of the SITRANS SL needs to be connected to the local potential equalization system.
See also Connecting cables (Page 52) Cable selection recommendations (Page 31)

Installing 4.3 Electric connections non Ex
SITRANS SL Operating Instructions, 12/2010, A5E01132948-04 47
4.3.1 System set-up (non Ex only) Install the cables in the transmitter sensor and receiver sensor according to the following figures.
Non Ex version with sensor connection cable kit
① Transmitter housing ⑨ Large cable gland (for cables with a diameter of
13 ... 18 mm) ② Transmitter tube unit ⑩,
⑪ Small cable gland (for cables with a diameter of 8 ... 12 mm)
③ Process interface ⑬ Reference cell inside the receiver unit ④ Customer flange (not included) ⑭ Remote control ⑤ Purging tube (accessory) ⑥ Receiver tube unit ⑦ Receiver housing ⑧ Connection cable (accessory)
Sensor connection cable kit (accessory) consisting of ⑫ Sensor connection cable ⑮ Receiver junction box ⑯ Receiver junction box cable ⑰ Cable gland for Ethernet cable
Figure 4-5 Connection of a non Ex system using a sensor connection cable kit

Installing 4.3 Electric connections non Ex
SITRANS SL 48 Operating Instructions, 12/2010, A5E01132948-04
4.3.2 Screw terminals
Receiver housing
CAUTION Damage to the equipment Damage to the equipment may result from short-circuit. No conductors of a cable may be left unconnected inside the SITRANS SL receiver or transmitter. Any unused conductor must be connected to the analyzer housing.
NOTICE No Ethernet connection possible If Ethernet is connected to a permanently installed cable, the Ethernet jack inside the receiver may not be used. Before using the Ethernet jack inside the receiver, ensure that no cable conductors are connected to the Ethernet screw terminal in the receiver.

Installing 4.3 Electric connections non Ex
SITRANS SL Operating Instructions, 12/2010, A5E01132948-04 49
① Infrared receiver for remote control ④ Switch for termination resistor for
PROFIBUS und Modbus ② Diagram circuit terminals ⑤ Terminals ③ Buttons for LUI navigation ⑥ Ethernet connection Figure 4-6 Control panel with switch for termination resistor in receiver housing
Figure 4-7 Diagram circuit terminals

Installing 4.3 Electric connections non Ex
SITRANS SL 50 Operating Instructions, 12/2010, A5E01132948-04
Transmitter housing
① Terminals Figure 4-8 Transmitter board with terminals
Figure 4-9 Transmitter circuit terminals
Installing 4.3 Electric connections non Ex
SITRANS SL Operating Instructions, 12/2010, A5E01132948-04 51
Receiver junction box
34
56
72
112
34
56
7
89
1011
89
1011
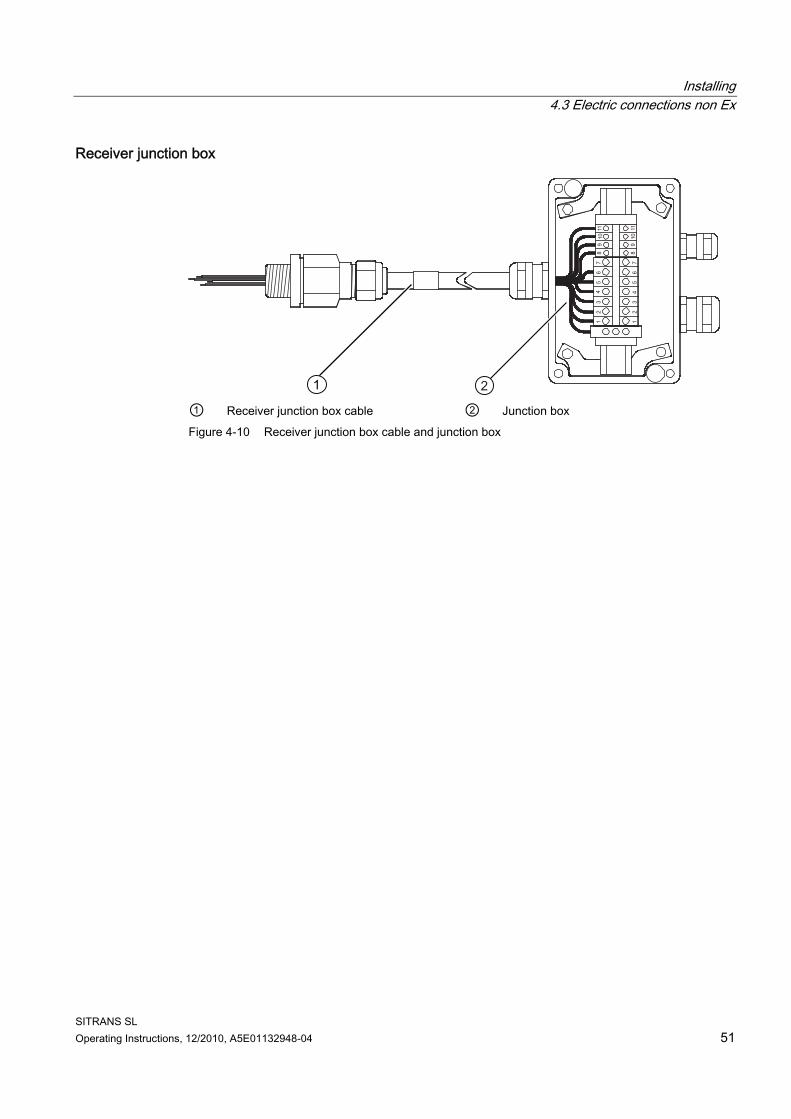
① Receiver junction box cable ② Junction box
Figure 4-10 Receiver junction box cable and junction box

Installing 4.3 Electric connections non Ex
SITRANS SL 52 Operating Instructions, 12/2010, A5E01132948-04
4.3.3 Connecting cables
Sensor connection cable The sensor connection cable connects the receiver and the transmitter of the SITRANS SL. The sensor connection cable is used to transfer: ● 100 kbps RS-485 communication and synchronization ● power for the transmitter ● ground.
Table 4- 1 Electric connections for sensor connection cable, valid for non Ex product versions
Screw terminals on junction board Receiver Transmitter
Function / Power
L1 S1 + L2 S2 -
24 V DC power supply to transmitter unit
L3 S3 Com+ L4 S4 Com- L5 S5 Sync+ L6 S6 Sync-
RS485 communication
Chassis Chassis Ground Chassis Chassis Ground

Installing 4.3 Electric connections non Ex
SITRANS SL Operating Instructions, 12/2010, A5E01132948-04 53
Receiver junction box Ex-e
Note The junction box of the receiver unit is the same for both ATEX applications and sensor connection cable kit for non Ex applications.
Table 4- 2 Electric connections for receiver junction box cable of sensor connection cable kit (accessory)
Conductor color Connector position in junction box
Remarks
Red 1 + Blue 2 -
24 V DC power supply for transmitter unit
Pink 3 Com + Grey 4 Com - White 5 Sync+ Brown 6 Sync -
RS485 communication
- 7 NC Grey-Pink 8 Tx + Red-Blue 9 Tx - Black 10 Rx + Violet 11 Rx -
Ethernet connection
Green PE terminal Yellow PE terminal Shield Gland

Installing 4.3 Electric connections non Ex
SITRANS SL 54 Operating Instructions, 12/2010, A5E01132948-04
Connection cable
Table 4- 3 Electric connections for analog I/O and Modbus connection cable, valid for non Ex product versions
Terminals in receiver junction board Function/Power Ethernet cable 1 + 2 -
Supply voltage 19 ... 30.2 V DC, 10 VA 1)
3 4
Closed when energized 4) Digital OUT 0 (relay) 30 V, 0.5 A 3)
5 6
Closed when energized 4) Digital OUT 1 (relay) 30 V, 0.5 A 3)
7 + 8 -
Digital IN 0 0 ... 30 V DC 2)
9 + 10 -
Analog OUT 0 (Measurement) 30 V DC, 24 mA 3)
11 + 12 -
Analog OUT 1 (Measurement) 30 V DC, 24 mA 3)
13 Modbus D1 (RxD/TxD_N - data inverted))
14 Modbus D0 (RxD/TxD_P - data not inverted)
15 Modbus Shield
RS-485 Modbus - 7 ...+ 12 V DC
16 Tx+ White/Orange 17 Tx- Orange 18 Rx+ White/Green 19 Rx-
Ethernet 5) Green
20 + 21 -
Analog IN 0 (Temperature) 0 .. 30mA 2)
22 + 23 -
Analog IN 1 (Pressure) 0 ... 30 mA 2)
24 Ground 25 Ground Chassis Ground Chassis Ground Shield
1) Maximum possible power consumption. 2) Maximum input values. 3) Maximum output values. The following figures show how the outputs are used. 4) Supported relay modes: "Normally Energized" (default), "Normally De-Energized". For
configuration, see Configuration (Page 116). 5) We recommend not to connect the connection cable directly to Ethernet connectors.
Instead the sensor connection cable kit should be used for this purpose.
Installing 4.3 Electric connections non Ex
SITRANS SL Operating Instructions, 12/2010, A5E01132948-04 55
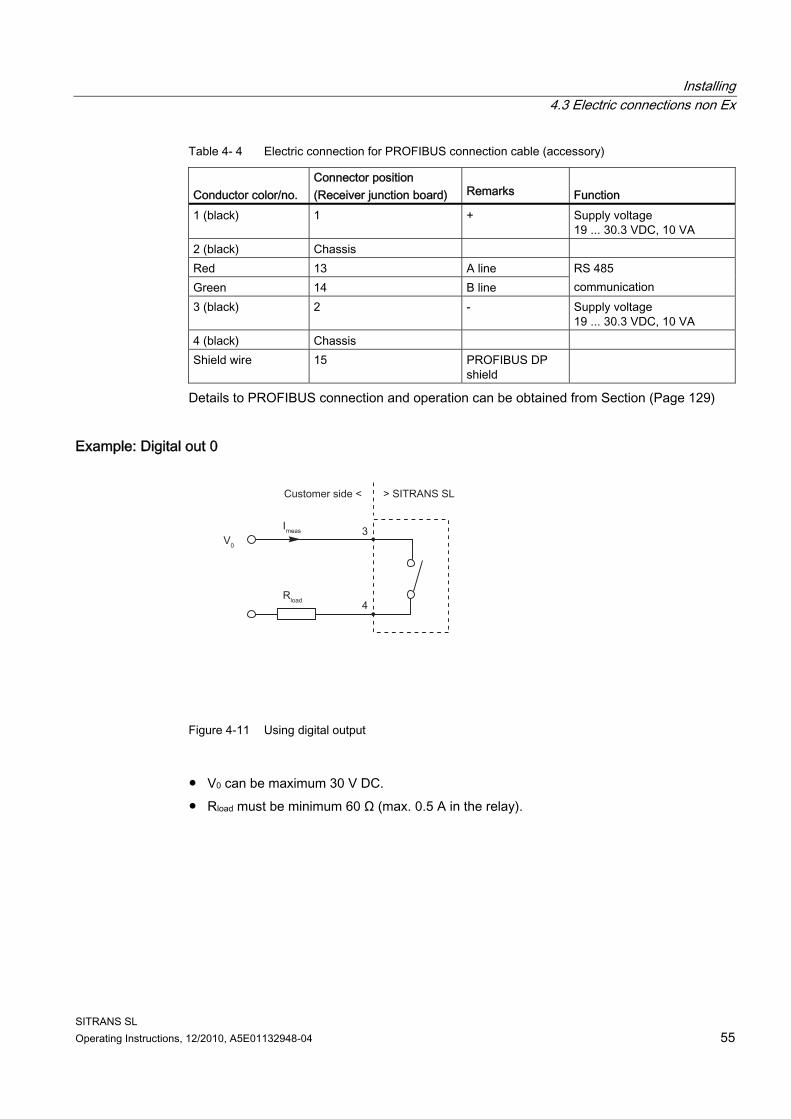
Table 4- 4 Electric connection for PROFIBUS connection cable (accessory)
Conductor color/no.
Connector position (Receiver junction board)
Remarks
Function
1 (black) 1 + Supply voltage 19 ... 30.3 VDC, 10 VA
2 (black) Chassis Red 13 A line Green 14 B line
RS 485 communication
3 (black) 2 - Supply voltage 19 ... 30.3 VDC, 10 VA
4 (black) Chassis Shield wire 15 PROFIBUS DP
shield
Details to PROFIBUS connection and operation can be obtained from Section (Page 129)
Example: Digital out 0
Figure 4-11 Using digital output
● V0 can be maximum 30 V DC. ● Rload must be minimum 60 Ω (max. 0.5 A in the relay).

Installing 4.3 Electric connections non Ex
SITRANS SL 56 Operating Instructions, 12/2010, A5E01132948-04
Example: Analog out 0
Figure 4-12 Using analog output
● V0 must be minimum 7.5 V and maximum 30 V DC. ● Rload can be maximum ((V0 – 7.5 V)/0.025 A) Ω.
Note SITRANS SL provides no supply voltage for the analog outputs, i.e. the analog outputs of the SITRANS SL are passive and thus must be powered externally!

Installing 4.4 Alignment of SITRANS SL
SITRANS SL Operating Instructions, 12/2010, A5E01132948-04 57
4.4 Alignment of SITRANS SL Both sensors of the SITRANS SL have to be aligned such that the laser beam from the transmitter hits the photo detector in the receiver. To facilitate this both transmitter and receiver have a spherical surface incorporated in the flanges. The alignment is done by adjusting the position of the flanges on this surface by means of two adjustment screws and thus pointing the axis of symmetry - see following figure.
① Center of alignment ② Flange with convex spherical surface ③ Flange with concave spherical surface ④ Spherical surface Figure 4-13 Alignment sphere
WARNING Danger of explosion The SITRANS SL alignment kit is not suitable for use in hazardous areas. Therefore it must never be used in a hazardous area except with an approval of the plant manager (hot work permit)!

Installing 4.4 Alignment of SITRANS SL
SITRANS SL 58 Operating Instructions, 12/2010, A5E01132948-04
4.4.1 Alignment kit
Note The alignment kit is not part of the delivery. If you commission the analyzer yourself, you need to order the alignment kit additionally.
The alignment kit is necessary to align SITRANS SL. It consists of: ● a light source ● an alignment tool consisting of
– aiming tool base – fine aligning unit
● an coarse alignment unit ● a lens hood ● an Allen key for the alignment of the sensors ● two wrenches to secure/release the clamp ring:
– one for the clamp ring, – one to prevent the adapter on the process interface to get loose when the clamp ring
is secured ● a tube of lubricant for the threads to prevent them form getting stuck.
① Thread lubricant ⑤ 4 Batteries LR 6 1.5 V ② Alignment tool ⑥ Allen key ③ Hook wrenches ⑦ Coarse alignment unit ④ Light source ⑧ Lens hood Figure 4-14 Alignment kit
See also Accessories (Page 193)

Installing 4.4 Alignment of SITRANS SL
SITRANS SL Operating Instructions, 12/2010, A5E01132948-04 59
4.4.2 Alignment procedure
CAUTION Alignment procedure Correct alignment is crucial for proper operation of the analyzer. The alignment procedure has to be carried out with utmost care. 1. Before mounting the alignment kit, make sure that the contact surface between flange
and the alignment kit is clean. 2. During the adjustment procedure make sure that you have obtained the smallest
possible focal spot and that it is positioned at the very center of the crosshair. 3. Before remounting the sensors make sure that the contact surfaces between sensors
and flanges are clean.
The aim of the alignment procedure is to provide a collinear optical axis of both receiver unit and transmitter unit. To do so first align the receiver to the transmitter and then align the transmitter to the receiver. To align a sensor, a point light source is mounted to the flange on the opposite side of the sensor to be aligned, and the alignment optics is mounted to the flange of the sensor. This flange is aligned by centering the projected image of the point source to the center of the cross hair of the alignment tool.

Installing 4.4 Alignment of SITRANS SL
SITRANS SL 60 Operating Instructions, 12/2010, A5E01132948-04
The complete procedure for the alignment is described as follows starting with the receiver side.
Note It is also possible to start with the transmitter side but it is always necessary to align both sides.
1. Release the clamp ring on
the RTU (receiver tube unit) using the wrenches. Support the receiver when releasing.
2. Remove the receiver unit
3. Attach the light source and switch it on

Installing 4.4 Alignment of SITRANS SL
SITRANS SL Operating Instructions, 12/2010, A5E01132948-04 61
Now go to the transmitter side!
4. Release the clamp ring on the TTU (transmitter tube unit) using the wrenches. Support the transmitter when releasing.
5. Remove the TTU.
6. Remove the fine aligning unit from the aiming tool base by loosening the securing screw without taking it off. Carefully slide the fine aligning unit out. Attach the aiming tool base. Orient the screw of the aiming tool towards the purging inlet such that they form one line (arrows in adjacent figure).
7. Start with the coarse aligning unit. Slide it into the aiming tool base.

Installing 4.4 Alignment of SITRANS SL
SITRANS SL 62 Operating Instructions, 12/2010, A5E01132948-04
8. Now you will see a light spot from the light source, provided it is turned on. Focus by moving the outer part as indicated in the adjacent figure until you get the smallest and sharpest possible spot. The size of the square spot depends on the distance between the receiver and the transmitter; the longer the path the smaller the spot. Use the lens hood to suppress ambient light for a better visibility of the focused light.
9. Align the transmitter using the supplied Allen key by turning the two screws without springs until the focused spot appears in the center of the crosshair. Do not turn the screws with the springs!
10. Remove the coarse aligning unit and replace it with the fine aligning unit. Verify if the target of the fine alignment unit is orientated such that the "B" axis points to the purging inlet of the flange.
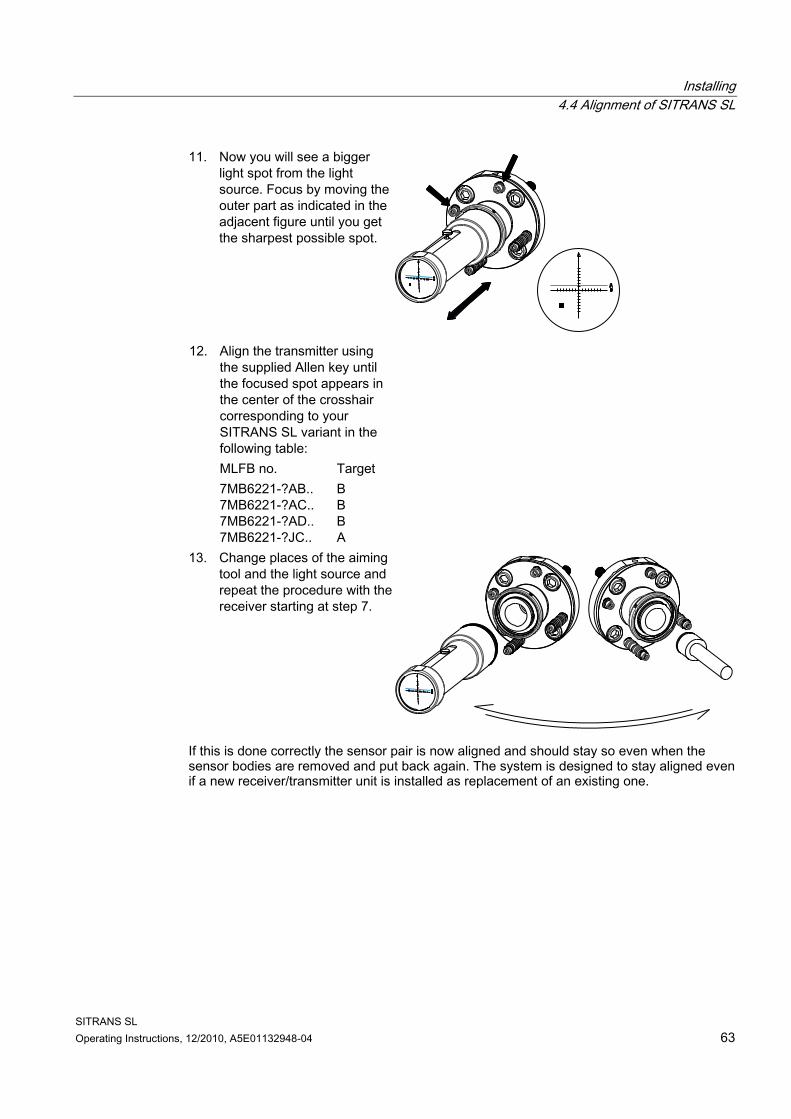
Installing 4.4 Alignment of SITRANS SL
SITRANS SL Operating Instructions, 12/2010, A5E01132948-04 63
11. Now you will see a bigger light spot from the light source. Focus by moving the outer part as indicated in the adjacent figure until you get the sharpest possible spot.
Align the transmitter using the supplied Allen key until the focused spot appears in the center of the crosshair corresponding to your SITRANS SL variant in the following table:
MLFB no. Target
12.
7MB6221-?AB.. 7MB6221-?AC.. 7MB6221-?AD.. 7MB6221-?JC..
B B B A
13. Change places of the aiming tool and the light source and repeat the procedure with the receiver starting at step 7.
If this is done correctly the sensor pair is now aligned and should stay so even when the sensor bodies are removed and put back again. The system is designed to stay aligned even if a new receiver/transmitter unit is installed as replacement of an existing one.
Installing 4.5 Purging
SITRANS SL 64 Operating Instructions, 12/2010, A5E01132948-04
4.5 Purging The easiest way to avoid condensation and dust deposits on the sensor windows or excessively high thermal load of the windows and the sealing material as well as the sensor electronics is to purge them, e.g. with air. Purging must be selected depending on the application. The sensors can therefore be configured for the respective situation. There are two different types ● Purging of optical process interfaces ● Purging of sensors.
Note Not all purging options are available to all applications. Please refer to the specification of each application for details.
4.5.1 Sensor side purging For some applications (e. g. oxygen) purging of the sensors is necessary. In this case a needle valve and an exit aperture must be mounted on the sensors. The exit aperture is used to build up a slight overpressure inside the sensor to enable the purging gas to penetrate all relevant areas within a short time during all measurements. The purging gas must not contain any concentrations of the measurement component. The presence of the gas in the sensor heads or the purging tubes may influence the measured concentration. In oxygen measurements it is necessary to purge the sensor with an oxygen free gas, such as nitrogen. When measuring CO also purging of the sensor may be considered. Normally the CO content in standard air is lower than the detection limit of SITRANS SL. Nevertheless, the CO content may be higher inside buildings and industrial plants due to exhalation or combustion processes. In this case sensor purging is necessary.
CAUTION When the sensor purging is connected to the process purging, it may be necessary to use non-return valves to ensure no process gas can enter the purging gas line in the event of failure of the purging gas supply. This applies especially in the case of cascaded process and sensor purging where there is otherwise the danger that, for example, corrosive process gases could enter the sensor enclosure.
Installing 4.5 Purging
SITRANS SL Operating Instructions, 12/2010, A5E01132948-04 65
Note When continuous purging is needed, make sure that the purging gas rate is 3 to 5 l/min. This rate assures that there is time enough to flush all measurement components out of the sensor. Purging with nitrogen on the sensor side is almost always necessary for O2 applications to avoid an offset caused by the oxygen of the air present in the unit. The cells in the sensor head are then continuously purged with nitrogen. Particularly when (re)starting the SITRANS SL O2, a sufficiently high flow of purging gas of approx. 3 to 5 l/min must be provided for several minutes to ensure that all residues of oxygen are displaced. The flow of sensor purging gas can subsequently be set to a lower value using the needle valve (included in delivery).
4.5.2 Process side purging This function is optional. With this option a needle valve is supplied with the analyzer. It is up to the customer to mount it on the process interface.
WARNING Observe that the use of this needle valve opens up into the process. The process must be permanently monitored if it is under pressure. If any danger for personnel or equipment can arise from the over pressurized process we recommended to mount a check valve on the process interface to prevent flow out from the process. Make sure that under no circumstances the process gas will intrude into the purging system. This applies particularly to a cascaded sensor and process purging which otherwise may lead to ingress of corrosive process gases.
CAUTION Always install the purging system before you install the sensors to avoid damage to the optics during the rest of the installation process. For optimal results use sensors equipped for the specific purging type, supplied by Siemens AG.

Installing 4.5 Purging
SITRANS SL 66 Operating Instructions, 12/2010, A5E01132948-04
4.5.3 Purging set-up Mount the purging connectors according to the following procedure (see the following figure): 1. Remove the plugs from the RTU/TTU and the process flange. 2. Mount the needle valves and the exit aperture. 3. Attach a piece of 6 mm tubing to the needle valves and route it to an appropriate purging
gas source.
CAUTION
Make sure that the purge gas quality is sufficient to avoid rapid degradation of the visibility in the optical path.
① Purging tube ⑤ RTU or TTU (Receiver or transmitter tube unit) ② Process flange ⑥ RHU or THU (Receiver or transmitter house unit)) ③ Process purging input ⑦ Needle valves ④ Sensor purging output ⑧ PI (Process interface) Figure 4-15 Sensor purging input with needle valve
Note When using a plastic tube for connecting the purge gas supply, be sure to use the supplied rigid metal insert.
SITRANS SL Operating Instructions, 12/2010, A5E01132948-04 67
Explosion protection 55.1 ATEX
5.1.1 Safety information
Electric Safety The SITRANS SL ATEX version is delivered with an approval for use in hazardous environments in which explosive gases are in use.
WARNING Observe the specifications of the examination certificate valid in your country. Observe the laws and regulations valid in your country for the electric installation in hazardous areas with risk of explosion. In Germany these are for example: -- Regulations for installation of electric equipment in hazardous areas, DIN EN 60079-14. Check whether the available power supply is compliant with the power supply specified on the type plate and specified in the examination certificate valid in your country.
WARNING Open cable inlet or incorrect cable gland Danger of explosion. Close the cable inlets for the electric connections. Only use cable glands or plugs which are approved for the type of protection "Flameproof enclosure Ex d". When using a conduit system, you must provide an ignition lock-out at a maximum distance of 46 cm (18") from the device inlet. Screw in the conduit with at least four turns of the thread. Observe the specifications and laws with regard to the installation location of the device.
WARNING Fix the safety mechanism for the lid.

Explosion protection 5.1 ATEX
SITRANS SL 68 Operating Instructions, 12/2010, A5E01132948-04
WARNING Never switch on or operate an analyzer with lid open. Before opening the device wait at least two minutes after de-energizing. Make sure that externally powered signals also shall be de-energized. For secure disconnection of all signals the device should be operated in hazardous areas only via a switch-off unit placed outside the hazardous area.
WARNING Never repair the device on site! Any components not mentioned in the spare parts list must be replaced or repaired by certified field service technicians. Failure to do so will also result in loss of Ex approval.
WARNING Before switching on the analyzer make sure that the housing is closed and grounded. The protective earth terminal of the SITRANS SL needs to be connected to the local potential equalization system. Death, personal injury and/or damage to property may result if this is not observed.
WARNING The use of the alignment kit (A5E01000740) for aligning the sensors is not covered by the ATEX certificate of the SITRANS SL analyzer. Never use the kit in the ATEX zone without permission of the plant manager (hot work permit).
WARNING Never open the lid of an energized SITRANS SL system in the ATEX zone without permission of the plant manager (hot work permit). Death, personal injury and/or damage to property may result if this is not observed.
SITRANS SL ATEX meets all regulations specified in the present EU regulations (LVD regulation 2006/95/EEC and EMC regulation 2004/108/EEC). The sensors may be used in explosive areas as described in ATEX certificate PTB 08 ATEX 1008 X following regulation 94/9/EC.

Explosion protection 5.1 ATEX
SITRANS SL Operating Instructions, 12/2010, A5E01132948-04 69
Materials in the sensor pair The sensor pair (transmitter and receiver) is built mainly using stainless or surface treated steel and Aluminium 231 (maximum magnesium content 0.5%). The O-rings and gaskets used are made of FKM (fluorine-polymer) or FFKM (perfluoro elastomer). The process interface consists of a borosilicate glass window and an O-ring made of FKM. If the gas purging of the sensor will fail the O-rings will be the limiting component for the temperature. They can withstand 215 °C/420 °F (FKM).
Pressure Safety In some applications the process can be over pressurized. Normally this is not a situation where the measurements will be adequate.
WARNING The high pressure glass in the sensors must not be subject to any mechanical impact which might cause damage to the glass (scratch, gash etc.). Only use a soft cloth for cleaning of the glass. Make sure that it is safe to dismount the sensor before cleaning.
WARNING Make sure all plugs and tube fittings are sealed with the enclosed pipe thread Sealant (Swagelok MS-PTS-6). (Instructions given on the sealant tube must be carefully followed).
Approval The concept of the ATEX approval is that the system is not modified and that special ATEX approved cables and bushings are used. An absolute condition for the approval is that the equipment is setup according to ATEX system set-up (Page 71) .
Liability Following commissioning, the total responsibility is with the owner.
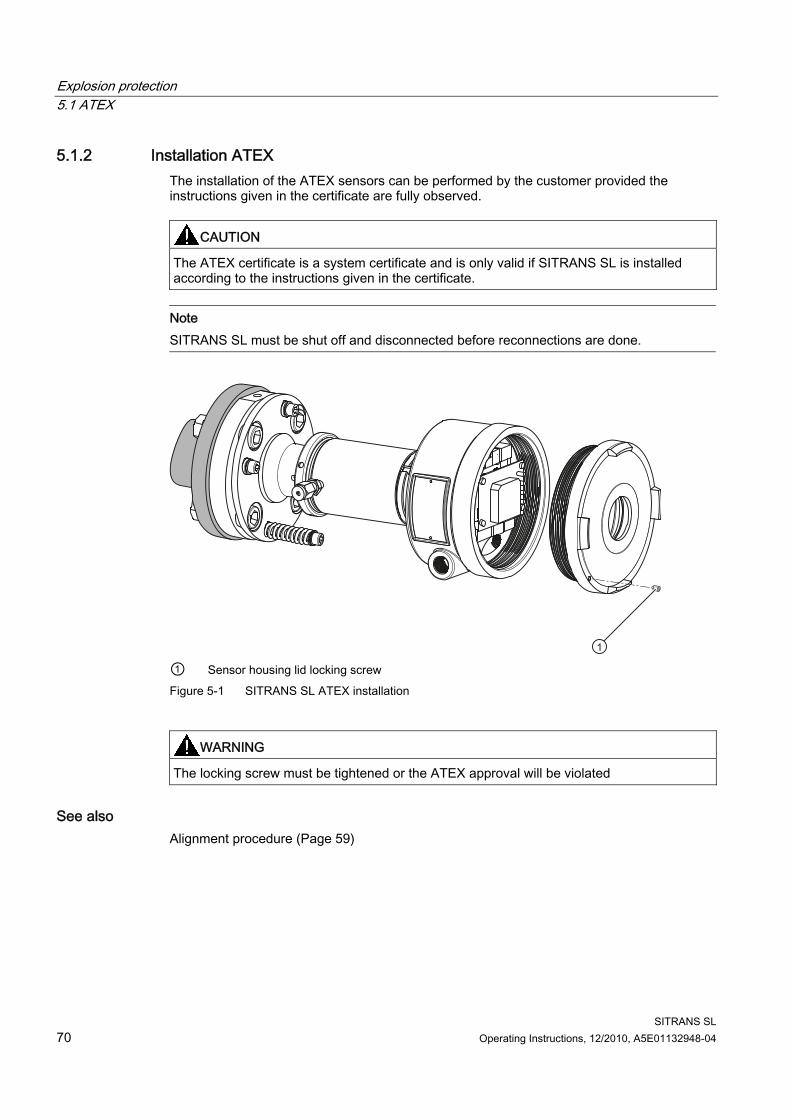
Explosion protection 5.1 ATEX
SITRANS SL 70 Operating Instructions, 12/2010, A5E01132948-04
5.1.2 Installation ATEX The installation of the ATEX sensors can be performed by the customer provided the instructions given in the certificate are fully observed.
CAUTION The ATEX certificate is a system certificate and is only valid if SITRANS SL is installed according to the instructions given in the certificate.
Note SITRANS SL must be shut off and disconnected before reconnections are done.
① Sensor housing lid locking screw Figure 5-1 SITRANS SL ATEX installation
WARNING The locking screw must be tightened or the ATEX approval will be violated
See also Alignment procedure (Page 59)

Explosion protection 5.1 ATEX
SITRANS SL Operating Instructions, 12/2010, A5E01132948-04 71
5.1.3 ATEX system set-up The figure below shows the cabling of the transmitter and receiver sensors.
WARNING - WAIT 2 MIN BEFORE OPENING AFTER DE-ENRGIZING
Figure 5-2 Overview of the ATEX version of SITRANS SL
SITRANS SL is delivered with the cables already connected in the receiver and the transmitter. The cable to the customer side is approximately 3 meters long and must be connected in a junction box (not part of the delivery) in which the customer cable is joined to the system. The sensor connection cable ⑮ is delivered in a standard length (5 m, 10 m or 25 m) and can be cut to a convenient length. The sensor connection cable is then connected to two junction boxes which are mounted to the receiver and transmitter respectively.

Explosion protection 5.1 ATEX
SITRANS SL 72 Operating Instructions, 12/2010, A5E01132948-04
① Manufacturer ⑥ Ex marking with Ex data ② CE marking ⑦ Serial number ③ Datamatrix code ⑧ Product version ④ Country of origin ⑨ Article number ⑤ Measuring range ⑩ Product name Figure 5-3 Example: ATEX label SITRANS SL
WARNING - WAIT 2 MIN BEFORE OPENING AFTER DE-ENERGIZING
Figure 5-4 Warning label SITRANS SL
1/2" NPT Figure 5-5 Thread size label SITRANS SL

Explosion protection 5.1 ATEX
SITRANS SL Operating Instructions, 12/2010, A5E01132948-04 73
5.1.4 Electric connections in the ATEX system The electric connections are done in two junction boxes between the receiver and the transmitter and in one junction box connecting the customer cable. The connections inside the unit housings are done in the factory before delivery and work here can only be done by certified technicians. The tables below illustrate the connections in the main junction box providing all in- and output connectors to the SITRANS SL. The terminals as well as their assignment are described in chapter Screw terminals (Page 48) .
Sensor connection cable The sensor connection cable connects the junction boxes at the receiver and transmitter of the SITRANS SL. This cable is used to transfer: ● 100 kbps RS-485 communication ● power for the transmitter ● ground.
Table 5- 1 Electric connection sensor connection cable, valid for ATEX product versions
Conductor color
Connector position (Receiver junction box)
Connector position (Transmitter junction box)
Remarks
Function
Red 1 1 + Blue 2 2 -
24 V DC power supply to transmitter unit
Pink 3 3 Com+ Grey 4 4 Com- White 5 5 Sync+ Brown 6 6 Sync-
RS 485 communication
Green PE terminal PE terminal Yellow PE terminal PE terminal Shield Gland Gland

Explosion protection 5.1 ATEX
SITRANS SL 74 Operating Instructions, 12/2010, A5E01132948-04
Receiver junction box cable
Table 5- 2 Electric connections for receiver junction box cable, valid for ATEX product versions
Conductor color
Connector position (Receiver junction board)
Connector position (Receiver junction box)
Remarks
Function
Red L1 1 + Blue L2 2 -
24 V DC power supply to transmitter unit
Pink L3 3 Com+ Grey L4 4 Com- White L5 5 Sync+ Brown L6 6 Sync-
RS 485 communication
Green Chassis PE terminal Yellow Chassis PE terminal Grey - pink 16 8 Tx+ Red - blue 17 9 Tx- Black 18 10 Rx+ Violet 19 11 Rx-
Ethernet connection
Shield Gland Gland
Transmitter junction box cable
Table 5- 3 Electric connections for transmitter junction box cable, valid for ATEX product versions
Conductor color
Connector position (Transmitter junction board)
Connector position (Transmitter junction box)
Remarks
Function
Red L1 1 + Blue L2 2 -
24 V DC power supply to transmitter unit
Pink L3 3 Com+ Grey L4 4 Com- White L5 5 Sync+ Brown L6 6 Sync-
RS 485 communication
Green Chassis PE terminal Yellow Chassis PE terminal Shield Gland Gland

Explosion protection 5.1 ATEX
SITRANS SL Operating Instructions, 12/2010, A5E01132948-04 75
Connection cable
Table 5- 4 Electric connections for connection cable analog and Modbus, valid for ATEX product versions
Conductor color
Connector position (Receiver junction board)
Remarks
Function
Red 1 + Blue 2 -
Supply voltage 19 ... 30,2 V DC, 10 VA 1)
Pink 3 Grey 4
Closed when energized 4)
Digital Out 0 (relay) 30 V DC, 0.5 A 3)
White 5 Brown 6
Closed when energized 4)
Digital Out 1 (relay) 30 V DC, 0.5 A 3)
Green 7 + Yellow 8 -
Digital In 0 0 ... 30 V DC 2)
Black 9 + Violet 10 -
Analog Out 0 30 V DC, 24 mA 3)
Grey - pink 11 + Red - blue 12 -
Analog Out 1 30 V DC, 24 mA 3)
White - green 13 Modbus D1 (RxD/TxD_N)
Brown - green 14 Modbus D0 (RxD/TxD_P)
White - yellow 15 Shield Modbus
RS 485 (Modbus) -7 ... + 12 V DC
White - grey 20 + Grey - brown 21 -
Analog In 0 0 ... 30 mA 2)
White - pink 22 + Pink - brown 23 -
Analog In 1 0 ... 30 mA 2)
Yellow - brown Chassis PE Shield Gland PE
1) Maximum possible power consumption. 2) Maximum input values. 3) Maximum output values. The following figures show how the outputs are used. 4) Supported relay modes: "Normally Energized" (default), "Normally De-Energized".
For configuration, see section Configuration (Page 116).

Explosion protection 5.1 ATEX
SITRANS SL 76 Operating Instructions, 12/2010, A5E01132948-04
Table 5- 5 Electric connection for PROFIBUS connection cable
Conductor color/no.
Connector position (Receiver junction board)
Remarks
Function
1 (black) 1 + Supply voltage 19 ... 30.3 VDC, 10 VA
2 (black) Chassis Red 13 A line Green 14 B line
RS 485 communication
3 (black) 2 - Supply voltage 19 ... 30.3 VDC, 10 VA
4 (black) Chassis Shield wire 15 PROFIBUS shield
Example: Digital out 0
Figure 5-6 Using digital output
● V0 can be maximum 30 V DC. ● Rload must be minimum 60 Ω (max. 0.5 A in the relay).

Explosion protection 5.1 ATEX
SITRANS SL Operating Instructions, 12/2010, A5E01132948-04 77
Example: Analog out 0
Figure 5-7 Using analog output
● V0 must be minimum 7.5 V DC and maximum 30 V DC. ● Rload can be maximum ((V0 – 7.5 V)/0.025 A) Ω.
Note The analog outputs of the SITRANS SL are passive and thus must be powered externally!

Explosion protection 5.2 FM
SITRANS SL 78 Operating Instructions, 12/2010, A5E01132948-04
5.2 FM
5.2.1 Introduction The basic principles of explosion protection are the same all over the world. However, technologies have developed in North America in the field of explosion protection for electric equipment and installations which are considerably different from those of the IEC (International Electrotechnical Commission). The differences from IEC technologies are among others the classification of hazardous locations, the construction of devices and the installation of electric systems.
WARNING The FM certificate is a system certificate and is only valid if SITRANS SL is installed according to the instructions given in the certificate.
5.2.2 Safety information
Electric safety The SITRANS SL FM version is delivered with an approval for use in hazardous environments in which explosive gases are in use.
WARNING Open cable inlet or incorrect cable gland Danger of explosion Close the cable inlets for the electric connections. Only use cable glands or plugs which are approved for the type of protection "Flameproof enclosure Ex d". When using a conduit system, you must provide an ignition lock-out at a maximum distance of 46 cm (18") from the device inlet. Screw in the conduit with at least four turns of the thread. Observe the specifications and laws with regard to the installation location of the device.
WARNING Fix the safety mechanism for the lid.

Explosion protection 5.2 FM
SITRANS SL Operating Instructions, 12/2010, A5E01132948-04 79
WARNING Before opening the device wait at least two minutes after de-energizing. Make sure that externally powered signals are also de-energized.
WARNING Never repair the device on site! Any components not mentioned in the spare parts list must be replaced or repaired by certified field service technicians. Failure to do so will also result in loss of FM approval.
WARNING Before switching on the analyzer make sure that the housing is closed and grounded. The protective earth terminal of the SITRANS SL needs to be connected to the local potential equalization system. Death, personal injury and/or damage to property may result if this is not observed.
WARNING The use of the alignment kit (A5E01000740) for aligning the sensors is not covered by the FM certificate of the SITRANS SL analyzer. Never use the kit in the hazardous area without permission of the plant manager (hot work permit).
WARNING Never open the cover of an energized SITRANS SL system in the hazardous area without permission of the plant manager (hot work permit). Death, personal injury and/or damage to property may result if this is not observed.
SITRANS SL FM meets all regulations specified in the present EU regulations (LVD regulation 2006/95/EEC, EMC regulation 2004/108/EEC, ATEX regulation 94/9/EC) as well as the regulations of the American market (FM).

Explosion protection 5.2 FM
SITRANS SL 80 Operating Instructions, 12/2010, A5E01132948-04
Materials in the sensor pair The sensor pair (transmitter and receiver) is built mainly using stainless or surface treated steel and aluminium 231 (maximum magnesium content 0.5%). The O-rings and gaskets used are made of FKM (fluoro polymer) or FFKM (perflour elastomer). The process interface window is a made of borosilicate glass and contains an O-ring made of FKM. In the case that gas purging of the sensor fails the O-rings will be the limiting component for the temperature. They can withstand 215 °C/420 °F (FKM).
Pressure Safety In some applications the process can be overpressurized. Normally this is not a situation where the measurements will be adequate.
WARNING The high pressure glass in the sensors must not be subject to any mechanical impact which might cause damage to the glass (scratch, gash etc.). Only use a soft cloth for cleaning of the glass. Make sure that it is safe to dismount the sensor before cleaning.
WARNING Make sure all plugs and tube fittings are sealed with the enclosed pipe thread Sealant (Swagelok MS-PTS-6). (Instructions given on the sealant tube must be carefully followed).
Approval The concept of the FM approval is that the system is not modified and that special FM approved cables and bushings are used. An absolute condition for the approval is that the equipment is set up according to FM system set-up (Page 82).
Liability Following commissioning, the total responsibility is with the owner.

Explosion protection 5.2 FM
SITRANS SL Operating Instructions, 12/2010, A5E01132948-04 81
5.2.3 Installation of the FM version of SITRANS SL The installation of the FM sensors can be performed by the customer provided the instructions given in the certificate are fully observed.
CAUTION The FM certificate is a system certificate and is only valid if SITRANS SL is installed according to the instructions given in the certificate.
Note SITRANS SL must be shut off and disconnected before reconnections are done.
① Sensor housing lid locking screw Figure 5-8 SITRANS SL FM installation
WARNING The locking screw must be tightened. Failure to do so will also result in a loss of the FM approval.
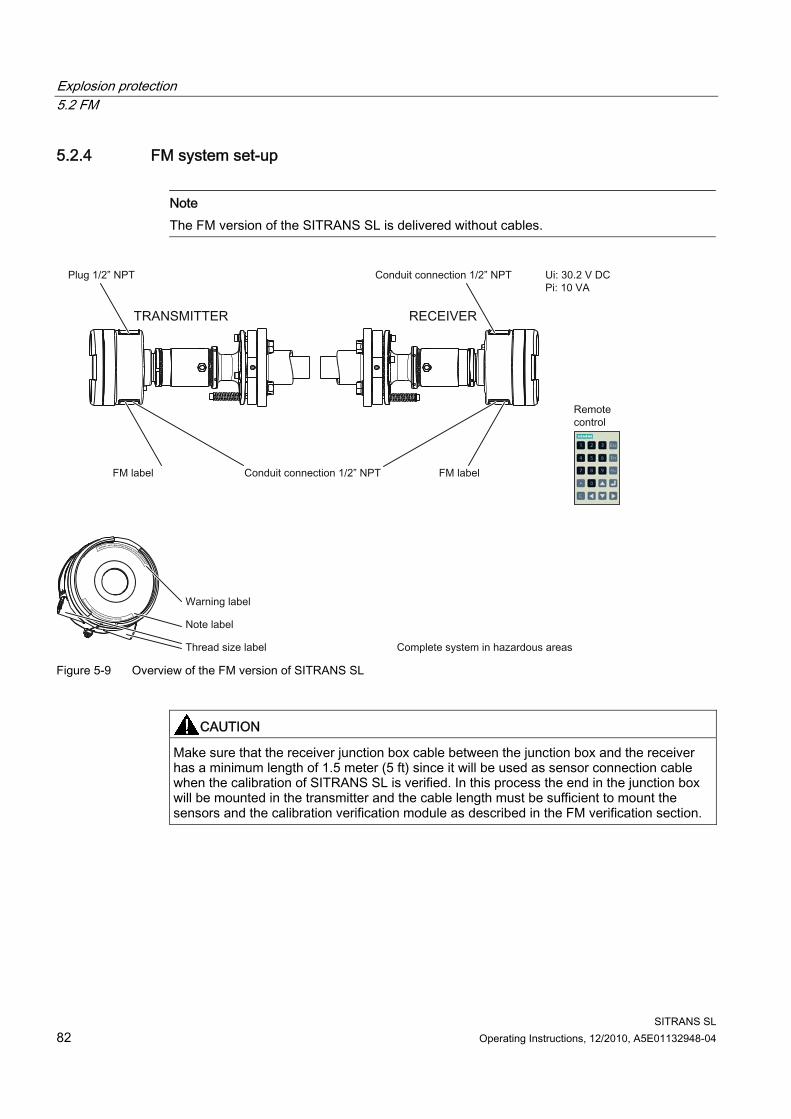
Explosion protection 5.2 FM
SITRANS SL 82 Operating Instructions, 12/2010, A5E01132948-04
5.2.4 FM system set-up
Note The FM version of the SITRANS SL is delivered without cables.
Figure 5-9 Overview of the FM version of SITRANS SL
CAUTION Make sure that the receiver junction box cable between the junction box and the receiver has a minimum length of 1.5 meter (5 ft) since it will be used as sensor connection cable when the calibration of SITRANS SL is verified. In this process the end in the junction box will be mounted in the transmitter and the cable length must be sufficient to mount the sensors and the calibration verification module as described in the FM verification section.

Explosion protection 5.2 FM
SITRANS SL Operating Instructions, 12/2010, A5E01132948-04 83
① Manufacturer ⑥ FM data ② FM marking ⑦ Serial number ③ Datamatrix code ⑧ Product version ④ Country of origin ⑨ Article number ⑤ Measuring range ⑩ Product name Figure 5-10 Example: FM label SITRANS SL
WARNING - WAIT 2 MIN BEFORE OPENING AFTER DE-ENERGIZING
Figure 5-11 Warning label
Figure 5-12 Note label SITRANS SL

Explosion protection 5.2 FM
SITRANS SL 84 Operating Instructions, 12/2010, A5E01132948-04
1/2" NPT Figure 5-13 Thread size label SITRANS SL
Verification of systems used in hazardous areas (Page 159)
5.2.5 Electric connections in the FM system The electric connections are done in the receiver and transmitter respectively. The tables below illustrate the connections in the receiver and the transmitter for the non PROFIBUS version. The terminals as well as their assignments are described in section Screw terminals (Page 48).
Sensor connection The sensor connection connects receiver and the transmitter of the SITRANS SL. The sensor connection is used to transfer: ● 100 kbps RS-485 communication ● power for the transmitter ● ground.
Table 5- 6 Electric connections for sensor connection, valid for FM product versions
Screw terminals on junction board Receiver Transmitter
Function / Power
L1 S1 + L2 S2 -
24 V DC power supply to transmitter unit
L3 S3 Com+ L4 S4 Com- L5 S5 Sync+ L6 S6 Sync-
RS 485 communication
Chassis Chassis Ground Gland Gland Ground

Explosion protection 5.2 FM
SITRANS SL Operating Instructions, 12/2010, A5E01132948-04 85
Connection cable
Table 5- 7 Electric connections for connection cable analog and Modbus, valid for FM product versions
Terminals in receiver junction board Function/Power Ethernet cable 1 + 2 -
Supply voltage 19 ... 30.2 V, 10 VA 1)
3 4
Closed when energized 4) Digital OUT 0 (relay) 30 V, 0.5 A 3)
5 6
Closed when energized 4) Digital OUT 1 (relay) 30 V, 0.5 A 3)
7 + 8 -
Digital IN 0 0 ... 30 V 2)
9 + 10 -
Analog OUT 0 (Measurement) 30 V, 24 mA 3)
11 + 12 -
Analog OUT 1 (Measurement) 30 V, 24 mA 3)
13 PROFIBUS A-Line (RxD/TxD_N - data inverted)
Modbus D1 (RxD/TxD_N - data inverted))
14 PROFIBUS B-Line (RxD/TxD_P - data not inverted)
Modbus D0 (RxD/TxD_P - data not inverted)
15 PROFIBUS / Modbus shield
RS-485 (PROFIBUS 5) / Modbus) - 7 ...+ 12 V DC
16 Tx+ White/Orange 17 Tx- Orange 18 Rx+ White/Green 19 Rx-
Ethernet 6)
Green 20 + 21 -
Analog IN 0 (Temperature) 0 .. 30 mA 2)
22 + 23 -
Analog IN 1 (Pressure) 0 ... 30 mA 2)
24 Ground 25 Ground Chassis Ground Gland Ground Shield
1) Maximum possible power consumption. 2) Maximum input values. 3) Maximum output values. The following figures show how the outputs are used. 4) Supported relay modes: "Normally Energized" (default), "Normally De-Energized". For configuration, see
section Configuration (Page 116). 5) Certified PROFIBUS wiring recommended, see section PROFIBUS DP interface (Page 129) 6) We recommend not to connect the connection cable directly to Ethernet connectors. Instead the sensor
connection cable kit should be used for this purpose.

Explosion protection 5.2 FM
SITRANS SL 86 Operating Instructions, 12/2010, A5E01132948-04
Example: Digital out 0
Figure 5-14 Using digital output
● V0 can be maximum 30 V DC. ● Rload must be minimum 60 Ω (max. 0.5 A in the relay).
Example: Analog out 0
Figure 5-15 Using analog output
● V0 must be minimum 7.5 V DC and maximum 30 V DC. ● Rload can be maximum ((V0 – 7.5 V)/0.025 A) Ω.
Note SITRANS SL provides no supply voltage for the analyzer outputs, i.e. the analog outputs of the SITRANS SL are passive and thus must be powered externally!
See also Screw terminals (Page 48)

Commissioning
SITRANS SL Operating Instructions, 12/2010, A5E01132948-04 87
Commissioning 66.1 General information for commissioning
Device position The SITRANS SL may be mounted in any direction. When mounting the sensors the large springs of the alignment flanges must face downwards. All purging outlets must face downwards.
Operation
WARNING Dangerous voltage Certain parts in the analyzer carry dangerous voltages which can become accessible as a result of an open cover. Before you commission the device make sure that it is properly closed. Never open the device during operation
Before connecting and switching on the device, the operator must be familiar with the device operation. The user must also be familiar with the connection and operation of: ● Analog and digital pressure and temperature sensors, e.g SITRANS P or SITRANS T ● PROFIBUS DP and SIMATIC Manager when using the PROFIBUS-enabled SITRANS SL
analyzer; ● Modbus protocol and Modbus system configuration when using the Modbus-enabled
SITRANS SL analyzer
Temperature influence During operation, make sure that the permissible ambient temperature of -20 °C to 55 °C (-4 °F to 131 °F) is observed.
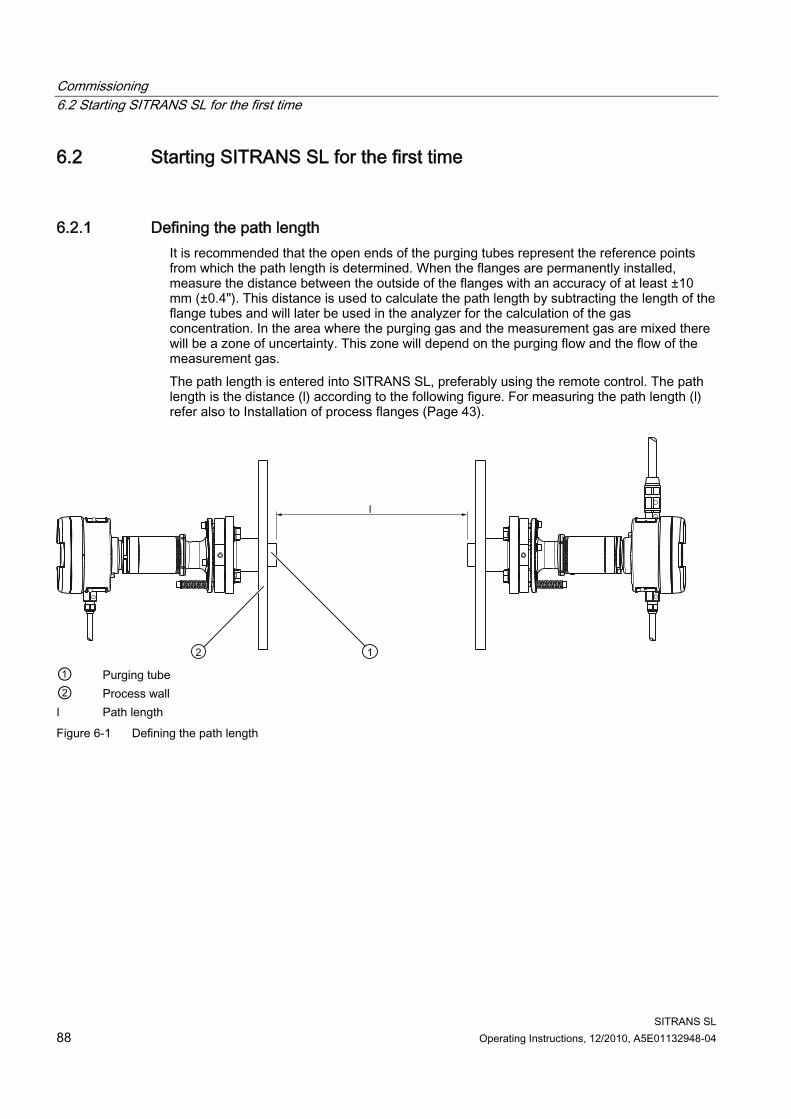
Commissioning 6.2 Starting SITRANS SL for the first time
SITRANS SL 88 Operating Instructions, 12/2010, A5E01132948-04
6.2 Starting SITRANS SL for the first time
6.2.1 Defining the path length It is recommended that the open ends of the purging tubes represent the reference points from which the path length is determined. When the flanges are permanently installed, measure the distance between the outside of the flanges with an accuracy of at least ±10 mm (±0.4"). This distance is used to calculate the path length by subtracting the length of the flange tubes and will later be used in the analyzer for the calculation of the gas concentration. In the area where the purging gas and the measurement gas are mixed there will be a zone of uncertainty. This zone will depend on the purging flow and the flow of the measurement gas. The path length is entered into SITRANS SL, preferably using the remote control. The path length is the distance (l) according to the following figure. For measuring the path length (l) refer also to Installation of process flanges (Page 43).
① Purging tube ② Process wall l Path length Figure 6-1 Defining the path length

Commissioning 6.3 PROFIBUS configuration for SITRANS SL
SITRANS SL Operating Instructions, 12/2010, A5E01132948-04 89
6.2.2 Further input parameters
Input of process temperature The process temperature can either be input using an external sensor or entered as a fixed value using the remote control, see also Electric connections non Ex (Page 46) and General (Page 111) .
Input of process pressure The process pressure can either be input using an external sensor or entered as a fixed value using the remote control, see also Electric connections non Ex (Page 46) and General (Page 111).
6.3 PROFIBUS configuration for SITRANS SL Information on the input and output range as well as the consistency of cyclically transmitted data is defined in the device master data file (GSD file). Using the configuration package, this information is checked by the device and declared valid. During projection phase the data to be transmitted in cyclical operation will be determined. This enables an optimal quantity of the data to be transmitted. In the Siemens control system, the GSD files of all commonly used devices are already available. These GSD files are also available on the Internet for a subsequent import.
6.3.1 Cyclic data transfer Cyclic data transmission is used to transfer data necessary for process automation between the control or automation system (class 1 master) and the SITRANS SL device.
Setting the PROFIBUS address The PROFIBUS address is factory-set to 126. It can be changed by the user ● using LUI (see section Menu - Communication (Page 125))
or ● using the configuration tool LDSComm.

Commissioning 6.3 PROFIBUS configuration for SITRANS SL
SITRANS SL 90 Operating Instructions, 12/2010, A5E01132948-04
6.3.2 System integration The user data which are provided over the PROFIBUS line to the process control system are based on the target configuration. The following example is from a Siemens STEP7 project, and demonstrates how to configure the cyclic DPV0 data exchange.
Overview of installation and configuration steps 1. SIMATIC MPI cable installation 2. PG/PC Interface setting 3. Loading GSD file 4. Network configuration with the SIMATIC Manager 5. Creation of a new project with the SIMATIC Manager 6. Hardware configuration
6.3.3 SIMATIC MPI cable installation ● SIMATIC Manager uses SIMATIC MPI cable for loading configuration data to the PLC via
its SIMATIC MPI connector. ● SIMATIC MPI cable consists of a PCMCIA card and a serial cable for connecting to the
MPI port of the PLC. ● SIMATIC MPI cable is ready to use after its driver has been installed successfully.
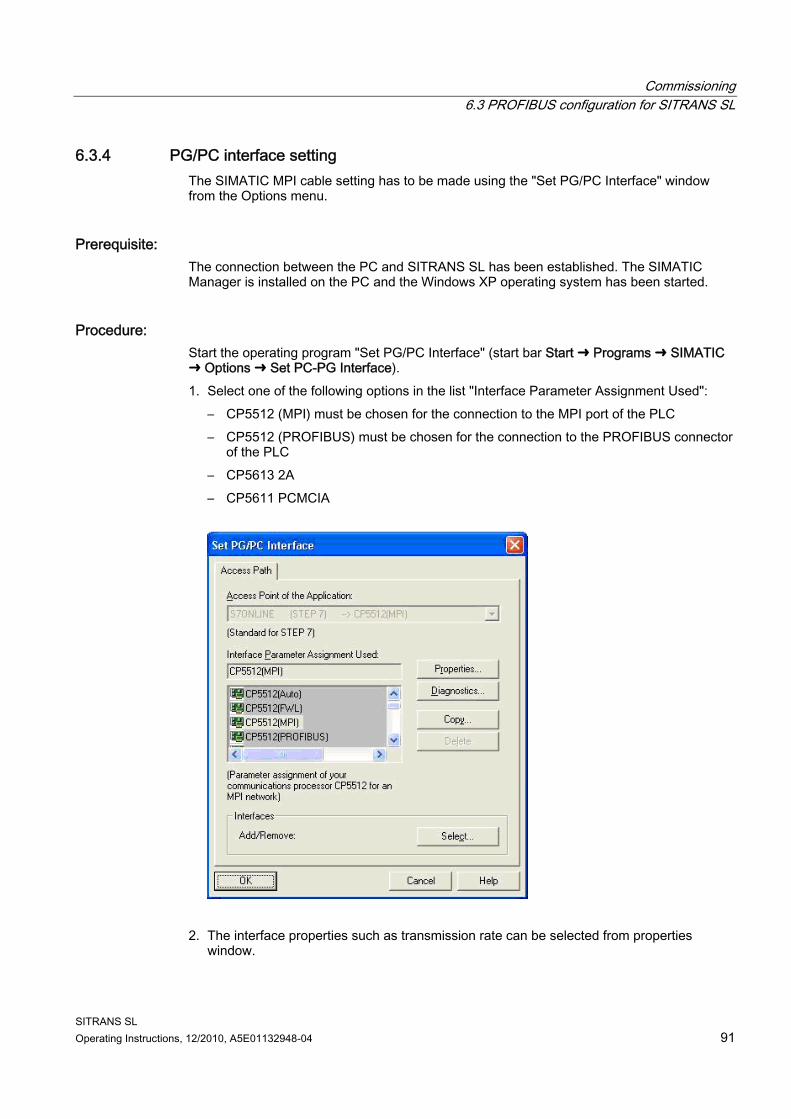
Commissioning 6.3 PROFIBUS configuration for SITRANS SL
SITRANS SL Operating Instructions, 12/2010, A5E01132948-04 91
6.3.4 PG/PC interface setting The SIMATIC MPI cable setting has to be made using the "Set PG/PC Interface" window from the Options menu.
Prerequisite: The connection between the PC and SITRANS SL has been established. The SIMATIC Manager is installed on the PC and the Windows XP operating system has been started.
Procedure: Start the operating program "Set PG/PC Interface" (start bar Start ➜ Programs ➜ SIMATIC ➜ Options ➜ Set PC-PG Interface). 1. Select one of the following options in the list "Interface Parameter Assignment Used":
– CP5512 (MPI) must be chosen for the connection to the MPI port of the PLC – CP5512 (PROFIBUS) must be chosen for the connection to the PROFIBUS connector
of the PLC – CP5613 2A – CP5611 PCMCIA
2. The interface properties such as transmission rate can be selected from properties window.
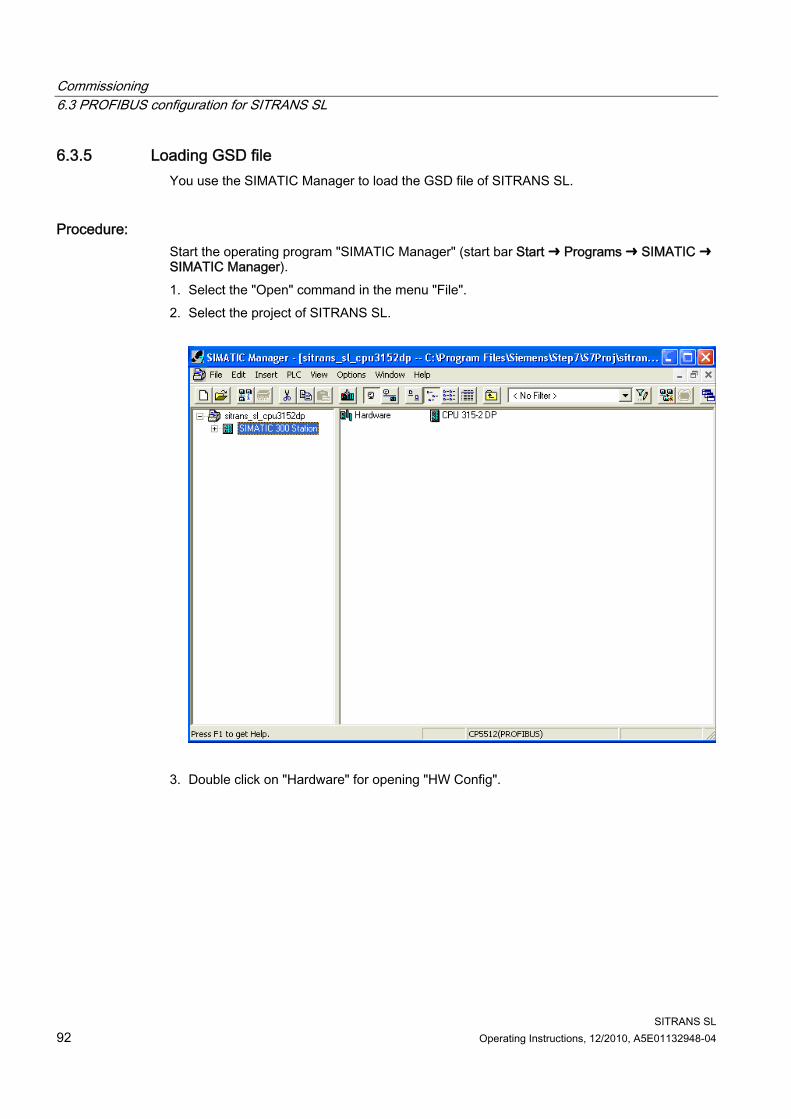
Commissioning 6.3 PROFIBUS configuration for SITRANS SL
SITRANS SL 92 Operating Instructions, 12/2010, A5E01132948-04
6.3.5 Loading GSD file You use the SIMATIC Manager to load the GSD file of SITRANS SL.
Procedure: Start the operating program "SIMATIC Manager" (start bar Start ➜ Programs ➜ SIMATIC ➜ SIMATIC Manager). 1. Select the "Open" command in the menu "File". 2. Select the project of SITRANS SL.
3. Double click on "Hardware" for opening "HW Config".

Commissioning 6.3 PROFIBUS configuration for SITRANS SL
SITRANS SL Operating Instructions, 12/2010, A5E01132948-04 93
4. Select the "Install GSD file..." in the menu "Options".
5. Close the opened project in HW Config.

Commissioning 6.3 PROFIBUS configuration for SITRANS SL
SITRANS SL 94 Operating Instructions, 12/2010, A5E01132948-04
6. Navigate to the corresponding GSD file using the button "Browse" on your hard drive.
7. Mark in the selection list the GSD file and press the button "Install". 8. Finish the installation of the GSD file by pressing the button "Close".

Commissioning 6.3 PROFIBUS configuration for SITRANS SL
SITRANS SL Operating Instructions, 12/2010, A5E01132948-04 95
6.3.6 Network configuration with SIMATIC Manager The SIMATIC Manager Step7 is the network configuration tool that will be used to configure the PROFIBUS DP network. SIMATIC Manager uses GSD files in order to know the properties of the devices in the network configuration. The configuration is then loaded to the PLC for informing the PLC about the PROFIBUS slaves in the network. After the network configuration is loaded to the PLC, the PROFIBUS communication will be started by the PLC with the configured slaves. The steps for creating and loading a Step7 project are: 1. Create the project by selecting CPU and organization blocks.
To do so use the 'New Project Wizard'. 2. Build the network configuration in hardware configuration window and compile. 3. Write the application software for the organization blocks in STL, LAD or FBD. 4. Adjust the PG/PC interface. 5. Download hardware configuration, system data and the organization blocks to the PLC 6. Wait for the PLC to restart. 7. Check the status LEDs on the PLC for a proper PROFIBUS communication. The Red SF
and BF LEDs must be off and the green RUN LED must be on.

Commissioning 6.3 PROFIBUS configuration for SITRANS SL
SITRANS SL 96 Operating Instructions, 12/2010, A5E01132948-04
6.3.7 Creation of a new project with SIMATIC Manager You create a new STEP 7 project using the SIMATIC Manager.
Procedure: 1. Start the operating program "SIMATIC Manager" (Start bar Start ➜ Programs ➜
SIMATIC ➜ SIMATIC Manager). 2. Create a new project in the SIMATIC Manager with the File ➜ "New Project" Wizard
menu command. Reaction: The STEP 7 Wizard: "New Project" opens.

Commissioning 6.3 PROFIBUS configuration for SITRANS SL
SITRANS SL Operating Instructions, 12/2010, A5E01132948-04 97
3. Click the button "Next". Reaction: The STEP 7 Wizard: "New Project" opens a dialog box for selecting the CPU.

Commissioning 6.3 PROFIBUS configuration for SITRANS SL
SITRANS SL 98 Operating Instructions, 12/2010, A5E01132948-04
4. Pick your required CPU from the selection list and click the button "Next". Reaction: The STEP 7 Wizard: "New Project" opens a dialog box for selecting the blocks.
5. In the selection list mark the check boxes for OB1 (program cycle execution block), OB100 (complete restart) and OB35.
Note OB1 is the block which is continuously active in the background. OB100 is the block which is called once during the startup of the PLC. OB35 is the block that is called periodically with a timer interrupt. Its period can be
changed. SFC14 and SFC15 are the system functions that are used in OB35 organization block.
OB80 to OB88 are the organization blocks that are used for error situations.

Commissioning 6.3 PROFIBUS configuration for SITRANS SL
SITRANS SL Operating Instructions, 12/2010, A5E01132948-04 99
6. Click the button "Next". Reaction: The STEP 7 Wizard: "New Project" opens a dialog box for setting the project name. Type the name or pick an existing one.
7. Click the button "Finish". Reaction: The STEP 7 project is created with the organization blocks OB1, OB100 and OB35.

Commissioning 6.3 PROFIBUS configuration for SITRANS SL
SITRANS SL 100 Operating Instructions, 12/2010, A5E01132948-04
● Optionally you can add the organization blocks from OB80 to OB88 with the menu command Insert ➜ S7 Block ➜ Organization Block.
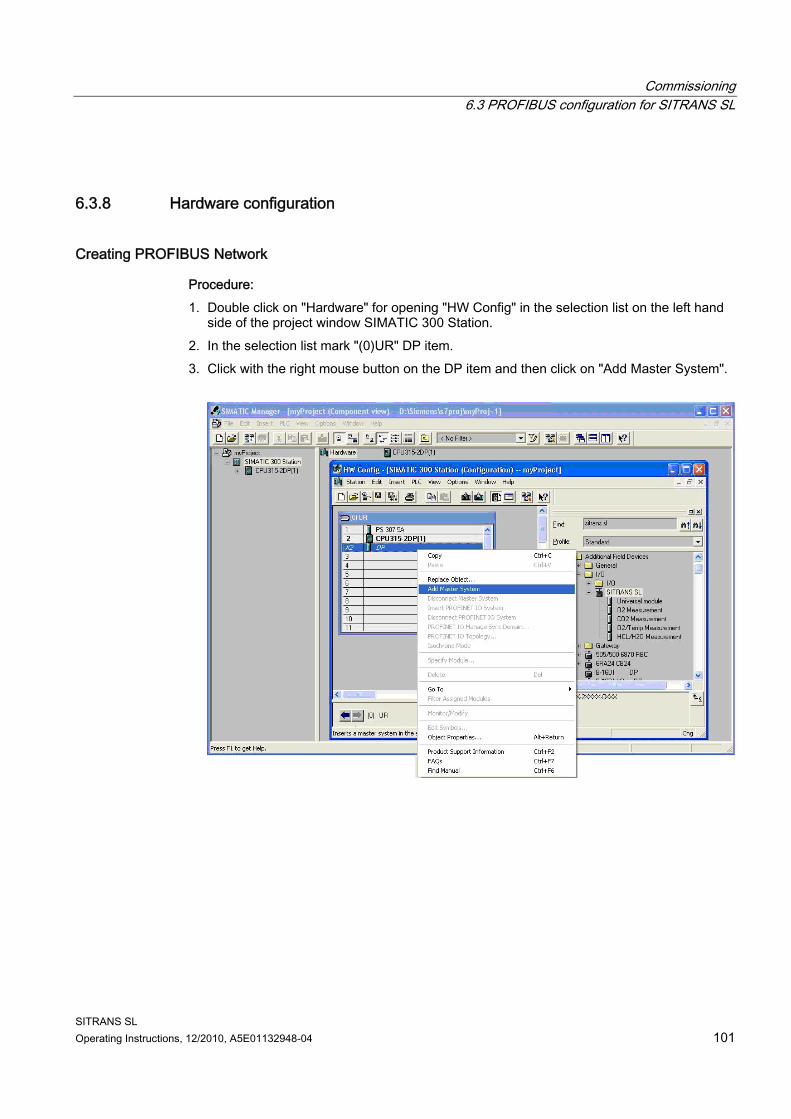
Commissioning 6.3 PROFIBUS configuration for SITRANS SL
SITRANS SL Operating Instructions, 12/2010, A5E01132948-04 101
6.3.8 Hardware configuration
Creating PROFIBUS Network
Procedure: 1. Double click on "Hardware" for opening "HW Config" in the selection list on the left hand
side of the project window SIMATIC 300 Station. 2. In the selection list mark "(0)UR" DP item. 3. Click with the right mouse button on the DP item and then click on "Add Master System".

Commissioning 6.3 PROFIBUS configuration for SITRANS SL
SITRANS SL 102 Operating Instructions, 12/2010, A5E01132948-04
PROFIBUS Network Configuration 1. Mark in the selection list "PROFIBUS(1): DP master system (1)" with the right mouse
button. 2. Enter the dialog box 'Network Settings' in "Properties -PROFIBUS" 3. In the selection lists pick your object properties.
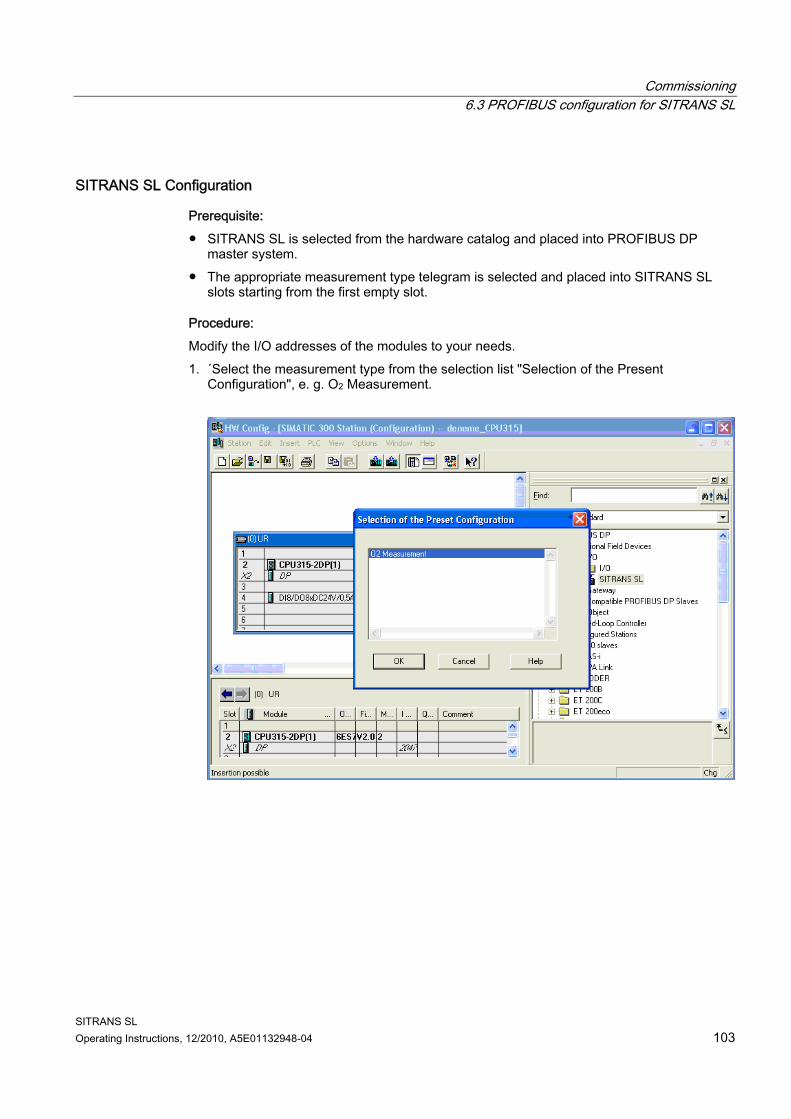
Commissioning 6.3 PROFIBUS configuration for SITRANS SL
SITRANS SL Operating Instructions, 12/2010, A5E01132948-04 103
SITRANS SL Configuration
Prerequisite: ● SITRANS SL is selected from the hardware catalog and placed into PROFIBUS DP
master system. ● The appropriate measurement type telegram is selected and placed into SITRANS SL
slots starting from the first empty slot.
Procedure: Modify the I/O addresses of the modules to your needs. 1. ´Select the measurement type from the selection list "Selection of the Present
Configuration", e. g. O2 Measurement.

Commissioning 6.3 PROFIBUS configuration for SITRANS SL
SITRANS SL 104 Operating Instructions, 12/2010, A5E01132948-04
2. Select the subnet type from the selection list "Properties - PROFIBUS interface
SITRANS SL".

Commissioning 6.3 PROFIBUS configuration for SITRANS SL
SITRANS SL Operating Instructions, 12/2010, A5E01132948-04 105
3. In the HW Config window you can check the number of blocks and the address assignment.
Measurement Type Selection ● Concentration measurement output
First input module in the first slot. Consists of 4 byte float value and 1 byte status value. ● Transmission value (absolute transmission) output
Third input module in the third slot. Consists of 4 byte float value and 1 byte status value. ● Temperature input:
First output module in the fifth slot. Consists of 4 byte float value and 1 byte status value. ● Pressure input:
Second output module in the sixth slot. Consists of 4 byte float value and 1 byte status value.

Commissioning 6.4 Modbus configuration for SITRANS SL
SITRANS SL 106 Operating Instructions, 12/2010, A5E01132948-04
6.4 Modbus configuration for SITRANS SL
6.4.1 Modbus settings Modbus settings are configurable via LUI. Detailed information about the parameters can be found in the Generic Modbus device specification. Default values of the Modbus settings are stored in the ModbusConfig.xml. If these parameters are modified by customers, the modified paramters will be stored in the EEPROM and then be effective.
Table 6- 1 Modbus settings
Setting parameter Default LUI Slave ID 1 to 247 1 X Baud Rate 300 – 115200 19200 X Parity None, Even, Odd None X Transmission mode RTU + ASCII RTU X RTU frame timeout 0 - 600000 ms 50 ms X ASCII frame timeout 50 - 600000 ms 1000 ms X Application answer timeout
50 - 10000 ms 1000 ms X
Minimum answer delay time
5 - 1000 ms 20 ms X
Data Bits 7, 8 8 X Stop Bits 1, 2 1 X
6.4.2 Byte and word ordering ● The interpretation of the data field within the Modbus RTU protocol is according to the
original Modbus Application Protocol Specification "big endian Mode". ● Given that the Modbus RTU message protocol is "big endian", in order to successfully
exchange a 32 bit data type via a Modbus RTU message, the endianness of both master and slave must be ensured. SITRANS SL allows specific selection of byte orders, so you must take care that both units are set to the same byte order.

Commissioning 6.4 Modbus configuration for SITRANS SL
SITRANS SL Operating Instructions, 12/2010, A5E01132948-04 107
6.4.3 Supported Modbus functions Modbus defines a set of data and control functions to perform data transfer and slave diagnostic. The following Modbus functions are implemented: ● 0x01 Read Coils ● 0x02 Read Discrete Inputs ● 0x03 Read Holding Registers ● 0x04 Read Input Registers ● 0x05 Write Single Coil ● 0x06 Write Single Register ● 0x08 Diagnostics, Echo Only (sub function 0) ● 0x0F Write Multiple Coils ● 0x10 Write Multiple Registers ● Enron Modbus Support
– Support for 32-bit registers via codes 0x03 and 0x10 – Optional support for offset 0 between frame and application
See also Modbus interface (Page 136)

Commissioning 6.4 Modbus configuration for SITRANS SL
SITRANS SL 108 Operating Instructions, 12/2010, A5E01132948-04

SITRANS SL Operating Instructions, 12/2010, A5E01132948-04 109
Operation 7
The following description contains an overview of the operating functions which you can perform on the device. You can operate the device using the remote control or the local user interface (LUI). This includes the setup of PROFIBUS, Modbus, analog and digital inputs and outputs.
WARNING Dangerous voltage Certain parts in the analyzer carry dangerous voltages which can become accessible as a result of an open cover. Before you switch on the device make sure that it is properly closed. Never open the device during operation
Local user interface (LUI) The local user interface consists of a digital display and four buttons.
① Digital display (measurement view) ② Buttons ③ Receiver for remote control signals Figure 7-1 Digital display and buttons

Operation
SITRANS SL 110 Operating Instructions, 12/2010, A5E01132948-04
CAUTION During operation only use remote control To operate the device directly via the buttons on the LUI PCB you have to unscrew the lid. Doing so airborne substances may intrude into the device thus leading to a possible damage. To avoid this always operate the device using the remote control. Operations via the buttons on the LUI PCB are only allowed for test and service purposes.
Remote control SITRANS SL can be operated at site with an infrared remote control. This device is intrinsically safe and certified: according to ATEX according to CSA/FM II 1 G EEx ie IIC T4 SIRA 01ATEX2147
CLASS I, DIV 1, GROUPS A,B,C,D
The following figure shows the keypad layout of the remote control.
Figure 7-2 Keypad of the remote control for SITRANS SL
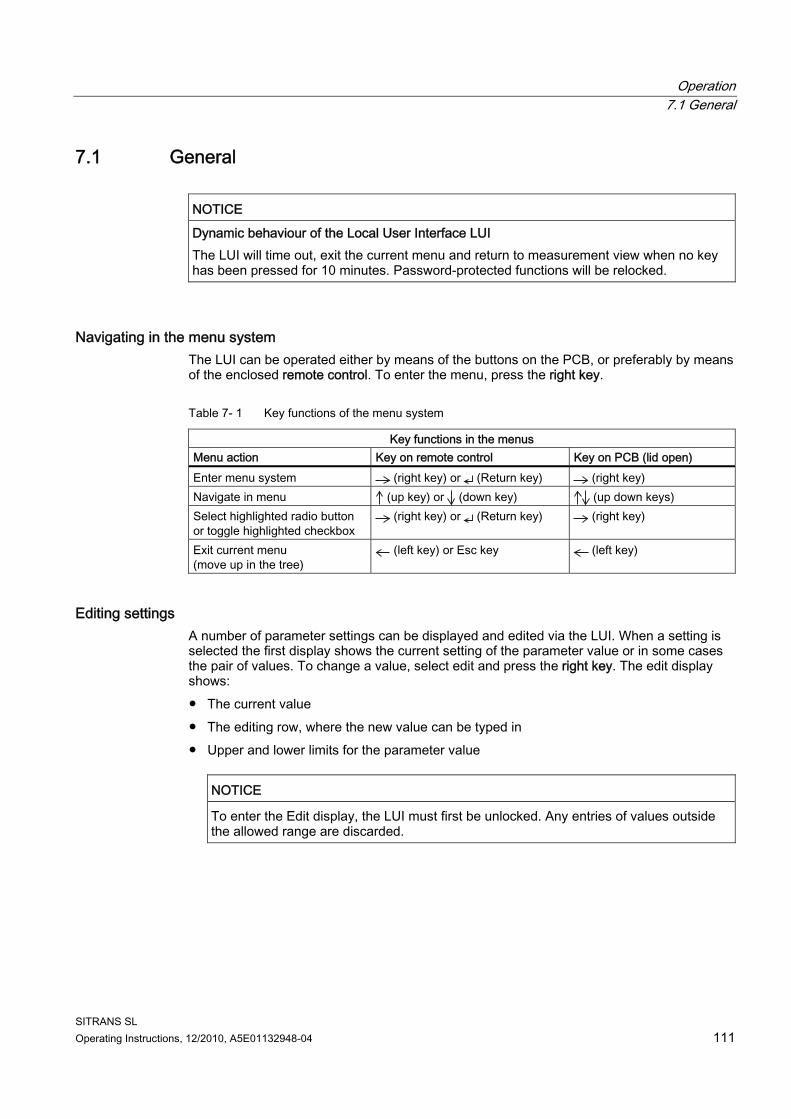
Operation 7.1 General
SITRANS SL Operating Instructions, 12/2010, A5E01132948-04 111
7.1 General
NOTICE Dynamic behaviour of the Local User Interface LUI The LUI will time out, exit the current menu and return to measurement view when no key has been pressed for 10 minutes. Password-protected functions will be relocked.
Navigating in the menu system The LUI can be operated either by means of the buttons on the PCB, or preferably by means of the enclosed remote control. To enter the menu, press the right key.
Table 7- 1 Key functions of the menu system
Key functions in the menus Menu action Key on remote control Key on PCB (lid open) Enter menu system (right key) or (Return key) (right key) Navigate in menu (up key) or (down key) (up down keys) Select highlighted radio button or toggle highlighted checkbox
(right key) or (Return key) (right key)
Exit current menu (move up in the tree)
(left key) or Esc key (left key)
Editing settings A number of parameter settings can be displayed and edited via the LUI. When a setting is selected the first display shows the current setting of the parameter value or in some cases the pair of values. To change a value, select edit and press the right key. The edit display shows: ● The current value ● The editing row, where the new value can be typed in ● Upper and lower limits for the parameter value
NOTICE
To enter the Edit display, the LUI must first be unlocked. Any entries of values outside the allowed range are discarded.

Operation 7.1 General
SITRANS SL 112 Operating Instructions, 12/2010, A5E01132948-04
Examples
Path length Edit path length
Scaling Edit lower value
Table 7- 2 Key functions when editing
Edit action Key on remote control Key on PCB (lid open) Move to digit and and Alter digit Press digit number key Delete digit C Use to select # Insert *) Use to select > Decimal point . Use to select . +/- Press +/-
(not dependent on cursor position)
Move to the leftmost position, Use to select + or -
Cancel editing Esc Move to the leftmost position, then press
Confirm edited value Move to the rightmost position, then press
*) Can not be done with the remote control. The input must be rewritten.

Operation 7.1 General
SITRANS SL Operating Instructions, 12/2010, A5E01132948-04 113
Saving settings When a change has been made to a setting the new value is immediately used by the analyzer. The value is however not yet stored permanently, i.e. after a power failure the old value(s) will be used. To store the new value(s), press left key or Esc key repeatedly to move back to the main menu, then press left key or Esc key once more to exit the menu. The LUI will now inform that changes have been made and display the save settings dialogue.
CAUTION After changing the settings exit the menu system and select OK when asked to save the settings.

Operation 7.2 Measurement views
SITRANS SL 114 Operating Instructions, 12/2010, A5E01132948-04
7.2 Measurement views
Measurement view
Gas component, e.g. O2 Pressure
Temperature Transmission When not being edited, the SITRANS SL LUI displays the Measurement view containing the following information: ● Present measured components with corresponding Value and Unit. ● Alarm status icon or icons, if multiple alarms are trigged. ● Alarm text. If multiple alarms are trigged only the most severe is presented by text, while
the icon toggles through the list of active alarms. ● To read through the list of active alarms, press the Left Key repeatedly. The following key functions are available: ● Up/Down – select component to view ● Right – enter menu ● Left – view next active alarm

Operation 7.3 Menu system
SITRANS SL Operating Instructions, 12/2010, A5E01132948-04 115
7.3 Menu system
7.3.1 The menu structure The main menu is entered by pressing To exit press Changes are saved when the main menu is exited. In the following menu structures white boxes indicate selection screens, grey boxes indicate edit screens, and black (inverted) boxes represent displays without any user interactions.
Figure 7-3 The menu system
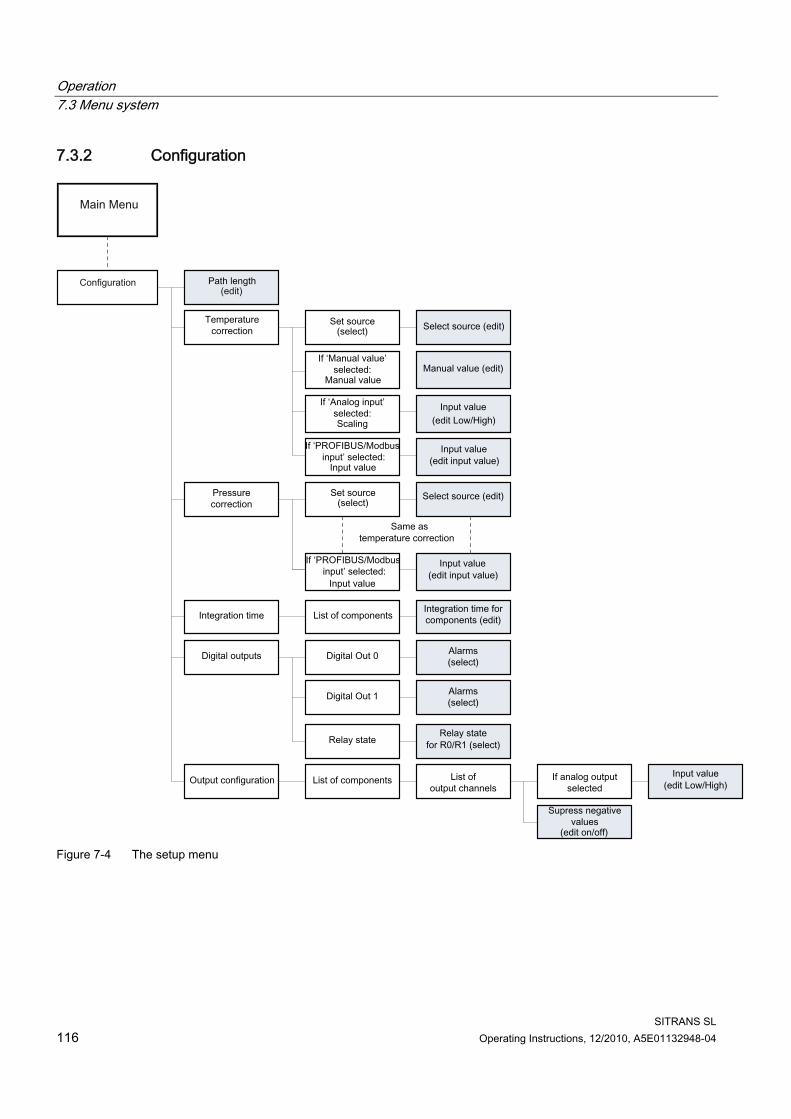
Operation 7.3 Menu system
SITRANS SL 116 Operating Instructions, 12/2010, A5E01132948-04
7.3.2 Configuration
Main Menu
Configuration(edit)
Figure 7-4 The setup menu

Operation 7.3 Menu system
SITRANS SL Operating Instructions, 12/2010, A5E01132948-04 117
Path length View/edit path length in meters with three decimal digits.
Temperature correction This menu is dynamic; at first level you're asked to "Set source" which then displays a list of all available temperature inputs. The example in the following display sequence shows the steps to change the source from analog input to manual input.
Parameter "Temperature correction" for analog input
Parameter "Set source" in a PROFIBUS device configuration
Parameter "Set source" in a Modbus device configuration
Paramater "Temperature correction" for manual input
Pressure correction Settings, sequences, and parameters are similar to those of the temperature correction menu.
Integration time This menu is dynamic and depends on the application. Integration time settings are possible for the following components: ● Measurement component (e.g. O2, CO) ● Absolute transmission ● Temperature ● Pressure An averaging filter is connected to each component. For each component the filter parameter "integration time" can be used to balance the needs of response time and noise reduction.

Operation 7.3 Menu system
SITRANS SL 118 Operating Instructions, 12/2010, A5E01132948-04
Digital outputs The digital outputs are realized as relays providing the following functions: ● Assign alarm(s) from the alarm list to a digital output. Possible settings are:
– M(aintenance) fault – M demanded – M required – P(rocess) V(alue) fault – PV warning – PV tolerance – No data exchange – Local override – Configuration warning – Data exchange – Device unlocked
To assign or cancel an alarm use the (right arrow) button. ● Select state of relay in normal operation
– "Normally energized" - relay contact for the alarm signal is closed. – "Normally de-energized" - relay contact for the alarm signal is open.
"Normal" refers to the normal state of operation of the analyzer. The system is powered and running without any problems, no error signal is generated and displayed. "Normally Energized" refers to the state of the relay in normal operation. The relay contact for the alarm signal is closed in normal state of operation when checked.
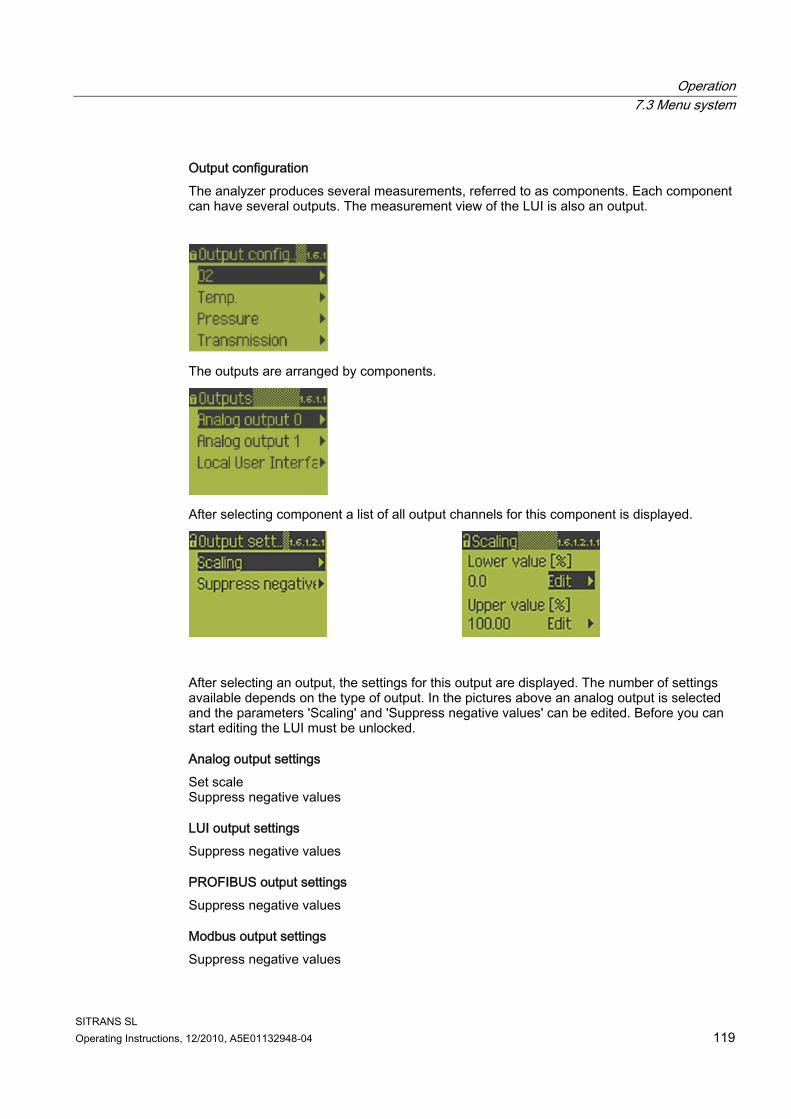
Operation 7.3 Menu system
SITRANS SL Operating Instructions, 12/2010, A5E01132948-04 119
Output configuration The analyzer produces several measurements, referred to as components. Each component can have several outputs. The measurement view of the LUI is also an output.
The outputs are arranged by components.
After selecting component a list of all output channels for this component is displayed.
After selecting an output, the settings for this output are displayed. The number of settings available depends on the type of output. In the pictures above an analog output is selected and the parameters 'Scaling' and 'Suppress negative values' can be edited. Before you can start editing the LUI must be unlocked.
Analog output settings Set scale Suppress negative values
LUI output settings Suppress negative values
PROFIBUS output settings Suppress negative values
Modbus output settings Suppress negative values

Operation 7.3 Menu system
SITRANS SL 120 Operating Instructions, 12/2010, A5E01132948-04
7.3.3 Diagnostics
Figure 7-5 The diagnostics menu
View log book The condition monitoring functions of the analyzer generates status messages, warnings and alarms. In this text the severity level of the alarm is disregarded and all status information is referred to as alarms. An alarm can go active at a certain time and then passive if the erroneous condition disappears. In the following text an alarm event refers to when an alarm changes state. When the log book is opened the groups screen is first displayed, it gives an overview of the analyzers status. To get detailed technical information for a group, highlight the group and press Right key.

Operation 7.3 Menu system
SITRANS SL Operating Instructions, 12/2010, A5E01132948-04 121
The log book groups screen The alarms are arranged in groups. The first screen of the logbook displays all groups that have had an alarm event since the logbook last was cleared. The groups are displayed in a compact format; each row contains the current status, the group name and a time-stamp for the last change.
Example
Sec
onds
Min
utes
Hou
rs
Day
s
Gro
up n
ame
+ (a
ctiv
e)
- (in
activ
e)
43:21:80 :183001G+
In the example above; an alarm related to a measurement being out of range went active after 381 days, 8 hours, 12 minutes and 34 seconds of runtime. Note that the time refers to systems total run time; the SITRANS SL does not have a real time clock. The groups are sorted by the time for the last event. The group which last had a change of status is on top of the list. Each group will only appear once in the list, so the group view will not display the entire history.
The log book details screen When "details" is opened for a group the underlying alarm log is displayed. The "details" screen gives technical information of the exact cause for the problem. The alarm events are displayed in the same format as the groups are; with status event, alarm name and the time-stamp of the event. The two possible events for an alarm are: ● Went active (+) ● Went inactive (-) The size of the log book is limited and can store 4 events for each individual alarm. Note that when one alarm within a group goes active the group is active. The group is inactive when all of the underlying alarms are inactive. For this reason there can be alarms within a group that are more recent than indicated by the group’s time-stamp, i.e. when an alarm within a group becomes active while the group contains active alarms. Log book groups and alarms are defined in chapter Alarm, error, and system messages (Page 163).
Clear log book Clears the log book. Before you use this function the LUI must be unblocked.
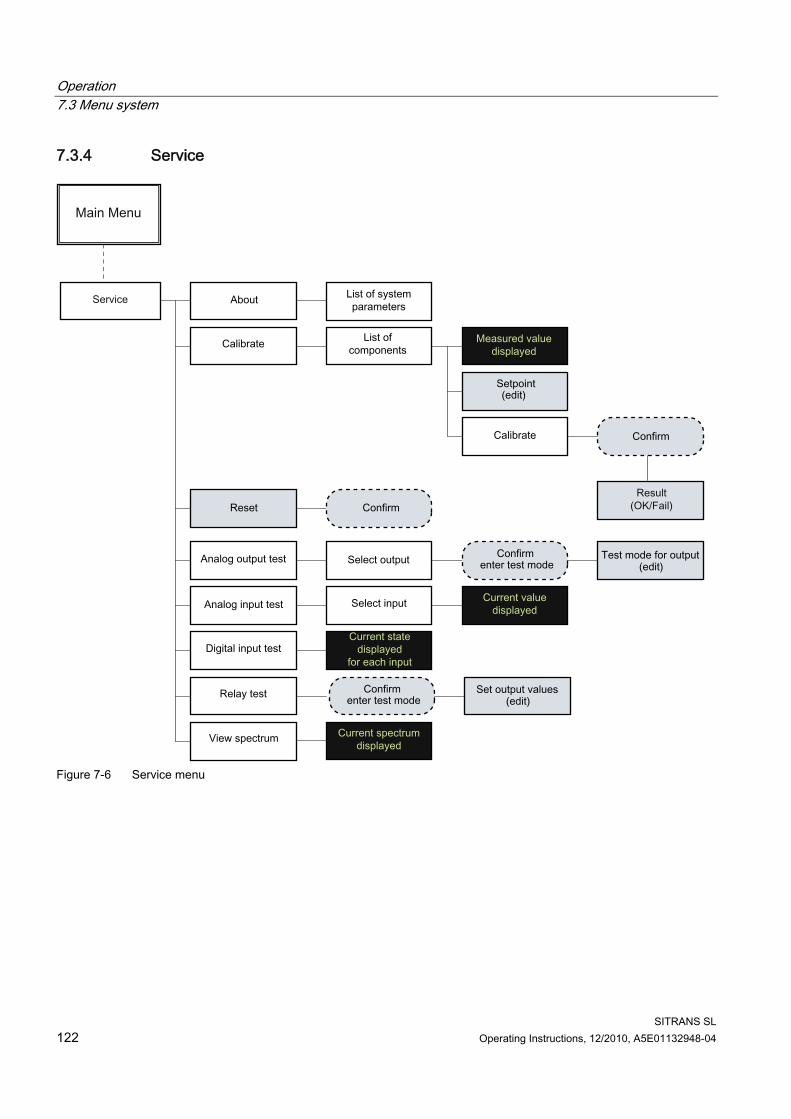
Operation 7.3 Menu system
SITRANS SL 122 Operating Instructions, 12/2010, A5E01132948-04
7.3.4 Service
Figure 7-6 Service menu

Operation 7.3 Menu system
SITRANS SL Operating Instructions, 12/2010, A5E01132948-04 123
About SITRANS SL Informative display informs about the following system parameters: ● Analyzer serial number ● Analyzer revision ● Application name ● Software Version ● MLFB (order) number ● Transmitter FPGA ● Receiver FPGA ● Transmitter PLD ● Junction PLD
Calibrate
CAUTION Never use this function without having contacted Siemens service first! Inappropriate use of this function may seriously affect the accuracy of the analyzer.
After selecting one of the gas components to be calibrated the calibration menu is displayed providing the following options: ● Measured value - displays currently measured value ● Setpoint – edit setpoint ● Calibrate – perform (or cancel) calibration
Reset Reset the analyzer This action requires confirmation before it is started.
Analog output test Select output to test: ● Analog out 0 ● Analog out 1 Once an output has been selected a confirmation is requested before test mode is entered. After confirmation the output current is displayed and can be edited.

Operation 7.3 Menu system
SITRANS SL 124 Operating Instructions, 12/2010, A5E01132948-04
Analog input test Select input to monitor ● Analog temperature input ● Analog pressure input The current reading for the selected input is displayed and continuously updated.
Digital input test Sitrans SL provides one configurable binary input for quality information of external sensors. This binary input is mapped within the application software to input 0 and input 1. Both inputs are displayed and continuously updated.
Relay test The test mode will override the actual output values of the analyzer. The user is asked for a confirmation before test mode is entered. The two relays are represented by check boxes, where X represents an active signal on the relay (i.e. relay de-energizes)
View spectrum Displays the spectrum as a graph
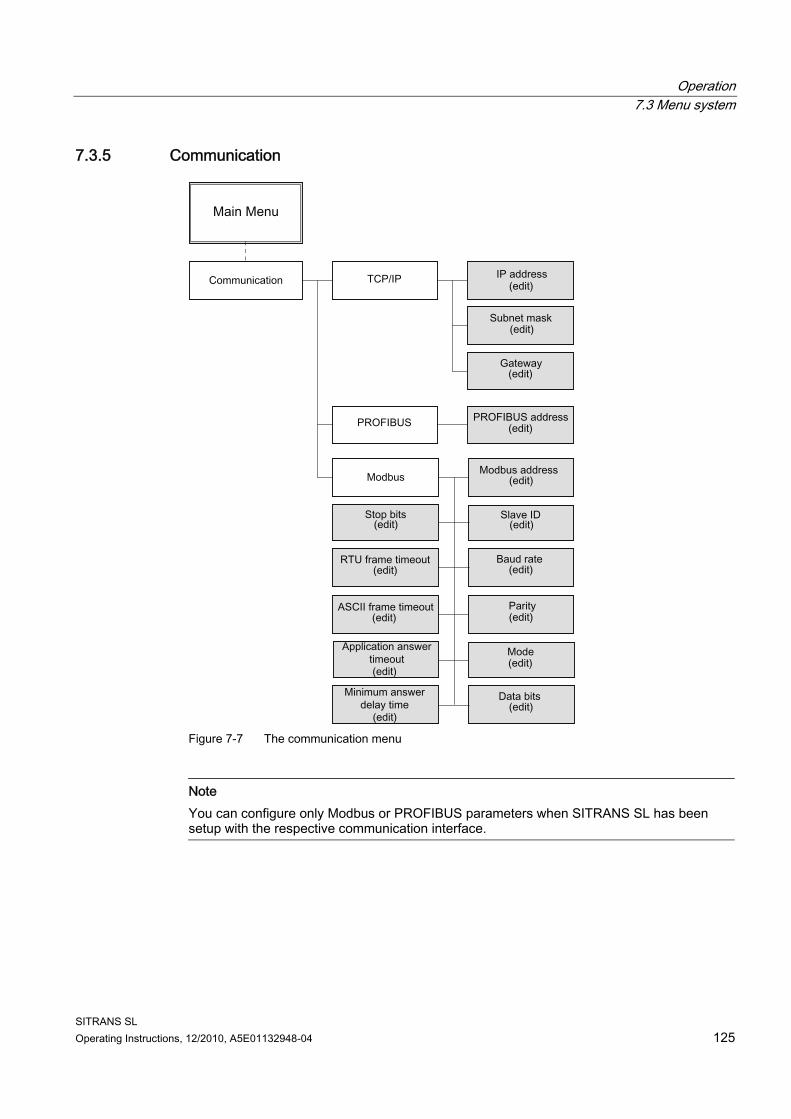
Operation 7.3 Menu system
SITRANS SL Operating Instructions, 12/2010, A5E01132948-04 125
7.3.5 Communication
Figure 7-7 The communication menu
Note You can configure only Modbus or PROFIBUS parameters when SITRANS SL has been setup with the respective communication interface.
Operation 7.3 Menu system
SITRANS SL 126 Operating Instructions, 12/2010, A5E01132948-04
TCP/IP Menu leads to editing screens for the setting of ● IP Address ● Subnet Mask ● Gateway
PROFIBUS Menu leads to the editing screen for the setting of ● PROFIBUS address After changing the parameter the analyzer must be reset before the new setting takes effect.
Modbus see Modbus settings (Page 106)

Operation 7.3 Menu system
SITRANS SL Operating Instructions, 12/2010, A5E01132948-04 127
7.3.6 Security
Figure 7-8 The security menu
Unlock Enter password "111" to unlock write protection. This enables editing of the settings available in the LUI.
Lock Locks the LUI. Settings can be viewed but not edited.
Indicator The state of the menu (locked/unlocked) is indicated by a symbol in the upper left corner of the display ( means locked, means unlocked).
Operating hours Operate the LUI using the buttons of the remote control: ● Press to open the menu ● Select Security, unlock and enter the password. ● Now select Diagnostics and open the log book. ● Select G6 ● The alarm E61 (LUI unlocked) is now active. ● The time stamp for this alarm is the system run time, Operating hours
(DDDD HH:MM:SS).

Operation 7.3 Menu system
SITRANS SL 128 Operating Instructions, 12/2010, A5E01132948-04
7.3.7 Language
Figure 7-9 The language menu
Select language from the list of available languages. After change of language the analyzer must save settings (user confirmation) and then restart (user confirmation) before the new setting takes effect.

Interfaces to automation systems
SITRANS SL Operating Instructions, 12/2010, A5E01132948-04 129
Interfaces to automation systems 88.1 PROFIBUS DP interface
Note You can obtain further information from the PROFIBUS user organization or on the Internet at (www.profibus.com).
8.1.1 PROFIBUS installation When you use the PROFIBUS DP interface then use the designated PROBIBUS DP cable, e.g. the PROFIBUS DP hybrid cable which includes instrument power and ground conductors.
Cable requirements Type-A PROFIBUS hybrid cable with conductors for supply voltage and protective earth. The ATEX variant is delivered with 3m of PROFIBUS hybrid cable mounted.
Connecting to the bus To install the SITRANS SL as the single or as the last device of a PROFIBUS segment: 1. Ensure that the termination resistor is turned on. 2. Connect the PROFIBUS hybrid cable to the SITRANS SL receiver. 3. Use a junction box to connect PROFIBUS network and power to the PROFIBUS hybrid
cable.

Interfaces to automation systems 8.1 PROFIBUS DP interface
SITRANS SL 130 Operating Instructions, 12/2010, A5E01132948-04
To install the SITRANS SL as a device in-between other devices on a PROFIBUS segment: 1. Ensure that the termination resistor is turned off. 2. Connect the PROFIBUS hybrid cable to the SITRANS SL receiver. 3. Use a junction box to connect supply voltage to the PROFIBUS hybrid cable. 4. For connecting the SITRANS SL to the PROFIBUS segment there are two options:
– Active bus tap-off: Use a bus terminal, repeater or an active cable to make the T-connection. In an Ex environment the repeater used must either be certified for use in an Ex environment, or be placed in a safe zone.
– Passive bus tap-off (stub-wire): Connect the SITRANS SL directly to the PROFIBUS segment.
Note Note that the hybrid cable will become a stub-wire of the PROFIBUS segment. This solution should only be considered by experienced PROFIBUS users, and if the network segment is known to have good quality. According to the PROFIBUS standard, the total length of stub-wires in a PROFIBUS segment must be less than 6.6 m at 1.5 Mbits/s provided that Type A cable is used. For higher bit-rates, stub-wires shall not be used.
Reference Voltage ● Grounded reference voltage system
This is the standard arrangement for PROFIBUS DP devices, where the shield of the PROFIBUS cable is connected to protective earth (PE) at every device. To achieve this in the SITRANS SL, connect screw terminal 15 (PROFIBUS shield) to screw terminal 24 (Ground) in the SITRANS SL Receiver.
● Non-Grounded reference voltage system To achieve this in the SITRANS SL, ensure that screw terminal 15 (PROFIBUS shield) is connected only to the shield of the PROFIBUS cable. Ensure that the shield of the PROFIBUS cable is not connected to the chassis at the cable gland. The SITRANS SL is equipped with a standard R/C circuit between PROFIBUS shield and protective earth (PE) in order to improve interference immunity for non-grounded reference voltage systems.

Interfaces to automation systems 8.1 PROFIBUS DP interface
SITRANS SL Operating Instructions, 12/2010, A5E01132948-04 131
Safe operation For safe operation of PROFIBUS DP note the following points: ● Observe the general PROFIBUS guidelines for installation. ● When installing the SITRANS SL as the only analyzer, or as the last analyzer in a
PROFIBUS DP network: – Ensure to switch on the terminal resistor on. The switch is found next to the screw
terminals in the receiver unit. ● When installing the SITRANS SL on a PROFIBUS DP network, where there are
subsequent devices: – Ensure to switch the terminal resistor off. The switch is found next to the screw
terminals in the receiver unit. – As the SITRANS SL connection cable will be a stub wire of the PROFIBUS DP
network, keep the length of the stub wire as short as possible and verify that the total length of stub wires is not exceeded in the network for the baud rate used.
8.1.2 Device data base files (GSD) PROFIBUS DP requires files for cyclic data transmission which you can download from the SIEMENS internet support site (http://support.automation.siemens.com) siem815b.gsd ( 9 KB) DP independent language siem815b.bmp (18 KB) Bitmap Device
8.1.3 Technical data PROFIBUS DP (according to EN 50170) Baud rates: 9.6, 19.2, 93.75, 187.5, 500 kBit/s, 1.5 MBit/s, 3 MBit/s
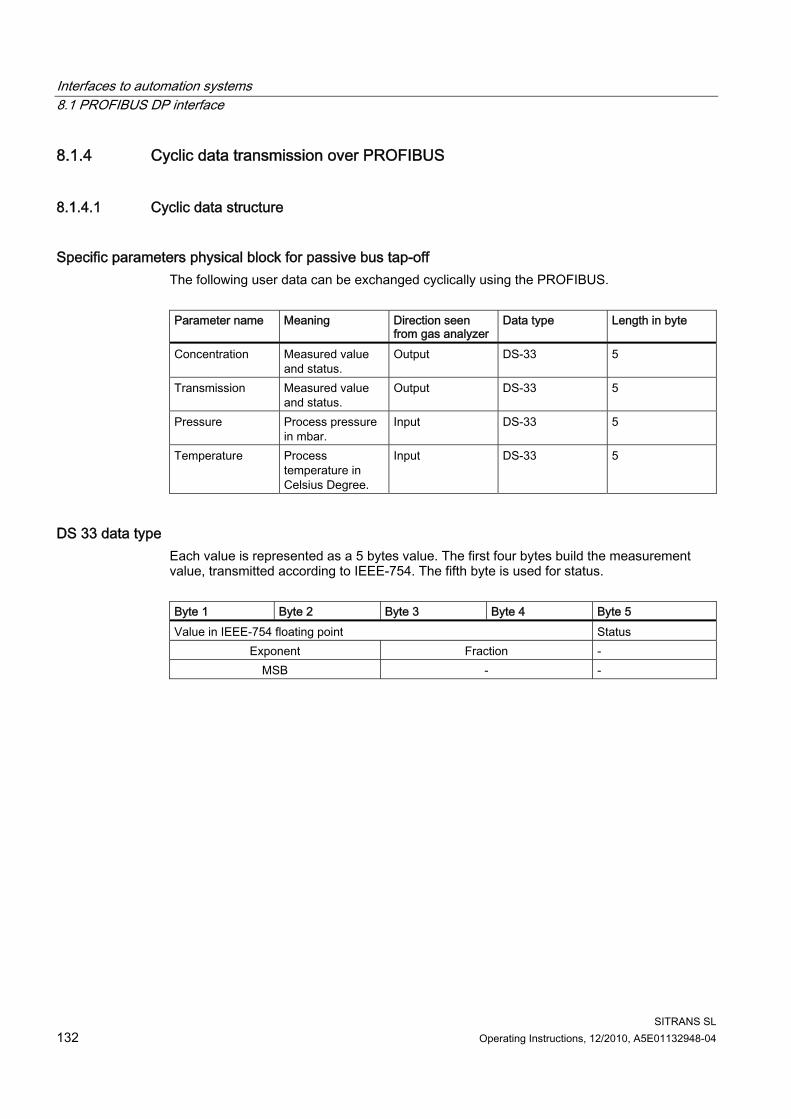
Interfaces to automation systems 8.1 PROFIBUS DP interface
SITRANS SL 132 Operating Instructions, 12/2010, A5E01132948-04
8.1.4 Cyclic data transmission over PROFIBUS
8.1.4.1 Cyclic data structure
Specific parameters physical block for passive bus tap-off The following user data can be exchanged cyclically using the PROFIBUS. Parameter name Meaning Direction seen
from gas analyzer Data type Length in byte
Concentration Measured value and status.
Output DS-33 5
Transmission Measured value and status.
Output DS-33 5
Pressure Process pressure in mbar.
Input DS-33 5
Temperature Process temperature in Celsius Degree.
Input DS-33 5
DS 33 data type Each value is represented as a 5 bytes value. The first four bytes build the measurement value, transmitted according to IEEE-754. The fifth byte is used for status. Byte 1 Byte 2 Byte 3 Byte 4 Byte 5 Value in IEEE-754 floating point Status
Exponent Fraction - MSB - -

Interfaces to automation systems 8.1 PROFIBUS DP interface
SITRANS SL Operating Instructions, 12/2010, A5E01132948-04 133
8.1.4.2 Quality byte
Meaning of status A status byte is transmitted synchronously in addition to each of the measured values in the DS-33 data structure. This byte provides indication of the quality for this value in a "quality code". Due to this it is henceforth referred to as "quality byte". The quality byte has the following structure:
Figure 8-1 Quality byte coding
Note Error codes and alarm list For explanation and action of error codes and the alarm list refer to chapter Alarm, error, and system messages (Page 163) .

Interfaces to automation systems 8.1 PROFIBUS DP interface
SITRANS SL 134 Operating Instructions, 12/2010, A5E01132948-04
Quality byte coding for measurement output:
Status coding for "bad quality" Dec Hex Cause Remedy 00 00 Maintenance fault or process value
fault. See alarm list.
Status coding for "uncertain quality"
Dec Hex Cause Remedy 64 40 Maintenance demanded or process
value warning or process value out of tolerance.
See alarm list.
Status coding for "good quality"
Dec Hex Cause Remedy 128 80 Normal operation. You can evaluate the measured values.
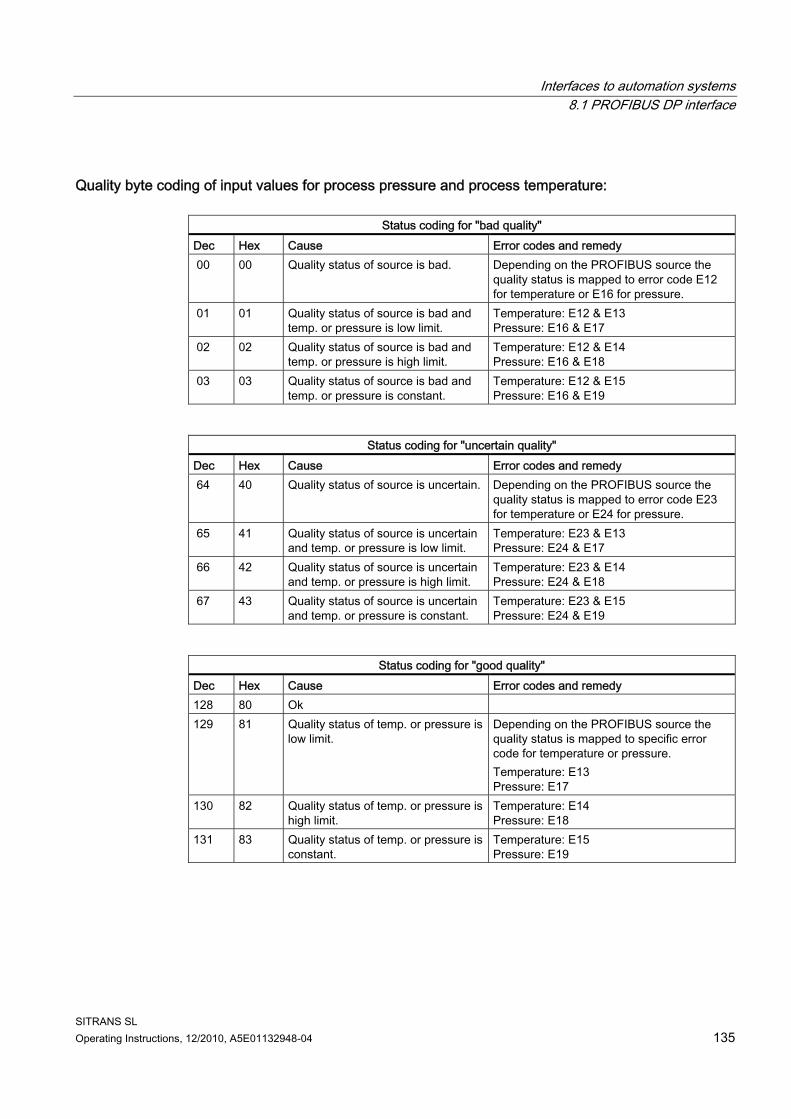
Interfaces to automation systems 8.1 PROFIBUS DP interface
SITRANS SL Operating Instructions, 12/2010, A5E01132948-04 135
Quality byte coding of input values for process pressure and process temperature:
Status coding for "bad quality" Dec Hex Cause Error codes and remedy 00 00 Quality status of source is bad. Depending on the PROFIBUS source the
quality status is mapped to error code E12 for temperature or E16 for pressure.
01 01 Quality status of source is bad and temp. or pressure is low limit.
Temperature: E12 & E13 Pressure: E16 & E17
02 02 Quality status of source is bad and temp. or pressure is high limit.
Temperature: E12 & E14 Pressure: E16 & E18
03 03 Quality status of source is bad and temp. or pressure is constant.
Temperature: E12 & E15 Pressure: E16 & E19
Status coding for "uncertain quality"
Dec Hex Cause Error codes and remedy 64 40 Quality status of source is uncertain. Depending on the PROFIBUS source the
quality status is mapped to error code E23 for temperature or E24 for pressure.
65 41 Quality status of source is uncertain and temp. or pressure is low limit.
Temperature: E23 & E13 Pressure: E24 & E17
66 42 Quality status of source is uncertain and temp. or pressure is high limit.
Temperature: E23 & E14 Pressure: E24 & E18
67 43 Quality status of source is uncertain and temp. or pressure is constant.
Temperature: E23 & E15 Pressure: E24 & E19
Status coding for "good quality"
Dec Hex Cause Error codes and remedy 128 80 Ok 129 81 Quality status of temp. or pressure is
low limit. Depending on the PROFIBUS source the quality status is mapped to specific error code for temperature or pressure. Temperature: E13 Pressure: E17
130 82 Quality status of temp. or pressure is high limit.
Temperature: E14 Pressure: E18
131 83 Quality status of temp. or pressure is constant.
Temperature: E15 Pressure: E19

Interfaces to automation systems 8.2 Modbus interface
SITRANS SL 136 Operating Instructions, 12/2010, A5E01132948-04
8.2 Modbus interface
Note You can obtain further information from the Modbus IDA user organization or on the Internet at the Modbus internet site (www.modbus.org).
8.2.1 Modbus installation
Connection via RS485 interface The SITRANS SL gas analyzer provides Modbus communication to a PC or an automation system via an RS485 interface. The SITRANS SL gas analyzer may be connected to a network. Such a network is normally built as a bus topology which needs to be terminated via RC termination plugs. The same applies to a point-to-point connection. In a physical network up to 32 SITRANS SL analyzers may be connected to a Modbus system via the RS485 interface.
Cable type A two lined twisted pair cable with shielding is used for the Modbus connection. The maximum cable length is limited to 1200 m.
Signal converter If the PC has no RS485 interface, an RS232/RS485 signal converter must be linked between the PC and the Modbus network.
Termination resistor The termination resistor on the junction board must be switched off.
Connection ● Data (N) = PROFIBUS A (electric connector 13 on junction board of SITRANS SL) ● Data (P)= PROFIBUS B (electric connector 14 on junction board of SITRANS SL) ● Shield= PROFIBUS shield (electric connector 15 on junction board of SITRANS SL)
Performance requirement The minimum access interval from Modbus master is >100 ms.

Interfaces to automation systems 8.2 Modbus interface
SITRANS SL Operating Instructions, 12/2010, A5E01132948-04 137
8.2.2 SITRANS SL Modbus map for gas measurement Information from the SITRANS SL can be transferred to a PC/PG via the Modbus. Measurement values, status signals and also signals of analog and digital inputs and outputs are thus available for further usage.
Overview of used register numbers (Standard Modbus) Modicon-modbus-address
Type Data Address Description
30001 Input Register (R) 0 Process data 30101 Input Register (R) 100 Device Status 40001 Holding Register (R+W) 0 Input process data
Example The first Holding Register, number 40001, has the Data Address 0000. Offset is 1.
Overview of used register numbers (Enron Modbus) Modicon-modbus-address
Variable type Data Address Description
3001 16 bit Short integer (R+W) 3000 Process data 5001 32 bit Long integer (R+W) 5000 Process data 7001 32 bit Floating point (R+W) 7000 Process data

Interfaces to automation systems 8.2 Modbus interface
SITRANS SL 138 Operating Instructions, 12/2010, A5E01132948-04
8.2.3 Quality byte coding
Overview quality byte coding The Modbus quality byte has the same structure and meaning as the one used for PROFIBUS. Structure and meaning of quality byte:
Figure 8-2 Quality byte coding
Note Error codes and alarm list See for explanation and action of error codes and the alarm list chapter Alarm, error, and system messages (Page 163) .

Interfaces to automation systems 8.2 Modbus interface
SITRANS SL Operating Instructions, 12/2010, A5E01132948-04 139
Quality byte coding for measurement output:
Table 8- 1 Status coding for "bad quality":
Dec Hex Cause Remedy 00 00 Maintenance fault or process value fault. See alarm list
Table 8- 2 Status coding for "uncertain quality":
Dec Hex Cause Remedy 64 40 Maintenance demanded or process value
warning or process value out of tolerance.See alarm list.
Table 8- 3 Status coding for "good quality":
Dec Hex Cause Remedy 128 80 Normal operation You can evaluate the measured values.
Quality byte coding of input values for process pressure and process temperature:
Table 8- 4 Status coding for "bad quality":
Dec Hex Cause Remedy 00 00 Quality status of source is bad Depending on the PROFIBUS source the
quality status is mapped to error code E12 for temperature or E16 for pressure.
01 01 Quality status of source is bad and temp. or pressure is low limit
Temperature: E12 & E13 Pressure: E16 & E17
02 02 Quality status of source is bad and temp. or pressure is high limit
Temperature: E12 & E14 Pressure: E16 & E18
03 03 Quality status of source is bad and temp. or pressure is constant
Temperature: E12 & E15 Pressure: E16 & E19

Interfaces to automation systems 8.2 Modbus interface
SITRANS SL 140 Operating Instructions, 12/2010, A5E01132948-04
Table 8- 5 Status coding for "uncertain quality":
Dec Hex Cause Remedy 64 40 Quality status of source is uncertain Depending on the Modbus source the
quality status is mapped to error code E23 for temperature or E24 for pressure.
65 41 Quality status of source is uncertain and temp. or pressure is low limit
Temperature: E23 & E13 Pressure: E24 & E17
66 42 Quality status of source is uncertain and temp. or pressure is high limit
Temperature: E23 & E14 Pressure: E24 & E18
67 43 Quality status of source is uncertain and temp. or pressure is constant
Temperature: E23 & E15 Pressure: E24 & E19
Table 8- 6 Status coding for "good quality":
Dec Hex Cause Remedy 128 80 Ok 129 81 Quality status of temp. or pressure is low
limit Depending on the PROFIBUS source the quality status is mapped to specific error code for temperature or pressure. Temperature: E13 Pressure: E17
130 82 Quality status of temp. or pressure is high limit
Temperature: E14 Pressure: E18
131 83 Quality status of temp. or pressure is constant
Temperature: E15 Pressure: E19
See also Quality byte (Page 133)

Interfaces to automation systems 8.2 Modbus interface
SITRANS SL Operating Instructions, 12/2010, A5E01132948-04 141
8.2.4 Modbus adresses
8.2.4.1 Standard Modbus ● The component value is transferred in IEEE 32 bit floating point format. SITRANS SL
uses two word registers representing a floating point value. ● The measurement counter is transferred in 32 bit integer format. SITRANS SL uses two
Word-Registers representing a 32 bit integer value. ● The time stamp fields (day, hour, minute, and second) are transferred in 16 bit integer
format. SITRANS SL uses one word register representing a 16 bit integer value.
Modbus addresses 30000 ... 39999 Modicon- modbus-address
Type Data Address
Description
30001 Input Register 0 Component 1 – Concentration Measurement counter
30003 Input Register 2 Component 1 – Concentration Quality
30004 Input Register 3 Component 1 – Concentration Value
30006 Input Register 5 Component 1 – Concentration Time stamp – Day
30007 Input Register 6 Component 1 – Concentration Time stamp – Hour
30008 Input Register 7 Component 1 – Concentration Time stamp – Minute
30009 Input Register 8 Component 1 – Concentration Time stamp – Second
30010 Input Register 9 Component 2 – Transmission Measurement counter
30012 Input Register 11 Component 2 – Transmission Quality
30013 Input Register 12 Component 2 – Transmission Value
30015 Input Register 14 Component 2 – Transmission Time stamp – Day
30016 Input Register 15 Component 2 – Transmission Time stamp – Hour
30017 Input Register 16 Component 2 – Transmission Time stamp – Minute
30018 Input Register 17 Component 2 – Transmission Time stamp – Second
30019 Input Register 18 Component 3 – Pressure Measurement counter
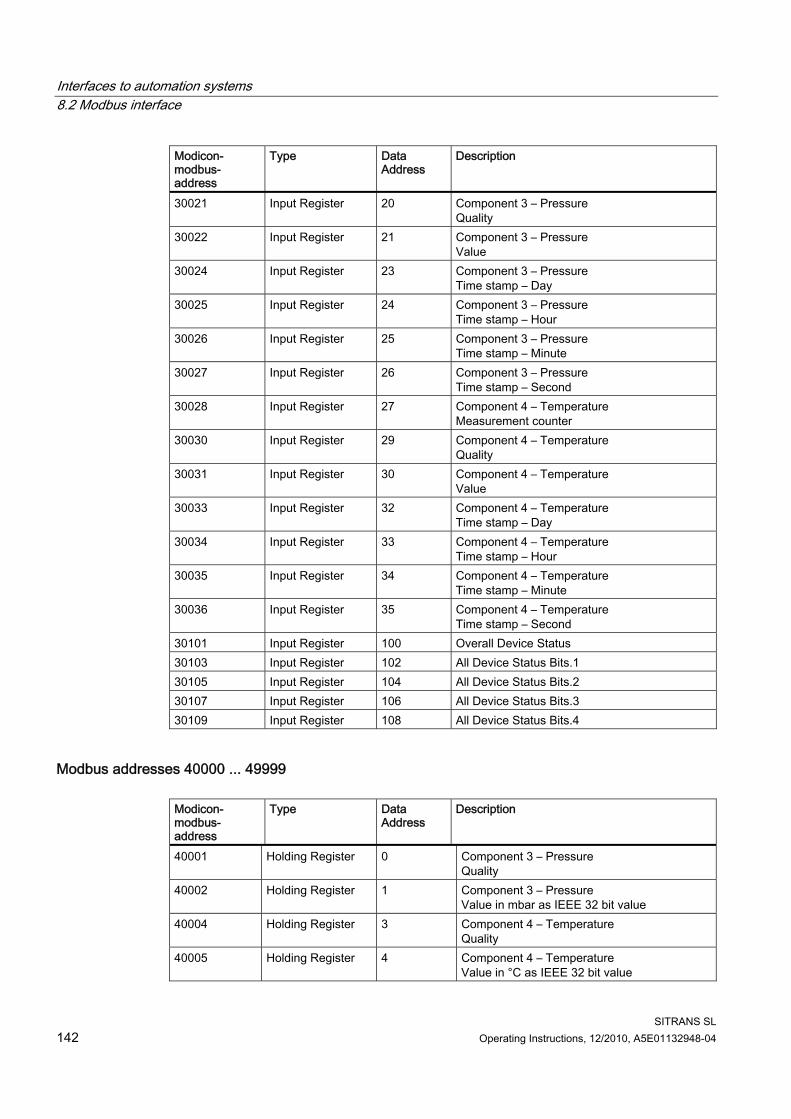
Interfaces to automation systems 8.2 Modbus interface
SITRANS SL 142 Operating Instructions, 12/2010, A5E01132948-04
Modicon- modbus-address
Type Data Address
Description
30021 Input Register 20 Component 3 – Pressure Quality
30022 Input Register 21 Component 3 – Pressure Value
30024 Input Register 23 Component 3 – Pressure Time stamp – Day
30025 Input Register 24 Component 3 – Pressure Time stamp – Hour
30026 Input Register 25 Component 3 – Pressure Time stamp – Minute
30027 Input Register 26 Component 3 – Pressure Time stamp – Second
30028 Input Register 27 Component 4 – Temperature Measurement counter
30030 Input Register 29 Component 4 – Temperature Quality
30031 Input Register 30 Component 4 – Temperature Value
30033 Input Register 32 Component 4 – Temperature Time stamp – Day
30034 Input Register 33 Component 4 – Temperature Time stamp – Hour
30035 Input Register 34 Component 4 – Temperature Time stamp – Minute
30036 Input Register 35 Component 4 – Temperature Time stamp – Second
30101 Input Register 100 Overall Device Status 30103 Input Register 102 All Device Status Bits.1 30105 Input Register 104 All Device Status Bits.2 30107 Input Register 106 All Device Status Bits.3 30109 Input Register 108 All Device Status Bits.4
Modbus addresses 40000 ... 49999 Modicon- modbus-address
Type Data Address
Description
40001 Holding Register 0 Component 3 – Pressure Quality
40002 Holding Register 1 Component 3 – Pressure Value in mbar as IEEE 32 bit value
40004 Holding Register 3 Component 4 – Temperature Quality
40005 Holding Register 4 Component 4 – Temperature Value in °C as IEEE 32 bit value
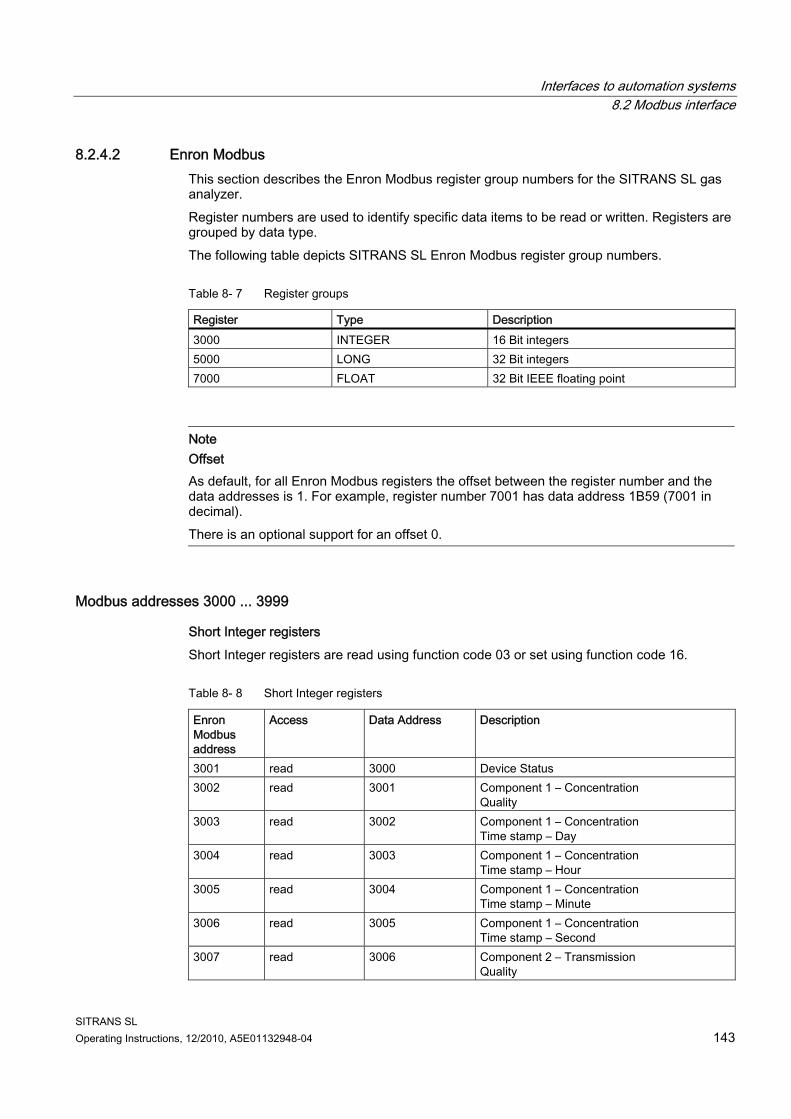
Interfaces to automation systems 8.2 Modbus interface
SITRANS SL Operating Instructions, 12/2010, A5E01132948-04 143
8.2.4.2 Enron Modbus This section describes the Enron Modbus register group numbers for the SITRANS SL gas analyzer. Register numbers are used to identify specific data items to be read or written. Registers are grouped by data type. The following table depicts SITRANS SL Enron Modbus register group numbers.
Table 8- 7 Register groups
Register Type Description 3000 INTEGER 16 Bit integers 5000 LONG 32 Bit integers 7000 FLOAT 32 Bit IEEE floating point
Note Offset As default, for all Enron Modbus registers the offset between the register number and the data addresses is 1. For example, register number 7001 has data address 1B59 (7001 in decimal). There is an optional support for an offset 0.
Modbus addresses 3000 ... 3999
Short Integer registers Short Integer registers are read using function code 03 or set using function code 16.
Table 8- 8 Short Integer registers
Enron Modbus address
Access Data Address Description
3001 read 3000 Device Status 3002 read 3001 Component 1 – Concentration
Quality 3003 read 3002 Component 1 – Concentration
Time stamp – Day 3004 read 3003 Component 1 – Concentration
Time stamp – Hour 3005 read 3004 Component 1 – Concentration
Time stamp – Minute 3006 read 3005 Component 1 – Concentration
Time stamp – Second 3007 read 3006 Component 2 – Transmission
Quality

Interfaces to automation systems 8.2 Modbus interface
SITRANS SL 144 Operating Instructions, 12/2010, A5E01132948-04
3008 read 3007 Component 2 – Transmission Time stamp – Day
3009 read 3008 Component 2 – Transmission Time stamp – Hour
3010 read 3009 Component 2 – Transmission Time stamp – Minute
3011 read 3010 Component 2 – Transmission Time stamp – Second
3012 read 3011 Component 3 – Pressure Quality
3013 read 3012 Component 3 – Pressure Time stamp – Day
3014 read 3013 Component 3 – Pressure Time stamp – Hour
3015 read 3014 Component 3 – Pressure Time stamp – Minute
3016 read 3015 Component 3 – Pressure Time stamp – Second
3017 read 3016 Component 4 – Temperature Quality
3018 read 3017 Component 4 – Temperature Time stamp – Day
3019 read 3018 Component 4 – Temperature Time stamp – Hour
3020 read 3019 Component 4 – Temperature Time stamp – Minute
3021 read 3020 Component 4 – Temperature Time stamp – Second
3101 write 3100 Component 3 – Input Pressure Quality
3102 write 3101 Component 4 – Input Temperature Quality

Interfaces to automation systems 8.2 Modbus interface
SITRANS SL Operating Instructions, 12/2010, A5E01132948-04 145
Modbus addresses 5000 ... 5999
Long Integer registers Access to long integer data is an extension of the Gould Modbus ASCII protocol. Long Integer registers are read using function code 03
Table 8- 9 Long Integer registers
Enron Modbus address
Access Data Address Description
5001 read 5000 Component 1 – Concentration Alarm
5002 read 5001 Component 1 – Transmission Alarm
5003 read 5002 Component 3 – Pressure Alarm
5004 read 5003 Component 4 – Temperature Alarm
5101 read 5100 Component 1 – Concentration Measurement counter
5102 read 5101 Component 1 – Transmission Measurement counter
5103 read 5102 Component 3 – Pressure Measurement counter
5104 read 5103 Component 4 – Temperature Measurement counter
Modbus addresses 7000 ... 7999
Floating Point registers Access to floating point data is an extension of the Gould Modbus ASCII protocol. Floating point registers are read using function code 03 or set using function code 16.
Table 8- 10 Floating Point registers
Modicon- modbus-address
Type Data Address Description
7001 read 7000 Component 1 – Concentration value 7002 read 7001 Component 2 – Transmission value 7003 read 7002 Component 3 – Pressure output value 7004 read 7003 Component 4 – Temperature output value 7101 write 7100 Component 1 – Pressure input value 7102 write 7101 Component 1 – Temperature input value

Interfaces to automation systems 8.2 Modbus interface
SITRANS SL 146 Operating Instructions, 12/2010, A5E01132948-04
8.2.4.3 Modbus alarm list The status information is transferred in 32 bit integer words. SITRANS SL uses four Word-Registers representing the detailed status information.
Status Word 1 Status Register description DWORD BIT position Description Error Code 1 0 "No transmission" E1 1 1 "Low transmission " E2 1 2 "Receiver power" E3 1 3 "Receiver junction power" E4 1 4 "Transmitter power" E5 1 5 "Startup procedure active" E6 1 6 "Shutdown procedure active" - 1 7 "Line locking failure" E8 1 8 "Save settings active" E9 1 9 "Process temp. range" E10 1 10 "Process pressure range" E11 1 11 "Ext. temperature bad" E12 1 12 "Ext. temperature low limited" E13 1 13 "Ext. temperature high limited" E14 1 14 "Ext. temperature constant" E15 1 15 "Ext. pressure bad" E16 1 16 "Ext. pressure low limited" E17 1 17 "Ext. pressure high limited" E18 1 18 "Ext. pressure constant" E19 1 19 "Ext. temp. source disconnected" E20 1 20 "Ext. pressure. source disconnected" E21 1 21 "Laser current lower limit" - 1 22 "Ext. temperature uncertain" E23 1 23 "Ext. pressure uncertain" E24 1 24 "PROFIBUS configuration error" E25 1 25 "PROFIBUS connection error" E26 1 26 "PROFIBUS master switch off" E27 1 27 "PROFIBUS internal error" E28 1 28 "Temp. comp. file range" E29 1 29 "Prs. comp. file range" E30 1 30 "CurveFit temp. file range" E31 1 31 "CurveFit prs. file range" E32
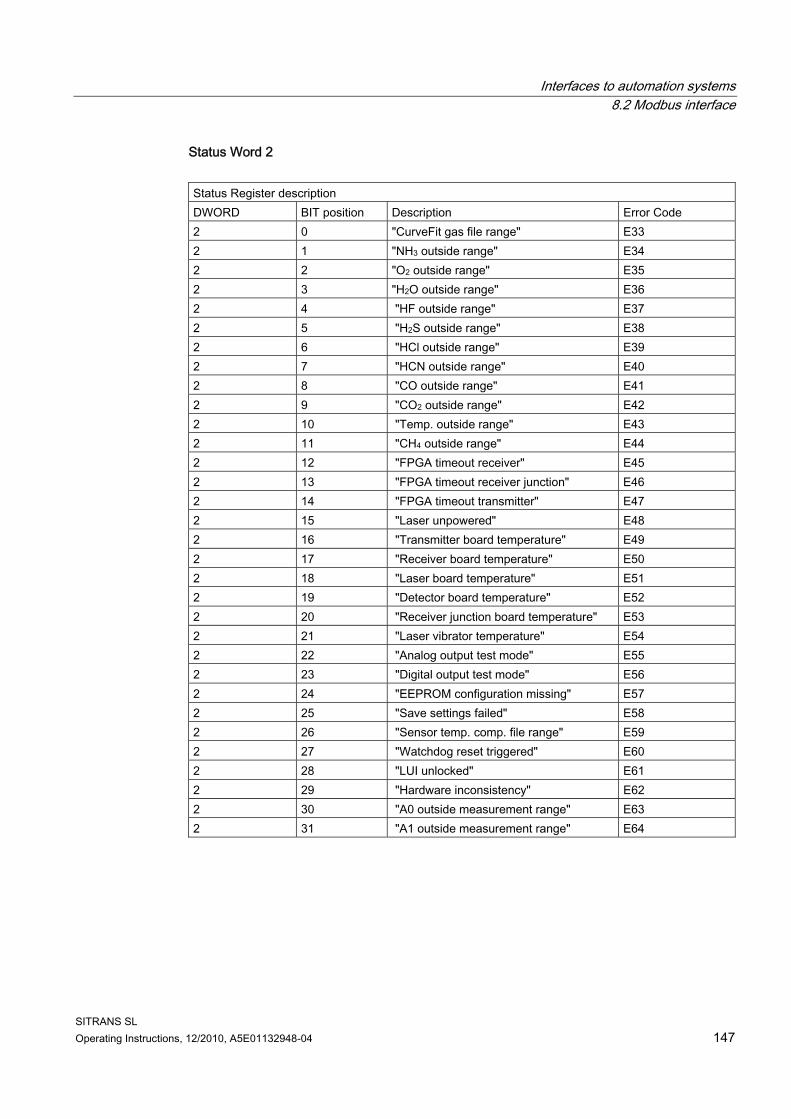
Interfaces to automation systems 8.2 Modbus interface
SITRANS SL Operating Instructions, 12/2010, A5E01132948-04 147
Status Word 2 Status Register description DWORD BIT position Description Error Code 2 0 "CurveFit gas file range" E33 2 1 "NH3 outside range" E34 2 2 "O2 outside range" E35 2 3 "H2O outside range" E36 2 4 "HF outside range" E37 2 5 "H2S outside range" E38 2 6 "HCl outside range" E39 2 7 "HCN outside range" E40 2 8 "CO outside range" E41 2 9 "CO2 outside range" E42 2 10 "Temp. outside range" E43 2 11 "CH4 outside range" E44 2 12 "FPGA timeout receiver" E45 2 13 "FPGA timeout receiver junction" E46 2 14 "FPGA timeout transmitter" E47 2 15 "Laser unpowered" E48 2 16 "Transmitter board temperature" E49 2 17 "Receiver board temperature" E50 2 18 "Laser board temperature" E51 2 19 "Detector board temperature" E52 2 20 "Receiver junction board temperature" E53 2 21 "Laser vibrator temperature" E54 2 22 "Analog output test mode" E55 2 23 "Digital output test mode" E56 2 24 "EEPROM configuration missing" E57 2 25 "Save settings failed" E58 2 26 "Sensor temp. comp. file range" E59 2 27 "Watchdog reset triggered" E60 2 28 "LUI unlocked" E61 2 29 "Hardware inconsistency" E62 2 30 "A0 outside measurement range" E63 2 31 "A1 outside measurement range" E64

Interfaces to automation systems 8.2 Modbus interface
SITRANS SL 148 Operating Instructions, 12/2010, A5E01132948-04
Status Word 3 Status Register description DWORD BIT position Description Error Code 3 0 "Laser drift" E65 3 1 "Algorithm error" E66 3 2 "Measurement quality" E67 3 3 "Line locking failure" E68
Status Word 4 Not used.
SITRANS SL Operating Instructions, 12/2010, A5E01132948-04 149
Service and maintenance 99.1 Instrument verification
The SITRANS SL should be verified within the time interval stated in the Technical data (Page 181). This procedure can be done by the customer or the Siemens Service. The verification of the instrument shall only be performed with the appropriate verification kit (see accessory list in section "Accessories (Page 193)"). Each verification process should be documented. For this purpose there are verification sheets included in Verification Sheets (Page 198) of this operating instructions. If the verification fails, contact Siemens support.
Note The verification kit is not part of the standard delivery. If you carry out the verification yourself, you have to order the verification kit additionally.
The zero value (the reading when there is no measurement gas in the measurement path) is compensated by the signal processing algorithm.
Note It is not necessary to verify the zero value in field.
See also Technical data (Page 181)

Service and maintenance 9.1 Instrument verification
SITRANS SL 150 Operating Instructions, 12/2010, A5E01132948-04
9.1.1 Verification with the verification tube The verification tube is intended for the oxygen version of the SITRANS SL (SITRANS SL O2).
Necessary equipment ● Verification kit ● Sensor connecting cable
If your regular sensor connection cable cannot be removed from the installation, you need a supplementary one.
● A barometer to measure the atmospheric pressure
9.1.1.1 Verification tube
① Transmitter ④ Receiver ② Calibration Tube ⑤ Needle valves ③ Thermometer Figure 9-1 Verification tube setup
The verification tube is an interface between the receiver and transmitter as shown in the previous figure. The kit comprises a metal tube with a temperature sensor and is mounted between the transmitter tube unit (transmitter) and receiver tube unit (receiver) during verification. Since the verification tube has no windows, the active path will be the one between the lenses on either tube unit. There is a small volume behind the lenses on both sides that must be filled with nitrogen during the calibration. The SITRANS SL O2 is designed to allow a small leakage into these volumes, and during normal usage they contain nitrogen. By following the instructions you can assure that they stay filled with nitrogen during the whole calibration procedure.

Service and maintenance 9.1 Instrument verification
SITRANS SL Operating Instructions, 12/2010, A5E01132948-04 151
9.1.1.2 Span verification For the span verification of the instrument follow steps 1 through 7 below. This process should be documented using the form "Verification Sheet" in Appendix A (Page 198).
Step 1: Setup of verification tube 1. Start the procedure by removing the receiver and transmitter from the flanges. Depending
on the prevailing safety conditions and what is more convenient, the power may be kept on and the sensor connection cable stay connected, or the power may be shut off and the sensor connection cable be disconnected.
CAUTION
Never disconnect the sensor connection cable with the power switched on.
2. Mount the receiver and transmitter on the verification tube. 3. If the analyzer has been moved to a location with a different ambient temperature than
that at the installation site, you need to wait until it has been adapted to the new temperature before proceeding from this step. In this way you avoid condensation problems and assure static and homogeneous temperature distribution in the verification tube.
4. If necessary, connect the sensor connection cable between the receiver and transmitter and power up the SITRANS SL.
Step 2: Preparations and LUI settings In order to document the verification procedure you should fill put the 'Verification sheet' form thoroughly during verification. 1. Make a copy of the "SITRANS SL O2 Verification sheet" form you can find in Appendix A. 2. Fill out the first part (General Information). 3. Enter the password to access the Local User Interface (LUI).
Note Remember to write down the original values before making alterations to the settings!
4. Note the current integration time in the verification sheet. Set the integration time to 20 s. 5. Note the settings for the path length in the verification sheet. Set the path length to 0.450
m which is the effective length in the verification tube. Notice that this is valid with the in-line reference cell in place.

Service and maintenance 9.1 Instrument verification
SITRANS SL 152 Operating Instructions, 12/2010, A5E01132948-04
6. Note pressure source settings and, if applicable, pressure manual value in the verification sheet. Set the pressure source to "manual" and enter the ambient pressure as manual value. Note this value also in the verification sheet.
7. Note temperature source settings and, if applicable, temperature manual value in the verification sheet. Set the temperature source to "manual". Note this value also in the verification sheet.
21
20.8
20.6
20.4
20.2
20
19.8
19.6
19.4
19.2
19
18.8
18.6
18.4
18.2
1850454035302520151050-5-10-15-20
100 %
90 %
80 %
70 %
60 %
50 %
40 %
30 %
20 %
10 %
0 %
Figure 9-2 Verification set point for different relative humidities and temperatures.
Note If you do not use dry air, your oxygen concentration is lower due to the air moisture.

Service and maintenance 9.1 Instrument verification
SITRANS SL Operating Instructions, 12/2010, A5E01132948-04 153
8. If you use ambient air, you can correct the verification set point according to the air moisture. Look for the ambient temperature on the x-axis of Fig. 9-2. Go vertically up to the line of the present ambient relative humidity. Go left horizontally and find your verification set point on the y-axis. Note this value in the "Verification Sheet". With pressurized air of unknown moisture content you there is a higher uncertainty for the verification set point. A good estimate is ±0.3 Vol%. O2. Note this value in the verification sheet.
CAUTION
Use a hygrometer and a thermometer at the site where you take the ambient air. The humidity must be measured at the temperature at which the verification is performed. If for example the outside temperature is 0 °C and the relative humidity close to 100 %, the relative humidity indoors at normal room temperature might only be around 20 %.
9. Enter the appropriate values for the verification errors: Instrument error (according to the instrument specifications), temperature error and pressure error. Temperature and pressure error depend on your measurement. If the system and the purging gas used are well tempered you can use the error of the thermometer itself: 1 °C.For the pressure error refer to the reading of your barometer.
10. Calculate the total uncertainty of the measurement by adding instrument error, pressure error, and temperature error.
CAUTION
Temperature and pressure influence on the verification procedure It is very important to enter the accurate values of ambient pressure, temperature and humidity. As a rule of thumb you need the same accuracy of the pressure or temperature values as you expect from verification tolerance. The value of 20.95 % is the relative concentration of oxygen in the atmosphere but the absolute value will vary due to the barometric pressure or temperature. As an example - in recent years the barometric pressure in Gothenburg, Sweden, which is at sea level, varied between a maximum of 1 052 hPa and a minimum of 950 hPa which corresponds to uncorrected oxygen readings between 21.78 % and 19.67 %. Although these are extreme values they point out the importance of having an accurate pressure value inside the tube.

Service and maintenance 9.1 Instrument verification
SITRANS SL 154 Operating Instructions, 12/2010, A5E01132948-04
Step 3: Purging with Nitrogen
Note In the instruction it is assumed that totally oxygen free nitrogen is used. The concentration value of the SITRANS SL during this procedure will not be lower than the oxygen content in the nitrogen.
1. Attach your source of purging gas (N2) to the needle valve on either the receiever or transmitter side.
2. Close the other needle valve. 3. Purge the verification tube until the concentration value falls below 0.05 Vol% O2. The
gas flow should be in a range of 4-10 l/min and the pressure of the nitrogen between 2 and 5 bar absolute. The gas should escape trough the two capillaries on the receiver and transmitter.
4. Close the needle valve. Wait for 10 minutes. After this time the O2 value should not have increased to more than 0.15 Vol%. If the O2 value exceeds this limit refer to section (Problem handling: insufficient purging) at the end of this chapter for further proceedings.
5. Remove the needle valve completely on either the receiver and transmitter side. This is necessary to avoid any over pressure in the tube.
6. Fill the verification tube according to one of the two alternatives below.
Step 4a: Filling the verification tube with ambient air 1. Disconnect both the receiver and the transmitter from the verification tube. Verification
must be performed within 10 minutes from this step to prevent air from entering into the volume behind the lenses.
2. Swing the verification tube a few times in the air to remove the purging gas from the tube and fill it with ambient air. Also swing the receiver and the transmitter a few times carefully.
3. Wait for about 60 seconds. 4. Reconnect the receiver and transmitter to the verification tube. Be careful not to allow any
other gas than air to enter the tube, including breath.
Step 4b: Filling the verification tube with pressurized air 1. Disconnect the nitrogen source. 2. Attach your source of dry, oil free, pressurized air to the needle valve on either of the
receiver or transmitter side, and purge with a volume flow of approx. 4 liters/minute. Verification must be performed within 10 minutes from this step to prevent air from entering into the volume behind the lenses.
3. Purge until the concentration value stabilizes (concentration changes less than 0.1 vol % / minute) and then turn off the gas.
4. Set the manual temperature value in the LUI to the temperature displayed by the thermometer.

Service and maintenance 9.1 Instrument verification
SITRANS SL Operating Instructions, 12/2010, A5E01132948-04 155
Step 5: Verification 1. Watch or record the measured value for at least 20 seconds to ensure that it is stable (i.
e. concentration varies not more than ±0.05 vol % / minute). 2. Take 5 successive concentration values and write them into the verification sheet. 3. If the difference between the highest and the lowest concentration value is more than the
maximum repeatability value (see technical data (Page 181)), the measurements must be repeated.
4. Compare the average of the 5 values with the verification set point. If it lies within the range between the set point and the total verification uncertainty, the instrument works properly. If the average value lies outside this range, please contact Siemens support.
5. Put the removed needle valve back into place and close it. Repeat all steps of one of the paragraphs "Filling the verification tube with ambient air" or "Filling the verification tube with pressurized air" as described before.
6. If the difference between measured value and verification point is more than 0.4 vol % O2 the verification procedure should be repeated from the start.
Step 6: Purging with nitrogen To make sure that the instrument was purged well all the time during the verification procedure another purging procedure with nitrogen is necessary. To do so: 1. Attach your nitrogen source to the remaining needle valve once more. 2. Purge the verification tube for about 5 minutes until the concentration value falls well
below 0.2 vol % O2. The gas flow should be approx. 4 l/min. If the O2 concentration value does not fall below 0.2 vol % O2 it is obvious that too much oxygen has entered the volume behind the lenses during verification. The verification procedure should be repeated from the start.
3. Close the needle valve. Wait for 10 minutes. After this time the O2 concentration value should not have increased to more than 0.15 vol % O2.
4. Note this value in the verification sheet.
Step 7: Restore 1. Restore path length, pressure correction and temperature correction to original settings
according to the notes taken. 2. After restoring correction settings, press button repeatedly to exit the menu. Select OK
when you are asked to save. 3. Reinstall the receiver and transmitter at the industrial interfaces.

Service and maintenance 9.1 Instrument verification
SITRANS SL 156 Operating Instructions, 12/2010, A5E01132948-04
Troubleshooting: Insufficient purging If the oxygen concentration in the verification tube moves above 0.15 vol % after having been purged with nitrogen, this may be due to an elevated oxygen content inside the housing units. To remove that oxygen you can follow one of the two procedures below depending on your permission to open the lids of the housing. If you are not permitted to open the lids, you shall just keep on purging the verification tube with nitrogen until all oxygen in the housing is gone. This may take several hours or even a whole day. Thus the purging should be interrupted from time to time to test if the oxygen content has fallen below 0.15 vol %. If the test result is above 0.15 vol % within a 10 minutes time you must continue purging with nitrogen. If you are permitted to open the lids, you should first turn on the nitrogen flow. Then open the lids such that the gas can easily enter the gap between lid and housing, but without risk of the lids falling off. After 15 minutes of nitrogen purging the housing should be free of oxygen. After purging first close the lids. Then turn off the nitrogen and wait for 10 minutes. If the oxygen value remains below 0.15 vol %, the problem is solved. If not, repeat the procedure.
See also Technical data (Page 181) Verification Sheets (Page 198)

Service and maintenance 9.1 Instrument verification
SITRANS SL Operating Instructions, 12/2010, A5E01132948-04 157
9.1.2 Verification with a verification cell The verification cell is intended for the carbon monoxide version of the SITRANS SL (SITRANS SL CO). The verification module is mounted between the transmitter tube unit (transmitter) and receiver tube unit (receiver) during verification. The verification kit consists of a metal tube and a gas filled glass cell with a defined gas concentration stated in the corresponding certificate.
9.1.2.1 Span verification For the span verification of the instrument follow steps 1 through 3 below. This process should be documented using the form "Verification Sheet" in Appendix A.
Necessary equipment ● Verification kit ● Sensor connecting cable
If your regular sensor connection cable cannot be removed from the installation, you need a supplementary one.
Step 1: Setup of verification tube 1. Start the procedure by removing the receiver and transmitter from the flanges. Depending
on the prevailing safety conditions and what is more convenient, the power may be kept on and the sensor connection cable stay connected, or the power may be shut off and the sensor connection cable be disconnected.
CAUTION
Never disconnect the sensor connection cable with the power switched on.
2. Mount the receiver and transmitter on the verification tube. 3. If the analyzer has been moved to a location with a different ambient temperature than
that at the installation site, you need to wait until it has been adapted to the new temperature before proceeding from this step. In this way you avoid condensation problems and assure static and homogeneous temperature distribution in the calibration tube.
4. If necessary, connect the sensor connection cable between the receiver and transmitter and power up the SITRANS SL.

Service and maintenance 9.1 Instrument verification
SITRANS SL 158 Operating Instructions, 12/2010, A5E01132948-04
Step 2: Preparations and LUI settings In order to document the verification procedure you should fill out the 'SITRANS SL CO Verification sheet' form thoroughly during verification. 1. Make a copy of the "Verification sheet" form you can find in Annex A. 2. Fill out the first part (General Information). 3. Enter the password to access the Local User Interface (LUI) using the remote control.
NOTICE
Remember to write down the original values before making any alterations to the settings!
4. Note the current integration time in the verification sheet. Set the integration time to 20 s. 5. Note the settings for the path length in the verification sheet. Set the path length to the
value stated in the certificate. Notice that this is valid with the in-line reference cell in place. Note this value also in the verification sheet.
6. Note pressure source settings and, if applicable, pressure manual value in the verification sheet. Set the pressure source to "manual" and enter the value stated in the certificate. Note this value also in the verification sheet.
7. Note temperature source settings and, if applicable, temperature manual value in the verification sheet. Set the temperature source to "manual" and set the temperature manual value to the ambient temperature. Note this value also in the verification sheet.
8. Enter the appropriate values for the verification errors: Instrument error (according to the instrument specifications), and temperature error. The temperature error depends on your measurement. If the system and the purging gas used are well tempered, you can use the error of the thermometer itself: 1 °C.
9. Calculate the total uncertainty of the measurement by adding instrument error, and temperature error.
CAUTION
Temperature influence on the verification procedure It is very important to enter the accurate temperature values. As a rule of thumb you need the same accuracy of the temperature values you expect for your verification tolerance.

Service and maintenance 9.1 Instrument verification
SITRANS SL Operating Instructions, 12/2010, A5E01132948-04 159
Step 3: Verification 1. Watch or record the measured value for at least 20 seconds to ensure that it is stable (i.
e. concentration varies not more than ±1 vol % of the reading). 2. Take 5 successive concentration values and write them into the verification sheet. 3. If the difference between the highest and the lowest concentration value is more than
1 %, the measurements must be repeated. 4. Compare the average of the 5 values with the verification set point stated in the
certificate. If it lies within the range between the set point and the total verification uncertainty, the instrument works properly. If the average value lies outside this range, repeat the verification procedure. If the test still fails, contact Siemens support providing the filled-out verification sheet will all verification results.
See also Verification Sheets (Page 198)
9.1.3 Verification of systems used in hazardous areas
Verification setup Verifying the system requires that it is mounted to the verification module.
WARNING If the verification is to be carried out in the hazardous area be sure to confirm with the
plant manager that it is safe to do so (hot work permit)! The thermometer is neither ATEX nor FM certified. If the thermometer therefore must be
removed, the hole where the thermometer was attached should be plugged and the temperature measured with some other device.
Note The verification kit is not part of the standard delivery. If you carry out the calibration verification for your own, you have to order the verification kit additionally.
Procedure 1. The sensor and transmitter have to be dismounted from the measuring setup. 2. If necessary the cables in the receiver and the transmitter have to be disconnected. The
units have then to be moved to an appropriate location for verification. The sensors must then be reconnected to each other using a sensor connection cable.
3. Verify the system as described in sections before. 4. Reinstall in reverse order.
Service and maintenance 9.2 Cleaning the optical parts of the sensor
SITRANS SL 160 Operating Instructions, 12/2010, A5E01132948-04
9.2 Cleaning the optical parts of the sensor
Preparations
WARNING Danger of burns Due to hot process gases and/or purging media the sensors and their environment can become very hot. This applies particularly when steam is used for purging since overheated steam is not visible! Before you start cleaning the optical parts of the sensor make sure that no purging is under way no hazardous or hot gases can escape from the process you are sufficiently protected against hot surfaces on and around the sensor, e.g. by
using protective gloves Failure to do so may result in severe burns!
Cleaning of the process interface window on the process side 1. Demount the process interface, also demount the purging tube if applicable.
WARNING
Dangerous or pressurized process Before you start demounting the process interface make sure that the process conditions are safe, e.g. there are no more pressure or dangerous substances on the process side.
2. Remove all dust particles using pressurized air or flushing water. 3. Clean the optical surface with a soft cloth. Water with a small amount of soap or a mild
detergent also works fine in many cases. Start the cleaning process at the center and work with circular movements towards the rim.
4. To remount the process interface, refer to section Installation . Also a new alignment of the sensors has to be carried out.
Service and maintenance 9.2 Cleaning the optical parts of the sensor
SITRANS SL Operating Instructions, 12/2010, A5E01132948-04 161
Cleaning of lens or the process interface window on the sensor side 1. Use an appropriate tool to release the clamp ring –– and pull the sensor out. 2. Remove all dust particles using pressurized air or flushing water. 3. Clean the optical surfaces with a soft cloth. Water with a small amount of soap or a mild
detergent also works fine in many cases. Start the cleaning process at the center and work with circular movements towards the rim.
4. When remounting the sensor, make sure that the guide pin fits the hole on the purging flange. Screw on the lock ring and tighten it gently with the tool.
If this operation is performed properly, it will not affect the alignment of the sensor.
NOTICE Any work with the optical lens requires utmost care. The lens is anti-reflection coated and thus very susceptible to scratches!
See also Mounting (Page 40)

Service and maintenance 9.2 Cleaning the optical parts of the sensor
SITRANS SL 162 Operating Instructions, 12/2010, A5E01132948-04

SITRANS SL Operating Instructions, 12/2010, A5E01132948-04 163
Alarm, error, and system messages 1010.1 Alarm
Introduction In this chapter the word 'alarm' is used as a general term without referring to the alarm level, i.e. if it is a failure, a warning or just informative. The actions to be taken when an alarm trigged are specific to each alarm.
s
Figure 10-1 Alarm overview

Alarm, error, and system messages 10.1 Alarm
SITRANS SL 164 Operating Instructions, 12/2010, A5E01132948-04
Alarm Triggering Generally a SITRANS SL alarm has three parameters: ● Triggering level ● Triggering time (TSet) ● Reset time (TRes)
Figure 10-2 Alarm triggering
Alarms with different behaviours or configurations are handled later in this chapter under the alarm description.

Alarm, error, and system messages 10.1 Alarm
SITRANS SL Operating Instructions, 12/2010, A5E01132948-04 165
Reporting the Alarm Binary outputs For each alarm it is possible to select if it should affect none, one or both of the relays. Configuration for both outputs can be edited using the LUI user interface. Analog outputs For each output, actions can be set up for the following cases: ● Maintenance Fault ● Maintenance Demanded ● Process Value Fault ● Process Value Warning ● Process Value Tolerance ● No Data Exchange ● Local Override ● Device Unlocked ● Configuration Warning Possible actions: ● Off (present measured value) ● Latest (freeze on the last presented value) ● Default level (set to a predefined default level) ● 3mA (NAMUR NE43 failstate) PROFIBUS and Modbus PROFIBUS and Modbus have two ways of reporting a problem, quality indication and alarm. Quality indication that comes with every cyclic data (measurements) and is either a value or one of the following states: ● Good ● Uncertain ● Bad

Alarm, error, and system messages 10.1 Alarm
SITRANS SL 166 Operating Instructions, 12/2010, A5E01132948-04
LUI The lower half of the measurement view (i.e. the standard view) of the LUI is designated for the alarm display. Once an alarm has been triggered the alarm text is displayed together with an icon. The icon indicates type and level of the alarm. If several alarms are simultaneously active, the most serious alarm is displayed. To indicate that there are more than one alarm active, the icons of for all active alarms appear alternately but the displayed text always refers to the most serious alarm. To scroll through the list of active alarms repeatedly press the key.
Start-up Failure Relays are not activated until system has completed the start-up procedure, i.e. the alarms go inactive when the system works properly. When being operated via PROFIBUS or Modbus, the PLC will notice that the SITRANS SL is missing on the bus if it does not start. In that case the PLC can generate an alarm.
States and Symbols An alarm display on the LUI consists of a text and an icon to the left of the text. The icon indicates type and level of an alarm. Icon Description
Maintenance fault The device is in immediate need for maintenance. Measurement values cannot be produced. Example: Transmission too low for measurement due to contamination or misalignment
Maintenance demanded The device is in need for maintenance to assure continuous operation. Measurement values are produced but may be uncertain. Example: Transmission is low due to contamination or misalignment
Maintenance required N/A
Process value fault Measurement values cannot be produced due to a problem with one or more process values. Examples: Malfunction of an external sensor. A process value is outside the limits of the compensation files.
Process value warning Measurement values are produced but may be uncertain due to a problem with one or several process values. Example: A process value exceeds the specification of the device.
Process value tolerance One or more process values have reached a tolerance limit. Example: An external sensor reports an uncertain quality code.
Alarm, error, and system messages 10.1 Alarm
SITRANS SL Operating Instructions, 12/2010, A5E01132948-04 167
Configuration fault The device cannot operate due to invalid configuration of parameters or hardware.
Configuration warning Device might work, but one or more parameters are invalid. Default values are used instead.
Configuration changed N/A
Local override Output values are not actual measurements. Example: Test mode is active for an output.
Simulation or substituted value N/A
Out of operation N/A
Data exchange Indicates irregular data communication Example: The software is executing save settings. No data exchange Communication failure. Example: PROFIBUS master has been switched of.
Write access on/off Write access on is used to indicate that the Local User Interface is unlocked.

Alarm, error, and system messages 10.1 Alarm
SITRANS SL 168 Operating Instructions, 12/2010, A5E01132948-04
Alarm groups The alarm groups are the base for alarm reporting on the conventional interface, i.e. relay outputs and failure signalling on analog outputs. The alarm groups are also used in the logbook. LUI Groups G1 External sensor G2 Receiver temperature G3 Transmitter temperature G4 Reference line G5 Transmitter tube unit G6 Service G7 Transmission G8 Receiver electronics G9 Transmitter electronics G10 Measurement out of range G11 Configuration error G12 Internal communication G13 PROFIBUS client The allocation of a specific alarm to its LUI alarm group is shown in table 10-1 "Alarm list (Page 170)".

Alarm, error, and system messages 10.1 Alarm
SITRANS SL Operating Instructions, 12/2010, A5E01132948-04 169
Log book In the log book there are some more groups
Figure 10-3 Log book groups

Alarm, error, and system messages 10.2 Alarm list
SITRANS SL 170 Operating Instructions, 12/2010, A5E01132948-04
10.2 Alarm list SITRANS SL can produce alarms from the following list.
Symbol/Group Error
Code Alarm (description) Explanation/Action
E6 Startup procedure active The system is starting up. This alarm should disappear when system has started. During normal ambient conditions the SITRANS SL should have started up within 5 minutes. Ensure that the ambient conditions are within the specifications for the SITRANS SL and restart the system if needed.
E8 Line locking failure The SITRANS SL has failed to lock on to the built in reference cell. Ensure that the ambient conditions are within the specifications for the SITRANS SL and restart the system. If the fault remains, contact Siemens support.
E45 FPGA timeout receiver Internal communication failure in the Receiver. Restart the system. If the fault remains, contact Siemens support.
E46 FPGA timeout receiver junction Internal communication failure in the Receiver. Restart the system. If the fault remains, contact Siemens support.
E47 FPGA timeout transmitter Sensor connection cable communication failure. Check that sensor connection cable is properly connected and not damaged.
E48 Laser unpowered The SITRANS SL has stopped measuring to protect the laser from getting too hot. The system may have been exposed to an ambient temperature higher than permitted. Check that the ambient temperature is within the specifications and ensure that the system is not exposed to direct sunlight. Restart the system.
E66 Curve fit algorithm The curve fit algorithm fails due to laser drift. Ensure that the ambient conditions are within the specifications for the SITRANS SL and restart the system. If the fault remains, contact Siemens support.
E68 Line locking failure The line locking state machine ended up in a fault state. Restart the system. If the fault remains, contact Siemens support.
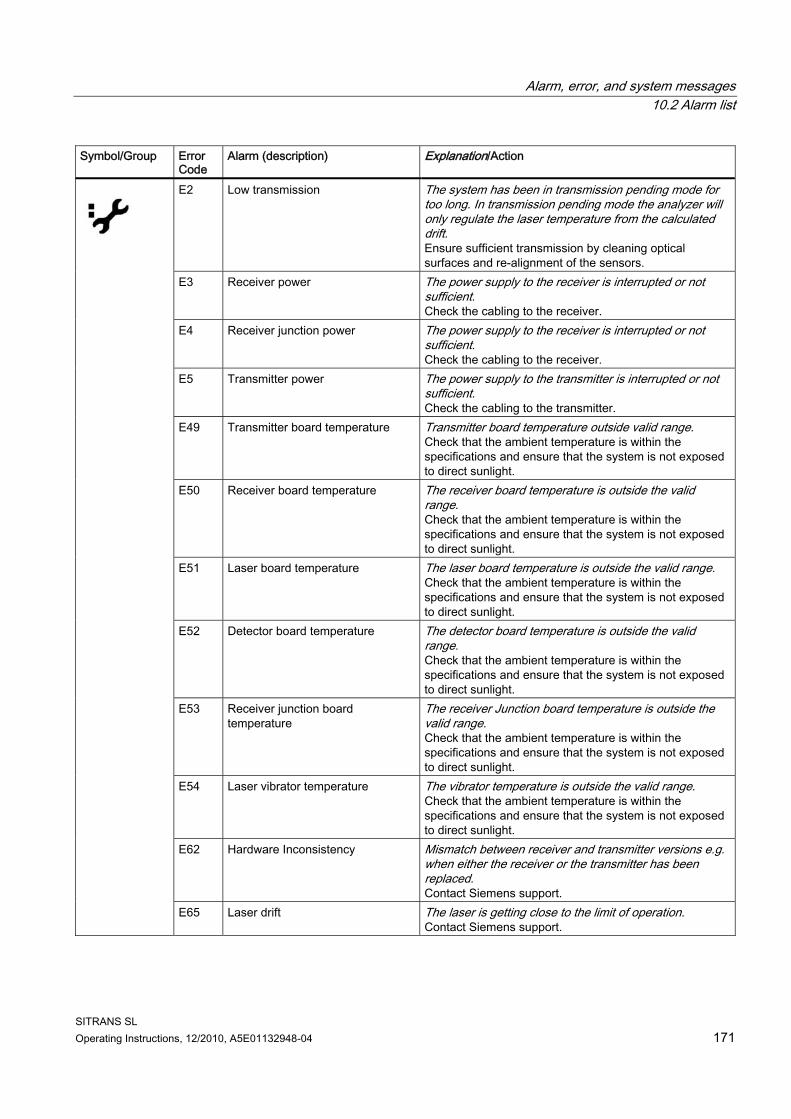
Alarm, error, and system messages 10.2 Alarm list
SITRANS SL Operating Instructions, 12/2010, A5E01132948-04 171
Symbol/Group Error Code
Alarm (description) Explanation/Action
E2 Low transmission The system has been in transmission pending mode for too long. In transmission pending mode the analyzer will only regulate the laser temperature from the calculated drift. Ensure sufficient transmission by cleaning optical surfaces and re-alignment of the sensors.
E3 Receiver power The power supply to the receiver is interrupted or not sufficient. Check the cabling to the receiver.
E4 Receiver junction power The power supply to the receiver is interrupted or not sufficient. Check the cabling to the receiver.
E5 Transmitter power The power supply to the transmitter is interrupted or not sufficient. Check the cabling to the transmitter.
E49 Transmitter board temperature Transmitter board temperature outside valid range. Check that the ambient temperature is within the specifications and ensure that the system is not exposed to direct sunlight.
E50 Receiver board temperature The receiver board temperature is outside the valid range. Check that the ambient temperature is within the specifications and ensure that the system is not exposed to direct sunlight.
E51 Laser board temperature The laser board temperature is outside the valid range. Check that the ambient temperature is within the specifications and ensure that the system is not exposed to direct sunlight.
E52 Detector board temperature The detector board temperature is outside the valid range. Check that the ambient temperature is within the specifications and ensure that the system is not exposed to direct sunlight.
E53 Receiver junction board temperature
The receiver Junction board temperature is outside the valid range. Check that the ambient temperature is within the specifications and ensure that the system is not exposed to direct sunlight.
E54 Laser vibrator temperature The vibrator temperature is outside the valid range. Check that the ambient temperature is within the specifications and ensure that the system is not exposed to direct sunlight.
E62 Hardware Inconsistency Mismatch between receiver and transmitter versions e.g. when either the receiver or the transmitter has been replaced. Contact Siemens support.
E65 Laser drift The laser is getting close to the limit of operation. Contact Siemens support.

Alarm, error, and system messages 10.2 Alarm list
SITRANS SL 172 Operating Instructions, 12/2010, A5E01132948-04
Symbol/Group Error Code
Alarm (description) Explanation/Action
E1 No transmission Transmission is too low. The dust level in the optical path may be too high. If the fault remains at good visibility it may be necessary to clean the process windows and verify alignment.
E12 Ext. temperature bad The state of the digital input indicates that the temperature value from the external sensor is bad. Solve the problem caused by the external temperature sensor.
E16 Ext. pressure bad The state of the digital input indicates that the pressure value from the external sensor is bad. Solve the problem caused by the external sensor.
E20 Ext. temperature source disconnected
Configuration Error. Contact Siemens support.
E21 Ext. pressure source disconnected Configuration Error. Contact Siemens support.
E29 Compensation temp. file range The process temperature deviates from the operational range of this SITRANS SL application. The deviation is so large that no measurement value can be produced. Delimit process temperature or verify that the temperature sensor produces correct measurements.
E30 Compensation pressure file range The process pressure deviates from the operational range of this SITRANS SL application. The deviation is so large that no measurement value can be produced. Delimit process pressure or verify that the pressure sensor produces correct measurements.
E31 CurveFit temp. file range The process temperature deviates from the operational range of this SITRANS SL application. The deviation is so large that no measurement value can be produced. Delimit process temperature or verify that the temperature sensor produces correct measurements.
E32 CurveFit pressure file range The process pressure deviates from the operational range of this SITRANS SL application. The deviation is so large that no measurement value can be produced. Delimit process pressure or verify that the pressure sensor produces correct measurements.
E33 CurveFit gas file range Internal error when reading the curve fit compensation file. Contact Siemens support.
E59 Sensor temp. comp. file range The ambient temperature at the sensor is outside the specifications. Check that the ambient temperature is within the specifications and ensure that the system is not exposed to direct sunlight.
E63 A0 outside measurement range The current measurement value is outside the scaling range for the analog output signal. Change the scaling of the analog output.
E64 A1 outside measurement range The current measurement value is outside the scaling range for the analog output signal. Change the scaling of the analog output.
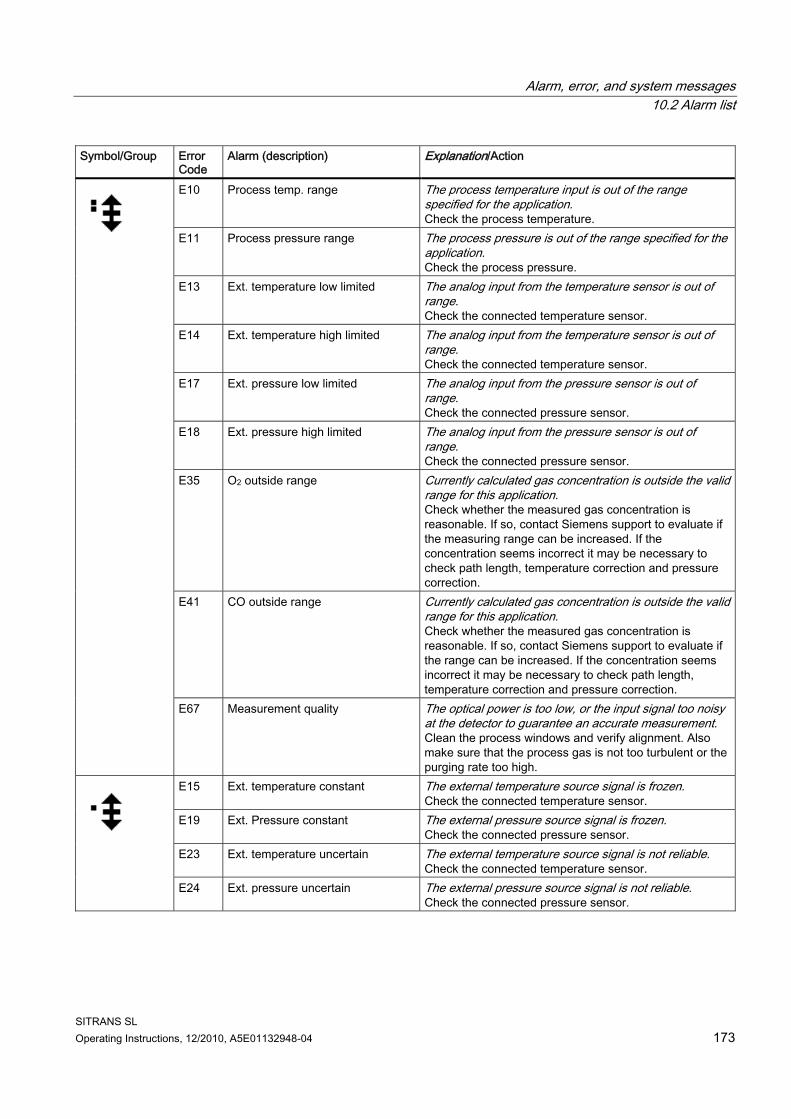
Alarm, error, and system messages 10.2 Alarm list
SITRANS SL Operating Instructions, 12/2010, A5E01132948-04 173
Symbol/Group Error Code
Alarm (description) Explanation/Action
E10 Process temp. range The process temperature input is out of the range specified for the application. Check the process temperature.
E11 Process pressure range The process pressure is out of the range specified for the application. Check the process pressure.
E13 Ext. temperature low limited The analog input from the temperature sensor is out of range. Check the connected temperature sensor.
E14 Ext. temperature high limited The analog input from the temperature sensor is out of range. Check the connected temperature sensor.
E17 Ext. pressure low limited The analog input from the pressure sensor is out of range. Check the connected pressure sensor.
E18 Ext. pressure high limited The analog input from the pressure sensor is out of range. Check the connected pressure sensor.
E35 O2 outside range Currently calculated gas concentration is outside the valid range for this application. Check whether the measured gas concentration is reasonable. If so, contact Siemens support to evaluate if the measuring range can be increased. If the concentration seems incorrect it may be necessary to check path length, temperature correction and pressure correction.
E41 CO outside range Currently calculated gas concentration is outside the valid range for this application. Check whether the measured gas concentration is reasonable. If so, contact Siemens support to evaluate if the range can be increased. If the concentration seems incorrect it may be necessary to check path length, temperature correction and pressure correction.
E67 Measurement quality The optical power is too low, or the input signal too noisy at the detector to guarantee an accurate measurement. Clean the process windows and verify alignment. Also make sure that the process gas is not too turbulent or the purging rate too high.
E15 Ext. temperature constant The external temperature source signal is frozen. Check the connected temperature sensor.
E19 Ext. Pressure constant The external pressure source signal is frozen. Check the connected pressure sensor.
E23 Ext. temperature uncertain The external temperature source signal is not reliable. Check the connected temperature sensor.
E24 Ext. pressure uncertain The external pressure source signal is not reliable. Check the connected pressure sensor.

Alarm, error, and system messages 10.2 Alarm list
SITRANS SL 174 Operating Instructions, 12/2010, A5E01132948-04
Symbol/Group Error Code
Alarm (description) Explanation/Action
E57 EEPROM configuration missing EEPROM configuration missing. Contact Siemens support.
E58 Save settings failed Save settings failed.
Contact Siemens support.
E09 Save settings active Configuration changed
E55 Analog output test mode The test mode for analog outputs is active
E56 Digital output test mode The test mode for digital outputs is active
E25 PROFIBUS configuration error PROFIBUS configuration fault. Contact PLC support.
E26 PROFIBUS connection error PROFIBUS Connection Error. Check that PROFIBUS cables are properly connected.
E27 PROFIBUS master switch off PROFIBUS Master Switch Off. Contact PLC support. Check the PROFIBUS master switch.
E28 PROFIBUS internal error PROFIBUS internal error. Contact Siemens support.
E61 LUI unlocked The LUI is unlocked and has no password protection. Lock the LUI.
E60 Watchdog reset triggered The analyzer has been reset due to a triggered watchdog event. This alarm is automatically cleared at the screen after restart of the system. The alarm will still be visible in the logbook.

Alarm, error, and system messages 10.2 Alarm list
SITRANS SL Operating Instructions, 12/2010, A5E01132948-04 175
Table 10- 1 Alarm list sorted by Error Codes
Error Code
Alarm (description) Alarm Application Status LUI Group
E1 No transmission Process value fault G7 E2 Low transmission Maintenance demanded G7 E3 Receiver power Maintenance demanded G2 E4 Receiver junction power Maintenance demanded G2 E5 Transmitter power Maintenance demanded G5 E6 Startup procedure active Maintenance fault G4 E8 Line locking failure Maintenance fault G4 E9 Save settings active Service G6 E10 Process temp. range Process value warning G10 E11 Process pressure range Process value warning G11 E12 Ext. temperature bad Process value fault G1 E13 Ext. temperature low limited Process value warning G1 E14 Ext. temperature high limited Process value warning G1 E15 Ext. temperature constant Process value tolerance G1 E16 Ext. pressure bad Process value fault G1 E17 Ext. pressure low limited Process value warning G1 E18 Ext. pressure high limited Process value warning G1 E19 Ext. pressure constant Process value tolerance G1 E20 Ext. temperature source disconnected Process value fault G1 E21 Ext. pressure source disconnected Process value fault G1 E23 Ext. temperature uncertain Process value tolerance G1 E24 Ext. pressure uncertain Process value tolerance G1 E25 PROFIBUS configuration error Data exchange / No data exchange G13 E26 PROFIBUS connection error Data exchange / No data exchange G13 E27 PROFIBUS master switch off Data exchange / No data exchange G13 E28 PROFIBUS internal error Data exchange / No data exchange G13 E29 Compensation temp file range Process value fault G10 E30 Compensation prs file range Process value fault G10 E31 CurveFit temp. file range Process value fault G10 E32 CurveFit pressure file range Process value fault G10 E33 CurveFit gas file range Process value fault G10 E35 O2 outside range Process value warning G10 E41 CO outside range Process value warning G10 E45 FPGA timeout receiver Maintenance fault G12 E46 FPGA timeout receiver junction Maintenance fault G12 E47 FPGA timeout transmitter Maintenance fault G12 E48 Laser unpowered Maintenance fault G5 E49 Transmitter board temperature Maintenance demanded G5 E50 Receiver board temperature Maintenance demanded G2
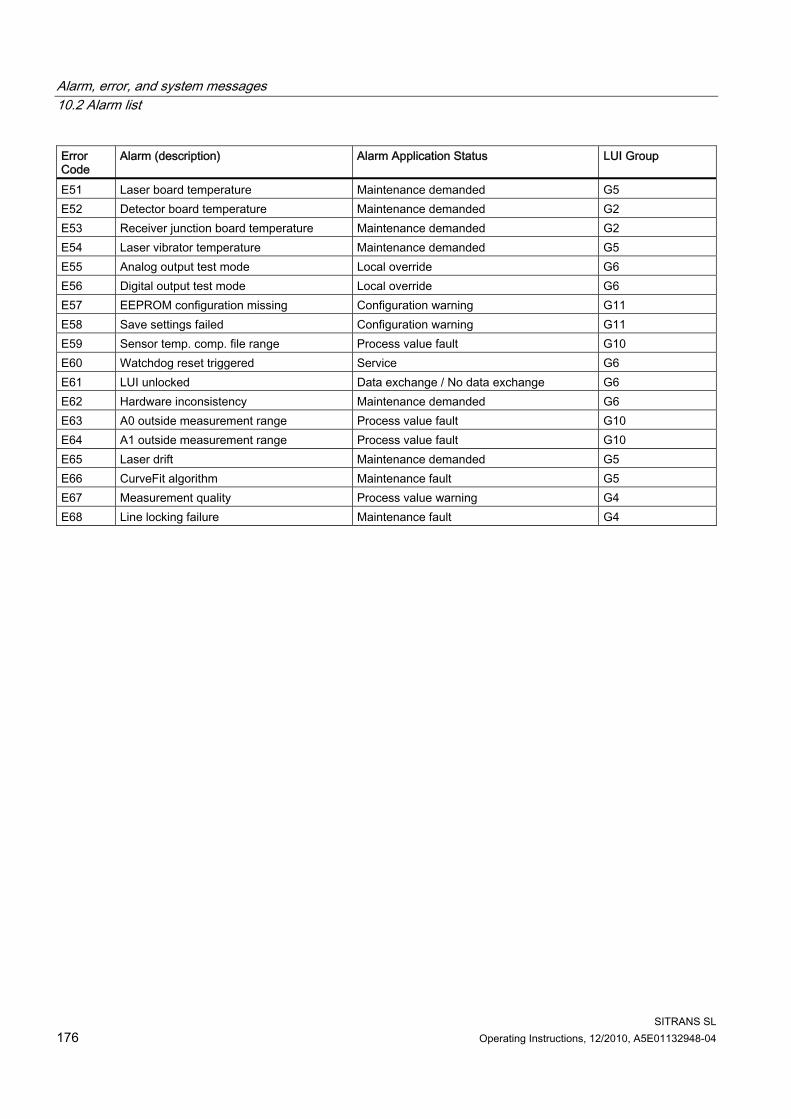
Alarm, error, and system messages 10.2 Alarm list
SITRANS SL 176 Operating Instructions, 12/2010, A5E01132948-04
Error Code
Alarm (description) Alarm Application Status LUI Group
E51 Laser board temperature Maintenance demanded G5 E52 Detector board temperature Maintenance demanded G2 E53 Receiver junction board temperature Maintenance demanded G2 E54 Laser vibrator temperature Maintenance demanded G5 E55 Analog output test mode Local override G6 E56 Digital output test mode Local override G6 E57 EEPROM configuration missing Configuration warning G11 E58 Save settings failed Configuration warning G11 E59 Sensor temp. comp. file range Process value fault G10 E60 Watchdog reset triggered Service G6 E61 LUI unlocked Data exchange / No data exchange G6 E62 Hardware inconsistency Maintenance demanded G6 E63 A0 outside measurement range Process value fault G10 E64 A1 outside measurement range Process value fault G10 E65 Laser drift Maintenance demanded G5 E66 CurveFit algorithm Maintenance fault G5 E67 Measurement quality Process value warning G4 E68 Line locking failure Maintenance fault G4

Alarm, error, and system messages 10.3 PROFIBUS diagnosis and alarms
SITRANS SL Operating Instructions, 12/2010, A5E01132948-04 177
10.3 PROFIBUS diagnosis and alarms
10.3.1 Diagnosis and alarm handling in PROFIBUS DP
Figure 10-4 Diagnosis and alarm handling in PROFIBUS DP

Alarm, error, and system messages 10.3 PROFIBUS diagnosis and alarms
SITRANS SL 178 Operating Instructions, 12/2010, A5E01132948-04
10.3.2 Meaning of the diagnosis information Standard PROFIBUS-DP mechanisms are used to transport diagnosis information and to signal actively to the class 1 master. The DIAGNOSIS parameter from the Physical Block is then available to the master as diagnostic information. To view the diagnosis information from PROFIBUS, the module information of the DP slave is viewed and the respective text from the GSD file is displayed on the DP slave diagnostics screen. The following table shows the assignment of the error signals and maintenance requests from the device to the diagnosis bits of the physical block in the GSD file and the related error code. The explanation and proposed remedial actions for each error code can be found in the Alarm list section.
Bit position Error text message in GSD file Error Code Unit_Diag_Bit(16) "Status appears" - Unit_Diag_Bit(17) "Status disappears" - Unit_Diag_Bit(24) "No transmission" E1 Unit_Diag_Bit(25) "Low transmission" E2 Unit_Diag_Bit(26) "Receiver power" E3 Unit_Diag_Bit(27) "Receiver junction power" E4 Unit_Diag_Bit(28) "Transmitter power" E5 Unit_Diag_Bit(29) "Startup procedure active" E6 Unit_Diag_Bit(30) "Shutdown procedure active" - Unit_Diag_Bit(31) "Line locking failure" E8 Unit_Diag_Bit(32) "Save settings active" E9 Unit_Diag_Bit(33) "Process temp. range" E10 Unit_Diag_Bit(34) "Process pressure range " E11 Unit_Diag_Bit(35) "Ext. temperature bad" E12 Unit_Diag_Bit(36) "Ext. temperature low limited" E13 Unit_Diag_Bit(37) "Ext. temperature high limited" E14 Unit_Diag_Bit(38) "Ext. temperature constant" E15 Unit_Diag_Bit(39) "Ext. pressure bad" E16 Unit_Diag_Bit(40) "Ext. pressure low limited" E17 Unit_Diag_Bit(41) "Ext. pressure high limited" E18 Unit_Diag_Bit(42) "Ext. pressure constant" E19 Unit_Diag_Bit(43) "Ext. temp. source disconnected" E20 Unit_Diag_Bit(44) "Ext. prs. source disconnected" E21 Unit_Diag_Bit(45) "Laser current lower limit" - Unit_Diag_Bit(46) "Ext. temperature uncertain" E23 Unit_Diag_Bit(47) "Ext. pressure uncertain" E24 Unit_Diag_Bit(48) "PROFIBUS configuration error" E25 Unit_Diag_Bit(49) "PROFIBUS connection error" E26 Unit_Diag_Bit(50) "PROFIBUS master switch off" E27 Unit_Diag_Bit(51) "PROFIBUS internal error " E28 Unit_Diag_Bit(52) "Temp. comp. file range" E29

Alarm, error, and system messages 10.3 PROFIBUS diagnosis and alarms
SITRANS SL Operating Instructions, 12/2010, A5E01132948-04 179
Bit position Error text message in GSD file Error Code Unit_Diag_Bit(53) "Prs. comp. file range" E30 Unit_Diag_Bit(54) "CurveFit temp. file range" E31 Unit_Diag_Bit(55) "CurveFit prs. file range" E32 Unit_Diag_Bit(56) "CurveFit gas file range" E33 Unit_Diag_Bit(57) "NH3 outside range" E34 Unit_Diag_Bit(58) "O2 outside range" E35 Unit_Diag_Bit(59) "H2O outside range" E36 Unit_Diag_Bit(60) "HF outside range" E37 Unit_Diag_Bit(61) "H2S outside range" E38 Unit_Diag_Bit(62) "HCl outside range" E39 Unit_Diag_Bit(63) "HCN outside range" E40 Unit_Diag_Bit(64) "CO outside range" E41 Unit_Diag_Bit(65) "CO2 outside range" E42 Unit_Diag_Bit(66) "Temperature outside range" E43 Unit_Diag_Bit(67) "CH4 outside range" E44 Unit_Diag_Bit(68) "FPGA timeout receiver" E45 Unit_Diag_Bit(69) "FPGA timeout receiver junction" E46 Unit_Diag_Bit(70) "FPGA timeout transmitter" E47 Unit_Diag_Bit(71) "Laser unpowered " E48 Unit_Diag_Bit(72) "Transmitter board temperature" E49 Unit_Diag_Bit(73) "Receiver board temperature" E50 Unit_Diag_Bit(74) "Laser board temperature" E51 Unit_Diag_Bit(75) "Detector board temperature" E52 Unit_Diag_Bit(76) "Receiver junction board temp." E53 Unit_Diag_Bit(77) "Laser vibrator temperature" E54 Unit_Diag_Bit(78) "Analog output test mode" E55 Unit_Diag_Bit(79) "Digital output test mode" E56 Unit_Diag_Bit(80) "EEPROM configuration missing" E57 Unit_Diag_Bit(81) "Save settings failed" E58 Unit_Diag_Bit(82) "Sensor temp. comp. file range" E59 Unit_Diag_Bit(83) "Watchdog reset triggered" E60 Unit_Diag_Bit(84) "LUI unlocked" E61 Unit_Diag_Bit(85) "Hardware inconsistency" E62 Unit_Diag_Bit(86) "A0 outside measurement range" E63 Unit_Diag_Bit(87) "A1 outside measurement range" E64 Unit_Diag_Bit(88) "Laser drift" E65 Unit_Diag_Bit(89) "Algorithm error" E66 Unit_Diag_Bit(90) "Measurement quality" E67 Unit_Diag_Bit(91) "Line locking failure" E68

Alarm, error, and system messages 10.3 PROFIBUS diagnosis and alarms
SITRANS SL 180 Operating Instructions, 12/2010, A5E01132948-04

SITRANS SL Operating Instructions, 12/2010, A5E01132948-04 181
Technical data 1111.1 Technical data
General Design Transmitter and receiver units, connected by a sensor
connection cable Materials Sensor enclosure: treated aluminium/stainless steel
Process interface: acid-resistant stainless steel Window: hardened borosilicate glass
Installation In-situ or bypass Concentration units ppm
vol % mg/Nm3
Display Digital concentration display (4 digits with floating decimal point)
Laser protection class Class 1, safe to the eye
Analytical performance Measuring range Internally adjustable Detection limit at standardized conditions: 25 °C gas temperature, 1000 hPa pressure, 1 m path length and constant ambient conditions.
O2: 200 ppm CO: 0.6 ppm
Minimum measuring range (at an effective optical path length of 1 m)
O2: 0 ... 1 vol. % CO: 0 ... 100 ppmv
Maximum measuring range (measuring range * path length)
O2: 0 ... 150 vol. % • m CO: 0 ... 2 000 ppmv • m
Calibration verification interval 1 year

Technical data 11.1 Technical data
SITRANS SL 182 Operating Instructions, 12/2010, A5E01132948-04
Design, enclosure Design, enclosure Degree of protection IP65 in accordance with EN 60529 Dimensions For each unit (transmitter, receiver)
Diameter: 165 mm Length 357 mm
Purging tube Length: 340 mm Outer diameter: ∅ 48 mm Inner diameter: ∅ 44 mm
Weight Receiver unit 6.0 kg Transmitter unit 5.2 kg Process interface
– For DN50/PN 10-40 5.3 kg – For ANSI4"/150 lbs. approx. 12 kg
Connection dimension customer flange
DN 50/PN 10-40 or ANSI 4"/150 lbs
Electric characteristics Power supply 24 V DC nominal (18 ... 30.2 V DC) Maximum power consumption 10 VA EMC immunity In accordance with EN 61326-1 Electric safety In accordance with EN 61010-1 External fuse specifications T1.6L250V
Dynamic performance Warm-up time at 20 °C/68 °F ambient temperature
Start of measurement: < 5 min. Full gas measurement accuracy: < 60 min.
Response time (T90) Approx. 2 s, depending on application Integration time 0 ... 100 s, selectable

Technical data 11.1 Technical data
SITRANS SL Operating Instructions, 12/2010, A5E01132948-04 183
Influencing variables Influencing variables Variations in ambient temperature < 0.5 % of measuring range/10 K Process gas temperature With compensation: < 1 % of measuring range /100 K Variations in ambient pressure Negligible Process gas pressure With compensation: < 0.25 % of measured value/1000 hPa Variations in supply voltage Negligible
Electric inputs and outputs Number of measurement channels 1 Analog outputs 2 outputs, 4 ... 20 mA DC, floating, ohmic resistance
max. 660 Ω. Note External isolating power supplies may have to be provided by the customer or have to be ordered.
Analog inputs 2 inputs, designed for 4 ... 20 mA, 120 Ω Digital outputs 2 outputs, with normally open contacts, configurable,
24 V/0.5 A, floating, single pole single throw (SPST) Digital input 1 input, designed for 24 V, floating, configurable Service port Ethernet 10BaseT (RJ-45) RS 485- PROFIBUS-DPV0 Two-wire interface, up to 3 Mbit/s, -7 ... + 12 V RS 485-Modbus Two-wire interface, up to 115 200 bit/s, -7 ... + 12 V
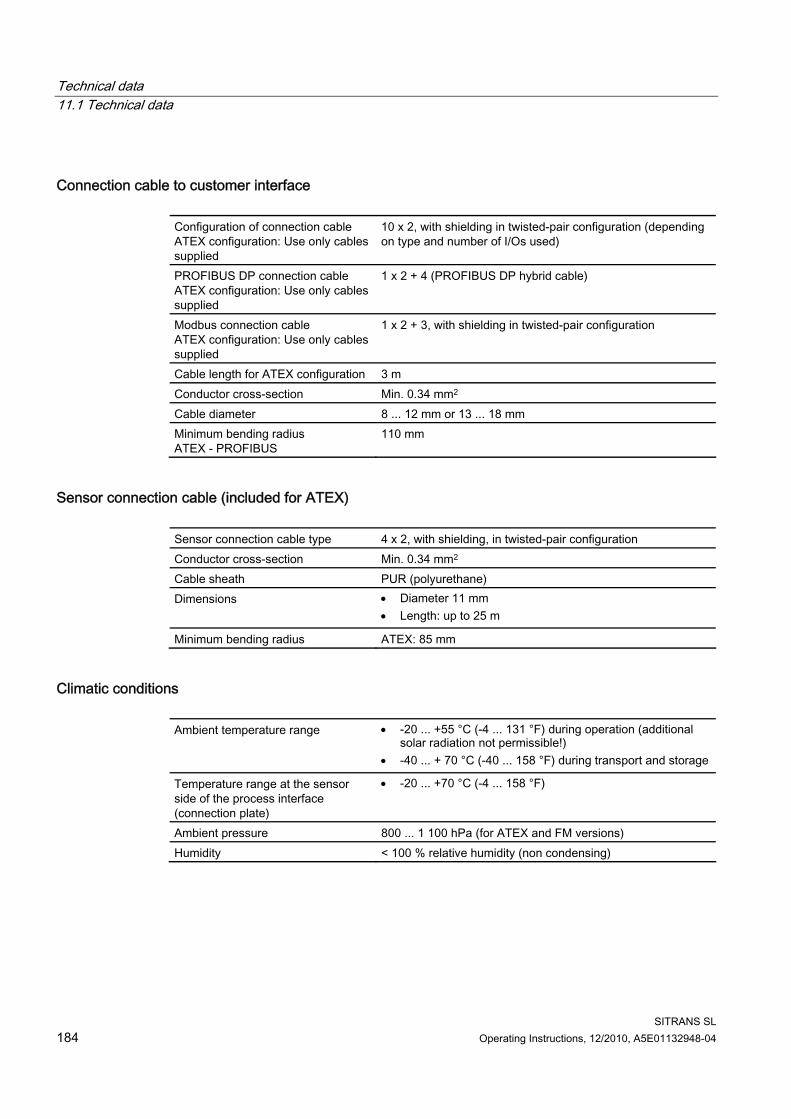
Technical data 11.1 Technical data
SITRANS SL 184 Operating Instructions, 12/2010, A5E01132948-04
Connection cable to customer interface Configuration of connection cable ATEX configuration: Use only cables supplied
10 x 2, with shielding in twisted-pair configuration (depending on type and number of I/Os used)
PROFIBUS DP connection cable ATEX configuration: Use only cables supplied
1 x 2 + 4 (PROFIBUS DP hybrid cable)
Modbus connection cable ATEX configuration: Use only cables supplied
1 x 2 + 3, with shielding in twisted-pair configuration
Cable length for ATEX configuration 3 m Conductor cross-section Min. 0.34 mm2 Cable diameter 8 ... 12 mm or 13 ... 18 mm Minimum bending radius ATEX - PROFIBUS
110 mm
Sensor connection cable (included for ATEX) Sensor connection cable type 4 x 2, with shielding, in twisted-pair configuration Conductor cross-section Min. 0.34 mm2 Cable sheath PUR (polyurethane) Dimensions Diameter 11 mm
Length: up to 25 m
Minimum bending radius ATEX: 85 mm
Climatic conditions Ambient temperature range -20 ... +55 °C (-4 ... 131 °F) during operation (additional
solar radiation not permissible!) -40 ... + 70 °C (-40 ... 158 °F) during transport and storage
Temperature range at the sensor side of the process interface (connection plate)
-20 ... +70 °C (-4 ... 158 °F)
Ambient pressure 800 ... 1 100 hPa (for ATEX and FM versions) Humidity < 100 % relative humidity (non condensing)

Technical data 11.1 Technical data
SITRANS SL Operating Instructions, 12/2010, A5E01132948-04 185
Measuring conditions Measuring conditions Measurement path 0.3 ... 8 m (other lengths: please contact Siemens AG) Process gas pressure, temperature O2: 900 ... 1 100 hPa (absolute), 0 ... 600 °C
(32 ... 1 111 °F) - applies to MLFB code AB O2: 700 ... 5 000 hPa (absolute), 0 ... 200 °C
(32 ... 392 °F) - applies to MLFB code AC CO: 700 ... 2 000 hPa (absolute), -20 ... 300 °C
(56 ... 392 °F) ) - applies to MLFB code JC CO: 800 ... 1 200 hPa (absolute), -20 ... 700 °C
(56 ... 1 111 °F) ) - applies to MLFB code JC
Dust load The influence of a high dust load is complex, and depends on the optical path length and particle size distribution.
Purging Purging Purging gas ● Quality ● Dew point
O2 applications: nitrogen CO applications: nitrogen, instrument air O2 applications: Purity better than 99.7 % in order to achieve full performance. For oxygen measurements, an oxygen content < 0.01 vol % in the purging gas is recommended. Instrument air: dry and oil-free < -10 °C (14 °F), condensation on the optics must be avoided
Sensor purging Max. overpressure in the sensor Purging gas temperature on
sensor side
Flow Purging on process side (optional) Pressure at purging gas inlet Flow
500 hPa 0 ... +55 °C (32 ... 131 °F) O2 application: After commissioning of a sensor enclosure previously filled with air: 3 ... 5 l/min (for at least 15 minutes), thereafter: min. 0.25 l/minute 2 000 ... 8 000 hPa Depending on process gas pressure, process gas speed, dust load, humidity etc. up to 50 l/minute

Technical data 11.1 Technical data
SITRANS SL 186 Operating Instructions, 12/2010, A5E01132948-04
Safety Electric safety In accordance with IEC 61010 / DIN VDE 0411 Protection against explosion ATEX II 2 G Ex de op is IIC T6
ATEX II 2 D Ex tD A21 IP 65 T85 °C FM: - Explosionproof for Class I, Division 1, Groups A, B, C and D, Temperature Class T6 Ta=55 °C; - Flameproof for Class I, Zone 1, AEx d IIC, Temperature Class T6 Ta=55 °C; - Dust-ignitionproof for Class II/III, Division 1, Groups E, F and G, Temperature Class T6 Ta=55 °C; - Dust-tight for Zone 21, AEx tD T85 °C Ta=55 C; indoors and outdoors (Type 4X/IP65)
The information provided in this chapter contains descriptions or characteristics of performance which in case of actual use may not apply as described as a result of further development of the product. Technical specifications are subject to change without further notice.

Dimension drawings
SITRANS SL Operating Instructions, 12/2010, A5E01132948-04 187
Dimension drawings 1212.1 Dimensional drawings
SITRANS SL can be delivered with two different process flanges - suitable for flange connections DIN (DN50/PN10-40) or ANSI (ANSI 4"/150lb).
① Purging tube ② Process interface ③ Process purging input ④ Receiver cable kit or transmitter cable junction box ⑤ Mounting bracket for Receiver cable kit or transmitter cable junction box ⑥ Sensor purging input ⑦ Process flange Figure 12-1 Dimensional drawing SITRANS SL (receiver and transmitter), all measures in mm (inches)

Dimension drawings 12.1 Dimensional drawings
SITRANS SL 188 Operating Instructions, 12/2010, A5E01132948-04
Figure 12-2 Dimensional drawing customer flange DN50/PN10-40, all measures in mm (inches)
Figure 12-3 Dimensional drawing customer flange ANSI 4"/150 lb, all measures in mm (inches)

Dimension drawings 12.1 Dimensional drawings
SITRANS SL Operating Instructions, 12/2010, A5E01132948-04 189
54 (2
1 1/
4”)
59.2
(23
1/4”
)
77 (3
0 1/
4”)
375 (147 5/8”)
355.5 (140”)
Figure 12-4 Dimensional drawing calibration tube, all measures in mm (inches)
① Cable gland for sensor connection cable, M20 with plug Figure 12-5 Dimensional drawing transmitter junction box, all measures in mm (inches)

Dimension drawings 12.1 Dimensional drawings
SITRANS SL 190 Operating Instructions, 12/2010, A5E01132948-04
① Cable gland for sensor connection cable, M20 with plug ② Cable gland for Ethernet cable, M16 with plug Figure 12-6 Dimensional drawing receiver junction box, all measures in mm (inches)

SITRANS SL Operating Instructions, 12/2010, A5E01132948-04 191
Spare parts and accessories 1313.1 Spare parts
Table 13- 1 General spare parts
Spare parts Order No. Process interface ANSI 4"/150 lbs with gasket A5E01009883 Process interface for DN 50/PN 10-40 with gasket A5E01009881 Purging tube 340 mm (13 3/8") with 1 gasket A5E01009892 Window lid A5E01009897 Lid machined unit A5E02568437 Connection cable analog and Modbus for ATEX A5E02608597 Connection cable PROFIBUS DP for ATEX A5E02608594 Transmitter junction box cable kit A5E02568463 Receiver junction box cable kit A5E02568465 Clamp ring A5E01010033 Remote control IS, CSA, FM, ATEX A5E02091214 Junction box Ex e 7 cores A5E02091532 Capillary kit A5E02183375 Gasket DN50 PN16 A5E02522036 Gasket ANSI 4"/150 lbs. A5E02789535 Needle valve kit A5E02569944 Sensor connection cable 5 m A5E02571180 Sensor connection cable 10 m A5E02571184 Sensor connection cable 25 m A5E02571186 Cable gland kit non Ex A5E02568457

Spare parts and accessories 13.1 Spare parts
SITRANS SL 192 Operating Instructions, 12/2010, A5E01132948-04
Application-specific spare parts
NOTICE The application-specific spare parts can be ordered by customers. The receiver and transmitter modules may only be replaced by certified personnel.
Table 13- 2 Application-specific spare parts
Spare parts for O2 measurement Order No. Transmitter module O2 A5E01273790 Receiver module O2 A5E01273791 Transmitter module O2 ATEX A5E02183403 Receiver module O2 ATEX A5E02183422 Transmitter module O2 FM A5E03000146 Receiver module O2 FM A5E03000236
Spare parts for CO measurement Order No. Transmitter module CO A5E03000243 Receiver module CO A5E03000250 Transmitter module COATEX A5E03000246 Receiver module COATEX A5E03000251 Transmitter module CO FM A5E03000247 Receiver module CO FM A5E03000253
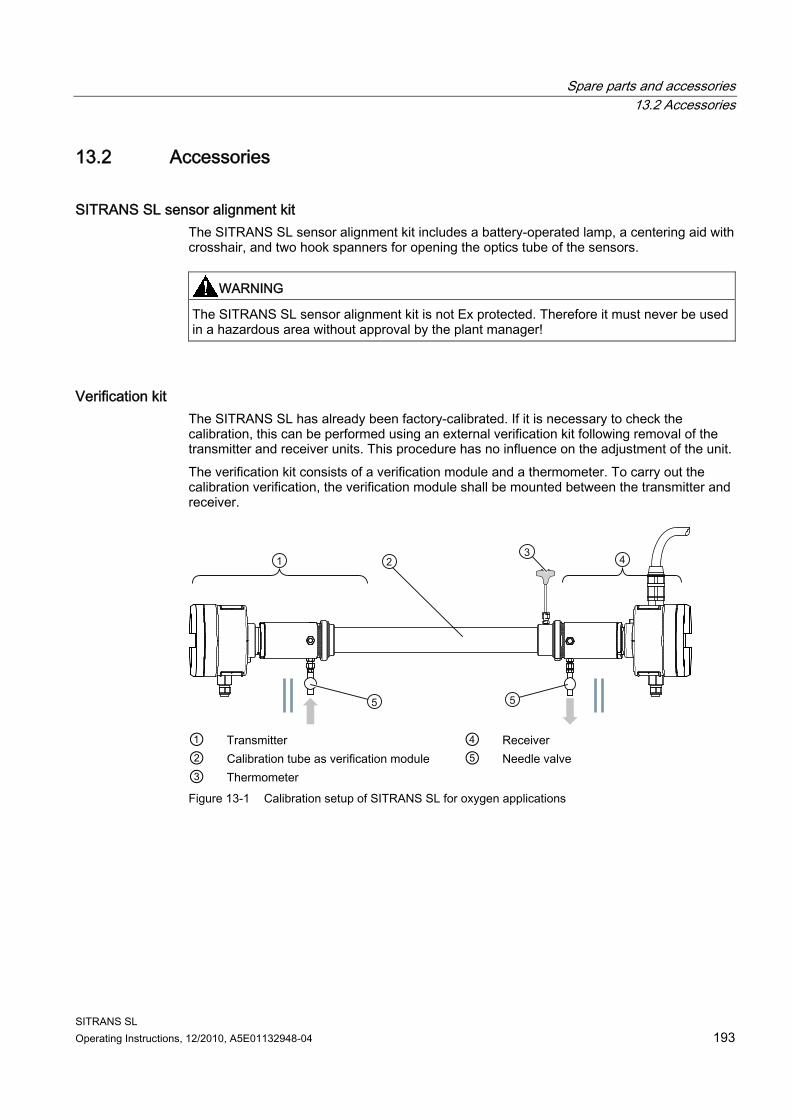
Spare parts and accessories 13.2 Accessories
SITRANS SL Operating Instructions, 12/2010, A5E01132948-04 193
13.2 Accessories
SITRANS SL sensor alignment kit The SITRANS SL sensor alignment kit includes a battery-operated lamp, a centering aid with crosshair, and two hook spanners for opening the optics tube of the sensors.
WARNING The SITRANS SL sensor alignment kit is not Ex protected. Therefore it must never be used in a hazardous area without approval by the plant manager!
Verification kit The SITRANS SL has already been factory-calibrated. If it is necessary to check the calibration, this can be performed using an external verification kit following removal of the transmitter and receiver units. This procedure has no influence on the adjustment of the unit. The verification kit consists of a verification module and a thermometer. To carry out the calibration verification, the verification module shall be mounted between the transmitter and receiver.
① Transmitter ④ Receiver ② Calibration tube as verification module ⑤ Needle valve ③ Thermometer
Figure 13-1 Calibration setup of SITRANS SL for oxygen applications

Spare parts and accessories 13.2 Accessories
SITRANS SL 194 Operating Instructions, 12/2010, A5E01132948-04
Sensor connection cable kit The sensor connection cable kits consist of: ● a sensor connection cable of specified length (4 x 2, twisted pair) ● a mounting bracket for a junction box ● a receiver junction box ● a receiver junction box cable of 1 m length
Connection cable kit analog, Modbus The connection cable kits consist of: ● a cable of 3 m length (10 x 2, twisted pair) ● a cable gland 1/2 NPT ● an adaptor 1/2 NPT to 3/4 NPT
Connection cable kit PROFIBUS DP The connection cable kits consist of: ● a certified PROFIBUS DP hybrid cable of 3 m length (1 x 2 + 4 x 1) ● a cable gland 1/2 NPT
List of accessories Accessories Order No. SITRANS SL alignment kit A5E01000740 Junction box Ex e for 25 cores A5E01267567 UV protective hose for outdoor use, ND = 48 mm, per 30 m A5E01714061 Sensor connection cable kit 5 m, accessory A5E02509347 Sensor connection cable kit 10 m, accessory A5E02528048 Sensor connection cable kit 25 m, accessory A5E02528052 Connection cable kit analog, Modbus A5E03328474 Connection cable kit PROFIBUS DP A5E03328473 Verification kit O2 A5E01000694 Verification kit CO A5E03090938002
The use of these accessories is described in one of the following sections: Alignment of SITRANS SL (Page 57) , Instrument verification (Page 149) , Connecting cables (Page 52)

SITRANS SL Operating Instructions, 12/2010, A5E01132948-04 195
Appendix AA.1 Gas flow calculations
Gas flow calculations are slightly complex because gases are compressible fluids whose density changes with pressure. In this application we are dealing with choked flow. The outlet pressure is less than one half of the inlet pressure and the gas reaches sonic velocity in the valve. A further decrease in outlet pressure does not increase the flow. The flow (q) of instrument air at P1 = 6000 hPa and T1 = 25 °C (77°F) through the needle valve when it is fully opened would then be a little more than 110 Nltr/min. The figure below shows the flow (q) as a function of the up-stream pressure (P1). There are two parameters in the diagram, the process pressure (Pp) and the temperature of the purge gas which is assumed to be air. The diagram shows the flow through a system with a total Cv of 0.1. The flow increases linearly with Cv. q = the flow rate on the low pressure side [Nl/min.] Cv= the flow coefficient (0.1 for the needle valve in our standard sensor) P1 = the inlet absolute pressure [hPa] Gg = the gas specific gravity (air = 1.0) T1 = the upstream temperature [°C] Pp = process pressure [hPa]
q (C
v = 0
.1) [
Nltr
/min
]
P1 [x1013 hPa]
140
120
100
80
60
40
20
076543210
T1 = 100 °C
T1 = 25 °C
Pp = 1013 hPa
Pp = 2026 hPa
Pp = 3039 hPa
Figure A-1 Purge air flow rate
Note This figure represents a general context between pressure and flow rate. The maximum purge flow rate of the SITRANS SL on process side is limited to 50 Nl/min.

Appendix A.2 ESD (ElectroStatic Discharge)
SITRANS SL 196 Operating Instructions, 12/2010, A5E01132948-04
A.2 ESD (ElectroStatic Discharge) ESD is the rapid, spontaneous transfer of electrostatic charge induced by a high electrostatic field. Electrostatic damage to electronic devices can occur at any point from manufacture to field service. Damage results from handling the devices in uncontrolled surroundings or when poor ESD control practices are used. Generally damage is classified as either a catastrophic failure or a latent defect.
Note Usually, the charge flows through a spark between two objects at different electrostatic potentials as they approach one another.
The symbol to the left indicates an ESD protected area, where all workspaces are ESD protected and all personnel must wear wrist straps. This symbol will be used in this chapter to indicate that a service task requires ESD protection. A catastrophic failure means that exposure to an ESD event has caused an electronic device to stop functioning. Such failures usually can be detected when the device is tested before shipment. A latent defect, on the other hand, is more difficult to identify. It means that the device has only been partially degraded from exposure to an ESD event. Latent defects are extremely difficult to prove or detect using current technology, especially after the device is assembled into a finished product.
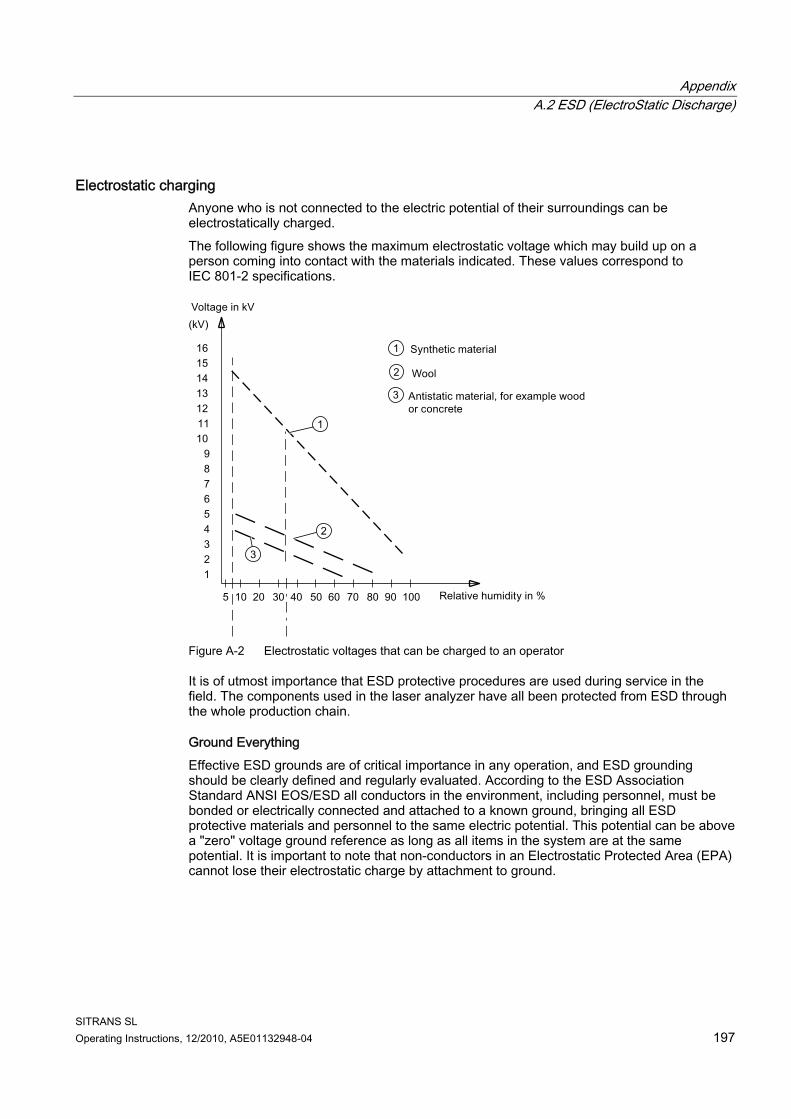
Appendix A.2 ESD (ElectroStatic Discharge)
SITRANS SL Operating Instructions, 12/2010, A5E01132948-04 197
Electrostatic charging Anyone who is not connected to the electric potential of their surroundings can be electrostatically charged. The following figure shows the maximum electrostatic voltage which may build up on a person coming into contact with the materials indicated. These values correspond to IEC 801-2 specifications.
Figure A-2 Electrostatic voltages that can be charged to an operator
It is of utmost importance that ESD protective procedures are used during service in the field. The components used in the laser analyzer have all been protected from ESD through the whole production chain.
Ground Everything Effective ESD grounds are of critical importance in any operation, and ESD grounding should be clearly defined and regularly evaluated. According to the ESD Association Standard ANSI EOS/ESD all conductors in the environment, including personnel, must be bonded or electrically connected and attached to a known ground, bringing all ESD protective materials and personnel to the same electric potential. This potential can be above a "zero" voltage ground reference as long as all items in the system are at the same potential. It is important to note that non-conductors in an Electrostatic Protected Area (EPA) cannot lose their electrostatic charge by attachment to ground.

Appendix A.3 Verification Sheets
SITRANS SL 198 Operating Instructions, 12/2010, A5E01132948-04
Wrist Straps In many facilities, people are one of the prime generators of static electricity. Therefore, wrist straps must be used while carrying out maintenance and service on the laser analyzer, to keep the person wearing it connected to ground potential. A wrist strap consists of the cuff that goes around the person's wrist and the ground cord that connects the cuff to the common point ground.
Work Surface An ESD protective work surface is defined as the work area of a single individual, constructed and equipped to limit damage to ESD sensitive items. The work surface helps to define a specific work area in which ESD sensitive devices may be safely handled. The work surface is connected to the common point ground by a resistance to ground of 106 Ω to 109 Ω. This is done by using a soft bench mat, which is connected to ground, on the work surface. All equipment must be connected to grounded outlets and all personnel must wear wrist straps connected to the bench mat using a cord.
A.3 Verification Sheets
Instrument Verification Albeit the SITRANS SL provides a high long-term stability due to the built-in, maintenance-free reference gas cell, a verification should be carried out at regular intervals. Details of that procedure are described in section 9.1. (Page 149) This procedure should be documented using the appropriate verification sheet provided later in this section. It can be separated from manual using a knife or a pair of scissors.

Appendix A.3 Verification Sheets
SITRANS SL Operating Instructions, 12/2010, A5E01132948-04 199
SITRANS SL O2
Figure A-3 Verification Sheet SITRANS SL O2

Appendix A.3 Verification Sheets
SITRANS SL 200 Operating Instructions, 12/2010, A5E01132948-04
SITRANS SL CO
Figure A-4 Verification sheet CO

Appendix A.4 Service and support
SITRANS SL Operating Instructions, 12/2010, A5E01132948-04 201
A.4 Service and support
Worldwide contact partners If you have any further questions relating to the products described in this documentation, contact your local representative at the Siemens office nearest you. You will find information on whom to contact at our contact partners website (http://www.siemens.com/automation/partner).
Product information on the Internet The instructions are included on the CDs which are already supplied or may be ordered. In addition, the instructions are available on the Internet on the Siemens homepage. A signpost to the range of technical documentation, the online catalog, and the online ordering system for individual SIMATIC products and systems is available at our homepage (http://www.siemens.com/processanalytics) Here you will find: ● Products & solutions, including our newsletter containing up-to-date information on your
products. ● Electronic trading over the Internet. ● Support with e.g. certificates, brochures and catalogs.
Training center Siemens offers corresponding courses for newcomers to laser spectroscopy. Please contact the central Training Center in Karlsruhe. Training Center Europe Process Instrumentation and Analytics Siemensallee 84 D-76181 Karlsruhe, Germany Internet (http://www.sitrain.siemens.com)
Technical support ● You can reach the "Technical Support" for all SC products using:
– the Web form for "Support Request" at (http://www.siemens.com/automation/support-request) .
– Phone: +49 (0)180 5050 222 (€ 0.14 /min. from the German landline network, max. € 0.42 /min. from German mobile communication networks)
– Fax: +49 (0)180 5050 223 (€ 0.14 /min. from the German landline network, deviating mobile communications prices are possible)
● You can find the latest information concerning your device on the Internet at our website (http://www.automation.siemens.com).

Appendix A.5 Returned deliveries
SITRANS SL 202 Operating Instructions, 12/2010, A5E01132948-04
A.5 Returned deliveries The analyzer or spare parts should be returned in the original packing material. If the original packing material is no longer available, wrap the analyzer in plastic foil and pack in a sufficiently large box lined with padding material (wood shavings or similar). When using wood shavings, the stuffing should be at least 15 cm thick on all sides. When shipping overseas, the analyzer must be additionally sealed air-tight in polyethylene foil at least 0.2 mm thick with addition of a drying agent (e.g. silica gel). In addition, the transport container should be lined with a layer of union paper. Please photocopy the Returned deliveries form and the Decontamination declaration, fill in, and enclose with the returned device. In case of guarantee claim, please enclose your guarantee card.
Addresses for Returned Deliveries
Spare parts service Please send your orders for spare parts to the following address: SIEMENS SPA CSC Tel.: (00333)88906677 Fax: (00333)88906688 1, chemin de la Sandlach F-67506 Haguenau - DP order form receiver: 0011E
Repairs To enable fast detection and elimination of faults, please return the analyzers to the following address - until further notice: SIEMENS SPA CSC Tel.: (00333)88906677 Fax: (00333)88906688 1, chemin de la Sandlach F-67506 Haguenau - DP order form receiver: 0011E

Appendix A.5 Returned deliveries
SITRANS SL Operating Instructions, 12/2010, A5E01132948-04 203
A.5.1 Returned deliveries form
Name of customer Person responsible Delivery address
Phone Fax Email
Address for returned delivery(if different from above)
Customer (original) order no. Device name Order (MLFB) no. Serial no. Designation of returned part Fault description
Process data at point of measurement
Operating temperature Operating pressure Composition of sample gas Duration of use/ date of commissioning
Process data at point of measurement
Appendix A.5 Returned deliveries
SITRANS SL 204 Operating Instructions, 12/2010, A5E01132948-04
A.5.2 Decontamination declaration To protect our employees, equipment and environment, it must be guaranteed that the returned device is free of all residues of the measured media. For this reason we check if a complete decontamination declaration is present before unpacking the device. Please securely apply a clear plastic envelope with the completely filled-in and signed decontamination declaration including the shipping papers outside on the packaging. Name of customer Person responsible Delivery address
Phone Fax Email
Address for returned delivery(if different from above)
Device name Order (MLFB) no. Serial no. Designation of returned part Medium Concentration Cleaning medium Duration of use/ date of commissioning
Confirmation It is herewith confirmed that all residues of the measured medium have been removed. The device is free of all dangerous and/or toxic materials.
Location / date / signature

SITRANS SL Operating Instructions, 12/2010, A5E01132948-04 205
List of abbreviations B
Abbreviation / symbol Explanation ″ Inch - 1″ ≙ 25.4 mm < Less than > Greater than ≤ Less than or equal to ≥ Greater than or equal to ° Degrees °C Degrees celsius - 1°C ≙ 1.8 °F °F Degrees fahrenheit - 1°F ≙ 0.555... °C AC Alternating Current ANSI American National Standards Institute API Application Interface ATEX Explosive atmospheres (French:Atmosphères Explosibles) Bit Binary digit CP Communication Processor CPU Central Processing Unit CSA Canadian Standards Association DC Direct Current DN Diameter nominal DP Distributed Peripheral I/O e.g. For example EEPROM Electrically Erasable Programmable Read Only Memory EMC Electromagnetic compatibility ESD Electrostatic Discharge EU European Union Ex Explosive atmosphere FM Factory Mutual, certifying body in the USA for hazardous area
approvals FPGA Field programmable gate array FTP Foiled twisted pair GSD Device master data file (German: Geräte-Stamm-Datei) HU Height unit for computer housings, 1 HU ≙ 1¾" ≙ 44.45 mm K Kelvin kHz Kilohertz

List of abbreviations
SITRANS SL 206 Operating Instructions, 12/2010, A5E01132948-04
Abbreviation / symbol Explanation l/min Liters per minute LAN Local Area Network LCD Liquid crystal display LD Laser diode LDS Laser Diode Spectrometer LDSComm Laser Diode Spectrometer Communication software LED Light emitting diode LUI Local User Interface max. Maximum mm Millimeter mm² Square millimeters MPa Megapascal MPI Message passing Interface MSB Most significant byte n. B. As required NAMUR Standards working committee for measuring and control
technology in the chemical industry. NC Not connected O2 Oxygen PA Process Automation PC Personal Computer PCB Printed Circuit Board PCMCIA Personal Computer Memory Card International Association PCS Process Control System PDM Process Device Manager PE Protective Earth (terminal) PG Programming device PI Process Interface PLC Programmable Logic Controller PN Pressure nominal PROFIBUS Process Field Bus QAL Quality Assurance Level RAM Random Access Memory RHU Receiver Housing Unit RTU Receiver Tube Unit Rx Receive (Rx) identifies a receiver s Second SELV Safety Extra Low Voltage SM374 Simulation module 374 SMA Sub-Miniature A, a coaxial connector type STP Screened twisted pair

List of abbreviations
SITRANS SL Operating Instructions, 12/2010, A5E01132948-04 207
Abbreviation / symbol Explanation TCP/IP Transmission Control Protocol/Internet Protocol; a reference model
for communication on the Internet THU Transmitter Housing Unit TTU Transmitter Tube Unit Tx Transmit (Tx) identifies a transmitter UL Underwriters Laboratories, a US certifying body V Volt Vol% Volume percent vpm Volume parts per million Δ Difference (Greek: delta) μC Microcontroller

List of abbreviations
SITRANS SL 208 Operating Instructions, 12/2010, A5E01132948-04
SITRANS SL Operating Instructions, 12/2010, A5E01132948-04 209
Glossary
Analog Continuous representation of a variable, e.g. voltage, using a scale, in contrast to "Digital".
ATEX ATEX stands for both the directives of the European Community for the field of explosion protection: the ATEX product directive 94/9/EC and the ATEX operation directive 1999/92/EC.
Automation system An automation system is a programmable logic controller consisting of at a central processing unit, a variety of input and output modules as well as operator control and monitoring (HMI) devices.
Bus A cable or conductor system used for data transfer among the components of a computer system. Buses are characterized by the number of bits they can transfer at any one time. There are serial bus systems (one bit after the other) and parallel bus systems (multiple bits simultaneously over several lines).
CSA The Canadian Standards Association sets standards for North America. The CSA also certifies products used in hazardous areas.
Digital Representation of a variable, e.g. time, in the form of characters or numbers. In its digital representation, this variable can be changed only in pre-defined steps, in contrast to "Analog".
Glossary
SITRANS SL 210 Operating Instructions, 12/2010, A5E01132948-04
Div. 0 Area in which dangerous, potentially explosive gaseous atmospheres can form frequently, constantly or over long time periods during the normal operation of a device. Div 0 (US standard) corresponds to Zone 0 (European standard).
Div. 1 Area in which dangerous, potentially explosive gaseous atmospheres are permanently present during the normal operation of a device. Div 1 (US standard) corresponds to Zone 0 and Zone 1 (European standard).
Div. 2 Area in which normally less dangerous, potentially explosive gaseous atmospheres form during the normal operation of a device. Div 2 (US standard) corresponds to Zone 2 (European standard).
EEPROM Electrically Erasable Programmable Read Only Memory EEPROMs are often used where individual bytes of data (e.g. configuration data or runtime meters) change over time and must be stored safely in the event of a mains power failure.
Electro Magnetic Compatibility Definition as per the EMC law: EMC is the capability of a device to operate satisfactorily in an electromagnetic environment without itself emitting electromagnetic signals which interfere with other devices in that environment.
Endian Date is sometimes saved in a different order in certain computer architectures. Intel-based computers, for example, save the data differently from the Siemens controllers (S7), namely, in reverse sequence. The byte sequence from Intel, termed Little Endian, is therefore the reverse S7 byte sequence, Big Endian. The following applies to these two forms: ● Little Endian: The most significant byte is located at the right-hand end of a word. ● Big Endian: The most significant byte is located at the left-hand end of a word.
Ethernet This is a specific type of local network that works according to a standard defined by Intel, DEC and Xerox.

Glossary
SITRANS SL Operating Instructions, 12/2010, A5E01132948-04 211
FBD A Function Block Diagram is a graphic representation of control functions. Each control task (function) has a corresponding symbol.
FM, Factory Mutual FM Global is a U.S.-based insurance company, with offices worldwide, that specializes in loss prevention services primarily to large corporations throughout the world in the Highly Protected Risk (HPR) property insurance market sector. "FM Global" is the communicative name of the company, whereas the legal name is "Factory Mutual Insurance Company". The company offers general and specialized risk management, materials research and testing and certifications in the fire security and explosion protection fields.
Interface, multi-point MPI is the programming interface of SIMATIC S7/M7. Allows remote access to programmable modules, text-based displays and OPs from central locations. The MPI nodes can intercommunicate.
LAD Ladder Diagram -> Graphic representation of controller functions based on a circuit diagram from protection technology. The current paths, however, are not arranged horizontally in relation to one another and the symbols deviate.
Modbus The Modbus protocol is a communications protocol based on a master/slave or client/server architecture. The Modbus protocol was defined by Modicon in 1979 for communication with its programmable controllers. Modbus is a de facto standard in industry, since it is an open protocol. Modbus is used to connect a master (e.g. a PC) and several slaves (e.g. measuring and control systems). There are two versions of Modbus: one for the serial interface and one for Ethernet.
MSB MSB is the byte (or octet) in that position of a multi-byte number which has the greatest potential value.

Glossary
SITRANS SL 212 Operating Instructions, 12/2010, A5E01132948-04
PC card Trademark of the Personal Computer Memory Card International Association (PCMCIA). Designation for auxiliary cards that conform with PCMCIA specifications. A PC card that has roughly the size of a credit card can be plugged into a PCMCIA slot. Version 1 specifies cards of Type I with a thickness of 3.3 millimeters, which are designed mainly for use as external memory. Version 2 of the PCMCIA specification also defines cards of Type II with a thickness of 5 mm and cards of Type III with a thickness of 10.5 mm. Type II cards can realize devices such as modems, fax cards and network interface cards. Type III cards are equipped with devices that require more space, for example wireless communication modules, or rotary storage media such as hard disk drives, for example.
PCMCIA Association consisting of approx. 450 member companies of the computer industry whose focus is set on providing worldwide standards for miniaturization and flexible use of PC expansion cards in order to provide basic technologies to the market.
PROFIBUS Process Field Bus-> International fieldbus standard to EN 50170/IEC 61158
PROFIBUS DP PROFIBUS-DP (distributed peripheral I/O) is used for controlling sensors and actuators using a central controller in production engineering. It is also used in connection with "distributed intelligence", i.e. connecting multiple controllers to form a network. It provides data transmission up to 12 Mbps on twisted-pair cables and data transmission over sliding contacts for mobile subscribers in exceptional cases or optical data transmission in unobstructed space.
PROFIBUS/MPI Process Field Bus (standard bus system for process applications)
RS 232 A recognized industrial standard for serial data transmission, and applies to cable lengths up to 15 m. Differential evaluation is not possible with RS 232. The sending and receiving of data take place on different lines.
RS 485 RS 485 is an interface standard for line-based, differential, serial data transmission. RS 485 uses a pair of cables in order to transmit one inverted version and one non-inverted version of the data signal. The original data signal is reconstructed at the receiver from the difference between these two signals. It is then possible to use significantly longer transmission links and higher speeds than with RS 232. Furthermore, several transmitters and several receivers can be connected to one pair of conductors.
Glossary
SITRANS SL Operating Instructions, 12/2010, A5E01132948-04 213
STEP 7 STEP 7 is programming software for the S7-300 and S7-400 controller families
STL Statement list -> User program in which control functions are listed in the form of statements.
Termination The termination (lat. terminare for "end") used in telecommunications technology describes the completion of a signal path. The termination results in minimization of signal reflections which could otherwise lead to interferences. The termination is normally used at the physical end of a signal path.
Zone 0 Area in which dangerous, potentially explosive gaseous atmospheres can form frequently, constantly or over long time periods during the normal operation of a device.
Zone 1 Area in which a dangerous, potentially explosive gaseous atmosphere occasionally forms during the normal operation of a device.
Zone 2 Area in which a dangerous, potentially explosive gaseous atmosphere usually doesn't form, or only for a short time period, during the normal operation of a device.

Glossary
SITRANS SL 214 Operating Instructions, 12/2010, A5E01132948-04