import msword 2007 document to madcap flare ·...
TRANSCRIPT

MadCap Flare Version 9Importing an MSWord 2007 Document
TECHCOMM PROCEDURESample Flare Project by Laura Protano

Copyright
©2014 Company Incorporated.
All Rights Reserved. The copyright and trade secret laws of the United States and other countries protect thismaterial. No part of this material or software covered by the copyrights herein may be reproduceddistributed or altered in any fashion without prior written consent of Company Incorporated. Content issubject to change without notice. For permission to reproduce or distribute this material please contactCompany Incorporated.
Trademarks
Company Incorporated is a trademark of Company Incorporated.
Microsoft Windows is a registered trademark ofMicrosoft Corporation.
All other trademarks and trade names are the property of their respective companies.
Last Revised: 6/26/2014
Contact Information
Company IncorporatedCorporate Headquarters123Main StreetTown, ST 00000Tel: 111-111-1111Fax: 111-111-1111www.lauraprotano.com

2ContentsAbout this Procedure 1
1 Prepare the Word Document for Import 3
2 Create the Flare Project 9
3 Import the Word Document to the Flare Project 15
4 Organize Topics by Chapter 23
5 Set Up the Project TOC 25
6 Clean Up the Imported Content 31
Delete Empty Tags 31Format Imported Tables 31Format Imported Lists 33Format Imported Images 34Format Imported Notes 35Fix Imported Text Cross-References 35Apply New Styles 36
7 Set Up the PDF Output 37
8 Set Up the HTML5 Output 39
Writing Sample © 2014 Laura Protano iii

iv Writing Sample © 2014 Laura Protano
Contents MadCap Flare

About this ProcedureThis procedure describes the steps to import a Microsoft®Word 2007 document into a MadCapFlare™ version 9 project. These steps assume that you have already created a global Flare projectthat contains a stylesheet, page layouts, a master page, an HTML5 skin file, common topic files (forexample, cover page and home page designs), as well as the required snippets, variables, andcondition tags.
To import a Word 2007 document to a Flare project, complete the following tasks:
n "Prepare theWord Document for Import" on page 3
n "Create the Flare Project" on page 9
n "Import theWord Document to the Flare Project" on page 15
n "Organize Topics by Chapter" on page 23
n "Set Up the Project TOC" on page 25
n "Clean Up the Imported Content" on page 31
n "Set Up the PDF Output" on page 37
n "Set Up the HTML5Output" on page 39
Writing Sample © 2014 Laura Protano 1

2 Writing Sample © 2014 Laura Protano
About this Procedure MadCap Flare

11Prepare the Word Document for ImportBefore you import a Word Document to a Flare project, you will apply several formatting changes totheWord document. This will reduce the amount ofmanual corrections needed in the Flare projectafter the import. Make theWord changes in a copy of the original document to ensure that theoriginalWord document remains intact and available for comparison with the completed Flareproject.
To prepare aWord 2007 document (*.docx) for import into a Flare project:
1. Make a copy of the originalWord document.
2. Open the copy of theWord document.
Note After theWord import to Flare, you will delete the imported cover page,copyright page, and table of contents (TOC) topics. Therefore, you do notneed to complete any prep work in those sections of theWord documentexcept for updating the TOC after you complete all other prep steps. (Flarecreates its project TOC based on theWord TOC.)
3. Attach the latest TechCommWord template (long version: TechComm_LongDocs_<date>.dotx),and select the Automatically Update Document Styles check box. You can do this from theDeveloper ribbon (if open), or fromWord Options > Add-ins > Manage: Templates.
4. Check if the document uses consistent heading and paragraph styles throughout thedocument. It's OK if the document uses old paragraph styles; we'll convert them to new stylesduring the import. However, you want to be sure that all headings and paragraphs don't use thesame paragraph style (e.g., Normal) with inline formatting applied to generate the desired look.If that is the case, apply paragraph styles to headings and body text as needed before startingthe preparation process.
5. For all heading styles in use in theWord document, including appendix headings, turn off auto-numbering. To do so:
a. Open the Styles window from the Home ribbon.
b. Right-click a heading style, and selectModify.
c. Click the Format button, and select Numbering.
The Numbering and Bullets window opens. By default, None is selected.
Writing Sample © 2014 Laura Protano 3

d. Click OK to clear the numbering for the heading styles.
e. Repeat for all heading styles in use in the document.
6. If any headings appear in all capital letters, change them to initial caps only. From the Homeribbon, Font group, click the Change Case tool and then select Capitalize Each Word. (Tip! Aneasy way to tell if any headings appear in all caps is to review the TOC.)
7. Do the following to prepare images in theWord document:
n Save a copy of inserted Visio objects.
If a Visio diagram is inserted as an object in theWord document, save a copy of the imageas a Visio file (*.VSD) so that you can edit the source file later. To do so, right-click theimage, select Visio Object >Open. Then, with Visio open, select Filemenu > Save Copy As,and save the Visio file to a local folder. (UnlikeWord, Flare does not let you insert a Visioobject into a topic.) During the Import, Flare automatically converts a Visio object to a PNGfile and inserts the PNG file into the topic. When you save your Flare project in sourcecontrol, also save a copy of the Visio files.
n Remove text boxes.
If an image is inserted within a text box, copy the image to a separate paragraph (e.g.,paragraph styleGraphic Centered or Graphic Left-Aligned), and then delete the text box.This avoids problems when working in Word's Outline view later in this process.
8. Do the following to prepare lists (numbered and bulleted) in theWord document:
n Single Level Lists
a. Apply theNormal paragraph style to the list (including images in the list). This removesall numbers and bullets.
b. UseWord’s Numbering or Bullets tool to reapply the numbers or bullets. This changesthe style to List Paragraph.
During the import to Flare, DO NOTmap Word's List Paragraph paragraph style to a Flarestyle. These lists will import as a single list, but you will need to tweak the list to get thecorrect bullet style and indentation.
n Multi-Level Lists
There are two ways to preparemulti-level lists; both methods require that you have anoriginal copy of theWord document so that you can recreate the nested levels.
Method 1, Set List Sublevels in Word Document
a. Apply theNormal paragraph style to the list (including images in the list). This removesall numbers and bullets.
b. UseWord’s Numbering or Bullets tool to reapply the numbers or bullets. This changesthe style to List Paragraph.
c. UseWord’s Increase Indent tool to indent the levels of numbers or bullets as needed.
4 Writing Sample © 2014 Laura Protano
1 Prepare the Word Document for Import MadCap Flare
During the import, DO NOTmap Word's List Paragraph paragraph style to a Flare style. Afterthe import, the indented levels will appear as separate lists within the original list (forexample, items 1 to 3, then 1-10 (the nested items), then 4-5 (continuation of the original list).Use Flare’s Merge with Previous List tool to link the indented level to the previous list, andthen use Flare’s indent tool to indent the sublevel. This method lets you more easily seewhere the indented levels appear in Flare than the next method.
n Method 2, Set List Sublevels in Flare
Apply the Normal style to the list (including images in the list); this removes all numbers andbullets. Then, useWord’s bullet/number tool to reapply the numbers/bullets. This changesthe style to “List Paragraph.”
a. Apply theNormal paragraph style to the list (including images in the list). This removesall numbers and bullets.
b. UseWord’s Numbering or Bullets tool to reapply the numbers or bullets. This changesthe style to List Paragraph.
During the import, DO NOTmap Word's List Paragraph paragraph style to a Flare style. Afterthe import, a single list appears with no indication of where to indent the sublevels. UseFlare's Indent Items tool to manually adjust list levels. Use a copy of the originalWorddocument to determine where the list levels need to be adjusted.
9. UseWord's Outline View (View ribbon, Document Views group, Outline tool) to complete thefollowing steps:
Notes If theWord document contains images placed within text boxes, they appearas blank paragraph marks in Outline View and could inadvertently get deleted.Before you complete the steps in this section, remove the text boxes asdescribed earlier in this process.
Make sureWord's Show/Hide Paragraph mark tool (Home ribbon, Paragraphgroup) is set to show the paragraph marks.
a. Use Outline View to remove empty paragraphs and hard page breaks from theWorddocument.
If you don't remove empty paragraphs, you'll have to delete them from the Flaredocument after the import. In Flare, spacing between paragraphs is controlled by Flarestyles; typically, no empty paragraphs are needed.. If you don't remove hard page breaks,topics will split badly during the import. (Outline View shows hard page breaks only; it doesnot show page breaks applied via Paragraph properties. You do not need to remove thelatter type of page break.)
b. If the document contains text with manual character formatting applied (for example, bold,italic, color), apply Word character styles to that text. During the Flare import, manualcharacter formatting is not retained. However, if you have applied Word character styles,you can map them to Flare span styles during the import in order to retain the formatting.
MadCap Flare 1 Prepare the Word Document for Import
Writing Sample © 2014 Laura Protano 5

Tip: In word, use the F4 key (repeat) when possible to save timewhen applying characterstyles.
Caution: Apply character styles that reflects the text's function (e.g., UI element), ratherthan trying to retain the existing manual formatting. This helps to ensure that the characterstyles match our current standards.
c. If theWord document contains a cross-references that has been entered manually ratherthan using theWord cross-reference tool, do the following to apply character formatting totext; after the import, this will provide a visual queue as to where a Flare cross-referenceshould be inserted:
i. Select the cross reference sentence in Word and clear all formatting (Ctrl+Spacebar) orClear All in the Style menu.
ii. Edit the text to remove references to chapter, guide, or "earlier/later in thedocument." For example, change the sentence "See the Module Overview chapter inthis guide for details on searching for letter triggers." to "See Module Overview fordetails on searching for letter triggers."
iii. Select only the name of the topic or chapter and apply the ImportReference style.
d. Apply theNote paragraph style to obvious notes so that you can map this style to the Flarep.note class during the import.
10. Update theWord document's headings to be semantically correct for conversion to HTML. Donot skip any heading levels, and any text that is used as a heading should have a headingparagraph style applied. TheWord chapter headings should be one of the Level 1 styles (e.g.,Heading 1, Heading 1 No Num), and subsequent heading levels should be used in sequencewithout skipping any levels. For example, if all your chapters start with "Heading 2", change thisto "Heading 1", and then adjust subsequent heading levels as needed. If you use bold body textas a pseudo-heading, change the style to a heading 3 or 4 to import the text as a heading.
Note It can be helpful to complete this step in Outline View, since that view showsany special formatting applied to text (e.g., red/bold) so you can easily identifytext formatted as a heading and verify that a heading style is applied.
11. Optionally, find and delete outdated index hits. From the Find dialog box, clickMore >>, thenclick Special, and select Field from the Special menu. Although index hits do get imported toFlare, don't import them if they are outdated. Alternatively, you can delete the imported indexentries from the Flare topics after the import.
6 Writing Sample © 2014 Laura Protano
1 Prepare the Word Document for Import MadCap Flare

12. Last Prep Step: Update the TOC in theWord document. Either click the Update Table link at thebeginning of the Table of Contents (see figure below), or select the entire document and updateall fields (Ctrl+A, then F9).
When you receive a prompt asking whether you want to update just the TOC page numberingor the entire TOC, select the option to update the entire TOC. It's important to complete thisstep after all other preparation is complete to ensure that the resulting Flare TOC entries will notcontain numbers or text that you'll need to edit, and to ensure that the hierarchy of the FlareTOC will bemore accurate.
Review the TOC to make sure there are no numbers in headings. This can happen if the headingstyle has a hidden number assigned. In that case, adjust the heading style or local formatting tomake sure that the numbering is removed from the heading style, and then repeat this step.
MadCap Flare 1 Prepare the Word Document for Import
Writing Sample © 2014 Laura Protano 7

8 Writing Sample © 2014 Laura Protano
1 Prepare the Word Document for Import MadCap Flare

22Create the Flare ProjectTo create a new Flare project based on the department's global Flare project, do the following:
1. Using SharePoint's Explorer View, copy the global project from SharePoint to a new emptyfolder where you will store the new project.
Note In order to use Explorer View to copy over Flare project files or folders alreadyposted to SharePoint , you must first check out the files. Since some Flarefolders (e.g., Content) can contain hundreds of files, it's best to useSharePoint'sManage Content and Structure tool (from the Site Actionsmenu) to check out the entire folder, and then check it back in again after youhave copied the updated files to the folder.)
2. Rename the project file (*.flprj file) to reflect your new project.
3. Double-click the project file to open it in Flare.
4. Optional. If not already configured, use Flare's SharePoint Explorer tool to point to the locationof the global project on SharePoint. This lets you keep your project synchronized with theteam's shared styles and other content.
Note This location is already configured in the global project so it should appear inyour project by default when you open SharePoint Explorer. This step isprovided for reference, but you can typically skip this step.
a. On the Flare Project ribbon, click SharePoint Explorer. SharePoint Explorer opens in theleft-side of the application window.
b. In the SharePoint Explorer pane, click the Connect to SharePoint Server tool. TheConnect to SharePoint Server dialog box opens.
c. Enter the URL of the department's GlobalProject folder on SharePoint, and then click theblue check mark button to connect to the server.
The dialog box shows a success message after Flare verifies that it can reach the server.
d. Click OK.
Writing Sample © 2014 Laura Protano 9

SharePoint Explorer shows the newly mapped location:
5. The global project that you use to create a new project is configured with mappings that allowyou to synchronize new projects with the global project. This is useful when wemake changesto files shared across projects such as our logo or style sheet. To view thesemappings, selectProject ribbon >Manage Mappings.
The following figure shows how theMap Files and Folders window should look for a TechCommFlare project:
Optionally. If your project does not have the correct mappings to the global project, completethe following steps to set thosemappings:
a. In SharePoint Explorer, navigate to the target folder or file (see table below), copy it to yourproject, and then select to synchronize it with your project. You can synchronize withentire folders or individual files in the Content folder (for example, all file in the TableStylesfolder), and you can synchronize with individual files only in the Project folder (for example,a condition tag file).
Folder or File toSynchronize
Location
In the project's CONTENT folder:
Global_Images folder Content > Resources > Images > Global Images
Global_Master_Page.flmsp and Startup_
Content > Resources >MasterPages > Global_Master_Page.flmsp
10 Writing Sample © 2014 Laura Protano
2 Create the Flare Project MadCap Flare

Folder or File toSynchronize
Location
Page.flmspMaster Pagefile
PageLayouts folder Content > Resources > PageLayouts
Snippets folder Content > Resources > Snippets
*Note that if you add project-specific snippets, ...(check what happens).
TechComm CSS.cssStylesheet file
Content > Resources > Stylesheets > TechCommCSS.css
TableStyles folder Content > Resources > TableStyles
Topic Templates folder Content > Topic Templates
In the project's PROJECT folder:
Default.flcts ConditionalText file
Project > ConditionTagSets > Default.flcts
Global_Variables.flvarVariables file
Project > VariableSets > Global_Variables.flvar
b. Right-click the folder or file name, and select Copy to Project.
n If copying a folder, the Select Folder dialog box opens.
MadCap Flare 2 Create the Flare Project
Writing Sample © 2014 Laura Protano 11
Select the folder in your project where you want to copy the contents of the specifiedfolder and then click OK. Always select the folder one level above where the folder islocated. For example, when you copy theGlobal_Images folder, select the Images folderbecause that contains theGlobal_Images folder.
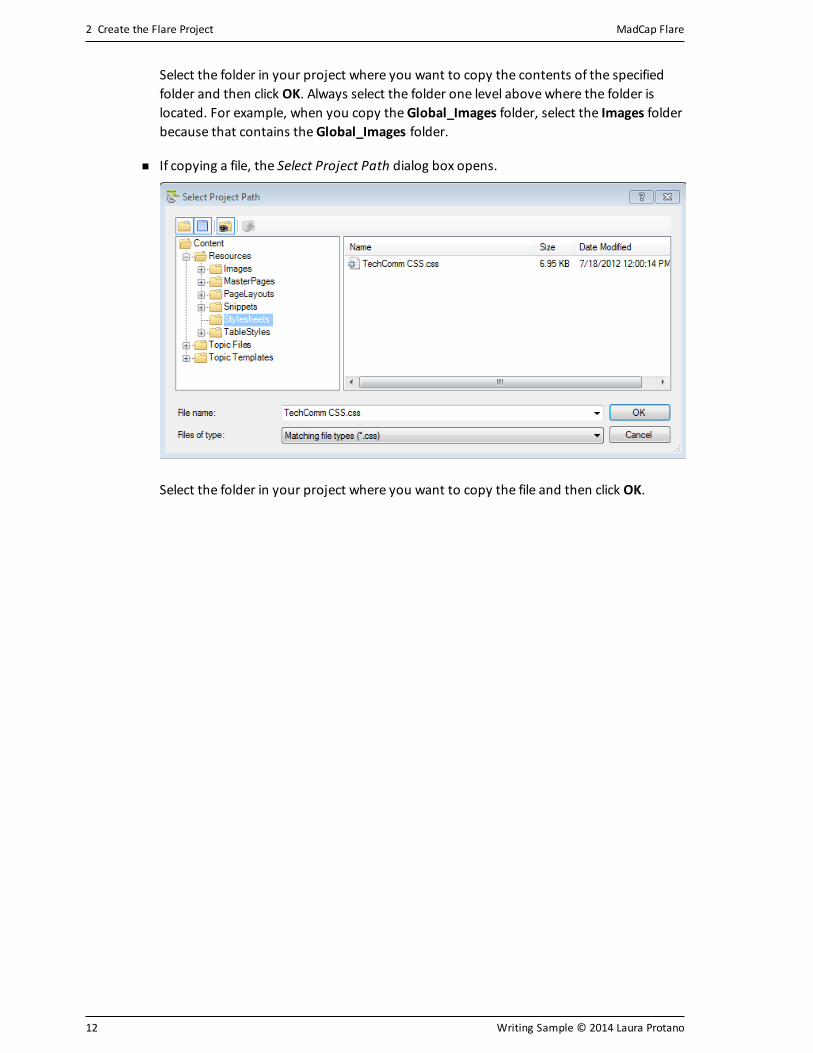
n If copying a file, the Select Project Path dialog box opens.
Select the folder in your project where you want to copy the file and then click OK.
12 Writing Sample © 2014 Laura Protano
2 Create the Flare Project MadCap Flare

Because your project already contains all of these global project components, a ConfirmReplace dialog box opens:
c. Select theDo this for all conflicts check box, and then click Replace.
The Copy to Project dialog box shows a list of the files to be copied to your project.
d. Select the Keep file(s) synchronized (created mapping) check box, and then click OK.
MadCap Flare 2 Create the Flare Project
Writing Sample © 2014 Laura Protano 13

6. Using Content Explorer, delete the following folders:
n Content > Topic Files > 1 Chap
n Content > Topic Files > 2 Chap
n Content > Topic Files > A Appendix
n Content > Topic Files > B Appendix
n Content > Topic Files > Glossary Example
n Content > Topic Files > DELETE Revision Table
When you delete the preceding folders, Flare searches for components linked to the files. A LinkUpdatewindow opens. Click Remove Links to remove the links to the folders and files you aredeleting.
Notes Do not delete the PrintOnly_Topics folder or the HelpOnly_Topics folder;these contain files that you will use for the print and Help output.
To use any of the topic folders or files from the global project in the future,you can browse to the location of the global project on SharePoint and selectthat folder or file. For example, if you want to use the sample glossary file.
7. From the Project Organizer, delete the sample Table of Contents files: Global TOC.fltoc andWord TOC.fltoc (Project Organizer > TOCs).
When you delete the TOC files, Flare searches for components linked to the files. A Link Updatewindow opens. Click Remove Links to remove the links to the TOC files you are deleting.
8. Enter the Project Variables. In Project Organizer, open the Project Variables file (Variables >Project_Variables) and enter values for this project. These values appear on the Cover Page andother places. Close the variables file when complete.
9. Click the Save All tool on the Quick Access toolbar to save the project.
10. If you haven't already done so, set up a SharePoint Alert for the global project folder. This wayyou'll knowwhen files change, and you can choose to synchronize your project files with theglobal project (Project ribbon > Synchronize Files tool). While in SharePoint Date View (thedefault view), float the cursor over the GlobalProject folder, and then click the down arrow toselect Alert Me. Click OK to use the default Alert settings, or modify the settings first so that youonly receive alerts once a day (recommended) or once a week. SharePoint sends you an emailalert when there is a change to the global project (new file, changed file, deleted file). SeeAppendix C for more information about synchronizing projects with the global project.
ALERT! When you synchronize your project with the global project, never copy filesfrom your project to the global project. Only copy files from the global projectto your project. For more information, see Appendix C.
14 Writing Sample © 2014 Laura Protano
2 Create the Flare Project MadCap Flare

33Import the Word Document to the Flare ProjectTo import the prepared MSWord document into the new Flare project:
1. Open the project file in Flare.
2. On the Project ribbon, click the down arrow under the Import tool (left side of ribbon), and thenselectMS Word Documents.
Writing Sample © 2014 Laura Protano 15

The Import Wizard opens. Under Import Options, notice that Import into this project isselected.
3. To use the import wizard, complete the following steps:
a. Click Next. The Select MS Word Documents to import page opens.
b. Clear the Link Generated Files to Source Files check box, click Add Files, browse to find themodified copy of theMSWord document that you will import, and then click Open.
16 Writing Sample © 2014 Laura Protano
3 Import the Word Document to the Flare Project MadCap Flare

The Select MS Word Documents to import page shows the selected file in theMS WordFiles list.
c. Click Next. Flare scans the source document to collect a list of styles.
d. When Flare finishes collecting styles, theNew Topic Styles page opens.
e. To generate new Flare topic files (that is, *.htm files) based on your heading styles, selectthose heading styles. For most import project, select Headings 1 through 3.
Note If your project contains heading 4 topics with lengthy content, you mightdecide to create separate topic files for each of your heading 4 topics. Inthat case, you should also select Heading 4 in this step. If the heading 4topics are short and you want to keep them contained within the parentHeading 3 topic file, then be sure to edit the topic file later and change theh4 heading style to h4.withinH3. For Help output, this style gives theHeading 4 a distinct appearance from the Heading 3 in the same Helptopic.
Most of our Word TOCs are designed to show 3 levels of headings only.As a result, the Flare TOC created by the import will NOT include Heading
MadCap Flare 3 Import the Word Document to the Flare Project
Writing Sample © 2014 Laura Protano 17

4 topic files. You'll need to manually add them.
f. Click Next. TheOptions page opens.
g. Change the value of the Approximate Filename Length from 24 to 35, and then click Next.The Stylesheet page opens.
18 Writing Sample © 2014 Laura Protano
3 Import the Word Document to the Flare Project MadCap Flare

h. Click Stylesheet to select the TechComm CSS.css file located here in the new project:\Project\Content\Resources\Stylesheets.
i. Under Source Styles, select Don't Preserve MS Word Styles.
j. Click Next. The Paragraph Style Mapping page opens.
k. Map theMSWord paragraph styles to Flare CSS styles. The styles mappings fromWord toFlare/CSS are located in the department's Team Docs folder on SharePoint.
l. Click Next. The Character Style Mapping page opens
MadCap Flare 3 Import the Word Document to the Flare Project
Writing Sample © 2014 Laura Protano 19

m. Map theMSWord character styles to Flare CSS styles (span.<class>) as described in theImport Mapping document.
n. Click Finish. Flare shows the import progress.
When Flare completes the import process, the Accept Imported Documents dialog box opens.
4. Click Accept.
20 Writing Sample © 2014 Laura Protano
3 Import the Word Document to the Flare Project MadCap Flare

The import process adds the following files to your project:
n Topic files. In Content Explorer, Flare adds a new folder with the same name as the importedMSWord Document. The new topic files are located in that folder.
n TOC file. See Project Organizer > TOCs.
n Import file. See Project Organizer > Import.
n Master Page. See Content > Resources >Master Pages.
n A copy of the TechComm CSS.css stylesheet file named TechComm CSS1.css. See ContentExplorer > Resources > Stylesheets.
5. From Content Explorer, delete the following:
n The TechComm CSS1.css file (not TechComm CSS.css) created by the import process(Content > Resources > Stylesheets). During the deletion, you will be prompted to break thelinks. Click Remove Links.
n The <Imported_DocumentName.flmsp> Master Page file created by the import process(Content > Resources >MasterPages). Do not delete the global master page file.
6. If the project includes Visio source files, copy them to a Visio Source Files folder in the Projectfolder at the same level as the *.flprj file; do not place this folder in the Contents folder; if youdo, it might inadvertently get included in the Help output files.
MadCap Flare 3 Import the Word Document to the Flare Project
Writing Sample © 2014 Laura Protano 21

22 Writing Sample © 2014 Laura Protano
3 Import the Word Document to the Flare Project MadCap Flare

44Organize Topics by ChapterTo organize imported topics by chapter::
1. With the Flare project file open, open Content Explorer in the left pane.
2. The imported topic files are located in a folder that has the same name as the importedMSWord document (for example, "EDI Module UG").
3. Click the Show Files tool ( ). Content Explorer expands to show files for the selected folder inthe right pane.
Writing Sample © 2014 Laura Protano 23

4. In the Topic Files folder, create a folder for each chapter in your document. Refer to either theoriginalWord document or the imported TOC file to see a list of chapter names and the topicsincluded in each chapter.
5. Do the following to move the topic files to the appropriate chapter folder:
a. Click the folder that contains the imported topic files so that you can view all files.
b. Select one or more files that you want to move.
c. Drag the files to the appropriate chapter folder under Topic Files. When you do this, Flarecompiles a list of links that it needs to update and shows this list in a dialog box. ClickUpdate Links.
Notes You might need to rename some topic files for clarity. For example, ifthere are two topics with the same name in theWord document, they willnames like Introduction.htm and Introduction1.htm in the Flare project.If you rename topic files, be sure to adjust the name of the heading withinthe topic, and the Topic Title (part of the topic file's properties) if needed.
If you don't see a topic file for an entry in the TOC, right-click the TOCentry and select Properties in order to see which topic file the entry islinked to. Rename the topic file for clarity if needed.
When performing memory-intensive tasks (for example, moving 20 filesto a new folder), Flare can sometimes show an erroneous "NotResponding" message at the top of the application window. Wait forseveral minutes before using Task Manager to end the job, because Flareusually recovers on its own.
6. If there were any hard page breaks left in the import document, you could end up with topicfiles that contain only part of a topic. Copy and paste content as needed to move a topic'scontent into the appropriate topic file.
7. The import process creates topics for the imported Cover Page and Copyright Page with topicfile names like EDI Module UG.htm, EDI Module UG1.htm. You can delete these because wewillcreate a new cover page topic and contents topic based on topic files from the global project.Before you delete the topic files that contain the imported Word cover page and TOC, checkwhether the files contain any topic content and, if yes, move that content to the appropriatefile.
8. Apply conditions to folders and files. For example, if you imported a chapter of test casescenarios that you want to appear in the PDF output, but not the HTML5 output, right-click thefolder in Content Explorer, and select Properties. On the Conditional Text tab, select thePrintOnly check box. (The default HTML5 target is already configured to exclude content markedas PrintOnly.)
9. Delete the empty folder that previously contained the imported topic files.
24 Writing Sample © 2014 Laura Protano
4 Organize Topics by Chapter MadCap Flare

55Set Up the Project TOC
Note The print TOC structure is generated based on the TOC proxy (part of theContents.htm file) and not based on the TOC file. However, the Help Contentsstructure is based on the TOC file. The TOC file does contain many settings thatimpact the print output, such as chapter and page numbers.
To set up the project TOC for an imported MSWord document:
1. In Project Explorer, open the default TOC created by the import process.
2. Adjust long TOC entry names so that they are not too long to appear in the Help TOC. (The TOCentry name can be different from the topic title and heading.)
Also, modify duplicate TOC entry names to make them unique (for example, add the name ofthe parent topic in parenthesis after the topic name). For duplicate TOC entry names, alsochange the *.htm file name, and the heading within the topic for easier maintenance. Forexample, if theWord document has two topics named "Search," the import creates two topicfiles: Search.htm and Search1.htm. The TOC entries for both those topics will read "Search", andthe first heading in each topic will be "Search."
3. During the import, if you selected to create new topic files for Heading 4 topics, then you'll needto manually add those topics to the Flare TOC (by default, the Flare TOC includes only samenumber of heading levels as theWord TOC). To complete this step, open Content Explorer, anddrag to the Heading 4 topics to the correct location in the Flare TOC.
4. Open Content Explorer in the left pane.
5. Open Content > Topic Files > PrintOnly_Topics, and drag the Cover Page.htm andContents.htm files to the beginning of the TOC, in that sequence.
Writing Sample © 2014 Laura Protano 25

In the TOC, change the default name of the cover page from "Copyright" (the name of the firstheading in that topic) to "Cover Page" for clarity.
6. Do the following to set up the Cover Page for print output (this had the conditional PrintOnlysetting by default):
a. In the TOC file, right-click the Cover Page and Copyright Page entry, and select Open Link.
b. If your project includes a subtitle, select the correct tag and class for the subtitle based onyour product line. The subtitle color varies by product line. Select one of the following:
n p.subtitle_generic
n p.subtitle_core
n p.subtitle_govt
n p.subtitle_sales
n p.subtitle_mm
c. Save and close the Cover page topic file.
26 Writing Sample © 2014 Laura Protano
5 Set Up the Project TOC MadCap Flare

d. In the TOC file, right-click the Cover Page and Copyright Page entry, and select Properties.This opens the TOC properties for the Cover Page TOC entry.
e. Set the following values on the Printed Output tab: Break Type: Page Layout Break, PageLayout: Cover, Page Type: First Right. Click OK.
Note For release notes or other technical documents that should not show theblue arrow graphic at the bottom of the cover page, set the Page Type to"Normal" instead of "First Right".
7. Do the following to set up the Contents page for print output:
a. In the TOC file, right-click the Contents entry, and select Properties. This opens the TOCproperties for the Contents TOC entry.
b. Set the following values on the Printed Output tab: Break Type: Chapter Break, PageLayout: TOC, Page Type: First Right, Page Number: Reset to 3, Format: roman. Click OK.
MadCap Flare 5 Set Up the Project TOC
Writing Sample © 2014 Laura Protano 27

8. For each chapter and appendix in the TOC, set the TOC properties as follows:
a. Right-click the TOC entry, and then select Properties. The Properties dialog box opens.
b. Set the following values on the Printed Output tab: Break Type: Chapter Break, PageLayout: Chapter, Page Type: First Right.
n For Chapter 1, also enter these values: Page Number: Reset to 1, Format: decimal.
n For Appendices, also enter these values: Page Number: Reset to {chapnum} — {n},Format: text.
Note The appendix page numbering format shown above is not supportedin Word output. UseWord output, use a separate TOC, and set theappendix page numbering to continue in decimal format from theprevious chapter.
c. Click Auto-numbers to open that tab.
d. For Chapter 1, under Chapter Number, select Reset to: 1 and Format: decimal.
28 Writing Sample © 2014 Laura Protano
5 Set Up the Project TOC MadCap Flare

e. For subsequent chapters, under Chapter Numbers, verify that Increment number isselected.
f. For Appendix A, under Chapter Number, select Reset to: 1 and Format: alpha.
g. For subsequent appendixes, under Chapter Numbers, verify that Increment number isselected.
h. Click OK.
9. If your project requires a revision history table, do the following:
a. Using Content Explorer, open the topic template NewTopic_RevisionHistory.htm (Content >Topic Templates), select File > Save As, and save the file to your Content > Topic Files >PrintOnly_Topics folder.
b. Enter revision information in the table in the new topic file, and then save changes.
c. Add the revision history topic file to your TOC as the last item in the TOC. Position the newentry at the same level as a chapter or appendix.
d. Right-click the TOC entry for the revision history table, select Properties, and then set thefollowing values on the Printed Output tab: Break Type: Chapter Break, Page Layout:Chapter_NoHeaderNums, Page Type: First Right, Page Number: Reset to RH— {n},Format: text.
10. Save changes to the TOC file.
11. Modify the Project Properties to point to your TOC. To do so, select Project ribbon > ProjectProperties. The Project Properties dialog box opens. On theGeneral tab, enter your TOC as theMaster TOC.
MadCap Flare 5 Set Up the Project TOC
Writing Sample © 2014 Laura Protano 29

30 Writing Sample © 2014 Laura Protano
5 Set Up the Project TOC MadCap Flare

66Clean Up the Imported ContentFrom the project's TOC file, open each book and topic, review the content, and fix the followingissues if applicable:
Delete Empty Tags 31
Format Imported Tables 31
Format Imported Lists 33
Format Imported Images 34
Format Imported Notes 35
Fix Imported Text Cross-References 35
Apply New Styles 36
Delete Empty TagsDelete empty tags, and occurrences of <p></p> that appear highlighted in yellowwithin the text(these result from hard page breaks in the sourceWord document).
Format Imported TablesDo the following to apply formatting to each imported table:
1. Select the Table element in the Blocks section of the editor.
2. Right-click and select Table Properties.
Writing Sample © 2014 Laura Protano 31

The Table Properties dialog box opens.
By default, an imported table has 0 header rows.
3. ChangeNumber of header rows from 0 to 1.
4. Under AutoFit Behavior, select Auto Fit to Window, and enter 95% (wide table) or 60%(narrow table). In lists that include both wide images and wide tables, enter a table width of100% for best left-alignment.
5. Under Align, select (default).
6. Under Table Style, select either Regular table (not alternating row color), or AltRowTable (for atable with alternating row colors). Do not select a style class.
7. Click OK.
8. Copy your header row content to the header row, and then delete the empty row. (You can alsodrag the tr block to the thead block and delete the empty tr row.)
By default, themapping process should set all table content to the p tag style, and then thetable style sets the format for the header row and other content. If an imported table contains alist (bullets or number), see "Format Imported Tables", next.
32 Writing Sample © 2014 Laura Protano
6 Clean Up the Imported Content MadCap Flare

Format Imported ListsThere are steps you can take during preparation of the import document to greatly reduce theamount of list reformatting required after an import. See "Prepare theWord Document for Import"on page 3.
If the sourceWord document included a list with a paragraph style other than List Paragraph, thenFlare imports each item in the list as a single list item (li tag) within its own list tag (ul or ol tag), ratherthan grouping related list items in a single list. This needs to be fixed so that all list items in the samelist are within a single ul or ol tag. The import process does not retain special formatting applied to"continue" list items (i.e., to hide the bullet or number), or a "last" list items (extra space below theitem). Those styles need to be re-applied. The import process does not format nested list itemscorrectly, those also need to be fixed.
Note When fixing a nested table, it helps to have theMSWord source document openduring this step so that you can see the formatting of the original list.
If there are images within an imported list, the image also needs to be formatted correctly.
Do the following to fix formatting for an imported list:
1. Select each ol or ul tag in the Blocks section of the editor, right-click, and select Unbind.
This changes each item in the list to a p tag.
2. Select all the p tags to include in the list, and then select Home ribbon> Bullet List tool. Thedefault list type is square bullets as configured in our style sheet. For a numbered list, click thedrop-down and change the selection to Numbered List.
3. For a nested list within the list, select the nested items in the editor, and then click the IndentItems tool (Paragraph pane of theHome ribbon). If the nested list is of the same type (i.e.,numbered or bulleted) as the parent list, then this step is complete. If the nested list is adifferent type (for example, bullets under a numbered item), then select Numbered List orBullet List from the Bullet List tool.
4. For a continued item (that is, a list item with no bullet or number) or an image within a list ,select the li tag within the Blocks section of the editor, then select the li.continue orli.continueLast style (Home ribbon > Styles pane).
Note If you apply a continue style within a numbered list (ol), then you need toadjust numbering for subsequent li items. To adjust numbering, position thecursor in the paragraph, and then select Set Item Number from the ListActions tool (Paragraph pane, Home ribbon).
5. For the last item in a list, select the li tag within the Blocks section of the editor, and then selectthe li.last style.
MadCap Flare 6 Clean Up the Imported Content
Writing Sample © 2014 Laura Protano 33

6. For a note within a list, apply the li.continue style. Then, right-click the li item (in the Blockssection of the editor), and selectMake Paragraph Item. This adds a p tag within the li tag. Then,apply the style p.importNote.
7. For a list item (li or li.continue) that you want to keep with a subsequent item such as an imageor sublist, apply one of the following classes: li.LeadIn or li.continueLeadIn. The first optionshows the number or bullet; the second option hides the number or bullet.
8. For a list that imports correctly as a single list, but items are at the wrong level (e.g., show level 2bullet icons instead of level 1 bullet icons), do the following:
a. Position your cursor within the li block and select the Home ribbon > Outdent Items tool.
The li tag changes to a p tag and the block is removed from the list.
b. After all items are outdented, select all the blocks that should be list items in a single list,and use the Home ribbon > Bullet list tool to apply bullets or numbering.
For information about how to format the images in a list, see "Format Imported Lists", next.
Format Imported ImagesTo format imported images, do the following:
n During the import, a paragraph that contains an image is mapped to the Flare style p.graphicwhich centers the image in print output and left-justifies it in Help. For small or narrow imagesthat should be left-aligned in print, apply the class p.graphicSmall to the paragraph that containsthe image. If the paragraph that contains the image does not use the style p.graphic orp.graphicSmall, apply the appropriate style. (Images in lists have their own styles, as describedlater in this section.)
n For images in paragraphs (not lists), apply Flare styles to the img tag as needed:
Apply img.border to images that require a border.
Apply img.bg to images that require a gray background.
n For images in lists, apply Flare styles to the li tag that contains the image, as well as the img tag asneeded:
To hide the number or bullet, and add extra space after the image, apply li.continueLast to theli tag that contains the image.
If the image is wide, constrain the width by applying the img.list style to the img tag.
If the image is wide and requires a border, apply the img.listborder style to the img tag.
n If the image source file includes a red border as was the old convention, use an image editor suchas SnagIt or Capture to remove the border. Then, apply an image class with a border to the imgtag (e.g., img.border or img.listborder). To determine the name of the image to edit, hover yourcursor over the img block; the image name displays. From Content Explorer, you can browse toselect the image (Resources > Images), right-click the image and then select Open with >SnagItEditor.exe (or other program).
34 Writing Sample © 2014 Laura Protano
6 Clean Up the Imported Content MadCap Flare

Tip! Use SnagIt's Custom Trim tool (Image ribbon > Resizemenu) to remove 1 px fromeach side of an image in order to quickly remove a red border. You can repeatthe command multiple times if the border is wide, or set a wider custom trim.
n Make sure imported inline images (e.g., an icon in a sentence) appear in correct location and notabove the target paragraph.
n If the image is a hyperlink, apply the img.linkNoBorder style to the img tag. (This fixes a known IEbug where a red border appears around images configured as hyperlinks.)
Format Imported NotesIn paragraphs that have the format p.note, apply the inline style span.noteHeading to the text"Note" or "Notes", delete the colon, and adjust the spacing between the Note Heading and thecontent (2 hard spaces if plural; 4 otherwise). To insert a hard space, type Shift+spacebar.
Fix Imported Text Cross-ReferencesDo the following to find and fix cross-references imported from MSWord that have the stylespan.importRef applied (these are easy to locate because they have red formatting):
1. Position your cursor immediately before the span containing the imported reference text andselect Insert ribbon, Cross Reference. You can also select the Insert a Cross Reference tool inthe toolbar at the top of the open topic:
2. In the Insert Cross Reference dialog box, select the target topic., and then select one of thesetwo xref styles in the Cross Reference Properties section:
n Madcap:xref.topicNameOnly -- For references to chapters. This style links to themain topicof the chapter (that you have selected) without a page number reference when the PDF isgenerated.
n Madcap:xref -- For references to topics. This style links to the topic that you have selected inthe upper part of the dialog and automatically adds the text “on XX page” to the crossreference sentence when the PDF is generated. (The page number does not appear in theHelp output.) If you don't select an xref format, Flare applies this default format.
MadCap Flare 6 Clean Up the Imported Content
Writing Sample © 2014 Laura Protano 35

The following figure shows an example of the Insert Cross Reference dialog box:
3. Right-click the span tag ( ) that contains the original import reference text, and select Delete.
Apply New StylesFor imported Word documents that did not use themost current paragraph and character styles (forexample, Lead In Sentence, Screen Name, etc.), apply the equivalent Flare styles. For example, applyp.leadInSentence to a sentence that precedes a list, image, or table.
36 Writing Sample © 2014 Laura Protano
6 Clean Up the Imported Content MadCap Flare

77Set Up the PDF OutputTo set up the PDF output:
1. In Project Organizer, double-click the PDF target to open it (Targets > PDF).
2. On theGeneral tab, enter an Output File name. For example, Benefits Module UG. Due to aknown issue: if the output file name includes the period (.) character, then the output file namemust include the *.pdf extension (e.g., Benefits Module v5.4.0 UG.pdf).
3. On the Conditional Text tab, verify that the condition ScreenOnly has the Exclude conditionselected.
4. On the Variables tab, adjust any project-level variables for this target if needed.
5. On the PDF Options tab, enter the following values:
n Document Properties, Title: Enter the document title as it will appear in the Acrobat Readertitle bar
n Document Properties, Author: Enter "<Company Name>"
n PDF Tagging: If your project must meet section 508 accessibility requirement, select thischeck box.
n Initial View, Magnification: Fit Page
n Initial View, Navigation: Page Only
n Initial View, Page Layout: Two-Up (Cover Page)
6. Save and close the PDF target file.
7. Create a PDF from the original document (Word) and from Flare, and compare for differences(for example, missing content, headers, images, and so on).
Note F7 opens Spell Check tool in Flare (located on Tools ribbon).
Writing Sample © 2014 Laura Protano 37

38 Writing Sample © 2014 Laura Protano
7 Set Up the PDF Output MadCap Flare

88Set Up the HTML5 OutputTo prepare the Flare project for Help output:
1. Open the Flare project. If you have not synched the project with the global project in awhile,sync it first.
2. Open theHTML5 skin (Project Organizer > Skins > HTML5), and do the following:
a. Update the Caption on theGeneral tab. The Caption appears in the browser tab when theHelp is open in a browser window. Themaximum Caption length that the browser tabshows is approximately 20 characters (for example, "ProductX Help").
b. Under Features, select to show the TOC tab only; keep all other tabs hidden.
c. UnderOptions, select Automatically Synchronize TOC.
The following figure shows an example of the HTML5 Skin Editor:
Writing Sample © 2014 Laura Protano 39

3. Do the following to enter the name of the Help output file:
a. Open the HTML5 target file (Project Organizer > Targets, and then double-click theHTML5target).
b. On theGeneral Tab, enter theOutput File name. For example, for the Benefits module,enter Benefits Module Help. The resulting output file namewill be: Benefits_Module_Help.htm.
c. On the Advanced tab, verify that the Exclude content not linked directly or indirectlyfrom the target check box is selected.
The following figure shows an example of the HTML5 Target Editor:
4. Do the following to create a home page for themodule:
a. Using Content Explorer, browse to find the Global_Home.htm file (Content > Topic Files >HelpOnly_Topics), and then rename it to reflect your project (e.g., Benefits_Help_Home).
b. Open the Help Home topic.
40 Writing Sample © 2014 Laura Protano
8 Set Up the HTML5 Output MadCap Flare

The new topic opens in the right pane as shown in the following figure:
c. In the Help Home topic, do the following:
i. Rename each h2 value to reflect themajor sections in your Help.
ii. Update the descriptive text below the section name.
iii. For each section, right-click theGo to link, and select Edit Hyperlink. Then, change thelink to point to the appropriate section, and adjust the tool tip for the link.
d. Do the following add the home page topic to the TOC:
i. Open the project TOC in the right pane (Project Organizer > TOCs, and then double-click the TOC file to open it).
ii. Open Content Explorer in the left pane.
iii. Drag the topic file from the Content Explorer pane to the top-most position in the TOC.
iv. Rename the new TOC Entry (e.g., Benefit Module Help Home).
5. If a topic has subtopics that are contained in separate topic files, make sure the topic includeslinks to the subtopics. The content can include cross-references to the topics as applicable, oryou can add a Help-only list of links. For example, if an H1 topic has three H2 subtopics that areeach contained in a separate topic file, update the H1 topic so that it includes a link to each ofthe H2 subtopics. If the links are not applicable for print output, apply the "Screen-Only"condition tag.
Methods to add topic links include:
n Insert contextual cross-references, or a bulleted list of cross-references. For moreinformation, refer to theMadCap Flare Help.
MadCap Flare 8 Set Up the HTML5 Output
Writing Sample © 2014 Laura Protano 41

n Create Concepts (View ribbon > Concept Window), associated related topics with the sameconcept, and then insert a Concept Link list (Insert ribbon > Concept Link (A-link) tool). Anadvantage to this approach is that you don't have to manually update the "Related Topics"link in each topic whenever you change the topics associated with the Concept. For moreinformation, refer to theMadCap Flare Help. Always apply the ScreenOnly condition tag tothe paragraph that contains the Concept Link list.
n Insert a Related Topics link list (Insert ribbon > Related Topics Control tool). For moreinformation, refer to theMadCap Flare Help. Always apply the ScreenOnly condition tag tothe paragraph that contains the Related Topics list.
n Insert a miniTOC proxy. This is the fastest way to add a list of child topics to a parent topic,and we should use it whenever we can. An advantage to this approach is that the listupdates automatically when you change child topics. This procedure is described below.
n Manually add a list of links. The only reason you would use this method is if the list of links islong (more than 5 links), and you want to format them in a table so that users won't have toscroll through a long list. This procedure is described below.
To insert a miniTOC proxy:
a. Add the lead-in sentence to the Help topic (for example, "This topic describes the followingtasks:". Style it with p.LeadInSentence.
b. Position the cursor where you want to insert theminiTOC proxy.
c. Select Insert ribbon > Proxy >Mini Toc Proxy.
TheMiniTOC Proxy dialog box opens:
f. Select a TOC Depth of 1, and then click OK.
g. Apply the condition tag ScreenOnly to both the lead-in sentence, and theminiTOC proxy.
42 Writing Sample © 2014 Laura Protano
8 Set Up the HTML5 Output MadCap Flare

Notes You can copy the conditionalized lead-in sentence and miniTOC proxyfrom topic to topic (even from an H1 to an H2) to quickly add link lists toother topics. Just be sure to modify the lead-in sentence content asneeded.
Use the List_Subtopics_MiniTOCProxy snippet to quickly insert a genericlead-in sentence and miniTOCProxy. Both parts of the snippet have theScreenOnly condition tag applied.
To manually add a list of links:
a. Add the lead-in sentence to the Help topic (for example, "This topic describes the followingtasks:". Style it with p.LeadInSentence.
b. Insert a one-row table of the type "TopicLinks" (no heading row).
c. Within the table, insert the cross-references to the topics (from the Insert ribbon). Selectthe xref format: "topicNameOnly".
d. After you insert all xrefs, apply the bullet style.
Notes If there aremore than 5 links, use two columns and set one of thecolumns to take up 50% of the available space. If there aremore than 10links, use three columns, and set two of the columns to take up 33% ofthe available space.
Use the List_Subtopics_Table snippet to quickly insert a generic lead-insentence and a table formatted for inserting a long list of subtopics. Bothparts of the snippet have the ScreenOnly condition tag applied.
e. Apply the condition tag ScreenOnly to both the lead-in sentence, and the table of links.
6. If a topic has subtopics that are contained in the SAME topic file (for example, if you haveseparate topic files for heading levels 1 to 3, but the heading 4 topics are contained within theheading 3 topic files), adjust the headings assigned to the lower-level subtopics so that they willappear correctly in the Help output.
Make the following adjustments:
n h2 heading within an h1 topic— Change style to h2.withinH1
n h3 heading within an h1 topic— Change style to h3.withinH1
n h3 heading within an h2 topic— Change style to h2.withinH2
n h4 heading within an h2 topic— Change style to h4.withinH2
n h4 heading within an h3 topic— Change style to h4.withinH3
7. If the source document includes one or more appendices, make the following adjustments forthe Help output:
MadCap Flare 8 Set Up the HTML5 Output
Writing Sample © 2014 Laura Protano 43

a. Rename the appendix TOC entry to remove theWord "Appendix."
The following figure shows an example of a TOC entry that needs to be renamed:
Note If the guide includes more than one appendix, create a new TOC booknamed "Reference" and then nest the appendix topics within theReference book. Create a new topic for the Reference book, and link thebook to the topic. The only content in the Reference book topic will belinks to the appendices (see the Global Project for an example of aReference book topic). Use Flare's Content Explorer window (not the TOC)to apply the condition ScreenOnly to the newReference topic.
b. From the TOC, open the TOC properties for the entry and edit the Topic Title (used only inHelp output) to remove the word "Appendix."
The following figure shows an example of a Topic Title to rename. (You can delete the TopicTitle, and Flare will use the first Heading in the topic as the Topic Title.)
c. Open the topic, and apply the condition tag PrintOnly to the text "Appendix:" and thespace immediately following it. To apply conditional text, select the text, and then, from theHome ribbon, click Conditions.
44 Writing Sample © 2014 Laura Protano
8 Set Up the HTML5 Output MadCap Flare

The following figure shows an appendix heading (h1) with the PrintOnly condition applied:
The following figures shows how the appendix will appear in HTML5 and PDF output afteryou make the adjustments:
MadCap Flare 8 Set Up the HTML5 Output
Writing Sample © 2014 Laura Protano 45

8. To ensure that the Help window shows the breadcrumb proxy at the top of the window, ratherthan opening to the first heading, do the following for all topics in the TOC except for the HelpHome Page and PrintOnly topics (e.g., Cover Page, Contents topic):
a. With the TOC file open, select each TOC entry and open its properties (either click F4, orright-click and select Properties).
b. On theGeneral tab, in the Link section, change the link from a bookmark link to a topic link.
Note A alternative, faster method to complete this step is to open the TOC filewith the internal text editor (right-click the TOC file in Project Organizer,and then select Open with > Internal Text Editor), and then edit the XMLfor each link to remove the bookmark portion of the link.
For example, a link with a bookmark looks like this (bookmark portion isbold in example below):
<TocEntry Title="Commission Scheduler Search" Link="/Content/TopicFiles/Module Overview/Commission_Scheduler_Search.htm#_Toc361747431" />
A link with the bookmark portion removed looks like this:
<TocEntry Title="Commission Scheduler Search" Link="/Content/TopicFiles/Module Overview/Commission_Scheduler_Search.htm" />
9. Optionally, add Related Topics links and Concept Links to topics as needed. Add in situationswhere topics are clearly associated (for example, an Add topic and an Edit topic). If there are agroup of related topics, you can use the Concept Window to associate the topics with the sameterm (e.g., Benefit Plans), and then add a concept link to those topics. Add related links andconcept links in list format, not popup format (for accessibility reasons).
10. Optionally, do the following to support Search and Indexing:
a. Add index terms.
b. Add topic descriptions to a topic file's properties. This appears as a description of the topicin the search results. If there is no topic description, then the search result descriptionshows the topic title followed by the text in the first paragraph.
c. Define search filters based on your concept links. For example, if you have defined a"Benefit Plan" concept, you can add a search filter for that concept so that users can restricttheir search to topics identified as "Benefit Plan" topics.
11. Determine which screen captures should be hidden in the Help, and then apply the PrintOnlycondition tags to the block that contains the img tag. This will typically be a p.graphic,p.graphicSmall, or li.continueLast block.
12. For images that will appear in the Help and are not purely decorative (e.g., a bullet item), use theEdit Image command to add alternative text for the image.
13. Compile the HTML5 Help output, review the Content tab and browse sequence, and test links.
46 Writing Sample © 2014 Laura Protano
8 Set Up the HTML5 Output MadCap Flare

Note In the compiled Help, if you notice that a few images were imported as HUGEimages while the rest of the images appear to be a normal size, you mightneed to reduce the size of the huge image. The best way to do this is to openthe HUGE image in an image editor (SnagIt or Capture) and reduce the overallimage size there. Although the img tag has max size properties defined in theCSS file, those settings alone won't prevent inconsistent sizing (for example,where a small graphic is captured at a high resolution and therefore appearsvery large.).
14. Use Viewmenu > Project Analyzer (or MadCap Analyzer tool) to check for broken links. Also, useProject Organizer > Reports to view reports for any project stats you want to check on (forexample, topics not included in a TOC). You might need to add the report first if it doesn't exist.
15. When the entire project is complete, you can delete the Topic Templates folder (Content >Topic Templates) folders from the project.
MadCap Flare 8 Set Up the HTML5 Output
Writing Sample © 2014 Laura Protano 47

48 Writing Sample © 2014 Laura Protano
8 Set Up the HTML5 Output MadCap Flare