if the vdr config download button does not appear in the update … · 2014-10-03 · if the vdr...
TRANSCRIPT
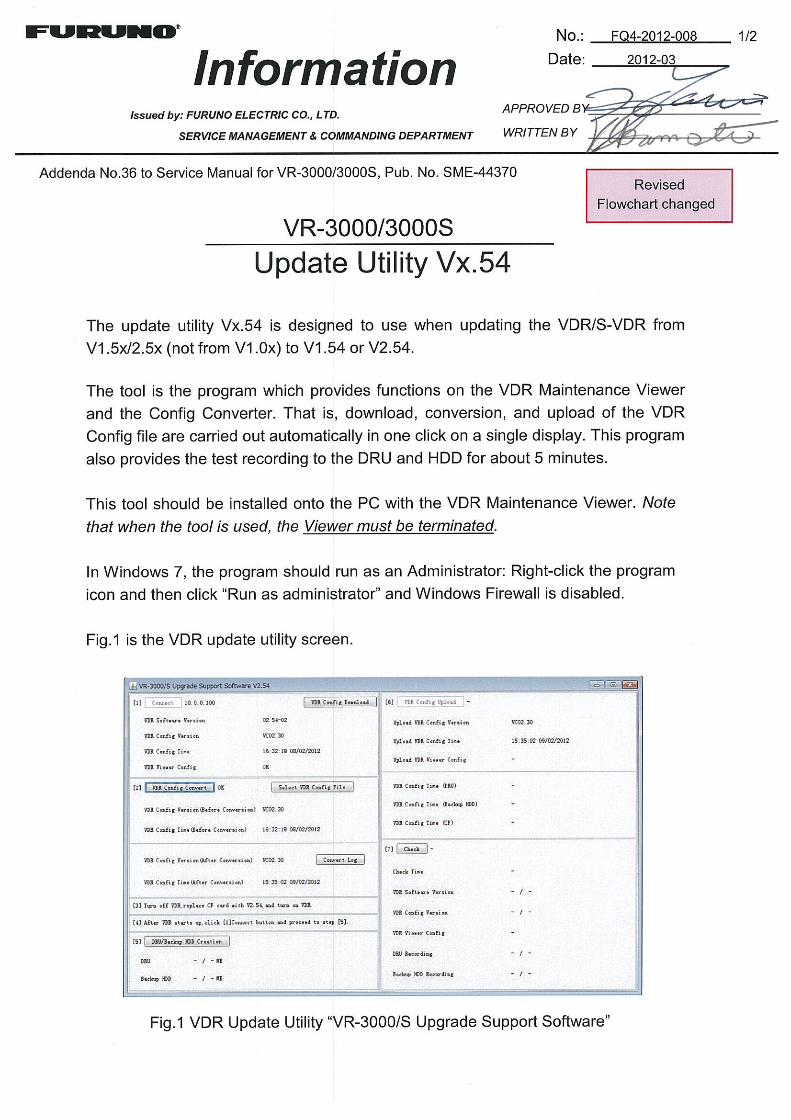
If the VDR Config Download button does not appear in the update utility screen as shown in Fig.2, change XP themes settings as below.
Fig.2 VDR update utility screen without VDR Config Download button 1. On an empty spot on the desktop, right-click your mouse. The following menu
(Fig.3) will appear.
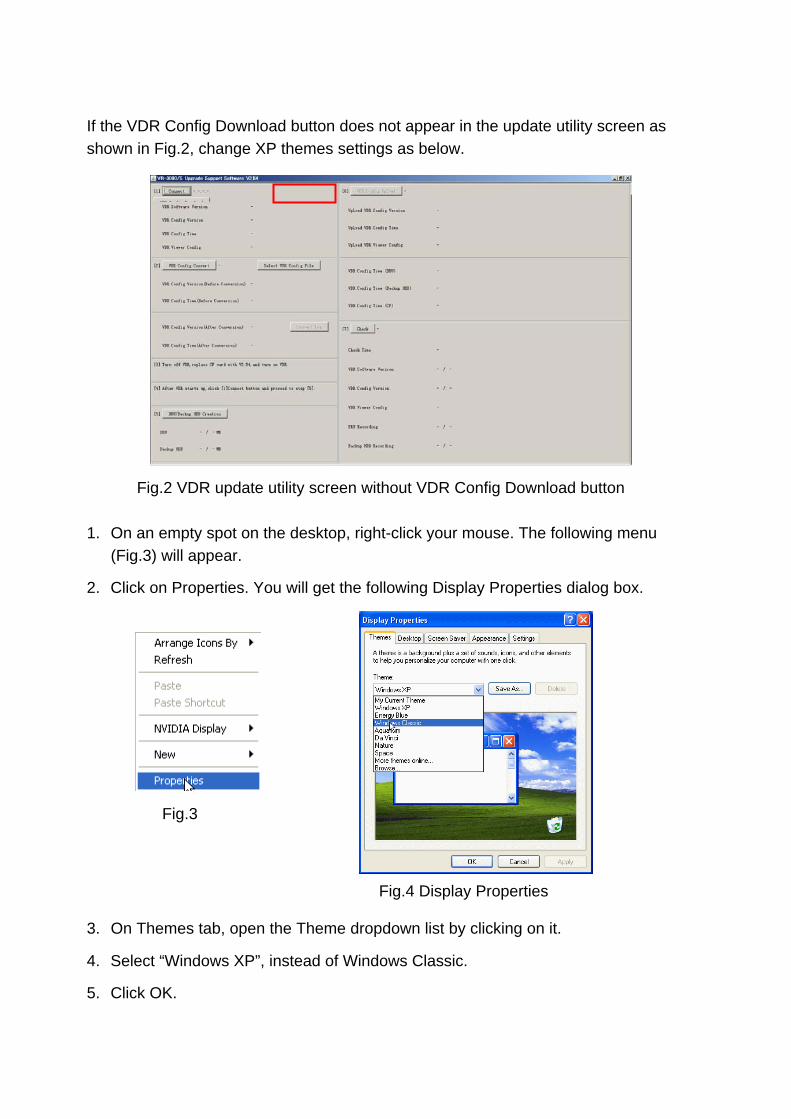
2. Click on Properties. You will get the following Display Properties dialog box.
Fig.3
Fig.4 Display Properties
3. On Themes tab, open the Theme dropdown list by clicking on it.
4. Select “Windows XP”, instead of Windows Classic.
5. Click OK.
1/4
VR-3000/3000S Instruction for Update Utility
1) General VDR update utility (Setup_VDR-Support.exe), or VR-3000/S Upgrade Support Software V2.54 is used for updating VR-3000/3000S from V1.5x/V2.xx to V1.54/V2.54. Using this tool, the data transfer and data conversion are made automatically by clicking a button on the single screen. The tool provides following functions. (1) Clicking the Connect button downloads the Config file from the system.
(2) Clicking the VDR Config Convert button converts the downloaded Config file to one for Vx.54 system program.
(3) Clicking the VDR Config Upload button uploads the Config file to the system. This tool cannot be used when updating the VDR from V1.xx to V2.xx. Applicable OS are Window XP, Windows Vista and Windows 7. The program must run as administrator* and the firewall is set to OFF in Windows 7.
*: Start -> Program -> VDR-Support -> Right-click on UpgradeSupport_Vx.54 and select “Run
As Administrator”.
The program is installed on the PC with the VDR Maintenance Viewer/Live Player V4, but before running the tool, terminate the VDR Maintenance Viewer. The tool has the “Check” button to check that the uploaded Config file is the correct one and that the data is saved onto the backup HDD and DRU normally.
2) Setup Procedure Connect the PC with the update utility to the DATA port on the DCU with a LAN cable. Then, take the steps below.
1. Ensure that the VDR Maintenance Viewer is closed and error 234 does not occur.
2. Run the VDR update utility.
(a) When updating V1.5xx to V1.54, select Start -> Program -> VDRSupport -> UpgradeSupport_V1.54.exe
(b) When updating V2.5xx to V2.54, select Start -> Program -> VDRSupport -> UpgradeSupport_V2.54.exe
2/4
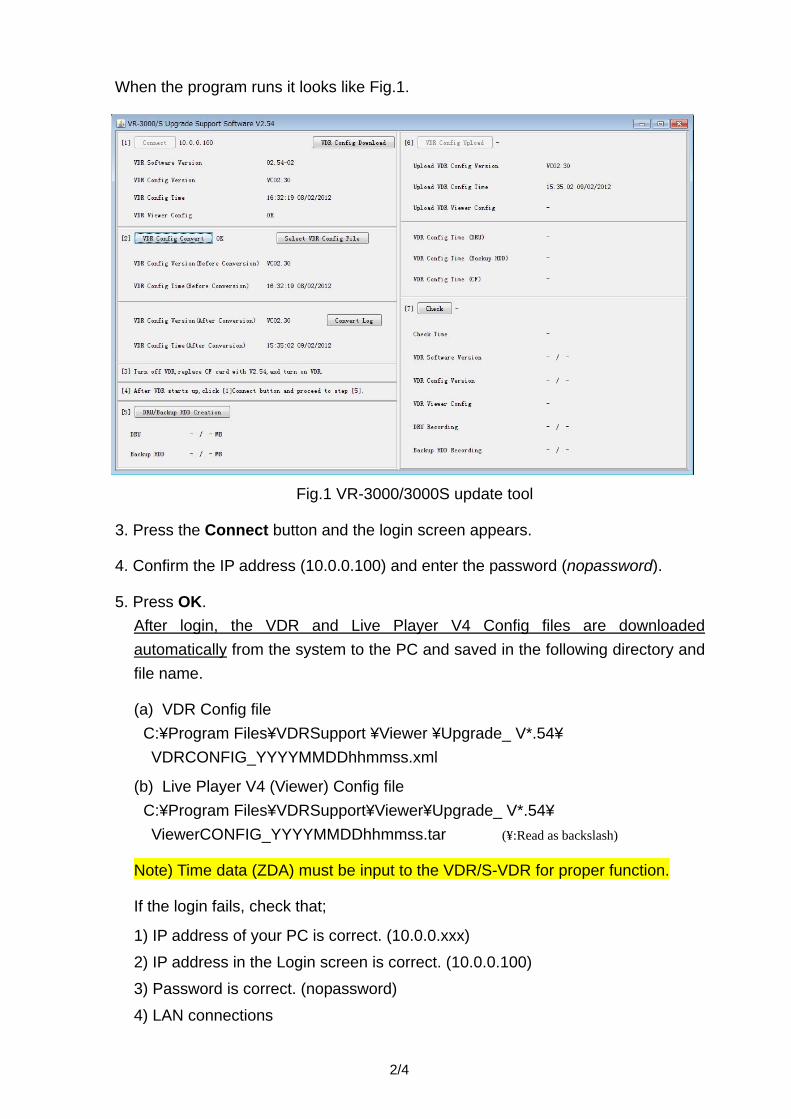
When the program runs it looks like Fig.1.
Fig.1 VR-3000/3000S update tool
3. Press the Connect button and the login screen appears.
4. Confirm the IP address (10.0.0.100) and enter the password (nopassword).
5. Press OK. After login, the VDR and Live Player V4 Config files are downloaded automatically from the system to the PC and saved in the following directory and file name.
(a) VDR Config file C:¥Program Files¥VDRSupport ¥Viewer ¥Upgrade_ V*.54¥ VDRCONFIG_YYYYMMDDhhmmss.xml
(b) Live Player V4 (Viewer) Config file C:¥Program Files¥VDRSupport¥Viewer¥Upgrade_ V*.54¥ ViewerCONFIG_YYYYMMDDhhmmss.tar (¥:Read as backslash)
Note) Time data (ZDA) must be input to the VDR/S-VDR for proper function.
If the login fails, check that;
1) IP address of your PC is correct. (10.0.0.xxx)
2) IP address in the Login screen is correct. (10.0.0.100)
3) Password is correct. (nopassword)
4) LAN connections
3/4
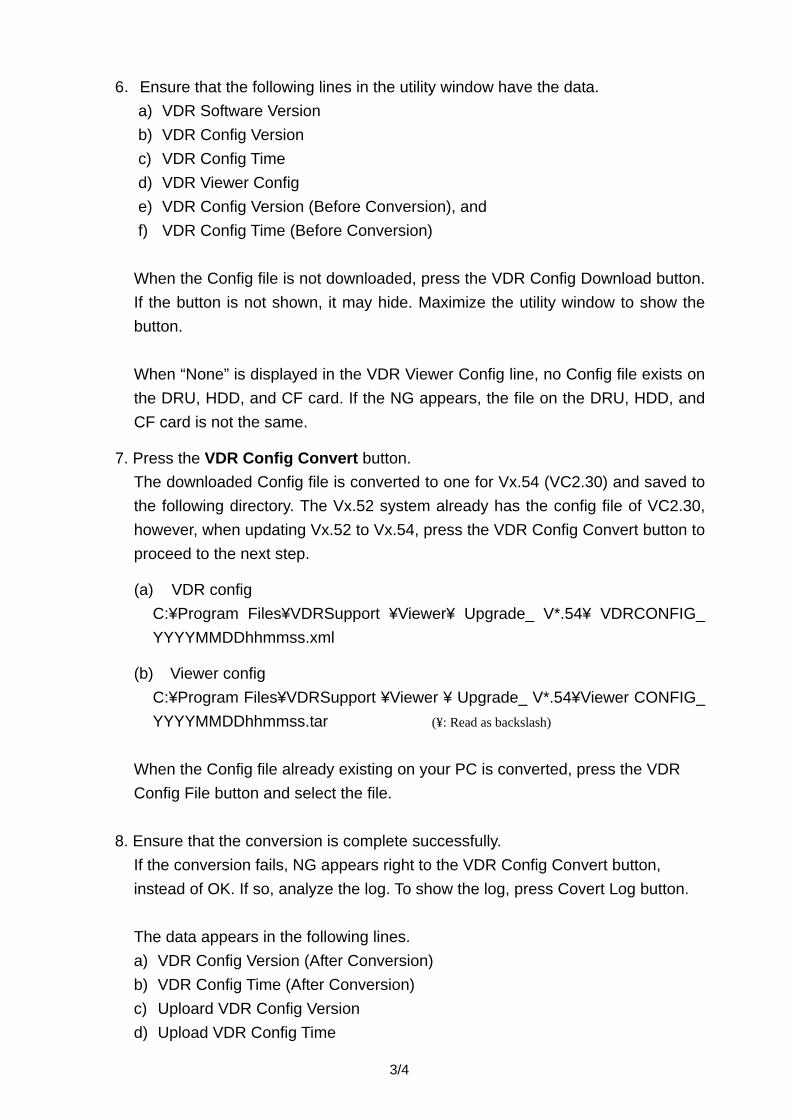
6.Ensure that the following lines in the utility window have the data. a) VDR Software Version b) VDR Config Version c) VDR Config Time d) VDR Viewer Config e) VDR Config Version (Before Conversion), and f) VDR Config Time (Before Conversion)
When the Config file is not downloaded, press the VDR Config Download button. If the button is not shown, it may hide. Maximize the utility window to show the button.
When “None” is displayed in the VDR Viewer Config line, no Config file exists on the DRU, HDD, and CF card. If the NG appears, the file on the DRU, HDD, and CF card is not the same.
7. Press the VDR Config Convert button. The downloaded Config file is converted to one for Vx.54 (VC2.30) and saved to the following directory. The Vx.52 system already has the config file of VC2.30, however, when updating Vx.52 to Vx.54, press the VDR Config Convert button to proceed to the next step.
(a) VDR config C:¥Program Files¥VDRSupport ¥Viewer¥ Upgrade_ V*.54¥ VDRCONFIG_ YYYYMMDDhhmmss.xml
(b) Viewer config C:¥Program Files¥VDRSupport ¥Viewer ¥ Upgrade_ V*.54¥Viewer CONFIG_ YYYYMMDDhhmmss.tar (¥: Read as backslash)
When the Config file already existing on your PC is converted, press the VDR Config File button and select the file.
8. Ensure that the conversion is complete successfully. If the conversion fails, NG appears right to the VDR Config Convert button, instead of OK. If so, analyze the log. To show the log, press Covert Log button. The data appears in the following lines. a) VDR Config Version (After Conversion) b) VDR Config Time (After Conversion) c) Uploard VDR Config Version d) Upload VDR Config Time
4/4
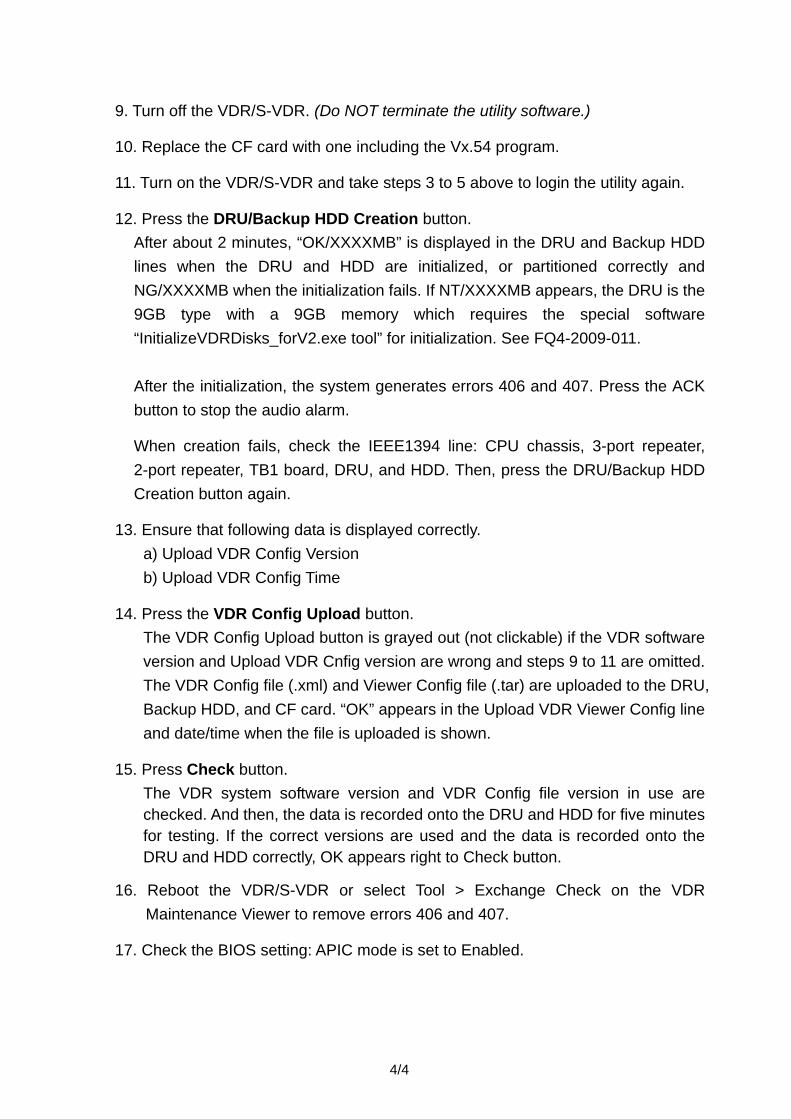
9. Turn off the VDR/S-VDR. (Do NOT terminate the utility software.)
10. Replace the CF card with one including the Vx.54 program.
11. Turn on the VDR/S-VDR and take steps 3 to 5 above to login the utility again.
12. Press the DRU/Backup HDD Creation button. After about 2 minutes, “OK/XXXXMB” is displayed in the DRU and Backup HDD lines when the DRU and HDD are initialized, or partitioned correctly and NG/XXXXMB when the initialization fails. If NT/XXXXMB appears, the DRU is the 9GB type with a 9GB memory which requires the special software “InitializeVDRDisks_forV2.exe tool” for initialization. See FQ4-2009-011. After the initialization, the system generates errors 406 and 407. Press the ACK button to stop the audio alarm.
When creation fails, check the IEEE1394 line: CPU chassis, 3-port repeater, 2-port repeater, TB1 board, DRU, and HDD. Then, press the DRU/Backup HDD Creation button again.
13. Ensure that following data is displayed correctly. a) Upload VDR Config Version b) Upload VDR Config Time
14. Press the VDR Config Upload button. The VDR Config Upload button is grayed out (not clickable) if the VDR software version and Upload VDR Cnfig version are wrong and steps 9 to 11 are omitted. The VDR Config file (.xml) and Viewer Config file (.tar) are uploaded to the DRU, Backup HDD, and CF card. “OK” appears in the Upload VDR Viewer Config line and date/time when the file is uploaded is shown.
15. Press Check button. The VDR system software version and VDR Config file version in use are checked. And then, the data is recorded onto the DRU and HDD for five minutes for testing. If the correct versions are used and the data is recorded onto the DRU and HDD correctly, OK appears right to Check button.
16. Reboot the VDR/S-VDR or select Tool > Exchange Check on the VDR Maintenance Viewer to remove errors 406 and 407.
17. Check the BIOS setting: APIC mode is set to Enabled.
VR-3000/3000S V0x.54 Update Procedure (With utility)
1/6
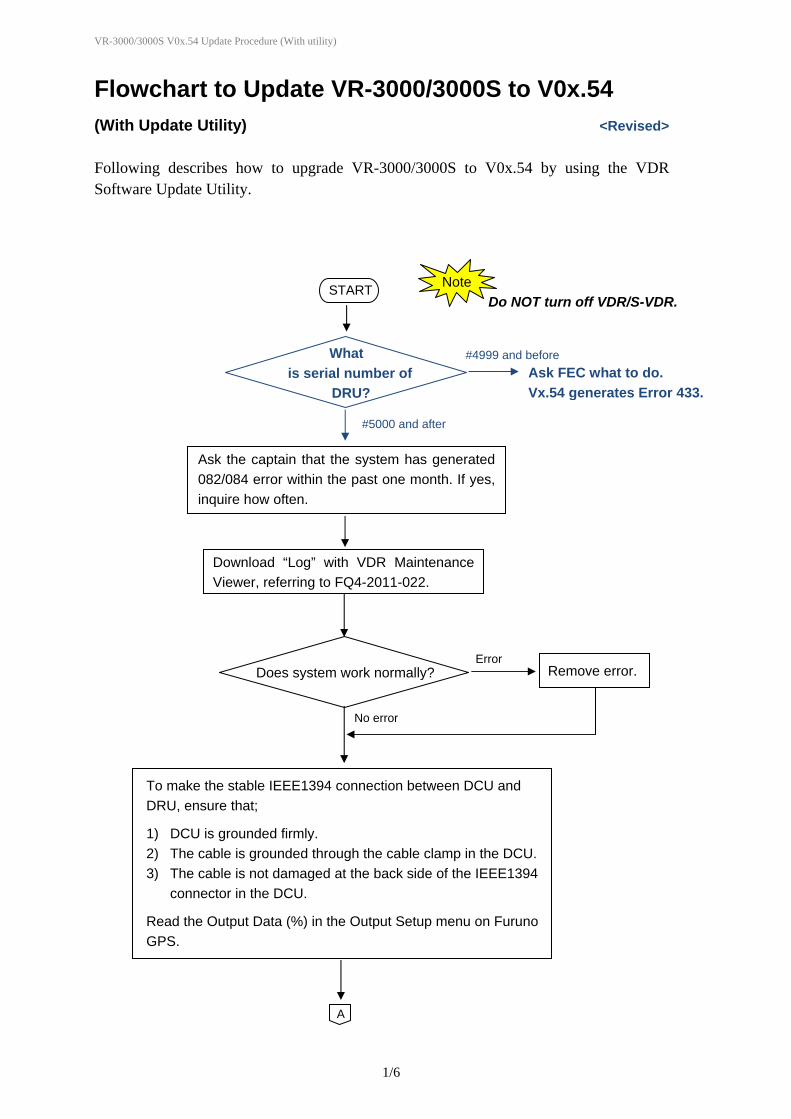
Flowchart to Update VR-3000/3000S to V0x.54 (With Update Utility) <Revised> Following describes how to upgrade VR-3000/3000S to V0x.54 by using the VDR Software Update Utility.
START
No error
Error Does system work normally? Remove error.
A
To make the stable IEEE1394 connection between DCU and DRU, ensure that;
1) DCU is grounded firmly. 2) The cable is grounded through the cable clamp in the DCU. 3) The cable is not damaged at the back side of the IEEE1394
connector in the DCU.
Read the Output Data (%) in the Output Setup menu on Furuno GPS.
Note Do NOT turn off VDR/S-VDR.
Download “Log” with VDR Maintenance Viewer, referring to FQ4-2011-022.
Ask the captain that the system has generated 082/084 error within the past one month. If yes, inquire how often. h
What is serial number of
DRU? Ask FEC what to do. Vx.54 generates Error 433.
#4999 and before
#5000 and after
VR-3000/3000S V0x.54 Update Procedure (With utility)
2/6
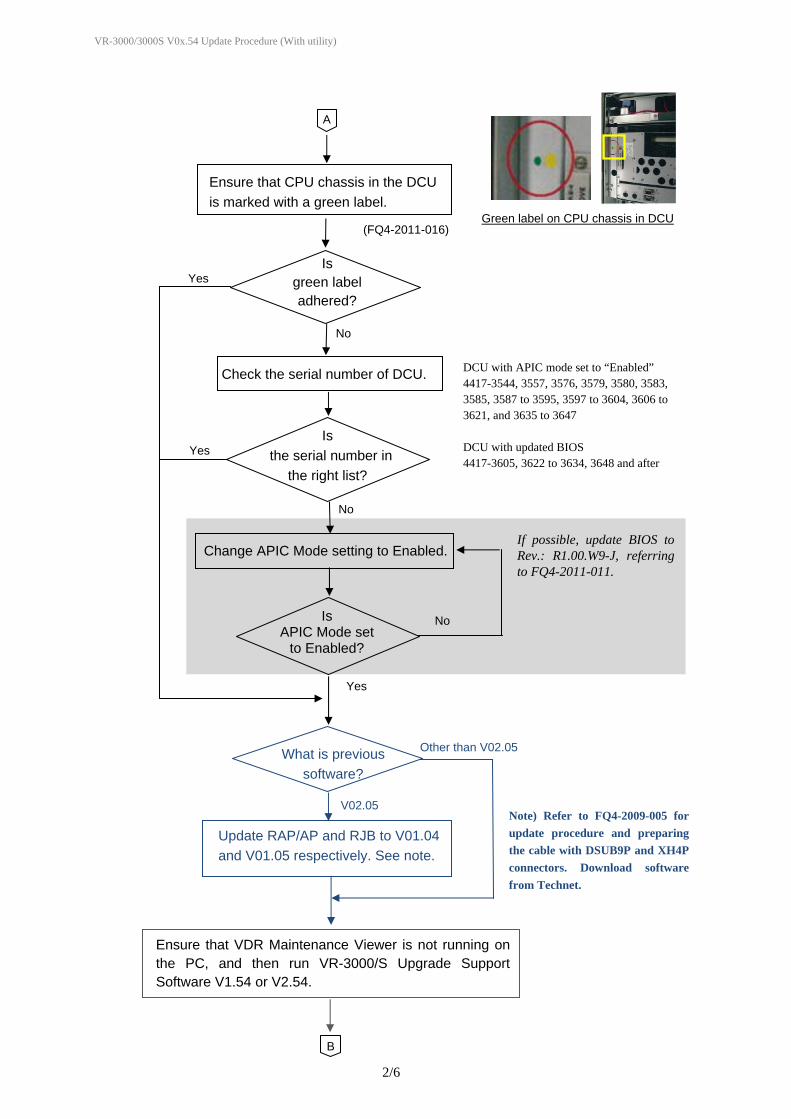
A
Yes
DCU with APIC mode set to “Enabled” 4417-3544, 3557, 3576, 3579, 3580, 3583, 3585, 3587 to 3595, 3597 to 3604, 3606 to 3621, and 3635 to 3647 DCU with updated BIOS 4417-3605, 3622 to 3634, 3648 and after
Yes
No
Is the serial number in
the right list?
Ensure that VDR Maintenance Viewer is not running on the PC, and then run VR-3000/S Upgrade Support Software V1.54 or V2.54.
B
Green label on CPU chassis in DCU (FQ4-2011-016)
Ensure that CPU chassis in the DCU is marked with a green label.
Yes
No
No
If possible, update BIOS to Rev.: R1.00.W9-J, referring to FQ4-2011-011.
Change APIC Mode setting to Enabled.
Is APIC Mode set
to Enabled?
Is green label adhered?
Check the serial number of DCU.
What is previous software?
V02.05
Other than V02.05
Update RAP/AP and RJB to V01.04 and V01.05 respectively. See note.
Note) Refer to FQ4-2009-005 for update procedure and preparing the cable with DSUB9P and XH4P connectors. Download software from Technet.
VR-3000/3000S V0x.54 Update Procedure (With utility)
3/6
B
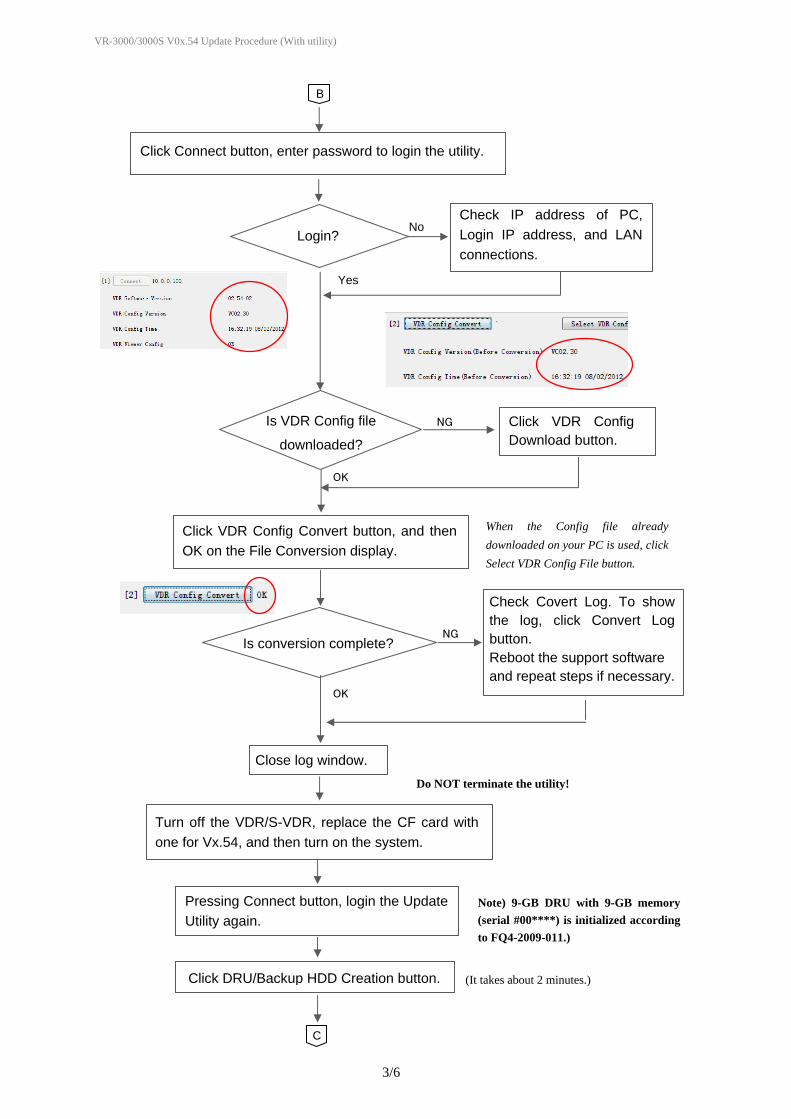
When the Config file already downloaded on your PC is used, click Select VDR Config File button.
Note) 9-GB DRU with 9-GB memory (serial #00****) is initialized according to FQ4-2009-011.)
Click Connect button, enter password to login the utility.
Check IP address of PC, Login IP address, and LAN connections.
Is VDR Config file
downloaded?
Click VDR Config Download button.
Click VDR Config Convert button, and then OK on the File Conversion display.
Is conversion complete?
Turn off the VDR/S-VDR, replace the CF card with one for Vx.54, and then turn on the system.
Pressing Connect button, login the Update Utility again.
Check Covert Log. To show the log, click Convert Log button. Reboot the support software and repeat steps if necessary.
Close log window.
Click DRU/Backup HDD Creation button.
OK
NG
NG
OK
C
Do NOT terminate the utility!
(It takes about 2 minutes.)
Yes
Login? No
VR-3000/3000S V0x.54 Update Procedure (With utility)
4/6
Yes
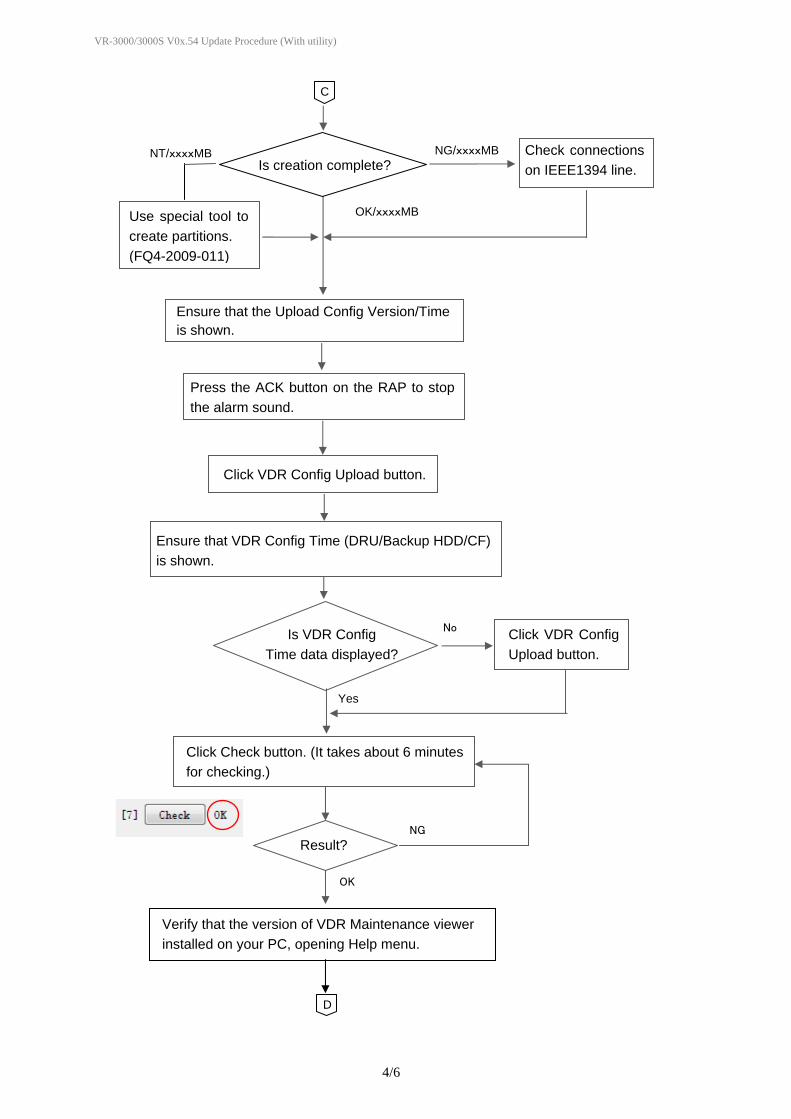
C
Is creation complete?
Ensure that the Upload Config Version/Time is shown.
Check connections on IEEE1394 line.
Press the ACK button on the RAP to stop the alarm sound.
Ensure that VDR Config Time (DRU/Backup HDD/CF) is shown.
Click Check button. (It takes about 6 minutes for checking.)
Result?
OK/xxxxMB
NG/xxxxMB
Verify that the version of VDR Maintenance viewer installed on your PC, opening Help menu.
OK
NG
Click VDR Config Upload button.
Is VDR Config Time data displayed?
NT/xxxxMB
Use special tool to create partitions. (FQ4-2009-011)
D
Click VDR Config Upload button.
No
VR-3000/3000S V0x.54 Update Procedure (With utility)
5/6
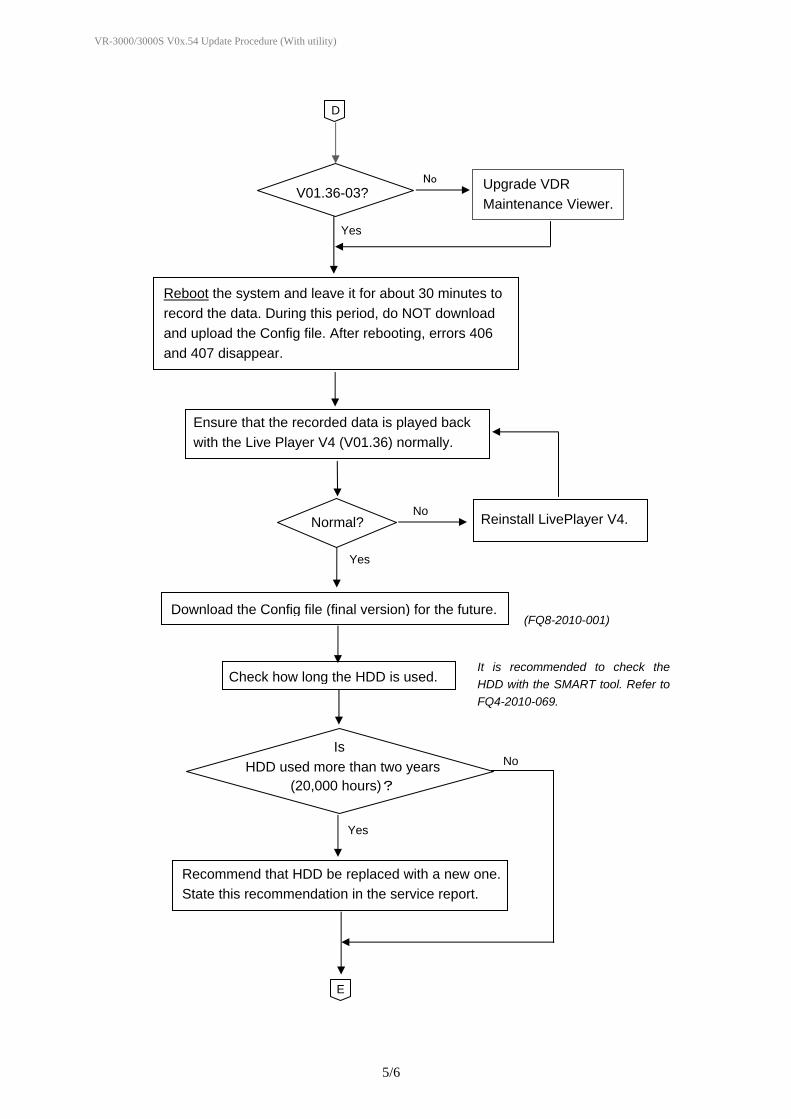
No
Yes
No
Yes
(FQ8-2010-001)
Normal? Reinstall LivePlayer V4.
It is recommended to check the HDD with the SMART tool. Refer to FQ4-2010-069.
Ensure that the recorded data is played back with the Live Player V4 (V01.36) normally.
Is HDD used more than two years
(20,000 hours)?
Recommend that HDD be replaced with a new one. State this recommendation in the service report.
E
Upgrade VDR Maintenance Viewer.
Download the Config file (final version) for the future.
Check how long the HDD is used.
V01.36-03?
Reboot the system and leave it for about 30 minutes to record the data. During this period, do NOT download and upload the Config file. After rebooting, errors 406 and 407 disappear.
D
No
Yes
VR-3000/3000S V0x.54 Update Procedure (With utility)
6/6
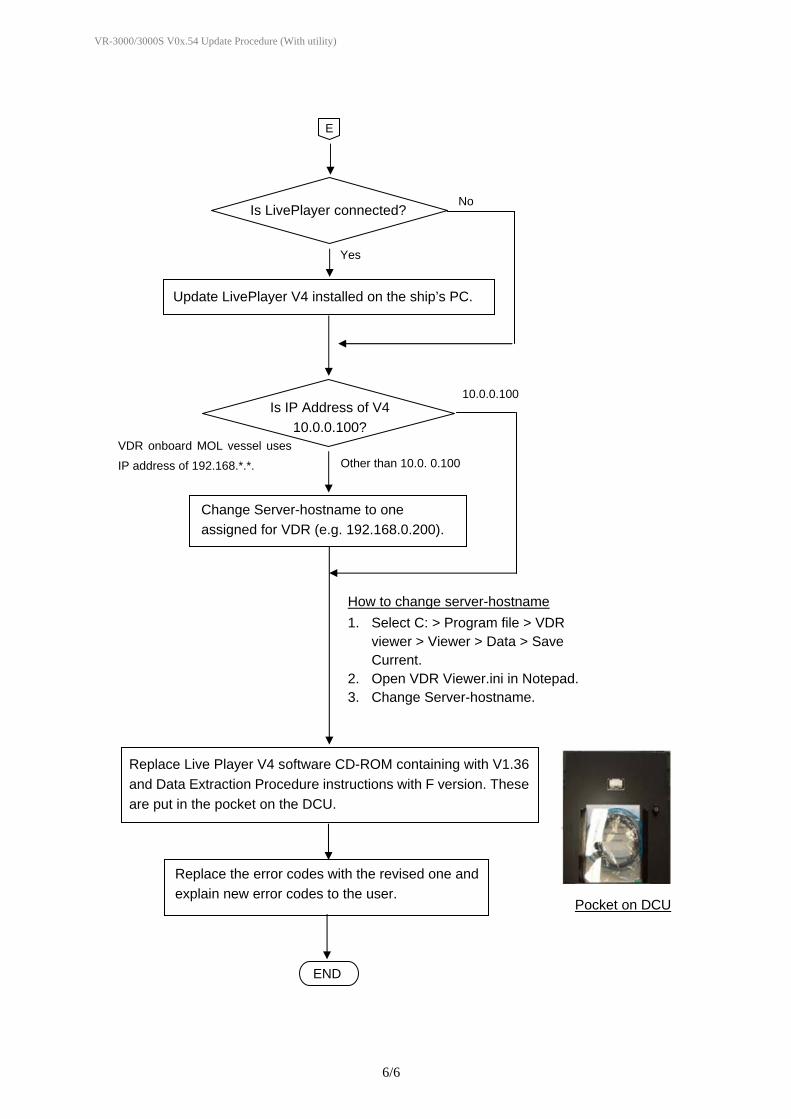
Pocket on DCU
END
Replace Live Player V4 software CD-ROM containing with V1.36 and Data Extraction Procedure instructions with F version. These are put in the pocket on the DCU.
Replace the error codes with the revised one and explain new error codes to the user.
Is IP Address of V4 10.0.0.100?
Change Server-hostname to one assigned for VDR (e.g. 192.168.0.200).
How to change server-hostname 1. Select C: > Program file > VDR
viewer > Viewer > Data > Save Current.
2. Open VDR Viewer.ini in Notepad. 3. Change Server-hostname.
E
Is LivePlayer connected?
Update LivePlayer V4 installed on the ship’s PC.
10.0.0.100
Other than 10.0. 0.100
Yes
No
VDR onboard MOL vessel uses
IP address of 192.168.*.*.