ic process 4.3 installation guide - mettler toledo · silverlight™ 4.0 browser plug-in ... (and...
TRANSCRIPT

iC Process™ 4.3 Seamless Pathway from Lab to Plant
December 2011
MK-PB-0072-AC Rev C
DCN 575
Inst
alla
tion
Guid
e

MK-PB-0072-AC Rev C DCN 575 Page 2 of 24
iC P
roce
ss™
Inst
alla
tion G
uid
e
Copyright and Trademarks
© 2011 (software and documentation) by Mettler-Toledo AutoChem, Inc. All rights reserved.
Neither this document nor the software described herein may be reproduced, transmitted, or disclosed to third
parties, in whole or in part, in any form or by any manner, electronic or mechanical, without the express written
consent of Mettler-Toledo AutoChem, Inc. except to the extent provided for by specific agreements. Mettler-Toledo
AutoChem, Inc. reserves the right to make improvements in this document and the software it describes at any
time, without notice or obligation.
iC Process™, iC IR™, ReactIR™, iC Quant™, and ConcIRT™ are trademarks of METTLER TOLEDO.
All other brand and product names are trademarks or registered trademarks of their respective owners.
12022011
MK-PB-0072-AC Rev C DCN 575 Page 3 of 24
iC P
roce
ss™
Inst
alla
tion G
uid
e
Contents
SYSTEM REQUIREMENTS 4
DEPLOYMENT PACKAGES AND DEPENDENCIES 4
INTRODUCTION 5
Overall System Diagram 5
Choosing a Configuration 6
1. INSTALLING THE IC PROCESS WEB APPLICATION 7
Overview of Installation 7
Installing the iC Process Server 8
Implementing iC Process According to Your Configuration 9
2. ACCESSING IC PROCESS THROUGH A CLIENT 10
How the Server Establishes a Silverlight Client 10
3. SETTING UP SECURITY 13
In a Non-Domain Environment—Server 13
In a Non-Domain Environment—Client 14
In a Domain and Non-Domain Environment 15
How Security Roles Control iC Process Permissions 17
How the Security Configuration File Controls User Access 17
Internet Options Advanced Security Setting (optional) 18
SETTING UP THE ‘PROCESS’ TASK PANE IN IC IR 19
APPLYING AN IC PROCESS 4.3 SERVICE PACK 20
Accessing the Service Pack Installer 20
APPENDIX A: INSTALLING OPC UA 21
Facts about OPC UA 21
Setting iC Process Configuration to Include (Start) OPC UA Server 21
Considering Run Time Certificates and Security 22
Address Space (Data Model) 23
INDEX 24
MK-PB-0072-AC Rev C DCN 575 Page 4 of 24
iC P
roce
ss™
Inst
alla
tion G
uid
e
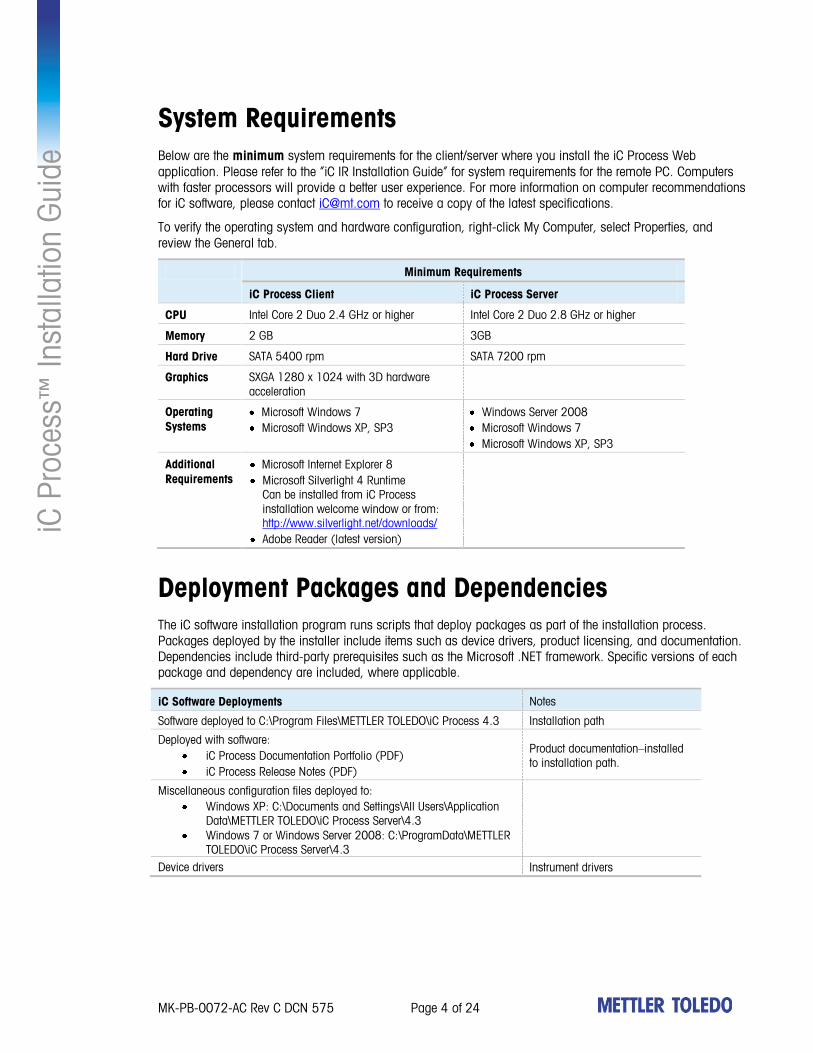
System Requirements
Below are the minimum system requirements for the client/server where you install the iC Process Web
application. Please refer to the ‚iC IR Installation Guide‛ for system requirements for the remote PC. Computers
with faster processors will provide a better user experience. For more information on computer recommendations
for iC software, please contact [email protected] to receive a copy of the latest specifications.
To verify the operating system and hardware configuration, right-click My Computer, select Properties, and
review the General tab.
Minimum Requirements
iC Process Client iC Process Server
CPU Intel Core 2 Duo 2.4 GHz or higher Intel Core 2 Duo 2.8 GHz or higher
Memory 2 GB 3GB
Hard Drive SATA 5400 rpm SATA 7200 rpm
Graphics SXGA 1280 x 1024 with 3D hardware
acceleration
Operating
Systems
Microsoft Windows 7
Microsoft Windows XP, SP3
Windows Server 2008
Microsoft Windows 7
Microsoft Windows XP, SP3
Additional
Requirements
Microsoft Internet Explorer 8
Microsoft Silverlight 4 Runtime
Can be installed from iC Process
installation welcome window or from:
http://www.silverlight.net/downloads/
Adobe Reader (latest version)
Deployment Packages and Dependencies
The iC software installation program runs scripts that deploy packages as part of the installation process.
Packages deployed by the installer include items such as device drivers, product licensing, and documentation.
Dependencies include third-party prerequisites such as the Microsoft .NET framework. Specific versions of each
package and dependency are included, where applicable.
iC Software Deployments Notes
Software deployed to C:\Program Files\METTLER TOLEDO\iC Process 4.3 Installation path
Deployed with software:
iC Process Documentation Portfolio (PDF)
iC Process Release Notes (PDF)
Product documentation–installed
to installation path.
Miscellaneous configuration files deployed to:
Windows XP: C:\Documents and Settings\All Users\Application
Data\METTLER TOLEDO\iC Process Server\4.3
Windows 7 or Windows Server 2008: C:\ProgramData\METTLER
TOLEDO\iC Process Server\4.3
Device drivers Instrument drivers
MK-PB-0072-AC Rev C DCN 575 Page 5 of 24
iC P
roce
ss™
Inst
alla
tion G
uid
e
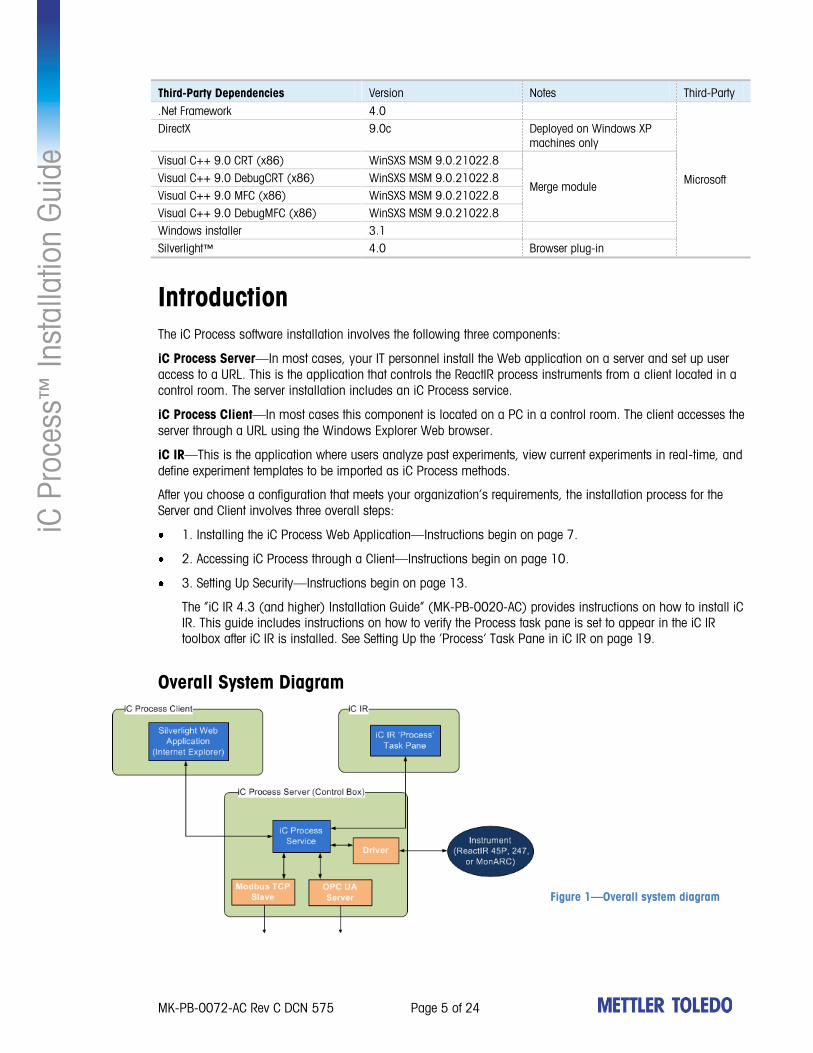
Third-Party Dependencies Version Notes Third-Party
.Net Framework 4.0
Microsoft
DirectX 9.0c Deployed on Windows XP
machines only
Visual C++ 9.0 CRT (x86) WinSXS MSM 9.0.21022.8
Merge module Visual C++ 9.0 DebugCRT (x86) WinSXS MSM 9.0.21022.8
Visual C++ 9.0 MFC (x86) WinSXS MSM 9.0.21022.8
Visual C++ 9.0 DebugMFC (x86) WinSXS MSM 9.0.21022.8
Windows installer 3.1
Silverlight™ 4.0 Browser plug-in
Introduction
The iC Process software installation involves the following three components:
iC Process Server—In most cases, your IT personnel install the Web application on a server and set up user
access to a URL. This is the application that controls the ReactIR process instruments from a client located in a
control room. The server installation includes an iC Process service.
iC Process Client—In most cases this component is located on a PC in a control room. The client accesses the
server through a URL using the Windows Explorer Web browser.
iC IR—This is the application where users analyze past experiments, view current experiments in real-time, and
define experiment templates to be imported as iC Process methods.
After you choose a configuration that meets your organization’s requirements, the installation process for the
Server and Client involves three overall steps:
1. Installing the iC Process Web Application—Instructions begin on page 7.
2. Accessing iC Process through a Client—Instructions begin on page 10.
3. Setting Up Security—Instructions begin on page 13.
The ‚iC IR 4.3 (and higher) Installation Guide‛ (MK-PB-0020-AC) provides instructions on how to install iC
IR. This guide includes instructions on how to verify the Process task pane is set to appear in the iC IR
toolbox after iC IR is installed. See Setting Up the ‘Process’ Task Pane in iC IR on page 19.
Overall System Diagram
Figure 1—Overall system diagram

MK-PB-0072-AC Rev C DCN 575 Page 6 of 24
iC P
roce
ss™
Inst
alla
tion G
uid
e
Choosing a Configuration
The following diagrams illustrate configuration options for the iC Process software and ReactIR instruments (ReactIR
247, ReactIR 45P, and MonARC). All connections use a router as the primary hub (see Figure 4 on page 8).
Figure 2—Configuration diagrams
Example 1—iC Process client and the server running on separate computers.
Example 2—iC Process client and the server running on the same computer.
Example 3—iC Process client and the multiple servers controlling individual instruments.
Two ‘instances’ of the client (Internet Explorer windows/tabs) on the same PC are necessary to
connect to two iC Process servers.
Each of the above configurations includes iC IR either on the iC Process server computer or a separate client
computer. Through the iC IR Process task pane, a user can connect to iC Process experiments, observe real-time or
batch results, and perform advanced analysis. In addition, iC IR provides the templates that must be imported into iC
Process to define methods.
NOTE: Since communication in HL (Hazardous Location) configurations is fiber optic, a media converter is also
required for the iC Process Server in order to communicate via Ethernet from the ReactIR instrument.
For ReactIR 247 HL systems, media converter (ST 10/100 MultiMode Fiber optic-to-Ethernet)
For ReactIR 45P HL, media converter (LC MultiMode Fiber optic-to-Ethernet)
These are available through METTLER TOLEDO or can be purchased separately.
Refer to page Figure 4—Network diagram for a network diagram that features a DCS plant control system or an
OPA UA Server for process control.
*

MK-PB-0072-AC Rev C DCN 575 Page 7 of 24
iC P
roce
ss™
Inst
alla
tion G
uid
e
1. Installing the iC Process Web Application
NOTE: This section is intended for IT personnel.
iC Process is built on a client/server based architecture. Every installation of iC Process contains a single server
that can support several types of clients, such as Modbus ‚masters,‛ OPC UA clients, and Microsoft Silverlight™
clients. The type of client used in iC Process is a Silverlight application that executes within a Web browser.
Installation focuses on the security configuration aspects of a web-based Silverlight client. Note that the single
server supports multiple simultaneous Silverlight clients.
Overview of Installation
NOTE: The iC Process Server machine must not be hosting any other Web content in addition to the iC
Process Web application.
iC Process software installation involves a server, clients, and a web browser. Security (roles) must be
configured and the procedure varies based on whether the server and client are under the same domain or a
trusted domain. iC Process has three roles:
Administrator (all permissions)
Operator (process operation permissions)
Technician (testing and servicing)
A table of distinct permissions for each role is on page 17.
Figure 4 shows a sample network diagram.
Web browser Web browser Web browser
Modbus
Client
Silverlight Application Client
iC Process Server
OPC UA
Client
Figure 3—Client/Server architecture

MK-PB-0072-AC Rev C DCN 575 Page 8 of 24
iC P
roce
ss™
Inst
alla
tion G
uid
e
Figure 4—Network diagram
Installing the iC Process Server
1. Insert the iC Process installation CD or go to the downloaded installation folder.
If you inserted the CD, the following welcome dialog box appears:
Figure 5—Installer welcome dialog box

MK-PB-0072-AC Rev C DCN 575 Page 9 of 24
iC P
roce
ss™
Inst
alla
tion G
uid
e If the welcome dialog box does not appear because the computer does not have AutoRun enabled, or if you
have downloaded the installation folder, open the CD or folder for browsing through Windows Explorer.
Then, click autorun.exe to display the welcome dialog box.
2. In the welcome dialog box, click Install iC Process 4.3 (setup.exe).
3. Advance through the wizard and accept the license agreements to install the .NET framework and/or the
Direct X required component software.
NOTE: This step only applies if the .NET and DirectX required components do not already exist on the
computer where you are installing iC Process.
4. When the iC Process installer begins, advance through the wizard to complete the installation.
Implementing iC Process According to Your Configuration
NOTE: After iC Process is installed on a server/PC, the following steps are performed by IT personnel.
1. On the server machine, open port 80 in the firewall for the iCProcessServerHost.exe process. This is the iC
Process 4.3 service.
2. Verify that the service is installed and started. By design, the service starts automatically after installation
and after a PC restart.
Figure 6—iC Process Service: Started
NOTE: If the service does not start, check the log file to verify that port 80 is not in use by another
application process. For example, Skype uses port 80, so it might be necessary to disable
Skype’s use of that port on the control computer.
3. Set up user authentication for iC Process by following the steps in the following section:
Setting Up Security on page 13
For more information about user authentication, refer to:
How Security Roles Control iC Process Permissions on page 13
How the Security Configuration File Controls User Access on page 17
MK-PB-0072-AC Rev C DCN 575 Page 10 of 24
iC P
roce
ss™
Inst
alla
tion G
uid
e
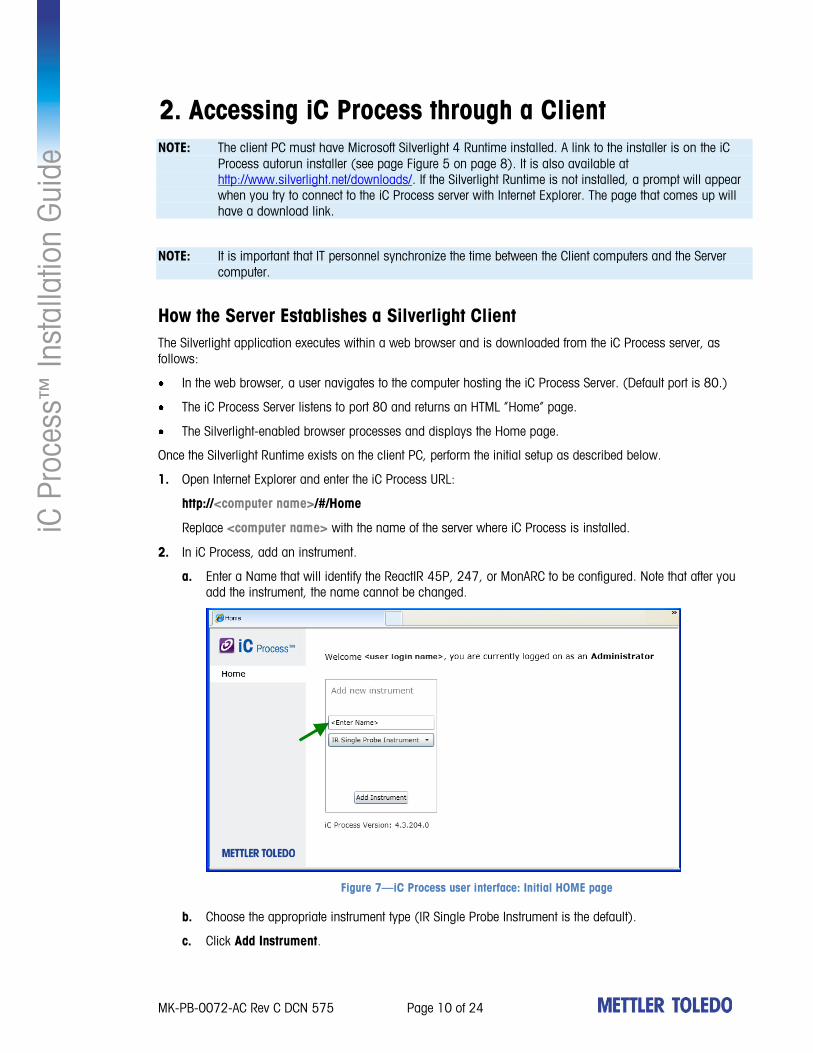
2. Accessing iC Process through a Client
NOTE: The client PC must have Microsoft Silverlight 4 Runtime installed. A link to the installer is on the iC
Process autorun installer (see page Figure 5 on page 8). It is also available at
http://www.silverlight.net/downloads/. If the Silverlight Runtime is not installed, a prompt will appear
when you try to connect to the iC Process server with Internet Explorer. The page that comes up will
have a download link.
NOTE: It is important that IT personnel synchronize the time between the Client computers and the Server
computer.
How the Server Establishes a Silverlight Client
The Silverlight application executes within a web browser and is downloaded from the iC Process server, as
follows:
In the web browser, a user navigates to the computer hosting the iC Process Server. (Default port is 80.)
The iC Process Server listens to port 80 and returns an HTML ‚Home‛ page.
The Silverlight-enabled browser processes and displays the Home page.
Once the Silverlight Runtime exists on the client PC, perform the initial setup as described below.
1. Open Internet Explorer and enter the iC Process URL:
http://<computer name>/#/Home
Replace <computer name> with the name of the server where iC Process is installed.
2. In iC Process, add an instrument.
a. Enter a Name that will identify the ReactIR 45P, 247, or MonARC to be configured. Note that after you
add the instrument, the name cannot be changed.
Figure 7—iC Process user interface: Initial HOME page
b. Choose the appropriate instrument type (IR Single Probe Instrument is the default).
c. Click Add Instrument.

MK-PB-0072-AC Rev C DCN 575 Page 11 of 24
iC P
roce
ss™
Inst
alla
tion G
uid
e 3. When the instrument appears in the left navigation, click the name to expand the menu.
The main display page for the instrument appears.
4. From the expanded menu, select Configuration.
Figure 8—iC Process user interface: Newly added instrument appears in left navigation and on main page
Figure 9—iC Process user interface: Instrument menu after instrument selection
MK-PB-0072-AC Rev C DCN 575 Page 12 of 24
iC P
roce
ss™
Inst
alla
tion G
uid
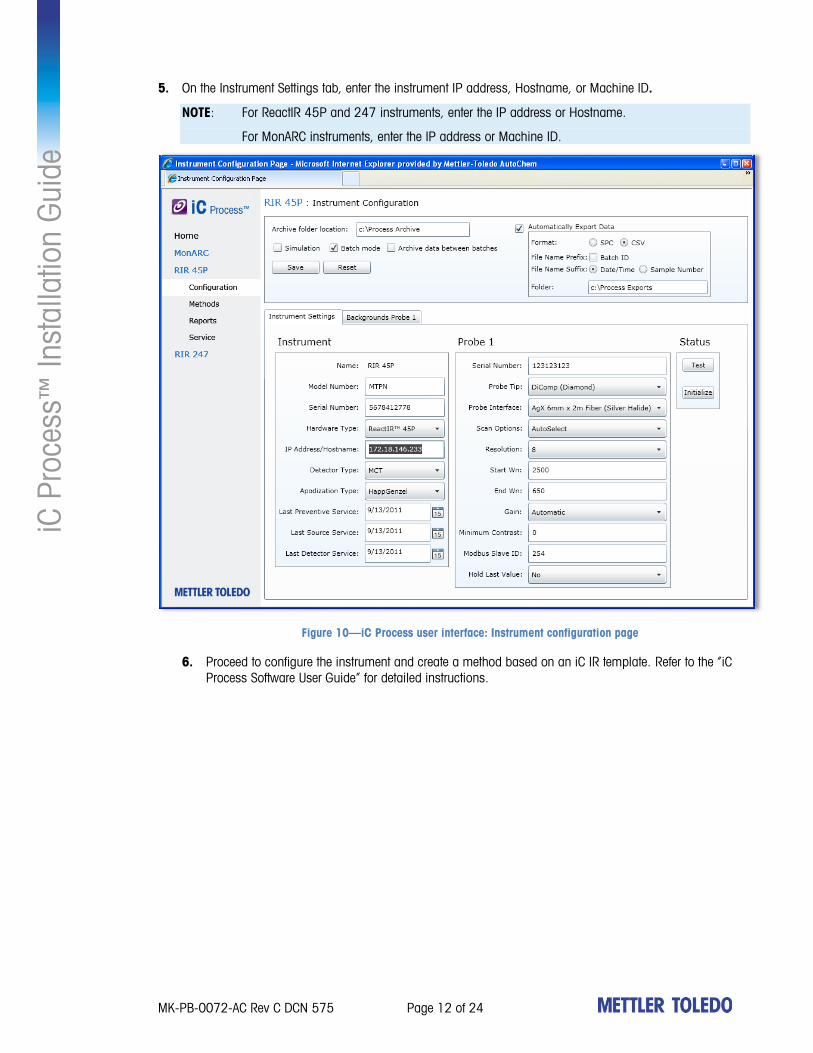
e 5. On the Instrument Settings tab, enter the instrument IP address, Hostname, or Machine ID.
NOTE: For ReactIR 45P and 247 instruments, enter the IP address or Hostname.
For MonARC instruments, enter the IP address or Machine ID.
Figure 10—iC Process user interface: Instrument configuration page
6. Proceed to configure the instrument and create a method based on an iC IR template. Refer to the ‚iC
Process Software User Guide‛ for detailed instructions.

MK-PB-0072-AC Rev C DCN 575 Page 13 of 24
iC P
roce
ss™
Inst
alla
tion G
uid
e
3. Setting Up Security
NOTE: This section is intended for IT personnel.
Set up security to establish user and group authentication to use iC Process and to access specific features. The
procedure is different for a domain environment and a non-domain environment.
Non-domain environment—Begin with steps under In a Non-Domain Environment on page 13. Then, proceed
with the domain environment steps on page 15.
Domain environment—Begin with steps under In a Domain and Non-Domain Environment on page 15 and
skip those steps that are specified for non-domain environments only.
Both Server and Client under Same Domain—The security profile is simple if both the client and the server
are executing under accounts in the same domain. Because the server is executing as a service, it can
validate Windows credentials for clients in the same domain as the service, or for clients in a domain
trusted by the service. However, when the client and server are not in the same or trusted domains, the
security scenario gets more complicated.
Server and Client NOT in Same or Trusted Domain—Under a scenario where the service and clients are not
in the same domain or a domain trusted by the service, the server will issue a challenge to the client upon
receiving a request for access. This causes the Web browser that is executing the client to display a
Windows login. Here, the user can enter a username and password that is valid at the server. This can be
either a domain account or a local account established on the server. From the perspective of the server, the
user then takes on the identity of that entered username. The user’s identity is very important, because it is
also used to determine which roles are granted to the user, as described on page 17.
The more complicated aspect of setting up the security profile involves enabling the WCF-based communications
to occur between the Silverlight application within the Web browser (client) and the iC Process server
application. The WCF communications is built on top of Windows security. For communications to occur, the
client application must be authorized to access the server. This implies that the server must be able to identify
and authenticate the client. The client identity is determined by the Windows identity of the currently logged on
user where the Web browser is executing. (This identity can be overridden by running Internet Explorer and
selecting the ‚run using specified credentials‛ option under Windows XP.)
In a Non-Domain Environment—Server
In a non-domain environment, begin by changing the user group and security settings on the server machine to
allow for local user authentication.
1. Run gpedit.msc.
2. Change the Security settings:
a. Navigate to the Security Options folder.
Local Computer Policy Computer Configuration Windows Settings Security Settings Local
Policies Security Options

MK-PB-0072-AC Rev C DCN 575 Page 14 of 24
iC P
roce
ss™
Inst
alla
tion G
uid
e b. Scroll to ‚Network Access: Sharing and security model for local accounts‛ and select:
‚Classic – local users authenticate as themselves‛
Figure 11—Setting network access to local user authentication
c. Reboot the computer.
In a Non-Domain Environment—Client
1. Open Internet Explorer and connect to the iC Process address: http://<computer name>
2. In Internet Explorer, set the site in the Local intranet list:
Tools Internet Options Security tab Local intranet Sites Advanced
MK-PB-0072-AC Rev C DCN 575 Page 15 of 24
iC P
roce
ss™
Inst
alla
tion G
uid
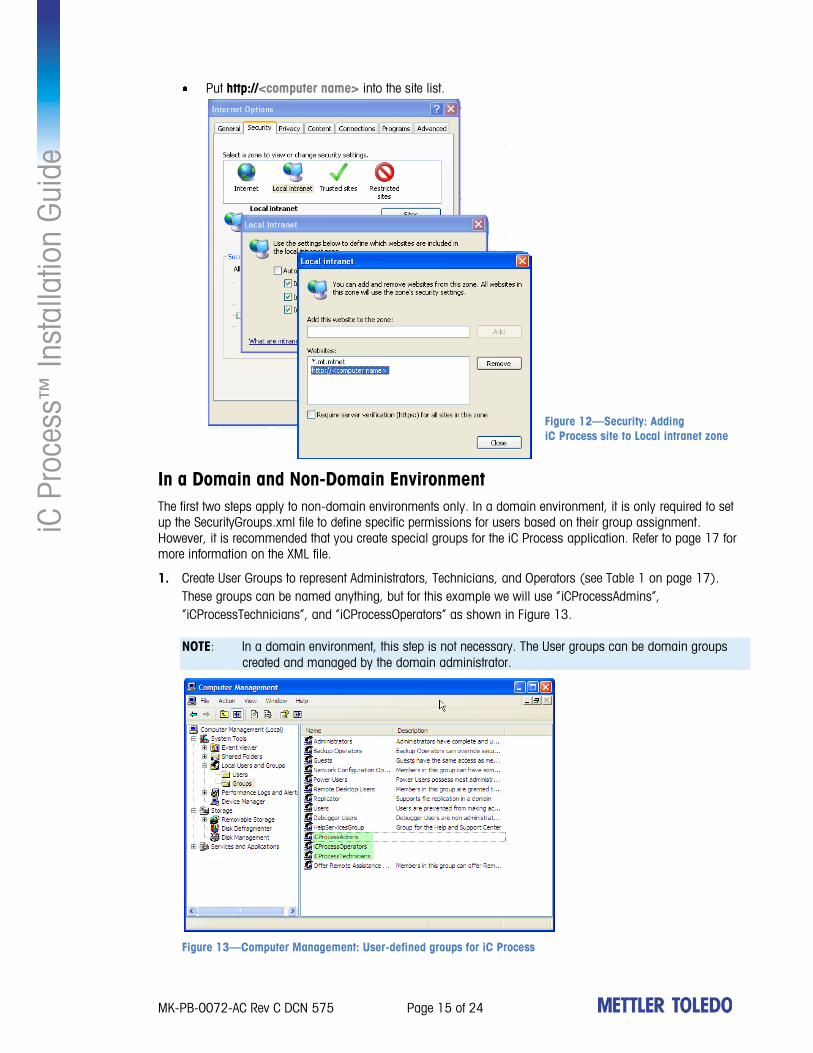
e Put http://<computer name> into the site list.
Figure 12—Security: Adding
iC Process site to Local intranet zone
In a Domain and Non-Domain Environment
The first two steps apply to non-domain environments only. In a domain environment, it is only required to set
up the SecurityGroups.xml file to define specific permissions for users based on their group assignment.
However, it is recommended that you create special groups for the iC Process application. Refer to page 17 for
more information on the XML file.
1. Create User Groups to represent Administrators, Technicians, and Operators (see Table 1 on page 17).
These groups can be named anything, but for this example we will use ‚iCProcessAdmins‛,
‚iCProcessTechnicians‛, and ‚iCProcessOperators‛ as shown in Figure 13.
NOTE: In a domain environment, this step is not necessary. The User groups can be domain groups
created and managed by the domain administrator.
Figure 13—Computer Management: User-defined groups for iC Process
MK-PB-0072-AC Rev C DCN 575 Page 16 of 24
iC P
roce
ss™
Inst
alla
tion G
uid
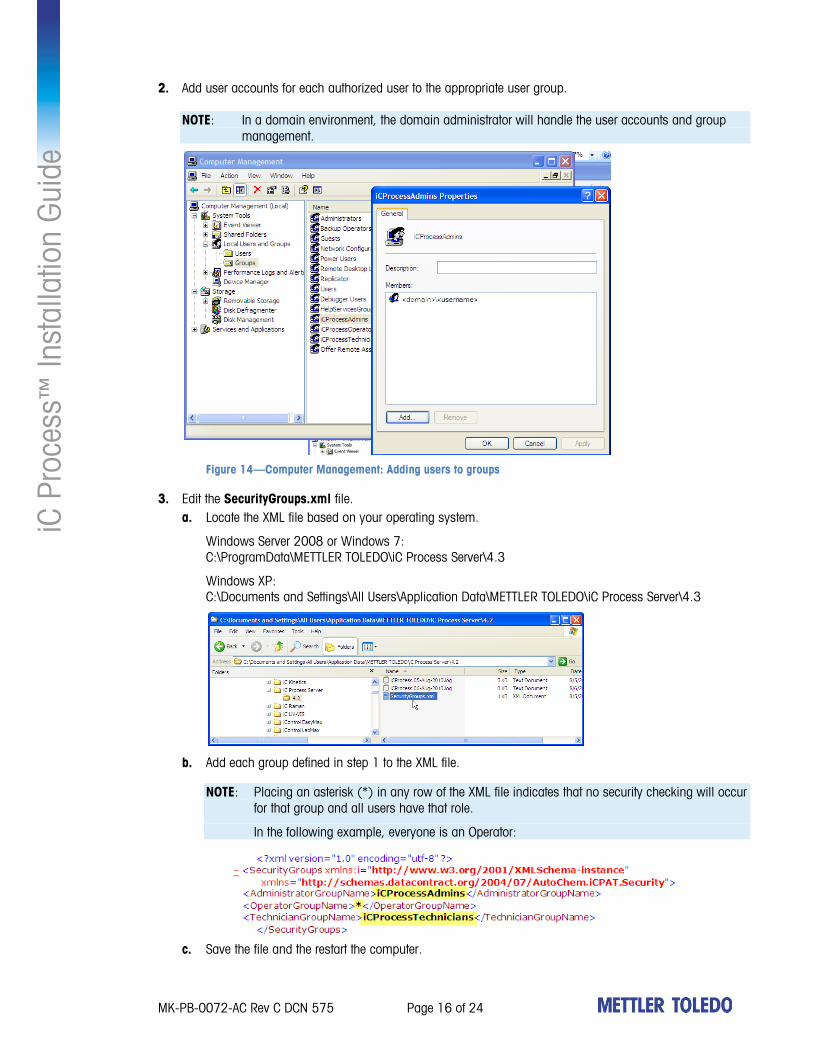
e 2. Add user accounts for each authorized user to the appropriate user group.
NOTE: In a domain environment, the domain administrator will handle the user accounts and group
management.
Figure 14—Computer Management: Adding users to groups
3. Edit the SecurityGroups.xml file.
a. Locate the XML file based on your operating system.
Windows Server 2008 or Windows 7:
C:\ProgramData\METTLER TOLEDO\iC Process Server\4.3
Windows XP:
C:\Documents and Settings\All Users\Application Data\METTLER TOLEDO\iC Process Server\4.3
b. Add each group defined in step 1 to the XML file.
NOTE: Placing an asterisk (*) in any row of the XML file indicates that no security checking will occur
for that group and all users have that role.
In the following example, everyone is an Operator:
c. Save the file and the restart the computer.

MK-PB-0072-AC Rev C DCN 575 Page 17 of 24
iC P
roce
ss™
Inst
alla
tion G
uid
e
How Security Roles Control iC Process Permissions
The following table lists the predefined iC Process actions and the roles that are authorized to perform each one:
Table 1: iC Process Security (Permissions by Role)
Permission to: Administrator Operator Technician
Select a method
Start a batch
Stop a batch
Pause a run
Resume a run
Collect backgrounds
Create a report
Run IPA validation
Start Stirling Engine
Stop Stirling Engine
Add an instrument
Delete an instrument
Configure an instrument
Perform service tests
Manage backgrounds
View instrument diagnostics
Run IPA calibration
Create a method
Manage methods
Approve a method
Unapprove a method
How the Security Configuration File Controls User Access
The system can be configured to enforce security by editing an XML file (SecurityGroups.xml) to specify the
names of the Windows Groups to associate with each of the three iC Process roles. Although each name can be
adapted from the built-in Windows Group (such as Users, Power Users, Administrators), the built-in groups are
not recommended. The recommended method is to create a group for the iC Process application. After a
Windows Group name has been associated with an iC Process role, a user only has the permissions for that
role when both the following conditions are true:
The specific Windows Group exists.
The user, as defined by their Windows login, is a member of that Windows Group.
When first installed, the ‚SecurityGroups.xml‛ file contains a wildcard character (‚*‛) for each of the three
Windows Group names. The wildcard indicates that no Windows Group is associated with that iC Process role,
and thus every user is considered to have that role. In other words, when first installed, every user has all three
iC Process roles, and therefore has all permissions.

MK-PB-0072-AC Rev C DCN 575 Page 18 of 24
iC P
roce
ss™
Inst
alla
tion G
uid
e Instructions for locating and editing the file are in step 3 on page 16. The sample ‚SecurityGroups.xml‛ file in
step b on page 16 shows a configuration where all users are members of the Operators role, but the user must
be a member of the user-created Windows Groups: iCProcessAdmins and/or iCProcessTechnicians to obtain the
iC Process Administrators and /or Technician roles.
Internet Options Advanced Security Setting (optional)
Consider setting the following Internet option on computers that may run the iC Process Client application to
ensure that temporary files are cleared from the cache when a user closes client application.
1. Select the Advanced tab from the Internet Options dialog box.
2. In the Security settings, select ‚Empty Temporary Internet Files folder when browser is closed.‛

MK-PB-0072-AC Rev C DCN 575 Page 19 of 24
iC P
roce
ss™
Inst
alla
tion G
uid
e
Setting Up the ‘Process’ Task Pane in iC IR
The final installation procedure is to verify that the ‘Process’ task pane appears in the iC IR toolbox and to
connect to iC Process through iC IR.
1. After successful installation of iC IR, launch the software and select Tools > Preferences.
2. Locate the ‘Show iC Process task pane‛ preference, verify the option is checked, and click OK.
3. Verify that the Process task pane is in the toolbox, as shown below.
Figure 15—iC Process task pane in iC IR

MK-PB-0072-AC Rev C DCN 575 Page 20 of 24
iC P
roce
ss™
Inst
alla
tion G
uid
e 4. In the Server Name box, enter the machine ID of the network computer where iC Process server is running.
5. Click Connect.
6. In the Instrument box, verify that the instrument/probe appear in the drop-down list.
Refer to the ‚iC Process Software User Guide‛ for information on how to use the Process task pane.
NOTE: If you have any issues with your iC Process installation, send an email to [email protected].
Applying an iC Process 4.3 Service Pack
NOTE: Updating to a new service pack retains the 4.3 license and instrument configuration.
If you already have a release of iC Process 4.3 installed and want to apply the latest version of iC Process 4.3
service pack, run the service pack installer.
1. Download the service pack installer for iC Process and follow the instructions provided to extract the
contents. (Access the installer as described in the next section.)
2. Locate the .msi file in the extracted contents.
3. Run the .msi file to launch the installation wizard. Then, follow the wizard prompts to install the service pack.
Accessing the Service Pack Installer
The service pack installer is available from the AutoChem Community Web site. Access a service pack from the
Downloads page, as follows:
1. From the METTLER TOLEDO AutoChem Community Web site:
Go to https://community.autochem.mt.com/index.php?q=download/icprocess
2. Log in and check the Service Packs section of the Downloads page to see if any service packs exist for your
version of software.

MK-PB-0072-AC Rev C DCN 575 Page 21 of 24
iC P
roce
ss™
Inst
alla
tion G
uid
e
APPENDIX A: Installing OPC UA
NOTE: This content is intended for The OPC UA Client Developer in your IT department.
This section introduces the OPC UA (Unified Architecture) framework that iC Process supports for process
control. Included are the steps to configure iC Process to include (start) the OPC UA Server when the iC
Process Server starts and general information about security and certificates.
Refer to the ‚iC Process Software User Guide‛ appendix for OPC UA address space information, including
sample code.
Facts about OPC UA
The iC Process OPC UA Server is an OPC UA Server embedded within iC Process. The OPC UA Server runs
within the context of the iC Process Server, not as a separate process. By default, the server is not included
(started) as part of the server. Instructions on how to change the configuration to start the OPC UA server are
in the next section.
An iC Process administrator maps process variables to trends that will be externally output to OPC UA.
After connecting to the server, an OPC UA client can:
Collect a background on a probe
Load and run an approved method
Start, stop, pause and resume a probe
Start or stop a batch
Obtain the current probe status
Obtain diagnostic values
Read process variables mapped within a method
Write to input variables mapped within a method
Start or stop the Stirling engine
Start IPA calibration or validation
Setting iC Process Configuration to Include (Start) OPC UA Server
A configuration parameter (‚IncludeOPCServer‛) must be set to True in the iC Process Server’s configuration file
(‚iCProcessServerHost.exe.config‛). If the parameter is set to True, the iC Process OPC UA Server starts and
provides functionality to OPC UA clients.
To include (start) the iC Process OPC UA Server, edit the IncludeOPCServer parameter, as follows:
1. Locate the iCProcessServerHost.exe.config file in the iC Process installation folder and open the XML file.
Figure 16—iC Process server configuration file

MK-PB-0072-AC Rev C DCN 575 Page 22 of 24
iC P
roce
ss™
Inst
alla
tion G
uid
e 2. Go to the IncludeOPCServer configuration setting under <applicationSettings> and change it to True.
3. Save the configuration file.
4. Restart the iC Process server.
When included, the iC Process OPC UA Server provides functionality to OPC UA clients.
Considering Run Time Certificates and Security
As part of setting up the OPC server within the iC Process server, application certificates and iC Process
security must be considered at run time.
Application Certificates
The OPC UA architecture requires that every installation (instance) of a client or server application have an
application certificate. The OPC UA SDK 1.00 Redistributables folder includes a certificate generation utility
(Opc.Ua.CertificateGenerator.exe) that can create an application certificate. The first time the iC Process
OPC UA Server is started, it will look for an application certificate. If the certificate is not found, the server will
create one using a standard OPC library method—CreateCertificate. This method triggers the certificate
generation utility to create the certificate.
NOTE: The implication of this is that the OPC UA SDK 1.00 Redistributables must be installed on the iC
Process server machine.
To install the application certificate utility:
1. Locate the OPC UA SDK 1.00 Redistributables Setup folder in the iC Process installation program
folder (for example, C:\Program Files\METTLER TOLEDO\iC Process 4.3).
2. Copy the folder to the iC Process server.
The OPC UA certificate is generated when the iC Process Server starts.
Application Certificate Management
Application certificates can be managed in a windows store (registry) or a directory store (folders). By
default, iC Process OPC UA Server uses a directory store. This is specified in a configuration file
(PatOpcSimpleServer.config.xml). The default directory location is a subdirectory (OPC
Foundation\CertificateStores\MachineDefault) of the shared program data area:
‚C:\Documents and Settings\All Users‛ on Windows XP; ‚C:\ProgramData‛ on Windows 7
When the certificate is generated, the utility creates a public and a private folder:
Public (‚certs‛ folder)—Must be copied to the "trusted peer" location of any clients that wish to
communicate with the iC Process OPC UA Server.
Private (‚private‛ folder)
NOTE: The public part must be copied to the ‚trusted peer‛ location of any clients that wish to
communicate with the iC Process OPC UA Server. Without the certificate, a client cannot encrypt
passwords when establishing secure connections to the server.

MK-PB-0072-AC Rev C DCN 575 Page 23 of 24
iC P
roce
ss™
Inst
alla
tion G
uid
e Security
iC Process OPC UA Server runs within the context of iC Process, and therefore uses the same role-based
security mechanism. iC Process supports three roles—Administrator, Operator, and/or Technician (see How
Security Roles Control iC Process Permissions on page 17).
An iC Process installation can configure a Windows Group name for each of these roles. When a Windows
Group is configured, an iC Process user must be a member of that Windows Group to obtain the role. Refer
to section 3. Setting Up Security on page 13 for more information.
A client connects to iC Process OPC UA Server in one of the following ways:
As an anonymous user—When an OPC UA client connects anonymously, the user is granted any iC
Process roles (Administrator, Operator, and/or Technician) that are marked with the wildcard symbol
(*)—meaning the roles are assigned with an asterisk instead of a group name.
By entering a valid Windows username/password—When an OPC UA client connects specifying a user
name and password, the user is granted the iC Process roles (Administrator, Operator, and/or
Technician) that are either marked with a wildcard symbol or assigned to a Windows Group that
includes the specified user name.
When specifying a user name/password combination, the user name can include a domain name. Both the
user name and password must be valid on the server machine, but they do not need to be valid on the client
machine.
Address Space (Data Model)
The address space for the OPC UA Server is documented in the ‚iC Process Software User Guide‛ appendix,
along with sample client code.

MK-PB-0072-AC Rev C DCN 575 Page 24 of 24
iC P
roce
ss™
Inst
alla
tion G
uid
e
Index
A
authentication, 17
C
client, 5, 10
computer
specifications, 4
synchronize clocks, 10
configuration
installation options, 6
of iC Process instrument, 12
security XML file, 9, 17
D
deployment packages, 4
G
gpedit.msc, 13
I
iC IR, 5
iC Process
client, 5
server, 5
Service (automatically started), 9
installation
components, 5
deployment packages, 4
overview, 7, 13
PC system requirements, 4
port 80, 9, 10
setting up security, 13
welcome window, 9
IP address, 12
L
login, 13
M
media converter, 6
Modbus TCP/IP, 5, 7
MSI installation file, 20
N
network diagram, 7
O
OPC/UA, 5, 7, 21
P
port 80, 9, 10
Process task pane, 5, 19
R
requirements
computer, 4
roles, 17
S
security, 13
configuration file, 9, 17
setting it up, 13
server, 5
installation of, 8
service pack, 20
services, 9
setup.exe, 9
Silverlight
client, 10
runtime, 4, 8
T
third-party dependencies, 5
U
user permissions/roles, 17