ibm tivoli identity manager: peopletools 8.1 agent for...
TRANSCRIPT

IBM Tivoli Identity Manager
PeopleTools 8.1 Agent for WindowsInstallation GuideVersion 4.4.0
SC32-1191-00
���


IBM Tivoli Identity Manager
PeopleTools 8.1 Agent for WindowsInstallation GuideVersion 4.4.0
SC32-1191-00
���

Note:Before using this information and the product it supports, read the information in Appendix C, “Notices”, on page 51.
First Edition (May 2003)
This edition applies to version 4.4.0 of Tivoli Identity Manager (product number 5724–C34) and to all subsequentreleases and modifications until otherwise indicated in new editions.
© Copyright International Business Machines Corporation 2002. All rights reserved.US Government Users Restricted Rights – Use, duplication or disclosure restricted by GSA ADP Schedule Contractwith IBM Corp.

Contents
Preface . . . . . . . . . . . . . . . vAudience . . . . . . . . . . . . . . . vConventions Used in this Manual . . . . . . . vCustomer Support . . . . . . . . . . . . vWorking with Customer Support . . . . . . . vi
Chapter 1. Overview . . . . . . . . . 1Basic Installation . . . . . . . . . . . . . 1Chapter Descriptions . . . . . . . . . . . 1
Chapter 2. Agent Installation . . . . . . 3Requirements . . . . . . . . . . . . . . 3Information Worksheet . . . . . . . . . . . 4
Step 1: Creating a PeopleTools Account for theAgent. . . . . . . . . . . . . . . . 4Step 2: Loading the PeopleTools Project for TivoliIdentity Manager . . . . . . . . . . . . 4Step 3: Installing the PeopleTools External API . . 4Step 4: Installing the Agent . . . . . . . . 4Step 5: Activating the Agent as a Service . . . . 4Step 6: Configuring the Agent . . . . . . . 4Step 7: Installing the Agent’s Certificate . . . . 5Step 8: Installing the Agent’s Profile . . . . . 5Step 9: Configuring the Agent’s Forms. . . . . 5
Step 1: Creating a PeopleTools Account for the Agent 5Step 2: Loading the PeopleTools Project for TivoliIdentity Manager . . . . . . . . . . . . . 5
Loading the Component Interfaces . . . . . . 5Setting the Component Interface Security . . . . 6
Step 3: Installing the PeopleTools External API . . . 6Step 4: Installing the Agent . . . . . . . . . 6Step 5: Activating the Agent as a Service . . . . . 8Step 6: Configuring the Agent . . . . . . . . 8Step 7: Installing the Agent’s Certificate . . . . . 9Step 8: Installing the Agent’s Profile . . . . . . 9Step 9: Configuring the Agent’s Forms. . . . . . 9
Chapter 3. Agent Profile Installation . . 11Requirements . . . . . . . . . . . . . . 11Installing the Agent Profile . . . . . . . . . 11
Chapter 4. Agent ParametersModification . . . . . . . . . . . . 13Accessing the Agent Configuration Tool Main Menu 13Viewing Configuration Settings . . . . . . . . 14Changing Protocol Configuration Settings . . . . 14
Adding a Protocol . . . . . . . . . . . 15Removing a Protocol . . . . . . . . . . 15Configuring a Protocol . . . . . . . . . 15
Setting Event Notification . . . . . . . . . 19Setting Attributes to be Reconciled . . . . . 21Modifying an Event Notification Context . . . 22
Changing Registry Settings . . . . . . . . . 25Modifying Non-encrypted Registry Settings . . 26
Multi-instance Settings . . . . . . . . . . 26Changing Advanced Settings . . . . . . . . 27Viewing Statistics . . . . . . . . . . . . 27Accessing Help and Additional Options . . . . . 28
Chapter 5. Certificate Installation . . . 31CA and Certificate Locations . . . . . . . . 31
Basic Configuration. . . . . . . . . . . 31Tivoli Identity Manager Configuration with anAgent Proxy . . . . . . . . . . . . . 32Clustered Tivoli Identity Manager Configuration 33
Accessing the Certificate Configuration Tool MainMenu . . . . . . . . . . . . . . . . 33Generating a Private Key and Certificate Request. . 35
Example of Certificate Request Script . . . . . 36Example of request.pem File. . . . . . . . 36
Installing the Certificate from a File . . . . . . 36Installing the Certificate and Key from a PKCS12File . . . . . . . . . . . . . . . . . 37Viewing Installed Certificates . . . . . . . . 37Viewing CA Certificates . . . . . . . . . . 37Installing a CA Certificate . . . . . . . . . 37Deleting a CA Certificate . . . . . . . . . . 38Viewing Registered Certificates . . . . . . . . 38Registering a Certificate . . . . . . . . . . 38Unregistering a Certificate . . . . . . . . . 38
Appendix A. Agent Variables . . . . . 41Variable Descriptions . . . . . . . . . . . 41Variables by PeopleTools 8.1 Agent Actions . . . . 42
System Login Add . . . . . . . . . . . 42System Login Change . . . . . . . . . . 43System Login Delete . . . . . . . . . . 43System Login Suspend . . . . . . . . . 43System Login Restore . . . . . . . . . . 44
Appendix B. Agent Removal . . . . . 45Automatic Uninstall . . . . . . . . . . . 45Custom Uninstall . . . . . . . . . . . . 46
Appendix C. Notices . . . . . . . . . 51Trademarks . . . . . . . . . . . . . . 52
Index . . . . . . . . . . . . . . . 55
© Copyright IBM Corp. 2002 iii

iv IBM Tivoli Identity Manager: PeopleTools 8.1 Agent for Windows Installation Guide
Preface
The Tivoli Identity Manager PeopleTools 8.1 Agent enables connectivity betweenthe IBM Tivoli Identity Manager Server and existing systems, networks, securitypackages, databases, and user interfaces. After the agent is installed and prepared,Tivoli Identity Manager manages access to PeopleTools resources with your site’ssecurity system. This manual describes how to install and configure a PeopleTools8.1 Agent.
AudienceThis manual is intended for security administrators responsible for installingsoftware on their site’s computer systems. Readers are expected to understandsecurity administration concepts. The person completing the installation procedureshould also be familiar with their site’s system standards. Readers should be ableto perform routine security administration tasks.
In addition, the person completing the installation procedure should be familiarwith PeopleTools Administration tasks. The installation procedure may require theinstallation of additional PeopleTools components.
Conventions Used in this ManualThe following list shows typographic and usage conventions of this manual:
Bold Bold text indicates selectable window buttons, field entries, andcommands appearing in this manual except from within examplesor the contents of files.
Monospace Text in monospace type indicates the contents of files or the outputfrom commands.
italic Italic text indicates context-specific values such as:v path namesv file namesv user namesv group namesv system parametersv environment variables
Customer SupportIBM Customer Support is available by phone and e-mail during standard businesshours. Our normal business hours are 6:00 a.m. to 6:00 p.m. Pacific Time, Mondaythrough Friday, excluding holidays. Support is also available outside of these hoursfor emergency Show Stopper problems.
IBM Customer Support can be reached by the following methods:
Table 1. Customer support
Phone 1–800–IBM–SERV (1–800–426–7378)
Web http://techsupport.services.ibm.com/guides/handbook.html
© Copyright IBM Corp. 2002 v

IBM international product support is currently serviced through our U.S.headquarters. For international support, refer to the Tivoli Customer SupportHandbook located at the previously stated Web site.
Working with Customer SupportIBM maintains a Tivoli Customer Support Handbook that contains all the informationnecessary for working with IBM Customer Support regarding product issues. Thisdocument is located at the previously stated Web site.
The handbook provides information about how to contact Customer Support,depending on the severity of your problem, and the following information:v Registration and eligibilityv Telephone numbers and e-mail addresses, depending on the country in which
you are locatedv The information you should gather before contacting Customer Support
vi IBM Tivoli Identity Manager: PeopleTools 8.1 Agent for Windows Installation Guide

Chapter 1. Overview
This installation guide provides all of the basic information necessary to install andconfigure the PeopleTools 8.1 Agent components. This chapter provides a simpleoverview of the installation process and a brief overview of the information ineach chapter.
Note: PeopleTools is a supporting layer for all PeopleSoft Applications.
Basic InstallationThe following lists the basic procedures necessary to install, configure, and run theagent:v Prepare PeopleTools API.v Install the agent software.v Activate the PeopleTools 8.1 Agent as a service on the agent’s system.v Configure the agent’s communication protocols to enable the PeopleTools 8.1
Agent to communicate with the Tivoli Identity Manager Server.v Install the agent’s profile on the Tivoli Identity Manager Server.v Configure the Tivoli Identity Manager Server to recognize the agent as a service.
Chapter DescriptionsThe PeopleTools 8.1 Agent for Windows Installation Guide contains informationpertinent to the proper installation and configuration of the PeopleTools 8.1 Agentin the following chapters and appendices:v Chapter 1, “Overview”
Provides an overview of this document and the basic procedures necessary toinstall and configure this agent.
v Chapter 2, “Agent Installation”, on page 3Contains detailed information about installing the agent. This chapter alsocontains additional steps required to configure the agent properly.
v Chapter 3, “Agent Profile Installation”, on page 11Contains detailed information about installing the agent’s profile on the TivoliIdentity Manager Server. Installing the agent’s profile on the Tivoli IdentityManager Server allows the Tivoli Identity Manager Server to recognize theagent. If the agent profile is not installed on the Tivoli Identity Manager Server,the Tivoli Identity Manager Server will not be able to manage access to theexisting systems.
v Chapter 4, “Agent Parameters Modification”, on page 13Contains information about using the agentCfg tool. The agentCfg tool providesan easy way to configure various properties specific to the agent, such ascommunication protocols, logging settings, etc.
v Chapter 5, “Certificate Installation”, on page 31Contains information about using the CertTool tool. The CertTool tool providesan easy way to request, install, and register certificates for use with the agent.
v Appendix A, “Agent Variables”, on page 41Contains information about the agent variables.
© Copyright IBM Corp. 2002 1

v Appendix B, “Agent Removal”, on page 45Contains information about uninstalling the agent.
v Appendix C, “Notices”, on page 51Contains legal notices for this agent.
2 IBM Tivoli Identity Manager: PeopleTools 8.1 Agent for Windows Installation Guide

Chapter 2. Agent Installation
This chapter describes the procedure to install and configure the PeopleTools 8.1Agent software. Each step includes a short procedure that completes one aspect ofthe overall agent installation process. You must complete the steps in the orderthey are listed.
RequirementsThe following table identifies hardware, software, and authorization requirementsto install the PeopleTools 8.1 Agent. Verify that all of the requirements have beenmet before installing the PeopleTools 8.1 Agent.
Table 2. Requirements to install the agent
System The agent must be installed on a server with a 32-bitx86-based microprocessor, at least 128 MB of memory, andat least 100 MB of free disk space.
CD-ROM Drive PeopleTools 8.1 Agent software is distributed onCD-Recordable (CD-R) media. Your CD-ROM drive mustbe able to read CD-R media.
Operating System Windows NT 4.0 with Service Pack 6 or Windows 2000with Service Pack 2 must be operational on the systemwhere the agent is installed.
PeopleTools Software PeopleTools version 8.1.x must be installed andoperational on the system where the agent will beinstalled.
The PeopleTools External API must be installed on thesystem where the agent will be installed and the systemPATH environment variable must be set to includepsapiadapter.dll in the external API directory.
The PS_HOME environment variable must exist and beset to the installed PeopleTools directory on the system.
Network Connectivity The agent must be installed on a system that cancommunicate with both the Tivoli Identity ManagerServer and the PeopleTools Application Server through aTCP/IP network.
For security purposes, IBM recommends installing theagent on a Windows NT file system.
System AdministratorAuthority
The person completing the PeopleTools 8.1 Agentinstallation procedure must have system administratorauthority to complete the steps in this chapter.
Server Communication Communication between the Windows Server and theTivoli Identity Manager Server should be tested beforeinstalling any IBM software. This makes troubleshootingeasier if you encounter installation problems.
© Copyright IBM Corp. 2002 3

Information WorksheetUse the following worksheet to document information required to install andconfigure the PeopleTools 8.1 Agent. Complete this worksheet before starting theinstallation procedure. The worksheet includes default values supplied by TivoliIdentity Manager and identifies the infomation you need to modify duringinstallation.
Make a copy of the worksheet for each server where you are installing thePeopleTools 8.1 Agent. For example, if you have five Windows Servers where youare installing the PeopleTools 8.1 Agent, you need five copies of the worksheet.
Step 1: Creating a PeopleTools Account for the AgentCreate a PeopleTools account for the Tivoli Identity Manager PeopleTools 8.1Agent.v Agent login account name____________________________________________________________v Agent account password____________________________________________________________
For more information, see “Step 1: Creating a PeopleTools Account for the Agent”on page 5.
Step 2: Loading the PeopleTools Project for Tivoli IdentityManager
Load the provided PeopleTools project to configure the PeopleTools Server for usewith the Tivoli Identity Manager Serverv File extraction location____________________________________________________________
For more information, see “Step 2: Loading the PeopleTools Project for TivoliIdentity Manager” on page 5.
Step 3: Installing the PeopleTools External APIInstall the PeopleTools External API.
Step 4: Installing the AgentInstall the PeopleTools 8.1 Agent using the provided executable installationprogram. The PeopleTools 8.1 Agent destination directory default is theC:\Tivoli\Agents\ps8Agent\ directory. For more information, see “Step 4:Installing the Agent” on page 6.
Step 5: Activating the Agent as a ServiceStart the PeopleTools 8.1 Agent as a service and configure it to start automatically.For more information, see “Step 5: Activating the Agent as a Service” on page 8.
Step 6: Configuring the AgentConfigure the agent’s communication protocol to use the DAML protocol tocommunicate with the Tivoli Identity Manager Server. For more information, see“Step 6: Configuring the Agent” on page 8.
4 IBM Tivoli Identity Manager: PeopleTools 8.1 Agent for Windows Installation Guide

Step 7: Installing the Agent’s CertificateInstall the agent’s certificate. This certificate is used by the DAML protocol duringcommunication with the Tivoli Identity Manager Server. For more information, see“Step 7: Installing the Agent’s Certificate” on page 9.
Step 8: Installing the Agent’s ProfileInstall the agent’s profile on the Tivoli Identity Manager Server. For moreinformation, see “Step 8: Installing the Agent’s Profile” on page 9.
Step 9: Configuring the Agent’s FormsConfigure the agent’s forms on the Tivoli Identity Manager Server. For moreinformation, see “Step 9: Configuring the Agent’s Forms” on page 9.
Step 1: Creating a PeopleTools Account for the AgentCreate a PeopleTools Account for the Tivoli Identity Manager PeopleTools 8.1Agent using the PeopleTools Web Interface. This account will be used to load thePeopleTools project for Tivoli Identity Manager.
Important: This account must have the System Administrator role. An existingaccount with System Administrator privileges can be used instead ofcreating a new account.
Step 2: Loading the PeopleTools Project for Tivoli Identity ManagerThe Tivoli Identity Manager PeopleTools 8.1 Agent software package comes with aPeopleTools project specific to Tivoli Identity Manager. This project contains all ofthe Tivoli Identity Manager-defined component interfaces. This project must tbeloaded and configured before the Tivoli Identity Manager PeopleTools 8.1 Agent isinstalled to ensure proper management of PeopleTools resources by the TivoliIdentity Manager Server.
Loading the Tivoli Identity Manager-specific PeopleTools project is a two partprocedure. First, the project must be copied into the PeopleTools system. Then, theproject security must be set. The following two sections provide detailedprocedures on how to load the PeopleTools project for Tivoli Identity Manager.
Loading the Component InterfacesThe PS_COMPONENT.ZIP file provided with the PeopleTools 8.1 Agent softwarecontains component interfaces within a subdirectory called ENROLE_AGENT. Thissubdirectory will be imported into the PeopleTools Application Designer as aPeopleTools project.1. Extract ENROLE_AGENT and its contents into a temporary directory on your
file system.2. Log into the PeopleTools Application Designer using the agent’s PeopleTools
account.3. Copy the ENROLE_AGENT project:
a. From the File menu, select Copy Project From File.The Copy Project from File dialog window appears.
b. Use the browse button to the right of the Import Directory field to navigateto the directory where you extracted ENROLE_AGENT.ENROLE_AGENT should appear in the Project Name list area.
Chapter 2. Agent Installation 5

c. Ensure that ENROLE_AGENT is highlighted and click on the Copy button.The ENROLE_AGENT project is loaded.A second dialog window appears.
d. Ensure that Component Interfaces is highlighted and click on the Copybutton.The component interfaces are loaded into PeopleTools.
4. Exit the PeopleTools Application Designer.
Setting the Component Interface Security1. Log into PeopleTools using the agent’s PeopleTools account.2. Open the ALLPORTL permission list window.
This window is accessible by selecting Update/Display from the ComponentInterface submenu of the Permission Lists menu under Use.
3. Click the Component Interface tab. All of the Tivoli Identity Managercomponents are listed. The following is a list of the Tivoli Identity Managercomponents:v ENROLE_CCODEv ENROLE_DELETEv ENROLE_LANGSv ENROLE_PERMv ENROLE_ROLESv ENROLE_USERS
4. Edit the Tivoli Identity Manager components to have Full Access permissions.5. Save the changes and exit the program.
Step 3: Installing the PeopleTools External APIInstall the PeopleTools External API according to the External Integrationinstallation instructions described in PeopleTools product installation information.
This API provides access to the Tivoli Identity Manager component interfacesloaded in “Step 2: Loading the PeopleTools Project for Tivoli Identity Manager” onpage 5.
.
Step 4: Installing the AgentAn executable installation program is provided for the PeopleTools 8.1 Agent.When you run the installation program, you can accept the default settings orselect new values.1. Insert the PeopleTools 8.1 Agent Product CD into the CD-ROM drive.2. Select Run... from the Start menu, type your CD-ROM drive, and then type
Setup.exe. For example:R:\Setup.exe
If there are multiple agent installation programs on your CD, click Browse,select the path name of the PeopleTools 8.1 Agent setup program, and selectSetup.exe.
6 IBM Tivoli Identity Manager: PeopleTools 8.1 Agent for Windows Installation Guide

The Welcome! dialog window appears.
3. Click Next.The Select Destination Directory dialog window appears.
4. Accept the default or select an alternate destination path and click Next.
<agentname> Installation
Welcome!
< ackB CancelNext >
This installation program will install the .
Press the Next button to start the installation.You can pressCancel and select Exit Setup now if you do not want to installthe at this time.
<agentname>
<agentname>
Figure 1. Welcome! dialog window
< ackB CancelNext >
Select Destination Directory
Please select the directory where the < > files are tobe installed.
agentname
BrowseC:\Tivoli\Agents\< >agentpath
Select Destination Directory
Figure 2. Select Destination Directory dialog window
Chapter 2. Agent Installation 7
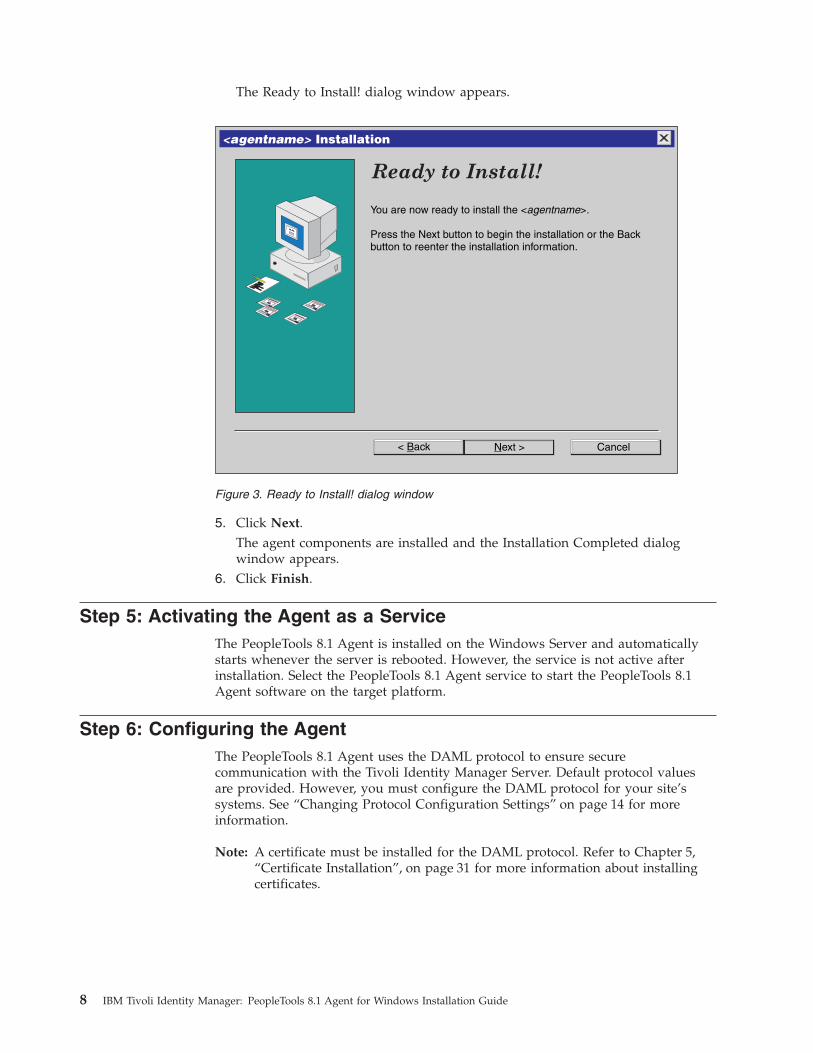
The Ready to Install! dialog window appears.
5. Click Next.The agent components are installed and the Installation Completed dialogwindow appears.
6. Click Finish.
Step 5: Activating the Agent as a ServiceThe PeopleTools 8.1 Agent is installed on the Windows Server and automaticallystarts whenever the server is rebooted. However, the service is not active afterinstallation. Select the PeopleTools 8.1 Agent service to start the PeopleTools 8.1Agent software on the target platform.
Step 6: Configuring the AgentThe PeopleTools 8.1 Agent uses the DAML protocol to ensure securecommunication with the Tivoli Identity Manager Server. Default protocol valuesare provided. However, you must configure the DAML protocol for your site’ssystems. See “Changing Protocol Configuration Settings” on page 14 for moreinformation.
Note: A certificate must be installed for the DAML protocol. Refer to Chapter 5,“Certificate Installation”, on page 31 for more information about installingcertificates.
<agentname> Installation
< ackB CancelNext >
You are now ready to install the < >.
Press the Next button to begin the installation or the Backbutton to reenter the installation information.
agentname
Ready to Install!
Figure 3. Ready to Install! dialog window
8 IBM Tivoli Identity Manager: PeopleTools 8.1 Agent for Windows Installation Guide

Step 7: Installing the Agent’s CertificateA certificate must also be installed for the DAML protocol. You must obtain aproduction certificate from a well-known Certificate Authority or create your owncertificate using your own Certificate Authority. The PeopleTools 8.1 Agent doesnot come prepackaged with a certificate. See Chapter 5, “Certificate Installation”,on page 31 for more information about installing certificates.
When you install the new certificate, you will also need to install the newCertificate Authority on the Tivoli Identity Manager Server. Refer to the TivoliIdentity Manager Server Configuration Guide for more information.
Note: You must configure the DAML protocol before installing your certificate.Stop and restart the agent after the certificate is installed.
Step 8: Installing the Agent’s ProfileBefore an agent can be added as a service to the Tivoli Identity Manager Server,the server must have a service profile to recognize the agent as a service. SeeChapter 3, “Agent Profile Installation”, on page 11 for more information oninstalling the agent’s profile on the Tivoli Identity Manager Server.
Step 9: Configuring the Agent’s FormsConfigure the agent’s service maintenance and account maintenance forms on theTivoli Identity Manager Server. Refer to the Tivoli Identity Manager Policy andOrganization Administration Guide for more information.
The Tivoli Identity Manager PeopleTools 8.1 Agent can be configured to managemore than one PeopleTools Application Server. This is accomplished by defining aseparate service profile for each PeopleTools Application Server to be managed.The specific PeopleTools Application Server being managed is defined by theattributes listed on the PS CONNECTION tab of the service’s profile. Thefollowing table lists the attributes on this tab and the description for each attribute.
Table 3.
Attributes Description
APP Server Name The name or IP address of the PeopleToolsApplication Server to be managed.
The value of this field must be preceded bytwo forward slashes, for example, //PPLSFTor //192.168.1.1.
APP Server Port The port number used to connect to thePeopleTools Application Server. This is theIP port number on which the PeopleToolsApplication Server listens for JOLTconnections. This value is typically port9000.
PS OPER ID The name of the PeopleTools account createdfor the PeopleTools 8.1 Agent.
OPER ID Password The agent’s PeopleTools account password
Chapter 2. Agent Installation 9

Configure the agent’s service maintenance and account maintenance forms on theTivoli Identity Manager Server. Refer to the Tivoli Identity Manager Policy andOrganization Administration Guide for more information about configuring theservice profile.
10 IBM Tivoli Identity Manager: PeopleTools 8.1 Agent for Windows Installation Guide

Chapter 3. Agent Profile Installation
Before an agent can be added as a service to the Tivoli Identity Manager Server,the server must have a service profile to recognize the agent as a service. ThePeopleTools 8.1 Agent comes with a second installation script that installs theagent’s profile on the Tivoli Identity Manager Server as a service profile.
This chapter describes the procedure to install and configure the PeopleTools 8.1Agent profile on the Tivoli Identity Manager Server. Each step includes a shortprocedure that completes one aspect of the overall profile installation process. Youmust complete the steps in the order they are listed.
Note: If you are upgrading the agent software, you must also upgrade the agentprofile on the Tivoli Identity Manager Server.
RequirementsThe following table identifies hardware, software, and authorization requirementsto install the PeopleTools 8.1 Agent profile on the Tivoli Identity Manager Server.Verify that all the requirements have been met before installing the PeopleTools 8.1Agent profile.
Table 4. Requirements before installing an agent profile
Server The Tivoli Identity Manager Server must be installed andrunning before the agent’s profile can be installed.
CD-ROM Drive PeopleTools 8.1 Agent software, including the profileinstallation script, is distributed on CD-Recordable(CD-R) media. Your CD-ROM drive must be able to readCD-R media.
System Administrator Authority The person completing the PeopleTools 8.1 Agent profileinstallation must have root access to the Tivoli IdentityManager Server to complete the procedures in thischapter.
Installing the Agent Profile1. Log in to the Tivoli Identity Manager Server as root.2. Insert the PeopleTools 8.1 Agent Product CD into the CD-ROM drive.3. Complete one of the following:
v For a Tivoli Identity Manager Server installed on a UNIX platform:a. Verify the mount point for the CD-ROM.
# df -k
b. Change the working directory to the CD-ROM drive.# cd /cdrom
where cdrom is the name of the CD-ROM drive.c. Run the PeopleTools 8.1 Agent profile installation script.
# ./instps8.bin
A graphical user interface appears.
© Copyright IBM Corp. 2002 11

v For Tivoli Identity Manager Servers installed on Windows 2000:Select Run... from the Start menu, type your CD-ROM drive, and then typeinstps8.exe. For example:R:\instps8.exe
4. Click OK to accept the default language (English).The Choose Tivoli Identity Manager Home Directory screen appears.
5. Type the Tivoli Identity Manager home directory in the text field and clickNext.You can also select the directory by clicking Choose... and browsing the correctdirectory.The Install Complete screen appears after installation is complete.
6. Click Done.The graphical user interface closes.
12 IBM Tivoli Identity Manager: PeopleTools 8.1 Agent for Windows Installation Guide

Chapter 4. Agent Parameters Modification
This chapter describes how to use the provided agent configuration program toview or modify PeopleTools 8.1 Agent parameters. All modifications made tosettings with this tool take effect immediately.
Accessing the Agent Configuration Tool Main MenuThe following procedure describes how to access the main menu of the agentCfgtool for PeopleTools 8.1 Agent parameters.1. Select Programs from the Start menu, select Accessories, and then select
Command Prompt.The DOS Command Prompt window appears.
2. Change to the agent’s bin directory.Type the following, if the PeopleTools 8.1 Agent directory is in the defaultlocation:cd \Tivoli\Agents\ps8Agent\bin
3. Type agentCfg -agent ps8Agent at the prompt.Enter configuration key for Agent ’ps8Agent’:
You can also use agentCfg to view or change configuration settings from aremote computer. See the table in “Accessing Help and Additional Options” onpage 28 for procedures on using the -hostname argument.
4. Type the configuration key for the PeopleTools 8.1 Agent.The default configuration key is agent. See “Changing Protocol ConfigurationSettings” on page 14 for procedures to change the configuration key.The Main Configuration menu appears.
ps8Agent 4.4.10xx Agent Main Configuration Menu-------------------------------------------A. Configuration Settings.B. Protocol Configuration.C. Event NotificationD. Change Configuration Key.E. Activity Logging.F. Registry Settings.G. Advanced Settings.H. StatisticsX. DoneSelect menu option:Type X to return to the main menu.
This chapter includes a section for each of the following main functions:v For option A, see “Viewing Configuration Settings” on page 14v For option B, see “Changing Protocol Configuration Settings” on page 14v For option C, see “Setting Event Notification” on page 19v For option D, see “Changing the Configuration Key” on page 23v For option E, see “Changing Activity Logging Settings” on page 24v For option F, see “Changing Registry Settings” on page 25v For option G, see “Changing Advanced Settings” on page 27v For option H, see “Viewing Statistics” on page 27
© Copyright IBM Corp. 2002 13

Viewing Configuration SettingsThe following procedure describes how to view the PeopleTools 8.1 Agentconfiguration settings.1. Type option A (Configuration Settings) at the main menu prompt.
The configuration settings for the PeopleTools 8.1 Agent appear. The followingis a sample of the PeopleTools 8.1 Agent configuration settings.
Configuration Settings-------------------------------------------Name : ps8AgentVersion : 4.4.10xxADK Version : 4.26ERM Version : 4.26enRole Version : 4.4License : NONEAsynchronous ADD Requests : TRUE (Max.Threads:3)Asynchronous MOD Requests : TRUE (Max.Threads:3)Asynchronous DEL Requests : TRUE (Max.Threads:3)Asynchronous SEA Requests : TRUE (Max.Threads:3)Available Protocols : DAML, FTPConfigured Protocols : DAMLLogging Enabled : TRUELogging Directory : C:\Tivoli\Agents\ps8Agent\\LogLog File Name : ps8Agent.logMax. log files : 3Max.log file size (Mbytes) : 2Debug Logging Enabled : TRUEDetail Logging Enabled : FALSEPress any key to continue
2. Press any key to return to the main menu.
Changing Protocol Configuration SettingsThe agent can communicate with the Tivoli Identity Manager Server through avariety of communication protocols. The main communication protocols used areDAML and FTP. IBM recommends using the DAML protocol to ensure securecommunication across a network.
The following procedure describes how to change the PeopleTools 8.1 Agentprotocol configuration settings. This section also describes the purpose of theprovided functions.1. Type B (Protocol Configuration) at the main menu prompt.
The Protocol Configuration menu appears. The configured and availableprotocols for your server display above the menu options. The FTP protocol isconfigured and available by default for the PeopleTools 8.1 Agent.
Agent Protocol Configuration Menu-----------------------------------Available Protocols: DAML, FTPConfigured Protocols: DAMLA. Add Protocol.B. Remove Protocol.C. Configure Protocol.X. DoneSelect menu option
2. See the following procedure that corresponds with the option that you want toselect:v For option A, see “Adding a Protocol” on page 15v For option B, see “Removing a Protocol” on page 15
14 IBM Tivoli Identity Manager: PeopleTools 8.1 Agent for Windows Installation Guide

v For option C, see “Configuring a Protocol”
Type X to return to the main menu.
Adding a Protocol1. Type A (Add Protocol) at the Protocol Configuration menu prompt.
The Add New Protocol menu appears and displays protocols that are availableon your server. If there are no protocols to add, the Protocol Configurationmenu reappears.
2. Type the menu option letter of the protocol that you want to add.The Protocol Configuration menu reappears. The protocol that you addedappears as a Configured Protocol. See the procedure for “Configuring aProtocol” to modify the default configuration settings for the protocol that youadded.
Removing a Protocol1. Type B (Remove Protocol) at the Protocol Configuration menu prompt.
The Remove Protocol menu appears and displays all protocols that have beenadded. If there are no protocols to remove, the Protocol Configuration menureappears.
2. Type the menu option letter of the protocol that you want to remove.The Protocol Configuration menu reappears and the protocol that you removedis no longer listed as a configured protocol. However, the protocol remains asan available protocol that can be added again.
Configuring a Protocol1. Type C (Configure Protocol) at the Protocol Configuration menu prompt.
The Configure Protocol menu appears.2. Type the menu option letter of the protocol that you want to configure.
The Protocol Properties menu for the configured protocol appears with protocolproperties.
Note: The properties on your menu may be different from the ones shown.
The following is an example of the DAML protocol properties:
DAML Protocol Properties--------------------------------------------------------------------A. PORTNUMBER 45580 ;Protocol Server port number.B. USERNAME ****** ;Authorized user name.C. PASSWORD ****** ;Authorized user password.D. SRV_NODENAME 192.168.6.40 ;Event Notif. Server name.E. SRV_PORTNUMBER 443 ;Event Notif. Server port number.F. SRV_USERNAME ****** ;Event Notif. user name.G. SRV_PASSWORD ****** ;Event Notif. Server password.H. SRV_TARGET_DN erservicename=agent,o=IBM.com,dc=com
;Event Notif. Server target DN.I. VALIDATE_CLIENT_CE FALSE ;Require client certificate.X. DoneSelect menu option:
The following is an example of the FTP protocol properties:
Chapter 4. Agent Parameters Modification 15

FTP Protocol Properties-------------------------------------------------------------------------------------------A. SRV_INBOX C:\Tivoli\Agents\ps8Agent\\Inbox ;Managed Resource Input mailboxB. SRV_SANDBOX C:\Tivoli\Agents\ps8Agent\\Sandbox ;Managed Resource temporary directoryC. SRV_OUTBOX C:\Tivoli\Agents\ps8Agent\\Outbox ;Managed Resource Output mailboxD. ENCRYPTION_TYPE **** ;Protocol Encryption method (NONE,XOR,COPYCAT,DES,DES3,RC4)E. ENCRYPTION_KEY **** ; Encryption keywordF. RECON_USER_NAME UserName ;Reconciliation login id key nameG. RET_TYPE_RECORDS FALSE ;(optional)Return Record Field InformationH. OUT_PACKET_UMASK 744 ;(optional) Output packet umask (UNIX only)I. AUTHENTICATION NONE ;(optional) Authentication stringJ. GROUPNAME_SUPPORT TRUE ;(optional) GroupName Support (TRUE,FALSE)K. FILTER_NON_ASCII FALSE ;(optional) Filter out non-ascii data (TRUE,FALSE)L. DISPLAY_RECON_RESP FALSE ;(optional) Display recon response to log file (TRUE,FALSE)X. DoneSelect menu option:
3. Type the menu option letter of the protocol property that you want toconfigure.See the table below for additional information about the menu options for theDAML protocol.
Table 5. Menu options for the DAML protocol
Type this Option To Accomplish this
A (PORTNUMBER) The following prompt appears:
Modify Property ’PORTNUMBER’:
Type a different port number, for example, 7004
This is the port number the Tivoli Identity ManagerServer uses to connect to the agent.
B (USERNAME) The following prompt appears:
Modify Property ’USERNAME’:
Type a username, for example, admin
This is the username the Tivoli Identity ManagerServer uses to connect to the agent.
C (PASSWORD) The following prompt appears:
Modify Property ’PASSWORD’:
Type a password, for example, *******
This is the password for the username the TivoliIdentity Manager Server uses to connect to the agent.
D (SRV_NODENAME) The following prompt appears:
Modify Property ’SRV_NODENAME’:
Type a server name, for example, 192.168.6.152
This is the DNS name or IP address of the TivoliIdentity Manager Server.
E (SRV_PORTNUMBER) The following prompt appears:
Modify Property ’SRV_PORTNUMBER’:
Type a different port number to access the TivoliIdentity Manager Server, for example, 7004
This is the port number the agent uses to connect tothe Tivoli Identity Manager Server.
16 IBM Tivoli Identity Manager: PeopleTools 8.1 Agent for Windows Installation Guide

Table 5. Menu options for the DAML protocol (continued)
Type this Option To Accomplish this
F (SRV_USERNAME) The following prompt appears:
Modify Property ’SRV_USERNAME’:
Type a different username, for example, admin
This is the username the agent uses to connect to theTivoli Identity Manager Server.
G (SRV_PASSWORD) The following prompt appears:
Modify Property ’SRV_PASSWORD’:
Type a different password, for example, *****
This is the password for the username the agent usesto connect to the Tivoli Identity Manager Server.
H (SRV_TARGET_DN) The following prompt appears:
Modify Property ’SRV_TARGET_DN’:
Type a different DN for the agent, for example:
erservicename=agent,o=company,dc=com
I (VALIDATE_CLIENT_CE) The following prompt appears:
Modify Property ’VALIDATE_CLIENT_CE’:
Type TRUE to require the Tivoli Identity ManagerServer to send a certificate when communicating withthe agent.
Type FALSE to allow the Tivoli Identity ManagerServer to communicate with the agent without acertificate.Note: You must configure options D through I of theCertTool if you set this option to TRUE.
See the table below for additional information about the menu options for theFTP protocol.
Table 6. Menu options for the FTP protocol
Type this Option To Accomplish this
A (SRV_INBOX) The following prompt appears:
Modify Property ’SRV_INBOX’:
Type a different inbox directory, for example,C:\Inbox
This directory is where the inbound requests reside.You must modify the inbox value on thePeopleTools 8.1 Agent service profile form on theTivoli Identity Manager Server.
Chapter 4. Agent Parameters Modification 17

Table 6. Menu options for the FTP protocol (continued)
Type this Option To Accomplish this
B (SRV_SANDBOX) The following prompt appears:
Modify Property ’SRV_SANDBOX’:
Type a different sandbox directory, for example,C:\Sandbox
This directory is the work area for requestprocessing. Requests are processed from the agentinbox. Requests processed successfully are movedto the outbox. Unsuccessful requests remain in thesandbox.
C (SRV_OUTBOX) The following prompt appears:
Modify Property ’SRV_OUTBOX’:
Type a different outbox directory, for example,C:\Outbox
This directory is where the outbound requestsreside. You must modify the inbox value on thePeopleTools 8.1 Agent service profile form on theTivoli Identity Manager Server.
D (ENCRYPTION_TYPE) The following prompt appears:
Modify Property ’ENCRYPTION_TYPE’:
Accept the default or type NONE to turn offencryption. Or type one of the following validencryption types to activate encryption:
v XOR
v COPYCAT
v DES
v DES3
v RC4
If you selet an encryption type, you must modifythe PeopleTools 8.1 Agent service profile form onthe Tivoli Identity Manager Server. You must alsoturn the encryption value to ON.
E (ENCRYPTION_KEY) The following prompt appears:
Modify Property ’ENCRYPTION_KEY’:
Type a different encryption key, up to 10 characters,and count the number of characters for theencryption key length.
You must modify the encryption key value in thePeopleTools 8.1 Agent service profile form on theTivoli Identity Manager Server.
F (RECON_USER_NAME) The following prompt appears:
Modify Property ’RECON_USER_NAME’:
It is recommended that you do not change thisvalue from the default, UserName. This value isused by Tivoli Identity Manager to separate userrecords in a reconciliation request.
18 IBM Tivoli Identity Manager: PeopleTools 8.1 Agent for Windows Installation Guide

Table 6. Menu options for the FTP protocol (continued)
Type this Option To Accomplish this
G (RET_TYPE_RECORDS) The following prompt appears:
Modify Property ’RET_TYPE_RECORDS’:
Type TRUE at the prompt to record the status ofrequests tracked in the log file.
H (OUT_PACKET_UMASK)
(UNIX only)
The following prompt appears:
Modify Property ’OUT_PACKET_UMASK’:
Type a different umask value to change the read,write, and execute properties of the protocol. Thisproperty is only for UNIX operating systems.
I (AUTHENTICATION) The following prompt appears:
Modify Property ’AUTHENTICATION’:
Type the agent server name. The value must matchthe Agent Server Name field in the PeopleTools 8.1Agent service profile form in the Tivoli IdentityManager Server.
J (GROUPNAME_SUPPORT) The following prompt appears:
Modify Property ’GROUPNAME_SUPPORT’:
Type TRUE at the prompt to enable this feature.
When the option is set to TRUE, group names andattributes are returned during reconciliations
K (FILTER_NON_ASCII) The following prompt appears:
Modify Property ’FILTER_NON_ASCII’:
Type TRUE to filter non-printable characters duringa reconciliation.
L (DISPLAY_RECON_RESP) The following prompt appears:
Modify Property ’DISPLAY_RECON_RESP’:
Type TRUE to send reconciliation responses to thelog file.
4. Change the value and press Enter.The Protocol Properties menu reappears and displays your new settings.
Note: Press Enter to return to the Protocol Properties menu without modifyingthe selected value.
Setting Event NotificationThe following procedure describes how to set Event Notification for the TivoliIdentity Manager Server. Event Notification updates the Tivoli Identity ManagerServer with changes to the Tivoli Identity Manager Server at set intervals.
Note: The example menu shows all the options displayed when Event Notificationis enabled. If Event Notification is disabled, not all of the options aredisplayed.
1. Type C (Event Notification) at the main menu prompt.The Event Notification Menu appears.
Chapter 4. Agent Parameters Modification 19

Event Notification Menu--------------------------------------------------------------* Reconciliation interval : 1 day(s)* Next Reconciliation time : 23 hour(s) 56 min(s). 23 sec(s).* Configured Contexts : Jupiter, dd309A. EnabledB. Time interval between reconciliations.C. Set Processing cache size. (currently: 50 Mbytes)D. Start event notification now.E. Setup attributes for reconciliation.F. Reconciliation process priority. (current: 1)G. Add Event Notification Context.H. Modify Event Notification Context.I. Remove Event Notification Context.J. List Event Notification Contexts.X. DoneSelect menu option:
2. Type the menu option letter of the Event Notification option that you want tochange.
Note: Option A must be enabled in order for the values of the other options totake affect.
Table 7. Event notification options
Type this Option To Accomplish this
A If this option is enabled, the agent updates the Tivoli IdentityManager Server with changes to the agent at regular intervals.
When the option is set to:
v disabled, it automatically changes to enabled
v enabled, it automatically changes to disabled
B (Time intervalbetween reconciliations)
The following prompt appears:
Enter new interval([ww:dd:hh:mm:ss])[00:01:00:00:00]:
Type a different reconciliation interval.
Press Enter to return to the Agent Activity Logging menuwithout changing the value.
C (Set processing cachesize)
The following prompt appears:
Enter new cache size[5]:
Type a different value to change the processing cache size.
Press Enter to return to the Agent Activity Logging menuwithout changing the value.
D (Start eventnotification now)
If this option is selected, event notification is started.
E (Set attributes to bereconciled)
The Event Notification Entry Types menu appears. See “SettingAttributes to be Reconciled” on page 21 for more information.
20 IBM Tivoli Identity Manager: PeopleTools 8.1 Agent for Windows Installation Guide

Table 7. Event notification options (continued)
Type this Option To Accomplish this
F (Reconciliationprocess priority)
The following prompt appears:
Enter new thread priority [1-10]:
Type a different thread value to change reconciliation processpriority.
Press Enter to return to the Agent Activity Logging menuwithout changing the value.
G (Add EventNotification Context)
The following prompt appears:
Context name :
Type the new context name and press Enter. The new context isadded.
H (Modify EventNotification Context)
A menu listing the available contexts appears. See “Modifying anEvent Notification Context” on page 22 for more information.
I (Remove EventNotification Context)
The Remove Context menu appears. Select the context to removeand the following prompt appears:
Delete context context1? [no]:
Press Enter to exit without deleting the context or type Yes andpress Enter to delete the context.
J (List EventNotification Contexts)
The Event Notification Contexts are displayed in the followingformat:
Context Name : Context1Target DN :erservicename=context1,o=IBM,ou=IBM,dc=com--- Attributes for search request ---{search attributes listed}-----------------------------------------------
3. Press Enter if you changed the value for option B, C, E or F.The Event Notification menu reappears and displays your new settings.
Note: The other options are changed automatically when you type thecorresponding menu option letter.
Setting Attributes to be Reconciled1. Type E (Set attributes to be reconciled) at the Event Notification Menu.
The Event Notification Entry Types menu appears.
Event Notification Entry Types-------------------------------------------A. USERB. GROUPX. DoneSelect menu option:
2. Type A for attributes returned during a user reconciliation or type B forattributes returned during a group reconciliation.The Event Notification Attribute Listing for the selected reconciliation typeappears.
Note: The default setting lists all attributes the agent supports.
Chapter 4. Agent Parameters Modification 21

Event Notification Attribute Listing-------------------------------------(a) ** (b) ** (c) **(d) ** (e) ** (f) **(g) ** (h) ** (i) **(j) ** (k) ** (l) **(m) ** (o) ** (q) **(r) ** (s) ** (t) **
(p)rev page 1 of 3 (n)ext-----------------------------
X. DoneSelect menu option:
3. Type the letter option of the attribute to exclude from an event notification.Attributes that are marked with the asterisks are returned during the eventnotification. Attributes that are not marked with asterisks are not returnedduring the event notification.
Modifying an Event Notification Context1. Type H (Modify Event Notification Context) at the Event Notification menu.
The Modify Context Menu appears.
Modify Context Menu------------------------------A. Context1B. Context2C. Context3X. DoneSelect menu option:
2. Select the desired context.The Modify Context menu for the selected context appears.
A. Set attributes for searchB. Target DN:C. Delete Baseline DatabaseX. DoneSelect menu option:
See “Adding Search Attributes for Event Notification” for option A.
See “Configuring the Target DN for Event Notification Contexts” on page 23 foroption B.
See “Removing the Baseline Database for Event Notification Contexts” onpage 23 for option C.
Adding Search Attributes for Event Notification1. Type A (Set attributes for search) at the desired context’s Modify Context menu.
The Reconciliation Attribute Passed to Agent menu appears.
22 IBM Tivoli Identity Manager: PeopleTools 8.1 Agent for Windows Installation Guide

Reconciliation Attributes Passed to Agent for Context: Context1--------------------------------------------------------------------------------------------------------A. Add new attributeB. Modify attribute valueC. Remove attributeX. DoneSelect menu option:
2. Select the desired option and complete the requested information at theprompts.The Reconciliation Attributes Passed to Agent menu reappears with thechanges displayed.
Configuring the Target DN for Event Notification Contexts1. Type B (Target DN) at the desired context’s Modify Context menu.
The following prompt appears:Enter Target DN:
2. Type the target DN for the context and press Enter.The target DN for the event notification context must be in the followingformat:erservicename=nameofservice,o=organizationname,ou=tenantname,dc=com
Each element of the DN is defined as follows:
erservicenameName of the target service used by the product name.
o Name of the organization in the product name.
ou Name of the tenant in which the organization is located. If the productname is an enterprise installation, this is the name of the organization.
dc=comRoot of the directory tree.
The selected context’s Modify Context menu reappears with the new target DNlisted.
Removing the Baseline Database for Event Notification ContextsThis option is only available after a context is created and a reconciliation is run onthe context to create a Baseline Database file.
Type C (Delete Baseline Database) at the desired context’s Modify Context menu.
The selected context’s Modify Context menu reappears with the Delete BaselineDatabase option removed.
Changing the Configuration Key: The following procedure describes how tochange the PeopleTools 8.1 Agent configuration key. You use this key as apassword to access the configuration tool from the selected agent.1. Type D (Change Configuration Key) at the main menu prompt.2. Change the value and press Enter.
Enter new configuration key for Agent ’ps8Agent 4.4.10xx’:
Press Enter to return to the Main Configuration menu without changing theconfiguration key. The default configuration key is agent.
Chapter 4. Agent Parameters Modification 23

Note: Enter a configuration key that you can easily remember.
A message appears:Configuration key successfully changed.
The configuration program exits and the main prompt reappears.
Changing Activity Logging Settings: The following procedure describes how tochange the PeopleTools 8.1 Agent activity logging settings. When you enablelogging, Tivoli Identity Manager maintains a log file of all transactions in a datedarchive log file, ps8Agent.log.1. Type E (Activity Logging) at the main menu prompt.
The Agent Activity Logging menu appears. The following sample shows thedefault activity logging settings.
Agent Activity Logging Menu-------------------------------------A. Activity Logging (Enabled).B. Logging Directory (current: C:\Tivoli\Agents\ps8Agent\\Log).C. Activity Log File Name (current: ps8Agent.log).D. Activity Logging Max. File Size ( 2 mbytes)E. Activity Logging Max. Files ( 3 )F. Debug Logging (Enabled).G. Detail Logging (Disabled).H. Base Logging (Disabled).X. DoneSelect menu option:
2. Type the menu option letter of the activity logging option that you want tochange.
Note: Option A (Activity Logging) must be enabled in order for the values ofthe other options to take effect.
Table 8. Event notification options
Type this Option To Accomplish this
A (Activity Logging) Set this option to enabled and Tivoli Identity Manager maintainsa log file of all transactions in a dated archive log file.
When the option is set to:
v disabled, it automatically changes to enabled
v enabled, it automatically changes to disabled
B (Logging Directory) Type a different value for the logging directory, for example,C:\Log. When the logging option is enabled, details about eachaccess request are stored in the logging file that is located in thisdirectory.
Press Enter to return to the Agent Activity Logging menuwithout changing the value.
C (Activity Log FileName)
Type a different value for the log file name. When the loggingoption is enabled, details about each access request are stored inthe logging file.
Press Enter to return to the Agent Activity Logging menuwithout changing the value.
24 IBM Tivoli Identity Manager: PeopleTools 8.1 Agent for Windows Installation Guide

Table 8. Event notification options (continued)
Type this Option To Accomplish this
D (Activity LoggingMax File Size)
Type a new value, for example, 10. The oldest data is archivedwhen the log file reaches the maximum file size. File size ismeasured in megabytes. Activity log file size can exceed diskcapacity.
Press Enter to return to the Agent Activity Logging menuwithout changing the value.
E (Activity LoggingMax Files)
Type a new value up to 100, for example, 5. The agentautomatically deletes the oldest activity logs beyond the specifiedlimit.
Press Enter to return to the Agent Activity Logging menuwithout changing the value.
F (Debug Logging) If this option is set to enabled, the agent includes the debugstatements in the log file of all transactions.
When the option is set to:
v disabled, it automatically changes to enabled
v enabled, it automatically changes to disabled
G (Detail Logging) If this option is set to enabled, the agent maintains a detailed logfile of all transactions.Note: The detail logging option should be used for diagnosticpurposes only. When the detail logging option is on, theapplication’s performance can be adversely affected.
When the option is set to:
v disabled, it automatically changes to enabled
v enabled, it automatically changes to disabled
H (Base Logging) If this option is set to enabled, the agent maintains a log file ofall transactions in the ADK and library files.
When the option is set to:
v disabled, it automatically changes to enabled
v enabled, it automatically changes to disabled
3. Press Enter if you changed the value for option B, C, D, or E.The Agent Activity Logging menu reappears and displays your new setting(s).
Note: The other options are changed automatically when you type thecorresponding menu option letter.
Changing Registry SettingsThe following procedure describes how to change the PeopleTools 8.1 Agentregistry settings.1. Type F (Registry Settings) at the main menu prompt.
The Registry menu appears.
Chapter 4. Agent Parameters Modification 25

ps8Agent 4.4.10xx Agent Registry Menu-------------------------------------------A. Modify Non-encrypted registry settings.B. Modify encrypted registry settings.C. Multi-instance settings.X. DoneSelect menu option:
2. See the following procedures on modifying registry setting.
Modifying Non-encrypted Registry Settings
Note: There are no encrypted registry settings for this agent.1. Type A (Modifying Non-encrypted Registry Settings) at the Registry menu
prompt.The Non-encrypted Registry settings menu appears.
Agent Registry Items------------------------------------01. ENROLE_Version ’4.4’------------------------------------
Page 1 of 1
A. Add new attributeB. Modify attribute valueC. Remove attributeX. DoneSelect menu option:
2. Type one of the following options:v A) Add new attributev B) Modify attribute valuev C) Remove attributev X) Done
3. Type the registry item name, and press Enter.4. Type the registry item value, if you selected option A or B, and press Enter.
The non-encrypted registry settings menu reappears and displays your newsetting(s).
Multi-instance SettingsThis option allows you to configure multi-instance settings.
Note: This option is only valid if the agent can support multi-instances.1. Type C (Multi-instance Settings) at the Registry Menu prompt.
The PeopleTools 8.1 Agent Instance Class Menu appears.
ps8Agent 4.4.10xx Agent Instance Class Menu--------------------------------------------------------------------------------------------------------------A. Select instance class.X. Done.
2. Type one of the available options.3. Type the requested information and press Enter.
26 IBM Tivoli Identity Manager: PeopleTools 8.1 Agent for Windows Installation Guide

The PeopleTools 8.1 Agent Instance Class Menu reappears and displays yournew setting(s).
Changing Advanced SettingsThe following procedure describes how to change the PeopleTools 8.1 Agent threadcount settings for the following types of requests:v System Login Addv System Login Changev System Login Deletev Reconciliation
These settings determine the maximum number of requests that the PeopleTools8.1 Agent processes concurrently. If your agent’s platform runs FTP, only onerequest is processed at a time; therefore, these settings are irrelevant for the FTPprotocol.1. Type G (Advanced Settings) at the main menu prompt.
The Advanced Settings menu appears. The following sample shows the defaultthread count settings.
ps8Agent 4.4.10xx Advanced Settings Menu-------------------------------------------A. Single Thread Agent (current:TRUE)B. ADD max. thread count. (current:3)C. MODIFY max. thread count. (current:3)D. DELETE max. thread count. (current:3)E. SEARCH max. thread count. (current:3)F. Allow User EXEC procedures (current:FALSE)G. Archive Request Packets (current:FALSE)H. UTF8 Conversion support (current:TRUE)I. Pass search filter to agent (current:FALSE)J. Thread Priority Level (1-10) (current:4)X. DoneSelect menu option:
2. Type the menu option letter of the advanced setting that you want to change.
Note: The UTF8 Conversion support setting must be set to FALSE to supportWestern European character sets.
3. Change the value and press Enter.The Advanced Settings menu reappears and displays your new setting(s).
Viewing StatisticsThe following procedures describes how to view an event log for the PeopleTools8.1 Agent.1. Type H (Statistics) at the main menu prompt.
The activity history for the agent is displayed.
Chapter 4. Agent Parameters Modification 27

ps8Agent 4.4.10xx Agent Request Statistics--------------------------------------------------------------------Date Add Mod Del Ssp Res Rec
-----------------------------------------------------------------
11/15/02 000001 000000 000000 000000 000000 000001
-----------------------------------------------------------------
X. Done
2. Type X to return to the Main Configuration Menu.
Accessing Help and Additional OptionsThe following describes how to access the agentCfg help menu and use the helparguments.1. Return to the PeopleTools 8.1 Agent bin directory by completing one of the
following:v Type X from the Main Configuration menu prompt.v Complete procedures 1 and 2 of “Accessing the Agent Configuration Tool
Main Menu” on page 13.2. Type agentCfg -help at the prompt to view the help menu.
The following list of possible commands appears:
-hostname < value ; Target nodename to connect to (Default:Local host IP address)-findall ; Find all agents on target node-list ; List available agents on target node-agent <value ; Name of agent-tail ; Display agent’s activity log-schema ; Display agent’s attribute schema-portnumber <value>; Specified agent’s TCP/IP port number-netsearch <value> ; Look up agents hosted on specified subnet-help ; Display this help screen
The following table describes the purpose of the provided arguments.
Table 9. Command argument purposes
-hostname <value> Use the -hostname argument with any of the followingcommands to specify a different host:
v -findall
v -list
v -tail
v -agent
Enter a hostname or IP address as the value.
-findall Use this argument to search and display all possible portaddresses for all agents. Must be used with the -listargument. Add the -hostname argument to search a remotehost.
-list Use this argument to search and display agents found atdefault ports. By default, the argument searches the local hostof the PeopleTools 8.1 Agent. Use the -hostname argument tosearch a different host.
28 IBM Tivoli Identity Manager: PeopleTools 8.1 Agent for Windows Installation Guide

Table 9. Command argument purposes (continued)
-agent <value> Use this argument to specify the agent that you want toconfigure. Enter an agent name as the value. Use thisargument with the -hostname argument to modify theconfiguration setting from a remote host. You can also usethis argument with the -tail argument.
-schema Use this argument with the -agent argument to display anagent’s attribute schema.
-portnumber <value> Use this argument with the -agent argument to specify anagent’s TCP/IP port number.
-netsearch <value> Use this argument with the -agent argument to display allagents installed on the system.
-tail Use this argument with the -agent argument to display anagent’s activity log. Add the -hostname argument to displaythe log file for an agent on a different host.
3. Type agentCfg and one or more of the supported arguments at the prompt.You must type agentCfg before every argument to run the agent configurationtool.
Table 10. Arguments
Argument Syntax Argument Example
-argument For example, type agentCfg -list
This example lists all agents on the local host IPaddress. Note that the default node for the TivoliIdentity Manager Server is 44970.
Agent(s) installed on node ’127.0.0.1’-----------------------ps8Agent (44970)
-argument <value> For example, type agentCfg -agent ps8Agent
This example displays the main menu of theagentCfg tool which is used to view or modify thePeopleTools 8.1 Agent parameters.
-argument <value>-argument
or
-argument -argument <value>
For example, type agentCfg -list -hostname192.9.200.7
This example lists agents on a host whose IPaddress is 192.9.200.7. Note that the default nodefor the PeopleTools 8.1 Agent is 44970.
Agent(s) installed on node ’192.9.200.7’------------------ps8Agent (44970)
-argument <value> -argument <value> For example, type agentCfg -agent ps8Agent-hostname 192.9.200.7
This example displays the main menu of theagentCfg tool for a host whose IP address is192.9.200.7. Use the menu options to view ormodify the PeopleTools 8.1 Agent parameters.
Chapter 4. Agent Parameters Modification 29

30 IBM Tivoli Identity Manager: PeopleTools 8.1 Agent for Windows Installation Guide

Chapter 5. Certificate Installation
This chapter describes how to use the provided certificate tool to install andconfigure certificates for your Tivoli Identity Manager Agent. The Tivoli IdentityManager Server relies on certificates to establish secure SSL communicationbetween the Tivoli Identity Manager Server and the Tivoli Identity ManagerAgents.
Certificates are used in conjunction with Certificate Authorities (CA) to verify thata transmission between the Tivoli Identity Manager Agent and the Tivoli IdentityManager Server has not been modified in any way.
You must obtain a production certificate from a well-known Certificate Authorityor use your own Certificate Authority to create a secure certificate to use with theTivoli Identity Manager Agent. The agent does not come prepackaged with acertificate.
Note: If you install, modify, or delete a certificate, you must stop and restart theagent before the changes will take affect.
CA and Certificate LocationsCertificates are required in several locations in the Tivoli Identity ManagerApplication. The following diagrams identify where each CA and correspondingcertificate is located, depending on the configuration of the system.
Basic ConfigurationIn this configuration, the Tivoli Identity Manager Server and a Web Server areinstalled on the same system. The Tivoli Identity Manager Agent must have a validclient certificate; the Tivoli Identity Manager Server must have the correspondingCA certificate. In order to utilize the client validation and event notificationfeatures, the Tivoli Identity Manager Server must also have a valid client certificateand the Tivoli Identity Manager Agent must have the corresponding CA certificate.
© Copyright IBM Corp. 2002 31

Tivoli Identity Manager Configuration with an Agent ProxyThis configuration of the Tivoli Identity Manager system is the same as the basicTivoli Identity Manager configuration except that this configuration has anadditional step. The configuration uses an Agent Proxy to communicate with theagents instead of having the Tivoli Identity Manager Server communicate to theagents directly.
The Tivoli Identity Manager Agent Proxy, hereafter referred to as Agent Proxy,must have a valid client certificate; the Tivoli Identity Manager Server must havethe corresponding CA certificate. The Agent Proxy must also have a valid CAcertificate that corresponds to the client certificate located on the Tivoli IdentityManager Agent.
In order to utilize the client validation and event notification features, the TivoliIdentity Manager Server must have a valid client certificate and the Agent Proxymust have the corresponding CA certificate. The Tivoli Identity Manager Agentmust also have a valid CA certificate that corresponds to a client certificate that isinstalled on the Agent Proxy.
WebSphere
Tivoli Identity Manager Server
MQ Series
Web Server
(IBM HTTP Server)
WebSphere Plug-in
(Servlet)
CA
Cert
A
Cert
A
https
Certificates denoted by a
solid line are required for
minimal SSL connections
CA
Cert
B
Cert
B
CA
Cert
C
Cert
C
Agent
Certificates denoted by
dashed lines are required
for client validation and
event notification
Figure 4. Basic configuration
32 IBM Tivoli Identity Manager: PeopleTools 8.1 Agent for Windows Installation Guide

Clustered Tivoli Identity Manager ConfigurationIn this sample clustered configuration, the Tivoli Identity Manager System uses oneWeb Server to manage and load balance multiple Tivoli Identity Manager Servers.Each Tivoli Identity Manager Server must have a valid CA certificate. All otherpieces of the cluster (Agent Proxy and Tivoli Identity Manager agents) must haveCA and client certificates as described in the previous sections.
Accessing the Certificate Configuration Tool Main MenuThe following procedure describes how to access the main menu of the CertToolfor PeopleTools 8.1 Agent certificate parameters.
WebSphere
Tivoli Identity Manager Server
MQ Series
Web Server
(IBM HTTP Server)
WebSphere Plug-in
(Servlet)
CA
Cert
A
Cert
A
https
Certificates denoted by a
solid line are required for
minimal SSL connections
CA
Cert
B
Cert
B
CA
Cert
C
Cert
C
CA
Cert
X
Cert
X
CA
Cert
Y
Cert
Y
Agent
ProxyAgentAgent
Proxy
Agent
Proxy
Certificates denoted by
dashed lines are required
for client validation and
event notification
Figure 5. Web proxy configuration
WebSphere
Tivoli Identity Manager Server
MQ Series
Web Server
(IBM HTTP Server)
WebSphere Plug-in
(Servlet)
CA
Cert
A
Cert
A
Certificates denoted by a
solid line are required for
minimal SSL connections
CA
Cert
B
Cert
B
Certificates denoted by
dashed lines are required
for client validation and
event notificationWebSphere
Tivoli Identity Manager Server
MQ Series
Web Server
(IBM HTTP Server)
WebSphere Plug-in
(Servlet)
CA
Cert
B
Cert
B
Same
configuration
as previous
examples
Figure 6. Clustered configuration
Chapter 5. Certificate Installation 33

1. Select Programs from the Start menu, select Accessories, and then selectCommand Prompt.The Microsoft Windows DOS Command Prompt window appears.
2. Change to the agent’s bin directory.If the PeopleTools 8.1 Agent directory is in the default location, type cd\Tivoli\Agents\ps8Agent\bin.
3. Type CertTool -agent ps8Agent at the prompt.The Main Configuration menu appears.
Main menu - Configuring agent: ps8Agent-------------------------------------------A. Generate private key and certificate requestB. Install certificate from fileC. Install certificate and key from PKCS12 fileD. View current installed certificateE. List CA certificatesF. Install a CA certificateG. Delete a CA certificateH. List registered certificatesI. Register certificateJ. Unregister a certificateX. QuitChoice:
The first set of options allows installing a certificate for the agent itself. Theoptions here are:
A Request a certificate with the private key for the certificate generatedand stored by the Tivoli Identity Manager Server.
B Install a certificate from a file. This file must be the certificate obtainedfrom the request generated by option A.
C Install a certificate from a PKCS12 format file that includes both thepublic certificate and a private key. If options A and B are not used toobtain a certificate, the certificate used must be in PKCS12 format.
D View installed certificates allows you to view all certificates installed onthe system.
The remaining options only apply if client validation is enabled.
The second set of options allows installing CA certificates. The CA certificatesare then used by the Tivoli Identity Manager Agent to validate the certificatesof associated Tivoli Identity Manager Servers.
E List CA Certificates shows the installed CA certificates. The agent onlycommunicates with Tivoli Identity Manager Servers whose certificatesare validated by one of the installed CA certificates.
F Install a CA Certificate installs a new CA certificate so that certificatesgenerated by this CA can be validated. The CA certificate file can beeither in X.509, binary, or PEM encoded formats.
G Delete a CA Certificate removes one of the installed CA certificates.
The third set of options allows the agent to register the Tivoli Identity ManagerServer certificate. The Tivoli Identity Manager Agent certificate is thenvalidated by the agent when SSL communication is established. If the TivoliIdentity Manager Server’s certificate is validated by one of the Agent’s CA
34 IBM Tivoli Identity Manager: PeopleTools 8.1 Agent for Windows Installation Guide

certificates but not registered with the Agent, the Agent will refuse tocommunicate with the Tivoli Identity Manager Server.
H List Registered Certificates lists all certificates that will be accepted forcommunications.
I Register Certificate registers a new certificate. The certificate to beregistered should be in Base 64 encoded X.509 format.
J Unregister a Certificate removes a certificate from the registered list.
This chapter includes a section for each of the following main functions:v For option A, see “Generating a Private Key and Certificate Request”.v For option B, see “Installing the Certificate from a File” on page 36.v For option C, see “Installing the Certificate and Key from a PKCS12 File” on
page 37.v For option D, see “Viewing Installed Certificates” on page 37.v For option E, see “Viewing CA Certificates” on page 37.v For option F, see “Installing a CA Certificate” on page 37.v For option G, see “Deleting a CA Certificate” on page 38.v For option H, see “Viewing Registered Certificates” on page 38.v For option I, see “Registering a Certificate” on page 38.v For option J, see “Unregistering a Certificate” on page 38.
Type X to return to the main menu.
Generating a Private Key and Certificate RequestThe following procedure describes how to view the PeopleTools 8.1 Agentconfiguration settings.1. Type option A (Generate a private key and certificate request) at the main
menu prompt.Enter values for certificate request (press enter to skip value)-------------------------------------------------------------------------
2. Type your organization name and press Enter.Organization:
3. Type the desired organizational unit and press Enter.Organizational Unit:
4. Type the name of the agent you are requesting a certificate for and pressEnter.Agent Name:
5. Type the contact email address and press Enter.Email:
6. Type the country in which the agent resides and press Enter.Country:
7. Type the state in which the agent resides (if the agent is located in the UnitedStates) and press Enter.State:
Note: Some certificate authorities do not accept two letter abbreviations forstates.
8. Type the name of the city in which the agent resides and press Enter.
Chapter 5. Certificate Installation 35

Locality:
9. Type Y to accept the values displayed or type N to re-enter the values andpress Enter.Accept these values (y/n)?
The key pair and certificate request are generated once the values areaccepted.
10. Type the name of the file to store the PEM certificate request and press Enter.Enter name of file to store PEM cert request (Enter to cancel):
11. Press Enter.The main menu reappears.
You must now request a certificate from a trusted certificate authority.
Example of Certificate Request ScriptThe following is an example of a certificate request:
Enter values for certificate request (press enter to skip value)-----------------------------------------------------------------Organization: ibmOrganizational Unit: engineeringAgent Name: ntagentEmail: [email protected]: USState: CaliforniaLocality: IrvineAccept these values (y/n)? yGenerating key pair and certificate request ...Enter name of file to store PEM cert request (Enter to cancel) : request.pemCertificate request written to request.pem. Press Enter to continue.
Example of request.pem File-----BEGIN CERTIFICATE REQUEST-----MIIB1jCCAT8CAQAwgZUxEjAQBgNVBAoTCWFjY2VzczM2MDEUMBIGA1UECxMLZW5naW5lZXJpbmcxEDAOBgNVBAMTB250YWdlbnQxJDAiBgkqhkiG9w0BCQEWFW50YWdlbnRAYWNjZXNzMzYwLmNvbTELMAkGA1UEBhMCVVMxEzARBgNVBAgTCkNhbGlmb3JuaWExDzANBgNVBAcTBklydmluZTCBnzANBgkqhkiG9w0BAQEFAAOBjQAwgYkCgYEAmR6AcPnwf6hLLc72BmUkAwaXcebtxCoCnnTH9uc8VuMHPbIMAgjuC4s91hPrilG7UtlbOfy6X3R3kbeR8apRR9uLYrPIvQ1b4NK0whsytij6syCySaFQIB6V7RPBatFr6XQ9hpsARdkGytZmGTgGTJ1hSS/jA6mbxpgmttz9HPECAwEAAaAAMA0GCSqGSIb3DQEBAgUAA4GBADxA1cDkvXhgZntHkwT9tCTqUNV9sim8N/U15HgMRh177jVaHJqbN1Er46vQSsOOOk4z2i/XwOmFkNNTXRVl9TLZZ/D+9mGZcDobcO+lbAKlePwyufxKXqdpu3d433H7xfJJSNYLYBFkrQJesITqKft0Q45gIjywIrbctVUCepL2-----END CERTIFICATE REQUEST-----
Installing the Certificate from a FileThe following procedure describes how to install a certificate in the agent registry.This is the certificate you receive from your trusted certificate authority aftersubmitting your certificate request.
Note: If you received the certificate as part of an e-mail message, copy the text ofthe certificate to a text file and copy the certificate file (the text file you justcreated) to the agent’s bin directory.
1. Type B (Install certificate from file) at the main menu prompt.A prompt appears:Enter name of certificate file:
36 IBM Tivoli Identity Manager: PeopleTools 8.1 Agent for Windows Installation Guide

2. Type the name of the certificate file and press Enter.The certificate is installed in the agent registry and the main menu reappears.
Installing the Certificate and Key from a PKCS12 FileThe following procedure describes how to install the certificate and the private keyin the agent registry from a PKCS12 (.pfx) file. This format includes both thecertificate and private key in a password protected file.
Note: Be sure to copy the certificate file to the agent’s bin directory.1. Type C (Install certificate and key from PKCS12 file) at the main menu prompt.2. Type the name of the PKCS12 file that has the certificate and private key
information and press Enter.Enter name of PKCS12 file:
3. Type the password to access the file and press Enter.Enter password:
The certificate and private key are installed in the agent registry.
Viewing Installed CertificatesYou can list all of the certificates installed on your system using option D (Viewcurrently installed certificates).
Type D (View currently installed certificates) at the main menu prompt.
The installed certificates are listed and the main menu reappears. The following isan example of an installed certificate:The following certificate is currently installed.Subject: c=US,st=California,l=Irvine,o=DAML,cn=DAML Server
Viewing CA CertificatesThe following procedure describes how to list all CA certificates installed on theagent.
Type E (List CA certificates) at the main menu prompt.
The installed CA certificates are listed and the main menu reappears. Thefollowing is an example only.Subject: o=IBM,ou=SampleCACert,cn=TestCAValid To: Wed Jul 26 23:59:59 2006
Installing a CA CertificateThe following procedure describes how to install a CA certificate.1. Type F (Install a CA certificate) at the main menu prompt.
A prompt appears:Enter name of certificate file:
2. Type the name of the certificate file and press Enter.The certificate file is opened and a prompt appears:[email protected],c=US,st=California,l=Irvine,o=IBM,ou=Engineering,cn=EngInstall the CA? (Y/N)
Chapter 5. Certificate Installation 37

3. Type Y to install the certificate and press Enter.The CA certificate file is installed in the CACerts.pem file.
Deleting a CA CertificateThe following procedures describe how to delete a CA certificate from the agentdirectories.1. Type G (Delete a CA certificate) at the main menu prompt.
A list of all CA certificates installed on the agent is displayed.0 - [email protected],c=US,st=California,l=Irvine,o=IBM,ou=Engineering,cn=Eng1 - [email protected],c=US,st=California,l=Irvine,o=IBM,ou=Support,cn=SupportEnter number of CA certificate to remove:
2. Type the number of the CA certificate you want to remove and press Enter.The CA certificate is deleted from the CACerts.pem file and the main menureappears.
Viewing Registered CertificatesThe following procedures describe how to view a list of all registered certificatesavailable to the agent. Only requests that present a registered certificate will beaccepted by the agent when client validation is enabled.
Type H (List registered certificates) at the main menu prompt.
The registered certificates are displayed and the main menu reappears. Thefollowing is an example only.0 - [email protected],c=US,st=California,l=Irvine,o=IBM,ou=Engineering,cn=Eng1 - [email protected],c=US,st=California,l=Irvine,o=IBM,ou=Support,cn=Support
Registering a CertificateThe following procedures describe how to register a certificate for the agent.1. Type I (Register certificate) at the main menu prompt.
A prompt appears:Enter name of certificate file:
2. Type the name of the certificate file to be registered and press Enter.The subject of the certificate is displayed and a prompt [email protected],c=US,st=California,l=Irvine,o=IBM,ou=Engineering,cn=EngRegister this CA? (Y/N)
3. Type Y to register the certificate and press Enter.The certificate is registered to the agent and the main menu reappears.
Unregistering a CertificateThe following procedures describe how to unregister a certificate for the agent.1. Type J (Unregister a certificate) at the main menu prompt.
The registered certificates are displayed. The following is an example only.0 - [email protected],c=US,st=California,l=Irvine,o=IBM,ou=Engineering,cn=Eng1 - [email protected],c=US,st=California,l=Irvine,o=IBM,ou=Support,cn=Support
2. Type the number of the certificate file to be unregistered and press Enter.The subject of the selected certificate is displayed.
3. Type Y to unregister the certificate and press Enter.
38 IBM Tivoli Identity Manager: PeopleTools 8.1 Agent for Windows Installation Guide

The certificate is removed from the registered certificate list for the agent andthe main menu reappears.
Chapter 5. Certificate Installation 39

40 IBM Tivoli Identity Manager: PeopleTools 8.1 Agent for Windows Installation Guide

Appendix A. Agent Variables
The PeopleTools 8.1 Agent consists of files and directories owned by the TivoliIdentity Manager account. The Tivoli Identity Manager-owned files establishcommunication with the Tivoli Identity Manager Server.
Variable DescriptionsThe Tivoli Identity Manager Server communicates with the PeopleTools 8.1 Agentusing variables included in transmission packets sent over a network. Thecombination of variables, included in the packets, depends on the type of actionthe Tivoli Identity Manager Server requests from the PeopleTools 8.1 Agent.
The following table is an alphabetical listing of the variables used by thePeopleTools 8.1 Agent. The table gives a brief description and the data formatassociated with the variable.
Table 11. Variable descriptions
Variable NameDirectory ServerAttribute Description Data Type
description description User’s accountdescription
String
erAccountStatus erAccountStatus Status of user’saccount
String
erPassword erPassword User’s accountpassword
Encrypted String
erPS8Admin erPS8Admin Flag indicatingwhether or not theuser is anadministrator
Boolean
erPS8AltId erPS8AltId Workflow alternateuser ID
String
erPS8AppPort erPS8AppPort Application Serverport number
Integer
erPS8AppServer erPS8AppServer Application Servername
String
erPS8CurrCode erPS8CurrCode Currency code String
erPS8Email erPS8Email User’s e-mail address String
erPS8EmailUser erPS8EmailUser Flag indicatingwhether or not toroute emails to theuser
Boolean
erPS8EndDate erPS8EndDate Workflow to date String
erPS8ExpertEntry erPS8ExpertEntry Flag indicatingwhether or not toenable the ExpertEntry feature
Boolean
erPS8FormId erPS8FormId Workflow form ID String
© Copyright IBM Corp. 2002 41

Table 11. Variable descriptions (continued)
Variable NameDirectory ServerAttribute Description Data Type
erPS8FormsUser erPS8FormsUser Flag indicatingwhether or not toroute forms to theuser
Boolean
erPS8HomePagePL erPS8HomePagePL Navigator home pagepermission list
String
erPS8LangCode erPS8LangCode Language code String
erPS8MultiLang erPS8MultiLang Flag indicatingwhether or notmulti-languagefeature is enabled
Boolean
erPS8Password erPS8Password Agent’s PeopleToolsaccount password
Encrypted String
erPS8PrimaryPL erPS8PrimaryPL Primary permissionlist
String
erPS8ProfilePL erPS8ProfilePL Process profilepermission list
String
erPS8Role erPS8Role Role names String
erPS8RowPL erPS8RowPL Row securitypermission list
String
erPS8StartDate erPS8StartDate Workflow effectivedate
String
erPS8SymbId erPS8SymbId Symbolic ID String
erPS8Uid erPS8Uid Agent’s PeopleToolsaccount name
String
erPS8WorklistUser erPS8WorklistUser Flag indicatingwhether or not toroute the worklist tothe user
Boolean
erUID (UserName) erUID User account name String
Variables by PeopleTools 8.1 Agent ActionsThe following lists are typical PeopleTools 8.1 Agent actions by their functionaltransaction group. The lists include more information about required and optionalvariables sent to the PeopleTools 8.1 Agent to complete that action.
System Login AddA Login Add is a request to create a new user account in the domain with thespecified attributes.
42 IBM Tivoli Identity Manager: PeopleTools 8.1 Agent for Windows Installation Guide

Table 12. Add function attributes
Required Variables Optional Variables
erPS8AppServer
erPS8AppPort
erPS8Password
erPassword
erUid
description
erPS8Admin
erPS8AltId
erPS8CurrCode
erPS8Email
erPS8EmailUser
erPS8EndDate
erPS8ExpertEntry
erPS8FormId
erPS8FormsUser
erPS8HomePagePL
erPS8LangCode
erPS8MultiLang
erPS8PrimaryPL
erPS8ProfilePL
erPS8Role
erPS8RowPL
erPS8StartDate
erPS8SymbId
erPS8WorklistUser
System Login ChangeUse the Change function to change one or more attributes for the specified users.
Table 13. Change function attributes
Required Variables Optional Variables
erPS8AppServer
erPS8AppPort
erPS8Password
erUid
description
erPassword
erPS8Admin
erPS8AltId
erPS8CurrCode
erPS8Email
erPS8EmailUser
erPS8EndDate
erPS8ExpertEntry
erPS8FormId
erPS8FormsUser
erPS8HomePagePL
erPS8LangCode
erPS8MultiLang
erPS8PrimaryPL
erPS8ProfilePL
erPS8Role
erPS8RowPL
erPS8StartDate
erPS8SymbId
erPS8WorklistUser
System Login DeleteThe Delete function removes the specified user from the active directory.
Table 14. Delete function
Required Variables Optional Variables
erPS8AppServer
erPS8AppPort
erPS8Password
erUid
None
System Login SuspendUse the Suspend function to disable a user account. The user is neither removednor are their attributes modified.
Appendix A. Agent Variables 43
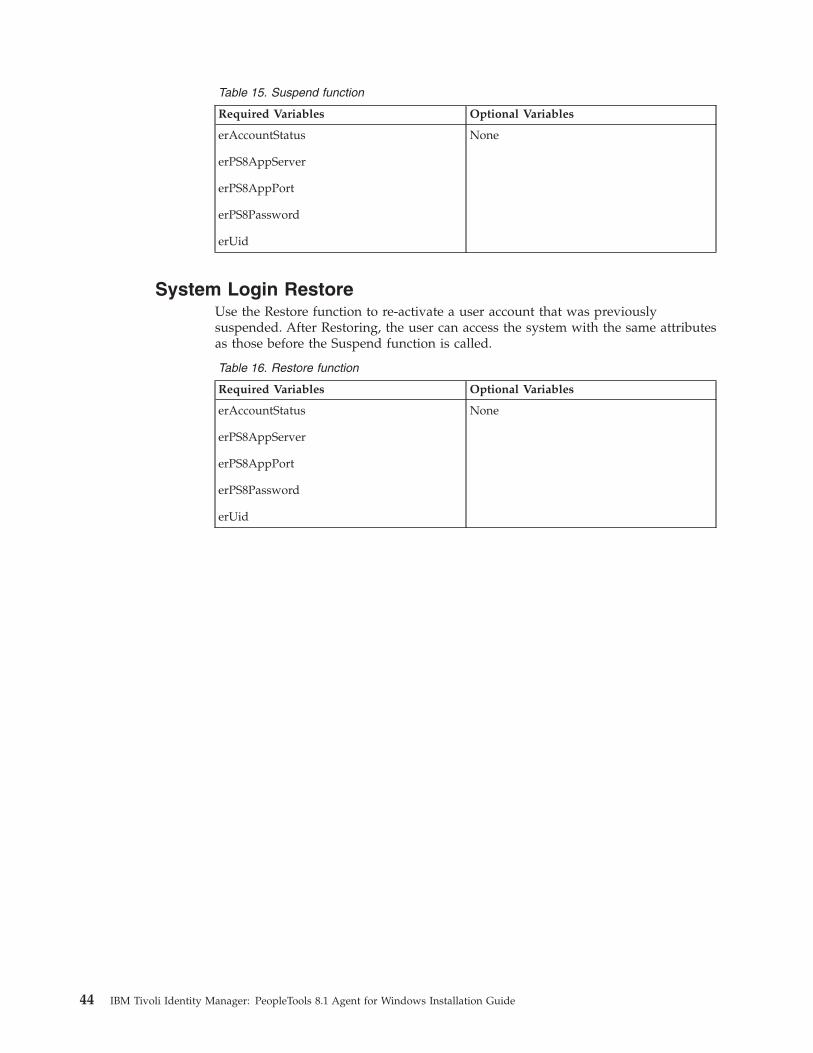
Table 15. Suspend function
Required Variables Optional Variables
erAccountStatus
erPS8AppServer
erPS8AppPort
erPS8Password
erUid
None
System Login RestoreUse the Restore function to re-activate a user account that was previouslysuspended. After Restoring, the user can access the system with the same attributesas those before the Suspend function is called.
Table 16. Restore function
Required Variables Optional Variables
erAccountStatus
erPS8AppServer
erPS8AppPort
erPS8Password
erUid
None
44 IBM Tivoli Identity Manager: PeopleTools 8.1 Agent for Windows Installation Guide

Appendix B. Agent Removal
This appendix describes the PeopleTools 8.1 Agent uninstall procedures. Give usersadvance warning that the resource will be unavailable prior to removing the agent.If the server is taken offline, PeopleTools 8.1 Agent requests that are not completedmay not be recoverable when the server is back online.
Automatic UninstallComplete the following procedure to remove the PeopleTools 8.1 Agent anddirectories.1. Stop the PeopleTools 8.1 Agent service.2. Open Windows Explorer and execute UNWISE.exe.3. Select the install.log file and click OK.
The Select Uninstall Method dialog window appears.
4. Select the Automatic radio button and click Next.The Perform Uninstall dialog window appears.
Uninstall <agentname>
Select Uninstall Method
CancelNext >
Welcome to the < > uninstall program.
You can choose to automatically uninstall this software or tochoose exactly which changes are made to your system.
Select the Custom button to select which modifications are to bemade during the uninstall. Select the Automatic button for thedefault uninstall options. Press the Next button to continue.
agentname
< ackB
A
C
utomatic
ustom
Figure 7. Automatic uninstall
© Copyright IBM Corp. 2002 45

5. Click Finish.The PeopleTools 8.1 Agent components are deleted.
Note: Inspect the directory tree for PeopleTools 8.1 Agent directories,subdirectories, and files to verify that uninstall is complete. ThePeopleTools 8.1 Agent should no longer appear in the Services dialogwindow.
Custom UninstallComplete the following procedures to selectively remove the PeopleTools 8.1 Agentprograms and directories.1. Stop the PeopleTools 8.1 Agent service.2. Open Windows Explorer and execute UNWISE.exe.3. Select the install.log file and click OK.
The Select Uninstall Method dialog window appears.
Uninstall <agentname>
Perform Uninstall
Cancel
You are now ready to uninstall the < > from yoursystem.
Press the Finish button to perform the uninstall. Press the Backbutton to change any of the uninstall options. Press the Cancelbutton to exit the uninstall.
agentname
< ackB Finish
Figure 8. Perform uninstall dialog
46 IBM Tivoli Identity Manager: PeopleTools 8.1 Agent for Windows Installation Guide

4. Select the Custom radio button and click Next.The Select Private Files to Remove dialog window appears.
5. Click Select All and then click Next.
Uninstall <agentname>
Select Uninstall Method
CancelNext >< ackB
Welcome to the < > uninstall program.
You can choose to automatically uninstall this software or tochoose exactly which changes are made to your system.
Select the Custom button to select which modifications are to bemade during the uninstall. Select the Automatic button for thedefault uninstall options. Press the Next button to continue.
agentname
A
C
utomatic
ustom
Figure 9. Custom uninstall
Uninstall <agentname>
Select Private Files to Remove
The following files should be deleted to remove the softwarefrom your system. Press the Select All button to remove all ofthe listed files or select the files individually.
C:\Tivoli\Agents\ \Data\xforms.xml<agentpath>C:\Tivoli\Agents\ \bin\CertTool.exeC:\Tivoli\Agents\ \bin\< >.exeC:\Tivoli\Agents\ \bin\< >.exeC:\Tivoli\Agents\ \bin\agentCfg.exeC:\Tivoli\Agents\ \bin\UNWISE.EXE
<agentpath><agentpath> agentname<agentpath> configname<agentpath><agentpath>
Select llA Select None
< ackB CancelNext >
Figure 10. Select private files dialog
Appendix B. Agent Removal 47

The Select Directories to Remove dialog window appears.
6. Do one of the following:v Select a directory and click Next to remove the directory.v Click Next without selecting a directory.
The Select Registry Keys to Edit dialog window appears. The Registry Keysthat were changed during the installation are listed.
Uninstall <agentname>
Select Directories to Remove
Select llA Select None
< ackB CancelNext >
The following directories were created during the installation.Selecting a directory will remove it and all files and directoriesthat are contained within it.
C:\TIVOLI\AGENTS\ \BIN<agentpath>
Figure 11. Select directories to remove dialog
48 IBM Tivoli Identity Manager: PeopleTools 8.1 Agent for Windows Installation Guide

7. Click Select All and then click Next.The Select Sub-Systems to Remove dialog window appears.
8. Click Select All and then click Next.
Uninstall <agentname>
Select Registry Trees to Remove
Select llA Select None
< ackB CancelNext >
The following registry trees were added during the installation.Select those registry keys that you want removed, including allof their sub-keys.
SOFTWARE\< >agenttree
Figure 12. Select Registry Keys to Edit dialog
Uninstall <agentname>
Select Sub-Systems to Remove
Select llA Select None
< ackB CancelNext >
The following sub-systems were configured during theinstallation. Select those sub-systems that you want toremove.
<a >gentpath
Figure 13. Select Sub-Systems to Remove dialog
Appendix B. Agent Removal 49

The Perform Uninstall dialog window appears.
9. Click Finish.The Uninstall program completes the uninstall of the PeopleTools 8.1 Agent.
Note: Inspect the directory tree for PeopleTools 8.1 Agent directories,subdirectories, and files to verify that uninstall is complete. ThePeopleTools 8.1 Agent should no longer appear in the Services dialogwindow.
Uninstall <agentname>
Perform Uninstall
Cancel
You are now ready to uninstall the < > from yoursystem.
Press the Finish button to perform the uninstall. Press the Backbutton to change any of the uninstall options. Press the Cancelbutton to exit the uninstall.
agentname
< ackB Finish
Figure 14. Perform Uninstall dialog
50 IBM Tivoli Identity Manager: PeopleTools 8.1 Agent for Windows Installation Guide

Appendix C. Notices
This information was developed for products and services offered in the U.S.A.IBM may not offer the products, services, or features discussed in this document inother countries. Consult your local IBM representative for information on theproducts and services currently available in your area. Any reference to an IBMproduct, program, or service is not intended to state or imply that only that IBMproduct, program, or service may be used. Any functionally equivalent product,program, or service that does not infringe any IBM intellectual property right maybe used instead. However, it is the user’s responsibility to evaluate and verify theoperation of any non-IBM product, program, or service.
IBM may have patents or pending patent applications covering subject matterdescribed in this document. The furnishing of this document does not give youany license to these patents. You can send license inquiries, in writing, to:
IBM Director of LicensingIBM CorporationNorth Castle DriveArmonk, NY 10504-1785U.S.A.
For license inquiries regarding double-byte (DBCS) information, contact the IBMIntellectual Property Department in your country or send inquiries, in writing, to:
IBM World Trade Asia CorporationLicensing2-31 Roppongi 3-chome, Minato-kuTokyo 106-0032, Japan
The following paragraph does not apply to the United Kingdom or any othercountry where such provisions are inconsistent with local law:INTERNATIONAL BUSINESS MACHINES CORPORATION PROVIDES THISPUBLICATION “AS IS” WITHOUT WARRANTY OF ANY KIND, EITHEREXPRESS OR IMPLIED, INCLUDING, BUT NOT LIMITED TO, THE IMPLIEDWARRANTIES OF NON-INFRINGEMENT, MERCHANTABILITY OR FITNESSFOR A PARTICULAR PURPOSE. Some states do not allow disclaimer of express orimplied warranties in certain transactions, therefore, this statement may not applyto you.
This information could include technical inaccuracies or typographical errors.Changes are periodically made to the information herein; these changes will beincorporated in new editions of the publication. IBM may make improvementsand/or changes in the product(s) and/or the program(s) described in thispublication at any time without notice.
Any references in this information to non-IBM Web sites are provided forconvenience only and do not in any manner serve as an endorsement of those Websites. The materials at those Web sites are not part of the materials for this IBMproduct and use of those Web sites is at your own risk.
IBM may use or distribute any of the information you supply in any way itbelieves appropriate without incurring any obligation to you.
© Copyright IBM Corp. 2002 51

Licensees of this program who wish to have information about it for the purposeof enabling: (i) the exchange of information between independently createdprograms and other programs (including this one) and (ii) the mutual use of theinformation which has been exchanged should contact:
IBM Corporation2ZA4/10111400 Burnet RoadAustin, TX 78758U.S.A.
Such information may be available, subject to appropriate terms and conditions,including in some cases, payment of a fee.
The licensed program described in this information and all licensed materialavailable for it are provided by IBM under terms of the IBM Customer Agreement,IBM International Program License Agreement, or any equivalent agreementbetween us.
Any performance data contained herein was determined in a controlledenvironment. Therefore, the results obtained in other operating environments mayvary significantly. Some measurements may have been made on development-levelsystems and there is no guarantee that these measurements will be the same ongenerally available systems. Furthermore, some measurements may have beenestimated through extrapolation. Actual results may vary. Users of this documentshould verify the applicable data for their specific environment.
Information concerning non-IBM products was obtained from the suppliers ofthose products, their published announcements or other publicly available sources.IBM has not tested those products and cannot confirm the accuracy ofperformance, compatibility or any other claims related to non-IBM products.Questions on the capabilities of non-IBM products should be addressed to thesuppliers of those products.
TrademarksThe following terms are trademarks or registered trademarks of InternationalBusiness Machines Corporation in the United States, other countries, or both:
AIXDB2IBMIBM logoSecureWayTivoliTivoli logoUniversal DatabaseWebSphere
Lotus is a registered trademark of Lotus Development Corporation and/or IBMCorporation.
Domino is a trademark of International Business Machines Corporation and LotusDevelopment Corporation in the United States, other countries, or both.
Microsoft, Windows, Windows NT, and the Windows logo are trademarks ofMicrosoft Corporation in the United States, other countries, or both.
52 IBM Tivoli Identity Manager: PeopleTools 8.1 Agent for Windows Installation Guide

Java and all Java-based trademarks and logos are trademarks or registeredtrademarks of Sun Microsystems, Inc. in the United States and other countries.
UNIX is a registered trademark of The Open Group in the United States and othercountries.
Other company, product, and service names may be trademarks or service marksof others.
Appendix C. Notices 53

54 IBM Tivoli Identity Manager: PeopleTools 8.1 Agent for Windows Installation Guide

Index
Aadministrator authority 3agent
profileinstallation 11purpose 11
variablesby Tivoli Identity Manager action 42descriptions 41
agent configuration tool, see agentCfg 13agentCfg
arguments, use 28changing agent parameters
accessing 13configuration key 23protocol settings 14registry settings 25request processing 27
menusactivity logging 24advanced settings 27event notification 19help 28Main Configuration 13Protocol Configuration 14registry 25
viewing configuration settings 14authentication, changing with agentCfg 19
CCD-ROM drive 3certificate
CAavailable functions 34deleting 38installing 37locations 31viewing installed 37
configuration settings, changing with CertTool 34example
request script 36request.pem file 36
installfrom file 36sample 37tool 31
locations 31protocol configuration tool, see CertTool 33registered
registering 38removing 38viewing 38
request 35viewing
installed 37registered 38
CertToolCA certificate
deleting 38
CertTool (continued)CA certificate (continued)
installing 37viewing 37
certificateinstall 37register 35request 35viewing installed 37viewing registered 38
changing agent parametersaccessing 33options 34
install, certificate 36private key, generating 35registered certificate
registering 38removing 38viewing 38
character sets, support 27configuration
keychanging with agentCfg 23default value 13, 23purpose 13
settingschanging with agentCfg 13default value 14viewing with agentCfg 14
COPYCAT encryption type 15customer support
phone number vweb site v
DDAML protocol
options 16properties, changing with agentCfg
options 16password 16srv_nodename 16srv_password 17srv_portnumber 16srv_target_dn 17srv_username 17srv_validate_client_ce 17username 16
debug logdefault value 24enable/disable with agentCfg 24purpose 25
DES3 encryption type 15detail log
default value 24enable/disable with agentCfg 24purpose 25
display recon resp, changing with agentCfg 19
© Copyright IBM Corp. 2002 55

Eencrypted registry settings 25encryption
default value 15key, agentCfg 18type
agentCfg 18default value 15
event notificationcache size 20changing with agentCfg 19context
deleting 21listing 21
enable/disable 20reconciliation
attributes 20context 21intervals 20modifying 21process priority 21
Ffilter non ascii, changing with agentCfg 19FTP protocol
default settings 15properties, changing with agentCfg
authentication 19display recon resp 19encryption key 18encryption type 18filter non ascii 19groupname support 19inbox directory 17options 17out packet umask 19outbox directory 18reconciliation user name 18return type records 19sandbox directory 18
Ggroup name support, changing with agentCfg 19
Hhelp menu for agentCfg
accessing with -help command 28arguments
-agent <value> 28-findall 28-help 28-hostname <value> 28-list 28-netsearch <value> 28-portnumber <value> 28-schema 28-tail 28
Iinbox directory, changing with agentCfg 17
installation requirementsadministrator authority 3, 11CD-ROM drive 3, 11communication with Tivoli Identity Manager Server 3network connectivity 3operating system 3server 3, 11system 3
Llog
directory, changing with agentCfg 24enable/disable, changing with agentCfg 24file name
changing with agentCfg 24file name, changing with agentCfg 24settings, changing with agentCfg
enable/disable 24enable/disable debug mode 25enable/disable detail mode 25log file directory 24log file name 24max file size 25
settings, default values 24
Nnetwork connectivity 3non-encrypted registry settings 25, 26
Ooperating system requirements 3out packet umask, changing with agentCfg 19outbox directory
purpose 18set value in Agent Maintenance 18
overview, PeopleTools 8.1 Agent 1
Ppassword
changing with agentCfg 16purpose 16set value in Agent Maintenance 16
phone number, customer support vportnumber
changing with agentCfg 16purpose 16set value in Agent Maintenance 16
protocoladding with agentCfg 15configuring with agentCfg 15removing with agentCfg 15
RRC4 encryption type 15reconciliation user name, changing with agentCfg 18registry settings
encrypted 25non-encrypted 25, 26
return type records TRUE/FALSEchanging with agentCfg 19
56 IBM Tivoli Identity Manager: PeopleTools 8.1 Agent for Windows Installation Guide

return type records TRUE/FALSE (continued)default value 15return type records 17
Ssandbox directory
purpose 18set value in Agent Maintenance 18
server requirements 3, 11srv_nodename
agentCfg 16purpose 16set value in Agent Maintenance 16
srv_password, changing with agentCfg 17srv_portnumber, changing with agentCfg 16srv_target_dn, changing with agentCfg 17srv_username, changing with agentCfg 17system requirements 3
Tthread count settings
changing with agentCfg 27default values 27maximum concurrent requests 27reconciliation requests 27system login add requests 27system login change requests 27system login delete requests 27
Tivoli Identity Managerbasic configuration 31clustered configuration 33web proxy configuration 32
Uusername, changing with agentCfg 16UTF8 support 27
Vvalidate_client_ce, changing with agentCfg 17variables
by Tivoli Identity Manager actionadd 42change 43delete 43restore 44suspend 43
descriptions 41
Wweb site, customer support vwestern European character set, support 27
XXOR encryption type 15
Index 57

58 IBM Tivoli Identity Manager: PeopleTools 8.1 Agent for Windows Installation Guide


����
Printed in U.S.A.
SC32-1191-00