ibm infosphere optim for db2 for z/os: common elements€¦ · 2005-11-02 · ibm infosphere optim...
TRANSCRIPT

IBM InfoSphere Optim for DB2 for z/OSVersion 7 Release 2
Common Elements
���


IBM InfoSphere Optim for DB2 for z/OSVersion 7 Release 2
Common Elements
���

NoteBefore using this information and the product it supports, read the information in “Notices” on page 397.
Version 7 Release 2
This edition applies to version 7, release 2 of IBM InfoSphere® Optim for DB2 for z/OS and to all subsequentreleases and modifications until otherwise indicated in new editions.
© Copyright IBM Corporation 1991, 2013.US Government Users Restricted Rights – Use, duplication or disclosure restricted by GSA ADP Schedule Contractwith IBM Corp.

Contents
About this publication . . . . . . . . vii
Chapter 1. Introduction . . . . . . . . 1Test Data Management . . . . . . . . . . . 1Data Privacy . . . . . . . . . . . . . . 1Data Retention, Application Retirement, and DataGrowth Management . . . . . . . . . . . 1Optim Components . . . . . . . . . . . . 1Common Elements and Facilities . . . . . . . 2General Information . . . . . . . . . . . . 4
Basic Screen Format and Handling . . . . . . 4Processing Order . . . . . . . . . . . . 5Naming Conventions . . . . . . . . . . 6Sample Database . . . . . . . . . . . 10Help and Tutorial Facility . . . . . . . . 10
Main Menu . . . . . . . . . . . . . . 11Choose a Definition Option . . . . . . . . . 12
Object Selection List Functions . . . . . . . 15Double-Byte Character Set Support . . . . . . 18
Chapter 2. Access Definitions . . . . . 21Select an Access Definition . . . . . . . . . 22
Access Definition Selection List . . . . . . . 24Components of an Access Definition . . . . . . 26Table/View Selection . . . . . . . . . . . 26
Table Status Indicators. . . . . . . . . . 32List Table Names . . . . . . . . . . . 34Handling the Table List . . . . . . . . . 41Completed Table Selection . . . . . . . . 42Associate Legacy Tables with Data Sources . . . 42
Selection Criteria . . . . . . . . . . . . 46Archive Criteria . . . . . . . . . . . . 46Selection Criteria . . . . . . . . . . . 49SQL WHERE Clause Specifications . . . . . 52Manage Data Displays. . . . . . . . . . 55Data Types Supported . . . . . . . . . . 58Zoom Column Information . . . . . . . . 59
Archive Actions . . . . . . . . . . . . . 60Substitution Variables . . . . . . . . . . . 70The Point-and-Shoot Facility. . . . . . . . . 72
Initial Display for Point-and-Shoot. . . . . . 74Point-and-Shoot Basics . . . . . . . . . 74Select Rows . . . . . . . . . . . . . 78Scroll Data. . . . . . . . . . . . . . 79Join Tables. . . . . . . . . . . . . . 80Manage the Display . . . . . . . . . . 80Display SQL . . . . . . . . . . . . . 80Reports . . . . . . . . . . . . . . . 83Terminate a Point-and-Shoot Session . . . . . 83Row List Status Indicated. . . . . . . . . 84
Group Selection Processing . . . . . . . . . 85Select Relationships. . . . . . . . . . . . 86
Display Information . . . . . . . . . . 90Relationship Status . . . . . . . . . . . 91Display Traversal Information . . . . . . . 94
Relationship Index Analysis . . . . . . . . 96Use Relationships . . . . . . . . . . . . 97
Sample Scenarios . . . . . . . . . . . 97Traversal Cycles . . . . . . . . . . . 103Referential Cycles . . . . . . . . . . . 104
Dynamically Define the Access Definition . . . . 110Database Changes . . . . . . . . . . . . 110Access Definition Parameters . . . . . . . . 112
Chapter 3. Primary Keys. . . . . . . 115Select a Primary Key . . . . . . . . . . . 116
Primary Key Selection List . . . . . . . . 117Edit or Browse a Primary Key . . . . . . . . 119Edit a Generic Primary Key . . . . . . . . 122
Chapter 4. Relationships . . . . . . 125Select a Relationship . . . . . . . . . . . 125
Relationship Selection List . . . . . . . . 127Create a Relationship . . . . . . . . . . . 129Edit or Browse a Relationship . . . . . . . . 130
Exit Routines for Relationships . . . . . . 132Populate Column Names . . . . . . . . 139Expressions . . . . . . . . . . . . . 145Model a Relationship . . . . . . . . . . 148Save and Use a Relationship . . . . . . . 150
Edit a Generic Relationship. . . . . . . . . 152
Chapter 5. Column Maps . . . . . . 155Select a Column Map. . . . . . . . . . . 156
Column Map Selection List . . . . . . . . 158Tables for a Column Map . . . . . . . . . 159
Source or Source 1 Table. . . . . . . . . 161Column Map Editor . . . . . . . . . . . 162
Manage Display . . . . . . . . . . . 165Edit Source Column Values. . . . . . . . 166LIST . . . . . . . . . . . . . . . 167Type a Source Column Value . . . . . . . 169Functions for Source Column Values . . . . 170Expressions for Source Column Values . . . . 172Special Register - for an IMS Concatenated Key 173Exit Routines for Source Column Values . . . 174Data Privacy Functions . . . . . . . . . 178Data Privacy Transformation Library Functions 188
Chapter 6. Table Maps . . . . . . . 199Select a Table Map . . . . . . . . . . . 199
Table Map Selection List. . . . . . . . . 201Source for a Table Map . . . . . . . . . . 203
Specify Table Map Source . . . . . . . . 203Specify Table Map Source Types and Sources 204
Table Map Editor . . . . . . . . . . . . 205Edit Destination or Source 2 Table List . . . . 210Apply a Table Map . . . . . . . . . . 211Include a Column Map . . . . . . . . . 212Associate Legacy Tables with Data Destinations 216
© Copyright IBM Corp. 1991, 2013 iii

Archive Actions . . . . . . . . . . . . 221
Chapter 7. Export and Import OptimObjects . . . . . . . . . . . . . . 229Use the Export Process . . . . . . . . . . 229
Select the Objects for Export . . . . . . . 232Build the Output File . . . . . . . . . . 234Export Summary . . . . . . . . . . . 234
Use the Import Process . . . . . . . . . . 236Import Summary . . . . . . . . . . . 238
File Format . . . . . . . . . . . . . . 240Primary Keys . . . . . . . . . . . . 241Relationships . . . . . . . . . . . . 241Access Definitions . . . . . . . . . . . 242Column Maps . . . . . . . . . . . . 249Table Maps . . . . . . . . . . . . . 251Compare Definition . . . . . . . . . . 254Legacy Tables . . . . . . . . . . . . 255Environment Definitions. . . . . . . . . 258Retrieval Definitions . . . . . . . . . . 260Archive Collections . . . . . . . . . . 262
Chapter 8. Convert Archive andExtract Files . . . . . . . . . . . . 263Convert File Panel. . . . . . . . . . . . 263
Output to External Format . . . . . . . . 266Perform Convert Process . . . . . . . . . 267
Online Execution . . . . . . . . . . . 267Batch Execution . . . . . . . . . . . 268Convert Process Report . . . . . . . . . 269
Chapter 9. Retry/Restart a Process 273
Chapter 10. Browse Related Data . . . 277Display Basics . . . . . . . . . . . . . 278
Available Commands . . . . . . . . . . 280Join Tables . . . . . . . . . . . . . . 282
Join Command . . . . . . . . . . . . 282Select Tables . . . . . . . . . . . . . 283Select Relationships . . . . . . . . . . 285Join All Command . . . . . . . . . . 286Multiple Table Display . . . . . . . . . 287Special Considerations for Multi-way Joins . . 289Zoom a Joined Table Display . . . . . . . 292Unjoin Tables . . . . . . . . . . . . 293
Manage the Display . . . . . . . . . . . 294Scroll . . . . . . . . . . . . . . . 294Navigate and Manage Display of Data . . . . 295Sort Criteria . . . . . . . . . . . . . 299Maximum Fetch Limit . . . . . . . . . 301Display Hexadecimal Data . . . . . . . . 301Wide Data Displays . . . . . . . . . . 302
Reports . . . . . . . . . . . . . . . 310Report Contents . . . . . . . . . . . 312Report Format Parameters . . . . . . . . 313
Chapter 11. Options . . . . . . . . 317User Options . . . . . . . . . . . . . 318
User Line Drawing Characters. . . . . . . 324
Print Tables in JCL . . . . . . . . . . 325Specify Description and Security Status. . . . 325File Unit Parameters . . . . . . . . . . 326
Editor and Display Options . . . . . . . . 328Job Card and Print Options. . . . . . . . . 331Compare Options . . . . . . . . . . . . 333Archive Options . . . . . . . . . . . . 334Legacy Options. . . . . . . . . . . . . 335
Chapter 12. Performance . . . . . . 339Processing Strategies . . . . . . . . . . . 339Performance Tools . . . . . . . . . . . . 340Table Access Strategy . . . . . . . . . . . 340
Access Method . . . . . . . . . . . . 342Key Lookup Limit . . . . . . . . . . . 343
Index Analysis . . . . . . . . . . . . . 343
Appendix A. Sample Database Tablesand Structure . . . . . . . . . . . 347SALES Table (FOPDEMO.OPTIM_SALES) . . . . 347CUSTOMERS Table(FOPDEMO.OPTIM_CUSTOMERS) . . . . . . 349ORDERS Table (FOPDEMO.OPTIM_ORDERS) . . 350DETAILS Table (FOPDEMO.OPTIM_DETAILS) . . 352ITEMS Table (FOPDEMO.OPTIM_ITEMS) . . . . 352SHIP_TO Table (FOPDEMO.OPTIM_SHIP_TO) . . 353SHIP_ INSTR Table(FOPDEMO.OPTIM_SHIP_INSTR) . . . . . . 355MALE_RATES Table(FOPDEMO.OPTIM_MALE_RATES). . . . . . 355FEMALE_RATES Table(FOPDEMO.OPTIM_FEMALE_RATES) . . . . . 356STATE_LOOKUP Table(FOPDEMO.OPTIM_STATE_LOOKUP) . . . . . 356VENDOR File (Legacy Table FOPDEMO.VENDOR) 357VENDITEM Table (Legacy TableFOPDEMO.VENDITEM) . . . . . . . . . 358DEPARTMENT Table (IMS Legacy TableFOPDEMO.DEPARTMENT) . . . . . . . . 358EMPLOYEE Table (IMS Legacy TableFOPDEMO.EMPLOYEE) . . . . . . . . . 359POSITION Table (IMS Legacy TableFOPDEMO.POSITION) . . . . . . . . . . 360JOBCODE Table (IMS Legacy TableFOPDEMO.JOBCODE) . . . . . . . . . . 360Sample Extract File . . . . . . . . . . . 361Sample Legacy File . . . . . . . . . . . 361Privacy Extract File . . . . . . . . . . . 361
Appendix B. Allocating External Files 365
Appendix C. Create a Row List File 371
Appendix D. Compatibility Rules . . . 375Relationship Column Compatibility . . . . . . 375Column Map Compatibility . . . . . . . . 377
Move and Archive Column Map Compatibility 380Compare Column Map Compatibility . . . . 381
iv IBM InfoSphere Optim for DB2 for z/OS: Common Elements

Appendix E. Optim Exit ParameterLists . . . . . . . . . . . . . . . 383
Appendix F. Glossary . . . . . . . . 387
Notices . . . . . . . . . . . . . . 397Trademarks . . . . . . . . . . . . . . 398
Index . . . . . . . . . . . . . . . 401
Contents v

vi IBM InfoSphere Optim for DB2 for z/OS: Common Elements

About this publication
This document provides information on using the elements common to the components of Optim™.
For detailed information on each component, refer to the appropriate user manual.
Note: Certain aspects of an element common to all Optim components do not apply to all components.For example, all Optim components use Access Definitions. However, only Archive supports ArchiveActions, which can be included in an Access Definition. Any features that do not apply to all installationsof Optim are clearly noted.
© Copyright IBM Corp. 1991, 2013 vii

viii IBM InfoSphere Optim for DB2 for z/OS: Common Elements

Chapter 1. Introduction
IBM® Optim for z/OS® manages enterprise data throughout every stage of the information life cycle.Optim enables you to assess, classify, subset, archive, store, and access enterprise application data.
Optim uses the relationships defined in the DB2® Catalog, where available, and supplements theserelationships with those defined in the Optim Directory. Optim runs as a TSO/ISPF application andincorporates familiar ISPF commands. Optim handles any number of tables and any number ofrelationships, regardless of the complexity.
Optim helps you achieve these benefits with the following components: Access, Archive, Move, andCompare. You can use these Optim components for test data management, data privacy, data retention,application retirement, and data growth management. This manual describes the use of elements that arecommon to all Optim components.
Test Data ManagementThe Optim test data management capabilities provide an efficient alternative to database cloning,allowing you to create development and testing environments that are sized appropriately. Forinformation about the test data management functions of Optim, see the Move User Manual, the AccessUser Manual, and the Compare User Manual.
Data PrivacyData privacy is a licensed function of test data management.
For information about the general test data management functions of Optim, see the Move User Manual,the Access User Manual, and the Compare User Manual. Data transformations for privacy are accomplishedthrough the use of Optim column maps. For information needed to transform data using a column map,see Chapter 5, “Column Maps,” on page 155.
Data Retention, Application Retirement, and Data Growth ManagementYou can use the archiving features in Optim to perform the following tasks:v Isolate historical data from current activity and safely remove it to a secure archive.v Access archived data easily, using familiar tools and interfaces.v Restore archived data to its original business context when it requires additional processing.
Optim ComponentsYour site may be licensed for one, all, or a combination of the following Optim components. The MainMenu provides release and copyright information for Optim.v Access is used to browse and edit sets of relationally intact data in multiple database tables. This tool
allows you to edit database data, review logical application paths, and browse data after testingapplications to ensure that results are as expected. You can use Access to support rapid development ofapplications, analyze the structure of your database, and browse precisely-defined segments ofrelational data.
v Archive enhances database performance by facilitating the removal of infrequently referenced data.This component allows you to identify and archive sets of relationally intact data before removingselected data from your database. Archived data is indexed and stored. You can use Archive to browse,search, or restore selected subsets of archived data.
© Copyright IBM Corp. 1991, 2013 1

v Compare facilitates comparisons of sets of relationally intact data. This component allows you tocompare data resulting from application tests to the original data, highlighting all differences. You canuse Compare to rapidly analyze the effects of application software or modifications to it.
v Move facilitates the extraction and migration of sets of relationally intact data. Move allows you tocreate test databases that are referentially intact subsets of a production database. You can use Move tocopy sets of related data to a file and transform the data as you migrate it to a test database.
Menu-driven prompt screens or panels are used to specify which data to obtain and how to handle thatdata. Intelligent screen handling allows simultaneous display of multiple tables, pop-up windows,context-sensitive online help, and tutorials.
Common Elements and FacilitiesFeatures common to all or most of the Optim components are discussed in this book. To carry out theirfunctions, the Optim components rely on user-defined objects that supplement objects defined to thedatabase (for example, tables, primary keys, relationships, stored procedures). These user-defined objects(collectively, Optim objects) are stored in the Optim Directory.
Optim Objects
The Optim Directory is a set of database tables used by Optim to track processing status and store theobjects needed for processing. Objects that are common to the Optim components include the following:v Access Definitions
An Access Definition identifies a set of related data to be processed by Optim. It references thedatabase tables and their relationships, and provides criteria to select specific rows within tables.
v An Access Definition is required for an Archive or Extract Process and is sometimes used for aCompare or Restore Process, or an Access edit or browse session.
v Primary KeysValues in primary key columns uniquely identify each row in a database table. A primary key can beused to create an Optim relationship, and is required for a table that is changed by a Delete, Insert, orRestore Process or a table that is visited more than once in an Extract or Archive Process. A primarykey is also required to enable the row selection (Point-and-Shoot) feature for an Access Definition or anArchive or Extract Process.
v Optim uses primary keys that are defined to the DB2 Catalog or, for Optim Move or Compare for IMS,VSAM, and Sequential Files, in an IBM IMS™ DBD. You can define Optim primary keys to supplementthose in the database.
v RelationshipsA relationship is a defined connection between the rows of two tables that determines the parent orchild rows to be processed and the order in which they are processed. A relationship can be defined inthe DB2 Catalog, the Optim Directory, or to IMS.
v Optim uses relationships to determine the data to be retrieved from related tables. Generally, arelationship is needed in a process that uses an Access Definition. Using Optim, you can create ormodify Optim relationships, browse DB2 relationships, or list IMS relationships.
v Column MapsA Column Map provides specifications needed to pair columns between two tables referenced in aTable Map. Also, a Column Map can be used to transform data, age dates in tables, and exclude one ormore columns from processing.
v A Column Map is used for a single table Compare Process and can be referenced in a Table Map usedfor a Compare, Convert, Insert, Load, or Restore Process. (Rules for Column Maps used with Archiveand Move are different from those for Compare. Features in a Column Map created with Archive orMove may not be available for Compare.)
2 IBM InfoSphere Optim for DB2 for z/OS: Common Elements
v Table MapsA Table Map identifies and matches two tables or sets of tables in a process and can be used to excludeone or more tables from processing.
v A Table Map is required for a Compare, Convert, Insert, Load, or Restore Process. (Rules for TableMaps used with Archive and Move are different from those for Compare.)
v Archive CollectionsAn Archive Collection is a mainframe object that contains one or more Archive Files. When an ODMconnection is made using a collection name, the Archive Files in the collection are unioned andpresented to the user as though a single Archive File was being accessed.
v For example, say you archive the customer database 50 times a year, and all 50 Archive Files areassigned to the same collection. Each Archive File has selection criteria for a single, unique state. Whenaccessed individually, each Archive File holds only one state's worth of data. However, when accessedvia the collection, data from all 50 states is available for retrieval. A collection can included anynumber of Archive Files, and a given Archive File may be included in more than one collection, buteach Archive File can be included only once in a given collection.
Note: Legacy Tables, IMS Environment Definitions, and IMS Retrieval Definitions are available to a sitelicensed for Move or Compare for IMS, VSAM, and Sequential Files. These objects are discussed in Move UserManual, Definitions and Compare for IMS, VSAM, and Sequential Files.
Utilities
Utilities common to the Optim components include the following:v Export/Import
The Export and Import Processes copy Optim Directory objects (e.g., Access Definitions, Table Maps,etc.) in the current DB2 subsystem to a dataset, so the objects can be imported to an Optim Directory inany DB2 subsystem.
v ConvertA Convert Process transforms data in an Extract or Archive File. The converted file can be used asinput to most Optim processes. You can use the Convert Process to mask sensitive data or to convertdata to a Comma Separated Values format to be used with any application that supports CSV files.
v Retry/RestartYou can retry an Insert or Restore Process when one or more rows are discarded during the process, orrestart an Insert, Restore, or Delete Process if the process does not execute to completion.
v BrowseDuring an Extract File, Archive File, or Compare File browse session or a Point-and-Shoot session, youcan use the Browse facility to join data in related tables and use various techniques to manage thedisplay while viewing the data.
v Batch UtilitiesBatch utilities allow you to maintain the Optim environment and automate Optim processes. Usemaintenance utilities to retrieve information from the Optim Directory, maintain objects in the OptimDirectory, migrate Optim objects, and manage Archive File entries and files. Use processing utilities toautomate Optim processes, such as Archive, Restore, Delete, Search, and Extract. (See the Batch UtilitiesGuide for detailed information on using the batch utilities.)
Options
Several types of options are available to manage the functions performed while using Optim. Theseoptions includev User Optionsv Editor Optionsv Job Card and Print Optionsv Compare Options (Compare only)
Chapter 1. Introduction 3

v Archive Options (Archive only)v Legacy Options (Move or Compare for IMS, VSAM, and Sequential Files only).
Note: Site Options are only available to users who have authorized passwords. Site Options arediscussed in the Customization Guide, Customize the Optim Site Options.
General InformationThis section provides general information about Optim, including basic system concepts and namingconventions.
Note: For a description of some common terms and system concepts related to Optim, see Appendix F,“Glossary,” on page 387.
Basic Screen Format and HandlingOptim emulates ISPF commands, screen format and handling, and provides an extensive set of primaryand line commands. Many commands are comparable to ISPF commands.
When the syntax is identical to ISPF (e.g., UP and DOWN), the functions are identical. However, manycommands, such as FIND, have been extended with operands and functionality to suit Optim.
The functioning of several primary commands differs depending on the current Optim activity.Information about these differences is included with the commands described in this manual. Fordetailed information about all Optim primary commands, see the Command Reference Manual, PrimaryCommands.
Common Panel
Facilities that are common to all Optim components are documented in this manual. For the most part,figures in this manual present the panels as they appear when all Optim components are installed. Thefacilities available exclusively with Archive, Access, Compare, or Move are noted in this manual anddocumented in the appropriate user manual.
Pop-up Windows
Optim incorporates a unique pop-up window facility that is independent of the current ISPF release. Apop-up window facilitates the current function, without terminating it.
Some pop-up windows provide selection lists. For example, when adding table names to an AccessDefinition, you can display a pop-up window with a list of available tables, and select the desired namesdirectly from the list. When the pop-up window is terminated, the selected tables are automatically listedin the Access Definition and you can continue editing it.
For sites using DB2 version 8 or later, pop-up windows are also used to enter Long Object Names (LONs)of up to 128 characters for objects such as tables and creator IDs. Pop-up windows for LONs aredisplayed using the EXPAND command. See “Long Object Names (LONs)” on page 8 for furtherinformation.
The characters used to draw the box around a pop-up window are site�defined. User options allow youto change these characters. The figures in this manual show pop-up windows delimited by dashes andvertical bars.
4 IBM InfoSphere Optim for DB2 for z/OS: Common Elements

Function Keys
Function keys are handled as in ISPF. The keys provide a simple way to execute primary commands.When a function key is pressed, it is evaluated as if the command assigned to the key were typed in theprimary command area of the screen. (See PF Keys in the Command Reference Manual for information onassigning values to function keys.)
The ISPF command PFSHOW is available to display the function key assignments on the screen. The ISPFcommand KEYS is available to list your current function key assignments. This list is modifiable.
Changes to the PF key assignments during an Optim session affect the assignments only while usingOptim. The changes do not affect assignments for other ISPF applications.
Several functions are frequently assigned to function keys. The following are of note:
HELP Displays Help information for the active Optim panel. This information explains the purpose anduse of the current panel. It may also list the commands available on the current panel. You canscroll certain Help panels, using the function keys F10 and F11. HELP is usually assigned to PF1.
END Process input and return to the previously displayed panel. END is usually assigned to PF3.
Scrolling
All ISPF scrolling functions are supported. Vertical and horizontal scrolling is coordinated with the scrollvalue specified in SCROLL. This value can be specified as:
blank Cursor location determines the scroll amount.
PAGE Full page scroll so that the line or column following the last line or column on the current page isthe first line or column of the next page.
DATA Full page scroll so that the last line or column on the current screen is the first line or column onthe next screen.
HALF Half page scroll.
n Specific number of rows or columns to scroll.
MAX Depending on direction, either the first full screen of data or the last full screen of data isdisplayed.
Scrolling LONs
Another type of scroll functionality is available for viewing Long Object Names (LONs) that exceed thedisplay area on a given panel. Table names, for example, can consist of up to 128 characters, which islarger than the display area allocated for those names on Optim panels. In such cases, you can use theLEFT and RIGHT function keys (typically F10 and F11) to scroll through the entire LON within thedisplay field. For example, if the Table Name area on a panel is 25 characters in length, only the first 25characters of a 128-character LON are displayed. Press the RIGHT function key to display the next 25characters, until the entire LON has been displayed; conversely, press the LEFT function key to displaythe previous 25 characters.
If you need to view the entire LON in a single viewing, you can use the EXPAND command to displaythe entire LON in a pop-up or LON panel. See “Long Object Names (LONs)” on page 8 for moreinformation on entering and displaying LONs.
Processing OrderThe CANCEL, HELP, and RESET primary commands take precedence over all other processing and areperformed first; otherwise, information is processed in the following order:
Chapter 1. Introduction 5

1. All editing is evaluated.2. Line commands are processed.3. Function key requests and primary commands are processed.
If editing introduces any syntax errors, all command processing is suspended and an appropriate errormessage is displayed. You must correct the error to resume processing.
A syntax error in a line command causes all command processing to be suspended with an appropriateerror message. Correct or delete the line command in error to resume processing. If scrolling is performedto complete a block command specification or enter a destination, errors in the pending block commandor Move/Copy command must be resolved prior to processing other line commands.
If a primary command is in error, all commands before the error are processed. All other processing issuspended and an appropriate error message is displayed. Correct or delete the faulty command toresume processing.
Naming ConventionsIn naming objects, you must avoid the use of DB2 reserved words.
For sites using DB2 version 8 or later, Long Object Names (LONs) are supported for objects such as tablenames and creator IDs, as described in “Long Object Names (LONs)” on page 8.
A Retrieval Definition name consists of the Environment Definition name and the IMS DBD name. Themaximum length for a DBD name is 8 characters. Names of other objects unique to Optim follow DB2conventions. These names, and the maximum length of each, include:
Access Definition base name12
Column Map base name12
Compare Definition base name12
Environment Definition name8
Group ID8
Legacy Table base name18
Map ID8
Table Map base name12
User ID8
(Archive) Collection ID8
(Archive) Collection Name12
6 IBM InfoSphere Optim for DB2 for z/OS: Common Elements

Delimited Identifiers
A DB2 delimited identifier is a sequence of one or more characters enclosed within quotation marks.Delimited identifiers are required when non�standard names are used, such as names with embeddedspaces or periods. DB2 delimited identifiers can be included in the name of any DB2 object.
Also, delimited identifiers, with delimiters, can be supplied as the operands of primary commands.However, delimited identifiers are not supported for Access Definition, Table Map, and Column Mapnames.
The use of delimited identifiers may require more space than provided on a panel. If so, the entry istruncated and cannot be edited. Use line commands to delete the entry. When line commands are notavailable, the entry area is large enough to support the maximum width so you can edit the entry.
To conserve space, the delimiters are not included with the delimited identifier when the name isdisplayed in the heading of a panel. Delimiters are also omitted when delimited names are presented inselection lists.
DB2 LIKE Syntax
Standard DB2 naming conventions are supported in Optim, including the ability to use DB2 LIKE syntax.Characters that have special meaning are:
% Represents any number of characters.
_ Represents any single character.
Use DB2 LIKE syntax for the operand on a primary command to display a matching selection list. Forexample, to obtain a selection list of tables with names that begin with the letters PST, enter:
LIST TABLES PST%.%
Note that when the '%' character is used in conjunction with the '_' character, the '_' is treated as a 'DB2like' character, and not as a literal.
File Names
Archive, Compare, and Move use external files to store information necessary for processes and todocument those processes. For these files, you can provide the name explicitly by enclosing it in singlequotes (‘ '), as shown in this example:'SAMPLE.CONTROL.FILE’
Alternatively, you can provide a name without quotes so that the default prefix selected on the UserOptions panel is automatically added to the file name. For example, if you provide the file nameSAMPLE.CONTROL.FILE
and the current default prefix is FOPDEMO, the resulting file name isFOPDEMO.SAMPLE.CONTROL.FILE
To obtain a selection list, specify an asterisk, alone or as the last character in the dataset name. Forexample, to obtain a selection list of names that begin with FOPDEMO.SAMP, specify:'FOPDEMO.SAMP*’
Chapter 1. Introduction 7

Long Object Names (LONs)
DB2 version 8 and higher supports Long Object Names (LONs) for various objects, such as table namesand creator IDs. Optim includes support of up to 128 characters for LON-eligible objects in DB2 Version 8and higher. Shown here are the names of LON-eligible fields, followed by 2 values: the maximumnumber of bytes allowed in DB2 prior to Version 8, and the maximum number of bytes allowed in DB2in version 8 and higher:
Creator IDs8
128
Column Names18
30
Table Names18
128
View Names18
128
Index Names18
128
Aliases18
128
Synonyms18
128
Relationship Names8
128
Correlation Names18
128
Stored Procedure Names8
128
User-Defined Function Names18
128
User-Defined Data Type Names18
128
8 IBM InfoSphere Optim for DB2 for z/OS: Common Elements

Triggers8
128
Schema Names8
128
Storage Group Names8
128
LONs are allowed for DB2 objects only; they are not allowed for legacy tables, which do not support theuse of Long Object Names.
Areas for LON-eligible names are identified on Optim panels by one or two arrows (> or >>). There aretwo methods of entering a LON: a separate LON panel or a LON pop-up. One arrow (>) means the LONpanel is used, two arrows (>>) means the LON pop-up is used. In either case, the EXPAND command isused to enter the LON, as described below:1. Type the EXPAND command.2. Position the cursor in the area in which you want to enter a LON and press Enter to display the LON
panel or pop-up.
Note: If you use LONs frequently, you might want to assign a function key to the EXPAND command, asdescribed in the Command Reference Manual under the heading PF Keys. You may then skip steps 1 and 2and display the LON panel or pop-up by pressing the assigned PF key while the cursor is anyLON-eligible field.1. Type or paste the Long Object Name in the panel or pop-up.
Note: If you paste the LON from a file, be sure the cursor is in the first character position on the panel orpop-up to prevent LON from being formatted incorrectly. In the LON pop-up, each line cannot exceed 65characters. In the LON panel, the first line cannot exceed 73 characters.1. Use the END command to return to the panel, which will now display the first portion of the LON.
Scrolling through a LON
When only a portion of a LON is displayed on a panel, one or more arrows will appear at the end of thearea to indicate that there is more data to the left or right:
> or >>there is more data to the right
< or <<there is more data to the left
<> or <<>>there is more in both directions
If a LON is displayed on a panel, you can scroll through it using the LEFT and RIGHT PF keys, typicallyassigned to F10 and F11. Use F10 to scroll to the left through the LON, and use F11 to scroll to the right.In most cases, the entire LON may also be displayed and edited using the EXPAND command. In somecases, however, such as in display-only tables, you can only scroll through the LON.
Note: We recommend that you delete or modify all LONs using the LON panel or pop-up — do not editthe LON on the main panel, which can display only a portion of the overall LON — to avoid deleting aportion of a LON or incorrectly modifying a LON.
Chapter 1. Introduction 9

When a LON is truncated on a panel because of space limitations, a plus sign (+) at the end of thedisplayed portion of the LON indicates that only a portion of the LON is displayed.
Sample DatabaseA sample database is distributed with Optim. The sample database is created during the installation ofOptim. The sample database provides data for training and allows you to experiment with Optimwithout fear of disrupting your production database.
Note: A detailed description of the sample database is included in Appendix A, “Sample Database Tablesand Structure,” on page 347.
This database includes the following tables (names are prefixed with the Creator ID FOPDEMO):v CUSTOMERSv ORDERSv DETAILSv SALESv FEMALE_RATESv SHIP_INSTRv ITEMSv SHIP_TOv MALE_RATESv STATE_LOOKUP
The database also includes the following Legacy Tables (for Move or Compare for IMS, VSAM, andSequential Filesonly):v DEPARTMENTv VENDITEMv EMPLOYEEv VENDORv POSITIONv JOBCODE
Note: Relationships may have been added to the sample database at your site during training or otheractivities.
Help and Tutorial FacilityOptim provides an online help facility that is available from any panel. Also, Option T TUTORIAL on theMain Menu invokes a tutorial that explains how to use Optim.
From each panel, use the HELP command (usually assigned to PF1) to obtain an overview for the panel.If a numbered list of commands available from that panel is included, enter the listed number associatedwith the command to obtain command information and syntax.
When an error condition occurs during a session, a short message is displayed in the upper-right cornerof the panel.
10 IBM InfoSphere Optim for DB2 for z/OS: Common Elements

Main MenuWhen you invoke Optim, the Main Menu is displayed, as in the following figure. The options availableon the Main Menu will vary based on which Optim components are installed at your site. Any optionmarked with an asterisk is not available for your installation.
Panel Options
To select an option, type the corresponding one-character identifier. Refer to the User Manual for theindicated Optim component for more information. The options are:
0 OPTIONS
Specify Optim options, including site and user options. Administrator privileges are required todefine site options. For details, see Chapter 11, “Options,” on page 317.
1 BROWSE TABLE
Browse the data in a DB2 table. This facility is documented in the Access User Manual, Editingand Browsing DB2 Data.
2 EDIT TABLE
Edit the data in a DB2 table. This facility is documented in the Access User Manual, Editing andBrowsing DB2 Data.
3 BROWSE USING AD
Browse DB2 data defined by an Access Definition. This facility is documented in the Access UserManual, Using an Explicit Access Definition.
4 EDIT USING AD
Edit DB2 data defined by an Access Definition. This facility is documented in the Access UserManual, Using an Explicit Access Definition.
5 ADS
Create and maintain Access Definitions. For more information, see Chapter 2, “AccessDefinitions,” on page 21.
6 DEFINITIONS
---------------------------- IBM’s InfoSphere Optim ----------------------------OPTION ===>
0 OPTIONS - Site and User Options SQLID ===> PSTDEMO1 BROWSE TABLE - Browse a DB2 Table SUBSYS ===> TDB22 EDIT TABLE - Edit a DB2 Table LOCATION ===>3 BROWSE USING AD - Browse DB2 Tables Using Access Definition4 EDIT USING AD - Edit DB2 Tables Using Access Definition5 ADS - Create or Modify Access Definitions6 DEFINITIONS - Maintain InfoSphere Optim Definitions (Keys, Maps, ...)7 MIGRATION - Data Migration - Extract, Insert, Update, ...8 COMPARE - Compare Two Sets of Data9 ARCHIVE - Archive and Restore Data
T TUTORIAL - Information About IBM’s InfoSphere OptimC CHANGES - Changes from Prior Release(s)X EXIT - Terminate Product UseP LICENSING - Product Licensing Modification
Figure 1. Main Menu
Chapter 1. Introduction 11

Invoke the Choose a Definition Option menu, described in “Choose a Definition Option.” Optionsfrom this menu allow you to define or edit Access Definitions, Optim primary keys, Optimrelationships, Table Maps, Column Maps, and Archive Collections, or to invoke utilities to exportor import these objects.
7 MIGRATION
Perform the Move or Compare processes. These facilities are documented in the Move UserManual, Data Migration, and the Compare User Manual, Extract Data.
8 COMPARE
Compare one set of tables with another and browse the results. This facility is documented in theCompare User Manual, Compare Process.
9 ARCHIVE
Perform the Archive processes for archiving data, browsing and searching the archives, andrestoring archived data. This facility is documented in the Archive User Manual, Session Overview.
T TUTORIAL
Display the online Tutorial.
C CHANGES
Display a list of enhancements for the current release.
X EXIT
Terminate Optim.
P LICENSING
Display a list of Optim components and their releases. The status for each component isidentified as “In Evaluation: n Days Left” or “Not Installed.” Administrator privilege is requiredto enable or disable a component. This facility is documented in the Customization Guide, Enableand Disable Products.
Choose a Definition OptionUse the Choose a Definition Option menu to create and maintain primary keys, relationships, ColumnMaps, Table Maps, and Archive Collections stored in the Optim Directory, and display primary keys andrelationships from the DB2 Catalog.
When you select Option 6 Definitions on the Main Menu, the Choose a Definition Option menu isdisplayed, as in the following figure. This menu also allows you to export objects defined in the OptimDirectory of one DB2 subsystem and import them to a Directory in another DB2 subsystem.
12 IBM InfoSphere Optim for DB2 for z/OS: Common Elements

Panel Options
The available options are:
1 - PRIMARY KEYSPrimary keys are columns that contain values that uniquely identify each row in a table.
Use Option 1 to create, modify, or delete primary keys in the Directory. You can also browse DB2and IMS primary keys. See Chapter 3, “Primary Keys,” on page 115 for detailed informationabout this option.
2 - RELATIONSHIPSRelationships are the sets of columns from each of two tables used to define a correspondencebetween the tables.
Use Option 2 to create, modify, or delete Optim relationships. You can also browse DB2relationships and list IMS relationships. See Section 4. Relationships for detailed informationabout this option.
3 - COLUMN MAPSColumn Maps are used by Optim to map source columns to destination columns, or to transformthe data for a destination column as part of a Restore, Insert, Load, or Convert Process. ColumnMaps are also used to exclude columns from participation in a process.
Use Option 3 to create, modify, or delete a Column Map. See Chapter 5, “Column Maps,” onpage 155 for detailed information about this option.
4 - TABLE MAPSTable Maps are used by Optim to map the source tables to their corresponding destination tables,so that tables with different names in the source and destination can be mapped and tables in thesource can be excluded from the process.
Use Option 4 to create, modify, or delete a Table Map. See Chapter 6, “Table Maps,” on page 199for detailed information about this option.
5 - ADSAccess Definitions are used by Optim to specify the related data to process. You can specify theset of tables, selection criteria, relationships, and other criteria to define the desired set of data.
Use Option 5 to create, modify, or delete an Access Definition. This option is the same as Option5 ADS on the Main Menu. For information about creating or modifying Access Definitions, seeChapter 2, “Access Definitions,” on page 21.
6 - LEGACY TABLESOption 6 is displayed only if Move or Compare for IMS, VSAM, and Sequential Filesis installed. A
-------------------------- Choose a Definition Option -------------------------OPTION ===>
SQLID ===> FOPDEMO1 PRIMARY KEYS - Maintain Primary Keys SUBSYS ===> TDB22 RELATIONSHIPS - Maintain Relationships LOCATION ===>3 COLUMN MAPS - Maintain Column Maps4 TABLE MAPS - Maintain Table Maps5 ADS - Maintain Access Definitions6 LEGACY TABLES - Maintain Legacy Tables for Non-DB2 Data7 IMS ENVIRONMENT - Maintain IMS Environment Definitions8 IMS RETRIEVAL - Maintain IMS Retrieval Definitions9 COLLECTIONS - Maintain Archive Collections
E EXPORT - Export Optim Object DefinitionsI IMPORT - Import Optim Object Definitions
Figure 2. Choose a Definition Option
Chapter 1. Introduction 13

Legacy Table allows you to incorporate legacy data into Move or Compare processes. The LegacyTable describes the legacy data and maps it to a DB2 table format.
Use Option 6 to create, modify, or delete a Legacy Table. For information about this option, seethe Move User Manual, Legacy Tables or Compare for IMS, VSAM, and Sequential Files.
7 - IMS ENVIRONMENTOption 7 is displayed only if Move or Compare for IMS, VSAM, and Sequential Filesis installed. AnIMS Environment Definition allows you to define the information needed to access IMS data.
Use Option 7 to create, modify, or delete an IMS Environment Definition. For information aboutthis option, see the Move User Manual, IMS Environment Definition or Compare for IMS, VSAM,and Sequential Files.
8 - IMS RETRIEVALOption 8 is displayed only if Move or Compare for IMS, VSAM, and Sequential Filesis installed. AnIMS Retrieval Definition provides the information necessary to dynamically process IMS data.
Use Option 8 to create, modify, or delete an IMS Retrieval Definition. For information about thisoption, see the Move User Manual, IMS Retrieval Definition or Compare for IMS, VSAM, andSequential Files.
9 - COLLECTIONSAn Archive Collection is an object that references one or more Archive Files. When an ODMconnection is made using a collection name, the data in the Archive Files is unioned andpresented to the user as though a single Archive File was being accessed.
Use Option 9 to create, modify, or delete an Archive Collection. For information about this option,see the Archive User Manual, Archive Collections.
E - EXPORTThe Export Process is used to copy objects specific to Optim from the Optim Directory and storethem in an external file. This file may then be used by the Import Process to add the objects to anOptim Directory in another DB2 subsystem.
Use Option E to export objects from the Optim Directory. See “Use the Export Process” on page229 for detailed information about this option.
I - IMPORTThe Import Process is used to import previously exported Optim objects. The imported objectsare stored in the Optim Directory. You can also import primary keys and relationships describedin CREATE TABLE and ALTER TABLE JCL statements, allowing you to import definitions storedin an external data modeling tool.
Use Option I to import objects to the Optim Directory. See “Use the Import Process” on page 236for detailed information about this option.
Panel Prompts
Using prompts on the Main Menu or the Choose a Definition Option menu, you can change the SQLID,DB2 subsystem, or remote location. This is especially useful for accessing the objects for a specificdatabase, or when exporting and importing, to connect to the desired target database. Values for promptsare profiled.
SQLIDThe current SQLID. Modify this value to connect using a different SQLID.
SUBSYSThe current DB2 subsystem. Modify this value to connect to a different DB2 subsystem.
When connecting to a remote subsystem, this value should be the local subsystem where theremote location is defined.
14 IBM InfoSphere Optim for DB2 for z/OS: Common Elements

LOCATIONThe remote location. This prompt is displayed if remote access is available. Specify a value toconnect to a remote DB2 subsystem. You can use a percent sign (%) to obtain a selection list ofavailable locations. If the connection fails, the Optim session is restarted and the Main Menu isredisplayed.
Note: If you leave this prompt blank, the local subsystem is assumed.
Object Selection List FunctionsFrom a selection list of Optim objects (e.g., Access Definitions), use the Select line command, S, to choosean object.
In the following figure, the formatted Access Definition selection list is displayed and the last definitionon the list, GRP.USER.ADSAMPLE, is selected.
Selection List Line Commands
The line commands for a selection list of Optim objects are:
S Select an object for processing.
D Delete an Optim object. After deleting, “*DELETED” is displayed in the selection list.
C Copy an Optim object to create a new Optim object. After copying, “*COPIED” is displayed inthe selection list.
R Change the name of an existing Optim object. After renaming, “*RENAMED” is displayed in theselection list.
AT Modify the attributes of a Optim object. The Object Attributes panel allows you to edit thedescription and security status of an Optim object.
The description is 1 to 40 characters. A user option determines whether the description isdisplayed on selection lists. (See “User Options” on page 318 for more information.)
I Display information about an Optim object.
------------------------- Select Access Definitions ---------------------------Command ===> Scroll ===> PAGE
Line Cmds: S-Select, D-Delete, C-Copy, R-Rename, AT-Attr, I-Info 1 of 8
----- Access Definition ------ ------ Last Modified -------Cmd Group User Name By Date--- -------- -------- ------------ -------- -------------------
****************************** TOP ************************************___ ADMIN JAA EMPL01 ALLEGRA 2005-09-21 16.36.59___ ADMIN JAA PAYROLL LISAC 2005-09-22 09.51.12___ DVLMT01 FOPDEMO SAMPLTST DCOHEN 2005-10-23 19.12.23___ DVLMT01 FOPDEMO TEST04 DCOHEN 2005-10-13 14.52.49___ DVLMT02 FOPDEMO TEST05 KEBLERD 2005-10-06 16.37.59___ DVLMT02 FOPDEMO TEST06 KEBLERD 2005-10-13 14.52.49__ GRP USER ADSAMP SENTNER 2005-11-02 13.23.14S__ GRP USER ADSAMPLE ALLEGRA 2005-10-26 12.14.39
**************************** BOTTOM ***********************************
Figure 3. Select an Optim Object
Chapter 1. Introduction 15

Copy an Optim Object
To copy an Optim object from a selection list, use the C line command next to the name of the object tobe copied. The following figure shows the Copy Access Definition panel.
The Copy panel displays the name of the object and prompts for a name for the new, copied object. Afteryou enter the new name, press ENTER to copy the object under the specified name.
Rename an Optim Object
To rename an Optim object from a selection list, use the R line command next to the name of the object tobe renamed. The following figure shows the Rename Access Definition panel.
The Rename panel displays the current name of the object and prompts for a new name. After you enterthe new name, press ENTER to rename the object.
Object Attributes
To modify the description and security status attributes of an Optim object from a selection list, use theAT line command for the object. The description and security status are specified on the ObjectAttributes panel.
+-------Copy Access Definition-------+¦ ¦¦ Existing Name: GRP.USER.ADSAMPLE ¦¦ ¦¦ New Name: ¦¦ ¦¦ Group ===> GRP ¦¦ User ===> USER ¦¦ Name ===> ADSAMPLE ¦+------------------------------------+
Figure 4. Copy an Optim Object
+------Rename Access Definition------+¦ ¦¦ Existing Name: GRP.USER.ADSAMPLE ¦¦ ¦¦ New Name: ¦¦ ¦¦ Group ===> GRP ¦¦ User ===> USER ¦¦ Name ===> ADSAMPLE ¦+------------------------------------+
Figure 5. Rename an Optim Object
16 IBM InfoSphere Optim for DB2 for z/OS: Common Elements

The Object Attributes panel provides a 40-character area to display and edit the description. An8-character area is also available to specify one of the following security statuses:
Public Anyone can edit and use.
PrivateOnly the owner can edit and use.
ReadonlyAnyone can use, only the owner can edit.
A site option determines whether security status is available. If it is not available, Security Status is notdisplayed. For additional information about the Object Attributes panel, see “Specify Description andSecurity Status” on page 325.
Scrolling
You can use standard ISPF scrolling facilities to scroll a selection list.
Primary Commands
The following primary commands are available for a selection list of Optim objects. For detailedinformation about these commands, see the Command Reference Manual, Primary Commands.
BOTTOMCANCELDOWNENDFINDLIST TABLESLOCATEOPTIONSRESETRFINDSELECTSHOWSORTTOPUP
+------------------------Object Attributes-----------------------+¦ ¦¦ Object Name: GRP.USER.ADSAMPLE ¦¦ ¦¦ Modify the attributes below as needed. ¦¦ ¦¦ Description ===> Customers Legacy Table ¦¦ ¦¦ Security Status ===> PUBLIC (PUBLIC, PRIVATE, READONLY) ¦¦ ¦¦ Use END command to accept any changes and return. ¦¦ Use CANCEL command to ignore any changes and return. ¦¦ ¦+----------------------------------------------------------------+
Figure 6. Object Attributes
Chapter 1. Introduction 17

Note:
v FIND locates a character string anywhere in the list. RFIND repeats the FIND operation. (Thiscommand is usually assigned to PF5.)
v LIST TABLES is available for selection lists of primary keys or relationships only.v LOCATE locates and scrolls to an object name that matches or is greater than the search value.v SORT arranges the list in ascending or descending order by values under a column heading (such as
SORT DATE).v SHOW limits the selection list to objects for which a specific value is displayed.
Double-Byte Character Set SupportOptim processes Double-Byte Character Set (DBCS) data and provides DBCS users with all Optimcapabilities that are available to Extended Binary Coded Decimal Interchange Code (EBCDIC) users.
Optim DBCS support assumes EBCDIC DBCS data. EBCDIC DBCS requires exactly two bytes for everyDBCS character. Optim DBCS support assumes a single DBCS language, including pure DBCS, andMixed Single-Byte Character Set (SBCS) and DBCS.
Note: Optim does not support double-byte or mixed-byte characters in ASCII, nor Unicode double-bytecharacters.
In mixed character strings (strings that contain both SBCS and DBCS characters), two special controlcharacters indicate the start and end of a DBCS substring. Shift Out (X'0E') indicates the start and Shift In(X'0F') indicates the end of the DBCS substring.
DB2 translates all DB2 character data between the internal DB2 table Coded Character Set Identifier(CCSID) and the external application (Optim) CCSID. All data that Optim processes remains in theexternal Optim CCSID.
Note: To eliminate problems with round-trip character translation, the Optim installer should ensure thatthe external Optim CCSIDs match the internal DB2 CCSIDs for DBCS data.
Optim Archive and Extract Files preserve the encoding scheme and CCSID. Optim warns users ifincompatible CCSIDs could cause problems in storing data. Site and User options (“Allow MismatchedCCSIDs”) indicate the action Optim should take when the CCSID of a source column does not match thatof a target column and when the CCSID of the terminal does not match that of the DB2 subsystem.
DBCS Data Types
Optim supports the following DBCS data types. The conversion and mapping rules for the DBCS datatypes are the same as the corresponding DB2 rules.v GRAPHIC - A fixed-length data type used to store a graphic string, that is, a string consisting of
double-byte EBCDIC characters that are not stored with Shift Out and Shift In characters. Themaximum length of a GRAPHIC string is 254 bytes.
v VARGRAPHIC/LONGVARGRAPHIC - A varying-length data type used to store a variable-lengthgraphic string. The maximum length of a VARGRAPHIC/LONGVARGRAPHIC string is 32704 bytes.
v CHAR or CLOB defined with “FOR MIXED DATA” - Used to store mixed data, that is, Multi-byteCharacter Set (MBCS) data (the MIXED=YES DB2 install option is required). Shift Out and Shift Incharacters are required to identify the double-byte data in a mixed character string.
v DBCLOB - A double-byte character large object. The maximum length of a DBCLOB is 1,073,741,823DBCS characters.
18 IBM InfoSphere Optim for DB2 for z/OS: Common Elements

Functions that Support DBCS Data
Optim supports DBCS data in the following functional areas:v The Optim ISPF interface accepts and displays DBCS data.v The Optim Directory accepts DBCS characters in object names (for example, column names, table
names, Access Definition names, Compare Definition names, relationship names). When DBCScharacters are used for an object name, they must be enclosed in double quotes.
v Keywords, commands, and control statements remain in EBCDIC SBCS. Batch Optim Directory controlstatements (for example, EXPORT, IMPORT) support DBCS characters.
v Access displays and allows entry of DBCS data.v Archive and Extract processes save and restore DBCS data in Archive and Extract Files. (Archive and
Extract Files save data in the external (Optim) application CCSIDs.)
Note: To eliminate problems with round-trip character translation, the Optim installer should ensurethat the external Optim CCSIDs match the internal DB2 CCSIDs for DBCS data.
v Compare supports DBCS data.v Browse/Edit mode presents DBCS data and allows insert and updates. It also supports DBCS data in
Selection Criteria and SQL WHERE clauses.v All Column Map functions support DBCS literals and SUBSTR operations with DBCS data.v Optim checks for data type compatibility between source and destination columns during Insert,
Restore, and Convert processes.v Functions that display table names, column names, and relationships support DBCS data.v Export/Import and substitution variables support DBCS data.v Process reports accommodate DBCS data.
Definitions
The following definitions explain terms used in this section:
Coded Character Set Identifier (CCSID)A 16-bit number that uniquely identifies a coded representation of graphic characters. Itdesignates an encoding scheme identifier and one or more pairs that consist of a character setidentifier and an associated code page identifier.
Double-Byte Character Set (DBCS)A set of characters, which are used by national languages such as Japanese and Chinese, thathave more symbols than can be represented by a single byte. Each character is 2 bytes in length.
Graphic StringA string consisting of double-byte EBCDIC characters that are not stored with Shift Out and ShiftIn characters.
Multi-Byte Character Set (MBCS)A character set that represents single characters with more than a single byte. UTF-8 is anexample of an MBCS. Characters in UTF-8 can range from 1 to 4 bytes in DB2.
Single-Byte Character Set (SBCS)A set of characters in which each character is represented by a single byte.
Chapter 1. Introduction 19

20 IBM InfoSphere Optim for DB2 for z/OS: Common Elements

Chapter 2. Access Definitions
An Access Definition defines a set of related data to be processed by Optim.
Use an Access Definition to select a set of related data thatv Archive copies to an Archive File or restores to a database.v Move or Compare copies to an Extract File for processing.v Access displays for browsing or editing.
The components of an Access Definition arev A list of tables or views (i.e., the Table List).v Selection criteria in the form of WHERE predicates, substitution variables, Point-and-Shoot, and or row
list designations.v Archive Actions to be performed before or after a row is archived, deleted, or restored.v Processing criteria in the form of row limits and selection factors.v A list of relationships among the listed tables and instructions for traversing them.v Optional instructions for displaying data for Point-and-Shoot, browsing, or editing.v Parameter settings to establish how the Access Definition is applied and to limit modifications to it
during use.
In addition, the Access Definition editor includes several features to help you analyze and tuneprocessing.v Show Steps lets you analyze a process before running it to ensure that the data processed and the
traversal paths used to process the data are as you expect.v The Relationship Index Analysis feature analyzes DBMS indexes for selected relationships in the Access
Definition, allowing you to create needed indexes to enhance performance.
You can define a temporary or permanent Access Definition for processing data. A permanent AccessDefinition is stored in the Optim Directory. For an Extract or Archive Process, a temporary AccessDefinition is discarded after the data is extracted. For a Compare Process, a temporary Access Definitionis a “LOCAL” definition stored with the current Compare Definition, and it is available only for thatCompare Definition.
Creating an Access Definition
A series of panels guides you through the process of creating or modifying an Access Definition. Thesepanels are referred to collectively as the Access Definition editor. You can invoke the Access Definitioneditor independently, by selecting Option 5 (or 6.5) ADS from the Main Menu, or while preparing toexecute an Archive, Compare, or Extract Process. (Each process is invoked from the Main Menu. Fordetails about each process option, see the appropriate User Manual.)
The features and methods used to create an Access Definition are the same as those used to modify anexisting Access Definition. You can initiate the creation of an Access Definition by providing a name thatis not in use when displaying the Access Definition editor. Alternatively, you can edit an existing AccessDefinition in the Access Definition editor and save it under a new name.
Consider Purpose
When creating an Access Definition, it is important to consider the purpose of the Access Definition andwho is to use it. An Access Definition can be used with Archive to archive data, with Access to browse or
© Copyright IBM Corp. 1991, 2013 21

edit data, with Move to extract data, or with Compare to select data for comparison. However, if AccessDefinitions are shared among the Optim components, care must be taken to avoid changes thatinadvertently affect other users of Optim. For example, if an Access user modifies an Access Definitionestablished by a Move user, the Move user might then extract an unexpected set of data.
In addition, an Access Definition used by Move, Compare, or Archive does not allow duplicate referencesto a table, whether direct or indirect (for example, a reference to a view, synonym, or alias for a listedtable). Access permits duplicate references.
Select an Access DefinitionOptim allows you to invoke the Access Definition editor and create or edit an Access Definition, withouthaving to initiate a process. Moreover, you can save the Access Definition in the Optim Directory for lateruse with an online or batch process.
Select Option 5 ADS from the Main Menu or Option 5 ADS from the Choose a Definition Option menu(accessed by selecting Option 6 DEFINITIONS on the Main Menu) to display the Choose an AccessDefinition panel. (For information about the Choose a Definition Option menu, see “Choose a DefinitionOption” on page 12.)
Panel
The prompts on the Choose an Access Definition panel are:
SQLIDThe current SQLID. Modify this value to connect using a different SQLID.
SUBSYSThe current DB2 subsystem. Modify this value to connect to a different DB2 subsystem.
When connecting to a remote subsystem, this value should be the local subsystem where theremote location is defined.
LOCATIONThe remote location. This prompt is displayed if remote access is available. Specify a value toconnect to a remote DB2 subsystem. You can use a percent sign (%) to obtain a selection list ofavailable locations. If the connection fails, the Optim session is restarted and the Main Menu isredisplayed. If you leave this prompt blank, the local subsystem is assumed.The Choose an Access Definition panel does not include prompts for SQLID, SUBSYS, andLOCATION when displayed from the Choose a Definition Option menu. You must return to theprevious panel to change these entries.
-------------------------- Choose an Access Definition ------------------------Command ===>
SQLID ===> FOPDEMOAccess Definition: SUBSYS ===> DSNA
Group ===> GRP LOCATION ===>User ===> USRName ===>
Use ’_’ for DB2 LIKE character ===> NO (Y-Yes, N-No)
To limit selection list to Access Definitions with certain start tables, enterthe start table name below. A wild card is allowed at the end of each part.
Start Table Creator ID ===> >Start Table Name ===> >
Figure 7. Choose an Access Definition
22 IBM InfoSphere Optim for DB2 for z/OS: Common Elements

Access Definition:Together, Group, User, and Name make up the fully qualified name of the Access Definition. Youcan enter an explicit value, DB2 LIKE syntax, or blanks for these prompts in any combination.
Group The Group ID for the Access Definition. Enter 1 to 8 characters. The default is thepreviously entered value, or the TSO ID of the current user if a Group has never beenspecified.
User The User name for the Access Definition. Enter 1 to 8 characters. The default is thepreviously entered value, or the DB2 SQLID for the current user if a User has never beenspecified.
Name The Name of the Access Definition. Enter 1 to 12 characters.
Use '_' for DB2 LIKE characterThis entry determines the use of the underscore ( _ ) character. Type Y if the underscore is usedas a DB2 LIKE character, or N if it is used literally as part of the name.
Note: When the ’_’ character is used in conjunction with the ’%’ DB2 LIKE character, the ’_’ istreated as a ’DB2 like’ character, and not as a literal.
For example, depending upon the use of the underscore character, A_B is a three-character namecontaining the characters ‘A_B', as entered, or a three-character name that begins with “A” andends with “B” with any valid character in the middle.
Start TableYou can list Access Definitions that reference a specific Start Table by specifying Start Tablecriteria. Enter an explicit value, wild card (%), or blanks for these prompts in any combination.
Creator IDThe Creator ID for the Start Table. Enter 1 to 128 characters. The default is the previouslyentered value.
Table NameThe Name for the Start Table. Enter 1 to 128 characters. The default is the previouslyentered value.
Note: See “Long Object Names (LONs)” on page 8 for information on entering CreatorIDs and Table Names of up to 128 characters.
Specify Name Explicitly
When you enter a fully qualified name explicitly, you are presented with the Select Tables/Views for ADpanel. If the explicitly named Access Definition exists, you can modify it and save it under the same or adifferent name. If the explicitly named Access Definition does not exist, you can enter the desiredinformation and save the newly defined object.
Obtain Selection List of Names
You can enter DB2 LIKE syntax or leave one or more prompts blank to obtain a selection list of AccessDefinitions. For example, you can obtain a selection list of all Access Definitions, regardless of the Group,User, or Name by leaving those three prompts blank.
To obtain a selection list of all Access Definitions in any Group beginning with ‘A' for the User identifiedas JAA, you would specify:
Group A%User JAAName blank or %
Chapter 2. Access Definitions 23

If no Access Definitions match the criteria, the message “NO MATCHES” is displayed.
Start Table Criteria
You can further limit an Access Definition selection list by entering Start Table criteria. Specify afully-qualified Start Table name or use DB2 LIKE syntax to obtain a selection list of Access Definitionsthat reference a Start Table that matches the specified criteria.
If no Access Definitions match the Start Table criteria, the message “START TABLE NOT FOUND” isdisplayed.
Subsequent Use
The specified Group, User, and Name values are profiled and displayed the next time you invoke thispanel. You can change any displayed value.
Primary Commands
Use END or CANCEL to return to the main menu or ENTER to display the next panel, whether selectionlist or Access Definition editor.
Access Definition Selection ListA selection list of Access Definitions based on the entries in Group, User, and Name is displayed on theSelect Access Definitions panel. The names in the selection list appear in alphabetical order by Group,User, and Name.
Use the S line command to select one or more Access Definitions for modification. You can also use theSELECT command to select a single Access Definition, by providing the fully qualified name as anoperand. The following figure shows the formatted list. In the example, the Access DefinitionGRP.FOPDEMO.AD is selected, as indicated by the S in the Cmd column for that AD.
Description
A User Option setting determines whether the description of each Access Definition is displayed on thispanel. See “User Options” on page 318 for information about the Selection List Format option.
Line Commands
The Cmd area on the left side of the panel is used to enter line commands.
Cmd The following line commands are available:
------------------------- Select Access Definitions ---------------------------Command ===> Scroll ===> PAGE
Line Cmds: S-Select, D-Delete, C-Copy, R-Rename, AT-Attr, I-Info 1 of 4
----- Access Definition ------ ------ Last Modified -------Cmd Group User Name By Date--- -------- -------- ------------ -------- -------------------
****************************** TOP ************************************___ ADMIN FOPDEMO ARCHIVE FOPSJD 2005-04-08 16.31.55___ DVLMT01 FOPDEMO ARCHIVE FOPSJD 2005-03-24 12.45.38___ DVLMT01 FOPDEMO EXTRACT FOPSJD 2005-03-22 14.40.48_S_ GRP FOPDEMO AD FOPSLN 2005-08-03 13.24.33
**************************** BOTTOM ***********************************
Figure 8. Select Access Definitions
24 IBM InfoSphere Optim for DB2 for z/OS: Common Elements

S Select an Access Definition.
D Delete an Access Definition.
C Copy an Access Definition.
R Rename an Access Definition.
AT Modify the attributes of an Access Definition.
I Display information about an Access Definition.
See “Object Selection List Functions” on page 15 for more information about these commands.
Access Definition Attributes
To display the attributes of an Access Definition from the selection list, type I in Cmd next to the name ofthe Access Definition. The following figure shows the read-only Access Definition Attributes panel.
Return Display
After selecting one or more Access Definitions from the Select Access Definitions panel, press ENTER todisplay the first selection in the Access Definition editor. After modifying or reviewing an AccessDefinition selected from the list, use END to display the next selection or redisplay the Select AccessDefinitions panel if no selections remain. If you selected Access Definitions using a line command, theredisplayed list is scrolled to show the last selection on the top line of the display screen.
Terminate List
Use END or CANCEL to return to the Choose an Access Definition panel.
-------------------------- Access Definition Attributes -----------------------Command ===>
Group : GROUPUser : USERName : ADSAMPLE
Description : Sample Access DefinitionSecurity Status : PUBLICLast Modified By : FOPDEMOModified On : 2005-01-12 11.06.42
Number of Tables : 6Start Table : CUSTOMERS >Default Creator ID : FOPDEMO >
Access Definition ParametersDynamically Add New Tables : YesModify Selection/Sort Criteria : YesBegin Table Display with : Selection Criteria for Start TableChanges to AD During Edit : PermanentUse NEW Relationships : YesApply Crit in Self Reference : Yes
Figure 9. Access Definition Attributes
Chapter 2. Access Definitions 25

Components of an Access DefinitionOptim displays a series of panels to prompt for the components of an Access Definition. These panelsmake up the Access Definition editor and the first panel, Select Tables/Views for AD, is used to specifythe list of tables (Table List). All other Access Definition panels are accessible from this panel.
The name of each panel is shown in boldface in the following diagram. The command used to displaythe panel is also shown in each box.
Note: The ARC and ACT commands are available only for Access Definitions used in an Archive Process.
The Access Definition panels are available from both the EXTRACT Process and ARCHIVE Processmenus, during a Compare Process, and by selecting Option 5 ADS from the Main Menu. For example,Option 1 TABLES on the ARCHIVE Process menu displays the Select Tables/Views for AD panel. Option2 PATHS on the ARCHIVE Process menu invokes the Specify Relationship Usage panel.
Each panel and its use in defining the set of data to be processed are discussed in the following sections.
Table/View SelectionUse the Select Tables/Views for AD panel to list the names of tables that are accessed in an Archive,Compare, or Extract Process or during an edit or browse session. This panel is displayed when you selectan Access Definition from the Select Access Definitions panel or explicitly name one on the Choose anAccess Definition panel. The Select Tables/Views for AD panel is also displayed when you select Option1 TABLES from the ARCHIVE Process menu or the EXTRACT Process menu, or if you specify an AccessDefinition for either source in a Compare Process. (For details, see the appropriate User Manual.)
Unless indicated otherwise in this discussion, references to tables include Legacy Tables (for Move orCompare for IMS, VSAM, and Sequential Filesonly) and Materialized Query Tables. The use of a LegacyTable or Materialized Query Table in an Access Definition is virtually identical to that of a table.Exceptions are noted, where appropriate.
26 IBM InfoSphere Optim for DB2 for z/OS: Common Elements

Two Pages
When Access and Archive, Compare, or Move are available, this panel is presented on two panels, aleft-hand and a right-hand “page.” To indicate the presence of right and left pages, “MORE” with anappropriate direction arrow is presented in the upper right of the panel. The direction of the arrowindicates whether the remaining prompts are to the right or left. Use the LEFT and RIGHT primarycommands or the assigned function keys to scroll the pages horizontally.
Note: If you are licensed only for Access, only the left-hand page is available. If Access is not licensed,then only the right-hand page is available.
For this manual, licensing of all Optim components is assumed.
Initial Display
If you provide the name of an existing Access Definition on the Choose an Access Definition panel, thelist of tables for that Access Definition is shown on the initial display of the Select Tables/Views for ADpanel. If you are creating a new Access Definition, the initial display provides space to enter the name ofa table. There are a variety of methods and commands available to help populate this list. For example,you can type the name of a single table and use the GET TABLES RELATED ALL command to populatethe list with the names of all tables related to the first table.
Sample Display
The following figure shows the left page of the Select Tables/Views for AD panel for a hypotheticalAccess Definition named AD. Note the fully qualified name of the Access Definition on the title line,which is GRP.FOPDEMO.AD in the example.
Panel
The prompts on the Select Tables/Views for AD panel are:
Default Creator IDThe default Creator ID automatically prefixed to any Table/View Name specified without one. Inthe above figure, for example, the Creator ID “FOPDEMO” would be prefixed to the table name“ORDERS” to form the fully qualified name “FOPDEMO.ORDERS”.
Specify a 1 to 128 character Creator ID. When creating an Access Definition, the default CreatorID is the DB2 SQLID for the current user.
-- Select Tables/Views for AD: GRP.FOPDEMO.AD ---------------------------------Command ===> Scroll ===> PAGE
Primary : COL,SEL,SQL,REL,POINT,GROUP,GET TABLES RELATED,INDENT,ARC,LIST SUBSLine : COL,SEL,SQL,ALL,GR(A),GP(A),GC(A),DR(A),OR(A),DP(A),OP(A),
DC(A),OC(A),EXP,ARC,ACT,STATable 1 of 1 MORE>>
Default Creator ID ===> FOPDEMO >>Start Table ===> ORDERS >>Start Table Options : None
---- Access Rights ----Cmd Status (CreatorID.)Table/View Name (S)el/(U)pd/(I)ns/(D)el Type--- ----------- ------------------------->> ----------------------- -------*** ********************************* TOP *********************************___ ORDERS D TABLE*** ******************************* BOTTOM ********************************
Figure 10. Select Tables/Views for AD – Access Rights
Chapter 2. Access Definitions 27

Start TableThe name of the table from which data is selected first. Specify the fully qualified name if theCreator ID is different from the Default Creator ID. You can specify a partial name, withwildcard characters, to display a table name list from which you can select the appropriate name.
The Start Table must be on the Table List. If you leave Start Table blank, the first name entered onthe Table List is automatically inserted as the default Start Table. Conversely, if you enter a namein Start Table that is not listed in the Access Definition, the name is added to the Table List.
Start Table OptionsStart Table selection criteria methods that apply. This is a display-only area that contains one ormore of the following designations:
None No special Start Table criteria have been specified.
Row List (POINT)Primary key values have been stored in a Row List and are available for any Archive orExtract Process.
Temp. Row List (POINT)Primary key values have been stored in a Row List and are available for the currentArchive or Extract Process only.
Group Selection (GROUP)Group selection processing has been specified. (Group selection processing is available forMove and Compare only.)
Note: Start Table Options are relevant for Archive, Compare, and Move. If only Access islicensed, the value is always None.
See “The Point-and-Shoot Facility” on page 72 for information about Row Lists. See “GroupSelection Processing” on page 85 for information about group selection processing.
Cmd Line command entry area. Use the following line commands to complete the Table List andspecify or remove criteria for the listed tables.
ACT Display the Select an Action To Be Defined panel. (This command is available if Archiveis licensed.)
ALL Remove or drop any selection criteria, SQL WHERE clauses, or archive criteria for thespecified table, so that all rows are selected.
ARC Display the Specify Archive Criteria for AD panel. (This command is available if Archiveis licensed.)
COL Display the Describe Columns for AD panel.
EXP Display the Expand - (Creator.ID)Table/View Name pop-up, which shows the table's fullname. This command is useful in displaying Long Object Names (LONs) that cannot bedisplayed in full on the panel.
GR(n) Add names of tables that are parents or children to the selected table.
Note: A number or the letter “A” with the GR, GP, GC, DR, DP, DC, PR, PP, and PC commandsindicate the number of levels or generations you want included. Specify a number from 1through 9 to indicate the number of levels you want included, such as GR3, or specify the letter“A” to indicate that you want ALL levels included, such as GRA. If a number or “A” is notspecified, the default is one level.
GP(n) Add names of tables that are parents to the selected table.
GC(n) Add names of tables that are children to the selected table.
28 IBM InfoSphere Optim for DB2 for z/OS: Common Elements

DR(n) Using DB2 relationships, add names of tables that are parents or children to the selectedtable.
DP(n) Using DB2 relationships, add names of tables that are parents to the selected table.
DC(n) Using DB2 relationships, add names of tables that are children to the selected table.
OR(n) Using Optim relationships, add names of tables that are parents or children to theselected table.
OP(n) Using Optim relationships, add names of tables that are parents to the selected table.
OC(n) Using Optim relationships, add names of tables that are children to the selected table.
LR Generate a selection list of tables related to the selected table.
SEL Display the Specify Selection Criteria for AD panel.
SQL Display the SQL WHERE Clause panel.
STA Display the Criteria in Effect pop-up window, which lists the types of criteria in effect forthe specified table.
Note: ISPF-like line commands are also available to copy, move, repeat, insert, or delete tablenames.
Status One or more status indicators for the table:
ACT Archive Actions are specified.
ARC Archive index or date criteria are specified.
blank All columns are selected with default display formatting. Default.
COL Column attributes are specified.
REMOTEThe named table is an alias to another DB2 subsystem. Remote tables are not supported.You must remove the name of a table in REMOTE status to save the Access Definition.
If remote access is available, you can change the LOCATION to access remote tables.
SEL Selection criteria are specified.
SQL An SQL WHERE clause is specified.
TEMPTABLEThe table is a DB2 Temporary Table. It contains no data and must be defined as areference table. It also cannot be used as a Start Table, joined in a browse orPoint�and-Shoot session, or selected for a browse or edit session.
UNKNOWNThe named table is not known to DB2. UNKNOWN status indicates the table does notexist. Possible reasons for UNKNOWN status are:v The table name is mistyped.v The named table does not exist or has been dropped.v Prefixing the name with the default Creator ID results in a name for a table that does
not exist.
You can save and use an Access Definition with any table or tables, other than the StartTable, in UNKNOWN status.
VIEWERRThe named view is not usable. Generally, this status indicates a conflict between the viewdefinition and the underlying base tables. You can save an Access Definition with anyview or views, other than the Start Table, in VIEWERR status.
Chapter 2. Access Definitions 29
Note: The Status area may not accommodate all the indicators that apply. See “Table StatusIndicators” on page 32 for more information.
Table/View NameThe names of tables and views to be processed (i.e., the Table List). Specify the fully qualifiedname if the Creator ID is different from the Default Creator ID.
The Table List must include at least one table or view name. If you delete all names and exit theAccess Definition editor, the Access Definition is deleted.
A table can be referenced only once in an Access Definition; therefore, the Table List cannotreference both a table and one or more views, aliases, or synonyms for the table. (This restrictiondoes not apply to Access.)
Generally, a Temporary Table on the list is ignored by Optim. For Move, however, you canspecify a temporary table, but it must be a reference table and cannot be used as the Start Table.Since there is no data in the table, you cannot join to it during a browse session.
Access RightsAccess privileges. (Access only) The Access Rights privilege applies if more restrictive for the userthan the DB2 authorization; otherwise, the authorization in the DB2 Catalog is used. Use AccessRights to restrict DB2 privileges for a user when editing or browsing data with the AccessDefinition.
S Select only.
U Update or select.
I Insert, update, or select.
D Delete, insert, update, or select.
The implied hierarchy is S, U, I, and D in order of increasing privilege. If no value is specified, Dis assumed.
Type The type of object. Possible values are:
TABLETable name
S-MQTSystem-maintained Materialized Query Table
U-MQTUser-maintained Materialized Query Table
VIEW View name
S-TABLESynonym for a table
S-VIEWSynonym for a view
A-TABLEAlias for a table
A-VIEWAlias for a view
LEGACYLegacy Table name
When you scroll right, the right-hand page of the Select Tables/Views for AD panel is displayed.
30 IBM InfoSphere Optim for DB2 for z/OS: Common Elements

Panel
Many prompts on this panel are also displayed on the left-hand page and are described previously in thissection. The following prompts are displayed only on the right-hand portion.
Optim displays this page first when you select Option 1 TABLES from the ARCHIVE Process orEXTRACT Process menu.
RF Identifier for a reference table, a table for which all rows are selected, unless selection criteria arespecified for the table. Specify:
N Select only the related rows.
Y Use as a reference table.
Any table on the Table List, except the Start Table, can be treated as a reference table. Overtypethe RF value with the desired designation or use the REF primary command to specify N or Y forall listed tables, other than the Start Table. Relationships for a reference table are not displayed onthe Specify Relationship Usage panel because the relationships are irrelevant when processingreference table data. This label is Ref Tbl when the Select Tables/Views for AD panel is invokedduring an Extract, Archive, or Compare Process.
DA Indicator for the deletion of database rows after they are archived. (This prompt is displayed onlyif Archive is installed.) Specify:
N Retain source rows after archiving.
Y Delete source rows after archiving.
You can select any table on the Table List. Overtype the DA value with the desired designation oruse the DAA primary command to specify N or Y for all listed tables.
Note: This label is DAA when the Select Tables/Views for AD panel is invoked from theARCHIVE Process menu.
EveryNthA numeric value used as a factor for selecting rows from the table. Specify any value from 1through 65,535. Specify “10” for example, to select every 10th row.
This entry is unavailable when the Select Tables/Views for AD panel is invoked from the ARCHIVEProcess menu, or if Move or Compare is not installed.
-- Select Tables/Views for AD: GRP.FOPDEMO.AD ---------------------------------Command ===> Scroll ===> PAGE
Primary : COL,SEL,SQL,REL,POINT,GROUP,GET TABLES RELATED,INDENT,ARC,LIST SUBSLine : COL,SEL,SQL,ALL,GR(A),GP(A),GC(A),DR(A),PR(A),DP(A),PP(A),
DC(A),PC(A),EXP,ARC,ACT,STATable 1 of 1 <<MORE
Default Creator ID ===> FOPDEMO >>Start Table ===> ORDERS >>Start Table Options : None
R D --Extract Parms--Cmd Status (CreatorID.)Table/View Name F A EveryNth RowLimit Type--- ----------- ------------------------------>> - - -------- -------- -------*** ********************************** TOP ***********************************___ ORDERS N ____ ________ TABLE*** ******************************** BOTTOM **********************************
Figure 11. Select Tables/Views for AD – Criteria Portion
Chapter 2. Access Definitions 31

RowLimitThe maximum number of rows that can be selected from the table. Specify any value from 1through your site maximum value.
You can use Row Limit as a check when processing data. For example, if you expect to archivefewer than 1000 rows from a table, a row limit causes the Archive Process to terminate if thenumber of archived rows exceeds 1000. The termination allows you to troubleshoot thespecifications for the process. Row Limit is also useful to extract a limited set of data for a testdatabase.
Top and bottom markers on both the left and right pages of the panel indicate the first and last tablenames in the list.
Table Status IndicatorsThis section describes the Status area on the Select Tables/Views for AD panel.
The Status area on the Select Tables/Views for AD panel contains:v ACT when Archive Actions have been specified.v ARC when archive indexing or date criteria have been specified.v COL when specifications have been made for the columns of the selected table.v SEL when selection criteria have been specified.v SQL when an SQL WHERE clause has been specified.v Blank when no criteria are specified.
In the following figure, archive criteria, column specifications, selection criteria, and an SQL WHEREclause have been defined for the ORDERS table.
STA Command
Status is not large enough to display all four status indicators, ARC, COL, SEL, and SQL. Use the STAline command to display the Criteria in Effect pop-up window, which lists the types of criteria in effectfor the table on the Select Tables/Views for AD panel, as shown below.
-- Select Tables/Views for AD: GRP.FOPDEMO.AD ---------------------------------Command ===> Scroll ===> PAGE
Primary : COL,SEL,SQL,REL,POINT,GROUP,GET TABLES RELATED,INDENT,ARC,LIST SUBSLine : COL,SEL,SQL,ALL,GR(A),GP(A),GC(A),DR(A),PR(A),DP(A),PP(A),
DC(A),PC(A),EXP,ARC,ACT,STATable 1 of 4 <<MORE
Default Creator ID ===> FOPDEMO >>Start Table ===> ORDERS >>Start Table Options : None
R D --Extract Parms--Cmd Status (CreatorID.)Table/View Name F A EveryNth RowLimit Type--- ----------- ------------------------------>> - - -------- -------- -------*** ********************************** TOP ***********************************___ ARC/COL/... ORDERS N ____ ________ TABLE___ CUSTOMERS N N ____ ________ TABLE___ DETAILS N N ____ ________ TABLE___ ITEMS N N ____ ________ TABLE*** ******************************** BOTTOM **********************************
Figure 12. Multiple Status Indicators
32 IBM InfoSphere Optim for DB2 for z/OS: Common Elements

Description
Before saving an Access Definition, you can provide a description to be displayed on a selection list. Usethe ATTRIBUTES command to display the Object Attributes panel, which provides a 40-character area todisplay and edit the description. (Site management determines whether this panel also displays a promptfor Security Status.) For additional information about the Object Attributes panel, see “Specify Descriptionand Security Status” on page 325.
Available Commands
The following commands are available when the Select Tables/Views for AD panel is displayed, exceptas noted.v ACTIONS2
v ALLv ARCHIVE2
v ATTRIBUTESv BOTTOMv BROWSEv CANCELv COLUMNSv CREATE PRIMARY KEYv CREATE RELv DAA2
v DOWNv EDIT1
v ENDv EXPAND or EXPv FINDv GET TABLES RELATEDv GROUP3
-- Select Tables/Views for AD: GRP.FOPDEMO.AD ---------------------------------Command ===> Scroll ===> PAGE
Primary : COL,SEL,SQL,REL,POINT,GROUP,GET TABLES RELATED,INDENT,ARC,LIST SUBSLine : COL,SEL,SQL,ALL,GR(A),GP(A),GC(A),DR(A),PR(A),DP(A),PP(A),
DC(A),PC(A),EXP,ARC,ACT,STATable 1 of 4 <<MORE
Default Creator ID ===> FOPDEMO >>Start Table ===> ORDERS >>Start Table Options : None
R D --Extract Parms--Cmd Status (CreatorID.)Table/View Name F A EveryNth RowLimit Type--- ----------- ------------------------------>> - - -------- -------- ---------- ----------- ---------- - - -------- -------- -------*** ********************** +--Criteria in Effect-+ ***************************STA ARC/COL/... ORDERS ¦ ¦ N ____ ________ TABLE___ CUSTOMERS ¦ Archive Criteria ¦ N ____ ________ TABLE___ DETAILS ¦ Column Criteria ¦ N ____ ________ TABLE___ ITEMS ¦ Selection Criteria ¦ N ____ ________ TABLE*** ********************** ¦ SQL Criteria ¦ ***************************
+---------------------+
Figure 13. Criteria in Effect
Chapter 2. Access Definitions 33

v INDENTv LEFTv LISTv LIST SUBSv OPTIONSv PARAMETERSv POINT4
v REF4
v REL4
v RESETv RFINDv RIGHTv SAVE1
v SEL CRITERIAv SORTv SQLv STA (Status)v TOPv UP
Note:
1. Access only.2. Archive only.3. Move and Compare only.4. Move, Compare, and Archive only.
List Table NamesAt least one table must be referenced by the Access Definition. You can type the table names on thepanel, or you can select the appropriate names from a selection list or use commands to let Optim insertthe table names automatically.
Use a Selection ListThe LIST commands provide a variety of selection lists.
LIST TABLES
Use the LIST TABLES command to display an alphabetical selection list of tables. If you do not include aname pattern operand, the list includes all tables for the default Creator ID. Specify a name pattern, usingDB2 LIKE syntax, to limit the selection list. For example, to list all table names that begin with “A” forthe default Creator ID, specify:LIST TABLES A%
You can include additional operands (DB, TS, PL, or PKG) to limit the list to tables in a specific database,tablespace, plan, or package. These operands also support DB2 LIKE syntax. For example, to list all tablenames that begin with “A” for the default Creator ID in a database named FOP1, specify:LIST TABLES A% IN DB FOP1
34 IBM InfoSphere Optim for DB2 for z/OS: Common Elements

LIST VIEWS
Use the LIST VIEWS command to display an alphabetical selection list of views. A name pattern may bespecified.
LIST ALIASES
Use the LIST ALIASES command to display an alphabetical selection list of aliases. A name pattern maybe specified.
LIST SYNONYMS
Use the LIST SYNONYMS command to display an alphabetical selection list of synonyms for the currentSQLID. (This command does not support DB2 LIKE syntax.)
LIST Example
As an example, assume you are creating a new Access Definition with ORDERS as the Start Table. Typethe LIST TABLES command and press ENTER to display the names of all tables for the default CreatorID, FOPDEMO.
Use the S command to select any number of tables individually, or use the SEL ALL command to selectall listed tables. You can select a maximum of 99 tables from the list at one time. Replace the S with ablank to “unselect” a table. When you scroll the list, each selection is processed to show a left�justifieduppercase S in Cmd. Selected tables are listed in the Access Definition when you press the ENTER key oruse END to terminate selection list processing.
Table Selected
In Figure 14, the CUSTOMERS table is selected by typing S in Cmd. Use END or press ENTER toredisplay the Select Tables/Views for AD panel with the name of the selected table added to the list, asshown in the following figure.
-- Select Tables/Views for AD: GRP.FOPDEMO.AD ---------------------------------Command ===> Scroll ===> PAGE
Primary : COL,SEL,SQL,REL,POINT,GROUP,GET TABLES RELATED,INDENT,ARC,LIST SUBSLine : COL,SEL,SQL,ALL,GR(A),GP(A),GC(A),DR(A),PR(A),DP(A),PP(A),
DC(A),PC(A),EXP,ARC,ACT,STATable 1 of 1 <<MORE
Default Creator ID ===> FOPDE >>Start Table ===> ORDER +----Select One or More Tables----+ >>Start Table Options : None ¦ Cmd CreatorID.TableName 1 OF 8 ¦
¦ --- -------------------- ¦ ms--Cmd Status (CreatorID. ¦ ********* TOP ********** ¦ imit Type--- ----------- ------------- ¦ _S_ FOPDEMO.CUSTOMERS ¦ ---- -------*** ************************* ¦ ___ FOPDEMO.DETAILS ¦ ************___ ORDERS ¦ ___ FOPDEMO.FEMALE_RATES ¦ ____ TABLE*** ************************* ¦ ___ FOPDEMO.ITEMS ¦ ************
¦ ___ FOPDEMO.MALE_RATES ¦¦ ___ FOPDEMO.SALES ¦¦ ___ FOPDEMO.SHIP_INSTR ¦¦ ___ FOPDEMO.SHIP_TO ¦¦ ******** BOTTOM ******** ¦+---------------------------------+
Figure 14. Table Selection List
Chapter 2. Access Definitions 35

Redisplay the selection list as needed. The selection list excludes any tables already listed in the AccessDefinition.
Selection List of Related Tables
A selection list is also available to display all tables that are related to a specific table. Use the LISTTABLES RELATED primary command or the LR line command to display a list of related tables. TheLIST TABLES RELATED command requires a table name operand. For example, to display a list of tableswith the default Creator ID that are related to the CUSTOMERS table, enter:LIST TABLES RELATED TO CUSTOMERS
You can display the same list by specifying:LIST TABLES RELATED
and positioning the cursor on the line for CUSTOMERS and pressing Enter. You can also type the LR lineCmd (command) on the CUSTOMERS line and press ENTER to list all tables related to that table.
The selection list shows the names of the related tables, the source of the relationship definition, and therole of a table in the relationship as either a parent or a child. The source of the relationship is indicatedas DB2 for relationships in the DB2 Catalog, OPT for those defined to the Optim Directory, or IMS forthose defined in an IMS DBD (Move or Compare for IMS, VSAM, and Sequential Files only).
Select tables in the same manner as from the LIST TABLES list. You can redisplay this list as needed.
Insert Table Names AutomaticallyUse the GET TABLES RELATED command to insert the names of related tables in the Access DefinitionTable List. The names are the same as those provided on the selection list obtained with the LIST TABLESRELATED command. You can delete any unwanted names that have been inserted.
The Relationship Processing User Option determines the type of relationship (OPT, DB2, or both) usedto populate the Table List. This option also allows you to use the Get Related Processing Optionspop-up window to determine the type of relationship. You can override the User Option by specifyingthe relationship type in the command.
Use the ALL operand with the command to obtain names of the entire set of tables, including all parents,grandparents, children, grandchildren, and so on, related to the named table.
-- Select Tables/Views for AD: GRP.FOPDEMO.AD ---------------------------------Command ===> Scroll ===> PAGE
Primary : COL,SEL,SQL,REL,POINT,GROUP,GET TABLES RELATED,INDENT,ARC,LIST SUBSLine : COL,SEL,SQL,ALL,GR(A),GP(A),GC(A),DR(A),PR(A),DP(A),PP(A),
DC(A),PC(A),EXP,ARC,ACT,STATable 1 of 2 <<MORE
Default Creator ID ===> FOPDEMO >>Start Table ===> ORDERS >>Start Table Options : None
R D --Extract Parms--Cmd Status (CreatorID.)Table/View Name F A EveryNth RowLimit Type--- ----------- ------------------------------>> - - -------- -------- -------*** ********************************** TOP ***********************************___ ORDERS N ____ ________ TABLE___ CUSTOMERS N N ____ ________ TABLE*** ******************************** BOTTOM **********************************
Figure 15. Selected Table Included in Access Definition
36 IBM InfoSphere Optim for DB2 for z/OS: Common Elements

For example, assume the four tables in the following diagram are related, as shown. (DB2 relationshipsare selected in the Relationship Processing User Option.) The arrows indicate the direction of therelationship from parent to child.
Specifying GET TABLES RELATED ALL for any table in the diagram populates the Table List with alltable names. You can use the D line command to remove any unwanted names from the list.
Use operands to insert only the names of related parents or related children for a specified number oflevels. Note the following examples:
GET TABLES RELATED TO CUSTOMERS CHILDThis command inserts the names of children directly related to CUSTOMERS. In this example,only ORDERS is inserted.
GET TABLES RELATED TO CUSTOMERS 2 CHILDThis command inserts the names of children at two levels: the child and grandchild levels. In thisexample, ORDERS and DETAILS are inserted.
Conversely, the command can be directed to include names of parent tables. Note the followingexamples:
GET TABLES RELATED TO DETAILS PARENTThis command inserts the names of parents of the DETAILS table only. In this example, theORDERS table and the ITEMS table are parents.
GET TABLES RELATED TO DETAILS 2 PARENTThis command inserts the names of parents at two levels: the parent and grandparent levels. Inthis example, the CUSTOMERS table, as the parent of the ORDERS table, is inserted, in additionto the ORDERS table and the ITEMS table, because CUSTOMERS is the grandparent of theDETAILS table.
You can also specify which relationships to use, that is, either DB2 or OPT. Specifying a relationship typeoverrides the Relationship Processing User Option. Note the following examples:
GET TABLES RELATED TO DETAILS PARENT OPTThis command inserts the names of parents from OPT relationships with the DETAILS table.
GET TABLES RELATED TO DETAILS 2 PARENT OPTThis command inserts the names of parents at two levels – the parent and grandparent levels –from OPT relationships with the DETAILS table.
Chapter 2. Access Definitions 37
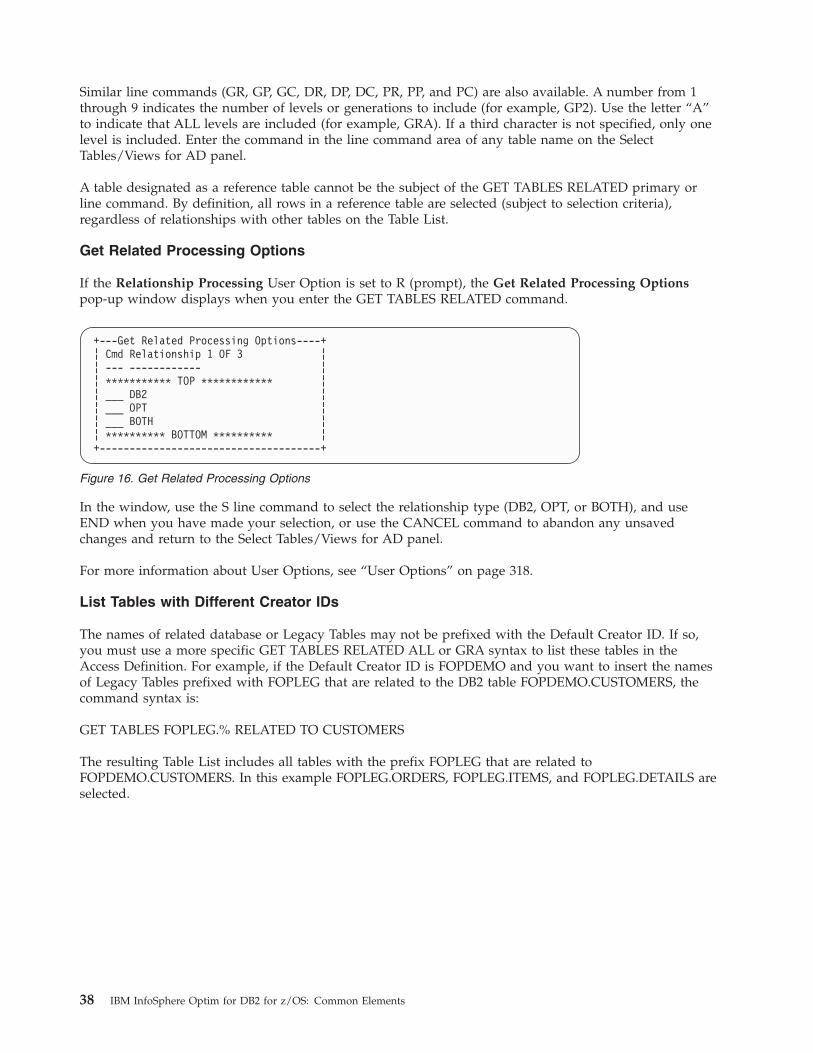
Similar line commands (GR, GP, GC, DR, DP, DC, PR, PP, and PC) are also available. A number from 1through 9 indicates the number of levels or generations to include (for example, GP2). Use the letter “A”to indicate that ALL levels are included (for example, GRA). If a third character is not specified, only onelevel is included. Enter the command in the line command area of any table name on the SelectTables/Views for AD panel.
A table designated as a reference table cannot be the subject of the GET TABLES RELATED primary orline command. By definition, all rows in a reference table are selected (subject to selection criteria),regardless of relationships with other tables on the Table List.
Get Related Processing Options
If the Relationship Processing User Option is set to R (prompt), the Get Related Processing Optionspop-up window displays when you enter the GET TABLES RELATED command.
In the window, use the S line command to select the relationship type (DB2, OPT, or BOTH), and useEND when you have made your selection, or use the CANCEL command to abandon any unsavedchanges and return to the Select Tables/Views for AD panel.
For more information about User Options, see “User Options” on page 318.
List Tables with Different Creator IDs
The names of related database or Legacy Tables may not be prefixed with the Default Creator ID. If so,you must use a more specific GET TABLES RELATED ALL or GRA syntax to list these tables in theAccess Definition. For example, if the Default Creator ID is FOPDEMO and you want to insert the namesof Legacy Tables prefixed with FOPLEG that are related to the DB2 table FOPDEMO.CUSTOMERS, thecommand syntax is:
GET TABLES FOPLEG.% RELATED TO CUSTOMERS
The resulting Table List includes all tables with the prefix FOPLEG that are related toFOPDEMO.CUSTOMERS. In this example FOPLEG.ORDERS, FOPLEG.ITEMS, and FOPLEG.DETAILS areselected.
+---Get Related Processing Options----+¦ Cmd Relationship 1 OF 3 ¦¦ --- ------------ ¦¦ *********** TOP ************ ¦¦ ___ DB2 ¦¦ ___ OPT ¦¦ ___ BOTH ¦¦ ********** BOTTOM ********** ¦+-------------------------------------+
Figure 16. Get Related Processing Options
38 IBM InfoSphere Optim for DB2 for z/OS: Common Elements

For more information about the GET TABLES command, see GET TABLES RELATED in the CommandReference Manual. For more information about Legacy Tables, see the MOVE User Manual, Legacy Tablesor Compare for IMS, VSAM, and Sequential Files.
Supporting FacilitiesWhen constructing an Access Definition, you may find that certain application-enforced relationships arenot defined to DB2. You can create or analyze relationships, if needed.
Create Relationships
If an expected table is not included when you use GET TABLES RELATED or LIST TABLES RELATED,the necessary relationship does not exist. You can use the CREATE RELATIONSHIP command on theSelect Tables/Views for AD panel to display the panels needed to define OPT relationships. (Option 6DEFINITIONS on the Main Menu also invokes these panels. Information about defining relationships isprovided in Chapter 4, “Relationships,” on page 125.)
When you have defined the relationship, use END or CANCEL to return to the Select Tables/Views forAD panel. After you create the needed relationship, the GET TABLES RELATED or LIST TABLESRELATED command uses the new relationship to populate the Table List.
Displaying Relationships
If a GET TABLES RELATED or LIST TABLES RELATED command returns an unexpected table name,you can display the list of tables in an indented format that illustrates the relationships. The indented listallows you to analyze the relationships to determine the tables and relationships that should be includedin the Access Definition. Use the INDENT command from the Select Tables/Views for AD panel or theSpecify Relationship Usage panel to display the indented list.
For example, if the CUSTOMERS, ORDERS, DETAILS, and ITEMS TABLES shown in the diagram onpage “Insert Table Names Automatically” on page 36 are listed in an Access Definition, the INDENTcommand will result in the following Indented Table Display.
-- Select Tables/Views for AD: FOPDEMO.FOPLEG.NEWLEGREL -----------------------Command ===> Scroll ===> PAGE
Primary : COL,SEL,SQL,REL,POINT,GROUP,GET TABLES RELATED,INDENT,ARC,LIST SUBSLine : COL,SEL,SQL,ALL,GR(A),GP(A),GC(A),DR(A),PR(A),DP(A),PP(A),
DC(A),PC(A),EXP,ARC,ACT,STATable 1 of 7 <<MORE
Default Creator ID ===> FOPDEMO >>Start Table ===> CUSTOMERS >>Start Table Options : None
R D --Extract Parms--Cmd Status (CreatorID.)Table/View Name F A EveryNth RowLimit Type--- ----------- ------------------------------>> - - -------- -------- -------*** ********************************** TOP ***********************************___ CUSTOMERS N ____ ________ TABLE___ FOPLEG.ORDERS N N ____ ________ LEGACY___ FOPLEG.ITEMS N N ____ ________ LEGACY___ FOPLEG.DETAILS N N ____ ________ LEGACY
Figure 17. Legacy Tables in Table/View Name List
Chapter 2. Access Definitions 39

Panel
The Indented Table Display panel includes:
Default Creator IDThe default Creator ID, as specified on the Select Tables/Views for AD panel.
Table NameThe name of each table. If the Creator ID is different from the Default Creator ID, it is includedwith the name.
The Start Table is listed first, followed by the other table names, and the list is formatted to reflectthe relationships. The names of parent tables are followed by the names of children. Within thisconstraint, tables are listed in the order of the Access Definition Table List.
Information about each relationship includes:
Parent/Child IndicatorsExcept for the Start Table, a table name is prefixed to indicate its relationship with thetable under which it is indented. The prefix is either: C: Child
P: Parent
Multiple Reference IndicatorThe second and subsequent references to a table (e.g., a table that is the child of threeparents) are noted by the suffix (n) where n is the line number for the first reference. Thefirst reference is not displayed with a multiple reference indicator and is the only one toshow the names of the tables indented under it.
Cycle IndicatorAny table in an RI cycle is noted by the suffix (CYCLE:n) where n indicates the linenumbers of the other tables in the cycle.
RelationThe name of the relationship between the table and the table under which it is indented. STARTTABLE is always specified for the Start Table.
Type Indicator for the type of relationship. Possible values are:
DB2 Relationship is defined in the DB2 Catalog.
OPT Relationship is defined in the Optim Directory.
IMS Relationship is defined within the referenced IMS DBD. (Move or Compare for IMS, VSAM,and Sequential Files only)
--------------------------- Indented Table Display ---------------------------Command ===> Scroll ===> PAGE
ROW 0 OF 10******************************** TOP OF DATA **********************************
Default Creator ID : FOPDEMO
Table Name Relation Type------------------------------------------------------------ -------- ----
1 CUSTOMERS START TABLE2 C:ORDERS RCO DB23 C:DETAILS ROD DB24 P:ITEMS RID DB2
******************************* BOTTOM OF DATA ********************************
Figure 18. Indented Table Display
40 IBM InfoSphere Optim for DB2 for z/OS: Common Elements

IML Relationship is defined in the Optim Directory, but is based on an existing Logical IMSRelationship. (Move or Compare for IMS, VSAM, and Sequential Files only)
If there is insufficient space for the full table name, the name is preceded with a level indicator (Ln wheren is the level number) and the indentation is eliminated to provide more room on the line.
Any reference tables are not included in the indented list but are noted at the bottom of the list. Anytable that does not have a relationship with any other table on the list is also noted at the bottom of theIndented Table Display.
Use END to return to the Select Tables/Views for AD panel.
Handling the Table ListOn the Select Tables/Views for AD panel, you can scroll the list of tables using UP, DOWN, TOP, andBOTTOM. You can also use the FIND command to locate a table name, specifying all or part of the namewith that command.
Line Commands
To edit the list of tables, you can type over a table name or use line commands. The line commandsavailable for editing include standard ISPF-like commands to change the order of the table names and toadd new rows to the Table List. Rearranging the names on the Table List has no effect on the sequence inwhich the tables are accessed during a process.
The available line commands are:
Copy C or CC
Delete D or DD
Insert I
Move M or MM
RepeatR or RR
Note: Use A or B to indicate the destination of a copy or move operation.
Each table name must be unique. If editing results in duplicate table names, the Access Definition mustbe corrected before you can save or use it.
Delete Names
To remove a table name, use the Delete line commands, space over the name, or use the Erase EOF key.Although any number of names can be deleted from the Access Definition, at least one name mustremain. If all table names are removed from the Access Definition when you exit the Select Tables/Viewsfor AD panel, the Access Definition is automatically deleted. Use the Confirm on Deletes user option tobe prompted for confirmation before the Access Definition is deleted.
Multiple Use
You can use a single Access Definition to process more than one version of your database tables. Forexample, if you modify only the Creator ID portion of a listed table name, any column specifications andSQL WHERE Clauses are retained in the Access Definition. Also, any relationships that do not apply tothe newly listed table remain on the Specify Relationship Usage panel with a status of UNKNOWN,
Chapter 2. Access Definitions 41

while any relationships for the newly listed table are added to the Specify Relationship Usage list. Youcan explicitly remove UNKNOWN relationships, or leave them in the Access Definition to be used whenyou reinstate the original Creator ID.
However, if you modify the base name entry for a table, any column specifications and SQL WHEREClauses are removed from the Access Definition, and any relationships for the previously listed table arealso removed.
Completed Table SelectionUse the END command to save the Access Definition specifications in the Optim Directory. After savingthe Access Definition, Optim redisplays the panel from which the Select Tables/Views for AD panel wasinvoked.
Error Handling
Any error conditions must be resolved. Some errors prevent you from proceeding with the AccessDefinition; other errors must be resolved before you can save the Access Definition.
The following errors must be resolved to proceed to another panel in the Access Definition editor.v Invalid line command entry.v Invalid characters.v Syntax errors in a command entry.
The following errors must be resolved to save the Access Definition, and browse or edit data.v A duplicate table name is specified (Archive, Move, and Compare only).v No table names are specified.v The designated Start Table is removed from the list.v A remote table name is specified.v DB2 cascade delete restrictions apply to one or more relationships (i.e., a table selected for a delete
operation is the parent of a table that is not in the Table List).
SAVE Command
Use the SAVE command to save the Access Definition under the current name or a new name. For moreinformation, see the Command Reference Manual, Primary Commands.
CANCEL
Use the CANCEL command to ignore any unsaved changes and redisplay the previous panel.
Associate Legacy Tables with Data SourcesFor Move or Compare for IMS, VSAM, and Sequential Files, a Legacy Table referenced in an AccessDefinition must be associated with a specific data source to be used in an Extract Process. Each time youexit the Access Definition editor using the END command, the Associate Legacy Tables with Data Sourcespanel is displayed. The panel contents vary based on whether the Legacy Tables in the Access Definitiondescribe IMS data, VSAM or sequential files, or both.
In the following example, the Access Definition references two Legacy Tables: FOPLEG.LORDERS, whichdescribes data in a VSAM file, and FOPIMS.I$ITEMS, which describes IMS data.
42 IBM InfoSphere Optim for DB2 for z/OS: Common Elements

Note: The labels displayed on this panel vary based on what type of legacy tables are displayed (i.e.,IMS, VSAM, or sequential files). The following labels are displayed for IMS files only: IMS--Segment,DBD, PSB, PCB, IMSID, DBRC, and Log. The following labels are displayed for VSAM or sequential filesonly: Overriding Dataset Prefix and File-Dataset Name (or just Dataset Name if no IMS files aredisplayed). If more than one file type is displayed, a combination of the above labels is displayed.
Panel
The Associate Legacy Tables with Data Sources panel includes:
OverridingDataset Prefix
An optional prefix for names of VSAM or sequential datasets associated with Legacy Tablesreferenced in the Access Definition. Specify 1 to 8 characters.
Legacy TableThe read-only name of each Legacy Table referenced in the Access Definition.
File-Dataset NameIf the Legacy Table describes data in a VSAM or sequential file (i.e., a VSAM Legacy Table), thedesignation File is displayed with any default data source or previously supplied Dataset Name.You can edit any supplied dataset name and if this area is blank, you must provide a datasetname in order to save the Access Definition.
Enclose the complete dataset name in single quotes, or it will be prefixed with the OverridingDataset Prefix or the default prefix specified in the User Options.
If several Legacy Tables are associated with the same dataset or a similarly named dataset, youcan type the dataset name for the first relevant Legacy Table and enter the equal sign (=) forsubsequent Legacy Tables to duplicate the entry.
IMS--SegmentIf the Legacy Table describes IMS data (i.e., an IMS Legacy Table), the designation IMS isdisplayed with the read-only name of the Segment associated with the Legacy Table.
DBD The read-only name of the DBD associated with the IMS Legacy Table.
PSB The name of the PSB for access to IMS services. PSB is populated with the Default PSB Namefrom the Retrieval Definition, if any, or with any previously entered PSB name for the LegacyTable; otherwise, it is blank.
A valid PSB name is required to save the Access Definition. To enter or replace the name, specifythe 1- to 8-character name of a PSB that is in a library referenced by the Environment Definitionfor the Legacy Table. Enter an asterisk to generate a selection list.
----------------- Associate Legacy Tables with Data Sources -------------------Command ===> Scroll ===> PAGE
Overriding Dataset Prefix ===> 1 of 2
File-Dataset NameLegacy Table IMS--Segment DBD PSB PCB IMSID DBRC LOG--------------------------- ---- -------- -------- -------- --- ----- ---- ---********************************** TOP ****************************************FOPLEG.LORDERS File ’FOPRT.LEGACY.ORDERS’FOPIMS.I$ITEMS IMS ITEMS ITEMHDAM ITEHDAMA 1 N N******************************** BOTTOM ***************************************
Figure 19. Associate Legacy Tables with Data Sources
Chapter 2. Access Definitions 43
PCB The relative number of the PCB within the PSB. PCB number is populated with the PCB numberfrom the Retrieval Definition, if any, or with any previously entered PCB number for the LegacyTable; otherwise, it is blank.
To enter or replace the number, specify the number for a PCB within the PSB. The PCB mustgrant Move the authorization to manipulate the data. Enter an asterisk to generate a selection listof PCB numbers for the PSB.
IMSIDThe IMS ID required to access the IMS data when allocated to a control region (i.e., the data isonline to IMS). IMSID is populated with the IMS System ID from the Environment Definition,unless overridden by the Default IMS ID from the Retrieval Definition, if any.
DBRC This entry is valid only for IMS processing in DL/I mode (i.e, when an IMS ID is not specified).If appropriate, enter Y for yes to use Database Recovery Control (DBRC) to control logging andperform database recovery; otherwise enter N for no. IMS uses the online log datasets (OLDS) ifthe database is accessed in BMP or DBB mode.
The default for a HALDB (High Availability Large DataBase), is Y, and that entry cannot bechanged.
DBRC use is optional for a non-HALDB, such as HIDAM, HDAM, HISAM, etc. Thus, you mayspecify Y for a non-HALDB, but it is not required.
LOG This entry is valid only for IMS processing in DL/I mode (i.e, when an IMS ID is not specified).If appropriate, enter Y for yes to use an IMS log to perform database recovery; otherwise enter Nfor no.
If you specify Y, you must specify a dataset name for the IMS log on the Associate IMS Segmentswith IMS Database Datasets panel. The DD Name “IEFRDER” is used to allocate the log dataseton that panel.
If a PSB with a Processing Option (PROCOPT) other than G (Get) is used while accessing aHALDB in DL/I mode (i.e., an IMS region name is not specified), you must specify the name ofthe dataset to be allocated for DD Name IEFRDER on the Associate IMS Segments with IMSDatabase Datasets panel.
After you specify the IEFRDER dataset name and exit the Associate IMS Segments with IMSDatabase Datasets panel, the Allocate Dataset panel automatically displays. You must providesufficient Primary and Secondary space units on that panel to allocate the IEFRDER dataset.Failing to do so will cause IMS to abort processing and lock the database from further updatesuntil a recover/rollback is done.
Use the END command when you are finished making changes to this panel, or use the CANCELcommand to abandon any unsaved changes and return to the Select Tables/Views for AD panel.
If one or more Legacy Tables describe IMS data and an IMS ID was not specified, the Associate IMSSegments With IMS Database Datasets panel displays. Otherwise, the previous panel displays, saving anychanges to the Access Definition.
Associate IMS Segments with IMS Database DatasetsWhen you use END to exit the Associate Legacy Tables with Data Sources panel and one or more LegacyTables in the Access Definition reference IMS data and an IMS ID was not specified, Optimdisplays theAssociate IMS Segments With IMS Database Datasets panel, shown below.
Use this panel to associate the Legacy Table with the IMS Database Dataset to be processed when theAccess Definition is used.
44 IBM InfoSphere Optim for DB2 for z/OS: Common Elements

Panel
The Associate IMS Segments With IMS Database Datasets panel includes:
OverridingDataset Prefix
An optional default prefix for IMS Database Dataset Names listed on the panel. Specify 1 to 8characters.
DBD Read-only name of the DBD associated with each IMS Legacy Table.
SegmentRead-only name of the segment within the DBD.
DD NameRead-only name of the Data Definition (DD) or the physical dataset associated with eachsegment. DD Name cannot be modified. If IMS logging was requested, the DD Name IEFRDERis displayed (along with the pseudo-Segment IMSLOG) to identify the Log dataset.
IMS DatabaseDataset Name
The name of the IMS Database Dataset to be processed when the Access Definition is used. IMSDatabase Dataset Name is populated with the Associated IMS Database Name from the RetrievalDefinition, if any, or with any previously entered dataset name; otherwise, it is blank.
To enter or replace the name, enter the location of the IMS Database Dataset associated with theDD name in the DBD. This data is then associated with the named Legacy Table duringprocessing.
If IMS logging was requested, you must specify the Log dataset for DD Name IEFRDER. If adefault name is displayed from the Provide Retrieval Information panel, you can override thatname, if needed.
After you specify the IEFRDER dataset name and exit the Associate IMS Segments with IMSDatabase Datasets panel, the Allocate Dataset panel automatically displays. You must providesufficient Primary and Secondary space units on that panel to allocate the IEFRDER dataset.Failing to do so will cause IMS to abort processing and lock the database from further updatesuntil a recover/rollback is done.
Note: You do not have to specify a dataset name for a HALDB because the appropriate datasetname will already be known to the IMS subsystem, but you do have to specify the IEFRDERdataset if it was not defaulted from the retrieval information specified on the Provide RetrievalInformation panel.
Use the END command to return to the Choose an Access Definition panel from the display, or use theCANCEL command to abandon any changes made on this panel and return to the Select Tables/Viewsfor AD panel.
------------- Associate IMS Segments With IMS Database Datasets ---------------Command ===> Scroll ===> PAGE
Overriding Dataset Prefix ===> 1 of 7
DBD Segment DD Name IMS Database Dataset Name-------- -------- -------- ----------------------------------------------************************************ TOP **************************************ITEMS ITEMSDBD ITEMDD********************************** BOTTOM *************************************
Figure 20. Associate IMS Segments With IMS Database Datasets
Chapter 2. Access Definitions 45

Selection CriteriaBy default, all rows in each table are processed, subject to user and site maximums. Optim uses criteria tolimit processing to specific rows from the Start Table and other tables in the Table List.
Types of selection criteria are:v Archive criteria (date and indexing) for individual columns in a table.v Selection criteria for individual columns in a table.v An SQL WHERE clause for a table.v Rows in the Start Table, selected with the Point-and-Shoot facility. (The Point-and-Shoot facility is
available from the Select Tables/Views for AD panel and is discussed in “The Point-and-Shoot Facility”on page 72.)
Combining Criteria
When more than one form of criteria is specified, the criteria are combined. However, if bothPoint-and-Shoot values and selection criteria are specified for a Start Table, an option on the panel for theprocess (e.g., Specify EXTRACT Parameters and Execute panel) allows you to use Point-and-Shoot valuesonly or combine Point-and-Shoot values and selection criteria.
Remove Criteria Specifications
To remove all archive criteria, selection criteria, and SQL WHERE clause specifications for a table, use theALL primary or line command from the Select Tables/Views for AD panel. For example, to removecriteria for the CUSTOMERS table, specify the primary command as:ALL CUSTOMERS
Archive CriteriaArchive criteria determine the archived columns that are indexed and define the set of rows archivedfrom each table. Archive criteria can be applied to one or more columns in a table and are combined withselection and other criteria to select rows during an Archive Process.
ARC Command
To specify archive criteria, use the ARC primary or line command on the Select Tables/Views for ADpanel. For example, to specify archive criteria for the ORDERS table, type the ARC Cmd (command) onthe ORDERS line and press ENTER to display the Specify Archive Criteria for AD panel. Use this panelto specify the archive criteria for the selected table. (You can use the SEL, SQL, or COL command fromthe Specify Archive Criteria for AD panel to view or edit other criteria or data display settings.)
46 IBM InfoSphere Optim for DB2 for z/OS: Common Elements

Panel
The Specify Archive Criteria for AD panel includes:
Table NameThe name of the current table or view.
Combine All Column Criteria byThe logical operator to apply to all criteria for the column. Specify:
A Combine all criteria with AND (default).
O Combine all criteria with OR.
Cmd The line command entry area. Valid commands are:
DC Specify date criteria for the column using the Define Date Criteria panel (see “SpecifyDate Criteria” on page 48).
Z Zoom to display all information for the column on a single panel.
Note: Zoom is a useful way to review characteristics of the column, such as data type ornull eligibility before defining date criteria. From the Zoom display, you can then use theDC command to display the Define Date Criteria panel.
Column NameThe name of the column. Archive lists all columns in the table, in the order defined to DB2. Youcannot edit, rearrange, insert or delete column names on this display. If the complete list cannotbe displayed, you can scroll it. Notation to the right of Table Name indicates the relative positionof the first visible column name. This notation is in the form, Col x of y, where x is the relativeposition of the first visible name and y the total number of names in the list.
IDX Indicator for indexing the column to facilitate searches of the archived data.
N Values in the column are not indexed. N is the default setting.
D Values in the column are indexed. The length of data in an indexed column must notexceed 254 bytes, and no more than 16 columns in a table can have a dense index.
S Values in the column are sparsely indexed (that is, high and low values indicate thepossibility that a value occurs in the column.) Use the IDX command to designate N, D,or S for all columns.
-- Specify Archive Criteria for AD: GRP.FOPDEMO.AD ----------------------------Command ===> Scroll ===> PAGE
Table Name: FOPDEMO.ORDERS Col 1 of 8 <<MORECombine All Column Criteria by ==> A (A-AND, O-OR)
Cmd Column Name IDX Criteria--- ------------------ --- --------------------------------------------------*** ********************************* TOP ***********************************___ ORDER_ID D___ CUST_ID D___ ORDER_DATE N___ ORDER_TIME N___ FREIGHT_CHARGES N___ ORDER_SALESMAN N___ ORDER_POSTED_DATE N___ ORDER_SHIP_DATE N*** ******************************* BOTTOM **********************************
Figure 21. Specify Archive Criteria for AD
Chapter 2. Access Definitions 47

Archive CriteriaDate criteria defined for a column.
Specify Date Criteria
You can use the DC line command to display the Define Date Criteria panel. This panel allows you todefine a specific date or a relative date to be used as criteria to select rows.
Panel
The Define Date Criteria panel includes:
Column NameThe name of the column for date criteria.
Date FormatThe format of dates in the column. Specify the format or enter an asterisk for a list of date typesthat are appropriate for the data type and precision of the column.
If the column is a DB2 DATE column, Archive lists the format as DB2DATE.
Pivot YearThe year used to determine whether a two-digit year value is treated as occurring in the 20th
century (1900s) or the 21st century (2000s). Specify a 2-digit numeric value. If the year is greaterthan or equal to this value, the 20th century is assumed.
Pivot Year is not displayed if the format is DB2DATE.
Specific DateThe cut-off date for archived data, specified in ISO, European, or USA format. Archive convertsthe date to your DB2 default format. Rows with a date earlier than the specified date are selectedfor archiving.
Years A number of years. This value is combined with any values in Months, Weeks, and Days, andoffset from the current date to determine the cut-off date for archived data.
MonthsA number of months. This value is combined with any values in Years, Weeks, and Days, andoffset from the current date to determine the cut-off date for archived data.
-- Specify Archive Criteria for AD: GRP.FOPDEMO.AD ----------------------------Command ===> Scroll ===> PAGE
Table Nam 8 <<MORECombine A +-----------------Define Date Criteria-----------------+
¦ ¦Cmd C ¦ Column Name : ORDER_SHIP_DATE ¦--- ---- ¦ Date Format ===> YY/MM/DD ¦ -----------*** **** ¦ Pivot Year ===> 55 (00 to 99) ¦ ***********___ ORDE ¦ ¦___ CUST ¦ Archive Data With Dates Earlier Than ¦___ ORDE ¦ ¦___ ORDE ¦ Specific Date ===> 1998-03-01 YYYY-MM-DD ¦___ FREI ¦ Or ¦___ ORDE ¦ Years ===> (up to +1581) ¦___ ORDE ¦ Months ===> (up to +30000) ¦DC ORDE ¦ Weeks ===> (up to +30000) ¦*** **** ¦ Days ===> (up to +99999) ¦ ***********
+------------------------------------------------------+
Figure 22. Define Date Criteria
48 IBM InfoSphere Optim for DB2 for z/OS: Common Elements

Weeks A number of weeks. This value is combined with any values in Years, Months, and Days, andoffset from the current date to determine the cut-off date for archived data.
Days A number of days. This value is combined with any values in Years, Months, and Weeks, andoffset from the current date to determine the cut-off date for archived data.
Note: You can provide a Specific Date or a relative date, using values in Years, Months, Weeks, andDays, but not both.
Enter the desired date information and use END to return to the Specify Archive Criteria for AD panel.The term “DATE_CRITERIA” and the specified criteria will appear in Criteria on that panel.
Available Commands
The primary commands available on the Specify Archive Criteria for AD panel include:v BOTTOMv BROWSEv CANCELv CAPSv CLEARv COLUMNSv DCv DOWNv EDITv ENDv EXPANDv IDXv LEFTv OPTIONSv RESETv SAVEv SEL CRITv SQLv TOPv UPv ZOOM
Note: The EDIT command is available if Access is installed with Archive.
Selection CriteriaLike archive criteria, selection criteria limit the set of rows extracted from each table in an Archive orExtract Process. You can also use selection criteria to manage the display of rows when browsing orediting data, or during a Point-and-Shoot session.
The Specify Selection Criteria for AD panel is used to specify the selection criteria for each table. (You canuse the ARC, SQL, or COL commands to view or edit other criteria or data display settings from thispanel.)
Chapter 2. Access Definitions 49

SEL Command
Use the Specify Selection Criteria for AD panel to provide selection criteria for a table. To invoke thispanel, use the SEL primary or line command from the Select Tables/Views for AD panel. For example, tospecify selection criteria for the ITEMS table, enter the primary command:SEL ITEMS
The prompts for selection criteria are displayed.
Panel
The Specify Selection Criteria for AD panel includes:
Table NameThe name of the current table or view.
Combine All Column Criteria byThe logical operator to apply to all archive, selection, and SQL WHERE criteria for the table.Specify:
A Combine all criteria with AND (default).
O Combine all criteria with OR.
Cmd The line command entry area. Valid commands are:
M or MMMove a line to rearrange the order of columns for an edit, browse, or Point-and-Shootdata display. (This rearrangement has no effect on data selection or sort sequence.)
A or B Destination for a Move line command:A = AfterB = Before
Z Zoom to display all information for the column on a single panel.
Column NameThe name of the column. Initially, all columns are listed in the order defined to DB2. The namescannot be edited and columns cannot be inserted or deleted on this panel.If the complete list cannot be displayed, you can scroll it. Notation to the right of Table Nameindicates the relative position of the first visible column name. This notation is in the form, Col xof y, where x is the relative position of the first visible name and y the total number of names inthe list.
-- Specify Archive Criteria for AD: GRP.FOPDEMO.AD ----------------------------Command ===> Scroll ===> PAGE
Table Name: FOPDEMO.ITEMS Col 1 of 6 <<MORECombine All Column Criteria by ==> A (A-AND, O-OR)
Cmd Column Name Selection Criteria--- ------------------ ------------------------------------------------------*** ********************************* TOP ************************************___ ITEM_ID___ ITEM_DESCRIPTION___ CATEGORY___ RATING = :SUB_RATING___ UNIT_PRICE > 100___ ON_HAND_INVENTORY*** ******************************* BOTTOM ***********************************
Figure 23. Specify Selection Criteria for AD
50 IBM InfoSphere Optim for DB2 for z/OS: Common Elements

Selection CriteriaSelection criteria for the column. Any valid SQL predicate is allowed:
Valid Operators= <> ¬=> >= ¬>< <= ¬<IN (a,b,c,d...) NOT IN (a,b,c,d...)IS NULL IS NOT NULLLIKE NOT LIKEBETWEEN x AND y NOT BETWEEN x AND y
Specify the Criteria
Specify selection criteria by supplying an appropriate operator and a corresponding value or a list ofvalues. For example, enter > 100100 in Selection Criteria for the UNIT_PRICE column to select all itemswith a unit price greater than $100.00.
You can also specify a column name as the operand for selection criteria, using the LIST COL command.Enter the LIST COL command at the Command prompt, specify an operator for the column, and with thecursor positioned on that column, press ENTER to display a selection list of columns in the current table.The selected column name is added after the operator.
You can also use a substitution variable as the operand for selection criteria, preceding the substitutionvariable name with a colon (:). You can use the LIST SUBS command to display a list of availablesubstitution variables. For example, to use an Access Definition to select ITEMS rows according to rating,you can define a substitution variable named SUB_RATING and enter = :SUB_RATING in SelectionCriteria for the RATING column. At the time the process is executed, you are prompted for a ratingvalue used to select rows for processing.
Note:
v Zoom is a useful way to review characteristics of a column, such as data type or null eligibility, neededto define selection criteria. From the Zoom display, you can enter any desired selection criteria. Use theZoom primary command to return to the Specify Selection Criteria for AD panel.
v A substitution variable must be defined on the Substitution Variable Display panel. (For moreinformation, see “Substitution Variables” on page 70.)
v Selection criteria applied to Legacy data described in a Legacy Table must use an internal SQLdescribed in the MOVE User Manual, SQL Grammar for Legacy.
See Figure 23 on page 50 for an example of selection criteria specifications.
Available Commands
The primary commands available on the Specify Selection Criteria for AD panel include:v ALLv ARCv BOTTOMv BROWSEv CANCELv CAPSv COLUMNSv DOWNv EDIT
Chapter 2. Access Definitions 51

v ENDv EXPANDv LEFTv LIST COLUMNSv LIST SUBSv OPTIONSv RESETv SAVEv SQLv TOPv UPv ZOOM
Note: The EDIT command is available only if ACCESS is licensed. The ARC command is available forARCHIVE only.
Criteria Complete
When criteria for the current table are completed, use END to return to the Select Tables/Views for ADpanel.
SQL WHERE Clause SpecificationsSometimes selection criteria for one or more columns in a table cannot adequately meet yourrequirements. For example, you may need a combination of OR and AND logical operators, rather thancombining all criteria with one. For those situations, use the SQL WHERE Clause panel to specify theWHERE clause for an SQL SELECT statement.
SQL Commands
From the Select Tables/Views for AD panel, use the SQL primary or line command to invoke the SQLWHERE Clause panel. To indicate the desired table for the primary command, use the name as anoperand or position the cursor on the name in the Table List. From the Describe Columns for AD, SpecifySelection Criteria for AD, or Specify Archive Criteria panel, use the SQL primary command with nooperands.
52 IBM InfoSphere Optim for DB2 for z/OS: Common Elements

For reference, the name of the table is provided in the SELECT...FROM heading near the top of the panel.This heading includes an ellipsis (...) following SELECT to indicate the column list, which is generally toolong for the available space.
Correlation Name
To simplify typing the table name in the SQL WHERE clause, you can enter a 1- to 128-characterCorrelation Name or a substitute for the fully qualified table name in the FROM clause. A correlationname is especially useful as a prefix for names of columns when the SQL references columns of the samename from different tables.
WHERE area
Type the desired SQL in the WHERE area of the panel. The scrollable area displays the SQL in segmentsof 8 lines of 72 positions each. A maximum of 425 lines is available for the SQL and documentingcomments. Notation on the right, above the WHERE area, indicates the number of lines and the relativeposition of the first displayed line. Standard DB2 conventions apply to comments; each line must beginwith two hyphens (--).
Column Names
You can specify an SQL WHERE clause using a column name. Use the LIST COLUMNS command todisplay a selection list of columns in the table. You can scroll this list and use the S line command toselect a column name. The selected column name is added to the end of any text in the SQL WHEREclause.
Substitution Variables
You can specify an SQL WHERE clause using a substitution variable that has been defined on theSubstitution Variable Display panel. The name of the substitution variable must be preceded by a colon(:). (For more information, see “Substitution Variables” on page 70.) Use the LIST SUBS command todisplay a selection list of substitution variables for the table. You can scroll this list and use the S linecommand to select a substitution variable. The selected substitution variable is added to the end of anytext in the SQL WHERE clause.
--------------- Enter an SQL WHERE Clause for a Table or View -----------------Command ===> Scroll ===> PAGE
SELECT ... FROM FOPDEMO.ORDERSCmd Correlation Name ===> A WHERE 1 of 8--- ------------------------------------------------------------------------*** ********************************* TOP **********************************___ ORDER_SALESMAN LIKE 'SW%’ and CUST_ID <'10000’___ or ORDER_DATE <'2005-01-31’__________________
Line Commands: (I)nsert, (D)elete, (R)epeat, (M)ove, (C)opyUse the LIST COLUMNS command to add column names, if neededUse the SQLEdit command to invoke the ISPF editor with all of its facilitiesAn optional correlation name can be entered to refer to the base table
Figure 24. Specify SQL WHERE Clause
Chapter 2. Access Definitions 53
Edit SQL WHERE Clause
Unless the SQL is applied to a Legacy Table, use standard DB2 SQL format for the SQL WHERE clause.When you type, any leading or trailing spaces on each line are maintained: only the spaces at the end ofthe last line of the SQL WHERE clause are deleted. To facilitate editing, a Cmd area is provided for eachline. The functions and corresponding line commands are:
Copy Cn, CC
Insert In
RepeatRn, RR
Delete Dn, DD
Move Mn, MM
Use A or B to indicate the destination for a Copy or Move line command.
Use the D line command to delete lines in an SQL WHERE clause. You can also replace the clause withblanks or press the Erase EOF key for each line of text.
Note: An SQL WHERE clause applied to Legacy data described in a Legacy Table must use an internalSQL described in the Move User Manual, section on SQL Grammar for Legacy Tables.
Available Commands
The following primary commands are available:v ARCv BROWSEv CANCELv COLUMNSv EDITv ENDv LIST COLUMNSv LIST SUBSv OPTIONSv SAVEv SEL CRITv SQLEDIT
Note: The EDIT command is available if Access is licensed. ARC is available for Archive only.
You can use the SQLEDIT command to invoke an ISPF edit session for the displayed SQL WHERE clause.All standard ISPF facilities are available. Use the ISPF COPY command to insert data from a file and editas desired.
Use END to terminate the ISPF session and redisplay the SQL WHERE Clause panel. The edited data isinserted into the panel.
Specification Complete
After you complete the SQL WHERE clause, use END to save the current specifications and terminateediting.
54 IBM InfoSphere Optim for DB2 for z/OS: Common Elements

Use the SAVE command to save the SQL WHERE clause and continue editing. You may want to useSAVE periodically to validate the SQL WHERE clause.
END or SAVE validates the SQL WHERE clause before redisplaying the previous panel. The clause mustbe 425 lines or fewer and must be acceptable to DB2. You must resolve any errors before you can savethe SQL WHERE clause and exit this panel.
When the Select Tables/Views for AD panel is redisplayed, “SQL” appears under Status to indicate thatan SQL WHERE clause is specified for the table.
Manage Data DisplaysUse the Describe Columns for AD panel to review column characteristics and format the display of datain a browse, edit, or Point-and-Shoot session. The column settings do not affect any Archive, Extract, orCompare Process that uses the Access Definition.
Scroll LEFT from the Specify Archive Criteria for AD panel or the Specify Selection Criteria for AD panelto view the Describe Columns for AD panel. Alternatively, you can use the COL command from theSelect Tables/Views for AD panel, the SQL WHERE Clause panel, the Specify Archive Criteria for ADpanel, or the Specify Selection Criteria for AD panel.
The column specification prompts are shown in the following figure:
Panel
The Describe Columns for AD panel includes:
Cmd The line command entry area. Valid commands are:
M Move a column in the list to change the display order.
Z Toggle between the list of all columns and a single column display. (Not available forCompare browse.)
Column NameThe name of each column that appears in the table.
Disp Select the columns to appear in the data display. Specify:
Y Display the column (default).
-- Describe Columns for AD: GRP.FOPDEMO.AD ------------------------------------Command ===> Scroll ===> PAGE
Table Name: FOPDEMO.CUSTOMERS Col 1 of 9 MORE>>
Disp Acc -Sort-- -Heading-Cmd Column Name Y/N S/U Lvl A/D N/L L/R/C Data Type Null Crit--- ------------------ ---- --- --- --- --- ----- -------------- ---- ----*** ********************************* TOP ************************************___ CUST_ID Y U __ _ N C CHAR(5) NO NO___ CUSTNAME Y U __ _ N C CHAR(20) NO YES___ ADDRESS Y U __ _ N C VARCHR(50) NO NO___ CITY Y U __ _ N C VARCHR(15) NO NO___ STATE Y U __ _ N C CHAR(2) NO YES___ ZIP Y U __ _ N C CHAR(5) YES NO___ YTD_SALES N U __ _ N C DECIMAL(7,2) NO NO___ SALESMAN_ID Y U __ _ N C CHAR(6) YES NO___ PHONE_NUMBER Y U __ _ N C CHAR(10) YES NO*** ******************************* BOTTOM ***********************************
Figure 25. Describe Columns for AD
Chapter 2. Access Definitions 55

N Do not display the column.
Note:
v You must display at least one column and, to insert a row during an Access editsession, you must display any columns that are part of the primary key or a uniqueindex.
v The initial setting for all columns is Y. You can use the DISPLAY N command to set allcolumns to N, or use DISPLAY Y to set all columns to Y.
v When a new column is added to a table, the default Disp value is based on settings forother columns. If all columns are set to Y, the default setting for a new column is alsoY. If any column is set to N, the default for a new column is N.
Acc Establish edit privileges for each column. (If Access is not installed, this prompt is not displayed.)
S Values are display only.
U Values can be updated.This setting can differ from the privilege defined in the DB2 Catalog. In any attempt toedit values using this Access Definition, the more restrictive setting is enforced.
Sort The display order for rows, based on the values specified for one or more columns. If you do notprovide values, the rows are displayed in an unpredictable order. (You can use sort criteria with acolumn for which Disp is N.) Specify sort criteria as two values:
Lvl A numeric value indicating the order of priority of this column in arranging the rows.Specify unique and consecutive values from 1 - 64, with 1 indicating the highest priority.
A/D Sort direction as (A)scending or (D)escending. Ascending is the default.
HeadingThe source of a column heading and its position in the data display. Specify the source as:
N The column name (default).
L The label defined in the DB2 Catalog.
Specify the position as:
L Left justified.
R Right justified.
C Centered (default).
Data TypeThe data type and dimension of each column (for display only). Generally, the DB2 or Legacydata type is displayed. For example, CHAR(15) and DECIMAL (10,2) are displayed as such.However, due to space limitations, the following data type specifications are abbreviated. Foreach data type, the DB2 format is shown in bold, followed by the abbreviated format:
VARCHARVARCHR
LONG VARCHARLVARCHR
FLOAT 4-byte lengthSINGLE FLOAT
FLOAT 8-byte lengthDOUBLE FLOAT
GRAPHICGR
56 IBM InfoSphere Optim for DB2 for z/OS: Common Elements

VARGRAPHICVGR
LONG VARGRAPHICVGR
CHAR FOR MIXED DATACH
CLOB FOR MIXED DATACLOB
BINARYBIN
VARBINARYVARBIN
Note: See “Editing and Browsing with Unsupported Data Types” on page 58
Null Null eligibility indicator (for display only). Possible values:
YES The column is NULL eligible.
NO The column is not NULL eligible.
Crit Selection criteria indicator (for display only). Possible values:
YES Criteria are specified.
NO Criteria are not specified.
Available Commands
The primary commands available on the Describe Columns for AD panel include:v ARC1
v BOTTOMv BROWSE2
v CANCELv DISPLAYv DOWNv EDIT2
v ENDv EXPANDv FINDv OPTIONSv RESETv RIGHT3
v SAVE3
v SEL CRIT3
v SQL3
v TOPv UPv ZOOM3
Note:
Chapter 2. Access Definitions 57

v1Archive only
v2Access only
v3Not available for Compare browse
Editing and Browsing with Unsupported Data TypesDuring an Edit or Browse session, DB2 tables that contain columns with unsupported data types aremanaged as follows.
Edit
When using the Edit function:v For tables containing columns with any unsupported data types, the Edit function is disabled and the
message “UNSUPPORTED DATA TYPE” appears.v For tables containing no columns with unsupported data types, the Edit function continues processing.
Browse
When using the Browse function:v For tables containing some columns with supported data types and some columns with unsupported
data types, the data type is displayed on columns with supported data types. The columns withunsupported data types are deselected from view and the data type is listed as “UNSUPPORTED.”
v For tables containing columns with unsupported data types only, the Browse function is disabled andthe message “UNSUPPORTED DATA TYPE” appears.
Data Types SupportedData types supported by Optim are listed below.
For detailed information on limitations or special considerations for a data type, see the documentationfor the specific function or request. The following data types are supported for Optim processes withexceptions as noted:v BINARYv VARBINARYv CHAR
– When used with SEQ function, values for start and step are limited to the range-9223372036854775808 and 9223372036854775807.
– When used with the RAND function, low and high values range from -9223372036854775808 to9223372036854775807.
v VARCHARv LONG VARCHARv DATEv TIMEv TIMESTAMPv TIMESTAMP WITH TIME ZONE
– Cannot be used in an Archive Action variable– Not supported by ODM Optim Connect
v GRAPHICv VARGRAPHICv LONG VARGRAPHICv INTEGERv SMALL INT
58 IBM InfoSphere Optim for DB2 for z/OS: Common Elements

v BIGINT– Cannot be used with: AGE function, substitution variables, TRANS CCN function– When used with RAND_LOOKUP function, maximum value of limit is 2,000,000,000.– When used with HASH_LOOKUP function, maximum value of seed is 2,000,000,000.– When used with SEQ function, values for start and step are limited to the range
-9223372036854775808 and 9223372036854775807.– When used with the RAND function, low and high values range from -9223372036854775808 to
9223372036854775807.– In TRANS SSN processing, only 32 bits of the SSN value will be used for the source and destination
values.v DECIMAL
– When used with SEQ function, values for start and step are limited to the range-9223372036854775808 and 9223372036854775807.
– When used with the RAND function, low and high values range from -9223372036854775808 to9223372036854775807.
v FLOAT– When used with SEQ function, values for start and step are limited to the range
-9223372036854775808 and 9223372036854775807.– When used with the RAND function, low and high values range from -9223372036854775808 to
9223372036854775807.v DECFLOAT
– Cannot be used with: AGE, RAND, RAND_LOOKUP, SEQ, TRANS CCN, TRANS SSN functions;with substitution variables; in relationships
– Values for this data type are displayed as: "***...***"– Literal values for this data type cannot be used as panel input, in control statements, selection
criteria, or with FIND, CHANGE, or ONLY commands.– Cannot create an Archive Index from columns containing this data type.– No support for Open Data Manager (ODM)– When used in Column Maps, column data type and precision must match.
v BLOB, CLOB, DBCLOB– Cannot be used as row selection criteria or with data transformation library functions.– Access editor and Browse utility display only the first 32K bytes of data. Data cannot be modified.
v INTEGERv DECIMAL
– When used with SEQ function, values for start and step are limited to the range-9223372036854775808 and 9223372036854775807.
– When used with the RAND function, low and high values range from -9223372036854775808 to9223372036854775807.
Zoom Column InformationUse a ZOOM command to switch between displaying information for a table on the Describe Columnsfor AD, Specify Selection Criteria for AD, or Specify Archive Criteria panel to displaying information fora single column in a given table. From these panels, you can also use the Z line command to zoom thedisplay for a specific column. The ZOOM primary command also can be assigned to a function key.
The zoomed display is shown in the following figure:
Chapter 2. Access Definitions 59
This display includes information from the Specify Archive Criteria for AD panel, the Specify SelectionCriteria for AD panel, or the Describe Columns for AD panel. Notation to the right of the Table Nameindicates the relative position of the currently displayed column and the total number of columns in thetable.
The prompt for Access Rights is displayed only if Access is available and you are defining the AccessDefinition by means of Option 5 ADS or Option 6 DEFINITIONS from the Main Menu.
Although Combine All Column Criteria is displayed with each column in zoom mode, it applies to theentire table. Modifying the value in a zoomed column display modifies the value for the table.
Use the ZOOM primary command to return to the column list display.
Available Commands
Use the scroll commands (UP, DOWN, TOP, and BOTTOM) to obtain a zoomed display of the previous,next, first and last columns in the table.
Archive ActionsArchive provides a facility that allows you to define actions to be executed at one or more predefinedpoints (action events) during an Archive, Delete, or Restore Process. Each action event can have only oneSQL statement associated with it, although action events can share an SQL statement association.
Note: Any Restore Actions in the Access Definition can be overridden, disarmed, or augmented in theTable Map for the Restore Process. For details, see “Archive Actions” on page 221.
Action SQL statements are different from and should not be considered interchangeable with SQLWHERE clauses created to select data for processing. (See “SQL WHERE Clause Specifications” on page52 for information about this feature.)
ACTIONS Primary Command
To define an Archive Action, invoke the Select an Action to Be Defined panel from the SelectTables/Views for AD panel using the ACTIONS primary command with the desired table name as anoperand. You can also enter the ACTIONS primary command and position the cursor on the desired tablename in the Table List before pressing ENTER.
-- Describe Columns for AD: GRP.FOPDEMO.AD ---------------–––------------------Command ===> Scroll ===> PAGE
Table Name: FOPDEMO.ORDERS Col 8 of 8Combine All Column Criteria by ==> A (A-AND, O-OR)
Column Name : ORDER_SHIP_DATEData Type : CHAR(8) NOT NULLUpdatable by DB2 : YES
Display This Column ===> Y (Y-Yes, N-No)Sort Level ===> __ (1-64 or blank)Ascending or Descending ===> _ (A, D or blank)Column Heading Position ===> C (L-Left, R-Right, C-Center)Column Heading ===> N (L-Use Label, N-Use Name)Access Rights ===> U (S-Select, U-Update)Index Column ===> N (D-Dense, S-Sparse, N-No)Criteria ===> = '2005-03-01’
Figure 26. Zoomed Column Information
60 IBM InfoSphere Optim for DB2 for z/OS: Common Elements

ACT Line Command
Alternatively, use the ACT line command to display the scrollable Select an Action to Be Defined panel.
Panel
The Select an Action To Be Defined panel includes:
Cmd The line command entry area. Valid commands are:
S Select the action event.
INF Display a list of action events that share the action statement.
CLR Clear the action statement association for the action event.
Action DescriptionEvent for the action. Select:v Before Extract of the First Row From a Tablev Before Extract of a Row From a Tablev After Extract of a Row From a Tablev After Extract of Last Row From a Tablev Before Delete of the First Row From a Tablev Before Delete of a Row From a Tablev After Delete of a Row From a Tablev After Delete of the Last Row From a Tablev Before Restore of the First Row To a Tablev Before Restore of a Row To a Tablev After Restore of a Row To a Tablev After Restore of the Last Row To a Table
Active Indicator for association with action statement.
N No action statement is associated with the event.
-- Select Tables/Views for AD: GRP.FOPDEMO.AD ---------------------------------Command ===> Scroll ===> PAGE
Pr +--------- Select an Action To Be Defined for FOPDEMO.CUSTOMERS -----+ UBS¦ ¦¦ 1 of 12 ¦
Def ¦ Cmd Action Description Active Shr ¦ E>>Sta ¦ --- ------------------------------------------ ------ --- ¦ >>Sta ¦ *** ************************ TOP ************************* ¦ >>
¦ ___ Before Extract of the First Row From a Table N N ¦Cmd ¦ ___ Before Extract of a Row From a Table N N ¦--- ¦ ___ After Extract of a Row From a Table N N ¦*** ¦ ___ After Extract of Last Row From a Table N N ¦ACT ¦ ___ Before Delete of the First Row From a Table N N ¦___ ¦ ___ Before Delete of a Row From a Table N N ¦___ ¦ ___ After Delete of a Row From a Table N N ¦___ ¦ ___ After Delete of the Last Row From a Table N N ¦*** ¦ ___ Before Restore of the First Row To a Table N N ¦
¦ ¦¦ Line Commands: (S)elect, (INF)ormation, (CLR)Clear ¦¦ ¦+--------------------------------------------------------------------+
Figure 27. Select an Action To Be Defined
Chapter 2. Access Definitions 61

Y An action statement is associated with the event.
Shr Indicator for shared status of an action statement.
N No associated action statement or action statement is not shared.
Y Associated action statement is shared with another action.
Y* Associated action statement is defined for this action and shared with another action.
Shared SQL Statements
When an action statement is shared by action events, an asterisk after the Y under Shr indicates theprimary action event, or the event that “owns” the shared action statement. Use the INF line command,as shown below, to list action events that share the statement associated with the primary action.
Define the Action
Use the S or SEL line command to select one or more action events. Archive displays the Enter an SQLStatement panel for each selection, in sequence.
+--------- Select an Action To Be Defined for FOPDEMO.CUSTOMERS -----+¦ ¦¦ 1 of 12 ¦¦ Cmd Action Description Active Shr ¦¦ --- ----- ¦¦ *** ***** +-----Before Extract of the First Row From a Table-----+ ¦¦ INF Befor ¦ SQL Shared With 1 OF 2 ¦ ¦¦ ___ Befor ¦ --------------------------------------------- ¦ ¦¦ ___ After ¦ ******************** TOP ******************** ¦ ¦¦ ___ After ¦ After Extract of a Row From a Table ¦ ¦¦ ___ Befor ¦ Before Delete of the First Row From a Table ¦ ¦¦ ___ Befor ¦ ****************** BOTTOM ******************* ¦ ¦¦ ___ After +------------------------------------------------------+ ¦¦ ___ After ¦¦ ___ Before Restore of the First Row To a Table N N ¦¦ ___ Before Restore of a Row To a Table N N ¦¦ ___ After Restore of the First Row To a Table N N ¦¦ ___ After Restore of a Row To a Table N N ¦¦ ¦¦ Line Commands: (S)elect, (INF)ormation, (CLR)Clear ¦¦ ¦+--------------------------------------------------------------------+
Figure 28. Shared Actions List at INF Command
62 IBM InfoSphere Optim for DB2 for z/OS: Common Elements

Use this panel to enter the complete action statement or call to a stored procedure that is executed whenthe action event occurs during processing. For example, you might use an action statement to recorddeletions by inserting the primary key value into a table before deleting the row. As another example,you can place an indicator in a row that has been restored so that it will not be archived a second time orcan be deleted in normal database maintenance procedures.
Type the desired SQL in the panel. The scrollable area displays the SQL in segments of 8 lines of 72positions each. A maximum of 425 lines is available for the SQL and documenting comments. Notationon the right indicates the number of lines and the relative position of the first visible line.
Standard DB2 conventions apply to comments; each line must begin with two hyphens (--).
Note: You must leave a space after a comma that precedes a numeric value if the DB2 setup specifies acomma as the decimal point value.
Line Commands
You can perform several editing functions using line commands. The functions and corresponding linecommands are:
Copy Cn, CC
Insert In
RepeatRn, RR
Delete Dn, DD
Move Mn, MM
Use A (After) or B (Before) to indicate the destination for a Copy or Move line command.
Column Variables
A column variable can be used in the statement for any action event except one executed beforeprocessing the first row or after processing the last row. The column variable must be preceded by acolon (:) in the statement.
------- Enter an SQL Statement to be used by the Action Being Defined ---------Command ===> Scroll ===> PAGE
Before Extract of the First Row From a TableCmd 1 of 5--- ------------------------------------------------------------------------*** ********************************* TOP **********************************_______________*** ******************************* BOTTOM *********************************
Line Commands: (I)nsert, (D)elete, (R)epeat, (M)ove, (C)opyUse the LIST COLUMNS command to add column names, if neededUse the LIST VARIABLES command to add Action Variables, if neededUse the SQLEdit command to invoke the ISPF editor with all of its facilitiesUse the SHARESQL command to select an Action whose SQL you wish to useUse the COPYSQL command to select an Action whose SQL you wish to copy
Figure 29. SQL Statement
Chapter 2. Access Definitions 63

Substitution Variables
You can use a substitution variable that has been defined on the Substitution Variable Display panel. Thename of the substitution variable must be preceded by a colon (:). (For more information, see“Substitution Variables” on page 70.)
Note: If you created a Substitution Variable with the same name as a Column Variable (e.g., :ZIP), youmay want to edit the substitution variable name if you want to use it in an SQL Statement because Optimwill assume the variable is a Column Variable, not a Substitution Variable, as intended.
Action Variables
Action Variables are built-in functions that can be used to return information about the specific Archive,Delete, or Restore Action. An Action Variable must be preceded by a colon (:) in the statement.
For users of action variables with releases of Optim prior to 7.2: Optim 7.2 increased processing limitsand changed the precision for some action variables. In Optim 6.1 and earlier, precision was integer forthe variables listed below. With Optim 7.2 and later, precision for the listed variables is bigint. Dependingon the way in which you use these variables, you may need to make changes to accommodate thedifference in data type. For example, if a variable inserts a value into a DB2 table, ensure that thedestination column is defined to allow a bigint value.
FOP_TOTAL_ROWS_EXTRACTEDFOP_TBL_ROWS_EXTRACTEDFOP_TOTAL_ROWS_PROCESSEDFOP_TOTAL_ROWS_REMAINING_TO_BE_PROCESSEDFOP_TOTAL_ROWS_IN_ERRORFOP_TBL_ROWS_PROCESSEDFOP_TBL_ROWS_REMAINING_TO_BE_PROCESSEDFOP_TBL_ROWS_IN_ERROR
The following General Variables are available to all action statements.
FOP_ACTIONA code that identifies the event for the action. (See list below.)Return Value Type: integer
FOP_ACTION_TEXTA text string that identifies the event for the action. (See list on page below.)Return Value Type: char (20)
FOP_ARCHIVE_FILE_NAMEName of the Archive File being processed.Return Value Type: char (44)
FOP_INDEX_FILE_NAMEName of any index file for the Archive File.Return Value Type: char (44)
FOP_GROUP_NAMEGroup name, if any, for the Archive File.Return Value Type: char (8)
FOP_USER_IDTSO ID for the user that created the Archive File.Return Value Type: char (8)
64 IBM InfoSphere Optim for DB2 for z/OS: Common Elements

FOP_SERVER_NAMEDB2 subsystem on which the operation is being executed.Return Value Type: char (4)
FOP_ARCHIVE_DESCDescription, if any, for the Archive File.Return Value Type: char (40)
FOP_START_DATETIMEDate and time the current operation began.Return Value Type: timestamp
FOP_CURRENT_DATETIMECurrent date and time.Return Value Type: timestamp
FOP_START_TABLE_IDCreator ID of the Start Table.Return Value Type: char (128)
FOP_START_TABLE_NAMEName of the Start Table.Return Value Type: char (128)
FOP_ACCESS_DEF_NAMEThree-part name of the Access Definition, separated by periods.Return Value Type: char (30)
FOP_BATCH_ONLINE_FLAG‘B' for batch execution; ‘O' for online execution.Return Value Type: char (1)
FOP_BATCH_JOBNAMEJob name if batch execution; TSO User ID if online execution.Return Value Type: char (8)
FOP_PROCESS_TYPE‘A' if Archive operation; ‘B' if Archive operation with delete (whether or not deferred); ‘R' ifRestore operation; ‘D' if Delete operation.Return Value Type: char (1)
FOP_RETURN_CODEFor CALL statements only. Return code supplied by the called stored procedure.Return Value Type: integer
FOP_RETURN_MESSAGEFor CALL statements only. Optional text message supplied by the called stored procedure ifFOP_RETURN_CODE is 2.Return Value Type: char (80)
FOP_ACTION and FOP_ACTION_TEXT return the following values:
FOP_ACTION 0FOP_ACTION_TEXT BefExtFirstRow
FOP_ACTION 2FOP_ACTION_TEXT BefExtRow
FOP_ACTION 3FOP_ACTION_TEXT AftExtRow
FOP_ACTION 4FOP_ACTION_TEXT AftExtLastRow
Chapter 2. Access Definitions 65

FOP_ACTION 5FOP_ACTION_TEXT BefDelFirstRow
FOP_ACTION 7FOP_ACTION_TEXT BefDelRow
FOP_ACTION 8FOP_ACTION_TEXT AftDelRow
FOP_ACTION 9FOP_ACTION_TEXT AftDelLastRow
FOP_ACTION 11FOP_ACTION_TEXT BefRestFirstRow
FOP_ACTION 13FOP_ACTION_TEXT BefRestRow
FOP_ACTION 14FOP_ACTION_TEXT AftRestRow
FOP_ACTION 15FOP_ACTION_TEXT AftRestLastRow
The following Extract Variables are available to Extract action statements.
FOP_TOTAL_ROWS_EXTRACTED
Note: Prior to Optim 7.2, the return value type for this variable was integer.Count of rows processed at this point. (See Note below.)Return Value Type: bigint
FOP_ARCHIVE_CRITERIAFirst 220 bytes of criteria used in the Archive operation. If no criteria were specified, returns azero-length string.Return Value Type: varchar (220)
FOP_SRCTBL_CREATOR_IDCreator ID for the source table being processed.Return Value Type: char (128)
FOP_SRCTBL_NAMEName of the source table being processed.Return Value Type: char (128)
FOP_TBL_ROWS_EXTRACTED
Note: Prior to Optim 7.2, the return value type for this variable was integer.Count of rows from the table being processed. (See Note below.)Return Value Type: bigint
FOP_REFERENCE_TABLEY if table is a reference table, N if not.Return Value Type: char (1)
FOP_ARCHIVE_DELETE_DATAY if delete after archive was specified for the table, N if not.Return Value Type: char (1)
The following Restore/Delete Variables are available to Restore and Delete action statements.
FOP_ARCHIVE_IDA unique and arbitrary number of no logical significance that is assigned to the Archive File
66 IBM InfoSphere Optim for DB2 for z/OS: Common Elements

being processed. Since this value is unique for each Archive File, it can serve as a DB2 index, ifneeded.Return Value Type: integer
FOP_TOTAL_ROWS_PROCESSED
Note: Prior to Optim 7.2, the return value type for this variable was integer.Count of all rows processed. (See Note below.)Return Value Type: bigint
FOP_TOTAL_ROWS_REMAINING_TO_BE_PROCESSED
Note: Prior to Optim 7.2, the return value type for this variable was integer.Count of all rows remaining to be processed. (See Note below.)Return Value Type: bigint
FOP_TOTAL_ROWS_IN_ERROR
Note: Prior to Optim 7.2, the return value type for this variable was integer.Count of all rows in error.Return Value Type: bigint
FOP_SRCTBL_CREATOR_IDCreator ID of the source table being processed.Return Value Type: char (128)
FOP_SRCTBL_NAMEName of the source table being processed.Return Value Type: char (128)
FOP_DSTTBL_CREATOR_ID(For Restore only.) Creator ID for the destination table being processed.Return Value Type: char (128)
FOP_DSTTBL_NAME(For Restore only.) Name of the destination table being processed.Return Value Type: char (128)
FOP_TBL_ROWS_PROCESSED
Note: Prior to Optim 7.2, the return value type for this variable was integer.Count of rows from the table that are processed. (See Note below.)Return Value Type: bigint
FOP_TBL_ROWS_REMAINING_TO_BE_PROCESSED
Note: Prior to Optim 7.2, the return value type for this variable was integer.Count of rows from the table that remain to be processed. (See Note below.)Return Value Type: bigint
FOP_TBL_ROWS_IN_ERROR
Note: Prior to Optim 7.2, the return value type for this variable was integer.Count of rows from the table that are in error at this point.Return Value Type: bigint
FOP_AFTER_ROW_STATUSStatus code returned by DB2 after processing a row.Return Value Type: integer
Chapter 2. Access Definitions 67

Note: Any row count value (e.g., FOP_TBL_ROWS_PROCESSED) that is returned does not include thecurrent row for “Before Row” events, but does include the current row for “After Row” events. Forexample, FOP_TBL_ROWS_PROCESSED for the first row of a table returns 0 for “Before Row” actions,and 1 for “After Row” actions.
An example of Action Variable usage is shown in the following figure:
Before each row is extracted, this action statement inserts CUST_ID and ARCHIVE_FILE name values(using the Action Variable FOP_ARCHIVE_FILE_NAME) into table FOPDEMO.ARCHIVE_ACTION.
Calls to Stored Procedures
An Action statement can call a stored procedure using one or both parts of the name (i.e.,userid.procname). If one part is used, the current User ID is assumed as the prefix.
Parameters passed with the CALL statement must be enclosed in parentheses. The number of parametersmust be the same as the number in the procedure and must be passed in the same order. If the storedprocedure does not require parameters, the CALL statement can pass an empty parameter list “( )” oromit the parentheses.
The CALL statement parameter list may include column variables, substitution variables, ActionVariables, and constants.v Type a column variable as a column name preceded by a colon (for example, :STOCK_NUMBER). The
data type of the column or substitution variable must be the same as that for the parameter in thestored procedure and the variable length must equal or exceed that for the parameter.
v The column names and Optim variables entered in the CALL statement on the Enter an SQL Statementpanel are issued by Archive in an SQLDA (e.g., CALL procname USING DESCRIPTOR sqlda).
v An error occurs if a column referenced by a column variable is null eligible unless, when defining thestored procedure to DB2, you specify PARAMETER STYLE as DB2SQL or GENERAL WITH NULLS.
v For null eligible fields, Archive automatically sets the parameters for a null indicator. WhenPARAMETER STYLE GENERAL WITH NULLS is specified, the null indicator is an array passed as aparameter in the stored procedure.
v The length of a parameter for an Action Variable must accommodate the Action Variable.v Constants for CHAR, VARCHAR, GRAPHIC, VARGRAPHIC, BINARY, VARBINARY, DATE, TIME,
and TIMESTAMP columns must be in single quotes. Constants for INTEGER, SMALLINT, and
------- Enter an SQL Statement to be used by the Action Being Defined ---------Command ===> Scroll ===> PAGE
Before Extract of the First Row From a TableCmd 1 of 3--- ------------------------------------------------------------------------*** ********************************* TOP **********************************___ INSERT INTO FOPDEMO.ARCHIVE_ACTION___ (ARCHIVE_CUSTID, ARCHIVE_FILE)___ VALUES (CUST_ID, :FOP_ARCHIVE_FILE_NAME);*** ******************************* BOTTOM *********************************
Line Commands: (I)nsert, (D)elete, (R)epeat, (M)ove, (C)opyUse the LIST COLUMNS command to add column names, if neededUse the LIST VARIABLES command to add Action Variables, if neededUse the SQLEdit command to invoke the ISPF editor with all of its facilitiesUse the SHARESQL command to select an Action whose SQL you wish to useUse the COPYSQL command to select an Action whose SQL you wish to copy
Figure 30. SQL Statement Using Action Variable
68 IBM InfoSphere Optim for DB2 for z/OS: Common Elements

DECIMAL cannot be in quotes. The length of a parameter for a character, graphic, or binary constantmust accommodate the constant. The parameter lengths for DATE, TIME, and TIMESTAMP constantsare 10, 8, and 26 bytes, respectively.A stored procedure called by an action statement can cause archive processing to skip a row or toterminate the process by passing a value in the Action Variable, FOP_RETURN_CODE. ValidFOP_RETURN_CODE values are:
0 Normal return (default).
1 Skip the row. This code can be returned by a stored procedure called by a “Before Row”statement. An error occurs if this code is returned by a stored procedure called by a “BeforeFirst Row” or “After” Action statement.
2 Terminate the process. An optional, 80-character message can be passed in theFOP_RETURN_MESSAGE Action variable.
3 Normal return and Archive performs a DB2 commit at that point.
Note: If a stored procedure called by an Extract Action is intended to return a “3” inFOP_RETURN_CODE, the parameter list must be followed by “WITHHOLD,” outside theparentheses, such as:CALL procname(parm1,parm2... ) WITHHOLD
4 Return the table to a known state (i.e., rollback) and skip the row. (After Extract of Last Row,Delete or Restore Action events only.)
LIST COLUMNS
Use the LIST COLUMNS primary command to display a list of column variables for the table. You canscroll this list and use the S line command to select a column variable from it. The selected columnvariable is added to the end of the action statement.
LIST SUBS
Use the LIST SUBS primary command to display a list of substitution variables. You can scroll this listand use the S line command to select a substitution variable from it. The selected substitution variable isadded to the end of the action statement.
LIST VARIABLES
Use the LIST VARIABLES command to display a list of Action Variables when formulating an actionstatement. Use the S line command to select a variable from the list. The selected variable is added at theend of the action statement.
SQLEDIT
Use the SQLEDIT command to invoke an ISPF edit session for the displayed action statement. Allstandard ISPF facilities are available. Use the ISPF COPY command to insert data from a file and edit asdesired.
Use END to terminate the ISPF session and redisplay the Enter an SQL Statement panel. The edited datais inserted into the panel.
SHARESQL
Use the SHARESQL command to select an action event that “owns” the action statement you wish toassociate with the current action. A list of available action events is displayed. You can scroll this list anduse the S line command to select a desired event. The statement associated with the selected event is
Chapter 2. Access Definitions 69

inserted into the action statement, overwriting anything already entered. You can edit the sharedstatement. If so, it is changed for all actions for which it is active.
COPYSQL
Use the COPYSQL command to select an event that “owns” the action statement you wish to copy to thecurrent event. A list of available events is displayed. You can scroll this list and use the S line commandto select a desired event. The action statement for the selected event is inserted at the end of your entry.Editing the action statement does not affect the statement from which it is copied.
Specification Complete
Use END to save the contents of the SQL Editor and return to the Select an Action To Be Defined panel.Use END again to return to the Select Tables/Views for AD panel. When the Select Tables/Views for ADpanel is redisplayed, Status contains “ACT” to indicate that an Archive Action has been specified for theselected table.
Substitution VariablesYou can use a substitution variable in selection criteria, an SQL WHERE clause, or an Archive Actionstatement, but you must first define that variable on the Substitution Variable Display panel.
Use the LIST SUBS command on the Select Tables/Views for AD panel to display the SubstitutionVariable Display panel. You can provide a default value and a prompt string for each substitutionvariable you define.
Panel
The Substitution Variable Display panel includes:
Cmd The line command entry area. Valid commands are:
D Delete substitution variable.
EXP Display an expanded pop-up window for the default value of the substitution variable.This display provides two 50-character lines to enter the default value.
I Insert line for new substitution variable.
Name Specify the name of the substitution variable, preceded by a colon (:). If you do not prefix thename with a colon, it is inserted automatically.
Substitution Variable DisplayCommand ===> Scroll ===> PAGE
Line : EXP, I, D
Variable 1 of 2
Cmd Name Default Value Prompt String--- ------------ ------------------------- -----------------------------------*** ********************************** TOP ***********************************___ :SUB_RATING ’PG’ ENTER THE RATING___ :TITLE ENTER THE MOVIE TITLE*** ******************************** BOTTOM **********************************
Figure 31. Substitution Variable Display
70 IBM InfoSphere Optim for DB2 for z/OS: Common Elements

Note: If you use a substitution variable that has the same name as a column variable in an actionstatement, unpredictable results will occur. Therefore, it is recommended that you do not use acolumn name as the substitution variable name.
Default ValueSpecify the default value of the substitution variable.
Values for CHAR, VARCHAR, GRAPHIC, VARGRAPHIC, BINARY, VARBINARY, DATE, TIME,and TIMESTAMP variables must be enclosed in single quotes. Values for INTEGER, SMALLINT,and DECIMAL variables cannot be enclosed in quotes. You can also specify a column name forthe default value; do not enclose the column name in quotes.
Values for DECFLOAT or BIGINT cannot be defined as default values.
To enter or modify a default value that is more than 25 characters, use the EXP line command todisplay a 100 character area.
Default values are not validated until run time. If a value is the incorrect data type or size for thecolumn, or does not conform to SQL syntax, processing errors may result.
Note:
v If you do not provide a default value, you must provide a value at run time, even if thesubstitution variable is not used in the process.
v If you provide a default value, you will not be prompted for a value at run time and the valuewill be used for online processing. For batch processing, you can provide the default value oroverride any default value, using the VAR keyword.
Prompt StringEnter any desired text to prompt for the substitution variable value at run time. Type the promptstring exactly as you want it to appear (a maximum of 35 characters). If a default value is notspecified, this prompt is displayed on the Default Value panel prior to extracting or archivingdata.
You can define any number of substitution variables for an Access Definition but are not required to usethe substitution variables in selection criteria, SQL WHERE Clauses, or Archive Actions for the AccessDefinition. In an online process, you will be prompted for values if you do not provide a default. Anerror condition will occur in a batch process if no value is provided, either as a default or by using theVAR override.
Default Value
If you do not provide a default value for a substitution variable on the Substitution Variable Display, theDefault Value panel prompts you for a value prior to executing any process that uses it (for example,Extract, Archive, or Point-and-Shoot).
------------------------------- Default Value ---------------------------------Command ===> Scroll ===> PAGE
Before the process can continue, you must supply a valuefor the substitution variable listed below.
Variable Name: TITLE
ENTER THE MOVIE TITLE:
Figure 32. Default Value
Chapter 2. Access Definitions 71

This panel displays the name of the substitution variable in Variable Name, and a prompt for entering avalue for the substitution variable. (The text for the prompt is taken from Prompt String, if specified, onthe Substitution Variable Display panel.) You must enter a value for the substitution variable to proceedwith the process.
Note: Specifying a value on the Default Value panel modifies the Access Definition, adding the newdefault value to the substitution variable. During an Extract or Archive Process, you are prompted to savethe modified Access Definition, if it is permanent, when you exit the Extract or Archive Process menu.
The Point-and-Shoot FacilityThe Point-and-Shoot facility is useful for selecting specific rows from the Start Table, which are used tostart an Archive, Compare, Extract, or Restore Process. If you have also defined selection criteria for theStart Table, you can optionally override or supplement the selection criteria with the Point-and-Shoot list.
Primary Key
Selected Start Table rows are identified by the primary key values; thus, the Start Table must have aprimary key.
Optim stores the primary key values in a sequential or partitioned data set that you specify. This data setis sometimes referred to as a Row List. In later Point-and-Shoot sessions, you can add to this Row List orreplace it. If the data set does not exist, Optim prompts for the required information and allocates thedata set for you. (See Appendix B, “Allocating External Files,” on page 365 for more information.) Oncesaved, the Row List can be used and modified as needed.
Legacy Tables
Although you can use an external Row List file with a Legacy Table, you cannot use Point-and-Shoot tointeractively select legacy data. (Refer to Appendix C, “Create a Row List File,” on page 371 for moreinformation.)
Permanent or Temporary
You can initiate Point-and-Shoot from the Table List when creating or editing an Access Definition orbefore executing an Archive, Extract, or Compare Process. If you are defining an Access Definition to beused in a subsequent process, it is saved in the Optim Directory along with the Row List.Point-and-Shoot specifications made when initiating an online Extract or Archive Process can be saved orrecorded in a temporary Row List, available for the current process only. You can use a temporary RowList only when you invoke the Select Tables/Views for AD panel from the EXTRACT Process orARCHIVE Process menu.
POINT Command
Use the POINT command on the Select Tables/Views for AD panel to invoke the Point-and-Shoot facility.Optim prompts for the name of an input data set to allow you to edit an existing Row List.
72 IBM InfoSphere Optim for DB2 for z/OS: Common Elements

Note: Prior to displaying this prompt, the Default Value panel may be displayed if you defined asubstitution variable in the Access Definition, but did not specify a default value for the variable. Youmust specify a value to proceed. See “Substitution Variables” on page 70.
Panel
The Start Table Row List Processing pop-up prompts for:
Input DSNThe name of a data set containing a Row List. Optim displays any previously specified InputDSN for the Access Definition. If none, the prompt is blank.
To edit an existing Row List, enter the data set name. You can type over any displayed name tochange the entry or clear a name to drop a previously specified Row List.
After any changes are made, press ENTER, or use END or CANCEL as indicated on the panel anddescribed below.
ENTERBegin the Point-and-Shoot session.
Optim displays data that matches any selection or other criteria. If you are editing an existingRow List, the previously identified rows are selected on the display. If Input DSN is blank, thePoint-and-Shoot session begins with no rows selected.
END Return to the Select Tables/Views for AD panel.
If an input data set name is supplied, the primary key values in the Row List remain in effect.Point-and-Shoot is not invoked. If the Input DSN is blank, no primary key values are used. (Youcan erase the Input DSN and use END to drop a previously specified Row List.)
CANCELCancel the display and POINT command and return to the Table List. Any modifications aredisregarded.
Intervening Changes
If database rows are deleted or changed in the interval between the earlier selection of primary keyvalues and the current Point-and-Shoot session, the rows that match primary key values in thePoint-and-Shoot file may be missing. If so, a prompt is displayed to notify you, indicating the number ofrows referenced in the Point-and-Shoot file.
-- Select Tables/Views for AD: GRP.FOPDEMO.AD ---------------------------------Command ===> Scroll ===> PAGE
Primary : COL,SEL,SQL,REL,POINT,GROUP,GET TABLES RELATED,INDENT,ARC,LIST SUBS
+-----------------------Start Table Row List Processing-----------------------+¦ ¦¦ Specify Input DSN if You Want to Use Previously Saved Row List ¦¦ Input DSN ===> ¦¦ ¦¦ Press ENTER to Start Point-and-Shoot Session ¦¦ Enter END Command to Return to Table List ¦¦ Enter CANCEL Command to Cancel POINT Command ¦¦ ¦¦ Special Line Commands Available for Row Selection: ¦¦ SR, SSR - Select Start Table Row and All Related Rows ¦¦ UR, UUR - UnSelect Start Table Row and All Related Rows ¦+-----------------------------------------------------------------------------+
Figure 33. Start Table Row List Selection Prompt
Chapter 2. Access Definitions 73

v Press ENTER to proceed without modifying the file.v Use END to remove unmatched primary key values from the Point-and-Shoot file.v Use the CANCEL command to terminate the Point-and-Shoot session without modifying the file.
The following sections discuss the facilities that are available during a Point-and-Shoot session. For moreinformation about the primary and line commands discussed in these sections, see the Command ReferenceManual, Primary Commands and Line Commands.
Initial Display for Point-and-ShootThe initial Point-and-Shoot display is determined by the Start Table, any selection criteria (but notArchive Criteria) for the Start Table, and the Begin Table Display With setting.
For more details, see “Access Definition Parameters” on page 112.
SELECTION CRITERIA Command
Use the SELECTION CRITERIA command to display the Specify Selection Criteria for Table panel at anytime during a Point-and-Shoot session. You can use this panel to change the selection criteria for anytable in the display. Any criteria are used for the Point-and-Shoot session only and are not saved in theAccess Definition.
The Specify Selection Criteria for Table panel prompts for selection criteria. All facilities for the SpecifySelection Criteria for AD panel are available. (For details on this panel, see “Selection Criteria” on page49.) After specifying the desired selection criteria, press ENTER or use END to display the data.
If you change the selection criteria for the Start Table so that the set of rows selected in thePoint-and-Shoot file are not appropriate, you are prompted to specify whether to continue with thesession or to retain or discard the previously selected rows.
Point-and-Shoot BasicsThe Point-and-Shoot display is very similar to an ISPF/PDF display. However, to allow you to selectspecific rows (and, therefore, the primary key values) while browsing data, Point-and-Shoot providesscreen elements and facilities not available in ISPF/PDF. This section discusses the Point-and-Shoot screenelements, commands, and display modes.
Display Format
There are two basic display formats: columnar (default) and sidelabels. In columnar format, the headingsare displayed across the top of the panel and the data is displayed in columns beneath the headings.More than one row from a table can be displayed.
ORDER_ID CUST_ID ORDER_DATE ORDER_TIME FREIGHT_CHARGES ORDER_SALESMAN-------- ------- ---------- ---------- --------------- --------------
7 00721 2005-04-26 14.22.31 9.22 NE0058 00021 2005-04-26 14.22.31 9.22 SC0059 02123 2005-04-26 14.22.31 9.22 SW005
In sidelabels format, the column headings are listed down the left side of the panel with the data to theright of the headings. Though the display is limited to a single row of data, data from a greater numberof columns is displayed for the row.
74 IBM InfoSphere Optim for DB2 for z/OS: Common Elements

ORDER_ID : 7CUST_ID : 00721ORDER_DATE : 2005-04-26ORDER_TIME : 14.22.31FREIGHT_CHARGES : 9.22ORDER_SALESMAN : NE005ORDER_POSTED_DATE : 2005-04-27-16.59.00.000000ORDER_SHIP_DATE : 05/04/29
You can switch between these two display formats by using the SIDELABELS primary command or theSID line command. For more information about the sidelabels format, see “Sidelabels Format” on page302.
Note: Most screen examples in this manual are in columnar format.
Screen ElementsThe screen elements in the columnar and sidelabels display formats are the same, only the positioning isdifferent.
The following figure shows key screen elements in columnar format.
The elements are:
CommandPrompt for primary commands. Refer to “Available Commands” on page 76 for a summary ofavailable primary commands.
Line CommandArea for line commands. Refer to “Available Commands” on page 76 for a summary of availableline commands.
In columnar format, the label is Cmd. In sidelabels format, the label is LineCmd.
--------------------------- Optim: Point-and-Shoot ---------- 18 ROWS SELECTEDCommand ===> Scroll ===> PAGE
Cmd F == Table: FOPDEMO.ORDERS(T1) ======================= 1 OF 1000 === MORE>>ORDER_ID CUST_ID ORDER_DATE ORDER_TIME FREIGHT_CHARGES ORDER_SALESMAN-------- ------- ---------- ---------- --------------- --------------
*** *********************************** TOP ***********************************___ S 7 00721 2005-04-26 14.22.31 9.22 NE005___ 8 00021 2005-04-26 14.22.31 9.22 SC005___ 9 02123 2005-04-26 14.22.31 9.22 SW005___ 10 00049 2005-04-26 14.22.31 9.22 WE005___ 11 00026 2005-04-26 14.22.31 9.22 SE005___ 12 00393 2005-04-26 14.22.31 9.22 NE005___ 13 03214 2005-04-26 14.22.31 9.22 NW005___ S 14 00309 2005-04-26 14.22.31 9.22 SC005___ S 15 00352 2005-04-26 14.22.31 9.22 SC005___ S 16 00264 2005-04-26 14.22.31 9.22 NW005___ S 17 00168 2005-04-26 14.22.31 9.22 SW005___ S 18 01021 2005-04-26 14.22.31 9.22 SE005___ S 19 00454 2005-04-26 14.22.31 9.22 NC005___ 20 00001 2005-04-26 08.16.09 14.80 NE005___ 21 05075 2005-04-26 08.16.09 14.80 SC005___ 22 00077 2005-04-26 08.16.09 14.80 SW005___ 23 00068 2005-04-26 08.16.09 14.80 WE005
Figure 34. Screen Elements
Chapter 2. Access Definitions 75

Status FlagIdentifier for selected rows. The letter “S” is displayed for rows selected in the Point-and-Shootsession.
In columnar format, the label is F. In sidelabels format, the label is Row Status.
Table NameThe fully qualified name of the table or view. The name is truncated if the Creator ID and TableName are more than 22 characters. This value cannot be edited; it is for display only.
Short NameAn identifier showing the level for each table (Tn) or view (Vn). In a multi-table display, T1identifies the first level, T2, the second, etc. Several tables can be joined at any level except T1.Tables joined at one level (i.e., stacked tables) have the same level identifier. (See “Multiple TableDisplay” on page 287 for additional information about multi-way joins and stacked tables.) Youcan use the level identifier in place of the table name as a command operand.
x OF yIf all rows cannot be displayed, you can scroll the display. Notation to the right of Table Nameindicates the relative position of the first visible row. In this notation, x is the relative position ofthe first visible row and y the total number of rows.
HorizontalScroll Indicator
Indicator (in the form MORE or <<MORE) that additional data can be displayed by scrolling tothe LEFT or RIGHT (refer to “Horizontal Scroll” on page 79).
Column HeadingsColumn names are used as headings for the rows from each table.
Column x of yIf the complete list of columns cannot be displayed, you can scroll it. This notation is in the form,Column x of y, where x is the relative position of the first visible column and y the total numberof columns in the table. (Displayed in sidelabels format only.)
The number of Start Table rows you select is always displayed in the upper right corner of the screen. InFigure 34 on page 75, 18 rows are selected.
Available CommandsBoth primary and line commands are available. Many of these commands are introduced in the followingsections. Detailed information about each command is provided in the Command Reference Manual,Primary Commands and Line Commands.
Primary Commands
The following is a list of primary commands available during a Point-and-Shoot session.v ANCHORv ATTRIBUTESv BOTTOMv CANCELv CAPSv COLUMNSv COUNTv DOWNv ENDv EXCLUDEv EXPAND
76 IBM InfoSphere Optim for DB2 for z/OS: Common Elements

v FINDv HEXv INDENTv JOINv LEFTv LISTv LOCKv MAX FETCH ROWSv ONLYv OPTIONSv REPORTv RESETv RESORTv RFINDv RIGHTv SEL CRITERIAv SELECT RELATEDv SHOWv SHOW SQLv SIDELABELSv SORTv SQLv STARTv SWITCHv TOPv UNJOINv UNLOCKv UNSELECT RELATEDv UPv ZOOM
Note: The INDENT, JOIN, UNJOIN, START, and SWITCH commands are not available in sidelabelsformat.
Line Commands
The following line commands are available during a Point-and-Shoot session.
X, Xn, XXExcludeTemporarily remove a row, a number of rows, or a block of rows from the display.
F, Fn FirstRedisplay the first row or the first n rows in a block of excluded rows.
J JoinJoin to related tables.
L, Ln LastRedisplay the last row or the last n rows in a block of excluded rows.
Chapter 2. Access Definitions 77
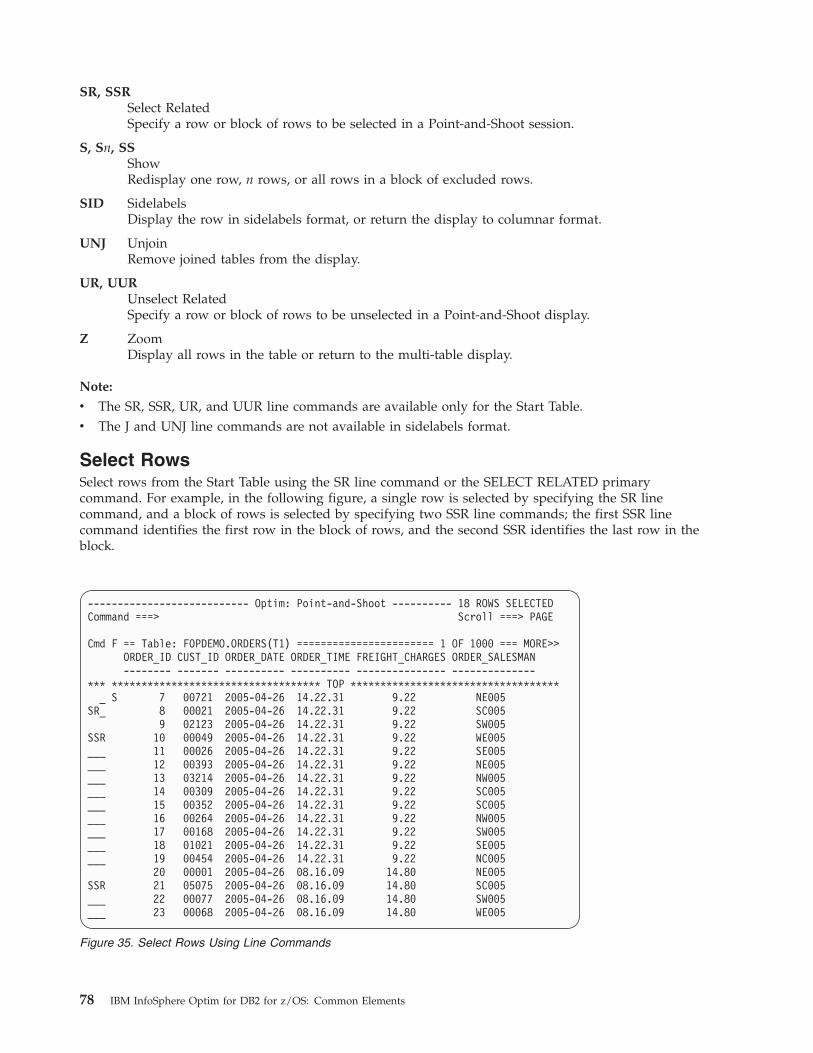
SR, SSRSelect RelatedSpecify a row or block of rows to be selected in a Point-and-Shoot session.
S, Sn, SSShowRedisplay one row, n rows, or all rows in a block of excluded rows.
SID SidelabelsDisplay the row in sidelabels format, or return the display to columnar format.
UNJ UnjoinRemove joined tables from the display.
UR, UURUnselect RelatedSpecify a row or block of rows to be unselected in a Point-and-Shoot display.
Z ZoomDisplay all rows in the table or return to the multi-table display.
Note:
v The SR, SSR, UR, and UUR line commands are available only for the Start Table.v The J and UNJ line commands are not available in sidelabels format.
Select RowsSelect rows from the Start Table using the SR line command or the SELECT RELATED primarycommand. For example, in the following figure, a single row is selected by specifying the SR linecommand, and a block of rows is selected by specifying two SSR line commands; the first SSR linecommand identifies the first row in the block of rows, and the second SSR identifies the last row in theblock.
--------------------------- Optim: Point-and-Shoot ---------- 18 ROWS SELECTEDCommand ===> Scroll ===> PAGE
Cmd F == Table: FOPDEMO.ORDERS(T1) ======================= 1 OF 1000 === MORE>>ORDER_ID CUST_ID ORDER_DATE ORDER_TIME FREIGHT_CHARGES ORDER_SALESMAN-------- ------- ---------- ---------- --------------- --------------
*** *********************************** TOP ***********************************_ S 7 00721 2005-04-26 14.22.31 9.22 NE005
SR_ 8 00021 2005-04-26 14.22.31 9.22 SC0059 02123 2005-04-26 14.22.31 9.22 SW005
SSR 10 00049 2005-04-26 14.22.31 9.22 WE005___ 11 00026 2005-04-26 14.22.31 9.22 SE005___ 12 00393 2005-04-26 14.22.31 9.22 NE005___ 13 03214 2005-04-26 14.22.31 9.22 NW005___ 14 00309 2005-04-26 14.22.31 9.22 SC005___ 15 00352 2005-04-26 14.22.31 9.22 SC005___ 16 00264 2005-04-26 14.22.31 9.22 NW005___ 17 00168 2005-04-26 14.22.31 9.22 SW005___ 18 01021 2005-04-26 14.22.31 9.22 SE005___ 19 00454 2005-04-26 14.22.31 9.22 NC005
20 00001 2005-04-26 08.16.09 14.80 NE005SSR 21 05075 2005-04-26 08.16.09 14.80 SC005___ 22 00077 2005-04-26 08.16.09 14.80 SW005___ 23 00068 2005-04-26 08.16.09 14.80 WE005
Figure 35. Select Rows Using Line Commands
78 IBM InfoSphere Optim for DB2 for z/OS: Common Elements

As an example of the SELECT RELATED primary command, enter the following to select all orders forsalesman SC005:SELECT RELATED IN ORDER_SALESMAN ALL SC005
Reverse a selection by using the UR line command or the UNSELECT RELATED primary command. Inthe following figure, the last selected row, Order 21, is unselected.
Only Start Table rows are selected or unselected directly. However, rows from other tables in the AccessDefinition are also selected if related to a selected Start Table row and, in a joined display, show the “S”status flag.
Scroll DataSeveral commands are available to scroll the data vertically and horizontally. Scroll vertically to viewadditional rows when the number of rows retrieved exceeds the number of lines available on the screen.Scroll horizontally to view additional columns when the width of the data display exceeds the width ofthe screen.
Vertical ScrollYou can enter the scrolling commands UP, DOWN, TOP, and BOTTOM on the command line or assignthem to program function keys. The ISPF SCROLL values, CSR, PAGE, DATA, HALF, MAX, and n (wheren is the number of lines to scroll) are supported.
When a single table is displayed, vertical scrolling is identical to vertical scrolling in ISPF. Scrolling amulti-table display is discussed in “Coordinated Scroll” on page 294.
Horizontal ScrollDuring a Point-and-Shoot session, all columns may not be displayed on the screen. When the combinedwidth of the columns exceeds the width of the screen, the scroll indicator, MORE with an appropriatedirection arrow, is displayed on the information line for the table. For example, if the display width of acolumn is 20 characters but only 10 spaces remain on the screen, the column is omitted from the displayuntil you scroll right.
--------------------------- Optim: Point-and-Shoot ---------- 25 ROWS SELECTEDCommand ===> Scroll ===> PAGE
Cmd F == Table: FOPDEMO.ORDERS(T1) ======================= 1 OF 1000 === MORE>>ORDER_ID CUST_ID ORDER_DATE ORDER_TIME FREIGHT_CHARGES ORDER_SALESMAN-------- ------- ---------- ---------- --------------- --------------
*** *********************************** TOP ***********************************___ S 7 00721 2005-04-26 14.22.31 9.22 NE005___ S 8 00021 2005-04-26 14.22.31 9.22 SC005___ 9 02123 2005-04-26 14.22.31 9.22 SW005___ S 10 00049 2005-04-26 14.22.31 9.22 WE005___ S 11 00026 2005-04-26 14.22.31 9.22 SE005___ S 12 00393 2005-04-26 14.22.31 9.22 NE005___ S 13 03214 2005-04-26 14.22.31 9.22 NW005___ S 14 00309 2005-04-26 14.22.31 9.22 SC005___ S 15 00352 2005-04-26 14.22.31 9.22 SC005___ S 16 00264 2005-04-26 14.22.31 9.22 NW005___ S 17 00168 2005-04-26 14.22.31 9.22 SW005___ S 18 01021 2005-04-26 14.22.31 9.22 SE005___ S 19 00454 2005-04-26 14.22.31 9.22 NC005
S 20 00001 2005-04-26 08.16.09 14.80 NE005UR_ S 21 05075 2005-04-26 08.16.09 14.80 SC005___ 22 00077 2005-04-26 08.16.09 14.80 SW005___ 23 00068 2005-04-26 08.16.09 14.80 WE005
Figure 36. Unselect Rows Using Line Commands
Chapter 2. Access Definitions 79

You can scroll horizontally using LEFT and RIGHT (usually assigned to PF10 and PF11) to display theremaining columns. Operands for these commands allow you to scroll by column name, numeric value,or cursor position. These commands perform the same functions in columnar or sidelabels format. Insidelabels format, if insufficient space is available, partial data from columns may be displayed.
When multiple tables are displayed, indicate the table to scroll by specifying a table name or identifierwith the column name (for example, T2.CUST_ID) or by cursor position. If a table is not indicated, thelowest-level table is scrolled.
Lock Columns for Horizontal Scroll
You can use the LOCK and UNLOCK commands to retain specified columns on the screen whenscrolling left and right. The LOCK command repositions the named column to the left of the screen andretains the column in that position when a horizontal scroll is performed. A locked column is identifiedby a series of plus signs, +, under the column heading. Multiple columns may be locked. The UNLOCKcommand unlocks the named locked column and returns it to the original position.
For more information about the LOCK and UNLOCK commands, see “Lock Columns” on page 309.
Join TablesA Point-and-Shoot session begins with a display of rows from the Start Table. You can add related rowsfrom other tables listed in the Access Definition to the display using a Join command. The table for whichthe join is executed, or the anchor table, is joined to a related table from the Access Definition, and therelated rows from that table are displayed.
For more information about joining tables, refer to “Join Command” on page 282.
Manage the DisplayData for a Point-and-Shoot session may involve extensive data from hundreds of tables, each with dozensof columns and thousands of rows. Navigating this data to identify a specific subset of related rows canbe daunting.
Optim provides many techniques and features to help you:v Navigate large lists of data easily and efficiently.v Find specific data and manage the display.v Review information about columns or data.v Arrange and format displays of wide data to accommodate browsing.
For more information about these features, see “Manage Data Displays” on page 55.
Display SQLDuring a Point-and-Shoot session, use the SHOW SQL command to display a generalized form of theSQL used to fetch the rows from any displayed table. By default, the SQL for the lowest-level table isdisplayed. To display the SQL for another table, supply either the table name or identifier with thecommand or position the cursor to the desired table. For example, to display the SQL for thehighest-level table, enter:SHOW SQL T1
The SQL may be in three parts.v A declaration of host variables, if the corresponding columns have different data types or dimensions.v Pseudo code to populate any host variables if declared.v The “generalized” SELECT statement, which incorporates the host variables.
80 IBM InfoSphere Optim for DB2 for z/OS: Common Elements

For example, if you enter the SHOW SQL command for the ORDERS table, a generalized SQL statementis displayed as:
Generalized WHERE Clause
This generalized form is probably more useful than the actual SQL generated by Optim, which includesthe specific data values for columns defined in the relationship. For example, the generated SQLrepresented by the generalized SQL in the previous figure includes a value for CUST_ID, as in:SELECT ...FROM FOPDEMO.ORDERS WHERE CUST_ID = ’17053’
In the generalized form, the right hand side of the predicate in the SQL statement is a meaningful namethat represents the processing.
Save the SHOW SQL Output
You can save or print the SQL Text Display using the OUTPUT command. When you enter the OUTPUTcommand, the Output Data Options panel is displayed.
--------------------------- Optim: Point-and-Shoot ----------------------------Command ===> Scroll ===> PAGE
Cmd F == Table: FOPDEMO.CUSTOMERS(T1) ====================== 1 OF 20 === MORE>>CUST_ID CUSTNAME ADDRESS CITY STATE
+-------------------------------SQL Text Display---------------------------+ *| || Generated SQL for: FOPDEMO.ORDERS || || || SELECT ORDER_ID, CUST_ID, ORDER_DATE, ORDER_TIME, FREIGHT_CHARGES, || ORDER_SALESMAN, ORDER_POSTED_DATE FROM FOPDEMO.ORDERS WHERE (CUST_ID = || CUSTOMERS.CUST_ID) || || || || Enter UP and DOWN Commands to Scroll the Statement || Enter OUTPUT Command to Save the Statement || Enter END Command to Return || |+--------------------------------------------------------------------------+
Figure 37. Text Display of Generated SQL
Chapter 2. Access Definitions 81

Panel
The Output Data Options panel includes:
Output TypeOption to save the SQL in a dataset or as a SYSOUT class for printing.
If Dataset:DSN
The name of the dataset. Specify the name of a new or existing sequential file, with a recordformat of fixed or fixed block, or Partitioned Data Set (PDS) with member name enclosed inparentheses.
The dataset name is automatically prefixed with the default prefix if you do not enclose it insingle quotes. (See “Editor and Display Options” on page 328 for information about the defaultprefix.)
If the specified data set does not exist, the Allocate Dataset panel is displayed (see Appendix B,“Allocating External Files,” on page 365 for details).
To generate a selection list of datasets, specify an asterisk (*) or the DB2 LIKE character % at theend of the DSN specification. For example: 'FOPDEMO.DDL*' or 'FOPDEMO.DDL%'
Each generates a selection list of all data sets with a valid format and a DSN beginning withFOPDEMO.DDL.
DispositionFor an existing, sequential data set only, specify:
M MOD. The SQL data is appended to the data set.
O OLD. The contents of the file are replaced with the SQL data.
If SYSOUT:You can direct the output to a SYSOUT class and use an output processor, such as SDSF, to printit.
SYSOUT ClassThe output class for the printed output. Specify SYSOUT Class as an alphabetic or numericcharacter or an asterisk (*).
--------------------------- Optim: Point-and-Shoot ----------------------------Command ===> Scroll ===> PAGE
Cmd F == Table: FOPDEMO.CUSTOMERS(T1) ====================== 1 OF 20 === MORE>>
+--------------------------Output Data Options--------------------------+| | +| Output Parameters: | || | || Output Type ===> D D-Dataset, S-SYSOUT | || | || If Dataset: | || DSN ===> ’FOPDEMO.SQL.OUTPUT.PDS(DDLJOIN)’ | || Disposition ===> M-Mod, O-Old | || | || If SYSOUT : | || SYSOUT Class ===> A - Z, 0 - 9, * | || Destination ===> | || Hold ===> Y-Yes, N-No | |+-----------------------------------------------------------------------+ |
Figure 38. Output Data Options
82 IBM InfoSphere Optim for DB2 for z/OS: Common Elements

DestinationThe SYSOUT destination. Specify a valid local or remote terminal, a node in the JES network, alocal or remote printer or workstation, or a TSO User ID.
Hold Disposition of the output. Specify:
Y Output is held until released or deleted by an operator.
N Output is not held.
Press ENTER to continue processing. To return to the previous panel without specifying output dataoptions, use END or CANCEL.
ReportsAt any time during a Point-and-Shoot session, you can produce a report about the contents of the session.Use the reporting facility to generate a report that includes some or all rows in a variety of formats. Toinvoke the report facility, use the REPORT command.
For more information about generating reports, refer to “Reports” on page 310.
Terminate a Point-and-Shoot SessionUse END to terminate a Point-and-Shoot session. Before returning to the Select Tables/Views for ADpanel, the Confirm Row List Processing prompt is displayed.
Output DSN Name
You can save the Row List for later use. The name of any Input DSN you supplied to begin thePoint-and-Shoot session is shown in Output DSN. You can simply press ENTER to update the nameddata set. You can also overtype the name to create a new data set or to update a different data set. If youdid not begin the session with an Input DSN, the area is blank and you must enter a name to save theRow List. The dataset name is saved with the Access Definition and replaces any previously specifieddata set name.
Extract/Archive Process Note
If you began the Point-and-Shoot session from within an Extract or Archive Process request, you canleave Output DSN blank to use the Point-and-Shoot Row List for only the current Extract or ArchiveProcess.
Subsequent Requests
You can re-enter a Point-and-Shoot session to modify a saved Row List. If the changes are temporary andthe POINT command is entered for a subsequent process during the same session, the following prompt
--------------------------- Optim: Point-and-Shoot ----------------------------Command ===> Scroll ===> PAGE
Cmd F == Table: FOPDEMO.ORDERS(T1) ====================== 11 OF 1000 === MORE>>
+------------------------Confirm Row List Processing-----------------------+¦ ¦¦ Specify Output DSN to Permanently Save Modified Row List ¦¦ ¦¦ Output DSN ===> ¦+--------------------------------------------------------------------------+
Figure 39. Confirm Row List Processing
Chapter 2. Access Definitions 83

confirms that temporary selection is still in effect.
Change the Start Table
If you change the Start Table and rows had been selected, you are notified that the Start Tablespecifications, including Point-and-Shoot selections, may be dropped since they may no longer beappropriate for the new Start Table.
Row List Status IndicatedAfter you terminate the Point-and-Shoot session, the Select Tables/Views for AD panel is redisplayed.Start Table Options indicates whether a Row List has been defined for the current Access Definition. Forexample, if a permanent Row List has been defined for the Access Definition, the Select Tables/Views forAD panel is displayed as:
+--------------------- Confirm Row List Processing --------------------+| || Currently Using a Temporary Start Table Row List || || Press ENTER to Continue Using List and Start Point-and-Shoot Session || Enter END Command to Drop Temporary List and Return to Table List || Enter CANCEL Command to Cancel POINT Command |+----------------------------------------------------------------------+
Figure 40. Reconfirm Temporary Point-and-Shoot Values
+-----------------Drop Start Table Options Confirmation-----------------+| || Start Table Options will be Dropped due to Change of Start Table Name || || Press ENTER Key to Confirm Drop of Start Table Options || Enter END Command to Keep Start Table Options |+-----------------------------------------------------------------------+
Figure 41. Confirm Drop Start Table Options
-- Select Tables/Views for AD: GRP.FOPDEMO.AD ---------------------------------Command ===> Scroll ===> PAGE
Primary : COL,SEL,SQL,REL,POINT,GROUP,GET TABLES RELATED,INDENT,ARC,LIST SUBSLine : COL,SEL,SQL,ALL,GR(A),GP(A),GC(A),DR(A),PR(A),DP(A),PP(A),
DC(A),PC(A),EXP,ARC,ACT,STATable 1 of 4 <<MORE
Default Creator ID ===> FOPDEMO >>Start Table ===> ORDERS >>Start Table Options : Row List (POINT)
R D --Extract Parms--Cmd Status (CreatorID.)Table/View Name F A EveryNth RowLimit Type--- ----------- ------------------------------>> - - -------- -------- -------*** ********************************** TOP ***********************************___ ORDERS N ____ ________ TABLE___ CUSTOMERS N N ____ ________ TABLE___ SALES N N ____ ________ TABLE___ SHIP_TO N N ____ ________ TABLE*** ******************************** BOTTOM **********************************
Figure 42. Start Table Options – Row List Indicated
84 IBM InfoSphere Optim for DB2 for z/OS: Common Elements

Group Selection ProcessingGroup selection processing allows you to extract a sampling of Start Table rows and is especially usefulwhen you want to sample a representative set of related data for specific data groups.
Although you can use other options on the Select Tables/Views for AD panel to define the data to beextracted (i.e., Point-and-Shoot, selection criteria, Every Nth row, etc.), group selection processing allowsyou to limit the selected rows to a number of different values in a specific column with a maximumnumber of rows to be extracted for each value. For example, you can specify that five rows from each often states are to be extracted from the Start Table.
Note: Group selection processing is available for Extract and Compare Processes, but not ArchiveProcesses.
Group selection can be used in combination with other selection criteria and parameters, except theEveryNth specification. In general, the criteria are applied first and group selection processing is appliedto the result.
To initiate group selection processing, enter the GROUP command on the Select Tables/Views for ADpanel to display the Start Table Group Selection Processing pop-up window.
Column Name
To use group selection processing, you must provide the name of a column in the Start Table to be usedfor forming groups. You can use the LIST command to display a selection list of column names forColumn Name to be used for Group. On the selection list, use the S line command to select a name. Toeliminate group selection processing, clear Column Name to be used for Group.
As an example of the use of prompts for Number of distinct values to use and Number of rows witheach value, assume the CUSTOMERS table is the Start Table and the STATE column is the Column Nameto be used for Group.
Distinct Values Limit and Number of Rows for Each Value
The criteria for selecting the sampling of rows can be based on distinct values in the STATE column. Thatis, you can limit the selection to a group of rows for some number of different states in the STATEcolumn. The states are selected randomly. However, if you want to explicitly define the states to be used,
-- Select Tables/Views for AD: GRP.USER.ADSAMPLE ------------------------------Command ===> Scroll ===> PAGE
Primary : COL,SEL,SQL,REL,POINT,GROUP,GET TABLES RELATED,INDENT,LIST SUBS
+--------------------Start Table Group Selection Processing ------------------+| || To select a set of up to 'N’ rows from each of up to 'M’ distinct values || for a specific column, provide the following information: || || Column Name to be used for Group ===> STATE || Number of distinct values to use (M) ===> (1-4294967295,*=NO LIM) || Number of rows with each value (N) ===> (1-4294967295,*=NO LIM) || || Note: To eliminate Group processing, clear the column name and press ENTER || Use the LIST command to get a selection list of column names || A limit must be specified for 'M’, 'N’, or both |+-----------------------------------------------------------------------------+
Figure 43. Start Table Group Selection Processing
Chapter 2. Access Definitions 85

do this on the Specify Selection Criteria panel or on the Specify SQL WHERE Clause panel. Since theselection criteria is processed first, you can be sure to select rows from only the desired states. Forexample:v To extract rows for customers in ten different states, specify “10” for the Number of distinct values to
use.On the Specify Selection Criteria or Specify SQL WHERE Clause panel, you can provide criteria forindividual state names (IN), a range of names (BETWEEN), and so forth. If the selection criteria applyto more than ten states, only ten are used, but the specific ten states to be selected is unpredictable.
v To extract five rows for each of the ten states, specify “5” as the Number of rows for each value.
You can use an asterisk (*) to select all rows found. For example, enter an asterisk for Number of rowsfor each value to obtain all rows for each included state. Alternatively, enter an asterisk for Number ofdistinct values to obtain a specific number of rows from all included states. You cannot enter an asteriskfor both limits.
Use ENTER or END to return to the Select Tables/Views for AD panel, where group selection processingis indicated in Start Table Options. In the following figure, both group selection processing and a RowList apply.
Select RelationshipsOptim uses relationships between pairs of tables on the Table List to determine the paths used to processdata. By default, all relationships are used. You can select the relationships used to process the data onthe Specify Relationship Usage panel. You also can use that panel to indicate how RI rules determine therows that are processed according to the parent-to-child and child-to-parent processing sequence.
Data only
These specifications only affect the data that is processed. All relationships, including unselectedrelationships and relationships for reference tables, are copied to the file and can be used to recreate theoriginal data model.
Specify Relationship Usage Panel
The Specify Relationship Usage panel lists all relationships between the pairs of tables on the Table List,except tables marked as reference tables. Display this panel by entering the REL primary command on
-- Select Tables/Views for AD: GRP.USER.ADSAMPLE ------------------------------Command ===> Scroll ===> PAGE
Primary : COL,SEL,SQL,REL,POINT,GROUP,GET TABLES RELATED,INDENT,ARC,LIST SUBSLine : COL,SEL,SQL,ALL,GR(A),GP(A),GC(A),DR(A),PR(A),DP(A),PP(A),
DC(A),PC(A),EXP,ARC,ACT,STATable 1 of 4 <<MORE
Default Creator ID ===> FOPDEMO >>Start Table ===> CUSTOMERS >>Start Table Options : Row List (POINT), Group Selection (GROUP)
R D --Extract Parms--Cmd Status (CreatorID.)Table/View Name F A EveryNth RowLimit Type--- ----------- ------------------------------>> - - -------- -------- -------*** ********************************** TOP ***********************************___ COL/SEL CUSTOMERS N ____ ________ TABLE___ SQL ORDERS N N ____ ________ TABLE___ ITEMS N N ____ ________ TABLE___ DETAILS N N ____ ________ TABLE*** ******************************** BOTTOM **********************************
Figure 44. Group Selection Processing Indicated
86 IBM InfoSphere Optim for DB2 for z/OS: Common Elements

the Select Tables/Views for AD panel or selecting the PATHS option from a Process menu (e.g., theEXTRACT Process menu). Relationships defined to the Optim Directory are displayed, as well as DB2,IMS, and IML relationships.
Panel
The Specify Relationship Usage panel includes:
Cmd The line command entry area. Valid commands are:
S Select a relationship.
U Unselect a relationship.
D Delete an unknown relationship.
I Display information about a relationship.
Status The status of the relationship. The relationships are listed by status, in the order NEW, SELECT,UNSEL, and UNKNWN. Within each status, relationships are listed in the order in which theparent table is listed on the Select Tables/Views for AD panel. Possible values are:
NEW The relationship is new to the list. The Specify Relationship Usage panel for the AccessDefinition is displayed for the first time, a new table has been added to the Table List, ora new relationship has been defined since the Access Definition was last edited.
SELECTThe relationship is used to process data. You can select any number of relationships.
UNSELThe relationship is not used to process data.
UNKNWNThe relationship does not apply to the listed tables. This status occurs when arelationship is deleted from the Directory or Catalog or the default Creator ID for theAccess Definition is changed and, as it affects one or more names on the Table List, arelationship no longer applies.
Q1 Option for processing parent rows of a selected child row. In a Restore Process, settings used tocreate the Archive File are the default; otherwise, the default setting is Y. Specify:
Y Satisfy RI rules by selecting all parent rows of a selected child row. Selection criteria arenot applied when a relationship is traversed from child to parent.
N Do not select parent rows.
------------------------- Specify Relationship Usage --------------------------Command ===> Scroll ===> PAGE
For Each Relationship Indicate: Rel 1 of 5
Q1: If a Child Row is Included, Include its Parent Row to Satisfy the RI Rule?Q2: If a Parent Row is Included to Satisfy any RI Rule, Include All Child Rows?
Q Q Child --Relation--Cmd Status 1 2 Limit Parent Table Child Table Name Type--- ------ - - ----- ---------------------- ---------------------- ------>> ---*** *********************************** TOP ***********************************___ NEW Y N ORDERS DETAILS ROD DB2___ NEW Y N CUSTOMERS ORDERS RCO DB2___ NEW Y N *CUSTOMERS ORDERS RCO1 OPT___ NEW Y N ITEMS DETAILS RID DB2*** ********************************* BOTTOM **********************************
Figure 45. Specify Relationship Usage
Chapter 2. Access Definitions 87
Q2 Option for processing child rows of a parent row that was selected to satisfy RI rules. This optionis relevant when the Q1 setting is Y for any relationship in which the parent table in thisrelationship is the parent. In a Restore Process, settings used to create the Archive File are thedefault; otherwise, the default setting is N. Specify:
Y Process all children.
N Do not process all children. Default.
Examples to clarify Q1 and Q2 specifications are provided in “Sample Scenarios” on page 97.
Child LimitThe maximum number of child rows to process for each parent using a specific relationship (e.g.,process no more than five ORDERS for any CUSTOMERS row, using the relationship RCO).
Specify 0 to prevent use of the relationship to process any child rows for a specific parent. AChild Limit of 0 is useful when you include a relationship to prevent orphans (process parentsfor children) but do not want to process additional children.
Note: Do not confuse this setting with the Row Limit on the Select Tables/Views for AD panel. The RowLimit parameter limits the total number of rows processed from the table regardless of relationshiptraversal. Neither Row Limit nor Child Limit is typically used in an Archive or Restore Process.
Parent Name of the parent table in the relationship, listed as entered on the Select Tables/Views for ADpanel (i.e., with or without Creator ID prefix).
If more than one relationship is defined for a pair of tables with the same parent and childdesignations, an asterisk is displayed before the name of the parent table for each occurrence.
Child The name of the child table in the relationship, listed as entered on the Select Tables/Views forAD panel, i.e., with or without Creator ID prefix.
Relation NameThe name of the relationship.
Relation TypeThe source of the relationship.
DB2 Relationship between DB2 tables, stored in the DB2 catalog.
IMS Logical or referential relationship between IMS Legacy tables in which the IMS data existsin the same database. (Move or Compare for IMS, VSAM, and Sequential Files only)
IML Logical relationship, based on columns, between IMS Legacy tables where the IMS data isstored in separate databases. (Move or Compare for IMS, VSAM, and Sequential Files only)
OPT Relationship between both DB2 and Legacy Tables stored in the Optim Directory.
QUES1/QUES2
You can use the QUES1 and QUES2 commands to change the Q1 and Q2 settings to YES or NO for alllisted relationships. These commands are useful, for example, when many relationships are listed and youwant to override the default setting for most of them or when, after making several changes, you want toreset the settings to the default.
CREATE RELATIONSHIP
If necessary, you can create Optim relationships using the CREATE RELATIONSHIP command on theSpecify Relationship Usage panel. This command invokes the panels used to define relationships storedin the Optim Directory. (Option 6 DEFINITIONS on the Main Menu also displays these panels.Information about defining relationships is provided in Chapter 4, “Relationships,” on page 125.)
88 IBM InfoSphere Optim for DB2 for z/OS: Common Elements

Note: A newly created relationship can be used in any process, but will not affect a Restore Process. Onlyrelationships in the Archive File are used to restore data.
Use END or CANCEL to return to the Specify Relationship Usage panel. Newly defined relationships fortables on the Table List are included in the list of relationships and assigned a NEW Status.
ACM
If necessary, you can use the ACM command to open the Choose Access Method / Key Lookup Limitpop-up dialog.
This panel allows you to override the default method (scan or key lookup) for accessing the parent orchild table for each relationship. A scan reads every row in a table at one time, whereas a key lookuplocates rows using a WHERE clause to search for primary or foreign key values. Additionally, you canchange the maximum number of key lookups performed at one time for a table. Valid values are 1through 1000. If a value is not specified, the default value specified via a user option is used. See “UserOptions” on page 318 for more information.
For more information, refer to “Table Access Strategy” on page 340.
Available Commands
The following commands are available when the Specify Relationship Usage panel is displayed.v ACMv BOTTOMv BROWSEv CANCELv CREATE PRIMARY KEYv CREATE RELATIONSHIPv DELETEv DOWNv END
------------------------- Specify Relationship Usage --------------------------Command ===> Scroll ===> PAGE
For Each Relationship Indicate: Rel 1 of 5
Q1: If a Child Row is Included, Include its Parent Row to Satisfy the RI Rule?
+------------------ Choose Access Method / Key Lookup Limit -----------------+¦ 1 of 3 ¦¦ Access Method Values: ¦¦ K - Key Lookup Key ¦¦ S - Table Scan Access Lookup ¦¦ blank - Software Chooses Method Limit ¦¦ Rel ------------ ------------ ¦¦ Parent Table Child Table Name Parent Child Parent Child ¦¦ ------------------- ------------------- ------>> ------ ----- ------ ----- ¦¦ ********************************** TOP *********************************** ¦¦ FOPDEMO.CUSTOMERS FOPDEMO.ORDERS RCO S S ¦¦ FOPDEMO.ORDERS FOPDEMO.DETAILS ROD K K 50 50 ¦¦ FOPDEMO.ITEMS FOPDEMO.DETAILS RID ¦¦ ******************************** BOTTOM ********************************** ¦+----------------------------------------------------------------------------+
Figure 46. Choose Access Method / Key Lookup Limit
Chapter 2. Access Definitions 89

v EXPANDv INDENTv OPTIONSv OUTPUTv QUES1v QUES2v RESETv SAVEv SHOW INDEXESv SHOW STEPSv TOPv UNSELECTv UPv USE
Display InformationYou can display information about a relationship to help decide whether to select it. Use the Informationline command, I, to browse a relationship, as shown in the following figure in which information aboutthe relationship RCO is displayed in the pop-up window.
Panel
The Browse Relationship panel includes:
Parent The fully qualified name of the parent table.
Child The fully qualified name of the child table.
Column NameThe expressions and names of columns for each table used in the relationship.
Data TypeThe data type of the matched columns. In addition to the standard DB2 data types, Data Typemay be EXPR to indicate that the relationship is based on an expression for which the data typeis determined when the relationship is used.
------------------------- Specify Relationship Usage --------------------------Command ===> Scroll ===> PAGE
For Each Relationship Indicate: Rel 1 of 5
Q +-------------------------- Browse Relationship ------------------------+ e?Q ¦ ¦ ws?
¦ Browse only Display of DB2 Relationship RCO ¦¦ ¦ n--
C ¦ Parent: FOPDEMO.CUSTOMERS Child: FOPDEMO.ORDERS ¦ ype- ¦ 1 OF 1 ¦ ---* ¦ Column Name Data Type Column Name Data Type ¦ ***
¦ -------------------->> ---------- -------------------->> ---------- ¦ DB2I ¦ ******************************* TOP ******************************** ¦ DB2_ ¦ CUST_ID CH(5) CUST_ID CH(5) ¦ OPT_ ¦ ***************************** BOTTOM ******************************* ¦ DB2* +-----------------------------------------------------------------------+ ***
Figure 47. Browse Relationship - Access Definition
90 IBM InfoSphere Optim for DB2 for z/OS: Common Elements

Use END or press ENTER to redisplay the Specify Relationship Usage panel.
Relationship StatusWhen you first display the Specify Relationship Usage panel, the order of the relationships matches theorder of parent tables on the Table List and the names of the tables are shown as entered on the SelectTables/Views for AD panel.
Also, the first time a relationship is listed, it is assigned a NEW Status, as shown in Figure 48.
Select and Unselect
On the relationship list, you can select and unselect relationships. Use the S line command to select arelationship and the U line command to unselect a relationship. In Figure 48, the first and secondrelationships are selected, the third is unselected, and the last is not explicitly selected or unselected.
Revised Status
The second and succeeding times that you use the REL command from the Select Tables/Views for ADpanel, the status on the Specify Relationship Usage panel is revised according to the Use NEWRelationships setting on the Access Definition Parameters panel. If that setting is Yes, NEW relationshipsare selected by default and participate in the process; if that setting is No, NEW relationships are notselected. (See “Access Definition Parameters” on page 112 for more information about the AccessDefinition Parameters panel.) If the response to the prompt Use NEW Relationships is Yes, the Status isdisplayed as shown in the following figure.
------------------------- Specify Relationship Usage --------------------------Command ===> Scroll ===> PAGE
For Each Relationship Indicate: Rel 1 of 5
Q1: If a Child Row is Included, Include its Parent Row to Satisfy the RI Rule?Q2: If a Parent Row is Included to Satisfy any RI Rule, Include All Child Rows?
Q Q Child --Relation--Cmd Status 1 2 Limit Parent Table Child Table Name Type--- ------ - - ----- ---------------------- ---------------------- ------>> ---*** *********************************** TOP ***********************************S _ NEW Y N ORDERS DETAILS ROD DB2S _ NEW Y N *CUSTOMERS ORDERS RCO DB2U _ NEW Y N *CUSTOMERS ORDERS RCO1 OPT___ NEW Y N ITEMS DETAILS RID DB2*** ********************************* BOTTOM **********************************
Figure 48. Select Relationships for Functions
Chapter 2. Access Definitions 91

The revised status is listed under Status and in the position of the relationships on the list. Newrelationships are listed first, then selected relationships, unselected relationships, and unknownrelationships.
If tables are added, new relationships are created, or if the Creator ID is modified, the changes can resultin NEW and UNKNWN designations for relationships. If they are not handled explicitly on the SpecifyRelationship Usage panel, warning messages are issued when the process is performed. (For moreinformation about performing a given process, see the appropriate User Manual.)
Since the default action for new relationships may not be desired, you should display the SpecifyRelationship Usage panel to handle changes to the relationship list. In fact, to ensure that the desiredrelationships and traversal paths are used, you should review the Specify Relationship Usage panelwhenever you modify the names or Creator ID for one or more tables on the Select Tables/Views for ADpanel.
Add a Table: An Example
Assume the SALES table is added to the Table List. When you enter the REL command, the revisedrelationship list includes any additional relationships for the additional table. As in the following figure,any relationships with a status of NEW are listed first, those with SELECT status next, followed by thosewith an UNSEL status.
------------------------- Specify Relationship Usage --------------------------Command ===> Scroll ===> PAGE
For Each Relationship Indicate: Rel 1 of 4
Q1: If a Child Row is Included, Include its Parent Row to Satisfy the RI Rule?Q2: If a Parent Row is Included to Satisfy any RI Rule, Include All Child Rows?
Q Q Child --Relation--Cmd Status 1 2 Limit Parent Table Child Table Name Type--- ------ - - ----- ---------------------- ---------------------- ------>> ---*** *********************************** TOP ***********************************___ SELECT Y N ORDERS DETAILS ROD DB2___ SELECT Y N *CUSTOMERS ORDERS RCO DB2___ SELECT Y N ITEMS DETAILS RID DB2___ UNSEL Y N *CUSTOMERS ORDERS RCO1 OPT*** ********************************* BOTTOM **********************************
Figure 49. Status Revised
92 IBM InfoSphere Optim for DB2 for z/OS: Common Elements

If you do not explicitly select or unselect the NEW relationship, it is automatically assigned a statusbased on the response to the Access Definition Parameters prompt for Use NEW Relationships.
USE Command
You can enter the USE NEW command to change the status of all new relationships to the SELECTstatus. You can enter USE ALL to change the status of all new or unselected relationships to the SELECTstatus.
UNKNWN Status
In a test environment, duplicate sets of tables that differ only by Creator ID may use comparablerelationships with the same names. In those instances, Optim maintains the assigned status. However,when a same-name relationship is not defined for both sets, any unused, previously listed relationshipsare assigned an UNKNWN status, and any new relationships are assigned a NEW status.
Note: Optim treats a change in the Creator ID for individual tables as if the original name was deletedand a new table name was supplied.
Change Default Creator ID: An Example
As an example, assume the default Creator ID has been changed, resulting in two new relationshipsbeing listed and the change in Status for an existing relationship to UNKNWN. In the following figure,the names of the two new relationships are added at the top of the list, and the name of the unknownrelationship is placed at the bottom of the list. The other relationships retain their previous status.
------------------------- Specify Relationship Usage --------------------------Command ===> Scroll ===> PAGE
For Each Relationship Indicate: Rel 1 of 5
Q1: If a Child Row is Included, Include its Parent Row to Satisfy the RI Rule?Q2: If a Parent Row is Included to Satisfy any RI Rule, Include All Child Rows?
Q Q Child --Relation--Cmd Status 1 2 Limit Parent Table Child Table Name Type--- ------ - - ----- ---------------------- ---------------------- ------>> ---*** *********************************** TOP ***********************************___ NEW Y N SALES CUSTOMERS RSC DB2___ SELECT Y N ORDERS DETAILS ROD DB2___ SELECT Y N *CUSTOMERS ORDERS RCO DB2___ SELECT Y N ITEMS DETAILS RID DB2___ UNSEL Y N *CUSTOMERS ORDERS RCO1 OPT*** ********************************* BOTTOM **********************************
Figure 50. Specify Relationship Usage Panel Redisplayed
Chapter 2. Access Definitions 93
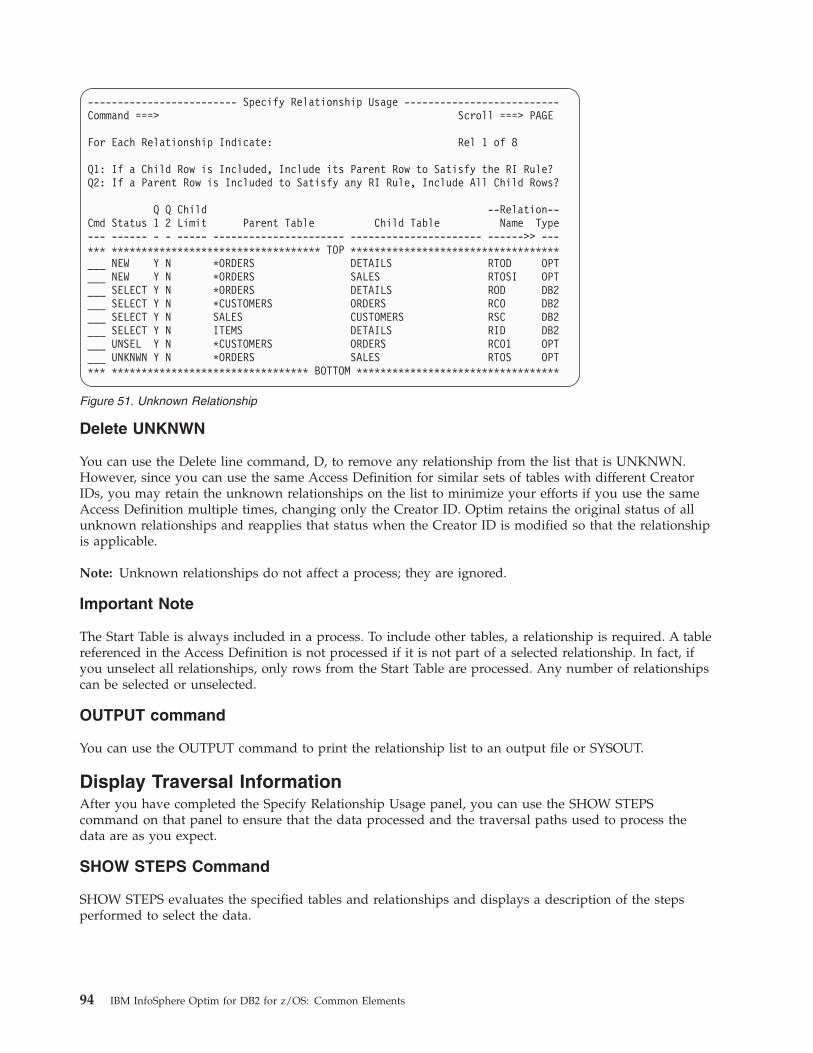
Delete UNKNWN
You can use the Delete line command, D, to remove any relationship from the list that is UNKNWN.However, since you can use the same Access Definition for similar sets of tables with different CreatorIDs, you may retain the unknown relationships on the list to minimize your efforts if you use the sameAccess Definition multiple times, changing only the Creator ID. Optim retains the original status of allunknown relationships and reapplies that status when the Creator ID is modified so that the relationshipis applicable.
Note: Unknown relationships do not affect a process; they are ignored.
Important Note
The Start Table is always included in a process. To include other tables, a relationship is required. A tablereferenced in the Access Definition is not processed if it is not part of a selected relationship. In fact, ifyou unselect all relationships, only rows from the Start Table are processed. Any number of relationshipscan be selected or unselected.
OUTPUT command
You can use the OUTPUT command to print the relationship list to an output file or SYSOUT.
Display Traversal InformationAfter you have completed the Specify Relationship Usage panel, you can use the SHOW STEPScommand on that panel to ensure that the data processed and the traversal paths used to process thedata are as you expect.
SHOW STEPS Command
SHOW STEPS evaluates the specified tables and relationships and displays a description of the stepsperformed to select the data.
------------------------- Specify Relationship Usage --------------------------Command ===> Scroll ===> PAGE
For Each Relationship Indicate: Rel 1 of 8
Q1: If a Child Row is Included, Include its Parent Row to Satisfy the RI Rule?Q2: If a Parent Row is Included to Satisfy any RI Rule, Include All Child Rows?
Q Q Child --Relation--Cmd Status 1 2 Limit Parent Table Child Table Name Type--- ------ - - ----- ---------------------- ---------------------- ------>> ---*** *********************************** TOP ***********************************___ NEW Y N *ORDERS DETAILS RTOD OPT___ NEW Y N *ORDERS SALES RTOSI OPT___ SELECT Y N *ORDERS DETAILS ROD DB2___ SELECT Y N *CUSTOMERS ORDERS RCO DB2___ SELECT Y N SALES CUSTOMERS RSC DB2___ SELECT Y N ITEMS DETAILS RID DB2___ UNSEL Y N *CUSTOMERS ORDERS RCO1 OPT___ UNKNWN Y N *ORDERS SALES RTOS OPT*** ********************************* BOTTOM **********************************
Figure 51. Unknown Relationship
94 IBM InfoSphere Optim for DB2 for z/OS: Common Elements

SHOW STEPS Example
As an example, assume data is processed from three tables: ORDERS, CUSTOMERS, and DETAILS. TheORDERS table is the Start Table. The ORDERS table is a child of CUSTOMERS, and DETAILS is a childof ORDERS. The SHOW STEPS text is displayed as:1. Step 1: Extract Rows from Start Table FOPDEMO.ORDERS. No Row List, Selection Criteria or
Statistical Controls used, therefore Start Table does not need to be Revisited, even if part of a Cycle.2. Step 2: Extract Rows from FOPDEMO.CUSTOMERS which are Parents of Rows Previously Extracted
from FOPDEMO.ORDERS in Step 1 to satisfy an RI rule using Relationship RCO.3. Step 3: Extract Rows from FOPDEMO.DETAILS which are Children of Rows Previously Extracted
from FOPDEMO.ORDERS in Step 1 using Relationship ROD.The text for the first step, the Start Table, varies depending on the specifications. In addition to thatshown above, the first step may include:v When a Point-and-Shoot list is used:
Row List is used and Determines the Rows Selected.v When Selection Criteria and/or Statistical Controls are used without a Point-and-Shoot list:
Selection Criteria and/or Statistical Controls are used, these Determine the Rows Selected.This simple example does not reflect the potential complexity of processing. Steps to select the datacan be repeated any number of times based on the relationships and specifications on the SpecifyRelationship Usage panel. A single step can process rows from more than one table or rows from onetable to satisfy more than one relationship. For example, if the DETAILS table is related to both theCUSTOMERS table and the ORDERS table, Step 3 is:
4. Step 3: Extract Rows from FOPDEMO.DETAILS which are Children of Rows Previously Archivedfrom FOPDEMO.ORDERS in Step 1 using Relationship ROD.--AND--Extract Rows from FOPDEMO.DETAILS which are Children of Rows Previously Archived fromFOPDEMO.CUSTOMERS in Step 2 using Relationship RCD.
Any table may be revisited multiple times in successive steps. Cycles may be involved causing a set oftables to be traversed repeatedly until a complete pass through the cycle does not result in processingany additional rows.
Based on the information provided by SHOW STEPS, you can change the relationship usage and executethe SHOW STEPS command again.
IMS Steps
For IMS, each hierarchy or logical relationship is represented by a step.1. Step 1: Extract Rows from Start Table FOPDEMO.IMSCUST. No Row List, Selection Criteria or
Statistical Controls used, therefore Start Table does not need to be Revisited, even if part of a Cycle.2. Table FOPDEMO.IMSCUST is a segment type in an IMS hierarchy. For each segment extracted from
FOPDEMO.IMSCUST, the following processing will be done:+ Extract Segments from FOPDEMO.IMSORDERS which are children of the FOPDEMO.IMSCUSTsegment.+ Extract Segments from FOPDEMO.IMSDETAILS which are children of the FOPDEMO.IMSORDERSsegments.
Handling the Text
All standard ISPF scrolling commands are available in the SHOW STEPS display.
Chapter 2. Access Definitions 95

You also can use the OUTPUT command to direct the contents of the SHOW STEPS display and theSpecify Relationship Usage panel to an output file or SYSOUT. You are prompted for the outputparameters and, based on your responses, the output is written to the destination.
Use END to return to the Specify Relationship Usage panel.
END and CANCEL Commands
From the Specify Relationship Usage panel, use END to return to the Select Tables/Views for AD panel,or use CANCEL to remove all changes made on the current panel and return to the Select Tables/Viewsfor AD panel.
Relationship Index AnalysisOne or more missing indexes may cause performance problems in an Archive or Extract Process. On theSpecify Relationship Usage panel, use the SHOW INDEXES command to analyze indexes for selectedrelationships in the Access Definition. The Relationship Index Analysis feature is a diagnostic tool fordetermining whether indexes are needed. If the status of an index is Partial or None, creating thenecessary index may enhance processing performance.
Panel
The Relationship Index Analysis panel lists each selected relationship referenced in the Access Definition,with an analysis of indexes for the corresponding parent and child tables, including:
AD The name of the Access Definition.
Stat The status of the indexes for each relationship.
Full One or more indexes exist for the complete set of required columns.
Partial One or more indexes exist for a partial set of the required columns.
None No index exists for the necessary columns.
NotAnlyzedAn index is not needed.
NeededWhen appropriate, a ‘Y' indicator will appear to the right of each status to indicate when anindex is needed. If the relationship's Status is Full, the index exists. If the relationship's Status isPartial or None, an index may enhance performance.
This area is blank if an index is not needed or was not analyzed.
------------------------ Relationship Index Analysis --------------------------Command ===> Scroll ===> PAGE
1 of 3AD: GRP.FOPDEMO.AD
Parent Ix Child IxStat/Needed Stat/Needed Relationship Parent Table----------- ----------- ----------------------------- ----------------------************************************ TOP **************************************NotAnlyzed None Y FOPDEMO.ORDERS.RCO FOPDEMO.CUSTOMERSFull Y NotAnlyzed FOPDEMO.DETAILS.RID FOPDEMO.ITEMSNotAnlyzed Full Y FOPDEMO.DETAILS.ROD FOPDEMO.ORDERS********************************** BOTTOM *************************************
Figure 52. Relationship Index Analysis
96 IBM InfoSphere Optim for DB2 for z/OS: Common Elements

RelationshipThe fully qualified name of the child table in the relationship, followed by the relationship name.
Parent TableThe fully qualified name of the parent table in the relationship.
Use RelationshipsOptim uses relationships between tables to determine the traversal path for processing data. Use theSpecify Relationship Usage panel to indicate the relationships that are traversed from table to table andhow those relationships are used.
Sample ScenariosThe examples in this section use a simple database structure to demonstrate functions of specifications onthe Specify Relationship Usage panel. This structure includes four tables: CUSTOMERS, ORDERS,DETAILS, and ITEMS. CUSTOMERS is the parent of ORDERS, and ORDERS and ITEMS are parents ofDETAILS.
Basic Traversal Path
The most common traversal begins at the Start Table and proceeds through the data model, traversing allrelationships from parent to child. For example, if the Start Table is CUSTOMERS, Optim automaticallytraverses downward to the ORDERS and DETAILS tables.
Alter Traversal Path
You can alter the traversal path by selecting and unselecting relationships on the Specify RelationshipUsage panel, as shown in Figure 53 on page 98. In addition, you can extend the traversal path using theQ1 and Q2 specifications.
The Q1 and Q2 specifications are relevant when:v The Start Table is a child table. For example, if the ORDERS table is the Start Table, the Q1 setting
determines whether the related CUSTOMERS rows are extracted and, if so, the Q2 setting determines ifadditional ORDERS rows, related to the CUSTOMERS rows, are selected.
v A table has more than one parent table. For example, if the ITEMS table is the Start Table, related rowsare extracted from the DETAILS table because it is a child of the ITEMS table. However, the ORDERStable is also a parent of the DETAILS table. The Q1 setting determines whether to traverse from childto parent to extract the ORDERS rows related to the DETAILS rows and, if so, the Q2 settingdetermines if additional DETAILS rows, related to the ORDERS rows, are selected.
Chapter 2. Access Definitions 97

Q1
The first setting, Q1, determines whether Optim follows a relationship from child to parent to extractdata. By default, Q1 is Y for Yes. The default setting ensures the relational integrity of the extracted data:that is, a parent row is extracted for every child row.
In the following figure, the Yes default for Q1, is shown for the three relationships.
Multiple Parent Tables
Assume you want to extract the related ORDERS, DETAILS, and ITEMS rows for a specific set ofcustomers.1. Designate CUSTOMERS as the Start Table.2. Specify selection criteria for the desired set of CUSTOMERS.3. Use the default Q1 setting (Yes) for RID, the relationship between ITEMS and DETAILS.
Optim extracts the CUSTOMERS rows that match the selection criteria and follows the relationship RCOto extract the child rows in the ORDERS table. Next, Optim follows the relationship ROD to extract thechild rows in the DETAILS table. However, the ITEMS table is a parent to the DETAILS table. The Q1setting (Yes) directs processing to follow the relationship RID from child to parent and obtain the ITEMSrows related to the extracted DETAILS rows.
Q2
The second setting, Q2, determines whether additional child rows are extracted when a parent row isextracted because of Q1. In other words, if Optim follows a relationship from child to parent and extractsa parent row, additional children of that parent are extracted when Q2 is Yes.
Child as Start Table
Assume you want to extract a set of CUSTOMERS and all related ORDERS beginning with specificcriteria for ORDERS. You can:1. Specify ORDERS as the Start Table.2. Specify selection criteria for the desired set of ORDERS.3. Set Q1 and Q2 for relationship RCO to Yes, as shown in the following figure.
------------------------- Specify Relationship Usage --------------------------Command ===> Scroll ===> PAGE
For Each Relationship Indicate: Rel 1 of 3
Q1: If a Child Row is Included, Include its Parent Row to Satisfy the RI Rule?Q2: If a Parent Row is Included to Satisfy any RI Rule, Include All Child Rows?
Q Q Child --Relation--Cmd Status 1 2 Limit Parent Table Child Table Name Type--- ------ - - ----- ---------------------- ---------------------- ------>> ---*** *********************************** TOP ***********************************___ SELECT Y N CUSTOMERS ORDERS RCO DB2___ SELECT Y N ORDERS DETAILS ROD DB2___ SELECT Y N ITEMS DETAILS RID DB2*** ********************************* BOTTOM **********************************
Figure 53. Default Specifications for Q1 and Q2
98 IBM InfoSphere Optim for DB2 for z/OS: Common Elements

Consider the following example. Customer B has three orders: 1, 2, and 3. Using Point-and-Shoot withthe ORDERS table as the Start Table, only the row for order 2 is selected. Q1 and Q2 are Yes for therelationship RCO between CUSTOMERS and ORDERS.
The rows are extracted in the following sequence.
Steps
1. Based on the Point-and-Shoot selection, row ORD2 of ORDERS is extracted.2. The CUSTOMERS row B is extracted because of Q1.3. ORDERS rows ORD1 and ORD3 are extracted because of Q2.
Since Q2 is Yes, Optim also extracts the remaining ORDERS rows that are children of the extractedCUSTOMERS rows.
Note that rows extracted from a table because of Q2 must meet any selection criteria specified for thattable. In addition, they are subject to any statistical controls.
------------------------- Specify Relationship Usage --------------------------Command ===> Scroll ===> PAGE
For Each Relationship Indicate: Rel 1 of 1
Q1: If a Child Row is Included, Include its Parent Row to Satisfy the RI Rule?Q2: If a Parent Row is Included to Satisfy any RI Rule, Include All Child Rows?
Q Q Child --Relation--Cmd Status 1 2 Limit Parent Table Child Table Name Type--- ------ - - ----- ---------------------- ---------------------- ------>> ---*** *********************************** TOP ***********************************___ SELECT Y Y CUSTOMERS ORDERS RCO DB2*** ********************************* BOTTOM **********************************
Figure 54. Both Q1 and Q2 Set to Yes
Chapter 2. Access Definitions 99

Child to Parent for Multiple Relationships
Consider another example. Assume you need to extract orders that are outstanding because a specificitem is discontinued. The set of extracted data should provide full information about the orders. Toobtain complete information, data must be extracted from the CUSTOMERS, ORDERS, DETAILS, andITEMS tables. Specify:1. The ITEMS table as the Start Table.2. Selection criteria for the discontinued ITEMS row.3. Y for Q1 for all relationships and for Q2 for the relationship ROD, as shown in the following figure.
The rows are extracted as follows:
ITEMS to DETAILS
After the specified ITEMS row is selected, the related DETAILS are extracted by traversing therelationship RID from parent to child.
Steps
------------------------- Specify Relationship Usage --------------------------Command ===> Scroll ===> PAGE
For Each Relationship Indicate: Rel 1 of 3
Q1: If a Child Row is Included, Include its Parent Row to Satisfy the RI Rule?Q2: If a Parent Row is Included to Satisfy any RI Rule, Include All Child Rows?
Q Q Child --Relation--Cmd Status 1 2 Limit Parent Table Child Table Name Type--- ------ - - ----- ---------------------- ---------------------- ------>> ---*** *********************************** TOP ***********************************___ SELECT Y N ITEMS DETAILS RID DB2___ SELECT Y Y ORDERS DETAILS ROD DB2___ SELECT Y N CUSTOMERS ORDERS RCO DB2*** ********************************* BOTTOM **********************************
Figure 55. Set Q2 to Yes for One Relationship
100 IBM InfoSphere Optim for DB2 for z/OS: Common Elements
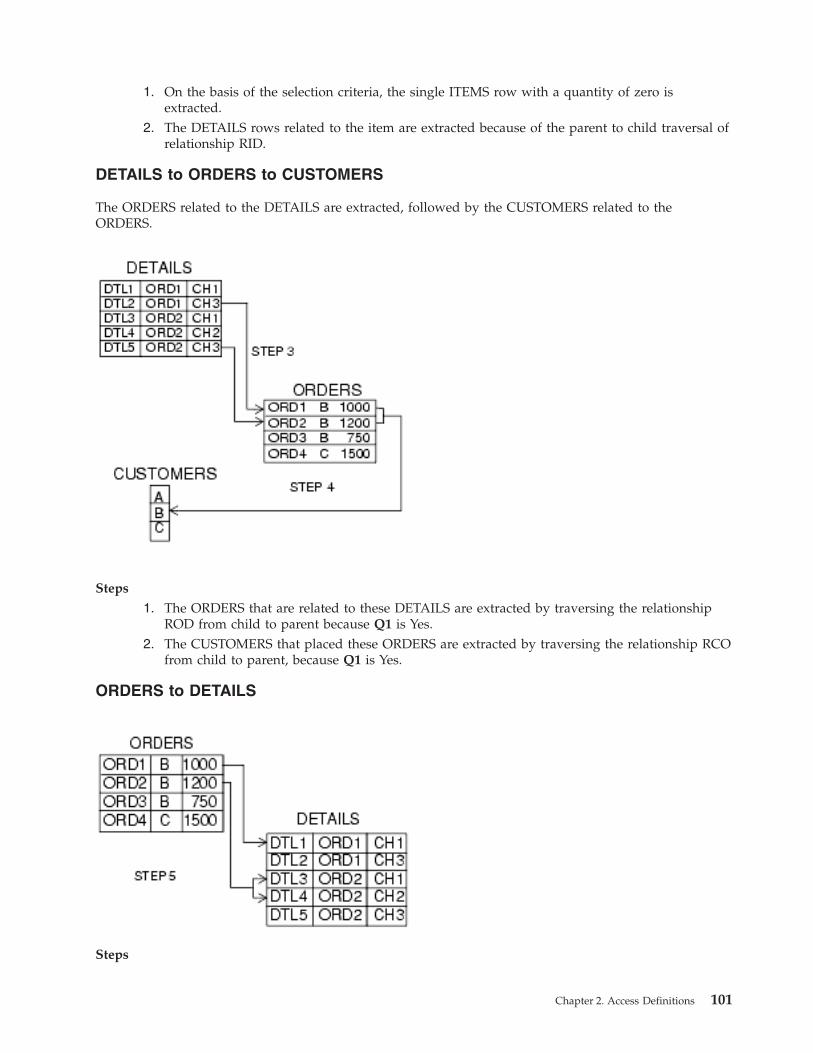
1. On the basis of the selection criteria, the single ITEMS row with a quantity of zero isextracted.
2. The DETAILS rows related to the item are extracted because of the parent to child traversal ofrelationship RID.
DETAILS to ORDERS to CUSTOMERS
The ORDERS related to the DETAILS are extracted, followed by the CUSTOMERS related to theORDERS.
Steps
1. The ORDERS that are related to these DETAILS are extracted by traversing the relationshipROD from child to parent because Q1 is Yes.
2. The CUSTOMERS that placed these ORDERS are extracted by traversing the relationship RCOfrom child to parent, because Q1 is Yes.
ORDERS to DETAILS
Steps
Chapter 2. Access Definitions 101

1. The additional DETAILS that are part of the ORDERS are extracted because Q2 is Yes for therelationship between ORDERS and DETAILS.
The additional DETAILS related to the ORDERS are extracted.
DETAILS to ITEMS
The ITEMS for the additional extracted DETAILS are extracted.
Steps
1. The ITEMS for the additional DETAILS are extracted because Q1 is Yes for the relationshipbetween ITEMS and DETAILS.
No Additional ORDERS
Only the ORDERS for the selected ITEMS are extracted. Additional ORDERS for the extractedCUSTOMERS are not extracted because Q2 is No for the relationship RCO between CUSTOMERS andORDERS.
Summary
Q2 allows you to extract additional children. That is, if parent rows are extracted to satisfy Q1 (makingthe set of extracted data referentially intact), the additional children for those parents are also extracted.
Multiple Children
Often a table is parent to more than one table. The specifications for Q1 and Q2 apply only to the pair oftables in the relationship. For example, if a row in the CUSTOMERS table is extracted because Q1 is Yesfor the relationship between CUSTOMERS and ORDERS, then Q2 for that relationship applies to relatedORDERS rows only. To extract data from other child tables, Q2 must be set to Yes for those relationships.
Assume the SHIP_TO and the ORDERS tables are children of the CUSTOMERS table. To obtain theshipping information for specific orders, specify:1. The ORDERS table as the Start Table.2. The selection criteria for the desired set of ORDERS.3. Y for Q1 for both relationships and for Q2 for the relationship RCST. These settings are shown in the
following figure.
Figure 56. Set Q1 and Q2 for Multiple Children
102 IBM InfoSphere Optim for DB2 for z/OS: Common Elements

------------------------- Specify Relationship Usage --------------------------Command ===> Scroll ===> PAGE
For Each Relationship Indicate: Rel 1 of 2
Q1: If a Child Row is Included, Include its Parent Row to Satisfy the RI Rule?Q2: If a Parent Row is Included to Satisfy any RI Rule, Include All Child Rows?
Q Q Child --Relation--Cmd Status 1 2 Limit Parent Table Child Table Name Type--- ------ - - ----- ---------------------- ---------------------- ------>> ---*** *********************************** TOP ***********************************___ SELECT Y N CUSTOMERS ORDERS RCO DB2___ SELECT Y Y CUSTOMERS SHIP_TO RCST OPT*** *********************************** BOTTOM ********************************
The rows are extracted in the sequence shown in the following figure:
STEPS
1. A single ORDERS row is extracted, based on the selection criteria.2. The CUSTOMERS row B is extracted because Q1 is Yes for the relationship RCO.3. The SHIP_TO row B is extracted because Q1 and Q2 are Yes for the relationship RCST.
Traversal CyclesOptim can cycle through tables to process data. These “traversal cycles” depend on the specifications foreach relationship.
The traversal cycle in this example results from extracting the item with an ITEM_ID of AD005 andtraversing as described in the following steps to obtain a complete set of orders. ITEMS is the Start Table.(Note that the CUSTOMERS table is not used in this example; the relationship between CUSTOMERS andORDERS, RCO, is unselected.) The Specify Relationship Usage panel is defined as shown in the followingfigure:
Chapter 2. Access Definitions 103

The following steps are performed for this traversal cycle:1. Extract the ITEMS with ITEM_ID AD005.2. Extract the DETAILS related to the ITEMS row by traversing the relationship RID from parent to
child.3. Extract the ORDERS related to the DETAILS by traversing the relationship ROD from child to parent.
(Q1 is Yes.)4. Extract the additional DETAILS for those ORDERS by traversing the relationship ROD from parent to
child. (Q2 is Yes.)5. Extract the ITEMS related to the additional DETAILS by traversing the relationship RID from child to
parent. (Q1 is Yes.)
A complete cycle is made, beginning with the ITEMS table and ending at the ITEMS table.
Multiple Traversal Cycles
Optim also can process multiple traversal cycles. Although unlikely, the previous example can beextended to show multiple traversal cycles.
After extracting the ITEMS rows for the additional items in Step 5, you may want to extract the ORDERSand DETAILS for these ITEMS. To accomplish this, Q2 for the relationship RID is set to Yes. After Step 5in the previous example, Optim traverses the relationship RID from parent to child to extract theremaining DETAILS related to these additional ITEMS. Then Steps 3, 4, and 5 are repeated to extractadditional ORDERS, the DETAILS related to those ORDERS, the ITEMS related to those DETAILS, and soon.
Referential CyclesOptim can extract data from tables that are related to each other by referential cycles. With a referentialcycle, you start at one table and return to it after traversing a series of one or more relationships. (Incontrast, many DB2 databases are defined as hierarchies or networks. To process data, you proceed up ordown through the hierarchy or the network and never return to the Start Table.)
Two Tables
For this discussion, assume there are two tables: DEPARTMENT and EMPLOYEE. DEPT_ID is theprimary key of the DEPARTMENT table; EMP_ID is the primary key of the EMPLOYEE table.
------------------------- Specify Relationship Usage --------------------------Command ===> Scroll ===> PAGE
For Each Relationship Indicate: Rel 1 of 3
Q1: If a Child Row is Included, Include its Parent Row to Satisfy the RI Rule?Q2: If a Parent Row is Included to Satisfy any RI Rule, Include All Child Rows?
Q Q Child --Relation--Cmd Status 1 2 Limit Parent Table Child Table Name Type--- ------ - - ----- ---------------------- ---------------------- ------>> ---*** *********************************** TOP ***********************************___ SELECT Y N ITEMS DETAILS RID DB2___ SELECT Y Y ORDERS DETAILS ROD DB2___ UNSEL Y N CUSTOMERS ORDERS RCO DB2*** ********************************** BOTTOM *********************************
Figure 57. Set Q1 and Q2 for Multiple Relationships
104 IBM InfoSphere Optim for DB2 for z/OS: Common Elements

Relationship
The relationships are shown in the following figure:
The data in each table is as follows:
Table 1. DEPARTMENT
DEPT_ID DEPT_NAME MGR_ID
A Executive 1
B Finance 2
C Sales 3
D Development 4
E Bookkeeping 5
F Support 9
Table 2. EMPLOYEE
EMP_ID EMP_NAME DEPT_ID
1 Fred A
2 Bill A
3 John A
4 Laurie A
5 Bobbie B
6 Don B
7 Pat C
8 Zack C
9 Meghan D
10 Tim D
11 Jack D
12 Diane E
13 Dick E
14 Jill F
15 Melanie F
Chapter 2. Access Definitions 105

The following is a sample company organization chart with pertinent values in the tables.
In the following pages, a sample query is used to demonstrate how to handle cyclic relationships throughthe specifications for Q1 and Q2. Changing these specifications changes the set of data extracted fromthese tables.
Example 1
Extract all employees in the Development Department, including employees who are members ofsubordinate departments. The DEPARTMENT table is the Start Table. The Point-and-Shoot facility is usedto select the appropriate row in the DEPARTMENT table. Since the existing relationships only need to betraversed from parent to child, specifications for Q1 and Q2 are set to No, as shown in the followingfigure:
------------------------- Specify Relationship Usage --------------------------Command ===> Scroll ===> PAGE
For Each Relationship Indicate: Rel 1 of 2
Q1: If a Child Row is Included, Include its Parent Row to Satisfy the RI Rule?Q2: If a Parent Row is Included to Satisfy any RI Rule, Include All Child Rows?
Q Q Child --Relation--Cmd Status 1 2 Limit Parent Table Child Table Name Type--- ------ - - ----- ---------------------- ---------------------- ------>> ---*** *********************************** TOP ***********************************___ SELECT N N DEPARTMENT EMPLOYEE MEMBER DB2___ SELECT N N EMPLOYEE DEPARTMENT MANAGER DB2*** *********************************** BOTTOM ********************************
Figure 58. Set Q1 and Q2 to NO
106 IBM InfoSphere Optim for DB2 for z/OS: Common Elements

The following steps are performed to extract the data:1. Extract the row containing the Development Department, Dept_ID = D, from the DEPARTMENT
table.2. Using the relationship MEMBER, search the EMPLOYEES table for all employees in the Development
Department with EMPLOYEE.DEPT_ID = D. Three EMPLOYEE rows are extracted:EMP_ID = 9EMP_ID = 10EMP_ID = 11
3. The relationship MANAGER is used to search the DEPARTMENT table to determine whether anyextracted employees are managers. The employee with EMP_ID = 9, Meghan, is a manager of theSupport Department, DEPT_ID = F. This row is extracted from the DEPARTMENT table.
4. The relationship MEMBER is used to search the EMPLOYEE table to extract all employees that belongto the Support Department, DEPT_ID = F.Two EMPLOYEE rows are extracted:EMP_ID = 14EMP_ID = 15
5. The relationship MANAGER is used to search the DEPARTMENT table to determine if either of thetwo extracted rows in step 4 are managers. They are not. No more rows are extracted.
Summary
Two rows are extracted from the DEPARTMENT table:
DEPT_ID = DDEPT_ID = F
Five rows are extracted from the EMPLOYEE table:
EMP_ID = 9EMP_ID = 10EMP_ID = 11EMP_ID = 14EMP_ID = 15
Example 2
In addition to all employees in the Development Department and subordinate departments, extract themanager of the Development Department.
As in Example 1, the DEPARTMENT table is the Start Table and the row in the DEPARTMENT tablewhere DEPT_ID = D is selected during Point-and-Shoot. To extract the manager of the DevelopmentDepartment, the relationship MANAGER must be traversed from child to parent. Q1 for the relationshipMANAGER is changed to Yes, as shown in the following figure.
Chapter 2. Access Definitions 107

The steps shown in Example 1 are performed to extract the data. In addition, Example 2 also traversesthe relationship MANAGER from child, DEPARTMENT, to parent, EMPLOYEE. Thus, Optim extracts themanager of the Development Department, Laurie. An additional row from the EMPLOYEE table isextracted, EMP_ID = 4.
Example 3
In addition to all employees in the Development Department and the manager of the DevelopmentDepartment, extract any other departments this manager manages.
To obtain the other departments, both Q1 and Q2 for the relationship MANAGER are set to Yes, asshown in the following figure.
In this example, after extracting Laurie from the EMPLOYEE table, Optim follows the MANAGERrelationship from parent, EMPLOYEE, to child, DEPARTMENT. Optim checks the DEPARTMENT table todetermine whether Laurie is manager of any other department. Based on the sample employee hierarchyused for these examples, no additional rows are extracted. Laurie manages only one department.
Example 4
In addition to all employees in the Development Department, the manager of the DevelopmentDepartment and any other departments the extracted managers manage, extract any other departmentswhere the manager is a member.
------------------------- Specify Relationship Usage --------------------------Command ===> Scroll ===> PAGE
For Each Relationship Indicate: Rel 1 of 2
Q1: If a Child Row is Included, Include its Parent Row to Satisfy the RI Rule?Q2: If a Parent Row is Included to Satisfy any RI Rule, Include All Child Rows?
Q Q Child --Relation--Cmd Status 1 2 Limit Parent Table Child Table Name Type--- ------ - - ----- ---------------------- ---------------------- ------>> ---*** *********************************** TOP ***********************************___ SELECT N N DEPARTMENT EMPLOYEE MEMBER DB2___ SELECT Y N EMPLOYEE DEPARTMENT MANAGER DB2*** ********************************** BOTTOM *********************************
Figure 59. Set Q1 to Extract Parent
------------------------- Specify Relationship Usage --------------------------Command ===> Scroll ===> PAGE
For Each Relationship Indicate: Rel 1 of 2
Q1: If a Child Row is Included, Include its Parent Row to Satisfy the RI Rule?Q2: If a Parent Row is Included to Satisfy any RI Rule, Include All Child Rows?
Q Q Child --Relation--Cmd Status 1 2 Limit Parent Table Child Table Name Type--- ------ - - ----- ---------------------- ---------------------- ------>> ---*** *********************************** TOP ***********************************___ SELECT N N DEPARTMENT EMPLOYEE MEMBER DB2___ SELECT Y Y EMPLOYEE DEPARTMENT MANAGER DB2*** ********************************** BOTTOM *********************************
Figure 60. Set Q1 and Q2 to YES
108 IBM InfoSphere Optim for DB2 for z/OS: Common Elements

To obtain the other departments where the manager is a member, Q1 for the relationship MEMBER is setto Yes, as shown in the following figure.
In this example, after extracting Laurie from the EMPLOYEE table, Optim follows the MEMBERrelationship from child to parent, from EMPLOYEE to DEPARTMENT. Optim checks the DEPARTMENTtable to determine if Laurie is a member of any other department. Laurie is a member of the ExecutiveDepartment. An additional row from the DEPARTMENT table is extracted, DEPT_ID = A.
Since Q1 is Yes for the MANAGER relationship, Optim follows this relationship from child to parent,from DEPARTMENT to EMPLOYEE, and extracts the manager of the Executive Department, Fred. Anadditional row from the EMPLOYEE table is extracted, EMP_ID = 1.
Example 5 Disable RI Cycles
Extract only the employees that are members of the Development Department. Unlike Example 1, do notextract employees in subordinate departments.
To obtain only the employees in the Development Department, Q1 and Q2 are set to No for therelationship MEMBER. In addition, the relationship MANAGER is unselected. This relationship is nottraversed, as shown in the following figure.
Setting Q1 and Q2 to N for No disables the RI cycle. Optim extracts the DEPARTMENT row for theDevelopment Department and, using the relationship MEMBER, traverses from parent to child to extract
------------------------- Specify Relationship Usage --------------------------Command ===> Scroll ===> PAGE
For Each Relationship Indicate: Rel 1 of 2
Q1: If a Child Row is Included, Include its Parent Row to Satisfy the RI Rule?Q2: If a Parent Row is Included to Satisfy any RI Rule, Include All Child Rows?
Q Q Child --Relation--Cmd Status 1 2 Limit Parent Table Child Table Name Type--- ------ - - ----- ---------------------- ---------------------- ------>> ---*** *********************************** TOP ***********************************___ SELECT Y N DEPARTMENT EMPLOYEE MEMBER DB2___ SELECT Y Y EMPLOYEE DEPARTMENT MANAGER DB2*** ********************************** BOTTOM *********************************
Figure 61. Set Q1 to YES
------------------------- Specify Relationship Usage --------------------------Command ===> Scroll ===> PAGE
For Each Relationship Indicate: Rel 1 of 2
Q1: If a Child Row is Included, Include its Parent Row to Satisfy the RI Rule?Q2: If a Parent Row is Included to Satisfy any RI Rule, Include All Child Rows?
Q Q Child --Relation--Cmd Status 1 2 Limit Parent Table Child Table Name Type--- ------ - - ----- ---------------------- ---------------------- ------>> ---*** *********************************** TOP ***********************************___ SELECT N N DEPARTMENT EMPLOYEE MEMBER DB2___ UNSEL N N EMPLOYEE DEPARTMENT MANAGER DB2*** *********************************** BOTTOM ********************************
Figure 62. Unselect to Disable RI Cycle
Chapter 2. Access Definitions 109

the three employees in the department. Since the MANAGER relationship is unselected, it is nottraversed. The extract is complete.
Dynamically Define the Access DefinitionYou can dynamically add tables and relationships to an Access Definition and specify sort, SQL, orselection criteria.
The ability to alter an Access Definition while using it to browse or edit data is controlled by parametersspecified on the Access Definition Parameters panel (see “Access Definition Parameters” on page 112).
This dynamic facility is available only when the Access Definition editor is invoked from Option 5 ADSon the Main Menu, or from the Choose a Definition Option menu. Use the BROWSE or EDIT commandto invoke a browse or edit session for the set of data defined by the Access Definition. During thissession you can “join” to tables not included in the Access Definition and specify sort, SQL, and selectioncriteria for any table as you display the data.
For the most part, the facilities available when browsing or editing data are the same as those providedduring a Point-and-Shoot session, and are not discussed here. Based on the Access Definition Parameters,the following facilities are also available during a browse or edit session for an Access Definition invokedfrom the Main Menu or the Choose a Definition Option menu.v Use the NEW operand with the JOIN command to specify the name of a table not listed in the Access
Definition. The newly joined table and any pertinent relationships are automatically included in theAccess Definition.
v All specifications for sort, SQL, and selection criteria are included in the Access Definition.
This dynamic capability provides another means of defining an Access Definition, and it allows you toview the set of data you want to ensure the correct Access Definition.
Note: Any dynamic specifications you make during a Point-and-Shoot session, or when you use theBROWSE command from the Access Definition editor during an Extract, Compare, or Archive Process,are temporary and are not saved in the Access Definition.
Browse or Edit Tables (Access only)
You also can invoke a browse or edit session for a table, rather than using an Access Definition. Accesscreates a temporary Access Definition that references the selected table and includes any criteriaspecifications. A prompt allows you to save and name this temporary Access Definition at the end of thesession. The saved Access Definition reflects all dynamic specifications made during the browse or editsession, including all joins, sort, SQL, and selection criteria. For details about defining an AccessDefinition while browsing or editing a table, see the Access User Manual, Dynamic Access.
Database ChangesAn Access Definition can be affected by changes to the database. The extent of the effect varies,depending upon what is changed and whether or not changed data is directly referenced in the AccessDefinition. The following lists the possible changes and their potential effect.
Column Added
A column that is added to a table referenced in an Access Definition is automatically processed. Anycolumns added to a table referred to as the source table in a Column Map are included in the list ofunused columns. If a column is added to the destination table, Optim attempts to match a source columnto the new column. If a source column is not available, Optim applies the defined column default. (Forinformation on Column Maps, see Chapter 5, “Column Maps,” on page 155.)
110 IBM InfoSphere Optim for DB2 for z/OS: Common Elements

For Access, a new column is displayed if all columns in the table are displayed. If selected columns in thetable are displayed, a new column is not displayed. You can also use the Describe Columns for AD panelto specify whether to display the new column.
Column Deleted
When a column is deleted from a table referenced in an Access Definition, you should be aware of theimpact. If you process the affected table, you receive a message:
Error You receive an error message if the column is referenced in the process. A column is referencedwhen it is:v Included in an SQL predicate.v Part of the primary key.
Note: For Access, a column is also referenced when explicitly designated for display orreferenced in the sort criteria. You can use the Access Definition to browse or edit data, but theaffected table cannot be the Start Table, and you cannot join to the affected table.
You must remove any explicit references to the column in the Access Definition.
WarningYou receive a warning message if the deleted column is not explicitly referenced. Processing cancontinue.
Note: For Access, you can use the Access Definition to browse or edit the table. A column isimplicitly selected for display if all columns are displayed by default.
Any column that is deleted from a table cannot be explicitly designated in a Column Map.
Column Modified
If the characteristics of a column have changed since the Access Definition was last modified, a warningmessage is issued when a process is attempted or you attempt to display data from the table.
For example, a change in the data length or data type affects the data handling by an Insert, Restore, orDelete Process, if the column participates in the process. An appropriate warning message is issued. Youshould verify that the desired data will be selected.
Table Added
Adding a table to the database has no direct effect on the Access Definition or any processes. In a browseor edit session, you can join to the new table and thereby reference it in the Access Definition.
Table Deleted
If a table in an Access Definition is deleted from the database, the table is labeled as UNKNOWN in theAccess Definition. The Access Definition can be used, but the deleted table cannot be the Start Table, andyou cannot join the UNKNOWN table.
Optim issues a warning message for this table when a process is initiated.
Relationships Added, Deleted, or Modified
When relationships are added or deleted, they directly affect the specifications on the SpecifyRelationship Usage panel. Deleted relationships are placed at the bottom of the list and assigned theUNKNWN status. New relationships are included at the top of the list and assigned the NEW status. Ifthe Specify Relationship Usage panel is not displayed, all NEW relationships are included in the process
Chapter 2. Access Definitions 111

by default and a warning message is displayed to inform the user of this situation. Set Use NEWRelationships on the Access Definition Parameters panel to No to prevent these NEW relationships frombeing traversed.
Modified relationships are handled in the same manner as newly specified relationships.
Note: Changes to relationships may affect the Join facility during a browse or edit session.
Access Definition ParametersYou can provide a variety of parameters for the Access Definition using the Access Definition Parameterspanel.
Display this panel by using the PARAMETERS command on the Select Tables/Views for AD panel.
Panel
The Access Definition Parameters panel includes:
Dynamically Add TablesIndicator for joins with tables that are not referenced in the Access Definition. This setting applieswhen browsing data while defining an Access Definition, or when an Access browse or editsession is invoked from a menu option. Specify:
Y New tables can be added. Default.
N New tables cannot be added.
Modify Selection CriteriaIndicator for defining or editing selection criteria when browsing data while defining an AccessDefinition (for all Optim components), when editing data for Access, or during a Point-and-Shootsession (for Archive, Compare, and Move). Specify:
Y Criteria can be specified or modified. Default.
N Criteria cannot be specified or modified.
Begin Table Display withIndicator for the beginning display when browsing data while defining an Access Definition (for
----Access Definition Parameters: GRP.USER.ADSAMPLE ---------------------------Command ===>
Dynamically Add Tables ===> Y (Y-Yes, N-No)
Modify Selection Criteria ===> Y (Y-Yes, N-No)
Begin Table Display with ===> D (D-Data,S-Criteria for Start Table only,Q-SQL for Start Table only,A-Criteria for All Tables)
Changes to AD During Edit ===> P (P-Permanent, T-Temporary)
Use NEW Relationships ===> Y (Y-Yes, N-No)
Apply Criteria Self Ref ===> Y (Y-Yes, N-No)
Archive Expiration Value ===> (YYYY-MM-DD or DDDDD)
Figure 63. Access Definition Parameters
112 IBM InfoSphere Optim for DB2 for z/OS: Common Elements

all Optim components), when browsing or editing data for Access, or during a Point-and-Shootsession (for Archive, Compare, and Move). Specify:
D DataDisplay begins with data from the named Start Table. Default.
S Criteria for Start Table OnlyDisplay begins with a prompt for selection criteria for the named Start Table.
Q SQL for Start Table OnlyDisplay begins with the SQL WHERE panel for the named Start Table.
A Criteria for All Tables
Display begins with a prompt for selection criteria for the named Start Table and allsubsequently joined tables.
Changes to AD During EditIndicator for the life of changes to an Access Definition during an Access edit or browse session.Specify:
P Changes are saved for future use.
T Changes apply to the current session only.
Use NEW RelationshipsIndicator for traversing NEW relationships that have not been explicitly selected or unselected.Specify:
Y Traverse NEW relationships. Default
N Do not traverse NEW relationships.
Apply Criteria Self RefIndicator for the application of selection criteria when a table is self-referenced. This settingapplies only when browsing or editing data using Access. Specify:
Y Apply any selection criteria for a table each time the table is referenced. Default.
N Apply selection criteria to the Start Table the first time it is accessed, but not when thetable is self-referenced.
Archive Expiration ValueExpiration parameters for Archive Files generated in Archive Processes that use the AccessDefinition. (Archive only) Specify:
blank No expiration date.
YYYY-MM-DDAn explicit date, after which the Archive File is considered to be expired. An error occursif an Archive Process uses the Access Definition after the specified date.
DDDDDThe number of days until expiration.
You can use the batch DIRECTORY utility to list expired Archive Files and the DELETE utility to deletethem. (See the Batch Utilities Guide, Maintenance Utilities for detailed information on these utilities.)
Available Commands
The following primary commands are available when the Access Definition Parameters panel isdisplayed.v BROWSEv CANCEL
Chapter 2. Access Definitions 113

v EDITv ENDv OPTIONSv SAVE
Note: The EDIT command is available for Access only.
Use END to return to the Select Tables/Views for AD panel.
114 IBM InfoSphere Optim for DB2 for z/OS: Common Elements

Chapter 3. Primary Keys
A primary key is the column or columns that contain values that uniquely identify each row in a table.
A primary key is needed:v To extract or archive data from a table that is visited more than once during a process (for example, a
child table that has two or more parent tables referenced in the Access Definition).v To insert, restore, or delete data from a table. The primary key is used to determine whether a row
exists.v To enable a Point-and-Shoot session for a Start Table.
Optim uses primary keys that are defined to the DB2 Catalog. You can, however, define Optim primarykeys to supplement those in the DB2 Catalog. If a primary key is not defined and is required to performa specific operation, Optim prompts you to create an Optim primary key.
You can define two types of primary keys that are stored in the Optim Directory:v An Explicit primary key applies to a single table.v A Generic primary key applies to any tables that have the same base name, column names, and
attribute specifications, but different Creator IDs.
There is no difference in function or appearance between generic and explicit primary keys. However, if atable has keys of both types, Optim uses the explicit primary key.
Legacy Tables
For Move or Compare for IMS, VSAM, and Sequential Filesonly, you can create an Optim primary key for aVSAM Legacy Table as though the Legacy Table were a DB2 table. Fields in a Legacy record are treatedas columns for the purpose of creating a primary key.
You can select and browse IMS primary keys, but IMS primary keys cannot be modified.
Match Keys
When a primary key has not been defined for either table in a pair of tables to be compared, you areprompted to define a “match key.” (Compare only)
Match keys are used to “match” rows from one source with rows from the other source for thecomparison. When available, Compare uses a primary key from a source table for the Compare Process.However, when a usable primary key is not defined in the DB2 Catalog or in the Optim Directory foreither table, you are prompted to create a match key.
For the most part, the prompts to define match keys are the same as those documented in this section fordefining primary keys. When defining a match key, the column names in both source tables must match— either directly, having the same base name and attributes, or indirectly, using a Column Map to matchunlike names.
Also note that, unlike the DB2 primary keys, match keys need not be based on a unique index and,unlike OPT primary keys, match keys are not available to other users or processes. Match keys reside inthe Compare Definition only.
© Copyright IBM Corp. 1991, 2013 115

For Relationships
If present, primary keys assist in defining relationships. Specifically, when you create a relationship andthe parent table has a primary key, the names of the primary key columns are automatically inserted intothe Define Relationship panel. You may then modify the column information as desired.
Select a Primary KeyTo edit or create a primary key, select Option 6.1 Primary Keys from the Main Menu. You can also selectOption 6 DEFINITIONS to display the Choose a Definition Option menu and select Option 1 PRIMARYKEYS. In either case, the Choose a Primary Key panel is displayed.
Use this panel to name a new Optim primary key and select existing Optim primary keys to modify ordelete. You can also browse DB2 and IMS primary keys.
Panel Prompts
The Choose a Primary Key panel includes:
Primary Key:The Creator ID and Table Name for the primary key. You can enter an explicit value, DB2 LIKEsyntax, or blanks for these prompts in any combination.
Creator IDThe Creator ID for the table for which the primary key is being created or modified. Thedefault is the previously entered value or the TSO ID of the current user if a Creator IDhas never been specified. Specify 1 to 128 characters. To create or edit a generic primarykey, type an asterisk at this prompt. (Refer to “Edit a Generic Primary Key” on page 122for details).
Table NameThe name of the table for which the primary key is defined or modified. Specify 1 to 128characters.
Note: See “Long Object Names (LONs)” on page 8 for information on entering Creator IDs andTable Names of up to 128 characters.
Primary Key TypeIndicate the type of primary keys to include in the selection list. This value has no effect if youindicate an explicit Creator ID and Table Name. Specify:
P or OInclude primary keys defined in the Optim Directory.
D Include primary keys defined to DB2.
----------------------------- Choose a Primary Key ------------------------COMMAND ===>
Primary Key:Creator ID ===> FOPDEMO >Table Name ===> CUSTOMERS >
Primary Key Type ===> OPT (P|O-OPTIM, D-DB2, I-IMS, A-All)
Use '_’ for DB2 LIKE character ===> NO (Y-Yes, N-No)
Figure 64. Choose a Primary Key
116 IBM InfoSphere Optim for DB2 for z/OS: Common Elements

I Include primary keys defined to IMS. (Optim Move for Legacy only.)
A Include all types.
Use '_' for DB2 LIKE characterUse of the underscore ( _ ) character. Specify Y to use the underscore as a DB2 LIKE character, orspecify N if it is used literally as part of the name.
Note: When the ’_’ character is used in conjunction with the ’%’ DB2 LIKE character, the ’_’ istreated as a ’DB2 like’ character, and not as a literal.
For example, depending on the use of the underscore character, A_B is a three-character namecontaining the characters “A_B”, as entered, or a three-character name that begins with “A” andends with “B” with any valid character in the middle. The default is No, which means that “_” isnot handled as a DB2 LIKE character.
Explicit Table Name
When you supply an explicit Creator ID and Table Name and the table does not exist, an error messageis displayed on the Choose a Primary Key panel. If the supplied name is for a DB2 table, Optim checksthe DB2 Catalog to determine if a primary key is defined for the table. If the name references an IMSLegacy Table, Optim checks the IMS DBD to determine if a key is defined for the associated IMSsegment.v If a DB2 or z/OS primary key for the table exists, the primary key information is displayed. This
information cannot be modified.v If a DBMS primary key for the table does not exist, Optim checks the Optim Directory. If a primary
key is defined in the Optim Directory, the information is displayed and can be modified.v If the database or Legacy Table exists and no primary key information is available, you are prompted
to define a new primary key for the table. The new primary key is stored in the Optim Directory.
Selection List
A selection list is requested using DB2 LIKE syntax or by leaving one or both of the Primary Keyprompts blank (i.e., Creator ID and Table Name).v DB2 tables, IMS Legacy Tables, or all are listed, depending on the value specified for Primary Key
Type.v If no tables satisfy the selection list criteria, a message is displayed on the Choose a Primary Key panel.
Primary Key Selection ListThis topic discusses the primary key selection list.
An example of a primary key selection list is shown in the following figure.
Chapter 3. Primary Keys 117

Tables for which a primary key is defined are listed. The Creator ID and table name are displayed. Anasterisk (*) in Creator indicates a generic primary key. Type indicates the source of the primary key, asdefined in the Optim Directory (OPT), the DB2 Catalog (DB2), or in an IMS DBD (IMS).
Description
A User Option setting determines whether the description of each Optim primary key is displayed. See“User Options” on page 318 for information about the Selection List Format option.
Line Commands
The Cmd area on the left side of the panel is used to enter line commands.
Cmd The line command entry area. Valid line commands are:
S Select a primary key.
D Delete an Optim primary key.
C Copy an Optim primary key.
R Rename an Optim primary key.
AT Modify attributes of an Optim primary key.
I Display information about an Optim primary key
See “Object Selection List Functions” on page 15 for more information about available commands.
The following messages may be displayed when you enter a line command for a primary key.v The message “*BUSY” is displayed when a primary key is being modified by another user.v The message “*NO COLUMN MATCH” is displayed when there are no Legacy Table columns that
match an IMS primary key.
Primary Key Attributes
To display the attributes of an Optim primary key, use the I line command next to the name of theprimary key. The following figure shows the Primary Key Attributes panel.
---------------------------- Select Primary Keys ------------------------------Command ===> Scroll ===> PAGE
Line Cmds: S-Select, D-Delete, C-Copy, R-Rename, AT-Attr, I-Info 1 OF 4
Cmd Creator Table Type By Date--- -------- ------------------ ---- -------- -------------------
******************************* TOP *************************************___ * ORDERS OPT DB2MGR 2005-09-03-08.45.50___ FOPDEMO CUSTOMERS DB2 DB2MGR 2005-08-26-16.06.30___ FOPDEMO DETAILS DB2 DB2MGR 2005-07-09-11.55.47___ FOPDEMO SHIP_INSTR OPT DB2MGR 2005-07-09-11.55.47
****************************** BOTTOM ***********************************
Figure 65. Select Primary Keys
118 IBM InfoSphere Optim for DB2 for z/OS: Common Elements

This is a read-only display. Optim generates and maintains the information on this panel based on yourspecifications for the primary key.
Edit or Browse a Primary KeyThis topic discusses editing and browsing primary keys.
When you enter the fully qualified name of a table on the Choose a Primary Key panel and the table:v Has a DB2 or IMS primary key, the Browse DB2 Primary Key or Browse IMS Primary Key panel is
displayed to allow you to view information about the primary key.v Has no primary key, the Define Optim Primary Key panel is displayed to allow you to create the
primary key.v Has only an Optim primary key, the Modify Optim Primary Key panel is displayed.
The appearance of these panels is identical. The operation of the Define Optim Primary Key and theModify Optim Primary Key panels is identical and is described in this section. However, the BrowsePrimary Key panel is read-only.
Panel
The Primary Key panel shows the name of the table for the primary key, as well as:
Cmd The line command entry area. Valid line commands on the Define/Modify Optim Primary Keypanel are:
D, Dn, or DDDelete one or more column names. DD is the block form of the command.
I or In Insert one or more blank lines.
M, Mn, or MMMove one or more column names. MM is the block form of the command.
--------------------------- Primary Key Attributes ----------------------------Command ===> SCROLL ===> PAGE
Table ID : FOPDEMOTable Name : CUSTOMERSDescription :Security Status : PUBLIC
Last Modified By : DB2MGRModified On : 2005-08-26-16.06.30
Figure 66. Primary Key Attributes
--------------------------- Modify OPTIM Primary Key --------------------------Command ===> Scroll ===> PAGE
Modify OPTIM Primary Key for FOPDEMO.SHIP_INSTRLimit Key to 64 Columns and 2000 Bytes
Cmd Column Name Data Type 1 OF 1--- ------------------------------ ---------------*** *********************** TOP **********************___ SHIP_INSTR_ID DECIMAL(5,0)*** ********************* BOTTOM *********************
Figure 67. Modify Optim Primary Key
Chapter 3. Primary Keys 119

A or B Destination (After or Before) for the Move line command.
Column NameThe name of each column in the primary key. When editing an Optim primary key, you canspecify a maximum of 64 columns with a total of 2000 bytes.
Data TypeThe data type for each column in the primary key. Optim automatically displays the data type.This value cannot be modified.
Selection List of Columns
Use the LIST COLUMNS command to display the columns available to be included in the primary key.Columns currently included in the primary key are not listed. For example, type the LIST COLUMNScommand to display the Select One or More Columns pop-up for the SHIP_INSTR table.
For each available column, the name and data type are listed. Use the S line command to select columnsfor the primary key. When finished, press ENTER or use END to redisplay the Modify Optim PrimaryKey panel. The selected column names are inserted in the list of columns comprising the key.
Selection List of Indexes
One or more unique indexes on a database table are often defined for various purposes. To define aprimary key based on an existing index, you can use the LIST UNIQUE INDEX primary command todisplay a selection list of unique indices. Use the S line command to select the appropriate index orindices. When you select an index as the primary key, the names of columns in the unique index replaceall column names previously specified on the Modify Optim Primary Key panel.
Note: LIST UNIQUE INDEX requires a tablespace scan of the catalog table, SYSIBM.SYSINDEX. Thisscan may be time consuming.
Specification Complete
Press ENTER or use END to end the Modify Optim Primary Key panel processing.
Primary key information is stored in the Optim Directory and used the next time the table is accessed.Any change to the information affects all users.
--------------------------- Modify OPTIM Primary Key --------------------------Command ===> Scroll ===> PAGE
Modify OPTIM Primary Key for FOPDEMO.SHIP_INSTRLimit Key to 64 Columns and 2000 Bytes
Cmd Column Name Data Type 1 OF 1--- -------*** ******* +----------------Select One or More Columns-----------------+___ SHIP_IN | Cmd Column Name Data Type 1 OF 3 |*** ******* | --- ---------------------------------------------- |
| ********************** TOP *********************** || ___ SHIP_ID SMALLINT || ___ ORDER_SHIP_INSTR VARCHAR(254) || ___ SHIP_UPDATED TIMESTAMP || ********************* BOTTOM ********************* |+-----------------------------------------------------------+
Figure 68. Select One or More Columns
120 IBM InfoSphere Optim for DB2 for z/OS: Common Elements

Available Primary Commands
The following primary commands are available from the Modify Optim Primary Key panel.ATTRIBUTESBOTTOMCANCELDELETEDOWNENDGENERICLIST COLUMNSLIST UNIQUERESETTOPUP
Description
You can display or edit a description for an Optim primary key to be displayed in selection lists. Use theATTRIBUTES command to display the Object Attributes panel, which provides a 40-character Descriptionprompt. For additional information about the Object Attributes panel, see “Specify Description andSecurity Status” on page 325.
Delete a Primary Key
In addition to using the DELETE command on the Modify Optim Primary Key panel to delete an Optimprimary key, you can also remove all column names and use END.
Convert to a Generic Primary Key
To convert an explicit primary key to a generic primary key, use the GENERIC command. Enter theGENERIC command on the Modify Optim Primary Key, the Define Optim Primary Key, or the BrowseDB2 Primary Key panel to convert the displayed explicit primary key into a generic primary key.
If a generic primary key already exists, a prompt requests confirmation to override it. If you convert anOptim primary key for which a generic primary key does not exist, the following pop-up prompts you todelete or retain the original, explicit Optim primary key. Use END to retain the existing explicit primarykey, or press ENTER to delete it.
Chapter 3. Primary Keys 121

Once converted, you can edit the generic primary key as you would an explicit primary key, usingtechniques described in this section.
Edit a Generic Primary KeyFor various site-specific reasons, a database may include several identical sets of tables, with the samebase names, columns, and attribute specifications, but different Creator IDs. This arrangement might beuseful in a test environment, for example, to provide a discrete set of tables and data for each softwaredeveloper or group of developers. As another example, a provider of administration services mightmaintain a set of tables for each client's data. For your convenience in these and similar instances, youcan define a generic primary key that applies to all tables with the same base name, regardless of CreatorID.
There is no difference in function or appearance between generic primary keys and explicit primary keys.Explicit primary keys, however, take precedence over generic primary keys, so if an explicit primary keyexists for a table, it is used, instead of any generic primary key that might exist.
Generic primary keys are identified with an asterisk (*) in the Creator ID. You can convert an existingprimary key to a generic primary key, as described in “Convert to a Generic Primary Key” on page 121,or you can create a generic primary key using the same methods used to create an explicit primary key.
Create or Edit a Generic Primary Key
To edit or create a generic primary key, display the Choose a Primary Key panel by selecting Option 6.1Primary Keys from the Main Menu, or Option 6 DEFINITIONS to display the Choose a DefinitionOption menu and then Option 1 PRIMARY KEYS. Type an asterisk in Creator ID and the desired tablename or use DB2 LIKE syntax in Table Name.
Press ENTER to display the Define Optim Primary Key panel, overlaid with a pop-up, prompting for aCreator ID, as shown in the following figure.
--------------------------- Modify OPTIM Primary Key --------------------------Command ===> Scroll ===> PAGE
Modify OPTIM Primary Key for FOPDEMO.SHIP_INSTRLimit Key to 64 Columns and 2000 Bytes
Cmd Column Name Data Type 1 OF 1--- ------------------------------ ---------------*** ***___ SHI +---------------- Confirm GENERIC Processing ---------------+*** *** | |
| Press ENTER to Delete Existing Explicit Primary Key || Enter END Command to Retain Existing Explicit Primary Key || Enter CANCEL Command to Return to Primary Key Editor |+-----------------------------------------------------------+
Figure 69. Confirm GENERIC Processing Prompt
122 IBM InfoSphere Optim for DB2 for z/OS: Common Elements

Before you can choose the columns for the generic primary key, you must supply a Creator ID for thebase table, which is used to validate the generic primary key and provide column information. Specify avalid Creator ID of 1 to 128 characters.
You may then identify the columns for the generic primary key, as described for explicit primary keys.(See “Edit or Browse a Primary Key” on page 119 for additional information.) After the generic primarykey is defined, any table that is named SHIP_INSTR and contains the key columns can use the genericprimary key.
Modify a Generic Primary Key
If the generic primary key specified on the Choose a Primary Key panel exists or you select a genericprimary key from the Select Primary Keys panel, the Modify Optim Primary Key panel is displayed. Tomodify a generic primary key, you must provide a Creator ID to identify the base table. You are notrequired to provide the same Creator ID that was used to create the generic primary key, but all columnsin the key must be included in the new base table. If you specify a different Creator ID, and the new basetable does not include all the columns, the Confirm New Base CreatorID prompt is displayed.
You can change your specification or override the existing generic primary key. If you choose to override,the existing generic primary key is deleted and you can redefine the generic primary key. Afterestablishing a base table, you can use the facilities described for modifying a primary key.
--------------------------- Define OPTIM Primary Key --------------------------Command ===> Scroll ===> PAGE
Define GENERLimit Key to +----------------CreatorID Prompt----------------+
| |Cmd | Primary Key Definition Involves a Generic Key | OF 1--- -------- | Supply a CreatorID for a Base Table |*** ******** | |... | Press ENTER Key or Enter END Command when Done |*** ******** | Enter CANCEL Command to Exit Key Definition |
| || CreatorID ===> >> |+------------------------------------------------+
Figure 70. Specify Creator ID for Base Table
--------------------------- Modify OPTIM Primary Key --------------------------Command ===> Scroll ===> PAGE
Modify GENERIC Primary Key using Base Table ?.SHIP_INSTRLimit Key to 64 Columns and 2000 Bytes
Cmd Column Name Data Type 1 OF 1--- ------------------*** ******************* +--------Confirm New Base CreatorID---------+___ | |*** ******************* | Base Table Specified by CreatorID does |
| not Contain All Generic Key Columns || || Press ENTER Key to Specify New CreatorID || Enter END Command to OverRide Generic Key |+-------------------------------------------+
Figure 71. Confirm New Base Creator ID
Chapter 3. Primary Keys 123

124 IBM InfoSphere Optim for DB2 for z/OS: Common Elements

Chapter 4. Relationships
A relationship is a defined connection between the rows of two tables. To support a relationship, DB2requires a parent table primary key of 1 to 64 columns that guarantees uniqueness. DB2 also requires thateach child table have a corresponding foreign key made up of the same number of columns. In addition,corresponding primary and foreign key columns must have identical data types and attributes.
Extended Relationships
While you can use Optim to define relationships that conform to DB2 requirements, you can also definemore flexible, “extended” relationships (referred to as Optim relationships) for which a number of theDB2 restrictions are relaxed. For these relationships:v Primary keys and foreign keys are not required.v Corresponding columns from the parent and child table need not be identical, but must be compatible.
Compatible column types are described in Appendix D, “Compatibility Rules,” on page 375.v You can use an expression, which can include string/graphic/binary literals, numeric constants,
concatenated column values, and substrings, to emulate application-managed relationships and allowyou to manipulate sets of relational data in the same manner as in your production environment.
v You can also use a relationship exit to define the way in which columns with internally incompatibledata are related. An example of paired columns for which a relationship exit might be useful is indefining a relationship between a numeric column, for which an Optim relationship adds leadingzeroes and a char column with leading blanks.
In addition, an Optim relationship can be stored in the Optim directory as:v An Explicit relationship, used for a single pair of tables.v A Generic relationship, used for one or more pairs of tables that have the same base name, column
names, and attributes, but different Creator IDs.
There is no difference in function or appearance between generic and explicit relationships. However,explicit relationships take precedence over generic relationships.
Legacy Tables
You can also create an Optim relationship for a Legacy Table as though the Legacy Table were a DB2table. Fields in a Legacy record are treated as columns for the purpose of creating a relationship.
You can create an Optim relationship between DB2 tables, between Legacy Tables, or between a DB2 tableand a Legacy Table, with either table as the parent and the other as the child.
Materialized Query Tables
You cannot define an Optim relationship for a Materialized Query Table.
Select a RelationshipTo edit or create a relationship, select Option 6.2 Relationships from the Main Menu.
You can also select Option 6 DEFINITIONS to display the Choose a Definition Option menu (see“Choose a Definition Option” on page 12) and select Option 2 RELATIONSHIPS. In either case, theChoose a Relationship panel is displayed.
© Copyright IBM Corp. 1991, 2013 125

Note: You can also display this panel by entering the CREATE RELATIONSHIP command from theSelect Tables/Views for AD panel or the Specify Relationship Usage panel while editing an AccessDefinition.
The Choose a Relationship panel allows you to create, modify, and select relationships. To use this panel,select an option and provide the needed information. You can type the necessary information on thepanel or use DB2 LIKE syntax.
Panel Options
The options on the Choose a Relationship panel include:
1 - CREATECreate an Optim relationship involving a specific table. For this option, you must provide thename of one table in the relationship and may also provide Relationship Name. The specifiedtable can be either the parent or child in the relationship.
After you specify a table name or select one from a selection list, the Create a Relationship panelis displayed. That panel is described in “Create a Relationship” on page 129.
2 - MODIFYModify an Optim Relationship or browse a DB2 relationship. For this option, you must indicatethe Relationship Type and Relationship Name.
After you indicate the Relationship Type and type a Relationship Name or select one from aselection list, the Modify Relationship panel (for an Optim relationship) or the read-only BrowseRelationship panel (for a DB2 relationship) is displayed.
3 - LISTUse this option to obtain a selection list of relationships for one or more specified tables. For thisoption, you must indicate the Relationship Type and Table Name.
Once you indicate the Relationship Type and supply a Table Name by typing it on the panel orselecting a table from a list, the Select Relationship panel is displayed (refer to “RelationshipSelection List” on page 127). Select a table from the list to display the Modify Relationship panel(for an Optim relationship) or the read-only Browse Relationship panel (for a DB2 relationship).
Panel Prompts
The prompts on the Choose a Relationship panel include:
---------------------------- Choose a Relationship ----------------------------OPTION ===> SCROLL ===> PAGE
1 CREATE - Create a Relationship for Specified Parent or Child Table2 MODIFY - Modify a Relationship for Specified Child Table3 LIST - List All Relationships for Specified Table
Specify Table Name (Child for OPTION 2, Parent or Child for OPTIONS 1 and 3)Creator ID ===> FOPDEMO >>Table Name ===> CUSTOMERS >>
Specify Relationship Name (OPTIONS 1 and 2)Relationship Name ===> >>
Specify Relationship Type (OPTIONS 2 and 3)Relationship Type ===> (P|0-OPTIM, D-DB2, I-IMS, A-All)
Use ’_’ for DB2 LIKE character ===> NO (Y-Yes, N-No)
Figure 72. Choose a Relationship
126 IBM InfoSphere Optim for DB2 for z/OS: Common Elements

Specify Table NameTogether, Creator ID and Table Name make up the fully qualified name of the database table. Youcan enter an explicit value, DB2 LIKE syntax, or blanks for these prompts in any combination.
Creator IDThe Creator ID for the table for which the relationship is being created or modified. The defaultis the previously entered value or the TSO ID of the current user if a Creator ID has never beenspecified. Specify 1 to 128 characters. To create or edit a generic relationship, type an asterisk atthis prompt. (Refer to “Edit a Generic Relationship” on page 152 for details).
Table NameThe name of the table for which the relationship is defined or modified. Specify 1 to 128characters.
Note: See “Naming Conventions” on page 6 for information on entering Creator IDs, TableNames, and Relationship Names of up to 128 characters.
Relationship NameThe unqualified name of the relationship. Specify 1 to 128 characters. For Option 2, specify theRelationship Type and use DB2 LIKE syntax or leave Relationship Name blank to obtain aselection list.
Relationship TypeIndicate the type of relationship to include in the selection list. This prompt has no effect forOption 1 if you indicate an explicit Creator ID, Table Name, and Relationship Name. Specify:
P or O Include relationships defined to the Optim Directory.
D Include relationships defined to the DB2 Catalog.
I Include IMS relationships (Move or Compare for IMS, VSAM, and Sequential Files only).
A Include all types of relationships.
Use '_' for DB2 LIKE characterIndicate whether the underscore “_” is used as a DB2 LIKE character or literally as part of thename. The default is NO, which means “_” is not handled as a DB2 LIKE character.
Note: When the ’_’ character is used in conjunction with the ’%’ DB2 LIKE character, the ’_’ istreated as a ’DB2 like’ character, and not as a literal.
For example, depending on the use of the underscore character, “A_B” can be a three-charactername containing the characters “A_B”, as entered, or a three-character name that begins with “A”and ends with “B” with any valid character in the middle.
Relationship Selection ListWhen you request a selection list for Option 2 or select Option 3 on the Choose a Relationship panel, theSelect Relationships panel lists all relationships for a specified table.
For example, specify the table FOPDEMO.CUSTOMERS and select Option 3 LIST on the Choose aRelationship panel to display a selection list similar to the following:
Chapter 4. Relationships 127
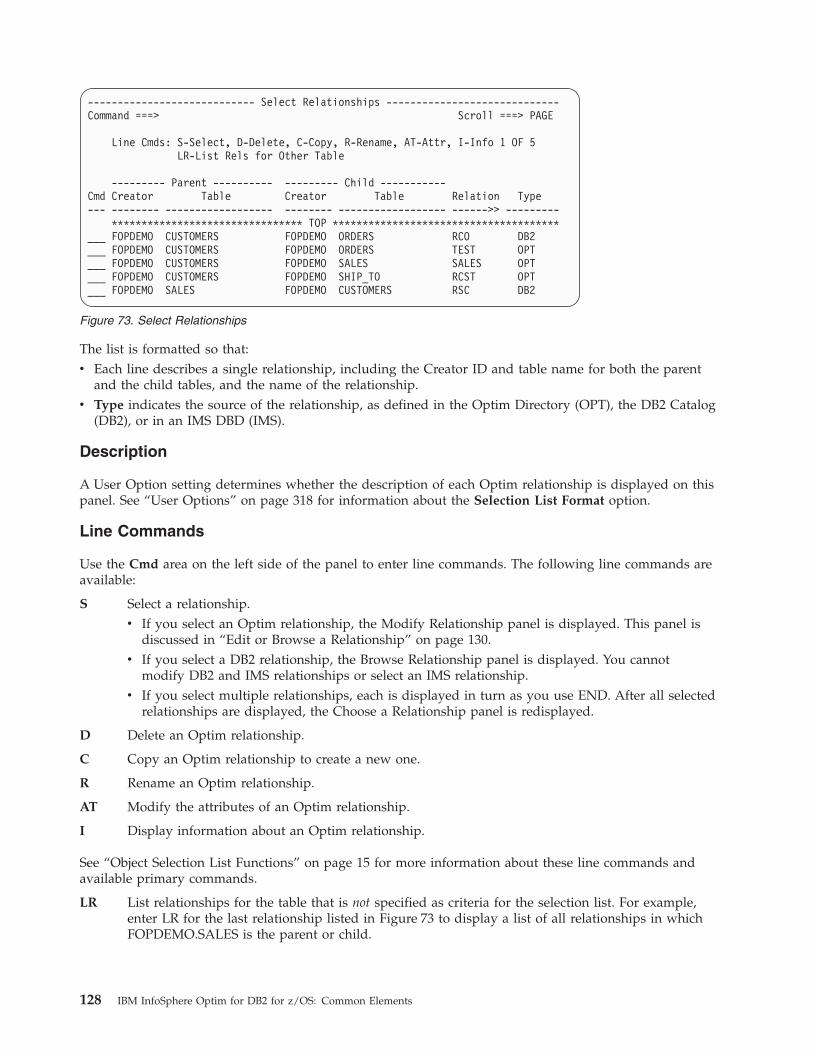
The list is formatted so that:v Each line describes a single relationship, including the Creator ID and table name for both the parent
and the child tables, and the name of the relationship.v Type indicates the source of the relationship, as defined in the Optim Directory (OPT), the DB2 Catalog
(DB2), or in an IMS DBD (IMS).
Description
A User Option setting determines whether the description of each Optim relationship is displayed on thispanel. See “User Options” on page 318 for information about the Selection List Format option.
Line Commands
Use the Cmd area on the left side of the panel to enter line commands. The following line commands areavailable:
S Select a relationship.v If you select an Optim relationship, the Modify Relationship panel is displayed. This panel is
discussed in “Edit or Browse a Relationship” on page 130.v If you select a DB2 relationship, the Browse Relationship panel is displayed. You cannot
modify DB2 and IMS relationships or select an IMS relationship.v If you select multiple relationships, each is displayed in turn as you use END. After all selected
relationships are displayed, the Choose a Relationship panel is redisplayed.
D Delete an Optim relationship.
C Copy an Optim relationship to create a new one.
R Rename an Optim relationship.
AT Modify the attributes of an Optim relationship.
I Display information about an Optim relationship.
See “Object Selection List Functions” on page 15 for more information about these line commands andavailable primary commands.
LR List relationships for the table that is not specified as criteria for the selection list. For example,enter LR for the last relationship listed in Figure 73 to display a list of all relationships in whichFOPDEMO.SALES is the parent or child.
---------------------------- Select Relationships -----------------------------Command ===> Scroll ===> PAGE
Line Cmds: S-Select, D-Delete, C-Copy, R-Rename, AT-Attr, I-Info 1 OF 5LR-List Rels for Other Table
--------- Parent ---------- --------- Child -----------Cmd Creator Table Creator Table Relation Type--- -------- ------------------ -------- ------------------ ------>> ---------
******************************** TOP **************************************___ FOPDEMO CUSTOMERS FOPDEMO ORDERS RCO DB2___ FOPDEMO CUSTOMERS FOPDEMO ORDERS TEST OPT___ FOPDEMO CUSTOMERS FOPDEMO SALES SALES OPT___ FOPDEMO CUSTOMERS FOPDEMO SHIP_TO RCST OPT___ FOPDEMO SALES FOPDEMO CUSTOMERS RSC DB2
Figure 73. Select Relationships
128 IBM InfoSphere Optim for DB2 for z/OS: Common Elements

Relationship Attributes
To display the attributes of an Optim relationship, use the I line command next to the name of theprimary key. The following figure shows the Relationship Attributes panel.
This is a read-only display. Optim generates and maintains the information on this panel according toyour specifications for the relationship.
Create a RelationshipTo create a relationship, you must provide the fully qualified name of a table in the relationship. You cantype the fully qualified table name or select a table from a selection list, before selecting Option 1CREATE. The Create a New Relationship pop-up window is then displayed to prompt you for therequired information.
Panel
The Create a New Relationship pop-up displays the name of the table for which you want to create anOptim relationship. It allows you to indicate the role for this table in the relationship, and prompts for
-------------------------- Relationship Attributes ----------------------------COMMAND ===> SCROLL ===> PAGE
Child Table ID : FOPDEMOChild Table Name : CUSTOMERSRelationship Name : RCO
Description :Security Status : PUBLICLast Modified By : FOPABCModified On : 2005-11-02-10.08.17
Parent Table ID : FOPDEMOParent Table Name : CUSTOMERS
Figure 74. Relationship Attributes
--------------------------- Choose a Relationship -----------------------------OPTION ===> SCROLL ===> PAGE
1 CREATE - Create a Relationship for Specified Parent or Child Table
+--------------------------Create a New Relationship-------------------------+| || Specified Table : FOPDEMO.ORDERS || Table Type ===> C (P-PARENT, C-CHILD) || || Leave blank or include wild cards for Table Selection List || || Other Table: || Creator ID ===> FOPDEMO >> || Table Name ===> CUSTOMERS >> || || Relationship Name ===> CUSTORD >> |+----------------------------------------------------------------------------+
Figure 75. Create New Relationship
Chapter 4. Relationships 129

the name of the second table in the relationship. A slightly different version of this pop-up is displayedduring an Access edit or browse session if you issue a JOIN command and no relationship exists betweenthe two tables.
Specified TableThe table name provided on the Choose a Relationship panel. This value cannot be modified.
Table TypeThe role of the Specified Table in the relationship. This value is profiled. Specify:
P Parent
C Child
Other Table:The name of the second table in the relationship. Creator ID and Table Name make up the fullyqualified name of the database table. You can enter an explicit value, DB2 LIKE syntax, or blanksfor these prompts in any combination.
Creator IDThe Creator ID for the second table for which the relationship is being created. Specify 1 to 128characters.
Table NameThe name of the second table for which the relationship is being created. Specify 1 to 128characters.
Relationship NameThe name of the relationship. If you provided a name on the Choose a Relationship panel, it isdisplayed and can be edited. Specify 1 to 128 characters.
Press ENTER to display the Define Relationship panel. Refer to “Edit or Browse a Relationship” fordetails.
Edit or Browse a RelationshipWhen you enter the required information on the Create a New Relationship panel, the DefineRelationship panel is displayed. If using Option 2, the display varies according to the type of relationship.
If the relationship:v Is a DB2 relationship, the Browse Relationship panel is displayed.v Is an Optim relationship, the Modify Relationship panel is displayed.
The appearance of these panels is identical, but the Browse Relationship panel is read-only. The operationof the Define Relationship and the Modify Relationship panels (i.e., the Relationship editor) is identicaland is described in this section.
130 IBM InfoSphere Optim for DB2 for z/OS: Common Elements

The upper portion of the Relationship editor indicates the relationship name and lists commands thatmight be especially useful when defining or modifying a relationship. The lower portion of the panel isdivided into two parts. The left portion shows the Parent table name and lists the parent table ColumnNames and Data Types. The right portion shows the Child table name and lists the child Column Namesand Data Types.
Enter the exit name if using a relationship exit or leave Exit Name blank to create a relationship that doesnot use an exit. See “Exit Routines for Relationships” on page 132 for information about relationshipexits.
At least one parent table column and one child table column must be referenced in a relationship, and atleast one relationship entry must relate a column from one table to a column from the other. That is, theColumn Name for each table must list an actual column name or column substring from that table.Additionally, you cannot relate a literal or constant to a literal or constant.
The combination of all entries in Column Name cannot exceed 2000 characters minus n, where n equalsthe number of nullable columns in the key. Also, no more than 64 columns from each table can bespecified in a relationship. A concatenated entry in Column Name cannot include more than 64 columnsand, if an entry is 2000 characters or includes 64 columns, no other Column Name entries for the tablecan be made.
Line Commands
In order to define or edit an Optim Relationship, you can manipulate individual lines or parts of lines inthe Relationship editor. The following line commands are available:
C[n] Copy one line, a number (n) of lines, or a block of lines (using the block form, CC).
D[n] Delete one line, a number (n) of lines, or a block of lines (using the block form, DD).
The entire line is deleted. To delete a column name, position the cursor at the beginning of thecolumn name and press EOF or overtype the prompt with blank spaces.
EXP Column names and values are protected if they exceed the space available in Column Name. Usethe EXP line command to display the Expanded Relationship Editor prompt to edit long columnnames or values.
I[n] Insert one blank line or a number (n) of blank lines.
M[n] Move one line, a number (n) of lines, or a block of lines (using the block form, MM).
R[n] Repeat one line, a number (n) of lines, or a block of lines (using the block form, RR).
A The “after” destination for copied or moved lines.
--------------------------- Define Relationship -------------------------------Command ===> Scroll ===> PAGE
Define OPTIM Relationship CUSTORDSpecial Commands: LIST COLUMNS, EXPAND, GENERIC, MODEL
Parent: FOPDEMO.CUSTOMERS Child: FOPDEMO.ORDERS
Exit Name ===>1 OF 1
Cmd Column Name Data Type Column Name Data Type--- ---------------------->> ---------- ---------------------->> ----------*** ********************************* TOP **********************************___ CUST_ID CH(5) CUST_ID CH(5)*** ******************************* BOTTOM *********************************
Figure 76. Define Relationship
Chapter 4. Relationships 131

B The “before” destination for copied or moved lines.
O The “overlay” destination for copied or moved lines.
Exit Routines for RelationshipsYou can use a site-defined exit routine to define the way in which two tables are related. Exits are usefulfor pairing columns with internally incompatible data that cannot be defined in other ways. For example,an exit can define a relationship using a numeric column and a char column by adding BLANKs to thenumeric value. The resulting numeric value is equal in length to the value in the char column. As anotherexample, an exit might establish a relationship using a binary column indicating the number of dayssince 1900 and a date column. A relationship exit can also be used to adjust column values according tospecific needs before passing control for Optim relationship processing.
Using an Exit Routine
A relationship exit is identified by the relationship exit module name. To use an exit, enter the Exit Nameon the Define OPTIM Relationship panel. The exit name must be a valid MVS module name and, to usethe relationship, the module must exist. If the module does not exist or cannot be found, you can savethe relationship but the following message is displayed.EXIT NOT FOUND
After entering the exit name, list all columns used in the relationship, using only valid column names orthe FOP_IMSKEY keyword. You must list at least one column for the parent table and one for the childtable. The list can include a different number of columns, of different data types, for each table. Thecolumns must exist in the respective tables and the data types must be supported for Optimrelationships. NULL values are supported. Use of literals, substrings, or other functions and expressionsis not allowed with an exit.
Depending upon the direction of processing, the exit in this example might adjust HIRE_DATE values inthe IMS table EMPLOYEE to conform to a TIMESTAMP data type so that Optim can match HIRE_DATEwith ORDER_DATE in the DB2 table ORDERS.
Writing a Relationship Exit Routine
All exits must conform to the following requirements:v The exit can be written in assembly language, VS COBOL II, PL/I, or C.
--------------------------- Define Relationship -------------------------------Command ===> Scroll ===> PAGE
Define OPTIM Relationship REL1Special Commands: LIST COLUMNS, EXPAND, GENERIC, MODEL
Parent: FOPDEMO.EMPLOYEE Child: FOPDEMO.ORDERS
Exit Name ===>EXIT11 OF 1
Cmd Column Name Data Type Column Name Data Type--- ---------------------->> ---------- ---------------------->> ----------*** ********************************* TOP **********************************___ ..... .....___ HIREDATE CH(8) ORDER_DATE TIMESTAMP___ .....*** ******************************* BOTTOM *********************************
Figure 77. Define Relationship
132 IBM InfoSphere Optim for DB2 for z/OS: Common Elements

v The exit is loaded and executed using standard z/OS rules for load module processing. It must bereentrant and must be available to all Optim online and batch processes using the relationship thatcalls the exit.
v Each exit must be compiled and linked as a separate load module. This load module is loadeddynamically at execution time.
v If the exit accesses DB2, the DBRM for that exit program must be bound into the Optim plan.v The exit must be valid for both parent-to-child traversals and child-to-parent traversals.
Both a parent and a child table are needed for all relationships. A relationship might be traversed fromparent to child or from child to parent, however. The exit is called for each row in the table from whichthe relationship is traversed (the "from" table), whether it is the child table or the parent table. The exitconverts values in the table from which the relationship is traversed to make them compatible withvalues in the table to which the relationship is traversed (the "to" table). At the time the exit is called iscalled, the addresses of four structures are passed to the exit. These structures provide:1. Parameters for the relationship exit2. Statistics about the "from" table3. Statistics about the "to" table4. A work area
Parameters
The relationship exit control block is used with every call to pass the following parameters to the exitusing standard OS linkage conventions.1. The address of a structure that contains the relationship exit parameters:
Table 3. Exit parameter structure
Name Offset Length in Bytes Data Type Description
RelExitID +0 8 Character "OPTRELX"
RelNameL +8 2 Binary Length of exit name
RelName +10 128 + 1 Character Name of exit withNULL termination
RelExitNameL +139 2 Binary Length of exitmodule name
RelexitName +141 8 + 1 Character Name of exit modulewith NULLtermination
OptRelExitVer +150 2 Binary Version of exit,initially 1
OptimRel +152 4 Character Release and versionof Optim
SSN +156 4 Character Subsystem name
UserIDL +160 2 Binary Length of primaryuser ID
UserID +162 8 + 1 Character Primary user ID withNULL termination
SQLIDL +171 2 Binary Length of SQL ID
SQLID +173 128 + 1 Character SQL ID with NULLtermination
Chapter 4. Relationships 133

Table 3. Exit parameter structure (continued)
Name Offset Length in Bytes Data Type Description
SCreatorIDL +302 2 Binary Length of Creator IDfor the table fromwhich therelationship istraversed
SCreatorID +304 128 + 1 Character Creator ID, withNULL termination,for the table fromwhich therelationship istraversed
STableNameL +433 2 Binary Length of name forthe table from whichthe relationship istraversed
STableName +435 128 + 1 Character Name, with NULLtermination, for thetable from which therelationship istraversed
DCreatorIDL +564 2 Binary Length of Creator IDfor the table to whichthe relationship istraversed
DCreatorID +566 128 + 1 Character Creator ID, withNULL termination,for the table to whichthe relationship istraversed
DTableNameL +695 2 Binary Length of name forthe table to which therelationship istraversed
DTableName +697 128 + 1 Character Name, with NULLtermination, for thetable to which therelationship istraversed
GlobalWorkL +826 2 Binary Length of sharedwork area
pGlobalwork +828 4 Address Pointer to sharedwork area
TblWorkL +832 2 Binary Length of table workarea
pTblWork +834 4 Address Pointer to table workarea
ParentChildFlag +838 1 Character "P" if DTableName isparent, "C" ifDTableName is child
IMSKeyL +839 2 Binary Length ofconcatenated IMS key
134 IBM InfoSphere Optim for DB2 for z/OS: Common Elements

Table 3. Exit parameter structure (continued)
Name Offset Length in Bytes Data Type Description
pIMSKey +841 4 Address Concatenated key
NumRows +845 8 binary Number ofSTableName rowsprocessed (includingcurrent row)
TotRowsS +853 8 binary Total number ofSTableName rows or-1 to indicateunknown
TotRowsD +861 8 binary Total number ofDTableName rows or-1 to indicateunknown
MessageLen +869 2 Binary Length of messagereturned by exit
Message +871 256 Character Message returned byexit
Flag1 +1127 1 Character OR representation of:
00 No flags
01 First call toexit
02 Last call toexit for lasttable
04 Processinglast table
08 Terminationcall to exit
Reserved +1128 1 Character
2. The address of an SQLDA for the table from which the relationship is traversed. The exit candetermine which is the "from" table in many ways, including the ParentChildFlag setting, the tablename, or the column name. The SQLDA for the table identifies the columns that participate in therelationship. An SQL variable for each participating column describes the data from the current rowand column.
Table 4. SQLDA for each table in a relationship
Name Offset Length in Bytes Data Type Description
ID +0 8 Character Identifier
bc +8 4 Binary Number of bytes
TotCols +12 2 Binary Total number ofcolumns or varoccurrences
NumCols +14 2 Binary Number of columnsused in relationship
Col +16 44 SQLVAR SQLDA for column
Example of SQLDA for a DB2 table:
Chapter 4. Relationships 135

/*----------------------------------------------------------------------* DB2 for z/OS SQLDA structure*--------------------------------------------------------------------*/typedef struct sSQLDA {
char ID[8]; // SQLDA identifierlong bc; // number of bytes in the tableshort TotCols; // total number of columns or var occurrencesshort NumCols; // number of columns used in relationshipSQLVAR Col[1]; // SQL variable for the first column in relationshipSQLVAR Col[2]; // SQL variable for the next column. . . .SQLVAR Col[n]; // SQL variable for the next column
} SQLDA;
For each column that participates in the relationship, the SQL variable structure is:
Table 5. SQLVAR for each column in a relationship
Name Offset Length in Bytes Data Type Description
DataType +0 2 Binary SQLTYPE for column,as a value defined inDB2 SQL Referenceand reflecting theNULL eligibility forthe column
Length +2 2 Binary Length of columnvalue in bytes
pData +4 4 Address Pointer to columndata
pInd +8 4 Address NULL indicatorvariable
NameLen +12 2 Binary Number of charactersin column name
Name +14 30 Character Name of column
Example of an SQLDA variable for a DB2 column:typedef struct sSQLVar {
short DataType; // Timestamp, NULL ineligibleshort Length; // lengthchar *pData; // pointer to column datashort *pInd; // pointer to null ind varshort NameLen; // length of column namechar Name[ORDER_DATE]; // column name or label
} SQLVAR;
3. The address of the SQLDA for the table to which the relationship is traversed. The exit populate theSQLDA with values used to select rows from the "to" table.
4. The address of the relational exit work area.
Return Codes
The exit sets one of the following return codes before passing control back to the Optim solution:
Return CodeMeaning
0 Processing is successful.
4 Row is skipped or does not participate in the relationship.
8 Fatal error. Terminate execution. To return an error message, the exit must place the message in
136 IBM InfoSphere Optim for DB2 for z/OS: Common Elements

the message area and set the message length in the parameter area. The error message is printedwith other Optim diagnostic messages issued for an abnormal process termination. Note that theexit can place diagnostic messages and set the appropriate message length in the exit messagearea at any time and the messages are included in diagnostic output when the Optim TRACEfacility is activated.
Information Returned from the Exit
Most of the parameters provide information that is passed to the exit and the exit should not changethem. In addition to return codes, the exit can return:v Messages and message lengthsv SQLVAR for each column in the table to which the relationship is traversedv pData (address of column data)v pInd (address of NULL indicator variable)
Performance
Because the exit might be called frequently, avoid unnecessary processing. For example, the exit canperform initialization processing in the first call and save information for subsequent calls in the workarea.
Termination Call
A termination call is made to the exit after all rows in DTableName are processed. The call is identifiedby a value of 08 in Flag1. The exit can use this call to clean up any dynamically acquired storage. Notethat a termination call can occur without a preceding first call as when a path is not followed for arelationship that potentially participates in processing.
Samples
A C relationship exit module uses the following sample logic to establish a relationship between TABLE1and TABLE2 that works in either direction:for (i = 0; i < pDstSQLDA->NumCols; i++) { /* only 1 column so i==0 */if(pExitParms->ParentChildFlag == ’C’) { /* Parent to Child conversion */ *(int*)pDstSQLDA->Col[i].pData =}if(pExitParms->ParentChildFlag == ’P’) { /* Child to Parent */
--------------------------- Define Relationship -------------------------------Command ===> Scroll ===> PAGE
Special Commands: LIST COLUMNS, EXPAND, GENERIC, MODEL
Parent: FOPDEMO.TABLE1 Child: FOPDEMO.TABLE2
Exit Name ===>EXIT11 OF 1
Cmd Column Name Data Type Column Name Data Type--- ---------------------->> ---------- ---------------------->> ----------*** ********************************* TOP **********************************___ CHARCOLUMN CH() INTEGERCOLUMN SMALLINT*** ******************************* BOTTOM *********************************
Figure 78. Sample 1: Define relationship using DB2 CHAR and DB2 SMALLINT columns
Chapter 4. Relationships 137

sprintf(pDstSQLDA->Col[i].pData, "%5d",*(int*)pSrcSQLDA->Col[i].pData);pDstSQLDA->Col[i].Length = 5;
} }return(RC_EXIT_SUCCESS);
A C relationship exit module uses the following sample logic to establish a relationship betweenEMPLOYEE_IMS and ORDERS that works in either direction:if(pExitParms->ParentChildFlag == ’C’)*(short*)pDstSQLDA->Col[0].pData = (short)atoi(pSrcSQLDA->Col[0].pData);if(pExitParms->ParentChildFlag == ’P’) {strncpy(pDstSQLDA->Col[i].pData, pSrcSQLDA->Col[i].pData + 5, 2); //Monthstrncpy(pDstSQLDA->Col[i].pData + 3, pSrcSQLDA->Col[i].pData + 8, 2); //Daystrncpy(pDstSQLDA->Col[i].pData + 6, pSrcSQLDA->Col[i].pData + 2, 2); //2 digit yearpDstSQLDA->Col[i].pData[2] = ’/’;pDstSQLDA->Col[i].pData[5] = ’/’;}
Sample Exits in C and COBOL
Sample exits are included with Optim. The samples illustrate how to use the data areas available to theexit and the type of processing that can be accomplished using an exit. The source for sample exits isdistributed with Optim in the FOPSAMP library. FOPSREL2 is a sample C exit that demonstrates basicdata conversion between various DB2 data types, for example, from CHARACTER to DECIMALPACKED and to CHARACTER from DECIMAL PACKED. FOPSRXS1 is a COBOL sample thatdemonstrates conversion between character and numeric data.
IMS Concatenated Key
If data from an IMS concatenated key is needed to create a relationship between an IMS table andanother table, use the special FOP_IMSKEY keyword. When using the FOP_IMSKEY keyword with arelationship exit, the parent table must be an IMS start table and FOP_IMSKEY must be the onlykeyword under the column heading. The IMS concatenated key and length will be passed to the exit inthe first parameter, the Exit parameter structure. The IMS concatenated key information can then be usedto fill in the child destination columns.
When extracting an IMS table with the FOP_IMSKEY keyword, the selected rows from the IMS start tableare extracted first. A list of unique concatenated keys from these extracted rows is then sorted and usedto select rows from the child destination table.
–-------------------—---—---— Modify Relationship --------------------------Command ===> Scroll ===> CSR
Special Commands: LIST COLUMNS, EXPAND, GENERIC, MODEL
Parent: FOPDEMO.EMPLOYEE_IMS Child: FOPDEMO.ORDERS
Exit Name ===> EXIT21 OF 2
Cmd Column Name Data Type Column Name Data Type--- ---------------------->> ---------- ---------------------->> ----------*** ********************************* TOP *********************************___ HIREDATE CH(8) ORDER_DATE DATE*** ******************************* BOTTOM*********************************
Figure 79. Sample 2: Define relationship using IMS date field and DB2 DATE column
138 IBM InfoSphere Optim for DB2 for z/OS: Common Elements

The default is to use the full IMS concatenated key from the root segment to the current segment. If onlya subset of levels from the IMS concatenated key is needed to create the relationship, use FOP_IMSKEYparameters to specify the needed levels.
The format of FOP_IMSKEY is:v FOP_IMSKEY with no parameters or FOP_IMSKEY(*) is the default. This default creates a concatenated
key for all levels including the current segment.v FOP_IMSKEY(first level to use, next level to use, ...) creates a concatenated key for the levels that are
specified. The level parameters must be less than or equal to the level of the IMS segment used tocreate the relationship. For example: FOP_IMSKEY(1,3,5) where IMS segment is >= 5. The root segmentis level '1'.
Example
An IMS database, SALES has a root segment key (level 1) that is 5 characters long and a customersegment key (level 2) that is 6 characters long. A DB2 table has an 11 character column containing IMSconcatenated key information from levels 1 and 2 of the SALES database. To create a relationshipbetween the level 2 customer segment and the DB2 table, use the FOP_IMSKEY as shown.
When exit IMSKEY1 is called, the IMS concatenated key is copied to the DB2 column. The following codeshows only that portion of the exit. If needed, the key can be split and copied to several columns. See theFOPSAMP library for all code needed to create an exit./*
Check key length and abort if key is not 11 chars*/if(pExitParms->IMSKeyL != 11) {
printf("\n***Error*** IMSKeyL != 11 (%hd)\n", pExitParms->IMSKeyL);return(RC_EXIT_ABORT);
}
/*Move the IMS concatenated key to DB2 destination col
*/memcpy(pDstSQLDA->Col[0].pData, pExitParms->pIMSKey, 11);return(RC_EXIT_SUCCESS);
Populate Column NamesMost often, a relationship is composed of corresponding columns from the parent and child tables. Thereare several ways to populate the Define Relationship panel with column names.
You can:
–-----------------—---— Modify Relationship --------------------Command ===> Scroll ===> CSR
Special Commands: LIST COLUMNS, EXPAND, GENERIC, MODEL
Parent: PSIMS.CUSTOMER_IMS Child: FOPDEMO3.SALES
Exit Name ===> IMSKEY11 OF 1
Cmd Column Name Data Type Column Name Data Type--- --------------->> ---------- ------------------>> ----------*** *************************** TOP ***************************___ FOP_IMSKEY(*) *IMSKEY* IMS_CONCATKEY_DATA CH(11)*** ************************* BOTTOM***************************
Figure 80. Define relationship using FOP_IMSKEY
Chapter 4. Relationships 139
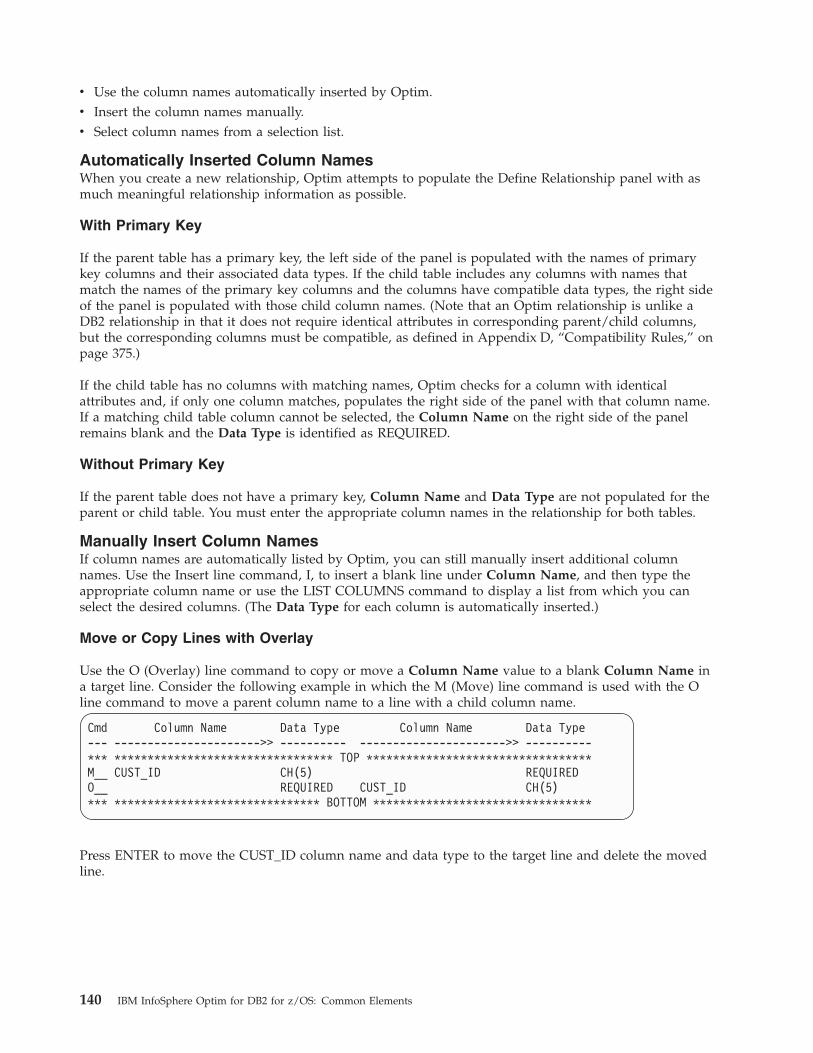
v Use the column names automatically inserted by Optim.v Insert the column names manually.v Select column names from a selection list.
Automatically Inserted Column NamesWhen you create a new relationship, Optim attempts to populate the Define Relationship panel with asmuch meaningful relationship information as possible.
With Primary Key
If the parent table has a primary key, the left side of the panel is populated with the names of primarykey columns and their associated data types. If the child table includes any columns with names thatmatch the names of the primary key columns and the columns have compatible data types, the right sideof the panel is populated with those child column names. (Note that an Optim relationship is unlike aDB2 relationship in that it does not require identical attributes in corresponding parent/child columns,but the corresponding columns must be compatible, as defined in Appendix D, “Compatibility Rules,” onpage 375.)
If the child table has no columns with matching names, Optim checks for a column with identicalattributes and, if only one column matches, populates the right side of the panel with that column name.If a matching child table column cannot be selected, the Column Name on the right side of the panelremains blank and the Data Type is identified as REQUIRED.
Without Primary Key
If the parent table does not have a primary key, Column Name and Data Type are not populated for theparent or child table. You must enter the appropriate column names in the relationship for both tables.
Manually Insert Column NamesIf column names are automatically listed by Optim, you can still manually insert additional columnnames. Use the Insert line command, I, to insert a blank line under Column Name, and then type theappropriate column name or use the LIST COLUMNS command to display a list from which you canselect the desired columns. (The Data Type for each column is automatically inserted.)
Move or Copy Lines with Overlay
Use the O (Overlay) line command to copy or move a Column Name value to a blank Column Name ina target line. Consider the following example in which the M (Move) line command is used with the Oline command to move a parent column name to a line with a child column name.
Cmd Column Name Data Type Column Name Data Type--- ---------------------->> ---------- ---------------------->> ----------*** ********************************* TOP **********************************M__ CUST_ID CH(5) REQUIREDO__ REQUIRED CUST_ID CH(5)*** ******************************* BOTTOM *********************************
Press ENTER to move the CUST_ID column name and data type to the target line and delete the movedline.
140 IBM InfoSphere Optim for DB2 for z/OS: Common Elements

Cmd Column Name Data Type Column Name Data Type--- ---------------------->> ---------- ---------------------->> ----------*** ********************************* TOP **********************************___ CUST_ID CH(5) CUST_ID CH(5)*** ******************************* BOTTOM *********************************
In contrast, consider the copy operation, which does not remove the original line. In this example, the C(Copy) line command is used with the O line command to copy a parent column name to a line with achild column name.
Cmd Column Name Data Type Column Name Data Type--- ---------------------->> ---------- ---------------------->> ----------*** ********************************* TOP **********************************C__ CUST_ID CH(5) REQUIREDO__ REQUIRED CUST_ID CH(5)*** ******************************* BOTTOM *********************************
The target line is updated and the copied line is retained.
Cmd Column Name Data Type Column Name Data Type--- ---------------------->> ---------- ---------------------->> ----------*** ********************************* TOP **********************************___ CUST_ID CH(5) REQUIRED___ CUST_ID CH(5) CUST_ID CH(5)*** ******************************* BOTTOM *********************************
If both Column Names in the target line have entries, the copy or move operation has no effect.
Literals and Constants
You can enter string/graphic/binary literals and numeric constants, as well as column names, in place ofa child or parent Column Name. The Data Type for a literal or a constant in Column Name reflects theattributes of the literal or numeric constant.
The column corresponding to a literal must have a data type of CHAR, VARCHAR, GRAPHIC,VARGRAPHIC, BINARY, or VARBINARY. You cannot specify NULL as a literal value. The literal ispreceded by an identifier (except for the string literal, which does not require an identifier) andsurrounded by delimiters. The following table shows the identifier for each type of literal and an exampleof how to specify each:
String Literal'SW012'
String Hexadecimal LiteralX'05B3'
Graphic Literal
G
Graphic Hexadecimal LiteralGX'05B305B3'
Binary Hexadecimal LiteralBX'C141C242'
Chapter 4. Relationships 141

The column corresponding to a numeric constant must have a data type of DECIMAL, INTEGER,BIGINT, or SMALLINT. Numeric constants cannot include floating point or hexadecimal values.
Data-Driven Relationships
A table is sometimes related to one of several child tables according to the values in a particular parentcolumn—in what is referred to as a data-driven relationship. As demonstrated in the preceding example,you can define such a relationship with literals. As another example, consider the following example inwhich tables are used to determine employee insurance rates for males and females.
The ID, age, and sex for each employee are in the EMPLOYEE table.
Table 6. EMPLOYEE
EMPLOYEE_ID AGE GENDER
058-44-2244 38 F
106-46-0619 40 M
248-91-2890 27 M
The FEMALE_RATES table provides age-based insurance rates for female employees. The MALE_RATEStable provides the insurance rates for male employees.
Table 7. FEMALE_RATES
AGE RATE/$1000
38 .25
39 .33
40 .43
Table 8. MALE_RATES
AGE RATE/$1000
38 .31
39 .38
40 .47
--------------------------- Define Relationship -------------------------------Command ===> Scroll ===> PAGE
Define OPTIM Relationship CUSTORDSpecial Commands: LIST COLUMNS, EXPAND, GENERIC, MODEL
Parent: FOPDEMO.CUSTOMERS Child: FOPDEMO.ORDERS1 OF 2
Cmd Column Name Data Type Column Name Data Type--- ---------------------->> ---------- ---------------------->> ----------*** ********************************* TOP **********************************___ CUST_ID CH(5) CUST_ID CH(5)___ 'SWO12’ CH(5) ORDER_SALESMAN CH(6)*** ******************************* BOTTOM *********************************
Figure 81. String Literal
142 IBM InfoSphere Optim for DB2 for z/OS: Common Elements

The EMPLOYEE table is related to the FEMALE_RATES table when the employee is female, and to theMALE_RATES table when the employee is male. To emulate this structure, you must define tworelationships.
The first relationship, between the EMPLOYEE table and the FEMALE_RATES table, is active when thevalue in the GENDER column corresponds to the string literal ‘F'. AGE, in the EMPLOYEE table,corresponds to the AGE column in the FEMALE_RATES table.
EMPLOYEEFEMALE_RATES
GENDER‘F'
AGE AGE
The second relationship, between the EMPLOYEE table and the MALE_RATES table, is identical to thefirst relationship, except the GENDER column corresponds to the string literal ‘M'.
EMPLOYEEMALE_RATES
GENDER‘M'
AGE AGE
For any row in the EMPLOYEE table, only one relationship can be satisfied because theEMPLOYEE.GENDER value can only be ‘M' or ‘F'. Once the appropriate relationship is chosen, therelated rows are identified by the values in the AGE columns.
Select Columns from a ListSelecting column names from a selection list is faster than typing them and prevents errors. Use the LISTCOLUMNS command to list columns in the parent or child table.
Use the PARENT or CHILD operands to indicate the appropriate table when requesting a columnselection list, or you can type the LIST COLUMNS command without an operand and position the cursoron the desired table name or list of columns and press ENTER to display the column selection list. Theselection list includes the data type for each column to assist you in selecting compatible columns.
For example, enter LIST COLUMNS CHILD to redisplay the Relationship editor with a selection list ofchild table columns.
Chapter 4. Relationships 143

A new column, Num, is displayed next to Column Name for the parent table and the parent columnnames are numbered, while the selection list overlays the child table area of the Relationship editor. Touse the selection list, type the number of the corresponding parent column next to the child column namein the selection list, as shown in Figure 83.
You can match as many as 64 pairs of columns by selecting from the list. If you want to select a columnor columns for which a corresponding column is not listed in the Relationship editor, type the numberfor the position in order to insert a new entry in the relationship. Additional new entries are inserted if
--------------------------- Define Relationship -------------------------------Command ===> Scroll ===> PAGE
Define OPTIM Relationship CUSTORDSpecial Commands: LIST COLUMNS, EXPAND, GENERIC, MODEL
Parent: FOPDEMO.CUSTOMERS Child: FOPDEMO.ORDERS
Cmd Num Column Name Data Ty +---------- Child Columns ---------+--- --- ---------------------->> ------- | |*** ********************************* TO | Select Columns by Matching ’Num’ |___ 1 CUST_ID CH(5) | |*** ******************************* BOTT | Num Column Name Data Type |
| --- --------------->> ---------- || *** *********** TOP ************ || ___ CUST_ID CH(5) || ___ ORDER_ID DEC(5,0) || ___ ORDER_DATE DATE || ___ ORDER_TIME TIME || ___ FREIGHT_CHARGES DEC(4,2) || ___ ORDER_SALESMAN CH(6) || ___ ORDER_POSTED_DATE TIMESTAMP || *** ********* BOTTOM *********** |+----------------------------------+
Figure 82. Child Columns
--------------------------- Define Relationship -------------------------------Command ===> Scroll ===> PAGE
Define OPTIM Relationship CUSTORDSpecial Commands: LIST COLUMNS, EXPAND, GENERIC, MODEL
Parent: FOPDEMO.CUSTOMERS Child: FOPDEMO.ORDERS
Cmd Num Column Name Data Ty +----------- Child Columns --------+--- --- ---------------------->> ------- | |*** ********************************* TO | Select Columns by Matching ’Num’ |___ 1 CUST_ID CH(5) | |*** ******************************* BOTT | Num Column Name Data Type |
| --- --------------->> ---------- || *** *********** TOP ************ || _1_ CUST_ID CH(5) || _ _ ORDER_ID DEC(5,0) || _3_ ORDER_DATE DATE || ___ ORDER_TIME TIME || _ _ FREIGHT_CHARGES DEC(4,2) || _2_ ORDER_SALESMAN CH(6) || ___ ORDER_POSTED_DATE TIMESTAMP || *** ********* BOTTOM *********** |+----------------------------------+
Figure 83. Select Child Columns
144 IBM InfoSphere Optim for DB2 for z/OS: Common Elements

you specify a series of sequential numbers that begin with a number that is one greater than the numberof the last entry, as in the above example in which the user typed 1, 2, and 3.
Use END to add the selected column names to the child table, as shown in the following figure. Noticethat the Num column is no longer displayed on the panel.
Alternatively, you can use the Select line commands, S or SS, to select columns from the selection list.These names are added, in the order shown on the selection list, at the end of the Column Name list.
ExpressionsPowerful flexibility allows you to define an Optim relationship on the basis of columns that have adifferent data structure—you can combine columns with concatenation or use the substring function toobtain partial column values.
Concatenate Columns
At times, two or more columns in a parent or child table match a single, composite column in a tablerelated by an application. To define an Optim relationship for this type of data structure, use theconcatenation operator (CONCAT or ||) in Column Name. Character and graphic data columns can beconcatenated.
For example, if a parent table includes a ZIP1 column for the first 5 digits of the ZIP code and a ZIP2column for the additional 4 digits, but the child table has only one ZIP column for the 10-character(including hyphen) ZIP code, you can define this relationship by entering one of the following in ColumnName for the parent table:ZIP1 || ZIP2 or ZIP1 CONCAT ZIP2
--------------------------- Define Relationship -------------------------------Command ===> Scroll ===> PAGE
Define OPTIM Relationship CUSTORDSpecial Commands: LIST COLUMNS, EXPAND, GENERIC, MODEL
Parent: FOPDEMO.CUSTOMERS Child: FOPDEMO.ORDERS1 OF 3
Cmd Column Name Data Type Column Name Data Type--- ---------------------->> ---------- ---------------------->> ----------*** ********************************* TOP **********************************___ CUST_ID CH(5) CUST_ID CH(5)___ REQUIRED ORDER_SALESMAN CH(6)___ REQUIRED ORDER_DATE DATE*** ******************************* BOTTOM *********************************
Figure 84. Selected Columns Inserted
Chapter 4. Relationships 145

When you use a concatenation operator, the Data Type reflects the attributes of the expression formed bythe concatenation. For example, if the data type for ZIP1 is CHAR(5) and ZIP2 is CHAR(4), the data typeof the concatenated expression is CHAR(9).
If you need more space to enter a concatenated expression, use the EXPAND command or EXP linecommand to display an expanded window to enter the appropriate column names (see page “EXPANDColumn Name Values” on page 147 for details). This method is particularly useful for specifying columnnames that are Long Object Names (LONs). Column Name LONs can be a maximum of 30 characters.
Note the following when defining a concatenated expression:v CHAR, VARCHAR, GRAPHIC, VARGRAPHIC, BINARY, and VARBINARY columns, string literals, and
substring functions can be concatenated.v Special Registers are not supported.v A zero-length string literal, usually indicated as ‘ ', is not valid in a concatenated expression.
Substring Columns
When one column in a table contains a value that is in two or more columns in another table, you mayfind it useful to use a portion of the composite column to define a relationship. Use the SUBSTR functionto select a substring of the value in a character or graphic column.
Note: You must leave a space after a comma that precedes a numeric value if the DB2 setup specifies acomma as the decimal point value.
SUBSTR ( column-name, start [, length] )
column-nameThe name of a non-numeric column with a character or graphic data type.
start The starting position of the substring as an integer greater than zero. The start value is required.
length The optional length of the substring as an integer greater than zero. If length is omitted, thesubstring consists of the value beginning at the start position and ending with the last character.The value of start plus length cannot exceed the data length for the column.
Note: The SUBSTR function is identical to the DB2 SUBSTR function except when handling acombination of character and graphic data. Since the SUBSTR parameters are character-based and theDB2 SUBSTR parameters are byte-based, when you use the functions with mixed character and graphicdata, Optim and DB2 will produce different results.
In the earlier example, the parent table includes a ZIP1 column for the first 5 digits of the ZIP Code anda ZIP2 column for the additional 4 digits, while the child table has only one ZIP column for the
--------------------------- Define Relationship -------------------------------Command ===> Scroll ===> PAGE
Define OPTIM Relationship CUSTORDSpecial Commands: LIST COLUMNS, EXPAND, GENERIC, MODEL
Parent: FOPDEMO.CUSTOMERS Child: FOPDEMO.ORDERS1 OF 1
Cmd Column Name Data Type Column Name Data Type--- ---------------------->> ---------- ---------------------->> ----------*** ********************************* TOP **********************************___ ZIP1 || ZIP2 CH(9) ZIP CH(9)*** ******************************* BOTTOM *********************************
Figure 85. Concatenated Columns
146 IBM InfoSphere Optim for DB2 for z/OS: Common Elements

9-character (excluding hyphen) ZIP code. As an alternative to concatenating ZIP1 and ZIP2, you can usethe substring function to obtain values from ZIP by entering the following in Column Name for the childtable:SUBSTR(ZIP,1,5) andSUBSTR(ZIP,6)
When you specify a substring function, the Data Type reflects the attributes of the substring.
If you need more space to enter a substring function, use the EXPAND command or EXP line commandto display the specified column in an expand window (see “EXPAND Column Name Values” for details).
Concatenate or Substring—Performance
Although these two variations are functionally equivalent and retrieve the same set of related rows, theconcatenation is more efficient than the series of substrings. In general, concatenation results in betterperformance because it directs DB2 to use an index if one is available.
The following SQL is generated for the first relationship:SELECT * FROM TABLE2
WHERE TABLE2.ZIP = ’composite value from bothparent columns’
The following SQL is generated for the second relationship:SELECT * FROM TABLE2
WHERE SUBSTR(TABLE2.ZIP, 1, 5) = ’value fromparent ZIP1 column’
AND SUBSTR(TABLE2.ZIP, 6, 4) = ’value fromparent ZIP2 column’
The second predicate in the second example references the low-order portion of a column; thus, DB2 doesnot use an index on the ZIP column, even if one exists, and must scan all rows in the table.
EXPAND Column Name Values
The space available on the Define Relationship panel may be insufficient to enter certain values inColumn Name, such as Column Name LONs and expressions using concatenation and substrings. If anentry exceeds the space available on the panel, the display is truncated and you cannot edit it directly. Insuch instances, type the EXPAND primary command, then position the cursor on the line for the desiredparent/child column pair, and press ENTER to display the Expanded Relationship Editor. Alternatively,you can use the EXP line command.
--------------------------- Define Relationship -------------------------------Command ===> Scroll ===> PAGE
Define OPTIM Relationship CUSTORDSpecial Commands: LIST COLUMNS, EXPAND, GENERIC, MODEL
Parent: FOPDEMO.CUSTOMERS Child: FOPDEMO.ORDERS1 OF 2
Cmd Column Name Data Type Column Name Data Type--- ---------------------->> ---------- ---------------------->> ----------*** ********************************* TOP **********************************___ ZIP1 CH(5) SUBSTR(ZIP,1,5) CH(5)___ ZIP2 CH(4) SUBSTR(ZIP,6) CH(4)*** ******************************* BOTTOM *********************************
Figure 86. Substring of Column
Chapter 4. Relationships 147

The Expanded Relationship Editor provides a 75-character area for both parent and child Column Namevalues. While it is displayed, you can scroll to the previous or next pair of columns using the UP,DOWN, TOP, or BOTTOM commands.
You can enter column names, string literals, numeric constants, substring functions, or concatenatedvalues. Also, the LIST COLUMNS command (described on page “Select Columns from a List” on page143) is available while the Expanded Relationship Editor is displayed. Only one column name, however,may be selected using the S line command. The selected name is added to the end of the entry, precededby the concatenation operator, ||. You can remove the concatenation operator, if desired.
Use CANCEL to abandon any changes to the current pair of columns and return to the Relationshipeditor. Any changes made prior to scrolling to the current pair of columns are retained.
Use END to return to the Relationship editor.
Model a RelationshipYou can use a DB2 or Optim relationship as a model for a new, similar relationship. On the DefineRelationship, Modify Relationship, or Browse Relationship panel, enter the MODEL command todisplay the Model New Relationship pop-up window.
--------------------------- Define Relationship -------------------------------Command ===> Scroll ===> PAGE
Define OPTIM Relationship CUSTORDSpecial Commands: LIST COLUMNS, EXPAND, GENERIC, MODEL
Parent: FOPDEMO.CUSTOMERS Child: FOPDEMO.ORDERS1 OF 3
Cmd Column Name Data Type Column Name Data Type
+-------------------------Expanded Relationship Editor-----------------3 OF 3-+| || Parent Table: FOPDEMO.CUSTOMERS Data Type: CH(3) || SUBSTR(PHONE_NUMBER,1,3) || || Child Table: FOPDEMO.ORDERS Data Type: CH(3) || AREA_CODE |+-----------------------------------------------------------------------------+
Figure 87. Expanded Relationship Editor
148 IBM InfoSphere Optim for DB2 for z/OS: Common Elements

The displayed information reflects the values for the current relationship. The name of the Parent Tablecannot be modified, but you can change the child table Creator ID and Table Name, and theRelationship Name.
If Relationship Exists
The full name of a relationship is the fully qualified child table name with the relationship name. If yourentries result in the name of a relationship already in the Directory, the following prompt is displayed. (Ifyou duplicate the name of a DB2 relationship, an error occurs.)
Press ENTER to display the Define Relationship panel for the new relationship. Use END to return to theModel New Relationship prompt to alter the table name or the relationship name. Use CANCEL to cancelthe MODEL command and return to the previously displayed panel.
---------------------------- Modify Relationship ------------------------------Command ===> Scroll ===> PAGE
Modify OPTIM Relationship CUSTORDSpecial Commands: LIST COLUMNS, EXPAND, GENERIC, MODEL
Par+------------------Model New Relationship------------------+ 1 OF 1
Cmd | | a Type--- --- | Modify Child Table or Relationship Name to Create a new | -------*** *** | relationship with the current column specifications | *******___ CUS | | 5)*** *** | Parent Table: FOPDEMO.CUSTOMERS | *******
| || Child Table: || Creator ID ===> FOPDEMO >> || Table Name ===> ORDERS >> || || Relationship Name ===> NEWREL >> |+----------------------------------------------------------+
Figure 88. Model New Relationship
----------------------------- Modify Relationship -----------------------------Command ===> Scroll ===> PAGE
+---------------------Verify MODEL Command------------------+| |
Par | The relationship name formed by the new child table name || and relationship name will conflict with an existing | 1 OF 1
Cmd | relationship. Indicate the action that should be taken. | Type--- --- | | ------*** *** | Press ENTER to Replace Existing Relationship and Proceed | ******___ CUS | Enter END Command to Alter New Table or Relationship Name | 0)*** *** | Enter CANCEL Command to Cancel MODEL Command and Return | ******
+-----------------------------------------------------------+
| Creator ID ===> FOPDEMO >> || Table Name ===> ORDERS >> || || Relationship Name ===> NEWREL >> |+----------------------------------------------------------+
Figure 89. Verify MODEL Command
Chapter 4. Relationships 149

Save and Use a RelationshipOnly a valid relationship can be saved. Use the SAVE command to save and continue editing arelationship. Use END (usually assigned to PF3) to save the relationship and return to the Choose aRelationship panel. Use CANCEL to abandon changes and return to the Choose a Relationship panel.
Optim verifies the compatibility of corresponding columns each time you press ENTER on theRelationship editor. If the columns are not compatible, an error message is displayed to identify thenature of the problem, and the cursor is positioned on the erroneous entry.
To save the relationship, you must correct any incompatibility. Information about column compatibility isprovided in Appendix D, “Compatibility Rules,” on page 375.
Effect of Database Changes
A relationship is not affected if new columns are added to a table or if columns outside the relationshipare dropped or altered. If a table referenced in a relationship is dropped, however, the relationship isinvalid and is no longer available to satisfy a JOIN request or to be used in an Extract or Archive Process.Moreover, the invalid relationship cannot be updated, but it can be deleted. Use the D line command onthe Select Relationships panel to delete the relationship.
If a column is dropped from a table or is altered so that it is incompatible with the corresponding columnin the relationship, the relationship is invalid and is not available to satisfy a JOIN request or to be usedin an Extract or Archive Process. If you attempt to update such a relationship, it is displayed in theRelationship editor with an error message indicating that it includes invalid entries. You may then correctthe column specifications.
Primary Commands
The following primary commands are available on the Define Relationship and Modify Relationshippanels. Detailed information about each command is provided in the Command Reference Manual, PrimaryCommands.
ATTRIBUTESBOTTOMCANCELCAPSCLEARDELETEDOWNENDEXPANDGENERICLIST COLUMNSMODELRESETSAVETOPUP
150 IBM InfoSphere Optim for DB2 for z/OS: Common Elements

Description
You can edit the description that appears in selection lists for an Optim relationship. To do that, use theATTRIBUTES command to display the Object Attributes panel, and then type an up to 40-characterDescription at the prompt. For additional information about the Object Attributes panel, see “SpecifyDescription and Security Status” on page 325.
CLEAR
The CLEAR command removes all column specifications from the Define Relationship or ModifyRelationship panel. This command is useful when you want to completely redefine the relationship.
Delete a Relationship
The DELETE command deletes the currently displayed relationship and redisplays the previous panel.You can also delete the displayed relationship with the END command after you delete or blank-out allcolumn entries.
Convert to a Generic Relationship
To convert an explicit relationship to a generic relationship, use the GENERIC command. Enter theGENERIC command on the Modify Relationship, the Define Relationship, or the Browse Relationshippanel to convert the displayed explicit relationship into a generic relationship. The GENERIC commandconverts only relationships in which both tables have the same Creator ID. If the tables do not have thesame Creator ID, an error message is displayed.
If a generic relationship already exists, a prompt requests confirmation to override it. If you areconverting a relationship for which a generic relationship does not exist, the following pop-up promptsyou to delete or retain the original, explicit relationship.
If the name matches that of an existing generic relationship, a confirmation prompt is displayed. You maythen decide whether to replace the existing generic relationship.
---------------------------- Modify Relationship ------------------------------Command ===> Scroll ===> PAGE
Modify OPTIM Relationship CUSTORDSpecial Commands: LIST COLUMNS, EXPAND, GENERIC, MODEL
Parent: FOPDEMO.CUSTOMERS Child: FOPDEMO.ORDERS1 OF 1
Cmd TYPE--- -- +-----------------Confirm GENERIC Processing-----------------+ ------*** ** | | ******___ CU | Press ENTER to Delete Existing Explicit Relationship | )*** ** | Enter END Command to Retain Existing Explicit Relationship | ******
| Enter CANCEL Command to Return to Relationship Editor |+------------------------------------------------------------+
Figure 90. Confirm GENERIC Processing
Chapter 4. Relationships 151

Once converted, you can edit the generic relationship as you would an explicit relationship, usingtechniques described in this section.
Edit a Generic RelationshipFor various site-specific reasons, a database may include several identical sets of tables, with the samebase names, columns, and attribute specifications, but different Creator IDs. This arrangement might beuseful in a test environment, for example, to provide a discrete set of tables and data for each softwaredeveloper or group of developers. As another example, a provider of administration services mightmaintain a set of tables for each client's data. For your convenience in these and similar instances, youcan define a generic relationship that applies to all tables with the same base name, regardless of CreatorID.
There is no difference in function or appearance between generic relationships and explicit relationships.Explicit relationships, however, take precedence over generic relationships, so if an explicit relationshipexists for a specific pair of tables, it is used, instead of any generic relationship that might exist.
Generic relationships are identified with an asterisk (*) in the Creator ID. You can convert an existingrelationship to a generic relationship, or you can create a generic relationship using the same methodsused to create an explicit relationship, as described on page “Convert to a Generic Relationship” on page151. The tables used to define or modify a generic relationship must have the same Creator ID. When ageneric relationship is used to join tables or extract or archive data, however, the tables are not requiredto have the same Creator ID.
Create or Modify a Generic Relationship
To edit or create a generic relationship, select Option 6.2 Relationships from the Main Menu, or selectOption 6 DEFINITIONS to display the Choose a Definition Option menu and then Option 2RELATIONSHIPS to display the Choose a Relationship panel. Type an asterisk in Creator ID and thedesired table name or use DB2 LIKE syntax in Table Name. After choosing the appropriate option (i.e., 1to Create or 2 to Modify), press ENTER to display a pop-up, prompting for Creator ID, as shown below.
---------------------------- Modify Relationship ------------------------------Command ===> Scroll ===> PAGE
Modify OPTIM Relationship CUSTORDSpecial Commands: LIST COLUMNS, EXPAND, GENERIC, MODEL
Parent: FOPDEMO.CUSTOMERS Child: FOPDEMO.ORDERS1 OF 1
C- +------------------Confirm GENERIC Override Processing------------------+* | |
| Generic Relationship With Same Name Already Exists |- | |* | Press ENTER to Confirm Override of Existing Generic Relationship |
| Enter END Command to Cancel Override of Existing Generic Relationship |+-----------------------------------------------------------------------+
Figure 91. Generic Relationship Override Confirmation
152 IBM InfoSphere Optim for DB2 for z/OS: Common Elements

Type a Creator ID and press ENTER to display the Create a New Relationship pop-up.
The table name entered on the Choose a Relationship panel is displayed as the Specified Table, and anasterisk is in Other Table: Creator ID. These values cannot be modified. Provide the Table Name for thesecond table. When the panel is displayed for the first time, the Table Type for the Specified Table isshown as C for child, with the Other Table as the parent. If you want the Specified Table to be theparent table and the Other Table to be the child, you can change the Table Type to P. The value youspecify for Table Type is profiled.
Press ENTER to display the Define Relationship panel (refer to “Edit or Browse a Relationship” on page130).
Modify a Generic Relationship
If modifying a generic relationship, you are prompted for a Creator ID to identify the base tables. You arenot required to specify the same Creator ID that was used to create the generic relationship, however, allcolumns referenced in the relationship must be included in the tables. If the columns are not contained inthe tables indicated by the specified Creator ID, you are prompted to specify a different Creator ID or
---------------------------- Choose a Relationship ----------------------------OPTION ===> SCROLL ===> PAGE
1 CREATE - Create a Relationship for Specified Parent or Child Table2 MODIFY - Modify a Relationship for Specified Child Table3 LIST - List All Relationships for Specified Table
Specify Table Name (Child for OPTION 2, Parent or Child for OPTIONS 1 and 3)Creator ID ===> * >>Table Name ===> CUSTOMERS >>
Specify RelaRelationsh +-----------------CreatorID Prompt---------------+
| |Specify Rela | Relationship Definition Involves a Generic Key |
Relationsh | Supply a CreatorID for Base Tables | MS, A-All)| |
Use ’_’ for | Press ENTER Key or Enter END Command when Done || Enter CANCEL Command to Exit Key Definition || || CreatorID ===> FOPDEMO >> |+------------------------------------------------+
Figure 92. Specify Creator ID for Base Tables
+--------------------------Create a New Relationship-------------------------+| || Specified Table : *.CUSTOMERS || Table Type ===> P (P-PARENT, C-CHILD) || || Leave blank or include wild cards for Table Selection List || || Other Table: (Base Creator ID: FOPDEMO) || Creator ID : * >> || Table Name ===> ORDERS >> || || Relationship Name ===> TEST >> |+----------------------------------------------------------------------------+
Figure 93. Create New Generic Relationship
Chapter 4. Relationships 153

override the existing generic relationship. If you elect to override, the existing generic relationship isdeleted and you can redefine the generic relationship.
For example, when you select Option 2 MODIFY for a generic relationship named *.ORDERS.CUSTORD,with the CUSTOMERS table as the parent and the ORDERS table as the child, the CreatorID prompt isdisplayed.
Once a Creator ID is specified, the Modify Relationship panel is displayed, as shown in the followingfigure.
You can modify a generic relationship using the same functions used to modify an explicit relationship.
---------------------------- Choose a Relationship ----------------------------OPTION ===> SCROLL ===> PAGE
1 CREATE - Create a Relationship for Specified Parent or Child Table2 MODIFY - Modify a Relationship for Specified Child Table3 LIST - List All Relationships for Specified Table
Specify Table Name (Child for OPTION 2, Parent or Child for OPTIONS 1 and 3)Creator ID ===> * >>Table Name ===> ORDERS >>
Specify RelaRelationsh +----------------CreatorID Prompt----------------+
| |Specify Rela | Relationship Definition Involves a Generic Key |
Relationsh | Supply a CreatorID for Base Tables | MS, A-All)| |
Use ’_’ for | Press ENTER Key or Enter END Command when Done || Enter CANCEL Command to Exit Key Definition || || CreatorID ===> FOPDEMO >> |+------------------------------------------------+
Figure 94. Prompt for Creator ID
--------------------------- Modify Relationship -------------------------------Command ===> Scroll ===> PAGE
Modify GENERIC Relationship CUSTORD using Base Creator ID FOPDEMOSpecial Commands: LIST COLUMNS, EXPAND, GENERIC, MODEL
Parent: *.CUSTOMERS Child: *.ORDERS1 OF 1
Cmd Column Name Data Type Column Name Data Type--- ---------------------->> ---------- ---------------------->> ---------*** ********************************* TOP *********************************___ CUST_ID CHAR(5) CUST_ID CHAR(5)*** ******************************* BOTTOM ********************************
Figure 95. Modify Generic Relationship
154 IBM InfoSphere Optim for DB2 for z/OS: Common Elements

Chapter 5. Column Maps
A Column Map provides specifications needed to direct data from source columns to destinationcolumns, match pairs of columns from separate tables for a Compare Process, or exclude columns fromprocessing. You can use a Column Map for a pair of tables regardless of Creator ID or table name.
For example, a Column Map defined to map columns in a table named FOPDEMO.CUSTOMERS to thosein a table named TEST.CUSTOMERS can also be used to map the identical tables PROD.CUSTOMER1and QA.CUSTOMERS.
A Convert, Insert, Load, Restore, or multi-table Compare Process requires a Table Map, which mayreference one or more Column Maps. A Compare Process for a single table comparison may reference aColumn Map directly. Column Maps stored in the Optim Directory are available for reuse or sharing withother users. A local Column Map is stored as part of a Table Map or Compare Request and is otherwisenot available.
A Column Map must be used when column names or attributes do not match, when datatransformations are needed, or when one or more columns are excluded from processing. A Column Mapused in a Convert, Insert, Load, or Restore Process can modify data. In a Convert, Insert or Load Processa Column Map can age dates. Advanced methods allow you to split data from one table into severaltables or copy one source column to several destinations. Column Maps also allow you to create a singledestination table from the data in a joined view. A Column Map cannot transform data during a CompareProcess, however.
For data transformations that are beyond the capacity of a Column Map, you can specify an exit routine.(Exit routines, programs written in Assembler, VS COBOL II, PL/I, or C programming language, arediscussed in “Exit Routines for Source Column Values” on page 174.)
Column Maps provide great control and flexibility for Archive, Move, and Compare Processes. Forexample, you can use a Column Map to bypass selected source columns for one process and a differentColumn Map to incorporate those columns in a different process.
Compare Column Maps can be used with Archive and Move Processes; however, Column Maps thatmodify data cannot be used with Compare.
Move and Archive Column Maps
Typically, in Archive and Move processing, source values are derived from the source columns. A ColumnMap, however, allows you to modify data and specify a variety of values for the destination. You can:v Mask sensitive data.v Insert literals, default values, or DB2 special registers into columns.v Propagate changes in primary key or foreign key values to all related tables in the process.v Derive values, using expressions or custom exit routines, to insert into destination columns.v Adjust date values in numeric, DATE, and TIMESTAMP columns. (MOVE only)
A Legacy Table, used with Move or Compare for IMS, VSAM, and Sequential Files, describes legacy data foruse with Optim. You can apply a Column Map to columns (fields) in a Legacy Table as though it were aDB2 table.
© Copyright IBM Corp. 1991, 2013 155

Compare Column Maps
For Compare processing, Column Maps allow you to pair Source 1 and Source 2 columns with dissimilarnames or compatible data types and exclude specific columns from the Compare Process. Also, you canmatch dissimilarly named columns from two source tables for a Match Key definition. A Column Mapused in a Compare Process cannot modify data.
Note: In this chapter, references to the source table also apply to the Compare Source 1 table andreferences to the destination table apply to the Source 2 table.
Select a Column MapYou can enter the name of a new Column Map on a Table Map panel or the Specify COMPARE Sourcespanel to display the Column Map editor or select Option 6.3 Column Maps from the Main Menu.
You can also select Option 6 DEFINITIONS to display the Choose a Definition Option menu (see“Choose a Definition Option” on page 12 ) and select Option 3 COLUMN MAPS. If using Option 6, theChoose a Column Map panel is displayed. Use this panel to name a new Column Map or to select anexisting Column Map to modify or delete.
Panel
The Choose a Column Map panel includes:
Column Map:The Map ID and Map Name for the Column Map. You can enter an explicit value, DB2 LIKEsyntax, or blanks for these prompts in any combination.
Map IDThe Map ID for the Column Map that is being created or modified. The default is the previouslyentered value. Specify 1 to 8 characters.
Map NameThe name of the map that is being defined or modified. Specify 1 to 12 characters.
Note: You can enter the name of an existing Column Map to use as a model for the Column Mapyou wish to create. After editing the Column Map, save it under a different name.
Use '_' for DB2 LIKE characterUse of the underscore ( _ ) character. Specify Y if the underscore is used as a DB2 LIKE characteror N if it is used literally as part of the name.
For example, depending upon the use of the underscore character, A_B is a three-character namecontaining the characters 'A_B', as entered, or a three-character name that begins with “A” andends with “B” with any valid character in the middle. The default is N, which means that “_” isnot recognized as a DB2 LIKE character.
------------------------------ Choose a Column Map ----------------------------Command ===>
Column Map:Map ID ===>Map Name ===>
Use ’_’ for DB2 LIKE character ===> YES (Y-Yes, N-No)
Rules used to validate Column Map ===> M (M-Move/Archive, C-Compare)
Figure 96. Choose a Column Map
156 IBM InfoSphere Optim for DB2 for z/OS: Common Elements

Rules used to validate Column MapSetting to apply Archive or Move validation rules or Compare validation rules. This prompt isdisplayed if Compare is installed. Specify:
M Comply with rules for Archive or Move.
C Comply with rules for Compare.
Archive and Move support mapping columns with compatible attributes, eliminating columnsfrom processing, and modifying data. Compare only allows mapping of columns with compatibleattributes and elimination of columns from processing.
Naming Conventions
Logical naming conventions for Column Maps help you organize the maps and identify their use. Forexample, all maps created by a specific user could share a common Map ID, with the Map Namereflecting specific projects. Thus, FOPUSER.INVCUST, FOPUSER.ACCTCUST, and FOPUSER.TSTCUSTmight be names for Column Maps created by the user FOPUSER. Each Column Map might apply to thesame destination CUSTOMERS table, with the source mapping varied according to the application to betested. The Column Maps of another user who tests different processes from the same applicationsagainst different data in the same table might be named FOPUSER2.INVCUST, FOPUSER2.ACCTCUST,and FOPUSER2.TSTCUST.
In other circumstances, one set of maps might be used to mask information in certain columns, whileanother set, available only for use by authorized personnel, might be used for processes that includesensitive data.
Also, logical naming conventions enhance the usefulness of the POPULATE command, whichautomatically inserts the names of Column Maps into a Table Map panel.
Explicit Names
When you supply an explicit Map ID and Map Name and the Column Map does not exist, the SpecifyColumn Map Tables panel is displayed, allowing you to specify the names of tables with columns thatwill be mapped. If the Column Map exists, the Modify Column Map panel is displayed.
Selection List
A selection list is requested by using DB2 LIKE syntax or leaving one or both prompts blank as criteria.Column Maps that match the criteria are listed on the Select Column Maps panel. If no Column Mapssatisfy the criteria, a message is displayed.
Validation Rules
When creating a Column Map, you must consider the purpose of the Column Map and the Optimcomponent with which it is used. A single Column Map can be used with Archive to restore data, withCompare to select data for comparison, or with Move to migrate extracted data to other tables orplatforms.
A Column Map defined for a Compare Process can be used in Archive or Move processing; however, theArchive and Move functions are not available to Compare, and a Column Map defined for Compareprocessing may not provide functions needed for Archive and Move. Therefore, you may want to usenaming conventions or other means to segregate Column Maps defined for Compare processing.
Chapter 5. Column Maps 157

Column Map Selection ListThe setting for Rules used to validate Column Map on the Choose a Column Map panel determines theformat of the selection list and the rules applied to a selected Column Map. If you select Archive andMove rules, the selection list identifies the source and destination tables and Archive and Move rulesapply to the selected Column Map. If you select Compare rules, the selection list identifies the Source 1and Source 2 tables and Compare rules apply to the selected Column Map.
An example of a Column Map Selection List when Archive and Move rules are selected is shown in thefollowing figure.
Column Maps that match the criteria are listed. The Map ID and Name are displayed, as well as CreatorID and Table Name for source and destination tables.
Description
A User Option determines whether the description of each Column Map is displayed on this panel. See“User Options” on page 318 for information about the Selection List Format option.
Line Commands
The Cmd area on the left side of the panel is used to enter line commands. The following line commandsare available:
Cmd The line command entry area. Valid line commands are:
S Select a Column Map.
D Delete a Column Map.
C Copy a Column Map.
R Rename a Column Map.
AT Modify attributes of a Column Map.
I Display information about a Column Map.
See “Object Selection List Functions” on page 15 for more information about available commands.
Select a Column Map
Use the S line command or the SELECT primary command to select a Column Map to display in theModify Column Map panel. If the source table or file for the Column Map does not exist, the SpecifyColumn Map Tables panel is displayed, prompting for source and destination table names. After you
--------------------------- Select Column Maps --------------------------------Command ===> Scroll ===> PAGE
Line Cmds: S-Select, D-Delete, C-Copy, R-Rename, AR-Attr, I-Info 1 of 8
-------- Map -------- -------- Source --------- ------ Destination ------Cmd ID Name Creator Table Creator Table--- -------- ---------––- ------>> -------------->> ------>> -------------->>
******************************* TOP ************************************___ ARC1997 ORDERS FOPDEMO ORDERS RESTORED ORDERS___ ARC1997 FOPCUST FOPDEMO CUSTOMERS RESTORED CUSTOMERS___ ARCHIVE TEST OPTIM SHIP_TO RESTORED SHIP_TO___ ARCHIVE TEST2 OPTIM CUSTOMERS FOPDEMO CUSTOMERS
Figure 97. Select Column Maps
158 IBM InfoSphere Optim for DB2 for z/OS: Common Elements

provide the table names, the Define Column Map panel is displayed, allowing you to define a ColumnMap. (The Modify Column Map panel is the same as the Define Column Map panel, and is described in“Column Map Editor” on page 162.)
You can also use the SELECT primary command to display a Column Map that is not included on theselection list. For example, to select the Column Map named FOPDEMO.TESTMAP, enter:
SELECT FOPDEMO.TESTMAP
If the Column Map named on the SELECT primary command does not exist, the Specify Column MapTables panel is displayed to allow you to create a new Column Map.
Column Map Attributes
To display the attributes of a Column Map, type I in Cmd next to the name of the Column Map. Thefollowing figure shows the read-only Column Map Attributes panel for an Archive or Move ColumnMap, which includes Source Table and Destination Table. Compare Column Maps will include Source 1Table and Source 2 Table information.
This is a read-only display. Optim generates and maintains the information on this panel based on yourspecifications for the Column Map. Number of Columns is the number of columns in the destinationtable, while Source Type indicates whether the source is a database table (TABLE), a table in an Extractor Archive File (FILE) or no table was provided (NONE). Note that Extract File Name is blank unlessSource Type is FILE. Validations indicates whether the Column Map was validated when created.
Tables for a Column MapCreating a Column Map requires information about the tables that are mapped. The Specify Column MapTables panel prompts for the names of source and destination tables or, for a Compare Process, the namesof Source 1 and Source 2 tables. These tables provide information (column names and data types) used topopulate the Column Map editor.
You must provide information about the destination, but can create a Column Map without identifying aSource or Source 1 table, manually entering the source information instead. The Specify Column MapTables panel is displayed when you provide the name of a new Column Map or specify “LOCAL” whileediting a Table Map or if you provide the name of a new Column Map on the Choose a Column Map
----------------------------- Column Map Attributes ---------------------------Command ===>
ID : ARC1997Name : ORDERS
Description :Security Status : PRIVATELast Modified By : FOPDEMOModified On : 2010-08-02 10.36.05
Number of Columns : 8Destination Table : RESTORED.ORDERS
Source Type : FILE
Extract File Name : FOPDEMO.ARCHIVE.FILESource Table : FOPDEMO.ORDERSValidations : YES
Figure 98. Column Map Attributes
Chapter 5. Column Maps 159

panel. This panel is also displayed if, from the Select Column Maps panel, you select a Column Map forwhich a source file or table does not exist.
The prompts for Destination or Source 2 table include:
Use Destination Columns From an Existing Table:The Creator ID and Table Name for the Destination or Source 2 table. You can enter an explicitvalue, DB2 LIKE syntax, or blanks for these prompts in any combination.
Creator IDThe Creator ID for the Destination or Source 2 table. The default is the SQL ID for thecurrent user. Specify 1 to 128 characters.
Table NameThe name of the Destination or Source 2 table. Specify 1 to 128 characters.
Note: See “Long Object Names (LONs)” on page 8 for information on entering Creator IDs andTable Names of up to 128 characters.
The prompts for Source or Source 1 table include the following:
Use Source Columns From:The Source or Source 1 table for Column Name and Data Type information used to populate theColumn Map editor. Optionally specify a table in an Extract or Archive File, a DB2 table, or aLegacy Table.
Note: Only one type of source entry is allowed. You cannot specify both file and table entries.
An Extract File:
DSN of Extract FileThe name of an Extract or Archive File for the Source or Source 1 table. Specify the nameof a file (on disk, not tape) explicitly by enclosing it in quotes; otherwise the default DataSet Prefix, specified on the User Options panel, is prefixed to the name. You can obtain aselection list of data sets by using a wildcard character in the last position.
Extract TableThe fully qualified name of the Source or Source 1 table in the file (e.g.,FOPDEMO.ORDERS). Use DB2 LIKE syntax or leave blank to select from a list of tablesin the file.
---------------------------- Specify Column Map Tables ------------------------Command ===> SCROLL ===> PAGE
Specify Destination Table (Required) and Source Table (Optional)for Column Map ARCDEMO.ORDERS
Use Destination Columns From an Existing Table:Creator ID ===> RESTORED >>Table Name ===> ORDERS >>
Use Source Columns From:An Extract File:
DSN of Extract File ===> ’FOPDEMO.ARCHIVE.FILE’Extract Table ===> FOPDEMO.ORDERS >>
Or, an Existing Table (Use LIKE Syntax for List):Source Creator ID ===> >>Source Table Name ===> >>
Figure 99. Specify Column Map Tables
160 IBM InfoSphere Optim for DB2 for z/OS: Common Elements
Or, An Existing Table:
Source Creator IDThe Creator ID for the Source or Source 1 table. Specify 1 to 128 characters.
Source Table NameThe name of the Source or Source 1 table. Specify 1 to 128 characters.
You can enter an explicit value or DB2 LIKE syntax for both prompts in any combination, or for asingle prompt with blanks for the other.
Source or Source 1 TableThe Column Map must reside in the Optim Directory for the Destination or Source 2 subsystem. In mostcases, you are connected to the Destination or Source 2 subsystem when defining a Column Map andwould typically select a Source or Source 1 table from an Archive or Extract File used in the process forwhich the Column Map is defined. If a file is not available, you can select a database or Legacy Table asthe source for column names. If you are processing data across DB2 subsystems, however, only a sourcetable in an Archive or Extract File is available.
No Source Table
In certain circumstances, you may not have access to either the source table or the Archive or Extract File.If so, you can create a Column Map without identifying a source table and manually enter the columnnames that map to the Destination or Source 2 columns. Since Optim cannot reference definitions for themanually entered source columns, validation is performed during processing.
Leave the Use Source Columns From: prompts on the Specify Column Map Tables panel blank to indicatethere is no source table. A prompt is displayed to confirm that a source table is not desired. Press Enter toproceed with the Column Map definition. Use END to return to the Specify Column Map Tables panel,where you can identify a source table.
Multiple Source Tables
When creating a Column Map manually, you can sometimes avoid errors and labor from typing sourcecolumn names by using the CHANGE TABLES command to return to the Specify Column Map Tablespanel. Enter the name of a table that has needed source column names and press Enter to return to theColumn Map editor. Any previous Source Column entries are retained and you can use the LISTUNUSED or LIST ALL commands to select names of columns. You can use CHANGE TABLE and LISTseveral times to collect source column names from accessible tables to avoid typing each source columnname.
For example, assume you do not have access to the source table and the destination table contains 100columns. One method of inserting the source column names in the Column Map is to type the 100entries. However, if an accessible table contains columns with 50 of the needed names, you can useCHANGE TABLE and specify this table as the source for the Column Map. Then, you can use LIST toinsert the 50 names rather than type them. Also, if a second table includes another 25 columns withneeded names, you can reuse CHANGE TABLE and LIST to include those names. In fact, since thedestination table may include many of the needed source column names, you can specify it as the sourcein order to list those names in the Column Map.
Using CHANGE TABLE is a convenient way to avoid typing in names of source columns that are presentin other tables. Note that you can turn validation off in order to save a Column Map created from severalsources. See “Validate Column Map” on page 166 for additional information.
Chapter 5. Column Maps 161

Column Map EditorAfter you identify the tables on the Specify Column Map Tables panel and press Enter, the Column Mapeditor is displayed, listing the Destination or Source 2 columns and data types with any matching sourcecolumns. The Column Map editor is also displayed from the Table Map editor or from the SpecifyCOMPARE Sources panel, when you enter the name of a new Column Map or use the MAP command.
The Column Map editor is labelled as the Define Column Map panel when you provide the name of anew Column Map, and the Modify Column Map panel when displayed from the Table Map editor or youenter the name of an existing Column Map. In the initial display for a new Column Map, destinationcolumns are automatically paired with any source columns with compatible data types that have thesame name. Source 1 and Source 2 columns are paired automatically if both name and attributes (datatype and precision) match exactly.
The Column Map editor includes:
Cmd The line command area. Valid line commands on the Define/Modify Column Map panel are:
CLR Clear Source or Source 1 Column entry.
D Delete entries with UNKNOWN status.
EXP Display Source or Source 1 Column entry in a 75-character pop-up window to specify acolumn value.
I Display status information about a source and destination pairing. Useful for *ERROR*status.
SRC Replace Source or Source 1 Column entry with name of Source Column.
AGE Display AGE function prompts (Move only).
Source or Source 1
The fully qualified name of the Source or Source 1 table is displayed above the headings:
ColumnThe value that is mapped to the Destination or Source 2 Column listed on the same line. For aCompare Process, specify a source column name or blanks. For processes other than Compare,
-- Define Column Map: ARC1997.ORDERS ------------------------------------------Command ===> Scroll ===> PAGE
Corresponding Columns MUST Have Compatible Data TypesUse LIST UNUSED Command for List of Unused Source ColumnsUse LIST ALL Command for List of All Source Columns VAL ON
MOVE1 OF 8
--------FOPDEMO.ORDERS---------- -------------RESTORED.ORDERS-------------Cmd Source Column Data Type Num Destination Column Data Type Status--- ------------------->> ---------- --- ------------------ ---------- -------*** *********************************** TOP ***********************************___ ORD_ID CH(5) 1 ORD_ID CH(5) EQUAL___ 2 CUST_ID CH(5) NOTUSED___ 3 ORDER_DATE DATE NOTUSED___ 4 ORDER_TIME TIME NOTUSED___ 5 FREIGHT_CHARGES DEC(4,2) NOTUSED___ ORDER_SALESMAN CH(6) 6 ORDER_SALESMAN CH(6) EQUAL___ 7 ORDER_POSTED_DATE TIMESTAMP NOTUSED___ ORDER_SHIP_DATE CH(8) 8 ORDER_SHIP_DATE CH(8) EQUAL*** ********************************* BOTTOM **********************************
Figure 100. Define Column Map - Initial Column List
162 IBM InfoSphere Optim for DB2 for z/OS: Common Elements

you can also enter a literal, an expression, a function, an exit routine, a special register, or NULL.Valid entries vary according to the destination Data Type.
Note: If you eliminate a foreign key column from a Compare Process by eliminating the Source 1value, the relationship cannot be used to determine whether related changes have occurred. Also,to use a Match Key in a Compare Process, all Match Key columns must be processed. If you omita primary key column from the Compare Process, you are prompted to specify a Match Key fromcolumns in the Column Map.
Data TypeThe data type for the source. Generally, Data Type is blank if the Source Column value is not thename of a column in the current source table. When the Source Column entry is an AGE functionspecification, however, the data type is either blank or PROP (if the aged value is to bepropagated).
The data types for source and destination must be compatible. See Appendix D, “CompatibilityRules,” on page 375 for more information.
The data type is automatically supplied and cannot be modified. Generally, the DB2 or Legacydata type is displayed; however, due to space limitations, the following data types areabbreviated. Data types are shown, followed by the abbreviations:
CHARCHAR FOR MIXED DATA
CH
VARCHARVCH
LONG VARCHARLVR
DECIMALDEC
FLOAT 4-byte lengthSNGL FLOAT
FLOAT 8-byte lengthDBL FLOAT
BLOB BL
CLOB CL
CLOB FOR MIXED DATACLOB
GRAPHICGR
VARGRAPHICLONG VARGRAPHIC
VGR
BINARYBIN
VARBINARYVARBIN
Chapter 5. Column Maps 163

Destination or Source 2
The fully qualified name of the Destination or Source 2 table is displayed above the headings:
Num A sequential number assigned, in ascending order, to each Destination or Source 2 column. Usethese values with source column selection lists or the EXPAND command.
Num is populated for columns in the current destination table only.
ColumnThe read-only names of the Destination or Source 2 columns listed in the order defined in thetable.
Data TypeThe data type for the Destination or Source 2 column. Data Type is blank if the column is not inthe current destination or source table. Due to space limitations, some data types are abbreviated.For more information, see the Source or Source 1 Data Type description above.
Status The status of each column pairing. The matched pairs are assigned the status EQUAL orMAPPED. Any pair that does not match is assigned NOTUSED or REQUIRD status.
EQUALThe columns have the same name, data type, and length.
*ERROR*The specified mapping is invalid. A Column Map cannot be saved with columns in*ERROR* status. Use the I line command to determine the reason for the error.
EXIT The source column value is determined by a site-provided exit routine.
EXPR The source column value is an expression or a function.
LITERALThe source column value is a literal.
MAPPEDThe columns do not have identical data types or length but are compatible. This statusalso applies to mapped columns that are not validated.
NOT_INSA value cannot be inserted into the column. For example, the column may be anexpression in a view.
NOTUSEDNo source entry is specified. For load or insert processing, the default value for thedestination column is inserted. For update processing, the value in the destinationcolumn is not updated. The column does not participate in a Compare Process.
NULL The source column value is NULL.
REQUIRDNo source column value is provided and the destination column is defined as NOTNULL (with no default column value). For update processing, the value in the destinationcolumn is not updated. For insert processing, a value is required.
When you save a Column Map with columns in REQUIRD status, a confirmation promptreminds you that the Column Map can be used only to update rows. Press Enter to savethe Column Map or use END to return to the editor from this pop-up.
Note:
v You cannot use a Column Map with columns in REQUIRD status for insert or loadprocessing.
v You cannot use a Column Map with a primary key column in REQUIRD.
164 IBM InfoSphere Optim for DB2 for z/OS: Common Elements

SPC_REGThe source column value is a special register.
TRANSFMThe source column value is a data privacy transformation library function.
UNKNOWNThe column does not exist in the current Destination or Source 2 table. This status mayoccur if the column is dropped from the destination table after the map is created or ifthe destination table specification is changed.
Use the D line command or the DELETE UNKNOWN primary command to delete entriesin UNKNOWN status and adjust the column count.
Available Commands
The following primary commands are available:
ATTRIBUTES DELETE UNKNOWN SAVE
BOTTOM DOWN SHOW
CANCEL END TOP
CAPS EXPAND UP
CHANGE TABLE LIST ALL/UNUSED VALIDATION
CLEAR RESET
Column Map Description
Use the ATTRIBUTES command to display the Object Attributes panel, which allows you to specify adescription for the Column Map. This panel provides a 40-character area to display and edit thedescription. (Site management determines whether this panel also displays a prompt for Security Status.)For additional information about the Object Attributes panel, see “Specify Description and SecurityStatus” on page 325.
SAVE
After editing a Column Map, you can save it under a different name, using the SAVE command with thefully qualified name as an operand. If you invoked the Column Map editor from the Table Map editor orthe Specify Compare Sources panel, you can also use SAVE LOCAL to save the Column Map as part ofthe Table Map or Compare Definition.
Manage DisplayBy default, all Destination or Source 2 columns are displayed in the Column Map editor. When the list ofcolumns is extensive, you can use the SHOW command to limit the display to columns having a specificstatus. This command is useful, for example, to focus on columns that have not been mapped.
To display columns that have NOTUSED status, enter:SHOW NOTUSED
For example, after entering the command on the panel in Figure 100 on page 162, the following isdisplayed.
Chapter 5. Column Maps 165

Use SHOW or SHOW ALL to redisplay all destination columns, regardless of status.
Add Destination Columns
To add Destination or Source 2 columns to the Column Map, use the CHANGE TABLE command toredisplay the Specify Column Map Tables panel and change the destination table name. When youredisplay the Column Map editor, the names of columns from the newly specified destination table arelisted above those from any previous destination tables.
Note: The CHANGE TABLE command is not available when the Column Map editor is invoked from theTable Map editor. However, you can change the name of the destination table from the Table Maps.
Clearing Source Columns
While editing the Column Map, you may want to remove one or more source column specifications. Youcan use the CLEAR primary command to remove all source column specifications or the CLR linecommand to remove the specifications for a single column.
The CLR line command is especially useful for clearing values that have been entered on the expandedsource column display. You can remove these specifications without invoking the expanded display.Using CLR or CLEAR is the only way to remove the AGE function.
Edit Source Column ValuesIn addition to automatic mapping of source to Destination or Source 2 columns, you can explicitly enter avalue using one of the following methods:v Selecting from a list.v Typing a value such as a column name, literal, constant, or expression.v Specifying a site-defined exit routine.
Validate Column MapWhen you specify a source column value and press Enter, Optim confirms, to the extent possible, that theentry is compatible with the Destination or Source 2 column. Optim also validates that any specialregisters, functions, and expressions use the proper syntax and are appropriate for destination columns.
-- Define Column Map: ARC1997.ORDERS ------------------------------------------Command ===> Scroll ===> PAGE
Corresponding Columns MUST Have Compatible Data TypesUse LIST UNUSED Command for List of Unused Source ColumnsUse LIST ALL Command for List of All Source Columns VAL ON
MOVE1 OF 5
--------FOPDEMO.ORDERS---------- -------------RESTORED.ORDERS-------------Cmd Source Column Data Type Num Destination Column Data Type Status--- ------------------->> ---------- --- ------------------ ---------- -------*** *********************************** TOP ***********************************___ 2 CUST_ID CH(5) NOTUSED___ 3 ORDER_DATE DATE NOTUSED___ 4 ORDER_TIME TIME NOTUSED___ 5 FREIGHT_CHARGES DEC(4,2) NOTUSED___ 7 ORDER_POSTED_DATE TIMESTAMP NOTUSED*** ********************************* BOTTOM **********************************
Figure 101. Display NOTUSED Columns
166 IBM InfoSphere Optim for DB2 for z/OS: Common Elements

By default, Optim validates the data types of paired columns to ensure that they are compatible. Anyvalidation errors are indicated by *ERROR* status. You can obtain an explanation of the error by usingthe I line command. You cannot save a Column Map with an *ERROR* status.
When a source table is specified in a Column Map, validation confirms that the Insert, Restore, Convert,or Load Process will operate properly. However, if you use multiple tables to obtain source columnnames, you can disable validation to allow you to save the Column Map. For example, you shoulddisable validation if you choose column names from one table and then select additional column namesfrom another table that does not include the columns from the first table. You should also disablevalidation when the data types of the source columns used in a process are different from the data typesof the columns used to provide the source column names.
Note that Optim always validates the compatibility of source and destination columns during a processthat uses a Column Map.
Disable Validation
Use the VALIDATION command to enable or disable validation. To disable automatic validation, enter:VAL OFF
To enable validation, enter:VAL ON
If validation is ON, a pairing of a column in the source table that matches exactly the destination columnis identified by the EQUAL status. If validation is OFF, MAPPED status is displayed for the same pair ofcolumns.
The validation status, VAL ON or VAL OFF, is displayed on the right-hand side of the Define ColumnMap panel above the column count.
LISTThe LIST command displays a list of columns in the current Source or Source 1 table. Use LIST ALL todisplay a list of all columns in the table. Use LIST UNUSED to display a list of columns that have notbeen paired. With either list, you can map columns by entering a Destination or Source 2 Num value forthe listed column.
Example
The following figure shows the list produced from using the LIST UNUSED command on the panelshown in Figure 101 on page 166. The data type specifications in the list assist in selecting compatiblecolumns. For more information about column compatibility, see Appendix D, “Compatibility Rules,” onpage 375.
Chapter 5. Column Maps 167

In the figure, the source column CUSTOMER_ID is mapped to the destination column CUST_ID, and thesource column LAST_ORD_DATE is mapped to the destination column, ORDER_POSTED_DATE. Theremaining source columns are not mapped.
To scroll the list of source columns, use the UP, DOWN, TOP, and BOTTOM commands or the PF keysassigned to these functions.
END List
Use END to return to the Define Column Map panel from the list. If validation is ON, the panel displaysEQUAL status for all mappings with matching data types, *ERROR* status for any invalid mappings, andMAPPED status for all other mappings. If validation is off, MAPPED status is displayed for all validmappings. (For additional information on validation, see page “Validate Column Map” on page 166.)
The following figure shows the Define Column Map panel after executing the SHOW ALL command toredisplay all destination columns and the specified source columns.
-- Define Column Map: ARC1997.ORDERS ------------------------------------------Command ===> Scroll ===> PAGE
Corresponding Columns MUST Have Compatible Data TypesUse LIST UNUSED Command for List of Unused Source ColumnsUse LIST ALL Command for List of All Source Columns VAL ON
MOVE1 OF 5
--------FOPDEMO.ORDERS---------- -------------RESTORED.ORDERS-------------ion Column Data Type Status
+--------------- Unused Columns ----------------+ ---------- ---------- -------| | *****************************| Select Items by Matching ’Num’ | CH(5) NOTUSED| | TE DATE NOTUSED| Num Column Name Data Type | ME TIME NOTUSED| --- ----------------------------------------- | CHARGES DEC(4,2) NOTUSED| *** **************** TOP ******************** | STED_DATE TIMESTAMP NOTUSED| 2__ CUSTOMER_ID CH(6) | *****************************| __ TOTAL_ORD DEC(7,2) || 7__ LAST_ORD_DATE DATE || ___ FREIGHT DEC(4,2) || ___ CUST_ORD_ZIP CH(5) |+-----------------------------------------------+
Figure 102. Match Unused Source Columns
168 IBM InfoSphere Optim for DB2 for z/OS: Common Elements

Type a Source Column ValueOn the Column Map editor, you can type any of the following in Source Column:v A column name. The source column need not have the same name or data type as the destination
column. Any value bounded by the escape character designated in the DB2 installation options isassumed to be a column name. If the column is in the current source table, the source column datatype and the appropriate status are displayed automatically. If not, Data Type is blank and the status isMAPPED.
v A literal value. A character literal must be bound by the SQL string delimiter character designated inthe DB2 installation options. The data type for a literal is blank and the status is LITERAL.
v NULL or a special register. Special registers are: CURRENT TIME or CURRENT_TIME, CURRENTDATE or CURRENT_DATE, CURRENT TIMESTAMP or CURRENT_TIMESTAMP, CURRENT SQLID orCURRENT_SQLID, CURRENT TSOID or CURRENT_TSOID, and USER.
v A function.v A concatenated or arithmetic expression.v An exit routine.
EXPAND Commands
If the value you want to enter exceeds the space available in Source Column, use the EXP line commandor the EXPAND primary command to display an ISPF panel on which you can enter an expanded entryof up to 720 characters. Type EXPAND at the command prompt, place the cursor in the desired SourceColumn position, and press Enter. You can also specify the destination column name or number with theEXPAND command (such as EXPAND ORDER_SALESMAN or EXPAND 6).
The following figure shows an expression entered on the ISPF panel for the columnORDER_SALESMAN. The expression creates a value by concatenating ‘FOP' with a random numbergreater than or equal to 100 and less than or equal to 999.
-- Define Column Map: ARC1997.ORDERS ------------------------------------------Command ===> Scroll ===> PAGE
Corresponding Columns MUST Have Compatible Data TypesUse LIST UNUSED Command for List of Unused Source ColumnsUse LIST ALL Command for List of All Source Columns VAL ON
MOVE1 OF 8
--------FOPDEMO.ORDERS---------- -------------RESTORED.ORDERS-------------Cmd Source Column Data Type Num Destination Column Data Type Status--- ------------------->> ---------- --- ------------------ ---------- -------*** *********************************** TOP ***********************************___ ORD_ID CH(5) 1 ORD_ID CH(5) EQUAL___ CUSTOMER_ID CH(6) 2 CUST_ID CH(5) MAPPED___ 3 ORDER_DATE DATE NOTUSED___ 4 ORDER_TIME TIME NOTUSED___ EXIT CHEKFRGT 5 FREIGHT_CHARGES DEC(4,2) EXIT___ ORDER_SALESMAN CH(6) 6 ORDER_SALESMAN CH(6) EQUAL___ LAST_ORD_DATE DATE 7 ORDER_POSTED_DATE TIMESTAMP MAPPED___ ORDER_SHIP_DATE CH(8) 8 ORDER_SHIP_DATE CH(8) EQUAL*** ********************************* BOTTOM **********************************
Figure 103. Define a Column Map - Return from LIST
Chapter 5. Column Maps 169

You can scroll the expanded source column display to the previous or next column using UP, DOWN,TOP, and BOTTOM.
Use END to return to the Define Column Map panel. If the length of the source specification exceeds 21characters, the data is truncated and the source column value is protected. Expand the source columnagain to change the value.
Completed Column Map
Use END to save the Column Map and redisplay the panel from which the Define/Modify Column Mappanel was invoked. You cannot save a Column Map with a column pairing in *ERROR* status.
Use the SAVE command to save the modified Column Map under a new name. You can use thiscommand to model a new Column Map on an existing one.
Functions for Source Column ValuesSeveral functions allow you to manipulate the source data prior to inserting or restoring it. Thesefunctions and their syntax are explained in the following discussion.
Propagating Primary and Foreign Key ValuesThe PROP function propagates values in the primary key or foreign key to all related tables. Thisfunction is especially useful for generating multiple sets of related data. Provide the value for the sourcecolumn in the Column Map and the value is automatically propagated during processing.
valuecolumn-name
Assigns a value to a column and propagates that value to all related tables.
value is one of the following:v A literal.v An expression such as a function or function concatenated with a literal, etc.v A special register.v An exit routine.
column-name is the source column containing the value that is the subject of the function. Theresulting value is inserted into the destination column of the mapped table and the appropriatedestination column in the participating related tables.
The column-name parameter is required if a source column does not match the destinationcolumn name or if value is a concatenated expression.
The following examples illustrate this function.
PROP('A' CONCAT SEQ(1, 1))
Propagate a literal value that is concatenated with a numerical value, starting with 1 andincrementing it by 1, in the destination column and the destination columns of the related tables.
PROP(SEQ(10000, 5))
EDIT COLUMN-MAP-EXPRESSION-TEXT Columns 00001 00072Command ===> Scroll ===> PAGE****** ****************************** Top of Data *****************************000001 'FOP’ || RAND(100,999)****** ***************************** Bottom of Data ***************************
Figure 104. Expanded Source Column
170 IBM InfoSphere Optim for DB2 for z/OS: Common Elements

Generate a sequential number, starting with 10000 and incrementing it by 5, and propagate thatnumber in the destination column and the destination columns of the related tables.
PROP(SEQ(10000, 5),CUST_NUMBER)
Generate a sequential number, starting with 10000 and incrementing it by 5, and propagate thatnumber in the destination column and the destination columns of the related tables.
PROP(EXIT CHEKCUST)
Call an exit routine to establish the value for the destination column and propagate that numberin the destination columns of the related tables.
Note the following when using PROP:v You can propagate a primary or foreign key, but not both in one operation.v If propagating a value from a foreign key column using a value in a named column, only one column
name can be used in the PROP statement. The column must participate in the relationship and becommon to both parent and child tables.
v If using an exit routine, the PROP function and the exit routine must apply to the same column. Optimdoes not call the exit before propagating the column to another table.
v Extended relationships are supported.v Conflicting PROP specifications cannot be identified until the process is executed. (The Control File
identifies any errors.)v The PROP function is not supported for conversion in self-referencing relationships.v In insert or load processing, rows are discarded if propagated primary key values duplicate an existing
value. Rows from related tables with the propagated value in a foreign key are also discarded toensure that “foster” child rows are not inserted.
v The PROP function is not allowed with update processing.v Move allows you to propagate values from a column with an AGE function. Select a setting on the
Aging Specifications panel to propagate the aged value. See the “Move Age Function” on page 185.The data type for the source column is shown as PROP.
v In a Convert Process, tables are processed in the order in which they were extracted. If using Convertto propagate a value from parent to child, the Access Definition for the Extract Process must list theparent table before the child.
Before executing a process, you can display propagation specifications for the process and print a reportusing the OUTPUT command.
Functions to Manipulate ValuesOther functions used to manipulate values are SUBSTR, RAND, and SEQ.
Note: You must leave a space after a comma that precedes a numeric value if the DB2 setup specifies acomma as the decimal point value.
SUBSTR (column-name, start[, length])
Inserts a substring of the contents of the named source column.
column-nameis the name of a non-numeric column with a character or graphic data type.
start and length are integers with a value greater than or equal to 1, where start indicates aposition within the string. start plus length cannot exceed the length attribute for the column.
Only column-name and start are required. If one integer is specified, it is considered the start valuefor a substring that ends with and includes the last character in the column.
Chapter 5. Column Maps 171

RAND(low, high)
Inserts a random number. The number is bounded by the values for low and high. Valid low and highvalues are listed in Values for Parameters, below.
SEQ(start, step)
Inserts a sequential number. The number is based on the start value and incremented by the stepvalue. A list of valid start and step values follows. If the SEQ value exceeds 2147483648, it is resetto the start value.
Values for Parameters
The range of valid values for low, high, start, and step varies according to the data type and function.
Data Type Function Low Value High Value
Character SUBSTR -2147483648 2147483647
Character RAND, SEQ -9223372036854775808 9223372036854775807
Integer SUBSTR, RAND, SEQ -2147483648 2147483647
Small integer SUBSTR, RAND, SEQ -32768 32767
BIGINT SUBSTR N/A N/A
BIGINT RAND, SEQ -9223372036854775808 9223372036854775807
Floating point SUBSTR -2147483648 2147483647
Floating point RAND, SEQ -9223372036854775808 9223372036854775807
Decimal SUBSTR maximum number of significant digits to the left of the decimal
Decimal RAND, SEQ -9223372036854775808 9223372036854775807
For example, if the data type for a column is defined as DEC(6,2), the maximum number of significantdigits to the left of the decimal is 4 because two digits are specified to the right. Therefore, the range forlow and high or start and step for this column is -9999 through 9999 inclusive.
The special registers CURRENT DATE or CURRENT_DATE, CURRENT TIME or CURRENT_TIME, andCURRENT TIMESTAMP or CURRENT_TIMESTAMP cannot be expressed by functions.
Expressions for Source Column ValuesA concatenation of arithmetic expressions, exit routines, values, or functions, other than DB2 specialregisters or LOOKUP, can be inserted in the destination column. Use the CONCAT keyword or twovertical bars, ||, to indicate concatenation.
For example, you can concatenate a literal value, 'OPT', with a function, SUBSTR, using either operator:’OPT’ CONCAT SUBSTR(ORD_ID,1,3)’OPT’ || SUBSTR(ORD_ID,1,3)
Since the expression is validated at run time, the source data type is blank and the status is EXPR. Aninvalid expression causes a process to discard any affected row and mark it as a conversion error.
The specifications in the Column Map are combined with the specifications for an individual request onthe Aging Parameters panel, which is used while defining an Insert, Convert, or Load Process.
When RAND or SEQ are in a concatenated expression, a VARCHAR string is returned.
172 IBM InfoSphere Optim for DB2 for z/OS: Common Elements

Arithmetic Expressions
Specify an arithmetic expression in Source Column to insert a value in any numeric destination column,including decimal, integer, small integer, and float data types. To specify an arithmetic expression, use thefollowing syntax:value operand value
Note that you cannot combine a RAND, SEQ, or SUBSTR function and an arithmetic expression. Forexample, given an integer column named AGE, the expression AGE + 7 is valid but the expression AGE+ RAND(1,99) is not valid.
value can be a source column name or a numeric constant.
v One value must be a column name.v Zero (0) cannot be specified as a value.v If NULL is specified as a value, NULL is inserted in the destination column.
operand can be:
+ Add
- Subtract
* Multiply
/ Divide
The following are examples of arithmetic expressions that can be specified as the source value in aColumn Map.
FREIGHT_CHARGES + 2.00ON_HAND_INVENTORY - 15UNIT_PRICE * 1.1TOTAL_COST / UNIT_PRICE
The following error conditions are detected only at run time and are reported in the Control File.v Overflow.v Null value in a non-nullable column.v Field too large to participate in computation.
Special Register - for an IMS Concatenated KeyOptim includes a special register for obtaining the value of an IMS Concatenated Key. You can use thisspecial register in an INSERT or CONVERT process to substitute the value of the concatenated key for anactual column value.
For an IMS Legacy Table stored in an Extract File, you can create a Column Map that includes the specialregister, FOP_IMSKEY. In the example shown below, FOP_IMSKEY is used to replace theSALESMAN_NAME from the source column with the IMS Concatenated Key in the destination column:
---------FOPQAHID.SALES--------- -------------FOPQAHID.SALES--------------Cmd Source Column Data Type Num Destination Column Data Type Status--- ------------------->> ---------- --- ------------------ ---------- -------*** *********************************** TOP ***********************************___ SALES CH(54) 1 SALES CH(54) EQUAL___ SALESMAN_ID CH(6) 2 SALESMAN_ID CH(6) EQUAL___ FOP_IMSKEY 3 SALESMAN_NAME CH(20) SPC_REG___ AGE INTEGER 4 AGE INTEGER EQUAL
In the following example, FOP_IMSKEY is used in an expression. The SALESMAN_NAME will bereplaced by the first 5 bytes of IMS Concatenated Key and the literal 'A'.
Chapter 5. Column Maps 173

Use the EXP line command in the Column Map editor and enter the following expression.
-------------------------------------------------------------------------------EDIT COLUMN-MAP-EXPRESSION-TEXT Columns 00001 00072Command ===> Scroll ===> CSR****** ***************************** Top of Data ******************************000001 SUBSTR(FOP_IMSKEY,1,5)||’A’
---------FOPQAHID.SALES--------- -------------FOPQAHID.SALES--------------Cmd Source Column Data Type Num Destination Column Data Type Status--- ------------------->> ---------- --- ------------------ ---------- -------*** *********************************** TOP ***********************************___ SALES CH(54) 1 SALES CH(54) EQUAL___ SALESMAN_ID CH(6) 2 SALESMAN_ID CH(6) EQUAL___ SUBSTR(FOP_IMSKEY,1,5) 3 SALESMAN_NAME CH(20) EXPR
Note: FOP_IMSKEY is valid only for a Legacy IMS source table.
Exit Routines for Source Column ValuesYou can use a site-defined exit routine to derive a value for any individual destination column. Exits areuseful for special processing, data manipulation, and literals that exceed the capacity of Source Column.
Use exits to:v Perform data transformations that are beyond the scope of a Column Map. For example, an exit can
change an employee department number for selected rows based on a complex algorithm.v Mask confidential information. For example, an exit can change an employee name or salary
information on selected rows.v Select specific rows to be processed and discard all others.
Note: Column map exits routines created with earlier releases of Optimz/OS products must be recompiled to be usable in Release 7.1 and later releases.
Using an Exit Routine
Enter the keyword EXIT followed by a space and the 1- to 8-character name of the exit routine in SourceColumn. When you press Enter, the EXIT status is displayed. The existence of the exit routine is notverified until executing an Insert, Restore, Convert, or Load Process using the Column Map.
For example, to specify the exit routine CHEKFRGT as the source of data inserted in theFREIGHT_CHARGES destination column, type the following in the corresponding Source Column:EXIT CHEKFRGT
See Figure 103 on page 169 for an example of this exit specification.
You can also provide a string of parameters to be queried by the exit routine. The combined exit nameand parameter string can be no more than 75 characters, including the required single quotes around theparameter string. The exit provides validation and any error messages. For example, to pass parametersto the CHEKFRGT exit, use the EXP line command or EXPAND command to display the expanded entryarea, and type the following:EXIT CHEKFRGT ’parm1, parm2, parm3’
Note: Only the opening and closing quotes are allowed. You cannot include quotes inside the parameterstring. The quotes are passed on to the exit routine.
174 IBM InfoSphere Optim for DB2 for z/OS: Common Elements

Requirements
All exits must conform to the following requirements:v The exit can be written in Assembly Language, VS COBOL II, PL/I, or C.v The exit must be reentrant and must be available to all Optim online and batch processes using the
Column Map.v Each exit must be compiled and linked as a separate load module. This load module is loaded
dynamically at execution time.v The exit must set the value in the destination column.v If the exit accesses DB2, the DBRM for that exit program must be bound into the Optim plan.v The exit must be built as an LE subroutine executing in the existing LE environment when compiled
with one of the IBM LE-enabled compilers.
Default Parameters
The exit is called for each row in the mapped table. With every call, the following four parameters arepassed to the exit using standard OS linkage conventions.1. The address of a structure that contains the following:
DB2 subsystem nameName of the DB2 subsystem for the table (4 characters, right-filled with blanks).
Optim IDVersion number of the Optim release (4 characters, right-filled with blanks).
Primary SQLIDPrimary authorization ID for the signed-on user account (8 characters, right-filled withblanks).
Current SQLIDCurrent® authorization ID (128 characters, right-filled with blanks).
Note: May be the primary SQLID or, if the user changes SQLID within Optim, a secondaryauthorization
Source Table
Creator IDCreator ID for the source table (1 to 128 characters, right-filled with blanks).
LengthLength of source table name (2 bytes, binary).
Table NameName of the source table (1 to 128 characters).
Destination Table
Creator IDCreator ID for the destination table (1 to 128 characters, right-filled with blanks).
LengthLength of destination table name (2 bytes, binary).
Table NameName of the destination table (1 to 128 characters).
Column IdentifierRelative position of column (beginning with 1) in table, equal to the subscript of the SQLVARentry for the column in the SQLDA describing the destination row (2 bytes, binary).
Chapter 5. Column Maps 175

AddressAddress of a 256-byte global work area (i.e., an area accessible to exits for columns in alldestination tables). Use this work area to share information among exits (4 bytes, pointer).
AddressAddress of a 256-byte table work area, i.e., the work area is unique to the table and accessibleto exits for all columns in the table (4 bytes, pointer).
Note: A zap to change the size of this work area is available, however, adjusting the size mayaffect other exits for columns in the table, especially if the size is decreased. Contact supportfor more information.
AddressAddress of the user parameters passed with the EXIT call (4 bytes, pointer).
2. Address of an SQLDA describing the source row. (The SQLDA described in the appropriate DB2documentation from IBM.)
3. Address of an SQLDA describing the destination row.4. Address of a 256-byte column work area (i.e., the work area is unique to the column for which the
exit is called, even if the exit is used for more than one column). Use this work area to passinformation from one exit call to another for a column, serve as a save area or for other reasons. Notethat the area is initialized to binary zeros on the first call.
Performance
Since the exit may be called frequently, avoid unnecessary overhead. For example, the exit shouldperform initialization processing in the first call and save information for subsequent calls in the workarea. Also, if you write the exit in COBOL or PL/I, be sure to maintain the COBOL or PL/I run timeenvironment across calls to the exit program, or performance will suffer from terminating andreestablishing this environment with each call. The specific technique used depends on the compiler.(Note that Optim creates the run time environment only once for an exit written in COBOL II.)
For example, when using LE/370, a reusable run time environment is established with the optionRTEREUS, either within the site default options module, CEEDOPT, or in the application specific optionsmodule, CEEUOPT. The delivered setting is OFF. In order to change this setting for your exit, you shouldassemble CEEUOPT, changing the statement “RTEREUS=(OFF)” to “RTEREUS=(ON).” The memberCEEUOPT is generally found in the LE SCEESAMP data set. You should then compile your exit program,and during the linkedit step, provide an INCLUDE statement for CEEUOPT. (For more information,consult the appropriate IBM documentation.)
Setting Destination Values
When the exit is called, all destination and source columns are available except those destination columnsthat are yet to be assigned a value by an exit. To set the value in the destination column, the exit canexamine data in the source row or the data in other columns in the destination row.
Note: Destination columns may be ordered differently than source columns, since destination columnswith no exit specified are always processed first. To locate the column in the source SQLVAR thatcorresponds to the column indicated by the destination column identifier, you can search the sourceSQLVAR one time and save the index value for later reference (as shown in the sample exits).
The exit is passed a copy of the destination row. The value for the destination column supplied by theexit is moved back into the actual row used by Optim. Thus, an exit can only set a value in the columnthat was specified. The exit must adhere to the following:v The exit must not change any other storage areas.v The exit must return a value appropriate for the column.
176 IBM InfoSphere Optim for DB2 for z/OS: Common Elements

v The exit must clear or set the null indicator if the column allows nulls.v The primary key information is used to build internal work areas. Any exit that assigns a value to a
column that is part of the primary key must ensure that it generates the same output value if it iscalled multiple times with the same source row.
Special Registers
The destination columns that use the special registers CURRENT DATE or CURRENT_DATE, CURRENTTIME or CURRENT_TIME, and CURRENT TIMESTAMP or CURRENT_TIMESTAMP are assigned valuesby DB2. These columns are marked in the SQLDATA field as:
Special RegisterSQLDATA Value
CURRENT DATECURRENT_DATE
-2
CURRENT TIMECURRENT_TIME
-1
CURRENT TIMESTAMPCURRENT_TIMESTAMP
-3
Special processing is provided for DATE, TIME, and TIMESTAMP destination columns that are markedas NOT NULL WITH DEFAULT when the mapped source column is NULL. For these columns,SQLDATA is set to -4. Note these special values only affect destination columns assigned values byOptim, not those assigned values by an exit.
Return Codes
The exit must set one of the following return codes:
Return CodeMeaning
0 Destination column has been assigned a value.
4 Destination column cannot be assigned a value and the row should be discarded.
8 Fatal error. Terminate execution. To return an error message, place the message in the work areaand set the unused space to blanks or null.
Termination Call
A termination call is made to the exit after all destination table processing is completed. The call isidentified by a value of 0 in the destination column identifier. The exit can use this call to clean up anydynamically acquired storage.
Sample Exits
Sample exits are included with Optim. The samples illustrate how to use the data areas available to theexit and the type of processing that can be accomplished using an exit. These exits are distributed on theOptim installation. The source is available on the Installation Library. FOPPEXA is available as a loadmodule on the product load library.
FOPPEXAAn Assembler exit that assigns a sequential value to a column for each row in the destination
Chapter 5. Column Maps 177

table. This can be used to mask sensitive information. The results are similar to those achieved byusing the SEQ function in a Column Map, but the exit can be used as an example of exitprocessing in Assembler.
FOPPEXCA COBOL exit that performs two operations on the CUSTOMERS table distributed with Optim.First, it filters rows processed by Optim such that any row with a value of 0 in the YTD_SALEScolumn is discarded. Second, it changes the SALESMAN_ID column for the customers in Florida.
For more details on these sample exits, consult the program source.
Data Privacy FunctionsData Privacy functions provide a variety of methods to transform or mask sensitive data. They require anOptim Data Privacy License.
LOOKUP FunctionThe LOOKUP function obtains the value for a destination column from a DB2 table, the lookup table,according to the value in the source column. Use the LOOKUP function to translate a source value to acorresponding look-up value, which is placed in the destination.
There are two forms of the LOOKUP function, single column and multiple column. The single columnform inserts a value into a single destination column. The multiple column form inserts values frommultiple lookup table columns into corresponding destination columns, based on a single source columnvalue. The LOOKUP function can be used alone or in combination with other Column Map functions toachieve the desired data masking results.
You can enter the multiple column LOOKUP function for any source column that will be replaced by alookup table value, but you must edit the Column Map to remove the names of remaining sourcecolumns that will also be replaced.
The IGNORE parameter allows you to ignore the lookup table and use a source value when a row in aspecified source column contains a specified value (NULL, SPACES (for CHAR columns), or zero-lengthVARCHAR).
If a match is not found in the lookup table, a conversion error is reported.
The LOOKUP function uses the following syntax:
LOOKUP( [sourcecol,] [dest=(col1, coln, ...),] lktablename( search,{ value | values=(col1, coln, ...) } ) { ,cache | ,nocache }[,ignore=(col(spaces, null, zero_len), ... )]
sourcecolName of the source table column that contains the search value (optional). If not specified, thename of the destination column is used.
Note: The source column must be compatible with the search column.
dest= Names of the destination table columns in which values from the lookup table are inserted.(Required for multiple column lookup.)
col1, coln, ...Destination table column names. The order of the column names must correspond to thelookup table columns in the source= parameter.
178 IBM InfoSphere Optim for DB2 for z/OS: Common Elements

lktablenameName of the lookup table. You may specify the DB2 table name as creatorid.tablename ortablename. If you do not fully qualify the table name, the qualifiers for the destination table areused.
search Name of the column in the lookup table that contains a value to match against the search valuefrom the source column.
value Name of the column in the lookup table that contains the translated search value to be inserted atthe destination. (Required for single column lookup.)
Note: The value column must be compatible with the destination column.
values=Names of the columns in the lookup table that contain values to be inserted at the destination.(Required for multiple column lookup.)
col1, coln, ...Lookup table column names. The order of the column names must correspond to thedestination table columns in the dest= parameter.
cache | no_cacheSpecify CACHE (default) to maintain a table of found lookup values in memory or NO_CACHEto discard found values. Using CACHE is faster when retrieving a value many times, but requiresextra memory.
ignore=List of source columns with values that are inserted at the destination instead of the lookup valuewhen the column has a row with a stated value (NULL, SPACES, or zero-length VARCHAR).
col The source column name. For single column lookup, enter one column name only. For multiplecolumn lookup, the order of the column names must correspond to the destination table columnsin the dest= parameter. The number of columns must equal the columns in the dest= parameter,and at least one column must include values. To not specify values for a column, do not enter avalue. For example, coln().
null Ignore the lookup table if the source column row has a NULL value.
spaces Ignore the lookup table if the source column row has a SPACES value. For CHARcolumns only.
zero_lenIgnore the lookup table if the source column row has a zero-length VARCHAR value.
Single Column Example
Use the LOOKUP function to translate the source value in a lookup table to a corresponding value inanother table.
For example, assume the source column, STATE, contains state abbreviations (for example, NJ) and thedestination column is to contain the complete state name (in this example, New Jersey). A lookup tablenamed STATE_LOOKUP contains a column (CODE) for state abbreviations or codes and a column(NAME) for the corresponding names.
To obtain the value for the destination column using the STATE_LOOKUP table, specify:
LOOKUP(STATE,STATE_LOOKUP(CODE,NAME))
The LOOKUP function searches for a value in the CODE column of the STATE_LOOKUP table thatmatches the value (NJ) in the source table STATE column. When a match is found, the function insertsthe corresponding value from the NAME column (New Jersey) in the destination column.
Chapter 5. Column Maps 179

Multiple Column Example
Use the LOOKUP function to insert values from columns in a lookup table row into columns in adestination table row, based on a value in a source column.
For example, based on a source column (SOC_SEC) that contains social security numbers, you can replacevalues in destination columns (FIRST_NAME and LAST_NAME) with first and last names from a lookuptable. A table named NAME_LOOKUP contains a column (SSN) with the social security numbers fromthe source table as well as columns (FIRST_MASK and LAST_MASK) to mask corresponding names inthe destination.
To replace names in the destination table based on a social security number, specify:
LOOKUP(SOC_SEC,DEST=(FIRST_NAME,LAST_NAME),NAME_LOOKUP(SSN,VALUES=(FIRST_MASK,LAST_MASK)))
The LOOKUP function searches for a value in the SSN column of the NAME_LOOKUP table thatmatches the value in the source table SOC_SEC column. When a match is found, the function inserts thecorresponding values from the lookup table FIRST_MASK and LAST_MASK columns into thecorresponding destination columns.
Ignore Example
Use the following statement to extend the Single Column Example, where you want to use the sourceNULL and SPACES values instead of lookup table values:
LOOKUP(STATE,STATE_LOOKUP(CODE,NAME),IGNORE=(STATE(NULL,SPACES)))
No_Cache Example
Use the following statement to extend the Single Column Example, where you do not want to maintain atable of found lookup values in memory:
LOOKUP(STATE,STATE_LOOKUP(CODE,NAME),NO_CACHE)
Random LOOKUP FunctionThe Random LOOKUP function selects a value at random from a specified lookup table to insert in adestination column. The function generates a random number between 1 and the limit or number of rowsin the lookup table to use as a subscript into the table. The column value or values from the row thatcorrespond to the subscript are inserted in the destination column.
The Random LOOKUP function is not supported for DECFLOAT data type.
There are two forms of the Random LOOKUP function, single column and multiple column. The singlecolumn form inserts a value into a single destination column. The multiple column form inserts valuesfrom multiple lookup table columns into corresponding destination columns.
You can enter the multiple column Random LOOKUP function for any source column that will bereplaced by a lookup table value, but you must edit the Column Map to remove the names of remainingsource columns that will also be replaced.
The IGNORE parameter allows you to ignore the lookup table and use a source value when a row in aspecified source column contains a specified value (NULL, SPACES (for CHAR columns), or zero-lengthVARCHAR).
180 IBM InfoSphere Optim for DB2 for z/OS: Common Elements

The Random LOOKUP function uses the following syntax:
RAND_LOOKUP(lktablename, { columnname | dest=(col1, coln, ...), values=(col1, coln, ...) } [, limit][,ignore=(col(spaces, null, zero_len), ... )]
lktablenameName of the lookup table. You may specify the lookup table name as creatorid.tablename ortablename. If the table name is not fully qualified, destination table qualifiers are used.
columnnameName of the column in the lookup table that contains the values to be randomly selected forinsertion at the destination. (Required for single column lookup.)
dest= Names of the destination table columns in which values from the lookup table are inserted.(Required for multiple column lookup.)
col1, coln, ...Destination table column names. The order of the column names must correspond to thelookup table columns in the values= parameter.
values=Names of the columns in the lookup table that contain values to be inserted at the destination.(Required for multiple column lookup.)
col1, coln, ...Lookup table column names. The order of the column names must correspond to thedestination table columns in the dest= parameter.
limit Optional limit on number of rows from the lookup table used to select column values. Specify aninteger, up to a maximum value of 2,000,000,000. If no limit is specified, all rows are used.
Note: You must leave a space after a comma that precedes a numeric value if the DB2 setupspecifies a comma as the decimal point value.
A table of column values is generated in memory. The size of this table may be limited by systemresources.
ignore=List of source columns with values that are inserted at the destination instead of the lookup valuewhen the column has a row with a stated value (NULL, SPACES, or zero-length VARCHAR).
col The source column name. For single column lookup, enter one column name only. Formultiple column lookup, the order of the column names must correspond to thedestination table columns in the dest= parameter. The number of columns must equal thecolumns in the dest= parameter, and at least one column must include values. To notspecify values for a column, do not enter a value. For example, coln().
null Ignore the lookup table if the source column row has a NULL value.
spaces Ignore the lookup table if the source column row has a SPACES value. For CHARcolumns only.
zero_lenIgnore the lookup table if the source column row has a zero-length VARCHAR value.
Single Column Example
To select a value at random from the STATE column in the first 50 rows of a table namedSTATE_LOOKUP and insert it in the destination column, specify:
RAND_LOOKUP (STATE_LOOKUP, STATE, 50)
Chapter 5. Column Maps 181

Multiple Column Example
To select values from the CITY, STATE, and ZIP columns in a random row of a table namedSTATE_LOOKUP and insert them in the corresponding destination columns, specify:
RAND_LOOKUP (STATE_LOOKUP, DEST=(CITY, STATE, ZIP),VALUES=(CITY, STATE, ZIP))
Ignore Example
Use the following statement to extend the Single Column Example, where the source column is namedSTATES and you want to use the source NULL and SPACES values instead of lookup table values:
RAND_LOOKUP (STATE_LOOKUP, STATE, 50,IGNORE=(STATES(NULL, SPACES)))
Hash Lookup FunctionThe Hash LOOKUP function obtains the value for a destination column from a lookup table, according toa hashed value derived from a source column. The Hash LOOKUP function allows you to consistentlymask data when you use the same source and lookup tables in any environment. The source column thatis hashed does not need to be a column that will be replaced by lookup table values.
There are two forms of the Hash LOOKUP function, single column and multiple column. The singlecolumn form inserts a value into a single destination column. The multiple column form inserts valuesfrom multiple lookup table columns into corresponding destination columns, based on a single hashvalue from a source column.
You can enter the multiple column Hash LOOKUP function for any source column that will be replacedby lookup table values, but you must edit the Column Map to remove the names of remaining sourcecolumns that will also be replaced.
The lookup table must include a key column that contains sequential number values without any gaps,and the remaining columns contain replacement values. The key column must be a numeric data type.The lookup table is typically indexed. The function hashes a source column to derive sequential numbersfrom 1 to the maximum value in the key column of the lookup table. The hashed value from the sourcetable is matched with the sequential numbers in the lookup table, and values from the correspondinglookup table row are inserted at the destination.
The function will assign NULL, SPACES (for CHAR columns), and zero-length VARCHAR values to thenumbers -1 (for NULL), -2 (for SPACES), and -3 (for zero-length VARCHAR). The lookup table shouldinclude a row for each of these numbers, allowing you to insert a lookup value for each of these sourcevalues. If one of these source values is found and a corresponding number is not in the lookup table, aconversion error is reported.
The IGNORE parameter allows you to ignore the lookup table and use a source value when a row in aspecified source column contains a specified value (NULL, SPACES (for CHAR columns), or zero-lengthVARCHAR).
You can use the SEED parameter to vary the calculation performed by the hashing algorithm. The hashedvalue from the source column and the SEED value are matched with a sequential number from thelookup table to obtain the replacement value for the destination column.
The syntax is:
182 IBM InfoSphere Optim for DB2 for z/OS: Common Elements

HASH_LOOKUP( [sourcecol,] [dest=(col1, coln, ...),]lktablename( search, { value | values=(col1, coln, ...) } ){ ,cache | ,nocache } [,ignore=(col(spaces, null, zero_len), ... )][,seed=n])
sourcecolName of the source table column from which hashed values are derived (optional). If notspecified, the name of the destination column is used.
dest= Names of the destination table columns in which values from the lookup table are inserted.(Required for multiple column lookup.)
col1, coln, ...Destination table column names. The order of the column names must correspond to thelookup table columns in the values= parameter.
lktablenameName of the lookup table. You may specify the lookup table name as creatorid.tablename ortablename. If you do not fully qualify the table name, the qualifiers for the destination table areused.
search Name of the column in the lookup table that contains sequential values to match against the hashvalues from the source column.
value Name of the column in the lookup table that contains the translated search value to be inserted atthe destination. (Required for single column lookup.)
values=Names of the columns in the lookup table that contain values to be inserted at the destination.(Required for multiple column lookup.)
col1, coln, ...Lookup table column names. The order of the column names must correspond to thedestination table columns in the dest= parameter.
cache | no_cacheSpecify CACHE to maintain a table of found lookup values in memory or NOCACHE to discardfound values. Using CACHE is faster when retrieving a value many times, but requires extramemory.
ignore=List of source columns with values that are inserted at the destination instead of the lookup valuewhen the column has a row with a stated value (NULL, SPACES, or zero-length VARCHAR).
col The source column name. For single column lookup, enter one column name only. Formultiple column lookup, the order of the column names must correspond to thedestination table columns in the dest= parameter. The number of columns must equal thecolumns in the dest= parameter, and at least one column must include values. To notspecify values for a column, do not enter a value. For example, coln().
null Ignore the lookup table if the source column row has a NULL value.
spaces Ignore the lookup table if the source column row has a SPACES value. For CHARcolumns only.
zero_lenIgnore the lookup table if the source column row has a zero-length VARCHAR value.
seed= Use seed= to vary the hashing algorithm calculation. Values from 1 to 2,000,000,000 can be used.If you use a value of 0, the seed parameter is ignored.
Chapter 5. Column Maps 183

Single Column Example
Use the Hash LOOKUP function to insert values from a column in a lookup table into a destination tablecolumn, based on a value hashed from a source column.
For example, assume the source column, FIRST_NAME, contains first names and the destination columnwill include replacement first names from the lookup table. A lookup table, NAME_LOOKUP, contains acolumn (FIRST) with first names and a column (SEQ) containing sequential values.
To obtain values for the destination column using the NAME_LOOKUP table, specify:
HASH_LOOKUP(FIRST_NAME,NAME_LOOKUP(SEQ,FIRST))
The Hash LOOKUP function matches the hash values from the source column with values in the SEQcolumn of the NAME_LOOKUP table. When a match is found, the function inserts the correspondingvalue from the FIRST column into the destination column.
Multiple Column Example
Use the Hash LOOKUP function to insert values from columns in a lookup table row into columns in adestination table row, based on a value hashed from a source column.
For example, based on values hashed from a source column (FIRST_NAME) that contains first names,you can replace values in destination columns (FIRST and LAST) with first and last names from a lookuptable. A lookup table named NAME_LOOKUP contains a column (SEQ) with sequential values as well ascolumns (FIRST_MASK and LAST_MASK) to mask values in the destination.
To replace names in the destination table based on a values hashed from a source column, specify:
HASH_LOOKUP(FIRST_NAME,DEST=(FIRST,LAST),NAME_LOOKUP(SEQ,VALUES=(FIRST_MASK,LAST_MASK)))
The Hash LOOKUP function matches the hash values from the source FIRST_NAME column with valuesin the SEQ column of the NAME_LOOKUP table. When a match is found, the function inserts thecorresponding values from the lookup table FIRST_MASK and LAST_MASK columns into thecorresponding destination columns.
Ignore Example
Use the following statement to extend the Single Column Example, where you want to use the sourceNULL and SPACES values instead of lookup table values:
HASH_LOOKUP(FIRST_NAME,NAME_LOOKUP(SEQ,FIRST),IGNORE=(FIRST_NAME(NULL,SPACES)))
No_Cache Example
Use the following statement to extend the Single Column Example, where you do not want to maintain atable of found lookup values in memory:
HASH_LOOKUP(FIRST_NAME,NAME_LOOKUP(SEQ,FIRST),NO_CACHE)
184 IBM InfoSphere Optim for DB2 for z/OS: Common Elements

Move Age Function
The Move AGE function:v Processes any character, numeric, DATE, or TIMESTAMP column.v Is not supported for BIGINT or DECFLOAT columns.v Ages to an explicit date or by explicit or relative values.v Increments or decrements by days, weeks, months, years, or a combination of these units. Also, you
can specify aging by a number of business units (e.g., payday, quarters, etc.).v Includes parameters to automatically adjust aged data to comply with business rules.
When the Column Map is used in an Insert, Load, or Convert Process, you are given the opportunity tospecify:v Default values for source columns defined with AGE for which you have not provided all required
values. For example, you can use one Column Map for multiple processes and specify unique agingamounts or business rules for each process without modifying the AGE function parameters on theColumn Map.
v Aging values for all DATE and TIMESTAMP columns not explicitly defined.v Whether aging is performed for an individual process.
AGE
AGE increments dates based on a variety of parameters. To specify parameters to age dates prior toinserting them at the destination, use the AGE line command. This command invokes the AgingSpecifications panel, which allows you to provide values to generate the AGE function and itsparameters. Assume AGE was specified for the ORDER_SHIP_DATE column. Some Aging Specificationsvalues for the column are included in the following figure.
Note that the Input Date Format defines a two-digit year, so the Pivot Year is included to determine thecentury. An Output Date Format is not specified in the figure, but you could specify a different formatsuch as “MMDDYYYY” to adjust the input to a four-digit year output.
.--------------------- Aging Specifications --------------------.| Command ===> || || Source Column ===> ORDER_SHIP_DATE > || Destination Column : ORDER_SHIP_DATE > || || Input Date Format ===> || Output Date Format ===> || Aging Rule ===> || Rule Table ===> || Pivot Year ===> (00 – 99) || || Specify Explicit Date or Aging Amount || Explicit Date ===> YYYY/MM/DD || || Aging Amount || Years ===> (-2500 to +1581) || Months ===> (-30000 to +30000) || Weeks ===> (-30000 to +30000) || Days ===> (-99999 to +99999) || Business Rules ===> (0 to 30000) || || Propagate Aging ===> (Y-Yes, N-No) |’---------------------------------------------------------------’
Figure 105. Aging Specifications
Chapter 5. Column Maps 185
The other values, such as aging values and rules, are not specified. These values are to be supplied foreach process when the Column Map is used.
Aging Specifications Panel
The Aging Specifications panel includes the following:
Source ColumnThe name of the source column to age.
Destination ColumnThe name of the destination column. This cannot be modified.
Input Date FormatThe date format of the source data. Specify this value using a distributed date format or a formatthat has been defined by the site. The format must be valid for the column length and type.
Use an asterisk to display a selection list of formats valid for the column. This value is required.For more information about specifying the date format, see “Date Formats” on page 187.
Output Date FormatSpecify the date format for the aged data. This value can be specified using a distributed dateformat or a format that has been defined by the site. The format length must match the inputformat length.
Use an asterisk to display a selection list of formats valid for the column. If not specified, theInput Data Format is used. For more information about specifying the date format, see “DateFormats” on page 187.
Aging RuleThe name of the default aging rule to use. An aging rule is required only when aging by businessunits or if a rule table is specified. If an aging rule is not specified, the aging rule specified for theprocess is used.
Use an asterisk to display a selection list of rules in the current rule table. Specify NONE toperform linear aging. An aging rule is not applied. See the Customization Guide, Customize AgingRules for additional information about aging rules.
Rule TableThe name of the rule table containing the specified aging rule. If not specified, the default ruletable is used.
Pivot YearThe year used to determine whether a two-digit year value is handled as occurring in the 20th
century (1900) or the 21st century (2000). If the year is greater than or equal to the pivot year, 1900is used. If not specified, the pivot year defined for the process is used.
Explicit DateAn explicit date to use. The specified aging rule is applied to this date. The date must be in theform YYYY/MM/DD or YYYY/DDD.
Aging Amount
Years The number of years to increment or decrement the date as a value in the range -2500 to +1581.
MonthsThe number of months to increment or decrement the date as a value in the range -30000 to+30000.
Weeks The number of weeks to increment or decrement the date as a value in the range -30000 to+30000.
Days The number of days to increment or decrement the date as a value in the range -99999 to +99999.
186 IBM InfoSphere Optim for DB2 for z/OS: Common Elements

Business RulesThe number of occurrences of a business rule to adjust the date as a value in the range 0 to30000. If you specify a value for Business Rules, you must specify an Aging Rule.
For example, if NEXTPAYDAY is the Aging Rule, the value in Business Rules is used to adjustthe date by the specified number of paydays. Therefore, a 4 in Business Rules adjusts the date tothe fourth payday after the date in the column. (The date to be adjusted is NOT included in thecalculation.)
You can specify either a value for Business Rules or values for calendar units (Years, Months,Weeks, or Days), but not both.
Propagate AgingAn option to propagate the resulting age value. If you choose to propagate the value, “PROP” isdisplayed in Data Type for the source column; otherwise, this prompt is not displayed. Forinformation about propagation, see “Propagating Primary and Foreign Key Values” on page 170.
Note that the combined values for Years, Months, Days, and Weeks cannot result in an aging amountgreater than 1581 years. An error will result when the aging is attempted.
DATE and TIMESTAMP Columns
You can direct Move to age values in DATE and TIMESTAMP columns using the global specifications forthe processor. However, if you want to age specific DATE and TIMESTAMP columns exclusively, agethese columns to unique values, or use an exit, specify the AGE function for the column. TheseDB2-defined data types must have the format DB2DATE.
DATE and TIMESTAMP columns defined as nullable are skipped if they contain NULL. These columnsare not aged and are included in the reported count of skipped columns. These skipped columns arehandled the same as other skipped values according to the process specifications.
Date Formats
Date formats specify the format of a date column. These are encoded internally as a list of possible datatypes in a single format table. New formats can be added easily to the table without requiring coding foreach individual format.
Each date format is specified by its name. Specify these formats in the Input Date Format and OutputDate Format prompts on the Aging Specifications panel. You can also display a selection list of valuesappropriate for the specific column data type by entering an asterisk in these prompts.
Valid names are determined by the data type of the column. Move can support a date format ofMMDDYY as a character column and a decimal column even though these are processed differently.
Date Components
The formats distributed with Move are formatted with the following characters to represent the datecomponent.
CC Two-digit century.
YY Two-digit year without century.
YYY Three-digit year relative to 1900.
YYYY orCCYY Four-digit year.
MM Two-digit month.
Chapter 5. Column Maps 187

MMM Three-character abbreviation for the month (e.g., Jan or JAN).
DD Two-digit day.
DDD Three-digit Julian day.
DDDDDDLilian date (i.e., the number of days since Oct. 14, 1582, the date the Gregorian Calendar wasadopted)
/ Slash in date.
- Dash in date.
* Any delimiter in date.
U Unsigned decimal. The “U” precedes the format.
Date Format Examples
Move supports a wide variety of internal date storage schemes. For instance, a YYMMDD date columnmay be stored in a variety of ways:v 6-byte character columnv 3-byte packed unsigned columnv 4-byte packed-decimal columnv 4-byte packed-decimal column with high-order bits indicating century
Character formats and numeric formats, as either packed decimal or binary columns, are allowed for anyformat without delimiters. The following are some examples of date formats.
CCYYMMDD DDD-YY YYMM
CCYY*MM*DD MMDDYY YY*DDD
CCYY/DDD MM*DD*YY YY*MM
DDMMYY MM/DD YYMMDD
DD*MM*YY MMM*DD*CCYY YY*MM*DD
DD/YY/MM MMM-YYYY YYYYDDMM
DDMMMCCYY YYDDD
AGE Specifications Complete
After you define values for the AGE function on the Aging Specifications panel, use END to return to theColumn Map editor. The AGE function is identified by the string “AGE(column)” where column is thename of the source column to be aged. You can modify these values using the AGE line command againto redisplay the Aging Specifications panel. However, you must use the CLR line command to removethe entire AGE function specification or the SRC line command to replace the AGE function with thesource column.
Data Privacy Transformation Library FunctionsThe data privacy transformation library functions allow you to mask personal data such as social securitynumbers, credit card numbers, and e-mail addresses. A data privacy license, separate from the Optimproduct license, is needed to use these functions.
188 IBM InfoSphere Optim for DB2 for z/OS: Common Elements

You can generate transformed data that is valid and unique. When a transformation library function iscalled, all destination and source columns are available except those destination columns that are yet tobe assigned a value by an exit or transformation library function. The parameters in a transformationlibrary function are validated at run time.
TRANS SSNUse the TRANS SSN function to generate a valid and unique U.S. Social Security Number (SSN). Bydefault, TRANS SSN algorithmically generates a consistently altered destination SSN based on the sourceSSN. TRANS SSN can also generate a random SSN when the source data does not have an SSN value orwhen there is no need for transforming the source SSN in a consistent manner.
An SSN is made of 3 subfields. The first 3 digits (area) represent an area generally determined by thestate in which the SSN is issued. The next 2 digits (group) define a group number corresponding to thearea number. The last 4 digits (serial) are a sequential serial number. Regardless of the type of processing,default or random, TRANS SSN will generate an SSN with a group number appropriate to the areanumber.
The default processing method generates an SSN that includes the source area number as well as alteredgroup and serial numbers based on the source SSN.
The random processing method generates an SSN that can include the source area number and uses agroup number most recently issued by the Social Security Administration for the destination areanumber. Serial numbers begin with 0001 and are incremented by 1 for each additional SSN generated forthe area number. When the serial number exceeds 9999, the serial number will be reset to 0001 and thegroup number preceding the number most recently issued for the area number will be used.
The syntax of TRANS SSN is:
TRANS SSN [‘[=flags] [sourcecol]']
flags You can specify one or more case-insensitive processing option flags.
n Generate a random SSN that is not based on a source value.
i Ignore invalid source values and copy them to the destination. Invalid values include thefollowing:v values less than 9 charactersv values with an area number not used by the Social Security Administrationv values containing non-numeric characters in CHAR or VARCHAR columns
For more information about invalid source values, see “Data Types Allowed” on page 190and “Skipped Rows” on page 190.
m Use the maximum group of all SSN area values, including values from 773 through 899,and excluding invalid area numbers.
r Generate a random SSN that includes the source area number.
v Validate the source group number by comparing it with numbers used by the SocialSecurity Administration.
- The destination SSN should include dashes separating the fields (e.g., 123-45-6789).Requires a character-type destination column at least 11 characters long.
sourcecolThe source column name. If a source column name is not specified, the destination column namewill be used. If a source column name is not specified and the destination column name does notmatch a column name in the source table, an error will occur during processing.
Chapter 5. Column Maps 189

Data Types Allowed
The following source and destination data types are permitted:
BIGINT32 bits of the value used for the source and destination.
CHARThe length of data in the column must be from 9 to 256 characters.
DECIMALThe precision of the column must be 9 and the scale 0.
INTEGERNo restrictions.
VARCHARThe length of data in the column must be from 9 to 254 characters.
If a source or destination column does not adhere to these restrictions, an error will occur duringprocessing.
Destination Processing Rules
The following rules apply to the destination SSN value, according to the destination data type or value:
CHARIf the source value is 0, spaces, or a zero-length VARCHAR, the source value will be copied,unchanged, to the destination.
If a source value is 11 characters or more and includes embedded dashes (-), or if the ‘-' flag isspecified, the destination value will include dashes if the destination column length is 11characters or more.
DECIMAL,INTEGER
If the source value is 0, spaces, or a zero-length VARCHAR, the destinations value will be 0.
VARCHARIf the source value is 0, spaces, or a zero-length VARCHAR, the source value will be copied,unchanged, to the destination.
If a source value is 11 characters or more and includes embedded dashes (-), or if the ‘-' flag isspecified, the destination value will include dashes if the destination column length is 11characters or more.
NULL If the source value is NULL, the destination value will be NULL.
Skipped Rows
The following conditions may cause a source row to be skipped and not written to the destination:v The source value is NULL, and the destination column does not allow a NULL value.v The source column is CHAR or VARCHAR, and the source value is less than 9 characters, contains a
non-numeric character (other than dashes between the 3 subfields), or is too large.v The source area number has not been used by the Social Security Administration.v The source group number has not been used with the area number by the Social Security
Administration (only if the ‘v' flag has been specified).v The source serial number is 0000, or the SSN is a reserved value not issued by the Social Security
Administration (e.g., 078-05-1120).v The source value cannot be converted to a format TRANS SSN supports.
190 IBM InfoSphere Optim for DB2 for z/OS: Common Elements

Error Messages
The following error messages may be issued:
SSN01Parm on Col ccccc ("ppp") is invalid
The parameter ppp, specified on destination column ccccc, is not valid. Check the processingoption flags specified.
SSN02Col ccccc not on source
The column name entered as the sourcecol parameter or the destination column name (ifsourcecol was omitted) was not found on the source table.
SSN03Source Col ccccc-aaa invalid
The format of the source column is not supported because the attribute aaa is invalid. The valueof aaa will be Type, Length, Precision, or Scale.
SSN04Dest Col ccccc-aaa invalid
The format of the destination column is not supported because the attribute aaa is invalid. Thevalue of aaa will be Type, Length, Precision, or Scale.
SSN05Get col ccccc data-rc=nnn
A return code of nnn was returned when TRANS SSN tried to get the value of source columnccccc.
SSN08Put col ccccc data-rc=nnn
A return code of nnn was returned when TRANS SSN tried to set the value of destination columnccccc.
If any other errors occur, contact Optim Technical Support.
Example 1
The following example uses a source column name that matches the destination column and generates arandom SSN that is not based on the source value:
TRANS SSN ‘=n'
Example 2
The following example uses a source column name (SOCIAL) that differs from the destination columnand generates an SSN using the default processing method and including dashes:
TRANS SSN ‘=- SOCIAL'
TRANS CCNUse the TRANS CCN function to generate a valid and unique credit card number (CCN). By default,TRANS CCN algorithmically generates a consistently altered CCN based on the source CCN. TRANSCCN can also generate a random value when the source data does not have a CCN value or when thereis no need for transforming the source CCN in a consistent manner.
Chapter 5. Column Maps 191

A CCN, as defined by ISO 7812, consists of a 6-digit issuer identifier followed by a variable lengthaccount number and a single check digit as the final number. The check digit verifies the accuracy of theCCN and is generated by passing the issuer identifier and account numbers through the Luhn algorithm.The maximum length of a CCN is 19 digits.
The default processing method generates a CCN by including the first 4 digits of the issuer identifierfrom the source CCN and altering the remaining 2 digits of the issuer identifier number and the accountnumber based on the source CCN. A valid check digit is also assigned.
The random processing method generates a CCN that can include the first 4 digits of the source issueridentifier number or an issuer identifier number assigned to American Express®, Discover, MasterCard, orVISA. A valid check digit is also assigned. If the first four digits of a source issuer identifier number areincluded, the first account number based on those digits will begin with 1, and for each additional CCNthat uses those digits, the account number will be incremented by 1.
The syntax of TRANS CCN is:
TRANS CCN [ (‘[=flag] [sourcecol] [ preserve=invalid ] ' ) ]
flag Specify an option flag to generate a random CCN.
n Generate a random CCN that is not based on a source value and includes an issueridentifier number assigned to American Express, Discover, MasterCard, or VISA.
r Generate a random CCN that includes the first 4 digits of the source issuer identifiernumber.
sourcecolThe source column name. If a source column name is not specified, the destination column nameis used.
If a source column name is not specified and the destination column name does not match acolumn name in the source table, an error will occur during processing.
preserve=invalidIf the source column contains an invalid CCN, do not replace it with a generated value. Thesource column value will be used in the destination column.
Data Types Allowed
The following source and destination data types are permitted:
CHARThe column length must be from 13 to 256 characters.
VARCHARThe column length must be from 13 to 254 characters.
PACKED DECIMALThe precision of the column must be from 13 to 254 and the scale must be zero.
If a source or destination column does not adhere to these restrictions, an error message occurs.
Destination Processing Rules
The following rules apply to the destination CCN value, according to the destination data type or value:
CHARIf the source value is spaces or a zero-length VARCHAR, the destination value will be set tospaces.
192 IBM InfoSphere Optim for DB2 for z/OS: Common Elements

VARCHARIf the source value is spaces or a zero-length VARCHAR, the destination length will be 0.
PACKED DECIMALIf the source value is zero, the destination value will be zero.
NULL If the source value is NULL, the destination value will be NULL.
Skipped Rows
The following conditions may cause a source row to be skipped and not written to the destination:v The source value is NULL, and the destination column does not allow a NULL value.v The source value is less than 13 characters, contains a non-numeric character, is too large, or has an
incorrect check digit.v The source value length is not valid for the credit card issuer.v The source value cannot be converted to a format TRANS CCN supports.
Error Messages
The following error messages may be issued:
CCN01Parm on Col ccccc ("ppp") is invalid
The parameter ppp, specified on destination column ccccc, is not valid. Check the processingoption flags specified.
CCN02Col ccccc not on source
The column name entered as the sourcecol parameter or the destination column name (ifsourcecol was omitted) was not found on the source table.
CCN03Source Col ccccc-aaa invalid
The format of the source column is not supported because the attribute aaa is invalid. The valueof aaa will be Type or Length.
CCN04Dest Col ccccc-aaa invalid
The format of the destination column is not supported because the attribute aaa is invalid. Thevalue of aaa will be Type or Length.
CCN05Get col ccccc data-rc=nnn
A return code of nnn was returned when TRANS CCN tried to get the value of source columnccccc.
CCN08Put col ccccc data-rc=nnn
A return code of nnn was returned when TRANS CCN tried to set the value of destinationcolumn ccccc.
If any other errors occur, contact Optim Technical Support.
Chapter 5. Column Maps 193

Example 1
The following example uses a source column name (CREDIT) that differs from the destination columnand generates a random CCN not based on the source value:
TRANS CCN ‘=n CREDIT'
Example 2
The following example uses a source column name (CREDIT) that differs from the destination columnand generates a CCN using the default processing method:
TRANS CCN ‘CREDIT'
TRANS EMLUse the TRANS EML function to generate an e-mail address. An e-mail address consists of two parts, auser name followed by a domain name, separated by ‘@'. For example, [email protected].
TRANS EML generates an e-mail address with a user name based on either destination data or a literalconcatenated with a sequential number. The domain name can be based on an e-mail address in thesource data, a literal, or randomly selected from a list of large e-mail service providers. The e�mailaddress can also be converted to upper or lower case.
TRANS EML can generate a user name based on the values in one or two destination table columns(usually containing the name(s) of a user). Processing options allow you to use only the first character ofthe value in the first column (e.g., the initial letter of a first name) and separate the values from bothcolumns using either a period or an underscore.
If the user name is based on a single destination column value or a literal, the name will be concatenatedwith a sequential number. If a user name is based on values in two destination table columns and aseparating period or underscore is not used, the values are concatenated. If a parameter is not providedfor the user name, the name will be formed by the literal “email” concatenated with a sequential number.Sequential numbers for user names are suffixes that begin with 1 and are incremented by 1.
The syntax of TRANS EML is:
TRANS EML [‘[=flags],[{sourcecol | “domain” | , }[{name1col[name2col] | “userpfx”}] ]']
flags You can specify one or more case-insensitive processing option flags.
n Generate a random domain name from a list of large e-mail service providers.
. Separate the name1col and name2col values with a period.
_ Separate the name1col and name2col values with an underscore.
i Use only the first character of the name1col value.
l Convert the e-mail address to lower case.
u Convert the e-mail address to upper case.
sourcecolThe source column name with e-mail addresses used to provide the domain name.
If neither the ‘n' flag nor the domain parameter are defined, the domain name in the sourcecolumn is used. (If sourcecol is not defined, the source column name is based on the destinationcolumn name.)
194 IBM InfoSphere Optim for DB2 for z/OS: Common Elements

If a source column name is not specified and the destination column name does not match acolumn name in the source table, an error will occur during processing.
domainA literal, up to 31 characters, that forms the domain name.
, A comma is required if neither a sourcecol nor a domain parameter are defined and you defineeither a literal or column name(s) for the domain name.
name1colA destination table column name with values used to form the first (or only) part of the username.
name2colA destination table column name with values used to form the second part of the user name.
userpfxA literal, up to 31 characters, that is concatenated with a sequential number to form the username.
Data Types Allowed
The following source and destination data types are permitted:
CHARThe column length must be from 3 to 256 characters.
VARCHARThe column length must be from 3 to 254 characters.
If a source or destination column does not adhere to these restrictions, an error message will be issued.
Destination Processing Rules
The following rules apply to the destination e-mail value, according to the destination data type or value:
CHARIf the source value is spaces or a zero-length VARCHAR, the destination value will be set tospaces.
VARCHARIf the source value is spaces or a zero-length VARCHAR, the destination length will be 0.
NULL If the source value is NULL, the destination value will be NULL.
Skipped Rows
The following conditions may cause a source row to be skipped and not written to the destination:v The source value is NULL, and the destination column does not allow a NULL value.v The source value is a VARCHAR less than 3 characters long.v The source e-mail value does not contain a ‘@'.v The source value cannot be converted to a format TRANS EML supports.
Error Messages
The following error messages may be issued:
EML01Parm on Col ccccc ("ppp") is invalid
Chapter 5. Column Maps 195

The parameter ppp, specified on destination column ccccc, is not valid. Check the processingoption flags specified.
EML02Col ccccc not on source
The column name entered as the sourcecol parameter or the destination column name (ifsourcecol was omitted) was not found on the source table.
EML03Source Col ccccc-aaa invalid
The format of the source column is not supported because the attribute aaa is invalid. The valueof aaa will be Availability, Type, or Length.
EML04Dest Col ccccc-aaa invalid
The format of the destination column is not supported because the attribute aaa is invalid. Thevalue of aaa will be Availability, Type, or Length.
EML05Get col ccccc data-rc=nnn
A return code of nnn was returned when TRANS EML tried to get the value of source columnccccc.
EML08Put col ccccc data-rc=nnn
A return code of nnn was returned when TRANS EML tried to set the value of destinationcolumn ccccc.
EML09Domain literal sssss too long
The string sssss, specified as the domain name literal (domain), exceeds 31 characters.
EML10User literal sssss too long
The string sssss, specified as the user name literal (userpfx), exceeds 31 characters.
EML11Name1 Col ccccc not on dest
The name1col column name was not found on the destination table.
EML12Name1 Col ccccc-aaa invalid
The format of the name1col column is not supported because the attribute aaa is invalid. The valueof aaa will be Availability, Type, or Length.
EML13Name2 Col ccccc not on dest
The name1col column name was not found on the destination table.
EML14Name2 Col ccccc-aaa invalid
The format of the name2col column is not supported because the attribute aaa is invalid. The valueof aaa will be Availability, Type, or Length.
If any other errors occur, contact Optim Technical Support.
196 IBM InfoSphere Optim for DB2 for z/OS: Common Elements

Example 1
The following example uses a literal (optim.com) to form the domain name and two destination tablecolumns (FIRST_NAME and LAST_NAME) to form a user name that includes an underscore:
TRANS EML ‘=_ “optim.com” FIRST_NAME LAST_NAME'
Example 2
The following example uses a domain name from the source column and a literal (OptimUser) to form auser name that will be suffixed with a sequential number:
TRANS EML ‘, “OptimUser” '
Chapter 5. Column Maps 197

198 IBM InfoSphere Optim for DB2 for z/OS: Common Elements

Chapter 6. Table Maps
A Table Map provides specifications needed to direct data from source tables to destination tables, matchpairs of tables for a Compare Process, or exclude tables from processing. A Table Map may also referencea Column Map for a pair of tables in the Table Map to pair columns with different names or attributes,generate column data, or eliminate individual columns from processing.
For more information about Column Maps, see Chapter 5, “Column Maps,” on page 155.
A Table Map is required for an Insert, Load, Restore, Convert, or multi-table Compare Process. You candefine a Table Map while setting up a process or independently, by selecting a menu option. Except in aBatch Utility Restore Process, however, an independently created Table Map is not directly referenced bythe process; you must use the APPLY command in order to use an independently created Table Mapduring processing. For more information about the APPLY command, see “Apply a Table Map” on page211.
Whether a Table Map is defined independently or in setting up a process, the steps are generally thesame. This section describes how to define a Table Map through a menu option, and mentions anyexceptions for Compare processes. Additional information about Table Maps defined within a process isprovided in the discussion of each process in the appropriate User Manual.
Note:
v An independently defined Table Map is always named and stored in the Optim Directory, while aTable Map defined for a process may be LOCAL (defined for that process only) or named and stored inthe Optim Directory.
v For Compare elements that also apply to Archive and Move, references to the source table in thischapter apply to the Source 1 table, and references to the destination table apply to the Source 2 table.
v References to tables also apply to Legacy Tables and Materialized Query Tables.
Select a Table MapTo edit or create a Table Map, select Option 6.4 Table Maps from the Main Menu.
You can also select Option 6 DEFINITIONS to display the Choose a Definition Option menu (see“Choose a Definition Option” on page 12 ) and select Option 4 TABLE MAPS. In either case, the Choosea Table Map panel is displayed. Use this panel to name a new Table Map or to select an existing TableMap to modify or delete.
----------------------------- Choose a Table Map ------------------------------Command ===>
Table Map:Map ID ===>Map Name ===>
Use ’_’ for DB2 LIKE character ===> N (Y-Yes, N-No)
Rules used to validate Table Map ===> M (M-Move/Archive, C-Compare)
Figure 106. Choose a Table Map
© Copyright IBM Corp. 1991, 2013 199

Panel
The Choose a Table Map panel includes:
Table MapThe Map ID and Map Name for the Table Map. You can enter an explicit value, DB2 LIKE syntax,or blanks for these prompts in any combination.
Map IDThe Map ID for the Table Map that is being created or modified. The default is thepreviously entered value. Specify 1 to 8 characters.
Map NameThe name of the map that is being defined or modified. Specify 1 to 12 characters.
Note: You can enter the name of an existing Table Map to use as a model for the Table Map youwish to create. After editing the Table Map, save it under a different name.
Use '_' for DB2 LIKE characterUse of the underscore ( _ ) character. Specify Y if the underscore is used as a DB2 LIKE characteror N if it is used literally as part of the name.
For example, depending upon the use of the underscore character, A_B is a three-character namecontaining the characters 'A_B', as entered, or a three-character name that begins with “A” andends with “B” with any valid character in the middle. The default is N, which means that “_” isnot recognized as a DB2 LIKE character.
Rules used to validate Table MapSetting to apply Move or Archive validation rules or Compare validation rules. This prompt isdisplayed if Compare is installed. Specify:
M Comply with rules for Move or Archive.
C Comply with rules for Compare.
Explicit Names
When you supply an explicit Map ID and Map Name and the Table Map does not exist, the SpecifyTable Map Sources panel (for Move and Archive) or the Specify Table Map Source Types panel (forCompare) is displayed. If the Table Map exists, the Modify Table Map panel is displayed.
Selection List
A selection list is requested by leaving one or both prompts blank or using DB2 LIKE syntax as criteria.Table Maps that match the criteria are listed on the Select Table Maps panel. If no Table Maps satisfy thecriteria, a message is displayed.
Validation Rules
When creating a Table Map, you must consider the purpose of the Table Map and the Optim componentwith which it is used. A single Table Map can be used with Archive to restore data, with Compare toselect data for comparison, or with Move to migrate extracted data to other tables or platforms.
A Table Map defined for a Compare Process can be used in Move or Archive processing; however, theMove and Archive functions are not available to Compare, and a Table Map defined for Compareprocessing may not provide functions needed for Move and Archive. Therefore, you may want to usenaming conventions or other means to segregate Table Maps defined for Compare processing.
200 IBM InfoSphere Optim for DB2 for z/OS: Common Elements

Move and Archive rules
Source TablesTables included in an Archive File, Extract File, or specified in an Access Definition.
Destination TablesDB2 or Legacy Tables (Optim Move for Legacy only).
Column MapsFull functionality includes expressions, literals, constants, special registers, and exit routines.Column Maps that include Move functions for aging cannot be used with Archive.
Compare rules
Source 1 TablesTables included in an Archive File, Extract File, or specified in an Access Definition.
Source 2 TablesTables included in an Archive File, Extract File, Access Definition, or DB2.
Column MapsFunctionality restricted to mapping columns with dissimilar names, columns with compatibleattributes, or excluding columns from processing.
Table Map Selection ListLeave Map ID, Map Name, or both blank or use DB2 LIKE syntax to display a selection list of TableMaps on the Select Table Map panel.v If no Table Maps match the pattern for a selection list, a message is displayed on the Choose a Table
Map panel.v Otherwise, the Select Table Map panel is displayed, listing Table Maps that match the criteria. The
panel is shown in the following figure.
Table Maps that match the criteria are listed. The Map ID and Name are displayed, as well as Creator IDand date of last modification.
------------------------------ Select Table Map -------------------------------Command ===> Scroll ===> PAGE
Line Cmds: S-Select, D-Delete, C-Copy, R-Rename, AT-Attr, I-Info 1 of 9
----- Table Map ----- ------ Last Modified -------Cmd Map ID Name By Date--- -------- ------------ -------- -------------------
************************** TOP *******************************___ FOPDEMO ARCACCT FOPDEMO 1999-06-22-14.20.29___ FOPDEMO ARCORDER FOPDEMO 1999-06-22-13.42.54___ FOPDEMO ARCPERS FOPDEMO 1999-06-21-23.13.10___ FOPDEMO ARCREST FOPDEMO 1998-10-09-15.59.17___ FOPDEMO ARCITEM FOPDEMO 1999-06-21-22.40.40___ FOPSAMP ARCORDER FOPSAMP 1999-06-22-14.24.56___ FOPTST DATE FOPPROD 1999-06-07-00.49.23___ FOPTST TEST1 FOPDEV 1998-10-02-01.46.52___ FOPTST TEST2 FOPDEV 1998-10-01-14.36.43
*********************** BOTTOM ******************************
Figure 107. Select Table Map
Chapter 6. Table Maps 201

Description
A User Option determines whether the description of each Table Map is displayed on this panel. See“User Options” on page 318 for information about the Selection List Format option.
Line Commands
The Cmd area on the left side of the panel is used to enter line commands. The following line commandsare available:
Cmd The line command entry area. Valid line commands are:
S Select a Table Map.
D Delete a Table Map.
C Copy a Table Map.
R Rename a Table Map.
AT Modify attributes of a Table Map.
I Display information about a Table Map.
See “Object Selection List Functions” on page 15 for more information about available commands.
Select a Table Map
Use the S line command or the SELECT primary command to select a Table Map to display in the ModifyTable Map panel. If the file for the Table Map does not exist, the Specify Table Map Source panel or theSpecify Table Map Source Types panel is displayed, prompting for an Archive or Extract File datasetname or Access Definition name. After you provide the name, the Define Table Map panel is displayed,allowing you to define a Table Map. (The Modify Table Map panel is the same as the Define Table Mappanel and is described in “Source for a Table Map” on page 203.)
You can also use the SELECT primary command to display a Table Map that is not included on theselection list. For example, to select the Table Map named FOPDEMO.TESTMAP, enter:
SELECT FOPDEMO.TESTMAP
If the Table Map named on the SELECT primary command does not exist, the Specify Table Map Sourcepanel or the Specify Table Map Source Types panel is displayed for you to create a new Table Map.
Table Map Attributes
To display the attributes of a Table Map, type I in Cmd next to the name of the Table Map. The followingfigure shows the read-only Table Map Attributes panel for a Move or Archive Table Map, which includesSource and Destination Creator ID and Type. Compare Table Maps will include Source 1 and Source 2information.
202 IBM InfoSphere Optim for DB2 for z/OS: Common Elements

If the Source Type is Access Definition, AD Name is displayed instead of the Extract File DSN prompt.Also, Security Status is displayed only if enabled.
Source for a Table MapCreating a Table Map requires information about the tables that are processed. Optim obtains preliminarytable information from a designated source to populate the Table Map editor. After the editor is“primed”, you can edit the information in it to suit your needs.
If you are creating a Table Map for an Insert, Convert, Load, or Restore Process, the Specify Table MapSource panel is displayed to prompt for the name of an Archive or Extract File or an Access Definition.The source file or Access Definition provides the names of tables with which Optim populates the TableMap editor. If you are creating a Table Map for a Compare Process, the Specify Table Map Source Typespanel is displayed to prompt for Source 1 and Source 2 information.
Specify Table Map SourceThe Specify Table Map Source panel is displayed when you indicate that Move rules apply and providethe name of a new Table Map on the Choose a Table Map panel or select a Table Map listed on the SelectTable Map panel for which the source file or Access Definition does not exist.
Panel
---------------------------- Table Map Attributes -----------------------------Command ===> Scroll ===> PAGE
Map ID : FOPDEMOMap Name : ARCORDER
Description : SAMPLE TABLE MAPSecurity Status : PUBLIC
Last Modified By : FOPDEMOModified On : 1999-09-30 13.16.41
Source Creator ID : FOPDEMODestination Creator ID : RESTORED
Source Type : Extract FileExtract File DSN : FOPDEMO.ARCHIVE.FILEDestination Type : DB2 Tables
Figure 108. Table Map Attributes
-------------------------- Specify Table Map Source ---------------------------Command ===> SCROLL ===> PAGE
Specify where Source Table List will come from.
Use Source Tables from an Extract or Archive File:DSN ===>
Or, Tables Specified in Access DefinitionGROUP ===>USER ===>NAME ===>
Figure 109. Specify Table Map Source
Chapter 6. Table Maps 203

The Specify Table Map Source panel requires that you provide either an:
Extract or Archive FileThe name of an Extract or Archive File used to populate the Table Map editor. Specify the filename explicitly by enclosing it in quotes; otherwise the default Data Set Prefix, specified on theUser Options panel, is prefixed to the name. You can obtain a selection list of data sets by using awildcard character in the last position.
Access DefinitionThe fully qualified name of an Access Definition used to populate the Table Map editor. Use DB2LIKE syntax to select from a list of Access Definitions.
After entering the name of a source, use END or press ENTER to display the Define Table Map panel, oruse CANCEL to return to the previous panel.
Specify Table Map Source Types and SourcesThe Specify Table Map Source Types panel is displayed when you indicate that Compare rules apply andprovide the name of a new Table Map on the Choose a Table Map panel.
The Specify Table Map Source Types panel prompts for the type of source used to populate the TableMap editor.
Source Types
The Specify Table Map Source Types panel requires that you indicate the type for Source 1 and Source 2as
1 - Extract FileAn Extract or Archive File is used to populate the Table Map editor.
2 - Set of Data Defined by an Access DefinitionAn Access Definition is used to populate the Table Map editor.
3 - All Rows from Multiple DB2 TablesDB2 Table names are used to populate the Table Map editor. This option is available for Source 2only.
Any combination of source types is valid. After you select the source types, Compare displays the SpecifyTable Map Sources panel to prompt for the name of each source. The panel is formatted according to thesource types you select.
----------------------- Specify Table Map Source Types ------------------------Command ===> SCROLL ===> PAGE
COMPARE can process data saved in an Extract File or in DB2 Tables.Specify source types as follows:
Source 1 ===> 1 1 - Extract File2 - Set of Data Defined by an Access Definition
Source 2 ===> 3 1 - Extract File2 - Set of Data Defined by an Access Definition3 - All Rows from Multiple DB2 Tables
Figure 110. Specify Table Map Source Types
204 IBM InfoSphere Optim for DB2 for z/OS: Common Elements

Specify Table Map Sources
The prompts to identify Source 1 and Source 2 are displayed on the Specify Table Map Sources panel.Your selection of source types on the Specify Table Map Source Types panel determines the specificprompts that are displayed.
For example, in the following figure, Source 1 is an Extract File and Source 2 is All Rows from MultipleDB2 Tables.
------------------------- Specify Table Map Sources ---------------------------Command ===> SCROLL ===> PAGE
Source 1: Extract FileDSN ===> ’FOPDEMO.PSTUSER.EXTRACT1’
Source 2: All Rows from Multiple DB2 TablesTable Map editor will Initially use matching Table Names from the aboveExtract File for the Table Map
After the sources are identified, use END or ENTER to display the Define Table Map panel.
Table Map EditorAfter you identify the sources and press ENTER, the Table Map editor is displayed, listing the source anddestination (or Source 2) tables.
The Table Map editor is also displayed from the Archive RESTORE Process panel, Specify CONVERTParameters and Execute panel, CREATE Process panel, INSERT Process panel, or LOAD Process panel.
The Table Map editor is presented on two screens, a left-hand and a right-hand “page.” MORE precededor followed by two arrows indicates the presence of a left or right page. Use the primary commandsLEFT and RIGHT or the assigned function keys to scroll the page horizontally.
To provide processing overrides for Restore or Insert processing, you can scroll right to display theright-hand portion of the Table Map editor. See “Processing Overrides” on page 207 for more information.
The Table Map editor lists the corresponding source and destination or Source 2 tables under theappropriate headings. Each table is mapped to the table listed on the same line. This panel is called theModify Table Map panel when you select an existing Table Map to edit.
Chapter 6. Table Maps 205

Panel
The Table Map editor includes:
Src CID orSrc 1 CID
The default Creator ID for the source tables, as identified in the source object (Archive File,Extract File, or Access Definition). This value cannot be modified.
Dest CID orSrc 2 CID
The default Creator ID for the Destination or Source 2 tables. You must enter a valid value. Usethe value in Src CID to restore, insert, convert, or update data into the source tables or, when ina different DB2 subsystem, to use tables with the same Creator ID.
Column Map IDThe default Map ID for any referenced Column Map. If you do not provide a value, you mustinclude the Map ID when referencing a Column Map.
Extract Tables or Source 1 Table NameNames of the source tables. These names are taken from the Archive File, Extract File, or AccessDefinition and cannot be modified. The fully qualified name is listed if the Creator ID is differentfrom the Src or Src 1 CID.
Destination or Source 2 Table NameNames of the destination or Source 2 tables. Specify the fully qualified name if the Creator ID isdifferent from the Dest or Src 2 CID. A table can be referenced only once as the destination; thus,you cannot enter the names of both a table and one or more synonyms, views, or aliases for thetable as a destination table.
Type Type of object listed in Destination Table Name. The possible values are:
TABLETable
VIEW View
U-MQTUser-maintained Materialized Query Table
UNKNOWNNon-existent table or no value in Src 1 or 2 CID
-- Define Table Map: FOPDEMO.NEWMAP -------------------------------------------Command ===> Scroll ===> PAGE
Available Commands: APPLY,SAVE,LIST,MAP,POPULATE,ACM,ACT,CLEAR, END when DoneSource 2 May be any DB2 Tables or Views MORE>>Src 1 CID: FOPDEMO ColumnSrc 2 CID: SMITH >> Map ID ===>
Source 1 Table Name Source 2 Table Name Type Column Map or "LOCAL"--------------------- ------------------------->> ------- ---------------------************************************* TOP *************************************CUSTOMERS CUSTOMERS TABLEDETAILS DETAILS TABLEITEMS ITEMS TABLEORDERS ORDERS TABLE*********************************** BOTTOM ************************************
Figure 111. Define Table Map
206 IBM InfoSphere Optim for DB2 for z/OS: Common Elements

A-TABLEAlias of a table
A-VIEWAlias of a view
S-TABLESynonym of a table
S-VIEWSynonym of a view
NOT INSNot insertable (e.g., a joined view or a System-maintained Materialized Query Table)
UNUSEDBlank
TEMPTBLTemporary table
LEGACYLegacy Table (for Move or Compare for IMS, VSAM, and Sequential Files)
Note:
v During a Create, Insert, Load, or Restore Process, the CREATE Object List panel is displayed to createUNKNOWN tables. However, you cannot save an independently defined Table Map with UNKNOWNdestination tables.
v An asterisk (*) to the right of Type indicates a Restore Action was defined in the Access Definitionused to archive the data.
Column MapThe name of any Column Maps used to map source and destination or Source 2 columns. Enterthe fully qualified name, if Map ID is different from the value in Column Map ID. (See “Includea Column Map” on page 212 for more information.)
Processing Overrides
To provide Insert or Restore processing overrides for individual tables, you can scroll right to display theright-hand portion of the Table Map editor.
The following prompts are displayed on the right-hand portion of the panel, and are blank by default.
-- Define Table Map: FOPDEMO.NEWMAP -------------------------------------------Command ===> Scroll ===> PAGE
Available Commands: APPLY,SAVE,LIST,MAP,POPULATE,ACM,ACT,CLEAR, END when DoneSource 2 May be any DB2 Tables or Views <<MORESrc 1 CID: FOPDEMO --Overriding--Src 2 CID: SMITH >> Process Delete
Mode BeforeSource 1 Table Name Source 2 Table Name Type U/I/B Insert--------------------- ------------------------->> ------- ------- ------************************************* TOP *************************************CUSTOMERS CUSTOMERS TABLEDETAILS DETAILS TABLEITEMS ITEMS TABLEORDERS ORDERS TABLE*********************************** BOTTOM ************************************
Figure 112. Table Map – Processing Overrides
Chapter 6. Table Maps 207

Process ModeThe overriding process mode for selected tables. Specify:
U Update only.
I Insert only.
B Both (update and insert).
Process Mode allows you to set the processing options for any table on an individual basis. The defaultprocessing options from the Specify RESTORE Parameters and Execute and Specify INSERT Parametersand Execute panels apply for tables with no overriding process parameters.
Delete Before InsertOption to delete all rows in the destination table prior to inserting data, resulting in a set of datathat exactly matches data in the Extract File. Specify:
Y Delete before Insert.
N Do not delete before Insert.
Note:
Delete Before Insert is not valid for a Restore Process.
Available Commands
The following commands are available from the Table Map editor.ACM2, 4
ACTIONS1
APPLYATTRIBUTES3
BOTTOMCANCELCLEARDOWNEXPANDLIST ALL3
LIST MAPSLIST objectLIST SUBS1
LIST UNUSED3
MAP2
OPTIONSPOPULATE2
PREFIXREL1
SAVESUFFIXTOPUP
Note:
208 IBM InfoSphere Optim for DB2 for z/OS: Common Elements

1. Restore Process only.2. Not available for the Create Process.3. Compare Process only.4. Not available for the Convert Process.
See the Command Reference Manual, Primary Commands for details about these commands.
Table Map Description
Use the ATTRIBUTES command to display the Object Attributes panel, which allows you to specify adescription for the Table Map. This panel provides a 40-character area to display and edit the description.(Site management determines whether this panel also displays a prompt for Security Status.) Foradditional information about the Object Attributes panel, see “Specify Description and Security Status” onpage 325.
Choose Access Method
If necessary, you can use the ACM command to open the Choose Access Method pop-up dialog.
This pop-up allows you to override the default method (scan or key lookup) for accessing each table inthe Extract or Archive File. A scan reads all rows in a table at one time; while a key lookup locates rowsusing a WHERE clause to search for primary or foreign key values.
Note:
v Changing the access method to Key Lookup in a Table Map only affects tables where the processingmethod is Update. If the processing method for a table is Insert, the access method is Table Scan.
v To set the access method for all listed tables, use the ACM command with a B (blank), K (key lookup),or S (table scan) operand. For example, enter ACM B to blank the access method for all listed tables.
For more information, see “Table Access Strategy” on page 340.
Save the Table Map
After editing a Table Map, you can save it, using the SAVE command with the fully qualified Table Mapname as an operand. The saved Table Map is available for other processes or to other users.
To save a Table Map:
+-------- Choose Access Method -------+¦ 1 of 4 ¦¦ Access Method Values: ¦¦ K - Key Lookup ¦¦ S - Table Scan ¦¦ blank - Software Chooses ¦¦ ¦¦ Access ¦¦ Destination Table Name Method ¦¦ --------------------------- ------ ¦¦ ************** TOP **************** ¦¦ FOPDEMO.CUSTOMERS ¦¦ FOPDEMO.DETAILS ¦¦ FOPDEMO.ORDERS ¦¦ FOPDEMO.ITEMS ¦¦ ************ BOTTOM *************** ¦+-------------------------------------+
Figure 113. Choose Access Method
Chapter 6. Table Maps 209

v Use the END command to exit the Table Map editor and automatically save any modifications to theTable Map.
v Use the SAVE command without a name operand to save the updated Table Map or provide a newname to save as a new Table Map.
You can save a Table Map under a new name, retaining the original, prototype version under its currentname.
Note:
v When defining a Table Map as part of a process, you can save the Table Map by specifying a fullyqualified name. If you do not explicitly save the Table Map, it is not stored in the Directory and isavailable for the current process only.
v If the Table Map references a Legacy Table (Move or Compare for IMS, VSAM, and Sequential Files only),the Associate Legacy Tables with Data Destinations panel is displayed when you exit the Define TableMap panel. The Associate Legacy Tables with Data Destinations panel allows you to associate a LegacyTable with a data source. For details, see “Associate Legacy Tables with Data Destinations” on page216.
Use END to return to the Choose a Table Map panel. Use the CANCEL command to abandon anychanges and return to the previous panel.
Edit Destination or Source 2 Table ListInitially, Optim provides a list of destination or Source 2 names that match the names of tables in thesource file.
To edit the list, you can:v Type over a name or select a new name from a list. You can request a selection list using the LIST
primary command.v Prefix a name with a Creator ID different from the default in Dest CID or Src 2 CID.v Prefix all names with a string using the PREFIX primary command.v Append a string to all names using the SUFFIX primary command.v Clear all names using the CLEAR primary command.v Bypass a table in a process by replacing the Destination or Source 2 table name with blanks.v Apply a Table Map to the list. (See “Apply a Table Map” on page 211.)
Table Type
Optim automatically revises the Type value to match the destination or Source 2 table name. If youmodify the Dest CID or Src 2 CID, the new CID applies to any table name entries specified withoutCreator ID, and the Type values revised accordingly.
For example, if the Destination Table Name entry is CUSTOMERS and Dest CID is OPTIM, the fullyqualified table name is OPTIM.CUSTOMERS. Using the fully qualified name, the Table Map references adatabase table and the Type is shown as TABLE. If you change the Dest CID to FOPUSER, causing theTable Map to reference a nonexistent table named FOPUSER.CUSTOMERS, the Type value is changed toUNKNOWN. To avoid changing a table name when changing the Dest CID, you can supply the CreatorID with the Destination Table Name.
LIST
Use the LIST command to obtain a selection list of available aliases, tables, synonyms, or views forDestination Table Name. For example, to obtain a selection list of tables with the destination Creator ID,use the command LIST TABLES. If the destination Creator ID is “SMITH,” a selection list of tables with
210 IBM InfoSphere Optim for DB2 for z/OS: Common Elements

this Creator ID is displayed when LIST TABLES is entered with no operands. You can also list tables for adifferent Creator ID by providing the Creator ID with the LIST TABLES command, as in LIST TABLESFOPUSER.%.
While the selection list is displayed, the Extract Tables or Source 1 Table entries are numbered,sequentially, in ascending order. You can map tables by entering the value in the Num for a table in thelist.
Scroll the list of tables using the UP, DOWN, TOP, and BOTTOM commands, or PF keys assigned tothese functions. Use END to return to the Table Map editor. As shown in the following figure, Optimautomatically populates the Destination Table Name list with the selected table names. The Type for thenewly listed tables in this example is TABLE.
Apply a Table MapUse the APPLY command to overlay all or part of the Table Map editor with specifications from anotherTable Map. When the source table names in the applied Table Map match the source table names
-- Define Table Map: FOPDEMO.NEWMAP -------------------------------------------Command ===> Scroll ===> PAGE
Available Commands: APPLY,SAVE,LIST,MAP,POPULATE,ACM,ACT,CLEAR, END when DoneSource 2 May be any DB2 Tables or Views MORE>>Src 1 CID: FOPDEMO ColumnSrc 2 CID: SMITH ==>
+------------- Tables --------------+Source 1 Table Name Type | | ap or "LOCAL"--------------------- ----- | Select Items by Matching ’Num’ | -------------*************************** | | *************CUSTOMERS TABLE | Num CreatorID.TableName 1 OF 5 |DETAILS TABLE | --- -------------------- |ITEMS TABLE | ********* TOP ********** |ORDERS TABLE | 1__ SMITH.XXCUSTOMERS |*************************** | 2__ SMITH.DETAILS | *************
| 3__ SMITH.ITEMS || 4__ SMITH.ORDERS || 5__ SMITH.SHIP_TO || ******** BOTTOM ******** |+-----------------------------------+
Figure 114. List Available Destination Tables
-- Define Table Map: FOPDEMO.NEWMAP -------------------------------------------Command ===> Scroll ===> PAGE
Available Commands: APPLY,SAVE,LIST,MAP,POPULATE,ACM,ACT,CLEAR, END when DoneSource 2 May be any DB2 Tables or Views MORE>>Src 1 CID: FOPDEMO ColumnSrc 2 CID: SMITH >> Map ID ===>
Source 1 Table Name Source 2 Table Name Type Column Map or "LOCAL"--------------------- ------------------------->> ------- ---------------------************************************* TOP *************************************CUSTOMERS XXCUSTOMERS TABLEDETAILS DETAILS TABLEITEMS ITEMS TABLEORDERS ORDERS TABLESHIP_TO SHIP_TO TABLE*********************************** BOTTOM ************************************
Figure 115. Define Table Map - Return from LIST
Chapter 6. Table Maps 211

displayed in the Table Map editor, corresponding destination or Source 2 table names and any ColumnMap entries are copied to the Table Map editor. APPLY also transfers data destination associations forsource Legacy Tables if an association is not already specified.
APPLY is useful to create a new Table Map from several existing Table Maps or to create a Table Mapthat is modeled on an existing or independently defined Table Map. For example, a “master” Table Mapcan establish default table mapping for a common pool of tables. A user can apply and edit the masterTable Map for any process (even though processes do not involve the same set of tables) to obtainconsistent mapping with a minimum of effort.
By default, the Destination or Source 2 Creator ID and table names are replaced when names of sourcetables match exactly (both table names must be qualified or not qualified). Other entries in the Table Mapeditor remain. Operands for the APPLY command allow you to:v Clear Dest CID and Destination Table Name before applying the Table Map.v Limit applied entries to the blank portions of the Table Map editor.v Limit the application to table names, Column Map names, Destination or Source 2 names, or all.
For example, to apply the Column Map entries from a Table Map named SMITH.TMAP, enter:APPLY ADD COLMAPS SMITH.TMAP
A Column Map name from the Table Map SMITH.TMAP is inserted in blank Column Map portions whenthe source table is the same for both Table Maps. Irrelevant Column Maps defined in SMITH.TMAP areignored. Any Column Maps named on the currently displayed Table Map are retained.
Selection List for APPLY
Use DB2 LIKE syntax with the APPLY command to display a selection list of Table Maps. For example,APPLY SMITH.% generates a selection list of all Table Maps that have the Map ID SMITH;APPLY%.TMAPS generates a list of Table Maps named TMAPS for all Map IDs; and APPLY with nooperands generates a selection list of all available Table Maps.
Include a Column MapBy default, columns with the same name and matching attributes are mapped. A Column Map must beused when column names or attributes between tables do not match, when data transformations areneeded, or to exclude one or more columns from processing. A Column Map used in a Convert, Insert,Load, or Restore Process can modify data or split data from one table into several tables or copy onesource column to several destinations. Column Maps also allow you to create a single destination tablefrom the data in a joined view. A Column Map cannot transform data during a Compare Process,however.
To reference a Column Map from a Table Map, you must enter the Column Map name for a pair oftables in the Table Map. To use a previously undefined Column Map, enter a unique name in ColumnMap and press ENTER. You are prompted to confirm that you are creating a new Column Map. UseEND to return to the Table Map editor or press ENTER to display the Define Column Map panel. Tocreate a new local Column Map, enter LOCAL for a pair of tables and press ENTER. The Define InternalColumn Map panel is displayed.
You must use the MAP command to edit an existing Column Map after entering the name on the TableMap editor. See “Edit Column Map” on page 216 for information.
To enter a Column Map name on the Table Map editor, you can:v Type the Column Map name, entering the name of an existing Column Map or of a new Column Map
that you will define. You can also enter “LOCAL” to use a Column Map that is embedded in and usedwith only the current Table Map.
212 IBM InfoSphere Optim for DB2 for z/OS: Common Elements

Note: You cannot restart or retry a process that uses a local Column Map.v Use the LIST MAPS command to display and select from a list of Column Maps.v Use the POPULATE command to automatically insert names of existing Column Maps for every pair
of source and destination tables.
The following figure shows Column Maps entered for three of the five tables listed.
Column Map ID
You can use Column Map ID on the Table Map editor to provide a default Map ID for any Column Mapnames referenced by the Table Map. If no default Column Map ID is specified, you must enter the fullyqualified Column Map name on the Table Map editor.
LIST MAPSThe LIST MAPS command allows you to select from a list of Column Maps. Use DB2 LIKE syntax in theoperand as criteria for the selection list. If no operand is specified, the list includes all Column Maps.
To use the LIST MAPS command, type the command, position the cursor on the line for the appropriatepair of tables and press ENTER. If a single name matches the criteria, it is automatically inserted. If twoor more names match the criteria, a selection list is displayed, as shown in the following figure.
-- Define Table Map: FOPDEMO.NEWMAP -------------------------------------------Command ===> Scroll ===> PAGE
Available Commands: APPLY,SAVE,LIST,MAP,POPULATE,ACM,ACT,CLEAR, END when DoneSource 2 May be any DB2 Tables or Views MORE>>Src 1 CID: FOPCOMP ColumnSrc 2 CID: FOPDEMO >> Map ID ===> FOPDEMO
Source 1 Table Name Source 2 Table Name Type Column Map or "LOCAL"--------------------- ------------------------->> ------- ---------------------************************************* TOP *************************************CUSTOMERS CUSTOMERS TABLE CUSMAPDETAILS DETAILS TABLE DETMAPITEMS ITEMS TABLE ITMMAPORDERS ORDERS UNKNOWNSHIP_TO SHIP_TO TABLE*********************************** BOTTOM ************************************
Figure 116. Column Maps Specified
Chapter 6. Table Maps 213

The fully qualified names of Column Maps that match the criteria are listed with notation that describesthe correlation between the tables mapped in the Column Map and those listed on the Table Map editor.Matches are described as:
FULL MATCHThe Creator ID and table name on the Table Map editor match those in the Column Map. InFigure 117, both table names in the first Column Map match those on the Table Map editor.
TABLE MATCHThe Creator ID on the Table Map editor does not match the Creator ID in the Column Map, butthe table names match. In Figure 117, the destination table name for the second and third ColumnMaps matches the destination table name on the Table Map editor, but the Creator ID does not.
NO MATCHNeither the Creator ID nor table name on the on the Table Map editor matches those in theColumn Map. In Figure 117, the source table name and Creator ID for the second and thirdColumn Maps do not match those specified on the Define Table Map panel. These maps areprobably not candidates for use.
Use the S line command to select a Column Map, and press ENTER or use END to return to the DefineTable Map panel. The name of the selected Column Map is inserted in Column Map for the selected pairof tables.
POPULATEUse the POPULATE command to insert Column Map names for every pair of source and destinationtables specified on the Table Map editor, beginning with the first pair. The processing sequence for eachpair of tables is as follows:1. Optim checks for a full match. (The Creator ID and table names in the Column Map and Table Map
must match exactly.) If only one Column Map is identified, the name is inserted in Column Map andprocessing continues with the next pair of tables.If there is a full match with more than one Column Map, a selection list of the matching ColumnMaps is displayed. (The selection list of Column Maps is similar to the one in Figure 117. However,FULL MATCH is indicated for the source and destination columns of each Column Map.)
2. If no full matches are found, Optim checks for table matches. (The table names of the source anddestination tables on the Column Map and Table Map match exactly, but the Creator IDs for one orboth tables do not match.) If only one Column Map is identified, the name is inserted in ColumnMap and processing continues with the next pair of tables.
-- Define Table Map: FOPDEMO.NEWMAP -------------------------------------------Command ===> Scroll ===> PAGE
Available Commands: APPLY,SAVE,LIST,MAP,POPULATE,ACM,ACT,CLEAR, END when DoneSource 2 May be any DB2 Tables or Views MORE>>Src 1 CID: FOPCOMP ColumnSrc 2 CID: FOPDEMO >> Map ID ===> FOPDEMO
Source 1 +--------------------Select One Column Map--------------------+ OCAL"--------- | Cmd MapID.MapName Source 1 Source 2 1 OF 4 | -----********* | --- ---------------------------------------------- | *****CUSTOMERS | ********************** TOP *********************** |DETAILS | ___ FOPDEMO.RESTORE FULL MATCH FULL MATCH |ITEMS | ___ FOPDEV.ORDERS NO MATCH TABLE MATCH |ORDERS | ___ FOPPROD.RESTORE NO MATCH TABLE MATCH |SHIP_TO | ___ FOPPROD.TEST NO MATCH NO MATCH |********* | ********************* BOTTOM ********************* | *****
+-------------------------------------------------------------+
Figure 117. Select One Column Map
214 IBM InfoSphere Optim for DB2 for z/OS: Common Elements
If there is a table match with more than one Column Map, a selection list of the matching ColumnMaps is displayed. (The selection list of Column Maps is similar to the one in Figure 117 on page 214.However, TABLE MATCH is indicated for the source and destination columns of each Column Map.)
3. If no full or table matches are found, Optim processes the next pair of tables in the Table Map.
When POPULATE processing for a specific pair of tables is complete, the Table Map display scrolls to thenext pair of tables on the list and processes that pair, until all are processed. When processing iscomplete, the Table Map editor is re-displayed with the appropriate Column Map names populated.
POPULATE Operands
You can use DB2 LIKE syntax as criteria for Column Map names inserted by POPULATE. For example, topopulate the Table Map with Column Map names having the Map ID FOPDEMO, type:POPULATE FOPDEMO.%
To populate the Table Map with Column Map names that begin with RES and have the Map IDFOPDEMO, type:POPULATE FOPDEMO.RES%
Other operands allow you to clear Column Map names on the panel prior to executing the POPULATEcommand or replace names if a new match is found. You can also limit POPULATE processing to insertonly Column Map names for which there is a full match. (See the POPULATE command in the CommandReference Manual for details.)
Selection List for POPULATE
When a selection list is displayed during POPULATE processing, use the S line command and pressENTER or use END to select a Column Map. The name of the selected Column Map is inserted for thecurrent pair and processing continues with the next pair.
Use CANCEL to terminate POPULATE processing and return to the Define Table Map panel. Anyinserted Column Map names remain on the Define Table Map panel.
Considerations for Naming Conventions
Naming conventions can be used to identify logical groups of Column Maps and to make best use of thePOPULATE command. For example, Column Maps created to insert data to a specific table might includethe table name, and the Map ID could identify the data model for the extracted data. Using thePOPULATE command with DB2 LIKE syntax in the name operand automatically identifies and insertsthe desired set of uniquely named Column Maps for all listed table pairs.
For example, assume two sets of three Column Maps have been defined for Insert processing to theproduction database from tables extracted from different production data models.
Column Map Set 1
FOP02.ORDERSFOP02.ACCTCUSTFOP02.DETAILSColumn Map Set 2
FOP03.ORDERSFOP03.ACCTCUSTFOP03.DETAILS
Chapter 6. Table Maps 215

Further, assume that the names of the tables defined in each of these maps are a FULL MATCH. Byspecifying POPULATE FOP03.% only the Column Maps with Map ID FOP03 are identified andautomatically inserted. This feature is especially useful when the list of source tables on the Define TableMap panel is extensive and all desired Column Maps have been named following a specific convention.
Edit Column MapTo edit a Column Map, use the MAP command and position the cursor on the row with the name of thedesired Column Map or enter the Column Map name as an operand.
Optim compares the names of tables mapped by the Column Map to the names on the Table Map editor.If table names and column names match, the Column Map is displayed in the Column Map editor. Ifthere is a discrepancy, however, you are prompted to confirm. For example, if one or both tables in aselected Column Map named FOPDEMO.TEST1 do not match the pair of tables on the Table Map, thefollowing confirmation message is displayed.
Press ENTER to proceed or use END to return to the Table Map editor. If you proceed, Optim changesthe table names in the Column Map to match those on the Table Map editor and displays the ModifyColumn Map panel.
See “Column Map Editor” on page 162 for detailed information on editing a Column Map.
When you have completed modifying the Column Map, use END to return to the Table Map editor.
Associate Legacy Tables with Data DestinationsFor Move or Compare for IMS, VSAM, and Sequential Files, a Legacy Table referenced in a Table Map mustbe associated with a specific data source in order to be used in an Insert Process. Each time you exit theTable Map editor using END, the Associate Legacy Tables with Data Destinations panel is displayed. Thepanel contents vary depending on whether the Legacy Tables in the Table Map reference IMS data,VSAM or sequential files, or both.
For more information about Legacy Tables, see the Move User Manual, Legacy Tables or Compare for IMS,VSAM, and Sequential Files.
In the following example, the Table Map references two Legacy Tables as the source tables(FOPLEG.LITEMS and FOPIMS.I$DETAILS) and as the destination tables (FOPLEG2.LITEMS andFOPIMS2.I$DETAILS). FOPLEG.LITEMS and FOPLEG2.LITEMS reference VSAM files andFOPIMS.I$DETAILS and FOPIMS2.I$DETAILS reference IMS data.
-- Modify Table Map: FOPDEMO.NEWMAP -------------------------------------------Command ===> Scroll ===> PAGE
Available Commands: APPLY,SAVE,LIST,MAP,POPULATE,ACM,ACT,CLEAR, END when DoneSource 2 MORE>>Src 1 C +--------------Edit Column Map Confirmation--------------+Src 2 C ¦ ¦ > FOPDEMO
¦ Column Map FOPDEMO.TEST1 is defined with ¦Source ¦ tables that do not match Specified pair of tables. ¦ or "LOCAL"-------- ¦ CHANGE TABLES command will be automatically performed. ¦ -----------******** ¦ ¦ ***********CUSTOMER ¦ Press ENTER Key to Proceed with Column Map Edit ¦DETAILS ¦ Enter END Command to Return to Table Map ¦ITEMS +--------------------------------------------------------+
Figure 118. Edit Column Map Confirmation
216 IBM InfoSphere Optim for DB2 for z/OS: Common Elements

Note: The labels displayed on this panel vary based on what type of legacy tables are displayed (i.e.,IMS, VSAM, or sequential files). The following labels are displayed for IMS files only: IMS--Segment,DBD, PSB, PCB, IMSID, DBRC, and Log. The following labels are displayed for VSAM or sequential filesonly: Source Dataset Prefix, Overriding Destination Dataset Prefix, and Dest Status. If more than one filetype is displayed, a combination of the above labels are displayed.
Panel
This panel includes
Source DatasetPrefix The prefix for datasets associated with the VSAM Legacy Tables specified on the Associate
Legacy Tables with Data Sources panel.
OverridingDestinationDataset Prefix
Optional 1- to 8-character prefix used by the datasets associated with the VSAM Legacy Tables inthe Table Map.
Source Legacy Table/Destination Legacy Table
Name of the source and destination Legacy Tables referenced in the Table Map.
Source Data/Destination Dataset
If the Table Map references a Legacy Table that describes a VSAM or sequential file, the names ofthe dataset for the source and destination Legacy Tables are displayed.
The Source Data is specified in the Access Definition used to create the Extract File and cannotbe modified.
The Destination Dataset is specified as a default in the Destination Legacy Table. If no dataset isspecified, Destination Dataset is blank. To enter or modify the Data Destination:v Type the fully qualified Destination Dataset name, enclosing it in single quotes.v Type a dataset name, without delimiting quotes. The dataset name is prefixed with the default
prefix specified in User Options unless you provide an Overriding Destination Dataset Prefix.A maximum of 17 characters can be entered as the Overriding Dataset.
v Use a shortcut. Use “=” to copy the Destination Dataset name from the preceding entry. Use“=s” to copy the Source Data from the current entry into Destination Dataset (in Figure 119),
--------------- Associate Legacy Tables with Data Destinations ----------------Command ===> Scroll ===> PAGE
Source Dataset Prefix : 1 of 2Overriding Destination Dataset Prefix ===> MORE>>
Source Legacy Table / Source Data / DestDestination Dataset Status
Destination Legacy Table IMS--Segment DBD PSB PCB IMSID DBRC LOG--------------------------- ---- -------- -------- -------- --- ---------- ---*********************************** TOP *************************************FOPLEG.LITEMS ’FOPRT.LEGACY.ITEMS’ LEGACY
FOPLEG2.LITEMS ’FOPRT.LEGACY.ITEMS’FOPIMS.I$DETAILS IMS DETAILS SALEHDAM SALHDAMA 1
FOPIMS2.I$DETAILS SALHDAMA 1 Y Y********************************* BOTTOM ************************************
Figure 119. Associate Legacy Tables with Data Destinations
Chapter 6. Table Maps 217

using the “=s” shortcut for FOPLEG.ITEMS copies the Source Data name,FOPRT.LEGACY.ITEMS, to the Destination Dataset).
IMS--SegmentIf the Table Map references a Legacy Table that describes IMS data, IMS is designated and thesource and destination segments within the DBD associated with the Legacy Table are displayed.These values cannot be modified.
DBD If the Legacy Table describes IMS data, the DBDs associated with the source and destinationLegacy Tables are displayed and cannot be modified.
PSB If the Legacy Table describes IMS data, PSB lists the PSB associated with the source Legacy Tablein the Table Map. You can specify the 1- to 8-character name of the PSB used to override the PSBfor the destination Legacy Table specified in the Retrieval Definition. If no Retrieval Definitionhas been created for the destination Legacy Table, PSB is blank and you must enter a valid PSB.
The PSB provides access to the IMS services that Move requires to access the database records.
The PSB must be included in the PSB library referenced in the Environment Definition for thedestination Legacy Table. Specify an asterisk to generate a selection list that includes PSBsreferenced in the Environment Definition for the IMS Legacy Table.
PCB If the Legacy Table references IMS data, PCB lists the PCB number associated with the sourceLegacy Table in the Table Map. You can specify the PCB number used to override the PCBnumber specified in the Retrieval Definition for the destination Legacy Tables. If no RetrievalDefinition has been created for the Legacy Table, PCB is blank and you must enter a valid PCBnumber.
The PCB must exist within the specified PSB and grant Move or Compare the authorization tomanipulate the data. Specify an asterisk to generate a selection list that includes PCBs in thespecified PSB.
Dest StatusIf the Table Map contains a Legacy Table that references a VSAM or sequential file, Dest Statusdisplays the status of the destination table. Possible values include:
LEGACY A Destination Dataset is specified.
MISSING A Destination Dataset has not been specified.
IMSIDIf the Table Map contains a Legacy Table that references IMS data, IMSID lists the IMS SystemID associated with the source Legacy Table in the Table Map. You can specify the IMS ID used tooverride the ID specified in the Environment Definition for the destination Legacy Tables. TheIMS ID is required to access the IMS data when allocated to a control region (i.e., the data isonline to IMS).
DBRC This entry is valid only for IMS processing in DL/I mode (i.e, when an IMS ID is not specified).If appropriate, enter Y for yes to use Database Recovery Control (DBRC) to control logging andperform database recovery; otherwise enter N for no. IMS uses the online log datasets (OLDS) ifthe database is accessed in BMP or DBB mode.
The default for a HALDB (High Availability Large DataBase), is Y, and that entry cannot bechanged.
DBRC use is optional for a non-HALDB, such as HIDAM, HDAM, HISAM, etc. Thus, you mayspecify Y for a non-HALDB, but it is not required.
LOG This entry is valid only for IMS processing in DL/I mode (i.e, when an IMS ID is not specified).If appropriate, enter Y for yes to use an IMS log to perform database recovery; otherwise enter Nfor no.
218 IBM InfoSphere Optim for DB2 for z/OS: Common Elements

If you specify Y, you must specify a dataset name for the IMS log on the Associate IMS Segmentswith IMS Database Datasets panel. The DD Name “IEFRDER” is used to allocate the log dataseton that panel.
If a PSB with a Processing Option (PROCOPT) other than G (Get) is used while accessing aHALDB in DL/I mode (i.e., an IMS region name is not specified), you must specify the name ofthe dataset to be allocated for DD Name IEFRDER on the Associate IMS Segments with IMSDatabase Datasets panel.
After you specify the IEFRDER dataset name and exit the Associate IMS Segments with IMSDatabase Datasets panel, the Allocate Dataset panel automatically displays. You must providesufficient Primary and Secondary space units on that panel to allocate the IEFRDER dataset.Failing to do so will cause IMS to abort processing and lock the database from further updatesuntil a recover/rollback is done.
If no IMS Legacy Tables are referenced in the Table Map, use END to return to the Choose a Table Mappanel from the display. If one or more IMS Legacy Tables are referenced and an IMS ID was notspecified, use END to display the Associate IMS Segments with IMS Database Datasets panel.
Delete/Insert Root Segment
When you scroll right, the right-hand page of the Associate Legacy Tables with Data Destinations panel isdisplayed. If one of the destination tables is a Legacy Table that references IMS data, the column below isdisplayed:
Delete/InsertRoot SegmentsOn Update
Option to more accurately update IMS segments. This option is used only when the processingmode for an Insert Process is update only or both (update and insert).
Y Update the IMS database by deleting matching entries from the destination root segmentand any child segments and inserting the data from the Extract File.
N Use the Extract File to update the IMS database. If you try to update an IMS segment thatdoes not have a unique key, the process fails and an error message is displayed.
Associate IMS Segments with IMS Database DatasetsWhen you use END to exit the Associate Legacy Tables with Data Destinations panel and one or moreLegacy Tables reference IMS data and an IMS ID was not specified, the Associate IMS Segments WithIMS Database Datasets panel is displayed. This panel allows you to override the default IMS Database
--------------- Associate Legacy Tables with Data Destinations ----------------Command ===> Scroll ===> PAGE
Source Dataset Prefix : 1 of 2Overriding Destination Dataset Prefix ===> <<MORE
Source Legacy Table / Source Data / Delete/InsertDestination Root Segments
Destination Legacy Table IMS--Segment DBD On Update--------------------------- ---- -------- -------- -------------*********************************** TOP **********************************FOPLEG.LITEMS ’FOPRT.LEGACY.ITEMS’
FOPLEG2.LITEMS ’FOPRT.LEGACY.ITEMS’FOPIMS.I$DETAILS IMS DETAILS SALEHDAM N
FOPIMS2.I$DETAILS********************************* BOTTOM *********************************
Figure 120. Delete/Insert Root Segments
Chapter 6. Table Maps 219
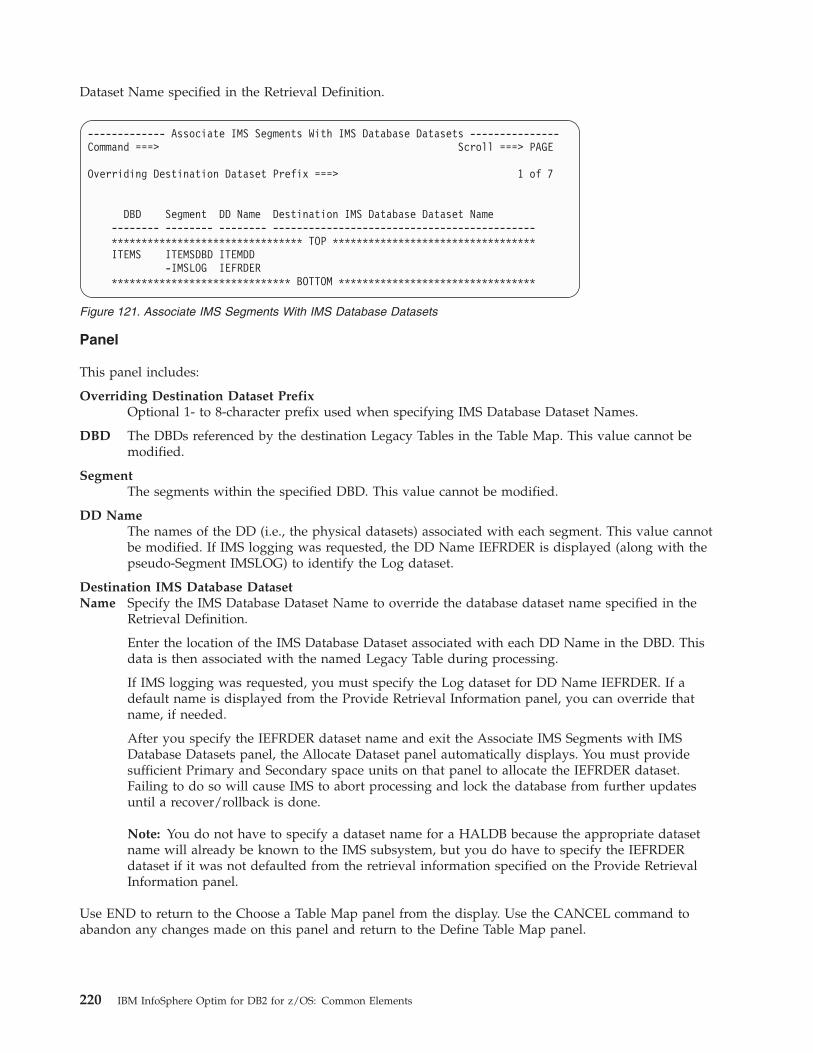
Dataset Name specified in the Retrieval Definition.
Panel
This panel includes:
Overriding Destination Dataset PrefixOptional 1- to 8-character prefix used when specifying IMS Database Dataset Names.
DBD The DBDs referenced by the destination Legacy Tables in the Table Map. This value cannot bemodified.
SegmentThe segments within the specified DBD. This value cannot be modified.
DD NameThe names of the DD (i.e., the physical datasets) associated with each segment. This value cannotbe modified. If IMS logging was requested, the DD Name IEFRDER is displayed (along with thepseudo-Segment IMSLOG) to identify the Log dataset.
Destination IMS Database DatasetName Specify the IMS Database Dataset Name to override the database dataset name specified in the
Retrieval Definition.
Enter the location of the IMS Database Dataset associated with each DD Name in the DBD. Thisdata is then associated with the named Legacy Table during processing.
If IMS logging was requested, you must specify the Log dataset for DD Name IEFRDER. If adefault name is displayed from the Provide Retrieval Information panel, you can override thatname, if needed.
After you specify the IEFRDER dataset name and exit the Associate IMS Segments with IMSDatabase Datasets panel, the Allocate Dataset panel automatically displays. You must providesufficient Primary and Secondary space units on that panel to allocate the IEFRDER dataset.Failing to do so will cause IMS to abort processing and lock the database from further updatesuntil a recover/rollback is done.
Note: You do not have to specify a dataset name for a HALDB because the appropriate datasetname will already be known to the IMS subsystem, but you do have to specify the IEFRDERdataset if it was not defaulted from the retrieval information specified on the Provide RetrievalInformation panel.
Use END to return to the Choose a Table Map panel from the display. Use the CANCEL command toabandon any changes made on this panel and return to the Define Table Map panel.
------------- Associate IMS Segments With IMS Database Datasets ---------------Command ===> Scroll ===> PAGE
Overriding Destination Dataset Prefix ===> 1 of 7
DBD Segment DD Name Destination IMS Database Dataset Name-------- -------- -------- --------------------------------------------******************************** TOP **********************************ITEMS ITEMSDBD ITEMDD
-IMSLOG IEFRDER****************************** BOTTOM *********************************
Figure 121. Associate IMS Segments With IMS Database Datasets
220 IBM InfoSphere Optim for DB2 for z/OS: Common Elements

Archive ActionsArchive provides a facility that allows you to define actions to be executed at one or more predefinedpoints (action events) during an Archive, Delete, or Restore Process. Each action is a single SQL statementor call to a stored procedure that may be included in the Access Definition or in the Restore Process TableMap. An action event can have only one SQL statement associated with it, although action events canshare an SQL statement association.
For information about defining actions in an Access Definition, see “Archive Actions” on page 60.
You can define actions in a Table Map for the Restore Process. Restore Actions defined in the Table Mapwill override or disarm any Restore Actions defined in the Access Definition. The Table Map can alsoinclude Restore Actions independent of actions in the Access Definition.
ACTIONS Primary Command
To invoke the Select an Action To Be Defined panel for a table, use the ACTIONS primary command withthe desired table name as an operand, or enter the ACTIONS primary command, position the cursor onthe desired table name, and press Enter.
Panel
This panel includes:
Cmd The line command entry area. Valid line commands are:
S Select the action event.
INF Display a list of action events that share the SQL statement.
CLR Clear the SQL statement association for the action event.
Action DescriptionThe event and time for the action. Select:
Before Restore of the First Row To a Table
Before Restore of a Row To a Table
After Restore of a Row To a Table
After Restore of the Last Row To a Table
-- Modify Table Map: FOPDEMO.NEWMAP -------------------------------------------Command ===> Scroll ===> PAGE
Ava +---------- Select an Action To Be Defined for FOPDEMO.NEWMAP -------+ neSou ¦ ¦ E>>Sr ¦ 1 of 4 ¦Sr ¦ Cmd Action Description Active Shr ¦ MO
¦ --- ------------------------------------------ ------ --- ¦So ¦ *** ************************ TOP ************************* ¦ CAL"--- ¦ ___ Before Restore of the First Row To a Table N N ¦ ----*** ¦ ___ Before Restore of a Row To a Table N N ¦ ****CUS ¦ ___ After Restore of a Row To a Table N N ¦DET ¦ ___ After Restore of the Last Row To a Table N N ¦ITE ¦ *** ********************** BOTTOM ************************ ¦ORD ¦ ¦*** ¦ Line Commands: (S)elect, (INF)ormation, (CLR)Clear ¦ ****
¦ ¦+--------------------------------------------------------------------+
Figure 122. Select an Action To Be Defined
Chapter 6. Table Maps 221

Active Indicator for assignment of SQL statement:
N No SQL statement is assigned.
Y An SQL statement is assigned.
Shr Indicator for shared status of an assigned SQL statement:
N No associated SQL or SQL is not shared.
Y Associated SQL is shared with another action.
Y* Associated SQL is defined for this action and is shared with another action.
Define the Action
Use the S or SEL line command to select one or more action events. Archive displays the Enter an SQLStatement panel for each selection, in sequence.
Use the Enter an SQL Statement panel to specify the complete SQL statement or call to a storedprocedure to be executed when the selected event in the Restore Process occurs. For example, beforerestoring a row, you might use an action SQL statement to keep a record of restorations by inserting theprimary key value into a table. As another example, you could place an indicator in a row that has beenrestored.
The SQL statement is displayed in segments of 8 lines of 72 positions each. A maximum of 200 lines areavailable in the scrollable area for specifying the SQL and self-documenting comments. Standard DB2conventions apply to comments; each comment line must begin with two hyphens (--).
Use standard DB2 SQL format for the SQL statement. Any leading or trailing spaces typed on a line aremaintained; only the spaces at the end of the last line of the SQL statement are deleted.
Line Commands
You can perform several editing functions using line commands. Enter the desired command at the Cmdprompt. The functions and their line commands are:
Copy Cn, CC
Insert In
------- Enter an SQL Statement to be used by the Action Being Defined ---------Command ===> Scroll ===> PAGE
Before Restore of a Row To a TableCmd 1 of 8--- ------------------------------------------------------------------------*** ********************************* TOP **********************************_______________*** ******************************* BOTTOM *********************************
Line Commands: (I)nsert, (D)elete, (R)epeat, (M)ove, (C)opyUse the LIST COLUMNS command to add column names, if neededUse the LIST VARIABLES command to add Action Variables, if neededUse the SQLEdit command to invoke the ISPF editor with all of its facilitiesUse the SHARESQL command to select an Action whose SQL you wish to useUse the COPYSQL command to select an Action whose SQL you wish to copy
Figure 123. SQL Statement
222 IBM InfoSphere Optim for DB2 for z/OS: Common Elements

RepeatRn, RR
Delete Dn, DD
Move Mn, MM
For Copy or Move operations, use A (After) or B (Before) to indicate the new destination. After specifyingthe new destination, press Enter and the copied or moved line appears, respectively, after or before theindicated location.
Column Variables
A column variable can be used in the statement for any action event except one executed beforeprocessing the first row or after processing the last row. The column variable must be preceded by acolon (:) in the statement.
Substitution Variables
You can use a substitution variable that has been defined on the Substitution Variable Display panel. Thename of the substitution variable must be preceded by a colon (:). (For more information, see“Substitution Variables” on page 70.)
Action Variables
Action Variables are built-in functions that can be used to return information about the specific action. Avariable must be preceded by a colon (:) in the SQL Editor.
General Variables
The following General Variables are available to all action SQL statements. Each variable name is shownwith its return value type and description.
FOP_ACTIONinteger
A code that identifies the type of action being executed. (See return values below.)
FOP_ACTION_TEXTchar (20)
A text string that identifies the type of action being executed. (See return values below.)
FOP_ARCHIVE_FILE_NAMEchar (44)
Name of the Archive File being processed.
FOP_INDEX_FILE_NAMEchar (44)
Name of the index file, if a dense index exists for the Archive File.
FOP_GROUP_NAMEchar (8)
Group name, if any, assigned to the Archive File by the user.
FOP_USER_IDchar (8)
TSO ID for the user that created the Archive File.
Chapter 6. Table Maps 223
FOP_SERVER_NAMEchar (4)
DB2 subsystem on which the operation is being executed.
FOP_ARCHIVE_DESCchar (40)
Description, if any, assigned to the Archive File by the user.
FOP_START_DATETIMEtimestamp
Date and time the current operation started.
FOP_CURRENT_DATETIMEtimestamp
Current date and time.
FOP_START_TABLE_IDchar (128)
Creator ID of the Start Table.
FOP_START_TABLE_NAMEchar (128)
Name of the Start Table.
FOP_ACCESS_DEF_NAMEchar (30)
Three-part name of the Access Definition, separated by periods.
FOP_BATCH_ONLINE_ FLAGchar (1)
‘B' for batch execution; ‘O' for online execution.
FOP_BATCH_JOBNAMEchar (8)
Job name if batch execution; TSO User ID if online execution.
FOP_PROCESS_TYPEchar (1)
‘A' if Archive operation; ‘B' if Archive operation with Delete (whether or not deferred); ‘R' ifRestore operation; ‘D' if Delete operation.
FOP_RETURN_CODEinteger
(For CALL statements only.) Return code supplied by the stored procedure.
FOP_RETURN_MESSAGEchar (80)
(For CALL statements only.) Optional text message supplied by the stored procedure ifFOP_RETURN_CODE is 2.
Return Values
FOP_ACTION and FOP_ACTION_TEXT return the following values.
224 IBM InfoSphere Optim for DB2 for z/OS: Common Elements
FOP_ACTION FOP_ACTION_TEXT
0 BefExtFirstRow
2 BefExtRow
3 AftExtRow
4 AftExtLastRow
5 BefDelFirstRow
7 BefDelRow
8 AftDelRow
9 AftDelLastRow
11 BefRestFirstRow
13 BefRestRow
14 AftRestRow
15 AftRestLastRow
Restore/Delete Variables
The following Restore Variables are available to Restore Action SQL statements. Each variable name isshown with its return value type and description.
Note:
For users of action variables with releases of Optim prior to 7.2: Optim 7.2 increased processing limitsand changed the precision for some action variables. In Optim 6.1 and earlier, precision was integer forthe variables listed below. With Optim 7.2 and later, precision for the listed variables is bigint. Dependingon the way in which you use these variables, you may need to make changes to accommodate thedifference in data type. For example, if a variable inserts a value into a DB2 table, ensure that thedestination column is defined to allow a bigint value.
FOP_TOTAL_ROWS_PROCESSEDFOP_TOTAL_ROWS_REMAINING_TO_BE_PROCESSEDFOP_TOTAL_ROWS_IN_ERRORFOP_TBL_ROWS_PROCESSEDFOP_TBL_ROWS_REMAINING_TO_BE_PROCESSEDFOP_TBL_ROWS_IN_ERROR
FOP_ARCHIVE_IDA unique and arbitrary number of no logical significance assigned to the Archive File beingprocessed. Since this value is unique for all Archive Files, it can serve as a DB2 index, if needed.
Return Value Type: integer
FOP_TOTAL_ROWS_PROCESSED
Note: Prior to Optim 7.2, the return value type for this variable was integer.Count of all rows processed at this point. (See Note below.)
Return Value Type: bigint
FOP_TOTAL_ROWS_REMAINING_TO_BE_PROCESSED
Chapter 6. Table Maps 225

Note: Prior to Optim 7.2, the return value type for this variable was integer.Count of all rows remaining to be processed. (See Note below.)
Return Value Type: bigint
FOP_TOTAL_ROWS_IN_ERROR
Note: Prior to Optim 7.2, the return value type for this variable was integer.Count of all rows in error at this point.
Return Value Type: bigint
FOP_SRCTBL_CREATOR_IDCreator ID of the source table currently being processed.
Return Value Type: char (128)
FOP_SRCTBL_NAMEName of the source table currently being processed.
Return Value Type: char (128)
FOP_DSTTBL_CREATOR_IDCreator ID of the destination table currently being processed.
Return Value Type: char (128)
FOP_DSTTBL_NAMEName of the destination table currently being processed.
Return Value Type: char (128)
FOP_TBL_ROWS_PROCESSED
Note: Prior to Optim 7.2, the return value type for this variable was integer.Count of rows from the current table processed at this point. (See Note below.)
Return Value Type: bigint
FOP_TBL_ROWS_REMAINING_TO_BE_PROCESSED
Note: Prior to Optim 7.2, the return value type for this variable was integer.Count of rows from the current table remaining to be processed. (See Note below.)
Return Value Type: bigint
FOP_TBL_ROWS_IN_ERROR
Note: Prior to Optim 7.2, the return value type for this variable was integer.Count of rows from the current table in error at this point.
Return Value Type: bigint
FOP_AFTER_ROW_STATUSStatus code returned by DB2 after processing a row.
Return Value Type: integer
Note: The value of any variable that involves a row count includes the current row for “After Row”actions, but does not include the current row for “Before Row” actions. For example, the value ofFOP_TBL_ROWS_PROCESSED for the first row of a table is 0 for “Before Row” actions, and 1 for “AfterRow” actions.
An example of Action Variable usage is shown in the following figure.
226 IBM InfoSphere Optim for DB2 for z/OS: Common Elements

This SQL statement inserts CUST_ID and ARCHIVE_FILE name values (using the Action VariableFOP_ARCHIVE_FILE_NAME) into table FOPDEMO.ARCHIVE_ACTION.
Calls to Stored Procedures
An Action statement can call a stored procedure using a one- or two-part name (i.e., userid.procname). If aone-part name is used, the current User ID is assumed.
Parameters passed with the CALL statement must be enclosed in parentheses. The number of parametersmust be the same as the number in the procedure and must be passed in the same order. If the storedprocedure does not require parameters, the CALL statement can pass an empty parameter list “( )” oromit the parentheses.
The CALL statement parameter list may include column variables, substitution variables, ActionVariables, and constants.v Type a column variable as a column name preceded by a colon (for example, :STOCK_NUMBER). The
data type of the column or substitution variable must be the same as that for the parameter in thestored procedure and the variable length must equal or exceed that for the parameter. An error occursif a column referenced by a column variable is null eligible, unless the PARAMETER STYLE specifiedwhen defining the stored procedure to DB2 is DB2SQL or GENERAL CALL WITH NULLS.
v The length of a parameter for an Action Variable must accommodate the Action Variable.v Constants for CHAR, VARCHAR, GRAPHIC, VARGRAPHIC, BINARY, VARBINARY, DATE, TIME,
and TIMESTAMP columns must be in single quotes. Constants for INTEGER, SMALLINT, andDECIMAL cannot be in quotes. The length of a parameter for a character, graphic, or binary constantmust accommodate the constant. The parameter lengths for DATE, TIME, and TIMESTAMP constantsare 10, 8, and 26 bytes, respectively.
A stored procedure called by an Action statement can cause restore processing to skip a row or toterminate the process by passing a value in the Action Variable FOP_RETURN_CODE. ValidFOP_RETURN_CODE values are:
0 Normal return (default).
1 Skip the row. This code can be returned by a stored procedure called by a “Before Row”statement. An error occurs if this code is returned by a stored procedure called by a “Before FirstRow” or “After” Action statement.
------- Enter an SQL Statement to be used by the Action Being Defined ---------Command ===> Scroll ===> PAGE
Before Restore of a Row To a TableCmd 1 of 3--- ------------------------------------------------------------------------*** ********************************* TOP **********************************___ INSERT INTO FOPDEMO.ARCHIVE_ACTION___ (ARCHIVE_CUSTID, ARCHIVE_FILE)___ VALUES (CUST_ID, :FOP_ARCHIVE_FILE_NAME);*** ******************************* BOTTOM *********************************
Line Commands: (I)nsert, (D)elete, (R)epeat, (M)ove, (C)opyUse the LIST COLUMNS command to add column names, if neededUse the LIST VARIABLES command to add Action Variables, if neededUse the SQLEdit command to invoke the ISPF editor with all of its facilitiesUse the SHARESQL command to select an Action whose SQL you wish to useUse the COPYSQL command to select an Action whose SQL you wish to copy
Figure 124. Action Variable SQL Statement
Chapter 6. Table Maps 227

2 Terminate the process. An optional, 80-character message can be passed in theFOP_RETURN_MESSAGE Action Variable.
3 Normal return and Archive performs a DB2 commit at that point.
4 Skip the row and return the table to a known state (i.e., rollback) and skip the row.
LIST COLUMNS
Use the LIST COLUMNS command to display a selection list of column variables for the table. Use the Sline command to select a column variable from the list. The selected column variable is added to the endof the SQL statement.
LIST SUBS
Use the LIST SUBS command to display a selection list of substitution variables for the table. Use the Sline command to select a substitution variable from the list. The selected substitution variable is added tothe end of the SQL statement.
LIST VARIABLES
Use the LIST VARIABLES command to display a selection list of Action Variables when formatting anSQL statement for an Archive Action. Use the S line command to select a variable from the list. Theselected variable is added to the end of the SQL statement.
SQLEDIT
You can use the SQLEDIT command to invoke an ISPF edit session for the displayed SQL statement. Allstandard ISPF facilities are available. Use the ISPF COPY command to insert data from a file and edit asdesired. Use END to terminate the ISPF session and redisplay the Enter an SQL Statement panel. Theedited data is inserted into the panel.
SHARESQL
Use the SHARESQL command to select from a list an action whose SQL statement you wish to associatewith the current action. You can scroll this list and use the S line command to select a desired action. TheSQL statement associated with the selected action is inserted into the SQL statement panel for the currentaction, overwriting anything already entered. You can edit the shared SQL statement, but it will changefor all actions for which it is active.
COPYSQL
Use the COPYSQL command to select from a list an action whose SQL statement you wish to copy intothe current action. You can scroll this list and use the S line command to select a desired action. The SQLstatement from the selected action is inserted at the end of your entry. Editing the SQL statement doesnot affect the statement from which it is copied.
Specification Complete
Use END to save the contents of the SQL Editor and return to the Select an Action To Be Defined panel.Use END again to return to the Define Table Map panel.
228 IBM InfoSphere Optim for DB2 for z/OS: Common Elements

Chapter 7. Export and Import Optim Objects
Many sites maintain similar databases on several different DB2 subsystems. For example, a site may havea database on one DB2 subsystem to support production and maintain databases on separate subsystemsfor testing. Another site may support multiple clients, each with its own database in a separatesubsystem.
The Optim objects are stored in the Optim Directory. Each DB2 subsystem has a unique Optim Directoryand objects in a Directory are available in only the subsystem that houses the Directory. The Export andImport Processes allow you to transport the Optim Directory objects (e.g., Access Definitions, Table Maps,etc.) to Directories in other DB2 subsystems. There is no need to re-create these objects on eachsubsystem. Thus, Export and Import save time and promote consistent, reliable data handling.
Although you can migrate table definitions, Legacy Tables, and related objects (e.g., primary keys andrelationships—DB2, IMS, or OPT) by using an Extract or Archive Process in combination with a CreateProcess, you cannot use these processes to migrate the objects unique to Optim that are not table-related.However, the Export and Import Processes must be used to migrate Access Definitions, Table Maps,Column Maps, Compare Definitions, Archive Collections, Legacy Tables, IMS Environment Definitions,and IMS Retrieval Definitions.
The Directory objects are migrated in two steps:1. Export Process
Copy objects from the Optim Directory in the current DB2 subsystem to a data set, so the objects canbe imported to an Optim Directory in any DB2 subsystem. Once copied to a data set, exported objectsmay be imported any number of times to any number of Optim Directories. To execute the ExportProcess, select Option E on the Choose a Definition Option menu.
2. Import Process
Copy the objects in the specified data set to the current DB2 subsystem. To execute the ImportProcess, select Option I on the Choose a Definition Option menu.
Typically, you use the Export Process to copy the object definitions from the current subsystem to a dataset. You can then return to the Choose a Definition Option menu, switch to the receiving subsystem bychanging the SUBSYS specification and, if appropriate, the LOCATION specification. Once you haveswitched to the new subsystem, you can use the Import Process to load the object definitions from thedata set. For details about the Choose a Definition Option menu, refer to “Choose a Definition Option”on page 12.
About Object Security
Security status is migrated, but applies only to objects in the database, not to objects in the data set. Forexample, only the owner can export an Access Definition with PRIVATE status. However, the samePRIVATE status does not prevent any user from importing the Access Definition from the Export Fileunless an Access Definition with the same name is in the importing Directory. After the Access Definitionis imported, it is assigned PRIVATE security status and, depending on an import processing option, theowner is either the importing user (default), the original owner from the Export File, or an explicit owner.(For details about assigning the owner of imported objects, see page Object Owner Processing.)
Use the Export ProcessTo export Optim objects, select Option 6.E Export from the Main Menu.
© Copyright IBM Corp. 1991, 2013 229

You can also select Option 6 DEFINITIONS to display the Choose a Definition Option menu (see“Choose a Definition Option” on page 12 ) and select Option E Export. In either case, the EXPORTProcess panel is displayed.
Panel
The panel includes:
Definition TypeThe type of object to export. Specify:
ALL All types
AC Archive Collections
AD Access Definitions
CD Compare Definitions (Compare only)
CM Column Maps
ED Environment Definitions (Move or Compare for IMS, VSAM, and Sequential Files only)
LT Legacy Tables (Move or Compare for IMS, VSAM, and Sequential Files only)
PK Primary Keys
R Relationships
RD Retrieval Definitions (Move or Compare for IMS, VSAM, and Sequential Files only)
TM Table Maps
A panel for the specified object type is displayed. Use this panel to enter the name of the desiredobject or use DB2 LIKE syntax to generate a selection list. You can select as many objects from theselection list as you wish. If you specify ALL, a separate panel is displayed for each object type.
Subordinate DefinitionsSubordinate objects may be associated with a selected object. If so, these subordinate objects canalso be exported. Specify:
Y Export subordinate objects.
-------------------------------- EXPORT Process -------------------------------Command ===>
Definition Type ===> (See List of Types Below)
ALL - All Types PK - Primary KeysR - Relationships AD - Access DefinitionsCM - Column Maps TM - Table MapsCD - Compare Definitions LT - Legacy TablesED - Environment Definitions RD - Retrieval DefinitionsAC - Archive Collections
Subordinate Definitions ===> NO (Y-Yes, N-No)
Output DSN ===>Disposition ===> REPLACE (A-Append, R-Replace)
Enter Report File Name or Leave Blank for a Temporary File:Report DSN ===>
Delete Exported Objects ===> NO (Y-Yes (With Confirmation Prompts), N-No)
Figure 125. EXPORT Process
230 IBM InfoSphere Optim for DB2 for z/OS: Common Elements

N Do not export subordinate objects.
Each object type and its subordinate objects are as follows:
Access DefinitionRelationship, Legacy Table
Archive Collectionsnone
Compare DefinitionAccess Definition, Relationship
Column Mapnone
Environment Definitionnone
Legacy Tablenone
Primary Keynone
Relationshipnone
Retrieval Definitionnone
Table MapColumn Map, Legacy Table
For example, if you specify CD as the type and YES to this prompt, the Compare Definitions are copiedand the subordinate Access Definitions and relationships are copied. Any additional relationships andLegacy Tables subordinate to the Access Definitions are also copied.
Output DSNThe name of a sequential or partitioned data set for the exported objects. You can provide thename of a new or an existing data set or place an asterisk as the last character of the name torequest a selection list.
If you specify the name of a new data set, you are prompted for allocation information and thedata set is allocated.
DispositionPlacement of objects copied to the output data set. Specify:
A Append objects to the contents of the output data set. (If objects are to be appended, theoutput data set must be a sequential file.)
R Replace the contents of the output data set.
Report DSNThe name of a sequential data set for the Export Process report. You can leave this prompt blank,provide the explicit name of a new or an existing data set, or request a selection list by includingan asterisk as the last character of the name. If you specify the name of a new data set, you areprompted for allocation information and the data set is allocated.
If you do not specify a name, the report is written to a temporary file. To view the report, youmust use the REPORT command from the EXPORT Summary panel.
Chapter 7. Export and Import Optim Objects 231

Delete Exported ObjectsIndicator for displaying a prompt, on which you specify whether to delete objects from the sourceOptim Directory after they are successfully exported. Specify:
Y Display the Deletion of Exported Objects pop-up window on which you can specifywhich objects are to be deleted:v Delete all exported objects, including subordinate objects.v Delete only exported objects that you explicitly selected; not subordinate objects.v Display a list of all exported objects and select specific objects to delete.v Do not delete any objects.
N Do not display a prompt and do not delete exported objects.
Select the Objects for ExportAfter you have completed the entries on the EXPORT Process panel, you are prompted to select thedefinitions of the designated type to export. If you specify a single type, such as AD or TM, anappropriate Choose a Definition panel is displayed. However, if you specify ALL, a Choose panel isdisplayed for each object type in the order listed on the EXPORT Process panel.v If you do not explicitly name an object on a Choose panel, a selection list is displayed.v If you are exporting objects of one type and provide an explicit name, the Export Process is executed
when you press ENTER. Alternatively, you can use END to cancel the Export Process and redisplay theEXPORT Process panel.
v If you specify ALL object types on the EXPORT Process panel and provide an explicit name on aChoose panel, the Choose panel for the next type of object is displayed when you press ENTER. Youcan use END to bypass any object type and proceed to the next object type. Once you complete theChoose panel for the last object type, the Export Process is invoked.
In the following figure, the Choose panel used to select Access Definitions is displayed.
This panel is similar to the panel displayed when you select Option 5 ADS from the Main Menu. Youcan provide a three-part Access Definition name to select a specific Access Definition for export. You canleave one or more prompts blank or use DB2 LIKE syntax to obtain a selection list of Access Definitions.
Selection List
Assume you have requested a selection list by specifying FOPDEMO for Group and SMITH for User onthe Choose an Access Definition to EXPORT panel. The following selection list is displayed.
-------------------- Choose an Access Definition to EXPORT --------------------Command ===>
Access Definition:Group ===>User ===>Name ===>
Use ’_’ for DB2 LIKE character ===> NO (Y-Yes, N-No)
Figure 126. Choose an Access Definition to EXPORT
232 IBM InfoSphere Optim for DB2 for z/OS: Common Elements

The Access Definitions with names that satisfy the selection list criteria are displayed in alphabeticalorder. The user that last modified each listed Access Definition and the date it was modified are alsodisplayed. You can scroll the list.
Status
A blank Status indicates the object is not selected. When the selection list is displayed, Status isblank—no objects are selected. The word “SELECT” in Status, to the left of the object name, indicates anobject is selected.
Select
On the selection list, you can select one or more objects using the S (Select) line command and deselectobjects using the U (Unselect) line command.
Use the SELECT and UNSELECT primary commands when many objects are listed and you want toselect or deselect most of them. For example, use SELECT ALL to select all objects on the list. You canthen de-select specific objects, using the U line command. Conversely, use UNSELECT ALL to de-selectall objects and the S line command to select the few you wish to export.
Selection Complete
Use END when your selections are complete. If you are exporting one type of object and:v Have selected one or more objects from the list, the Export Process is executed.v Have not selected an object from the list, the Choose panel is redisplayed. You can change the pattern
for the selection list, specify the explicit name of an object, or use END without specifying an objects.
If you specified ALL objects on the EXPORT Process panel and:v Have selected one or more objects from the list, the Choose panel for the next type of object is
displayed.v Have not selected an object from the list, the Choose panel is redisplayed. You can change the pattern
for the selection list, specify the explicit name of an object, or use END without specifying any objectsof the current type and display the Choose panel for the next object type.
-------------------- Select Access Definitions to EXPORT ----------------------Command ===> Scroll ===> PAGE
Use S to Select an Entry, U to Unselect an Entry. 1 OF 6Use the SELECT ALL Command to Select All Entries.Use the END Command to Indicate that Selections are Complete.
------ Access Definition ----- ----- Last Modified -----Cmd Status Group User Name By Date--- ------ -------- -------- ------------ -------- ----------------*** *************************** TOP ********************************___ SELECT FOPDEMO SMITH CUSTOMER SMITH 1999-09-21-16.36___ SELECT FOPDEMO SMITH DEMO1 SMITH 1999-10-15-12.15___ SELECT FOPDEMO SMITH DEMO3 SMITH 1999-10-22-10.45___ SELECT FOPDEMO SMITH SAMPLE SMITH 1998-12-19-04.21___ SELECT FOPDEMO SMITH SAMPLE2 SMITH 1998-12-26-10.44*** ************************* BOTTOM *******************************
Figure 127. Select Access Definitions to EXPORT
Chapter 7. Export and Import Optim Objects 233
Available Commands
The following primary commands are available from a selection list:BOTTOMCANCELDOWNENDFINDLOCATEOPTIONSRESETRFINDSELECTSHOWSORTUPTOPUNSELECT
Build the Output FileAt times, you may need to export objects in several steps or from several DB2 subsystems to be importedto another DB2 subsystem.
For example, you may want to export a Compare Definition with subordinate objects and a secondCompare Definition with no subordinate objects. As another example, you may want to use the AccessDefinitions in one DB2 subsystem and supplement them with the relationships in a second and the TableMaps in a third.
In either case, the export must occur in several steps. Using one method, you can export the objects toseparate output files and execute the Import Process for each file. However, if you export all objects to asingle file, you can import them in one Import Process. To create a single output file, specify APPEND asthe Disposition on the EXPORT Process panel for each Export Process.
The Export Process copies objects from the Optim Directory for the current DB2 subsystem. To build anoutput file containing objects from several DB2 subsystems, you must switch the subsystem beforeexecuting each Export Process. (You can change the DB2 subsystem designation on the Choose aDefinition Option menu.)
Export SummaryWhen the Export Process is complete, the EXPORT Summary is displayed.
The following is a sample summary.
234 IBM InfoSphere Optim for DB2 for z/OS: Common Elements

This summary provides the following information:
Output File DSNName of the data set containing the exported object definitions.
Report File DSNName of the data set containing the report for the Export Process. “Temporary” indicates a dataset name was not specified for the report.
Summary of ResultsA list of the object definition types and the number of each copied to the output file.
The Summary of Results is followed by a message indicating any error conditions encountered in theprocess. Explanatory text for each error is provided in the report file.
From the EXPORT Summary panel, press ENTER to redisplay the EXPORT Process panel, or use END toreturn to the Choose a Definition Option menu.
REPORT Command
You can use the REPORT command to invoke the ISPF browse facility and display the contents of thereport file. The report lists categories of exported object definitions with the name of each exported objectby category. Any error messages are also included in the report.
------------------------------- EXPORT Summary --------------------------------Command ===>
Output File DSN: FOPDEMO.EXPORT.SAMPLEReport File DSN: FOPDEMO.EXPORT.REPORT
Summary of Results
Primary Keys Processed : 1Relationships Processed : 1Column Maps Processed : 1Table Maps Processed : 1Access Definitions Processed : 1Collection Definitions Processed : 1Compare Definitions Processed : 1Legacy Tables Processed : 1Environment Definitions Processed: 1Retrieval Definitions Processed : 1
No error conditions were found
Enter REPORT Command to View the Report FilePress ENTER Key to Continue Processing
Figure 128. EXPORT Summary
Chapter 7. Export and Import Optim Objects 235

Use END to terminate the ISPF browse session and return to the Optim session.
Use the Import ProcessTo import Optim objects, select Option 6.I Import from the Main Menu.
You can also select Option 6 DEFINITIONS to display the Choose a Definition Option menu (see“Choose a Definition Option” on page 12 ) and select Option I Import. In either case, the IMPORTProcess panel is displayed.
********************************* Top of Data *********************************EXPORT Process Report
Created on Friday, September 12, 2008 at 09:15 AMFile: FOPDEMO.EXPORT.SAMPLE
Primary Key Exported : FOPDEMO.VENDORRelationship Exported : FOPDEMO.ORDERS.PIBColumn Map Exported : FOPDEMO.MAP10Table Map Exported : FOPDEMO.TESTMAPArchive Collection Exported : FOPWD.SALES_2007
Archive Files in Collection : FOPWD.SALES_01_2007FOPWD.SALES_02_2007FOPWD.SALES_03_2007FOPWD.SALES_04_2007
Legacy Table Exported : FOPJS.CUSTEnvironment Definition Exported: LEGACYRetrieval Definition Exported : FOPJS.SALEHLDAccess Definition Exported : FOPDEMO.FOPSP.TST01Compare Definition Exported : FOPDEMO.CUSTOMERS.COMPARE******************************** Bottom of Data *******************************
Figure 129. EXPORT Process Report
------------------------------- IMPORT Process --------------------------------Command ===>
Definition Type ===> ALL (See List of Types Below)
ALL - Import All Definitions PK - Primary KeysR - Relationships AD - Access DefinitionsCM - Column Maps TM - Table MapsCD - Compare Definitions LT - Legacy TablesED - Environment Definitions RD - Retrieval DefinitionsAC - Archive Collections
Input DSN ===>
Processing Options:Overwrite Existing Defs ===> NO (Y-Yes, N-No)Continue Import on Error ===> NO (Y-Yes, N-No)Create Generic OPTIM Rels ===> NO (Y-Yes, N-No)Create Generic OPTIM Keys ===> NO (Y-Yes, N-No)
If YES, Specify CID ===> * (* for All)Object Owner Processing ===> USER (U-User, S-Source, E-Explicit)
If Explicit, Specify Owner ===> (1-8 Alphanumeric Characters)
Enter Report File Name or Leave Blank for a Temporary File:Report DSN ===>
Figure 130. IMPORT Process
236 IBM InfoSphere Optim for DB2 for z/OS: Common Elements

Panel
The panel includes:
Definition TypeThe type of object to import. The available types are:
ALL All types (all objects in the input data set are imported)
AC Archive Collections
AD Access Definitions
CD Compare Definitions (Compare only)
CM Column Maps
ED Environment Definitions (Move or Compare for IMS, VSAM, and Sequential Files only)
LT Legacy Tables (Move or Compare for IMS, VSAM, and Sequential Files only)
PK Primary Keys
R Relationships
RD Retrieval Definitions (Move or Compare for IMS, VSAM, and Sequential Files only)
TM Table Maps
Input DSNThe name of the data set containing the objects to be imported. You can provide an explicit nameor a pattern, with an asterisk as the last character of the name, to request a selection list.
Overwrite Existing DefsAction taken if the name of an imported object matches the name of an object in the importingOptim Directory. Specify:
Y Overwrite objects in the Directory.
N Do not process a conflicting object. Proceed with the next object in the input data set.
The Import Process never replaces objects in the DB2 catalog. If the name of a primary key orrelationship conflicts with a name in the DB2 Catalog, an error message is written to the reportfile and processing continues according to the Continue Import on Error specification.
Continue Import on ErrorAction taken if an error is encountered during the Import Process. Specify:
Y Bypass processing for the object in error and continue with the next object in the inputdata set. Error messages are written to the report file.
N Stop processing.
Create Generic OPTIM RelsGeneric processing for all imported relationships. Specify:
Y Import all relationships as generic.
N Import all relationships as exported.
Create Generic OPTIM KeysGeneric processing for imported primary keys. Specify:
Y Import primary keys as generic primary keys.
N Import all primary keys as exported.
Chapter 7. Export and Import Optim Objects 237

If YES, Specify CIDIf Create Generic OPTIM Keys is Y, specify the identifier for primary keys to be converted togeneric.
creatoridCreator ID for primary keys to be imported as generic.
* Import all primary keys in the file as generic.
Object Owner ProcessingDetermine the owner of all imported objects, as well as the date and time last modified. Specify:
U The owner of all imported objects is the user performing the Import Process, and the dateand time last modified is the current date and time. This is the default value.
S The owner and the date and time last modified are set to the original values from thesource Export File. This is useful for creating a mirror image of an Optim Directory.
E The owner of all imported objects is the value specified for If Explicit, Specify Owner.The date and time last modified is set to the original value from the source Export File.
Note:
v Only an administrator (with the authorized password specified in User Options) can modifythis prompt. If you are not an administrator, this prompt is set to U and cannot be modified.
v An error occurs if you specify S or E for Object Owner Processing and the source Export Filewas created using release 5.1 or earlier of the Optim products.
If Explicit, Specify OwnerIf Object Owner Processing is E, specify the owner of all imported objects. You can specify 1 to 8alphanumeric characters; the first character must be alphabetic. (If Object Owner Processing is Uor S, this value is ignored.)
Report DSNThe name of a sequential data set for the Import Process report. You can leave this prompt blank,provide the explicit name of a new or an existing data set, or specify a pattern, using an asteriskas the last character of the name, to request a selection list. If you specify the name of a new dataset, you are prompted for allocation information and the data set is allocated.
If you do not specify a name, the report is written to a temporary file. Use the REPORTcommand from the IMPORT Summary panel to view the report.
Press ENTER to perform the Import Process. Use END or CANCEL to abandon the process. If you useEND, specifications are profiled.
Import SummaryWhen the Import Process is finished, the IMPORT Summary panel is displayed.
238 IBM InfoSphere Optim for DB2 for z/OS: Common Elements

Panel
This panel includes the following:
Input File DSNName of the data set containing the object definitions to be imported.
Report File DSNName of the sequential data set containing the results of the Import Process. “Temporary”indicates a data set name was not specified for the report.
Summary of ResultsA list of the object types and the total number of each added to the Directory. Conversions ofprimary keys and relationships to generic are shown in the Summary of Results.
This information is followed by a message indicating whether error conditions were encountered inprocessing. Explanatory text for each error is provided in the report file.
When the IMPORT Summary panel is displayed, press ENTER to redisplay the IMPORT Process panel, oruse END to return to the Choose a Definition Option menu.
REPORT Command
To display the contents of the report file, use the REPORT command. This command automaticallyinvokes the ISPF browse facility and displays the contents of the report.
The report lists the names of imported objects by category. Any error messages are also included in thereport.
------------------------------ IMPORT Summary -----------------------------Command ===>
Input File DSN: FOPDEMO.EXPORT.SAMPLEReport File DSN: FOPDEMO.IMPORT.REPORT
Summary of Results
Primary Keys Processed : 0Relationships Processed : 1Column Maps Processed : 1Table Maps Processed : 1Access Definitions Processed : 1Collection Definitions Processed : 0Compare Definitions Processed : 1Legacy Tables Processed : 0Environment Definitions Processed: 0Retrieval Definitions Processed : 0
No error conditions were foundEnter REPORT Command to View the Report FilePress ENTER Key to Continue ProcessingEnter END Command to Exit
Figure 131. IMPORT Summary
Chapter 7. Export and Import Optim Objects 239

Use END to terminate the ISPF browse session and return to the Optim session.
File FormatThe Export Process generates a set of SQL-like statements for each selected Optim object definition andcopies the statements to a file, which serves as the input to the Import Process. This section documentsthe format of these statements.
You can use ISPF facilities to browse and edit this file. Use care, however, when editing the file.Deviations from the syntax required by the Import Process cause errors.
The general format rules are:v Each statement begins with the CREATE keyword in the first position of a line.v Each statement ends with a semicolon. While the Export Process inserts a blank line after the
semicolon, this is not required.v At least one space between parameters is required.v The qualifiers for individual objects in sets of specifications, such as the Table List entries for an Access
Definition, are enclosed in parentheses.v If the length of a statement exceeds the length of the line, a break occurs before or after a parameter
and its qualifiers. The remaining text is continued on the next line. The Export Process indents thecontinued text, but this is not required. (Continuation characters are not used, except as noted for theSQL WHERE clause and selection criteria text.)
v If the first two non-blank characters on the line are dashes (-), the entire line is treated as a commentand ignored. Comments can be placed within an object definition or between definitions.
The format of the statement for each object type is documented in the following pages. The syntax usedfor these statements is:
KEYWORDStatement keywords are shown in uppercase and must be supplied as shown.
text Variable text is shown in lowercase italics.
( ) Required as a statement delimiter to group a series of qualifiers for a parameter. For example,(text1, text2,...) or (KEYWORD1 text1, KEYWORD2 text2,...).
[ ] Indicates an optional parameter.
{ } Indicates a choice of two or more settings from which one (and only one) must be selected.
| Separates options.
< > Indicates a choice of two or more settings from which one or more may be selected.
********************************* Top of Data ***********************IMPORT Process Report
Created on Wednesday, July 28, 2007 at 09:45 AMFile: FOPDEMO.EXPORT.SAMPLE
Primary Key Imported : FOPDEMO.CUSTOMERSRelationship Imported : FOPDEMO.ORDERS.CUSORDColumn Map Imported : FOPDEMO.DEMOMAPTable Map Imported : FOPDEMO.TESTMAPAccess Definition Imported : FOPDEMO.FOPSP.TEST1******************************** Bottom of Data *********************
Figure 132. IMPORT Process Report
240 IBM InfoSphere Optim for DB2 for z/OS: Common Elements

Primary KeysThe following statement is generated for each primary key:CREATE PK tablename
[ DESCRIPTION //description// ][ SECURITY security ]OWNER owneridMODIFIED yyyy-mm-dd-hh.mm.ssCOLS ( columnname1 [ ,columnnamen ] )
Parameters
The fully qualified table name is followed by:
DESCRIPTIONThe optional description. The 1 to 40 character text must be enclosed in double slashes.
SECURITYThe security assigned to the object, specified as:
PUBLICAll can use and modify (default).
READONLYAll can use, but only owner can modify.
PRIVATEOnly owner can use and modify.
OWNERThe owner of the exported object.
MODIFIEDThe date and time the object was last modified.
COLS The names of columns in the primary key, enclosed in parentheses and separated by commas.
Standard DDL CREATE TABLE and ALTER TABLE statements are also acceptable.
RelationshipsThe following statement is generated for each relationship:CREATE REL relationshipname
[ DESCRIPTION //description// ][ SECURITY security ]OWNER owneridMODIFIED yyyy-mm-dd-hh.mm.ssCHI child PAR parent ( parent-expr1 = child-expr1[ , parent-exprn = child-exprn ] )
Parameters
The relationship name is followed by:
DESCRIPTIONThe optional description. The 1 to 40 character text must be enclosed in double slashes.
SECURITYThe security assigned to the object, specified as:
PUBLICAll can use and modify (default).
READONLYAll can use, but only owner can modify.
Chapter 7. Export and Import Optim Objects 241

PRIVATEOnly owner can use and modify.
OWNERThe owner of the exported object.
MODIFIEDThe date and time the object was last modified.
CHI The fully qualified name of the child table in the relationship.
PAR The fully qualified name of the parent table in the relationship.
Relationship Expressions
Each pair of expressions must be enclosed in parentheses and separated by commas, with the parentexpression on the left and the child expression on the right of the equal sign. Continuation characters arenot used. Place breaks before or after an expression or the equal sign, or after a comma or a space withinthe expression.
Standard DDL CREATE TABLE and ALTER TABLE statements are also acceptable.
Access DefinitionsThe following statement is generated for each Access Definition:CREATE AD group.user.ad
[ DESCRIPTION //description// }[ SECURITY security ]DEFCID defaultcreatorid START starttableOWNER owneridMODIFIED yyyy-mm-dd-hh.mm.ssADDTBLS { Y | N } MODCRIT { Y | N } BEGINDISP { D | S | A }ADCHGS { T | P } USENEW { Y | N } APPLYSELFREF { Y | N }[ EXPIREVALUE { ddddd | yyyy-mm-dd } ][ ROWLIST dsname ][ GRPCOL column GRPROWS n GRPVALS n ]TABLE ( table ACCESS { S | U | I | D } REF { Y | N }
[ EXTRFREQ n ] [ EXTRLIMIT n ] PREDOP { A | O }[ SQL //sqlwhereclause// ] [ CORRELNAME correlname ]COLFLAG { Y | N }[ ARCIXTAB { Y | N } ][ ARCDAA { Y | N } ][ ARCOP { A | O } ][ ARC_ACTION
( ( type_of_action1 share_status1 [ //sql_statement// ] )( type_of_actionn share_statusn [ //sql_statement// ] ) ) ]
[ COLUMN ( column DISP { Y | N } ACCESS { S | U }HEADING { N | L } { L | R | C }[ SORT n { A | D } ][ PRED //selectioncriteria// ][ ARCIXCOL { D | N | S } ][ ARCFMT ’formatparam’ ][ ARCDATE ’explicitdate’ ][ ARCPIVOT n ][ ARCYRS n ][ ARCMOS n ][ ARCWKS n ][ ARCDAYS n ] ) ]
[ LEGDSN dsname ][ LEGTYPE { D | I }][ LEGPSB psbname ][ LEGPCB pcbnum ][ LEGSEG segname ] )
REL ( relationship STATUS { NEW | SEL | UNSEL | UNK }Q1 { Y | N } Q2 { Y | N }
242 IBM InfoSphere Optim for DB2 for z/OS: Common Elements

CHILDLIMIT { n | NOCHILDREN | UNLIMITED }TYPE { DB2 | PST | IMS } DUPRELS { Y | N }[PAR_ACCESS { K | S }][PAR_KEYLIMIT n][CHI_ACCESS { K | S }][CHI_KEYLIMIT n]PAR parent CHI child )
SUBVAR ( :variablename VALUELEN 101[ VALUE // value // ] [ PROMPT // prompt // ] )
Parameters
The Access Definition name is followed by:
DESCRIPTIONThe optional description. The 1 to 40 character text must be enclosed in double slashes.
SECURITYThe security assigned to the object, specified as:
PUBLICAll can use and modify (default).
READONLYAll can use, but only owner can modify.
PRIVATEOnly owner can use and modify.
DEFCIDThe default Creator ID.
STARTThe name of Start Table. The Creator ID is included only when it differs from the default CreatorID.
OWNERThe owner of the exported object.
MODIFIEDThe date and time the object was last modified.
The following parameters correspond to those specified on the Access Definition Parameters panel:
ADDTBLSDynamically add tables. Specify:
Y Users can dynamically add tables during an edit or browse session.
N Users cannot add tables.
MODCRITModify selection criteria. Specify:
Y Users can modify selection criteria during an edit or browse session.
N Users cannot modify selection criteria.
BEGINDISPThe initial display when an Access Definition is used to edit or browse. Specify:
D Data
S Selection criteria prompt for the Start Table.
A Selection criteria prompt for each accessed table, including the Start Table.
Chapter 7. Export and Import Optim Objects 243

ADCHGSWhether changes made to an Access Definition during edit or browse are saved. Specify:
T (Temporary) Changes to an Access Definition during an edit or browse session are notsaved, but used for the current session only.
P (Permanent) Changes to an Access Definition during an edit or browse session are saved..
USENEWUse new relationships. Specify:
Y Select new relationships for traversal.
N Do not select new relationships.
APPLYSELFREFApply selection criteria when a table is self-referenced. This setting applies only when browsingor editing data. Specify:
Y Apply any criteria for a table each time the table is referenced. Default.
N Apply criteria to the Start Table the first time it is accessed, but not when the table isself�referenced.
EXPIREVALUEThe optional expiration parameters for Archive Files generated in Archive Processes that use theAccess Definition. (Archive only) Specify:
yyyy-mm-dd An explicit expiration date, in ISOformat, for the Archive File.
ddddd The number of days until expiration.
The following parameters are included only if a Row List or group selection processing has been definedfor the Start Table.
ROWLISTThe name of the data set containing the Row List from a Point-and-Shoot session.
GRPCOLThe name of the column specified for group selection processing.
GRPROWSThe maximum number of rows selected for each unique column value for group selectionprocessing.
GRPVALSThe maximum number of unique column values for group selection processing.
Tables
A TABLE entry is provided for each table in the Access Definition. The set of keywords for each table isenclosed in parentheses. The table name is followed by keywords that correspond to a value for a tablethat can be specified in the Access Definition.
ACCESSAccess rights for the table, specified as:
S Select only.
U Update or select.
I Insert, update, or select.
D Delete, insert, update, or select (default).
244 IBM InfoSphere Optim for DB2 for z/OS: Common Elements

REF Reference table identifier:
Y Reference table.
N Not a reference table.
EXTFREQAn optional numeric selection factor for rows in the table.
EXTRLIMITThe optional maximum number of rows extracted or archived.
PREDOPThe logical operator to apply to selection criteria:
A Combine criteria with AND operator (default).
O Combine criteria with OR operator.
SQL Optional SQL WHERE clause text.
CORRELNAMECorrelation name specified on the SQL WHERE Clause panel, if applicable.
COLFLAGModifications to the Define Columns panel:
Y Specifications on the Define Columns panel were modified.
N The panel was not modified.
ARCIXTABArchive index indicator. (Archive only)
Y One or more columns in the table are indexed.
N Columns are not indexed.
ARCDAADelete after archive indicator. (Archive only)
Y Delete source rows after archiving.
N Retain rows after archiving.
ARCOPThe logical operator to apply to archive criteria. (Archive only)
A Combine criteria with AND operator (default).
O Combine criteria with OR operator.
ARC_ACTIONArchive Action definition. An entry is required for each Archive Action associated with theAccess Definition. Each entry may include the following three qualifiers, which are positional andare separated from each other by blanks (not commas).
type_of_actionThe type of Action, specified as one of the following: (Required)
BEFORE_EXT_1ST_ROW
BEFORE_EXT_ROW
AFTER_EXT_ROW
AFTER_EXT_LAST_ROW
BEFORE_DEL_1ST_ROW
Chapter 7. Export and Import Optim Objects 245

BEFORE_DEL_ROW
AFTER_DEL_ROW
AFTER_DEL_LAST_ROW
BEFORE_REST_1ST_ROW
BEFORE_REST_ROW
AFTER_REST_ROW
AFTER_REST_LAST_ROW
share_statusThe shared status for the Action, specified as either NOT_SHARED or OWNER.(Required)
//sql_statement//The SQL statement for the Action. (Optional)
Note: An SQL WHERE clause must be delimited by double slashes, “//”. If the text exceeds the lengthof one line, continuation is indicated by slashes at the end and at the beginning of the continuation line.The text can be broken anywhere since the continuation lines are appended without inserting blanksduring the Import Process.You must leave a space after a comma that precedes a numeric value if the DB2 setup specifies a commaas the decimal point value.
A COLUMN entry is provided for every column in a table only when the defaults have been modifiedfor the Access Definition. The set of keywords is enclosed in parentheses. The column name is followedby keywords that correspond to values that can be specified for a column.
DISP Indicator for display of column.
Y Display the column (default).
N Do not display the column.
ACCESSEdit access to a column.
U Column can be updated.
S Column is display only.
HEADINGTwo values indicating:
The column heading, displayed as:
N The column name (default).
L The label specified in the DB2 Catalog.
And the position of the heading in relation to the data length for a column, specified as:
L Left-justified
R Right-justified
C Centered (default)
SORT Two values indicating:
The sort level as a numeric value,
and the sort direction, as:
A Ascending (default)
246 IBM InfoSphere Optim for DB2 for z/OS: Common Elements

D Descending
(Included only if sort criteria are specified.)
PRED The text of the selection criteria. (Included only if selection criteria are specified.)
ARCIXCOLArchive index indicator for a column. (Archive only)
D Values in the column have a dense index.
N Values in the column are not indexed (default).
S Values in the column have a sparse index.
ARCFMTThe format of the date in the column. The format must be appropriate for the data type andprecision of the column. (Archive only)
ARCPIVOTThe year used to determine whether a two-digit year value is handled as a 20th century (1900) or21st century (2000) value. If the year is greater than or equal to this value, 1900 is assumed.(Archive only)
ARCDATEThe cut-off date for archived data, specified in ISO, European, or USA format. Archive convertsthe date to your DB2 default format. Rows with a date earlier than the specified date are selectedfor archiving. (Archive only)
ARCYRSThe number of years. This value is combined with any values for months, weeks, and days, andis subtracted from the current date to determine the cut-off date for archived data. (Archive only)
ARCMOSThe number of months. This value is combined with any values for years, weeks, and days, andis subtracted from the current date to determine the cut-off date for archived data. (Archive only)
ARCWKSThe number of weeks. This value is combined with any values for years, months, and days, andis subtracted from the current date to determine the cut-off date for archived data. (Archive only)
ARCDAYSThe number of days. This value is combined with any values for years, months, and weeks, andis subtracted from the current date to determine the cut-off date for archived data. (Archive only)
The following parameters apply only if TABLE is a Legacy Table. The type of legacy source filedetermines which parameters are included. (Move or Compare for IMS, VSAM, and Sequential Files only)
LEGTYPEThe type of legacy source file:
D VSAM or Sequential file
I IMS file
LEGDSNThe name of the legacy source data set.
LEGPSBThe name of the PSB that provides access to the IMS services that Optim Legacy requires toaccess the database records. (Included only if LEGTYPE is I.)
LEGPCBThe relative number of the database PCB within the specified PSB that grants Optim Legacy theauthorization to manipulate the data. (Included only if LEGTYPE is I.)
Chapter 7. Export and Import Optim Objects 247

LEGSEGThe names of the segments within the specified DBD. (Included only if LEGTYPE is I.)
Relationships
A REL entry is provided for each relationship in the Access Definition, as listed on the SpecifyRelationship Usage panel. The set of keywords for each relationship is enclosed in parentheses. Therelationship name is followed by keywords that correspond to values that can be specified to determinethe use of a relationship by an Access Definition.
STATUSThe status of the relationship, specified as:
NEW New to the relationship list.
SEL Selected.
UNSELNot selected.
UNK Not defined for the listed tables.
Q1 Value specified for Question 1:
Y Process all parent rows (default).
N Do not process all parent rows.
Q2 Value specified for Question 2:
Y Process all child rows.
N Do not process all child rows (default).
CHILDLIMITThe maximum number of child rows processed for each parent row, specified as:
n An explicit number of rows.
NOCHILDRENNo child rows.
UNLIMITEDAll related child rows.
TYPE The type of relationship, specified as DB2, OPT (Optim), or IMS.
DUPRELSIndicator for duplicate relationships:
Y At least one other relationship with the same parent and child tables.
N No duplicate relationships.
PAR_ACCESSAccess method used to retrieve rows from the parent table when the traversal is from child toparent. Optim determines the default if this keyword is omitted.
K Access by key lookup.
S Access using table scan.
PAR_KEYLIMITMaximum number of parent table rows that can be retrieved in one SQL call, when the traversalis from child to parent. Specify a value in the range 1 - 100. The default is 1. This parameterapplies only if PAR_ACCESS is K.
248 IBM InfoSphere Optim for DB2 for z/OS: Common Elements

CHI_ACCESSAccess method used to retrieve child table rows when the traversal is from parent to child. Optimdetermines the default if this keyword is omitted.
K Access by key lookup.
S Access using table scan.
CHI_KEYLIMITMaximum number of child table rows that can be retrieved in one SQL call, when the traversal isfrom parent to child. Specify a value in the range 1 - 100. The default is 1. This parameter appliesonly if CHI_ACCESS is K.
PAR The name of the parent table in the relationship.
CHI The name of the child table in the relationship.
Substitution Variables
A SUBVAR entry is provided for each substitution variable that has been defined in the Access Definition.The set of keywords for each substitution variable is enclosed in parentheses. The substitution variablename must be preceded by a colon (:), and can be up to 12 characters. The substitution variable name isfollowed by:
VALUELENThe value length is always 101. (This keyword must immediately follow the substitution variablename.)
VALUEThe optional default value for the substitution variable. The 1 to 100 character value must beenclosed in double slashes.
PROMPTThe optional prompt text to be displayed for the substitution variable. The 1 to 35 character textmust be enclosed in double slashes.
Column MapsThe following statement is generated for each Column Map:CREATE CM columnmapname
[ DESCRIPTION //description// ][ SECURITY security ]OWNER owneridMODIFIED yyyy-mm-dd-hh.mm.ss[ EXTDSN dsname ]SRC table DEST tableVAL { ON | OFF }SRCTYPE code1 source-expr1 = dest-col1
[ , SRCTYPE coden source-exprn = dest-coln ]
Parameters
The Column Map name is followed by:
DESCRIPTIONThe optional description. The 1 to 40 character text must be enclosed in double slashes.
SECURITYThe security assigned to the object, specified as:
PUBLICAll can use and modify (default).
Chapter 7. Export and Import Optim Objects 249

READONLYAll can use, but only owner can modify.
PRIVATEOnly owner can use and modify.
OWNERThe owner of the exported object.
MODIFIEDThe date and time the object was last modified.
EXTDSNThe optional name of the Extract or Archive File from which the column definitions are taken.
SRC The fully qualified name of the source table.
DEST The fully qualified name of the destination table.
VAL The validation setting, specified as:
ON Validation was performed when the map was created.
OFF Validation was not performed.
SRCTYPESRCTYPE is included for each source and destination mapping, where code describes the sourceexpression as one of the following:
A numeric literal
B string, graphic, or binary literal
C valid column name
D current time register
E current date register
F current timestamp register
H current user register
I current SQLID register
J a default
K exit routine
L error
M source column matches the destination
N column is NULL-eligible
U column is unusable
T current TSOID register
X valid expression for source
source-exprThe specified source expression.
dest-columnThe name of the destination column.
Note: See “Literals and Constants” on page 141 for examples of how to specify string, graphic, andbinary literals.
250 IBM InfoSphere Optim for DB2 for z/OS: Common Elements

Table MapsThe following statement is generated for each Table Map:CREATE TM tablemap
[ DESCRIPTION //description// ][ SECURITY { PUBLIC | READONLY | PRIVATE } ]OWNER owneridMODIFIED yyyy-mm-dd-hh.mm.ssVALRULES { C | M }SRCCID sourceid DESTCID destid [ COLMAPID colmapid ]{ SRCEXT dsname | SRCAD ad }{ DESTEXT dsname | DESTAD ad }[ SRCTYPE { X | A | T } ] [ DESTTYPE { X | A | T } ]( sourcetablename = desttablename[ { CM mapname | LOCALCM ( mapdef ) } ][ ARC_ACTION ( ( type_of_action1 share_status1 [ //sql_statement// ] )
( type_of_actionn share_statusn [ //sql_statement// ] ) ) ][ LEGTYPE { D | I } ] [ LEGDSN dsname ][ LEGPSB psbname ] [ LEGPCB pcbnum ] [ LEGSEG segname ][ PROCESSMODE { I | U | B } ] [ DELETEFLAG { Y | N } ][ , sourcetablename = desttablename[ CM mapname | LOCALCM ( mapdef ) ][ ARC_ACTION ( ( type_of_action1 share_status1 [ //sql_statement// ] )
( type_of_actionn share_statusn [ //sql_statement// ] ) ) ][ LEGTYPE { D | I } ] [ LEGDSN dsname ][ LEGPSB psbname ] [ LEGPCB pcbnum ] [ LEGSEG segname ][ PROCESSMODE { I | U | B } ] [ DELETEFLAG { Y | N } ] ] )
Parameters
The Table Map name is followed by:
DESCRIPTIONThe optional description. The 1 to 40 character text must be enclosed in double slashes.
SECURITYThe security assigned to the object, specified as:
PUBLICAll can use and modify (default).
READONLYAll can use, but only owner can modify.
PRIVATEOnly owner can use and modify.
OWNERThe owner of the exported object.
MODIFIEDThe date and time the object was last modified.
VALRULESThe validation rules for the Table Map, specified as:
M Move or Archive rules.
C Compare rules.
SRCCIDThe default Creator ID for the source.
DESTCIDThe default Creator ID for the destination.
Chapter 7. Export and Import Optim Objects 251

COLMAPIDThe optional default Column Map ID.
The following parameters are included, depending on the source and destination types, as well aswhether the Table Map is for Move, Archive, or Compare.
SRCEXTThe name of the data set containing an Extract or Archive File used as the source.
SRCADThe fully qualified name of the Access Definition used as the source.
DESTEXTThe name of the data set containing an Extract or Archive File used as the destination.
DESTADThe fully qualified name of the Access Definition used as the destination.
SRCTYPEThe source type as:
X Extract or Archive File
A Access Definition
T Table
DESTTYPEThe destination type as:
X Extract or Archive File
A Access Definition
T Table
Table Mapping
The following source table to destination table mapping information is provided for each pair of tablesreferenced in the Table Map. At least one pair of tables must be specified.
sourcetablenameThe source table name. The Creator ID is included if it differs from the SRCCID.
desttablenameThe destination table name. The Creator ID is included if it differs from the DESTCID. The words“NOT-SPECIFIED” are inserted when the destination table in a pair is omitted.
CM or LOCALCM is included if a Column Map has been specified for a pair of tables. ARC_ACTION isincluded if any Archive Actions apply.
CM The name of the Column Map for the pair of tables. The Map ID is included if it differs from theCOLMAPID.
LOCALCMThe local Column Map definition, enclosed in parentheses. Only the source and destinationmapping (source-expr = dest-column) is included here. For details, see “Column Maps” on page249.
ARC_ACTIONArchive Action definition. An entry is required for each Archive Action associated with the TableMap. Each entry may include the following three qualifiers, which are positional and areseparated from each other by blanks (not commas):
252 IBM InfoSphere Optim for DB2 for z/OS: Common Elements

type_of_actionThe type of Action, specified as one of the following: (Required)
BEFORE_REST_1ST_ROW
BEFORE_REST_ROW
AFTER_REST_ROW
AFTER_REST_LAST_ROW
share_statusThe shared status for the Action, specified as either NOT_SHARED or OWNER.(Required)
//sql_statement//The SQL statement for the Action. (Optional)
Note: You must leave a space after a comma that precedes a numeric value if the DB2setup specifies a comma as the decimal point value.
The following parameters apply only to Legacy Tables referenced in the Table Map. The type of legacysource file determines which parameters are included. (Move or Compare for IMS, VSAM, and SequentialFilesonly)
LEGTYPEThe type of legacy source file to be used with the Legacy Table:
D VSAM or Sequential file
I IMS file
LEGDSNThe name of the legacy source data set.
LEGPSBThe name of the PSB that provides access to the IMS services that Move or Compare for IMS,VSAM, and Sequential Filesrequires to access the database records. (Included only if LEGTYPE isI.)
LEGPCBThe relative number of the database PCB within the specified PSB that grants Move or Compare forIMS, VSAM, and Sequential Filesthe authorization to manipulate the data. (Included only ifLEGTYPE is I.)
LEGSEGThe names of the segments within the specified DBD. (Included only if LEGTYPE is I.)
Note: Additionally, a Table Map referencing one or more Legacy Tables for IMS data includes parametersfor any Retrieval Definitions that are referenced by the Legacy Table. (For details, see “RetrievalDefinitions” on page 260.)
The following parameters are included only if the Table Map contains processing overrides:
PROCESSMODEThe processing mode for the table:
I Insert only.
U Update only.
B Both insert and update.
DELETEFLAGDelete parameter for the table.
Chapter 7. Export and Import Optim Objects 253

Y Delete all rows in the destination table prior to inserting data.
N Do not delete.
Compare DefinitionThe following statement is generated for each Compare Definition (for Compare only):CREATE CD group.user.name
[ DESCRIPTION //description// ][ SECURITY security ]OWNER owneridMODIFIED yyyy-mm-dd-hh.mm.ssSRC1TYP { EXTR dsname | AD ad | LOCALAD ( addef ) }SRC2TYP { EXTR dsname | AD ad | LOCALAD ( addef ) | ALL }TM ( tablemap )[ REL ( relname STATUS { SEL | UNSEL | REF } SOURCE { 1 | 2 }TYPE { DB2 | OPT } PAR parent CHILD child ) ][ CMPDSN dsname ]
Parameters
The Compare Definition name is followed by:
DESCRIPTIONThe optional description. The 1 to 40 character text must be enclosed in double slashes.
SECURITYThe security assigned to the object, specified as:
PUBLICAll can use and modify (default).
READONLYAll can use, but only owner can modify.
PRIVATEOnly owner can use and modify.
OWNERThe owner of the exported object.
MODIFIEDThe date and time the object was last modified.
SRC1TYPThe type and name for Source 1, specified as one of the following:
EXTR Fully qualified name of the Extract or Archive File.
AD Fully qualified name of the Access Definition.
LOCALADEntire Access Definition specification.
Note: For details on the contents of the Access Definition, see “Access Definitions” on page 242in this section.
SRC2TYPThe type and name for Source 2, specified as one of the following:
EXTR Fully qualified name of the Extract or Archive File.
AD Fully qualified name of the Access Definition.
LOCALADEntire Access Definition specification.
254 IBM InfoSphere Optim for DB2 for z/OS: Common Elements
ALL All tables in the database. (The tables are listed in the Table Map specifications.)
CMPDSNThe name of the data set for the results of the Compare Process. (Included only if a data set namewas specified.)
Table Map
The complete definition of a Table Map, TM, is always included. The qualifiers are specified withinparentheses. For details on the contents of the Table Map, see “Table Maps” on page 251.
Relationships
A REL entry is provided for each relationship in the Compare Definition. The set of keywords for eachrelationship is enclosed in parentheses. The relationship name is followed by keywords that correspondto the relationship specifications for the Compare Definition:
STATUSThe status of the relationship, specified as:
SEL Selected.
UNSELNot selected.
REF For a reference table.
SOURCEIndicates the source of the relationship as Source 1 or 2.
TYPE The type of relationship, specified as DB2 or OPT (Optim).
PAR The fully qualified name of the parent table in the relationship.
CHI The fully qualified name of the child table in the relationship.
Legacy TablesThe following statement is generated for each Legacy Table (for Move or Compare for IMS, VSAM, andSequential Filesonly).CREATE LT cid.ltname
[ DESCRIPTION //description// ][ SECURITY security ]OWNER owneridMODIFIED yyyy-mm-dd-hh.mm.ssLANGUAGE { P | C }[ CRIT //recordcriteria// ]LEGTYPE { D | I }
[ DBDNAME dbdname ][ SEGNAME segname ][ LEGDSN dsname ]
[ FIELD ( fieldnameTYPE typeLEVEL nLENGTH n[ COLNAME colname ][ PRECISION value ][ SCALE value ][ SYNC { Y | N } ][ BOUNDARY { 1 | 2 | 4 | 8 } ][ SIGNED { Y | N } ][ PICTURE //pictureclause// ][ OCCURSFROM value ][ OCCURSTO value ][ OCCURSNAME name ]
Chapter 7. Export and Import Optim Objects 255

[ REDEFNAME name ] ) ][ LEGEXIT ioexitname ][ SBCS_CCSID ccsid ][ MBCS_CCSID ccsid ][ DBCS_CCSID ccsid ][ DETECT_ISO { NO | YES } ]
Parameters
The Legacy Table name is followed by:
DESCRIPTIONThe optional description. The 1 to 40 character text must be enclosed in double slashes.
SECURITYThe security assigned to the object, specified as:
PUBLICAll can use and modify (default).
READONLYAll can use, but only owner can modify.
PRIVATEOnly owner can use and modify.
OWNERThe owner of the exported object.
MODIFIEDThe date and time the object was last modified.
LANGUAGEThe language for the legacy file:
P PL/I
C COBOL
CRIT The criteria used to match the Legacy Table with a record in the source dataset. (Included onlywhen specified in the Legacy Table definition.)
LEGTYPEThe type of legacy source file.
D A sequential or VSAM data set.
I An IMS file.
DBDNAMEThe name of the DBD for the IMS database with which the Legacy Table is associated. The DBDmust be in a DBD Library referenced in the Environment Definition that matches the Creator IDof the Legacy Table. (Required if LEGTYPE is I.)
SEGNAMEThe name of the segment in the specified DBD with which the Legacy Table is associated.(Required if LEGTYPE is I.)
LEGDSNThe name of the source data set.
FIELD The name of a field in the Legacy Table. A FIELD keyword and fieldname are required for eachfield in the Legacy Table. The allowable parameters for each field are listed below. (Theseparameters are optional, unless otherwise indicated.)
256 IBM InfoSphere Optim for DB2 for z/OS: Common Elements

TYPE The type is required and can be any DB2 type (e.g., SHORT, CHAR, INTEGER,TIMESTAMP, etc.). The following are also allowed:
LTTYPE_GROUPLTTYPE_NUMLTTYPE_VALUELTTYPE_LARGEINTLTTYPE_OTHER
LEVELThe field level number is required.
LENGTHThe field length is required.
COLNAMEThe associated column name. If omitted, the field name becomes the column name.
PRECISIONThe precision value.
SCALEThe scale value.
SYNC The synchronization characteristic.
Y Field is synchronized.
N Field is not synchronized.
BOUNDARYThe field alignment, specified as 1, 2, 4, or 8. Default is 1.
SIGNEDThe signed status.
Y Field is signed.
N Field is not signed.
PICTUREThe picture clause, which must be enclosed in double slashes.
OCCURSFROMThe occurs-from value.
OCCURSTOThe occurs-to value.
OCCURSNAMEThe name for the depending-on clause.
REDEFNAMEThe name for the redefine clause.
LEGEXITThe name of the I/O Exit Load module, if different from FOPIMIOX or FOP2DIOX or the defaultexit name specified in the Site Options.
SBCS_CCSIDSingle-byte Coded Character Set Identifier (CCSID) for the Legacy Table
MBCS_CCSIDMulti-byte CCSID for the Legacy Table
Chapter 7. Export and Import Optim Objects 257

DBCS_CCSIDDouble-byte CCSID for the Legacy Table
DETECT_ISOSpecifies whether Optim looks for the $$FOPDAT, $$FOPTIM, and $$FOPSTP keywords whenparsing copybooks to build Legacy Table definitions.
NO Optim does not look for the $$FOPxxx keywords when parsing copybooks (default).
YES Optim looks for the $$FOPxxx keywords when parsing copybooks. The $$FOPDAT,$$FOPTIM, and $$FOPSTP keywords can be included within copybook comments. Thecomment must appear on the line directly before the related field definition. The$$FOPxxx keyword must be separated by spaces from other text in the comment line.
The $$FOPxxx keywords indicate that the field following the comment is in ISO DATE,TIME, or TIMESTAMP format. When Optim finds the $$FOPxxx keyword, it sets thefollowing field to the appropriate DAT, TIM, or STP type in the Legacy Table definition.For COBOL, the field must be defined as alphanumeric. For PL/I, the field must bedefined as character. The field must also adhere to the following rules.
$$FOPDAT - ISO DATE: The field must have a length of 10 and be defined inYYYY-MM-DD format.
$$FOPTIM - ISO TIME: The field must have a length of 8 and be defined in HH:MM:SSformat.
$$FOPSTP - ISO TIMESTAMP: The field must have a length of 26 and be defined inYYYY-MM-DD-HH.MM.SS.NNNNNN format.
The following examples illustrate the $$FOPxxx keyword comments and related fielddefinitions.
COBOL copybook01 SAMPREC.
02 CUSTNAME PIC X(80).* $$FOPDAT
02 SAMPLE-DATE PIC X(10).* $$FOPTIM
02 SAMPLE-TIME PIC X(8).* $$FOPSTP
02 SAMPLE-TIMESTAMP PIC X(26).
PL/I copybook1 SAMPREC,
2 CUSTNAME CHAR(80),/* $$FOPDAT */
2 SAMPLE_DATE CHAR(10),/* $$FOPTIM */
2 SAMPLE_TIME CHAR(8),/* $$FOPSTP */
2 SAMPLE_TIMESTAMP CHAR(26);
Environment DefinitionsThe following statement is generated for each Environment Definition (for Move or Compare for IMS,VSAM, and Sequential Filesonly):CREATE ED environmentname
[ DESCRIPTION //description// ][ SECURITY security ]OWNER owneridMODIFIED yyyy-mm-dd-hh.mm.ss [ SYSLIB1 syslib1 ][ SYSLIB2 syslib2 ][ SYSLIB3 syslib3 ]DBDLIB1 dbdlib1 [ DBDLIB2 dbdlib2 ]
258 IBM InfoSphere Optim for DB2 for z/OS: Common Elements

[ DBDLIB3 dbdlib3 ][ DBDLIB4 dbdlib4 ]DFSVSAMP_DSN dfsdsn DFSVSAMP_MEM dfsmem [ IMSID imsid ][ IMSAGN imsagn ][ IMSDALOC { Y | N } ]
Parameters
The Environment Definition name is followed by:
DESCRIPTIONThe optional description of the Environment Definition. The 1 to 40 character text must beenclosed in double slashes.
SECURITYThe security assigned to the object, specified as:
PUBLICAll can use and modify (default).
READONLYAll can use, but only owner can modify.
PRIVATEOnly owner can use and modify.
OWNERThe owner of the exported object.
MODIFIEDThe date and time the object was last modified.
SYSLIB1, SYSLIB2, SYSLIB3The optional names of the IMS Program Libraries included in the Environment Definition. TheIMS Program Libraries define and load the libraries required to run IMS.
DBDLIB1, DBDLIB2, DBDLIB3, DBDLIB4The names of IMS DBD and PSB Libraries included in the Environment Definition. The DBD andPSBs within the libraries define the structure of the IMS database, as well as how Optim Legacyaccesses the data.
DBDLIB1 is a required parameter, but DBDLIB2-4 are optional.
DFSVSAMP_DSNThe dataset name of the DFSVSAMP containing the IMS buffer parameters to be used whenrunning in batch mode.
DFSVSAMP_MEMThe DFSVSAMP member name in the specified dataset containing the IMS buffer parameters tobe used when running in batch mode.
IMSIDThe IMS System ID required to access the IMS data when allocated to a control region (i.e., thedata is online to IMS).
IMSAGNThe IMS Application Group Name required to access the IMS data when allocated to a controlregion, if required by your IMS database.
IMSDALOCThe dynamic allocation of database datasets.
Y Dynamic allocation is used.
N Dynamic allocation is not used.
Chapter 7. Export and Import Optim Objects 259

Retrieval DefinitionsThe following statement is generated for each Retrieval Definition (for Move or Compare for IMS, VSAM,and Sequential Filesonly):CREATE RD environmentname.DBDname
[ DESCRIPTION //description// ][ SECURITY security ]OWNER owneridMODIFIED yyyy-mm-dd-hh.mm.ss PSBNAME psbname PCBNBR pcbnbr [ DSNPREFIX dsnprefix ][ IDNAME idname ][ USE_DBRC { YES | NO } ][ USE_IEFRDER { YES | NO } ][ DBTYPE { HIDAMOS | HDAMOS | HIDAM | HDAM | HISAM | HSAM | DEDB | HALDB | SHSAM | SHISAM } ]DDGROUP ( DDNAME ddname DSNAME dsname TYPE type
NUMSEG numseg SEGMENT ( SEGNAME segname )DCB_PARMS(UNIT esoteric unit LRECL logical record lengthBLKSIZE block size ALLOCSIZE allocation sizePRIMARY primary quantitySECONDARY secondary quantity VOLUME (volume serial))
Parameters
The Retrieval Definition name (environmentname.DBDname) is followed by:
DESCRIPTIONThe optional 1 to 40 character description of the Retrieval Definition. The text must be enclosedin double slashes.
SECURITYThe security assigned to the object, specified as:
PUBLICAll can use and modify (default).
READONLYAll can use, but only owner can modify.
PRIVATEOnly owner can use and modify.
OWNERThe owner of the exported object.
MODIFIEDThe date and time the object was last modified.
PSBNAMEThe 1 to 8 character name of the default PSB in a PSB library referenced in the specifiedEnvironment Definition. The PSB provides access to the IMS services that Optim requires toaccess the database records.
PCBNBRThe relative number of the database PCB within the specified PSB that grants Optim theauthorization to manipulate the data.
DSNPREFIXThe optional 1 to 8 character prefix used when specifying Associated IMS Database DatasetNames.
IDNAMEThe optional IMS System ID required to access the IMS data when allocated to a control region(i.e., the data is online to IMS).
USE_DBRCThis entry is valid only for IMS processing in DL/I mode (i.e, when an IMS ID is not specified).
260 IBM InfoSphere Optim for DB2 for z/OS: Common Elements

If appropriate, enter YES to use Database Recovery Control (DBRC) to control logging andperform database recovery; otherwise specify NO. IMS uses the online log datasets (OLDS) if thedatabase is accessed in BMP or DBB mode.
The default for a HALDB (High Availability Large DataBase) is YES, and that entry cannot bechanged.
DBRC use is optional for a non-HALDB, such as HIDAM, HDAM, HISAM, etc. Thus, you mayspecify YES for a non-HALDB, but it is not required.
USE_IEFRDERThis entry is valid only for IMS processing in DL/I mode. If appropriate, enter YES to use anIMS log to perform database recovery; otherwise specify NO.
If you specify YES, you must specify the appropriate dataset name (DSNAME) for the IMS logwithin the DDGROUP identified by the DDNAME “IEFRDER”.
DBTYPEIf appropriate, specify the database type as one of the following:
HIDAMOS HDAMOS HIDAM HDAMHISAM HSAM DEDB HALDBSHSAM SHISAM
The following information is provided for each DD Group (i.e., group of physical data sets) associatedwith each segment in the DBD. Each DD Group must be enclosed in parentheses.
DDNAMEThe name of the DD (i.e., the physical data sets) associated with the segments. If IMS logging isrequested, DD Name IEFRDER is used along with the Segment Name IMSLOG to identify the logdataset.
DSNAMEThe IMS Database Dataset location associated with each DD name in the DBD.
TYPE The type of DD group, specified as:
D Dataset
I Index
O Overflow
NUMSEGThe number of segments within the DD group.
SEGMENTDefines a segment entry within the DD group. Each segment must be enclosed in parentheses.
SEGNAMEThe name of the segment within the DD group.
DCB_PARMSThis keyword is used to specify the IMS Log dataset attributes for the following:
UNIT Esoteric Unit
LRECLLogical Record Length
BLKSIZEBlock Size
ALLOCSIZEAllocation Size
Chapter 7. Export and Import Optim Objects 261

PRIMARYPrimary quantity (see Note)
SECONDARYSecondary quantity (see Note)
VOLUMEVolume serial
Note: If you specify an IMS Log Dataset Name (DSNAME), you must provide sufficient Primaryand Secondary space units to allocate the IEFRDER dataset. Failing to do so will cause IMS toabort processing and lock the database from further updates until a recover/rollback is done.
Archive CollectionsThe following statement is generated for each Archive Collection:CREATE AC collectionid.collectionname
[ SECURITY security ][ DESCRIPTION //description// ]OWNER owneridMODIFIED yyyy-mm-dd-hh.mm.ssDEFDATE yyyy/mm/ddFILES ( filename1 [, filename2 ] [ , ... ] )
Parameters
The fully qualified Archive Collection name is followed by:
SECURITYThe security assigned to the object, specified as:
PUBLICAll can use and modify (default).
READONLYAll can use, but only owner can modify.
PRIVATEOnly owner can use and modify.
DESCRIPTIONThe optional description. The 1 to 40 character text must be enclosed in double slashes.
OWNERThe owner of the exported object.
MODIFIEDThe date and time the object was last modified.
DEFDATEThe collection's default date. This date is used for rows in a table without a date column that isunioned with a table that includes a date column.
FILES The fully qualified names of Archive Files in the collection, enclosed in parentheses and separatedby commas.
262 IBM InfoSphere Optim for DB2 for z/OS: Common Elements

Chapter 8. Convert Archive and Extract Files
The Convert Process transforms data in an Extract or Archive File. This converted file can be used asinput to most Optim processes. However, since a converted file does not include object definitionsneeded to recreate the database, it cannot be used to create objects, and your ability to browse aconverted Extract or Archive File in Table Mode is limited.
The Convert Process can be performed on an existing Extract or Archive File, using a Table Map and aset of Column Maps.
Note: The Convert Process can also be performed as part of an Extract Process. For details, see the MoveUser Manual, Extract Data.
Because an Extract or Archive File does not have the same level of security afforded by DB2, you can usethe Convert Process to mask sensitive data. The converted file can be used to create reports, while theoriginal file can be retained for audit or restoration purposes. If desired, you can also convert the data toa comma separated values (CSV) format to be used with any application that supports CSV files.
Convert File PanelWhen you select the CONVERT Option on the Data Migration menu for Move, or on the Archive andRestore menu for Archive, the Specify CONVERT Parameters and Execute panel is displayed.
Note: The Convert panels shown in this section are for processing an Extract File. Any differencesbetween the panels for processing an Extract File and for processing an Archive File are noted, wherepertinent. Also, for readability, the text in this section refers to the Extract File or Archive File as thesource file.
------------------- Specify CONVERT Parameters and Execute --------------------OPTION ===> SCROLL ===> PAGE
1 TABLE MAP - Specify Table Map and Column Maps2 PERFORM - Execute Extract File Conversion Process
Specify Data Set Names for Source Extract File and Control File:Source Extract File DSN ===> SAMPLE.FOP.SRCEXTRControl File DSN ===> EXTRACT.CTRL
Specify Data Set Name for Destination Extract File. If Omitted,Destination Extract DSN will be same as the Source Extract DSN:
Destination Extract DSN ===> SAMPLE.FOP.DESTEXTR
Age Date Values ===> N (Y-Yes, N-No)Output to External Format ===> Y (Y-Yes, N-No)Limit Number of Discarded Rows ===> (1-4294967295,Blank-No Limit)If Destination Tables have a Cluster Index:
Sort Extract File Rows ===> N (Y-Yes, N-No)Review Propagation Key Sets ===> (A-Always, E-Errors)
Run Process in Batch or Online ===> O (B-Batch, O-Online)If Batch, Review or Save JCL ===> R (N-No, R-Review, S-Save)
Process Report Type ===> D (D-Detailed, S-Summary)
Figure 133. Specify CONVERT Parameters and Execute
© Copyright IBM Corp. 1991, 2013 263

Panel Options
The options on this panel include:
1 TABLE MAPA Table Map, listing the destination table for each table in the source file, is required to performthe Convert Process. If you do not select this option, the Convert Process Table Map panel isdisplayed automatically before proceeding with the selected option. When the Table Map isdisplayed, you must provide the destination Creator ID at the Dest CID prompt. By default, thenames defined in the source file are inserted as the base destination table names. There is nodefault for destination Creator ID.
You may reference a Column Map for one or more destination tables. Using a Column Map, youcan specify the destination data column-by-column.
For more information about Column Maps and Table Maps, see Chapter 5, “Column Maps,” onpage 155 and Chapter 6, “Table Maps,” on page 199.
2 PERFORMPerform the Convert Process.
Panel
This panel includes:
Source Extract File DSNThe name of the source file that contains the data to be converted.
For an Archive File, this prompt is labeled Source Archive File DSN.
Control File DSNThe name of a sequential file that is to be used to accumulate information and statistics about theConvert Process.
Destination Extract DSNFor an Extract File, you can enter the name of the dataset for the converted Extract File. If you donot provide a name, the actual transformations are performed in a temporary file that you areprompted to allocate. After the Convert Process is successfully executed, the source Extract File isdeleted and the temporary file is saved under the source Extract File name. The converted datareplaces the original extracted data, and object definitions are lost.
For an Archive File, you must enter the name of a dataset for the converted Archive File, whichmust be different from the Source Archive File DSN.
Note: When you convert an Archive File, the destination dataset is an Extract File.
Age Date ValuesIndicator for aging date values as part of the Convert Process. This prompt is displayed forExtract Files only. Specify:
Y Age date values and display the Specify Aging Parameters panel. On this panel, you canspecify aging values to supplement the specifications for columns mapped with the AGEfunction. These values are used, if requested, to age DATE and TIMESTAMP columnsthat are not explicit targets of an AGE function.
N Do not age date values and ignore any specifications for aging that are on Column Mapsincluded in the process.
See Age Date Values in the Move User Manual for details about the Specify Aging Parameterspanel.
264 IBM InfoSphere Optim for DB2 for z/OS: Common Elements

Output to External FormatIndicator for creating a comma delimited file based on the contents of the source file. This file canbe used to input changes for any application that supports CSV files. Specify:
Y Display the External Format Specification panel to create a CSV file. For details, see page“Output to External Format” on page 266.
N Do not create a CSV file.
Limit Number of Discarded RowsThe maximum number of rows that can be discarded. The Convert Process terminates when thisvalue is reached.
Sort Extract File RowsFor DB2 tables only. Indicator for sorting data for destination tables with a cluster index. Specify:
Y Sort rows.
N Do not sort rows.
For an Archive File, this prompt is Sort Archive File Rows.
Review Propagation Key SetsIndicator for displaying the Propagating Key Set(s) panel before performing the Convert Process.This prompt is displayed only when one or more Column Maps include the PROP function.Specify:
A Always display the panel prior to performing the Convert Process.
E Display the panel prior to performing the Convert Process only when the PROPspecifications contain errors. Default.
For information about the Propagating Key Set(s) panel, see View PROP Specifications in theMOVE User Manual or View PROP Specifications in the Archive User Manual.
Run Process in Batch or OnlineIndicator for executing the Convert Process in batch or online. Specify:
B Batch
O Online
If site management has established a maximum number of rows for online processing and thisrequest exceeds that limit, this option is forced to Batch and cannot be changed. Consult sitemanagement for guidelines.
If Batch, Review or Save JCLIndicator for reviewing or saving the JCL and Batch Utility control statements prior to jobsubmission. This setting applies to batch execution only. Specify:
N Submit job. Do not display or save the JCL and control statements.
R Display the JCL and control statements for review, prior to job submission.
S Save the JCL and control statements. Prompts are provided for you to specify the name ofa file in which to store the JCL and control statements. For details, see page “Save” onpage 268.
Process Report TypeIndicator to include additional information in the Convert Process Report. If selected, detailedinformation about Column Map usage is displayed.
D Display detailed information in the Convert Process Report.
S Display summarized information in the Convert Process Report.
Chapter 8. Convert Archive and Extract Files 265

Note: You can obtain a selection list of Extract, Archive, or Control File names by using a wildcardcharacter as the last character in the name. When the list is displayed, use the S line command to selectan entry.
Available Commands
The following primary commands are available:CANCELENDOPTIONS
Output to External FormatWhen you enter Yes at the Output to External Format prompt, the External Format Specification panel isdisplayed.
Panel
This panel includes:
Extract DSNName of the source file that contains the data to be converted. You cannot modify this value.
For an Archive File, this prompt is Archive DSN.
Output FormatType of output format. You cannot modify this value.
Generate HeaderIndicator for generating a header for the external file.
Y Generate a header.
N Do not generate a header.
----------------------- External Format Specification -------------------------Command ===> Scroll ===> PAGE
1 of 3Extract DSN : SAMPLE.FOP.SRCEXTROutput Format : DelimitedGenerate Header ===> N (Y-Yes, N-No)
Beginning Label ===>Ending Label ===>Header Delimiter ===> ,Use Column Labels ===> N (Y-Yes, N-No)
Field Delimiter ===> ,String Delimiter ===>
Delimiter Escape Char ===>Default Destination DSN ===> SAMPLE.FOP.DESTEXTR
Table/View Destination DataSet--------------------------- ----------------------------------------------********************************** TOP ************************************FOPDEMO.CUSTOMERSFOPDEMO.DETAILSFOPDEMO.ORDERS******************************** BOTTOM ***********************************
Figure 134. External Format Specification
266 IBM InfoSphere Optim for DB2 for z/OS: Common Elements

Beginning LabelA label placed before the first column in the table. Specify “$table” to include the table name.
Ending LabelA label placed after the last column in table.
Header DelimiterThe character used to separate column headings.
Use Column LabelsIndicator for using column labels in the header (if a header is generated).
Y Use columns labels.
N Do not use column labels (use column names).
Field DelimiterThe character used to separate values in a row.
String DelimiterThe character used to separate character literal values.
Delimiter Escape CharThe character used to generate the value of a character normally used as a delimiter.
Default Destination DSNName of the default dataset for the converted file. You can enter a file name explicitly byenclosing it in quotes; otherwise the default prefix, as specified in User Options, is prefixed to thename. You can obtain a selection list of datasets by using a wildcard character in the last position.
Table/ViewNames of source tables or views.
Destination DatasetThe name of a dataset for the converted data for each source table or view. Leave blank to usethe dataset named in Default Destination DSN.
Perform Convert ProcessSelect Option 2 PERFORM on the Specify CONVERT Parameters and Execute panel to begin the ConvertProcess.
Online ExecutionIf you execute the process online, a panel is displayed noting the progress of the Convert Process.
+------------------------CONVERT Process Status-------------------------+| || CONVERT Process in Progress || || Number of Rows Processed: 2053 of 10340 || || Completed Table: FOPDEMO.CUSTOMERS || Converted Rows: 523 || Failed Rows: 0 || |+-----------------------------------------------------------------------+
Figure 135. CONVERT Process Status
Chapter 8. Convert Archive and Extract Files 267

This panel displays the total number of rows that have been processed, the total number of rows to beprocessed, the name of the table that is currently processing, and the total number of rows that have beenconverted or failed for that table. This information is revised:v Every 1000 rows for each table to display the current total number of processed rows.v When the processing for a table is complete and the processing for the next table begins.
Batch ExecutionIf you choose batch execution, Optim builds the necessary JCL and Batch Utility control statements. TheJob card information is taken from the JCL specified on the Job Card and Print Options panel.
If you specified YES to Prompt for Changes Before Job Submission, the Job Card and Print Optionspanel is displayed prior to job submission. You can edit the job card information and specify whetheryour changes apply to the current job only or are to be applied permanently. (See “Job Card and PrintOptions” on page 331.) The information on the Job Card and Print Options panel is used, with theConvert Process parameters, to build the JCL and control statements required to perform the ConvertProcess.
Review
If you specify Review to the If Batch, Review or Save JCL prompt, the complete JCL and controlstatements are displayed in the ISPF editor and can be edited and saved. (See the Batch Utilities Guide,CONVERT for the CONVERT statement keywords and values.)
After reviewing the JCL and control statements, use END. If jobs are automatically submitted when ENDis used, the job is submitted. Otherwise, you will have to explicitly SUBMIT the job from the ISPF editor.(See “User Options” on page 318 for information on the option to automatically submit jobs when END isused.)
Save
If you specify Save to the If Batch, Review or Save JCL prompt, the Save JCL Parameters panel promptsfor the name of the file in which to save the JCL and control statements and whether the job should besubmitted after saving.
The following prompts are displayed:
DSN to Save JCL toThe name of the sequential file or partitioned data set to receive the JCL and control statements.If you specify a partitioned data set, specify the member name at the Member prompt.
.---------------------------- Save JCL Parameters --------------------------.| || DSN to Save JCL to ===> || Member (if PDS) ===> || Replace Existing Data ===> Y-Yes, N-NO || || DSN to Hold SYSIN Data ===> || Member (if PDS) ===> || Replace Existing Data ===> Y-Yes, N-NO || || Submit JCL, or Review? ===> (S-Submit, R-Review, N-Neither) |’---------------------------------------------------------------------------’
Figure 136. Save JCL Parameters
268 IBM InfoSphere Optim for DB2 for z/OS: Common Elements

Member (if PDS)The name of the member in the partitioned data set specified for the DSN to Save JCL to prompt.If you specify a member name when a sequential file is specified, an error message displays.
Replace Existing Data?Indicator for replacing existing data in the specified file.
DSN to Hold SYSIN DataThe name of the sequential file or partitioned data set to hold SYSIN data. If you specify apartitioned data set, specify the member name at the Member prompt.
Member (if PDS)The name of the member in the partitioned data set specified for the DSN to Hold SYSIN Dataprompt. If you specify a member name when a sequential file is specified, an error messagedisplays.
Replace Existing Data?Indicator for replacing existing data in the specified file.
Submit JCL or Review?Option for handling the JCL and control statements. Specify:
S Save and submit the JCL and control statements.
R Display the JCL and control statements for review. You can use ISPF facilities to save orsubmit the JCL and control statements.
N Save the JCL and control statements; however, the JCL and control statements are notdisplayed for review or submitted.
Job Card Error
If you submit the job and an error is encountered in the job card, a message is displayed. You can reviewthe job card and correct the error, or terminate the Convert Process.
Convert Process ReportA Convert Process Report is generated as part of the Convert Process. This report contains variousstatistics and information about the execution of the Convert Process.
Display Report Contents
You can browse the contents of the Convert Process Report. When the process is executed online, theConvert Process Report is automatically displayed after the process completes. Standard ISPF scrollingfunctions are available.
In batch, the report is placed in the default output file specified in the JCL. You can then display thereport as you would the output from any job.
Report Format
The Convert Process Report is formatted as follows. (The report is truncated in this example; there ismore data to the right than displayed in the example.)
Chapter 8. Convert Archive and Extract Files 269

Report headings identify the information, including the source file name, the Control File name, thedestination file name, the user requesting the Convert Process, and the date and time the process wasexecuted. This information is followed by the total number of tables, number of rows in the source file tobe converted, number of rows successfully converted, number of rows having conversion errors, andnumber of rows discarded by an exit routine.
The tables are listed below this information in the order in which they were saved in the source file. Acomplete breakdown of the totals for each table is provided.
External File Format
If you created a CSV file as part of the Convert Process, processing options, including the file format, anindicator for generating a header, the field delimiter, and column labels option are displayed above thetotals. Also, the name of the dataset for the converted data for each source table is provided.
Aging Parameters
For Extract Files only, if aging parameters have been specified for the Convert Process, the report alsoincludes:
--------------------------- CONVERT Process Report ----------------------------Command ===> Scroll ===> PAGE
ROW 0 OF 29********************************* Top of Data **********************************
CONVERT Process Report
Extract File : FOPDEMO.SAMPLE.EXTRACT.FILE.DSNControl File : FOPDEMO.SAMPLE.CONTROL.FILE.DSNUser ID : COHENDTime Started : 1998-10-19 12.18.04Time Finished : 1998-10-19 12.18.06
Due to Successful Completion of Process, Control File is No Longer Valid
Process OptionsFile Format : DelimitedGenerate header : NField Delimiter : ,
Totals:Number of Convert Tables : 4Number of Original Extract Rows : 4972Number of Converted Rows : 4972Number of Conversion Errors : 0Number of Exit Routine Discards : 0
Data ExitExtract Converted Conversion Routine
Convert Tables Rows Rows Errors Discards EXte--------------------------- --------- --------- ---------- --------- ----
1 FOPDEMO.CUSTOMERS 132 132 0 0 FOPW2 FOPDEMO.ORDERS 792 796 0 0 FOPW3 FOPDEMO.DETAILS 2176 2176 0 0 FOPW4 FOPDEMO.ITEMS 872 872 0 0 FOPW
****** End of Report ************************************** Bottom of Data ********************************
Figure 137. Convert Process Report
270 IBM InfoSphere Optim for DB2 for z/OS: Common Elements

v Any exception conditions encountered for each table are included if you specify Yes to Report SkippedDates and Report Invalid Dates. The following is a sample list of exception conditions for agingORDER_SHIP_DATE in the ORDERS table.Exception Conditions for Table FOPDEMO.ORDERS
Row 1: Field ORDER_SHIP_DATE (YY/MM/DD) cannot age date: X’0’Row 78: Field ORDER_SHIP_DATE (YY/MM/DD) cannot age date: X’1’
v Aging parameters for the process are listed after the summary information. For example, the followingspecifications for a Convert Process use many of the defaults.Processing Parameters:
Default Aging Amount:='2000/01/31'
Default Aging Table:FOP2RUSA
Default Aging Rule:NEXTWORKDAY
Century Pivot Year:65
Process Date Columns:All
Report Invalid Dates:Yes
Report Skipped Dates:Yes
Output Rows With Invalid Dates:Yes
Output Rows With Skipped Dates:Yes
v Aging results for each table include information specified on the Specify Aging Parameters panel. Theinformation includes:
v Destination Column/Source Column namesv Number of valid datesv Number of invalid datesv Number of skipped datesv Minimum value encounteredv Maximum value encounteredv Date formatv Aging Rule applied to columnv Rule Table containing Aging Rule applied to columnv Aging Amount applied to columnv Pivot year specifications for column
(DB2 DATE and TIMESTAMP columns are displayed as DB2 DATE and DB2 TMSTAMP.)
If you request a detailed process report from the Specify EXTRACT Parameters and Execute panel, thereport includes the following:
Chapter 8. Convert Archive and Extract Files 271

Detailed Extract Report
If you request a detailed process report from the Specify CONVERT Parameters and Execute panel, thereport includes the following:
Any Column Maps specified for the Convert Process. If the Column Map is Local, no Column Mapinformation, Column Map Name, Security Status, etc., is displayed.Column Maps in Use:
Map Name : FOPDEMO.CM2Source File : ’FOPDEMO.PERF.APR14’Modfied By : FOPDEMOLast Modified : 2004-04-28Security Status : PUBLIC
Source Table: FOPDEMO.CUSTOMERS Destination Table: FOPDEMO2.CUSTOMERS
Source Column Data Type Destination Column Data Type Status------------------ --------------- -------------------- -------------- -------CUST_ID CHAR(5) CUST_ID CHAR(5) EQUALCUSTNAME CHAR(20) CUSTNAME CHAR(20) EQUALADDRESS VARCHAR(50) ADDRESS VARCHAR(50) EQUALCITY VARCHAR(15) CITY VARCHAR(15) EQUAL’PA’ LITERAL STATE CHAR(2) LITERALZIP CHAR(5) ZIP CHAR(5) EQUAL
UNUSED YTD_SALES DECIMAL(7,2) UNUSEDSALESMAN_ID CHAR(6) SALESMAN_ID CHAR(6) EQUALPHONE_NUMBER CHAR(10) PHONE_NUMBER CHAR(10) EQUAL
Print Report
While browsing the Convert Process Report online, you can use the OUTPUT command to direct thecontents of the report to an output file or SYSOUT. A panel prompts for output destination information.(For details, see the OUTPUT command in the Command Reference Manual.)
Browse
After the Convert Process has executed, you can review the resulting Extract File to ensure thetransformation of the data. Use Option B BROWSE on the Data Migration menu for Move, or on theArchive and Restore menu for Archive to display the contents of the file.
You can also use Option B BROWSE to browse the Control File to determine which rows were notconverted. Rows are discarded when conversion cannot be performed. For example, a row is discarded ifan expression used to convert the source would cause an invalid data type for the column. The discardedrows are noted in the Control File. Also, rows discarded by user-defined exit routines are included in theControl File.
272 IBM InfoSphere Optim for DB2 for z/OS: Common Elements

Chapter 9. Retry/Restart a Process
If Insert, Delete, or Restore processing fails for some reason, you can retry or restart a process. You canretry a process when one or more rows are discarded during the process (for example, when you attemptto insert or restore child rows and the parent rows are not in the database). You can restart a process thatdoes not execute to completion (for example, a process can terminate abnormally when the allocated timeor space resources are insufficient, or the user ends the process prematurely).
Select Option R RETRY/RESTART on the Data Migration menu for MOVE, or on the Archive andRestore menu for ARCHIVE, to display the Pending Process List panel. This panel lists any pendingprocesses initiated by the current user.
Note: The Pending Process List panel lists any pending Insert or Delete Processes when invoked from theData Migration menu, and lists any pending Restore or Delete Processes when invoked from the Archiveand Restore menu.
Panel
The Pending Process List includes:
Cmd The line command area. Valid line commands are:
D Delete a pending process from the list.
I Display information about a pending process.
S Select a pending process to retry or restart.
TimestampDate and time of the last process. The list is arranged in ascending order by timestamp, but canbe rearranged using the SORT command.
Process/StatusThe process performed and the status of the process. Process is indicated as:
DELETEDelete Process, including the delete portion of an Archive Process
INSERTInsert Process (with insert processing)
RSTORERestore Process
UPDATEInsert Process (with update or both insert and update processing)
----------------------- Pending Process List for FOPDEMO ----------------------Command ===> Scroll ===> PAGE
Cmd Timestamp Process/Status Control File--- -------------- -------------- --------------------------------------------
******************************** TOP *************************************___ 12-15-98 12.30 INSERT RETRY FOPDEMO.CONTROL.SAMPLE2___ 12-16-98 03.23 INSERT RESTART FOPDEMO.CONTROL.SAMPLEX
****************************** BOTTOM ************************************
Figure 138. Pending Process List – Current SQL ID
© Copyright IBM Corp. 1991, 2013 273

Status is indicated as:
RESTARTIncomplete process can be restarted.
RETRYDiscarded rows can be retried.
*DELETEDProcess deleted with the D line command.
*INVALIDYou attempted to retry, restart, or display information about the listed process, but theExtract or Archive File has been modified since the process was executed (i.e, the ControlFile is no longer valid and the process cannot be retried or restarted).
*RUN Process successfully retried or restarted.
Control FileName of the Control File created in the process and required for the Retry or Restart Process.
Note: You can browse a Control File to review the status of an Insert, Delete, or Restore Process.See the Archive User Manual, Control Files for details about browsing a Control File for a Restoreor Delete Process; and see the Move User Manual, Control Files for details about browsing aControl File for an Insert Process.
Available Commands
You can scroll the list of pending processes using standard ISPF scrolling facilities. The following primarycommands are available:
ALLBOTTOMCANCELDOWNENDOPTIONSTOPUP
All SQL IDs
Use the ALL command to display a list of pending processes for all SQL IDs.
----------------------------- Pending Process List ----------------------------Command ===> Scroll ===> PAGE
Cmd SQLID Timestamp Proc/Status Control File--- -------- -------------- --------- -----------------------------------------
******************************** TOP **************************************___ FOPDEMO 12-15-98 01.15 DEL RSTRT FOPDEMO.CONTROL.SAMPLE1___ FOPDEMO 12-15-98 12.30 INS RETRY FOPDEMO.CONTROL.SAMPLE2___ FOPDEMO 12-16-98 03.23 INS RSTRT FOPDEMO.CONTROL.SAMPLEX___ OPTIM 12-10-98 03.39 INS RSTRT OPTIM.CONTROL.SAMPLEY___ OPTIM 12-10-98 04.30 UPD RSTRT OPTIM.CONTROL.SAMPLE4
******************************* BOTTOM ************************************
Figure 139. Pending Process List – All SQL IDs
274 IBM InfoSphere Optim for DB2 for z/OS: Common Elements

The format of the list of pending processes for all SQL IDs is similar to that of the list for the current SQLID, shown in Figure 138 on page 273. However, the Process/Status column is abbreviated toaccommodate the SQLID column. Also, the status indicator RESTART is shortened to RSTRT. The list isarranged initially by SQLID and TIMESTAMP, in ascending order. You can use the USER command toredisplay the list of pending processes for the current SQL ID only.
Process Information
Use the I line command on the Pending Process List panel to display additional information, orattributes, about any listed pending process.
The Pending Process Attributes panel includes:v The name of the Control File and the associated Extract or Archive File.v The status of the entry (RETRY or RESTART).v Creation information about the Extract or Archive File.v Information about the last process attempted using this Control File.
Use END to return to the Pending Process List panel.
Execute Retry/Restart
Use the Select line command, S, to select a process from the list and retry or restart it, according to itsstatus.
Parameters Panel
The Specify Parameters and Execute panel is displayed before retrying or restarting a process. The paneltitle indicates the type of process (i.e., Insert, Update/Insert, Restore, or Delete) to retry or restart. Youcan respecify the displayed parameters, except for the names of the Extract, Archive, or Control Files and,for the Restore Process, the value for Restore Method to Use. The following figure shows the paneldisplayed when an Insert Process is restarted. (For details about these prompts, see Insert ParametersPanel in the Move User Manual or Specify Restore Parameters Panel in the Archive User Manual.)
-------------------------- Pending Process Attributes -------------------------Command ===>
Control File: FOPDEMO.CONTROL.SAMPLE2Status : RETRY
Extract File: FOPDEMO.EXTRACT.SAMPLE2Created By :
Job : FOPDEMOSQLID : FOPDEMORun On : 1998-12-15 10.14.22
Last Process: INSERTJob : FOPDEMOSQLID : FOPDEMORun On : 1998-12-15 12.30.55
Figure 140. Pending Process Attributes
Chapter 9. Retry/Restart a Process 275

During Restart processing, the initial process commences with the rows after the last committed row. Anydiscarded rows from the original processing are retained. Any rows discarded in the current execution aremarked accordingly. During Retry processing, only rows that were initially skipped due to an errorcondition are reprocessed.
Processing progress is displayed during online execution, and a Process Report is generated. If a processsucceeds and there are no rows to retry or restart, the process is removed from the Pending Process Listpanel. A process that does not succeed remains on the list and can be retried or restarted, as needed.
Resubmit a Batch Job
If a processing failure occurs during the execution of a batch job, the failed process can be retried orrestarted by adding the RESTART operand to the end of PARM on the EXEC statement of the batch joband resubmitting the batch job with no other changes. The RESTART operand must be separated from theprevious operand in PARM by a blank. The RESTART operand must be used, regardless of whether theactual condition is a retry or restart; the appropriate action is determined automatically. (Note that this isan alternative to returning to the online system to initiate a retry or restart of a failed process.)
Note: The RESTART operand may also be used to resubmit a batch job to perform a Restore or Archivewith delete process, and to resubmit the execution of an Archive Utility that contains one or moreRESTORE control statements. (See the Batch Utilities Guide, Processing Utilities for detailed information onthe batch utilities.)
---------------- Specify Restart INSERT Parameters and Execute ----------------Command ===>
Names for Extract File and Control File:Extract File DSN : FOPDEMO.EXTRACT.SAMPLE2Control File DSN : FOPDEMO.CONTROL.SAMPLE2
Process Options:Age Date Values ===> N (Y-Yes, N-No)Commit Every Nth Row ===> 1000 (1-1000, Blank-Site Limit)Limit Number of Discarded Rows ===> (1-4294967295, Blank-No Limit)
Run Process in Batch or Online ===> O (B-Batch, O-Online)If Batch, Review or Save JCL ===> R (N-No, R-Review, S-Save)
Process Report Type ===> D (D-Detailed, S-Summary)
Figure 141. Restart INSERT Parameters
276 IBM InfoSphere Optim for DB2 for z/OS: Common Elements
Chapter 10. Browse Related Data
While using the Browse and Point-and-Shoot facilities, you can join data in related tables and use varioustechniques to manage the display while viewing the data. Then you can join related rows from multipletables and manage the display of data according to your needs. While browsing Extract or Archive Filesor using the Point-and-Shoot facility, you can also create a report about the contents of the display.
Note: For information about joining and managing relational data during an Access edit or browsesession, see the Access User Manual, Join Tables.
Browse Facility
Optim provides a full Browse facility for online review of data in files generated by Optim. You canbrowse the contents of the following files to obtain information or to verify the data.v Archive Files, including converted and Subset Archive Filesv Extract Files, including converted Extract Filesv Compare Filesv Control Files
To view data from Archive Files and Extract Files, the Browse facility offers several modes: Table Mode,Report Mode, Summary Mode, and Access Definition Mode. The features highlighted in this sectionapply to browsing Archive File and Extract File data in Table Mode only. Table Mode provides adynamically formatted display of related data. In Table Mode, you can display data by specifyingselection criteria for rows in any table in the file and by joining related rows from remaining tables.
You can browse Control Files in Report Mode only; thus, you cannot join or manage Control File datausing the Browse facility. For information about browsing in Report, Summary, and Access DefinitionModes, see the User Manual for Archive, Move, or Compare.
Note: You can browse a converted Archive or Extract File in Table Mode; however, since a converted filedoes not include object definitions, you can browse only the initially displayed table and cannot join datain related tables.
The features highlighted in this section also apply to browsing data in Compare Files. For informationunique to browsing Compare Files, see the Compare User Manual, Browse Compare File.
Point-and-Shoot Facility
The Point-and-Shoot facility allows you to select specific rows from the Start Table for an Archive,Restore, Extract, or Compare Process. Also, you can join to related tables referenced in the AccessDefinition and select related rows. If you have defined selection criteria for the Start Table, you canchoose to override or supplement the selection criteria with the Point-and-Shoot list. For generalinformation about the Point-and-Shoot facility, see “The Point-and-Shoot Facility” on page 72.
About this Section
This section describes features common to both the Browse facility and the Point-and-Shoot facility. Thesefeatures apply to browsing data in Archive Files, Extract Files, and Compare Files, as well as to selectingrows during a Point-and-Shoot session for an Archive, Restore, Extract, or Compare Process. Anydifferences between these facilities are noted.
© Copyright IBM Corp. 1991, 2013 277
The figures in this section show the Browse facility while browsing an Archive File. Note that the title ofthe panel in a Browse or Point-and-Shoot display indicates the type of session. For example, in anArchive File browse session, the title indicates “Archive Browse” and the name of the Archive File;whereas, in a Point-and-Shoot session, the title indicates “Optim: Point-and-Shoot.”
Display BasicsThe display for the Browse and Point-and-Shoot facilities is very similar to an ISPF/PDF display. Thissection discusses the display modes, screen elements, and commands available for both Browse andPoint-and-Shoot.
Display Format
There are two basic display formats: columnar and sidelabels. Columnar format is the default. Incolumnar format, headings are displayed across the top of the panel and the data is displayed in columnsbeneath the headings. Columnar format allows you to look at multiple rows in a table and join to relatedtables. The following figure shows data from the ORDERS table displayed in columnar format.
Screen Elements
The screen elements in the columnar and sidelabels display formats are the same; only the positioning isdifferent. For more information about sidelabels format, see “Sidelabels Format” on page 302. Theelements are:
CommandPrompt for primary commands. Refer to “Primary Commands” on page 280 for a summary ofavailable primary commands.
CmdorLineCmd
The line commands area. Refer to “Line Commands” on page 281 for a summary of available linecommands.
--------------------- Archive Browse: FOPDEMO.ARCHIVE.FILE --------------------Command ===> Scroll ===> PAGE
Cmd F == Table: FOPDEMO.ORDERS(T1) ========================= 1 OF 79 === MORE>>ORDER_ID CUST_ID ORDER_DATE ORDER_TIME FREIGHT_CHARGES ORDER_SALESMAN-------- ------- ---------- ---------- --------------- --------------
*** *********************************** TOP ***********************************___ 10 00049 1998-01-26 14.22.31 9.22 WE005___ 23 00068 1998-01-26 08.16.09 14.80 WE005___ 130 00049 1998-01-26 10.12.39 7.02 WE005___ 143 00069 1998-01-26 14.22.31 17.60 WE012___ 160 00067 1998-01-26 10.22.31 13.82 WE012___ 176 00069 1998-01-26 11.28.30 11.88 WE012___ 207 00067 1997-02-24 12.12.51 48.52 WE012___ 222 00068 1998-01-26 14.22.31 19.05 WE005___ 278 00068 1998-01-26 11.51.47 21.97 WE005___ 373 00049 1998-01-26 12.08.13 27.97 WE005___ 404 00049 1998-01-26 12.18.58 23.37 WE005___ 658 00069 1998-01-26 10.00.28 13.33 WE012___ 686 00067 1998-01-26 12.08.13 21.97 WE012___ 752 00069 1998-01-26 09.11.47 33.99 WE012___ 817 00069 1998-01-26 16.00.00 7.85 WE012___ 869 00015 1998-01-26 12.08.13 8.23 WE005___ 879 00070 1998-01-26 12.08.13 11.85 WE012
Figure 142. Columnar Screen Display
278 IBM InfoSphere Optim for DB2 for z/OS: Common Elements

In columnar format, the label is Cmd.
In sidelabels format, the label is LineCmd.
Chg Displayed in a Compare File browse session only. Identifies the type of change as one of thefollowing:
blank No changes.
D Direct changes. One or more columns, other than the match key columns, are different.
R Related changes. One or more rows in a related table have a direct change or areunmatched.
U Unusual rows. Identifies orphan rows and pairs of compared rows that result in adifferent set of related data. Orphan rows are identified when the child relationshipcolumn does not correspond to a parent row. When the values in the parent relationshipcolumns in a pair of matched rows are not the same, different sets of child rows arerelated.
Since these conditions are determined by relationships, they are detected only when setsof related data are compared.
/|\ Identifies rows in a single source table that have duplicate match key values. The
brackets group the rows together. These rows are not compared.
For additional information about Chg flags, see the Compare User Manual, Compare Process.
Src Displayed in a Compare File browse session only. Identifies the source of the row as one of thefollowing:
1 Source 1.
2 Source 2.
12 Source 1 and Source 2. These rows are identical and only one copy of the row isdisplayed.
In sidelabels format, identical Source 1 and Source 2 columns are displayed once and differing orunmatched columns are displayed separately. Src indicates these unmatched rows as “1/2.”
For additional information about Src flags, see the Compare User Manual, Compare Process.
Status FlagDisplayed in Point-and-Shoot only. Identifies selected rows.
In columnar format, the label is F. In sidelabels format, the label is Row Status.
Table The fully qualified name of the table or view. The name is truncated if the Creator ID and TableName together are more than 22 characters.
In a Compare File browse session, the name is displayed without the Creator ID.
Short NameAn identifier showing the level for each table (Tn) or view (Vn). In a multiple table display, T1identifies the first level, T2, the second level, etc. Several tables can be joined at the second orgreater level. Tables joined at the same level (i.e., stacked tables) have the same level identifier.(See “Multiple Table Display” on page 287 for additional information about multi-way joins andstacked tables.) The level identifier can be substituted for the table name as a command operand.
x OF yThe position of the first data row on the screen (x) in relation to the total number of displayedrows (y) from the table.
Chapter 10. Browse Related Data 279

Horizontal Scroll IndicatorIndicator, in the form MORE or <<MORE, that additional data can be displayed by scrollingLEFT or RIGHT. See “Scroll” on page 294 for additional information about scrolling.
Column HeadingsColumn names are used as headings for the rows from each table.
Column CountDisplayed in sidelabels format only. Indicates the current position of the first column within theset of columns.
Available CommandsBoth primary and line commands are available in the display. Many of these commands are introduced inthe following sections. Detailed information about each command is provided in the Command ReferenceManual, Primary Commands and Line Commands.
Primary Commands
The following is a list of primary commands available using the Browse or Point-and-Shoot facility, withexceptions noted.
ANCHORATTRIBUTESBOTTOMCANCELCAPS1
COLUMNSCOUNT1
DOWNENDEXCLUDEEXPANDFINDFLIP3
HEXINDENT4
INFO3
JOIN4
LEFTLIST2
LOCKMAX FETCH ROWS2
ONLYOPTIONSREPORT1
RESETRESORT2
RFINDRIGHTSELECT RELATED2
280 IBM InfoSphere Optim for DB2 for z/OS: Common Elements

SELECTION CRITERIA1
SHOWSHOW SQL2
SIDELABELSSORT5
SQL1
START2 4
SWITCH4
TOPUNJOIN4
UNLOCKUNSELECT RELATED2
UPZOOM
Note:1Not available in a Compare File browse session.2Available only in a Point-and-Shoot session. (START is also available in a Compare File browsesession.)3Available only in a Compare File browse session.4Not available in sidelabels format.5Limits on a DB2 ORDER BY clause apply.
Line Commands
The following line commands are available using the Browse or Point-and-Shoot facility, with theexceptions noted.
X, Xn, XXExcludeTemporarily remove a row, a number of rows, or a block of rows from the display.
F, Fn FirstRedisplay the first row, or the first n rows, in a block of excluded rows.
I InfoObtain information about tables that contain related changes during a Compare File browsesession.1
J JoinJoin to related tables.2
L, Ln LastRedisplay the last row, or the last n rows, in a block of excluded rows.
SR, SSRSelect RelatedSpecify a row, or block of rows, to be selected in a Point-and-Shoot session.3
S, Sn, SSShowRedisplay one row, n rows, or all rows in a block of excluded rows.
SID SidelabelsDisplay the row in sidelabels format, or return the display to columnar format.
Chapter 10. Browse Related Data 281

UNJ UnjoinRemove joined tables from the display.2
UR, UURUnselect RelatedSpecify a row, or block of rows, to be deselected in a Point-and-Shoot display.3
Z ZoomDisplay all rows in the table, or return to the multiple table display.
Note:1 Available only in a Compare File browse session.2 Not available in sidelabels format.3 Available only for the Start Table in a Point-and-Shoot session.
Join TablesA browse session begins with the display of rows from a table selected on the Browse Parameters panel;a Point-and-Shoot session begins with the display of rows from the Start Table specified on the SelectTables/Views for AD panel or the Archive Selection Criteria - Tables panel (Restore Process only). Relatedrows from other tables, which are included in the Access Definition or the file, may be added to thedisplay using a Join command. You can use various navigation aids to view a set of related data in thedisplay at one time.
The table for which the join is executed, the anchor table, is joined to a related table and any related rowsfrom that table are displayed. To perform a join, Optim requires the name of the table to join and arelationship between the named table and the anchor table. The relationship can be a DB2 or an Optimrelationship and must be referenced in the Access Definition or the file. It does not matter if the anchortable is the parent or the child table; you can join from the parent to the child or vice versa.
Note: You cannot join to a reference table during a Point-and-Shoot session, even if a relationship exists.
Join CommandYou can use the JOIN primary command or the J line command to display simultaneously a row from theanchor table and related rows from the joined table. Use the J line command to select a specific row inthe anchor table.
By default, a JOIN primary command operates on the first displayed row in the table at the lowest levelin the display. This table becomes the anchor table for that operation. To specify the anchor table, use theJOIN command with the FROM operand and anchor table name. For example, JOIN FROM ORDERS orJOIN FROM T1. Additionally, you can designate the anchor table and row by positioning the cursor onthe desired row in the anchor table.
In the following figure, the JOIN command is specified and the cursor is positioned on the row forORDER_ID 211.
282 IBM InfoSphere Optim for DB2 for z/OS: Common Elements

Press ENTER to execute the JOIN command. If only one table in the Access Definition or the file isdirectly related to the anchor table, any related rows from that table are displayed automatically. If theanchor table has no related tables, a message indicates the command cannot be satisfied. See “No RelatedTables” on page 285 for more information.
Join Using DB2 LIKE Syntax
You can use DB2 LIKE syntax to display a selection list of tables to join at any level. For example, to findtables with names beginning with “D” that are related to the ORDERS table, specify:JOIN D% FROM ORDERS
If several tables with names that begin with “D” are directly related to ORDERS, they are included in aselection list. You can select one or more listed tables. If only one table meets the criteria, it is joined anddisplayed without displaying a selection list.
To minimize typing, you can use the level indicator to specify the anchor table for the FROM operand.For example, the ORDERS table in Figure 143 is assigned the level T1. You can specify the JOINcommand as:JOIN D% FROM T1
Select TablesOften, more than one table is related to the anchor table. When this is the case, a selection list isdisplayed. The selection list includes all related tables in the Access Definition or the file.
An example of the selection list, displayed after entering the JOIN command, is shown in the followingfigure.
--------------------- Archive Browse: FOPDEMO.ARCHIVE.FILE --------------------Command ===> JOIN Scroll ===> PAGE
Cmd F == Table: FOPDEMO.ORDERS(T1) ========================= 1 OF 19 === MORE>>ORDER_ID CUST_ID ORDER_DATE ORDER_TIME FREIGHT_CHARGES ORDER_SALESMAN-------- ------- ---------- ---------- --------------- --------------
*** *********************************** TOP ***********************************___ 205 00192 1997-05-24 12.12.51 48.52 NE012___ 205 00192 1997-02-24 12.12.51 48.52 NE012___ 206 00093 1997-02-24 12.12.51 48.52 SW012___ 207 00067 1997-02-24 12.12.51 48.52 WE012___ 208 03189 1997-02-24 12.12.51 48.52 NW012___ 209 00143 1997-02-24 12.12.51 48.52 SW012___ 210 00239 1997-02-24 12.12.51 48.52 NW012|__ 211 00284 1997-02-24 12.12.51 48.52 SC012___ 212 00327 1997-02-24 12.12.51 48.52 SC012___ 213 00371 1997-02-24 12.12.51 48.52 NE012___ 214 00415 1997-02-24 12.12.51 48.52 NC012___ 215 02221 1997-02-24 12.12.51 48.52 SE012___ 216 00019 1997-02-24 12.12.51 48.52 SC012___ 217 00110 1997-02-24 12.12.51 48.52 SE012___ 288 00131 1997-02-24 12.12.51 48.52 SW012___ 333 01210 1997-02-24 12.12.51 48.52 SE012___ 417 00448 1997-02-24 12.12.51 48.52 SE012___ 727 00420 1997-02-24 12.12.51 48.52 NE012
Figure 143. JOIN Command
Chapter 10. Browse Related Data 283

The names of related tables are listed on the left side of the selection list. From identifies eachrelationship as a DB2 relationship, an Optim relationship, or both. Type indicates the role of the table inthe relationship, as child or parent of the anchor table. Use the Select line command, S, to select one ormore tables from the list and press ENTER or use END.
If there is only one relationship between the anchor table and the selected table, the tables are joined anddisplayed, as shown in the following figure.
--------------------- Archive Browse: FOPDEMO.ARCHIVE.FILE --------------------Command ===> Scroll ===> PAGE
Cmd F == Table: FOPDEMO.ORDERS(T1) ========================= 1 OF 19 === MORE>>ORDER_ID CUST_ID ORDER_DATE ORDER_TIME FREIGHT_CHARGES ORDER_SALESMAN-------- ------- ---------- ---------- --------------- --------------
*** *********************************** TOP ***********************************___ 205___ 206 +--------Select One or More Related AD Tables--------+___ 207 ¦ Cmd CreatorID.TableName From Type 1 OF 2 ¦___ 208 ¦ --- --------------------------------------- ¦___ 209 ¦ ******************* TOP ******************* ¦___ 210 ¦ _S_ FOPDEMO.CUSTOMERS DB2 PARENT ¦___ 211 ¦ _S_ FOPDEMO.DETAILS DB2 CHILD ¦___ 212 ¦ ***************** BOTTOM ****************** ¦___ 213 +----------------------------------------------------+___ 214___ 215 02221 1997-02-24 12.12.51 48.52 SE012___ 216 00019 1997-02-24 12.12.51 48.52 SC012___ 217 00110 1997-02-24 12.12.51 48.52 SE012___ 288 00131 1997-02-24 12.12.51 48.52 SW012___ 333 01210 1997-02-24 12.12.51 48.52 SE012___ 417 00448 1997-02-24 12.12.51 48.52 SE012___ 727 00420 1997-02-24 12.12.51 48.52 NE012
Figure 144. Table Selection List for Join
--------------------- Archive Browse: FOPDEMO.ARCHIVE.FILE --------------------Command ===> Scroll ===> PAGE
Cmd F == Table: FOPDEMO.ORDERS(T1) ========================= 7 OF 19 === MORE>>ORDER_ID CUST_ID ORDER_DATE ORDER_TIME FREIGHT_CHARGES ORDER_SALESMAN-------- ------- ---------- ---------- --------------- --------------
___ 211 00284 1997-02-24 12.12.51 48.52 SC012
Cmd F == Table: FOPDEMO.DETAILS(T2) ======================== 1 OF 12 ==========ORDER_ID ITEM_ID ITEM_QUANTITY DETAIL_UNIT_PRICE-------- ------- ------------- -----------------
*** *********************************** TOP ***********************************___ 211 AD005 4 15.00___ 211 CH006 4 14.00___ 211 CM019 4 20.00___ 211 DR011 4 20.00___ 211 DR012 4 19.00___ 211 DR013 4 22.00___ 211 DR014 4 17.00___ 211 DR017 14 22.00___ 211 DR018 4 17.00___ 211 DR019 4 21.00___ 211 DR023 4 21.00___ 211 DR038 4 20.00
Figure 145. Result of Join
284 IBM InfoSphere Optim for DB2 for z/OS: Common Elements

If more than one relationship exists between the anchor table and the selected table, a selection list ofrelationships is displayed. For more information about this selection list, see “Select Relationships.”
No Related Tables
If the anchor table is not related to any tables in the Access Definition or the file, a join cannot beperformed.
Select RelationshipsIf there are two or more relationships between the anchor table and a selected table, a selection list ofrelationships is displayed, as in the following figure.
Panel Elements
The panel includes:
Cmd Line command entry area. Valid commands are:
I Display the Browse Relationship panel, allowing you to view the names and data type ofthe columns in the selected relationship.
S Select the relationship to be used to join the anchor table and the selected table.
RelationThe 1 to 8 character name of the relationship.
From The type of relationship. Valid commands are:
DB2 The relationship is defined to the DB2 Catalog.
OPT The relationship is defined to the Optim Directory.
Child Table NameThe fully qualified name (Creator ID and Table Name) of the child table in the relationship.
Parent Table NameThe fully qualified name (Creator ID and Table Name) of the parent table in the relationship.
--------------------- Archive Browse: FOPDEMO.ARCHIVE.FILE --------------------Command ===> Scroll ===> PAGE
Cmd F == Table: FOPDEMO.ORDERS(T1) ========================= 1 OF 19 === MORE>>ORDER_ID CUST_ID ORDER_DATE ORDER_TIME FREIGHT_CHARGES ORDER_SALESMAN-------- ------- ---------- ---------- --------------- --------------
*** *********************************** TOP ***********************************___ 205 00192 1997-05-24 12.12.51 48.52 NE012
+---------------------------Select One Relationship---------------------------+¦ Available Line Commands: I-Info,S-Select ¦¦ Cmd Relation From Child Table Name Parent Table Name ¦¦ --- ------>> -------------------------------------------------------------- ¦¦ *********************************** TOP *********************************** ¦¦ ___ RCO DB2 FOPDEMO.ORDERS FOPDEMO.CUSTOMERS ¦¦ ___ RCO1 OPT FOPDEMO.ORDERS FOPDEMO.CUSTOMERS ¦¦ ********************************* BOTTOM ********************************** ¦+-----------------------------------------------------------------------------+
Figure 146. Relationship Selection List
Chapter 10. Browse Related Data 285

When you have selected a table, press ENTER or use END to display the joined tables, as shown inFigure 145 on page 284.
Browse Relationship PanelIn the following figure, information about the relationship RCO is displayed in the panel.
Panel
The Browse Relationship panel includes:
Parent The fully qualified name of the parent table.
Child The fully qualified name of the child table.
Column NameThe expressions and names of columns for each table that are used in the relationship.
Data TypeThe data type of the matched columns. In addition to the standard DB2 data types, Data Typemay be EXPR, to indicate that the relationship is based on an expression for which the data typeis determined when the relationship is used.
Use END or press ENTER to return to the Select One Relationship panel.
Join All CommandIf you have a complex set of relationships in an Access Definition or file, you may want to join all relatedtables at one time so you can view all parent-child relationships. Instead of manually joining each table inthe display, you can use the JOIN ALL command.
Use the JOIN ALL command to join all tables in the Access Definition or file related to the initiallydisplayed table.
Note: The Point-and-Shoot facility uses the Start Table as the initial table in the display, whereas theBrowse facility allows you to specify any table in the file.
You cannot use the JOIN ALL command if tables are already joined in the display. If you enter JOIN ALLwhen one or more tables are joined, an error message is displayed.
The following figure shows the results of executing the JOIN ALL command for the CUSTOMERS table.In this example, the ORDERS, DETAILS, ITEMS, and SALES tables are related tables.
---------------------------- Browse Relationship ------------------------------OPTION ===> SCROLL ===> PAGE
Browse only Display of DB2 Relationship RCO
Parent: FOPDEMO.CUSTOMERS Child: FOPDEMO.ORDERS1 OF 1
Column Name Data Type Column Name Data Type---------------------->> ---------- ---------------------->> ----------********************************* TOP **********************************CUST_ID CH(5) CUST_ID CH(5)******************************* BOTTOM *********************************
Figure 147. Browse Relationship - Join
286 IBM InfoSphere Optim for DB2 for z/OS: Common Elements

If there are two or more relationships between a parent and child table, you are prompted to select therelationship to use for the join. See Figure 146 on page 285 for details about this selection list.
In Figure 148, the SALES table is not displayed because it is stacked. For information about the multipletable display, see “Multiple Table Display.” For information about multi-way joins and stacked tables, see“Special Considerations for Multi-way Joins” on page 289.
Multiple Table DisplayAfter one or more joins, the display shows related rows from multiple tables. In the following figure, theCUSTOMERS table is joined to the ORDERS table, and the SALES table is joined to the CUSTOMERStable.
--------------------- Archive Browse: FOPDEMO.ARCHIVE.FILE --------------------Command ===> Scroll ===> PAGE
Cmd F == Table: FOPDEMO.CUSTOMERS(T1) ===================== 1 OF 704 === MORE>>CUST_ID CUSTNAME ADDRESS CITY STATE------- -------------------- ==================== --------------- -----
___ 00001 Audio-Video World 593 West 37th Street Brass Castle NJ
Cmd F == Table: FOPDEMO.ORDERS(T2) ================ STACKED = 1 OF 4 === MORE>>ORDER_ID CUST_ID ORDER_DATE ORDER_TIME FREIGHT_CHARGES ORDER_SALESMAN-------- ------- ---------- ---------- --------------- --------------
___ 20 00001 1998-01-26 08.16.09 14.80 NE005
Cmd F == Table: FOPDEMO.DETAILS(T3) ========================= 1 OF 4 ==========ORDER_ID ITEM_ID ITEM_QUANTITY DETAIL_UNIT_PRICE-------- ------- ------------- -----------------
___ 20 AD005 5 15.00
Cmd F == Table: FOPDEMO.ITEMS(T4) =========================== 1 OF 1 ==========ITEM_ID ITEM_DESCRIPTION CATEGORY RATING UNIT_PRICE------- ==================== -------------- ------ ----------
*** *********************************** TOP ***********************************___ AD005 Conan the Barbarian Adventure R 15.00*** ********************************** BOTTOM *********************************
Figure 148. Results of JOIN ALL
Chapter 10. Browse Related Data 287
An information line is provided for each table in the joined display. This line includes:
Name of the tableFOPDEMO.ORDERS
Identifier indicating the level of the table(T1)
Row number relative to the totalnumber of rows selected for display
4 OF 78
The TOP and BOTTOM markers are displayed before the first line and after the last line of thelowest-level table, the SALES table in Figure 149. These markers indicate the first and last related rows inthe table.
If more than one table is joined at one level (i.e., a multi-way join), the STACKED indicator is displayed.See “Stacked Tables” on page 289 for details.
The maximum number of tables that can be joined is 64. If necessary, higher-level tables are scrolled fromthe display to make room at the bottom for newly joined tables. Use the UNJOIN command to redisplayhigher�level tables by removing lower-level tables. For more information about the UNJOIN command,see “Unjoin Tables” on page 293.
Note: Additionally, you can use the ZOOM command to focus the display on a single higher-level tablein the display, without unjoining the table. For more information about the ZOOM command, see “Zooma Joined Table Display” on page 292.
Change Highest Display Levels
In a Point-and-Shoot session or Compare File browse session, you can use the START command todisplay the specified table at the top of the display, temporarily removing higher-level tables from thedisplay. The table name or identifier of a table currently active in the display can be specified with theSTART command (e.g., START SALES or START T3), as long as there is sufficient screen space to displayat least one line of the lowest-level table.
Note: The START command does not change the Start Table or remove tables from the Access Definitionor Compare File.
--------------------- Archive Browse: FOPDEMO.ARCHIVE.FILE --------------------Command ===> Scroll ===> PAGE
Cmd F == Table: FOPDEMO.ORDERS(T1) ========================= 4 OF 78 === MORE>>ORDER_ID CUST_ID ORDER_DATE ORDER_TIME FREIGHT_CHARGES ORDER_SALESMAN-------- ------- ---------- ---------- --------------- --------------
___ 10 00049 1998-01-26 14.22.31 9.22 WE005
Cmd F == Table: FOPDEMO.CUSTOMERS(T2) ======================= 1 OF 1 === MORE>>CUST_ID CUSTNAME ADDRESS CITY STATE------- -------------------- ==================== --------------- -----
___ 00049 Pick-a-Flick 120 Central Avenue Blue Jay CA
Cmd F == Table: FOPDEMO.SALES(T3) =========================== 1 OF 1 === MORE>>SALESMAN_ID SALESMAN_NAME AGE SEX TERRITORY----------- -------------------- ----------- --- --------------
*** *********************************** TOP ***********************************___ WE005 Captain Kangaroo 79 M West*** ********************************* BOTTOM **********************************
Figure 149. Sample Multiple Table Display
288 IBM InfoSphere Optim for DB2 for z/OS: Common Elements

The START command is useful when you want to display additional rows from the lowest-level tablewithout zooming the display. Changing the highest-level table is also useful when you change from splitscreen to single screen and you want to focus on one or more specific tables.
You can also use the Indented Table Display to view or navigate the tables. For more information, see“Display Traversal Paths” on page 290.
Special Considerations for Multi-way JoinsIn many cases, a database table is related to two or more other tables. When multiple tables are related,several navigational paths are available for joining and browsing the data. You may find it useful todisplay the related data obtained by traversing several of these paths. You can use multi-way joining tobrowse multiple related tables without unjoining any tables.
Stacked Tables
When multiple tables are joined to a single table, the tables are “stacked” in the order they were joined.The most recently joined table is above the second most recent, the second above the third, and so on.The table at the top of the stack is displayed; the other tables are hidden.
You can stack multiple tables at any display level except the first level. If tables are joined below thestacked table, these lower-level tables are hidden when the stacked table is hidden.
Consider the following example. An Access Definition or a file contains the tables shown in the followingdiagram with the indicated relationships.
If you are looking for information about a specific order, you would start the Browse or Point-and-Shootsession with ORDERS. When you use the JOIN command, a selection list of the related tables,CUSTOMERS and DETAILS, is displayed. You can select both tables, which are then joined in a stackwith the last joined table, DETAILS, displayed. The other table in the stack, CUSTOMERS, is hidden.
Switch the Displayed TableYou can display any table in the stack using the SWITCH command.v If only two tables are joined in the stack, the hidden table is displayed and the previously displayed
table is hidden.
Chapter 10. Browse Related Data 289

v If three or more tables are joined in the stack, a selection list is displayed.v If a single table is joined, a message is displayed.
By default, the SWITCH command operates on the lowest level of the display. You can use the cursorposition to indicate the target level for the SWITCH command. You may also find it useful to assign theSWITCH command to a PF key and use the cursor position to indicate the target level.
Using SWITCH with several tables
If three or more tables are joined in a stack, you can use operands to display a specific table in a stack ata specific level. To display a selection list of joined tables for a stack at the second level, specify:SWITCH T2
To display the next table in a stack on the second level, specify:SWITCH T2 NEXT
You can also specify the name of a table. To display the ORDERS table in a stack on the second level,specify:SWITCH T2 ORDERS
Related lower-level tables
Any table in a stack can be joined to lower-level tables. However, only related data is displayed. Anysubordinate tables or stacks are hidden or displayed with the stacked table to which they are joined. Ifyou switch the display from one table in a stack to another, the related lower-level tables also switch.
Display Traversal PathsUsing the Browse or Point-and-Shoot facilities with multi-way joining can become very complex. Youmay have joined to tables on lower levels for one or more tables within the stack and you may have“nested stacks” (i.e., stacked tables within a stack). Even if there are no stacks, it may be difficult to keeptrack of joined tables and the relationships between them, especially if all levels cannot be displayed onthe screen at one time.
You can use the INDENT primary command to obtain the Indented Table Display, which provides anindented list of all active tables. The format of this list identifies the display-level hierarchy of all joinedtables and all stacks.
Note: The INDENT command is available while using the Browse or Point-and-Shoot facility, regardlessof whether you have stacked or joined tables.
In the following figure, CUSTOMERS is the Start Table. All active tables are listed, and asterisks are usedto identify the tables currently displayed on the main panel from which the indented listed wasgenerated. The display level of each table is indicated on the left. Tables in a stack are on the same leveland, except for the active table, are identified by the word “Yes” in the Stkd column, as shown below forthe SALES and SHIP_TO tables.
290 IBM InfoSphere Optim for DB2 for z/OS: Common Elements

Panel Elements
The panel includes:
DefaultCreator ID
The default Creator ID specified in the Access Definition.
x OF yThe relative position of the first displayed table (x) and the total number of active tables (y).
Cmd Line command entry area. Use the S line command to switch the display to a different table inthe stack.
For example, in the preceding figure, the ORDERS, SALES, and SHIP_TO tables are stacked atlevel 2, and the ORDERS table is currently displayed. You can display the SHIP_TO table bytyping “S” in Cmd for the SHIP_TO table, or any subordinate table of the SHIP_TO table (e.g.,SHIP_INSTR), and pressing ENTER.
Lvl The display level for the table. Tables at the same level are in a stack, and the currently displayedtable is identified by an asterisk next to its level number. Any stacked tables that are not currentlydisplayed are identified by the word “Yes” in Stkd.
Table NameThe name of the table. If the Creator ID is different from the default Creator ID, it is includedwith the name. (In a Compare File browse session, the Creator ID is always included with thename.)
The Start Table is listed first, with other tables listed in the order displayed. Indentations reflectthe display level. Tables in a stack are listed in stack order.
The names of all tables, except the Start Table, are prefixed with “C:” or “P:” to indicate whethera table is the parent or child in the relationship with the table under which it is indented.
Stkd Any stacked tables that are not currently displayed are identified by the word “Yes.”
RelationName of the relationship between the table and the table under which it is indented. “STARTTABLE” is always specified for the Start Table.
Type Identifier to denote whether the relationship is defined in the DB2 Catalog or the OptimDirectory.
--------------------------- Indented Table Display ----------------------------Command ===> Scroll ===> PAGE
Default Creator ID: FOPDEMO 1 OF 7
Cmd Lvl Table Name Stkd Relation Type--- --- -------------------------------------------------- ---- ------->> ----*** ********************************** TOP ***********************************___ 1* CUSTOMERS START TABLE___ 2* C:ORDERS RCO DB2___ 3* C:DETAILS ROD DB2___ 4* P:ITEMS RID DB2___ 2 C:SALES Yes RSC DB2___ 2 C:SHIP_TO Yes RCST DB2___ 3 C:SHIP_INSTR RSTSI DB2*** ******************************** BOTTOM **********************************
Figure 150. Indented Table Display
Chapter 10. Browse Related Data 291

Zoom a Joined Table DisplayThe Zoom command switches the display between a multiple table display and a single table formatwithout altering the joins. You can use the Zoom command when multiple tables are joined and youwant to display additional rows from an upper-level table.
Zoom Line Command
To switch from a multiple table display to focus on a single table, enter the Z line command for a row inthe table. To return to a multiple table display, enter the Z line command for any row. The row on whichthe command is entered is displayed first in the multiple table display.
ZOOM Primary Command
You can select a table to zoom using an operand (e.g., ZOOM ORDERS or ZOOM T1), or by positioningthe cursor. If the cursor is positioned on a row, that row is the first line of data in the zoomed display. IfZOOM is executed without positioning the cursor or specifying a table name operand, the lowest-leveltable is displayed in single table format.
Similarly, if the cursor is positioned on a row in the zoomed display when ZOOM is requested again, theselected row is scrolled to the first position in the multiple table display. If the cursor is not positioned,the first displayed row in the zoomed display is shown in the multiple table display.
The primary command can be entered as ZOOM DETAILS or ZOOM T2, as shown in the followingfigure.
In the following figure, the display is changed from a multiple table to a single table display of theDETAILS table.
--------------------- Archive Browse: FOPDEMO.ARCHIVE.FILE --------------------COMMAND ===> ZOOM T2 Scroll ===> PAGE
Cmd F == Table: FOPDEMO.ORDERS(T1) ========================= 7 OF 19 === MORE>>ORDER_ID CUST_ID ORDER_DATE ORDER_TIME FREIGHT_CHARGES ORDER_SALESMAN-------- ------- ---------- ---------- --------------- --------------
___ 211 00284 1997-02-24 12.12.51 48.52 SC012
Cmd F == Table: FOPDEMO.DETAILS(T2) ============== STACKED = 2 OF 12 ==========ORDER_ID ITEM_ID ITEM_QUANTITY DETAIL_UNIT_PRICE-------- ------- ------------- -----------------
___ 211 CH006 4 14.00
Cmd F == Table: FOPDEMO.ITEMS(T3) =========================== 1 OF 1 === MORE>>ITEM_ID ITEM_DESCRIPTION CATEGORY RATING UNIT_PRICE------- ==================== -------------- ------ ----------
*** *********************************** TOP ***********************************___ CH006 Willie Wonka & the C Children G 14.00*** ********************************** BOTTOM *********************************
Figure 151. Zoom Multiple Table Display
292 IBM InfoSphere Optim for DB2 for z/OS: Common Elements

Note: Optim returns to the multiple-table columnar display, even if the zoom is executed in sidelabelsformat. See “Sidelabels Format” on page 302 for a description of sidelabels format.
Impact on Joined Tables
All joins between tables are retained when zoom is used. The single-table zoomed display can be scrolled.If a table is scrolled during a zoomed display, any tables joined at a lower level are logically scrolled.When the multiple table display is restored, the scrolled data is displayed.
Unjoin TablesIn a multiple table display, the UNJOIN command severs the join between the specified table and thenext higher-level table. The specified table and any related lower-level tables are removed from thedisplay.
When you enter the UNJOIN command, you can either position the cursor on the desired table,regardless of level, or you can specify the table name or identifier as an operand (e.g., UNJOIN ORDERSor UNJOIN T2). The UNJOIN command removes the specified table and all related lower-level tables. Ifyou do not specify a table, the lowest-level table is unjoined.
You can also use the UNJ line command on a row in the table you want to unjoin. Entering the UNJcommand removes the specified table and any related lower-level tables from the display.
If the unjoined table is not stacked, the remaining joined tables are repositioned and the display of thelowest-level table expands to include any additional rows.
Unjoining Stacked Tables
If the unjoined table is stacked, the next table in the stack is displayed along with any related lower-leveltables.
You can use operands with the UNJOIN command to unjoin all tables in a stack. UNJOIN ALL removesall tables in a stack at the lowest level. If there is no stack at the lowest level, the table at the lowest levelis unjoined. When there are multiple stacks, you can specify the target stack using the cursor position orthe level indicator (e.g., UNJOIN T2 ALL).
--------------------- Archive Browse: FOPDEMO.ARCHIVE.FILE --------------------COMMAND ===> Scroll ===> PAGE
Cmd F == Table: FOPDEMO.DETAILS(T2) ================ ZOOMED = 2 OF 12 =========ORDER_ID ITEM_ID ITEM_QUANTITY DETAIL_UNIT_PRICE-------- ------- ------------- -----------------
___ 211 CH006 4 14.00___ 211 CM019 4 20.00___ 211 DR011 4 20.00___ 211 DR012 4 19.00___ 211 DR013 4 22.00___ 211 DR014 4 17.00___ 211 DR017 14 22.00___ 211 DR018 4 17.00___ 211 DR019 4 21.00___ 211 DR023 4 21.00___ 211 DR038 4 20.00*** ********************************* BOTTOM **********************************
Figure 152. Zoomed Display
Chapter 10. Browse Related Data 293
Manage the DisplayAn Access Definition or file may contain extensive data from hundreds of tables, each with dozens ofcolumns and thousands of rows. Navigating this data to locate a specific subset of related rows can bedaunting.
Optim provides many techniques and features to help you:v Navigate large lists of data easily and efficiently.v Find specific data and manage the display.v Review information about columns or data.v Arrange and format displays of wide data to accommodate browsing.
ScrollOptim uses familiar ISPF commands to scroll data, including DOWN, UP, BOTTOM, TOP, LEFT, andRIGHT. These commands can be entered on the command line or assigned to program function keys.ISPF SCROLL values, CSR, PAGE, DATA, HALF, MAX, and n (where n is the number of lines to scroll)are supported.
Vertical Scroll
You can scroll using DOWN, UP, BOTTOM, and TOP to view additional rows when the number of rowsretrieved exceeds the number of lines available on the screen. DOWN scrolls the display forward and UPscrolls the display backward. Operands for the DOWN and UP commands allow you to scroll by page,numeric value, or cursor position. You can also use the BOTTOM command to scroll to the last entry andthe TOP command to scroll to the first entry in the table.
When a single table is displayed, vertical scrolling is exactly like vertical scrolling in ISPF. Scrolling amultiple table display is discussed in “Coordinated Scroll.”
Horizontal Scroll
You can scroll using LEFT and RIGHT to view additional columns when the combined width of thecolumns exceeds the width of the screen. Operands for these commands allow you to scroll by columnname, numeric value, or cursor position. MORE, with an appropriate direction arrow, is displayed on theinformation line for a table to indicate that you can scroll horizontally.
When multiple tables are displayed, indicate the table to scroll by specifying a table name or identifierwith the column name (for example, T1.CUST_ID) or by positioning the cursor. If a table is not indicated,the lowest-level table is scrolled.
Coordinated Scroll
Scrolling a table vertically in a multiple table display automatically scrolls any tables joined at lowerlevels. For example, scrolling the DETAILS table in Figure 151 on page 292 automatically scrolls theITEMS table to display the related rows, if any. Scrolling the ORDERS table scrolls the DETAILS table andthe ITEMS table to the related rows.
You can indicate the table you want to scroll by including its name or identifier as an operand for thecommand or by positioning the cursor. For example, UP T2 scrolls the table at level T2 backwards. If thecursor is not positioned in a window and no operands are given with the scroll command, the tabledisplayed at the lowest level is scrolled.
You can also scroll by positioning the cursor on a specific row in any table and pressing a PF keyassigned to scroll. All lower-level tables are scrolled accordingly.
294 IBM InfoSphere Optim for DB2 for z/OS: Common Elements

Navigate and Manage Display of DataIf working with many rows, you may find it difficult to find the rows you want to browse or select. Thefollowing commands allow you to search for specific rows and adjust the display according to yourneeds.
Find Locate a row containing a specified value and position the cursor to that row.
ExcludeTemporarily remove specified rows from the display.
Only Display only rows that match defined criteria, excluding rows that do not.
Show Redisplay rows excluded with the EXCLUDE or ONLY commands.
Operands for these commands allow you to specify how a search is conducted (e.g., where a searchbegins, the direction in which it proceeds, or the name of the column to search). Detailed informationabout available operands for each command is provided in the Command Reference Manual, PrimaryCommands.
Working with Multiple Tables
In a multiple table display, the FIND, EXCLUDE, and ONLY commands operate on the lowest-level table,by default. To specify a particular table, enter the command and do one of the following:v Use the cursor position to indicate the desired table.v Use the IN operand with creatorid.tablename.columname, or use the table identifier (such as T1 or T2) in
place of the creatorid.tablename., as indicated below:EXCLUDE CH006 IN FOPDEMO.DETAILS.ITEM_IDorEXCLUDE CH006 IN T2.ITEM_ID
In a multiple table display, the SHOW command operates on all currently displayed tables.
Find Specific DataUse the FIND command to locate a row containing a specified value and position the cursor on the rowand column where the value is located. A row that is not currently visible is scrolled to the top of thedisplay in the window of the searched table. In a multiple table display, any lower-level tables areautomatically scrolled to related rows, if any. To locate the next occurrence of the search value, use theRFIND command (usually assigned to PF5).
Several operands are available for the FIND command that allow you to specify where a search begins,the direction in which it proceeds, and whether it includes excluded rows. The Optim FIND command issimilar to the ISPF FIND command. The Optim FIND command, however, is extended to support DB2data, such as null values and floating point data types.
For example, to locate the first occurrence of the ITEM_ID DR017 in DETAILS, enter:FIND FIRST DR017 IN DETAILS.ITEM_IDorFIND FIRST DR017 IN T2.ITEM_ID
As indicated in the following figure:
Chapter 10. Browse Related Data 295

The results of the FIND are:
The FIRST operand specifies that the search is to begin with the first row of data. Otherwise, the searchbegins at the cursor location. The IN operand specifies the search is limited to the named column. In thisexample, the search is limited to the ITEM_ID column. If a column name operand is omitted, all columnswith a data type appropriate to the specified value are searched. (See page “Display Attributes” on page304 for a description of attributes and data types.) If the specified column name is in more than one table(for example, ITEM_ID, in the preceding figure) and is not prefixed with the table name, the lowest-leveltable containing the specified column is searched.
Case-sensitive Searching
For a case-sensitive search, qualify the search string with “C” and enclose it in quotes, as in C'DR017'. Ifthe value includes blanks or apostrophes, you must use double quotes, as in “DR' 017”. If the valueincludes quotation marks, use single quotes, as in ‘DR”017'.
--------------------- Archive Browse: FOPDEMO.ARCHIVE.FILE --------------------Command ===> FIND FIRST DR017 IN DETAILS.ITEM_ID Scroll ===> PAGE
Cmd F == Table: FOPDEMO.ORDERS(T1) ========================= 7 OF 19 === MORE>>ORDER_ID CUST_ID ORDER_DATE ORDER_TIME FREIGHT_CHARGES ORDER_SALESMAN-------- ------- ---------- ---------- --------------- --------------
___ 211 00284 1997-02-24 12.12.51 48.52 SC012
Cmd F == Table: FOPDEMO.DETAILS(T2) =============== STACKED = 2 OF 12 =========ORDER_ID ITEM_ID ITEM_QUANTITY DETAIL_UNIT_PRICE-------- ------- ------------- -----------------
___ 211 CH006 4 14.00
Cmd F == Table: FOPDEMO.ITEMS(T3) =========================== 1 OF 1 === MORE>>ITEM_ID ITEM_DESCRIPTION CATEGORY RATING UNIT_PRICE------- ==================== -------------- ------ ----------
*** *********************************** TOP ***********************************___ CH006 Willie Wonka & the C Children G 14.00*** ********************************* BOTTOM **********************************
Figure 153. FIND Command
--------------------- Archive Browse: FOPDEMO.ARCHIVE.FILE --------------------Command ===> Scroll ===> PAGE
Cmd F == Table: FOPDEMO.ORDERS(T1) ========================= 7 OF 19 === MORE>>ORDER_ID CUST_ID ORDER_DATE ORDER_TIME FREIGHT_CHARGES ORDER_SALESMAN-------- ------- ---------- ---------- --------------- --------------
___ 211 00284 1997-02-24 12.12.51 48.52 SC012
Cmd F == Table: FOPDEMO.DETAILS(T2) =============== STACKED = 8 OF 12 =========ORDER_ID ITEM_ID ITEM_QUANTITY DETAIL_UNIT_PRICE-------- ------- ------------- -----------------
___ 211 DR017 14 22.00
Cmd F == Table: FOPDEMO.ITEMS(T3) =========================== 1 OF 1 === MORE>>ITEM_ID ITEM_DESCRIPTION CATEGORY RATING UNIT_PRICE------- ==================== -------------- ------ ----------
*** *********************************** TOP ***********************************___ DR017 Chariots of Fire Drama PG 22.00*** ********************************* BOTTOM **********************************
Figure 154. FIND Results
296 IBM InfoSphere Optim for DB2 for z/OS: Common Elements

FIND ALL
The FIND ALL command is useful in combination with EXCLUDE ALL to display all occurrences of thespecified character string. (See “EXCLUDE Command.”) For example, to display all rows containing“Drama,” specify:EXCLUDE ALLFIND ALL DRAMA
Manage Data DisplayWhen a display includes many rows, you can use the EXCLUDE and ONLY commands to temporarilyremove from the display any rows that you select or that meet specified criteria, allowing you toconcentrate on the remaining rows. The SHOW command allows you to redisplay temporarily removedrows.
EXCLUDE CommandWhen working with a large number of rows, you can use the Exclude command to temporarily removerows from the display. The EXCLUDE primary command and the Exclude line command (X) allow youto exclude rows. Excluded rows are retained in the table, but are not displayed.
EXCLUDE Primary Command
You can use the EXCLUDE primary command to exclude rows based on specific search criteria. You mustspecify a search value when using the EXCLUDE primary command. Several operands for the EXCLUDEcommand allow you to specify the direction in which the search proceeds, the name of the column tosearch, and whether to include all rows. For example, to exclude the ITEMS table rows for items with aPG rating, enter:EXCLUDE ALL PG IN ITEMS.RATING
or specify the appropriate table by its table identified, such as T1:EXCLUDE ALL PG IN T1.RATING
The EXCLUDE ALL command with no other parameters excludes all rows in a table.
Exclude Line Command
The Exclude line command allows you to select individual rows to exclude from the display.v To exclude a single row, type X in Cmd for the row.v To exclude a block of rows, type XX in Cmd for the first and last rows you want to remove from the
display.
In the following example, the block form of the Exclude line command is used to identify the first andlast rows of a block of rows to be excluded.
Chapter 10. Browse Related Data 297

The excluded rows are retained in the table, but are replaced with a marker indicating the location andnumber of excluded rows.
The excluded rows are no longer included in the row count; however, the excluded lines marker countsas a row. In this example, four consecutive rows are excluded and replaced with a marker, so the rowcount decreases by three.
ONLY CommandUse the ONLY command to limit the display to rows that match criteria you specify, excluding all rowsthat do not. The excluded rows are replaced with a marker. For example, to display only the rows thatcontain the value NE012, specify:ONLY NE012
To limit the selection to rows with the value in the ORDER_SALESMAN column, specify:
--------------------- Archive Browse: FOPDEMO.ARCHIVE.FILE --------------------Command ===> Scroll ===> PAGE
Cmd F == Table: FOPDEMO.ORDERS(T1) ========================= 1 OF 19 === MORE>>ORDER_ID CUST_ID ORDER_DATE ORDER_TIME FREIGHT_CHARGES ORDER_SALESMAN-------- ------- ---------- ---------- --------------- --------------
*** *********************************** TOP ***********************************___ 205 00192 1997-02-24 12.12.51 48.52 NE012___ 206 00093 1997-02-24 12.12.51 48.52 SW012___ 207 00067 1997-02-24 12.12.51 48.52 WE012___ 208 03189 1997-02-24 12.12.51 48.52 NW012___ 209 00143 1997-02-24 12.12.51 48.52 SW012
_ 210 00239 1997-02-24 12.12.51 48.52 NW012XX_ 211 00284 1997-02-24 12.12.51 48.52 SC012___ 212 00327 1997-02-24 12.12.51 48.52 SC012
_ 213 00371 1997-02-24 12.12.51 48.52 NE012XX_ 214 00415 1997-02-24 12.12.51 48.52 NC012___ 215 02221 1997-02-24 12.12.51 48.52 SE012___ 216 00019 1997-02-24 12.12.51 48.52 SC012___ 217 00110 1997-02-24 12.12.51 48.52 SE012___ 288 00131 1997-02-24 12.12.51 48.52 SW012
Figure 155. Exclude Rows
--------------------- Archive Browse: FOPDEMO.ARCHIVE.FILE --------------------Command ===> Scroll ===> PAGE
Cmd F == Table: FOPDEMO.ORDERS(T1) ========================= 1 OF 16 === MORE>>ORDER_ID CUST_ID ORDER_DATE ORDER_TIME FREIGHT_CHARGES ORDER_SALESMAN-------- ------- ---------- ---------- --------------- --------------
*** *********************************** TOP ***********************************___ 205 00192 1997-02-24 12.12.51 48.52 NE012___ 206 00093 1997-02-24 12.12.51 48.52 SW012___ 207 00067 1997-02-24 12.12.51 48.52 WE012___ 208 03189 1997-02-24 12.12.51 48.52 NW012___ 209 00143 1997-02-24 12.12.51 48.52 SW012___ 210 00239 1997-02-24 12.12.51 48.52 NW012___ ----------------------------------------------------- 4 LINE(S) EXCLUDED___ 215 02221 1997-02-24 12.12.51 48.52 SE012___ 216 00019 1997-02-24 12.12.51 48.52 SC012___ 217 00110 1997-02-24 12.12.51 48.52 SE012___ 288 00131 1997-02-24 12.12.51 48.52 SW012___ 333 01210 1997-02-24 12.12.51 48.52 SE012___ 417 00448 1997-02-24 12.12.51 48.52 SE012
Figure 156. Excluded Rows Marker
298 IBM InfoSphere Optim for DB2 for z/OS: Common Elements

ONLY NE012 IN ORDER_SALESMAN
The ONLY primary command provides the same results obtained by executing EXCLUDE ALL followedby FIND ALL. The previous ONLY command is equivalent to an EXCLUDE ALL command, followed by:FIND ALL NE012 IN ORDER_SALESMAN
SHOW CommandUse the SHOW primary command to redisplay all rows previously hidden with the EXCLUDE or ONLYcommands. When multiple tables are displayed, the SHOW command affects all currently displayedtables.
In addition, you can use the following Show line commands to redisplay specific rows.
F, Fn Redisplay the first row in a block of excluded rows. If n is specified, the first n rows in a block ofexcluded rows are redisplayed.
L, Ln Redisplay the last row in a block of excluded rows. If n is specified, the last n rows in a block ofexcluded rows are redisplayed.
S, Sn, SSRedisplay one row in a block of excluded rows. If n is specified, n rows in a block of excludedrows are redisplayed. The block form of the line command, SS, redisplays all excluded rowswithin the specified block of rows.
Sort CriteriaRows in a table are displayed in the order dictated by the Access Definition, or in an undetermined orderif no sort criteria was specified in the Access Definition. (In a Compare File browse session, rows aredisplayed in ascending order by the match key.)
Refer to “Manage Data Displays” on page 55 for information about defining column specifications for atable.
When browsing or selecting data, you can use the SORT command to arrange rows in the displayaccording to values in any column, noting that limits on the DB2 ORDER BY clause apply. You can applysort criteria to a table indicated by cursor position or by specifying a table name or identifier (e.g., SORTORDERS or SORT T2). If you do not specify a table, the sort criteria are applied to the lowest-level table.The SORT command displays the Specify Sort Criteria panel, as shown in Figure 157 on page 300.
The Specify Sort Criteria panel lists all columns in the table, prompts for sort criteria, and displays anypreviously specified sort criteria. You can use Level to specify a numeric value, 1 through 64, indicatingthe sort priority of a column. The value for each column must be unique and consecutive starting with 1,which is the highest priority. You can use Asc/Desc to specify the sort order as ascending or descending.By default, rows are sorted in ascending order.
For example, to sort rows from the ORDERS table by customer ID values, specify 1 for Level and A forAsc/Desc for the CUST_ID column, as shown in the following figure.
Chapter 10. Browse Related Data 299

Once you specify the sort criteria, press ENTER or use END. Based on the sort criteria, the ORDERS rowsare sorted in ascending order by customer ID, as shown in the following figure.
For additional information on the SORT (or SORT CRITERIA) command, see the SORT command in theCommand Reference Manual.
--------------------- Archive Browse: FOPDEMO.ARCHIVE.FILE --------------------Command ===> Scroll ===> PAGE
Cmd F == Table: FOPDEMO.ORDERS(T1) ========================= 1 OF 19 === MORE>>ORDER_ID CUST_ID ORDER_DATE ORDER_TIME FREIGHT_CHARGES ORDER_SALESMAN------ - -------
*** ******** +------Specify Sort Criteria for FOPDEMO.ORDERS------+ ***********___ 20 ¦ ¦ 12___ 20 ¦ Sort Level is a Consecutive Value Between 1 and 64 ¦ 12___ 20 ¦ Sort Direction is A - Ascending or D - Descending ¦ 12___ 20 ¦ ¦ 12___ 20 ¦ --Sort Criteria-- 1 OF 8 ¦ 12___ 21 ¦ Column Name Level Asc/Desc ¦ 12___ 21 ¦ ------------------ ----- -------- ¦ 12___ 21 ¦ *************** TOP *************** ¦ 12___ 21 ¦ ORDER_ID _ ¦ 12___ 21 ¦ CUST_ID 1_ A ¦ 12___ 21 ¦ ORDER_DATE __ _ ¦ 12___ 21 ¦ ORDER_TIME __ _ ¦ 12___ 21 ¦ FREIGHT_CHARGES __ _ ¦ 12___ 28 ¦ ORDER_SALESMAN __ _ ¦ 12___ 28 ¦ ORDER_POSTED_DATE __ _ ¦ 12___ 28 ¦ ORDER_SHIP_DATE __ _ ¦ 12___ 28 +----------------------------------------------------+ 12
Figure 157. Specifying Sort Criteria
--------------------- Archive Browse: FOPDEMO.ARCHIVE.FILE --------------------Command ===> Scroll ===> PAGE
Cmd F == Table: FOPDEMO.ORDERS(T1) ========================= 1 OF 19 === MORE>>ORDER_ID CUST_ID ORDER_DATE ORDER_TIME FREIGHT_CHARGES ORDER_SALESMAN-------- ------- ---------- ---------- --------------- --------------
*** *********************************** TOP ***********************************___ 216 00019 1997-02-24 12.12.51 48.52 SC012___ 207 00067 1997-02-24 12.12.51 48.52 WE012___ 206 00093 1997-02-24 12.12.51 48.52 SW012___ 217 00110 1997-02-24 12.12.51 48.52 SE012___ 288 00131 1997-02-24 12.12.51 48.52 SW012___ 209 00143 1997-02-24 12.12.51 48.52 SW012___ 205 00192 1997-02-24 12.12.51 48.52 NE012___ 210 00239 1997-02-24 12.12.51 48.52 NW012___ 211 00284 1997-02-24 12.12.51 48.52 SC012___ 3398 00289 1997-02-24 12.12.51 48.52 NW012___ 212 00327 1997-02-24 12.12.51 48.52 SC012___ 213 00371 1997-02-24 12.12.51 48.52 NE012___ 214 00415 1997-02-24 12.12.51 48.52 NC012___ 727 00420 1997-02-24 12.12.51 48.52 NE012___ 417 00448 1997-02-24 12.12.51 48.52 SE012___ 333 01210 1997-02-24 12.12.51 48.52 SE012___ 215 02221 1997-02-24 12.12.51 48.52 SE012
Figure 158. Sort Criteria Results
300 IBM InfoSphere Optim for DB2 for z/OS: Common Elements

Maximum Fetch LimitWhen the total number of rows that satisfy the criteria for a table exceeds the maximum fetch limitspecified on the Editor and Display Options panel, a message is displayed indicating that all possiblerows have not been retrieved.
COUNT Command
Use the COUNT command to determine the number of rows in a table that satisfy the criteria. Thisnumber is displayed in the upper right corner of the panel. You can then change the selection criteria toretrieve fewer rows or use the MAX ROWS command to increase the number of rows fetched.
Note: The COUNT command is not available when browsing a Compare File.
MAX ROWS Command
To view rows in excess of the maximum fetch limit, use the MAX ROWS command to increase themaximum number of retrieved rows. For example, if the maximum fetch limit is 200 rows, and theCOUNT command shows that there are 300 rows to view, specify “MAX ROWS 300” and press ENTERto display the 300 rows.
Note: The MAX ROWS command is only available in a Point-and-Shoot session.
Increase Maximum Fetch Limit
The MAX ROWS command increases the maximum fetch limit temporarily, until you terminate thePoint-and-Shoot display. To increase the default maximum number of fetch rows, use the OPTIONSEDITOR command to display the Editor and Display Options panel. On this panel, you can change thespecification for Maximum Fetch Rows.
Display Hexadecimal DataUnder certain circumstances, you may need to display the hexadecimal (or hex) value of data.
For example, if a Warning indicates that the data contains nondisplayable characters, a hexadecimaldisplay may be useful (see Figure 159 on page 302). You can use the HEX primary command to displayeach line of data in standard text format along with its hexadecimal format.
The HEX primary command displays each row of data on three lines. One line is in the standard textrepresentation of the data and two are used for the hexadecimal representation. The hexadecimalrepresentation is shown as two digits directly under each EBCDIC character. The hexadecimal displayremains in effect until you use the HEX command again to return the display to character representation.
In the following figure, note that the hexadecimal representation is displayed only for columns withcharacter data type (see “Display Attributes” on page 304 for a description of attributes and data types).The Warning in the figure refers to the character with a hexadecimal value of BB. This character is foundafter the word “Airplane” in the ITEM_DESCRIPTION column.
Chapter 10. Browse Related Data 301

The same primary and line commands that are available in standard display are available in thehexadecimal display. Some commands, such as the FIND command, have operands specifically for ahexadecimal display.
FIND HEX Command
To locate a specific hexadecimal value anywhere in the data, use the FIND command with the HEXoperand. HEX is useful when you want to locate an invalid (non-displaying) character value. Forexample, to locate the first occurrence of the hex value BB, enter:FIND HEX BB
To locate the next occurrence of the search value, use the RFIND command (usually assigned to PF5).
Trailing Blanks and Nulls
Trailing blanks in CHAR columns are stored in the database and are displayed in hex mode as thehexadecimal value 40. Trailing blanks in VARCHAR columns are not stored in the database and are notdisplayed.
Wide Data DisplaysData is sometimes too wide for display on the Browse or Point-and-Shoot panel. A table column may bewider than the maximum display width or a table may include more columns than can be displayed atonce. Several features and techniques help you browse or select wide data easily.
Sidelabels FormatWhen browsing tables containing multiple or wide columns, you may find it useful to use the sidelabelsformat instead of the standard columnar format. The sidelabels format displays a single row from asingle table at one time. The column headings are displayed down the left side of the panel, and the datais displayed to the right of the headings. Generally, the sidelabels format displays more columns perpanel and more data per row than the columnar format.
--------------------- Archive Browse: FOPDEMO.ARCHIVE.FILE --------------------Command ===> Scroll ===> PAGECAUTION - DATA CONTAINS INVALID (NON-DISPLAY) CHARACTERSCmd F == Table: FOPDEMO.ITEMS(T1) ========================-= 1 OF 33 === MORE>>
ITEM_ID ITEM_DESCRIPTION CATEGORY RATING UNIT_PRICE------- ==================== -------------- ------ ----------
*** *********************************** TOP ***********************************___ AD005 Conan the Barbarian Adventure R 15.00
CCFFF C99894A884C89889889 C8A89AA98 D44414005 3651503850219219915 145553495 9000
___ AD008 Dirty Harry Adventure R 25.00CCFFF C89AA4C899A C8A89AA98 D44414008 49938081998 145553495 9000
___ CH006 Willie Wonka & the C Children G 14.00CCFFF E899884E9998454A884C C8898989 C44438006 69339506652100038503 38934955 7000
___ CH007 Fantasia Children G 34.00CCFFF C89A8A88 C8898989 C44438007 61531291 38934955 7000
___ CM009 Airplane. Comedy PG 14.00CDFFF C8999898B C9988A DC4434009 19973155B 364548 7700
Figure 159. Hexadecimal Values Displayed
302 IBM InfoSphere Optim for DB2 for z/OS: Common Elements

To view a specific table in sidelabels format, you can use the sidelabels primary or line command. Also,you can specify the sidelabels display format on the Editor and Display Options panel. Once specified,either by command or from the options panel, sidelabels format remains in effect until you change it.
The following figure shows a row from the ORDERS table in sidelabels format.
Sidelabels Primary Command
You can view a specific table in sidelabels format by typing the SIDELABELS primary command andeither specifying a table name operand (e.g., SIDELABELS ITEMS or SID T3) or positioning the cursor onthe table. If the cursor is positioned on a row, that row is displayed in sidelabels format; otherwise, thefirst row in the table is displayed. If you do not specify a table name, the first row from the lowest-leveltable is displayed.
Note: When in sidelabels format, you can use the SIDELABELS command with a table name operand todisplay a different active table. During sidelabels display, joins between tables are retained andredisplayed when you return to columnar format.
To return to the columnar display, enter the SIDELABELS primary command.
Sidelabels Line Command
To switch from columnar format to sidelabels format using the line command, enter the SID linecommand in Cmd for the row in the table. The selected row is then displayed in sidelabels format. Toreturn to the columnar display, enter the SID line command in LineCmd.
Screen Elements
The screen elements in the columnar and sidelabels formats are the same; only the positioning isdifferent. However, only one data row can be displayed at a time in sidelabels format. In addition to theelements included in columnar format, sidelabels format shows the position of the first displayed columnand the total number of columns in the table. (The screen elements are described in “Display Basics” onpage 278.)
Available Commands
Except for the INDENT, JOIN, UNJOIN, START, and SWITCH commands, the primary and linecommands that are available in columnar format are also available in sidelabels format. However, sinceonly a single row from a single table is displayed in sidelabels format, certain commands are better suitedto columnar format.
--------------------- Archive Browse: FOPDEMO.ARCHIVE.FILE --------------------Command ===> Scroll ===> PAGE
== Table: FOPDEMO.ORDERS(T1) ================================ROW 1 OF 79 ===== LineCmd ==> ___ Row Status: COLUMN 1 OF 8
ORDER_ID : 10CUST_ID : 00049ORDER_DATE : 1998-01-26ORDER_TIME : 14.22.31FREIGHT_CHARGES : 9.22ORDER_SALESMAN : WE005ORDER_POSTED_DATE : 1998-01-27-16.59.00.000000ORDER_SHIP_DATE : 98/01/29*********************************** BOTTOM ************************************
Figure 160. Sidelabels Format
Chapter 10. Browse Related Data 303

Scroll - Sidelabels
In sidelabels format, you can scroll using DOWN, UP, BOTTOM, and TOP to display another row in thetable. You can also use LEFT and RIGHT to perform a logical horizontal scroll to view additionalcolumns in the same row. In sidelabels format, a horizontal row appears as “up” and “down.” See “Scroll- Wide Tables” on page 309 for further discussion of horizontal scrolling in sidelabels format.
Wide ColumnsData is sometimes too wide to be displayed on the panel. When the width of a column exceeds theuser-specified maximum column display width, the data in that column is truncated. In columnar format,this truncation is indicated by equal signs (=) under the column heading; in sidelabels format, an equalsign is displayed to the right of the column heading.
In the following figure, the data column ITEM_DESCRIPTION is wider than the maximum columndisplay width. Note the equal signs under the ITEM_DESCRIPTION heading.
The maximum number of characters that can be displayed per column is determined by the valuespecified as the Columnar Max Display Width and the Sidelabel Max Display Width on the Editor andDisplay Options panel. If the display of data from a column is truncated because of the maximumdisplay width, several techniques make it possible for you to view the complete data. You can:v Use the OPTIONS EDITOR primary command to display the Editor and Display Options panel, where
you can increase the maximum column display width.v Use the EXPAND primary command to invoke a scrollable pop-up window of all data in the column.v If in columnar format, use the SIDELABELS primary command or the SID line command to display a
row of data in a vertical format that allows a maximum display width (of 50 to 32,767 characters percolumn) greater than the columnar format.
Display Attributes
It may be helpful to first review information about the displayed columns. If the Display ColumnAttributes prompt on the Editor and Display Options panel is Y, column attributes are shownautomatically. If attributes are not shown, use the ATTRIBUTES primary command to display informationabout data type, length, and nullability for each column in each table in the Browse or Point-and-Shootdisplay.
Attributes can be displayed in any display mode (i.e., columnar, sidelabels, or hexadecimal mode). Incolumnar format, attributes are displayed below the column heading. In sidelabels format, attributes aredisplayed to the left of the column name, which is truncated if insufficient space is available to displayboth the attributes and the full column name.
In the following figure, attributes for each column are displayed directly beneath the column heading.
--------------------- Archive Browse: FOPDEMO.ARCHIVE.FILE --------------------Command ===> Scroll ===> PAGE
Cmd F == Table: FOPDEMO.ITEMS(T1) =========================== 1 OF 1 === MORE>>ITEM_ID ITEM_DESCRIPTION CATEGORY RATING UNIT_PRICE------- ==================== -------------- ------ ----------
*** *********************************** TOP ***********************************___ CH006 Willie Wonka & the C Children G 14.00*** ********************************* BOTTOM **********************************
Figure 161. Wide Column
304 IBM InfoSphere Optim for DB2 for z/OS: Common Elements

The attribute information is in the form type(n,n):N, where type is the data type and n,n is the width ofthe column. An N indicates the column is nullable. To conserve space on the screen, certain data typeindicators are abbreviated when attributes are displayed. The data type indicators and the DB2 data typesthey represent include the following:
CH CHAR/CHAR FOR MIXED DATA
VCH VARCHAR
LVR LONG VARCHAR
DEC DECIMAL
INT INTEGER
SMALLINTSMALLINT
DATE DATE
TIME TIME
TIMESTAMPTIMESTAMP
SNGL FLOATSINGLE FLOAT
DBL FLOATDOUBLE FLOAT
GR GRAPHIC
VGR VARGRAPHIC/LONG VARGRAPHIC
CLOB CLOB FOR MIXED DATA
DBCLOBDBCLOB
BIN BINARY
VARBINVARBINARY
BIGINTBIGINT
DECFLOATDECFLOAT(16) or DECFLOAT(34), depending on precision
--------------------- Archive Browse: FOPDEMO.ARCHIVE.FILE --------------------Command ===> Scroll ===> PAGE
Cmd F == Table: FOPDEMO.ITEMS(T1) =========================== 1 OF 1 === MORE>>ITEM_ID ITEM_DESCRIPTION CATEGORY RATING UNIT_PRICE-CH(5)- ======VCH(72)======= ---VCH(14)---- -CH(4)- -DEC(5,2)-
*** *********************************** TOP ***********************************___ CH006 Willie Wonka & the C Children G 14.00*** ********************************* BOTTOM **********************************
Figure 162. Column Attributes
Chapter 10. Browse Related Data 305

Note: See “Browsing with Unsupported Data Types” on page 310 for information on unsupported datatypes.
In Figure 162 on page 305, the attributes for the ITEM_DESCRIPTION column indicate it is 72 characterswide. Thus, you cannot display the entire column in columnar format by increasing the Columnar MaxDisplay Width on the Editor and Display Options panel, which has an upper limit of 70. To remove thecolumn attributes from the display, use the ATTRIBUTES OFF command. You can also use theATTRIBUTES command with no operand to toggle between displaying and not displaying columnattributes.
Maximum Column Display WidthThe maximum column display width is specified by the Columnar Max Display Width and theSidelabel Max Display Width options on the Editor and Display Options panel. You can use theOPTIONS EDITOR command to display this panel. In columnar format, you can specify the maximumcolumn display width in the range of 2 to 70 characters. In sidelabels format, you can specify themaximum column display width in the range of 50 to 32,767 characters. (See “Editor and DisplayOptions” on page 328 for additional information about these options.)
For VARCHAR columns, the entire width of the column, padded with trailing blanks, is displayedregardless of the actual length of the data (see Figure 165 on page 308). Therefore, when a table hasseveral wide columns that do not contain correspondingly wide data, you may want to decrease themaximum display width so that more columns from the table are displayed per screen.
Expand ColumnWhen the maximum display width does not provide sufficient display space for a specific column orwhen changing the maximum display width is undesirable, the EXPAND primary command can be usedto display all data in that column. You can use this command on columns with the following data types,regardless of whether the column width exceeds the maximum display width: CHAR, VARCHAR, LONGVARCHAR, GRAPHIC, VARGRAPHIC, LONG VARGRAPHIC, BINARY, and VARBINARY. You can usethis command on columns with data types of TIMESTAMP and DECIMAL only if the column widthexceeds the maximum display width.
When you enter the EXPAND command, you can either position the cursor on the desired table,regardless of level, or you can specify the column name. In a multiple table display, the EXPANDcommand operates on the lowest-level table by default. You can indicate the table in which the columnyou want to expand resides by including its table name or identifier in the command. For example, toexpand the ITEM_DESCRIPTION column in the ITEMS table, type EXPANDITEMS.ITEM_DESCRIPTION or EXPAND T1.ITEM_DESCRIPTION. You can also assign EXPAND to aprogram function key.
If the EXPAND command is entered on the command line and the cursor is positioned on theITEM_DESCRIPTION column of the item CH006, the following pop-up window is displayed.
--------------------- Archive Browse: FOPDEMO.ARCHIVE.FILE --------------------Command ===> EXPAND Scroll ===> PAGE
Cmd F == Table: FOPDEMO.ITEMS(T1) =========================== 1 OF 1 === MORE>>ITEM_ID ITEM_DESCRIPTION CATEGORY RATING UNIT_PRICE-CH(5)- ======VCH(72)======= ---VCH(14)---- -CH(4)- -DEC(5,2)-
*** *********************************** TOP ***********************************___ CH006 Willie Wonka & the C Children G 14.00*** ********************************* BOTTOM **********************************
Figure 163. EXPAND Command
306 IBM InfoSphere Optim for DB2 for z/OS: Common Elements

The column name and the actual width are shown in the top border, as well as the position of the rowand the number of rows in the Browse or Point-and-Shoot display.
In sidelabels format, positioning the cursor in a wrapped segment when executing the EXPANDcommand designates both the column to expand and the segment with which the expanded displaybegins.
Scroll - Expanded Column Display
The currently displayed starting and ending column positions are indicated in the bottom border of thewindow. When the column width exceeds 66 characters, the expanded data can be scrolled horizontallyusing the LEFT and RIGHT commands.
The following line commands can also be used to scroll left and right in an expanded column display.
<nn or -nnScroll left nn spaces.
>nn or +nnScroll right nn spaces.
Use the UP and DOWN commands to scroll the data in the expanded window by row. The row counterdisplayed in the top border of the window indicates the row that is currently displayed.
When you have finished viewing the expanded data, use END to terminate the expanded column display.
Wide Columns in Sidelabels FormatWhen a table contains many columns or wide columns, you may find it useful to use the sidelabelsformat instead of the standard columnar format. The sidelabels format displays more data per row,allowing the maximum number of characters per column to range from 50 to 32,767 characters.
When the maximum sidelabels display width permits, wide columns are automatically wrapped. Thedata is divided into 50-character segments and presented on multiple lines. If a column is wider than themaximum display width, it is displayed with the truncated data indicator, an equal sign (=), to the rightof the column heading. As in columnar format, data in a truncated column can be displayed by using theEXPAND command or by increasing the maximum display width. See “Expand Column” on page 306 fordetails on using the EXPAND command.
--------------------- Archive Browse: FOPDEMO.ARCHIVE.FILE --------------------Command ===> Scroll ===> PAGE
Cmd F == Table: FOPDEMO.ITEMS(T1) =========================== 1 OF 1 === MORE>>ITEM_ID ITEM_DESCRIPTION CATEGORY RATING UNIT_PRICE-CH(5)- ======VCH(72)======= ---VCH(14)---- -CH(4)- -DEC(5,2)-
*** *********************************** TOP ***********************************___ CH006 Willie Wonka & the C Children G 14.00*** ********************************* BOTTOM **********************************
+-Cmd-F----------------(ITEM_DESCRIPTION) Width: 72--------------- 1 OF 1 ---+¦ ¦¦ ----+----1----+----2----+----3----+----4----+----5----+----6----+- ¦¦ ___ Willie Wonka & the Chocolate Factory ¦¦ ¦+Col: 1--------------------------------------------------------------Col: 66-+
Figure 164. Expanded Column Display
Chapter 10. Browse Related Data 307

In the following figure, the maximum display width is 254 characters and data in theORDER_SHIP_INSTR column is wrapped.
The column data begins to the right of the column name and continues, in 50-character segments, on thenext five lines. The beginning and ending character positions of each segment are displayed under thecolumn heading. For more information about sidelabels format, see “Sidelabels Format” on page 302.
Wide TablesMany database tables have more columns than can be displayed at once in columnar format. In addition,columns may exceed the user-specified maximum width for columnar or sidelabels displays. Forexample, in the following figure, the table FOPDEMO.ITEMS has more columns than can be displayed onthe screen at one time, as indicated by the MORE>> designation to the right of the row count. Also, thecolumn ITEM_DESCRIPTION is wider than both the user-specified maximum column display width andthe 70 character upper limit for the columnar format parameter. (Note the length attribute under theITEM_DESCRIPTION heading.)
Browsing may be difficult when you can view the data in no more than a few columns at a time. If thedisplay of data in a table is truncated because of the screen width, several techniques and features makeit possible for you to view the complete data for each row or to juxtapose columns of primary interest.You can:v Use LEFT and RIGHT to scroll a columnar or sidelabels display to view additional columns.v Use the LOCK primary command to retain one or more columns in a columnar or sidelabels display
while scrolling the remaining columns. (The ANCHOR command is a synonym for the LOCKcommand.)
v Use the COLUMNS primary command to arrange columns in a columnar or sidelabels display so thatthe columns of interest are displayed together.
--------------------- Archive Browse: FOPDEMO.ARCHIVE.FILE --------------------Command ===> Scroll ===> PAGE
== Table: FOPDEMO.SHIP_INSTR(T1) ============================ROW 13 OF 120 ==== LineCmd ==> ___ Row Status: COLUMN 1 OF 4
SHIP_ID : 106SHIP_INSTR_ID : 10013ORDER_SHIP_INSTR : Federal Express. This is the third time this orde
(51 - 100) : r has been sent. Customer claims that first two or(101 - 150) : ders never arrived at store. Make sure customer s(151 - 200) : igns for package.(201 - 250) :(251 - 254) :
SHIP_UPDATED : 1998-03-09-11.27.000000******************************** BOTTOM ***************************************
Figure 165. Column Wrapping
--------------------- Archive Browse: FOPDEMO.ARCHIVE.FILE --------------------Command ===> Scroll ===> PAGE
Cmd F == Table: FOPDEMO.ITEMS(T1) =========================== 1 OF 1 === MORE>>ITEM_ID ITEM_DESCRIPTION CATEGORY RATING UNIT_PRICE-CH(5)- ======VCH(72)======= ---VCH(14)---- -CH(4)- -DEC(5,2)-
*** ********************************** TOP ************************************___ CH006 Willie Wonka & the C Children G 14.00*** ******************************** BOTTOM ***********************************
Figure 166. Wide Table
308 IBM InfoSphere Optim for DB2 for z/OS: Common Elements

v If browsing data in columnar format, use the SIDELABELS primary command or the SID linecommand to display a row of data in a vertical format that allows a greater maximum display width(from 50 to 32,767 characters per column) and provides room for more columns. See “SidelabelsFormat” on page 302 for additional information.
Scroll - Wide TablesIn columnar format, a column is not displayed when the display width of the column exceeds theavailable space for display on the screen. For example, if the display width for a column is 20 characters,but only 10 spaces remain on the screen, the column is not displayed until you scroll right or left, asappropriate. When all columns do not fit on the screen, you can scroll horizontally through the columnsusing the LEFT and RIGHT commands (usually assigned to PF10 and PF11).
In sidelabels format, the LEFT and RIGHT commands perform a logical “left” and “right” scroll as incolumnar format, however this appears as “up” and “down.” For example, if you use the LEFTcommand based on cursor location, the column containing the cursor is scrolled to the bottom of thedisplay and all columns to the “right” are displayed appropriately below this column.
Lock ColumnsUse the LOCK, or ANCHOR, command to position one or more columns at the beginning of the display.The locked columns are retained on the screen when you scroll the remaining columns.
For example, assume the combined width of the column data for the ORDERS table exceeds the width ofthe screen in columnar format. Thus, the display must be scrolled horizontally to view all columns. Bylocking the ORDER_DATE column, ORDER_DATE is repositioned to the left of the screen and remains inthat position on the screen when scrolling to view the remaining columns. In sidelabels format, lockedcolumns are positioned at the top of the display.
In the following figure, assume the LOCK command has been entered to retain the ORDER_DATEcolumn on the display.
--------------------- Archive Browse: FOPDEMO.ARCHIVE.FILE --------------------Command ===> Scroll ===> PAGE
Cmd F == Table: FOPDEMO.ORDERS(T1) ========================= 1 OF 19 === MORE>>ORDER_DATE ORDER_ID CUST_ID ORDER_TIME FREIGHT_CHARGES ORDER_SALESMAN++++++++++ -------- ------- ---------- --------------- --------------
*** *********************************** TOP ***********************************___ 1997-02-24 205 00192 12.12.51 48.52 NE012___ 1997-02-24 206 00093 12.12.51 48.52 SW012___ 1997-02-24 207 00067 12.12.51 48.52 WE012___ 1997-02-24 208 03189 12.12.51 48.52 NW012___ 1997-02-24 209 00143 12.12.51 48.52 SW012___ 1997-02-24 210 00239 12.12.51 48.52 NW012___ 1997-02-24 211 00284 12.12.51 48.52 SC012___ 1997-02-24 212 00327 12.12.51 48.52 SC012___ 1997-02-24 213 00371 12.12.51 48.52 NE012___ 1997-02-24 214 00415 12.12.51 48.52 NC012___ 1997-02-24 215 02221 12.12.51 48.52 SE012___ 1997-02-24 216 00019 12.12.51 48.52 SC012___ 1997-02-24 217 00110 12.12.51 48.52 SE012___ 1997-02-24 288 00131 12.12.51 48.52 SW012___ 1997-02-24 333 01210 12.12.51 48.52 SE012
Figure 167. Repositioned Locked Column
Chapter 10. Browse Related Data 309

Identify Locked Columns
In columnar format, a locked column is identified by a series of plus signs (+) under the column heading.The first locked column is placed in the left-most position with each succeeding locked columnpositioned to the right of the previously locked column.
A column that exceeds the maximum column display width is indicated by equal signs, =, under thecolumn heading. If the truncated column is also locked, a series of dots under the column headingdistinguish it from locked columns that are not truncated. For more information on truncated columns,see “Wide Columns” on page 304.
In sidelabels format, the first locked column is placed at the top of the display and successive lockedcolumns under it. A locked column is marked with a plus sign (+) to the right of the column name.
Lock Multiple Columns
In columnar format, any number of columns may be locked, as long as enough space remains to displayat least one unlocked column. The number of positions reserved for unlocked columns is determined bythe user-defined maximum display width specified on the Editor and Display Options panel. Forexample, if the maximum display width is 20 characters, then the right-most 21 character positions on thescreen are reserved for unlocked columns to ensure that at least one unlocked column is displayed. Morecolumns may be displayed if they fit, in their entirety, in the remaining area.
Use the LOCK KEY command to lock all columns that comprise the primary key.
Unlock Columns
Use the UNLOCK command with no operands to unlock all locked columns. Use the UNLOCKcommand with a column name operand to unlock a single column.
Arrange ColumnsTo rearrange the display order of the columns, use the COLUMNS command. The COLUMNS commanddisplays the Describe Columns panel, discussed in “Manage Data Displays” on page 55.
On the Describe Columns panel, you can change the order of columns by using the Move (M) linecommand with the Before (B) and After (A) commands to designate the destination.
Browsing with Unsupported Data TypesDuring a Browse session, DB2 tables that contain columns with unsupported data types are managed asfollows.v For tables containing columns with supported and unsupported data types, supported data types are
displayed and unsupported data types are listed as “UNSUPPORTED.”v For tables containing columns with unsupported data types only, the Browse function is disabled and
the message “UNSUPPORTED DATA TYPE” appears.
ReportsAt any time during an Extract File or Archive File browse session or a Point-and-Shoot session, you cancreate a report about the contents of the display.
Use the report facility to format and print or save a report that includes some or all displayed rows. Toinvoke the report facility, use the REPORT command. (Note that the REPORT command is not availablewhile browsing a Compare File.) The following panel prompts for the report specifications.
310 IBM InfoSphere Optim for DB2 for z/OS: Common Elements
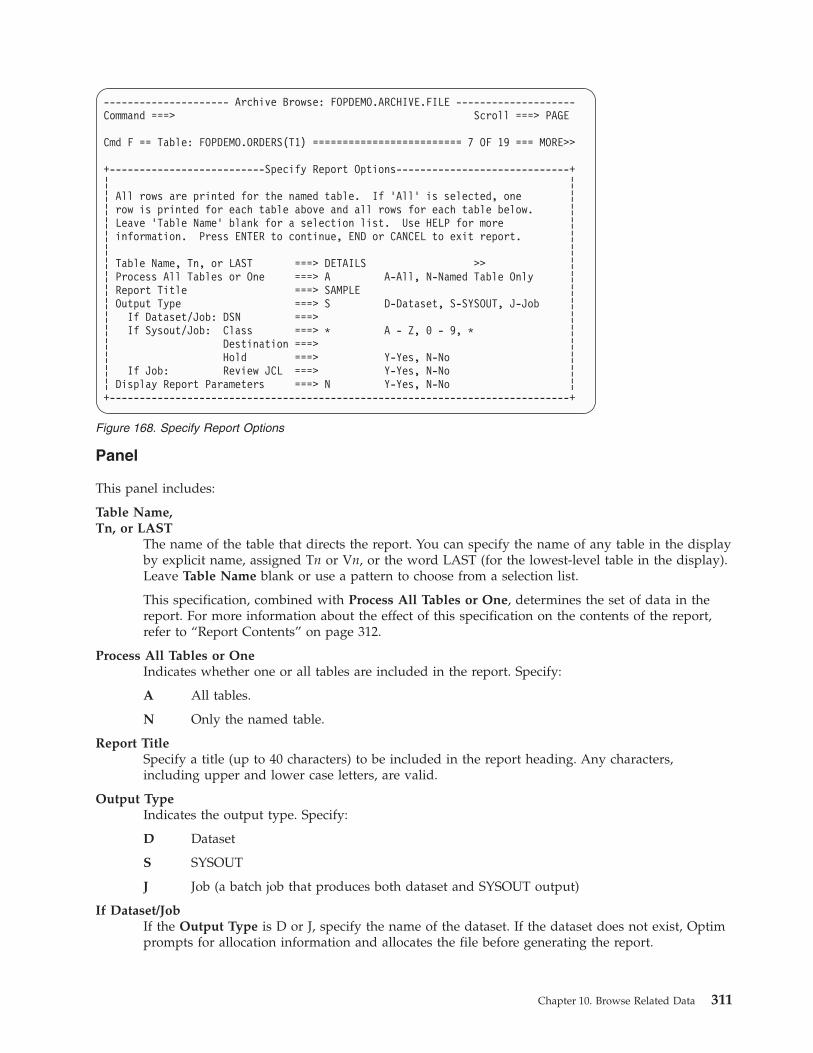
Panel
This panel includes:
Table Name,Tn, or LAST
The name of the table that directs the report. You can specify the name of any table in the displayby explicit name, assigned Tn or Vn, or the word LAST (for the lowest-level table in the display).Leave Table Name blank or use a pattern to choose from a selection list.
This specification, combined with Process All Tables or One, determines the set of data in thereport. For more information about the effect of this specification on the contents of the report,refer to “Report Contents” on page 312.
Process All Tables or OneIndicates whether one or all tables are included in the report. Specify:
A All tables.
N Only the named table.
Report TitleSpecify a title (up to 40 characters) to be included in the report heading. Any characters,including upper and lower case letters, are valid.
Output TypeIndicates the output type. Specify:
D Dataset
S SYSOUT
J Job (a batch job that produces both dataset and SYSOUT output)
If Dataset/JobIf the Output Type is D or J, specify the name of the dataset. If the dataset does not exist, Optimprompts for allocation information and allocates the file before generating the report.
--------------------- Archive Browse: FOPDEMO.ARCHIVE.FILE --------------------Command ===> Scroll ===> PAGE
Cmd F == Table: FOPDEMO.ORDERS(T1) ========================= 7 OF 19 === MORE>>
+--------------------------Specify Report Options-----------------------------+¦ ¦¦ All rows are printed for the named table. If ’All’ is selected, one ¦¦ row is printed for each table above and all rows for each table below. ¦¦ Leave ’Table Name’ blank for a selection list. Use HELP for more ¦¦ information. Press ENTER to continue, END or CANCEL to exit report. ¦¦ ¦¦ Table Name, Tn, or LAST ===> DETAILS >> ¦¦ Process All Tables or One ===> A A-All, N-Named Table Only ¦¦ Report Title ===> SAMPLE ¦¦ Output Type ===> S D-Dataset, S-SYSOUT, J-Job ¦¦ If Dataset/Job: DSN ===> ¦¦ If Sysout/Job: Class ===> * A - Z, 0 - 9, * ¦¦ Destination ===> ¦¦ Hold ===> Y-Yes, N-No ¦¦ If Job: Review JCL ===> Y-Yes, N-No ¦¦ Display Report Parameters ===> N Y-Yes, N-No ¦+-----------------------------------------------------------------------------+
Figure 168. Specify Report Options
Chapter 10. Browse Related Data 311

If Sysout/JobIf the Output Type is S or J, specify SYSOUT parameters:
Class The output class for the printed output. Specify an alphabetic or numeric character (A –Z, 0 – 9) or an asterisk (*).
DestinationThe SYSOUT destination. Specify a valid local or remote terminal, a node in the JESnetwork, a local or remote printer or workstation, or a TSO User ID.
Hold Specify Y or N.
If Job: Review JCLIf the Output Type is J, specify:
Y Review JCL.
N Do not review JCL.
Display Report ParametersIndicates whether you want to review the prompts for report parameters. (For more information,refer to “Report Format Parameters” on page 313.) Specify:
Y Review prompts.
N Do not review prompts.
Report ContentsThe Table Name and Process All Tables or One specifications determine the contents and layout of thereport. For example, assume you are browsing four tables joined for display as follows:ORDERS
C:DETAILSP:ITEMS
P:CUSTOMERS (STACKED)
CUSTOMERS and DETAILS are joined at the same level (stacked) and ITEMS is joined to DETAILS. (Foran explanation of stacked tables, refer to “Multiple Table Display” on page 287.)1. To generate a report on the rows from a single table, enter the table name and specify “N” for Process
All Tables or One. For example, to include only the DETAILS rows in the report, specify:Table Name, Tn, or LAST ===> DETAILSProcess All Tables or One ===> N
All the rows from the DETAILS table, which are related to the displayed ORDERS row (the nexthighest table), are included in the report. No other tables are included in this report.
2. To limit the report to a specific set of related data, specify the name of the table for which all rows onthe current level are included. For reference, the related row from each higher-level table is included.The rows from lower-level tables are always included with this specification.For example, to generate a report on the DETAILS rows for the currently displayed ORDERS row andthe related ITEMS rows for each of the DETAILS rows, specify:Table Name, Tn, or LAST ===> DETAILSProcess All Tables or One ===> A
The report lists the displayed row from the ORDERS table and, one at a time, each DETAILS rowwith the related ITEMS rows in a control break format.
3. To include the rows from all the tables joined in the current session, specify the name of the StartTable and “A” for the Process All Tables or One prompt. For example, assume the ORDERS table isthe Start Table, specify:Table Name, Tn, or LAST ===> ORDERSProcess All Tables or One ===> A
312 IBM InfoSphere Optim for DB2 for z/OS: Common Elements

If you want to include all information for a single ORDERS row, specify DETAILS as the table name.The ORDERS row is included with all current DETAILS rows, and related ITEMS rows.
Format
The format of rows in the report conforms to the browse or Point-and-Shoot display format. A headeridentifies the table, column headings are presented above the columns, and the row(s) of data are listedbeneath the headings. You can specify the parameters for the report format.
When there are multiple lower-level tables, the report display is similar to that of the browse orPoint-and-Shoot display.v For each table that is higher than the lowest-level table, only one row is displayed.v For the lowest-level table, all rows are displayed.v When multiple rows are included in the report for a higher-level table, each row is displayed in order
with the related, lower-level rows.
Report Format ParametersWhen you indicate Y to Display Report Parameters, prompts for the parameters are displayed. Normally,you establish these parameters once, and use them consistently for all reporting.
Panel
The following prompts are displayed on this panel.
Lines per PageThe maximum number of lines printed on a page. Normally, this is the number of lines thatphysically fit on a page, excluding lines for the top and bottom margins. The default is 57.Specify:
0 Print the title line at the start of the report and do not insert page breaks. Use 0 to writeto a dataset without inserting page breaks.
--------------------- Archive Browse: FOPDEMO.ARCHIVE.FILE --------------------Command ===> Scroll ===> PAGE
Cmd F == Table: FOPDEMO.ORDERS(T1) ========================= 7 OF 19 === MORE>>
+------------------------Report Format Parameters------------------------+ --+¦ ¦ ¦¦ Lines per Page ===> 57 0-No Titles, 20-999 ¦ ¦¦ Maximum Report Rows per Table ===> blank-Editor Max Fetch Rows ¦ ¦¦ Report Line Width ===> 132 80-n, Blank-Maximum ¦ ¦¦ Oversized Lines ===> W T-Truncate, W-Wrap Data ¦ ¦¦ Maximum Character Column Width ===> Blank-Maximum Display Width ¦ ¦¦ New Page per Start Table Row ===> N Y-Yes, N-No ¦ ¦¦ Blank Lines between Levels ===> 1 0 - 3 ¦ ¦¦ Blank Lines between Rows ===> 0 0 - 3 ¦ ¦¦ Blanks between Columns ===> 1 0 - 20 ¦ ¦¦ Indent for Subordinate Tables ===> 2 0 - 40 ¦ ¦¦ Omit Table Name Heading Line ===> N Y-Yes, N-No ¦ ¦¦ Omit Subordinate Table Headings ===> N Y-Yes, N-No ¦ ¦¦ Omit Redundant Table Headings ===> N Y-Yes, N-No ¦ ¦¦ Show Inactive Multi-Way Tables ===> Y Y-Yes, N-No ¦ ¦¦ ¦ ¦¦ Press ENTER to continue, END or CANCEL to exit report. ¦ ¦+------------------------------------------------------------------------+ ¦
Figure 169. Report Format Parameters
Chapter 10. Browse Related Data 313

20-999 Print the indicated number of lines per page. When the number of lines have beenprinted, Access inserts a page break, prints the title at the top of the new page, andincrements the page number by 1.
Maximum Report Rows per TableThe maximum number of rows fetched for each table in the report. The value must be from 1through the fetch limit specified by site management. Leave blank to use the value specified forMaximum Fetch Rows in the Editor and Display Options.
Report Line WidthThe maximum number of characters on a line in the report. If a row exceeds this value, it iswrapped or truncated according to the Oversized Lines specification.
The minimum value is 80. A value less than 80 is automatically reset to 80. Use 80 if the report isdirected to a data set for subsequent browsing or printing. Leave blank to set the line widthequal to the longest row of any table in the report.
If the report is directed to a printer, this value is normally the line length of the printer (132 formost printers), excluding the carriage control byte in the first position of the line.
Oversized LinesIndicates the handling of lines that exceed the maximum width. Specify:
T Data is truncated. Any columns that do not fit entirely on the line are omitted.
W Data is wrapped. Each row occupies as many lines as needed. Line breaks occur betweencolumns when the column width exceeds the remaining line width.
Maximum Character Column WidthThe maximum number of bytes that can be included in a report column.
Note: For GRAPHIC and DBCLOB columns, the Shift Out and Shift In characters are included inthe maximum width. Therefore, a report displays the specified maximum number of GRAPHICand DBCLOB bytes minus the number of Shift Out and Shift In characters.
Leave blank to use the value specified for Columnar Max Display Width on the Editor andDisplay Options panel.
New Page per Start Table RowIndicator for a new page for each Start Table row. (If the report is for a single table, this isignored.) Specify:
Y Print on a new page.
N Continue printing on the current page.
Blank Lines between LevelsIndicates the number of blank lines inserted between table levels in the report. Specify a valuefrom 0 through 3.
Blank Lines between RowsThe number of blank lines inserted between rows. This parameter applies only to the tables forwhich all relevant rows are included; only a single line is included for other tables. Specify avalue from 0 through 3.
Blank between ColumnsIndicates the number of blanks inserted between columns. Specify a value from 0 through 20.
This value is the minimum number of blanks between any two columns. The report may displaymore blanks between some columns, depending on the contents of the column and thejustification of that data in relation to the column heading.
314 IBM InfoSphere Optim for DB2 for z/OS: Common Elements
Indent for Subordinate TablesThe number of positions to indent data from a subordinate table at each control break todistinguish it from the immediately preceding table. Use this indentation to present a clear visualrepresentation of the display levels.
Specify a value from 0 through 40. This value is subtracted from the Report Line Width todetermine the actual number of characters in the indented table that can fit on a line.
Omit Table Name Heading LineIndicator for including the line containing the table name and level number for each level in thereport. Specify:
Y Omit heading.
N Include heading.
Omit Subordinate Table HeadingsIndicator for including header lines for all tables other than the Start Table in the report. If thesubordinate table names and column titles are not necessary, use this option to eliminate them.Specify:
Y Omit heading.
N Include heading.
Omit Redundant Table HeadingsIndicator for including table headings more than once on a page. That is, if a table is included ona page more than once, the headings are included with the first occurrence only. Specify:
Y Omit redundant table headings.
N Include table headings for all occurrences of a table on a page.
Show Inactive Multi-Way TablesIndicator for including all joined tables in a multi-way join. Although all tables cannot becurrently active, all must have been displayed during the session. Specify:
Y Include all tables in a multi-way join.
N Include only the currently displayed table.
Additional Notes
The following notes apply to reports:v Excluded rows are included in the report. When you return to the browse or Point-and-Shoot display
after generating a report, any excluded rows are redisplayed.v If you specify a table in a stack and only one table is printed, only the active table is included in the
report. The hidden tables on that level are not printed, regardless of the Show Inactive Multi-wayTables option.
v All locked column specifications are respected; locked columns are positioned as on the browse orPoint-and-Shoot display.
v The Describe Columns panel specifications for column and label handling are used to format the reportlines.
v The REPORT command is not available from a ZOOMed display.
Chapter 10. Browse Related Data 315

316 IBM InfoSphere Optim for DB2 for z/OS: Common Elements

Chapter 11. Options
Several types of options are available to manage the functions performed while using Optim.
These options can be modified by selecting Option 0 OPTIONS on the Main Menu or by entering theOPTIONS command from any panel with a Command prompt. The Choose Option Type menu isdisplayed, allowing you to specify User, Editor, Job Card, Compare, Archive, and Legacy options onseparate panels.
Panel Options
The available options are:
1 USERDisplay the User Options panel, which prompts for user-specific parameters that affect thecurrent session.
2 EDITDisplay the Editor and Display Options panel, which prompts for parameters that affect anAccess edit or browse session, a Point-and-Shoot session, or a Compare File, Extract File, orArchive File browse session.
3 JOBCARDDisplay the Job Card and Print Options panel, which prompts for information needed to submit abatch job. (Available only if Move, Archive, or Compare is installed.)
4 COMPAREDisplay the Compare Options panel, which prompts for parameters used for a Compare Process.(Available only if Compare is installed.)
5 ARCHIVEDisplay the Archive Options panel, which prompts for parameters used for an Archive Process.(Available only if Archive is installed.)
6 LEGACYDisplay the Legacy Options panel, which prompts for parameters used when creating LegacyTables.(Available only if Move or Compare for IMS, VSAM, and Sequential Filesis installed.)
C CUSTOMDisplay the Custom Options panel, which allows the enablement and disablement of variouscustom options that affect Optim behavior. (Displayed only for users with authorized passwords.)
------------------------------- Choose Option Type ----------------------------OPTION ===>
1 USER - User Options2 EDIT - Editor and Display Options3 JOBCARD - Job Card and Print Options4 COMPARE - Compare Options5 ARCHIVE - Archive Options6 LEGACY - Legacy Options
C CUSTOM - Custom Options
Figure 170. Choose Option Type
© Copyright IBM Corp. 1991, 2013 317
An additional option, Option 0 SITE, is displayed for any user having an authorized password. Fordetailed information on Site Options, see the Customization Guide, Customize the Optim Site Options.
Panel Format
Options panels are displayed in full-screen or pop-up format, depending upon the method used to accessthe panel: full-screen format when you select an option through the Choose Option Type menu, andpop-up format when you use the OPTIONS command.
Note: For further information, see the OPTIONS command in the Command Reference Manual.
Values Profiled
Values on the Options panels are profiled.
User OptionsUser options determine several user-specific parameters that govern the current Optim session. When youselect Option 1 from the Choose Option Type menu, the User Options panel is displayed. Due to spacelimitations, only the first panel of User Options is shown below.
318 IBM InfoSphere Optim for DB2 for z/OS: Common Elements

Panel
The user options apply to all Optim components, unless indicated. The user options include:
Caps Mode OnCase translation mode. This option applies to entries in an edit session, entries of selection criteriaor SQL WHERE clauses, or entries in Column Maps. Specify:
Y Caps Mode is on. All entered data is translated to upper case.
N Caps Mode is not on. All entered data remains as entered.
Confirm on DeletesOption for confirmation prompts when deleting an Access Definition, Compare Definition,Primary Key, Relationship, Table Map, or Column Map or, for Access only, a row from a table.Specify:
Y Display a confirmation prompt.
N Do not display a confirmation prompt.
Load Utility to UseFor Move and Archive. Select the load utility to use for a Load Process. (Site management mayestablish a default load utility and prevent modification.) If modifiable, specify:
--------------------------------- User Options --------------------------------Command ===> SCROLL ===> PAGE
Caps Mode On ===> N Y-Yes, N-NoConfirm on Deletes ===> N Y-Yes, N-NoLoad Utility to Use : D D-DB2, B-BMCSubmit Jobs with END ===> Y Y-Yes, N-NoDisplay DB2 SubSystem ===> N Y-Yes, N-NoSelection List Format ===> S S-Short, F-Full, D-DescData Set Prefix ===> USERID PREFIX, USERID, NONE or valueUser Supplied Password ===> Enable Administrator Mode
Change Line Characters ===> N Y-Yes, N-NoPrint Tables in JCL ===> N Y-Yes, N-NoAlways Display Create ===> U A-Always, U-Unknown tableUse DB2 LOB Defaults ===> N Y-Yes, N-NoCheck Create Table Chg ===> N Y-Yes, N-NoDisplay GDG Level ===> A A-Absolute, R-RelativeDel LOAD work DSN RC=4 ===> N Y-Yes, N-NoLoad when Zero Rows ===> N Y-Yes, N-NoGenerate TYPRUN=HOLD ===> N Y-Yes, N-NoGenerate Multi-Job DSN ===> Y Y-Yes, N-NoDisplay UDT Name ===> N Y-Yes, N-NoAD Default Creator ID ===> S P-Profile, S-SQLIDReview Job Card ===> N Y-Yes, N-NoStage Centera File ===> Y Y-Yes, N-NoStorage Recall Processing ===> P P-Prompt,A-Auto,B-AbortIgnore Generic Rels : N N-Never,A-Always,S-SameCIDMax Selection List Entry ===> 16384 1-32767Specify Unit Parameters ===> N Y-Yes, N-NoDefer Auth-Chk for Batch ===> Y Y-Yes, N-NoRelationship Processing ===> B D-DB2,P-OPT,B-Both,R-PromptKey Lookup Limit Default ===> 1 1-100Allow Mismatched CCSIDs ===> N Y-Yes, N-NoAllow Empty Tables RC=4 ===> N Y-Yes, N-NoNo Rows Found RC=4 ===> Y Y-Yes, N-NoZero Rows Deleted RC=4 ===> N Y-Yes, N-NoDelete Failures RC=4 ===> N Y-Yes, N-No
Figure 171. User Options
Chapter 11. Options 319

D Use the DB2 Load utility.
B Use the BMC LOADPLUS utility.
Submit Jobs with ENDFor Move, Compare, and Archive. Default method of submission for batch jobs when reviewingthe JCL and Batch Utility control statements. Specify:
Y User can submit job using END.
N User cannot submit job using END, and must use the SUBMIT command to submit thejob.
A message, displayed with the JCL and control statements, indicates whether to use END or theSUBMIT command to submit the job.
Display DB2 SubSystemOption for displaying the name of the current DB2 subsystem in the upper right corner of Optimpanels. Specify:
Y Display the DB2 subsystem on every panel.
N Do not display the DB2 subsystem on every panel, but only on the main menus, where itcan be changed.
If connected to a remote subsystem, the location of the remote subsystem is displayed instead.
Selection List FormatInformation presented on a selection list of Optim objects (e.g., Access Definitions, Table Maps,Column Maps, Relationships, Primary Keys, Legacy Tables, etc.). Specify:
S Short format (i.e., the object name and modification information). (This format is usedthroughout the Optim documentation.)
D Object name and description only.
F Full format (i.e., object name and modification information on the first line, and thedescription and the security status (if other than PUBLIC) on the second line. (See“Specify Description and Security Status” on page 325 for information about securitystatus.)
Data Set PrefixThe value used as the default high order qualifier for any data set name that is not enclosed insingle quotes. Specify:v PREFIX (or PRFX)
The TSO Prefix for the current user.v USERID (or USER)
The TSO ID for the current user.v NONE
No prefix. (The data set name or pattern is accepted exactly as entered, whether or notenclosed in single quotes.)
v valueAn explicit 1- to 17-character value. This value can be a combination of PREFIX, USERID, anda literal.
User Supplied PasswordPrompt for the Administrator Password. If the proper password is entered correctly, the currentuser can access the Site Options panel.
320 IBM InfoSphere Optim for DB2 for z/OS: Common Elements

Change Line CharactersCharacters used to define the perimeter of pop-up windows. (Site management can set thedefault characters, which users can override.) Specify:
Y Display the User Line Drawing Characters panel to specify characters. (For information,see “User Line Drawing Characters” on page 324.)
N Do not display the User Line Drawing Characters panel.
Print Tables in JCLFor Move and Archive. Option to list tables that participate in a batch process, as comments inthe JCL. The list of tables is displayed when you review JCL and control statements beforesubmitting a job, or when you browse the saved JCL and control statements. Specify:
Y Display the Print Tables in JCL panel, which prompts you for the processes for whichtables are printed in the JCL. (For information, see “Print Tables in JCL” on page 325.)
N Do not print tables in the JCL (default).
Always Display CreateFor Move and Archive. Default behavior for displaying the CREATE Object List panel. Specify:
A Always display the CREATE Object List panel, regardless of table status.
U Display the CREATE Object List panel only when a table is in Unknown status (default).
Use DB2 LOB DefaultsFor Move and Archive. Tablespace for Large Objects (LOBs) when the Create Process generates anauxiliary table. (This option is available only if enabled by a Site Option.) Specify:
Y Use DB2 default LOB tablespace.
N User explicitly creates a tablespace for LOBs (default).
Check Create Table ChgFor Move and Archive. Default status displayed on the CREATE Object List panel if a destinationtable definition is altered before executing the Create Process. Specify:
Y Display the CHANGED status.
N Display the EXISTS status (default).
Display GDG LevelDisplay of GDG Level. Specify:
A Absolute (default)
R Relative
Del LOAD work DSN RC=4For Move and Archive. Action taken if the LOAD operation return code is 4. Specify:
Y Delete the data set name.
N Do not delete the data set name (default).
Load when Zero RowsFor Move and Archive. Action taken when the Load Process will insert no rows. Specify:
Y Perform the Load Process.
N Do not perform the Load Process (default).
On the Specify LOAD Parameters and Execute panel, if Delete all rows in tablespace=Y, anytables in the input file with zero rows will be included in the Load Process, regardless of theLoad when Zero Rows value.
Chapter 11. Options 321

Generate TYPRUN=HOLDFor Move and Archive. Option to include the TYPRUN=HOLD statement in JCL generated for amulti-step Load Process that requires multiple jobs. (See the following Generate Multi-Job DSNoption.) Specify:
Y Include TYPRUN=HOLD in the JCL (default).
N Do not include TYPRUN=HOLD in the JCL.
Generate Multi-Job DSNFor Move and Archive. If the number of job steps in the Load Process exceeds 256, Optimautomatically splits the process into multiple jobs. These jobs must be executed in the propersequence to maintain the system-determined order. Specify:
Y Include the DD statement PSDFFLAG in the batch process (default). PSDFFLAG containsinformation used to maintain the correct processing sequence.
N Do not include PSDFFLAG. The user must submit the jobs manually, in the correctsequence.
Display UDT NameOption for display of user-defined type (UDT) names. Specify:
Y Display the UDT name in addition to the base type name.
N Display only the base type name (default).
AD Default Creator IDThe default Creator ID (CID) displayed in the Access Definition Editor. Specify:
P Display the most recently used (i.e., profiled) Creator ID as the CID.
S Display the SQLID of the current user as the CID (default).
Review Job CardFor Move, Compare, and Archive. Option to display the Job Card and Print Options panel, toreview or change the job statement or other job parameters before submitting a batch job. (See“Job Card and Print Options” on page 331.) Specify:
Y Display the Job Card and Print Options panel.
N Do not display the Job Card and Print Options panel.
Stage Centera FileFor Archive only. Option for recalling an Archive File in its entirety or in 2 MB stages.
Y Recall the Archive File in stages (default).
N Recall the Archive File in its entirety.
Storage Recall ProcessingFor Archive only. Determine how Archive Files are managed when recalled from external storage(e.g., Centera or Tivoli® Server) through Archive processing (e.g., browse or restore). Specify:
P An allocation panel is displayed when a recall of the Archive File is attempted.
A The Archive File is automatically recalled to the original location, with no userintervention.
B If the original Archive File does not exist, the request is aborted.
Note: This option is available if the Recall Processing option on Storage Site Options is set to U.See Specifying Storage Options in the Customization Guide for more information.
Ignore Generic RelsOption for ignoring generic relationships to increase performance. Specify:
322 IBM InfoSphere Optim for DB2 for z/OS: Common Elements

N Use generic relationships to retrieve data from related tables.
A Do not use generic relationships to retrieve data.
S Use generic relationships to retrieve data, only if the Creator ID is the same for both theparent and child tables.
Note: This option is available if the Ignore Generic Rels option in Site Options is set to U. SeeCustomize the Optim Site Options in the Customization Guide for more information.
Max Selection List EntryThe maximum number of items that can be selected by a user from a selection list. Specify anumber from 1 to 32767.
Specify Unit ParametersFor Move and Archive. Option to provide default volume information that can be used whenallocating Optim-generated files that span multiple volumes.
Y Display the File Unit Parameters panel to prompt for unit, volume number, and one tosix volume serial numbers. (For information, see “File Unit Parameters” on page 326.)
N Do not display the File Unit Parameters panel.
Defer Auth-Chk for BatchTiming of authorization checks on objects when creating JCL and Batch Utility control statementsfor batch Extract and Archive Processes.
Note: This option is available if the Defer Auth-Check for Batch Site Option is set to U. SeeCustomize the Optim Site Options in the Customization Guide for more information.
Y Defer authorization checks.
N Do not defer authorization checks.
Relationship ProcessingFor Move and Archive. Type of relationships processed when the GET TABLES RELATEDcommand is issued from the Select Tables/Views for AD panel.
D Process DB2 relationships only.
P Process Optim relationships only.
B Process both DB2 and Optim relationships.
R Display the Get Related Processing Options panel, which allows you to select therelationship type.
Key Lookup Limit DefaultDefault value for the maximum number of key lookups performed at one time for a table. Thisvalue is used whenever a key lookup is the access method used to scan a table and no specifickey lookup limit is specified. Valid values are 1 through 100.
For more information, see “Key Lookup Limit” on page 343.
Allow Mismatched CCSIDsControls the action Optim should take if the Coded Character Set Identifier (CCSID) of a sourcecolumn does not match the CCSID of a target column, or the terminal CCSID does not match thatof the DB2 subsystem.
Note: This option is available if the Allow Mismatched CCSIDs Site Option is set to U. SeeCustomize the Optim Site Options in the Customization Guide for more information.
Y Allow the Optim process to continue despite the mismatched CCSIDs if the user choosesto proceed. (The process may fail if the CCSIDs are not compatible.)
Chapter 11. Options 323

N Terminate the Optim process when mismatched CCSIDs are detected (default).
Allow Empty Tables RC=4Indicate the action taken and return code (RC) setting when empty tables have been detectedduring Insert, Restore, Delete, or Load batch processing.
Y Restore/Insert - Empty tables will be processed and a warning message will be issuedwith RC=4. Delete/Load - Empty tables will be processed and processing will end withRC=4.
N Restore/Insert - Empty tables will cause termination with an error and RC=12. Load -Empty tables will be processed and processing will end with RC=0. Delete - Empty tableswill be ignored and processing will end with RC=0. (Default)
No Rows Found RC=4Indicate the action taken and return code (RC) setting when no rows meet the selection criteriaduring Restore or Subset batch processing or when rows have not been found during Deletebatch processing.
Y The program will end with RC=4 (default).
N The program will end with RC=0.
Zero Rows Deleted RC=4Indicate the action taken and return code (RC) setting during Delete batch processing when atable has rows in an Archive File or Extract File but no rows have been deleted. Possible reasonsincludev The rows cannot be deleted because there are no matching rows in DB2 tablesv A condition existed that prevented it (for example, a violation of Referential Integrity would
occur).
Y Processing will end with RC=4.
N Processing will end with RC=0 (default).
Delete Failures RC=4Indicate the action taken and return code (RC) setting when some rows of a table have failed tobe deleted because a condition existed that prevented it (for example, a violation of ReferentialIntegrity would occur).
Y Processing will end with RC=4.
N Processing will end with RC=0 (default).
Resolve DB2 Rel ChangeFor batch execution of extract and archive processes, determines whether Optim rebuilds any DB2relationship if the columns in the relationship have changed since the time when the relationshipwas originally defined.
Note: This option is available if the Resolve DB2 Rel Change Site Option is set to U. SeeCustomize the Optim Site Options in the Customization Guide for more information.Specify:
Y Yes. Rebuild a DB2 relationship if the columns have changed.
N No. Do not rebuild a DB2 relationship if the columns have changed. If an extract orarchive process encounters a relationship with columns that have changed, it will failwith a return code of 12. This is the default.
User Line Drawing CharactersIf you enter Yes for the Change Line Characters option, the User Line Drawing Characters panel isdisplayed.
324 IBM InfoSphere Optim for DB2 for z/OS: Common Elements

This panel allows you to indicate the characters used to draw borders around pop-up windows, and toreplace certain line characters. You can enter any displayable character for any position or character. Sitemanagement sets the default characters. To reset any value to the site default, leave an entry blank. (Onlyoverrides to the default characters are displayed.) When you have completed this panel, press ENTER oruse END to return to the User Options panel.
Print Tables in JCLIf you enter Yes for the Print Tables in JCL option, the following panel is displayed.
This panel allows you to select processes for which tables in the JCL are printed. For each process, youcan specify:
Y Print the relevant tables in the JCL.
N Do not print the tables in the JCL (default).
Note: When you return to the User Options panel, the Print Tables in JCL value is displayed as N, butthe option will work as specified.
Specify Description and Security StatusWhile the setting for Selection List Format governs whether the description and security status aredisplayed on a selection list of Optim objects, you must use the ATTRIBUTES command from the objecteditor or the AT line command on the selection list to modify these values.
The prompts are displayed on the Object Attributes panel. In the following figure, the attributes for anAccess Definition named FOPDEMO.TEST.SAMPLE are displayed.
------------------------ User Line Drawing Characters -------------------------Command ===> SCROLL ===> PAGE
Top Left Corner ===> Any Displayable CharacterTop Right Corner ===> Any Displayable CharacterBottom Left Corner ===> Any Displayable CharacterBottom Right Corner ===> Any Displayable CharacterHorizontal Bar ===> Any Displayable CharacterVertical Bar ===> Any Displayable CharacterForward Slash ===> Any Displayable CharacterBackward Slash ===> Any Displayable Character
Figure 172. User Line Drawing Characters
---------------------------- Print Tables in JCL ------------------------------Command ===> SCROLL ===> PAGE
Extract Process ===> N Y-Yes, N-NoArchive Process ===> N Y-Yes, N-NoInsert Process ===> N Y-Yes, N-NoRestore Process ===> N Y-Yes, N-NoConvert Process ===> N Y-Yes, N-NoDelete Process ===> N Y-Yes, N-NoLoad Process ===> N Y-Yes, N-No
Figure 173. Print Tables in JCL
Chapter 11. Options 325

Panel
The name of the object is displayed. You can modify the following:
DescriptionA 1 to 40 character description of the object.
Security StatusAccess privileges for the named object as:
PUBLICAny user can access and edit the object.
PRIVATEOnly the user that created the object can access and edit the object.
READONLYAny user can access the object, but only the user who created the object can edit it.
Site management determines whether security status is available. If it is not available, SecurityStatus is not displayed.
File Unit ParametersIf you enter Yes for the Specify Unit Parameters option, the following panel is displayed.
------------------------- Select Access Definitions ---------------------------Command ===> Scroll ===> PAGE
Line Cmds: S-Select, D-Delete, C-Copy, R-Rename, AT-Attr, I-Info 1 OF 8
+------------------------Object Attributes-----------------------+Cmd ¦ ¦--- ¦ Object Name: FOPDEMO.TEST.SAMPLE ¦
¦ ¦ ***___ ¦ Modify the attributes below as needed. ¦___ ¦ ¦
¦ Description ===> ¦AT_ ¦ ¦___ ¦ Security Status ===> PUBLIC (PUBLIC, PRIVATE, READONLY) ¦___ ¦ ¦
¦ Use END command to accept any changes and return. ¦¦ Use CANCEL command to ignore any changes and return. ¦¦ ¦+----------------------------------------------------------------+
Figure 174. Object Attributes
326 IBM InfoSphere Optim for DB2 for z/OS: Common Elements

The File Unit Parameters panel allows you to provide information that generated files use to allocate newdata sets. You can specify information for multiple volumes as a default and individually for specific filetypes (e.g., Archive, Control, Extract, or Load Files).
Optim allocates the data set on the first volume with available space. If the data set does not fit on asingle volume, additional space is allocated on the next volume with available space.
File TypeThe Optim file type for which the data set is to be allocated.
DefaultVolume information for allocating data sets for Optim file types not listed (such as,Point-and-Shoot Files).
Additionally, if you do not specify volume information for an individual file type listed on thepanel, the default volume information is used.
ArchiveVolume information for allocating data sets for Archive Files, as well as Subset ExtractFiles.
ExtractVolume information for allocating data sets for Extract Files.
ControlVolume information for allocating data sets for Control Files.
Load Volume information for allocating data sets for Load files.
Unit NameThe 1 to 8 character name of a group of devices, such as TAPE, SYSDA, or SYSALLDA. Consultsite management to obtain a valid list of names for your installation. If a unit name is notspecified, the default unit is used.
Nbr VolsThe maximum number of volume serials the data set may span.
---------------------------- File Unit Parameters -----------------------------Command ===> Scroll ===> PAGE
Enter values for each file type as required. You may specify either thenumber of volumes or the volume serial(s) for each file type, but not both.Values specified on the defaults line are used when the corresponding valuesfor the type of file being allocated are omitted.
File Unit NbrType Name Vols Volume Serial(s)------- -------- ---- -----------------------------------------------------Default > > > > > >
Archive > > > > > >
Extract > > > > > >
Control > > > > > >
Load > > > > > >
Maximum DASD Tracks ===> In Range (16695 - 65535)
Press END to return and apply any changes.Press CANCEL to return without applying any changes.
Figure 175. File Unit Parameters
Chapter 11. Options 327

Volume Serial(s)Up to six specific volume serial numbers to be used for allocating data sets.
Note: You can enter the number of volumes or the volume serial, but not both.
Maximum DASD TracksThe maximum number of tracks allowed to be allocated for a data set on a DASD device. Specifya value in the range 16695 to 65535. Consult with site management before entering a value.
For more information about allocating data sets, see Appendix B, “Allocating External Files,” on page 365.
Editor and Display OptionsA set of editor and display options are available. When you select Option 2 from the Choose OptionType menu, the Editor and Display Options panel is displayed.
Panel
The editor and display options apply to all Optim components, unless otherwise indicated. They include:
NULL Value IndicatorThe character used to represent the null value. Specify one of the following characters:
? ! & % # @
The NULL Value Indicator must be different from the DB2 VarChar Delimiter. The defaultcharacter is question mark (?).
DB2 VarChar DelimiterThe character used to delimit the end of a variable-length character string when trailing blanksare to be retained. Specify one of the following characters:
; : ? ! & % # @
The DB2 VarChar Delimiter must be different from the NULL Value Indicator. The defaultcharacter is the semicolon (;).
------------------------ Editor and Display Options ----------------------Command ===>
NULL Value Indicator ===> ? ?,!,&,%,#,@DB2 VarChar Delimiter ===> ; ;,:,?,!,&,%,#,@AutoCommit Mode ===> A A-Automatic, M-ManualDeleted Rows Display ===> S S-Show, H-HideAudit Mode : OFF Forced OFFMaximum Fetch Rows ===> 1000 In Range (1 - 100000)Display Column Attributes ===> N Y-Yes, N-NoDisplay Data in Hex ===> N Y-Yes, N-NoEditor Display Format ===> C C-Columnar, S-SidelabelsColumnar Max Display Width ===> 20 In Range (2 - 70)Sidelabel Max Display Width ===> 50 In Range (50 - 32767)Columnar LOB Display Width ===> 15 In Range (2 - 70)User Supplies Defaults ===> N Y-Yes, N-NoNULL as Insert Default ===> N Y-Yes, N-NoEditor Exit Processing ===> E E-Entry Panel, P-Prompt PanelENTER Exits Criteria Panels ===> A A-Always, N-Never, U-UnchangedAutoSwitch Mode ===> Y Y-Yes, N-NoSelCrit w/Self Ref Rel ===> Y Y-Yes, N-NoSingle View Mode ===> N Y-Yes, N-No
Figure 176. Editor and Display Options
328 IBM InfoSphere Optim for DB2 for z/OS: Common Elements

For example, if the string “ABC ” is entered in a variable-length character field, it is retained as“ABC” unless a delimiter is used to indicate otherwise. If the delimiter character is “;”, the stringentered as “ABC ;” is retained as “ABC ”.
AutoCommit ModeFor Access only. Mode for committing changes to the database. Specify:
A AutoCommit (default). Changes to the data are automatically committed to the databaseevery time you press a program function key or ENTER.
M Manual. You must use the COMMIT command to commit database changes.
You can use the AUTOCOMMIT command during a session to change this option.
Deleted Rows DisplayFor Access only. Indicator for displaying deleted rows when editing data. Specify:
S Show deleted rows. (The D, Delete, status flag indicates deleted rows.)
H Hide deleted rows.
You can use the SHOW and HIDE commands to override this option during an edit session.
Audit ModeFor Access only. Indicator for the Audit facility during an edit session. (Site management mayforce this option to ON or OFF, and prevent its modification. If so, ON indicates the Audit facilityis active for all users; OFF indicates that the Audit facility is not active for all users.) Ifmodifiable, specify:
Y Activate the Audit facility.
N Deactivate the Audit facility.
Maximum Fetch RowsThe maximum number of rows that can be obtained from one table at one time during a session.This value can be from 1 to the site-defined maximum. The figure shows the distributed defaultmaximum, 1000 rows. (This value may be different at your site.)
You can use the MAX FETCH ROWS command to modify this value for the current edit, browse,or Point-and-Shoot session and refetch all data.
Note: This limit does not apply during a Compare File browse session. See “Compare Options”on page 333.
Display Column AttributesIndicator for the display of column attributes (data type, length, and nullability). Specify:
Y Display attributes below each column heading in columnar display, or to the left of eachcolumn heading in sidelabels display.
N Do not display attributes.
You can use the ATTRIBUTES command during the session to toggle the display of columnattributes.
Display Data in HexIndicator for display of hexadecimal data. Specify:
Y Display in hexadecimal format. Each line of text character data requires three displaylines: one for text characters and two for the corresponding hexadecimal values.
N Display text characters only.
Chapter 11. Options 329

You can use the HEX command during the session to toggle the display of hexadecimal format.
Editor Display FormatIndicates the panel display format for the data. Specify:
C Display data in columnar format. (Column headings are arranged horizontally, withmultiple rows of data displayed beneath.)
S Display data in sidelabels format. (Column headings are arranged down the left side ofthe panel, and one row of data is displayed at a time.)
During the session, you can use the SIDELABELS command to toggle between columnar andsidelabels format.
Columnar Max Display WidthThe maximum number of characters (from 2 through 70) per column that are displayed incolumnar format. This value does not affect the actual data in the column, but may truncate thedisplay.
Note: To edit a column, all data must be displayed. Specify a maximum display width that isgreater than or equal to the length of data in the column, or use the EXPAND command todisplay the entire column.
Sidelabel Max Display WidthThe maximum number of characters (from 50 through 32767) per column that are displayed insidelabels format. This value does not affect the actual data in the column, but may truncate thedisplay.
Note: To edit a column, all data must be displayed. Specify a maximum display width that isgreater than or equal to the data length of the column, or use the EXPAND command to displaythe entire column.
Columnar LOB Display WidthThe maximum number of characters (from 2 through 70) displayed for an LOB column. Thissetting does not affect the actual data in the column, but may truncate the display.
User Supplies DefaultsFor Access only. Source of default values for columns defined to DB2 without a default value.(Site management may force this option to Yes or No, and prevent its modification.) If modifiable,specify:
Y User must supply values for every column that cannot receive a default.
N Access supplies default values, based on the column data type, including blank, zero,current date, current time, and current timestamp.
NULL as Insert DefaultFor Access only. Default handling of blank nullable columns when inserting a row. (Sitemanagement may force this option to Yes or No, and prevent its modification.) Specify:
Y Nullable columns default to the NULL value.
N Access supplies default values (other than NULL), based on the column data type,including blank, zero, current date, current time, and current timestamp.
Editor Exit ProcessingFor Access only. Default behavior when END is used to terminate an edit or browse session.Specify:
E Display the panel from which the session was invoked. This panel may be the DescribeColumns panel, the Specify Selection Criteria panel, or the SQL WHERE Clause panel.
330 IBM InfoSphere Optim for DB2 for z/OS: Common Elements

P Display the prompt panel with which the session was initially begun. This panel may bea Choose panel or a selection list.
ENTER Exits Criteria PanelsFor Access only. Action taken when the ENTER key is used to exit the Specify Selection Criteriapanel, the SQL WHERE Clause panel, and the Describe Columns panel during an edit or browsesession. Specify:
A ENTER or END exits the panel, unless errors are detected (default).
N ENTER never exits the panel; only END exits the panel.
U ENTER exits the panel if values are not changed. If values are changed, END exits thepanel.
AutoSwitch ModeFor Access only. AutoSwitch mode for multi-way joining during an edit or browse session.Specify:
Y AutoSwitch mode. When scrolling a table that is joined to two or more lower-level tablesin a stack and the currently displayed lower-level table has no related rows, the first tablein the stack that has at least one related row is displayed instead.
N No AutoSwitch mode (default). If the lower-level table has no related rows, do not switchto another table in the stack.
SelCrit w/Self Ref RelFor Access only. Application of selection criteria when a table is self-referenced while browsing orediting data. Specify:
Y Apply any selection criteria each time the table is referenced. (This setting is the defaultAccess Definition parameters setting.)
N Apply selection criteria to the table the first time it is accessed, but not when the table isself-referenced.
Single View ModeFor Access only. Indicator for joining views when browsing and editing data. Specify:
Y Views cannot be joined.
N Views can be joined (default).
Browsing and editing views in single view mode is faster and more efficient because relationshipprocessing is bypassed. However, joining is required to display or edit a segment of related data.(You cannot modify this option from an edit or browse session.)
Job Card and Print OptionsThe Job Card and Print Options panel determines several user-specific parameters that govern batchexecution.
When you select Option 3 from the Choose Option Type menu or when you enter Yes at the Review JobCard prompt on the User Options panel, the following panel is displayed. The information displayed onthe panel is initially set to the user specifications for ISPF option 0 (select option 2 from the Log/ListMenu).
Chapter 11. Options 331

Panel
The job card and print options apply to Move, Compare and Archive, and include the followingparameters.
Job StatementThe default job statement for batch jobs. Type a valid job statement of up to five lines of 66characters each. The first line must be in the form:
//name JOB
where name is the job name.
Report TypeIndicate the type of report output generated. Type:v D to write the report to a dataset.v S to route the report to SYSOUT.
If Data Set: DSNSpecify the name of the dataset to receive the report. Type the name of a sequential file.
If Data Set: DispositionSpecify the disposition of the dataset. Type:v M to append the new report to existing data.v O to overwrite existing data with the new report.
If SYSOUT: SYSOUT CLASSSpecify the SYSOUT class. Type:v A-Z for any alphabetic character.v 0-9 for any numeric character.v * (an asterisk) to use the msgclass for the job.
If SYSOUT: DestinationSpecify the destination of the SYSOUT file.
If SYSOUT: HoldIndicate the hold job output status. Type:v Y to hold the SYSOUT file for online viewing.
----------------------- Job Card and Print Options ----------------------------Command ===> SCROLL ===> PAGE
Job Statement:===> //SPECHTR JOB ’ACCT-INFO’,MSGCLASS=8,CLASS=6,===> // NOTIFY=SPECHTR===>===>===>
Report Parameters:Report Type ===> D D-Dataset, S-SYSOUTIf Dataset: DSN ===> FOP.PRINT
Disposition ===> M M-Mod, O-OldIf SYSOUT: SYSOUT Class ===> * A - Z, 0 - 9, *
Destination ===> LOCALHold ===> Y Y-Yes, N-No
Job Changes Permanent ===> N Y-Yes, N-No
Figure 177. Job Card and Print Options
332 IBM InfoSphere Optim for DB2 for z/OS: Common Elements

v N to indicate the SYSOUT file is available for printing when execution is complete.
If not specified, the site default is used.
Job Changes PermanentIndicate whether the job changes are permanent. Type:v Y if the job changes are permanent.v N to if the job changes are not permanent.
Job Card Profiled
The job card information is profiled. If no information is profiled, the job card is filled in with ISPFvariables, set from ISPF option 0 (then select option 4 from the Log/List Menu). Use the RESETcommand to reset the job card to these original values.
Note: If the profiled information exceeds the display width of 66 characters, it is truncated.
Compare OptionsThe compare options determine several user-specific parameters that govern the Compare Process. Whenyou select Option 4 from the Choose Option Type menu, the Compare Options panel is displayed.
Panel
The compare options apply to Compare, and include:
Source Flags DisplayOption to display the “12” source flag for equal rows, while browsing the Compare File. Specify:
D Display the source flag.
B Do not display the source flag. (Src is blank for equal rows.)
Maximum Fetch RowsThe maximum number of rows that can be obtained from one table at one time when browsing aCompare File. Specify a value from 1 through the site-defined maximum. (The possible range ofvalues is displayed on the panel.)
Display Unused ColsOption to display unused columns in Compare Browse or the Compare File Report. Unusedcolumns are specified in a Column Map used with the Compare Process. Specify:
Y Display unused columns.
N Do not display unused columns.
------------------------------ Compare Options --------------------------------Command ===> SCROLL ===> PAGE
Source Flags Display ===> D D-Display, B-BlankMaximum Fetch Rows ===> 100000 In Range (1 - 2000000000)Display Unused Cols ===> Y Y-Yes, N-No
Figure 178. Compare Options
Chapter 11. Options 333

Archive OptionsSeveral options are provided for archive and restore processing. When you select Option 5 from theChoose Option Type menu, the following panel is displayed.
Panel
The archive options apply to Archive, and include:
Sort Archive List byThe default column for sorting Archive Directory entries listed on the Archive Files panel.Specify:
1 Date
2 User
3 File Name
4 Group
5 Description
Default Sort SequenceThe default sequence for sorting Archive Directory entries listed on the Archive Files panel.Specify:
A List in ascending order, according to the value in the Sort Archive List by column.
D List in descending order, according to the value in the Sort Archive List by column.
Display Detail ModeThe default setting for Optim Directory entries listed on the Archive Files panel. Specify:
Y List each entry in two-line detail mode. Display the Date, File Name, Group, and Unit onthe first line, and the User, Description, and Security on the second line.
N List each entry in single-line mode to display only the Date, File Name, Group, and Unit.
Share Search in ListOption to retain criteria for searching, browsing, or restoring data from the Archive Files for usewith subsequent commands. Specify:
Y Retain criteria specified on the Archive Selection Criteria – Columns panel and displayeach time a Search, Browse, or Restore line command invokes the Archive Search Criteria– Columns panel from the Archive Files panel.
N Always display the Archive Selection Criteria – Columns panel without previouslyspecified criteria.
------------------------------ Archive Options --------------------------------Command ===> SCROLL ===> PAGE
Sort Archive List by ===> 1 1-Date, 2-User, 3-Name, 4-Grp, 5-DescDefault Sort Sequence ===> D A-Ascending, D-DescendingDisplay Detail Mode ===> Y Y-Yes, N-NoShare Search in List ===> Y Y-Yes, N-NoDual Archive File Output ===> Y Y-Yes, N-NoDefault DAA Table in TM ===> Y Y-Yes, N-NoRestore Table Change ===> N N-None, I-Info, F-FailReplace Archive Dir ===> Y Y-Yes, N-No
Figure 179. Archive Options
334 IBM InfoSphere Optim for DB2 for z/OS: Common Elements

Dual Archive OutputOption to write an Archive File to more than one output. Specify:
Y Write Archive File to more than one output.
N Do not write Archive File to more than one output.
Default DAA Table in TMOption for populating destination table names in the Table Map editor. Specify:
Y Populate with names of tables for which Delete After Archive was specified in the AccessDefinition when data was archived.
N Populate with names of all tables in the Archive File.
Restore Table ChangeAction taken when a table targeted for restoration is different from the table used to create theArchive File. Specify:
N No action is taken; the Restore Process proceeds.
I Display an informational message.
F The Restore Process fails.
Replace Archive DirOption for batch processing when an entry for the Archive File already exists. (This option isavailable only if enabled by a Site Option.) Specify:
Y Proceed with the Archive Process, replacing the Archive File entry in the ArchiveDirectory (default).
N Halt the Archive Process with an error message.
Legacy OptionsThe Legacy options apply when creating Legacy Tables needed to apply Move or Compare processes tolegacy data. When you select Option 6 from the Choose Option Type menu, the Legacy Options panel isdisplayed.
Panel
The Legacy options apply to Optim Legacy, and include:
Default Libraries: CopybookThe name of the Default Library for copybooks used to create Legacy Tables. You can enter thefully qualified name by enclosing it in single quotes. Or you can specify a pattern, using * or %,to request a selection list of copybook data sets.
----------------------------------- Legacy Options ----------------------------Command ===> SCROLL ===> PAGE
Default Libraries:Copybook ===>
PL/I Source Margins:From ===> 2 In Range (1 - 100), Default value is 2To ===> 72 In Range (1 - 100), Default value is 72
Legacy Data Attributes:MIXED DATA : N (Y-Yes, N-No)EBCDIC CCSID : 0 In Range (1 - 65533)
Detect ISO keywords : N (Y-Yes, N-No)
Figure 180. Legacy Options
Chapter 11. Options 335

PL/I Source Margins:The location of the PL/I statement within a source record. Specify:
From A value from 1 through 100. The default value is 2.
To A value from 1 through 100. The default value is 72.
Legacy Data AttributesThe Legacy Data Attributes apply to all legacy data processed by Optim. They must be set toappropriate values before creating a definition for a Legacy Table.
Note: The values can only be updated if the Legacy MIXED DATA site option has been set to 'U'.
MIXED DATASpecifies whether the code points X'0E' and X'0F' have special meaning as the shift-out andshift-in controls for double-byte character strings in Legacy data.
Y Indicates that these code points have the special meaning. Therefore, character strings canbe either single-byte character set (SBCS) or MIXED data. The CCSID that is specified inthe Legacy EBCDIC CCSID field must be the mixed CCSID for the encoding scheme.Using this value, Optim determines the associated SBCS and double-byte character set(DBCS) CCSIDs for the encoding scheme.
N Indicates that these code points have no special meaning. Therefore, all character stringsin Legacy data processed by Optim are SBCS data.
EBCDIC CCSIDSpecifies the default CCSID for EBCDIC-encoded character data that is stored in your Legacydata. Acceptable values for this field are in the range of 1 - 65533.
Note: If Legacy MIXED DATA is set to 'Y', you must specify a valid mixed CCSID value.
Detect ISO keywordsSpecifies whether Optim looks for the $$FOPDAT, $$FOPTIM, $$FOPSTP keywords when parsingcopybooks to build Legacy Table definitions.
Y Optim looks for the $$FOPxxx keywords when parsing copybooks. The $$FOPDAT,$$FOPTIM, and $$FOPSTP Optim keywords can be included within copybook comments.The comment must appear on the line directly before the related field definition. The$$FOPxxx keyword must be separated by spaces from other text in the comment line.
The $$FOPxxx keywords indicate that the field following the comment is in ISO DATE,TIME, or TIMESTAMP format. When Optim finds the $$FOPxxx keyword, it sets thefollowing field to the appropriate DAT, TIM, or STP type in the Legacy Table definition.For COBOL, the field must be defined as alphanumeric. For PL/I, the field must bedefined as character. The field must also adhere to the following rules.
$$FOPDAT - ISO DATE: The field must have a length of 10 and be defined inYYYY-MM-DD format.
$$FOPTIM - ISO TIME: The field must have a length of 8 and be defined in HH:MM:SSformat.
$$FOPSTP - ISO TIMESTAMP: The field must have a length of 26 and be defined inYYYY-MM-DD-HH.MM.SS.NNNNNN format.
The following example illustrates the $$FOPxxx keyword comments and related fielddefinitions in a COBOL copybook.
01 SAMPREC.02 CUSTNAME PIC X(80).
* $$FOPDAT02 SAMPLE-DATE PIC X(10).
336 IBM InfoSphere Optim for DB2 for z/OS: Common Elements

* $$FOPTIM02 SAMPLE-TIME PIC X(8).
* $$FOPSTP02 SAMPLE-TIMESTAMP PIC X(26).
N Optim does not look for the $$FOPxxx keywords when parsing copybooks (default).
Chapter 11. Options 337

338 IBM InfoSphere Optim for DB2 for z/OS: Common Elements

Chapter 12. Performance
You can configure Archive as well as your database so that Archive, Restore, and Delete Processing are asefficient as possible. The configuration strategy you choose depends on your needs and the constraints ofyour database processing. This chapter provides some general strategies that you can employ to meetyour specific performance needs.
These strategies are not intended to solve specific performance problems but are simply suggestions toaid your development of an archive strategy for your database, and can be tailored or even combined tofit your specific needs.
Note: This chapter focuses on methods and strategies that allow you to improve performance forArchive, Delete, and Restore Processing. You can employ these same strategies to improve the Compare,Extract, and Insert Processing of large numbers of rows.
Processing StrategiesThe following section describes strategies and tips to help you optimize processing. To help youdetermine the best strategy for your database, you can use the DB2 Performance Monitor to measureprocessing speed under different strategies. Once you decide on a strategy, you can fine-tune Archive andyour database to achieve the best results.
Note: Changes to your database that provide maximum optimization for Archive Processing may havenegative implications for your database application processing. You must determine for yourself thecombination of solutions that best suits the demands upon your particular database. In doing this, youshould consider Archive an important database application, and configure your database accordingly.
Speed Processing
The most basic archiving strategy applies a single Archive Process to as many rows as possible in theshortest period of time. Speed processing is typically performed during off-peak or maintenance hours toreduce (or eliminate) competition from other application processing. In cases where the database has nocompetition, you can remove any unnecessary constraints from the database and from Archive. Anotherway to enhance efficiency is to design the partitioning of your database tables so that you can access therows quicker. (For more information, see Partitioned Tables, below.)
To improve the performance of Delete Processing, you might remove any unnecessary indexes fromdatabase tables and, within Archive, you can disable row comparison and increase the commit frequency.
Running Multiple Processes
A more intricate strategy for processing rows during off-peak hours is to process as many rows aspossible using multiple processes, rather than a single process. Since Archive and Delete Processing islight on CPU usage, creating multiple requests to process data at one time may significantly increaseprocessing throughput.
The recommendations for this strategy are similar to those for the Speed Processing strategy. Additionally,for the Delete Process, you could disable row comparison and table locking and maximize the commitfrequency.
© Copyright IBM Corp. 1991, 2013 339

Data Integrity Processing
The previously listed strategies are designed to process rows during off-peak hours. However, if youmust process a significant number of rows, your off-peak window may be inadequate. Additionally, yourdatabase tables may be continuously updated, where a significant shut down of database access isdifficult to accommodate.
In this case, you can adopt a strategy in which a small number of rows are processed regularly duringnormal operating hours. The archiving and deleting of such a small number of rows should not affectother application processing. If you want to ensure database integrity during the Delete Process you wantto ensure that table locking and compare row contents are enabled.
Partitioned Tables
An additional way to increase the speed of Archive and Delete Processing is to divide your databasetables into partitions. Depending on the type of data in the tables, rows can be sorted by frequency ofaccess and age into the partitions. Since there is less I/O traffic to an infrequently used partition, thespeed of processing rows is increased. Additionally, you could more easily disable unnecessary databaseindexes for a partition that is used infrequently.
Performance ToolsArchive provides various features and tools to complement the processing strategies that you establish tobest enhance performance at your site. Using these features you can better diagnose and configureArchive and your database to more successfully process your database tables. These features arediscussed in this chapter.
Table AccessStrategy
Archive generally uses a key lookup when a DBMS index is available and a scan when an indexis not available. You can override the default strategy:
Note: If accessing a significant portion of the table, Archive will use a scan, even if an index isavailable.v For an Archive Process you can override the default method of accessing the parent or child
table for each relationship.v For a Delete or Restore Process, you can override the default method used to delete rows from
or restore rows to the database.
Key Lookup LimitWhen processing rows using a key lookup, Archive generally looks up one key at a time. You canspecify the maximum number of key lookups performed at one time for a table.v For an Archive Process, you can specify the maximum number of simultaneous key lookups (1
to 100) performed when processing rows from the parent and child tables.v For a Delete or Restore Process, you can specify the maximum number (1 to 100) of key
lookups performed at one time for a table.
Index AnalysisAnalyze DBMS indexes to process rows in the Access Definition or the Archive File, anddetermine if you need to create any indexes.
Table Access StrategyArchive allows you to modify the default method (scan or key lookup) used to access tables forprocessing. Additionally, for an Archive or Delete Process, if Key Lookup is the method used, you canspecify the maximum number of key lookups performed at one time.
340 IBM InfoSphere Optim for DB2 for z/OS: Common Elements

You can change the access strategy for an Archive, Delete, and Restore Process, from the followingpanels:
Specify Relationship Usage
From the Specify Relationship Usage panel, type ACM to display the Choose Access Method / KeyLookup Limit pop-up window.
The window displays all of the relationships in the Access Definition. You can override the default accessmethod and specify the maximum number of simultaneous key lookups used when archiving rows foreach relationship in the Access Definition.
Delete Rows from Archive Process
From the Delete Rows from Archive Process panel, type ACM to display the Specify Access Method andKey Lookup Limit pop-up window.
The window displays the names of all the tables in the Archive File. You can override the default accessmethod and specify the maximum number of simultaneous key lookups used when deleting rows foreach table in the Archive File.
+------------------ Choose Access Method / Key Lookup Limit -----------------+¦ 1 of 3 ¦¦ Access Method Values: ¦¦ K - Key Lookup Key ¦¦ S - Table Scan Access Lookup ¦¦ blank - Software Chooses Method Limit ¦¦ Rel ------------ ------------ ¦¦ Parent Table Child Table Name Parent Child Parent Child ¦¦ ------------------- ------------------- ------>> ------ ----- ------ ----- ¦¦ ********************************** TOP *********************************** ¦¦ FOPDEMO.CUSTOMERS FOPDEMO.ORDERS RCO ¦¦ FOPDEMO.ORDERS FOPDEMO.DETAILS ROD ¦¦ FOPDEMO.ITEMS FOPDEMO.DETAILS RID ¦¦ ******************************** BOTTOM ********************************** ¦+----------------------------------------------------------------------------+
Figure 181. Choose Access Method / Key Lookup Limit
+--- Choose Access Method/Key Lookup Limit --+¦ 1 of 4 ¦¦ Access Method Values: ¦¦ K - Key Lookup ¦¦ S - Table Scan ¦¦ blank - Software Chooses ¦¦ Key ¦¦ Access Lookup ¦¦ Table Names In Archive File Method Limit ¦¦ --------------------------- ------ ------ ¦¦ ****************** TOP ******************** ¦¦ FOPDEMO.CUSTOMERS ¦¦ FOPDEMO.DETAILS ¦¦ FOPDEMO.ORDERS ¦¦ FOPDEMO.ITEMS ¦¦ **************** BOTTOM ******************* ¦+---------------------------------------------+
Figure 182. Choose Method/Limit - Delete Process
Chapter 12. Performance 341
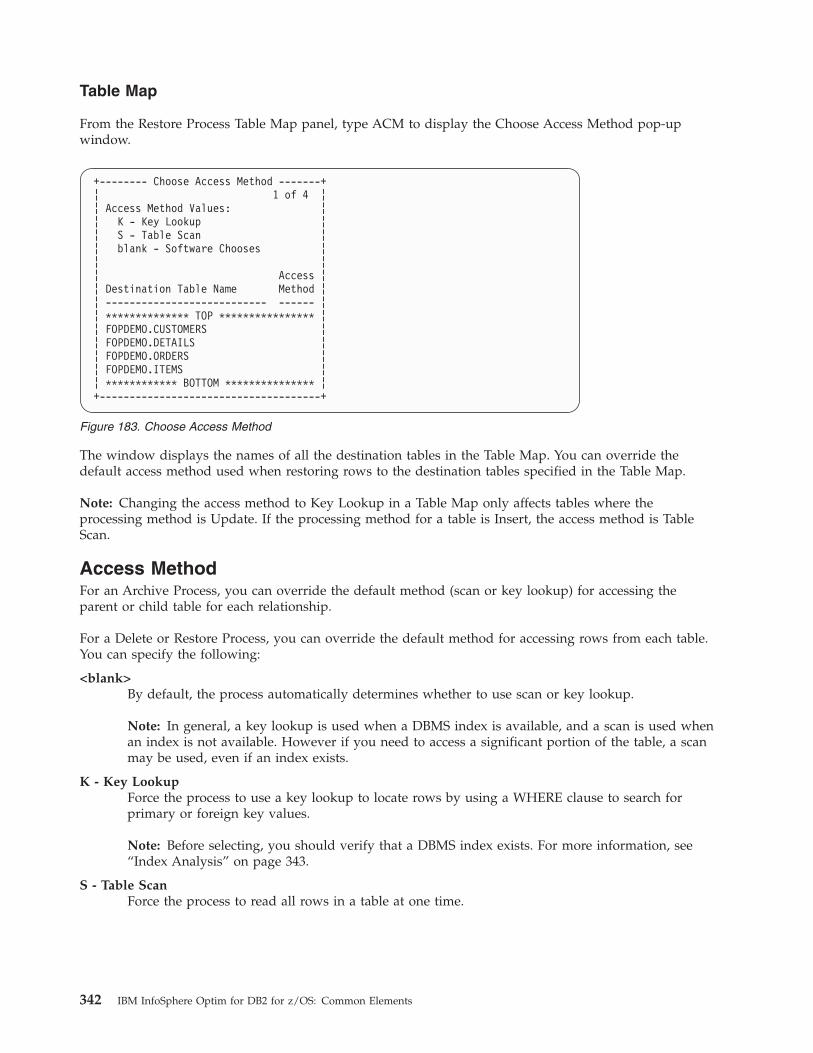
Table Map
From the Restore Process Table Map panel, type ACM to display the Choose Access Method pop-upwindow.
The window displays the names of all the destination tables in the Table Map. You can override thedefault access method used when restoring rows to the destination tables specified in the Table Map.
Note: Changing the access method to Key Lookup in a Table Map only affects tables where theprocessing method is Update. If the processing method for a table is Insert, the access method is TableScan.
Access MethodFor an Archive Process, you can override the default method (scan or key lookup) for accessing theparent or child table for each relationship.
For a Delete or Restore Process, you can override the default method for accessing rows from each table.You can specify the following:
<blank>By default, the process automatically determines whether to use scan or key lookup.
Note: In general, a key lookup is used when a DBMS index is available, and a scan is used whenan index is not available. However if you need to access a significant portion of the table, a scanmay be used, even if an index exists.
K - Key LookupForce the process to use a key lookup to locate rows by using a WHERE clause to search forprimary or foreign key values.
Note: Before selecting, you should verify that a DBMS index exists. For more information, see“Index Analysis” on page 343.
S - Table ScanForce the process to read all rows in a table at one time.
+-------- Choose Access Method -------+¦ 1 of 4 ¦¦ Access Method Values: ¦¦ K - Key Lookup ¦¦ S - Table Scan ¦¦ blank - Software Chooses ¦¦ ¦¦ Access ¦¦ Destination Table Name Method ¦¦ --------------------------- ------ ¦¦ ************** TOP **************** ¦¦ FOPDEMO.CUSTOMERS ¦¦ FOPDEMO.DETAILS ¦¦ FOPDEMO.ORDERS ¦¦ FOPDEMO.ITEMS ¦¦ ************ BOTTOM *************** ¦+-------------------------------------+
Figure 183. Choose Access Method
342 IBM InfoSphere Optim for DB2 for z/OS: Common Elements

ACM Command
To set the access method for all listed tables, use the ACM command with a B (blank), K (key lookup), orS (table scan) operand. For example, enter ACM B to blank the access method for all listed tables.
Key Lookup LimitAllows you to specify the maximum number of key lookups performed at one time for a table. Validvalues are 1 through 100.
If no value is specified, then the default value is used. The default value is specified by a user option. See“User Options” on page 318 for more information.
Note: Increasing the Key Lookup Limit only affects processes that use the Key Lookup access method.
Increasing the Key Lookup Limit may significantly improve performance. For example, if you specify 5as the Key Lookup Limit, 5 key values are searched in a single request to the DBMS, which reduces thenumber of times the DBMS is called.
For most sites, increasing the Key Lookup Limit to the maximum (100) is most effective.
Note: The following conditions must be true to use multiple key lookups in a Delete Process.v An index on the primary key is defined for the table.v Compare Row Contents is not selected for the Delete Request.v Row level Archive Actions are not defined for the Delete Process (e.g., Before Delete of Row).v The table is not a parent table in a DBMS relationship.
Index AnalysisMissing DBMS indexes is the most frequent cause of performance problems in an Archive or DeleteProcess. Archive allows you to analyze DBMS indexes for selected relationships and primary keys,allowing you to diagnose whether you need to create indexes.
If the status of an index is shown as Partial, or None, creating the necessary index may enhanceprocessing performance.
Relationship Index Analysis
You can analyze DBMS indexes for relationships used with the Access Definition through the SpecifyRelationship Usage panel. Type SHOW INDEXES to display the Relationship Index Analysis panel.
Chapter 12. Performance 343

The Relationship Index Analysis panel lists each selected relationship in the Access Definition, with ananalysis of DBMS indexes for the corresponding parent and child tables.
Primary Key Index Analysis
Use Primary Key Index Analysis window to determine the tables in an Archive File that have an indexon the primary key. The Primary Key Index Analysis pop-up window lists each table in the Archive File,with an analysis of DBMS indexes for the table.
From a Specify Parameters and Execute panel or the Delete Rows from Archive Process panel, use theSHOW INDEXES command to display the Index Analysis pop-up window listing the tables and thestatus of supporting indexes.
Status
The possible status of indexes for the Relationship Index Analysis and Index Analysis windows are:
DBPK Index exactly matches the DBMS primary key definition for the table. (Index Analysis only)
UniqueA unique index is defined for the table; however, no primary key is defined. (Index Analysisonly)
Full An index on an Optim primary key is defined for the table. The index includes all primary keycolumns at the beginning of the index, in any order, but may include additional columns.
Note: On the Relationship Index Analysis window, the Full status describes any DBPK, Unique,or Full index on the primary key.
Partial An index on an Optim primary key is defined for the table. The index includes at least oneprimary key column at the beginning of the index, but may include additional columns.
------------------------ Relationship Index Analysis --------------------------Command ===> Scroll ===> PAGE
1 of 3AD: GRP.FOPDEMO.AD
Parent Ix Child IxStat/Needed Stat/Needed Relationship Parent Table----------- ----------- ---------------------------->> ----------------------************************************ TOP **************************************NotAnlyzed None Y FOPDEMO.ORDERS.RCO FOPDEMO.CUSTOMERSFull Y NotAnlyzed FOPDEMO.DETAILS.RID FOPDEMO.ITEMSNotAnlyzed Full Y FOPDEMO.DETAILS.ROD FOPDEMO.ORDERS********************************** BOTTOM *************************************
Figure 184. Relationship Index Analysis
+----------------------- Index Analysis ----------------------+¦ 1 of 3 ¦¦ Table Name Index Name Index Status ¦¦ --------------------------- ------------------ ------------ ¦¦ ************************** TOP **************************** ¦¦ FOPDEMO.ITEMS XITEMPK DBPK ¦¦ FOPDEMO.ORDERS XORDRPK Unique ¦¦ FOPDEMO.DETAILS Partial ¦+-------------------------------------------------------------+
Figure 185. Index Analysis
344 IBM InfoSphere Optim for DB2 for z/OS: Common Elements

None No index for the necessary columns exists.
NotAnalyzedIndex is not needed. (Relationship Index Analysis only)
Chapter 12. Performance 345

346 IBM InfoSphere Optim for DB2 for z/OS: Common Elements

Appendix A. Sample Database Tables and Structure
The sample database, created during installation of Optim, is described in this Appendix. As a group, thedatabase tables include information on customers, orders, shipping instructions, and so on.
Two files for demonstrating Move or Compare for IMS, VSAM, and Sequential Filesare also provided andyou can use the FOPNPRIV Extract File to create tables for use with the Column Map lookup functionsor for other data privacy or data masking needs.
The data model contains related tables and Legacy files with the following names. Each table name hasthe Creator ID FOPDEMO.
OPTIM_CUSTOMERS OPTIM_SALES VENDOR
OPTIM_DETAILS OPTIM_SHIP_INSTR DEPARTMENT
OPTIM_FEMALE_RATES OPTIM_SHIP_TO EMPLOYEE
OPTIM_ITEMS OPTIM_STATE_LOOKUP POSITION
OPTIM_MALE_RATES OPTIM_ACTIONS JOBCODE
OPTIM_ORDERS VENDITEM
The database also contains the following tables with the Creator ID FOPDEMO2. The tables with theCreator ID FOPDEMO2 are not populated during installation. These tables are used to demonstrate thefacilities provided by Optim.
OPTIM_CUSTOMERS OPTIM_DETAILS
OPTIM_ITEMS OPTIM_ORDERS
Another table, FOPDEMO3.ACCOUNTS, is also used to demonstrate Optim. There are no distributedrelationships for this table.
SALES Table (FOPDEMO.OPTIM_SALES)The SALES table identifies each salesperson by name, ID number, and manager.
It is created as follows:CREATE TABLE FOPDEMO.OPTIM_SALES
(SALESMAN_ID CHAR(6) NOT NULLABLE,FIRST_NAME VARCHAR(15) NOT NULLABLE,LAST_NAME VARCHAR(15) NOT NULLABLE,NATIONALITY VARCHAR(30) NULLABLE,NATIONAL_ID VARCHAR(30) NULLABLE,PHONE_NUMBER VARCHAR(20) NOT NULLABLE,AGE INTEGER NOT NULLABLE,SEX CHAR(1) NOT NULLABLE,TERRITORY VARCHAR(14) NOT NULLABLEEMAIL_ADDRESS VARCHAR(70) NOT NULLABLE,MANAGER_ID CHAR(6)NULLABLE)IN FOPDEMOB.FOPDEMOSCCSID EBCDIC;
© Copyright IBM Corp. 1991, 2013 347

Content
The SALES table contains the following columns:
SALESMAN_IDCHAR; up to 6 characters; cannot contain null
FIRST_NAMEVARCHAR; up to 15 characters; cannot contain null
LAST_NAMEVARCHAR; up to 15 characters; cannot contain null
NATIONALITYVARCHAR; up to 30 characters; nullable
NATIONAL_IDVARCHAR; up to 30 characters; nullable
PHONE_NUMBERVARCHAR; up to 20 characters; cannot contain null
AGE INTEGER; cannot contain null
SEX CHAR; 1 character; cannot contain null
TERRITORYVARCHAR; up to 14 characters; cannot contain null
EMAIL_ADDRESSVARCHAR; up to 70 characters; cannot contain null
MANAGER_IDCHAR; up to 6 characters; nullable
Indexes and Primary Keys
The SALES table has one index and primary key:
Name On ColumnType ofIndex
Type ofPrimary Key
FOPDEMO.XSALESPK SALESMAN_ID Primary,ascending
DB2
Relationships to other tables
The SALES table is a parent of:v The CUSTOMERS table, through a foreign key on column SALESMAN_ID.v The MALE_RATES table, through an Optim data-driven relationship on column AGE when SEX = ‘M'.v The FEMALE_RATES table, through an Optim data-driven relationship on column AGE when SEX =
‘F'.v The STATE_LOOKUP table, through an Optim substring relationship using
SUBSTR(SALESMAN_ID,1,2).v The ORDERS table, through an Optim relationship on column SALESMAN_ID.
The SALES table is a child of the EMPLOYEE Legacy Table, through an Optim relationship on columnSALESMAN_ID.
348 IBM InfoSphere Optim for DB2 for z/OS: Common Elements

CUSTOMERS Table (FOPDEMO.OPTIM_CUSTOMERS)The CUSTOMERS table contains customer names, ID numbers, and addresses.
It is created as follows:CREATE TABLE FOPDEMO.OPTIM_CUSTOMERS
(CUST_ID CHAR(5) NOT NULL,CUSTNAME CHAR(60) NOT NULL,ADDRESS1 VARCHAR(100) NULLABLE,ADDRESS2 VARCHAR(100) NULLABLE,LOCALITY VARCHAR(56) NULLABLE,CITY VARCHAR(60) NULLABLE,STATE VARCHAR(30) NULLABLE,COUNTRY CODE CHAR(2) NULLABLE,POSTAL_CODE VARCHAR(15) NULLABLE,POSTAL_CODE_PLUS4 CHAR(4) NULLABLE,EMAIL_ADDRESS VARCHAR(70) NULLABLE,PHONE_NUMBER VARCHAR(20) NULLABLE,YTD_SALES DECIMAL(7,2) NOT NULL,SALESMAN_ID CHAR(6) NULLABLE,NATIONALITY VARCHAR(30) NULLABLE,NATIONAL_ID VARCHAR(30) NULLABLE,CREDITCARD_NUMBER VARCHAR(19) NULLABLE,CREDITCARD_TYPE VARCHAR(30) NULLABLE,CREDITCARD_EXP CHAR(4) NULLABLE,CREDITCARD_CVV VARCHAR(4) NULLABLE,DRIVER_LICENSE VARCHAR(30) NULLABLECREDITCARD_HISTORY CLOB(10K) NULLABLE)IN FOPDEMOB.FOPDEMOS
CCSID EBCDIC;
Content
The OPTIM_CUSTOMERS table contains these columns:
CUST_IDCHAR; up to 5 characters; cannot contain null
CUSTNAMECHAR; up to 60 characters; cannot contain null
ADDRESS1VARCHAR; up to 100 characters; nullable
ADDRESS2VARCHAR; up to 100 characters; nullable
LOCALITYVARCHAR; up to 56 characters; nullable
CITY VARCHAR; up to 60 characters; nullable
STATEVARCHAR; up to 30 characters; nullable
COUNTRY_CODECHAR; 2 characters; nullable
POSTAL_CODEVARCHAR; up to 15 characters; nullable
POSTAL_CODE_PLUS4CHAR; 4 characters; nullable
Appendix A. Sample Database Tables and Structure 349

EMAIL_ADDRESSVARCHAR; up to 70 characters; nullable
PHONE_NUMBERVARCHAR; up to 20 characters; nullable
YTD_SALESDECIMAL; dollar amount; cannot contain null
SALESMAN_IDCHAR; up to 6 characters; nullable
NATIONALITYVARCHAR; up to 30 characters; nullable
NATIONAL_IDVARCHAR; up to 30 characters; nullable
CREDITCARD_NUMBERVARCHAR; up to 19 characters; nullable
CREDITCARD_TYPEVARCHAR; up to 30 characters; nullable
CREDITCARD_EXPCHAR; 4 characters; nullable
CREDITCARD_CVVVARCHAR; up to 4 characters; nullable
DRIVER_LICENSEVARCHAR; up to 30 characters; nullable
CREDITCARD_HISTORYCLOB; up to 10K; nullable
Indexes and Primary Keys
The OPTIM_CUSTOMERS table has one index and primary key:
Name On ColumnType ofIndex
Type ofPrimary Key
FOPDEMO.XCUSTPK CUST_ID Primary, ascending DB2
Relationships to other tables
The OPTIM_CUSTOMERS table is a parent of:v The OPTIM_ORDERS table, through a foreign key on column CUST_ID.v The OPTIM_SHIP_TO table, through an Optim relationship on column CUST_ID.
It is a child of the OPTIM_SALES table, through its foreign key on column SALESMAN_ID.
ORDERS Table (FOPDEMO.OPTIM_ORDERS)The ORDERS table contains information for customer orders, including order number, customer ID, andsalesman.
The ORDERS table is created as follows:
350 IBM InfoSphere Optim for DB2 for z/OS: Common Elements
CREATE TABLE FOPDEMO.OPTIM_ORDERS(ORDER_ID DECIMAL(10,0) NOT NULL,CUST_ID CHAR(5) NOT NULL,ORDER_DATE TIMESTAMP NOT NULL WITH DEFAULT,ORDER_TIME TIMESTAMP NOT NULL WITH DEFAULT,FREIGHT_CHARGES DECIMAL(4,2),ORDER_SALESMAN CHAR(6),ORDER_POSTED_DATE TIMESTAMP NOT NULL WITH DEFAULT,ORDER_SHIP_DATE CHAR(8) NOT NULL WITH DEFAULT)
IN FOPDEMOB.FOPDEMOSCCSID EBCDIC;
Content
The ORDERS table has these columns:
ORDER_IDDECIMAL; order ID number; cannot contain null.
CUST_IDCHAR; customer ID number; up to 5 characters; cannot contain null.
ORDER_DATETIMESTAMP; cannot contain null; has default value.
ORDER_TIMETIMESTAMP; cannot contain null; has default value.
FREIGHT_CHARGESDECIMAL; dollar amount; can contain null value.
ORDER_SALESMANCHAR; up to 6 characters; can contain null value.
ORDER_POSTED_DATETIMESTAMP; cannot contain null; has default value.
ORDER_SHIP_DATECHAR; date when order is shipped; up to 8 characters; cannot contain null; has default value.
Indexes and Primary Keys
The ORDERS table has one index and primary key:
Name On ColumnType ofIndex
Type ofPrimary Key
FOPDEMO.XORDRPK ORDER_ID Primary,ascending
DB2
Relationships to other tables
The ORDERS table is a parent of the DETAILS table, through a foreign key on column ORDER_ID.
The ORDERS table is a child of:v The CUSTOMERS table, through its foreign key on column CUST_ID.v The SALES table, through an Optim relationship on column ORDER_SALESMAN.
Appendix A. Sample Database Tables and Structure 351

DETAILS Table (FOPDEMO.OPTIM_DETAILS)The DETAILS table contains additional information for each order in the ORDERS table.
It is created as follows:CREATE TABLE FOPDEMO.OPTIM_DETAILS
(ORDER_ID DECIMAL(5,0) NOT NULL,ITEM_ID CHAR(5) NOT NULL,ITEM_QUANTITY SMALLINT NOT NULL,DETAIL_UNIT_PRICEDECIMAL(5,2) NOT NULL)IN FOPDEMOB.FOPDEMOSCCSID EBCDIC;
Content
The DETAILS table has the following columns:
ORDER_IDDECIMAL; order ID number; cannot contain null.
ITEM_IDCHAR; item ID number; cannot contain null.
ITEM_QUANTITYSMALLINT; number of items; cannot contain null.
DETAIL_UNIT_PRICEDECIMAL; unit price; dollar amount; cannot contain null.
Indexes and Primary Keys
The DETAILS table has one index and primary key:
Name On ColumnsType ofIndex
Type ofPrimary Key
FOPDEMO.XDETLPK ORDER_ID
ITEM_ID
Primary,ascending
DB2
Relationships to other tables
The DETAILS table is a child of:v The ORDERS table, through its foreign key on column ORDER_ID.v The ITEMS table, through its foreign key on column ITEM_ID.
ITEMS Table (FOPDEMO.OPTIM_ITEMS)The ITEMS table contains information about each item for an order, including description, price, andquantity in inventory. It is created as follows:CREATE TABLE FOPDEMO.OPTIM_ITEMS
(ITEM_ID CHAR(5) NOT NULL,ITEM_DESCRIPTION VARCHAR(72) NOT NULL,CATEGORY VARCHAR(14) NOT NULL,RATING CHAR(4) NOT NULL,
352 IBM InfoSphere Optim for DB2 for z/OS: Common Elements

UNIT_PRICE DECIMAL(5,2) NOT NULL,ON_HAND_INVENTORY INTEGER NOT NULL)IN FOPDEMOB.FOPDEMOSCCSID EBCDIC;
Content
The ITEMS table has these columns:
ITEM_IDCHAR; up to 5 characters; cannot contain null.
ITEM_DESCRIPTIONVARCHAR; up to 72 characters; cannot contain null.
CATEGORYVARCHAR; up to 14 characters; cannot contain null.
RATINGCHAR; up to 4 characters; cannot contain null.
UNIT_PRICEDECIMAL; dollar amount; cannot contain null.
ON_HAND_INVENTORYINTEGER; cannot contain null.
Indexes and Primary Keys
The ITEMS table has one index and primary key:
Name On ColumnType ofIndex
Type ofPrimary Key
FOPDEMO.XITEMPK ITEM_ID Primary, ascending DB2
Relationships to other tables
The ITEMS table is a parent of:v The DETAILS table, through a foreign key on column ITEM_ID.v The VENDITEM Legacy Table, through an Optim relationship on column ITEM_ID.
SHIP_TO Table (FOPDEMO.OPTIM_SHIP_TO)The SHIP_TO table contains order shipping information.
It is created as follows:CREATE TABLE FOPDEMO.OPTIM_SHIP_TO
(CUST_ID CHAR(5) NOT NULL,SHIP_ID DECIMAL(10,0) NOT NULL,ADDRESS1 VARCHAR(100) NULLABLE,ADDRESS2 VARCHAR(100) NULLABLE,LOCALITY VARCHAR(56) NULLABLE,CITY VARCHAR(30) NULLABLE,STATE VARCHAR(20) NULLABLE,COUNTRY_CODE CHAR(2) NULLABLE,POSTAL_CODE VARCHAR(15) NULLABLE,POSTAL_CODE_PLUS4 CHAR(4) NULLABLE,
Appendix A. Sample Database Tables and Structure 353

IN_CARE_OF VARCHAR(31) NULLABLE,SHIPPING_CHANGE_DT TIMESTAMP NOT NULLABLE)
IN FOPDEMOB.FOPDEMOSCCSID EBCDIC;
Content
The SHIP_TO table has these columns:
CUST_IDCHAR; up to 5 characters; cannot contain null
SHIP_IDDECIMAL; cannot contain null
ADDRESS1VARCHAR; up to 100 characters; nullable
ADDRESS2VARCHAR; up to 100 characters; nullable
LOCALITYVARCHAR; up to 56 characters; nullable
CITY VARCHAR; up to 30 characters; nullable
STATEVARCHAR; up to 20 characters; nullable
COUNTRY_CODECHAR; 2 characters; nullable
POSTAL_CODEVARCHAR; up to 15 characters; nullable
POSTAL_CODE_PLUS4CHAR; 4 characters; nullable
IN_CARE_OFVARCHAR; up to 31 characters; nullable
SHIPPING_CHANGE_DTTIMESTAMP; cannot contain null
Indexes and Primary Keys
The SHIP_TO table does not have an index. It has the following primary key:
Name On ColumnType ofIndex
Type ofPrimary Key
SHIP_ID OPT
Relationships to other tables
The SHIP_TO table is a parent of the SHIP_INSTR table, through an Optim relationship on columnSHIP_ID.
It is a child of the CUSTOMERS table, through its Optim relationship on column CUST_ID.
354 IBM InfoSphere Optim for DB2 for z/OS: Common Elements
SHIP_ INSTR Table (FOPDEMO.OPTIM_SHIP_INSTR)The SHIP_INSTR table contains detailed information for order shipping.
It is created as follows:CREATE TABLE FOPDEMO.OPTIM_SHIP_INSTR
(SHIP_ID DECIMAL(10,0) NULLABLE,SHIP_INSTR_ID INTEGER NULLABLE,ORDER_SHIP_INSTR VARCHAR(254) NULLABLE,SHIP_UPDATED TIMESTAMP NOT NULLABLE)
IN FOPDEMOB.FOPDEMOSCCSID EBCDIC;
Content
The SHIP_INSTR table contains these columns:
SHIP_IDDECIMAL; nullable
SHIP_INSTR_IDINTEGER; nullable
ORDER_SHIP_INSTRVARCHAR; up to 254 characters; nullable
SHIP_UPDATEDTIMESTAMP; cannot contain null
Indexes and Primary Keys
The SHIP_INSTR table has one index and primary key:
Name On ColumnType ofIndex
Type ofPrimary Key
FOPDEMO.XSHIPIPK SHIP_INSTR_ID Unique,ascending
OPT
Relationships to other tables
The SHIP_ INSTR table is a child of the SHIP_TO table, through its Optim relationship on columnSHIP_ID.
MALE_RATES Table (FOPDEMO.OPTIM_MALE_RATES)The MALE_RATES table contains insurance rates, based on age. It is created as follows:CREATE TABLE FOPDEMO.OPTIM_MALE_RATES
(AGE INTEGER, RATE_PER_1000 DECIMAL(5,0))IN FOPDEMOB.FOPDEMOSCCSID EBCDIC;
Content
The MALE_RATES table has these columns:
AGE INTEGER; can contain a null value.
RATE_PER_1000DECIMAL; rate in dollar amount; can contain a null value.
Appendix A. Sample Database Tables and Structure 355

Indexes and Primary Keys
The MALE_RATES table does not have an index. It has the following primary key:
Name On ColumnType ofIndex
Type ofPrimary Key
RATE_PER_1000 OPT
Relationships to other tables
The MALE_RATES table is a child of the SALES table, through its Optim data-driven relationship oncolumn AGE.
FEMALE_RATES Table (FOPDEMO.OPTIM_FEMALE_RATES)The FEMALE_RATES table contains insurance rates based on age. It is created as follows:CREATE TABLE FOPDEMO.OPTIM_FEMALE_RATES
(AGE INTEGER,RATE_PER_1000 DECIMAL(5,0))
IN FOPDEMOB.FOPDEMOSCCSID EBCDIC;
Content
The FEMALE_RATES table has the following columns:
AGE INTEGER; can contain a null value.
RATE_PER_1000DECIMAL; rate in dollar amount; can contain a null value.
Indexes and Primary Keys
The FEMALE_RATES table does not have an index. It has the following primary key:
Name On ColumnType ofIndex
Type ofPrimary Key
RATE_PER_1000 OPT
Relationships to other tables
The FEMALE_RATES table is a child of the SALES table, through its Optim data-driven relationship oncolumn AGE.
STATE_LOOKUP Table (FOPDEMO.OPTIM_STATE_LOOKUP)The STATE_LOOKUP table is created as follows:CREATE TABLE FOPDEMO.OPTIM_STATE_LOOKUP
(DIST_CODE CHAR(3) NOT NULL,DISTRICT CHAR(2) NOT NULL)
IN FOPDEMOB.FOPDEMOSCCSID EBCDIC;
356 IBM InfoSphere Optim for DB2 for z/OS: Common Elements

Content
The STATE_LOOKUP table has the following columns:
DIST_CODECHAR; 3 characters; cannot contain a null value.
DISTRICTCHAR; 2 characters; cannot contain a null value.
Indexes and Primary Keys
The STATE_LOOKUP table does not have an index or a primary key.
Relationships to other tables
The STATE_LOOKUP table is a child of the SALES table through an Optim substring relationship oncolumn DISTRICT using SUBSTR(SALESMAN_ID,1,2).
VENDOR File (Legacy Table FOPDEMO.VENDOR)The VENDOR Legacy Table is created from the following copybook:
01 VENDOR.05 VEND-ID PIC S9(8) COMP.05 VEND-NAME PIC X(20).05 VEND-ADDR PIC X(50).05 VEND-CITY PIC X(15).05 VEND-STATE PIC X(2).05 VEND-ZIP PIC X(5).05 VEND-PHONE PIC X(10).
Content
The VENDOR Legacy Table contains these fields:
VEND-IDFullword binary.
VEND-NAMECharacter; up to 20 characters.
VEND-ADDRCharacter; up to 50 characters.
VEND-CITYCharacter; up to 15 characters.
VEND-STATECharacter; 2 characters.
VEND-ZIPCharacter; 5 characters.
VEND-PHONECharacter; up to 10 characters.
VENDOR is a KSDS VSAM file with a key defined on the VEND-ID field.
Appendix A. Sample Database Tables and Structure 357

Relationships to other Tables
The VENDOR Legacy Table is a parent of the VENDITEM Legacy Table through an Optim relationshipon field VEND-ID.
VENDITEM Table (Legacy Table FOPDEMO.VENDITEM)The VENDITEM Legacy Table is created from the following copybook:
01 VENDITEM.05 VEND-ITEM-ID PIC X(5).05 VEND-ID PIC S9(8) COMP.05 SKU PIC X(10).05 PRICE PIC S9(5)V99 COMP-3.
Content
The VENDITEM Legacy Table contains the following fields:
VEND-ITEM-IDCharacter; up to 5 characters.
VEND-IDFullword binary.
SKU Character; up to 10 characters.
PRICEPacked Decimal with up to 5 significant digits and 2 decimal places.
VENDITEM is a KSDS VSAM file with a key defined on theVEND-ITEM-ID, VEND-ID, and SKU fields.
Relationships to other tables
The VENDITEM Legacy Table is a child of the ITEMS table, through its Optim relationship on fieldVEND-ITEM-ID.
The VENDITEM Legacy Table is a child of the VENDOR Legacy Table through its Optim relationship onfield VEND-ID.
DEPARTMENT Table (IMS Legacy Table FOPDEMO.DEPARTMENT)The DEPARTMENT Legacy Table is created from the copybook shown below.
01 DEPARTMT.05 DEPTCODE PIC X(3).05 DEPTNAME PIC X(30).05 LOCATION PIC X(30).05 LOCCODE PIC X(3).
Content
The DEPARTMENT Legacy Table contains the following fields:
DEPTCODECharacter; up to 3 characters.
358 IBM InfoSphere Optim for DB2 for z/OS: Common Elements

DEPTNAMECharacter; up to 30 characters.
LOCATIONCharacter; up to 30 characters.
LOCCODECharacter; up to 3 characters.
DEPARTMENT is the root segment of the FOPDEPDB DBD. DEPTCODE is the sequence field.
Relationships to other tables
The DEPARTMENT Legacy Table is a parent of the EMPLOYEE Legacy Table through a physicalrelationship in the DBD.
EMPLOYEE Table (IMS Legacy Table FOPDEMO.EMPLOYEE)The EMPLOYEE Legacy Table is created from the following copybook:
01 EMPLOYEE.05 EMPNO PIC X(6).05 FRSTNAME PIC X(15).05 INITIAL PIC X(1).05 LASTNAME PIC X(15).05 HIREDATE PIC X(8).05 MANAGER PIC X(6).
Content
The EMPLOYEE Legacy Table contains the following fields:
EMPNOCharacter; up to 6 characters.
FRSTNAMECharacter; up to 15 characters.
INITIALCharacter; up to 1 character.
LASTNAMECharacter; up to 15 characters.
HIREDATECharacter; up to 8 characters.
MANAGERCharacter; up to 6 characters.
EMPLOYEE is a segment in the FOPDEPDB DBD. EMPNO is the sequence field.
Relationships to other tables
The EMPLOYEE Legacy Table is dependent on the DEPARTMENT Legacy Table through a physicalrelationship in the DBD.
The EMPLOYEE Legacy Table is a parent of the POSITION Legacy Table through a physical relationshipin the DBD.
Appendix A. Sample Database Tables and Structure 359

The EMPLOYEE Legacy Table is a parent of the SALES table through an Optim relationship on fieldEMPNO.
POSITION Table (IMS Legacy Table FOPDEMO.POSITION)The POSITION Legacy Table is created from the following copybook:
01 POSITION.05 JOBCODE-STARTDATE10 JOBCODE PIC X(3).10 STARTDATE PIC X(8).05 SALARY PIC S9(7)V9(2) USAGE COMP-3.05 ENDDATE PIC X(8).
Content
The POSITION Legacy Table contains the following fields:
JOBCODECharacter; up to 3 characters.
STARTDATECharacter; up to 8 characters.
SALARYPacked Decimal with up to 7 significant digits and 2 decimal places.
ENDDATECharacter; up to 8 characters.
POSITION is a segment in the FOPDEPDB DBD. JOBCODE is the sequence field.
Relationships to other tables
The POSITION Legacy Table is dependent on the EMPLOYEE Legacy Table through a physicalrelationship in the DBD.
The POSITION Legacy Table is dependent on the JOBCODE Legacy Table through an Optim relationshipon field JOBCODE.
JOBCODE Table (IMS Legacy Table FOPDEMO.JOBCODE)The JOBCODE Legacy Table is created from the following copybook:
01 JOBS.05 JOBCODE PIC X(3).05 TITLE PIC X(15).05 DESC PIC X(30).05 GRADE PIC 9(2).
Content
The JOBCODE Legacy Table contains the following fields:
JOBCODECharacter; up to 3 characters.
TITLE Character; up to 15 characters.
360 IBM InfoSphere Optim for DB2 for z/OS: Common Elements

DESC Character; up to 30 characters.
GRADENumber; up to 2 digits.
JOBCODE is the root segment of the FOPJOBDB DBD. JOBCODE is the sequence field.
Relationships to other tables
The JOBCODE Legacy Table is a parent of the POSITION Legacy Table through an Optim relationship onfield JOBCODE.
Sample Extract FileA sample Extract File, qual1.qual2.DEMO.EXTRACT, is provided and contains data from the sampledatabase to demonstrate Compare.
For additional information, see the Compare User Manual, Specify the Data to Compare.
Sample Legacy FileA sample Legacy File, qual1.qual2.LEGACY.UNLOAD, is provided and contains data from the sampledatabase to demonstrate VSAM files for Move or Compare for IMS, VSAM, and Sequential Files.
Privacy Extract FileThe Privacy Extract file, qual1.qual2.PRIVACY.EXTRACT, includes several tables with data that can beused for data masking or data privacy processing. The PERSON table is created as follows:
PERSON TableCREATE TABLE FOPMASK.PERSON
(EMPNO CHAR(6),NATIONAL_ID CHAR(20),NATIONAL_ID_TYPE CHAR(6),ADDR_STREET1 VARCHAR(30),ADDR_STREET2 VARCHAR(30),ADDR_CITY CHAR(20),ADDR_STATE CHAR(6),ADDR_ZIP CHAR(6),ADDR_COUNTRY CHAR(3),PHONE_NUMBER CHAR(20),PHONE_COUNTRY CHAR(3),SALARY DECIMAL(11,2)NAME_FIRST CHAR(15),NAME_LAST CHAR(15),NAME_FULL VARCHAR(40),BIRTHDATE DATE,GENDER CHAR(1),EMAIL CHAR(70),CREDITCARD CHAR(19))
IN FOPDEMOB.FOPDEMOSCCSID EBCDIC;
Content
The PERSON table contains the following columns:
EMPNOCHAR; 6 characters.
Appendix A. Sample Database Tables and Structure 361

NATIONAL_IDCHAR; 20 characters.
NATIONAL_ID_TYPECHAR; 6 characters.
ADDR_STREET1VARCHAR; 30 characters.
ADDR_STREET2VARCHAR; 30 characters.
ADDR_CITYCHAR; 20 characters.
ADDR_STATECHAR; 6 characters.
ADDR_ZIPCHAR; 6 characters.
ADDR_COUNTRYCHAR; 3 characters.
PHONE_NUMBERCHAR; 20 characters.
PHONE_COUNTRYCHAR; 20 characters.
SALARYDECIMAL; 11 places with 2 decimal places.
NAME_FIRSTCHAR; 15 characters.
NAME_INITIALCHAR; 1 character.
NAME_LASTCHAR; 15 characters.
NAME_FULLVARCHAR; 40 characters.
BIRTHDATEDATE
GENDERCHAR; 1 character.
EMAILCHAR; 70 characters.
CREDITCARDCHAR; 19 characters.
ADDRESS Table
The ADDRESS table is created as follows:CREATE TABLE FOPMASK.ADDRESS
(SEQ INTEGER,ADDRESS CHAR(50),CITY CHAR(28),STATE CHAR(2),
362 IBM InfoSphere Optim for DB2 for z/OS: Common Elements

ZIPCODE CHAR(5),ZIPPLUS4 CHAR(4))
IN FOPDEMOB.FOPDEMOSCCSID EBCDIC;
Content
The ADDRESS table contains the following columns:
SEQ INTEGER.
ADDRESSCHAR; 50 characters.
CITY CHAR; 28 characters.
STATECHAR; 2 characters.
ZIPCODECHAR; 5 characters.
ZIPPLUS4CHAR; 4 characters.
Note: Data in the ADDRESS table is copyrighted by the United States Postal Service and is providedwith permission.
COMPANY Table
The COMPANY table is created as follows:CREATE TABLE FOPMASK.COMPANY
(SEQ INTEGER,DATAVALUE CHAR(40) )IN FOPDEMOB.FOPDEMOSCCSID EBCDIC;
Content
The COMPANY table has the following columns:
SEQ INTEGER.
DATAVALUECHAR; 40 characters.
Note: Data in the COMPANY table is copyrighted by the United States Postal Service and is providedwith permission.
Name Tables
The name tables are FIRSTNAME, FIRSTNAME_F for female names, FIRSTNAME_M for male names,and LASTNAME.
Using FIRSTNAME as an example, the name tables are created as follows:CREATE TABLE FOPMASK.FIRSTNAME
(SEQ INTEGER,DATAVALUE CHAR(15) )
IN FOPDEMOB.FOPDEMOSCCSID EBCDIC;
Appendix A. Sample Database Tables and Structure 363

Content
The name tables have the following columns:
SEQ INTEGER.
DATAVALUECHAR; 15 characters.
364 IBM InfoSphere Optim for DB2 for z/OS: Common Elements

Appendix B. Allocating External Files
Optim requires several types of files, depending on the component you are using and the process you areperforming.
Your site may have any or all of the following file types:v Access Edit or Browse Reportv Control Browsev Archivev Exportv Archive Browsev Extractv Archive Dense Indexv Extract Browsev Comparev OUTPUTv Compare Process Reportv Output SQLv Controlv Point-and-Shoot
Optim automatically prompts for information to allocate these external files if they do not exist. Some ofthe values, based on the type of file to be allocated, are required as specified and cannot be changed. ForSpace Units values may vary depending on use of Profiled or Stored values and Optim’s priorcalculations). The following figure shows the prompts for data sets. The values for each prompt for eachtype of external file are shown in the chart “Defaults for Specific Files” on page 369.
+-----------------------------Allocate Dataset-----------------------------+¦ ¦¦ Data Set Name: Z13600MP.TEST.DSN ¦¦ Management Class ===> (Blank for Default Management Class) ¦¦ Storage Class ===> (Blank for Default Storage Class) ¦¦ Use Stored Values ===> (Y-Yes, N-No, V-View Stored Values) ¦¦ Volume Serial ===> (Blank for Authorized Default Volume) ¦¦ Device Type ===> (Generic Unit or Device Address) ¦¦ Data Class ===> (Blank for Default Data Class) ¦¦ Space Units : (BLKS, CYLS, TRKS, KB or MB) ¦¦ Primary Quantity ===> (In Above Units) ¦¦ Secondary Quantity ===> (In Above Units) ¦¦ Directory Blocks : ¦¦ Record Format : ¦¦ Record Length : (Value Will Be Set to Block Size) ¦¦ Block Size ===> (Minimum 7944;0=Determine at Runtime) ¦¦ Data set name type ===> (BASIC, LARGE, EXTREQ, EXTPREF or ¦¦ Blank) ¦¦ ¦¦ Calculated Values Shown, Change to Profiled Values ===> N (Y-Yes, N-No) ¦+--------------------------------------------------------------------------+
Figure 186. Allocate Dataset
© Copyright IBM Corp. 1991, 2013 365

Panel
The prompts include:
Management ClassThe management class used to obtain the data management-related information (migration,backup, and retention criteria) for the allocation of the data set. Leave blank for default.Management Class is active only if SMS is active.
Storage ClassThe storage class used to obtain the storage-related information for the allocation of the data set.Leave blank for default. Storage Class is active only if SMS is active.
Use Stored ValuesThe source of volume information.
Y Use the volume information specified on the File Unit Parameters panel, accessedfrom User Options. See “File Unit Parameters” on page 326 for more information.
Note: If you select Y, but no explicit or default volume information was specifiedon the File Unit Parameters panel, an error message is displayed.
N Use the volume information specified on the Allocate Dataset panel.
V Display the File Unit Parameters panel to specify values for unit, volume number,and one to six volume serial numbers. (For information, see Figure 187 on page369.)
Volume SerialThe serial number of the volume on which the data set is to reside. This value mustcontain only alphanumerics, national characters, and the hyphen. Alternatively, you canleave Volume Serial blank to use a default volume for which you are authorized. Youcannot provide both Volume Serial and Device Type.
Device TypeThe generic unit or device address of the device on which the data set is to reside. Onlyalphanumeric characters are valid. Alternatively, you can leave Device Type blank to usethe default device type. You cannot provide both Device Type and Volume Serial. Thisprompt is not displayed for a VSAM file.
Data ClassThe data class used to obtain the data-related information (SPACE, LRECL, etc.) for the allocationof the data set. Leave blank for default. Data Class is active only if SMS is active.
Space UnitsThe DASD space for the data set to be allocated. When Optim provides the suggestedsizes, this value may be BLKS, KB or MB. If you are supplying the value, select one ofthe following:
BLKS Blocks (abbreviations: BLK or B). This value is not allowed for a VSAM file.
TRKS Tracks (abbreviations: TRK or T).
CYLS Cylinders (abbreviations: CYL or C).
KB Kilobytes
MB Megabytes
Site management may provide guidelines regarding the units to use.
Primary QuantityThe primary quantity of space to be allocated in the indicated space units. Sitemanagement may provide guidelines regarding appropriate values.
366 IBM InfoSphere Optim for DB2 for z/OS: Common Elements

Secondary QuantityThe secondary quantity of space to be allocated in the indicated space units. Sitemanagement may provide guidelines.
Directory BlocksThe number of directory blocks to be allocated. This value is required for partitioned datasets and must be 0 for sequential data sets. This prompt is not displayed for a VSAM file.Site management may provide guidelines.
VSAM TypeArchive Index File (Dense Index) only. The value is L (LINEAR) for an SMS-managedVSAM file and cannot be modified. This prompt is displayed only if you are creating adata set for an Archive Dense Index.
Record FormatThe record format depends on the type of file and is specified as:
FB Export file, Point-and-Shoot file, or when using the OUTPUT command to directbrowsed output, SQL, or a Process Report to a data set.
FBS Compare only. Required for Compare Files.
FS Extract Files and Control Files.
FSA Archive only. Required for sequential data sets created for Archive Files.
VB Files being browsed (e.g., browsing an Extract File, Control File or Archive File)and for Compare Report Files.
FBM Access Edit or Browse Report Files.
Site management may provide guidelines.
Record LengthThe logical record length. Note requirements in the chart “Defaults for Specific Files” onpage 369 for default values. It is recommended that you specify the default of 0 to allowthe system to calculate the actual value at run time. Site management may provideguidelines.
Block SizeThe block size in bytes. Note requirements in the chart “Defaults for Specific Files” onpage 369 for default values.
It is recommended that you specify the default of 0 to allow the system to calculate theactual value at run time. Site management may provide guidelines.
Data set name typeThe type of data set being allocated. Specify:
BASICThe data set is not an extended or large format data set.
LARGEAllocates a large format sequential data set.
EXTREQSpecifies that an extended data set is required.
EXTPREFSpecifies that an extended data set is preferred.
blank Allocates a partitioned or sequential data set based on the values entered on the panel.
Calculated Values Shown, Change to Profiled ValuesThe values used to allocate the file. Specify:
Appendix B. Allocating External Files 367

Y Use values previously specified and profiled. Also, if you have modified the values onthis panel, they are profiled and replace any previously specified values.
N Use the values calculated by Optim.
Calculated values are based on the “worst case scenario.” For example, for an Extract File, thevalue is determined by the maximum number of rows that can be extracted times the length ofthe longest row. When available, a table’s DB2 RUNSTATS values are used for the computation ofrows. If valid RUNSTATS are not available, the DB2 Table Space Statistics, when activated andaccess granted to the user, may also be used to estimate the number of rows to be processed.Reasonable primary and secondary extents are also calculated from this value. When theestimated size of the extents exceeds the maximum value allowed by DFSMS then the allocationsize will be adjusted and possibly spread over multiple disk volumes. Any unused space is freedwhen the process using the data set is complete.
When you have entered the necessary information on this panel, press ENTER to allocate the data set. Toreturn to the previous panel without allocating a data set, use END or CANCEL.
SMS Considerations
If Managed Data Support for the underlying operating environment is present, the panel displays theprompts needed to create an SMS data set.
Extract Files, Archive Files, Control Files, and Compare Files can be physical sequential data sets(DSNTYPE=BASIC), Physical Sequential Extended data sets (DSNTYPE=EXTENDED) or large formatdata sets (DSNTYPE=LARGE).
Optim will use DFSMS compression, which requires special DFSMS setup, if compression is available onPhysical Sequential Extended format data sets. A compressed data set can save from 20 to 40 percent ofDASD storage, compared to an uncompressed data set.
Restrictions:v You cannot allocate a compressed data set for a Control, Compare, Point-and-Shoot, trace, or Report
file.v Large format data sets are not supported for Print or Report files.v For a multi-volume extended data set, you must define a Stripe Count greater than 1. The Stripe Count
is determined by the Sustained Data Rate (SDR) value. Use these guidelines to define the SDR:– For 3390 devices, SDR must be greater than or equal to 8– For 3380 devices, SDR must be greater than or equal to 6
For additional information, refer to z/OS V1R12.0 DFSMSdfp Storage Administration notes:http://publib.boulder.ibm.com/infocenter/zos/v1r12/index.jsp?topic=%2Fcom.ibm.zos.r12.idas200%2Fstripvs.htm
File Unit Parameters
If you enter V for the Use Stored Values option, the following panel is displayed.
368 IBM InfoSphere Optim for DB2 for z/OS: Common Elements
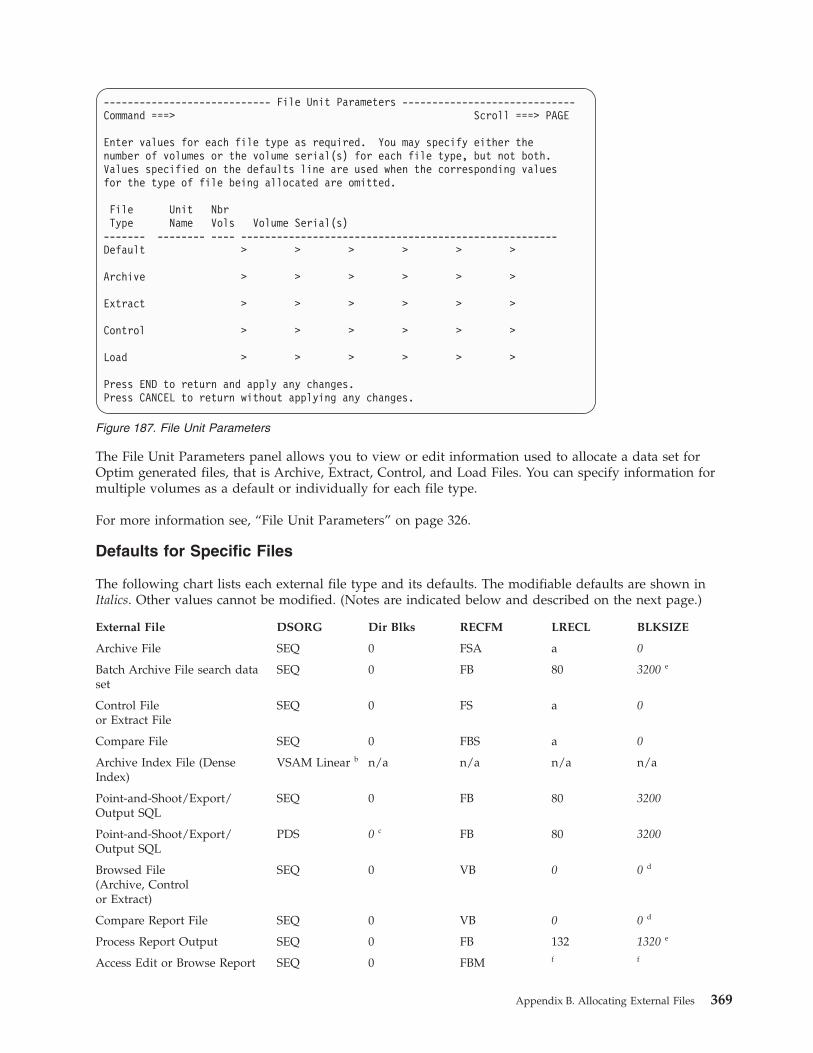
The File Unit Parameters panel allows you to view or edit information used to allocate a data set forOptim generated files, that is Archive, Extract, Control, and Load Files. You can specify information formultiple volumes as a default or individually for each file type.
For more information see, “File Unit Parameters” on page 326.
Defaults for Specific Files
The following chart lists each external file type and its defaults. The modifiable defaults are shown inItalics. Other values cannot be modified. (Notes are indicated below and described on the next page.)
External File DSORG Dir Blks RECFM LRECL BLKSIZE
Archive File SEQ 0 FSA a 0
Batch Archive File search dataset
SEQ 0 FB 80 3200 e
Control Fileor Extract File
SEQ 0 FS a 0
Compare File SEQ 0 FBS a 0
Archive Index File (DenseIndex)
VSAM Linear b n/a n/a n/a n/a
Point-and-Shoot/Export/Output SQL
SEQ 0 FB 80 3200
Point-and-Shoot/Export/Output SQL
PDS 0 c FB 80 3200
Browsed File(Archive, Controlor Extract)
SEQ 0 VB 0 0 d
Compare Report File SEQ 0 VB 0 0 d
Process Report Output SEQ 0 FB 132 1320 e
Access Edit or Browse Report SEQ 0 FBM f f
---------------------------- File Unit Parameters -----------------------------Command ===> Scroll ===> PAGE
Enter values for each file type as required. You may specify either thenumber of volumes or the volume serial(s) for each file type, but not both.Values specified on the defaults line are used when the corresponding valuesfor the type of file being allocated are omitted.
File Unit NbrType Name Vols Volume Serial(s)------- -------- ---- -----------------------------------------------------Default > > > > > >
Archive > > > > > >
Extract > > > > > >
Control > > > > > >
Load > > > > > >
Press END to return and apply any changes.Press CANCEL to return without applying any changes.
Figure 187. File Unit Parameters
Appendix B. Allocating External Files 369

Note:
va LRECL=BLKSIZE; minimum is 7944. (This value is based on the number of columns.)
vb To release unused space, the file must be SMS-managed using SMS 1.5 and allocated in extendedformat using an SMS dataclass with DSNTYPE=EXT.
vc If DSORG=PDS, Dir Blks must be a value other than 0.
vd BLKSIZE>=LRECL+4; min LRECL=84; min BLKSIZE=88.
ve BLKSIZE=multiple of LRECL.
vf LRECL and BLKSIZE values are determined at run time.
About Point-and-Shoot File
The Point-and-Shoot file, by default, is allocated as a sequential file with a RECFM of FB. To allocate thisfile as a member of a PDS, you must specify a value other than 0 for directory blocks.
For more detailed information, refer to the IBM Job Control Language documentation for your operatingsystem.
370 IBM InfoSphere Optim for DB2 for z/OS: Common Elements

Appendix C. Create a Row List File
The Point-and-Shoot facility is used with Archive, Compare, or Move to select the primary key values forrows in the Start Table when you want to extract data from a database or restore it to a database. Thesevalues are automatically stored in a Row List file.
The Point-and-Shoot facility is available for DB2 tables only. If the data does not reside in DB2, you cancreate a Row List file with ISPF or a similar editor. The file must conform to the format generated byPoint-and-Shoot, as follows:v The file must be a member of a partitioned dataset or a sequential dataset.v The file must contain 80-character records. (Note that any line numbers in positions 73-80 are
interpreted as data. Do not use line numbers.)v The data in the file must conform to DB2 syntax and rules for column data types. Additionally, the
data must match, by data type and length, the attributes of the primary key column(s) in the StartTable.
v The DD name of the file must be PSDFPNS.
Example
For example, assume you want to archive or extract specific rows from the DETAILS table using a listcreated by a method other than Point-and-Shoot. The primary key for the DETAILS table consists of twocolumns, ORDER_ID and ITEM_ID. These columns are defined as follows:
Column Name Data Type
ORDER_ID DEC(5,0)
ITEM_ID CHAR(5)
The following figure shows an example of the structure of the list. In the example, the file containing thelist is displayed in the ISPF editor. The value in the ORDER_ID column is followed by the value in theITEM_ID column for each row. Commas separate the column values for each row, and semicolonsseparate each row.
The format requirements are:v Values must be separated by commas (,) and one or more spaces.v Primary key values for each row must be separated by semicolons (;) and one or more spaces.
Character Datav Character data must be enclosed in single quotes (e.g., ‘abc'). Embedded quotes must be in the form of
two single quotes.
EDIT ---- FOPDEMO.FOPPK.KEY -------------------------- COLUMNS 001 072COMMAND ===> SCROLL ===> CSR****** ************************ TOP OF DATA **************************000001 00123, ’CH001’; 00124, ’CH002’; 00125, ’CH003’; 00126, ’CH004’;000002 00133, ’CH001’; 00134, ’CH002’; 00135, ’CH003’; 00146, ’CH004’;000003 00153, ’CH001’; 00154, ’CH002’; 00155, ’CH003’; 00156, ’CH004’;****** ********************** BOTTOM OF DATA *************************
Figure 188. Primary Key Values
© Copyright IBM Corp. 1991, 2013 371

Character data in a column can be wrapped to the next line. Each portion of the data must be enclosedin quotes, without an intervening semicolon. For example:
‘Data for Row 1'‘Col 1', ‘Data for'‘Row 1 Col 2'
The value for a column exceeds the length of the line and wraps to the next line. Each portion ofa value is enclosed in single quotes (‘ '). Commas separate column values.
‘Data for Row 1 Col 1',‘Data for Row 1 Col 2';‘Data for Row 2 Col 1',‘Data for Row 2 Col 2';
The value for a column fills the entire line length. Each column value is enclosed in single quotes(‘ '). Commas separate column values. Semicolons (;) separate column values for each row.
Character data that is stored in fixed-length columns is truncated or padded appropriately to fit thecolumn. Character data that is stored in variable-length columns is truncated if necessary, but is notpadded.
Date/Timev All date and time data must be enclosed in single quotes. Any valid DB2 format for these values is
acceptable and is handled appropriately.
Numeric Datav Numeric data is not enclosed in quotes. A decimal can be indicated by either a comma or a period, and
it is handled appropriately.
Partial Primary Key
You can use this information to create a Point-and-Shoot file to specify an alternate key or a partialprimary key. This is very useful for selecting non-unique values or values that do not correspond to theprimary key. To indicate that the data in a file contains values for some set of the columns, prefix the filewith:
COLUMN-LIST
Names of the columns for which data is supplied
END-COLUMN-LIST
The data for the columns is specified in the order in which the columns are listed.
Example 1 ~
Assume you have a set of ITEMS rows that are not in your DB2 database. However, you want to extractthe DETAILS rows from your DB2 database for specific ITEMS. The primary key for the DETAILS rows iscomprised of two columns: ORDER_ID and ITEM_ID. However, you prefer to extract rows based on theITEM_ID only. You can generate a file to use as the Point-and-Shoot file to extract the several DETAILSrows for each specified ITEM_ID value, regardless of the ORDER_ID value.
372 IBM InfoSphere Optim for DB2 for z/OS: Common Elements

Example 2 ~
Assume that two columns comprise the partial primary key: ORDER_ID and ITEM_ID. Specify thecolumn values in the order they are listed. For each row in this example, the values for ORDER_ID arefollowed by the values for ITEM_ID, separated by commas. Semicolons separate the rows. Since commasand semicolons delimit the values, entries can span multiple lines and multiple entries can be specifiedon a single line.
Use the Row List File
Do the following to use a Row List file for a process:1. For an Archive or Extract Process, choose Option 1 TABLES from the EXTRACT Process or
ARCHIVE Process menu to display the Select Tables/Views for AD panel.For a Compare Process that uses an Access Definition as one or both sources, specify that the AccessDefinition is to be modified and display the Select Tables/Views for AD panel.For an Archive Selective Restore Process, choose Option 3 SELECTION CRITERIA to display theArchive Selection Criteria - Tables panel.
2. Enter the POINT command on the panel to display a pop-up window that will prompt you for anInput DSN. Specify the name of the Row List file you created and press END. When the process isperformed, that file is used to select rows from the Start Table.
EDIT ---- FOPDEMO.FOPPK.KEY --------------------------- COLUMNS 001 07COMMAND ===> SCROLL ===> CSR****** ************************ TOP OF DATA **************************000001 COLUMN-LIST000002 ITEM_ID000003 END-COLUMN-LIST000004 ’CH001’; ’CH002’; ’CH003’; ’CH004’;000005 ’CH005’; ’CH006’; ’CH007’; ’CH008’;000006 ’CH009’; ’CH010’;****** ********************** BOTTOM OF DATA *************************
Figure 189. Specify Partial Primary Key - Example 1
EDIT ---- FOPDEMO.FOPPK.KEY --------------------------- COLUMNS 001 07COMMAND ===> SCROLL ===> CSR****** ************************ TOP OF DATA **************************000001 COLUMN-LIST000002 ORDER_ID000003 ITEM_ID000004 END-COLUMN-LIST000001 00123, ’CH001’; 00124, ’CH002’; 00125, ’CH003’; 00126, ’CH004’;000002 00133, ’CH001’; 00134, ’CH002’; 00135, ’CH003’; 00146, ’CH004’;000003 00153, ’CH001’; 00154, ’CH002’; 00155, ’CH003’; 00156, ’CH004’;****** ********************** BOTTOM OF DATA *************************
Figure 190. Specify Partial Primary Key - Example 2
Appendix C. Create a Row List File 373

374 IBM InfoSphere Optim for DB2 for z/OS: Common Elements

Appendix D. Compatibility Rules
When you define an Optim relationship or a Column Map, corresponding columns must be compatible.
For relationships, column compatibility rules are the same for all Optim components. There aredifferences in the compatibility rules for Column Maps, depending on the Optim component with whichyou plan to use a Column Map.
Relationship Column CompatibilityThe following list shows compatibility for each column data type when you are creating or modifying arelationship.
The columns listed are compatible and may be defined as corresponding columns. Here, the term“column” refers to actual columns, as well as expressions containing concatenation, substrings, andliterals.
Numeric
v Numericv CHAR 2
v VARCHAR 2
v Numeric Constant 3
CHAR
v Numeric 2
v CHAR 4
v VARCHAR 4
v String Literalv String Expression1
v CLOB 4
VARCHAR
v Numeric 2
v CHAR 4
v VARCHAR 4
v String Literalv String Expression1
v CLOB 4
DATE
v DATE
TIME
v TIME
TIMESTAMP
v TIMESTAMP
TIMESTAMP WITH TIME ZONE
v CHARv VARCHAR
© Copyright IBM Corp. 1991, 2013 375

v DATEv TIMEv TIMESTAMPv TIMESTAMP WITH TIME ZONE
StringLiteral
v CHARv VARCHARv String Expression1
Graphic Literal
v DBCLOBv VARGRAPHIC
Numeric Constant
v Numeric 3
String Expression1
v CHARv VARCHARv String Literalv String Expression1
Binary Expression
v BINARYv VARBINARY
CLOB
v CHAR 4
v VARCHAR 4
v CLOB 4
DBCLOB
v Graphic Literalv DBCLOBv GRAPHICv VARGRAPHIC
GRAPHIC
v Graphic Literalv DBCLOBv GRAPHICv VARGRAPHIC
VARGRAPHIC
v Graphic Literalv DBCLOBv GRAPHICv VARGRAPHIC
BINARY
v Binary Literalv BINARY
376 IBM InfoSphere Optim for DB2 for z/OS: Common Elements

v VARBINARY
VARBINARY
v Binary Literalv BINARYv VARBINARY
Note: 1 “String Expression” is any comparand containing a concatenation operator or a substringfunction.
2 The “Numeric” column must be an INTEGER, SMALLINT, BIGINT column or a DECIMAL column witha scale of 0 (the numeric value cannot have digits to the right of the decimal point).
3 The “Numeric” column must be an INTEGER, SMALLINT, BIGINT, or DECIMAL column.
4 If the parent column is for mixed data, the child column must also be for mixed data.
Verification
When you press ENTER on the panel to define or modify the relationship, Optim verifies thatcorresponding columns are compatible. If they are not, an error message is displayed. You must correctthe incompatibility before saving the relationship definition.
Comparing Character to Numeric Columns
Character columns are compatible with numeric columns when defined in an Optim relationship. Tocompare character data to numeric data, it may be necessary to convert the numeric data to characterformat. This may involve padding the data prior to the comparison. Optim pads the data on the left withzeros so the two strings are equal in length. This operation is performed internally and does not affectyour DB2 data. To demonstrate, assume the following columns are defined in a relationship.
COL1 CHAR(5) COL2 DECIMAL(2)
If the data in COL2 is 43, Optim pads the value with three leading zeros to form “00043,” prior tocomparing that entry to the data in COL1, which is five characters long. This automatic padding mayaffect how Optim retrieves related rows of data.
Character-to-numeric conversion will occur only if the character column contains all digits.
Comparing Different Length Columns
Corresponding CHAR and VARCHAR columns do not require the same length attribute. However, if thelength of one column exceeds the length of its corresponding column, Optim truncates any trailing blanksuntil the column is equal in length to the corresponding column. If the data in the longer column doesnot have enough trailing blanks to truncate, that data is not considered related and is not retrieved.Truncation also occurs when the length of a concatenated expression exceeds the length of itscorresponding column.
Column Map CompatibilityWhen you create a Column Map to use with Archive or Move, you can map columns with compatibleattributes, including the use of literals, constants, expressions, exit routines, and special registers.Compare allows you to map columns with compatible attributes only. Literals, constants, expressions, exitroutines, and special registers can not be used. Column Maps are not used with Access.
Appendix D. Compatibility Rules 377

The columns listed are compatible and may be defined as corresponding columns. Here, the term“column” refers to actual columns, as well as expressions containing concatenation, substrings, andliterals.
Numeric
v Numericv CHAR 2
v VARCHAR 2
v Numeric Constant 3
CHAR
v Numeric 2
v CHARv VARCHARv String Literalv String Expression1v Graphic Literal 4
v String Expression1v CLOBv DBCLOB 4
v GRAPHIC 4
v VARGRAPHIC 4
VARCHAR
v Numeric 2
v CHARv VARCHARv String Literalv String Expression1v Graphic Literal 4
v String Expression1v CLOBv DBCLOB 4
v GRAPHIC 4
v VARGRAPHIC 4
DATE
v DATEv TIMESTAMP
TIME
v TIMEv TIMESTAMP
TIMESTAMP
v DATEv TIMEv TIMESTAMP
StringLiteral
v CHAR
378 IBM InfoSphere Optim for DB2 for z/OS: Common Elements

v VARCHARv String Expression1
Binary Literal
v BINARYv VARBINARY
Numeric Constant
v Numeric 3
String Expression1
v CHARv VARCHARv String Literalv String Expression1
Binary Expression
v BINARYv VARBINARY
BLOB
v BLOBv CLOB
CLOB
v CHARv VARCHARv BLOBv CLOBv DBCLOB 4
v GRAPHIC 4
v VARGRAPHIC 4
DBCLOB
v DBCLOBv GRAPHICv VARGRAPHIC
GRAPHIC
v Graphic Literalv DBCLOBv GRAPHICv VARGRAPHIC
VARGRAPHIC
v DBCLOBv GRAPHICv VARGRAPHIC
BINARY
v Graphic Literalv BINARYv VARBINARY
Appendix D. Compatibility Rules 379

VARBINARY
v Graphic Literalv BINARYv VARBINARY
DECFLOAT
v DECFLOAT 5
Note:
1 “String Expression” is any comparand containing a concatenation operator or a substring function.
2 The “Numeric” column must be an INTEGER, SMALLINT or BIGINT column or a DECIMAL columnwith a scale of 0 (the numeric value cannot have digits to the right of the decimal point).
3 The “Numeric” column must be an INTEGER, SMALLINT, BIGINT or DECIMAL column.
4 Only “mixed” source data can be inserted. Data cannot be compared.
5 A DECFLOAT column can be mapped only to a column with matching data type and precision.
Move and Archive Column Map CompatibilityOptim converts source data when necessary.
Character Data
Optim converts source data in character format to any character data type for the destination column,padding or truncating the source data on the right to fit the destination column. It also converts a validnumeric value in character format to a numeric format if the length of the converted value isaccommodated in the destination column.
Numeric Data
Optim converts source data in a numeric format to any numeric or character data type in a destinationcolumn, truncating decimal positions, if necessary.
A destination column with character data type must be defined with a minimum width of five, CH (5),when converting single or double floating point data types.
If significant positions for numeric data would be truncated by the transformation, the transformation isnot performed and a conversion error results.
Date, Time, or Timestamp Data
Optim cannot convert date, time, or timestamp values to a character or numeric data type. Conversely,character or numeric data types cannot be converted to date, time, or timestamp data types.
Optim can convert a timestamp value in a source column to a time or date, dropping the extraneousportion of the timestamp, or convert a date or time value to a timestamp. The time portion of thedestination timestamp is filled with zeros, when converting a date, or the date portion with the currentdate, when converting a time.
380 IBM InfoSphere Optim for DB2 for z/OS: Common Elements

Special Registers
Optim supports the DB2 special registers, CURRENT TIME or CURRENT_TIME, CURRENT DATE orCURRENT_DATE, CURRENT TIMESTAMP or CURRENT_TIMESTAMP, CURRENT SQLID orCURRENT_SQLID, and USER as source data specifications.
The Optim special register, CURRENT TSOID, is also available. This special register contains the TSO IDof the current user.
Compare Column Map CompatibilityThe Compare rules for Column Maps allow you to map columns with dissimilar name and columns withcompatible data types.
Compatible data types are determined as follows:v Character data types CHAR, VARCHAR, and LONGVARCHAR can be compared, regardless of length.
The shorter value is padded with blanks before the comparison. When browsing a Compare File, thelonger data type is assumed.
v Character data types GRAPHIC, VARGRAPHIC, and LONG VARGRAPHIC can be compared. Theshorter value is padded with blanks before the comparison. When browsing a Compare File, the longerdata type is assumed.
v BINARY and VARBINARY can be compared. Binary values are padded with binary zeroes. Whenbrowsing a Compare File, the longer data type is assumed.
v INTEGERS, SMALLINT, and BIGINT columns can be compared. When browsing the Compare File, thedata is displayed as INTEGER.
v DECIMALS of any scale and precision can be compared. When comparing DECIMALS of differentscale, precision, or both, the larger in each dimension is used and displayed when browsing theCompare File. The resulting number of digits cannot exceed 31. For example, if comparing a columnDEC(4,2) with a column DEC(4,4), the resulting dimension and precision is DEC(6,4).
v SINGLE PRECISION FLOATING POINT and DOUBLE PRECISION FLOATING POINT columns canbe compared. When browsing the Compare File, the values are displayed as DOUBLE PRECISIONFLOATING POINT.
v DECFLOAT columns can be compared only to DECFLOAT columns with the same precision.v Comparisons cannot be performed on LOB or XML data.v A DATE, TIME, TIMESTAMP, and TIMESTAMP WITH TIME ZONE data type column can be
compared only with a column of the same data type.
Appendix D. Compatibility Rules 381

382 IBM InfoSphere Optim for DB2 for z/OS: Common Elements

Appendix E. Optim Exit Parameter Lists
Before compiling each Security Exit, Column Map Exit, Archive Exit, or API, locate and edit thecorresponding parameter list, indicated by the DSect name.
In the parameter list, locate the specified field or fields and edit as indicated (to change the length for anyfields except PDP-STRUCTID). After saving the updates, proceed to recompile the exit. Value shown for"Old Length" represents the length of the field for releases prior to Release 5.5.3.Exit Name: PSXOSCxxLanguage: AssemblerDSECT Name: XPARMSField Name: XPLEV1Old Length: 18New Length: 128
Exit Name: PSXOSCxxLanguage: AssemblerDSECT Name: XPARMSField Name: XPLEV2Old Length: 18New Length: 128
Exit Name: PSXOSCxxLanguage: AssemblerDSECT Name: XPARMSField Name: XPLEV3Old Length: 18New Length: 128
Exit Name: PSXOSCxxLanguage: AssemblerDSECT Name: XPARMSField Name: XPSQLIDOld Length: 8New Length: 128
Exit Name: PSXFSCxxLanguage: AssemblerDSECT Name: RTPARMSField Name: SQLIDOld Length: 8New Length: 128
Exit Name: PSXASCxxLanguage: AssemblerDSECT Name: XPARMSField Name: XPSQLIDOld Length: 8New Length: 128
Exit Name: Column Map ExitLanguage: AssemblerDSECT Name: IDENTField Name: I_OPTIMRELOld Length: --New Length: 4
Exit Name: Column Map ExitLanguage: AssemblerDSECT Name: IDENTField Name: I_SQLID
© Copyright IBM Corp. 1991, 2013 383

Old Length: 8New Length: 128
Exit Name: Column Map ExitLanguage: AssemblerDSECT Name: IDENTField Name: I_SCRIDVOld Length: 8New Length: 128
Exit Name: Column Map ExitLanguage: AssemblerDSECT Name: IDENTField Name: I_STBNMVOld Length: 18New Length: 128
Exit Name: Column Map ExitLanguage: AssemblerDSECT Name: IDENTField Name: I_DCRIDVOld Length: 8New Length: 128
Exit Name: Column Map ExitLanguage: AssemblerDSECT Name: IDENTField Name: I_DTBNMVOld Length: 18New Length: 128
Exit Name: Column Map ExitLanguage: COBOLDSECT Name: PARMAREAField Name: 1PARMOPTIMRELOld Length: --New Length: 4
Exit Name: Column Map ExitLanguage: COBOLDSECT Name: PARMAREAField Name: PARMSQLIDOld Length: 8New Length: 128
Exit Name: Column Map ExitLanguage: COBOLDSECT Name: PARMAREAField Name: PARMSCRIDVOld Length: 8New Length: 128
Exit Name: Column Map ExitLanguage: COBOLDSECT Name: PARMAREAField Name: PARMSTBNMVOld Length: 18New Length: 128
Exit Name: Column Map ExitLanguage: COBOLDSECT Name: PARMAREAField Name: PARMDCRIDVOld Length: 8New Length: 128
Exit Name: Column Map Exit
384 IBM InfoSphere Optim for DB2 for z/OS: Common Elements

Language: COBOLDSECT Name: PARMAREAField Name: PARMDTBNMVOld Length: 18New Length: 128
Exit Name: Column Map ExitLanguage: COBOLDSECT Name: COLWKAREAField Name: CW-TABLEOld Length: 18New Length: 128
Exit Name: Column Map ExitLanguage: COBOLDSECT Name: COLWKAREAField Name: FILLEROld Length: 208New Length: 98
Exit Name: Column Map ExitLanguage: COBOLDSECT Name: ROWWKAREAField Name: RW-TABLEOld Length: 18New Length: 128
Exit Name: Column Map ExitLanguage: COBOLDSECT Name: ROWWKAREAField Name: FILLEROld Length: 208New Length: 98
Exit Name: Column Map ExitLanguage: COBOLDSECT Name: TBLWKAREAField Name: TW-TABLEOld Length: 18New Length: 128
Exit Name: Column Map ExitLanguage: COBOLDSECT Name: TBLWKAREAField Name: FILLEROld Length: 208New Length: 98
Exit Name: SAMPAPI2/SAMPAPI3Language: COBOLDSECT Name: PARMLISTField Name: 2PDP-STRUCTIDOld Length: 8New Length: 8
Exit Name: SAMPAPI2/SAMPAPI3Language: COBOLDSECT Name: PARMLISTField Name: PDP-TABLEOld Length: 18New Length: 128
Exit Name: SAMPAPI2/SAMPAPI3Language: COBOLDSECT Name: PARMLISTField Name: PDP-CREATOROld Length: 8
Appendix E. Optim Exit Parameter Lists 385

New Length: 128
Exit Name: SAMPAPI2/SAMPAPI3Language: COBOLDSECT Name: PARMLISTField Name: PDP-SQLIDOld Length: 8New Length: 128
Exit Name: SAMPAPI2/SAMPAPI3Language: COBOLDSECT Name: PARMLIST2Field Name:Old Length: 342New Length: 692
1PARMOPTIMREL should be added after PARMSSN in the DSECT.
2Change value of PDP-STRUCTID from API00100 to API00200
386 IBM InfoSphere Optim for DB2 for z/OS: Common Elements

Appendix F. Glossary
This Glossary defines some terms used throughout the documentation for Optim.
Access DefinitionsAn Access Definition allows you to define and store a description of the set of data to beextracted or archived. An Access Definition contains a variety of information including:v The list of tables from which data is extracted or archived.v The relationships used to extract or archive data, and the direction of traversal.v The indexes and date criteria for archived data.v Optionally, the order in which data is displayed or the selection criteria for data in the listed
tables.
The first table from which the data is extracted or archived is the Start Table. All other listedtables are processed in logical sequence, based on relationships and specifications in the AccessDefinition.
You can save an Access Definition for future use. The saved definition can be modified and savedunder the same name or a new name. Once saved, the same Access Definition can be used byACCESS to browse and edit data, by COMPARE to compare data, by MOVE to extract data, andby ARCHIVE to archive data.
Access Definition NameThe name of an Access Definition is in three parts:
group.user.name
The group and user portions of the name are useful for organizing projects. For example, you canassign a unique group name to each project and, within each project, a unique user value foreach person or user in the group.
Action VariablesAction Variables are built-in functions that can be used to return information about a specificArchive, Delete, or Restore Action. A variable must be preceded by a colon (:) in the SQL Editor.Use the LIST VARIABLES command to display a list of Action Variables when specifying anArchive Action SQL statement.
Archive ActionsArchive Actions define actions to be executed at a specific event in an Archive, Delete, or RestoreProcess. Each Archive Action is a single SQL statement or a call to a stored procedure. Eachaction can have only one SQL statement associated with it, although several actions can share thesame SQL statement.
For example, you might use an action SQL statement to keep a record of deletions by insertingthe primary key value into a table before deleting a row.
Archive CollectionAn Archive Collection is a list of Archive Files that can be logically unioned as a single datasource for Open Data Manager (ODM) access. For example, ODM uses an Archive Collection toprovide access to data in multiple Archive Files, even if all files do not include a specific table orcolumn or if the attributes of data in a column vary from file to file.
When an ODM connection is made using a collection name, the Archive Files in the collection areunioned and presented to an ODM user as though a single Archive File is being accessed.
Archive FilesAn Archive File is a sequential file that contains the archived data and information about the datacharacteristics. An Archive File provides safe, unmodified, storage of archived data. Once an
© Copyright IBM Corp. 1991, 2013 387

Archive File is created, data in it can be searched, browsed, and restored. (You can also use anArchive File with MOVE to insert data from an Archive File, and as a source file for COMPARE.)
Archive ProcessAn Archive Process copies a set of related rows from one or more tables and stores this data inan Archive File. You must define the set of data to archive using an Access Definition. Thearchived data, including rows from the specified set of source tables and object definitions forthose tables, is stored in an Archive File.
Archive Index FileAn Archive Index File is an SMS-managed VSAM file for dense indexes.
Batch OverridesYou can use batch overrides to customize a batch job. For batch execution of an Extract, Insert,Archive, Restore, or Compare Process, you can save the generated job to a data set and includebatch overrides in the JCL by inserting the DD name PSDFOVRD, followed by the desiredoverrides.
Batch UtilitiesBatch utilities allow you to maintain the Optim environment and automate Optim processes. Usemaintenance utilities to retrieve information from the Optim Directory, maintain objects in theDirectory, migrate Optim objects, and manage Archive File entries and files. Use processingutilities to automate Optim processes, such as Archive, Restore, Delete, Search, or Extract. (See theBatch Utilities Guide for detailed information on using the batch utilities.)
BrowseThe Browse facility allows you to review the contents of an Extract File, Archive File, or ControlFile. The Browse facility works in four modes:v Table Mode provides a dynamically formatted display of related data from an Extract or
Archive File.v Report Mode generates a static report on the contents of an Extract, Archive, or Control File.v Summary Mode provides a summarized listing showing only the tables in the Extract or
Archive File and the row counts for each.v Access Definition Mode lets you browse the Access Definition used to create an Extract or
Archive File.
You can also browse a Compare File as a set of related data, and focus on the changes.
Column MapsA Column Map is a set of specifications used to match the columns in the source table with thecolumns in the destination table, or to determine which columns are included in a comparisonand the correspondence of unlike-named columns.
The Column Map name consists of two parts:
mapid.mapname
The mapid is frequently used to group Column Maps by user or project.
Columns Maps can be created by ARCHIVE, MOVE, or COMPARE and stored in the OptimDirectory. A Column Map can be used interchangeably by Optim, if the definition fits thecomponent. (The rules used to define Column Maps for MOVE and ARCHIVE are different fromthose for COMPARE. Column Maps created with MOVE or ARCHIVE may not be available forCOMPARE.)
Column VariablesA column variable is the name of a column in a table preceded by a colon (for example,:STOCK_NUMBER). You can use column variables in an Archive Action SQL statement for anyArchive, Delete, or Restore action event, except one executed before the first row or after the lastrow. Use the LIST COLUMNS command to display a list of column variables for a table whenspecifying an Archive Action SQL statement.
388 IBM InfoSphere Optim for DB2 for z/OS: Common Elements

You can also use column variables in the CALL statement parameter list for a stored procedurecalled by an Archive Action. The data type of the column variable must be the same as that forthe parameter in the stored procedure, and column variable length must equal or exceed that forthe parameter.
Compare DefinitionsA Compare Definition contains information you provide to define a Compare Process. Thisdefinition can be specified for a single Compare Process, or stored in the Optim Directory andreused. A Compare Definition includes:v Specifications for the data sources. You can compare one table to another, or you can compare
two sets of tables and specify the data sources as:– An Extract or Archive File containing the data.– A set of data defined by an Access Definition.– All rows from the tables specified for Source 1 (available for Source 2 only).
v Specifications (i.e., a Table Map and, optionally, Column Maps) to map the two sets of data.v A Match Key.
The name of a Compare Definition is in three parts:
group.user.name
The group and user portions are useful for organizing projects. For example, you can assign aunique group name to each project and, within each project, a unique user value for each personor user in the group.
Compare FilesA Compare File is a sequential file created by COMPARE to store the results of the comparison.The contents of a Compare File can be browsed online or printed.
Note: The Compare File contains the actual data only when COMPARE must extract the datafrom DB2 to perform the comparison. When an Extract or Archive File is used as a source, thedata has already been extracted and is used directly from the file. Therefore, the Extract orArchive File should remain available and unchanged for as long as the Compare File is used.
Compare ProcessA Compare Process compares two sets of related data. You can compare data from a single pairof tables or from several pairs of tables. You must define the source data from tables or Extract orArchive Files. COMPARE accesses the data, performs the comparison, and presents the results ina row-by-row manner.
Control FilesA Control File is a sequential file used by MOVE and ARCHIVE to accumulate information andstatistics about an Archive, Restore, Delete, Insert, Load, or Convert Process. This includesinformation about process parameters, the success or failure of the processing of each row, andwhether the process was completed. The contents of a Control File can be browsed or printed.
Convert ProcessA Convert Process transforms data in an Extract or Archive File. The converted file can be usedas input to most Optim processes. However, since a converted Extract or Archive File does notinclude object definitions, it cannot be used to create objects, and your ability to browse aconverted file in Table Mode is limited.
You can use the Convert Process to mask sensitive data or to convert data to a Comma SeparatedValues format to be used with any application that supports CSV files.
Create ProcessA Create Process uses the object definitions in an Extract or Archive File to create the selectedobjects (for example, tables, primary keys and relationships, indexes, etc.) without inserting orrestoring the source data.
Appendix F. Glossary 389

Delete ProcessFor ARCHIVE, the Delete Process removes archived data from the database. Specify the data tobe deleted on the Specify Tables/Views for AD panel. The data can be deleted during the ArchiveProcess, or you can defer deletion. If you defer deletion, you can use a Delete Process to deletedata directly from the database, or you can execute an offline Delete Process in conjunction withstandard DB2 utilities (UNLOAD or REORG) with LOAD to avoid the overhead of DB2 logging.
Note: If both ARCHIVE and MOVE are installed, you can also use a Delete Process with MOVEto delete data from a database based on the contents of an Extract File.
Direct ChangesIn a Compare Process, a direct change indicates that rows from Source 1 and Source 2 have thesame match key value, but different values in one or more other columns. Direct changes arenoted in the comparison results by a “D” marking the changed rows. The columns containing thechanges are highlighted. A variety of commands are available to locate and scroll to the changedrows.
Discarded RowsRows that cannot be processed successfully are marked as discarded and written to a ControlFile. You can limit the number of discarded rows in an Insert, Restore, Load, Convert, or DeleteProcess. When this limit is reached, the process is terminated. You can retry an Insert or RestoreProcess for the discarded rows only.
Environment DefinitionsAn Environment Definition identifies the IMS Program Libraries, the DBD and PSB ProgramLibraries, the DFSVSAMP dataset and member name, as well as the IMS System ID and AGNused with IMS Legacy Tables. IMS Legacy Tables and Retrieval Definitions reference theinformation specified in the Environment Definition.
The Environment Definition name consists of: environmentname
Export ProcessAn Export Process copies objects from the Optim Directory in the current DB2 subsystem to adataset, so the objects can be imported to an Optim Directory in any DB2 subsystem. Once copiedto a dataset, exported objects can be imported any number of times to any number of OptimDirectories.
Extract FilesAn Extract File is a sequential file that contains the extracted data and information that definesthe characteristics of the data. Once created, an Extract File can be reused, providing a constantset of data with which to create and refresh test databases or compare modified data. Extract Filescan be used with MOVE, COMPARE, or ARCHIVE.
Extract ProcessAn Extract Process copies a set of related rows from one or more tables to store in an Extract File.To migrate a set of related data, you must specify the source using an Access Definition. TheExtract Process always includes the definitions for tables and columns. You can also choose toextract object definitions, including primary keys, relationships, and indexes. MOVE extracts thespecified data and object definitions to an Extract File.
Foreign KeysA foreign key defines the set of columns in a child table that describe the correspondence withthe primary key columns in the parent table. For example, the ORDERS table has a column,CUST_ID, with values that coincide with those in the primary key column, CUST_ID, in theCUSTOMERS table. The CUST_ID column in the ORDERS table is the foreign key.
Group Selection ProcessingGroup selection processing defines a sample set of rows from the Start Table with which to begin
390 IBM InfoSphere Optim for DB2 for z/OS: Common Elements

row selection for extracting data. Specify a maximum number of rows for a number of uniquevalues based on a selected column in the Start Table. (Group selection processing is available forMOVE and COMPARE only.)
Import ProcessAn Import Process copies the objects in the specified dataset (created during the Export Process)to the current DB2 subsystem.
IndexesAn index allows you to quickly locate needed information. In general, using an index is moreefficient than scanning all rows in a table.
Two types of index entries are stored in the Optim Directory. A sparse index consists of a rangeof values in a column. A dense index consists of all values for a column. (ARCHIVE only)
Insert ProcessAn Insert Process copies source data and object definitions from an Extract File or an Archive Fileinto specified destination tables. You must define a Table Map to identify the destination tablesthat correspond to the source tables, and you can use a Column Map for any pair of source anddestination tables. You can choose the type of processing (insert, update, or both) for all tables asa group, or by table.v Insert processing inserts new rows only.v Update processing replaces existing destination rows.v Both (insert and update) processing inserts new rows and updates existing rows.
Legacy TablesMove or Compare for IMS, VSAM, and Sequential Filesallow you to create Legacy Tables toincorporate legacy data (IMS, VSAM, or sequential data) into Move or Compare processes. ALegacy Table is an Optim object that defines the layout of a legacy record and its associatedphysical data source. You can create Legacy Tables from COBOL or PL/I copybooks, whichprovide description information similar to that in the DB2 catalog for DB2 tables.
Note: Two additional Optim definitions, IMS Environment Definitions and IMS RetrievalDefinitions, help process IMS data described in a Legacy Table.
To use Legacy Tables in Move or Compare processes, you must associate each Legacy Table witha specific data source. For VSAM or sequential files, you must provide the dataset name. ForIMS, you must provide the PSB and PCB for the source table's DBD, as well as the dataset name.
The Legacy Table name consists of two parts:
creatorid.tablename
Load ProcessA Load Process transforms the contents of an Extract or Archive File to Load utility format andexecutes a Load utility. The Load utility can be from IBM or another software vendor. If usingLOADPLUS, you are presented with a set of panels specific to LOADPLUS.
You can use the Load utility instead of an Insert or Restore Process. Both the Load utility and theLOAD phase of LOADPLUS require exclusive control of the database. During an Insert or RestoreProcess, however, the database is available to all users.
Match KeysA match key is used by the Compare Process to “match” rows from one source with rows fromthe other source. A match key consists of one or more corresponding columns from each source.When available, COMPARE uses a primary key from one of the source tables. However, when aprimary key is not defined in either the DB2 Catalog or the Optim Directory for either sourcetable, you are prompted to create a match key. You can also define a temporary match key thatyou can use with the current Compare Process or save in the Compare Definition.
Appendix F. Glossary 391

Match key definitions are similar to primary keys, except that the column name in the key mustexist in both source tables either directly, having the same base name, or indirectly, using aColumn Map to match unlike names. Also, unlike DB2 primary keys, match keys do not have tobe based on a unique index and, unlike Optim primary keys, match keys are not available for useby any other user or process. Match keys are stored in the current Compare Definition only, notin the Optim Directory.
Object DefinitionsObject definitions are the parameters required by DB2 to create an object. Optim can migrate DB2objects from one subsystem to another by extracting the object definitions from the source andusing them to create the objects at the destination. The objects that can be migrated include thefollowing:v Aliasesv Column Field Procedure Namesv Foreign Keysv Environment Definitionsv Indexesv Legacy Tablesv Primary Keysv Retrieval Definitionsv Relationshipsv Stored Proceduresv Synonymsv Triggersv Tablesv User Defined Typesv Viewsv User Defined Functions
Optim DirectoryThe Optim Directory is a set of DB2 tables that contain the Optim object definitions used byOptim. This includes:v Primary Keysv Access Definitionsv Column Mapsv Compare Definitionsv Relationshipsv Archive Entries & Indexesv Table Mapsv IMS Environment Definitionsv Legacy Tablesv IMS Retrieval Definitionsv Archive Collections
Access Definitions, Compare Definitions, Column Maps, Table Maps, Legacy Tables, EnvironmentDefinitions, Retrieval Definitions, Archive Entries, and Archive Indexes are unique to Optim.Primary keys and relationships are available in the DB2 Catalog, and IMS logical relationships inthe DBD. Optim uses DB2 Catalog information whenever possible. If DB2 Catalog information isnot available, however, you can specify the information and store it in the Optim Directory.
392 IBM InfoSphere Optim for DB2 for z/OS: Common Elements

Point-and-ShootThe Point-and-Shoot facility allows you to select specific rows from the Start Table to be used inan Archive, Compare, Extract, or Restore Process. The selected Start Table rows are identified bythe primary key values; thus, the Start Table must have a primary key. Optim stores the primarykey values specified by you in a sequential or partitioned dataset.
Note: If the Start Table is a Legacy Table, you cannot use the POINT command, but you can usean external Row List.
Primary KeysA primary key defines a column or set of columns that uniquely identifies each row in a table.For example, the CUSTOMERS table has a column, CUST_ID, that contains a unique value foreach row in the table. CUST_ID is an acceptable primary key for the CUSTOMERS table.
Primary keys are required when:v Extracting or archiving data from a table that has two or more parents. The primary key
guarantees that the extracted or archived rows are unique.v Inserting or restoring data. The primary key is used to determine whether a row exists. If a
row exists, the extracted or archived row is used to update the existing row. If a row does notexist, the extracted or archived row is used to create a new row in the database.
v Selecting rows from the Start Table during a Point�and-Shoot session.
Referential Integrity RulesOptim uses referential integrity information and table and column information from the DB2Catalog. When the DB2 Catalog does not provide the needed relationship information,user-specified objects, stored in the Optim Directory, supplement the DB2 Catalog.
Related ChangesIn a Compare Process, a related change indicates that dependent rows in a related table havedirect changes or unmatched rows. Related changes are noted in the comparison results by an“R” marking the row in the parent table related to the changed rows in the dependent table. The“R” indicator is propagated through the levels such that the related row in the parent,grandparent, great-grandparent, and so on, also display the indicator. The actual changed rows inthe dependent table are identified as direct changes by a “D” indicator.
RelationshipsA relationship determines how two tables are related. A relationship can be defined in the DB2Catalog, the Optim Directory, or IMS. You can use Optim to create or modify an Optimrelationship, or to browse DB2 relationships.
DB2 relationships require that each parent table have a primary key and that each child tablehave a corresponding foreign key consisting of the same number of columns as the primary key,with identical data types and attributes.
Optim relationships, however, do not require primary keys and foreign keys. You can defineOptim relationships that pair any compatible columns between two tables. You can also defineOptim relationships using substring and concatenation functions for columns, as well as literaland constant values. An Optim relationship can be defined between DB2 tables, between LegacyTables, or between a DB2 table and a Legacy Table.
Note: Move or Compare for IMS, VSAM, and Sequential Filesalso recognize IMS relationshipsbetween two segments within the same DBD, and IMS logical relationships between twosegments in separate databases. If an IMS relationship exists between two Legacy Tables, you donot need to create an Optim relationship.
Restore ProcessThe Restore Process selects data from an Archive File and restores it to its original database oranother database. You must define a Table Map to restore an Archive File, and you can optionallyuse one or more Column Maps to specify the archived data for each destination column. You can
Appendix F. Glossary 393

provide criteria to select the set of related data from the Archive File. ARCHIVE automaticallyrestores the data and objects in a logical manner and allows you to change the destinationspecifications, as needed.
Retrieval DefinitionsA Retrieval Definition contains a set of specifications used by IMS Legacy Tables that provide thedefault PSB Name (FOPDEPPR), PCB number (1), and IMS ID (IMSA) for the DBD PSTDEDB,and associate the dataset for the IMS database with each DD (data definition) within the DBD.
The Retrieval Definition name consists of:
environmentname.dbdname
Retry/RestartYou can retry or restart an Insert, Delete, or Restore Process if processing fails for some reason.v You can retry an Insert or Restore Process when one or more rows are discarded during the
process (for example, when you attempt to insert or restore child rows and the parent rows arenot in the database). Only rows that were initially skipped due to an error condition arereprocessed.
v You can restart an Insert, Restore, or Delete Process if the process does not execute tocompletion (for example, a process may not complete if it exceeds the allowable CPU limit).The initial process is restarted with the row after the last committed row.
Row ListA Row List stores the primary key values of Start Table rows selected in a Point-and-Shootsession. You can save Point�and-Shoot specifications in a dataset to use and modify as needed, orcreate a temporary Row List only for the current process.
Source 1 and Source 2In a Compare File, Source 1 and Source 2 can be either:v An Extract or Archive File containing the data to be compared.v An Access Definition that defines the data to be extracted for the comparison.
An additional choice is available for Source 2 to specify that all rows from the tables defined forSource 1 are to be extracted.
Note: For the Compare Process, it is irrelevant which data is identified as Source 1 and Source 2.However, when browsing the data online and in reports, Source 1 is used by default to determinetable names and column headings.
SQL WHERE ClauseAn SQL WHERE clause specifies criteria for extracting or archiving data. You can use an SQLWHERE clause when you define criteria in an Access Definition. Use standard DB2 SQL formatfor the SQL WHERE clause.
Start TableThe Start Table is the first table from which the data is processed. You can specify any table in theAccess Definition as the Start Table, except a reference table. If you do not explicitly specify aStart Table, the first table in the Table List is the Start Table.
Subset FileThe Subset File is an Archive File that contains a set of related rows from the source Archive Fileand the objects needed to recreate the database table. Selection criteria allow you to define thesubset. You can use a Subset File as if it were generated directly from the database. However, tosearch a Subset File, you must first use the Archive Import option to establish an ArchiveDirectory entry and create indexes for the Subset File.
394 IBM InfoSphere Optim for DB2 for z/OS: Common Elements

Substitution VariablesSubstitution variables are user-defined variables that you can reference in selection criteria, anSQL WHERE clause, or an Archive Action SQL statement. A substitution variable must bepreceded by a colon (:) in the criteria.
Before you can reference a substitution variable in the criteria, you must define that variable onthe Substitution Variable Display panel. You can provide a default value and a prompt string foreach substitution variable you define. If you do not provide a default value for a substitutionvariable, you must provide a value at run time of the process.
Tables Throughout this manual, the term “tables” refers to DB2 tables, aliases, synonyms, views,Materialized Query Tables, and joined views, as well as to Legacy Tables, which describe data inIMS, VSAM, or sequential files. These objects are manipulated similarly. The differences inhandling are noted, where pertinent.
Table LevelsThe set of tables described by an Access Definition do not have to be related in a hierarchicalmanner. Rather, tables are assigned levels on the basis of the sequence in which they aredisplayed when the Access Definition is used to retrieve data. The first table in the display is thehighest�level table, the next table is the second highest-level, and so forth. The last table in thedisplay is the lowest-level table.
Table ListThe Table List is the set of tables referenced by the Access Definition. To create the Table List,specify a Start Table and add other tables.
Note: The Table List cannot reference a table as well as one or more views, aliases, or synonymsfor the table. (ACCESS permits duplicate references.)
Table MapsA Table Map is a set of specifications used to match source tables to destination tables, or a set ofsource tables when comparing data from multiple tables.
The Table Map name consists of two parts:
mapid.mapname
The mapid is frequently used to group the maps by user or project.
Table Maps can be created by ARCHIVE, MOVE, or COMPARE and stored in the OptimDirectory. They then can be used interchangeably by Optim, if the definition fits the component.(Different rules are used to define Table Maps for MOVE and ARCHIVE, than for COMPARE.)
Traversal PathA traversal path directs an Extract or Archive Process through related tables specified in theAccess Definition. The traversal path is defined by relationships selected between tables, as wellas the responses to Q1 and Q2 on the Specify Relationship Usage panel.
The most common traversal begins at the Start Table and proceeds through the data model,traversing all relationships from parent to child.
Appendix F. Glossary 395

396 IBM InfoSphere Optim for DB2 for z/OS: Common Elements

Notices
This information was developed for products and services offered in the U.S.A.
IBM may not offer the products, services, or features discussed in this document in other countries.Consult your local IBM representative for information on the products and services currently available inyour area. Any reference to an IBM product, program, or service is not intended to state or imply thatonly that IBM product, program, or service may be used. Any functionally equivalent product, program,or service that does not infringe any IBM intellectual property right may be used instead. However, it isthe user's responsibility to evaluate and verify the operation of any non-IBM product, program, orservice.
IBM may have patents or pending patent applications covering subject matter described in thisdocument. The furnishing of this document does not grant you any license to these patents. You can sendlicense inquiries, in writing, to:
IBM Director of LicensingIBM CorporationNorth Castle DriveArmonk, NY 10504-1785U.S.A.
For license inquiries regarding double-byte (DBCS) information, contact the IBM Intellectual PropertyDepartment in your country or send inquiries, in writing, to:
Intellectual Property LicensingLegal and Intellectual Property LawIBM Japan Ltd.1623-14, Shimotsuruma, Yamato-shiKanagawa 242-8502 Japan
The following paragraph does not apply to the United Kingdom or any other country where suchprovisions are inconsistent with local law: INTERNATIONAL BUSINESS MACHINES CORPORATIONPROVIDES THIS PUBLICATION “AS IS” WITHOUT WARRANTY OF ANY KIND, EITHER EXPRESSOR IMPLIED, INCLUDING, BUT NOT LIMITED TO, THE IMPLIED WARRANTIES OFNON-INFRINGEMENT, MERCHANTABILITY OR FITNESS FOR A PARTICULAR PURPOSE. Somestates do not allow disclaimer of express or implied warranties in certain transactions, therefore, thisstatement may not apply to you.
This information could include technical inaccuracies or typographical errors. Changes are periodicallymade to the information herein; these changes will be incorporated in new editions of the publication.IBM may make improvements and/or changes in the product(s) and/or the program(s) described in thispublication at any time without notice.
Any references in this information to non-IBM Web sites are provided for convenience only and do not inany manner serve as an endorsement of those Web sites. The materials at those Web sites are not part ofthe materials for this IBM product and use of those Web sites is at your own risk.
IBM may use or distribute any of the information you supply in any way it believes appropriate withoutincurring any obligation to you.
© Copyright IBM Corp. 1991, 2013 397

Licensees of this program who wish to have information about it for the purpose of enabling: (i) theexchange of information between independently created programs and other programs (including thisone) and (ii) the mutual use of the information which has been exchanged, should contact:
IBM CorporationSoftware Interoperability CoordinatorDirector of Engineering, Information Management111 Campus DrivePrinceton, NJ 08540USA
Such information may be available, subject to appropriate terms and conditions, including in some cases,payment of a fee.
The licensed program described in this information and all licensed material available for it are providedby IBM under terms of the IBM Customer Agreement, IBM International Program License Agreement, orany equivalent agreement between us.
Any performance data contained herein was determined in a controlled environment. Therefore, theresults obtained in other operating environments may vary significantly. Some measurements may havebeen made on development-level systems and there is no guarantee that these measurements will be thesame on generally available systems. Furthermore, some measurements may have been estimated throughextrapolation. Actual results may vary. Users of this document should verify the applicable data for theirspecific environment.
Information concerning non-IBM products was obtained from the suppliers of those products, theirpublished announcements or other publicly available sources. IBM has not tested those products andcannot confirm the accuracy of performance, compatibility or any other claims related to non-IBMproducts. Questions on the capabilities of non-IBM products should be addressed to the suppliers ofthose products.
All statements regarding IBM's future direction or intent are subject to change or withdrawal withoutnotice, and represent goals and objectives only.
All IBM prices shown are IBM's suggested retail prices, are current and are subject to change withoutnotice. Dealer prices may vary.
This information is for planning purposes only. The information herein is subject to change before theproducts described become available.
This information contains examples of data and reports used in daily business operations. To illustratethem as completely as possible, the examples include the names of individuals, companies, brands, andproducts. All of these names are fictitious and any similarity to the names and addresses used by anactual business enterprise is entirely coincidental.
If you are viewing this information softcopy, the photographs and color illustrations may not appear.
TrademarksIBM, the IBM logo, and ibm.com® are trademarks or registered trademarks of International BusinessMachines Corporation in the United States, other countries, or both. If these and other IBM trademarkedterms are marked on their first occurrence in this information with a trademark symbol (® or ™), thesesymbols indicate U.S. registered or common law trademarks owned by IBM at the time this informationwas published. Such trademarks may also be registered or common law trademarks in other countries. Acurrent list of IBM trademarks is available on the Web at “Copyright and trademark information” atwww.ibm.com/legal/copytrade.shtml.
398 IBM InfoSphere Optim for DB2 for z/OS: Common Elements

Java™ is a trademark of Sun Microsystems, Inc.
Linux is a registered trademark of Linus Torvalds.
UNIX is a registered trademark of The Open Group.
Microsoft and Windows are registered trademarks of Microsoft Corporation.
Other company, product, or service names may be trademarks or service marks of others.
Notices 399

400 IBM InfoSphere Optim for DB2 for z/OS: Common Elements

Index
Special characters*
Aging Rule Selection ListColumn Map 178
Creator IDprimary key, generic 122relationship, generic 152
File name 7Generic
primary key 122relationship 152
Primary key, generic 117Relationship, generic 152
*ERROR*, Column Map status 162|| concatenation operator
Column Map 172Relationship 145
=Destination Dataset Name
entry shortcut 216=s
Source Dataset entry shortcut 216
AAccess Definitions
description 16Export Process 230
output file format 242Import Process 236
Action VariablesGeneral variables 221Restore/Delete variables 221Table Map 221
ActionsACTIONS command 221Active indicator, Table Map 221COPYSQL command 221Edit Action SQL statement
line commands 221Shared SQL statement
defining 221SHARESQL command 221Table Map 221
ACTIONS commandTable Map 221
Active indicatorActions
Table Map 221AGE function
CLR to delete 178Column Maps 178
Aging dataColumn Maps for 178Convert Process information 269
Aging RulesColumn Maps 178
Aging Specificationsaging amounts 178business rules 178
Aging Specifications (continued)Pivot Year 178prompts for Column Maps 178
AliasType indicator 205
ALL commandPending Process List 273
Allocating external files 365ANCHOR command 302Anchor table, definition 282Archive Options 334Archive Performance Tools 339Archive Process
strategies 339Archive Process Report
detailed 263Arithmetic calculations, in Column
Map 172Asterisk
generic Primary key 122generic Relationship 152
Attributes (I line command)Column Map 158Pending Process 273Primary Key 117Relationship 127Table Map 201
ATTRIBUTES commandbrowse file 302Column Map editor 162Primary key 119Relationship 150Table Map editor 205
authorization checksbatch 318
BBatch
Convert Process 268option 263
batch authorization checks 318Both (processing method)
table-level 205Browse
allocating external files 365Browse Archive or Extract File
display management techniques 294ANCHOR command 302ATTRIBUTES command 302EXPAND command 302HEX command 301horizontal scroll 302LOCK command 302ONLY command 295sidelabels display elements 302wide columns 302wide data 302wide tables 302
Lock columns 302
Browse Archive or Extract File (continued)Table Mode
Browse panel 278report 310report contents 310report format 310specify report options 310Table Name prompt 310
Browse Compare FileSrc 278
Browse Control File 277Browse panel
anchor table 282change display level 287column headings 278display management techniques 294
ANCHOR command 302ATTRIBUTES command 302EXPAND command 302HEX command 301horizontal scroll 302LOCK command 302ONLY command 295sidelabels display elements 302wide columns 302wide data 302wide tables 302
display traversal path 289EXCLUDE command 295find and limit data 295
exclude data 295find data 295multiple tables 295ONLY command 295SHOW command 295
FIND command 295case-sensitive search 295FIND ALL 295
hexadecimal display 301INDENT command 289JOIN ALL command 286JOIN command 282join tables 282
anchor table 282DB2 LIKE syntax 282join all tables 286level indicator 282no related tables 283relationship selection list 285table selection list 283unjoin 293zoom tables 292
level identifier 278line commands 278manage the display 294
display format 302scroll 294sidelabels format 302
maximum fetch limit 301COUNT command 301MAX ROWS command 301
© Copyright IBM Corp. 1991, 2013 401

Browse panel (continued)MORE indicator 294multi-table display 287multi-way joins
change stack 289join all tables 286stacked tables 289SWITCH command 289
ONLY command 295primary commands 278scroll expanded column
commands 302scroll multiple tables 294SHOW command 295SIDELABELS command 302sidelabels format 302STACKED indicator 287status flag 278SWITCH command 289table display format 287Table/View name 278UNJOIN command 293ZOOM command 292
Business rulesColumn Map 178
CCANCEL command
Relationship 145Centera
Recall Processing 318Stage File 318
Character data, convert 380Choose a Column Map panel 156Choose a Definition Option menu 12Choose a Primary Key panel 116Choose a Relationship panel 125Choose a Table Map panel 199Choose Option Type menu 317CLEAR command
Column Map 165CLR line command
ActionsRestore Process Table Map 221
Column Map 165Define Column Map 162delete AGE function 178
Columnmatch in Column Map 162Validation for Column Map 166
Column compatibility 375Column Maps 378relationships 375
Column Mapcompatibility
Compare 381Column Maps 155
AGE function 178Aging Specifications 178arithmetic calculations 172Attributes display 158business rules 178Choose a Column Map 156CLEAR command 165CLR line command 165, 178
Column Maps (continued)Column
concatenation 172destination 162match source and destination 162selection list 167status 162validation 166
column compatibility 378Concatenate columns 172Data Privacy Transformation Library
Functions 189data type
validation 166default mapping 162description 162destination
columns 162EQUAL column status 162ERROR column status 162EXIT column status 162exit routines 174EXPAND command 169Export Process 230
Output file format 249EXPR column status 162expressions 172functions 170Hash LOOKUP function 178Import Process 236information display 158LIST MAPS command 212LIST UNUSED command 167LITERAL column status 162literal values 172LOOKUP function 178Map display 158MAPPED column status 162MAPS command 212matching columns 162naming 156NOT_INS column status 162NOTUSED column status 162NULL column status 162PROP function 170purpose 155Random LOOKUP function 178selection list
columns 167from Table Map 212
sourcecolumns 162explicit value 166
source table specification 159SPC_REG column status 162SRC line command 178TRANSFM column status 162UNKNOWN column status 162validation 166
disable 166rules specification 156
VALIDATION command 166Column Name restrictions 130Columnar format
Browse 278
Columnsattributes
options 328match in Column Map 162names
in relationships 130primary key 119
selection listColumn Map 166Define Relationship panel 139
Substring in relationship 145Validation for Column Map 166
CommandsExport Process
object selection list 232Import Process 238Join and manage relational data 278Primary
ALL 273ANCHOR 302ATTRIBUTES 302COUNT 301EXCLUDE 295EXPAND 302FIND 295HEX 301INDENT 289JOIN 282MAXIMUM ROWS 301ONLY 295SHOW 295SIDELABELS 302START 287SWITCH 289UNJOIN 293UNLOCK 302ZOOM 292
Primary keydefine/modify 119
Relationshipdefine/modify 130line command list 128
Table Maplist of available commands 205selection list 201
Compare Filesbrowse
Src 278Maximum Fetch Rows option 333
Compare Options 333Compatibility rules
Column MapCompare 381
Column Maps 378Relationships 375
Concatenate columns (CONCAT)Column Maps 172Relationships 145
Confirm on Deletes user option 318Control Files
allocating external files 365Convert Process 263
Convert Process 263Batch execution 268Control File DSN 263Destination DSN 263discard limit 263
402 IBM InfoSphere Optim for DB2 for z/OS: Common Elements

Convert Process (continued)discarded rows 269External Format Specification 266JCL
Convert Process 268modify dates at destination 263overview 263parameters 263propagating primary key values 263Report 269
aging information 269Save JCL 268selection list 263Source File DSN 263Status 267Table Map 263
Convert to genericprimary keys 119relationships 150
COPYSQL commandActions 221
COUNT command 301Create relationship 129Creator ID
and Generic primary key 122and Generic relationship 152Choose Primary Key 116Choose relationship 125
DData conversion
Convert Process 263Data Privacy 1Data Privacy Transformation Library
CCN function 189EML function 189Functions 189SSN function 189
Data typevalues for Column Map
functions 170data types 58Database
sample tables 347CUSTOMERS 349DEPARTMENT Legacy Table 358DETAILS 352EMPLOYEE Legacy Table 359FEMALE_RATES 356ITEMS 352JOBCODE Legacy Table 360MALE_RATES 355ORDERS 350POSITION Legacy Table 360SALES 347SHIP_INSTR 355SHIP_TO 353STATE_LOOKUP 356, 361VENDITEM Legacy Table 358VENDOR Legacy Table 357
DATEaging DB2 column 178
Date Formatscharacter set 178examples 178
Dates, modifying at destinationConvert Process 263
DB2aging DATE and TIMESTAMP
columns 178DB2 Catalog
Relationship 125DB2 LIKE character 6
Choose Column Map 156Column Map selection 156POPULATE command 212Primary Key selection 116Relationship selection 125Table Map selection 199
DB2DATE 178default key lookups 318default volume information 318Definitions
Column Maps 155Export 230Import 236Primary keys 115Relationships 125Table Maps 199
Delete Performance Tools 339Delete Process
Primary Key Index Analysis 343strategies 339
Delimited identifiers 6Delimiter character option 328Description (Object Attributes)
Column Map 162Primary Key 119Relationship 150Table Map 205
Destination Dataset NameEntry shortcut 216
Directory (Optim)Migrate to another subsystem 229Primary Key 115Relationships 125Table Map 199, 205
Displaying dataSTART command 287
EEdit Action SQL statement
line commands 221Editor and Display Options 328
Editor Display Format 328END command 4EQUAL, Column Map status 162ERROR, Column Map status 162EXCLUDE command 295Exit Routines
Column Map 174parameters 132, 174Relationship 132requirements 132, 174return codes 132, 174samples 132, 174set destination 132, 174special registers 132, 174termination call 132, 174
EXIT, Column Map status 162EXPAND command 302
EXPAND command (continued)browse file 302Column Map 169Relationship 145
Expanded Relationship Editorprompt 130
Export Process 230Append 234Definition Type 230delete objects 230Output DSN 230Output file
Append 234disposition 230format 240
output file format 241Output file format
Access Definition 242Column Map 249Environment Definitions 258Legacy Table 255primary key 241, 262relationship 241Retrieval Definitions 260Table Map 251
overview 229Report 234Report DSN 230Selection List of objects 232Type of definition 230
Export Process panel 230EXPR, Column Map status 162Expressions
Column Map 172Extended relationship, overview 125Extract Files
allocate external files 365
FFile Unit Parameters 326, 365FIND command 295
with Hexadecimal data 301FOP_IMSKEY special register 173Function keys 4
GGeneric
Primary key 122Relationship 152
performance option 318GENERIC command
Primary key 119Relationship 150
GET TABLES RELATED commandprocessing option 318
Glossary 387
HHash LOOKUP function 178HELP command 4
function key 4HEX command 301
Browse panel 301
Index 403

Hexadecimal display 301in editor option 328
Horizontal (left-right) scrollin browse file 302
IImport Process 236
Definition Type 236Error handling 236Existing definitions 236Input DSN 236overview 229panel 236Report command 238Report DSN 236
Import Summary Report 238IMS Legacy Table
concatenated key 173INDENT command
browse file 289Point-and-Shoot 289
Indented Table Displaybrowse file 289Point-and-Shoot 289with JOIN ALL 287
Index Analysis pop-up window 343Index, selection list (LIST UNIQUE
INDEX command) 119INF line command
Restore Process Table MapActions 221
Information (I line command)Column Map 158Primary Key 117Relationship 127Retry/Restart 273Table Map 201
Input DSNImport Process 236
Insert (processing method)table-level 205
JJCL
Convert Processexecution 268review 268save 268
Job Card and Print Options 331Review Job Card options 318
JOIN ALL command 286JOIN command 282Join tables 282
anchor table 282DB2 LIKE syntax 282join all tables 286level indicator 282multi-way joins 289no related tables 283relationship selection list 285table selection list 283unjoin 293zoom tables 292
KKey Lookup Limit 318
LLegacy Options 335Legacy Tables
associate with data destinationsTable Maps 216
Line commands 6Define/Modify Primary Key
panel 119Define/Modify Relationship
panel 130scrolling
in an expanded column 302selection list 15
LIST COLUMNS commandExpanded Relationship Editor 145Primary Key editor 119Relationship editor 139
LIST commandColumn Map editor 167
LIST MAPS commandTable Map editor 212
LIST UNIQUE INDEX command 119LITERAL, Column Map status 162LOCATION prompt
for Directory migration 229LOCK command
browse file 302LOOKUP function 178LR line command 128
MMain Menu 11MAP command
Column Map 212Map ID
Choose Column Map 156Table Maps 199
Map NameChoose Column Map 156Table Maps 199
MAPPED, Column Map status 162Match Keys
when primary key not defined 115MAX ROWS command 301Maximum Fetch Rows
Compare option 333Editor option 328
MODEL new relationship 148MORE, scroll indicator 294
NNaming conventions
DB2 LIKE syntax 6NONE
as aging rule 178Not Insertable
Type indicator 205NOT_INS, Column Map status 162NOTUSED, Column Map status 162
NULLColumn Map keyword 162NULL Value indicator option 328
OObject Definitions
Export Process 230Import Process 236
ONLY command 295Optim Relationships
description 127Options
Archive 334Choose Option Type menu 317Compare 333Editor and Display 328Job Card and Print 331Legacy 335User 318
Description and SecurityStatus 325
Line Drawing Characters 325Print Tables in JCL 325
OUTPUT commandConvert Process Report 269
Output Date FormatColumn Maps 178
Output DSNExport Process 230
Output filesallocating external files 365format
Export Process 240Overriding parameters
Table Map 205
PParameters
Convert Process 263Partial Primary key 371Pending Process Attributes panel 273PF keys, use of 4Pivot Year
Column Maps 178Point-and-Shoot
allocating external files 365anchor table 282change display level 287display traversal path 289EXCLUDE command 295File Layout in Row List file 371find and limit data 295
exclude data 295find data 295multiple tables 295ONLY command 295SHOW command 295
FIND command 295case-sensitive search 295FIND ALL 295
INDENT command 289JOIN ALL command 286JOIN command 282join tables 282
404 IBM InfoSphere Optim for DB2 for z/OS: Common Elements

Point-and-Shoot (continued)anchor table 282DB2 LIKE syntax 282join all tables 286level indicator 282no related tables 283relationship selection list 285table selection list 283unjoin 293zoom tables 292
Lock columns 302manage the display 294
display format 302scroll 294sidelabels format 302
maximum fetch limit 301COUNT command 301MAX ROWS command 301
MORE indicator 294multi-table display 287multi-way joins
change stack 289join all tables 286stacked tables 289SWITCH command 289
ONLY command 295scroll multiple tables 294SHOW command 295SIDELABELS command 302sidelabels format 302STACKED indicator 287SWITCH command 289table display format 287UNJOIN command 293ZOOM command 292
Pop-up windows 4POPULATE command 212Primary Key Index Analysis 343Primary Keys 115, 241
Column Names 119commands 119convert to generic 119Creator ID specification 116define 119description specified 119Export Process 230
output file format 262Generic 122Import Process 236Legacy Table 115line commands 119modify 119Name specification 116overview 115partial 371Primary Keys
delete 119propagating 170
Convert Process 263selection list 117
Process Report Type 263Processing Options
Table MapBoth 205Insert 205override parameters 205table-level specifications 205
Processing Options (continued)Table Map (continued)
Update 205Processing order 6PROP function
for aging 178specifying 170
Propagate, primary key value 170
RRandom LOOKUP function 178Relationship Column Compatibility 375Relationships 125
column compatibility 375Column Names 130column selection list 139concatenate columns 145Creator ID specification 125database changes 150description specified 150edit (define, modify, browse) 130exit routines 132Expand protected columns 145Export Process 230
output file format 241Generic 152Import Process 236Legacy Tables 125line commands 130MODEL new relationship 148Primary keys in 115select columns 139selection list 127
line commands 128substring columns 145
REPORT commandImport Process 238
Report DSNExport Process 230Import Process 236
ReportsConvert Process 269
Reports, Default JCL 331Restart Process
See Retry/Restart Process 273Restore Process Table Map
Actions 221CLR line command 221INF line command 221shared status indicator 221
Retry/Restart Process 273ALL command 273Pending Process Attributes panel 273Pending Process List 273resubmit batch job 273Specify Parameters and Execute
panel 273Row List
create 371
SSample Database Tables and
Structure 347
SAVE commandRelationship 150
Save JCL Parameters panelConvert Process 268
ScrollBrowse panel 294
coordinated scroll 294horizontal scroll 294scroll commands 294scroll multiple tables 294vertical scroll 294
expanded column in Browse 302ISPF function 4lock columns 302MORE indicator 294Point-and-Shoot 294
See also Scroll, Browse Panel 294SCROLL values 4
SELECT commandExport Process 232
Selection List 15column
define relationship 139Column Map 158
for Table Map 212Convert Process
Extract File/Control File 266Extract, Archive, or Control
File 263Export Process objects 232indexes (LIST UNIQUE INDEX
command) 119maximum items 318Pending Process List 273POPULATE command 212primary key 117relationship 127Table Map 201
Tables 210Session options
See Options 334Shared SQL statement
Actions 221defining 221
Shared status indicatorActions
Restore Process Table Map 221SHARESQL command
Actions 221SHOW command
Browse panel 295Column Map status 165Point-and-Shoot 295
SHOW INDEXES command 343SIDELABELS command 302Sidelabels format
available commands 302line command 302Max Disp Width 328primary command 302screen elements 302
browse file 302Site Options 317Skipped Dates
DATE and TIMESTAMP 178Source 2
Table Map, table type 210
Index 405

Source Flags Display option 333Source Types
specify for Table Maps 204SPC_REG, Column Map status 162Special Registers
Column Map 169, 380functions 170
Specify Parameters and Execute panelRetry/Restart 273
Specify Report Options panelTable Name 310
SQLEDIT commandwith Actions 221
SQLIDChoose a Definition Option menu 12
SRC line commandinsert source column 178
START command 287Substitution variables
Archive Action 221SUBSTR function 145
in Column Maps 170Substring columns in relationship 145SUBSYS
Choose a Definition Option menu 12for Directory migration 229LOCATION prompt
Choose a Definition Optionmenu 12
supported data types 58SWITCH command 289Synonyms
Type indicator 205SYSIBM.SYSINDEX 119
TTable Access Strategy 341Table Map editor
Type indicator 205Table Maps 199
Actions 221Active indicator 221
ACTIONS command 221APPLY command 212associate Data Destinations 216Attributes display 201Choose a Table Map panel 199Column Map, include in 212Convert Process 263Description attribute 205destination tables 210Export Process 230
Table Map output file format 251Import Process 236Information display 201Legacy Tables 216LIST MAPS command 212Map display 201Map ID 199Map Name 199MAPS command 212object type 205POPULATE command 212Restore Process
Actions 221Source 1 Table Name 205
Table Maps (continued)Specify Source Types 204Src 1 CID 205Src 2 CID 205UNKNOWN 205validation rules 199
Table Modebrowse Archive File
report 310report contents 310report format 310Specify Report Options 310
Browse panel 278Table-level processing options 205
Process Mode 205Table Maps 205
TablesType indicator 205
Temporary TableType indicator 205
Test Data Management 1TIMESTAMP
Aging DB2 column 178TRANSFM, Column Map status 162Tutorial (Help) Key 4
UUnit parameters 318UNJOIN command 293Unknown
Type indicator 205UNKNOWN
Column Map status 162Table Map, Type value 205
UNLOCK command 302UNSELECT command
Export Process 232Unsupported Data Types
during Browse 302Update (processing method)
table-level 205User Options 318
VVALIDATION command 166Validation rules
Column Maps 156Table Maps 199
VariablesActions 221
ViewType indicator 205
WWide columns
browse file 302Wide data displays
Browse panel 302Wide tables
browse file 302
ZZOOM command
Browse panel 292Point-and-Shoot 292
406 IBM InfoSphere Optim for DB2 for z/OS: Common Elements


����
Printed in USA