ibm ibm thinkpad 770 user's guide - ps -...
TRANSCRIPT

IBM ThinkPad 770 User's GuideIBM
Title: C79DMMST CreationDate: 07/16/97 13:09:22
Note
Before using this information and the product it supports, be sure to read the general information in “SafetyInformation” on page vii, Appendix C, and Appendix E.
First Edition (September 1997)
The following paragraph does not apply to the United Kingdom or any country where such provisions areinconsistent with local law:INTERNATIONAL BUSINESS MACHINES CORPORATION PROVIDES THIS PUBLICATION “AS IS” WITHOUT ANYWARRANTY OF ANY KIND, EITHER EXPRESS OR IMPLIED, INCLUDING, BUT NOT LIMITED TO, THE LIMITEDWARRANTIES OF MERCHANTABILITY OR FITNESS FOR A PARTICULAR PURPOSE. Some states do not allowdisclaimers or express or implied warranties in certain transactions; therefore, this statement may not apply to you.
This publication could include technical inaccuracies or typographical errors. Changes are periodically made to theinformation herein; these changes will be incorporated in new editions of the publication. IBM may makeimprovements or changes in the products or the programs described in this publication at any time.
Requests for technical information about IBM products should be made to your IBM authorized dealer or your IBMmarketing representative.
Copyright International Business Machines Corporation 1997. All rights reserved. Note to U.S. GovernmentUsers – Documentation related to restricted rights – Use, duplication, or disclosure is subject to restrictions set forth inGSA ADP Schedule Contract with IBM Corp.
Title: C79DMMST CreationDate: 07/16/97 13:09:22

Contents
Safety Information . . . . . . . . . . . . . . . . . . . . . . . . . . viiLaser Compliance Statement . . . . . . . . . . . . . . . . . . . . . ix
Chapter 1. Getting to Know Your Computer . . . . . . . . . 1-1Knowing the Indicators on the LCD Indicator Panel . . . . . . . 1-7Using the Fn Key Function . . . . . . . . . . . . . . . . . . . . . 1-9Using the Numeric Keypad . . . . . . . . . . . . . . . . . . . . 1-11Knowing the LED Color Indications . . . . . . . . . . . . . . . 1-12Functional Highlights . . . . . . . . . . . . . . . . . . . . . . . . 1-13
DVD . . . . . . . . . . . . . . . . . . . . . . . . . . . . . . . . 1-13Audio . . . . . . . . . . . . . . . . . . . . . . . . . . . . . . . 1-13Audio with 3D Stereo Sound . . . . . . . . . . . . . . . . . . 1-13Video Capture . . . . . . . . . . . . . . . . . . . . . . . . . . 1-13Infrared . . . . . . . . . . . . . . . . . . . . . . . . . . . . . . 1-14Video Phone Features . . . . . . . . . . . . . . . . . . . . . 1-14System Management Features . . . . . . . . . . . . . . . . 1-14TrackPoint with Enhanced Controls . . . . . . . . . . . . . . 1-14
Chapter 2. Fine-Tuning Your Computer . . . . . . . . . . . . 2-1Starting the ThinkPad Configuration Program . . . . . . . . . . 2-3
ThinkPad Configuration Program for Windows 95 . . . . . . 2-3ThinkPad Configuration Program for Windows NT . . . . . . 2-4ThinkPad Configuration for DOS . . . . . . . . . . . . . . . . 2-5Switching Screens . . . . . . . . . . . . . . . . . . . . . . . . . 2-7Switching between the External Display and Television . . . 2-7
Using the TrackPoint . . . . . . . . . . . . . . . . . . . . . . . . . 2-9Operating the TrackPoint . . . . . . . . . . . . . . . . . . . . . 2-9Cleaning the Cap . . . . . . . . . . . . . . . . . . . . . . . . 2-10Customizing the TrackPoint . . . . . . . . . . . . . . . . . . 2-10
Using the ThinkPad Online Book . . . . . . . . . . . . . . . . . 2-15Using the Security Features . . . . . . . . . . . . . . . . . . . . 2-16
Using Passwords . . . . . . . . . . . . . . . . . . . . . . . . 2-16Using the Personalization Editor . . . . . . . . . . . . . . . 2-24
Saving Battery Power . . . . . . . . . . . . . . . . . . . . . . . 2-26Using the Power Management Modes . . . . . . . . . . . . 2-26Using Other Battery Saving Methods . . . . . . . . . . . . . 2-30Checking the Battery Status . . . . . . . . . . . . . . . . . . 2-31Using the Fuel Program . . . . . . . . . . . . . . . . . . . . 2-32
Using the Audio Features . . . . . . . . . . . . . . . . . . . . . 2-35Using the 3D Sound Retrieval System (SRS) Function . . 2-36
Copyright IBM Corp. 1997 iii
Title: C79DMMST CreationDate: 07/16/97 13:09:22

Using the MIDI Features . . . . . . . . . . . . . . . . . . . . 2-37Using the ThinkPad Modem . . . . . . . . . . . . . . . . . . . . 2-39
Using the ThinkPad Modem in Windows 95 and WindowsNT . . . . . . . . . . . . . . . . . . . . . . . . . . . . . . . . 2-41
Using the ThinkPad Modem in OS/2 . . . . . . . . . . . . . 2-41Using the 56 Kbps Modem . . . . . . . . . . . . . . . . . . . 2-41Telephony Features . . . . . . . . . . . . . . . . . . . . . . . 2-43
Using the DVD and Enhanced Video Adapter . . . . . . . . . 2-44Using the DVD Enhanced Video Adapter with Windows 95 2-45Using the Enhanced Video Features in OS/2 . . . . . . . . 2-51
Using Easy-Setup . . . . . . . . . . . . . . . . . . . . . . . . . 2-54Knowing Your Configuration . . . . . . . . . . . . . . . . . . 2-56Setting the Date and Time . . . . . . . . . . . . . . . . . . . 2-57Changing the Drive Startup Sequence . . . . . . . . . . . . 2-57
Chapter 3. Installing Options . . . . . . . . . . . . . . . . . . 3-1Installing IBM Options . . . . . . . . . . . . . . . . . . . . . . . . 3-2
Installing a Memory Option . . . . . . . . . . . . . . . . . . . . 3-2Replacing the Hard Disk Drive in the HDD Bay . . . . . . . . 3-5Installing the Battery Pack . . . . . . . . . . . . . . . . . . . . 3-6Removing and Installing a Device in UltraBay II . . . . . . . 3-7Installing the DVD and Enhanced Video Adapter . . . . . . 3-10Replacing the Backup Battery . . . . . . . . . . . . . . . . . 3-11Attaching a Mouse, a Numeric Keypad, or an External
Keyboard . . . . . . . . . . . . . . . . . . . . . . . . . . . . 3-13Inserting or Removing a PC Card . . . . . . . . . . . . . . . 3-15
Installing Other Devices . . . . . . . . . . . . . . . . . . . . . . 3-17Using a Docking Station . . . . . . . . . . . . . . . . . . . . 3-17Using the Security System Lock . . . . . . . . . . . . . . . 3-21Attaching a Television to Your Computer . . . . . . . . . . 3-22
Chapter 4. Solving Computer Problems . . . . . . . . . . . . 4-1Frequently Asked Questions . . . . . . . . . . . . . . . . . . . . 4-2Troubleshooting Guide . . . . . . . . . . . . . . . . . . . . . . . . 4-3Troubleshooting Charts . . . . . . . . . . . . . . . . . . . . . . . 4-4
Error Codes or Screen Messages . . . . . . . . . . . . . . . . 4-5No Error Codes or Screen Messages . . . . . . . . . . . . 4-10An Input Problem . . . . . . . . . . . . . . . . . . . . . . . . 4-11A Suspend or Hibernation Problem . . . . . . . . . . . . . . 4-12An LCD Problem . . . . . . . . . . . . . . . . . . . . . . . . 4-16
iv
Title: C79DMMST CreationDate: 07/16/97 13:09:22

An Indicator Problem . . . . . . . . . . . . . . . . . . . . . . 4-17A Battery Problem . . . . . . . . . . . . . . . . . . . . . . . . 4-17A CD-ROM Drive Problem . . . . . . . . . . . . . . . . . . . 4-18A DVD Problem . . . . . . . . . . . . . . . . . . . . . . . . . 4-20An Infrared Communication Problem . . . . . . . . . . . . . 4-21An Enhanced Video/MPEG Problem . . . . . . . . . . . . . 4-22An Audio or a Telephony Problem . . . . . . . . . . . . . . 4-22A Universal Serial Bus (USB) Problem . . . . . . . . . . . . 4-23A Modem Problem . . . . . . . . . . . . . . . . . . . . . . . 4-23Other PC Card Problems . . . . . . . . . . . . . . . . . . . . 4-26A SelectaDock Problem . . . . . . . . . . . . . . . . . . . . 4-26A Printer Problem . . . . . . . . . . . . . . . . . . . . . . . . 4-27An External Display Problem . . . . . . . . . . . . . . . . . 4-27A Television Problem . . . . . . . . . . . . . . . . . . . . . . 4-29Other Option Problems . . . . . . . . . . . . . . . . . . . . . 4-29A Software Problem . . . . . . . . . . . . . . . . . . . . . . . 4-31Other Problems . . . . . . . . . . . . . . . . . . . . . . . . . 4-31
Testing Your Computer . . . . . . . . . . . . . . . . . . . . . . 4-32
Chapter 5. Getting Service . . . . . . . . . . . . . . . . . . . . 5-1Information on Your ThinkPad . . . . . . . . . . . . . . . . . . . 5-2
Option List . . . . . . . . . . . . . . . . . . . . . . . . . . . . . 5-2Identification Numbers . . . . . . . . . . . . . . . . . . . . . . 5-2Problem Recording Sheet . . . . . . . . . . . . . . . . . . . . 5-3
How to Receive Customer Support and Service . . . . . . . . . 5-4Help by Telephone . . . . . . . . . . . . . . . . . . . . . . . . 5-4ThinkPad EasyServ . . . . . . . . . . . . . . . . . . . . . . . . 5-5Getting Help around the World . . . . . . . . . . . . . . . . . 5-5Online Housecall . . . . . . . . . . . . . . . . . . . . . . . . . 5-6Fax Information . . . . . . . . . . . . . . . . . . . . . . . . . . 5-6Electronic Support Services . . . . . . . . . . . . . . . . . . . 5-6
Purchasing Additional Services . . . . . . . . . . . . . . . . . . . 5-8Enhanced PC Support Line . . . . . . . . . . . . . . . . . . . 5-8Network and Server Support Line . . . . . . . . . . . . . . . . 5-8Ordering Support Line Services . . . . . . . . . . . . . . . . . 5-9Warranty and Repair Services . . . . . . . . . . . . . . . . . 5-10
Obtaining IBM Operating System Updates . . . . . . . . . . . 5-11Getting Update Diskettes . . . . . . . . . . . . . . . . . . . . 5-11Ordering Publications . . . . . . . . . . . . . . . . . . . . . . 5-11About Your Warranty . . . . . . . . . . . . . . . . . . . . . . 5-11
Contents v
Title: C79DMMST CreationDate: 07/16/97 13:09:22

Appendix A. Operating Requirements . . . . . . . . . . . . . A-1Specifications . . . . . . . . . . . . . . . . . . . . . . . . . . . . . A-2Operating Environment . . . . . . . . . . . . . . . . . . . . . . . A-3Power Cord Requirements . . . . . . . . . . . . . . . . . . . . . A-5
For 2-Pin Power Cords . . . . . . . . . . . . . . . . . . . . . . A-5For 3-Pin Power Cords . . . . . . . . . . . . . . . . . . . . . . A-6
Appendix B. Installing a New Operating System . . . . . . B-1
Appendix C. Ergonomics Information . . . . . . . . . . . . . C-1
Appendix D. Product Warranty . . . . . . . . . . . . . . . . . D-1
Appendix E. Notices . . . . . . . . . . . . . . . . . . . . . . . . E-1Trademarks . . . . . . . . . . . . . . . . . . . . . . . . . . . . . . E-1Electronic Emission Notice . . . . . . . . . . . . . . . . . . . . . E-2
Federal Communications Commission (FCC) Statement . . E-2Canadian Department of Communications Compliance
Statement . . . . . . . . . . . . . . . . . . . . . . . . . . . . . E-2Avis de conformité aux normes du ministère des
Communications du Canada . . . . . . . . . . . . . . . . . . E-3European Community Directive Conformance Statement . . E-3
Telecommunication Notice . . . . . . . . . . . . . . . . . . . . . E-4Industry Canada Requirements . . . . . . . . . . . . . . . . . . . E-6
Notice . . . . . . . . . . . . . . . . . . . . . . . . . . . . . . . . E-6Caution . . . . . . . . . . . . . . . . . . . . . . . . . . . . . . . E-6Notice . . . . . . . . . . . . . . . . . . . . . . . . . . . . . . . . E-7Avis . . . . . . . . . . . . . . . . . . . . . . . . . . . . . . . . . E-7Avertissement . . . . . . . . . . . . . . . . . . . . . . . . . . . E-8
Index . . . . . . . . . . . . . . . . . . . . . . . . . . . . . . . . . . X-1
vi
Title: C79DMMST CreationDate: 07/16/97 13:09:22

Safety Information
Danger:
Electrical current from power, telephone, and communication cable is hazardous. To avoid shockhazard, connect and disconnect cables as shown below when installing, moving, or opening the coversof this product or attached devices. The 3-pin power cord must be used with a properly groundedoutlet.
Turn everything OFF.Turn everything OFF.
First, attach all cables to devices. First, remove the power cord fromthe outlet.
Attach the signal cables toreceptacles.
Remove signal cables fromreceptacles.
Attach the power cord to an outlet.
Remove all cables from devices.
Turn the device ON.
To Connect To Disconnect
In the U.K., by law :
The telephone line cable must be connected after the power cord.The power cord must be disconnected after the telephone line cable.
Copyright IBM Corp. 1997 vii
Title: C79DMMST CreationDate: 07/16/97 13:09:22

Danger:
Do not disassemble, incinerate, or short-circuit the rechargeablebattery pack. Do not put it in trash that is disposed of inlandfills. Dispose of it as required by local ordinances orregulations. In the United States, call IBM at 1-800-IBM-4333 forinformation on disposal .
Caution:
The fluorescent lamp in the liquid crystal display (LCD) containsmercury. Do not put it in trash that is disposed of in landfills.Dispose of it as required by local ordinances or regulations.
The LCD is made of glass, and rough handling or dropping thecomputer can cause the LCD to break. If the LCD breaks and theinternal fluid gets into your eyes or on your hands, immediately washthe affected areas with water for at least 15 minutes; then getmedical care if any symptoms are present after washing.
viii
Title: C79DMMST CreationDate: 07/16/97 13:09:22

Laser Compliance Statement
The optional CD-ROM and DVD drives in the IBM ThinkPad 770 arelaser products. The drives' classification label (shown below) arelocated on the top of these drives.
CLASS 1 LASER PRODUCTLASER KLASSE 1LUOKAN 1 LASERLAITEAPPAREIL A LASER DE CLASSE 1KLASS 1 LASER APPARAT
The CD-ROM and DVD drives are certified in the U.S. to conform tothe requirements of the Department of Health and Human Services21 Code of Federal Regulations (DHHS 21 CFR) Subchapter J forClass I laser products.
In other countries, the drives are certified to conform to therequirements of EN60825.
Caution:
Do not open the CD-ROM or DVD drive; no user adjustments orserviceable parts are inside.
Use of controls, adjustments, or the performance of procedures otherthan those specified may result in hazardous radiation exposure.
Class I (1) laser products are not considered to be hazardous. TheCD-ROM and DVD drives have an internal, Class I (1), 0.5-milliwatt,aluminum gallium-arsenide laser that operates at a wavelength of760 to 810 nanometers. The design of the laser system and theCD-ROM and DVD drives ensure that there are no exposure to laserradiation above a Class I (1) level during normal operation, usermaintenance, or servicing conditions.
Safety Information ix
Title: C79DMMST CreationDate: 07/16/97 13:09:22

x
Title: C79DMMST CreationDate: 07/16/97 13:09:22

Chapter 1. Getting to Know Your Computer
Thank you for purchasing the IBM ThinkPad Computer. TheThinkPad 770 series of computers incorporates the latest inhardware technology. The high-end models have a larger screenthan the low-end models and are equipped with an internal modem.A digital versatile disk is available as an option for playingoff-the-shelf DVD titles and movies.
You can use this book to find out how to use the various softwarebundled with your computer and also about the hardware features.You can also refer to the online book which is in your hard disk, tofind out on more technical matters. See “Using the ThinkPad OnlineBook” on page 2-15 for details.
Knowing the Indicators on the LCD Indicator Panel . . . . . . . 1-7Using the Fn Key Function . . . . . . . . . . . . . . . . . . . . . 1-9Using the Numeric Keypad . . . . . . . . . . . . . . . . . . . . 1-11Knowing the LED Color Indications . . . . . . . . . . . . . . . 1-12Functional Highlights . . . . . . . . . . . . . . . . . . . . . . . . 1-13
DVD . . . . . . . . . . . . . . . . . . . . . . . . . . . . . . . . 1-13Audio . . . . . . . . . . . . . . . . . . . . . . . . . . . . . . . 1-13Audio with 3D Stereo Sound . . . . . . . . . . . . . . . . . . 1-13Video Capture . . . . . . . . . . . . . . . . . . . . . . . . . . 1-13Infrared . . . . . . . . . . . . . . . . . . . . . . . . . . . . . . 1-14Video Phone Features . . . . . . . . . . . . . . . . . . . . . 1-14System Management Features . . . . . . . . . . . . . . . . 1-14TrackPoint with Enhanced Controls . . . . . . . . . . . . . . 1-14
Copyright IBM Corp. 1997 1-1
Title: C79DMMST CreationDate: 07/16/97 13:09:22

1 The liquid crystal display (LCD) displaystext and graphics on the computer screen.
2 The numeric keypad is used for typingnumbers in NumLk mode.
3 The internal modem port (also calledthe telephone jack ), equipped on somemodels, is used for connecting your computerto a telephone line.
1-2
Title: C79DMMST CreationDate: 07/16/97 13:09:22

4 The legs can be extended to angle thekeyboard for more comfortable typing.
5 The PC Card slots support the followingtype of PC cards: PCMCIA (Type I, Type II,and Type III), CardBus, and Zoomed Video(ZV) card. The eject buttons 6 eject thePC cards from the slots.
7 The UltraBay II is used for inserting variousdevices such as a CD-ROM drive, diskettedrive, DVD drive, a secondary hard diskdrive, and a secondary battery pack.
8 The emergency eject hole is used to ejectthe optional DVD or CD-ROM tray when itdoes not open with the eject button 9 .Insert a pin to eject the tray.
9 The eject button ejects the tray from theoptional CD-ROM or DVD drive.
1 The drive-in-use lamp goes on when datais being read from a CD-ROM or a DVD discin the optional CD-ROM or DVD drive. Donot enter suspend mode or eject a disc whenthis lamp is on.
11 The diskette eject button ejects a diskettefrom the diskette drive.
12 The diskette drive-in-use lamp goes onwhen data is being written to or is being readfrom a diskette. Do not enter suspend modeor eject a diskette when this lamp is on.
13 The left and right cover release latchesrelease the cover for operation.
14 The left and right internal speakersgenerate stereo sound.
15 The left and right release latches releasethe left and right bay eject levers 16 whichrelease any device in the battery bay or theUltraBay II, respectively. The right releaselatch contains an LED that indicates whenyou can safely remove a device from theUltraBay II. See page 1-12 for details of thelamp color indications.
17 The left click , right click , and center clickbuttons are used to select items on thescreen, double-click and bring up contextmenus. They work like mouse click buttons.The center click button (below the otherbuttons) is used to activate the enhancedTrackPoint functions. See page 2-9.
18 Press the Fn key with certain function keys(F1–F12) to activate special ThinkPadfunctions (shown with blue-gray icons on thefunction keys). See page 1-9.
19 The TrackPoint is a built-in pointing stickthat functions like a mouse. It also hasenhanced features that a mouse does nothave. See page 2-9.
2 The function keys are used for activatingvarious functions.
21 The built-in microphone is used for soundrecording and telephony.
22 The LCD indicator panel shows the currentstatus of the computer and battery powerwith indicators and numeric information. Seepage 1-7.
23 The brightness control lever adjuststhe brightness of the screen.
Chapter 1. Getting to Know Your Computer 1-3
Title: C79DMMST CreationDate: 07/16/97 13:09:22

1 The battery pack is a built-in power sourcefor the computer. It allows you to operate thecomputer when ac power is not available.
2 The video-in port is used forconnecting such devices as the VCR andvideo camera to receive video images.
1-4
Title: C79DMMST CreationDate: 07/16/97 13:09:22

3 The video-out port is used forconnecting your computer to a television or aVCR to send video images to these devices.
4 Reserved.
5 The volume control adjusts the soundlevel of the built-in speakers.
6 The microphone/line-in jack is whereyou connect a stereo microphone or externalaudio device.
7 The headphone jack is where youconnect a stereo headphone or externalspeakers.
8 The power switch turns the computer onand off.
9 The reset switch resets the system in anemergency.
1 The security keyhole is used with asecurity lock. See page 3-21.
11 The AC power jack is where youconnect the AC Adapter cable.
12 The external-input-device port allowsyou to attach a mouse, an external keyboard,or an external numeric keypad.
13 The serial port (9-pin) is where youconnect a serial-device cable.
14 The universal serial bus (USB)allows you to connect any device thatconforms to this new interface. Many recentdigital devices comply to this new standard.
15 The fan louvers are for circulating air withinthe computer. Do not place any object infront of these louvers.
16 The system-expansion port (240-pin)allows you to connect the IBM ThinkPadSelectaBase 770 port replicator.
17 The rear infrared port allows yourcomputer to communicate with other devicesthat have infrared data-transfer capabilities.
18 The external-display port (15-pin) iswhere you attach an external display.
19 The parallel port (25-pin) is where youusually connect a parallel-printer signal cable.
2 The external-diskette-drive port iswhere you attach an external-diskette-drive.
21 The power-on lamp indicates that thecomputer power is on, regardless of whetherthe computer is in suspend mode.
22 The suspend lamp indicates that thecomputer is in suspend mode.
Green : The computer is in suspendmode.Blinking green : The computer is in theprocess of changing modes.
23 The charge lamp shows the chargestatus of your battery.
Green : Enough battery power is left foroperation.Orange : The battery pack is beingcharged.Blinking orange : The battery packneeds to be charged.
You will hear three beeps the moment thislamp starts blinking if you had set the alarmin the ThinkPad Configuration program.
Chapter 1. Getting to Know Your Computer 1-5
Title: C79DMMST CreationDate: 07/16/97 13:09:22
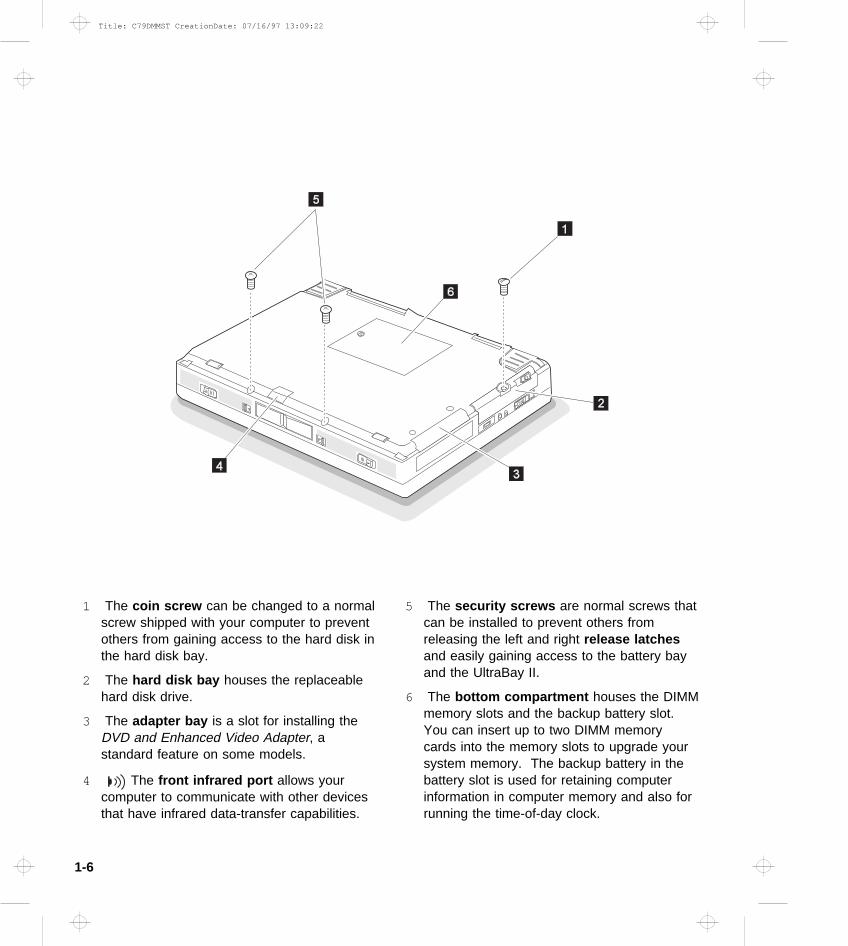
1 The coin screw can be changed to a normalscrew shipped with your computer to preventothers from gaining access to the hard disk inthe hard disk bay.
2 The hard disk bay houses the replaceablehard disk drive.
3 The adapter bay is a slot for installing theDVD and Enhanced Video Adapter, astandard feature on some models.
4 The front infrared port allows yourcomputer to communicate with other devicesthat have infrared data-transfer capabilities.
5 The security screws are normal screws thatcan be installed to prevent others fromreleasing the left and right release latchesand easily gaining access to the battery bayand the UltraBay II.
6 The bottom compartment houses the DIMMmemory slots and the backup battery slot.You can insert up to two DIMM memorycards into the memory slots to upgrade yoursystem memory. The backup battery in thebattery slot is used for retaining computerinformation in computer memory and also forrunning the time-of-day clock.
1-6
Title: C79DMMST CreationDate: 07/16/97 13:09:22

Knowing the Indicators on the LCD Indicator Panel
Various indicators appear on the LCD indicator panel. Theseindicators show the operating conditions of your computer. You willbe able to use your computer more efficiently if you know what theseindicators mean.
1 The speaker indicator appears when the speaker beeps. Itturns off when a key is pressed.
2 The remaining battery indicator shows the remaining batterypower in either percent (%), days (d), hours (h), or hours andminutes (hh:mm).
When a secondary battery is used, the indicator shows theaverage percentage of the main battery and the secondarybattery combined.
3 The battery status indicator shows the status of the mainbattery pack 1 (in the battery bay) and the secondary batterypack 2 (in the UltraBay II) in five levels, from empty to full
.
The indicator on the right shows the battery charge status;charging ( ) and discharging ( ). A blank indicates nobattery activity.
Chapter 1. Getting to Know Your Computer 1-7
Title: C79DMMST CreationDate: 07/16/97 13:09:22

4 The diskette drive in-use indicator appears when data isbeing read from or is being written to a diskette.
Do not enter suspend mode or eject the diskette when thisindicator is being displayed.
5 The hard disk in-use indicator appears when data is beingread from or is being written to the hard disk.
Do not enter suspend mode or turn off the computer when thisindicator is being displayed.
6 The numeric lock indicator indicates that the numeric keypadfunction is enabled. Press and hold the Shift key whilepressing the NumLk key to enable or disable this function.
7 The caps lock indicator indicates that the caps lock mode isenabled. This mode enables you to enter the alphabetcharacters (A–Z) in capital letters without using the Shift key.The Caps Lock key enables and disables this mode.
8 The scroll lock indicator indicates that the scroll lock functionis enabled. This function enables you to use the Arrow keysto scroll the screen. However, you will not be able to movethe cursor with these keys when this function is enabled. TheScrLk key enables and disables this function. Not allapplication programs support this function.
1-8
Title: C79DMMST CreationDate: 07/16/97 13:09:22

Using the Fn Key Function
The Fn key allows you to change the operating conditions of yourcomputer instantly. To use the ThinkPad functions, press and holdthe Fn key 1 ; then press the appropriate function key 2 (F1 toF12).
KeyCombination
Keytop Function
Fn + F1 — Unused
Fn + F2 Displays the battery power statusindicator or erases it when it is beingdisplayed. The Fuel program must beactivated before you can use thisfunction. See page 2-32.
Fn + F 3Places the computer in standby mode.See page 2-26.
Fn + F4 Places the computer in suspend mode.See page 2-26.
Fn + F5 — Unused
Fn + F6 — Unused
Chapter 1. Getting to Know Your Computer 1-9
Title: C79DMMST CreationDate: 07/16/97 13:09:22

KeyCombination
Keytop Function
Fn + F7 Switches the computer display in thefollowing sequence when an externaldisplay is attached.
External Both Display LCD
Fn + F8 — Switches the LCD mode betweenexpanded and shrunk mode. Youshould expand the LCD screen asmuch as possible in expanded mode.If you are displaying in full colors, yourdisplay area will be smaller even inexpanded mode.
Fn + F9 — Unused
Fn + F10 — Unused
Fn + F11 Switches the power mode in thefollowing sequence:
High Auto Customized
Fn + F12 Places the computer in hibernationmode. See page 2-26.
1-10
Title: C79DMMST CreationDate: 07/16/97 13:09:22

Using the Numeric Keypad
You can use a group of keys on the keyboard as numeric keys.There are numbers engraved in the lower right corner of these keys.To enable this function, press and hold the Shift key and then press
the NumLk key. The NumLK icon ( ) appears on the LCDindicator panel.
/
.0
1 2 3
4 5 6
7 8 9
+
-
*
NumLk
6
Y
F8 F9 F10
Shift
Alt Ctrl
F11 F12
H
N <
_
{
"
Once you enable this function, you can also use the following keysfor cursor-control and screen-control by pressing and holding theShift key.
To disable the numeric keypad function, press and hold the Shiftkey; then press NumLk again.
Note: You cannot use the numeric keypad function when you areusing an external numeric keypad or an external keyboard.
Chapter 1. Getting to Know Your Computer 1-11
Title: C79DMMST CreationDate: 07/16/97 13:09:22

Knowing the LED Color Indications
The ThinkPad computer enables you to attach or detach devicesdynamically (hot or warm plugging and unplugging) in theUltraBay II.
Hot plug or unplug means to attach or detach a device whilethe computer is operating.Warm plug or unplug means to attach or detach a devicewhile the computer is in suspend mode.Cold plug or unplug means to attach or detach a device whilethe computer is powered off. Your computer supports coldplugging and unplugging for all devices.
See the User's Guide Supplement for a list of devices that supportthis function.
The LED at the front of your computer and a beep indicates thefollowing conditions of the UltraBay II:
Color Action Sound
Green Ready to remove a device from or install a device in the UltraBayII.
No beep
Blinking green Removal or installation in-process. Wait. No beep
Black (off) A device is operating normally in the UltraBay II or there is nodevice is in the UltraBay II.
No beep
Blinking yellow A device (such as a hard disk drive) is about to be removedand the hot and warm unplugging function is not supported.Do not remove the device. Push back the bay eject lever.
A device (such as a hard disk drive) is about to be installedand the hot and warm plugging function is not supported. Donot install the device. Push back the bay eject lever, poweroff your computer; then reinstall the device.
A short beepfollowed by acontinuousbeep
Yellow A device that was not supposed to be removed (such as a harddisk drive) was removed. The computer may be damaged.
A long beep
1-12
Title: C79DMMST CreationDate: 07/16/97 13:09:22

Functional Highlights
This section summarizes the major functions of your computer.These functions are offered as standard on some models and asoptions on others.
DVDThe digital versatile disk (DVD) drive can play standard CD-ROMdiscs. When used with the DVD and Enhanced Video Adapter, itcan play business presentations recorded in DVD format or playoff-the-shelf DVD titles and movies.
AudioThe audio feature supports the following:
Wave audio recording and playback of up to 16 bits, stereo, and44 KHz sampling.DOS games using the Sound Blaster** interface.
A model equipped with the IBM Advanced CommunicationsProcessor provides a high-quality MIDI wave table synthesizer with128 instruments and up to 32 voices.
Audio with 3D Stereo SoundYour computer is equipped with internal audio record and playbackcapabilities including 3D audio from just two speakers. When 3Dstereo sound is enabled, sounds will appear to be generated allaround you, even though only two speakers are used.
The ThinkPad 770 features a high-quality MIDI wave tablesynthesizer with 128 instruments and up to 32 voices, plus supportfor DOS Sound Blaster games.
Video CaptureThe DVD and Enhanced Video Adapter provides for the capture ofstill and motion video from an analog source such as a VCR and TV.The ThinkPad 770 includes the Digital Video Producer application forediting and compressing the video.
Chapter 1. Getting to Know Your Computer 1-13
Title: C79DMMST CreationDate: 07/16/97 13:09:22

InfraredInfrared technology makes wireless communication possible betweeninfrared-enabled devices. Your computer has two infrared ports.Each port can be aimed for point-to-point communication with aportable computer, printer, or other infrared-enabled device. Eachport can communicate at a distance of up to approximately 1 m (3.3ft.) at a rate of up to 4 megabits per second (Mbps).
Video Phone FeaturesThe Intel Video Phone** feature lets you use your computer like atelephone. It lets you see the person you are talking to in a windowafter you've made a call with your computer's call center. Thisprogram also lets you send such files as documents orspreadsheets, or play games with the person you are talking to. Youcan use either a regular telephone line or the Internet to make calls.Regular phone lines produce better audio and video quality.However, long distance calls over the Internet might save money,since you pay only for the local call. You can use this function onlyin receive mode if you don't have a camera; that is, you can seeyour caller, but he or she can't see you. To enable send mode sothat the caller can see you, you must purchase an upgrade kit fromIntel. This kit comes with a camera.
System Management FeaturesYour computer has features that enable a network administrator tocontrol it remotely over a network from a management console. Ifyour computer is connected to a SelectaDock III docking station withan IBM 100/10 Ethernet PCI Adapter with Wake on LAN and an IBMAuto Wake Token Ring ISA Adapter installed, the Wake-on-LANcapability is also supported.
TrackPoint with Enhanced ControlsYour computer has an enhanced TrackPoint function that enablesyou to make selections merely by pressing on the TrackPoint. Anew center button converts the TrackPoint into a scroll controllingdevice or a magnifying glass on the screen.
1-14
Title: C79DMMST CreationDate: 07/16/97 13:09:22

Chapter 2. Fine-Tuning Your Computer
This chapter describes how to use the following features of yourThinkPad computer:
Starting the ThinkPad Configuration Program . . . . . . . . . . 2-3ThinkPad Configuration Program for Windows 95 . . . . . . 2-3ThinkPad Configuration Program for Windows NT . . . . . . 2-4ThinkPad Configuration for DOS . . . . . . . . . . . . . . . . 2-5Switching Screens . . . . . . . . . . . . . . . . . . . . . . . . . 2-7Switching between the External Display and Television . . . 2-7
Using the TrackPoint . . . . . . . . . . . . . . . . . . . . . . . . . 2-9Operating the TrackPoint . . . . . . . . . . . . . . . . . . . . . 2-9Cleaning the Cap . . . . . . . . . . . . . . . . . . . . . . . . 2-10Customizing the TrackPoint . . . . . . . . . . . . . . . . . . 2-10
Using the ThinkPad Online Book . . . . . . . . . . . . . . . . . 2-15Using the Security Features . . . . . . . . . . . . . . . . . . . . 2-16
Using Passwords . . . . . . . . . . . . . . . . . . . . . . . . 2-16Setting a Password . . . . . . . . . . . . . . . . . . . . . 2-16Changing or Removing a Password Using Easy-Setup . 2-19Entering a Password . . . . . . . . . . . . . . . . . . . . . 2-22Using the Supervisor Password on Several Hard Disk
Drives . . . . . . . . . . . . . . . . . . . . . . . . . . . . 2-23Using the Personalization Editor . . . . . . . . . . . . . . . 2-24
Saving Battery Power . . . . . . . . . . . . . . . . . . . . . . . 2-26Using the Power Management Modes . . . . . . . . . . . . 2-26
Setting the Suspend Timer . . . . . . . . . . . . . . . . . 2-27Enabling Hibernation Mode . . . . . . . . . . . . . . . . . 2-28
Using Other Battery Saving Methods . . . . . . . . . . . . . 2-30Checking the Battery Status . . . . . . . . . . . . . . . . . . 2-31Using the Fuel Program . . . . . . . . . . . . . . . . . . . . 2-32
Changing the Battery Status Indication . . . . . . . . . . 2-34Using the Audio Features . . . . . . . . . . . . . . . . . . . . . 2-35
Using the 3D Sound Retrieval System (SRS) Function . . 2-36Using the MIDI Features . . . . . . . . . . . . . . . . . . . . 2-37
Using the ThinkPad Modem . . . . . . . . . . . . . . . . . . . . 2-39Using the ThinkPad Modem in Windows 95 and Windows
NT . . . . . . . . . . . . . . . . . . . . . . . . . . . . . . . . 2-41Using the ThinkPad Modem in OS/2 . . . . . . . . . . . . . 2-41Using the 56 Kbps Modem . . . . . . . . . . . . . . . . . . . 2-41Telephony Features . . . . . . . . . . . . . . . . . . . . . . . 2-43
Using the DVD and Enhanced Video Adapter . . . . . . . . . 2-44
Copyright IBM Corp. 1997 2-1
Title: C79DMMST CreationDate: 07/16/97 13:09:22

Using the DVD Enhanced Video Adapter with Windows 95 2-45Using the Capture Function . . . . . . . . . . . . . . . . . 2-45Using the Overlay Function . . . . . . . . . . . . . . . . . 2-47Using the MPEG Playback . . . . . . . . . . . . . . . . . 2-49Using the DVD Player . . . . . . . . . . . . . . . . . . . . 2-50
Using the Enhanced Video Features in OS/2 . . . . . . . . 2-51Using Easy-Setup . . . . . . . . . . . . . . . . . . . . . . . . . 2-54
Knowing Your Configuration . . . . . . . . . . . . . . . . . . 2-56Setting the Date and Time . . . . . . . . . . . . . . . . . . . 2-57Changing the Drive Startup Sequence . . . . . . . . . . . . 2-57
2-2
Title: C79DMMST CreationDate: 07/16/97 13:09:22
Starting the ThinkPad Configuration Program
This section describes how to start the ThinkPad Configurationprogram. This program allows you to set up and customize thecomputer's built-in devices to your needs.
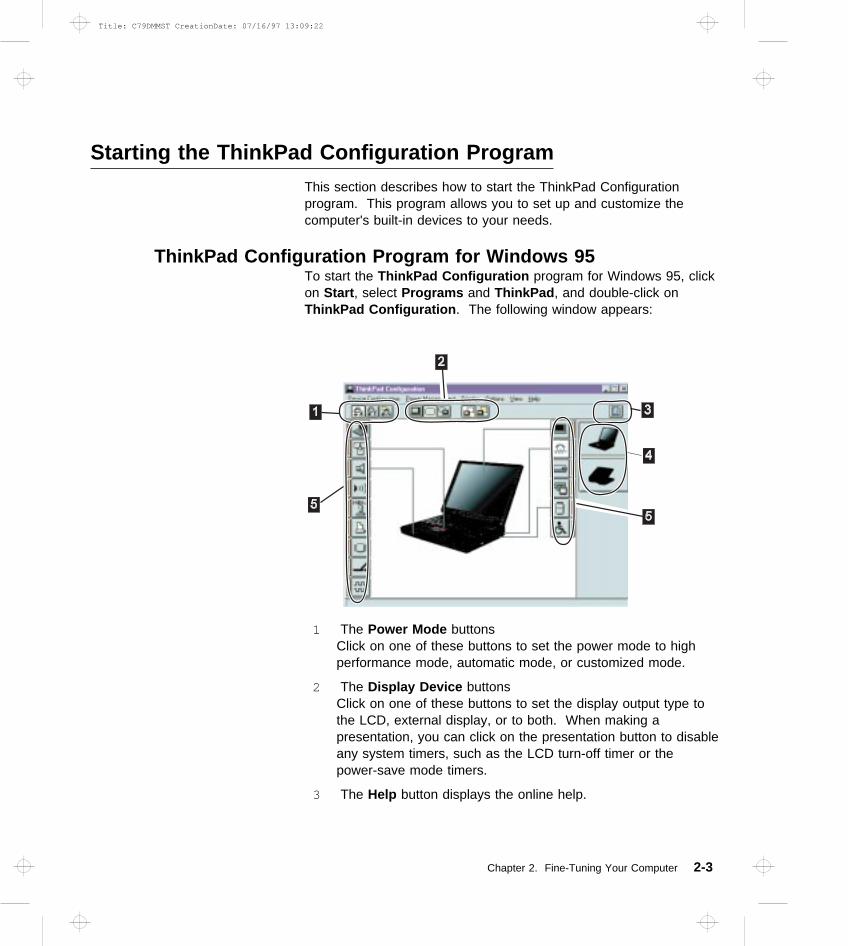
ThinkPad Configuration Program for Windows 95To start the ThinkPad Configuration program for Windows 95, clickon Start , select Programs and ThinkPad , and double-click onThinkPad Configuration . The following window appears:
1 The Power Mode buttonsClick on one of these buttons to set the power mode to highperformance mode, automatic mode, or customized mode.
2 The Display Device buttonsClick on one of these buttons to set the display output type tothe LCD, external display, or to both. When making apresentation, you can click on the presentation button to disableany system timers, such as the LCD turn-off timer or thepower-save mode timers.
3 The Help button displays the online help.
Chapter 2. Fine-Tuning Your Computer 2-3
Title: C79DMMST CreationDate: 07/16/97 13:09:22
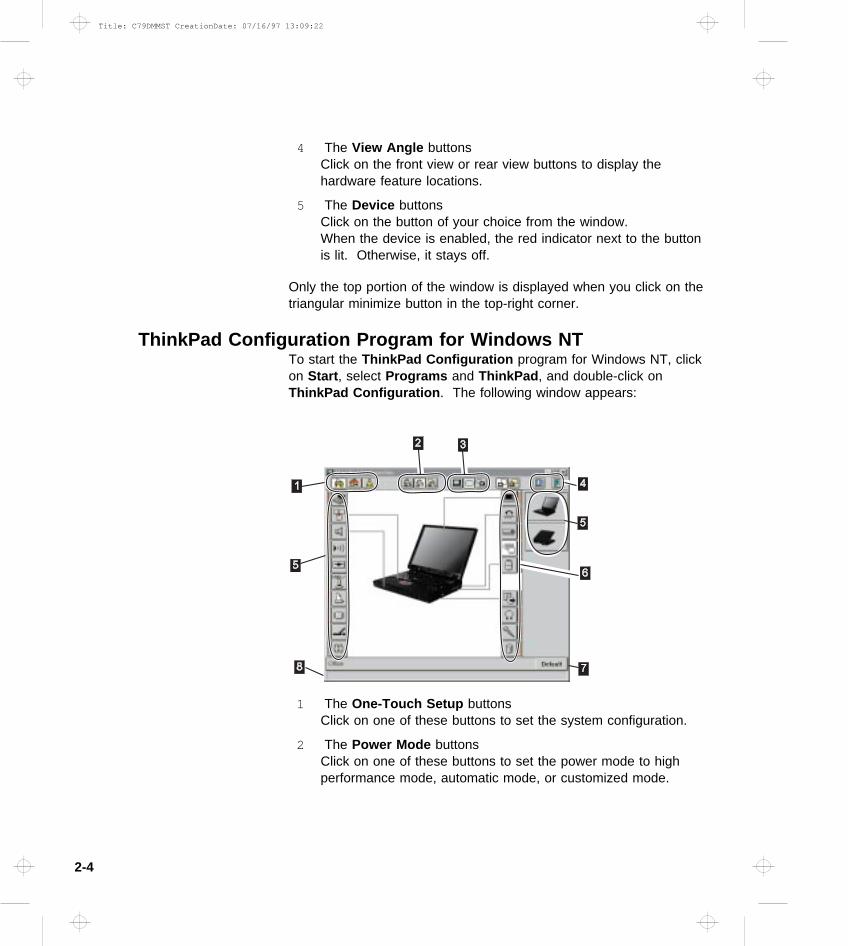
4 The View Angle buttonsClick on the front view or rear view buttons to display thehardware feature locations.
5 The Device buttonsClick on the button of your choice from the window.When the device is enabled, the red indicator next to the buttonis lit. Otherwise, it stays off.
Only the top portion of the window is displayed when you click on thetriangular minimize button in the top-right corner.
ThinkPad Configuration Program for Windows NTTo start the ThinkPad Configuration program for Windows NT, clickon Start , select Programs and ThinkPad , and double-click onThinkPad Configuration . The following window appears:
1 The One-Touch Setup buttonsClick on one of these buttons to set the system configuration.
2 The Power Mode buttonsClick on one of these buttons to set the power mode to highperformance mode, automatic mode, or customized mode.
2-4
Title: C79DMMST CreationDate: 07/16/97 13:09:22
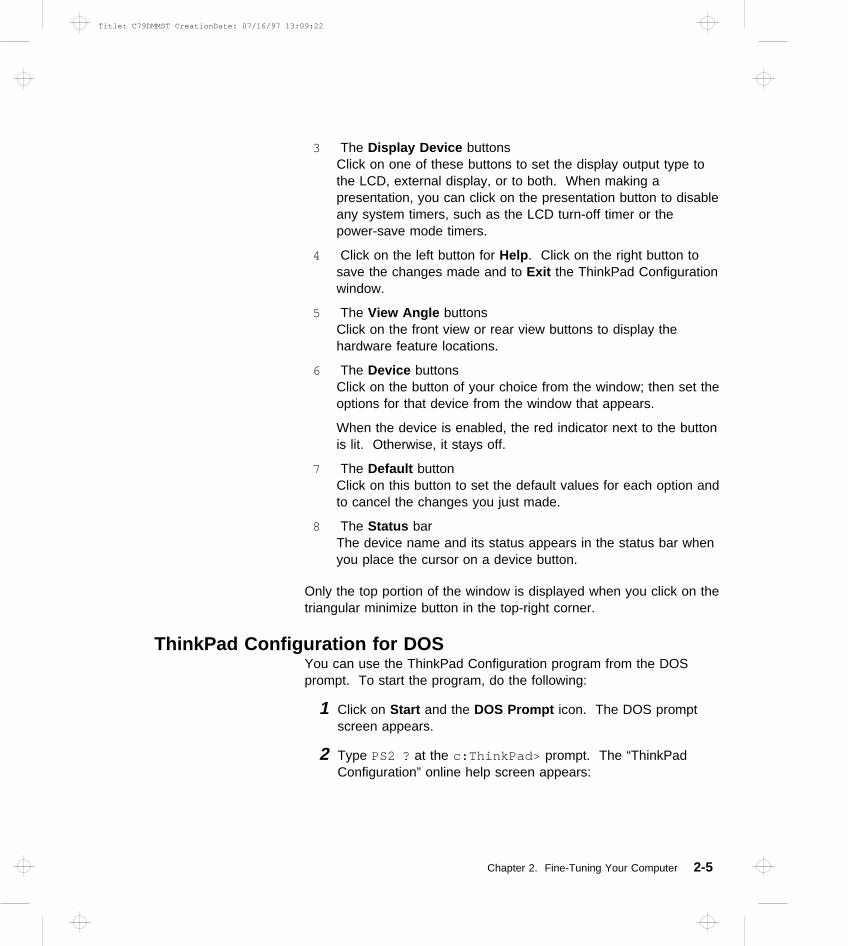
3 The Display Device buttonsClick on one of these buttons to set the display output type tothe LCD, external display, or to both. When making apresentation, you can click on the presentation button to disableany system timers, such as the LCD turn-off timer or thepower-save mode timers.
4 Click on the left button for Help . Click on the right button tosave the changes made and to Exit the ThinkPad Configurationwindow.
5 The View Angle buttonsClick on the front view or rear view buttons to display thehardware feature locations.
6 The Device buttonsClick on the button of your choice from the window; then set theoptions for that device from the window that appears.
When the device is enabled, the red indicator next to the buttonis lit. Otherwise, it stays off.
7 The Default buttonClick on this button to set the default values for each option andto cancel the changes you just made.
8 The Status barThe device name and its status appears in the status bar whenyou place the cursor on a device button.
Only the top portion of the window is displayed when you click on thetriangular minimize button in the top-right corner.
ThinkPad Configuration for DOSYou can use the ThinkPad Configuration program from the DOSprompt. To start the program, do the following:
1 Click on Start and the DOS Prompt icon. The DOS promptscreen appears.
2 Type PS2 ? at the c:ThinkPad> prompt. The “ThinkPadConfiguration” online help screen appears:
Chapter 2. Fine-Tuning Your Computer 2-5
Title: C79DMMST CreationDate: 07/16/97 13:09:22
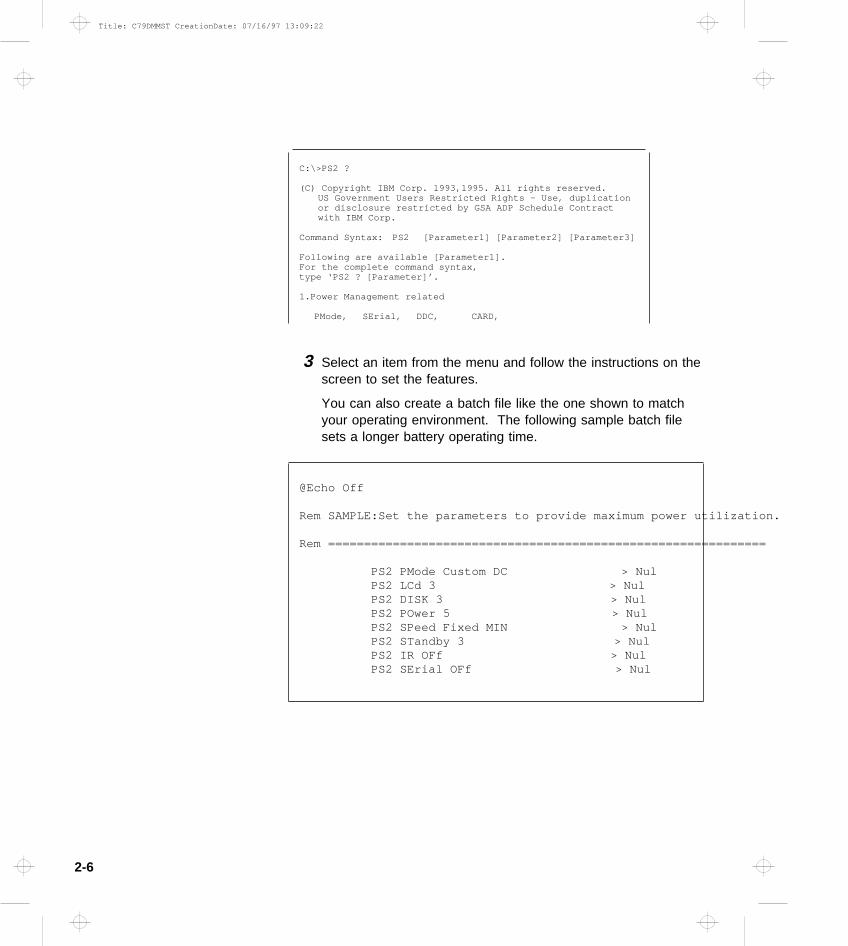
C: \ >PS2 ?
(C) Copyright IBM Corp. 1993,1995. All rights reserved.US Government Users Restricted Rights - Use, duplicationor disclosure restricted by GSA ADP Schedule Contractwith IBM Corp.
Command Syntax: PS2 [ Parameter1 ] [ Parameter2 ] [ Parameter3 ]
Following are available [ Parameter1 ] .For the complete command syntax,type ‘PS2 ? [ Parameter ] ’.
1.Power Management related
PMode, SErial, DDC, CARD,
3 Select an item from the menu and follow the instructions on thescreen to set the features.
You can also create a batch file like the one shown to matchyour operating environment. The following sample batch filesets a longer battery operating time.
@Echo Off
Rem SAMPLE:Set the parameters to provide maximum power utilization.
Rem =============================================================
PS2 PMode Custom DC > NulPS2 LCd 3 > NulPS2 DISK 3 > NulPS2 POwer 5 > NulPS2 SPeed Fixed MIN > NulPS2 STandby 3 > NulPS2 IR OFf > NulPS2 SErial OFf > Nul
2-6
Title: C79DMMST CreationDate: 07/16/97 13:09:22

Switching ScreensTo switch screens between the LCD and the external display ortelevision, you should:
Start the ThinkPad Configuration program and click on either:
– for the LCD screen.
– for the external display or television screen. To switchto the television screen, your computer must have theoptional DVD and Enhanced Video Adapter.
Or, use the Fn+F7 keys.
Notes:
1. You cannot display a screen on television and on theexternal display screen at the same time.
2. You cannot display a screen on television and on the LCDscreen at the same time.
Switching between the External Display and TelevisionIf you are using the optional DVD and Enhanced Video Adapter, youcan display the LCD output on an external display or television bydoing the following:
1 Turn off the computer and attach an external display to theexternal-display port or a television cable to the video-out portat the rear of the computer.
2 Turn on the computer and start the ThinkPad Configurationprogram.
3 Click on the Enhanced Video/MPEG ( ) button. The“Enhanced Video/MPEG” window appears.
4 If you want to use the television, select Enable for theVideo-out Port ; then go to the next step.
Note: Select Enable only when you have a television attachedto your computer. Otherwise, the LCD screen turns
Chapter 2. Fine-Tuning Your Computer 2-7
Title: C79DMMST CreationDate: 07/16/97 13:09:22

blank. If this happens, use the Fn+F7 keys to restorethe LCD output.
If you want to use the external display, select Disable for theVideo-out Port ; then go to step 6.
5 Select the appropriate television color standard: NTSC (default)or PAL .
For NTSC, you can select only the 640x480 screenresolution.For PAL, you can select both the 640x480 and 800x600resolutions.
6 Restart the computer to make the change effective.
Note: The LCD display always appears before the television display.If you selected the television, the display switches to thetelevision after appearing momentarily on the LCD.
2-8
Title: C79DMMST CreationDate: 07/16/97 13:09:22

Using the TrackPoint
Your keyboard has a unique red button 1 called a TrackPoint,which functions like a mouse. Pushing this button in any directionmoves the pointer in that direction on the screen. You can select anicon or a button by clicking on it, just as you would click on a mouseclick button. You can use the TrackPoint together with the threeclick buttons 2 . The left and right click buttons function like the leftand right click buttons on a mouse. The center click button enablesthe scroll and magnifying glass functions. Read the following sectionfor details on these functions.
The function of the click buttons depends on the software you areusing.
Operating the TrackPoint1 Place your hands in the typing position and press gently on the
stick with either index finger in the direction you want the cursorto move in.
Pressing the stick away from you moves the cursor up thescreen.Pressing it toward you moves the cursor down the screen.
Chapter 2. Fine-Tuning Your Computer 2-9
Title: C79DMMST CreationDate: 07/16/97 13:09:22

Pressing it sideways moves the cursor side to side.
2 Press the click buttons with either thumb to select and drag asrequired by your software, as with any other pointing device.
Notes:
1. Remember that the stick does not move, and your finger shouldnot move on it.
2. The pointer may drift in some computer conditions. This is not adefect. Do not use the TrackPoint until the pointer stops moving.
Cleaning the CapThe cap 1 on the end of the TrackPoint is removable. You canreplace it with one of the spares shipped with your computer.
When the cap is worn out, replace it. You can remove the cap bypulling it off the TrackPoint stick.
Customizing the TrackPointTo use the TrackPoint program, do the following:
1 Double-click on My Computer , Control Panel , andTrackPoint . The “TrackPoint Properties” window appears:
2-10
Title: C79DMMST CreationDate: 07/16/97 13:09:22

2 Select the features that you want to use.
The Enable Press-to-Select functionThis function enables you to tap quickly on the TrackPoint tostart programs, press buttons, use menus, and so on. You canalways use the left click button and the right click button asmouse buttons.
The Enable Dragging functionThis function enables you to drag and drop an object. Pressdown on the TrackPoint to grab the object. Then, drag theobject by moving the TrackPoint. Drop the object by releasingthe TrackPoint.
The Enable Release-to-Select functionThis function enables you to click by simply lifting your fingerquickly off the TrackPoint. Release-to-Select can also help youmake a double-click. When you move the pointer onto an icon,and then lift your finger off the TrackPoint, one click is made(Release-to-Select). Then, when you press the TrackPointagain, the second click is made. The result is a double-click.
Press MeansPress-to-Select simulates only a single mouse button. Use thisfunction to choose whether you want Press-to-Select to work like
Chapter 2. Fine-Tuning Your Computer 2-11
Title: C79DMMST CreationDate: 07/16/97 13:09:22

a left click or a right click button. You can change the left clickand right click button from the “Mouse Properties” window of theControl Panel .If you set your Button configuration as right-handed, the rightclick displays a context menu and the left click works as aselector.If you set the configuration as left-handed, the left click displaysa context menu and the right click works as selector.
The Click Pace function adjusts how quickly you must press theTrackPoint for clicks and double-clicks. If you set the pace tooslow, you might notice unintended clicks, a pointer delay, or adragging delay. However, if you set the pace too quick, youmight notice that it is hard to use Press-to-Select.
The TrackPoint Sensitivity function under the Sensitivity tabadjusts the force required for both cursor movement andPress-to-Select. Slide toward Firm Touch to increase the forceneeded to move the pointer, and to increase the force needed toactivate Press-to-Select. Slide toward Light Touch to decrease theforce needed to move the pointer, and to reduce the force needed toactivate Press-to-Select.
2-12
Title: C79DMMST CreationDate: 07/16/97 13:09:22

The Choose Scrolling or Magnifying Glass Function under theScrolling tab enables you to do the following:
With the TrackPoint center button you can control the Scrolling or theMagnifying Glass feature.
The Scrolling function enables you to navigate easily throughlong documents or large spreadsheets with a press of a button.You never need to use a scroll bar again! To scroll, press thecenter button and then use the TrackPoint instead of the scrollbars in any program.
The Magnifying Glass enables you to enlarge a movable areaof your display. You can click on objects “through” theMagnifying Glass. The right button changes the size of theMagnifying Glass, and the left mouse button changes itsmagnifying power. Move the magnified area the same way asyou use the Scrolling function. By default, press the centerbutton and then use the TrackPoint to move the magnified area.
Select the Neither button to disable the Scrolling and MagnifyingGlass functions. The center button becomes mouse button 3.
Chapter 2. Fine-Tuning Your Computer 2-13
Title: C79DMMST CreationDate: 07/16/97 13:09:22

Note: All Windows 95 and most Windows NT applications ignoremouse button 3.
Choose Scrolling MethodSelect which input device will be the scrolling device, that is, thedevice for Scrolling or Magnifying Glass control.
Press Center Button, then use TrackPointHolding down the center button on the keyboard allows theTrackPoint to control the Scrolling or Magnifying Glass. TheTrackPoint operates normally (controls the mouse cursor) whenthe center button is not pressed.
Use External MouseThis option sets an externally attached mouse to scroll (or movethe Magnifying Glass) horizontally or vertically. Use theTrackPoint as a pointer.
Use TrackPointThis option sets the TrackPoint to scroll horizontally or vertically.Use an externally attached mouse as a pointer. This setting isrecommended if you have a mouse attached.
Note: You can still use the TrackPoint to control the mousepointer by pressing the center button.
2-14
Title: C79DMMST CreationDate: 07/16/97 13:09:22

Using the ThinkPad Online Book
To see the online book, do the following:
Double-click on My Computer , Control Panel , and on ThinkPad770 User's Guide . The online book appears.
Go to the respective section and make a printout if necessary. Theonline book covers the topics in more detail.
Chapter 2. Fine-Tuning Your Computer 2-15
Title: C79DMMST CreationDate: 07/16/97 13:09:22

Using the Security Features
This section describes how to use the following security features:
Passwords Personalization features
Using PasswordsThe password setting feature prevents your computer from beingused by others. You can set the following passwords on yourcomputer:
The Power-on password protects your computer from beingused by unauthorized persons.
The Hard Disk password protects the data on your primary harddisk from being accessed by unauthorized persons. You canalso set a password for your secondary hard disk.
The Supervisor password protects the system informationstored in Easy-Setup and also makes your computertamper-resistant.
Setting a PasswordA password protects your computer from being used by unauthorizedpersons. Once you set a password, a prompt appears on the screeneach time you turn on the computer. You must enter your passwordat the prompt. You will not be able to use the computer unless youtype the correct password.
To set a password, do the following:
1 Start Easy-Setup (refer to “Using Easy-Setup” on page 2-54).
2 Click on Password in the “Easy-Setup” menu. The first“Password” submenu appears:
2-16
Title: C79DMMST CreationDate: 07/16/97 13:09:22

Note: An unlocked keylock icon indicates a password that isnot yet set.
3 Click on the type of password you want to set: Power-On ,Hard Disk , or Supervisor . The next “Password” submenuappears.
4 Type an appropriate password.You can type a maximum of 7 random characters using acombination of letters (A to Z) and numbers (0 to 9).
Selecting this icon displays a submenu for setting thepower-on password.
Selecting this icon displays a submenu for setting thehard disk password.
Selecting this icon displays a submenu for setting thesupervisor password.
Chapter 2. Fine-Tuning Your Computer 2-17
Title: C79DMMST CreationDate: 07/16/97 13:09:22

Uppercase and lowercase letters (for example, A and a) aretreated as the same characters.
If you type a wrong character, use the Backspace key to eraseit and then type the correct one.
5 Press Enter . The “Password Confirmation” submenu appears:
6 Type your password again to verify it; then press Enter again.
Note: The following submenu appears if you are setting thehard disk or the supervisor password, reminding you towrite down the password on piece of paper and to keepit in a safe place.
Your password is set.
2-18
Title: C79DMMST CreationDate: 07/16/97 13:09:22

Don't Forget Your HDD and Supervisor Password
If you forget your hard disk or supervisor password, there is noway to reset your password or recover data from the harddisk . You will have to take your computer to an IBM authorizedreseller or an IBM marketing representative to have the hard diskor the system board replaced. Proof of purchase is required, andan additional charge might be required for the service.
Changing or Removing a Password Using Easy-SetupThis security feature prevents someone from removing a passwordand using your computer. To remove a password, do the following:
1 Start Easy-Setup (refer to “Using Easy-Setup” on page 2-54).The password prompt appears (only when the supervisorpassword is set):
2 Enter the supervisor password. The “Easy-Setup” menuappears.
3 Select Password on the menu. The “Password” submenuappears.
4 Select the password that you want to change or remove.
Power-On Hard Disk Supervisor
A submenu appears.
To change a password, go to the next step.
Chapter 2. Fine-Tuning Your Computer 2-19
Title: C79DMMST CreationDate: 07/16/97 13:09:22

To remove a password, go to step 8 on page 2-21.
5 Enter the password you wish to change and press theSpacebar . A submenu appears:
6 Type the new password. Press Spacebar . A submenuappears:
7 Type the new password again; then press Enter . The“Password” submenu appears and the password is changed.Go to step 11 on page 2-22.
2-20
Title: C79DMMST CreationDate: 07/16/97 13:09:22
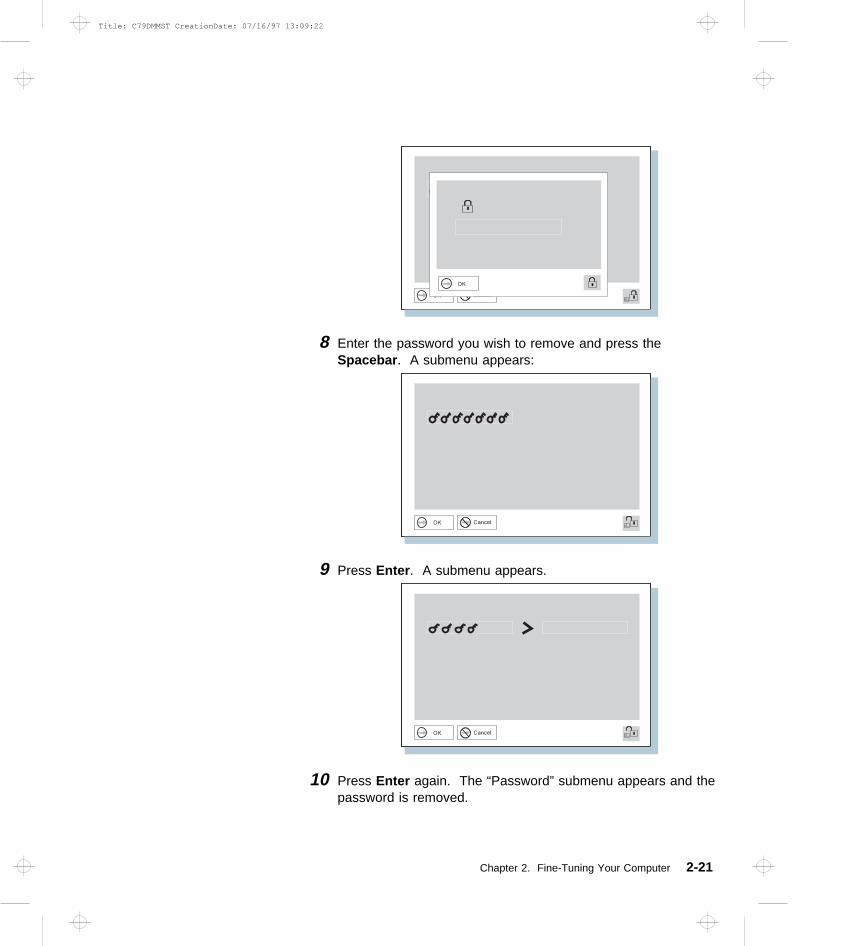
8 Enter the password you wish to remove and press theSpacebar . A submenu appears:
9 Press Enter . A submenu appears.
10 Press Enter again. The “Password” submenu appears and thepassword is removed.
Chapter 2. Fine-Tuning Your Computer 2-21
Title: C79DMMST CreationDate: 07/16/97 13:09:22

11 Click on Exit .
12 Select Restart . Your computer restarts.
Entering a PasswordOnce you set a password, a password prompt appears at the top leftcorner of the screen. This prompt appears each time you turn onyour computer or when your computer returns from suspend mode tonormal operation.
However, a password prompt is not displayed if the computer returnsto normal operation by a preset timer or an incoming call on themodem, in which case you will have to display it by pressing a key ormoving the pointing device.
To enter a password, do the following:
1 Type your password. The symbol appears each time youpress a key. Don't hold down a key too long since the samecharacter will be entered continuously.
2 Press the Enter key.
An OK appears if you enter the correct password, and an Xappears if you enter the wrong password. If you fail to enterthe correct password in three tries, you must turn off thecomputer, wait 5 seconds, and then turn it on again and retry.
2-22
Title: C79DMMST CreationDate: 07/16/97 13:09:22

Using the Supervisor Password on Several Hard Disk DrivesIf you are using several hard disk drives, you must set a supervisorpassword for each of these drives. The same password that you setfor the supervisor password is set as the hard disk password. Youcan use the same supervisor password that you set on the mainhard disk drive for the secondary hard disk drive in the UltraBay II.To set a supervisor password for the hard disk drive in the dockingstation, you must move the hard disk drive to the UltraBay II, set apassword there, and then reinstall the drive in the docking station.
Setting the Supervisor Password on Several Hard DiskDrives
1 If you haven't set a supervisor password, set it now. Refer to“Setting a Password” on page 2-16. When you set thesupervisor password, your computer automatically sets thesame password for the hard disk drive.
2 Remove the device from the UltraBay II and install a secondaryhard disk drive.
3 Turn on the computer. A 158 error appears.
4 Press Enter . The power-on password prompt appears.
5 Type your supervisor password. The supervisor password isset for the secondary hard disk drive and your operatingsystem starts.
If the error code 158 appears again, go to “Error Codes orScreen Messages” on page 4-5.
6 Turn off the computer. Repeat steps 2 through 6 to set thesupervisor password for the other hard disk drives that you maybe using in the future.
Changing or Removing the Supervisor Password onSeveral Hard Disk Drives
1 If you haven't changed or removed the supervisor password onyour computer, do it now. Refer to “Changing or Removing aPassword Using Easy-Setup” on page 2-19.
Chapter 2. Fine-Tuning Your Computer 2-23
Title: C79DMMST CreationDate: 07/16/97 13:09:22

2 Remove the device from the UltraBay II and install the harddisk drive with the old supervisor password.
3 Turn on the computer. The hard disk password promptappears.
4 Do one of the following:
If you changed the supervisor password in step 1, changethe old password on the hard disk drive to the newsupervisor password by doing the following:
a) Typing your old password and pressing the Spacebar .b) Typing your new password and pressing the Spacebar .c) Typing your new password again.
If you removed the supervisor password in step 1, type theold supervisor password; then press the Spacebar .
5 Press Enter .
6 Turn off the computer.
To change or remove the supervisor password for each harddisk drive, repeat steps 2 through 6.
Using the Personalization EditorWhen you use the Personalization Editor, you can display suchpersonal information as your name and address on the screen eachtime you power on your computer. To display this information, thepower-on password must already have been set. This feature helpsyou to identify your computer when identical computers are beingused in your location, or to deter theft.
To register your name, address, and company on the PersonalizationEditor, do the following:
1 Click on Start , select Programs and ThinkPad , and click onPersonalization Editor . The following window appears:
2-24
Title: C79DMMST CreationDate: 07/16/97 13:09:22

2 Click on Personal Data and type in the necessary informationinto the boxes.
Click on Help for more information.
The information that you typed in will be displayed the next time youpower on.
Chapter 2. Fine-Tuning Your Computer 2-25
Title: C79DMMST CreationDate: 07/16/97 13:09:22

Saving Battery Power
Your battery pack should be useful for approximately 3 years. Thenumber of years or charge-discharge cycles may vary depending onhow wisely you use your computer. This section describes thefollowing:
How to use the power management modes.
How to use other battery saving methods.
How to check your battery status.
Using the Power Management ModesYou can use your computer under battery power for a considerablelength of time by using the following power management modes:
Standby Mode
Your computer enters this mode by default when there isinactivity on your computer for a set duration of time. You canalso enter this mode by pressing the Fn+F3 keys.
To return to normal operation, press any key or move theTrackPoint.
Suspend Mode
In this mode, your computer stops all tasks and stores all data inmemory. You can enter suspend mode by:
– Pressing the Fn+F4 keys
– Closing the cover
– Selecting the Suspend button ( ) in the Fuel program
You cannot enter suspend mode or resume normal operationwhen the right bay eject lever is open.
Hibernation Mode
In this mode, your computer stops all tasks and stores all data inthe hard disk; then it powers off. You should set your computerto this mode when you want to maintain the present operatingcondition until the next day, for instance. RediSafe is anotherhibernation mode option.
2-26
Title: C79DMMST CreationDate: 07/16/97 13:09:22

You can set hibernation mode by doing any of the following:
– Pressing the Fn+F12 keys.
– Selecting the Hibernation button ( ) in the Fuelprogram.
Notes:
1. You cannot enter hibernation mode or resume normaloperation when the right bay eject lever is open.
2. You cannot enter hibernation mode when you are using thecommunication network.
3. Hibernation mode might be terminated if you connect yourcomputer to a docking station or if you use a particular PCCard.
The following figure shows the relationship between the differentpower management modes and battery power consumption:
Setting the Suspend TimerTo set the suspend timer, do the following:
For Windows 95
1 Start the ThinkPad Configuration program (refer to “ThinkPadConfiguration Program for Windows 95” on page 2-3).
Chapter 2. Fine-Tuning Your Computer 2-27
Title: C79DMMST CreationDate: 07/16/97 13:09:22

2 Click on the Power Management ( ) button. The “PowerProperties” window appears.
3 Select the Power Mode tab. The “Power Mode” windowappears.
4 Select Customize . The bottom gray portion is displayed inblack, and you can specify the timeout value in minutes in theSuspend Timer box.
5 Click on OK.
For Windows NT
1 Start the ThinkPad Configuration program (refer to “ThinkPadConfiguration Program for Windows NT” on page 2-4).
2 Click on the Power Management ( ) button. Three buttonsappear on the right.
3 Click on the Power Mode Settings ( ) button. The “PowerMode Settings” window appears.
4 Specify the timeout value in minutes in the Suspend Timerbox.
5 Click on OK.
Enabling Hibernation ModeTo enable hibernation mode, do the following:
For Windows 95
1 Start the ThinkPad Configuration program (refer to “ThinkPadConfiguration Program for Windows 95” on page 2-3).
2 Click on the Power Management ( ) button. The “PowerProperties” window appears.
3 Select the Hibernation tab. The “Hibernation” subwindowappears.
2-28
Title: C79DMMST CreationDate: 07/16/97 13:09:22

4 Click on Enable Hibernation . (If you already created ahibernation file, this button appears in gray and you cannotclick on it.) The “Enable Hibernation” subwindow appears.
5 Click on Create Now .
6 Click on OK.
For Windows NT
1 Start the ThinkPad Configuration program (refer to “ThinkPadConfiguration Program for Windows NT” on page 2-4).
2 Click on the Power Management ( ) button.
3 Click on the Suspend/Resume Options ( ) button. The“Suspend/Resume Options” window appears.
4 Add a check mark ( ) on the option you want to set.
5 Click on OK.
For Windows NT Users
You cannot create a hibernation file in a Windows NT system thatuses the NTFS format system, the Windows NT default format. Ifyou want to use hibernation mode, you should reinstall WindowsNT with a FAT format system.
The following chart shows how to switch between the different powermanagement modes.
Chapter 2. Fine-Tuning Your Computer 2-29
Title: C79DMMST CreationDate: 07/16/97 13:09:22

Using Other Battery Saving MethodsAnother battery-saving method is to decrease the LCD brightness.You can use the ThinkPad Configuration program to decrease the
brightness of the LCD by clicking on the LCD ( ) button andselecting Normal for Brightness (battery operation) in the windowthat appears.
2-30
Title: C79DMMST CreationDate: 07/16/97 13:09:22

Checking the Battery StatusYou can check the status of your battery by looking at the batterystatus indicator.
BatteryStatus
Indicator
RemainingPower(Percentage)
Status and Action
100% Full battery power remains.
Less than75%
Sufficient battery power remains.
Less than50%
Sufficient battery power remains.
Less than25%
Not much battery power remains.
0% No battery power is available foroperation.
(Blinking)
You haveonly 10minutes leftfor batteryoperation.
The battery pack is almostdischarged and is about to enter alow-battery condition. Do either ofthe following immediately:
Change to ac power operationby connecting the AC Adapter toyour computer and to a poweroutlet.Replace the battery pack with afully charged one.
If corrective action is not takenwithin 30 seconds, the computerenters suspend mode.
— The battery pack is being charged(appears only when the AC Adapteris connected). The battery packcannot be charged if the batteryoverheats. Charging is resumedwhen its temperature decreases.
Chapter 2. Fine-Tuning Your Computer 2-31
Title: C79DMMST CreationDate: 07/16/97 13:09:22

Attention
Do not leave the computer in the blinking state for a long time. Ifyou leave it in this state, data in the memory will be lost.
Notes:
1. If you had set the alarm with the ThinkPad Configurationprogram, you will hear three beeps the moment this indicatorstarts blinking.
2. If this indicator starts blinking, the indicated percentage may notbe accurate. You need to repeat discharging and charging ofthe battery pack at least three times.
BatteryStatus
Indicator
RemainingPower(Percentage)
Status and Action
— The battery pack is beingdischarged or is being used.
Off — The battery pack is not installed.The computer is turned off.
Using the Fuel ProgramThe Fuel program enables you to do the following:
Enable suspend modeEnable hibernation mode
This program also displays the following status:
The battery charge statusThe remaining battery power percentage and duration ofremaining powerThe current power mode
Operation mode
Battery-powered operation mode ( )
AC-powered operation mode ( )
2-32
Title: C79DMMST CreationDate: 07/16/97 13:09:22

To start the Fuel program click on Start , select Programs andThinkPad , and click on Fuel . The following window appears:
If you want to erase this window from the desktop, press the Fn+F2key combination. It reappears the next time you press this keycombination.
If you want to see Help, click on the Fuel button at the upper leftof the window.
Chapter 2. Fine-Tuning Your Computer 2-33
Title: C79DMMST CreationDate: 07/16/97 13:09:22

Changing the Battery Status IndicationWhen you want to change the indication from percent ( ) tohours and minutes ( ) or vice versa, do the following:
1 Click on the upper left corner of the “Fuel” window and selectOption... from the pull-down window.
2 Click on your choice; then click on OK.
2-34
Title: C79DMMST CreationDate: 07/16/97 13:09:22

Using the Audio Features
Your computer is equipped with the following:
A -inch (3.5-mm) diameter external stereo line-in or monauralmicrophone/line-in jack.
A -inch (3.5-mm) diameter stereo headphone or anexternal-powered speaker jack.
A MIDI/joystick port on the port replicator. To use a MIDI device,you should first connect your computer to a port replicator; thenconnect an external MIDI device to the port replicator. Afterdocking your computer in the port replicator, you should enablethis port using the ThinkPad Configuration program.
Your computer also has an audio chip that enables you to enjoy thevarious multimedia audio features. This audio chip provides thefollowing features:
Recording and playing back of PCM and WAV files in 8-bit or16-bit format.
Sampling of various rates from 8 KHz to 44 KHz for the WAVfile.
Playing back of MIDI files through an FM synthesizer.
Recording from various sound sources, such as an integratedmicrophone, an external microphone, or an audio deviceattached to a line-in jack or an integrated CD-ROM drive.
DOS game campatibility. You should select Sound Blaster Pro**for the audio adapter in the sound setup of the game.
The 3D Sound Retrieval System (SRS) function compensates forthe flat, two dimensional sound image limitations byreestablishing the necessary information that allows the humanear to hear in three dimensions.
Models equipped with the internal modem use the AdvancedCommunication Adapter, which enables you to use the digital signalprocessor (DSP) WaveTable MidiSynth function.
Chapter 2. Fine-Tuning Your Computer 2-35
Title: C79DMMST CreationDate: 07/16/97 13:09:22

Using the 3D Sound Retrieval System (SRS) FunctionTo use the SRS function, do the following:
1 Double-click on the small speaker icon ( ) at the bottom rightof the Windows desktop.
or
Click on the Start button, and then select Programs ,Accessories , Multimedia , and Volume Control . The “MasterOut” window appears:
2 Make sure that the SRS Balance column is displayed and theMute checkbox is unchecked.
3 If the column is displayed and the checkbox is not checked,exit the window. You can use the SRS function; skip theremaining steps.
If the column is not displayed, select Options on the upper leftcorner of the window and select Properties . The “Properties”window appears:
2-36
Title: C79DMMST CreationDate: 07/16/97 13:09:22
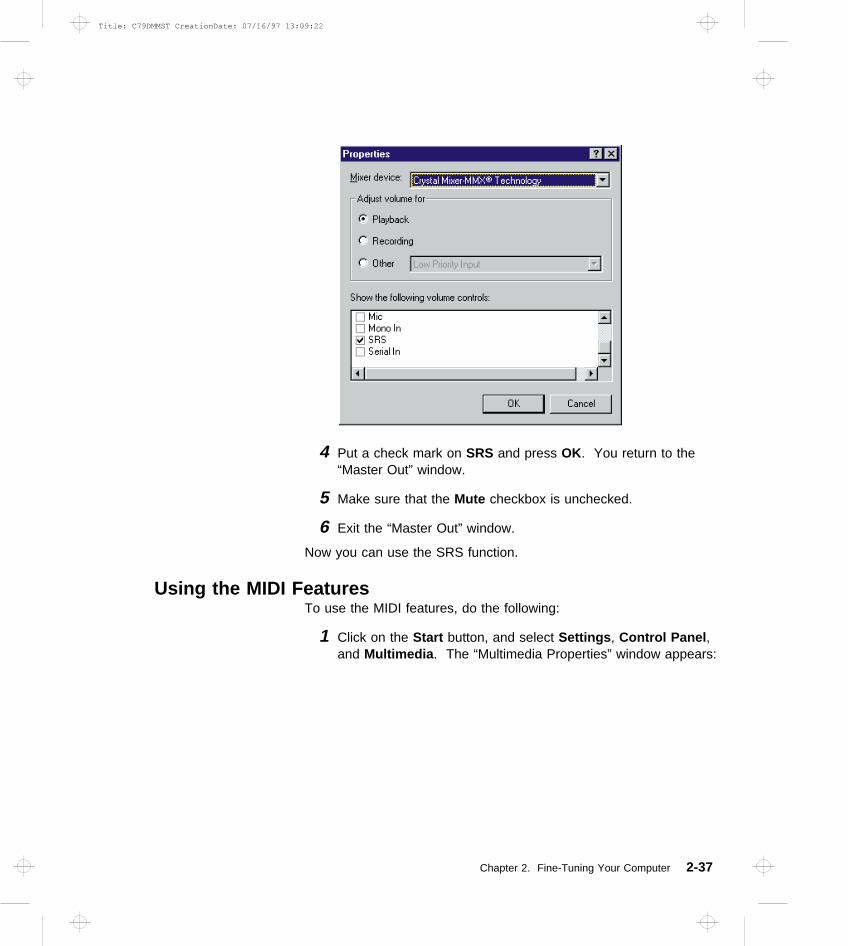
4 Put a check mark on SRS and press OK. You return to the“Master Out” window.
5 Make sure that the Mute checkbox is unchecked.
6 Exit the “Master Out” window.
Now you can use the SRS function.
Using the MIDI FeaturesTo use the MIDI features, do the following:
1 Click on the Start button, and select Settings , Control Panel ,and Multimedia . The “Multimedia Properties” window appears:
Chapter 2. Fine-Tuning Your Computer 2-37
Title: C79DMMST CreationDate: 07/16/97 13:09:22

2 Select the MIDI tab.
3 Select the MIDI for Wave Table MidiSynth Device when youwant better quality sound. You can then use the Wave TableMIDI sound.
or
Select MIDI for FM Synthesis when you want to use FM MIDIsound. This is the default setting.
or
Select MIDI for Crystal** PnP Audio System MPU-401Compatible when you want to use the external MIDI deviceattached to the port replicator.
4 Click on OK to exit the window.
Now you can use the MIDI function.
2-38
Title: C79DMMST CreationDate: 07/16/97 13:09:22

Using the ThinkPad Modem
The ThinkPad modem, available on some models, enables you tosend or receive data, faxes, and voice over the telephone line. Thismodem uses a digital signal processor (DSP) and its software can beupgraded, allowing great flexibility. It enables you to enhance themodem capability to 56 Kbps.
Data modem functions– Asynchronous communications port interface (NS16550A
UART compatible) operation– ITU-T V.34 up to 33.6 Kbps data modem– ITU-T V.32bis protocols with data rates of 4800, 7200, 9600,
12000, and 14000 bps– ITU-T V.32 protocols with data rates of 4800, 9600 uncoded,
and 9600 bps Trellis coded– ITU-T V.21/V.22, V.22bis protocols with data rates from 300
bps to 2400 bps– Hayes** AT command set compatibility– Asynchronous error recovery protocol– Microcom Network Protocol (MNP**) protocols
- Error correction via MNP classes 1–4- Data compression via MNP class 5 and V.42bis- MNP class 5 for up to 2x data compression
– VoiceView (Windows 95 only)Facsimile (fax) modem functions– Class 1 fax modem– Class 2 fax modem
– G3 transfers– ITU-T T.4 & T.30 operations– ITU-T V.27ter-2400/4800 bps send/receive– ITU-T V.29-7200/9600 bps send/receive– ITU-T V.17-14400 bps send/receive
You can use this ThinkPad modem only on a public-switchedtelephone network (PSTN). You cannot use a private branchexchange (PBX) or some other type of digital telephone extensionline. If you connect the modem to a line other than PSTN, an errormessage appears, preventing you from using the line. If you are notsure which kind of phone line you are using, contact your telephonecompany.
Chapter 2. Fine-Tuning Your Computer 2-39
Title: C79DMMST CreationDate: 07/16/97 13:09:22

Attention for Use Overseas
In many countries, you cannot use the ThinkPad modemfunction before obtaining approval from the proper authorities.
Your ThinkPad modem is a worldwide modem and can beused in any country where Postal Telegraph and Telephone(PTT) type approval has been obtained. If the country youwant is not on the Country Selection listing, seehttp://www.us.pc.ibm.com/thinkpad/thinkpad.html on theInternet, and download the newest Country Selection list.
If you are a non-U.S. user, run the Country Selectionprogram in the ThinkPad Modem folder after you completethe ThinkPad Modem installation. The “Country Selection”window enables you to change the country name to thecountry in which you are actually going to use the ThinkPadModem telephony function in. Click on ThinkPad Modem inyour operating system; then click on Country Selection .Confirm whether the selection matches the country name inthe Dialing Properties listing (for Windows 95).
For more information on the use of the internal modem in aspecific country, contact the IBM customer support center in thatcountry. You can look up the phone number by referring to theinternational service information booklet that came with yourcomputer.
DANGER
To avoid shock hazard, do not connect the cable to ordisconnect the cable from the telephone outlet on the wall duringelectrical storms.
2-40
Title: C79DMMST CreationDate: 07/16/97 13:09:22

To use the ThinkPad modem, connect one end 1 of the telephonecable to the telephone jack; then connect the other end 2 to thetelephone outlet on the wall.
Using the ThinkPad Modem in Windows 95 and Windows NTWhen you start Windows, the ThinkPad Modem automatically startsand will be ready for use.
Using the ThinkPad Modem in OS/2To start the ThinkPad modem from OS/2, do the following:
1 Open the Communications for OS/2 folder.
2 Double-click on the Modem icon.
3 Start your communication program.
Using the 56 Kbps ModemYour modem can be upgraded to enable communication speeds ofup to 56 Kbps (receive only). For upgrade information refer to:
http://www.us.pc.ibm.com/thinkpad/thinkpad.html
To take advantage of your modem's 56 Kbps x2** technology, youmust first make sure that your internet service provider (ISP)supports a 56 Kbps modem protocol.
1 Contact your ISP and determine which 56 Kbps modemprotocol they use.
Chapter 2. Fine-Tuning Your Computer 2-41
Title: C79DMMST CreationDate: 07/16/97 13:09:22

2 Determine which 56 Kbps modem protocol your modemsupports. To view your modem's supported protocol, do thefollowing:
a) Click on the Start button, and select Programs andModem (or Modem & Audio ).
b) Click on Modem .
c) Choose Options from the “Modem Status” window; thenchoose Settings .
The available transfer speeds are displayed. The 56 Kbpsprotocol your modem supports is listed in parenthesesfollowing the 56 Kbps transfer setting.
If no 56 Kbps transfer setting is listed, your modem's 56Kbps technology is not currently enabled. Refer to theuser's guide supplement for details.
Your modem and your ISP must support the same 56 Kbps protocol,or your maximum connection speed will be limited to V.34technology.
Significantly higher Internet modem connection speeds up to 56Kbps require all-digital transmission connections from your ISP to theline card in the central office to which your phone line is connected.The actual rate of reception is limited by the quality of your telephoneline, which may vary from location to location.
In the U.S., current FCC regulations limit the maximum speed fordownstream communication to 53 Kbps. Even though your modemcontains 56 Kbps technology, connect rate in the receive directionmight be significantly less than 56 Kbps.
Currently, 56 Kbps capability is in the receive direction only (from theISP to your local modem). The transmit or send direction (from yourlocal modem to the ISP) uses V.34 technology.
Note: 56 Kbps transfer rates are not available in all locations orcountries. You must check with your ISP to determine if yourarea is capable of 56 Kbps transfer rates.
2-42
Title: C79DMMST CreationDate: 07/16/97 13:09:22

Telephony FeaturesThe ThinkPad modem, with the associated software, provides thefollowing telephony features:
Industry standard modem support up to 33.6 KbpsIndustry standard fax support up to 14.4 KbpsComputer telephony function support– DTMF and pulse dialing– Detecting DTMF digits received from the phone line– Call progress monitoring
– Auto-dialing feature– Telephony API (TAPI) support through Windows 95
Unimodem V (Windows 95 only)– Microsoft MS Phone support– VoiceView support for the SystemSoft Talkshop application
and Windows 95 File Transfer (Windows 95 only)– IBM Digital Simultaneous Voice over Data (DSVD) support at
33.6 KbpsTelephone answering machine support (Windows 95 only)– Recording and playback of messages and greetings– Answering device with caller ID– Modem class 8 AT commands for TAPI calls
Full-duplex speaker phone support (Windows 95 only)– Acoustic echo cancelation
Other– DOS box operation for 33.6 Kbps data and 14.4 Kbps fax– System level and device level power management
Chapter 2. Fine-Tuning Your Computer 2-43
Title: C79DMMST CreationDate: 07/16/97 13:09:22

Using the DVD and Enhanced Video Adapter
The DVD and Enhanced Video Adapter, available as standard onsome models and as an option on others, enables you to view DVDdiscs with video contents, such as business presentations and DVDmovies. It also enables you to use the video overlay and capturefunctions as well as the MPEG function when you connect atelevision or a home video equipment to the video-in/out ports. TheMPEG function enables you to view MPEG-1 and MPEG-2 videos.
The DVD and Enhanced Video Adapter allows you to take advantageof the following:
DVD and MPEG playback: With the MPEG playback feature,you can play many available video CD, CD-i movies, and DVDtitles. No DOS/CD-i game titles are currently supported.
Video-in:
– You can capture still images or motion video from such videoequipment as a video cassette recorder (VCR).
– You can overlay motion video from video equipment.
Video-out: Refer to “Attaching a Television to Your Computer”on page 3-22 on how to use the video-out port.
You will need to install the optional DVD drive to play DVD titles.
Note: You should remember the following points when using theDVD and Enhanced Video Adapter:
You cannot enable or disable this feature while theplayback or capture window is open. Close the playbackor the capture window before you make any changes.
The MPEG playback and the video-in (video capture)functions use the same hardware resources. Only one ofthe two functions can be used at a time. Likewise, no twoMPEG functions can be used at the same time.
Instructions for using the DVD and Enhanced Video Adapterdepends on your operating system:
For Windows 95 , go to “Using the DVD Enhanced VideoAdapter with Windows 95” on page 2-45.
2-44
Title: C79DMMST CreationDate: 07/16/97 13:09:22

For OS/2 , go to “Using the Enhanced Video Features in OS/2”on page 2-51.
Using the DVD Enhanced Video Adapter with Windows 95This section describes how to use the DVD and Enhanced VideoAdapter in Windows 95:
“Using the Capture Function”
“Using the Overlay Function” on page 2-47
“Using the MPEG Playback” on page 2-49
“Using the DVD Player” on page 2-50
Using the Capture FunctionOn your computer, you can use the capture applications supportedby Video for Windows. You can also overlay motion video from thevideo-in port by using applications supported by the MCI (MediaControl Interface) overlay.
Notes:
1. Only one capture window can be open at a time.
2. When you use video capture with the overlay screen on, thecaptured screen might be distorted. However, the data iscorrectly captured.
To capture motion video, do the following:
1 Turn off the computer.
Chapter 2. Fine-Tuning Your Computer 2-45
Title: C79DMMST CreationDate: 07/16/97 13:09:22

2 Connect the video in-out cable 1 to the video-in port ( ) 2of the computer; then connect your video equipment.
Only the video in-out cable 1 is supplied with yourcomputer. The other cables are not supplied; you mustpurchase them.
If you are using video equipment with an S-video output,connect the S-video port of the video in-out cable to theS-video-out port 3 of your video equipment for betterpicture quality.
If you are not using video equipment with an S-videooutput, connect the video in-out cable to the video-out port
4 of your video equipment.
If your video equipment has only one audio-output port, usethe left-audio connector of the audio cable.
3 Check the Enhanced Video status.
a) Open the ThinkPad Configuration program.
b) Select the Enhanced Video/MPEG button ( ).c) If Video capture/MPEG status is enabled, go to step 5.
If not, continue to the next step.d) Click on Advanced .
2-46
Title: C79DMMST CreationDate: 07/16/97 13:09:22

e) Click on the 1st IRQ list box and assign an IRQ for thedevice. (The default IRQ is 11.)
4 Restart the computer to make the IRQ setting effective.
5 Start the video capture application program.
If you are going to use the Digital Video Producer (DVP)program, see the online help included in the application.
If you are going to use the Media Player, go to “Using theOverlay Function.”
Using the Overlay FunctionYou can use the video overlay function using the Media Player forWindows 95. To view a video using the overlay function, do thefollowing:
1 Open Media Player in Windows.
2 Click on Device .
3 Select MCI OVERLAY Driver .
Chapter 2. Fine-Tuning Your Computer 2-47
Title: C79DMMST CreationDate: 07/16/97 13:09:22

Operational Restrictions
The following shows restrictions when using the Enhanced Videofunctions in Windows 95:
You cannot change the video resolution when you arecapturing, overlaying, or playing back an MPEG file.
You can use only one video application at a time—forexample, you cannot capture video while playing back anMPEG file.
Video overlay, capture, and MPEG playback functions do notwork under the following video modes:
– 800x600 resolution and 16M colors– 1600x1200 resolution and 256 colors– All 16 color modes
Do not select virtual screen in the ThinkPad Configurationprogram.Video overlay, capture, and MPEG playback functions are notsupported in virtual screen mode, such as the 1280x1024resolution on an LCD.
For better motion video quality of MPEG-2 and DVD movieplayback, you should select 1024x768 resolution 256 color.
Audio streams are decoded in software. MPEG/DVDplayback performance is contingent upon the speed andpower of the system. Audio subsystem needs to be fullyfunctional.
MPEG playback and Video overlay/capure requires MicrosoftDirectX 2** support.
DVD titles cannot be played by Media Player. You must usea DVD player application.
2-48
Title: C79DMMST CreationDate: 07/16/97 13:09:22

Using the MPEG PlaybackThe MPEG feature enables hardware to decode MPEG playbackfiles under playback application programs.
To use MPEG playback in Windows 95, do the following:
1 Open Media Player .
2 Click on Device .
3 Do one of the following:
When you want to play MPEG files, select IBM MPEG-2.
When you want to play a movie or CD, selectCD-i/VideoCD .
4 When you want to play a video CD or a CD-i movie from the
CD-ROM drive of your computer, click on the Play ( ) icon.Otherwise, select the MPEG file you want to play; then click on
the Play ( ) icon.
Changing the Drive Letter
You must change the drive letter when you use the MPEGplayback function. To change the drive letter for CD-i/VideoCD,do the following:
1 Select Control Panel from the My Computer folder.
2 Click on the Multimedia icon.
3 Select Advanced .
4 Click on Media control device .
5 Click on IBM MPEG CD-i/VideoCD[mci] .
6 Confirm that Use this Media Control device is selected;then select Settings .
7 Change the drive letter.
Chapter 2. Fine-Tuning Your Computer 2-49
Title: C79DMMST CreationDate: 07/16/97 13:09:22

Using the DVD PlayerWhen you install the optional DVD drive and the player applicationshipped with the option, you can view various DVD titles. You canview DVD movies on your computer screen or on your TV.
When you attach your computer to the television, you can view aDVD movie on your TV screen either as an MPEG full-screen or as acomputer-overlay screen. You can switch between these two modesby using the Fn+F7 keys. To enable this screen switching function,you should select Enable for the Video out port (TV out) on the“Enhanced Video/MPEG” window of the ThinkPad Configurationprogram. In summary, you can view a DVD movie on the following:
You cannot use this screen switching function if you selectedDisable for the Video out port (TV out) on the “EnhancedVide/MPEG” window of the ThinkPad Configuration program. Thenyou can see a DVD movie only as an MPEG full-screen image onyour TV. In summary, you can see as follows:
LCD Screen External Display TV Screen
MPEG on Graphics Not applicable MPEG full screen(when you playMPEG)
No image Not applicable Computer overlayscreen(no image if themovie iscopy-protected)
LCD Screen External Display TV Screen
MPEG on Graphics Same as LCDscreen
MPEG full screen(when you playMPEG)
2-50
Title: C79DMMST CreationDate: 07/16/97 13:09:22

Warning
Copyright-protected DVD movies can be viewed only as afull-screen image on the TV, not as a computer-overlayscreen image. If you are viewing this type of movie in full TVscreen mode and you try to switch to the computer-overlayscreen mode using the Fn+F7 keys, your screen will turnblack. Press these keys again to return to the full TV screenmode.
Copyright-protected DVD movies contain copy-protect signalsthat prevent them from being copied. These images, playedback on the VCR, are distorted.
To attach your computer to the television, refer to “Attaching aTelevision to Your Computer” on page 3-22.
Using the Enhanced Video Features in OS/2You can capture still images and motion video using the videocapture application Video IN supported by MMPM/2, and the video-inport of your computer.
Notes:
1. You need at least 12 MB of memory to capture video from thevideo-in port using Video IN.
2. When installing the Enhanced Video device driver, install VideoIN from the BonusPak, prior to the device drivers.
3. The DVD/MPEG feature is not supported in OS/2.
Chapter 2. Fine-Tuning Your Computer 2-51
Title: C79DMMST CreationDate: 07/16/97 13:09:22

To capture a motion video, do the following:
1 Turn off the computer and connect the video in-out cable 1 tothe video-in port ( ) 2 of the computer; then connect yourvideo equipment.
Cables other than the video in-out cable 1 are not suppliedwith the computer.
If you are using video equipment with S-video output,connect the S-video port of the video in-out cable to theS-video-out port of your video equipment 3 for betterpicture quality.
If you are not using video equipment with S-video output,connect the composite video port of the video in-out cableto the video-out port of your video equipment 4 .
If your video equipment has only one audio-output port, usethe left-audio connector of the audio cable.
2 Check the Enhanced Video status.
a) Open the ThinkPad Configuration program and select the
Enhanced Video/MPEG button ( ).b) If Video capture/MPEG status is enabled, go to step 4.
If not, continue to the next step.
2-52
Title: C79DMMST CreationDate: 07/16/97 13:09:22

c) Click on Advanced ; then click on the 1st IRQ list box andassign an IRQ for the device. (The default IRQ is 11.)
Operational Restrictions
You must be aware on the following points when using theEnhanced Video feature:
Do not use the Enhanced Video feature (capturing oroverlaying video images using the Video-IN Recorder) in thefollowing display modes:
– 800x600 resolution and 16M colors,– 1600x1200 resolution and 256 colors
If you use the Enhanced Video feature in these displaymodes, the image may be corrupted.
Do not select virtual screen in the ThinkPad Configurationprogram.
The video overlay and the capture functions are notsupported in virtual screen mode, such as the 1280x1024resolution on an LCD.
Chapter 2. Fine-Tuning Your Computer 2-53
Title: C79DMMST CreationDate: 07/16/97 13:09:22

Using Easy-Setup
Your computer provides a user-friendly program called “Easy-Setup”that allows you to select various setup parameters. You shouldperform this program before you start using your computer. Do thefollowing steps to start the program:
1 Turn off the computer, and remove any diskette from thediskette drive.
2 Press and hold F1; then turn on the computer. Hold F1 untilthe “Easy-Setup” menu appears:
3 Move to an icon you want to change, using the arrow keys orthe TrackPoint, and click on the icon. A submenu is displayed.
4 Change the items you wish to change.
5 Click on Exit to exit to the “Easy-Setup” menu.
Changing the Screen Color
You can change the color of the “Easy-Setup” menu by pressingthe Ctrl +PgUp keys or by pressing the Ctrl +PgDn keys.
To return to the original color, press the Ctrl +Home keys.
2-54
Title: C79DMMST CreationDate: 07/16/97 13:09:22

Pressing the Config button displays the “Config”submenu. It shows information about the installedmemory and system board. You can also use theMultiple Display function, and enable or disable theWake-On-LAN and Flash-Over-LAN functions. Go to“Knowing Your Configuration” on page 2-56.
Pressing the Date/Time button displays the “Date andTime” submenu. It is used to set the current date andtime. Go to “Setting the Date and Time” on page 2-57.
Pressing the Password button displays the “Password”submenu. It is used to set the power-on password, harddisk password, and the supervisor password. Go to“Using Passwords” on page 2-16.
Notes:
1. An icon for HDD-2 is displayed in solid black if anoptional secondary hard disk exists in the UltraBay II.It will be displayed in a lighter shade if this option isnot installed.
2. An unlocked lock icon shows a password not yet set.
Pressing the Start up button displays the “Start up”submenu. It is used to change the startup sequence ofyour computer. Go to “Changing the Drive StartupSequence” on page 2-57.
Pressing the Test button displays the “Test” submenu. Itis used to run diagnostic tests on your computer to checkfor hardware errors. Go to “Testing Your Computer” onpage 4-32.
Pressing the Restart button ends the Easy-Setupprogram and restarts the computer.
Chapter 2. Fine-Tuning Your Computer 2-55
Title: C79DMMST CreationDate: 07/16/97 13:09:22

Knowing Your ConfigurationTo find out which devices are installed on your computer, do thefollowing:
1 Start Easy-Setup (refer to “Using Easy-Setup” on page 2-54).
2 Click on Config in the “Easy-Setup” menu. The “Configuration”submenu appears:
3 Move the cursor to any device icon whose information you wantand click on it. Detailed information on that device is displayed.
The Memory button shows the amount of memoryinstalled and available.
The System Board button provides information on theinstalled system board.
The Display button sets the screen output to bedisplayed on either a Single screen or on Multiplescreens.
The Network button sets the Wake on LAN, the startupsequence, and the Flash update features. For furtherinformation. refer to the chapter on “Total Cost ofOwnership” in the online book.
Initialize sets all device settings to the default values.
2-56
Title: C79DMMST CreationDate: 07/16/97 13:09:22

4 Click on Exit to exit from the submenus, or press Esc to cancelthe selection.
Setting the Date and TimeTo change the date and time, do the following:
1 Start Easy-Setup (refer to “Using Easy-Setup” on page 2-54).
2 Click on Date/Time on the “Easy-Setup” menu. The“Date/Time” submenu appears:
3 Move the cursor to any field (year, month, date, hour, minute,or second) and place the pointer on any of the arrow icons ( ,
, , or ) to adjust the date and time. Clicking on thedouble-arrow icon scrolls the numbers faster.
4 Click on OK to save the changes or on Cancel to cancel it.
Changing the Drive Startup SequenceThis feature enables you to change the startup sequence of thedrives in your computer. It is useful when you have differentoperating systems on different replaceable hard disk drives or in PCcards. You can have the system boot up from these devices.
Attention
You must be extremely careful not to specify a wrong deviceduring a copy, save, or a format operation after you change yourstartup sequence. If you do, your data and programs will beerased or overwritten.
Chapter 2. Fine-Tuning Your Computer 2-57
Title: C79DMMST CreationDate: 07/16/97 13:09:22

To change the startup sequence, do the following:
1 Start Easy-Setup (refer to “Using Easy-Setup” on page 2-54).
2 Click on Start up in the “Easy-Setup” menu. The “Startup”submenu appears:
3 Click on Power-On in the submenu. The “Power-On” submenuappears:
The FDD-1 icon is the diskette drive in the UltraBay II, if youhave one. If you don't have one but you have a diskette drive
The Power-On button sets the startup sequence of yourcomputer.
The Network button sets the network functions of yourcomputer.
For more information on this function, refer to the chapteron “System Management” in the online book.
2-58
Title: C79DMMST CreationDate: 07/16/97 13:09:22
in the docking station, that diskette drive becomes FDD-1. Ifyou have an additional diskette drive, that drive becomesFDD-2.
The hard disk drive in your computer is HDD-1. If you have ahard disk drive in the UltraBay II, that drive becomes HDD-2.The HDD-3 and HDD-4 are the external hard disk drives on thedocking station.
4 Move the cursor to the Reset icon; and click on it.
5 Select the first device you want for the startup sequence; thenclick on it.
The device moves up to box 1. You cannot set a hard diskdrive before a PCMCIA** card.
6 If you are using a remote program loading (RPL) systemthrough a token-ring card or some other network card, do thefollowing:
a Select Network and click on it. The “Speed” menuappears.
b If you are using a token-ring card, select the speed youwant (4 or 16), and click on it; then press Enter .
If you are using a network card other than a token-ringcard, such as an Ethernet card, you need not specify theRPL speed. Press Esc and exit this menu.
7 Repeat these steps for the other devices. You can set up tofour devices.
8 Click on OK or press Enter to save the changes.
Chapter 2. Fine-Tuning Your Computer 2-59
Title: C79DMMST CreationDate: 07/16/97 13:09:22

2-60
Title: C79DMMST CreationDate: 07/16/97 13:09:22

Chapter 3. Installing Options
This chapter describes how to install (and remove) the followingoptions:
Installing IBM Options . . . . . . . . . . . . . . . . . . . . . . . . 3-2Installing a Memory Option . . . . . . . . . . . . . . . . . . . . 3-2Replacing the Hard Disk Drive in the HDD Bay . . . . . . . . 3-5Installing the Battery Pack . . . . . . . . . . . . . . . . . . . . 3-6Removing and Installing a Device in UltraBay II . . . . . . . 3-7
Installing the Secondary Hard Disk Drive . . . . . . . . . . 3-9Installing the Secondary Battery Pack . . . . . . . . . . . 3-10
Installing the DVD and Enhanced Video Adapter . . . . . . 3-10Replacing the Backup Battery . . . . . . . . . . . . . . . . . 3-11Attaching a Mouse, a Numeric Keypad, or an External
Keyboard . . . . . . . . . . . . . . . . . . . . . . . . . . . . 3-13Inserting or Removing a PC Card . . . . . . . . . . . . . . . 3-15
Installing Other Devices . . . . . . . . . . . . . . . . . . . . . . 3-17Using a Docking Station . . . . . . . . . . . . . . . . . . . . 3-17
Docking with Your Computer Powered Off . . . . . . . . 3-18Undocking with Your Computer Powered On or While in
Suspend Mode . . . . . . . . . . . . . . . . . . . . . . . 3-19Presetting a Device to Avoid a Resource Conflict . . . . 3-20
Using the Security System Lock . . . . . . . . . . . . . . . 3-21Attaching a Television to Your Computer . . . . . . . . . . 3-22
Copyright IBM Corp. 1997 3-1
Title: C79DMMST CreationDate: 07/16/97 13:09:22

Installing IBM Options
This section describes how to install (and remove) IBM options.
Installing a Memory OptionYou can increase the amount of memory in your computer byinstalling a dual inline memory module (DIMM).
Attention
To avoid damaging the DIMM memory board electrically, do nottouch the connector edge directly with your hands.
1 Turn off your computer; then disconnect the AC Adapter and allcables from the computer.
2 Discharge any static electricity that may be in your body bytouching a metal object with your hands.
3 Turn the computer upside down.
4 Open the bottom compartment with a screwdriver 1 andremove the bottom cover 2 .
3-2
Title: C79DMMST CreationDate: 07/16/97 13:09:22
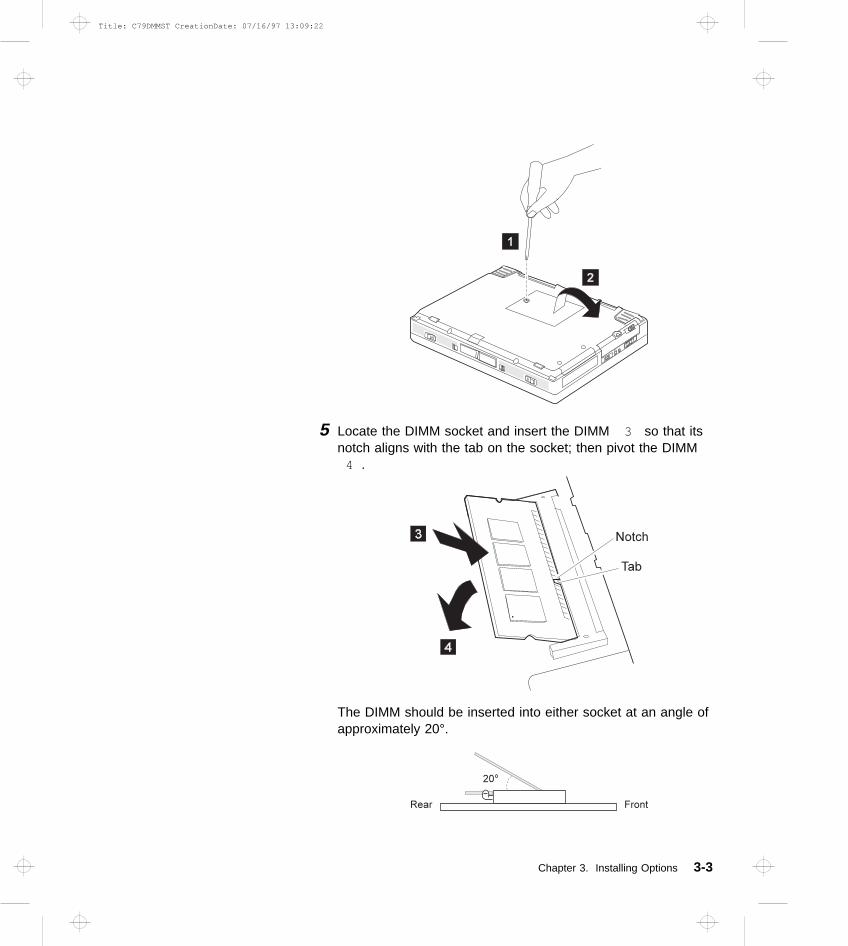
5 Locate the DIMM socket and insert the DIMM 3 so that itsnotch aligns with the tab on the socket; then pivot the DIMM
4 .
The DIMM should be inserted into either socket at an angle ofapproximately 20°.
Chapter 3. Installing Options 3-3
Title: C79DMMST CreationDate: 07/16/97 13:09:22

6 If you have another DIMM, install it into the vacant socket.
Removing a Memory Option
To remove the DIMM from its socket, push out the left andright latches.
7 Replace the bottom cover and the screw, and turn thecomputer rightside up.
8 Connect the AC Adapter to the computer.
9 Power on the computer and confirm the new memory size. Forexample, information such as the following appears:
32384 KB OK
10 Is the new memory size what you expected?
Yes You have installed the DIMM successfully. Go to thenext step.
No Go to “Testing Your Computer” on page 4-32.
11 Turn off the computer and reconnect all cables.
3-4
Title: C79DMMST CreationDate: 07/16/97 13:09:22

Replacing the Hard Disk Drive in the HDD Bay
Attention
The hard disk is a delicate device; therefore, handle it carefully.You can damage this device if you drop it on a hard surface.
1 Turn off the computer; then disconnect the AC Adapter and allcables from the computer.
2 Turn the computer upside down, unscrew the HDD bay coverscrew 1 using a coin, slide the latch to the rear 2 , andremove the bay cover 3 .
Note: To prevent others from gaining access to the hard diskdrive. you can change the coin screw at the rear with anormal screw shipped with your computer.
Chapter 3. Installing Options 3-5
Title: C79DMMST CreationDate: 07/16/97 13:09:22

3 Pull out the hard disk drive from the bay.
4 Insert the new hard disk drive into the bay and screw on theHDD bay cover.
Make sure you insert the hard disk drive with the label facingdown .
5 Turn the computer rightside up, connect the AC Adapter to thecomputer, and turn on the computer.
Installing the Battery Pack
If you are going to use ac power without the battery pack, or if youwant to replace the battery pack, do the following:
Slide the left release latch to the left 1 and gently lift up the bayeject lever 2 and pull out the battery pack 3 .
3-6
Title: C79DMMST CreationDate: 07/16/97 13:09:22

Insert the new battery pack until it snaps into place; then push in thebay eject lever to the level position.
Make sure you align the slanted edge of the battery pack with theslant on the battery bay.
Removing and Installing a Device in UltraBay IIYou can install one of the following devices in UltraBay II:
CD-ROM Drive Diskette Drive DVD Drive
Secondary Hard Disk Drive(requires a secondary HDD adapter)
Secondary Battery Pack(requires a battery adapter)
Chapter 3. Installing Options 3-7
Title: C79DMMST CreationDate: 07/16/97 13:09:22

Before you remove a CD-ROM device or a diskette drive from theUltraBay II, make sure there are no CD-ROMs or diskettes insertedin the drive.
To remove a device from the UltraBay II, do the following:
1 (Cold unplugging only.) Power off the computer, disconnect theAC Adapter, and disconnect all cables from the computer.
2 Slide the right release latch to the right 1 .
3 Gently lift up the bay eject lever 2 and remove the devicefrom the bay 3 .
4 Install another device into the UltraBay II by referring to themanuals shipped with the option.
3-8
Title: C79DMMST CreationDate: 07/16/97 13:09:22

Make sure you align the slanted edge of the device with theslant on the UltraBay II.
5 You can install the screws shipped with your computer toprevent others from gaining access to the device (see page1-6).
Installing the Secondary Hard Disk DriveBefore you install the secondary hard disk drive into the UltraBay II,do the following:
1 Attach the ThinkPad 770 Second Hard Disk Drive Adapteroption 770 adapter component 1 .
2 Open the disk stopper 2 , install the hard disk drive into theadapter 3 .
3 Slide the hard disk drive to the right 4 and close the stopper5 .
Note: The ThinkPad 770 Second Hard Disk Drive Adapteroption includes a 760 and a 765 adapter component forinstalling the ThinkPad Model 760 and 765 hard disks.
4 Install the secondary hard disk drive adapter option into theUltraBay II.
Chapter 3. Installing Options 3-9
Title: C79DMMST CreationDate: 07/16/97 13:09:22

Installing the Secondary Battery PackBefore installing a secondary battery pack into the battery bay, attachthe battery pack to the adapter case; then insert it into the bay.
Installing the DVD and Enhanced Video AdapterTo install the adapter, do the following:
1 Turn the computer upside down.
2 Remove the battery pack.
3 Remove the screws on the adapter slot 1 and remove thecover 2 .
3-10
Title: C79DMMST CreationDate: 07/16/97 13:09:22

4 Insert the adapter into the slot 3 and replace the screws 4and the battery pack.
5 Turn the computer rightside up.
Refer to “Using the DVD and Enhanced Video Adapter” onpage 2-44 for details on the usage.
Replacing the Backup BatteryThis section explains how to replace the backup (lithium-ion) batteryin the bottom compartment.
1 Turn off the computer; then disconnect the AC Adapter and allcables from the computer.
2 Turn the computer upside down.
Chapter 3. Installing Options 3-11
Title: C79DMMST CreationDate: 07/16/97 13:09:22

3 Open the bottom compartment with a screwdriver 1 andremove the bottom cover 2 .
4 Find the old backup battery in the bottom compartment andremove it from the battery holder by pushing it in 3 ; thenlifting it up 4 .
5 Install a new backup battery.
6 Replace the bottom cover.
7 Connect the AC Adapter to the computer.
3-12
Title: C79DMMST CreationDate: 07/16/97 13:09:22
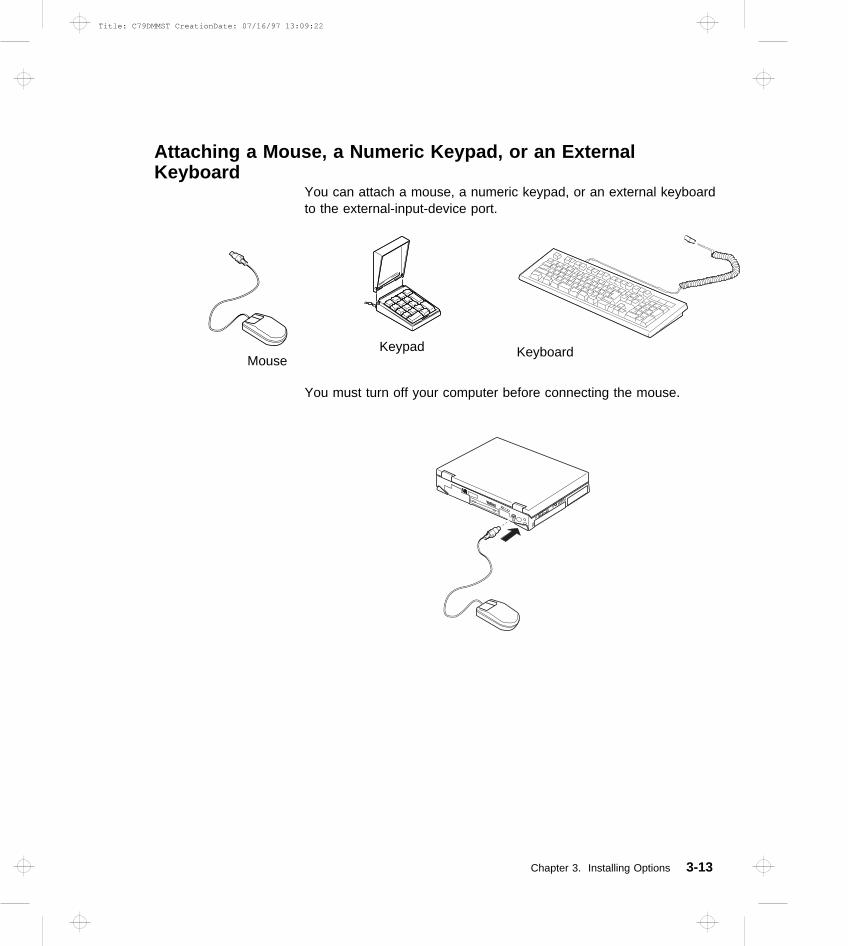
Attaching a Mouse, a Numeric Keypad, or an ExternalKeyboard
You can attach a mouse, a numeric keypad, or an external keyboardto the external-input-device port.
MouseKeypad Keyboard
You must turn off your computer before connecting the mouse.
Chapter 3. Installing Options 3-13
Title: C79DMMST CreationDate: 07/16/97 13:09:22

If you want to use the external numeric keypad and the mouse at thesame time, first connect the keypad cable to the computer 1 ; thenconnect the mouse cable 2 to the connector on the keypad.
If you want to use an external keyboard and a mouse at the sametime, you must use the optional keyboard/mouse connector cableand do the following:
1 Turn off the computer.
2 Connect the optional keyboard/mouse connector cable to theexternal-input-device port 1 on your computer.
3-14
Title: C79DMMST CreationDate: 07/16/97 13:09:22

3 Connect the external keyboard and mouse to the connectors2 on the cable connector.
You cannot use the numeric keypad on your computer when you areusing the external keyboard.
Inserting or Removing a PC CardThis section explains how to insert and remove a PC Card.
Your computer has an upper and a lower PC Card slot. This slotsupports the following type of cards:
PCMCIA (Type I, Type II, and Type III) CardBus
Zoomed Video (ZV)
Chapter 3. Installing Options 3-15
Title: C79DMMST CreationDate: 07/16/97 13:09:22

You can insert a Type I and a Type II card into the upper 1 andlower 2 slots and a Type III (double-height) card into the lowerslot.
Refer to the chapter “Using PC Cards” in the online book for detailson their usage.
1 Make sure that the notch 3 on the PC Card is on the left.
2 Insert the PC Card all the way into the slot.
To remove a card, push the button; the card will pop out.
3-16
Title: C79DMMST CreationDate: 07/16/97 13:09:22

Installing Other Devices
Using a Docking StationYou can extend the capabilities of your computer by docking it first tothe SelectaBase 770 port replicator and then to a docking station:
SelectaBase 770(Port Replicator)
SelectaDock I(ISA 1/PCI 1,
UltraBay 1)
SelectaDock II(ISA 2/PCI 3, UltraBay 2,
Half-height Bay 1)
SelectaDock III(ISA 2/PCI 3, UltraBay II 1,Half-height Bay 1, USB 2)
You can dock your computer to a docking station under the followingconditions:
With your computer powered off (cold docking).With your computer operating (hot docking)With your computer in suspend mode (warm docking)
Notes:
1. Depending on the hardware configuration or the operatingsystem, docking with your computer while powered on or insuspend mode might not be supported. Refer to the user'sguide shipped with these options for instructions on how to dockyour computer to a docking station.
2. You might not be able to read the indicator panel or access the
Chapter 3. Installing Options 3-17
Title: C79DMMST CreationDate: 07/16/97 13:09:22

diskette drive easily on the SelectaDock I after you dock it withthe SelectaBase 770 port replicator.
Docking with Your Computer Powered OffYou should dock with both your computer and your docking stationpowered off when:
It is the first time you dock your computer to the docking station.
You have changed the device configuration of your dockingstation, such as when you have installed or removed a device.
This resets the docking station's device status recorded on yourcomputer. Thereafter, you can dock your computer with the dockingstation at any time.
To dock the computer for the first time, do the following:
1 Install new devices in the docking station.
2 Connect the power cord to the docking station.
3 Slide the rear door at the rear of the computer and dock yourcomputer to the docking station.
The indicator appears on the docking station LCD,indicating that the computer is properly docked.
4 Turn on the computer.
Windows 95 begins to check the status of the docking stationand restarts a couple of times. Follow the instructions thatappear on the screen.
During this operation, Windows 95 creates a configurationprofile for the docking station with the name Dock X.
Notes:
a) X can be any number from 1 to 3. Your computer iscapable of creating configuration information for threedocking stations.
b) The message “Version Conflict” might appear on thescreen. Answer Yes to the prompt “Do you want to keepthis file?”
3-18
Title: C79DMMST CreationDate: 07/16/97 13:09:22

5 In Windows 95, select My Computer , Control Panel , System ,and then the Hardware Profile tab.
6 Make sure the new profile, Dock X, is created. Also, select theDevice Manager tab and make sure that the new devices aredisplayed in the device list.
If Dock X is not created, repeat from step 1.
If the symbol “!” or “x” appears next to the device symbol, aresource conflict might have occurred. Resolve the problem byreferring to “Resolving System Resource Conflicts” in the onlinebook.
After the new hardware profile Dock X is created, you can dock orundock your computer to the docking station while the power is on.
Undocking with Your Computer Powered On or While in SuspendMode
To undock your computer from the docking station when thecomputer is operating (or hot undocking) or when the computer is insuspend mode (or warm undocking), do the following:
1 Select Start in Windows 95, and then Eject PC . The LCD onyour computer turns off and on.
Preloaded Applications
ThinkPad Information
ThinkPad Tools
Programs
Documents
Settings
Find
Help
RUN...
Suspend
Shut Down...
Eject PC
Chapter 3. Installing Options 3-19
Title: C79DMMST CreationDate: 07/16/97 13:09:22

or
Turn the security key of the docking station to the rear, andremove the computer. You may have to push strongly.
An eject request is made to the operating system. It may takesome time for this eject operation to end.
Note: To see if the eject operation is complete, click on Startagain and see if the Eject PC icon still appears. If theicon still appears, wait until it disappears.
2 When you hear a beep, turn the security key to the rear again.Now you can eject your computer from the docking station.
Note: If the operating system rejects the eject request, amessage appears on the screen. You should then trycold undocking.
Presetting a Device to Avoid a Resource ConflictThe Windows 95 plug and play function enables you to use devicesthat you install in the docking station immediately after you power on.If you cannot use them, a system resource conflict might haveoccurred. Do the following to resolve the conflict:
For a PCI adapter or an SCSI device:
1. Start the ThinkPad Configuration program and click on the
Docking Station ( ) button.
2. Assign at least one IRQ value. The default setting is IRQ 11.
For an ISA adapter card:
1. Open Windows 95 Device Manager and check the resourcesavailable for the new card.
2. Set the jumper or the DIP switches on the adapter card.
For an IDE device such as a hard disk drive or a CD-ROM drive:
1. Start the ThinkPad Configuration program and click on the
Docking Station ( ) button.
2. Add a checkmark on Enable IDE device in the DockingStation , if there isn't any, and restart the computer.
3-20
Title: C79DMMST CreationDate: 07/16/97 13:09:22

3. Click on Device Manager and check whether there is a resourceconflict between the new IDE device and the other devices in thecomputer. If there is a resource conflict, go to “ResolvingSystem Resource Conflicts” in the online book.
Using the Security System Lock
To prevent your computer from being stolen, you should purchasethe optional security system lock from your dealer. You will beresponsible for its evaluation, selection, and installation. IBM will notbe held responsible for its functionality, quality, or performance.
Refer to the instructions shipped with this option for how to use thissecurity feature.
Chapter 3. Installing Options 3-21
Title: C79DMMST CreationDate: 07/16/97 13:09:22

Attaching a Television to Your ComputerYou can attach a television (NTSC or PAL) to your computer anddisplay the computer screen on it.
To display the computer screen on television, do the following:
1 Turn off the computer and television.
2 Connect the video in-out cable 1 to the video-out port 2( ); then connect your television.
3 Enable the video-out port (TV out) in the “EnhancedVideo/MPEG” window in the ThinkPad program.
Notes:
a) Only the video in-out cable 1 is supplied with yourcomputer. The other cables are not supplied; you mustpurchase them.
b) If you are using a television with an S-video input, connectthe video in-out cable to the S-video-in port 3 on yourtelevision for better picture quality.
c) If you are using a television with non-S-video input, connectthe video in-out cable to the normal television connector 4on your television.
3-22
Title: C79DMMST CreationDate: 07/16/97 13:09:22

d) If your video equipment has only one audio-input connector,use the left-audio connector of the audio cable.
Chapter 3. Installing Options 3-23
Title: C79DMMST CreationDate: 07/16/97 13:09:22

3-24
Title: C79DMMST CreationDate: 07/16/97 13:09:22

Chapter 4. Solving Computer Problems
Frequently Asked Questions . . . . . . . . . . . . . . . . . . . . 4-2Troubleshooting Guide . . . . . . . . . . . . . . . . . . . . . . . . 4-3Troubleshooting Charts . . . . . . . . . . . . . . . . . . . . . . . 4-4
Error Codes or Screen Messages . . . . . . . . . . . . . . . . 4-5No Error Codes or Screen Messages . . . . . . . . . . . . 4-10An Input Problem . . . . . . . . . . . . . . . . . . . . . . . . 4-11A Suspend or Hibernation Problem . . . . . . . . . . . . . . 4-12An LCD Problem . . . . . . . . . . . . . . . . . . . . . . . . 4-16An Indicator Problem . . . . . . . . . . . . . . . . . . . . . . 4-17A Battery Problem . . . . . . . . . . . . . . . . . . . . . . . . 4-17A CD-ROM Drive Problem . . . . . . . . . . . . . . . . . . . 4-18A DVD Problem . . . . . . . . . . . . . . . . . . . . . . . . . 4-20An Infrared Communication Problem . . . . . . . . . . . . . 4-21An Enhanced Video/MPEG Problem . . . . . . . . . . . . . 4-22An Audio or a Telephony Problem . . . . . . . . . . . . . . 4-22A Universal Serial Bus (USB) Problem . . . . . . . . . . . . 4-23A Modem Problem . . . . . . . . . . . . . . . . . . . . . . . 4-23Other PC Card Problems . . . . . . . . . . . . . . . . . . . . 4-26A SelectaDock Problem . . . . . . . . . . . . . . . . . . . . 4-26A Printer Problem . . . . . . . . . . . . . . . . . . . . . . . . 4-27An External Display Problem . . . . . . . . . . . . . . . . . 4-27A Television Problem . . . . . . . . . . . . . . . . . . . . . . 4-29Other Option Problems . . . . . . . . . . . . . . . . . . . . . 4-29A Software Problem . . . . . . . . . . . . . . . . . . . . . . . 4-31Other Problems . . . . . . . . . . . . . . . . . . . . . . . . . 4-31
Testing Your Computer . . . . . . . . . . . . . . . . . . . . . . 4-32
Copyright IBM Corp. 1997 4-1
Title: C79DMMST CreationDate: 07/16/97 13:09:22

Frequently Asked Questions
How can I expand my hard disk space?
Most preloaded applications in the hard disk can be uninstalled to make more room forother applications. Check whether the application you want to delete has its own deletionicon.
After you create the necessary driver diskettes using the Diskette Factory, delete the files.
How can I get the operating system or the device driver diskettes?You can restore Windows 95 using the Recovery CD, which is shipped with your computer.For details, refer to the online book.
You can make a backup copy of your device drivers by using the Diskette Factory program asfollows:
1. Click on Start ,2. Move the cursor on ThinkPad Tool .3. Click on Diskette Factory .
How can I resolve a resource conflict (such as an IRQ or a COM port setting) occurring duringthe installation of a new option or a new application?
See “Resolving System Resource Conflicts” in the online book to obtain information onhardware resources used by the devices in the computer.
My computer does not perform as I expected.Your computer's performance varies depending on the hardware and software installed, suchas memory size, swapper file size, and smart drive settings.
Also, close all windows you are not using; for example, close the “Media Player” window whenyou play a CD in the CD-ROM drive.
4-2
Title: C79DMMST CreationDate: 07/16/97 13:09:22

Troubleshooting Guide
The following chart shows how to find or solve a problem.
When a beep sounds, when a message appears, or when afunction-related problem occurs:
1 Find your symptom from thetable and try solving yourproblem.
“TroubleshootingCharts” on page 4-4
2 If you can't solve theproblem, run the test andmake sure the hardware andthe device drivers are OK.
“Testing YourComputer” onpage 4-32
3 Write down the error codeand let the servicer know theerror; then request service.
Chapter 5
When you accidentally lose or damage software in yourcomputer:
Recover it by using the RecoveryCD or the Diskette Factory.
Refer to the section“RecoveringPreloaded Software(for Windows 95Only)” in the onlinebook.
Chapter 4. Solving Computer Problems 4-3
Title: C79DMMST CreationDate: 07/16/97 13:09:22

Troubleshooting Charts
If your computer has an error, it often displays a message or an errorcode, or a beep sounds when you power it on. Go through thecharts and look for your problem. If you find your problem, go to thepage indicated and do the specified action.
Troubleshooting Chart Page
Error codes or screen messages 4-5
No error codes or screen messages 4-10
An input problem 4-11
A suspend or a hibernation problem 4-12
An LCD problem 4-16
An indicator problem 4-17
A battery problem 4-17
A CD-ROM problem 4-18
A DVD problem 4-20
An infrared communication problem 4-21
An enhanced video/MPEG problem 4-22
An audio or a telephony problem 4-22
A universal serial bus problem 4-23
A modem problem 4-23
Other PC Card problems 4-26
A SelectaDock problem 4-26
A printer problem 4-27
An external display problem 4-27
A television problem 4-29
Other option problems 4-29
A software problem 4-31
Other problems 4-31
4-4
Title: C79DMMST CreationDate: 07/16/97 13:09:22
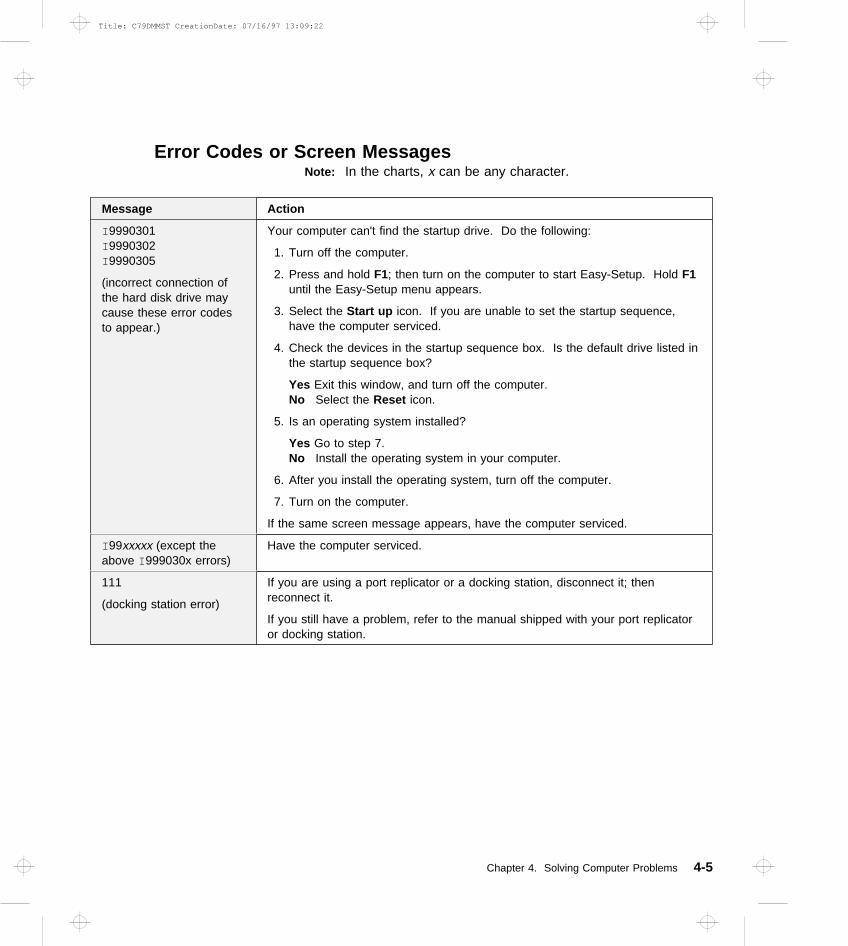
Error Codes or Screen MessagesNote: In the charts, x can be any character.
Message Action
I 9990301I 9990302I 9990305
(incorrect connection ofthe hard disk drive maycause these error codesto appear.)
Your computer can't find the startup drive. Do the following:
1. Turn off the computer.
2. Press and hold F1; then turn on the computer to start Easy-Setup. Hold F1until the Easy-Setup menu appears.
3. Select the Start up icon. If you are unable to set the startup sequence,have the computer serviced.
4. Check the devices in the startup sequence box. Is the default drive listed inthe startup sequence box?
Yes Exit this window, and turn off the computer.No Select the Reset icon.
5. Is an operating system installed?
Yes Go to step 7.No Install the operating system in your computer.
6. After you install the operating system, turn off the computer.
7. Turn on the computer.
If the same screen message appears, have the computer serviced.
I 99xxxxx (except theabove I 999030x errors)
Have the computer serviced.
111
(docking station error)
If you are using a port replicator or a docking station, disconnect it; thenreconnect it.
If you still have a problem, refer to the manual shipped with your port replicatoror docking station.
Chapter 4. Solving Computer Problems 4-5
Title: C79DMMST CreationDate: 07/16/97 13:09:22

Message Action
158
(supervisor passworderror)
A hard disk drive was installed with a different supervisor password, or it did nothave a hard disk password.
The hard disk drive with the error can be in any of the following:
The main bay of your computerThe UltraBay IIThe UltraBay II of the docking station attached to your computer.
To solve the problem, do the following:
1. Make sure a hard disk drive without the error is installed in the main harddisk bay of your computer.
If the hard disk drive is installed in the UltraBay II of the docking station, turnoff the computer and reinstall it into the main hard disk bay of yourcomputer.
2. Press Enter .
3. Type your supervisor password at the power-on password prompt.
If the 158 error appears, press Enter to proceed to the Easy-Setup“Password” submenu.
4. Select the Supervisor icon; then press Enter .
The same password as the supervisor password is set for the hard diskpassword on the main hard disk bay.
5. Turn off the computer.
159
(supervisor passworderror)
The hard disk password differs from the supervisor password.
The hard disk drive with the error can be in any of the following:
The main hard disk drive bay of your computerThe UltraBay IIThe UltraBay II of the docking station attached to your computer
To solve the problem, do the following:
1. Make sure the hard disk drive password and the supervisor password differ.
If the hard disk drive is in the UltraBay II of the docking station, turn off thecomputer and reinstall it into the main bay of your computer.
2. Turn off the computer; then turn it on again.
3. Change the hard disk password to the supervisor password at the hard diskpassword prompt.
4-6
Title: C79DMMST CreationDate: 07/16/97 13:09:22

Message Action
16x or 17x(undefined date orconfiguration error)
Follow the instructions on the screen.
174(device configurationerror)
Make sure that the hard disk drive and the device in the UltraBay II are firmlyinstalled. Check the connection.
184(invalid password error)
The password entered is invalid.
Turn off the computer and wait at least 5 seconds; then turn it on again andtype the correct password.
190(critical low-battery error)
The computer turned off because the battery is low.
Connect the AC Adapter to the computer and charge the battery pack, orreplace the battery pack with the fully charged one.
195(hibernation error)
The system configuration differs from the time your computer enteredhibernation mode and after it exited this mode, and your computer cannotresume normal operation.
Change the system configuration to what it was before your computerentered hibernation mode.If the memory size was changed, re-create the hibernation file.
196(hibernation error)
The computer cannot read the hibernation file.
Have the computer serviced.
2xx(memory error)
Make sure that the DIMM option is correctly installed.
30x(keyboard error)
Make sure that no object is placed on the keyboard or on the external keyboard,if you have one. Power off the computer and power off all attached devices.Power on the computer first; then power on the attached devices.
If you still have a problem, do the following:
If an external keyboard is connected, do the following:– Turn off the computer and disconnect the external keyboard; then turn
on the computer. Make sure that your keyboard operation is correct. Ifit is, have the external keyboard serviced.
– Make sure that the external keyboard is connected to the correctconnector.
Test the computer by selecting the Start icon in the Easy-Setup “Test”submenu.
– If the computer stops during the test, have the computer serviced.
Chapter 4. Solving Computer Problems 4-7
Title: C79DMMST CreationDate: 07/16/97 13:09:22

Message Action
Diskette and F1 prompts
F2 F3 F4 F5 F6 F7 F8 F9 F11 F12F10
F1
Make sure that the hard disk drive is correctly installed.
Or, make sure that the self-starting diskette is inserted correctly (with the labelfacing up and metal-shutter end first) in the diskette drive.
If it is, press F1. If both prompts remain, have the computer serviced.
A 163 error appears andthen the Date and Timewindow appears.
Neither the date nor the time is set in the computer.
Set the date and time by typing or clicking on or to set the values; thenclick on OK.
When both the power-on password and supervisor password are set, do thefollowing:
1. Power on the computer.The password prompt appears after the error code.
2. Type the supervisor password, not the power-on password.An error window appears.
3. Click on OK or press Enter .4. Set the time and date in the next screen; then press Enter .
The system reboots.
Note: If the power-on password is rejected, reset the power-on password usingEasy-Setup if you need to.
The power-on passwordprompt
A power-on password or supervisor password is set. Type the correct passwordand press Enter to use the computer (see page 2-16).
If the power-on password is not accepted, a supervisor password may havebeen set. Type the supervisor password and press Enter .
If you still have a problem, have the computer serviced.
The hard disk passwordprompt
A hard disk password is set. Type the correct password and press Enter to usethe computer (see page 2-16).
If you still have a problem, have the computer serviced.
4-8
Title: C79DMMST CreationDate: 07/16/97 13:09:22
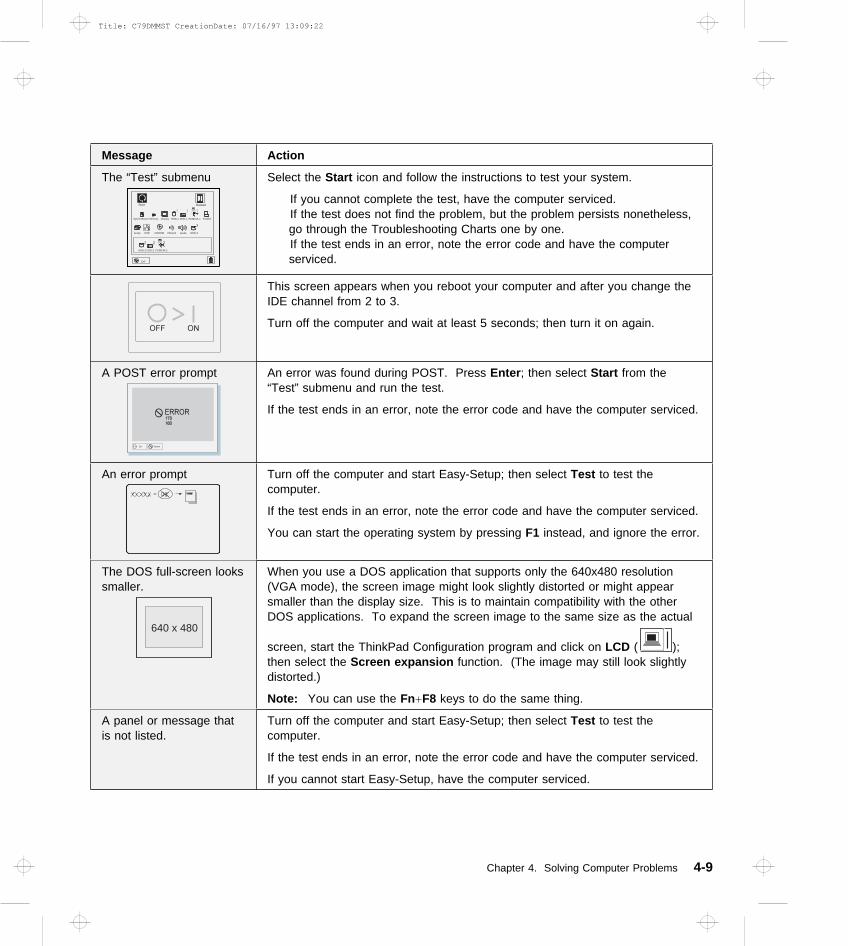
Message Action
The “Test” submenu
Exit
RestartStart
SystemBoard Memory Display HDD-1 FDD-1 ParallelPCMCIA-1
PCMCIA-2FDD-2HDD-2
HDD-3Serial CDROMDSP AudioInfrared
Select the Start icon and follow the instructions to test your system.
If you cannot complete the test, have the computer serviced.If the test does not find the problem, but the problem persists nonetheless,go through the Troubleshooting Charts one by one.If the test ends in an error, note the error code and have the computerserviced.
This screen appears when you reboot your computer and after you change theIDE channel from 2 to 3.
Turn off the computer and wait at least 5 seconds; then turn it on again.
A POST error prompt An error was found during POST. Press Enter ; then select Start from the“Test” submenu and run the test.
If the test ends in an error, note the error code and have the computer serviced.
An error prompt Turn off the computer and start Easy-Setup; then select Test to test thecomputer.
If the test ends in an error, note the error code and have the computer serviced.
You can start the operating system by pressing F1 instead, and ignore the error.
The DOS full-screen lookssmaller.
640 x 480
When you use a DOS application that supports only the 640x480 resolution(VGA mode), the screen image might look slightly distorted or might appearsmaller than the display size. This is to maintain compatibility with the otherDOS applications. To expand the screen image to the same size as the actual
screen, start the ThinkPad Configuration program and click on LCD ( );then select the Screen expansion function. (The image may still look slightlydistorted.)
Note: You can use the Fn+F8 keys to do the same thing.
A panel or message thatis not listed.
Turn off the computer and start Easy-Setup; then select Test to test thecomputer.
If the test ends in an error, note the error code and have the computer serviced.
If you cannot start Easy-Setup, have the computer serviced.
Chapter 4. Solving Computer Problems 4-9
Title: C79DMMST CreationDate: 07/16/97 13:09:22

Message Action
xxxxx KB OK appearsand the computer stops.
Have the computer serviced.
No Error Codes or Screen Messages
Problem Action
The screen is blank andyou don't hear any beeps.
Note: If you are not surewhether you heard anybeeps or not, turn thecomputer off; then turn iton again, and listen again.
Make sure that:
The battery pack is installed correctly.The AC Adapter is connected to the computer and the power cord isplugged into a working electrical outlet.The computer power is on. (Turn on the power switch again forconfirmation.)
If these items are correct and the screen remains blank, have the computerserviced.
The screen is blank andyou can't hear any beeps.
Note: If you are using anexternal display, go to “AnExternal Display Problem”on page 4-27.
If a power-on password is set, press any key to display the power-on passwordprompt, and then type the correct password and press Enter (see page 2-16).
If the power-on password does not appear, the brightness control lever might beset to minimum brightness. Adjust the brightness level. If the screen stillremains blank, have the computer serviced.
The screen is blank andyou hear a continuousbeep, or two or morebeeps.
Have the computer serviced.
Only the cursor appears. Reinstall your operating system and turn on the computer.
If you still have a problem, have the computer serviced.
4-10
Title: C79DMMST CreationDate: 07/16/97 13:09:22

An Input Problem
Problem Action
The pointer does notmove after the computerawakens from one of thepower-saving modes.
Make sure you followed the instructions in the online book correctly when youinstalled Windows with the Advanced Power Management (APM) option.
All or some keys on thekeyboard do not work.
If the problem occurred immediately after the computer returned fromsuspend mode, enter the power-on password if it is set.If an external keyboard is connected, the numeric keypad on your computerwill not work. This is not a defect.If an external numeric keypad or a mouse is connected:1. Turn off the computer.2. Remove the external numeric keypad or the mouse.3. Turn on the computer and try using the keyboard again.
If the keyboard problem is resolved, check the connection of the externalnumeric keypad, external keyboard, or the mouse.
If you still have a problem, have the computer serviced.
The pointer drifts whenthe computer is turned onor after it resumes normaloperation.
The pointer may drift when you are not using the TrackPoint during normaloperation. This is a normal characteristic of the TrackPoint and is not a defect.Pointer drifting may occur for several seconds under the following conditions:
When the computer is turned on.When the computer resumes normal operation.When the TrackPoint is pressed for a long time.When the temperature changes.
The mouse or pointingdevice does not work.
Make sure that the mouse or pointing-device cable is securely connected tothe computer.Try using the TrackPoint. If the TrackPoint works, the error might be due tothe mouse.If your mouse is incompatible with the IBM PS/2 mouse, disable theTrackPoint using the ThinkPad Configuration program.
Note: See the manual supplied with the mouse for more information.
The mouse buttons don'twork.
Change the mouse driver to Standard PS/2 Port Mouse , and then change toPS/2 TrackPoint .
The Scrolling orMagnifying Glass functiondoesn't work.
See the General tab page in “Mouse Properties,” and make sure that the PS/2TrackPoint driver is loaded.
Note: Refer to the README file in the TrackPoint driver diskette for driverinstallation.
Chapter 4. Solving Computer Problems 4-11
Title: C79DMMST CreationDate: 07/16/97 13:09:22

Problem Action
A number appears whenyou type a letter.
The numeric lock function is on. To disable it, press and hold Shift ; then pressNumLk .
A Suspend or Hibernation Problem
Problem Action
The computer enterssuspend modeautomatically.
The computer enters suspend mode automatically when the processortemperature reaches a certain level. This is not a defect.
Performance degradeswhen the computer getshot during use.
The processor speed might decrease under the following conditions:
Use in a hot environmentHigh-powered processing that requires high-power consumption
This is not a defect.
The computer enterssuspend modeimmediately after POST(the suspend lamp turnson).
Make sure that:
The battery pack is charged.The operating temperature is within the acceptable range. Refer toAppendix A.
If these items are correct, have the computer serviced.
Error 19 appears and thecomputer immediatelyturns off.
The battery pack power is getting low. Connect the AC Adapter to thecomputer, or replace the battery pack with a fully charged one.
The computer does notreturn from suspendmode, or the suspendlamp stays on and thecomputer does not work.
The computer automatically enters suspend or hibernation mode when thebattery power is empty. Do one of the following:
Replace the battery pack with a fully charged one and then press Fn.Connect the AC Adapter to the computer; then press Fn.
4-12
Title: C79DMMST CreationDate: 07/16/97 13:09:22

Problem Action
Your computer does notenter suspend orhibernation mode.
1. Check if the suspend or hibernation mode is disabled.
2. If your computer is docked to the SelectaDock and a network card isinstalled,orif you are using the AC Adapter and your computer is connected to anetwork,do the following :
Windows 95:
a) Click on Start .b) Move the cursor to Programs and ThinkPad ; then click on ThinkPad
Configuration .
c) Click on Docking Station ( ).d) Make sure that hibernation mode is enabled.
Windows NT:
a) Click on Start .b) Move the cursor to Programs and ThinkPad ; then click on ThinkPad
Configuration .
c) Click on Docking Station ( ).
d) Click on Power Management ( ).
e) Click on the Suspend/Hibernation/Resume Options ( ).f) Make sure that Suspend/hibernate while docking is selected.
g) Click on OK.
Chapter 4. Solving Computer Problems 4-13
Title: C79DMMST CreationDate: 07/16/97 13:09:22

Problem Action
The computer does notenter suspend mode asset by the timer underWindows 95 or WindowsNT.
For Windows 95:
The Windows 95 generic CD-ROM driver accesses the internal CD-ROM driveevery 3 seconds to see if a CD-ROM is inserted in the CD-ROM drive. Thisprevents your computer from entering suspend mode even after a timeout.
To prevent this from occurring, do the following:
1. Double-click on My Computer , Control Panel , and System .2. Click on the Device Manager tab.3. Click on the + mark of CD-ROM.4. Double-click on the CD-ROM name.5. Click on the Setting tab.6. Remove the check mark from Auto insertion notification .
Windows 95 no longer detects the CD-ROM insertion automatically.
For Windows NT:
The computer does not enter suspend mode by the timer if you enable theCD-ROM AutoRun feature. To enable the Suspend Timer function in theregistry, do the following:
HKEY_LOCAL_MACHINE\ SYSTEM\ CurrentControlSet \ Services \ Cdrom\
Autorun: x1 → Autorun:
4-14
Title: C79DMMST CreationDate: 07/16/97 13:09:22

Problem Action
The computer does notenter hibernation modewith the Fn+F12 keycombination.
Enable hibernation mode as follows:
For Windows 95:
1. Click on Start .2. Move the cursor to Programs and ThinkPad ; then click on ThinkPad
Configuration .
3. Click on Power Management ( ).4. Click on the Hibernation tab.5. Click on Enable Hibernation .
Note: If you have already created the hibernation file, this button isdisplayed in gray and you cannot click on it.
6. Click on Create Now .7. Click on OK.
The computer cannot enter hibernation mode when you are using one of theIBM communication PC Cards.
To enter hibernation mode, stop the communication program, and then removethe PC Card or turn off power on the PC Card slot using the Control Panel .
For Windows NT:
Note: You must format your hard disk with the FAT format system to usehibernation mode in Windows NT. When you format your hard disk withNTFS, the Windows NT default format, you will not be able to usehibernation mode.
1. Click on Start .2. Move the cursor to Programs and ThinkPad ; then click on ThinkPad
Configuration .
3. Click on Power Management ( ).
4. Click on Suspend/Hibernation/Resume Options ( ).5. Select the option you want to enable and add a check mark ( ) by clicking
on the box.6. Click on OK.
The computer cannot enter hibernation mode when you are using one of theIBM communication PC Cards.
Chapter 4. Solving Computer Problems 4-15
Title: C79DMMST CreationDate: 07/16/97 13:09:22

An LCD Problem
Problem Action
The screen is unreadableor distorted.
Make sure that:
The display driver is installed correctly by doing the following:1. Double-click on My Computer , Control Panel , and then Display2. Select the Settings tab.3. Click on Advanced Properties . The “Adapter/Driver Information”
window appears. Make sure the display driver information in thewindow is correct.
The refresh rate setting is set to your display resolution and color depth bydoing the following:
1. Click on Start .2. Move the cursor to Programs and ThinkPad ; then click on ThinkPad
Configuration .
3. Click on LCD ( ).4. (For Windows 95) Click on Properties... .
(For Windows NT) Click on Advanced... .5. Make sure that the setting in the next window is correct.6. Click on OK.
Incorrect charactersappear on the screen.
Did you install the operating system or application program correctly?
If they are installed and configured correctly, have the computer serviced.
The screen stays on evenafter you power off yourcomputer.
Press the reset switch with the tip of a pen and turn off your computer; then turnit on again.
Missing, discolored, orbright dots appear on thescreen every time youpower on your computer.
This is not a problem. It is an intrinsic characteristic of the TFT technology.Your computer display contains multiple thin-film transistors (TFTs). A smallnumber of missing, discolored, or bright dots on the screen may exist all thetime.
4-16
Title: C79DMMST CreationDate: 07/16/97 13:09:22

An Indicator Problem
Problem Action
The battery statusindicator does not go oneven though a batterypack is installed in thecomputer.
The over-current protection device inside the battery pack has been activated.Wait several hours and try again. If the indicator does not appear, replace thebattery pack or have the computer serviced.
The diskette-drive-in-useicon stays on.
If a diskette is in the drive, make sure that:– The internal or externally diskette drive is firmly connected to the
computer.– The diskette contains the necessary files to start the system.– There is nothing wrong with your application program.– There is nothing wrong with the diskette.– The diskette is inserted correctly (label facing up and the metal-shutter
end first) in the diskette drive.
If these items are correct, have the computer serviced.If there is no diskette in the drive, have the computer serviced.
A Battery Problem
Problem Action
The battery pack cannotbe fully charged in 3hours by the power-offcharging method.
The battery pack might be over-discharged. Do the following:
1. Turn off the computer.2. Make sure that the over-discharged battery pack is in the computer.3. Connect the AC Adapter to the computer and let it charge.
If the battery pack cannot be fully charged in 24 hours, use a new battery pack.
If the optional Quick Charger is available, use it to charge the over-dischargedbattery pack.
Your computer shutsdown before the batterystatus indicator showsempty,–or–Your computer operatesafter the battery statusindicator shows empty.
Repeat discharging and charging the battery pack at least three times.
Chapter 4. Solving Computer Problems 4-17
Title: C79DMMST CreationDate: 07/16/97 13:09:22

Problem Action
The operating time for afully charged battery packis short.
Repeat discharging and charging of the battery pack three to six times. If youstill have a problem, use a new battery pack.
The computer does notoperate with a fullycharged battery pack.
The over-current protective function in the battery pack might be activated. Turnoff the computer for 1 minute to reset this function; then turn it back on again.
A CD-ROM Drive Problem
Problem Action
The CD-ROM does notwork.
Make sure that:
The computer power is turned on and a compact disc is in the CD-ROMdrive.The CD-ROM drive connector is firmly connected to the computer.The CD-ROM drive tray is firmly closed.The device drivers are correctly installed.If the CD-ROM drive in the docking station does not work, do the following:1. Click on Start .2. Move the cursor to Programs and ThinkPad ; then click on ThinkPad
Configuration .
3. Click on Docking Station ( ).4. Make sure that you checked Enable IDE device in the docking
station .
Note: Do not use IRQ 11 and 15 for the PCI device setting.
5. Click on OK.
You hear a noise from theCD-ROM drive when theCD-ROM is spinning.
The CD-ROM drive cover might be bent. Have the CD-ROM drive serviced.
The CD-ROM tray doesnot open even if youpress the CD-ROM ejectbutton.
Insert a pin into the CD-ROM emergency eject hole and eject the CD-ROM tray.
4-18
Title: C79DMMST CreationDate: 07/16/97 13:09:22

Problem Action
The compact disc cannotbe read.
Make sure that:
The compact disc is not dirty. If it is, clean it with a CD-ROM cleaner kit.The compact disc is not defective. If it is, try another compact disc.The compact disc is placed in the tray with the label side up.The compact disc format conforms with one of the following: – Music CD
– CD-ROM or CD-ROM XA– Multisession photo CD– Video CD and CD-i movie (Windows 95 does not support CD-i movies)
Chapter 4. Solving Computer Problems 4-19
Title: C79DMMST CreationDate: 07/16/97 13:09:22

A DVD Problem
Problem Cause and Action
The DVD does not work. Make sure that:
The computer power is turned on and a DVD disc or a compact disc is inthe DVD drive.The DVD drive connector is firmly connected to the computer.The DVD drive tray is firmly closed.The device drivers are correctly installed.If the DVD drive in the docking station does not work, do the following:1. Click on Start .2. Move the cursor to Programs and ThinkPad ; then click on ThinkPad
Configuration .
3. Click on Docking Station ( ).4. Make sure that you checked Enable IDE device in the docking
station .
Note: Do not use IRQ 11 and 15 for the PCI device setting.
5. Click on OK.
You hear a noise from theDVD drive when the DVDdisk or compact disk isspinning.
The DVD drive cover might be bent. Have the DVD drive serviced.
The DVD tray does notopen even if you pressthe DVD eject button.
Insert a pin into the DVD emergency eject hole and eject the DVD tray.
The DVD disc or compactdisc cannot be read.
Make sure that:
The DVD disc or compact disc is not dirty. If it is, clean it.The DVD disc is not defective. If it is, try another DVD disc.The DVD disc is placed in the tray with the label side up.The DVD disc format conforms with one of the following: – Music CD
– CD-ROM or CD-ROM XA– Multisession photo CD– Video CD and CD-i movie (Windows 95 does not support CD-i movie)
– DVD-ROM (DVD-video)– DVD-movie with MPEG hardware and software
4-20
Title: C79DMMST CreationDate: 07/16/97 13:09:22

An Infrared Communication Problem
Problem Action
Your computer cannotcommunicate with otherdevices using the infraredport.
Make sure that:
The communication speeds are the same.The infrared ports are clean and do not have any spots.No objects are between the computer and the communicating device.The distance and angle between the computer and the communicatingdevice is within the acceptable range. Move the computer or device; thentry the communication again. The communicating distance might be less if:
– The other computer is not the same model as yours.– There is interference from ambient light. You should not use infrared
communication under direct sunlight or under artificial lighting conditions.– The infrared port is not directly facing the other communicating port.
Communication can be affected by the light from the display on thecomputer. To avoid this from happening, open the display to a wide angle.The same communication application has to be run on your computer andthe communicating computer. Refer to the application manuals for moreinformation.ThinkPad mode cannot be used if you are using a conventionalcommunication application that uses the serial port and cable for dataexchange. In this case, the infrared port is just a substitute for them.
Incorrect data is sentbetween your computerand a communicatingdevice.
Make sure that:
The distance and angle between your computer and the device is within theset range.The communication speeds are the same.There are no other devices that radiate infrared rays, such asremote-controlled devices or wireless headphones, near your computer orthe communicating device.You are not operating under direct sunlight.No fluorescent lamps are near your computer or the communicating device.
Chapter 4. Solving Computer Problems 4-21
Title: C79DMMST CreationDate: 07/16/97 13:09:22

An Enhanced Video/MPEG Problem
Problem Cause and Action
The Enhanced Videofunction or the MPEGfunction does not work.
Make sure there are no resource conflicts (IRQ or I/O address).Enable the Enhanced Video/MPEG function by doing the following:1. Click on Start .2. Move the cursor to Programs and ThinkPad ; then click on ThinkPad
Configuration .
3. Click on Enhanced Video/MPEG ( ).4. Make sure that at least one IRQ is assigned for the PCI devices.
If you find a conflict with other devices, change the IRQ value. (see“Resolving System Resource Conflicts” in the online book).
The MPEG playback and the video capture functions use the samehardware resources. Only one of the two functions can be used at onetime. Likewise, two MPEG functions cannot be used at the same time.
An Audio or a Telephony Problem
Problem Cause and Action
The volume of theWaveTable MidiSynthdevice cannot becontrolled.
Use the Serial-in control in the volume control panel to control the volume.
The voice quality over theVoice-Over-Datacommunication is poor.
Due to limitations of the ThinkPad Modem, the voice quality that is transmittedand received over the Voice-Over-Data communication is not as good as thenormal telephone line. There may be momentary voice discontinuities, delays,or distortions.
Other problems. Problems may be due to such other factors as:
Incompatibility between the ThinkPad Modem feature and other adaptercards in the docking station. To isolate this problem to a card or device,remove the adapter cards in the docking station one by one, and run theEasy-Setup “Test” submenu.The telephone cable configuration is not correct for your application.The telephone cable is defective.The telephone is defective.The audio cable configuration is not correct for your application.The audio cable is defective.The audio equipment is defective.
4-22
Title: C79DMMST CreationDate: 07/16/97 13:09:22

A Universal Serial Bus (USB) Problem
Problem Cause and Action
A device connected to theUSB port does not work.
For Windows 95, make sure that:
1. The USB device is connected correctly.
2. Open the “Device Manager” window, and make sure that the USB devicesetup is correct, and that computer resource assignment and device driverinstallation are correct.
Note: To open the “Device Manager” window, double-click on MyComputer , Control Panel , and System . Then click on the DeviceManager tab in the “System Properties” window.
Refer to “Testing Your Computer” on page 4-32 and run the diagnostic test forthe USB port.
A Modem Problem
Problem Action
The internal modem doesnot work when you bootyour computer from anoperating system otherthan Windows 95.
The operating system may be sharing the same IRQ levels as your modem.The ThinkPad Modem software might not work under these conditions. Youmust cancel the IRQ shared condition to use the modem.
Refer to the online book to cancel the IRQ shared condition.
Chapter 4. Solving Computer Problems 4-23
Title: C79DMMST CreationDate: 07/16/97 13:09:22
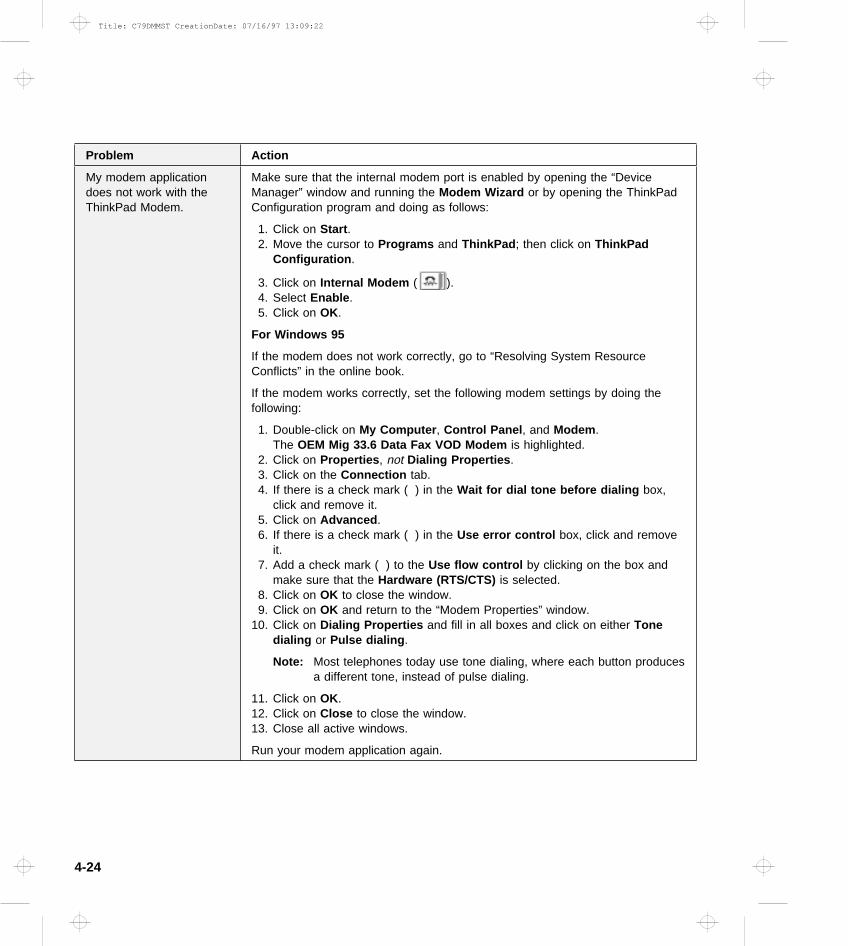
Problem Action
My modem applicationdoes not work with theThinkPad Modem.
Make sure that the internal modem port is enabled by opening the “DeviceManager” window and running the Modem Wizard or by opening the ThinkPadConfiguration program and doing as follows:
1. Click on Start .2. Move the cursor to Programs and ThinkPad ; then click on ThinkPad
Configuration .
3. Click on Internal Modem ( ). 4. Select Enable .
5. Click on OK.
For Windows 95
If the modem does not work correctly, go to “Resolving System ResourceConflicts” in the online book.
If the modem works correctly, set the following modem settings by doing thefollowing:
1. Double-click on My Computer , Control Panel , and Modem .The OEM Mig 33.6 Data Fax VOD Modem is highlighted.
2. Click on Properties , not Dialing Properties .3. Click on the Connection tab.4. If there is a check mark ( ) in the Wait for dial tone before dialing box,
click and remove it.5. Click on Advanced .6. If there is a check mark ( ) in the Use error control box, click and remove
it.7. Add a check mark ( ) to the Use flow control by clicking on the box and
make sure that the Hardware (RTS/CTS) is selected.8. Click on OK to close the window.9. Click on OK and return to the “Modem Properties” window.
10. Click on Dialing Properties and fill in all boxes and click on either Tonedialing or Pulse dialing .
Note: Most telephones today use tone dialing, where each button producesa different tone, instead of pulse dialing.
11. Click on OK.12. Click on Close to close the window.13. Close all active windows.
Run your modem application again.
4-24
Title: C79DMMST CreationDate: 07/16/97 13:09:22

Problem Action
My PC Card modem doesnot work
Make sure that the infrared port is disabled and the modem is set up correctly.
You can disable the infrared port from the ThinkPad Configuration program orthe “Device Manager” window.
Open the ThinkPad Configuration program and do as follows:
1. Click on Start .2. Move the cursor to Programs and ThinkPad ; then click on ThinkPad
Configuration .
3. Click on Infrared ( ). 4. Select Disable .
5. Click on OK.
For Windows 95
To set up the modem, do the following:
1. Double-click on My Computer , Control Panel , and then Modem .The “Modem Properties” window appears.
2. Make sure the PC Card (PCMCIA) modem is in the window.3. Click on Properties , not Dialing Properties .4. Click on the Connection tab.5. Remove the check mark ( ) in the Wait for dial tone before dialing box if
it is checked.6. Click on Advanced .7. If there is a check mark ( ) in the Use error control box, click and remove
it.8. Add a check mark ( ) to the Use flow control by clicking on the box and
make sure that the Hardware (RTS/CTS) is selected.9. Close the window by clicking on OK.
10. Return to the “Modem Properties” window by clicking on OK.11. Click on Dialing Properties in the “Modem Properties” window, and fill in all
boxes.
Note: Click on either Tone dialing or Pulse dialing . Most telephonestoday use tone dialing.
12. Click on OK.13. Click on Close to close the window.14. Close all active windows.
Run your modem application again.
Chapter 4. Solving Computer Problems 4-25
Title: C79DMMST CreationDate: 07/16/97 13:09:22

Other PC Card Problems
Problem Action
The PC Card shows“Ready,” but it does notwork correctly.
Make sure that:
The system resources reserved for the PC Card do not conflict with othersystem devices.
Refer to “Resolving System Resource Conflicts” in the online book.
The resources reserved for the PC Card match the settings in theapplication program.
If you are using a modem card, check the COM number, I/O port address,and IRQ level. If you are using a network card, check the I/O port address,IRQ level, and memory window address. To check the resources assignedto the PC Card, click on Status in the Easy-Setup program.
A system resource conflictoccurred when a PC Cardwas used.
See “Resolving System Resource Conflicts” in the online book.
The screen looks busy orthe overlay position isshifted.
1. Run VPMADJ.EXE in the Windows directory.2. Adjust the x and y positions.
A SelectaDock Problem
Problem Action
The IDE CD-ROM drive orthe hard disk drive in thedocking station does notwork.
Make sure that the system resources of the secondary IDE device in thedocking station do not conflict with the system resources of the other devices.Do the following:
1. Click on Start .2. Move the cursor to Programs and ThinkPad ; then click on ThinkPad
Configuration .
3. Click on Docking Station ( ) and put a check mark ( ) on Enable IDEdevice in the docking station .
Note: Do not use IRQ 11 and 15 for the PCI device setting.
4. Click on OK.
4-26
Title: C79DMMST CreationDate: 07/16/97 13:09:22

A Printer Problem
Problem Action
The printer does not work. Make sure that:
The parallel port is enabled.1. Click on Start .2. Move the cursor to Programs and ThinkPad ; then click on ThinkPad
Configuration .
3. Click on Parallel Port ( ). 4. Select Enable .
5. Click on OK.The printer is turned on and ready to print.The printer signal cable is connected to the correct connector of yourcomputer.
If these items are correct and the printer still does not work, run the testsdescribed in the printer manual. If the tests show that the printer is OK, havethe computer serviced.
An External Display Problem
Problem Action
The external display isblank.
Do the following:
1. Connect the external display to another computer to make sure it works.2. Reconnect the external display to your computer.3. Click on Start .4. Move the cursor to Programs and ThinkPad ; then click on ThinkPad
Configuration .
5. Click on External Display ( ) or LCD + External Display ( ) on thetoolbar in the ThinkPad Configuration.
If nothing appears on the external display, have the external display serviced.
Chapter 4. Solving Computer Problems 4-27
Title: C79DMMST CreationDate: 07/16/97 13:09:22

Problem Action
You cannot set a higherresolution than thepresent one on yourexternal display.
Make sure that:
The ThinkPad display driver is installed correctly by doing the following:1. Double-click on My Computer , Control Panel , and then Display .2. Select the Settings tab in the “Display Properties” window.3. Click on Advanced Properties . The “Adapter/Driver Information”
window appears. Make sure that the ThinkPad display driver isinstalled.
If you are not sure that the ThinkPad display driver is installed correctly,reinstall it.An appropriate display type or refresh rate is selected.1. Click on Start .2. Move the cursor to Programs and ThinkPad ; then click on ThinkPad
Configuration .
3. Click on LCD ( ).4. (For Windows 95) Click on Properties... .
(For Windows NT) Click on Advanced... .5. Make sure the setting in the next window is correct.6. Click on OK to close the window.
The screen is unreadableor distorted.
Make sure that:
The ThinkPad display driver is installed correctly by doing the following:1. Double-click on My Computer , Control Panel , and then Display .2. Select the Settings tab in the “Display Properties” window.3. Click on Advanced Properties . The “Adapter/Driver Information”
window appears. Make sure that the ThinkPad display driver isinstalled.
The display is set correctly.1. Click on Start .2. Move the cursor to Programs and ThinkPad ; then click on ThinkPad
Configuration .
3. Click on LCD ( ).4. (For Windows 95) Click on Properties... .
(For Windows NT) Click on Advanced... .5. Make sure the setting in the next window is correct.6. Click on OK to close the window.
If the settings are correct, run the tests described in the manual supplied withthe external display. If the tests show that the external display is OK, have thecomputer serviced.
4-28
Title: C79DMMST CreationDate: 07/16/97 13:09:22

Problem Action
Wrong characters appearon the screen.
Did you install the operating system or application program with the correctprocedure?
If you did, have the external display serviced.
A Television Problem
Problem Action
The screen is blank.Even if you select the television for the external display ( ) in the ThinkPadprogram, the LCD always turns on first when you power on your computer.Press the Fn+F7 keys to switch to the television.
Other Option Problems
Problem Action
An IBM option that youjust installed does notwork.
Make sure that:
The option is designed for your computer.The option was installed following to the instructions supplied with the optionor this book.Other installed options or cables are not loose.There is no I/O address or interrupt level (IRQ) DMA channel conflict. Tosee the system resource status, start the ThinkPad Configuration programand click on the respective device buttons.
If the test program for the option did not find the problem, have the computerand option serviced.
An IBM option that usedto work no longer works.
Make sure that:
The option is securely connected to your computer.If the option came with its own test instructions, use those instructions totest the option.There is no system resource conflict (see “Resolving System ResourceConflicts” in the online book).
If these items are correct and the test program did not find the problem, havethe computer and option serviced.
Chapter 4. Solving Computer Problems 4-29
Title: C79DMMST CreationDate: 07/16/97 13:09:22

Problem Action
The serial port does notwork.
Make sure that the serial port is enabled by doing the following:
For Windows 95:
1. Click on Start .2. Move the cursor to Programs and ThinkPad ; then click on ThinkPad
Configuration .
3. Click on Serial Port ( ). 4. Select Enable .
5. Click on Device Manager .6. Set up the port in the “Device Manager” window.7. Click on OK.
For Windows NT:
1. Click on Start .2. Move the cursor to Programs and ThinkPad ; then click on ThinkPad
Configuration .
3. Click on Serial Port ( ).4. Select Enable ; then select COM1, COM2, COM3, or COM4.5. Click on OK.
4-30
Title: C79DMMST CreationDate: 07/16/97 13:09:22

A Software Problem
Problem Action
An application does notrun correctly.
Check the following to make sure that the problem is not being caused by theapplication:
Your computer has the minimum required memory to run the application.Refer to the manuals supplied with the application.The application is designed to operate with your operating system.Other applications run correctly on your computer.The necessary device drivers are installed (see the online book).The application works OK when it is run on some other computer.
If an error message appeared when you were using the application program,refer to the manuals supplied with the application.
If these items are correct and you still have a problem, contact your place ofpurchase or the service representative for help.
You cannot install OS/2Warp.
See the online book.
Other Problems
Problem Cause or Action
The computer locks ordoes not accept any input.
Your computer might lock when it enters suspend mode during acommunication operation. You should disable the Suspend Timer when youare working on the network.When you turn on the computer with OS/2 Warp installed, make sure nocompact disc (CD) is in the CD-ROM drive. If there is, remove the CD, turnoff the computer, and turn it on again.To turn the computer, press the reset switch using the tip of a ballpoint pen.
The computer does notturn off with the powerswitch.
If the suspend lamp is on and you are working under battery power, change thebattery to a fully charged one or change your power source to ac power.
If you still have a problem, press the reset switch using the tip of a ballpointpen.
The computer does notstart from a diskette.
Make sure that the startup sequence in Easy-Setup is set so that the computerboots from the diskette drive (see page 2-57).
Chapter 4. Solving Computer Problems 4-31
Title: C79DMMST CreationDate: 07/16/97 13:09:22

Testing Your Computer
If you still have a problem with your computer after using theTroubleshooting Charts, test the computer using the Test function ofEasy-Setup.
To test your computer, do the following:
1 Make sure that the speaker volume control is in the middleposition.
2 Press and hold F1; then turn on the computer to startEasy-Setup. Hold F1 until the following Easy-Setup menuappears:
You will hear a short beep. If you are not sure whether youheard a beep or not, turn off the computer and try again. Ifyou still don't hear a beep, the speaker is not working.Have your computer serviced.
4-32
Title: C79DMMST CreationDate: 07/16/97 13:09:22

3 Select the Test icon; then select the Start icon or press Enter .
Note: Do not touch the keyboard or the pointing device duringthe test.
If you cannot go to the next menu, have your computerserviced.If an X appears to the left of a device and an error codeappears below it, write down the error code on a piece ofpaper and tell it to the person who will be repairing yourcomputer.
Chapter 4. Solving Computer Problems 4-33
Title: C79DMMST CreationDate: 07/16/97 13:09:22

4-34
Title: C79DMMST CreationDate: 07/16/97 13:09:22

Chapter 5. Getting Service
Preparation
If you need further assistance, call your IBM authorized reselleror IBM marketing representative.
You will need to know the following information when requestingrepair service:
Identification numberInstalled options in your system
Note: Use the checklist on page 5-2.
Error message or problem
Note: Error messages can help identify what service actionis required and help the service representative providequick and efficient service.
Use the record sheet on page 5-3
Important
You may have to bear the cost of repair even during the warrantyperiod if the product damage was due to misuse, accident,modification, unsuitable physical or operating environment, orimproper maintenance.
For your convenience, write the service phone numbers here.
Copyright IBM Corp. 1997 5-1
Title: C79DMMST CreationDate: 07/16/97 13:09:22

Information on Your ThinkPad
Option List DIMM
Slot 1 (front) _____MBSlot 2 (rear) _____MB
PC Cards
______MB Hard Disk Drive Option in the UltraBay II
Internal Diskette Drive Battery Pack
Identification NumbersThe serial number label is located on the bottom of your computer.Write down the Machine Type and the Serial Number S/N into thefollowing box:
IBM Product Name ThinkPad 770____
Machine Type
Serial Number
5-2
Title: C79DMMST CreationDate: 07/16/97 13:09:22

Problem Recording Sheet Computer information:
Machine type:_________
Serial number:_________
Date of purchase:___/___/___
Type of problem:
Continuous problem Intermittent problem
Error code:
The operating system and its version number, if available:
Application programs running at the time of the problem:
Problem symptom:
Describe the problem more specifically.
Can it be reproduced?:
Yes No
If yes, describe how it can be reproduced:
DOS Version______ OS/2 Version______ Windows 3.1 Windows 95 Windows NT Version______
Chapter 5. Getting Service 5-3
Title: C79DMMST CreationDate: 07/16/97 13:09:22

How to Receive Customer Support and Service
Purchasing an IBM PC hardware product entitles you to receivesupport and services during the warranty period. If you needadditional support and services, a wide variety of extended solutionsthat addresses most needs are available for purchase.
Help by TelephoneYou can get support and information by telephone during thewarranty period at no additional charge, through the IBM PC SupportLine. Experienced technical-support representatives will be on handto assist you in answering any questions you might have, such as:
How to set up your computerHow to install and set up your IBM options purchased directlyfrom IBM or through an IBM resellerHow to use the 30-day support for the preloaded operatingsystemHow to get service
Please have the following information ready when you call:
Serial number of your computer and proof of purchaseDescription of the problemExact wording of the error messageHardware and software configuration information for your system
If possible, be at your computer when you call:
In the U.S. and Puerto Rico, call 1-800-772-2227.In Canada, call 1-800-565-3344.
These lines are available 24 hours a day, 7 days a week. Theanswering technical-support representative can also fax or mailyou technical or product information, such as:
Sales information Product brochures
Location of IBM resellersServices available from IBM
5-4
Title: C79DMMST CreationDate: 07/16/97 13:09:22
ThinkPad EasyServThinkPad EasyServ is a courier repair service for IBM mobileproducts wherein your ThinkPad computer will be picked up, sent toIBM for repair, and then returned to the location of your choice. Thisservice is available at no additional charge during the warrantyperiod. Most computers can be repaired the day that it arrives at theIBM repair location.
Support personnel first try to solve your problem over the phone. Ifthey are unsuccessful, you can arrange for EasyServ service bycalling the PC Support Line.
If possible, you should use the original ThinkPad shipping materialsthat your computer came in, for re-sending it to IBM. If the box isnot available, the courier will deliver a shipping carton and will returnlater to pick it up. This service is available only in the U.S. andCanada.
Getting Help around the WorldIf you make frequent overseas trips or you are residing abroad, youcan register with the International Warranty Service Office. Theoffice will issue an International Warranty Service Certificate, whichyou can use wherever IBM or IBM resellers sell and service IBM PCproducts.
For more information on registering with the InternationalWarranty Service Office, call 1-800-497-7426 in the U.S. orCanada.
Chapter 5. Getting Service 5-5
Title: C79DMMST CreationDate: 07/16/97 13:09:22

Online HousecallOnline Housecall is a remote communication tool that allows an IBMtechnical-support representative to access your PC by modem.Many problems can be diagnosed quickly and easily through thismethod. A modem and a remote access application program arerequired. There may be a charge for this service.
For more information on configuring your computer for OnlineHousecall, call:
In the U.S., 1-800-772-2227In Canada, 1-800-565-3344
Fax InformationIn the U.S. and Canada, if you have a touch-tone telephone andaccess to a fax machine, you can receive marketing and technicalinformation on such topics as computer hardware, operatingsystems, and local area networks (LANs) by fax. You can call theIBM PC Company Automated Fax System 24 hours a day, 7 days aweek. Follow the recorded instructions, and the information that yourequest will be sent your fax machine.
To access the IBM PC Company Automated Fax System, call:
In the U.S., 1-800-426-3395In Canada, 1-800-465-3299 a)
Electronic Support ServicesIf you have a modem, you can access such public informationservices as the electronic bulletin boards and messaging areas,electronic conferences, and searchable databases available inseveral of the most popular online information services.
5-6
Title: C79DMMST CreationDate: 07/16/97 13:09:22

Bulletin boards and online services contain information on manytopics such as:
PC user groupsPC questions and answers
OS/2 topics Problem solving Technical information
Hardware and software configurations Networking
The IBM PC Company Bulletin Board System (BBS) can be reached24 hours a day, 7 days a week. Modem speeds of up to 14,400baud are supported. Long-distance telephone charges may apply.
Commercial online services that have information on IBM productsare:
CompuServe:Use the GO word ThinkPad .
Prodigy:Use the Jump command; type IBM and select PC ProductSupport.
America Online:Use the Go to keyword IBM.
To access the PC Company BBS, call:
In the U.S., 1-919-517-0001For Canada, call the center closest to you: – 905-316-4255 (Markham) – 514-938-3022 (Montreal) – 416-492-1823 (Toronto) – 604-664-6466 (Vancouver)
Chapter 5. Getting Service 5-7
Title: C79DMMST CreationDate: 07/16/97 13:09:22

Purchasing Additional Services
During and after the warranty period, you can purchase additionalservices, such as:
Support for IBM and non-IBM hardware, operating systems, andapplication programsNetwork setup and configurationUpgraded or extended hardware repair services
Custom installation
The availability of the service and its name might vary by country.
Enhanced PC Support LineEnhanced PC Support is available for desktop and mobile IBMcomputers that are not connected to a network. Technical support isprovided for IBM computers and IBM or non-IBM options, operatingsystems, and application programs on the supported products list.
This service includes technical support for the following:
Installing and configuring your out-of-warranty IBM computerInstalling and configuring non-IBM options in IBM computersAssistance with the preloaded operating systemUsing selected application software and gamesTuning performance, such as memory managementInstalling device drivers remotelySetting up and using multimedia devicesIdentifying system problems
Interpreting documentation
You can purchase this service for a single incident or for multipleincidents. For more information about purchasing the Enhanced PCSupport, see “Ordering Support Line Services” on page 5-9.
Network and Server Support LineNetwork and Server Support includes all the features of theEnhanced PC Support Line and is available for simple and complexnetworks made up of IBM workstations and servers using majornetwork operating systems. This line also supports the manypopular non-IBM adapters and network interface cards.
5-8
Title: C79DMMST CreationDate: 07/16/97 13:09:22

This service includes technical support for the following:
Installing and configuring client workstations and servers
Identifying system problems and correcting problems on theclient or the server
Using IBM and non-IBM network operating systems
Interpreting documentation
You can purchase this service for a single incident or for multipleincidents. For more information about purchasing Network andServer Support, see “Ordering Support Line Services.”
Ordering Support Line ServicesEnhanced PC Support Line and the Network and Server SupportLine services are available for products on the Supported Productslist.
To receive a Supported Products list,
In the U.S: – Call 1-800-772-2227.
– Select the automated fax system option.– Select the service for which you would like a Supported
Products list:- For Enhanced PC Support Line, select document
11682.- For Network and Server Support Line, select
document 11683. In Canada:
– Call 1-800-465-7999 or 1-800-465-3299In other countries, contact your IBM reseller or IBMmarketing representative.
Chapter 5. Getting Service 5-9
Title: C79DMMST CreationDate: 07/16/97 13:09:22
For more information on how to purchase the Support LineServices:
In the U.S.: call 1-800-772-2227.In Canada: call 1-800-465-7999.In other countries, contact your IBM reseller or IBMmarketing representative.
Warranty and Repair ServicesYou can upgrade your ThinkPad EasyServ/Customer Carry-Inwarranty services or extend their period of service.
Upgradable warranties for the U.S. include:
Overnight service option. You can upgrade your currentwarranty that provides ThinkPad EasyServ/Carry-in repairservice. Your warranty provides ThinkPad EasyServ/Carry-inrepair service.
You can also extend your period of warranty. The “Warranty andRepair Services” offers a ThinkPad EasyServ MaintenanceAgreement.
For more information on warranty upgrades and extensions:
In the U.S.: call 1-800-426-7697.In Canada: call 1-800-465-7999.In other countries, contact your IBM reseller or IBMmarketing representative.
5-10
Title: C79DMMST CreationDate: 07/16/97 13:09:22

Obtaining IBM Operating System Updates
IBM provides update diskettes, called ServicePaks or correctiveservice diskettes (CSDs), to customers who report a DOS or OS/2problem for which there is or will be a corrective program.
Getting Update DiskettesYou can obtain update diskettes from:
IBM PC Company BBS.IBM Software Solutions Center (1-800-992-4777 for the U.S. andCanada)An IBM authorized reseller or an IBM marketing representative.
Ordering PublicationsAdditional publications are available for purchase from IBM. For alist of publications available in your country:
In the U.S. and Puerto Rico: call IBM PC Books at1-800-426-7282.In Canada: call 1-800-465-1234.In other countries, contact your IBM authorized reseller or IBMmarketing representative.
About Your WarrantyDuring the warranty period, you may be responsible for repair costs ifthe product damage was due to misuse, accident, modification,unsuitable physical or operating environment, or impropermaintenance.
For full information on product warranties, see Appendix D.
Chapter 5. Getting Service 5-11
Title: C79DMMST CreationDate: 07/16/97 13:09:22

5-12
Title: C79DMMST CreationDate: 07/16/97 13:09:22

Appendix A. Operating Requirements
This appendix describes the following:
Specifications . . . . . . . . . . . . . . . . . . . . . . . . . . . . . A-2Operating Environment . . . . . . . . . . . . . . . . . . . . . . . A-3Power Cord Requirements . . . . . . . . . . . . . . . . . . . . . A-5
For 2-Pin Power Cords . . . . . . . . . . . . . . . . . . . . . . A-5For 3-Pin Power Cords . . . . . . . . . . . . . . . . . . . . . . A-6
Copyright IBM Corp. 1997 A-1
Title: C79DMMST CreationDate: 07/16/97 13:09:22

Specifications
Component 13.1-Inch TFTModel
14.1-Inch TFTModel
Processor Pentium MMX200 or 233 MHz
Pentium MMX233 MHz
Second-level cache 512 KB 512 KB
Memory
Built-in Optional DIMM
32 MB16 MB, 32MB, or 64 MB
32 MB16 MB, 32MB, or 64 MB
Hard disk size 3.2/4.0 GB 5.1 GB
Diskette drive 1.44 MB 1.44 MB
CD-ROM drive 8X to 20X(Optional)
8X to 20X(Optional)
DVD Drive Optional Optional
DVD and EnhancedVideo Adapter
Optional Yes
Audio Stereo Stereo
Modem No 33.6 Kbps(upgradable)
Infrared ports 4 Mbps 4 Mbps
Universal Serial Bus Yes Yes
CardBus/ZV Yes Yes
Pointing device TrackPoint TrackPoint
Battery 9 cell lithium-ion 9 cell lithium-ion
AC Adapter 56 W 56 W
A-2
Title: C79DMMST CreationDate: 07/16/97 13:09:22

Dimensions
Width
Depth
Height
313 mm(12.3 in.)
240 mm(9.4 in.)
56 mm(2.2 in.)
313 mm(12.3 in.)
254 mm(10.0 in.)
56 mm(2.2 in.)
Operating Environment
Your computer operates under the following conditions:
Model 13.1-Inch TFT 14.1-Inch TFT
Air temperature
System on(without diskette)
System on(with diskette)
System off
Storage andshipment
Wet bulb(maximum)
5° to 35°C(41° to 95°F)10° to 35°C(50° to 95°F)5° to 43°C(41° to 110°F)−20° to 60°C(−4° to 140°F)
29.4°C(85°F)
5° to 35°C(41° to 95°F)10° to 35°C(50° to 95°F)5° to 43°C(41° to 110°F)−20° to 60°C(−4° to 140°F)
25.7°C(78°F)
Humidity
System on(without diskette)
System on(with diskette)
Storage andshipment
8% to 95% 8% to 80% 5% to 95%
Appendix A. Operating Requirements A-3
Title: C79DMMST CreationDate: 07/16/97 13:09:22

Note: * The atmospheric pressure must be more than 715Hecto-Pascal.
Maximum altitude
System on or off Storage and
shipment
3050 m (10,000 ft.)12,200 m (40,000 ft.)*
Heat output 56 W (191 BTUs/hour) maximum
Shock or vibration Damage boundary 210 G/3 ms, 70 G/11ms
A-4
Title: C79DMMST CreationDate: 07/16/97 13:09:22

Power Cord Requirements
IBM power cords for a specific country are usually available only inthat country.
For 2-Pin Power CordsIBM PowerCordPart Number
Used in These Countries
13H5264
Bahamas, Barbados, Bermuda, Bolivia, Canada,Cayman Islands, Colombia, Costa Rica, DominicanRepublic, Ecuador, El Salvador, Guatemala, Guyana,Haiti, Honduras, Jamaica, Korea (South), Mexico,Netherlands Antilles, Nicaragua, Panama, Peru,Philippines, Saudi Arabia, Suriname, Taiwan,Thailand, Trinidad (West Indies), United States ofAmerica, Venezuela
13H5267
Abu Dhabi, Albania, Antigua, Bahrain, Brunei, Dubai,Fiji, India, Ireland, Kenya, Kuwait, Macao, Malasia,Nigeria, Oman, People's Republic of China, Qatar,Singapore, United Kingdom
13H5270
Austria, Belgium, Bulgaria, Chile, Czech Republic,Denmark, Egypt, Finland, France, Germany, Greece,Hungary, Iceland, Indonesia, Israel, Italy,Netherlands, Norway, Poland, Portugal, Romania,Slovakia, Spain, Sweden, Switzerland, Turkey, formerYugoslavia
13H5273 Japan
13H5276Argentina, Australia, New Zealand, Papua NewGuinea, Paraguay, Uruguay
13H5279 Bangladesh, Pakistan, South Africa, Sri Lanka
Appendix A. Operating Requirements A-5
Title: C79DMMST CreationDate: 07/16/97 13:09:22

For 3-Pin Power CordsNote: The grounded adapter is required for full MPRII compliance.
IBM PowerCordPart Number
Used in These Countries
76H3514Argentina, Australia, Papua New Guinea, NewZealand, Paraguay, People's Republic of China,Uruguay
76H3516
Aruba, Bahamas, Barbados, Bermuda, Bolivia, Brazil,Canada, Cayman Islands, Colombia, Costa Rica,Curacao, Dominican Republic, Ecuador, El Salvador,Guatemala, Guyana, Haiti, Honduras, Jamaica, Korea(South), Liberia, Mexico, Netherlands Antilles,Nicaragua, Panama, Peru, Philippines, Saudi Arabia,Suriname, Taiwan, Thailand, Trinidad (West Indies),United States of America, Venezuela
76H3518
Austria, Belgium, Bulgaria, Czech Republic, Egypt,Finland, France, Germany, Greece, Hungary, Iceland,Indonesia, Macao, Netherlands, Norway, Poland,Portugal, Romania, Slovakia, Spain, Sweden, Turkey,former Yugoslavia
76H3520 Denmark
76H3522Bangladesh, Pakistan, Myanmar, South Africa, SriLanka
76H3524Abu Dhabi, Albania, Antigua, Bahrain, Brunei, Dubai,Fiji, India, Ireland, Kenya, Kuwait, Malaysia, Nigeria,Oman, Qatar, Singapore, United Kingdom
76H3526 Japan
76H3528 Switzerland, Liechtenstein
76H3530 Chile, Italy, Ethiopia, Libya
76H3532 Israel
76H3535 Korea
A-6
Title: C79DMMST CreationDate: 07/16/97 13:09:22

Appendix B. Installing a New Operating System
This appendix explains how to install an operating system. You canreplace the preloaded Windows 95 or Windows NT operating systemwith the following operating systems:
IBM PC DOS Version 7.0Microsoft Windows 3.1Microsoft Windows 95Microsoft Windows NT Version 3.51 or 4.0IBM Operating System/2 (OS/2) Warp Version 3 or 4
To install a new operating system, do the following:
1 Have the new operating system installation package on hand.
2 Make a backup copy of your software and all data files in thehard disk.
3 Make a printout of the “Installing Software” section in the onlinebook. Refer to “Using the ThinkPad Online Book” onpage 2-15.
4 Create the various device driver diskettes using the DisketteFactory program by doing the following:
a) Click on the ThinkPad Tools icon in the Windows desktop,and double-click on Diskette Factory . The “DisketteFactory” window appears:
Copyright IBM Corp. 1997 B-1
Title: C79DMMST CreationDate: 07/16/97 13:09:22

b) Select the operating system that you want to install; thenclick on Yes. The following window appears:
You will need about 30 blank diskettes, depending on theoperating system that you will be installing.
c) Click on all the diskette names and then click on Build tocreate the device driver diskettes.
5 Install the new operating system and the device driver diskettesby following the instructions on the printout.
To Get the Lastest Information on Device Drivers
Connect to the IBM PC Company home page(http://www.us.pc.ibm.com/thinkpad/thinkpad.html ) on theInternet and download the device drivers.
B-2
Title: C79DMMST CreationDate: 07/16/97 13:09:22

Appendix C. Ergonomics Information
This is important information to read before using your ThinkPadcomputer.
Working while “on the go” may mean adapting to frequent changes inyour environment. Following some simple “rules of the road” willmake things easier and bring you the maximum benefits of yourThinkPad computer. Keeping in mind such basics as good lightingand proper seating, for example, can go a long way in helping youenhance your performance and achieve greater comfort whereveryou are.
What if I am traveling?
It may not be possible to observe the best ergonomic practices whenyou are using the ThinkPad computer while on the move or in a“casual” setting, such as the seashore or on a mountaintop.Sometimes, your lap may be the only “desk” around. Regardless ofthe setting, try to observe as many of the tips for proper usage aspossible. Sitting properly and using adequate lighting, for example,will help you maintain desirable comfort and performance levels.
Questions about vision?
IBM's visual display screens are designed to meet the higheststandards and to provide you with clear, crisp images and large,bright displays that are easy to see, yet easy on the eyes. Ofcourse, any concentrated and sustained visual activity can be tiring.If you have questions on eye fatigue or visual discomfort, consult avision care specialist for advice.
Copyright IBM Corp. 1997 C-1
Title: C79DMMST CreationDate: 07/16/97 13:09:22

Note: The example shown here of someone in a traditional setting.Even when not in such a setting, you can follow many of these tips.Develop good habits and they will serve you well.
4 Chair
6 Thighs
5 Arms
1 Head
3 Display
2 View
1 HeadKeep your head in a comfortableand vertical position.
2 ViewMaintain a comfortable viewingdistance of 20–30 inches.
3 DisplayPosition the display to avoidglare or reflections fromoverhead lighting or outsidesources of light.
Keep the display screen cleanand set the contrast andbrightness to levels that allowyou to see the screen clearly.
4 ChairUse a chair that gives you goodback support.
5 ArmsKeep your forearms, wrists, andhands in a relaxed and neutralposition. Don't pound the keys;type with a soft touch.
6 ThighsKeep your thighs parallel to thefloor and your feet flat on thefloor or on a footrest.
C-2
Title: C79DMMST CreationDate: 07/16/97 13:09:22

Appendix D. Product Warranty
United States, Puerto Rico and Canada Statement of LimitedWarranty
The warranties provided by IBM in this Statement of Limited Warranty apply only toMachines you originally purchase for your use, and not for resale, from IBM or an IBMauthorized reseller. The term “Machine” means an IBM machine, its features,conversions, upgrades, elements, or accessories, or any combination of them.Machines are subject to these terms only if purchased in the United States or PuertoRico, or Canada, and located in the country of purchase. If you have any questions,contact IBM or your reseller.
International Business Machines Corporation Armonk, New York 10504
Machine: IBM ThinkPad 770Warranty Period*: Three years, One Year on Battery
*Elements and accessories are warranted for three months. Contact your placeof purchase for warranty service information.
Production StatusEach Machine is manufactured from new parts, or new and serviceable used parts(which perform like new parts). In some cases, the Machine may not be new and mayhave been previously installed. Regardless of the Machine's production status, IBM'swarranty terms apply.
The IBM WarrantyIBM warrants that each Machine 1) is free from defects in materials and workmanshipand 2) conforms to IBM's Official Published Specifications. IBM calculates theexpiration of the warranty period from the Machine's Date of Installation. The date onyour receipt is the Date of Installation, unless IBM or your reseller informs youotherwise.
During the warranty period, IBM or your reseller will provide warranty service underthe type of service designated for the Machine and will manage and install engineeringchanges that apply to the Machine. IBM or your reseller will specify the type ofservice.
For a feature, conversion, or upgrade, IBM or your reseller may require that theMachine on which it is installed be 1) the designated, serial-numbered Machine and 2)at an engineering-change level compatible with the feature, conversion, or upgrade.Some of these transactions (called “Net-Priced” transactions) may include additionalparts and associated replacement parts that are provided on an exchange basis. Allremoved parts become the property of IBM and must be returned to IBM.
Replacement parts assume the remaining warranty of the parts they replace.
If a Machine does not function as warranted during the warranty period, IBM or yourreseller will repair or replace it (with a Machine that is at least functionally equivalent)without charge. If IBM or your reseller is unable to do so, you may return it to yourplace of purchase and your money will be refunded.
If you transfer a Machine to another user, warranty service is available to that user forthe remainder of the warranty period. You should give your proof of purchase and thisStatement to that user.
Warranty ServiceTo obtain warranty service for the Machine, you should contact your reseller or callIBM. In the United States, call IBM at 1-800-772-2227. In Canada, call IBM at1-800-565-3344. You may be required to present proof of purchase.
Copyright IBM Corp. 1997 D-1
Title: C79DMMST CreationDate: 07/16/97 13:09:22

Depending on the Machine, the service may be 1) a “Repair” service at your location(called “On-site”) or at one of IBM's or a reseller's service locations (called “Carry-in”)or 2) an “Exchange” service, either On-site or Carry-in.
When a type of service involves the exchange of a Machine or part, the item IBM oryour reseller replaces becomes its property and the replacement becomes yours. Thereplacement may not be new, but will be in good working order and at leastfunctionally equivalent to the item replaced.It is your responsibility to:
1. obtain authorization from the owner (for example, your lessor) to have IBM or yourreseller service a Machine that you do not own;
2. where applicable, before service is provided —a) follow the problem determination, problem analysis, and service request
procedures that IBM or your reseller provide,b) secure all programs, data, and funds contained in a Machine,c) inform IBM or your reseller of changes in a Machine's location, andd) for a Machine with exchange service, remove all features, parts, options,
alterations, and attachments not under warranty service. Also, the Machinemust be free of any legal obligations or restrictions that prevent its exchange;and
3. be responsible for loss of, or damage to, a Machine in transit when you areresponsible for the transportation charges.
Extent of WarrantyIBM does not warrant uninterrupted or error-free operation of a Machine.Unless IBM specifies otherwise, IBM provides non-IBM machines on an “AS IS” basis.However, non-IBM manufacturers may provide their own warranties to you.
Misuse, accident, modification, unsuitable physical or operating environment, impropermaintenance by you, removal of product labels or parts identification labels, or failurecaused by a product for which IBM is not responsible may void the warranties.
THESE WARRANTIES REPLACE ALL OTHER WARRANTIES, EXPRESSOR IMPLIED, INCLUDING, BUT NOT LIMITED TO, THE IMPLIEDWARRANTIES OF MERCHANTABILITY AND FITNESS FOR APARTICULAR PURPOSE. HOWEVER, SOME LAWS DO NOT ALLOWTHE EXCLUSION OF IMPLIED WARRANTIES. IF THESE LAWS APPLY,THEN ALL EXPRESS AND IMPLIED WARRANTIES ARE LIMITED INDURATION TO THE WARRANTY PERIOD. NO WARRANTIES APPLYAFTER THAT PERIOD.
In Canada, warranties include both warranties and conditions.
Some jurisdictions do not allow limitations on how long an implied warranty lasts, sothe above limitation may not apply to you.
Limitation of LiabilityCircumstances may arise where, because of a default on IBM's part (includingfundamental breach) or other liability (including negligence and misrepresentation),you are entitled to recover damages from IBM. In each such instance, regardless ofthe basis on which you are entitled to claim damages, IBM is liable only for:
1. bodily injury (including death), and damage to real property and tangible personalproperty; and
2. the amount of any other actual loss or damage, up to the greater of $100,000 orthe charge for the Machine that is the subject of the claim.
Under no circumstances is IBM liable for any of the following:1. third-party claims against you for losses or damages (other than those under the
first item listed above);2. loss of, or damage to, your records or data; or
D-2
Title: C79DMMST CreationDate: 07/16/97 13:09:22

3. economic consequential damages (including lost profits or savings) or incidentaldamages, even if IBM is informed of their possibility.
Some jurisdictions do not allow the exclusion or limitation of incidental orconsequential damages, so the above limitation or exclusion may not apply to you.
This warranty gives you specific legal rights and you may also have other rights whichvary from jurisdiction to jurisdiction.
Appendix D. Product Warranty D-3
Title: C79DMMST CreationDate: 07/16/97 13:09:22

D-4
Title: C79DMMST CreationDate: 07/16/97 13:09:22

Appendix E. Notices
References in this publication to IBM products, programs, or servicesdo not imply that IBM intends to make these available in all countriesin which IBM operates. Any reference to an IBM product, program,or service is not intended to state or imply that only that IBM product,program, or service may be used. Any functionally equivalentproduct, program, or service that does not infringe any of theintellectual property rights of IBM may be used instead of the IBMproduct, program, or service. The evaluation and verification ofoperation in conjunction with other products, except those expresslydesignated by IBM, are the responsibility of the user.
IBM may have patents or pending patent applications coveringsubject matter in this document. The furnishing of this documentdoes not give you any license to these patents. You can sendlicense inquiries, in writing, to the IBM Director of Licensing, IBMCorporation, 500 Columbus Avenue, Thornwood, NY 10594, U.S.A.
Trademarks
The following terms are trademarks of the IBM Corporation in theUnited States or other countries or both:
Microsoft, Windows NT, and the Windows 95 flag logo aretrademarks or registered trademarks of the Microsoft Corporation.
Pentium , MMX , VideoPhone , ProShare , LANDesk , andActionMedia are trademarks or registered trademarks of IntelCorporation in the U.S. and other countries.
Other company, product, and service names, which may be denotedby a double asterisk (**), may be trademarks or service marks ofothers.
IBMHelpCenterHelpWareMMPM/2Multimedia Presentation Manager/2Operating System/2OS/2PC Card Director
Presentation ManagerPS/2RediSafeSelectaDockThinkPadTrackPointWIN-OS/2Ultimotion
Copyright IBM Corp. 1997 E-1
Title: C79DMMST CreationDate: 07/16/97 13:09:22

Electronic Emission Notice
Federal Communications Commission (FCC) StatementIBM ThinkPad Model 770, 9548, 9549
This equipment has been tested and found to comply with the limits for a Class Bdigital device, pursuant to Part 15 of the FCC Rules. These limits are designed toprovide reasonable protection against harmful interference in a residential installation.This equipment generates, uses, and can radiate radio frequency energy and, if notinstalled and used in accordance with the instructions, may cause harmful interferenceto radio communications. However, there is no guarantee that interference will notoccur in a particular installation. If this equipment does cause harmful interference toradio or television reception, which can be determined by turning the equipment offand on, the user is encouraged to try to correct the interference by one or more of thefollowing measures:
Reorient or relocate the receiving antenna.Increase the separation between the equipment and receiver.Connect the equipment into an outlet on a circuit different from that to which thereceiver is connected.Consult an IBM authorized dealer or service representative for help.
Properly shielded and grounded cables and connectors must be used in order to meetFCC emission limits. Proper cables and connectors are available from IBM authorizeddealers. IBM is not responsible for any radio or television interference caused byusing other than recommended cables and connectors or by unauthorized changes ormodifications to this equipment. Unauthorized changes or modifications could void theuser's authority to operate the equipment.
This device complies with Part 15 of the FCC Rules. Operation is subject to thefollowing two conditions: (1) this device may not cause harmful interference, and (2)this device must accept any interference received, including interference that maycause undesired operation.
Responsible Party:
International Business MachinesOld Orchard RoadArmonk, NY 10504
Telephone 1-919-543-2193
Canadian Department of Communications ComplianceStatement
This equipment does not exceed Class B limits per radio noise emissions for digitalapparatus, set out in the Radio Interference Regulation of the Canadian Department ofCommunications.
E-2
Title: C79DMMST CreationDate: 07/16/97 13:09:22

Avis de conformité aux normes du ministère desCommunications du Canada
Cet équipement ne dépasse pas les limites de Classe B d'émission de bruitsradioélectriques pour les appareils numériques, telles que prescrites par le Règlementsur le brouillage radioélectrique établi par le ministère des Communications duCanada.
European Community Directive Conformance StatementThis product is in conformity with the protection requirements of EC Council Directive89/336/EEC on the approximation of the laws of the Member States relating toelectro-magnetic compatibility.
A declaration of Conformity with the requirements of the Directive has been signed byIBM United Kingdom Limited, PO BOX 30 Spango Valley Greenock ScotlandPA160AH.This product satisfies the Class B limits of EN 55022.
Appendix E. Notices E-3
Title: C79DMMST CreationDate: 07/16/97 13:09:22

Telecommunication Notice
Federal Communications Commission (FCC) and TelephoneCompany Requirements (Part 68 of the FCC Rules)
1. The Telephone Consumer Protection Act of 1991 makes it unlawful forany person to use a computer or other electronic device to send anymessage via a telephone fax machine unless such message clearlycontains in a margin at the top or bottom of each transmitted page or onthe first page of the transmission, the date and time it is sent and anidentification of the business or other entity, or other individual sendingthe message and the telephone number of the sending machine or suchbusiness, other entity, or individual.
In order to program this information into your computer, you should besure to follow the installation instructions for your fax software package.
2. The built-in modem is built into the ThinkPad computer. It complies withPart 68 of the FCC Rules. A label is affixed to the bottom of thecomputer that contains, among other things, the FCC registrationnumber, USOC, and Ringer Equivalency Number (REN) for thisequipment. If these numbers are requested, look at the label andprovide this information to your telephone company.
3. The REN is useful to determine the quantity of devices you may connectto your telephone line and still have those devices ring when yournumber is called. In most, but not all, areas, the sum of the RENs of alldevices should not exceed five (5.0). To be certain of the number ofdevices you may connect to your line, as determined by the REN, youshould call your local telephone company to determine the maximumREN for your calling area.
4. If the built-in modem causes harm to the telephone network, thetelephone company may discontinue your service temporarily. Ifpossible, they will notify you in advance. But, if advance notice isn'tpractical, you will be notified as soon as possible. You will be advised ofyour right to file a complaint with the FCC.
5. Your telephone company may make changes in its facilities, equipment,operations, or procedures that could affect the proper operation of yourequipment. If they do, you will be given advance notice so as to giveyou an opportunity to maintain uninterrupted service.
6. If you experience trouble with this built-in modem, contact your IBMAuthorized Seller, or the IBM Corporation, 500 Columbus Avenue,Thornwood, NY 10594, 1-800-772-2227, for repair/warranty information.The telephone company may ask you to disconnect this equipment from
E-4
Title: C79DMMST CreationDate: 07/16/97 13:09:22

the network until the problem has been corrected, or until you are surethe equipment is not malfunctioning.
7. No customer repairs are possible to the modem. If you experiencetrouble with this equipment, contact your Authorized Seller or the IBMCorporation for information.
8. The modem may not be used on coin service provided by the telephonecompany. Connection to party lines is subject to state tariffs. Contactyour state public utility commission or corporation commission forinformation.
9. When ordering network interface (NI) service from the Local ExchangeCarrier, specify service arrangement USOC RJ11C.
Appendix E. Notices E-5
Title: C79DMMST CreationDate: 07/16/97 13:09:22

Industry Canada Requirements
NoticeThe Industry Canada label identifies certified equipment. Thiscertification means that the equipment meets certaintelecommunications networks protective, operational and safetyrequirements. The Department does not guarantee the equipmentwill operate to the user's satisfaction.
Before installing this equipment, users should ensure that it ispermissible to be connected to the facilities of the localtelecommunications company. The equipment must also be installedusing an acceptable method of communication. In some cases, thecompany's inside wiring associated with a single line individualservice may be extended by means of a certified connector assembly(telephone extension cord). The customer should be aware thatcompliance with the above conditions ma not prevent degradation ofservice in some situations.
Repairs to certified equipment should be made by an authorizedCanadian maintenance facility designated by the supplier. Anyrepairs of alterations made by the user to this equipment, orequipment malfunctions, may give the telecommunications companycause to request the user to disconnect the equipment.
Users should ensure for their own protection that the electricalground connections of the power utility, telephone lines and internalmetallic water pipe system, if present, are connected together. Thisprecaution may be particularly important in rural areas.
CautionUsers should not attempt to make such connections themselves, butshould contact the appropriate electric inspection authority, orelectrician, as appropriate.
E-6
Title: C79DMMST CreationDate: 07/16/97 13:09:22

NoticeThe Ringer Equivalent Number (REN) assigned to each terminaldevice provides an indication of the maximum number of terminalsallowed to be connected to a telephone interface. The terminationon an interface may consist of any combination of devices subjectonly to the requirement that the sum of the Ringer EquivalenceNumber of all the devices does not exceed 5.
AvisL'étiquette du ministère de l'Industrie Canada identifie le matérielhomologué. Cette étiquette certifie que le matériel est conforme àcertaines normes de protection, d'exploitation et de sécurité desréseaux de télécommunications. Le Ministère n'assure toutefois pasque le matériel fonctionnera à la satisfaction de l'utilisateur.
Avant d'installer ce matériel, l'utilisateur doit s'assurer qu'il est permisde le raccorder aux installations de l'entreprise locale detélécommunication. Le matériel doit également être installé ensuivant une méthode acceptée de raccordement. Dans certains cas,les fils intérieurs de l'entreprise utilisés pour un service individuel àligne unique peuvent être prolongés au moyen d'un dispositifhomologué de raccordement (cordon prolongateur téléphoniqueinterne). L'abonné ne doit pas oublier qu'il est possible que laconformité aux conditions énoncées ci-dessus n'empechent pas ladégradation du service dans certaines situations. Actuellement, lesentreprises de télécommunication ne permettent pas que l'onraccorde leur matériel à des jacks d'abonné, sauf dans les cas précisprévus par les tarifs paticuliers de ces entreprises.
Les réparations de matériel homologué doivent être effectuées parun centre d'entretien canadien autorisé désigné par le fournisseur.La compagnie de télécommunications peut demander à l'utilisateurde débrancher un appareil à la suite de réparations ou demodifications effectuées par l'utilisateur ou à cause de mauvaisfonctionnement.
Pour sa propre protection, l'utilisateur doit s'assurer que tous les filsde mise à la terre de la source d'énergie électrique, des lignestéléphoniques et des canalisations d'eau métalliques, s'il y en a, sont
Appendix E. Notices E-7
Title: C79DMMST CreationDate: 07/16/97 13:09:22

raccordés ensemble. Cette précaution est particulièrementimportante dans les régions rurales.
AvertissementL'utilisateur ne doit pas tenter de faire ces raccordements lui-même;il doit avoir recours à un service d'inspection des installationsélectriques, ou à électricien, selon le cas.
L'indice de charge (IC) assigné à chaque dispositif terminal indique,pour éviter toute surcharge, le pourcentage de la charge totale quipeut être raccordée à un circuit téléphonique bouclé utilisé par cedispositif. La terminaison du circuit bouclé peut être constituée den'importe quelle combinaison de dispositifs, pourvu que la sommedes indices de charge de l'ensemble des dispositifs ne dépasse pas100.
E-8
Title: C79DMMST CreationDate: 07/16/97 13:09:22

Index
Numerics56 Kbps modem, using 2-41
Aac power jack 1-5adapter bay 1-6America Online 5-7audio 1-13
problems 4-22audio features, using 2-35
Bbackup battery 3-11battery pack 1-4, 3-6
problems 4-17battery save method 2-26, 2-30battery status check 2-31battery status indicator 1-7bottom compartment 1-6brightness control lever 1-3built-in microphone 1-3bulletin boards 5-6
Ccaps lock indicator 1-8CD-ROM drive 1-3, 3-7
problems 4-18charge lamp 1-5click buttons 1-3coin screw 1-6cold dock 3-20cold plug 1-12cold undock
docking station 3-17cold unplug 1-12CompuServe 5-7controls 1-2corrective service diskette (CSD) 5-11cover release latch 1-3
Ddealer locations 5-4device in UltraBay II 3-7diagnostic diskette 5-11diskette drive 1-3, 3-7diskette drive in-use indicator 1-8diskette drive-in-use lamp 1-3diskette eject button 1-3display
problems 4-16docking station 3-17
cold dock 3-17cold undock 3-17hot dock 3-17hot undock 3-17warm dock 3-17warm undock 3-17
drive-in-use lamp 1-3DVD
drive 1-3player 2-50
DVD and Enhanced Video Adapterinstalling 3-10using 2-44
DVD drive 3-7
EEasy-Setup
changing drive startupsequence 2-57
knowing your configuration 2-56setting date and time 2-57using 2-54
EasyServ 5-5eject button 1-3electronic support 5-6emergency eject hole 1-3enhanced PC support line 5-8enhanced video/MPEG features
problems 4-22ergonomics information C-1error codes 4-5external display
Copyright IBM Corp. 1997 X-1
Title: C79DMMST CreationDate: 07/16/97 13:09:22

external display (continued)port 1-5problems 4-27, 4-29
external keyboard 3-13external numeric keypad
problems 4-11external-diskette-drive port 1-5external-input-device port 1-5
Ffan louvers 1-5fee, services 5-8Fn key 1-3, 1-9fuel program, using 2-32function keys
Fn + F11 1-10Fn + F12 1-10, 2-26Fn + F2 1-9, 2-33Fn + F3 1-9, 2-26Fn + F4 1-9, 2-26Fn + F7 1-10, 2-7, 2-8, 2-50, 2-51Fn + F8 1-10
functional highlights 1-13audio 1-13audio with 3D stereo sound 1-13DVD 1-13infrared port 1-14system management features 1-14TrackPoint 1-14video capture 1-13video phone 1-14
Hhard disk bay 1-6hard disk drive 3-5hard disk in-use indicator 1-8hard disk password 2-16hardware 1-2
AC power jack 1-5adapter bay 1-6battery pack 1-4bottom compartment 1-6brightness control lever 1-3
hardware (continued)built-in microphone 1-3charge lamp 1-5click buttons 1-3coin screw 1-6cover release latch 1-3diskette drive-in-use lamp 1-3diskette eject button 1-3drive-in-use lamp 1-3eject button 1-3emergency eject hole 1-3external-diskette-drive port 1-5external-display port 1-5external-input-device port 1-5fan louvers 1-5Fn key 1-3front infrared port 1-6function keys 1-3hard disk bay 1-6headphone jack 1-5internal modem port 1-2internal speakers 1-3LCD 1-2LCD indicator panel 1-3LED 1-3microphone/line-in jack 1-5numeric keypad 1-2parallel port 1-5PC Card eject buttons 1-3PC Card slot 1-3power switch 1-5power-on lamp 1-5release latches 1-3reset switch 1-5security keyhole 1-5security screws 1-6serial port 1-5system-expansion port 1-5TrackPoint 1-3UltraBay II 1-3universal serial bus (USB) 1-5video-in port 1-4video-out port 1-5volume control 1-5
headphone jack 1-5
X-2
Title: C79DMMST CreationDate: 07/16/97 13:09:22

hibernation modeenabling 2-28problems 4-12
hot dock 3-19hot plug 1-12hot undock
docking station 3-17hot unplug 1-12
II99xxxxx
See error codesidentification numbers, recording 5-2indicator
battery status 1-7caps lock 1-8diskette drive in-use 1-8hard disk in-use 1-8numeric lock 1-8remaining battery 1-7scroll lock 1-8speaker 1-7
infrared portfront 1-6functional highlights 1-14problems 4-21rear 1-5
internal modemport 1-2using 2-39
internal speakers 1-3
Kkeyboard
problems 4-11
Llamps 1-2LCD 1-2
problems 4-16LCD indicator panel 1-3LED 1-3, 1-12
LED (continued)black (off) 1-12blinking green 1-12blinking yellow 1-12green 1-12yellow 1-12
Mmemory option 3-2messages on screen 4-5microphone/line-in jack 1-5MIDI features, using 2-37modem
problems 4-22, 4-23mouse 3-13MPEG
playback 2-49problems 4-22
NNetwork and Server Support fee 5-8new operating system, installing B-1numeric keypad 1-2, 3-13numeric lock indicator 1-8
Oonline book, using the 2-15Online Housecall 5-6operating system
updates 5-11options
installing and removing 3-2problems 4-29
Pparallel port 1-5password 2-16
changing or removing 2-23entering 2-22hard disk password 2-16power-on password 2-16
Index X-3
Title: C79DMMST CreationDate: 07/16/97 13:09:22

password (continued)setting 2-16, 2-23supervisor password 2-16using 2-23
PC Card 3-15eject buttons 1-3problems 4-26slot 1-3
personalization editor 2-24plug, cold 1-12plug, hot 1-12plug, warm 1-12pointing device
problems 4-11port replicator 3-17POST error prompt 4-5power management
hibernation mode 2-26standby mode 2-26suspend mode 2-26
power switch 1-5power-on lamp 1-5power-on password 2-16printer
problems 4-27problems
audio 4-22battery pack 4-17CD-ROM drive 4-18DSP features 4-22enhanced video/MPEG
features 4-22error codes 4-5external display 4-27external numeric keypad 4-11hibernation mode 4-12infrared 4-21keyboard 4-11LCD 4-16messages on screen 4-5modem 4-22options 4-29PC Card 4-26pointing device 4-11printer 4-27
problems (continued)SelectaDock 4-26serial port 4-29software 4-31suspend mode 4-12television 4-29testing the computer 4-32TrackPoint 4-11troubleshooting charts 4-2, 4-31
Prodigy 5-7publications
ordering 5-11
Rrelease latches 1-3remaining battery indicator 1-7remote technical support 5-6repair services 5-11
getting service 5-11identification numbers 5-2
reset switch 1-5
Ssafety information viisales information 5-4scroll lock indicator 1-8secondary battery pack 1-3, 3-7secondary hard disk drive 1-3, 3-7security features
password 2-16personalization editor 2-24
security keyhole 1-5security screws 1-6security system lock 3-21SelectaDock
installing 3-17problems 4-26
serial number 5-2serial port 1-5
problems 4-29service 5-11
how to get 5-11ServicePak 5-11
X-4
Title: C79DMMST CreationDate: 07/16/97 13:09:22

softwareproblems 4-31
speaker indicator 1-7SRS function, using 2-36supervisor password 2-16suspend mode
problems 4-12timer 2-27
switches 1-2system management features 1-14system-expansion port 1-5
Ttechnical support 5-4
fee 5-8remote 5-6
telephone assistance 5-4telephone features 2-43television 3-22
problems 4-29testing the computer 4-32ThinkPad Configuration for Windows
95 2-3ThinkPad Configuration for Windows
NT 2-4ThinkPad EasyServ 5-10TrackPoint 1-3, 2-10
cap cleaning 2-10customizing 2-10operation 2-9problems 4-11
troubleshootingcharts 4-2modem 4-23USB port 4-23
UUltraBay II 1-3
cold plug 1-12cold unplug 1-12hot plug 1-12hot unplug 1-12warm plug 1-12
UltraBay II (continued)warm unplug 1-12
universal serial bus (USB) 1-5unplug, cold 1-12unplug, hot 1-12unplug, warm 1-12updating, operating system 5-11
Vvideo capture 1-13, 2-45video overlay 2-47video phone 1-14video-in port 1-4video-out port 1-5volume control 1-5
Wwarm dockwarm plug 1-12warm undock
docking station 3-17warm unplug 1-12warranty D-1
extensions and upgrades 5-10product D-1service, international 5-5
Index X-5
Title: C79DMMST CreationDate: 07/16/97 13:09:22

IBM
Part Number: 06J0764
Printed in the United States of America
6J 764
Title: C79DMMST CreationDate: 07/16/97 13:09:22