hypermodern chess opening strategy and tactics - eric schiller
TRANSCRIPT

26
CARDOZA PUBLISHING • ERIC SCHILLER
BASIC CONCEPTS
All good chessplayers understand the basic ideas which un-derlie good opening play. They are not always easy to articulate,and it must never be forgotten that principles often come intoconf lict, and should never be followed unthinkingly. Consider themas mere guidelines or good advice, and try to follow them as oftenas you can.
STRATEGIC GOALS IN A HYPERMODERN OPENINGWhite’s primary goal in a hypermodern opening is to move
pieces onto their best squares as quickly as possible. Move order isimportant only in how it affects the ability to place pieces in adesired position. The main battle is postponed until themiddlegame, and the two sides can, to some extent, ignore eachother in the Réti until both positions are established.
In this section, we will look at the role of the center in theRéti, and present a target position which represents the optimalformation for the most common variations. Then we will take alook at the role of each piece in the Réti Opening.
The CenterBecause we are dealing with a hypermodern opening, the cen-
ter is not going to be occupied by our own forces. Instead, we arewilling to let Black establish a strong center which will act as atarget for our operations in the middlegame.
The assault on the center cannot begin until all pieces havebeen developed. Most of the pressure will come from long range,along the diagonals. With no open files in the center, the rookswill have little say in the discussion.

27
BASIC CONCEPTS
In the opening, White is not concerned with attacking thecenter directly, but at the same time Black cannot be allowed towork freely in the middle of the board. It is very important to keepthe Black pawns from advancing too far. They can be allowedonto e4 and d4, but no further.
Ideal FormationThe basic formation of the Réti is a double fianchetto with
kingside castling and a pawn at c4 supported by another at d3. Inmany cases, White can set up the formation seen in the diagrambelow. White’s position is very solid and there are only two smallf laws. The pawn at b3 is a little weak, defended only by a knight.The pawn at e2, though harder to get at, has no support at all.
cuuuuuuuuC(rhb1kgn4}70p0p0p0p}6wDwDwDwD}5DwDwDwDw}&wDPDwDwD}3)PDPDN)w}2RGwHP)B)}%!w$wDwIw}v,./9EFJMV
There is a certain elegance and efficiency in White’s plans.Each piece has moved exactly once and has arrived at its idealposition. The king has some breathing room and all of the piecesexcept for the rook at a2 have some f lexibility. About the onlycriticism that can be leveled against White’s play is that it is con-fined to the first four ranks. No enemy territory is conquered.This gives Black time to choose a defensive formation withoutworrying about immediate threats.
To understand the position better, let’s look at the role of eachindividual piece. Of course, White must alter the formation inresponse to certain Black strategies, so this section only applies tothose positions where the ideal formation is used. The alternative

28
CARDOZA PUBLISHING • ERIC SCHILLER
use of pieces in specific variations will be discussed in the Defen-sive Formations chapter.
KingcuuuuuuuuC(rhb1kgn4}70p0p0p0p}6wDwDwDwD}5DwDwDwDw}&wDPDwDwD}3)PDPDN)w}2RGwHP)B)}%!w$wDwIw}v,./9EFJMV
The king should be safely castled on the kingside, no matterwhat sort of defense Black mounts. Castling should be accom-plished in the first ten to twelve moves. The king generally stays atg1 until the endgame, though it may move to g2 to recapture ifBlack exchanges light-squared bishops there. The king is defendedby the bishop and knight at f3, but the knight at d2 can come to f1to provide extra defense for h2.
Once the rook moves from f1, the weakness of the pawn at f2should be kept in mind. As we will see later, Black can effectivelyram the e-pawn down the file to e3 if White is not careful. Thenthe pawn at f2 either moves or is captured, and the pawn at g3loses support.

29
BASIC CONCEPTS
QueencuuuuuuuuC(rhb1kgn4}70p0p0p0p}6wDwDwDwD}5DwDwDwDw}&wDPDwDwD}3)PDPDN)w}2RGwHP)B)}%!w$wDwIw}v,./9EFJMV
White has two different plans for the queen. In the purestRéti formations, it is stationed at a1. From this square it supportsoperations on the long diagonal and on the a-file. In the mainlines, White often gains control of one of these important linesand this can be the main source of offensive action. Alternatively,it can go to c2, working on the c-file and the light squares in thecenter.
RookscuuuuuuuuC(rhb1kgn4}70p0p0p0p}6wDwDwDwD}5DwDwDwDw}&wDPDwDwD}3)PDPDN)w}2RGwHP)B)}%!w$wDwIw}v,./9EFJMV
In the main line, the rook advances from a1 to a2 to makeroom for the queen. Sometimes the defense of the second rank,

30
CARDOZA PUBLISHING • ERIC SCHILLER
especially e2 and f2, is necessary, and the rook can also usefullytransfer to b2, c2, or d2 should opportunities arise on one of thosefiles. There is usually a need to keep one rook on the c-file, as thatfile can be opened if White captures, for example, a pawn at d5 orb5. Another popular approach is to double rooks on the c-file.
The kingside rook can also move to e1 to support the advanceof the e-pawn. If Black exchanges pawns so that the d-file is open,one or both rooks may find a home there. So be prepared to bef lexible in placing your rooks, and study the use of rooks in theillustrative games and strategy sections below.
BishopscuuuuuuuuC(rhb1kgn4}70p0p0p0p}6wDwDwDwD}5DwDwDwDw}&wDPDwDwD}3)PDPDN)w}2RGwHP)B)}%!w$wDwIw}v,./9EFJMV
The cornerstone of the Réti is the fianchetto of both bishops.Each will work on a long diagonal and simultaneously stand guardover important squares in the base camp. This is both a strengthand a weakness in that if the bishops leave the board, there isimportant work that cannot be done. For this reason, White doesnot part with either bishop until the endgame, unless there is acompelling reason to do so.

31
BASIC CONCEPTS
KnightscuuuuuuuuC(rhb1kgn4}70p0p0p0p}6wDwDwDwD}5DwDwDwDw}&wDPDwDwD}3)PDPDN)w}2RGwHP)B)}%!w$wDwIw}v,./9EFJMV
The kingside knight operates from f3, sometimes leaping toe5 as part of an attack, or to prevent the advance of Black’s e-pawn. The other knight is usually placed at d2, so that it does notget in the way of the queen and bishop battery on the queenside,or hinder rooks from operating cleanly on the c-f ile. In the RétiAccepted, the knight has a different role, moving to a3 to recap-ture at c4, where it eyes e5, d6 and other useful squares.
PawnscuuuuuuuuC(rhb1kgn4}70p0p0p0p}6wDwDwDwD}5DwDwDwDw}&wDPDwDwD}3)PDPDN)w}2RGwHP)B)}%!w$wDwIw}v,./9EFJMV

32
CARDOZA PUBLISHING • ERIC SCHILLER
The unbroken chain usually remains intact throughout theopening unless Black captures one of the pawns. The a-pawn an-chors an advance of the b-pawn. Moving the b-pawn up the boardis a strong maneuver which can cause great weaknesses in theBlack position if there is a pawn at c6. The role of the c-pawn is toguard d5, sometimes capturing an enemy pawn there to open upthe c-file.
Hypermodern strategy indicates that the central pawns remainat the second or third rank, except when going to e4 has tacticalor positional justification. The f-pawn rarely moves, as it wouldexpose the king and also weaken the e3-square. The kingsidefianchetto mandates that the g-pawn be at g3, and it is wise tokeep the h-pawn home in support, though sometimes it needs togo to h3 to kick out an annoying enemy piece.

33
TYPICAL STRATEGIES AND TACTICS
TYPICAL STRATEGIESAND TACTICS
In this section we examine typical strategic and tactical de-vices available to both sides. These patterns can often turn up inthe early middlegame, so it is a good idea to pay close attention tothese positions as well as those you encounter as you work yourway through the illustrative games.
The examples are presented in full so that you can observesome of the transpositional move orders and trace the buildup ofthe position. Each diagram illustrates a specific tactical device.Study these carefully as you go along so that you can increase yourstrength and advantage with these openings.
Let us first turn our attention to the strategies and tactics forWhite, and after, we will look at these issues from the other sideof the board, so we understand what Black is thinking when facedwith our Hypermodern ideas.
STRATEGIES AND TACTICS FOR WHITEFor the most part, White is concerned with queenside activity
in the Réti and the related lines discussed in this repertoire. Thecenter must not be neglected, however.
There are three different pawn breaks, where White uses apawn to confront an enemy pawn and threaten to cause structuraldamage or advance into a more favorable position. The threebreaks are at e4, b4 and d4. We’ll look at those first. We’ll thenconsider the situation at e5, an important battlefield. The powerof the fianchettoed bishops is then explored, after which two weak-nesses in Black’ s position are considered.

34
CARDOZA PUBLISHING • ERIC SCHILLER
The e4-breakFor some reason, the e4-break seems to inspire bad play by
Black at times, as the position unravels quickly. The advance of apawn to e4 to confront a Black pawn at d5 is effective when theBlack knight at f6 has to stand guard at f6 because of pressure onthe pawn at g7. White often has a queen at a1 and bishop at b2,and even when Black has castled, the pawn at g7, can be weak.
Here is a simple example, where Black has delayed castlingtoo long.
HEINE VS. FOXDortmund Open, 1991
New York System1.Nf3 d5; 2.c4 c6; 3.b3 Bf5; 4.g3 Nf6; 5.Bg2 e6; 6.0–0 Nbd7;
7.d3 h6; 8.Bb2 Bh7; 9.Nbd2 a5; 10.a3 Bd6; 11.cxd5 cxd5.cuuuuuuuuC(rDw1kDw4}7DpDnDp0b}6wDwgphw0}50wDpDwDw}&wDwDwDwD}3)PDPDN)w}2wGwHP)B)}%$wDQDRIw}v,./9EFJMV
The position is deceptively calm, but the potential advance ofthe e-pawn has been underestimated by Black. 12.e4! The threatof e5 is very real. 12…Bc7?! 12…dxe4 would have been smarter.After 13.dxe4 Black could then play 13…Bc5, but even so Whitehas a nice game after 14.Qe2, after which the rooks can take upuseful positions on the c-file and d-file.
13.exd5 Nxd5? It was necessary to play 13…exd5, even thoughBlack would have a rotten position after 14.Re1+. 14.Bxg7 Rg8;15.Bd4 Bxd3. Otherwise White is simply up a pawn with a goodposition. 16.Re1 Kf8. Or 16…N7f6; 18.Ne5! Bxe5; 19.Bxe5 Ng4;20. Nf3. 17.Ne4 Ba6? Suicide. 17…Bxe4 was forced, but in anycase White has a tremendous game. 18.Qd2. Black resigned.

35
TYPICAL STRATEGIES AND TACTICS
The h-pawn is lost.Life is rarely that simple, of course. In our next example Black
has taken care of castling, but the same strategy proves effectivefor White.
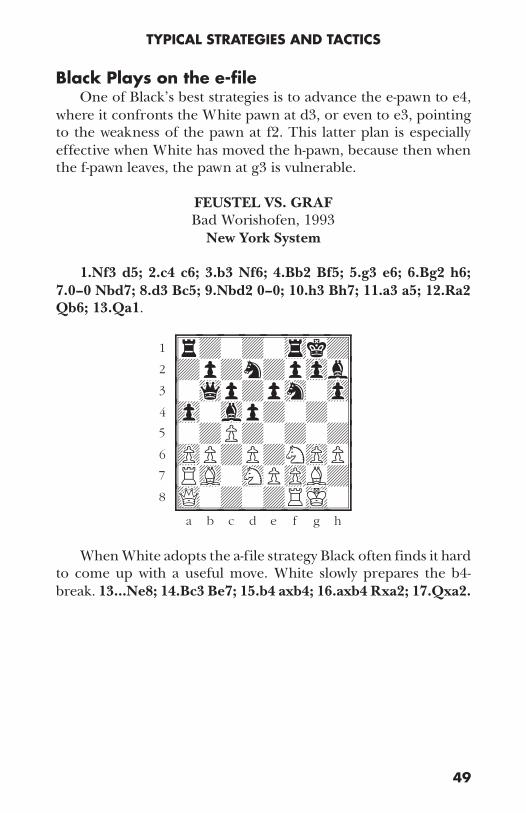
DONCEVIC VS. LUTGARDA GONZALEZCorte Ingles, 1989New York System
1.c4 c6; 2.Nf3 Nf6; 3.g3 d5; 4.b3 Bf5; 5.Bg2 e6; 6.0–0 Nbd7;7.Bb2 Bd6; 8.d3 0–0; 9.Nbd2 h6; 10.cxd5 cxd5.
cuuuuuuuuC(rDw1w4kD}70pDnDp0w}6wDwgphw0}5DwDpDbDw}&wDwDwDwD}3DPDPDN)w}2PGwHP)B)}%$wDQDRIw}v,./9EFJMV
Black has prevented the advance of the e-pawn to e4. Or hashe?
11.e4!? dxe4 Black bites at the bait. Instead, 11…Bg4 was in-teresting. 12.dxe4 Bxe4; 13.Nxe4 Nxe4; 14.Nd4!
cuuuuuuuuC(rDw1w4kD}70pDnDp0w}6wDwgpDw0}5DwDwDwDw}&wDwHnDwD}3DPDwDw)w}2PGwDw)B)}%$wDQDRIw}v,./9EFJMV

36
CARDOZA PUBLISHING • ERIC SCHILLER
White is down a pawn, but the pin on the long diagonal issufficient compensation by itself. 14…Ndf6; 15.Re1 Nc5; 16.b4!Ncd7.
cuuuuuuuuC(rDw1w4kD}70pDnDp0w}6wDwgphw0}5DwDwDwDw}&w)wHwDwD}3DwDwDw)w}2PGwDw)B)}%$wDQ$wIw}v,./9EFJMV
Perhaps now Black expected White to capture at b7. There isa much stronger move, however. 17.Nxe6! fxe6; 18.Qxd6 Rb8;19.Qxe6+ Kh8; 20.Rad1 Qb6; 21.Qxb6 axb6; 22.Re7! Black re-signed.
Our third example shows the strategy in use from a pure Rétiformation. Here the queenside battery comes to life and the weak-ness at g7 is once again exposed.

37
TYPICAL STRATEGIES AND TACTICS
DALY VS. MCDONNELLIreland Championship, 1991
New York System1.Nf3 Nf6; 2.g3 d5; 3.Bg2 Bf5; 4.c4 e6; 5.0–0 Be7; 6.b3 0–0;
7.Bb2 Nbd7; 8.d3 c6; 9.Nbd2 h6; 10.a3 a5; 11.Ra2 Re8; 12.Qa1Bd6.
cuuuuuuuuC(rDw1rDkD}7DpDnDp0w}6wDpgphw0}50wDpDbDw}&wDPDwDwD}3)PDPDN)w}2RGwHP)B)}%!wDwDRIw}v,./9EFJMV
Black’s bishop at d6 invites White to play e4, since the e5-square is weak, and so is g7! 13.e4! dxe4; 14.dxe4 Nxe4; 15.Nxe4Bxe4; 16.Bxg7. The barrier is destroyed. Black is already in trouble.
16…Bf8; 17.Bxf8 Nxf8; 18.Rd2 Qb6; 19.Qf6 Bg6. 19…Qxb3;20.Ne5 Bg6; 21.Ng4! Kh7; 22.Be4! is crushing, because 22…Bxe4is answered by mate in two. 23.Qxh6+ Kg8; 24.Nf6# 20.Ne5 Red8.20…Qxb3 transposes to the previous note. 21.Rfd1 Rxd2; 22.Rxd2Qxb3.
cuuuuuuuuC(rDwDwhkD}7DpDwDpDw}6wDpDp!b0}50wDwHwDw}&wDPDwDwD}3)qDwDw)w}2wDw$w)B)}%DwDwDwIw}v,./9EFJMV

38
CARDOZA PUBLISHING • ERIC SCHILLER
Now Black will have the resource of a check at b1, but thatisn’t enough. 23.Bf1 Qc3. 23…Qxa3; 24.Ng4 Kh7; 25.Nxh6! a4(25…Kxh6; 26.Rd4 leads to checkmate.) 26.Nxf7 Bxf7; 27.Qxf7+Kh8; 28.Rd4 wins. 24.Rd3 Bxd3. 24…Qa1! would have saved Black,though White does have compensation for the pawn. 25.Qxf7+Kh8; 26.Qf6+ Kg8; 27.Bxd3. With the Black queen at a1 this wouldnot have been possible. 27…Qc1+; 28.Kg2 Qg5; 29.Qf7+ Kh8;30.Ng6+! Black resigned, having nothing better than 30…Nxg6;31.Bxg6 Qxg6; 32.Qxg6.
The b4-breakWhen Black has a pawn at a5 or c5, White can undermine the
pawn structure by playing b4. If Black captures, then a useful fileis opened. If Black does not capture, White can choose to captureor advance the pawn to b5, securing important space on thequeenside. The b4-break doesn’t usually lead to an immediate win,but it can have some dramatic effects.
PALATNIK VS. SHERZERChicago, 1992
New York System1.Nf3 Nf6; 2.g3 d5; 3.Bg2 Bf5; 4.c4 e6; 5.0–0 c6; 6.b3 Nbd7;
7.Bb2 Be7; 8.d3 0–0; 9.Nbd2 a5; 10.a3 h6; 11.Rc1 Bh7; 12.Rc2Ne8; 13.Qa1 Bf6; 14.Rfc1.
cuuuuuuuuC(rDw1n4kD}7DpDnDp0b}6wDpDpgw0}50wDpDwDw}&wDPDwDwD}3)PDPDN)w}2wGRHP)B)}%!w$wDwIw}v,./9EFJMV

39
TYPICAL STRATEGIES AND TACTICS
The exchange of pieces and queens does not reduce the ad-vantage White enjoys because of his control of more queensideterritory. 14…Bxb2; 15.Qxb2 Qf6; 16.b4! Qxb2; 17.Rxb2 axb4;18.axb4.
cuuuuuuuuC(rDwDn4kD}7DpDnDp0b}6wDpDpDw0}5DwDpDwDw}&w)PDwDwD}3DwDPDN)w}2w$wHP)B)}%Dw$wDwIw}v,./9EFJMV
Even in the endgame White can play effectively on thequeenside, as seen in this example. The position is by no meanswinning, but the burden is on Black to defend precisely.
18…Nd6; 19.Nd4 dxc4. 19…e5! is a better defense. 20.c5 Nf5;21.Nxf5 Bxf5; 22.e4 dxe4; 23.dxe4 Be6 is pretty solid, and Blackwill make good use of the a-file. 20.dxc4 Rfd8; 21.c5 Nf5; 22.Nxf5Bxf5; 23.Nc4 Ra7; 24.e4 Bg6; 25.Rd2. An excruciating pin, whichleads to the win of material. 25…Ra4; 26.Nb6 Rxb4; 27.Rxd7Rxd7; 28.Nxd7 Bxe4; 29.Bxe4 Rxe4; 30.Rb1. Black resigned.
The d4-breakWhen Black has a pawn at e5 or c5, White can advance the d-
pawn to d4 and create a crisis in the center. When there is anenemy pawn at e5, White must calculate the consequences of Blackadvancing to e4, keeping the center blocked. A further complica-tion here, seen later in the section on Black strategies and tactics,is the possible advance of the pawn to e3.
40
CARDOZA PUBLISHING • ERIC SCHILLER
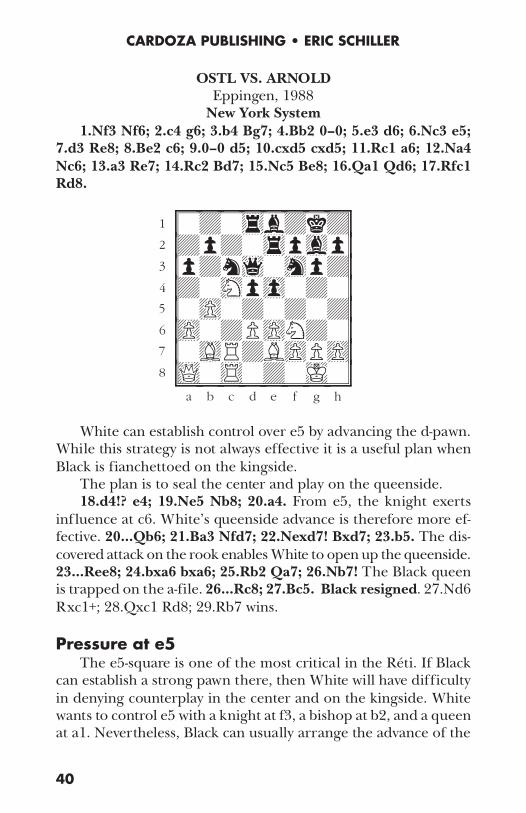
OSTL VS. ARNOLDEppingen, 1988
New York System1.Nf3 Nf6; 2.c4 g6; 3.b4 Bg7; 4.Bb2 0–0; 5.e3 d6; 6.Nc3 e5;
7.d3 Re8; 8.Be2 c6; 9.0–0 d5; 10.cxd5 cxd5; 11.Rc1 a6; 12.Na4Nc6; 13.a3 Re7; 14.Rc2 Bd7; 15.Nc5 Be8; 16.Qa1 Qd6; 17.Rfc1Rd8.
cuuuuuuuuC%wDw4bDkD}2DpDw4pgp}3pDn1whpD}&DwHp0wDw}5w)wDwDwD}6)wDP)NDw}7wGRDB)P)}(!w$wDwIw}v,./9EFJMV
White can establish control over e5 by advancing the d-pawn.While this strategy is not always effective it is a useful plan whenBlack is fianchettoed on the kingside.
The plan is to seal the center and play on the queenside.18.d4!? e4; 19.Ne5 Nb8; 20.a4. From e5, the knight exerts
inf luence at c6. White’s queenside advance is therefore more ef-fective. 20…Qb6; 21.Ba3 Nfd7; 22.Nexd7! Bxd7; 23.b5. The dis-covered attack on the rook enables White to open up the queenside.23…Ree8; 24.bxa6 bxa6; 25.Rb2 Qa7; 26.Nb7! The Black queenis trapped on the a-file. 26…Rc8; 27.Bc5. Black resigned. 27.Nd6Rxc1+; 28.Qxc1 Rd8; 29.Rb7 wins.
Pressure at e5The e5-square is one of the most critical in the Réti. If Black
can establish a strong pawn there, then White will have difficultyin denying counterplay in the center and on the kingside. Whitewants to control e5 with a knight at f3, a bishop at b2, and a queenat a1. Nevertheless, Black can usually arrange the advance of the

41
TYPICAL STRATEGIES AND TACTICS
e-pawn supported by a rook on the e-file, a bishop at d6, and aknight at d7. When the pawn arrives at e5, White can sometimesexpose it to attack by eliminating the pawn at d5 (if necessary)and bringing a knight to c4.
WEYERSTRASS VS. VAN DERLaren (Training), 1988Semi-Slav Formation
1.g3 Nf6; 2.Bg2 e6; 3.c4 d5; 4.Nf3 c6; 5.b3 Be7; 6.Bb2 Nbd7;7.0–0 0–0; 8.d3 Re8; 9.Nbd2 Bd6; 10.e4 e5; 11.exd5 cxd5; 12.cxd5Nxd5; 13.Nc4 Qe7?
cuuuuuuuuC(rDbDrDkD}70pDn1p0p}6wDwgwDwD}5DwDn0wDw}&wDNDwDwD}3DPDPDN)w}2PGwDw)B)}%$wDQDRIw}v,./9EFJMV
An obvious move, defending the pawn, but White has a win-ning combination. Instead, Black should have dropped the bishopback to c7 or b8 and then supported the e-pawn with …f6.
14.Nfxe5! N7f6. Or 14…Nxe5; 15.Bxd5!; 15.Nxf7! Kxf7;16.Bxd5+ Nxd5; 17.Qh5+ Kg8; 18.Qxd5+ Be6; 19.Qxd6 Bh3;20.Qxe7 Rxe7; 21.Rfe1. Black resigned.
The Bishop AwakensThe bishop at b2 can often seem to be passive, not hitting any
particularly useful target. In the worst case, it is hemmed in byBlack pawns and has no scope at all. The lack of scope can dictatestrategy, as White can adopt extreme measures, sometimes evensacrificial ones, to bring new life to the old cleric.

42
CARDOZA PUBLISHING • ERIC SCHILLER
MILANOVIC- RANDJELOVICBecici, 1993
Semi-Slav System1.Nf3 d5; 2.c4 e6; 3.g3 Nf6; 4.Bg2 c6; 5.b3 Nbd7; 6.Bb2 Bd6;
7.0–0 0–0; 8.d3 Re8; 9.Nbd2 e5; 10.e4 Nc5; 11.Qc2 dxe4; 12.Nxe4Ncxe4; 13.dxe4 Bg4; 14.Nh4 Qc8; 15.c5 Bc7; 16.Nf5.
cuuuuuuuuC(rDqDrDkD}70pgwDp0p}6wDpDwhwD}5Dw)w0NDw}&wDwDPDbD}3DPDwDw)w}2PGQDw)B)}%$wDwDRIw}v,./9EFJMV
White has a good position, but there are no immediate threats.Black should not weaken the protective pawn barrier. The conse-quences are fatal!
16…g6? Perhaps Black thought that the distant bishop at b2poses no danger, because the pawn at e5 is in the way, and issolidly supported by a bishop and a rook. Appearances can bedeceiving! 16…Qe6 was the correct move. 17.Nd6! Bxd6; 18.cxd6Bh3? Black has no time for such luxuries. 18…Nh5; 19.Qd2 a5was a more dynamic possibility. 19.f4!
cuuuuuuuuC(rDqDrDkD}70pDwDpDp}6wDp)whpD}5DwDw0wDw}&wDwDP)wD}3DPDwDw)b}2PGQDwDB)}%$wDwDRIw}v,./9EFJMV

43
TYPICAL STRATEGIES AND TACTICS
This is the key to bringing the bishop at b2 into the attack.19…Bxg2; 20.Kxg2 Nd7; 21.fxe5 Nxe5. The long diagonal is stillblocked, but White has a strong initiative. 22.Rf6 Ng4? Black for-gets how necessary the knight was at e5! 22…Qd7; 23.Raf1 is nota lot of fun, but may be best. 23.Qc3!
cuuuuuuuuC(rDqDrDkD}70pDwDpDp}6wDp)w$pD}5DwDwDwDw}&wDwDPDnD}3DP!wDw)w}2PGwDwDK)}%$wDwDwDw}v,./9EFJMV
The diagonal leads to victory. 23…Rxe4?; 23…Nxf6?? 24.Qxf6mates quickly. 23…Ne5 was necessary, though after 24.Raf1 Qd7;25.Rxf7 Qxf7; 26.Rxf7 Kxf7; 27.d7 Nxd7; 28.Qg7+ Ke6; 29.Qxh7and the h-pawn will advance. Or 27…Re7; 28.Ba3 Re6; 29.Qd2Rd8; 30.Qg5! Rxd7; 31.Qf4+ Rf6. The king cannot retreat becauseof Qf8#. 32.Qxe5 and White should win.
24.Rxg6+. Black resigned.
Weakness at b7Black’s position is usually vulnerable at b7 if the bishop has
left its home square of c8 and headed out toward the kingside.The pawn can be attacked on the diagonal, on the b-file, or froma knight at c5 or a5. Black usually takes measures to protect thepawn, by placing a pawn or piece at c6, and the b-file is closed atthe start of the game. In some variations White opens the b-fileby a recapture at c4, but there is one variation where the pawn atb7 is exposed early in the game. This is the deferred form of theRéti Gambit where Black captures at c4 on the third move.

44
CARDOZA PUBLISHING • ERIC SCHILLER
POLULJAHOV VS. DOROSHKIEVICHNovosibirsk, 1995
Réti Gambit Deferred
1.c4 e6; 2.g3 d5; 3.Nf3 dxc4; 4.Na3 Bxa3; 5.bxa3 Qd5; 6.Bg2Nf6; 7.0–0 0–0; 8.Bb2 Rd8; 9.Qc2 Nc6; 10.Rac1 Qh5; 11.Bxf6gxf6; 12.Qxc4 e5; 13.d3 Be6; 14.Qc2 f5? Black cannot afford toweaken the kingside like this. Now the a1–h8 diagonal can be ex-ploited. 15.Qb2!
uuuuuuuu(rDw4wDkD}70p0wDpDp}6wDnDbDwD}5DwDw0pDq}&wDwDwDwD}3)wDPDN)w}2P!wDP)B)}%Dw$wDRIw}v,./9EFJMV
White has the optimal Réti pressure at b7. The queen directlyattacks the pawn, and the bishop at g2 is ready to participate oncethe knight moves out of the way. 15…e4 Black hopes to seal thediagonal, relying on the bishop to get to d5 to provide additionaldefense.
16.Qxb7! Bd5! Black was counting on this move, but Whitewas ready with a crushing reply. Taking the knight wasn’t much ofan alternative: 16…exf3; 17.Bxf3 Qh3; 18.Rxc6 is hopeless forBlack. 17.Rxc6!! Rab8. Taking the rook is possible, but risky.17…Bxc6; 18.Qxc6 exf3; 19.Bxf3 Qg6; 20.Qxc7 Rab8; 21.Qxa7gives White more than enough compensation for the exchange.
18.Qxc7 Bxc6; 19.Qxc6 exf3; 20.Bxf3 Qg6. At least Black hassaved the a-pawn, but White is still much better and went on towin.

45
TYPICAL STRATEGIES AND TACTICS
Weakness at f7The traditional weakness at f7 can sometimes be exploited in
the Réti, especially when a knight at g5 combines forces with aqueen on the a2-g8 diagonal. I’ll illustrate this with one of myown recent victories.
SCHILLER VS. SNYDERMechanics’ Institute Masters, San Francisco, 1998
Symmetrical Variation
1.Nf3 Nf6; 2.c4 c5; 3.b3 g6; 4.Bb2 Bg7; 5.e3 0-0; 6.Be2 Nc6;7.0-0 b6; 8.Na3!? Bb7; 9.Nc2 d5; 10.cxd5 Qxd5; 11.d3 Rad8;12.Qb1 Rfe8; 12…Ba6; 13.e4 Qe6; 14.Ne3 is not very clear. Per-haps Black can play 14…Nxe4; 15.Bxg7 Kxg7; 16.dxe4 Bxe2;17.Qb2+ Nd4; 18.Nxd4 cxd4; 19.Qxe2 dxe3; 20.Qxe3 with anuninspiring position, though White controls a bit more space.
13.Rd1 e5; 14.e4 Qe6; 15.Bc3 Nd7. 15…Nd4; 16.Ncxd4 cxd4;17.Bd2 is a reasonable alternative. 16.a3 Nd4; 17.Ncxd4 cxd4;18.Bd2 Nc5; 19.b4! Na4?! This looks strong, but the a2-f8 diago-nal is weaker than it looks. 19…Nb3!? 20.Ng5 Nxd2; 21.Nxe6 Nxb1;22.Nxd8 Nc3 is the only way to avoid dropping the exchange im-mediately, but 23.Nxb7 Nxe2+; 24.Kf1 Nc3; 25.Nd6 (25.Rdc1 Bf8!traps the knight at b7.) 25…Rd8; 26.Nc4 Nxd1; 27.Rxd1 b5; 28.Nd2Rc8; 29.Ra1 Rc3; 30.Ke2 Bh6 is certainly no worse for Black.19…Nd7; 20.Rc1 Rc8; 21.Ng5 Qe7; 22.Qb3 Bh6; 23.h4 was pos-sible.
20.Rc1 Rc8; 21.Ng5! Rxc1+; 22.Qxc1 Qd7.cuuuuuuuuC(wDwDrDkD}70bDqDpgp}6w0wDwDpD}5DwDw0wHw}&n)w0PDwD}3)wDPDwDw}2wDwGB)P)}%$w!wDwIw}v,./9EFJMV

46
CARDOZA PUBLISHING • ERIC SCHILLER
23.Qc4! This is awkward to meet. Black should probably pas-sively defend f7. 23…Rc8; 24.Qb3 Nc3?; 24…Bc6; 25.Bg4!! is avariation on the theme seen in the game. 25…Qxg4; 26.Qxf7+Kh8; 27.Ne6 Rg8; 28.f3! Qh5; 29.Nxg7 Rxg7; 30.Qf8+ Rg8; 31.Qf6+Rg7; 32.Qxc6 wins. 24…Rf8 is ugly, but probably best. White is alittle better after 25.Rc1. 25.Bg4!! Qxg4; 26.Qxf7+ Kh8; 27.Qxb7Re8; 28.Nf7+ Kg8; 29.Nd6! Rd8. 29…Rf8; 30.Bxc3 dxc3; 31.Qd5+Kh8; 32.Nf7+ wins. 30.Qf7+ Kh8.
cuuuuuuuuC(wDw4wDwi}70wDwDQgp}6w0wHwDpD}5DwDw0wDw}&w)w0PDqD}3)whPDwDw}2wDwGw)P)}%$wDwDwIw}v,./9EFJMV
31.Bh6! Bxh6; 32.Qf6+ Kg8; 33.Qxd8+ Bf8; 34.Qe8 Qf4;35.Qe6+ Kg7. 35…Kh8; 36.Qxe5+ Qxe5; 37.Nf7+ Kg7; 38.Nxe5 issimple enough. 36.Ne8+ Kh6; 37.Qh3+ Kg5; 38.Qxh7 Qg4; 39.f3Qe6; 40.h4+ Kf4; 41.Nc7. 41.Kf2 can be played immediately, butBlack can prolong the struggle with 41…Nd1+; 42.Rxd1 Qa2+;43.Kg1 Ke3. 41…Qd6; 42.Kf2! White forces mate with the g-pawn,so Black resigned.
Trapped QueenIn defending the queenside, Black can sometimes find the
queen in an uncomfortable position. The disadvantage in controlof space leaves the queen with less f light squares. Sometimes, thereis simply no way to evade attack by White’s forces.

47
TYPICAL STRATEGIES AND TACTICS
TARUFFI VS. CAPPELLOReggio Emilia, 1978New York System
1.c4 c6; 2.b3 d5; 3.Bb2 Nf6; 4.Nf3 Bf5; 5.d3 e6; 6.g3 Nbd7;7.Bg2 h6; 8.0–0 Be7; 9.Nbd2 0–0; 10.a3 a5; 11.Qc2 Bh7; 12.Rfb1Qc7; 13.b4 Rfc8; 14.Qb3 axb4; 15.axb4 Ne8; 16.Rc1 Qb6; 17.Bc3Bg6; 18.d4 Nc7; 19.c5 Qb5; 20.Bf1 Be4; 21.Ne1!
cuuuuuuuuC(rDrDwDkD}7Dphngp0w}6wDpDpDw0}5Dq)pDwDw}&w)w)bDwD}3DQGwDw)w}2wDwHP)w)}%$w$wHBIw}v,./9EFJMV
Black’s queen is in deep trouble, and there is no place to run,so Black resigned.
Premature Queenside Break by BlackThe advance of a Black pawn to b5 is not a bad plan, as long as
the b-file is still occupied by a White pawn. When Black exchangesthe pawn at d4 for the pawn at c4, White recaptures with the b-pawn, except in the Réti Accepted, when there is not yet a pawn atb3. This structure creates a problem for Black, as the pawn at b7is weak. One natural remedy is to advance it to b5, but as we see,this too has its drawbacks.

48
CARDOZA PUBLISHING • ERIC SCHILLER
SCHWARTZMAN VS. HERRMANNDortmund, 1989New York System
1.c4 c6; 2.Nf3 d5; 3.b3 Bf5; 4.g3 Nf6; 5.Bb2 e6; 6.Bg2 h6;7.0–0 Be7; 8.d3 0–0; 9.Nbd2 a5; 10.a3 Nbd7; 11.Re1 Bh7; 12.Bc3dxc4; 13.bxc4 Qc7; 14.Qc1 Rfc8; 15.Qb2. Black plays an inferiorplan, trying to exchange a pair of rooks. This robs Black of a use-ful defensive piece. 15…Ra6?; 16.Rab1 Rb6; 17.Qa1! Rxb1;18.Rxb1.
cuuuuuuuuC%wDrDwDkD}2Dp1ngp0b}3wDpDphw0}&0wDwDwDw}5wDPDwDwD}6)wGPDN)w}7wDwHP)B)}(!RDwDwIw}v,./9EFJMV
White is going to add to the pressure on the b-file, but Blackshould not over-react. 18…b5? Passive defense with 18…a4 followedby …Nc5 would have been better. 19.Nd4! Bf8; 20.Nxc6. Blackresigned.
STRATEGIES AND TACTICS FOR BLACKBlack’s strategic goals vary depending on the defensive for-
mation. It is hard to generalize, but there is one theme that mustbe understood by both sides, and that is the effects of an advanceof Black’s e-pawn to e5, e4 or even e3. There are three squaresthat can become vulnerable in the Réti: e2, b3 and f2. Each ofthese squares lacks sufficient support to withstand an organizedassault by Black’s pieces, but fortunately they are relatively hard toget at. White must also avoid allowing the pieces to become en-tangled or stuck in unproductive positions.
49
TYPICAL STRATEGIES AND TACTICS
Black Plays on the e-fileOne of Black’s best strategies is to advance the e-pawn to e4,
where it confronts the White pawn at d3, or even to e3, pointingto the weakness of the pawn at f2. This latter plan is especiallyeffective when White has moved the h-pawn, because then whenthe f-pawn leaves, the pawn at g3 is vulnerable.
FEUSTEL VS. GRAFBad Worishofen, 1993
New York System
1.Nf3 d5; 2.c4 c6; 3.b3 Nf6; 4.Bb2 Bf5; 5.g3 e6; 6.Bg2 h6;7.0–0 Nbd7; 8.d3 Bc5; 9.Nbd2 0–0; 10.h3 Bh7; 11.a3 a5; 12.Ra2Qb6; 13.Qa1.
cuuuuuuuuC%rDwDw4kD}2DpDnDp0b}3w1pDphw0}&0wgpDwDw}5wDPDwDwD}6)PDPDN)P}7RGwHP)BD}(!wDwDRIw}v,./9EFJMV
When White adopts the a-file strategy Black often finds it hardto come up with a useful move. White slowly prepares the b4-break. 13…Ne8; 14.Bc3 Be7; 15.b4 axb4; 16.axb4 Rxa2; 17.Qxa2.
50
CARDOZA PUBLISHING • ERIC SCHILLER
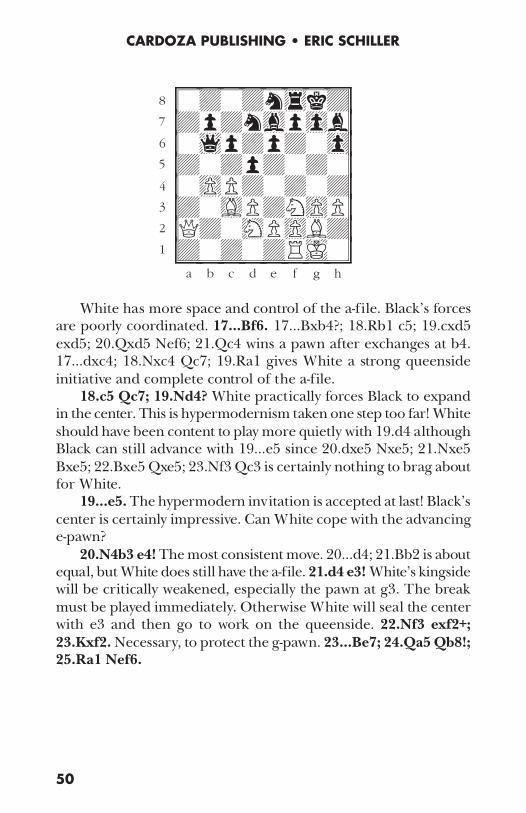
cuuuuuuuuC(wDwDn4kD}7DpDngp0b}6w1pDpDw0}5DwDpDwDw}&w)PDwDwD}3DwGPDN)P}2QDwHP)BD}%DwDwDRIw}v,./9EFJMV
White has more space and control of the a-file. Black’s forcesare poorly coordinated. 17…Bf6. 17…Bxb4?; 18.Rb1 c5; 19.cxd5exd5; 20.Qxd5 Nef6; 21.Qc4 wins a pawn after exchanges at b4.17…dxc4; 18.Nxc4 Qc7; 19.Ra1 gives White a strong queensideinitiative and complete control of the a-file.
18.c5 Qc7; 19.Nd4? White practically forces Black to expandin the center. This is hypermodernism taken one step too far! Whiteshould have been content to play more quietly with 19.d4 althoughBlack can still advance with 19…e5 since 20.dxe5 Nxe5; 21.Nxe5Bxe5; 22.Bxe5 Qxe5; 23.Nf3 Qc3 is certainly nothing to brag aboutfor White.
19…e5. The hypermodern invitation is accepted at last! Black’scenter is certainly impressive. Can White cope with the advancinge-pawn?
20.N4b3 e4! The most consistent move. 20…d4; 21.Bb2 is aboutequal, but White does still have the a-file. 21.d4 e3! White’s kingsidewill be critically weakened, especially the pawn at g3. The breakmust be played immediately. Otherwise White will seal the centerwith e3 and then go to work on the queenside. 22.Nf3 exf2+;23.Kxf2. Necessary, to protect the g-pawn. 23…Be7; 24.Qa5 Qb8!;25.Ra1 Nef6.

51
TYPICAL STRATEGIES AND TACTICS
cuuuuuuuuC(w1wDw4kD}7DpDngp0b}6wDpDwhw0}5!w)pDwDw}&w)w)wDwD}3DNGwDN)P}2wDwDPIBD}%$wDwDwDw}v,./9EFJMV
The simple threat of …Ne4+ is difficult to meet. 26.Nfd2 Nh5;27.Nf1. White thinks this maneuver saves the g-pawn, but it doesn’t.27…Nxg3!; 28.Nxg3 Bh4; 29.Kf3. White resigned without wait-ing for the checkmate at g3.
LARSEN, F VS. WELLINGLugano Open, Switzerland, 1986
Capablanca System
1.c4 c6; 2.Nf3 d5; 3.b3 Nf6; 4.Bb2 Bg4; 5.d3 e6; 6.Nbd2 Nbd7;7.g3 Bc5; 8.Bg2 0–0; 9.0–0 a5; 10.a3 Qe7; 11.Ra2 e5; 12.h3 Bh5;13.Qa1.
cuuuuuuuuC(rDwDw4kD}7DpDn1p0p}6wDpDwhwD}50wgp0wDb}&wDPDwDwD}3)PDPDN)P}2RGwHP)BD}%!wDwDRIw}v,./9EFJMV
52
CARDOZA PUBLISHING • ERIC SCHILLER
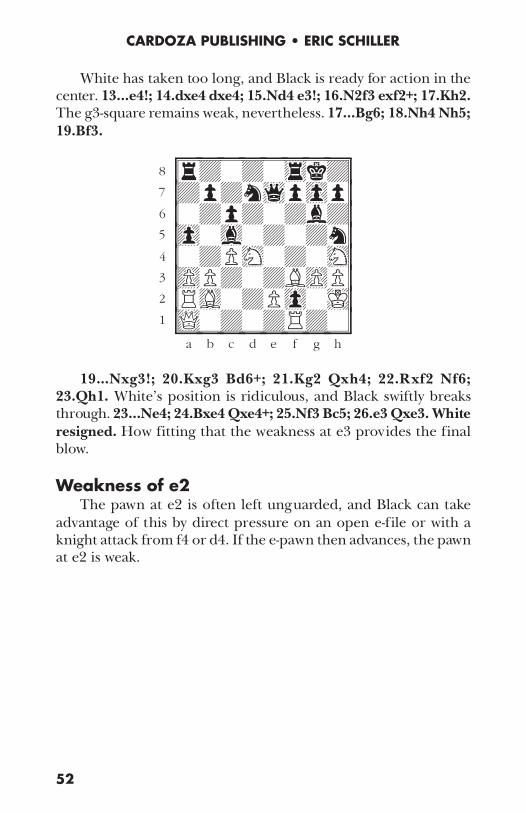
White has taken too long, and Black is ready for action in thecenter. 13…e4!; 14.dxe4 dxe4; 15.Nd4 e3!; 16.N2f3 exf2+; 17.Kh2.The g3-square remains weak, nevertheless. 17…Bg6; 18.Nh4 Nh5;19.Bf3.
cuuuuuuuuC(rDwDw4kD}7DpDn1p0p}6wDpDwDbD}50wgwDwDn}&wDPHwDwH}3)PDwDB)P}2RGwDP0wI}%!wDwDRDw}v,./9EFJMV
19…Nxg3!; 20.Kxg3 Bd6+; 21.Kg2 Qxh4; 22.Rxf2 Nf6;23.Qh1. White’s position is ridiculous, and Black swiftly breaksthrough. 23…Ne4; 24.Bxe4 Qxe4+; 25.Nf3 Bc5; 26.e3 Qxe3. Whiteresigned. How fitting that the weakness at e3 provides the finalblow.
Weakness of e2The pawn at e2 is often left unguarded, and Black can take
advantage of this by direct pressure on an open e-file or with aknight attack from f4 or d4. If the e-pawn then advances, the pawnat e2 is weak.

53
TYPICAL STRATEGIES AND TACTICS
SPINDELBOECK VS. PALACGraz Open, Austria, 1995
Réti Gambit Deferred
1.Nf3 d5; 2.c4 e6; 3.g3 dxc4; 4.Qa4+ Nd7; 5.Bg2 a6; 6.Qxc4b5; 7.Qc2 Bb7; 8.0–0 c5; 9.d3 Ngf6; 10.Nc3 Rc8; 11.b3 Be7; 12.Bb20–0; 13.Rac1 Qb6; 14.Nd2 Bxg2; 15.Kxg2 Nd5; 16.Qb1 Rfe8;17.Qa1 Bf8; 18.a3 Qb7; 19.Kg1 e5; 20.h3 Re6; 21.Nde4 f5; 22.Ng5Rg6; 23.Nf3 Nf4; 24.Nh4 Be7; 25.Nf3.
cuuuuuuuuC%wDrDwDkD}2DqDngw0p}3pDwDwDrD}&Dp0w0pDw}5wDwDwhwD}6)PHPDN)P}7wGwDP)wD}(!w$wDRIw}v,./9EFJMV
Black has an aggressive position even though the only advancedpiece is under attack. The knight is safe for the moment, becausethe g-pawn is pinned. More importantly, the e2-square has beenneglected and Black wins by simply chasing the knight at c3. 25…b4.White resigned.
Weakness at b3When both the a-pawn and c-pawn have moved, the b-pawn
loses its valuable protector and can often become a backward pawn.This can be an easy target for Black’s operations. I used this togain a victory over an International Master at a recent tourna-ment.

54
CARDOZA PUBLISHING • ERIC SCHILLER
REY VS. SCHILLERWilkerson International, San Francisco, 1998
New York System
1.c4 c6; 2.Nf3 d5; 3.b3 Nf6; 4.Bb2 Bf5; 5.g3 h6; 6.Bg2 e6; 7.0-0 Nbd7; 8.d3 Be7; 9.Nbd2 0-0; 10.a3 a5; 11.Qc2 Re8; 12.Rfe1Bf8; 13.e4 dxe4; 14.Nxe4 Nxe4; 15.dxe4 Bh7; 16.Rad1 Qc7;17.Nd4 Rad8; 18.Qc3 Nc5; 19.Qe3.
cuuuuuuuuC(wDw4rgkD}7Dp1wDp0b}6wDpDpDw0}50whwDwDw}&wDPHPDwD}3)PDw!w)w}2wGwDw)B)}%DwDR$wIw}v,./9EFJMV
Black has an ideal defensive formation. The bishop at f8 de-fends g7, so there are no tricks on the diagonal. There is a strongknight at c5, tying White down to the defense of b3. The b-pawnis actually very weak, and Black was able to exploit this.
19…e5!; 20.Ne2? White underestimated the power of the sac-rifice of the e-pawn. 20.Nf5 was necessary, though Black would behappy with the position after 20…Qb6; 21.Rxd8 Rxd8; 22.Bxe5Qxb3; 23.Qxb3 Nxb3. 20.Nc2 b5 gives Black the initiative.20…Rxd1!; 21.Rxd1 Rd8; 22.Rxd8 Qxd8; 23.Bxe5 Qd1+; 24.Bf1Nxb3; 25.Nc3 Qd2!
Black has recovered the pawn, and the remaining queensidepawns are weak. It took a while, but Black eventually won.
Weakness at f2In most openings the f-pawn is the weak spot in the king’s
defense, whether castled or not. In the castled position, the pawnhas the support of both king and rook. In the position below,

55
TYPICAL STRATEGIES AND TACTICS
White even has the queen helping out, and Black is only attackingwith three pieces. Nevertheless, the weakness is exposed withdeadly efficiency.
KISS VS. SCHARNBECKPostal, 1987
New York System
1.Nf3 d5; 2.g3 Nf6; 3.c4 c6; 4.b3 Bf5; 5.Bg2 e6; 6.Bb2 Nbd7;7.0–0 h6; 8.d3 Bc5; 9.Nbd2 0–0; 10.Qc2 Qb6; 11.e3 a5; 12.a3Bh7; 13.Ne5 Nxe5; 14.Bxe5 Ng4; 15.Nf3.
cuuuuuuuuC(rDwDw4kD}7DpDwDp0b}6w1pDpDw0}50wgpGwDw}&wDPDwDnD}3)PDP)N)w}2wDQDw)B)}%$wDwDRIw}v,./9EFJMV
White seems to have the f2-square sufficiently defended, withqueen, rook and king facing queen bishop and knight. But Whitehas a weakness at d3, too. Black takes advantage by sacrificing ate3.
15…Bxe3! The bishop cannot be captured because then theknight gets to e3 and forks queen and rook. 16.Bd6. 16.Bxg7 Bxd3!;17.Qxd3 Nxf2 and White has nothing better than 18.Qxe3 Qxe3;19.Rae1 Nh3+; 20.Kh1 Qxb3; 21.Bxf8 Rxf8; 22.Bxh3 Qxa3 withfour healthy pawns and the queen for the rook and minor pieces.
16.Ra2 dxc4; 17.bxc4 Nxe5; 18.Nxe5 Rad8!; 19.Rb2 Qc5;20.fxe3 Qxe3+; 21.Qf2 Qxe5; 22.Rxb7 Bxd3; 23.Re1 Qc3; 24.Bxc6Bxc4 and Black has two extra pawns. 16…Bxf2+; 17.Rxf2 Bxd3;18.Qxd3 Qxf2+; 19.Kh1 dxc4; 20.Qe4 Rfd8; 21.Qxg4 Rxd6;22.Qxc4 Rad8. White resigned, since Black has three extra pawnsand threats on the back rank.

56
CARDOZA PUBLISHING • ERIC SCHILLER
Artificial Piece PlacementAnother way for White to get into trouble is to place pieces in
positions which are not comfortable in the Réti system. For ex-ample, it makes little sense for White to transfer the bishop fromg2 to c2. Most players do not deliberately place pieces on badsquares. They arrive at their unfortunate locations usually as partof an attacking or defensive maneuver. In our example, Whiteuses g4 for the knight and pays a price.
RESCHKE VS. HABAWuerzburg Open, 1992
New York System
1.c4 c6; 2.b3 d5; 3.Bb2 Bf5; 4.Nf3 e6; 5.g3 h6; 6.Bg2 Nf6;7.0–0 Be7; 8.d3 0–0; 9.Nbd2 Nbd7; 10.Qc2 Bh7; 11.e4 dxe4;12.Nxe4 Nxe4; 13.dxe4 Nc5; 14.Rad1 Qb6; 15.Ne5 Rad8; 16.Bd4Qc7; 17.Ng4.
cuuuuuuuuC(wDw4w4kD}70p1wgp0b}6wDpDpDw0}5DwhwDwDw}&wDPGPDND}3DPDwDw)w}2PDQDw)B)}%DwDRDRIw}v,./9EFJMV
White has no real threats and the position of the knight at g4is truly strange. Black takes advantage instantly. 17…f5!; 18.Be5Qb6; 19.exf5 exf5 and the knight cannot retreat. 20.Qc3. 20.Ne3f4. 20…fxg4; 21.Bxg7 Rxd1; 22.Rxd1 Ne4. White resigned.