hydrovar - xylem.com · input your motor power hp from motor nameplate commercial water xylem inc....
TRANSCRIPT

INSTRUCTION MANUALIM289
Hydrovar®
WIRINGINPUT POWER WIRING:
For Single Phase Input For Three phase
(230V) Wiring Input Wiring use
use L1, L3 and Ground L1, L2, L3, and Ground
FOR MOTOR WIRING:
Use U, V, and W for Motor Terminals and Ground.
CONTROL WIRING (FOR SINGLE PUMP APPLICATIONS):
NOTE: Jumpers will need to be installed if your application is not using a low water device or Start/ Stop switch.
Install Jumpers on X-1 Terminals:
16 & 17 (Low Water Input)
18 & 19 (Start/ Stop Input)
Transducer: X1 Terminal:
Brown #1 (24VDC)
White #2 (Analog Input #1)
Shield on Chassis
FOR MULTI CONTROL (CASCADE SERIAL APPLICATIONS):
Complete all programming, power down all units and connect RS485 communication cable on terminal X1 on 11, 12, 13. Please refer to your Quick Startup Guide on page 33, Figure #6, for multiple units.
WARNING: This product is intended to be operated by qualified personnel only.

PROGRAMMINGPLEASE NOTE: Drive will need to be changed from Europe (Metric Units) to USA (Imperial Units) before performing Quick Startup.
Your first step is to hold the left arrow and the right arrow key together for three seconds until the main controller screen appears
Push the right arrow key until you get to M00 Main Menu
Push the down key until you get to M60 Settings
Push the right arrow key to P61 Password
Push the up arrow until you get to the Passcode 66. Then hold the right arrow key for three seconds. Once it defaults back to zeros you are OK.
Now push the right arrow key until you get back to M60 Settings
Push the down arrow to advance to M1100 Setup Menu
Push the Right arrow button until P1110 Factory Set Comes up
Push the up arrow and change 1110 to USA. Hold the right arrow key for three seconds to accept the change. (An * asterisk will be to the left of the USA).
Push the left arrow key to get back to M1100 Setup Menu
Push the down arrow to M1300 Startup
Push the right arrow key to P1301 Language and verify English is your Language
Push the right arrow to P1302 Motor Nom Power and input your motor power HP from motor nameplate
Commercial Water
Xylem Inc.
PAGE 2

Push the right arrow key to P1303 Motor Nom Voltage and enter Motor Voltage
Push the right arrow key to P1304 Preset Motor. Select No for U.S. motors and Yes for Lowara 50 Hz Motors. Refer to Manual for further information.
Push the right arrow key to P1305 Motor Nom. Current and input current from motor nameplate
Push the right arrow key to P1306 Motor Nom. Speed and input your motor speed
Push the right arrow key to P1307 AMPI (Automatic Motor Parameter Identification). Select OFF. Refer to the IOM for further instructions.
Push the right arrow key to P1308 STC Motor Trip and select STC Trip. If you are using a motor thermistor select Thermistor Trip. Refer to the manual for further information.
Push the right arrow key to P1309 Mode. Select Controller for Single pump, Cascade Serial for Multi pump, Actuator for Speed Control, Cascade Synchron for all pumps to operate on the same frequency. Refer to the manual for further information.
Push the right arrow key to P1310 Pump Address. If selecting cascade serial (multi pump) each address will have to be different. Example: One Hydrovar has address 1, and the next unit requires address 2.
Push the right arrow key to P1311 Control Mode and select Constant for constant pressure, and differential for differential pressure control. Refer to your IOM for further instructions.
Push the right arrow key to P1312 Dimension Unit and select PSI.
Push the right arrow key to P1313 Start-up Completed? and select No as we are not complete with our setup.
Commercial Water
Xylem Inc.
PAGE 3
CentriPro is a trademark of Xylem Inc. or one of its subsidiaries.
© 2016 Xylem Inc. IM289 Rev. 0 October 2016
Xylem Inc.2881 East Bayard Street Ext., Suite A, Seneca Falls, NY 13148Phone: (866) 325-4210 Fax: (888) 322-5877www.centripro.com
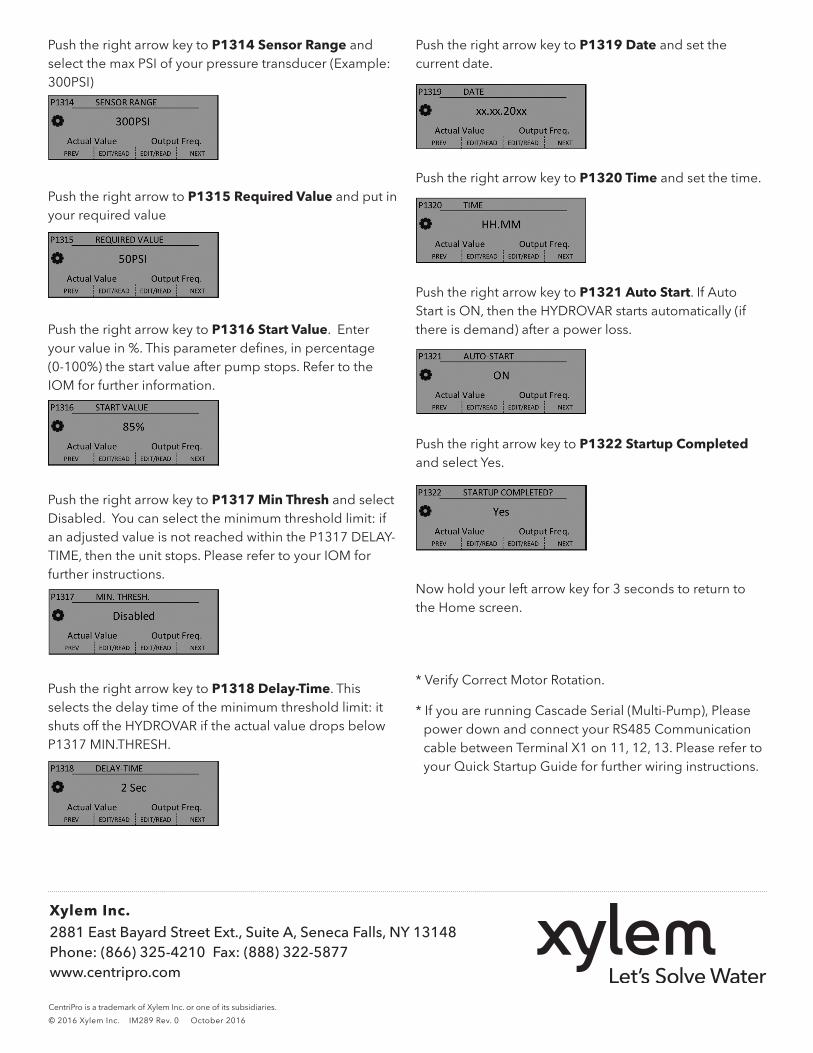
Push the right arrow key to P1314 Sensor Range and select the max PSI of your pressure transducer (Example: 300PSI)
Push the right arrow to P1315 Required Value and put in your required value
Push the right arrow key to P1316 Start Value. Enter your value in %. This parameter defines, in percentage (0-100%) the start value after pump stops. Refer to the IOM for further information.
Push the right arrow key to P1317 Min Thresh and select Disabled. You can select the minimum threshold limit: if an adjusted value is not reached within the P1317 DELAY-TIME, then the unit stops. Please refer to your IOM for further instructions.
Push the right arrow key to P1318 Delay-Time. This selects the delay time of the minimum threshold limit: it shuts off the HYDROVAR if the actual value drops below P1317 MIN.THRESH.
Push the right arrow key to P1319 Date and set the current date.
Push the right arrow key to P1320 Time and set the time.
Push the right arrow key to P1321 Auto Start. If Auto Start is ON, then the HYDROVAR starts automatically (if there is demand) after a power loss.
Push the right arrow key to P1322 Startup Completed and select Yes.
Now hold your left arrow key for 3 seconds to return to the Home screen.
* Verify Correct Motor Rotation.
* If you are running Cascade Serial (Multi-Pump), Please power down and connect your RS485 Communication cable between Terminal X1 on 11, 12, 13. Please refer to your Quick Startup Guide for further wiring instructions.